

3
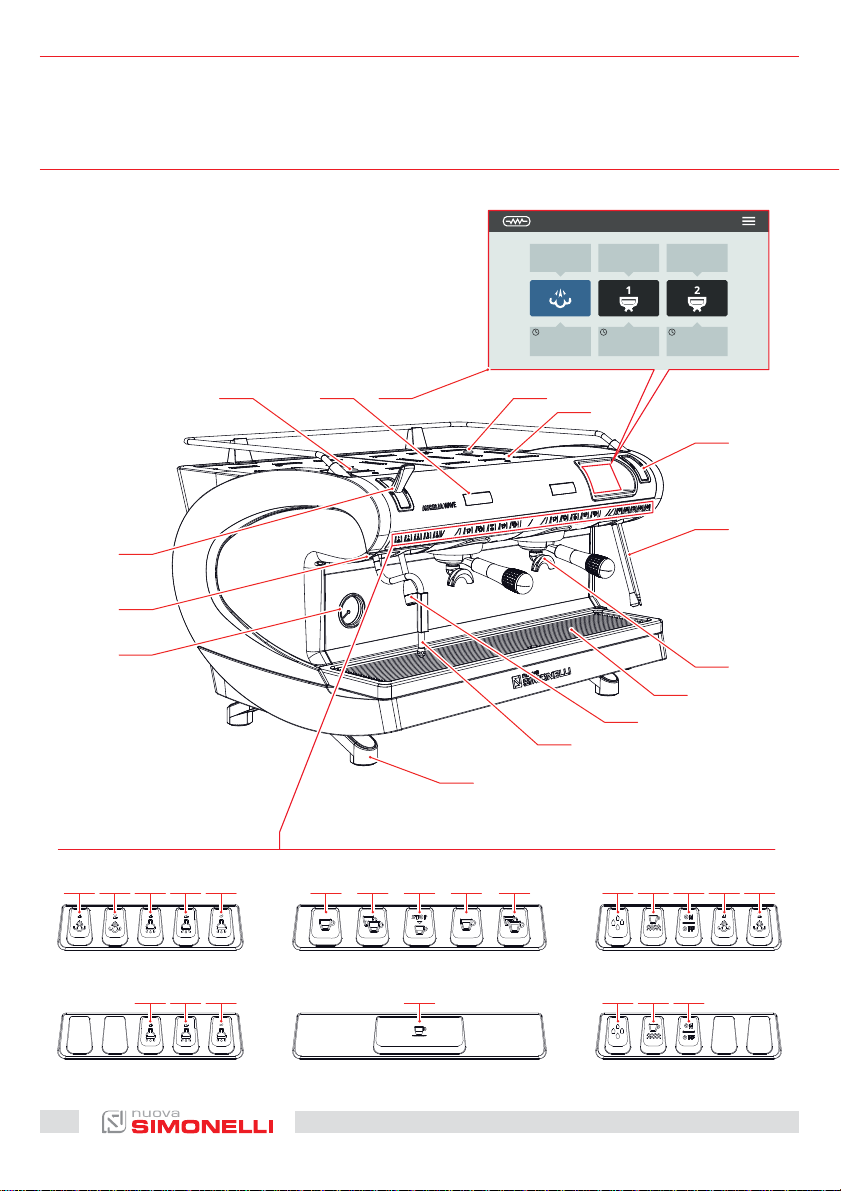
DESCRIZIONE MACCHINA
MACHINE DESCRIPTION
13
12
11
14 10
1.21 bar
°C
102.55°C90.58
1
10
2
9
3
SUNDAY 20 MAY 12:34
°C
98.00
7
8
4
5
6
P1 P11
20
P3
P3
P4
P4
P5
P7P6P2 P12
P16
AURELIA WAVE DIGIT-T
P10P9P8
3
P11
P12
P13
P13
P14P5
P15

IT
1 Display touch screen
2 Regolatore Easycream (opt)
3 Scaldatazze
4 Display Easycream (opt)
5 Lancia Easycream (opt)
6 Gruppo erogazione
7 Griglia
8 Lancia acqua calda
9 Lancia vapore
10 Piedino macchina
11 Manometro
12 Led esterno
13 Leva vapore
14 Regolatore acqua calda
EN
1 Touch screen display
2 Easycream regulator (opt)
3 Cup warmer
4 Easycream display (opt)
5 Easycream wand (opt)
6 Dispensing group
7 Grid
8 Hot water wand
9 Steam wand
10 Machine feet
11 Pressure gauge
12 External led
13 Steam lever
14 Hot water regulator
P1 Vapore 1
P2 Vapore 2
P3 Acqua calda 1
P4 Acqua calda 2
P5 Acqua calda 3
P6 1 caè corto
P7 2 caè corti
P8 Caè continuo
P9 1 caè lungo
P10 2 caè lunghi
P11 Lavaggio
P12 ON/OFF scaldatazze
P13 ON/OFF macchina
P14 Vapore 1(T3-DIGIT-V)
P15 Vapore 2(T3-DIGIT-V)
P16 START/STOP caè
P1 Steam 1
P2 Steam 2
P3 Hot water 1
P4 Hot water 2
P5 Hot water 3
P6 1 short coee
P7 2 short coees
P8 Continuously coee
P9 1 long coee
P10 2 long coees
P11 Washing
P12 Cup warmer ON/OFF
P13 Machine ON/OFF
P14 Steam 1(T3-DIGIT-V)
P15 Steam 2(T3-DIGIT-V)
P16 Coee START/STOP
IT
Per ogni gruppo di erogazione, è presente un display che visualizza il tempo di erogazione. Se presente
il sistema Easycream (optional), ogni lancia vapore è provvista del relativo display e regolatore.
EN
For each delivery group, there is a display that displays the delivery time. If the Easycream system (optional) is present, each steam wand is provided with the relevant display and regulator.
AURELIA WAVE DIGIT-T
3
21
6
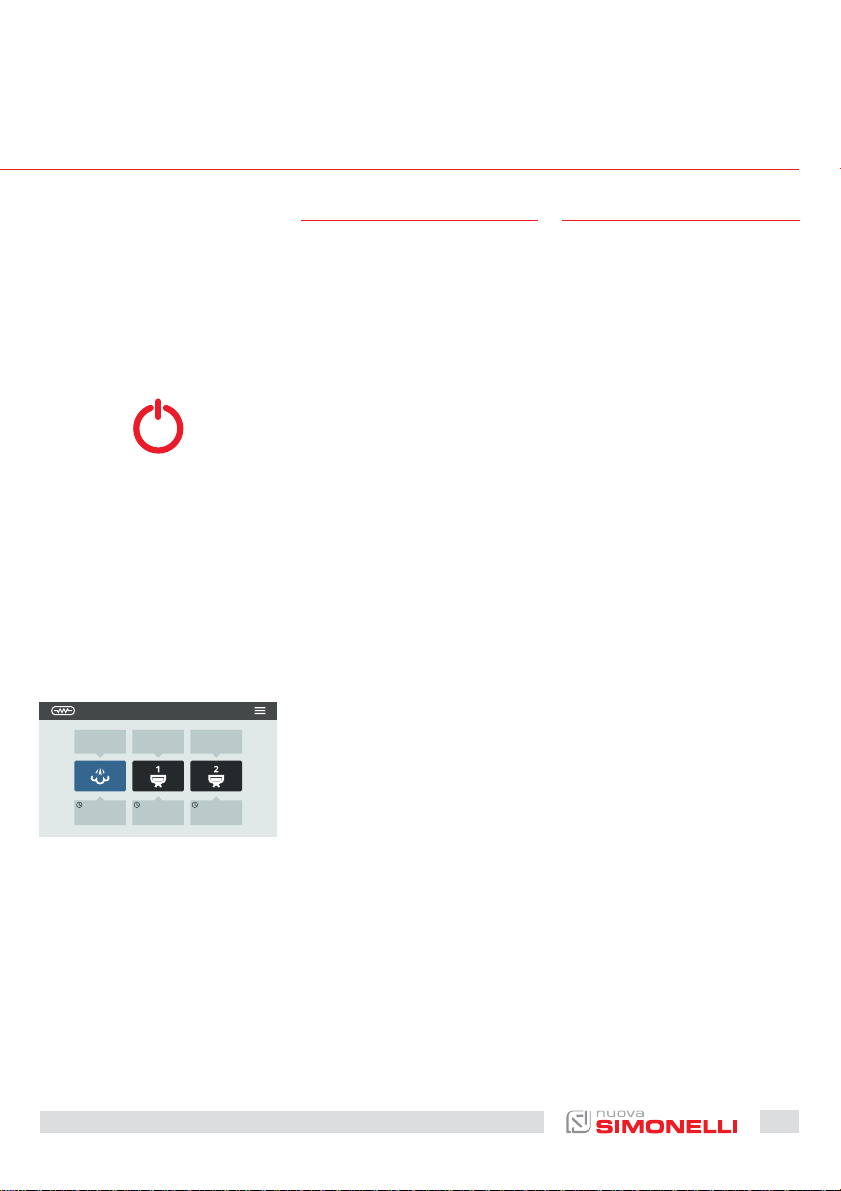
UTILIZZO
USE
IT
L’operatore deve prima di iniziare la lavorazione, accertarsi
di aver letto e ben compreso le
prescrizioni di sicurezza di questo manuale.
6.1
ACCENSIONE/
SPEGNIMENTO
DELLA MACCHINA
• Premere “I” per accendere la
macchina.
• Premere “0” per spegnere la
macchina.
Nel caso in cui l’autodiagnosi indichi anomalie o guasti, l’operatore NON DEVE intervenire; contattare il Centro di Assistenza.
Sul display:
• Illuminato: compare la ver-
sione del firmware per circa 1
secondo.
• Non illuminato: compare la
scritta OFF.
EN
Before starting to use the appliance, the operator must be sure
to have read and understood
the safety prescriptions contained in this booklet.
6.1
SWITCHING
THE MACHINE
ON/OFF
• Press “I” to switch on the ma-
chine.
• Press “0” to switch o the
machine.
If the self-diagnostics report
anomalies or failures, the operator MUST NOT intervene.
Please contact the Assistance
Centre.
On the display:
• Illuminated: appear the firm-
ware version for about 1 second.
• Not illuminated: appear the
message OFF.
30
La macchina non è operativa, in
quanto l’interruttore generale
permette solo l’alimentazione
della scheda elettronica.
In caso di manutenzione alla
scheda elettronica, spegnere la
macchina tramite l’interruttore
generale esterno o scollegare il
cavo di alimentazione.
AURELIA WAVE DIGIT-T
3
The machine is not operational,
since the main switch only powers the electronic card.
For electronic card maintenance, turn the machine o
by means of the external main
switch or disconnect the plug.
IT
EN
1.21 bar
°C
102.55°C90.58°C98.00
SUNDAY 20 MAY 12:34
6.1.1
ACCENSIONE /
SPEGNIMENTO MANUALE
ON - OFF Automatico
NON PROGRAMMATO
Assicurarsi che l’interruttore generale sia sempre in posizione
“I”.
ACCENSIONE
Premere il pulsante accensione/
spegnimento per circa 2 secondi fino all’illuminazione della
spia. La centralina effettua l’autodiagnosi delle funzioni, tutti i
tasti di selezione si illuminano.
Terminata la diagnosi, sul display compare la “Home Page”
Tutti i tasti di selezione sono
abilitati sin dalla fine della diagnosi.
6.1.1
MANUAL
SWITCHING ON/OFF
Automatic On/O
NOT PROGRAMMED
Make sure that the general
switch is always on the position
“I”.
SWITCH ON
Press the ON/OFF button for
about 2 seconds until the light
switches on. The control unit
will start up an auto diagnosis
cycle to check the functions, all
the selection keys will light up.
After the diagnostics stage, the
“Home Page” will open on the
screen”:
On completion of the check up
all the selection keys are activated.
SPEGNIMENTO
Premere il pulsante accensione/spegnimento per circa 2
secondi fino allo spegnimento
della spia.
La macchina si spegne e sul display è indicato OFF.
AURELIA WAVE DIGIT-T
3
SWITCHING OFF
Press the ON/OFF button for
about 2 seconds, until the light
switches o.
The machine will switch o and
the display will read OFF.
31

IT
EN
ON - OFF Automatico
PROGRAMMATO
Assicurarsi che l’interruttore generale sia sempre in posizione
“I”.
La macchina si ACCENDERÀ al
primo orario di accensione programmato.
La centralina eettua l’autodiagnosi delle funzioni, tutti i tasti
di selezione si illuminano.
Terminata la diagnosi, sul display compare la “Home Page”.
Tutti i tasti di selezione sono
abilitati sin dalla fine della diagnosi.
La macchina si SPEGNERÀ al
primo orario di spegnimento
programmato.
Automatic On/O
PROGRAMMED:
Make sure that the general
switch is always on the position
“I”.
The machine will SWITCH ON at
the first programmed switch-on
time.
The control unit will perform an
auto diagnosis of all functions
and all of the selection keys will
light up.
Aer the diagnostics stage, the
“Home Page” will open on the
screen.
Once the auto diagnosis has
been completed all the keys are
activated.
The machine will SWITCH OFF
at the first time set for stopping
the coee maker.
32
P13
STAND BY
Se la macchina è in stand by,
premere il tasto di accensione
(P13).
Per maggiori informazioni, vedere il paragrafo GESTIONE POTENZA.
AURELIA WAVE DIGIT-T
3
STAND BY
If the machine is in stand by,
press the ON/OFF button (P13).
For more information see the
POWER MANAGEMENT paragraph.
IT
EN
6.2
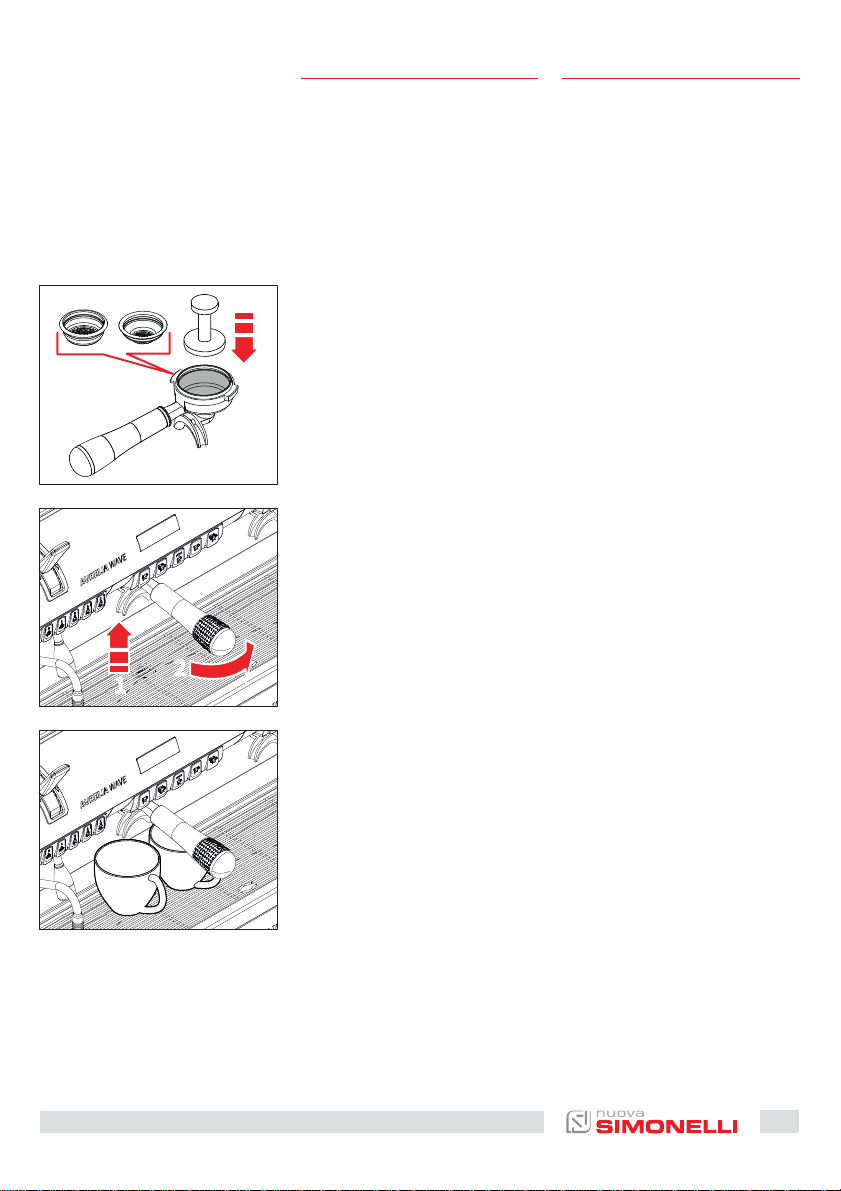
EROGAZIONE CAFFÈ
Dopo aver messo a punto la
macchina:
• Inserire il filtro desiderato
(singolo o doppio all’interno
del portafiltro).
• Riempire il filtro con caè op-
portunamente macinato.
• Pressare il caè nel filtro in
maniera uniforme con l’apposito pressino.
• Pulire dai residui di polvere
di caè il bordo anulare del
filtro.
• Prima di inserire il portafil-
tro nel gruppo, è necessario
spurgare per almeno 2 secondi l’acqua presente nel circuito del gruppo attivando e
disattivando l’erogazione.
• Inserire il portafiltro nel grup-
po erogazione.
• Posizionare la/le tazzina/e
2
2
11
sotto i beccucci e premere il
pulsante caè desiderato.
6.2
COFFEE DISPENSING
After commissioning the machine:
• Insert the desired filter (sin-
gle or double inside the filter
holder).
• Fill the filter with coee ap-
propriately ground.
• Press the coee in the filter
uniformly using the appropriate presser.
• Clean the edge of the filter of
coee residues and insert the
filter holder into the dispensing unit.
• Before insert the filter holder,
the group must be purged for
at least 2 seconds to refresh
the water present in the circuit,
turning on and o the supply.
• Insert the filter holder inside
the dispensing group.
• Position the cup/s under the
spout/s and press the desired
coee button.
Al termine di ogni erogazione di
caè lasciare il portafiltro innestato al gruppo ainché rimanga sempre caldo.
AURELIA WAVE DIGIT-T
3
At the end of each coffee dispensing leave the filter-holder
inserted in the unit so that it will
keep warm.
33
IT
EN
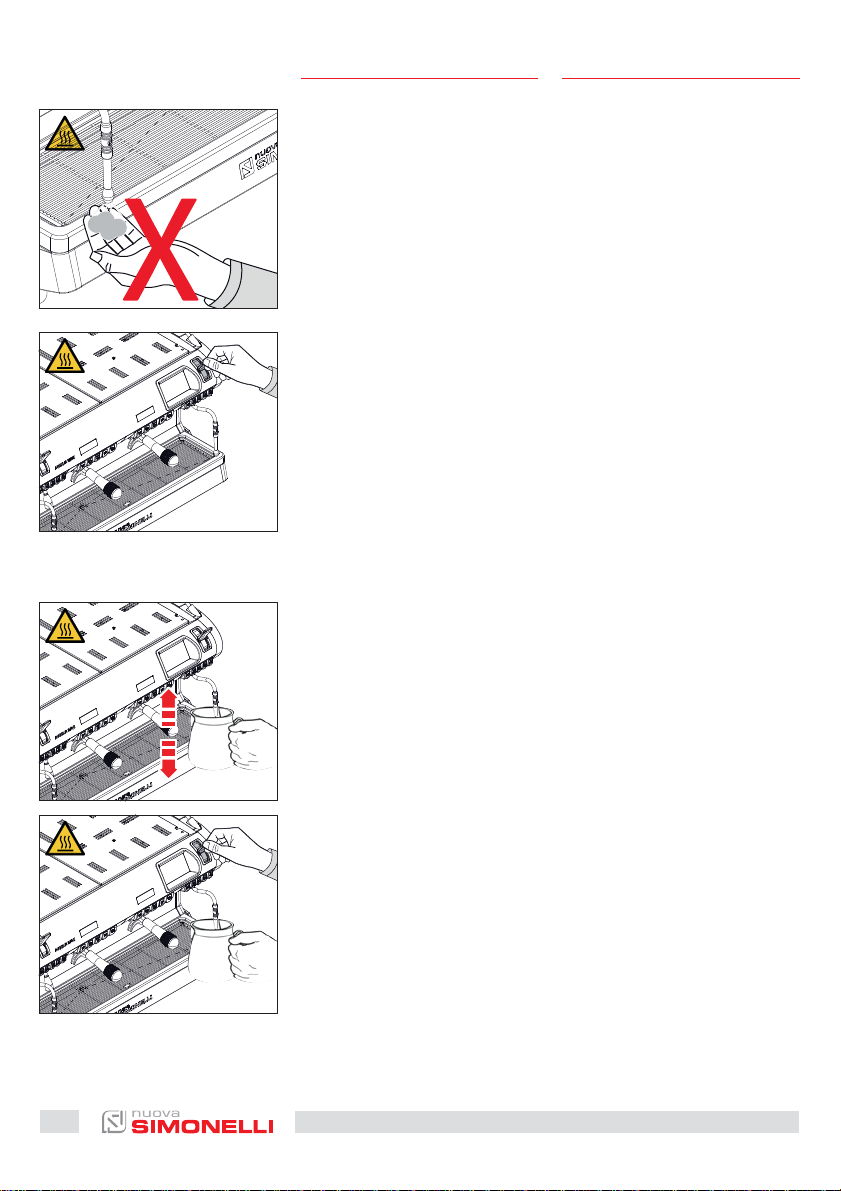
6.3
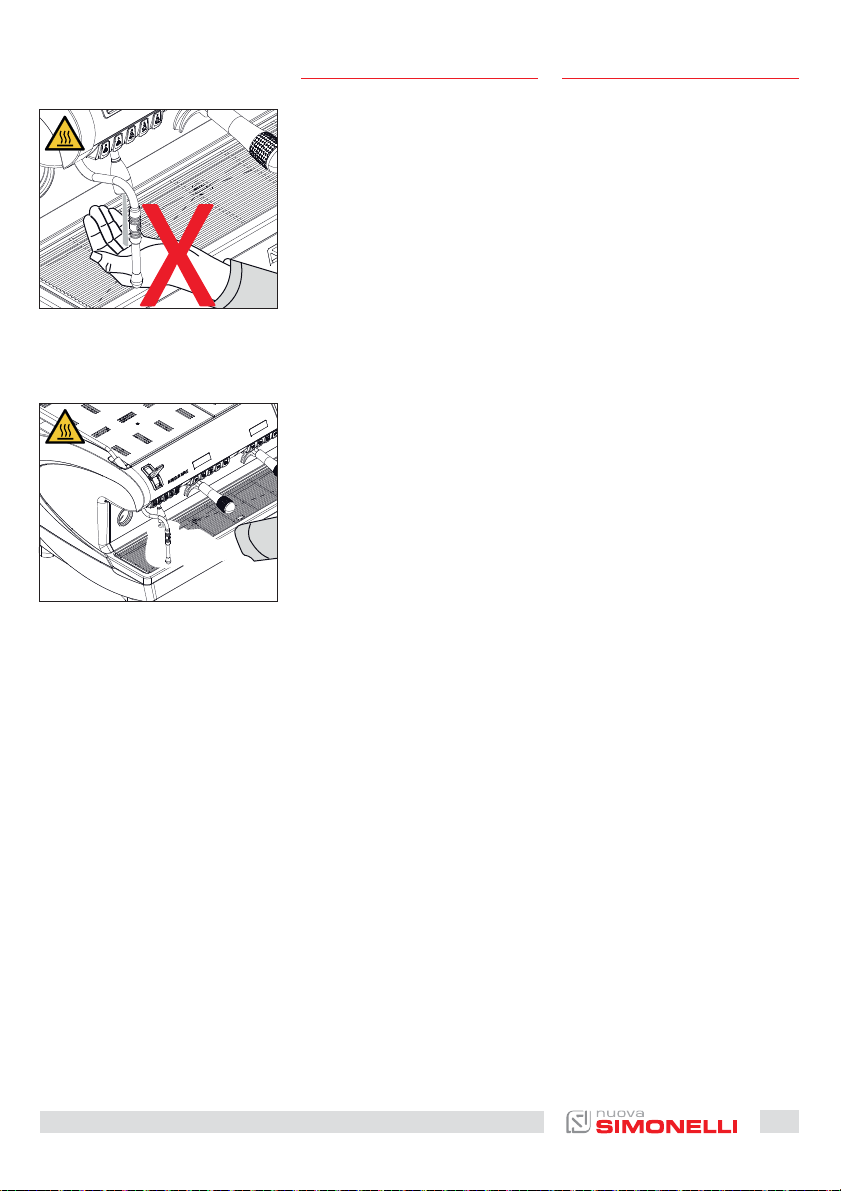
EROGAZIONE VAPORE
Durante l’uso della lancia del
vapore, prestare molta attenzione a non mettere le mani sotto di essa e non toccarla subito
dopo.
Prima di usare la lancia vapore,
eseguire lo spurgo della condensa per almeno 2 secondi.
Tirare o spingere la leva vapore.
Tirando completamente, la leva
rimane bloccata nella posizione
di massima erogazione, spingendo, il ritorno della leva è automatico.
6.4
PREPARAZIONE
DEL CAPPUCCINO
6.3
STEAM DISPENSING
While using the steam nozzle,
you must pay attention to not
place your hands beneath it
or touch just aer it has been
used.
Before use the steam wand,
cleaning out of the condensation for at least 2 seconds.
Pull or push the steam lever.
By pulling it completely the lever will hold a position of maximum delivery; by pushing it,
the lever will automatically give
way.
6.4
MAKING
CAPPUCCINO
34
Immergere il beccuccio del vapore in fondo al recipiente di
latte pieno per 1/3.
Aprire il vapore.
Prima che il latte abbia raggiunto la temperatura desiderata,
spostare il beccuccio del vapore
in superficie facendo sfiorare il
latte con piccoli spostamenti in
senso verticale.
Alla fine dell’operazione pulire
accuratamente la lancia con un
panno morbido.
AURELIA WAVE DIGIT-T
3
Immerse the nozzle all the way
into a container 1/3 full of milk.
Turn on the steam.
Before the milk has reached the
desired temperature, pull the
nozzle slightly up and lightly
move it vertically across the
surface of the milk.
When you have completed the
procedure, clean the nozzle
carefully with a so cloth.
IT
EN
6.5
EROGAZIONE ACQUA CALDA
Durante l’uso della lancia
dell’acqua calda, prestare molta attenzione a non mettere le
mani sotto di essa e non toccarla subito dopo.
Prima di usare la lancia dell’acqua calda, eseguire lo spurgo
del circuito idraulico per almeno 2 secondi.
• Posizionare sotto la lancia ac-
qua calda un contenitore.
• Premere una volta sul pul-
sante selezione acqua calda,
la spia si illumina.
Dalla lancia acqua calda verrà
erogata acqua per un tempo
equivalente al valore programmato o ripremere il pulsante
per interrompere l’erogazione.
L’erogazione dell’acqua calda
può avvenire contemporaneamente a quella del caè.
6.6
EASYCREAM (optional)
6.5
HOT WATER DISPENSING
While using the hot water nozzle, pay careful attention not
to place your hands beneath it
or touch it just aer it has been
used.
The use of the hot water wand
must always be preceded by the
purge of the hydraulic circuit for
at least 2 seconds.
• Place a suitable container un-
der the hot water nozzle.
• Press the hot water select
button once; the light will
switch on.
The hot water wand will deliver
water for the amount of time
equivalent to the set value or
press the button again to stop
pouring.
Hot water can be delivered at
the same time as coee.
6.6
EASYCREAM (optional)
Durante l’uso dell’Easycream,
prestare molta attenzione a non
mettere le mani sotto di essa e
non toccarla subito dopo.
• Consente l’erogazione del
vapore misto ad aria. La temperatura e la quantità di aria
sono programmabili, controllate da una sonda di temperatura e vengono impostate in
fase di programmazione.
• Premere il tasto vapore, la
spia si illumina.
Eseguire sempre lo spurgo prima dell’erogazione. L’erogazione del vapore può avvenire contemporaneamente a quella del
caè e terminerà nel momento
in cui si è raggiunta la temperatura del liquido impostata.
AURELIA WAVE DIGIT-T
3
When using Easycream, take
great care not to place your
hands underneath it and never
touch it immediately aerwards.
• This serves to deliver steam
mixed with air. The temperature and the quantity of
air are programmable, controlled by a temperature
probe and are set during the
programming phase.
• Press the steam button, the
light will switch on.
Always purge before dispensing. The steam can be delivered
at the same time as coee and
the delivery will stop as soon as
the set temperature for the liquid is reached.
35

7
PROGRAMMAZIONE
PROGRAMMATION
A
B
C
D
1.21 bar
°C
102.55°C90.58°C98.00
SUNDAY 20 MAY 12:34
M
12 345 678
IT
ZONE SENSIBILI
EN
SENSIBLE AREAS
36
AURELIA WAVE DIGIT-T
3

IT
EN
Le schermate descritte nel presente manuale sono puramente
indicative.
HOME PAGE
A Pressione vapore e barra
informazioni
B Temperatura gruppi
C Icone gruppi
D Tempo di infusione
Premere (M) per accedere al
menu principale.
MENU PRINCIPALE
1 My coees
2 Impostazione tasti e display
3 Programma dosi
4 Pulizia macchina
5 Gestione potenza
6 Impostazione temperature
7 Contatori
8 Impostazioni
Premere una delle icone per accedere al relativo menù.
The screens described in this
manual are indicative only.
HOME PAGE
A Steam pressure and
informations bar
B Groups temperature
C Groups icon
D Brewing time
Press (M) to access the main
menu.
MAIN MENU
1 My coees
2 Display and button settings
3 Dose programming
4 Machine cleaning
5 Power management
6 Temperature settings
7 Counters
8 Settings
Press one of the icons to access
the relative menu.
Interagire con il display della
macchina premendo sulle aree
sensibili.
Interact with the machine display by pressing on the sensitive areas.
AURELIA WAVE DIGIT-T
3
37

DISPONIBILE SOLO NELLA
VERSIONE SOFTWARE
DEFINITIVA
AVAILABLE ONLY IN THE
EXECUTIVE SOFTWARE
VERSION
A CB D
1
2
IT
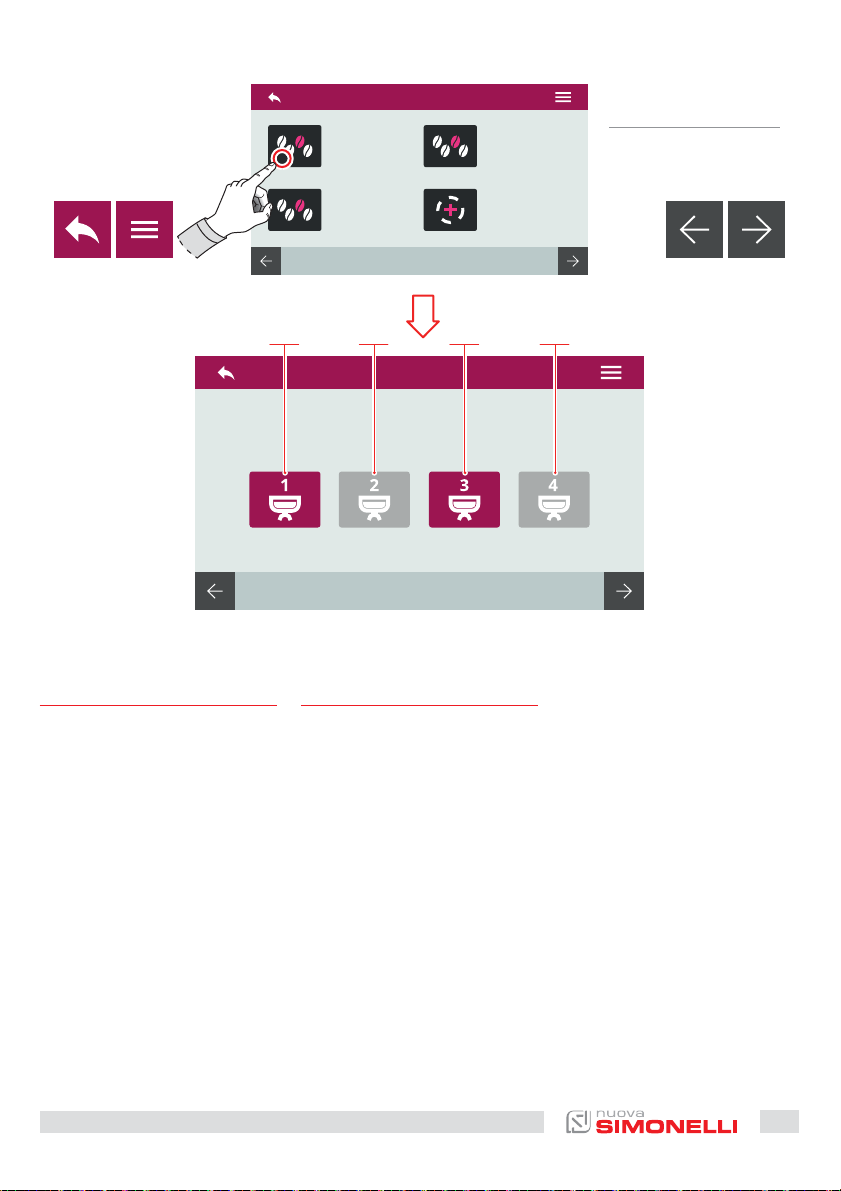
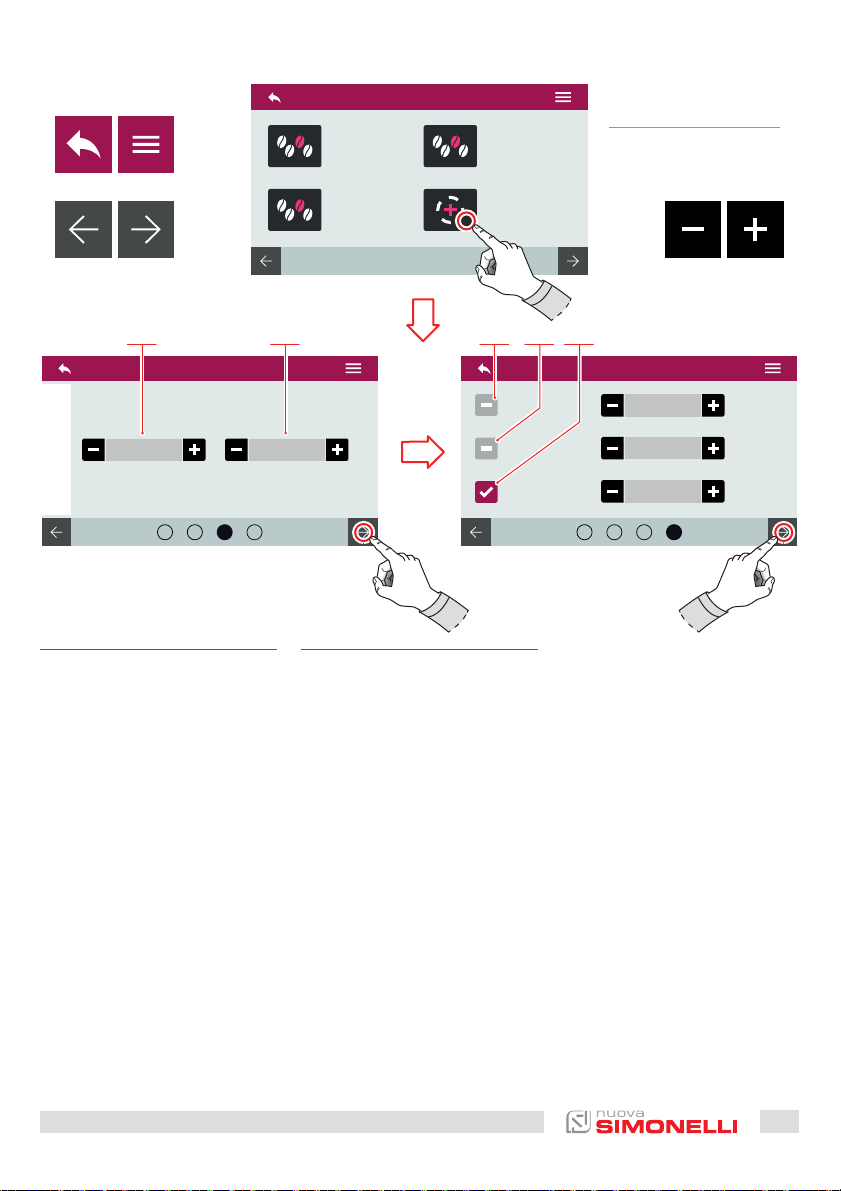
7.1
MY COFFEES
Selezionare una ricetta impostata (max 12) per procedere
all’erogazione.
1 Ricetta impostata
2 Aggiungi ricetta
A Al menu precedente
B Al menu principale
C Pagina precedente
D Pagina successiva
38
EN
7.1
MY COFFEES
Select a recipe set (max 12) to
proceed with the dispensing.
1 Recipe set
2 Add recipe
A To the previous menu
B To the main menu
C Previous page
D Next page
AURELIA WAVE DIGIT-T
3
DISPONIBILE SOLO NELLA
VERSIONE SOFTWARE
DEFINITIVA
AVAILABLE ONLY IN THE
EXECUTIVE SOFTWARE
VERSION
A CB D
1 2 3 4
IT
7.1.1
ATTIVA RICETTA
Selezionare il gruppo in cui attivare la ricetta impostata.
1 Gruppo 1
2 Gruppo 2
3 Gruppo 3
4 Gruppo 4
A Al menu precedente
B Al menu principale
C Pagina precedente
D Pagina successiva
EN
7.1.1
ACTIVE RECIPE
Select the group to activate the
set recipe.
1 Group 1
2 Group 2
3 Group 3
4 Group 4
A To the previous menu
B To the main menu
C Previous page
D Next page
AURELIA WAVE DIGIT-T
3
39

DISPONIBILE SOLO NELLA
VERSIONE SOFTWARE
DEFINITIVA
AVAILABLE ONLY IN THE
EXECUTIVE SOFTWARE
A
B
VERSION
CD
1 4 52 3
100 °C
91 °C
17 g
321 4
IT
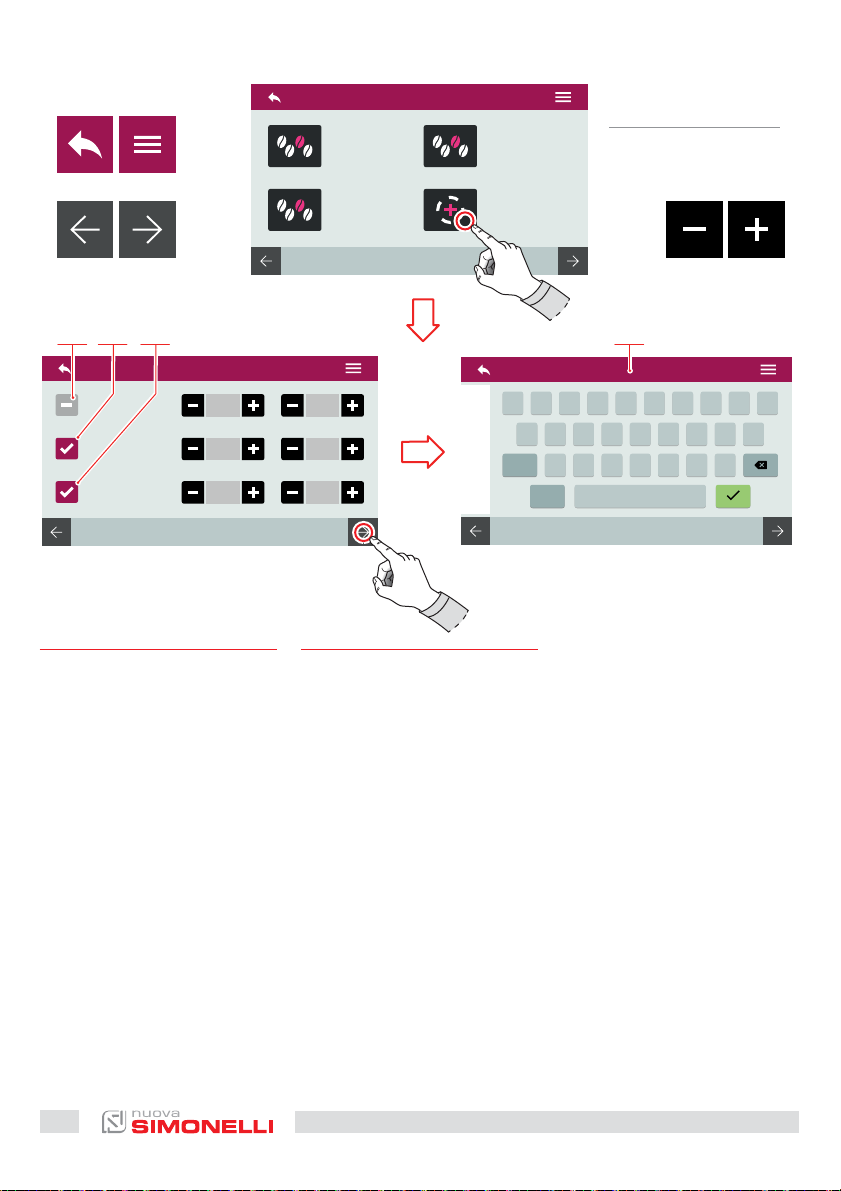
7.1.2
CREARE UNA RICETTA
Dopo aver selezionato il gruppo
a cui applicare una nuova ricetta, impostare:
1 Temperatura gruppo
2 Temp. caldaia caè (T
3 Grammi caè macinato
4 Dose 1 caè corto
5 Dose 1 caè lungo
6 Dose 2 caè corti
7 Dose 2 caè lunghi
3
)
EN
7.1.2
CREATE A RECIPE
Aer selecting the group to apply a new recipe, set:
1 Group temperature
2 Coee boiler temp. (T
3 Grams ground coee
4 1 short coee dose
5 1 long coee dose
6 2 short coees dose
7 2 long coees dose
3
)
20 cc
40 cc
321 4
6 7
E
50 cc
100 cc
F
A Al menu precedente
B Al menu principale
C Pagina precedente
D Pagina successiva
E Decremento
F Incremento
40
A To the previous menu
B To the main menu
C Previous page
D Next page
E Decrease
F Increase
AURELIA WAVE DIGIT-T
3
DISPONIBILE SOLO NELLA
VERSIONE SOFTWARE
DEFINITIVA
AVAILABLE ONLY IN THE
EXECUTIVE SOFTWARE
A
B
VERSION
CD
8 9 10 11 12
1,5 sec 5 sec
321 4
IT
8 Tempo ON pre-infusione
9 Tempo OFF pre-infusione
10 Pre-infusione (T on - T o)
11 Infusione (T on - T o)
12 Post-infusione (T on - T o)
A Al menu precedente
B Al menu principale
C Pagina precedente
D Pagina successiva
E Decremento
F Incremento
EN
8 Pre-wetting time ON
9 Pre-wetting time OFF
10 Pre-wetting (T on - T o)
11 Wetting (T on - T o)
12 Post-wetting (T on - T o)
A To the previous menu
B To the main menu
C Previous page
D Next page
E Decrease
F Increase
10 sec
12 sec
8 sec
321 4
E
F
AURELIA WAVE DIGIT-T
3
41
DISPONIBILE SOLO NELLA
VERSIONE SOFTWARE
DEFINITIVA
AVAILABLE ONLY IN THE
EXECUTIVE SOFTWARE
A
B
VERSION
CD
13 161514
6’ 10’
4’ 9’
5’ 11’
IT
Funzioni PULSEJET (optional)
13 Pulsejet pre-infusione
(T on - T o)
14 Pulsejet infusione
(T on - T o)
15 Pulsejet post-infusione
(T on - T o)
Salvare la ricetta con nome tramite la tastiera (16).
Per maggiori informazioni vedere “PROGRAMMA DOSI”.
_
W E R T Y U I O P
Q
A S D F G H J K L
SYM N M
123
EN
PULSEJET functions (optional)
13 Pre-wetting pulsejet
(T on - T o)
14 Wetting pulsejet
(T on - T o)
15 Post-wetting pulsejet
(T on - T o)
Save the recipe with a name by
using the keyboard (16).
For more informations see
“DOSE PROGRAM”.
Z X C V B
space
E
F
A Al menu precedente
B Al menu principale
C Pagina precedente
D Pagina successiva
E Decremento
F Incremento
42
A To the previous menu
B To the main menu
C Previous page
D Next page
E Decrease
F Increase
AURELIA WAVE DIGIT-T
3
A
B
C
D
1
2 4 7
IT
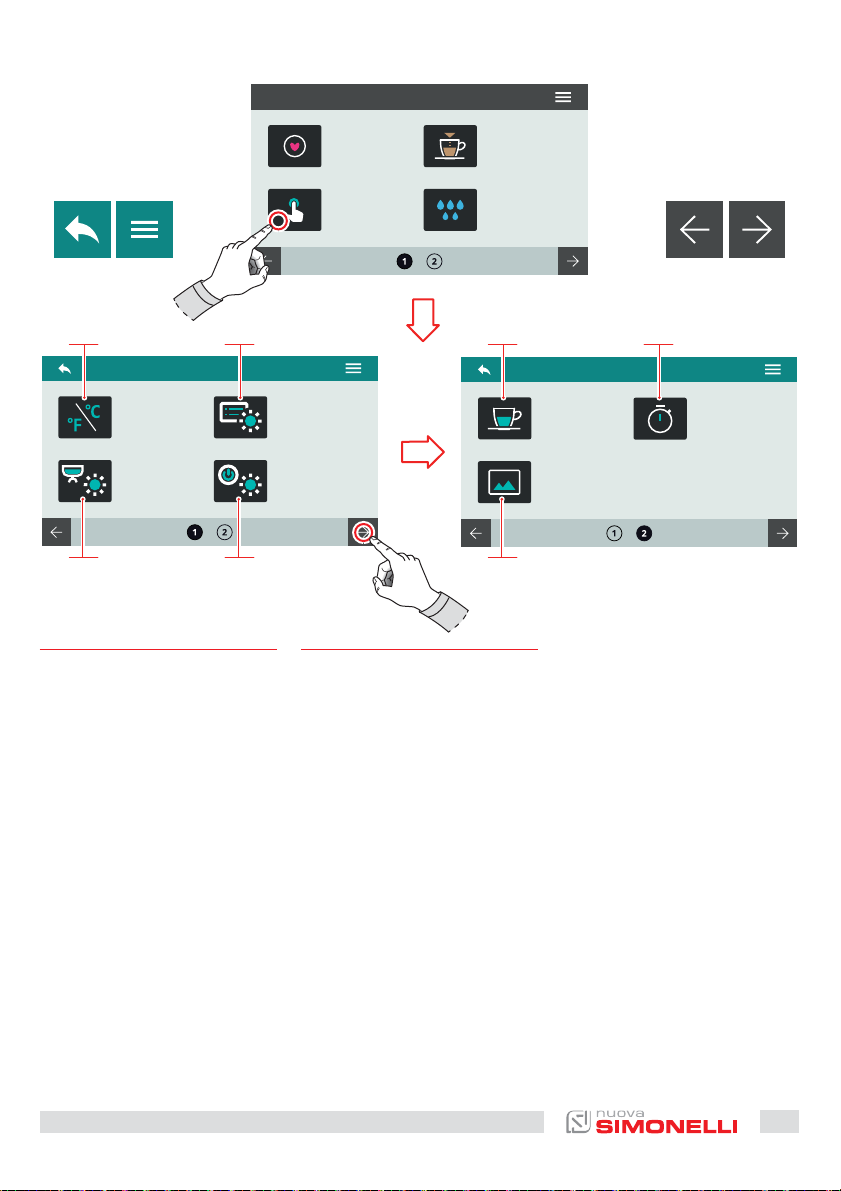
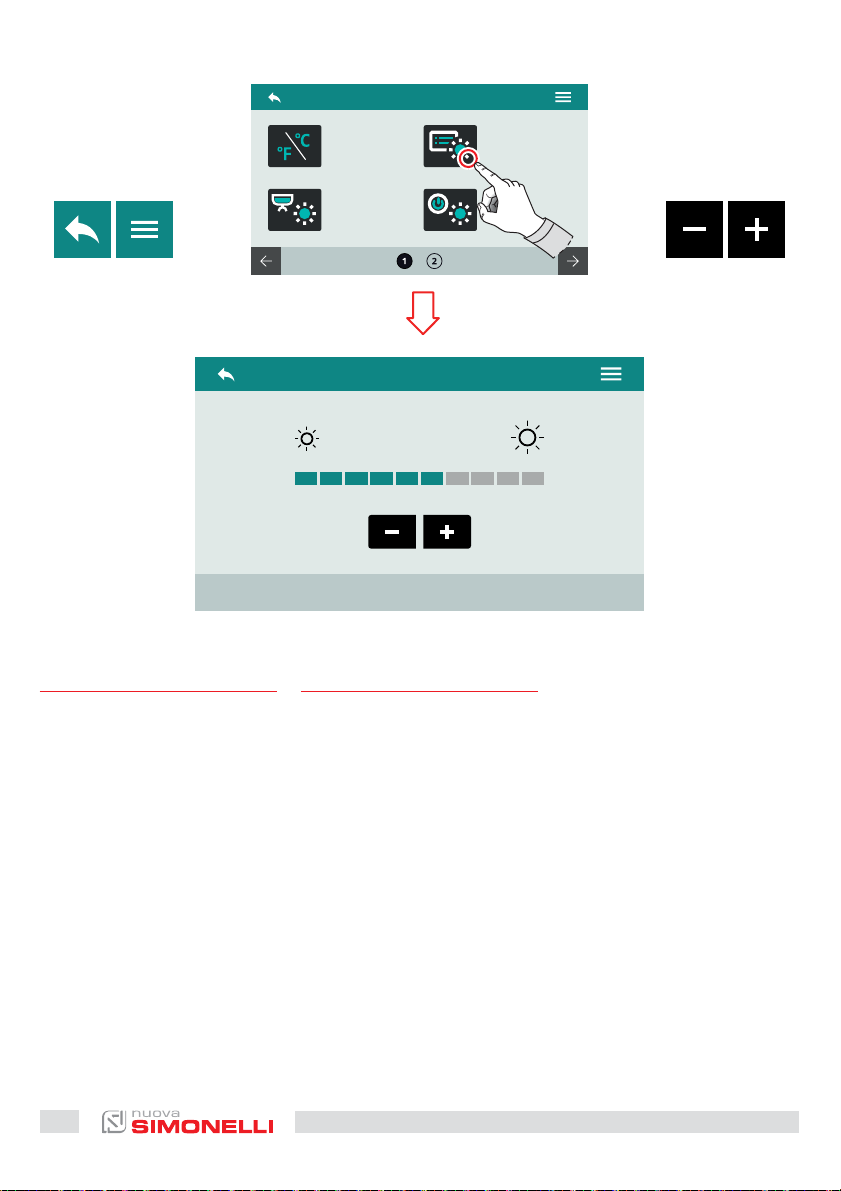
7.2
IMPOSTAZIONE
TASTI E DISPLAY
Premere una delle icone per accedere al relativo menu.
1 Unità di misura (°C o °F)
2 Luminosità led esterni
3 Luminosità display
4 Luminosità tasti
5 Visualizza temperatura
erogazione
6 Visualizza tempo
erogazione
7 Personalizza screensaver
EN
7.2
DISPLAY AND
BUTTON SETTINGS
Press one of the icons to access
the relative menu.
1 Measurement units (°C or °F)
2 External led brightness
3 Screen brightness
4 Button pad brightness
5 Delivery temperature
displaying
6 Delivery time
displaying
7 Screensaver editing
53 6
A Al menu precedente
B Al menu principale
C Pagina precedente
D Pagina successiva
A To the previous menu
B To the main menu
C Previous page
D Next page
AURELIA WAVE DIGIT-T
3
43
AB
1 2
IT
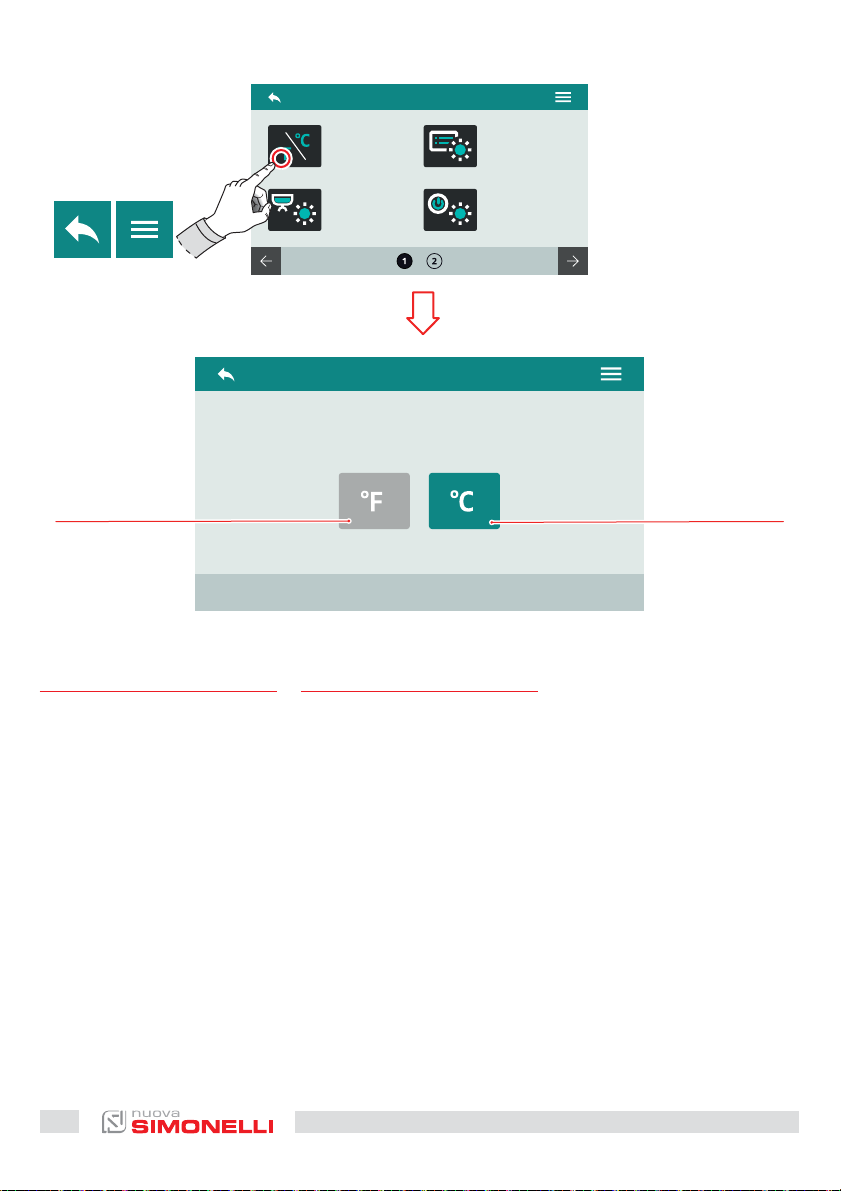
7.2.1
UNITÀ DI MISURA
Scegliere l’unità di misura di
default.
1 Fahrenheit
2 Celsius
A Al menu precedente
B Al menu principale
44
EN
7.2.1
MEASUREMENT UNITS
Choose the default measurements units.
1 Fahrenheit
2 Celsius
A To the previous menu
B To the main menu
AURELIA WAVE DIGIT-T
3

AB
CD
IT
7.2.2
LUMINOSITÀ
TAST I
Impostare la luminosità dei tasti.
A Al menu precedente
B Al menu principale
C Decremento
D Incremento
EN
7.2.2
BUTTON PAD LIGHT
INTENSITY
Set the button pad light intensity.
A To the previous menu
B To the main menu
C Decrease
D Increase
AURELIA WAVE DIGIT-T
3
45
AB
CD
IT
7.2.3
LUMINOSITÀ DISPLAY
Impostare la luminosità del display.
A Al menu precedente
B Al menu principale
C Decremento
D Incremento
46
EN
7.2.3
SCREEN LIGHT INTENSITY
Set the screen light intensity.
A To the previous menu
B To the main menu
C Decrease
D Increase
AURELIA WAVE DIGIT-T
3
AB
CD
IT
7.2.4
LUMINOSITÀ LED ESTERNI
Impostare la luminosità dei led
esterni.
A Al menu precedente
B Al menu principale
C Decremento
D Incremento
EN
7.2.4
EXTERNAL LED BRIGHTNESS
Set the external led brightness.
A To the previous menu
B To the main menu
C Decrease
D Increase
AURELIA WAVE DIGIT-T
3
47
AB
1
IT
7.2.5
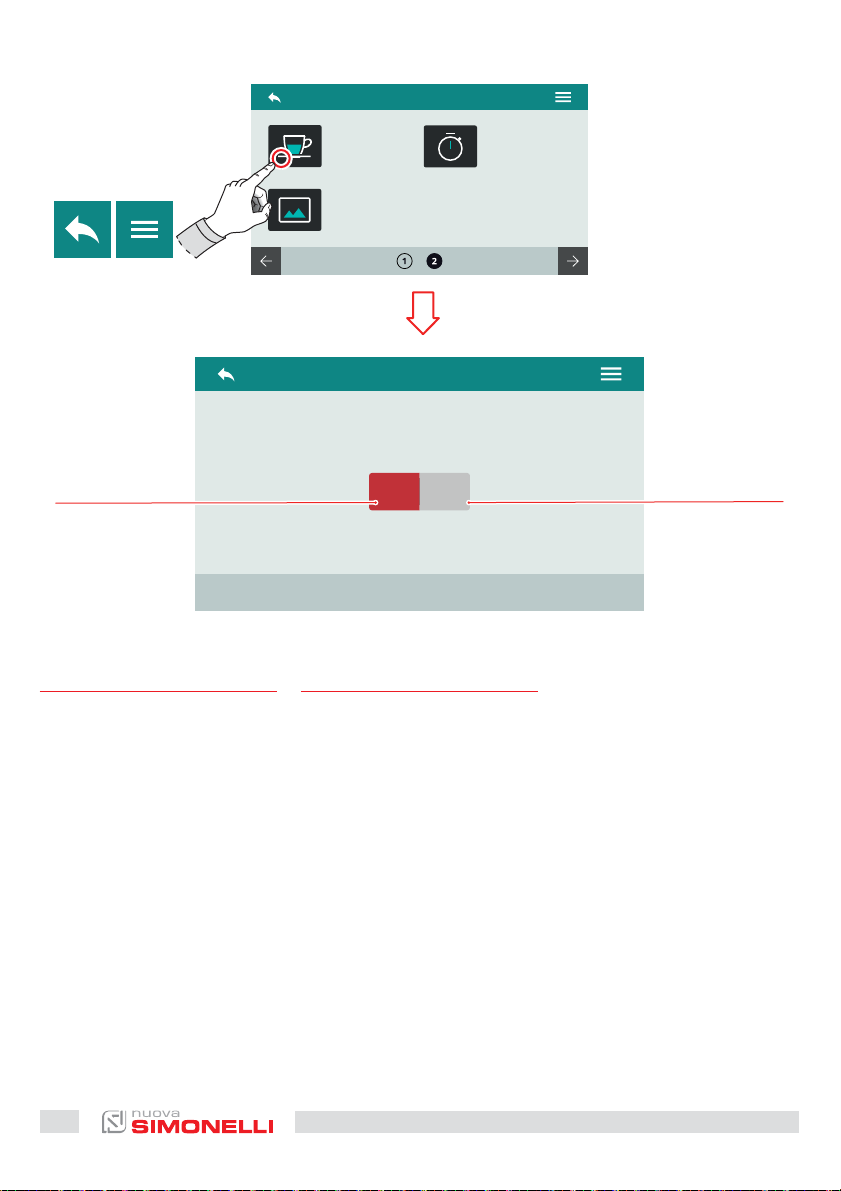
VISUALIZZA TEMPERATURA
EROGAZIONE
Impostare la visualizzazione
della temperatura di erogazione sul display.
1 Disabilitata
2 Abilitata
A Al menu precedente
B Al menu principale
ONOFF
EN
7.2.5
DELIVERY TEMPERATURE
DISPLAYING
Set the delivery temperature
displaying on the screen.
1 Disable
2 Enable
A To the previous menu
B To the main menu
2
48
AURELIA WAVE DIGIT-T
3
AB
1
IT
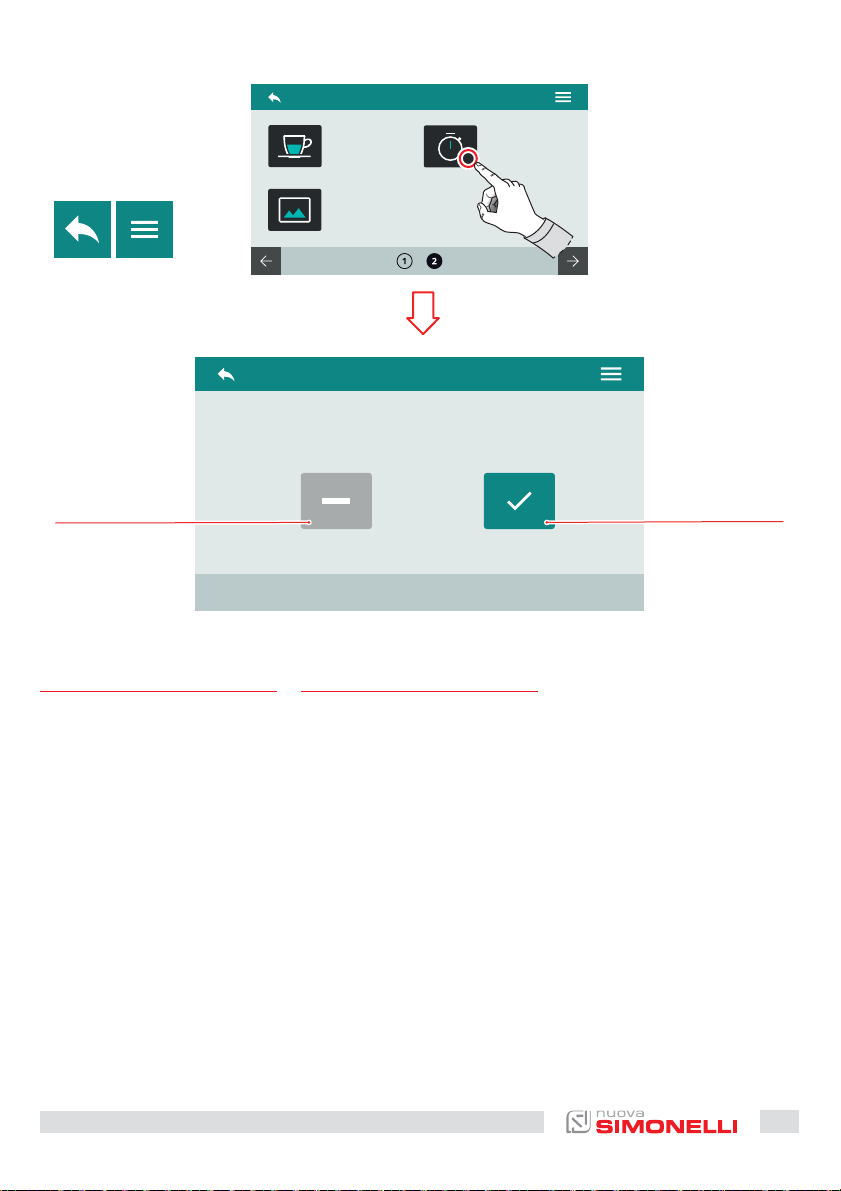
7.2.6
VISUALIZZA TEMPO
EROGAZIONE
Impostare la visualizzazione del
tempo di erogazione sul display.
1 Temporizzato
2 Persistente
A Al menu precedente
B Al menu principale
2
EN
7.2.6
DELIVERY TIME
DISPLAYING
Set the delivery time displaying
on the screen.
1 Timed
2 Persistent
A To the previous menu
B To the main menu
AURELIA WAVE DIGIT-T
3
49
AB
480 × 272 PIXEL
JPEG - PNG - GIF
DISPONIBILE SOLO NELLA
VERSIONE SOFTWARE
DEFINITIVA
AVAILABLE ONLY IN THE
EXECUTIVE SOFTWARE
VERSION
1 5 6
USB
72 DPI
IT
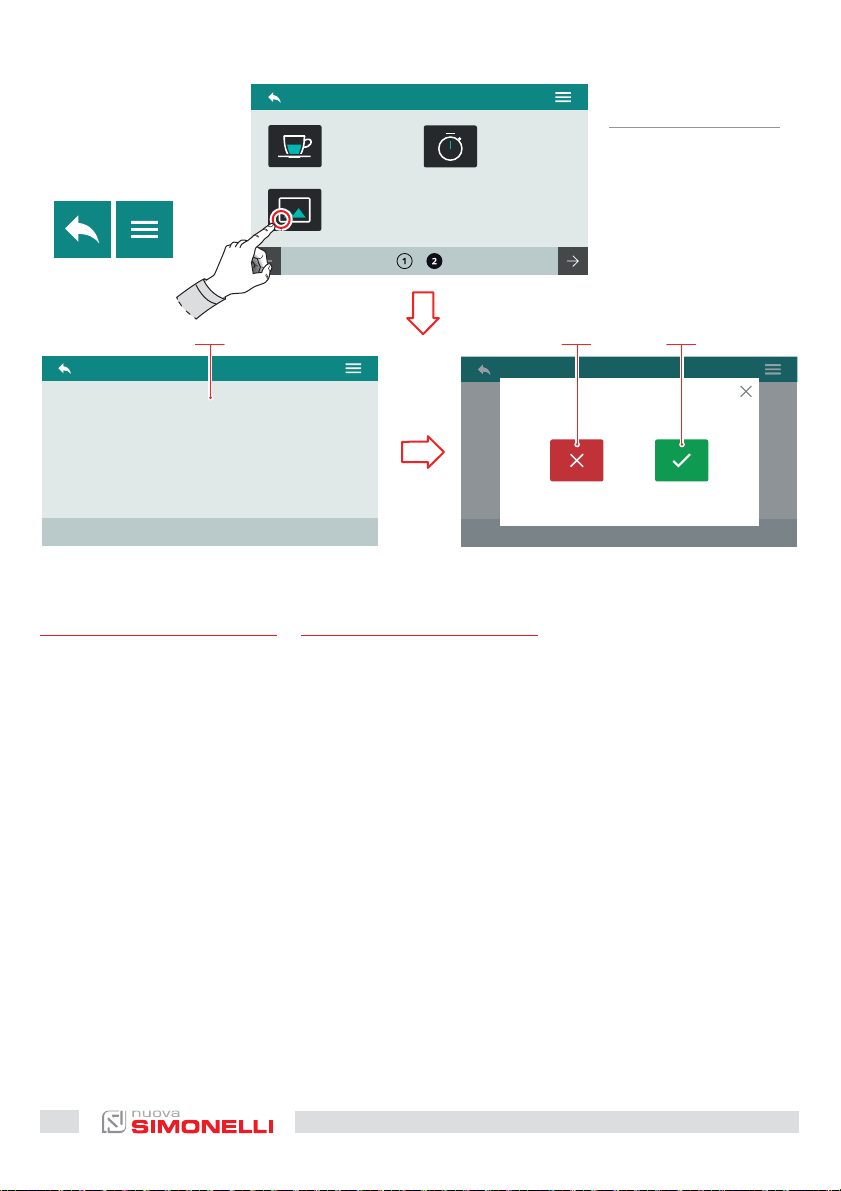
7.2.7
PERSONALIZZA
SCREENSAVER
All’accesso, il sistema richiede
di collegare un dispositivo USB
(1) alla macchina.
L’immagine deve rispettare i requisiti indicati.
Viene rilevata la nuova immagine e viene richiesta la visualizzazione dell’anteprima.
1 Annulla
2 Conferma
A Al menu precedente
B Al menu principale
50
EN
7.2.7
SCREENSAVER
EDITING
On access, the system requires
that a USB device (1) be con-
nected to the machine.
The image must comply with
the indicated requirements.
The new image is detected and
the preview is requested.
1 Cancel
2 Confirm
A To the previous menu
B To the main menu
AURELIA WAVE DIGIT-T
3
DISPONIBILE SOLO NELLA
VERSIONE SOFTWARE
DEFINITIVA
AVAILABLE ONLY IN THE
EXECUTIVE SOFTWARE
VERSION
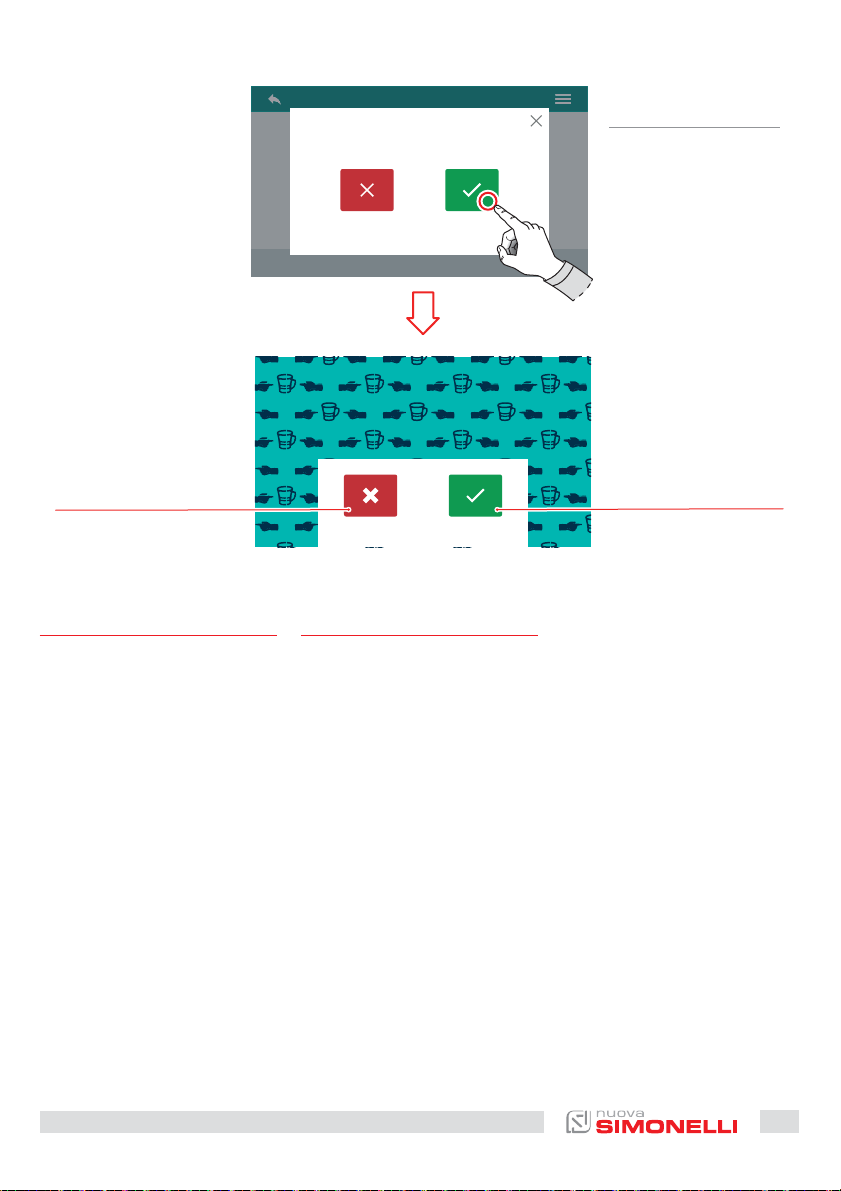
1
IT
Dopo l’anteprima viene richiesta la conferma dell’impostazione.
3 Annulla
4 Conferma
2
EN
Confirmation of the setting is
requested aer the preview.
3 Cancel
4 Confirm
AURELIA WAVE DIGIT-T
3
51
 Loading...