

Page 1
PIE1028 – indice A – avril 2018 1/120
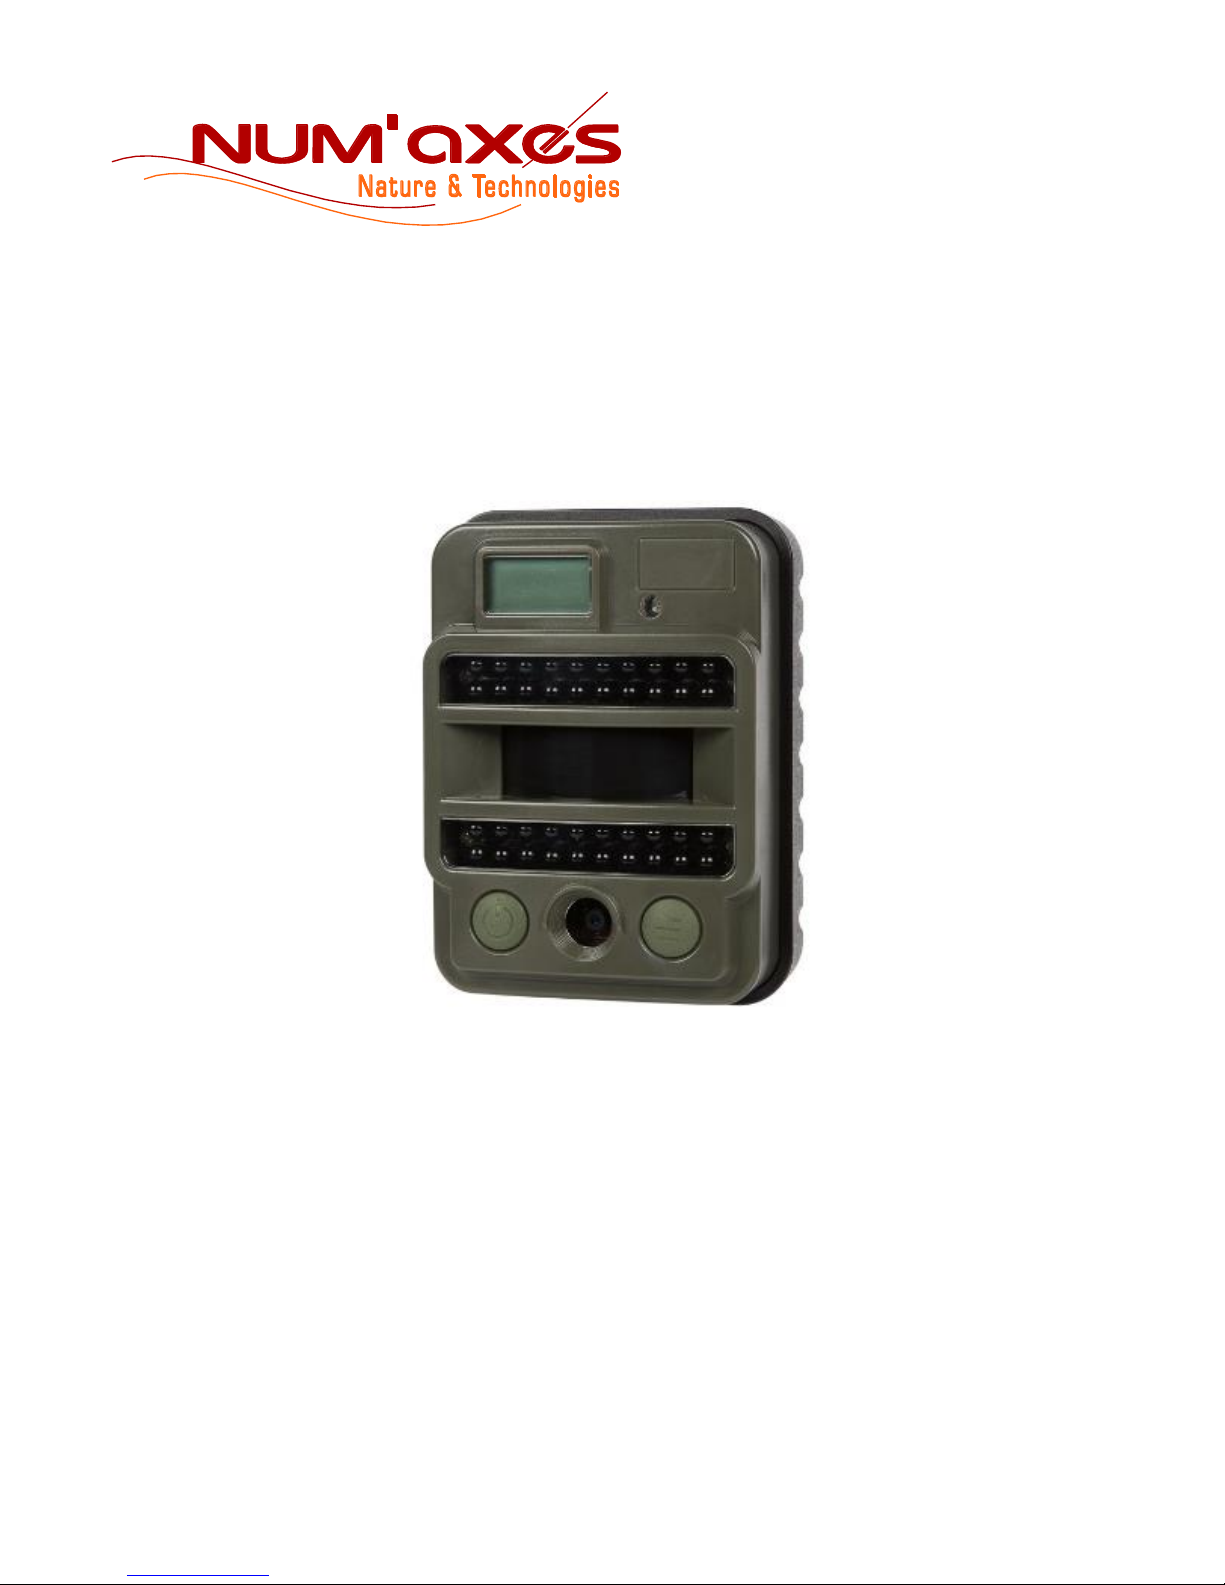
Piège photographique / Trail camera
Cámara trampa / Fotofalle / Fotocamera da esplorazione
PIE1028
Guide d’utilisation ........................................................................ 2
User’s guide ............................................................................... 26
Manual de instrucciones ............................................................ 48
Gebrauchsanleitung ................................................................... 72
Manuale d’uso ........................................................................... 96
Page 2
PIE1028 – indice A – avril 2018 2/120
Guide d’utilisation
1. Composition du produit
piège photographique
sangle de fixation
câble USB
guide d’utilisation
2. Présentation du produit
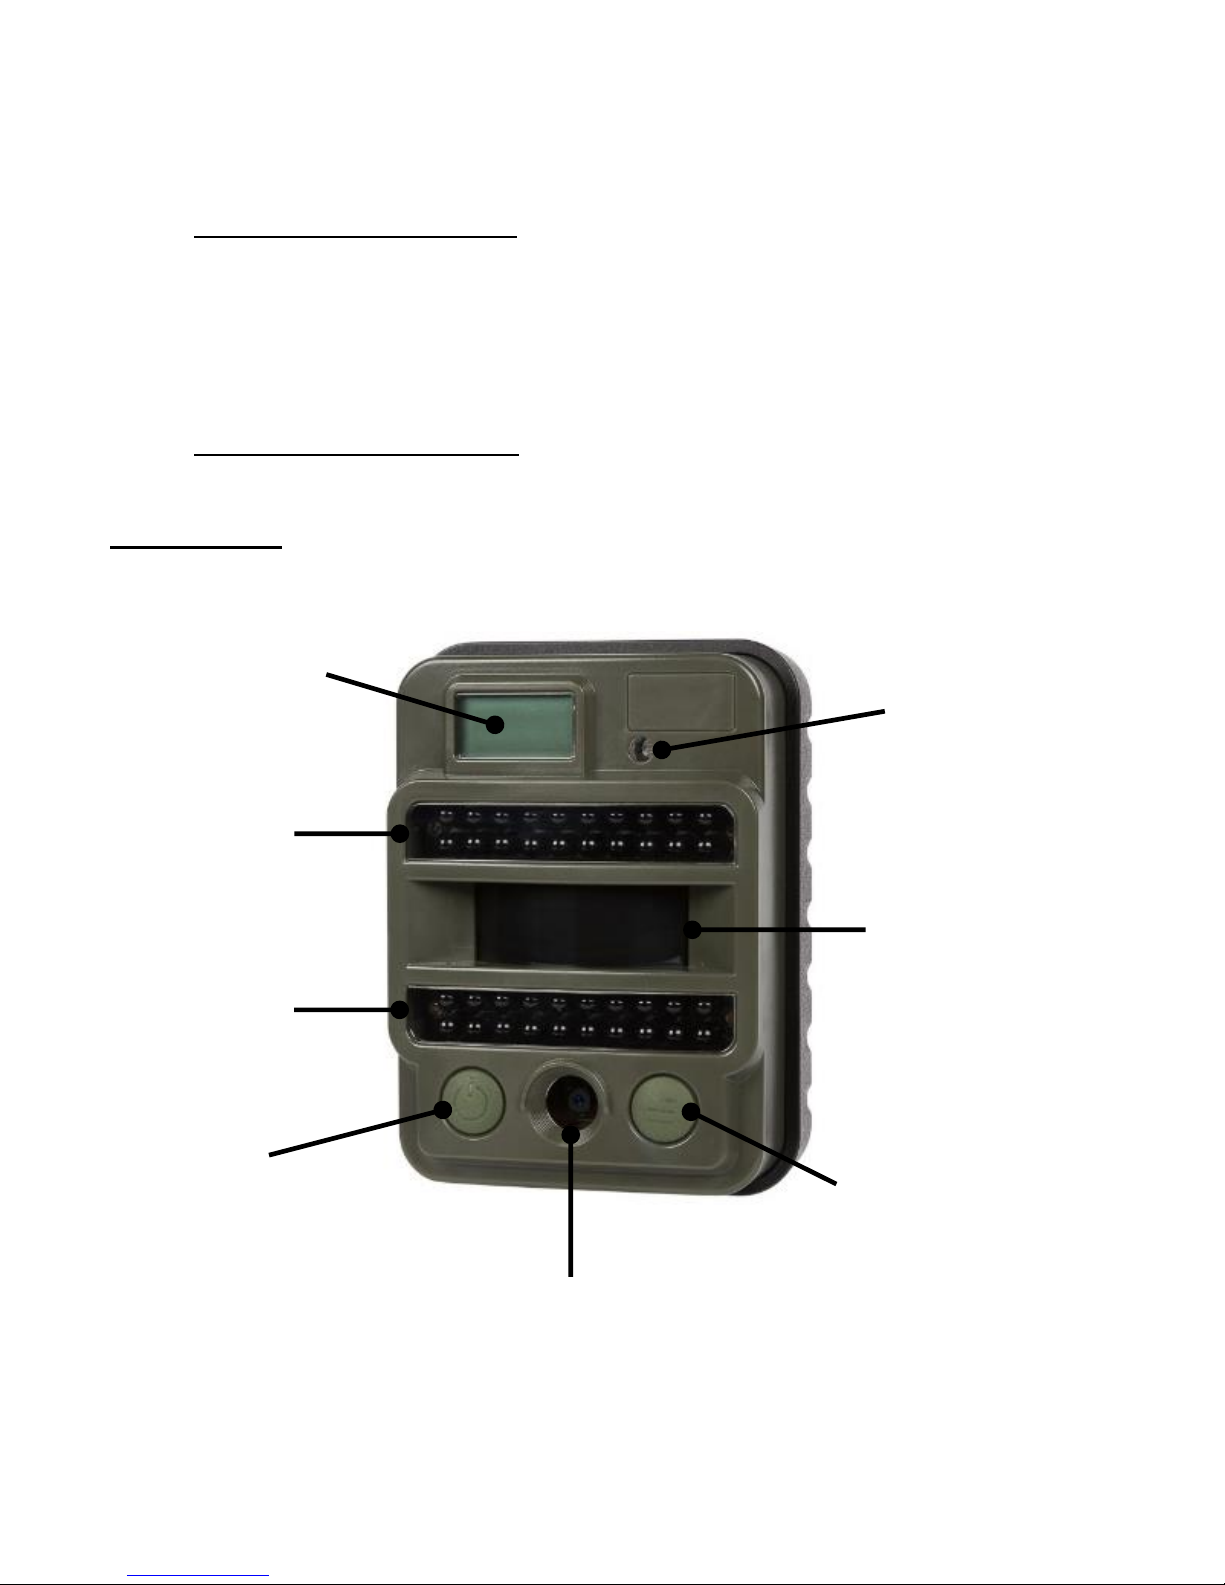
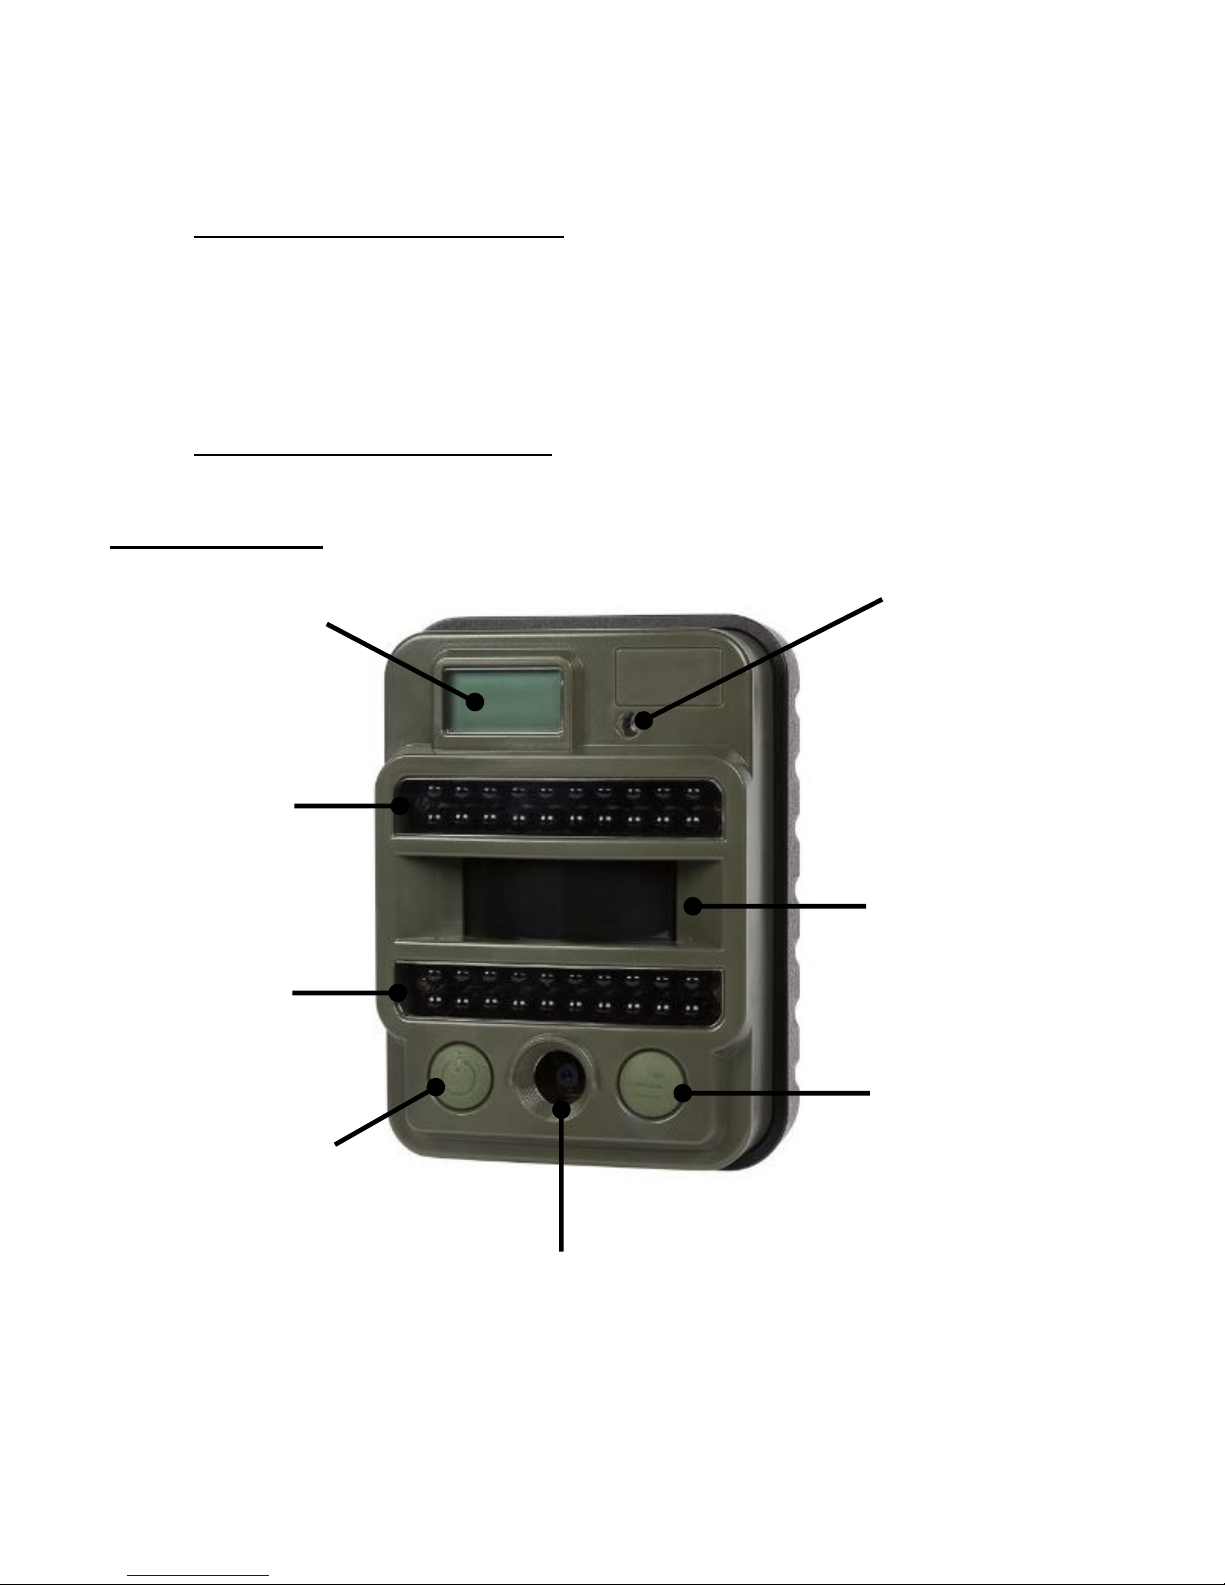
FACE AVANT
20 LEDS
infrarouges
20 LEDS
infrarouges
Ecran LCD
Bouton GAUCHE :
Marche/Arrêt
+
Navigation (NEXT)
Bouton DROIT :
MENU
+
OK (SET)
Objectif
Capteur de
luminosité
+
Témoin
lumineux
Capteur
infrarouge
passif (PIR)
Page 3
PIE1028 – indice A – avril 2018 3/120
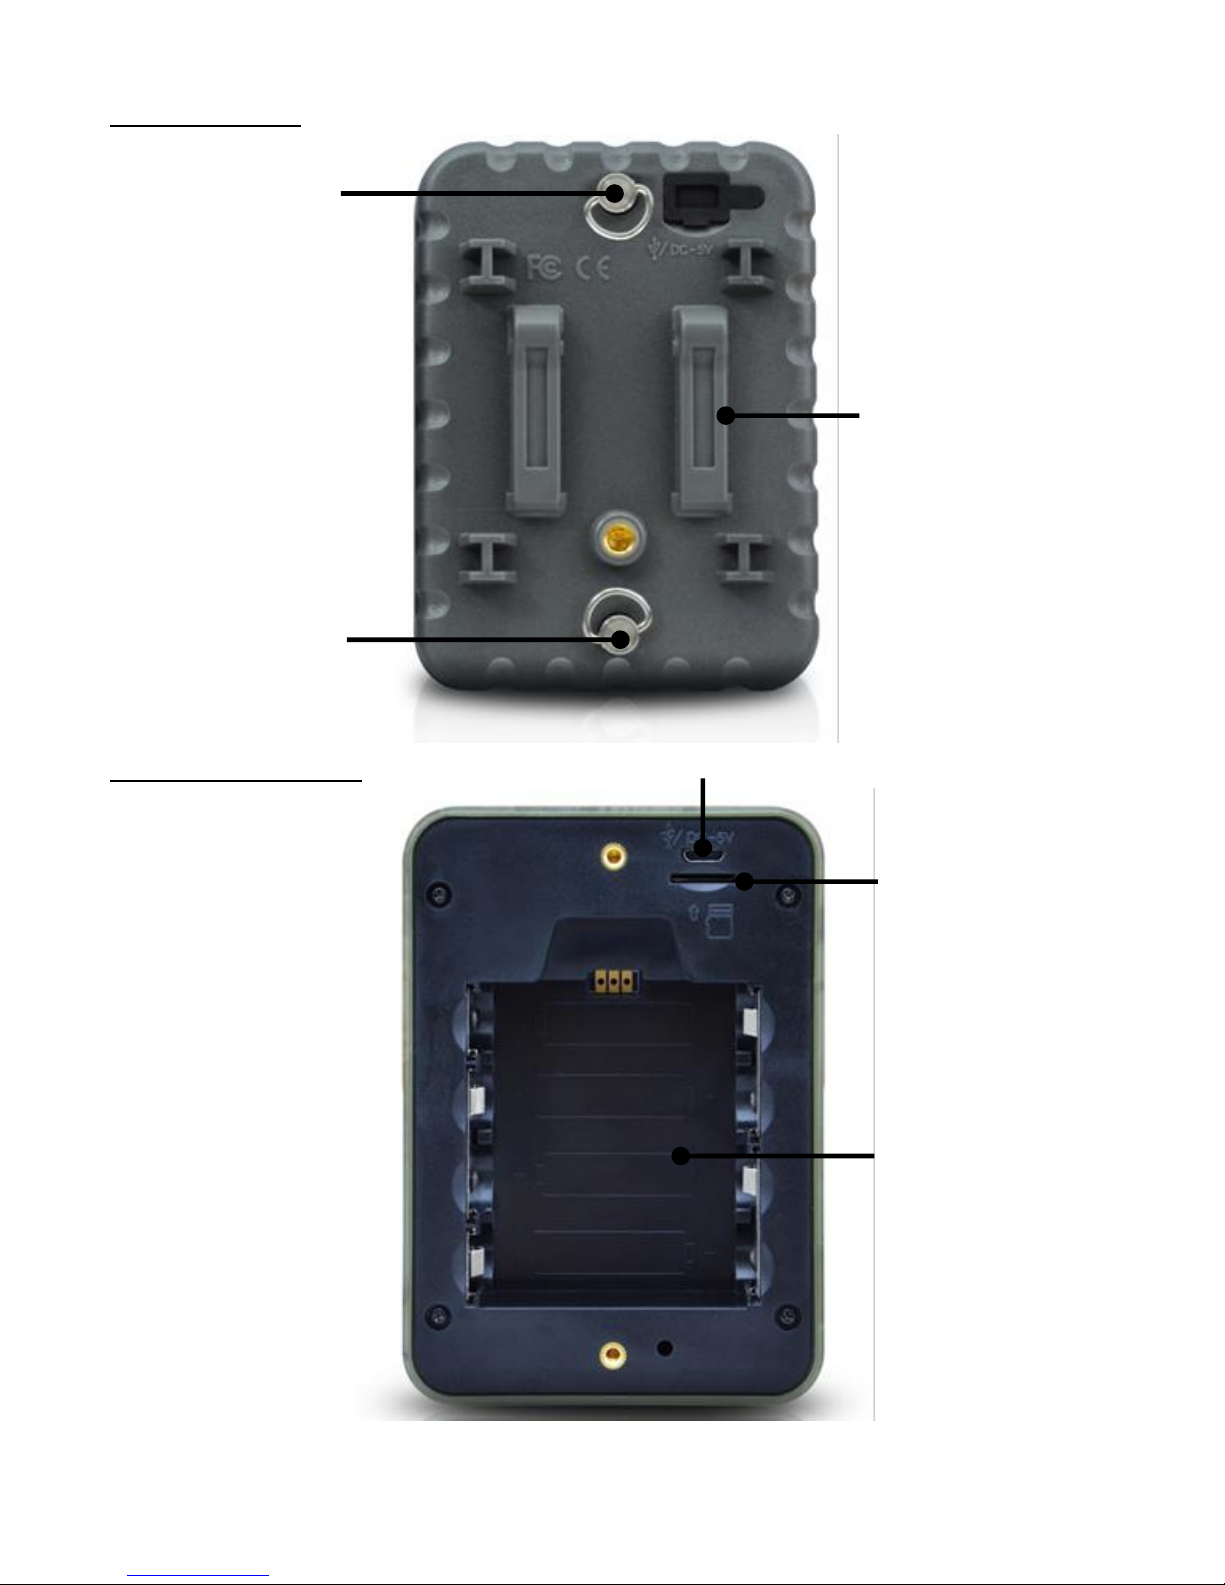
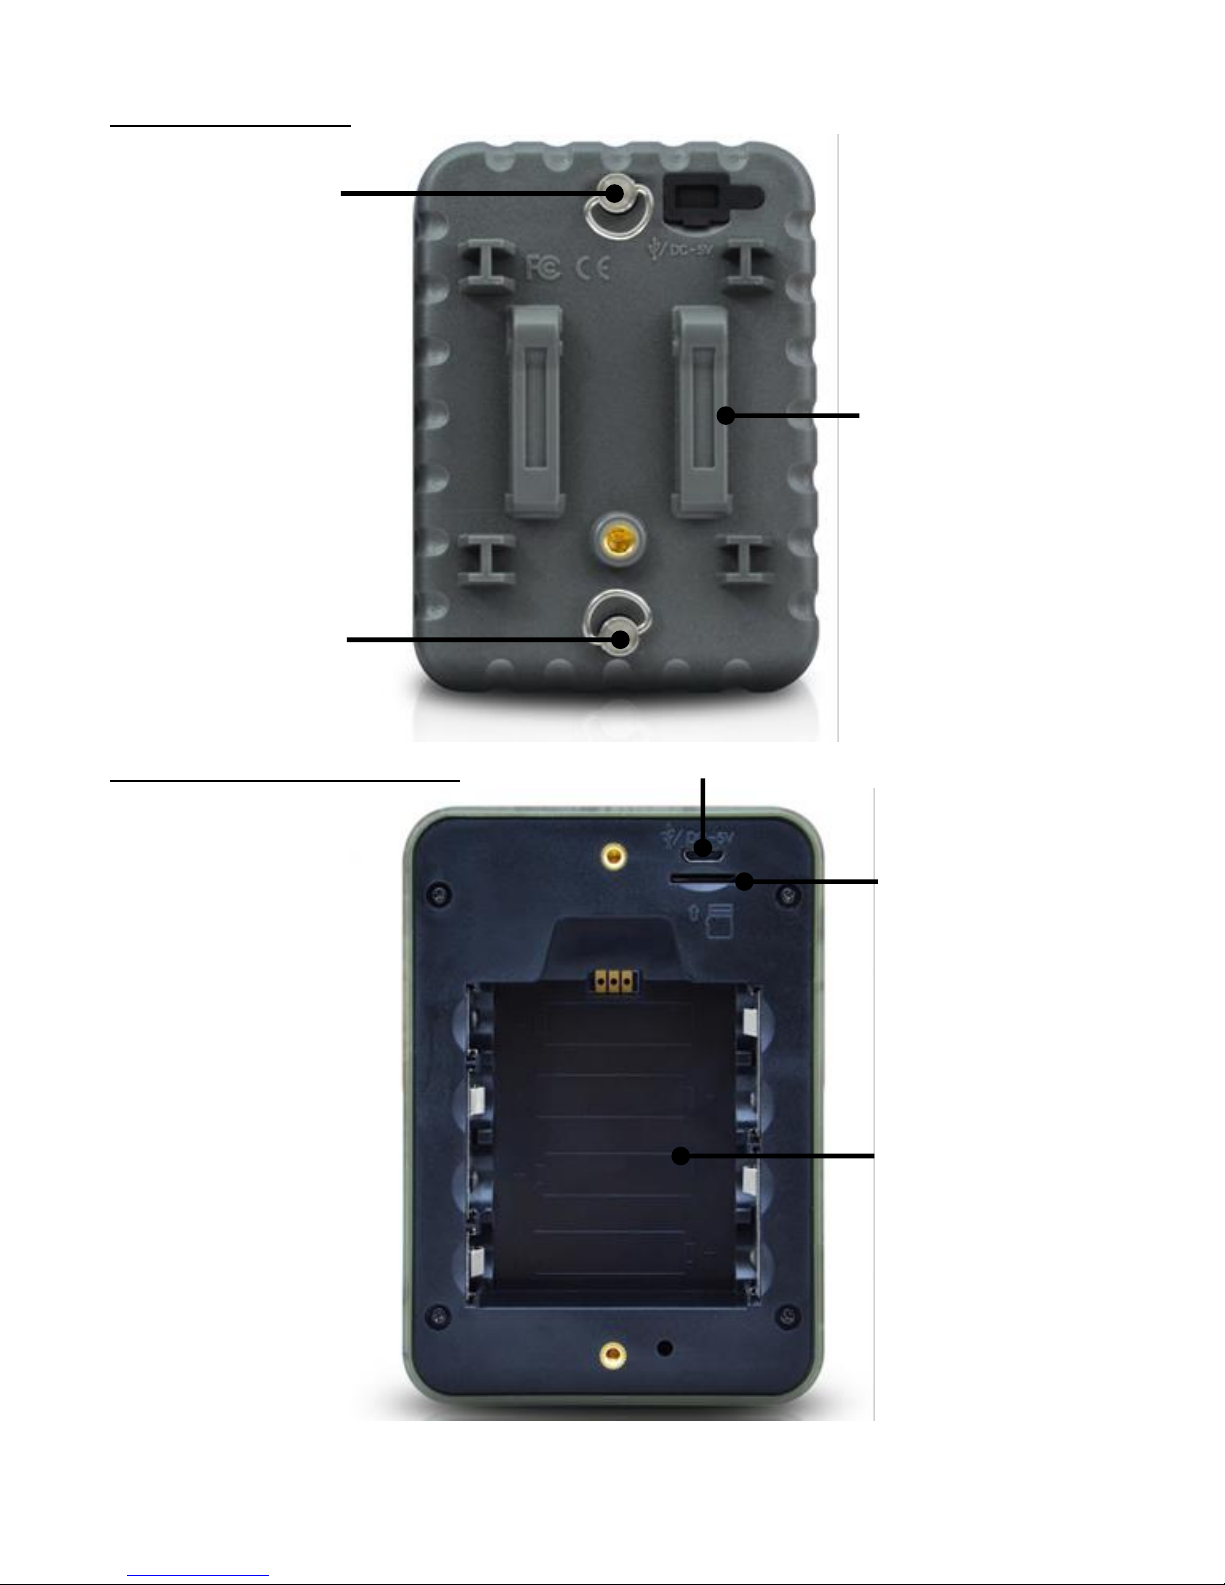
FACE ARRIERE
APPAREIL OUVERT
A dévisser
pour ouvrir
l’appareil
A dévisser
pour ouvrir
l’appareil
Passage
de sangle
Port USB
Emplacement
carte micro SD
Emplacement
piles (4 x AA)
Page 4
PIE1028 – indice A – avril 2018 4/120
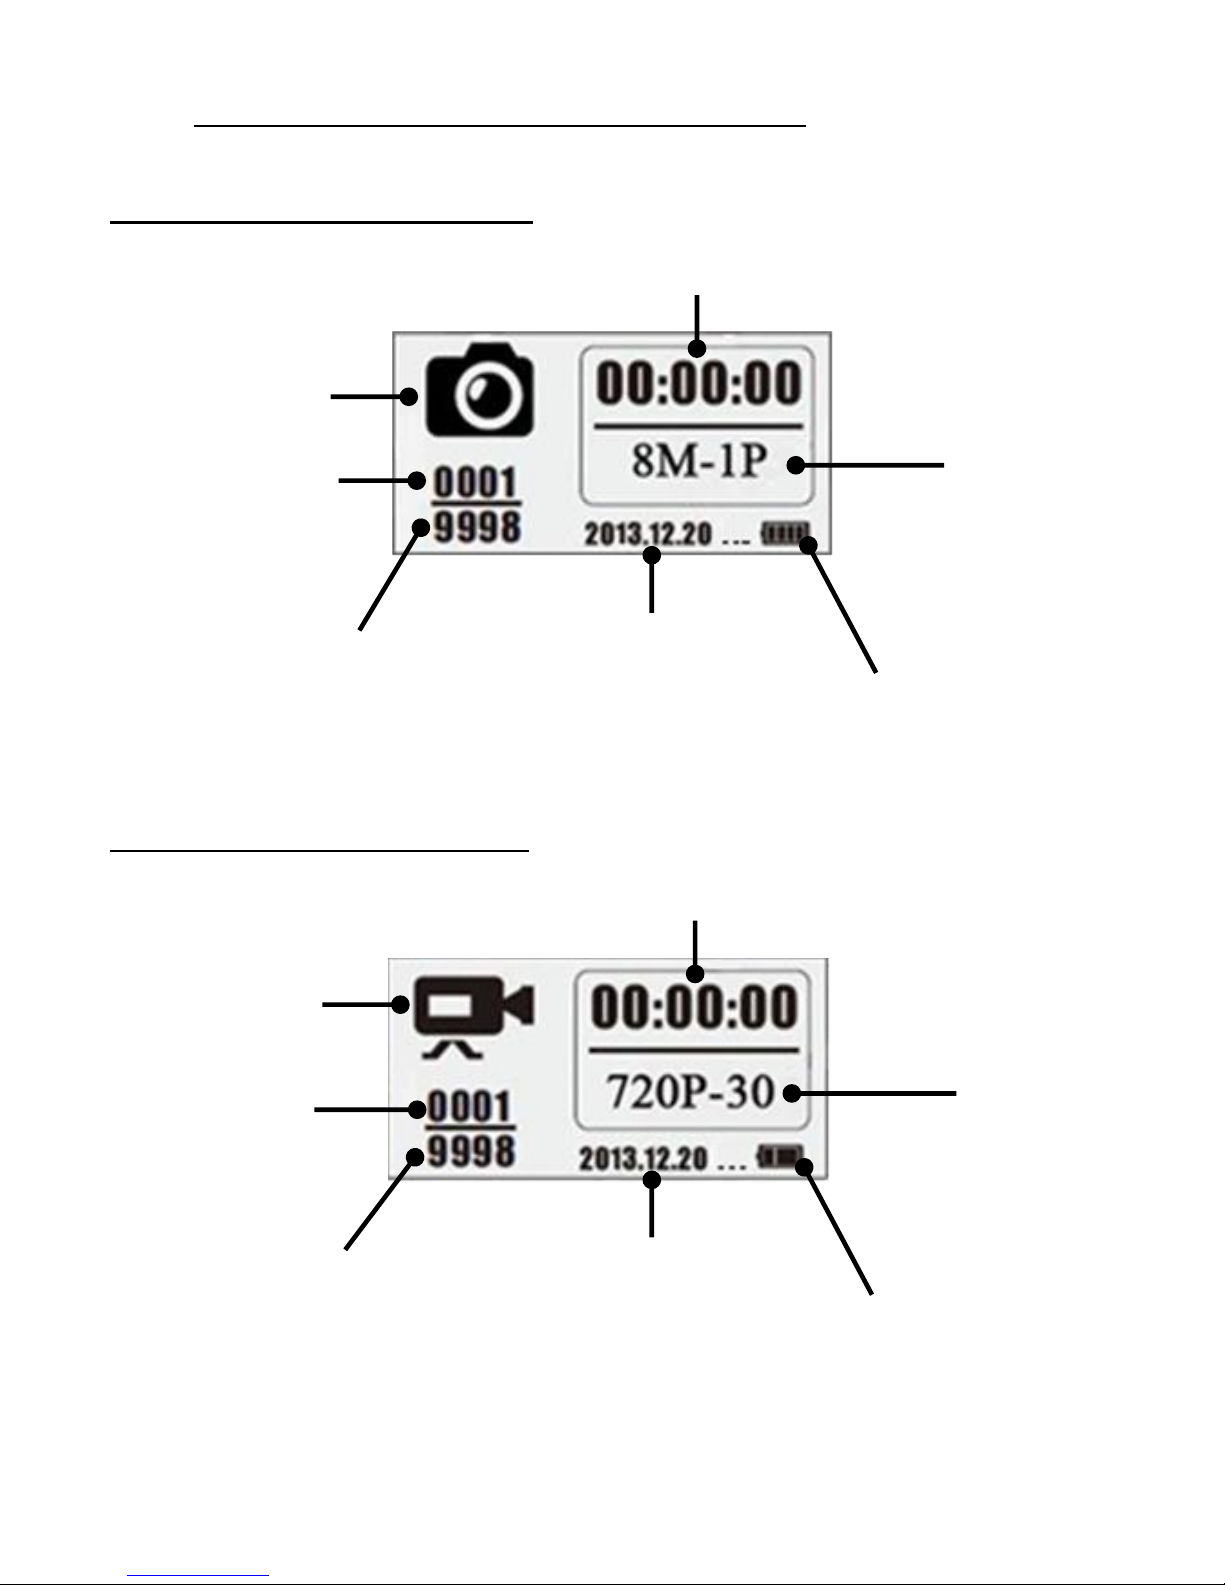
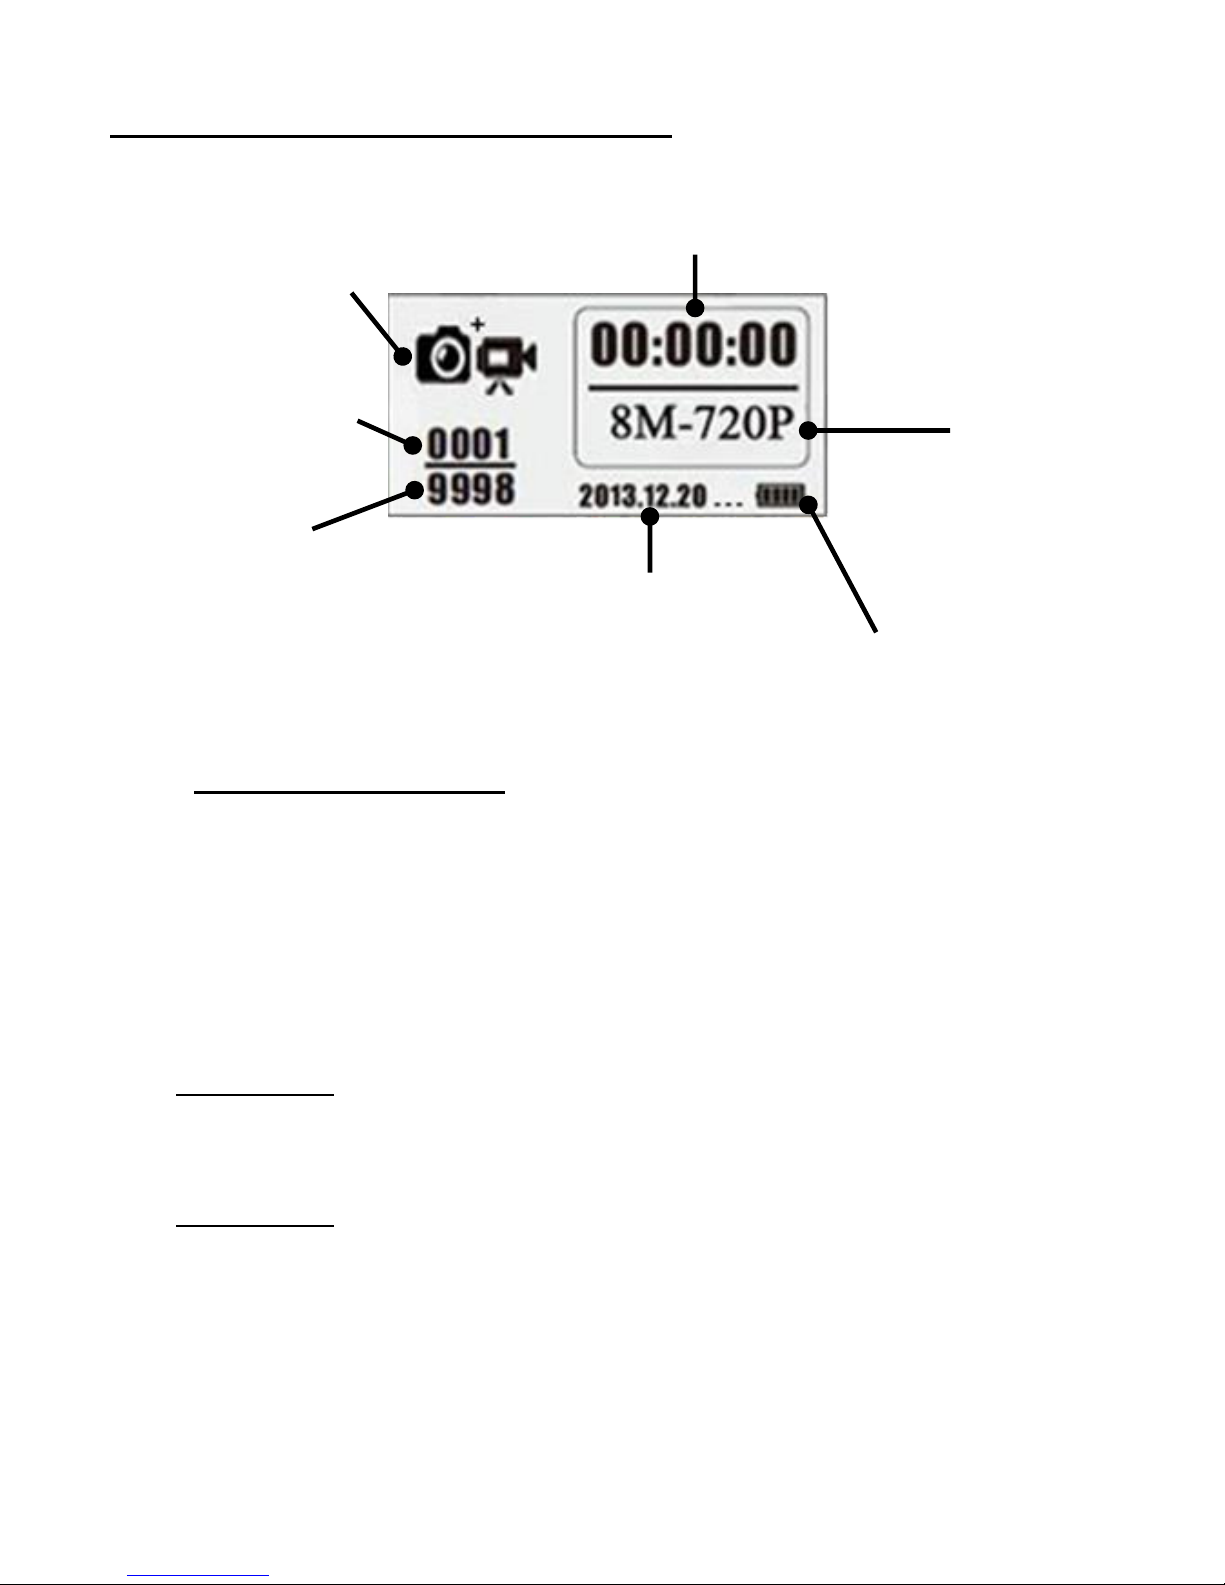
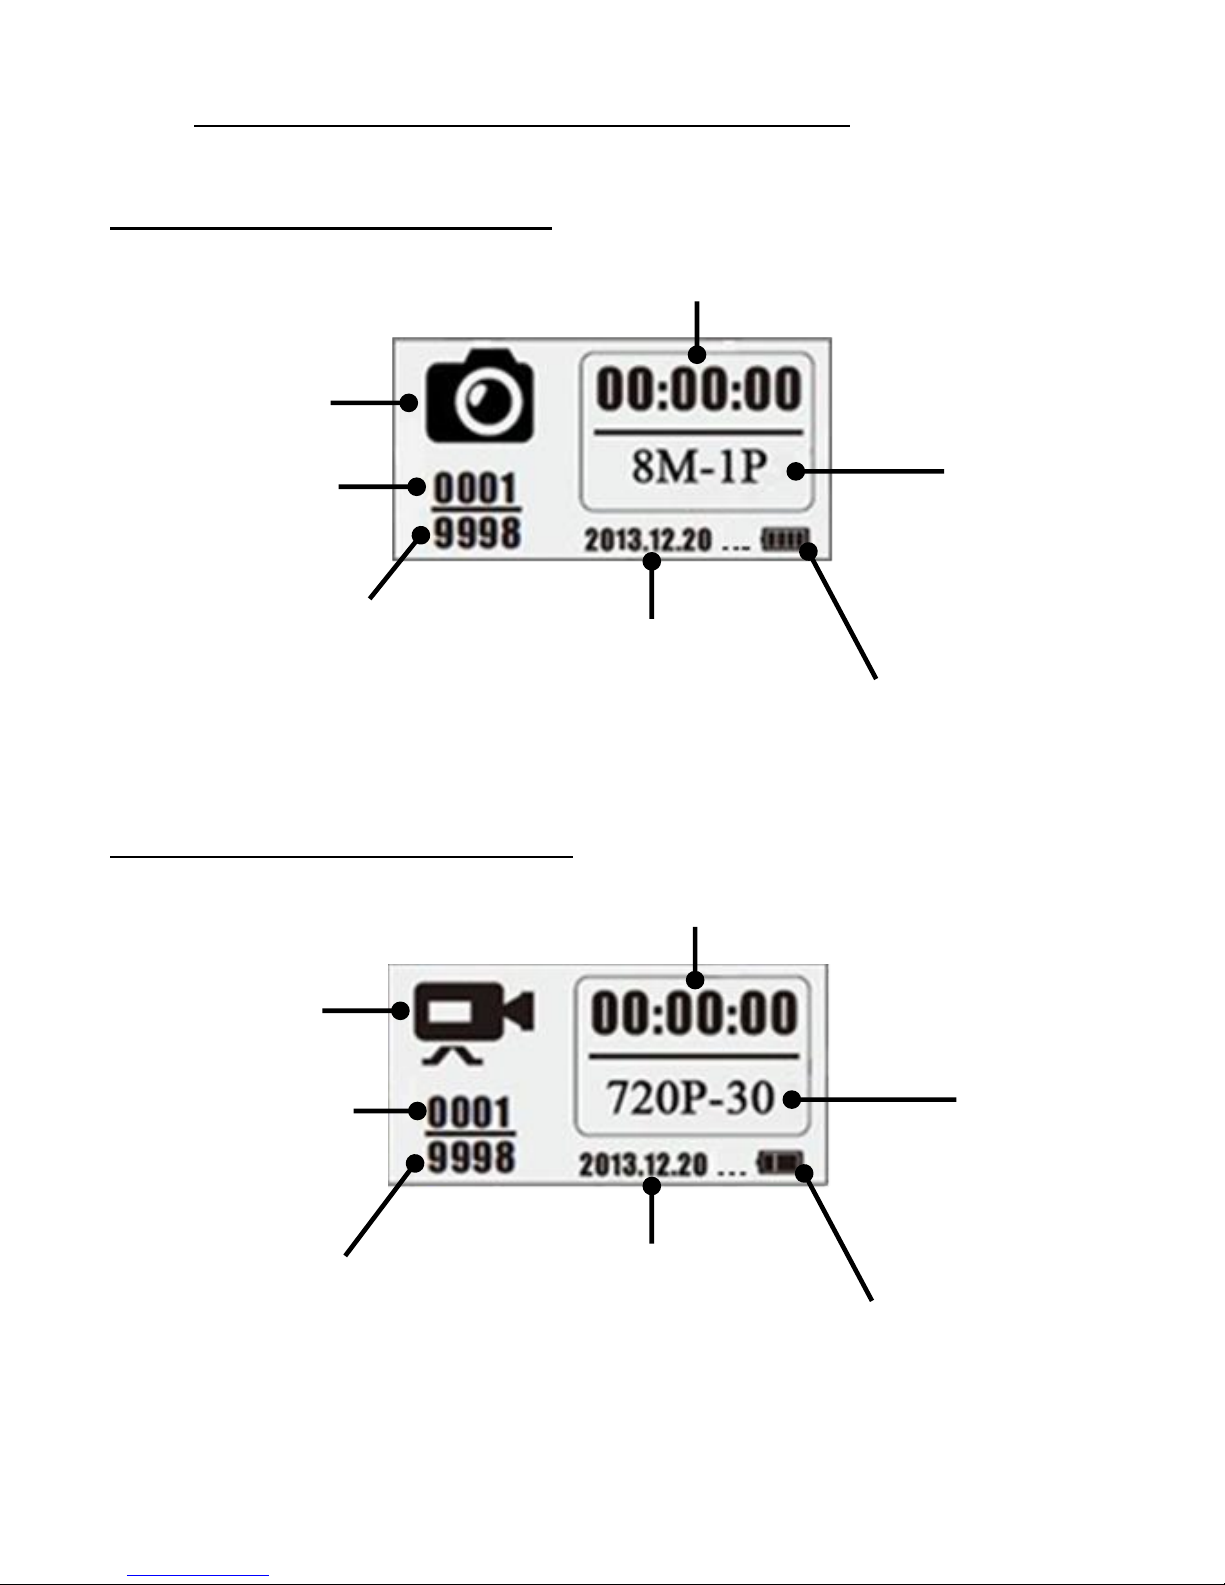
3. Ecran d’information (interface du mode Test)
Ecran LCD – Mode Photo
Ecran LCD – Mode Vidéo
Mode Vidéo
Date
(année/mois/jour)
Date
(année/mois/jour)
Résolution
vidéo
+
Nombre
d’images par
seconde
Heure
Niveau de pile
Mode Photo
Niveau de pile
Nombre de
photos
enregistrées
Estimation
espace disponible
(nombre de fichiers)
Nombre de
vidéos
enregistrées
Estimation
espace disponible
(nombre de fichiers)
Heure
Résolution
photo
+
Nombre de
photos en
rafale
Page 5
PIE1028 – indice A – avril 2018 5/120
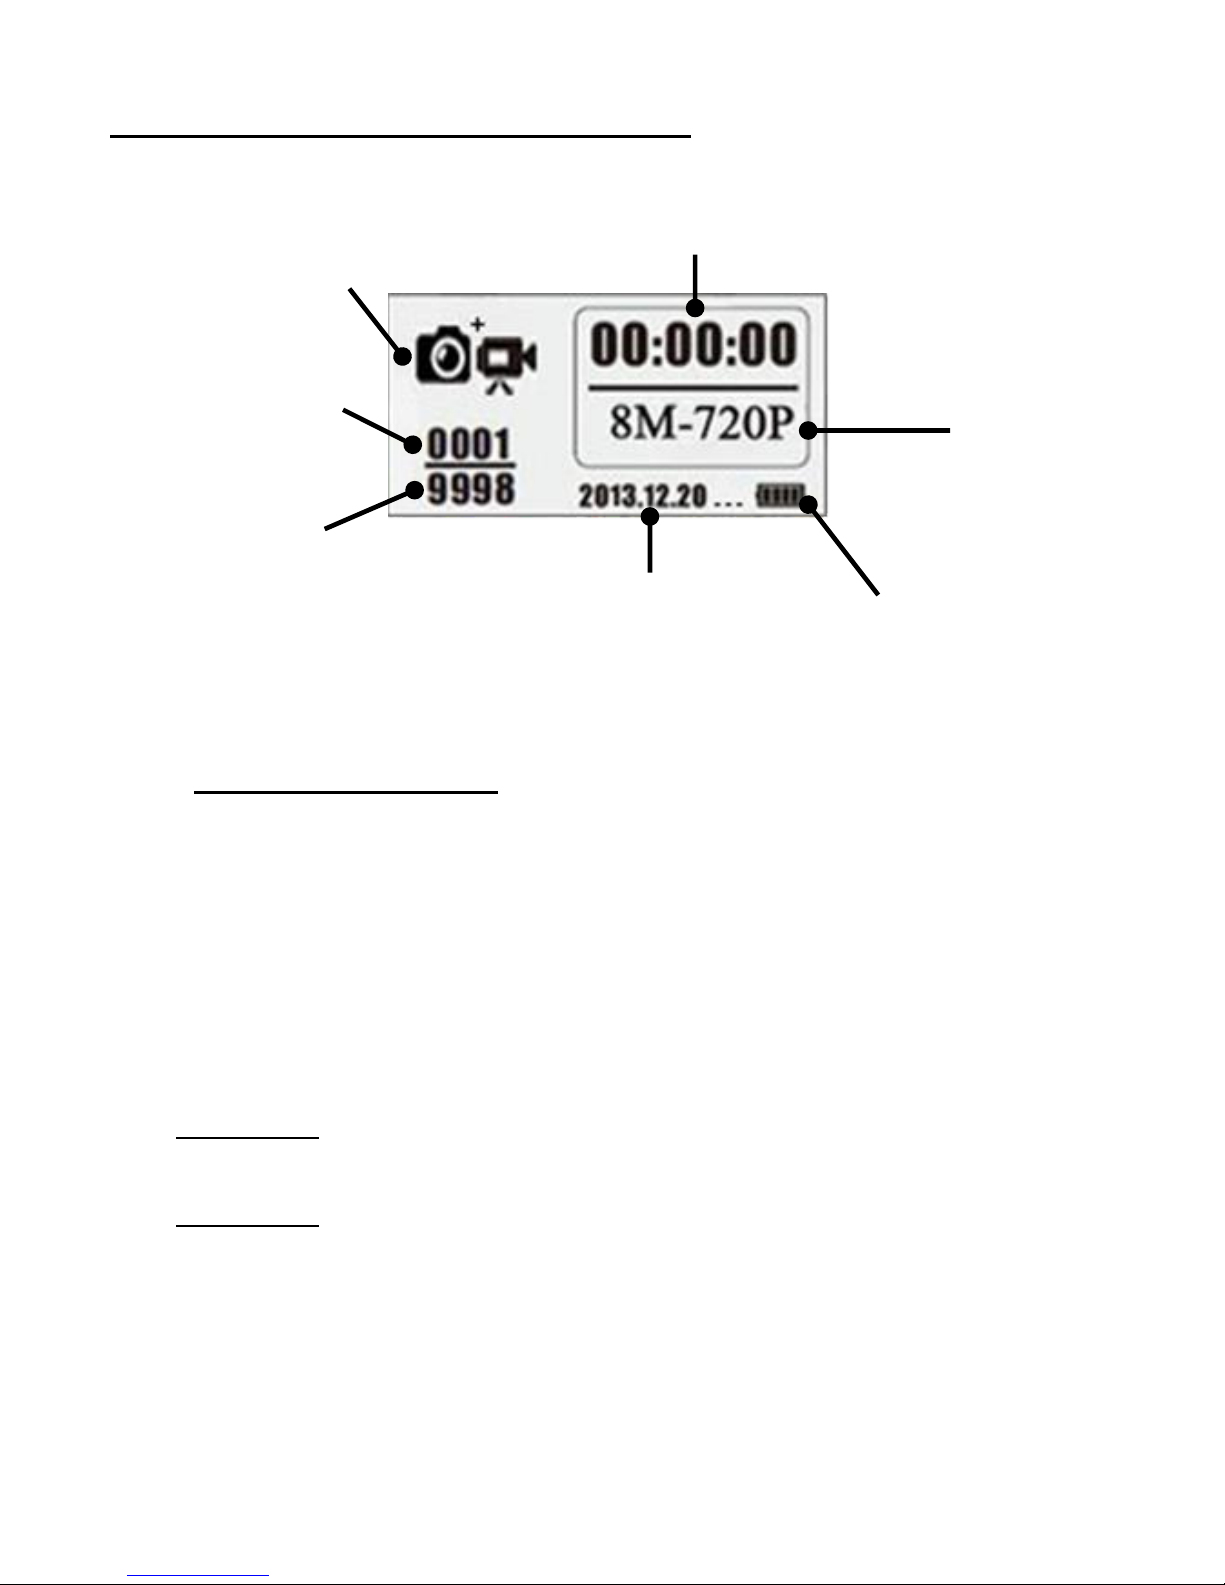
Ecran LCD – Mode Photo + Vidéo
4. Mise en place des piles
Le compartiment à piles accepte 4 piles AA (LR06). Utilisez des piles de
bonne qualité (vous pouvez vous procurer des piles NUM’AXES auprès de
votre distributeur ou directement sur www.numaxes.com). Insérez-les en
respectant bien les polarités (+/-) indiquées dans le compartiment à piles.
ATTENTION : n’utilisez pas de piles différentes de celles indiquées
dans ce guide. En faisant cela, vous endommageriez le produit et
annuleriez la garantie.
ATTENTION : l’appareil doit impérativement être à l’arrêt quand vous
installez ou remplacez les piles. Retirer les piles alors que l’appareil est
en marche peut endommager le produit.
Ne mélangez pas des piles ayant déjà servi et des piles neuves. Ne
mélangez pas des piles alcalines, standard ou rechargeables.
Mode
Photo + Vidéo
Résolution
photo
+
Résolution
vidéo
Heure
Nombre de
photos/vidéos
enregistrées
Estimation
espace disponible
(nombre de fichiers)
Date
(année/mois/jour)
Niveau de pile
Page 6

PIE1028 – indice A – avril 2018 6/120
5. Mise en place de la carte micro SD
L’appareil utilise une carte mémoire micro SD (Secure Digital) standard
pour sauvegarder les photos et/ou les vidéos. Les cartes micro SD d’une
capacité maximum de 32 Go sont supportées.
Avant d’insérer ou de retirer la carte SD, l’appareil doit être mis à l’arrêt.
Si vous ne le faites pas, cela peut causer la perte ou la détérioration des
fichiers déjà enregistrés sur la carte mémoire.
Ouvrez le couvercle, insérez la carte micro SD dans l’emplacement
prévu à cet effet. Positionnez-la correctement en respectant le
schéma explicatif situé en-dessous de l’emplacement et enclenchez-la
bien.
Pour retirer la carte micro SD, enfoncez-la légèrement pour la libérer
puis dégagez-la doucement.
La carte micro SD doit être vide (pas d’images provenant d’autres
sources). Si vous utilisez une carte micro SD provenant d’un autre
appareil, prenez soin de la formater avant de l’utiliser dans le produit.
Les cartes SD neuves peuvent être utilisées telles quelles sans
formatage.
6. Fonctionnement
ON/OFF (mode Fonctionnement Automatique PIR, mode Test, OFF)
Allumer l’appareil et entrer dans le mode Fonctionnement
Automatique PIR : Appuyez sur le bouton GAUCHE pendant 3
secondes, le témoin lumineux va clignoter 5 fois et l’appareil va
entrer en mode Fonctionnement Automatique PIR.
Page 7

PIE1028 – indice A – avril 2018 7/120
Entrer dans le mode Test : En mode Fonctionnement Automatique
PIR, appuyez une fois sur le bouton DROIT pour activer l’écran LCD
et entrer en mode Test.
Eteindre l’appareil : Appuyez sur le bouton GAUCHE pendant
5 secondes pour éteindre l’appareil.
Configuration des paramètres de fonctionnement
Entrer dans le menu de configuration : En mode Test, appuyez sur le
bouton DROIT pour accéder au menu de configuration. En mode
Configuration, le bouton GAUCHE sert toujours à la navigation et le
bouton DROIT sert toujours à dire OK et enregistrer/confirmer la
configuration souhaitée.
Revenir au mode Test depuis le menu de configuration : Après avoir
effectué tous les réglages, appuyez sur le bouton DROIT pendant
3 secondes pour revenir au mode Test.
Entrer en mode Fonctionnement Automatique PIR depuis le mode
Test : Appuyez sur le bouton DROIT pendant 3 secondes pour entrer
en mode Fonctionnement Automatique PIR (le témoin lumineux va
clignoter 5 fois et l'écran LCD va s’éteindre).
Enregistrement manuel
En mode Test, appuyez sur le bouton GAUCHE pour prendre des
photos, des vidéos ou des photos + vidéos en fonction des réglages
de l'appareil.
Pour arrêter l'enregistrement vidéo (en mode Vidéo ou Photo +
Vidéo), appuyez à nouveau sur le bouton GAUCHE.
Page 8
PIE1028 – indice A – avril 2018 8/120
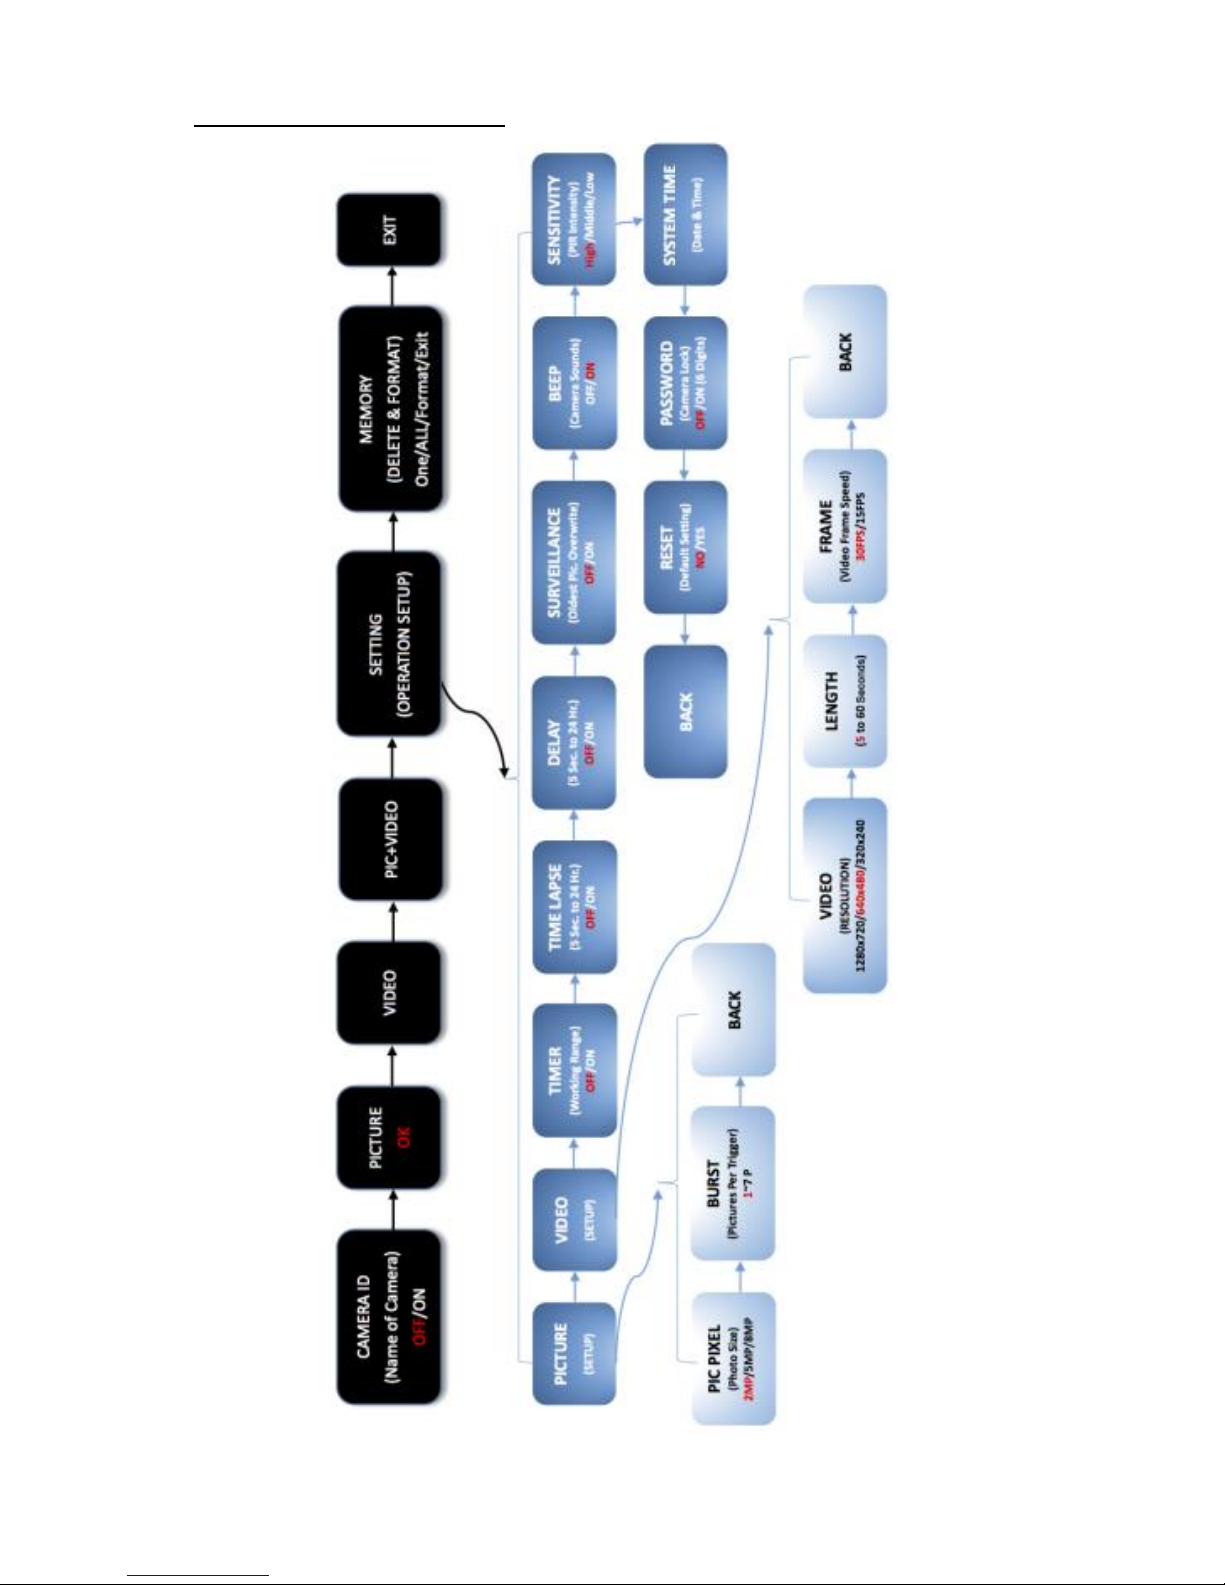
7. Menu de configuration
Page 9
PIE1028 – indice A – avril 2018 9/120
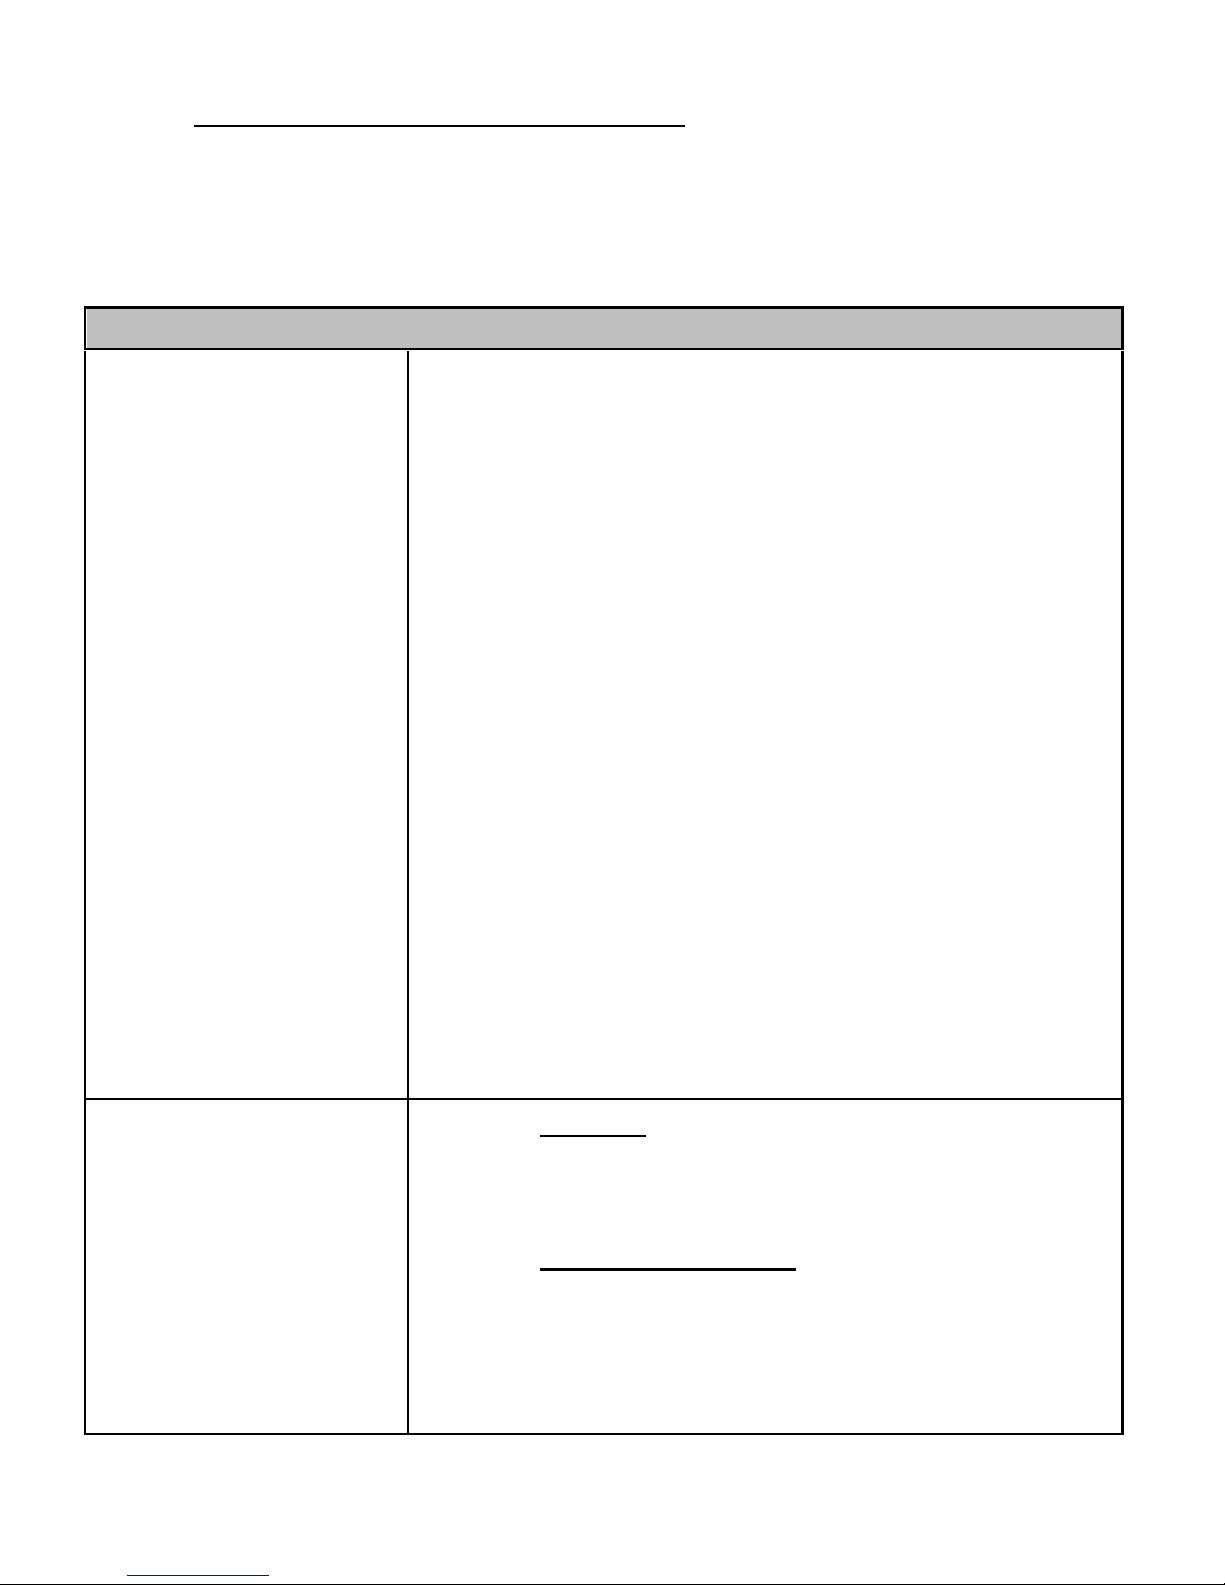
8. Liste des paramètres et des réglages
Appuyez sur le bouton DROIT pour entrer dans les paramètres et procéder
aux réglages.
MENU
CAMERA ID
(Name of camera)
IDENTIFICATION
Nom de l’appareil
(4 chiffres et/ou
lettres)
1. OFF (réglage par défaut)
2. ON
Appuyez sur le bouton GAUCHE pour sélectionnez
ON puis appuyez sur le bouton DROIT pour entrer
dans la page de configuration.
0 0 0 0 (4 chiffres et/ou lettres)
Appuyez sur le bouton GAUCHE pour choisir le
caractère souhaité puis appuyez sur le bouton
DROIT pour confirmer et passer au caractère
suivant.
Quand les 4 caractères sont programmés,
appuyez sur le bouton DROIT pour confirmer le
nom de l’appareil et sortir.
_______________________________
Attribuer un nom à l’appareil peut vous aider à
identifier où et par quel appareil une photo a été
prise.
PICTURE
PHOTO
Réglage par défaut
a) Réglage
Appuyez sur le bouton DROIT pour entrer dans le
mode Photo OK apparaît sur l’écran LCD.
b) Prendre une photo
Appuyez sur le bouton DROIT pendant 3 secondes
pour retourner à l’écran d’information puis
appuyez sur le bouton GAUCHE pour prendre une
photo.
Page 10

PIE1028 – indice A – avril 2018 10/120
VIDEO
VIDEO
a) Réglage
Appuyez sur le bouton DROIT pour entrer dans le
mode Vidéo OK apparaît sur l’écran LCD.
b) Prendre une vidéo
Appuyez sur le bouton DROIT pendant 3 secondes
pour retourner à l’écran d’information puis
appuyez sur le bouton GAUCHE pour démarrer
l’enregistrement d’une vidéo, appuyez à nouveau
sur le bouton GAUCHE pour arrêter
l’enregistrement de la vidéo.
PIC+VIDEO
PHOTO + VIDEO
a) Réglage
Appuyez sur le bouton DROIT pour entrer dans le
mode Photo + Vidéo OK apparaît sur l’écran
LCD.
b) Prendre une photo puis une vidéo
Appuyez sur le bouton DROIT pendant 3 secondes
pour retourner à l’écran d’information puis
appuyez sur le bouton GAUCHE pour prendre une
photo puis démarrer l’enregistrement d’une
vidéo, appuyez à nouveau sur le bouton GAUCHE
pour arrêter l’enregistrement.
_______________________________
En mode « PIC+VIDEO », une (des) photo(s) puis
une vidéo sont prises à chaque déclenchement.
SETTING
(Operation setup)
CONFIGURATION
Réglage des
paramètres de
fonctionnement de
l’appareil
Voir tableau ci-dessous pour le détail des
paramètres et des réglages.
Appuyez sur le bouton DROIT pour entrer dans le
menu de configuration.
Page 11

PIE1028 – indice A – avril 2018 11/120
MEMORY
Delete & Format
MEMOIRE
Effacer & Formater
1. One (Un)
2. All (Tout)
3. Format (Formater)
4. EXIT (SORTIR)
Appuyez sur le bouton GAUCHE pour naviguer
puis sur le bouton DROIT pour valider votre choix.
Appuyez sur le bouton GAUCHE pour sélectionner
Yes/Oui ou No/Non puis appuyez sur le bouton
DROIT pour valider et sortir.
Si tous les fichiers sont supprimés, l’appareil
retourne automatiquement à l’écran
d’information.
_______________________________
One (un) : seul le dernier fichier est effacé.
All (tout) : efface tous les fichiers présents sur la
carte micro SD.
Format (formater) : efface tous les fichiers
stockés sur la carte micro SD pour la préparer à sa
réutilisation.
Attention : Les fichiers effacés ne peuvent pas
être restaurés. Veillez à télécharger et
sauvegarder tous les fichiers que vous désirez
conserver.
EXIT
SORTIR
Appuyez sur le bouton DROIT pour retourner à
l’écran d’information.
Page 12
PIE1028 – indice A – avril 2018 12/120
SETTING (operation setup)
CONFIGURATION (réglage des paramètres de fonctionnement de
l’appareil)
PICTURE
(setup)
PHOTO
Réglage
Appuyez sur le bouton DROIT pour entrer.
PIC PIXEL (photo size)
RESOLUTION PHOTO
Appuyez sur le bouton DROIT pour entrer.
1. 8M
2. 5M
3. 2M (réglage par défaut)
Appuyez sur le bouton GAUCHE pour naviguer
puis sur le bouton DROIT pour enregistrer le
réglage et sortir.
_______________________________
Sélectionne la résolution pour les photos de 2 à 8
mégapixels. Une résolution haute donne des
photos de meilleure qualité, mais crée des
fichiers plus lourds qui prennent plus de place sur
la carte micro SD (qui se remplit plus vite).
BURST (pictures per trigger)
RAFALE (nombre de photos par déclenchement)
Appuyez sur le bouton DROIT pour entrer.
1. 1P (réglage par défaut)
2. 2P
3. 3P
4. 4P
5. 5P
6. 6P
7. 7P
Page 13

PIE1028 – indice A – avril 2018 13/120
Appuyez sur le bouton GAUCHE pour naviguer
puis sur le bouton DROIT pour enregistrer le
réglage et sortir.
_______________________________
Sélectionne combien de photos sont prises en
rafale à chaque déclenchement en mode Photo.
VIDEO
(setup)
VIDEO
Réglage
Appuyez sur le bouton DROIT pour entrer.
VIDEO RESOLUTION
RESOLUTION VIDEO
Appuyez sur le bouton DROIT pour entrer.
1. 1280x720 (HD 720P)
2. 640x480 (VGA – réglage par défaut)
3. 320x240 (QVGA)
Appuyez sur le bouton GAUCHE pour naviguer
puis sur le bouton DROIT pour enregistrer le
réglage et sortir.
_______________________________
Sélectionne la résolution vidéo. Une résolution
haute donne des vidéos de meilleure qualité,
mais crée des fichiers plus lourds qui prennent
plus de place sur la carte micro SD (qui se remplit
plus vite).
LENGTH (5 to 60 seconds)
DUREE DE LA VIDEO (de 5 à 60 secondes)
Appuyez sur le bouton DROIT pour entrer.
Réglage par défaut : 5 secondes
Appuyez sur le bouton GAUCHE pour choisir la
durée souhaitée puis appuyez sur le bouton
DROIT pour enregistrer le réglage et sortir.
Page 14

PIE1028 – indice A – avril 2018 14/120
FRAME (video frame speed)
NOMBRE D’IMAGES PAR SECONDE
Appuyez sur le bouton DROIT pour entrer.
1. 30 FPS (réglage par défaut)
2. 15 FPS
FPS = Frames Per Second = Images Par Seconde
Appuyez sur le bouton GAUCHE pour naviguer
puis sur le bouton DROIT pour enregistrer le
réglage et sortir.
TIMER
(working range)
HORAIRES FIXES
Plage horaire de
fonctionnement
Appuyez sur le bouton DROIT pour entrer.
1. OFF (réglage par défaut)
2. ON
Appuyez sur le bouton GAUCHE pour sélectionner
ON puis appuyez sur le bouton DROIT pour
paramétrer la plage horaire de fonctionnement.
Star (début) : 00:00:00 (HH:MM:SS)
End (fin) : 00:00:00 (HH:MM:SS)
Appuyez sur le bouton GAUCHE pour choisir le
chiffre souhaité puis appuyez sur le bouton DROIT
pour confirmer et passer au chiffre suivant.
Quand l’heure de début et l’heure de fin sont
programmées, appuyez à nouveau sur le bouton
DROIT pour sortir.
_______________________________
Quand le paramètre « Horaires Fixes » est réglé
sur ON, l’appareil peut être programmé pour
fonctionner uniquement pendant une certaine
plage horaire de la journée. Le reste du temps,
l’appareil ne se déclenchera pas.
Page 15
PIE1028 – indice A – avril 2018 15/120
Exemple : si le réglage est Début : 15:00:00 et
Fin : 18:00:00, chaque jour, l’appareil ne
fonctionnera qu’entre 15h00 et 18h00.
TIME LAPSE
(5 sec. to 24 hr.)
TIME LAPSE
Intervalle de temps
(de 5 secondes à 24
heures)
Appuyez sur le bouton DROIT pour entrer.
1. OFF (réglage par défaut)
2. ON
Appuyez sur le bouton GAUCHE pour sélectionner
ON puis appuyez sur le bouton DROIT pour
paramétrer l’intervalle de temps entre chaque
prise de photo/vidéo automatique.
00:00:00 (HH:MM:SS)
Appuyez sur le bouton GAUCHE pour choisir le
chiffre souhaité puis appuyez sur le bouton DROIT
pour confirmer et passer au chiffre suivant.
Quand l’intervalle de temps est programmé,
appuyez à nouveau sur le bouton DROIT pour
sortir.
_______________________________
L’appareil va prendre des photos ou des vidéos
automatiquement à l’intervalle de temps indiqué.
Exemple : si l’intervalle de temps est réglé sur
00:30:00, l’appareil prendra une photo ou une
vidéo automatiquement toutes les 30 minutes.
Nota : ne pas régler sur « ON » TIME LAPSE et
INTERVALLE PIR en même temps.
DELAY
(5 sec. to 24 hr.)
INTERVALLE PIR
(de 5 secondes à 24
heures)
Appuyez sur le bouton DROIT pour entrer.
1. OFF (réglage par défaut)
2. ON
Page 16

PIE1028 – indice A – avril 2018 16/120
Appuyez sur le bouton GAUCHE pour sélectionner
ON puis appuyez sur le bouton DROIT pour
paramétrer l’intervalle PIR.
00:00:00 (HH:MM:SS)
Appuyez sur le bouton GAUCHE pour choisir le
chiffre souhaité puis appuyez sur le bouton DROIT
pour confirmer et passer au chiffre suivant.
Quand l’intervalle PIR est programmé, appuyez à
nouveau sur le bouton DROIT pour sortir.
_______________________________
En mode ON, ce paramètre permet de régler
l’intervalle souhaité entre la prise de photo/vidéo
quand un mouvement est détecté. Ce paramètre
permet d’éviter de prendre trop de
photos/vidéos.
Exemple : si l’intervalle PIR est réglé sur 00:01:00,
l’appareil va attendre 1 minute entre chaque
enregistrement de photo/ ou de vidéo même si
un mouvement est détecté.
Nota : ne pas régler sur « ON » TIME LAPSE et
INTERVALLE PIR en même temps.
SURVEILLANCE
(oldest pic.
overwrite)
ENREGISTREMENT
EN BOUCLE sur la
carte micro SD
Appuyez sur le bouton DROIT pour entrer.
1. OFF (réglage par défaut)
2. ON
Appuyez sur le bouton GAUCHE pour naviguer
puis sur le bouton DROIT pour enregistrer le
réglage et sortir.
_______________________________
Sélectionnez ON pour activer l’enregistrement en
boucle sur la carte micro SD.
Page 17

PIE1028 – indice A – avril 2018 17/120
Quand la carte sera pleine, la caméra continuera
à enregistrer les photos/vidéos en supprimant les
photos/vidéo les plus anciennes.
BEEP
(camera sounds)
SON des touches de
l’appareil
Appuyez sur le bouton DROIT pour entrer.
1. ON (réglage par défaut)
2. OFF
Appuyez sur le bouton GAUCHE pour naviguer
puis sur le bouton DROIT pour enregistrer le
réglage et sortir.
_______________________________
Vous pouvez choisir d’entendre (ON) ou non
(OFF) un bip sonore quand vous appuyez sur les
touches de l’appareil.
SENSITIVITY
(PIR sensitivity)
SENSIBILITE
DU CAPTEUR PIR
Appuyez sur le bouton DROIT pour entrer.
1. High (Haute – réglage par défaut)
2. Middle (Moyenne)
3. Low (Basse)
Appuyez sur le bouton GAUCHE pour naviguer
puis sur le bouton DROIT pour enregistrer le
réglage et sortir.
_______________________________
Une sensibilité haute 1) est plus sensible aux
mouvements de petits sujets, 2) a une plus
longue distance de détection, 3) rend plus facile
pour le capteur de détecter une différence de
température entre le corps du sujet et la
température ambiante, 4) rend plus facile le
déclenchement de la caméra.
Dans un environnement avec une forte
température, la chaleur du corps des sujets est
Page 18

PIE1028 – indice A – avril 2018 18/120
difficile à différencier de la chaleur ambiante pour
la caméra, nous vous recommandons d’utiliser la
sensibilité haute.
Il est conseillé d’utiliser la sensibilité basse dans
un environnement avec beaucoup d’interférences
telles que vent chaud, fumée, proximité d’une
fenêtre, etc.
SYSTEM TIME
(Date & Time)
DATE & HEURE
Appuyez sur le bouton DROIT pour entrer.
04.22.2018 00:00
MM.DD.YYYY HH:MM
Appuyez sur le bouton GAUCHE pour choisir le
chiffre souhaité puis appuyez sur le bouton DROIT
pour confirmer et passer au chiffre suivant.
Quand la date et l’heure sont programmées,
appuyez à nouveau sur le bouton DROIT pour
sortir.
_______________________________
Le format de la date est mois/jour/année.
Le format de l’heure est Heure:Minute.
PASSWORD
(camera lock)
MOT DE PASSE
(6 chiffres)
Appuyez sur le bouton DROIT pour entrer.
1. OFF (réglage par défaut)
2. ON
Appuyez sur le bouton GAUCHE pour sélectionnez
ON puis appuyez sur le bouton DROIT entrer dans
la page de configuration.
0 0 0 0 0 0 (6 chiffres)
Appuyez sur le bouton GAUCHE pour choisir le
chiffre souhaité puis appuyez sur le bouton DROIT
pour confirmer et passer au chiffre suivant.
Page 19
PIE1028 – indice A – avril 2018 19/120
Quand les 6 chiffres sont programmés, appuyez
sur le bouton DROIT pour confirmer le mot de
passe et sortir.
RESET
(default setting)
RESET
Retour aux réglages
par défaut
Appuyez sur le bouton DROIT pour entrer.
1. No (Non – réglage par défaut)
2. Yes (Oui)
Appuyez sur le bouton GAUCHE pour naviguer
puis sur le bouton DROIT pour enregistrer le
réglage et sortir.
_______________________________
Sélectionnez « Yes/Oui » pour revenir aux
réglages usine (réglages par défaut).
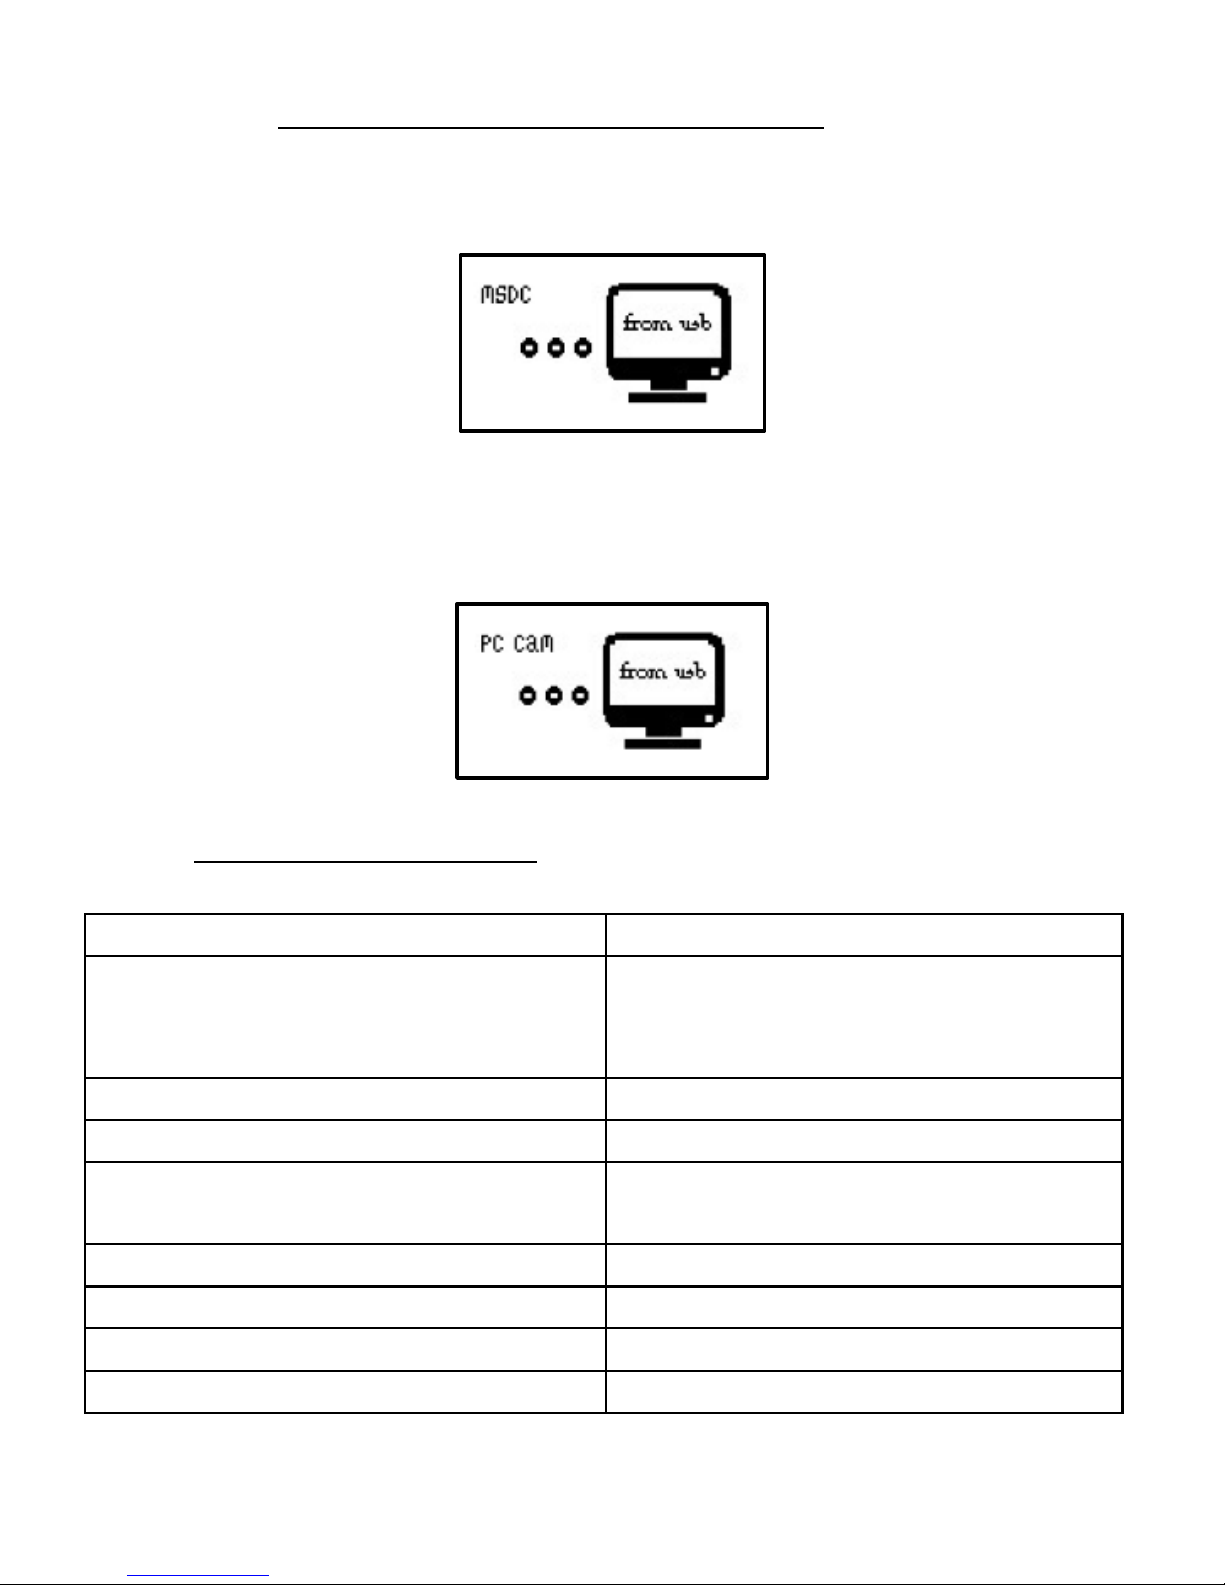
9. Connexion USB
Quand l’appareil est connecté via USB, appuyez sur le bouton GAUCHE
jusqu’à ce que le témoin lumineux rouge s’allume ; puis l’interface ci-
dessous apparaît :
Appuyez sur le bouton GAUCHE pour choisir connexion DC (alimentation)
ou PC (ordinateur). Appuyez sur le bouton DROIT pour valider votre choix.
Connexion DC pour l’alimentation
L’appareil entre en mode Test.
Page 20
PIE1028 – indice A – avril 2018 20/120
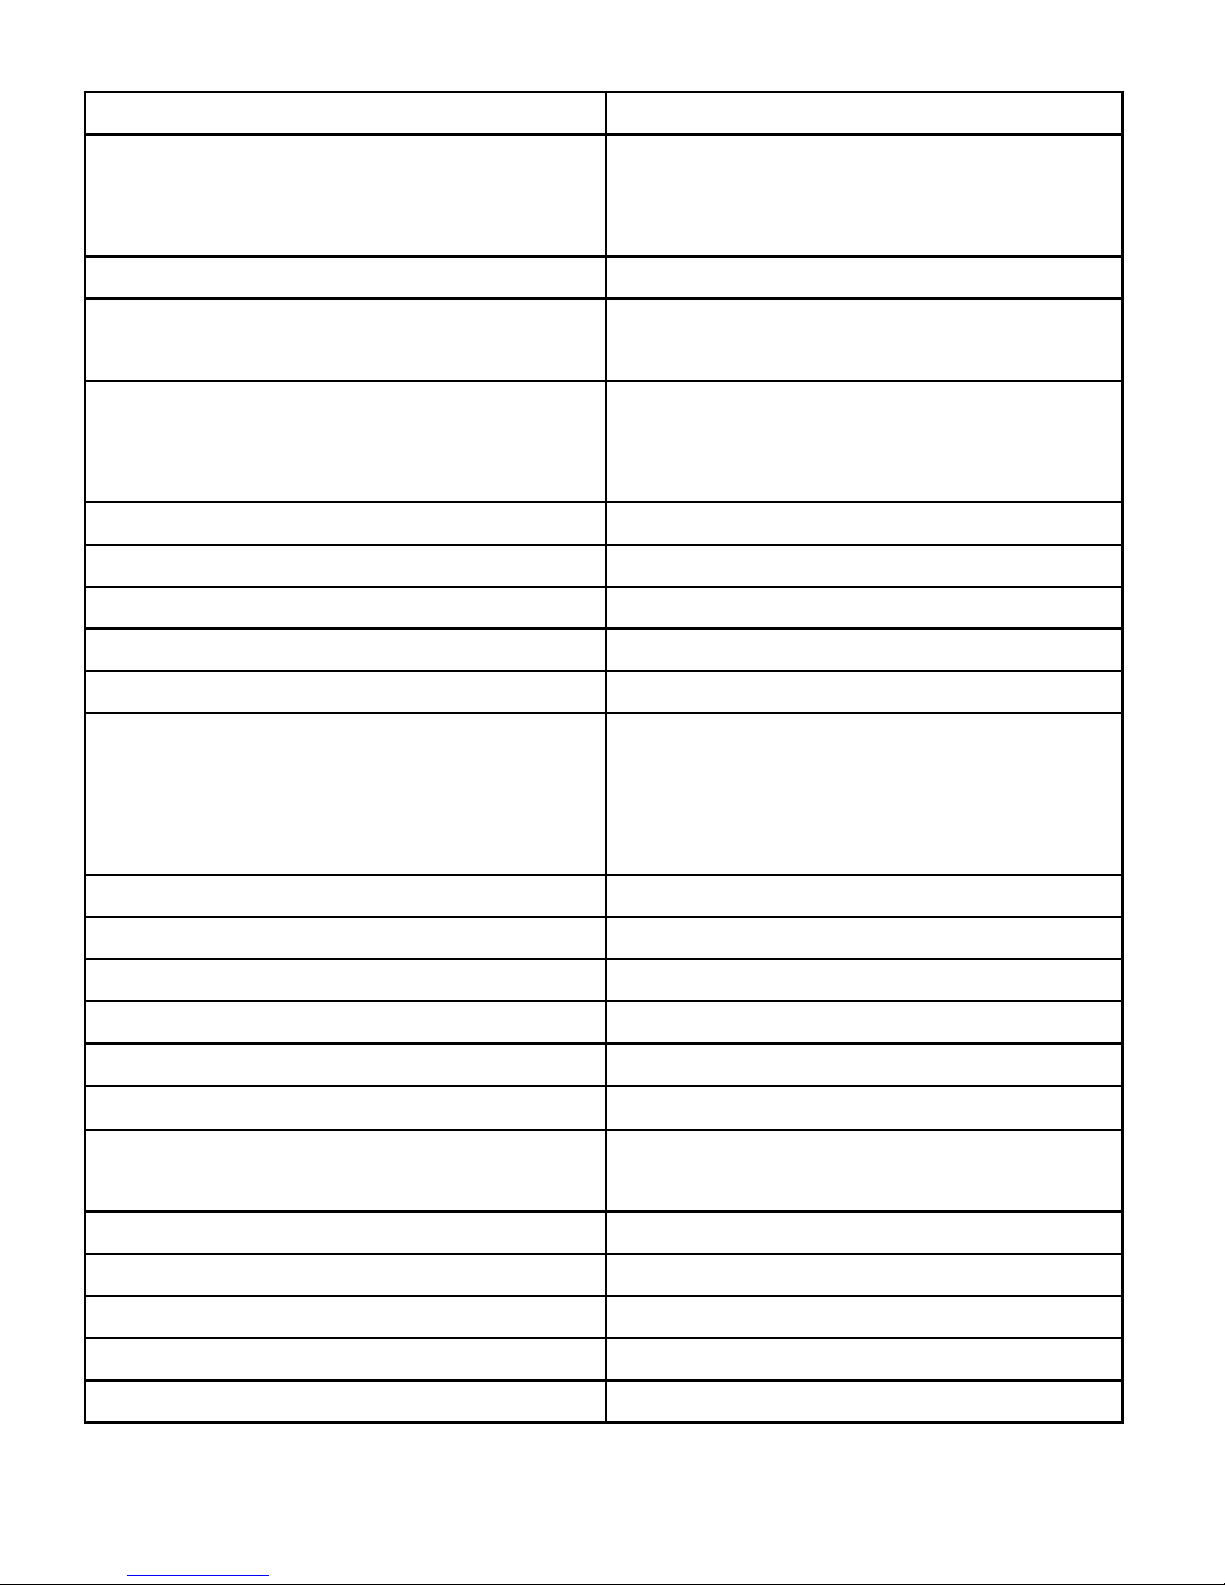
Connexion PC pour lire la carte micro SD
L’écran LCD de l’appareil montre l’interface ci-dessous. Vous pouvez
maintenant lire le contenu de la carte micro SD via votre ordinateur.
En appuyant à nouveau sur le bouton DROIT, vous allez transformer le
piège photographique en webcam. L’écran LCD va montrer l’interface ci-
dessous. Appuyez à nouveau sur le bouton DROIT pour sortir.
10. Spécifications techniques
Capteur d’images
1,3 Mégapixels couleur CMOS
Objectif
Focale = 3,0
Champ de vision = 49°
Auto IR-cut-remove
Portée du capteur PIR
Environ 15 m
Angle de détection du capteur PIR
100°
Sensibilité du capteur PIR
Ajustable :
haute / moyenne / faible
Flash infrarouge
940 nm – 40 LEDS
Portée du flash infrarouge
Environ 10 m
Carte mémoire
Carte micro SD jusqu’à 32 GB
Enregistrement en boucle
Oui - programmable
Page 21
PIE1028 – indice A – avril 2018 21/120
Modes de capture
Photo / Vidéo / Photo + Vidéo
Résolution photo
2MP (1920 x 1080)
5MP (2560 x 1920)
8MP (3264 x 2448)
Format fichiers photo
.JPEG
Photos en rafale
Programmable de 1 à 7 photos par
déclenchement
Résolution vidéo
720P (1280 x 720)
VGA (640 x 480)
QVGA (320 x 240)
Images par seconde
Programmable - 15FPS ou 30FPS
Format fichiers vidéo
.AVI
Durée de la vidéo
Programmable de 5 à 60 secondes
Enregistrement audio
Oui
Vitesse de déclenchement
Environ 0,8 seconde
Horodatage sur les photos
Date, heure, température, phase
lunaire, niveau de charge des piles,
nom de l’appareil (si l’utilisateur
en a programmé un)
Balance des blancs
Automatique
Identification de l’appareil
Oui – programmable
Mot de passe
Oui - programmable
Ecran LCD
1’’ (2,5 cm) – Monochrome
Alimentation
4 piles AA LR06 (non fournies)
Puissance
5-6 V DC (12 A)
Consommation
190 mA (+1920 mA avec flash
infrarouge)
Interface
Port USB, port carte micro SD
Dimensions
115 x 84 x 54 mm
Poids
224 g
Etanchéité
IP54
Température de fonctionnement
-20°C à +60°C
Page 22

PIE1028 – indice A – avril 2018 22/120
Taux d’humidité de
fonctionnement
5% - 90%
11. En cas de dysfonctionnement
Avant d’attribuer une panne à l’appareil, prenez soin de relire ce guide et
assurez-vous que le problème n’est pas dû à des piles faibles ou à des
erreurs d’utilisation.
Si le problème persiste, appelez le service après-vente NUM’AXES au 02 38
63 64 40. Avec l’aide de nos techniciens, de nombreux problèmes peuvent
être résolus par téléphone.
Selon l’ampleur du dysfonctionnement, vous devrez peut-être retourner
votre produit au service après-vente NUM’AXES afin qu’il soit réparé et
testé.
Ne retournez pas votre produit à votre distributeur.
Retournez-le à l’adresse suivante :
NUM’AXES
Z.A.C. des Aulnaies – 745 rue de la Bergeresse – C.S. 30157
45161 OLIVET CEDEX - FRANCE
Pour toutes réparations, le service après-vente NUM’AXES a
impérativement besoin :
de votre produit complet
de la preuve d’achat (facture ou ticket de caisse)
Si vous omettez l’un de ces éléments, le service après-vente NUM’AXES
vous facturera la réparation.
Une somme forfaitaire de 25 € TTC sera facturée en cas de retour SAV non
justifié (par exemple piles hors service ou mises en place dans le mauvais
sens).
Page 23

PIE1028 – indice A – avril 2018 23/120
12. Garantie
NUM’AXES garantit le produit contre les défauts de fabrication pendant les
deux années qui suivent l’acquisition.
Les frais de transport aller-retour du produit sont à la charge exclusive de
l’acheteur.
13. Conditions de garantie
1. La garantie sera assurée uniquement si la preuve d’achat (facture ou
ticket de caisse) est présentée sans rature à NUM’AXES.
2. Cette garantie ne couvre aucun des points suivants :
le remplacement de la sangle de fixation ou du câble USB
les risques de transport directs ou indirects liés au retour du
produit chez NUM’AXES.
l’endommagement du produit résultant :
de la négligence ou faute de l’utilisateur
d’une utilisation contraire aux instructions ou non prévue
de réparations faites par des réparateurs non agréés
la perte ou le vol
3. Si le produit est reconnu défectueux, NUM’AXES le réparera ou
l’échangera selon son choix.
4. NUM’AXES ne pourra être tenu pour responsable des dommages qui
pourraient résulter d’une mauvaise utilisation ou d’une panne du produit.
5. NUM’AXES se réserve le droit de modifier les caractéristiques de ses
produits en vue d’y apporter des améliorations techniques ou de respecter
de nouvelles réglementations.
6. Les informations contenues dans ce guide peuvent faire l’objet de
modifications sans préavis.
7. Photos et dessins non contractuels.
Page 24
PIE1028 – indice A – avril 2018 24/120
14. Enregistrement de votre produit
Vous pouvez enregistrer votre produit sur notre site web
www.numaxes.com.
15. Collecte et recyclage de votre appareil en fin de vie
Le pictogramme apposé sur votre produit signifie que l’équipement
ne peut être mêlé aux ordures ménagères. Il doit être remis à un point de
collecte approprié pour le traitement, la valorisation et le recyclage des
déchets électroniques ou rapporté chez votre distributeur.
En adoptant cette démarche, vous faites un geste pour l’environnement,
vous contribuez à la préservation des ressources naturelles et à la
protection de la santé humaine.
Pour plus d’informations sur les lieux de collecte des équipements usagés,
vous pouvez contacter votre mairie, le service de traitement des déchets
ménagers ou nous retourner le produit.
16. Conformité aux normes européennes
Ce produit est conforme aux normes européennes.
Directive 2014/30/UE relative à l’harmonisation des législations des
Etats membres concernant la compatibilité électromagnétique
EN 55032 : 2015, EN 55024 : 2010
EN 61000-3-2 : 2014, EN 61000-3-3 : 2013
Page 25

PIE1028 – indice A – avril 2018 25/120
Directive 2011/65/UE relative à la limitation de l’utilisation de certaines
substances dangereuses dans les équipements électriques et électroniques
Annexe II RoHS2.0 Directive (UE) 2015/863
IEC 62321-3-1 : 2013 IEC 62321-5 : 2013 IEC 62321-4 : 2013
IEC 62321-6 : 2015 IEC 62321-7-1 : 2015 IEC 62321 : 2008
ANNEXE C IEC 62321-8 : 2017
Z.A.C. des Aulnaies
745 rue de la Bergeresse
C.S. 30157
45161 OLIVET CEDEX
FRANCE
Tél. +33 (0)2 38 63 64 40
Fax +33 (0)2 38 63 31 00
www.numaxes.com
Page 26
PIE1028 – indice A – avril 2018 26/120
User’s guide
1. Contents of the product
Trail camera
Mounting strap
USB cable
User’s guide
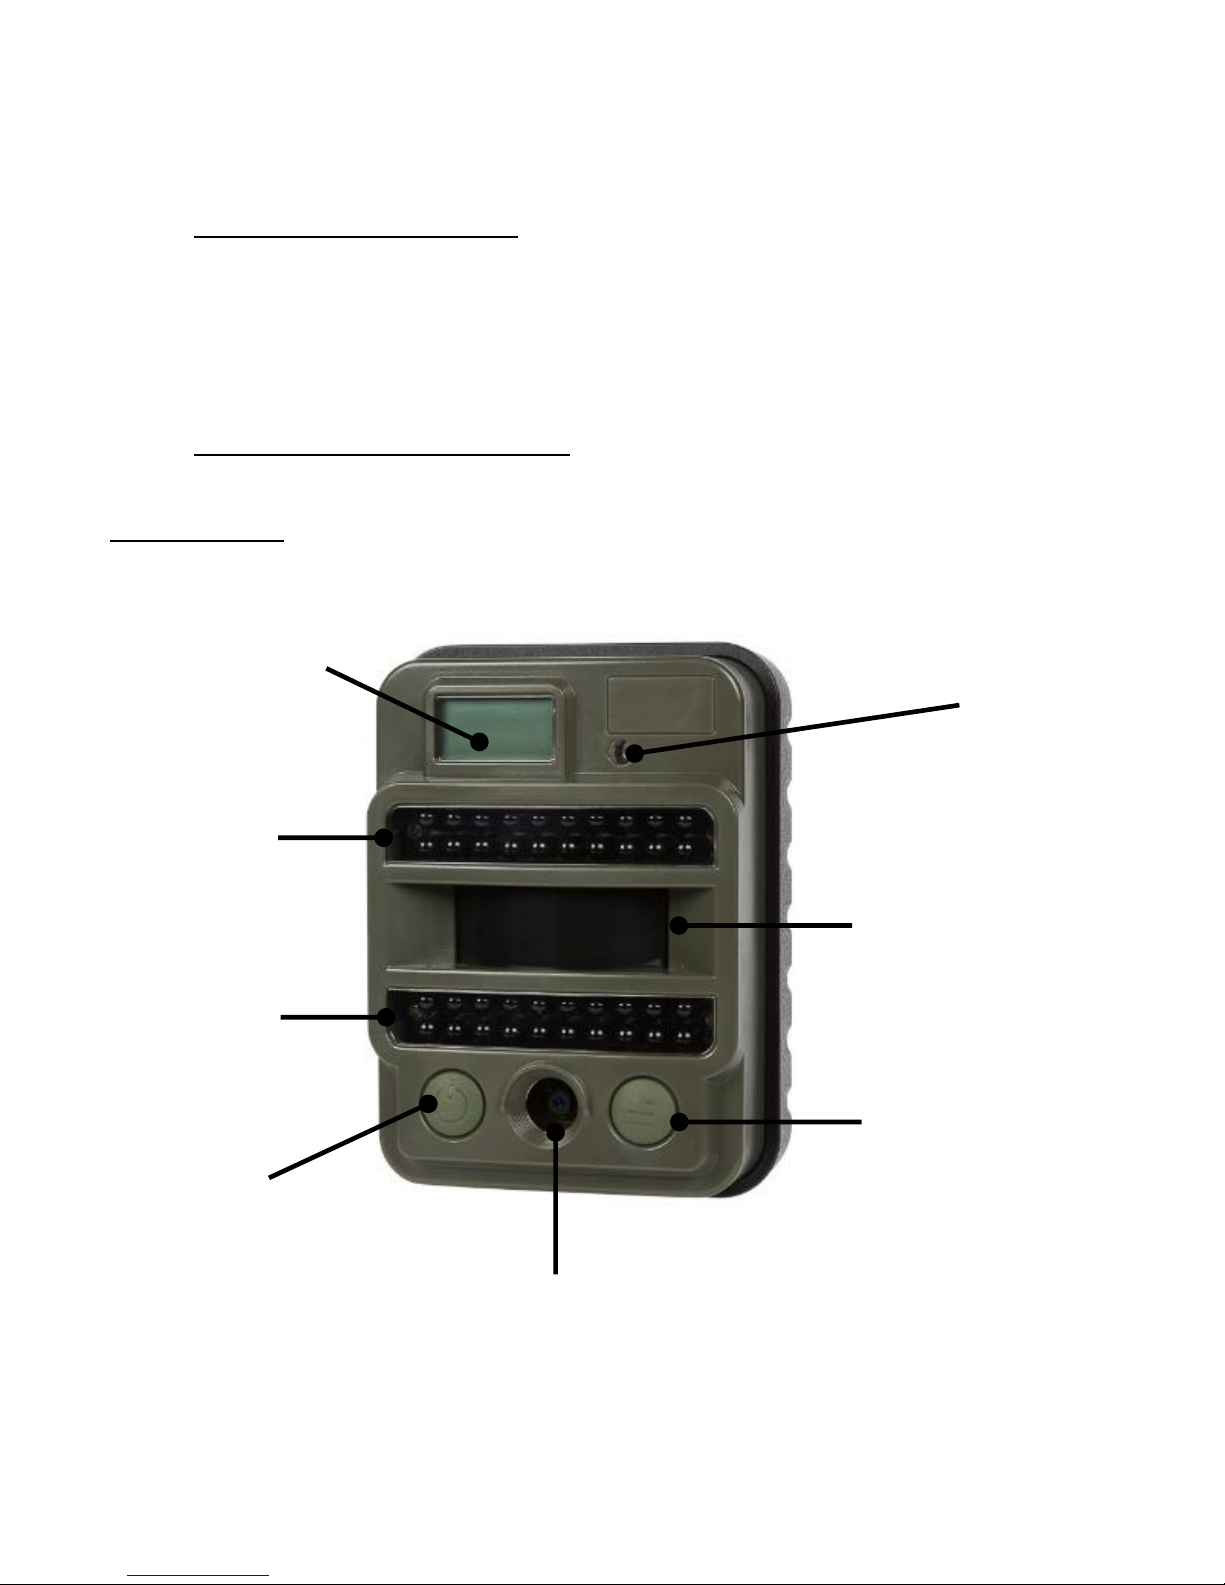
2. Presentation of the product
FRONT VIEW
Lens
LEFT button:
Power
+
Navigation (NEXT)
20 infrared
LEDS
LCD screen
20 infrared
LEDS
Light sensor
+
Indicator light
Passive
Infrared
sensor (PIR)
RIGHT button:
MENU
+
OK (SET)
Page 27
PIE1028 – indice A – avril 2018 27/120
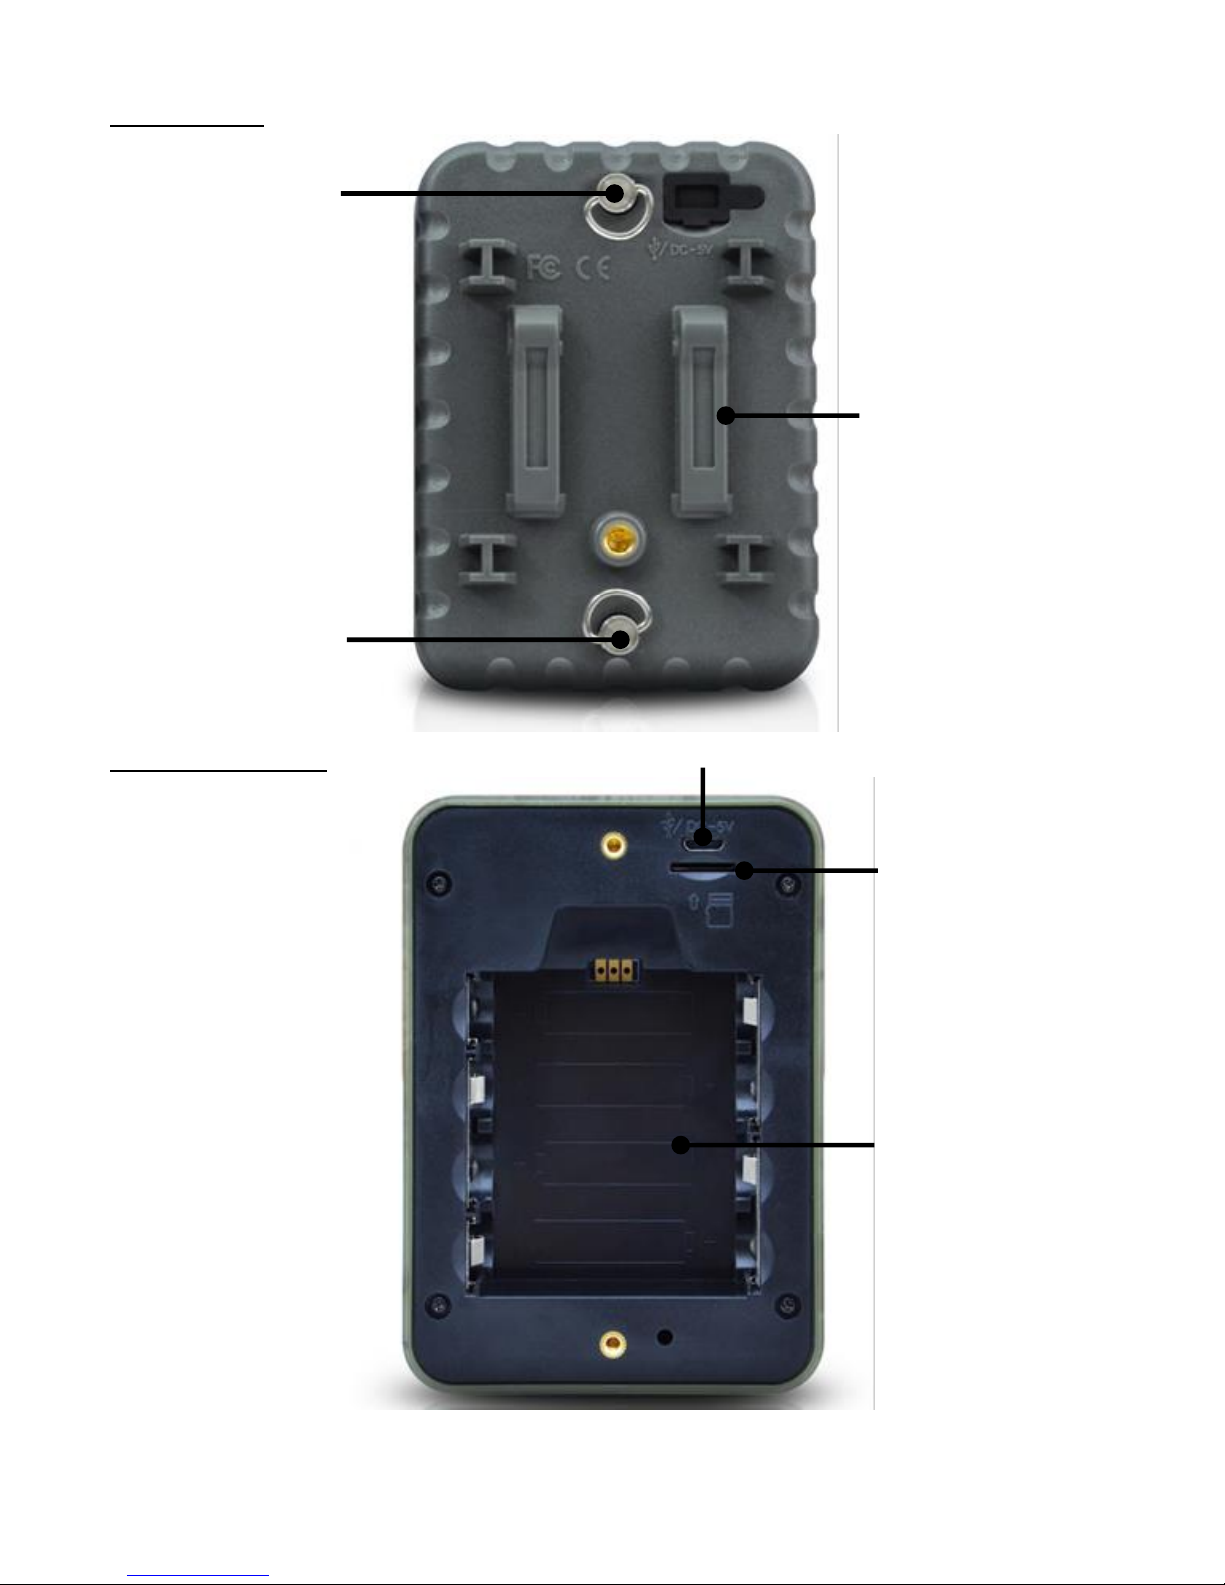
BACK VIEW
INTERNAL VIEW
Unscrew to
open the
device
Unscrew to
open the
device
Strap hole
USB port
Micro SD
card slot
Battery slots
(4 x AA)
Page 28
PIE1028 – indice A – avril 2018 28/120
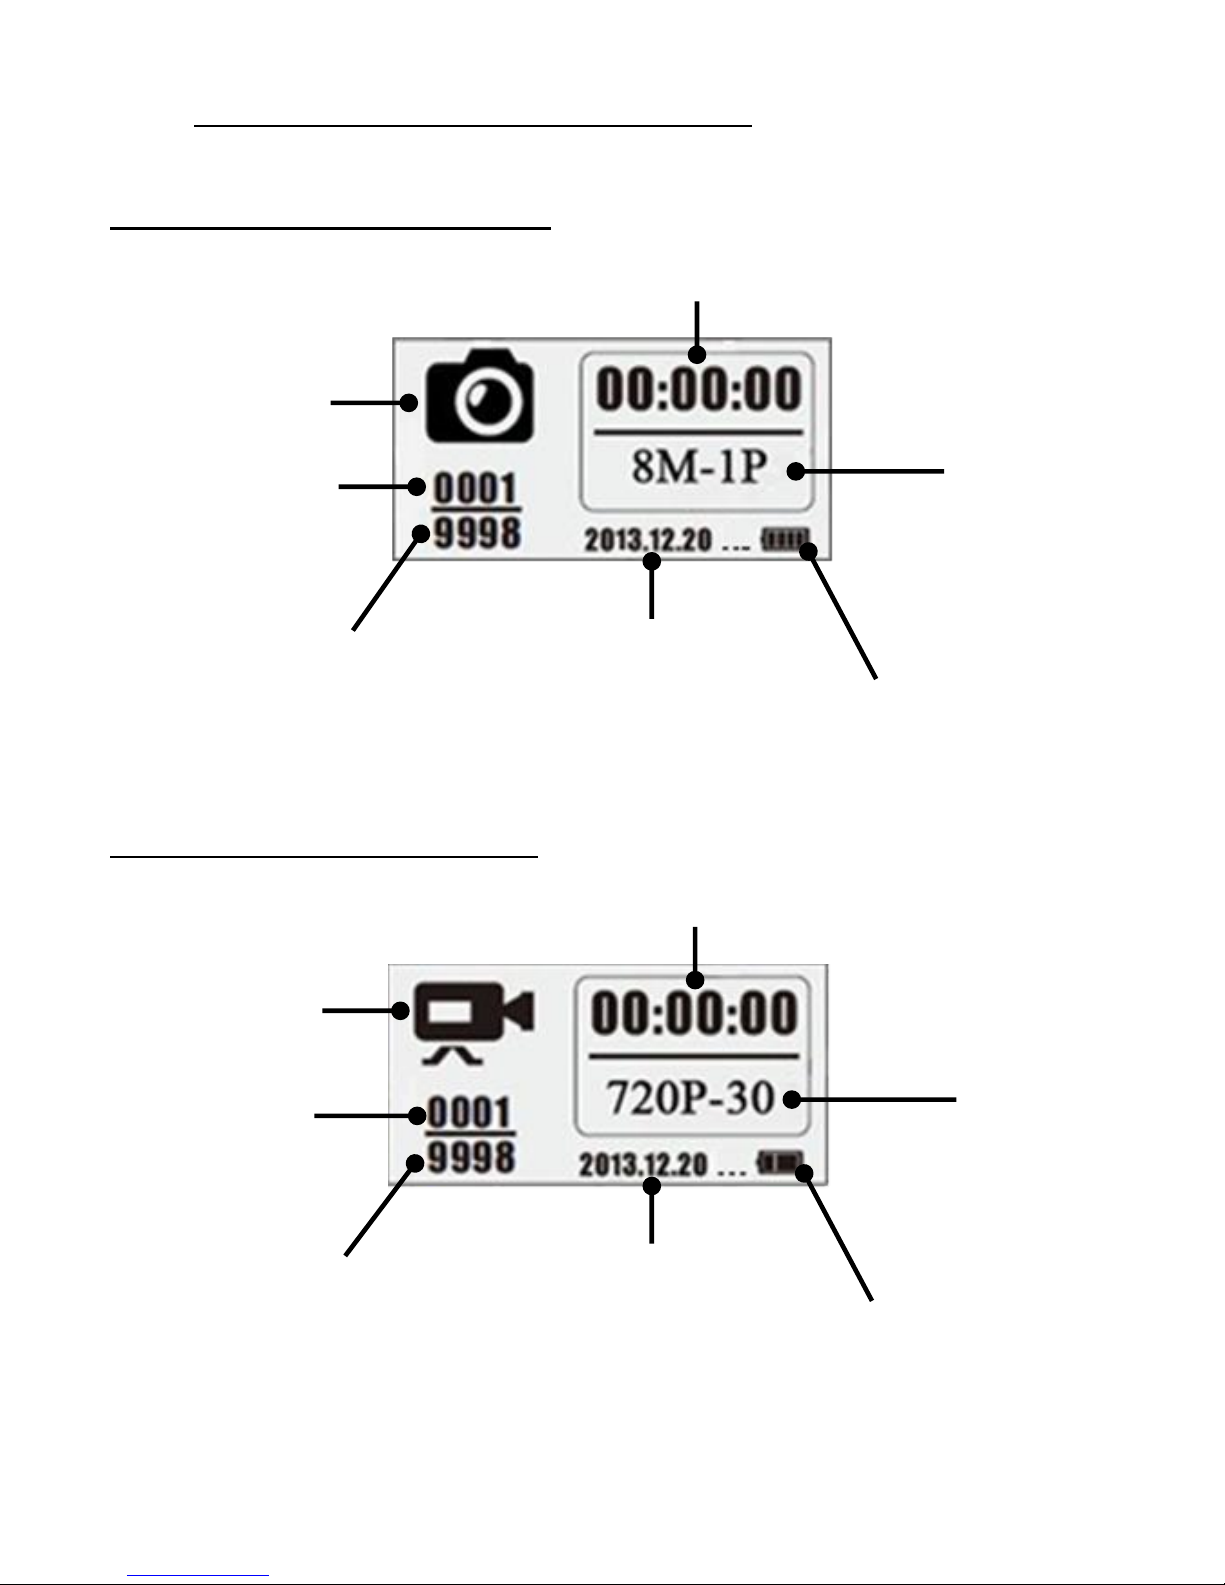
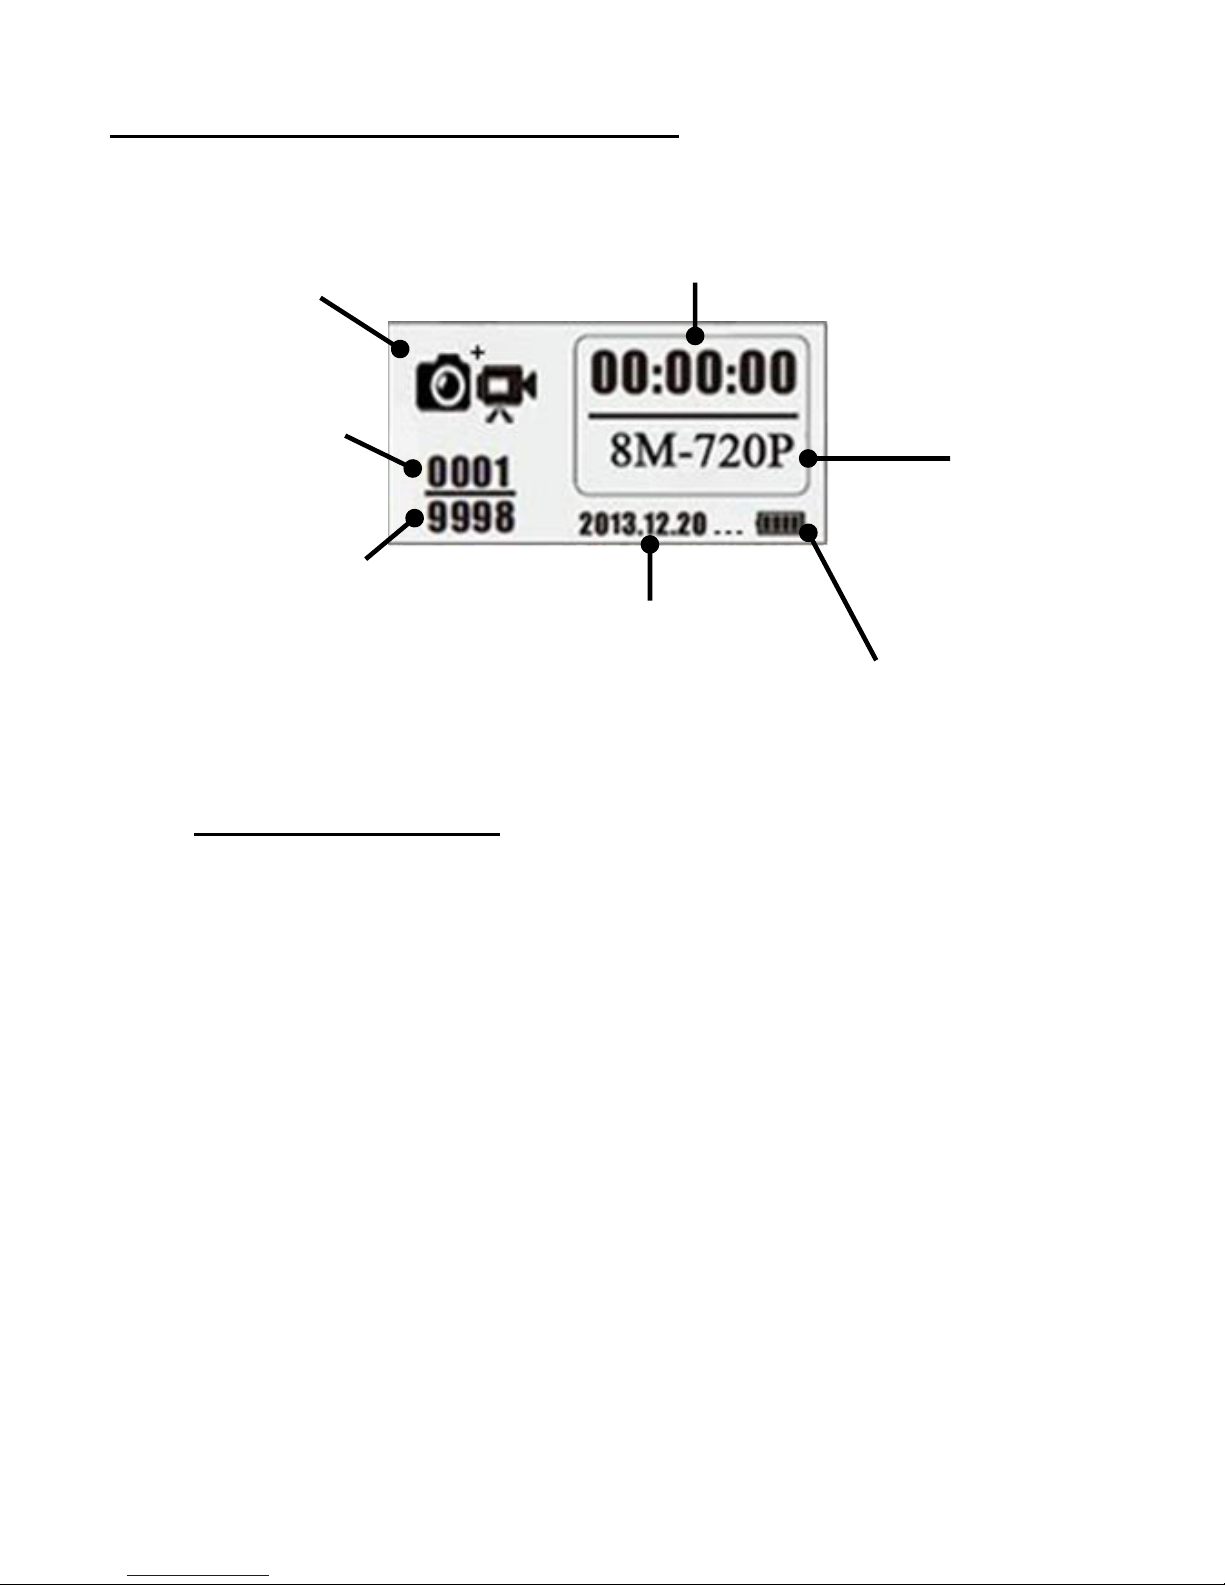
3. Information screen (Test mode interface)
LCD screen – Photo Mode
LCD screen– Video Mode
Photo Mode
Number of
recorded
images
Estimated
available space
(number of files)
Number of
recorded
video clips
Video Mode
Date
(year/month/day)
Date
(year/month/day)
Video
resolution
+
Frame per
second
Time
Battery level
Battery level
Time
Photo
resolution
+
Photo burst
Estimated
available space
(number of files)
Page 29
PIE1028 – indice A – avril 2018 29/120
LCD screen– Photo + Video Mode
4. Installing the batteries
The internal battery tray accepts 4 AA (LR06) batteries. Be sure to use high
quality alkaline batteries (you can purchase NUM’AXES batteries from
NUM’AXES (www.numaxes.com) or from your distributor). Install the
batteries with correct polarity (+/-) as noted inside the battery tray.
WARNING: Do not use batteries other than the ones specified in this
section. Doing so will damage the camera and will void the warranty.
WARNING: ALWAYS have the camera in the OFF position when
installing or removing batteries. Removing while the camera is ON
may damage the product.
Do not mix old and new batteries. Do not mix alkaline, standard or
rechargeable batteries.
Photo + Video
Mode
Photo
resolution
+
Video
resolution
Time
Number of
recorded
images/videos
Estimated
available space
(number of files)
Date
(year/month/day)
Battery level
Page 30

PIE1028 – indice A – avril 2018 30/120
5. Inserting the micro SD card
The camera uses a standard micro SD (Secure Digital) memory card to save
photos and/or videos. Micro SD cards up to a maximum capacity of 32GB
are supported.
Before inserting or removing the memory card, the camera must be
turned off. Failing to do so may cause loss of or damage the files already
recorded on the memory card.
Open the cover, and insert the SD card in the SD card slot completely
and oriented correctly as shown by the icon under the slot.
To remove the micro SD memory card, depress it and pull it out
gently.
Micro SD cards must be empty (no images from other sources). If the
micro SD card has been used in another device, please make sure to
format it before using it in your camera. New cards are ready to use
straight from the package.
6. Operation
ON/OFF (PIR Auto Working mode, Test mode, OFF)
Turn On the camera and enter PIR Auto Working Mode: Press the
LEFT button for 3 seconds, the indicator light will flash 5 times and
the camera will enter PIR Auto Working mode.
Enter Test mode: In PIR Auto Working mode, press the RIGHT
button once to wake up the camera LCD screen and enter Test
mode.
Turn Off the device: Press the LEFT button for 5 seconds to turn off
the camera.
Page 31

PIE1028 – indice A – avril 2018 31/120
Configuration of operating parameters
Enter Configuration menu: In Test mode, press the RIGHT button to
enter settings configuration menu. In Configuration mode, the LEFT
button is always used for navigation and the RIGHT button is always
used to say OK and save/confirm the desired setup.
Return to Test mode from configuration menu: After all the settings
are done, press the RIGHT button for 3 seconds to return to Test
mode.
Enter PIR Auto Working mode from Test mode: Press the RIGHT
button for 3 seconds to enter PIR Auto Working mode (the indicator
light will flash 5 times and the LCD screen will go out).
Manual recording
In Test mode, press the LEFT button to shoot photos, videos or
photos + videos based on camera settings.
To stop video recording (in Video or Photo + Video mode), press the
LEFT button again.
Page 32
PIE1028 – indice A – avril 2018 32/120
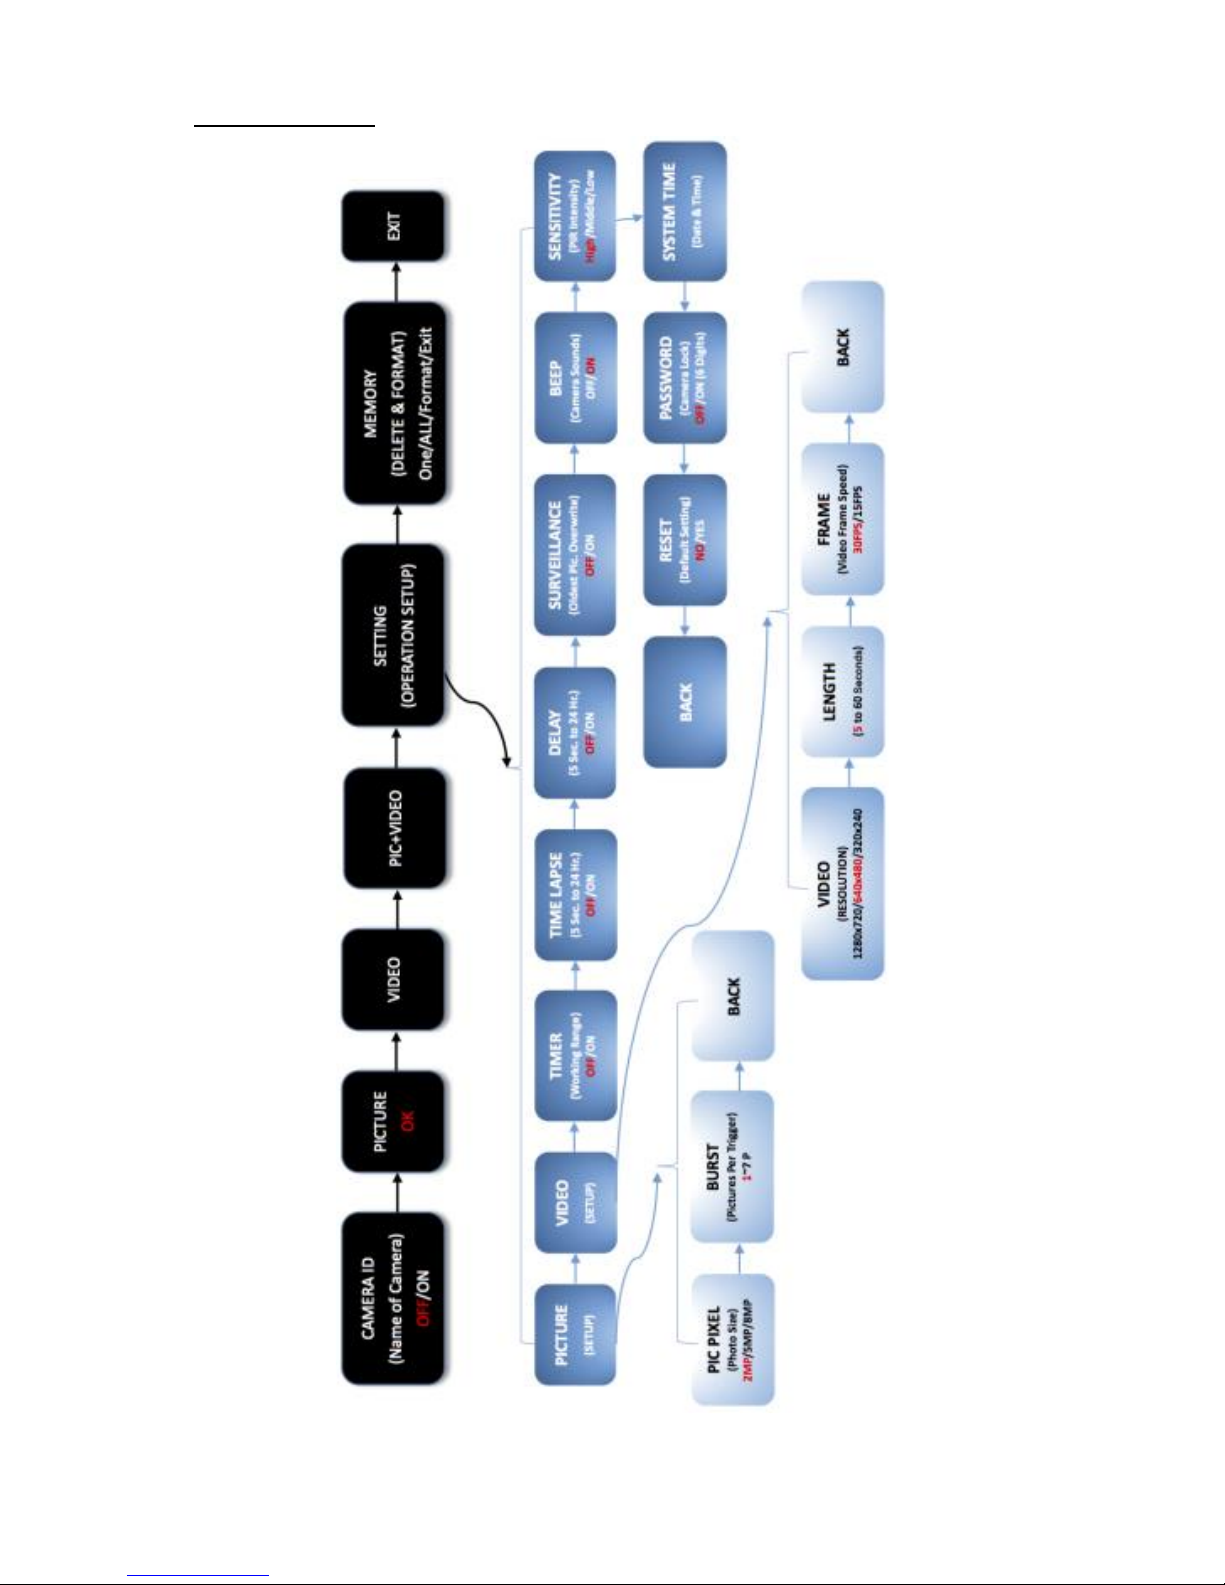
7. Setting menu
Page 33
PIE1028 – indice A – avril 2018 33/120
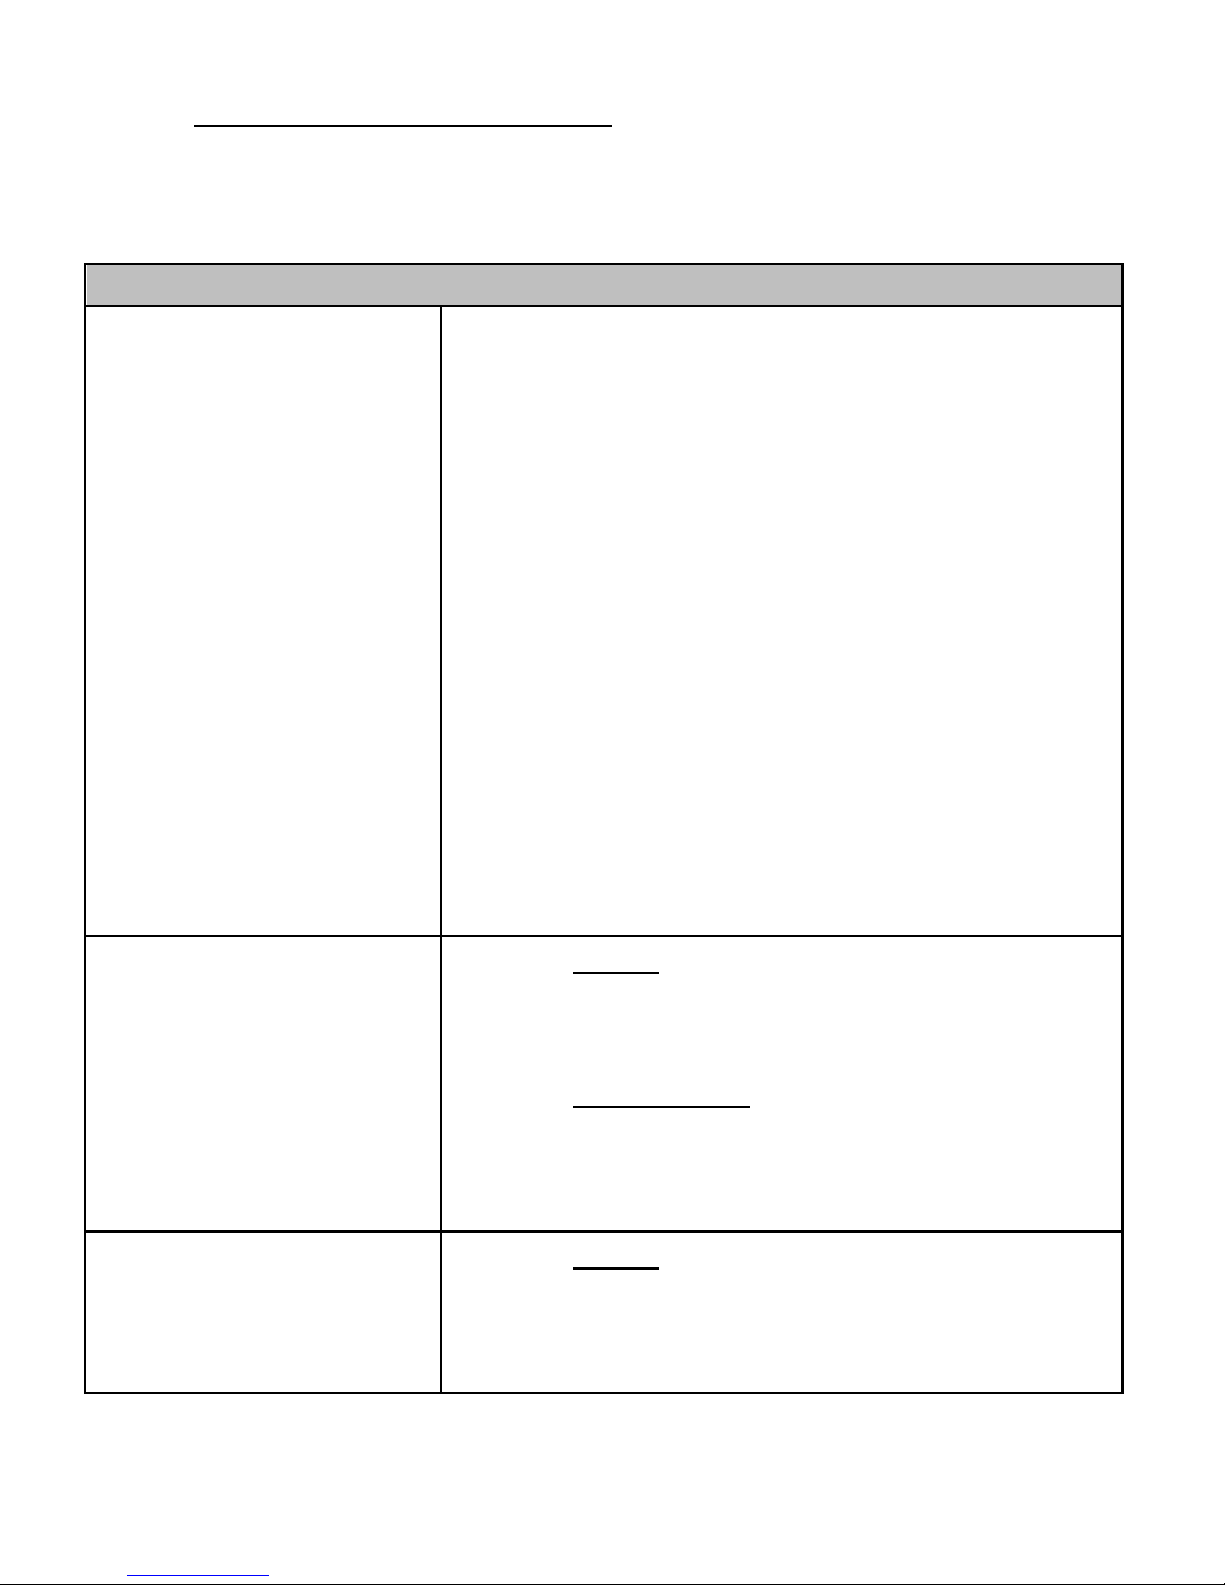
8. List of parameters and settings
Press the RIGHT button to enter the parameters and choose the settings.
MENU
CAMERA ID
(Name of camera)
4 digits and/or letters
1. OFF (default setting)
2. ON
Press the LEFT button to select ON then the
RIGHT button to enter the configuration page.
0 0 0 0 (4 digits and/ or letters)
Press the LEFT button to choose the desired
character then the RIGHT button to confirm
and move to the next character.
Once the 4 characters are programmed, press
the RIGHT button to confirm the ID and exit.
_______________________________
Set an ID number for the camera can help the
user to identify from where and from which
camera the photos are.
PICTURE
(default setting)
a) Set up
Press the RIGHT button to enter Photo mode
OK appears on the LCD screen.
b) Take a photo
Press the RIGHT button for 3 seconds to go
back to the information screen then the LEFT
button to take a picture.
VIDEO
a) Set up
Press the RIGHT button to enter Video mode
OK appears on the LCD screen.
Page 34

PIE1028 – indice A – avril 2018 34/120
b) Record a video
Press the RIGHT button for 3 seconds to go
back to the information screen then the LEFT
button to start recording a video. Press the
LEFT button again to stop the recording.
PIC+VIDEO
a) Set up
Press the RIGHT button to enter Pic +Video
mode OK appears on the LCD screen.
b) Take a photo then record a video
Press the RIGHT button for 3 seconds to go
back to the information screen then the LEFT
button to take a picture and start recording a
video. Press the LEFT button again to stop the
recording.
_______________________________
In “Pic + Video” mode a still photo/still photos
and a video clip are both captured for each
trigger.
SETTING
(Operation setup)
See table below for details on the parameters
and settings.
Press the RIGHT button to enter the
configuration menu.
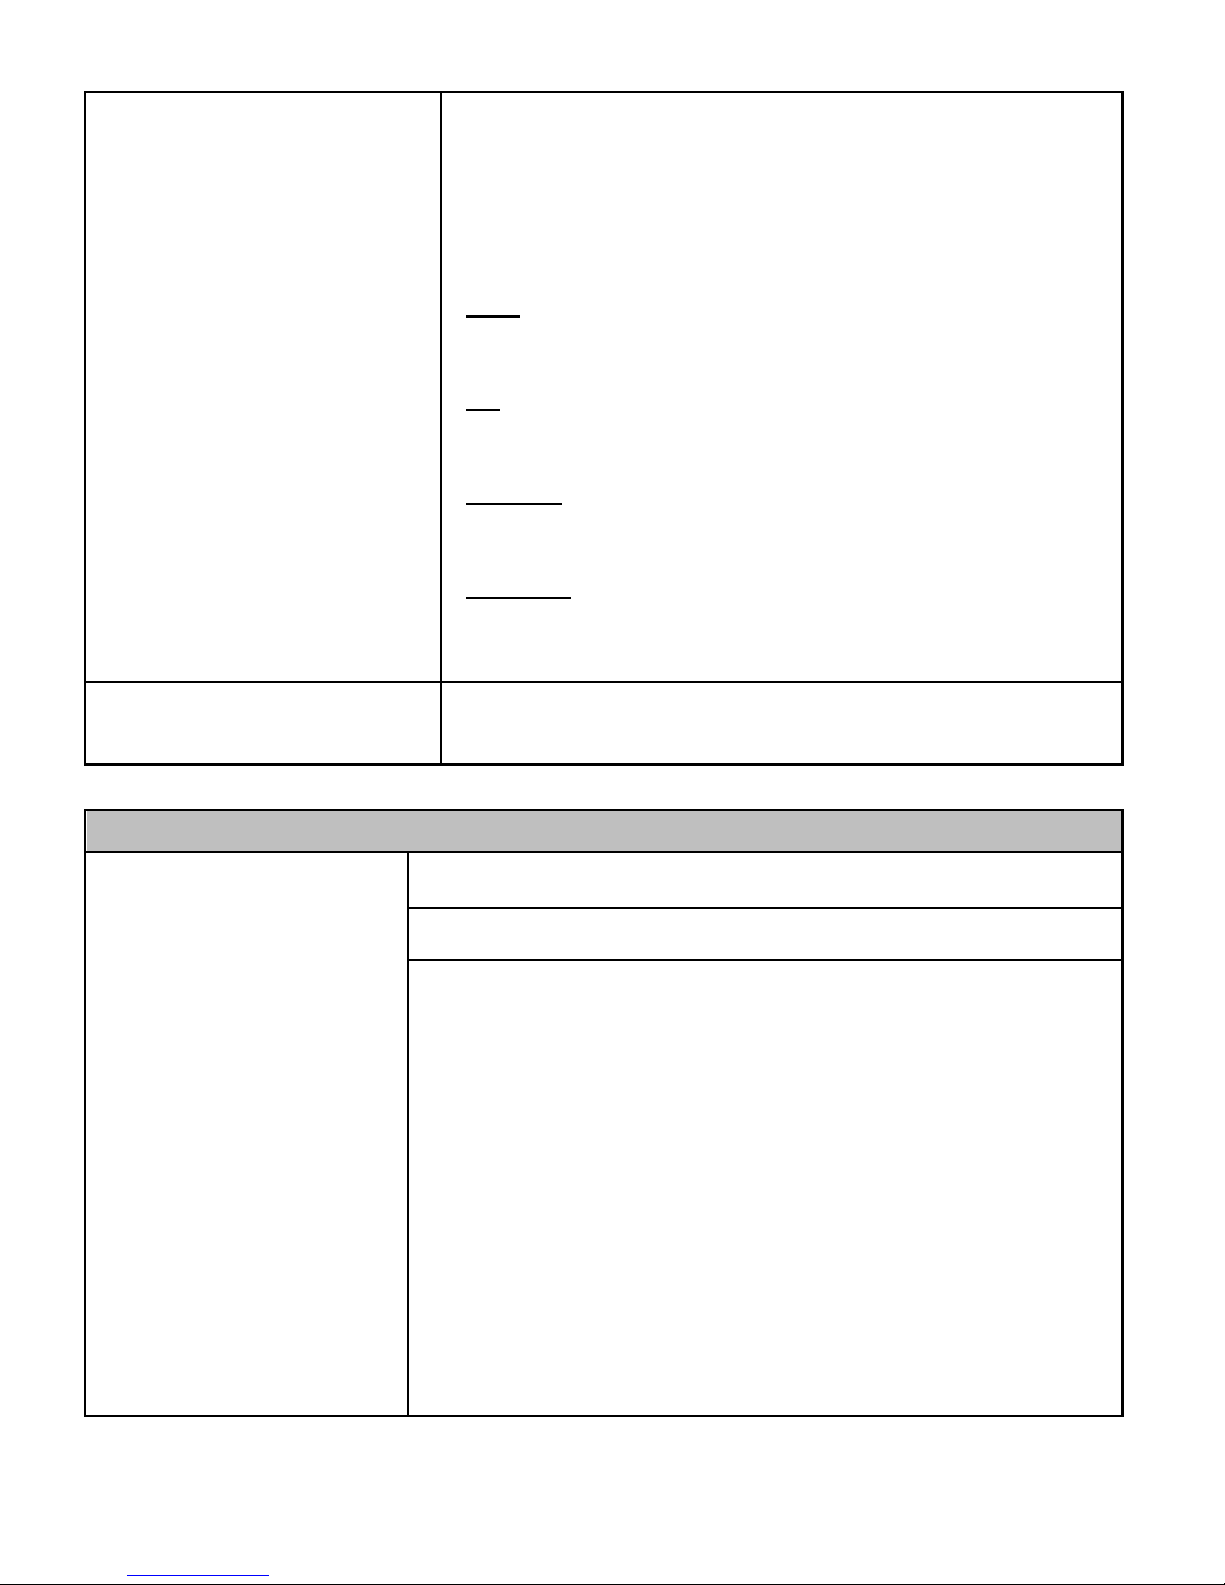
MEMORY
Delete & Format
1. One
2. All
3. Format
4. EXIT
Press the LEFT button to navigate then the
RIGHT button to confirm your choice.
Press the LEFT button to select Yes or No then
the RIGHT button to confirm and exit.
Page 35
PIE1028 – indice A – avril 2018 35/120
If all the files are deleted, the camera will
automatically go back to the information
screen.
_______________________________
One: only the last photo/video file will get
deleted.
All: deletes all photo/video files on the micro
SD card.
Format: Deletes (erases) all files stored on the
micro SD card to prepare it for reuse.
Caution: the deleted files can’t be restored.
Make sure you have downloaded or backed up
any files you want to preserve first.
EXIT
Press the RIGHT button to go back to the
information screen.
SETTING (operation setup)
PICTURE
(setup)
Press the RIGHT button to enter.
PIC PIXEL (photo size)
Press the RIGHT button to enter.
1. 8M
2. 5M
3. 2M (default setting)
Press the LEFT button to navigate then the RIGHT
button to save the setting and exit.
_______________________________
Selects resolution for still photos from 2 to 8
megapixels. Higher resolution produces better
quality photos, but creates larger files that take
Page 36

PIE1028 – indice A – avril 2018 36/120
up more of the micro SD card capacity (fills up
faster).
BURST (pictures per trigger)
Press the RIGHT button to enter
1. 1P (default setting)
2. 2P
3. 3P
4. 4P
5. 5P
6. 6P
7. 7P
Press the LEFT button to navigate then the RIGHT
button to save the setting and exit.
_______________________________
Selects how may photos are taken in sequence
per trigger in Photo mode.
VIDEO
(setup)
Press the RIGHT button to enter.
VIDEO RESOLUTION
Press the RIGHT button to enter.
1. 1280x720 (HD)
2. 640x480 (VGA – default setting)
3. 320x240 (QVGA)
Press the LEFT button to navigate then the RIGHT
button to save the setting and exit.
_______________________________
Selects video resolution. Higher resolution
produces better quality videos, but creates larger
files that take up more of the micro SD card
capacity (fills up faster).
Page 37

PIE1028 – indice A – avril 2018 37/120
LENGTH (5 to 60 seconds)
Press the RIGHT button to enter.
Default setting: 5 seconds
Press the LEFT button to choose the desired
length for the video then the RIGHT button to
save the setting and exit.
FRAME (video frame speed)
Press the RIGHT button to enter
1. 30FPS (default setting)
2. 15FPS
FPS = Frames Per Second
Press the LEFT button to navigate then the RIGHT
button to save the setting and exit.
TIMER
(working range)
Press the RIGHT button to enter.
1. OFF (default setting)
2. ON
Press the LEFT button to select ON then the
RIGHT button to set the working range.
Star: 00:00:00 (HH:MM:SS)
End: 00:00:00 (HH:MM:SS)
Press the LEFT button to choose the desired digit
then the RIGHT button to confirm and move to
the next digit.
Once the start and end time are programmed,
press the RIGHT button again to exit.
_______________________________
When “Timer” is set to ON, the camera can be set
Page 38

PIE1028 – indice A – avril 2018 38/120
to work only at a certain time of the day. The rest
of the time, the camera will not work.
Example: If start time is 15:00:00 and end time is
18:00:00, each day, the camera will work only
between 15h00 (03:00 PM) and 18h00 (06:00
PM).
TIME LAPSE
(5 sec. to 24 hr.)
Press the RIGHT button to enter.
1. OFF (default setting)
2. ON
Press the LEFT button to select ON then the
RIGHT button to set the interval between the
automatic shooting of photos/videos.
00:00:00 (HH:MM:SS)
Press the LEFT button to choose the desired digit
then the RIGHT button to confirm and move to
the next digit.
Once the interval is programmed, press the
RIGHT button again to exit.
_______________________________
The camera will take photos or videos
automatically at the programmed time interval.
Example: if programmed interval is 00:30:00, the
camera will automatically capture photo/video
every 30 minutes.
Note: please don’t turn “ON” TIME LAPSE and
DELAY simultaneously.
DELAY
(PIR INTERVAL)
(5 sec. to 24 hr.)
Press the RIGHT button to enter.
1. OFF (default setting)
2. ON
Page 39

PIE1028 – indice A – avril 2018 39/120
Press the LEFT button to select ON then the
RIGHT button to set up the Delay (PIR interval).
00:00:00 (HH:MM:SS)
Press the LEFT button to choose the desired digit
then the RIGHT button to confirm and move to
the next digit.
Once the Delay (PIR interval) is programmed,
press the RIGHT button again to exit.
_______________________________
In ON mode, this parameter indicates how long
the PIR sensor will be disabled after each
triggering. During this time the PIR sensor will not
react to the motion of humans or animals. This
parameter prevents camera taking to many
photos or videos.
Example: if Delay (PIR interval) is set on 00:01:00,
the camera will wait 1 minute between
photo/video recordings with motion.
Note: please don’t turn “ON” TIME LAPSE and
DELAY simultaneously.
SURVEILLANCE
(oldest pic.
overwrite)
Press the RIGHT button to enter.
1. OFF (default setting)
2. ON
Press the LEFT button to navigate then the RIGHT
button to save the setting and exit.
_______________________________
Select “ON” to activate cycle recording. When the
micro SD card will be full, the camera will
continue to record photos/videos by deleting
earliest photos or video clips.
Page 40

PIE1028 – indice A – avril 2018 40/120
BEEP
(camera sounds)
Press the RIGHT button to enter.
1. ON (default setting)
2. OFF
Press the LEFT button to navigate then the RIGHT
button to save the setting and exit.
_______________________________
You can choose to hear a beep sound (ON) or not
(OFF) when you press a key.
SENSITIVITY
(PIR sensitivity)
Press the RIGHT button to enter.
1. High (default setting)
2. Middle
3. Low
Press the LEFT button to navigate then the RIGHT
button to save the setting and exit.
_______________________________
High sensitivity 1) is more sensitive to movements
by smaller subjects; 2) offers longer detection
distance; 3) makes it easier for sensor to detect
difference between body heat and outdoor
temperature; 4) makes it easier to trigger camera
to record.
In high temperature environment, body heat of
subjects and environment temperature are hard
to tell by camera, the suggested setting is high.
It is recommended to use low sensitivity for
environments with lots of interference like hot
wind, smoke, near window, etc.
SYSTEM TIME
(Date & Time)
Press the RIGHT button to enter.
04.22.2018 00:00
MM.DD.YYYY HH:MM
Page 41

PIE1028 – indice A – avril 2018 41/120
Press the LEFT button to choose the desired digit
then the RIGHT button to confirm and move to
the next digit.
Once date and time are programmed, press the
RIGHT button again to confirm and exit.
_______________________________
The date format is Month/Day/Year).
The time format is Hour:Minute.
PASSWORD
(camera lock)
6 digits
Press the RIGHT button to enter.
1. OFF (default setting)
2. ON
Press the LEFT button to select ON then the
RIGHT button to enter the configuration page.
0 0 0 0 0 0 (6 digits)
Press the LEFT button to choose the desired digit
then the RIGHT button to confirm and move to
the next digit.
Once the 6 digits are programmed, press the
RIGHT button to confirm the password and exit.
RESET
(default setting)
Press the RIGHT button to enter.
1. No (default setting)
2. Yes
Press the LEFT button to navigate then the RIGHT
button to save the setting and exit.
_______________________________
Select “Yes” to restore all parameters to the
original factory settings (default settings).
Page 42
PIE1028 – indice A – avril 2018 42/120
9. USB connection
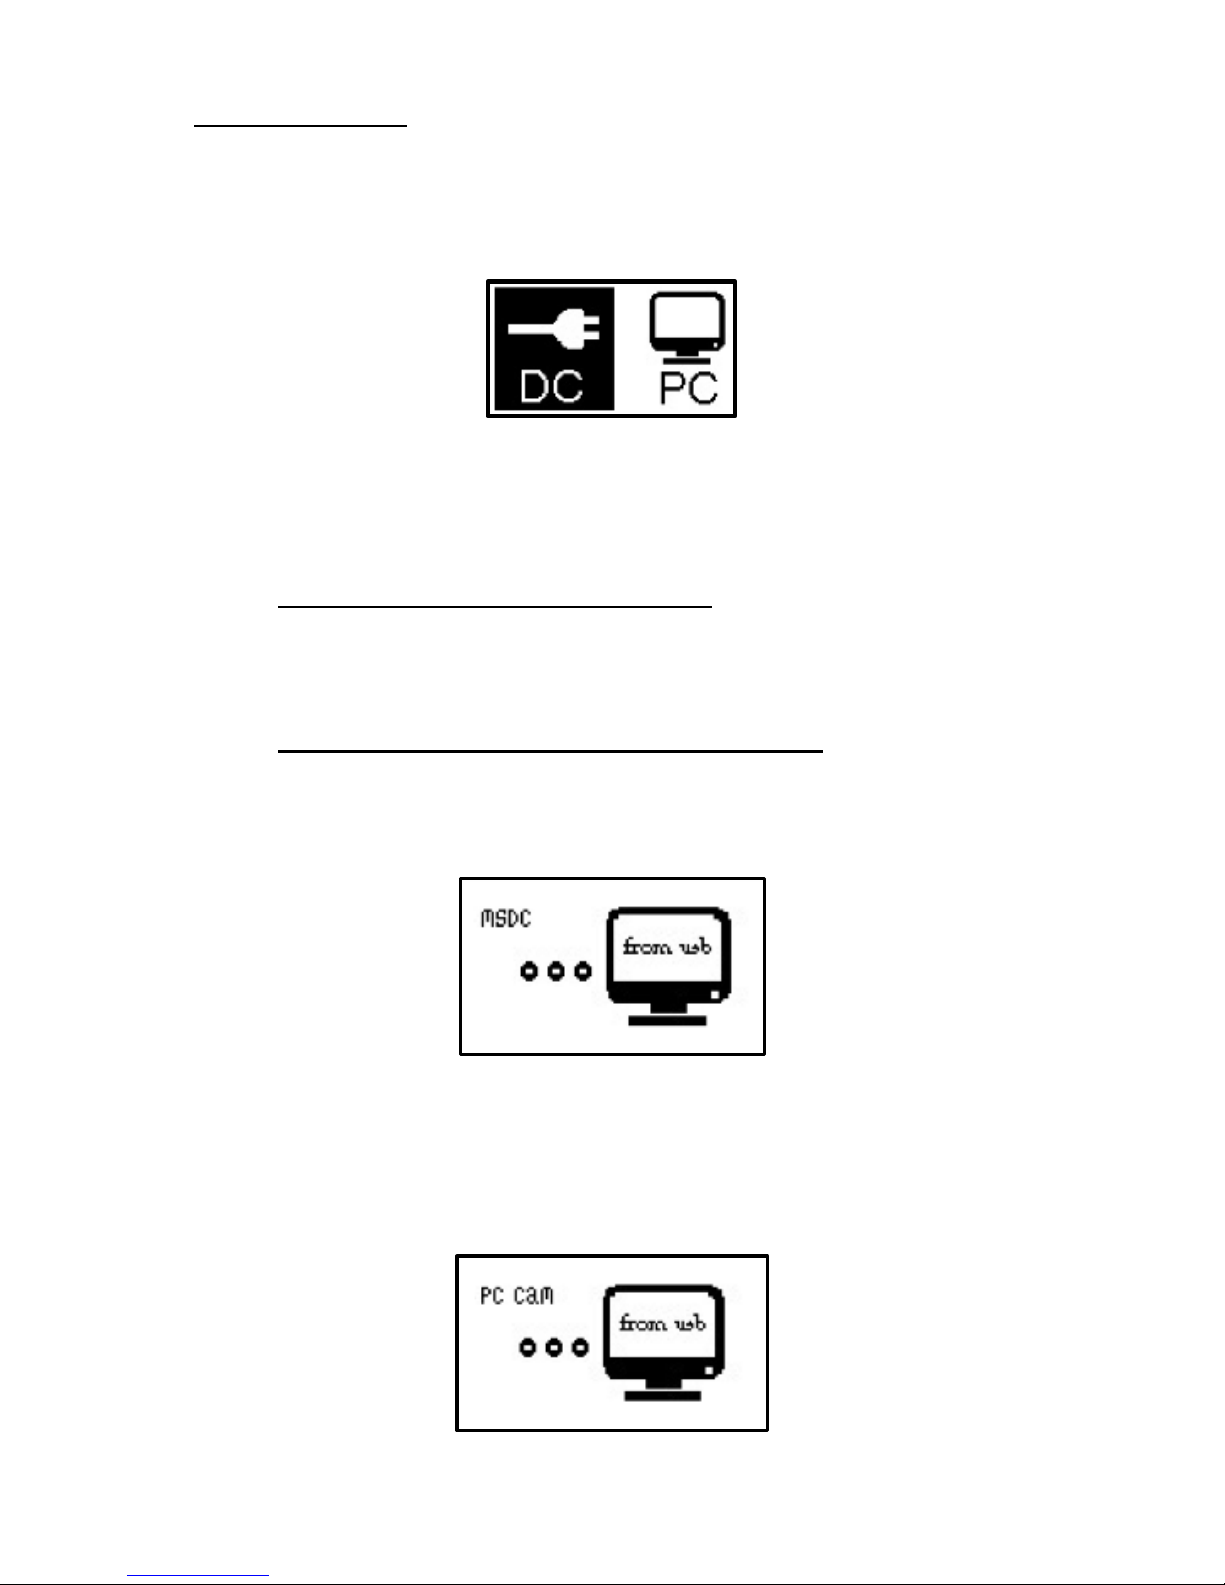
When the unit is connected via USB, press the LEFT button until the red
indicator light comes on; then the interface below appears:
Press the LEFT button to choose DC (power) or PC (computer) connection.
Press the RIGHT button to confirm your choice.
DC connection for power supply
The device enters Test mode.
PC connection to read the micro SD card
The LCD screen of the device shows the interface below. You can now read
the contents of the micro SD card via your computer.
By pressing the RIGHT button again, you will turn the camera into a
webcam. The LCD screen will show the interface below. Press the RIGHT
button again to exit.
Page 43
PIE1028 – indice A – avril 2018 43/120
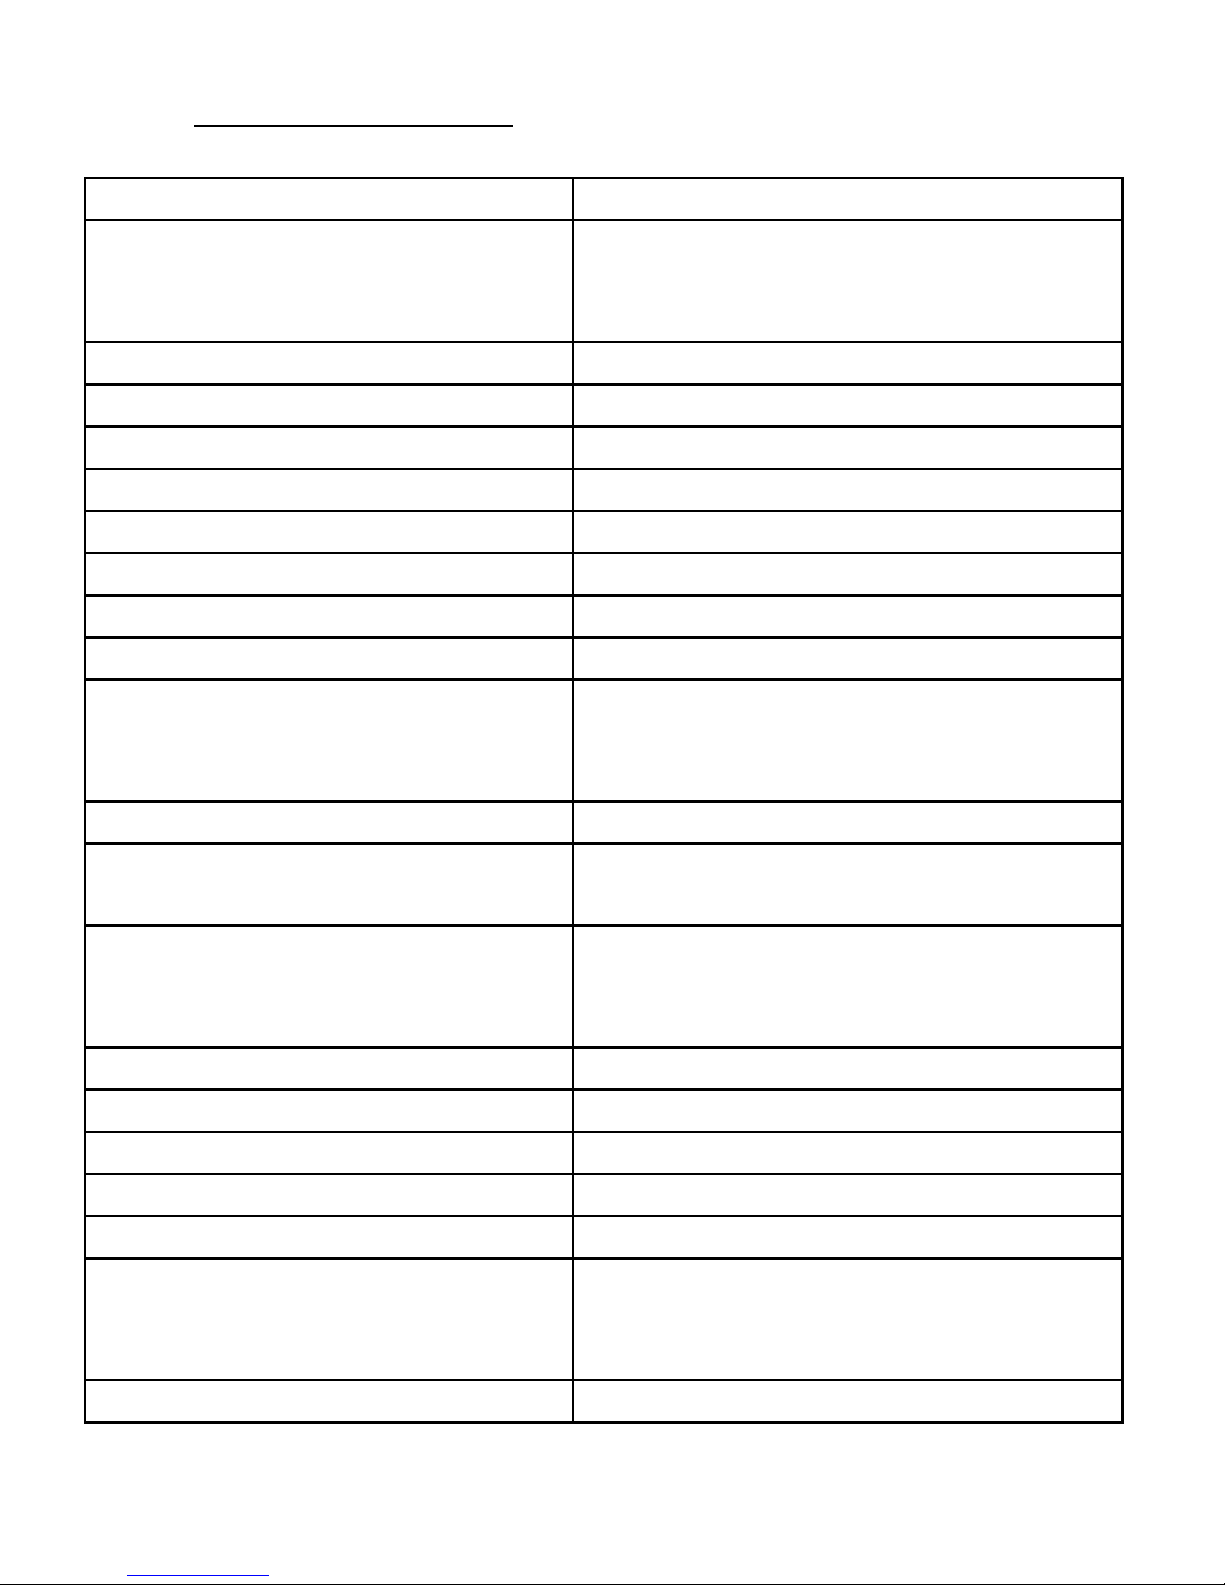
10. Technical specifications
Image sensor
1.3 Mega Pixels colour CMOS
Lens
Focal = 3.0
Field of view = 49°
Auto IR-cut-remove
PIR sensor range
Approximately 15 m
PIR sensor detection angle
100°
PIR sensor sensitivity
Adjustable: high / middle / low
Infrared flash
940 nm – 40 LEDS
Infrared flash range
Approximately 10 m
Memory
Micro SD card up to 32 GB
Micro SD card cycle recording
Yes - programmable
Capture modes
Photo / Video / Photo + Video
Photo resolution
2MP (1920 x 1080)
5MP (2560 x 1920)
8MP (3264 x 2448)
Photo files format
.JPEG
Burst (multi-shot)
Programmable from 1 to 7 photos
per trigger
Video resolution
HD 720P (1280 x 720)
VGA (640 x 480)
QVGA (320 x 240)
Frame per second
Programmable 15FPS or 30FPS
Video files format
.AVI
Video length
Programmable from 5 to 60 seconds
Audio recording
Yes
Trigger speed
Approximately 0,8 second
Time stamp on photos
Date, time, temperature, moon
phase, battery level, camera ID (if the
user programmed one)
White balance
Automatic
Page 44
PIE1028 – indice A – avril 2018 44/120
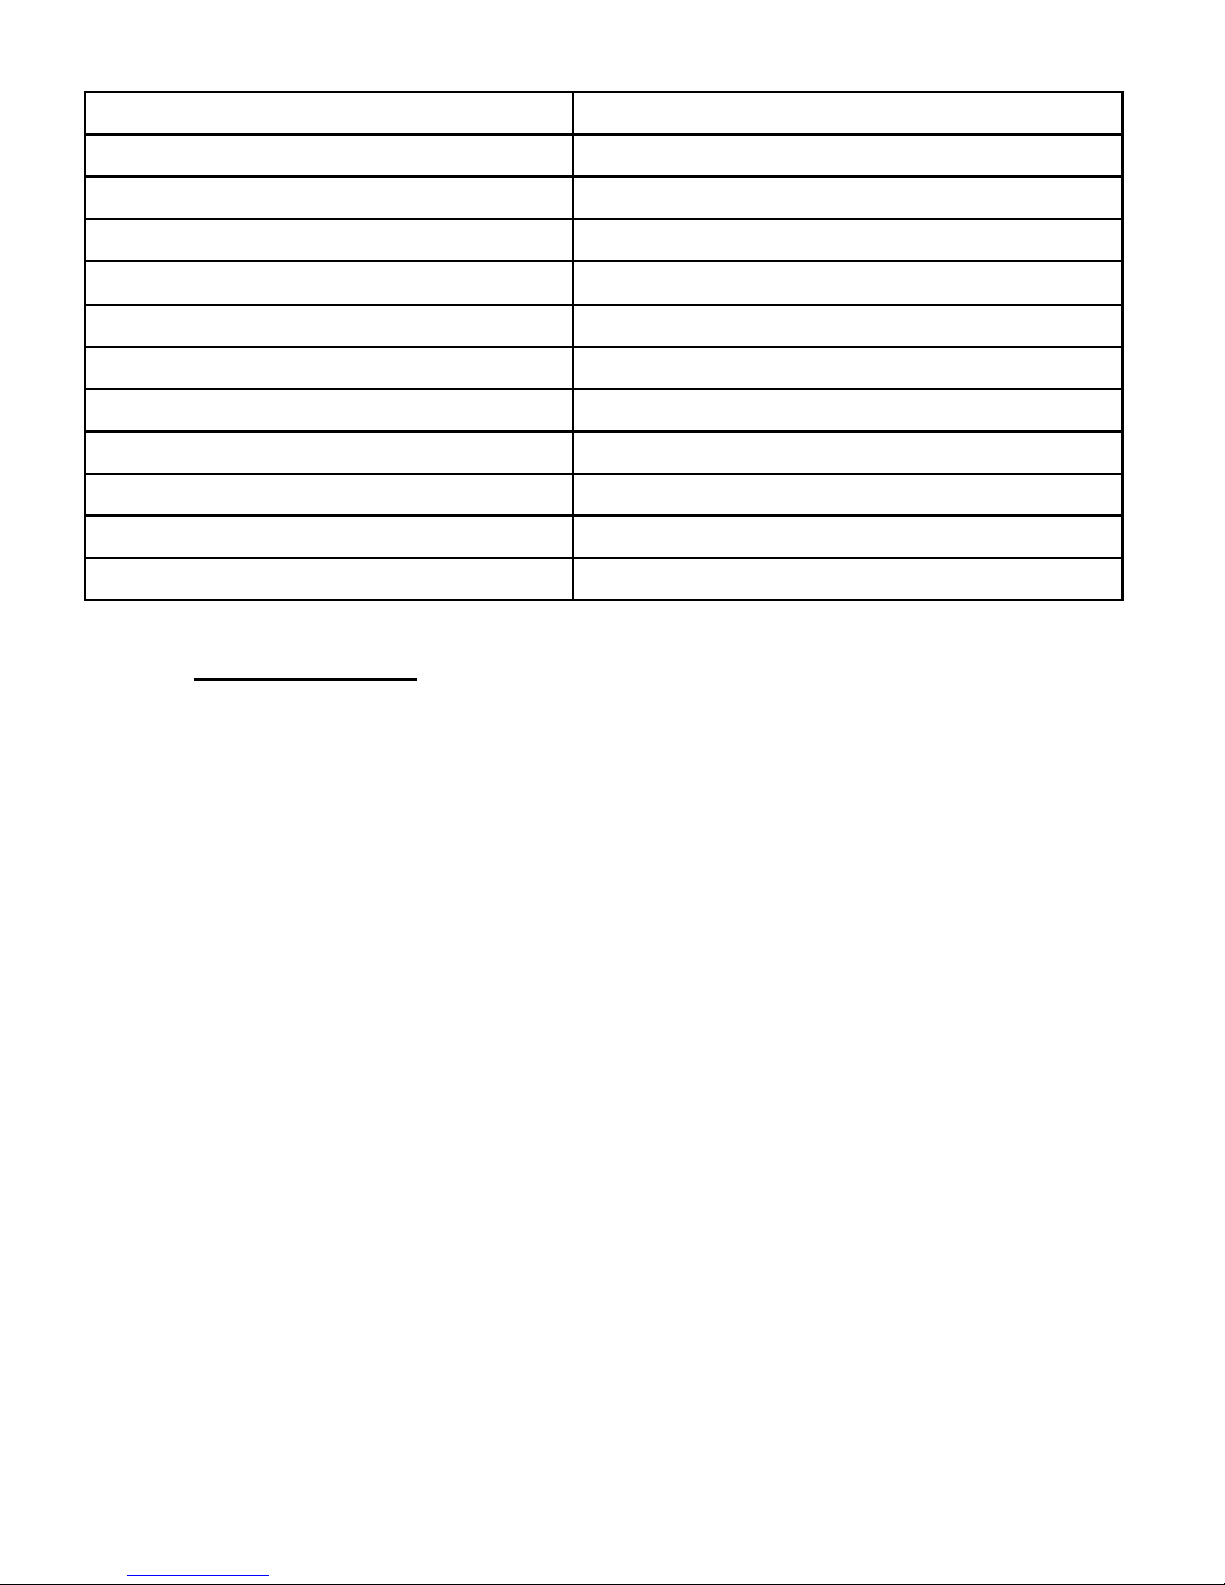
Camera ID
Yes – programmable
Password
Yes – programmable
LCD screen
1’’ – Monochrome
Power supply
4 AA batteries (not supplied)
Operation power
5-6 V DC (12 A)
Power consumption
190Ma (+1920mA with infrared flash)
Interface
USB port, micro SD card slot
Dimensions
115 x 84 x 54 mm / 4.5 x 3.3 x 2.1 in.
Weight
224 g / 7.9 oz.
Waterproof grade
IP54
Operating temperature
-20°C to +60°C / -4°F to +140°F
Operating humidity
5% - 90%
11. Troubleshooting
Should your product stop working or develop a fault, first read this guide
over, and then check the batteries and replace them if necessary. Also
check that you are using the product correctly.
If the problem persists, contact your distributor or check out on
www.numaxes.com.
You can also contact NUM’AXES at + 33.2.38.69.96.27 or by email
[email protected].
Depending on the extent of the malfunction, you may have to return the
product for service and repair.
For all repairs, please supply the following:
the complete product
the proof of purchase (invoice or sales receipt)
If you omit one of these items, the After Sales Service will have to invoice
you for any repair costs incurred.
Page 45

PIE1028 – indice A – avril 2018 45/120
12. Guarantee
NUM’AXES guarantees the product against production defects for two
years after purchase.
All postage and packing charges will be the purchaser’s sole responsibility.
13. Guarantee conditions
1. The guarantee will be valid only if the proof of purchase (invoice or
sales receipt), without cancellation, is submitted to the distributor or
to NUM’AXES. The guarantee is limited to the original purchaser.
2. This guarantee does not cover the following:
changing the strap or USB cable
direct or indirect risks incurred when sending the article back to
the distributor or to NUM’AXES
damage to the product caused by:
negligence or incorrect use
use contrary to the instructions or not envisioned therein
repairs performed by unauthorized persons
loss or theft
3. If the product is found to be defective, NUM’AXES will either decide to
repair or to replace it.
4. No claim may be advanced against NUM’AXES, particularly in relation
to incorrect use or breakdown.
5. NUM’AXES reserves the right to modify the characteristics of its
products with a view to making technical improvements or to comply
with new regulations.
6. The information contained in this guide may be subject to amendment
without prior notice.
7. Photos and drawings are not contractual.
Page 46
PIE1028 – indice A – avril 2018 46/120
14. Register your product
Your product can be registered on our website www.numaxes.com.
15. Collection and recycling of your device at the end of its life
The pictogram means that your product can not be thrown with
household refuse.
You have to bring the device to a collection location suitable for treatment,
development, recycling of electronic wastes or bring it back to your
distributor.
Adopting this process, you do something for the environment; you
contribute to the preservation of natural resources and to the protection of
human health.
16. EC compliance
This equipment is in compliance with EC standards.
Directive 2014/30/EU on the harmonisation of the laws of the
Member States relating to electromagnetic compatibility
EN 55032: 2015, EN 55024: 2010
EN 61000-3-2: 2014, EN 61000-3-3: 2013
Page 47

PIE1028 – indice A – avril 2018 47/120
Directive 2011/65/EU on the restriction of the use of certain
hazardous substances in electrical and electronic equipment
Annex II RoHS2.0 (EU) 2015/863
IEC 62321-3-1: 2013 IEC 62321-5: 2013 IEC 62321-4: 2013
IEC 62321-6: 2015 IEC 62321-7-1: 2015 IEC 62321: 2008
ANNEX C IEC 62321-8: 2017
Z.A.C. des Aulnaies
745 rue de la Bergeresse
C.S. 30157
45161 OLIVET CEDEX
FRANCE
Tél. +33 (0)2 38 69 96 27
Fax +33 (0)2 38 63 31 00
www.numaxes.com
Page 48
PIE1028 – indice A – avril 2018 48/120
Manual de instrucciones
1. Componentes del producto
Cámara trampa
Correa de fijación
Cable USB
Manual de instrucciones
2. Presentación del producto
VISTA FRONTAL
Sensor de
infrarrojos
pasivo (PIR)
Lente
20 LEDS
infrarrojos
20 LEDS
infrarrojos
Botón
DERECHO:
MENÚ
+
OK (SET)
Pantalla LCD
Botón IZQUIERDO:
Encendido/Apagado
+
Navegación (NEXT)
Sensor de luz
+
Indicador
luminoso
Page 49
PIE1028 – indice A – avril 2018 49/120
VISTA POSTERIOR
VISTA DESDE EL INTERIOR
Desenrosque
para abrir el
dispositivo
Orificio
para la
correa
Puerto USB
Ranura para
tarjeta micro SD
Compartimento
de las pilas
(4 x AA)
Desenrosque
para abrir el
dispositivo
Page 50
PIE1028 – indice A – avril 2018 50/120
3. Pantalla de información (interfaz del modo Test)
Pantalla LCD – Modo Foto
Pantalla LCD – Modo Vídeo
Modo Foto
Modo Vídeo
Fecha
(año/mes/día)
Fecha
(año/mes/día)
Resolución
vídeo
+
Cuadros por
segundo
Hora
Nivel de
batería
Nivel de
batería
Cantidad de
fotos grabadas
Hora
Estimación espacio
disponible
(cantidad de archivos)
Resolución
foto
+
Número de
imágenes en
ráfaga
Cantidad de
videos grabados
Estimación espacio
disponible
(cantidad de archivos)
Page 51
PIE1028 – indice A – avril 2018 51/120
Pantalla LCD – Modo Foto + Vídeo
4. Instalación de las pilas
El alojamiento de pila acepta 4 pilas AA (LR06). Se recomienda la utilización
de pilas de buena calidad (Puede conseguir las pilas adecuadas
directamente en NUM’AXES (www.numaxes.com) o en su distribuidor).
Inserte las pilas respetando la polaridad indicada en el compartimento de
pilas.
¡Atención! no utilice pilas que no sean los especificados en esta guía.
Al hacerlo, causara daños al producto y le anulará la garantía.
¡Atención! la cámara debe estar apagada al instalar o reemplazar las
pilas. Retirar las pilas mientras la cámara está encendida podría dañar
el producto.
No mezcle pilas nuevas y usadas. No mezcle pilas de distintos tipos;
utilícelas todas de litio o todas alcalinas.
Nivel de
batería
Modo
Foto + Vídeo
Resolución
foto
+
Resolución
vídeo
Hora
Cantidad de
fotos/videos
grabadas(os)
Estimación espacio
disponible
(cantidad de archivos)
Fecha
(año/mes/día)
Page 52

PIE1028 – indice A – avril 2018 52/120
5. Instalación de la tarjeta micro SD
La cámara utiliza una tarjeta de memoria micro SD (Secure Digital) estándar
para guardar fotos y/o vídeos. Se admiten tarjetas micro SD hasta un
máximo de 32 GB.
Antes de introducir o de retirar la tarjeta de memoria, la cámara debe
estar apagada. No hacerlo podría provocar la pérdida o el deterioro de los
archivos que están guardados en la tarjeta de memoria.
Abra la tapa e introduzca la tarjeta micro SD en la ranura insertándola
por completo y correctamente orientada, como indica el símbolo
situado bajo la ranura.
Para retirar la tarjeta micro SD presione la tarjeta y tire de ella con
suavidad (no intente tirar de ella sin presionarla antes).
Se recomienda utilizar una tarjeta micro SD nueva y en blanco. Si se ha
utilizado la tarjeta micro SD en otro dispositivo, recuerde formatearla
antes de utilizarla por primera vez. Las tarjetas nuevas están listas
para usarse al sacarlas del paquete.
6. Funcionamiento
ON/OFF (modo Operación Automática PIR, modo Test, OFF)
Encender la cámara e ingresar al modo Operación Automática PIR:
Presione el botón IZQUIERDO durante 3 segundos, el indicador
luminoso parpadeará 5 veces y la unidad ingresará al modo
Operación Automática PIR.
Ingresar al modo Test: En modo Operación Automática PIR,
presione el botón DERECHO una vez para activar la pantalla LCD del
dispositivo e ingresar al modo Test.
Page 53

PIE1028 – indice A – avril 2018 53/120
Apagar la cámara: Presione el botón IZQUIERDO durante
5 segundos para apagar la unidad.
Configuración de parámetros de operación
Ingresar al menú de configuración: En modo Test, presione el botón
DERECHO para acceder al menú de configuración. En modo
Configuración, el botón IZQUIERDO siempre se usa para navegar y
el botón DERECHO siempre se usa para decir OK y
guardar/confirmar la configuración deseada.
Volver al modo Test desde el menú de configuración: Después de
completar todas las configuraciones, presione el botón DERECHO
durante 3 segundos para volver al modo Test.
Ingresar al modo Operación Automática PIR desde el modo Test:
Presione el botón DERECHO durante 3 segundos para ingresar al
modo Operación Automática PIR (el indicador luminoso parpadeará
5 veces y la pantalla LCD se apagará).
Grabación manual
En modo Test, presione el botón IZQUIERDO para tomar fotos,
videos o fotos + videos de acuerdo con la configuración de la
cámara.
Para detener la grabación de vídeo (en modo Vídeo o Foto + Vídeo),
presione el botón IZQUIERDO de nuevo.
Page 54
PIE1028 – indice A – avril 2018 54/120
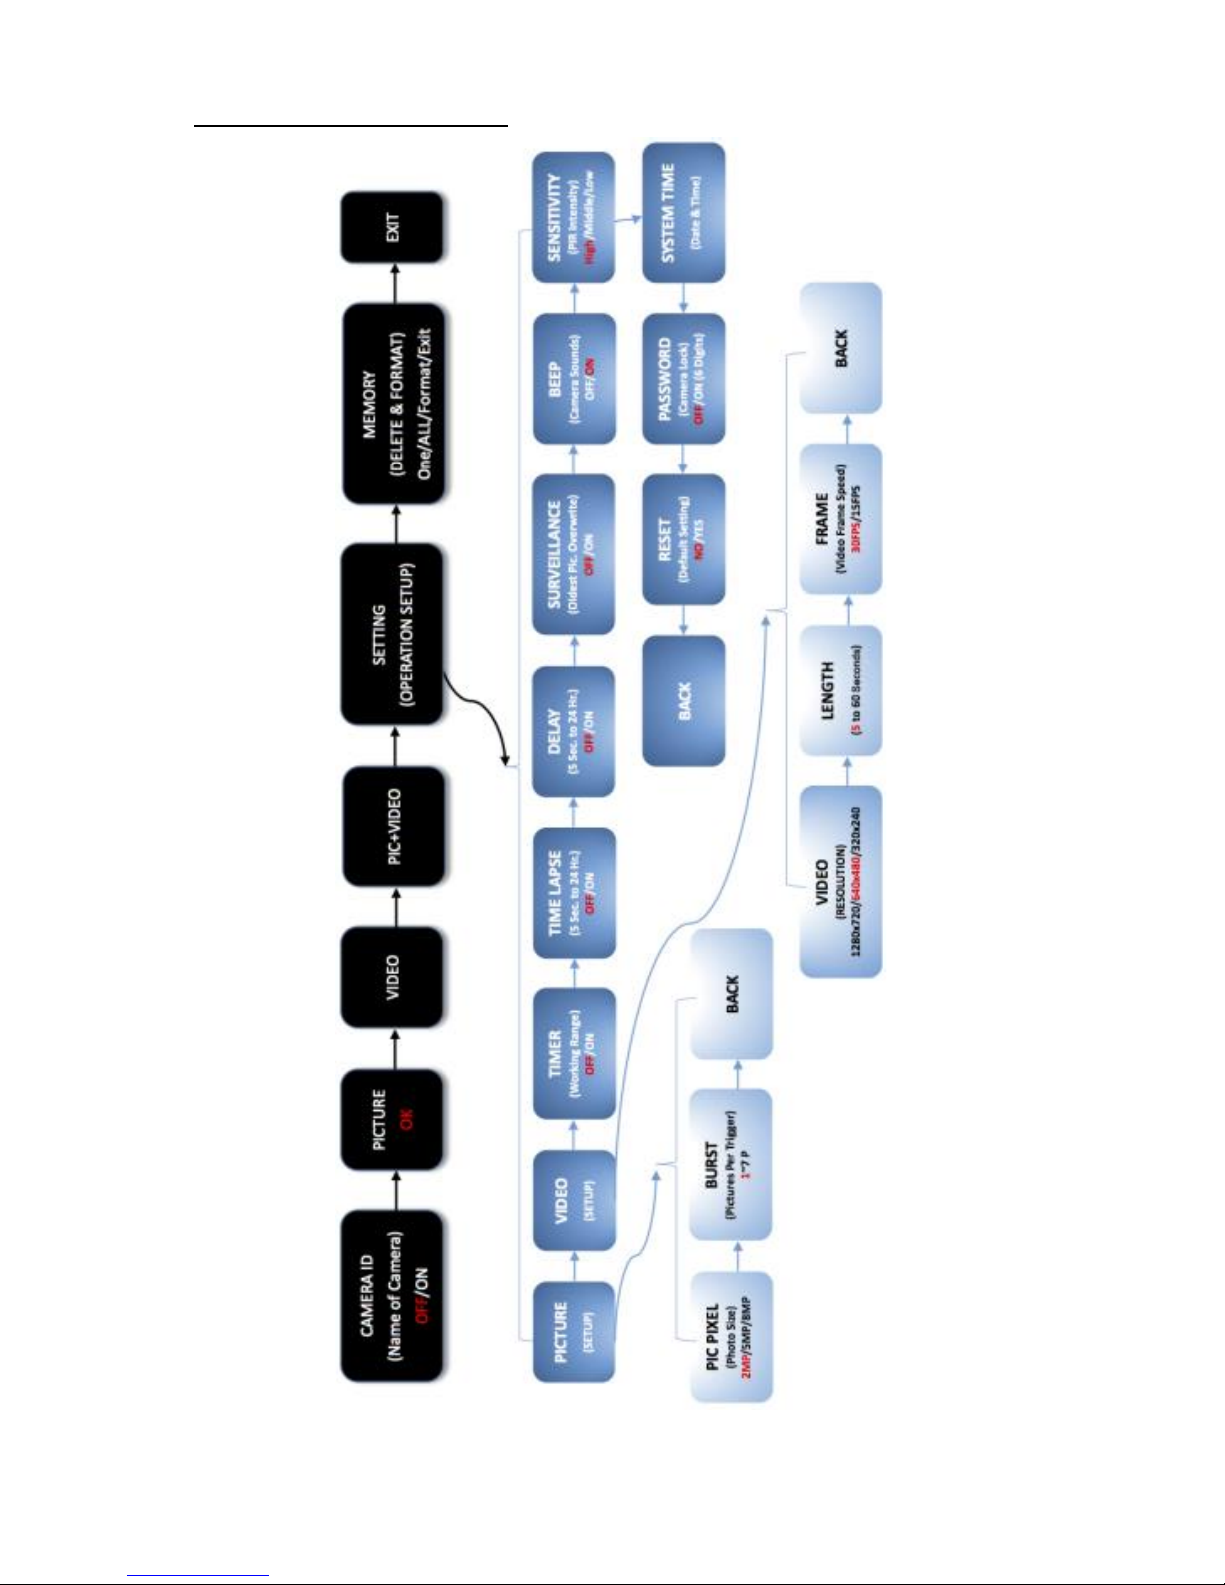
7. Menú de configuración
Page 55
PIE1028 – indice A – avril 2018 55/120
8. Lista de ajustes y parámetros
Pulse el botón DERECHO para entrar en los parámetros y ajustarlos.
MENU
CAMERA ID
(Name of camera)
ID DE CÁMARA
4 cifras e/o letras
1. OFF (ajuste por defecto)
2. ON
Presione el botón IZQUIERDO para seleccionar
ON y luego el botón DERECHO para entrar en la
página de configuración.
0 0 0 0 (4 cifras e/o letras)
Presione el botón IZQUIERDO para seleccionar
el carácter deseado, luego presione el botón
DERECHO para confirmar y pasar al siguiente
carácter.
Cuando los 4 caracteres están programados,
presione de nuevo el botón DERECHO para
confirmar el ID de la cámara y salir.
_______________________________
Asignar un ID a la cámara puede ayudarle a
identificar dónde y desde qué cámara se han
tomado las fotos.
PICTURE
FOTO
Ajuste de fábrica
a) Ajuste
Presione el botón DERECHO para entrar en el
modo Foto OK aparece en la pantalla LCD.
b) Tomar una fotografía
Presione el botón DERECHO durante 3
segundos para regresar a la pantalla de
información y luego presione el botón
IZQUIERDO para tomar una fotografía.
Page 56

PIE1028 – indice A – avril 2018 56/120
VIDEO
VÍDEO
a) Ajuste
Presione el botón DERECHO para entrar en el
modo Vídeo OK aparece en la pantalla LCD.
b) Tomar un vídeo
Presione el botón DERECHO durante 3
segundos para regresar a la pantalla de
información y luego presione el botón
IZQUIERDO para comenzar a grabar un vídeo.
Presione el botón IZQUIERDO de nuevo para
detener la grabación del vídeo.
PIC+VIDEO
FOTO + VÍDEO
a) Ajuste
Presione el botón DERECHO para entrar en el
modo Foto + Vídeo OK aparece en la
pantalla LCD.
b) Tomar una fotografía y luego un vídeo
Presione el botón DERECHO durante 3
segundos para regresar a la pantalla de
información y luego presione el botón
IZQUIERDO para tomar una fotografía y luego
comenzar a grabar un vídeo. Presione el botón
IZQUIERDO de nuevo para detener la grabación
del vídeo.
_______________________________
En el modo “Foto + Vídeo”, por cada disparo se
realizará una foto/fotos y un vídeo.
SETTING
(Operation setup)
AJUSTES
Consulte la tabla a continuación para obtener
detalles de los parámetros y configuraciones.
Presione el botón DERECHO para entrar en el
menú de configuración.
Page 57

PIE1028 – indice A – avril 2018 57/120
MEMORY
Delete & Format
MEMORIA
Borrar & Formatear
1. One (Uno)
2. All (Todo)
3. Format (Formatear)
4. EXIT (Salir)
Presione le botón IZQUIERDO para navegar y
luego le botón DERECHO para validar su
elección.
Presione el botón IZQUIERDO para seleccionar
Yes/Sí o No y luego presione el botón DERECHO
para validar y salir.
Si se eliminan todos los archivos, el dispositivo
vuelve automáticamente a la pantalla de
información.
_______________________________
One (Uno): Sólo se elimina el último archivo.
All (Todo): Borra todo los archivos de la tarjeta
micro SD.
Format (Formatear): Elimina (borra) todos los
archivos guardados en una tarjeta micro SD
con objeto de prepararla para un uso posterior.
Precaución: los archivos eliminados no podrán
recuperarse. Asegúrese primero de haber
descargado o realizado una copia de seguridad
de todos los archivos que desea conservar.
EXIT
SALIR
Presione el botón DERECHO para regresar a la
pantalla de información.
Page 58

PIE1028 – indice A – avril 2018 58/120
SETTING (operation setup)
PICTURE
(setup)
FOTO
Ajustes
Presione el botón DERECHO para entrar.
PIC PIXEL (photo size)
RESOLUCIÓN DE FOTO
Presione el botón DERECHO para entrar.
1. 8M
2. 5M
3. 2M (ajuste de fábrica)
Presione el botón IZQUIERDO para navegar y
luego el botón DERECHO para guardar la
configuración y salir.
_______________________________
Permite seleccionar la resolución de las fotos
estáticas de 2 a 8 megapíxeles. Una resolución
más alta produce fotos de mejor calidad, pero
crea archivos más grandes que ocupan más
espacio en la tarjeta micro SD (se llena antes).
BURST (pictures per trigger)
FOTOS EN SERIE (imágenes por disparo)
Presione el botón DERECHO para entrar.
1. 1P (ajuste de fábrica)
2. 2P
3. 3P
4. 4P
5. 5P
6. 6P
7. 7P
Presione el botón IZQUIERDO para navegar y
luego el botón DERECHO para guardar la
configuración y salir.
Page 59

PIE1028 – indice A – avril 2018 59/120
_______________________________
Permite seleccionar cuántas fotos se hacen en
secuencia por cada disparo en el modo Foto.
VIDEO (setup)
VÍDEO (Ajustes)
Presione el botón DERECHO para entrar.
VIDEO RESOLUTION
RESOLUCIÓN DE VÍDEO
Presione el botón DERECHO para entrar.
1. 1280x720 (HD)
2. 640x480 (VGA – ajuste de fábrica)
3. 320x240 (QVGA)
Presione el botón IZQUIERDO para navegar y
luego el botón DERECHO para guardar la
configuración y salir.
_______________________________
Permite seleccionar la resolución de vídeo. Una
resolución más alta produce vídeos de mejor
calidad, pero crea archivos más grandes que
ocupan más espacio en la tarjeta micro SD (se
llena antes).
LENGTH (5 to 60 seconds)
DURACIÓN DEL VÍDEO (de 5 hasta 60 segundos)
Presione el botón DERECHO para entrar.
Ajuste de fábrica: 5 segundos
Presione el botón IZQUIERDO para seleccionar la
duración deseada del vídeo y luego presione el
botón DERECHO para guardar la configuración y
salir.
Page 60

PIE1028 – indice A – avril 2018 60/120
FRAME (video frame speed)
CUADROS POR SEGUNDO
Presione el botón DERECHO para entrar.
1. 30 FPS (ajuste de fábrica)
2. 15 FPS
FPS = frames per second = cuadros por segundo
Presione el botón IZQUIERDO para navegar y
luego el botón DERECHO para guardar la
configuración y salir.
TIMER
(working range)
HORARIOS FIJOS
Rango de tiempo
operativo
Presione el botón DERECHO para entrar.
1. OFF (ajuste de fábrica)
2. ON
Presione el botón IZQUIERDO para seleccionar
ON y luego el botón DERECHO para establecer el
rango de tiempo operativo.
Star (Inicio): 00:00:00 (HH:MM:SS)
End (Fin): 00:00:00 (HH:MM:SS)
Presione el botón IZQUIERDO para seleccionar la
cifra deseada y luego el botón DERECHO para
confirmar y pasar a la siguiente cifra.
Cuando el horario de inicio y el horario de fin
están programados, presione de nuevo el botón
DERECHO para salir.
_______________________________
Cuando “Horarios fijos” está activado (ON), la
cámara puede configurarse para funcionar sólo
en una determinada franja horaria del día. El
resto del tiempo, la cámara estará apagada y no
registrará ningún disparo por movimiento.
Page 61

PIE1028 – indice A – avril 2018 61/120
Por ejemplo: si el horario de inicio es 15:00:00 y
el horario de fin es 18:00:00, cada día, la cámara
funcionará solamente entre las 15:00 y las 18:00
horas.
TIME LAPSE
(5 sec. to 24 hr.)
INTERVALO DE
TIEMPO
(5 segundos hasta
24 horas)
Presione el botón DERECHO para entrar.
1. OFF (ajuste de fábrica)
2. ON
Presione el botón IZQUIERDO para seleccionar
ON y luego el botón DERECHO para establecer el
intervalo de tiempo.
00:00:00 (HH:MM:SS)
Presione el botón IZQUIERDO para seleccionar la
cifra deseada y luego el botón DERECHO para
confirmar y pasar a la siguiente cifra.
Cuando el intervalo de tiempo está programado,
presione de nuevo el botón DERECHO para salir.
_______________________________
La cámara hará fotos o vídeos automáticamente
en función del intervalo de tiempo ajustado,
independientemente de si se detectan
movimientos.
Por ejemplo: si el intervalo de tiempo se ajusta en
00:30:00, la cámara hará una foto o un vídeo
automáticamente cada 30 minutos.
Nota: no ponga en “ON” simultáneamente el
INTERVALO PIR y el INTERVALO DE TIEMPO.
DELAY
(5 sec. to 24 hr.)
Presione el botón DERECHO para entrar.
Page 62

PIE1028 – indice A – avril 2018 62/120
INTERVALO PIR
(5 segundos hasta
24 horas)
1. OFF (ajuste de fábrica)
2. ON
Presione el botón IZQUIERDO para seleccionar
ON y luego el botón DERECHO para establecer el
intervalo PIR.
00:00:00 (HH:MM:SS)
Presione el botón IZQUIERDO para seleccionar la
cifra deseada y luego el botón DERECHO para
confirmar y pasar a la siguiente cifra.
Cuando el intervalo PIR está programado,
presione de nuevo el botón DERECHO para salir.
_______________________________
En modo ON, este parámetro indica cuánto
tiempo estará desactivado el sensor PIR después
de cada disparo. Durante este intervalo de
tiempo, el sensor PIR del dispositivo no
reaccionará al movimiento de humanos o
animales. Esta función permite evitar hacer
demasiadas fotos o demasiados vídeos.
Por ejemplo: si el intervalo PIR está ajustado en
00:01:00, la cámara esperará 1 minuto entre cada
foto/vídeo aunque se detecte un movimiento.
Nota: no ponga en “ON” simultáneamente el
INTERVALO PIR y el INTERVALO DE TIEMPO.
SURVEILLANCE
(oldest pic.
overwrite)
GRABACION EN
BUCLE en la tarjeta
micro SD
Presione el botón DERECHO para entrar
1. OFF (ajuste de fábrica)
2. ON
Presione el botón IZQUIERDO para navegar y
luego el botón DERECHO para guardar la
configuración y salir.
Page 63

PIE1028 – indice A – avril 2018 63/120
_______________________________
Seleccione "ON" para activar la grabación en
bucle. Cuando la tarjeta micro SD esté llena, la
cámara seguirá guardando fotos/vídeos
eliminando las fotos/los vídeos más antiguas(os).
BEEP
(camera sound)
BIP SONORO
Sonido de las teclas
Presione el botón DERECHO para entrar.
1. ON (ajuste de fábrica)
2. OFF
Presione el botón IZQUIERDO para navegar y
luego el botón DERECHO para guardar la
configuración y salir.
_______________________________
Permite seleccionar entre escuchar (ON) o no
(OFF) un sonido cuando se pulsa una tecla.
SENSITIVITY
(PIR sensitivity)
SENSIBILIDAD
SENSOR PIR
Presione el botón DERECHO para entrar.
1. High (Alta - ajuste de fábrica)
2. Middle (Media)
3. Low (Baja)
Presione el botón IZQUIERDO para navegar y
luego el botón DERECHO para guardar la
configuración y salir.
_______________________________
Una sensibilidad alta 1) es más sensible a los
movimientos de sujetos pequeños, 2) ofrece una
mayor distancia de detección, 3) facilita al sensor
la detección de una diferencia de temperatura
entre el cuerpo y la temperatura ambiente, 4)
facilita el disparo de la cámara.
Page 64

PIE1028 – indice A – avril 2018 64/120
En un entorno a alta temperatura, a la cámara le
resulta difícil diferenciar entre el calor corporal de
los sujetos y la temperatura ambiente, por lo que
le recomendamos utilizar la sensibilidad alta.
Se recomienda utilizar la sensibilidad baja en
entornos con muchas interferencias como, por
ejemplo, viento caliente, humo, proximidad de
ventanas, etc.
SYSTEM TIME
(Date & Time)
FECHA & HORA
Presione el botón DERECHO para entrar.
04.22.2018 00:00
MM.DD.YYYY HH:MM
Presione el botón IZQUIERDO para seleccionar la
cifra deseada y luego el botón DERECHO para
confirmar y pasar a la siguiente cifra.
Cuando la fecha y la hora están programadas,
presione de nuevo el botón DERECHO para salir.
_______________________________
El formato de fecha es mes/día/año.
El formato de tiempo es Hora:Minuto.
PASSWORD
(camera lock)
CONTRASEÑA
(6 cifras)
Presione el botón DERECHO para entrar.
1. OFF (ajuste de fábrica)
2. ON
Presione el botón IZQUIERDO para seleccionar
ON y luego el botón DERECHO para entrar en la
página de configuración.
0 0 0 0 0 0 (6 cifras)
Presione el botón IZQUIERDO para seleccionar la
cifra deseada, luego presione el botón DERECHO
para confirmar y pasar a la siguiente cifra.
Page 65
PIE1028 – indice A – avril 2018 65/120
Cuando las 6 cifras están programadas, presione
de nuevo el botón DERECHO para confirmar la
contraseña y salir.
RESET
(default setting)
AJUSTES DE
FÁBRICA
Presione el botón DERECHO para entrar.
1. No (ajuste de fábrica)
2. Yes (Sí)
Presione el botón IZQUIERDO para navegar y
luego el botón DERECHO para guardar la
configuración y salir.
_______________________________
Seleccione “Yes/Sí” para restablecer todos los
parámetros a los valores de fábrica.
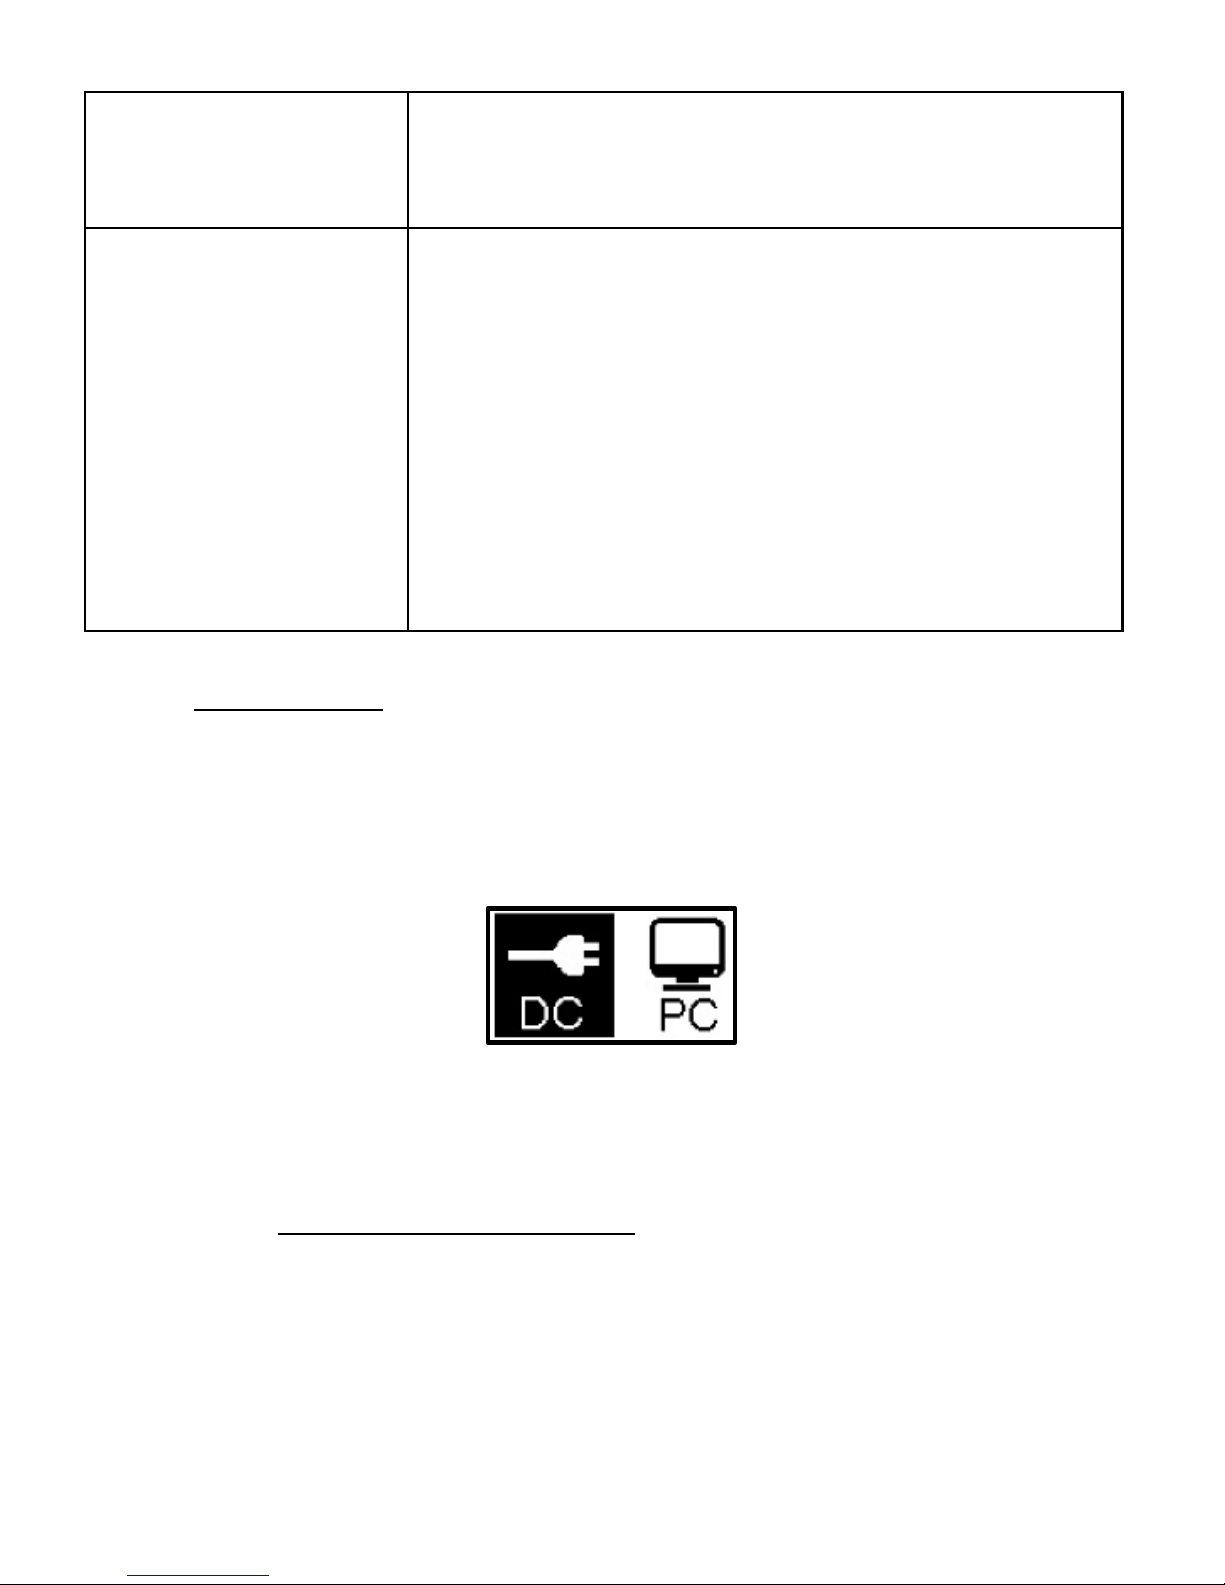
9. Conexión USB
Cuando la unidad esté conectada a través de USB, presione el botón
IZQUIERDO hasta que se encienda el indicador luminoso rojo; entonces
aparece la siguiente interfaz:
Presione el botón IZQUIERDO para elegir la conexión DC (alimentación) o
PC (ordenador). Presione el botón DERECHO para validar su elección.
DC conexión para el poder
El dispositivo ingresa al modo Test.
Page 66
PIE1028 – indice A – avril 2018 66/120
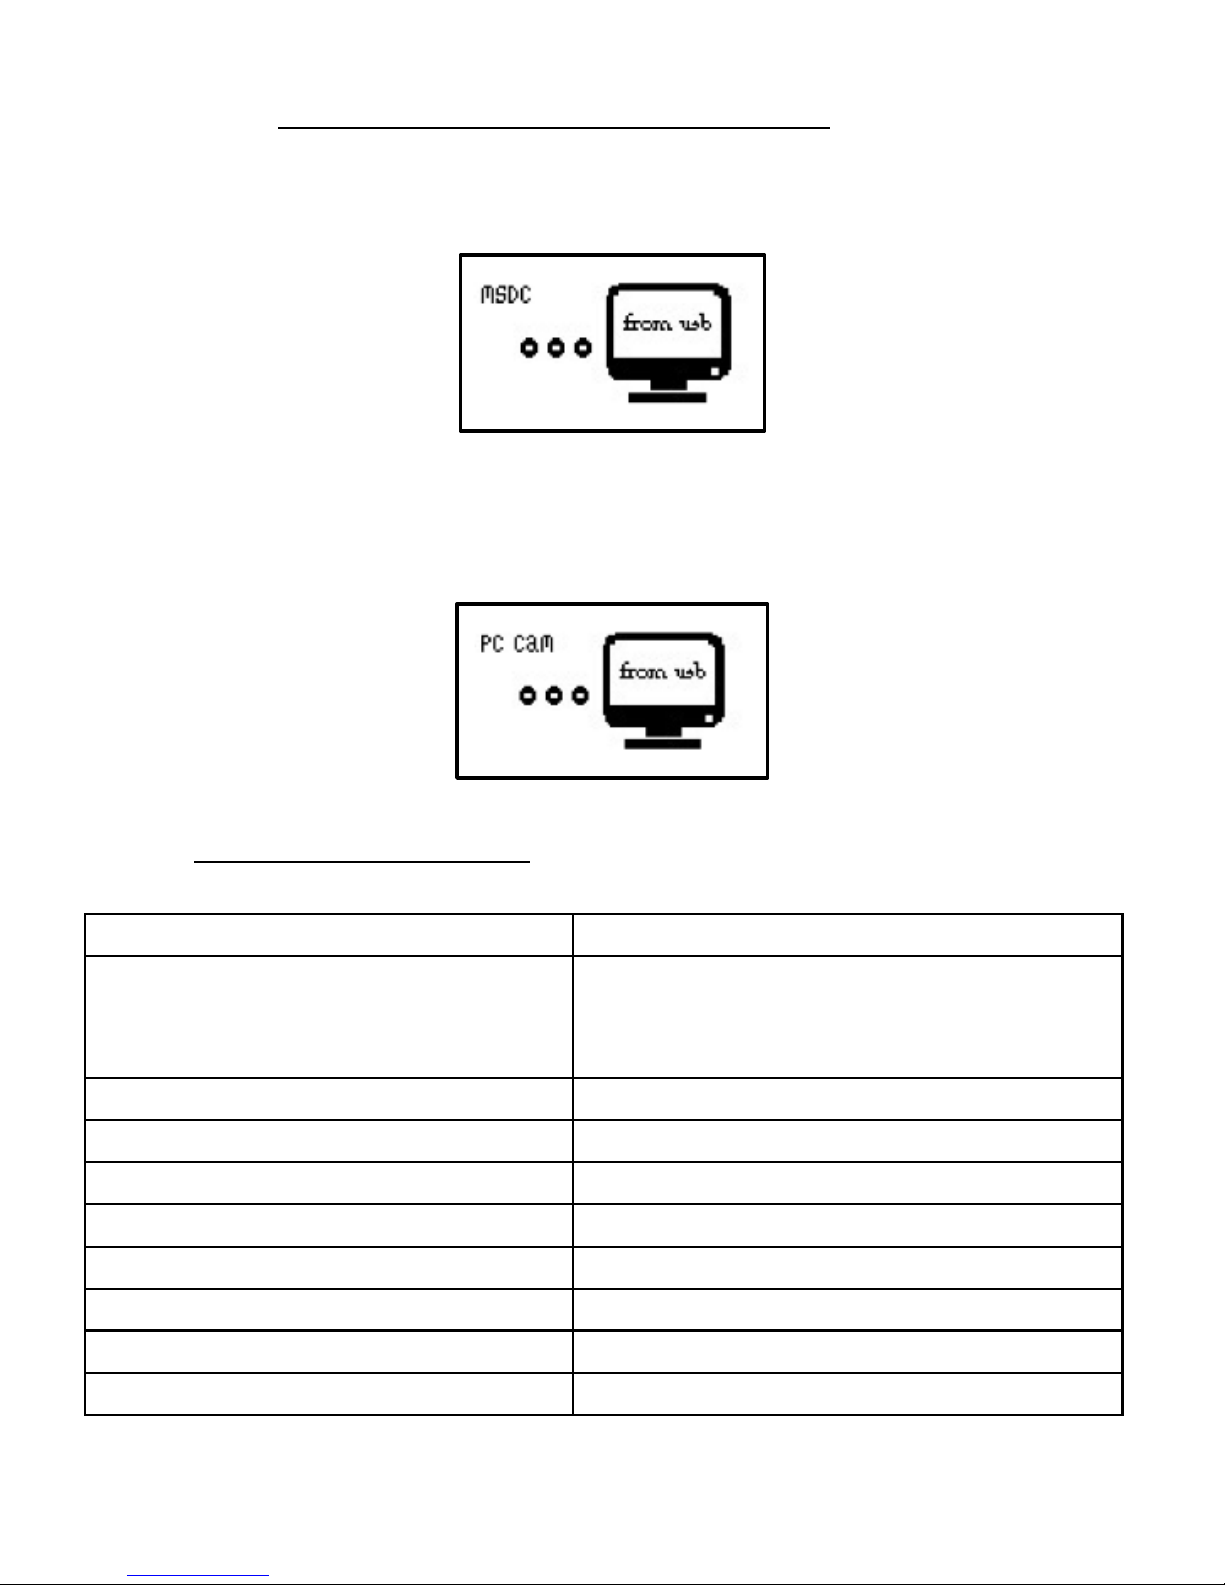
PC conexión para leer la tarjeta micro SD
La pantalla LCD del dispositivo muestra la interfaz a continuación. Ahora
puede leer el contenido de la tarjeta micro SD a través de su ordenador.
Al presionar el botón DERECHO otra vez, la cámara se convierte en una
cámara web. La pantalla LCD mostrará la interfaz a continuación. Presione
el botón DERECHO nuevamente para salir.
10. Especificaciones técnicas
Sensor de imágenes
1,3 Megapíxeles color CMOS
Lente
Focal = 3,0
Campo de visión = 49°
Auto IR-cut-remove
Alcance sensor PIR
Alrededor de 15 m
Ángulo de detección sensor PIR
100°
Sensibilidad sensor PIR
Ajustable: alta / media / baja
Flash infrarrojo
940 nm – 40 LEDS
Alcance flash infrarrojo
Alrededor de 10 m
Tarjeta memoria
Tarjeta micro SD hasta 32 GB
Grabación en bucle
Sí - programable
Modos de captura
Foto / Vídeo / Foto + Vídeo
Page 67
PIE1028 – indice A – avril 2018 67/120
Resolución foto
2MP (1920 x 1080)
5MP (2560 x 1920)
8MP (3264 x 2448)
Formato de foto
.JPEG
Fotos en ráfaga
Programable de 1 hasta 7 fotos por
disparo
Resolución vídeo
HD 720P (1280 x 720)
VGA (640 x 480)
QVGA (320 x 240)
Cuadros por segundo
Programable – 15 FPS o 30 FPS
Formato de vídeo
.AVI
Duración del vídeo
Programable de 5 hasta 60 segundos
Grabación audio
Sí
Velocidad de disparo
Alrededor 0,8 segundo
Estampado de la hora
Fecha, hora, temperatura, fase lunar,
nivel de carga de las baterías, ID
cámara (definido por el usuario)
Balance des blancos
Automática
ID cámara
Sí –programable
Contraseña
Sí - programable
Pantalla LCD
1’’ (2,5 cm) – Monocromo
Alimentación
4 baterías AA LR06 (no incluidas)
Potencia
5-6 V DC (12 A)
Consumo de energía
190mA
(+1920mA con flash infrarrojo)
Interfaz
Puerto USB, ranura para tarjeta
micro SD
Dimensiones
115 mm x 84 mm x 54 mm
Peso
224 g
Estanqueidad
IP54
Temperatura de funcionamiento
-20°C hasta +60°C
Humedad de funcionamiento
5% - 90%
Page 68

PIE1028 – indice A – avril 2018 68/120
11. Solución de problemas
En caso de que su producto dejara de funcionar o presentara algún fallo,
lea primero estas instrucciones detenidamente y, a continuación,
compruebe las pilas y cámbielas si fuera necesario. Asimismo, compruebe
que está utilizando el producto correctamente.
Si el problema persiste, contacte con su distribuidor o consulte
www.numaxes.com.
También puede contactar con NUM’AXES en el + 33.2.38.69.96.27 o por email: [email protected].
Dependiendo de la magnitud del fallo, es posible que tenga que enviarnos
el producto para su reparación.
Para cualquier reparación, deberá facilitarnos lo siguiente:
el producto completo
la prueba de compra (factura o recibo de compra)
En caso de no proporcionar alguno de estos elementos, el servicio de
atención al cliente le cobrará los costes de reparación.
12. Garantía
NUM’AXES garantiza el producto contra cualquier fallo de fabricación
durante los dos años posteriores a la compra.
Todos los gastos de envío y embalaje corren a cargo del comprador.
Page 69

PIE1028 – indice A – avril 2018 69/120
13. Condiciones de garantía
1. La garantía sólo será válida si se envía la prueba de compra en vigor
(factura o recibo de compra) al distribuidor o a NUM’AXES. La garantía
se limita al comprador original.
2. Esta garantía no cubre lo siguiente:
el cambio de la correa o cable USB
los riesgos directos o indirectos provocados durante la devolución al
distribuidor o a NUM’AXES
daños en el producto causados por:
negligencia o uso incorrecto
uso contrario a las instrucciones o no indicado
reparaciones realizadas por personas no autorizadas
pérdida o robo
3. Si el producto se considera defectuoso, NUM’AXES optará por realizar
un cambio o una reparación.
4. NUM’AXES no podrá ser considerada responsable de los daños
derivados de un uso incorrecto o de una avería.
5. NUM’AXES se reserva el derecho de modificar las características de
sus productos con objeto de aportar mejoras técnicas o cumplir con
nuevas normativas.
6. La información incluida en estas instrucciones puede ser objeto de
modificaciones sin previo aviso.
7. Las fotos y los dibujos no son contractuales.
14. Registre su producto
Su producto puede registrarse en nuestra página web www.numaxes.com.
Page 70
PIE1028 – indice A – avril 2018 70/120
15. Recogida y reciclaje del aparato al final de su vida útil
El pictograma significa que su producto no puede eliminarse junto
con los residuos domésticos.
Deberá llevarse a un punto de recogida adecuado para el tratamiento, el
aprovechamiento y el reciclado de residuos electrónicos. También puede
devolver el producto a su distribuidor.
Este modo de proceder contribuye al respeto del medio ambiente así como
a la protección de los recursos naturales y de la salud humana.
16. Conformidad a las normas europeas
Este equipo cumple con las directivas CE.
Directiva 2014/30/UE sobre la armonización de la legislación de los
Estados miembros en materia de compatibilidad electromagnética
EN 55032: 2015, EN 55024: 2010
EN 61000-3-2: 2014, EN 61000-3-3: 2013
Directiva 2011/65/UE sobre la limitación del uso de algunas
sustancias peligrosas en los aparatos eléctricos y electrónicos
Anexo II RoHS2.0 Directiva (UE) 2015/863
IEC 62321-3-1: 2013 IEC 62321-5: 2013 IEC 62321-4: 2013
IEC 62321-6: 2015 IEC 62321-7-1: 2015 IEC 62321: 2008
ANEXO C IEC 62321-8: 2017
Page 71

PIE1028 – indice A – avril 2018 71/120
Z.A.C. des Aulnaies
745 rue de la Bergeresse
C.S. 30157
45161 OLIVET CEDEX
FRANCE
Tél. +33 (0)2 38 69 96 27
Fax +33 (0)2 38 63 31 00
www.numaxes.com
Page 72
PIE1028 – indice A – avril 2018 72/120
Gebrauchsanleitung
1. Lieferumfang des Produkts
Fotofalle
Befestigungsgurt
USB-Kabel
Bedienungsanleitung
2. Präsentation des Produkts
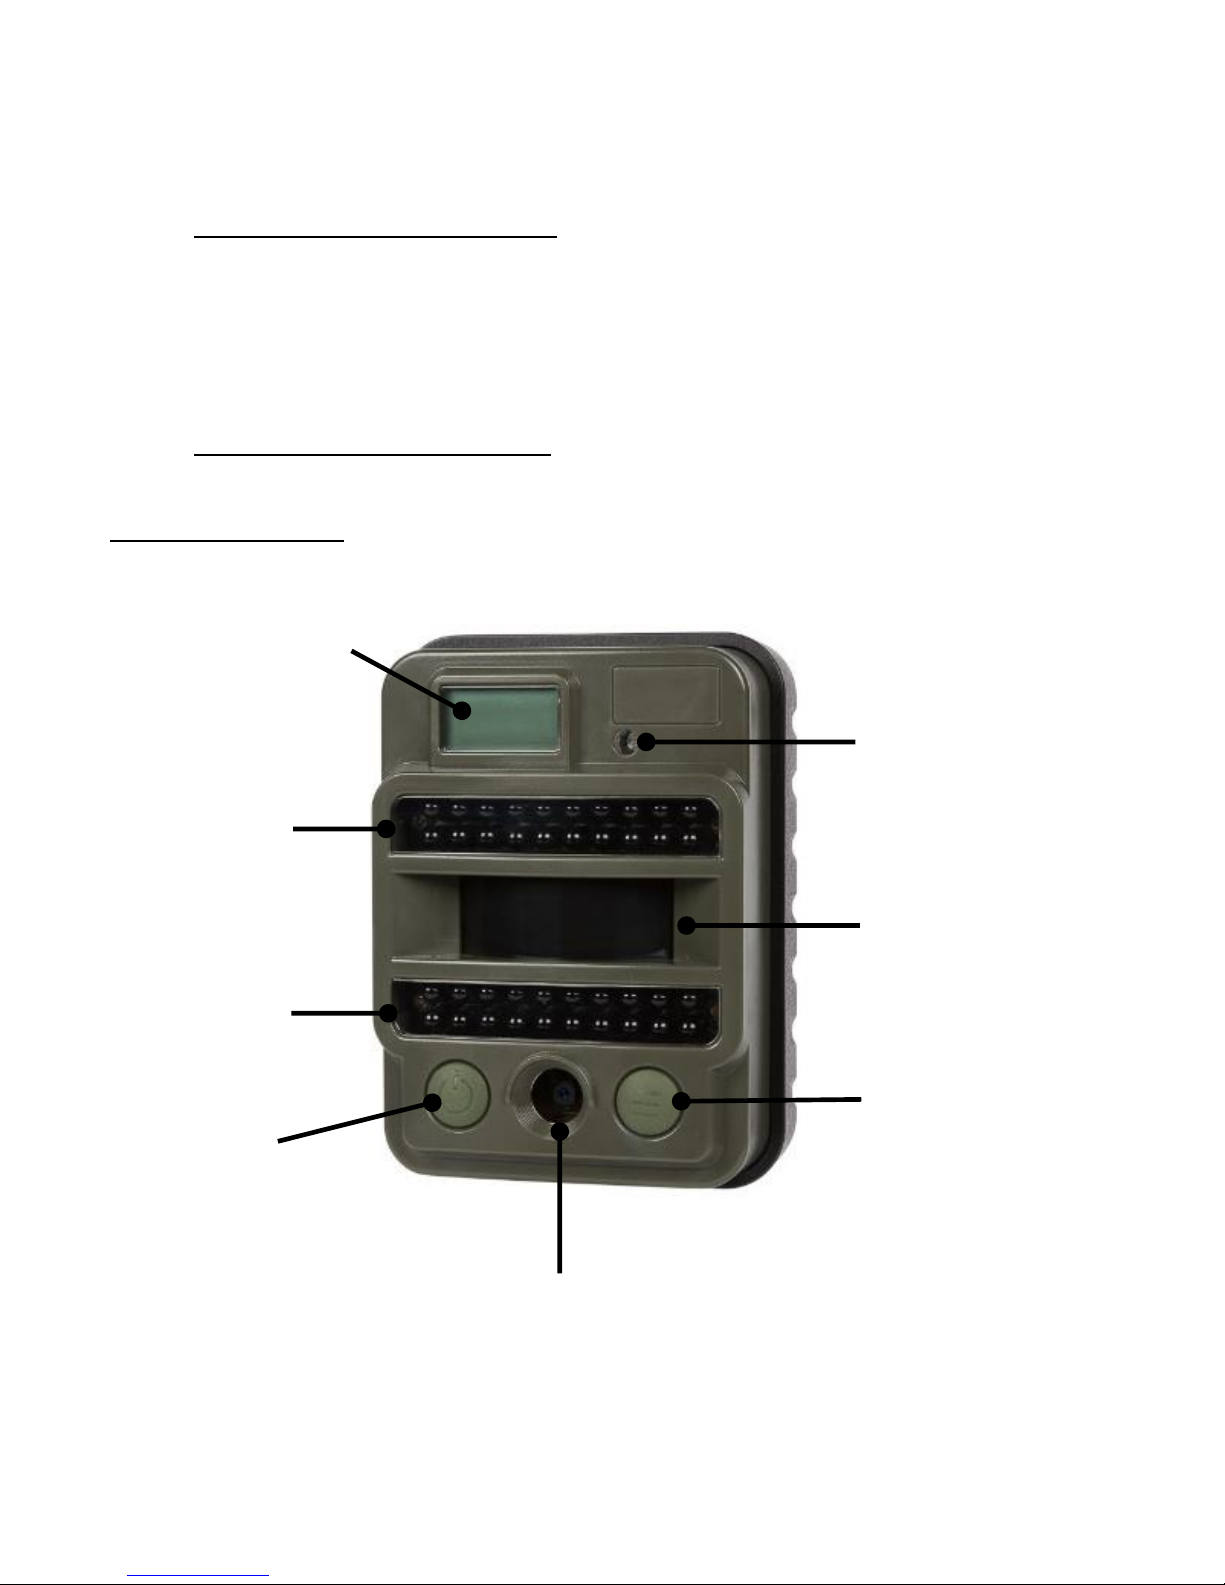
VORDERANSICHT
PIR-Sensor
20 Infrarot-
LEDS
20 Infrarot-
LEDS
LCD-Bildschirm
LINKE Taste:
Ein/Aus
+
Navigation (NEXT)
Lichtsensor
+
Leuchtanzeige
RECHTE Taste:
MENÜ
+
OK (SET)
Objektiv
Page 73
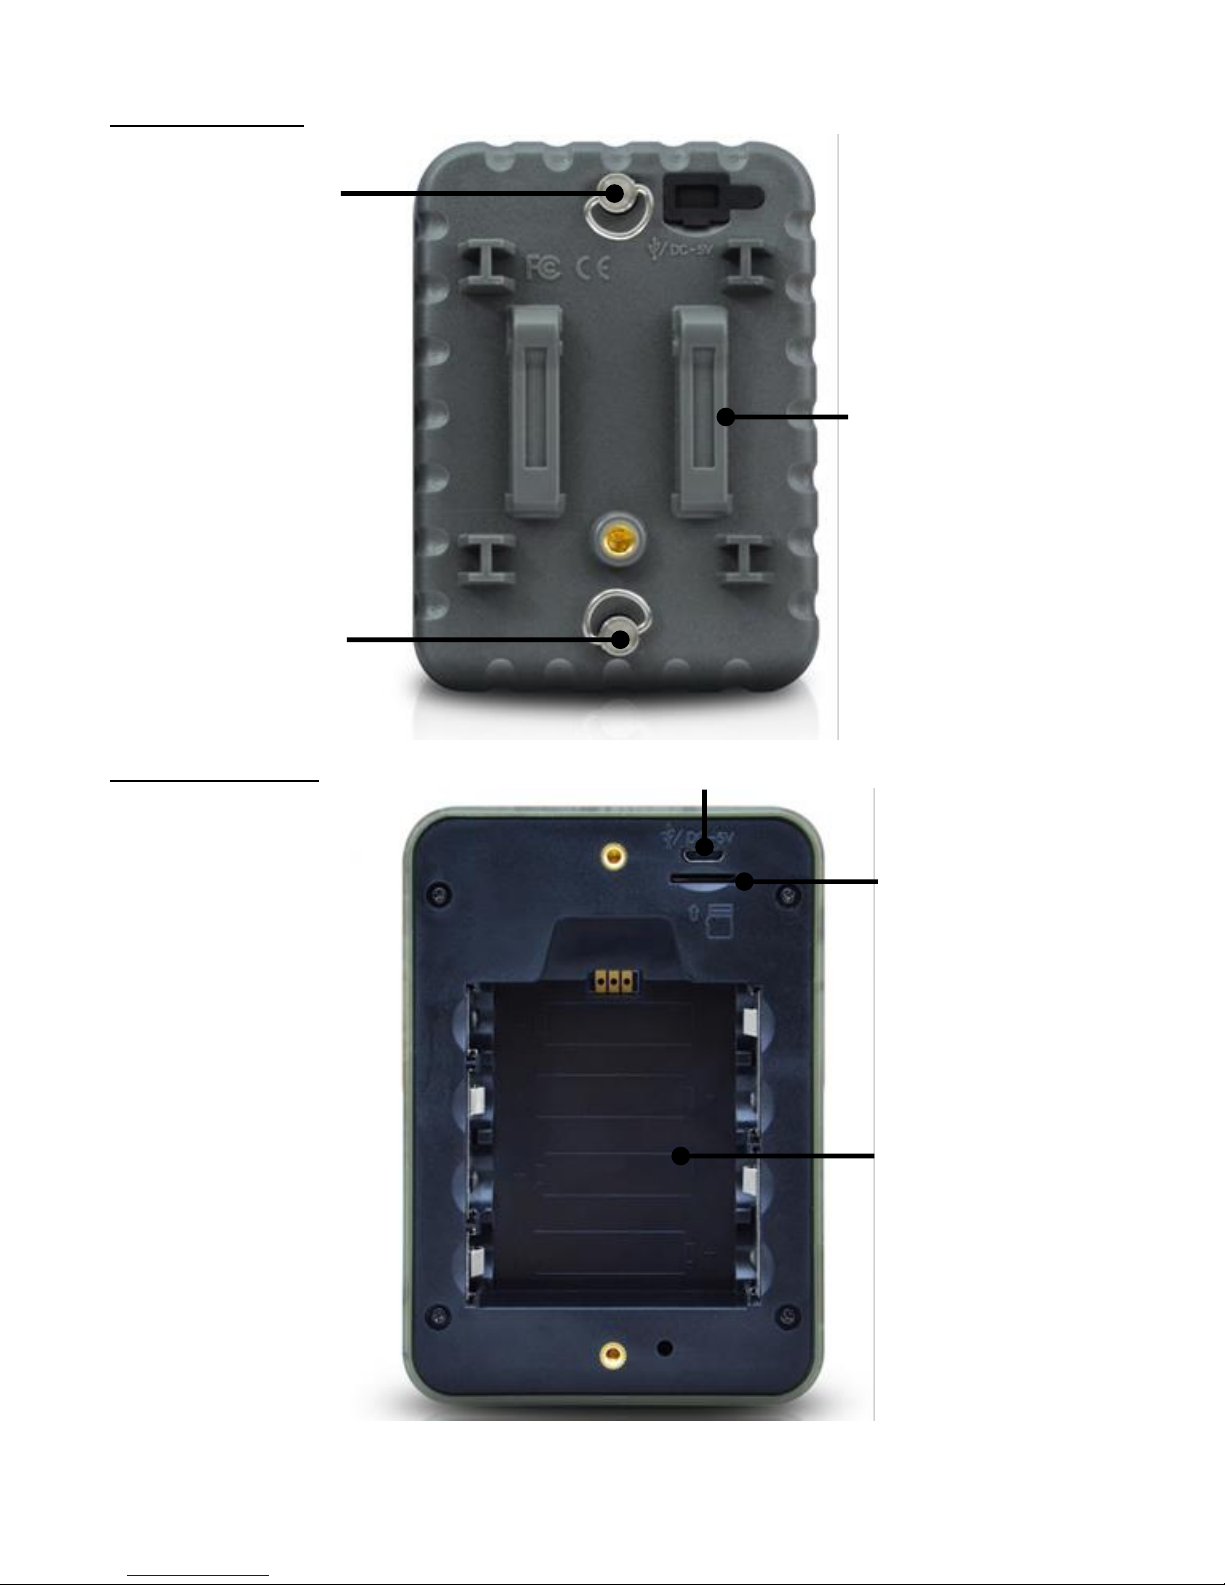
PIE1028 – indice A – avril 2018 73/120
RÜCKANSICHT
INNENANSICHT
Schrauben
Sie ab, um
das Gerät zu
öffnen.
Schrauben
Sie ab, um
das Gerät zu
öffnen.
Öffnung für den
Befestigungsgurt
USB-Port
Micro-SD-
Kartensteckplatz
Batteriefach
(4 x AA)
Page 74
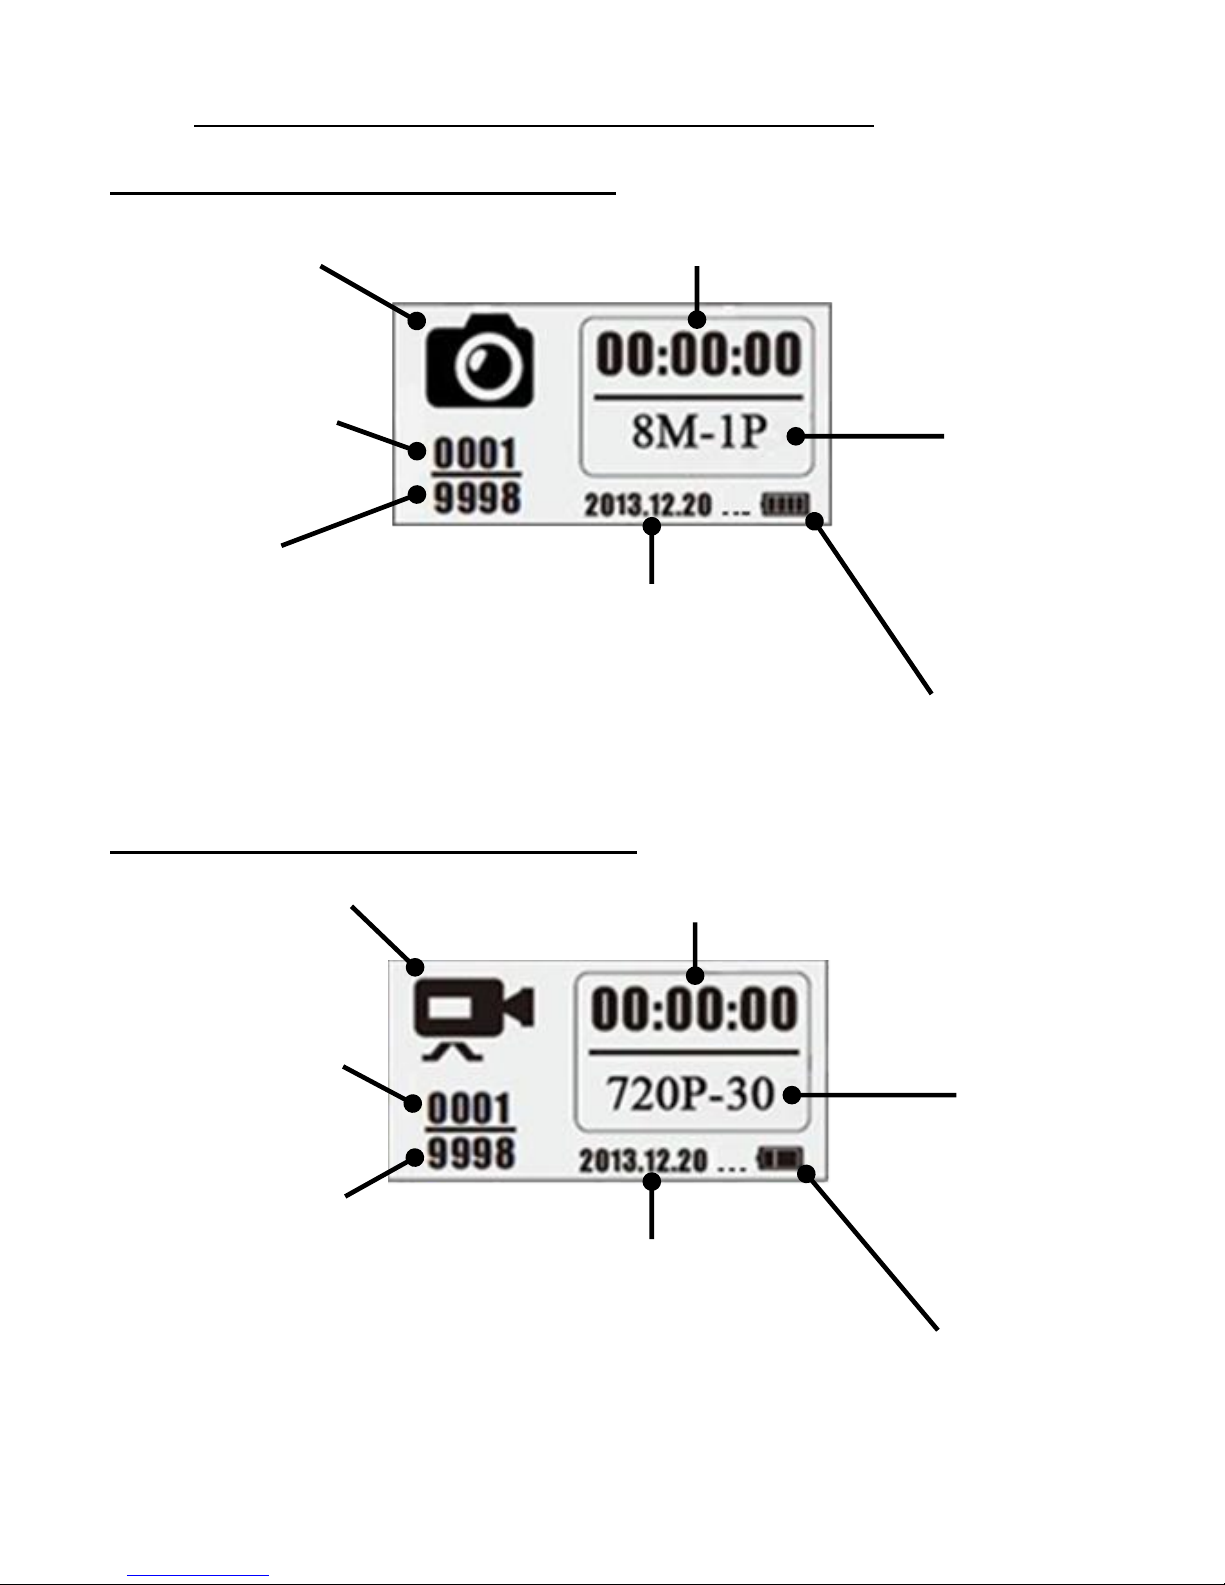
PIE1028 – indice A – avril 2018 74/120
3. Informationsbildschirm (Test-modus Schnittstelle)
LCD-Bildschirm – Foto-Modus
LCD-Bildschirm – Video-Modus
Foto-Modus
Video-Modus
Datum
(Jahr/Monat/Tag)
Videoauflösung
+
Anzahl der
Bilder pro
Sekunde
Batterieladezustand
Anzahl der
aufgenommenen
Fotos
Uhrzeit
Geschätzter
verfügbarer
Speicherplatz
(Anzahl der Dateien)
Fotoauflösung
+
Anzahl der
Fotos pro
Auslösung
Batterieladezustand
Datum
(Jahr/Monat/Tag)
Uhrzeit
Anzahl der
aufgenommenen
Videos
Geschätzter
verfügbarer
Speicherplatz
(Anzahl der Dateien)
Page 75
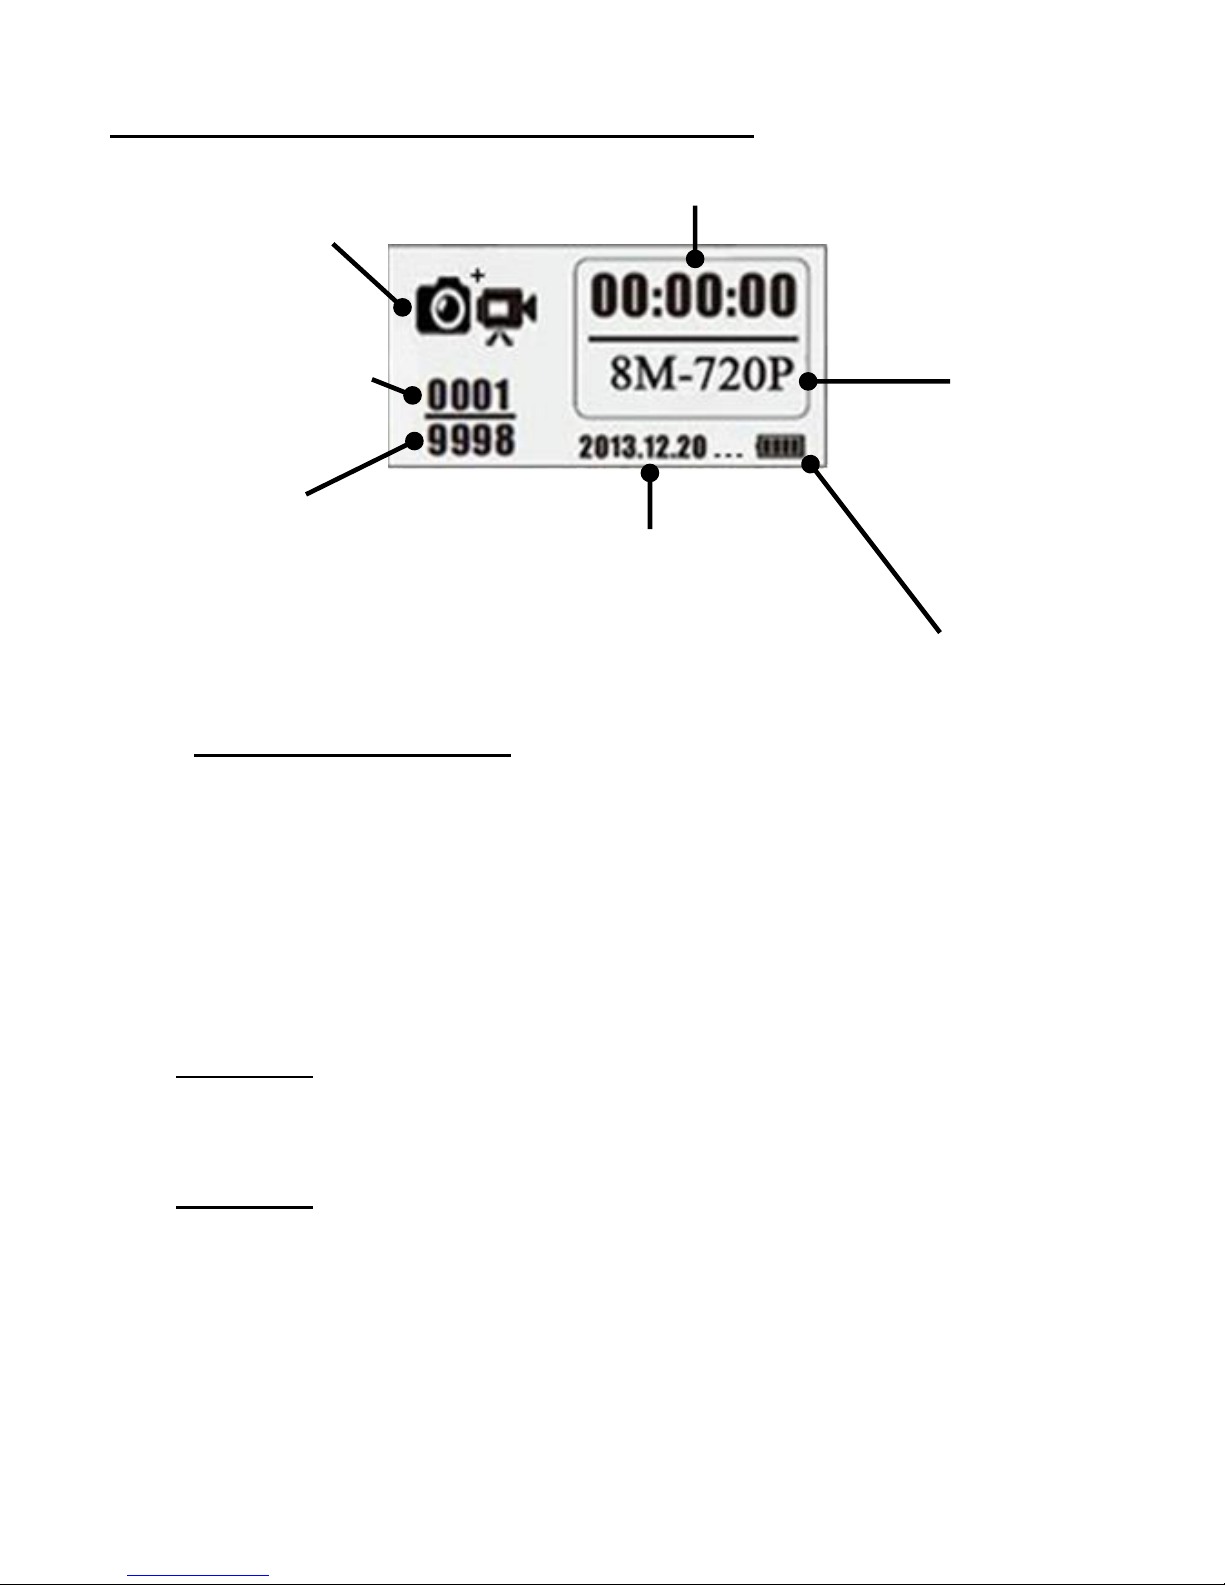
PIE1028 – indice A – avril 2018 75/120
LCD-Bildschirm – Foto + Video-Modus
4. Einsetzen der Batterien
In das integrierte Batteriefach passen 4 „AA“-Batterien (LR06). Es müssen
qualitativ hochwertige Batterien verwendet werden (NUM’AXES-Batterien
sind bei NUM’AXES (www.numaxes.com) oder bei Ihrem Händler
erhältlich). Batterien mit der korrekten Polarität einlegen (+/-), wie im
Batteriefach angegeben.
ACHTUNG: Verwenden Sie keine anderen als die in diesem Handbuch
angegebenen Batterien. Dadurch werden Sie das Produkt beschädigen
und die Garantie ungültig machen.
ACHTUNG: Die Fotofalle muss IMMER auf OFF stehen, wenn Sie
Batterien einlegen oder herausnehmen. Die Fotofalle kann beschädigt
werden, wenn Batterien bei eingeschaltetem Gerät entfernt werden.
Verwenden Sie nicht alte und neue Batterien zusammen. Verwenden
Sie nicht Alkaline- und Standardbatterien oder wiederaufladbare
Batterien zusammen.
Foto + Video
Modus
Datum
(Jahr/Monat/Tag)
Uhrzeit
Geschätzter verfügbarer
Speicherplatz
(Anzahl der Dateien)
Fotoauflösung
+
Videoauflösung
Anzahl der
aufgenommenen
Fotos/Videos
Batterieladezustand
Page 76

PIE1028 – indice A – avril 2018 76/120
5. Einsetzen der Micro-SD-Karte
Die Fotofalle nutzt eine Standard-Micro-SD-Karte (Secure Digital) für die
Speicherung von Fotos und/oder Videos. Das Gerät unterstützt Micro-SDund Micro SDHC (High Capacity)-Karten mit bis zu 32 GB Kapazität.
Vor dem Einlegen bzw. Entfernen der Speicherkarte muss die Fotofalle
ausgeschaltet werden. Wenn Sie dies nicht tun, kann es zu Verlust oder
Beschädigungen der auf der Speicherkarte gespeicherten Dateien
kommen.
Abdeckung öffnen und Micro-SD-Karte unter Beachtung des Symbols
unter dem Steckplatz vollständig in den Micro-SD-Kartensteckplatz
einstecken.
Zum Entnehmen der Micro-SD-Karte auf die Micro SD-Karte drücken
und Karte vorsichtig herausziehen.
Micro SD-Karten müssen leer sein (keine Bilder aus anderen Quellen).
Wurde die Micro-SD-Karte bereits in einem anderen Gerät verwendet,
formatieren Sie die Micro-SD-Karte bitte, bevor Sie sie in die Fotofalle
einsetzen. Neue Karten können nach der Packungsentnahme direkt
eingesetzt werden.
6. Betrieb
ON/OFF (PIR Auto-Betriebsmodus, Testmodus, OFF)
Schalten Sie das Gerät ein und gehen Sie in den automatischen PIR-
Betriebsmodus: Drücken Sie die LINKE Taste für 3 Sekunden, die
Leuchtanzeige blinkt 5 Mal und das Gerät wechselt in den PIR AutoBetriebsmodus.
Page 77

PIE1028 – indice A – avril 2018 77/120
Gehen Sie in den Testmodus auf: Im PIR Auto-Betriebsmodus,
drücken Sie einmal die RECHTE Taste, um den LCD-Bildschirm zu
aktivieren und in den Testmodus zu wechseln.
Gerät ausschalten: Drücken Sie die LINKE Taste für 5 Sekunden, um
das Gerät auszuschalten.
Konfiguration der Betriebsparameter
Gehen Sie in das Konfigurationsmenü auf: Im Testmodus, drücken
Sie die RECHTE Taste, um das Konfigurationsmenü aufzurufen. Im
Konfigurationsmodus wird die LINKE Taste immer für die Navigation
verwendet und die RECHTE Taste wird immer verwendet, um OK zu
sagen und die gewünschte Konfiguration zu speichern/bestätigen.
Rückkehr zum Testmodus aus dem Konfigurationsmenü auf:
Nachdem Sie alle Einstellungen vorgenommen haben, drücken Sie
die RECHTE Taste für 3 Sekunden, um zum Testmodus
zurückzukehren.
Gehen Sie in den PIR Auto-Betriebsmodus aus dem Testmodus auf:
Drücken Sie die RECHTE Taste für 3 Sekunden, um den PIR AutoBetriebsmodus aufzurufen (die Leuchtanzeige blinkt 5 Mal und das
LCD wird ausgeschaltet).
Manuelle Registrierung
Im Testmodus, drücken Sie die LINKE Taste, um abhängig von den
Kameraeinstellungen Fotos, Videos oder Standbilder und Videos
aufzunehmen.
Um die Videoaufnahme (im Video- oder Foto + Video-Modus) zu
beenden, drücken Sie erneut die LINKE Taste.
Page 78
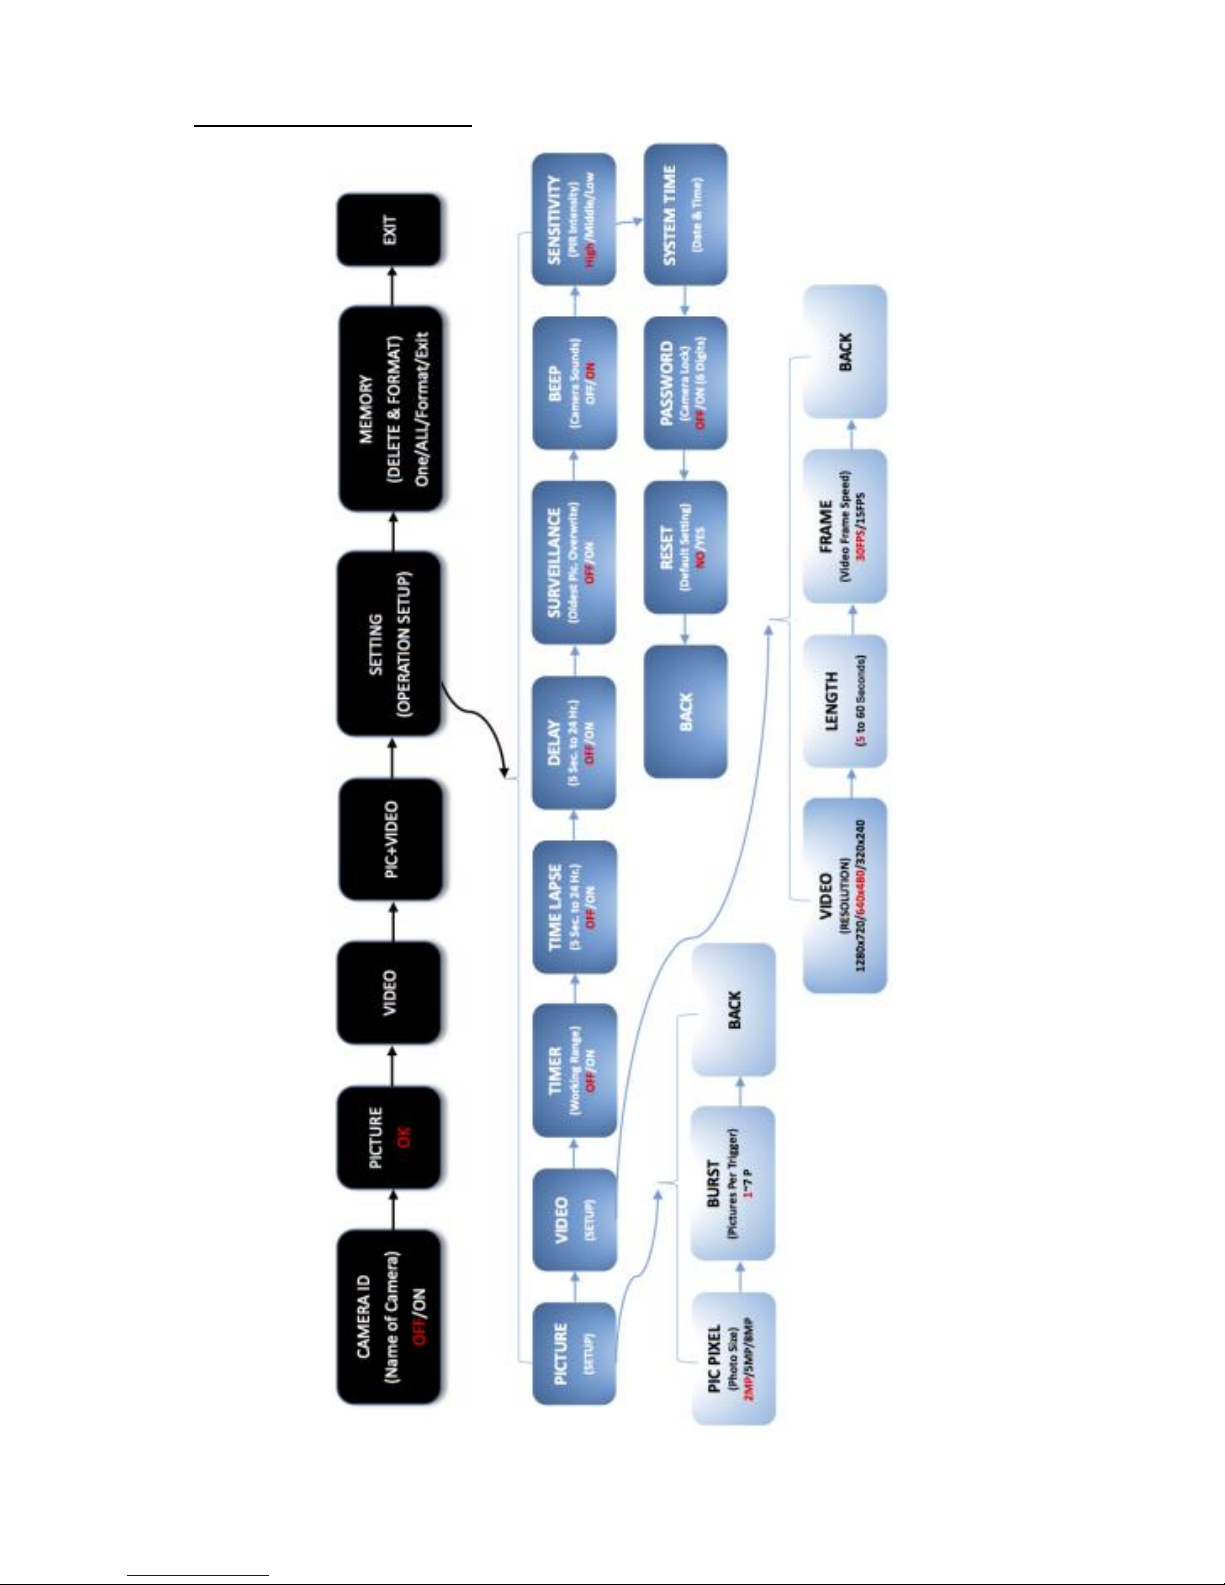
PIE1028 – indice A – avril 2018 78/120
7. Konfigurationsmenü
Page 79
PIE1028 – indice A – avril 2018 79/120
8. Liste der Parameter und Einstellungen
Drücken Sie die RECHTE Taste, um die Einstellungen einzugeben und die
Einstellungen vorzunehmen.
MENÜ
CAMERA ID
(Name of camera)
IDENTIFIZIERUNG
Fotofallen-ID
4 Ziffern und/oder
Buchstaben
1. OFF (Standardeinstellung)
2. ON
Drücken Sie die LINKE Taste, um ON auszuwählen,
und dann die RECHTE Taste, um die
Konfigurationsseite aufzurufen.
0 0 0 0 (4 Ziffern und/oder Buchstaben)
Drücken Sie die LINKE Taste, um das gewünschte
Zeichen auszuwählen, und dann die RECHTE
Taste, um zu bestätigen und zum nächsten
Zeichen zu gelangen.
Wenn die 4 Zeichen programmiert sind, drücken
Sie die RECHTE Taste erneut, um den
Gerätenamen zu bestätigen und zu beenden.
_______________________________
Mit dieser Funktion kann der Benutzer erkennen,
von wo und von welcher Fotofalle die Fotos
stammen.
PICTURE
FOTO
Standardeinstellung
a) Einstellung
Drücken Sie die RECHTE Taste, um den
Fotomodus aufzurufen OK erscheint auf dem
LCD-Bildschirm.
b) Mach ein Foto
Drücken Sie die RECHTE Taste für 3 Sekunden, um
zum Informationsbildschirm zurückzukehren, und
drücken Sie dann die LINKE Taste, um ein Bild
aufzunehmen.
Page 80

PIE1028 – indice A – avril 2018 80/120
VIDEO
VIDEO
a) Einstellung
Drücken Sie die RECHTE Taste, um den
Videomodus aufzurufen OK erscheint auf dem
LCD-Bildschirm.
b) Nimm ein Video
Drücken Sie die RECHTE Taste für 3 Sekunden, um
zum Informationsbildschirm zurückzukehren, und
drücken Sie dann die LINKE Taste, um mit der
Aufnahme eines Videos zu beginnen. Drücken Sie
die LINKE Taste erneut, um die Aufzeichnung des
Videos zu beenden.
PIC+VIDEO
FOTO + VIDEO
a) Einstellung
Drücken Sie die RECHTE Taste, um den Foto +
Video-modus aufzurufen OK erscheint auf dem
LCD-Bildschirm.
b) Mach ein Foto und ein Video
Drücken Sie die RECHTE Taste für 3 Sekunden, um
zum Informationsbildschirm zurückzukehren, und
drücken Sie dann die LINKE Taste, um mit der
Aufnahme zu beginnen. Drücken Sie die LINKE
Taste erneut, um die Aufnahme zu stoppen.
_______________________________
Im „Foto + Video“-Modus wird bei jedem
Auslösen ein Bild gemacht und ein Video
aufgenommen.
SETTING
(Operation setup)
KONFIGURATION
Einstellen der
Betriebs-parameter
des Geräts
Einzelheiten zu den Parametern und
Einstellungen finden Sie in der folgenden Tabelle.
Drücken Sie die RECHTE Taste, um in das
Konfigurationsmenü zu gelangen.
Page 81
PIE1028 – indice A – avril 2018 81/120
MEMORY
Delete & Format
SPEICHER
Löschen und
formatieren
1. One (Ein)
2. All (Alle)
3. Format (Formatieren)
4. EXIT (Ausfahrt)
Drücken Sie die LINKE Taste, um zu navigieren,
und dann die RECHTE Taste, um die Einstellung zu
speichern und zu beenden.
Wenn alle Dateien gelöscht wurden, kehrt das
Gerät automatisch zum Informationsbildschirm
zurück.
_______________________________
One (Ein): Nur die letzte Datei wird gelöscht.
All (Alle): Löscht alle Dateien von der Micro SDKarte.
Format (formatieren): Löscht (entfernt) sämtliche
Dateien, die auf einer Karte gespeichert sind, um
diese für eine Wiederverwendung vorzubereiten.
Achtung: Eine gelöschte Bild- oder Videodatei
kann nicht mehr wiederhergestellt werden.
Stellen Sie sicher, dass Sie vor dem Löschen alle
Dateien, die Sie behalten möchten,
heruntergeladen oder gesichert haben.
EXIT
AUSFAHRT
Drücken Sie die RECHTE Taste, um zum
Informationsbildschirm zurückzukehren.
SETTING (operation setup)
KONFIGURATION (Einstellen der Betriebsparameter des Geräts)
PICTURE (setup)
FOTO (Einstellung)
Drücken Sie die RECHTE Taste zum Eingeben.
Page 82

PIE1028 – indice A – avril 2018 82/120
PIC PIXEL (photo size)
FOTOAUSFLÖSUNG
Drücken Sie RECHTE Taste zum Eingeben.
1. 8M
2. 5M
3. 2M (Standardeinstellung)
Drücken Sie die LINKE Taste, um zu navigieren,
und dann die RECHTE Taste, um die Einstellung zu
speichern und zu beenden.
_______________________________
Zur Auswahl der Bildauflösung von 2 bis 8
Megapixel. Eine höhere Auflösung sorgt zwar für
eine höhere Bildqualität, führt jedoch auch zu
größeren Dateien, die mehr Speicherplatz auf der
Micro SD-Karte verbrauchen (sie wird schneller
voll).
BURST (pictures per trigger)
BILDER IN SERIE
(Anzahl der Fotos pro Auslösung)
Drücken Sie die RECHTE Taste zum Eingeben.
1. 1P (Standardeinstellung)
2. 2P
3. 3P
4. 4P
5. 5P
6. 6P
7. 7P
Drücken Sie die LINKE Taste, um zu navigieren,
und dann die RECHTE Taste, um die Einstellung zu
speichern und zu beenden.
Page 83

PIE1028 – indice A – avril 2018 83/120
_______________________________
Zur Auswahl der Anzahl von Fotos, die bei jedem
Auslösen im Foto-Modus in Serie aufgenommen
werden.
VIDEO
(setup)
VIDEO
Einstellung
Drücken Sie die RECHTE Taste zum Eingeben.
VIDEO RESOLUTION
VIDEOAUSFLÖSUNG
Drücken Sie die RECHTE Taste zum Eingeben.
1. 1280x720 (HD)
2. 640x480 (VGA – Standardeinstellung)
3. 320x240 (QVGA)
Drücken Sie die LINKE Taste, um zu navigieren,
und dann die RECHTE Taste, um die Einstellung zu
speichern und zu beenden.
_______________________________
Zur Auswahl der Videoauflösung (in Pixel pro
Bild). Eine höhere Auflösung sorgt zwar für eine
höhere Videoqualität, führt jedoch auch zu
größeren Dateien, die mehr Speicherplatz auf der
Micro SD-Karte verbrauchen (sie wird schneller
voll).
LENGTH (5 to 60 seconds)
VIDEOLÄNGE (von 5 bis 60 Sekunden)
Drücken Sie die RECHTE Taste zum Eingeben.
Standardeinstellung: 5 Sekunden
Drücken Sie die LINKE Taste, um die gewünschte
Länge auszuwählen, und drücken Sie dann die
RECHTE Taste, um die Einstellung zu speichern
und zu beenden.
Page 84

PIE1028 – indice A – avril 2018 84/120
_______________________________
Zur Einstellung der Länge der aufgenommenen
Videofilme.
FRAME (video frame speed)
BILDER PRO SEKUNDE
Drücken Sie die RECHTE Taste zum Eingeben.
1. 30 FPS (Standardeinstellung)
2. 15 FPS
FPS = Frames Per Second = Bilder pro Sekunde
Drücken Sie die LINKE Taste, um zu navigieren,
und dann die RECHTE Taste, um die Einstellung zu
speichern und zu beenden.
TIMER
(working range)
FESTE ZEITPLÄNE
Betriebszeitbereich
Drücken Sie die RECHTE Taste zum Eingeben.
1. OFF (Standardeinstellung)
2. ON
Drücken Sie die LINKE Taste, um ON auszuwählen,
und dann die RECHTE Taste, um den
Betriebszeitbereich einzustellen.
Star (Anfang): 00:00:00 (SS:MM:SS)
End (Ende): 00:00:00 (SS: MM:SS)
Drücken Sie die LINKE Taste, um die gewünschte
Ziffer auszuwählen, und dann die RECHTE Taste,
um zu bestätigen und zur nächsten Ziffer zu
gehen.
Wenn die Anfangs- und Endzeit programmiert
sind, drücken Sie die RECHTE Taste erneut, um zu
beenden.
_______________________________
Page 85

PIE1028 – indice A – avril 2018 85/120
Die Fotofalle kann so programmiert werden, dass
sie nur innerhalb eines bestimmten Zeitraums
Fotos/Videos aufnimmt, wenn die Einstellung
„Feste Zeitpläne“ auf „AN“ gestellt ist. Die
restliche Zeit über bleibt die Fotofalle
ausgeschaltet und kann keine Aufnahmen durch
Bewegungsmeldung aufzeichnen.
Beispiel: Wenn der Betriebstimer auf Anfang:
15:00:00 – Ende: 18:00:00 eingestellt ist, ist die
Fotofalle jeden Tag nur zwischen 15.00 Uhr
(03:00 PM) und 18.00 Uhr (06:00 PM) in Betrieb.
TIME LAPSE
(5 sec. to 24 hr.)
TIME LAPSE
Zeitintervall
(von 5 Sekunden bis
24 Stunden)
Drücken Sie die RECHTE Taste zum Eingeben.
1. OFF (Standardeinstellung)
2. ON
Drücken Sie die LINKE Taste, um ON auszuwählen,
und dann die RECHTE Taste, um das Zeitintervall
zwischen jedem Foto/Video einzustellen.
00:00:00 (SS:MM:SS)
Drücken Sie die LINKE Taste, um die gewünschte
Ziffer auszuwählen und dann die RECHTE Taste,
um zu bestätigen und zur nächsten Ziffer zu
gehen.
Wenn das Zeitintervall programmiert ist, drücken
Sie die RECHTE Taste erneut, um zu beenden.
_______________________________
Anhand der Funktion Zeitintervall kann die
Fotofalle auch ohne Bewegungserkennung Bilder
oder Videos zu einem voreingestellten
Zeitintervall automatisch aufnehmen.
Page 86

PIE1028 – indice A – avril 2018 86/120
Beispiel: Wenn der Zeitintervall auf 00:30:00
eingestellt ist, nimmt die Fotofalle automatisch
alle 30 Minuten Fotos/Videos auf.
Hinweis: TIME LAPSE und PIR-INTERVALL nicht
gleichzeitig auf „ON“ stellen.
DELAY
(5 sec. to 24 hr.)
PIR-INTERVALL
(von 5 Sekunden bis
24 Stunden)
Drücken Sie die RECHTE Taste zum Eingeben.
1. OFF (Standardeinstellung)
2. ON
Drücken Sie die LINKE Taste, um ON auszuwählen,
und dann die RECHTE Taste, um das PIR-Intervall
einzustellen.
00:00:00 (SS:MM:SS)
Drücken Sie die LINKE Taste, um die gewünschte
Ziffer auszuwählen und dann die RECHTE Taste,
um zu bestätigen und zur nächsten Ziffer zu
gehen.
Wenn das PIR-Intervall programmiert ist, drücken
Sie die RECHTE Taste erneut, um zu beenden.
_______________________________
Wählen Sie ON, um den gewünschten
Zeitintervall zwischen Fotos/Videos durch
Bewegung einzustellen. Mit dieser Option wird
verhindert, dass die Fotofalle zu viele Fotos oder
Videos aufnimmt.
Beispiel: Wenn der PIR-Intervall auf 00:01:00
beträgt, wartet die Fotofalle 1 Minute zwischen
den Foto/Video-Aufnahmen mit Bewegung.
Hinweis: TIME LAPSE und PIR-INTERVALL nicht
gleichzeitig auf „ON“ stellen.
Page 87

PIE1028 – indice A – avril 2018 87/120
SURVEILLANCE
(oldest pic.
overwrite)
ZYKLUSAUFNAHME
Drücken Sie die RECHTE Taste zum Eingeben.
1. OFF (Standardeinstellung)
2. ON
Drücken Sie die LINKE Taste, um zu navigieren,
und dann die RECHTE Taste, um die Einstellung zu
speichern und zu beenden.
_______________________________
Wählen Sie ON, um die Zyklusaufnahme zu
aktivieren. Sobald die Micro SD-Karte voll ist,
nimmt die Fotofalle weiter Fotos/Videos auf,
indem sie die ersten Fotos oder Videoclips löscht.
BEEP
(camera sounds)
PIEPTON
Ton der Tasten des
Geräts
Drücken Sie die RECHTE Taste zum Eingeben.
1. ON (Standardeinstellung)
2. OFF
Drücken Sie die LINKE Taste, um zu navigieren,
und dann die RECHTE Taste, um die Einstellung zu
speichern und zu beenden.
_______________________________
Sie können auswählen, ob Sie bei Drücken einer
Taste einen Piepton hören möchten
SENSITIVITY
(PIR sensitivity)
PIREMPFINDLICHKEIT
Drücken Sie die RECHTE Taste zum Eingeben.
1. High (Hoch - Standardeinstellung)
2. Middle (Mittel)
3. Low (Niedrig)
Drücken Sie die LINKE Taste, um zu navigieren,
und dann die RECHTE Taste, um die Einstellung zu
speichern und zu beenden.
_______________________________
Hohe Empfindlichkeit 1) höhere Empfindlichkeit
für Bewegungen durch kleinere Objekte; 2) bietet
Page 88

PIE1028 – indice A – avril 2018 88/120
eine höhere Erfassungsreichweite; 3) Sensor kann
den Unterschied zwischen Körperwärme und
Umgebungswärme leichter erkennen; 4)
einfacheres Auslösen der Fotofalle für die
Aufnahme.
Bei hoher Umgebungstemperatur kann die
Fotofalle Körperwärme und normaler
Umgebungswärme nur schwer unterscheiden,
empfohlene Einstellung: hoch.
Es wird empfohlen, eine geringe Empfindlichkeit
für Umgebungen mit vielen Störungen wie
heißem Wind, Rauch, Fensternähe, etc.
einzustellen.
SYSTEM TIME
(Date & Time)
DATUM & UHRZEIT
Drücken Sie die RECHTE Taste zum Eingeben.
04.22.2018 00:00
MM.DD.YYYY HH:MM
Drücken Sie die LINKE Taste, um die gewünschte
Ziffer auszuwählen und dann die RECHTE Taste,
um zu bestätigen und zur nächsten Ziffer zu
gehen.
Wenn Datum und Uhrzeit programmiert sind,
drücken Sie die RECHTE Taste erneut, um zu
beenden.
_______________________________
Das Format des Datums ist Monat / Tag / Jahr.
Das Zeitformat ist Stunde:Minute.
PASSWORD
(camera lock)
PASSWORT
(6 Ziffern)
Drücken Sie die RECHTE Taste zum Eingeben.
1. OFF (Standardeinstellung)
2. ON
Drücken Sie die LINKE Taste, um ON auszuwählen,
und dann die RECHTE Taste, um die
Page 89
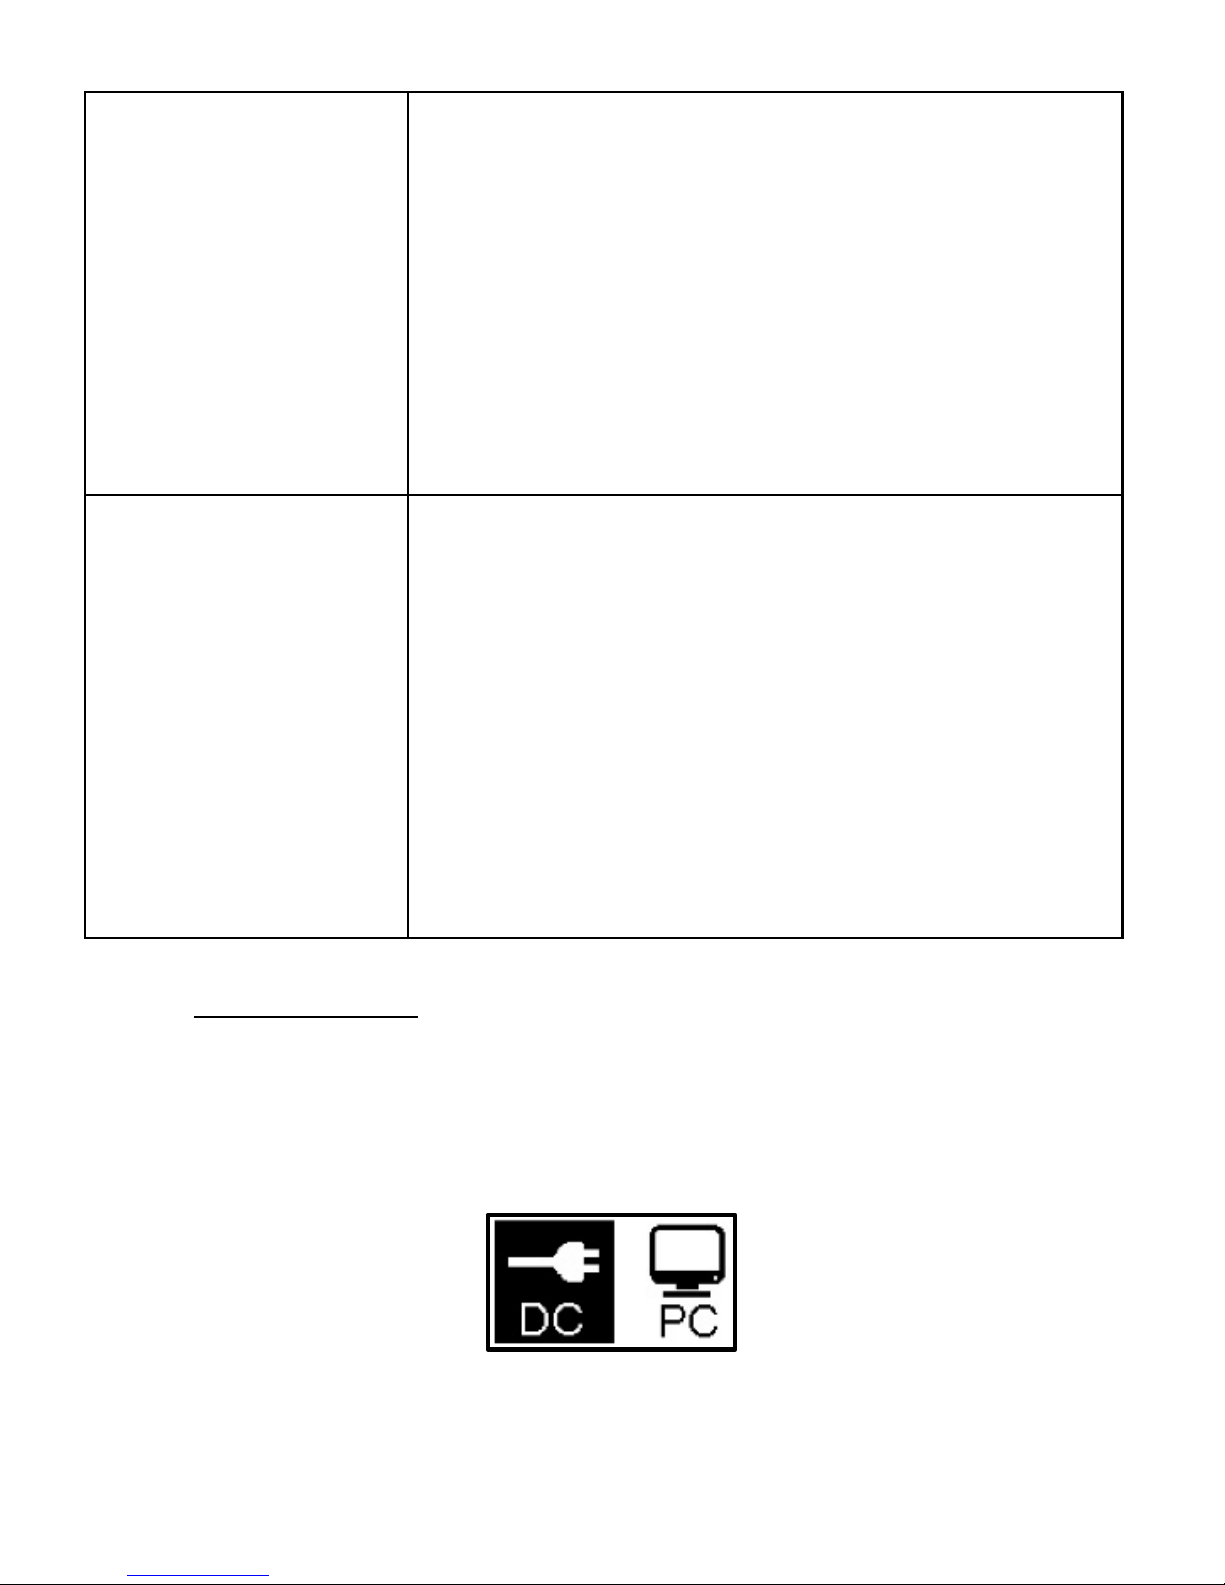
PIE1028 – indice A – avril 2018 89/120
Konfigurationsseite aufzurufen.
0 0 0 0 0 0 (6 Ziffern)
Drücken Sie die LINKE Taste, um das gewünschte
Ziffer auszuwählen, und dann die RECHTE Taste,
um zu bestätigen und zum nächsten Ziffer zu
gelangen.
Wenn die 6 Ziffern programmiert sind, drücken
Sie die RECHTE Taste erneut, um das Passwort zu
bestätigen und zu beenden.
RESET
(default setting)
RESET
Standardeinstellungen
Drücken Sie die RECHTE Taste zum Eingeben.
1. No (Nein – Standardeinstellung)
2. Yes (Ja)
Drücken Sie die LINKE Taste, um zu navigieren,
und dann die RECHTE Taste, um die Einstellung zu
speichern und zu beenden.
_______________________________
Wählen Sie „Ja“, um sämtliche Parameter auf die
ursprüngliche werksseitige Standardeinstellung
zurückzusetzen.
9. USB-Verbindung
Wenn das Gerät über USB angeschlossen ist, drücken Sie die LINKE Taste,
bis die rote Leuchtanzeige aufleuchtet; dann erscheint die folgende
Schnittstelle:
Page 90
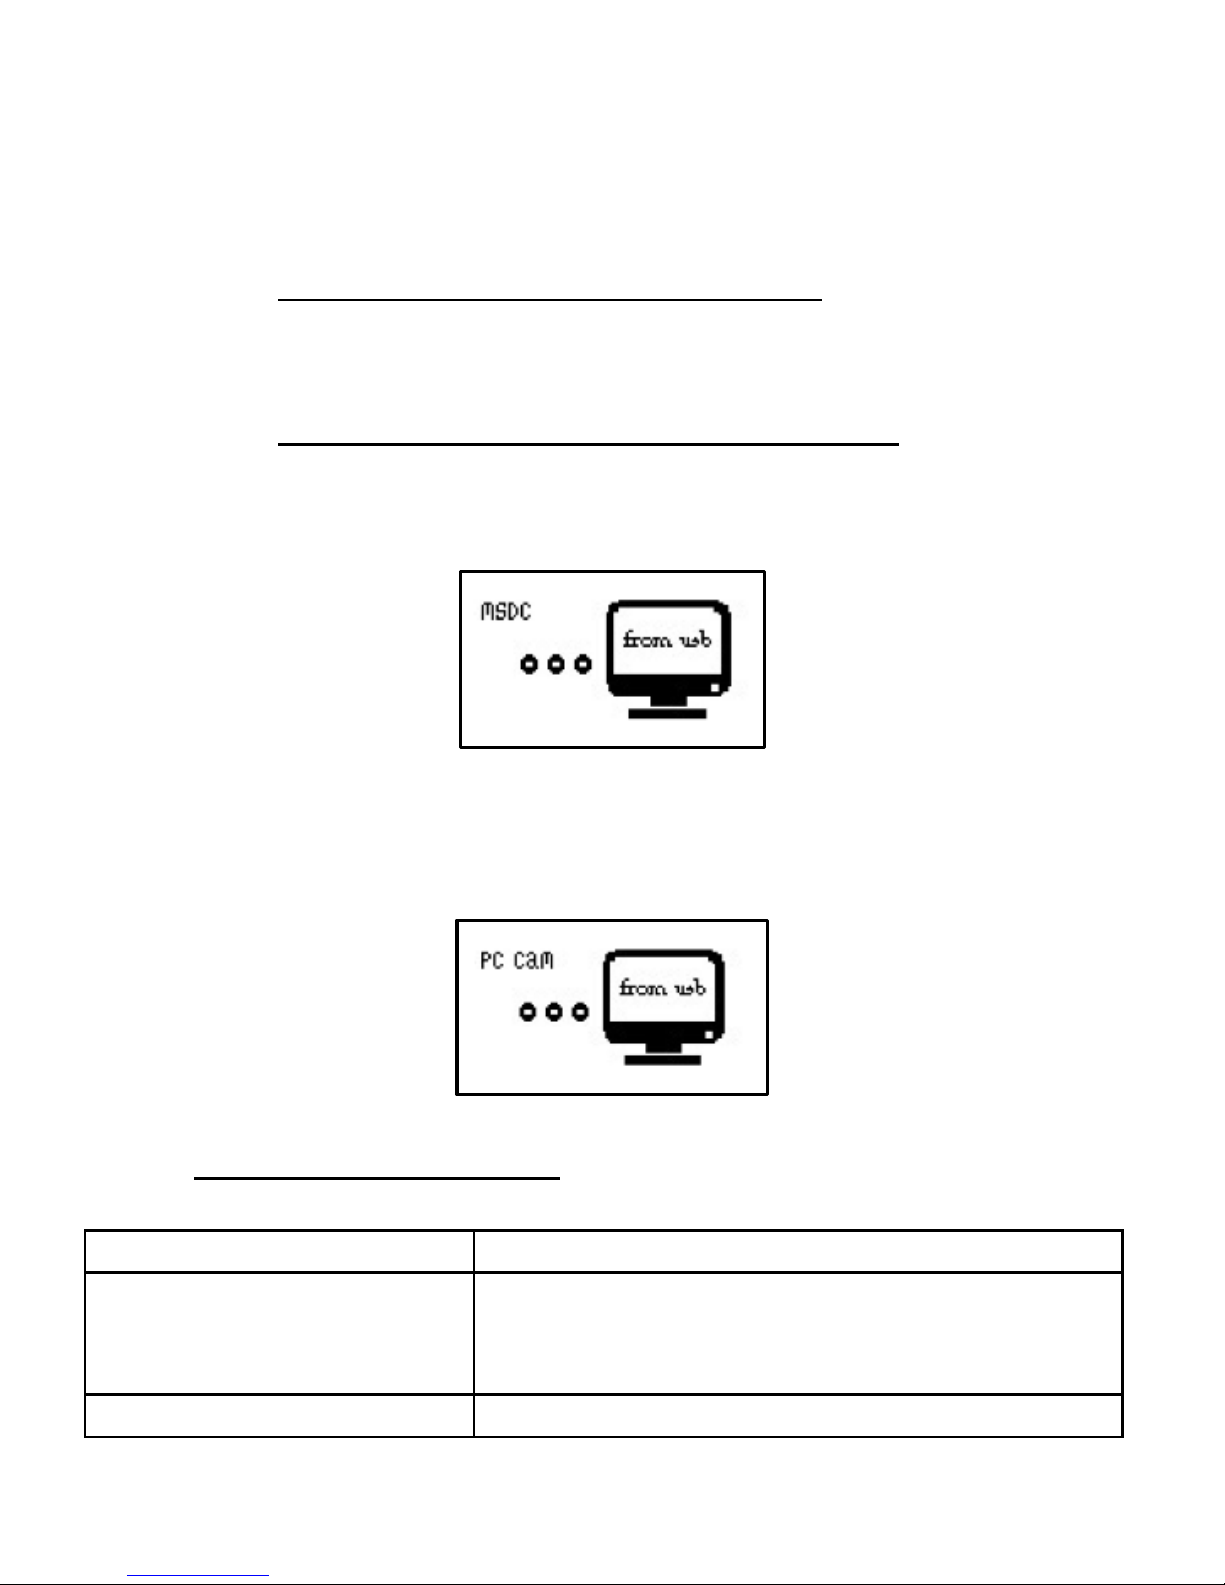
PIE1028 – indice A – avril 2018 90/120
Drücken Sie die LINKE Taste, um die DC (Strom) oder PC (Computer)
Verbindung zu wählen. Drücken Sie die RECHTE Taste, um Ihre Auswahl zu
bestätigen.
DC-Verbindung für die Stromversorgung
Das Gerät wechselt in den Testmodus.
PC-Verbindung zum Lesen der Micro-SD-Karte
Der LCD-Bildschirm des Geräts zeigt die folgende Schnittstelle. Sie können
jetzt den Inhalt der Micro-SD-Karte über Ihren Computer lesen.
Durch erneutes Drücken der RECHTE Taste wird die Kamera in eine
Webcam umgewandelt. Der LCD-Bildschirm zeigt die folgende Schnittstelle.
Drücken Sie die RECHTE Taste erneut, um zu beenden.
10. Technische Spezifikationen
Bildsensor
1,3 Megapixels Farbe CMOS
Objektiv
F = 3,0
FOV = 49°
Auto IR-cut-remove
PIR-Reichweite
Ungefähr 15 m
Page 91
PIE1028 – indice A – avril 2018 91/120
PIR-Erfassungswinkel
100°
PIR-Empfindlichkeit
Einstellbar: Hoch / Mittel / Niedrig
Infrarotblitz
940 nm – 40 LEDS
Infrarotblitz-Reichweite
Ungefähr 10 m
Speicherkarte
Micro SD-Karte bis 32 GB
Zyklusaufnahme
Ja - Programmierbar
Betriebsmodus
Foto / Video / Foto + Video
Foto Auflösung
2MP (1920 x 1080)
5MP (2560 x 1920)
8MP (3264 x 2448)
Bildformat
.JPEG
Bilder in Serie
Programmierbar von 1 bis 7 Fotos pro
Auslösung
Video Auflösung
720P (1280 x 720)
VGA (640 x 480)
QVGA (320 x 240)
Bilder pro Sekunde
Programmierbar 15FPS oder 30FPS
Videoformat
.AVI
Videolänge
Programmierbar: Von 5 bis 60 Sekunden
Audioaufnahme
Ja
Auslösegeschwindigkeit
Ungefähr 0,8 Sekunde
Zeitstempel
Datum, Uhrzeit, Temperatur, Mondphase,
Batterieladezustand, Name der Fotofalle
(Wenn der Benutzer eine programmiert)
Weißabgleich
Automatischer
Geräteidentifikation
Ja – Programmierbar
Passwort
Ja - Programmierbar
LCD-Bildschirm
1’’ (2,5 cm) – Einfarbig
Versorgung
4 Batterien AA LR06 (nicht enthalten)
Energie
5-6 V DC (12 A)
Stromverbrauch
190 mA (+1920 mA mit Infrarotblitz)
Schnittstelle
USB-Anschluss, Micro SD-Kartensteckplatz
Page 92

PIE1028 – indice A – avril 2018 92/120
Maße
115 x 84 x 54 mm
Gewicht
224 g
Wasserdichtigkeit
IP54
Betriebstemperatur
-20°C bis +60°C
Betriebsfeuchtigkeit
5% - 90%
11. Fehlersuche
Falls Ihr Produkt nicht mehr funktioniert bzw. einen Fehler aufweist, lesen
Sie bitte zunächst diese Anleitung und prüfen dann die Batterien, um sie
ggf. auszutauschen. Stellen Sie außerdem sicher, dass Sie das Produkt
sachgemäß verwenden.
Falls das Problem bestehen bleibt, kontaktieren Sie Ihren Händler oder
suchen Sie die Lösung auf www.numaxes.com. Oder Sie kontaktieren
NUM’AXES unter +33.2.38.69.96.27.
Oder per E-Mail an [email protected].
Je nach Ausmaß der Fehlfunktion kann es sein, dass Sie das Produkt zur
Reparatur an den Kundendienst zurücksenden müssen.
Bitte senden Sie uns für jede Reparatur:
das vollständige Produkt
den Kaufbeleg (Rechnung oder Kassenbon)
Falls Sie eines dieser Elemente weglassen, muss Ihnen der Kundendienst
die ausgeführten Reparaturen berechnen.
Page 93

PIE1028 – indice A – avril 2018 93/120
12. Garantie
NUM’AXES bietet eine 2-jährige Produktgarantie ab dem Kaufdatum für
Fabrikationsfehler. Sämtliche Transport- und Verpackungskosten gehen
ausschließlich zu Lasten des Käufers.
13. Garantiebedingungen
1. Die Garantie kommt nur dann zum Tragen, wenn der Kaufbeleg
(Rechnung oder Kassenbon) ohne Stornierung dem Händler oder
NUM’AXES vorgelegt wird. Die Garantie beschränkt sich auf den
ursprünglichen Käufer.
2. Diese Garantie deckt folgende Leistungen nicht ab:
Austausch des Befestigungsgurts oder des USB-Kabels
direkte oder indirekte Transportrisiken beim Zurücksenden des
Artikels an den Händler oder an NUM’AXES
Beschädigung des Produkts aufgrund von:
Fahrlässigkeit oder fehlerhafter Bedienung
Nutzung entgegen den Anweisungen bzw. nicht
vorgesehene Nutzung
Reparaturen durch nicht zugelassene Personen
Verlust oder Diebstahl
3. Wenn das Produkt als defekt anerkannt wird, übernimmt NUM’AXES
wahlweise die Reparatur oder den Austausch des Produkts.
4. NUM’AXES haftet für keinerlei Schäden infolge von fehlerhafter
Bedienung oder Pannen.
5. NUM’AXES behält sich das Recht vor, Eigenschaften seiner Produkte
zu ändern, um technische Verbesserungen daran vorzunehmen oder
um neuen Vorschriften zu entsprechen.
6. Die in dieser Anleitung enthaltenen Informationen können ohne
vorherige Ankündigung geändert werden.
Page 94
PIE1028 – indice A – avril 2018 94/120
7. Unverbindliche Fotografien und Zeichnungen.
14. Registrieren Ihres Produkts
Sie können Ihr Produkt auf unserer Website www.numaxes.com
registrieren lassen.
15. Entsorgen und Recyceln Ihres ausgedienten Geräts
Das Piktogramm bedeutet, dass Ihr Produkt nicht in den Restmüll
geworfen werden darf. Sie müssen das Gerät an einer für die Behandlung,
Verwertung und das Recycling von Elektronikmüll geeigneten
Abfallsammelstelle entsorgen bzw. zu Ihrem Händler zurückbringen.
Mit dieser Maßnahme tragen Sie zum Umweltschutz, zur Bewahrung
natürlicher Ressourcen und zum Schutz der menschlichen Gesundheit bei.
16. CE-Kennzeichnung
Dieses Gerät entspricht den EG-Normen.
Richtlinie 2014/30/EU zur Harmonisierung der Rechtsvorschriften der
Mitgliedstaaten über die elektromagnetische Verträglichkeit
EN 55032: 2015, EN 55024: 2010
EN 61000-3-2: 2014, EN 61000-3-3: 2013
Page 95

PIE1028 – indice A – avril 2018 95/120
Richtlinie 2011/65/EU zur Beschränkung der Verwendung bestimmter
gefährlicher Stoffe in Elektro- und Elektronikgeräten
Anhang II RoHS2.0 Richtlinie (EU) 2015/863
IEC 62321-3-1: 2013 IEC 62321-5: 2013
IEC 62321-4: 2013 IEC 62321-6: 2015
IEC 62321-7-1: 2015 IEC 62321: 2008
ANHANG C IEC 62321-8: 2017
Z.A.C. des Aulnaies
745 rue de la Bergeresse
C.S. 30157
45161 OLIVET CEDEX
FRANCE
Tél. +33 (0)2 38 69 96 27
Fax +33 (0)2 38 63 31 00
www.numaxes.com
Page 96
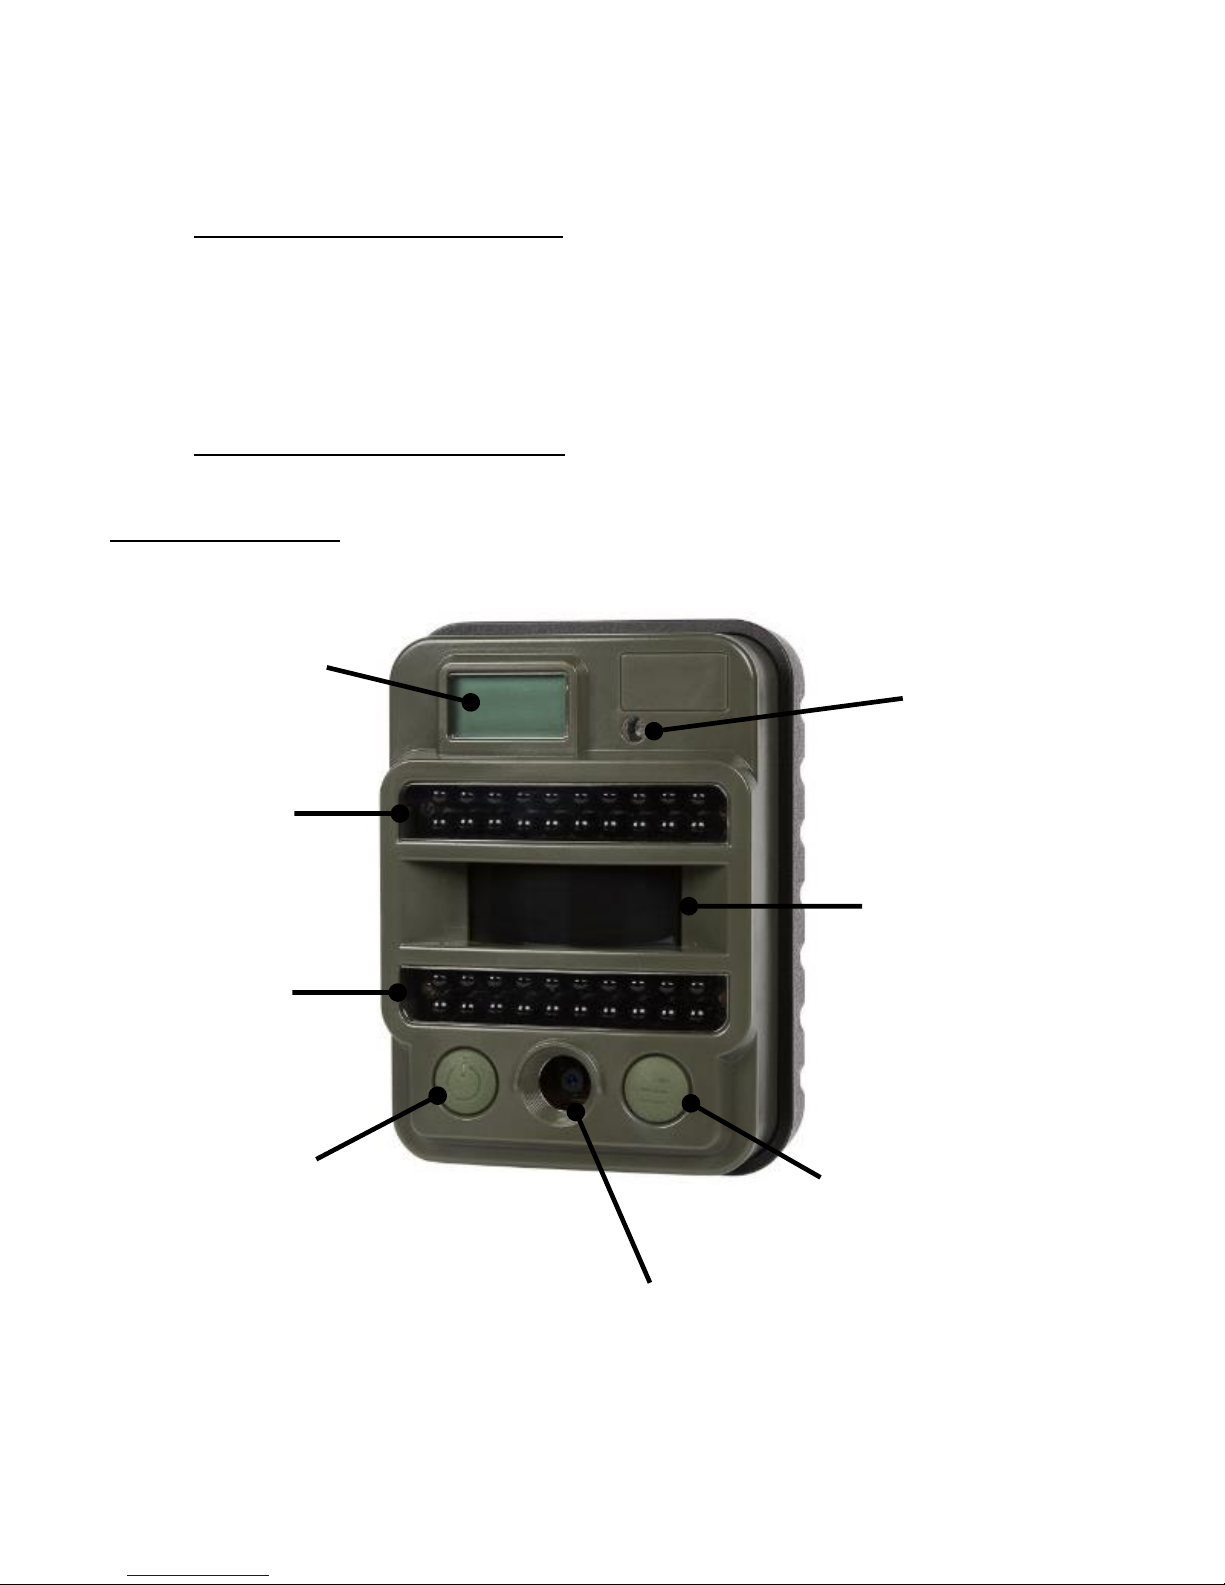
PIE1028 – indice A – avril 2018 96/120
Manuale d’uso
1. Composizione del prodotto
Fotocamera da esplorazione
Cinghia di fissagio
cavo USB
manuale d’uso
2. Presentazione del prodotto
VISTA FRONTALE
20 LED a
infrarossi
20 LED a
infrarossi
Pulsante SINISTRO:
Accensione/Spegnimento
+
Navigazione (NEXT)
Pulsante DESTRO:
MENU
+
OK (SET)
Sensore
luminsosità
(giorno/notte)
+
Indicatore
luminoso
Lente
Schermo LCD
Sensore
infrarosso
passivo (PIR)
Page 97
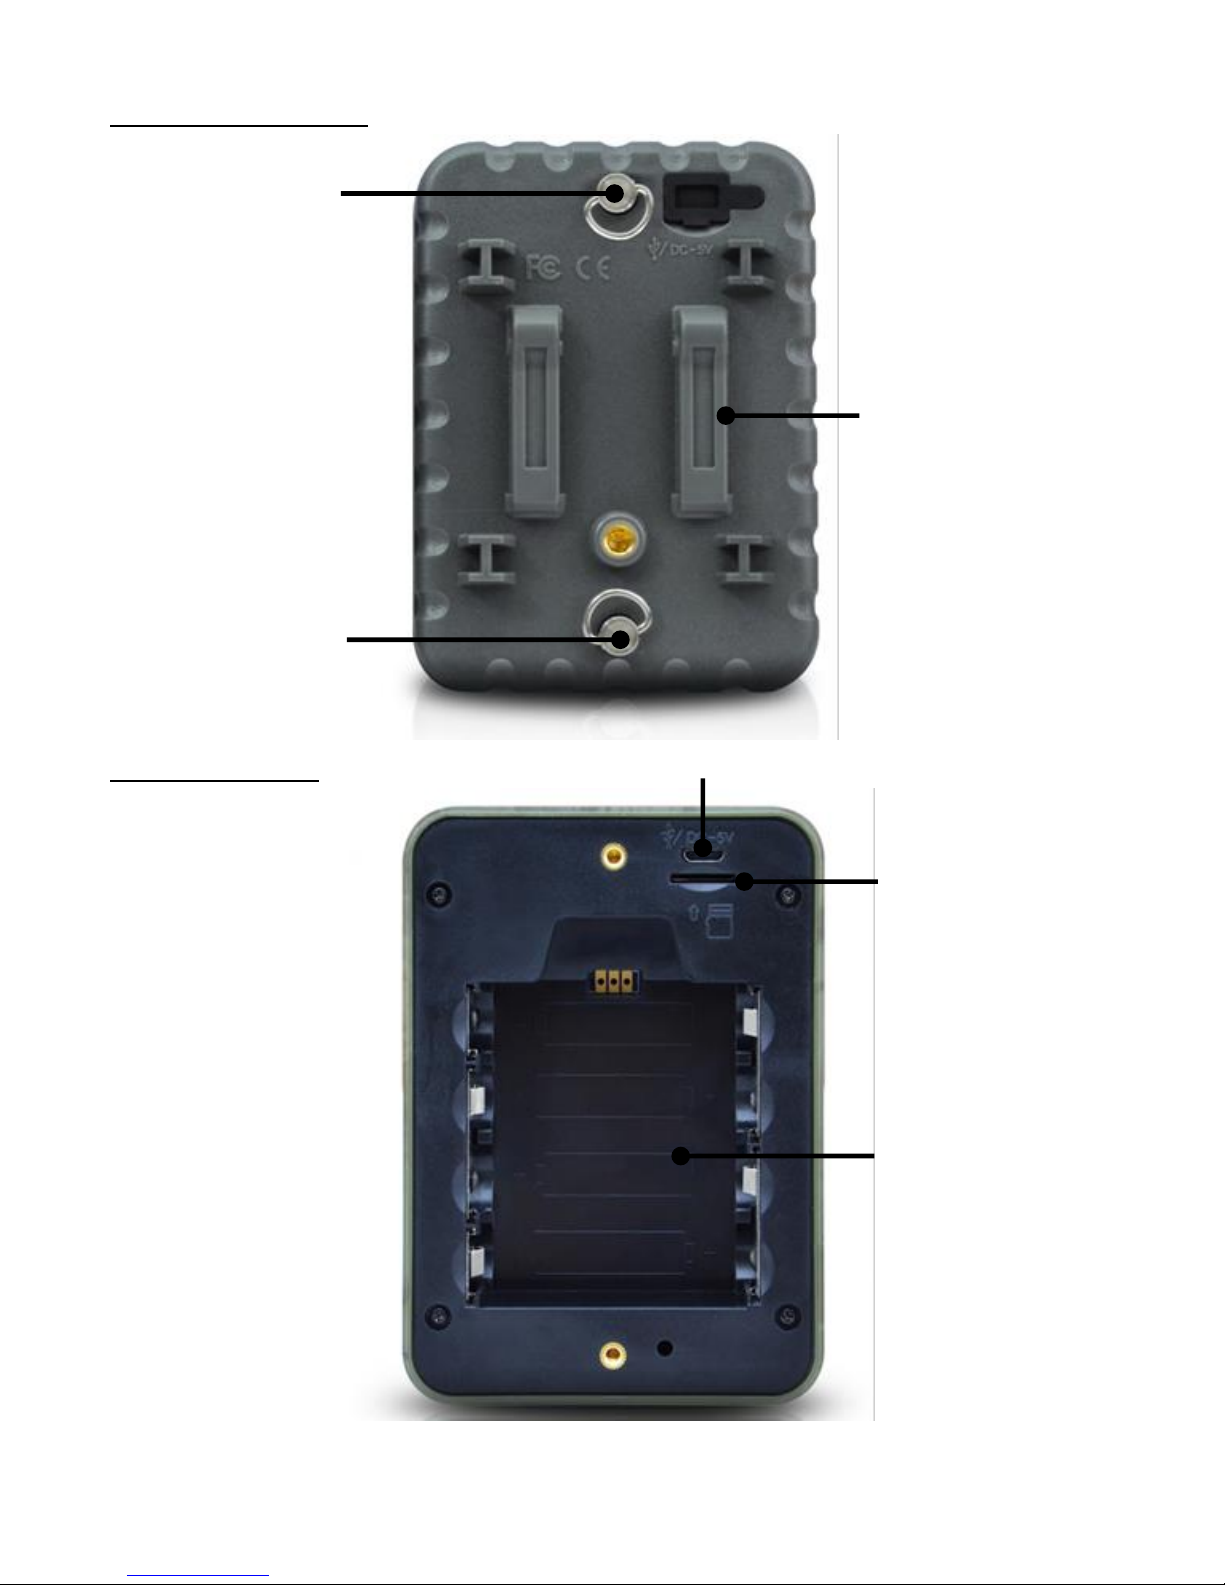
PIE1028 – indice A – avril 2018 97/120
VISTA POSTERIORE
VISTA INTERNA
Svitare per
aprire il
dispositivo
Passaggio
per la
cinghia
Porta USB
Alloggiamento
per scheda
micro SD
Vano pile
(4 x AA)
Svitare per
aprire il
dispositivo
Page 98
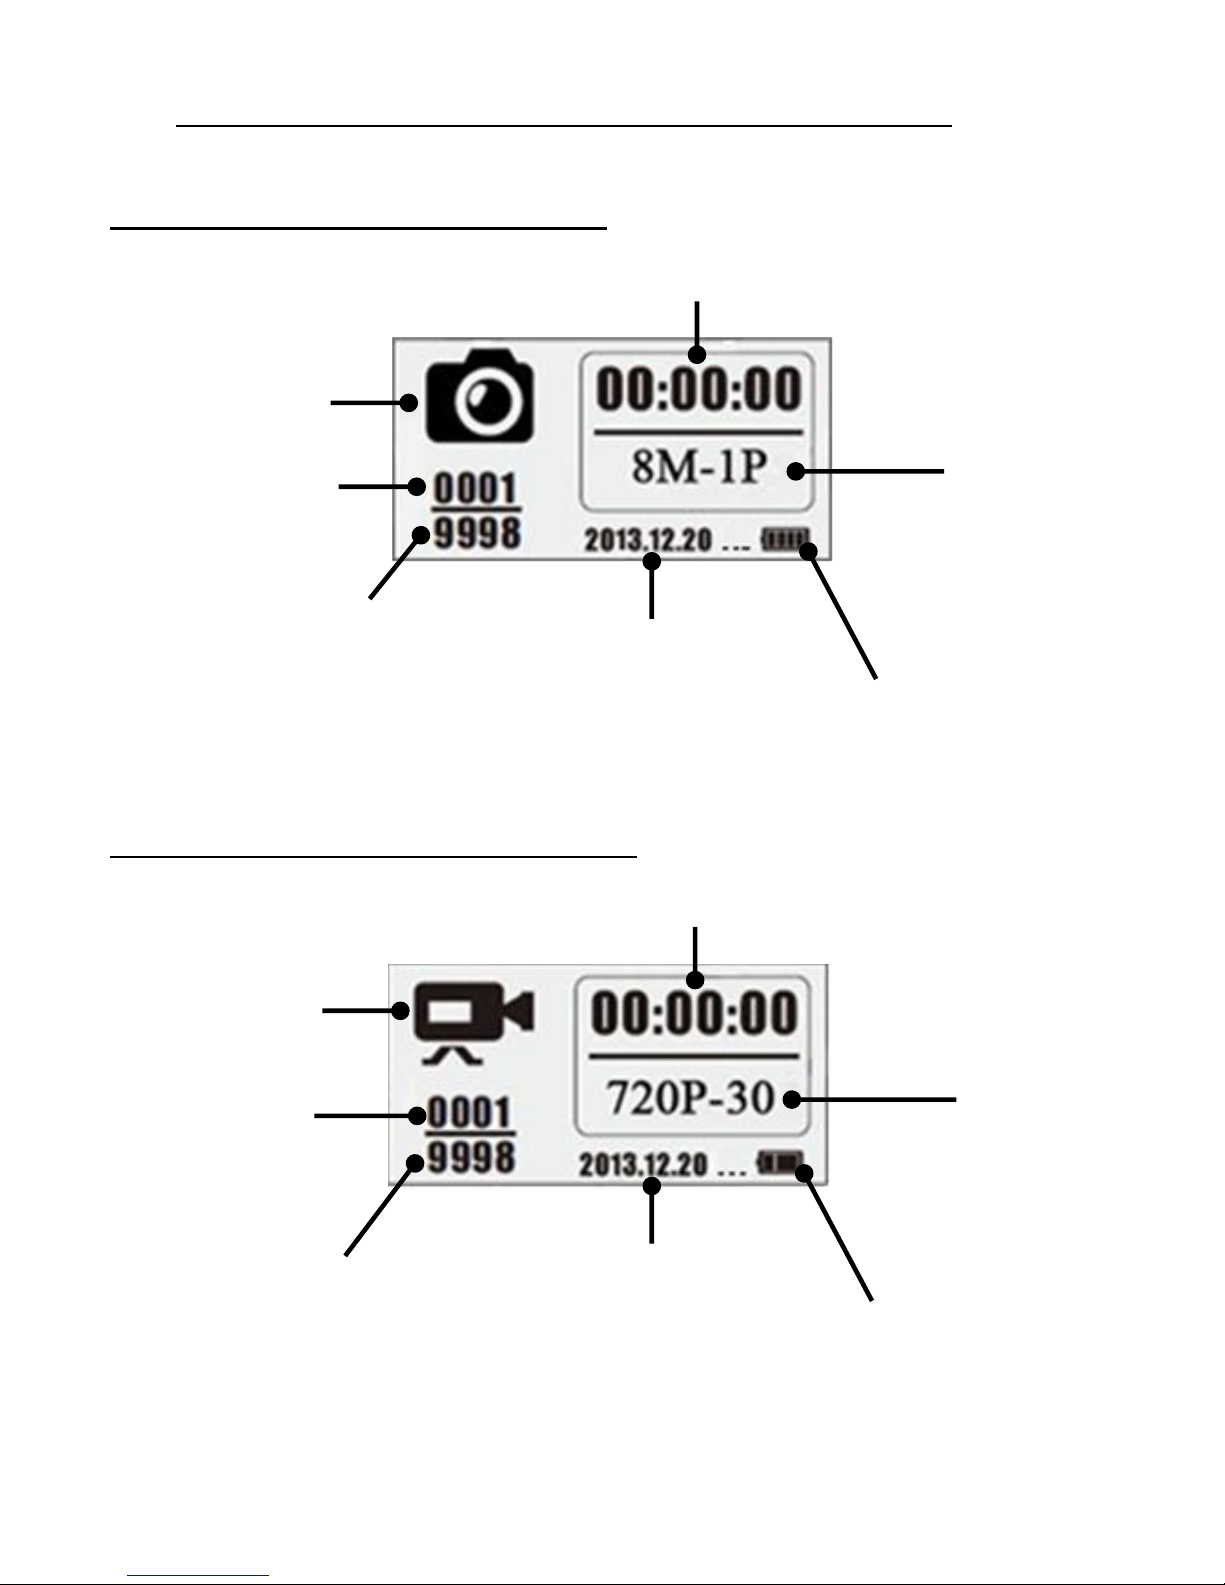
PIE1028 – indice A – avril 2018 98/120
3. Schermo di informazione (interfaccia della modalità Test)
SchermoLCD – Modalità Foto
Schermo LCD – Modalità Video
Ora
Modalità
Foto
Modalità
Video
Risoluzione
video
+
Numero di
fotogrammi
al secondo
Numero di
foto scattate
Stima dello
spazio disponibile
(numero di file)
Risoluzione
foto
+
Numero di
foto per
azionamento
Data
(anno/mese/giorno)
Data
(anno/mese/giorno)
Livello pile
Livello pile
Ora
Numero di
video presi
Stima dello
spazio disponibile
(numero di file)
Page 99
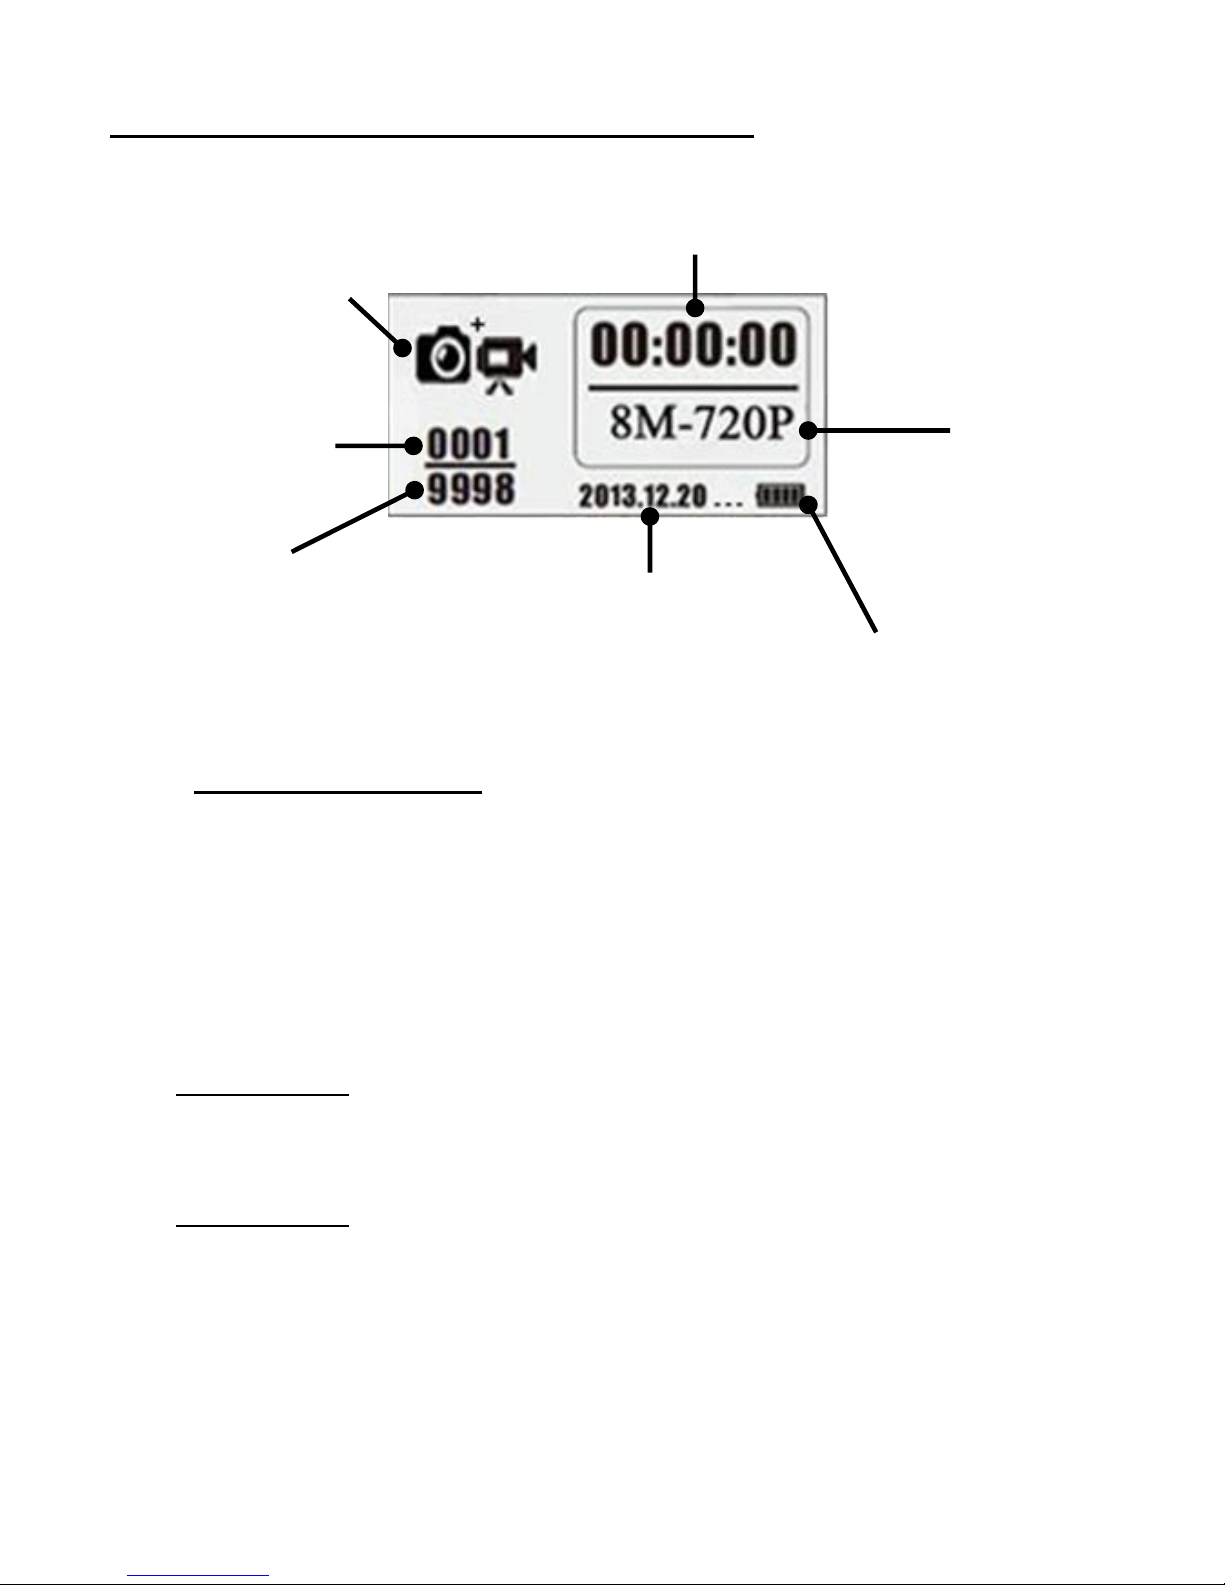
PIE1028 – indice A – avril 2018 99/120
Schermo LCD – Modalità Foto + Video
4. Installazione batterie
Il vano batterie accetta 4 batterie AA (LR06). Utilizzare batterie di buona
qualità (potete procurarvi pile di marca NUM’AXES direttamente da
NUM’AXES (www.numaxes.com) o presso il vostro rivenditore di fiducia).
Assicurarsi di inserire ciascuna batteria secondo la polarità correta.
ATTENZIONE: non utilizzare batterie diverse da qualle specificate in
questa guida. Così facendo, si danneggia il prodotto e invalidarne la
garanzia.
ATTENZIONE: il dispositivo deve sempre essere spento durante
l'installazione o la sostituzione delle batterie. La rimozione delle
batterie mentre l'unità è in funzione può danneggiare il prodotto.
Evitare di utilizzare insieme batterie vecchie e nuove. Evitare di
utilizzare insieme diversi tipi di batterie (alcaline, al litio...).
Modalità
Foto + Video
Risoluzione
foto
+
Risoluzione
video
Ora
Numero di
foto/video
presi
Stima dello
spazio disponibile
(numero di file)
Data
(anno/mese/giorno)
Livello pile
Page 100

PIE1028 – indice A – avril 2018 100/120
5. Inserimento scheda micro SD
Il dispositivo prevede l’utilizzo di scheda di memoria micro SD per il
salvataggio di foto e video (max. 32 GB).
Sempre spegnere la videocamera prima di inserire o togliere la scheda di
memoria. In caso contrario, si potrebbero perdere o danneggiare i file già
registrati sulla scheda di memoria.
Aprire el coperchio, inserire la scheda micro SD fino in fondo nella slot
apposita, orientandola in modo corretto secondo quanto mostrato
dall’immagine posta sotto la slot. Un clic avvisa che la scheda è stata
installata correttamente.
Per rimuovere la scheda micro SD, basta premere leggermente la
scheda (non tentare di tirarla fuori senza prima averla premuta). La
scheda è rilaschiata dalla slot e pronta ad essere rimossa quando si
sente il clic.
Si raccomanda l’impiego di una scheda micro SD nuova e pulita.
Laddove la scheda micro SD sia stata utilizzata all’interno di un altro
dispositivo, eseguire una formattazione prima di utilizzarla nel
prodotto. Le schede nuove sono pronte per l’uso non appena estratte
dall’imballaggio.
6. Funzionamento
ON/OFF (modalità Funzionamento Automatico PIR, modalità Test, OFF)
Accendere il dispositivo e accedere alla modalità Funzionamento
Automatico PIR: Premere il pulsante SINISTRO per 3 secondi, il
indicatore luminoso lampeggerà 5 volte e l'unità entrerà nella
modalità Funzionamento Automatico PIR.
 Loading...