

Page 1
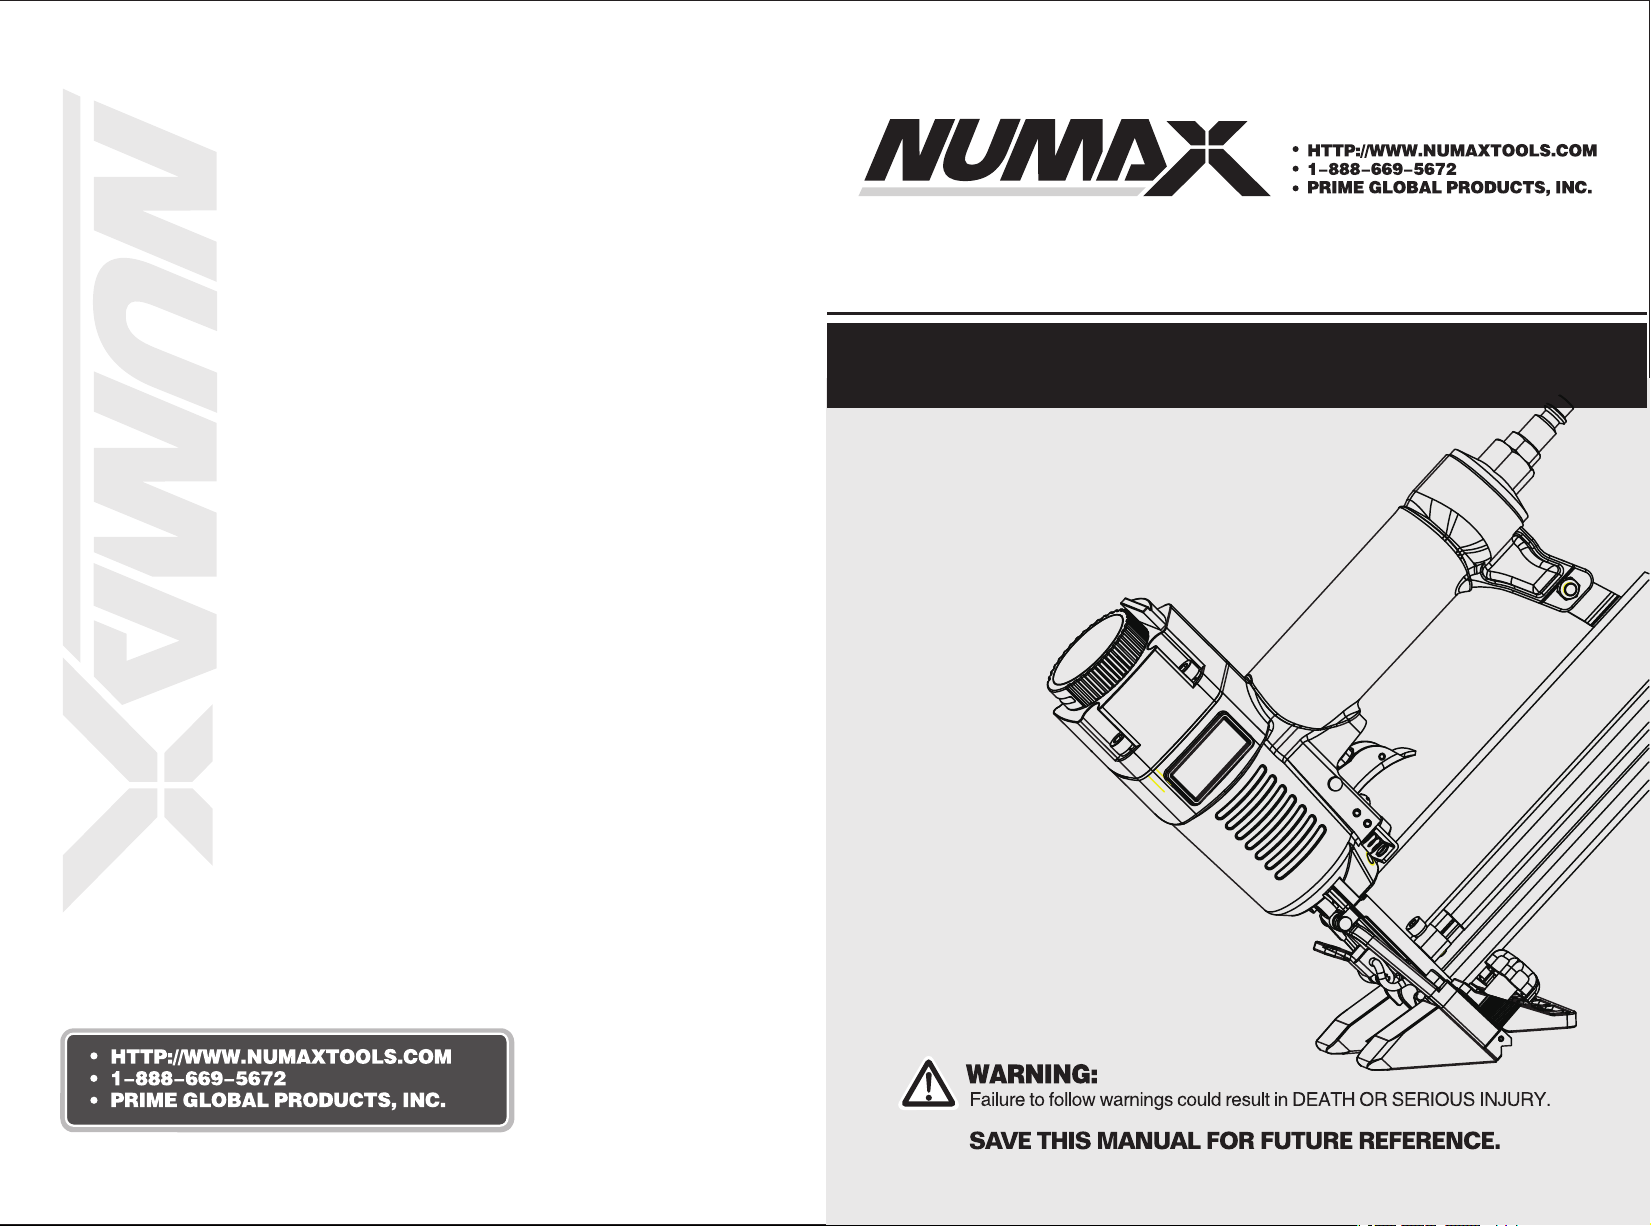
MODEL: SFBC940
18 GAUGE 4 IN 1 BRAD NAILER/STAPLER AND
FLOORING BRAD NAILER/STAPLER COMBO
SFBC940-V1 04/19
Page 2
MODEL: SFBC940 MODEL: SFBC940
GENERAL SAFETY RULES
UNPACKING
FEATURES
P3
P6
P6
OPERATION
ADJUSTING THE EXHAUST
CHANGING THE NOSE COVER
LOADING FASTENERS
UNLOADING FASTENERS
CLEARING JAMS
SETTING THE AIR PRESSURE
DEPTH ADJUSTMENT
ADJUSTING THE FLOORING PLATE
FIRING THE TOOL
MAINTENANCE
RECOMMENDED HOOKUP
TROUBLESHOOTING
WEARABLE PARTS
WARRANTIES
P7
P7
P8
P8
P9
P9
P9
P10
P10
P11
P12
P13
P13
P14
WARNING:
The warnings and precautions discussed in this manual cannot cover all possible conditions
and situations that may occur. Please be aware of the potential hazards, and take all
necessary precautions to avoid risk of injuries.
SAVE THIS MANUAL
●
K e e p t h i s m a n u a l f o r t h e s a f e t y
war n i n g, pr ecau t i ons , opera t i ons ,
i n s p e c t i o n s a n d m a i n t e n a n c e
in fo rm ation. Kee p this manual an d
the receipt in a safe and d ry pl ac e for
future re ference.
!
WARNING:
To avoid serio us per so na l in ju ry,
d o n o t a t te m p t t o u s e t h i s
prod uc t un til you read the ma nu al
thoro u g h l y a n d under s t a n d it
co mp le tely. Sa ve th is ma nu al and
revi ew fr eq ue nt ly fo r con tinuing
sa f e ope rat ion a nd in str uct ing
ot he rs w ho may use th is t oo l.
SYMBOLS
●
The following sig na l wo rds and meaning s are intended to expla in t he l ev els of risk
associated with t hi s to ol , an d can be found in the man ua l, p ac ka ging, labeling, a nd
all other informa ti on p rovided with th is t oo l:
SYMBOLS SIGNAL MEANING
!
!
WARNING:
CAUTION:
CAUTION:
GENERAL SAFETY RULES
INSTRUCTIONS PERTAINING TO A RISK OF
FIRE, ELECTRIC SHOCK, OR INJURY TO
PERSONS.
!
WARNING:
When using tools, basic precautions
should always be followed, including
the following:
CALIFORNIA PROPOSITION 65
!
WARNING:
This product can expose you to
chemicals including lead, which is
known to the State of California to
cause cancer and birth defects or
other reproductive harm. For more
information, go to
www.P65Warnings.ca.gov.
WORK AREA
Keep the work area clean and well lit.
●
Cl utt er ed benc hes and dark are as
increase the risks of accidents.
●
Do not operate the tool in explosive
atmospheres, such as in the presence
of flammable liquids, gases, or dust.
The tool creates a spark which may
ignite flammable liquids, gases or dust.
Keep bystanders, children, and others
●
away w h i l e o p e ratin g t h e t o o l.
Distractions could result in improper use
and cause injury.
Avoid unintentional misfires. Always
●
use caution to avoid accidentally firing.
Do not point at yourself or anyone else
regardless if it contains fasteners or not.
Indicates a poten ti al ly h azardous si tu at io n,which, if
not avoided, coul d result in death or seri ou s in ju ry.
Indicates a poten ti al ly h azardous si tu at io n, which, if
not avoided, may re sult in minor or modera te i nj ur y.
(Without symbol ) In di ca te s a situation that ma y result
in proper ty d am ag e.
PERSONAL SAFETY
Do not nail on top of another nail. This nail
can cause the nail to be deflected and hit
someone, or cause the tool to react and
result in a risk of injury to persons.
Remove finger from the trigger when not
driving fasteners. Never carry the tool with
finger on trigger, the tool is able to fire a
fastener.
Always wear eye protection. Operator and
others in the work area should always wear
ANSI-approved safety goggles with side
shields. Eye protection is used to guard
against flying fasteners and debris, which
may cause severe eye injury.
Always wear hearing protection when
using the tool. Prolonged exposure to high
intensity noise may cause hearing loss.
Use safety equipment. A dust mask, nonskid safety shoes and a hard hat must be
used for the applicable conditions. Wear a
full face shield if you are producing metal
filings or wood chips.
Dress properly. Do not wear loose clothing
or jewelry. Contain long hair. Keep your long
hair, clothing, and gloves away from moving
parts. Loose clothes, jewelry, or long hair
can be caught in moving parts.
Stay alert, watch what you are doing and
use common sense when operating a
power tool. Do not use tool while tired or
under the influence of drugs, alcohol, or
medication. A moment of inattention while
operating the tool may cause serious injury.
Avoid unintentional firing. Keep fingers
away from t rigger when not driving
fasteners, especially when connecting the
tool to the air supply.
Keep proper footing and balance at all
times. Proper footing and balance enables
better control of the tool in unexpected
situations.
HTTP://WWW.NUMAXTOOLS.COM 1-888-669-5672
HTTP://WWW.NUMAXTOOLS.COM 1-888-669-5672
Page 3
MODEL: SFBC940 MODEL: SFBC940
Do not use on a ladder or unstable
supports. Stable footing on a solid surface
enables better control of the tool in
unexpected situations.
Make s u r e t h e h o s e i s f r e e o f
obstructions or snags. Entangled or
snarled hoses can cause loss of balance or
footi ng a nd m ay b ecome damag ed,
resulting in possible injury.
Do not overreach. Keep proper footing and
balance at all times. Proper footing and
balance enables better control of the tool in
unexpected situations.
Do not attach the hose or tool to your
body.
Attach the hose to the structure to
reduce the risk of loss of balance if the
hose shifts.
Always assume that the tool contains
fasteners. Do not point the tool toward
yourself or anyone whether it contains
fasteners or not.
Wash hands after handling. This product
or its power cord may contain chemicals
known to the State of California to cause
ca nce r a nd bir th def ect s o r o the r
reproductive harm.
TO OL US E AND CARE
Know this tool. Read manual carefully,
●
learn its applications and limitations, as
well as the specific potential hazards
related to this tool.
O n l y u s e f a s t e n e r s t h a t a re
●
recommended for your models. Do not
use the wrong fasteners or load the
fasteners incorrectly.
Check for misalignment or binding of
●
moving parts, breakage of parts, and any
other condition that may affect the tool’s
operation. If damaged, have the tool
serviced before using. Many accidents are
caused by poorly maintained tools.
Maintain tools with care. Keep tool clean.
●
A properly maintained tool reduces the risk
of binding and is easier to control.
Store tools out of the reach of children
●
and other untrained people. Tools are
dangerous in the hands of untrained users.
●
Check operation of the tool before using.
Do not use the tool if the workpiece contact
mechanism is not working correctly as
accidental driving of a fastener may occur.
Do not use tool if trigger does not actuate
●
properly. Any tool that cannot be controlled
with the trigger is dangerous and must be
repaired.
Do not force tool. Use the correct tool for
●
your application. The correct tool will do the
job better and safer at the rate for which it is
designed.
Use clamps or another practical way to
●
secure and support the workpiece to a
stable platform. Holding a tool by hand or
against the body is unstable and may lead
to loss of control.
Keep the tool and its handle dry, clean
●
and free from oil and grease. Always use a
clean cloth when cleaning. Never use brake
fluids, gasoline, petroleum-based products,
or any strong solvents to clean your tool.
Do not use the tool as a hammer.
●
●
Never use this tool in a manner that could
cause a fastener to be directed toward
anything other than the workpiece.
●
Never use gasoline or other flammable
liquids to clean the tool. Never use the tool
in the presence of flammable liquids or
gases. Vapors could ignite by a spark and
cause an explosion which will result in
death or serious personal injury.
Do not remove, tamper with, or otherwise
●
cause the trigger lock or trigger to
become inoperable. Do not operate any
tool which has been modified in a like
fashion. Death or serious personal injury
could result.
Do not touch the trigger unless driving
●
fasteners. Never attach air line to tool or
carry tool while touching the trigger. The
tool could eject a fastener which will result
in death or serious personal injury. Also
actuate the trigger lock to the safe position
when not in use.
Always fit tool with a fitting or hose the
●
coupling on or near the tool that in a way
all compressed air in the the remaining
tool is discharged at the time the fitting or
hose coupling is disconnected. Do not use
a check valve or any other fitting which
allows air to remain in the tool. Death or
serious personal injury could occur.
Never place hands or any other body
●
parts in the fastener discharge area of
the tool. The tool might eject a fastener and
could result in death or serious personal
injury.
Never carry the tool by the air hose or pull
●
th e h os e t o m ove t he t ool o r a
compressor. Keep hoses away from heat,
oil and sharp edges. Replace any hose that
is weak, worn, or otherwise damaged.
Personal injury or tool damage could occur.
Al wa ys ass um e the tool c on tains
●
fasteners. Respect the tool as a working
implement; no horseplay.
Always keep others at a safe distance
●
from the work area in case of accidental
discharge of fasteners. Do not point the
tool toward yourself or anyone whether it
contains fasteners or not. Accidental
triggering of the tool could result in death or
serious personal injury.
Do not drop or throw the tool. Dropping or
●
throwing the tool can result in damage that
will make the tool unusable or unsafe. If the
tool has been dropped or thrown, examine
the tool closely for an air leak or bent,
cracked or broken parts. STOP and repair
before using, or serious injury could occur.
Avoid using the tool when the magazine is
●
empty. Accelerated wear on the tool may
occur.
Clean and check all air supply hoses and
●
fittings before connecting the tool to an
air supply. Replace any damaged or worn
hoses or fittings. Tool performance or
durability may be reduced.
Do not use the tool if it leaks air or does
●
not function properly.
Do not operate the tool if it does not
●
contain a legible warning label.
Always carry the tool by the handle. Never
●
carry the tool by the air hose.
TOOL SERVICE
Only use accessories that are identified
●
by the manufacturer for the specific tool
model.
Use of unauthorized parts or failure to
●
follow maintenance instructions may
create a risk of injury.
Only use the lubricants supplied with the
●
tool or specified by the manufacturer.
Tool service must be performed only by
●
qualified repair personnel.
OPERATION
Do not drive fasteners near edge of the
●
workpiece. The workpiece may split
causing the fastener or ricochet, potentially
injuring you or people around.
Do not carry the tool from place to place
●
holding the trigger. Accidental discharge
could result. Choice of triggering method is
important. Check manual for triggering
options.
During normal use the tool will recoil
●
immediately after driving a fastener. This
is a normal function of the tool. Do not
attempt to prevent the recoil by holding the
tool against the workpiece. Restriction to
the recoil can result in a second fastener
being driven from the tool. Grip the handle
firmly and let the tool do the work. Failure to
heed this warning can result in serious
personal injury.
●
Do not drive fasteners on top of other
fasteners or with the tool at an overly
steep angl may cause deflection of e. This
fasteners which could cause injury.
●
Do not actuate the tool unless you intend
to drive a fastener into the workpiece.
●
Always handle the tool with care:
Respect the tool as a working implement.
◆
Never engage in horseplay.
◆
Never pull the trigger unless nose is
◆
directed toward the workpiece.
Keep others a safe distance from the tool
◆
while tool is in operation as accidental
actuation may occur, possibly causing
injury.
AIR SUPPLY AND CONNECTIONS
The connector on the tool must not hold
●
pressure when air supply is disconnected.
If an incorrect fitting is used, the tool can
remain charged with air after disconnecting
and thus will be able to drive a fastener even
after the air line is disconnected, possibly
causing injury.
Do not use any type of reactive gases,
●
including, but not limited to, oxygen and
combustible gases, as a power source.
Use filtered, lubricated, and regulated
compressed air only. Use of a reactive gas
instead of compressed air may cause the
tool to explode which will cause death or
serious personal injury.
O n l y u s e a p re s s u r e - r e g u l a t e d
●
compressed air source to limit the air
pressure s upplied to the to ol. The
regulated pressure must not exceed 1 psi. 10
If the regulator fails, the pressure delivered
to the tool must not exceed 200 psi. The tool
could explode which will cause death or
serious personal injury.
Always disconnect the air source:
●
Before unloading or making adjustments.
When maintaining the tool.
When clearing a jam.
When touching the safety yoke.
When tool is not in use.
When moving to a different work area.
HTTP://WWW.NUMAXTOOLS.COM 1-888-669-5672
HTTP://WWW.NUMAXTOOLS.COM 1-888-669-5672
Page 4
MODEL: SFBC940 MODEL: SFBC940
Such precautionary measures reduce the risk
of injury to persons.
LOADINGTOOL
Do not load the tool with fasteners
●
when any one of the operating controls
is activated.
Never place a hand or any part of body
●
in fastener discharge area of tool.
Never point the tool at anyone.
●
Do not pull the trigger or depress the
●
wo rkp iec e c ont act a s a cc i de nta l
actuation may occur, possibly causing
injury.
!
WARNING:
Th e war nin gs and p re c au t io ns
discussed above cannot cover all
possible conditions and situations that
may occur. It must be understood by
the user that common sense and
caution are factors which cannot be
built into this product, but must be
supplied by the user.
UNPA C KING
This tool has been shipped completely
●
assembled.
Carefully remove the tool and any
●
accessories from the box.
Inspect the tool carefully to make sure
●
no breakage or damage occurred during
shipping.
Do not discard the packing material until
●
you have carefully inspected and
satisfactorily operated the tool.
If any parts are damaged or missing,
●
please call 1-888-669-5672.
!
WARNING:
If any parts are missing do not operate
this tool until the missing parts are
replaced. Failure to do so could result
in possible serious personal injury.
!
WARNING:
Do not attempt to modify this tool or
create accessories not recommended
for use with this tool. Any such
alteration or modification is misuse
an d cou l d r es u lt in h aza rd o us
condition leading to possible serious
personal injury.
FEATURES
SPECIFICATIONS
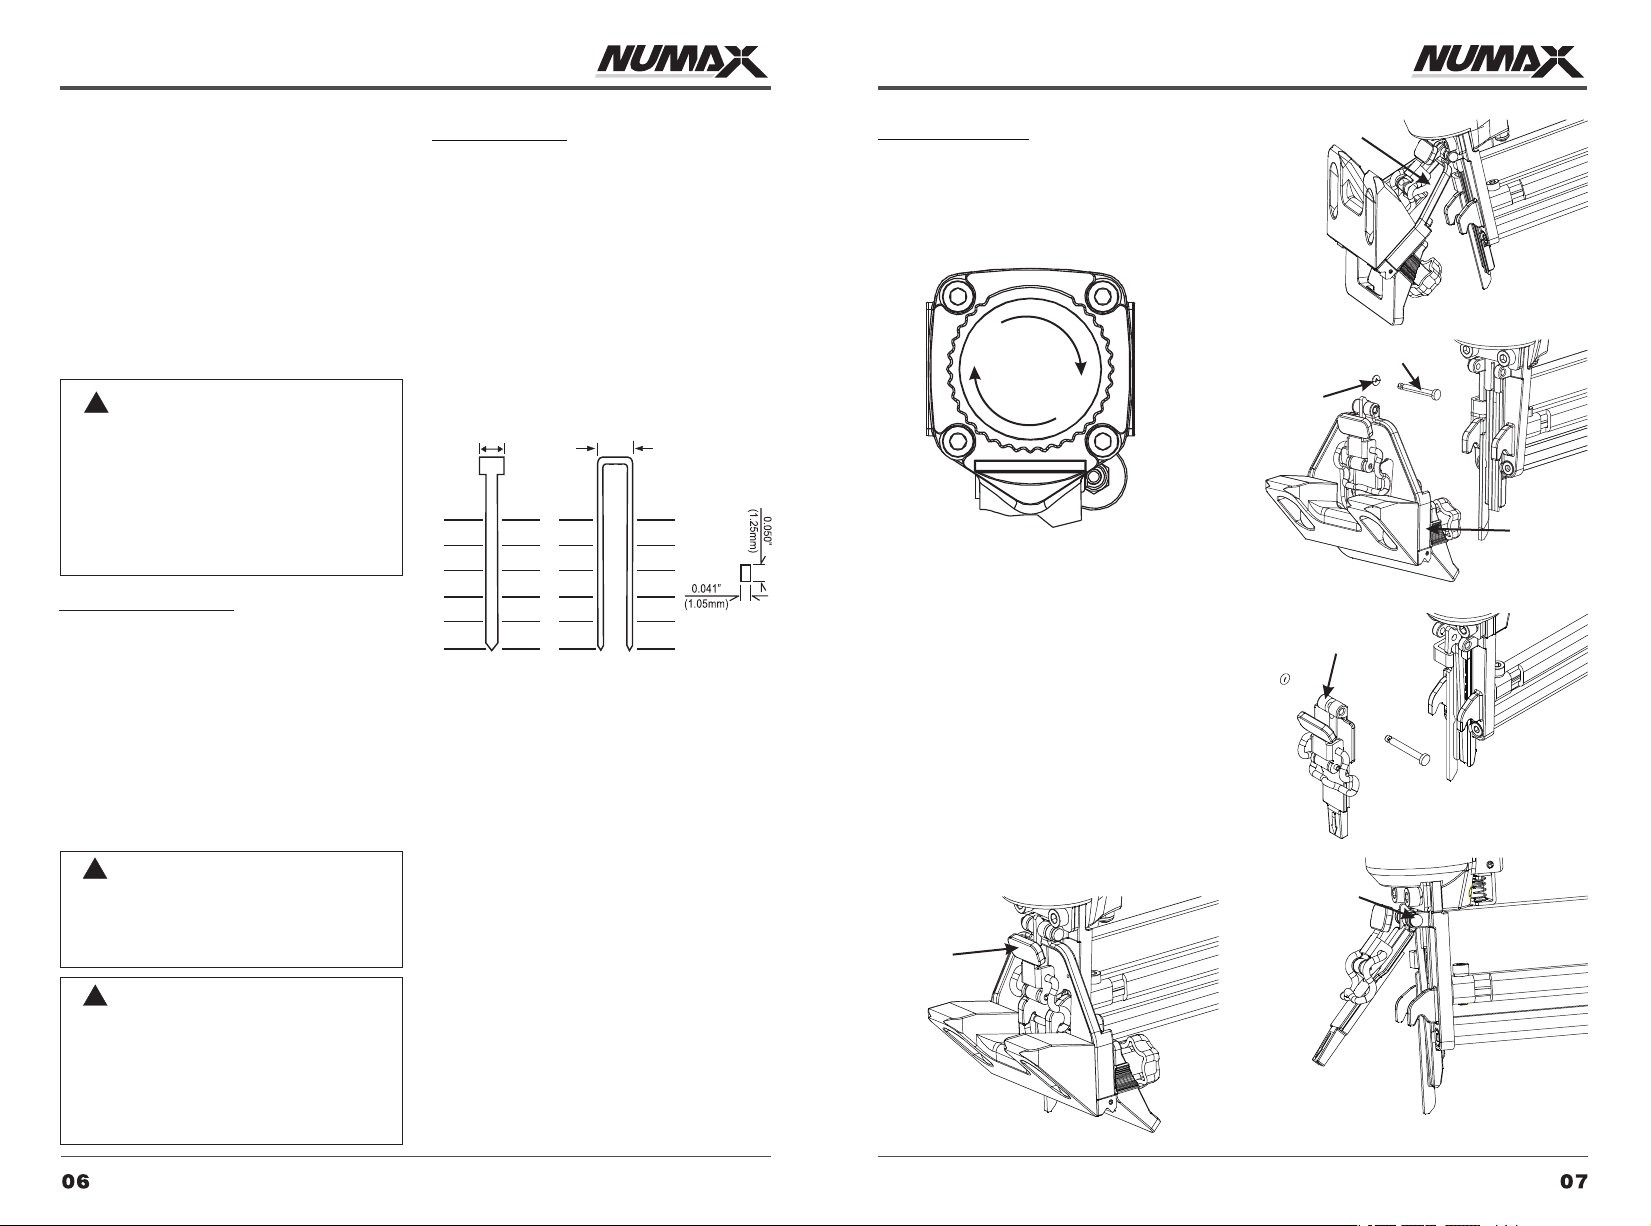
AIR CONSUMPTION:1.76 SCFM with 100
fasteners per minute @ 90 psi
AIR INLET: 1/4 inch NPT
MAGAZINE CAPACITY:
100 fasteners, 18 gauge
WEIGHT: 3.44 lbs
MAXIMUM PRESSURE: 110 psi
PRESSURE RANGE: 70 psi – 110 psi
FASTENERS RANGE:
0.079”(2mm)
15mm
5/8”
20mm
3/4”
25mm
1”
1-3/16”
30mm
32mm
1-1/4”
40mm
1-9/16”
Compatible with generic 18 gauge brad nails
and staples.
FEATURES
360 ° ADJUSTABLE EXHAUST
●
Allows user to direct air away from face.
●
COMFORT-GRIP HANDLE
For increased comfort and control.
●
WITH RELOAD INDICATOR
Visible nail level.
●
ADJUSTABLE DEPTH
Depth is easily adjustable for various
applications.
Brad nails: 5/8” to 1-9/16”
Staples:1/2” to 1-9/16”
1/4”(5.7mm)
1/2”
5/8”
3/4”
1”
1-1/4”
1-9/16”
13mm
16mm
19mm
25mm
32mm
40mm
OPERATION
ADJUSTING THE EXHAUST
The adjustable exhaust on the cap of the tool
allows users to direct the exhaust according to
operator preference. To adjust the direction,
turn the exhaust cap in the desired direction.
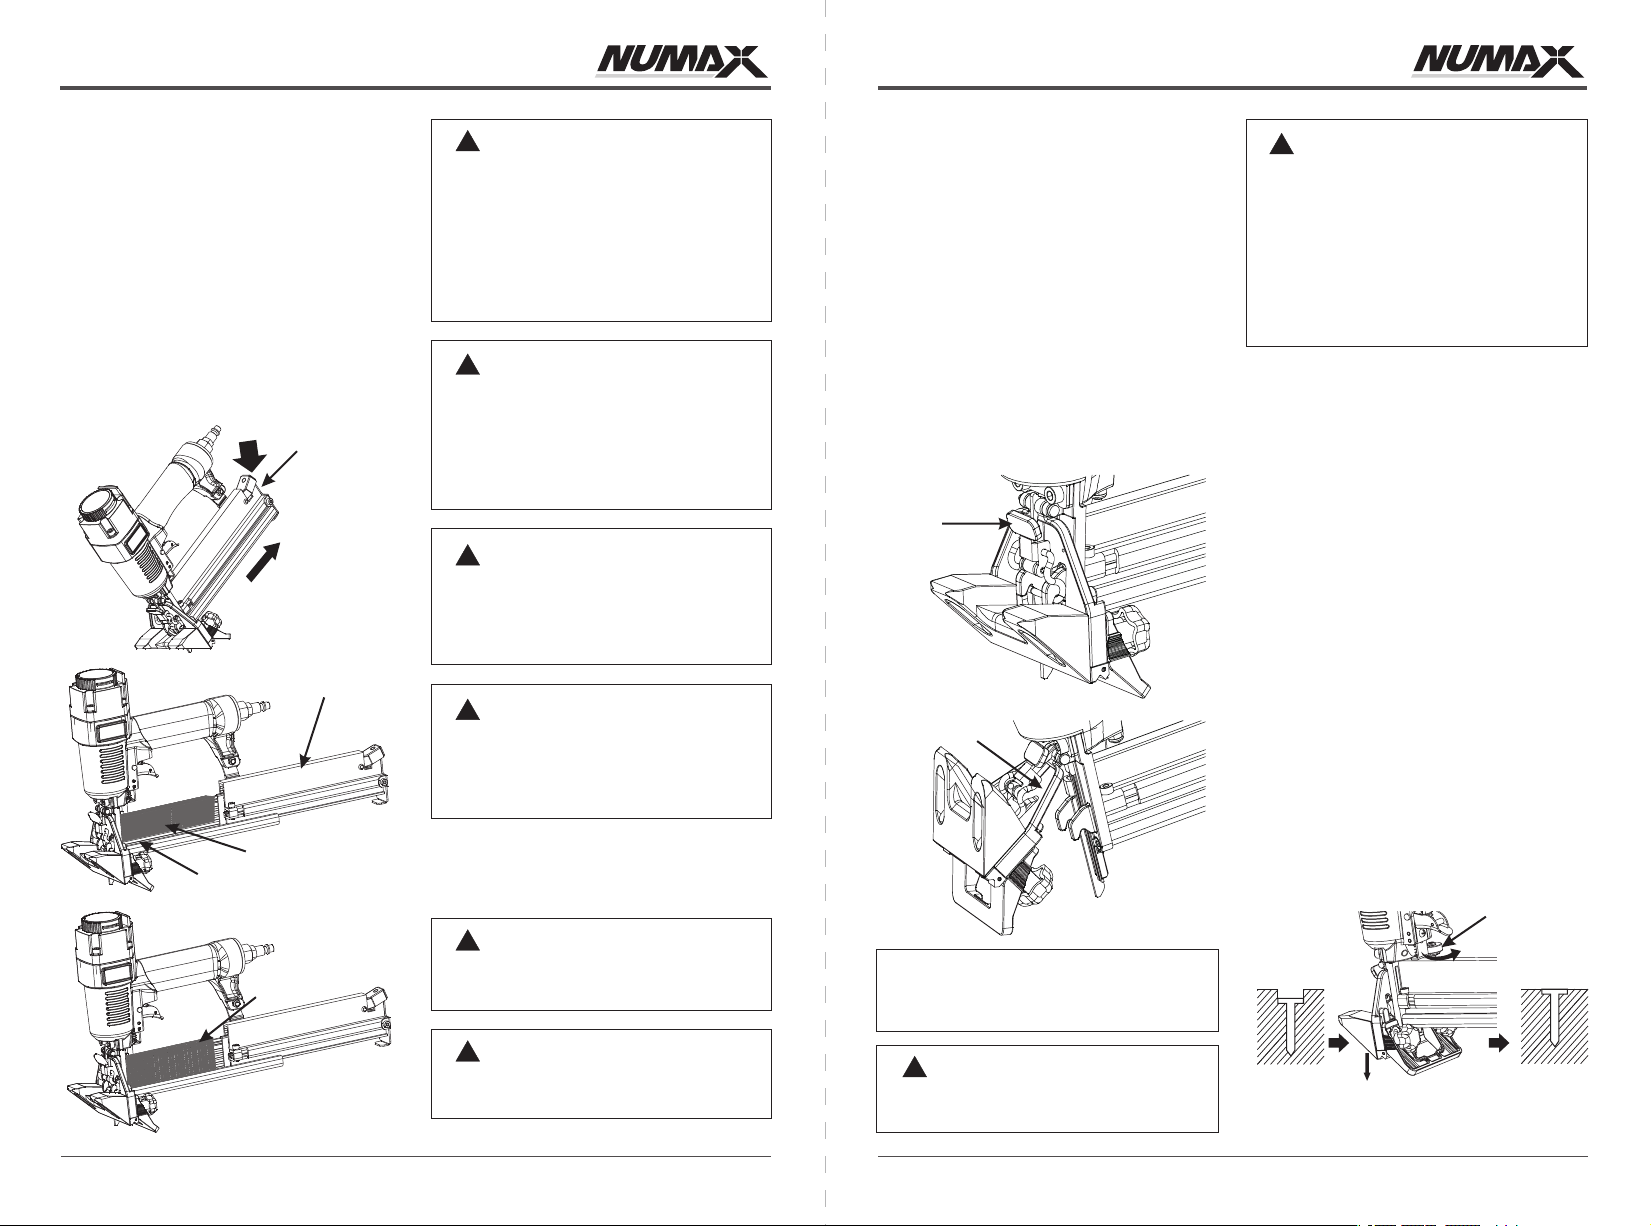
CHANGING THE NOSE COVER
The tool is packed with an additional nose
cover with which the nailer can be changed to
be regular brad nailer/stapler.
1.
Disconnect the tool from air source.
2.
Remove fasteners from the tool. Failure to
do so will cause the fasteners to eject from
the front of the tool.
3.
Pull up on the latch(A) and open the flooring
nose cover (B).
4.
Remove the O-ring (C) and pin (D)
5.
Remove the flooring nose cover(B).
6.
Pull the regular nose cover (E) on the nose
of the nailer.
7.
Put the pin (D) and O-ring (C) back.
8.
Push the latch back to the nose cover on
the nailer's nose.
Latch(A)
Flooring nose cover(B)
Pin(D)
O-Ring (C)
Flooring
nose cover
(B)
Regular nose cover(E)
Put the pin(D) and
O-ring(C)back
HTTP://WWW.NUMAXTOOLS.COM 1-888-669-5672
HTTP://WWW.NUMAXTOOLS.COM 1-888-669-5672
Page 5
MODEL: SFBC940 MODEL: SFBC940
LOADING FASTENERS
Connect the tool to the air source.
1.
Press down on the magazine latch
2.
button(F). Pull back on the magazine
cover(G).
Brad nails: Insert a stick of fasteners into
3.
the magazine rail(H). Make sure the pointed
ends of the fasteners are resting on the
bottom edge of the magazine when
loading. Make sure the fasteners are not
dirty or damaged.
Staples: Load a clip of fasteners with the
crowns straddling the magazine rail(H).
Push the magazine cover(G) forward until
4.
latch button pops up.
PRESS
PULL OPEN
Magazine rail (H)
Latch
button(F)
Magazine cover (G)
Staples
Brad nail head
!
WARNING:
The tool may fire when it is first
connected to the air source. Always
connect the tool to the air source
before loading fasteners to prevent
injury from unintended cycling. Always
make sure the tool's magazine is empty
at the beginning of each work session,
before connecting to an air source.
!
WARNING:
Use only those fasteners recommended
for use with this tool. Fasteners not
identified for use with this tool by the
tool manufacturer are able to result in a
risk of injury to persons or tool damage
when used in this tool.
!
WARNING:
Keep the tool pointed away from
yourself and others when loading
fasteners. Failure to do so could result
in possible serious personal injury.
!
WARNING:
Never load fasteners with the
workpiece contact or trigger activated.
Doing so could result in possible
serious personal injury.
UNLOADING FASTENERS
Unloading is the reverse of loading. Always
disconnect the air source before unloading.
!
WARNING:
Always unload all fasteners before
removing tool from service.
CLEARING JAMS
Occasionally, a fastener may become jammed
in the firing mechanism of the tool, making the
tool inoperable. To remove a jammed fastener,
follow these steps below:
1.
Disconnect the tool from air source.
2.
Remove fasteners from the tool. Failure to
do so will cause the fasteners to eject from
the front of the tool.
3.
Pull up on the latch (A) and open the flooring
nose cover(B).
4.
Using caution not to bend or damage the
driver blade, using pliers or a screwdriver if
required to clear the jammed fastener.
5.
Close the jam release and latch.
6.
Reconnect the tool to the air source.
7.
Reload the tool with fasteners.
Latch(A)
Flooring nose cover(B)
NOTE:
It's the same way to clear the jam with
the regular nose cover.
!
WARNING:
Disconnect the tool from the air source
whenever clearing a jam. After
disconnecting the tool from the air
compressor, there should still be
enough air pressure to fire the tool.
After the air hose is disconnected,
always fire the tool into scrap wood
repeatedly to make sure all of the
compressed air is expended.
SETTING THE AIR PRESSURE
The amount of air pressure required depends
on the size of the fasteners and the workpiece
material.
Begin testing the depth of drive by driving a test
nail into the same type of workpiece material
used for the actual job. Drive a test fastener
with the air pressure set at 90-95 psi.
Raise or lower the air pressure to find the
lowest setting that will perform the job with
consistent results.
It may be possible to achieve the desired depth
with air pressure adjustments alone.
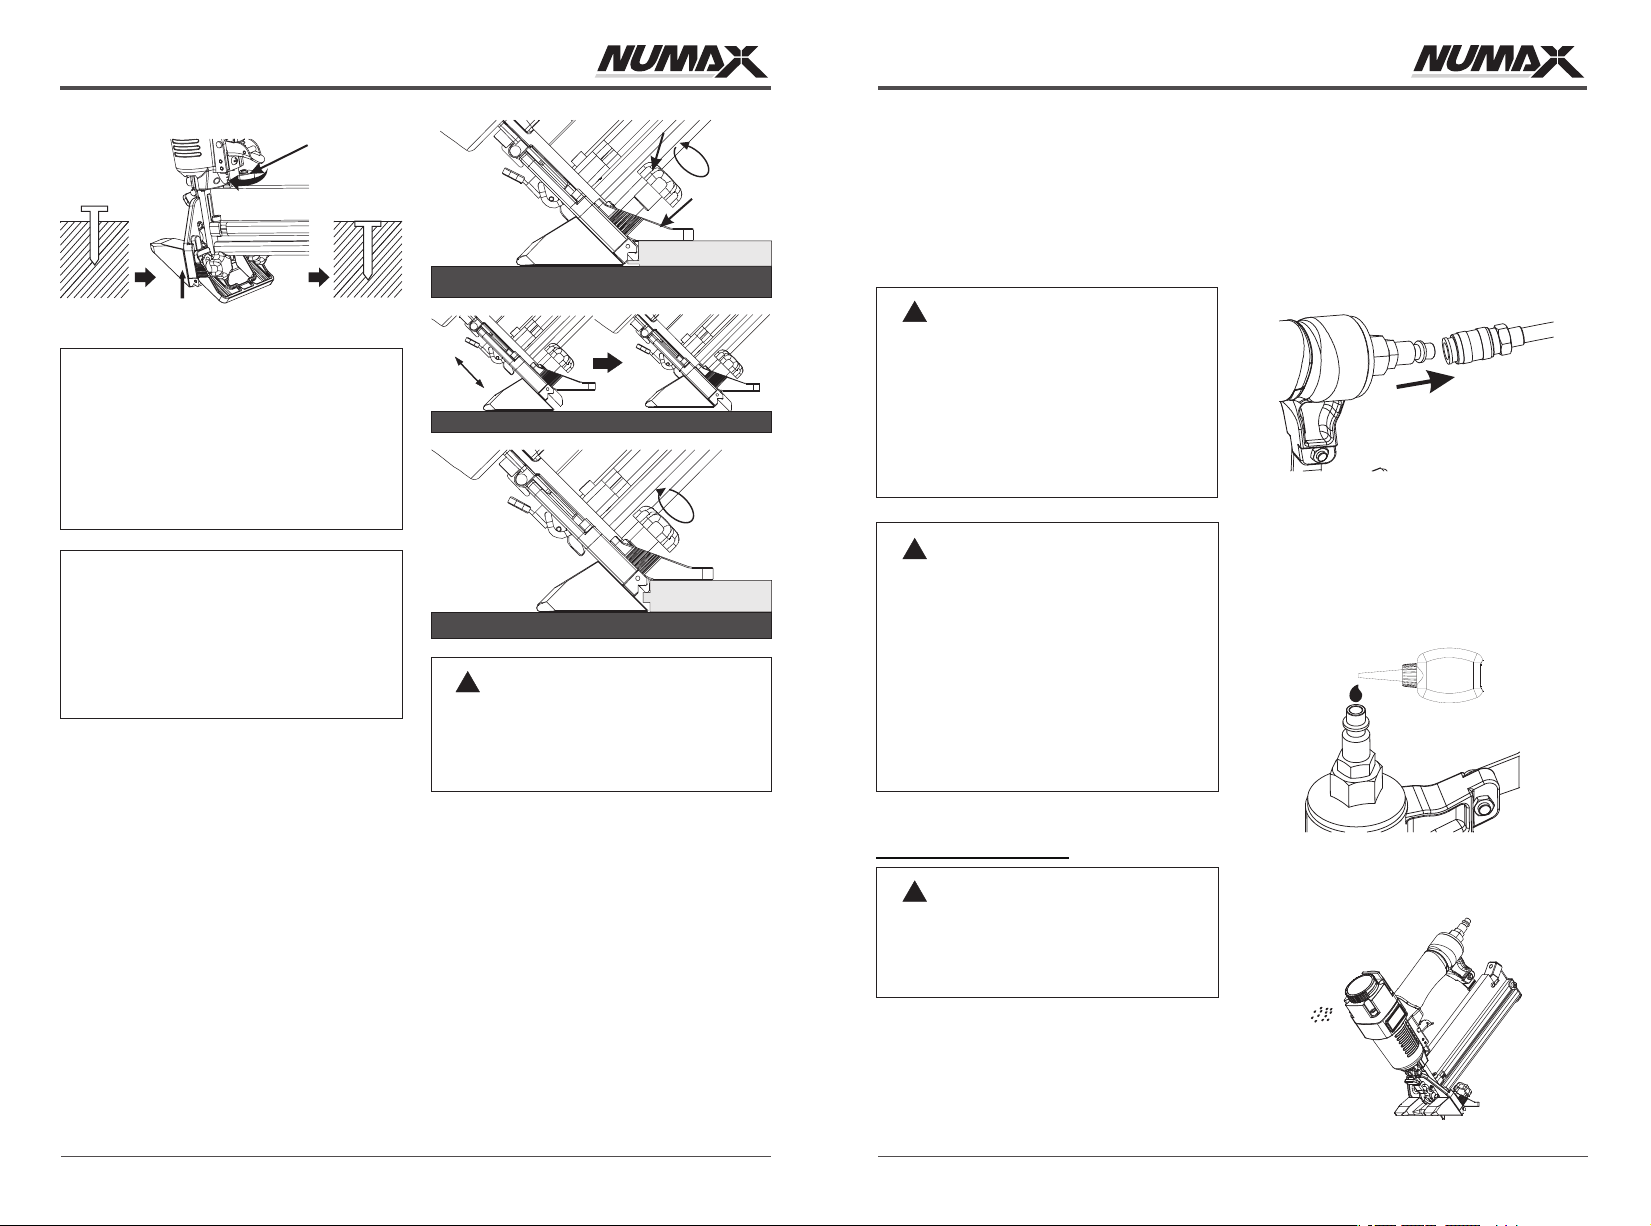
DEPTH ADJUSTMENT
The driving depth of the fasteners are
adjustable. To adjust the depth, use the drive
depth adjustment wheel (J) on the the tool.
1.
Disconnect the tool from air source.
2.
Turn the depth wheel left or right to change
the driving depth.
3.
Reconnect the tool to the air source.
4.
Drive a test nail after each adjustment until
the desired depth is set.
Adjustment
wheel(J)
Too Deep
Flush
!
WARNING:
Always disconnect the air source
before unloading.
08 09
HTTP://WWW.NUMAXTOOLS.COM 1-888-669-5672
!
WARNING:
Make sure there is no fastener in
magazine before clearing a jam.
HTTP://WWW.NUMAXTOOLS.COM 1-888-669-5672
Turn the adjustment knob counter clockwise
Page 6
MODEL: SFBC940 MODEL: SFBC940
Adjustment
wheel(J)
Too Shallow
Turn the adjustment knob clockwise
Flush
NOTE:
When use the tool as a flooring nailer,
the depth adjustment wheel must be
set at the top of the wheel bar.
To set the wheel:
1.Turn the wheel right to move the
wheel up.
2.Set the wheel at the top of the wheel.
CAUTION:
It is advisable to test the depth on a
scrap workpiece to determine the
required depth for the application.
To determine depth of drive, first adjust
the air pressure and drive a test
fastener. Never exceed 110 psi.
ADJUSTING THE FLOORING PLATE
When the flooring nose cover set on the nailer,
the floor plate depth is adjustable for 3/8”, 5/8”
and 1/2” thickness floor wood. To adjust the
floor plate depth, please follow these steps as
listed below:
1.
Disconnect the tool from air source.
2.
Loose the plastic screw (K) on both sides of
the flooring plate (L).
3.
Slide the floor plate up or down to suit your
flooring application.
4.
Fasten the plastic screws tightly.
5.
Ensure the correct depth set for the wood
floor by firing into a scrap piece of flooring
an d c he ck in g f or pr op er fa st en er
placement.
Plastic Screws
(K)
Floor Plate
(L)
!
WARNING:
Disconnect the tool from the air source
whenever adjust the floor plate. Make
sure there is no fastener in magazine
before adjusting the floor plate.
FIRING THE TOOL
(SEQUENTIAL FIRING MODE)
Single sequential actuation provides the most
accurate fastener placement.
To use the tool to drive nails in this actation
mode, WCE and trigger must be used in a
specific order.
1.
Connect the tool to the air source.
2.
The work contact element(WCE) must be
completely depressed by placing the nose
of the tool against the work piece.
3.
The trigger must be pulled firmly and then
released.
4.
The trigger must be released to reset the
tool before another fastener can be driven.
5.
The tool must be allowed to recoil away
from the work piece.
Note:
Pull the trigger, then depress the WCE on
working surface, the tool CANNOT operate.
This is considered to be more restrictive mode
of operation, suitable for less experienced
users.
Please don’t use the tool for wood density over
3
0.7g/cm .
!
WARNING:
An improperly functioning tool must not
be used. Do not actuate the tool unless
the tool is placed firmly against the
work place.
Always know the operational mode of
the tool before using. Failure to know
the operational mode could result in
death or serious personal injury.
!
WARNING:
During normal use, the tool will recoil
immediately after driving a fastener.
This is a normal function of the tool. Do
not attempt to prevent the recoil by
holding the tool against the working
surface. Restriction to the recoil can
result in a second fastener being driven
from the tool. Grip the handle firmly and
let the tool do the work. Failure to heed
this warning can result in serious
personal injury.
MAINTENANCE
!
WARNING:
Any time inspection, maintenance, and
cleaning are done:
◆Disconnect the tool from the air source.
◆ Empty the magazine completely.
ANTI-DUST
Each tool is packed with an anti-dust cap on the
air connector, check it after unpacking.
Keep the anti-dust cap cover the air connector
when the tool is not in use.
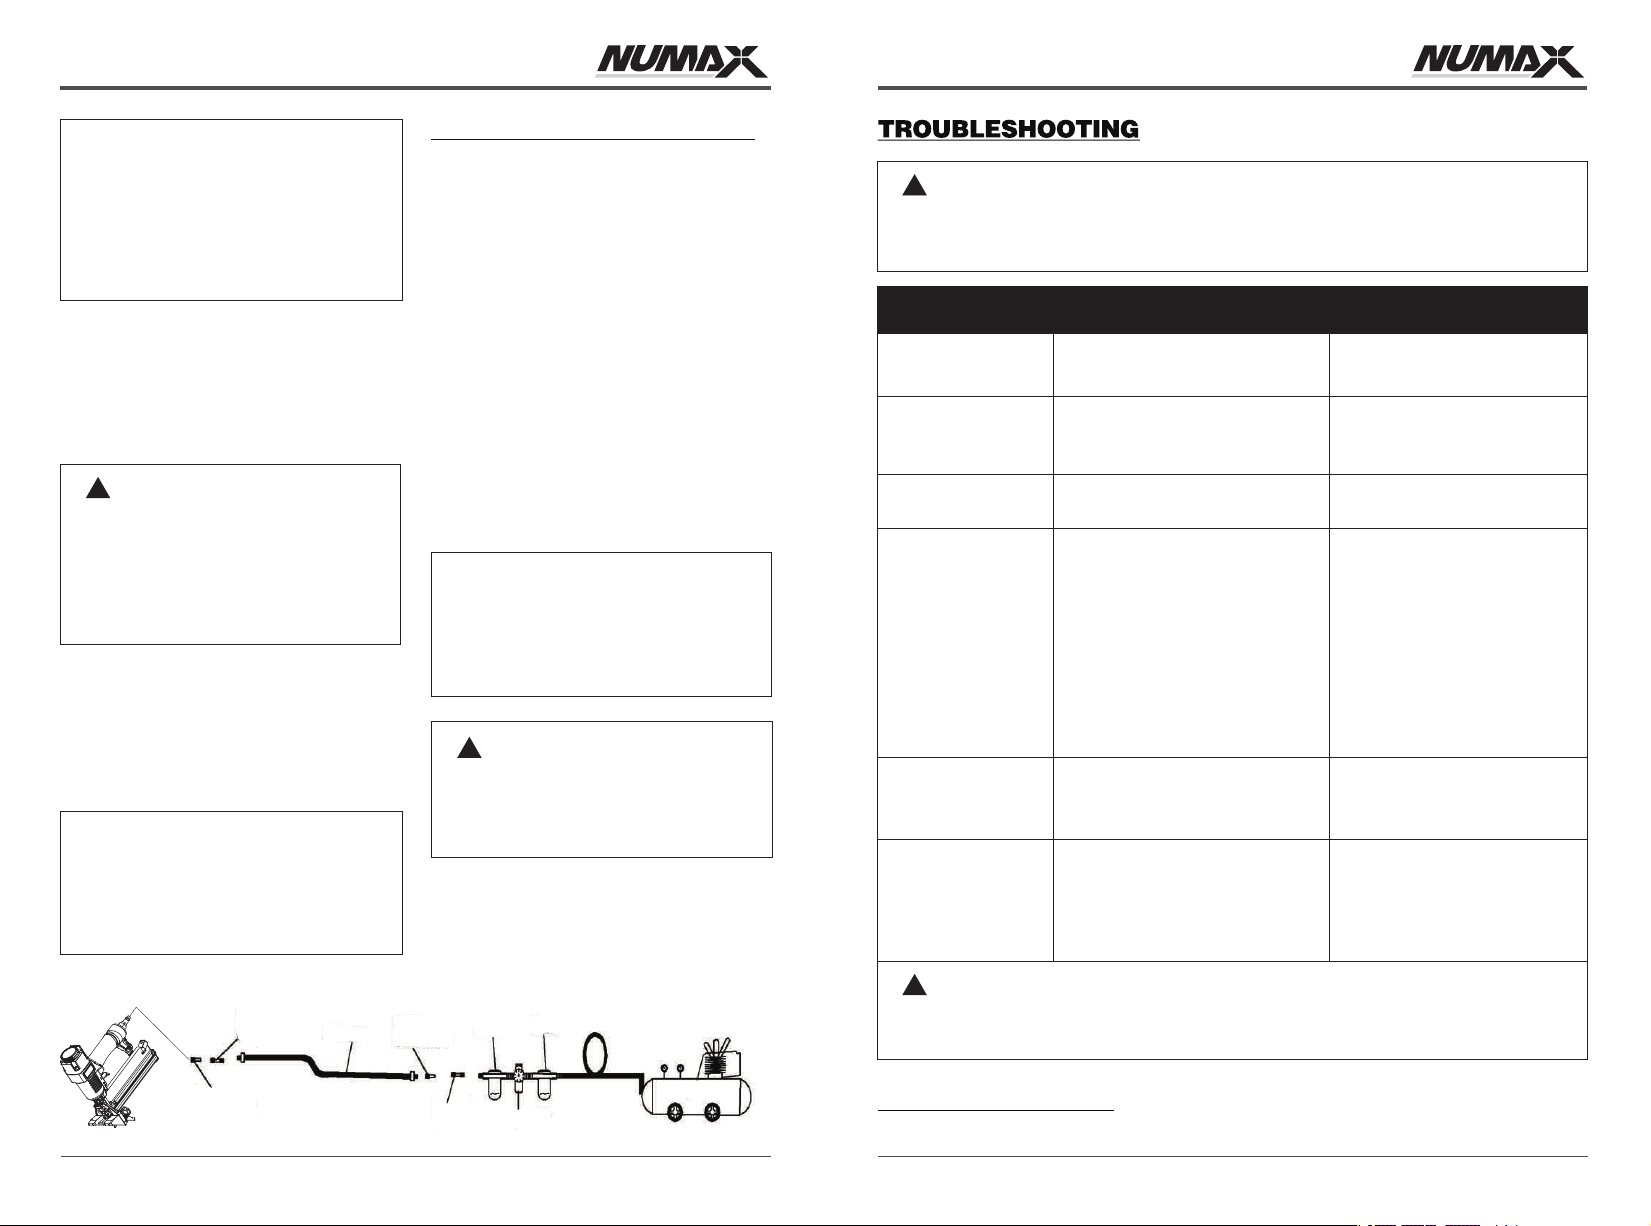
LUBRICATION
Frequent, but not excessive, lubrication is
required for best performance after long
periods use. Oil for pneumatic fastening tools is
added through the air line connection and will
lubricate internal parts.
1.
Disconnect the air supply from the tool to
add the lubricant.
2.
Turn the tool so the air inlet is facing up.
Place 2-3 drops of pneumatic fastening tool
oil into air inlet. Do not use detergent oils, oil
additives, or air-tool oils as these lubricants
will cause accelerated wear to the seals and
bumpers in the tool, resulting in poor tool
p e r f or ma nce a n d f r e qu en t t oo l
maintenance.
oil
3.
After adding oil, connect the tool to the air
source, run tool briefly. Wipe off any excess
oil from the cap exhaust.
10 11
HTTP://WWW.NUMAXTOOLS.COM 1-888-669-5672
HTTP://WWW.NUMAXTOOLS.COM 1-888-669-5672
Page 7
MODEL: SFBC940 MODEL: SFBC940
CAUTION:
The work surface can become
damaged by excessive lubrication.
Proper lubrication is the owner's
responsibility. Failure to lubricate the
tool properly will dramatically shorten
the life of the tool and void your
warranty.
CLEANING
Avoid using solvents when cleaning plastic
parts. Most plastics are susceptible to damage
from various types of commercial solvents and
may be damaged by their use. Use clean cloths
to remove dirt, dust , oil, grease, etc.
!
WARNING:
Do not at any time let brake fluids,
gasoline, petroleum-based products,
penetration oils, ect., come in contact
with plastic parts. Chemicals can
damage, weaken or destroy plastic
which may result in serious personal
injury.
COLD WEATHER OPERATION
For cold weather operation, near and below
freezing, the moisture in the air line may freeze
and prevent tool operation. We recommend the
use of air tool lubricant or permanent antifreeze
(ethylene glycol) as a cold weather lubricant.
CAUTION:
Do not store tools in a cold weather
environment to prevent frost or ice
formation on the tool's operating
valves and mechanisms that could
cause tool failure.
RECOMMENDED HOOKUP
1.
The air compressor must be able to maintain
a minimum of 70 psi when the tool is being
used. An inadequate air supply can cause a
loss of power and inconsistent driving.
2.
An oiler can be used to provide oil circulation
through the tool. A filter can be used to
remove liquid and solid impurities which can
rust or gum up internal parts of the tool.
3.
Always use air supply hoses with a minimum
working pressure rating equal to or greater
than the pressure from the power source if a
regulator fails, or 150 psi, whichever is
greater. Use 3/8 in. air hose for runs up to 50
ft. and use a 3/8 in. quick coupler on the air
hose.
4.
Use a pressure regulator on the compressor,
with an operating pressure of 0-125 psi. A
pressure regulator is required to control the
operating pressure of the tool between 70
psi and 110 psi.
CAUTION:
The air compressor must be able to
maintain a minimum of 70 psi when the
tool is being used. An inadequate air
supply can cause a loss of power and
inconsistent driving.
!
WARNING:
Do not connect with an air compressor
which can potentially exceed 200 psi.
As tool may burst, possibly causing
injury.
!
WARNING:
Stop using tool immediately if any of the following problems occur. Serious personal injury
could result. Any repairs or replacements must be done by a qualified service person or an
authorized service center.
PROBLEMS POSSIBLE CAUSE(S) CORRECTIVE ACTION
Air leaking at trigger
valve area.
Air leaking between
housing and nose.
Air leaking between
housing and cap.
Tool skips driving
fastener.
Tool runs slow or has
loss of power.
Fasteners are jammed
in tool.
O-rings in trigger valve housing are
damaged.
1.Loose screws in housing.
2.Damaged O-rings.
3.Damaged to bumper.
1.Loose screws.
2.Damaged gasket.
1.Worn bumper.
2.Dirt in nose piece.
3.Dirt or damage prevent fasteners or
pusher from moving freely in magazine.
4.Damaged pusher spring.
5.Inadequate air flow to tool.
6.Worn O-ring on piston or lack
of lubrication.
7.Damaged O-ring on trigger valve.
8.Air leaks.
9.Cap seal leaking.
1.Tool not lubricated sufficiently.
2.Broken spring in cylinder cap.
3.Exhaust port in cap is blocked.
1.Guide on driver is worn.
2.Fasteners are not correct size.
3.Fasteners are bent.
4.Magazine or nose screws are loose.
5.Drive blade is damaged.
Replace O-rings. Check operation
of Work Contact Element(WCE).
1.Tighten screws.
2.Replace O-rings.
3.Replace bumper.
1.Tighten screws.
2.Replace gasket.
1.Replace bumper.
2.Clean drive channel.
3.Clean magazine.
4.Replace spring.
5.Check fitting, hose or compressor.
6.Replace and lubricate O-rings.
7.Replace O-rings.
8.Tighten screws and fittings.
9.Replace gasket.
1.Lubricate nailer.
2.Replace spring.
3.Replace damaged internal parts.
1.Replace guide.
2.Use only recommended fasteners.
3.Replace with undamaged fasteners.
4.Tighten screws.
5.Replace drive blade.
!
WARNING:
Quick
Coupler
Quick
connector
12 13
HTTP://WWW.NUMAXTOOLS.COM 1-888-669-5672
Air hose
Quick
connector
Quick
Coupler
Oiler
Regulator
Filter
Compressor
Use only Numax authorized repair parts. For questions please call 1-888-669-5672 or
visit our website at http://www.numaxtools.com
WEARABLE PARTS
Repair parts can be ordered from our website: http://www. tools.comnumax
HTTP://WWW.NUMAXTOOLS.COM 1-888-669-5672
Page 8
MODEL: SFBC940 MODEL: SFBC940
Repairs or alterations have been made, or attempted, by others, and/or the unauthorized use of
non-conforming parts or accessories.
Repairs are required due to normal wear and tear.
The Nail Gun has been abused, misused, improperly maintained or operated, including: the
failure to use clean, dry, regulated compressed air at the recommended pressure; accidents
caused by use of the Product after partial failure.Numax
The Product is used commercially in assembly lines or production lines. The Numax Numax
Product is intended for use by individuals and these warranties do not extend to such
commercial uses.
THESE WARRANTIES ARE SUBJECT TO CHANGE WITHOUT NOTICE.
14 15
HTTP://WWW.NUMAXTOOLS.COM 1-888-669-5672
HTTP://WWW.NUMAXTOOLS.COM 1-888-669-5672
 Loading...