

Numatic TwinTec 455 Operation Manual
LAST PAGE
RETURN TO MENU
TT-455 OPERATION MANUAL
the knowledge is in our hands

TT 455 OPERATION - INFORMATION INDEX
1. Part Identification Diagram
2. Basic Operation Instructions
3. Dos and Donts
4. Fitting The Brush / Drive Board
5. Filling The Clean Water Tank
6. Water Release Controls
7. Adjusting The Handle Height
8. Handle Controls
9. Emptying The Top Tank
10. Emptying The Bottom Tank
11. Cleaning The Separator Filter
12. Cleaning The Top Tank Filter
13. Cleaning The Bottom Tank Filter
14. Daily Maintenance Routine
15. Changing The Squeegee Blades
16. Problem Solving
TWINTEC 455

TT 455 OPERATION - PART IDENTIFICATION
HANDLE
SQUEEGEE TOOL
SEPARATOR
TOP (DIRTY
WATER) TANK
BOTTOM (CLEAN
WATER) TANK
CHASSIS
BRUSH
TWINTEC 455

TT 455 OPERATION - OPERATING INSTRUCTIONS
1. Ensure that power lead is plugged into appropriate mains scoket
2. Ensure that the red power indicator light is illuminated
3. Fit pad & drive board / scrubbing brush
4. Unclip deck so that the pad / brush is positioned flat to the floor
5. Lower the squeegee blade so that it is positioned flat to the floor
6. Fill bottom tank with clean water and detergent
7. Ensure that water on/off control is set at appropriate position
8. Ensure that top tank(s) are empty
9. Ensure that separator is fitted correctly
10. Adjust handle height to suit
11. Stand behind the machine
12. Press both of the green switches on the front of the handle
13. Press and hold in the yellow button on the rear of the handle and at the same
time squeeze the triggers on the handle. Release the yellow button
14. Push the machine in the direction in which you want to clean, holding in the black
triggers
15. When you want the machine to stop, release triggers
TWINTEC 455

TT 455 OPERATION - DOS AND DONTS
DO ensure only competent persons unpack and assemble the machine
DO keep the machine clean
DO keep the brushes in good condition
DO replace any worn or damaged parts immediately
DO ensure that the working area is clear of obstructions
DO ensure that the working are is well illuminated
DO follow all the instructions supplied
DO ensure that if using a pad, it is washed after each use
DONT use steam cleaners or pressure washers to clean the machine
DONT use the machine outdoors in the rain
DONT attempt machine maintenance or cleaning with the isolator pin intact
DONT allow any inexperienced repairs
DONT leave the brush or pad on the machine when not in use
DONT allow the machine to be used by inexperienced or unauthorised personnel
DONT lift or pull the machine by any of the operating triggers
DONT leave the machine running in one spot, turn off if not being used
DONT leave the brush or pad on the machine overnight, they will flatten
WARNING
It is essential that the equipment is correctly assembled and operated in accord
ance with current safety regulations. When using the equipment always ensure
that all necessary precautions are taken to guarantee the safety of the operator
and any other persons who may be affected. Wear non-slip footwear when
scrubbing. Always use a respiratory mask in dusty environments. The use of
other accessories may affect the safety of the scrubber dryer. A full range of
brushes and other accessories are available from Numatic International.
TWINTEC 455
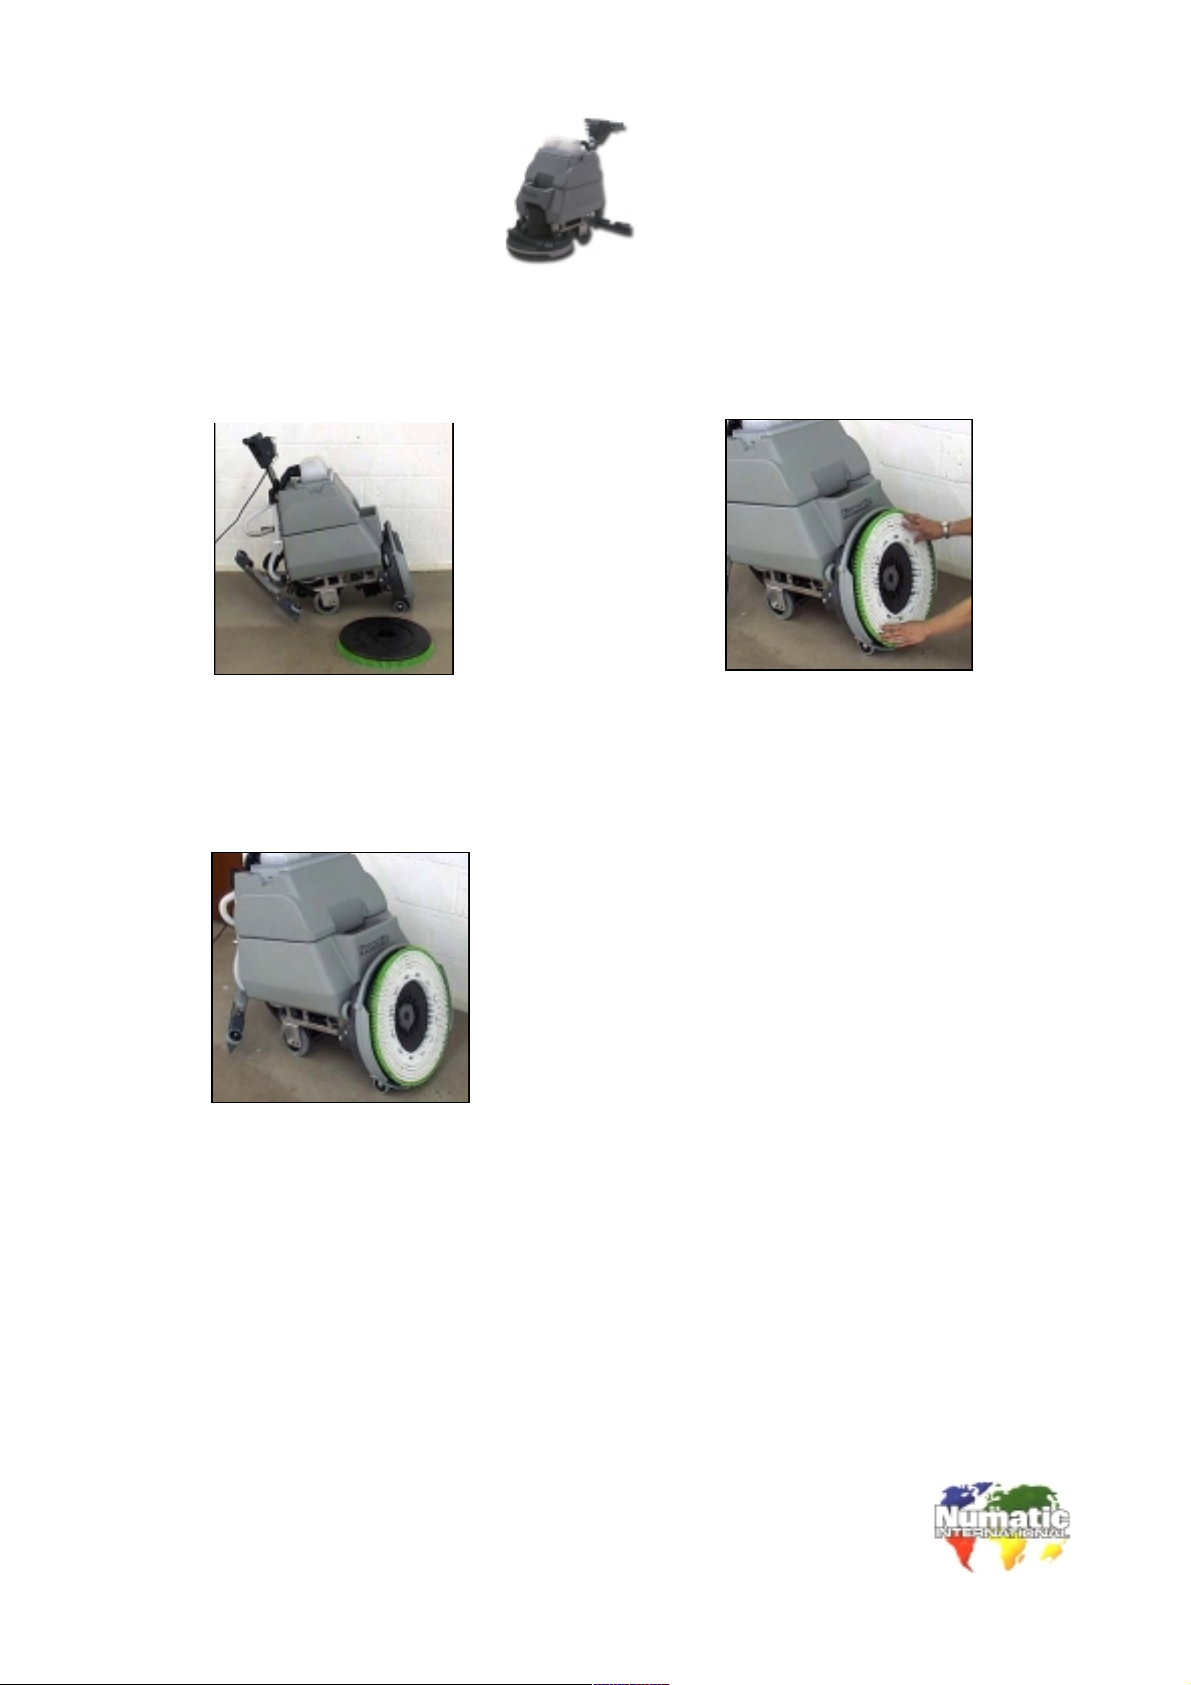
TT 455 OPERATION - FITTING THE BRUSH / DRIVE BOARD
2. POSITION BRUSH ONTO
1. MACHINE SHOWN WITH
SCRUB RING AND BRUSH.
THE GEARBOX WITH THE 3
INDENTATIONS ALLIGNING
WITH THE 3 TABS. TURN
ANTI-CLOCKWISE TO LOCK
THE BRUSH IN PLACE.
3. THE BRUSH WILL NOW
BE LOCKED IN PLACE AND
READY FOR USE.
NOTE: WHEN USING A DRIVE BOARD FOLLOW THE SAME INSTRUCTIONS
TO FIT DRIVE BOARD AND THEN FIX PAD CENTRALLY ONTO BOARD.
TWINTEC 455
 Loading...