

Numatic TTB 1840G Owner's Manual
Warning! Read instructions before using the machine
Owner Instructions
TTB 1840G
SCRUBBER DRYER
www.numatic.co.uk
Machine Overview ................................ Pages 2
Control Panel Overview ................................ Page 3
Quick Set up Guide ................................ Page 4
Machine Set up Guide ................................ Page 5
Fitting the Brush / Pad ................................ Page 5
Fitting the Floor Tool ................................ Page 5
Filling the Clean Water Tank .......................... Page 6
Fill Level Indicator .............................. Page 6
Water Flow Adjustment ................................ Page 6
Setting the Cleaning Controls .................... Page 7
Raising/Lowering Floor Tool ............................ Page 8
Emptying Top/Bottom Tanks ........................... Page 8
Machine in Use ................................ Page 8
Regular Maintenance ................................ Page 9
Changing Floor tool Blades ............................. Page 10
Removing Battery ................................ Page 11
Removing Battery Fuse ................................ Page 11
Battery Charging ................................ Page 11
Specications ................................ Page 12
Trouble Shooting ................................ Page 12
Rating Label / Personal Protective Equipment /
Recycling ................................ Page 13
Safety Precautions ................................ Page 14-15
Recommended Spare Parts .......................... Page 16
Schematic Diagram ................................ Page 16
EU Declaration Document ............................. Page 17
Warranty ................................ Page 18
Company Address ................................ Page 19
SCRUBBER DRYER
Index
After the removal of all the packaging,
carefully open and check the contents
●
Owner Manual
●
Battery Charger & Lead
● Battery Pack ●
Scrub Brush
●
Squeegee Assembly
PLEASE READ
BEFORE COMMENCING
OPERATION
1
Operator control panel ( see page 3 )
2
Triggers
3
Waste-water tank
4
Clean-water tank
5
Brush deck
6
Squeegee blades
7
Floor-tool retaining knobs
8
Clean-water On / Off tap
9
Clean-water emptying cap
10
Floor-tool vacuum hose
11
Vacuum hose
12
Separator
13
Clean-water ller cap
14
Clean-water level indicator
15
Clean-water tank ll point
16
On / Off switch
17
Battery connector
18
Top tank (waste water) drainage hose
19
Battery
TTB 1840G
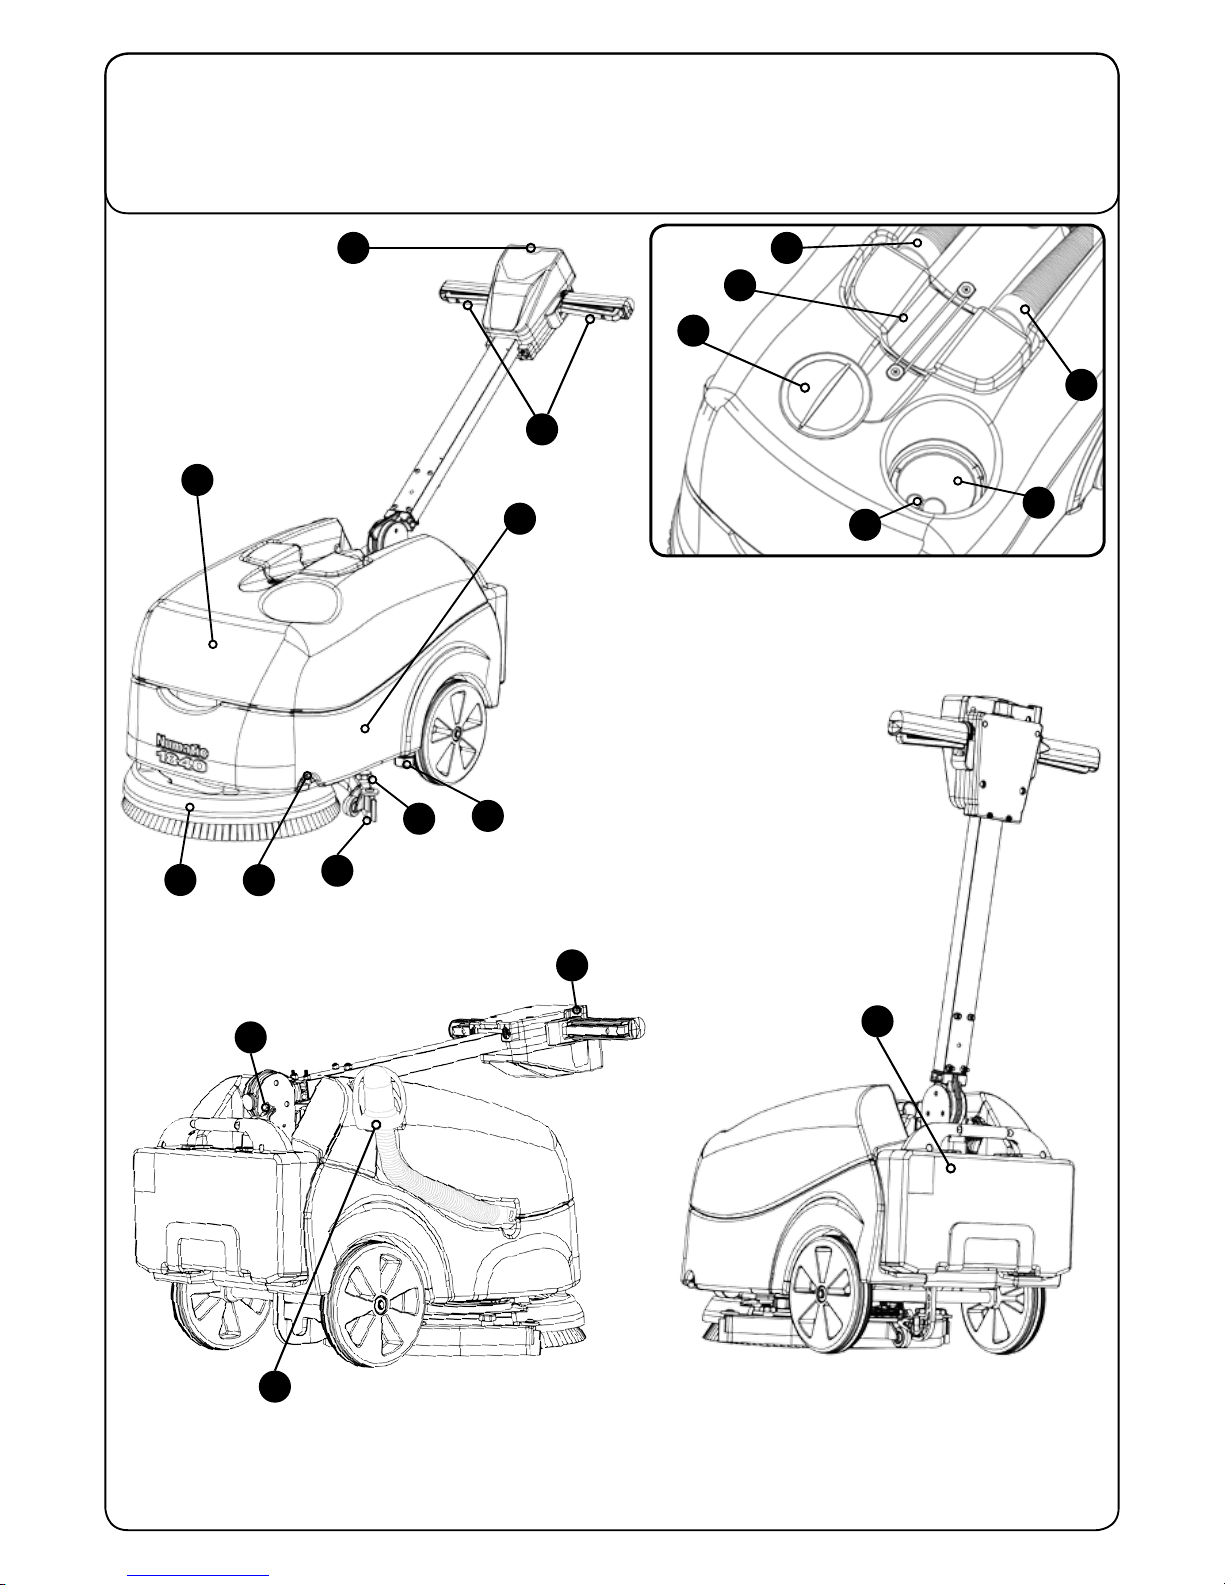
Machine Overview
1
6
4
2
3
9
8
7
5
13
14
15
16
12
17
191811
10
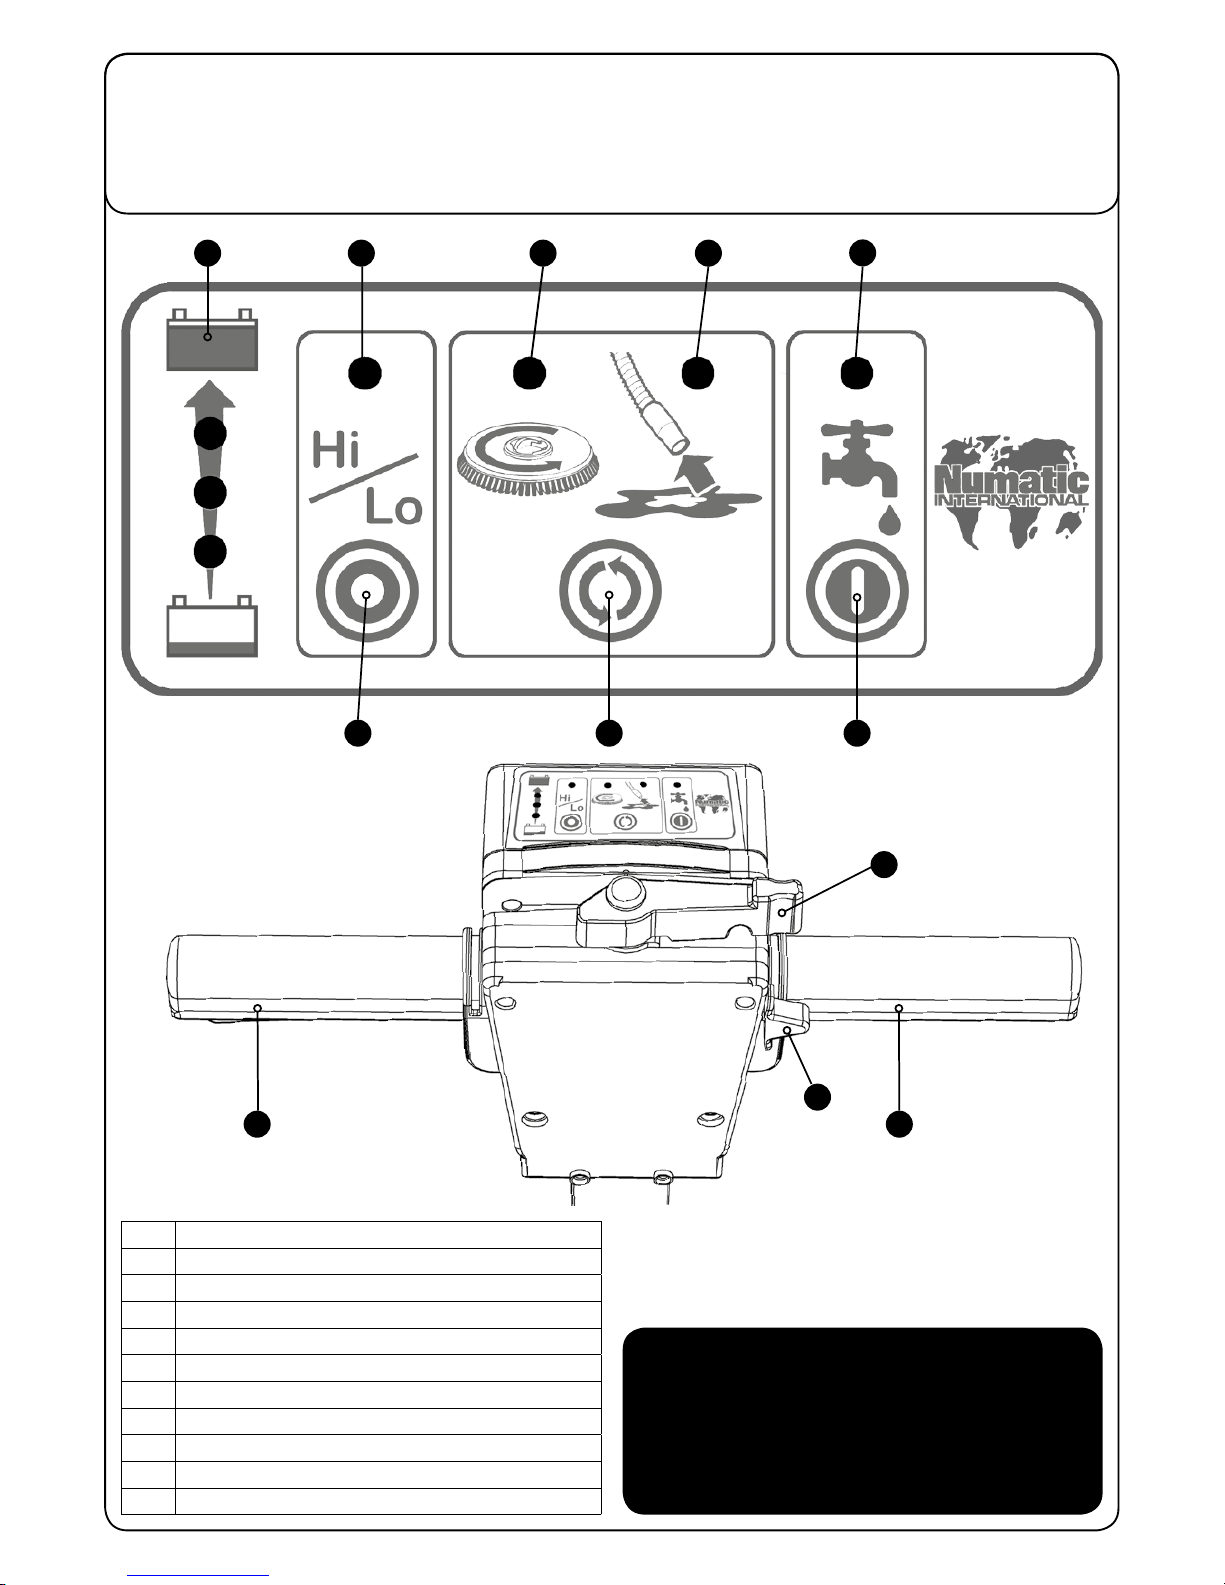
SCRUBBER DRYER
1
Battery Charge Level Meter
2
Hi / Lo Indicator
3
Brush Operation / Load Indicator
4
Vacuum Indicator
5
Water Flow Indicator
6
Hi / Lo Button
7
Mode Select Button
8
Water Flow On / Off Button
9
Handle Position Lever
10
Start Switch
11
Triggers
Control Panel Overview
In the event of a breakdown contact
your Numatic dealer or the
Numatic Technical
help line +44 (0)1460 269268
152
3
6
11
11
9
1087
4
TTB 1840G
4
T 01460 68600
Quick Set-up Guide
TTB1840G CONTENTS
●
Owner Manual
●
Battery Charger & Lead
● Battery Pack ●
Scrub Brush
●
Squeegee Assembly
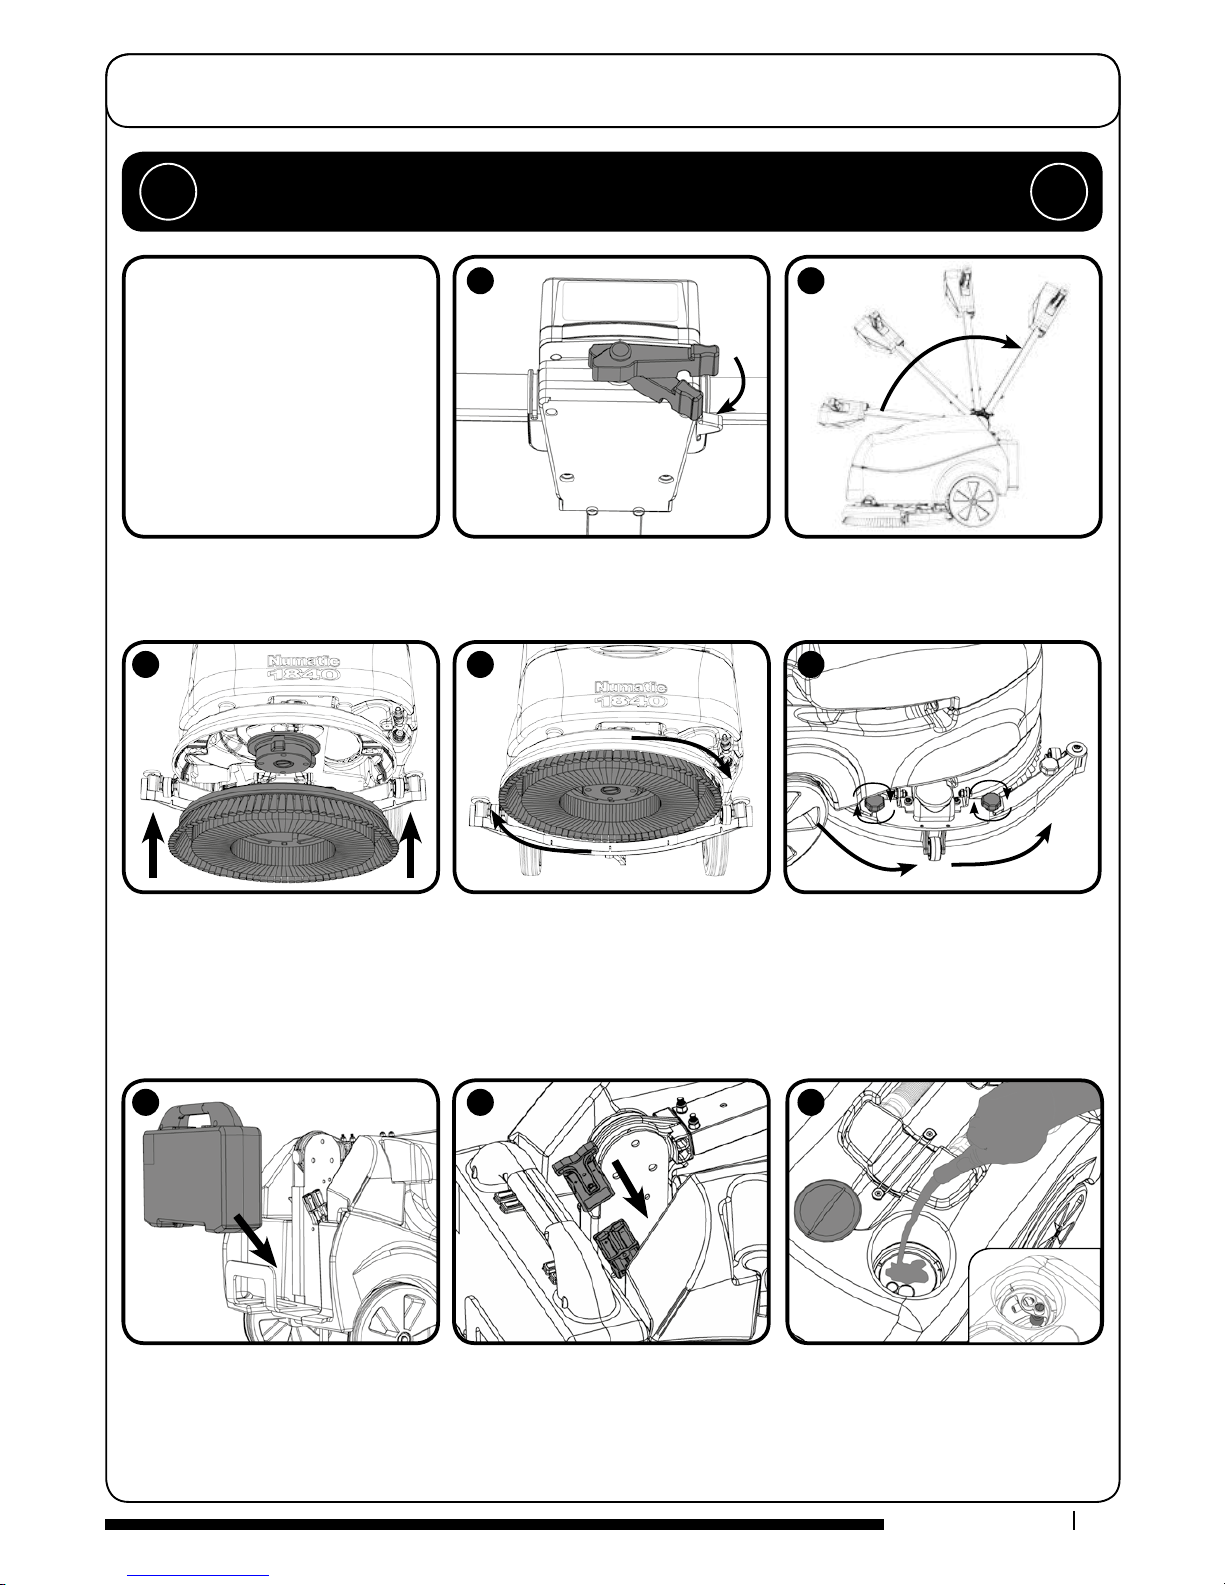
Using the handle position lever, (Fig.1) move the handle into the upright position, (Fig.2)
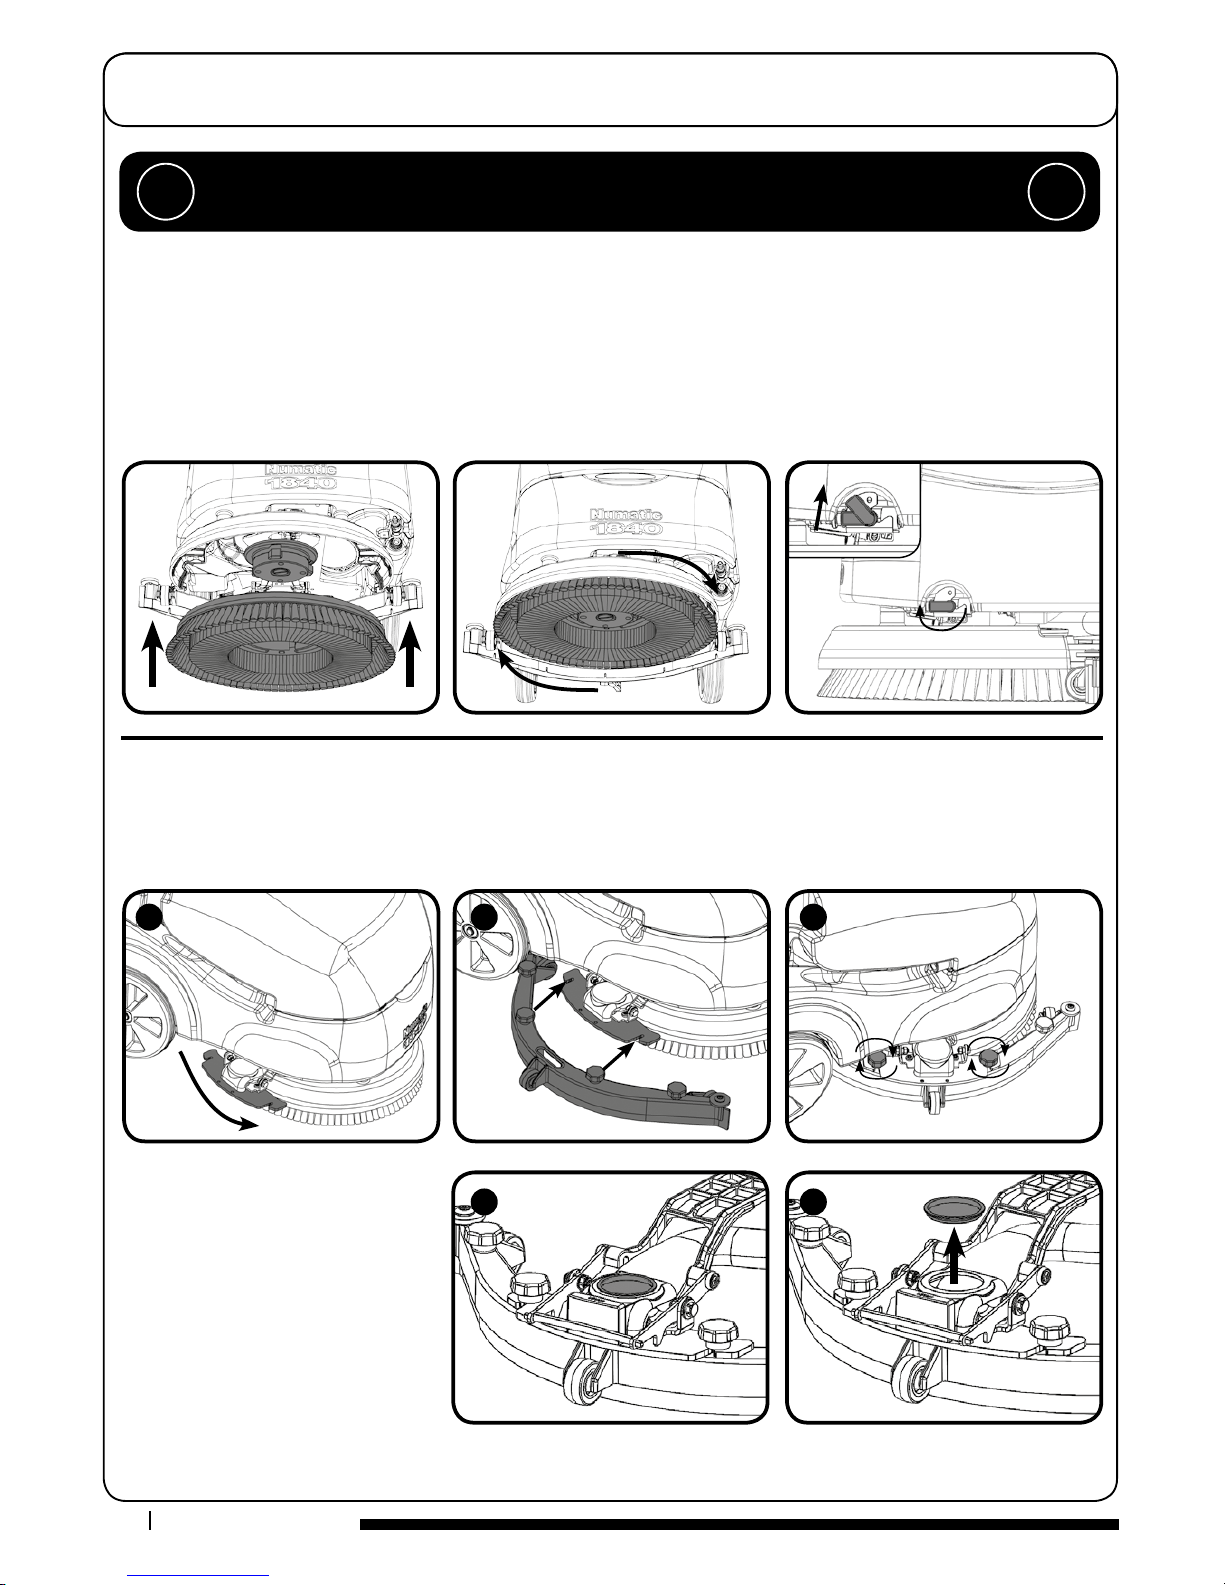
Slide the brush / pad under the brush deck
(Fig.3).
Fit the brush / pad onto the Nulock drive
chuck, twist to lock the brush / pad in
place (Fig.4).
Swing the oor-tool carrier from behind the
brush. Using the two locking knobs tted to
the oor-tool, secure to the oor-tool to the
oor-tool carrier (Fig.5).
Fill the clean-water to a Max of 18 litres
Fit the battery to the machine (Fig.6) and plug in the power supply (Fig.7). Ensure the
battery has been charged before use.
PLEASE READ BEFORE COMMENCING ANY OPERATION AFTER THE REMOVAL OF ALL
THE PACKAGING, CAREFULLY OPEN AND CHECK THE CONTENTS.
!!
3
687
142
5
5
www.numatic.co.uk
Swing the oor-tool carrier to the side
of the machine. (Fig.1).
Secure to the carrier using the two
knobs tted to the oor-tool carrier
(Fig.2) - (Fig.3).
Do not over tighten the retaining
knobs.
Ensure inspection cap is in place on
the uid pipe. (Fig.4) - (Fig.5)
For tting the oor tool blades
(See Page 10).
Machine Set-up Guide
ALWAYS ENSURE THAT THE MACHINE IS SWITCHED OFF
BEFORE MAKING ANY ADJUSTMENTS
!!
400mm Brush / 360mm Pad.
Featuring the Nulock brush system.
The brush is simply pushed and twisted to lock, making tting and removal a simple process.
Slide the brush / pad under the brush deck.
Fit the brush / pad onto the Nulock drive chuck, twist to lock the brush / pad in place.
Safety gloves are recommended for the changing of used brushes.
Turn on the clean water tap.
Fitting the Brush / Pad / Turn on water
Fitting the Floor Tool
The oor tool has been designed for quick tting, allowing easy squeegee blade replacement and a safety knock-o feature if the
oor tool gets snagged, whilst in transit.
NOTE: It is easier to t the oor tool if the weight of the machine is resting on the brush. Ensure the brush is tted rst.
123
4
5
 Loading...