

Numatic TGB2120, TGB2128 Owner's Manual

Warning! Read instructions before using the machine
Owner Instructions
TGB2120/2128
RIDE-ON SCRUBBER DRYER
www.numatic.co.uk
TGB 2120
TGB 2128

Machine Overview ................................ Pages 2-3
Control Panel Overview ................................ Page 4
Machine Set up Guide ................................ Page 5
Hose U Bend Clip ................................ Page 6
Fitting the Floor tool ................................ Page 6
Breakaway Floor tool Feature ......................... Page 6
Raise / Lower Brush Deck ............................... Page 7
Fitting the brush ................................ Page 7
Floor tool Transit Bracket ................................ Page 7
Filling the Clean Water Tank .......................... Page 8
Fill Level Indicator .............................. Page 8
Setting the Cleaning Controls .................... Page 9
Waste Water Tank Full ................................ Page 9
Brush Pressure .............................. Page 10
Emergency Stop Button and Horn .................. Page 10
Maximum Speed Control ................................ Page 10
Anti-tip System ................................ Page 10
Machine in Use ................................ Page 11
O-aisle Cleaning Kit ................................ Page 11
Machine Cleaning ................................ Pages 12-13
Free-Wheel Function ................................ Page 13
Changing Floor tool Blades ............................. Page 14
Machine Charging ................................ Page 15
Battery Care ................................ Page 16
Charging Lights Sequence .............................. Pages 16-17
Trouble Shooting ................................ Pages 18-19
Specications ................................ Page 18
Rating Label / Personal Protective Equipment /
Recycling ................................ Page 20
Safety Precautions ................................ Page 21
Recommended Spare Parts .......................... Page 22
Schematic Diagram ................................ Page 22
Battery Wiring ................................ Page 23
Warranty ................................ Page 24
EU Declaration Document ............................. Page 25
Company Address ................................ Page 28
RIDE ON SCRUBBER DRYER
Index
After the removal of
all the packaging,
carefully open and
check the contents
●
Owner Manual
●
Battery Charging Lead
●
Isolator Key
●
40 Amp Fuse
●
Maxi Fuse-puller
PLEASE
READ
BEFORE
COMMENCING
OPERATION
1
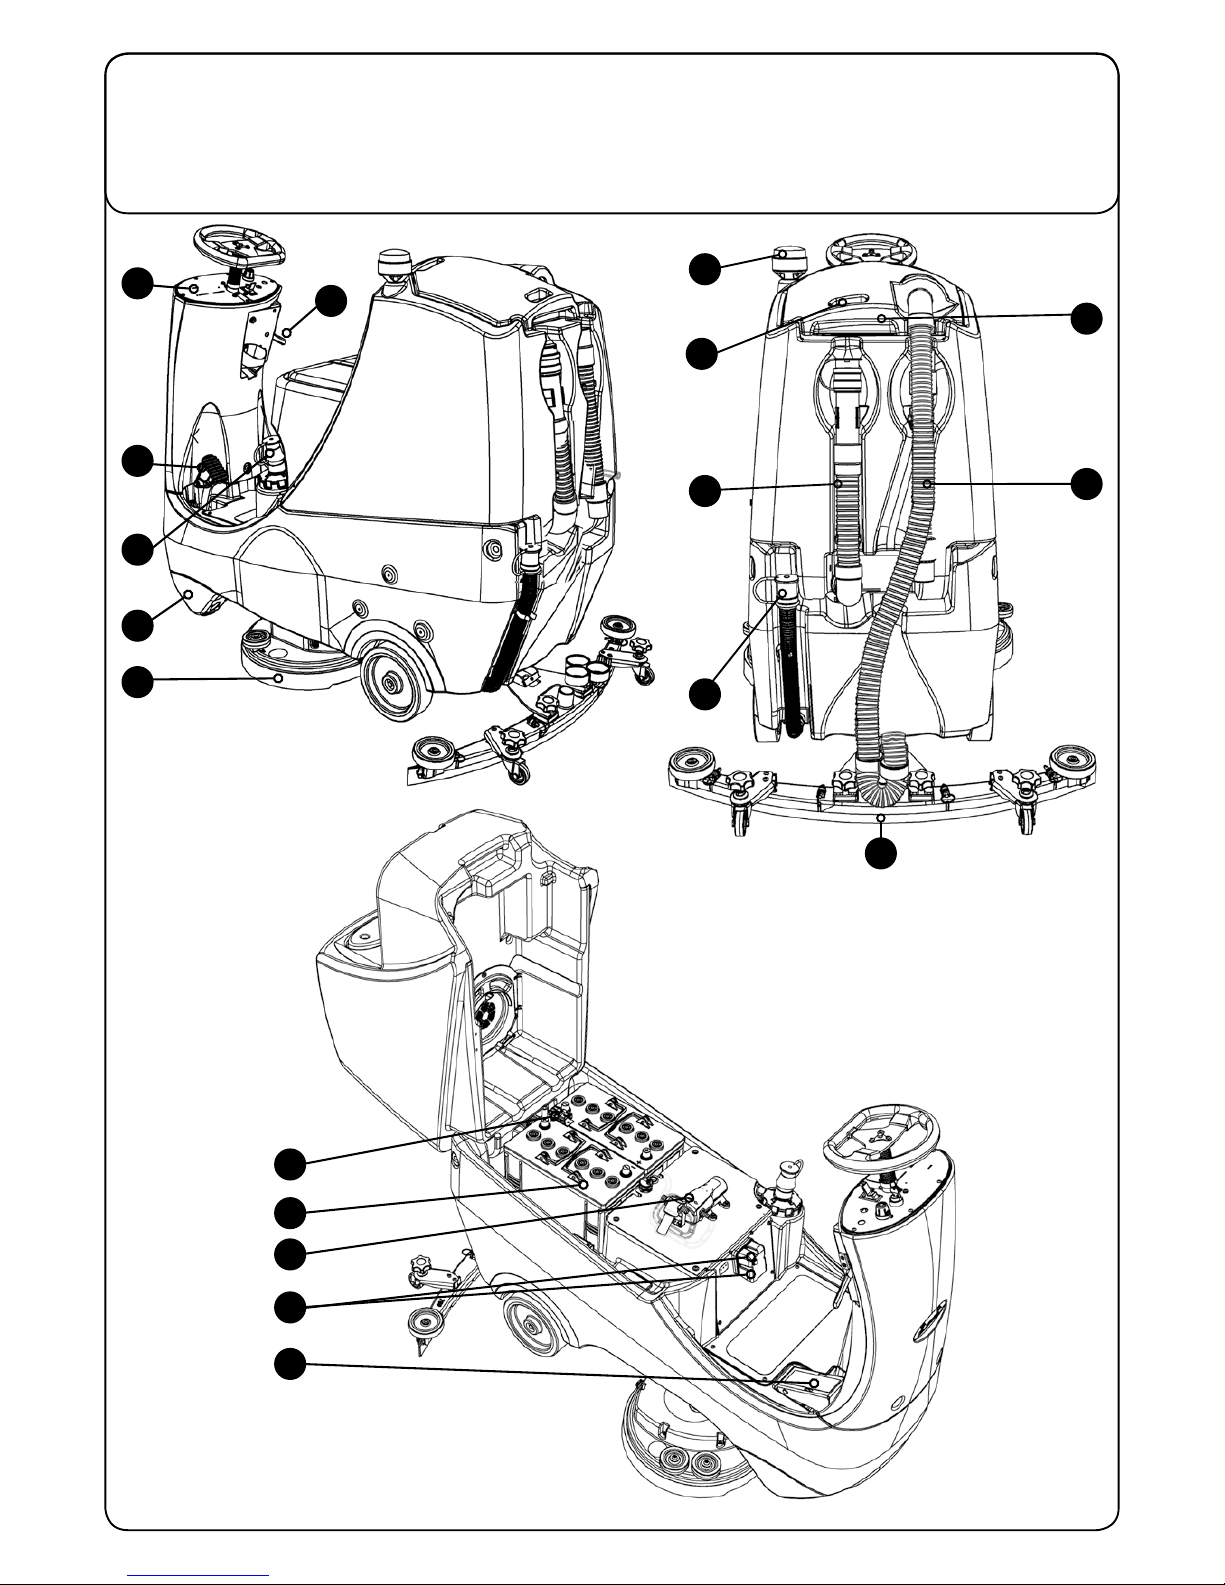
Operator control panel
2
Brush deck foot pedal
3
Anti-tip buers
4
Floor-tool raise / lower lever
5
Clean water tank ll point
6
Brush deck
7
40 Amp battery fuse
8
Gel batteries
9
Clean water tank lter
10
On-board charger and charge indicator
11
Accelerator pedal
12
Pedestrian warning light
13
Floor-tool transit bracket
14
Air separator assembly
15
Waste water emptying hose
16
Vacuum hose
17
Clean water tank emptying hose
18
Floor-tool
TGB 2120/2128
6
5
4
2
1
3
121314
15
16
17
18
10
9
8
7
11
Machine Overview

TGB 2120/2128
RIDE ON SCRUBBER DRYER
1
3
4
5
6
7
9
10
12
13
11
8
2
1
Water Flow Rate Indicator and Selection Button
8
On / O Switch
2
Brush Engage and Disengage Button
9
Forward / Reverse Switch
3
Service Indicator
10
LED Status Indicator
4
Brush Pressure / Load Indicator
11
Maximum Speed Control
5
Run Time Selection Button
12
Horn Button
6
Battery Charge Level Indicator
13
Emergency Stop Button
7
O Aisle Vacuum Button
Control Panel Overview
In the event of a breakdown contact
your Numatic dealer or the
Numatic Technical
help line +44 (0)1460 269268
5
T 01460 68600
Ensure that no metal objects
come into contact with
battery terminals while the
batteries are exposed.
ALWAYS WEAR GLOVES.
When inserting the rst
fuse you may notice
a spark, this is normal.
Use handle grip when
raising or lowering the
top waste-tank.
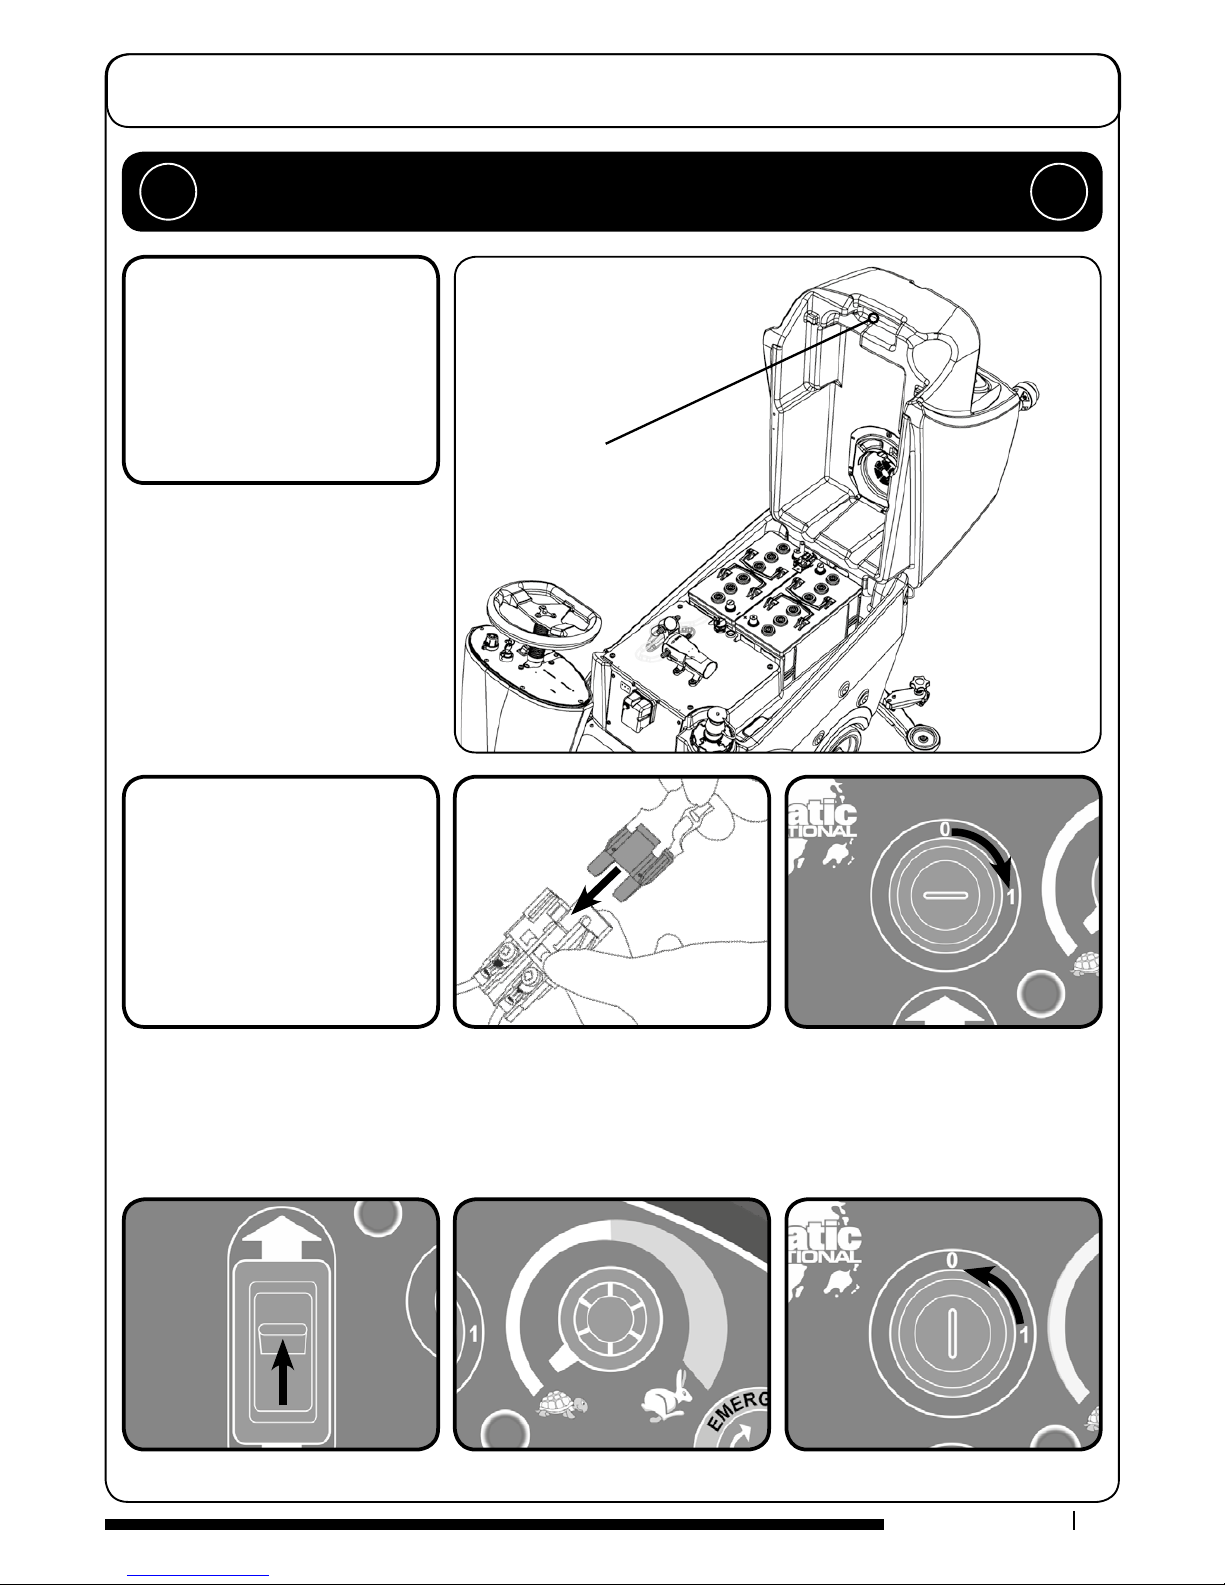
Machine Set-up Guide
CONTENTS
1 x Owner Manual
2 x Battery Charging Lead
2 x Keys
1 x 40 Amp Fuse (1 spare)
1 x
Maxi Fuse-puller
Lift top tank assembly to reveal
battery compartment.
Always lift using handle grips as shown.
Remove transit block from pallet.
PLEASE READ BEFORE COMMENCING ANY OPERATION AFTER THE REMOVAL OF ALL
THE PACKAGING, CAREFULLY OPEN AND CHECK THE CONTENTS.
!!
Fit the battery fuse. Switch on the machine.
Set lever to forward. Set to slowest speed, depress accelerator and
drive o the palette using ramp provided.
Once in a safe location switch o machine.
Less Battery Models - Numatic International Ltd recommends using MK Batteries for 2120 and 2128 in the TGB machines
mentioned in this manual. For full battery specications see page 22.
NOTE: DO NOT depress accelerator pedal while software initialises.
The seat is
tted with a pressure sensor that disables the machine until an operator is seated.

6
www.numatic.co.uk
The U-bend in the hose prevents water spillage when the vacuum is switched o.
Ret vacuum hose to the oor tool when nished.
Hose U-bend Clip
NOTE: DO NOT push the vacuum hose
onto the oor tool with the oor tool in
the raised position.
Machine Set-up Guide
The oor tool design incorporates a safety knock-o feature, this allows it to safely
disengage from its mounting should it become caught on an obstruction during
forward movement.
Make sure you do not over tighten the retaining knobs.
Break-away Floor Tool
Fitting the Floor Tool
NOTE: Raise oor tool before driving to the cleaning area.
The machine will not operate in reverse with the oor tool lowered.
Lower the oor tool.
Slide oor tool onto bracket. Tighten retaining knobs to nger tight
and attach hose.
Raise the oor tool.
7
T 01460 68600
Machine Set-up Guide
Always ensure that the machine is switched o before making any adjustments.
!!
10
11
12
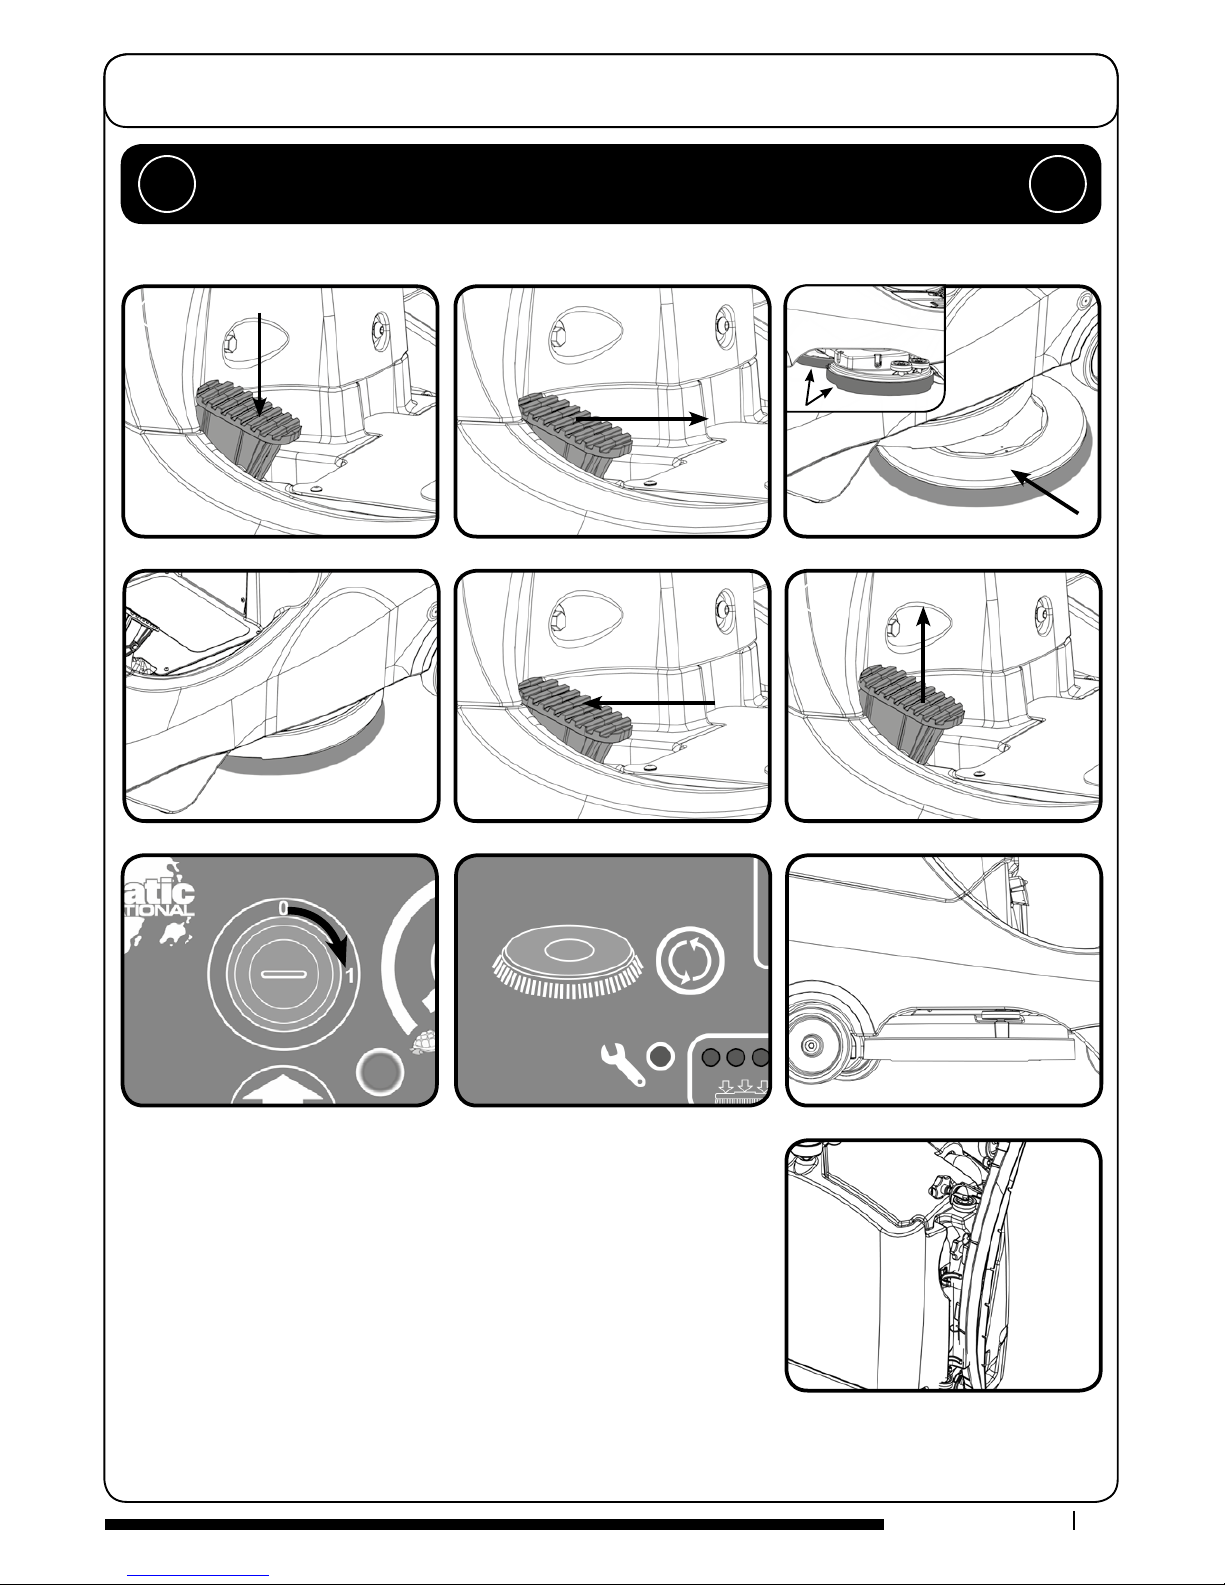
Raise Brush Deck / Fitting the Brush / Lower Brush Deck
Please follow the same process to fit both brushes to the TGB
2128 as is for the single
brush fitting on the TGB 2120.
To disengage the brush, press the brush engage button with the brush deck in the
raised position.
NOTE: Do not lift the brush deck until the brush has stopped revolving or the
brush will release.
Make sure you raise the brush deck before driving to the cleaning site.
Safety Gloves are recommended for the changing of used brushes.
Floor Tool Transit Bracket
When in transit, the oor tool can be placed on the bracket at the rear of the machine.
Simply slot the retaining knob into the bracket.
Raise brush deck. Brush deck raised position. Slide brush under machine.
Brush in place. Lower brush deck. Brush deck lowered.
Press brush engage button.
Switch machine on. Machine has picked up the brush.
TGB
2128
Twin Brush

8
www.numatic.co.uk
NOTE: Great care must be taken to ensure that contaminants (leaves, hair, dirt, etc.) are not allowed to enter the clean water
tank during the lling process. If using a bucket or similar, ensure it is always clean and free from debris.
When lling the clean water tank, do not ll
above the clean water tank emptying hose
retaining clip.
This can be found at the rear of
the machine.
Machine Set-up Guide
Always ensure that the machine is switched o before making any adjustments.
!!
F
illing the Clean Water Tank
The TGB 2120/2128 is equipped with a large capacity 80 litre clean water tank, allowing for large areas to be covered in a single fill.
10
Fill Level Indicator
If you need to access the batteries, make sure that the
waste water tank is empty before lifting.
!!
To ll clean water tank extend ll hose. Remove rubber seal and ll. Alternatively remove ller cap completely.

9
T 01460 68600
Drive the machine to the cleaning site (read set-up guide again if necessary - page 5).
Before cleaning operation, place out appropriate warning signs and sweep or dust-mop the oor.
When ready for cleaning lower the oor tool (page 6) and the brush deck (page 7).
The vac shut o system stops the airow when the top waste water tank is full.
The vac motor will continue to run, there is an audible dierence in the sound when the shut o system operates.
For more details on checking and cleaning the shut o system see page 13.
Machine Operation
IMPORTANT
Do not operate machine unless the operator manual has been read and fully understood.
!!
Setting the Cleaning Controls
= No Flow
= 0.5 L/min
= 1.0 L/min
= 1.5 L/min
= 2.0 L/min
= 3.0 L/min
Waste Water Tank Full
Always ensure that the oor is pre-swept and relevant safety signs are displayed.
!!
Open Closed
Switch machine on.
Battery charge-level indicator illuminates. Set the water ow rate as required.
 Loading...