

Page 1
•
•
•
•
Professional CD Mixing Console
Quick Start Owner’s Manual
BOX CONTENTS
• CDMIX3 CD MIXING STATION
POWER ADAPTER
Manual de inicio rápido del
usuario
(ESPAÑOL)
CONTENIDO DE LA CAJA
• ESTACIÓN DE MEZCLAS DE CD CDMIX3
• ADAPTADOR DE CORRIENTE
Schnellbedienungsanleitung(DEUTSCH)
BOX CONTENTS
• CDMIX3 CD MIXING STATION
POWER ADAPTER
Manuale Rapido di Utilizzazione(ITALIANO)
CONTENUTO DELLA CONFEZIONE
• CD MIXING STATION CDMIX3
ADATTATORE
Guide d’utilisation simplifié (FRANÇAIS)
CONTENU DE LA BOÎTE
• STATION DE MIXAGE CDMIX3
ADAPTATEUR DE COURANT
Page 2
CDMIX3 QUICK SETUP
1. Make sure all items listed on the front of this guide
are included in the box.
2. READ SAFETY INSTRUCTION BOOKLET BEFORE
USING THE PRODUCT.
3. Study this setup diagram.
4. Place CDMIX3 station in an appropriate position for
operation.
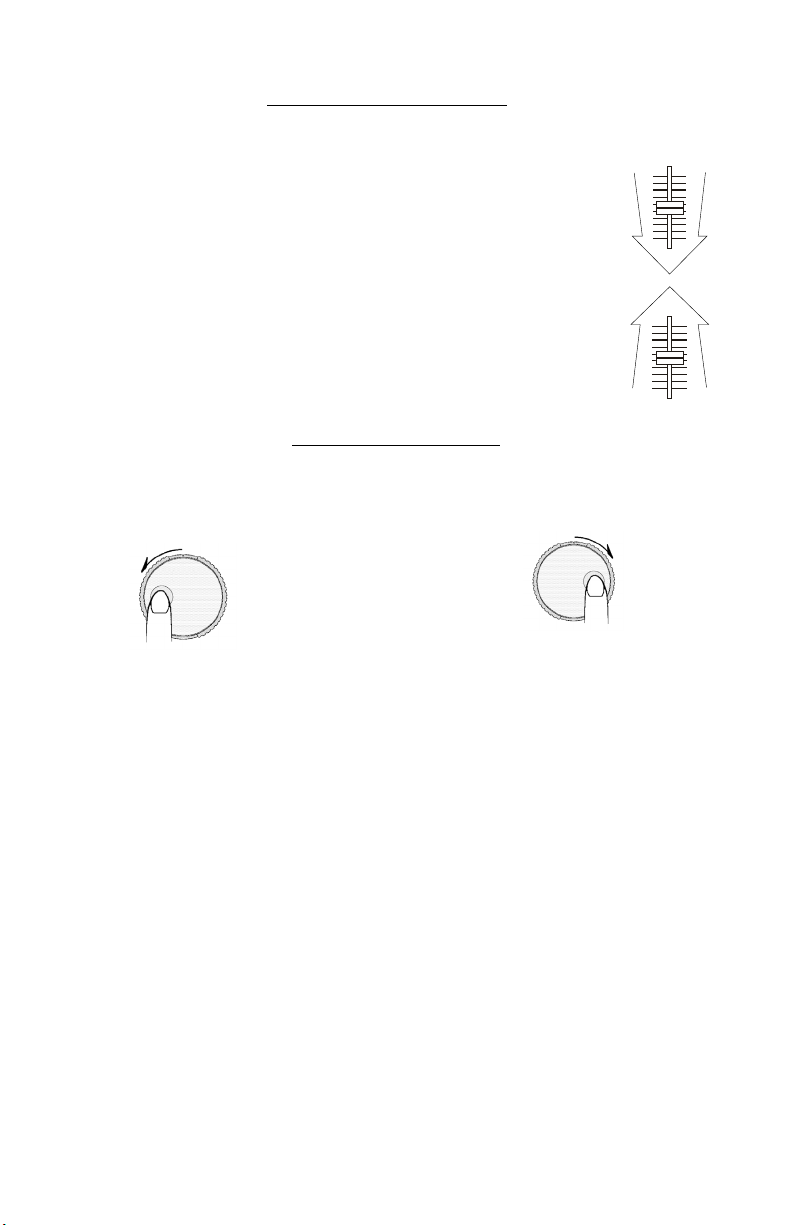
5. Make sure all devices are turned off and all faders
and gain knobs are set to “zero”
6. Connect all stereo input sources as indicated in the
diagram.
7. Connect the stereo outputs to power amplifier(s),
tape decks, and/or other audio sources.
8. Plug all devices into AC power.
9. Switch everything on in the following order:
• audio input sources (i.e. turntables or CD
players)
• CDMIX3
• last, any amplifiers or output devices
10. When turning off, always reverse this operation by,
• turning off amplifiers
• CDMIX3
• last, any input devices
11. Go to http://www.numark.com
registration.
More information about this product may be found at
http://www.numark.com
for product
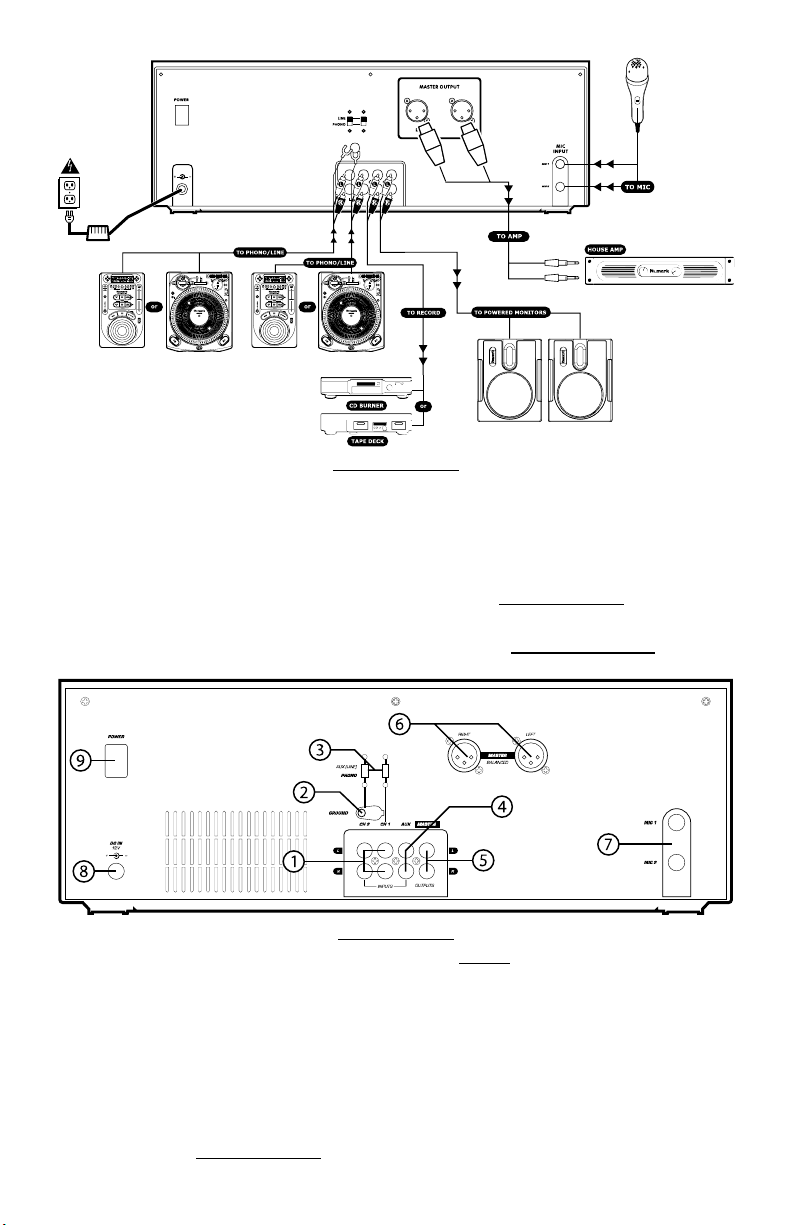
REAR CONNECTIONS
1. Channel Inputs: Unbalanced RCA jacks for
connecting external sources. The Phono/Line input is
selected using the toggle switch on the front panel.
Turntables, HiFi VCRs, cassette and reel-to-reel tape
decks, DAT machines, CD players, laser discs, tuners,
even synthesizers or other mixing consoles can be
connected using these jacks. NOTE: Plug mono audio
sources into both left and right inputs using a “Y”
cable connector.
2. GND: This screw connector should be used to connect
any turntables or other devices that need to be
grounded.
3. Line/Phono Input Switch: Use this to allow either
line level or phono level equipment to be plugged into
your channel inputs. When Phono input is selected,
your signal is fed directly to the high-quality RIAA
phono pre-amplifiers. Use this position only for
turntables. Line level sources will overload the
sensitive phono pre-amps and will sound very bad, so
always be sure to toggle the li ne/phono switch over to
line before connection of line sources.
4. Third Line Input: Plug in a third line level device
such as a tape deck or additional CD player here.
5. Stereo Master Outputs: Unbalanced RCA connectors
controlled by the Master fader.
6. Stereo Balanced Master Outputs (XLR): lowimpedance XLR type connectors controlled by the
Master fader.
7. Mic Input: Plug your 1/4” Microphone plug in here.
8. AC In: This mix station is designed to work with the
power supply cord that comes with the unit. While the
power is switched off, plug the power supply into the
mix station first, then plug it into the outlet.
Page 3

9. Power Switch: Use this switch to turn on the mix
station after all input devices are already connected to
prevent damage to your equipment. Turn the station
on before you turn on amplifiers and turn off
amplifiers before you turn off the mix station.
FRONT PANEL FEATURES
1. Input Fader: Controls individual source levels in
the mix.
2. Input toggle switch - Selects which source will be
live to that channel based on what you have
connected to the rear panel input section
3. 2-Band Stereo Equalizer (EQ) - compensates for
differences in source material sound quality.
4. Replaceable Crossfader - Achieves clean segues
between the two input channels. "Hard left" selects
Channel 1. "Hard right" selects Channel 2. With the
crossfader centered, both assigned channels are
live. Use the crossfader for fast and seamless
segues from one selected channel to the other
Note: The crossfader is user replaceable in case of
failure. Simply unscrew the two large screws which
hold it in place, lift it out and disconnect it’s cable.
Re-attach the new crossfader and screw the
mounting plate back onto the unit - you’re back in
business!
CD PLAYER FEATURES
1. OPEN/CLOSE (Disc Tray Open/Close) - Press to
load or eject the disc. Each press will open or close
the disc tray on the transport. NOTE: Tray will not
open unless the disc has been paused. Tray will
automatically close after 30 seconds.
2. TIME (Time Button) - Switches the time display
between elapsed playing time and remaining time
on the track and remaining time on the entire CD.
3. CONT/SING - Will cause just a single track to play
or all tracks in order by pressing once or twice.
4. LCD DISPLAY - Indicates all the functions, as they
are occurring, with the CD. These functions are
explained in the next section.
5. TRACK (Track Buttons) - Used to select the track
to be played.
5. Fader Start – Activation allows you to start the CD
players from you crossfader. Travel from left to right
will start the right CD player and pause the left CD
player
6. Mic Input Fader – Adjusts microphone level.
7. Mic 1 Equalizer (EQ) – Adjusts microphone 1
treble and bass levels.
8. Master Stereo EQ – Adjust final master ouput
equalization of trevle, middle, and bass levels.
9. Master Fader – Controls the overall outuput level.
10. Stereo/Mono Toggle – Changes the master
output between Mono and Stereo.
11. LED METER - Indicates the Master output level.
12. Channel Monitor Selector – Used to route channel
audio to your headphones for cueing.
13. Cue Mix Control – Adjusts the headphone blend of
master output (PGM) and monitor (CUE) sound.
14. Headphone Level – Adjusts cue volume.
15. Headphone Jacks – Used to connect either 1/8” or
1/4” plugs for audio monitoring with headphones.
6. Folder/ +10 – Selects folder from which tracks are
to be played. On a disc which contains no folders,
this button is used to advance tracks in increments
of 10
7. PROGRAM - Depress this button and the unit will
stop and the program indicator will light. Select
each track to be programmed and press the
PROGRAM button between selections. You can
program up to 30 tracks. Press PLAY to start the
program. To exit and erase program, either hold
the program button down for more than 2 seconds
while the unit is stopped, open the disc tray, or turn
off the power.
Page 4
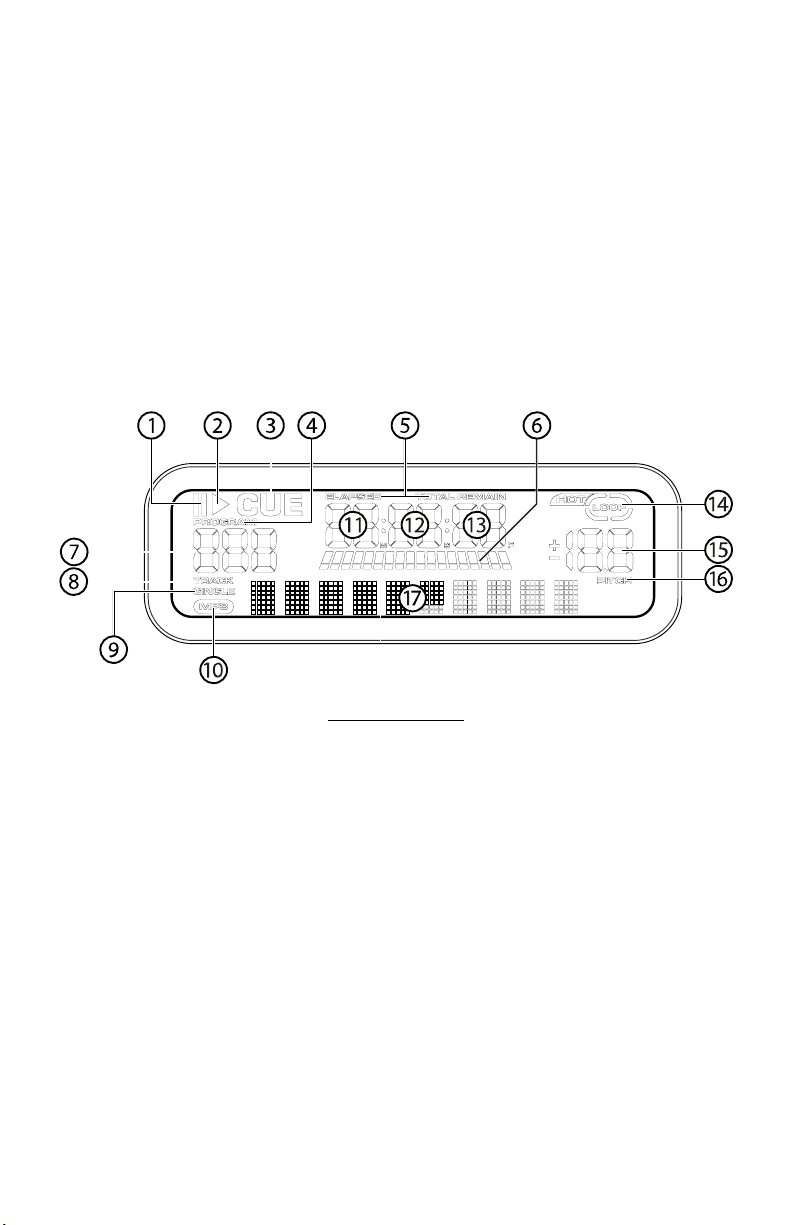
8. PITCH (Pitch Button) - Activates the Pitch Slider.
To alternate between ±8% and ±16%, press and
hold PITCH button. LED will indicate active setting.
9. PITCH SLIDER - The pitch can be changed up to
±16% by pressing the PITCH button so the PITCH
LED is lit, then moving the sliding fader. The pitch
will not be changed if the PITCH LED is off.
10. SEARCH WHEEL (OUTER RING) - 3 forward and 3
reverse speed positions for searching through
songs. The more you turn the wheel in either
direction the faster you search through the music.
11. PITCH BEND/JOG WHEEL (INNER RING) - The
jog wheel serves 2 functions depending on the
current mode.
a) The jog wheel will control a slow frame
search when the CD is not playing. To set a
new frame cue point, spin the wheel then
press play when you have determined the
proper position. Press CUE to return to the
“CUE POINT”.
b) When both CD players are playing a CD, the
pitch bend function allows the positioning of
the bass beats to be matched after the pitch
of each disc is matched. Either player can
“catch up” or “fall back” to match the other
player. The jog wheel will temporarily bend
the pitch of the music if the song is already
playing by rotating the wheel clockwise to
speed up or counterclockwise to slow down.
By changing the pitch of one disc with
respect to the pitch of the other disc, the
12. CUE - Pressing the CUE button during play provides
13. START/PAUSE (Play/Pause Button) - Each
14. LOOP IN – Used for setting a start loop point and
15. LOOP OUT – Used for setting the end loop point
16. RELOOP / STUTTER – Depending on mode, as
beats can be matched.
a return to the position at which play was started.
If PAUSE is used before CUE, that will become the
cue point. Alternately pressing the PLAY button and
the CUE button allows the CD to be played from the
same position any number of times. The CUE LED
will light up from the time the CUE button is pressed
until the CD has been reset to the position at which
play was started. Steady lighting of this LED
indicates the ready condition.
press of the Play/Pause Button causes the operation
to change from play to pause or from pause to play.
new cue points during playback.
and releasing the loop action.
explained further, this button is used for either
repeating a previously set loop or seamlessly
stuttering on the last set cue point.
1. PAUSE: Active when the unit is paused.
2. PLAY: Active while a CD is playing.
3. CUE: Flashing when the unit is setting a cue point.
Lit continuously when the unit is paused at a cue
point.
4. PROGRAM: Used for pre-programming the track
order to automatically be played by the unit. This is
a great function if you need to leave the CD player
alone.
5. TIME MODE: (Elapsed) is for showing time as it is
taking place.(Remain) shows how much time is left
on a particular track. This function is controlled by
the TIME BUTTON.
6. TIME BAR: Shows either time remaining or
elapsed depending on the setting of the TIME
BUTTON.
7. TRACK NUMBER: Shows the current track that the
unit is playing. While searching folders, the selected
folder is displayed, denoted by the letter F.
8. TRACK: Lights while unit is in Track Play mode.
9. SINGLE: Shows when the unit is set to play just
one track at a time. When this is not lit, the CD will
LCD DISPLAY FEATURES
play continuously through all tracks. This function is
controlled by the SING/CONT BUTTON.
10. MP3: Lit when unit is playing an MP3 file.
11. MINUTES: Shows the minutes elapsed or
remaining depending on mode setting.
12. SECONDS: Shows the seconds elapsed or
remaining depending on mode setting.
13. FRAMES: The CD Player breaks down a second into
75 frames for accurate cueing. This shows the
frames elapsed or remaining depending on mode
setting.
14. LOOP: Indicates when loop is actively playing.
15. PITCH: Shows the percentage change in pitch.
16. PITCH: Is lit when the PITCH BUTTON is active.
17. MATRIX DISPLAY: Displays CD Text or MP3 Tag
information. If reading a disc with no encoding,
display will read “NO TEXT”. Also displays folder
names while searching through folders.
Page 5
o
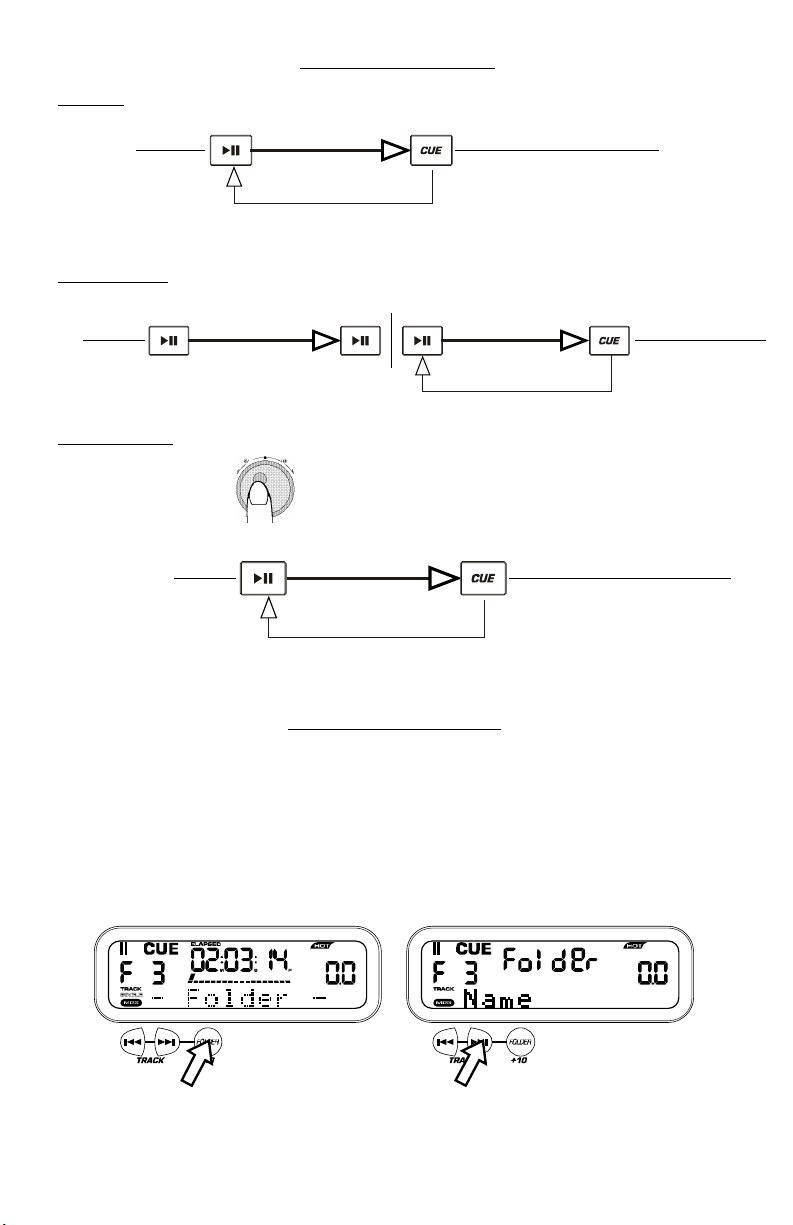
PLAY & CUE
PLAY / PAUSE & CUE OPERATIONS
Press "PLAY/PAUSE"
to start music
Play Interval
Press "CUE" return to
last starting point
Position on Disc
Pressing the “PLAY/PAUSE” button starts the disc. Pressing the “CUE” button will reset the disc to the last place where the disc was
started. This is called the cue point. By alternately pressing the “PLAY/PAUSE” button and the “CUE” button, the disc may be returned
and played from the cue point any number of times. This function is called back cue.
PLAY, PAUSE & CUE
Press "PLAY/PAUSE"
to start music
Play Interval Play Interval
When play has been paused and then started again, the return position for the back cue will be updated to this new position.
EDITING CUE POINT
Adjust the "CUE" point
with the jog wheel
Press "PLAY/PAUSE"
When the inner dial is turned while a cue point is set, a new cue point can be located. The CD player will repeatedly play small parts of the
CD as you move it to the desired position. By pressing “PLAY/PAUSE” then “CUE” you can confirm that the new cue point is desirable.
One way to organize the MP3 files on your CD’s is by using Folders. Folders make it easier to find the music you want quickly. The
CDMIX3 is set up to navigate folders, making it the ideal tool for the professional DJ.
Note that the Track +10 feature is not available when a disc that contains folders is inserted into the drive. This feature is only used
with discs that do not contain folders.
The CDMIX3 Folder Search feature is easy to use.
1. Place an MP3 CD that contains folders into one of the CDMIX3’s two CD drives.
2. When the Disc is ready, the LCD display will change from “READ” to displaying the folder name.
3. Press the FOLDER button. The LCD display will flash “FOLDER”. Use the TRACK search buttons to scan through the
named folders contained on the disc. Press the FOLDER button again to select a folder. LCD display will flash “TRACK
LIST”.
4. You may now search tracks contained within the selected folder using the TRACK search buttons to scan through the
tracks contained within the folder.
Back Cue Operation
Press "PLAY/PAUSE"
to pause music
to start music
Play Interval
Back Cue Operation
USING THE FOLDER SEARCH FEATURE
Press "PLAY/PAUSE"
to start music
Press "CUE" return to
last starting point
Back Cue Operation
Press "CUE" return t
last starting point
Position on Disc
Position on Disc
Page 6
Match the tempo by monitoring the music of both PLAYER 1 and PLAYER 2 by ear and adjusting the pitch. When the tempo of the music of
the selected CD player is sl ow compared to the tempo of the other player, move the slider to the ( + ) side and match the tempo. When
faster, move the pitch slider to the ( - ) side. The following illustration shows the case of matching the pitch of PLAYER 2 to the pitch of
the music being played on PLAYER 1.
1. Press PLAY/PAUSE to start PLAYER 1.
PLAYER 1 is playing
2. Press PLAY/PAUSE to start PLAYER 2
Both CD players are playing discs.
3. Listen to PLAYER 2 in your headphones. If the beat of channel 2 (in the headphones) is faster than channel
1, slow down the beat of channel 2 using the pitch control.
4. If the beat of channel 2 (in the headphones) slower than the beat of channel 1, speed up the beat using the
pitch control.
If you find the BPM’s (Beats Per Minute or Tempos) are the same, however, the drum beats are not matched you will need to
temporarily change the pitch. The illustration below shows how to match the beat of PLAYER 2 to the beat of the music being played
on PLAYER 1. (This procedure can be done on either PLAYER).
After matching the BPM’s adjust the pitch temporarily as follows:
When PLAYER 2 is rotate the jog wheel counter clockwise
MATCHING THE BEATS PER MINUTE (BPM)
BEAT MATCHING USING PITCH BEND
When PLAYER 2 is behind rotate the jog wheel clockwise
The pitch changes automatically while the jog wheel is rotated. The faster you rotate the wheel the more you change. Releasing the
wheel results in a return to the original pitch. (So the BPM’s are once again the same.)
Page 7
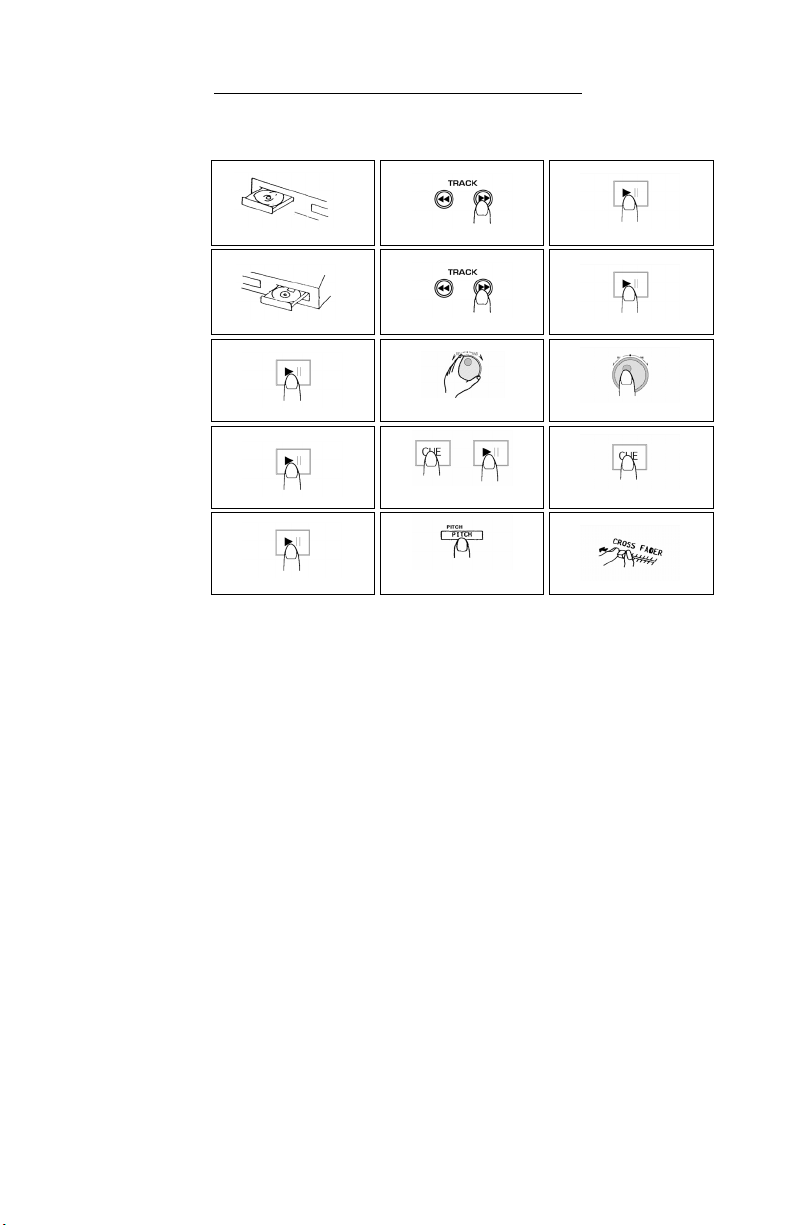
While playing a disc on PLAYER 1, load a disc into PLAYER 2 and select your next track, match its pitch to the track playing on
PLAYER1 and when you are ready use the crossfader on your mixer to fade from PLAYER 1 to PLAYER 2.
EXAMPLE OF MIXING USING BOTH PLAYERS OF YOUR CD PLAYER
Load a disc in PLAYER 1 and
select the track and press PLAY.
Load a disc in PLAYER 2 and
select the track then play.
Set and edit a start cue point on
PLAYER 2
Check your new cue point
Do a MIX!
PLAYER 1
Load a disc and press the
OPE N/CLOSE butto n.
PLAYER 2
Load a disc and press the
OPE N/CLOSE butto n.
PLAYER 2
Press the Pause button ofPLAYER 2.
PLAYER 2
Listen with the mo nitor an d
press the play button.
PLAYER 2
With a matchingdownbeat from
Player1 pressthe playbutton.
PLAYER 1
Se lect the tra ck to b e pla yed.
PLAYER 2
Se lect the tra ck to b e pla yed.
PLAYER 2
Rapidlys earch fora cue pointus ing
the oute r whee l
PLAYER2
Press the cue button then playto be
sure of the set cue point.
PLAYER 2
Ifyou are bea tmixing, turn on your
Pitch ad just an d follow the directions
for beat matching.
PLAYER1
Pre ss the PLAY butto n
PLAYER2
Pre ss the PLAY butto n
PLAYER 2
Slowly set the rightc ue point
usingthe innerwheel
PLAYER2
Re set the playe r to the Cue po int
by pressing Cue
MIXER
Whenyouarehappywithyourmix
move the cros sfad er a ccording ly.
Page 8

Page 9
INSTALACIÓN RÁPIDA DEL CDMIX3 (ESPAÑOL)
1. Asegúrese de que todos los artículos incluidos al
inicio de este manual están incluidos en la caja.
2. LEA EL FOLLETO DE INSTRUCCIONES DE
SEGURIDAD ANTES DE UTILIZAR EL
PRODUCTO.
3. Estudie este diagrama de instalación.
4. Coloque la estación de mezclas en una posición
adecuada para su funcionamiento.
5. Asegúrese de que todos los dispositivos están
apagados y de que todos los faders y
potenciómetros de ganancia están en posición
“cero”.
6. Conecte todas las fuentes de entrada al estéreo
como se indica en el diagrama.
7. Conecte las salidas del estéreo a los amplificadores
de alimentación, unidades de cinta magnética y/o
otras fuentes de audio.
8. Enchufe todos los dispositivos al suministro de
corriente alterna.
9. Prenda todo en el siguiente orden:
• fuentes de entrada de audio (por ej.
• CDMIX3
• por último, cualquier amplificador o
10. Al apagar, realice siempre esta operación al
contrario:
• apague los amplificadores
• CDMIX3
• por último, cualquier dispositivo de entrada
11. Visite http://www.numark.com
producto.
Puede encontrar más información sobre este
producto al visitar http://www.numark.com
giradiscos o reproductores de CD)
dispositivo de salida
para registrar el
CONEXIONES TRASERAS
1. Entradas de canal: Jacks RCA no balanceados para
la conexión de fuentes externas. La salida de
Phono/Línea es seleccionada utilizando el interruptor
de palanca del panel delantero. Giradiscos,
reproductores de video de alta fidelidad (HiFi),
casetes y unidades de cinta magnética reel-to-reel,
máquinas DAT (Digital Audio Tape), reproductores
de CD, discos láser, sintonizadores e incluso
sintetizadores u otros instrumentos pueden ser
conectados utilizando estos jacks. NOTA: Enchufe
las fuentes de audio mono en ambas entradas,
derecha e izquierda, usando un cable conector tipo
“Y”.
2. GND: Este conector de tornillo debe ser usado para
conectar cualquier giradiscos u otro dispositivo que
tiene que ser conectado a tierra.
3. Line/Phono Input Switch: Haga uso de este
interruptor para dejar que el equipo de nivel de
línea o nivel de phono pueda ser enchufado en sus
entradas de canal. Cuando se seleccione la entrada
de phono, su señal introducida directamente a los
pre-amplificadores phono RIAA de alta calidad.
Page 10

Utilice esta posición solo para giradiscos. Las
Fuentes de nivel de línea sobrecargarán los preamplificadores de phono sensibles y tendrá un
sonido de muy mala calidad, así que asegúrese
siempre de conmutar el interruptor de línea/phono a
línea antes de conectar las fuentes de línea.
4. Third Line Input: Plug in a third line level device
such as a tape deck or additional CD player here.
5. Stereo Master Outputs: Unbalanced RCA
connectors controlled by the Master fader.
6. Salidas Master Balanceadas de Estéreo (XLR):
conectores tipo XLR de baja impedancia controlados
por el Master fader.
7. Salida de micro (Mic): Enchufe su micrófono de
¼” aquí.
8. AC In (Entrada de corriente alterna): Esta
estación de mezclas está diseñada para trabajar con
el cable de suministro de alimentación que
acompaña a la unidad. Mientras que la alimentación
esté apagada, enchufe primero el suministro de
alimentación a la estación de mezclas y luego
enchúfelo a la toma de corriente.
9. Interruptor de alimentación: Use este
conmutador para prender la estación de mezclas
después de que todos los dispositivos de entrada
hayan sido conectados para evitar daño a su equipo.
Prenda la estación de mezclas antes de prender los
amplificadores y apague los amplificadores antes de
apagar la estación de mezclas.
LAS CARACTERÍSTICAS DEL PANEL FRONTAL
1. Fader de entrada: Controla los niveles de fuente
individuales del mezclador.
2. Interruptor de palanca de entrada: Selects
which source will be live to that channel based on
what you have connected to the rear panel input
section
3. 2-Band Stereo Equalizer (EQ) - compensates for
differences in source material sound quality.
4. Crossfader reemplazable – Consigue segues
limpios entre los dos canales de entrada.
“Completamente hacia la izquierda” selecciona el
canal 1. “Completamente hacia la derecha”
selecciona el canal 2. Con el crossfader en el centro,
ambos canales están activos. Use el crossfader para
segues rápidas y uniformes de un canal
seleccionado a otro.
Nota: El crossfader puede ser reemplazado por el
usuario en caso de fallo. Simplemente, desatornille
los dos tornillos grandes que lo sujetan, sáquelo
hacia fuera y desconecte el cable. Vuelva a sujetar
el nuevo crossfader y atornille la placa de montaje
de nuevo en la unidad – ¡ya puede volver al trabajo!
5. Activador del Fader (Start) – La activación le
permite poner los reproductores de CD en
6. Fader de entrada de micro – Ajusta el nivel del
7. Mic 1 Equalizer (EQ) – Adjusts microphone 1
8. Master Stereo EQ – Adjust final master ouput
9. Master Fader – Controls the overall outuput level.
10. Stereo/Mono Toggle – Changes the master
11. MEDIDOR LED – Indica el nivel de salida del
12. Channel Monitor Selector – Used to route channel
13. Cue Mix Control – Adjusts the headphone blend of
14. Nivel de auriculares- Ajusta el volumen de cue.
15. Conector de auriculares – Utilizado para conectar
funcionamiento desde su crossfader. Al desplazarlo
de izquierda a derecha, activará el reproductor de
CD de la derecha y desactivará el reproductor de CD
de la izquierda.
micrófono.
treble and bass levels.
equalization of trevle, middle, and bass levels.
output between Mono and Stereo.
master.
audio to your headphones for cueing.
master output (PGM) and monitor (CUE) sound.
clavijas de 1/8” o 1/4” para el monitoreo de audio
con los auriculares.
Page 11

Características del reproductor de CD
1. ABRIR/CERRAR (Bandeja de disco
Abrir/Cerrar) – Púlselo para introducir o expulsar
el disco. Cada vez que lo pulse se abrirá o cerrará la
bandeja del disco en la unidad. NOTA: La bandeja
no se abrirá a menos que el disco haya sido
detenido. La bandeja se cerrará automáticamente a
los 30 segundos.
2. TIME (Botón de tiempo) – Cambia la visualización
del tiempo entre el tiempo de reproducción
transcurrido y el tiempo restante en la pista y el
tiempo restante en todo el CD.
3. CONT/SING – Al pulsar una o dos veces, hará que
se reproduzcan una o todas las pistas en orden.
4. PANTALLA LCD – Indica todas las funciones del CD
a medida que van teniendo lugar. Estas funciones se
explican en la siguiente sección.
5. TRACK (Botones de pista) – Utilizados para
seleccionar la pista que se va a reproducir.
6. Folder/ +10 – Selects folder from which tracks are
to be played. On a disc which contains no folders,
this button is used to advance tracks in increments
of 10
7. PROGRAMA – Pulse este botón y la unidad se
detendrá y el indicador de programa se iluminará.
Seleccione todas las pistas que desee programar y
pulse el botón de PROGRAMA entre cada selección.
Podrá programar hasta 30 pistas. Pulse PLAY para
activar el programa. Para salir y borrar el programa,
mantenga pulsado el botón de programa durante
más de 2 segundos mientras la unidad está parada,
abra la bandeja del disco, o apague la fuente de
alimentación.
8. PITCH (Botón de Pitch) – Activa el deslizador de
tono (pitch). To alternate between ±8% and ±16%,
press and hold PITCH button. LED will indicate
active setting.
9. DESLIZADOR DEL PITCH – El pitch puede variar
hasta un ±16% pulsando el botón del PITCH de
modo que el LED del pitch esté iluminado; tras esto,
deslizando el fader. El pitch no variará si el LED del
pitch está apagado (OFF).
10. SEARCH WHEEL (RUEDA EXTERIOR) – esta
rueda dispone de 3 posiciones de velocidad de
avance y 3 de reverso para buscar dentro de las
canciones. Cuanto más gire la rueda en cualquiera
de las dos direcciones, más rápida será la búsqueda.
11. PITCH BEND/JOG WHEEL (RUEDA INTERIOR) –
Esta rueda de avance lento tiene 2 funciones
dependiendo del modo en el que se encuentre.
a) La rueda de avance lento controlará una
búsqueda de frames lentos cuando el CD no
se esté reproduciendo. Para determinar un
nuevo punto cue de frame, gire la rueda y
pulse PLAY una vez que haya determinado la
posición adecuada. Pulse CUE para volver al
“PUNTO CUE”.
b) Cuando ambos reproductores de CD están
reproduciendo un CD, la función pitch bend
permite el posicionamiento de los beats de
graves para que coincidan una vez que el
pitch de cada disco coincide. Cualquiera de
los reproductores puede “adelantarse” o
“atrasarse” para coincidir con el otro
reproductor. La rueda de avance lento (jog
wheel) cambiará provisionalmente el tono de
la música si la canción se está reproduciendo
girando la rueda en el sentido de las agujas
del reloj para acelerar o en el sentido
contrario para ralentizar. Cambiando el tono
de un disco con respecto al tono del otro
12. CUE – Al pulsar el botón de CUE durante la
13.
14. LOOP IN – Used for setting a start loop point and
15. LOOP OUT – Used for setting the end loop point
16. RELOOP / STUTTER – Depending on mode, as
disco, los beats pueden ser igualados.
reproducción, se volverá a la posición a la cual
comenzó la reproducción. Si se activa la PAUSA
antes del CUE, esto se convertirá en un punto cue.
Si se presionan alternativamente los botones PLAY y
CUE, el CD será reproducido desde la misma
posición cuantas veces se desee. El LED del CUE se
iluminará desde el momento en que se pulse el
botón de CUE hasta que el CD haya sido reiniciado a
la posición a la que se comenzó la reproducción.
Una iluminación continua de este LED indica que el
CUE está listo.
START/PAUSE (Botón de reproducción/pausa)
– Cada vez que se pulsa el botón de
reproducción/pausa esto hace que se cambie de
reproducción a pausa o de pausa a reproducción.
new cue points during playback.
and releasing the loop action.
explained further, this button is used for either
repeating a previously set loop or seamlessly
stuttering on the last set cue point.
1. PAUSE: Está activo si la unidad está en pausa.
2. PLAY: Está activo si la unidad está reproduciendo
un CD en ese momento.
3. CUE: Parpadea si la unidad está determinando un
punto cue. Se ilumina de forma continua si la unidad
está detenida en un punto cue.
4. PROGRAMA: Se utiliza para programar con
antelación el orden de las pistas que van a ser
reproducidas automáticamente por la unidad. Esta
Características de la pantalla LCD
es una función de gran utilidad si necesita dejar
alejarse del reproductor de CD.
5. MODO DE TIEMPO: “Transcurrido” muestra el
tiempo a medida que va teniendo lugar; “restante”
muestra cuánto tiempo queda en una pista
determinada. Esta función se controla mediante el
botón de TIEMPO (TIME).
6. BARRA DE TIEMPO: Muestra el ti empo restante o
transcurrido dependiendo de la configuración del
botón de tiempo.
Page 12

7. TRACK NUMBER: Shows the current track that the
a
a
l
a
unit is playing. While searching folders, the selected
folder is displayed, denoted by the letter F.
8. TRACK: Lights while unit is in Track Play mode.
9. SINGLE: Muestra cuando la unidad está configurada
para reproducir las pistas de una en una. Cuando no
esté encendido, el CD se reproducirá todas las
pistas de forma continua. Esta función se controla
mediante el botón de SING/CONT.
10. MP3: Lit when unit is playing an MP3 file
11. MINUTOS: Muestra los minutos restantes o
transcurridos dependiendo de la configuración del
modo.
12. SEGUNDOS: Muestra los segundos restantes o
transcurridos dependiendo de la configuración del
modo.
PLAY (REPRODUCCIÓN) Y CUE
Pulse "PLAY/PLAUSE" para
que comience la música
OPERACIONES DE PLAY/PAUSA Y CUE
Reproduzca la música
durante cierto tiempo
13. FRAMES: El reproductor de CD divide un segundo
en 75 frames para un cueing más preciso. Muestra
los frames restantes o transcurridos dependiendo de
la configuración del modo.
14. LOOP: Indicates when loop is actively playing.
15. PITCH: Shows the percentage change in pitch.
16. PITCH: Está iluminado cuando el botón de tono
(pitch) está activado.
17. MATRIX DISPLAY: Displays CD Text or MP3 Tag
information. If reading a disc with no encoding,
display will read “NO TEXT”. Also displays folder
names while searching through folders.
Pulse "CUE" para volver al
último punto de partida
Posición en el disco
Pulsando el botón de “PLAY/PAUSE” se pondrá el disco en funcionamiento. Pulsando el botón "CUE" se el disco comenzará de nuevo
en la misma posición en la que comenzó anteriormente. Esto es lo que se llama punto cue. Pulsando los botones de “PLAY/PAUSE” y
“CUE” alternativamente, el disco podrá volver al mismo punto cue y reproducirse cuantas veces desee. Esta función se denomina back
cue.
PLAY, PAUSE Y CUE
Pulse "PLAY/PLAUSE" par
Cuando la reproducción se haya detenido y comenzado de nuevo, la posición de retorno para el back cue será actualizada a la nueva posición.
MODIFICACIÓN DEL PUNTO CUE
Ajuste el punto "CUE" con la rueda
de avance lento (jog wheel).
que comience la música
Pulse "PLAY/PLAUSE" para
Operación de back cue
Pulse "PLAY/PLAUSE" par
que pare la música
Reproduzca la música
durante cierto tiempo
que comience la música
Pulse "PLAY/PLAUSE" par
que comience la música
Reproduzca la música
durante cierto tiempo
Operación de back cue
Pulse "CUE" para volver al
último punto de partida
Pulse "CUE" para volver a
último punto de partida
Posición en el disco
Posición en el disco
Reproduzca la música
durante cierto tiempo
Si la rueda interna se gira cuando se establece un punto cue, podrá hallarse un nuevo punto cue. El reproductor de CD reproducirá
repetidamente fragmentos cortos del CD a medida que lo mueve a la posición deseada. Pulsando “PLAY/PAUSE” y luego “CUE” podrá
confirmar que el nuevo punto cue es el que usted desea.
Operación de back cue
Page 13

One way to organize the MP3 files on your CD’s is by using Folders. Folders make it easier to find the music you want quickly. The
CDMIX3 is set up to navigate folders, making it the ideal tool for the professional DJ.
Note that the Track +10 feature is not available when a disc that contains folders is inserted into the drive. This feature is only
used with discs that do not contain folders.
The CDMIX3 Folder Search feature is easy to use.
5. Place an MP3 CD that contains folders into one of the CDMIX3’s two CD drives.
6. When the Disc is ready, the LCD display will change from “READ” to displaying the folder name.
7. Press the FOLDER button. The LCD display will flash “FOLDER”. Use the TRACK search buttons to scan through the
named folders contained on the disc. Press the FOLDER button again to select a folder. LCD display will flash “TRACK
LIST”.
8. You may now search tracks contained within the selected folder using the TRACK search buttons to scan through the
tracks contained within the folder.
USING THE FOLDER SEARCH FEATURE
Iguale el tempo monitoreando la música del reproductor 1 y 2 de oído y ajustando el pitch. Cuando el tempo de la música del
reproductor de CD seleccionado sea lento comparado con el del otro reproductor, desplace el deslizador hacia el (+) e iguale el
tempo. Cuando sea más rápido, desplace el pitch hacia (-). La siguiente ilustración muestra el caso en el que se iguala el pitch del
reproductor 2 con el pitch de la música reproducida por el reproductor1.
1. Pulse PLAY/PLAUSE para que comience el reproductor 1.
El reproductor 1 está en marcha.
2. Pulse PLAY/PLAUSE para que comience el reproductor 2.
Ambos reproductores de CD están en funcionamiento.
3. Escuche el reproductor 2 en sus auriculares. Si el beat del canal 2 (en los auri culares) es más rápido
que el del canal 1, ralentice el beat del canal 2 por medio del control del pitch.
4. Si el beat del canal 2 (en los auriculares) es más lento que el beat del canal 1, acelere el beat por
medio del control del pitch.
Aunque observe que los BPM (Beats por minuto o tempos) son iguales, sin embargo, los beats de la batería
no se corresponden y necesitará cambiar el pitch provisionalmente. La ilustración siguiente muestra cómo
igualar el beat del reproductor 2 al beat de la música que está sonando en el reproductor 1. (Este
procedimiento puede realizarse en cualquiera de los reproductores).
Una vez haya igualado los BPM, ajuste el pitch provisionalmente como se muestra a continuación:
Cuando el reproductor 2 esté adelantado, gire la rueda de
avance lento (jog wheel) en el sentido contrario a las
agujas del reloj
El pitch cambia de forma automática a medida que se gira la rueda de avance lento. Cuanto más rápido gire la rueda, más cambiará.
Si se suelta la rueda, se volverá al pitch original. (De modo que los BPM son de nuevo los mismos).
IGUALACIÓN DEL BEAT HACIENDO USO DEL PITCH BEND
IGUALAR LOS BEATS POR MINUTO
Cuando el reproductor 2 esté retrasado, gire la rueda de
avance lento (jog wheel) en el sentido de las agujas del
reloj
Page 14

Mientras reproduce un disco en el reproductor 1, inserte un disco en el reproductor 2 y seleccione la siguiente pista, iguale el pitch
con el de la pista del reproductor 1 y, cuando esté listo, use el crossfader de su mezclador para pasar lentamente del reproductor 1 al
reproductor 2.
EJEMPLO DE MEZCLA UTILIZANDO AMBOS REPRODUCTORES DE SU REPRODUCTOR DE CD
Page 15

Page 16

CDMIX3 SCHNELLAUFBAU
1. Versichern Sie sich, daß alle auf der Vorderseite
dieser Anleitung aufgeführten Gegenstände in der
Schachtel enthalten sind.
2. LESEN SIE DIE SICHERHEITSHINWEISE,
BEVOR SIE DAS PRODUKT IN BETRIEB
NEHMEN.
3. Sehen Sie sich dieses Aufbaudiagramm genau an.
4. Stellen Sie das CDMIX-Bedienpult an eine für den
Betrieb geeignete Stelle.
5. Stellen Sie sicher, daß alle Geräte ausgeschaltet
sind und alle Blendregler und Drehknöpfe auf "null”
stehen
6. Schließen Sie alle Stereo-Eingabequellen wie im
Diagramm gezeigt an.
7. Verbinden Sie die Stereo-Ausgabekanäle mit
dem/den Verstärker/n, Kassettendecks und/oder
anderen Tonquellen.
8. Schliessen Sie alle Geräte an den Wechselstromkreis
an.
(DEUTSCH)
9. Schalten Sie alles in der folgenden Reihenfolge ein:
• Toneingabequellen (z.B. Plattenspieler oder
CD-Spieler)
• CDMIX3
• zuletzt jegliche Verstärker oder
10. Beim Ausschalten, drehen Sie diese Reihenfolge
11. Besuchen Sie die Webseite
Weitere Informationen über dieses Produkt können
Ausgabegeräte
jeweils um, indem Sie:
• die Verstärker ausschal ten
• dann den CDMIX3
• zuletzt alle Eingabequellen
http://www.numark.com, um Ihr Produkt zu
registrieren.
unter der Adresse http://www.numark.com
gefunden werden
ANSCHLÜSSE RÜCKSEITE
1. Kanalanschlüsse: Unbalancierte RCA-Buchsen zum
Anschluss von externen Quellen. Der Phono/LineAnschluss wird über den Kippschalter an der
Vorderseite des Gerätes selektiert. Plattenspieler,
HiFi VCRs, Kassetten- und Tonbanddecks, DATMaschinen, CD-Spieler, Laser Discs, Tuner, sogar
Synthesizer oder andere Mix-Bedienpulte können
über diese Buchsen angeschlossen werden.
HINWEIS: Schliessen Sie Mono-Tonquellen mit
einer "Y”-Kabelverbindung an die linken und rechten
Anschlüsse an.
2. GND: Diese Schraubverbindung sollte zum
Anschluss jeglicher Plattenspieler oder anderer
Geräte, welche geerdet weden müssen, verwendet
werden.
3. Line/Phono Input Switch: Verwenden Sie diesen,
um entweder Line-Pegel oder Phono-Pegel Geräte
an Ihre Kanalanschlüsse anzuschliessen. Wenn
Phonoeingabe angewählt ist, wird Ihr Signal direkt
durch die Hochqualitäts-RIAA Phono-Vorverstärker
geleitet. Verwenden Sie diese Auswahl nur für
Plattenspieler. Line-Pegelquellen führen zu einer
Page 17

Überlastung der sensiblen Phonovorverstärker und
werden sehr schlechten Klang erzeugen, versicheren
Sie sich also, daß der Line-/Phono-Schalter auf Line
gestellt ist, bevor Sie Line-Quellen anschliessen.
4. Third Line Input: Plug in a third line level device
such as a tape deck or additional CD player here.
5. Stereo Master Outputs: Unbalanced RCA
connectors controlled by the Master fader.
6. Stereo-Balancierte Master-Ausgaben (XLR):
Niedrig-Impedanz Verbindungen vom Typ XLR,
welche vom Master-Blendregler gesteuert werden.
7. Mikrofoneingang: Schliessen Sie hier Ihren 1/4”Mikrofonstecker an.
8. Wechselstromanschluß: Dieses Mix-Bedienpult
ist für den Betrieb mit dem mitgelieferten
Stromkabel entworfen. Mit dem Gerät in
ausgeschaltetem Zustand, schliessen Sie die
Stromversorgung erst an das Mix-Bedienpult und
dann an die Steckdose an.
9. EIN/AUS-Schalter: Verwenden Si e diesen
Schalter, um das Gerät einzuschalten, nachdem alle
Eingabegeräte bereits angeschlossen sind, um Ihre
Ausrüstung vor Beschädigung zu schützen.
Schalten Sie das Bedienpult ein, bevor Sie den/die
Verstärker einschalten und schalten Sie den/die
Verstärker aus, bevor Sie das Bedienpult
ausschalten.
BEDIENUNGSELEMENTE VORDERSEITE
1. Eingabe-Blendregler: Steuert die Pegel der
individuellen Quellen im Mix.
2. Eingabe-Kippschalter – Selektiert die Live-Quelle
für diesen Kanal, abhängig davon, welche Geräte
Sie im Eingabebereich an der Rückseite
angeschlossen haben
3. 2-Band Stereo Equalizer (EQ) - compensates for
differences in source material sound quality.
4. Austauschbarer Überblendregler – Ermöglicht
saubere Übergänge zwischen den zwei
Eingabekanälen. "Ganz links" wählt Kanal 1 an.
"Ganz rechts" wählt Kanal 2. Wenn der
Überblendregler in der Mitte steht, sind beide
zugeordneten Kanäle live. Benutzen Sie den
Überblendregler für schnelle und nahtlose
Übergänge von einem gewählten Kanal zum
anderen
HINWEIS: Der Überblendregler kann vom Benutzer
bei Defekt ausgewechselt werden. Lösen Sie
lediglich die zwei großen Befestigungsschrauben,
heben Sie ihn heraus und ziehen Sie das Kabel aus
dem Regler. Stecken Sie den neuen Überblendr egler
ein und schrauben Sie di e Trägerplatte wieder an
das Gerät - und schon geht’s weiter!
5. Blendregler-Start – Falls dieser aktiviert ist,
6. Mikrofon-Eingabeblendregler – Steuert den
7. Mic 1 Equalizer (EQ) – Adjusts microphone 1
8. Stereo-EQ – Einstellung der Entzerrung von Höhen,
9. Master Fader – Controls the overall outuput level.
10. Stereo/Mono-Umschalter – Umschalten der
11. LED ANZEIGE – Zeigt den Pegel der Master-
12. Channel Monitor Selector – Used to route channel
13. Cue Mix Control – Adjusts the headphone blend of
14. Kopfhörerpegel – Stellt die Cue-Lautstärke ein.
15. Kopfhörerbuchsen – Werden zum Anschluss von
können Sie die CD-Spieler von Ihrem
Überblendregler aus starten. Wenn von links nach
rechts geschoben wird, wird der rechte CD-Spieler
gestartet und der linke CD-Spieler pausiert
Mikrofonpegel.
treble and bass levels.
Mitten und Bässen für die endgültige MasterAusgabe.
Master-Ausgabe zwischen Mono und Stereo
Ausgabe an.
audio to your headphones for cueing.
master output (PGM) and monitor (CUE) sound.
entweder 1/8” oder 1/4” Steckverbindungen zum
Ton-Monitoring mit Kopfhörer verwendet.
CD-SPIELER BEDIENELEMENTE
Page 18

1. AUF/ZU (Disc-Einlegevorrichtung Auf/Zu) –
Drücken Sie hier, um die Disc einzulegen oder
herauszunehmen. Jedes Betätigen wird die
Einlegevorrichtung auf der Schiene öffnen oder
schliessen. HINWEIS: Die Einlegevorrichtung öffnet
nur dann, wenn die CD pausiert ist. Die
Einlegevorrichtung schli esst nach 30 Sekunden
automatisch.
2. ZEIT (Zeittaste) – Schaltet die Zeitanzeige
zwischen vergangener Abspielzeit, verbleibender
Abspielzeit des Titels und verbleibender Abspielzeit
der gesamten CD..
3. KONT/EINZ – Bei einmaligem oder mehrfachem
Drücken, spielt das Gerät nur einen Titel oder alle
Titel nacheinander ab.
4. LCD-ANZEIGE- Zeigt alle CD-Funktionen
während des Ablaufs an. Diese Funktionen
werden im nächsten Abschnitt erläutert.
5. TITEL (Titeltasten) - Diese Tasten werden
benutzt, um den Titel, welcher gespielt werden soll,
auszuwählen.
6. Folder/ +10 – Selects folder from which tracks are
to be played. On a disc which contains no folders,
this button is used to advance tracks in increments
of 10
7. PROGRAMM – Drücken Sie diese Taste herunter,
wird das Gerät anhalten und die Programmanzeige
leuchtet auf. Wählen Sie alle Titel, welche in das
Programm aufgenommen werden sollen, aus und
drücken Sie die PROGRAMM-Taste nach jeder Wahl.
Sie können bis zu 30 Titel vorprogrammieren.
Drücken Sie PLAY, um das Programm zu starten.
Um aus dem Programm auszusteigen oder es zu
löschen, halten Sie entweder die Programmtaste für
mehr als 2 Sekunden gedrückt während das Gerät
gestoppt ist, öffnen die Einlegevorrichtung oder
schalten den Strom ab.
8. TONLAGE (Tonlagentaste) – Aktiviert den
Tonlagenschieberegler. To alternate between ±8%
and ±16%, press and hold PITCH button. LED will
indicate active setting.
9. TONLAGEN-SCHIEBEREGLER – Die Tonlage kann
bis zu ±16% verändert werden, indem man die
TONLAGE-Taste drückt, so daß das TONLAGE LED
aufleuchtet und dann den Schiebeblendregler
bewegt. Die Tonlage wird nicht verändert, wenn
das TONLAGE LED nicht aufleuhtet.
10. SUCHRAD (ÄUßERER RING) - 3 vorwärts und 3
rückwärts Geschwindigkeitsstellungen um
Musikstücke zu durchsuchen. Je mehr das Rad in
die eine oder andere Richtung gedreht wird, umso
schneller wird das Musikstück durchsucht.
11. TONLAGE VERÄNDERUNG/JOG-RAD (INNERER
RING) – Das Jog-Rad hat, abhängig von der
augenblicklichen Betriebsart, 2 Funktionen.
a) Während die CD nicht abgespielt wird, kann
das Jog-Rad eine langsame Rahmensuche
ausführen. Um einen neuen Rahmen-CuePunkt zu setzen, drehen Sie das Rad und
drücken Sie dann Play, sobald Sie die genaue
Position bestimmt haben. Drücken Sie CUE,
um zum “CUE POINT” zurückzukehren.
b) Falls beide CD-Spieler eine CD abspielen,
ermöglicht es die
Tonlageveränderungsfunktion, die Position
der Basstakte anzugleichen, nachdem die
Tonlage beider Discs angeglichen wurde.
Jeder der beiden Spieler kann “aufholen”
oder “zurückfallen” um dem jeweils anderen
Spieler gleichzukommen. Das Jog-Rad wird
vorübergehend die Tonlage des Musikstücks
verändern, wenn dieses bereits abgespielt
wird, durch Drehen des Rads im
Uhrzeigersinn um schneller zu werden oder
gegen den Uhrzeigersinn, um langsamer zu
werden. Die Takte können angeglichen
werden, indem die Tonlage einer Disc unter
Berücksichtigung der Tonlage der anderen
12. CUE – Drücken der CUE-Taste während des
13. START/PAUSE (Play/Pause-Taste) – Jedes
14. LOOP IN – Used for setting a start loop point and
15. LOOP OUT – Used for setting the end loop point
16. RELOOP / STUTTER – Depending on mode, as
Disc verändert wird.
Abspielens erzeugt eine Rückkehr zur anfänglichen
Abspielposition. Falls PAUSE vor CUE gedrückt wird,
wird dies der neue Cue-Punkt. Abwechselndes
Drücken der Tasten PLAY und CUE führt zum
beliebig oftmaligen Abspielen der CD, angefangen
von derselben Position. Das CUE LED leuchtet ab
dem Zeitpunkt auf, in dem die CUE-Taste gedrückt
wurde, bis die CD wieder auf die Position, an
welcher das Abspielen begann, zurückgesetzt
wurde. Falls dieses LED ständig aufleuchtet, zeigt
dies Betriebsbereitschaft an.
Drücken der Play/Pause-Taste schaltet zwischen
Abspielen und Pausieren und umgekehrt um.
new cue points during playback.
and releasing the loop action.
explained further, this button is used for either
repeating a previously set loop or seamlessly
stuttering on the last set cue point.
1. PAUSE: Aktiviert, wenn das Gerät pausiert.
2. PLAY: Aktiviert, während das Gerät eine CD
abspielt.
3. CUE: Blinkt, wenn das Gerät einen Cue-Punkt setzt.
Leuchtet ununterbrochen, wenn das Gerät an einem
Cue-Punkt pausiert.
4. PROGRAM: Wird verwendet, um die Titelfolge,
welches das Gerät automatisch abspielen soll,
vorzuprogrammieren. Dies ist eine hervorragende
LCD-ANZEIGEELEMENTE
Funktion für den Fall, daß Sie den CD-Spieler sich
selbst überlassen müssen.
5. TIME MODE: (Abgelaufen) zeigt die Zeit im
tatsächlichen Abspielverlauf an.(Verbleibend) zeigt
an, wieviel Zeit für einen bestimmten Titel verbleibt.
Diese Funktion wird über die ZEIT-Taste gesteuert.
6. TIME BAR: Zeigt entweder die verbleibende oder
die abgelaufene Zeit an, je nach Einstellung der
ZEIT-TASTE.
Page 19

7. TRACK NUMBER: Shows the current track that the
r
r
unit is playing. While searching folders, the selected
folder is displayed, denoted by the letter F.
8. TRACK: Zeigt an, welchen Titel das Gerät im
Augenblick abpielt.
9. SINGLE: Wird angezeigt, wenn das Gerät auf das
jeweilige Abspielen eines einzigen Titels eingestellt
ist. Falls dies nicht aufleuchtet, werden alle Titel
der CD nacheinander abgespielt. Diese Funktion
wird über die KONT/EINZ-Taste gesteuert.
10. MP3: Lit when unit is playing an MP3 file.
11. MINUTES: Zeigt entweder die vergang enen oder
verbleibenden Minuten an, je nach Einstellung der
Betriebsart.
12. SECONDS: Zeigt entweder die vergangenen oder
verbleibenden Sekunden an, je nach Einstellung der
Betriebsart.
PLAY/PAUSE & CUE-FUNKTIONEN:
PLAY & CUE:
Drücken Sie "PLAY/PAUSE",
um Musik abzuspielen.
Drücken Sie "CUE", um zum letzten
Abspielintervall
13. FRAMES: Für exaktes Cueing unterteilt der CDSpieler eine Sekunde in 75 Rahmen. Zeigt entweder
die vergangenen oder verbleibenden Rahmen an, je
nach Einstellung der Betriebsart.
14. LOOP: Indicates when loop is actively playing.
15. PITCH: Shows the percentage change in pitch.
16. PITCH: Leuchtet auf, wenn die TONLAGE-TASTE
aktiviert ist.
17. MATRIX DISPLAY: Displays CD Text or MP3 Tag
information. If reading a disc with no encoding,
display will read “NO TEXT”. Also displays folder
names while searching through folders.
Anfangspunkt zurückzukehren
Position auf Disc
Ein Drücken der “PLAY/PAUSE”-Taste startet die Disc. Wird die “CUE”-Taste gedrückt, wird die Disc zum letzten Anfangspunkt
zurückgesetzt. Dies ist der Cue-Punkt. Abwechselndes Drücken der Tasten “PLAY/PAUSE” und “CUE” führt zum beliebig oftmaligen
Abspielen der CD, angefangen von derselben Position. Diese Funktion wird Rück-Cue genannt.
PLAY, PAUSE & CUE
Drücken Sie "PLAY/PAUSE",
um Musik abzuspielen.
Abspielintervall Abspielintervall
Falls das Abspielen pausiert und dann wieder gestartet wurde, wird die Rückkehrposition für das Rück-Cue auf diese neue Position festgelegt.
EDITING CUE POINT
Drücken Sie "PLAY/PAUSE",
Stellen Sie den "CUE"-
Punkt mit dem Jog-Rad ein.
um Musik abzuspielen.
Rück-Cue-Funktion
ücken Sie "PLAY/PAUSE",
D
um das Abspielen der
Musik zu pausieren.
Drücken Sie "CUE", um zum letzten
ücken Sie "PLAY/PAUSE",
D
um das Abspielen der
Musik zu starten.
Rück-Cue-Funktion
Anfangspunkt zurückzukehren
Drücken Sie "CUE", um zum letzten
Anfangspunkt zurückzukehren
Position auf Disc
Position auf Disc
Abspielintervall
Wird das innere Rad während des Festlegens eines Cue-Punkts gedreht, kann ein neuer Cue-Punkt gefunden werden. Der CD-Spieler wird
wiederholt kleine Teile der CD abspielen während Sie die gewünschte Positi on anwählen. Sie können bestätigen, daß der neue Cue-Punkt der
Gewünschte ist, indem Sie “PLAY/PAUSE” und dann “CUE” drücken.
Rück-Cue-Funktion
Page 20

One way to organize the MP3 files on your CD’s is by using Folders. Folders make it easier to find the music you want quickly. The
CDMIX3 is set up to navigate folders, making it the ideal tool for the professional DJ.
Note that the Track +10 feature is not available when a disc that contains folders is inserted into the drive. This feature is only used
with discs that do not contain folders.
The CDMIX3 Folder Search feature is easy to use.
9. Place an MP3 CD that contains folders into one of the CDMIX3’s two CD drives.
10. When the Disc is ready, the LCD display will change from “READ” to displaying the folder name.
11. Press the FOLDER button. The LCD display will flash “FOLDER”. Use the TRACK search buttons to scan through the
named folders contained on the disc. Press the FOLDER button again to select a folder. LCD display will flash “TRACK
LIST”.
12. You may now search tracks contained within the selected folder using the TRACK search buttons to scan through the
tracks contained within the folder.
USING THE FOLDER SEARCH FEATURE
Gleichen Sie das Tempo an, indem Sie sowohl die Musik von SPIELER 1 als auch SPIELER 2 abhören und die Tonlage angleichen. Falls
das Tempo der Musik des gewählten CD-Spielers im Vergleich zum Tempo des anderen Spielers langsam ist, bewegen Sie den
Schieberegler auf die ( + )-Seite und passen Sie das Tempo an. Falls schneller, bewegen Sie den Schieberegler auf die ( - )-Seite. Die
folgende Abbildung zeigt den Fall, in welchem die Tonlage von SPIELER 2 der Tonlage der Musik, welche auf SPIELER 1 abgespielt
wird, angepasst wird.
1. Drücken Sie “PLAY/PAUSE”, um SPIELER 1 zu starten.
PLAYER 1 spielt
2. Drücken Sie “PLAY/PAUSE”, um SPIELER 2 zu starten.
Beide CD-Spieler spielen CDs ab.
3. Hören Sie SPIELER 2 über Ihren Kopfhörer ab. Falls der Takt auf Kanal 2 (im Kopfhörer) schneller als der von
Kanal 1 ist, verlangsamen Sie den Takt von Kanal 2 mit der Tonlagensteuerung.
4. Falls der Takt auf Kanal 2 (im Kopfhörer) langsamer als der von Kanal 1 ist, erhöhen Sie den Takt mit der
Tonlagensteuerung.
Falls Sie entdecken, daß die TPMs (Takte pro Minute oder das Tempo) zwar gleich sind, doch die Trommelschläge
nicht übereinstimmen, müssen Sie vorübergeh end die Tonlage veränd ern. Die folgende Abbildung zeigt Ihnen,
wie man den Takt von SPIELER 2 mit dem Takt der Musik, welche auf SPIELER 1 abgespielt wird, in Einklang
bringt. (Dieser Vorgang kann auf jedem der beiden SPIELER durchgeführt werden).
Nachdem Sie die TPMs in Einklang gebracht haben, verändern Sie die Tonlage wie folgt:
Falls SPIELER 2 schneller ist, drehen Sie das Jog-Rad
gegen den Uhrzeigersinn.
Die Tonlage verändert sich automatisch während das Jog-Rad gedreht wird. Je schneller Sie das Rad drehen, umso mehr verändert
sich die Tonlage. Ein Loslassen des Rads bringt die Musik wieder zur originalen Tonlage zurück. (Die TPMs sind also wieder gleich.)
ANPASSUNG DES TAKTS DURCH DIE TONLAGENVERÄNDERUNG
ANGLEICHEN DER TAKTE PRO MINUTE
Falls SPIELER 2 langsamer ist, drehen Sie das Jog-Rad im
Uhrzeigersinn.
Page 21

Während SPIELER 1 eine CD abspielt, legen Sie eine Disc in SPIELER 2 und wählen Sie Ihr nächstes Musikstück aus, bringen Sie die
Tonlage in Einklang mit dem Musikstück auf SPIELER 1 und wenn Sie fertig sind, blenden Sie mit dem Überblendregler Ihres Mixers
von SPIELER 1 auf SPIELER 2 über.
BEISPIELE ZUM MIXEN MIT BEIDEN CD-SPIELERN
Page 22

1. Verificare che tutti gli elementi elencati sul
frontespizio di questo manuale siano inclusi
nella confezione.
2. PRIMA DI UTILIZZARE IL PRODOTTO
LEGGERE IL LIBRETTO DELLE
ISTRUZIONI DI SICUREZZA.
3. Esaminare attentamente lo schema di
montaggio.
4. Posizionare la console CDMIX in modo
adeguato all’operazione.
5. Assicurarsi che tutti i dispositivi siano spenti
e che tutti i fader e le manopole di guadagno
siano a “zero”.
6. Collegare tutti gli ingressi stereo come
indicato nello schema.
7. Collegare le uscite stereo all’amplificatore(i),
alle piastre di registrazione e/o altre sorgenti
audio.
MONTAGGIO RAPIDO CDMIX3
(ITALIANO)
8. Collegare tutti gli apparecchi alla corrente
C.A.
9. Accendere tutto nel seguente ordine:
• sorgenti di ingresso audio (cioè le piastre o i
lettori CD)
• il CDMIX3
• per ultimi, tutti gli amplificatori o i dispositivi
di uscita
10. Al momento dello spegnimento, invertire
sempre questa operazione,
• spegnendo gli amplificatori,
• il CDMIX3
• per ultimi, tutti i dispositivi di ingresso
11. Andare sul sito http://www.numark.com
la registrazione del prodotto.
Potrete trovare ulteriori informazioni relative a
questo prodotto sul sito http://www.numark.com
per
COLLEGAMENTI POSTERIORI
1. Ingressi Canale: Jack RCA non bilanciati per il
collegamento di sorgenti esterne. L’ingresso
Phono/Linea viene selezionato utilizzando il
commutatore situato sul pannello anteriore.
Utilizzando questi jack è possibile collegare
giradischi, VCR HiFi, macchine a cassette e reel-toreel, macchine DAT, lettori CD, laser disc, tuner, e
perfino sintetizzatori o altre console di missaggio.
NOTA: Inserire sorgenti audio mono negli ingressi
di sinistra e di destra utilizzando un cavo connettore
a “Y”.
2. GND: Questo connettore a vite va utilizzato per
collegare giradischi o altri apparecchi che richiedono
una messa a terra
3. Line/Phono Input Switch: Viene usato per
permettere la connessione di apparecchi a livello di
linea o phono negli ingressi di canale. Quando viene
selezionato l’ingresso Phono, il segnale è alimentato
direttamente dai pre-amplificatori RIAA phono di
alta qualità. Utilizzare questa posizione unicamente
per le piastre. Le sorgenti a livello di linea
sovraccaricheranno i phono pre-amp, sensibili, e
suoneranno molto male, quindi bisogna sempre
Page 23

ricordarsi di commutare l’interruttore linea/phono su
linea prima di collegare sorgenti di linea.
4. Third Line Input: Plug in a third line level device
such as a tape deck or additional CD player here.
5. Stereo Master Outputs: Unbalanced RCA
connectors controlled by the Master fader.
6. Uscite Stereo Master Bilanciate (XLR):
connettori di tipo XLR a bassa impedenza regolati
dal Master fader.
7. Ingresso Mic: Inserire qui un microfono a 1/4”.
8. AC In: Questa console di missaggio è progettata
per funzionare con i cavi di alimentazione forniti con
l’apparecchio. Ad alimentazione scollegata, inserire
il cavo per prima cosa nella console, quindi inserirlo
nella presa.
9. Interruttore di Alimentazione: Utilizzare questo
interruttore per accendere la console dopo aver
collegato tutti gli ingressi per prevenire eventuali
danni all’apparecchio. Accendere la console prima
degli amplificatori, e spegnere gli amplificatori prima
della console.
CONFIGURAZIONE PANNELLO ANTERIORE
1. Fader Ingressi: Controlla i singoli livelli di sorgente
nel mix.
2. Interruttore selettore di ingressi – Seleziona la
sorgente che sarà attiva sul canale, a seconda di
cosa è stato collegato alla sezione degli ingressi sul
pannello posteriore.
3. 2-Band Stereo Equalizer (EQ) - compensates for
differences in source material sound quality.
4. Crossfader Sostituibile – Ottiene passaggi puliti
tra i due canali di ingresso. "Hard left" seleziona il
Channel 1. "Hard right" seleziona il Channel 2. Con il
crossfader centrato, entrambi i canali assegnati
sono attivi. Usare il crossfader per passaggi veloci e
continui da un canale all’altro
Nota: Il cursore è sostituibile dal’utente caso mai si
dovesse usurare. Svitare le due grosse viti che lo
fissano in posizione, tira rlo fuori sollevandolo
escollegarne il cavo. Fis sare nuovamente il nuovo
crossfader e riavvitare il coperchio sull’apparecchio -
ora siete di nuovo in corsa!
CARATTERISTICHE LETTORE CD
1. OPEN/CLOSE (Apertura/Chiusura del Vassoio
del Disco) – Va premuto per caricare o estrarre il
disco. Ciascuna pressione aprirà o chiuderà il
vassoio. NOTA: Se il disco non è stato messo in
5. Fader Start – La sua attivazione consente di
6. Fader Ingresso Mic – Regola il livello del
7. Mic 1 Equalizer (EQ) – Adjusts microphone 1
8. EQ Stereo – Regola l’equalizzazione finale
9. Master Fader – Controlla il livello globale delle
10. Commutatore Stereo/Mono – Cambia l’uscita
11. LED METER – Indica il livello dell’uscita Master.
12. Channel Monitor Selector – Used to route channel
13. Cue Mix Control – Adjusts the headphone blend of
14. Livello Cuffie – Regola il volume di cue.
15. Jack Cuffie – Usato per collegare prese da 1/8” o
2. TIME (Tasto Time) – Commuta il tempo
avviare i lettori CD dal crossfader. Un movimento da
sinistra a destra avvierà il lettore CD destro e
metterà in pausa il lettore CD sinistro .
microfono.
treble and bass levels.
dell’uscita master degli acuti, medi e bassi.
uscite
Master da Mono a Stereo
audio to your headphones for cueing.
master output (PGM) and monitor (CUE) sound.
1/4” per il monitoraggio audio con le cuffie.
pausa il vassoio non si aprirà. Il vassoio si chiuderà
automaticamente dopo 30 secondi.
visualizzato a display tra tempo di riproduzione
Page 24

trascorso, tempo rimanente sulla singola traccia e
tempo rimanente sull’intero CD.
3. CONT/SING – Premuto una o due volte, provoca la
riproduzione di una singola traccia o di tutte le
tracce, in ordine.
4. DISPLAY LCD - Indica le funzioni in corso sul CD.
Le funzioni verranno descritte nel prossimo
paragrafo.
5. TRACK (Tasti Track) – Servono a scegliere le
tracce da riprodurre.
6. Folder/ +10 – Selects folder from which tracks are
to be played. On a disc which contains no folders,
this button is used to advance tracks in increments
of 10
7. PROGRAM – Premendo questo tasto l’apparecchio
si ferma e si accende l’indicatore di programma.
Selezionare ciascuna traccia da riprodurre e
premere il tasto PROGRAM tra una selezione e
l’altra. È possibile programmare fino a 30 tracce.
Premere PLAY per avviare il programma. Per uscire
e cancellare il programma, mantenere la pressione
sul tasto program per più di 2 secondi ad
apparecchio fermo, aprire il vassoio del disco, o
disconnettere l’alimentazione.
8. PITCH (Tasto Pitch) - Attiva il Pitch Slider. To
alternate between ±8% and ±16%, press and hold
PITCH button. LED will indicate active setting.
9. PITCH SLIDER - Il pitch può essere modificato fino
a ±16% premendo il tasto PITCH in modo da
accendere il LED del PITCH, e facendo scorrere il
fader. Il pitch non verrà modificato se il LED è
spento.
10. ROTELLA SEARCH (ANELLO ESTERNO) - 3
velocità di ricerca delle canzoni in avanti e 3
indietro. Più viene ruotata la rotella in ciascuna
direzione, maggiore sarà la velocità di ricerca della
musica.
11. ROTELLA PITCH BEND/JOG (ANELLO
INTERNO) - La rotella jog wheel assolve a 2
funzioni, a seconda della modalità corrente.
a) Regola una ricerca lenta di frame quando il
CD non è in corso di riproduzione. Per
impostare un nuovo punto cue dei frame, far
ruotare la rotella, quindi premere play
quando è stata determinata la posizione
corretta. Premere CUE per tornare al “PUNTO
CUE”.
b) Quando entrambi i lettori CD stanno
riproducendo un CD, la funzione pitch bend
permette il posizionamento del beat dei bassi
in modo tale da accordarli dopo che è stato
accordato il pitch di ciascun disco. Ciascun
lettore può “recuperare” o “perdere terreno”
per accordarsi all’altro lettore. La jog wheel
piegherà temporaneamente il pitch della
musica se la canzone è già in corso di
riproduzione , con una rotazione in senso
orario per accelerare o i n senso antiorario
per rallentare. Modifi cando il pitch di un di sco
rispetto al pitch dell’altro disco, è possibile
12. CUE – La pressione del tasto CUE durante la
13. START/PAUSE (Tasto Play/Pause) – Ciascuna
14. LOOP IN – Used for setting a start loop point and
15. LOOP OUT –
16. RELOOP / STUTTER – Depending on mode, as
accordare i beat.
riproduzione fornisce un punto di ritorno al punto in
cui è stat avviata la riproduzione. Se PAUSE viene
impiegato prima di CUE, quello diventerà il punto
cue. Una pressione alternata dei tasti PLAY e CUE
permette la riproduzione del CD dalla stessa
posizione per un numero qualsiasi di volte. Il LED
del CUEsi accenderà dal momento in cui viene
premuto il tasto CUE fino a quando il CD viene
nuovamente impostato alla posizione di avvio della
riproduzione. Un’illuminazione fissa di questo LED
indica una condizione operativa.
pressione del tasto Play/Pause provoca il passaggio
dalla riproduzione alla pausa e viceversa.
new cue points during playback.
and releasing the loop action.
explained further, this button is used for either
repeating a previously set loop or seamlessly
stuttering on the last set cue point.
Used for setting the end loop point
1. PAUSE: Attivo quando l’apparecchio è in pausa.
2. PLAY: Ativo quando l’apparecchio riproduce un CD.
3. CUE: Lampeggia quando l’apparecchio sta
impostando un punto cue. È acceso in maniera fissa
in pausa e al punto cue.
4. PROGRAM: Usato per pre-programmare l’ordine di
riproduzione automatica delle tracce. Questa è
un’ottima funzione nel caso in cui si debba lasciare il
lettore CD da solo.
5. TIME MODE: (Elapsed) mostra il tempo trascorso in
via di riproduzione.(Remain) mostra il tempo
rimasto di una traccia specifica. Questa funzione è
comandata tramite il TASTO TIME.
6. TIME BAR: Mostra il tempo rimanente o quello
trascorso, a seconda dell’impostazione del TASTO
TIME.
7. TRACK NUMBER: Shows the current track that the
unit is playing. While searching folders, the selected
folder is displayed, denoted by the letter “F”
8. TRACK: Lights while unit is in Track Play mode.
9. SINGLE: Mostra quando l’apparecchio è impostato
per riprodurre una traccia per volta. Quando non è
CARATTERISITCHE DISPLAY LCD
acceso, il CD rirodurrà in maniera continua tutte le
tracce. Questa funzione è comandata tramite il
TASTO SING/CONT.
10. MP3: Lit when unit is playing an MP3 file.
11. MINUTES: Mostra i minuti trascorsi o rimanenti, a
seconda dell’impostazi one.
12. SECONDS: A seconda dell’impostazione, mostra i
secondi trascorsi o rimanenti.
13. FRAMES: Il lettore CD suddivide un secondo in 75
frame per effettuare un cueing preciso. Questo
mostra i frame trascorsi o rimanenti a seconda
dell’impostazione
14. LOOP: Indicates when loop is actively playing.
15. PITCH: Shows the percentage change in pitch.
16. PITCH: È acceso quando il TASTO PITCH è attivo.
17. MATRIX DISPLAY: Displays CD Text or MP3 Tag
information. If reading a disc with no encoding,
display will read “NO TEXT”. Also displays folder
names while searching through folders.
Page 25

PLAY e CUE
Premere "PLAY/PAUSE"
per avviare la musica
OPERAZIONI PLAY / PAUSE e CUE
Intervallo di Riproduzione
Premere "CUE" per tornare
all'ultimo punto di avvio
Posizione sul disco
Premendo il tasto “PLAY/PAUSE” il disco viene avviato. La pressione del tasto “CUE” imposterà il disco sull’ultima posizione in cui era
stato avviato. Questo viene chiamato punto cue. Premendo i tasti “PLAY/PAUSE” e “CUE” in maniera alternata, il disco può tornare
ad essere avviato dal punto cue quante volte si vuole. Questa funzione prende il nome di back cue.
PLAY, PAUSE e CUE
Quando la riproduzione è stata interrotta momentaneamente e quindi ripresa, la posizione di ritorno per il back cue verrà aggiornata
su questa nuova posizione.
EDITARE IL PUNTO CUE
Quando il selettore interno viene ruotato quando è già stato impostato un punto cue, è possibile localizzare un nuovo punto cue. Il
lettore CD riprodurrà ripetutamente piccole parti del CD man mano che vi spostate verso la posizione desiderata. Premendo
“PLAY/PAUSE” e quindi “CUE” viene confermato che il nuovo punto cue è accettabile.
Premere "PLAY/PAUSE"
per avviare la musica
Intervallo di Riproduzione Intervallo di Riproduzione
Regolare il punto "CUE"
con la rotella jog wheel.
Operare il Back Cue
Premere "CUE" per tornare
all'ultimo punto di avvio
Intervallo di Riproduzione
Operare il Back Cue
Premere "PLAY/PAUSE"
per avviare la musica
Operare il Back Cue
Premere "CUE" per tornare
all'ultimo punto di avvio
Premere "CUE" per tornare
all'ultimo punto di avvio
Posizione sul disco
Posizione sul disco
Page 26

USING THE FOLDER SEARCH FEATURE
One way to organize the MP3 files on your CD’s is by using Folders. Folders make it easier to find the music you want quickly. The
CDMIX3 is set up to navigate folders, making it the ideal tool for the professional DJ.
Note that the Track +10 feature is not available when a disc that contains folders is inserted into the drive. This feature is only
used with discs that do not contain folders.
The CDMIX3 Folder Search feature is easy to use.
13. Place an MP3 CD that contains folders into one of the CDMIX3’s two CD drives.
14. When the Disc is ready, the LCD display will change from “READ” to displaying the folder name.
15. Press the FOLDER button. The LCD display will flash “FOLDER”. Use the TRACK search buttons to scan through the
named folders contained on the disc. Press the FOLDER button again to select a folder. LCD display will flash “TRACK
LIST”.
16. You may now search tracks contained within the selected folder using the TRACK search buttons to scan through the
tracks contained within the folder.
Accordare il tempo monitorando la musica del PLAYER 1 e del PLAYER 2 a orecchio e regolando il pitch. Quando il tempo della
musica del lettore CD selezionato, paragonato al tempo dell’altro lettore, è lento, muovere il cursore verso il lato ( + ) e accordare
il tempo. Quando è più veloce, muovere il cursore del pitch verso il lato ( - ). La seguente immagine illustra il caso di accordo del
pitch del PLAYER 2 al pitch della musica riprodotta sul PLAYER 1.
1. Premere PLAY/PAUSE per avviare il PLAYER 1.
PLAYER 1 è in riproduzione
2. Premere PLAY/PAUSE per avviare il PLAYER 2
Entrambi i lettori CD stanno riproducendo dischi.
3. Ascoltare il PLAYER 2 in cuffia. Se il beat del channel 2 (in cuffia) è più veloce di quello del channel 1,
rallentare il beat del channel 2 utilizzando il comando del pitch.
4. Se il beat del channel 2 (in cuffia) è più lento di quello del channel 1, accelerare il beat utilizzando il
comando del pitch.
Nel caso in cui il BPM (Battiti Al Minuto o Tempi) sia lo stesso, ma il ritmo delle percussioni non corrisponda,
sarà necessario modificare temporaneamente il pitch. La figura sottostante illustra come abbinare il beat del
PLAYER 2 a quello della musica riprodotta sul PLAYER 1. (Questo procedimento può essere effettuato su
entrambi i PLAYER, indifferentemente).
Dopo aver accordato il BPM, regolare temporaneamente il pitch come segue:
Quando il PLAYER 2 è in anticipo, ruotare la jog wheel in
senso antiorario
Il pitch cambia automaticamente durante la rotazione della jog wheel. Più la rotella verrà ruotata velocemente, maggiore sarà il
cambiamento. Rilasciando la rotella si torna al pitch originale. (Cosicchè i BPM saranno nuovamente uguali.)
ACCORDARE IL BEAT UTILIZZANDO IL PITCH BEND
ACCORDARE i BATTITI AL M INUTO
Quando il PLAYER 2 è in ritardo, ruotare la jog wheel in
senso orario
Page 27

Durante la riproduzione di un disco sul PLAYER 1, caricare un disco nel PLAYER 2 e selezionare la traccia successiva, regolare il pitch
accordandolo a quello della traccia in riproduzione sul PLAYER1 e una volta pronti, utilizzare il crossfader del mixer per sfumare dal
PLAYER 1 al PLAYER 2.
ESEMPIO DI MISSAGGIO EFFETTUATO UTILIZZANDO ENTRAMBI I LETTORI DEL LETTORE CD
Page 28

GUIDE D’INSTALLATION SIMPLIFIÉE
1. Assurez-vous que tous les articles énumérés sur la
page couverture de ce guide sont inclus dans la
boîte.
2. LIRE LE LIVRET DES CONSIGNES DE SÉCURITÉ
AVANT D’UTILISER LE PRODUIT.
3. Examinez bien le schéma d’installation.
4. Placer la station de mixage CDMIX dans une position
appropriée pour l’utilisation.
5. Assurez-vous que tous les appareils sont hors
tension et que tous les atténuateurs et le gain sont
réglés à « zéro ».
6. Connecter toutes les sources d’entrée tel qu’indiqué
sur le schéma.
7. Brancher toutes les sorties aux amplificateurs de
puissance, aux lecteurs de cassette et aux sources
audio.
8. Branchez tous les appareils à une prise de courant
alternatif (AC).
CARACTÉRISTIQUES DU PANNEAU ARRIÈRE
1. Entrées canaux : Des entrées RCA asymétriques
pour brancher des sources externes. L’entrée
Phono/Line est sélectionnée en activant
l’interrupteur sur le panneau avant. Tournedisques, magnétoscopes à vidéocassette HIFI,
magnétophones à bobines, appareils
audionumériques, lecteurs CD, disques lasers,
syntoniseurs, même des synthétiseurs ou autres
consoleS de mixage peuvent être connectés à ces
(FRANÇAIS)
9. Mettre tous les appareils sous tension dans l’ordre
suivant :
• sources d’entrée audio (i.e. tourne-disque ou
lecteurs de disques compacts)
• CDMIX3
• en dernier, tous amplificateurs ou appareils
10. Pour mettre hors tension, toujours inverser
11. Allez à http://www.numark.com
Plus d’information sur ce produit est disponible au
2. GND : Ce raccord à vis doit être utilisé pour
3. Line/Phono Input Switch : Permet de brancher
de sortie
l’opération :
• Éteindre les amplificateurs
• CDMIX3
• En dernier, tous les appareils d’entrée
produit.
site internet http://www.numark.com
entrées. NOTE : Branchez des sources audio mono
dans les entrées gauches et droites en utilisant un
connecteur de câble en Y.
brancher toutes platines et autres dispositifs qui ont
besoin d’une mise à terre.
des appareils à niveau de ligne ou phono aux
entrées canaux. Lorsque Phono est sélectionné, le
pour enregistrer le
Page 29

signal est acheminé directement aux
préamplificateurs RIAA de qualité supérieure.
Utilisez cette position uniquement pour les tournedisques. Les sources à niveau de ligne vont
surcharger les préamplis phono sensible est le son
sera mauvais. Alors, assurez vous de mettre
l’interrupteur PHONO/LINE à LINE avant de
brancher vos sources à niveau ligne.
4. Third Line Input: Plug in a third line level device
such as a tape deck or additional CD player here.
5. Stereo Master Outputs: Unbalanced RCA
connectors controlled by the Master fader.
6. Sortie stéréo principale symétrique (XLR) :
Connecteurs à faible impédance de type XLR
contrôlé par l’atténuateur principal.
7. Entrée micro : Branchez les microphones ¼ po
dans cette entrée.
8. Prise d’alimentation CA : Cette station de mixage
est conçue pour fonctionner avec le câble
d’alimentation fourni. Lorsque le courant est coupé,
brancher d’abord le câble d’alimentation dans la
station de mixage, puis dans la prise de courant.
9. Interrupteur d’alimentation : Utiliser cet
interrupteur pour mettre en marche la station de
mixage uniquement après avoir branché tous les
appareils afin d’éviter d’endommager votre
équipement. Mettre la station de mixage sous
tension avant de mettre en marche les
amplificateurs, et mettre les amplificateurs hors
tension avant la station de mixage.
CARACTÉRISTIQUES DU PANNEAU AVANT
1. Entrée Atténuateur : Contrôle le niveau individuel
des sources dans le mix.
2. Interrupteur d’entrée : Détermine la source sous
tension pour ce canal en fonction des appareils
branchés aux entrées sur le panneau arrière.
3. 2-Band Stereo Equalizer (EQ) - compensates for
differences in source material sound quality.
4. Crossfader remplaçable : Permet de faire des
transitions nettes entre les deux canaux d’entrées.
Lorsque le crossfader est déplacé à l’extrême gauche,
le canal 1 est sous tension, lorsque qu’il est déplacé à
l’extrême droite, le canal 2 est sous tension. Lorsque le
crossfader est au centre, les deux canaux sont sous
tension. Utilisez le crossfader pour faire des transitions
nettes d’un canal à l’autre.
Note : Le crossfader est remplaçable en cas de
panne. Simplement dévisser les deux vis qu’il le
retiennent, le soulevez et débranchez son câble.
Remplacez le avec un crossfader et revissez la
plaque de montage à l’appareil. - Et vous êtes en
affaires!
5. Fonction auto-start de l’atténuateur : Cette
fonction permet le démarrage du lecteur CD à partir du
crossfader. Le déplacement de gauche à droite
démarre le lecteur CD droit et pause le lecteur CD
gauche.
6. Atténuateur de l’entrée micro : Ajuste le niveau du
microphone.
7. Mic 1 Equalizer (EQ) – Adjusts microphone 1 treble
and bass levels.
8. Stéréo EQ : Ajuste l’égalisation des aigus, des moyens
et des graves du signal principal.
9. Atténuateur principal : Contrôle le niveau de sortie
général.
10. Bouton Stéréo/Mono : Permet de modifier la sortie
principale du mode mono à stéréo.
11. Voyant DEL : Indique le niveau de sortie principale.
12. Channel Monitor Selector – Used to route channel
audio to your headphones for cueing.
13. Cue Mix Control – Adjusts the headphone blend of
master output (PGM) and monitor (CUE) sound.
14. Niveau du casque d’écoute : Permet de régler le
volume de pré-écoute.
15. Prise casque d’écoute : Permet de brancher un
casque d’écoute de 1/8 po ou de ¼ po.
Page 30

CD PLAYER FEATURES
1. OPEN/CLOSE (Ouvrir/fermer compartiment à
disque) - Appuyez pour insérer ou éjecter un
disque. Chaque fois que vous appuyez sur cette
touche, le plateau s’ouvre ou se ferme. NOTE : Le
plateau ne s’ouvre que si le disque est en mode
pause. Le plateau se ferme automatiquement après
30 secondes.
2. TIME (Durée) - Modifie le mode d’affichage de la
durée entre le temps écoulé, le temps restant de la
piste et le temps restant sur le disque.
3. CONT/SING - Permet de faire la lecture d’une
seule piste ou de toutes les pistes dans l’ordre sur le
CD en appuyant une fois ou deux.
4. LCD DISPLAY (AFFICHEUR LCD) - Indique toutes
les fonctions en cours du lecteur CD. Ces fonctions
sont vues en détail dans la section suivante.
5. Touches TRACK - Permet de sélectionner la piste à
écouter.
6. Folder/ +10 – Selects folder from which tracks are
to be played. On a disc which contains no folders,
this button is used to advance tracks in increments
of 10
7. Touche PROGRAM - Lorsque cette touche est
enfoncée, le lecteur cesse la lecture et l’indicateur
de programme s’allume. Sélectionnez chaque piste
à programmer et appuyez sur la touche PROGRAM
entre chacunes des sélections. Vous pouvez
programmer jusqu’à 30 pistes. Appuyez sur PLAY
pour débuter le programme. Pour sortir et effacer
le programme, vous pouvez maintenir la touche
PROGRAM enfoncée pour plus de 2 secondes lorsque
lecteur est arrêté, ouvrir le compartiment à disques
ou encore, mettre l’appareil hors tension.
8. Touche PITCH - Active l’atténuateur de tonalité. To
alternate between ±8% and ±16%, press and hold
PITCH button. LED will indicate active setting.
9. Atténuateur de tonalité - La tonalité peut être
modifiée jusqu’à ±16% en appuyant la touche
PITCH jusqu’à ce que le PITCH LED (DEL de tonalité)
s’allume, et en déplaçant ensuite l’atténuateur de
tonalité. La tonalité ne peut être modifiée si le
PITCH LED est éteint.
10. Cadran de recherche (Cadran extérieur) - 3
vitesses avant et 3 vitesses arrière pour effectuer
une recherche au sein d’une piste. Plus vous
tournez le cadran rapidement d’un côté ou de
l’autre, plus la recherche se fait rapidement.
11. PITCH BEND/JOG WHEEL (Cadran intérieur) -
La roue JOG à deux utilisations en fonction du mode
d’opération :
a) La roue permet de faire une recherche à la
frame près lorsque le lecteur n’est pas en mode
lecture. Pour programmer un nouveau point de
référence, tournez la roue jusqu’à ce que vous
trouviez la séquence désirée et appuyez sur
PLAY. Appuyez sur CUE pour retourner au point
de référence.
b) Lorsque les deux lecteurs sont en mode lecture,
la fonction PITCH BEND permet de synchroniser
le tempo après avoir synchronisé la tonalité des
deux disques. Les deux lecteurs peuvent
augmenter ou diminuer leur vitesse pour se
synchroniser à l’autre. Il est possible de
modifier la tonalité de la musique même si elle
joue déjà en tournant la roue Jog dans le sens
des aiguilles d’une montre pour l’accélérer ou
dans le sens contraire des aiguilles d’une montre
pour la ralentir. En modifiant la tonalité d’un
disque pour la synchroniser à l’autre disque, le
tempo peut être synchronisé.
12. Touche CUE - Appuyer sur la touche CUE durant la
lecture permet de retourner à la position de départ.
Si vous enfoncez la touche PAUSE avant la touche
CUE, cet endroit sera le nouveau point de référence.
Parcontre appuyer sur la touche PLAY et ensuite sur
la touche CUE permet de recommencer la lecture
toujours au même endroit plusieurs fois. Le CUE
LED (voyant de pré-écoute) s’allume lorsque la
touche CUE est enfoncée et ce jusqu’à ce que le
lecteur recommence la lecture du CD du point de
référence. Une lumière régulière de ce voyant
indique que la fonction est en attente.
13. LECTURE/PAUSE (Touche Play/Pause) - La
touche PLAY/PAUSE permet de passer au mode
lecture au mode pause et vice versa.
14. LOOP IN – Used for setting a start loop point and
new cue points during playback.
15. LOOP OUT – Used for setting the end loop point
and releasing the loop action.
16. RELOOP / STUTTER – Depending on mode, as
explained further, this button is used for either
repeating a previously set loop or seamlessly
stuttering on the last set cue point.
1. PAUSE : Activé lorsque le lecteur est en mode
pausé.
2. PLAY : Activé lorsque le lecteu r est en mode
lecture.
3. CUE : Clignote lorsque le lecteur programme un
point de référence. Allumé lorsque le lecteur est en
mode pause au point de référence.
4. PROGRAM : Activé lorsque le lecteur est
programmé pour faire la lecture automatique des
pistes dans un ordre prédéterminé. Grâce à ette
fonction vous n’êtes pas confiné à surveiller
l’appareil.
LES CHARACTERISTIQUES DE L’AFFICHEUR LCD
5. TIME MODE : (Elapsed) indique le temps
écoulé;(Remain) indique le temps qu’il reste avant
la fin de la piste. Cette fonction est contrôlée par la
touche TIME.
6. TIME BAR : Indique le temps restant ou le temps
écoulé en fonction du mode d’affichage de la touche
TIME.
7. TRACK NUMBER: Shows the current track that the
unit is playing. While searching folders, the selected
folder is displayed, denoted by the letter F.
8. TRACK: Lights while unit is in Track Play mode.
9. SINGLE : Indique que l’appareil est programmé
pour faire la lecture d’une seule piste. Lorsque le
Page 31

voyant est éteint, l’appareil fait la lecture de toutes
g
les pistes. Cette fonction est contrôlée par la touche
SING/CONT.
10. MP3: Lit when unit is playing an MP3 file.
11. MINUTES : Indique les minutes écoulées ou
restantes en fonction du mode d’affichage
sélectionné.
12. SECONDS : Indique les secondes écoulées ou
restantes en fonction du mode d’affichage
sélectionné.
13. FRAMES : Le lecteur CD divise une seconde en 75
frames pour une recherche plus précise. Indique les
LECTURE ET PRÉ-ÉCOUTE
Appuyez sur la touche
PLAY/PAUSE pour commencer
la lecture du disque.
FONCTIONS DE LECTURE/PAUSE ET DE PRÉ-ÉCOUTE
Jouez l'intervalle
frames écoulées ou restantes en fonction du mode
d’affichage sélectionné.
14. LOOP: Indicates when loop is actively playing.
15. PITCH: Shows the percentage change in pitch.
16. PITCH : Allumé lorsque la touche PITCH est
activée.
17. MATRIX DISPLAY: Displays CD Text or MP3 Tag
information. If reading a disc with no encoding,
display will read “NO TEXT”. Also displays folder
names while searching through folders.
Appuyez sur la touche CUE
pour retourner au dernier
point de départ.
Position sur le disque
Appuyez sur la touche PLAY/PAUSE pour commencer la lecture du disque. Appuyer sur la touche CUE renvoie la lecture du disque au
dernier point de départ. Ce point de départ s’appelle un point de référence. Appuyer sur la touche PLAY et ensuite sur la touche CUE
permet de recommencer la lecture toujours au même endroit plusieurs fois. Cette fonction s’appelle la lecture de recherche inversée.
LECTURE/PAUSE ET DE PRÉ-ÉCOUTE
Appuyez sur la touche
PLAY/PAUSE pour commencer
la lecture du disque.
Lorsque la lecture est interrompue et recommencée, le lecteur programme ce nouvel endroit comme la position de retour pour la lecture de
recherche inversée.
MODIFICATION DU POINT DE RÉFÉRENCE
Ré
lez le point de référence
avec la roue JOG.
PLAY/PAUSE pour commencer
Lorsque vous tournez le cadran intérieur et qu’un point de référence est déjà programmé, vous pouvez en programmer un nouveau. Le
lecteur CD joue plusieurs fois des extraits du CD comme vous tournez le cadran à la position désirée. En appuyant sur la touche PLAY/PAUSE
et ensuite CUE vous confirmez le nouveau point de référence.
Fonction lecture de recherche inversée
Appuyez sur la touche
PLAY/PAUSE pour mettre le
lecteur en mode pause.
Jouez l'intervalle Jouez l'intervalle
PLAY/PAUSE pour commencer
Appuyez sur la touche
la lecture du disque.
Jouez l'intervalle
Fonction lecture de recherche inversée
Appuyez sur la touche CUE
pour retourner au dernier
point de départ.
Appuyez sur la touche
la lecture du disque.
Fonction lecture de recherche inversée
Position sur le disque
Appuyez sur la touche CUE
pour retourner au dernier
point de départ.
Position sur le disque
Page 32

One way to organize the MP3 files on your CD’s is by using Folders. Folders make it easier to find the music you want quickly. The
CDMIX3 is set up to navigate folders, making it the ideal tool for the professional DJ.
Note that the Track +10 feature is not available when a disc that contains folders is inserted into the drive. This feature is only
used with discs that do not contain folders.
The CDMIX3 Folder Search feature is easy to use.
17. Place an MP3 CD that contains folders into one of the CDMIX3’s two CD drives.
18. When the Disc is ready, the LCD display will change from “READ” to displaying the folder name.
19. Press the FOLDER button. The LCD display will flash “FOLDER”. Use the TRACK search buttons to scan through the
named folders contained on the disc. Press the FOLDER button again to select a folder. LCD display will flash “TRACK
LIST”.
20. You may now search tracks contained within the selected folder using the TRACK search buttons to scan through the
tracks contained within the folder.
USING THE FOLDER SEARCH FEATURE
Synchronisez le tempo de la musique du lecteur 1 et 2 en écoutant et en ajustant la tonalité. Lorsque le tempo de la musique du
lecteur sélectionné est plus lent que celui de l’autre lecteur, déplacez l’atténuateur vers ( + ) et synchronisez le tempo. Lorsqu’il est
plus rapide, déplacez l’atténuateur vers le ( - ). L’illustration suivante démontre la synchronisation de la tonalité du lecteur 2 avec
la tonalité de la musique qui joue sur le lecteur 1.
1. Appuyez sur la touche PLAY/PAUSE pour commencer la lecture du lecteur 1.
Lecteur 1 est en mode lecture
2. Appuyez sur la touche PLAY/PAUSE pour commencer la lecture du lecteur 2
Les deux lecteurs sont en mode lecture
3. Écoutez le lecteur 2 avec votre casque d’écoute. Si le tempo du canal 2 (casque d’écoute) est plus rapide
que celui du canal 1, diminuez le tempo du canal 2 en utilisant le contrôle de tonalité.
4. Si le tempo du canal 2 (casque d’écoute) est plus lent que celui du canal 1, augmentez le tempo en utilisant
le contrôle de tonalité.
Si toutefois les BPM (Battements par minute ou tempo) sont identiques mais que les basses ne sont pas synchronisées, vous
devrez modifier temporairement la tonalité. L’illustration suivante démontre comment synchroniser le rythme du lecteur 2 avec le
rythme de la musique qui joue sur le lecteur 1. (Cette procédure peut être faite sur l’un ou l’autre lecteur)
Après avoir synchronisé le BPM, ajustez temporairement la tonalité comme suit :
Lorsque le lecteur 2 est en avance, tournez la roue JOG
dans le sens inverse des aiguilles d’une montre
La tonalité change automatiquement en même temps que la rotation de la roue JOG. Plus vous tournez rapidement la roue, plus vous modifiez
la tonalité. Lorsque vous relâchez la roue, la tonalité revient à son niveau initial. Les BPM sont à nouveau identiques.
LA SYNCHRONISATION DU TEMPO AVEC LA FONCTION PITCH BEND
SYNCHRONISER LE BATTEMENT PAR MINUTE
Lorsque le lecteur 2 est en retard, tournez la roue JOG
dans le sens des aiguilles d’une montre
Page 33

En même temps que le lecteur 1 fait la lecture d’un disque, insérez un disque dans le lecteur 2, sélectionnez une piste et synchronisez la
tonalité à celle de la piste qui joue sur le lecteur 1. Lorsque vous êtes prêt, utilisez le crossfader de votre console pour passer du lecteur 1 au
lecteur 2.
UN EXEMPLE DE MIXAGE À L’AIDE DES DEUX LECTEURS DE VOTRE APPAREIL
LECTEUR 1
LECTEUR 2
LECTEUR 2
LECTEUR 2
LECTEUR 2
LECTEUR 1 LECTEUR 1
LECTEUR 2 LECTEUR 2
LECTEUR 2
LECTEUR 2
LECTEUR 2
LECTEUR 2
LECTEUR 2
 Loading...