

Page 1
AXIS 9
PROFESSIONAL CD PLAYER
Quick Start Owner’s Manual
BOX CONTENTS
• CD PLAYER
• POWER CABLE
• AUDIO CABLE
Manual Rápido Del Comienzo (ESPANOL)
CONTENIDO DE LA CAJA
• LECTOR DE CD
• CABLE DE LA CORRIENTE ALTERNA
• CABLE AUDIO
Manuel d’utilisation du propriétaire
(FRANÇAIS)
Contenu de la boîte
• Lecteur de CD
• Cable d’alimentation
• Cable audio
• Cable start potentiomètre
Schnelles Hinweisbuch (DEUTSCH)
INHALT DER SCHACHTEL
• CD PLAYER
• Versorgungskabel
• Audiokabel
• Startkabel für Fader
Manuale rapido di utilizzazione (ITALIANO)
CONTENUTO DELLA SCATOLA
• CD PLAYER
• CAVO DI ALIMENTAZIONE
• CAVO AUDIO
Page 2
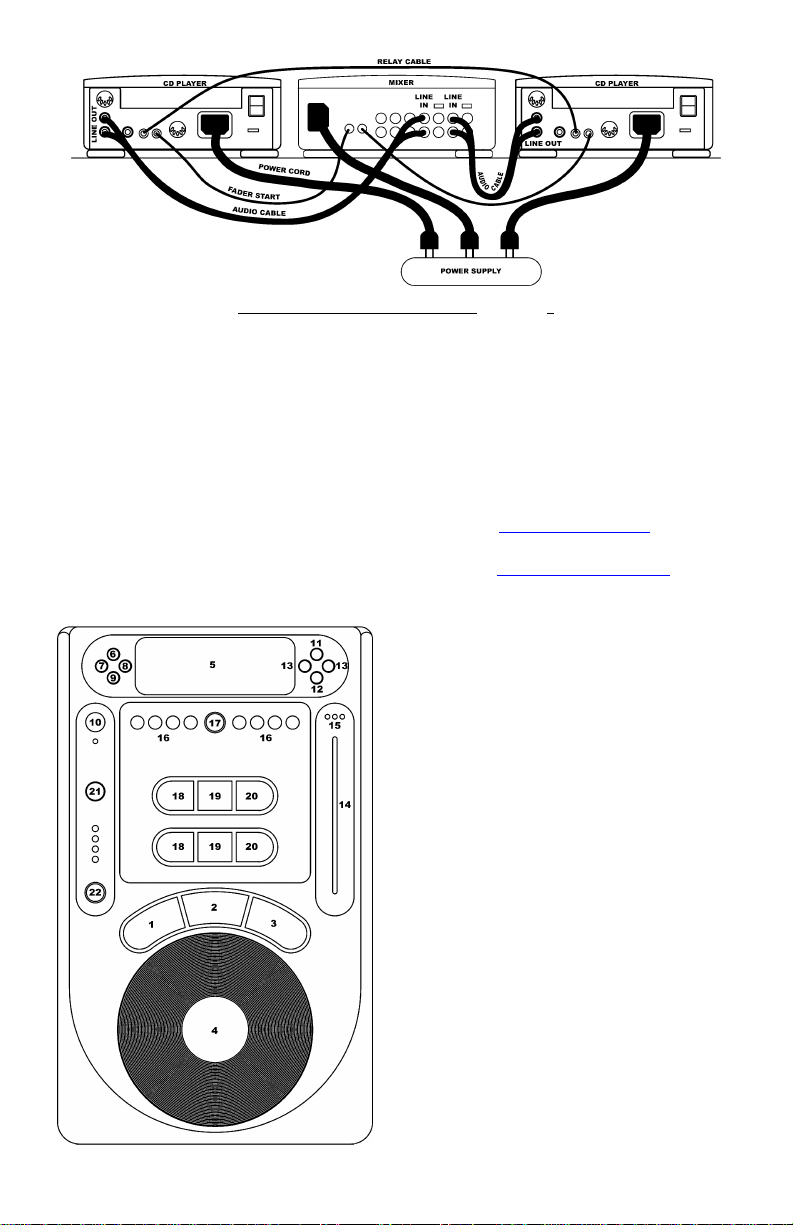
CD PLAYER QUICK SETUP (ENGLISH)
1. Make sure all items listed on the front of
this guide were in the box.
2. READ SAFETY INSTRUCTION BOOKLET
BEFORE USING THE PRODUCT.
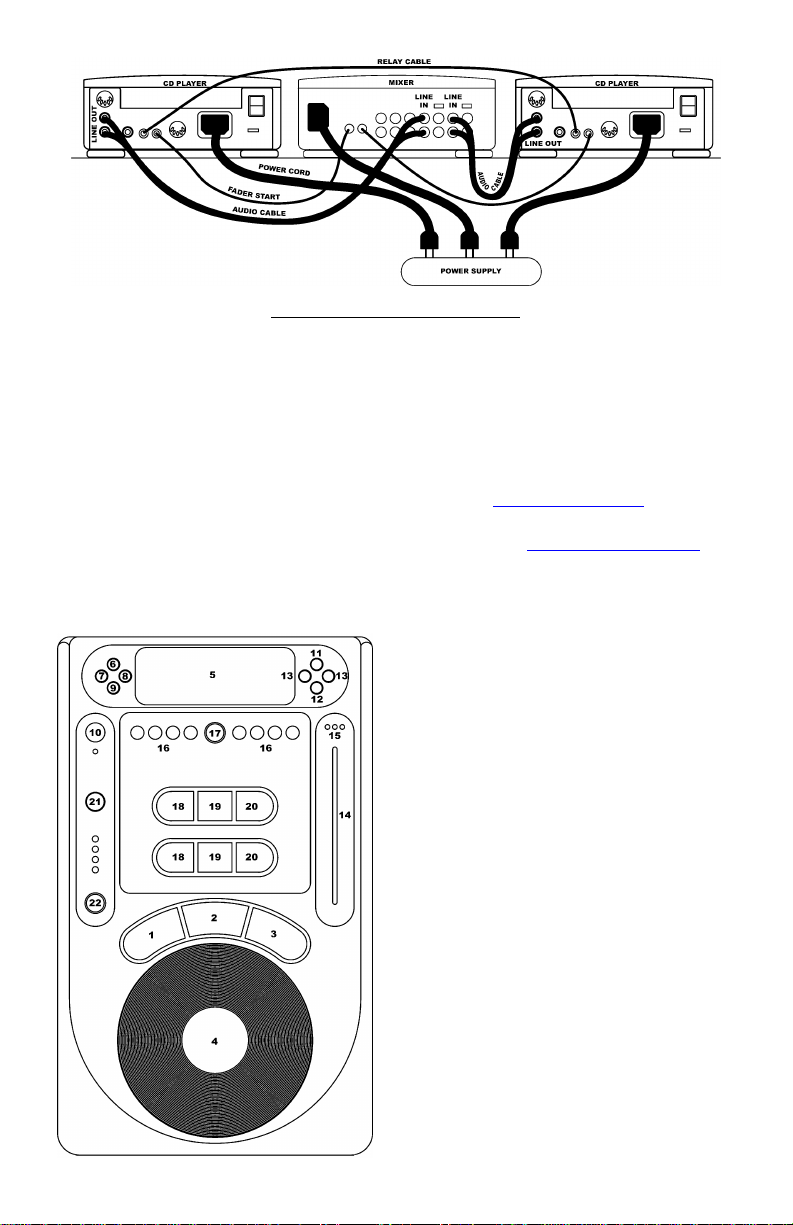
3. Study this setup diagram.
4. Place mixer in an appropriate position for
operation.
5. Make sure all devices are turned off and all
faders and gain knobs are set to “zero”
6. Connect all stereo input sources as
indicated in the diagram, your microphone,
and headphones
7. Connect the stereo outputs to power
amplifier(s), tape decks, and/or other audio
sources.
8. Plug all devices into AC power.
9. Switch everything on in the following order.
• audio input sources (i.e. turntables or
CD players)
• mixer
• last, any amplifiers or output devices
10. When turning off, always reverse this
operation by,
• turning off amplifiers
• mixer
• last, any input devices
11. Go to http://www.numark.com for product
registration.
More information about this product may be
found at http://www.numark.com
FEATURES:
1. PLAY/STUTTER- To start the music from the
initial cue point.
2. PAUSE- To pause the music.
3. CUE- To move the music to the cue point
and preview the selection.
4. JOG WHEEL-
a. INNER TOUCH WHEEL- Used for
various functions such as cueing,
scratching, pitch bend, searching, and
effect control
b. Outer Pitch Wheel - Used for
temporary pitch bend.
5. LCD DISPLAY- Indicates all the functions,
as they are occurring, with the CD.
6. OPEN/CLOSE- Pressing will open or close
the disc tray on the transport.
7. SGL- To set play mode in single or
continuous play.
8. TIME- Controls display indication of time
mode.
9. PROGRAM- Used for setting track order and
various special commands.
10. TRACK SELECT/SEARCH-
a. Rotation – selects tracks
b. Pressing while rotating – selects
tracks +10
c. Pressing once- Puts wheel in search
mode.
Page 3
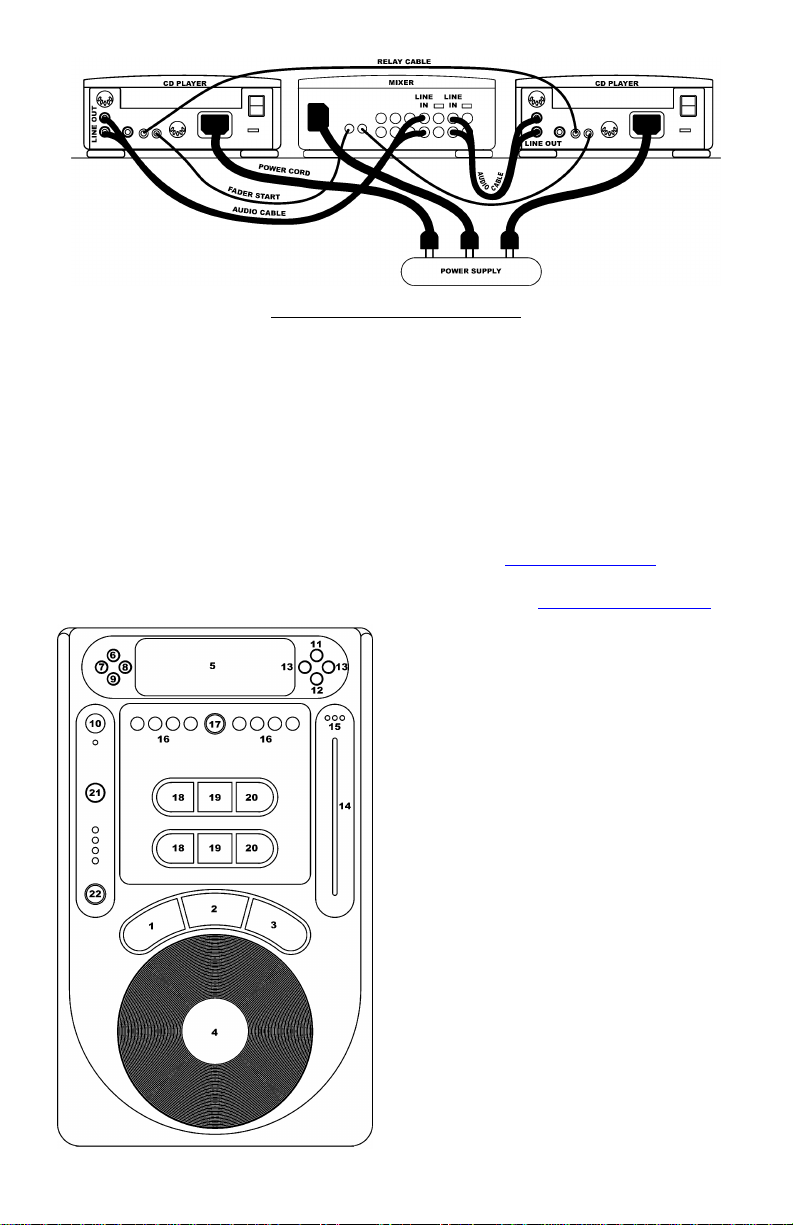
11. PITCH- Actives and sets pitch slider range.
12. KEY- Used for various key control.
13. -,+ - Works as pitch bend and controls key
and pitch functions.
14. PITCH SLIDER- Controls the overall speed
of the music.
15. PITCH RANGE LED- Indicates current pitch
range of the pitch slider
16. EFFECT BUTTON- Used to determine
desired effect.
17. EFFECT HOLD- Used to set effects to an
alternate position
18. LOOP IN- Used to set stutter and loop in
points.
19. LOOP OUT- Used to set loop out points and
release the loop.
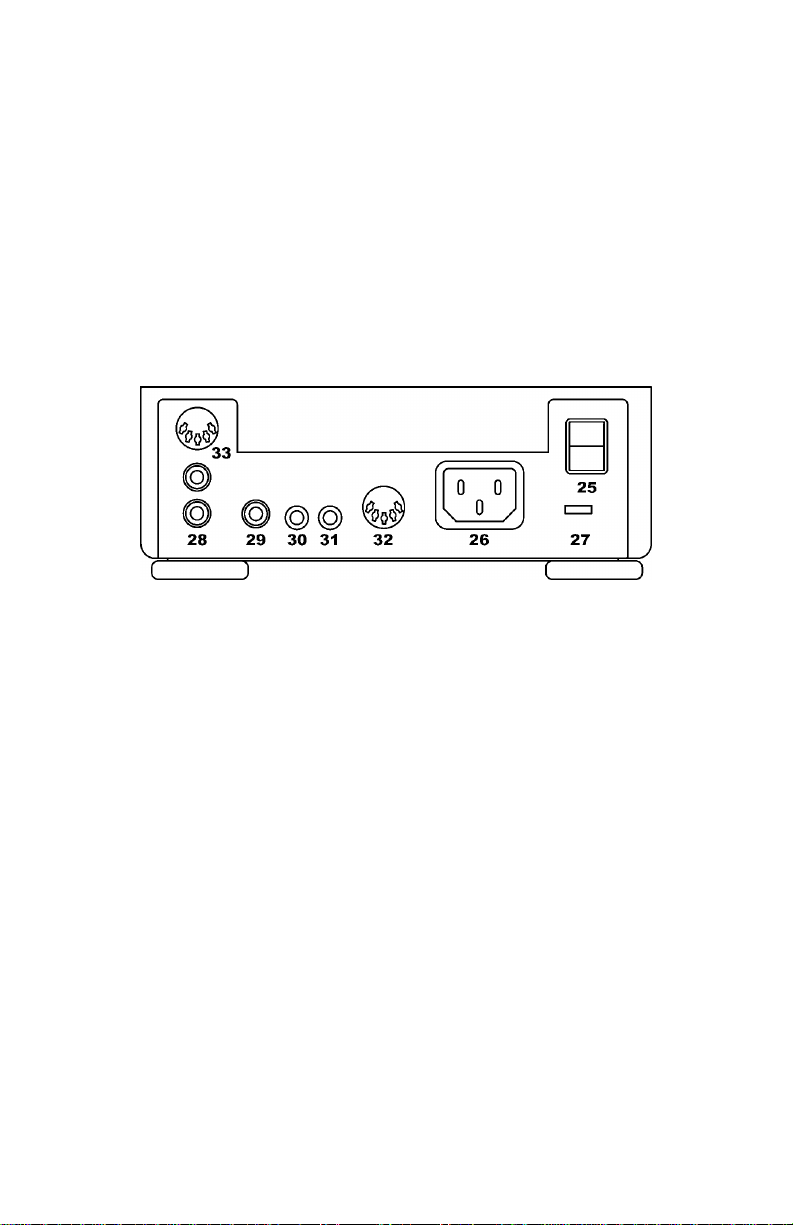
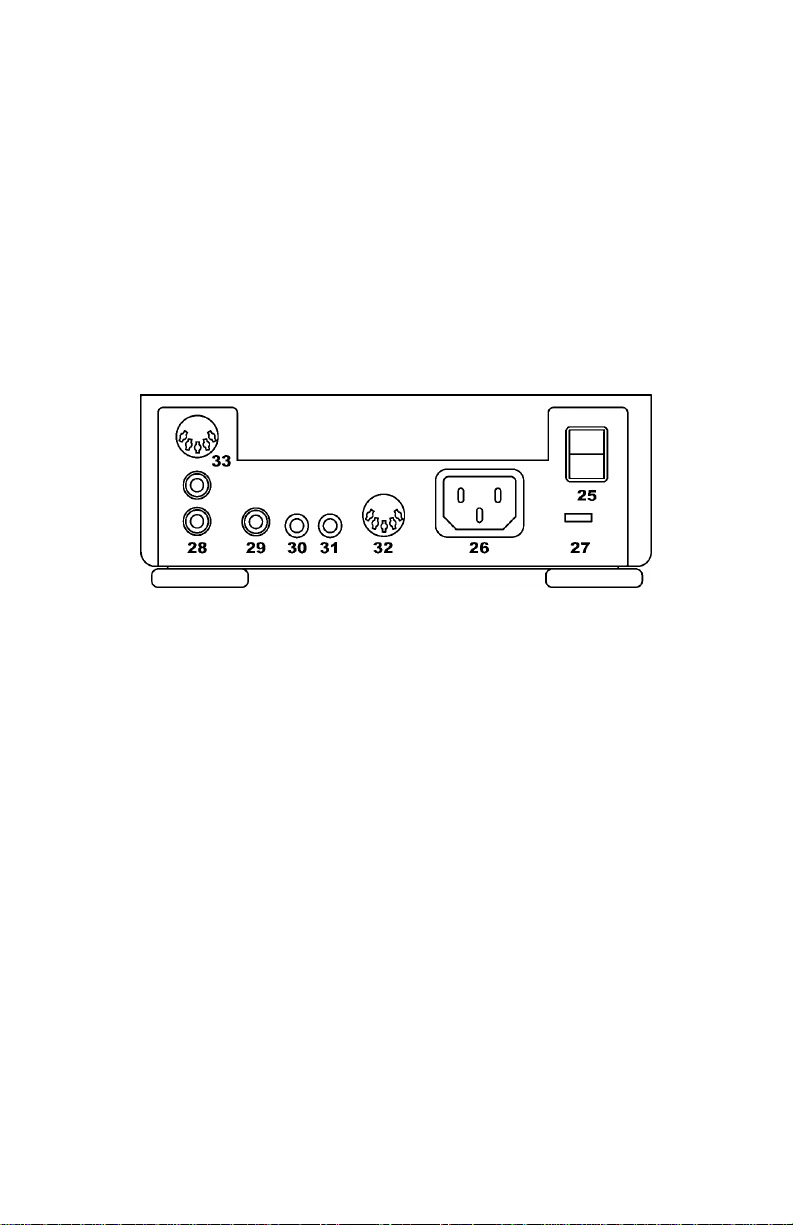
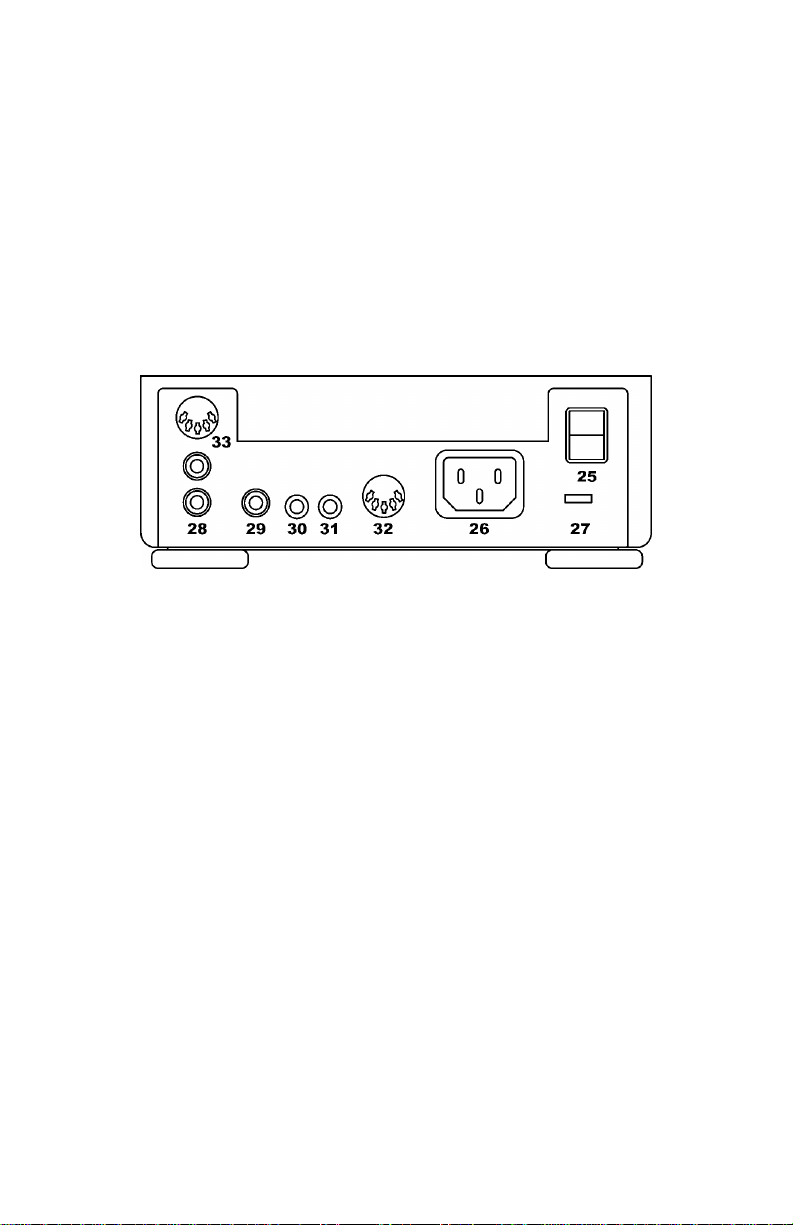
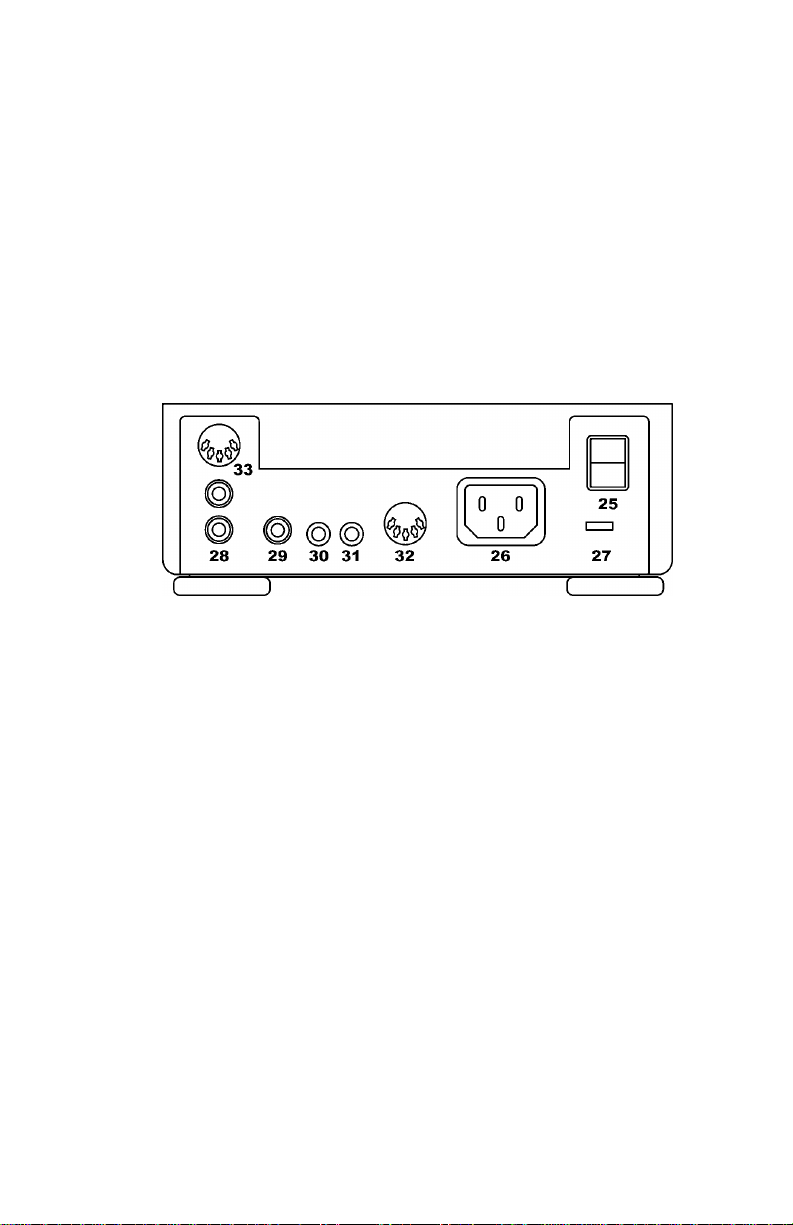
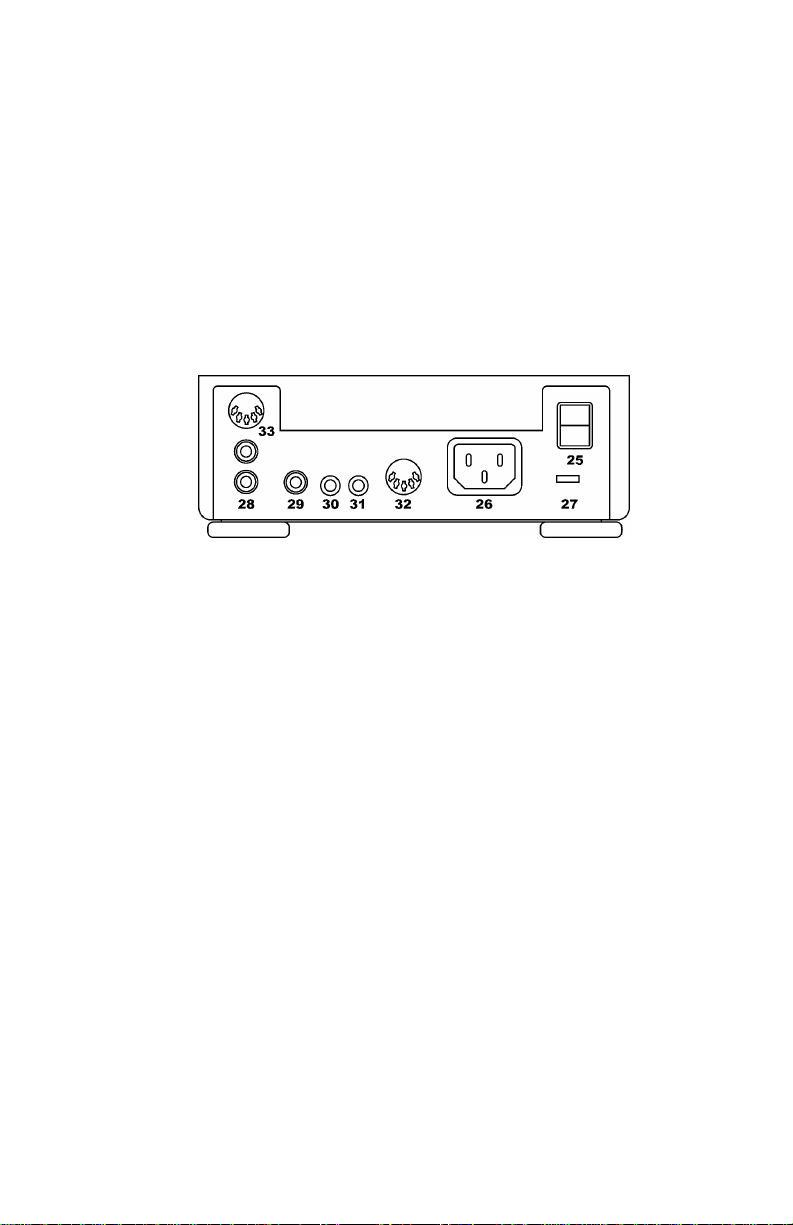
25. Power Switch- Turn on and turn off the
machine with this button. The unit should
always be shut down with this button first
before any external power is removed.
Typically it is recommended that the CD
player is powered on before amplifiers and
off after amplifiers to avoid an audio spike
to be sent through your equipment.
26. IEC Power Plug Connector - Plug your
supplied power cord in here.
27. Voltage Selector - Set this switch to the
voltage for your location.
28. RCA Audio Connectors - Connect your CD
player to your mixer from this line level
output.
29. Digital Output - The format is type 2, form
1, also known as S/PDIF (Sony/Phillips
Digital Interface Format). To active digital
output, hold down “PROG” followed by
“PITCH”. This allows digital audio
information to be sent. Some CDs also
have information encoded in the original
audio output such as CDG graphic CDs for
Karaoke.
30. Relay Connector- If you wish to use the
relay function plug in your 3.5mm stereo
control cables into here and then into your
other unit. The cable must be a stereo
style plug for the units to work properly
20. RELOOP/STUTTER- Used for repeated play
(stutter) from the loop in point, repeating a
previously set, and hot start.
21. RELAY- Used for setting Alternating play
start between attached units.
22. BEAT SYNC with MARCHING BAR GRAPHTracks the beats and measure position of
music
23. CD Illumination Light (unit front) – lights
up the CD drawer and CD when open.
24. CD Drawer (Unit Front) – Place your CDs
you wish to play in here. This unit is
designed to play commercially available CD
and properly burned and finalized CDR.
Due to variances on the specification of
certain CD burners and CDs some discs
home made CDs may not play properly.
31. Remote Start Connector – Use this
connector to plug into your fader start
compatible mixer or remote switch. This
function is always active.
a. To use this connector for fader start,
connect the supplied fader start cable to a
fader start compatible mixer. Every time
you move the crossfader on the mixer over
to the side that the unit is on, it will
automatically start playing. When you
move the fader away from that side, the
unit will stop. Moving the fader back to the
unit side will start play again.
b. Foot switches can also be attached to this
jack for creative mixing techniques and can
be found in most music shops. Connector
plugs are often ¼” and an adapter to 1/8”
will be needed for connection. There are
also two types of footswitches that will
work with this connector. The first is a
typical, on/off pushbutton switch and are
generally used for switching channels on
guitar amps. The second switch is a
momentary footswitch and is usually used
for keyboard sustain pedals.
32. MIDI IN Connector – The port is for
receiving MIDI (Musical Instrument Digital
Interface) signals from other MIDI devices
such as CD players, Keyboards, or Drum
machines.
33. MIDI OUT Connector – The port is for
sending MIDI signals to other MIDI devices.
Page 4

MANUAL DE COMIENZO RÁPIDO DEL LECTOR DE CD (ESPANOL)
1. Cerciórese de que todos los items
enumerados a principios de esta guía estén
en la caja.
2. LEA EL LIBRETE DE LA INSTRUCCIÓN
DE SEGURIDAD ANTES DE USAR EL
PRODUCTO.
3. Estudie este diagrama de ensamblaje.
4. Coloque el mezclador en una posición de
funcionamiento apropiada.
5. Cerciórese de que todos los dispositivos
estén apagados y todos los atenuadores y
las perillas del aumento estén puestas a
"cero".
6. Conecte todas las fuentes estéreas de la
entrada de información según lo indicado
en el diagrama, su micrófono, y auriculares
7. Conecte las salidas estéreas con el
amplificador(es) del poder, las cubiertas de
cinta, y/o otras fuentes audio.
8. Tape todos los dispositivos en la corriente
alterna.
9. Cambie todo encendido en la siguiente
orden.
• fuentes audio de la entrada de
información (es decir placas
giratorias o lectores de cd)
• el mezclador
• último, cualquier amplificador o
10. Al apagar, invierta siempre esta operación:
11. Vaya a http://www.numark.com para
enregistrar el producto.
CARACTERÍSTICAS:
1. PLAY/STUTTER- Para comenzar la música
2. PAUSE- Para detenerse brevemente la
3. CUE- Para mover la música hasta un cierto
4. JOG WHEEL-
5. LCD DISPLAY- Indica todas las funciones,
6. OPEN/CLOSE- Al presionar se abrirá o
7. SGL- Para fijar el modo de operación en
8. TIME- Indicación de la visualización de los
9. PROGRAM- Utilizado para fijar el ordenes
10. TRACK SELECT/SEARCH-
dispositivo de salida
• apaga los amplificadores
• el mezclador
• último, cualquier dispositivo de
entrada de información
Más información sobre este producto se
puede encontrar en
http://www.numark.com
de la señal inicial señale.
música.
punto y vea la selección de antemano.
a. INNER TOUCH WHEEL- Utilizado para
varias funciones tales como
contar(cueing), rasguño (scratching),
pitch bend, buscar, y control del efecto
b. Outer Pitch Wheel - Utilizado para la
pitch bend temporal.
mientras está ocurriendo, con el CD.
cerrará la bandeja que transporta el disco.
solo o continuo.
controles del modo de tiempo.
de la pista y varias comandos especiales.
a. Rotación - selecciona las pistas
b. Al presionar mientras que rota -
selecciona las pistas +10
c. Al presionar una vez rueda puesta
adentro empezará la búsqueda.
Page 5
11. PITCH- Activa y establece las limitaciones
del resbalador Pitch.
12. KEY- Utilizado para varios controles llave.
13. -,+ - Funciona como Pitch Bend y controla
las funciones llave y pitch.
14. PITCH SLIDER- Controla la velocidad total
de la música
15. PITCH RANGE LED- indica los limites
corrientes del Pitch
16. EFFECT BUTTON- Determina el efecto
deseado.
17. EFFECT HOLD- Fija los efectos a una
posición alterna
18. LOOP IN- Fija el tartamudeo y las puntas
de entrada del bucle.
19. LOOP OUT- Fijar las puntas de la salida del
bucle y deja salir del bucle.
20. RELOOP/STUTTER- Utilizado para una
canción repetada (tartamudeo) del punto
de entrada del bucle, repetando un
comienzo previamente fijado, y hot start.
21. RELAY- Utilizado para fijar el comienzo de
la cancion que se alterna entre las
unidades adjuntos.
22. BEAT SYNC con MARCHING BAR GRAPHSigue los ritmos y mide la posición de la
música
23. Luz de la iluminación del CD (frente a la
unidad)– ilumina el cajón del CD y el CD
cuando está abierto.
24. Cajón del CD (frente a la unidad) - coloque
su CDs que usted desea poner adentro.
Esta unidad está diseñada para poner el CD
comercial disponible y a CDR
correctamente escritos y cerrados. Debido
a las variaciones en la especificación de
ciertos escritores de CD y CDs que están
hechos en casa pueden funcionar
incorrectamente.
25. Power Switch- enciende y apaga la
máquina con este botón. La unidad se debe
cerrar siempre con este botón primero
antes de que se quite cualquier potencia
externa. Se recomienda típicamente que
accione el lector de CD, encendido antes de
los amplificadores y apagado después de
los amplificadores para evitar un punto
audio que se enviará a través de su equipo.
26. Conector del enchufe de poder del IEC enchufe su cable eléctrico previsto aquí.
27. Selector del voltaje - fije este interruptor al
voltaje para su localización.
28. Los conectores audio RCA - conecte a su
lector de CD con su mezclador de esta línea
salida.
29. Salida Digital - el formato es el tipo 2,
forma 1, también conocida como S/PDIF
(formato del interfaz de Sony/Phillips
Digital). Para activar la salida digital,
mantenga "PROG" seguido por la " PITCH".
Esto permite que la información audio
digital sea enviada. Algunos CDs también
tienen información codificada en la salida
audio original tal como gráfico CDs de CDG
para Karaoke.
30. Relay Connector- si usted desea utilizar la
función de relay enchufa sus cables
estéreos de control de 3.5mm aquí y
después en su otra unidad. El cable debe
ser un enchufe estéreo para que las
unidades trabajen correctamente.
31. Remote Start Connector – utilice este
conector para tapar en su mezclador
compatible fader start o mando. Esta
función siempre está activa.
a. Conecte el cable previsto al fader start con
un mezclador compatible fader start para
utilizar este conector para el fader start.
Cada vez que usted mueve el crossfader en
el mezclador hacia la unidad, comenzará
automáticamente a cantar. Cuando usted
mueve el crossfader lejos de esta unidad
se parará. El movimiento del crossfader
otra vez hacia la unidad comenzará a
cantar de nuevo.
b. Los interruptores del pie se pueden
también asociar a este enchufe para las
técnicas creativas de mezcla y se pueden
encontrar en la mayoría de los
departamentos de la música. Los enchufes
del conector son a menudo 1/4"y un
adaptador a 1/8" será necesario para la
conexión. Hay también dos tipos de
interruptores de pie que funcionan con este
conector. El primero es un interruptor tipico
pulsador, comezar./apagar y se utiliza
generalmente para los canales de la
conmutación en los amplificadores de
guitarra. El segundo interruptor es un
interruptor de pie momentáneo y se utiliza
generalmente para los pedales sostenidos
del teclado.
32. MIDI IN Connector – el acceso está para
recibir las senales de MIDI (Musical
Instrument Digital Interface) de otros
dispositivos de MIDI tales como lectores de
cd, teclados, o del tambor (drum machine).
33. MIDI OUT Connector – el acceso está para
enviar las senales de MIDI a otros
dispositivos de MIDI
Page 6
Instructions pour le lecteur de CD (FRANÇAIS)
1. Assurez-vous que toutes les articles
mentionnés ci-dessus sont dans la boîte.
2. LISEZ LES INSTRUCTIONS DE SECURITE
DU MANUEL AVANT D’UTILISER CE
PRODUIT.
3. Etudiez la diagramme de programation.
4. Placez le mixer dans un endroit conforme a
l’opération.
5. Assurez vous que tous les boutons sont sur la
position OFF et toutes les manches sont
à « zero »
6. Connectez toutes les sources comme indiqué
dans la diagramme, votre microphone et votre
casques.
7. Connectez les output stéreo à
l’amplificateur(s), les decks de cassette et/ou
autre sources audio.
8. Branchez tout dans la prise AC.
9. Tournez les boutons et les manches dans
l’ordre suivante:
• Sources audio input (i.e. tables de mixage ou
CD palyers)
• mixer
• Finalement, tout amplificateur ou articles
output
10. Quand vous voulez éteindre, changez cette
opération par :
• Arrêter vos amplificateurs
• mixer
• Finalement, articles input.
11. Visitez http://www.numark.com pour la
régistration du produit.
Plus d’informations peut être trouvées à
CARACTERISTIQUES:
1. PLAY/STUTTER- pour commencer la
2. PAUSE-pour faire la pause.
3. CUE- Pour bouger la musique au point de
4. JOG WHEEL- MANCHE FREIN -
5. DISPLAY LCD – indique toutes les
6. OPEN/CLOSE – en appuyant on peut ouvrir
7. SGL – pour établir le play –mode en single
8. TIME – contrôle le display du mode temps.
9. PROGRAM- utilisé pour établir l’ordre de la
10. TRACK SELECT/SEARCH-
11. PITCH – Actionne et programme la ratio du
http://www.numark.com
musique du point initiel.
queue et prévoir la séléction.
a. MANCHE INTERNE – utilisé pour différents
fonctions comme cueing, scrathing, pitch
bend, contrôle des effets
b. MANCHE EXTERNE – utilisé pour pitch-bend
temporaire.
fonctions, comme elle apparaîssent, avec le
CD.
ou fermer la boîte du disque.
(seul) ou continous (continu).
musique et autre commandes spéciales
variées.
a. Rotation-sélecte la musique
b. Appuyer en même temps avec la rotation-
selecter musique +10
c. Appuyer une seule fois- Met la manche en
search-mode (recherche).
pitch slider.
Page 7
12. KEY –Utilisé pour différents contrôles.
13. -,+ - Fonctionne comme pitch bend et
contrôle les touches et les fonctions pitch.
14. PITCH SLIDER – Contrôle la vitesse
moyenne de la musique.
15. PITCH RANGE LED – Indique la rate
courrante du pitch slider
16. EFFECT BUTTON – Utilisé a determiner
l’éffet désiré.
17. EFFECT HOLD – Utilisé pour établir les
éffets dans une position alternative
18. LOOP IN – Utilisé à établir le stutter et loop
dans des points.
19. LOOP OUT – Utilisé à déterminer les points
loop et éliberer le loop.
20. RELOOP / STUTTER – utilisé pour un play
répété du loop au point, en répétant un
préétablissement.
21. RELAY – Utilisé pour établir un
commencement alternative entre les unités
attachées.
22. BEAT SYNC with MARCHING BAR GRAPH –
Détermine les tapes et mesure la position
de la musique
23. CD Illumination Light (façade de l’unité) il
s’allume au moment ou on retire le tiroir du
CD et le CD.
24. CD Drawer (façade de l’unité) – Placez les
CD que vous voulez écouter ici. Cette unité
est fait pour les CD disponibles et pour le
CDR finalisé. A cause de la variabilité de
chaque CD disque, ceux qui sont fait à la
maison ne peuvent pas réprésenter
correctement.
25. POWER SWITCH – c’est le button qui
permet d’allumer ou d’éteindre la machine.
L’unité doit être éteinte premièrement par
ce button avant de débrancher la machine.
En général il est recommandé d’allumer
avant le CD player et après les
amplificateurs pour éviter un choque audio
à l’intérieur de votre système.
26. IEC Power Plug Connector – branchez votre
corde d’alimentation ici.
27. Voltage Selector – Etablit le voltage pour
votre location.
28. RCA Audio Connectors – Connectez votre
CD player au mixer de ce niveau output.
29. Digital Output – Le format est type 2,
forme 1 , connu comme S/PDIF (Sony,
Phillips Format digital de l’interface) Pour
activer le output digital, appuyez « PROG »
et ensuite « PITCH ». Cela permet que
l’information digitale soit envoyée.
Quelques CDs ont de l’information codée
dans le output original comme la graphique
CDG des CD pour Karaoke.
30. Relay Connector – Si vous voulez utiliser la
fonction relay branchez vos cables 3.5 mm
stereo ici et ensuite dans l’autre unité. Pour
fonctionner correctement le cable doit avoir
la prise stereo.
31. Remote Start Connector – Utilisez ce
connecteur pour brancher votre
potentiomètre dans votre mixer
compatible. Cette fonction est toujours
active.
a. Pour utiliser ce connecteur, connectez le
cable à votre mixer. Chaque fois que vous
bougez le cable connecteur du mixer sur la
partie où l’unité fonctionne, cela va
commencer a fontionner automatiquement.
Quand vous éloignez le cable fader , l’unité
arrêtera. En bougeant le fader sur l’unité,
cela va recommencer a fonctionner.
b. Des manches de changement pour les
pieds peuvent être attachées pour un
mixage creative et peuvent être trouvées
dans la majorité des magasins de musique.
Les prises de connection sont souvent L et
un adapteur pour 1/8 sera nécéssaire pour
la connection. Il existe deux types de
manches pour le pied qui fonctionnent avec
ce connecteur. Le premier est typique,
button on/off et il est utilisé en général
pour changer les canaux pour les guitares
éléctriques. Le deuxième type est un
button temporaire et il est utilisé pour les
keyboards.
32. MIDI IN Connector – L’article est pour
recevoir MIDI (Musique Instrumentale
Digitale Interface) signaux d’autres MIDI
machines comme CD players, Keyboards,
ou tambours.
33. MIDI OUT Connector – L’article est pour
envoyer signaux MIDI to autres machines
MIDI
Page 8

CD-Player – schneller Start (DEUTSCH)
1. Versichern Sie sich dass alle Objekte
aufgezählt auf der vorderen Seite dieses
Führers in der Schachtel waren.
2. LESEN SIE DIE BROSCHÜRE MIT
SICHERHEITSHINWEISE VOR DER
BENUTZUNG DES PRODUKTES.
3. Studieren Sie das Montagediagramm.
4. Setzen Sie de Mixer in einer entsprechenden
Position für Handhabung.
5. Versichern Sie sich dass alle Vorrichtungen
geschlossen sind und alle Fader und Tasten der
Verstärkungspotentiometer auf Position “Null“
sind
6. Schließen Sie alle Stereoeintritte wie im
Diagramm an, das Mikrofon und die Kopfhörer
7. Schließen Sie die Stereoaustritte zum
Verstärker (zu den Verstärker) für Kraft,
Deckcassettenrecorder, und/oder andere
Audioquellen.
8. Stecken Sie alle Vorrichtungen in der Dose für
Wechselstrom (AC).
9. Starten Sie alles in folgender Reihenfolge.
• Audioeintrittquellen (z.B. Turntable oder CD
player)
• Mixer
• Als letzte, jedwelche Verstärker oder
Austittsvorrichtungen
10. Wenn Sie schließen, immer in umgekehrter
Reihenfolge, und zwar,
• schließen Sie die Verstärker
• Mixer
• Zuletzt jedwelche Schließvorrichtung
11. Gehen Sie auf http://www.numark.com für die
Registrierung des Produktes.
Mehr Informationen über dieses Produkt auf
ERLEICHTERUNGEN:
1. PLAY/STUTTER- um die Musik von einem
2. PAUSE- um die Musik abzustellen (oder in
3. CUE- um die Musik zu einem gewissen
4. JOG WHEEL-
5. LCD DISPLAY- zeigt alle Funktionen,
6. OPEN/CLOSE- auf Druck schließt oder
7. SGL- um die Vorgehensart einzustellen
8. TIME- die Kontrollen zeigen die Anzeigne
9. PROGRAM- benutzt für die Einstellung der
10. TRACK SELECT/SEARCH-
http://www.numark.com
ursprünglichen Punkt zu starten.
Pause).
Punkt zu versetzen und die Selektion
vorzuschauen.
a. INNER TOUCH WHEEL- – benutzt für
verschiedene Funktionen wie Cueing,
Scratching, Pitch Bend, Suchen und
Kontrolle der Effekte
b. Outer Pitch Wheel - benutzt für
zeitweiligen Pitch Bend.
während es passiert, mit CD.
öffnet das Transporttablett des Disks.
(play mode) in single oder ständig.
des Zeitmodus.
Reihenfolge der Tracks und verschiedene
spezielle Steuerungen.
a. Rotation – selektiert die Tracks
b. Drückend während der Rotation – selektiert
die Tracks + 10
c. Drückend nochmals – stellt das Rädchen in
Bewegung im Suchungsmode (search
mode).
Page 9
11. PITCH- aktiviert und stellt ein die Granzen für
den Pitch-Kursor.
12. KEY- benutzt für verschiedene
Schlüsselkontrolllen.
13. -,+ - funktionieren als Pitch Bend und
kontrollieren die Schlüsselfunktionen und Pitch.
14. PITCH SLIDER- kontrollieren die totale
Geschwindigkeit der Musik.
15. PITCH RANGE LED- zeigt den kurrenten
Intervall des Pitch-Kursors
16. EFFECT BUTTON- benutzt für den gewünschten
Effekt zu determinieren.
17. EFFECT HOLD- benutzt um die Effekte in
alternativen Positionen einzustellen
18. LOOP IN- – benutzt um die Punkte Loop in und
sttuter zu wählen.
19. LOOP OUT- benutzt um die Punkte Loop out
und Loop fertig zu wählen.
20. RELOOP/STUTTER- benutzt für wiederholtes
Play (Stutter) vom Loop in – Punkt, repetant
eine vorherige Einstellung, und Hot Start.
21. RELAY- benutzt um das Play zwischen den
angelegten Einheiten zu abwechseln.
22. BEAT SYNC mit MARCHING BAR GRAPHverfolgt den Rhytmus (beat) und mißt die
Position der Musik
23. CD Illumination Light (Vorseite der Einheit) –
beleuchtet das CD Tablett und das CD wenn
es geöffnet ist.
24. CD Drawer (Vorseite der Einheit) – setzen
Sie die CD die Sie hören wollen (Play) hier
hinein. Diese Einheit wurde projektiert um
CD aus dem Handel zu benutzen und korrekt
eingebrannte und abgeschlossenen
CDR.Wegen den Variierungen der
Spezifikationen der verschiedenen Brenner
(Burner) von CD, und den CD-s, können
einige selbstgemachte CD-s nicht richtig
funktionieren.
25. Power Switch- starten Sie und stellen Sie die
Maschine mit dieser Taste. Die Einheit muss
immer mit deser Taste abgstellt werden bevor
jede Versorgungskabel herausgenommen wird.
Typisch wird empfohlen dass der CD Player vor
den Verstärker gestartet wird und abgestellt
nach den Verstärker, um zu vermeiden dass
ein Audiogipfel durch die Ausstattung
übertragen wird.
26. IEC Power Plug Connector - stecken Sie den
gelieferten Versorgungskabel hier ein.
27. Voltage Selector - stellen Sie diese Taste zur
Spannung von Ihrem Standort ein.
28. RCA Audio Connectors - schließen Sie den CD
Player zum Mixer aus diesem Austritt mit
Linienniveau ein t.
29. Digital Output - Format ist Typ 2, Form 1,
bekannt auch als S/PDIF (Sony/Phillips Digital
Interface Format). Um den digitalen Austritt zu
aktivieren, drücken Sie „Prog“ gefolgt von
„Pitch“. Dieses gibt die Möglichkeit dass die
digitale Audioinformation übertragen wird.
Bestimmte CD-s haben auch Kodeinformation
in der originalen Audioaustrit wie CDG grafisch,
CD für Karaoke.
30. Relay Connector- wenn Sie die Relay-Funktion
benutzen wollen stecken Sie die
Stereokontrollekabeln von 3,5 mm hier und
dann in die andere Einheit. Die Kabel muss
stereo sein damit die Einheiten entsprechend
funktionieren
31. Remote Start Connector – – benutzen Sie
diesen Connector um ihn im Mixer oder
Fernbedienung kompatibel Fader Start zu
stecken. Diese Funktion ist immer aktiv.
a. um diesen Connector zum Starten von
Fader zu benutzen, schließe den gelieferten
Fader Kabel Start zu einem Mixer
kompatibel Fader Start an. Jedes Mal wenn
Sie den Crossfader des Mixers gegen die
Einheit bewegen, wird dieser automatisch
beginnen zu singen. Wenn Sie den Fader
zur anderen Seite bewegen, wird die
Einheit aufhören. Bewegen Sie den Fader
zurück gegen die Einheitsseite, dieser wird
wieder zu singen beginnnen.
b. Die Fußschalter können auch angeschlossen
sein dieser Jack-muffe für kreative
Mixentechniken und können aus den
meisten Musikgeschäften erhalten werden.
Die Anschließmuffen sinf häufig ¼“ und ein
Adapter von 1/8“ ist nötig für den
Anschluss. Es gibt auch zwei Arten von
Fußschalter die mit diesem Connector
funktionieren können. Die erste ist eine
Schaltertaste typisch ON/OFF und wird
benutzt im allgemeinen um die Kanäle bei
den Gitarrenverstärker zu wechseln. Die
zweite Taste ist ein momentaner
Fußschalter der gewöhnlich benutzt wird
damit als Sustain-Pedal für die Instrumente
mit.
32. MIDI IN Connector – dieser Port ist für das
Erhalten von Signale MIDI (Musical
Instrument Digital Interface) von anderen
MIDI Vorrichtungen als CD Player,
Keyboards, Drum Machines
(Trommelmaschinen).
33. MIDI OUT Connector – dieser Port ist für
die Übertragung von Signale MIDI (Musical
Instrument Digital Interface) zu anderen
MIDI Vorrichtungen
Page 10
Il CD player – inizio rapido (Italiano)
1. Assicurarsi che tutti gli oggetti iscritti sulla
parte frontale di questa guida sono stati
nella scatola.
2. LEGGERE LA BROSSURA DI
ISTRUZIONI DI SICUREZZA PRIMA DI
UTILIZZARE IL PRODOTTO.
3. Studiare questo diagramma di montaggio.
4. Collocare l’apparecchio da missare in una
posizione adeguata per il funzionamento.
5. Assicurarsi che tutti i dispositivi sono accesi
e che tutti i pulsanti dei potenziometri di
amplificazione sono collocati nella posizione
« zero »
6. Connettere tutte le fonti di entrata stereo
tale come è indicato nel diagramma, il
microfono e le cuffie
7. Connettere le entrate stereo
all’amplificatore (agli amplificatori) di
potere, ai cassetofoni deck e/o ad altre
fonti audio.
8. Introdurre tutti i dispositivi nella presa di
corrente alternativo (AC).
9. Premere tutti i pulsanti nell’ordine
seguente.
• Le fonti di entrata audio (per esempio le
tavole di missaggio o il CD player)
• L’apparecchio da missare
• Ultimamente, qualsiasi amplificatore o
dispositivo di uscita (output)
10. Quando si spegne l’apparecchio, sempre si
procede nell’ordine inverso, così:
• Si spengono gli amplificatori
• L’apparecchio da missare
• Ultimamente, qualsiasi dispositivo di
entrata (input)
11. Visitare http://www.numark.com per la
registrazione del prodotto.
Più informazioni si possono incontrare
all’indirizzo http://www.numark.com
FACILITA’:
1. PLAY/STUTTER – per cominciare la musica
da un punto iniziale.
2. PAUSE – per spegnere la musica (mettere
la pausa).
3. CUE – per mettere la musica a un certo
punto e prevedere la selezione.
4. JOG WHEEL-
a. INNER TOUCH WHEEL – utilizzata per varie
funzioni tali come cueing, scrathing, pitch
bend, controllo degli effetti
b. OUTER PITCH WHEEL – utilizzata per il
pitch-bend temporaneo.
5. LCD DISPLAY – indica tutte le funzioni,
mentre appaiono, con il CD.
6. OPEN/CLOSE – premendo si chiuderà o si
aprirà il cassetto di trasporto del disco.
7. SGL – per stabilire il modo di
funzionamento (play mode) in single o
continuo.
8. TIME – i controlli affissano le indicazioni del
modo di tempo.
9. PROGRAM – utilizzato per stabilire l’ordine
dei track e vari commandi speciali.
10. TRACK SELECT/SEARCH-
a. Rotazione – seleziona la musica
b. Premendo mentre si svolge la rotazione –
seleziona la musica + 10
c. Premendo una sola volta – Mette la marcia
nel modo di ricerca (search mode).
11. PITCH – Mette in funzionamento e
stabilisce i limiti per il cursore pitch.
Page 11
12. KEY – Utilizzata per vari controlli chiave.
13. -,+ - Funziona come pitch bend e controlla
le funzioni chiave e le funzioni pitch.
14. PITCH SLIDER – Controlla la velocità totale
della musica.
15. PITCH RANGE LED – Indica l’intervallo
corrente del cursore pitch
16. EFFECT BUTTON- Utilizzato per determinare
l’effetto desiderato.
17. EFFECT HOLD- Utilizzato per stabilire gli
effetti in posizioni alternative
18. LOOP IN- Utilizzato per selezionare i punti
di loop in e di stutter.
19. LOOP OUT- Utilizzato per selezionare i punti
di loop out e di terminazione loop.
20. RELOOP/STUTTER- Utilizzato per un play
ripetuto (stutter) dal punto loop in,
ripetendo un set precedente, e hot start.
21. RELAY- Utilizzato per alternare il play fra le
unità allegate.
22. BEAT SYNC con MARCHING BAR GRAPHSegue il ritmo e misura la posizione della
musica
23. CD Illumination Light (facciata dell’unità) –
Illumina il cassetto CD e il CD quando
questo è aperto.
24. CD Drawer (facciata dell’unità) – Si
collocano i CD che uno desidera ascoltare
(play) qui dentro. Questa unità è
progettata per utilizzare dei CD disponibili
nel commercio e dei CDR iscritti e finalizzati
correttamente. A causa delle variazioni
nelle specificazioni dei diversi iscrittori
(burner) di CD e dei CD stessi, certi CD
manufatti potrebbero non funzionare
correttamente.
25. Power Switch – questo è il pulsante che
permette di accendere e di spegnere
l’apparecchio. L’unità deve essere spenta
sempre con questo pulsante prima che
qualsiasi cavo di alimentazione sia tolto.
Tipicamente, si raccomanda che il CD
player sia acceso prima degli amplificatori e
spento dopo gli amplificatori per evitare che
un choc audio sia trasmesso tramite
l’equipaggiamento.
26. IEC Power Plug Connector - Introdurre il
cavo di alimentazione fornito qui.
27. Voltage Selector - Collocare questo
commutatore alla tensione della sua
locazione.
28. RCA Audio Connectors - Connettere il CD
player all’apparecchio da missare di questa
uscita con livello di linea.
29. Digital Output - Il formato è tipo 2, forma
1, conosciuto anche con la denominazione
di S/PDIF (Sony/Phillips Digital Interface
Format). Per mettere in funzionamento
l’uscita digitale, si deve tenere premito
“PROG” seguito da “PITCH”. Questo dà la
possibilità che l’informazione audio digitale
sia trasmessa. Certi CD hanno anche delle
informazioni codificate nell’uscita audio
originale, tali come i CDG grafici, i CD per
Karaoke.
30. Relay Connector- Se loro desiderano
utilizzare la funzione relay, devono
introdurre i cavi stereo di controllo di 3.5
mm qui e dopo all’altra unità. Il cavo deve
essere stereo perchè le unità funzionino
adeguatamente.
31. Remote Start Connector – Utilizzare questo
connettore per introdurlo nell’apparecchio
da missare o il telecommando compatibile
fader start. Questa funzione è sempre
attiva.
a. Per utilizzare questo connettore allo scopo
di accendere il fader, si collegga il cavo
fader start fornito a un apparecchio da
missare compatibile fader start. Ogni volta
che si muove il crossfader dell’apparecchio
da missare nella parte in cui si trova l’unità,
questo comincerà a cantare
automaticamente. Quando si muove il cavo
fader nella parte opposta, l’unità si spegne.
Muovendo il cavo fader indietro verso la
parte dell’unità, questa comincerà a
cantare di nuovo.
b. Anche dei commutatori di piede possono
essere allegati a questo manicotto jack per
delle tecniche creative di missaggio e questi
si possono procurare dalla maggior parte
dei magazzini musicali. I manicotti
connettori sono frequentemente ¼” ; un
adattore di 1/8” è necessario per la
connessione. Ci sono anche due tipi di
commutatori di piede che possono
funzionare con questo connettore. Il primo
è un commutatore pulsante da premere
acceso/spento tipico ed è utilizzato in
generale per cambiare i canali degli
amplificatori di chitarra. Il secondo
commutatore di piede momentaneo è
utilizzato di solito come pedale di sostegno
per gli strumenti con keyboards.
32. Questo si utilizza per ricevere dei segnali
MIDI (Musical Instrumental Digital
Interface - Interfaccia Di Strumenti
Musicali Digitali) da altri dispositivi MIDI tali
come CD players, Keyboards, Drum
machines (tamburi).
33. MIDI OUT Connector – Questo serve alla
trasmissione di segnali MIDI ad altri
dispositivi MIDI
Page 12

Page 13

AXIS 8/9
Tabletop CD Players
Reference Guide
©2002 Industries http://www.numark.com
Page 14

-2-
Page 15

TABLE OF CONTENTS
Table of Contents 3
Basic Operation
Play, Pause, Cue, Pitch, General CD control 4
Advanced Operations
Setting Cue Points 6
Saving Cue Points 7
Beatkeeper Operation 8
Adjusting Pitch/ Aligning Beats 9
Looping 10
Stuttering (Hot Starts) 12
Key Lock / Key Change 13
Effects 14
Program Functions (A MUST READ!!!) 18
Relay 19
Fader Start 20
Remote Start 20
MIDI IN-OUT 21
Updating your Software 24
-3-
Page 16
BASIC OPERATIONS
Open/Close: Press to load or eject the disc. The drawer will
automatically close to protect the tray from accidental damage
while open. NOTE: Tray will not open if the disc is in play.
In order to program the automatic close time press and hold
“PROG” followed by “OPEN/CLOSE”. The display will indicate
options of 30 seconds, 60 seconds, 120 seconds, and (no) for no
auto close. This setting will be remembered at power down.
Play/Stutter: Starts the music from either the first set cue point or
the last point of pause. By starting from the last pause point
while the unit is paused a new cue point is set. Pressing this
button while the unit is in play restarts the unit from the last cue
point, creating a “stutter” effect.
Startup speed of initial play can be adjusted by pressing “PROG”
followed by “PLAY/STUTTER” and then rotating the wheel until
the desired seconds of startup are shown. Pressing “PROG”
followed by “PLAY/STUTTER” twice will toggle startup between
0 to the desired seconds. This setting will be remembered at
power down.
Pause: Stops the music while in play. Pressing play following this sets
a new cue point. Holding down the button while scratching or
stuttering the music will stop the music at the current position,
allowing you to capture a loop in or cue point.
Pause speed (BRAKING) can be adjusted, by pressing “PROG”
followed by “PAUSE” and then rotating the wheel until the
desired seconds of startup are shown. Pressing “PROG” followed
by “PAUSE” twice will toggle startup from 0 to the desired
seconds. This setting will be remembered at power down.
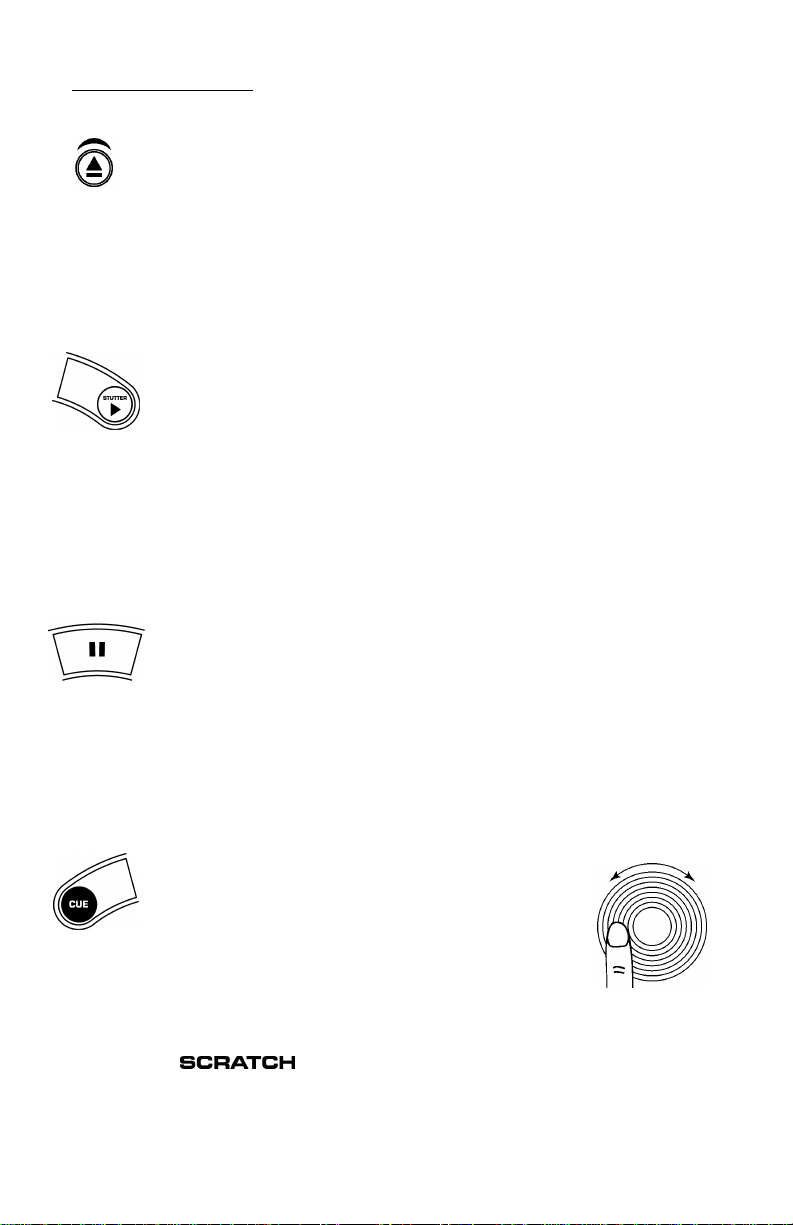
Cue: Returns and pauses the music at the last set cue point. The cue
point is the last place in which the unit was paused and then play
was pressed. Pressing a second time allows for
temporary play of this point. You can easily edit
the cue point by turning the wheel. As you
rotate the wheel the music will sound. By
stopping the wheel and pressing play a new
point is set.
The sound during wheel rotation can be adjusted from a smooth
“scratch” sound to the traditional “stutter” sound. To alternate
modes hold “PROG” followed by “CUE”. The display will indicate
will go away when the style of cue is stutter. This setting will be
remembered at power down.
when the scratch sound is active. This indication
-4-
Page 17
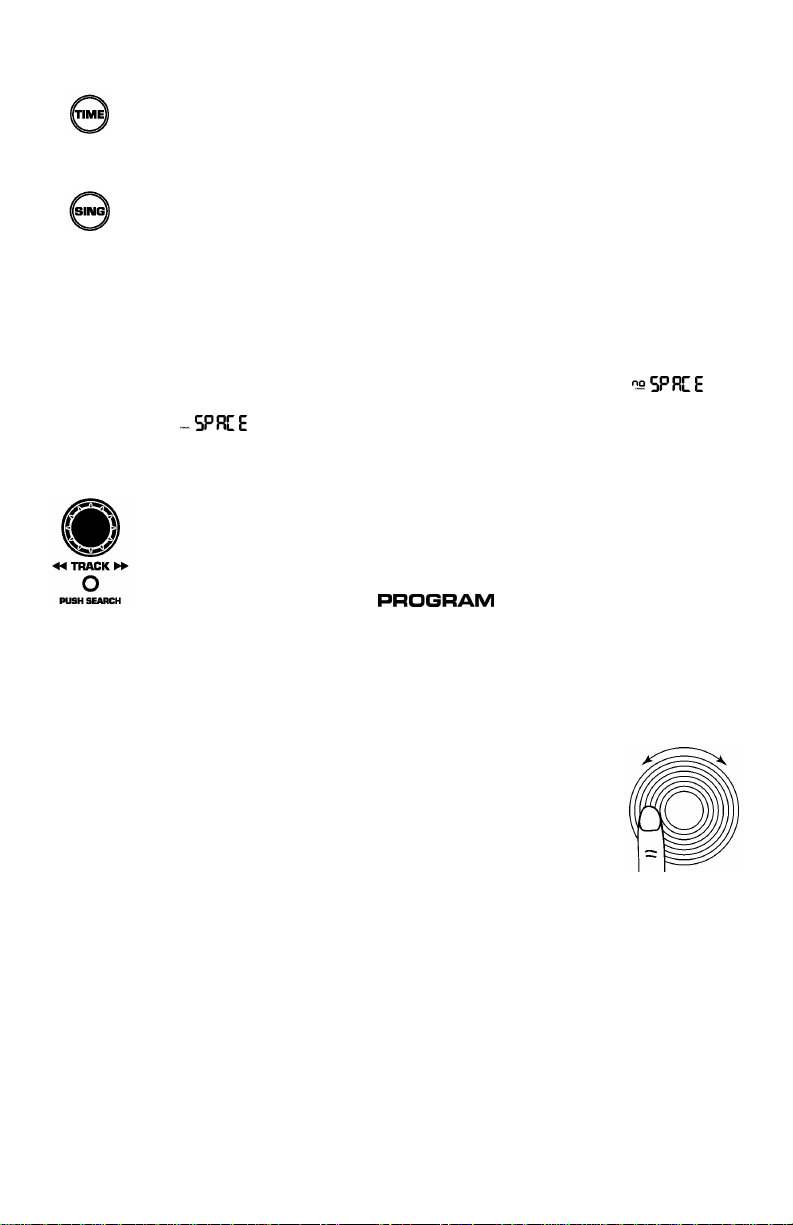
Time: switches the time modes on the display between elapsed
playing time, remaining time on the track and remaining time on
the entire CD. This setting will be remembered at power down.
Single: toggles the unit to play back just one track at a time (single)
or play continuously through all tracks and then start over
repeating the CD infinitely (continuous). This setting will be
remembered at power down.
You have an option for eliminating the dead space at the end of
tracks during continuous mode. The unit already automatically
removes dead space at the beginning of tracks. End of track dead
space elimination is useful if you are playing a CD continuously
and want to eliminate all the gaps between songs. Press
“PROG” followed by “SGL”. The display will indicate “ ”
when the function is set to eliminate space and indicates “
tracks. This setting will be remembered at power down.
Track Selection: Rotate the dial to quickly find the desired track. To
advance by +10, press the knob while rotating.
You can also pre program the desired sequence of songs Track
sequence programming can be done by pressing “PROG” while
the unit is stopped and “ ” will light. Select each
track to be programmed then press “PROG” between selections.
Press “PLAY/STUTTER” to start the track sequence program
playing. To exit and erase program hold “PROG” for more than 2
seconds while the unit is stopped, open the disc tray, or turn off
the power.
Search: Pressing the “TRACK” selector changes the
mode of the jog wheel to a search mode. Search
will remain active while the wheel is being moved
and for 8 seconds after. Moving the wheel clockwise
rapidly moves forward through the music.
Counterclockwise moves backwards through the
music. There are 2 search speeds depending upon
wheel rotation speed.
“ when the unit is left to leave the natural space between
-5-
Page 18
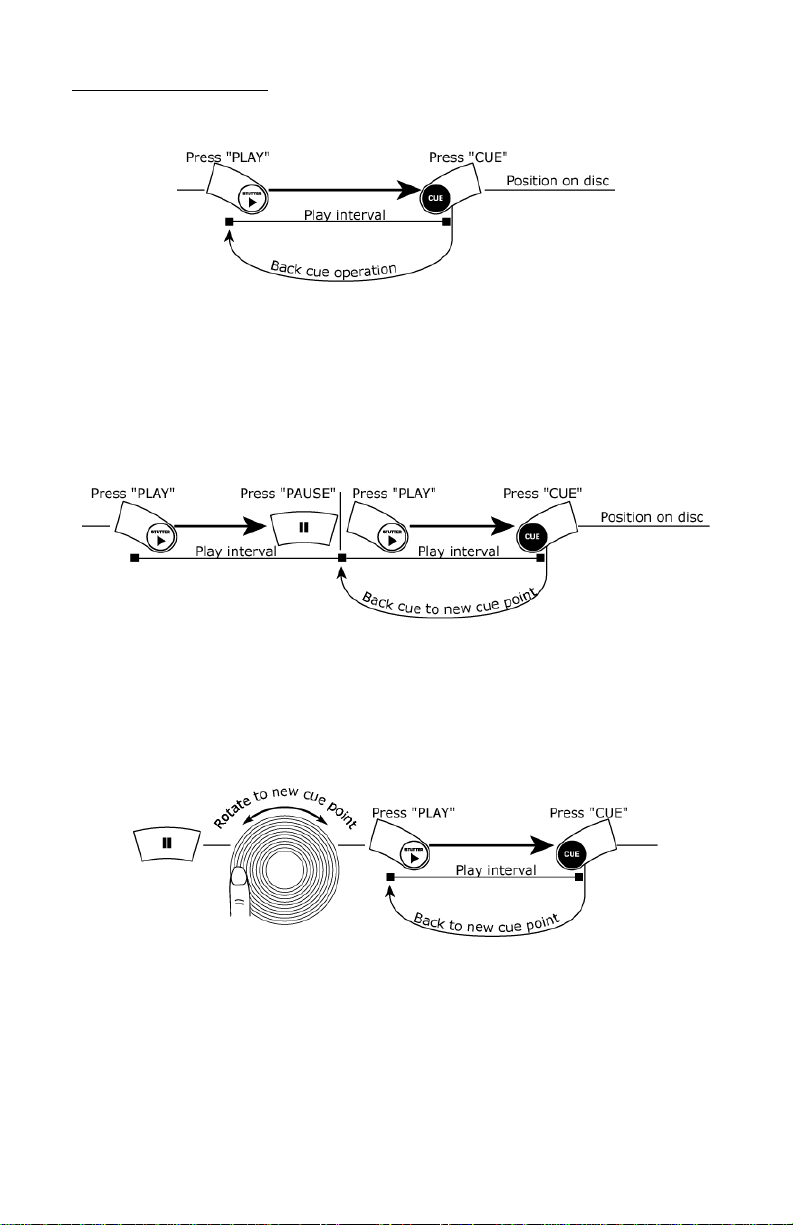
SETTING CUE POINTS
PLAY and CUE
Pressing the “PLAY” button starts the disc. Pressing the “CUE” button will
reset the disc to the last place where the disc was started. This is called the
cue point. By alternately pressing the “PLAY” button and the “CUE” button,
the disc may be returned and played from the cue point any number of times.
This function is called back cue.
PLAY, PAUSE and CUE
When pressing “PLAY” to start then pressing “PAUSE” and then “PLAY”
again, a new cue point will be set. Pressing “CUE” will return to the last pause
position and will be the new cue point.
EDITING CUE POINT
When the jog wheel is turned while paused, a new cue point can be located.
By pressing “PLAY” while paused that point will be set. By pressing “PLAY”
again (STUTTER) the point can be checked as desirable.
-6-
Page 19

CUE/LOOP POINT STORAGE AND RECALL
To SAVE Cue and Loop points on the current CD:
• CD should still be in the drawer with cue and loop points set.
• Press “PROG” + .
• Cue points are stored and LCD shows "CUE STORE" for 1 second.
• If MIDI OUT is connected to the MIDI in of another CD player’s MIDI
To RECALL Cue points on the current CD:
To TRANSFER stored cue points from another unit:
IN, the cue point is stored on the other CD player.
• Press “PROG” + .
• If CD player is open, it will automatically close and LCD will show "CUE
FETCH" to indicate cue point loading.
• If CD is already in the player, it will stop the current function and show
"CUE FETCH" to indicate cue point loading ".
• All cue, loop in, and loop out points are restored along with the BPM
and downbeat for immediate access to beatkeeper functions.
• If the CD doesn't have cue points stored on the CD player, then the
LCD will show "NO FETCH.
• “No Disc” should be in the player you want to get the points into,
(Player A).
• The CD Player needing cue points, (Player A), should be looped via
MIDI to another CD player with the cue points already stored (Player
B).
• Press “PROG” + on Player A to retrieve cue points from Player
B.
• Player B will flash "CUE FETCH" and send all of its cue points to Player
A
• Player A will then flash "CUE STORE" and store all cue points received.
Notes:
• If over 1024 CDs have cue points written, the oldest cue points are
overwritten.
• If the same CD is found with other cue points, the old cue point data is
replaced by the new cue point data.
-7-
Page 20

THE BEATKEEPER™ III
The AXIS 9 includes the latest Numark patented Beatkeeper™ technology. The
Beatkeeper™ automatically tracks beats based upon a combination of
frequencies and rhythm patterns in the music. It shows BPM in the display and
outputs 4-count (a.k.a. measure) information about the music in a marching
bar graph.
The Bar Graph: Most dance music and rock is set up in 4 beat
increments called measures. Many of the features within the
AXIS-8 use this information for incredible results. It’s important
to understand the basics of how the Beatkeeper works to
effectively take advantage of other advanced features in the unit.
The bottom LED is for the 1st beat or “Down Beat”. Typically,
most music starts on the downbeat so the unit sets the first beat
to where the music begins. Occasionally this may not be correct or
you may wish to reset it. To reset the downbeat simply tap the
“BPM” button at the new downbeat location as the music is
playing or while in pause.
BPM: This button is used for resetting the downbeat and also re-
calibrating the BPM. The Beatkeeper is considered by many to be
the most accurate automatic beat counter on the market today,
however, it occasionally may have trouble determining the correct
BPM. This can happen when the music contains complex rhythms,
or if it starts without a beat at all. If you know the BPM showing
in the display is incorrect, or if the beat LEDs are not flashing with
the beat, you have 2 options to reset the Beatkeeper.
1. Tap “BPM” on the downbeat and hold for a second. This will
tell the unit to search and display the next BPM it finds.
2. If holding the “BPM” button doesn’t work you can manually
tap “BPM” on the beat and the display will indicate the new
BPM. The BPM will be based upon the average of your last 8
taps. The Beatkeeper will then know which beats in the
music it should be using to determine the correct BPM and it
will track them through the song.
Occasionally the unit will be tracking the wrong beat but have the
correct BPM. To reset the downbeat, simply tap the “BPM”
button once on the downbeat.
-8-
Page 21
ADJUSTING PITCH/ALIGNING BEATS
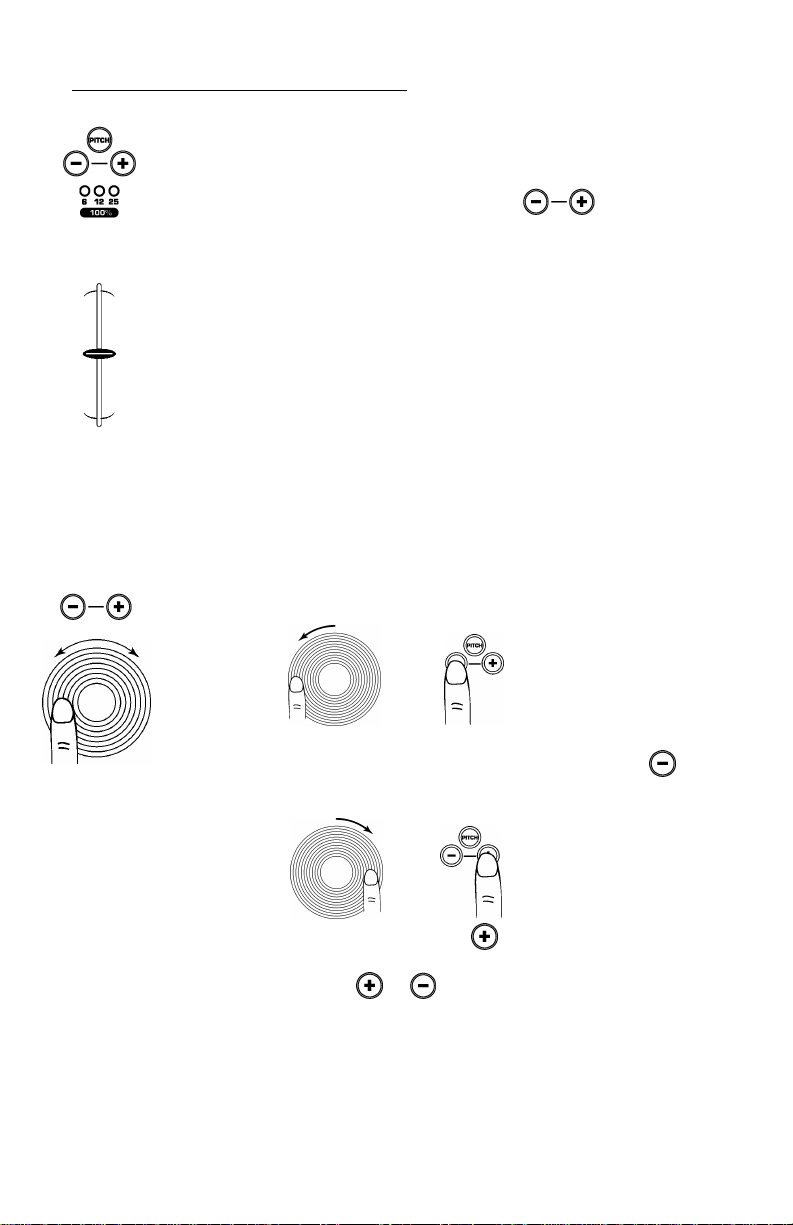
Pitch Button: Activates the pitch slider and adjusts the amount of
control the pitch slider has on the overall speed of music.
Pressing “PITCH” will toggle the slider on and off. Range
adjustments of 6, 12, 25, and 100% can be achieved by
holding down “PITCH” and then pressing to cycle
through the range options. This setting will be remembered
at power down.
Pitch Slider: By moving the slider toward “+” the speed of the
music speeds up. By moving toward “-” the speed slows
down. With 100% control the music can be stopped or played
at 2 times original speed. To match the speeds of two units
you can either monitor the music of both units by ear or use
the automatic BPM readout and adjust the pitch to match.
When the tempo of the music of the CD you wish to match is
slow compared to the tempo of the other music, move the
slider to the (+) end and match the BPM.
When faster, move the pitch slider to the (-) end. By making
this adjustment the speeds will be matched though the beats
may not yet be aligned.
Pitch Bend: Buttons and Jog Wheel: Allows the user to
temporarily change the speed of the music to align beats.
or
When the beats of the music of the CD you wish to match are
fast compared to the tempo of the other music press the
button or rotate the jog wheel counter clockwise (to the left).
or
When PLAYER 2 is behind press the button or rotate the
jog wheel clockwise (to the right). The pitch changes
temporarily while the or buttons are being pressed or
the jog wheel is rotated.
The faster you rotate the wheel or the longer you hold the
buttons the more you change the speed. Releasing the button
or wheel results in a return to the original pitch.
-9-
Page 22

LOOPING OPERATIONS
A loop is any area of a CD that you choose to repeat seamlessly. On the AXIS
8/9 two seamless loops are possible.
LOOP IN: is the point where you wish for the loop to start. The initial
“CUE” or “PLAY” point of the CD is also the default “LOOP IN” point for
both loops or “Hot Start” point. If you wish to set a new “LOOP IN”
point, just press “LOOP IN” while the CD is playing when it reaches
the desired point. The “LOOP IN” button will light indicating a new
loop is set. The “RELOOP/STUTTER” button and in the
display will also illuminate indicating a point has been set and is
accessible for “STUTTER”. By default the “LOOP IN” also becomes the
“STUTTER” or “HOT START” point.
The CD Player will always remember a new set point as the “LOOP IN”
or “HOT START” point until you actually set a new “LOOP IN” point or
put in a new CD. The new point will be accessible until you remove the
CD from the unit. If you change tracks and you previously set a “Loop
In” on another track, pressing “RELOOP/STUTTER” will jump to that
point.
LOOP OUT: is the end point for a loop. The first time you press “LOOP
OUT” while a CD is in play mode, the “LOOP OUT” LED will turn on
and flash while the song automatically returns to the “LOOP IN” point
with no breaks and continues to play. When the song reaches the
“LOOP OUT” point again it returns to the “LOOP IN” point and
continues to repeat this action. You will notice the “LOOP IN” LED will
also be flashing during loop action. To release or end the LOOP press
“LOOP OUT” a second time and play will continue forward when the
song passes the previously set “LOOP OUT” point. The “LOOP OUT”
LED will be lit solid indicating that the LOOP is now in memory for
“RELOOP” purposes.
-10-
Page 23

Note: The “LOOP OUT” point will be erased if “LOOP IN” is pressed or
a new “CUE” point is set after the “LOOP OUT” point. This is important
because without this point, “RELOOP” will not be possible.
MOVING LOOP POINTS
The “LOOP IN” point can be moved while the music is playing just by
pressing “LOOP IN” at the new desired point. The next time “LOOP OUT”
is reached the CD will return to this new “LOOP IN” point. If “LOOP IN”
is press after the “LOOP OUT” point it will clear the “LOOP OUT” point.
The “LOOP IN” point can also be edited while paused. First hold down “CUE”
then press “LOOP IN” to move to the loop in point. Next rotate the wheel
to search for a new cue point and then press “LOOP IN” again to set the
new point. Check your point by pressing “RELOOP/STUTTER”.
The “LOOP OUT” point can also be moved while a loop is playing. Press
“LOOP OUT” to release the old “LOOP OUT” point and pressing it again at
the new desired point.
SMART LOOPING
The Beatkeeper and Looping can work together to set perfect loops every
time. In order to work correctly first properly align the Beatkeeper™ on
the beat. To activate smart looping hold down “PROG” followed by
“RELOOP/STUTTER” at the same time. After this has been done all
loop points and stuttering will play perfectly to the beat of the music.
-11-
Page 24

RELOOP/STUTTER: 2 functions depending on loop setting.
“RELOOP” is only possible if “LOOP” points have been previously set.
The “RELOOP” function automatically returns the music to the “LOOP
IN” point and will play the loop until it is released with the “LOOP OUT”
button.
“STUTTER” starts instant play from previously set “Hot” points. Simply
set your stutter (Hot Start) point by follow the directions for setting
loop in because the points are the same. Remember the button
serves also for the reloop function so if a loop out has been set
the unit will also loop until released. This function lets you set 3
Hot Start points. The first is based on the “PLAY” cue point and the
second two are based upon “LOOP IN”. Since the default “LOOP IN”
points are also the initial start point your unit can be “stutter” started
from up to 3 buttons.
Note: The CD Player will always remember a new set “Hot” points until you
actually set a new “LOOP IN” point or put in a new CD. The new point will be
accessible until you remove the CD from the unit. If you change tracks and you
previously set a “Loop In” on another track, pressing “RELOOP/STUTTER” will
jump to that point.
-12-
Page 25

KEY LOCK / KEY CHANGE
The AXIS 9 uses Numark exclusive technology to lock the key of the music
in place at the current pitch position or change it from the current position.
This is different than “master tempo” often found on many modern units
because the key lock to the current pitch position and not automatically set
to the “0” pitch position. By doing this we have allowed you to activate
this function while playing without changing the key.
Key Lock: Pressing “KEY” holds the key in place. The display will
indicate to show the current key is locked. If pitch
(tempo) is changed the current key will continue to play. By
putting the pitch at 100% you can actually slow the music to a
complete stop while playing the last heard tones of the music.
This works very well on vocals and can be a very cool effect. If
the unit has Key Lock active after the track has been changed
and before play is hit, the unit will lock to 0. If Key is
deactivated during pause the unit will reset to match the current
pitch position.
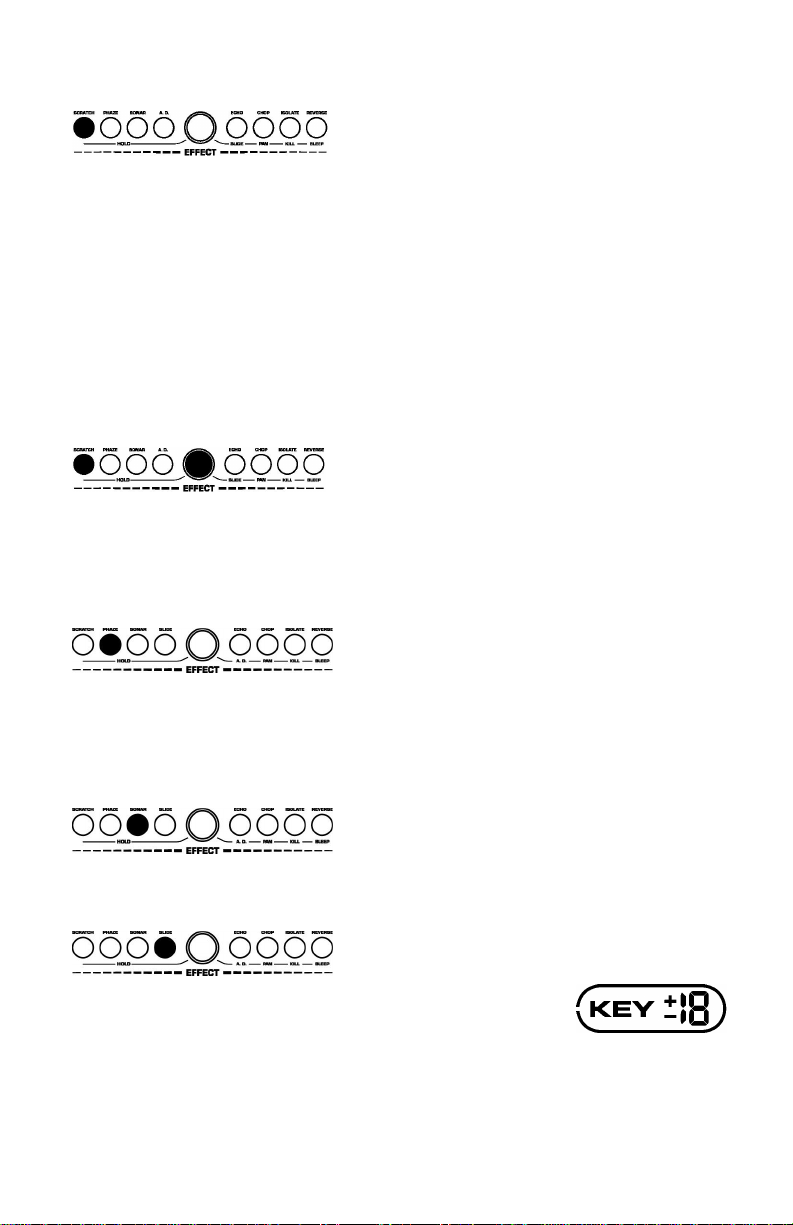
Key Change: Pressing “KEY” and then or will change the
key. The display will indicate the and the new key .
The key can increase to 1 octave above normal key or up to 2
octaves above normal key when the Slide effect is used. The key
can decrease up to 5 octaves below normal key. The display will
limit to 19 half steps above or below normal key. If the key is
higher, the display will show "H". If it is lower, the display will
show "L".
-13-
Page 26

SPECIAL EFFECTS
EFFECT SELECTION (Single Mode): To select and activate an effect tap on
it’s button, it will light to indicate activation and effect will indicate in the
display. To put the effect into hold mode or active alternate effects press the
center button. The button will light indicating the hold has been activated and
hold will show in the display. To release any button, tap it once again.
EFFECT SELECTION (Multiple Effect Mode) (AXIS 9 ONLY): In order to
activate/deactivate this mode press PROG + HOLD. The display will indicate
“MULTI” or “NO MULTI”. Press an effect and move the wheel to the desired
parameter. Then press a second effect. The first effect will flash while the
current effect will be solid. To change effects, select the effect you want. To
release, press the “current/solid” effect a second time.
You can use a combined effect value of 4 effect values at the same time.
These values are:
SCRATCH : 0
PHAZE : 2
SONAR : 2
SLIDE : 2
ECHO/A.D. : 1
CHOP/PAN : 1
ISO/KILL : 1
REVERSE/BLEEP : 0
Scratch and Reverse are always possible. If more than the allowed values are
attempted, they will not activate.
For example:
• You can have Echo, ISO, Scratch and Sonar
• Phaze and Slide with Reverse
• You can not have Phaze, Sonar, and Echo
EFFECT PARAMETER SELECTION: Once an
effect is active, rotate the wheel (AXIS 8) or inner
touch wheel (AXIS 9) to the desired parameter
value. The parameter value for most effects will
show in the display above the effect indication.
Note: For all effects except reverse, you will need to
activate pitch bend via the pitch bend buttons. On
the AXIS 9 you can also use the outer non-touch
section of the jog wheel.
EFFECT PARAMETER PRESET: Press on the desired effect and rotate the
wheel (AXIS 8) or inner touch wheel (AXIS 9) without releasing the button.
When the desired parameter is reached in the display, release the button. If an
effect is already playing, the new parameter will be heard upon button release.
If the effect is not active, then the next time the effect is activated it will be set
to play from this parameter in “hold” mode. If you wish to preset an alternate
effect such as SLIDE, PAN, or KILL press the hold button first, then hold down
the effect button and spin the wheel as described above.
-14-
Page 27
EFFECTS:
SCRATCH – This effect makes it possible for the wheel to scratch the music
while it is playing. If you move the wheel back and forth the music will stop
and play slowly as the wheel is moved similar to scratching a record. There are
several modes of operation for this effect. By pressing “PROG” followed by the
scratch button you can toggle between Scratch 1,2,3, and 4. In “Scratch 1” the
unit automatically returns to play when the wheel is released. In “Scratch 2”,
when the wheel is brought to a stop the music will stop and when you push the
wheel forward the unit will automatically play. In “Scratch 3” the unit
scratches from the current buffer until the unit is released. When released, the
unit jumps ahead to the point where the music would have been, if not
interrupted. This essentially allows a bleep of dirty lyrics through scratch. In
“Scratch 4” the unit scratches from the last set cue point until released. This
allows you to scratch from a set “sample”.
SCRATCH HOLD – This effect works like the above except the music will not
release when the wheel is pushed forward or let go. It is basically the same as
scratching on a powered off turntable. Scratch is similar to working with a
playing turntable, while the Scratch hold is similar to scratching a turntable with
the power off.
PHAZE – Creates an effect on the music similar to the sound of an airplane
taking off. As the wheel is moved the effect is created. If the wheel stops
moving the effect will return to the beginning on it’s own. If the effect is in
“Hold” the effect will stay at the current sound until the effect is released by the
button or hold removed.
SONAR – Creates a metallic hollow effect to create a slightly different sound.
The wheel works a similar way as Phaze.
SLIDE – Smoothly changes the key of the music. In the
key display you will see the key change as the wheel is
moved.
-15-
Page 28

ECHO – this effect adds echo to the music also based upon the Beatkeeper™.
The start parameter is no echo “0”. If you move the wheel to the right the
numbers will go 1-64, 1-32, 1-16, 1-8, 1-4, 1-2, and 1-1 indicating the amount
of echo added to the unit. If you move the wheel to the left you will create
negative or preceding echo. This essentially plays the music before you get to
it. At 1-1 the music will echo 1 full measure or
4 beats of music. If you turn off the effect then
back on again it remembers the last set
parameter.
(Note: a preceding echo requires the unit to play
from buffer memory. If the buffer becomes
unavailable the effect will stop until buffer is
regained.)
A.D. (Artificial-Dissemination) – Reduces the bit rate of the music creating
increasing distortion with intensity.
CHOP – This effect works best when the Beatkeeper™ is properly aligned.
Chop breaks up the music by turning the volume on and off based upon the
BPM of the Beatkeeper™. First activation of the effect plays 1/8th note or half
of every beat. In the BPM display will indicate an 1-8 which means one
measure (4 beats) of music has been broken into 8 parts. Rotation of the
wheel to the left decreases the parts to 1-4, 1-2, and 1-1. At 1-1 the music
plays for 4 beats then is silent. Rotating to the right breaks up the music into
1-16, 1-32, 1-64, then smaller increments making for another interesting
effect. When the effect is first activated the
music will play the section then turn off for a
section. This is important because you can
reverse the sections that are off and on by
activating the effect in the other section. If you
deactivate the effect then turn it on again it
remembers the last set parameter.
PAN - This effect also works best when the Beatkeeper™ is properly aligned.
Auto-pan alternates playing right and left audio based upon the BPM of the
Beatkeeper™. First activation of the effect plays alternates on 1/8th notes or
half of every beat. In the BPM display will indicate an 1-8 which means one
measure (4 beats) of music has been broken
into 8 parts. Rotation of the wheel to the left
decreases the parts to 1-4, 1-2, and 1-1.
Rotating to the right makes faster changes of
1-16, 1-32, 1-64, then smaller increments
making for another interesting effect. If you
deactivate the effect then turn it on again it
remembers the last set parameter.
-16-
Page 29

Isolate - This isolation filter lets you play only a specific frequency of the
music. Rotation of the wheel moves the frequency played through the audio
spectrum. If you turn off the
effect then on again it
remembers the last set
parameter.
KILL- This elimination filter lets you play all but a specified frequency. Rotation
of the wheel moves the frequency not played through the audio spectrum. If
you turn off the effect then
on again it remembers the
last set parameter.
Reverse- Plays the music backwards. When the effect is activated the music
will play backwards until it is released. There is no limit to the amount of time
you can reverse.
Bleep- The effect activates as soon as the button is pressed. It is a temporary
(forward) reverse function for “bleeping” dirty lyrics or creating interesting
effects. By pressing the button the music plays backwards from buffer until
released or until the buffer runs out. When the button is release, or the buffer
runs out, the audio plays forward form the point where the music would have
been if the button was never
pressed. For example, is the
effect is activated for 5
seconds at 10 seconds into a
song, forward play will
resume at 15 seconds. The
buffer time for this operation
is variable depending upon
the number of loops set and
anti-shock buffer available.
-17-
Page 30

PROGRAM FUNCTIONS PLEASE READ!!!!
This button provides several programmable functions depending upon the
combination of buttons used.
The following functions will work by pressing “PROG” followed by appropriate
function while still holding the program button:
Track Sequence Programming - Depress “PROG” while the unit is
stopped and “ ” will light. Select each track to be
programmed then press “PROG” between selections. Press
“PLAY/STUTTER” to start the track sequence program playing.
To exit and erase program hold “PROG” for more than 2 seconds
while the unit is stopped, open the disc tray, or turn off the
power.
Effect Options - pressing program with an effect button will offer
alternative options to that effect. In the case of the “SCRATCH”
effect the display will toggle between Scratch 1,2,3, and 4. Not all
effects offer options. More information on these options is
available in the effects section of this manual.
End of track dead space elimination – this will give and option for
eliminating the dead space at the end of tracks. The unit already
automatically removes dead space at the beginning of tracks. End
of track dead space elimination is useful if you are playing a CD
continuously and want to eliminate all the gaps between songs.
The display will indicate “ ” when the function is set to
eliminate space and indicates “ “ when the unit is left to
leave the natural space between tracks. This setting will be
remembered at power down.
Cueing Style Selection – this will alternate the jog wheel cue
function from a smooth “scratch” sound to the tradition “stutter”
sound modes during cue operations. The display will indicate “
” when the “scratch” style is active. This indication
will go away when the style of cue is stutter. This setting will be
remembered at power down.
Brake Speed – this allows you to adjust the speed of “PAUSE”, or
braking. Press “PAUSE” then rotate the wheel until the desired
seconds of startup are shown. Pressing “PAUSE” twice will toggle
startup from “ ” to the desired seconds.
Startup Speed – this allows you to adjust the startup speed of initial
play. Press “PLAY/STUTTER” then rotate the wheel until the
desired seconds of startup are shown. The “STUTTER” function
will not be affected. Pressing “PLAY/STUTTER” twice will toggle
startup between “ ” and the desired seconds.
-18-
Page 31

Relay time – this gives options for the amount of time used for
relaying between tracks on two connected units. Options will
appear to relay immediately after the track (0), with time added
of 1, 2, or 3 seconds (1,2,3), or a reduction of 1,2, or 3 seconds (1,-2,-3). By reducing time the attached CD player will start
playing before the end of a track, creating an automatic segue.
This feature will also work in track sequence program mode;
however, if the units are also in SINGLE mode the same number
of tracks programmed should be the same. Play will stop at the
end of the last track. This setting will be remembered at power
down.
Remote Start – The sets the mode for the “remote” jack on the rear
of the unit. Details can be found in the relay and remote start
sections of this manual.
Automatic door close protection – this option automatically closes
the door at the specified time. The display will indicate 30
seconds, 60 seconds, 120 seconds, and (no) for no auto close.
This setting will be remembered at power down.
Digital Output – This actives digital output for CDG disks and allows
digital audio information to be extracted from the unit. CDG
graphic CDs are often used for Karaoke.
Smart Looping – When active the display will indicate “ ”
and all looping and stuttering will follow the beat of the music
based upon the Beatkeeper information.
Sleep Mode – The unit will automatically enter sleep mode after 15
minutes of inactivity. In this mode the unit will still start instantly
from buffer, however, the laser will turn off to extend it’s life. If
this feature is undesirable, then it can be turned off. This setting
will be remembered at power down.
RELAY PLAY
This mode will be operational only when 2 units are connected via
a relay cable.
1. Insert CDs into both of the units.
2. We recommend putting both sides in SINGLE play mode while learning this
function.
3. Press the “RELAY” button on one unit to activate.
4. Press play on the first unit. When that unit has finished play it will send a
signal to the second unit to start play. You will see the second unit start
play and the first unit pause and cue to the beginning of the next track.
When unit 2 has completed play unit 1 will start.
Note: The play signal is sent at the end of specified play. If the unit is in
SINGLE mode the play signal will start the second unit at the end of the track.
If the unit is in CONTINUOUS mode the play signal will be sent at the end of the
full CD. Two CDs will play continuously, alternating from unit to unit.
-19-
Page 32

FADER START
Fader Start is achievable by attaching your CD player to a
similarly equipped DJ mixer and setting the rear panel
selection switch to “mixer” mode.
1. Connect cables between the CD player and your DJ mixer.
2. Press the button or switch on your mixer into fader start mode to activate
the fader start capability.
3. Set the CD player to fader start by hold down “PROG” followed by tapping
“TIME” until the display says .
4. Typically if you move the crossfader toward the active channel, the
attached CD player will activate. When it is moved away the unit will cue
or pause depending upon CD player setting.
To select start/stop mode hold the time button for 2 seconds.
• If the display shows then the CD will pause when the
crossfader is moved away.
• If the display shows then the CD will CUE when the
crossfader is moved away.
REMOTE SWITCH START
Remote switch start is achievable by attaching your CD player to a switch like a
foot switch found in most music shops. Foot switch connector plugs are often
¼” and an adapter to 1/8” will be needed for connection.
1. Connect the remote switch to your CD player.
2. Select the type of foot switch you will use. There are two types of
footswitches that will work with this connector. The first is a typical, ONOFF pushbutton switch and are generally used for switching channels on
guitar amps. Set the CD player to a ON-OFF switch by hold down “PROG”
followed by tapping “TIME” until the display says . The second
switch is a momentary footswitch and is usually used for keyboard sustain
pedals. Set the CD player to a ON-ON switch by hold down “PROG”
followed by tapping “TIME” until the display says . If you are
unsure of the style of switch you have, try each position until it works as
desired.
3. Typically if you press the switch once, the attached CD player will activate.
When it is pressed again the unit will cue or pause depending upon CD
player setting.
Note: You can also use a momentary switch in the ON-OFF switch position. In
this case the unit will only play while the switch is depressed. When the button
is release it will either cue or pause depending upon mode.
-20-
Page 33

MIDI IN-OUT
MIDI – stands for musical instrument digital interface. Basically this means
you can hook up 2 MIDI compatible devices and they will talk to each other. In
this case you might connect 2 AXIS 8/9s and have them synchronize beats, add
a MIDI keyboard and have it control the CD players or hook up a drum machine
and play a rhythm pattern in time with the music.
MIDI CLOCK and INTERLOCK MODE: For interlock you will need 2 units
hooked up via 2 MIDI cables input to output. Pressing PROG + BPM
will put the unit in INTERLOCK mode when (2) units are connected via
MIDI. This mode will automatically match the BPM on (2) AXIS 8/9
units and lock them together on the beat. Before using this function it
is important to be sure the Beatkeeper is tracking the correct BPM and
is actually synchronized with the beat. In order to match effectively
one unit will indicate master and the other, slave. The master is
always the first unit to be playing. The slave follows the master.
As soon as the master is stopped for any reason the opposite side
becomes the new master control. Before using this function it is
advisable to activate the key lock since pitch shifts are automatic and
can be audible. When interlock is pressed you will see the BPM
display of the slave automatically change to match the master and the
pitch indication in the display change the amount needed to match
speeds. During interlock all pitch functions of the slave will deactivate
and follow everything you do with the master. All actions of the slave
such as LOOP points, and PLAY will now also be beat aligned with the
master.
• If both units are playing the slave will adjust to match to the
nearest beat of the master.
• If is pressed the slave will now start with the next beat of
the master.
• If “RELAY” is pressed during INTERLOCK, the slave will
automatically start the next time the master matches the beat of
the slave.
SLAVE TO MIDI CLOCK: When the AXIS 8/9 is hooked up to receive
another clock device through it’s MIDI input, such as a drum machine,
beat synchronization can be achieved similarly to the above. In this
case the AXIS 8/9 will receive and synchronize to the global clock and
always remain as the slave device.
GLOBAL MIDI CLOCK TRANSMIT: when the MIDI output of the AXIS 8/9
is attached to another clock receiving device, such as a drum machine,
the device will receive global clock information from the AXIS 8/9.
Play and Pause commands will be sent as well.
-21-
Page 34

INCREASE/DECREASE: When the slave becomes the
master or is released from interlock and still playing,
the pitch playing will often be different than the
original position of the pitch slider. The pitch slider will
not function until it is brought to the new position.
Move the pitch slider in the direction shown in the
display. For example if the display says “INCREASE
4.5%” move the slider in the positive direction 4.5%
(increase). If it says “DECREASE -3%” then move
the slider in the negative direction 3% (decrease). As
you get closer to the correct position the indication will
reduce until you are at the pitch currently playing.
After this has been achieved all pitch functions will
return to the player and pitch can be adjusted as
normally. If the unit is stopped for any reason the
pitch will automatically reset to the current position of
the slider. Note: Interlock may automatically
deactivate when effects are engaged that can not
be beat aligned such as live scratch.
MIDI CONTROL COMMANDS
You can control the CD player via an external MIDI
controller such as a computer or Keyboard. The device
needs to transmit commands on Channel 6. The chart to
the right references which notes will trigger control of
various CD functions. You can also add a foot pedal for
even greater control.
-22-
Page 35

MIDI IMPLEMENTATION CHART
ote: further MIDI Specs may be found at our web site http://www.numark.com
-23-
*n
Page 36

UPGRADING YOUR UNIT
This unit contains the latest software available at the time of manufacturing.
Our engineering staff will be working hard to constantly improve and offer
additional features in the future. The unit software has been designed to be
easily updateable by you through supplied CD updates from Numark. To
obtain the latest software version contact your local Numark Dealer or visit
us on the web at http://www.numark.com.
In order to check your unit’s software version press “PROG” followed by the
“+” button. Three sets of numbers will appear. 000 00 00 00. Your units
function software will be in the “seconds” set of numbers
For example if R1 05 34 09 appears in the display you have version 34,
revision 1 of the unit code
Audio CD Programming Procedure
Downloading
1. Go to www.numark.com and download the latest version of the unit
software.
2. Load update wave file onto a computer with CD Drive capable of
burning Audio CDs.
3. If zipped, using an unzip program on your computer, unzip the file.
Burning
4. Open up your CD burning software to burn an AUDIO CD.
5. Add the software wave file to the audio program contents. It is
advisable to burn the CD at the slowest speed possible to ensure an
accurate burn. If you have a disc-at-once option it should be used.
6. You should set the program to finalize the CD.
7. Burn the disc.
Programming
8. Power up your CD player with no CD inside.
9. Place in the CD in the tray and close the drawer with the OPEN/CLOSE
button. Do not close the drawer by pressing PLAY.
10. Wait until the display indicates time remaining.
11. Press the Play button. In the effect parameter display you will see the
word “test” as the time counts down. The unit will then go through the
cycle again and indicate “busy” while the unit is programmed.
12. At completion of the procedure the CD should eject automatically and
the display will indicate “good”.
Completion
13. Remove the CD and power the unit off for 3 seconds and then on
again.
14. Recalibrate the unit following the “calibration procedure” included with
the software update.
Note: CD burning is dependant upon both the recording equipment and the CD
players ability to read the burned information. On rare occasions the unit may
have difficulty reading the burned CD. If the CD is ejected during the test
procedure, remove the CD and try again. If it fails again try re-burning the CD.
If this doesn’t work, contact Numark service at 401-295-9000 or
techsupport@numark.com for a free upgrade CD.
-24-
 Loading...