

Page 1
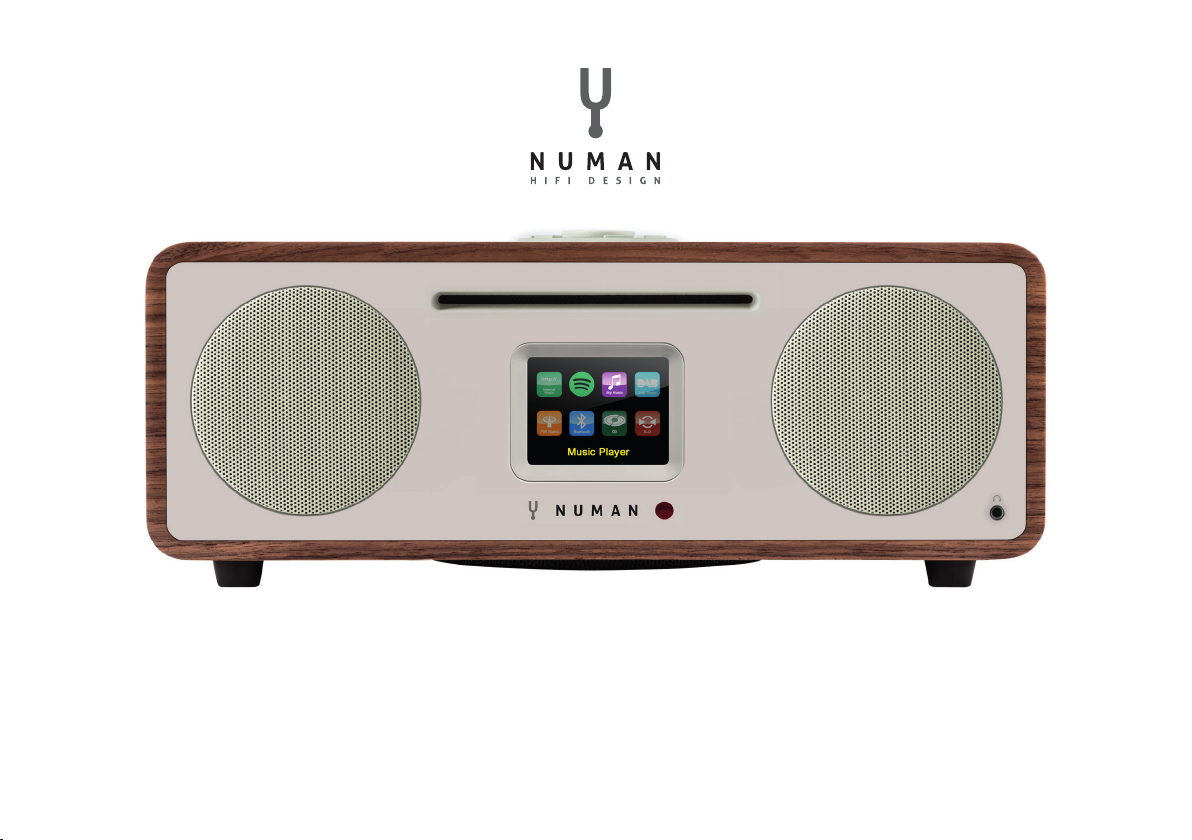
NUMAN Two
Benutzerhandbuch
www.numan-hi.com
Page 2

Wir freuen uns, dass Sie sich für ein NUMAN-Produkt entschieden haben.
Wir wünschen Ihnen damit viel Freude und Musikgenuss!
Bitte nehmen Sie sich ein wenig Zeit für diese Anleitung, um alle
Möglichkeiten und Funktionen Ihres neuen Gerätes kennenzulernen.
Bitte bewahren Sie diese Anleitung an einem sicheren Ort auf,
um später noch einmal hineinschauen zu können.
Bei Fragen und Verbesserungsvorschlägen freuen wir uns
auf Ihre Anfrage über unsere Webseite www.elektronik-star.de.
Wir helfen Ihnen gerne weiter!
Mit freundlichen Grüßen aus Berlin
Ihre NUMAN-Mitarbeiter
Page 3

INHALT
Technische Daten und Lieferumfang ................................................................................................. 4
Sicherheitshinweise .............................................................................................................................. 5
Geräteübersicht .................................................................................................................................... 6
Bildschirmanzeigen ............................................................................................................................. 9
Inbetriebnahme und Grundeinstellungen ......................................................................................... 11
Radioportal-Registrierung .................................................................................................................. 16
Installation eines Musikservers ........................................................................................................ 17
Spotify Connect .................................................................................................................................. 18
Internetradio ....................................................................................................................................... 20
Musik über ein Netzwerk abspielen ................................................................................................. 26
Musik-Streaming unter Windows 7 .................................................................................................. 29
DAB-Radio ........................................................................................................................................... 31
FM-Radio ............................................................................................................................................. 34
CD-Wiedergabe.................................................................................................................................... 37
BT, AUX, Alarm und Sleeptimer ........................................................................................................ 39
Software-Update und Reset .............................................................................................................. 42
Fehlermeldungen und Fehlerbehebung ........................................................................................... 43
Entsorgung und Konformitätserklärung .......................................................................................... 47
Page 4

TECHNISCHE DATEN UND LIEFERUMFANG
TECHNISCHE DATEN
Artikelnummer: 10030017, 10030018, 10030019, 10030808
Stromversorgung: 100-240 V ~ 50-60 Hz
Ausgangsleistung: RMS 30 W
Lautsprecher: 2 x 2.5“ (Gesamtspektrum)
Subwoofer: 1 x 5.25“
Abmessungen: 350 mm (Breite) x 124 mm (Höhe) x 215 mm (Tiefe)
Gewicht: 4,8 kg
Display: 2.8‘‘ TFT-Display
Radio: DAB, DAB+, DMB, FM und Internetradio (Wi-Fi oder LAN)
CD-Wiedergabe-Formate: Audio-CD, MP3-CD, WMA-CD, CD-R und CD-RW
LIEFERUMFANG
1x Radio
1x Teleskopantenne
1x Netzkabel
1x Fernbedienung
1x Benutzerhandbuch
4
Page 5

SICHERHEITSHINWEISE
Lesen Sie sich alle Hinweise vor der Benutzung sorgfältig durch und bewahren Sie die Bedienungsanleitung zum
Nachschlagen an einem sicheren Ort auf.
• Benutzen Sie das Radio nicht in der Nähe von Wasser oder Dampf.
• Reinigen Sie das Radio nur mit einem trockenen Lappen. Ziehen Sie den Stecker aus der Steckdose, bevor Sie
das Radio reinigen.
• Stellen Sie das Radio auf eine stabile Oberäche.
• Stellen Sie das Radio nicht in geschlossenes Regale oder Schränke, in denen der Luftstrom zu den
Lüftungsöffnungen behindert wird.
• Stellen Sie das Radio nicht in die Nähe von Wärmequellen, wie Heizungen, Heizregister, Öfen oder andere
Geräte, die Wärme produzieren.
• Verlegen Sie das Netzkabel so, dass keiner darauf tritt und es nicht eingeklemmt wird. Das gilt insbesondere
für Stellen, an denen es aus dem Gerät oder dem Netzstecker kommt.
• Falls das Radio defekt ist, entfernen Sie nicht das Gehäuse und versuchen Sie nicht, das Radio selbst zu
reparieren. Wenden Sie sich stattdessen mit einer kurzen Problembeschreibung an unseren Kundendienst, der
• ihnen gerne weiterhilft.
• Überlasten Sie Wandsteckdosen, Verlängerungskabel und Mehrfachsteckdosen nicht, um Feuer oder
Stromschläge zu verhindern.
• Achten Sie darauf, dass keine Objekte oder Flüssigkeiten ins Radio eindringen.
• Schließen Sie das Radio nur an Steckdosen an, die der Spannung des Geräts entsprechen. Informationen dazu
nden Sie auf dem Gerät oder unter „Technische Daten“.
5
Page 6

• Wenn Sie die Quelle wechseln während eine CD abgespielt wird, stoppt die Wiedergabe. Die Wiedergabe wird
fortgesetzt, sobald als Quelle wieder CD ausgewählt wird.
• Die Soundqualität von MP3, CD-R, CD-RW und kommerziellen CDs kann stark variieren. Das Gleiche gilt, falls
tragbare MP3-Player angeschlossen werden.
• Verwenden Sie keine Reinigungs-CDs, außer Sie sind speziell für CD-Slots konzipiert.
• Achten Sie darauf die CD nicht zu biegen, während sie eingezogen oder ausgeworfen wird.
• Bewegen Sie das Gerät nicht während eine CD abgespielt wird und transportieren Sie das Gerät nicht, solange
sich noch eine CD darin bendet.
• Versuchen Sie nicht eine CD einzuschieben, solange sich noch eine CD im Gerät bendet.
• Legen Sie keine speziell geformten CDs oder 3“ Single-CDs ein.
• Wenn Sie eine MP3- oder WMA-CD einlegen kann es zu einer verzögerten Wiedergabe kommen, da der Player
zuerst das Verzeichnis lesen muss.
• Aufgeklebte CD-Label aus Papier könnten sich lösen und den CD-Player beschädigen.
• Verkratzte CDs werden möglicherweise nicht richtig wiedergegeben.
• Schieben Sie nichts anderes als CDs in den CD-Slot.
• Sollten Sie einen Fehler bemerken, ziehen Sie den Stecker aus der Steckdose und warten Sie 60 Sekunden.
Stecken Sie den Stecker dann wieder in die Steckdose und starten Sie die Wiedergabe erneut.
6
Page 7

1 2 3 4 5
1
Ein-Schalter 2 Netzanschluss 3 LAN-Anschluss 4 USB-Anschluss 4 Line out | Aux in Anschluss
SO BENUTZEN SIE DEN DREHREGLER AM GEHÄUSE (OBEN)
Drehen Sie am Regler, um durch ein Menü oder eine Liste zu blättern. Die ausgewählte Option wird in dunkler
Schrift auf hellem Hintergrund angezeigt. Drücken Sie auf den Regler um die Option auszuwählen. Drehen Sie
am Regler, um während der Musikwiedergabe die Lautstärke anzupassen. Drücken Sie während der Wiedergabe
auf den Regler um die Musik stummzuschalten. Wenn der Alarm des Weckers erklingt, drücken Sie auf den Regler, um die Schlummerfunktion zu aktivieren. Drücken Sie länger auf den Regler, um das Gerät auszuschalten.
7
Page 8

1
Auswahl | Lautstärke | Schlummern | Stummschaltung
1 2
10
9
8
Steuerung am Gehäuse (oben)
11
12
2
Ein- und Ausschalten
3
4
5
67
3
Sleeptimer einstellen
4
Musikquelle auswählen
5
Alarmfunktion | Wecker
6
Weiterführende Informationen
7
Menü | Im Menü einen Schritt zurück
8
Sender speichern
9
Sendersuche | vorheriger Titel | Zurück-Taste
10
Sendersuche | nächster Titel | Vorwärts-Taste
11
Abspielen | Pause (in verschiedenen Modi)
12
1x drücken: CD anhalten | 2x drücken: CD auswerfen |
3x drücken: CD laden
8
Page 9
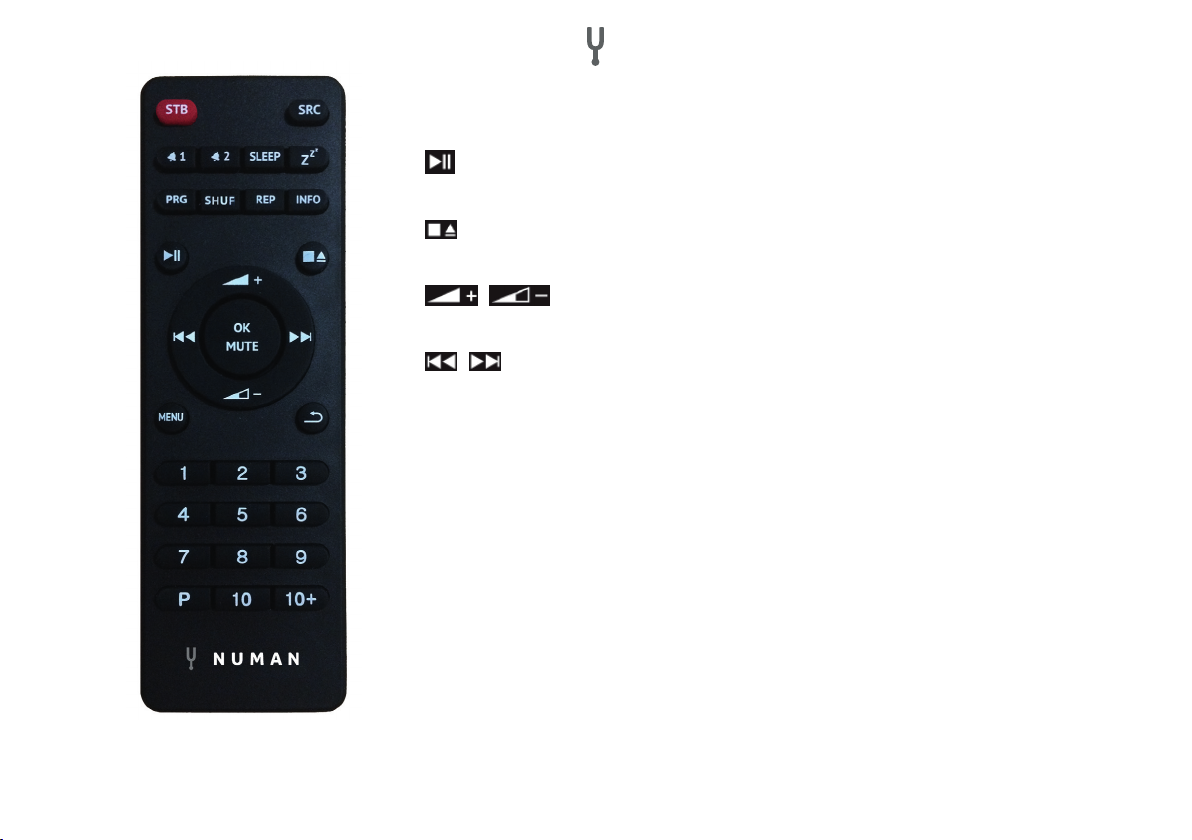
Fernbedienung
NUMMERNTASTEN: Benutzen Sie die Tasten 1-10+ an der Fernbedienung, um einen voreingestellten Sender aufzurufen.
ABSPIELEN | PAUSE: Drücken Sie diese Taste, um die Wiedergabe zu starten oder
anzuhalten.
CD ANHALTEN | CD AUSWERFEN: Drücken Sie die Taste, um die Wiedergabe zu stoppen.
Drücken Sie die Taste erneut, um die CD auszuwerfen.
| LAUTSTÄRKE HOCH | RUNTER: Benutzen Sie die Tasten, um die Lautstär-
ke zu erhöhen oder zu verringern.
| STATION ODER TITEL VOR | ZURÜCK: Im Wiedergabemodus links oder rechts
drücken, um einen Sender oder ein Titel auszuwählen.
[P] SENDER SPEICHERN: Um einen FM-Sender zu speichern, halten Sie PRESET gedrückt,
bis das Display „Save preset“ zeigt. Wählen Sie dann über den Drehregler oder die Fernbedienung einen der 20 Speicherplätze aus. Um einen gespeicherten Sender aufzurufen, drücken
Sie kurz auf PRESET und wählen Sie einen der aufgelisteten Sender. Sobald Sie den Sender
abspielen, wird unten auf dem Bildschirm die Speichernummer (*1, *2, usw.) angezeigt.
[PRG]: Stellen Sie die Wiedergabereihenfolge der CD-Titel ein.
[SHUF]: Drücken Sie während der CD-Wiedergabe einmal kurz auf die Taste, um die Titel in
zufälliger Reihenfolge wiederzugeben.
[REP]: Drücken Sie während der CD-Wiedergabe einmal auf die Taste, um den Titel zu wiederholen. Drücken Sie zweimal auf die Taste, um die gesamte CD zu wiederholen. Drücken Sie
ein drittes Mal auf die Taste, um die Wiederholung abzubrechen. Wenn die Zufallswiedergabe
aktiv ist, kann kein einzelner Titel wiederholt werden.
9
Page 10
BILDSCHIRMANZEIGEN
Der Bildschirm zeigt verschiedene Menüs, Dialogfelder und Anzeigen. Falls der angezeigte Text zu lang ist, wird
er zunächst abgeschnitten angezeigt und beginnt dann nach wenigen Sekunden zu ießen. Es gibt folgende
Arten von Bildschirmanzeigen:
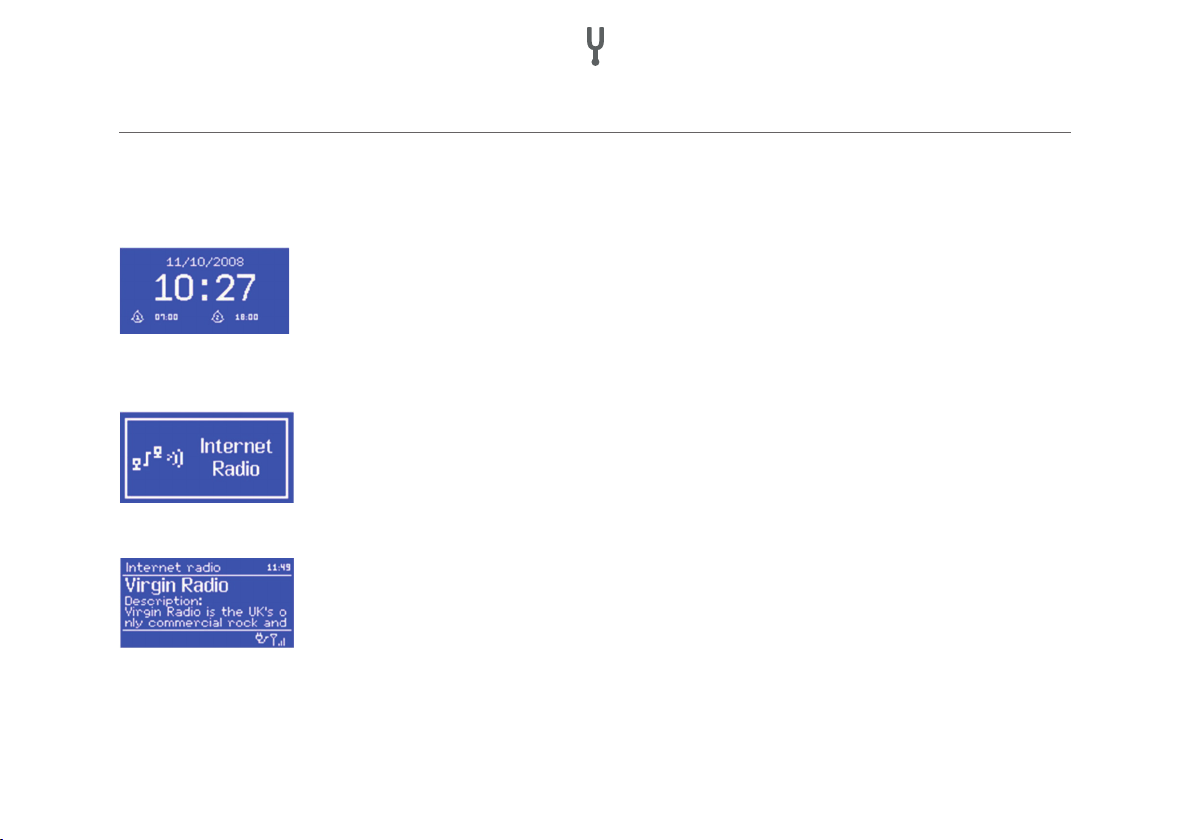
STANDBY-BILDSCHIRM
Im Standby zeigt der Bildschirm die Zeit, das Datum und alle derzeitig aktiven Alarme an.
STARTBILDSCHIRM (MODUS)
Wenn Sie mit SOURCE zwischen den verschiedenen Abspielmodi wechseln, wird für
jeden Modus ein eigener Startbildschirm angezeigt. Nach einer Sekunde wird der ausgewählte Modus aufgerufen und das Gerät versucht den letzten Sender oder Titel aufzurufen, der in diesem Modus abgespielt wurde. Falls das nicht möglich ist, sucht das Gerät
nach Sendern und Netzwerken oder verlangt eine Benutzereingabe.
INFORMATION ZUM AKTUELL GESPIELTEN TITEL ODER SENDER
Der Bildschirm zeigt die Informationen zum aktuell abgespielten Titel oder Sender an.
10
Page 11

DIALOGBILDSCHIRM
Im Dialogbildschirm haben Sie die Möglichkeit Einstellungen zu verändern. Einfache
Dialogbildschirme erwarten eine Eingabe in Form von YES/NO, während komplexere
Bildschirme Menüs zum Blättern bieten. Der Ausgewählte Menüpunkt ist gelb hinterlegt.
Die Ausgewählte Einstellung wird mit einem Stern (*) markiert.
FEHLER- UND INFORMATIONSBILDSCHIRME
Im Bildschirm wird für einige Sekunden eine Information eingeblendet, die danach automatisch wieder verschwindet.
MENÜS
Das Gerät verfügt über drei Menü-Typen. Benutzen Sie den Drehregler, um im Menü zu
blättern und Optionen aufzurufen. Die Bildlaueiste rechts am Rand zeigt, ob es oberhalb
und unterhalb der sichtbaren Optionen noch weitere Optionen gibt. Jeder Modus zeigt ein
Menü mit bestimmten Optionen. Der FM-Modus im Beispiel hat zwei Optionen: Scan Setting und Audio Setting. Zusätzlich gibt es in jedem Menü die Optionen: System Settings
und Main menu. Ein Pfeil am rechten Rand signalisiert, dass es ein Untermenü gibt.
SYSTEMEINSTELLUNGEN UND HAUPTMENÜ
Über dieses Untermenü haben Sie Zugang zu Netzwerk-, Zeit- und Spracheinstellungen,
sowie zum Software-Update. Die Bildlaueiste rechts zeigt, dass es weitere Optionen
gibt. Das Hauptmenü bietet Zugang zu allen Modi, Sleeptimer und den Timer-Funktionen.
11
Page 12

INBETRIEBNAHME UND GRUNDEINSTELLUNGEN
START UND EINRICHTUNG
Um DAB- oder FM-Radio zu hören, brauchen Sie nur den Stecker in die Steckdose zu stecken. Um Musik abzuspielen benötigen Sie ein drahtloses oder ein verkabeltes Netzwerk und eine UPnP-Musikquelle (z. B. einen PC).
Um Internetradio abzuspielen brauchen Sie ebenfalls eine Internetverbindung.
Wenn Sie das Gerät zum ersten Mal benutzen öffnet sich der Setup Wizard, der Sie durch
die Einstellungen für Zeit, Datum und Netzwerk führt. Sobald die Einstellungen abgeschlossen sind ist das Gerät bereit. Um die Einstellungen zu einem späteren Zeitpunkt zu
ändern, wählen Sie: MENU > System settings. Gleiches gilt, wenn Sie den Wizard erneut
ausführen möchten. Wählen Sie YES, wenn Sie den Setup Wizard starten möchten. Wenn
Sie NO wählen werden Sie gefragt, ob Sie den Wizard beim nächsten Start ausführen
möchten. Falls Sie den Setup Wizard beim ersten Start nicht ausführen, startet das System ohne diese Einstellungen und sie gelangen direkt ins Hauptmenü.
HINWEIS: Falls die Stromversorgung unterbrochen wird während der Wizard arbeitet,
öffnet er sich beim nächsten Start erneut.
ZEIT UND DATUM EINSTELLEN
Um zwischen der 12- und 24-Stunden-Anzeige zu wechseln, wählen Sie: Set 12/24 und wählen Sie dann das
gewünschte Anzeigeformat.
12
Page 13

Zeit und Datum können automatisch oder manuell aktualisiert werden. Mit dem Auto-Update werden Zeit und
Datum automatisch mit externen Uhren abgeglichen. Das Auto-Update ist in der Regel genauer.
AUTOMATISCHE ZEITEINSTELLUNG
Beim Auto-Update werden Daten über DAB, FM oder das Internet gesendet. Das Update funktioniert nur, wenn
sich das Radio im entsprechenden Modus bendet. Wählen Sie daher einen Modus, den Sie regelmäßig benutzen (z. B. FM-Modus). DAB und FM benutzen die Zeitsignale, die mit dem Radio übertragen werden. Network
benutzt ein Zeitsignal, dass vom Frontier Silicon Internetradio Portal gesendet wird, wenn sich das Gerät im
Internet-Modus bendet. So stellen Sie das Auto-Update richtig ein:
• Wählen Sie Update from DAB, Update from FM, Update from Network oder No update.
• Falls die Uhr über das Netzwerk abgleichen, stellen Sie ihre Zeitzone ein.
• Falls Sie sich in einem Land mit Zeitumstellung benden, kann die Uhr im Winter um
eine Stunde falsch liegen. Aktivieren Sie daher zu Beginn der Winterzeit die WinterzeitEinstellung (Daylight savings), um diesen Fehler zu umgehen. Auf das Zeitsignal, das
Sie über DAB oder FM empfangen hat die Zeitumstellung keinen Einuss.
MANUELLE ZEITEINSTELLUNG
Falls sie „No update“ ausgewählt haben, werden Sie aufgefordert die Zeit und Datum
manuell einzugeben. Das Datum wird im Format TT-MM-JJJJ, die Zeit im Format hh:mm
dargestellt. Sobald der Tag aufblinkt, stellen Sie ihn mit dem Drehregler ein. Sobald Sie
einen Wert eingestellt haben, blinkt der nächste Wert auf.
13
Page 14

VERBINDUNG MIT DEM NETZWERK HERSTELLEN
Das Gerät ist kompatibel mit allen gängigen Netzwerkprotokollen und Verschlüsselungsmethoden.
Um das Gerät mit dem Netzwerk zu verbinden brauchen Sie einen Wireless-Router und
Ihr Netzwerkpasswort (falls Ihr Netzwerk verschlüsselt ist). Wählen Sie: WLAN region/
county > Wi-Fi network (SSID) und suchen Sie Ihr Netzwerk aus der Liste aus. Falls Ihr
Netzwerk nicht verschlüsselt ist, verbindet sich das Gerät mit dem Netzwerk und Sie
müssen nichts weiter tun.
Falls Ihr Netzwerk eine Standardverschlüsselung verwendet, benutzen Sie den Drehregler
um den Pfeil zu bewegen und die Buchstaben auszuwählen. Geben Sie Ihr Passwort ein.
Um BKSP (löschen), OK und CANCEL (Abbrechen) zu erreichen, drehen Sie den Regler
zurück bis vor die ersten Buchstaben.
Falls Ihr Netzwerk WPS-verschlüsselt ist gibt es drei Verbindungsmethoden. Wählen Sie
eine davon aus und befolgen Sie die Anweisungen:
• Push Button: Das Gerät fordert Sie auf den Knopf zur Verbindungsherstellung am
Router zu drücken, scannt danach nach einem WPS-Netzwerk und verbindet sich damit.
• Pin: Das Gerät generiert einen 8-stelligen Code, den Sie in den Router oder
Zugangspunkt eingeben müssen.
• Skip WPS: Geben Sie das Passwort mit dem Drehregler ein, wie bereits bei den
Netzwerken mit Standardverschlüsselung beschrieben. Weitere Informationen zu WPSNetzwerken nden Sie im Handbuch Ihres Routers.
14
Page 15

Nachdem Sie das Passwort eingegeben haben, versucht das Gerät eine Verbindung zum
Netzwerk aufzubauen. Falls die Verbindung fehlschlägt, kehrt das Gerät zum vorherigen
Bildschirm zurück. Falls die Netzwerkverbindung erfolgreich war und zwischendrin abbricht, versucht das Gerät, selbstständig die Verbindung wieder herzustellen.
EQUALIZER
Der Equalizer bietet neben diversen Wiedergabe-Einstellungen auch benutzerdenierte
Einstellungen. Um eine Einstellung auszuwählen Wählen Sie MENU > Systemeinstellungen
> Equalizer. Nun können Sie einen voreingestellten Wiedergabemodus auswählen oder
Bass, Höhen und Lautstärke selbst einstellen. Wählen Sie dazu: Meine EQ Einstellungen,
wählen Sie die Einstellung und benutzen Sie den Regler um den Ton anzupassen.
NETZWERK UND SPRACHE
Das Gerät merkt sich die letzten vier Drahtlos-Netzwerke, mit denen es verbunden war und versucht automatisch Verbindung, mit ihnen aufzunehmen. Die Liste der registrierten Netzwerke nden Sie unter: MENU > Sys-
tem settings > Network > Network prole. Dort können Sie auch nicht gewollte Netzwerke löschen, indem sie
das Netzwerk aussuchen, auf SELECT (Drehregler) drücken und die Löschung mit YES bestätigen. Es gibt noch
weitere Optionen Netzwerke einzusehen und die Netzwerkeinstellungen manuell zu ändern. Wählen Sie dazu:
MENU > System settings > Network. Benutzer, die sich mit Netzwerken auskennen, können mit diesen Optionen
das Netzwerk analysieren oder Probleme nden.
Die voreingestellte Sprache ist Englisch. Um die Sprache zu ändern wählen Sie: MENU > System settings >
Language und wählen Sie die bevorzugte Sprache aus.
15
Page 16

SMARTHONE PER UNDOK-APP MIT DEM RADIO VERBINDEN
Um ihr Smarthone mit dem NUMAN Two verbinden zu können, benötigen Sie die App „UNDOK“, die Sie kostenlos
im iTunes-Store oder Google Play Store erhalten. WICHTIG: Das Handy muss sich im gleichen WLAN-Netz wie
das Radio benden.
1. Laden Sie die App herunter und öffnen Sie sie.
2. Die App sucht automatisch nach verfügbaren Geräten. Wählen Sie in der Liste „NUMAN Two“ aus.
3. Unter QUELLE könenn Sie zwischen den verschiedenen Eingangssignalen wählen.
4. Unter DURCHSUCHEN erhalten Sie eine Liste der verfügbaren Sender. Wählen Sie den gewünschten Sender aus.
5. Unter JETZT LÄUFT erhalten Sie nähere Informationen zum aktuellen Sender.
6. In den Einstellungen können Sie z.B. Equalizer, Sleeptimer und weitere Funktionen bequem einstellen.
7. Wenn Sie zwei oder mehr Geräte von NUMAN besitzen, können sie diese mit Hilfe der UNDOK App im
Multiroommodus miteinander verbinden.
Ausführliche Informationen zur Bedienung unserer kostenlosen App, nden Sie auf unserem YouTube Channel.
Bitte suchen nach NUMAN One und NUMAN Two auf YouTube.
16
Page 17
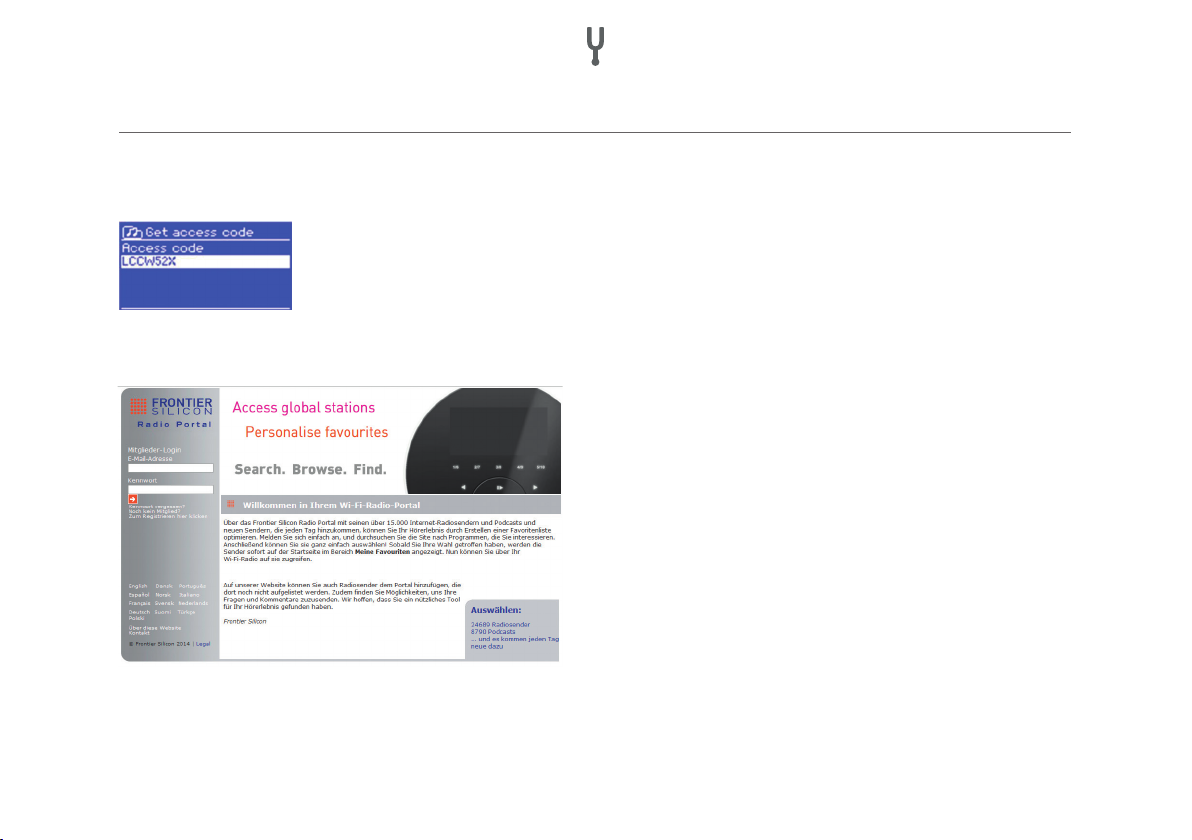
RADIOPORTAL-REGISTRIERUNG
Das Gerät nutzt die Webseite des Frontier Silicon Radioportals, das es Ihnen ermöglicht Internetradio zu hören
und Listen mit bevorzugten Sendern anzulegen.
Um sich beim Portal zu registrieren gehen Sie in den Internetradio-Modus und holen
Sie sich Ihren individuellen Zugangscode über: MENU > Station list > Get access code.
Notieren Sie sich Ihren Zugangscode.
Rufen Sie nun die Portalwebseite auf: http://www.wiradio-frontier.com.
Falls Sie die Webseite das erste Mal besuchen, legen
Sie sich einen neuen Account an und geben Sie dabei
die folgenden Informationen ein: den Zugangscode, Ihre
Email-Adresse, ein Passwort und Ihr Radio-Modell.
Falls Sie schon einen Account besitzen, loggen Sie sich
ein und fügen Sie das Radio hinzu. Wählen Sie dazu in
Ihrem Account: My preferences > Add another Wi-Fi
radio. Sobald das Radio beim Portal registriert ist kön-
nen Sie Ihre Lieblingssender darauf abspeichern und die
erweiterten Funktionen nutzen.
17
Page 18

INSTALLATION EINES MUSIKSERVERS
Damit das Gerät Musikdateien von einem Computer abspielen kann, müssen Sie den Computer so einrichten,
dass von extern auf die Musik- und Mediendateien zugegriffen werden kann. UPnP erlaubt es Geräten Musik aus
einer gemeinsamen Medien-Sammlung abzuspielen und durch verschiedene Menüs, wie z. B. Künstler, Album
oder Genre zu navigieren.
Falls Sie einen entsprechenden Rechner mit Windows Media Player 10 (oder neuer) besitzen und Ihre Musikbibliothek gut sortiert ist, empfehlen wir Ihnen den Medienaustausch. In diesem Fall müssen Sie nur den UPnPServer aufsetzen (siehe „Medienaustausch mit dem Windows Media Player“).
HINWEIS: iTunes ist zum Medienaustausch nicht geeignet. Es gibt aber Add-ons, die es ermöglichen mit der
iTunes-Musikbibliothek zu arbeiten.
MEDIENAUSTAUSCH MIT DEM WINDOWS MEDIA PLAYER
Das gängigste Programm zum Einrichten eines UPnP-Servers ist der Windows Mediaplayer 10 (oder neuer).
Alternativ können Sie auch andere UPnP-Plattformen oder Server nutzen. Um den Media Player für den Medienaustausch einzurichten, befolgen Sie die folgenden Schritte:
• Versichern Sie sich, dass der PC mit dem Netzwerk verbunden ist.
• Versichern Sie sich, dass das Radio eingeschaltet und mit demselben Netzwerk verbunden ist.
• Fügen Sie nun im Media Player die Musikdateien hinzu, die Sie mit dem Radio teilen wollen:
Library > Add to Library.
• Aktivieren Sie nun den Medienaustausch: Library > Media sharing.
18
Page 19

SPOTIFY CONNECT
Mit Spotify stehen Ihnen Millionen von Songs zur Verfügung. Ihre Lieblingskünstler, vorgefertigte Playlisten für
jede Stimmungslage, die neuesten Hits und speziell auf Sie zugeschnittene Musikempfehlungen.
Mit der Spotify Connect Funktion können Sie kabellos Musik auf ihrem Radio abspielen und steuern. Wählen Sie
die gewünschte Musik auf Ihrem Smartphone, Tablet oder ihrem PC aus und spielen Sie sie über Ihr Radio ab.
*Ob der Dienst in Ihrem Land verfügbar ist, erfahren Sie unter: www.spotify.com
SO BENUTZEN SIE SPOTIFY CONNECT
In Ihrem Radio ist die Spotify Connect Funktion bereits integriert. Dadurch können Sie die Musik, die Sie über die
App auf dem Radio abspielen über ihr Smartphone, Tablet oder ihren PC steuern.
Während der Verbindung können Sie parallel Anrufe annehmen, sich Videos anschauen, spielen oder ihr Smartphone einfach ausschalten, ohne dass die Musik unterbrochen wird. So macht Musik hören noch mehr Spaß.
Um die Spotify Connect Funktion nutzen zu können, benötigen Sie einen Spotify Premium Account. Falls Sie
keinen besitzen, gehen Sie auf www.spotify.com/premium und richten Sie sich einen Account ein.
19
Page 20
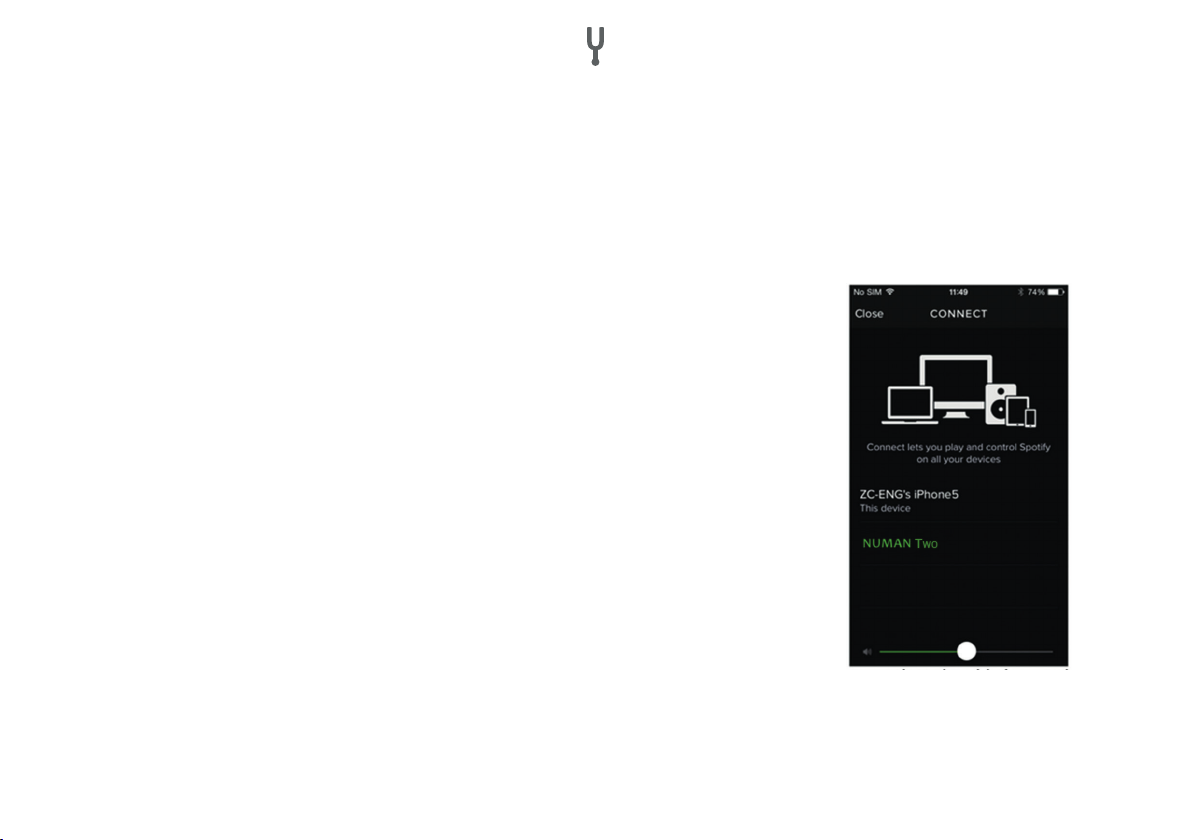
1. Laden Sie die Spotify App auf Ihr Smartphone, Ihr Tablet oder Ihren PC.
2. Verbinden Sie Ihr Radio mit dem selben Drahtlos-Netzwerk (siehe „VERBINDUNG MIT DEM NETZWERK HERSTELLEN“)
3. Spielen Sie einen Song auf Spotify ab und drücken Sie auf „VERFÜGBARE GERÄTE“.
4. Wählen das gewünschte Gerät aus und die Musik wird laut abgespielt.
5. Tippen Sie in der Liste auf „NUMAN Two“, um ihr Radio auszuwählen.
Falls Sie das Radio nicht in der Liste sehen, überprüfen Sie ob es sich im selben
Drahtlos-Netzwerk bendet, wie Ihr Smartphone oder Tablet. Ihr Radio wird
in der Spotify App als „NUMAN Two xxxxxxxxxxxx“ aufgelistet (Der 12-stellige
alphanumerische Code ist die MAC Adresse ihres Radios).
Falls Sie den Namen ändern oder personalisieren möchten (z. B. „Tinas Radio“),
gehen Sie wie folgt vor:
a. Am Radio: Drücken Sie MENU und wählen Sie Main menu > System settings >
Network > View settings. Scrollen Sie herunter und notieren Sie sich die IP-Adresse.
b. Am Computer: Versichern Sie sich, dass der Computer mit dem selben
Netzwerk wie das Radio verbunden ist. Geben Sie dann die notierte IP-Adresse
in die Adresszeile Ihres Browsers ein (z. B. 192.168.0.34). Sie sehen nun eine
Übersicht bestimmter Parameter, können dort aber auch den Namen ändern.
6. Das Verbindungs-Icon wird grün und signalisiert, dass Ihr Radio nun verbunden und bereit zum Abspielen ist.
20
Page 21

7. Die Spotify App erkennt ihr Radio nur, wenn ein Modus mit Internetverbindung aktiv ist (z. B. Internet-Radio,
Spotify Connect oder der Musikabspiel-Modus). Um Spotify in Modi ohne Internetverbindung nutzen zu
können (z. B. im DAB, FM oder BT-Modus) wählen Sie: Main menu > System settings > Network > Keep
network connected > YES. So können Sie ihr Radio direkt aus dem Standby aktivieren, wenn Sie die Spotify
App starten.
Hinweis: Wenn Sie ihr Radio längere Zeit unbeaufsichtigt lassen (z. B. über Nacht, während des Urlaubs oder
wenn Sie außer Haus sind), empfehlen wir Ihnen „NO“ zu wählen, um Strom zu sparen.
Weitere Informationen zur Installation und zum Gebrauch von Spotify Connect nden Sie auf: www.spotify.com/connect
SO STEUERN SIE SPOTIFY CONNECT
Sie können Spotify wie gewohnt von ihrer App aus steuern, z. B. Songs suchen und abspielen, die Lautstärke
regeln und Playlisten hinzufügen, auch wenn die Musik über das Radio abgespielt wird. Wenn Sie die App das
nächste Mal öffnen, wird die Musik automatisch über das Radio abgespielt. Da Spotify ein Cloud-basierter
Dienst ist, brauchen Sie sich nach der Aktivierung des Radios mit Ihrem Smartphone oder Tablet nicht länger im
selben Drahtlos-Netzwerk benden, um die Wiedergabe zu steuern.
SO BENUTZEN SIE EINEN ZWEITEN SPOTIFY ACCOUNT MIT IHREM RADIO
Die Spotify Account-Daten werden im Radio gespeichert. Um Sie mit anderen Account-Daten zu überschreiben,
befolgen Sie einfach die Aktivierungs-Schritte, während Sie Spotify mit dem gewünschten Account geöffnet
haben. Dazu muss sich das Smartphone, Tablet oder PC wieder im selben Drahtlos-Netzwerk, wie das Radio benden. Die Spotify Drittanbieter-Software-Lizenz nden Sie unter: www.spotify.com/connect/third-party-licenses
21
Page 22

• Geben Sie den Medienaustausch frei, indem Sie das Radio im Fenster auswählen (der Name kann variieren)
und auf „Allow“ klicken (siehe Bild). Klicken Sie dann auf „OK“ um das Fenster zu schließen.
• Der PC ist nun bereit Musik zu teilen und auf dem Radio abzuspielen. Der Media Player UPnP-Service läuft
im Hintergrund. Um Musik auf dem Radio abzuspielen, müssen Sie den Media Player nicht extra starten.
HINWEIS: Die Einrichtung hängt davon ab, welche Version des Media Players Sie benutzen.
STREAMING MIT DER WINDOWS 7 STREAMING-FUNKTION
Befolgen Sie folgende Schritte, um Musik zu teilen und das Radio über den Windows Media Player 12 (nur Windows 7) zu steuern:
• Versichern Sie sich, dass Ihr PC ans Netzwerk angeschlossen ist.
• Versichern Sie sich, dass das Gerät eingeschaltet und mit demselben Netzwerk verbunden ist.
• Rufen Sie aus Windows 7 folgende Einstellung auf: Start > Geräte und Drucker.
• Wählen Sie „Gerät hinzufügen“, wählen Sie das gefundene Gerät aus der Liste und befolgen Sie die
Anweisungen des Installationsassistenten.
• Sobald das Geräte-Symbol unter „Geräte und Drucker“ auftaucht ist der Rechner bereit Musikdateien zu teilen.
22
Page 23

INTERNETRADIO
Über das Internet kann Ihr Radio tausende Radiosender und Podcasts aus der ganzen
Welt empfangen. Wenn Sie den Internetradio-Modus wählen, nimmt das Radio Kontakt
mit dem Frontier Silicon Internetradio-Portal auf. Dort lädt es sich eine Liste von Sendern,
die nach Sparten und Genre sortiert sind. Sobald Sie sie einen Sender auswählen werden
sie direkt mit ihm verbunden.
Das Portal ermöglicht es unterschiedliche Listen von Lieblingssendern anzulegen, die Sie personalisieren können (z. B. Pauls Sender, Evas Sender, Toms Sender). Um Senderlisten anlegen und nutzen zu können, müssen
Sie sich beim Radioportal registrieren (siehe „Radioportal-Registrierung“). Sie können alle Listen auf demselben
Account abspeichern, so dass das Radio Zugang zu allen Listen hat. Lieblingssender können direkt über das
Radio oder über das Portal hinzugefügt werden.
Um den Internetradio-Modus aufzurufen, drücken Sie auf SOURCE, bis der Bildschirm „Internet radio“ anzeigt
oder wählen Sie: MENU > Main menu > Internet Radio.
HINWEIS: Die Senderliste wird vom Internetradio-Portal übermittelt und ist nur zugänglich, wenn das Radio mit
dem Internet verbunden ist. Senderlisten und Untermenüs können sich von Zeit zu Zeit ändern.
Es gibt mehrere Möglichkeiten Sender auszuwählen:
• Über das Radio: Zeigt die zuletzt gelisteten Sender und voreingestellte Sender.
• Aus dem Portal über MENU > Station list > MENU: Zeigt Sender sortiert nach Lieblingssender, Land, Genre,
beliebten oder neuen Sendern. Daneben können Sie Sender nach Stichworten suchen oder die Liste Ihrer
hinzugefügten Sender durchsuchen.
23
Page 24

• Wenn Sie bereits einen Internet-Sender hören, benutzen Sie die Sie auf die Zurück-Taste
auf MENU, um im Menübaums einen Schritt zurück zu gehen.
ZULETZT GEHÖRTE SENDER
Wenn Sie das Radio das nächste Mal im Internet-Modus starten, wird der Sender abgespielt, den Sie zuletzt
gehört haben. Um einen anderen Sender auszuwählen, wählen Sie: MENU > Last listened und wählen Sie einen
anderen Sender aus der Liste der zuletzt gehörten Sender.
Um einen gespeicherten Sender auszuwählen, drücken Sie kurz auf PRESET und wählen
Sie einen der aufgelisteten Sender. Wenn Sie einen voreingestellten Sender hören, wird
unten im Bildschirm die Speichernummer des Senders eingeblendet (P1, P2, usw.).
HINWEIS: Die Auswahl gespeicherter Sender erfolgt beim Internetradio, bei DAB und FM auf die gleiche Art.
LIEBLINGSSENDER IM RADIOPORTAL ABSPEICHERN
Lieblingssender können im Internetradio-Portal gespeichert werden. Bevor Sie einen Account auf der Webseite
des Portals (www.wiradio-frontier.com) anlegen, werden Ihre Lieblingssender einzeln auf dem jeweiligen Radio
gespeichert, mit dem Sie einen Sender auswählen. Nachdem Sie sich einen Account erstellt haben, werden die
Lieblingssender aller dort angelegten Radios in einer Gesamtliste mit Lieblingssendern zusammengefügt.
Um einen aktuell laufenden Sender als Lieblingssender abzuspeichern, halten Sie SELECT (Drehregler) gedrückt,
bis auf dem Bildschirm „Favourite added“ erscheint. Der Sender erscheint darauf in der Liste der Lieblingssender. Um einen Lieblingssender abzuspielen, wählen Sie MENU > Station list > My favourites und wählen Sie
dann die entsprechende Liste und den gewünschten Sender aus.
oder drücken Sie
24
Page 25
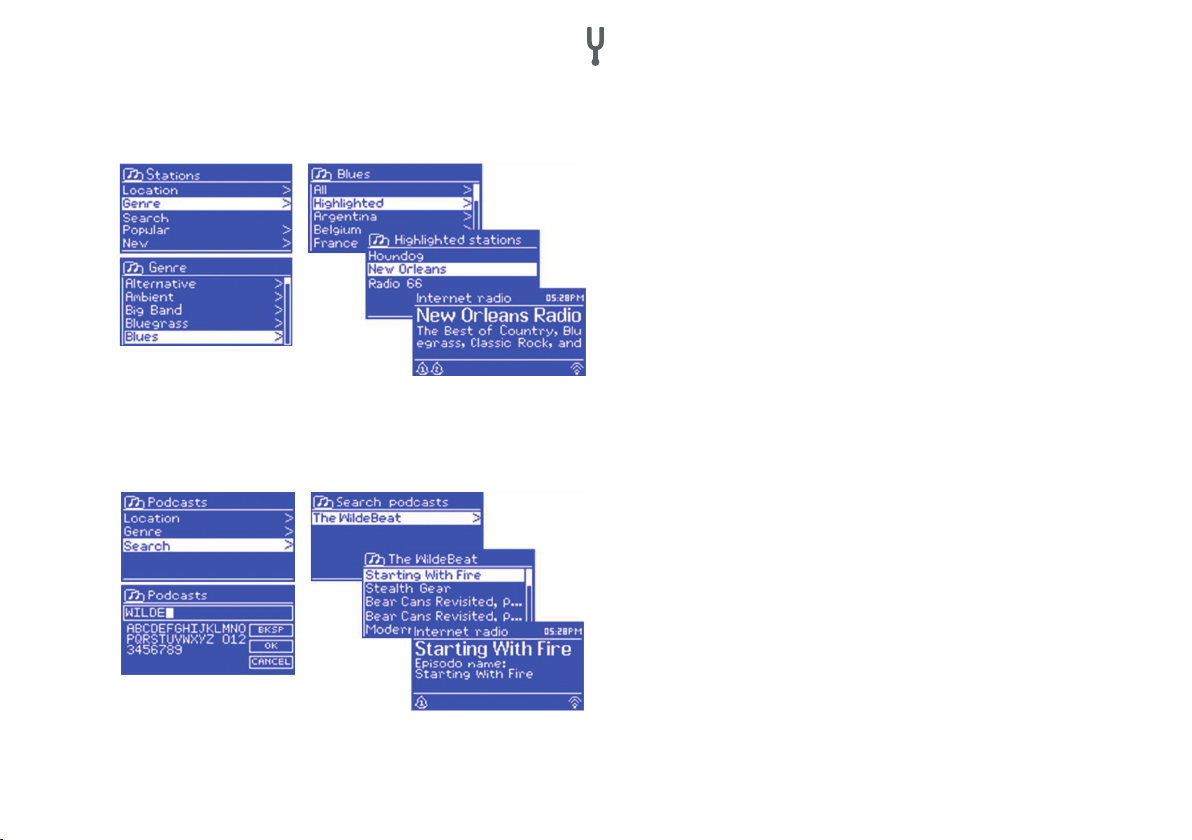
INTERNET-SENDER SUCHEN
INTERNET-SENDER ÜBER SCHLAGWORTE SUCHEN
Um nach Internetsendern zu suchen, wählen Sie:
MENU > Station list und dann entweder „Stations“
oder „Podcast“. Durchsuchen Sie dann die Menüs,
um einen Sender zu nden.
HINWEIS: Die BBC Radio „Listen Again“ Programme
erreichen sie über das Podcast-Menü. Beispielsweise
über: MENU > Podcasts > Location > Europe > United
Kingdom > All shows > BBC Radio 4 > You and Yours
> 20/10/2008 – Oktober 2010.
Sie können das Internet auch mit Hilfe von Schlagworten nach Sendern oder Podcasts durchsuchen.
Um eine Suche zu starten wählen Sie: MENU >
Station list und dann entweder „Stations“ oder
„Podcasts“. Wählen Sie die Buchstaben aus, um
ein Schlagwort einzugeben und bestätigen Sie die
Eingabe mit OK. Wählen Sie einen Sender aus der
Liste aus. Bei Podcasts kann manchmal noch eine
bestimmte Folge ausgewählt werden.
25
Page 26

MY ADDED STATIONS
Obwohl im Portal tausende Sender aufgelistet sind, kann es sein, dass ihr gewünschter Sender dort nicht aufgelistet ist. Sie können den gewünschten Sender über das Portal hinzufügen. Sie erreichen den hinzugefügten
Sender über das Radio über die folgende Auswahl: MENU > Station list > My added stations. Wählen Sie dann
den gewünschten Sender aus.
INFORMATIONEN ZUM AKTUELL GESPIELTEN TITEL
Während ein Internetsender abgespielt wird, zeigt der Bildschirm seinen Namen und einen Beschreibungstext.
Falls Informationen zu Künstler und Titel verfügbar sind, werden diese ebenfalls angezeigt. Um weitere Informationen anzuzeigen, drücken Sie auf die INFO-Taste. Jedes Mal wenn Sie die Taste drücken wir eine weitere
Information in der folgenden Reihenfolge eingeblendet:
• Künstler und Titel
• Beschreibung
• Genre und Herkunftsland des Senders
• Zuverlässigkeit
• Bitrate, Kodierung und Samplingrate
• Wiedergabepuffer
• Heutiges Datum.
26
Page 27
MUSIK ÜBER EIN NETZWERK ABSPIELEN
Im Music Player Modus können Sie MP3-, AAC-, WMA- oder FLAC-Dateien abspielen, die
auf einem Computer oder im Netzwerk vorliegen. Drücken Sie dazu auf SOURCE bis der
Bildschirm „Music Player“ anzeigt oder wählen Sie: MENU > Main menu > Music Player.
• Sobald Sie im Music Player Modus sind, wählen Sie „Shared Media“.
• Falls Sie bereits einen Titel abspielen, drücken Sie mehrmals hintereinander auf BACK,
um im Menübaum einen Schritt zurückzugehen.
• Benutzen Sie die
oder
Sie kurz auf eine der Tasten um den vorherigen oder nächsten Titel auszuwählen.
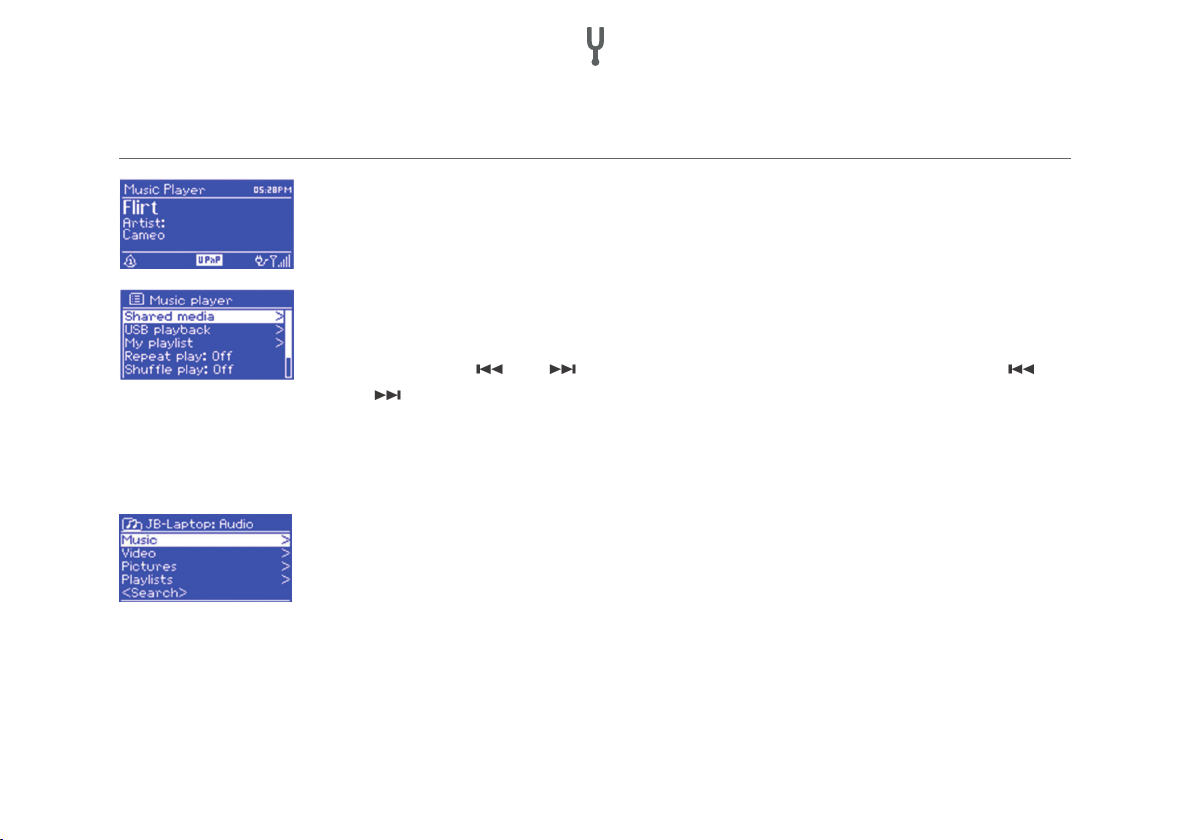
MUSIK VON EINEM MUSIKSERVER ABSPIELEN
Wählen Sie MENU > Shared media. Falls Sie bereits einen Musikserver aufgesetzt haben
(siehe „Installation eines Musikservers“), sollten Sie einen Eintrag sehen, der den Computer und den Namen der geteilten Musiksammlung anzeigt, z. B. JB-Laptop: Audio. Falls
sie mehrere Musiksammlungen mit dem Server teilen, werden die Alternativen aufgelistet. Wählen Sie die Datei aus, die Sie abspielen möchten. Von diesem Punkt an werden
die Menüs vom Abspielprogramm (Windows Media Player) des Musikservers generiert.
Die erste Liste zeigt eine Liste der verfügbaren Medientypen, z. B. Music, Videos, Pictures
und Playlists. Das Radio kann nur Musikdateien und Playlisten anspielen.
Taste gedrückt, um innerhalb eines Titel vor- oder zurückzuspulen. Drücken
und Taste, um einen Titel auszuwählen. Halten Sie die
27
Page 28

Sie können Titel auf verschiede Arten aussuchen, beispielsweise über Genre, Künstler,
Album, Komponist oder Bewertung. Sobald Sie einen Titel gefunden haben, drücken Sie
auf SELECT (Drehregler). Drücken Sie kurz auf den Regler, um den Titel abzuspielen.
Halten Sie den Regler gedrückt, um den Titel zur Playlist hinzuzufügen. Sie können auch
ganze Alben zur Playlist hinzufügen. Das Radio spielt entweder einen gewählten Titel
oder die gesamte Playlist ab.
WAKE ON LAN
Wake On LAN ist ein Standard, der es erlaubt einen ausgeschalteten Computer über die eingebaute Netzwerkkarte zu starten. Falls Sie „shared media“ auswählen wird eine Liste verfügbarer Musikserver angezeigt. Ein
Fragezeichen vor dem Servernamen zeigt, dass bereits ein Rechner mit Wake On LAN mit dem Radio verbunden
war, dieser aber aktuell nicht im Netzwerk gefunden wird. Falls sie einen Server mit Fragezeichen auswählen,
versucht das Radio den Server zu starten und eine Verbindung aufzubauen.
Falls keine Verbindung zustande kommt kann es daran liegen, dass der Server nicht mehr mit dem Netzwerk
verbunden ist oder ausgeschaltet wurde. Um einen nicht mehr vorhandenen Server aus der Liste zu löschen
wählen Sie: MENU > Prune servers > YES.
28
Page 29

PLAYLISTEN ABSPIELEN
Das Radio kann bis zu 500 Titel in einer Playlist speichern. Die Titel können von verschiedenen UPnP-Servern zusammengestellt werden. Um eine Playlist zu erstellen, wählen
Sie: MENU > My playlists.
• Um die Playlist durchzusehen, drehen Sie am Drehregler. Um einen Titel abzuspielen, drücken Sie kurz auf
SELECT (Drehregler).
• Um einen Titel aus der Playlist zu löschen, halten Sie SELECT gedrückt und bestätigen Sie mit YES.
• Falls Sie einen Titel/Album/Ordner ohne Playlist abspielen, bleibt die Playlist trotzdem gespeichert. Gleiches
gilt, wenn sich das Gerät im Standby-Modus bendet.
TITEL WIEDERHOLEN UND ZUFALLSWIEDERGABE
• Um können Titel zu wiederholen, wählen Sie: MENU > Repeat play.
• Um die Zufallswiedergabe zu aktivieren wählen Sie: MENU > Shufe play.
INFORMATIONEN ZUM AKTUELL GESPIELTEN TITEL
Während ein Titel abgespielt wird zeigt der Bildschirm den Titelnamen und den Künstler an. Zudem wird ein Fortschrittsbalken angezeigt, der die abgelaufene Zeit und die Gesamtdauer des Titels zeigt. Unten im Bildschirm
sehen Sie das UPnP-Symbol.
Um weitere Informationen aufzurufen, drücken Sie auf INFO. Jedes Mal wenn Sie die Taste drücken wir eine
weitere Information in der folgenden Reihenfolge angezeigt: Fortschrittsbalken (Standardansicht) > Album >
Kodierung und Samplingrate > Wiedergabepuffer > Heutiges Datum.
29
Page 30
MUSIK-STREAMING UNTER WINDOWS 7
Eine der neuen Funktionen von Windows 7 ist die sogenannte “ Wiedergeben auf” Funktion, mit der Sie Ihren
Computer als Fernbedienung für das Radio nutzen, Musikdateien austauschen und in der Mediensammlung
navigieren können. Das Radio unterstützt den DLNA-Standard (Digital Living Network Alliance), durch den es mit
andere Geräten im Haushalt zu kommunizieren kann. Um die Funktion benutzen können, müssen Sie das Radio
für das Streaming vorbereiten.
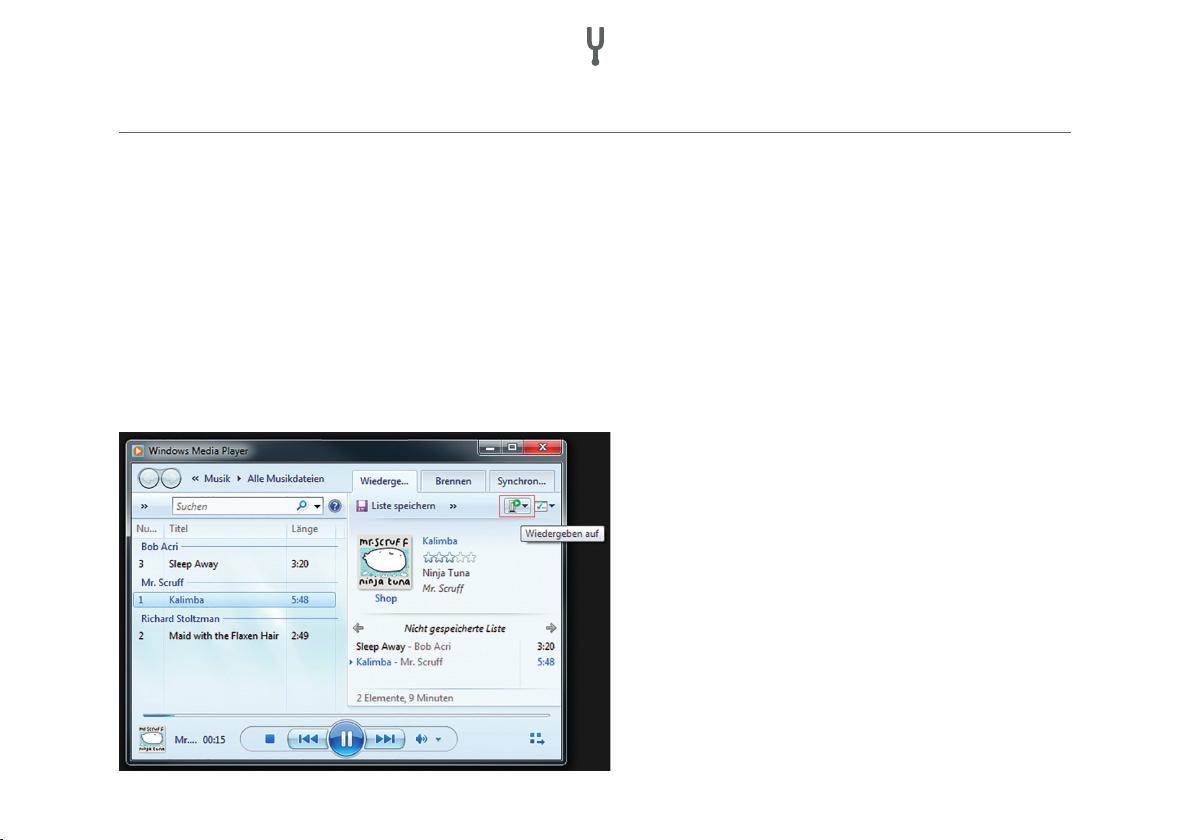
„WIEDERGEBEN AUF“ FUNKTION MIT DEM WINDOWS MEDIA PLAYER NUTZEN
Der Windows Media Player erleichtert Ihnen die Verwaltung Ihrer Mediendateien, ndet Dateien und benutzt die
„Wiedergeben auf“ Funktion. Um Musikdateien zum Abspielen auszuwählen befolgen Sie folgende Schritte:
• Wählen Sie am PC: Start > Alle Programme >
Windows Media Player.
• Falls Sie den Player bereits geöffnet haben,
wählen Sie Ihre Musikbibliothek aus.
• Suchen Sie sich die Titel für Ihre Playlist heraus
und ziehen Sie die Titel aus der Übersicht in die
rechte Spalte.
• Drücken Sie auf das „Wiedergeben auf“ Symbol,
oben rechts in der Spalte. Wählen Sie das Gerät
aus, auf dem die Musik abgespielt werden soll.
• Es öffnet sich ein Fenster, über das Sie die
Wiedergabe steuern und zum vorherigen oder
nächsten Titel in der Liste wechseln können.
30
Page 31

„WIEDERGEBEN AUF“ FUNKTION OHNE WINDOWS MEDIA PLAYER NUTZEN
Sie können die „Wiedergeben auf“ Funktion auch außerhalb des Windows Media Players nutzen. Um eine Datei
auszuwählen und auf dem Radio abzuspielen befolgen Sie folgende Schritte:
• Markieren Sie die Musikdateien, die sie auf dem Radio abspielen möchten.
• Klicken Sie die rechte Maustaste, wählen Sie „Wiedergeben auf“ und wählen Sie das Gerät, auf dem die
Dateien abgespielt werden sollen.
• Es öffnet sich ein Fenster, über das Sie die Wiedergabe steuern und zum vorherigen oder nächsten Titel in der
Liste wechseln können.
INFORMATIONEN ZUM AKTUELL GESPIELTEN TITEL
Während ein Titel abgespielt wird zeigt der Bildschirm den Titelnamen. Daneben wird ein
Fortschrittsbalken angezeigt, der die abgelaufene Zeit und die Gesamtdauer des Titels
anzeigt. Unten im Bildschirm sehen Sie das UPnP-Symbol.
Um weitere Informationen aufzurufen, drücken Sie auf INFO. Jedes Mal wenn Sie die Taste drücken wird eine
weitere Information in der folgenden Reihenfolge angezeigt: Künstler, Album, Kodierung und Samplingrate >
Wiedergabepuffer.
31
Page 32

DAB-RADIO
Im DAB-Modus empfängt das Radio DAB und DAB+ und zeigt Informationen zum Sender
und zum abgespielten Titel an. Um den DAB-Modus aufzurufen, drücken Sie auf SOUR-
CE, bis der Bildschirm DAB anzeigt oder wählen Sie: MENU > Main menu > DAB.
SENDER SUCHEN
Falls Sie DAB zum ersten Mal benutzen oder die Senderliste leer ist, führt das Radio automatisch einen kompletten Sendersuchlauf aus.
Es kann sein, dass Sie den Suchlauf von Zeit zu Zeit wiederholen müssen, weil Sender
wechseln, der Empfang beim letzten Suchlauf nicht gut genug war oder weil sie nur
Sender mit gutem Empfang in der Liste haben möchten. Um einen manuellen Suchlauf
durchzuführen, wählen Sie: MENU > Scan.
Sobald der Suchlauf beendet ist, zeigt das Radio eine Liste der verfügbaren Sender an.
Um Sender von der Liste zu entfernen, wählen Sie: MENU > Prune invalid > YES.
SENDER AUSWÄHLEN
Um einen Sender zu hören oder zu wechseln, drücken Sie die Taste MENU/BACK, danach drücken Sie auf
SELECT (Drehregler), um einen Sender auszuwählen. Der Sender wird abgespielt und auf dem Bildschirm
erscheinen die Informationen zum Sender.
32
Page 33

SENDER SPEICHERN UND AUFRUFEN
Um einen Lieblingssender abzuspeichern drücken Sie an der Fernbedienung eine der Nummerntasten 1-10 für
ca. 2 Sekunden. Um die Speicherplätze 11-20 zu belegen, drücken Sie an der Fernbedienung die 10+ Taste für
ca. 2 Sekunden und dann kurz eine der Nummerntasten.
Um einen gespeicherten Sender aufzurufen, drücken Sie kurz auf PRESET und wählen Sie einen Sender aus der
Liste. Sobald Sie einen gespeicherten Sender abspielen, wird die Speichernummer (*1, *2, usw.) unten rechts im
Bildschirm eingeblendet. Um einen gespeicherten Sender über die Fernbedienung aufzurufen, benutzen Sie die
Nummerntasten 1-10. Um einen auf den Speicherplätzen 11-20 voreingestellten Sender aufzurufen, drücken Sie
kurz die 10+ Taste und dann eine Nummerntaste.
INFORMATIONEN ZUM AKTUELL GESPIELTEN TITEL
Während ein Titel abgespielt wird zeigt der Bildschirm den Titelnamen und die DLS-Information (Dynamic
Label Segment) des Senders, die mit dem Radiosignal übertragen wird und beispielsweise Informationen zu
Programmnamen und dem Titel liefert. Stereo-Übertragungen werden mit einem Symbol oben im Bildschirm
gekennzeichnet.
Um weitere Informationen aufzurufen, drücken Sie auf INFO. Jedes Mal wenn Sie die Taste drücken wird eine
weitere Information in der folgenden Reihenfolge angezeigt: DLS-Text > Programmtyp > DAB-Gruppe und Frequenz > Signalstärke und Fehlerrate > Bitrate, Kodex und Kanäle > Heutiges Datum.
33
Page 34

DRC (AUDIODYNAMIKKOMPRESSION)
Manche DAB-Sender bieten DRC an. DRC erlaubt es den Laustärkeumfang der Audiowiedergabe auszugleichen,
so dass sehr leise Töne etwas lauter und sehr laute Töne etwas leiser wiedergegeben werden. Das ist vor allem
dann nützlich, wenn die Umgebungslautstärke relativ hoch ist.
Um die DRC-Einstellungen zu ändern, wählen Sie: MENU > DRC und wählen Sie dann DRC high, DRC low oder
DRC off aus. Falls der Sender kein DRC anbietet hat die DRC-Einstellung keine Auswirkung auf die Musikwiedergabe.
SENDER-REIHENFOLGE
Sie können Sich die Sender entweder sortiert nach alphanumerischer Reihenfolge, DAB-Gruppe oder nach Aktivität anzeigen lassen. Die DAB-Gruppe (Ensemble) listet Sender auf, die nach Genre oder Ort zusammengefasst
werden. Die Aktivität (Valid) listet zuerst die aktiven Sender in alphanumerischer Reihenfolge auf, danach die
inaktiven Sender.
Um die Senderreihenfolge zu ändern wählen Sie: MENU > Station order und dann Alphanumeric, Ensemble oder
Valid.
34
Page 35

FM-RADIO
Im FM-Modus werden analoge Radiosignale empfangen. Der Bildschirm zeigt den Sender
und Informationen zur Sendung an, sofern ein RDS-Signal (Radio Data System) übermittelt wird. Um den FM-Modus aufzurufen, drücken Sie MODE, bis der Bildschirm FM Radio
anzeigt, oder wählen Sie MENU > Main menu > FM.
SENDER SUCHEN
• Automatisch:
Um Sender zu suchen, drücken Sie auf SELECT. Die Frequenzanzeige führt nun einen kompletten Suchlauf im
FM-Frequenzbereich durch.
• Manuell:
Um manuell nach Sender zu suchen, halten Sie die
mehrfach kurz hintereinander. Alternativ können Sie auch den Drehregler zur Suche benutzen.
SENDER SPEICHERN
Um einen FM-Sender zu speichern, halten Sie PRESET gedrückt, bis das Display „Save preset“ zeigt. Wählen Sie
dann über den Drehregler oder die Fernbedienung einen der 20 Speicherplätze aus.
Um einen gespeicherten Sender aufzurufen, drücken Sie kurz auf PRESET und wählen Sie einen der aufgelisteten Sender. Sobald Sie den Sender abspielen, wird unten auf dem Bildschirm die Speichernummer (*1, *2, usw.)
angezeigt.
oder Taste gedrückt oder drücken Sie die Tasten
35
Page 36

INFORMATIONEN ZUM AKTUELL GESPIELTEN TITEL
Während Sie einen FM-Sender abspielen, zeigt der Bildschirm eines der folgenden Daten-Sets:
• Falls ein RDS-Signal übermittelt wird, werden der Sendername und Informationen zur Sendung auf dem
Bildschirm angezeigt.
• Falls kein RDS-Signal übermittelt wird, zeigt der Bildschirm die aktuelle Frequenz an.
SUCHEINSTELLUNGEN
Normalerweise stoppt die FM-Suche bei jedem verfügbaren Sender. Dadurch werden auch Sender mit einem
schlechten Empfangssignal in die Liste mitaufgenommen. Falls der Suchlauf nur bei Sendern mit starkem Empfangssignal anhalten soll, wählen Sie: MENU > Scan settings > Strong stations only? > YES.
AUDIOEINSTELLUNGEN
Normalerweise werden alle Sender, die in Stereo senden auch in Stereo wiedergegeben. Bei Sendern mit
schlechtem Empfang kann dies zu Rauschen führen. Um Sender mit schwachem Empfangssignal in Mono wiederzugeben, wählen Sie MENU > Audio Settings > FM weak reception: Listen in mono only > YES.
36
Page 37

CD-WIEDERGABE
Hinweis: Unsachgemäße Bedienung kann zu Schäden am Gerät führen!
Schieben Sie keine CDs in das Gerät, die vom Standard-Format abweichen, z. B. Mini-CDs. Sie werden möglicherweise nicht abgespielt und nicht wieder ausgeworfen. Schieben Sie immer nur eine CD auf einmal in den
CD-Slot.
Schieben Sie die CD mit der bedruckten Seite nach oben in den Slot, bis sie eingezogen wird. Der CD-Player
lädt die CD automatisch und beginnt mit der Wiedergabe. Auf dem Display erscheint die Meldung „Loading“.
Während die CD noch eingelesen wird, ist keine der Funktion (wie z. B. Stop, Pause) verfügbar. Sobald die CD
eingelesen wurde wird sie automatisch abgespielt. Wenn Sie den CD-Modus auswählen und keine CD eingelegt
ist, erscheint auf dem Display die Meldung „No Disc“. Legen Sie eine CD mit der bedruckten Seite nach oben ein,
das Display zeigt die folgenden Informationen:
• CD-Modus
• Zeit
• Verstrichene Wiedergabe-Zeit
• Titel-Nummer
• Wiedergabestatus (Play/Pause)
37
Page 38

CD-FUNKTIONEN
• Drücken Sie auf die
• Drücken Sie einmal auf die
• Um schnell innerhalb eines Titels vorzuspulen, halten Sie die
• Um zum vorherigen Titel zurückzuspringen, drücken Sie auf die
• Um die Wiedergabe zu stoppen, drücken Sie auf die
SO PASSEN SIE DIE WIEDERGABE AN
Sie können zwischen verschiedenen Wiedergabe-Sequenzen wählen, indem Sie die PRG-Taste an der Fernbedienung drücken. Drücken Sie auf die MENU-Taste, um die Systemeinstellungen für die CD-Wiedergabe zu öffnen.
Taste, um die Wiedergabe anzuhalten oder damit fortzufahren.
Taste, um zum nächsten Titel zu springen.
Taste gedrückt.
Taste.
Taste.
38
Page 39

AUX, BT, ALARM UND SLEEPTIMER
AUX-MODUS
Im AUX-Modus können Sie über das Radio Musik von externen Geräten (z. B. MP3-Player) abspielen. Um Musik
über den AUX-Modus abzuspielen:
• Schließen Sie das externe Gerät mit einem AUX-Kabel am 3,5 mm AUX-Anschluss
am Radio an.
• Drücken Sie SOURCE bis AUX auf dem Bildschirm erscheint, oder wählen Sie:
MENU > Main menu > AUX in.
• Passen Sie die Lautstärke am Radio und, falls nötig, am externen Gerät an.
BT-MODUS
Überprüfen Sie vor dem Verbindungsaufbau ob Ihr Gerät den BT-Standard 4.0 + EDR A2DP unterstützt und versichern
Sie sich, dass Ihr Gerät mit keinen anderen BT-Gerät verbunden ist. Der Verbindungsaufbau geschieht bei verschiedenen Gerät auf unterschiedliche Art und Weise. Im Folgenden nden Sie eine allgemeine Anleitung.
1. Drücken Sie auf SOURCE und wählen Sie den BT-Modus.
2. BT geht an. Drehen Sie die Lautstärke zum Beginn um ¼ hoch. Drehen Sie die Lautstärke am Gerät, vom dem
Sie streamen, ebenfalls höher.
3. Aktivieren Sie die BT-Funktion auf dem Gerät, vom dem Sie streamen.
4. Um die Suche zu starten, wählen Sie „NUMAN Two“ aus, sobald das Gerät in der Liste erscheint.
5. Sie können nun drahtlos Musik auf ihrem Radio abspielen. Regeln sie die Lautstärke am Gerät, vom dem Sie
abspielen. Beim nächsten Mal müssen Sie ihr Gerät nicht erneut verbinden.
39
Page 40

Abhängig von Ihrem Gerät, kann es mehrere Versuche dauern, bis sie Ihr Gerät mit dem NUMAN Two verbunden
hat. Lassen Sie dem Gerät aber genug Zeit sich zu verbinden, bevor Sie einen neuen Versuch unternehmen.
Verbinden eines BT-fähigen iPhone / iPod touch / iPad:
1. Drücken Sie auf SOURCE und wählen Sie den BT-Modus. BT geht an. Drehen Sie die Lautstärke zum Beginn
um ¼ hoch. Drehen Sie die Lautstärke am Gerät, vom dem Sie streamen, ebenfalls höher.
2. Wählen Sie “Einstellungen” (abhängig von der Software-Version).
3. Wählen Sie “Allgemein”.
4. Wählen Sie “BT”.
5. Stellen Sie BT auf “Ein“, um die Suche zu starten.
6. Wählen Sie “NUMAN Two”, sobald das Gerät auf dem Display erscheint.
7. Sobald Sie einen Klingelton vom NUMAN Two hören, können Sie ihre Musikdateien kabellos abspielen.
Regeln Sie die Lautstärke am Gerät, von dem Sie die Musik abspielen. Beim nächsten Mal müssen Sie Ihr
iPhone / iPod touch / iPad nicht erneut verbinden. Die Lautstärke der einzelnen Dateien kann schwanken.
Falls Sie einen noch höheren Ausgangspegel möchten, überprüfen Sie die Einstellungen auf Ihrem iPhone / iPod
touch / iPad: Stellen Sie den EQ, den Soundcheck und die Lautstärkebegrenzung aus. Falls es zu Problemen
mit der Verbindung kommt, drücken Sie auf den kleinen Pfeil rechts neben „NUMAN Two BT“ auf Ihrem iPhone
/ iPod touch / iPad Display und wählen Sie „Dieses Gerät ignorieren“, und wiederholen Sie den Verbindungsversuch.
Abhängig von Ihrem Gerät, kann es mehrere Versuche dauern, bis sie Ihr Gerät mit dem NUMAN Two verbunden
hat. Lassen Sie dem Gerät aber genug Zeit sich zu verbinden, bevor Sie einen neuen Versuch unternehmen.
40
Page 41

ALARM
Um eine Alarm einzustellen oder zu ändern, drücken Sie auf ALARM oder wählen Sie: MENU > Main menu >
Alarms. Wählen Sie die Nummer des Alarms (1 oder 2) und stellen Sie die folgenden Parameter ein:
• Alarm an/aus
• Häugkeit: täglich, einmalig, Wochenende oder Wochentage.
• Weckzeit
• Modus: Alarmsignal, Internetradio, DAB, FM oder CD.
• Wecken mit Radio: Letzter gehörter Sender oder 1-10
• Lautstärke: 0 - Max.
Um die neuen Einstellungen zu aktivieren, blättern Sie nach unten und wählen Sie „Save“. Auf dem Bildschirm wird der
aktive Alarm mit einem Symbol unten am linken Bildschirmrand dargestellt. Der Alarm ertönt zur eingestellten Zeit.
SCHLUMMERFUNKTION
Um den Alarm vorübergehend anzuhalten, drücken Sie auf SNOOZE. Sie können die Zeit,
die vergeht bis der Alarm wieder ertönt, mit dem Drehregler verändern. Das Radio kehrt
für die eingestellte Zeit in den Standby-Modus zurück, während das Alarm-Symbol blinkt.
SLEEPTIMER
Um den Sleeptimer einzustellen, drücken Sie auf: MENU > Main menu > Sleep. Wählen Sie dann eine der folgenden Optionen: Aus, 15, 30, 45, 60 Minuten. Sobald Sie die gewünschte Zeit ausgewählt haben kehrt das Radio
ins Hauptmenü zurück. Um zum aktuell gespielten Titel zurückzukehren, drücken Sie auf MENU.
41
Page 42

SOFTWARE-UPDATE UND RESET
SOFTWARE-UPDATE
Von Zeit zu Zeit werden Software-Updates für ihr Radio angeboten, die Zusatzfunktionen hinzufügen oder
Fehler beheben. Sie können entweder manuell nach neuen Updates suchen oder das Radio so einstellen, dass
es in bestimmten Abständen nach Updates sucht (Standardeinstellung). Sobald ein Software-Update verfügbar
ist fragt Sie das Radio ob Sie ein Update durchführen möchten. Falls Sie zustimmen wird die neue Software
heruntergeladen und installiert. Beim Update werden alle vorherigen Benutzereinstellungen beibehalten. Um die
automatische Suche nach Updates ein- oder auszuschalten, drücken Sie auf:
MENU > System settings > Software update > Auto check settings.
ACHTUNG:
Achten Sie darauf, dass das Radio während des Updates an ein stabiles Netz angeschlossen ist. Ein Stromausfall während des Updates kann das Radio dauerhaft beschädigen.
RADIO AUF WERKSEINSTELLUNGEN ZURÜCKSETZEN
Wenn Sie das Radio auf Werkseinstellungen zurücksetzen werden alle Benutzer- und Netzwerkeinstellungen
gelöscht. Nur die aktuelle Software-Version wird beibehalten, da sie für die Registrierung im Internetradio-Portal
benötigt wird. Auch Ihre Radio-Favoriten auf der Portalseite bleiben erhalten, es sei denn Sie legen sich einen
neuen Account an, mit dem Sie das Radio verbinden. Um Das Radio zurückzusetzen, drücken Sie auf:
MENU > System settings > Factory reset > Proceed > YES.
42
Page 43

FEHLERMELDUNGEN UND FEHLERBEHEBUNG
Meldung Beschreibung Mögliche Ursache
Failed to connect Korrektes Passwort eingegeben aber
der Router weist die Anfrage zurück.
Format error Das Datenformat kann nicht
ausgelesen werden.
Network error Die Daten, die das Netzwerk liefert
sind nicht korrekt.
Network not ready Es gibt ein Problem mit der
Verbindung zum Router.
Network timeout Es kommt kein Signal aus dem
Netzwerk an.
No UPnP media
found
Service not
available (DAB)
Unauthorised Der UPnP-Server gewährt keinen
Update failed Das Software-Update ist
Es wird kein UPnP-Server gefunden. Es ist kein UPnP-Server installiert.
Das Radio hat keinen DAB-Empfang. Die Antenne ist nicht richtig ausgerichtet.
Zugang.
fehlgeschlagen.
Die MAC-Filterung am Router ist aktiviert.
Die Datei kam als .wma an, ist aber keine
WMA-Datei und lässt sich nicht dekodieren.
Die Daten, die vom Server eingeholt werden
sind nicht lesbar.
Der Router ist ausgeschaltet.
Bestimmte Internet-Sender existieren nicht
mehr.
Aktivieren sie den Zugang für das Radio auf
dem UPnP-Server.
Die Internet-Verbindung wurde während des
Updates unterbrochen.
43
Page 44

FEHLERSUCHE UND FEHLERBEHEBUNG
Problem Ursache Mögliche Lösung
FM: rauscht
DAB: rauscht,
ist unterbrochen
oder abgehackt
DAB: „No stations available“
Keiner
Verbindung zum
Internet.
Keine Verbindung zum
Netzwerk
Die Signalstärke ist zu
gering.
Geringe
Signalstärke.
Die Firewall
verhindert den
Zugang.
Internetanschluss ist
aus.
Das Netzwerk
ist aus.
Die Firewall
verhindert den
Zugang.
Überprüfen Sie die Antenne und richten Sie sie neu aus.
Stellen Sie das Radio an einem anderen Ort auf.
Starten Sie einen Suchlauf nach Sendern mit starkem Signal.
Starten Sie einen Suchlauf nach Sendern mit starkem Signal.
Überprüfen Sie, ob folgende Ports im Router offen sind: UDP/TCP-Ports
80 und 123; DNS-Port 53. Für den Windows-Medienaustausch: Port 135,
139 und 445. Windows Media Player: variiert. Sämtliche „Nicht-Windows“Firewalls erfordern möglicherweise eine individuelle Einrichtung. Firewall
muss UPnP möglicherweise noch eingerichtet werden.
Versuchen Sie ob das Internet auf einem Computer im selben Netzwerk
läuft.
Überprüfen Sie ob Server und Radio im Netzwerk angemeldet sind und
das Netzwerk an ist.
Überprüfen Sie, ob folgende Ports im Router offen sind: UDP/TCP-Ports
80 und 123; DNS-Port 53. Für manche Internet-Sender müssen zusätzliche Ports geöffnet werden.
44
Page 45

Keine Verbindung
zum Netzwerk
Der Router verweigert den Zugang für
die gelistete MACAdresse.
Überprüfen Sie die MAC-Adresse des Radios unter: MENU >
System settings > Network > View settings und speichern Sie die
Adresse in der Router-Liste. Das Radio hat unterschiedliche MACAdressen für kabellose und verkabelte Netzwerke. Sie sehen nur
die Adresse des aktuell verwendeten Netzwerks. Sie können die
Adresse aber einfach anpassen, indem sie das erste Zahlenpaar
von „00“ (kabellos) auf „02“ (verkabelt) ändern.
Ein bestimmter
Internet-Sender
lässt sich nicht
abspielen.
Das Wi-Fi-Signal ist
zu schwach.
Unbekannte Verschlüsselungsmethode.
Falsche Netzwerkkonguration.
Sender sendet
nicht, ist überlastet
oder hat ein zu
schwaches Signal.
Sender benutzt
einen unbekannten
Kodex.
Die Verknüpfung ist
nicht mehr aktuell.
Überprüfen Sie die Entfernung zum Router und testen Sie, ob
einem Rechner eine Verbindung zum Netzwerk herstellen kann.
Ändern Sie die Verschlüsselungsmethode auf dem Router. Das
Radio unterstützt WEP, WPA und WPA2.
Richten Sie das Netzwerk manuell ein: MENU > System settings >
Network > Manual settings.
Versuchen Sie andere Sender zu hören, versuchen Sie es über
den Computer oder die Portal-Webseite oder probieren Sie es zu
einem späteren Zeitpunkt noch einmal eine Verbindung zu dem
Sender herzustellen.
45
Page 46

Die
CD-Wiedergabe
startet nicht.
Das CD-Format ist
nicht kompatibel.
Die CD ist dreckig. Reinigen Sie die CD.
Stecken Sie eine andere CD ins Gerät.
Die CD ist
beschädigt.
Die CD wurde mit
der Oberseite nach
unten ins Gerät
gesteckt.
Stecken Sie eine andere CD ins Gerät.
Werfen Sie die CD aus und stecken Sie sie richtig herum ein.
46
Page 47

ENTSORGUNG UND KONFORMITÄTSERKLÄRUNG
HINWEISE ZUR ENTSORGUNG
Be ndet sich die linke Abbildung (durchgestrichene Mülltonne auf Rädern) auf dem Produkt,
gilt die Europäische Richtlinie 2002/96/EG. Diese Produkte dürfen nicht mit dem normalen
Hausmüll entsorgt werden. Informieren Sie sich über die örtlichen Regelungen zur getrennten Sammlung elektrischer und elektronischer Gerätschaften. Richten Sie sich nach den
örtlichen Regelungen und entsorgen Sie Altgeräte nicht über den Hausmüll. Durch die regelkonforme Entsorgung der Altgeräte werden Umwelt und die Gesundheit ihrer Mitmenschen
vor möglichen negativen Konsequenzen geschützt. Materialrecycling hilft, den Verbrauch
von Rohstoffen zu verringern.
Das Produkt enthält Batterien, die der Europäischen Richtlinie 2006/66/EG unterliegen und nicht mit dem normalen
Hausmüll entsorgt werden dürfen. Bitte informieren Sie sich über die örtlichen Bestimmungen zu gesonderten
Entsorgung von Batterien. Durch regelkonforme Entsorgung schützen Sie die Umwelt und die Gesundheit ihrer
Mitmenschen vor negativen Konsequenzen.
KONFORMITÄTSERKLÄRUNG
Hersteller: Chal-Tec GmbH, Wallstraße 16, 10179 Berlin.
Dieses Produkt entspricht den folgenden Europäischen Richtlinien:
2014/30/EU (EMV)
2014/35/EU (LVD)
2011/65/EU (RoHS)
47
Page 48

Chal-Tec GmbH
Wallstraße 16
10179 Berlin, Germany
Page 49

We are very pleased you’ve chosen to purchase a NUMAN product.
A spectrum of pure sound, fun and satisfaction!
Before using your product, please take some time to read through the user
manual to become familiar with all the great features this product has to offer.
Be sure to retain the manual in a safe location for future reference.
If you have any questions or suggestions, please don’t hesitate to contact
us via our website www.hi-tower.co.uk.
We will gladly help you as quickly as possible.
Best Regard from Berlin
Your NUMAN Team
Page 50

CONTENTS
Technical Data and Packing Content .............................................................................................. 51
Safety Instructions ............................................................................................................................. 52
Product Description .......................................................................................................................... 54
Screens .............................................................................................................................................. 57
Use and Operation ............................................................................................................................. 59
Radio Portal Registration .................................................................................................................. 64
Setting up a Music Server ................................................................................................................ 65
Spotify Connect ................................................................................................................................. 67
Internet Radio Mode ......................................................................................................................... 70
Music Streaming over the Network ................................................................................................ 74
Music Streaming in Windows 7 ....................................................................................................... 77
DAB Radio Mode ................................................................................................................................ 79
FM Radio Mode .................................................................................................................................. 82
CD Playback ........................................................................................................................................ 84
BT, AUX, Alarms and Sleep Timer ................................................................................................... 86
Software Update and Factory Reset ............................................................................................... 89
Error Messages and Troubleshooting ............................................................................................ 90
Disposal and Declaration of Conformity ........................................................................................ 94
Page 51

TECHNICHAL DATA AND PACKING CONTENT
TECHNICAL DATA
Item number: 10030017, 10030018, 10030019, 10030808
Power supply: 100-240 V ~ 50-60 Hz
Audio power output: RMS 30 W
Speaker: 2 x 2.5“ (full range)
Subwoofer: 1 x 5.25“
Dimensions: 350 mm (W) x 124 mm (H) x 215 mm (D)
Weight: 4.8 kg
Display: 2.8‘‘ TFT-Display
Radio: DAB, DAB+, DMB, FM and internet radio (Wi-Fi or Ethernet)
CD Playback formats: Audio CD, MP3 CD, WMA CD, CD-R and CD-RW
PACKING CONTENT
1x Radio
1x Telescopic antenna
1x Power cord
1x Remote control
1x User manual
51
Page 52

SAFETY INSTRUCTIONS
Read all the safety and operating instructions carefully and retain them for future reference.
• Do not use this product near water or moisture.
• Clean only with a dry cloth. Unplug this product from the wall outlet before cleaning.
• Place the unit on a solid surface.
• Do not put it in a closed bookcase or a cabinet that may keep air from owing through its ventilation openings.
• Do not install near any heat sources, such as radiators, heat registers, stoves or other appliances that produce heat.
• Protect the power cord from being walked on or pinched, particularly at plugs and the point where they exit
from the product.
• Servicing is required when the product has been damaged. Do not attempt to service this product yourself.
Opening or removing covers may expose you to dangerous voltages or other hazards. Please contact us via
our website www.hi-tower.co.uk and describe the problem. We will help you as soon as possible.
• To prevent risk of re or electric shock, avoid overloading of wall outlets, extension cords or integral
convenience receptacles.
• Do not let objects or liquids enter the product.
• Use proper power sources. Plug the product into a proper power source, as described in the operating
instructions or as marked on the product.
52
Page 53

• Changing sources while a CD is playing causes the CD to stop playback. Playback will resume when the
source is set to CD again.
• The sound quality of MP3, CD-R/CD-RW, and even commercially recorded discs can vary greatly. The same
holds true for the sound quality of portable MP3 players.
• Do NOT use any CD lens cleaning discs since these are not designed for slot-load machines.
• Avoid bending the disc when loading or ejecting.
• Do not move the unit while a disc is playing and do not ship the unit with a CD inside.
• Do not try to insert a disc in the slot if one is already inside the unit.
• Do not insert specially shaped discs or 3“ CD “single” discs.
• You may experience a delay in playback when inserting MP3 or WMA discs while the player reads the
directory.
• Paper labels stuck to CD-R/CD-RWs may become loose and possibly damage the player.
• CDs with severe scratches may not play properly.
• Do not insert anything except a CD inside the loading slot.
• In the rare event you experience an error, unplug the power cord for 60 seconds and then plug it back in rmly.
53
Page 54

1 2 3 4 5
1
Power switch
2
Power in
LAN for Ethernet connect
3
4 USB for MP3 4 Line out | Aux in connection
HOW TO USE THE SCROLL (TOP)
Turn to scroll through a menu or station list. The chosen option is highlighted in reverse text (dark characters
on a white background). Press to the button to select. Turn to the button to adjust the volume up or down when
playback. Press to the button to mute the music when playing. Press the button to snooze a set time when
alarm sounding. Long press this button to power off the unit.
54
Page 55

1
Select | Volume | Mute | Snooze
10
9
8
Controls on the cover (top)
1 2
11
12
2
Power on | off the unit
3
4
5
67
3
Sleeptimer
4
Changing the source
5
Alarm 1 or 2
6
View more information
7
Menu | Menu back
8
Save the favorite station
9
Tune- | Previous
10
Tune+ | Next
11
Select Play | Pause (in different mode)
12
Press once: Stop CD-Track | Press twice: CD ejection |
Press triple: CD loading
55
Page 56

NUMBERED BUTTONS: Use the buttons 1-5 on the remote control to call up a preset station.
PLAY | PAUSE: Press to play | pause the playing.
STOP CD | EJECT CD: Press to stop CD playback, press again for CD ejection.
| VOLUME UP | DOWN: Press to volume up or volume down.
| STATION OR TITLE FORWARD | BACKWARD: In playing screen, press right or left
to select FM/DAB/internet radio stations or CD tracks.
[P] PRESET RECALL | SAVE MENU: To store an FM preset, press and hold Preset until the
display shows the Save preset screen. Select one of the 20 presets to save the currently
playing station. To select a preset, press Preset brie y, then select one of the listed Preset
stations. When a preset station is playing, it shows (*1, *2 etc) in the bottom right of the
screen.
[PRG]: for CD programme, adjust the different playback sequences to play tracks.
[SHUF]: with a CD playing, brie y press to play the tracks in random order. Press the Shuf e
button a second time to cancel shuf e play.
[REP]: With a CD playing, press once to repeat the track being played; Press twice to repeat
the entire disc; Press again to cancel the Repeat mode or press stop. Repeat 1 cannot be
used in conjunction with Shuf e.
Remote control
56
Page 57

SCREENS
The screen shows various menus, dialogues and displays as described below. There are basically six types of
screen. When text is too long to t on the screen, it is rst shown truncated, then after a few seconds, slowly
scrolls so that you can read it all.
STANDBY SCREEN
The Standby screen shows the time, date and any active alarm times.
SPLASH SCREENS (MODE)
As you cycle through the play modes using SOURCE, the radio shows a splash screen for
each mode. After one second, the radio enters the selected mode and tries to start playing the last station or track that was playing in that mode. If this is not possible, the radio
tries to connect to the selected source by scanning for stations, networks, or prompting
for user input as appropriate.
NOW PLAYING SCREENS
Now playing screens show information about the audio source and track now playing,
where available.
57
Page 58

DIALOGUE SCREENS
Dialogue screens are shown to allow the user to change settings. They vary in complexity
from simple Yes/No options up to the scrollable network password input screen. As with
menus, the selected item is shown with a yellow background. Dialogue screens mark the
current setting with an asterisk (*).
ERROR AND INFORMATION SCREENS
Error/Information screens give specic messages for a few seconds, then change automatically to another screen.
MENUS
The radio has basically three types of menu. Use the Select control to step through and
select options. A scroll bar on the right of the screen shows if there are further options
above or below those visible. Each mode has a Mode menu, with options specic to that
mode. In addition, each mode menu has two nal options: System settings and Main
menu.The ‘>’ indicates options leading to further menus.
SYSTEM SETTINGS AND MAIN MENU
The System settings menu allows access to system settings and information such as
network, time, language and software update. Menus with more options than will t on
one screen have a scroll bar to the right. The Main menu allows access to all modes plus
sleep and timer functions. Some menus have several submenus.
58
Page 59

USE AND OPERATION
GETTING STARTED AND SETUP
The radio is easy to use. To play DAB or FM radio, all you need is a power source (a 100-240 V mains supply);
For Music Player mode, you need a wired/wireless Ethernet network and a UPnP music server (e.g. a PC). For
Internet-connected modes such as Internet radio, you also need a broadband Internet connection.
When the radio is started for the rst time, it runs through a setup wizard to congure
settings for date/time and network. Once this has nished, the system is ready to use
in most modes. Note: To change these settings later, select MENU > System settings >.
To run the setup wizard again, select MENU > System settings > Setup wizard. Select
Yes to start the setup wizard. If you choose No, the next screen asks if you would like to
run the wizard next time the radio is started. The system then starts without conguring
time/date and network settings and enters the Main Menu.
NOTE: If power is removed while the wizard is in progress, the wizard will run again next
time the radio is started.
SETTING TIME AND DATE
To change between 12 and 24 hour display, select Set 12/24 hour and then select your preference.
59
Page 60

The time and date can be updated manually or automatically. Withauto-update, the time and date are automatically synchronised with external clocks. Auto-update is generally more accurate.
AUTO-UPDATE
Auto-update works with data sent over DAB, FM or the Internet. The clock is only updated when in a corresponding mode, so it is best to select a mode you use regularly. DAB and FM use time signals broadcast with radio
transmissions. Network uses a time signal sent from the Frontier Silicon Internet radio portal when in networkconnected mode.
• Select Update from DAB, Update from FM, Update from Network or No update.
• If you are updating from the network, set your time zone.
• If your country uses daylight saving, the automatically updated timefrom the network
may be wrong by one hour. When daylight savingsare in effect (during the winter), turn
on the Daylight savings option to rectify this. Note that if you are updating the time
from DAB or FM, the Daylight savings option has no effect on the clock’s time. The
radio will auto-update from the selected source when time information is available.
MANUAL SET
If you set No update, the wizard now prompts you to set the time and date manually. The
date and time are displayed as dd-mm-yyyy and hh:mm AM/PM with the rst value, dd,
active (ashing). Adjust each value with the Select control. As each value is set, the next
value becomes active and ashes.
60
Page 61

NETWORK
The radio is compatible with all common network protocols and encryption methods.
To connect the radio to your network, you need a Wi-Fi wireless router, together with
password key if set. Select WLAN region/country > Wi-Fi network (SSID), and then
select a network from the list. If the network is open (non-encrypted), the radio connects
without any further ado.
If your network is standard encrypted enter the network’s key (password), use the Select
control to move the cursor through the characters and select. As each character is selected, the key is built up near the top of the display. There are three options accessible by
turning Select back before the rst characters (0123…) - Backspace, OK and Cancel.
WPS encrypted networks are identied by ‘[WPS]’ at the start of the network name, and
have three methods of connection. Select one and follow the prompts:
• Push Button: The radio prompts you to press the connect button on the router. It then
scans for a ready Push Button Connect network and connects.
• Pin: The radio generates an 8-digit code number which you enter into the wireless
router, Access point, or an external registrar (e.g. advanced versions of Windows Vista).
• Skip WPS: Enter key as for a standard encrypted network, above.For more information
on setting up a WPS encrypted network, see your WPS router’s instructions.
61
Page 62

The radio tries to connect to the selected network. If connecting fails, the radio returns to
a previous screen to try again. If the network connection is lost, the radio automatically
tries to reconnect.
EQUALIZER
Several preset EQ modes are available; also a user-dened setting. To adjust the EQ, select MENU > System settings > Equalizer. You can then choose from a variety of preset
modes or create your own, with custom bass, treble and loudness settings. Choose: My
EQ prole setup, choose the setting and Use the SCROLL/SOURCE to adjust the chosen
setting.
NETWORK AND LANGUAGE
The radio remembers the last four wireless networks it has connected to, and automatically tries to connect to
whichever one of them it can nd. You can see the list of registered networks through MENU > System settings
> Network > Network prole > From here you can delete unwanted networks by turning pressing Select then
conrming delete Yes. There are also other options for viewing and manually altering network settings from
MENU > System settings > Network > (for example setting up a wired network). Users experienced with networ-
king may nd these options useful for diagnosing and nd network problems.
The default language is English. To change, select MENU > System settings > Language > then select your
favourite language.
62
Page 63

CONNECTING YOUR SMARTHONE WITH THE RADIO VIA UNDOK APP
To connect your Smarthone with NUMAN Two, you need to download the free app „UNDOK“ from iTunes Store or
Google Play Store. IMPORTANT: The phone must be in the same wireless network as the radio.
1. Download the app and open it.
2. The app automatically searches for available devices. Select „NUMAN Two“ from the list.
3. Open SOURCE to choose between different input signals.
4. Open BROWSE to get a list of available stations. Select the desired station.
5. Open NOW PLAYING to get more information about the channel.
6. Open the settings to adjust the equalizer, set sleep timer and other functions easily.
7. If you own two or more NUMAN devices, they can be connected in Multiroom Mode using the UNDOK app.
For detailed information about the operation of our free app, visit our YouTube Channel. Please search for
NUMAN One and NUMAN Two on YouTube.
63
Page 64

RADIO PORTAL REGISTRATION
The radio uses the Frontier Silicon Internet radio portal website that allows you to organize your favourite’s lists
and also listen to Internet radio on a computer.
To register your radio with the portal, switch to internet radio mode as described in
Section „Internet Radio Mode“, and then obtain your radio’s unique portal access code by
selecting MENU > Station list > Help > Get access code. Write down the access code.
Visit the portal website at www.wiradio-frontier.com.
If this is your rst visit to the portal, register for a new
account, entering the following information: access code,
your e-mail address, password, radio model.
If you already have an account and wish to add an
additional radio, log into your account and select My
preferences > Add another Wi-Fi radio. Once your radio
is registered with the portal, you can immediately use the
Internet radio favourites and added stations features.
64
Page 65

SETTING UP A MUSIC SERVER
In order for the radio to play music les from a computer, the computer must be set up to share les or media.
UPnP media sharing allows devices like the radio to play music from a shared media library, navigating through
tag menus such as Artist, Album or Genre.
If you are running a suitable server system such as a PC with Windows Media Player 10 or later (WMP), and your
music library is well-tagged, then it is recommended to use media sharing. Only the UPnP server needs to be set
up.
NOTE: iTunes does not currently work as a UPnP media server, but there are add-ons available to work with an
iTunes library.
SHARING MEDIA WITH WINDOWS MEDIA PLAYER
The most common UPnP server is Windows Media Player (10 or later). Alternatively, other UPnP platforms and
servers may be used. To set up WMP for media sharing, perform the following steps:
• Ensure that the PC is connected to the network.
• Ensure that the radio is powered on and connected to the same network.
• In WMP, add to the media library the audio les and folders you want to share with the radio:
Library > Add to Library.
• In WMP, enable media sharing: Library > Media sharing.
• Setup can differ depending on which version of WMP you have.
65
Page 66

• Make sure that the radio has access to the shared media by selecting it and clicking Allow. Click OK to close
the dialogue boxes.
• The PC is now ready to stream the music to the radio.
• The WMP UPnPservice runs in the background; there is no need to start WMP explicitly.
WINDOWS 7 STREAMING MEDIA FEATURE
To set-up the radio to be controlled and to stream music via Windows Media Player 12 (Windows 7 only), perform the following steps:
• Ensure that the PC is connected to the network.
• Ensure that the radio is powered on and connected to the same network. Note: The radio must be in an
Internet radio mode to be detected.
• From the Windows 7 main screen, select Start > Devices and Printers.
• Select the Add a device tab in the top left of the Devices and Printers window and follow the instruction
prompts given by the wizard.
• In the Devices and Printers window a icon will appear and you are now ready to stream your Windows media
music les to the radio.
66
Page 67

SPOTIFY CONNECT CONTROL AND PLAY BACK
Spotify gives you millions of songs at your ngertips. The artists you love, the readymade playlists for every
mood and genre, the latest hits and new discoveries just for you.
With Spotify Connect feature, you can play and control all this music wirelessly. Choose music on your smartphone, tablet or desktop, and listen on your radio.
*For service availability in your country, check www.spotify.com
USING SPOTIFY CONNECT
Your radio has Spotify Connect built in. This lets you control the music playing on your radio using the Spotify
app on your smartphone, tablet or desktop.
Listening is seamless – you can take calls, play games, watch a video, even switch your phone off, all without
interrupting the music. It’s a better way to listen at home.
You’ll need a Spotify Premium account to use Spotify Connect. If you don’t have it, just go to
www.spotify.com/premium to get yours.
67
Page 68

1. Fire up the Spotify app on your phone, tablet or PC.
2. Add your speakers to the same wi network (see product user instructions for details).
3. Play a song on Spotify and hit ‘DEVICES AVAILABLE’.
4. Choose your speakers and your music will start playing out loud.
5. Tap ‘NUMAN Two‘ from the list to select your radio.
If you can’t see it, just check it’s connected to the same wireless network as
your smartphone or tablet. You will notice that your radio is currently listed
as “NUMAN Two xxxxxxxxxxxx” (the 12 digit alphanumeric code is the MAC
address of your radio) in the Spotify App.
If you would like to change this name to something more personal (‘John’s IR
for example), you can do so as follows:
a. On the radio: Press MENU and select Main menu > System settings > Network > View settings. Scroll down and take a note of the ‘IP address’.
b. On your computer: Ensure that your computer is on the same network as
the radio, then enter the IP address into your browser’s address bar (example:
192.168.0.34). This will allow you to view some of the radio’s diagnostics, but
also change its name.
6. The Connect icon will turn green to signify that your radio is now selected and being used for audio playback.
68
Page 69

7. Your Spotify app will only recognize your radio when the radio is connected to the Internet (i.e. in Internet
Radio, Spotify Connect or Music player modes). To use Spotify when your radio is in non-internet modes
(i.e. in DAB, FM or BT modes) you need to select Main menu > System settings > Network > Keep network
connected > YES. This also allows you to wake the radio from standby using your Spotify app.
Note: If unattended to use radio for long periods of time, e.g. overnight, while on holiday or while out of the
house, select NO to save power is recommended.
For information on how to set up and use Spotify Connect please visit www.spotify.com/connect
CONTROLLING SPOTIFY CONNECT
You can now control Spotify from the app like normal; search for and play your tracks, change the volume and
add to playlists even though playback is through your radio. The next time you open the Spotify app, playback
will continue through your radio. Spotify Connect is a cloud-based service, therefore after activation on your
radio, your smartphone or tablet no longer needs to be on the same wireless network to control audio playback.
USING ANOTHER SPOTIFY ACCOUNT WITH RADIO
Spotify account details are now stored on the radio. To overwrite this with another Spotify account, simply follow
the activation steps again while running Spotify app with the desired account. Please remember that both your
Smartphone, tablet or desktop and the radio must be on the same wireless network for the overwrite to happen.
The Spotify software is subject to third party licenses found here: www.spotify.com/connect/third-party-licenses
69
Page 70

INTERNET RADIO MODE
The radio can play thousands of radio stations and podcasts from around the world
through a broadband Internet connection. When you select Internet radio mode, the radio
contacts the Frontier Silicon Internet radio portal to get a list of stations, organized into
different categories like Country, Most popular and Genre. Once you select a station, the
radio connects directly to that station.
The portal also enables multiple lists of favourite stations that you can personalise, for example Andy’s stations,
Jo’s favourites, Talkshows. To use the favourites feature, register your radio with the portal website as described
on page 53. If you have several Frontier Silicon radios, you can register them all on the same account so that
each radio has access to your favourite’s lists. It is possible to add favourites either directly through the radio or
through any computer with a web browser.
To enter Internet Radio mode, either press Mode until the display shows Internet Radio or select:
MENU > Main menu > Internet Radio.
NOTE: The station list menu is provided from the Internet radio portal, so it is only accessible when the radio is
connected to the Internet. Station lists and submenus may change from time to time.
There are several ways of selecting stations.
• Directly from the radio: shows last listened and preset stations.
• From the portal through the Menu > Station list > Menu: shows stations sorted by favourite lists, county,
genre, most popular, newest. You may also search for keywords or added stations.
70
Page 71

• If you are already listening to an Internet radio station, you can press Back
return to the last visited branch of the menu tree.
LAST LISTENED AND PRESETS
When Internet radio mode restarts, the last-listened station is selected. To select another recently used station,
select MENU > Last listened then one of the stations listed. Most recent stations appear at the top of the list.
Presets are stored in the radio and cannot be accessed from other radios.
To store an Internet radio preset, press and hold Preset until the display shows the Save
preset screen. Select one of the presets to save the currently playing station. To select a
preset, press Preset briey, then select one of the listed preset stations. When a preset
station is playing, it shows Pn (P1, P2 etc) in the bottom of the screen.
NOTE: Operation of presets is identical for Internet radio, DAB and FM.
SAVING FAVOURITE STATIONS
Favourites are stored on the Internet radio portal. Before you set up an account on the portal from its Web
interface (www.wiradio-frontier.com), the favourites are associated solely with the radio on which you set
them. After you set up a portal account, all the favourites from your different radios are merged into a combined
favourites list. This combined list is available to all the radios on your account.
rather than MENU to quickly
To store a playing station as a favourite, press and hold Select until the display shows ‘Favourite added’. The
station appears in the default favourites list Stations. To select a favourite, select:
MENU > Station list > My favourites > [Favourites list] > [Station].
71
Page 72

BROWSE INTERNET BROADCASTS
SEARCHING BROADCASTS
To browse Internet broadcasts, select MENU > Stati-
on list > then either Stations > or Podcasts > Browse
through the menus to nd broadcasts.
NOTE: BBC radio ‘Listen Again’ programmes are
accessible through the Podcast menu, for example:
MENU > Podcasts > Location > Europe > United
Kingdom > All shows > BBC Radio 4 >You and Yours
> 20/10/2008- October 2010.
You can also search through Internet broadcasts for
stations or podcasts with particular keywords in their
title.
To search, select MENU > Station list > then either
Stations > or Podcasts > Enter a keyword by selecting characters then OK. The search entry screens
are similar in operation to the Wi-Fi password entry
screen. Select a broadcast from the list. For podcasts, you may be able to select a particular episode.
72
Page 73

MY ADDED STATIONS
Even though the Internet radio portal contains thousands of stations, you may want to listen to stations not
listed. You can add your own stations via the portal. These added stations are accessible from the radio by
selecting MENU > Station list > My added stations > [Station].
NOW PLAYING INFORMATION
While the stream is playing, the screen shows its name and description. If artist and track information is available, this is also shown. To view further information, press Info. Each time you press Info , another set of information is displayed, cycling through the following details:
• Artist and track name (default; where available)
• Description
• Genre and show country
• Reliability
• Bit rate and Codec and Sampling
• Playback buffer
• Today’s Date
73
Page 74

MUSIC STREAMING OVER THE NETWORK
Music player mode plays audio les such as MP3s, AACs, WMAs or FLACs from a
computer on the local network. To enter Music player mode, either press Mode until the
display shows Music player, or select: MENU > Main menu > Music Player.
• Once in music player mode, press MENU, then select Shared media. Note: The radio
does not support USB playback as shown in the picture below
• If you are already playing a music le, you can press Back to quickly return to the last
visited branch of the menu tree.
• You can use
button to quickly to select previous or next track.
SHARED MEDIA (FROM UPNP MEDIA SERVER)
Select MENU > Shared media. If you have set up shared media, you should see an entry
consisting of <computer name>: <Shared media name>, for example JB-Laptop: Audio.
If you have more than one computer sharing media, the alternatives are listed. Select
the shared media you want to play. From this point on, the menus are generated from
the shared media server (typically Windows Media Player). The rst menu shows a list
of media types, for example Music, Video, Pictures and Playlists. The radio can only play
music and playlists.
and button, to move through tracks. Press and hold the or
74
Page 75

From Music, there are numerous ways of selecting tracks, including: Genre, Artist, Album, Composer and Rating.
Once you have found a track you want to play, press Select . A short press plays the
track immediately and a long press adds the track to the playlist. You can also add entire
albums to the playlist. The radio plays either the selected track or the playlist.
WAKE-ON-LAN
If shared media is selected a list of available music servers will be displayed. If a question mark appears before
the server name, this indicates that the server has been seen before and supports Wake-on-LAN functionality,
but cannot currently be found on the network. If a server with a question mark is selected by the user, the device
will try to wake the server up and connect to it. In some instances this may not be possible as the server may
not be connected to the network any more or may be switched off.
From time to time it may be necessary to remove servers displaying question marks in front of the server name
from the server list. For example, if the device is moved to a new network or if a Wake-on-LAN server is removed
from your current network. To perform this function go to: MENU > Prune servers > YES.
75
Page 76

PLAYLISTS
The radio holds a queue of up to 500 tracks in the playlist. Playlist tracks can be mixed
from multiple UPnP servers. To manage the playlist, select:
MENU > My playlists.
• To view the playlist, scroll through it by turning Select. UPnP tracks show their track name.
• To play the playlist from a certain track, quick Select.
• To erase a track from the playlist, long Select, then conrm YES.
• If you select a track/album/folder for instant playback (without using the playlist), the playlist is preserved.
The playlist is also preserved during standby.
REPEAT AND SHUFFLE
• To repeat tracks select: MENU > Repeat play.
• To play tracks in random order select: MENU > Shufe play.
NOW PLAYING INFORMATION
While a track is playing, the screen shows its track and artist (UPnP). There is also a progress bar with gures
for elapsed and total track time. At the bottom of the screen, an icon indicates UPnP.
To view further information, press INFO. Each time you press Info, another set of information is displayed, cycling through: playback progress bar (default), album, codec/sampling rate, playback, buffer bar, today’s date.
76
Page 77

MUSIC STREAMING IN WINDOWS 7
One of the new Windows 7 features includes a feature called “Play To” and this lets your PC running Windows 7
control the radio to push media and use as a universal remote control for your media collection. The radio supports the industry standard DLNA (Digital Living Network Alliance) 1.5 digital media renderer. This allows you to
„Play To“ other devices around your home. Before you can use the “Play To” feature you need the set-up the radio
for Windows 7 streaming media.
USE “PLAY TO” IN WINDOWS MEDIA PLAYER
Windows Media Player makes it easy to manage your media, nd items that you want to play, and open Play To.
To select items that you want to play, follow these steps:
• Open Windows Media Player. If the Player is open
and you’re in Now Playing mode, click the Switch
to Library button in the upper-right corner.
• If the list pane is closed or if the Burn or Sync
tabs are exposed, click the Play tab.
• Find the items that you want to play in the Player
Library, and then drag those items From the
details pane into the list pane.
• Click the Play to button at the top of the list pane, click
the device on your network that receives the media.
• In the Play To dialog box, use playback controls to
play, pause, stop the stream or change to the next
or previous item in the list.
77
Page 78

USE “PLAY TO” ELSEWHERE IN WINDOWS 7
Outside of Windows Media Player, you can stream media to the radio with “Play To” by right-clicking music les.
To select music les and stream them to the radio, follow these steps:
• Click the les you want to stream to the radio.
• Right-click the selected les, point to “Play to”, and then click the device on the network that will receive the
media.
• In the Play To dialog box, use the playback controls to play, pause, or stop the media stream, and to change to
the next or previous item in the list..
NOW PLAYING INFORMATION
While a track is playing, the screen shows its track name (UPnP). There is also a progress
bar with gures for elapsed and total track time. At the bottom of the screen, an icon
indicates UPnP.
To view further information, press INFO. Each time you press Info, another set of information is displayed,
cycling through the following: artist, album, codec/sampling rate, playback buffer.
78
Page 79

DAB RADIO MODE
DAB radio mode receives DAB/DAB+ digital radio and displays information about the
station, stream and track playing. To enter DAB mode, either press Mode until the display
shows DAB Radio or select: MENU > Main menu > DAB.
SCANNING FOR STATIONS
The rst time you select DAB radio mode, or if the station list is empty, the radio automatically performs a full
scan to see what stations are available.
You may also need to start a scan manually to update the list of stations for one of
the following reasons: Available stations change from time to time. If reception was
not good for the original scan (for example the antenna was not up), this may result in
an empty or incomplete list of available stations. If you have poor reception of some
stations (burbling), you may wish to list only stations with good signal strength. To start
a scan manually, select: MENU > Scan.
Once the scan is complete, the radio shows a list of available stations. To remove stations that are listed but
unavailable, select: MENU > Prune invalid > YES.
SELECTING STATIONS
To listen to a station or to change it, press the MENU/BACK key, then press SELECT (knob) to select a station.
Once selected, the station plays and the screen shows information about the station, track or show as broadcast.
79
Page 80

SAVE AND SELECT PRESETS
To save a favorite station press one of the number buttons 1-10 on the remote control for 2 seconds. To prove
the presets 11-20, press the 10+ button on the remote control for about 2 seconds and then short one of the the
number buttons.
To select a preset, press Preset briey, then select one of the listed preset stations. When a preset station is
playing, it shows (*1, *2 etc) in the bottom right of the screen. To call a preset station using the remote control,
use the number keys 1-10. To call a preset station in the memory cells 11-20, press and release the 10+ key and
then a number key.
NOW PLAYING INFORMATION
While the stream is playing, the screen shows its name and DLS (Dynamic Label Segment) information broadcast by the station giving real-time information such as programme name, track title and contact details. Stereo
broadcasts are indicated with an icon at the top of the screen.
To view further information, press Info. Each time you press Info , another set of information is displayed,
cycling through DLS text, programme type, ensemble name/frequency, signal strength/error rate, bit rate/codec/
channels and today’s date.
80
Page 81

DYNAMIC RANGE COMPRESSION
Some DAB broadcasts offer dynamic range compression (DRC). This feature allows radios to compress the
dynamic range of the output audio stream, so that the volume of quiet sounds is increased, and the volume of
loud sounds is reduced. This can be useful if you are listening to music with a high dynamic range in a noisy
environment (for example, classical music while cooking).
To change the DRC of the the radio, select MENU > DRC, and then DRC high, DRC low or DRC off.
NOTE: The radio’s DRC setting does not have any effect if DRC data is not included in the broadcast.
STATION ORDER
You can choose the order of the DAB station list to be either Alphanumeric, Ensemble or Valid. Ensemble lists
groups of stations that are broadcast together on the same ensemble, for example BBC or South Wales local.
Valid lists valid stations rst, alphanumerically, then off-air stations.
To change station order, select MENU > Station order > then Alphanumeric, Ensemble or Valid.
81
Page 82

FM RADIO MODE
FM radio mode receives analogue radio from the FM band and displays RDS (Radio Data
System) information about the station and show (where broadcast). To enter FM mode,
either press Mode until the display shows FM Radio or select: MENU > Main menu > FM.
SELECTING STATIONS
• Automatic
To nd a station, press Select . The frequency display starts to run up as the radio scans the FM band.
• Manually:
Alternatively, you can scan up or down by pressing and holding the
quick presses, or by turning the Select control.
STORING FM PRESETS
To store an FM preset, press and hold Preset until the display shows the Save preset screen. Select one of the
20 presets to save the currently playing station.
To select a preset, press Preset briey, then select one of the listed Preset stations. When a preset station is
playing, it shows (*1, *2 etc) in the bottom right of the screen.
or buttons or tune manually with
82
Page 83

NOW PLAYING INFORMATION
While an FM station is playing, the screen shows one of the two following sets data:
• If RDS information is available, by default the service name (i.e. station name) is displayed. You can cycle
through further RDS information by pressing INFO. Each time you press the button, another set of information
is displayed, cycling through RDS radio text, RDS programme type, frequency and today’s date.
• If no RDS information is available, the currently tuned frequency is shown.
SCAN SETTINGS
By default, FM scans stop at any available station. This may result in a poor signal-to-noise ratio (hiss) from
weak stations. To change the scan settings to stop only at stations with good signal strength, select:
MENU > Scan settings > Strong stations only? > YES.
AUDIO SETTINGS
By default, all stereo stations are reproduced in stereo. For weak stations, this may result in a poor signal-tonoise ratio (hiss). To play weak stations in mono, select: MENU > Audio Settings > FM weak reception: Listen
in mono only > YES.
83
Page 84

CD PLAYBACK
NOTICE: Improper operation can result in material damages!
Do not insert any recording media that deviate from the standard CD format (eg: mini-discs) into the CD player.
These may not be played and ejected correctly. Insert only one disc at a time into the CD player.
Insert a disc (with printing side facing up) until it is drawn inside. The CD player will automatically load the CD
and start playback. The display will say “Loading”. Disc functions will not work while the disc is loading. Playback will begin automatically once the table of contents is read. The display will show “No Disc” when the unit
is set to CD mode and there is no CD inside. Insert the CD into the CD slot with the label side up, The display
shows the following information in CD mode:
• CD mode
• Time
• Elapsed playback time in minutes
• Track number
• Playback status (playing/pause)
84
Page 85

CD FUNCTIONS
• To pause/resume playback of the CD, press the
• To switch to the next track, press the
• To fast forward through a track, press and hold
• To switch to the previous track, press and
• To stop CD playback, press
ADJUSTING CD PLAYBACK
You can choose different playback sequences to play tracks by press PRG on remote control. Press the MENU
button to open the CD menu for system settings.
.
button once.
button.
.
.
85
Page 86

AUX MODE, ALARMS AND SLEEP TIMER
AUX MODE
Aux in mode plays audio from an external source such as an MP3 player. To play audio with Aux in mode:
• Connect the external audio source to the AuxIn 3.5 mm stereo socket.
• Either press Mode until the display shows AUX in or select
MENU > Main menu > AUX in.
• Adjust the volume of the radio (and, if necessary, the audio source device) as
required.
BT MODE
Prior to pairing, verify your device supports BT 4.0+EDR A2DP and your device is not connected to any other BT
product. Devices may pair differently. Below is a general guide.
1. Press to source to BT mode. This will power on the BT. Turn the volume up about ¼ to start. Also turn up the
volume on the source device (the device you are streaming from).
2. Turn on the BT on your enabled device.
3. Select BT device name “NUMAN Two” when it appears on your device’s screen to Initiate searching.
4. You can start to play your music les wirelessly. Adjust the volume level on your device.
You should not have to pair your device again.
86
Page 87

Depending on your device, you may need to make multiple attempts at Pairing and/or Connecting to the NUMAN
Two, but please give your device adequate time to Pair or Connect before repeating the process.
Pairing A BT Wireless Technology Enabled iPhone /iPod touch/iPad:
1. Press source to select BT mode. This will power on the BT. Turn the volume up about ¼ to start. Also turn up
the volume on the source device (the device you are streaming from).
2. Select “Settings”. (Depending on software version).
3. Select “General”.
4. Select “BT”.
5. Switch BT “On” to initiate searching.
6. Select “NUMAN Two” when it appears on the display.
7. You will hear a ring tone from the NUMAN Two and you can begin playing your music les wirelessly. Adjust
the volume level on your device. You should not have to pair your iPhone/iPod/iPad again. The volume output
level of music les varies.
If you prefer an even higher output level, check the settings in your iPhone/iPod touch/iPad: Set the EQ Off, the
SoundCheck Off, and the Volume limit Off. If you encounter a problem Pairing, press the small arrow to the right
of “NUMAN Two BT” on your iPhone /iPod touch/iPad display and select “Forget this Device”, then repeat the
Pairing process.
Depending on your device you may need to make multiple attempts at Pairing and / or Connecting to the
NUMAN Two, but please give your device adequate time to Pair or Connect before repeating the process.
87
Page 88

ALARMS
To set or change an alarm, either press Alarm or select: MENU > Main menu > Alarms. Select the alarm number
(1 or 2) then congure the following parameters:
• Enable: on/off,
• Frequency: Daily, Once, Weekends or Weekdays,
• Time,
• Mode: Buzzer, Internet radio, DAB, FM, CD
• Preset: Last listened or 1-10
• Volume: 0 - max.
To activate the new settings, scroll down and select Save. The screen shows active alarms with an icon at the
bottom left. At the set time, the alarm will sound.
SNOOZE FUNCTION
To temporarily silence it, press Snooze. You can change the snooze period with the
Select control if you like. The radio returns to standby for the set period, with the silenced
alarm icon ashing.
SLEEP TIMER
To set the sleep timer, select MENU > Main menu > Sleep then choose from Sleep OFF, 15, 30, 45, 60 minutes. Once
you select a sleep period, the system returns to the main menu. Press Menu to return to the Now playing screen.
88
Page 89

SOFTWARE UPDATE AND FACTORY RESET
SOFTWARE UPDATE
From time to time, the radio may make software upgrades available with bug Fixes and/or additional features.
You can either check manually, or set the radio to check periodically automatically (this is the default). If the
radio detects that newer software is available, it asks if you want to go ahead with an update. If you agree, the
new software is then downloaded and installed. After a software upgrade, all user settings are maintained. To
turn automatic checking on or off, select: MENU > System settings > Software update > Auto check settings.
CAUTION:
Before starting a software upgrade, ensure that the radio is plugged into a stable mains power connection.
Disconnecting power during a software update may permanently damage the unit..
FACTORY RESET
A factory reset resets all user settings to default values, so time/date, network conguration and presets are
lost. However, the radio’s current software version is maintained, as is registration with the Internet radio portal.
Internet radio favourites therefore remain unless you re-register your radio with another account on the portal
website. To perform a factory reset, select: MENU > System settings > Factory reset > Proceed > YES.
89
Page 90

ERROR MESSAGES AND TROUBLESHOOTING
Message Description Possible cause
Failed to connect Correct key entered, But router rejects
request.
Format error Cannot recognise le format - inde-
pendent of network.
Network error Problem past router -incorrect data
being received from network.
Network not ready Problem with connection to router. Router switched off.
Network timeout Problem past router - no response
being received from network.
No UPnP media
found
Service not
available (DAB)
Unauthorised Access not granted by UPnP server. Allow access for the radio in UPnP server
Update failed Software upgrade failed. Try it again.
No UPnP servers found. Install an UPnP server.
No DAB reception. The antenna is not aligned correctly.
MAC ltering enabled on router.
Received .wma, but found that the stream
wasn’t WMA when trying to decode.
Data obtained from server is unreadable.
Streaming IR station and suddenly station
becomes unavailable.
settings.
90
Page 91

TROUBLESHOOTING
Problem Cause Solution
FM: Hiss
DAB: burbling,
intermittent or
cut-out
DAB: ‘No stations
available’
message
Cannot connect
to Internet
Cannot connect
to network
Low signal
strength
Low signal
strength
Internet connection down
Firewall
preventing
access
Network down Check that network is working between a computer and the router
Firewall pre-
venting
access
Check/move antenna.
Move radio.
Rescan local (high-strength) stations only
As above, then rescan stations.
Check, if Internet is working for a computer connected to the same
network
Check the following ports are open: UDP and TCP ports 80 and 123;
DNS port 53. Some Internet radio stations may require additional ports
to be opened.
Check the following ports are open on the router: UDP and TCP ports
80 and 123; DNS port 53. Windows shares: ports 135 – 139 and 445.
Windows Media Player: varies – non-Microsoft rewalls may require
conguration for UPnP.
91
Page 92

Cannot connect to
network
Router restricts access to listed MAC
addresses
Obtain the the radio MAC address from MENU > System settings
> Network > View settings and add to router list. Note: The radio
has separate MAC addresses for wired and wireless networks;
only the current network adaptor method address is displayed,
but the other address can be obtained by changing the rst pair
of digits between ‘00’ (wireless) and ‘02’ (wired).
Cannot play
particular Internet
radio station
Insufcient Wi-Fi
signal strength
Unknown encryption method
Unusual network
conguration
Station not broadcasting, overloaded
or insufcient
bandwidth.
Station broadcasting using unknown
codec.
Link out of date.
Check distance to router; see if a computer can connect to the
network in this location.
Change encryption method on router. The radio supports WEP,
WPA and WPA2
Setup network manually through MENU > System settings >
Network > Manual settings.
Try other stations; try listening on computer via Internet radio
portal website; try later.
92
Page 93

CD playback does
not start
CD format is not
compatible
CD is dirty Clean the CD
CD is damaged Insert a different CD into the CD slot
Insert a different CD into the CD slot
CD is upside down
in the CD slot
Eject the CD and insert it in the CD slot the right way up
93
Page 94

DISPOSAL AND DECLARATION OF CONFORMITY
HINTS ON DISPOSAL
According to the European waste regulation 2002/96/EC this symbol on the product or on its packaging
indicates that this product may not be treated as household waste. Instead it should be taken to the appropriate collection point for the recycling of electrical and electronic equipment. By ensuring this product
is disposed of correctly, you will help prevent potential negative consequences for the environment and
human health, which could otherwise be caused by inappropriate waste handling of this product. For more
detailled information about recycling of this product, please contact your local council or your household
waste disposial service.
Your product contains batteries covered by the European Directive. 2006/66/EC, which cannot be disposed of with normal
household waste. Please check local rules on separate collection of batteries. The correct disposal of batteries helps prevent
potentially negative consequences on the environment and human health.
DECLARATION OF CONFORMITY
Producer: Chal-Tec, Wallstraße 16, 10179 Berlin.
This product is conform to the following European Directives:
2011/65/EU (RoHS)
2014/30/EU (EMC)
2014/35/EU (LVD)
Page 95

Chal-Tec GmbH
Wallstraße 16
10179 Berlin, Germany
Page 96

Nous sommes heureux que vous ayez choisi cet article NUMAN.
Nous vous souhaitons beaucoup de joie et de plaisirs musicaux !
Veuillez prendre un petit moment pour lire ce mode d’emploi an de prendre
connaissance de toutes les possibilités et fonctions de votre nouvel ppareil.
Conservez ce mode d’emploi en lieu sûr an de pouvoir vous y référer
de nouveau ultérieurement.
Si vous avez des questions ou des propositions d’améliorations, nous
aurons plaisir à recevoir vos remarques sur notre site internet www.
electronic-star.fr Nous serions heureux de pouvoir vous aider !
Salutations cordiales de Berlin
Votre conseiller client NUMAN.
Page 97

SOMMAIRE
Fiche technique et contenu de l’emballage .................................................................................... 98
Consignes de sécurité ....................................................................................................................... 99
Aperçu de l’appareil .........................................................................................................................101
Affichages ......................................................................................................................................... 104
Mise en marche et réglages de base .............................................................................................106
Enregistrement sur un portail radio ............................................................................................... 111
Installation d’un serveur musical ................................................................................................... 112
Spotify Connect ................................................................................................................................ 113
Radio internet ................................................................................................................................... 117
Diffuser de la musique via un réseau ............................................................................................ 121
Streaming audio sous Windows 7 ................................................................................................. 124
Radio DAB ......................................................................................................................................... 126
Radio FM ........................................................................................................................................... 129
Lecture de CD ................................................................................................................................... 131
BT, AUX, réveil et mise en veille programmée .............................................................................. 133
Mise à jour logicielle et réinitialisation .......................................................................................... 136
Messages d’erreur et résolution des problèmes .......................................................................... 137
Information sur le recyclage et déclaration de conformité ........................................................141
Page 98

FICHE TECHNIQUE ET CONTENU DE L’EMBALLAGE
FICHE TECHNIQUE
Numéro d’article : 10030017, 10030018, 10030019, 10030808
Alimentation électrique : 100-240 V ~ 50-60 Hz
Puissance de sortie : 30 W RMS
Haut-parleur : 2 x 2,5 “ (spectre complet)
Caisson de basse : 1 x 5.25 “
Dimensions : 350 mm (largeur) x 124 mm (hauteur) x 215 mm (profondeur)
Poids : 4,8 kg
Écran : Afchage TFT 2,8 “
Radio : DAB, DAB+, DMB, FM et radio internet (Wi ou LAN)
Formats de lecture CD: Audio CD, MP3 CD, WMA CD, CD-R et CD-RW
CONTENU DE L’EMBALLAGE
1 x radio
1 x antenne
1 x cordon électrique
1 x télécommande
1 x manuel de l’utilisateur
98
Page 99

CONSIGNES DE SÉCURITÉ
Lire attentivement ce mode d’emploi et le conserver en lieu sûr pour pouvoir s’y référer ultérieurement.
• Ne pas utiliser la radio à proximité d’eau ou de vapeur.
• Nettoyer la radio uniquement avec un chiffon sec. Débrancher la radio avant de la nettoyer.
• Placer la radio sur une surface stable.
• Ne pas installer la radio sur une étagère fermée ou une armoire, ce qui empêcherait une bonne circulation de
l’air par ses ouvertures d’aération.
• Ne pas installer la radio à proximité de sources de chaleur comme par exemple un radiateur, une batterie de
chauffage, un four ou tout autre appareil producteur de chaleur.
• Disposer le câble de sorte à ce que personne ne trébuche dessus et à ce qu’il ne se coince pas. Cela
s’applique tout particulièrement aux endroits où il sort de l’appareil ou de la prise électrique.
• Si la radio est défectueuse, ne pas ouvrir le boîtier et ne pas essayer de réparer la radio soi-même. Contacter
plutôt notre service client en lui fournissant une brève description du problème, un agent de clientèle se fera
un plaisir à vous aider.
• Ne pas encombrer les prises murales, les rallonges électriques ou les multiprises pour éviter tout incendie ou
toute décharge électrique.
• Veiller à ce qu’aucun objet ou liquide ne pénètre dans la radio.
• Brancher la radio uniquement à des prises dont la tension correspond à celle de l’appareil. Pour plus
d’informations, regarder les indications sur l’appareil ou se reporter à la section « Fiche technique ».
99
Page 100

• Si une autre source est sélectionnée pendant la lecture d’un CD, la lecture est interrompue. La lecture reprend
dès que la source CD est de nouveau sélectionnée.
• La qualité sonore des CD Mp3, des CD-R/CD-RW et des CD commerciaux peuvent varier grandement. Cela
vaut également dans le cas où un lecteur Mp3 portable est branché à l’appareil.
• Ne pas utiliser de CD de nettoyage sauf s’il a été conçu pour des slots CD.
• Veiller à ne pas tordre les CD lors de leur insertion ou de leur éjection.
• Ne pas déplacer l’appareil pendant la lecture d’un CD et ne pas transporter l’appareil tant qu’un CD se trouve à
l’intérieur.
• Ne pas essayer d’insérer un CD dans l’appareil si un autre CD s’y trouve déjà.
• Ne pas insérer de CD à forme spéciale ou de CD singles 3″.
• Lors de l’insertion d’un CD MP3 ou WMA, il est possible que la lecture soit différée, car le lecteur doit
préalablement lire le contenu du dossier.
• Une étiquette en papier collée sur un CD peut se détacher et endommager le lecteur CD.
• Les CD rayés sont susceptibles de ne pas être lus correctement.
• Ne pas insérer autre chose qu’un CD dans la fente pour CD.
• Si un dysfonctionnement semble se produire, débrancher l’appareil et attendre 60 secondes. Rebrancher la
che d’alimentation dans la prise et redémarrer la lecture.
100
 Loading...