

Page 1

Thank you for selecting a new Nukeproof headset. With proper care and installation, it will give you
trouble-free, enjoyable use.
In order to maximise the safe enjoyment of this product, you should read and carefully follow the
following installation instructions and warnings. Failure to do so could result in unexpected wear and or
failure, possibly resulting injury. We recommend having your parts fitted by a qualified bicycle mechanic.
Nukeproof assumes no responsibility for malfunction or injury due to faulty installation.
AS1 Headset Installation Instructions:
Note: Prior to installation please ensure that the headtube of the frame is properly faced, has an
internal diameter (I.D.) of 49mm and that the reamed area is deep enough to accommodate this
headset.
1)
2)
3)
4)
5)
6)
7)
8)
9)
10)
11)
12)
13)
14)
15)
16)
17)
Prepare frame, fork and other assembling tools;
Apply a small amount of Teflon grease to all surfaces, which will make contat with the
headset cup inside the headtube;
To slacken the head angle on your frame by 1 degree, position the “front centre -1”graphic
on the (A) upper cup to the front of the headtube, ensuring it is perfectly central. (If you
wish to steepen your head angle position the “front centre +1” graphic to the front);
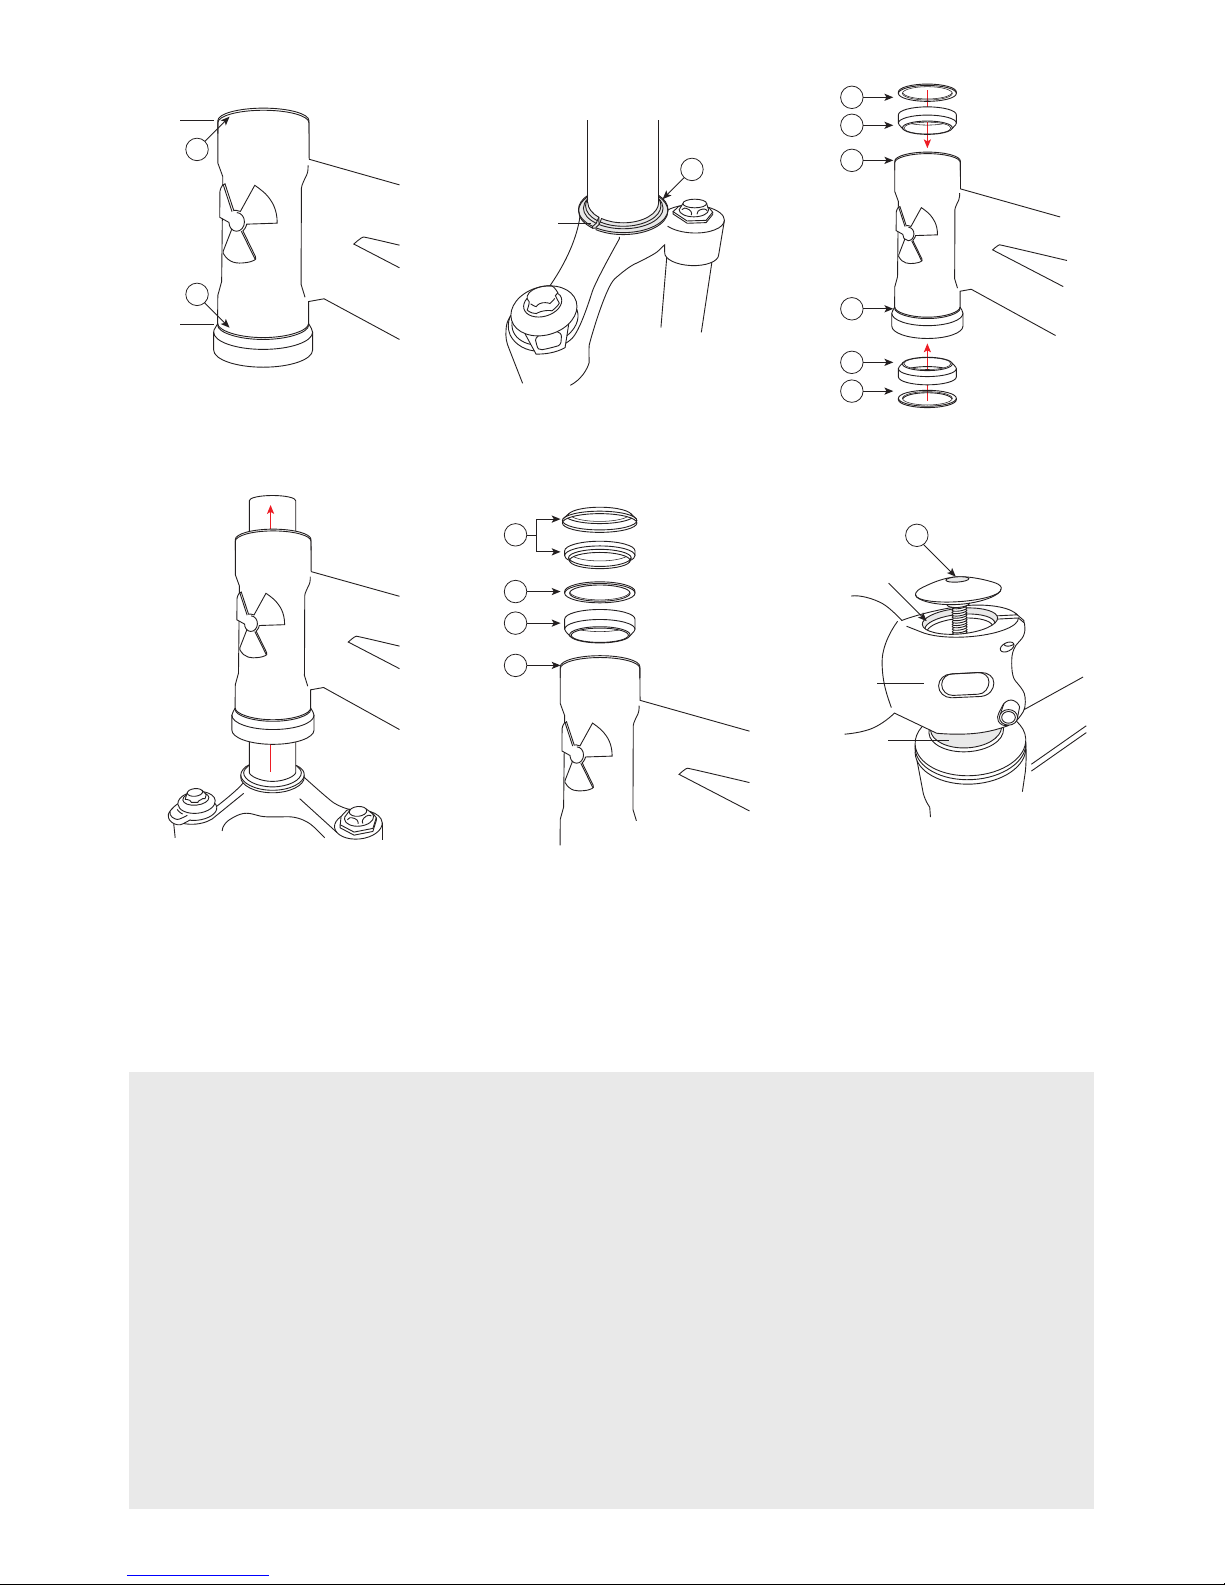
Using a headset press, carefully press the (A) upper cup into the frame until it is flush with
the headtube as shown in figure 1;
As you have decided to slacken your head angle, position the “front centre -1”graphic on
the (B) lower cup to the front of the headtube ensuring it is perfectly central. (If you wish to
steepen your head angle position the “front centre +1” graphic to the front);
Using a headset press, carefully press the (B) lower cup into the frame until both the (A)
upper cup and (B) lower cup are pressed flush with the headtube as shown in figure 1;
Press the (C) crown race on to the fork’s steerer tube, leaving the split perpendicular to the
front wheel. Make sure that you have put it on correct side up as shown in figure 2;
Apply a small amount of Teflon grease to the inside of the (A) upper and (B) lower cups and
press the (D) + (E) bearings into the cups with your fingers. Note that the bearings are fitted
correct side up as shown in figure 3;
Carefully fit one of the (G) seals into each cup on top of the fitted bearings as shown in
figure 3;
Insert the steerer tube into the headtube as shown in figure 4;
Place the (F) upper lock ring and bearing top cap onto the top of the headset assembly as
shown in figure 5;
Fit the stem onto the fork steerer tube and adjust to desired height using spacers as shown
in figure 6;
Mark where you want to cut, check again and then cut the steerer tube using appropriate
tools so that the stem sits 2-3mm higher than the top of the cut steerer tube as shown in
figure 6;
Remove the fork from the bike and fit the star fangled nut into the steerer tube using the
appropriate tool;
Now re-insert the fork into the correctly assembled headset, fit the spacers/stem, place
the top cap onto the top of the assembly and screw the (H) bolt into the star nut until it is
finger tight as shown in figure 6;
Tighten the (H) bolt with a 5mm Allen key until there is no play in the headset but it can still
turn freely;
Follow the manufacture’s installation instructions for your stem and other controls before
riding the bike.
AS1 HEADSET
INSTALLATION INSTRUCTIONS
Page 2
LIMITED WARRANTY
Nukeproof warrants this product to be free from defects in materials and workmanship for a period of One year from the
date of original retail purchase. This warranty is extended only to the original owner of the product. Proof of purchase is
required for any warranty service, so be sure to keep your receipt.
This warranty does not cover cosmetic or structural damage arising from misuse or abuse, including but not limited to
damage caused by jumping and landing, front end impact, or any other collision, falls or crashes, owner neglect, improper
installation of parts and accessories, improper assembly, improper maintenance, or use of racks in transportation. Any
modications, changes, additions or substitutions to any part or component are done so at the sole risk of the user and
will render the warranty null and void. Nukeproof makes no warranty against said modications, changes, additions or
substitutions. Wear from normal use or exposure to environmental elements is not covered by this warranty. Nukeproof
makes no warranty against any incidental or consequential damage to bike or parts, or rider injury caused by defects as
covered in this warranty. Nukeproof will repair or replace, at its sole discretion, any Nukeproof products deemed defective
under this warranty. There is no other remedy, either expressed or implied, under this warranty.
Nukeproof is not responsible for any shipping or dealer charges related to any warranty claim, whether or not said claim is
accepted by Nukeproof.
Thank you for choosing Nukeproof.
For further information, please visit us on the Web at www. Nukeproof .com
A
no gap
C
B
spacer
stem
2–3mm
no gap
figure 1. figure 2. figure 3.
figure 4. figure 5. figure 6.
90°
A
E
G
B
D
G
A
E
G
F
H
(A)
(B)
(C)
(D)
(E)
(F)
(G)
(H)
Upper cup
Lower cup
Crown race
Lower bearing
Upper bearing
Lock ring & bearing top cap
Bearing seal
Bolt
 Loading...