

Page 1
Babyphone
Eco Control Audio 500
Bedienungsanleitung
Operating Instructions
NL
Art.-Nr. 10.256.438
Page 2

Deutsch . . . . . . . . . . . . . . . . . . . . . . . . . . . . . . . . . . . . . . . . 3
Bitte Ausklappseite beachten
English . . . . . . . . . . . . . . . . . . . . . . . . . . . . . . . . . . . . . . . . 19
Please note inner coverpage
Français . . . . . . . . . . . . . . . . . . . . . . . . . . . . . . . . . . . . . . . 35
Veuillez tenir compte des informations fournies sur les rabats
Nederlands . . . . . . . . . . . . . . . . . . . . . . . . . . . . . . . . . . . . . 50
Neem a.u.b. ook de uitklappagina in acht.
Italiano . . . . . . . . . . . . . . . . . . . . . . . . . . . . . . . . . . . . . . . . 66
Leggere attentamente la pagina pieghevole
Česky . . . . . . . . . . . . . . . . . . . . . . . . . . . . . . . . . . . . . . . . . 82
Povšimněte si vyklápěcí strany
Ελληνικά . . . . . . . . . . . . . . . . . . . . . . . . . . . . . . . . . . . . . . . 97
Παρακαλούμε προσέξτε την εσωτερικά διπλωμένη σελίδα του εξώφυλλου
Die Bedienungsanleitung kann in weiteren Sprachen auch auf unserer Internetseite
www.nuk-service.com heruntergeladen werden.
This manual can be downloaded in other languages from our website
www.nuk-service.com.
Page 3
1
2
9
3
8
10 11
4
5
6
7
12
13
14
15
20
16
17
18
19
Page 4

Page 5

Inhalt
1. Gerätebeschreibung . . . . . . . . . . . . . . . . . . . . . . . . . . . . . . . . . . . . . . . . . . . 4
1.1 Verwendungszweck . . . . . . . . . . . . . . . . . . . . . . . . . . . . . . . . . . . . . . . . . . . . . . . 4
1.2 Funktionsbeschreibung. . . . . . . . . . . . . . . . . . . . . . . . . . . . . . . . . . . . . . . . . . . . . 4
1.3 Zulassung . . . . . . . . . . . . . . . . . . . . . . . . . . . . . . . . . . . . . . . . . . . . . . . . . . . . . . . 4
1.4 Lieferumfang . . . . . . . . . . . . . . . . . . . . . . . . . . . . . . . . . . . . . . . . . . . . . . . . . . . . . 4
2. Sicherheitshinweise . . . . . . . . . . . . . . . . . . . . . . . . . . . . . . . . . . . . . . . . . . . 5
2.1 Allgemeine Hinweise. . . . . . . . . . . . . . . . . . . . . . . . . . . . . . . . . . . . . . . . . . . . . . . 5
2.2 Schutz vor elektrischem Schlag . . . . . . . . . . . . . . . . . . . . . . . . . . . . . . . . . . . . . . 5
2.3 Zur Sicherheit Ihres Kindes . . . . . . . . . . . . . . . . . . . . . . . . . . . . . . . . . . . . . . . . . . 5
2.4 Schutz vor Verletzungen . . . . . . . . . . . . . . . . . . . . . . . . . . . . . . . . . . . . . . . . . . . . 6
2.5 Sachschäden . . . . . . . . . . . . . . . . . . . . . . . . . . . . . . . . . . . . . . . . . . . . . . . . . . . . 6
2.6 Umgang mit LiPo-Akkus . . . . . . . . . . . . . . . . . . . . . . . . . . . . . . . . . . . . . . . . . . . . 6
3. Bestandteile des Babyphones . . . . . . . . . . . . . . . . . . . . . . . . . . . . . . . . . . . 7
3.1 Kurzübersicht Meldungen . . . . . . . . . . . . . . . . . . . . . . . . . . . . . . . . . . . . . . . . . . . 8
4. Gerät in Betrieb nehmen . . . . . . . . . . . . . . . . . . . . . . . . . . . . . . . . . . . . . . . 8
4.1 Elterneinheit anschließen . . . . . . . . . . . . . . . . . . . . . . . . . . . . . . . . . . . . . . . . . . . 8
4.2 Babyeinheit anschließen . . . . . . . . . . . . . . . . . . . . . . . . . . . . . . . . . . . . . . . . . . . . 9
4.3 Babyeinheit und Elterneinheit verbinden. . . . . . . . . . . . . . . . . . . . . . . . . . . . . . . . 9
4.4 Stromversorgung. . . . . . . . . . . . . . . . . . . . . . . . . . . . . . . . . . . . . . . . . . . . . . . . . 10
4.5 Eco-Mode . . . . . . . . . . . . . . . . . . . . . . . . . . . . . . . . . . . . . . . . . . . . . . . . . . . . . . 10
5. Bedienen der Babyeinheit . . . . . . . . . . . . . . . . . . . . . . . . . . . . . . . . . . . . . 11
5.1 Babyeinheit ein- und ausschalten. . . . . . . . . . . . . . . . . . . . . . . . . . . . . . . . . . . . 11
5.2 Anzeigen LEDs . . . . . . . . . . . . . . . . . . . . . . . . . . . . . . . . . . . . . . . . . . . . . . . . . . 11
6. Bedienen der Elterneinheit. . . . . . . . . . . . . . . . . . . . . . . . . . . . . . . . . . . . . 11
6.1 Elterneinheit ein- und ausschalten . . . . . . . . . . . . . . . . . . . . . . . . . . . . . . . . . . . 11
6.2 Anzeigen LEDs . . . . . . . . . . . . . . . . . . . . . . . . . . . . . . . . . . . . . . . . . . . . . . . . . . 12
6.3 Übertragungssensibilität der VOX-Funktion einstellen . . . . . . . . . . . . . . . . . . . . 12
6.4 Lautstärke einstellen . . . . . . . . . . . . . . . . . . . . . . . . . . . . . . . . . . . . . . . . . . . . . . 13
6.5 Stummschaltung. . . . . . . . . . . . . . . . . . . . . . . . . . . . . . . . . . . . . . . . . . . . . . . . . 13
6.6 Talk-Back Funktion . . . . . . . . . . . . . . . . . . . . . . . . . . . . . . . . . . . . . . . . . . . . . . . 13
7. Reinigung und Wartung des Gerätes . . . . . . . . . . . . . . . . . . . . . . . . . . . . 14
7.1 Reinigung . . . . . . . . . . . . . . . . . . . . . . . . . . . . . . . . . . . . . . . . . . . . . . . . . . . . . . 14
7.2 Akku tauschen. . . . . . . . . . . . . . . . . . . . . . . . . . . . . . . . . . . . . . . . . . . . . . . . . . . 14
8. Störungen und deren Beseitigung. . . . . . . . . . . . . . . . . . . . . . . . . . . . . . . 15
9. Technische Daten . . . . . . . . . . . . . . . . . . . . . . . . . . . . . . . . . . . . . . . . . . . . 16
9.1 FHSS Technologie. . . . . . . . . . . . . . . . . . . . . . . . . . . . . . . . . . . . . . . . . . . . . . . . 16
10. Entsorgung . . . . . . . . . . . . . . . . . . . . . . . . . . . . . . . . . . . . . . . . . . . . . . . . . 17
10.1 Gerät . . . . . . . . . . . . . . . . . . . . . . . . . . . . . . . . . . . . . . . . . . . . . . . . . . . . . . . . . . 17
10.2 Verpackung . . . . . . . . . . . . . . . . . . . . . . . . . . . . . . . . . . . . . . . . . . . . . . . . . . . . . 17
10.3 Akku . . . . . . . . . . . . . . . . . . . . . . . . . . . . . . . . . . . . . . . . . . . . . . . . . . . . . . . . . . 17
11. Garantie . . . . . . . . . . . . . . . . . . . . . . . . . . . . . . . . . . . . . . . . . . . . . . . . . . . . 17
11.1 Service-Center NUK . . . . . . . . . . . . . . . . . . . . . . . . . . . . . . . . . . . . . . . . . . . . . . 18
11.2 Service-Center Babyphone. . . . . . . . . . . . . . . . . . . . . . . . . . . . . . . . . . . . . . . . . 18
11.3 Lieferant. . . . . . . . . . . . . . . . . . . . . . . . . . . . . . . . . . . . . . . . . . . . . . . . . . . . . . . . 18
12. Konformitätserklärung . . . . . . . . . . . . . . . . . . . . . . . . . . . . . . . . . . . . . . . . 18
3
Page 6

1. Gerätebeschreibung
1.1 Verwendungszweck
Mit diesem Babyphone Eco Control Audio
500 können Sie Ihr Baby oder kleine Kinder
im Kinderzimmer überwachen. Es kann
auch zur Tonüberwachung von Senioren
eingesetzt werden.
Dieses Gerät ist nur für trockene Umgebungen vorgesehen. Für den Betrieb in feuchten
Räumen oder bei nasser Witterung im Freien
ist das Gerät nicht geeignet.
Dieses Gerät ist für den Einsatz in Privathaushalten vorgesehen. Für den gewerblichen Einsatz ist es nicht vorgesehen.
Dieses Gerät dient nur als Hilfsmittel. Es
ersetzt keinesfalls die körperliche Anwesenheit und Überwachung durch Eltern, Babysitter oder Betreuer.
1.2 Funktionsbeschreibung
Die Babyeinheit 1 wird in dem zu überwa-
chenden Raum aufgestellt. Sie registriert die
Geräusche und sendet sie kabellos an die
Elterneinheit 8.
Die Elterneinheit 8 besitzt einen eingebauten
Akku, sodass Sie sie stets in Ihrem Sichtbereich aufstellen können. Geladen wird der
Akku mit Hilfe des mitgelieferten Netzadapters.
Die Reichweite zwischen Baby- und ElternEinheit beträgt ca. 40 m im Innenbereich
und bis zu 250 m im Außenbereich (im freien
Feld). Der Empfangsbereich des Babyphones ändert sich abhängig von der Umgebung. Dicke Mauern oder Metall können die
Reichweite reduzieren.
Das Babyphone verfügt über einen EcoMode, bei dem der Sender (Babyeinheit)
automatisch in den Standby-Modus
geschaltet wird, sobald ihr Baby ruhig
schläft. Es schaltet sich je nach eingestellter
Sensibilität erst dann wieder ein, wenn ihr
Baby Geräusche von sich gibt oder anfängt
zu weinen.
Wenn Sie alle Geräusche aus dem Babyzimmer hören möchten, können Sie die
Übertragungssensibilität der VOX-Funktion
mit der Taste VOX 17 auf Maximum einstellen (=Stufe 5). Auf dieser Stufe bleibt die
Babyeinheit kontinuierlich eingeschaltet
(siehe „6.3 Übertragungssensibilität der
VOX-Funktion einstellen“ auf Seite 12).
Sollten Sie auf jegliche Geräusche verzichten wollen, können Sie über die Taste Vol -
11 die Lautstärke auf Mute setzen. In diesem Fall sehen Sie nur über die LED
Anzeige 16 wenn ihr Baby Geräusche von
sich gibt.
Wenn der Eco-Mode aktiviert ist, wird die
hochfrequente Strahlung im Kinderzimmer
auf ein Minimum heruntergefahren. Die
Babyeinheit sendet dann lediglich alle
30 Sekunden ein kurzes Signal an die
Elterneinheit, um die Verbindung zu prüfen.
Befindet sich die Elterneinheit außerhalb der
Reichweite, werden die Eltern durch einen
Signalton darauf hingewiesen.
Mehr zum Eco-Mode finden Sie in „4.5 EcoMode” auf Seite 10 sowie in
„6.3 Übertragungssensibilität der VOXFunktion einstellen” auf Seite 12.
1.3 Zulassung
Das Babyphone arbeitet auf einer Frequenz
von 2,4 GHz. Dieses Gerät darf in allen Ländern der EU verwendet werden. In Russland
und der Ukraine sind die länderspezifischen
Einschränkungen zu beachten.
1.4 Lieferumfang
•Babyphone:
– 1 Babyeinheit (für das Kinderzimmer)
– 1 Netzadapter für die Babyeinheit
– 1 Elterneinheit
– 1 Netzadapter für die Elterneinheit
– 1 LiPo- Akku 3,7 V, 1200 mAh
• 1 Bedienungsanleitung
• 1 Quick Start Guide
4
Page 7
2. Sicherheitshinweise
2.1 Allgemeine Hinweise
• Lesen Sie vor dem Gebrauch bitte
sorgfältig diese Bedienungsanleitung. Sie
ist Bestandteil des Gerätes und muss
jederzeit verfügbar sein.
• Verwenden Sie das Gerät und das Zubehör
nur für den beschriebenen Verwendungszweck (siehe „1.1 Verwendungszweck“ auf
Seite 4).
• Verwenden Sie nur Zubehör, das mitgeliefert wurde oder ausdrücklich in dieser
Bedienungsanleitung erlaubt wird.
• Vor jeder Benutzung müssen Sie immer
prüfen, ob das Gerät richtig funktioniert.
Neben der Überprüfung der Reichweite
und Verbindung wird empfohlen, die
Verbindung nach Gehör zu kontrollieren,
wenn es im Einsatz ist.
• Die Geräte dürfen ausschließlich zur
Übertragung von Geräuschen in Ihrer
privaten Umgebung genutzt werden.
Jede Person im Raum, die abgehört
werden könnte, muss über den Einsatz
des Gerätes informiert werden.
• Bitte beachten Sie, dass eine
Übertragung immer abhängig ist von der
Umgebung. Elektronische Geräte,
Isolierungen, Wände, Nässe oder Bäume
können den Empfang erheblich stören.
2.2 Schutz vor elektrischem
Schlag
Warnung! Die folgenden Sicher-
heitshinweise sollen Sie vor einem
elektrischen Schlag schützen:
• Nehmen Sie keine Reparaturversuche
vor. Die Teile dürfen nur durch
qualifiziertes Fachpersonal geöffnet
werden.
• Das Gerät darf nicht im beschädigten
Zustand verwendet werden.
• Wenn Sie auf Reisen sind, beachten Sie
stets, dass die verfügbare Spannung den
Technischen Daten entspricht.
2.3 Zur Sicherheit Ihres Kindes
Warnung! Kinder erkennen nicht
die Gefahren, die sich durch den
Gebrauch des Gerätes ergeben
können. Deshalb sind Kinder von
diesen Geräten fernzuhalten.
• Achten Sie darauf, dass sich das Gerät
und sein Zubehör außerhalb der
Reichweite des Babys befinden. Der
Abstand zwischen Baby und Gerät/
Zubehör sollte mindestens 1 m betragen.
• Kinder können Gefahren oft nicht richtig
einschätzen und sich dadurch
Verletzungen zuziehen. Beachten Sie
daher:
– Dieses Gerät ist nicht für die
Verwendung durch Personen (auch
Kinder) mit physischer, sensorischer
oder geistiger Behinderung oder ohne
hinlängliche Erfahrung und/oder
Kenntnis vorgesehen, es sei denn, sie
werden durch eine für ihre Sicherheit
verantwortliche Person beaufsichtigt
oder im Gebrauch des Geräts
unterwiesen.
– Kinder sollten beaufsichtigt werden,
damit sie nicht mit dem Gerät spielen
können.
– Achten Sie darauf, dass die Ver-
packungsfolie nicht zur tödlichen Falle
für Kinder wird. Es droht Erstickungsgefahr. Verpackungsfolien sind kein
Spielzeug.
– Um ein Strangulieren zu vermeiden,
muss sich das Netzkabel stets außerhalb der Reichweite des Babys befinden.
• Verwenden Sie das Gerät nur zu Ihrer
zusätzlichen Sicherheit. Es kann niemals
als Ersatz für eine menschliche
Aufsichtsperson dienen.
5
Page 8
2.4 Schutz vor Verletzungen
Warnung! Beachten Sie folgende
Hinweise, um Verletzungen zu vermeiden.
• Achten Sie darauf, dass die Kabel der
Netzadapter nicht zur Stolperfalle werden
und jemand darüber stürzen kann.
2.5 Sachschäden
Vorsicht! Um Sachschäden zu vermeiden,
beachten Sie folgende Bestimmungen:
• Setzen Sie das Gerät nicht dem direkten
Sonnenlicht oder großer Hitze aus, da
UV-Strahlung und Überhitzung zu einer
Versprödung der Kunststoffe führen
können und die Elektronik beschädigt
werden könnte.
• In der Nähe des Gerätes dürfen sich
keine Wärmequellen befinden und das
Gerät darf auch nicht abgedeckt werden,
um eine Überhitzung zu vermeiden.
• Verwenden Sie das Gerät nie in feuchter
oder nasser Umgebung.
• Verwenden Sie das Gerät nicht in
staubiger Umgebung. Dies könnte die
Lebensdauer verkürzen.
• Verwenden Sie niemals scharfe oder
scheuernde Reinigungsmittel, da Ihr
Gerät dadurch beschädigt werden
könnte.
• Wenn das Gerät nicht genutzt wird,
schalten Sie es immer mit der Ein/
Ausschalttaste aus.
2.6 Umgang mit LiPo-Akkus
Warnung!
Um potentielle Gefahren zu vermeiden, die zu Personen- oder Sachschäden führen können, beachten
Sie folgende Hinweise:
• Vermeiden Sie Kurzschlüsse.
Die Pole des Akkus dürfen nicht mit
Metallgegenständen in Berührung kommen, da dies zu einem Kurzschluss führen kann. Ein Kurzschluss kann zu einer
Überhitzung des Akkus führen und in der
Folge zum Auslaufen von Elektrolyt,
Explosionsgefahr oder Flammenbildung.
Wenn Elektrolyt ausgelaufen ist, vermeiden Sie den Kontakt mit Haut, Augen und
Schleimhäuten, um Verletzungen zu verhindern. Spülen Sie bei Hautkontakt mit
dem Elektrolyt die betroffenen Stellen
sofort mit reichlich klarem Wasser und
suchen Sie umgehend einen Arzt auf.
• Der eingebaute Akku darf nur gegen
einen Original-Austauschakku
ausgetauscht werden. Falls er defekt ist,
wenden Sie sich bitte an eine
Serviceadresse (siehe „Contact
addresses NUK“ auf Seite115).
• Um eine Explosionsgefahr zu vermeiden,
dürfen Akkus nicht erhitzt oder durch
Verbrennen beseitigt werden.
• Versuchen Sie niemals, den Akku zu
öffnen, die Kontakte zu verbiegen oder
abzureißen. Werfen Sie den Akku nicht
auf den Boden oder schlagen einen
Nagel ein.
Eine Beschädigung kann zu einem inneren Kurzschluss führen und in der Folge
zum Auslaufen von Elektrolyt, Explosionsgefahr oder Flammenbildung.
• Verwenden Sie ausschließlich den
mitgelieferten Netzadapter zum Laden
des Akkus.
Ein „falscher” Netzadapter könnte zu
einer Überladung des Akkus führen,
wodurch er überhitzen und explodieren
kann.
• LiPo-Akkus dürfen nur auf feuerfesten,
nicht brennbaren Untergründen geladen
oder gelagert werden.
• LiPo-Akkus dürfen nur unter Aufsicht
geladen werden, um im Fehlerfall
rechtzeitig einschreiten zu können.
• LiPo-Akkus enthalten giftige Substanzen.
Beachten Sie daher die
Entsorgungsvorschriften in „10.3 Akku”
auf Seite 17.
6
Page 9

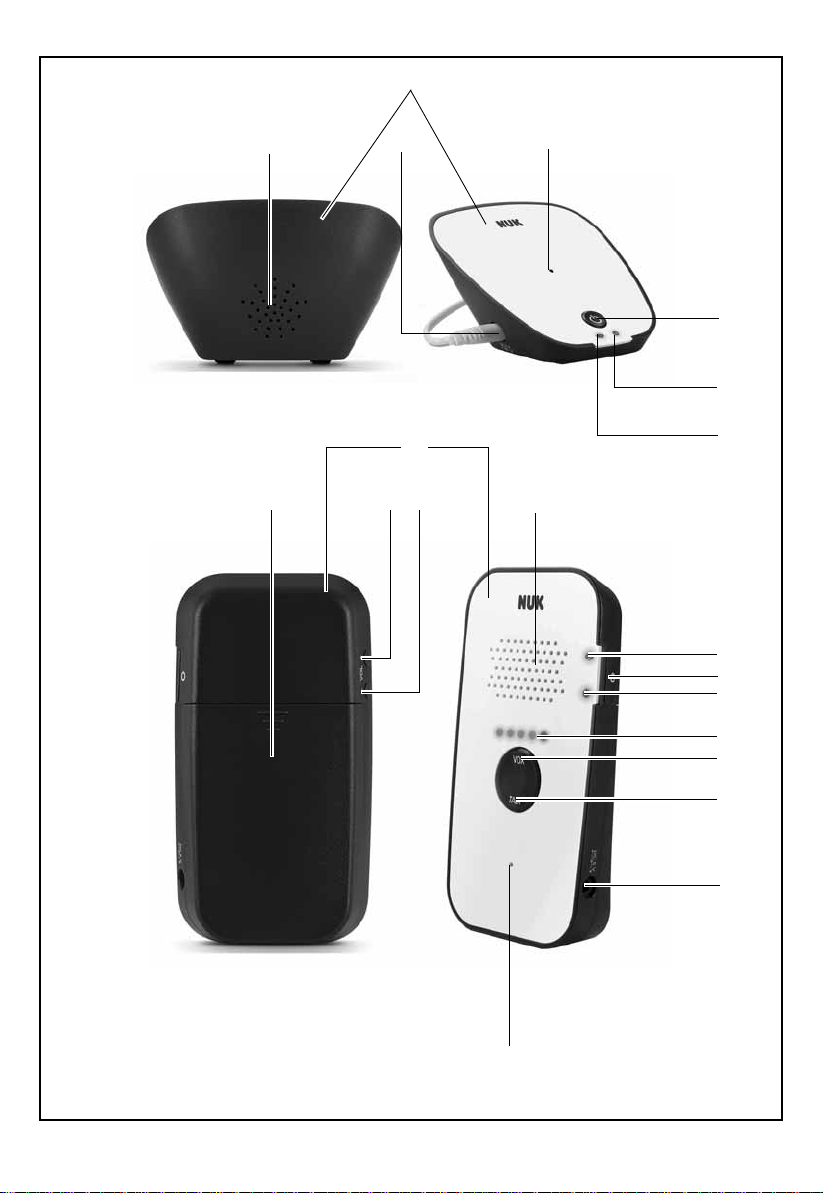
3. Bestandteile des Babyphones
1Babyeinheit
2 Lautsprecher
3 Buchse für Netzadapter
4 Mikrofon
5 Ein/Aus Taste:
– kurz drücken: einschalten
– lang drücken: ausschalten
6 Power LED
– leuchtet grün, wenn Babyeinheit
eingeschaltet ist
7 VOX LED
– leuchtet grün, wenn eine Verbindung zu
Elterneinheit aufgebaut ist;
– schaltet sich aus, wenn die Verbindung
zur Elterneinheit unterbrochen ist.
8 Elterneinheit
9 Akkuabdeckung
10 Tas te Vol +:
– Lautstärke erhöhen
11 Tas te VOL -:
– Lautstärke verringern
– Stummschaltung bei geringster Stufe.
Geräusche werden nur noch durch die
Anzeige LEDs 16 angezeigt.
12 Lautsprecher
13 Verbindungsanzeige
– leuchtet grün: wenn eine Verbindung
zwischen beiden Geräten besteht;
– blinkt grün: wenn eine Verbindung
besteht, der Eco-Mode aber aktiviert
ist;
– leuchtet rot: wenn keine Verbindung
zwischen den Geräten besteht.
14 Ein/Aus Taste
15 Anzeige Stromversorgung POWER
– leuchtet grün: Gerät ist ein geschaltet
und der Akku ist voll;
– blinkt grün: Akku wird geladen;
– leuchtet rot und 1 Piepton alle
60 Sekunden: Warnung leerer Akku.
Innerhalb von ca, 15 - 20 Minuten
schaltet sich die Elterneinheit
automatisch ab.
16 Anzeige LEDs
– zeigt den Geräuschepegel im
Kinderzimmer an. Je mehr LEDs
leuchten, desto lauter sind die
Geräusche;
– zeigt beim Ändern der Lautstärke die
unterschiedlichen Stufen an. Je mehr
LEDs leuchten, desto lauter ist die
Übertragung über den Lautsprecher;
– zeigt bei Einstellung der VOX-
Sensibilität die unterschiedlichen
Stufen an. Je mehr LEDs blinken, desto
schneller reagiert das Gerät auf
Geräusche. Bei 5 leuchtenden LEDs
wird in die Dauerübertragung
geschaltet.
17 Tas te VOX
– kurz drücken und mit Vol +/- die Über-
tragungssensibilität einstellen.
18 Tas te TAL K:
– durch Halten der Taste wird die
Funktion „Mit dem Baby sprechen”
aktiviert;
– befindet sich die Babyeinheit im Eco-
Mode, wird die Talk-Back Funktion
gesperrt und dies durch zwei
Signaltöne angezeigt.
19 Buchse für Netzadapter
20 Mikrofon
7
Page 10

3.1 Kurzübersicht Meldungen
Babyeinheit
Leuchte Anzeige Bedeutung
Power-LED 6 grün Babyeinheit ist eingeschaltet
grün Verbindung ok (ohne Eco-Mode)
VOX LED 7
Leuchte Anzeige Bedeutung
Verbindungsanzeige 13
Power-LED 15
Anzeige LEDs 16
keine 1 Piepton „Mit dem Baby sprechen” (Talk-Back)
keine doppelter Piepton
1 - 5 LEDs leuchten
1 - 5 LEDs leuchten Anzeige Lautstärke der Babygeräusche.
aus Verbindung ok (im Eco-Mode)
Verbindung unterbrochen
Elterneinheit
grün Verbindung ok (ohne Eco-Mode)
blinkt grün Verbindung ok (im Eco-Mode)
blinkt rot
1 Piepton alle 30 s
grün Elterneinheit ist eingeschaltet, Akku ist
leuchtet rot
1 Piepton alle 60 s
blinkt grün Akku wird geladen
1 - 5 LEDs blinken Einstellung VOX-Sensibilität. Je mehr
1 - 5 Pieptöne
Verbindung unterbrochen
voll
Warnung leerer Akku. Elterneinheit
schaltet innerhalb von 15 min
automatisch ab.
LEDs blinken, desto sensibler reagiert
das Gerät auf Geräusche. Bei 5
leuchtenden LEDs wird in die
Dauerübertragung geschaltet.
Einstellung Lautstärke. Je mehr LEDs
leuchten, desto lauter ist die
Übertragung über den Lautsprecher.
Je mehr LEDs leuchten, desto lauter
sind die Geräusche im Babyzimmer.
„Mit dem Baby sprechen” (Talk-Back)
während aktiviertem Eco-Mode
4. Gerät in Betrieb nehmen
Hinweis: Stellen Sie immer zuerst die
Kabelverbindungen her, bevor Sie die Netzadapter in die Steckdose stecken.
4.1 Elterneinheit anschließen
Die Elterneinheit wird vom mitgelieferten
LiPo-Akku mit Strom versorgt. Dieser Akku
kann mit dem mitgelieferten Netzteil aufgeladen werden.
Vorsicht! Um eine Fehlfunktion zu vermeiden, installieren Sie zuerst den Akku in der
Elterneinheit und verbinden erst anschließend den Netzadapter mit der Elterneinheit.
1. Entfernen Sie die Akkuabdeckung 9 auf
der Rückseite der Elterneinheit 8, indem
Sie sie nach unten schieben.
8
Page 11

2. Legen Sie den Akku gemäß Markierungen in das Akkufach. Achten Sie
dabei unbedingt auf die korrekte Polarität
(+ und -).
3. Schieben Sie die Akkuabdeckung 9 wieder auf die Elterneinheit 8.
4. Stecken Sie den kleinen Stecker des
Netzadapters in die Buchse für den Netzadapter 19 der Elterneinheit.
5. Stecken Sie den Netzadapter in eine
Steckdose, die den technischen Daten
entspricht (siehe „9. Technische Daten“
auf Seite 16).
6. Laden Sie die Elterneinheit beim ersten
Mal durchgehend für 10 Stunden auf,
um die volle Kapazität des Akkus zu aktivieren.
Alle anschließenden Aufladungen des
Akkus benötigen nur ca. 5 Stunden. Das
Aufladen kann auch während des
Betriebes durchgeführt werden.
Die LED POWER 15 zeigt den Ladevorgang an:
– blinkt grün: Akku wird geladen;
– leuchtet grün: Akku ist voll;
– leuchtet rot und 1 Piepton alle
60 Sekunden: Warnung leerer Akku.
Innerhalb von ca, 15 - 20 Minuten
schaltet sich die Elterneinheit
automatisch ab.
4.2 Babyeinheit anschließen
Hinweis: Installieren Sie die Babyeinheit 1
erst, wenn der Akku der Elterneinheit 8 vollständig geladen ist.
1. Stellen Sie die Babyeinheit 1 im Babyzimmer so auf, dass das Baby sie nicht erreichen kann.
Optimal ist eine Entfernung zwischen
Babyeinheit und Baby von 1 - 2 m.
2. Stecken Sie den Stecker des Netzadapters in die Buchse 3 der Babyeinheit 1.
3. Stecken Sie den Netzadapter in eine
Steckdose, die den technischen Daten
entspricht (siehe „9. Technische Daten“
auf Seite 16).
4.3 Babyeinheit und Elterneinheit verbinden
Im Regelfall schaltet sich die Babyeinheit
automatisch ein, sobald der Netzstecker in
die Steckdose eingesteckt wird.
Falls dies nicht der Fall ist:
1. Schalten Sie die Babyeinheit 1 mit der
Ein/Aus Taste 5 ein. Halten Sie dazu die
Ein/Aus Taste kurz gedrückt, bis die
Power LED 6 leuchtet.
2. Schalten Sie die Elterneinheit 8 mit der
Ein/Aus Taste 14 ein. Halten Sie dazu die
Ein/Aus Taste kurz gedrückt, bis die
LED 15 dauerhaft grün leuchtet.
Die Verbindung wird automatisch hergestellt. Während der Verbindungsaufnahme leuchtet die
Verbindungsanzeige 13 rot.
Sobald die Verbindung hergestellt ist,
leuchtet sowohl an der Elterneinheit die
Verbindungsanzeige 13 als auch bei der
Babyeinheit die VOX LED 7 grün.
Beginnt die Verbindungsanzeige 13 grün
zu blinken, bedeutet dies, dass zwar eine
Verbindung zwischen der Elterneinheit
und der Babyeinheit besteht, ihr Baby
aber schläft und sich so der Eco-Mode
automatisch aktiviert hat, um die hochfrequente Strahlung im Kinderzimmer zu
reduzieren und Energie zu sparen.
Sollte die Verbindung Elterneinheit-Babyeinheit unterbrochen werden, versuchen die
Geräte automatisch eine neue Verbindung
aufzubauen.
Sollte innerhalb von 30 Sekunden keine
neue Verbindung zustande kommen, ertönt
bei der Elterneinheit 8 in regelmäßigen
Abständen ein Piepton und die Verbindungsanzeige 13 leuchtet rot. Eventuell
müssen Sie den Standort der Elterneinheit
ändern, um eine neue Verbindung aufbauen
zu können.
9
Page 12

3. Schauen Sie zuerst nach Ihrem Baby, ob
alles in Ordnung ist.
4. Versuchen Sie dann, eine neue Verbindung herzustellen, indem Sie Ihren
Standort ändern.
Die Verbindung wird automatisch erneut
aufgebaut, sobald Sie sich wieder innerhalb der Reichweite befinden.
Sobald die Verbindung hergestellt ist,
leuchtet die Verbindungsanzeige 13 wieder grün.
4.4 Stromversorgung
• Die Stromversorgung der Babyeinheit 1
läuft nur über den Netzadapter.
• Die Elterneinheit 8 kann ohne
Stromanschluss über den Akku betrieben
werden.
Der Ladezustand des Akkus wird durch die
LED POWER 15 angezeigt:
– leuchtet grün: Gerät ist ein geschaltet
und der Akku ist voll;
– blinkt grün: Akku wird geladen;
– leuchtet rot und 1 Piepton alle
60 Sekunden: Warnung leerer Akku.
Innerhalb von ca, 15 - 20 Minuten
schaltet sich die Elterneinheit
automatisch ab.
In diesen 15 Minuten können noch alle
Funktionen aktiviert und deaktiviert
werden. Bitte berücksichtigen Sie,
dass die Nutzung von zum Beispiel der
Talk-Back Funktion und das
Hochsetzen der Lautstärke auf die
höchste Stufe mehr Energie kostet und
sich so die verbleibende Zeit verkürzen
kann. Sie sollten den Netzadapter an
das Stromnetz anschließen, sobald die
LED POWER 15 anfängt, rot zu
blinken.
• Die Elterneinheit kann über den
Netzadapter ans Stromnetz
angeschlossen werden und erhält von
dort ihren Strom, während gleichzeitig
der Akku geladen wird. Die Akkuladezeit
verlängert sich etwas, wenn die
Elterneinheit eingeschaltet ist. Während
der Akku geladen wird, blinkt die LED 15
grün.
Hinweise:
– Mit vollständig aufgeladenem Akku
können Sie die Elterneinheit bis zu
18 Stunden betreiben. Diese Zeit hängt
von der Nutzung ab (die Elterneinheit
schaltet sich häufig ein, die
Gegensprechfunktion wird viel genutzt,
die Lautstärke ist hoch, etc.).
– Die Aufladezeit des leeren Akkus
beträgt etwa 5 Stunden.
4.5 Eco-Mode
Funktionsbeschreibung
Dieses Babyphone hat eine Eco-Mode
Funktion, die nicht nur strom- bzw. energiesparend ist, sondern darüber hinaus
auch die hochfrequente Strahlung im Babyzimmer auf ein Minimum reduziert.
In den VOX-Leveln 1, 2, 3 und 4 (siehe
„6.3 Übertragungssensibilität der VOXFunktion einstellen“ auf Seite 12) wird der
Eco-Mode nach etwa 10 Sekunden automatisch aktiviert, sobald Ihr Baby schläft und
keine Geräusche mehr macht.
Sie erkennen dies daran, dass die Verbindungsanzeige 13 anfängt, grün zu blinken.
Im Eco-Mode wird nicht nur die Babyeinheit
automatisch auf Standby gesetzt, sondern
auch die Elterneinheit.
Ist der Eco-Mode aktiviert werden alle Funktionen, die das Baby wecken könnten, automatisch deaktiviert. So können Sie zum
Beispiel die Talk-Back Funktion nicht nutzen, bleiben aber auch im Eco-Mode stets
mit Ihrem Baby verbunden und wissen
immer, ob Sie sich noch in Reichweite befinden.
Dieses Babyphone verfügt über eine Reichweitenkontrolle, die auch im Eco-Mode
funktioniert. Sollten Sie sich also außerhalb
der Reichweite begeben, erhalten Sie automatisch einen Warnhinweis, auch wenn der
Eco-Mode aktiviert ist, da die Babyeinheit
auch im Standby-Modus alle 30 Sekunden
10
Page 13

ein Signal an die Elterneinheit sendet, um
die Verbindung zu prüfen.
Leuchtet die Verbindunsanzeige 13 grün,
besteht eine reguläre Verbindung zwischen
der Baby- und der Elterneinheit. Blinkt die
Verbindunsanzeige 13 grün, hat sich der
Eco-Mode aktiviert. Wechselt die Verbindungsanzeige 13 auf rot bedeutet dies, dass
Sie sich außerhalb der Reichweite befinden
und/oder keine Verbindung zwischen den
beiden Einheiten besteht.
Hinweis: Überprüfen Sie die Reichweite
Ihres Babyphones, bevor Sie den Eco-Mode
verwenden. Vergewissern Sie sich, dass
sich die Einheiten immer innerhalb der
Reichweite befinden, damit Sie Ihr Baby
auch hören.
Das Gerät schaltet automatisch in den
Übertragungsmodus, sobald Ihr Baby
5. Bedienen der Babyeinheit
Geräusche macht, die die eingestellte
Geräuschschwelle (VOX-Level 1 - 4) überschreitet. Der Eco-Mode wird sofort deaktiviert und die Verbindungsanzeige 13 hört
auf zu blinken.
Im VOX-Level 5 findet eine dauerhafte Übertragung statt und der Eco-Mode ist deaktiviert.
Sollten Sie trotz aktiviertem Eco-Mode, was
bedeutet, dass ihr Baby ruhig schläft, prüfen
wollen ob alles OK ist, können Sie den EcoMode deaktivieren, in dem Sie in den DauerÜbertragungsmodus umschalten:
1. Drücken Sie an der Elterneinheit 8 die
Tast e VOX 17.
2. Drücken Sie dann die Taste Vol+ 10, bis
alle 5 LEDs 16 leuchten.
5.1 Babyeinheit ein- und ausschalten
Die Babyeinheit 1 schaltet sich automatisch
ein, sobald Sie den Netzadapter angeschlossen und mit dem Stromnetz verbunden haben. Danach können Sie die
Babyeinheit jederzeit ein- und ausschalten:
• Um die Babyeinheit 1 ein- oder auszu-
schalten, drücken Sie die Ein/Aus
Tast e 5.
6. Bedienen der Elterneinheit
6.1 Elterneinheit ein- und ausschalten
Um die Elterneinheit 8 ein- oder auszuschalten, halten Sie die Ein/Aus Taste 14
gedrückt:
– sobald sie einen Signalton hören und
die Power-LED 15 leuchtet, ist die
Elterneinheit eingeschaltet;
5.2 Anzeigen LEDs
•Die Power LED 6 leuchtet grün, wenn die
Babyeinheit eingeschaltet ist.
•Die VOX LED 7 der Babyeinheit leuchtet
grün, wenn eine Verbindung zwischen
Babyeinheit und Elterneinheit aufgebaut
ist.
• Die VOX LED 7 leuchtet nicht, wenn sich
die Babyeinheit 1 in den Eco-Mode
geschaltet hat oder wenn keine
Verbindung zur Elterneinheit aufgebaut
werden konnte.
– sobald sie einen Signalton hören und
die Power-LED 15 erlischt, ist die
Elterneinheit ausgeschaltet.
11
Page 14

6.2 Anzeigen LEDs
• Die Verbindungsanzeige 13 an der Elterneinheit 8 zeigt den Verbindungsstatus zur
Babyeinheit 1 an:
– leuchtet grün, wenn die Verbindung
steht;
– blinkt grün, wenn die Babyeinheit im
Eco-Mode ist und signalisiert, dass ihr
Baby ruhig schläft;
– leuchtet rot, wenn die Verbindung
unterbrochen ist oder wenn die
Babyeinheit ausgeschaltet ist.
Hinweise:
– Wenn sich die Babyeinheit 1 im Eco-
Mode befindet und sich die
Elterneinheit außerhalb der Reichweite
begibt, leuchtet die
Verbindungsanzeige 13 rot. Zusätzlich
hören Sie alle 30 Sekunden einen
Signalton.
– Sobald sich die Elterneinheit 8 erneut
in Reichweite befindet oder die
Ursache für die Verbindungsstörung
behoben wurde, leuchtet die
Verbindungsanzeige 13 grün und die
Geräte kommunizieren wieder
miteinander.
– Wenn beide Einheiten eingeschaltet
werden, leuchtet zunächst die
Verbindungsanzeige 13 rot.
Elterneinheit und Babyeinheit werden
verbunden. Sobald die Verbindung
steht, wird die Anzeige grün.
•Die Anzeige POWER 15:
– leuchtet grün: Gerät ist ein geschaltet
und der Akku ist voll;
– blinkt grün: Akku wird geladen;
– leuchtet rot und 1 Piepton alle
60 Sekunden: Warnung leerer Akku.
Innerhalb von ca, 15 - 20 Minuten
schaltet sich die Elterneinheit
automatisch ab. Bitte beachten Sie,
das je nach Nutzung das Gerät auch
schneller abgeschaltet werden kann.
(VOX Level 5 zum Beispiel verbraucht
mehr Energie als Level 1).
•Die 5 Anzeige LEDs 16 haben drei
verschiedene Funktionen und sind nur
sichtbar bei Aktivität:
– zeigt den Geräuschepegel im
Kinderzimmer an. Je mehr LEDs
leuchten, desto lauter sind die
Geräusche;
– zeigt beim ändern der Lautstärke die
unterschiedlichen Stufen an. Je mehr
LEDs leuchten, desto lauter ist die
Übertragung über den Lautsprecher;
– zeigt bei Einstellung der VOX-
Sensibilität die unterschiedlichen
Stufen an. Je mehr LEDs blinken, desto
schneller reagiert das Gerät auf
Geräusche. Bei 5 leuchtenden LEDs
wird in die Dauerübertragung
geschaltet.
6.3 Übertragungssensibilität
der VOX-Funktion
einstellen
Babys machen eine Reihe von Geräuschen.
Das kann von deutlichem Schnaufen über
Plappern bis zum lauten Weinen oder Rufen
gehen. Die VOX-Funktion kann so eingestellt
werden, dass eine Geräuschübertragung
nur bei lautem Rufen oder Weinen, nicht
aber bei anderen Geräuschen ausgelöst
wird.
Mit der VOX-Funktion stellen Sie die Übertragungssensibilität des Mikrofons ein. Je
höher der VOX-Level, desto sensibler reagiert das Gerät auf Geräusche.
1. Um die VOX-Funktion zu aktivieren,
drücken Sie kurz VOX 17.
Die LEDs 16 zeigen Ihnen durch Blinken,
wie sensibel Ihr Gerät eingestellt ist.
2. Erhöhen oder verringern Sie die Übertragungssensibilität mit der Taste VOL +
10 oder VOL - 11. Das gewählte Level
entspricht der Anzahl der blinkenden
LEDs 16:
– VOX-Level 1 = sehr niedrige Sensibili-
tät, Aktivierung nur wenn das Baby
sehr laut schreit;
12
Page 15

– VOX-Level 2 = niedrige Sensibilität,
Aktivierung wenn das Baby laut weint;
– VOX-Level 3 = normale Sensibilität,
Aktivierung wenn das Baby normal
weint;
– VOX-Level 4 = starke Sensibilität, Akti-
vierung auch bei kleinen Geräuschen;
– VOX-Level 5 = Eco-Mode ist ausge-
schaltet. Die Übertragung ist auf
Dauerbetrieb eingestellt.
Wie laut die übertragenen Geräusche in der
Elterneinheit abgespielt werden, stellen Sie
mit den Tasten VOL + 10 und VOL - 11 ein
(siehe „6.4 Lautstärke einstellen“ auf
Seite 13).
Hinweis: Für die Änderung der Übertragungssensibilität nach der Aktivierung
der VOX-Funktion haben Sie ca. 2 Sekunden Zeit. Dann schaltet das Gerät automatisch wieder auf die Übertragung von
Geräuschen um. Dies erkennen Sie daran,
dass die LEDs 16 nicht mehr blinken und
daran, dass Sie mit den Tasten VOL + 10
oder VOL - 11 lediglich die Lautstärke verändern können.
Achtung! In der Dauerübertragung VOX
Level 5 werden kontinuierlich alle Geräusche
übertragen. Wenn das Baby ruhig schläft,
wird die Lautstärke nach einigen Sekunden
automatisch auf die niedrigste Stufe angepasst, um die Hintergrundgeräusche zu
minimieren. Sobald das Kind anfängt
Geräusche von sich zu geben, geht die
Lautstärke automatisch wieder auf die Voreinstellung zurück.
6.4 Lautstärke einstellen
1. Stellen Sie die Lautstärke, mit der Sie die
Geräusche in der Elterneinheit hören können, mit den Tasten VOL + 10 und VOL -
11 ein.
Bei jedem Tastendruck ertönt ein Piepton, der die eingestellte Lautstärke wiedergibt. Die LEDs 16 leuchten
entsprechend auf. Je lauter Sie die Einstellung wählen, desto lauter wird der
Signalton und umso mehr LEDs leuchten.
Hinweis: Wenn die VOX-Funktion auf
geringe Sensibilität eingestellt ist (siehe
„6.3 Übertragungssensibilität der VOXFunktion einstellen“ auf Seite 12), werden
unabhängig von der eingestellten Lautstärke keine leisen Geräusche übertragen. Das heißt, man hört nicht mehr, in
dem man die Lautstärke erhöht. Möchte
man mehr Geräusche hören, muss die
Sensibilität der Übertragung durch ein
höheres VOX-Level erhöht werden.
6.5 Stummschaltung
Die Elterneinheit kann auf „STUMM”
geschaltet werden. Geräusche im Babyzimmer werden dann nicht mehr übertragen.
1. Drücken Sie die Taste VOL - 11 so oft,
bis Sie keinen Piepton mehr hören.
Nun werden auch keine Geräusche mehr
übertragen.
Die Lautstärke im Babyzimmer wird weiterhin durch die LEDs 16 angezeigt. Je
mehr LEDs leuchten, desto lauter sind
die Geräusche im Babyzimmer.
2. Um die Stummschaltung aufzuheben,
betätigen Sie die Taste VOL + 10.
3. Ist die Elterneinheit Stumm gestellt und
sie aktivieren die Talk-Back Funktion,
wird die Lautstärke automatisch wieder
auf die erste Stufe hochgestellt.
6.6 Talk-Back Funktion
Mit der Funktion „Mit dem Baby sprechen”
(Talk-Back) können Sie zu ihrem Baby sprechen.
1. Halten Sie die Taste TALK 18 der Elterneinheit gedrückt.
Nachdem Sie einen Signalton hören, ist
die Sprechverbindung aufgebaut.
2. Sprechen Sie gleichzeitig in das
Mikrofon 20 der Elterneinheit.
Ihr Baby kann Sie nun über den Lautsprecher 2 der Babyeinheit hören.
3. Lassen Sie die TALK 18 wieder los, um
die Reaktion Ihres Babies zu hören.
13
Page 16
Hinweise:
– Befindet sich die Babyeinheit 1 im Eco-
Mode, wird diese Funktion deaktiviert,
damit Sie nicht aus Versehen ihr Baby
wecken. In diesem Fall wird Ihnen
durch zwei aufeinander folgende
Signaltöne angezeigt, dass die Talk-
7. Reinigung und Wartung des Gerätes
Back Funktion derzeit nicht zur
Verfügung steht.
– Sollte die Lautstärke der Elterneinheit
auf „STUMM” gestellt sein (siehe
„6.4 Lautstärke einstellen“ auf
Seite 13), wird sie automatisch auf die
Lautstärke Level I erhöht, sobald Sie
die Taste TALK 18 drücken.
7.1 Reinigung
Warnung! Um die Gefahr eines
elektrischen Schlages, einer Verletzung oder einer Beschädigung
zu vermeiden:
– Ziehen Sie immer die Netzadap-
ter aus der Netzsteckdose, bevor
Sie das Gerät reinigen.
– Die Einzelteile niemals in Wasser
tauchen.
Vorsicht! Verwenden Sie keinesfalls scheuernde, ätzende oder kratzende Reinigungsmittel. Dadurch könnte das Gerät
beschädigt werden.
1. Wischen Sie, falls erforderlich, die Einzelteile mit einem feuchten Tuch ab.
2. Benutzen Sie das Babyphone erst wieder, wenn alle Teile vollständig getrocknet sind.
7.2 Akku tauschen
Der eingebaute Lithium-Polymerakku (LiPoAkku) 3,7V, 1200 mAh, darf ausschließlich
durch einen Original-Akku ersetzt werden.
Wenden Sie sich ggf. an unser Produktservice (siehe „Produktservice Babyphone
in Europa“ auf Seite116).
1. Entfernen Sie die Akkuabdeckung 9 auf
der Rückseite der Elterneinheit 8, indem
Sie sie nach unten schieben.
2. Entnehmen Sie den defekten Akku.
3. Legen Sie den neuen Akku laut Markierungen in das Akkufach. Achten Sie
dabei unbedingt auf die korrekte Polarität
(+ und -).
4. Schieben Sie die Akkuabdeckung 9 wieder auf die Elterneinheit 8.
5. Laden Sie den neuen Akku beim ersten
Mal durchgehend für 10 Stunden auf,
um die volle Kapazität des Akkus zu aktivieren (siehe „4.1 Elterneinheit anschließen“ auf Seite 8).
14
Page 17

8. Störungen und deren Beseitigung
Störung Ursache Beseitigung
Babyeinheit oder
Elterneinheit
arbeitet nicht
Lautes
Pfeifgeräusch
Elterneinheit piept Verbindung zur Babyeinheit ist
Verbindungsanzeige 13
leuchtet
rot
Kein Ton von der
Elterneinheit
Wenn diese Tipps das Problem nicht lösen,
können Sie versuchen, den Fehler folgendermaßen zu beheben:
1. Entnehmen Sie den Akku aus der Elterneinheit.
2. Trennen Sie die Netzteile von der Steckdose.
3. Warten Sie ein paar Minuten.
4. Legen Sie den Akku wieder ein und
schließen Sie die Netzteile wieder an.
Keine Stromversorgung Stromversorgung herstellen (siehe
„4.4 Stromversorgung“ auf Seite 10)
Akku in der Elterneinheit ist leer Akku laden (siehe „4.4 Stromversorgung“
auf Seite 10)
Gerät ist nicht eingeschaltet Gerät einschalten (siehe „4.1 Elterneinheit
anschließen” auf Seite 8 sowie
„4.2 Babyeinheit anschließen” auf Seite 9)
Der Abstand zwischen Babyeinheit
und Elterneinheit ist zu groß oder
Signal wird durch dicke Wände
oder andere Elektrogeräte gestört
Rückkoppelung, da Abstand
Babyeinheit - Elterneinheit zu
gering
unterbrochen
Probleme mit der Stromversorgung Stromversorgung überprüfen (siehe
Elterneinheit befindet sich
außerhalb der Reichweite
Lautstärke ist abgeschaltet Lautstärke erhöhen (siehe
VOX-Funktion ist zu niedrig
eingestellt
Abstand verringern oder einen anderen Ort
für die Elterneinheit wählen
Abstand vergrößern auf mindestens 2 - 3 m
Reduzieren Sie die Lautstärke und den
VOX-Level der Elterneinheit, wenn Sie sich
damit in unmittelbarer Nähe der Babyeinheit
befinden (siehe
„6.3 Übertragungssensibilität der VOXFunktion einstellen” auf Seite 12 sowie
„6.4 Lautstärke einstellen” auf Seite 13).
Verbindung herstellen (siehe
„4.3 Babyeinheit und Elterneinheit
verbinden“ auf Seite 9)
„4.4 Stromversorgung” auf Seite 10)
Verbindung herstellen (siehe
„4.3 Babyeinheit und Elterneinheit
verbinden“ auf Seite 9)
„Stummschaltung“ auf Seite13)
Übertragungssensibilität erhöhen (siehe
„6.3 Übertragungssensibilität der VOX-
Funktion einstellen” auf Seite 12 bzw.
„3.1 Kurzübersicht Meldungen” auf Seite 8)
Sollte das Problem noch immer nicht gelöst
sein, wenden Sie sich bitte an den Kundendienst (siehe „11.2 Service-Center Babyphone“ auf Seite 18).
15
Page 18
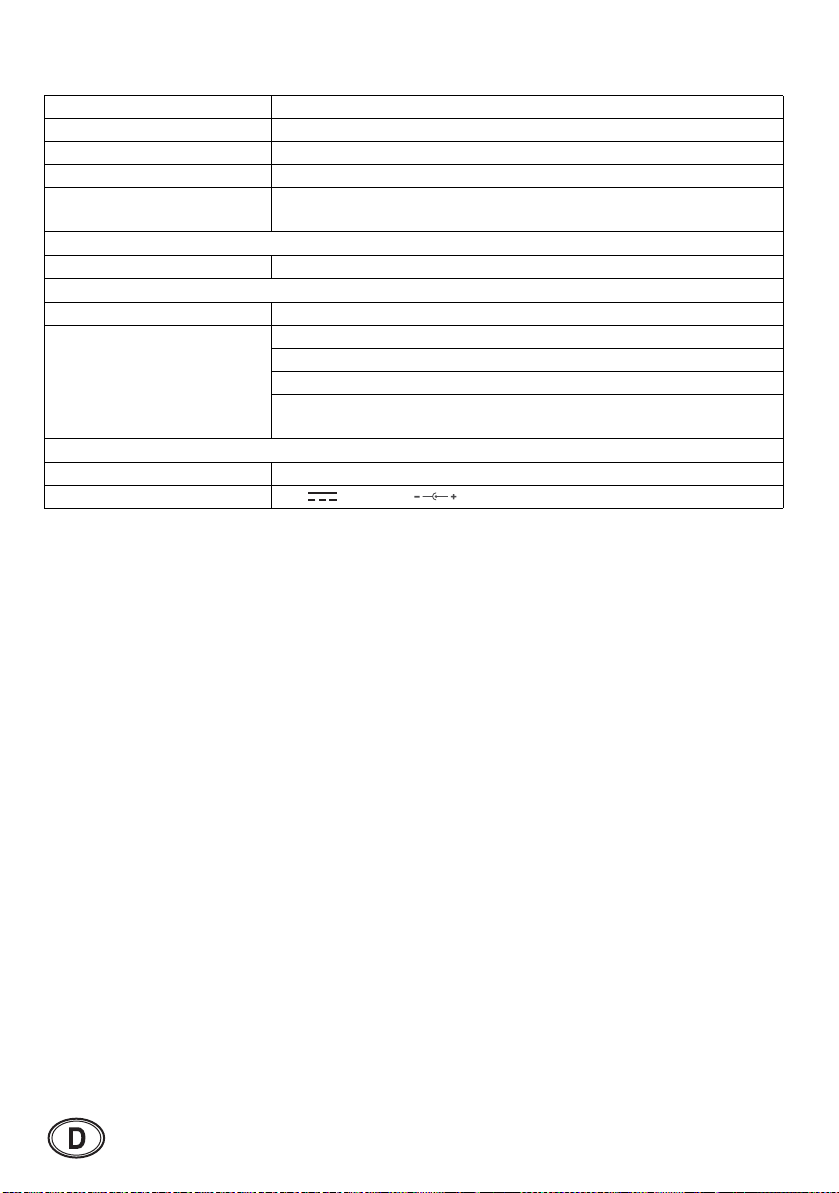
9. Technische Daten
Funkverbindung 2.4 Ghz FHSS
Senderfrequenz 2408 MHz - 2474 MHz, max EIRP 100mW
Anzahl Kanäle 12 / Automatische Kanalwahl
Reichweite bei freier Sicht ca. 250 m
Reichweite in geschlossenen
Räumen
Betriebstemperatur 0 °C bis 40 °C Umgebungstemperatur
Betriebstemperatur 0 °C bis 40 °C Umgebungstemperatur
Akku Lithium-Polymerakku (LiPo-Akku), 3,7 V, 1200 mAh
Eingang 100-240 V AC; 50/60 Hz; 0,1 A
Ausgang 5 V ; 2,75 W;
ca. 40 m. Eine Übertragung ist abhängig von der Umgebung. Wände
oder Bäume können den Empfang erheblich stören.
Babyeinheit
Elterneinheit
Betriebsdauer im normalen Übertragungsmodus: > 15 Stunden
Betriebsdauer im Eco-Mode: > 18 Stunden
Ladezeit bei erster Aufladung mind. 10 Stunden,
jede weitere Akku-Aufladung benötigt ca. 5 Stunden
Netzteile
9.1 FHSS Technologie
Dieses Babyphone arbeitet bei der Funkübertragung mit der modernen FHSS-Technologie.
Frequency Hopping Spread Spectrum
(FHSS) ist ein digitales Frequenzspreizverfahren für die Datenübertragung per Funk.
Dabei wird die gesamte Sendeleistung nicht
wie früher auf einer Trägerfrequenz konzentriert. Stattdessen wechselt die Trägerfrequenz nach dem Zufallsprinzip. Im
Empfänger werden dann die auf verschiedene Trägerfrequenzen aufgeteilten Datenpakete wieder zusammengesetzt.
Dieses Verfahren bringt gegenüber der konventionellen Funkübertragung einige Vorteile:
• Das Funksignal kann wesentlich
schwieriger abgehört werden, da der
Abhörende nicht weiß, auf welche
Trägerfrequenzen es verteilt wurde und
wie das Signal wieder korrekt
zusammengesetzt werden muss. Daher
wird dieses Verfahren z.B. auch bei
Bluetooth oder im militärischen Bereich
verwendet.
• Die Funkübertragung ist deutlich weniger
anfällig für Störsignale. Das liegt daran,
dass eine bestimmte Trägerfrequenz
immer nur sehr kurz benutzt wird, bevor
auf eine andere umgeschaltet wird.
Treten nun auf einer bestimmten
Frequenz Störungen auf, sind immer nur
kleine Datenpakete davon betroffen.
Diese Störungen lassen sich durch
entsprechende Fehlerkorrekturverfahren
aber beseitigen.
16
Page 19
10. Entsorgung
10.1 Gerät
Das Symbol der durchgestrichenen Abfalltonne auf Rädern
bedeutet, dass das Produkt in
der Europäischen Union einer
getrennten Müllsammlung
zugeführt werden muss. Dies
gilt für das Produkt und alle mit
diesem Symbol gekennzeichneten Zubehörteile. Gekennzeichnete Produkte dürfen
nicht über den normalen Hausmüll entsorgt
werden, sondern müssen an einer Annahmestelle für das Recycling von elektrischen
und elektronischen Geräten abgegeben
werden. Recycling hilft, den Verbrauch von
Rohstoffen zu reduzieren und die Umwelt zu
entlasten.
11. Garantie
Neben den Gewährleistungsverpflichtungen des Verkäufers aus dem Kaufvertrag
gewähren wir als Hersteller bei sachgemäßer Handhabung des Gerätes und unter
Beachtung der Bedienungsanleitung 24
Monate Garantie ab Kauf des Gerätes. Das
Kaufdatum und der Gerätetyp sind durch
eine Kaufquittung zu belegen.
Die gesetzlichen Rechte des Käufers werden durch diese Herstellergarantie nicht eingeschränkt.
Wir verpflichten uns, innerhalb der Garantiezeit alle Mängel zu beseitigen, die auf Material- oder Herstellungsfehlern beruhen.
Verschleißteile sind von der Garantie ausgenommen.
Geringfügige Abweichungen von der SollBeschaffenheit, die für Wert und
Gebrauchstauglichkeit des Gerätes unerheblich sind, lösen die Garantiepflicht nicht
aus. Ebenso kann keine Garantie übernommen werden, wenn die Mängel am Gerät auf
Transportschäden, die nicht von uns zu
10.2 Verpackung
Wenn Sie die Verpackung entsorgen möchten, achten Sie auf die entsprechenden
Umweltvorschriften in Ihrem Land. Entsorgen Sie die Verpackung in Deutschland über
eine Sammlung des Dualen Systems
(Grüner Punkt).
10.3 Akku
Akkus dürfen nicht in den Hausmüll.
Verbrauchte Akkus müssen sachgerecht entsorgt werden. Zu diesem
Zweck stehen im batterievertreibenden Handel sowie bei den kommunalen
Sammelstellen entsprechende Behälter zur
Akku-Entsorgung bereit. Akkus, die mit den
folgenden Buchstaben versehen sind, beinhalten u.a. die Schadstoffe: Cd (Cadmium),
Hg (Quecksilber), Pb (Blei).
vertreten sind, auf Fehlgebrauch oder
mangelnde Pflege zurückzuführen sind oder
wenn am Gerät Eingriffe von Personen vorgenommen werden, die hierfür von uns
nicht ermächtigt sind.
Die Garantieleistung erfolgt nach unserer
Wahl durch Reparatur, Austausch von Teilen
oder Austausch des Gerätes. Die Ausführung von Garantieleistungen bewirkt weder
eine Verlängerung noch einen Neubeginn
der Garantiezeit. Die Garantiefrist für eingebaute Ersatzteile endet mit der Garantiefrist
für das ganze Gerät.
Weitergehende oder andere Ansprüche, insbesondere solche auf Ersatz außerhalb des
Gerätes entstandener Schäden sind soweit eine Haftung nicht zwingend gesetzlich angeordnet ist - ausgeschlossen.
Transportkosten und -risiken werden von
uns nicht übernommen.
17
Page 20

Die Einsendung eines Gerätes ohne Nachweis des Kaufdatums wird als Reparaturfall
behandelt. Eine Reparatur des Gerätes
erfolgt erst nach Rücksprache mit dem Kunden.
Für eventuelle Rückfragen bewahren Sie
bitte Anschrift und Artikel-Nummer auf.
Diese Garantiebedingungen gelten für in
Deutschland gekaufte Geräte.
Für nicht in Deutschland gekaufte Geräte
kommen die für das jeweilige Land geltenden Garantiebedingungen zur Anwendung.
MAPA GmbH, Industriestraße 21-25, 27404
Zeven, Germany
11.2 Service-Center Babyphone
Bei Fragen zu ihrem Babyphone kontaktieren Sie bitte unsere Experten für Babyphone. Die Produkt-Hotline finden Sie unter
„Produktservice Babyphone in Europa” auf
Seite 116, oder kontaktieren Sie uns über
unsere Webseite www.nuk-service.com.
Artikel-Nr.: 10.256.438
11.3 Lieferant
Bitte beachten Sie, dass diese Anschrift
keine Serviceanschrift ist. Kontaktieren Sie
bei Problemen und Fragen zum Produkt das
unter 11.2 genannte Service-Center.
11.1 Service-Center NUK
Die Service-Adressen zu Fragen der Garantie oder bei allgemeinen Fragen zur Marke
NUK finden Sie in „Contact addresses NUK”
auf Seite 115.
MAPA GmbH
Industriestraße 21-25
27404 Zeven
Germany
www.nuk.com
12. Konformitätserklärung
Das Gerät erfüllt alle anwendbaren europäischen Richtlinien sowie deren nationalen Umsetzungen. Diese sind aus der EU-Konformitätserklärung ersichtlich, die beim Hersteller angefordert werden kann.
Die Konformitätserklärung finden Sie neben der Bedienungsanleitung im Verkaufskarton
oder auch unter www.nuk.de.
18
Page 21

Contents
1. Description of device . . . . . . . . . . . . . . . . . . . . . . . . . . . . . . . . . . . . . . . . . 20
1.1 Proper use. . . . . . . . . . . . . . . . . . . . . . . . . . . . . . . . . . . . . . . . . . . . . . . . . . . . . . 20
1.2 Description of function . . . . . . . . . . . . . . . . . . . . . . . . . . . . . . . . . . . . . . . . . . . . 20
1.3 Approval . . . . . . . . . . . . . . . . . . . . . . . . . . . . . . . . . . . . . . . . . . . . . . . . . . . . . . . 20
1.4 Contents of package. . . . . . . . . . . . . . . . . . . . . . . . . . . . . . . . . . . . . . . . . . . . . . 20
2. Safety information. . . . . . . . . . . . . . . . . . . . . . . . . . . . . . . . . . . . . . . . . . . . 21
2.1 General information. . . . . . . . . . . . . . . . . . . . . . . . . . . . . . . . . . . . . . . . . . . . . . . 21
2.2 Protection against electric shock . . . . . . . . . . . . . . . . . . . . . . . . . . . . . . . . . . . . 21
2.3 For your child’s safety . . . . . . . . . . . . . . . . . . . . . . . . . . . . . . . . . . . . . . . . . . . . . 21
2.4 Protection from injury . . . . . . . . . . . . . . . . . . . . . . . . . . . . . . . . . . . . . . . . . . . . . 21
2.5 Material damage . . . . . . . . . . . . . . . . . . . . . . . . . . . . . . . . . . . . . . . . . . . . . . . . . 22
2.6 Using LiPo rechargeable batteries . . . . . . . . . . . . . . . . . . . . . . . . . . . . . . . . . . . 22
3. Components of the baby monitor . . . . . . . . . . . . . . . . . . . . . . . . . . . . . . . 23
3.1 Brief overview of messages . . . . . . . . . . . . . . . . . . . . . . . . . . . . . . . . . . . . . . . . 24
4. Starting the device . . . . . . . . . . . . . . . . . . . . . . . . . . . . . . . . . . . . . . . . . . . 24
4.1 Connecting the parent unit . . . . . . . . . . . . . . . . . . . . . . . . . . . . . . . . . . . . . . . . . 24
4.2 Connecting the baby unit . . . . . . . . . . . . . . . . . . . . . . . . . . . . . . . . . . . . . . . . . . 25
4.3 Connecting baby unit and parent unit. . . . . . . . . . . . . . . . . . . . . . . . . . . . . . . . . 25
4.4 Power supply. . . . . . . . . . . . . . . . . . . . . . . . . . . . . . . . . . . . . . . . . . . . . . . . . . . . 26
4.5 Eco-Mode . . . . . . . . . . . . . . . . . . . . . . . . . . . . . . . . . . . . . . . . . . . . . . . . . . . . . . 26
5. Operating the baby unit . . . . . . . . . . . . . . . . . . . . . . . . . . . . . . . . . . . . . . . 27
5.1 Switching the baby unit on and off . . . . . . . . . . . . . . . . . . . . . . . . . . . . . . . . . . . 27
5.2 Indicator LEDs. . . . . . . . . . . . . . . . . . . . . . . . . . . . . . . . . . . . . . . . . . . . . . . . . . . 27
6. Operating the parent unit . . . . . . . . . . . . . . . . . . . . . . . . . . . . . . . . . . . . . . 27
6.1 Switching the parent unit on and off. . . . . . . . . . . . . . . . . . . . . . . . . . . . . . . . . . 27
6.2 Indicator LEDs. . . . . . . . . . . . . . . . . . . . . . . . . . . . . . . . . . . . . . . . . . . . . . . . . . . 27
6.3 Using the VOX function to adjust the transmission sensitivity . . . . . . . . . . . . . . 28
6.4 Adjusting the volume control . . . . . . . . . . . . . . . . . . . . . . . . . . . . . . . . . . . . . . . 29
6.5 Mute setting . . . . . . . . . . . . . . . . . . . . . . . . . . . . . . . . . . . . . . . . . . . . . . . . . . . . 29
6.6 Talk-Back function. . . . . . . . . . . . . . . . . . . . . . . . . . . . . . . . . . . . . . . . . . . . . . . . 29
7. Cleaning and care . . . . . . . . . . . . . . . . . . . . . . . . . . . . . . . . . . . . . . . . . . . . 29
7.1 Cleaning . . . . . . . . . . . . . . . . . . . . . . . . . . . . . . . . . . . . . . . . . . . . . . . . . . . . . . . 29
7.2 Changing the battery. . . . . . . . . . . . . . . . . . . . . . . . . . . . . . . . . . . . . . . . . . . . . . 30
8. Faults and how to remedy them . . . . . . . . . . . . . . . . . . . . . . . . . . . . . . . . 30
9. Technical data . . . . . . . . . . . . . . . . . . . . . . . . . . . . . . . . . . . . . . . . . . . . . . . 31
9.1 FHSS Technology . . . . . . . . . . . . . . . . . . . . . . . . . . . . . . . . . . . . . . . . . . . . . . . . 31
10. Disposal . . . . . . . . . . . . . . . . . . . . . . . . . . . . . . . . . . . . . . . . . . . . . . . . . . . . 32
10.1 Equipment. . . . . . . . . . . . . . . . . . . . . . . . . . . . . . . . . . . . . . . . . . . . . . . . . . . . . . 32
10.2 Packaging . . . . . . . . . . . . . . . . . . . . . . . . . . . . . . . . . . . . . . . . . . . . . . . . . . . . . . 32
10.3 Disposable/rechargeable batteries . . . . . . . . . . . . . . . . . . . . . . . . . . . . . . . . . . . 32
11. Warranty. . . . . . . . . . . . . . . . . . . . . . . . . . . . . . . . . . . . . . . . . . . . . . . . . . . . 32
11.1 Service Centres NUK . . . . . . . . . . . . . . . . . . . . . . . . . . . . . . . . . . . . . . . . . . . . . 33
11.2 Service Centres Babyphone . . . . . . . . . . . . . . . . . . . . . . . . . . . . . . . . . . . . . . . . 33
11.3 Supplier. . . . . . . . . . . . . . . . . . . . . . . . . . . . . . . . . . . . . . . . . . . . . . . . . . . . . . . . 33
12. Declaration of conformity. . . . . . . . . . . . . . . . . . . . . . . . . . . . . . . . . . . . . . 33
19
Page 22

1. Description of device
1.1 Proper use
This baby monitor Eco Control Audio 500
allows you to listen in to your baby or small
child in the nursery. It can also be used for
sound-only monitoring of the elderly.
This device is intended only for dry
environments. It is not suitable for use in
wetrooms or outdoors in wet weather.
This device is intended for use in private
households. It is not intended for
commercial use.
This device is intended as a supplementary
aid. It is in no way a substitute for the
physical presence and attention of parents,
babysitters or carers.
1.2 Description of function
The baby unit 1 is set up in the room that is
to be monitored. It registers the sounds in
the room and sends it wirelessly to the
parent unit 8.
The parent unit 8 has a built-in rechargeable
battery so that you can always set it up
where you can see it. The battery is
recharged using the supplied mains
adapter.
The limiting distance between baby and
parent unit is about 40 m indoors and up to
250 m outdoors (in open country). The
babyphone’s reception will vary depending
on its surroundings. Thick walls or metal can
reduce the range.
The babyphone has an Eco-Mode, in which
the transmitter (baby unit) automatically
switches to standby as soon as your baby is
sleeping peacefully. Depending on the
sensitivity setting, it will not switch back on
until your baby begins making a noise or
starts to cry.
If you want to be sure of hearing every
single sound from the nursery you can use
the VOX 17 button to set the transmission
sensitivity to its maximum (=level 5). On this
setting the baby unit is continually switched
on (see "6.3 Using the VOX function to
adjust the transmission sensitivity" on
page 28).
If you do not want to hear any sounds at all
you can use the Vol - 11 button to set the
volume to mute. In this case only the LED
display 16 will show you if your baby is
making noise.
Activating Eco-Mode minimises the highfrequency radiation in the children’s room. In
this mode the baby unit merely sends a brief
signal to the parent unit every 30 seconds to
test the connection. If the parent unit is out
of range, the parents will be alerted by a
beep.
You will find more information about EcoMode in "4.5Eco-Mode" on page 26 and in
"6.3Using the VOX function to adjust the
transmission sensitivity" on page 28.
1.3 Approval
The baby monitor operates at a frequency of
2.4 GHz. This device may be used in all EU
countries. In Russia and Ukraine you should
comply with the specific national
restrictions.
1.4 Contents of package
• Baby monitor:
– 1 baby unit (for the nursery)
– 1 mains adapter for the baby unit
– 1 parent unit
– 1 mains adapter for the parent unit
– 1 3.7 V LiPo battery, 1200 mAh
•1 User Manual
• 1 Quick Start Guide
20
Page 23
2. Safety information
2.1 General information
• Please read these operating instructions
carefully before using the device. These
instructions form part of the device and
must be kept to hand at all times.
• The device should only be used for the
intended purpose, as described (see
"1.1 Proper use" on page 20).
• Use only accessories supplied with the
device or expressly permitted in these
instructions.
• Each time you use the device, first check
that it is working properly. As well as
checking the range and the connection,
we recommend always checking that the
device is audible when in use.
• These devices may be used only for the
transmission of sound within your
personal environment. Everybody in a
room that could be overheard must be
informed that you are using the device.
• Please note that transmission will always
depend on the surroundings. Electronic
devices, insulation, walls, moisture or
trees can seriously interfere with
reception.
2.2 Protection against electric
shock
Warning! The following safety
instructions are intended to protect
you from electric shock.
• Do not attempt to repair the device
yourself. The device may be opened only
by qualified technicians.
• The device may not be used if it is
damaged.
• If you are travelling, please always make
sure that the available voltage matches
that given in the technical data.
2.3 For your child’s safety
Warning! Children cannot
recognise the dangers associated
with using such devices. They
should therefore be kept away from
them.
• Make sure that the unit and its
accessories are always kept out of
baby’s reach. The unit and its
accessories should always be at least
1 m way.
• Children are often poor judges of hazard
and are liable to injure themselves. You
should therefore note:
– This device is not designed to be used
by people (including children) with
physical, sensory or mental disabilities
or with insufficient experience and/or
knowledge, unless a person
responsible for their safety is
supervising them or instructing them
on how to use the device.
– Children should be supervised to
ensure that they cannot play with the
device.
– Make sure that the plastic packaging
does not become a lethal trap for children. There is a risk of suffocation.
Plastic packaging is not a toy.
– To avoid the possibility of
strangulation, the power cable must
always be out of baby’s reach.
• Use the unit only to give you additional
safety. It can never serve as a substitute
for a human carer.
2.4 Protection from injury
Warning! Follow the instructions
below to prevent injuries.
• Make sure the power supply cable is
tucked away neatly to prevent anyone
from tripping over it.
21
Page 24
2.5 Material damage
Caution! To prevent material damage,
follow the instructions below.
• Do not expose the device to direct
sunlight or extreme heat as UV rays and
overheating may make the plastic brittle
and the electronics could become
damaged.
• The baby monitor should not be placed
near to a source of heat and the device
should also not be covered, to prevent it
overheating.
• Never use the baby monitor in damp or
wet surroundings.
• Never use the baby monitor in dusty
surroundings. This could shorten the life
of the device.
• Never use sharp or abrasive cleaning
agents as these could damage your
device.
• When the device is not in use, always
switch it off using the On/Off button.
2.6 Using LiPo rechargeable
batteries
Warning!
To avoid potential hazards that
could cause injuries or damage the
equipment, always note the
following:
• Avoid short circuits.
The battery poles should never be
allowed to come into contact with any
metal objects, as this could cause a short
circuit. A short circuit can cause the
battery to overheat, in which case it
could leak electrolyte and possibly cause
an explosion or fire.
If electrolyte does leak out, avoid any
contact with skin, eyes and mucous
membranes in order to prevent injuries. In
the event of any contact with the
electrolyte, rinse the affected areas with
plenty of clean fresh water and
immediately seek medical attention.
• The built-in battery may be replaced only
by a genuine replacement battery. If the
battery is defective, please contact one
of our service addresses (see "Contact
addresses NUK“ on page115).
• To avoid the risk of explosion, normal
batteries should not be recharged,
heated up or disposed of by incineration.
• Never try to open the battery, bend the
contacts or pull them off. Do not throw
the battery onto the floor or knock nails
into it.
Damaging the battery could cause an
internal short circuit, in which case it
could leak electrolyte and possibly cause
an explosion or fire.
• Use only the supplied mains adapter to
charge the battery.
Using the wrong mains adapter could
overcharge it, causing it to overheat and
explode.
• LiPo batteries may be charged or stored
only on heatproof, non-combustible
surfaces.
• LiPo batteries may be charged only under
supervision so that you can intervene in
good time in the event of a failure.
• LiPo batteries contain toxic substances.
For this reason always observe the
regulations for its disposal given in
"10.3Disposable/rechargeable batteries"
on page 32.
22
Page 25

3. Components of the baby monitor
1Baby unit
2 Speaker
3 Mains adapter socket
4 Microphone
5 On/Off button:
– brief press: switches on;
– long press: switches off.
6 Power LED
7 VOX LED
– lights up green when it has set up a
connection to the parent unit;
– switches off if the connection to the
parent unit is lost.
8 Parent unit
9 Battery cover
10 The Vol + button:
– increases the volume.
11 The Vol - button:
– reduces the volume.
– Switches to mute on the lowest setting.
Sounds are then indicated only by the
LEDs 16.
12 Speaker
13 Connection indicator
– lights up green when it has a
connection;
– flashes green: if there is a working
connection but Eco-Mode is activated;
– lights up red if the connection is lost.
14 On/Off button
15 The power supply indicator POWER
– lights up green: the device is switched
on and the battery is fully charged;
– flashes green: the battery is currently
being charged;
– lights up red and beeps at one minute
intervals: low battery warning. Within
about 15 – 20 minutes the parent unit
will switch off automatically.
16 Indicator LEDs
– indicates the noise level in the nursery.
The more LEDs are lit, the louder are
the noises;
– indicates the different levels when you
are adjusting the volume. The more
LEDs are lit, the louder the sound from
the loudspeaker;
– indicates the different levels when you
are adjusting the VOX sensitivity. The
more LEDs are flashing, the sooner the
device will react to sounds. If 5 LEDs
are lit the device will switch to
continuous transmission.
17 Press the VOX button
– press briefly and use Vol +/- to set the
transmission sensitivity.
18 Hold down the TAL K button:
– Holding down this button activates the
function “talk to baby”;
– while the baby unit is in Eco-Mode, the
Talk-Back function is disabled and this
is indicated by two consecutive beeps.
19 Mains adapter socket
20 Microphone
23
Page 26

3.1 Brief overview of messages
Baby unit
Light Display Meaning
Power-LED 6 green Baby unit is switched on
green Link ok (non Eco-Mode)
VOX LED 7
Light Display Meaning
Connection
indicator 13
Power-LED 15
1 - 5 LEDs blinking Sensitivity (VOX) setting. The more
Indicator
LEDs 16
None single beep Talk-Back on parent unit
None double beep
OFF Link ok (Eco-Mode)
Link not ok
Parent unit
green Link ok (non Eco-Mode)
green blinking Link ok (Eco-Mode)
red blinking
1 beep every 30 s
green The parent unit is switched on and the
red
1 beep every 60 s
green blinking Charge battery indicator
1 - 5 LEDs
1 - 5 beeps
1 - 5 LEDs Visual baby sound indication. The more
Link not ok
battery is fully charged
Low battery warning.
The parent unit will switch off within the
next 15 min without additional warning.
LEDs are flashing, the sooner the device
will react to sounds. If 5 LEDs are lit the
device will switch to continuous
transmission.
Volume regulation. The more LEDs are
lit, the louder the sound from the
loudspeaker.
LEDs are lit, the higher the noise level in
the nursery.
Talk-Back on parent unit during
Eco-Mode
4. Starting the device
Note: Always connect the cables before
inserting the mains adapter into the socket.
4.1 Connecting the parent unit
The parent unit is powered by the supplied
rechargeable LiPo battery. This can be
charged using the supplied mains adapter.
Caution! To prevent malfunctions, first
insert the battery into the parent unit and
then connect the mains adapter to the
parent unit.
1. Remove the battery cover 9 on the back
of the parent unit 8, by sliding it
downwards.
24
Page 27

2. Put the battery in its compartment as
indicated on the unit. Make sure you
insert it with the correct polarity (+ and -).
3. Slide the battery cover 9 back onto the
parent unit 8.
4. Insert the small plug of the mains adapter
into the mains adapter socket 19 of the
parent unit.
5. Insert the plug into a power socket that
matches the rating given in the technical
data (see "9. Technical data" on
page 31).
6. Initially, charge the parent unit
continuously for 10 hours to activate the
full battery capacity.
Subsequently the battery will take only
about 5 hours to charge. It can also be
charged while the unit is in operation.
The POWER 15 LED indicates that
charging is in progress. If it:
– flashes green: the battery is currently
being charged;
– lights up green: the battery is fully
charged;
– lights up red and beeps at one minute
intervals: low battery warning. Within
about 15 – 20 minutes the parent unit
will switch off automatically.
4.2 Connecting the baby unit
Note: Don’t install the baby unit 1 until the
battery of the parent unit 8 is fully charged.
1. Put the baby unit 1 somewhere in the
nursery where your baby will not be able
to reach it.
An optimal distance between baby and
the baby unit is from 1 to 2 m.
2. Insert the mains adapter plug into the
socket 3 of the baby unit 1.
3. Insert the plug into a power socket that
matches the rating given in the technical
data (see "9. Technical data" on
page 31).
4.3 Connecting baby unit and parent unit
1. Use the On/Off button 5 to switch the
baby unit 1 on. Keep the button pressed
for a moment until the Power LED 6 lights
up.
2. Use the On/Off button 14 to switch the
parent unit 8 on. Keep the button pressed
for a moment until the LED 15 lights up a
steady green.
The connection will be set up
automatically. While this is being done
the connection indicator 13 will light up
red.
As soon as the connection has been
established, the connection indicator on
the parent unit 13 and the VOX LED on
the baby unit 7 will light up green.
If the connection indicator 13 begins to
flash green, this means that there is a
connection between the parent unit and
the baby unit, but your baby is currently
asleep and therefore the device has
automatically activated Eco-Mode to
reduce the high-frequency radiation in
the children’s room and save energy.
In the event that the connection between
the parent unit and the baby unit breaks
down, the devices will automatically attempt
to establish a new one.
If a new connection is not established within
30 seconds, the parent unit 8 will emit a
regular beep and the connection
indicator 13 will light up red. You may need
to move the parent unit to a different
location before a new connection can be
established.
3. First go and check on baby to make sure
everything is OK.
4. Then try to set up a new connection by
moving about.
The connection will be automatically re-
established as soon as you are within
range.
25
Page 28

As soon as the connection has been set
up the connection indicator 13 will again
light up green.
4.4 Power supply
• The power supply for the baby unit 1
works only via the mains adapter.
• The parent unit 8 can be operated with
no mains connection using the battery.
The state of the battery is indicated by the
POWER 15 LED. If it:
– lights up green: the device is switched
on and the battery is fully charged;
– flashes green: the battery is currently
being charged;
– lights up red and beeps at one minute
intervals: low battery warning. Within
about 15 – 20 minutes the parent unit
will switch off automatically.
During these 15 minutes you can still
activate and deactivate any functions
you wish. Please be aware that using
e.g. the Talk-Back function and/or
maximising the volume control will
increase the unit’s power consumption
and therefore reduce the remaining
time you have available. You should
connect the mains adapter to your
mains supply as soon as the
POWER 15 LED begins to flash red.
• The parent unit can be connected to the
mains via the mains adapter and receive
power from there, while at the same time
recharging the battery. If the parent unit is
switched on, recharging the battery will
take somewhat longer. While the battery
is charging, the LED 15 flashes green.
Notes:
– With a fully charged battery you can
operate the parent unit for up to
18 hours. The exact time will depend
on how the unit is used (whether the
parent unit frequently switches on,
whether the two-way speaking function
is much used, how high the volume is
set, etc.).
– Charging an empty battery takes about
5 hours.
4.5 Eco-Mode
Description of function
This babyphone has an Eco-Mode setting,
which not only saves electric power but also
minimises the high-frequency radiation in
the nursery.
At VOX levels 1, 2, 3 and 4, (see "6.3 Using
the VOX function to adjust the transmission
sensitivity" on page 28) Eco-Mode is
activated automatically about 10 seconds
after your baby goes to sleep and no longer
makes any noise.
You can see when this happens because the
connection indicator 13 will begin to flash
green. In Eco-Mode, not only the baby unit
is automatically set to standby, but also the
parent unit.
While Eco-Mode is activated, any functions
that might wake the baby are automatically
deactivated. For example, you cannot use
the Talk-Back function, but even in EcoMode you are always connected to your
baby and always know if you are still within
range.
This babyphone has a range checker that
also works in Eco-Mode. If you are out of
range, you will automatically receive a
warning even if Eco-Mode is activated,
because even in standby mode, the baby
unit sends a signal to the parent unit every
30 seconds to check the connection.
If the connection indicator 13 lights up
green, there is a functioning connection
between the baby unit and the parent unit. If
the connection indicator 13 flashes green,
Eco-Mode has been activated. If the
connection indicator 13 changes to red, this
means that you are out of range and/or the
two units are no longer communicating.
Note: Check the range of your baby monitor
before using Eco-Mode. Make sure that the
two units are always within range, so that
you can hear your baby.
The device automatically switches to
transmission mode as soon as your baby
26
Page 29

makes a noise that exceeds your selected
sound threshold (VOX levels 1 - 4). EcoMode is deactivated immediately and the
connection indicator 13 stops flashing.
At VOX level 5 the device transmits
continuously and Eco-Mode is deactivated.
If you want to check that everything is OK
while Eco-Mode is activated (although this
5. Operating the baby unit
already indicates that your baby is sleeping
peacefully), you can deactivate Eco-Mode
by switching to permanent transmission
mode:
1. press the VOX button 17on the parent
unit 8.
2. Then press the Vol+ button 10 repeatedly
until all 5 LEDs 16 are lit.
5.1 Switching the baby unit on and off
The baby unit 1 will switch on automatically
as soon as you have connected the mains
adapter and plugged it into the power
supply. You can subsequently switch the
baby unit on or off at any time:
• To switch the baby unit 1 on or off, press
the On/Off button 5.
6. Operating the parent unit
6.1 Switching the parent unit on and off
To switch the parent unit 8 on or off, press
and hold the On/Off button 14:
– when you hear a beep and the Power
LED 15 lights up, the parent unit is
switched on;
– when you hear a beep and the Power
LED 15 goes out, the parent unit is
switched off.
6.2 Indicator LEDs
• The connection indicator 13 on the
parent unit 8 shows the state of the
connection to the baby unit 1. It:
– lights up green when it has a
connection;
– flashes green when the baby unit is in
Eco-Mode and indicates that your
baby is sleeping peacefully;
5.2 Indicator LEDs
•The Power LED 6 lights up green while
the baby unit is switched on.
• The VOX LED 7 on the baby unit lights up
green when there is an established
connection between it and the parent
unit.
• The VOX LED 7 will not be lit while the
baby unit 1 is switched to Eco-Mode or if
it was not possible to set up a connection
to the parent unit.
– lights up red if the connection has
broken down or the baby unit is
switched off.
Notes:
– If the baby unit 1 is in Eco-Mode and
the parent unit moves out of range, the
connection indicator 13 will light up
red. You will also hear a beep every
30 seconds.
– As soon as the parent unit 8 comes
back into range, or the reason for the
breakdown in communications is
eliminated, the connection indicator 13
lights up green again indicating that the
units are able to communicate.
– When the units are first switched on,
the connection indicator 13 will initially
be red. The parent unit and baby unit
will set up a connection. As soon as the
connection is set up the display will
turn green.
27
Page 30

• The power supply indicator POWER 15:
– lights up green: the device is switched
on and the battery is fully charged;
– flashes green: the battery currently
being charged;
– lights up red and beeps at one minute
intervals: low battery warning. Within
about 15 – 20 minutes the parent unit
will switch off automatically. Please be
aware that this interval may be
reduced, depending on how you use
the device (for example, VOX level 5
uses more power than level 1).
•The display 16 with the 5 LEDs has three
functions. The LEDs are only visible when
in use.
– indicates the noise level in the nursery.
The more LEDs are lit, the louder the
noises;
– indicates the different levels when you
are adjusting the volume. The more
LEDs are lit, the louder the sound from
the loudspeaker;
– indicates the different levels when you
are adjusting the VOX sensitivity. The
more LEDs are flashing, the sooner the
device will react to sounds. If 5 LEDs
are lit the device will switch to
continuous transmission.
6.3 Using the VOX function to
adjust the transmission
sensitivity
Babies make a lot of different noises. These
can range from loud breathing through
babbling to calling or loud crying. The VOX
function can be set up in such a way that
only loud sounds such as crying or calling
are transmitted while quieter sounds are not
registered.
The VOX function sets up the transmission
sensitivity of the microphone. The higher the
VOX level the more sensitive the device is to
noises.
1. You activate the VOX function by briefly
pressing the VOX button 17.
The LEDs 16 indicate the sensitivity of
the current setting by flashing.
2. You can increase or decrease the
transmission sensitivity by pressing one
of the buttons VOL + 10 or VOL - 11. The
number of flashing LEDs 16 corresponds
to the selected level:
– VOX level 1 = extremely low sensitivity,
reacts only if baby screams really
loudly;
– VOX level 2 = low sensitivity, reacts if
baby screams loudly;
– VOX level 3 = normal sensitivity, reacts
if baby cries normally;
– VOX level 4 = high sensitivity, reacts
even to slight sounds;
– VOX level 5 = Eco-Mode is switched
off. The unit is set to transmit continuously.
You can set up the volume at which the
parent unit should output the transmitted
sounds using the two buttons VOL + 10 and
VOL - 11 (see "6.4 Adjusting the volume
control" on page 29).
Note: After activating the VOX function, you
have about two seconds to alter the
transmission sensitivity. The device will then
automatically switch back to transmitting
sounds. You can see this has happened
because the LEDs 16 will no longer be
flashing, and the VOL + 10 and VOL - 11
buttons now only modify the volume.
Caution! In continuous transmission mode
at VOX level 5, all sounds are transmitted
continuously. When the baby is sleeping
peacefully, the volume is automatically
reduced to its lowest level after a few
seconds to minimise background noise. As
soon as the child begins to make a noise,
the volume automatically returns to its
previous setting.
28
Page 31

6.4 Adjusting the volume control
1. You can use the VOL + 10 and VOL - 11
buttons to set the volume at which you
hear the sounds emitted by the parent unit.
Each time you press one of the buttons you
will hear a beep at the volume that is
currently set up and it will show you with
the accordance of lit LEDs 16. The louder
your chosen setting, the louder any beeps
will be and the more LEDs will light up.
Note: When the VOX function is set to
low sensitivity (see "6.3 Using the VOX
function to adjust the transmission
sensitivity" on page 28), then quiet
sounds will not be transmitted regardless
of the volume setting. This means that
turning up the volume will not enable you
to hear anything more. If you want to hear
more of the sounds from the nursery you
will need to increase the transmission
sensitivity by selecting a higher VOX
level.
6.5 Mute setting
The parent unit can be “MUTED”. Sounds
from the nursery will then no longer be
transmitted.
1. Press the VOL - 11 button repeatedly
until you can no longer hear beeping.
No sounds will now be transmitted.
2. The LEDs 16 will continue to indicate the
noise level in the nursery. The more LEDs
are lit the louder are the noises in the
nursery.
3. You can cancel the mute setting by
pressing the VOL + 10 key.
4. If the parent unit is muted and you
activate the Talk-Back function, the
volume will automatically return to the
first level.
6.6 Talk-Back function
You can use the “Talk-Back” function to
speak to your baby.
1. Hold down the TA LK 18 button on the
parent unit.
When you hear a beep, this means that
voice connection is established.
2. At the same time, speak into the
microphone 20 on the parent unit.
Your baby can now hear your voice from
the loudspeaker 2 on the baby unit.
3. Release the TALK 1 8 button in order to
hear the baby’s reaction.
Notes:
– If the baby unit 1 is in Eco-Mode, this
function is deactivated so that you do
not inadvertently wake your baby. In
this case, two consecutive beeps will
remind you that the Talk-Back function
is currently not available.
– If the volume of the parent unit is set to
“MUTE” (see "6.4 Adjusting the volume
control" on page 29), it will
automatically be increased to level 1 as
soon as you press the TALK 1 8 button.
7.1 Cleaning
Warning! To avoid the risk of electric
shocks, injuries and damage:
– Always disconnect the mains
adapter from the power socket
before cleaning the device.
– Never immerse the individual
parts in water.
7. Cleaning and care
Caution! Under no circumstances use
abrasive, corrosive or scratching cleaning
agents, as these could damage the device.
1. If necessary, wipe the individual parts
with a damp cloth.
2. Only use the baby monitor again when all
the parts have fully dried out.
29
Page 32

7.2 Changing the battery
The installed 3.7V 1200 mAh lithium polymer
battery (LiPo) may be replaced only by a
genuine replacement battery as used by us.
If necessary please contact our Product
Service (see "Product service babyphone in
Europe“ on page116).
1. Remove the battery cover 9 on the back
of the parent unit 8, by sliding it
downwards.
2. Remove the defective battery.
3. Put the new battery in its compartment
as indicated on the unit. Make sure you
insert it with the correct polarity (+ and -).
4. Slide the battery cover 9 back onto the
parent unit 8.
5. Initially, charge the parent unit
continuously for 10 hours to activate the
full battery capacity (see "4.1 Connecting
the parent unit" on page 24).
8. Faults and how to remedy them
Fault Cause Remedy
Baby unit or
parent unit does
not work
Loud whistling Feedback due to the parent unit
Parent unit is
beeping
Connection
indicator
13 has lit
up red
No sound from the
parent unit
No power supply Set up the power supply (see "4.4 Power
supply" on page 26)
Battery of parent unit is empty Charge the battery (see "4.4 Power supply"
on page 26)
The unit is not switched on Switch it on (see "4.1Connecting the parent
unit" on page 24 and "4.2Connecting the
baby unit" on page 25)
The baby unit and parent unit are
too far apart, or the signal is being
blocked by solid walls or other
electrical equipment
and baby unit being too close
together
Connection to the baby unit has
been lost
Problem with the power supply Check the power supply (see "4.4Power
The parent unit is out of range Set up the connection (see "4.3 Connecting
Volume is muted Increase the volume (see "Mute setting“ on
VOX function is set too low Increase the transmission sensitivity (see
Reduce the distance or place the parent
unit somewhere else
Increase the distance to at least 2 – 3 m
Reduce the volume and the VOX level on
the parent unit if you are in the immediate
vicinity of the baby unit (see "6.3Using the
VOX function to adjust the transmission
sensitivity" on page 28 and "6.4Adjusting
the volume control" on page 29).
Set up the connection (see "4.3 Connecting
baby unit and parent unit" on page 25)
supply" on page 26)
baby unit and parent unit" on page 25)
page29)
"6.3Using the VOX function to adjust the
transmission sensitivity" on page 28 and
"3.1Brief overview of messages" on page
24)
30
Page 33

If these hints do not solve the problem you
can try to clear the fault as follows:
1. Take the battery out of the parent unit.
2. Unplug the mains adapters from their
power sockets.
3. Wait a few minutes.
4. Replace the battery and plug the mains
adapters back in.
If this has not resolved your problem, please
contact one of our Service Centres (see
"11.2 Service Centres Babyphone" on
page 33).
9. Technical data
Wireless connection 2.4 GHz FHSS
Transmission frequency 2408 MHz - 2474 MHz, max EIRP 100mW
Number of channels 12 / automatic channel selection
Line of sight range about 250 m
Range within enclosed rooms about 40 m. Successful transmission depends on the environment.
Walls or trees can seriously interfere with reception.
Baby unit
Operating temperature 0 °C to 40 °C ambient temperature
Parent unit
Operating temperature 0 °C to 40 °C ambient temperature
Battery Lithium polymer battery (LiPo), 3.7 V, 1200 mAh
Period of operation in normal transmission mode: at least 15 hours
Period of operation in Eco-Mode: at least 18 hours
Charging time when battery is charged for the first time: at least 10
hours,
on subsequent occasions, charging takes about 5 hours
Mains adapters
Input 100–240 V AC; 50/60 Hz; 0.1 A
Output 5 V ; 2.75 W;
9.1 FHSS Technology
The wireless transmissions of this baby
monitor use modern FHSS technology.
Frequency Hopping Spread Spectrum
(FHSS) is a digital frequency spreading
method for wireless data transmissions.
Unlike earlier methods, the whole of the
transmission power is not concentrated on a
single frequency. Instead, the carrier
frequency is changed at random. The
individual data packets transmitted via the
different carrier frequencies are then
reassembled in the receiver.
This method has several advantages over
conventional radio transmission:
• It is also much more difficult to intercept
the radio signal, because the listener
does not know how the signal is
31
distributed among the different
frequencies and how to correctly
reassemble it. For this reason the same
method is used by Bluetooth and by the
military.
• Radio transmissions that use this method
are also much less susceptible to
interference. This is because a given
carrier frequency is always used only very
briefly before switching to another. If
there is interference on one frequency it
will affect only small data packets, and
appropriate correction algorithms can
compensate for such errors.
Page 34

10. Disposal
10.1 Equipment
The symbol of the crossedthrough wheelie bin means,
within the European Union, that
the product is subject to a
separate waste collection. This
applies to the product and all
accessories marked with this
symbol. Products labelled as such must not
be disposed of with the normal household
waste collections; they must be taken to a
recycling bank for electrical and electronic
equipment. Recycling helps to reduce the
use of raw materials and is eco-friendly.
10.2 Packaging
When you wish to dispose of the packaging,
please observe the relevant environmental
regulations for your country.
11. Warranty
In addition to the seller's warranty
obligations arising from the contract to
purchase, we as the manufacturers provide
a warranty of 24 months from purchase of
the appliance as long as the appliance is
used properly and the operating instructions
are followed. Evidence of the date of
purchase and the type of appliance should
be provided by means of a receipt.
The purchaser's statutory rights are
unaffected by this manufacturer warranty.
During the warranty period, we undertake to
remedy any defects attributable to poor
materials or workmanship. Wear parts are
excluded from the warranty.
Minor deviations from specified quality
which do not affect the value or usability of
the appliance are not covered by the
warranty. We are likewise unable to accept
the warranty if the defects on the appliance
are due to transport damage for which we
are not responsible, if they are attributable
to misuse or lack of care or if the appliance
10.3 Disposable/rechargeable batteries
Batteries must not be disposed of
with domestic waste. Flat batteries
must be disposed of properly.
Special containers for battery
disposal are provided for this purpose at
shops selling batteries or at municipal
collection points. Batteries and
rechargeable batteries on which the
following letters are printed contain, among
other things, the following harmful
substances: Cd (cadmium), Hg (mercury),
Pb (lead).
has been interfered with by persons not
authorized by us to do so.
The warranty service will involve repair,
replacement of parts or replacement of the
appliance at our discretion. The warranty
period will be neither extended nor restarted
by the performance of warranty services.
The warranty for any spare parts fitted will
expire with the warranty for the appliance as
a whole.
Extended or different claims, especially
those relating to the making good of
damage sustained outside the appliance,
are excluded unless liability is compulsory in
law.
We will not accept the costs or risks of
transport.
An appliance sent in without evidence of the
purchase date will be treated as a repair.
The appliance will only be repaired following
discussion with the customer.
Please keep this address and article number
in case of any queries.
32
Page 35

Warranty conditions applicable for the
country in question apply to devices not
bought in Germany.
"Product service babyphone in Europe" on
page 116, or you can contact us via our
website www.nuk-service.com.
MAPA GmbH, Industriestraße 21-25, 27404
Zeven, Germany
11.1 Service Centres NUK
You will find our service addresses for
guarantee questions and general queries
about the NUK brand at "Contact addresses
NUK" on page 115.
11.2 Service Centres Babyphone
If you have any queries about your
babyphone, please contact our babyphone
experts. You will find the product hotline at
Article no.: 10.256.438
11.3 Supplier
Please note that this is not an address for
service. If you have any problems with or
queries about your product, contact one of
the Service Centres listed in 11.2.
MAPA GmbH
Industriestraße 21-25
27404 Zeven
Germany
www.nuk.com
12. Declaration of conformity
The device meets all applicable European directives, as well as the relevant national laws
implementing them. These are shown in the EU declaration of conformity which can be
requested from the manufacturer.
You will find the Declaration of Conformity and the Operating Instructions in the package, or
at www.nuk.de.
33
Page 36

Sommaire
1. Description de l’appareil . . . . . . . . . . . . . . . . . . . . . . . . . . . . . . . . . . . . . . 35
1.1 Usage prévu . . . . . . . . . . . . . . . . . . . . . . . . . . . . . . . . . . . . . . . . . . . . . . . . . . . . 35
1.2 Description du fonctionnement . . . . . . . . . . . . . . . . . . . . . . . . . . . . . . . . . . . . . . 35
1.3 Homologation . . . . . . . . . . . . . . . . . . . . . . . . . . . . . . . . . . . . . . . . . . . . . . . . . . . 35
1.4 Contenu livré . . . . . . . . . . . . . . . . . . . . . . . . . . . . . . . . . . . . . . . . . . . . . . . . . . . . 35
2. Consignes de sécurité . . . . . . . . . . . . . . . . . . . . . . . . . . . . . . . . . . . . . . . . 36
2.1 Consignes générales . . . . . . . . . . . . . . . . . . . . . . . . . . . . . . . . . . . . . . . . . . . . . . 36
2.2 Protection contre le choc électrique . . . . . . . . . . . . . . . . . . . . . . . . . . . . . . . . . . 36
2.3 Pour la sécurité de votre enfant. . . . . . . . . . . . . . . . . . . . . . . . . . . . . . . . . . . . . . 36
2.4 Protection contre les blessures . . . . . . . . . . . . . . . . . . . . . . . . . . . . . . . . . . . . . . 37
2.5 Dommages matériels. . . . . . . . . . . . . . . . . . . . . . . . . . . . . . . . . . . . . . . . . . . . . . 37
2.6 Utilisation des batteries LiPo. . . . . . . . . . . . . . . . . . . . . . . . . . . . . . . . . . . . . . . . 37
3. Composants de l’écoute bébé . . . . . . . . . . . . . . . . . . . . . . . . . . . . . . . . . . 38
3.1 Aperçu des messages. . . . . . . . . . . . . . . . . . . . . . . . . . . . . . . . . . . . . . . . . . . . . 39
4. Mise en marche de l’appareil. . . . . . . . . . . . . . . . . . . . . . . . . . . . . . . . . . . 40
4.1 Raccordement de l’unité parents . . . . . . . . . . . . . . . . . . . . . . . . . . . . . . . . . . . . 40
4.2 Raccordement de l’unité bébé . . . . . . . . . . . . . . . . . . . . . . . . . . . . . . . . . . . . . . 40
4.3 Connexion de l’unité bébé et de l’unité parents . . . . . . . . . . . . . . . . . . . . . . . . . 40
4.4 Alimentation en courant. . . . . . . . . . . . . . . . . . . . . . . . . . . . . . . . . . . . . . . . . . . . 41
4.5 Eco-Mode . . . . . . . . . . . . . . . . . . . . . . . . . . . . . . . . . . . . . . . . . . . . . . . . . . . . . . 41
5. Commande de l’unité bébé . . . . . . . . . . . . . . . . . . . . . . . . . . . . . . . . . . . . 42
5.1 Mise en marche et mise à l’arrêt de l’unité bébé. . . . . . . . . . . . . . . . . . . . . . . . . 42
5.2 Témoins d’affichage . . . . . . . . . . . . . . . . . . . . . . . . . . . . . . . . . . . . . . . . . . . . . . 42
6. Commande de l’unité parents . . . . . . . . . . . . . . . . . . . . . . . . . . . . . . . . . . 43
6.1 Mise en marche et mise à l’arrêt de l’unité parents. . . . . . . . . . . . . . . . . . . . . . . 43
6.2 Témoins d’affichage . . . . . . . . . . . . . . . . . . . . . . . . . . . . . . . . . . . . . . . . . . . . . . 43
6.3 Réglage du niveau de sensibilité de la fonction VOX . . . . . . . . . . . . . . . . . . . . . 43
6.4 Réglage du volume . . . . . . . . . . . . . . . . . . . . . . . . . . . . . . . . . . . . . . . . . . . . . . . 44
6.5 Mise en sourdine. . . . . . . . . . . . . . . . . . . . . . . . . . . . . . . . . . . . . . . . . . . . . . . . . 44
6.6 Fonction Talk-Back . . . . . . . . . . . . . . . . . . . . . . . . . . . . . . . . . . . . . . . . . . . . . . . 45
7. Nettoyage et entretien de l’appareil . . . . . . . . . . . . . . . . . . . . . . . . . . . . . 45
7.1 Nettoyage . . . . . . . . . . . . . . . . . . . . . . . . . . . . . . . . . . . . . . . . . . . . . . . . . . . . . . 45
7.2 Remplacement de la batterie . . . . . . . . . . . . . . . . . . . . . . . . . . . . . . . . . . . . . . . 45
8. Dysfonctionnements et solutions . . . . . . . . . . . . . . . . . . . . . . . . . . . . . . . 46
9. Caractéristiques techniques . . . . . . . . . . . . . . . . . . . . . . . . . . . . . . . . . . . 47
9.1 Technologie FHSS. . . . . . . . . . . . . . . . . . . . . . . . . . . . . . . . . . . . . . . . . . . . . . . . 47
10. Mise au rebut. . . . . . . . . . . . . . . . . . . . . . . . . . . . . . . . . . . . . . . . . . . . . . . . 48
10.1 Appareil . . . . . . . . . . . . . . . . . . . . . . . . . . . . . . . . . . . . . . . . . . . . . . . . . . . . . . . . 48
10.2 Emballage . . . . . . . . . . . . . . . . . . . . . . . . . . . . . . . . . . . . . . . . . . . . . . . . . . . . . . 48
10.3 Batterie . . . . . . . . . . . . . . . . . . . . . . . . . . . . . . . . . . . . . . . . . . . . . . . . . . . . . . . . 48
11. Garantie . . . . . . . . . . . . . . . . . . . . . . . . . . . . . . . . . . . . . . . . . . . . . . . . . . . . 48
11.1 Centre de services NUK . . . . . . . . . . . . . . . . . . . . . . . . . . . . . . . . . . . . . . . . . . . 49
11.2 Centre de services Écoute bébé . . . . . . . . . . . . . . . . . . . . . . . . . . . . . . . . . . . . . 49
11.3 Fournisseur . . . . . . . . . . . . . . . . . . . . . . . . . . . . . . . . . . . . . . . . . . . . . . . . . . . . . 49
12. Déclaration de conformité . . . . . . . . . . . . . . . . . . . . . . . . . . . . . . . . . . . . . 49
34
Page 37

1. Description de l’appareil
1.1 Usage prévu
L’écoute bébé Eco Control Audio 500 vous
permet de surveiller le sommeil de bébé ou
des enfants en bas âge dans leur chambre.
Il vous permet également de rester à
l’écoute des seniors.
Cet appareil a été conçu pour une utilisation
dans les environnements secs. Il n’est pas
adapté à l’utilisation dans les pièces
humides, ni en extérieur lorsqu’il pleut.
Cet appareil est destiné à un usage privé. Il
n’a pas été conçu pour un usage
commercial.
Cet appareil est un outil d’assistance. Il n’a
pas vocation à remplacer la présence
physique ni la surveillance active des
parents, baby-sitter ou nourrices.
1.2 Description du fonctionnement
L’unité bébé 1 est installée dans la pièce à
surveiller. Elle enregistre les bruits qu’elle
transmet sans fil à l’unité parents 8.
L’unité parents 8 dispose d’une batterie
intégrée pour une utilisation mobile dans le
champ de vision des adultes. La batterie se
recharge à l’aide de l’adaptateur secteur
fourni.
La distance limite entre l’unité bébé et
l’unité parents est d’env. 40 m en intérieur et
peut aller jusqu’à 250 m en extérieur (champ
libre). La zone de portée de l’écoute bébé
varie en fonction de l’environnement. Les
murs épais ou le métal ont tendance à
réduire la portée.
L’écoute bébé dispose d’un Eco-Mode :
l’émetteur (unité bébé) bascule
automatiquement dans un état de veille
active dès que bébé a trouvé le sommeil.
Selon le niveau de sensibilité réglé, il se
réactive dès que bébé commence à babiller
ou à pleurer.
Si vous souhaitez entendre tous les bruits
provenant de la chambre d’enfant, vous
pouvez régler le niveau de sensibilité de la
fonction VOX sur le maximum (niveau 5) à
l’aide de la touche VOX 17 . Lorsqu’elle est
réglée sur ce niveau, l’unité bébé reste activée
en continu (voir « 6.3 Réglage du niveau de
sensibilité de la fonction VOX » à la page 43).
Si vous ne souhaitez pas entendre les bruits,
vous pouvez mettre l’unité en sourdine à l’aide
de la touche VOL - 11. Dans ce cas, vous
disposerez uniquement d’une signalétique
visuelle, via les témoins d’affichage, 16
lorsque votre enfant fera du bruit.
Lorsque le Eco-Mode est activé, les ondes
haute fréquence émises dans la chambre de
votre enfant sont réduites à un strict
minimum. L’unité bébé envoie seulement un
bref signal à l’unité parents toutes les
30 secondes pour vérifier la connexion. Si
l’unité parents est hors de portée, un signal
sonore les en avertit.
Vous trouverez plus d’informations sur le
Eco-Mode sous « 4.5 Eco-Mode » à la
page 41 et sous « 6.3 Réglage du niveau de
sensibilité de la fonction VOX » à la page 43.
1.3 Homologation
L’écoute bébé fonctionne sur la bande des
2,4 GHz. Il est homologué dans les pays de
l’Union européenne. En Russie et en
Ukraine, des restrictions spécifiques
s’appliquent.
1.4 Contenu livré
•Écoute bébé :
– 1 unité bébé (pour la chambre d’enfant)
– 1 adaptateur secteur pour l’unité bébé
–1 unité parents
– 1 adaptateur secteur pour l’unité
parents
– 1 batterie LiPo 3,7 V, 1200 mAh
• 1 notice d’utilisation
• 1 Quick Start Guide
35
Page 38

2. Consignes de sécurité
2.1 Consignes générales
• Veuillez lire attentivement la notice
d’utilisation avant de mettre l’appareil en
service. Elle fait partie intégrante de
l’appareil et doit toujours être à portée de
main.
• N'utilisez l'appareil et ses accessoires
que dans le cadre de l'usage prévu décrit
ici (voir « 1.1 Usage prévu » à la page 35).
• N’utilisez que les accessoires fournis ou
ceux qui sont expressément autorisés
dans la notice d’utilisation.
• Avant l’utilisation, vous devez vous
assurer du bon fonctionnement de
l’appareil. Après avoir vérifié la connexion
et la portée radio, il est recommandé de
tester le son en fonctionnement.
• Les unités sont exclusivement réservées
à la transmission radio sonore dans un
cadre privé. Toute personne présente
dans cet espace et susceptible d’être
écoutée doit en être informée.
• Il est important de savoir que la qualité
de la transmission radio varie en fonction
de l’environnement. Les appareils
électroniques, dispositifs d’isolation,
murs et cloisons, l’humidité et les arbres
ont un effet considérable sur la qualité de
la réception.
2.2 Protection contre le choc
électrique
Avertissement ! Les consignes de
sécurité suivantes doivent vous
protéger contre tout choc
électrique.
• N’essayez pas de réparer les unités. Seuls
les techniciens sont autorisés à les ouvrir.
• S’il est endommagé, l’appareil ne doit
pas être utilisé.
• Lorsque vous êtes à l’étranger, assurezvous toujours que la tension
d’alimentation correspond aux
caractéristiques techniques de l’appareil.
2.3 Pour la sécurité de votre enfant
Avertissement ! Les enfants ne
reconnaissent pas les dangers
auxquels ils s’exposent en utilisant
cet appareil. C’est la raison pour
laquelle il est important de les tenir
éloignés des appareils.
• Veillez à ce que l’appareil et ses
accessoires se trouvent toujours hors de
portée de votre enfant. Prévoyez au
minimum un écart d’1 m entre votre
enfant et l’appareil ou ses accessoires.
• N’étant guère capables d’évaluer
correctement les dangers, les enfants
risquent de se blesser. Veillez à respecter
les points suivants :
– Cet appareil n’est pas conçu pour être
utilisé par des personnes (y compris
enfants) affectées par un handicap
physique, sensoriel ou mental ou par
des personnes qui ne disposent pas
d’une expérience ou de
connaissances suffisantes, à moins
qu’elle soient sous la surveillance
d’une personne responsable de leur
sécurité ou aient été informées des
modalités d’utilisation de l’appareil.
– Surveillez les enfants pour éviter qu’ils
ne jouent avec l’appareil.
– Veillez à ne pas laisser les enfants
jouer avec le film d’emballage. Il
représente un danger mortel pour les
enfants en les exposant à un risque de
suffocation. Les films d’emballage ne
sont pas des jouets.
– Pour éviter tout risque de strangula-
tion, le câble secteur doit toujours être
hors de portée de l’enfant.
• L’appareil n’est qu’un complément de
sécurité. Il ne saurait en aucun cas
remplacer la surveillance active d’une
personne.
36
Page 39

2.4 Protection contre les blessures
Avertissement ! Respectez les
consignes suivantes pour éviter
toute blessure.
• Veillez à ce que le câble de l’adaptateur
secteur ne constitue jamais un obstacle
sur lequel une personne pourrait
trébucher et tomber.
2.5 Dommages matériels
Attention ! Respectez les consignes
suivantes pour éviter tout dommage
matériel.
• N’exposez pas l’appareil aux rayons
directs du soleil ni à de fortes chaleurs.
Le rayonnement UV et la surchauffe
peuvent fragiliser les matières plastiques
et endommager le système électronique.
• Pour éviter les surchauffes, ne placez pas
l’appareil à proximité de sources de
chaleur et ne le recouvrez pas.
• N’utilisez jamais l’appareil dans des
environnements humides ou exposés à
l’eau.
• N’utilisez jamais l’appareil dans les
environnements poussiéreux. Cela
pourrait réduire la durée de vie du
produit.
• N’utilisez jamais de nettoyants agressifs
ou abrasifs, ceux-ci pouvant
endommager l’appareil.
• Lorsque vous n’utilisez pas l’appareil,
utilisez toujours le bouton marche/arrêt
pour l’éteindre.
2.6 Utilisation des batteries LiPo
Avertissement !
Afin d’éviter les dangers potentiels
susceptibles d’entraîner des
lésions corporelles ou des
dommages matériels, veuillez
respectez les consignes suivantes :
• Éviter les courts-circuits.
Pour éviter tout risque de court-circuit,
les bornes de la batterie ne doivent pas
entrer en contact avec des objets
métalliques. Les courts-circuits peuvent
entraîner une surchauffe de la batterie
avec pour conséquence un écoulement
d’électrolyte, un risque d’explosion et
d’incendie.
Si de l’électrolyte s’écoule, évitez le
contact avec la peau, les yeux et les
muqueuses pour prévenir les blessures.
En cas de contact avec la peau, rincez
immédiatement et abondamment à l’eau
les parties concernées et consultez
immédiatement un médecin.
• Seules les batteries de rechange
d’origine sont autorisées pour remplacer
la batterie intégrée. En cas de défaut,
veuillez vous adressez au service
d’assistance (voir «Contact addresses
NUK» à la page115).
• Pour éviter tout risque d’explosion, ne
jamais charger les batteries, les chauffer
ni les éliminer par incinération.
• Ne jamais essayer d’ouvrir une batterie,
d’en tordre les bornes ni de les arracher.
Ne jamais jeter la batterie sur le sol ni la
crever avec un clou.
Si elle est abîmée, la batterie risque la
surchauffe, avec pour conséquence un
écoulement d’électrolyte et un risque
d’explosion et d’incendie.
• Veuillez utiliser exclusivement
l’adaptateur secteur fourni pour
recharger la batterie.
Un adaptateur secteur inadapté pourrait
entraîner une surcharge électrique et,
par suite, une surchauffe avec risque
d’explosion.
• Les batteries LiPo doivent être
rechargées et/ou conservées uniquement
sur des supports non inflammables et
résistants à des températures très
élevées.
37
Page 40

• La recharge des batteries LiPo nécessite
une surveillance rapprochée pour
permettre une réaction rapide.
3. Composants de l’écoute bébé
1Unité bébé
2 Haut-parleur
3 Prise pour adaptateur secteur
4 Microphone
5 Bouton marche/arrêt :
– Pression brève : allumer
– Pression longue : éteindre
6 Témo in PO WER
– Vert permanent lorsque l’unité bébé
est en marche
7 Témo in VO X
– Vert permanent si la connexion à
l’unité parents est établie ;
– Éteint si la connexion à l’unité parents
est coupée.
8Unité parents
9 Couvercle batterie
10 Tou ch e VOL + :
– Augmenter le volume
11 Tou ch e VOL - :
– Diminuer le volume
– Mise en sourdine (niveau de volume
inférieur). La signalisation des bruits se
fait alors uniquement via les témoins
d’affichage 16.
12 Haut-parleur
13 Témoin de connexion
– Vert permanent : la connexion est
établie entre les deux appareils ;
– Vert clignotant : la connexion est
établie, mais le Eco-Mode est activé ;
– Rouge permanent : les deux appareils
ne sont pas connectés.
14 Bouton marche/arrêt
15 Témoin d’alimentation en courant
POWER
– Vert permanent : l’appareil est en
marche et la batterie est pleine ;
• Les batteries LiPo contiennent des
substances toxiques. Veuillez respecter
les règles applicables en matière
d’élimination des déchets sous
« 10.3 Batterie » à la page 48.
– Vert clignotant : batterie en cours de
charge ;
– Rouge permanent et 1 bip sonore
toutes les 60 secondes :
avertissement batterie vide. 15 - 20
minutes plus tard, l’unité parents se
met automatiquement à l’arrêt.
16 Témoins d’affichage
– Indiquent le niveau sonore dans la
chambre d’enfant. Plus les témoins
sont nombreux à s’allumer, plus le
bruit est intense ;
– Indiquent les variations du niveau
sonore. Plus les témoins sont
nombreux à s’allumer, plus le volume
des bruits transmis est élevé ;
– Indiquent le niveau de sensibilité au
bruit (fonction VOX). Plus les témoins
sont nombreux à clignoter, plus
l’appareil est réactif au bruit. Si les
5 témoins s’allument, la transmission
sonore est permanente.
17 Touche VOX
– pression brève puis réglage du niveau
de sensibilité avec VOL +/-
18 Touche TA LK :
– activation de la fonction « parler avec
bébé » (fonction Talk-Back) par
pression longue de la touche ;
– si l’unité bébé se trouve en Eco-Mode,
la fonction Talk-Back est bloquée, ce
qui est indiqué par deux signaux
sonores.
19 Prise pour adaptateur secteur
20 Microphone
38
Page 41

3.1 Aperçu des messages
Unité bébé
Témoin État Signification
Témoin P O WER 6 Vert L’unité bébé est en marche
Vert Connexion ok (hors Eco-Mode)
Témoin VOX 7
Témoin État Signification
Té mo in
de connexion 13
1 bip sonore toutes les 30 s
Témoin POWER 15
Té mo ins
d’affichage 16
Aucun 1 bip sonore
Aucun Bip sonore double
1 bip sonore toutes les 60 s
1 - 5 témoins clignotent Réglage du niveau de sensibilité avec
1 - 5 témoins allumés
1 - 5 témoins allumés Affichage du volume sonore des cris et
Éteint Connexion ok (en Eco-Mode)
Connexion coupée
Unité parents
Vert Connexion ok (hors Eco-Mode)
Vert clignotant Connexion ok (en Eco-Mode)
Rouge clignotant
Vert L’unité parents est en marche, la
Rouge permanent
Vert clignotant Batterie en cours de charge
1 - 5 bips sonores
Connexion coupée
batterie est pleine
Avertissement batterie vide. L’unité
parents s’arrête automatiquement dans
les 15 min qui suivent.
VOX. Plus les témoins sont nombreux à
clignoter, plus l’appareil est sensible au
bruit. Si les 5 témoins s’allument, la
transmission sonore est permanente.
Réglage du volume sonore. Plus les
témoins sont nombreux à s’allumer,
plus le volume des bruits transmis est
élevé.
du babil de bébé. Plus les témoins sont
nombreux à s’allumer, plus le bruit est
intense dans la chambre d’enfant.
« parler avec bébé » (fonction TalkBack)
« parler avec bébé » (fonction TalkBack) lorsque le Eco-Mode est activé
39
Page 42

4. Mise en marche de l’appareil
Remarque : Raccordez toujours les câbles
avant de brancher l’adaptateur secteur sur
la prise secteur.
4.1 Raccordement de l’unité parents
L’unité parents est alimentée en électricité
par la batterie LiPo fournie. Cette batterie se
recharge avec l’adaptateur secteur fourni.
Attention ! Afin d’éviter tout
dysfonctionnement, installez la batterie
dans l’unité parents avant de brancher
l’adaptateur secteur dessus.
1. Retirez le couvercle de la batterie 9 au
dos de l’unité parents 8 en le poussant
vers le bas.
2. Placez la batterie dans son logement en
suivant les repères. Veiller
particulièrement à respecter la polarité (+
et -).
3. Replacez le couvercle de la batterie 9 sur
l’unité parents 8.
4. Branchez la petite fiche de l’adaptateur
secteur dans la prise réservée 19 sur
l’unité parents.
5. Branchez l’adaptateur secteur sur une
prise de courant conforme aux
caractéristiques techniques (voir
« 9. Caractéristiques techniques » à la
page 47).
6. La première fois, chargez l’unité parents
en continu pendant 10 heures pour que
la batterie atteigne sa capacité
maximale.
Par la suite, la recharge ne durera plus
qu’environ 5 heures. La recharge est
possible parallèlement au
fonctionnement.
Le témoin POWER 15 indique le niveau
de charge :
– Vert clignotant : batterie en cours de
charge ;
– Vert permanent : batterie pleine ;
4.2 Raccordement de l’unité
Remarque : Installez l’unité bébé 1
uniquement une fois la batterie de l’unité
parents 8 entièrement chargée.
1. Placez l’unité bébé 1 hors de portée de
2. Branchez la fiche de l’adaptateur secteur
3. Branchez l’adaptateur secteur sur une
4.3 Connexion de l’unité bébé
En règle générale, l’unité bébé se met
automatiquement en marche dès que vous
enfoncez la fiche secteur dans la prise.
Si ce n’est pas le cas :
1. Allumez l’unité bébé 1 en appuyant sur
2. Allumez l’unité parents 8 en appuyant
– Rouge permanent et 1 bip sonore
toutes les 60 secondes :
avertissement batterie vide. 15 - 20
minutes plus tard, l’unité parents se
met automatiquement à l’arrêt.
bébé
l’enfant dans la chambre.
La distance optimale entre l’unité bébé
et l’enfant est de 1 à 2 m.
dans la prise réservée 3 de l’unité
bébé 1.
prise de courant conforme aux
caractéristiques techniques (voir
« 9. Caractéristiques techniques » à la
page 47).
et de l’unité parents
le bouton marche/arrêt 5. Pour cela,
appuyez brièvement sur le bouton
marche/arrêt, jusqu’à ce que le témoin
POWER 6 s’allume.
sur le bouton marche/arrêt 14. Pour cela,
appuyez brièvement sur le bouton
marche/arrêt, jusqu’à ce que le
témoin 15 reste allumé vert.
La liaison est établie automatiquement.
Tandis que la connexion est en cours
d’établissement, le témoin de
connexion 13 est rouge.
40
Page 43

Dès que la connexion est établie, le
témoin de connexion 13 de l’unité
parents ainsi que le témoin VOX 7 de
l’unité bébé sont verts.
Si le témoin de connexion se met 13 à
clignoter vert, cela signifie simplement
que la connexion entre les unités parents
et bébé reste active, mais que comme
votre enfant dort, le système a basculé
automatiquement en Eco-Mode pour
réduire la concentration d’ondes haute
fréquence dans la chambre et faire des
économies d’énergie.
Si la connexion est coupée, les appareils
essaient de la rétablir automatiquement.
Si la connexion n’est pas rétablie sous
30 secondes, l’unité parents 8 émet un bip
sonore à intervalles réguliers et le témoin de
connexion 13 passe au rouge. Le cas
échéant, il est nécessaire de déplacer l’unité
parents pour rétablir la connexion.
3. Dans un premier temps, assurez-vous
que votre enfant va bien.
4. Essayez ensuite de rétablir la connexion
en déplaçant l’unité parents.
Dès qu’elle se trouve dans la zone de
portée, la connexion est rétablie
automatiquement.
Une fois la connexion établie, le témoin
de connexion 13 repasse au vert.
4.4 Alimentation en courant
• L’alimentation en courant de l’unité
bébé 1 se fait uniquement par
l’intermédiaire de l’adaptateur secteur.
•L’unité parents 8 peut fonctionner sur
batterie sans raccordement électrique.
Le niveau de charge de la batterie est
indiqué par le témoin POWER 15 :
– Vert permanent : l’appareil est en
marche et la batterie est pleine ;
– Vert clignotant : batterie en cours de
charge ;
– Rouge permanent et 1 bip sonore toutes
les 60 secondes : avertissement batterie
vide. 15 - 20 minutes plus tard, l’unité
parents se met automatiquement à
l’arrêt.
Pendant ces 15 minutes, toutes les
fonctions peuvent encore être activées
ou désactivées. Il est important de
savoir que la fonction Talk-Back et le
réglage du volume sur le niveau
maximum coûtent plus d’énergie et
raccourcissent donc ce délai. Il est donc
recommandé de raccorder l’adaptateur
secteur au secteur dès que le témoin
POWER 15 se met à clignoter rouge.
• L’unité parents est ainsi alimentée via
l’adaptateur secteur tandis que la batterie
se recharge. La recharge prend plus de
temps quand l’unité parents fonctionne.
Lorsque la batterie se recharge, le
témoin 15 clignote vert.
Remarques :
– Lorsque la batterie est pleine, vous
pouvez utiliser l’unité parents jusqu’à
18 heures. Mais la durée d’autonomie
varie en fonction de l’intensité
d’utilisation (l’unité parents s’active
souvent, la fonction « parler avec
bébé » est beaucoup utilisée, le
volume est élevé, etc.).
– Une batterie vide a besoin d’environ
5 heures pour être entièrement
rechargée.
4.5 Eco-Mode
Description du fonctionnement
L’écoute bébé dispose de la fonction EcoMode, qui non seulement permet de faire
des économies d’énergie et d’électricité,
mais aussi réduit la concentration des
ondes haute fréquence à un minimum dans
la chambre d’enfant.
Aux niveaux VOX 1, 2, 3 et 4 (voir
« 6.3 Réglage du niveau de sensibilité de la
fonction VOX » à la page 43), le Eco-Mode
s’active automatiquement au bout de
10 secondes environ, si bébé s’est endormi
et ne fait plus de bruit.
41
Page 44

Vous le reconnaîtrez au témoin de
connexion 13 qui se met à clignoter vert. En
Eco-Mode, les deux unités se mettent en
veille automatiquement, l’unité bébé et
l’unité parents.
Lorsque le Eco-Mode est activé, toutes les
fonctions susceptibles de réveiller bébé
sont automatiquement désactivées. Ainsi,
par exemple, vous ne pouvez pas utiliser la
fonction Talk-Back, mais vous restez
connecté(e) à l’unité bébé et savez
exactement si vous vous trouvez dans la
zone de portée.
Car l’écoute bébé dispose d’un dispositif de
contrôle de la connexion qui fonctionne
aussi en Eco-Mode. Ainsi, dès que vous
sortez de la zone de portée, un signal
d’avertissement est émis automatiquement,
même en Eco-Mode, car l’unité bébé
continue à envoyer un signal à l’unité
parents toutes les 30 secondes pour vérifier
la connexion.
Lorsque le témoin de connexion 13 est vert,
la connexion entre l’unité bébé et l’unité
parents est normale. Lorsque le témoin de
connexion 13 clignote vert, le Eco-Mode
s’est activé. Lorsque le témoin de
connexion 13 passe au rouge, cela signifie
que vous êtes sorti(e) de la zone de portée
et que le connexion entre les deux unités a
été coupée.
Remarque : Vérifiez la portée de l’écoute
bébé avant d’utiliser le Eco-Mode. Assurezvous que les unités sont toujours à portée
l’une de l’autre pour pouvoir écouter votre
enfant.
L’appareil sort automatiquement du mode
veille active dès que votre enfant
commence à faire des bruits qui dépassent
le niveau sonore réglé (niveaux VOX 1 à 4).
Le Eco-Mode se désactive immédiatement
et le témoin de connexion 13 ne clignote
plus.
Au niveau VOX 5, la transmission est
continue et le Eco-Mode reste désactivé.
Si vous souhaitez vérifier que tout va bien
alors que le Eco-Mode est activé, et que
donc votre enfant dort paisiblement, vous
pouvez désactiver le Eco-Mode en
basculant sur le mode de transmission
sonore permanente :
1. Sur l’unité parents 8, appuyez sur la
touche VOX 17.
2. Appuyez ensuite sur la touche VOL + 10
jusqu’à ce que les 5 témoins 16
s’allument.
5. Commande de l’unité bébé
5.1 Mise en marche et mise à l’arrêt de l’unité bébé
L’unité bébé 1 se met automatiquement en
marche dès que vous raccordez
l’adaptateur au secteur. Ensuite, vous
pouvez allumer et éteindre l’unité bébé à
tout moment :
• Pour allumer ou éteindre l’unité bébé 1,
appuyez sur le bouton marche/arrêt 5.
42
5.2 Témoins d’affichage
•Le témoin POWER 6 est vert lorsque
l’unité bébé est en marche.
•Le témoin VOX 7 de l’unité bébé est vert
lorsque la connexion est établie entre
l’unité bébé et l’unité parents.
•Le témoin VOX 7 est éteint lorsque l’unité
bébé 1 est passée au Eco-Mode ou
lorsque la connexion à l’unité parents ne
peut pas être établie.
Page 45

6. Commande de l’unité parents
6.1 Mise en marche et mise à l’arrêt de l’unité parents
Pour allumer ou éteindre l’unité parents 8,
maintenez le bouton marche/arrêt 14
enfoncé :
– Dès que vous entendez un signal sonore
et voyez le témoin POWER 15 s’allumer,
l’unité parents est en marche ;
– Dès que vous entendez un signal
sonore et voyez le témoin POWER 15
s’éteindre, l’unité parents s’arrête.
6.2 Témoins d’affichage
• Le témoin de connexion 13 de l’unité
parents 8 indique l’état de la connexion à
l’unité bébé 1 :
– Vert permanent lorsque la connexion
est établie ;
– Vert clignotant lorsque l’unité bébé est
en Eco-Mode et signalise que l’enfant
dort paisiblement ;
– Rouge permanent lorsque la
connexion a été coupée ou si l’unité
bébé est éteinte.
Remarques :
– Si l’unité bébé 1 est en Eco-Mode alors
que l’unité parents sort de la zone de
portée, le témoin de connexion 13
passe au rouge. En outre, un signal
sonore retentit toutes les 30 secondes.
– Dès que l’unité parents 8 retourne
dans la zone de portée ou que la
cause du défaut a été résolue, le
témoin de connexion 13 repasse au
vert et les appareils reprennent leur
communication.
– À l’allumage des deux unités, le
témoin de connexion 13 est d’abord
rouge. L’unité parents et l’unité bébé
sont ensuite couplées. Une fois la
connexion établie, le témoin passe au
vert.
•Témoin POWER 15 :
– Vert permanent : l’appareil est en
marche et la batterie est pleine ;
– Vert clignotant : batterie en cours de
charge ;
– Rouge permanent et 1 bip sonore
toutes les 60 secondes :
avertissement batterie vide. 15 - 20
minutes plus tard, l’unité parents se
met automatiquement à l’arrêt.
Attention, selon les modes de
fonctionnement utilisés, l’appareil peut
aussi se mettre à l’arrêt plus vite. (le
niveau VOX 5, par exemple,
consomme plus d’énergie que le
niveau 1).
• Les 5 témoins d’affichage 16 ont trois
fonctions différentes visibles à l’activité :
– Indiquent le niveau sonore dans la
chambre d’enfant. Plus les témoins
sont nombreux à s’allumer, plus le
bruit est intense ;
– Indiquent les variations du niveau
sonore. Plus les témoins sont
nombreux à s’allumer, plus le volume
des bruits transmis est élevé ;
– Indiquent le niveau de sensibilité au
bruit (fonction VOX). Plus les témoins
sont nombreux à clignoter, plus
l’appareil est réactif au bruit. Si les
5 témoins s’allument, la transmission
sonore est permanente.
6.3 Réglage du niveau de
sensibilité de la fonction
VOX
Les bébés font différents types de bruits.
Depuis une respiration forte jusqu’à des
pleurs ou des cris intenses, en passant par
des gazouillis. Il est possible de régler la
fonction VOX de façon à activer la
transmission des bruits uniquement pour les
cris et pleurs forts, mais pas pour les autres
bruits.
43
Page 46

Le réglage de la fonction VOX fait varier le
niveau de sensibilité du microphone. Plus le
niveau VOX est élevé, plus l’appareil est
sensible au bruit.
1. Pour activer la fonction VOX, appuyez
brièvement sur VOX 17.
Les témoins 16 clignotent pour indiquer
le niveau de sensibilité de l’appareil.
2. Vous pouvez augmenter ou diminuer le
niveau de sensibilité avec la touche
VOL + 10 et la touche VOL - 11. Le
nombre de témoins 16 clignotants
correspond au niveau sélectionné :
– Niveau VOX 1 = très faible sensibilité,
activation uniquement lorsque bébé
crie très fort ;
– Niveau VOX 2 = faible sensibilité, acti-
vation lorsque bébé pleure fort ;
– Niveau VOX 3 = sensibilité normale,
activation lorsque bébé pleure
normalement ;
– Niveau VOX 4 = sensibilité accrue,
activation pour les bruits les plus
légers ;
– Niveau VOX 5 = Eco-Mode désactivé.
La transmission sonore est permanente.
Le volume des bruits transmis sur l’unité
parents est réglé à l’aide des touches VOL +
10 et VOL - 11 (voir « 6.4 Réglage du
volume » à la page 44).
Remarque : Vous avez env. 2 secondes
pour modifier le niveau de sensibilité après
l’activation de la fonction VOX. Au terme de
ce délai, l’appareil bascule
automatiquement sur la transmission sonore
permanente. Vous reconnaîtrez le
changement au fait que les témoins 16 ne
clignotent plus et que les touches VOL + 10
et VOL - 11 permettent seulement de faire
varier le volume.
Attention ! Avec la transmission sonore
permanente (niveau VOX 5), tous les bruits
sont audibles en continu. Lorsque bébé dort
paisiblement, le volume bascule sur le niveau
le plus bas au bout de quelques secondes afin
de minimiser les bruits d’arrière-plan. Dès que
l’enfant commence à faire du bruit, le réglage
précédent est rétabli.
6.4 Réglage du volume
1. Le volume de l’unité parents se règle
6.5 Mise en sourdine
Vous pouvez mettre l’unité parents en
sourdine. Les bruits de la chambre d’enfant
seront alors coupés.
1. Appuyez sur la touche VOL - 11 jusqu’à
2. Pour supprimer la mise en sourdine,
3. Si vous activez la fonction Talk-Back
avec les touches VOL + 10 et VOL - 11.
À chaque pression de touche, vous
entendez un bip sonore dont l’intensité
correspond au volume sonore réglé. Les
témoins 16 s’allument en conséquence.
Plus le volume réglé est intense, plus le
signal sonore est fort et le nombre de
témoins s’allumant est important.
Remarque : Si le niveau de sensibilité
de la fonction VOX est minime (voir
« 6.3 Réglage du niveau de sensibilité de
la fonction VOX » à la page 43), les sons
les plus bas ne seront pas transmis quel
que soit le volume de l’unité. Autrement
dit, vous n’entendrez pas plus de bruits
en augmentant le volume. Si vous
souhaitez entendre plus de sons, vous
devez augmenter le niveau de sensibilité
de la transmission en passant à un
niveau VOX supérieur.
ne plus entendre de bip sonore.
Les bruits provenant de la chambre
d’enfant sont alors coupés.
Le volume des bruits dans la chambre
d’enfant est mais il reste visible grâce
aux témoins. 16. Plus les témoins sont
nombreux à s’allumer, plus le bruit est
intense dans la chambre d’enfant.
appuyez sur la touche VOL + 10.
alors que l’unité parents est en sourdine,
le volume est automatiquement réactivé
au niveau 1.
44
Page 47

6.6 Fonction Talk-Back
La fonction Talk-Back vous permet de parler
avec votre enfant.
1. Appuyez longtemps sur la touche
TALK 18 de l’unité parents.
Dès que vous entendez un signal
sonore, la liaison vocale est établie.
2. Parlez alors dans le microphone 20 de
l’unité parents.
Votre enfant vous entend désormais
dans le haut-parleur 2 de l’unité bébé.
3. Relâchez alors la touche TAL K 18 pour
écouter la réaction de votre enfant.
7. Nettoyage et entretien de l’appareil
Remarques :
– Si l’unité bébé 1 se trouve en Eco-
Mode, la fonction Talk-Back est
désactivée pour que vous ne puissiez
pas réveiller bébé par inadvertance.
Dans ce cas, deux signaux sonores
successifs vous indiquent que la
fonction Talk-Back est indisponible.
– Si le volume est en sourdine sur l’unité
parents (voir « 6.4 Réglage du
volume » à la page 44), il passe
automatiquement au niveau I dès que
vous enfoncez la touche TALK 18.
7.1 Nettoyage
Avertissement ! Pour éviter les
risques de décharge électrique, de
blessures ou d'endommagement :
– Débranchez toujours l’adapta-
teur secteur de la fiche secteur
avant de nettoyer l’appareil.
– Ne plongez jamais les différents
éléments de l’appareil dans l’eau.
Attention ! N'utilisez jamais de détergents
décapants, corrosifs ou abrasifs. Cela
risque d'endommager l'appareil.
1. Si nécessaire, essuyez les différents
éléments de l’appareil à l’aide d’un
chiffon humide.
2. Vérifiez que tous les éléments sont
entièrement secs avant de réutiliser
l’écoute bébé.
7.2 Remplacement de la batterie
La batterie lithium-polymère intégrée
(batterie LiPo) 3,7 V, 1200 mAh doit être
exclusivement remplacée par une batterie
d’origine. Le cas échéant, contacter notre
service produits (voir «Product service
babyphone in Europe» à la page116).
1. Retirez le couvercle de la batterie 9 au
dos de l’unité parents 8 en le poussant
vers le bas.
2. Retirez la batterie défectueuse.
3. Placez la nouvelle batterie dans son
logement en suivant les repères. Veiller
particulièrement à respecter la polarité
(+ et -).
4. Replacez le couvercle de la batterie 9 sur
l’unité parents 8.
5. La première fois, chargez la nouvelle
batterie en continu pendant 10 heures
pour que la batterie atteigne sa capacité
maximale (voir « 4.1 Raccordement de
l’unité parents » à la page 40).
45
Page 48

8. Dysfonctionnements et solutions
Dysfonctionne-
ment
L’unité bébé ou
l’unité parents ne
fonctionne pas
Sifflement
intense
L’unité parents
bipe
Le témoin de
connexion 13 est
rouge
L’unité parents
n’émet aucun
son
Si ces conseils ne résolvent pas le
problème, vous pouvez essayer les
opérations suivantes :
1. Retirez la batterie de l’unité parents.
2. Débranchez les adaptateurs du secteur.
3. Attendez quelques minutes.
Pas d’alimentation en
courant
La batterie de l’unité
parents est vide
L’appareil n’est pas en
marche
L’écart entre l’unité bébé et
l’unité parents est trop
important ou le signal est
interrompu par des murs
épais ou d’autres appareils
électriques
Effet Larsen car l’écart
entre l’unité bébé et l’unité
parents est trop faible
La connexion avec l’unité
bébé est coupée
Problèmes d’alimentation
en courant
L’unité parents est hors de
portée
Le volume est coupé Augmenter le volume (voir «Mise en
Le niveau de la fonction
VOX est trop faible
Cause Solution
Établir l’alimentation en courant (voir
« 4.4 Alimentation en courant » à la page 41)
Recharger la batterie (voir « 4.4 Alimentation
en courant » à la page 41)
Allumer l’appareil (voir « 4.1 Raccordement
de l’unité parents » à la page 40 et
« 4.2 Raccordement de l’unité bébé » à la
page 40)
Réduire la distance entre les unités ou
changer la position de l’unité parents
Augmenter la distance pour qu’elle atteigne
au moins 2 - 3 m
Réduisez le volume et le niveau VOX de
l’unité parents lorsque vous passez avec à
proximité de l’unité bébé (voir « 6.3 Réglage
du niveau de sensibilité de la fonction VOX »
à la page 43 et « 6.4 Réglage du volume » à
la page 44).
Rétablir la connexion (voir « 4.3 Connexion
de l’unité bébé et de l’unité parents » à la
page 40)
Vérifier l’alimentation en courant (voir
« 4.4 Alimentation en courant » à la page 41)
Rétablir la connexion (voir « 4.3 Connexion
de l’unité bébé et de l’unité parents » à la
page 40)
sourdine» à la page44)
Augmenter le niveau de sensibilité (voir
« 6.3 Réglage du niveau de sensibilité de la
fonction VOX » à la page 43 et « 3.1 Aperçu
des messages » à la page 39)
4. Remettez la batterie en place et
rebrancher l’adaptateur secteur.
Si le problème n’est toujours pas résolu,
veuillez vous adresser au S.A.V. (voir
« 11.2 Centre de services Écoute bébé » à la
page 49).
46
Page 49

9. Caractéristiques techniques
Connexion radio 2,4 GHz FHSS
Fréquence d’émission 2408 MHz - 2474 MHz, PIRE maxi 100 mW
Nombre de canaux 12 / Sélection automatique du canal
Portée en champ libre env. 250 m
Portée dans les espaces
fermés
Température de service Température ambiante : 0 °C à 40 °C
Température de service Température ambiante : 0 °C à 40 °C
Batterie Lithium-polymère (batterie LiPo), 3,7 V, 1200 mAh
Entrée 100-240 V c.a. ; 50/60 Hz ; 0,1 A
Sortie 5 V ; 2,75 W ;
env. 40 m. La transmission varie en fonction de
l’environnement. Les murs et les arbres peuvent fortement
détériorer la réception.
Unité bébé
Unité parents
Durée de service en transmission normale : > 15 heures
Durée de service en Eco-Mode : > 18 heures
Temps de charge de 10 heures minimum à la première
recharge,
chaque recharge ultérieure durant env. 5 heures
Adaptateurs secteur
9.1 Technologie FHSS
La transmission radio de l’écoute bébé fait
appel à la technologie moderne FHSS.
L’étalement de spectre par saut de
fréquence (Frequency Hopping Spread
Spectrum, FHSS) est une méthode
numérique d’étalement du spectre de
fréquences pour la transmission sans fil des
données. Contrairement aux techniques
anciennes, l’intégralité de la puissance
d’émission n’est pas concentrée sur une
seule fréquence porteuse. La fréquence
porteuse change de manière aléatoire. Les
paquets de données sont transmis sur
plusieurs fréquences porteuses, puis
recomposés dans le récepteur.
Face à la transmission radio
conventionnelle, cette méthode présente
divers avantages :
• Le signal radio est beaucoup plus difficile
à intercepter dans la mesure où celui qui
écoute ne sait pas sur quelles fréquences
47
porteuses il a été réparti et comment le
recomposer correctement. C’est la raison
pour laquelle cette technologie est
également utilisée avec la transmission
Bluetooth ou dans le domaine militaire.
• La transmission radio est nettement
moins sensible aux interférences, car les
fréquences porteuses ne sont utilisées
que brièvement, avant de céder leur
place à une autre. Si une fréquence
isolée est donc touchée par des
interférences, seuls de petits paquets de
données seront touchés. Ces défauts
peuvent être lissés grâce à des
technologies de correction appropriées.
Page 50

10. Mise au rebut
10.1 Appareil
Le pictogramme avec la poubelle
barrée signifie que le produit doit
être affecté à une collecte des
déchets séparées dans les Etats
membres de l'Union européenne.
Cette disposition s'applique au produit et à
tous les accessoires portant ce
pictogramme. Il est interdit de jeter les
produits marqués en conséquence dans les
ordures ménagères normales et imposé de
les remettre à un poste de collecte pour le
recyclage des appareils électriques et
électroniques. Le recyclage aide à réduire la
consommation de matières premières et
soulage notre environnement. Par
conséquent, veuillez absolument respecter
les prescriptions en matière d’élimination en
vigueur dans votre pays.
11. Garantie
Outre les obligations de garantie du vendeur
découlant du contrat d'achat, nous
garantissons, en tant que fabricant,
l'appareil pendant 24 mois à partir de
l'achat en cas de maniement correct de
l'appareil et de respect du mode d'emploi.
La date d'achat et le type d'appareil doivent
être justifiés par la facture d'achat.
La présente garantie du fabricant ne
restreint pas les droits de l'acheteur prévus
par la loi.
Nous nous engageons pendant la garantie à
éliminer tous les défauts dus à des erreurs
de matériau ou de fabrication. Les pièces
d'usure sont exclues de la garantie.
Les légères différences pouvant exister par
rapport à la nature prévue du produit,
insignifiantes pour la valeur et l'aptitude à
l'emploi de l'appareil, ne rentrent pas dans
le cadre de la garantie. De la même manière,
Le recyclage permet de réduire la
consommation de matières premières et la
pollution de l’environnement.
10.2 Emballage
Si vous souhaitez mettre l'emballage au
rebut, respectez les règlements en vigueur
dans votre pays.
10.3 Batterie
Les batteries ne doivent pas être
éliminées avec les ordures
ménagères. Les batteries usagées
doivent être éliminées de manière
appropriée. Des conteneurs sont réservés
aux batteries usagées dans les points de
vente ainsi qu’aux points de collecte gérés
par les municipalités. Les batteries affichant
les symboles chimiques suivants
contiennent, entre autres, les éléments
toxiques : Cd (cadmium), Hg (mercure),
Pb (plomb).
nous excluons toute garantie en cas de
défaut de l'appareil dû au transport et pour
lequel nous ne sommes pas responsables, à
une mauvaise utilisation ou à une absence
d'entretien ou à l'intervention de personnes
que nous n'avons pas autorisées à utiliser
l'appareil.
En cas de garantie, nous gardons le choix
de décider d'une réparation, d'un
remplacement de pièces ou du
remplacement de l'appareil. L'exécution des
prestations de garantie n'entraîne pas de
prolongation de la durée de la garantie ni de
recommencement de cette dernière.. La
période de garantie pour les pièces de
rechange montées prend fin avec la période
de garantie de l'appareil complet.
48
Page 51

Toute autre revendication, en particulier
toute prétention à réparation pour des
dommages survenus à l'extérieur de
l'appareil, à moins que nous soyons tenus
légalement d'une obligation, est exclue.
Nous n'assumons aucune responsabilité
pour les coûts et risques de transport.
Si l'appareil est envoyé sans justificatif de la
date d'achat, un dossier de réparation sera
ouvert. Une réparation de l'appareil
s'effectue uniquement après consultation
du client.
Veuillez conserver l’adresse et la référence
article pour une éventuelle demande de
précisions.
11.1 Centre de services NUK
Si vous avez des questions en relation avec
la garantie ou d’autres questions d’ordre
général sur la marque NUK, vous pouvez
contacter les «Contact addresses NUK» à
la page115.
11.2 Centre de services Écoute bébé
Si vous avez des questions concernant
votre écoute bébé, veuillez contacter nos
experts écoute bébé. Vous trouverez le
numéro de la ligne d’assistance produits
sous «Product service babyphone in
Europe» à la page116 ; vous pouvez
également nous contacter sur notre site
Internet www.nuk-service.com.
Référence produit : 10.256.438
11.3 Fournisseur
Veuillez noter que cette adresse n’est pas
une adresse de S.A.V. Si vous avez des
problèmes et des questions sur le produit,
veuillez contacter le centre de services
mentionné au chapitre 11.2.
MAPA GmbH
Industriestraße 21-25
27404 Zeven
Allemagne
www.nuk.com
12. Déclaration de conformité
L'appareil est conforme à toutes les directives européennes applicables et leurs
transpositions nationales. Ces directives sont énumérées dans la déclaration de conformité
UE pouvant être obtenue auprès du fabricant.
La déclaration de conformité est délivrée avec la notice d’utilisation dans le carton
d’emballage. Vous la trouverez également sous www.nuk.de.
49
Page 52

Inhoudsopgave
1. Beschrijving van het apparaat . . . . . . . . . . . . . . . . . . . . . . . . . . . . . . . . . . 51
1.1 Toepassingsdoel . . . . . . . . . . . . . . . . . . . . . . . . . . . . . . . . . . . . . . . . . . . . . . . . . 51
1.2 Functiebeschrijving . . . . . . . . . . . . . . . . . . . . . . . . . . . . . . . . . . . . . . . . . . . . . . . 51
1.3 Goedkeuring . . . . . . . . . . . . . . . . . . . . . . . . . . . . . . . . . . . . . . . . . . . . . . . . . . . . 51
1.4 Omvang van de levering . . . . . . . . . . . . . . . . . . . . . . . . . . . . . . . . . . . . . . . . . . . 51
2. Veiligheidsaanwijzingen . . . . . . . . . . . . . . . . . . . . . . . . . . . . . . . . . . . . . . . 52
2.1 Algemene aanwijzingen. . . . . . . . . . . . . . . . . . . . . . . . . . . . . . . . . . . . . . . . . . . . 52
2.2 Bescherming tegen elektrische schok . . . . . . . . . . . . . . . . . . . . . . . . . . . . . . . . 52
2.3 Voor de veiligheid van uw kind . . . . . . . . . . . . . . . . . . . . . . . . . . . . . . . . . . . . . . 52
2.4 Bescherming tegen letsel . . . . . . . . . . . . . . . . . . . . . . . . . . . . . . . . . . . . . . . . . . 53
2.5 Materiële schade. . . . . . . . . . . . . . . . . . . . . . . . . . . . . . . . . . . . . . . . . . . . . . . . . 53
2.6 Omgang met lipo-accu's . . . . . . . . . . . . . . . . . . . . . . . . . . . . . . . . . . . . . . . . . . . 53
3. Bestanddelen van de babyfoon . . . . . . . . . . . . . . . . . . . . . . . . . . . . . . . . . 54
3.1 Kort overzicht van de meldingen. . . . . . . . . . . . . . . . . . . . . . . . . . . . . . . . . . . . . 55
4. Apparaat in gebruik nemen . . . . . . . . . . . . . . . . . . . . . . . . . . . . . . . . . . . . 55
4.1 Oudereenheid aansluiten. . . . . . . . . . . . . . . . . . . . . . . . . . . . . . . . . . . . . . . . . . . 55
4.2 Baby-eenheid aansluiten. . . . . . . . . . . . . . . . . . . . . . . . . . . . . . . . . . . . . . . . . . . 56
4.3 Baby-eenheid en oudereenheid met elkaar verbinden . . . . . . . . . . . . . . . . . . . . 56
4.4 Stroomvoorziening: . . . . . . . . . . . . . . . . . . . . . . . . . . . . . . . . . . . . . . . . . . . . . . . 57
4.5 Eco-Mode . . . . . . . . . . . . . . . . . . . . . . . . . . . . . . . . . . . . . . . . . . . . . . . . . . . . . . 57
5. Bedienen van de baby-eenheid . . . . . . . . . . . . . . . . . . . . . . . . . . . . . . . . . 58
5.1 Baby-eenheid in- en uitschakelen. . . . . . . . . . . . . . . . . . . . . . . . . . . . . . . . . . . . 58
5.2 Indicatie leds . . . . . . . . . . . . . . . . . . . . . . . . . . . . . . . . . . . . . . . . . . . . . . . . . . . . 58
6. Bedienen van de oudereenheid . . . . . . . . . . . . . . . . . . . . . . . . . . . . . . . . . 58
6.1 Oudereenheid in- en uitschakelen. . . . . . . . . . . . . . . . . . . . . . . . . . . . . . . . . . . . 58
6.2 Indicatie leds . . . . . . . . . . . . . . . . . . . . . . . . . . . . . . . . . . . . . . . . . . . . . . . . . . . . 58
6.3 Overdrachtsgevoeligheid van de VOX-functie instellen . . . . . . . . . . . . . . . . . . . 59
6.4 Volume instellen. . . . . . . . . . . . . . . . . . . . . . . . . . . . . . . . . . . . . . . . . . . . . . . . . . 60
6.5 Mute schakelen . . . . . . . . . . . . . . . . . . . . . . . . . . . . . . . . . . . . . . . . . . . . . . . . . . 60
6.6 Functie Talk-Back . . . . . . . . . . . . . . . . . . . . . . . . . . . . . . . . . . . . . . . . . . . . . . . . 60
7. Reiniging en onderhoud van het apparaat . . . . . . . . . . . . . . . . . . . . . . . . 61
7.1 Reiniging . . . . . . . . . . . . . . . . . . . . . . . . . . . . . . . . . . . . . . . . . . . . . . . . . . . . . . . 61
7.2 Accu vervangen. . . . . . . . . . . . . . . . . . . . . . . . . . . . . . . . . . . . . . . . . . . . . . . . . . 61
8. Storingen en het verhelpen ervan . . . . . . . . . . . . . . . . . . . . . . . . . . . . . . . 62
9. Technische gegevens . . . . . . . . . . . . . . . . . . . . . . . . . . . . . . . . . . . . . . . . . 63
9.1 FHSS- technologie . . . . . . . . . . . . . . . . . . . . . . . . . . . . . . . . . . . . . . . . . . . . . . . 63
10. Afval . . . . . . . . . . . . . . . . . . . . . . . . . . . . . . . . . . . . . . . . . . . . . . . . . . . . . . . 64
10.1 Apparaat . . . . . . . . . . . . . . . . . . . . . . . . . . . . . . . . . . . . . . . . . . . . . . . . . . . . . . . 64
10.2 Verpakking. . . . . . . . . . . . . . . . . . . . . . . . . . . . . . . . . . . . . . . . . . . . . . . . . . . . . . 64
10.3 Accu . . . . . . . . . . . . . . . . . . . . . . . . . . . . . . . . . . . . . . . . . . . . . . . . . . . . . . . . . . 64
11. Waarborg . . . . . . . . . . . . . . . . . . . . . . . . . . . . . . . . . . . . . . . . . . . . . . . . . . . 64
11.1 Servicecenter NUK . . . . . . . . . . . . . . . . . . . . . . . . . . . . . . . . . . . . . . . . . . . . . . . 65
11.2 Servicecenter babyfoon . . . . . . . . . . . . . . . . . . . . . . . . . . . . . . . . . . . . . . . . . . . 65
11.3 Leverancier . . . . . . . . . . . . . . . . . . . . . . . . . . . . . . . . . . . . . . . . . . . . . . . . . . . . . 65
12. Conformiteitsverklaring . . . . . . . . . . . . . . . . . . . . . . . . . . . . . . . . . . . . . . . 65
NL
50
Page 53

1. Beschrijving van het apparaat
1.1 Toepassingsdoel
Met deze babyfoon Eco Control Audio 500
kunt u uw baby of kleine kinderen in de
kinderkamer bewaken. Hij kan ook worden
gebruikt voor de geluidsbewaking van
senioren.
Dit apparaat is allen bestemd voor droge
omgevingen. Voor de werking in vochtige
ruimtes of bij nat weer in de open lucht is dit
apparaat niet geschikt.
Dit apparaat is bedoeld voor gebruik in privé
huishoudens. Het is niet bedoeld voor
commercieel gebruik.
Dit apparaat is alleen bestemd als
hulpmiddel. Het vervangt in geen geval de
lichamelijk aanwezigheid en bewaking door
ouders, babysitter of begeleider.
1.2 Functiebeschrijving
De baby-eenheid 1 wordt in de ruimte
geplaatst, die u wilt bewaken. Hij registreert
de geluiden en zendt deze snoerloos aan de
oudereenheid 8.
De oudereenheid 8 beschikt over een
ingebouwde accu zodat u deze steeds in
het zicht kunt opstellen. De accu wordt
geladen met behulp van de meegeleverde
voedingseenheid.
De reikwijdte tussen de baby-eenheid en de
oudereenheid bedraagt ca. 40 m
binnenshuis en tot 250 m buiten (in het open
veld). Het ontvangstbereik van de babyfoon
verandert afhankelijk van de omgeving.
Dikke muren of metaal kunnen de reikwijdte
reduceren.
De babyfoon beschikt over een Eco-Mode
waarbij de zender (baby-eenheid)
automatisch in de stand-by-modus wordt
geschakeld zodra uw baby rustig slaapt. Hij
schakelt, afhankelijk van de ingestelde
gevoeligheid, pas weer in wanneer uw baby
geluiden maakt of begint te huilen.
Wanneer u alle geluiden uit de babykamer
wilt horen, kunt u de overdrachtsgevoeligheid van de VOX-functie met de
toets VOX 17 op maximum instellen
(=stand 5). Op deze stand blijft de babyeenheid continu ingeschakeld (zie
„6.3 Overdrachtsgevoeligheid van de VOXfunctie instellen“ op pagina 59).
Wanneer u geen enkel geluid wilt horen kunt
u via de toets Vol - 11 het volume op mute
zetten. In dit geval ziet u alleen via de ledindicatie 16 wanneer uw baby geluiden
maakt.
Wanneer de Eco-Mode geactiveerd is,
wordt de hoogfrequente straling in de
kinderkamer tot een minimum gereduceerd.
De baby-eenheid zendt dan uitsluitend
iedere 30 seconden een kort signaal aan de
oudereenheid om de verbinding te
controleren. Wanneer de oudereenheid zich
buiten de reikwijdte bevindt, worden de
ouders daarop gewezen door een
geluidssignaal.
Meer over de Eco-Mode vindt u in "4.5EcoMode" op pagina57 en in
"6.3Overdrachtsgevoeligheid van de VOXfunctie instellen" op pagina59.
1.3 Goedkeuring
De babyfoon werkt op een frequentie van
2,4 GHz. Dit apparaat mag in alle landen van
de EU worden gebruikt. In Rusland en de
Oekraïne moeten de landspecifieke
beperkingen in acht worden genomen.
1.4 Omvang van de levering
• Babyfoon:
– 1 baby-eenheid (voor de kinderkamer)
– 1 voedingseenheid voor de
baby-eenheid
–1 oudereenheid
– 1 voedingseenheid voor de
oudereenheid
– 1 lipo-accu 3,7 V, 1200 mAh
• 1 gebruiksaanwijzing
• 1 Quick Start Guide
51
Page 54

2. Veiligheidsaanwijzingen
2.1 Algemene aanwijzingen
• Lees voor het gebruik deze
gebruiksaanwijzing aandachtig door.
Deze is een bestanddeel van het
apparaat en moet te allen tijde
beschikbaar zijn.
• Gebruik het apparaat en zijn accessoires
zo verklaart in de deel 1.1
"Toepassingsdoel".
• Gebruik alleen de accessoires die
werden meegeleverd of die uitdrukkelijk
in deze gebruiksaanwijzing werden
toegestaan.
• Voor ieder gebruik moet u controleren of
het apparaat correct functioneert. Naast
de controle van de reikwijdte en de
verbinding, wordt aanbevolen om de
verbinding op geluid te controleren
wanneer het in gebruik is.
• De apparaten mogen uitsluitend worden
gebruikt voor de overdracht van geluid in
uw privé-omgeving. Iedere persoon in de
ruimte die kan worden afgeluisterd moet
over het gebruik van het apparaat
worden geïnformeerd.
• Let erop dat een overdracht altijd
afhankelijk is van de omgeving.
Elektronische apparaten, isolaties.
wanden, natheid of bomen kunnen de
ontvangst aanzienlijk storen.
2.2 Bescherming tegen
elektrische schok
Waarschuwing! De volgende
veiligheidsaanwijzingen moeten u
beschermen tegen een elektrische
schok:
• Voer geen reparatiepogingen uit. De
delen mogen alleen door gekwalificeerd
vakpersoneel worden geopend.
• Het apparaat mag niet in beschadigde
toestand worden gebruikt.
• Wanneer u op reis bent, let er dan steeds
op dat de beschikbare spanning in
overeenstemming is met de technische
gegevens.
2.3 Voor de veiligheid van uw kind
Waarschuwing! Kinderen
herkennen de gevaren niet die door
het gebruik van het apparaat
kunnen ontstaan. Daarom moeten
kinderen op afstand van deze
apparaten worden gehouden.
• Let erop dat het apparaat en de
accessoires zich buiten de reikwijdte van
de baby bevinden. De afstand tussen
baby en apparaat/accessoires moet
minstens 1 m bedragen.
• Kinderen kunnen gevaren vaak niet
correct inschatten en daardoor letsel
oplopen. Neem daarom het volgende in
acht:
– Dit apparaat is niet bedoeld voor het
gebruik door personen (ook kinderen)
met een fysieke, sensorische of
geestelijke handicap of zonder
voldoende ervaring en/of kennis,
behalve wanneer ze door een persoon
worden begeleid die verantwoordelijk
is voor hun veiligheid of wanneer zij in
het gebruik van het apparaat werden
geïnstrueerd.
– Kinderen moet onder toezicht worden
gehouden opdat ze niet met het
apparaat kunnen spelen.
– Let erop dat de verpakkingsfolie niet
tot een dodelijke valstrik voor kinderen
wordt. Er dreig gevaar voor verstikking.
Verpakkingsfolie is geen speelgoed.
– Om wurgen te voorkomen moet het
netsnoer zich steeds buiten de
reikwijdte van de baby bevinden.
• Gebruik het apparaat alleen voor uw
aanvullende veiligheid. Het apparaat kan
nooit als vervanging voor een menselijke
toezichthouder dienen.
NL
52
Page 55

2.4 Bescherming tegen letsel
Waarschuwing! Neem de
volgende aanwijzingen in acht, om
letsel te voorkomen.
• Let erop dat er niemand over de kabels
van de voedingseenheid kan struikelen of
vallen.
2.5 Materiële schade
Voorzichtig! Neem de volgende
voorschriften in acht om materiële schade te
voorkomen:
• Stel het apparaat niet bloot aan direct
zonlicht of grote hitte, omdat de UVstraling en oververhitting ertoe kan leiden
dat het kunststof bros wordt en de
elektronica beschadigd zou kunnen
worden.
• In de nabijheid van het apparaat mogen
geen warmtebronnen aanwezig zijn en
het apparaat mag ook niet worden
afgedekt om oververhitting te
voorkomen.
• Gebruik het apparaat nooit in vochtige of
natte omgeving.
• Gebruik het apparaat niet in een stoffige
omgeving. Dit kan de levensduur
verkorten.
• Gebruik nooit scherpe of schurende
reinigingsmiddelen omdat het apparaat
daardoor beschadigd zou kunnen
worden.
• Wanneer het apparaat niet wordt gebruikt
schakel het dan steeds uit met de Aan/
Uit-toets.
2.6 Omgang met lipo-accu's
Waarschuwing!
Om eventuele gevaren te
vermijden, die persoonlijk letsel of
materiaalschade kunnen
veroorzaken, neemt u de volgende
aanwijzingen in acht:
• Vermijd kortsluitingen.
De polen van de accu's mogen niet met
metalen voorwerpen in aanraking komen,
omdat dit een kortsluiting tot gevolg kan
hebben. Een kortsluiting kan leiden tot
een oververhitting van de accu en
dientengevolge tot het uitlopen van
elektrolyt, explosiegevaar of de vorming
van vlammen.
Wanneer er elektrolyt is uitgelopen,
vermijd dan contact met de huid, ogen en
slijmvliezen om letsel te voorkomen.
Spoel bij huidcontact met elektrolyt de
desbetreffende plaatsen direct met veel
schoon water en consulteer onmiddellijk
een arts.
• De ingebouwde accu mag alleen door
een originele reserveaccu worden
vervangen. Indien deze defect is, neem
dan contact op met een serviceadres (zie
„Contact addresses NUK“ op
pagina115).
• Om explosiegevaar te voorkomen,
mogen accu's niet worden verhit of door
verbranden worden verwijderd.
• Probeer nooit de accu te openen, de
contacten te verbuigen op los te trekken.
Gooi de accu niet op de bodem en sla er
geen spijker in.
Een beschadiging kan leiden tot een
interne kortsluiting en dientengevolge tot
het uitlopen van elektrolyt,
explosiegevaar of de vorming van
vlammen.
• Gebruik uitsluitend de meegeleverde
voedingseenheid voor het laden van de
accu.
Een "verkeerde" voedingseenheid zou tot
te vol laden van de accu kunnen leiden
waardoor deze kan oververhitten en
exploderen.
• Lipo-accu's mogen alleen op vuurvaste,
niet brandbare ondergronden worden
geladen of bewaard.
53
Page 56

• Lipo-accu's mogen alleen onder toezicht
worden geladen om in geval van storing
tijdig te kunnen ingrijpen.
3. Bestanddelen van de babyfoon
1 Baby-eenheid
2 Luidspreker
3 Bus voor voedingseenheid
4 Microfoon
5 Aan/Uit-toets:
– kort indrukken: inschakelen
– lang indrukken: uitschakelen
6 Power LED
– brandt groen wanneer de baby-
eenheid is ingeschakeld
7 VOX LED
– brandt groen wanneer er een
verbinding met de oudereenheid is
gemaakt;
– schakelt uit wanneer de verbinding tot
de oudereenheid is onderbroken.
8 Oudereenheid
9 Accu-afdekking
10 Toe ts Vol +:
– Volume verhogen
11 Toe ts Vol -:
– Volume verlagen
– Mute-schakelen bij de geringste stand.
Geluiden worden alleen nog door de
indicatie-leds 16 weergegeven.
12 Luidspreker
13 Verbindingsindicatie
– brandt groen wanneer er een
verbinding tussen beide apparaten
bestaat;
– knippert groen: wanneer er een
verbinding bestaat maar de Eco-Mode
geactiveerd is;
– brandt rood: wanneer er geen
verbinding tussen beide apparaten
bestaat.
14 Aan/Uit-toets
• Lipo-accu's bevatten giftige substanties.
Let daarom op de afvalverwijderingsvoorschriften in "10.3Accu" op
pagina64.
15 Indicatie stroomvoorziening POWER
– brandt groen: apparaat is ingeschakeld
en de accu is vol;
– knippert groen: accu wordt geladen;
– brandt rood en 1 pieptoon ieder
60 seconden: waarschuwing lege
accu. Binnen ca. 15 - 20 minuten
schakelt de oudereenheid automatisch
uit.
16 Indicatie leds
– geeft het geluidsniveau in de
kinderkamer aan. Hoe meer leds
branden, des te luider zijn de geluiden;
– toont bij het wijzigen van het volume de
verschillende standen. Hoe meer leds
branden, des te luider is de overdracht
via de luidspreker;
– toont bij het wijzigen van de VOX-
sensibiliteit de verschillende standen.
Hoe meer leds knipperen, des te
sneller reageert het apparaat op
geluiden. Bij 5 brandende leds wordt in
permanente overdracht omgeschakeld.
17 Toet s VOX
– kort indrukken en met Vol +/- de
overdrachtsgevoeligheid instellen
18 Toet s TAL K:
– door ingedrukt houden van de toets
wordt de functie "met de baby
spreken" geactiveerd;
– als de baby-eenheid zich in de Eco-
Mode bevindt, wordt de Talk-Back
functie geblokkeerd en wordt dit door
twee geluidssignalen weergegeven.
19 Bus voor voedingseenheid
20 Microfoon
NL
54
Page 57

3.1 Kort overzicht van de meldingen
Baby-eenheid
Lamp Indicatie Betekenis
Power-LED 6 groen Baby-eenheid is ingeschakeld
groen Verbinding ok (zonder Eco-Mode)
VOX LED 7
Lamp Indicatie Betekenis
Verbindingsindicatie 13
1 pieptoon iedere 30 s
Power-LED 15
1 pieptoon iedere 60 s
1 - 5 leds knipperen Instelling VOX-sensibiliteit. Hoe meer
Indicatie leds 16
geen 1 pieptoon "Met de baby spreken" (Talk-Back)
geen dubbele pieptoon
1 - 5 leds branden
1 - 5 leds branden Indicatie volume van de babygeluiden.
uit Verbinding ok (in de Eco-Mode)
Verbinding onderbroken
Oudereenheid
groen Verbinding ok (zonder Eco-Mode)
knippert groen Verbinding ok (in de Eco-Mode)
knippert rood
groen Oudereenheid is ingeschakeld, accu is
brandt rood
knippert groen Accu wordt geladen
1 - 5 pieptonen
Verbinding onderbroken
vol
waarschuwing lege accu. Oudereenheid
schakelt binnen 15 min. automatisch uit.
leds knipperen, des te gevoeliger
reageert het apparaat op geluiden. Bij 5
brandende leds wordt in permanente
overdracht omgeschakeld.
Instelling volume. Hoe meer leds
branden, des te luider is de overdracht
via de luidspreker.
Hoe meer leds branden, des te luider
zijn de geluiden in de babykamer.
"Met de baby spreken" (Talk-Back)
tijdens geactiveerde Eco-Mode
4. Apparaat in gebruik nemen
Opmerking: Maak altijd eerst de
kabelverbindingen voordat u de
voedingseenheid in het stopcontact steekt.
4.1 Oudereenheid aansluiten
De oudereenheid wordt door de
meegeleverde lipo-accu van stroom voorzien.
Deze accu kan met de meegeleverde
voedingseenheid worden geladen.
55
Voorzichtig! Om een storing te voorkomen,
installeert u eerst de accu in de
oudereenheid en verbindt u pas daarna de
voedingseenheid met de oudereenheid.
1. Verwijder de accu-afdekking 9 aan de
achterzijde van de oudereenheid 8, door
deze omlaag te schuiven.
Page 58

2. Plaats de accu volgens de markeringen
in het accuvak. Let daarbij absoluut op
de juiste polariteit (+ en -).
3. Schuif de accu-afdekking 9 weer op de
oudereenheid 8.
4. Steek de kleine stekker van de
voedingseenheid in de bus voor de
voedingseenheid 19 van de oudereenheid.
5. Steek de voedingseenheid in een
stopcontact dat overeenkomt met de
technische gegevens (zie „9. Technische
gegevens“ op pagina 63).
6. Laad de oudereenheid bij de eerste keer
continu gedurende 10 uur op, om de
volledige capaciteit van de accu te
activeren.
Voor alle aansluitende opladingen van de
accu is nog slechts 5 uur nodig. Het
opladen kan ook tijdens de werking
worden uitgevoerd.
De led POWER 15 geeft het laadproces
aan:
– knippert groen: accu wordt geladen;
– brandt groen: accu is vol;
– brandt rood en 1 pieptoon ieder
60 seconden: waarschuwing lege accu.
Binnen ca. 15 - 20 minuten schakelt de
oudereenheid automatisch uit.
4.2 Baby-eenheid aansluiten
Opmerking: Installeer de baby-eenheid 1
pas wanneer de accu van de
oudereenheid 8 volledig is geladen.
1. Plaats de baby-eenheid zodanig 1 in de
babykamer dat de baby deze niet kan
bereiken.
Optimaal is een afstand tussen babyeenheid en baby van 1 - 2 m.
2. Steek de stekker van de
voedingseenheid in de bus 3 van de
baby-eenheid 1.
3. Steek de voedingseenheid in een
stopcontact dat overeenkomt met de
technische gegevens (zie „9. Technische
gegevens“ op pagina 63).
4.3 Baby-eenheid en oudereenheid met elkaar verbinden
In het algemeen schakelt de baby-eenheid
automatisch in zodra de stekker in het
stopcontact wordt gestoken.
Als dit niet het geval is:
1. Schakel de baby-eenheid 1 op de Aan/
Uit-toets 5 in. Houd daartoe de Aan/Uittoets kort ingedrukt, tot de power led 6
brandt.
2. Schakel de oudereenheid 8 op de Aan/
Uit-toets 14 in. Houd daartoe de Aan/Uittoets kort ingedrukt, tot de led 15
permanent groen brandt.
De verbinding wordt automatisch
gemaakt. Tijdens het maken van de
verbinding brandt de
verbindingsindicatie 13 rood.
Zodra de verbinding is gemaakt brandt
zowel op de oudereenheid de
verbindingsindicatie 13 als ook bij de
baby-eenheid de VOX LED 7 groen.
Als de verbindingsindicatie 13 groen
begint te knipperen, betekent dit, dat er
weliswaar een verbinding tussen de
oudereenheid en de baby-eenheid
bestaat, maar dat uw baby slaapt en
daarom de Eco-Mode automatisch werd
geactiveerd om de hoogfrequente
straling in de kinderkamer te reduceren
en energie te sparen.
Als de verbinding oudereenheid-babyeenheid wordt onderbroken, proberen de
apparaten automatisch een nieuwe
verbinding te maken.
Indien er binnen 30 seconden geen nieuwe
verbinding tot stand komt, klinkt er bij de
oudereenheid 8 in regelmatige afstanden
een pieptoon en de verbindingsindicatie 13
brandt rood. Eventueel moet u de
standplaats van de oudereenheid
veranderen om een nieuwe verbinding te
kunnen opbouwen.
3. Kijk eerst naar uw baby of alles in orde is.
NL
56
Page 59

4. Probeer dan een nieuwe verbinding te
maken door uw standplaats te
veranderen.
De verbinding wordt automatisch
opnieuw opgebouwd zodra u zich weer
binnen de reikwijdte bevindt.
Zodra de verbinding is gemaakt, brandt
de verbindingsindicatie 13 weer groen.
4.4 Stroomvoorziening:
• De stroomvoorziening van de babyeenheid 1 loopt alleen via de
voedingseenheid.
• De oudereenheid 8 kan zonder
stroomaansluiting via de accu worden
toegepast.
De laadtoestand van de accu wordt door de
led POWER 15 weergegeven:
– brandt groen: apparaat is ingeschakeld
en de accu is vol;
– knippert groen: accu wordt geladen;
– brandt rood en 1 pieptoon ieder
60 seconden: waarschuwing lege
accu. Binnen ca. 15 - 20 minuten
schakelt de oudereenheid automatisch
uit.
In deze 15 minuten kunnen nog alle
functies worden geactiveerd en
gedeactiveerd. Houd er rekening mee
dat het gebruik van bijvoorbeeld de
Talk-Back functie en het omhoog
draaien van het volume op de hoogste
stand meer energie kost en de
resterende tijd zo kan worden ingekort.
U moet de voedingseenheid aan het
stroomnet aansluiten zodra de led
POWER 15 begint rood te knipperen.
• De oudereenheid kan via de
voedingseenheid aan het stroomnet
worden aangesloten en ontvangt van
daar de stroom terwijl gelijktijdig de accu
wordt geladen. De laadtijd van de accu
wordt iets langer wanneer de
oudereenheid is ingeschakeld. Terwijl de
accu wordt geladen, knippert de LED 15
groen.
Aanwijzingen:
– Met een volledig opgeladen accu kunt
u de oudereenheid tot max. 18 uur
gebruiken. Deze tijd hangt af van het
gebruik (de oudereenheid schakelt
vaak in, de intercomfunctie wordt veel
gebruikt, het volume is hoog enz.).
– De laadtijd van de lege accu bedraagt
ongeveer 5 uur.
4.5 Eco-Mode
Functiebeschrijving
Deze babyfoon heeft een Eco-Mode-functie
die niet alleen stroom- resp.
energiebesparend is maar bovendien ook
de hoogfrequentie straling in de babykamer
tot op een minimum reduceert.
In de VOX-levels 1, 2, 3 en 4 (zie
„6.3 Overdrachtsgevoeligheid van de VOXfunctie instellen“ op pagina 59) wordt de
Eco-Mode na ongeveer 10 seconden
automatisch geactiveerd zodra uw baby
slaapt en geen geluiden meer maakt.
U herkent dit doordat de
verbindingsindicatie 13 begint groen te
knipperen. In de Eco-Mode wordt niet alleen
de baby-eenheid automatisch op stand-by
gezet, maar ook de oudereenheid.
Als de Eco-Mode geactiveerd is, worden
alle functies die de baby zouden kunnen
wekken, automatisch gedeactiveerd. Zo
kunt u bijvoorbeeld de Talk-Back functie niet
gebruiken maar blijft u ook in de Eco-Mode
steeds met uw baby verbonden en weet u
altijd of u zich nog binnen de reikwijdte
bevindt.
Deze babyfoon beschikt over een controle
van de reikwijdte die ook in de Eco-Mode
functioneert. Wanneer u zich dus buiten de
reikwijdte beweegt, krijgt u automatisch een
waarschuwing ook wanneer de Eco-Mode
geactiveerd is, omdat de baby-eenheid ook
in de stand-by-modus iedere 30 seconden
een signaal aan de oudereenheid zendt om
de verbinding te controleren.
Als de verbindingsindicatie 13 groen brandt,
bestaat er een regulaire verbinding tussen
de baby- en de oudereenheid. Als de
57
Page 60

verbindingsindicatie 13 groen knippert, is de
Eco-Mode geactiveerd. Als de
verbindingsindicatie 13 naar rood wisselt,
betekent dit, dat u zich buiten de reikwijdte
bevindt en/of geen verbinding tussen de
beide eenheden bestaat.
Opmerking: Controleer de reikwijdte van
uw babyfoon voordat u de Eco-Mode
gebruikt. Controleer of de eenheden zich
altijd binnen de reikwijdte bevinden zodat u
uw baby ook hoort.
Het apparaat schakelt automatisch in de
overdrachtsmodus zodra uw baby geluiden
maakt die de ingestelde geluidsdrempel
(VOX-level 1 - 4) overschrijden. De EcoMode wordt onmiddellijk gedeactiveerd en
5. Bedienen van de baby-eenheid
de verbindingsindicatie 13 stopt met
knipperen.
In VOX-level 5 vindt een permanente
overdracht plaats en is de Eco-Mode
gedeactiveerd.
Wanneer u ondanks de geactiveerde EcoMode, wat betekent dat uw baby rustig
slaapt, wilt controleren of alle OK is, kunt u
de Eco-Mode deactiveren door de
permanenten overdrachtsmodus om te
schakelen:
1. Druk op de oudereenheid 8 op de toets
VOX 17.
2. Druk vervolgens op de toets Vol+ 10, tot
alle 5 leds 16 branden.
5.1 Baby-eenheid in- en uitschakelen
De baby-eenheid 1 schakelt automatisch in,
zodra u de voedingseenheid hebt
aangesloten en met het stroomnet hebt
verbonden. Daarna kunt u de baby-eenheid
op ieder moment in- en uitschakelen:
• Om de baby-eenheid 1 in- of uit te
schakelen, drukt u op de Aan/Uit-toets 5.
6. Bedienen van de oudereenheid
6.1 Oudereenheid in- en uitschakelen
Om de oudereenheid 8 in- of uit te
schakelen, houdt u de Aan/Uit-toets 14
ingedrukt:
– zodra u een geluidssignaal hoort en de
Power-LED 15 brandt, is de
oudereenheid ingeschakeld;
– zodra u een geluidssignaal hoort en de
Power-LED 15 uitgaat, is de
oudereenheid uitgeschakeld.
5.2 Indicatie leds
•De Power LED 6 brandt groen wanneer
de baby-eenheid ingeschakeld is.
•De VOX LED 7 van de baby-eenheid
brandt groen wanneer er een verbinding
tussen baby-eenheid en oudereenheid is
gemaakt.
•De VOX LED 7 brandt niet wanneer de
baby-eenheid 1 in de Eco-Mode is
geschakeld of wanneer er geen
verbinding naar de oudereenheid kon
worden gemaakt.
6.2 Indicatie leds
• De verbindingsindicatie 13 op de
oudereenheid 8 geeft de
verbindingsstatus naar de babyeenheid 1 aan:
– brandt groen, wanneer de verbinding
bestaat;
– knippert groen wanneer de baby-
eenheid in de Eco-Mode is en
signaleert dat uw baby rustig slaapt;
NL
58
Page 61

– brandt rood wanneer de verbinding
onderbroken is of wanneer de babyeenheid uitgeschakeld is.
Aanwijzingen:
– Wanneer de baby-eenheid 1 zich in de
Eco-Mode bevindt en de oudereenheid
zich buiten de reikwijdte beweegt,
brandt de verbindingsindicatie 13 rood.
Bovendien hoort u iedere 30 seconden
een geluidssignaal.
– Zodra de oudereenheid 8 zich opnieuw
binnen reikwijdte bevindt of de oorzaak
voor de verbindingsstoring werd
verholpen, brandt de
verbindingsindicatie 13 groen en
communiceren de apparaten weer met
elkaar.
– Wanneer beide eenheden worden
ingeschakeld, brandt eerst de
verbindingsindicatie 13 rood.
Oudereenheid en baby-eenheid
worden met elkaar verbonden. Zodra
de verbinding bestaat, wordt de
indicatie groen.
• De indicatie POWER15:
– brandt groen: apparaat is ingeschakeld
en de accu is vol;
– knippert groen: accu wordt geladen;
– brandt rood en 1 pieptoon ieder
60 seconden: waarschuwing lege
accu. Binnen ca. 15 - 20 minuten
schakelt de oudereenheid automatisch
uit. Let erop dat afhankelijk van het
gebruik het apparaat ook sneller kan
worden uitgeschakeld. (VOX level 5
verbruikt bijvoorbeeld meer energie
dan level 1).
• De 5 indicatie-leds 16 hebben drie
verschillende functies en zijn alleen
zichtbaar bij activiteit:
– geeft het geluidsniveau in de
kinderkamer aan. Hoe meer leds
branden, des te luider zijn de geluiden;
– toont bij het wijzigen van het volume de
verschillende standen. Hoe meer leds
branden, des te luider is de overdracht
via de luidspreker;
– toont bij het wijzigen van de VOX-
sensibiliteit de verschillende standen.
Hoe meer leds knipperen, des te
sneller reageert het apparaat op
geluiden. Bij 5 brandende leds wordt in
permanente overdracht omgeschakeld.
6.3 Overdrachtsgevoeligheid van de VOX-functie instellen
Baby's maken vele verschillende geluiden.
Dat kan van duidelijk snuiven of gebabbel
tot luid huilen of roepen gaan. De VOXfunctie kan zodanig worden ingesteld dat
een geluidsoverdracht alleen bij luid roepen
of huilen, maar niet bij andere geluiden
wordt geactiveerd.
Met de VOX-functie stelt u de
overdrachtsgevoeligheid van de microfoon
in. Hoe hoger het VOX-level, des te
gevoeliger reageert het apparaat op
geluiden.
1. Om de VOX-functie te activeren, drukt u
kort op VOX 17.
De leds 16 geven u door te knipperen aan
hoe gevoelig uw apparaat is ingesteld.
2. Verhoog of verlaag de
overdrachtsgevoeligheid met de toets
VOL + 10 of VOL - 11. Het gewenste
level komt overeen met het aantal
knipperende leds16:
– VOX-level 1 = zeer lage gevoeligheid,
activering alleen wanneer de baby heel
luid huilt;
– VOX-level 2 = lage gevoeligheid,
activering wanneer de baby luid huilt;
– VOX-level 3 = normale gevoeligheid,
activering wanneer de baby normaal
huilt;
– VOX-level 4 = sterke gevoeligheid,
activering ook bij zachte geluiden;
– VOX-level 5 = Eco-Mode is
uitgeschakeld. De overdracht is
ingesteld op permanente werking.
Hoe luid de overgedragen geluiden in de
oudereenheid worden afgespeeld, stelt u
59
Page 62

met de toetsen VOL + 10 en VOL - 11 in (zie
„6.4 Volume instellen“ op pagina 60).
Opmerking: Voor de wijziging van de
overdrachtsgevoeligheid na de activering
van de VOX-functie heeft u ca. 2 seconden
tijd. Dan schakelt het apparaat automatisch
weer over op de overdracht van geluiden.
Dit herkent u aan het feit, dat de leds 16 niet
meer knipperen en dat u met de toetsen
VOL + 10 of VOL - 11 alleen het volume
kunt veranderen.
Opgelet! In de permanente overdracht VOX
level 5 worden continu alle geluiden
overgedragen. Wanneer de baby rustig
slaapt, wordt het volume na enkele
seconden automatisch op de laagste stand
aangepast om het achtergrondgeluid te
minimaliseren. Zodra het kind begint
geluiden te maken, gaat het volume
automatisch weer terug naar de
voorinstelling.
6.4 Volume instellen
1. Stel het volume waarmee u de geluiden
in de oudereenheid kunt horen, in met de
toetsen VOL + 10 en VOL - 11.
Bij iedere druk op de toets klinkt er een
pieptoon die het ingestelde volume
weergeeft. De leds 16 gaan
overeenkomstig branden. Hoe luider u de
instelling kiest, des te luider wordt het
geluidssignaal en des te meer leds
branden.
Opmerking: Wanneer de VOX-functie op
geringe gevoeligheid is ingesteld (zie
„6.3 Overdrachtsgevoeligheid van de
VOX-functie instellen“ op pagina 59),
worden onafhankelijk van het ingestelde
volume geen zachte geluiden
overgedragen. Dat wil zeggen, men hoort
niet meer wanneer men het volume
verhoogt. Wanneer men meer geluiden
wil horen, moet de gevoeligheid van de
overdracht op een hoger VOX-level
worden verhoogd.
6.5 Mute schakelen
De oudereenheid kan op "MUTE" worden
geschakeld. Geluiden in de babykamer
worden dan niet meer overgedragen.
1. Druk zo vaak op de toets VOL - 11 tot u
geen pieptoon meer hoort.
Nu worden er ook geen geluiden meer
overgedragen.
Het volume in de babykamer wordt
verder door de leds 16 weergegeven.
Hoe meer leds branden, des te luider zijn
de geluiden in de babykamer.
2. Om de mute-schakeling op te heffen,
bedient u de toets VOL + 10.
3. Als de oudereenheid op mute is
geschakeld en u activeert de Talk-Back
functie wordt het volume automatisch
weer op de eerste stand ingesteld.
6.6 Functie Talk-Back
Met de functie Talk-Back kunt u met uw
baby spreken.
1. Houd de toets TAL K 18 van de
oudereenheid ingedrukt.
Nadat u een geluidssignaal hoort, is de
spreekverbinding gemaakt.
2. Spreek gelijktijdig in de microfoon 20 van
de oudereenheid.
Uw baby kan u nu horen via de
luidspreker 2 van de baby-eenheid.
3. Laat TALK 1 8 weer los om naar de
reactie van uw baby te luisteren.
Aanwijzingen:
– Als de baby-eenheid 1 zich in de Eco-
Mode bevindt, wordt deze functie
gedeactiveerd zodat u uw baby niet
per ongeluk wekt. In dit geval wordt
door twee op elkaar volgende
geluidssignalen aangegeven dat de
Talk-Back functie momenteel niet
beschikbaar is.
NL
60
Page 63

– Wanneer het volume van de
oudereenheid op „MUTE” is gezet (zie
„6.4 Volume instellen“ op pagina 60),
wordt deze automatisch op het volume
level I verhoogd zodra u de toets
TALK 18 indrukt.
7. Reiniging en onderhoud van het apparaat
7.1 Reiniging
Waarschuwing! Om gevaar van
elektrische schok, letsel of
beschadiging te voorkomen:
– Trek altijd de voedingseenheid uit
het stopcontact voordat u eht
apparaat reinigt.
– Dompel de afzonderlijke delen
nooit onder in water.
Voorzichtig! Gebruik nooit schurende,
bijtende of krassende reinigingsmiddelen.
Daardoor zou het apparaat beschadigd
kunnen worden.
1. Indien nodig kunt u de afzonderlijke delen
afvegen met een vochtige doek.
2. Gebruik het apparaat pas weer, als alle
delen helemaal droog is.
7.2 Accu vervangen
De ingebouwde lithium-polymeeraccu (lipoaccu) 3,7V, 1200 mAh, mag uitsluitend door
een originele accu worden vervangen.
Neem daarvoor contact op met onze
productservice (zie „Product service
babyphone in Europe“ op pagina116).
1. Verwijder de accu-afdekking 9 aan de
achterzijde van de oudereenheid 8, door
deze omlaag te schuiven.
2. Verwijder de defecte accu.
3. Plaats de nieuwe accu volgens de
markeringen in het accuvak. Let daarbij
absoluut op de juiste polariteit (+ en -).
4. Schuif de accu-afdekking 9 weer op de
oudereenheid 8.
5. Laad de nieuwe accu bij de eerste keer
continu gedurende 10 uur op, om de
volledige capaciteit van de accu te
activeren (zie „4.1 Oudereenheid
aansluiten“ op pagina 55).
61
Page 64

8. Storingen en het verhelpen ervan
Storing Oorzaak Verhelpen
Baby-eenheid
of oudereenheid
werkt niet
Luid fluitend
geluid
Oudereenheid
piept
Verbindingsindicatie 13 brandt
rood
Geen geluid van
de
oudereenheid
Wanneer deze tips het probleem niet
oplossen, kunt u proberen de storing als
volgt te verhelpen:
1. Neem de accu uit de oudereenheid.
2. haal de voedingseenheid uit het
stopcontact.
3. Wacht een paar minuten.
Geen stroomvoorziening Stroomvoorziening tot stand brengen (zie
„4.4 Stroomvoorziening:“ op pagina 57)
Accu in de oudereenheid is
leeg
Apparaat is niet ingeschakeld Apparaat inschakelen (zie
De afstand tussen de babyeenheid en de oudereenheid is
te groot of het signaal wordt
door dikke muren of andere
elektrische apparaten
gestoord
Terugkoppeling, omdat de
afstand baby-eenheid oudereenheid te gering is
Verbinding naar baby-eenheid
is onderbroken
Problemen met de
stroomvoorziening
Oudereenheid bevindt zich
buiten de reikwijdte
Volume is uitgeschakeld Volume verhogen (zie „Mute schakelen“ op
VOX-functie is te laag
ingesteld
Accu laden (zie „4.4 Stroomvoorziening:“
op pagina 57)
"4.1Oudereenheid aansluiten" op
pagina55 en "4.2Baby-eenheid
aansluiten" op pagina56)
Afstand kleiner maken of een andere plaats
voor de oudereenheid kiezen
Afstand groter maken tot minstens 2 - 3 m
Reduceer het volume en het VOX-level van
de oudereenheid wanneer u zich daarmee
in directe nabijheid van de baby-eenheid
bevindt (zie "6.3Overdrachtsgevoeligheid
van de VOX-functie instellen" op pagina59
en "6.4Volume instellen" op pagina60).
Verbinding maken (zie „4.3 Baby-eenheid
en oudereenheid met elkaar verbinden“ op
pagina 56)
Stroomvoorziening controleren (zie
"4.4Stroomvoorziening:" op pagina57)
Verbinding maken (zie „4.3 Baby-eenheid
en oudereenheid met elkaar verbinden“ op
pagina 56)
pagina60)
Overdrachtsgevoeligheid verhogen (zie
"6.3Overdrachtsgevoeligheid van de VOX-
functie instellen" op pagina59 resp.
"3.1Kort overzicht van de meldingen" op
pagina55)
4. Plaats de accu terug en sluit de
voedingseenheid weer aan.
Als het probleem nog steeds niet is
opgelost, neem dan contact op met de
klantenservice (zie „11.1 Servicecenter
NUK“ op pagina 65).
NL
62
Page 65

9. Technische gegevens
Draadloze verbinding 2.4 Ghz FHSS
Zenderfrequentie 2408 MHz - 2474 MHz, max. EIRP 100mW
Aantal kanalen 12 / Automatische kanaalkeuze
Reikwijdte bij vrij zicht ca. 250 m
Reikwijdte in gesloten
ruimtes
Bedrijfstemperatuur 0 °C tot 40 °C omgevingstemperatuur
Bedrijfstemperatuur 0 °C tot 40 °C omgevingstemperatuur
Accu lithium-polymeeraccu (lipo-accu) 3,7 V, 1200 mAh
Ingang 100-240 V AC; 50/60 Hz; 0,1 A
Uitgang 5 V ; 2,75 W;
ca. 40 m. Een overdracht is afhankelijk van de omgeving.
Wanden of bomen kunnen de ontvangst aanzienlijk storen.
Baby-eenheid
Oudereenheid
Bedrijfsduur in normale overdrachtsmodus: > 15 uur
Bedrijfsduur in Eco-Mode: > 18 uur
Laadtijd bij eerste opladen min. 10 uur
iedere verdere laadtijd duurt ca. 5 uur
Voedingseenheden
9.1 FHSS- technologie
Deze babyfoon werkt bij draadloze
overdracht met de moderne FHSStechnologie.
Frequency Hopping Spread Spectrum
(FHSS) is een digitale
frequentiespreidingsmethode voor de
draadloze gegevensoverdracht. Daarbij
wordt het gehele zendvermogen niet zoals
vroeger op een dragerfrequentie
geconcentreerd. In plaats daarvan wisselt
de dragerfrequentie volgens het
toevalsprincipe. In de ontvanger worden
dan de over verschillende dragerfrequenties
verdeelde gegevenspakketten weer
samengesteld.
Deze methode brengt ten opzicht van de
conventionele draadloze overdracht enkele
voordelen:
• Het draadloze signaal kan veel moeilijker
worden afgeluisterd omdat de
afluisterende persoon niet weet over
welke dragerfrequenties het werd
verdeeld en hoe het signaal weer correct
moet worden samengesteld. Daarom
• De draadloze overdracht is duidelijk
wordt deze methode bijvoorbeeld ook bij
bluetooth of bij het militair gebruikt.
minder gevoelig voor stoorsignalen. Dat
ligt aan het feit dat een bepaalde
dragerfrequentie altijd slechts kort wordt
gebruikt alvorens op een andere wordt
omgeschakeld. Indien er nu op een
bepaalde frequentie storingen optreden,
zijn daarvan steeds slechts kleine
gegevenspakketten betroffen. Deze
fouten kunnen echter door
foutcorrigerende methoden worden
verholpen.
63
Page 66

10. Afval
10.1 Apparaat
Het symbool met de
doorgestreepte afvalemmer op
wielen betekent dat het product in
de Europese Unie gescheiden
moet worden ingeleverd. Dit geldt
voor dit product en voor alle met dit
symbool gekenmerkte accessoires.
Gekenmerkte producten mogen niet met het
normale huisvuil worden verwijderd maar
moeten bij een aparte inzamelplaats voor
recycling van elektrische en elektronische
apparaten worden ingeleverd.
Recycling helpt om het verbruik van
grondstoffen te reduceren en het milieu te
ontzien.
10.2 Verpakking
Als u de verpakking wilt wegwerpen, let dan
op de desbetreffende milieuvoorschriften in
uw land.
10.3 Accu
batterijen worden verkocht en bij
gemeentelijke inzamelplaatsen
overeenkomstige bakken voor het
verwijderen van accu's opgesteld. Accu's
die met de volgende letters zijn gekenmerkt
bevatten onder andere de volgende
schadelijke stoffen: Cd (cadmium), Hg
(kwikzilver), Pb (lood).
11. Waarborg
Naast de garantieverplichtingen van de
verkoper uit het koopcontract verlenen wij
als fabrikant bij correct gebruik van het
apparaat onder inachtneming van de
gebruiksaanwijzing een garantie van 24
maanden vanaf de koop van het apparaat.
De koopdatum en het apparaattype moeten
door een kassabon worden aangetoond.
De wettelijke rechten van de koper worden
door deze fabrieksgarantie niet beperkt.
Wij verplichten ons om binnen de
garantieperiode alle gebreken te verhelpen
die veroorzaakt zijn door materiaal- of
fabricagefouten. Slijtonderdelen vallen niet
onder de garantie.
Geringe afwijkingen van de aangestreefde
hoedanigheid die niet van betekenis zijn
voor de waarde en de functionaliteit van het
apparaat, vallen niet onder de
garantieplicht. Er kan evenmin garantie
worden verleend wanneer de gebreken aan
het apparaat voortvloeien uit
transportschade die niet door ons te
verantwoorden is, uit verkeerd gebruik of
gebrekkig onderhoud of wanneer aan het
apparaat ingrepen werden uitgevoerd door
personen die hiertoe niet door ons werden
geautoriseerd.
De garantieprestatie vindt plaats volgens
onze keuze. Dit kan zijn door reparatie,
vervanging van onderdelen of door
vervanging van het apparaat. De uitvoering
van de garantieprestaties bewerkstelligt
noch een verlenging noch een nieuw begin
van de garantieperiode. De garantieperiode
voor ingebouwde onderdelen eindigt
gelijktijdig met de garantieperiode voor het
hele apparaat.
Verdergaande of andere claims in het
bijzonder op vervanging van schade die
buiten het apparaat is ontstaan zijn
uitgesloten - voor zover een
aansprakelijkheid niet dwingend wettelijk is
voorgeschreven.
Transportkosten en risico's worden niet
door ons overgenomen.
Accu's mogen niet bij het huisvuil.
Verbruikte accu's moeten volgens de
voorschriften worden verwijderd.
Voor dit doel zijn in de handel,waar
NL
64
Page 67

De inzending van een apparaat zonder
aantoning van de koopdatum wordt als
reparatiegeval behandeld. Een reparatie van
het apparaat vindt pas na overleg met de
klant plaats.
Voor eventuele vragen adres en
artikelnummer bewaren.
11.2 Servicecenter babyfoon
Bij vragen over uw babyfoon, neemt u
contact op met onze experts voor babyfoon.
De product-hotline vindt u onder „Product
service babyphone in Europe” op
pagina116, of u neemt contact op met ons
via onze website www.nuk-service.com.
11.1 Servicecenter NUK
De service-adressen voor vragen over
garantie of bij algemene vragen over het
merk NUK vindt u in „Contact addresses
NUK” op pagina115.
Artikelnummer: 10.256.438
11.3 Leverancier
Let erop dat dit adres geen service-adres
is. Neem bij problemen of vragen over het
product contact op met het onder 11.2
genoemde servicecenter.
MAPA GmbH
Industriestraße 21–25
27404 Zeven
Germany
www.nuk.com
12. Conformiteitsverklaring
Het apparaat voldoet aan alle toepasbare Europese richtlijnen en de nationale omzettingen.
Deze zijn zichtbaar uit de EU-conformiteitsverklaring die bij de fabrikant kan worden
aangevraagd.
De conformiteitsverklaring vindt u naast de gebruiksaanwijzing in de verkoopverpakking of
ook onder www.nuk.de.
65
Page 68

Indice
1. Descrizione dell'apparecchio. . . . . . . . . . . . . . . . . . . . . . . . . . . . . . . . . . . 67
1.1 Destinazione d’uso . . . . . . . . . . . . . . . . . . . . . . . . . . . . . . . . . . . . . . . . . . . . . . . 67
1.2 Descrizione del funzionamento . . . . . . . . . . . . . . . . . . . . . . . . . . . . . . . . . . . . . . 67
1.3 Omologazione . . . . . . . . . . . . . . . . . . . . . . . . . . . . . . . . . . . . . . . . . . . . . . . . . . . 67
1.4 Materiale in dotazione . . . . . . . . . . . . . . . . . . . . . . . . . . . . . . . . . . . . . . . . . . . . . 67
2. Indicazioni di sicurezza . . . . . . . . . . . . . . . . . . . . . . . . . . . . . . . . . . . . . . . 68
2.1 Avvertenze generali . . . . . . . . . . . . . . . . . . . . . . . . . . . . . . . . . . . . . . . . . . . . . . . 68
2.2 Protezione contro le scosse elettriche. . . . . . . . . . . . . . . . . . . . . . . . . . . . . . . . . 68
2.3 Per la sicurezza del vostro bambino . . . . . . . . . . . . . . . . . . . . . . . . . . . . . . . . . . 68
2.4 Prevenzione delle lesioni . . . . . . . . . . . . . . . . . . . . . . . . . . . . . . . . . . . . . . . . . . . 69
2.5 Danni ai materiali. . . . . . . . . . . . . . . . . . . . . . . . . . . . . . . . . . . . . . . . . . . . . . . . . 69
2.6 Utilizzo degli accumulatori LiPo. . . . . . . . . . . . . . . . . . . . . . . . . . . . . . . . . . . . . . 69
3. Componenti del baby phone . . . . . . . . . . . . . . . . . . . . . . . . . . . . . . . . . . . 70
3.1 Panoramica dei messaggi . . . . . . . . . . . . . . . . . . . . . . . . . . . . . . . . . . . . . . . . . . 71
4. Messa in funzione dell’apparecchio . . . . . . . . . . . . . . . . . . . . . . . . . . . . . 71
4.1 Collegamento dell’unità genitore. . . . . . . . . . . . . . . . . . . . . . . . . . . . . . . . . . . . . 71
4.2 Collegamento dell’unità bambino . . . . . . . . . . . . . . . . . . . . . . . . . . . . . . . . . . . . 72
4.3 Collegamento dell’unità bambino e dell’unità genitore . . . . . . . . . . . . . . . . . . . . 72
4.4 Alimentazione di corrente . . . . . . . . . . . . . . . . . . . . . . . . . . . . . . . . . . . . . . . . . . 73
4.5 Eco-Mode . . . . . . . . . . . . . . . . . . . . . . . . . . . . . . . . . . . . . . . . . . . . . . . . . . . . . . 73
5. Utilizzo dell’unità bambino. . . . . . . . . . . . . . . . . . . . . . . . . . . . . . . . . . . . . 74
5.1 Accensione e spegnimento dell’unità bambino . . . . . . . . . . . . . . . . . . . . . . . . . 74
5.2 Spie con LED. . . . . . . . . . . . . . . . . . . . . . . . . . . . . . . . . . . . . . . . . . . . . . . . . . . . 74
6. Utilizzo dell’unità genitore . . . . . . . . . . . . . . . . . . . . . . . . . . . . . . . . . . . . . 74
6.1 Accensione e spegnimento dell’unità genitore . . . . . . . . . . . . . . . . . . . . . . . . . . 74
6.2 Spie con LED. . . . . . . . . . . . . . . . . . . . . . . . . . . . . . . . . . . . . . . . . . . . . . . . . . . . 74
6.3 Impostazione della sensibilità di trasmissione della funzione VOX . . . . . . . . . . . 75
6.4 Regolazione del volume . . . . . . . . . . . . . . . . . . . . . . . . . . . . . . . . . . . . . . . . . . . 76
6.5 Silenziamento . . . . . . . . . . . . . . . . . . . . . . . . . . . . . . . . . . . . . . . . . . . . . . . . . . . 76
6.6 Funzione Talk-Back . . . . . . . . . . . . . . . . . . . . . . . . . . . . . . . . . . . . . . . . . . . . . . . 76
7. Pulizia e manutenzione dell’apparecchio . . . . . . . . . . . . . . . . . . . . . . . . . 77
7.1 Pulizia . . . . . . . . . . . . . . . . . . . . . . . . . . . . . . . . . . . . . . . . . . . . . . . . . . . . . . . . . 77
7.2 Sostituzione della batteria . . . . . . . . . . . . . . . . . . . . . . . . . . . . . . . . . . . . . . . . . . 77
8. Guida all'eliminazione dei guasti . . . . . . . . . . . . . . . . . . . . . . . . . . . . . . . . 77
9. Dati tecnici. . . . . . . . . . . . . . . . . . . . . . . . . . . . . . . . . . . . . . . . . . . . . . . . . . 79
9.1 Tecnologia FHSS. . . . . . . . . . . . . . . . . . . . . . . . . . . . . . . . . . . . . . . . . . . . . . . . . 79
10. Smaltimento. . . . . . . . . . . . . . . . . . . . . . . . . . . . . . . . . . . . . . . . . . . . . . . . . 80
10.1 Apparecchio . . . . . . . . . . . . . . . . . . . . . . . . . . . . . . . . . . . . . . . . . . . . . . . . . . . . 80
10.2 Imballaggio . . . . . . . . . . . . . . . . . . . . . . . . . . . . . . . . . . . . . . . . . . . . . . . . . . . . . 80
10.3 Accumulatore . . . . . . . . . . . . . . . . . . . . . . . . . . . . . . . . . . . . . . . . . . . . . . . . . . . 80
11. Garanzia . . . . . . . . . . . . . . . . . . . . . . . . . . . . . . . . . . . . . . . . . . . . . . . . . . . . 80
11.1 Centro assistenza NUK . . . . . . . . . . . . . . . . . . . . . . . . . . . . . . . . . . . . . . . . . . . . 81
11.2 Centro assistenza baby phone . . . . . . . . . . . . . . . . . . . . . . . . . . . . . . . . . . . . . . 81
11.3 Fornitore. . . . . . . . . . . . . . . . . . . . . . . . . . . . . . . . . . . . . . . . . . . . . . . . . . . . . . . . 81
12. Dichiarazione di conformità. . . . . . . . . . . . . . . . . . . . . . . . . . . . . . . . . . . . 81
66
Page 69

1. Descrizione dell'apparecchio
1.1 Destinazione d’uso
Con questo baby phone Eco Control Audio
500 potete sorvegliare il vostro neonato o
bambino nella sua cameretta. Può essere
utilizzato anche come sistema di controllo
audio degli anziani.
L’apparecchio è previsto per l’uso in
ambienti asciutti. L’apparecchio non è
adatto per il funzionamento in ambienti
umidi o all’aperto in caso di pioggia.
L’apparecchio è idoneo all’uso domestico.
Non è predisposto per l'uso industriale.
L’apparecchio funge esclusivamente come
ausilio. Non sostituisce in alcun modo la
presenza fisica e la sorveglianza da parte di
genitori, babysitter o personale
assistenziale.
1.2 Descrizione del funzionamento
L’unità bambino 1 viene installata nella
stanza da sorvegliare. Registra i rumori e li
invia via radio all’unità genitore 8.
L’unità genitore 8 è dotata di accumulatore,
per cui può essere sempre collocata
all’interno del vostro campo visivo.
L’accumulatore si ricarica tramite
l’adattatore di rete fornito in dotazione.
La portata tra unità bambino e unità genitore
è di ca. 40 m all’interno e di un massimo di
250 m all'esterno (in campo libero). Il campo
di ricezione del baby phone varia a seconda
dell’ambiente circostante. Pareti spesse o
metallo possono ridurre la portata.
Il baby phone dispone di una Eco-Mode,
con la quale l’apparecchio trasmittente
(unità bambino) passa automaticamente in
modalità standby se il bambino dorme
tranquillo. A seconda della sensibilità
impostata si riaccende quando il bambino
comincia a produrre dei rumori o a piangere.
Per sentire tutti i rumori della cameretta è
possibile regolare la sensibilità di
trasmissione della funzione VOX con il tasto
VOX 17 impostato sul massimo (=livello 5).
Su questo livello l’unità bambino rimane
costantemente accesa (ved.
“6.3Impostazione della sensibilità di
trasmissione della funzione VOX“ a
pagina75).
Per non sentire alcun rumore è possibile
impostare il volume su Mute con il tasto
Vol - 11. In tal caso solo la spia LED
indicherà 16 quando il bambino emette dei
suoni.
Quando la Eco-Mode è attivata, le radiazioni
ad alta frequenza nella cameretta del
bambino vengono ridotte al minimo. L’unità
bambino invia quindi un breve segnale
all’unità genitore solo ogni 30 secondi, per
verificare il collegamento. Se l’unità genitore
è fuori portata, i genitori vengono avvisati
con un segnale acustico.
Maggiori informazioni sulla Eco-Mode sono
reperibili in "4.5Eco-Mode" a pagina73 e in
"6.3Impostazione della sensibilità di
trasmissione della funzione VOX" a
pagina75.
1.3 Omologazione
Il baby phone funziona con una frequenza di
2,4 GHz. Può essere utilizzato in tutti i paesi
dell’UE. In Russia e in Ucraina occorre
rispettare le limitazioni specifiche del paese.
1.4 Materiale in dotazione
•Baby phone:
– 1 unità bambino (per la cameretta)
– 1 adattatore di rete per l’unità bambino
– 1 unità genitore
– 1 adattatore di rete per l’unità genitore
– 1 accumulatore LiPo 3,7 V, 1200 mAh
• 1 manuale d’uso
• 1 Quick Start Guide
67
Page 70

2. Indicazioni di sicurezza
2.1 Avvertenze generali
• Leggere attentamente il presente
manuale prima dell’uso. Esso costituisce
parte integrante dell’apparecchio e deve
sempre essere tenuto a portata di mano.
• L'apparecchio e gli accessori devono
essere utilizzati esclusivamente per lo
scopo descritto (ved. “1.1Destinazione
d’uso“ a pagina67).
• Non utilizzare accessori diversi da quelli
forniti o espressamente autorizzati
indicati nel presente manuale d’uso.
• Prima di ogni utilizzo verificare sempre
che l’apparecchio funzioni correttamente.
Oltre a verificare la portata e il
collegamento si consiglia di verificare
l’ascolto durante il funzionamento.
• Gli apparecchi devono essere utilizzati
esclusivamente per la trasmissione di
suoni in ambienti domestici. Qualsiasi
persona che si trova nella stanza deve
essere avvisata della possibilità di essere
ascoltata.
• Ricordiamo che la trasmissione dipende
sempre dall’ambiente circostante. Gli
apparecchi elettronici, gli isolamenti, le
pareti, l’umidità e gli alberi possono
disturbare sensibilmente la ricezione.
2.2 Protezione contro le
scosse elettriche
Attenzione! Le seguenti avvertenze
di sicurezza vi proteggono da
eventuali scosse elettriche.
• Non tentare di riparare l'apparecchio
autonomamente. I componenti devono
essere aperti solo da personale tecnico
qualificato.
• L’apparecchio non deve essere utilizzato
se è danneggiato.
• Quando si è in viaggio accertarsi sempre
che la tensione disponibile corrisponda a
quella indicata nei dati tecnici.
2.3 Per la sicurezza del vostro bambino
Attenzione! I bambini non sono in
grado di riconoscere i pericoli
connessi all'utilizzo dell'apparecchio.
Pertanto tenere lontano i bambini da
questo tipo di apparecchi.
• Accertarsi scrupolosamente che
l’apparecchio e i suoi accessori siano
sempre lontani dalla portata del bambino.
La distanza tra il bambino e
l’apparecchio/gli accessori deve essere
di minimo 1 m.
• I bambini spesso non sono in grado di
valutare correttamente i pericoli e
corrono quindi il rischio di procurarsi
lesioni. Osservate pertanto le seguenti
indicazioni:
– Questo apparecchio non è previsto per
l'uso da parte di persone (anche
bambini) con disabilità fisiche,
sensoriali o mentali o senza adeguata
esperienza e/o conoscenza, a meno
che non siano sorvegliate da una
persona responsabile per la loro
sicurezza o addestrate all'uso
dell'apparecchio.
– Sorvegliare sempre i bambini affinché
non giochino con l’apparecchio.
– Attenzione: il cellofan dell'imballo può
essere causa di soffocamento per i
bambini. Sussiste pericolo di
soffocamento. Non lasciare che il
cellofan dell'imballo sia utilizzato come
giocattolo.
– Per evitare il rischio di strangolamento,
tenere sempre il cavo di rete fuori dalla
portata del bambino.
• Utilizzare l'apparecchio solo come
sicurezza aggiuntiva. L’apparecchio non
deve mai sostituire la sorveglianza di una
persona.
68
Page 71

2.4 Prevenzione delle lesioni
Attenzione! Rispettare le seguenti
avvertenze per evitare lesioni.
• Accertarsi che il cavo dell'adattatore di
rete non presenti un rischio di inciampo e
che non sia causa di cadute.
2.5 Danni ai materiali
Cautela! Per evitare danni ai materiali
attenersi a quanto segue:
• Non esporre l'apparecchio alla luce
diretta del sole o a fonti di calore
consistente, in quanto i raggi UV e il
surriscaldamento possono causare un
infragilimento delle materie plastiche,
danneggiando l'elettronica.
• Nelle vicinanze dell’apparecchio non
devono trovarsi fonti di calore e
l'apparecchio non deve essere coperto al
fine di evitare un surriscaldamento.
• Mai utilizzare l’apparecchio in ambienti
molto umidi o bagnati.
• Non utilizzare l’apparecchio in ambienti
polverosi. Ciò potrebbe ridurne la durata
di funzionamento.
• Mai utilizzare detergenti abrasivi o
aggressivi che potrebbero danneggiare
l’apparecchio.
• Quando l’apparecchio non viene
utilizzato spegnerlo sempre con il tasto
On/Off.
2.6 Utilizzo degli accumulatori
LiPo
Attenzione!
Per evitare potenziali pericoli con
conseguenti danni alle persone o
alle cose, rispettare le seguenti
avvertenze:
• Evitare cortocircuiti.
Evitare il contatto tra i poli
dell’accumulatore e oggetti metallici,
poiché si potrebbe verificare un
cortocircuito. Un eventuale cortocircuito
potrebbe causare il surriscaldamento
dell'accumulatore e quindi la fuoriuscita
di elettrolita, pericolo di esplosione o
formazione di fiamme.
In caso di fuoriuscita di elettrolita, evitare
il contatto con la pelle, gli occhi e le
mucose, per prevenire eventuali lesioni.
In caso di contatto con l'elettrolita
sciacquare immediatamente le parti
interessate con acqua pulita e contattare
subito un medico.
• L'accumulatore integrato deve essere
sostituito soltanto con un accumulatore
di ricambio originale. Qualora fosse
difettoso, rivolgersi al Servizio di
assistenza a uno degli indirizzi indicati
(ved. “Contact addresses NUK“ a
pagina115).
• Per evitare il pericolo di esplosione,
l’accumulatore non deve essere riscaldato
o smaltito mediante incenerimento.
• Non tentare mai di aprire l'accumulatore,
piegare i contatti o strapparli. Non gettare
l'accumulatore a terra né colpirlo con un
martello.
Un eventuale danno potrebbe causare un
cortocircuito interno e quindi la
fuoriuscita di elettrolita, pericolo di
esplosione o formazione di fiamme.
• Per caricare l'accumulatore utilizzare
esclusivamente l’adattatore di rete fornito
in dotazione.
Un adattatore di rete “sbagliato”
potrebbe caricare eccessivamente
l’accumulatore, provocandone il
surriscaldamento e l’esplosione.
• Gli accumulatori LiPo devono essere
caricati o conservati esclusivamente su
sottofondi resistenti e non infiammabili.
• Non lasciare incustoditi gli accumulatori
LiPo durante la ricarica, per poter
intervenire tempestivamente in caso di
problemi.
• Gli accumulatori LiPo contengono
sostanze nocive. Rispettare pertanto le
norme sullo smaltimento contenute in
"10.3Accumulatore" a pagina80.
69
Page 72

3. Componenti del baby phone
1Unità bambino
2 Altoparlante
3 Presa per l’adattatore di rete
4 Microfono
5 Tasto On/Off:
– premuto brevemente: accensione
– premuto a lungo: spegnimento
6 LED Power
– verde, acceso fisso quando l’unità
bambino è accesa
7 LED VOX
– verde, acceso fisso quando il
collegamento con l’unità genitore è
attivo;
– si spegne quando il collegamento con
l’unità genitore si interrompe.
8 Unità genitore
9 Coperchio accumulatore
10 Tas to Vol +:
– alza il volume
11 Tas to VOL -:
– abbassa il volume
– Silenziamento al livello più basso.
I suoni vengono mostrati solamente
tramite la spia LED 16.
12 Altoparlante
13 Spia del collegamento
– verde, accesa fissa: quando i due
apparecchi sono collegati tra loro;
– verde, lampeggiante: quando il
collegamento è presente ma è stata
attivata la Eco-Mode;
– rossa, accesa fissa: quando i due
apparecchi non sono collegati tra loro.
14 Tas to On /Off
15 Spia dell’alimentazione di corrente
POWER
– verde, accesa fissa: l’apparecchio è
acceso e l'accumulatore è carico;
– verde, lampeggiante: l'accumulatore è
in carica;
– rossa, accesa fissa e 1 bip ogni
60 secondi: avviso di accumulatore
scarico. Entro ca. 15 - 20 minuti l’unità
genitore si spegne automaticamente.
16 Spia con LED
– mostra il livello di rumorosità nella
cameretta del bambino. Più LED sono
accesi e più suoni vi saranno nella
cameretta;
– modificando il volume mostra i veri
livelli. Più LED sono accesi e più forte
sarà la trasmissione tramite
l’altoparlante;
– l’impostazione della sensibilità VOX
mostra i vari livelli. Più LED
lampeggiano, più velocemente
reagisce l’apparecchio ai suoni. Con 5
LED accesi si attiva la trasmissione
dati.
17 Tas to VOX
– premere brevemente assieme a Vol +/-
per impostare la sensibilità di
trasmissione
18 Tas to TA LK :
– tenendo premuto il tasto si attiva la
funzione “Parlare con il bambino”;
– se l’unità bambino si trova in Eco-
Mode, la funzione Talk-Back è bloccata
come indicato dai due segnali acustici.
19 Presa per l’adattatore di rete
20 Microfono
70
Page 73

3.1 Panoramica dei messaggi
Unità bambino
Spie Display Significato
LED Power 6 verde L'unità bambino è accesa
LED VOX 7 verde Collegamento ok (senza Eco-Mode)
spento Collegamento ok (con Eco-Mode)
Collegamento interrotto
Unità genitore
Spie Display Significato
Spia del
collegamento 13
LED Power 15 verde L’unità genitore è accesa,
Spie con LED 16 1 - 5 LED lampeggianti Impostazione della sensibilità VOX. Più
nessuno 1 bip “Parlare con il bambino” (Talk-Back)
nessuno bip doppio “Parlare con il bambino” (Talk-Back) con
verde Collegamento ok (senza Eco-Mode)
verde lampeggiante Collegamento ok (con Eco-Mode)
rosso lampeggiante
1 bip ogni 30 s
rosso fisso
1 bip ogni 60 s
verde lampeggiante L'accumulatore è in carica
1 - 5 LED accesi fissi
1 - 5 bip
1 - 5 LED accesi fissi Visualizzazione del volume dei suoni del
Collegamento interrotto
l’accumulatore è carico
Avviso di accumulatore scarico. L’unità
genitore si spegne automaticamente
entro 15 min.
LED lampeggiano, più sensibile è
l’apparecchio ai suoni. Con 5 LED
accesi si attiva la trasmissione dati.
Impostazione del volume. Più LED sono
accesi e più forte sarà la trasmissione
tramite l’altoparlante.
bambino. Più LED sono accesi e più
suoni si sentiranno nella cameretta del
bambino.
Eco-Mode attiva
4. Messa in funzione dell’apparecchio
Nota: Prima di inserire l'adattatore di rete
nella presa collegare sempre prima i cavi.
4.1 Collegamento dell’unità genitore
L’unità genitore riceve corrente
dall’accumulatore LiPo in dotazione.
L’accumulatore può essere caricato con
l’alimentatore in dotazione.
Cautela! Per evitare problemi di
funzionamento, inserire prima
l’accumulatore nell’unità genitore e quindi
collegare l’adattatore di rete con l’unità
genitore.
71
Page 74

1. Rimuovere il coperchio dell’accumulatore 9
sul retro dell’unità genitore 8, spingendolo
verso il basso.
2. Inserire l’accumulatore nel
corrispondente vano in base ai
contrassegni. Prestare particolare
attenzione alla corretta polarità (+ e -).
3. Fare scorrere nuovamente il coperchio
dell’accumulatore 9 sull’unità genitore 8.
4. Inserire la spina piccola dell’adattatore di
rete nella presa dell’adattatore di rete 19
dell’unità genitore.
5. Inserire l'adattatore di rete in una presa
conforme ai dati tecnici (ved. “9.Dati
tecnici“ a pagina79).
6. Caricare l’unità genitore per la prima volta
per 10 ore senza interruzione, per
attivare la piena capacità
dell’accumulatore.
Successivamente l'accumulatore deve
essere caricato ogni volta solo per ca.
5 ore. La ricarica può avvenire anche
durante il funzionamento.
La spia LED POWER 15 indica il
processo di carica:
– verde, lampeggiante: l'accumulatore è
in carica;
– verde, accesa fissa: l'accumulatore è
carico;
– rossa, accesa fissa e 1 bip ogni
60 secondi: avviso di accumulatore
scarico. Entro ca. 15 - 20 minuti l’unità
genitore si spegne automaticamente.
4.2 Collegamento dell’unità
bambino
Nota: Installare l’unità bambino 1 solo
quando l’accumulatore dell’unità genitore 8
è interamente carico.
1. Collocare l’unità bambino 1 nella
cameretta in un luogo inaccessibile al
bambino.
La distanza ideale tra unità bambino e
bambino è di 1 - 2 m.
2. Inserire la spina dell’alimentatore di rete
nella presa 3 dell'unità bambino 1 .
3. Inserire l'adattatore di rete in una presa
conforme ai dati tecnici (ved. “9.Dati
tecnici“ a pagina79).
4.3 Collegamento dell’unità
bambino e dell’unità
genitore
Di solito l’unità bambino si accende
automaticamente appena la spina viene
inserita nella presa.
In caso contrario:
1. Accendere l’unità bambino 1 dal tasto
On/Off 5. A tal scopo tenere brevemente
premuto il tasto On/Off fino a quando il
LED 6 Power si accende.
2. Accendere l’unità genitore 8 dal tasto On/
Off 14. A tal scopo tenere brevemente
premuto il tasto On/Off fino a quando il
LED 15 Power si illumina fisso di verde.
Il collegamento viene creato
automaticamente. Quando il
collegamento è in corso la spia del
collegamento 13 è rossa.
Quando il collegamento è attivo
diventano verdi sia la spia del
collegamento 13 sull’unità genitore che il
LED VOX 7 dell’unità bambino.
Se la spia verde del collegamento 13
comincia a lampeggiare significa che
l’unità genitore e l'unità bambino sono sì
collegate, ma il bambino dorme e si è
attivata automaticamente la Eco-Mode,
per ridurre le radiazioni ad alta frequenza
nella cameretta e risparmiare energia.
Se il collegamento tra unità bambino e unità
genitore si interrompe, gli apparecchi
tentano automaticamente di ripristinare il
collegamento.
Se entro 30 secondi non si instaura un
nuovo collegamento, sull’unità genitore 8
risuona un bip a intervalli regolari e la spia
del collegamento 13 diventa rossa.
Eventualmente occorrerà cambiare la
72
Page 75

collocazione dell’unità genitore per poter
instaurare un nuovo collegamento.
3. Controllare dapprima che il bambino stia
bene.
4. Quindi riprovare a instaurare un nuovo
collegamento cambiando la collocazione.
Il nuovo collegamento si instaura
automaticamente appena l’apparecchio
torna ad essere all’interno della portata.
Quando il collegamento è attivo la spia
del collegamento 13 ritorna verde.
4.4 Alimentazione di corrente
•L’unità bambino 1 è collegata
all'alimentazione di corrente tramite
l'adattatore di rete.
•L’unità genitore8 funziona anche senza
dover essere collegata a una presa di
corrente, semplicemente con
l’accumulatore.
Lo stato di carica dell’accumulatore è
indicato dalla spia LED POWER 15:
– verde, accesa fissa: l’apparecchio è
acceso e l'accumulatore è carico;
– verde, lampeggiante: l'accumulatore è
in carica;
– rossa, accesa fissa e 1 bip ogni
60 secondi: avviso di accumulatore
scarico. Entro ca. 15 - 20 minuti l’unità
genitore si spegne automaticamente.
In questi 15 minuti è ancora possibile
attivare e disattivare tutte le funzioni.
Ricordiamo che l’utilizzo ad esempio
della funzione Talk-Back e la
regolazione del volume al massimo
livello consumano più energia e
possono quindi ridurre il tempo
residuo. È necessario collegare
l'adattatore di rete alla corrente
elettrica non appena il LED POWER 15
comincia a lampeggiare di rosso.
• L’unità genitore può essere collegata alla
corrente elettrica tramite l’adattatore di
rete e ricevere così corrente mentre
l'accumulatore è in carica. Il tempo di
carica dell’accumulatore aumenta se
l’unità genitore è accesa. Mentre
l’accumulatore è in carica il LED 15
lampeggia di verde.
Note:
– Con accumulatore completamente
pieno l’unità genitore può funzionare
fino a 18 ore. Il tempo dipende
dall’utilizzo (frequenza di accensione
dell’unità genitore, frequenza di utilizzo
della funzione Talk-Back, volume
dell’altoparlante, etc.).
– Il tempo di carica dell'accumulatore
completamente scarico è di circa 5 ore.
4.5 Eco-Mode
Descrizione del funzionamento
Questo baby phone è dotato di funzione
Eco-Mode, che non solo consente di
risparmiare corrente ovvero energia, ma
riduce anche al minimo le radiazioni ad alta
frequenza all’interno della cameretta del
bambino.
Nei livelli VOX 1, 2, 3 e 4 (ved.
“6.3Impostazione della sensibilità di
trasmissione della funzione VOX“ a
pagina75) la Eco-Mode si attiva
automaticamente dopo circa 10 secondi,
quando il bambino si addormenta e non
emette più alcun suono.
Questa modalità si riconosce dal fatto che la
spia verde del collegamento 13 comincia a
lampeggiare. In Eco-Mode sia l’unità
bambino che l’unità genitore passano
automaticamente in standby.
Quando la Eco-Mode è attiva, tutte le
funzioni che potrebbero svegliare il bambino
vengono automaticamente disattivate. Così,
ad esempio, non è possibile utilizzare la
funzione Talk-Back, ma in Eco-Mode si
rimane comunque sempre in collegamento
con il bambino, purché ci si trovi all’interno
della portata del dispositivo.
Questo baby phone dispone di un controllo
della portata che funziona anche in EcoMode. Se si esce dalla portata, il dispositivo
emette automaticamente un segnale di
avvertenza, anche quando la Eco-Mode è
73
Page 76

attiva, poiché l’unità bambino emette ogni
30 secondi un segnale allunità genitore
anche in modalità standby, per verificare il
collegamento.
Se la spia verde del collegamento 13 si
accende, il collegamento tra l’unità bambino
e genitore è regolare. Se la spia verde del
collegamento 13 lampeggia, la Eco-Mode è
attiva. Se si accende la spia rossa del
collegamento13 significa che è stata
superata la portata del dispositivo e/o che
non vi è più alcun collegamento con l’unità
genitore.
Nota: Controllare la portata del baby phone
prima di utilizzare la Eco-Mode. Accertarsi
che le unità siano sempre all’interno della
portata, in modo da poter sentire il bambino.
5. Utilizzo dell’unità bambino
L’apparecchio si attiva automaticamente in
modalità di trasmissione appena il bambino
emette dei suoni che superano la soglia di
rumorosità impostata (livello VOX 1 - 4). La
Eco-Mode viene subito disattivata e la spia
del collegamento 13 smette di lampeggiare.
Nel livello VOX 5 si ha una trasmissione
continua e la Eco-Mode è disattivata.
Se in Eco-Mode attiva, ovvero mentre il
bambino dorme tranquillamente, si desidera
controllare che tutto sia OK, è possibile
disattivare la Eco-Mode passando alla
modalità di trasmissione continua:
1. sull’unità genitore 8 premere il tasto
VOX 17.
2. Premere quindi il tasto Vol+ 10, fino a che
tutti i 5 LED 16 si accendono.
5.1 Accensione e spegnimento dell’unità bambino
L’unità bambino 1 si accende
automaticamente quando l'adattatore di
rete è collegato alla corrente elettrica.
L’unità bambino può quindi essere accesa e
spenta in qualsiasi momento:
• per accendere o spegnere l’unità
bambino 1, premere il tasto On/Off 5.
6. Utilizzo dell’unità genitore
6.1 Accensione e spegnimento dell’unità genitore
Per accendere o spegnere l’unità genitore 8
tenere premuto il tasto On/Off 14:
– quando si sente un segnale acustico e
il LED Power 15 si accende l’unità
genitore è accesa;
5.2 Spie con LED
•Il LED Power 6 si illumina di verde
quando l’unità bambino è accesa.
•Il LED VOX 7 dell’unità bambino si
accende di verde quando è attivo un
collegamento tra l’unità bambino e l’unità
genitore.
•Il LED VOX 7 non si accende quando
l’unità bambino 1 è attiva in Eco-Mode
oppure quando non è stato possibile
instaurare alcun collegamento con l’unità
genitore.
– quando si sente un segnale acustico e
il LED Power 15 si spegne l’unità
genitore è spenta.
6.2 Spie con LED
• La spia del collegamento 13 sull’unità
genitore 8 mostra lo stato del
collegamento all’unità bambino 1 :
– verde fissa: collegamento attivo;
74
Page 77

– verde lampeggiante: l’unità bambino è
in Eco-Mode e indica che il bambino
dorme tranquillamente;
– rossa fissa: quando il collegamento si
interrompe o l’unità bambino è spenta.
Note:
– Quando l’unità bambino 1 è in Eco-
Mode e l’unità genitore si trova fuori
dalla portata, la spia rossa del
collegamento 13 è accesa. Ogni
30 secondi risuona inoltre un segnale
acustico.
– Quando l’unità genitore 8 rientra nella
portata o la causa del problema di
collegamento viene rimossa, la spia
verde del collegamento 13 si accende
e gli apparecchi riprendono a
comunicare tra loro.
– Quando entrambe le unità vengono
accese si accende per prima la spia
rossa del collegamento 13. L’unità
genitore e l’unità bambino vengono
collegate. Quando il collegamento è
attivo la spia diventa verde.
• Quando la spia POWER 15 è:
– verde, accesa fissa: l’apparecchio è
acceso e l'accumulatore è carico;
– verde, lampeggiante: l'accumulatore è
in carica;
– rossa, accesa fissa e 1 bip ogni
60 secondi: avviso di accumulatore
scarico. Entro ca. 15 - 20 minuti l’unità
genitore si spegne automaticamente.
Ricordiamo che a seconda dell’uso
dell’apparecchio potrebbe spegnersi
anche più velocemente. (Il livello 5 VOX
ad esempio consuma più energia del
livello 1).
• Le 5 spie con LED 16 hanno tre diverse
funzioni e sono visibili solo quando sono
attive:
– mostra il livello di rumorosità nella
cameretta del bambino. Più LED sono
accesi e più suoni vi saranno nella
cameretta;
– modificando il volume mostra i veri
livelli. Più LED sono accesi e più forte
sarà la trasmissione tramite
l’altoparlante;
– l’impostazione della sensibilità VOX
mostra i vari livelli. Più LED
lampeggiano, più velocemente
reagisce l’apparecchio ai suoni. Con 5
LED accesi si attiva la trasmissione
dati.
6.3 Impostazione della sensibilità di trasmissione della funzione VOX
I bambini producono una serie di suoni.
Possono respirare profondamente, oppure
chiacchierare, piangere forte o chiamare. La
funzione VOX può essere impostata in modo
da attivare la trasmissione dei suoni solo in
caso di chiamata o pianto forte, ma non
degli altri rumori.
La funzione VOX consente di impostare la
sensibilità di trasmissione del microfono. Più
alto è il livello VOX, più sensibile sarà la
reazione dell’apparecchio ai suoni.
1. Per attivare la funzione VOX, premere
brevemente VOX 17.
I LED 16 lampeggiano e mostrano così la
sensibilità impostata sull’apparecchio.
2. Aumentare o diminuire la sensibilità di
trasmissione con il tasto VOL + 10 o
VOL - 11. Il livello selezionato
corrisponde al numero di LED 16
lampeggianti:
– Livello VOX 1 = sensibilità molto bassa,
attivazione solo quando il bambino urla
forte;
– Livello VOX 2 = sensibilità bassa,
attivazione solo quando il bambino
piange forte;
– Livello VOX 3 = sensibilità normale,
attivazione solo quando il bambino
piange normalmente;
– Livello VOX 4 = sensibilità forte,
attivazione anche in caso di suoni lievi;
– Livello VOX 5 = Eco-Mode spenta. La
trasmissione è impostata sul
funzionamento continuo.
75
Page 78

Il volume di riproduzione dei suoni sull’unità
genitore può essere impostato con i tasti
VOL + 10 e VOL - 11 (ved. “6.4Regolazione
del volume“ a pagina76).
Nota: Per modificare la sensibilità di
trasmissione dopo l’attivazione della
funzione VOX si ha tempo ca. 2 secondi.
L’apparecchio passa quindi
automaticamente alla trasmissione dei
suoni. Si riconosce dal fatto che i LED 16
non lampeggiano più e con i tasti VOL + 10
o VOL - 11 è possibile modificare solo il
volume.
Attenzione! In modalità trasmissione
continua Livello VOX 5 tutti i rumori vengono
trasmessi costantemente. Quando il
bambino dorme tranquillamente, il volume
viene automaticamente impostato dopo
pochi secondi sul livello più basso, per
ridurre al minimo i rumori di sottofondo.
Appena il bambino comincia a produrre dei
suoni, il volume torna automaticamente
all’impostazione precedente.
6.4 Regolazione del volume
1. Il volume di ascolto dei suoni sull’unità
genitore si imposta con i tasti VOL + 10 e
VOL - 11.
Ogni volta che si preme un tasto risuona
un bip, che riproduce il volume
impostato. Anche i vari LED 16 si
accendono. Più alto è il volume, più alto
sarà il segnale acustico e il numero di
LED che si accenderanno.
Nota: Quando la funzione VOX è
impostata sulla sensibilità minima (ved.
“6.3Impostazione della sensibilità di
trasmissione della funzione VOX“ a
pagina75), a prescindere dal volume
impostato non vengono trasmessi
neppure i suoni più deboli. Ovvero anche
alzando il volume i suoni non si sentono.
Se si desidera ascoltare un numero
maggiore di suoni, la sensibilità della
trasmissione deve essere aumentata con
un livello VOX più alto.
6.5 Silenziamento
L’unità genitore può essere commutata su
“MUTE”. I suoni nella cameretta del
bambino non vengono più trasmessi.
1. Premere il tasto VOL - 11 fino a quando
non si sente più alcun bip.
Ora i suoni non vengono più trasmessi.
Il volume nella cameretta viene
visualizzato tramite i LED 16. Più LED
sono accesi e più suoni si sentiranno
nella cameretta del bambino.
2. Per rimuovere il silenziamento azionare il
tasto VOL + 10.
3. Se l’unità genitore è impostata su MUTE
e viene attivata la funzione Talk-Back, il
volume viene automaticamente alzato al
primo livello.
6.6 Funzione Talk-Back
Con la funzione Talk-Back è possibile
comunicare con il bambino.
1. Tenere premuto il tasto TALK 18
dell’unità genitore.
Dopo il segnale acustico, il collegamento
vocale è attivo.
2. Parlare nel microfono 20 dell’unità
genitore.
Il bambino può sentire ora tramite
l’altoparlante 2 dell’unità bambino.
3. Rilasciare il tasto TALK 18 per ascoltare
la reazione del bambino.
Note:
– Se l’unità bambino 1 si trova in Eco-
Mode, questa funzione viene disattivata,
in modo da non svegliare
inavvertitamente il bambino. In questo
caso due segnali acustici uno di seguito
all’altro indicano che la funzione TalkBack non è al momento disponibile.
– Se il volume dell’unità genitore è
impostato su “MUTE” (ved.
“6.4Regolazione del volume“ a
pagina76), sarà automaticamente
impostato sul livello I quando si preme
il tasto TALK 18.
76
Page 79

7. Pulizia e manutenzione dell’apparecchio
7.1 Pulizia
Attenzione! Per evitare scosse
elettriche, lesioni o danni:
– Prima di pulire l’apparecchio
staccare sempre l'adattatore di
rete dalla presa.
– Mai immergere in acqua i singoli
componenti.
Cautela! Non utilizzare mai detergenti
abrasivi o aggressivi. L'apparecchio
potrebbe rovinarsi.
1. Pulire i singoli componenti con un panno
umido se necessario.
2. Riutilizzare il baby phone soltanto
quando tutti i componenti sono
completamente asciutti.
8. Guida all'eliminazione dei guasti
7.2 Sostituzione della batteria
L’accumulatore ai polimeri di litio
(accumulatore LiPo), 3,7V, 1200 mAh, può
essere sostituito unicamente con un
accumulatore originale. Per informazioni al
riguardo rivolgersi alla nostra assistenza
prodotto (ved. “Product service babyphone
in Europe“ a pagina116).
1. Rimuovere il coperchio dell’accumulatore 9
sul retro dell’unità genitore 8, spingendolo
verso il basso.
2. Rimuovere l’accumulatore difettoso.
3. Inserire il nuovo accumulatore nel
corrispondente vano in base ai
contrassegni. Prestare particolare
attenzione alla corretta polarità (+ e -).
4. Fare scorrere nuovamente il coperchio
dell’accumulatore 9 sull’unità genitore 8.
5. Caricare il nuovo accumulatore per la prima
per 10 ore senza interruzione per attivare
la piena capacità dell’accumulatore (ved.
“4.1Collegamento dell’unità genitore“ a
pagina71).
Guasto Causa Rimedio
L’unità bambino
o l’unità genitore
non funziona
Alimentazione di corrente
assente
L'accumulatore dell’unità
genitore è scarico
L’apparecchio non è acceso Accendere l’apparecchio (ved.
La distanza tra l’unità bambino
e l’unità genitore è troppo
grande oppure il segnale è
disturbato da pareti spesse o
altri apparecchi elettronici
Ripristinare l’alimentazione di corrente
(ved. “4.4Alimentazione di corrente“ a
pagina73)
Caricare l'accumulatore (ved.
“4.4Alimentazione di corrente“ a
pagina73)
"4.1Collegamento dell’unità genitore" a
pagina71 e "4.2Collegamento
dell’unità bambino" a pagina72)
Ridurre la distanza o collocare l’unità
genitore in un altro luogo
77
Page 80

Guasto Causa Rimedio
Si sente un forte
fischio
L’unità genitore
emette dei bip
La spia rossa del
collegamento 13
si accende
L’unità genitore
non emette alcun
suono
Se questi suggerimenti non risolvono il
problema tentare di rimuovere il guasto
come segue:
1. Estrarre l’accumulatore dall’unità
genitore.
2. Staccare gli alimentatori dalla presa.
3. Attendere un paio di minuti.
4. Ricollocare l’accumulatore e ricollegare
gli alimentatori.
Se il problema non dovesse risolversi,
rivolgersi al nostro servizio clienti (ved.
“11.2Centro assistenza baby phone“ a
pagina81).
Accoppiamento reattivo a
causa della distanza ridotta tra
unità bambino e unità genitore
Il collegamento all’unità
bambino si è interrotto
Problemi con l’alimentazione di
corrente
L’unità genitore si trova al di
fuori della portata
Il volume è spento Aumentare il volume (ved.
La funzione VOX è impostata
troppo bassa
Aumentare la distanza almeno a 2 - 3 m
Ridurre il volume e il livello VOX
dell’unità genitore, se ci si trova nelle
immediate vicinanze dell’unità bambino
(ved. "6.3Impostazione della sensibilità
di trasmissione della funzione VOX" a
pagina75 e "6.4Regolazione del
volume" a pagina76).
Ripristinare il collegamento (ved.
“4.3Collegamento dell’unità bambino e
dell’unità genitore“ a pagina72)
Controllare l’alimentazione di corrente
(ved. "4.4Alimentazione di corrente" a
pagina73)
Ripristinare il collegamento (ved.
“4.3Collegamento dell’unità bambino e
dell’unità genitore“ a pagina72)
“Silenziamento“ a pagina76)
Aumentare la sensibilità di trasmissione
(ved. "6.3Impostazione della sensibilità
di trasmissione della funzione VOX" a
pagina75 o "3.1Panoramica dei
messaggi" a pagina71)
78
Page 81

9. Dati tecnici
Collegamento radio FHSS 2.4 Ghz
Frequenza trasmettitore 2408 MHz - 2474 MHz, max EIRP 100 mW
Numero di canali 12 / selezione canali automatica
Portata in campo libero ca. 250 m
Portata in ambienti chiusi ca. 40 m. La trasmissione dipende dall’ambiente circostante.
Le pareti o gli alberi possono disturbare sensibilmente la
ricezione.
Unità bambino
Temperatura di esercizio Temperatura ambiente da 0 °C a 40 °C
Unità genitore
Temperatura di esercizio Temperatura ambiente da 0 °C a 40 °C
Accumulatore Accumulatore ai polimeri di litio (accumulatore LiPo), 3,7 V,
1200 mAh
Durata di esercizio in modalità di trasmissione normale:
> 15 ore
Durata di esercizio in Eco-Mode: > 18 ore
Tempo di ricarica alla prima carica min. 10 ore,
ogni successiva ricarica richiede ca. 5 ore
Alimentatori
Ingresso 100-240 V CA; 50/60 Hz; 0,1 A
Uscita 5 V ; 2,75 W;
9.1 Tecnologia FHSS
Questo baby phone trasmette i segnali radio
servendosi della moderna tecnologia FHSS.
Frequency Hopping Spread Spectrum
(FHSS) è una tecnica di diversificazione
delle frequenze usata per la trasmissione via
radio dei dati. La potenza di trasmissione
non si concentra più su una sola frequenza
portante. Al contrario la frequenza portante
cambia in modo del tutto casuale. I
pacchetti di dati suddivisi in tante frequenze
portanti vengono poi ricomposti nel
ricevitore.
Rispetto alla trasmissione radio
convenzionale questa tecnica presenta
alcuni vantaggi:
• Il segnale radio è più difficile da decifrare,
poiché chi ascolta non sa su quali
frequenze portanti è stato suddiviso e
come deve essere correttamente
ricomposto il segnale. Per questo motivo
la tecnica è utilizzata ad es. anche per il
Bluetooth e le comunicazioni in ambito
militare.
• La trasmissione radio inoltre è
significativamente meno sensibile ai
segnali di disturbo. Questo dipende dal
fatto che una determinata frequenza
portante viene sempre utilizzata per un
tempo molto breve, per poi passare a
un’altra frequenza. E se su una
determinata frequenza si verificano delle
interferenze, queste riguardano solo
piccoli pacchetti di dati. Interferenze di
questo tipo possono comunque essere
risolte con tecniche di correzione
appropriate.
79
Page 82

10. Smaltimento
10.1 Apparecchio
Il simbolo con il bidone della
spazzatura su ruote con croce
significa che nell'Unione
Europea il prodotto deve essere
smaltito nella spazzatura
differenziata. Ciò vale sia per il
prodotto che per tutti gli
accessori contrassegnati con lo stesso
simbolo. I prodotti contrassegnati non
possono essere smaltiti nei rifiuti normali,
ma devono essere consegnati ad un ufficio
accettazione di riciclaggio per
apparecchiature elettriche ed elettroniche. Il
riciclaggio aiuta a ridurre notevolmente il
consumo di materie grezze e soprattutto
l'inquinamento ambientale. Rispettare
scrupolosamente le disposizioni in materia
di smaltimento in vigore nel proprio paese.
11. Garanzia
Oltre alla garanzia di legge fornita dal
venditore, maneggiando l’apparecchio con
cautela e attenendosi alle istruzioni per
l’uso, il produttore garantisce 24 mesi di
garanzia dalla data di acquisto del prodotto.
La ricevuta di acquisto fa fede per la data di
acquisto e il tipo di apparecchio.
La garanzia del venditore non pregiudica i
diritti di legge dell'acquirente.
Per la durata della garanzia ci impegniamo a
risolvere eventuali difetti del materiale o di
fabbricazione. Le parti soggette ad usura
sono escluse dalla garanzia.
Eventuali scostamenti dalle caratteristiche
concordate del prodotto, irrilevanti per
valore e idoneità all'uso dell'apparecchio,
non saranno risarciti. Non potrà altresì
essere fornita alcuna garanzia per difetti
dell'apparecchio riconducibili a danni di
trasporto che non dipendono da noi, a un
utilizzo errato o a una cura insufficiente o in
caso di interventi sull'apparecchio eseguiti
da persone non autorizzate dal produttore.
Il riciclaggio consente di ridurre il consumo
di materie prime salvaguardando
l’ambiente.
10.2 Imballaggio
Se si desidera smaltire l’imballaggio,
rispettare le relative norme vigenti in materia
ambientale nel proprio paese.
10.3 Accumulatore
Gli accumulatori non devono essere
smaltiti insieme alla normale
immondizia domestica. Smaltire
correttamente gli accumulatori usati.
A tal scopo, presso i rivenditori di batterie e i
centri di conferimento comunali sono
presenti appositi contenitori per lo
smaltimento degli accumulatori. Gli
accumulatori provvisti delle seguenti lettere
contengono inoltre gli inquinanti: Cd
(cadmio), Hg (mercurio), Pb (piombo).
Ci riserviamo di scegliere se riparare o
sostituire l'apparecchio in tutto o in parte.
L'effettuazione di una riparazione in
garanzia non comporta il prolungamento, né
l'inizio di una nuova garanzia. La garanzia
dei pezzi di ricambio montati cessa con la
garanzia dell'apparecchio nel suo insieme.
Si escludono ulteriori diritti di garanzia, in
particolare per danni che non riguardano
l'apparecchio, fatte salve le garanzie
previste dalla legge.
Non ci assumiamo i costi e i rischi del
trasporto.
L'invio dell'apparecchio senza la
dimostrazione della data d'acquisto
comporta l'addebito dei costi di riparazione.
Il cliente verrà contattato prima di effettuare
qualsiasi riparazione all'apparecchio.
Conservare indirizzo e codice articolo per
eventuali domande future.
80
Page 83

11.1 Centro assistenza NUK
Gli indirizzi di assistenza per domande
relative alla garanzia o quesiti di natura
generale sul marchio NUK si trovano in
"Contact addresses NUK" a pagina 115.
11.3 Fornitore
Ricordiamo che questo indirizzo non è
l'indirizzo di assistenza. In caso di
problemi o domande sul prodotto contattare
il Centro assistenza riportato al paragrafo
11.2.
11.2 Centro assistenza baby phone
In caso di domande sul baby phone si prega
di contattare i nostri esperti. La hotline del
prodotto è consultabile su "Product service
babyphone in Europe" a pagina 116 oppure
contattare il nostro sito web all’indirizzo
www.nuk-service.com.
N. articolo: 10.256.438
MAPA GmbH
Industriestraße 21-25
27404 Zeven
Germany
www.nuk.com
12. Dichiarazione di conformità
L'apparecchio è conforme alle direttive europee applicabili e alle misure in vigore a livello
nazionale, così come riportate nella dichiarazione di conformità CE, richiedibile al
produttore.
La dichiarazione di conformità è contenuta assieme al manuale d’uso nell’imballaggio di
vendita oppure può essere consultata agli indirizzi www.nuk.de.
81
Page 84

Obsah
1. Popis přístroje . . . . . . . . . . . . . . . . . . . . . . . . . . . . . . . . . . . . . . . . . . . . . . . 83
1.1 Účel použití . . . . . . . . . . . . . . . . . . . . . . . . . . . . . . . . . . . . . . . . . . . . . . . . . . . . . 83
1.2 Popis funkce . . . . . . . . . . . . . . . . . . . . . . . . . . . . . . . . . . . . . . . . . . . . . . . . . . . . 83
1.3 Schválení . . . . . . . . . . . . . . . . . . . . . . . . . . . . . . . . . . . . . . . . . . . . . . . . . . . . . . . 83
1.4 Rozsah dodávky . . . . . . . . . . . . . . . . . . . . . . . . . . . . . . . . . . . . . . . . . . . . . . . . . 83
2. Bezpečnostní pokyny . . . . . . . . . . . . . . . . . . . . . . . . . . . . . . . . . . . . . . . . . 84
2.1 Všeobecné informace . . . . . . . . . . . . . . . . . . . . . . . . . . . . . . . . . . . . . . . . . . . . . 84
2.2 Ochrana před zasažením elektrickým proudem . . . . . . . . . . . . . . . . . . . . . . . . . 84
2.3 Pro bezpečnost vašeho dítěte. . . . . . . . . . . . . . . . . . . . . . . . . . . . . . . . . . . . . . . 84
2.4 Ochrana před poraněním. . . . . . . . . . . . . . . . . . . . . . . . . . . . . . . . . . . . . . . . . . . 84
2.5 Věcné škody . . . . . . . . . . . . . . . . . . . . . . . . . . . . . . . . . . . . . . . . . . . . . . . . . . . . 85
2.6 Manipulace s akumulátory LiPo . . . . . . . . . . . . . . . . . . . . . . . . . . . . . . . . . . . . . 85
3. Součásti dětské chůvičky. . . . . . . . . . . . . . . . . . . . . . . . . . . . . . . . . . . . . . 86
3.1 Krátký přehled hlášení. . . . . . . . . . . . . . . . . . . . . . . . . . . . . . . . . . . . . . . . . . . . . 87
4. Uvedení přístroje do provozu. . . . . . . . . . . . . . . . . . . . . . . . . . . . . . . . . . . 87
4.1 Připojení jednotky rodičů. . . . . . . . . . . . . . . . . . . . . . . . . . . . . . . . . . . . . . . . . . . 87
4.2 Připojení jednotky dítěte . . . . . . . . . . . . . . . . . . . . . . . . . . . . . . . . . . . . . . . . . . . 88
4.3 Spojení jednotky dítěte a jednotky rodičů . . . . . . . . . . . . . . . . . . . . . . . . . . . . . . 88
4.4 Napájení. . . . . . . . . . . . . . . . . . . . . . . . . . . . . . . . . . . . . . . . . . . . . . . . . . . . . . . . 89
4.5 Režim Eco-Mode. . . . . . . . . . . . . . . . . . . . . . . . . . . . . . . . . . . . . . . . . . . . . . . . . 89
5. Ovládání jednotky dítěte. . . . . . . . . . . . . . . . . . . . . . . . . . . . . . . . . . . . . . . 90
5.1 Zapnutí a vypnutí jednotky dítěte . . . . . . . . . . . . . . . . . . . . . . . . . . . . . . . . . . . . 90
5.2 Kontrolky LED . . . . . . . . . . . . . . . . . . . . . . . . . . . . . . . . . . . . . . . . . . . . . . . . . . . 90
6. Ovládání jednotky rodičů . . . . . . . . . . . . . . . . . . . . . . . . . . . . . . . . . . . . . . 90
6.1 Zapnutí a vypnutí jednotky rodičů. . . . . . . . . . . . . . . . . . . . . . . . . . . . . . . . . . . . 90
6.2 Kontrolky LED . . . . . . . . . . . . . . . . . . . . . . . . . . . . . . . . . . . . . . . . . . . . . . . . . . . 90
6.3 Nastavení citlivosti přenosu funkce VOX. . . . . . . . . . . . . . . . . . . . . . . . . . . . . . . 91
6.4 Nastavení hlasitosti . . . . . . . . . . . . . . . . . . . . . . . . . . . . . . . . . . . . . . . . . . . . . . . 91
6.5 Vypnutí zvuku . . . . . . . . . . . . . . . . . . . . . . . . . . . . . . . . . . . . . . . . . . . . . . . . . . . 92
6.6 Funkce Talk-Back . . . . . . . . . . . . . . . . . . . . . . . . . . . . . . . . . . . . . . . . . . . . . . . . 92
7. Čištění a údržba přístroje. . . . . . . . . . . . . . . . . . . . . . . . . . . . . . . . . . . . . . 92
7.1 Čištění . . . . . . . . . . . . . . . . . . . . . . . . . . . . . . . . . . . . . . . . . . . . . . . . . . . . . . . . . 92
7.2 Výměna akumulátoru. . . . . . . . . . . . . . . . . . . . . . . . . . . . . . . . . . . . . . . . . . . . . . 92
8. Poruchy a jejich odstranění . . . . . . . . . . . . . . . . . . . . . . . . . . . . . . . . . . . . 93
9. Technické údaje . . . . . . . . . . . . . . . . . . . . . . . . . . . . . . . . . . . . . . . . . . . . . 94
9.1 Technologie FHSS. . . . . . . . . . . . . . . . . . . . . . . . . . . . . . . . . . . . . . . . . . . . . . . . 94
10. Likvidace . . . . . . . . . . . . . . . . . . . . . . . . . . . . . . . . . . . . . . . . . . . . . . . . . . . 95
10.1 Přístroj . . . . . . . . . . . . . . . . . . . . . . . . . . . . . . . . . . . . . . . . . . . . . . . . . . . . . . . . . 95
10.2 Obal. . . . . . . . . . . . . . . . . . . . . . . . . . . . . . . . . . . . . . . . . . . . . . . . . . . . . . . . . . . 95
10.3 Akumulátor . . . . . . . . . . . . . . . . . . . . . . . . . . . . . . . . . . . . . . . . . . . . . . . . . . . . . 95
11. Záruka . . . . . . . . . . . . . . . . . . . . . . . . . . . . . . . . . . . . . . . . . . . . . . . . . . . . . 95
11.1 Servisní centrum NUK . . . . . . . . . . . . . . . . . . . . . . . . . . . . . . . . . . . . . . . . . . . . . 96
11.2 Servisní centrum dětské chůvičky. . . . . . . . . . . . . . . . . . . . . . . . . . . . . . . . . . . . 96
11.3 Dodavatel . . . . . . . . . . . . . . . . . . . . . . . . . . . . . . . . . . . . . . . . . . . . . . . . . . . . . . 96
12. Prohlášení o shodě . . . . . . . . . . . . . . . . . . . . . . . . . . . . . . . . . . . . . . . . . . . 96
82
Page 85

1. Popis přístroje
1.1 Účel použití
Pomocí této elektronické chůvičky Eco
Control Audio 500 můžete své miminko
nebo malé děti kontrolovat v dětském
pokoji. Je možné ji používat také k
monitorování zvuku seniorů.
Tento přístroj je určen jen pro použití v
suchém prostředí. Přístroj není vhodný pro
použití ve vlhkých prostorách nebo venku
při vlhkém počasí.
Tento přístroj je určen pro použití v
soukromých domácnostech. Není určen pro
komerční použití.
Tento přístroj slouží jen jako pomůcka.
V žádném případě nenahrazuje fyzickou
přítomnost a kontrolu ze strany rodičů,
chůvy nebo opatrovatelů.
1.2 Popis funkce
Jednotka dítěte 1 se umístí do kontrolované
místnosti. Registruje zvuky a tyto
bezkabelově vysílá k jednotce rodičů 8.
Jednotka rodičů 8 obsahuje vestavěný
akumulátor, takže může být vždy umístěna
ve vašem zorném poli. Akumulátor je
nabíjen pomocí dodaného síťového
adaptéru.
Dosah mezi jednotkou dítěte a rodičů je cca
40 m ve vnitřních prostorách a až 250 m ve
venkovních prostorách (venku). Rozsah
příjmu chůvičky se mění v závislosti na okolí.
Silné stěny nebo kov dosah snižuje.
Chůvička má režim Eco-Mode, ve kterém se
vysílač (jednotka dítěte) automaticky přepne
do pohotovostního režimu v případě, že
vaše dítě klidně spí. V závislosti na
nastavené citlivosti se zapíná až tehdy,
pokud vaše dítě vydává zvuky nebo začne
plakat.
Pokud chcete slyšet všechny zvuky z
dětského pokoje, můžete citlivost přenosu
funkce VOX nastavit pomocí tlačítka VOX 17
na maximum (= stupeň 5). Na tomto stupni
zůstane jednotka dítěte průběžně zapnutá
(viz »6.3Nastavení citlivosti přenosu funkce
VOX« na straně 91).
Pokud nechcete slyšet žádné zvuky, můžete
pomocí tlačítka Vol - 11 nastavit hlasitost na
Mute. V takové případě pouze pomocí
indikace LED 16 vidíte, že vaše dítě vydává
zvuky.
Při aktivaci režimu Eco-Mode je
vysokofrekvenční záření v dětském pokoji
sníženo na minimum. Jednotka dítěte pak
pouze každých 30 sekund vysílá k jednotce
rodičů krátký signál pro kontrolu spojení.
Pokud se jednotka rodičů nachází mimo
dosah, budou rodiče upozorněni signálním
tónem.
Více informací o režimu Eco-Mode viz
»4.5Režim Eco-Mode« na straně 89 a
»6.3Nastavení citlivosti přenosu funkce
VOX« na straně 91.
1.3 Schválení
Elektronická chůvička pracuje s frekvencí
2,4 GHz. Tento přístroj se smí používat ve
všech zemích EU. V Rusku a Ukrajině musí
být dodržovány omezení dané země.
1.4 Rozsah dodávky
• Dětská chůvička:
– 1 jednotka dítěte (pro dětský pokoj)
– 1 síťový adaptér jednotky dítěte
– 1 jednotka rodičů
– 1 síťový adaptér jednotky rodičů
– 1 akumulátor LiPo 3,7 V, 1200 mAh
• 1 návod k použití
• 1 Quick Start Guide
83
Page 86

2. Bezpečnostní pokyny
2.1 Všeobecné informace
• Před použitím přístroje si pečlivě přečtěte
tento návod k použití. Návod k použití je
součástí přístroje a musí být kdykoliv k
dispozici.
• Přístroj používejte jen pro popsaný účel
použití (viz »1.1Účel použití« na straně
83).
• Používejte pouze příslušenství, které bylo
společně s tímto přístrojem dodáno nebo
které je v tomto návodu k použití
výslovně povoleno.
• Před každým použitím musíte vždy
zkontrolovat, zda přístroj správně
pracuje. Kromě kontroly dosahu a spojení
se doporučuje kontrola spojení při
vlastním použití podle sluchu.
• Přístroje se smí používat výhradně k
přenosu zvuků ve vašem soukromí.
Každá osoba v místnosti, která by mohla
být odposlouchávána, musí být o použití
přístroje informována.
• Dbejte na to, že přenos vždy závisí na
okolí. Elektronické přístroje, izolace,
stěny, vlhkost nebo stromy mohou
výrazně rušit příjem.
2.2 Ochrana před zasažením
elektrickým proudem
Výstraha! Následující
bezpečnostní pokyny by Vás měly
uchránit před zasažením elektrickým
proudem.
• Nezkoušejte přístroj opravovat. Díly smí
otvírat jen kvalifikovaný odborný
personál.
• Přístroj se nesmí používat v poškozeném
stavu.
• Pokud jste na cestách, vždy dbejte na to,
aby napětí odpovídalo technickým
údajům.
2.3 Pro bezpečnost vašeho dítěte
Výstraha! Děti nemají schopnost
rozpoznání nebezpečí, které je
možné při použití přístroje. Proto
tyto přístroje nepatří do rukou dětí.
• Dbejte na to, aby se přístroj a jeho
příslušenství nenacházelo v dosahu
dítěte. Vzdálenost mezi dítětem a
přístrojem/příslušenstvím by měla být
nejméně 1 m.
• Děti nemohou nebezpečí často správně
ohodnotit a tím si mohou způsobit
poranění. Proto dodržujte:
– Tento přístroj není určen pro použití
osobami (také děti) s fyzickým,
senzorickým nebo duševním
postižením nebo osobami bez
dostatečných zkušeností a/nebo
znalostí. Výjimkou je, pokud jsou tyto
osoby pod dozorem osoby odpovědné
za jejich bezpečnost nebo pokud jsou
informovány o použití přístroje.
– Děti by měly být pod dozorem, aby si s
přístrojem nemohly hrát.
– Obalová fólie by mohla pro děti
znamenat smrtelné nebezpečí. Hrozí
nebezpečí udušení. Obalové fólie
nejsou hračky.
– Aby se zabránilo zaškrcení, musí se
síťový kabel vždy nacházet mimo
dosah dítěte.
• Přístroj používejte jen pro vaši
dodatečnou bezpečnost. Nikdy nesmí
být používán jako náhrada dohlížející
osoby.
2.4 Ochrana před poraněním
Výstraha! Abyste zabránili
poranění, dodržujte níže uvedená
upozornění.
• Dbejte na to, aby se kabely síťových
adaptérů nestaly zdrojem nebezpečí
zakopnutí a pádu.
84
Page 87

2.5 Věcné škody
Pozor! Pro zabránění věcných škod
dodržujte níže uvedená ustanovení:
• Přístroj nevystavujte přímému
slunečnímu záření nebo vysokým
teplotám. UV záření a přehřátí může
způsobit zkřehnutí plastových materiálů a
poškození elektroniky.
• V blízkosti přístroje se nesmí nacházet
zdroje tepla a přístroj se také nesmí
zakrývat, aby se zabránilo přehřátí.
• Přístroj nikdy nepoužívejte ve vlhkém
nebo mokrém prostředí.
• Přístroj nepoužívejte v prašném prostředí.
Mohlo by to zkrátit jeho životnost.
• Nikdy nepoužívejte agresivní nebo
abrazivní čisticí prostředky, mohlo by tak
dojít k poškození přístroje.
• Pokud se přístroj nepoužívá, vždy ho
vypněte vypínačem.
• Aby se zabránilo nebezpečí výbuchu,
• Nikdy nezkoušejte akumulátor otvírat,
• K nabíjení akumulátoru používejte
• Akumulátory LiPo se smí nabíjet a
2.6 Manipulace s akumulátory
LiPo
Výstraha!
Aby se zabránilo možnému
nebezpečí, které by mohlo způsobit
poranění osob nebo věcné škody,
dodržujte tyto pokyny:
• Zabraňte zkratům.
Póly akumulátoru se nesmí dostat do
kontaktu s kovovými předměty, protože
by to mohlo způsobit zkrat. Zkrat může
způsobit přehřátí akumulátoru a
následkem toho by mohlo dojít k úniku
elektrolytu, nebezpečí výbuchu nebo
vzniku plamene.
V případě úniku elektrolytu zabraňte
kontaktu s pokožkou, očima a sliznicí,
aby se zabránilo poranění. V případě
kontaktu elektrolytu s pokožkou
zasažená místa ihned opláchněte velkým
množstvím čisté vody a vyhledejte lékaře.
• Vestavěný akumulátor se smí vyměnit jen
za originální výměnný akumulátor. Pokud
je defektní, obraťte se na naši servisní
• Akumulátory LiPo se smí nabíjet jen pod
• Akumulátory LiPo obsahují jedovaté
adresu (viz »Contact addresses NUK« na
straně 115).
nesmí být akumulátory zahřívány nebo
likvidovány spalováním.
ohýbat nebo odstraňovat kontakty.
Akumulátor nikdy nenechte padat na zem
nebo do něho nevrážejte hřebíky.
Poškození může způsobit vnitřní zkrat a
následkem toho by mohlo dojít k úniku
elektrolytu, nebezpečí výbuchu nebo
vzniku plamene.
výhradně dodaný síťový adaptér.
„Chybný” síťový adaptér by mohl
způsobit nadměrné nabití akumulátoru, v
důsledku čehož by mohlo dojít k jeho
přehřátí a výbuchu.
skladovat pouze na ohnivzdorném a
nehořlavém podkladu.
dozorem, aby byl v případě chyby
zaručen včasný zásah.
látky. Proto dodržujte předpisy o likvidaci
v »10.3Akumulátor« na straně 95.
85
Page 88

3. Součásti dětské chůvičky
1 Jednotka dítěte
2 Reproduktor
3 Zdířka síťového adaptéru
4 Mikrofon
5 Vypínač:
– krátké stisknutí: zapnout
– dlouhé stisknutí: vypnout
6 Kontrolka power LED
– svítí zeleně, když je zapnutá jednotka
dítěte
7 Kontrolka VOX LED
– svítí zeleně, když je navázáno spojení s
jednotkou rodičů;
– vypne se v případě přerušení spojení s
jednotkou rodičů.
8 Jednotka rodičů
9 Kryt akumulátoru
10 Tlačítko Vol +:
– zvýšení hlasitosti
11 Tlačítko VOL -:
– snížení hlasitosti
– Vypnutí zvuku na nejnižším stupni.
Zvuky jsou indikovány pouze pomocí
kontrolky LED 16.
12 Reproduktor
13 Indikace spojení
– svítí zeleně, když je navázáno spojení
mezi oběma přístroji;
– bliká zeleně, když existuje spojení, ale
je aktivován režim Eco-Mode;
– svítí červeně, když není navázáno
spojení mezi přístroji.
14 Vypínač
15 Indikace napájení POWER
– svítí zeleně: přístroj je zapnutý a
akumulátor je zcela nabitý;
– bliká zeleně: akumulátor se nabíjí;
– svítí červeně a každých 60 sekund
zazní 1 tón: Varování v případě
vybitého akumulátoru.
Během cca 15 - 20 minut se jednotka
rodičů automaticky vypne.
16 Kontrolka LED
– zobrazuje hladinu zvuku v dětském
pokoji. Čím více kontrolek LED svítí, tím
hlasitější jsou zvuky;
– při změně hlasitosti zobrazuje různé
stupně. Čím více kontrolek LED svítí,
tím hlasitější je přenos reproduktorem;
– při nastavení citlivosti VOX zobrazuje
různé stupně. Čím více kontrolek LED
bliká, tím rychleji reaguje přístroj na
zvuky. Pokud svítí 5 kontrolek LED,
zapne se trvalý přenos.
17 Krátce stiskněte tlačítko VOX
–a pomocí Vol +/- nastavte citlivost
přenosu
18 Tlačítko TALK :
– podržením tlačítka se aktivuje funkce
„Mluvit s dítětem”;
– pokud se jednotka dítěte nachází v
režimu Eco-Mode, je blokována funkce
Talk-Back a to je indikováno dvěma
signálními tóny.
19 Zdířka síťového adaptéru
20 Mikrofon
86
Page 89

3.1 Krátký přehled hlášení
Jednotka dítěte
Světlo Indikace Význam
Kontrolka power
LED 6
Kontrolka VOX
LED 7
Světlo Indikace Význam
Indikace
spojení 13
Kontrolka powerLED 15
Bliká 1 - 5 kontrolek LED Nastavení citlivosti VOX. Čím více
Kontrolka LED
16
žádné 1 tón „Mluvit s dítětem” (Talk-Back)
žádné dvojitý tón
Svítí 1 - 5 kontrolek LED
Svítí 1 - 5 kontrolek LED Indikace hlasitosti zvuků dítěte. Čím
zelená Jednotka dítěte je zapnutá
zelená Spojení ok (bez režimu Eco-Mode)
VYP. Spojení ok (v režimu Eco-Mode)
Spojení přerušeno
Jednotka rodičů
zelená Spojení ok (bez režimu Eco-Mode)
bliká zeleně Spojení ok (v režimu Eco-Mode)
bliká červeně
1 tón každých 30 s
zelená Jednotka rodičů je zapnutá, akumulátor
svítí červeně
1 tón každých 60 s
bliká zeleně Akumulátor se nabíjí
1 - 5 tónů
Spojení přerušeno
je zcela nabitý
Varování v případě vybitého
akumulátoru. Jednotka rodičů se
během 15 min automaticky vypne.
kontrolek LED bliká, tím citlivěji reaguje
přístroj na zvuky. Pokud svítí 5 kontrolek
LED, zapne se trvalý přenos.
Nastavení hlasitosti. Čím více kontrolek
LED svítí, tím hlasitější je přenos
reproduktorem.
více kontrolek LED svítí, tím hlasitější
jsou zvuky v dětském pokoji.
Funkce „Mluvit s dítětem” (Talk-Back)
během aktivovaného režimu Eco-Mode
4. Uvedení přístroje do provozu
Upozornění: Před připojením síťového
adaptéru do zdířky vždy nejprve proveďte
kabelové spojení.
4.1 Připojení jednotky rodičů
jednotka rodičů je napájena el. proudem
dodaným akumulátorem LiPo. Tento
akumulátor je možné dobíjet dodaným
síťovým dílem.
87
Pozor! Aby se zabránilo chybné funkci,
instalujte nejprve akumulátor v jednotce
rodičů a teprve poté spojte síťový adaptér s
jednotkou rodičů.
1. Posunutím směrem dolů sejměte kryt
akumulátoru 9 na zadní straně jednotky
rodičů 8.
Page 90

2. V souladu s označením vložte akumulátor
do přihrádky akumulátoru.
Bezpodmínečně dbejte na správnou
polaritu (+ a -).
3. Kryt akumulátoru 9 opět nasuňte na
jednotku rodičů 8.
4. Malý konektor síťového adaptéru připojte
ke zdířce síťového adaptéru 19 jednotky
rodičů.
5. Síťový adaptér připojte do zásuvky, která
odpovídá technickým údajům (viz
»9.Technické údaje« na straně 94).
6. Při prvním použití nabijte jednotku rodičů
průběžně po dobu 10 hodin , aby byla
aktivována celá kapacita akumulátoru.
Všechna následující nabíjení akumulátoru
již potřebují jen cca 5 hodin. Nabíjení
může probíhat také během provozu.
Kontrolka LED POWER 15 zobrazuje
proces nabíjení:
– bliká zeleně: akumulátor se nabíjí;
– svítí zeleně: akumulátor je plný;
– svítí červeně a každých 60 sekund
zazní 1 tón: Varování v případě
vybitého akumulátoru. Během
cca 15 - 20 minut se jednotka rodičů
automaticky vypne.
4.2 Připojení jednotky dítěte
Upozornění: Jednotku dítěte 1 instalujte
teprve tehdy, když je akumulátor jednotky
rodičů 8 zcela nabitý.
1. Jednotku dítěte 1 umístěte v dětském
pokoji tak, aby na ni dítě nedosáhlo.
Optimální vzdálenost mezi jednotkou
dítěte a dítětem je 1 - 2 m.
2. Konektor síťového adaptéru zastrčte do
zdířky 3 jednotky dítěte 1.
3. Síťový adaptér připojte do zásuvky, která
odpovídá technickým údajům (viz
»9.Technické údaje« na straně 94).
4.3 Spojení jednotky dítěte a jednotky rodičů
Zpravidla se jednotka dítěte zapíná
automaticky, jakmile je síťový konektor
připojen k zásuvce.
Pokud tomu tak není:
1. Zapněte jednotku dítěte 1 vypínačem 5.
Za tímto účelem krátce podržte stisknutý
vypínač, až svítí kontrolka Power LED 6.
2. Zapněte jednotku rodičů 8 vypínačem 14.
Za tímto účelem krátce podržte stisknutý
vypínač, až trvale zeleně svítí kontrolka
LED 15.
Spojení se vytvoří automaticky. Během
navazování spojení svítí červeně indikace
spojení 13.
Jakmile je spojení vytvořeno, svítí jak na
jednotce rodičů indikace spojení 13, tak
také na jednotce dítěte kontrolka VOX
LED 7 zeleně.
Pokud začne indikace spojení 13 zeleně
blikat, znamená to, že sice existuje
spojení mezi jednotkou rodičů a
jednotkou dítěte, vaše dítě ale spí a proto
se automaticky aktivoval režim EcoMode, aby bylo sníženo
vysokofrekvenční záření v dětském pokoji
a byla šetřena energie.
Pokud by mělo být spojení mezi jednotkou
rodičů a dítěte přerušeno, přístroje
automaticky zkusí navázat nové spojení.
Pokud by se během 30 sekund nenavázalo
nové spojení, zazní u jednotky rodičů 8 v
pravidelném intervalu tón a indikace
spojení 13 svítí červeně. Aby bylo možné
navázání nového spojení, musíte příp.
změnit stanoviště jednotky rodičů.
3. Nejprve zkontrolujte, zda je u vašeho
dítěte vše v pořádku.
4. Poté zkuste vytvořit nové spojení tak, že
změníte své stanoviště.
Spojení se automaticky naváže v okamžiku,
kdy se opět nacházíte v dosahu.
Jakmile je spojení navázáno, svítí
indikace spojení 13 opět zeleně.
88
Page 91

4.4 Napájení
• Napájení dětské jednotky 1 je možné
pouze přes napájecí adaptér.
• Jednotka rodičů 8 může být provozována
bez připojení k přívodu proudu pomocí
akumulátoru.
Stav nabití akumulátoru je zobrazován
kontrolkou LED POWER 15:
– svítí zeleně: přístroj je zapnutý a
akumulátor je zcela nabitý;
– bliká zeleně: akumulátor se nabíjí;
– svítí červeně a každých 60 sekund
zazní 1 tón: Varování v případě
vybitého akumulátoru. Během
cca 15 - 20 minut se jednotka rodičů
automaticky vypne.
Během těchto 15 minut mohou být
ještě aktivovány nebo deaktivovány
všechny funkce. Dbejte na to, že
používání například funkce Talk-Back a
nastavení hlasitosti na nejvyšší stupeň
potřebuje více energie a může se tak
zkrátit zbývající doba. Síťový adaptér
byste měli připojit k síti ihned, jakmile
začne kontrolka LED POWER 15
červeně blikat.
• Jednotka rodičů může být síťovým
adaptérem připojena k síti a je tak
zásobena proudem, zatímco současně
probíhá napájení akumulátoru. Je-li
připojena jednotka rodičů, doba nabíjení
akumulátoru se o něco prodlouží. Při
nabíjení akumulátoru bliká kontrolka
LED 15 zeleně.
Upozornění:
– Se zcela nabitým akumulátorem
můžete jednotku rodičů provozovat až
18 hodin. Tato doba závisí na způsobu
použití (jednotka rodičů se často
zapíná, často se používá obousměrný
hovor, vysoká hlasitost, atd.).
– Doba nabíjení vybitého akumulátoru je
cca 5 hodin.
4.5 Režim Eco-Mode
Popis funkce
Tato dětská chůvička je vybavena funkcí
režimu Eco-Mode, která šetří nejen proud
resp. energii, ale kromě toho snižuje na
minimum také vysokofrekvenční záření v
dětském pokoji.
V úrovních VOX 1, 2, 3 a 4 (viz
»6.3Nastavení citlivosti přenosu funkce
VOX« na straně 91) se režim Eco-Mode
automaticky aktivuje po uplynutí cca
10 sekund, jakmile vaše dítě spí a je
potichu.
Poznáte to tak, že začne zeleně blikat
indikace spojení 13. V režimu Eco-Mode se
do pohotovostního režimu automaticky
nepřepíná jen jednotka dítěte, ale také
jednotka rodičů.
Je-li aktivován režim Eco-Mode, jsou
všechny funkce, které by mohly dítě
probudit, automaticky deaktivovány.
Nemůžete tak např. používat funkci TalkBack, jste ale také v režimu Eco-Mode
neustále spojeni s vašim dítětem a vždy víte,
zda se ještě nacházíte v dosahu.
Tato dětská chůvička je vybavena funkcí
kontroly dosahu, která funguje také v režimu
Eco-Mode. Pokud se tedy dostanete mimo
dosah, automaticky obdržíte výstražný
signál i tehdy, pokud je aktivován režim
Eco-Mode, protože jednotka dítěte také v
pohotovostním režimu každých 30 sekund
vysílá k jednotce rodičů signál ke kontrole
spojení.
Svítí-li indikace spojení 13 zeleně, existuje
regulérní spojení mezi jednotkou dítěte a
jednotkou rodičů. Pokud indikace spojení 13
bliká zeleně, aktivoval se režim Eco-Mode.
Pokud je indikace spojení 13 červená,
znamená to, že se nacházíte mimo dosah a/
nebo že neexistuje spojení mezi oběma
jednotkami.
Upozornění: Před použitím režimu EcoMode zkontrolujte dosah vaší chůvičky.
Abyste své dítě slyšeli, ujistěte se, že se
jednotky vždy nachází v dosahu.
89
Page 92

Přístroj se automaticky přepne do režimu
přenosu, jakmile vaše dítě vydává zvuky,
které překračují nastavenou mez hluku
(úroveň VOX 1 - 4). Režim Eco-Mode se
ihned deaktivuje a indikace spojení 13
přestane blikat.
V úrovni VOX 5 probíhá trvalý přenos a režim
Eco-Mode je deaktivovaný.
5. Ovládání jednotky dítěte
Pokud chcete i přes aktivovaný režim EcoMode, což znamená, že vaše dítě klidně spí,
zkontrolovat, zda je vše v pořádku, můžete
režim Eco-Mode deaktivovat tak, že
přepnete režim trvalého přenosu:
1. Na jednotce rodičů 8 stiskněte tlačítko
VOX 17.
2. Poté stiskněte tlačítko Vol+ 10, až svítí
všech 5 kontrolek LED 16.
5.1 Zapnutí a vypnutí jednotky dítěte
Jednotka dítěte 1 se zapne automaticky,
jakmile je připojen síťový adaptér a je
připojen k síti. Poté můžete jednotku dítěte
kdykoliv zapnout a vypnout:
• Pro zapnutí nebo vypnutí jednotky
dítěte 1 stiskněte vypínač 5.
6. Ovládání jednotky rodičů
6.1 Zapnutí a vypnutí jednotky rodičů
Pro zapnutí nebo vypnutí jednotky rodičů 8
podržte stisknutý vypínač 14:
– jakmile zazní tón a svítí kontrolka
Power-LED 15, je jednotka rodičů
zapnutá;
– jakmile zazní tón a zhasne kontrolka
Power-LED 15, je jednotka rodičů
vypnutá.
6.2 Kontrolky LED
• Indikace spojení 13 na jednotce rodičů 8
zobrazuje stav spojení s jednotkou
dítěte 1 :
– pokud existuje spojení, svítí zeleně;
– bliká zeleně, pokud se jednotka dítěte
nachází v režimu Eco-Mode a
signalizuje, že vaše dítě klidně spí;
5.2 Kontrolky LED
• Kontrolka Power LED 6 svítí zeleně,
pokud je zapnutá jednotka dítěte.
• Kontrolka VOX LED 7 jednotky dítěte svítí
zeleně, pokud je navázáno spojení mezi
jednotkou dítěte a jednotkou rodičů.
• Kontrolka VOX LED 7 nesvítí, pokud se
jednotka dítěte 1 přepnula do režimu
Eco-Mode nebo pokud nebylo možné
navázat spojení k jednotce rodičů.
– svítí červeně, pokud je přerušené
spojení nebo pokud je jednotka dítěte
vypnutá.
Upozornění:
– Pokud se jednotka dítěte 1 nachází v
režimu Eco-Mode a jednotka rodičů se
dostane mimo dosah, svítí indikace
spojení 13 červeně. Kromě toho slyšíte
každých 30 sekund tón.
– Jakmile se jednotka rodičů 8 opět
nachází v dosahu nebo byla
odstraněna příčina poruchy spojení,
svítí indikace spojení 13 zeleně a oba
přístroje spolu opět vzájemně
komunikují.
– Při zapnutí obou jednotek indikace
spojení 13 nejprve svítí červeně.
Jednotka rodičů a jednotka dítěte se
spojí. Jakmile je navázáno spojení,
kontrolka změní barvu a je zelená.
90
Page 93

• Kontrolka POWER 15:
– svítí zeleně: přístroj je zapnutý a
akumulátor je zcela nabitý;
– bliká zeleně: akumulátor se nabíjí;
– svítí červeně a každých 60 sekund
zazní 1 tón: Varování v případě
vybitého akumulátoru. Během
cca 15 - 20 minut se jednotka rodičů
automaticky vypne. Dbejte na to, že v
závislosti na použití se přístroj může
vypnout také rychleji. (úroveň VOX 5
má například vyšší spotřebu energie
než úroveň 1).
• 5 kontrolek LED 16 mají tři různé funkce a
tyto jsou vidět jen při aktivitě:
– zobrazuje hladinu zvuku v dětském
pokoji. Čím více kontrolek LED svítí, tím
hlasitější jsou zvuky;
– při změně hlasitosti zobrazuje různé
stupně. Čím více kontrolek LED svítí,
tím hlasitější je přenos reproduktorem;
– při nastavení citlivosti VOX zobrazuje
různé stupně. Čím více kontrolek LED
bliká, tím rychleji reaguje přístroj na
zvuky. Pokud svítí 5 kontrolek LED,
zapne se trvalý přenos.
6.3 Nastavení citlivosti
přenosu funkce VOX
Malé děti vydávají různé zvuky. Může to být
hlasité dýchání, blábolení nebo hlasitý pláč
a volání. Funkce VOX může být nastavena
tak, že se funkce přenosu zvuku aktivuje jen
v případě hlasitého volání nebo pláče, ne ale
v případě jiných zvuků.
Pomocí funkce VOX nastavujete citlivost
přenosu mikrofonu. Čím vyšší je úroveň
VOX, tím citlivěji přístroj reaguje na zvuky.
1. Pro aktivaci funkce VOX krátce stiskněte
VOX 17.
Kontrolky LED 16 vám svým blikáním
zobrazují, jak citlivě je váš přístroj
nastaven.
2. Citlivost přenosu zvyšujete nebo
snižujete pomocí tlačítka VOL + 10 nebo
VOL - 11. Zvolená úroveň odpovídá
počtu blikajících kontrolek LED 16:
– Úroveň VOX 1 = velmi nízká citlivost,
aktivace jen v případě velmi hlasitého
křiku dítěte;
– Úroveň VOX 2 = nízká citlivost, aktivace v
případě hlasitého pláče dítěte;
– Úroveň VOX 3 = normální citlivost,
aktivace v případě normálního pláče
dítěte;
– Úroveň VOX 4 = vysoká citlivost,
aktivace i v případě tichých zvuků;
– Úroveň VOX 5 = režim Eco-Mode je
vypnutý. Přenos je nastaven na trvalý
provoz.
Hlasitost přehrávání přenášených zvuků v
jednotce rodičů nastavujete pomocí tlačítek
VOL + 10 a VOL - 11 (viz »6.4Nastavení
hlasitosti« na straně 91).
Upozornění: Pro provedení změny citlivosti
přenosu po aktivaci funkce VOX máte čas cca
2 sekundy. Poté se přístroj automaticky
přepne opět na přenos zvuků. To rozpoznáte
podle toho, že kontrolky LED 16 již neblikají a
podle toho, že můžete pomocí tlačítek VOL +
10 nebo VOL - 11 měnit pouze hlasitost.
Pozor! Při trvalém přenosu úrovně VOX 5
jsou nepřetržitě přenášeny všechny zvuky.
Pokud dítě klidně spí, hlasitost se po
několika sekundách automaticky přizpůsobí
nejnižšímu stupni, aby se minimalizovaly
zvuky v pozadí. Jakmile začne dítě vydávat
zvuky, hlasitost se automaticky nastaví zpět
na předchozí nastavení.
6.4 Nastavení hlasitosti
1. Nastavte hlasitost, se kterou chcete
slyšet zvuky v jednotce rodičů, pomocí
tlačítek VOL + 10 a VOL - 11.
Při každém stisknutí tlačítka zazní tón v
nastavené hlasitosti. Kontrolky LED 16 se
příslušným způsobem rozsvítí. Čím
hlasitější zvolíte nastavení, tím hlasitější je
tón a svítí tím větší počet kontrolek LED.
Upozornění: Je-li funkce VOX nastavena
na malou citlivost (viz »6.3Nastavení
citlivosti přenosu funkce VOX« na straně
91), nebudou nezávisle na nastavené
hlasitosti přenášeny žádné tiché zvuky.
91
Page 94

To znamená, že při zvýšení hlasitosti již
nic neuslyšíte. Pokud chcete slyšet více
zvuků, musí být zvýšena citlivost přenosu
vyšší úrovní VOX.
6.5 Vypnutí zvuku
Jednotka rodičů může být přepnuta na „BEZ
ZVUKU”. Zvuky z dětského pokoje pak již
nejsou přenášeny.
1. Stiskněte tlačítko VOL - 11 tolikrát, dokud
neuslyšíte žádné pípnutí.
Nyní již nejsou přenášeny žádné zvuky.
Hlasitost v dětském pokoji je nadále
zobrazována kontrolkami LED 16. Čím
více kontrolek LED svítí, tím hlasitější jsou
zvuky v dětském pokoji.
2. Pro opětovné zapnutí zvuku stiskněte
tlačítko VOL + 10.
3. Je-li u jednotky rodičů vypnutý zvuk a
aktivujete funkci Talk-Back, hlasitost se
automaticky opět nastaví na první stupeň.
6.6 Funkce Talk-Back
Při použití funkce Talk-Back můžete na své
dítě mluvit.
1. Držte stlačené tlačítko TALK 1 8 jednotky
rodičů.
Poté, co uslyšíte signální tón, je navázáno
spojení umožňující hovor.
2. Současně mluvte do mikrofonu 20
jednotky rodičů.
Vaše dítě vás nyní slyší přes
reproduktor 2 jednotky dítěte.
3. Uvolněte tlačítko TAL K 18, abyste slyšeli
reakci vašeho dítěte.
Upozornění:
– Pokud se jednotka dítěte 1 nachází v
režimu Eco-Mode, je tato funkce
deaktivována, aby nedošlo k
nechtěnému probuzené dítěte. V
takovém případě vám dva následující
signální tóny signalizují, že funkce TalkBack nyní není k dispozici.
– Pokud je hlasitost jednotky rodičů
nastavena na „BEZ ZVUKU” (viz
»6.4Nastavení hlasitosti« na straně 91),
bude automaticky zvýšena na hlasitost
úrovně I, jakmile stisknete tlačítko
TALK 18.
7. Čištění a údržba přístroje
7.1 Čištění
Výstraha! Aby se zabránilo
nebezpečí úrazu elektrickým
proudem, poranění nebo poškození:
– Před čištěním přístroje vždy
odpojte síťový adaptér od síťové
zásuvky.
– Součásti nikdy neponořujte do
vody.
Pozor! V žádném případě nepoužívejte
drsné, leptavé nebo abrazivní čisticí
prostředky. Mohlo by tak dojít k poškození
spotřebiče.
1. Je-li nutné, součásti otřete vlhkým
hadříkem.
92
2. Chůvičku opět používejte až po
kompletním oschnutí všech součástí.
7.2 Výměna akumulátoru
Vestavěný lithium-polymerový akumulátor
(LiPo-akumulátor) 3,7V, 1200 mAh smí být
nahrazen výhradně originálním
akumulátorem. Popř. kontaktujte náš servis
produktů (viz »Produktservice Babyphone in
Europa« na straně 116).
1. Posunutím směrem dolů sejměte kryt
akumulátoru 9 na zadní straně jednotky
rodičů 8.
2. Vyjměte defektní akumulátor.
Page 95

3. V souladu s označením vložte nový
akumulátor do přihrádky akumulátoru.
Bezpodmínečně dbejte na správnou
polaritu (+ a -).
4. Kryt akumulátoru 9 opět nasuňte na
jednotku rodičů 8.
5. Při prvním použití nabijte nový
akumulátor průběžně po dobu 10 hodin ,
aby byla aktivována celá kapacita
akumulátoru (viz »4.1Připojení jednotky
rodičů« na straně 87).
8. Poruchy a jejich odstranění
Porucha Příčina Odstranění
Jednotka dítěte
nebo jednotka
rodičů nepracuje
Hlasité pískání Zpětná vazba, příliš malá
Jednotka rodičů
pípá
Indikace spojení
13 svítí červeně
Z jednotky
rodičů není
slyšet tón
Žádné napájení Vytvoření napájení proudem (viz
»4.4Napájení« na straně 89)
Akumulátor v jednotce rodičů je
vybitý
Přístroj není zapnutý Zapněte přístroj (viz »4.1Připojení
Příliš velká vzdálenost mezi
jednotkou dítěte a jednotkou
rodičů nebo je signál rušen
příliš silnou stěnou nebo jinými
elektronickými přístroji
vzdálenost mezi jednotkou
dítěte a jednotkou rodičů
Spojení s jednotkou dítěte je
přerušené
Problémy s napájením proudem Zkontrolujte napájení proudem (viz
Jednotka rodičů se nenachází v
dosahu
Hlasitost je vypnutá Zvyšte hlasitost (viz »Vypnutí zvuku« na
Funkce VOX je nastavena příliš
nízká
Nabití akumulátoru (viz »4.4Napájení«
na straně 89)
jednotky rodičů« na straně 87
a »4.2Připojení jednotky dítěte« na
straně 88)
Zmenšete vzdálenost nebo zvolte jiné
stanoviště jednotky rodičů
Zvětšete vzdálenost na nejméně 2 - 3 m
Pokud se s jednotkou rodičů nacházíte
v bezprostřední blízkosti jednotky
dítěte, snižte hlasitost a úroveň VOX
jednotky rodičů (viz »6.3Nastavení
citlivosti přenosu funkce VOX« na straně
91 a
»6.4Nastavení hlasitosti« na straně 91).
Vytvořte spojení (viz »4.3Spojení
jednotky dítěte a jednotky rodičů« na
straně 88)
»4.4Napájení« na straně 89)
Vytvořte spojení (viz »4.3Spojení
jednotky dítěte a jednotky rodičů« na
straně 88)
straně 92)
Zvýšení citlivosti přenosu (viz
»6.3Nastavení citlivosti přenosu funkce
VOX« na straně 91 resp. »3.1Krátký
přehled hlášení« na straně 87)
93
Page 96

Pokud se pomocí těchto rad problém
neodstraní, můžete zkusit problém odstranit
takto:
1. Z jednotky rodičů vyjměte akumulátor.
2. Odpojte síťové díly od zásuvky.
3. Vyčkejte několik minut.
4. Opět vložte akumulátor a připojte síťové
díly.
Pokud se tímto problém nevyřeší,
kontaktujte zákaznický servis (viz
»11.2Servisní centrum dětské chůvičky« na
straně 96).
9. Technické údaje
Rádiové spojení 2.4 Ghz FHSS
Frekvence vysílání 2408 MHz - 2474 MHz, max EIRP 100 mW
Počet kanálů 12 / automatická volba kanálu
Dosah při volném rozhledu cca 250 m
Dosah v uzavřených
prostorách
Provozní teplota Okolní teplota 0 °C až 40 °C
Provozní teplota Okolní teplota 0 °C až 40 °C
Akumulátor Lithium-polymerový akumulátor (LiPo-akumulátor), 3,7 V,
Vstup 100-240 V AC; 50/60 Hz; 0,1 A
Výstup 5 V ; 2,75 W;
cca 40 m. Dosah přenosu závisí na okolí. Stěny nebo stromy
mohou výrazně rušit příjem.
Jednotka dítěte
Jednotka rodičů
1200 mAh
Provozní doba v normálním přenosovém režimu: > 15 hodin
Provozní doba v režimu Eco-Mode: > 18 hodin
Doba nabíjení při prvním nabíjení min. 10 hodin,
každé další nabíjení akumulátoru potřebuje cca 5 hodin
Síťové díly
9.1 Technologie FHSS
Tato dětská chůvička používá při rádiovém
přenosu moderní technologii FHSS.
Frequency Hopping Spread Spectrum
(FHSS) digitální metoda rozpětí frekvence
pro rádiový přenos dat. V porovnání s
předchozí metodou přitom není vysílací
výkon soustředěn na jedné nosné frekvenci.
Namísto toho se nosná frekvence náhodně
mění. V přijímači jsou pak balíčky dat, které
jsou rozděleny na různé nosné frekvence,
opět spojeny.
Tato metoda má v porovnání s obvyklým
rádiovým přenosem několik předností:
• Rádiový signál je možné obtížněji
odposlouchávat, protože odposlouchající
neví, na které nosné frekvence byla data
94
rozdělena a jak musí být signál opět
správně sestaven. Proto se tato metoda
používá např. také u Bluetooth nebo ve
vojenské oblasti.
• Rádiový přenos je výrazně odolnější proti
rušivým signálům. Je to dáno tím, že
určitá nosná frekvence je používána vždy
jen krátce před přepnutím na jinou
frekvenci. Pokud tedy na určité frekvenci
dochází k poruchám, jsou vždy zasaženy
jen malé balíčky dat. Tyto poruchy je
možné odstranit příslušnou metodou
opravy chyb.
Page 97

10. Likvidace
10.1 Přístroj
Symbol přeškrtnutého
kontejneru na kolečkách
znamená, že se výrobek musí v
rámci Evropské unie likvidovat
tříděným sběrem odpadu. To
platí pro výrobek a všechny díly
příslušenství označené tímto
symbolem. Označené produkty nesmí být
likvidovány v rámci normálního domovního
odpadu, ale musí být odevzdány v místě
sběru určeném pro recyklaci elektrických a
elektronických přístrojů.
Recyklování napomáhá při redukci surovin a
ochraně životního prostředí.
11. Záruka
Kromě povinností záručního plnění prodejce
na základě prodejní smlouvy, my jako
výrobce, poskytujeme při správné
manipulaci se spotřebičem a při dodržení
návodu k použití záruku 24 měsíců od
zakoupení spotřebiče. Datum zakoupení a
typ spotřebiče se dokládají prodejním
dokladem.
Zákonná práva kupujícího nejsou touto
zárukou výrobce omezována.
Zavazujeme se, během záruční doby
odstranit všechny nedostatky způsobené
chybou materiálu nebo chybou výroby. Díly
podléhající opotřebení jsou ze záruky
vyloučeny.
Malé odchylky od požadovaného stavu,
které jsou bezvýznamné z hlediska hodnoty
a vhodnosti použití spotřebiče, nespadají
pod záruční povinnost. Stejně tak nelze
přebírat záruku v případě, že jsou
nedostatky na spotřebiči způsobeny
přepravou, chybným použitím nebo
nedostatečnou údržbou nebo pokud byly na
10.2 Obal
Při likvidaci obalu respektujte příslušné
předpisy o ochraně životního prostředí své
země.
10.3 Akumulátor
Akumulátory nesmí být likvidovány v
domovním odpadu. Prázdné
akumulátory musí být zlikvidovány
odborně. Za tímto účelem jsou v
obchodech, které prodávají baterie, a na
místních sběrných místech umístěny
příslušné schránky pro likvidaci
akumulátorů. Akumulátory, které jsou
označeny těmito písmeny, obsahují mimo
jiné tyto škodlivé látky: Cd (kadmium), Hg
(rtuť), Pb (olovo).
spotřebiči provedeny zásahy osobami, které
nejsou z naší strany k takovýmto zásahům
oprávněny.
Poskytnutí záruky probíhá podle naší volby
opravou, výměnou částí nebo spotřebiče.
Záruční doba se prodlužuje o, po který byl
výrobek podle záznamu v záruční opravě.
Záruční lhůta pro vestavěné náhradní díly
končí společně se záruční lhůtou celého
spotřebiče.
Další nebo jiné nároky, především nároky
náhrady škod vzniklých mimo spotřebič,
jsou - pokud není ručení nařízeno ze zákona
- vyloučeny.
Náklady na přepravu a přepravní rizika
nepřebíráme.
Zaslání spotřebiče bez prokázání data
zakoupení je vnímáno jako oprava. Oprava
spotřebiče bude provedena až po konzultaci
se zákazníkem.
Pro případné dotazy uschovejte prosím
označení a číslo výrobku.
95
Page 98

11.1 Servisní centrum NUK
Servisní adresy v případě dotazů na záruku
nebo obecných dotazů ke značce NUK viz
»Contact addresses NUK« na straně115.
11.3 Dodavatel
Pozor, tato adresa není servisní adresa. V
případě problémů a dotazů k výrobku
kontaktujte servisní centrum uvedené v
bodě 11.2.
11.2 Servisní centrum dětské chůvičky
V případě dotazů týkajících se vaší chůvičky
kontaktujte naše odborníky na dětské
chůvičky. Horká linka výrobku viz »Product
service babyphone in Europe« na straně116
nebo nás kontaktujte prostřednictvím
webových stránek www.nuk-service.com.
Č. výrobku.: 10 256 438
MAPA GmbH
Industriestraße 21-25
27404 Zeven
Německo
www.nuk.com
12. Prohlášení o shodě
Spotřebič splňuje všechny příslušné evropské směrnice a také jejich národní provádění. Tyto
jsou patrné z EU prohlášení o shodě, které lze na vyžádání obdržet u výrobce.
Prohlášení o shodě se nachází vedle návodu k použití v prodejním kartonu nebo také na
stránkách www.nuk.de.
96
Page 99

Περιεχόμενα
1. Περιγραφή συσκευής . . . . . . . . . . . . . . . . . . . . . . . . . . . . . . . . . . . . . . . . . 98
1.1 Σκοπός χρήσης . . . . . . . . . . . . . . . . . . . . . . . . . . . . . . . . . . . . . . . . . . . . . . . . . . 98
1.2 Περιγραφή λειτουργίας. . . . . . . . . . . . . . . . . . . . . . . . . . . . . . . . . . . . . . . . . . . . 98
1.3 Άδεια λειτουργίας . . . . . . . . . . . . . . . . . . . . . . . . . . . . . . . . . . . . . . . . . . . . . . . . 98
1.4 Περιεχόμενο παράδοσης. . . . . . . . . . . . . . . . . . . . . . . . . . . . . . . . . . . . . . . . . . . 99
2. Υποδείξεις ασφαλείας . . . . . . . . . . . . . . . . . . . . . . . . . . . . . . . . . . . . . . . . 99
2.1 Γενικές υποδείξεις. . . . . . . . . . . . . . . . . . . . . . . . . . . . . . . . . . . . . . . . . . . . . . . . 99
2.2 Προστασία από ηλεκτροπληξία . . . . . . . . . . . . . . . . . . . . . . . . . . . . . . . . . . . . . 99
2.3 Για την ασφάλεια του παιδιού σας . . . . . . . . . . . . . . . . . . . . . . . . . . . . . . . . . . . 99
2.4 Προστασία από τραυματισμούς . . . . . . . . . . . . . . . . . . . . . . . . . . . . . . . . . . . . 100
2.5 Υλικές βλάβες . . . . . . . . . . . . . . . . . . . . . . . . . . . . . . . . . . . . . . . . . . . . . . . . . . 100
2.6 Χειρισμός συσσωρευτών LiPo . . . . . . . . . . . . . . . . . . . . . . . . . . . . . . . . . . . . . . 100
3. Δομικά μέρη ενδοεπικοινωνίας Babyphone . . . . . . . . . . . . . . . . . . . . . . 101
3.1 Επισκόπηση μηνυμάτων . . . . . . . . . . . . . . . . . . . . . . . . . . . . . . . . . . . . . . . . . . 102
4. Θέση της συσκευής σε λειτουργία. . . . . . . . . . . . . . . . . . . . . . . . . . . . . . 103
4.1 Σύνδεση μονάδας γονέων . . . . . . . . . . . . . . . . . . . . . . . . . . . . . . . . . . . . . . . . . 103
4.2 Σύνδεση μονάδας μωρού . . . . . . . . . . . . . . . . . . . . . . . . . . . . . . . . . . . . . . . . . 104
4.3 Σύνδεση μονάδας μωρού και μονάδας γονέων. . . . . . . . . . . . . . . . . . . . . . . . . 104
4.4 Ηλεκτρική τροφοδοσία . . . . . . . . . . . . . . . . . . . . . . . . . . . . . . . . . . . . . . . . . . . 104
4.5 Eco-Mode . . . . . . . . . . . . . . . . . . . . . . . . . . . . . . . . . . . . . . . . . . . . . . . . . . . . . 105
5. Χειρισμός μονάδας μωρού . . . . . . . . . . . . . . . . . . . . . . . . . . . . . . . . . . . . 106
5.1 Ενεργοποίηση και απενεργοποίηση μονάδας μωρού . . . . . . . . . . . . . . . . . . . . 106
5.2 LED ένδειξης . . . . . . . . . . . . . . . . . . . . . . . . . . . . . . . . . . . . . . . . . . . . . . . . . . . 106
6. Χειρισμός μονάδας γονέων . . . . . . . . . . . . . . . . . . . . . . . . . . . . . . . . . . . 106
6.1 Ενεργοποίηση και απενεργοποίηση μονάδας γονέων. . . . . . . . . . . . . . . . . . . . 106
6.2 LED ένδειξης . . . . . . . . . . . . . . . . . . . . . . . . . . . . . . . . . . . . . . . . . . . . . . . . . . . 106
6.3 Ρύθμιση ευαισθησίας μεταβίβασης λειτουργίας VOX . . . . . . . . . . . . . . . . . . . . 107
6.4 Ρύθμιση έντασης ήχου. . . . . . . . . . . . . . . . . . . . . . . . . . . . . . . . . . . . . . . . . . . . 108
6.5 Σίγαση . . . . . . . . . . . . . . . . . . . . . . . . . . . . . . . . . . . . . . . . . . . . . . . . . . . . . . . . 108
6.6 Λειτουργία Talk-Back . . . . . . . . . . . . . . . . . . . . . . . . . . . . . . . . . . . . . . . . . . . . 108
7. Καθαρισμός και συντήρηση συσκευής . . . . . . . . . . . . . . . . . . . . . . . . . . 109
7.1 Καθαρισμός. . . . . . . . . . . . . . . . . . . . . . . . . . . . . . . . . . . . . . . . . . . . . . . . . . . . 109
7.2 Αντικατάσταση συσσωρευτή . . . . . . . . . . . . . . . . . . . . . . . . . . . . . . . . . . . . . . . 109
8. Βλάβες και η αποκατάστασή τους . . . . . . . . . . . . . . . . . . . . . . . . . . . . . 110
9. Τεχνικά στοιχεία . . . . . . . . . . . . . . . . . . . . . . . . . . . . . . . . . . . . . . . . . . . . 111
9.1 Τεχνολογία FHSS . . . . . . . . . . . . . . . . . . . . . . . . . . . . . . . . . . . . . . . . . . . . . . . 112
10. Απόσυρση . . . . . . . . . . . . . . . . . . . . . . . . . . . . . . . . . . . . . . . . . . . . . . . . . 112
10.1 Συσκευή. . . . . . . . . . . . . . . . . . . . . . . . . . . . . . . . . . . . . . . . . . . . . . . . . . . . . . . 112
10.2 Συσκευασία . . . . . . . . . . . . . . . . . . . . . . . . . . . . . . . . . . . . . . . . . . . . . . . . . . . . 112
10.3 Συσσωρευτής . . . . . . . . . . . . . . . . . . . . . . . . . . . . . . . . . . . . . . . . . . . . . . . . . . 112
11. Εγγύηση . . . . . . . . . . . . . . . . . . . . . . . . . . . . . . . . . . . . . . . . . . . . . . . . . . . 113
11.1 Κέντρο σέρβις της NUK . . . . . . . . . . . . . . . . . . . . . . . . . . . . . . . . . . . . . . . . . . 113
11.2 Κέντρο σέρβις ενδοεπικοινωνίας Babyphone. . . . . . . . . . . . . . . . . . . . . . . . . . 113
11.3 Προμηθευτής. . . . . . . . . . . . . . . . . . . . . . . . . . . . . . . . . . . . . . . . . . . . . . . . . . . 113
12. Δήλωση συμμόρφωσης. . . . . . . . . . . . . . . . . . . . . . . . . . . . . . . . . . . . . . . 114
97
Page 100

1. Περιγραφή συσκευής
1.1 Σκοπός χρήσης
Με αυτή την ενδοεπικοινωνία Babyphone
Eco Control Audio 500 μπορείτε να
επιτηρείτε το μωρό σας ή τα μικρά σας
παιδιά, ενώ αυτά βρίσκονται στο παιδικό
δωμάτιο. Μπορεί επίσης να χρησιμοποιηθεί
για ηχητική επιτήρηση για ηλικιωμένους.
Η παρούσα συσκευή προβλέπεται μόνο για
χρήση σε ξηρά περιβάλλοντα. Η συσκευή
δεν είναι κατάλληλη για λειτουργία σε
υγρούς χώρους ή σε υγρές καιρικές
συνθήκες σε εξωτερικούς ώρους.
Η παρούσα συσκευή προβλέπεται για χρήση
σε ιδιωτικό νοικοκυριό. Δεν προβλέπεται για
επαγγελματική χρήση.
Η παρούσα συσκευή χρησιμεύει
αποκλειστικά ως βοήθημα. Δεν μπορεί σε
καμία περίπτωση να αντικαταστήσει τη
φυσική παρουσία και επίβλεψη των γονέων,
των μπέιμπι-σίερ ή των φροντιστών.
1.2 Περιγραφή λειτουργίας
Η μονάδα μωρού 1 τοποθετείται στο χώρο,
τον οποίο επιθυμείτε να επιβλέπετε.
Καταγράφει τους θορύβους και τους
μεταδίδει ασύρματα στη μονάδα γονέων 8.
Η μονάδα γονέων 8 διαθέτει ενσωματωμένο
συσσωρευτή, έτσι ώστε να μπορείτε να την
τοποθετείτε πάντα εντός του οπτικού σας
πείου. Ο συσσωρευτής φορτίζεται με τη
βοήθεια του συνημμένου προσαρμογέα
δικτύου.
Η εμβέλεια μεταξύ της μονάδας μωρού και
γονέων ανέρχεται σε περ. 40 m σε
εσωτερικούς χώρους και σε έως περ. 250 m
σε εξωτερικούς χώρους (σε ανοιχτούς
χώρους). Η περιοχή λήψης της
ενδοεπικοινωνίας Babyphone εξαρτάται
από το περιβάλλον. Τοίχοι μεγάλου πάχους
ή μέταλλα ενδέχεται να περιορίσουν την
εμβέλεια.
Η ενδοεπικοινωνία Babyphone διαθέτει
Eco-Mode, κατά την οποία ο πομπός
(μονάδα μωρού) μεταβαίνει αυτόματα σε
λειτουργία αναμονής, αμέσως μόλις το
μωρό σας αρχίζει να κοιμάται ήρεμα.
Ενεργοποιείται εκ νέου, ανάλογα με τη
ρυθμισμένη ευαισθησία, όταν το μωρό σας
αρχίζει να κάνει θορύβους ή ν κλαίει.
Εάν επιθυμείτε να ακούτε όλους τους
θορύβους από το παιδικό δωμάτιο,
μπορείτε να ρυθμίσετε την ευαισθησία
μεταβίβασης της λειτουργίας VOX με το
πλήκτρο VOX 17 στο μέγιστο επίπεδο
(=Επίπεδο 5). Στην εν λόγω βαθμίδα, η
μονάδα μωρού παραμένει διαρκώς
ενεργοποιημένη (βλέπε “6.3 Ρύθμιση
ευαισθησίας μεταβίβασης λειτουργίας VOX”
στη σελίδα 107).
Εάν επιθυμείτε τη σίγαση όλων των ήχων,
μπορείτε να ρυθμίσετε με τη βοήθεια του
πλήκτρου Vol - 11 την ένταση ήχου σε
σίγαση. Σε αυτή την περίπτωση, μπορείτε
μόνο να δείτε μέσω της ένδειξης LED 16
πότε το μωρό σας κάνει θορύβους.
Όταν είναι ενεργοποιημένη η Eco-Mode, η
ακτινοβολία υψηλής συχνότητας στο
παιδικό δωμάτιο μειώνεται στο ελάχιστο. Η
μονάδα μωρού αποστέλλει μόνο κάθε
30 δευτερόλεπτα ένα σύντομο σήμα στη
μονάδα γονέων, για να ελέγχει τη σύνδεση.
Εάν η μονάδα γονέων βρίσκεται εκτός
εμβέλειας, οι γονείς ειδοποιούνται με τη
βοήθεια ενός χαρακτηριστικού σήματος.
Περισσότερες πληροφορίες σχετικά με την
Eco-Mode θα βρείτε σε “4.5 Eco-Mode” στη
σελίδα 105 όπως και σε “6.3 Ρύθμιση
ευαισθησίας μεταβίβασης λειτουργίας VOX”
στη σελίδα 107.
1.3 Άδεια λειτουργίας
Η ενδοεπικοινωνία Babyphone λειτουργεί
σε συχνότητα 2,4 GHz. Η παρούσα συσκευή
επιτρέπεται να χρησιμοποιείται σε όλες τις
χώρες της ΕΕ. Στη Ρωσία και στην Ουκρανία
πρέπει να λαμβάνονται υπόψη οι εθνικοί
περιορισμοί.
98
 Loading...