

Page 1
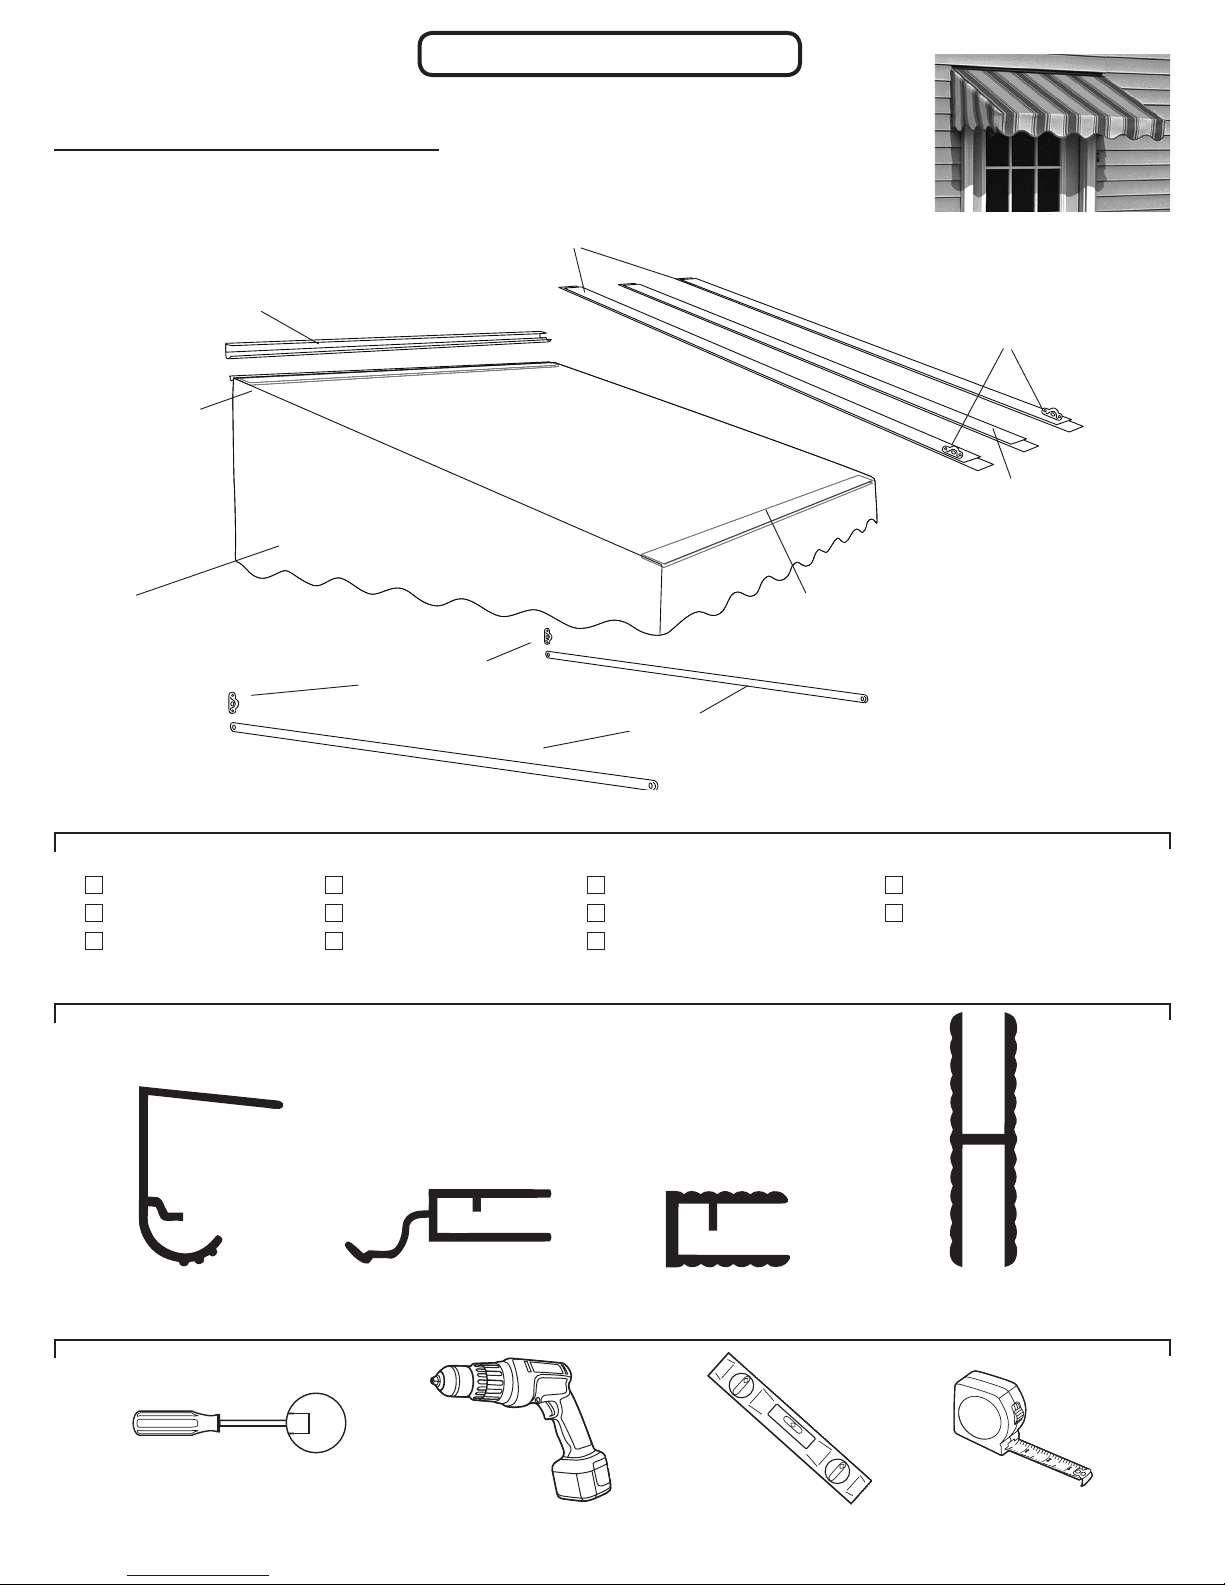
Series 2700
Fabric Door Canopy
It is our recommendation that you read instructions
carefully prior to assembly and installation.
www.nuimageawnings.com
top trim
(pre-attached on
the underside of
the canopy)
fabric canopy
mounting bar
camel back wall
brackets
edge rafters
support arms
front trim
(pre-attached on the
underside of the canopy)
Series 2700 Fabric Door Canopy
camel back wall brackets
(pre-attached to the outside, Front Trim
ends of the Edge Canopy Rafters)
center
rafter(s)
Series 2700 Parts Check List:
Fabric Canopy Edge Rafters (2) Support Arms* Small Screws*
Top Trim (attached) Center Rafter(s) Camel Back Wall Brackets* Large Screws*
Front Trim (attached) Mounting Bar Machine Screws (its tip is flat)
*QUANTITIES & SIZE OF PARTS MAY VARY BY AWNING SIZE AND MODEL SERIES
Actual Size - End Views of Canopy parts for easy reference and assembly:
Mounting Bar Top Trim Front Trim Edge & Center Canopy Rafter
Required Tools:
1
2
3
Phillips, Regular & 1/4” Hex Head
Screwdrivers or Drill Bits Power Drill Level Tape Measure
Page 2
Assembly Instructions Series 2700 Fabric Door Canopy
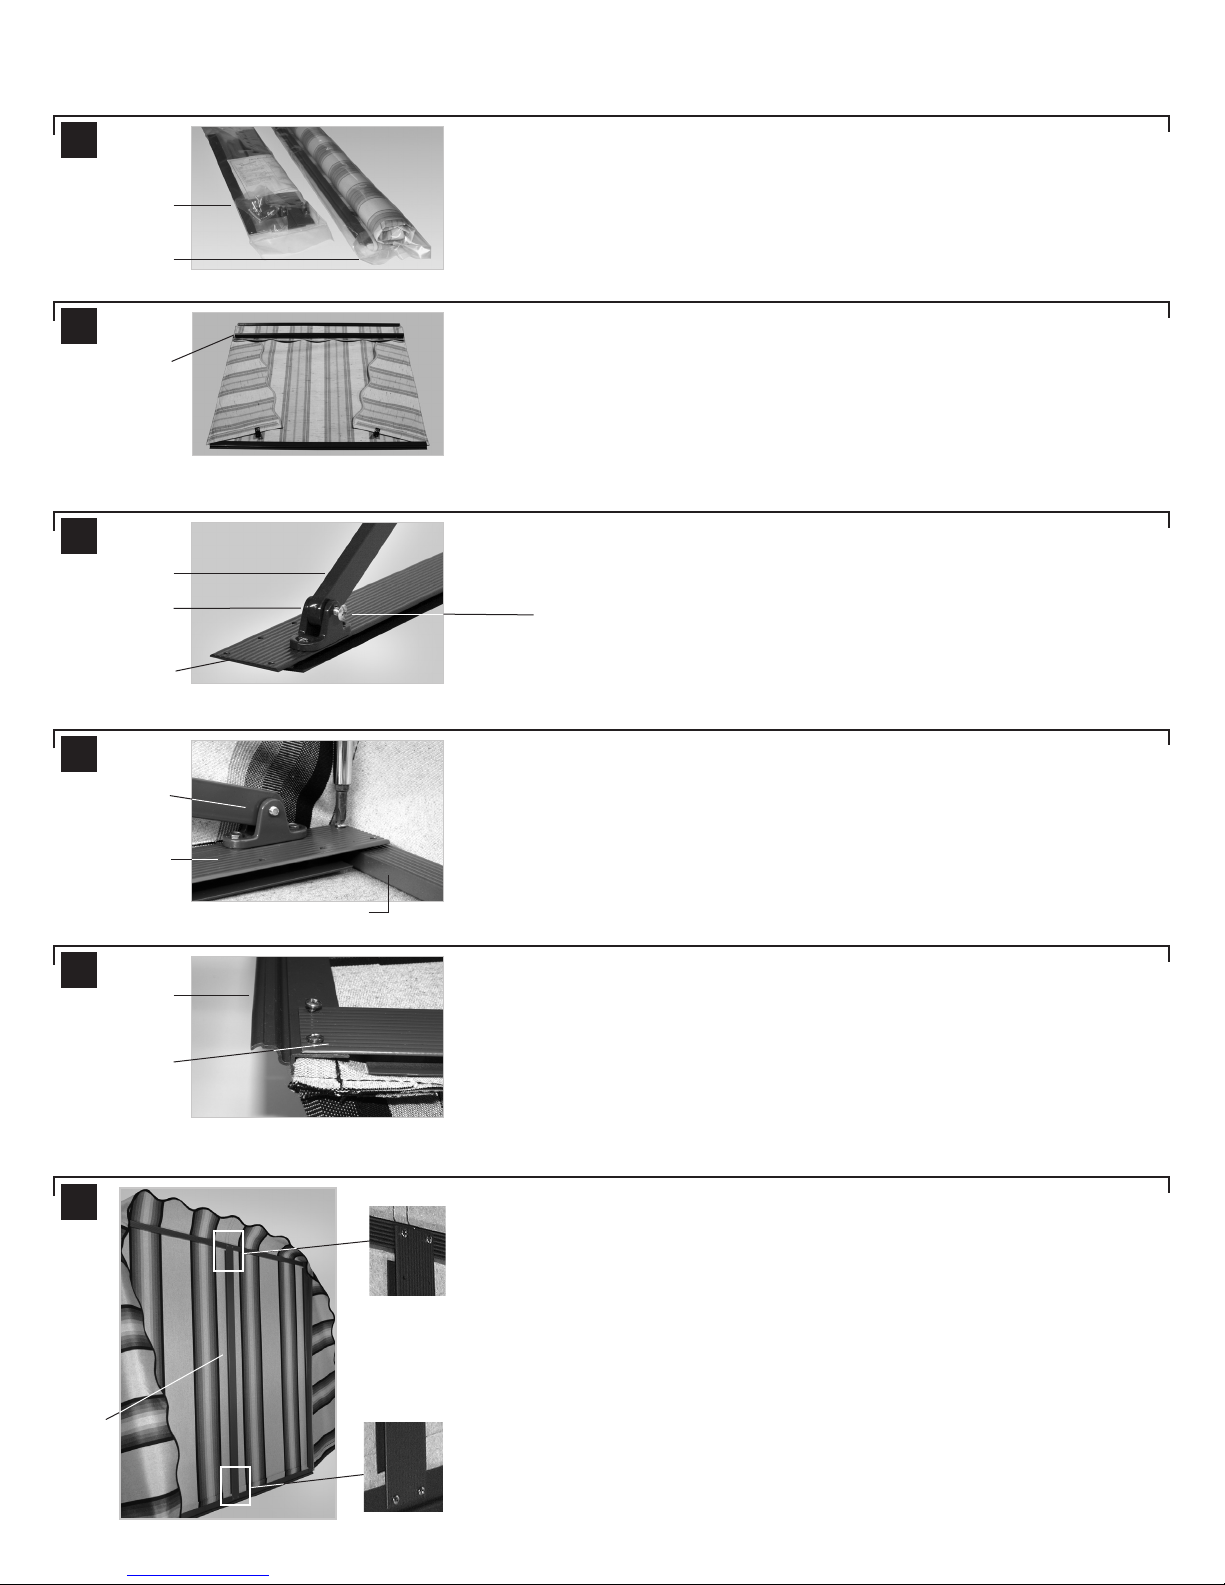
1
Hardware Pack
Canopy Pack
2
Mounting Bar
The Front Trim and
the Top Trim are
pre-attached with
the Mounting Bar
rolled in loose
3
Support Arm
Camel Back
Wall Bracket
Edge Rafter
FIG. 1
FIG. 2
FIG. 3
The Series 2700 Fabric Door Canopy comes packaged in two separate
plastic bags: Bag one contains the hardware and instructions; bag two
contains the canopy with three frame pieces, a Mounting Bar, Top Trim
and Front Trim. For your convenience, the Front Trim and Top Trim frame
parts are already attached to the canopy.
The canopy will come rolled with the top or outside rolled to the inside.
Unroll the canopy. (The Mounting Bar is rolled inside the canopy and
will be used in Step 1 of this manual’s Installation Instructions. Set it
aside for now.) Open the sides and flip the whole canopy over. The
canopy will be assembled from this position, upside (or topside)
down and inside (or underside) up. The Top Trim and Front Trim frame
pieces are already attached.
To begin, attach one end of one of the Support Arms to the Edge Rafter
by inserting it into the Camel Back Wall Bracket that is already mounted
on the Edge Rafter using a machine screw.
NOTE: Insert the machine screws through the Camel Back Wall Bracket and
the Support Arms from the outside in, toward the canopy.
4
Support Arm with
Camel Back Wall
Bracket
Edge Rafter
5
Top Trim
Edge Rafter
6
Front Trim
FIG. 4
FIG. 5
INSET 6A
Center
Rafter to
Front Trim
Attach one Edge Rafter to the Front Trim using small screws in prepunched holes; the Front Trim is behind the valance on the inside of
the canopy and is pre-attached.
NOTE: Be sure to position the Edge Rafters so that the ends with the
attached Camel Back Wall Bracket/Support Arm are toward the outside
and at the front of the canopy (Front Trim).
Attach the other end of the Edge Rafter to the Top Trim on both sides
using two small screws in pre-punched holes.
Repeat Steps 3, 4 and 5 for the second Support Arm and secure the
other Edge Rafter on the other side of the canopy.
Position the Center Rafter(s) and align with pre-punched holes at the
Front Trim and the Top Trim. Then, fasten the Center Rafter to the Front
Trim first and then the Top Trim with two small screws at each end
(FIG. 6).
Your canopy is now ready for installation.
INSETS 6A & 6B The Fabric Canopy is turned vertically to show placement
of Center Rafter with attachment details to the Front Trim and Top Trim.
Center
Rafter
FIG. 6
INSET 6B
Center
Rafter to
Top Trim
Page 3
Installation Instructions
SERIES 2700
Door Canopy
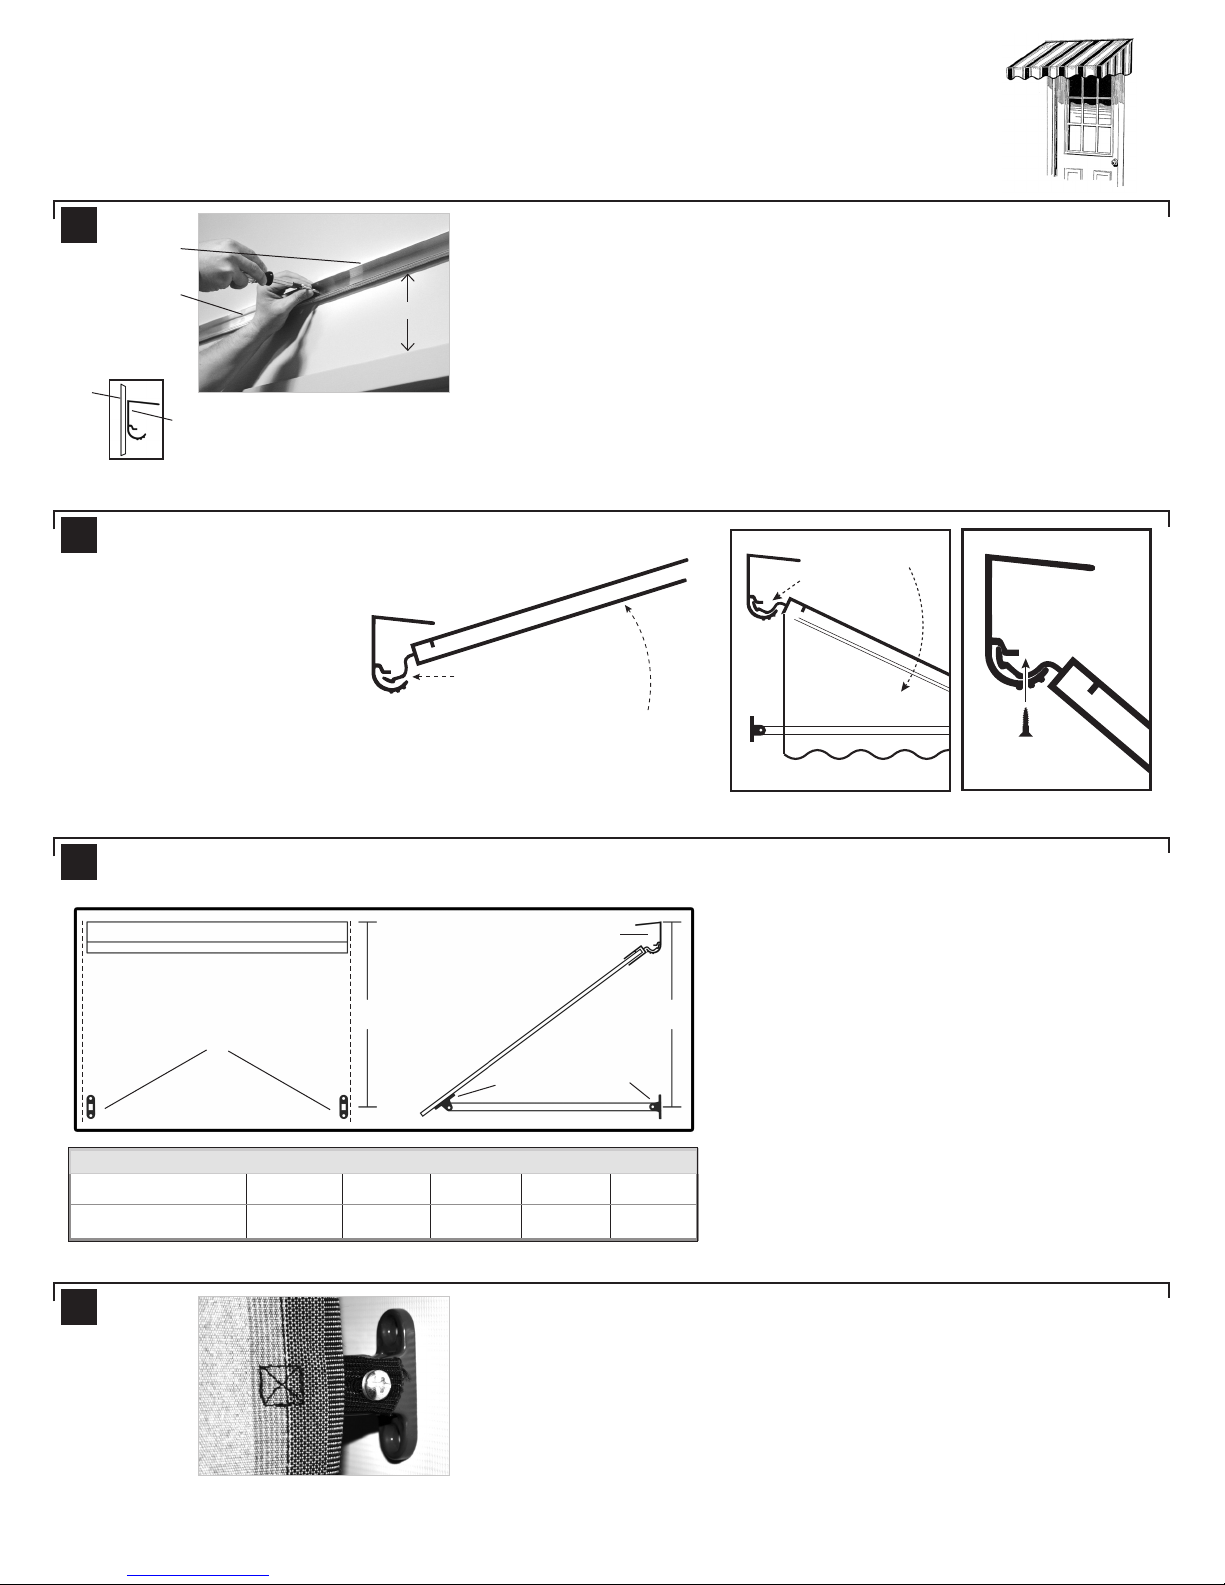
1
Caulk
Mounting
Bar
Wall
Mounting Bar
< INSET: Position the Mounting Bar against
the wall as shown here.
2
Lift the front of the canopy
upward and insert the Top
Trim into the Mounting Bar
(FIG. 2A). Lower front of
canopy slowly and allow Sides
and Support Arms to rest on
the house (FIG. 2B); be sure
the two parts are completely
interlocked. Align holes and
secure Top Trim to Mounting
Bar with small screws from
bottom side (FIG. 2C).
13-inch clearance
FIG. 1
FIG. 2A
insert
Install Mounting Bar with large screws 13” above the door.
Be sure the bar is level and centered over the door opening. Screws must
be in studs or heavy sheathing. (Drill alternate holes in bar if necessary.)
Please refer to FIG. 1 INSET to place the Mounting Bar correctly on the
wall.
Caulk the top of the Mounting Bar against the house.
!
l
interlocked
lift
canopy
upward
camel
back
wall
bracket
FIG. 2B
canopy
side
lower front
of canopy
slowly
support arm
small screw
FIG. 2C
3
plumb and in line with
Model Number
Mounting Point
4
(Front) - Canopy Frame Views - (Side)
Mounting Bar
Mount Camel Back
Wall Brackets
Mounting Bar
Door Canopy Mounting Chart
Mounting Bar
AA
Camel Back Wall Brackets
4 5 6 7 8
7-1/2” 9” 10-1/2” 12” 13-1/2”
After Camel Back Wall Brackets have been secured to the house,
remove the machine screws and re-insert them through grommeted
tabs on your canopy to secure the canopy sides, and screw them back
into the Camel Back Wall Brackets.
Installation of your Series 2700 Fabric Door Canopy is now complete.
Temporarily attach the two loose Camel Back
Wall Brackets to the other end of the Support
Arms using machine screws.
Before securing Support Arms with Camel Back
Wall Brackets to your house, please refer to the
mounting chart to the left for model number
and correct mounting points for your canopy.
NOTE: Mounting dimension ‘A’ is measured from
the top of the Mounting Bar to the center of the
Camel Back Wall Brackets (see chart).
Now, attach mounting brackets to the house
using large screws, making sure the Camel Back
Wall Brackets are secured in solid sheathing at
the proper points from the reference chart.
FIG. 4
Page 4
Thank you for ordering the Series 2700 Fabric Door Canopy
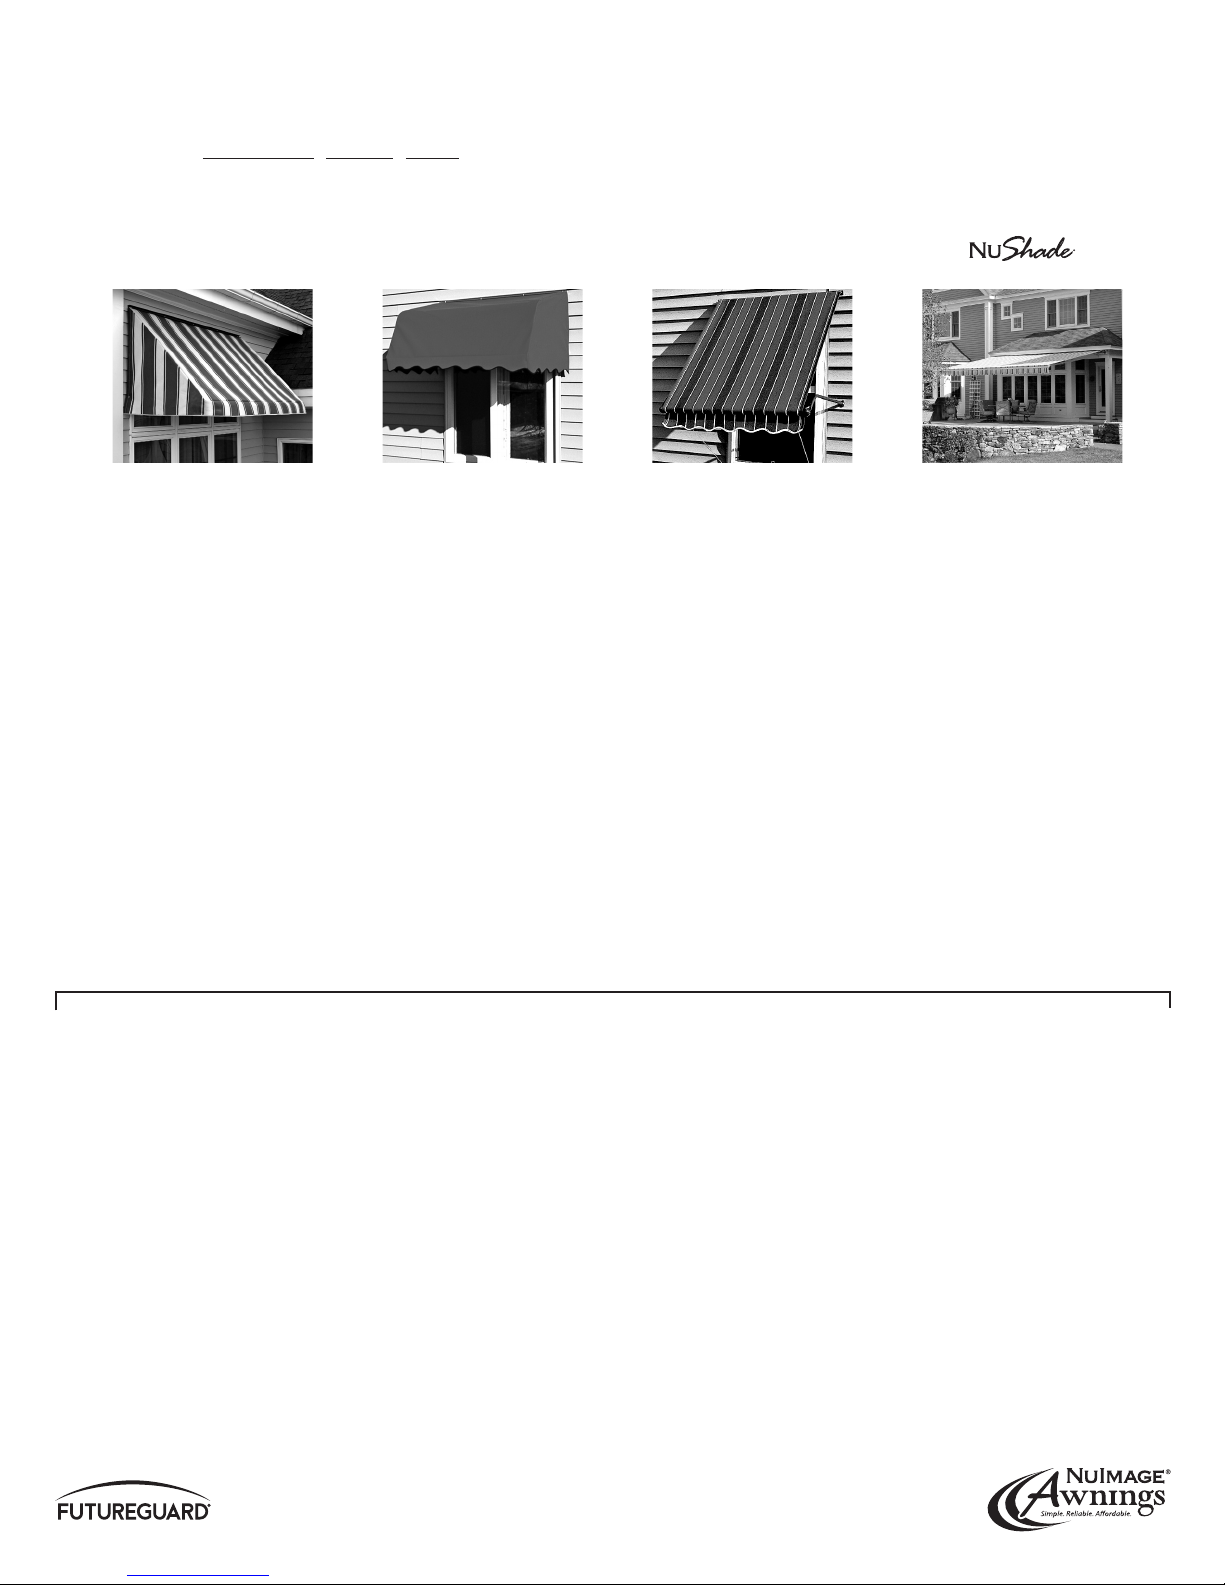
NuImage Awnings® has a full line of fabric awnings to complement your selection. Contact your local home improvement
retailer, or visit www.nuimageawnings.com today to learn more about these other quality products made in the USA.
Series 3700 Series 4700 Series 5700
Fabric Window Awning
with Sides
Fabric Casement Window
Awning with Sides
Fabric Roll-up
Window Awning
Retractable Patio Awning
Limited Warranty information
NuImage® Awnings and Canopies are manufactured by Futureguard® under the highest standards of production, after comprehensive research and development, and will be
warranted by Futureguard® to the original purchaser from date of purchase for a period of Five (5) years against the occurrence of manufacturing defects directly resulting in
peeling, flaking, blistering or rusting under conditions of normal use and service, subject to the terms and conditions contained in this Limited Warranty.
Futureguard® does not warrant installation nor defects caused by installation. This Limited Warranty does not cover any other defects as specified herein. This Limited Warranty
does not cover any other damage or material failure resulting from, but not limited to, normal weathering, oxidation, accidental damage or intentional damage, fire or flood,
windblown objects, windstorm, sleet or chemical pollutants, mildew or structural defects, negligent maintenance or misuse or abuse, or any other causes or occurrences beyond
the control of Futureguard®. Under this warranty Futureguard agrees to provide material, repair, refinish, or replace at their sole option, only the parts found to be defective at no
cost to the original owner. This warranty does not include any shipping or labor required to complete the warranty work.
Normal weathering may cause any surface to oxidize, chalk, gradually fade or accumulate surface dirt or stains due to varying exposures to sunlight, weather or atmospheric
conditions. The geographic location, the quality of the atmosphere and other local factors in the area, over which Futureguard® has no control, contribute to the severity of these
conditions.
This Limited Warranty is void if incompatible accessory products are installed which cause defects to occur.
The provisions of this Limited Warranty are the full and complete warranty policy extended by Futureguard®.
This Limited Warranty shall be null and void if harmful cleaning compounds are used.
THE WARRANTY STATEMENTS CONTAINED IN THIS LIMITED WARRANTY SET FORTH THE ONLY EXPRESS WARRANTIES EXTENDED BY FUTUREGUARD®, IN LIEU OF ALL OTHER
WARRANTIES, AND THE PROVISIONS OF THIS LIMITED WARRANTY SHALL CONSTITUTE THE ENTIRE LIABILITY OF FUTUREGUARD® AND THE PROPERTY OWNER’S EXCLUSIVE REMEDY
FOR BREACH OF THIS WARRANTY FUTUREGUARD® SHALL NOT BE LIABLE TO THE PROPERTY OWNER FOR INCIDENTAL OR CONSEQUENTIAL DAMAGES OF ANY KIND FOR BREACH OF
ANY EXPRESS OR IMPLIED WARRANTY.
Claim procedure and other warranty provisions. All claims for warranty must be reported in writing to Futureguard, 101 Merrow Road, Auburn, Maine 04210 Attention: Warranty
Dept., within the warranty period and promptly after discovery. Describe the defect in detail and include photos, if possible together with proof of purchase. The effective
warranty date shall not be increased by any such warranty work performed and the remaining warranty time shall continue in effect.
Some states do not allow the exclusion or limitation of incidental or consequential damages, so the above limitations or exclusions may not apply to you. This Warranty gives you
the specific legal rights and you may also have other rights, which vary from state to state.
www.nuimageawnings.com Customer Service 1-800 - 901-3313
FGNI.2700.Rev12/16
 Loading...