

Page 1
SEQ-S & SEQ-ST Operation Manual
OPERATION MANUAL
SEQ-S & SEQ-ST
Linear Phase Spline ‘Match & Morph’ EQ
1
© 2020 NUGEN Audio
© 2020 NUGEN Audio
1
www.nugenaudio.com
Contents
Page 2
SEQ-S & SEQ-ST Operation Manual
Contents
Introduction
Interface
General Layout
Utility Controls
Main Display and Direct Draw Zone
Processing and Control Options
Advanced Controls
Match EQ
3
4
4
5
6
8
10
12
EQ Morphing
Reporting a Problem
Version History
15
17
18
© 2020 NUGEN Audio
© 2020 NUGEN Audio
2
2
www.nugenaudio.com
Contents
Page 3

SEQ-S & SEQ-ST Operation Manual
Introduction
Note: This manual covers both SEQ-S (full surround plug-in) and SEQ-ST (stereo
version). The only difference between the two versions is the surround capability of
SEQ-S. In general, SEQ-S is referred to and illustrated with screen shots, and where
surround functionality is discussed, this is not available in SEQ-ST. Other operational
aspects are the same for both versions.
NUGEN Audio SEQ-S is a high resolution, linear phase spline and match EQ delivering
powerful sonic sculpting and EQ matching up to 7.1 (SEQ-ST is stereo only), with stereo
mid-side operation and automated spectrum analysis. A direct-draw interface and
detailed spectrum analysis make it easy to quickly identify and specically ne-tune
your audio. Couple this with EQ matching via sonic ngerprinting and you have some
unique possibilities.
SEQ-S is suitable for high-end audio production, including mastering and post
production.
Unlike most digital EQ’s, SEQ-S is linear phase. This means the the phase shift is
linear across the frequency spectrum, resulting in a natural sounding EQ change, and
producing minimal phase artefacts.
Traditional EQ algorithms employ a mathematical technique knows as IIR (Innite
Impulse Response). Whilst this provides low CPU usage and is relatively simple from a
mathematical point of view, there is an important side effect know as Phase Warping.
Digital EQ utilising the classic IIR approach distorts the relationship between frequency
and phase.
The computational algorithm employed in SEQ-S is based upon the FFT (Fast Fourier
Transform). This is a much more involved process, transforming the audio data into
the frequency domain, before applying frequency related computations and then
transforming back into the temporal domain. The advantage of this process is that the
frequency and temporal relationship remains intact – linear phase transformation. The
benet of this method is that the linear phase adjustments sound clearer, it is possible
to create a much more transparent EQ using this technology. Phase Warping also
affects the clarity of transients, as it causes Phase Smearing. Linear Phase calculations
avoid this limitation, producing a sharper audio image.
© 2020 NUGEN Audio
3
Contents
Page 4

SEQ-S & SEQ-ST Operation Manual
Interface - General Layout
The SEQ-S interface is designed to facilitate intuitive operation by allowing many
parameters to be accessed directly from the main ‘direct-draw’ window, with ancillary
controls of related functionality grouped together to aid selection.
1
2
3
1 Utility controls
2 Graphical readout and direct-draw zone
3 Processing and control options
© 2020 NUGEN Audio
4
Contents
Page 5

SEQ-S & SEQ-ST Operation Manual
Utility Controls
1 2 3 4 5 6
1 Bypass. This button bypasses the effect ‘in-place’. This allows for direct A | B
comparisons to be made with and without the effect, without altering any other
processing in the chain.
2 Undo | Redo. Unlimited session undo and redo commands allowing the user to
step back and forward through processing modications.
3 Reset. Global plug-in reset button, instantly resetting the EQ to initial ‘blank’
settings.
4 Preset browser. Use the arrow buttons to step sequentially through the presets
or click the end control to open the preset menu to select from a list. Double click
the name to re-name session presets.
5 A | B and A to B (B to A). These controls switch data between the ‘A’ and ‘B’
memories for direct comparisons between two different sets of EQ envelopes.
The A|B control toggles between the A and B memories (current active memory
highlighted). The A to B (B to A) button transfers current settings to the memory
indicated, ie. From A to B or vice versa.
6 ? Opens the ‘About’ page, with access to credits, de-authorisation options and
the product manual (if installed).
© 2020 NUGEN Audio
5
Contents
Page 6
SEQ-S & SEQ-ST Operation Manual
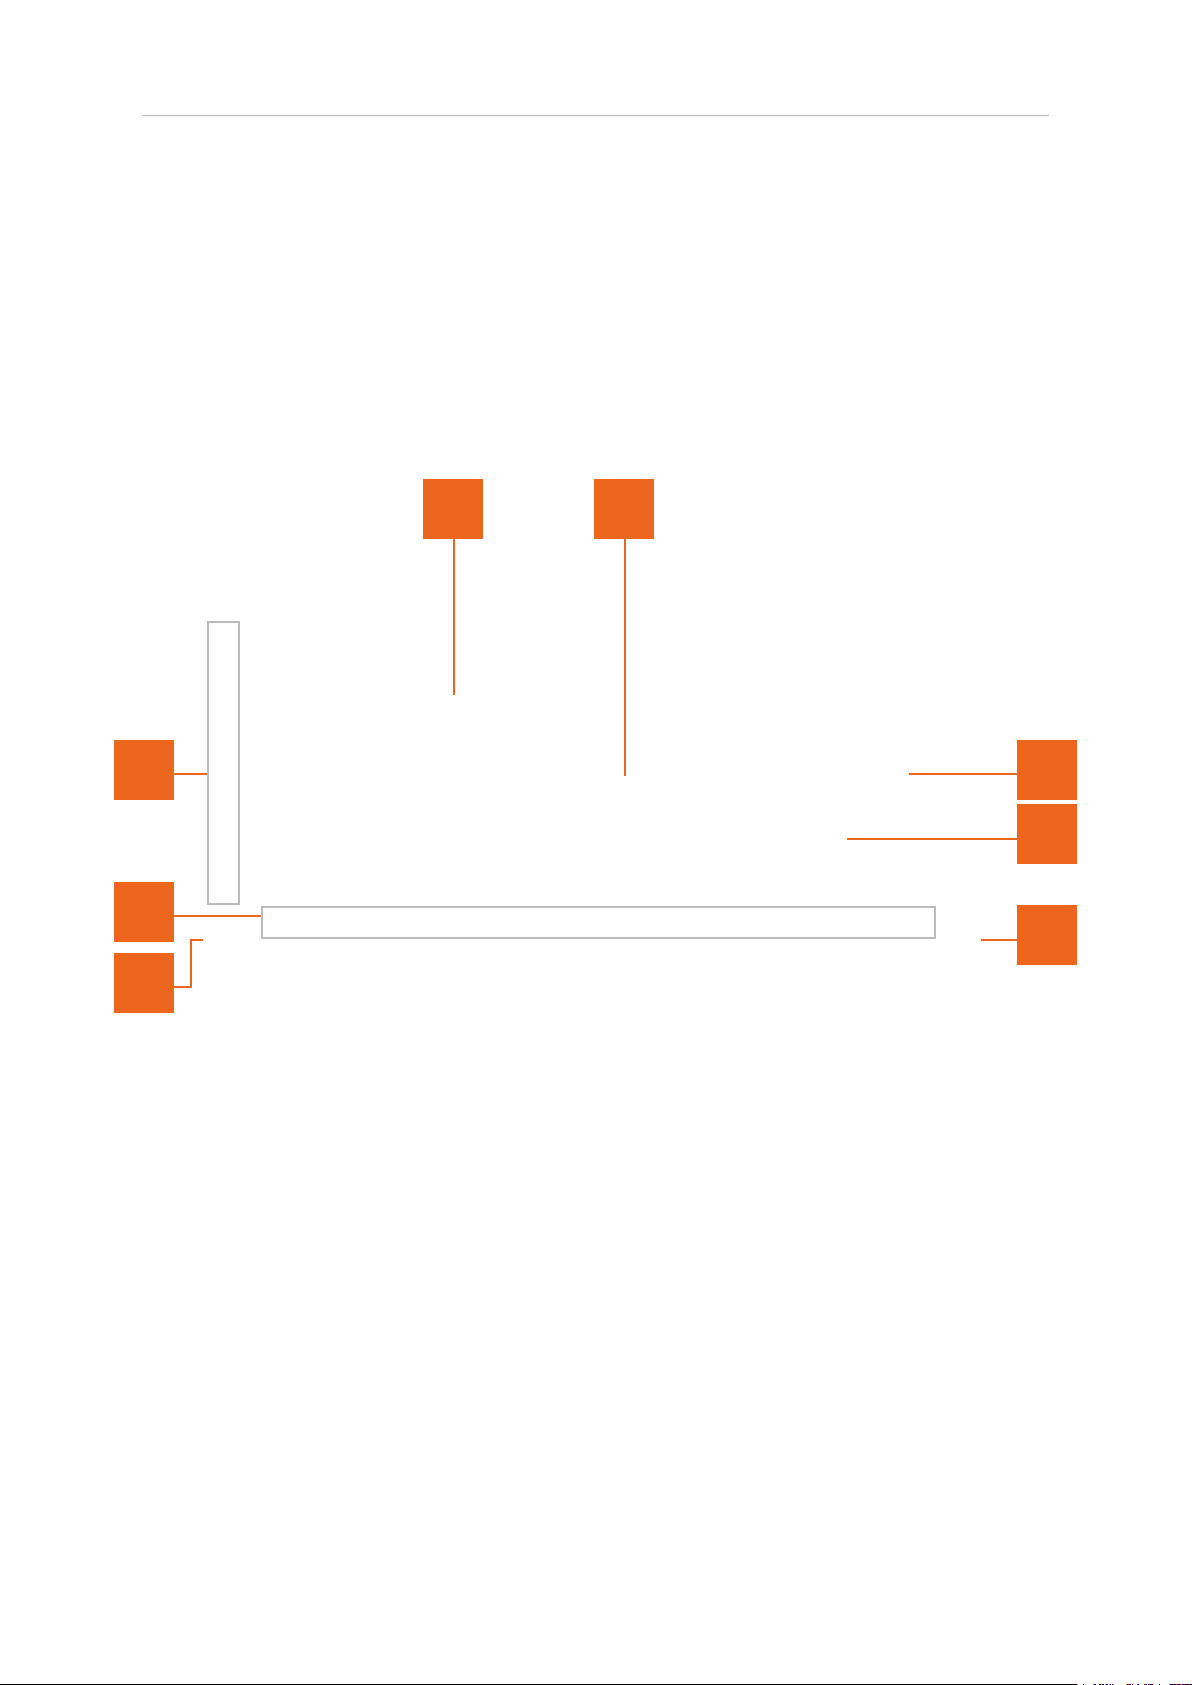
Main Display and Direct-draw Zone
This section shows the EQ envelopes and spectrum analysis of the input and output
signals. The graph shows frequency (horizontally) against dB (vertically). It is possible to
draw the eq curve required directly form this window, and adjust a number of additional
controls. The view can be zoomed by drag-clicking the vertical and horizontal scales to
examine an area of interest in greater detail.
2 1
8
7
6
1 Control point. SEQ-S utilises a spline curve to determine the overall EQ to be
applied to the audio. This is a ‘line of best t’ between a number of consecutive
control points. The desired EQ shape is simply ‘drawn’ in using click-drag. The
control points will jump into place and the spline forms to join them in a smooth
EQ transition.
2 EQ envelope. The outlined shaded zone represents the EQ envelopes being
applied to the audio, showing boost (above the 0dB axis) and cut (below the 0dB
axis). This, rather than the position of the individual control points [1], best shows
the effect of the EQ. EQ envelopes can be applied to individual channels or to
groups of channels allowing rapid overall EQ adjustment and specic detailed
correction as required. It is possible to utilise up to three EQ curves
simultaneously.
3
4
5
© 2020 NUGEN Audio
6
Contents
Page 7

SEQ-S & SEQ-ST Operation Manual
3 Zone controls. The zone controls are activated using the Zone button (see
below). When active they can be used to ‘lock’ the control points outside (or
within the upper and lower controls. This is useful for adjusting the EQ in a tight
frequency range without accidentally affecting control points outside. The zone
can also be used to apply match EQ, curve reset and invert functions to a
specic range of control points.
4 Spectrum Analysis. Spectrum analysis can be activated using the Analysis
button (see below). When active, a spectrum analyser will show the input/output
signal, colour coded for each active band. Note, the left-hand frequency scale
matches the scale for the EQ envelope. The dB scale for the analyser is shown
on the right hand side when the analyser is active.
5 Low Pass Filter. The triangle represents the cut-off point of the LPF. The cutoff
point can be dragged left/right. If the lter is dragged all the way to the right hand
side it will be de-activated.
6 High Pass Filter. The triangle represents the cut-off point of the HPF. The cutoff
point can be dragged left/right. If the lter is dragged all the way to the left hand
side it will be de-activated.
7* dB scale zoom and scroll zone. Click and drag in this area to zoom in/out and
scroll the frequency scale of the display. Can be reset to defaults using
control/command click.
8* Frequency zoom zone. Click and drag in this area to zoom in/out and scroll the
dB scale of the display. Can be reset to defaults using control/command click.
*The scroll/zoom setting can be locked to avoid accidental changes, or to make
accessing control points close to the zone boundaries easier by clicking the padlock
icon in the parameter readout area (see below).
© 2020 NUGEN Audio
7
Contents
Page 8
SEQ-S & SEQ-ST Operation Manual
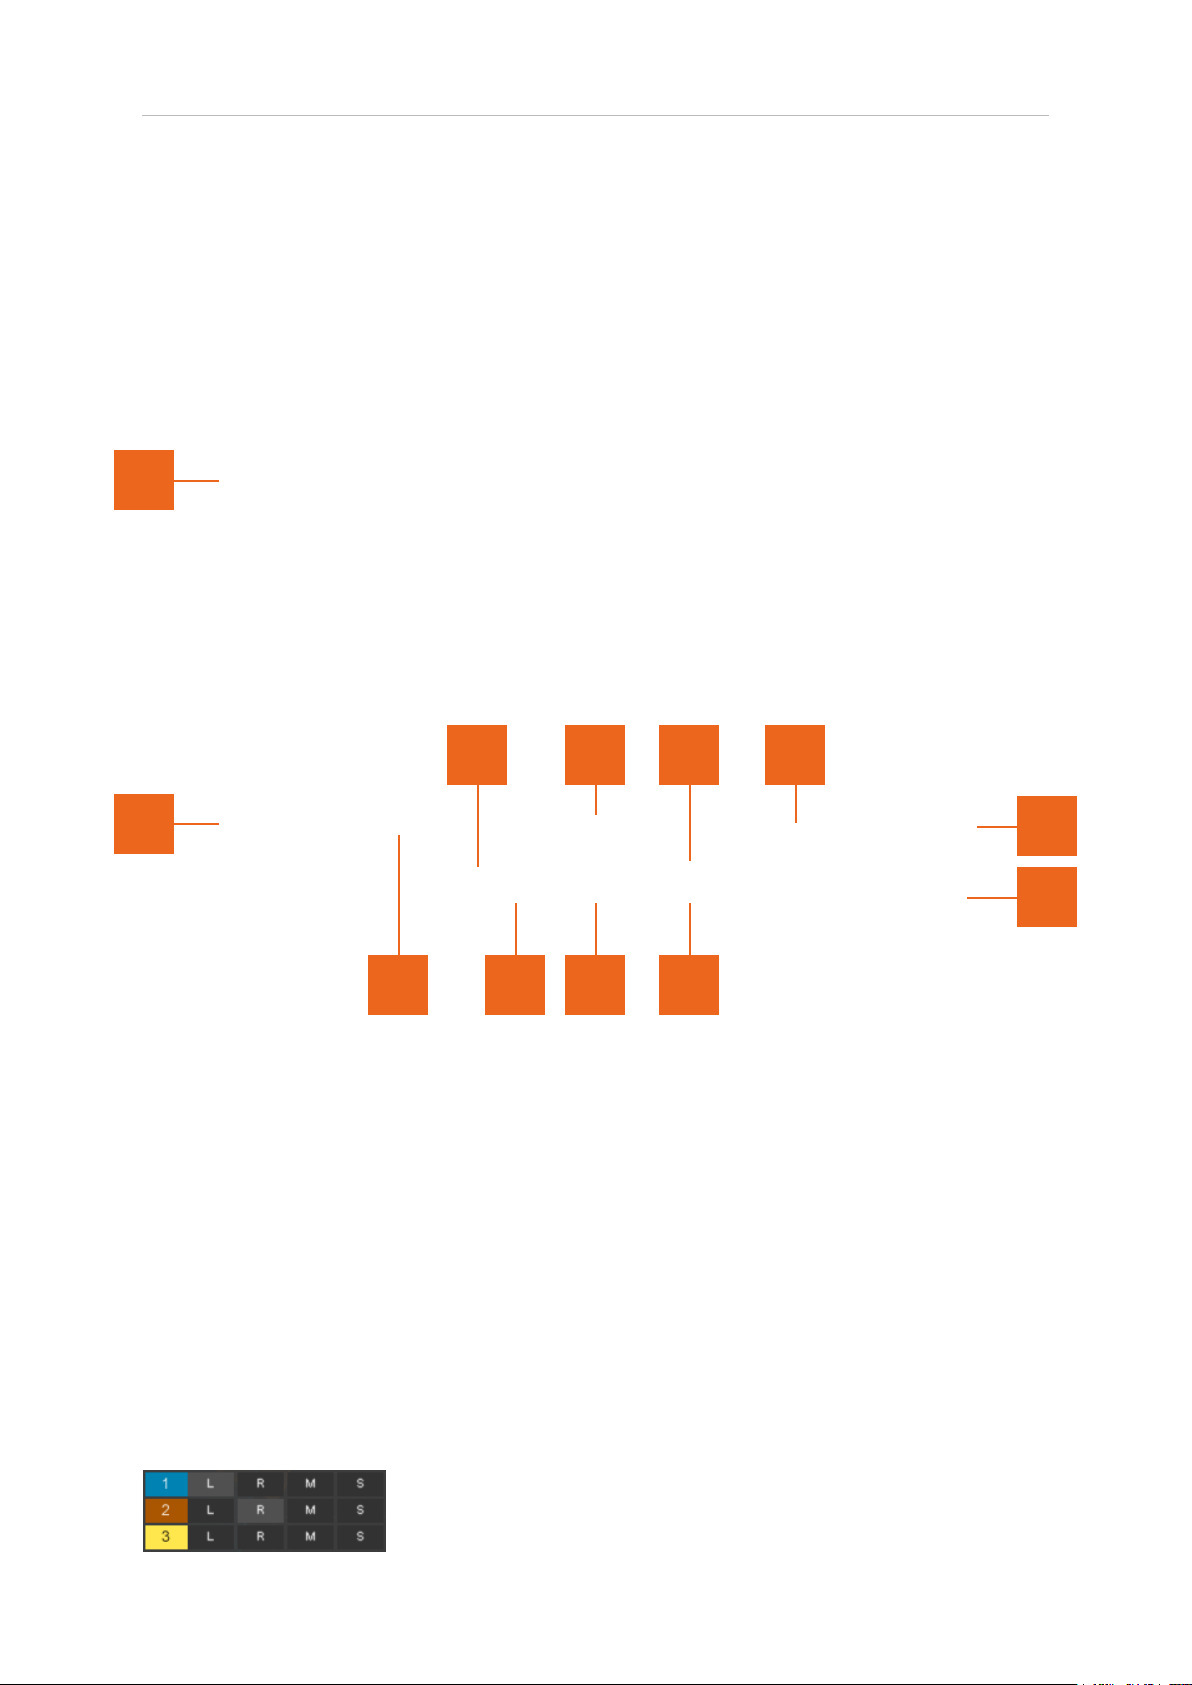
Processing and Control Options
This section contains additional controls for accessing, assigning and modifying the
EQ envelopes. The controls in this section are also used to determine the information
shown in the main display zone.
12
5 1 3 7
6
11 4 2 10
1 Parameter Readout. This area displays the value of parameters as they are
adjusted, allowing specic values to be dialled in if required and conrming the
settings of any controls modied.
2 EQ envelope selectors. SEQ-S has three EQ envelopes available. Each envelope
may be assigned to a single, or combination of input channels. To modify an
envelope, select the number of the envelope you wish to modify in the main
display by clicking the corresponding number (1, 2 or 3). Each envelope can be
toggled On/Off by using the ‘On’ button below
8
9
3 Envelope assign. This button is used to bring up the envelope assign window.
This window shows the available input channels and shows which channel is
assigned to which envelope. The options available will depend upon the type of
track the plug-in is operating upon (mono, stereo, 5.1 etc.)
In this example, envelope 1 has been assigned to the Left input
channel, envelope 2 to the Right and envelope 3 is unassigned.
© 2020 NUGEN Audio
8
Contents
Page 9

SEQ-S & SEQ-ST Operation Manual
4 Envelope smoothing. The envelope smoothing control determines the
‘sharpness’ of the spline curve envelope. Higher values give a smoother curve,
lower values make the curve more angular. This function affects all envelopes.
5 Depth. Controls the overall EQ envelope depth. This function is applied only to
the active envelopes and can be re-applied if required.
6 Zone. The Zone button activates the zone controls (see above). When active they
can be used to ‘lock’ the control points outside (or within if the ‘exclude option
is active) the upper and lower controls. This is useful for adjusting the EQ in a
tight frequency range without accidentally affecting control points outside. The
zone can also be used to apply match EQ, curve reset, cut/copy/paste and invert
functions to a specic range of control points.
7 Analysis. Activates the spectrum analysis view (see above).
8 Pre. Toggles spectrum analysis pre/post processing.
Bands. Toggles between raw data and banded spectrum analysis. When banding
is selected, the analysis will reect the control point position banding as selected
in the advanced options (see below).
Colours. The colours option opens the colour selection window. It is possible to
choose the colours of the EQ Curves, level meter and level meter peaks.
9 Level meters. The level meters show the audio output levels, with peak hold and
margin levels. If a peak clip is detected the margin background will turn red. Click
to reset. The meter layout will reect the channels available to the plug-in,
depending upon the type of track it is operating upon (stereo, 5.1 etc.)
10 Output Trim. Applies a dB offset to the output for gain optimisation purposes.
Click drag up and down to increase/decrease the value, or double click to enter a
number directly.
11 Advanced. This button shows/hides the advanced controls [12], giving access to
the match EQ section and additional specialised controls.
12 Advanced controls tool bar (see below).
© 2020 NUGEN Audio
9
Contents
Page 10

SEQ-S & SEQ-ST Operation Manual
Advanced Controls (Including Match EQ
and EQ Morph)
1 2 3 4 5 6 7 8
1 Match. Initiates the match EQ (see section 6 below). Clicking the Match control
starts the process by, opening a new set of options.
2 Curve reset. Clicking this control will reset all the control points on the currently
selected EQ curve envelope. The curve reset can be used in conjunction with the
zone control to reset a specic section of the curve.
3 Cut | Copy | Paste. These utility controls can be used to cut, copy and paste the
current control point positions to and from the clipboard. When used in
conjunction with the zone control (see above) these controls can be used on a
specic section of the EQ curve envelope. Switching between the active curve
envelope allows the transfer of node information from one EQ curve envelope to
another.
4 Invert. Inverts the active EQ curve envelope (can be used in conjunction with the
zone control).
5 Banding. The banding option is used to determine the frequency position of the
control points in the EQ curve envelope. Click in this area to choose from a drop
down menu.
Thirds Splits the frequency range into equal 1/3 octave bands.
Sixths Splits the frequency range into equal 1/6 octave bands.
Chromatic Sets the nodes at chromatic intervals.
Bark Arranges the bands according to the Bark scale. This is a
psycho-acoustically derived scale that splits the frequency range
into bands according to how well the ear can differentiate the
frequencies i.e. The bands narrow where the ear is more sensitive
and broaden where distinction is harder to dene.
Mel As with the Bark scale above, with with a slightly different curve.
Bark Thirds As the bark Scale, but with twice the number of curves.
© 2020 NUGEN Audio
10
Contents
Page 11
SEQ-S & SEQ-ST Operation Manual
6 Link. This option links the ‘Quality Setting’ of multiple instances of SEQ-S
together. See ‘Setup and process info’ below.
7 Setup & info. This button opens up the Set-up and processing information
window.
Resolution. The resolution setting is used to set SEQ-S to the most suitable for
the application at hand. This setting can be unique to this instance, or linked to
the other instances of SEQ-S, to allow global switching of the resolution across
all other linked instances by changing the setting on only one (see Link above).
The Resolution setting governs overall CPU and latency trade-offs and has
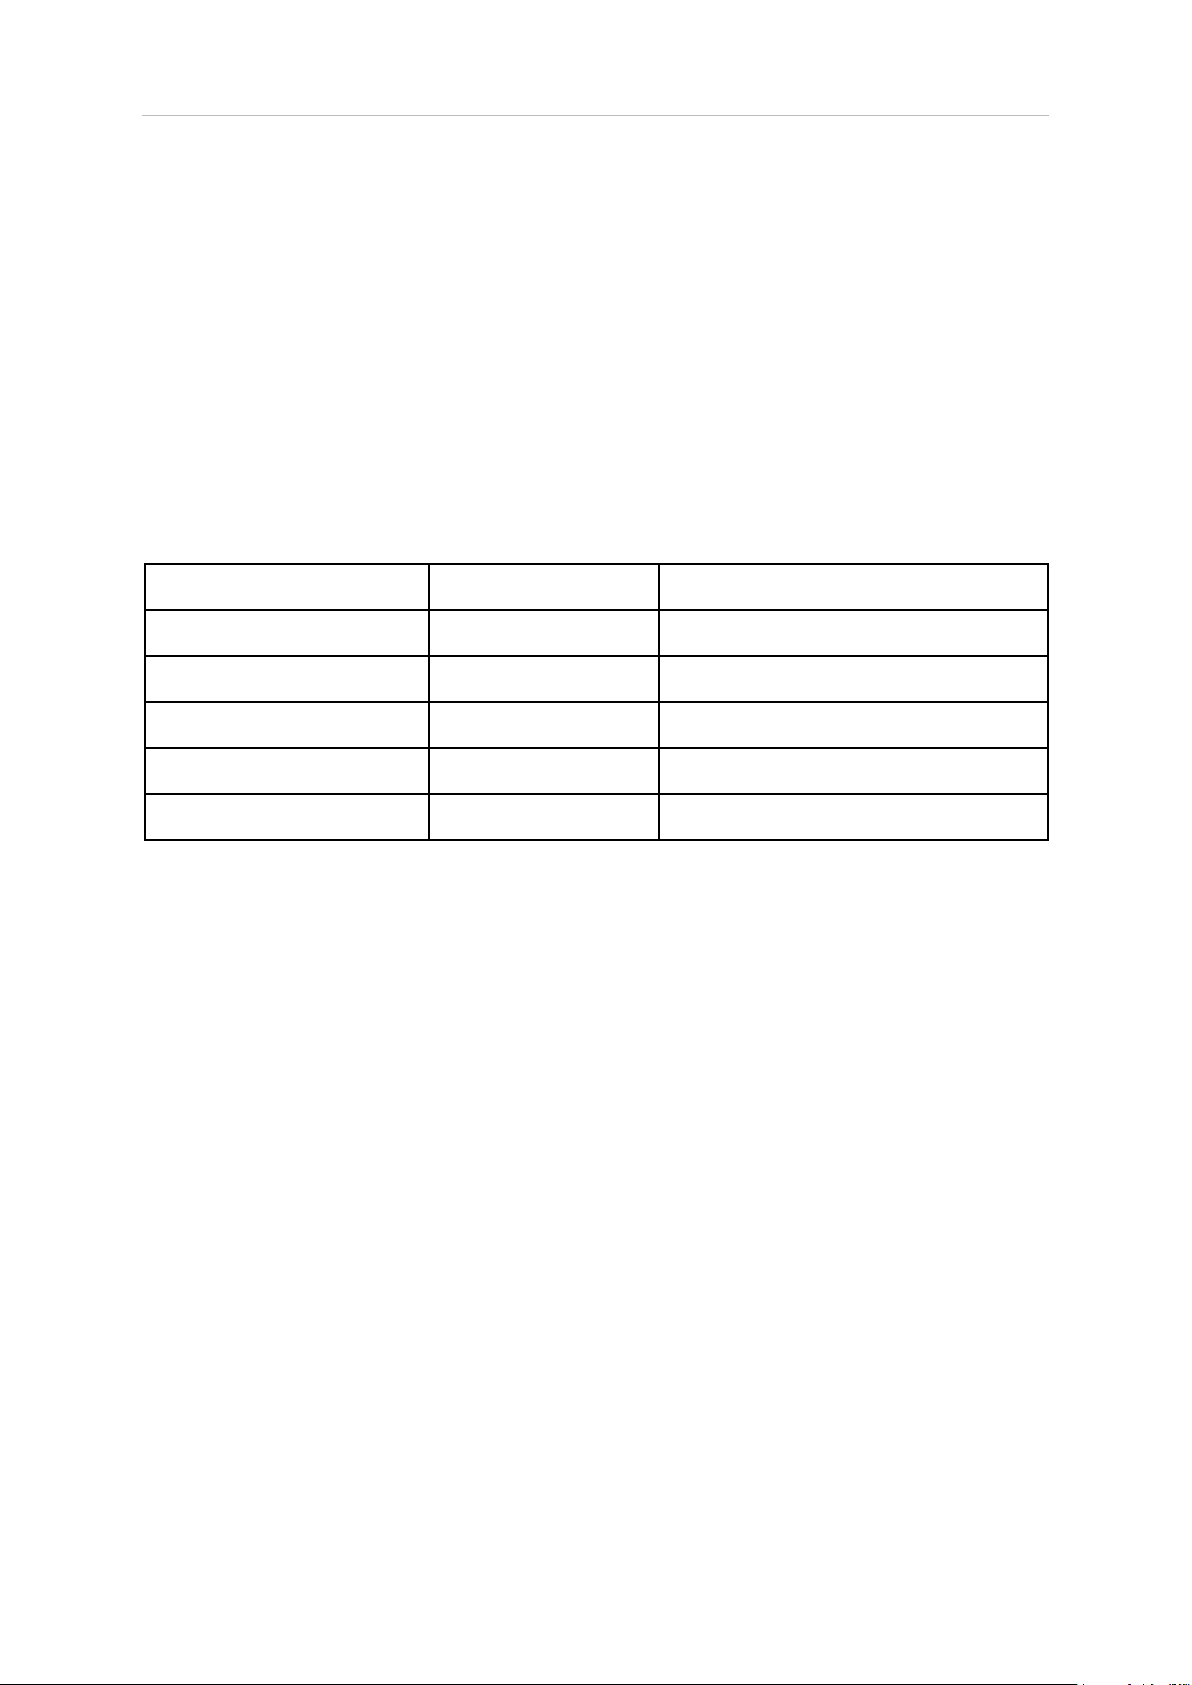
several possible states as shown in the table below.
Resolution FFT Size* Suggested Application
Minimum 512 Mixing
Low 1/2 1024/2048 Mixing
General 4096 Mixing/Mixdown
High 8192 Mixdown/Mastering
Maximum 16384 Mastering
*When M/S processing is active alongside L/R processing, the FFT size is shared between two FFT algorithms.
Changing FFT sample size affects the resolution of the EQ. The larger the
sample block, the better the resolution of the algorithm. This is particularly
important for low frequencies, as generally speaking, the FFT analysis gives
greater resolution, the higher the frequency. This does not change what the
EQ ‘does’ or how it sounds exactly, but allows for sharper changes in the EQ
curve envelope. If you need high resolution, particularly in the low frequencies,
you should employ a higher FFT size. NB. You should also switch the nodes
available to ‘chromatic’ banding if you are using High or maximum settings to
gain maximum benet from the increased resolution.
Dither. The SEQ-S internal calculations are performed with 64-bit oating point
accuracy. Depending upon your DAW, it is highly likely that the output from
SEQ-S will be truncated to a lower bit-depth. There are several options for
how this should be handled, either with or without dither. Note: This is not the
same as using a 64-bit or 32-bit DAW/version of the plug-in.
Invert gain cap. This is a safety setting which prevents the EQ ‘Invert’ button
from introducing extremely high gain settings.
6 Morph. Engages the morph EQ function. This function switched SEQ-S into
‘morph mode’ allowing two EQ states to be morphed from one to the other.
© 2020 NUGEN Audio
11
Contents
Page 12

SEQ-S & SEQ-ST Operation Manual
Match EQ
Match EQ is used to ‘match’ the EQ spectrum of a source section of audio with a target
piece. In the match process, SEQ-S uses frequency templates. A frequency template
is formed by analysing a section of audio over time. An ‘average’ of the frequencies
present in the audio is then built up, which can be thought of as a frequency ‘ngerprint’
for this section of audio.
Match EQ can be used in several different situations, and can be highly effective if
suitable source material is chosen. With individual instruments, the ‘vintage’ or ‘feel’
of one take can be applied to another. Different takes from individual sessions can be
matched, even if the recording set-up differs form the original. These techniques can
also be applied to dialog recordings and audio restoration. It is even possible to apply
match EQ to entire tracks, harmonising differing program content using the depth
control to govern the ‘strength’ of the effect or applying the feel of one track to another.
In order to successfully generate a match EQ curve, SEQ-S uses two templates. A
source template to ‘match from’, generated form the audio you wish to transfer the
sonic properties from, and a template of the audio to be modied to ‘apply to’. SEQ-S
then uses these two templates to produce a match EQ envelope which can be applied
to your audio to ‘match’ it with the original source.
Clicking the Match control in the advanced options controls bar (see section 5 above)
starts the process for choosing these two templates, opening a new set of options.
1 2 3 4
1 Cancel. Cancels the match operation and returns to the advanced controls
interface.
2 Match From. Choose the source template to match from. This is the template
from the audio you wish to ‘transfer’, ‘clone’ or ‘copy’ from. You can either;
• Current Source snapshot. If you have a current template already in the
SEQ-S temporary memory, choose this to recall.
• Record a new snapshot. As an alternative to using a preset template, you
can also record your own template. To do this you will need a copy of
the audio you wish to ‘sample’ in the same sequence as the plug-in. Once
the option to record a new template is selected, you a set of controls will
be available.
© 2020 NUGEN Audio
12
Contents
Page 13

SEQ-S & SEQ-ST Operation Manual
a b c d e f
a Cancel. Cancels the template recording and returns to the main Match
EQ interface above.
b Record From. This chooses the input source for the recording. Choose
from ‘self’, which is the audio currently routed through the plug-in, from
one of the NUGEN Audio Send plug-ins if available, which can be used
as a side chain to route audio from another source into SEQ-S. For
information on how to use the NUGEN Audio Send plug-in, see
separate instruction manual.
c Select Channels. By default, this will be set to Avg: LR. Clicking this
option opens a window which will allow a selection of input channels to
be chosen. The plug-in can then be set to use the Maximum, Minimum or
Average value between the selected channels for the template data.
d Record Time. This value determines how long SEQ-S will listen to the
input to perform the template recording. Click-drag up/down to change
the value, double click to type in a value directly
e Record. Click to begin recording from the chosen input. To stop
recording before the record time has elapsed, click Stop. Once nished,
the recorded template will be shown in the main display.
f Save. Saves the current data-set and returns to the main Match EQ
interface.
3 Apply to. Choose the template for the audio you wish to match to. This is usually
a template taken from the audio currently routed through SEQ-S ie. A template of
the audio you wish to match to a previous recording.
Record a new template. Choose this option if you wish to conform your track
to a template of another piece of audio. The process for recording the template
for the audio you wish to match to the original source template is exactly as
described above.
Use empty snapshot. This is a special case use. It is possible to use match EQ
to create very specic space in a complex mix where traditional EQ would be just
too cumbersome.
© 2020 NUGEN Audio
13
Contents
Page 14
SEQ-S & SEQ-ST Operation Manual
If for example, you would like to create space for an acoustic guitar within a
heavy keyboard part, but wish to keep as much of the original keyboard
sound intact as possible, record the spectrum of the guitar at the Match
from template, and select ‘Use empty snapshot’ as the Apply To template. When
the match curve is produced, it is automatically inverted to turn the resulting
curve ‘upside down’. You can now use the depth control to adjust the strength of
the curve until the guitar sits neatly into the delicate space made using the match
EQ. With care this technique can be used to create very complex and transparent
‘notches’ that could not be achieved with traditional EQ techniques.
4 Match. Choose which curve the match will be sent to and click Match. This will
perform the match calculation, close the match interface and load the Match EQ
curve envelope to the selected target (1, 2 or 3). Note this will overwrite any EQ
present on this EQ envelope.
Tip: To achieve the most tonal detail possible within the match process, it is
advisable to rst roughly match the loudness of the source and target audio to avoid
loosing resolution by generating large dB offsets.
Note: The match process is designed to preserve the maximum tonal detail
possible at the expense of a possible level change. If an undesirable level change is
generated, this can be compensated for within the SEQ-S buy adjusting the Output
Trim control (see ‘Processing and Control Options’ above)
© 2020 NUGEN Audio
14
Contents
Page 15
SEQ-S & SEQ-ST Operation Manual
EQ Morphing
The EQ Morphing functionality of SEQ-S is designed to allow a smooth transition over
time between two EQ lter states. This feature can be used to produce creative lter
sweeps, sophisticated tremolo & auto-pan effects, for audio transitions matching scene
changes or for adding a temporal dimension to the match EQ process when moving
from one environment to another.
The morph function uses the two EQ memories ‘A’ and ‘B’ as the basis for operation,
enabling a transition between these two states over time.
Clicking the Morph control in the advanced options controls bar (see section 5 above)
opens a new set of options for controlling the morphing behaviour between the two EQ
memories A and B.
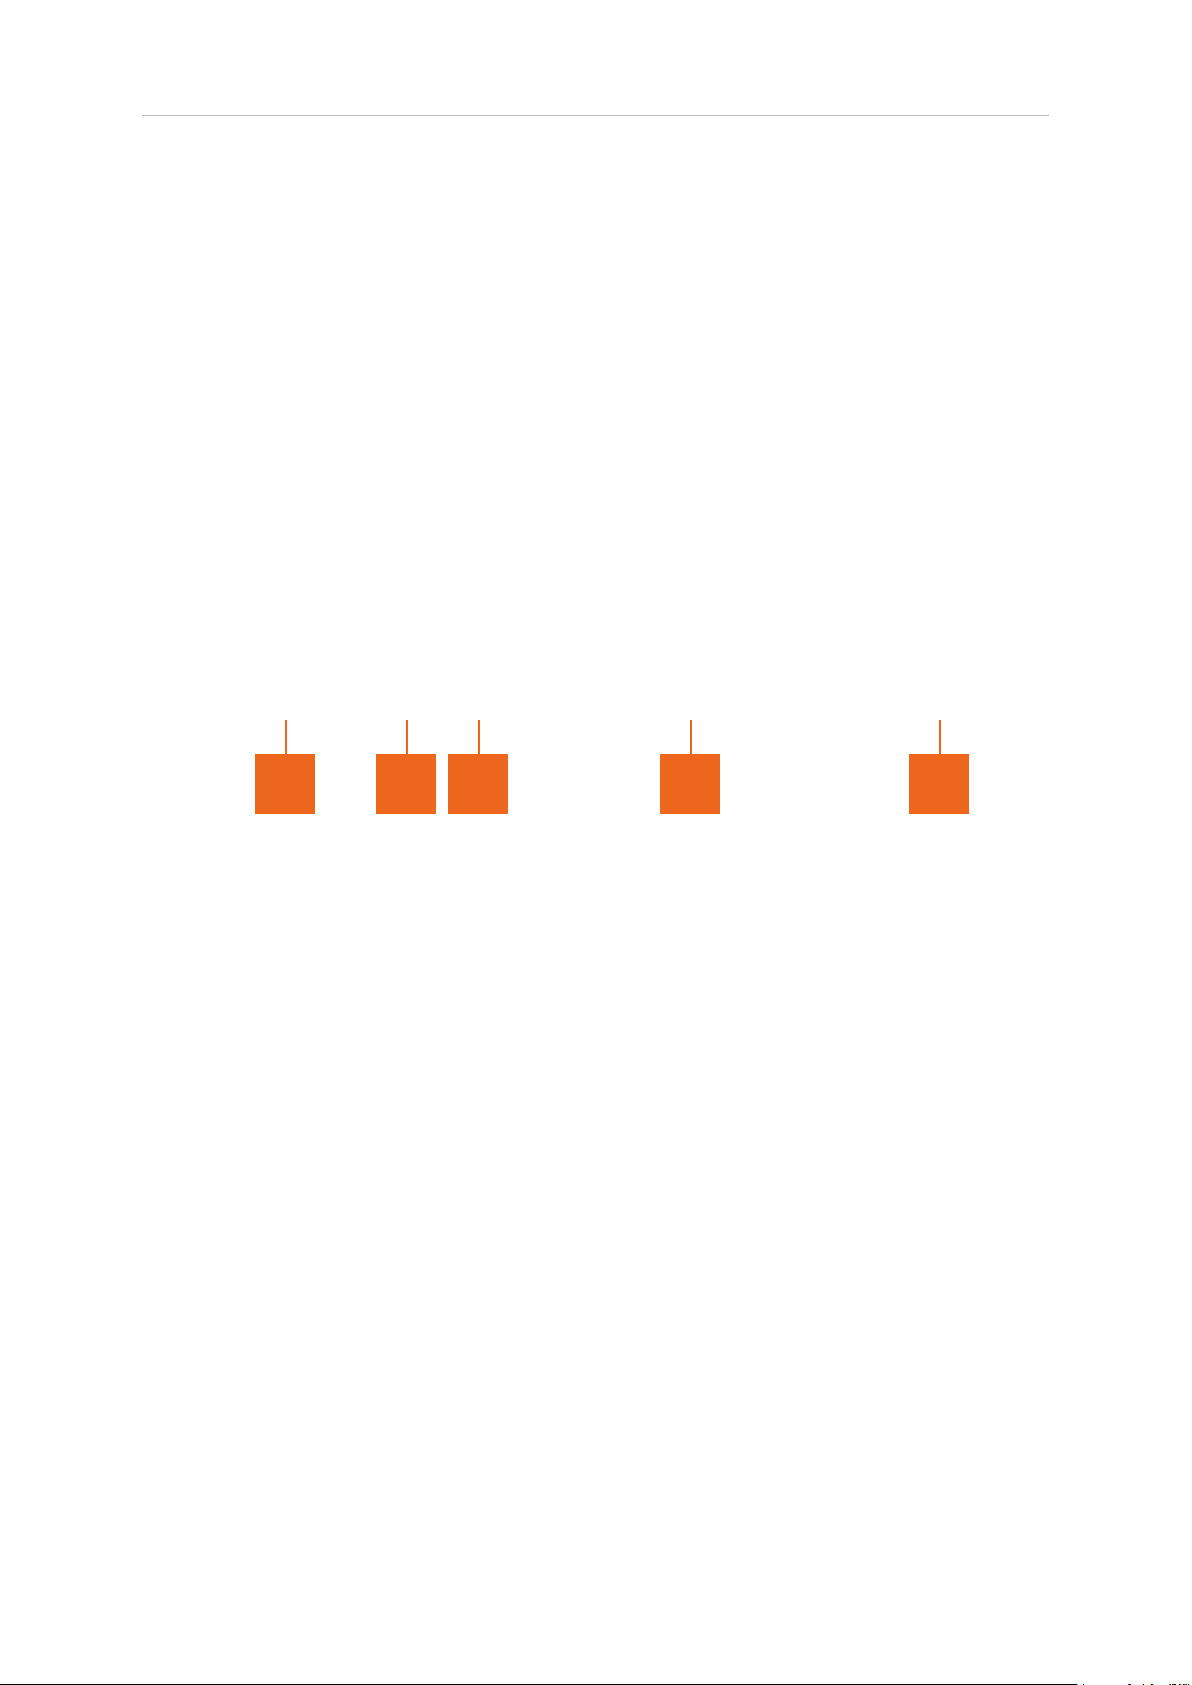
1 2 3 4 5
1 Timebase. Two time bases are available.
Seconds allows entry of the overall transition time to be entered as a specic
value. This is useful for syncing transitions to picture and other content not
directly related to a musical score.
The BPM setting will automatically detect the BPM setting of the DAW/NLE
project session as a basis for calculating transition time. An additional scaling
factor can then be applied to further subdivide or multiply the transition time as
a proportion of a tempo-locked bar.
2 Transition type.
Single will perform a ‘one shot’ morph from one state to another.
Return performs a morph from the current state and back again.
Loop morphs between A and B and back, continuously.
3 Play. Starts a morph. If the time base is set to seconds, this will engage
immediately. If BPM is selected, the morph process will begin at the start of the
next relevant tempo block.
© 2020 NUGEN Audio
15
Contents
Page 16

SEQ-S & SEQ-ST Operation Manual
4 A | B and Progress bar. The A and B buttons are used to determine which set
of EQ envelopes is currently being edited. Click the appropriate button to edit
the desired envelope set. The progress bar shows the progress of the morph
between A and B states. This is also reected dynamically in the main graphical
display.
5 Pass lters. There are several possible modes for pass lters.
Off. Turns off the pass lters when morph mode is engaged.
Static. This mode performs a ‘cross-fade’ between different pass lter positions.
This mode generates a relatively subtle shift, from one state to the other and is
useful for opening up or closing in the overall sound without obviously drawing
attention to the process used.
Dynamic. The dynamic mode morphs the cut-off frequency of the pass lter
between two different positions and can be used to create more dramatic
ltersweep effects.
© 2020 NUGEN Audio
16
Contents
Page 17

SEQ-S & SEQ-ST Operation Manual
Reporting a Problem
If you encounter a problem with any of NUGEN Audio’s products, please let us know, to
help us improve them.
Please email NUGEN Audio at [email protected] giving a clear explanation of
the problem. Please state how frequently you’ve experienced the problem. If there are
any particular steps you need to go through to see the problem, please detail these.
Please also state your operating system, and the rough specs for your machine (e.g.CPU speed, RAM) - in Windows XP you can get this information by rightclicking “My
Computer” and selecting properties.
Please be patient with any problems you may experience, particularly with products at
a beta stage of release. At NUGEN Audio we take problems with our software seriously,
and will endeavour to correct them as quickly as possible.
© 2020 NUGEN Audio
17
Contents
Page 18

SEQ-S & SEQ-ST Operation Manual
Version History
1.0 Initial release
1.1 Changes to empty snapshot match EQ implemented.
Scroll/zoom lock option added.
EQ dB range extended to +/- 60dB, dB safety cap introduced.
1.2 New lter-morph mode added.
Preset handling system updated.
1.3 Added resizeable interface.
© 2020 NUGEN Audio
18
Contents
Page 19
SEQ-S & SEQ-ST Operation Manual
© 2020 NUGEN Audio
www.nugenaudio.com
19
Contents
 Loading...