

Page 1

MasterCheck Operation Manual
OPERATION MANUAL
MasterCheck
Producing for today’s digital music services
1
© 2019 NUGEN Audio
© 2019 NUGEN Audio
1
www.nugenaudio.com
Contents
Page 2

MasterCheck Operation Manual
Contents
Introduction
Interface
Main interface
Codec monitoring (MasterCheck Pro only)
Settings panel
Practical Operation
Mixing/mastering for playout
Mixing/mastering to a specic target
3
5
5
8
11
13
13
14
Audio data compression codecs
Measuring dynamics
Comparing to reference material
Removing loudness from an FX chain
Dialogue clarity - Podcast / post–production
Reporting a Problem
Version History
Appendix 1 – Codec Notes
16
17
18
20
21
22
23
24
© 2019 NUGEN Audio
© 2019 NUGEN Audio
2
2
www.nugenaudio.com
Contents
Page 3

MasterCheck Operation Manual
Introduction
The NUGEN Audio MasterCheck is a meter designed to facilitate the production of high
quality audio in the paradigm of Loudness normalisation, with particular focus on the
music industry and podcast community. The meter includes internationally recognised
loudness measurements, dynamics monitoring and ITU compliant truepeak
inter-sample metering to provide a comprehensive set of tools that enable condent
audio production, both in reference to existing material and in the context of fully
exploiting the available headroom in a loudness normalised environment.
MasterCheck has ve primary applications:
1. Audio production to a loudness target
Consumer audio consumption is increasingly being delivered through loudness
normalised channels. iTunes RadioTM, SpotifyTM, WindowsTM 8 and others all
incorporate loudness normalisation, which is designed to ensure that the user receives
audio at a consistent level and doesn’t have to constantly reach for the volume control
from track to track. This has repercussions for the audio producer, your ‘hot’ master will
be effectively turned down automatically at playback – in other words, there is no longer
any advantage in ‘being louder’ than the loudness level as determined by the playout
system. Using ‘Offset to match’ button in MasterCheck will immediately show you how
your audio is going to sound to the listener, allowing you to mix with this reality in mind.
Mixing and Mastering to playout loudness targets allows you to take full advantage of
an increased headroom (and increased dynamics) that would otherwise be lost due to
the loudness normalisation process.
2. Measuring dynamic content
MasterCheck introduces new standardised numerical measures of dynamic content
(dynamic range) within audio, the Peak to Loudness Ratio (PLR) and the Peak to
Short-term Loudness Ratio (PSR). MasterCheck provides both an integrated program
measure, and a short-term meter, showing the dynamic
content of the audio at playback.
3. Avoiding downstream clipping introduced by compression codecs
These same consumer channels also employ compression codecs (mp3, AAC, Ogg
etc.) to reduce the le size/bandwidth required. Unfortunately, these codecs do not
handle high levels well, introducing clipping into the signal. Inter-sample true-peak
monitoring can be used to reduce this. The True-peak level as dened in ITU-R B.S.
1770 (or by the Apple afclip variant) gives a more accurate representation of the levels in
the signal than traditional sample-peak metering. Mixing to a level of -1dBTP (or -3dBTP
for mp3), helps avoid introducing downstream distortion when compression codecs are
employed.
© 2019 NUGEN Audio
3
Contents
Page 4

MasterCheck Operation Manual
Codec monitoring and metering (MasterCheck Pro only). MasterCheck Pro also
provides codec monitoring and metering. This allows for the real-time encoding and
analysis of up to 5 codecs streams simultaneously, simulating the real-world consumer
listening experience and allowing limiting to be applied to produce an optimal master for
today’s digital delivery systems.
4. Comparing your dynamics and loudness levels with reference material
In addition to targeting recognised playout loudness levels, MasterCheck can take a
reference track as a source for comparison. This can be a useful tool when comparing
your work with respected material in the same genre, helping you to determine
appropriate compression levels and characteristics.
It is also possible to use MasterCheck in a mix to determine loudness differentials
between different tracks and groups. This technique can be used to maintain dialogue
clarity during radio and podcast mixes where a differential of dialogue level over M&E is
desirable.
5. ‘Removing’ loudness from the signal chain
A diculty in applying compression and limiting is that these techniques inevitably
boost the loudness of the output - louder audio, sounds better. As a result, it can be
very dicult to determine if the effect is actually making things sound better, or it is just
that we prefer the sound when it’s louder. MasterCheck can be used to A/B your audio
with and without effects, whilst simultaneously matching the loudness, to allow you to
make a truly objective assessment of the processing applied – remember, once you mix
to a level louder than the playout system, any additional loudness you achieve will be
automatically turned down. MasterCheck allows you to choose objectively what you do
with this additional headroom without being misled by loudness mismatches.
© 2019 NUGEN Audio
4
Contents
Page 5
MasterCheck Operation Manual
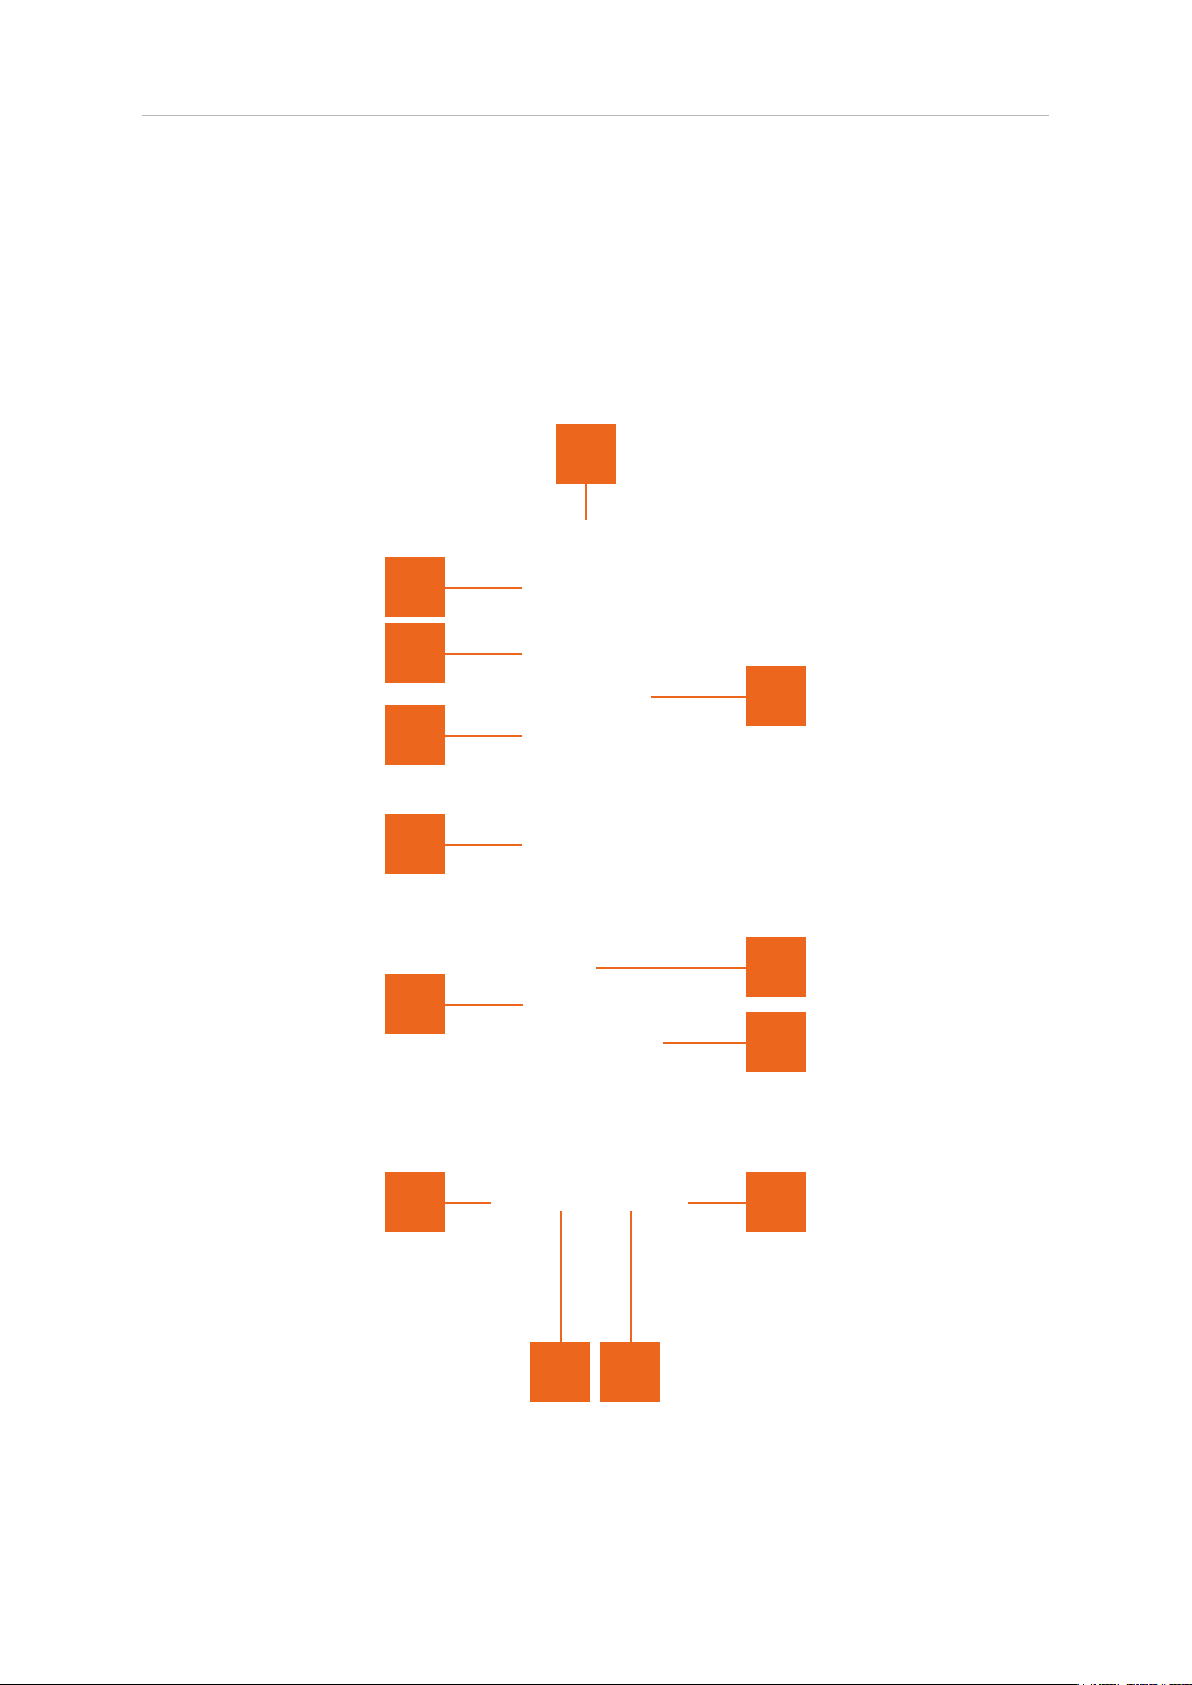
Main Interface
With the exception of the Codec encoding, monitoring and metering section, both
MasterCheck and MasterCheck Pro provide the same functionality, via a slightly
different layout. The MasterCheck Pro interface can be switched between the compact
and codec layouts using the ‘Mode’ control in the settings panel [11].
1
2
3
13
4
5
10
12
6
9
11
7 8
1 Utility controls
Preset browser. Use the arrow buttons to step sequentially through the presets
or click the end control to open the preset menu to select from a list.
© 2019 NUGEN Audio
5
Contents
Page 6

MasterCheck Operation Manual
Double click the name to re-name session presets.
Preset Management.
The ‘Installed’ folder contains the factory presets. These cannot be overwritten.
User presets can be saved in the ‘User folder’. An ‘*’ symbol will be shown
against the preset name if the settings have changed from the saved version.
Additional folders can be created using the ‘+’ button
Presets and folders can be organised by clicking the ‘…’ symbol which is
highlighted when the mouse pointer is placed over the folder/preset name.
Folders can be deleted, renamed and browsed using the standard OS interface.
Presets can additionaly be moved and copied.
? Opens the ‘About’ page, with access to credits, de-authorisation options and
the product manual (if installed).
2 PSR. The PSR (Peak to Short-term Loudness Ratio), gives a real-time PSR
reading for the audio during playback.
3 Program Loudness. Measured according to ITU-R B.S. 1770. This is the
integrated program loudness value since last reset, and is generally used as the
target value for loudness normalisation. The target value (either as dened in the
settings or derived from a reference track, if active) is shown in the bottom left
corner.
4 Short-term Loudness meter. Showing loudness over a 3 second sliding window
according to ITU-R B.S. 1770, giving a real-time loudness value for the audio
during playback. The numerical value at the top of the meter shows short term
loudness.
5 Program loudness indicator. This overlay shows the intergrated program
loudness level.
6 PSR meter. Showing the Peak to Short-term loudness, giving a real-time PSR for
the audio during playback. The numerical value at the top of the meter shows the
PLR, Peak to loudness ratio, using the integrated program loudness value since
the last reset.
7 Anchor. Anchors the PSR meter to the top of the scale. This can be useful in
making a reading against the scale.
8 M|S. This button can be used to switch the metering into Mid/Side mode. When
Mid/Side is active, the bar meters will split to show Mid and Side readings
instead of left/right. When Mid/Side is active, the main PSR and Program
loudness values are still derived from the complete stereo mix, only the bar
meters switch to Mid/Side.
© 2019 NUGEN Audio
6
Contents
Page 7

MasterCheck Operation Manual
9 True-peak meter. Measuring dBTP according to ITU-R B.S. 1770, or the Apple
afclip algorithm (a variation of B.S. 1770 used in the iTunes specication). The
algorithm employed is selected from the settings panel [10]. The numerical value
at the top of the meter shows TPmax (maximum true-peak level).
10 Reset. Master reset to reset all meter readings.
11 Settings. Click to open the settings panel for detailed meter conguration
options. See below.
12 Offset to match. This control is used to apply an LU (Loudness Unit) offset to
the output in order to match the overall program loudness to the chosen target.
This is either the target dened on the options panel (or by the preset), or the
loudness of the external reference track (if active).
If ‘Offset to match’ is active, the level will be boosted or attenuated accordingly,
and the amount of offset applied shown on the interface. All meter readings will
also be adjusted accordingly.
The offset applied is a static value (to avoid ‘wandering’ as the reference or
program loudness adjusts). If there is signicant drift from target, click the
refresh button to re-align with the target value.
It is recommended that the Offset to Match control is used primarily as an
orientation and auditioning facility. Where large offsets are generated, rather than
using the offset output, a better approach would be to restructure the gain prior
to the MasterCheck plugin, to achieve the desired level.
If using this control to match audio with very different loudness levels it is
possible to generate a large positive correction value, which will cause overload
at the output. To avoid distortion downstream it is recommended that an
intersample limiter (eg. NUGEN Audio ISL) is inserted to limit the level.
13 External reference. This control is used to activate an external reference audio
source (side chain input) and is not required during general operation. The
external reference is connected to the MasterCheck plug-in using the NUGEN
Audio Send plug-in. For details of the NUGEN Audio Send plug-in, please refer to
the separate plug-in manual.
If a SEND plug-in is active, click ‘External ref.’ to use this a a reference audio
source.
Ᵹ. If this option is active the main program PLR and program loudness indicators
will switch to ‘delta’ or ‘difference’ mode, showing the difference in PLR and
program loudness between the audio reference and the current program
material.
The speaker control can be used to direct the reference audio through the main
output.
© 2019 NUGEN Audio
7
Contents
Page 8
MasterCheck Operation Manual
Codec Monitoring
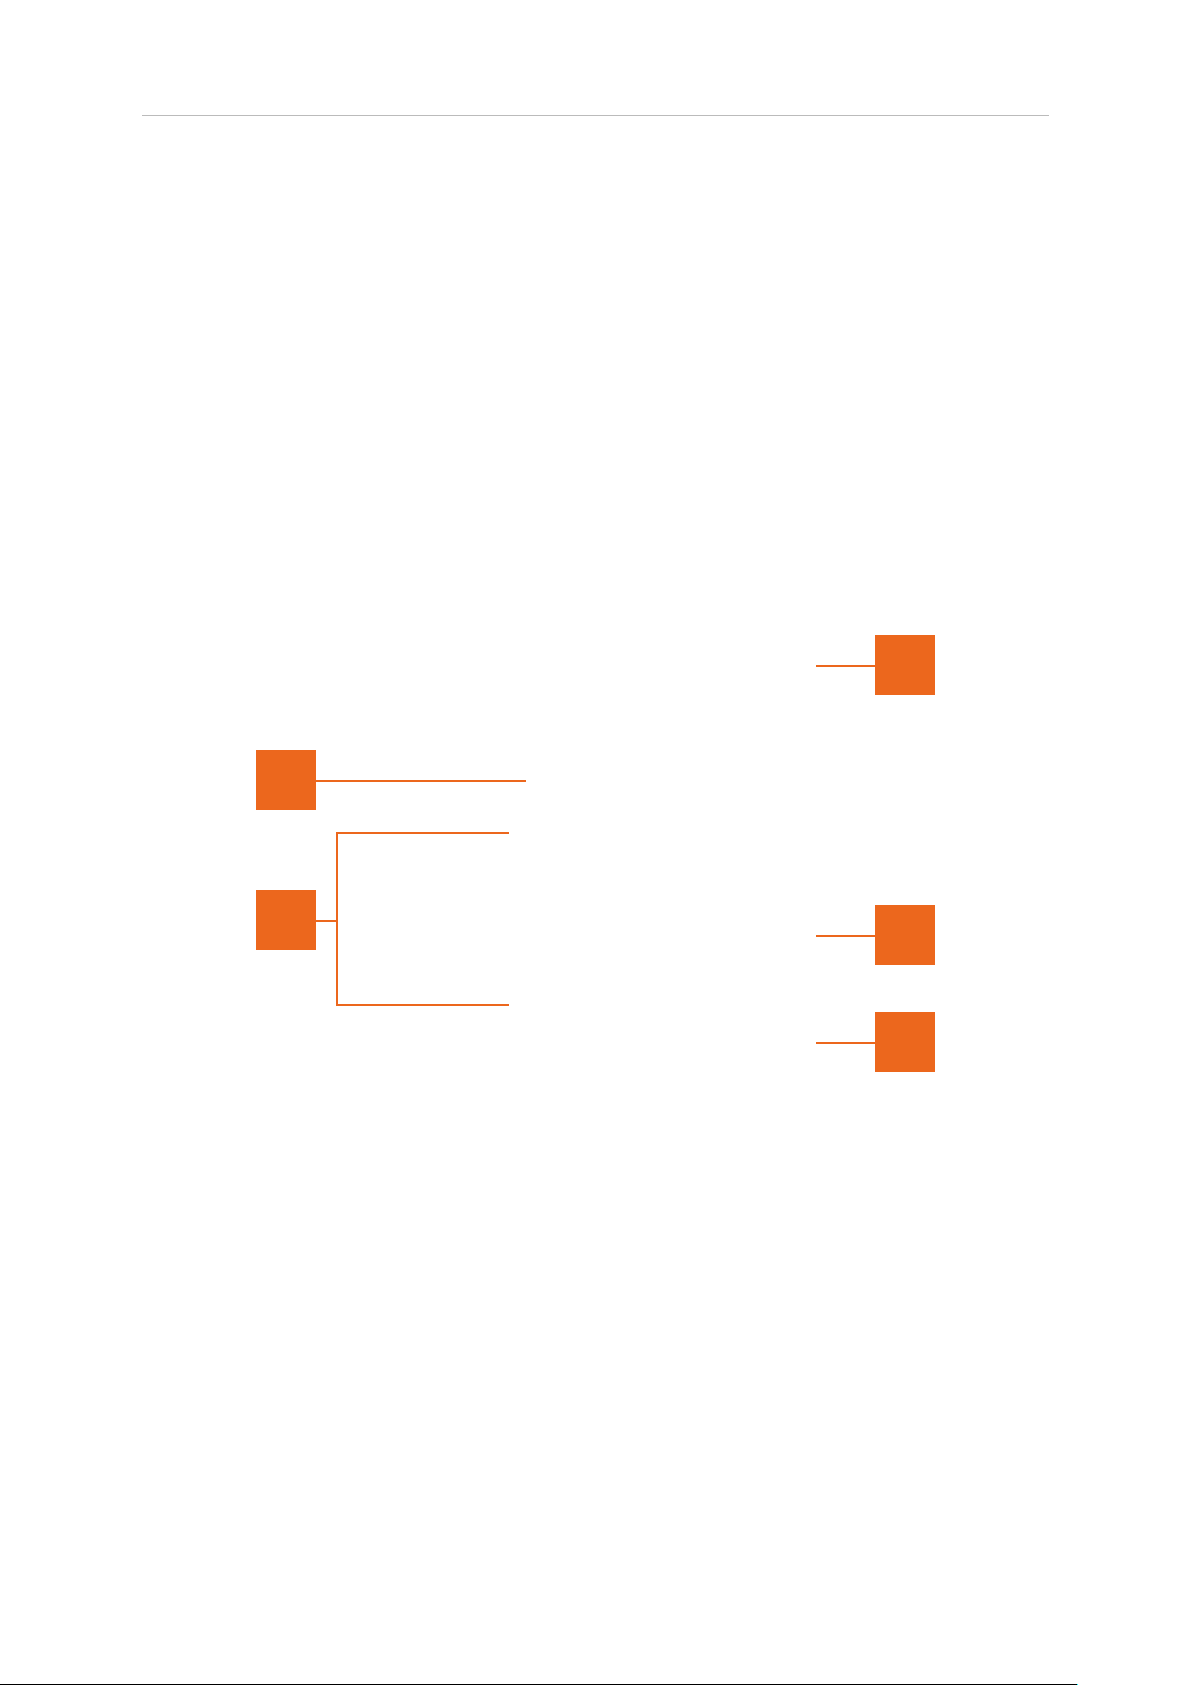
MasterCheck Pro provides a real-time audio codec metering and monitoring section.
This is accessed through the expanded ‘Codec’ interface, which can be selected using
the option in the settings panel if it is not already active.
3
1
2
4
5
1 Metering and Monitoring. These controls determine the output metering and
monitoring for MasterCheck pro.
Meter. When Meter is selected MasterCheck pro will meter selected codecs,
but will continue to output the native DAW audio ie. The audio output will be at
the native DAW/NLE audio resolution and not the audio codec output. This mode
allows for a full resolution mixdown to be produced, while continuing to monitor
multiple audio compression codecs for clipping.
Monitor. When Monitor is selected, the audio output is that of the selected
real-time codec stream. This control should not be engaged when making an
© 2019 NUGEN Audio
8
Contents
Page 9
MasterCheck Operation Manual
audio mix-down as many audio compression codecs are highly lossy and can
degrade the quality of the original native audio stream signicantly.
ᵹ. Use this control to hear the difference between the original audio and the
compressed audio stream.
Note:
1. The delta control is not available when the Ogg Vorbis codec is selected.
2. The delta can often be seemingly quite large, however as codecs are generally
optimised to ‘hide’ the difference using psychoacoustic techniques, the A|B
comparison before and after encoding may be far more acceptable than would
initially appear from a rst inspection of the audio delta.
2 Codec selection. The square check boxes can be used to activate/deactivate
each of the 5 codec slots individually. The radio buttons to the right are used
monitor the codec output on the main True-Peak meter [3]. The specic details
of the active codec are shown below the codec selection panel.
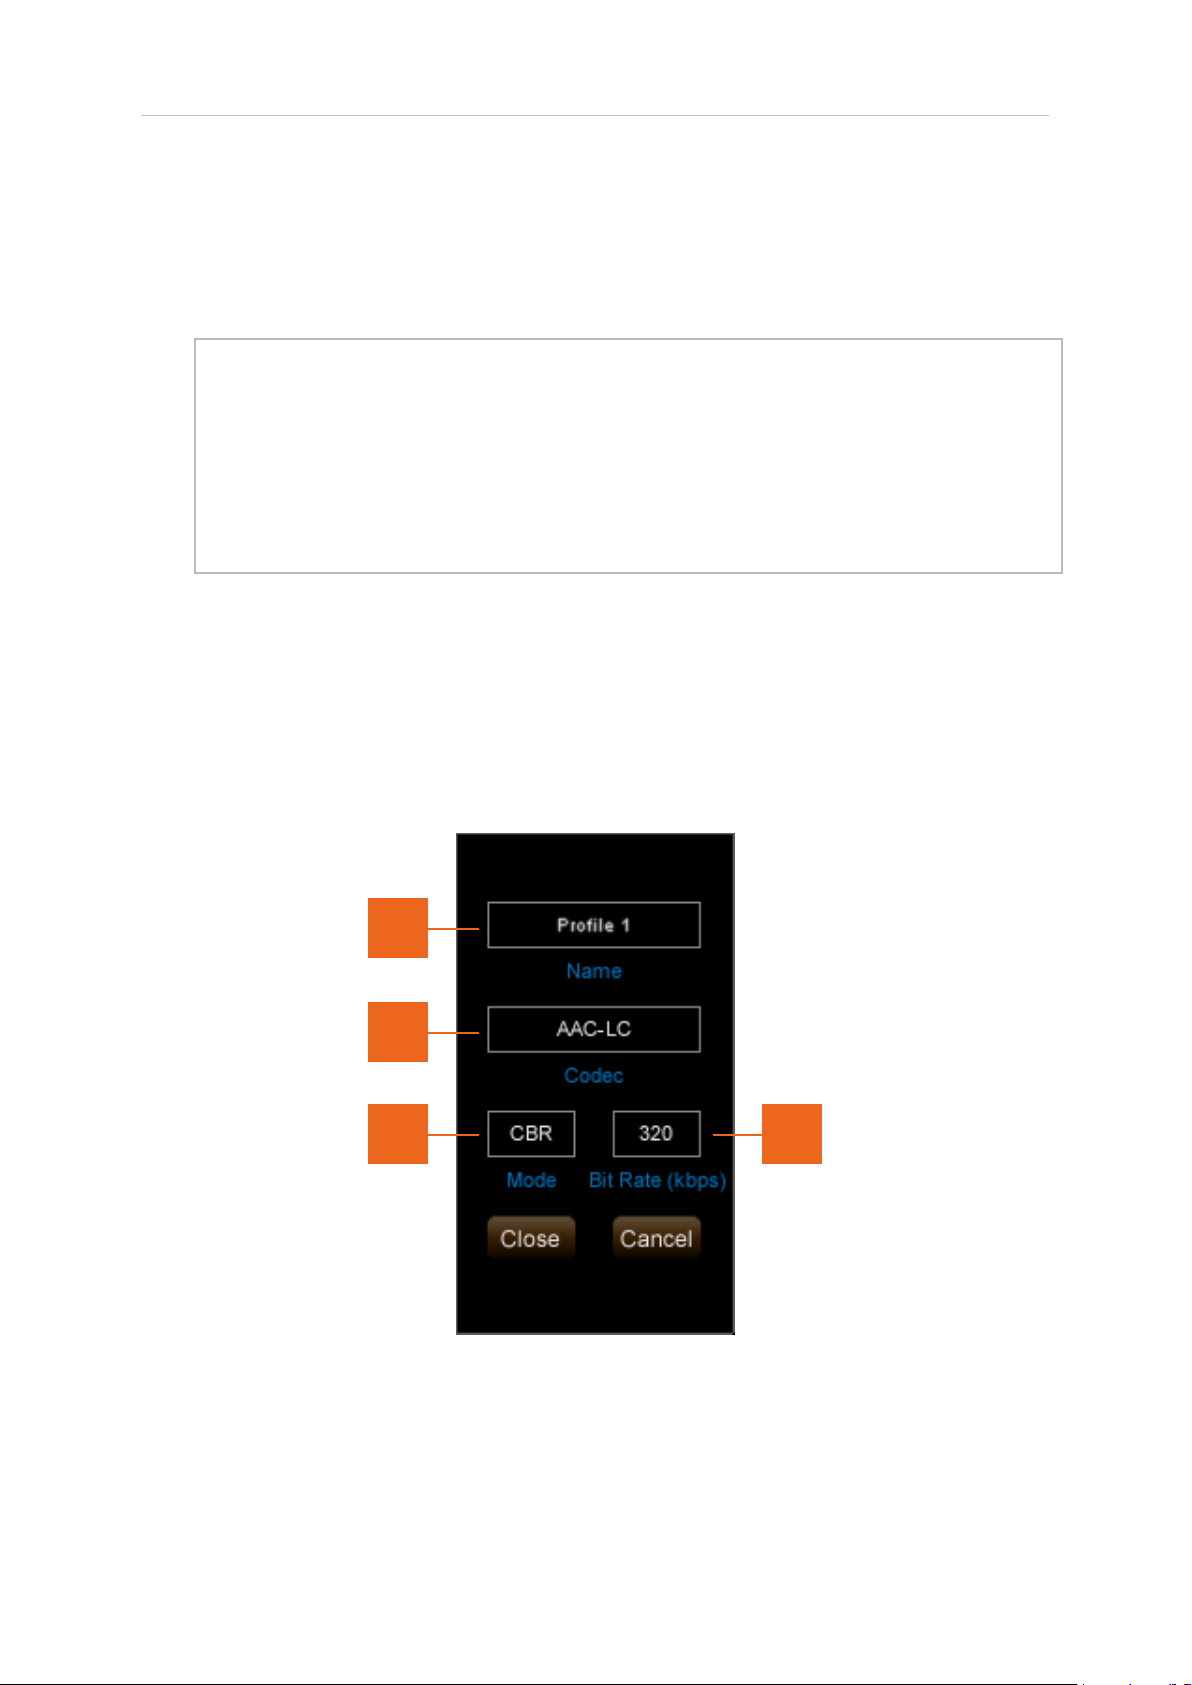
To change the settings of the codec applied in each slot, click the name box to
open the codec option panel for that slot.
a
b
c
d
a) Codec prole name. Click to type in a custom tag.
b) Codec to be employed. Click to choose from a drop-down list.
c) Mode. Choose from CBR (Constant bit rate) or VBR (Variable Bit Rate).
© 2019 NUGEN Audio
9
Contents
Page 10

MasterCheck Operation Manual
d) Bit rate. Bit rate. Choose from a drop down list. As VBR encoders choose a
exible bitrate dependent upon the audio in question, if VBR is chosen, the
selectable bitrates are approximate.
Note: CBR is not available for the Ogg Vorbis codec.
3-5 True-Peak meters. The main True-Peak meter [3], meters the selected output.
This can be switched between the native DAW audio (NONE) or any of the active
codecs using the radio buttons on the left hand side of the codec selection
panel.
Note: It is possible to meter a codec on the main True-Peak meter whilst
monitoring (listening to) the native NLE audio. This is determined using the
metering and monitoring section [1].
Individual Codec meters. Individual ‘mini. codec meters [4] are available for each
active codec. These can be switched globally using the mini meter control [5].
A note about codecs and looping audio.
Audio codecs deal with audio in blocks of data. The data in these blocks is then
processed and a data compressed stream is generated. This means that looping audio
can in fact provide different data in each block as the loop length is unlikely to be an
exact multiple of the data block size. As a result, the maximum level of the audio within
looping audio sections may vary as the different block content generates differing data
compression responses from the algorithm.
© 2019 NUGEN Audio
10
Contents
Page 11
MasterCheck Operation Manual
Settings
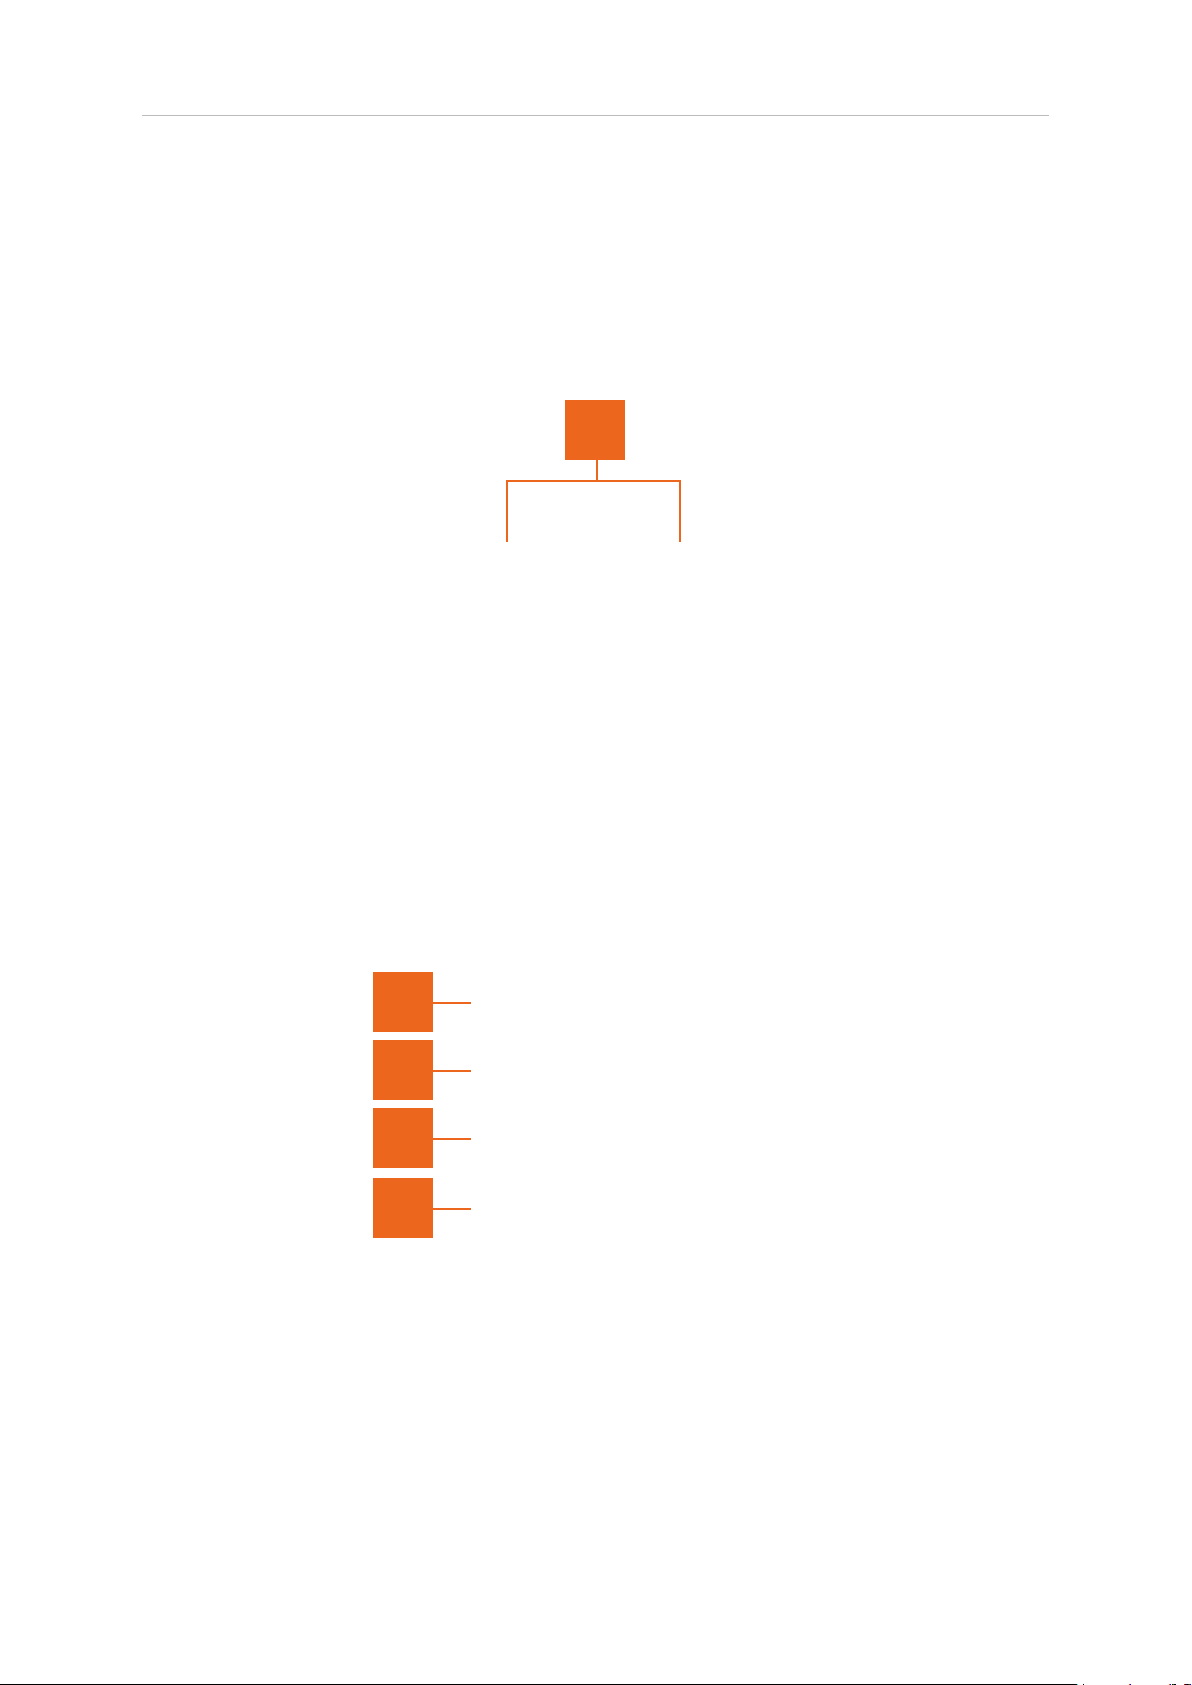
In addition to a number of presets for typical use, MasterCheck can be customised to
specic requirements using a number of options contained in the settings panel.
1
2
3
4
5
1 Colour Splits. The colour splits can be used to dene different zones within
the bar meters, to indicate desired targets/out of specication values etc. The
split values determine the position of the colour boundaries. Click-drag up and
down to change the value or double click to enter a specic value. To change the
colours of the sections, click the swatch to open the colour picker window.
© 2019 NUGEN Audio
11
Contents
Page 12

MasterCheck Operation Manual
2 External reference source. The colour splits can be used to dene different This
shows the name of any connected NUGEN Audio Send plug-in. Click to choose
from a drop down list of available options.
Tip. If the plug-in is being used to remove loudness from a signal chain, the
circular control can be used to sync the SEND plug-in with the output of
MasterCheck so that plug-in latencies are compensated for when bypassing
the signal chain. If plug-ins are added/removed from the chain, it may be
necessary to refresh the sync.
3 TP. Determines the algorithm used to determine the True-peak measurement.
Choose from afclip (Apple
TM
) or ITU (ITU-R B.S. 1770).
Auto reset. Resets the PLR, PSR and Program loudness values automatically
when playback is stopped and restarted.
Ballistics. Sets meter ballistics to recognised standards. The update rate and
time window is as dened in EBU R128, this parameter determines the decay
time only and does not affect the maximum values.
4 Segments. Determines the number of loudness units represented by each
segment on the short-term loudness meter.
Tex t . Determines the colour of the text on the interface.
Target. Determines the reference target used when using the ‘offset to match’
feature. ie. It is the target loudness value being aimed for.
5 Units. Choose between LKFS (ATSC A/85) or LUFS (EBU R128).
Mode. The MasterCheck interface is available in three different modes.
Meter. Metering without codec encoding, metering and monitoring options.
Compact. Switches to a vertically reduced size suitable for display on smaller
screens (eg. laptops). For convenience, the interface will autoresize to compact
mode if initially opened on a screen not capable of displaying the full length
interface.
Codec (MasterCheck Pro only). Switches to the full interface, including codec
encoding, metering and monitoring.
© 2019 NUGEN Audio
12
Contents
Page 13

MasterCheck Operation Manual
Practical Operation
Mixing/mastering for playout
In the new world of loudness normalised playout, it is important to understand how
your music will reach the consumer. If you do not take this into account, there is a good
chance that it will not be as you originally intended!
Consumer audio consumption is increasingly being delivered through loudness
normalised channels. iTunes Radio
loudness normalisation, which are designed to ensure that the user receives audio at
a consistent level and doesn’t have to constantly reach for the volume control from
track to track. This has repercussions for the audio producer, your ‘hot’ master will be
effectively turned down automatically at playback - in other words, there is no longer
any advantage in ‘being louder’ than the loudness level as determined by the playout
system.
Loudness normalisation means that simply pushing your audio into the master
limiter could in fact make your productions seem quieter and ‘at’ compared with the
competition.
To experience this effect, place a limiter on the master bus and make a heavily
compressed traditionally ‘loud’ mix. Then place MasterCheck after the limiter. There is a
good chance that you will now be reading loudness levels around -11 or -12 LKFS if the
limiter is working hard. Choose any preset and click ‘offset to match’. This is how your
audio will actually be heard by the consumer.
There are two points to notice:
a) There is a signicant drop in level at playout (6dB or more in extreme cases)
b) The audio now peaks well below 0dBFS
TM
, SpotifyTM, WindowsTM 8 and others all incorporate
ie. Mastering as hot as possible simply wastes headroom and creates a dull mix that
never really gets ‘loud’.
Using MasterCheck, it is possible to mix to loudness normalisation targets, and
produce dynamic masters that make full use of the available headroom and are not
automatically turned down at playout. MasterCheck empowers you to mix with
condence, and preserve your musical intention all the way through the transmission
chain.
© 2019 NUGEN Audio
13
Contents
Page 14

MasterCheck Operation Manual
Mixing/mastering to a specic target
1. Place MasterCheck on master bus.
2. Choose a preset and play some audio.
Mix to get the program loudness for the whole track to match the target.
Program
Target
loudness
The preset will determine the target loudness for your audio. Different playout
situations use slightly different targets (if you have a specic target you would
like to mix to, this can be set directly in the settings panel.)
loudness
As the audio plays, MasterCheck will measure the Program Loudness. This value
is constantly updated and gives a reading for all the audio measured since last
reset (by default MasterCheck will reset the meter every time playback is
stopped and then restarted).
The Program Loudness for a piece of music is the value acquired by playing
the entire piece through the meter from start to nish. This can be thought of
as the ‘average loudness’ for the track, and is the value used by playout systems
to achieve a consistent average loudness from track to track.
A note about presets.
At the time of writing, different play-out platforms are using different PLR
and loudness targets. These targets are subject to change and in some
cases are approximate, as the underlying algorithm can only be deduced by
measurement.
3. At any point you can use the ‘Offset to match’ button to automatically
match the loudness for your audio to the target. The loudness offset
applied is indicated on the interface.
Loudness
offset
As the program loudness changes, the adjusted value may drift away from the
target value. Click the circular refresh button to re-align to target.
© 2019 NUGEN Audio
14
Contents
Page 15

MasterCheck Operation Manual
4. Mix to avoid distortion due to downstream codec conversion.
Keep the True-peak meter out of the red (or use a True-peak limiter such
as NUGEN Audio ISL).
Most streaming services also use some form of data compression (mp3,
AAC etc.) which can introduce distortion into the audio if the level is too
high. Truepeak metering is a new form of standardised inter-sample
metering dened in ITU-R B.S. 1770 (with a variation to the standard
preferred by Apple
TM
known as afclip) designed to accurately model the
analogue waveform to give an accurate indication of the audio levels.
To avoid codec conversion distortion, many loudness standards also
specify a maximum True-peak level, which is indicated on the True-peak
meter for the preset.
5. Ease off the compressor!
Loudness normalisation rewards dynamic mixing.
If you are used to the loudness wars, you may nd that the only way
to bring your audio in on target is to turn it down on the master bus,
which means that the audio now peaks well below the maximum. Try
experimenting with less compression to produce a more dynamic mix
to make the most of the available headroom, without over compressing
- ideally your mix should arrive more or less at target without the need to
use the ‘Offset to match’ facility.
© 2019 NUGEN Audio
15
Contents
Page 16

MasterCheck Operation Manual
Audio Data Compression Codecs (MasterCheck Pro only)
Most of today’s audio streaming services employ data compression techniques to
reduce the band width required to deliver audio to the consumer. These codecs
generally struggle to cope with transient peaks and can distort unpleasantly when
attempting to reconstruct levels in the uncompressed original audio approaching
-1dBTP, especially at lower bit rates.
MasterCheck pro allows the monitoring of several codecs simultaneously to simulate
different services and listening conditions in order to achieve an acceptable level of
distortion for chosen target services.
Tip. Some low quality codecs distort very easily, requiring a True-peak limit several
dBTP below the max allowable for the uncompressed signal and other more robust
codecs. These codecs are usually employed where the audio stream is targeted at
the mobile listener, who may well be in an less well controlled environment with a
higher noise oor, and therefore a higher level of clipping may be acceptable in order
to preserve transient detail for higher quality streams.
© 2019 NUGEN Audio
16
Contents
Page 17

MasterCheck Operation Manual
Measuring dynamics
MasterCheck introduces new numerical measures of dynamic content (dynamic range)
within audio, the Peak to Loudness Ratio (PLR) and the Peak to Short-term Loudness
Ratio (PSR). MasterCheck provides both a PSR bar meter, showing the dynamic content
of the audio at playback, and an integrated program measure, PLR, shown at the top of
the PSR bar meter.
The PLR value is the ‘Peak to Loudness Ratio’ and is a measure of the dynamics within
the audio. The PLR for a piece of music is the value acquired by playing the entire piece
through the meter from start to fnish is known as the Program PLR, as shown at the
top of the PSR bar meter). The value obtained by playing sections of music is also of
interest, giving an indicator of the dynamics within that section. The PSR is the ‘Peak
to Short-term Loudness Ratio’ and uses the Short-term loudness, which calculates the
loudness over the last 3 seconds of audio, and the True-Peak. The PSR meter gives an
ongoing readout of the PSR at playback.
In a loudness normalised playback situation, over-compression achieves nothing
(except a at mix). Over-compression damages the transient peaks in a recording,
leading to a mix that sounds less detailed and ‘at’. As loudness normalised playout
systems ‘undo’ the effect of increased loudness beyond that target loudness value,
other perceived gains are lost, so the main question becomes one of taste and
audio quality. The PLR meter can be used to assess the dynamics of your audio and
objectively compare this with reference tracks. PLR values are genre specifc to some
extent, however a PLR range of 8 - 15 would be a reasonable rule of thumb for a
healthy dynamic mix.
MasterCheck can also be used in Mid/Side mode to examine the Mid/Side relationship
of the PLR values when using Mid/Side compression techniques.
Creating an open and dynamic mix can now lead to a track standing out from the
competition. As it is no longer possible to be ‘the loudest’, other solutions to gain listener
attention and interest must be explored.
© 2019 NUGEN Audio
17
Contents
Page 18

MasterCheck Operation Manual
Comparing to reference material
MasterCheck can also be used to compare your tracks to reference material in order to
measure the differences in loudness, PLR and true peak readings.
1. Place send plug-in on reference track
The NUGEN Audio SEND plug-in is installed with MasterCheck and should
be available in your plug-ins folder. The SEND plug-in is used to ‘tap’ the
audio at any point in the signal ow in your DAW and send the audio
through the MasterCheck.
To make a comparison between your audio and a reference track, create
an audio track with your reference audio and insert the SEND plug-in in
this track.
2. Click External ref.
Reference
PSR
Reference
loudness
Place MasterCheck as you usually would to monitor your mix and click
the ‘External ref.’ button. If you are using more than one NUGEN Audio
SEND plug-in in your mix, you may need to open the settings panel and
select the correct source from the drop down menu.
MasterCheck will now replace the target loudness value in the bottom
left with the loudness measurement from the reference track. The PSR of
the reference track will also be shown in the PSR window.
You can monitor the reference audio by clicking the speaker button.
© 2019 NUGEN Audio
18
Contents
Page 19

MasterCheck Operation Manual
3. [Option] Click the ᵹ button to show PSR and loudness the difference.
Reference
4. [Option] Click ‘Offset to match’ to hear your audio matched to source.
If you wish, you can use the ‘Offset to match’ control to match the
loudness of your material to the reference audio. As these values
are constantly updated, there may well be some drift over time. Use the
circular refresh button to recalibrate if required.
5. Examine difference between PSR and loudness
You can now use the meters to examine the differences in PSR, loudness
and true-peak readings and adjust compression/limiting to taste.
Your
track
Difference
© 2019 NUGEN Audio
19
Contents
Page 20

MasterCheck Operation Manual
Removing loudness from an FX chain
Using MasterCheck to remove loudness from an FX chain can be a very useful
technique to employ when trying to evaluate the effect of processing without being
inuenced by the ‘feel good factor’ of increased loudness.
Generally speaking, if you turn up some audio, it sounds better. This can be problematic
when attempting to make an objective assessment of any form of processing that
affects the loudness (eg. a compressor or limiter), because the loudness increase alone
will make things sound better. MasterCheck can be used to ‘remove’ the loudness
difference by matching loudness before and after effects, so the effect without loudness
can be auditioned, making it much easier to assess the contribution of the processing
involved.
The process is very similar to comparing your audio to reference material (see above)
except we are now comparing with the same track, before and after processing.
1. Place MasterCheck at end of plug-in chain.
2. Place send plug-in at start of chain (check ‘Audio Thru’ in SEND plug-in).
It is important to check the ‘Audio Thru’ box in the SEND plug-in to allow
the audio to pass through the signal chain. By default this is unchecked.
3. Play audio and click ‘Offset to match’ to remove loudness differential.
4. Use the speaker control to A/B before and after.
You can now toggle before and after the FX chain using the speaker
control.
Note: If the FX chain contains plug-ins that introduce latency (eg. FFT
based EQ or Impulse reverbs etc.), there may be a noticeable delay in the
signal chain. If this is the case, you can remove this by syncing the SEND
and MasterCheck by clicking the circular ‘sync’ control in the settings
menu.
Click to sync MasterCheck
with SEND plug-in to remove
delays caused by plug-in
Latencies FX chain.
© 2019 NUGEN Audio
20
Contents
Page 21

MasterCheck Operation Manual
Dialogue clarity - Podcast / Audio for video / post–production
MasterCheck has several applications beyond music production, particularly in the
arena of dialogue intelligibility.
Playout environment – background noise/reduced PLR
With much of today’s audio being delivered to mobile devices, the high dynamic
range of a typical podcast or talk radio program may in fact be too wide for dialogue
intelligibility. This means that the consumer is constantly reaching for the volume
control to boost quiet sections, and then experiences discomfort in the louder sections.
In extreme cases, it may not even be possible to boost the level of the audio enough on
the consumer playback device to make the dialogue intelligible.
As a rule of thumb, this can be avoided by keeping the PLR below 16.
Dialog clarity and background music/FX
Another common source of consumer complaint is a lack of dialogue clarity due to the
background music and FX being too loud. This simple mistake can occur due to the fact
that many consumer playback systems are simply of too low a quality to replicate what
sounded perfectly clear in the post-production studio. Specifying a minimum rule of
thumb for dialogue vs background loudness separation can assist in accidental errors
of this kind.
MasterCheck can be used to automatically monitor the relative loudness of the Dialog
bus relative to the M&E bus using the SEND plug-in and the ᵹ control to make sure that
there is always a loudness differential high enough to maintain dialog clarity.
Loudness differential
M&E
Bus
Dialog
Bus
© 2019 NUGEN Audio
21
Contents
Page 22

MasterCheck Operation Manual
Reporting a Problem
If you encounter a problem with any of NUGEN Audio’s products, please let us know, to
help us improve them.
Please email NUGEN Audio at [email protected] giving a clear explanation of
the problem. Please state how frequently you’ve experienced the problem. If there are
any particular steps you need to go through to see the problem, please detail these.
Please also state your operating system, and the rough specs for your machine (e.g.CPU speed, RAM) - in Windows XP you can get this information by rightclicking “My
Computer” and selecting properties.
Please be patient with any problems you may experience, particularly with products at
a beta stage of release. At NUGEN Audio we take problems with our software seriously,
and will endeavour to correct them as quickly as possible.
© 2019 NUGEN Audio
22
Contents
Page 23

MasterCheck Operation Manual
Version History
1.0 Initial release
1.1 New presets added
Compact/Laptop mode added
1.2 MasterCheck Pro released
1.4 FLAC and Opus codecs added
1.7 MP3 codec added
Notes:
AAX, VST and AU are VST are registered trademarks of their respective owners.
This software uses libraries from the FFmpeg project and encoding technology by Mp3Dev.org.
© 2019 NUGEN Audio
23
Contents
Page 24

MasterCheck Operation Manual
Appendix 1 – Codec notes
Codec Samplerates** Sample formats
FLAC* 1 Hz to 65,535 Hz signed 16 bit integer
signed 32 bit integer
AAC 8000 Hz signed 16 bit integer
11025 Hz
12000 Hz
16000 Hz
22050 Hz
24000 Hz
3200 Hz
44100 Hz
48000 Hz
64000 Hz
88200 Hz
96000 Hz
Opus 8000 Hz signed 16 bit integer
12000 Hz oat
16000 Hz
24000 Hz
48000 Hz
Vorbis Any oat
MP3 32000 Hz signed 16 bit integer
44100 Hz
48000 Hz
*FLAC is a lossless codec, however, the FLAC bitstream uses integers and so can only process
integer based audio.
**If a sample rate is not supported by the codec, MasterCheck Pro will re-sample to the nearest
appropriate supported sample rate eg. The Opus codec does not support the 44.1 kHz sample
rate so MasterCheck Pro wil re-sample to 48 kHz.
As DAWs and plug-ins represent audio in a oating point format, MasterCheck internally
performs a conversion of the audio into integer representation so it can be encoded as a FLAC
stream, as would be the case when exported from the DAW and prepared as a FLAC stream
externally. This quantisation process is not to be guaranteed lossless.
MasterCheck provides two options for the previewing the FLAC encoding, to use either signed
16-bit integers, or signed 32 bit integers. This can be toggled using the ‘quality’ setting in the
codec options.
© 2019 NUGEN Audio
24
Contents
Page 25
MasterCheck Operation Manual
© 2019 NUGEN Audio
www.nugenaudio.com
25
Contents
 Loading...