

Page 1

Halo Downmix Operation Manual
OPERATION MANUAL
Halo Downmix
Precise Downmixing & Surround Rebalancing
© 2018 NUGEN Audio
© 2018 NUGEN Audio
1
1
www.nugenaudio.com
Contents
Page 2

Halo Downmix Operation Manual
Contents
Introduction
Interface
General Layout
Utility Controls
Input Section
Monitoring Section
Surround Adjustment
Stereo Downmix
Settings Panel
3
4
4
6
7
8
9
12
14
3D Immersive Audio Extension
Applications
Surround to stereo
Surround to surround
Surround to surround to stereo
Reporting a Problem
Version History
17
18
18
18
18
19
20
© 2018 NUGEN Audio
© 2018 NUGEN Audio
2
2
www.nugenaudio.com
Contents
Page 3

Halo Downmix Operation Manual
Introduction
NUGEN Audio Halo Downmix is a versatile surround sound manipulation and balancing
tool capable of producing better balanced surround and stereo mixes from original
surround material.
Intuitive, visual controls for relative levels, timing, and direct vs. ambient sound balance
allow for precise ne-tuning, delivering accurate downmixes that are no longer limited by
typical in-the-box coecients-based processes.
Halo Downmix is also capable of providing a parallel surround/stereo workow enabling
a rapid monitoring system that promotes better surround/stereo coherence, awareness
and control when working solely with surround delivery requirements.
© 2018 NUGEN Audio
3
Contents
Page 4
Halo Downmix Operation Manual
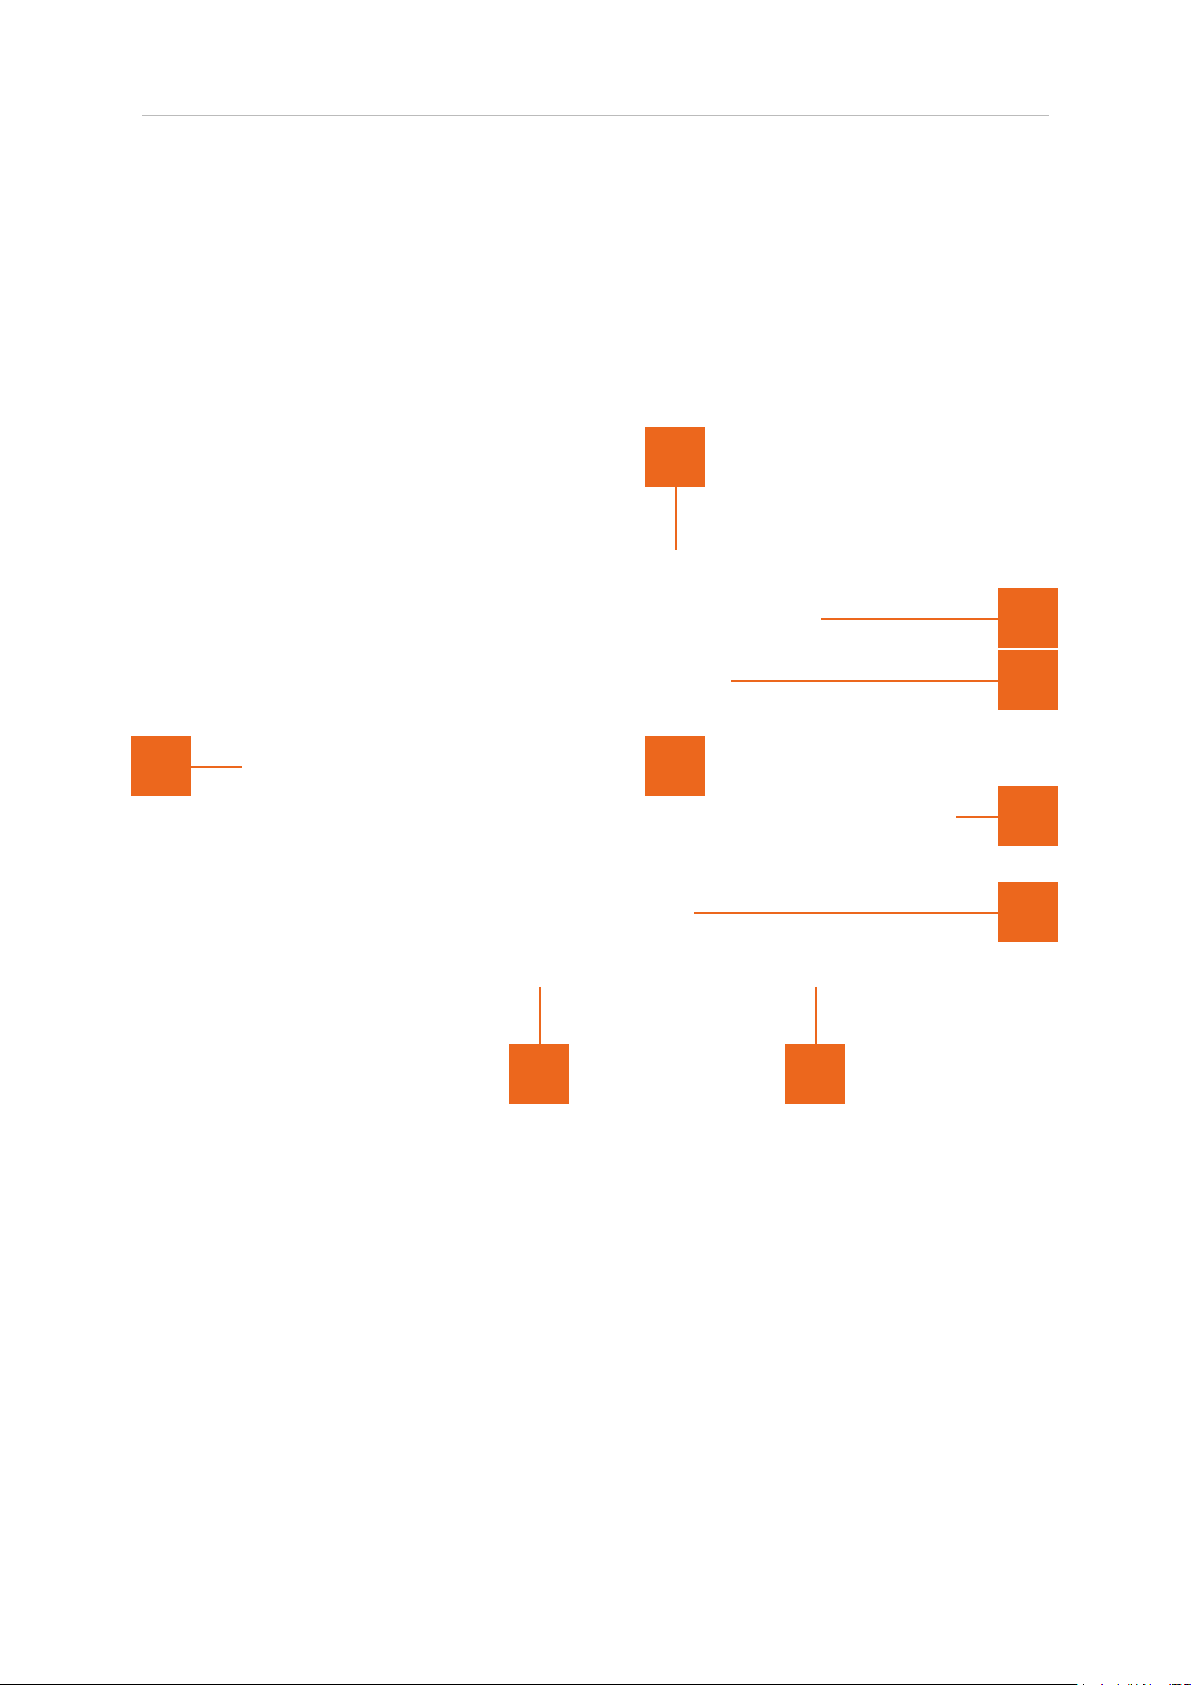
Interface - General Layout
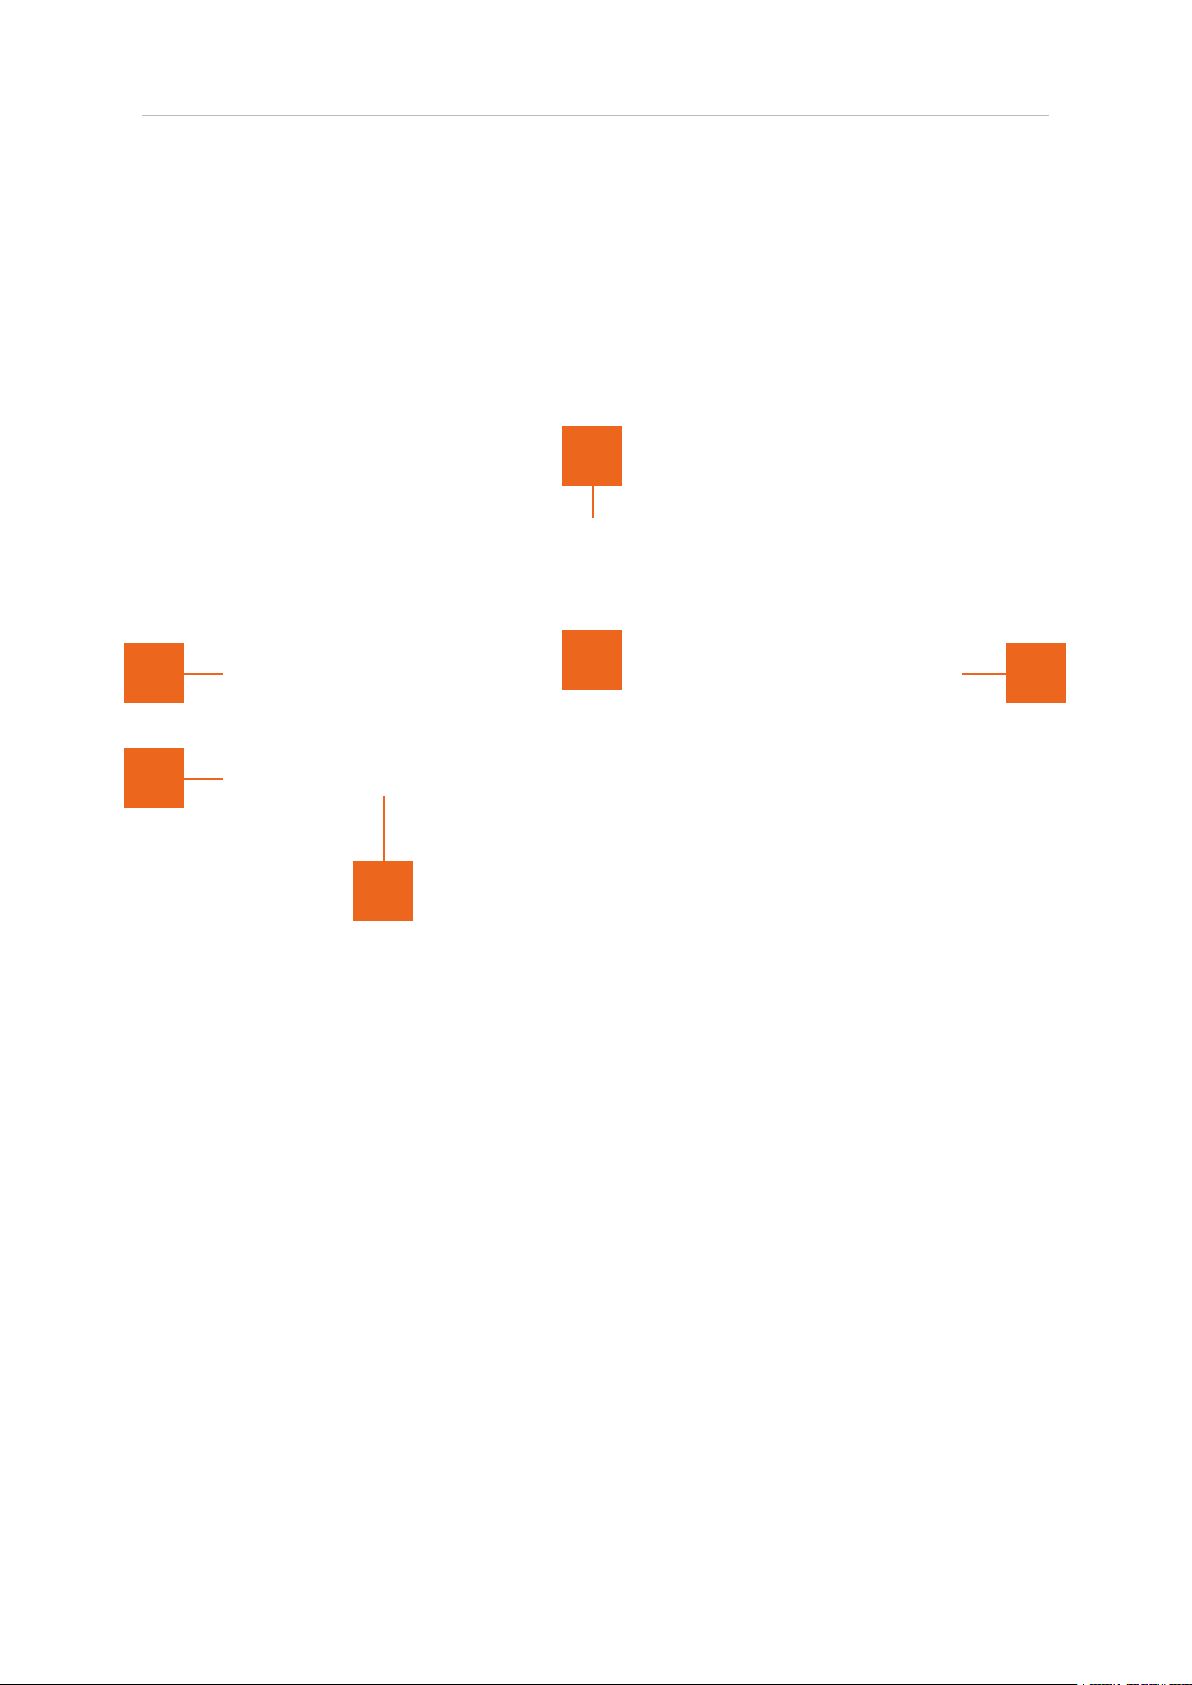
The Halo Downmix interface has been designed to facilitate intuitive operation by
following a logical ow from left (input) to right (output), grouping related aspects of
operation together into distinct zones as shown below.
1
2
4
3
6
1 Utility controls
2 Input section
3 Monitoring section
4 Surround adjustment zone
5 Stereo downmix metering and control
6 Settings panel control
5
© 2018 NUGEN Audio
4
Contents
Page 5
Halo Downmix Operation Manual
Interface - Compact Layout
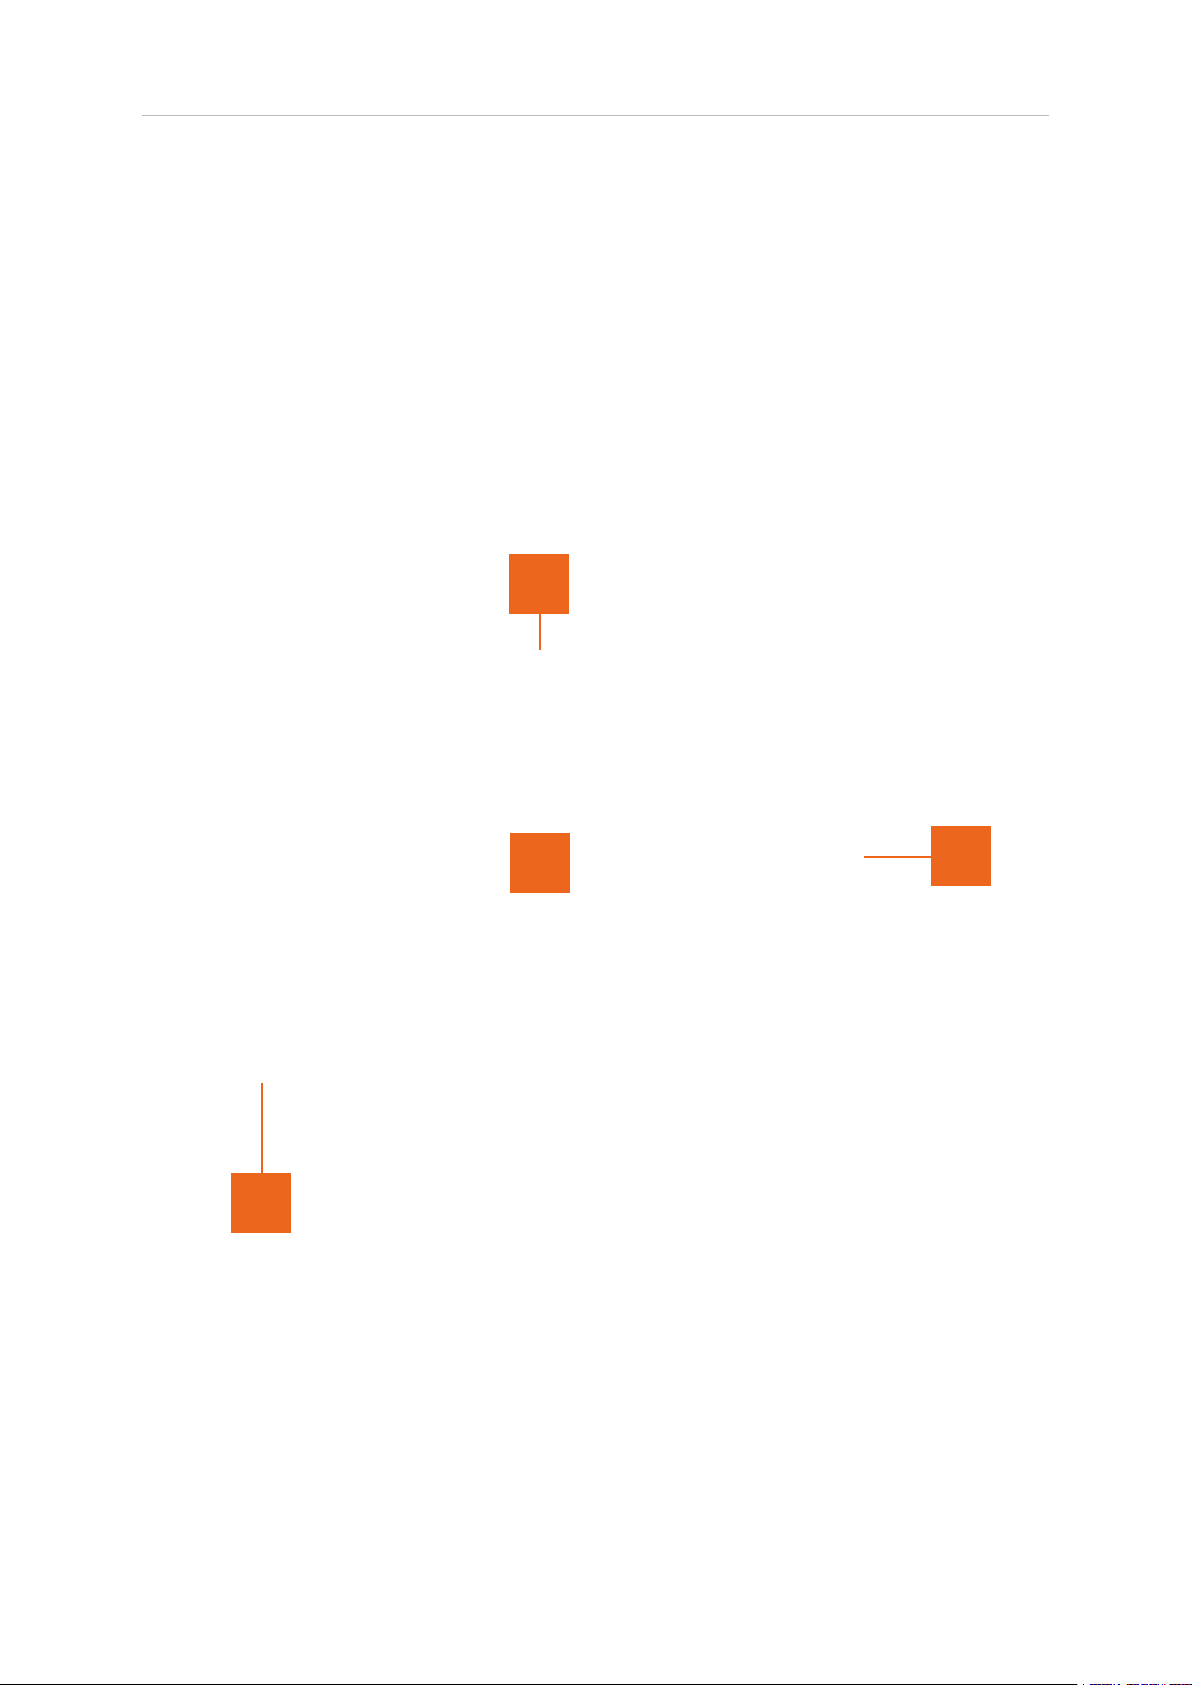
A compact interface is also provided. This view enables a minimal foot print mode,
reducing the Halo Downmix interface to displaying essential metering and parameters
only. The controls are illustrated in the remainder of the manual using the main
interface, however most functionality remains the same when compact mode is
active.
The compact interface is enabled via the ‘Compact’ on/off toggle switch in the Options
panel, accessed by clicking the ‘Options’ button on the main interface.
1
4
1 Utility controls
2 Surround manipulation zone
3 Output metering, control
2
3
4 Settings panel control
© 2018 NUGEN Audio
5
Contents
Page 6
Halo Downmix Operation Manual
Utility Controls
1 2 3 4 5
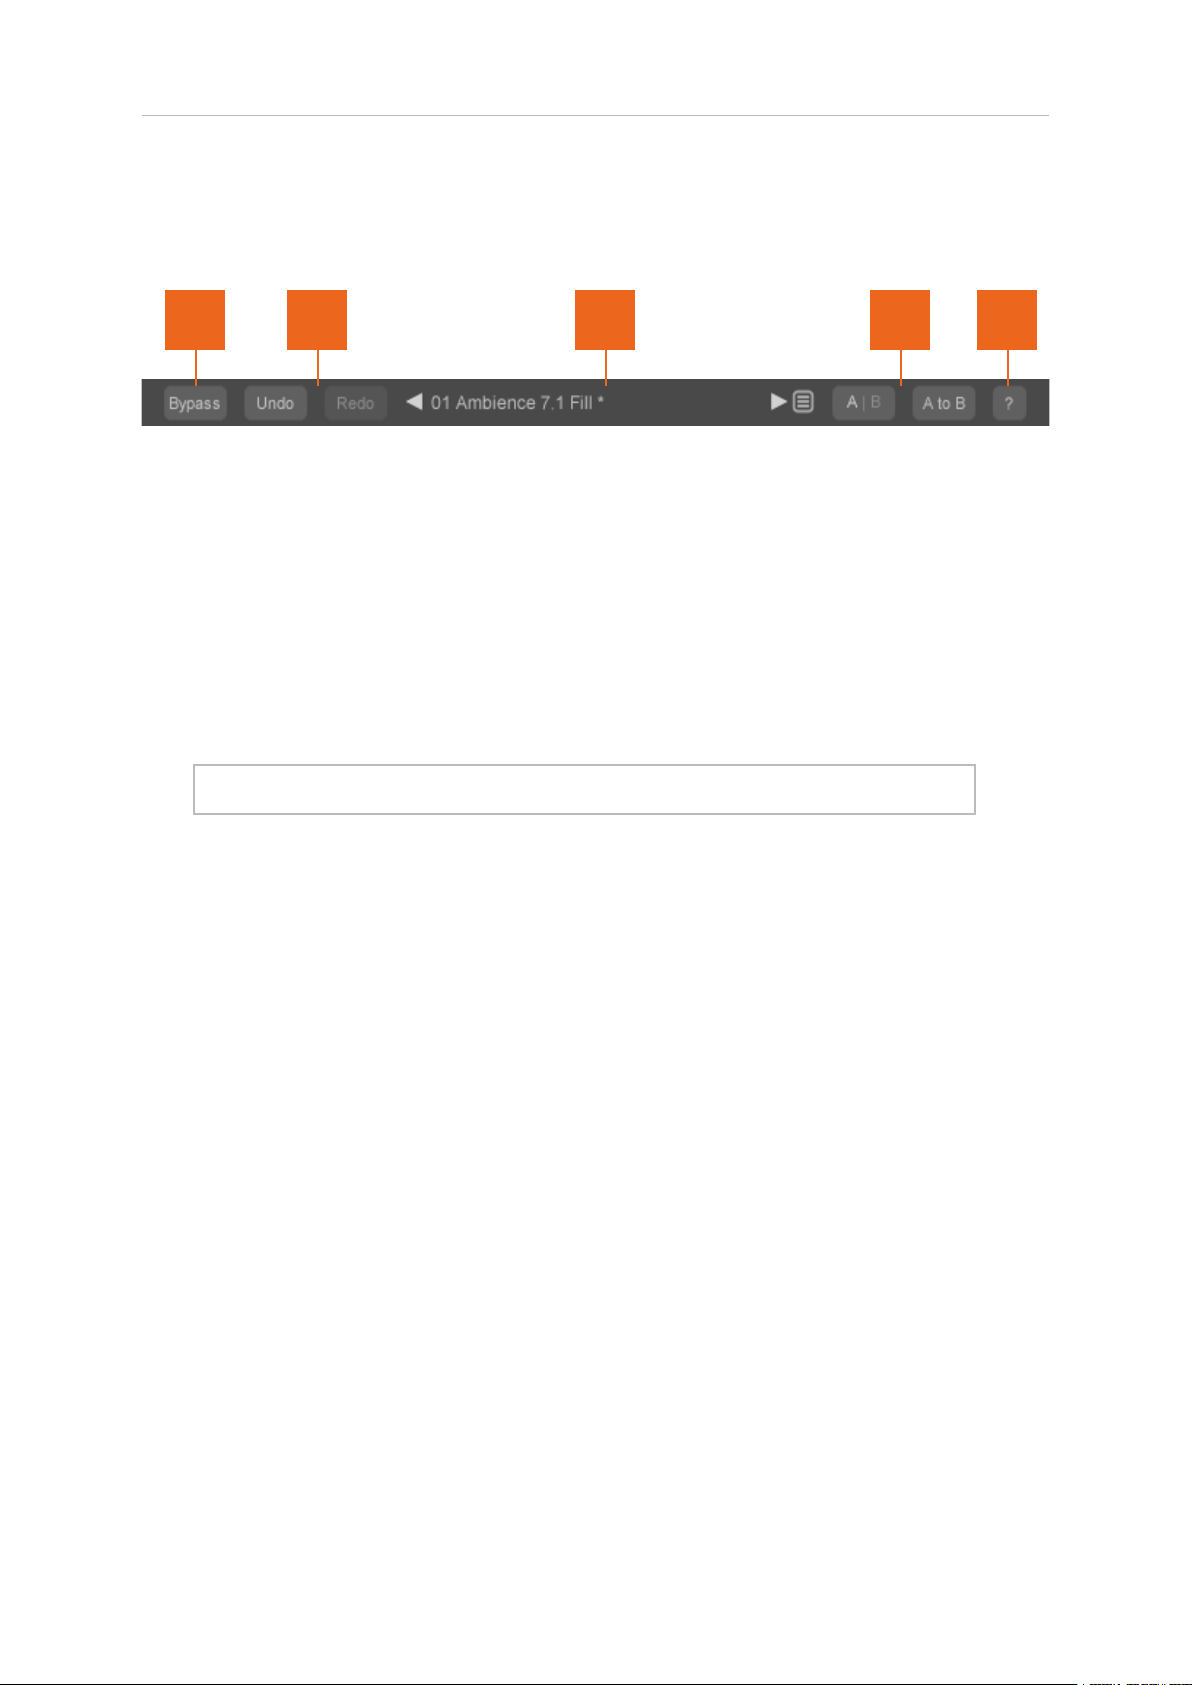
1 Bypass. This button bypasses the effect 'in-place'. This allows for direct A | B
comparisons to be made with and without the effect, without altering any other
processing in the chain.
2 Undo | Redo. Unlimited session undo and redo commands allowing the user to
step back and forward through processing modications.
3 Preset browser. Use the arrow buttons to step sequentially through the presets
or click the end control to open the preset menu to select from a list. Double
click the name to re-name session presets.
Note: 5.1 and 7.1 versions of Halo maintain independent preset systems.
Preset management.
• The 'Installed' folder contains the factory presets. These cannot be
overwritten.
• User presets can be saved in the 'User folder'. An '*' symbol will be shown
against the preset name if the settings have been changed from the
saved version.
• Additional folders can be created using the '+' button
• Presets and folders can be organised by clicking the '…' symbol which is
highlighted when the mouse pointer is placed over the folder/preset
name. Folders can be deleted, renamed and browsed using the standard
OS interface. Presets can additionally be moved and copied.
4 A | B and A to B (B to A). These controls switch data between the 'A' and 'B'
memories for direct comparisons between two different sets of parameters.
The A|B control toggles between the A and B memories (current active memory
highlighted). The A to B (B to A) button transfers current settings to the memory
indicated, ie. From A to B or vice versa.
5 ? Opens the 'About' page, with access to credits and the product manual (if
installed).
© 2018 NUGEN Audio
6
Contents
Page 7
Halo Downmix Operation Manual
Input Section
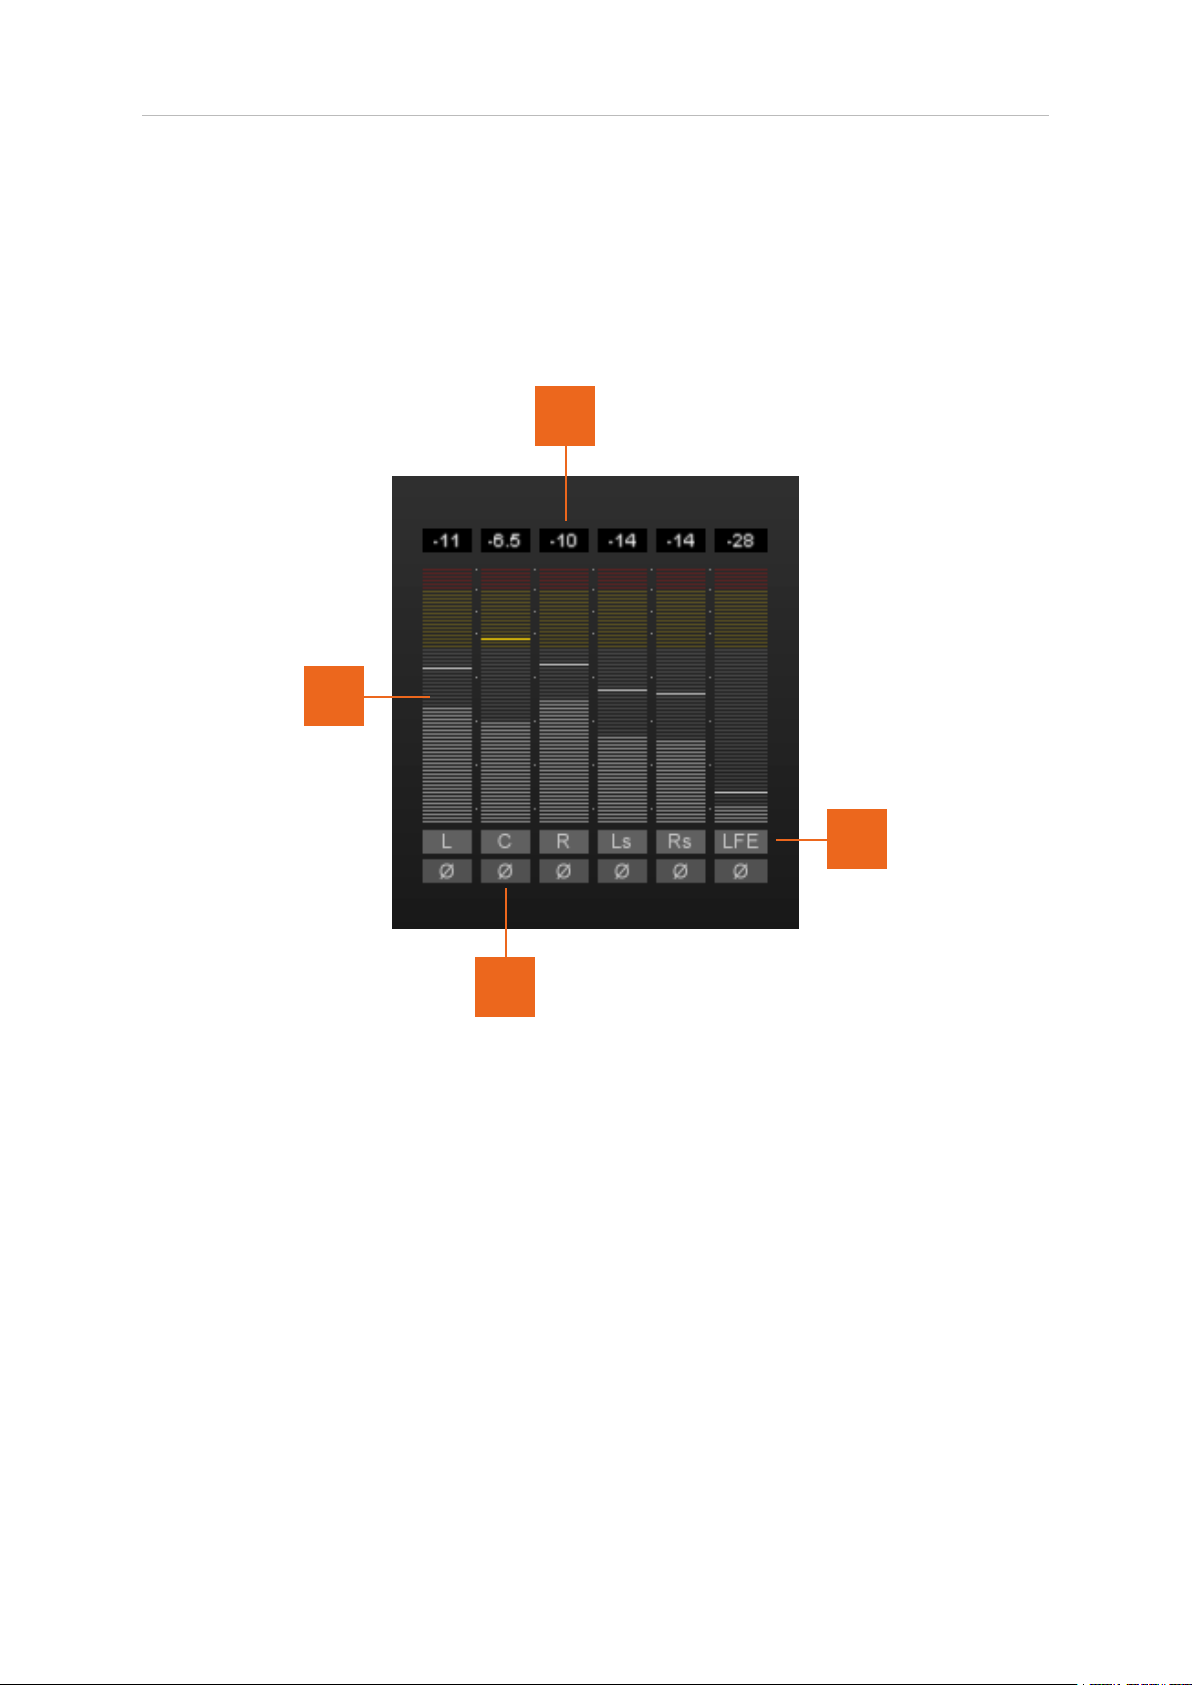
The inputs section (advanced interface only) shows input audio levels, and gives access
to secondary input monitoring functions.
2
1
3
4
1 Input meter. Shows sample peak input levels for each input channel individually.
2 Margin. Shows remaining channel headroom. Click to reset.
3 Individual channel label. Clicking the channel label allows for individual
channel Mute (M) and Solo (S) control depending upon the conguration
determined in the settings panel. Muted channels will show ‘greyed out’ meters
as the audio is no longer contributing to the audio output.
4 Input phase invert. Click to invert phase of incoming audio.
© 2018 NUGEN Audio
7
Contents
Page 8
Halo Downmix Operation Manual
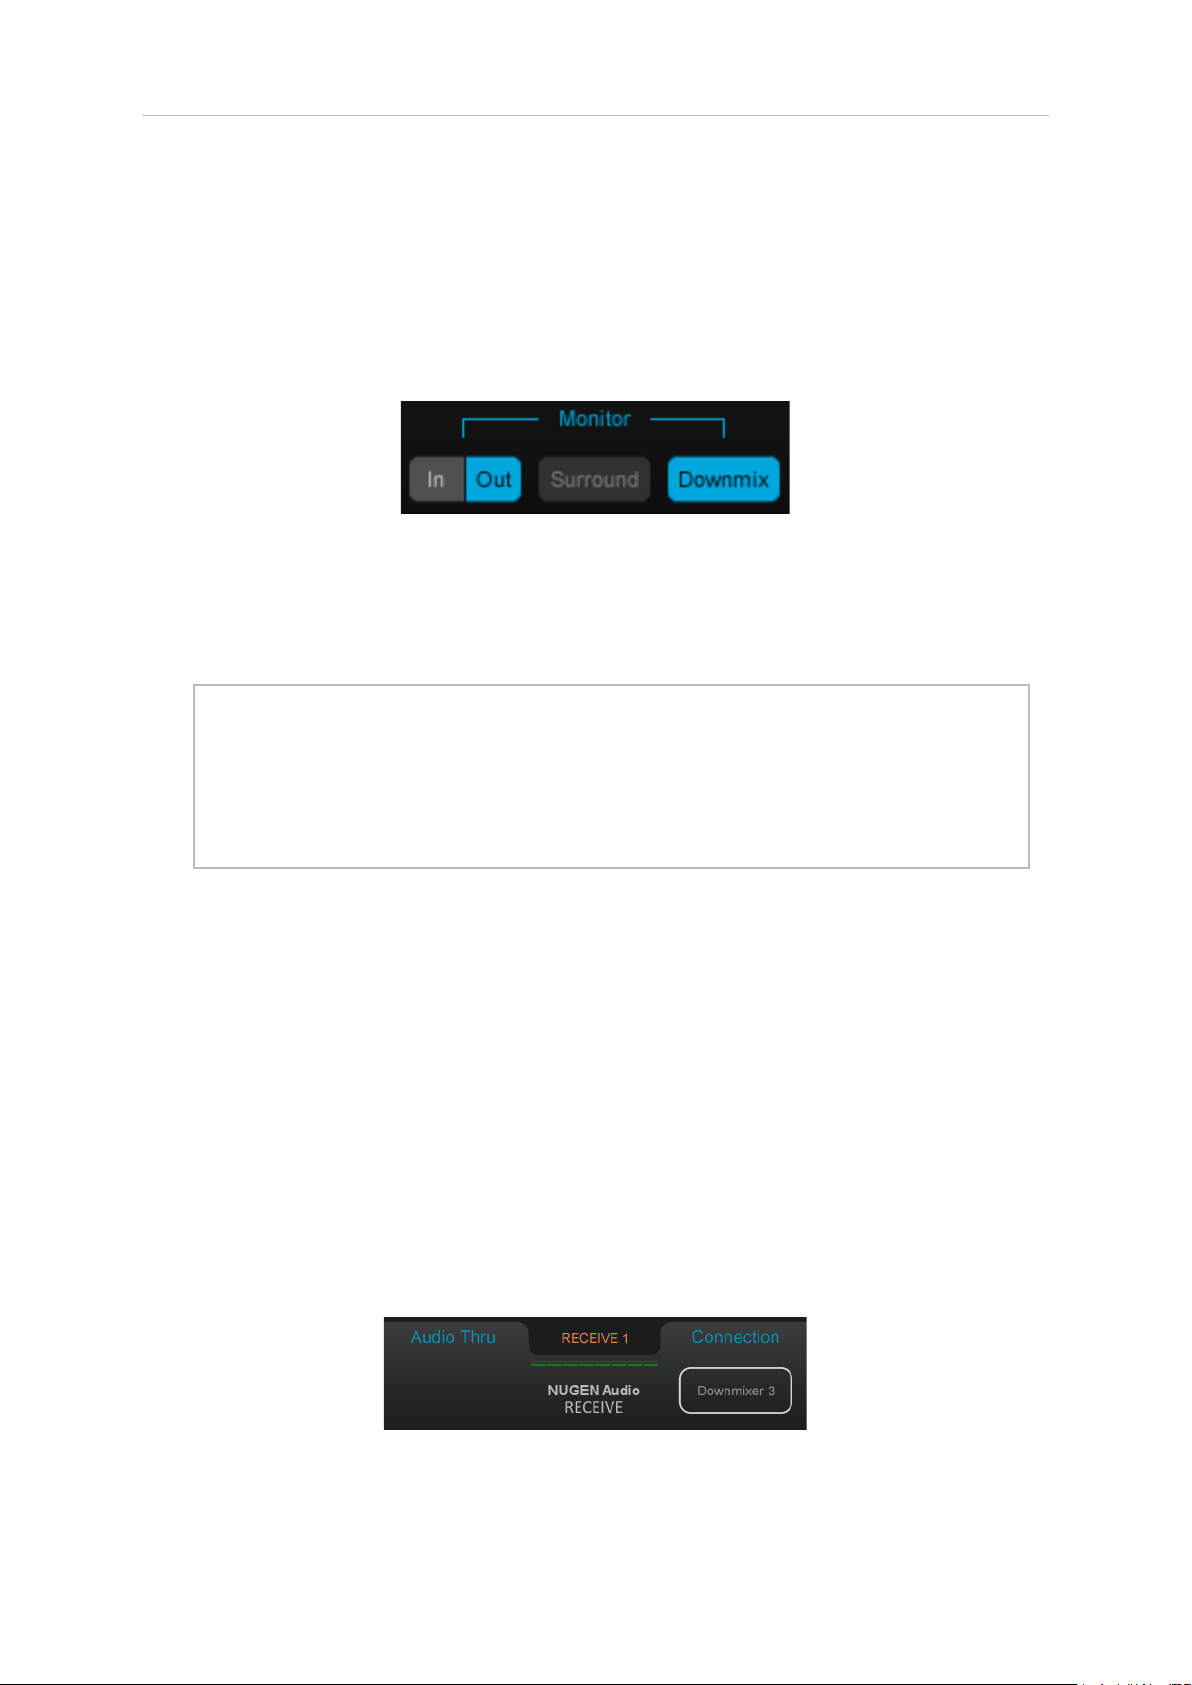
Monitoring Section
Halo Downmix provides a number of useful monitoring facilities which enable easy A/B
auditioning and comparison when using the functions for different tasks.
In/Out.
These controls toggle between input (unprocessed audio) and output audio.
NB: downmix coecients
When listening to the combination In + Downmix, the input audio will be
summed using the downmix coecients as specied in the settings panel to
allow for quick comparison between the original downmix of the input audio
and the processed version. For more info see settings panel notes below.
Surround / Downmix
These controls toggle the output between the downmixed and surround signal
path. The exact audio routing depends upon how the plug-in has been initiated.
Surround-to-surround instance. If the plug-in is in surround-to-surround mode,
the audio is routed through the plug-in in both cases.
Surround-to-stereo instance. If the plug-in is in surround-to-stereo mode, the
downmix button monitors the audio through the plug-in. To activate the Sur
round button, a NUGEN Audio Receive plug-in (included in the Halo Downmix
installer) will need to be instantiated on an appropriately routed surround track.
Halo Downmix can then be connected to the Receive plug-in and audio will be
monitored through the receive plug-in when the Surround button is active.
© 2018 NUGEN Audio
8
Contents
Page 9
Halo Downmix Operation Manual
Surround Adjustment
This section allows for the adjustment of the surround mix before it is downmixed to
stereo. The plug-in is available in two different versions, 7.1 and 5.1. The 7.1 version is
described here, however the functionality is analogous in the 5.1 version.
2
4
6
5
1
7
3
9 8
1 Surround analysis. This dynamic real-time analysis view shows the energy
distribution of the audio output prior to downmix. Brighter sections indicate
increased energy at that position in the surround panorama. Colour can also be
used to indicate the speaker source of the audio in any position.
2 Channel node. Indicates an upmix channel. L, C, R etc. Click to Solo the channel
output. The Solo function can be globally switched to Mute in the settings panel.
Channels are paired left and right (where appropriate) by default. This pairing can
be adjusted using the link control [4].
3 Link. This control is used to pair related channel operation (eg. L and R) to allow
single-click operation of both sides simultaneously when activated.
© 2018 NUGEN Audio
9
Contents
Page 10

Halo Downmix Operation Manual
4 Balance. This control can be used to pan each side of the input matrix to adjust
any L/R present in the original audio. The centre channel remains unaffected.
5 Rear shelf lter. The Shelf button Activates a shelf lter to roll off or boost the
high frequencies from the rear channels to address any imbalance which may
have occurred due to proximity and directional shadowing during recording, or
as a result of surround balance energy adjustments.
6 Centre divergence. NB. This control is only available when downmixing to
channel congurations which include a centre channel (eg. 7.1 to 5.1). The
centre channel divergence control is used to determine the spread of the centre
channel (if any) into the L & R channels in the downmix. At 0%, this directly
translates the existing centre channel to the downmix. Increasing the divergence
will move some of the centre channel energy into the L & R channels, until at
100%, the centre channel is effectively off, and all of the energy is in the phantom
centre.
7 Rear channel delay. These parameters can be used to ‘un-delay’ the rear
channels to provide a more coherent sum to stereo. Legacy upmix practices
often utilise delay in the rear channels (approx. 10 -25 ms) to create a sense of
space in the upmix. When downmixed this can lead to phase or even audible
delay artefacts, which can be redressed using the delay parameters. The Delay
switch activates the delay.
The Seek control will engage an automated algorithm which will attempt to
determine a best-t value for reducing correlation issues in the downmix to a
minimum. The success of this algorithm will depend upon the complexity of the
problems within the original source and has primarily been designed to ‘undo’
legacy upmix practice offsets. Once a delay has been automatically detected,
further adjustment can be made by click-dragging (or double-clicking and
directly entering) the individual values in the edit boxes.
8 LFE control. The On button can be used to switch the LFE channel on/off. For
a standard TV downmix, the LFE channel is discarded. This button can be used
to audition this effect when working on a full surround mix. The LPF button can
be used to enable the low pass lter, to ensure compliance with certain
distribution platforms. The frequency control can be used to adjust the LPF
frequency cutoff.
NB. The LFE channel remains subject to the downmix coecients determined
in the settings panel. If the LFE downmix coecient is set to -inf, then the On
button will have no effect
9 ‘Gear’ icon. This button opens the settings panel (see below).
© 2018 NUGEN Audio
10
Contents
Page 11
Halo Downmix Operation Manual
10
14
11
12
13
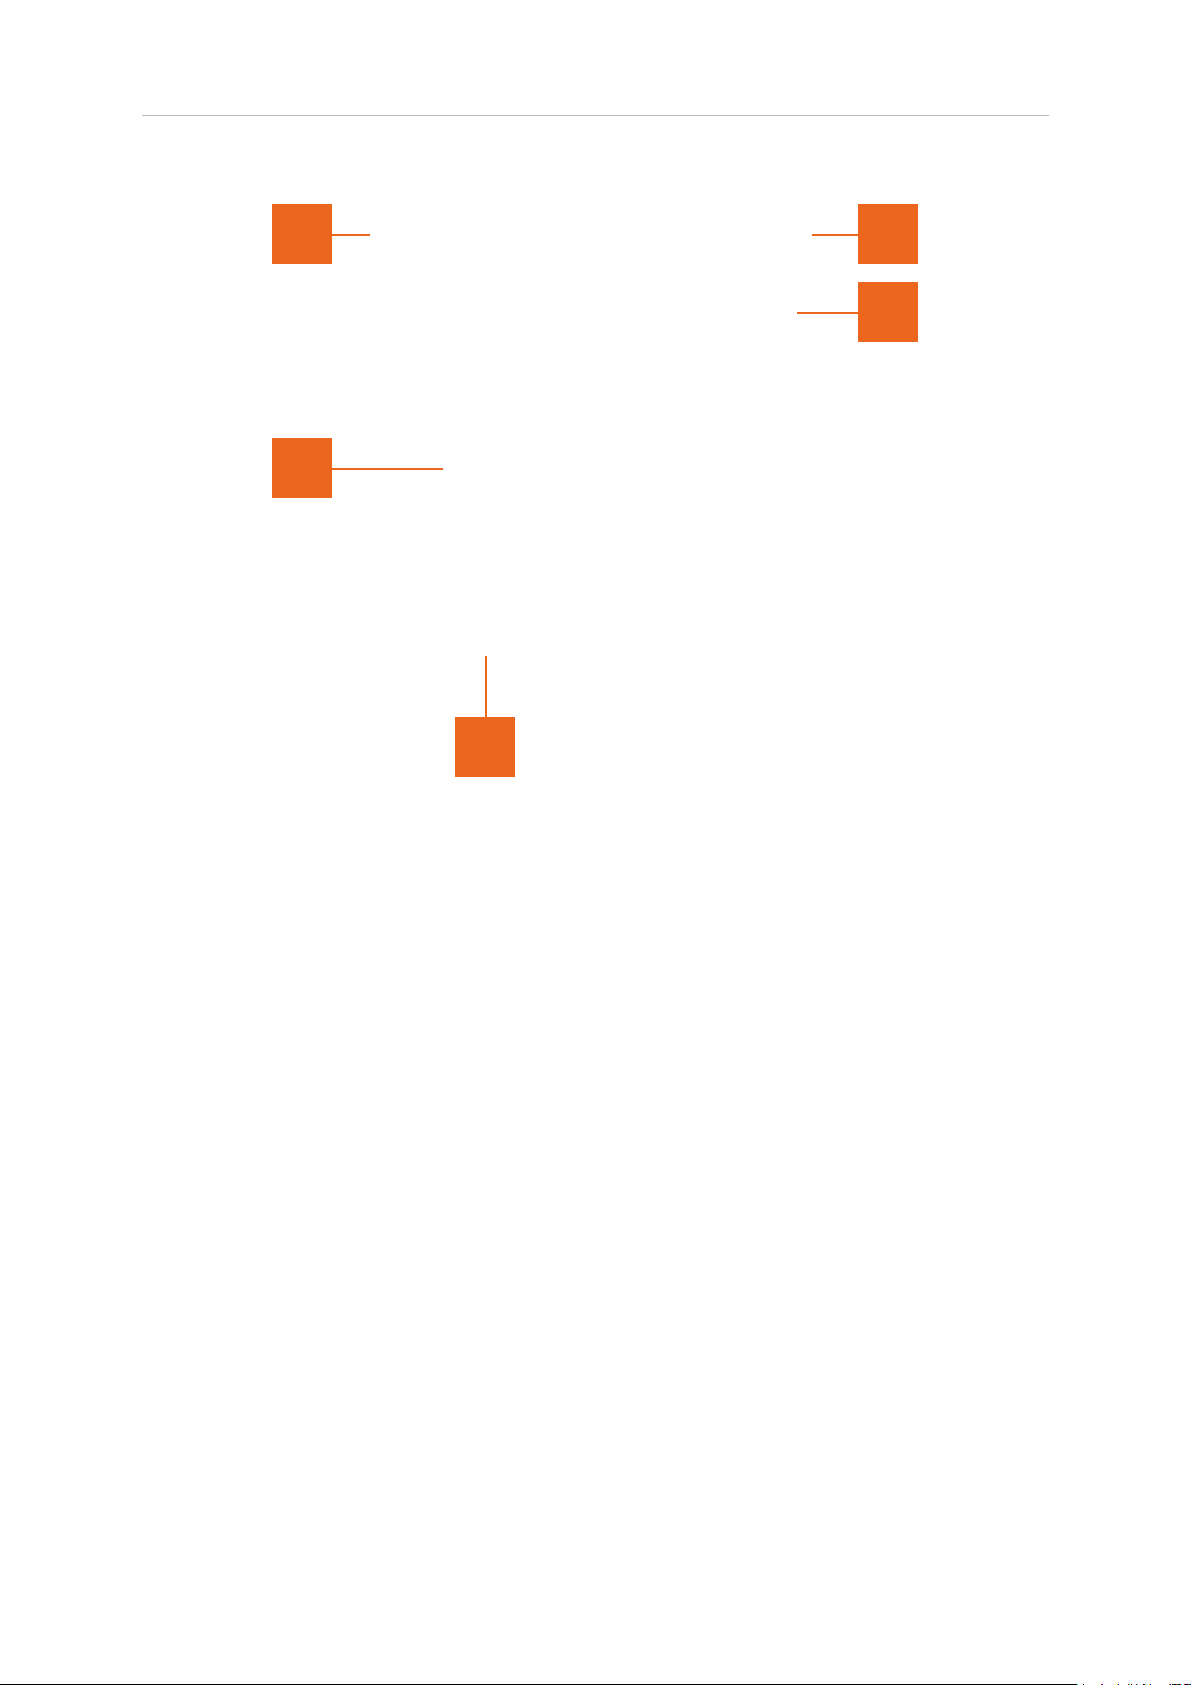
10 Channel node. Indicates an upmix channel or channel pair. Click to Solo the
channel output. The Solo function can be globally switched to Mute in the
settings panel.
11 Channel level meter. This meter shows the channel level immediately prior to
output. In the case where the channels are presented as a stereo pair, the meters
indicate Mid/Side levels as noted on the meter.
12 Channel trim. These arrows can be dragged vertically to apply a dB offset (gain
or reduction) to the channels concerned. Again, these are subject to the Link
‘pairing’ function below.
Stereo pairs are presented in Mid-Side mode to allow adjustment of the relative
direct and indirect sound in the nal downmix. A standard downmix can lead
to an overly diffuse sounding stereo mix resulting from the addition of excess
rear surround energy. Mid/Side balancing can be used to alleviate this, while
maintaining important direct sound queues. These controls can be automated
where required to allow for differences in treatment between scenes.
13 dB offset. The offset applied using the trim controls is shown here. Double click
to enter a numerical value directly.
14 Link. Pairs related Mid and Side channels, allowing a single control to affect the
stereo pair with a single gain boost/reduction adjustment.
© 2018 NUGEN Audio
11
Contents
Page 12
Halo Downmix Operation Manual
Stereo Downmix
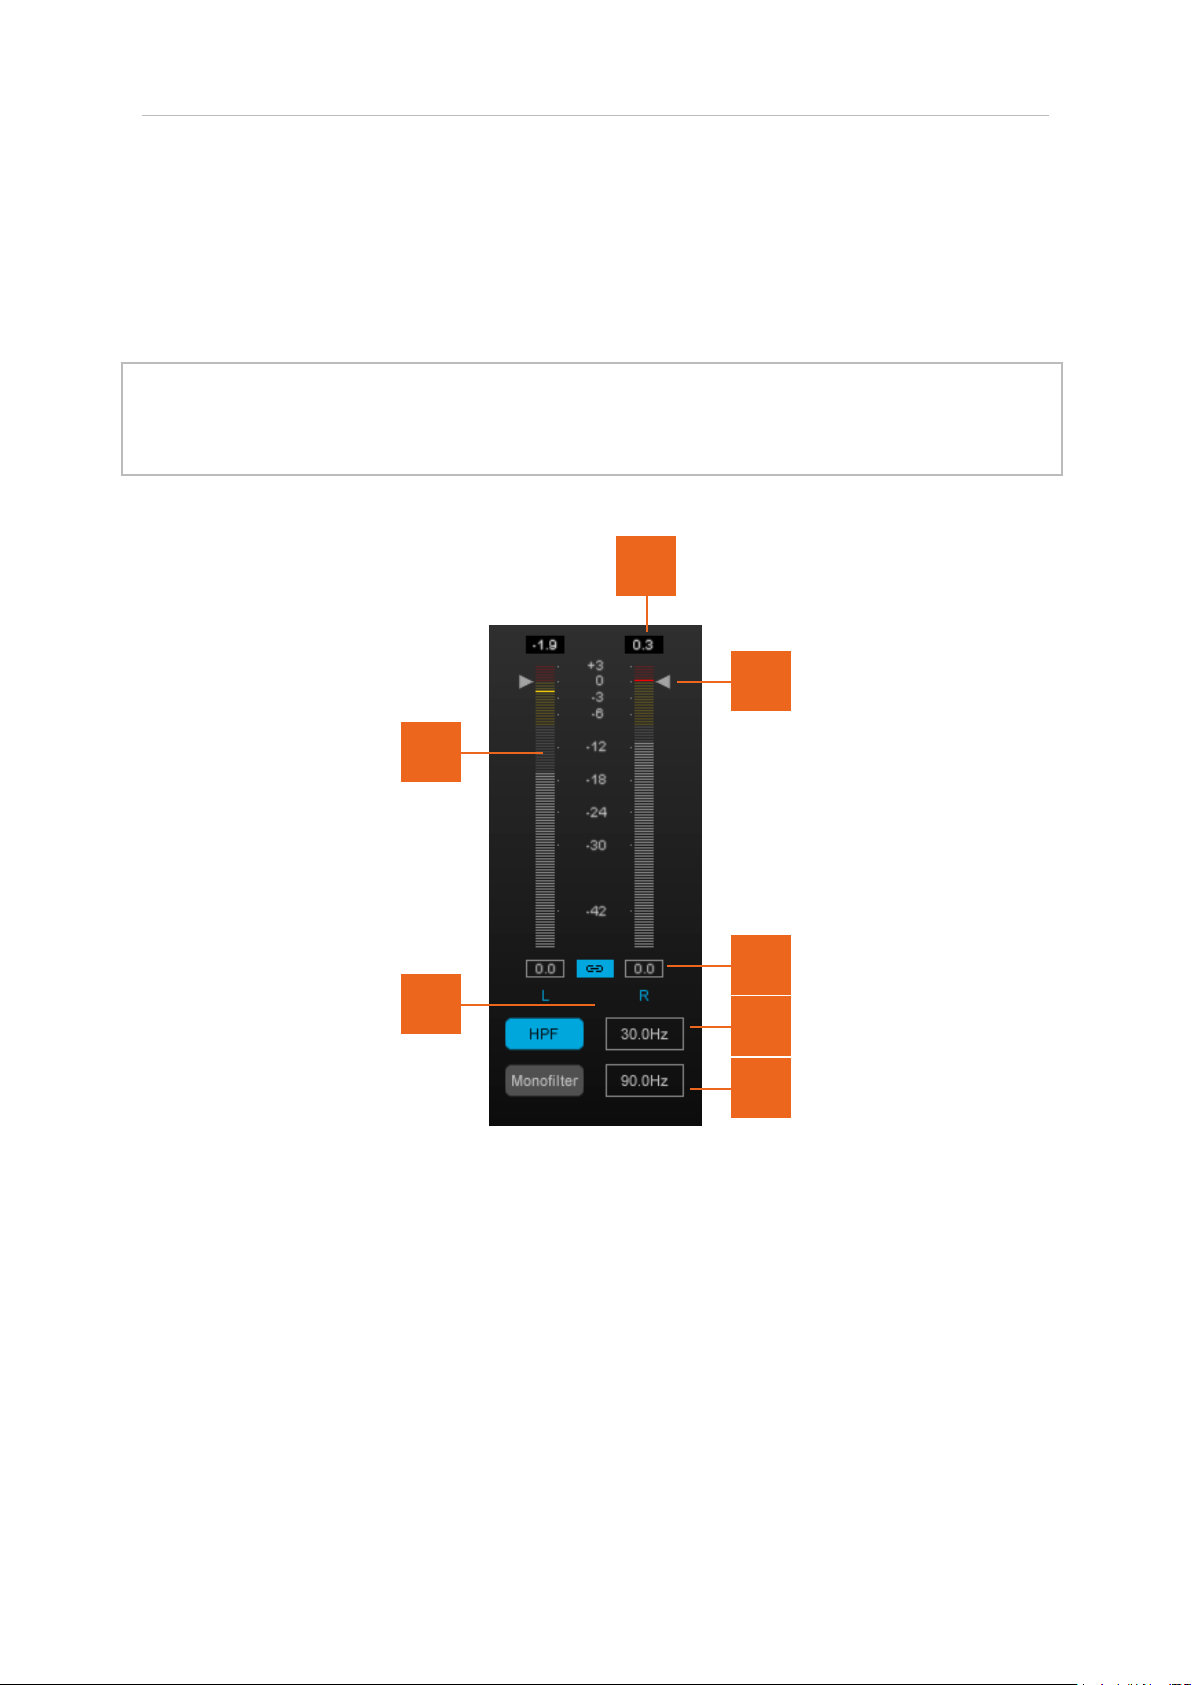
The stereo downmix section provides metering and additional control when the monitor
section is set to monitor the downmix.
NB. Prior to metering and nal adjustment, the surround audio is summed to generate
the stereo downmix using the downmix coecients as determined in the settings panel
(see below).
2
3
1
4
5
6
7
1 Output level meter. Indicates peak level output of downmixed stereo audio.
2 Margin. Shows remaining channel headroom. Click to reset.
3 Trim control arrows. These arrows can be dragged vertically to apply a dB offset
(gain or reduction) to the channels concerned. These are subject to the Link
‘pairing’ function below).
4 dB offset. The offset applied using the trim controls is shown here. Double click
to enter a numerical value directly.
5 Link. Pairs Left and Right channels, mirroring changes to one side on the other.
© 2018 NUGEN Audio
12
Contents
Page 13

Halo Downmix Operation Manual
6 High pass lter. Rolls off low frequency energy below the cut-off point when
activated.
7 Monolter. When active, this control automatically sums low frequency energy
to mono. This can be helpful when mixing down highly stereo material for TV
reproduction where power distribution and stereo imaging may be a concern.
© 2018 NUGEN Audio
13
Contents
Page 14
Halo Downmix Operation Manual
Settings panel
In addition to a number of presets for typical use, Halo Downmix can be customised to
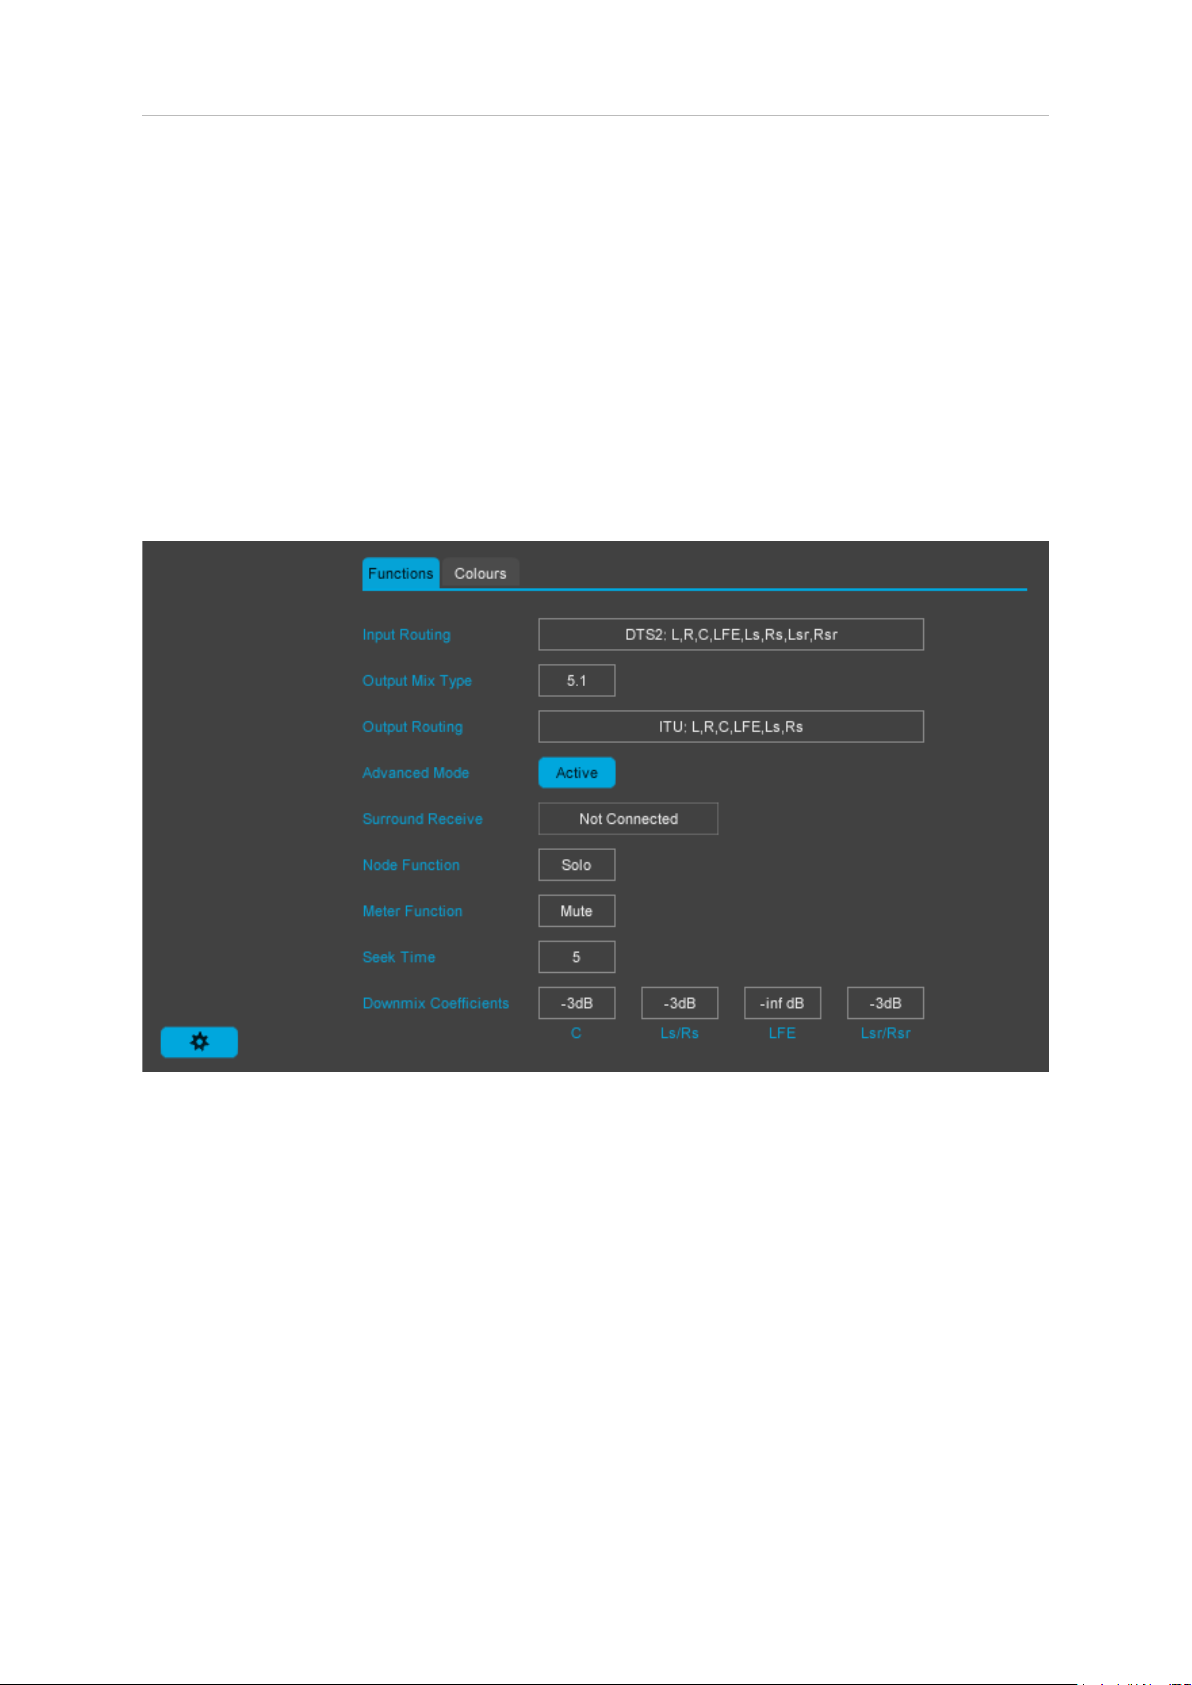
a high level via the options in the settings panel. The settings panel contains two tabs;
Functions - the main parameters governing the operation and set-up of Halo
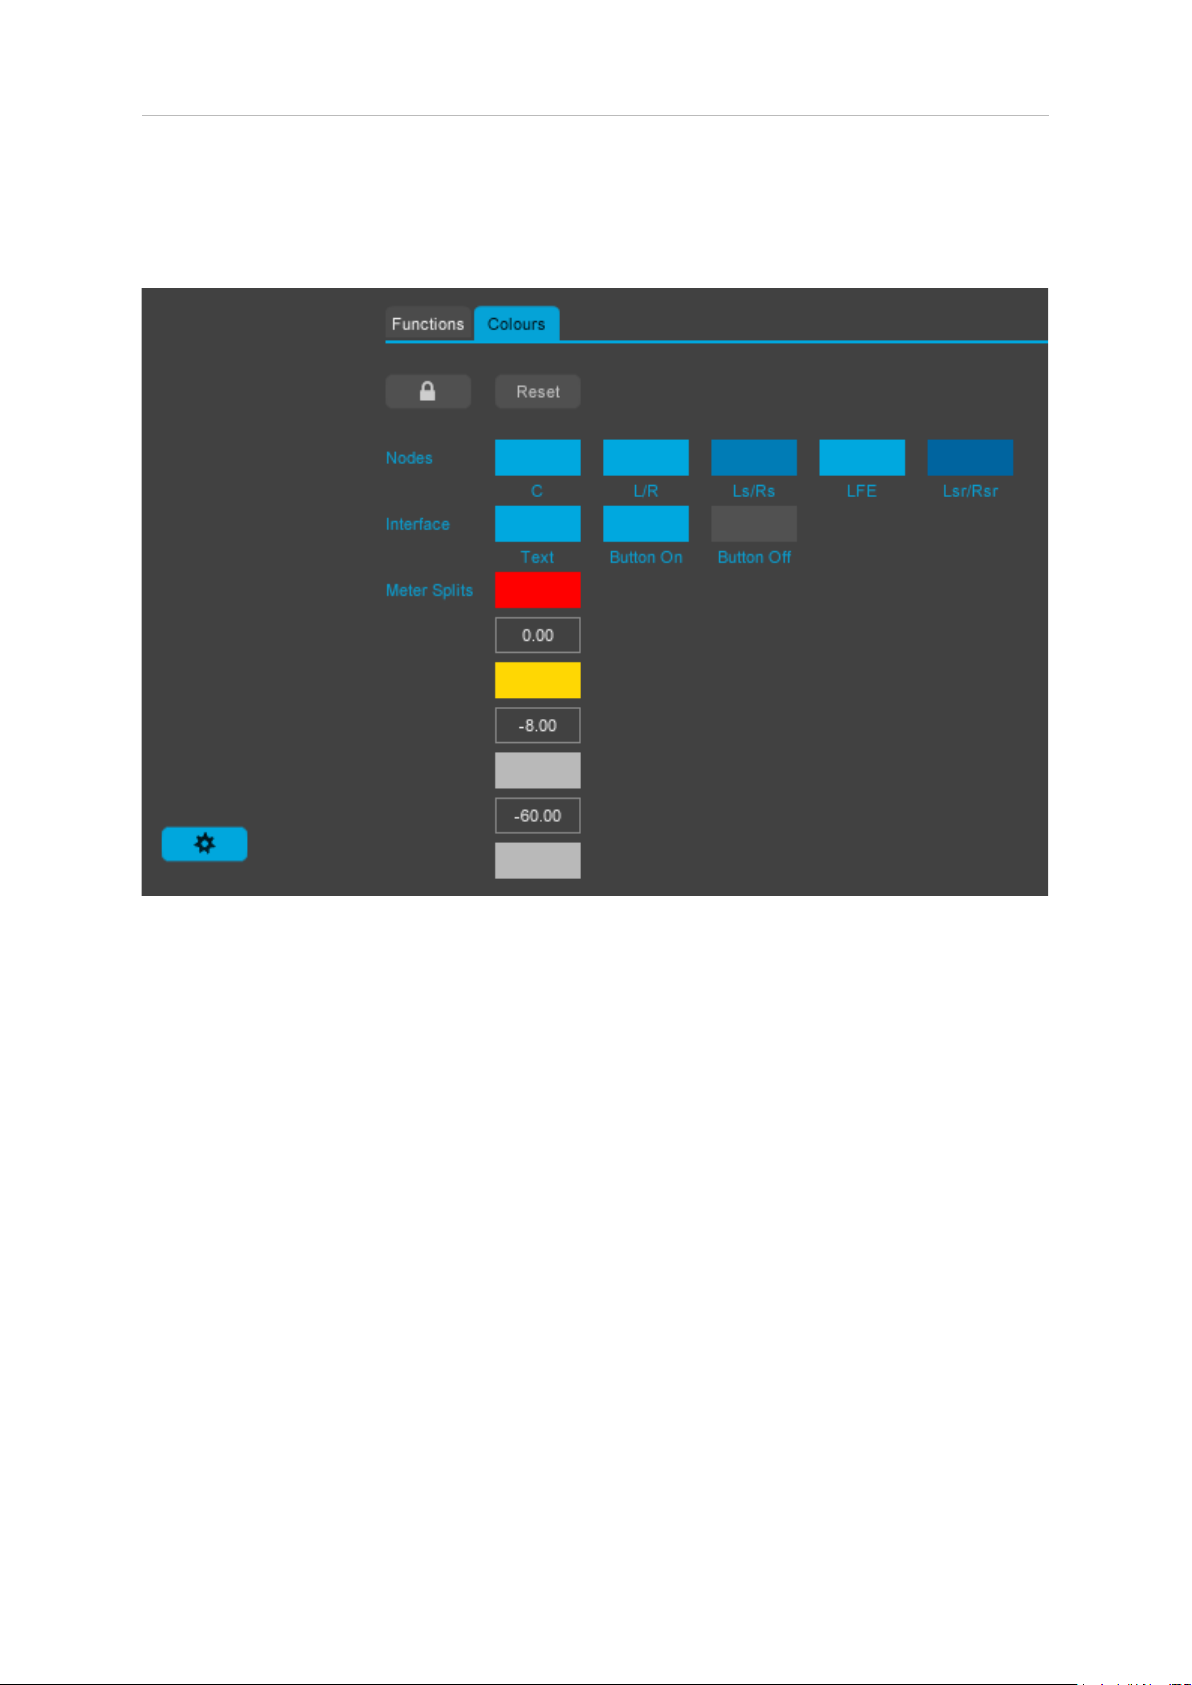
Colours - which is used to dene channel colours and meter split colours
Functions
Input routing. Depending upon the DAW/NLE and/or project requirements, different
surround channel routings may be required. By default, Halo Downmix will generally
choose the appropriate input for the DAW/NLE in question, however, if the routing is
not as expected/desired, these can be changed using the 'Routing' option in the
settings panel, which allows for a number of different standard congurations.
Output mix type. This is used in some versions of Halo Downmix to determine the
type of Downmix to be performed where this is not automatically determined by the
type of track the plug-in is inserted onto.
Advanced mode. When active, the full (advanced) control interface is displayed. If
de-activated, the interface will switch to compact mode. Most important options are
available within compact mode, allowing for a simpler workow and freeing up more
screen space.
© 2018 NUGEN Audio
14
Contents
Page 15

Halo Downmix Operation Manual
Surround receive. This drop down menu is used to select a NUGEN Audio Receive
plug-in. See the section on monitoring for operational details.
Main node function. Determines whether clicking a channel node on the main
interface engages the Solo or Mute function.
Meter function. Determines whether clicking a channel label on the meter bars in the
output and monitoring section engages the Solo or Mute function.
Seek time. This parameter determines the amount of time the delay 'Seek' function will
use to determine a value. The default setting is usually suitable, however in
complex mixes with high channel counts (eg. 7.1.2), more audio pairs must be
compared and on occasion a higher value will be required.
Downmix coecients. Downmix coecients are the way that a 'standard' downmix is
produced from a surround input. Typically these are those as specied in ITU-R BS.775,
although alternatives are sometimes used and can be implemented here.
In normal operation, Halo Downmix bypasses these settings and uses the gain
structure as implemented in the main interface. The downmix coecients are used
when the surround input is listened to in stereo through the combination of 'In' and
'Downmix' in the monitor section of the plug-in. This allows for a quick and easy
comparison between the Halo Downmix stereo output and a typical 'in the box'
downmix.
© 2018 NUGEN Audio
15
Contents
Page 16
Halo Downmix Operation Manual
Colors
Colours are automatically saved with the preset.
Lock. The Lock control can be used to prevent preset-recall overwriting established
colour sets with those saved with the preset.
Reset. The Reset button can be used at any time to restore default colours.
Nodes. These colours set the colours for each channel. This is also used to determine
the colour spectrum used by the surround analysis veiw.
Interface. These colours dene the global colours used by the remainder of the
interface and can be used to tweak to suit a user dened set of node colours.
Meter splits. The Meter splits are persistent settings and only affect the meters on the
Center and I/O panels.
© 2018 NUGEN Audio
16
Contents
Page 17

Halo Downmix Operation Manual
3D Immersive Audio Extension
The 3D Immersive Audio optional extension for Halo Downmix expands the core Halo
Downmix algorithm, introducing the ability to handle 7.1.2 format les.
This extension expands the Halo Downmix interface, introducing additional visual
feedback and a number of additional parameters.
All operational functionality is analogous to 5.1 and 7.1 operation as discussed above.
© 2018 NUGEN Audio
17
Contents
Page 18

Halo Downmix Operation Manual
Applications
Surround to stereo downmix.
In standard mode, Halo Downmix operates as a surround-to-stereo downmixer.
Stereo mixes are required from surround material in numerous situations.
A standard downmix is usually generated by simply mixing together the surround output
according to standard downmix coecients, however, this can often lead to
unsatisfactory results, particularly if legacy upmix practices have been employed in
generating the original surround mix. Halo Downmix can be quickly employed to
mitigate these issues eg. controlling excessive diffuse sound from added articial
reverberation, or removal of delay artefacts introduced in the rear channels.
Halo Downmix can be quickly deployed to produce a more controlled, coherent
stereo mix. Typical applications include:
• Stereo Mix production for Television within a Surround workow.
• Producing a controlled, precise stereo downmix of a 7.1 feature lm.
• Generating a stereo mix from surround recordings where no stereo recording
exists.
• Producing stereo interim listening mixes in a surround workow.
Surround to surround.
In surround to surround mode, Halo Downmix can be used to optimise an existing
surround mix, re-balancing levels, controlling the general direct vs diffuse surround
balance and brightening or toning down real channels for a more balanced surround
presentation.
Surround to surround to stereo.
Halo Downmix can also be used in conjunction with the Receive plug-in (see above)
to enable a parallel surround/stereo workow.
This workow allows for rapid A/B listening checks between surround and stereo
downmix. This mode is particularly useful for:
• Optimising a surround mix for better stereo downmix (standard coecients)
• Harmonising surround and stereo experiences, producing both a modied and
stereo mix
© 2018 NUGEN Audio
18
Contents
Page 19

Halo Downmix Operation Manual
Reporting a Problem.
If you encounter a problem with any of NUGEN Audio’s products, please let us know, to
help us improve them.
Please email NUGEN Audio at [email protected] giving a clear explanation of
the problem. Please state how frequently you’ve experienced the problem. If there are
any particular steps you need to go through to see the problem, please detail these.
Please also state your operating system, and the rough specs for your machine (e.g.CPU speed, RAM) - in Windows XP you can get this information by rightclicking “My
Computer” and selecting properties.
Please be patient with any problems you may experience, particularly with products at
a beta stage of release. At NUGEN Audio we take problems with our software seriously,
and will endeavour to correct them as quickly as possible.
© 2018 NUGEN Audio
19
Contents
Page 20

Halo Downmix Operation Manual
Version History
1.0 Initial release
1.1 3D Immersive Audio extension added
Multichannel to multichannel (beyond stereo) support added
Centre divergence control added
Several minor bug xes
VST2 support retired
1.2 New ranges for downmix coecients added
LFE LPF enable control added
LFE LPF lter cutoff control added
Netix preset added
© 2018 NUGEN Audio
20
Contents
Page 21
Halo Downmix Operation Manual
© 2018 NUGEN Audio
www.nugenaudio.com
21
Contents
 Loading...