

Page 1
Fire-Fountain Setup 6’ & 8’
Garden
Create your own Oasis Indoors or Out*
Fall
C
E
R
T
F
I
I
E
D
P
E
L
S
I
M
Easy Install Just Simple Steps
5
We strive to make your installation experience just as pleasant and relaxing as our fountains. Our “Certified Simple” instructions require no
tools and can have you enjoying your fountain within minutes of unpacking. Follow the 5 simple steps below to create your own urban oasis.
FYI: You will need an additional 6” for the 6’ model and 7” for the 8’ model above the overall height of your fountain to access the disperser bar and light
tray located under the header for maintenance. When selecting your fountain placement please keep this in mind.
We advise running your fountain 24/7 whenever possible. Standing water will grow algae or become stagnant and slimy. Running your fountain continuously,
while maintaining the proper water level will keep the maintenance down to a minimum and lengthen the life of your pump.
Often people are tempted to use chlorine or bleach to clean their fountain, this is unfortunately one of the worst things you can do. Chlorine or most products
ending in “ine” or “ide”will ruin a finish quickly and damage your pump. We recommend non-toxic additives like Fountec (an algaecide) and Protec (a mineral
and scale preventative) should you use tap water. These are available through your authorized Bluworld dealer or Bluworld
HOMelements.
IMPORTANT: NEVER USE THE FIRE BURNER WITHOUT RUNNING THE FOUNTAIN AT THE SAME TIME. Damage or injury may occur
Read the Fire Manual thoroughly before using the burner(s)
DO NOT leave slack cord in the base
DO NOT allow water to splash inside or fill the burner
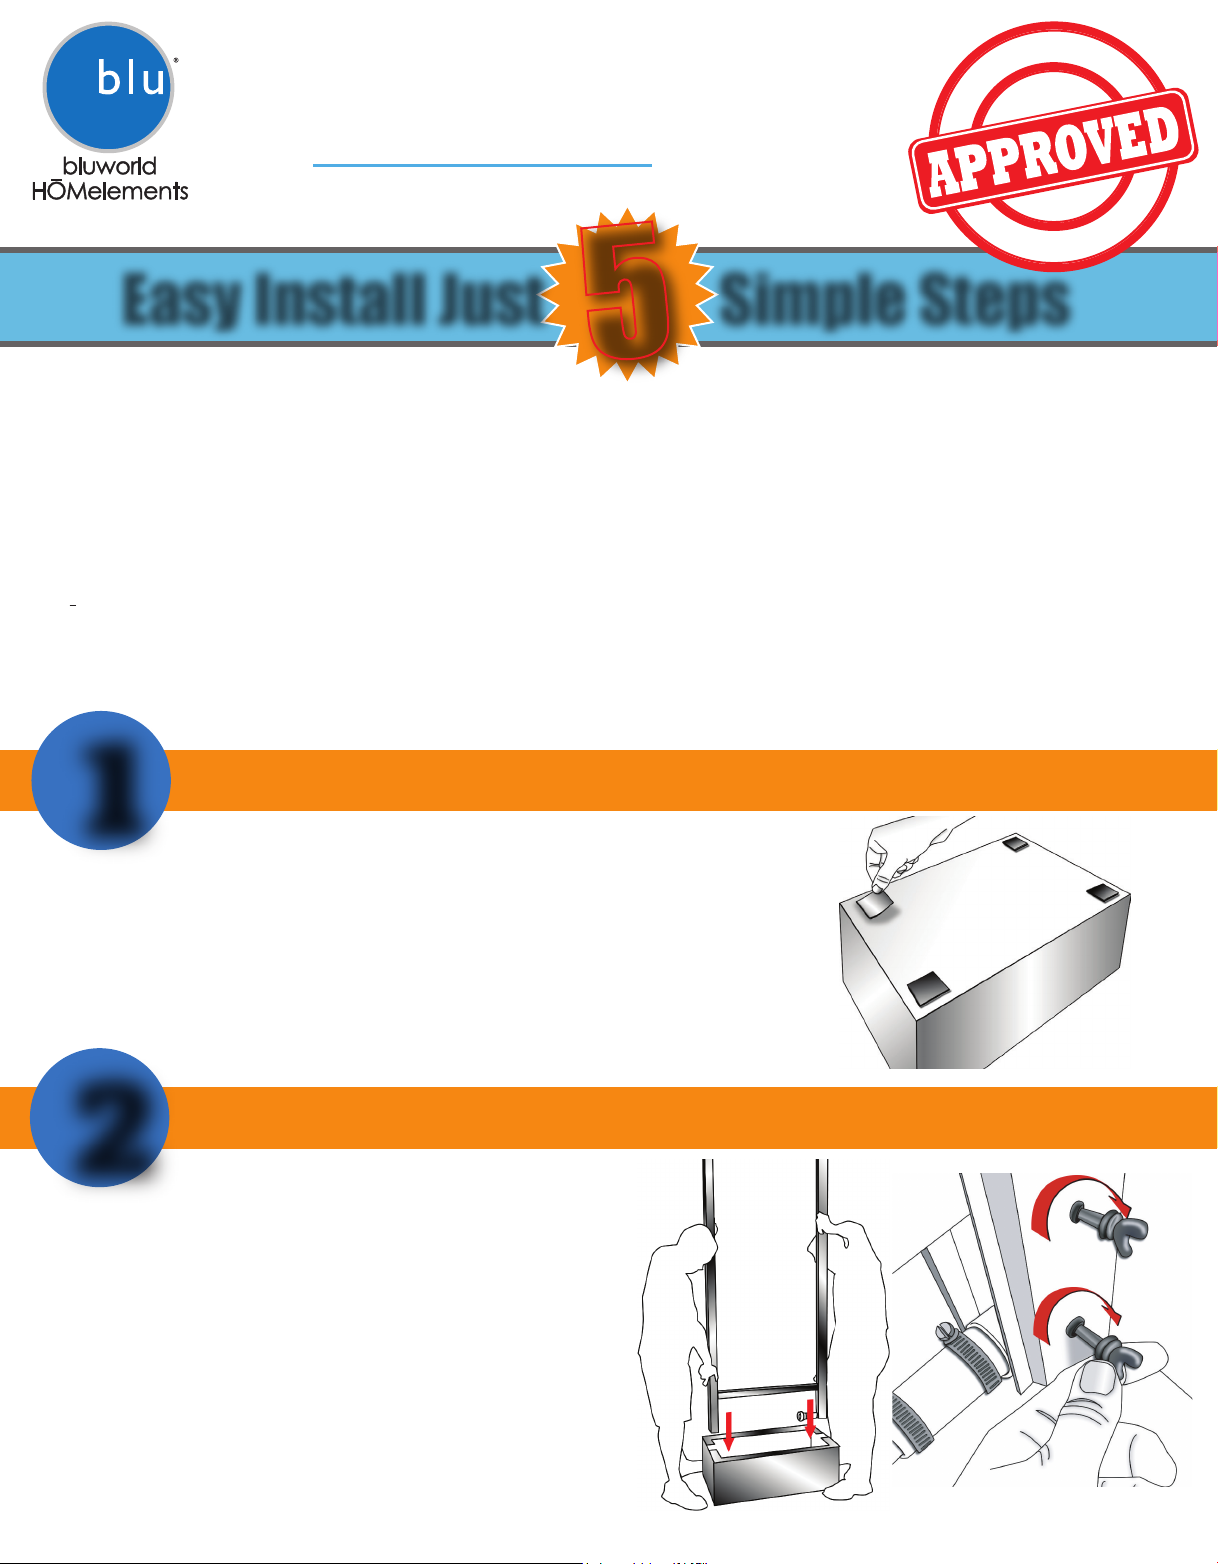
Place the Base
1
If you are placing your fountain on a hard flooring surface such as wood or tile please use the
included peel and stick rubber pads for protection against marring. Place one pad on all four
corners of the bottom of the base (Fig 1.A). If placing on carpet you may skip this step.
2
When considering a location keep in mind the closest electrical outlet and ease of
accessibility for maintenance. Once you have settled on a location for your Gardenfall position
the base so the electrical access hole is to the rear.
Insert the Panel
Determine the front of the panel. For clear glass Gardenfall
fountains the PVC disperser located at the top of the panel
indicates the front or ‘flow side’ of the panel. Placement of the
panel inside the base will require two people. Note the LED light
cord has been carefully fed through the panel upright at our factory.
Place the LED light cord inside the base.
Carefully slide the panel into the base (Fig 2.A). Make certain both
panel legs are touching the bottom of the base and are not sitting
on the light cord. Feed the light cord out through the electrical
access hole on the side of the base.
Pull all the extra cord out. DO NOT leave slack cord in the base.
With the panel now in place you will need to tighten the thumb
screws in the base. There are two screws on each side to secure
the panel in a vertical position (Fig 2.B).
FIG 2.A
FIG 1.A
FIG 2.B
Page 2
Pump Assembly & Connection
3
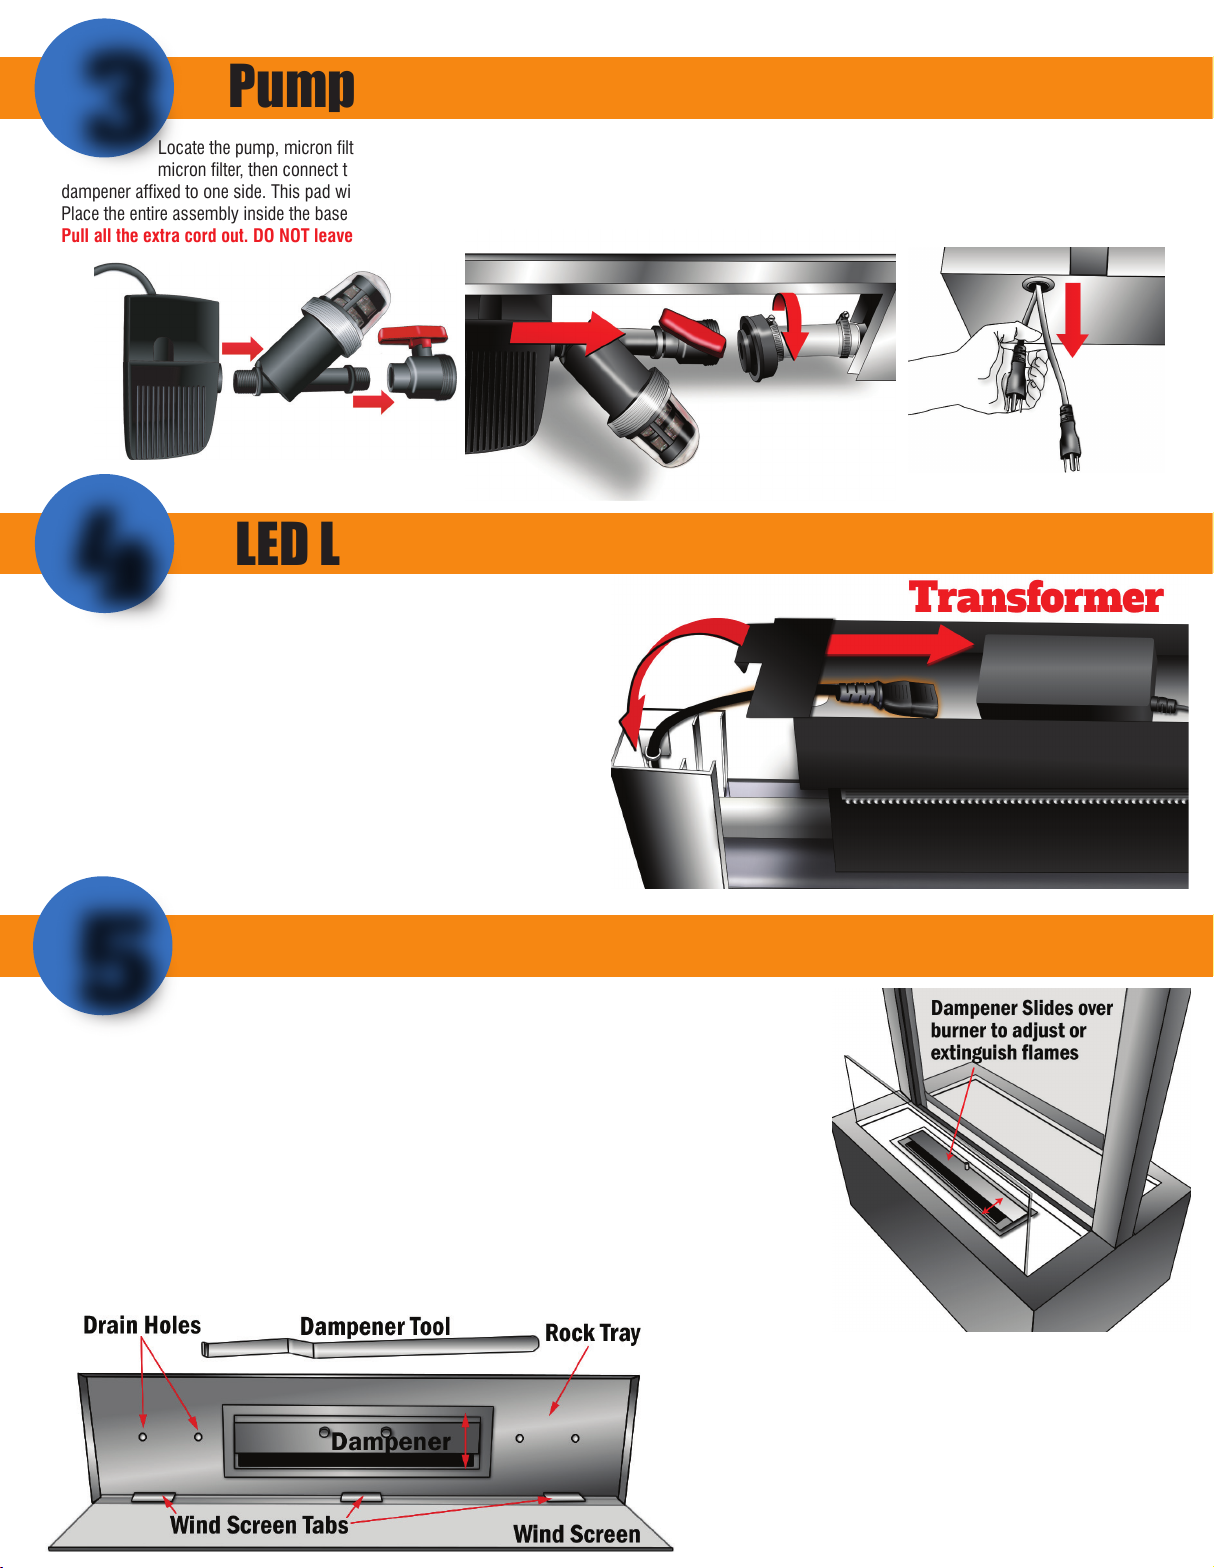
Locate the pump, micron filter and flow valve with the“Quick Connect” assembly. Simply thread the flow valve and “Quick Connect” to the
micron filter, then connect the assembly by screwing it into the pump output port (Fig 3.A)(Do not over tighten). Your pump has a vibration
dampener affixed to one side. This pad will rest on the bottom of the base. Make certain the flow adjuster’s red handle is facing up for easy access (Fig 3.B).
Place the entire assembly inside the base with pump pad side down. Take the pump cord and feed it through the electrical access hole (Fig 3.C).
Pull all the extra cord out. DO NOT leave slack cord in the base.
FIG 3.A FIG 3.B
LED Lights and Header
4
Locate the LED Light tray. Inside the top of the tray is the remote
receiver and the transformer. The LED light tube is to the front.
Note there are two tabs on either side of the light tray, these tabs rest inside
the panels uprights. Take the power cord and feed it through the opening under
the left tab. Lower the Light tray onto the fountain uprights. Place the tabs
inside each upright opening and center the light tray from left to right and
connect the light cord to the transformer. Push the light tray back so it is in full
contact with the stainless steel spill over lip.
Plug in the LED light cord in your electrical outlet. Read the Remote Control
Guide for more information about the LED light displays and operation.
Fill and Start Up
5
The water level must be maintained at least 1.5”-2” above the pump. If the water level drops below the pump,
splashing and damage may occur. This will also void the warranty.
Never operate your fountain dry or with low water levels.
Before turning on your fountain for the first time make certain the flow adjuster is fully open, having the flow
valve in a closed position puts excessive pressure on the pump and may cause it to overheat and break. Plug
in the pump cord. The flow valve lets you increase or decrease the amount of water flowing over the
waterfall. You will need to adjust the flow valve to the proper rate for solid water coverage but not so fast that
it causes splashing. Turn the flow valve down if the pressure is too strong and splashing occurs.
Slide the Header over the top of the light tray and fountain. Turn off the fountain and install the rear Rock Tray and
spread 3/4 of the Rocks evenly throughout the tray. Install the front burner rock tray, the welded tabs that hold the
glass wind screen are to the front. Take the burner assembly and drop it into the
We strongly suggest the use of distilled water. Fill the base with water, these are the models
water requirements: GF6 Center Mount-12 gallons GF8 Center Mount-17 gallons
rock tray, the burner opening is to the
front.
Slide the glass wind screen inside the
tabs, make certain it is fully seated.
Rest the Dampener on top of the burner, note it slides easily over the burner
opening back and forth. Using the dampener tool you can slide the
dampener by pushing or pulling against the dampener tab(s). You can adjust
the flame size up or down to your liking or extinguish the flames by covering
the burner opening completely.
Spread the remaining rocks in the front rock tray making certain not to cover
the burner or impede the dampener from opening or closing. Do not
allow rocks to fall inside the burner(s).
FIG 3.C
 Loading...