

Page 1
RIC (Receiver-In-Canal)
O P E R AT I O N S M A N U A L
Page 2

Page 3

Table of Contents
Overview
Features, Controls and Identification ................................. 2
Preparation
Batteries ............................................................................. 4
Battery Indicators ............................................................... 6
Insertion and Removal
Instant Fit Earbud ............................................................... 8
Custom Eartip ..................................................................... 9
Operation
On & Off ...........................................................................10
Multimemory Settings ...................................................... 11
Directional Settings .......................................................... 12
Telephone Use .................................................................. 13
T
2
(touch-tone) Function ...................................................16
Self Check......................................................................... 18
Reminder .......................................................................... 19
Summary of Settings ........................................................ 20
Hearing System Care
Instrument Care ................................................................ 22
Service and Repair ............................................................ 24
Troubleshooting Guide .................................................... 25
Tips for Better Communication
For You ............................................................................. 26
For Your Family and Friends ............................................. 27
FDA Information
Required Information .......................................................28
1
Page 4

2
Overview
Features, Controls and Identification
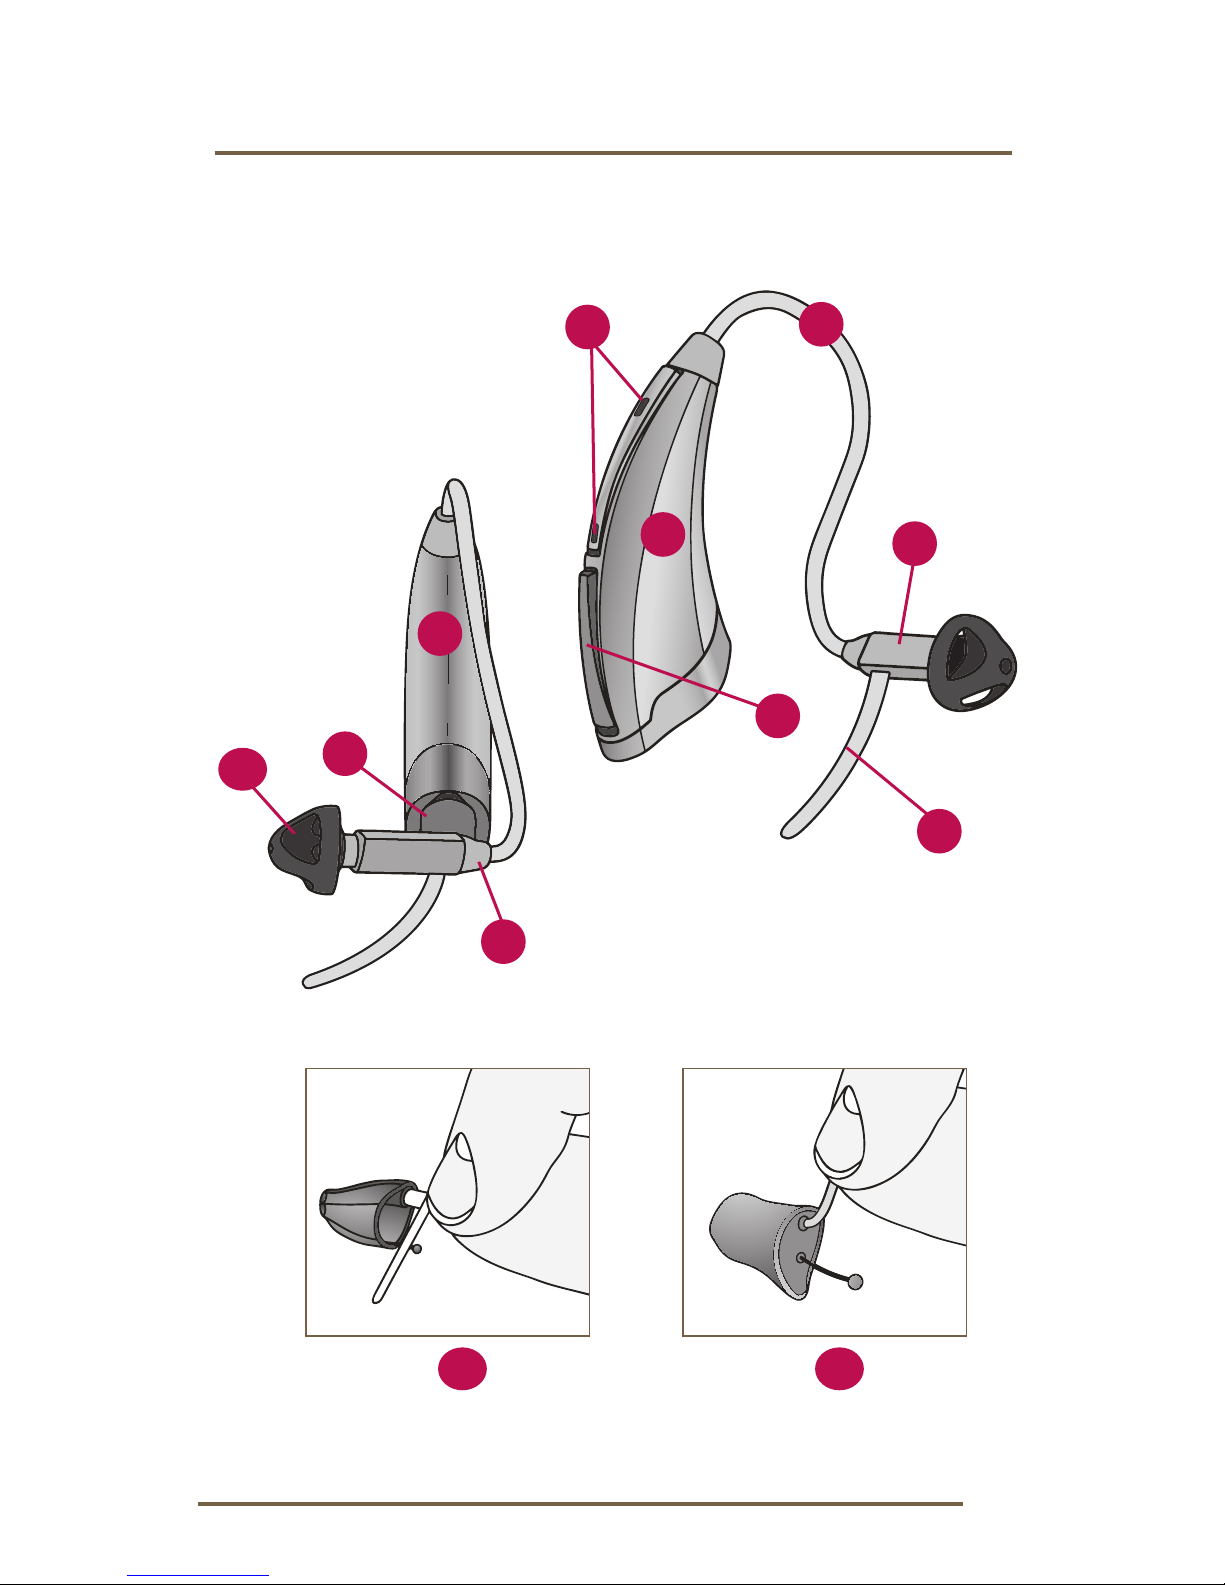
Your hearing system controls include:
1. Hearing Instrument
2. Cable
3. Receiver
4. Microphone(s)
5. Multimemory Button
6. Battery Compartment (on/off control)
Location of serial number
7. Retention Lock
8. Location of manufacturer’s name and
model name
9. Location of left/right side indicator
10. Instant Fit Earbud
11. Custom Earmold (optional)
12. RIC Custom Power Earmold (optional)
Page 5
3
2
Overview
3
1211
10
4
9
8
5
6
1
7
Page 6

4
Preparation
Batteries
Your hearing system uses a battery as its power
source. This battery size can be identified by the
brown (312) color code on the packaging.
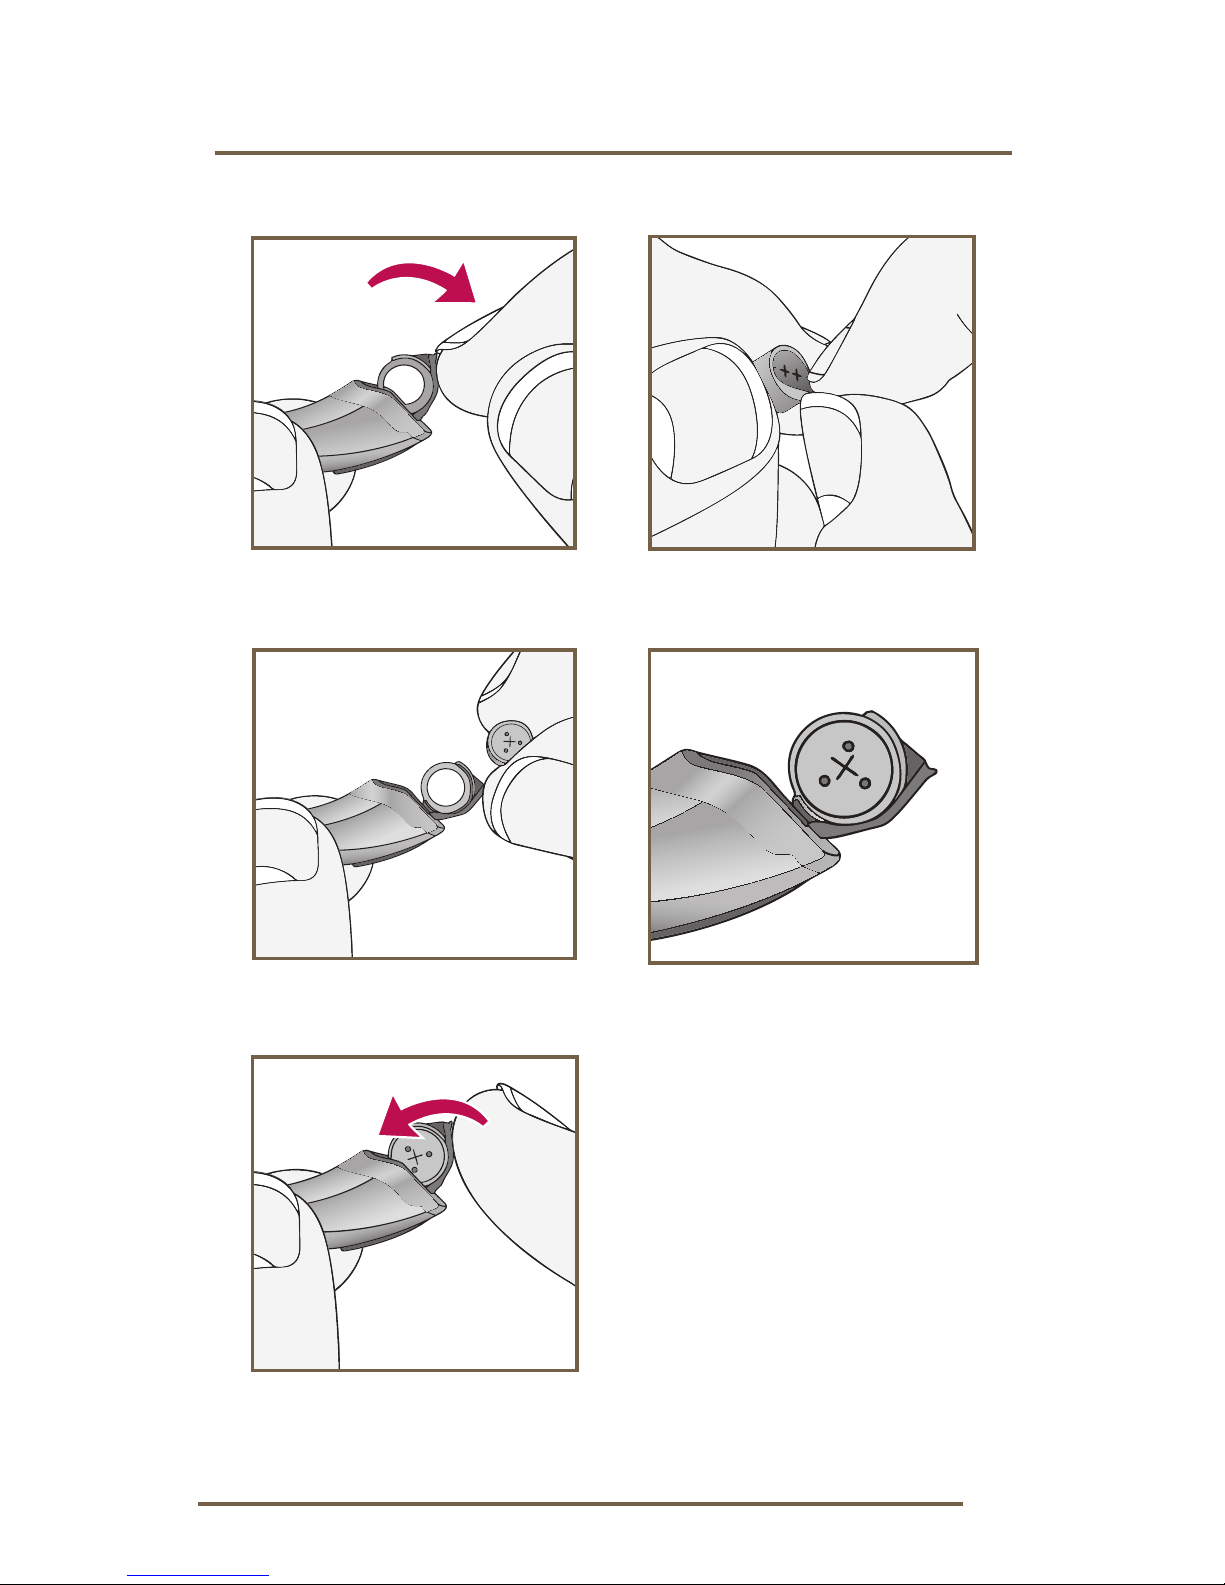
To insert or replace the battery:
1. Use the nail grip on the battery door.
2. Remove the tab from the new battery.
3. Open the battery door gently and remove
the old battery.
4. Line up the battery’s plus “+” sign (flat side of
the battery) with the “+” on the battery door.
5. Close the battery door.
Page 7
5
Preparation
1 2
3
4
5
Page 8

6
Preparation
Battery Indicators
An indicator will sound when the battery’s voltage
is low. You have approximately 5 minutes* to
replace the battery. An indicator will sound just
before the battery stops working.
* Actual time between low battery indicator and shut
down will vary depending on environmental noise
levels and brand of battery used.
Helpful Hints
• NEVER FORCE THE BATTERY DOOR SHUT;
this could result in serious damage; if the door
will not close securely, check that the battery
is inserted correctly
• Do not open the battery door too far or
damage is likely to occur
• Dispose of used batteries immediately in the
proper waste or recycling container
Page 9

7
Preparation
• Because batteries can vary in size and
performance, your hearing care professional
is your best source for lifespan estimates and
verification that you are using the proper size
and type
Warnings
Batteries are dangerous if swallowed. To help
prevent the accidental ingestion of batteries:
Keep out of reach of children and pets
Check your medications before taking them –
batteries have been mistaken for pills
Never put batteries in your mouth, as they can
easily be swallowed
National Button Battery Ingestion Hotline:
202-625-3333
Page 10
8
Insertion and Removal
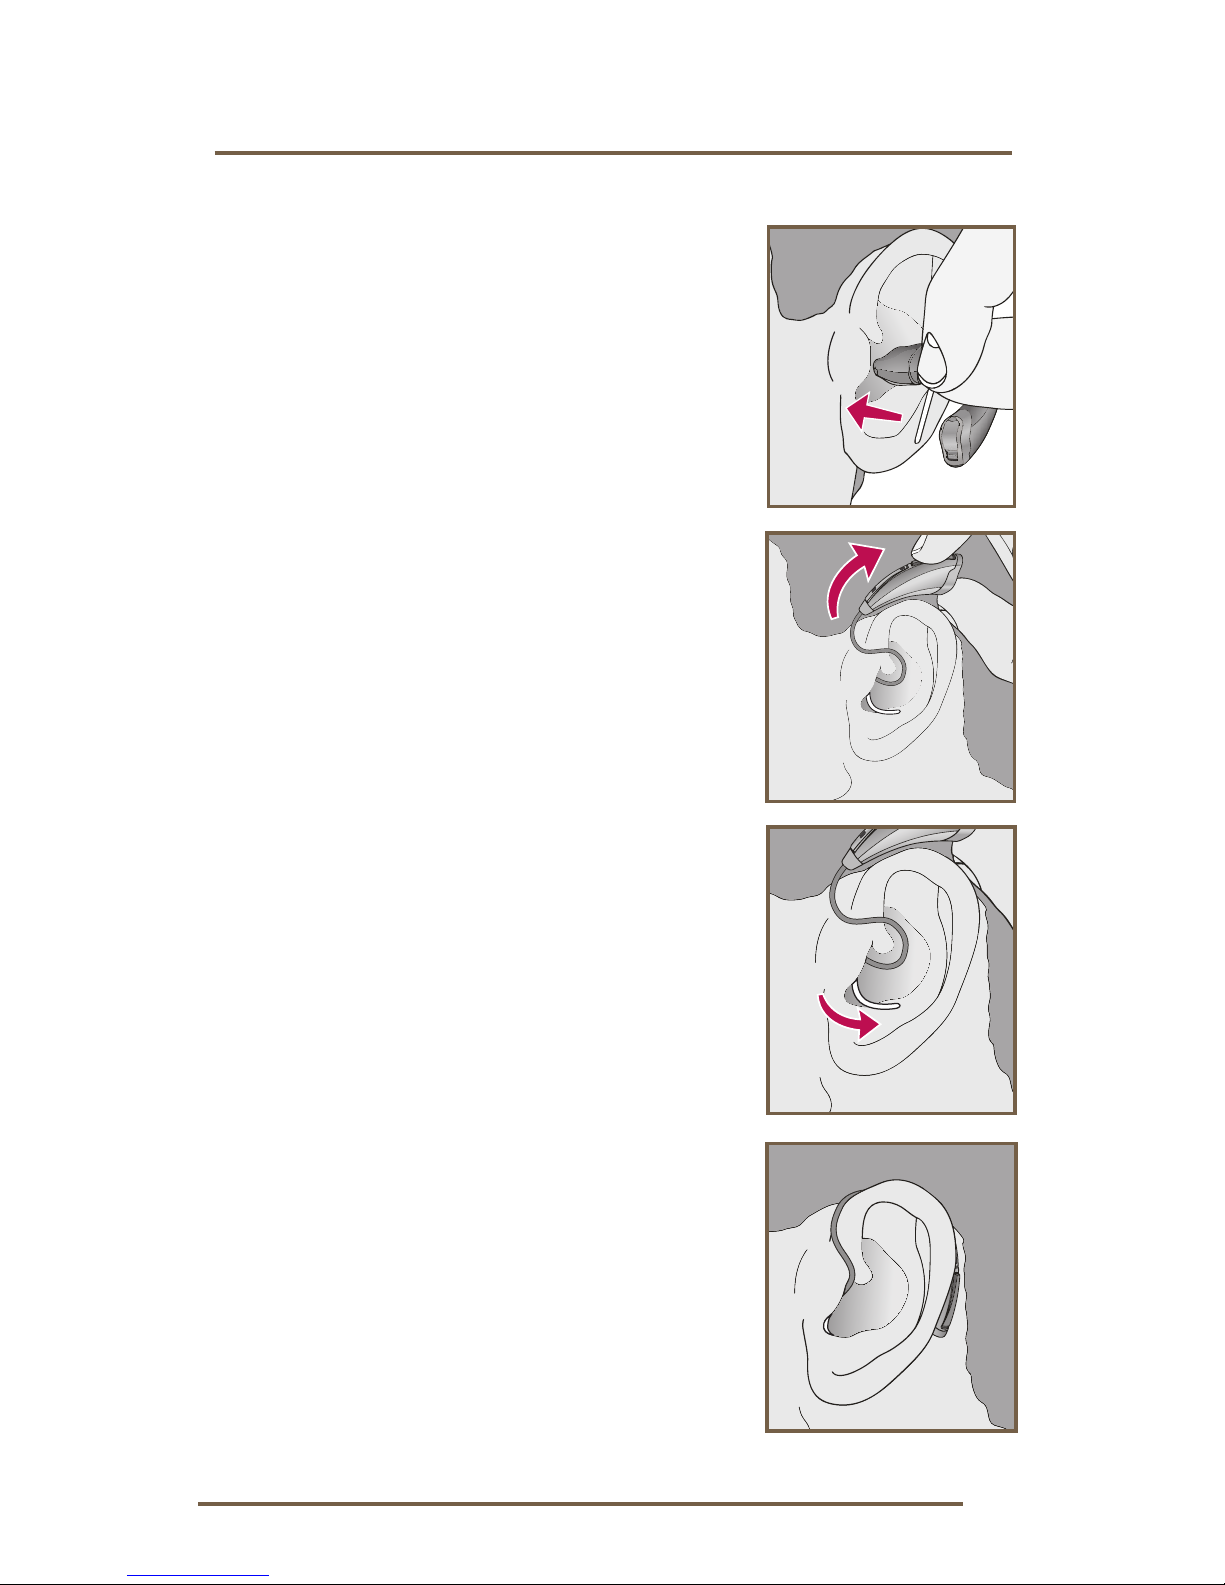
Insertion and Removal of
Instant Fit Earbud
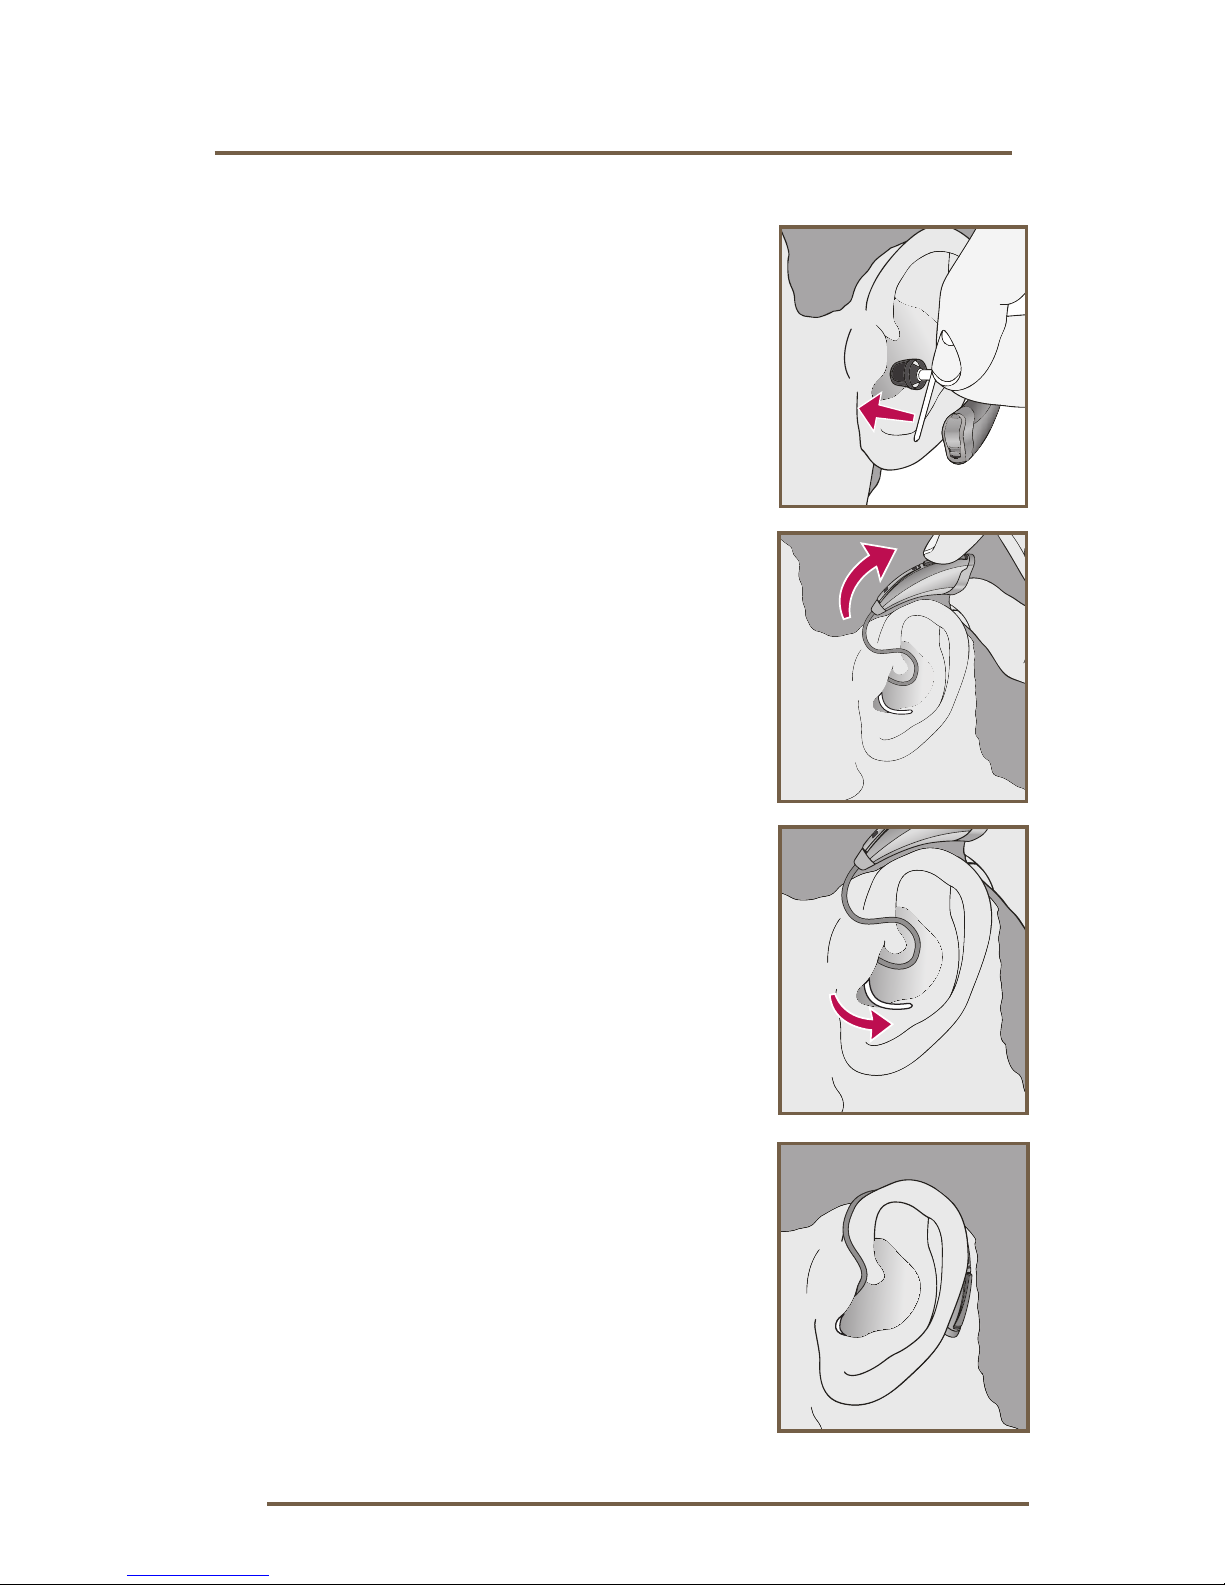
To insert the Instant Fit Earbud:
1. Hold the cable at the bend in front
of the receiver with your thumb and
forefi nger. Gently insert the receiver
into your ear canal.
2. Carefully place the hearing
instrument behind your ear,
wrapping it over the top of your ear.
3. Place the lock inside the bowl of
your ear.
To remove the Instant Fit Earbud:
1. Remove the lock from the bowl of
your ear.
2. Remove the hearing instrument
from behind your ear.
3. Grasp the receiver with your thumb
and forefi nger. Gently pull out of
your ear canal.
Do not pull with the hearing
instrument case as this may damage
the connection.
Page 11
9
Insertion and Removal of
Custom Eartip
To insert the Custom Eartip:
1. Hold the cable at the bend in front
of the receiver with your thumb and
forefi nger. Gently insert the receiver
into your ear canal.
2. Carefully place the hearing
instrument behind your ear,
wrapping it over the top of your ear.
3. Place the lock inside the bowl of
your ear.
To remove the Custom Eartip:
1. Remove the lock from the bowl of
your ear.
2. Remove the hearing instrument
from behind your ear.
3. Grasp the receiver with your thumb
and forefi nger. Gently pull out of
your ear canal.
Do not pull with the hearing
instrument case as this may damage
the connection.
Insertion and Removal
Page 12
10
Operation
Helpful Hints
•
Minor irritation and inflammation may occur as your
ear becomes accustomed to having an object in it;
if so, please contact your hearing care professional.
•
If an actual allergic reaction occurs, alternative
earmold materials are available; contact your hearing
care professional.
•
Severe swelling, discharge from the ear, excessive
wax, or other unusual conditions warrant immediate
consultation with a physician.
On & Off
To turn ON:
Insert a battery and completely close the
battery door.
To turn OFF: Open the battery door until the battery is
no longer touching the battery contacts.
Some hearing instruments are programmed to have a
Power-On delay. Your hearing professional will place a
check in the box below if your hearing instruments have
this feature.
The Power-On delay means that your instruments will
take several seconds to power up once they have been
turned on. This feature allows you to get the hearing
instruments in your ear before they start to amplify
sound. You may hear a tone series indicating that your
device is fully powered on.
My hearing instrument has a Power-On delay.
Page 13
11
Multimemory Settings
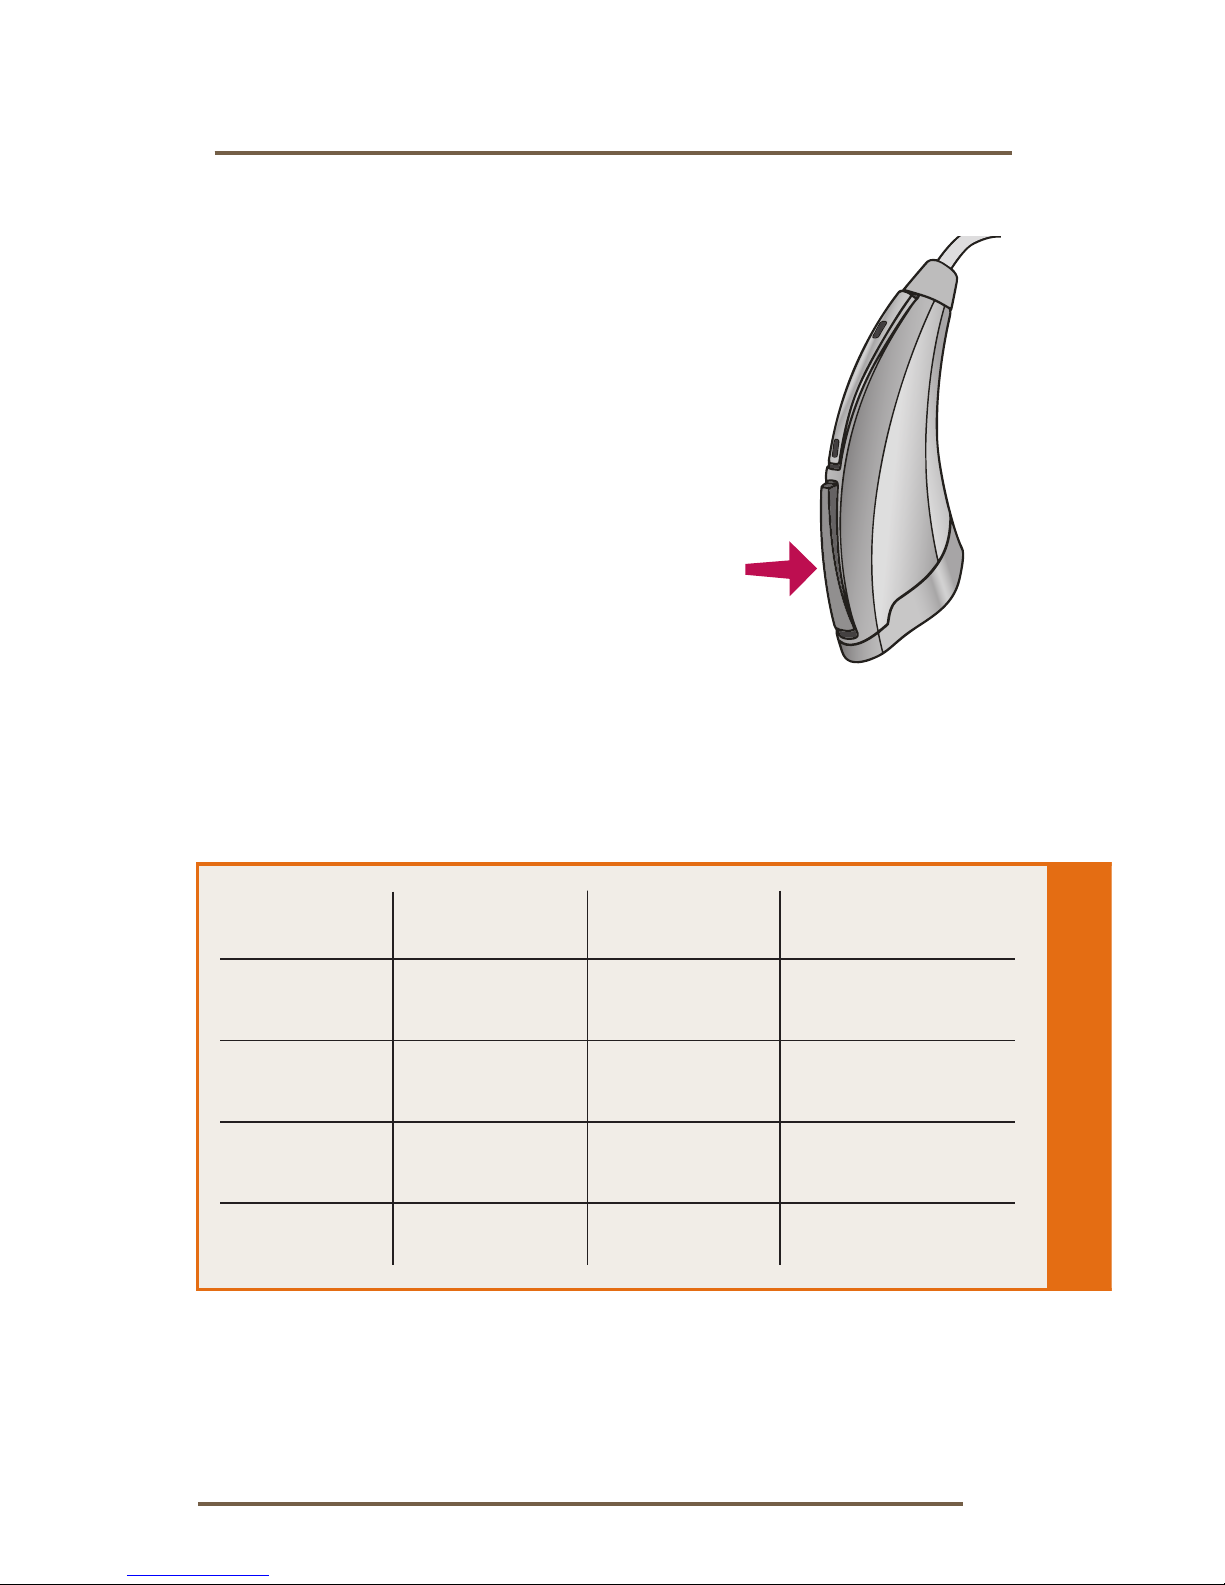
Your hearing care professional can
set up to four hearing programs
for you. These additional programs
are accessed by pressing the
Multimemory button inward.
When you press the Multimemory
button, you may hear a speech
indicator or a tone series indicating
the device has changed to the next
program. Your hearing instrument
has been set up with the following
indicators and environments:
Program Tone Speech Environment
1 1 Tone “One” Normal
2 2 Tones “Two”
3 3 Tones “Three”
4 4 Tones “Four”
Operation
Page 14

12
Directional Settings
Your hearing system has directional microphones to
help improve speech understanding in noisy situations.
Your hearing system has been set up with the
following directional settings:
When the directional microphones are activated
automatically (automatic), the hearing instrument will
continually monitor the environment and gradually
adjust to the appropriate mode to optimize speech
intelligibility. When the directional microphones
are activated by pushing the Multimemory button
(manual), the hearing instrument optimizes speech
when you select the directional memory.
Ask your hearing care professional about your
particular directional settings.
Program Directional Setting
1 Automatic Manual Off
2 Automatic Manual Off
3 Automatic Manual Off
4 Automatic Manual Off
Operation
Page 15
13
Telephone Use
Your hearing system has a telephone feature that
enables you to comfortably use the telephone
without removing your hearing instrument.
ATR or Autocoil:
Place the telephone handset in a normal
position and then shift slightly back. When
correctly positioned, you will hear an indicator
for the automatic activation of the telephone
program. When finished, the hearing system will
automatically return to the previous setting.
Operation
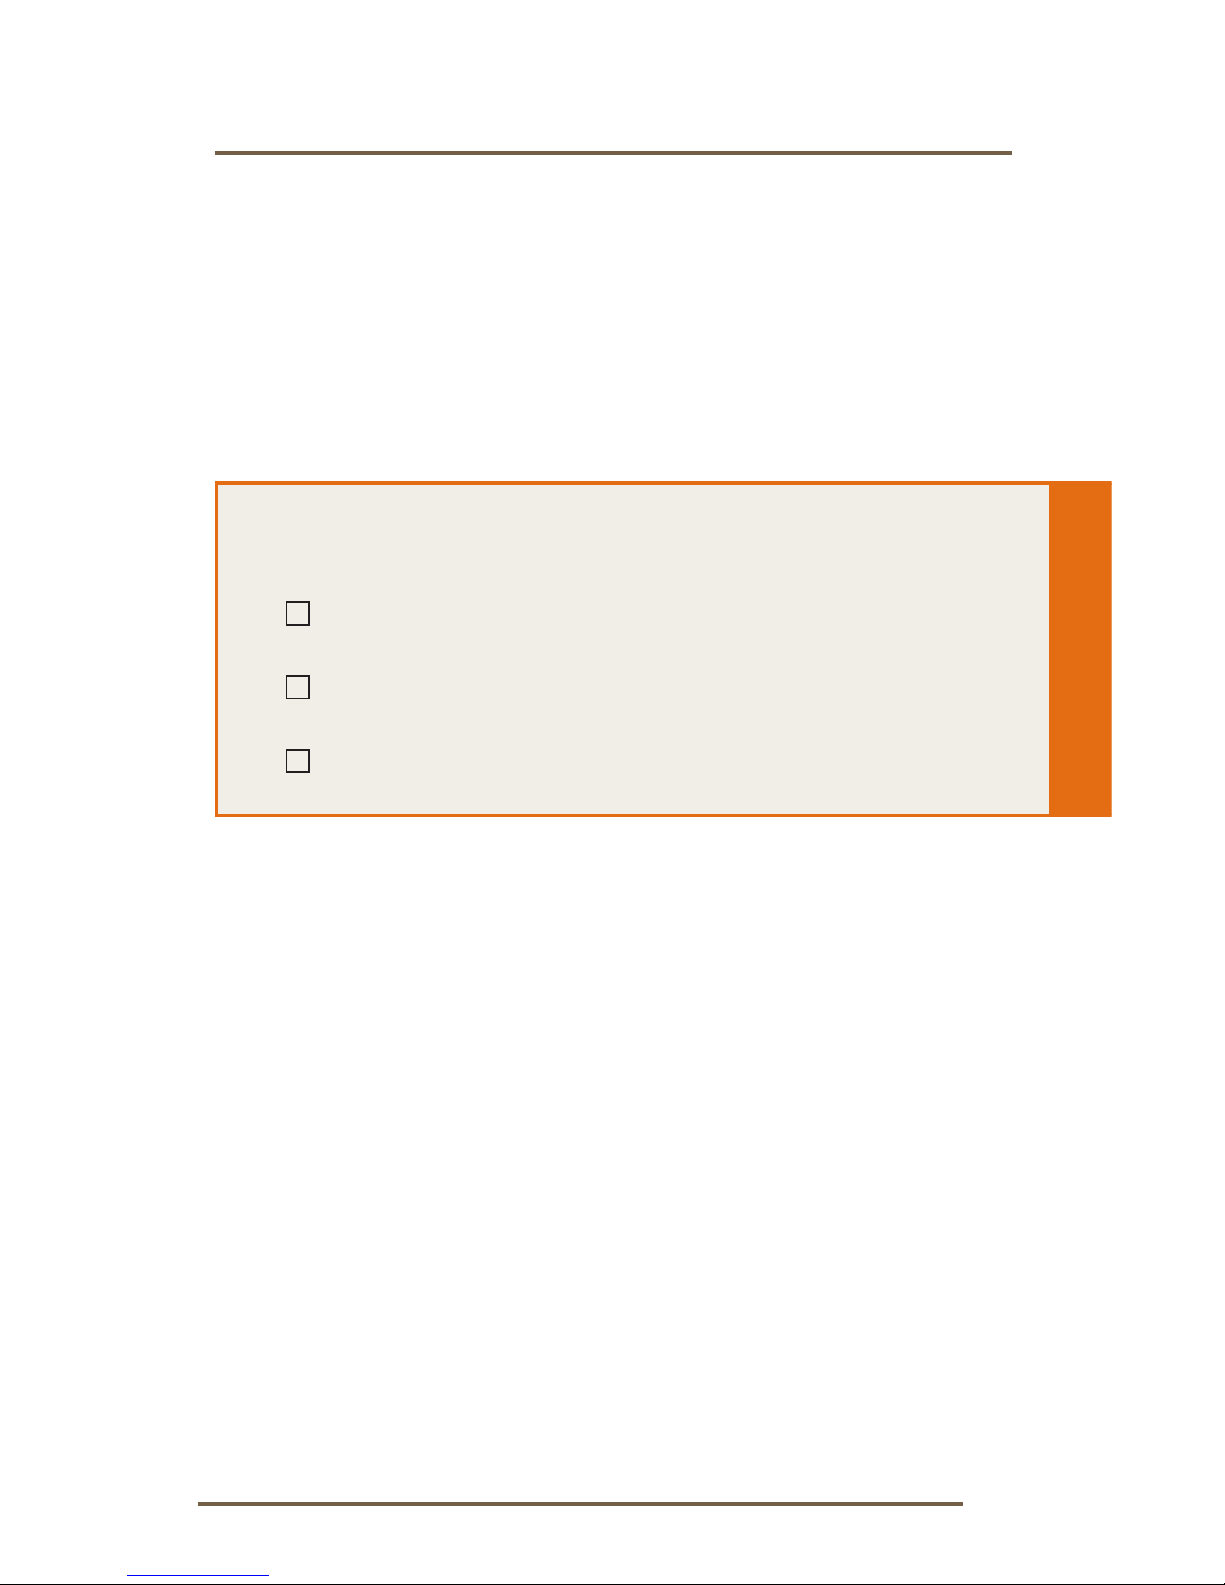
My telephone feature is:
Automatic Telephone Response (ATR)
Automatic Telecoil (Autocoil)
Manual Telecoil (Program #__________ )
Page 16
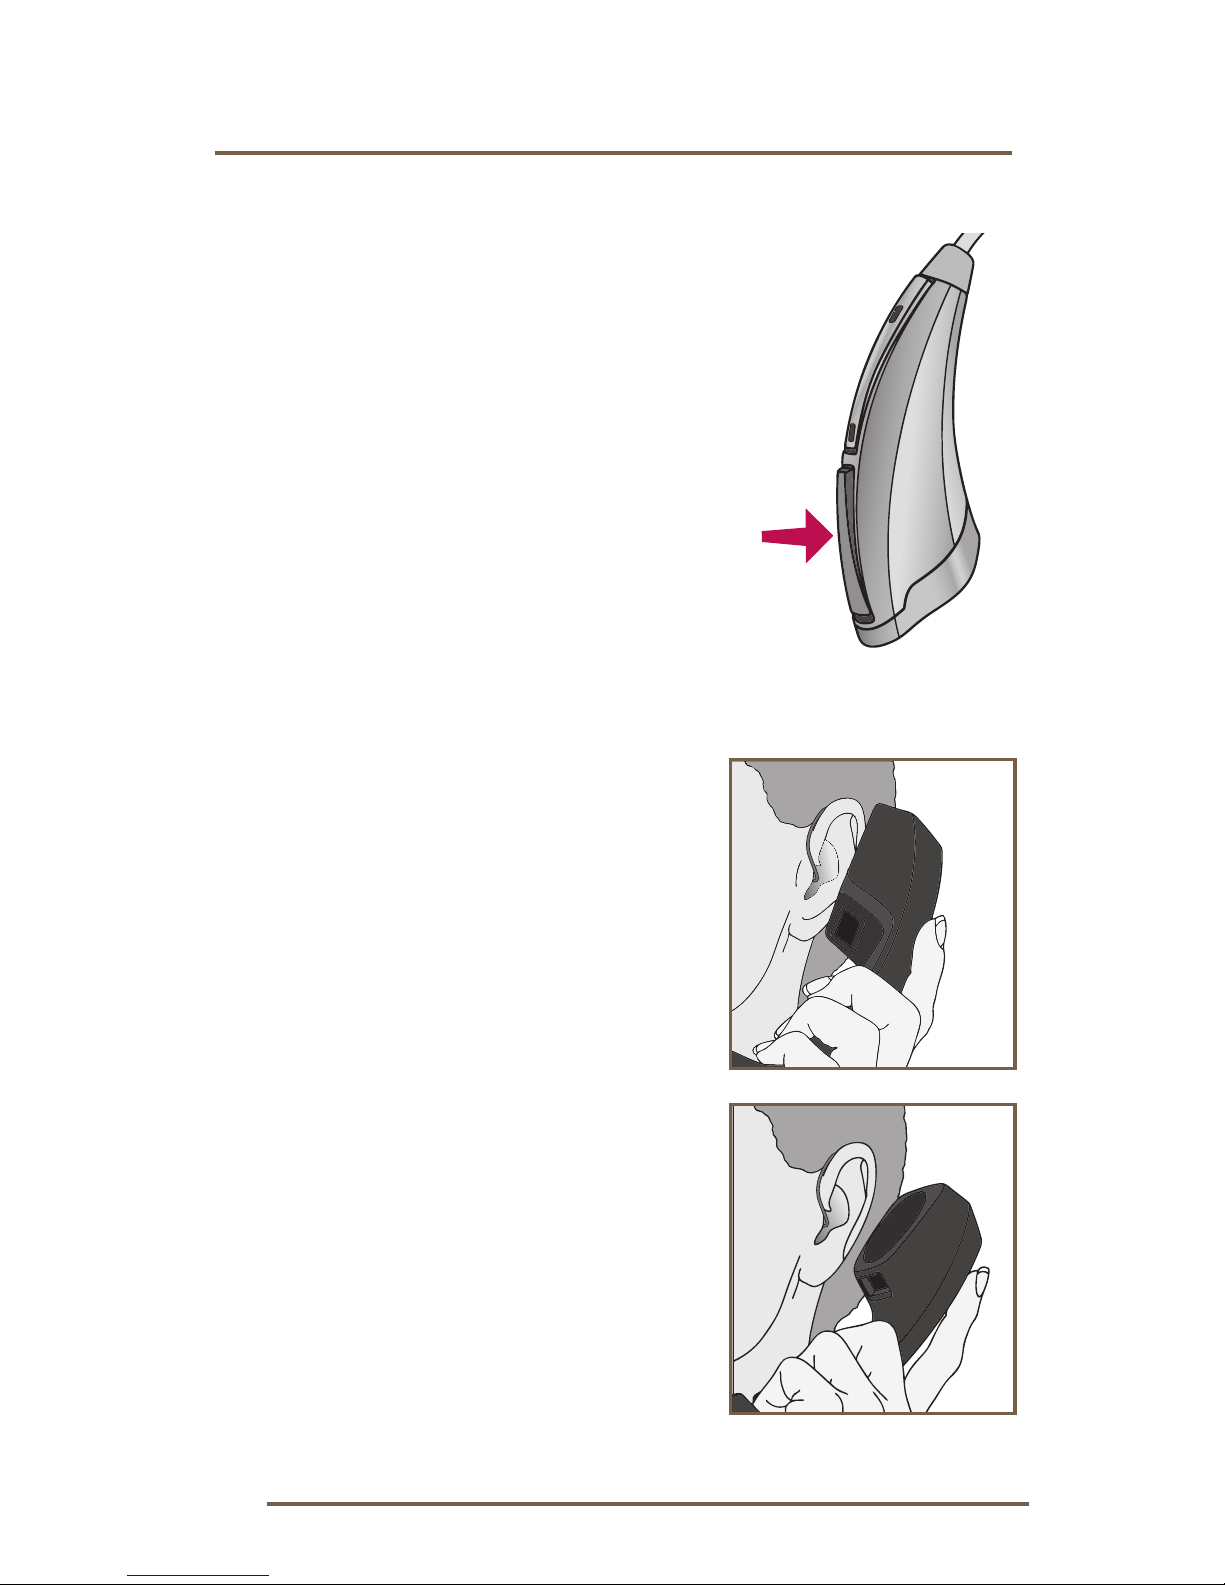
14
Telecoil and Manual Switching
Hearing instruments with a
manual telecoil allow you to
switch the devices to telephone
mode when needed.
Manually switched telecoils
are activated by choosing the
telecoil setting using the
Multimemory button.
General Telephone Use
Some hearing instruments
work best by holding the
phone close to, but not fully
covering your ear. In some
instances, if you encounter
whistling (feedback), tilt the
receiver at an angle until the
whistling stops. Your hearing
professional can provide
instructions and techniques
for your specifi c needs.
Operation
Page 17

15
Operation
DISCLAIMER – Some hearing aid users have
reported a buzzing sound in their hearing aids when
they are using cell phones, indicating that the cell
phone and hearing aid may not be compatible.
According to the ANSI C63.19 standard (ANSI
C63.19-2006 American National Standard Methods
of Measurement of Compatibility Between Wireless
Communications Devices and Hearing Aids), the
compatibility of a particular hearing aid and cell
phone can be predicted by adding the rating for
the hearing aid immunity to the rating for the
cell phone emissions. For example, the sum of a
hearing aid rating of 2 (M2) and a telephone rating
of 3 (M3) would result in a combined rating of 5.
Any combined rating that equals at least 5 would
provide “normal use”; a combined rating of 6 or
greater would indicate “excellent performance.”
The immunity of this hearing aid is at least M2/T2.
The equipment performance measurements,
categories and system classifi cations are based
upon the best information available but cannot
guarantee that all users will be satisfi ed.
NOTE: The performance of individual hearing aids
may vary with individual cell phones. Therefore,
please try this hearing aid with your cell phone
or, if you are purchasing a new phone, be sure to
try it with your hearing aid prior to purchase. For
additional guidance, please ask your cell phone
provider for the booklet entitled “Hearing Aid
Compatibility with Digital Wireless Cell Phones.”
Page 18
16
Operation
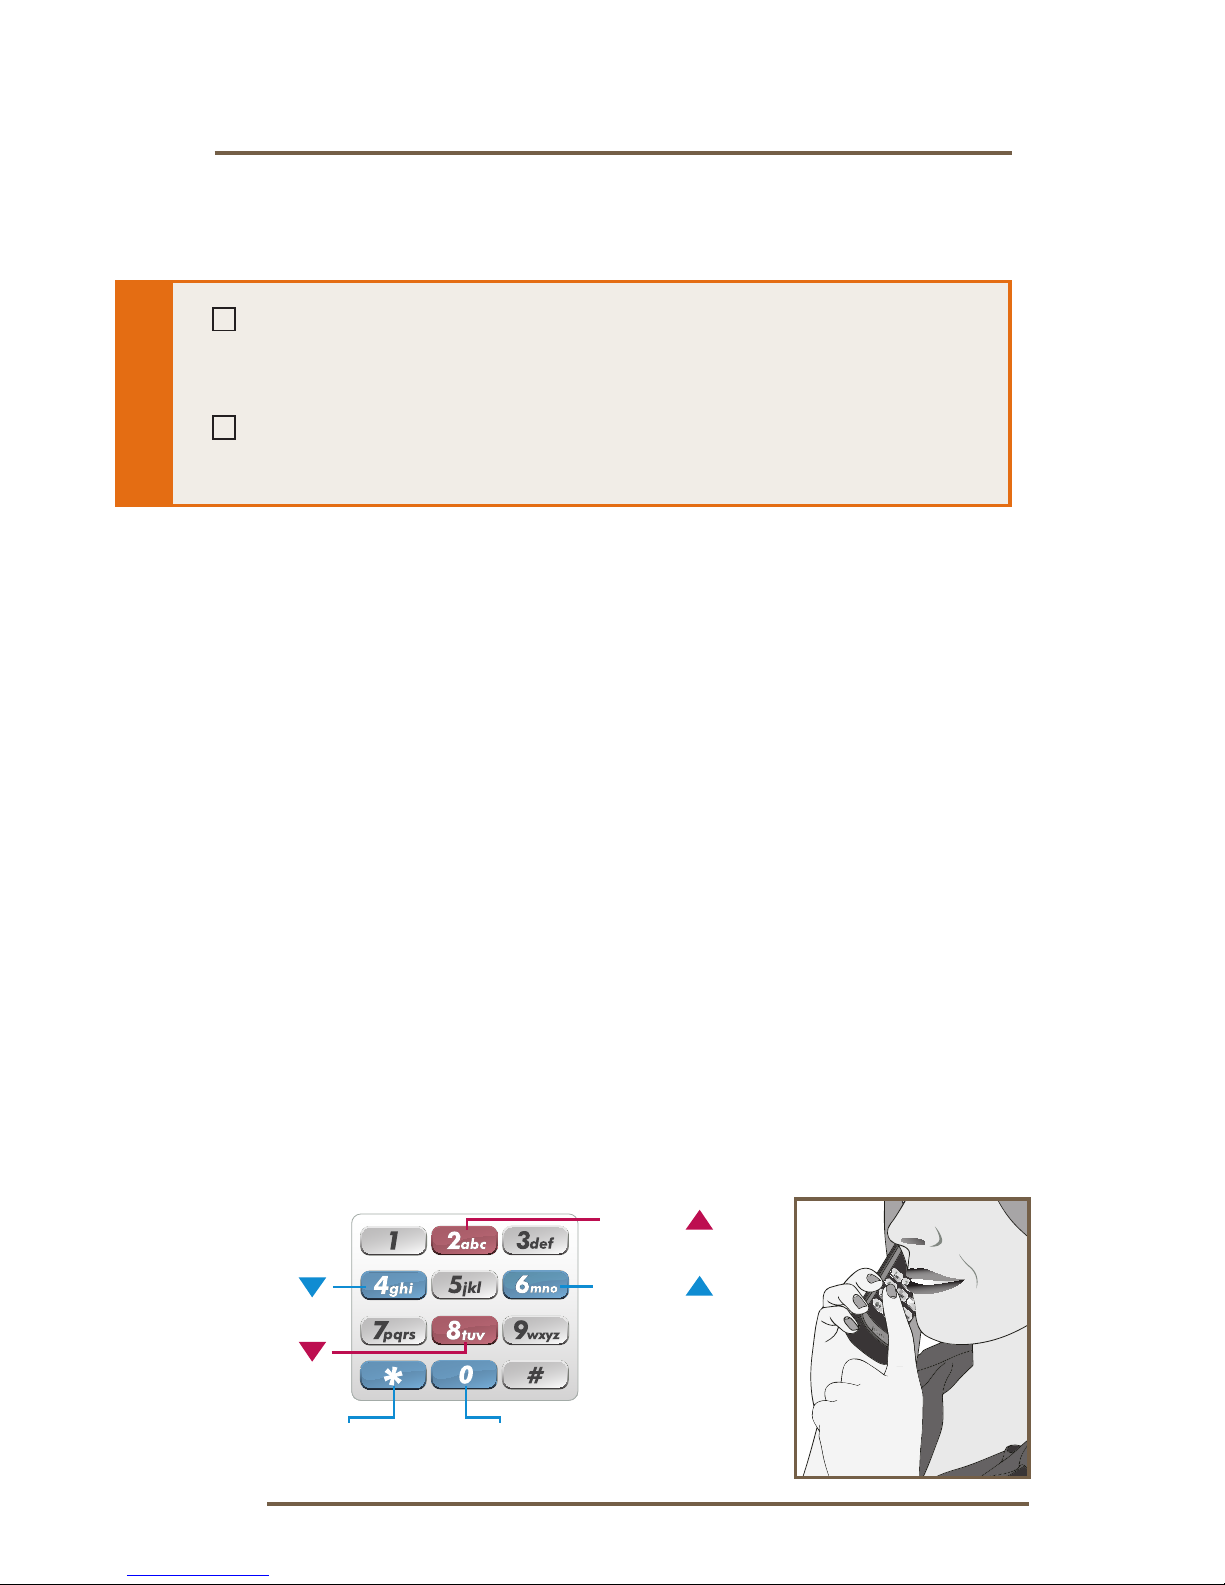
T2 (touch-tone) Function
You may use a cell phone, cordless telephone, or
corded telephone to adjust your hearing system.
The telephone MUST “beep” when the keys are
pressed for this function to work. If your telephone
does not “beep” when the keys are pressed, consult
your telephone operator’s manual or contact your
telephone service provider.
•
Hold the phone approximately 3 inches from the ear
•
Press ** to “wake” T² (a tone series
indicates that it is ready for a command)
•
Press the telephone key that corresponds
to the desired function
•
T² will “sleep” after 20 seconds
My hearing instrument has T2 capability.
Please read the section below.
My hearing instrument does not have
T2 capability. See page 18.
Use the following keypad buttons to
remotely adjust your hearing aid settings.
Volume
Memory
Memory
Press 2 times
to wake
Mute
Volume
Page 19

17
Operation
SYMPTOM POSSIBLE CAUSES SOLUTIONS
Hearing system
not responding
to telephone
command
Telephone keys not
emitting beep tones
Consult telephone
operator’s manual to
enable beep tones
T² not unlocked prior
to command
Press ** and listen for
unique T² indicator
Telephone too far
from hearing system
Bring telephone closer
to hearing system
microphone
Incorrect key command
Press ** to wake then
press 2 or 8 to increase
or decrease volume or
4 or 6 to change programs
if device has multiple
programs
Hearing system
responded but
won’t respond to
later command
T² automatically
“sleeps” 20 seconds
after last command
Press ** to wake then
press key that corresponds
to desired action
Troubleshooting Guide
Page 20

18
Operation
Self Check
Some hearing systems can run a diagnostic test of
their own performance. This feature is called Self
Check. Your hearing care professional will check the
box below if this feature is activated.
To perform the Self Check:
1. Open and close the battery door three times.
2. Place the hearing system in your ear.
3. Listen for the status indicator.
4. Schedule an appointment with your hearing
care professional, if needed.
My Self Check feature is activated.
My Self Check indicator is a:
Speech Indicator (“Good”/
“Make Appointment”)
Tone Indicator
Page 21
19
Operation
Reminder
Some hearing systems have been programmed
with a Reminder indicating that it is time to
schedule an appointment. Your hearing care
professional will check the box below if this feature
is activated.
The Reminder will occur automatically. When you
hear the Reminder indicator, please contact your
hearing care professional.
My Reminder feature is activated.
My Reminder indicator is a:
Speech Indicator (“Make Appointment”)
Tone Indicator
Page 22

20
Operation
Summary of Settings
Environment Directional Setting Indicator Tone On Indicator Tone Type
Program 1 Normal
Off
Automatic
Yes
No
Program 2
Off
Automatic
Manual
Yes
No
Program 3
Off
Automatic
Manual
Yes
No
Program 4
Off
Automatic
Manual
Yes
No
Low Battery — —
Yes
No
Power On — — — Tone Series
Volume Control — —
Yes
No
Optimal VC
Minimum VC
Maximum VC
Standby — —
Yes
No
Push and Hold — —
Yes
No
Self Check — —
Yes
No
Reminder — —
Yes
No
Page 23
21
Operation
Yes
No
Speech
1 Tone
Yes
No
Speech
2 Tones
Tone Series
Yes
No
Speech
3 Tones
Tone Series
Yes
No
Speech
4 Tones
Tone Series
Yes
No
Speech
Tone Series
Yes
No
Optimal VC
Minimum VC
Maximum VC
Tone Series
Yes
No
Tone Series
Yes
No
Speech
Tone Series
Yes
No
Speech
Tone Series
Yes
No
Speech
Tone Series
Page 24

22
Hearing System Care
Instrument Care
Do your best to keep your hearing instrument clean
at all times. Heat, moisture and foreign substances
can result in poor performance.
• Use a cleaning brush or soft cloth to clean
debris from around the switches, microphone,
and battery compartment; inspect the receiver,
Instant Fit Earbud/Custom Earmold and
Wax Guard regularly
• Never use water, solvents, cleaning fluids or oil
to clean your instrument
Your hearing care professional can provide further
information on additional maintenance procedures
for your hearing system if needed.
Page 25

23
Hearing System Care
Helpful Hints
• When not wearing your hearing system,
open the battery door to allow any moisture
to evaporate
• When not in use, remove the batteries
completely; place your hearing system in
the storage container and store:
– In a dry, safe place
– Away from direct sunlight or heat to
avoid extreme temperatures
– Where you can easily find them
– Safely out of reach of pets and children
• Do not take apart your hearing instruments or
insert the cleaning tools inside them
Page 26

24
Hearing System Care
Service and Repair
If, for any reason, your hearing system does not
operate properly, do NOT attempt to fix it yourself.
Not only are you likely to violate any applicable
warranties or insurance, you could easily cause
further damage.
Should your hearing system fail or perform poorly,
check the guide on the next page for possible
solutions. If problems continue, contact your
hearing care professional for advice and assistance.
Many common problems may be solved right in
your hearing care professional’s office or clinic.
Page 27

25
Hearing System Care
SYMPTOM POSSIBLE
CAUSES
SOLUTIONS
Not Loud
Enough
Low battery Replace battery
Blocked
earmold/tubing/
earbud
Clean or replace Wax
Guard as needed
Hearing change
Contact your hearing
care professional
Debris buildup
Clean both microphone
and receiver with brush
Inconsistent
Performance
Low battery Replace battery
Blocked
earmold/tubing/
earbud
Clean or replace Wax
Guard as needed
Unclear,
Distorted
Performance
Low battery Replace battery
Blocked
earmold/tubing/
earbud
Clean or replace Wax
Guard as needed
Defective hearing
instrument
Contact your hearing
care professional
Dead
Low battery Replace battery
Blocked
earmold/tubing
Clean or replace Wax
Guard as needed
Crimped tubing
Contact your hearing
care professional
Troubleshooting Guide
Page 28

26
Tips for Better Communication
Your hearing care professional will recommend an
appropriate schedule to help you adapt to your
new hearing system. It will take practice, time and
patience for your brain to adapt to the new sounds
that your hearing system provides. Hearing is only
part of how we share thoughts, ideas and feelings.
Reading lips, facial expressions and gestures
can help the learning process and add to what
amplification alone may miss.
Please review the following simple
communication tips:
For You
• Move closer to and look at the speaker
• Sit face-to-face in a quiet room
• Try different locations to find the best place
to listen
• Minimize distractions
• Background noises may be frustrating at first;
remember, you have not heard them for a while
• Let others know what you need; keep in mind that
people cannot “see” your hearing loss
Page 29

27
Tips for Better Communication
• Develop realistic expectations of what your
hearing instruments can and cannot do
• Better hearing with hearing instruments
is a learned skill combining desire, practice
and patience
For Your Family and Friends
Your family and friends are also affected by your
hearing loss. Request that they:
• Get your full attention before beginning
to speak
• Look at you or sit face-to-face in a quiet room
• Speak clearly and at a normal rate and level;
shouting can actually make understanding
more difficult
• Rephrase rather than repeat the same words;
different words may be easier to understand
• Minimize distractions while speaking
Page 30

FDA Information
Required Information
The following additional information is provided in compliance with U.S.
Food and Drug Administration (FDA) regulations:
WARNING TO HEARING AID DISPENSERS. A hearing aid dispenser
should advise a prospective hearing aid user to consult promptly with
a licensed physician (preferably an ear specialist) before dispensing a
hearing aid if the hearing aid dispenser determines through inquiry, actual
observation, or review of any other available information concerning
the prospective user, that the prospective user has any of the following
conditions:
i. Visible congenital or traumatic deformity of the ear.
ii. History of active drainage from the ear within the previous 90 days.
iii. History of sudden or rapidly progressive hearing loss within the
previous 90 days.
iv. Acute or chronic dizziness.
v. Unilateral hearing loss of sudden or recent onset within the previous
90 days.
vi. Audiometric air-bone gap equal to or greater than 15 decibels at
500 Hertz (Hz), 1,000 Hz and 2,000 Hz.
vii. Visible evidence of significant cerumen accumulation or a foreign
body in the ear canal.
viii. Pain or discomfort in the ear.
IMPORTANT NOTICE FOR PROSPECTIVE HEARING AID USERS.
Good health practice requires that a person with a hearing loss have
a medical evaluation by a licensed physician (preferably a physician
who specializes in diseases of the ear) before purchasing a hearing
aid. Licensed physicians who specialize in diseases of the ear are often
referred to as otolaryngologists, otologists, or otorhynolaryngologists.
The purpose of the medical evaluation is to assure that all medically
treatable conditions that may affect hearing are identified and treated
before the hearing aid is purchased.
Following the medical evaluation, the physician will give you a written
statement that states that your hearing loss has been medically evaluated
and that you may be considered a candidate for a hearing aid. The
physician will refer you to an audiologist or hearing aid dispenser, as
appropriate, for a hearing aid evaluation.
28
Page 31

29
FDA Information
The audiologist or hearing aid dispenser will conduct a hearing aid
evaluation to assess your ability to hear with and without a hearing aid.
The hearing aid evaluation will enable the audiologist or dispenser to
select and fit a hearing aid to your individual needs.
If you have reservations about your ability to adapt to amplification, you
should inquire about the availability of a trial-rental or purchase-option
program. Many hearing aid dispensers now offer programs that permit
you to wear a hearing aid for a period of time for a nominal fee after
which you may decide if you want to purchase the hearing aid.
Federal law restricts the sale of hearing aids to those individuals who
have obtained a medical evaluation from a licensed physician. Federal
law permits a fully informed adult to sign a waiver statement declining
the medical evaluation for religious or personal beliefs that preclude
consultation with a physician. The exercise of such a waiver is not in your
best health interest and its use is strongly discouraged.
A hearing aid will not restore normal hearing and will not prevent or
improve a hearing impairment resulting from organic conditions. Use
of a hearing aid is only part of hearing habilitation and may need to be
supplemented by auditory training and instruction in lip reading. In most
cases infrequent use of a hearing aid does not permit a user to attain full
benefit from it.
CHILDREN WITH HEARING LOSS. In addition to seeing a physician for
a medical evaluation, a child with a hearing loss should be directed to
an audiologist for evaluation and rehabilitation since hearing loss may
cause problems in language development and the educational and social
growth of a child. An audiologist is qualified by training and experience
to assist in the evaluation and rehabilitation of a child with a hearing loss.
Page 32

30
LIMITED WARRANTY
LIMITED WARRANTY
This Limited Warranty provided by NuEar, a division of Starkey Laboratories, Inc.
(“NuEar”), to you, the original purchaser of a NuEar hearing instrument, covers your
new hearing instrument when sold by a hearing professional authorized by NuEar.
The duration of this Limited Warranty begins when you first take delivery of your
hearing instrument from an authorized hearing professional and ends twenty-four
(24)months later (“warranty period”).
LIMITATION ON DURATION OF IMPLIED WARRANTIES:
IMPLIED WARRANTIES, IF ANY, ARISING BY WAY OF STATE LAW, INCLUDING ANY
IMPLIED WARRANTY OF MERCHANTABILITY AND/OR ANY IMPLIED WARRANTY
OF FITNESS FOR A PARTICULAR PURPOSE, ARE LIMITED IN DURATION TO THE
WARRANTY PERIOD. There is no warranty of any nature made by NuEar beyond this
Limited Warranty. No person has authority to enlarge, amend, or modify this Limited
Warranty. NuEar is not responsible for any undertaking, representation, or warranty
(written, express, or implied) made by any hearing professional or other person
beyond those expressly set forth in this Limited Warranty.
Some States do not allow limitations on how long an implied warranty lasts, so the
above limitation may not apply to you.
WHAT THIS LIMITED WARRANTY COVERS:
This Limited Warranty covers only a “defect” in the workmanship performed and/or
materials used to manufacture your hearing instrument. “Defect” means the failure
of the workmanship performed and/or materials used to conform the hearing
instrument to NuEar’s design and manufacturing specifications and tolerances.
Your hearing professional may have issued a warranty or service plan that goes
beyond the provisions of this Limited Warranty. Please contact him or her for further
information.
NuEar will either replace the hearing instrument or repair any covered defect in your
hearing instrument, provided that you deliver your hearing instrument to one of
NuEar’s authorized hearing professionals and notify the hearing professional of the
defect during the warranty period and within thirty (30) days of discovering the
defect. There will be no cost to you for NuEar’s repair or replacement of the
instrument itself, but the hearing professional may charge a fee for services he or she
provides. Performance of warranty repairs on your hearing instrument shall not
extend the duration of the warranty period. Any repairs performed on your hearing
instrument after the warranty period has expired shall be considered “good will”
repairs, which shall not alter the terms of this Limited Warranty.
HOW TO OBTAIN WARRANTY SERVICE:
Deliver your hearing instrument (at your expense) to the NuEar authorized hearing
professional from whom you purchased it. If that professional is unavailable, visit
www.nuear.com or call the toll-free telephone number on the back of the Operations
Manual to locate another authorized NuEar hearing professional.
Page 33

31
LIMITED WARRANTY
WHAT THIS LIMITED WARRANTY DOES NOT COVER:
Batteries; earmolds; accessories; or damage to your hearing instrument caused by
misuse or neglect, accident, unauthorized alteration, or failure to provide reasonable
and necessary maintenance and cleaning.
DISCLAIMER OF CONSEQUENTIAL AND INCIDENTAL DAMAGES:
THE PURCHASER SHALL NOT BE ENTITLED TO RECOVER FROM NUEAR ANY
CONSEQUENTIAL OR INCIDENTAL DAMAGES RESULTING FROM ANY DEFECT
IN THE HEARING INSTRUMENT, INCLUDING BY WAY OF EXAMPLE ONLY,
EXPENSES TO DELIVER THE HEARING INSTRUMENT TO AN AUTHORIZED
HEARING PROFESSIONAL, HOTEL ROOMS, OR LOST WAGES. THIS EXCLUSION
AND DISCLAIMER OF CONSEQUENTIAL AND INCIDENTAL DAMAGES SHALL BE
DEEMED INDEPENDENT OF, AND SHALL SURVIVE, ANY FAILURE OF THE
ESSENTIAL PURPOSE OF ANY REMEDY OF THIS LIMITED WARRANTY.
Some States do not allow the exclusion or limitation of consequential or incidental
damages, so the above exclusions may not apply to you.
YOUR LEGAL REMEDIES:
THIS LIMITED WARRANTY DOES NOT “EXTEND TO FUTURE PERFORMANCE.”
ANY ACTION TO ENFORCE THIS LIMITED WARRANTY OR ANY IMPLIED
WARRANTIES MAY AND SHALL NOT BE COMMENCED MORE THAN 90 DAYS
AFTER THE EXPIRATION OF THE WARRANTY PERIOD. THE PERFORMANCE OF
REPAIRS SHALL NOT SUSPEND THIS LIMITATIONS PERIOD FROM EXPIRING.
UNDER NO CIRCUMSTANCES SHALL NUEAR BE OBLIGATED TO REFUND ALL OR
ANY PART OF THE PURCHASE PRICE OF THE HEARING INSTRUMENT. Some
States do not allow the reduction in the limitation period, so the above reduction in
the limitation period may not apply to you.
This warranty gives you specific legal rights. You may also have other rights which
vary from State to State.
This warranty is valid only in the United States.
NuEar
9444 Waples Street, Suite 405
San Diego, CA 92121
Wm. F. Austin House, Bramhall Technology Park
Pepper Road, Hazel Grove, Stockport SK7 5BX
United Kingdom
www.NuEar.com
Page 34

32
Notes
Page 35

33
Notes
Page 36

© 2010 NuEar All Rights Reserved
84 4 48-500 3/10 BK LT0175-01-EE-NE Rev.B
NuEar
9444 Waples Street, Suite 405
San Diego, CA 92121
800.626.8327
www.NuEar.com
 Loading...