


1
SL3601 Smart Lock
User Manual for Adding APP
NUCTECH COMPANY LIMITED
2
I. Product description
A WiFi smart module is installed in a smart device, through which the smart device connects to the
home WiFi network to realize the information interconnection between the smart device and the APP
of mobile phone.
When the APP is used for the first time, you need to register an account with your mobile phone, and
the account can backup the relevant configuration so that the configuration can be restored
automatically when the mobile phone is replaced.
II. Quick setting
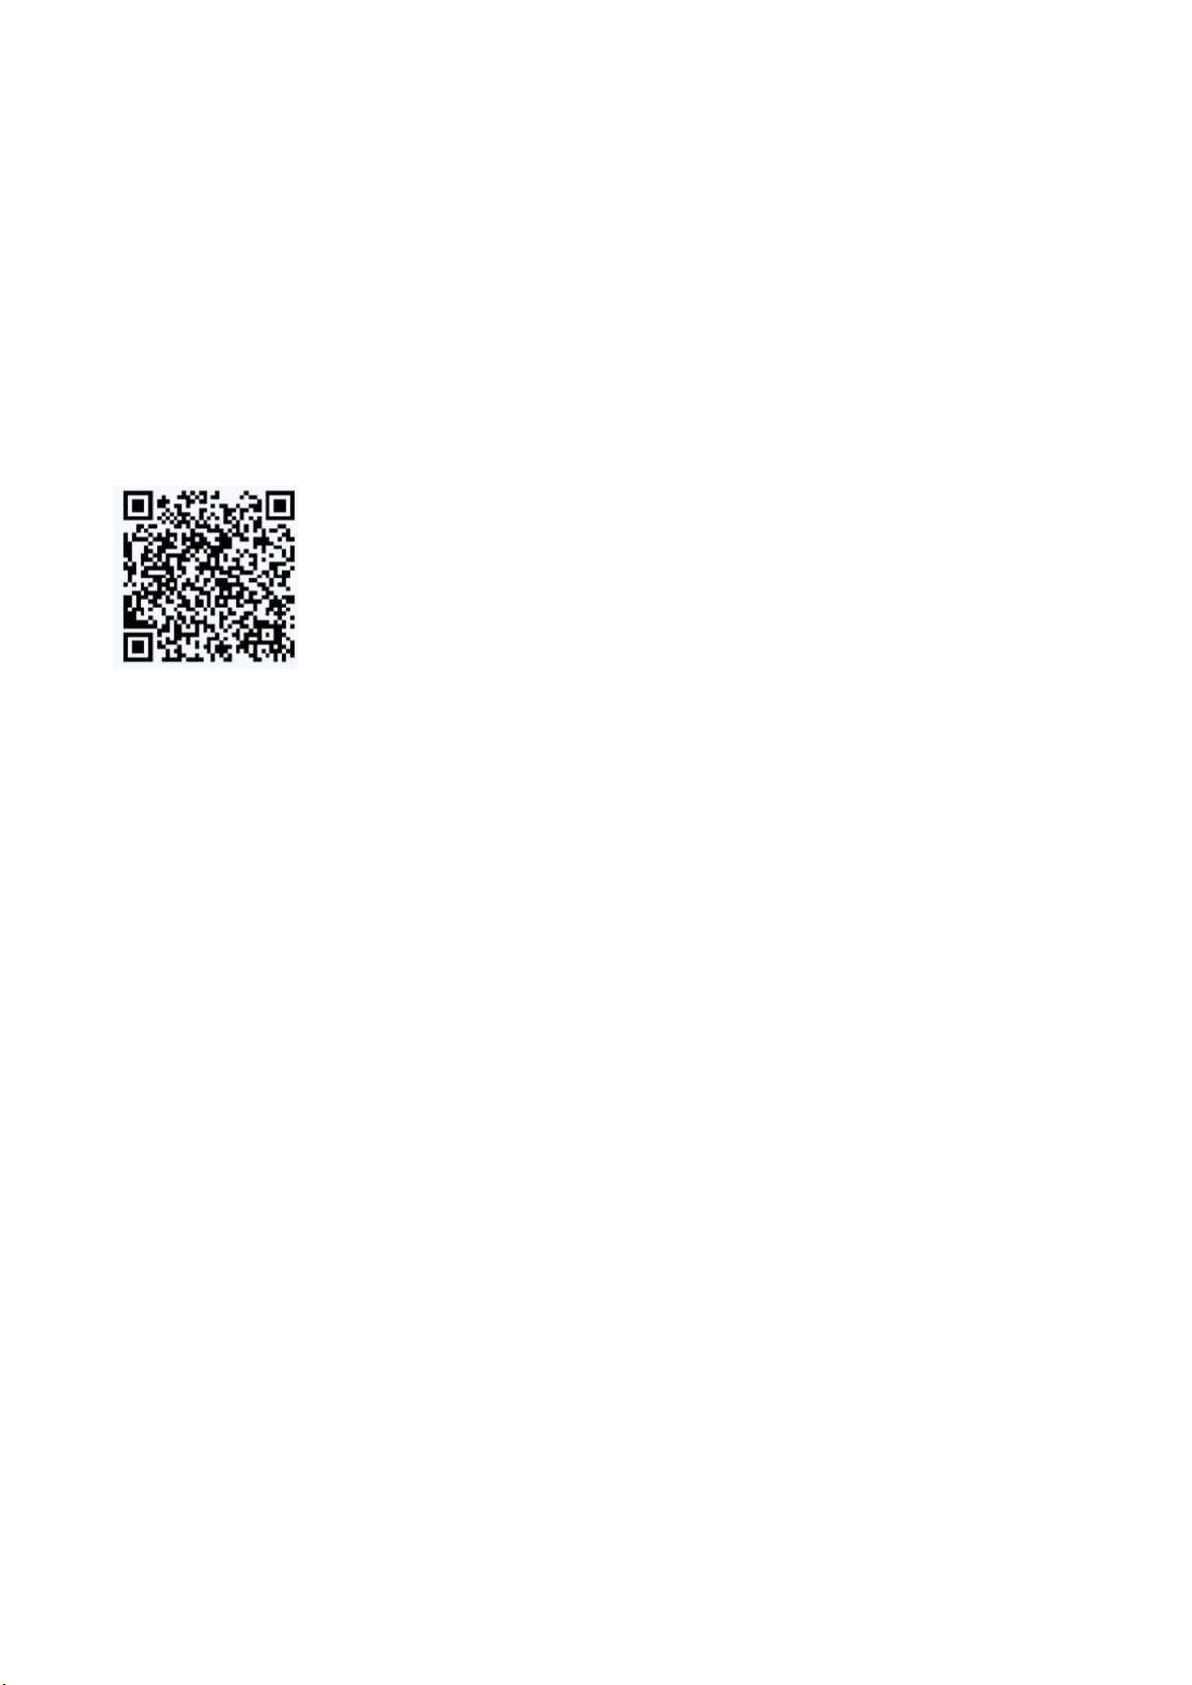
2.1 Download YouZhiYunJia APP (YZYJ APP): you can download YZYJ APP by any of the
following methods.
(1) Scan the following QR code to download YZYJ APP.
(2). Search "YouZhiYunJia” in the application store and download the App.
2.2 Add smart fingerprint lock
(1). Open YZYJ APP and register an account for login.
(2). Power on the smart door lock, enter the administration mode, select “Networking Settings”, and
then select “Add Mobile Phone” to enter the connection mode.
(3). Make sure the mobile phone is connected to WiFi, open YZYJ APP, log in it, tap "Add Device",
and add it according to the indication on the mobile phone interface in the following way:
Tap "Door Lock" and then tap "Next". Set the graphical password twice according to the indication to
enter the distribution network status. After entering the WiFi password, tap "Next". When the
connection is successful, an indication will display on the screen after two beeps, showing “Add
Success” and the ID number of the mobile phone user. Please memorize the user ID which is the
proof to unlock the door remotely in the future.
★ Notes: The smart door lock and the connected mobile phone must be in a same Wi-Fi network
environment for distribution network. If the distribution network fails, please check whether the router
is connected to the network and whether the Wi-Fi name or password is correct, and then reinitialize
the hardware equipment and add it again on the APP.
III. Basic use
3.1 View record
Tap "Door Lock" to view the Door opening and alarm records.
3.2 Remote unlocking
(1) Wake up the door lock panel, and there will be an indication "Please enter the mobile phone
number" after pressing "8+#", and then enter the ID number allocated when the addition is
successful and press the "#" to confirm it.
(2) At this moment, the mobile phone will receive a remote indication for unlocking. Tap "OK" to
display a Sudoku interface for entering the password, and then enter the graphical password entered
when it was added.
Note: Each key of your smart lock can be named independently.
3.3 Configuration of backup and restore
NUCTECH COMPANY LIMITED

3
YZYJ APP supports the backup and restore of configuration files, and can synchronize the
configuration of the APP on different mobile devices with a same registered account, including the
device list and other information. The operating steps are as follows:
Enter the page "Me" and tap the menu "Backup" or "Restore". "Backup" means to upload the
configuration on the APP to the cloud server, and "Restore" means to download the configuration on
the cloud server to the APP.
IV. Function description
After completing the quick settings in the manual, you can start a new smart life.
4.1 Key administration
The electronic keys such as fingerprint and password can be added to the smart lock, and they can
be named on YZYJ APP.
4.2 Door opening records
The information of opening the door each time will be pushed to YZYJ APP, so that you can always
know the information that your family enters and goes out of the door.
4.3 Low battery reminder
When the electric quantity of the smart lock is too low, YZYJ APP will remind you to replace the
battery in time.
4.4 Basic parameters
Product model: smart WiFi module
Working temperature: -10°C-+55°C
Working humidity: 0-90%RH
NUCTECH COMPANY LIMITED
1
SL3601 Smart Lock
User Manual
NUCTECH COMPANY LIMITED
2
I Instructions and verification manual
Type
Unlocking permissions
Common mode
(password/fingerprint)
Fingerprint +
password
unlocking mode
Fingerprint +
fingerprint
unlocking mode
Back
locking
mode
Channel
mode
Administrator
fingerprint
√
√
√
√
√
Administrator
password
√
√
×
√
√
User fingerprint
√
√
√
×
√
Temporary
fingerprint
√
×
×
×
√
Temporary
password
√
×
×
×
√
Card (optional)
√
×
×
×
√
Mechanical key
√
√
√
√
√
No.
Verification item
Verification method
1
Power-on test
Wake up the system by sliding the cover or touching the screen after installing four
batteries.
2
Internal handle
test
The door should be locked by lifting the internal handle, and unlocked by pressing
the internal handle, and the handle should be pulled flexibly and returned
smoothly.
3
External handle
test
The door should be locked by lifting the external handle, but not unlocked by
pressing the external handle, and the handle should be pulled flexibly and
returned smoothly.
4
Safety button test
The door cannot be locked or unlocked when the safety button of internal handle
Dear users, welcome to use this smart lock. Please check the product list carefully and read the
operating manual before you install and use the product. Please choose professionals to install the
door lock and operate it according to the installation standard provided by our company. Don’t
disassemble and assemble the door lock without permission, and protect relevant sealing signs so
as to avoid unnecessary troubles during the quality maintenance period.
★ Instructions
1. In the initial state, the door can be unlocked by any fingerprint and any 6-12-digit password.
Please complete the registration as soon as possible after the smart lock is debugged as qualified.
2. There are 199/170 fingerprints: 10 groups of Administrator fingerprints (ID 001-010), 160
groups of user fingerprints (ID 011-170), and 0/29 groups of temporary fingerprints (ID 171-199).
3. There are 10 groups of passwords (the valid digit number of passwords is 6-12), including a
group of administrator passwords, and 9 groups of temporary/user passwords.
4. There are 100 groups of cards (ID 001-100).
5. There are 4 types of unlocking methods: fingerprint, password, mechanical key, and card
(optional).
6. There are two power supply modes: the main power supply (4 AA batteries, the normal service
life is 1 year); the standby power supply (when the batteries run out) which is connected with USB.
7. Safety button: This button has the function of preventing the cat eye when it is enabled, and the
door can't be opened inside. When it is disenabled, the function of preventing the cat eye will fail,
but the door can be opened normally by pressing the handle inside.
8. The unlocking permissions are shown in the following table:
★
Verification manual for successful installation
After the entire lock is installed, make sure that the following validation must be carried out and all
validation items must be normal. The lock must be reinstalled if there is any wrong with any of them.
Please contact the local customer service or call the service hotline of our company in time when
necessary.
NUCTECH COMPANY LIMITED
3
pops up. At this moment, it can be locked by lifting the external handle back, and
the safety button can be pressed after it is locked (must be sure).
5
Back locking test
When the back locking button is rotated horizontally, there will be a voice
indicating "The door is locked back", and the triggle bolt can be controlled to pop
up. When the button is rotated vertically, the display screen will display "The door
is unlocked" and the triggle bolt can be controlled to retract.
6
Unlocking test
When the door is locked, enter the valid password or fingerprint to unlock the door
by pressing the external handle when the indicator light is on in green. When the
green indicator is off, it cannot be unlocked by pressing the external handle.
★ Common problems and solutions
Common problems and solutions
No.
Problem description
Solutions
1
After the fingerprint or password passes the
verification, if the door is unlocked by pressing the
handle, the external handle must be lifted first and
then be pressed to open the door.
If the problem is caused by poor installation,
please read the installation manual carefully and
reinstall it again according to the installation steps
to ensure that the lock center stays the same.
2
When the system is awakened every time and the
system indicates that the door has been locked
back, and it only can be unlocked by the
Administrator fingerprint or password.
If back locking thumb turn is installed reversely,
reinstall the internal surface plate. If the triggle bolt
doesn’t pop up, the back locking button shall be
installed vertically.
3
The function of external handle is normal, but the
internal handle is disabled.
If the square bar is too long or too short, cut the
square bar again according to the thickness of the
door. The length of the square bar is 1.5 cm thicker
than the door.
4
Under normally-opened state, and the door can be
opened by pressing the external handle without
verification.
In case of wrong rotation direction of the front
handle head, take down the front surface plate,
rotate the black handle head by 180°, and reinstall
it.
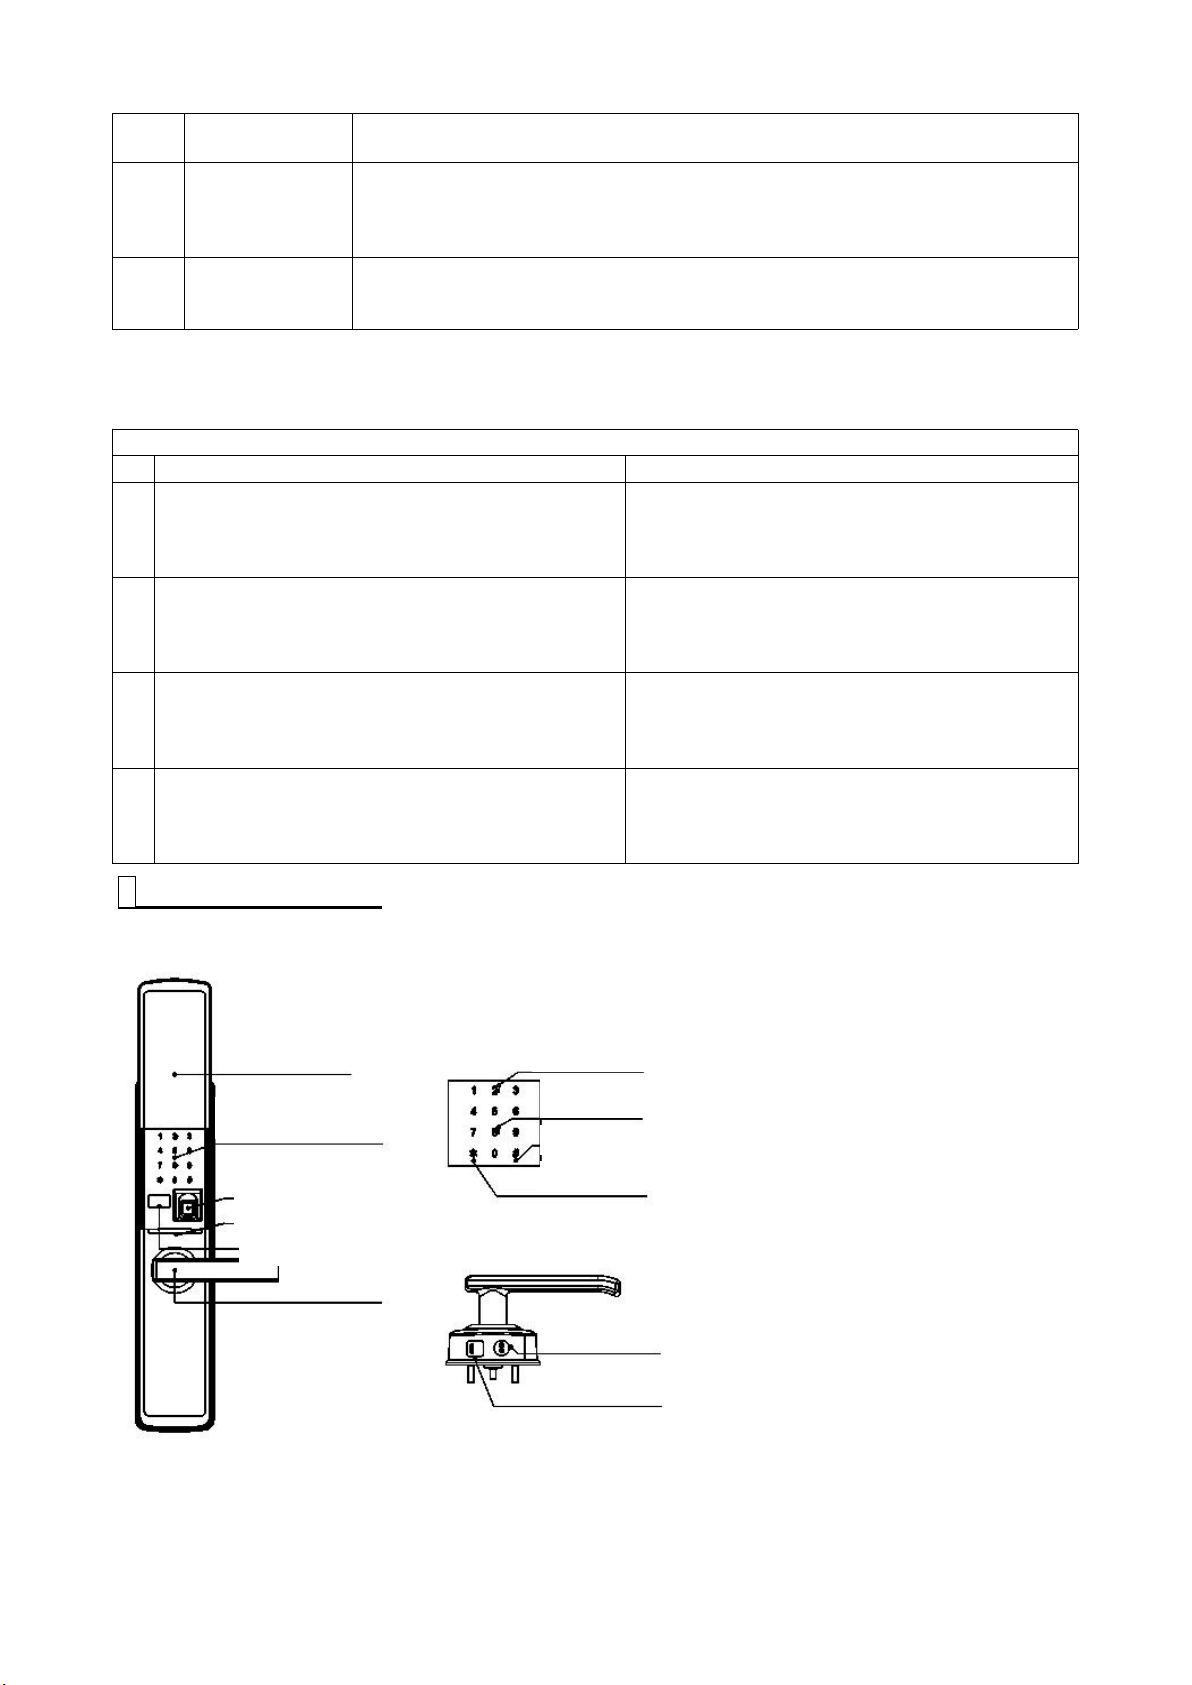
[1] Sliding cover
[2] Password key
[7] Up
[8] Down
[9] OK
[3]Fingerprint library
[4] LED indicator light
[5] LED panel
[6] External handle
[10] Return
[11] Mechanical key
[12] Emergency power supply
The common problems and solutions are as follows:
II Product drawing
1. Components of external surface plate
2. Components of internal surface plate
NUCTECH COMPANY LIMITED

4
3. Lock body
Product list
No.
Designation
Quantity of each lockset
Remark
1
External surface plate
12Internal surface plate
13Internal bottom plate
14Internal rubber mat
15Lock body
1
6
Screw kit
1
Refer to the following table for
details
7
Box striking plate (striking plate) of wooden
door
1
8
Striking plate of anti-theft door
1
9
Card (optional)
1
Screw kit list (for the doors 40~90 thick)
No.
Designation
Quantity
Remark
1
Cross countersunk head tapping screw
6
ST4.2X20 is used for installation of wooden doors
2
Cross countersunk head screw
8
M5X10 is used for installation of iron doors
3
Cross pan head screw
4
M5X15 internal surface plate is used to fix the
internal bottom plate.
Dead bolt
Triggle bolt
Anti-theft
bar
Latch bolt
Anti-theft
bar
[6] Back locking thumb turn
[5] Internal handle
[4] Safety button
[7] Battery holder cover
[3] Battery holder
[2] Voice Setting
[1] Settings
III Product list and installation exploded-view drawing
Please check the following list carefully after unpacking. If you find any omission, please contact our
company or local agents in time.
NUCTECH COMPANY LIMITED

5
4
Cross pan head external tooth
two-combination screw
3
M5X35 is adaptive to 50~70mm thick doors
5
Cross pan head external tooth
two-combination screw
3
M5X65 is adaptive to 70~90mm thick doors
6
Cross pan head external tooth
two-combination screw
3
M5X25 is adaptive to 40~50mm thick doors
7
Square bar
18Back locking square bar
1
9
Allen wrench
1
Used to fix external handle
10
Square bar guide holder (plastic part)
1
Used for installation guidance of internal bottom
plate (must be used)
11
Surface plate screw stuffing hole
2
12
Locating pin
1
Used to fix the back locking square bar
13
Joint pipe
3
Used to fix internal and external plates
Installation exploded-view drawing
Right inwards
Left inwards
Right outwards
Left outwards
1. External surface plate
2. Square bar
3. Internal rubber mat
4. Internal bottom plate
5. Internal surface plate
6. Surface plate screw
7. Battery holder
8. Bottom plate screw
9. Tapping screw
10. Lock body
11. Joint pipe
Notes: This component is only used to install the positioning square bar, and it shall be
removed before the installation of surface plate.
IV Installation instructions
1.Confirm door direction before installation
This smart door lock is applicable to the doors with four opening directions: left outwards, left
inwards, right outwards and right inwards. Confirm the direction of the handle according to left or
right opening, and confirm the direction of the latch bolt according to inwards opening or outwards
opening.
As shown in the following figures:
2.Change the direction of handle
Unscrew the hexagon socket screw and set screw of the handle with the Allen wrench and cross
screwdriver, pull out the handle properly, rotate it by 180° to the correct position, and then return the
NUCTECH COMPANY LIMITED

6
screws. When opening the door right outwards or inwards, rotate the handle to No.1 position; when
Turn the
screw
Change the direction
of external handle
Direction of handle for
right open
Direction of handle for
left open
A: Unscrew the hexagon
socket screw and Philip's
head screw with the Allen
wrench and cross screwdriver,
take down the external
handle, adjust the direction,
and then return the screws.
Change the direction
of external handle
Direction of handle for
left open
Direction of handle for right
open
B: Press the safety button,
unscrew two screws with a
screwdriver, rotate the
handle by 180° to the
correct position, and then
return the screws.
Notes
Lock body
Change direction
Fig. 1
Fig. 2
Unscrew the
screws of lock
body and panel
with a cross
screwdriver.
After removing
the panel, rotate
the latch bolt by
180°, install the
panel into the
lock body, and
then tighten the
screws.
opening the door left inwards, rotate the left direction to No.2 position. The specific steps are shown
as follows:
3. Change the direction of lock body latch bolt
When the door is opened right outwards and left inwards, the direction of lock body latch bolt is
shown in Fig. 1; when the door is opened right inwards and left, the direction of lock body latch bolt
is shown in Fig. 2. The specific steps are shown as follows:
1. Before installation, make sure to confirm the direction of opening the door and change the
directions of handle and latch bolt according to the installation manual.
2. After installing the whole lock, open the front surface plate cover, enter any 6-12-digit password
any fingerprint to simulate an unlocking action. If the lock body latch bolt and the dead bolt can be
controlled normally by pressing the front handle when the LED indicator light is on in green, the
installation is successful. Do not close the door outside before the successful installation.
NUCTECH COMPANY LIMITED

7
V Guidance for setting smart lock
Admin PW 01
Add Success
Add Admin PW 01
Enter Again
Add Admin PW 01
Enter Password
Welcome
00:00:00
2016-01-01
Setting key on
the back plate
Register the
first password
1.Register the first Administrator password in the initial state
The door can be unlocked by any fingerprint or password in the initial state, so it is necessary to
enter the Administrator password in time to enter the administration mode for the follow-up
operations. The first Administrator password of this smart lock can be registered by pressing the
setting key on the back surface plate. After operation, enter 6-12-digit password and press [#],
according to the indication “Please Add Administrator Password”. When the recognition is
successful, there will be an indication "Enter Again". The password entered for the second time
must be the same with the first time. When the password is added successfully, there will be an
indication "Add Success" and the LED indicator light will be on in green. At this moment, you have
been authenticated to be first owner of the lock, and you can continue to operate it. The specific
operations are as follows:
The specific adding process is as follows:
2. How to enter the administration mode and display the menu indexes
Open the sliding cover, press the setting key on the back surface plate, and there will be a voice
indicating "Please Verify the Administrator Fingerprint or Enter the Administrator Password". Enter
the Administrator password registered before to enter the administration interface. The concrete
operations are similar to the steps of registering the first Admin fingerprint. The LCD menu indexes
are as follows:
NUCTECH COMPANY LIMITED

8
Add Admin FP
Add User FP
Add Temp FP
Add Fingerprint
Add Password
Add Card
Add Admin PW
Add Temp/User PW
Add Card
Del Admin FP
Del User FP
Del Temp FP
Add User
Del User
System Settings
Record Inquiry
Del Fingerprint
Del Password
Del Card
Del Admin PW
Del Temp/User PW
Del Card
Set Time
Open Mode
Normally Open
Store status
Voice Setting
Language
Restore Factory
Information
Record Inquiry
V Guidance for setting smart lock
3. Add user
3.1 Add fingerprint
Enter the administration mode, and press the direction key to move the marquee up and down. Confirm
the selection by pressing [#] when the marquee stays at [Add User]. Select [Add Fingerprint] by the same
method. The smart lock can store 199/170 fingerprints (10 administrator fingerprints, 160 user
fingerprints and 0/29 temporary fingerprints).
3.1.1 Add fingerprint
The Administrator fingerprints have the permission to enter the administration mode, under which the
door can be unlocked in the common mode and security mode, and can be unlocked when it is locked
back inside. Select the fingerprint ID to be added according to the direction key, and confirm it by
pressing [#]. After successful addition, there will be an indication "Add Success" and LED indicator light
will be on in green. The specific adding process is as follows:
NUCTECH COMPANY LIMITED

9
Add User
Del User
System Settings
Record Inquiry
Add Fingerprint
Add Password
Add Card
Add Admin FP
Add User FP
Add Temp FP
Please Select ID
ID: 001/010
ID (001--010)
Add Admin FP 001
Enter FP
Add Admin FP 001
Enter Again
Admin FP: 001
Add Success
3.1.2 Add user fingerprint
Add User
Del User
System Settings
Record Inquiry
Add Fingerprint
Add Password
Add Card
Add Admin FP
Add User FP
Add Temp FP
Please Select ID
ID: 011/170
ID (011--170)
Add User FP 011
Enter FP
Add User FP 011
Enter Again
User FP: 011
Add Success
Add User
Del User
System Settings
Record Inquiry
Add Fingerprint
Add Password
Add Card
Add Admin FP
Add User FP
Add Temp FP
Please Select ID
ID: 171/199
ID (171--199)
171 Time Limit
Time1 ON OFF
Time2 ON OFF
Time3 ON OFF
Add Temp FP 171
Enter FP
Add Temp FP 171
Enter Again
Enter Deadline
2016-01-01
Temp FP: 171
Add Success
171 Time Limit
Time1 ON
Time2 ON OFF
Time3 ON OFF
171 Time Settings
From 00:00:00
To 00:00:00
The door can be unlocked by the user fingerprints only in the common mode and security mode, and the
adding method is similar to that for adding the administration fingerprints. The specific adding process is
as follows:
3.1.3 Add temporary fingerprint:
The temporary fingerprints are valid only before the deadline defined by you and the use time limits (the
deadline and time limits can be passed and you can set 1-3 time limits). The door can be unlocked only
in the common mode. The specific adding process is as follows:
3.2 Add password
Enter the management mode, and press the direction key to move the marquee up and down. Confirm
the selection by pressing [#] when the marquee stays at [Add User]. Select [Add PW] by the same
method. This smart lock can store 10 passwords (1 administration password and 9 temporary/user
passwords). The valid digit of passwords is between 6 and 12.
3.2.1 Modify the admiration password:
The administration password has the same permission as the Admin fingerprint. Because the first
administration password was registered initially, now the administration password can be modified.
Enter the new password twice, exactly the same both times. There will be a voice indicating "Modify
Success" after the password is modified successfully. The adding process is as follows:
NUCTECH COMPANY LIMITED

10
V Guidance for setting smart lock
Modify Admin PW
Enter Password
Add User
Del User
System Settings
Record Inquiry
Add Fingerprint
Add Password
Add Card
Modify Admin PW
Add Temp/User PW
Admin PW
Modify Success
Modify Admin PW
Enter Again
Add User
Del User
System Settings
Record Inquiry
Add Fingerprint
Add Password
Add Card
Add Admin PW
Add User PW
Please Select ID
User PW ID: 02-10
ID: 02/10
Add User PW
Enter PW
Add User PW
Enter Again
User PW ID: 02
Add Success
Add User
Del User
System Settings
Record Inquiry
Add Fingerprint
Add Password
Add Card
Please Select ID
ID: 001/100
ID (001-100)
Add Card 001
Please swipe
User Card: 001
Add Success
3.2.2 Add user password:
The user password has the same permission with the user fingerprint. Please refer to modifying
Administrator password and adding user fingerprint for the specific addition steps, which are
described briefly here. The new adding process is as follows:
▲3.3 Add card
The card is optional. The adding process is similar to that of adding fingerprint and password. The
adding process is as follows.
4. Delete user
4.1 Delete fingerprint
Save at least one group of Admin fingerprints while deleting fingerprints. The concrete operations
are similar to adding fingerprints. Select the fingerprint ID to be deleted through the direction key,
and press [#] for confirmation. After confirmation, there will be an indication “Yes/No”. Move the
cursor to [Yes], press [#] to confirm the deletion. The LED indicator light will turn green after the
deletion is successful. The deleting process is as follows:
NUCTECH COMPANY LIMITED

11
Add User
Del User
System Settings
Record Inquiry
Del Fingerprint
Del Password
Del Card
Del Admin FP
Del User FP
Del Temp FP
001 Admin FP
002 Admin FP
003 Admin FP
Confirm Delete
NO
YES
Admin FP 001
Del Success
4.2 Delete password
Add User
Del User
System Settings
Record Inquiry
Del Fingerprint
Del Password
Del Card
Del Temp/User PW
Confirm Delete
NO
YES
Temp/User PW
Del Success
Add User
Del User
System Settings
Record Inquiry
Del Fingerprint
Del Password
Del Card
001 User Card
Confirm Delete
NO
YES
User Card 001
Del success
The administrator passwords cannot be deleted, but the temporary and user passwords can be
deleted. Refer to deleting fingerprint for the concrete operation steps. The LED indicator light will turn
green after successful deletion. The operating process is as follows:
▲4.3 Delete card
For the concrete operations of deleting card, please refer to deleting fingerprint. The LED indicator
light will turn green after successful deletion. The operating process is as follows:
V Guidance for setting smart lock
5. System settings
(1) [Time Settings]: After entering the management mode, select [System Settings] and [Time
Settings] in turn. Input the time to be saved by pressing the number key, cancel the last inputting by
pressing the key [*], and confirm it by pressing [#] after successful setting. The concrete operations
are as follows:
NUCTECH COMPANY LIMITED

12
Add User
Del User
System Settings
Record Inquiry
Set Time
Open Mode
Normally Open
Set Time
Date: 16-01-01
Time: 00-00-00
Back(*) OK(#)
Setting Succeed
(2) [Unlocking Mode]: There are three unlocking modes: fingerprint/password, fingerprint +
Add User
Del User
System Settings
Record Inquiry
Set Time
Open Mode
Normally Open
FP/PW
FP+FP
FP+PW
FP/PW
Setting Succeed
Normally Open
Enabled
Open NO
Close NO
Set Time
Open Mode
Normally Open
Add User
Del User
System Settings
Record Inquiry
Admin PW 0/1
Temp/User PW 1/9
User Card 001/100
Admin FP 01/10
User FP 000/160
Temp FP 00/29
Store Status
Voice Setting
Language
Add User
Del User
System Settings
Record Inquiry
Voice Enabled
Voice On
Voice Off
Store Status
Voice Setting
Language
Add User
Del User
System Settings
Record Inquiry
Setting Succeed
Simplified Chinese
English
Store Status
Voice Setting
Language
Add User
Del User
System Settings
Record Inquiry
fingerprint, and fingerprint + password. In fingerprint + fingerprint and fingerprint + password
unlocking modes, the fingerprint and password should not be those of the temporary users. You can
move the cursor to the corresponding mode as required and confirm the selection by pressing [#].
The concrete operation process is as follows:
(3) [Normally Open]: After the Normally Open is enabled, when the touch screen is awakened, the
LED panel will indicate that "Normally Open Enabled" and the LED indicator light will be green all the
time. At this moment, the door is an access door, and it can be opened by pressing the external
handle directly without password. The normally open mode can be removed after a valid unlocking
action. Or it can be closed through [Normally Open]. The concrete operations are as follows:
(4) [Store Status]: The store status displays the number of various types of users registered at
present and the total capacity of these users. The specific viewing process is as follows:
(5) [Voice Setting]: The voice setting is divided into [Voice On] and [Voice Off]. You can set it as
needed or turn on/off the voice through the mute key on the back surface plate. The concrete
operations are as follows:
(6) [Language]: This product provides Chinese and English for you to choose. You can select
corresponding language as needed. The specific selecting process is as follows:
NUCTECH COMPANY LIMITED

13
(7) [Restore Factory]: The smart operating system can be initialized by the restore factory function.
Initializing
>>>>>>>>>>>>>
Restore the Factory
N(*) Y(#)
Language
Restore Factory
Information
Add User
Del User
System Settings
Record Inquiry
Setting Succeed
Version:
SL3601VXX
Language
Restore Factory
Information
Add User
Del User
System Settings
Record Inquiry
The last page
2016-01-01
00-00-10
Admin: 001
Add User
Del User
System Settings
Record Inquiry
Notes
After moving the cursor to [Restore Factory], press [#] to confirm or press [*] to cancel it. The factory
setting can be restored by pressing the setting key on the back surface plate for 5s.
V Guidance for setting smart lock
(8) [Information]: The information displays the product ID and software version.
6. Record inquiry
After entering the management mode, select [Record Inquiry] and press the key [#] for confirmation
to view at most 200 pieces of unlocking records, unlocking user ID, date and time recently. Press the
keys [2] and [8] to view the inquiry record up and down. The concrete operating process is as follows:
1.The administration mode can be enabled only by entering the administrator account to
complete the above-mentioned operations.
2.A part of the above-mentioned operations are voice indications, and the LED indicator light will
make corresponding judgments according to the settings. The LED indicator light turns blue in the
normal operations, green after successful setting or the setting is confirmed, and will turn red and
flash when the setting fails.
3. The number keys [2] and [8] are compound keys that can be used to flip menus up and down.
4. [*] is a cancel key or return compound key, and [#] is a confirmation key.
5.The temporary passwords and fingerprints are valid only within the time limit set at the time of
addition and before the deadline. At most three time limits can be set. Move the cursor to a valid
place and press [#] to confirm the start of setting. Move the cursor to [Cancel] to complete the setting
after successful setting of time limit
6. Over-registration of the passwords and accounts that have been saved is not allowed.
7.This smart lock is a green energy-saving product. The system will return to the sleep
energy-saving state 12s after the operation is stopped, and it needs to be awakened by touching the
key.
8. When the door lock is deformed seriously or picked with external force, this smart lock will send
out a sound-light alarm signal to frighten the lawbreakers and give a timely indication to the user.
NUCTECH COMPANY LIMITED

14
▲9. In the future, the software of the smart lock can be adjusted, as needed, to adapt to different
Safety precautions
Normal state
On-state
Enter PW
Open sliding cover
Enter FP
Press handle
networking modules, realizing the networking function in the future. Refer to the networking manual
for the adding process and application method.
1.The users shall not repair this product at will.
2. Do not close the door for the first time of registration.
3.Please keep the password carefully. It is suggested to change the administration password
regularly to prevent the password from being disclosed.
4. Do not operate this product with wet hands, and prevent water, beverages and other liquids
from entering the product, so as to avoid short circuit of circuit board.
5.Do not press the electronic touch screen and fingerprint read head with excessive force or
sharp instruments.
6.Make sure the door is locked safely when you go out.
7. Do not pull down or lift the sliding cover with excessive force.
8.When the battery life is over, please replace all the batteries at the same time. Don’t mix the old
and new batteries together.
9. When the product gives a low-voltage alarm, please replace the batteries in time.
10. It is suggested to place the key outside the house. The mechanical key can be used to unlock
the door in emergency circumstances, and it can give an alarm for one minute.
11. It is suggested to turn on the safety button when you go out, which means the function of
preventing the cat eye is enabled. The on-state is shown in the following figure.
VI Guidance for using smart lock
6.1. [Fingerprint\password] mode
In this mode, users can unlock the door with any valid fingerprint or password registered before. The
specific steps are shown as follows:
(1) Open the sliding cover and wake up the entire system.
(2) Enter any valid fingerprint or password that has been registered.
(3) When the LED indicator light turns green or you hear “Ding Dong”, press down the handle to
open the door.
6.2. [Fingerprint + fingerprint] mode
In this mode, you can unlock the door with any two non-temporary fingerprints registered before. The
specific steps are as follows:
NUCTECH COMPANY LIMITED

15
(1) Open the sliding cover to wake up the entire system, or touch the screen lightly to wake up the
Notes
system.
(2) Enter any previously added non-temporary fingerprint, and then enter another non-temporary
fingerprint when you hear "Enter Fingerprint" after beeping
(3) When the LED indicator light turns green or you hear "Ding Dong", press down the handle to
open the door.
6.3. [Fingerprint + password] mode
In this mode, you can unlock the door with any non-temporary fingerprint + administration password.
The specific steps are as follows:
(1) Open the sliding cover to wake up the entire system, or touch the screen lightly to wake up the
system.
(2) First of all, enter any previously added non-temporary fingerprint, and then enter the
administration password when you hear "Enter Fingerprint” after beeping; or enter the administration
password at first, and then enter any previously added non-temporary fingerprint after pressing [#].
(3) When the LED indicator light turns green or you hear "Ding Dong", press down the handle to
open the door.
6.4. Mechanical key
If you forget the password, or the fingerprint is unrecognizable, the batteries run out or the system is
unable to work normally, the mechanical key can be used to unlock the door. Insert the designated
mechanical key into the keyhole at the bottom of the front surface plate and rotate it by 90°, and then
press down the handle to open the door (if the latch bolt and the deadbolt cannot be opened by the
mechanical key, the key must not be rotated forcefully so as to avoid being damaged). Meanwhile, it
will give a sound-light alarm for one minute. The alarm can be canceled through entering the Admin
fingerprint or user fingerprint.
6.5. Card
This function is optional. If you forget the password or the fingerprint is unrecognizable, wake up the
system and swipe the previously added card on the touch screen to unlock the door.
6.6. Locking door
The door can be locked outdoors only by lifting the external handle.
The door can be locked indoors only by lifting the internal handle.
Rotate the back locking thumb turn for indoor back locking. At this moment, the door can be opened
only by entering the Administrator fingerprint or password.
1.If the fingerprint is entered wrongly for 5 consecutive times, the system will enter the standby
state, and then it is necessary to wake up the system again before operation.
2. If the password is entered wrongly for 5 consecutive times, the system will be self-locked for 1
minute and give an alarm, and the LED indicator light will turn red and flash at the same time.
3. In the normal use, the system will give a low-voltage alarm when it is awakened each time after
the batteries are lower than 5V, the LED indicator light will turn red and flash, and there will be a
voice indicating “Low Power. Please Replace the Batteries”.
4. This smart lock supports the front virtual-digit and back virtual-digit passwords. As long as the
unlocking password entered contains a complete and effective password combination, the door can
be opened, but the total digital number of the password entered shall not be more than 20.
5.Operation results can be determined by observing the LED indicator light in the mute mode:
blue represents the normal state, red represents the operation fails, and green represents the
operation is successful. In the voice mode, besides judging the operation results by the LED
indicator light, the results can be judged through the voice indications: “Ding Dong” means the
operation is successful, and “Beeping” sound means the operation fails.
NUCTECH COMPANY LIMITED

16
VII Main technical parameters
No.
Category
Detail
Technical characteristics
1
Working power
supply
Working voltage
4*1.5V AA battery (5#)
Battery life
≈6,000 times
Alarm voltage
≤5.0V
2
Power dissipation
Quiescent current
<50μA
Dynamic current
≤500mA
Peak current
≤500mA
3
Fingerprint
acquisition head
Working temperature
-30℃~60℃
Relative humidity
20%~95%
Fingerprint capacity
199
Memory capacity
100 years
False rejection rate
<0.1%
False accept rate
<0.001%
Acquisition angle
360°Fingerprint sensing
Semiconductor fingerprint sensor
4
Password
Password length
6~12 digits
Password capacity
10 groups
5
Auxiliary functions
Clock
Adjust time and date
Record inquiry
Recent 200 pieces of unlocking records
6
LED display
Screen area
0.96 inch
Display content
Operating process and result
Working temperature
-25℃~60℃
7
WiFi Module
Frequency range
2412.0 MHZ----2462.0 MHZ
8
Executive standard
GA 701-2007 GB 21556-2008
Disclaimer
1. Main technical parameters:
The main technical parameters of this smart lock are shown in the following table:
We have done our best to ensure that the information provided in this manual is correct and reliable,
but we cannot fully guarantee that there is no error before and during printing. We apologize for
some inconsistency between the material object and that as described in the manual, because we
may sometimes upgrade the product in order to improve the performance, reliability and easy
installation of the components and the system, but this will not affect the actual operation.
The functions described in this manual shall not be used as the reasons for special purposes. Our
company will not undertake the accidents and hazards caused by users’ mal-operations.
Thank you for reading this manual carefully. If you encounter any problems while using this smart
lock in the future, please contact the local dealer or call our service hotline in time.
NUCTECH COMPANY LIMITED

17
FCC WARNING
This device complies with part 15 of the FCC Rules. Operation is subject to the following two
conditions: (1) this device may not cause harmful interference, and (2) this device must accept any
interference received, including interference that may cause undesired operation.
Any changes or modifications not expressly approved by the party responsible for compliance
could void the user's authority to operate the equipment.
NOTE: This equipment has been tested and found to comply with the limits for a Class B digital
device, pursuant to Part 15 of the FCC Rules. These limits are designed to provide reasonable
protection against harmful interference in a residential installation. This equipment generates, uses
and can radiate radio frequency energy and, if not installed and used in accordance with the
instructions, may cause harmful interference to radio communications. However, there is no
guarantee that interference will not occur in a particular installation.
If this equipment does cause harmful interference to radio or television reception,
which can be determined by turning the equipment off and on, the user is encouraged to try to correct
the interference by one or more of the following measures:
-- Reorient or relocate the receiving antenna.
-- Increase the separation between the equipment and receiver.
-- Connect the equipment into an outlet on a circuit different
from that to which the receiver is connected.
-- Consult the dealer or an experienced radio/TV technician for help.
FCC ID:2AS4P-SL3601
NUCTECH COMPANY LIMITED
 Loading...