

Page 1

1
TURBO TANK 2.0
Commercial Grade
Portable HVACR Rinsing Sprayer
Model No. 4781-00
● High Flow Portable HVAC Coil Rinsing Sprayer
● Extremely Portable – NO MORE SEARCHING for Water Connections
● Optimal 150 psi Water Pressure – Rinse Quickly and Effectively
● High-Capacity Li-Ion Rechargeable Battery
● Improved Brass Hardware for Commercial Grade Durability
● Perfect for Wall Splits, Air Handlers, Condensers, and Rooftop Units
Page 2

2
CONTENTS
OPERATING INSTRUCTIONS ............................................ 3
IMPORTANT SAFETY INSTRUCTIONS .............................. 3
WARNING ............................................................................ 4
LIMITED WARRANTY .......................................................... 5
PARTS DI AGR AM ................................................................ 6
ASSEMBLY PROCEDURE .................................................. 7
INSTALLING THE BATTERY ............................................... 8
OPERATION ........................................................................ 9
CHARGING THE BATTERY ............................................... 10
AUTOMATIC SHUTOFF ..................................................... 10
GENERAL MAINTENANCE ................................................ 11
STORAGE OF THE TURBO TANK .................................... 12
FAQ .................................................................................... 13
TROUBLESHOOTING ....................................................... 14
Page 3

3
CONGRATULATIONS!
Thank you for your purchase of Nu-Calgon’s Turbo Tank 2.0 Commercial Grade Portable HVACR Rinsing
Sprayer. We have designed this product to make your daily HVACR maintenance work easier and more effective.
No more searching for hard to access water connection or lugging around long water hoses. This is specially
designed to be used to rinse air cooled coil after a Nu-Calgon cleaner has been applied independently. We are
very proud of this product, and we hope that you are equally satisfied with the quality and performance.
Thank you for your support in choosing Nu-Calgon products!
OPERATING INSTRUCTIONS
Please read these instructions and warnings carefully before using your Turbo Tank 2.0 HVACR Rinsing Sprayer.
WARNING:
Small parts may cause choking hazard
IMPORTANT SAFETY INSTRUCTIONS
When using the Turbo Tank 2.0 HVACR Rinsing Sprayer, these basic precautions should always be followed:
1. DO NOT FILL THE TURBO TANK HVACR RINSING SPRAYER WITH ANY NU-CALGON COIL
CLEANER OR OTHER LIQUID OTHER THAN CLEAN WATER. SERIOUS INJURY MAY OCCUR.
ALSO, CLEANERS CAN DAMAGE THE SPRAYER AND WILL VOID THE WARRANTY.
2. ALWAYS APPLY NU-CALGON COIL CLEANER SEPARATELY IN A PUMP-UP SPRAYER OR WITH AN
AEROSOL CANISTER. COIL CLEANER CAN ALSO BE APPLIED USING THE COIL GUN (PN: 4774-0
AVAILABLE SEPARATELY) ATTACHED TO T H E TURBO TAN K WITH T H E IN C L U DED A DAPTER. THE
TURBO TANK HVACR RINSING SPRAYER IS MEANT TO BE A RINSING TOOL AND ONLY TO BE USED
WITH CLEAN WATER.
3. CONNECT THE TURBO TANK HANDLE WITH THE SUPPLIED BRASS CONNECTOR TO NU-CALGON’S
COIL GUN (PN: 4774-0) TO USE NU-CALGON COIL CLEANERS. NEVER POUR COIL CLEANER INTO THE
TURBO TANK ITSELF.
4. STUDY THE PRODUCT THOROUGHLY BEFORE OPERATING IT. BE FAMILIAR WITH ITS
OPERATING CONTROLS.
5. DO NOT OPERATE THE PRODUCT UNDER THE INFLUENCE OF ALCHOHOL OR DRUGS.
6. DAMAGED HIGH-PRESSURE HOSES CAN BURST AND CAN CAUSE A POTENTIALLY
HAZARDOUS SITUATION AND OR INJURY. HIGH PRESSURE HOSES SHOULD NOT
BE KINKED, CRUSHED, TWISTED, OR DAMAGED IN ANY WAY. SHOULD THIS OCCUR,
REPLACE THE HIGH-PRESSURE HOSE.
7. ONLY USE WATER BETWEEN 40°F TO 105°F.
Page 4

4
WARNING
TO REDUCE THE RISK OF INJURY:
1. ONLY use the SUPPLIED charger for the supplied battery. Only use the SUPPLIED 18VDC adaptor when
using the Turbo Tank 2.0 HVACR Rinsing Sprayer with wall power. Any other device may cause damage to
your machine.
2. Do not pull the cord, carry the unit by the cord, use the cord as handle, or pull the cord around sharp edges.
Keep the cord away from heated surfaces.
3. Use only Nu-Calgon’s recommended accessories and replacement parts. Do not use with a damaged cord
or plug. Do not use the Turbo Tank 2.0 HVACR Rinsing Sprayer if it is damaged, dropped into water, or when it
is not working as it should.
4. This is NOT a toy. Close attention is necessary when used near children.
5. Keep the nozzles free of obstructing objects. Do not use the Turbo Tank 2.0 HVACR Rinsing Sprayer when
the nozzle clogged; keep free of dust, lint, hair, and anything that may reduce or obstruct flow.
6. Keep hair, loose clothing, fingers, and all body parts away from moving machine parts.
7. Do not use without the water filter in place.
8. Turn off all controls before unplugging.
9. Using improper voltage may result in damage to the motor and possible injury to the user. The proper
voltage is listed on the cover plate.
10. Do not direct the water jet toward the unit itself, electrical parts, or towards other electrical equipment.
11. Do not a l t er the original d iameter of th e s pr ay head nozzl e .
12. DISCHARGE residual pressure before disconnecting the Turbo Tank HVACR Rinsing Sprayer hose.
13. Before using the Turbo Tank 2.0 HVACR Rinsing Sprayer, CHECK that the screws are fully tightened and
that there are no broken or worn parts.
14. DO NOT USE with any chlorine-based type cleaners, detergents or any coil cleaner.
15. Do not fill the water container with anything but clean water or your warranty will be VOID.
16. Never submerse the machine in water.
17. Do not allow the system to freeze. Always empty and store indoors. Freezing will damage the
pump and water lines.
18. Do not remove cover plate or attempt to disassemble your machine. This will void all warranty and may
cause serious injury.
19. Do not spray water directly at the eyes or mouth.
Page 5

5
LIMITED WARRANTY
Nu-Calgon will warrant the product for a period of 12 months from the date of purchase to be free of defects in
material or workmanship. Keep your original sales invoice to validate the warranty period.
If the product should become defective within the warranty period, we will repair or replace any defective parts
free of charge. Return the sprayer to a Nu-Calgon authorized wholesaler to initiate the process of
repairing or replacing the defective part. Typically, the sprayer can be remedied in the field – do not
send back to Nu-Calgon without prior authorization.
The warranty does not include usual wear and tear, damage resulting from accident or unreasonable use of the
product, unauthorized repairs or parts that does not belong to the product. The sprayer is designed for clean
water only. The use of any coil cleaner will void warranty since it will damage the wetted parts of the sprayer.
Page 6
6
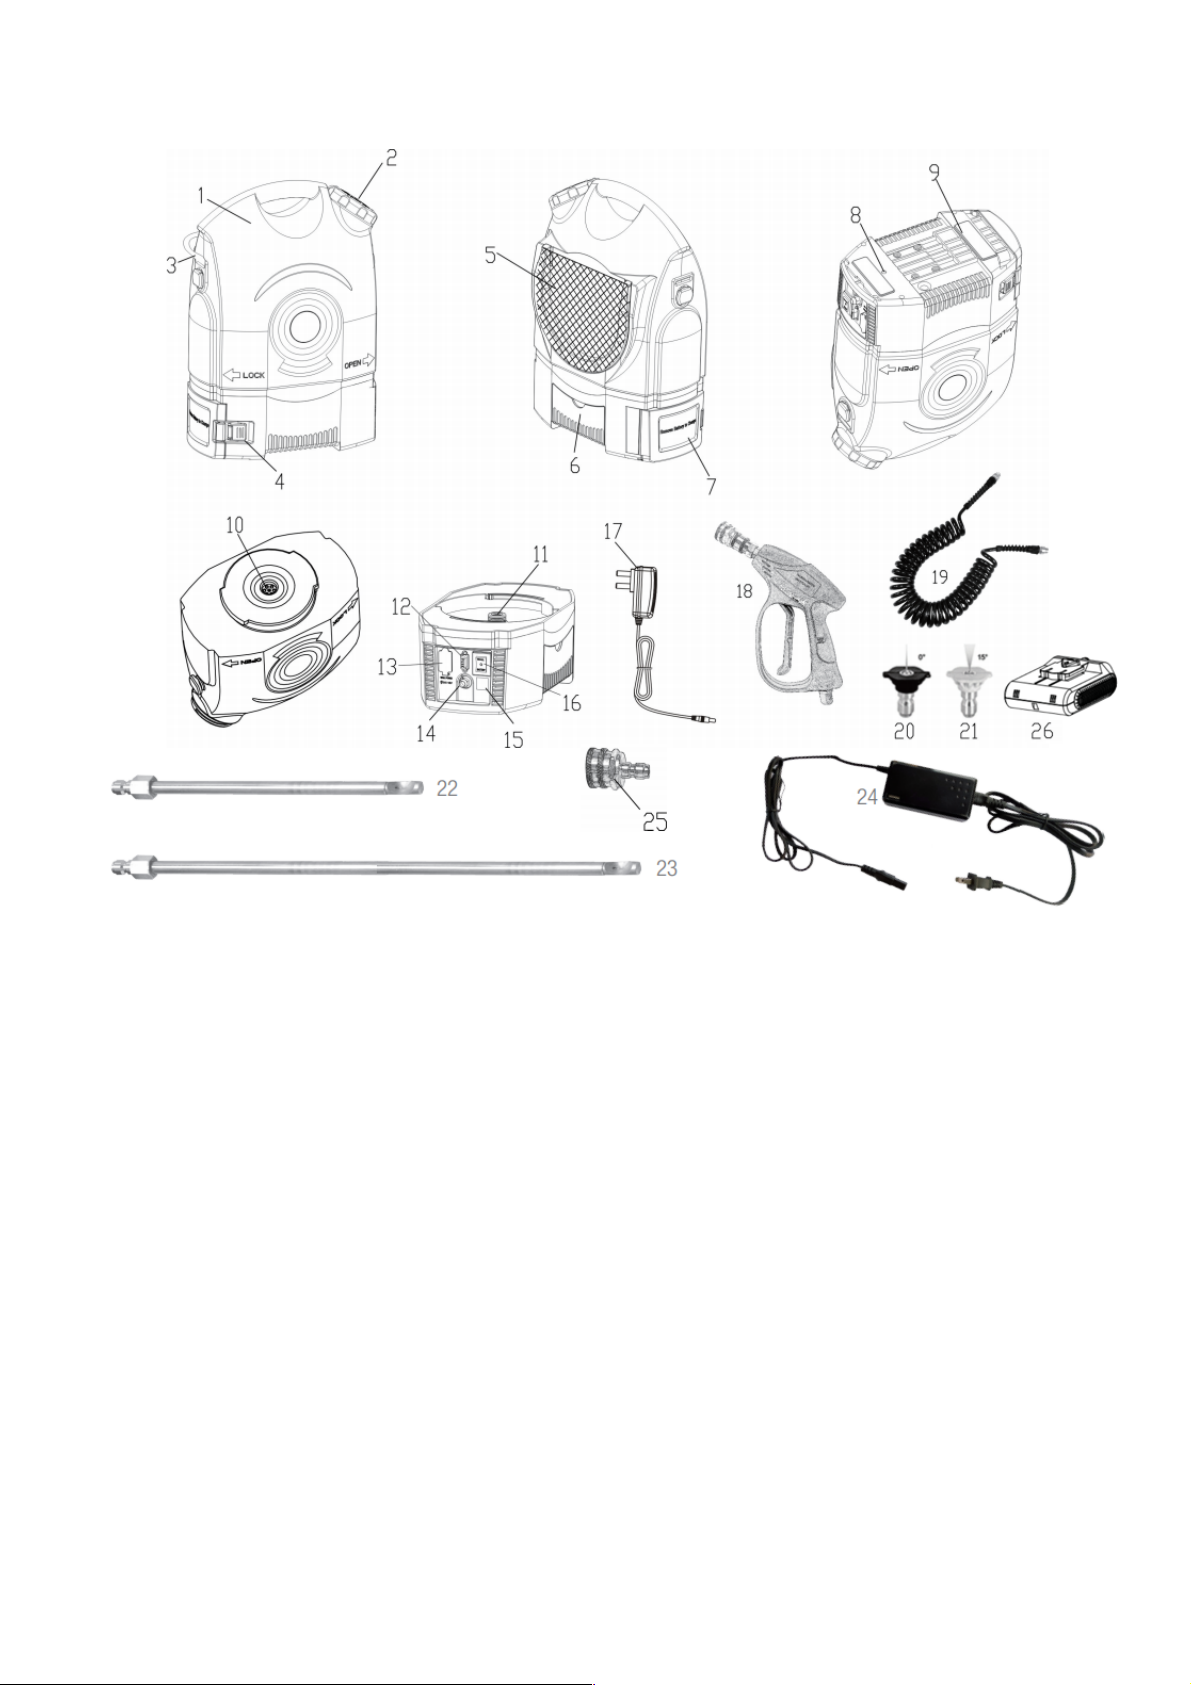
PAR TS D IA GR AM
1. Water tank
2. Lid
3. Adjustable Shoulder Strap
4. Battery Cover Clasp
5. Mesh Storage Compartment
6. Cover for AC/DC Adaptor
7. Battery Cover Door
8. Drain Hole
9. Rubber Pad
10. Tan k Wa te r O utlet Val v e
11. Base Water Inlet
12. 10A Fuse (4781-03)
13. 18v Wall Adapter Inlet
14. Hose Inlet
15. Instructions QR Code
16. Power Switch
17. Battery Charger (4781-02)
18. Commercial Spray Gun (4778-21)
19. Self-Recoil Hose (4778-20)
20. Red Straight Nozzle (4778-13)
21. Yel low 15 ºN oz zl e (4778-14)
22. Mini-Split 90º spray wand (4778-10)
23. 39-inch 90º spray wand - Available
Separately (4778-11)
24. 18VDC-120VAC Wall Adapter
(4781-04)
25. Coil Gun Adapter (4778-26)
26. Lithium Battery Pack (4781-01)
Page 7
7
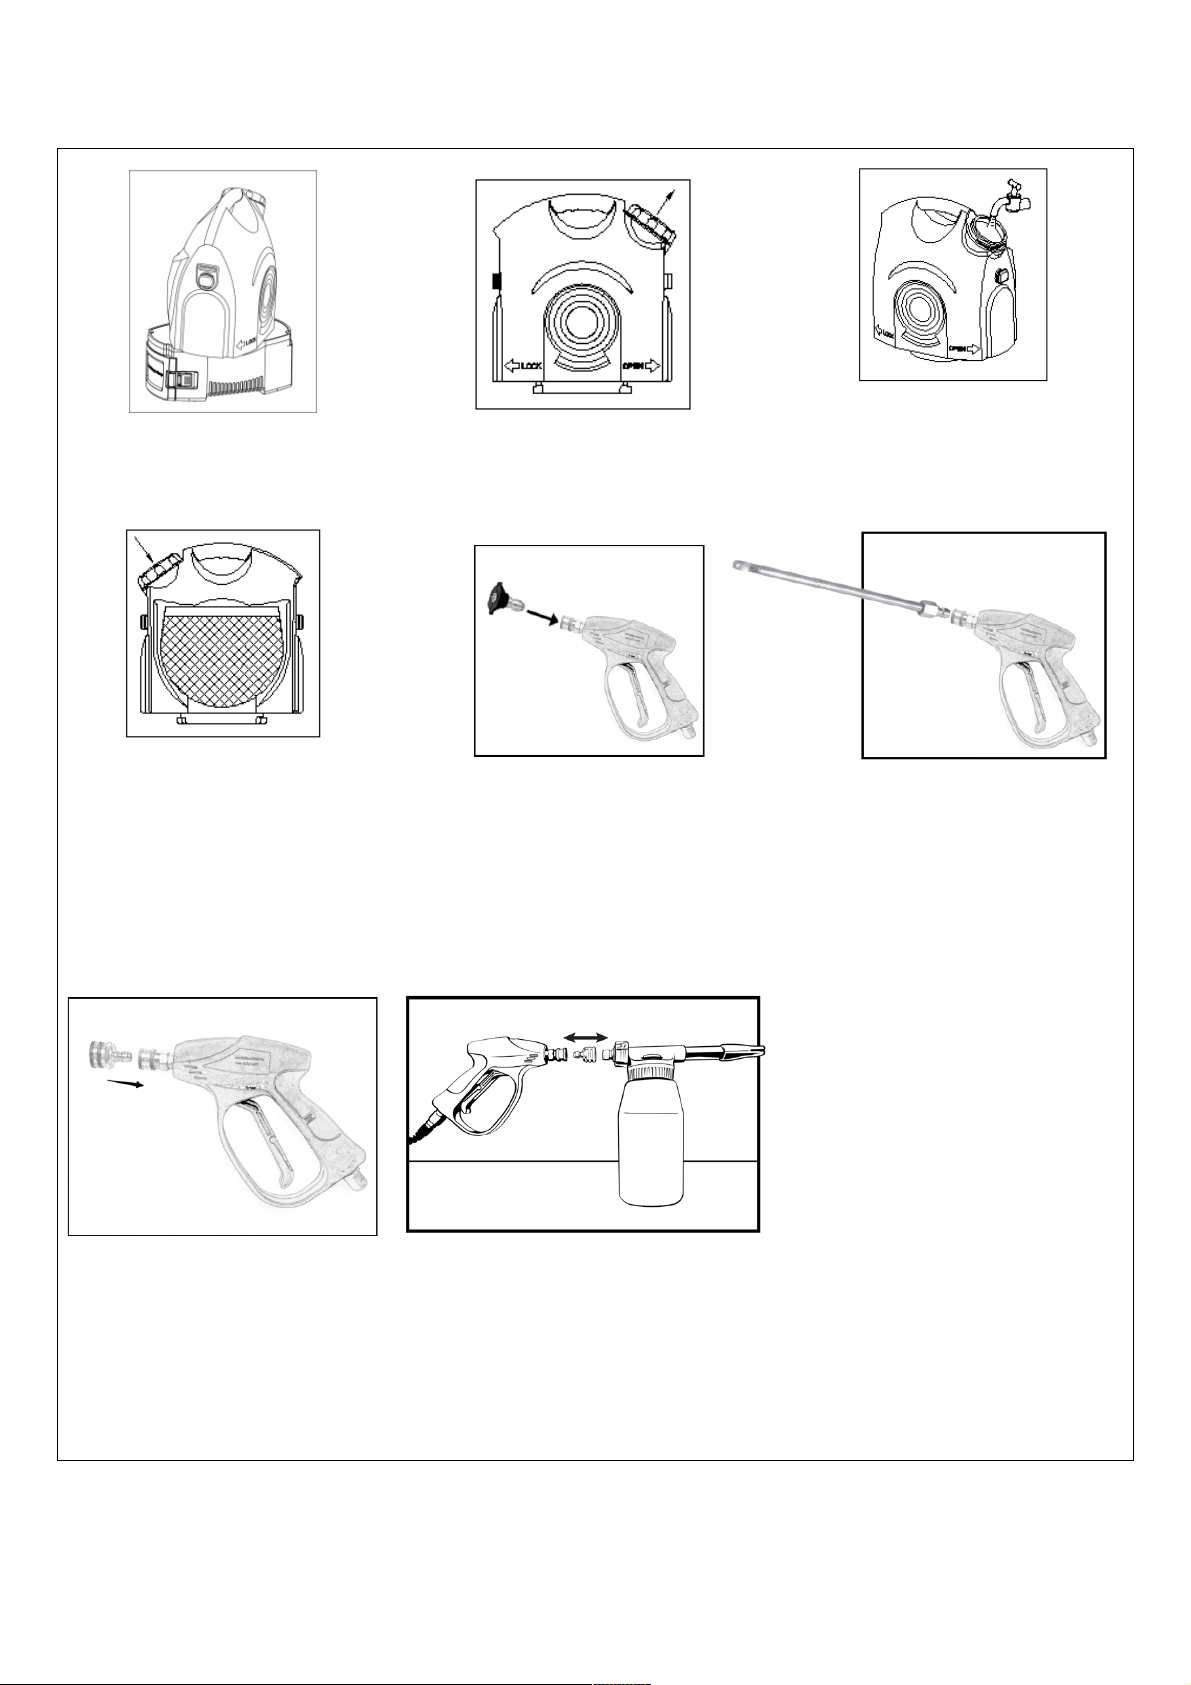
Ta ke off t he wa t er t a nk
Turn lid counterclockwise to remove.
Fill tank with fresh water.
IMPORTANT: Te m pe r at ur e
should be 40°F to 105°F
Replace the lid by turning
clockwise to secure it in place.
Reattach water tank to base
following the reverse steps.
ATTACH Spray nozzle: OPTION: MINI-SPLIT WAND
Connect spray nozzle by pulling Connect the spray wand by pulling
back on the quick connector and back on the quick connector and
fully inserting the nozzle and fully inserting mini-split wand (for
fully releasing the quick coupling cleaning the blower) and fully
releasing the quick coupling.
OPTION: COIL GUN ADAPTER
Connect the Coil Gun adapter by
pulling back on the quick
connector and fully inserting the
adapter.
ATTACH THE NU-CALGON COIL GUN (SOLD SEPARATELY, P/N 4774-0)
Connect the Coil Gun to the female end of the Coil Gun Adapter. Fill the Coil
Gun bottle with a Nu-Calgon coil cleaner and rotate the dial on the mixing
head to select the desired mixing ratio.
ASSEMBLY PROCEDURE
Page 8
8
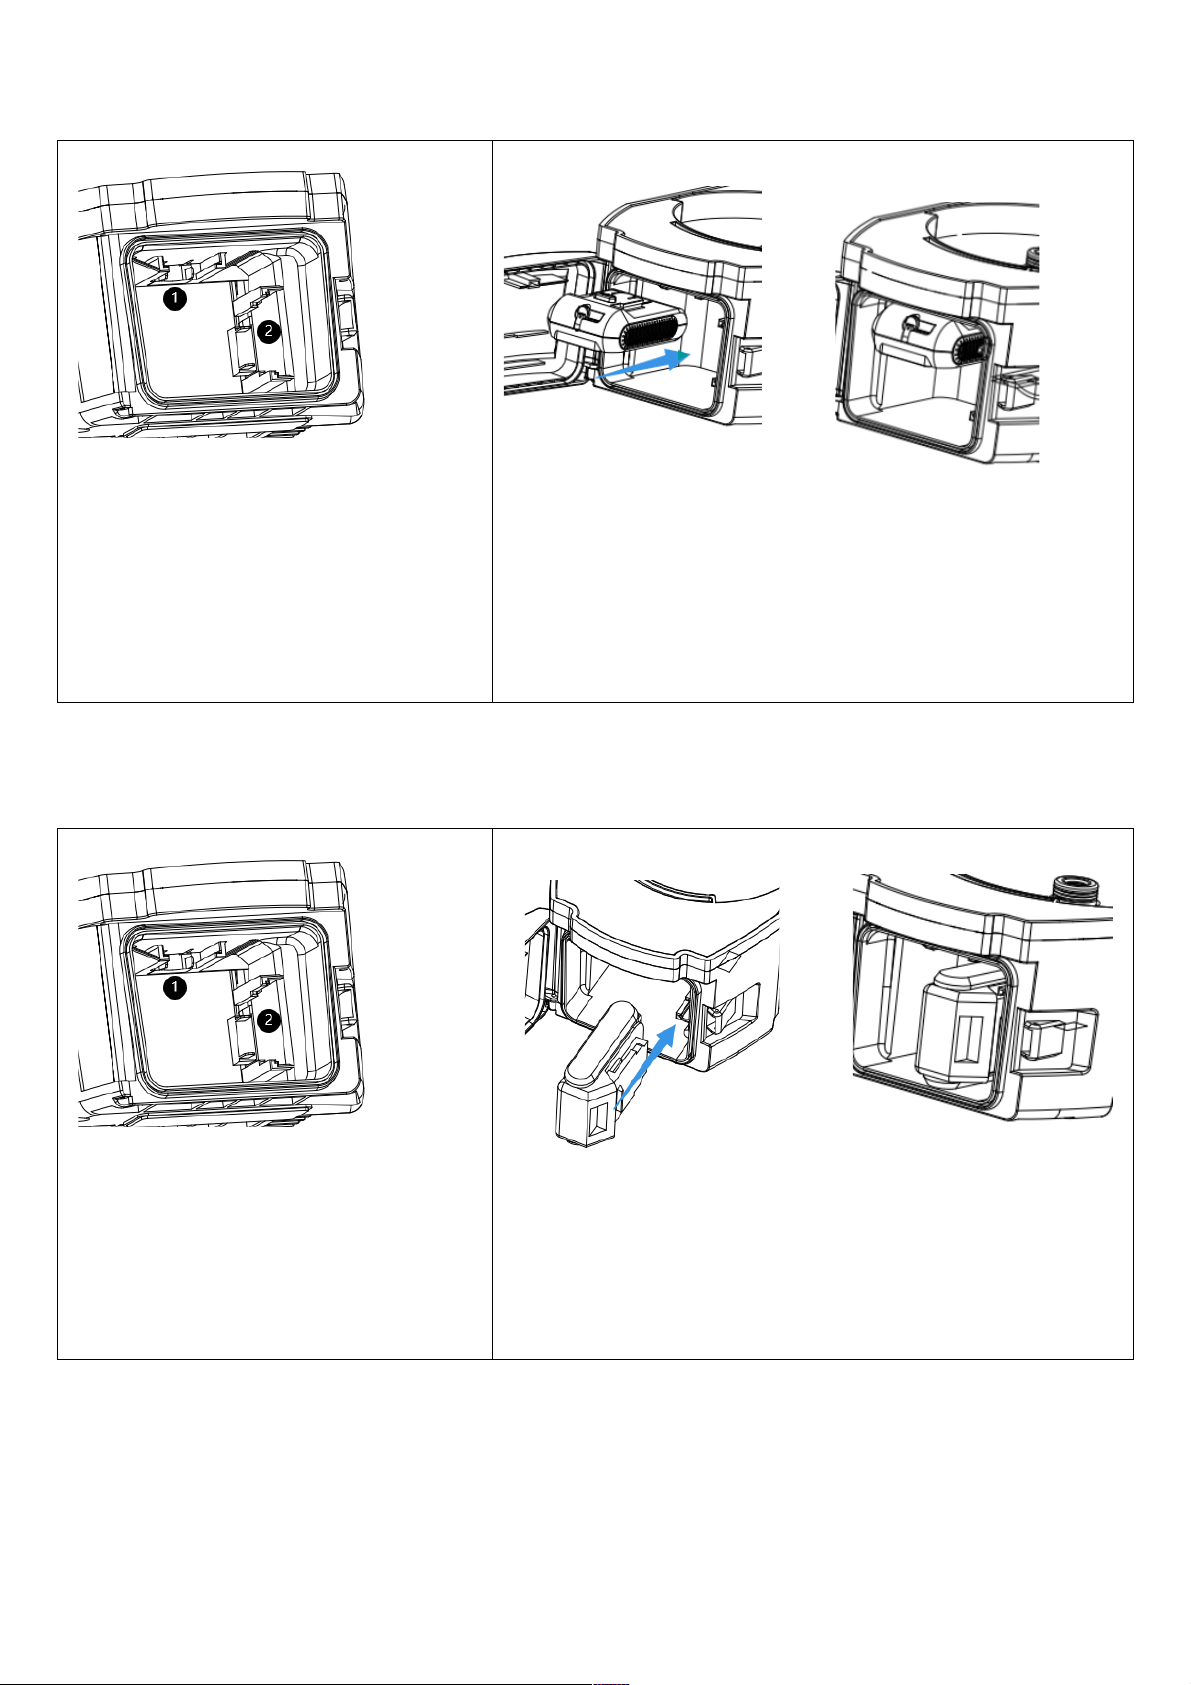
#1 - This port is for the supplied Turbo Tan k
Lithium battery.
#2 - The Turbo Tank 2.0 is compatible with
other 18-21V batteries including
MilwaukeeÒ and DeWaltÒ.*
The supplied battery arrives with a 30% charge. Please charge
the battery completely before first use.
Mount the supplied battery pack into the #1 battery interface of
the machine.
#1 - This port is for the supplied Turbo Tank
Lithium battery.
#2 - The Turbo Tank 2.0 is compatible with
other 18-21V batteries including
MilwaukeeÒ and DeWaltÒ.*
Mount other brand battery pack into the #2 battery interface of
the machine.
INSTALLING THE SUPPLIED BATTERY
INSTALLING ALTERNATE 18-21V BATTERIES
*This product is not manufactured or distributed by MilwaukeeÒ or DeWaltÒ.
Page 9
9
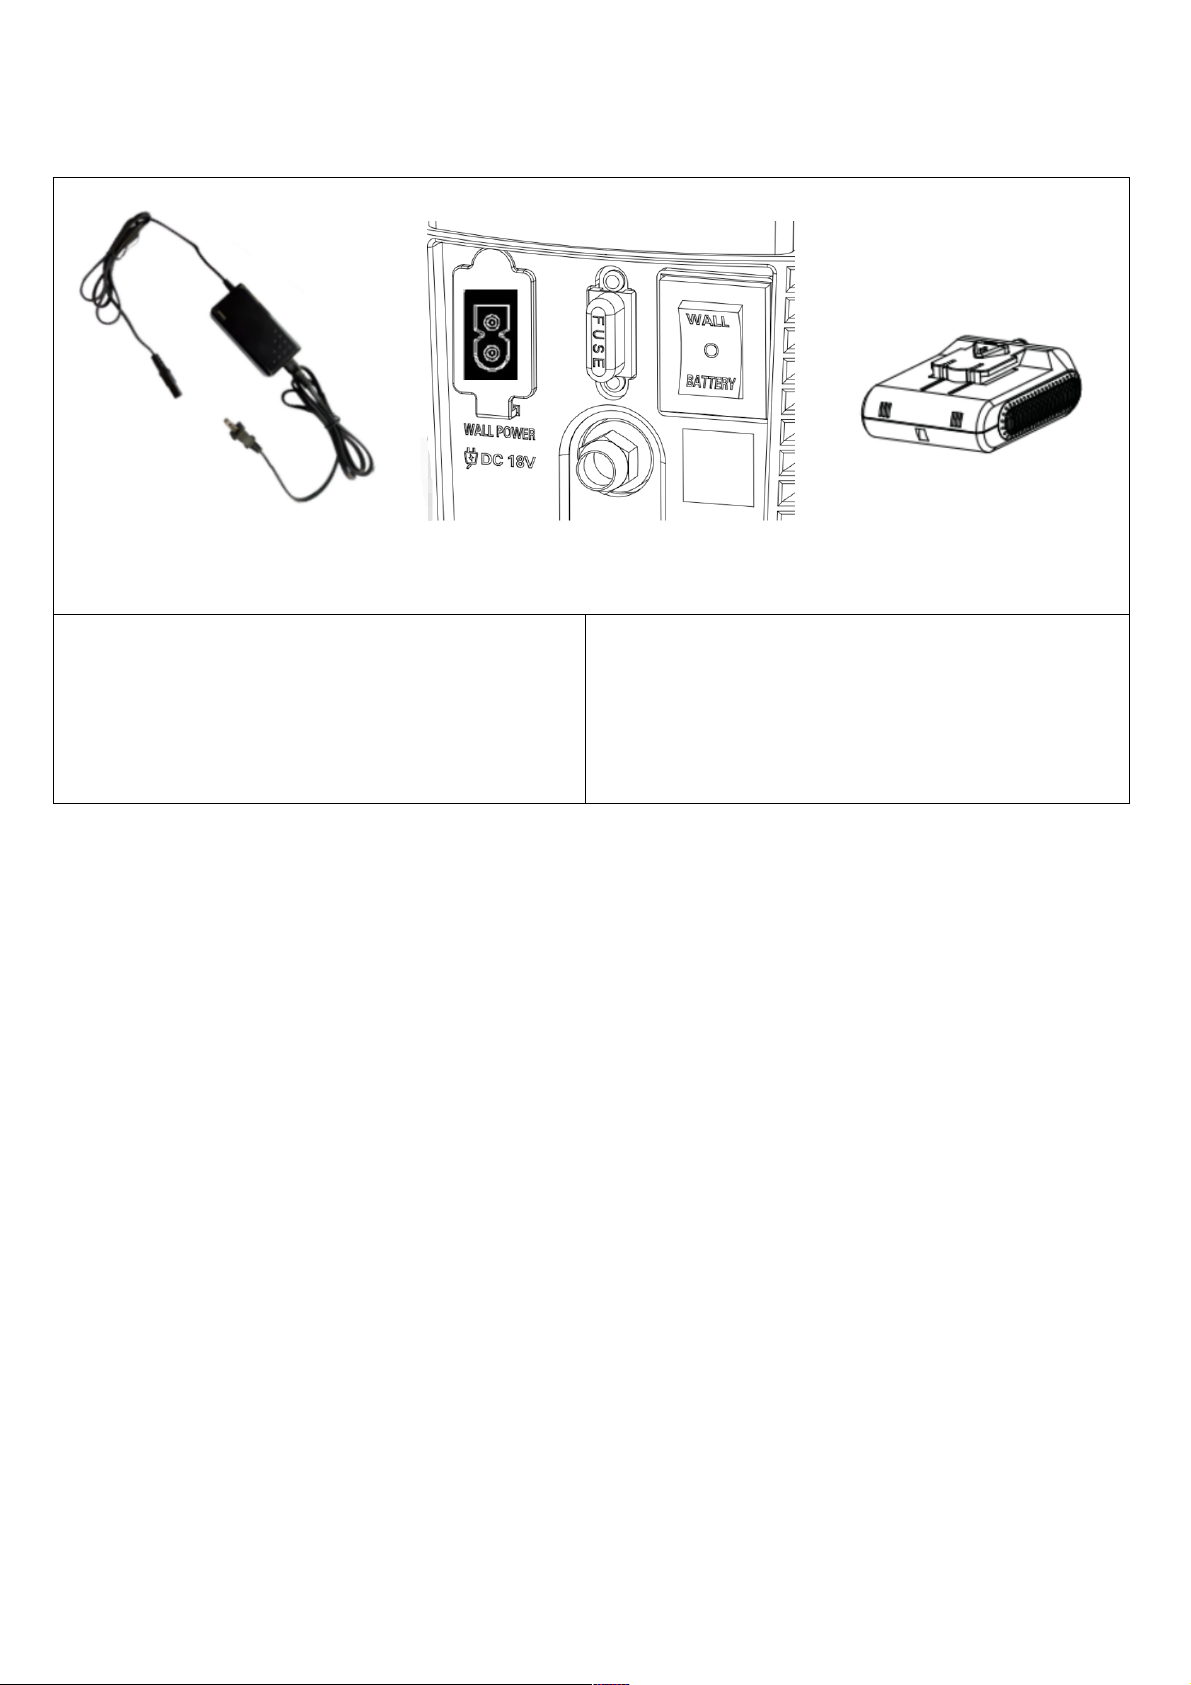
P/N 4781-04 P/N 4781-01
FOR USE WITH DC 18V WALL POWER
1. Plug the 120VAC - 18VDC wall adapter into the
Wall Power plug hole.
2. Press WALL on the power switch to turn on.
FOR USE WITH RECHARGEABLE BATTERY PACK
1. Install battery the pack into battery case
compartment.
2. Press BATTERY on the power switch to turn on.
OPERATION
With normal use, air can get trapped in the hose. We recommend the following steps to purge air out of your
system and get the maximum amount of pressure from your new Turbo Tank 2.0 HVACR Rinsing Sprayer.
PURGE AIR FROM THE SYSTEM: To pu rg e a ir, t ur n t he un it on " WALL" or "BATTERY." Point the nozzle into
water tank and squeeze lever until steady stream of water exits the hose.
FOLLOW THESE STEPS AFTER EACH TIME YOU REFILL YOUR TANK:
1. Fill the tank with water and cap tank.
2. For 18V AC/DC adaptor Use: Connect into 18V AC/DC power port. Turn unit on "WALL."
For Internal Sprayer Battery: Insert a charged battery and switch the unit to "BATTERY.”
3. Turn the power on and run for approximately 30 seconds or until a steady stream of water is present.
4. Connect the yellow or red nozzle, mini-split wand, Coil Gun (sold separately), or 39” wand (sold separately)
to spray gun.
Page 10
10
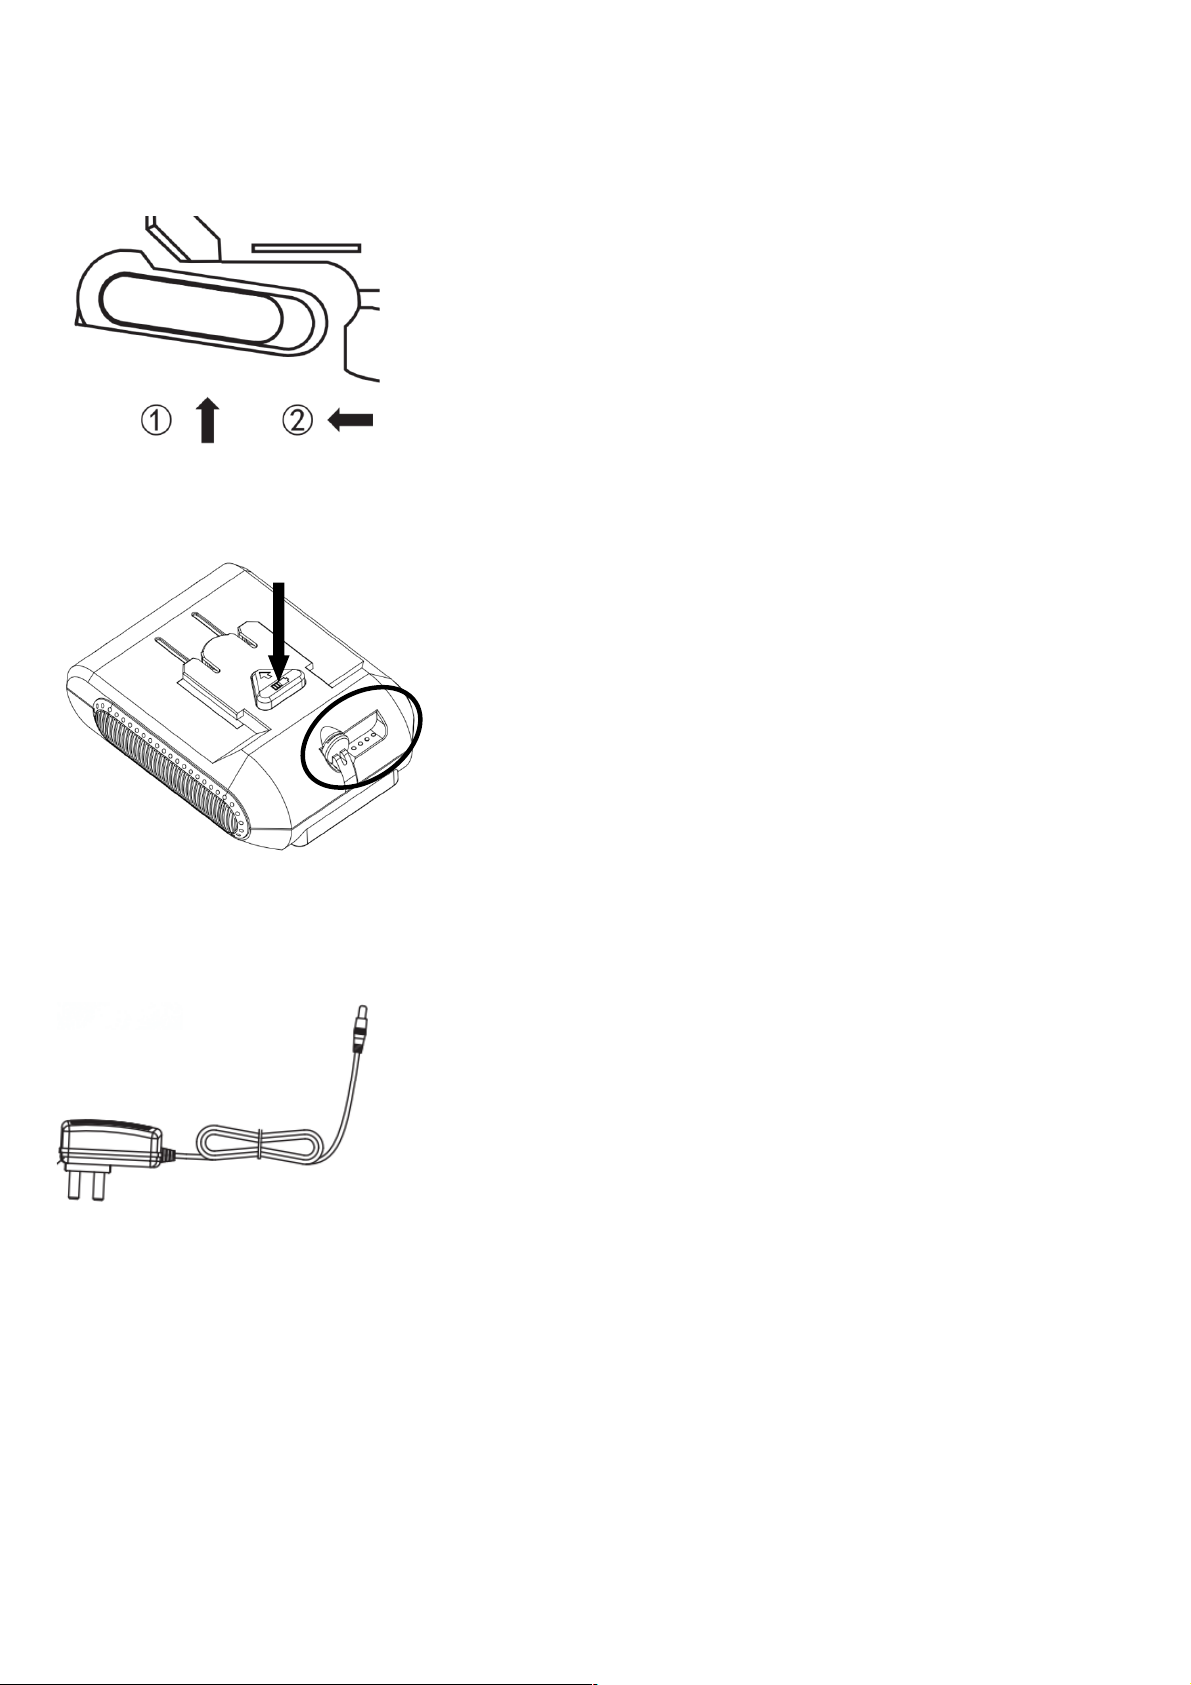
CHARGING THE BATTERY
WARNING: DO NOT OPERATE SPRAYER WHILE CHARGER THE BATTERY
(1) ① Lift the battery pack up ② Then pull the battery pack out.
(2) Check the battery power status by holding the on/off switch on the battery pack. If the battery level is less
than 50% (less than 2 LED lights on), please recharge it before using.
(3) Charge the battery pack (2500mAh) for 3.5 - 4 hours with the supplied charger. A new fully charged battery
will run the sprayer for approximately 45 minutes. Ambient conditions will affect the operation time. Consider
purchasing a separate battery if more daily sprayer use in battery mode is required.
AUTOMATIC SHUTOFF
THE AUTOMATIC SHUTOFF FEATURE:
When the handle lever is released, the dynamic pressure sensor shuts the motor pump off automatically. When
the trigger is pressed, the pressure drop automatically activates the motor and pressure is increased
once again with a slight delay. To ensure the correct automatic shutoff operation, the time interval
between trigger release and engagement must not be less than 5-10 seconds.
SHUTTING DOWN YOUR PORTABLE HVAC SPRAYER:
1. Place the switch in the OFF position.
2. Pull trigger on spray gun to relieve any water pressure in hose or spray gun.
Page 11
11
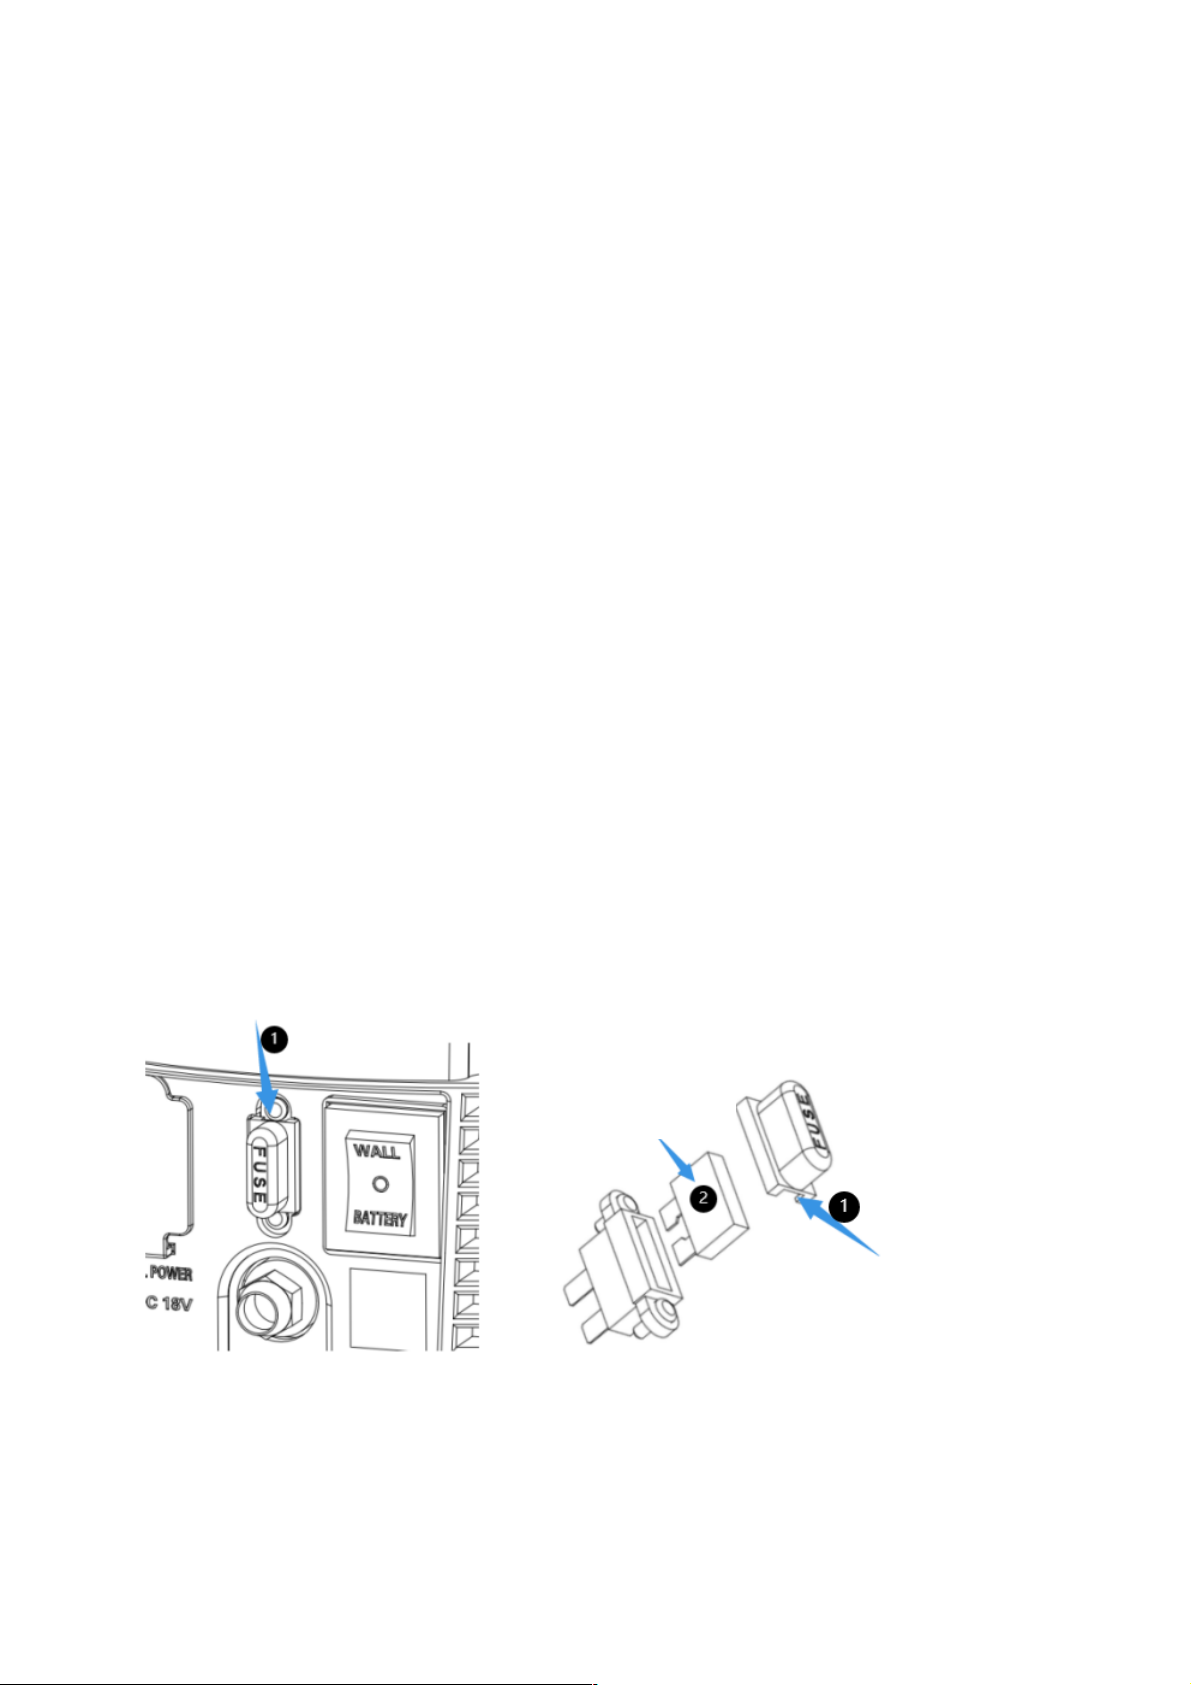
P/N 4781-03
GENERAL MAINTENANCE
FOR DEVICE:
WARNING: ALWAYS DISCONNECT THE PLUG FROM THE POWER SUPPLY BEFORE ANY MAINTENANCE
IS STARTED.
1. WATER FILTER SCREEN: Inspect the water filter screen before filling tank with water. Clean the water filter
screen when necessary.
2. NOZZLE CLOGGED: A clogged nozzle will cause the operating pressure to be too high, causing the portable
sprayer to surge. If this happens turn unit off and unplug the pressure sprayer:
Unplug the power supply, pull the handle lever to relieve pressure, remove the nozzle from the handle.
● Flush assembly backwards with water or compressed air.
● If pressure is still too high, repeat steps 1-2.
3. LUBRICATION: No lubrication is required for this pump. Silicone grease may be added to hose connector
O-rings if connecting becomes difficult.
4. Add some silicone grease to the metal part of the spray nozzle if it has not been used for a long period of
time.
REPLACING THE FUSE
The Turbo Ta nk Sp ra ye r i s e qu ip pe d w it h a 1 0A fuse located beside the power switch. Please check it if the
sprayer does not power on.
Use a screwdriver to take off the cover of the fuse (NO.1) and replace with a new fuse NO.2.
NOTE: There is a SPARE FUSE located on the inside of the battery door.
Page 12

12
BATTERY MAINTENANCE
1. Try to maintain a fully charged battery so the sprayer is ready for use. We recommend charging
the battery fully after each use to ensure the maximum battery life. Before the first use, charge for 3-4 hours.
2. Please note that the battery’s charge will reduce over time if stored without use. Ideally, charge the battery
at least once every three months to ensure it remains in a fully charged state.
3. Check the battery clamps regularly to ensure they are not loose, corroded, or defective.
4. Please always store the Battery/Sprayer/Power Pack away from high temperatures, flammable or explosive
goods.
5. To prevent electrical shock, please use an insulated tool or glove when fixing or performing maintenance.
6. Please contact your local Nu-Calgon distributor or Nu-Calgon if there is any defect of the battery. Do not
disassemble the battery yourself.
7. Do not clean the battery by using solvents, as it may damage the battery.
STORING OF THE PORTABLE HVAC SPRAYER
Your Tur bo Tan k 2.0 HVACR Rinsing Sprayer should be stored in such a way to protect it from freezing. Do not
store this unit outdoors or in areas where temperatures will fall below 32°F. This can cause extensive damage
to this unit and void the warranty. Before storing, follow these shut down instructions:
DRAIN WATER FROM MACHINE:
1. Turn off the switch, squeeze the lever to release pressure. Remove the nozzle and squeeze handle lever to drain
the water. Empty the water from the tank. Turn the unit on and run it for approximately 30 seconds without the nozzle
while engaging the handle lever.
3. Lower one end of the hose, engage the lever on the handle and allow the water to drain from the hose.
4. Remove and place the spray gun and power cord in the mesh storage compartments.
5. If the unit must be stored under freezing condition, or will be stored for more the 30 days, a pump
winterizer/protector or a non-toxic RV anti-freeze can be used to prevent freezing and reduce mineral deposits.
ADD ANTI-FREEZE AS FOLLOWS:
1. Pour approximately 3/4 gallon (3 liters) of RV anti-freeze into tank.
2. Connect high pressure hose, nozzle, and power cord.
3. Turn unit on, squeeze lever until a steady stream of RV anti-freeze in present.
4. Turn unit off. Squeeze handle lever to release pressure.
5. Remove and place the spray gun and power cord in the mesh storage compartment
Page 13

13
USING THE TURBO TANK SPRAYER AFTER STORING WITH ANTI-FREEZE:
1. Drain RV anti-freeze. (Follow steps 1 and 2 from Drain Water from Machine)
2. Run 1 tank of fresh water through system before using and ensure that all anti-freeze is purged from the system.
WARNING: USE ONLY RV ANTIFREEZE. OTHER FORMULATED ANTI-FREEZE PRODUCTS FOR
HVAC APPLICATIONS CAN DAMAGE PUMP AND VOID WARRANTY.
FAQ
THE PORTABLE HVAC SPRAYER DOESN’T WORK?
● Check if the battery is attached properly and press the battery status button to check the LED power gauge.
● If using the 18V AC/DC adaptor, check if the power cord is attached properly and the LED turns on.
● Check the fuse beside the power switch.
NO WATER SPRAYS OUT WHEN STARTING THE WATER PUMP?
● Check if the nozzle is clogged.
● Check if the water inlet or outlet is clogged.
● Check if the water inlet filter screen on the base unit is clogged.
● Check if the water hose is bent.
WATER IS LEAKING WHEN I REMOVE THE TANK TO FILL?
● Small amounts of water leaking onto the base is normal when disconnecting the valve between the tank and the
base
SPECIFICATIONS:
● Pressure (PSI): 150
● Volts: 18V(DC)
● Power: 72W
● Hose: 4.5meter
● Power Cord: 3.0 meter
● Capability: 17 Liter
● G.W.: 7.8kg
● Dimension: 355 x 230 x530mm
IMPORTANT: Consult Nu-Calgon literature for other details. Contact Nu-Calgon for any
warranty related concern. In most cases, the Turbo Tank can easily be repaired in the field.
Page 14
14
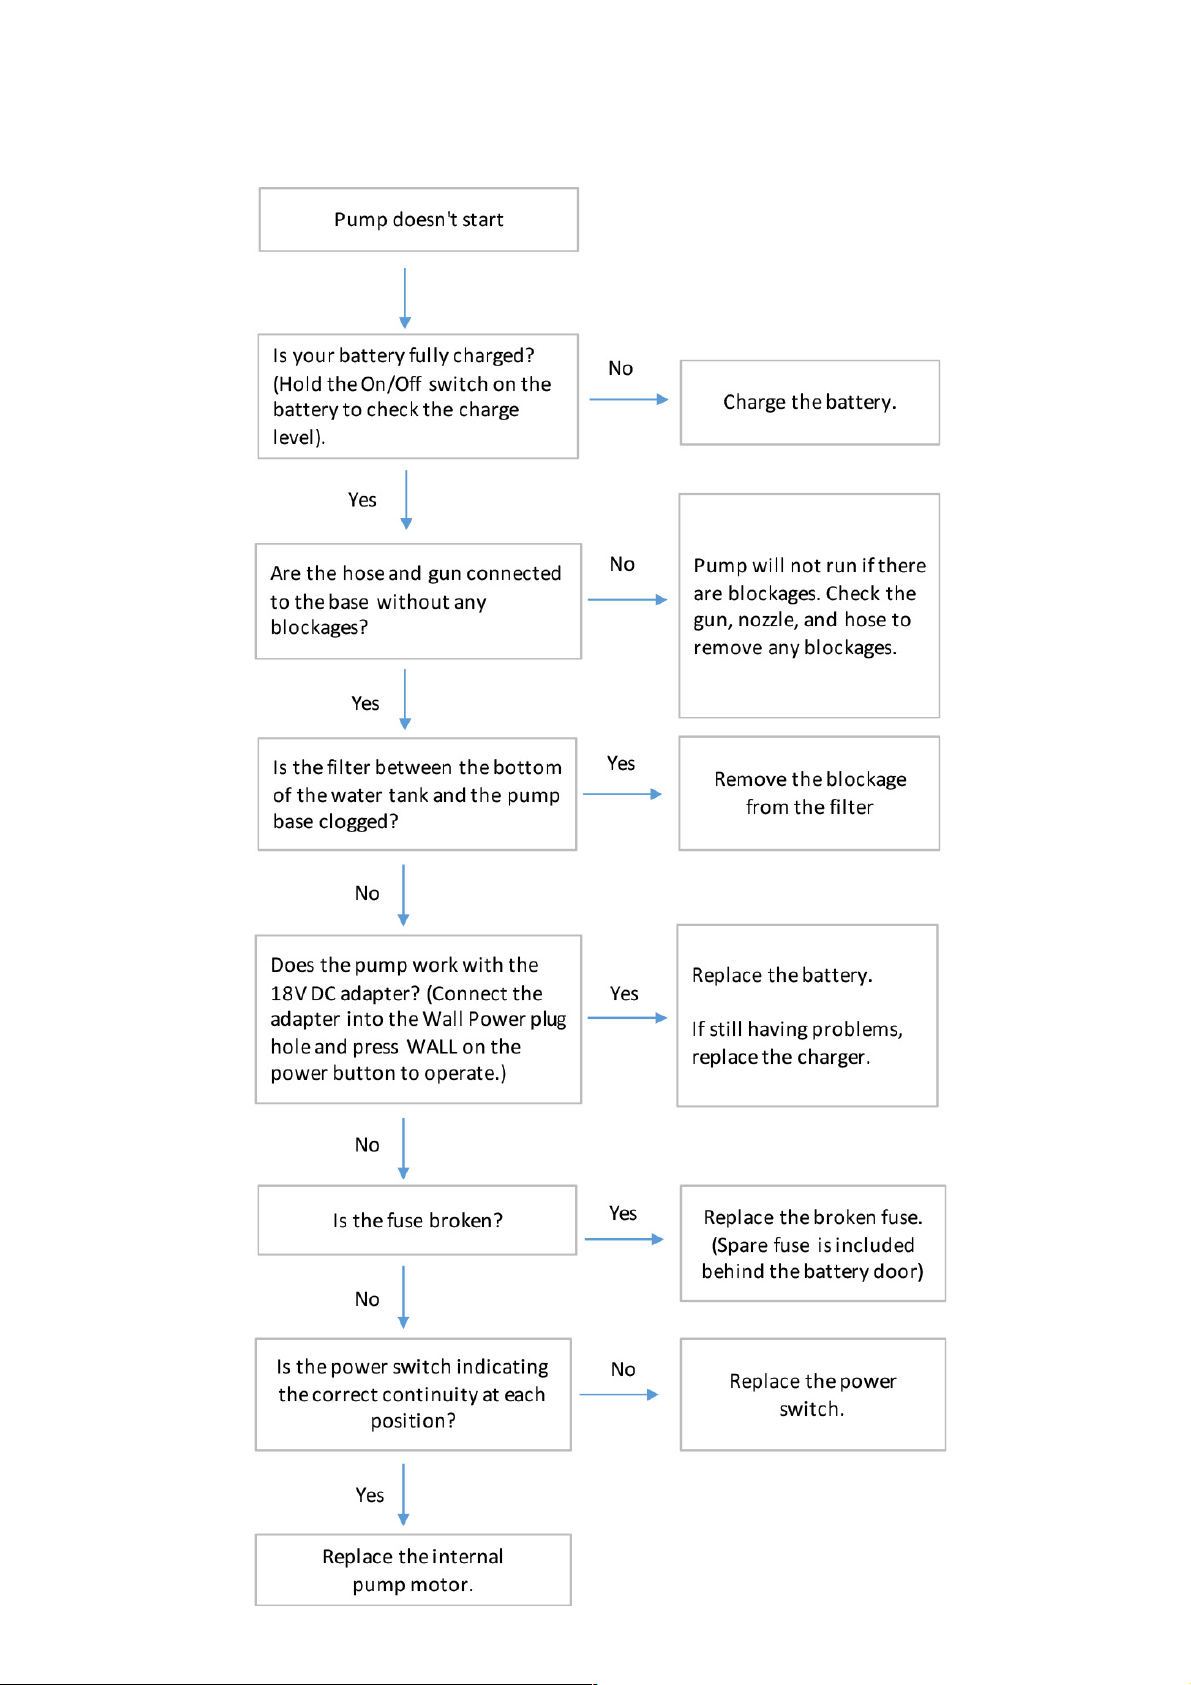
Troubleshooting Procedures
 Loading...