

Page 1

uniFLOW Release Station
Installation & Configuration Manual
Page 2

Page 3

Document
Versioning
Version
Date
Author(s)
Reviewer(s)
1.0
03-Sep-2014
Sebastian
Husnik
Oliver Shikaloski, Holger Bauszus, Thomas Lemmer
1.1
05-Sep-2014
Sebastian
Husnik
Thomas Lemmer
1.2
08-Sep-2014
Sebastian
Husnik
Thomas Lemmer
1.3
17-Sep-2014
Sebastian
Husnik
Thomas Lemmer
Versioning
Page 4

1.4
06-Oct-2014
Sebastian
Husnik
Thomas Lemmer
1.5
08-Oct-2014
Sebastian
Husnik
Thomas Lemmer
1.6
20-Jan-2015
Sebastian
Husnik
Thomas Lemmer
1.7
29-Apr-2015
Sebastian
Husnik
Thomas Lemmer
1.8
08-Jun-2015
Sebastian
Husnik
Thomas Lemmer
1.9
15-Oct-2015
Sebastian
Husnik
Thomas Lemmer
1.10
22-Mar-2016
Sebastian
Husnik
Thomas Lemmer
1.11
26-Apr-2016
Sebastian
Husnik
Thomas Lemmer
1.12
03-Aug-2016
Sebastian
Husnik
Thomas Lemmer, Holger Bauszus
1.13
03-Nov-2016
Sebastian
Husnik
Thomas Lemmer
2.0
10-Feb-2017
Sebastian
Husnik
Thomas Lemmer
2.1
16-Aug-2017
Sebastian
Husnik
Thomas Lemmer
2.2
16-Aug-2017
Thomas
Lemmer
Thomas Lemmer
2.3
08-Dec-2017
Thomas
Lemmer
Thomas Lemmer
Document Name
uniFLOW Release Station - Installation & Configuration
Knowledgebase
MOMKB-770 (https://web.nt-ware.net/its/browse/MOMKB-770)
File Name
uniFLOW Release Station - Installation & Configuration - V2.2.pdf
Technologies
Concerned
uniFLOW Release Station HID
uniFLOW Release Station Hitag
uniFLOW Release Station Multi
uniFLOW Release Station PLUS
uniFLOW Release Station PLUS-2 V2
uniFLOW Release Station Touch
uniFLOW
uniFLOW Online
Short Summary
This document describes the installation and configuration of the uniFLOW Release Station.
Document
Version
Topic(s)
Changes
Page 5
Changes
1.1
Configuration (on page 6), Network
Configuration (see "Network" on page 19),
Firmware Update (on page 24), Factory
Reset (on page 24), Job Release via
uniFLOW Release Station (see "Job
Release" on page 25)
Added note that IPv6 is not
supported.
Added note about USB drive file
system (FAT, FAT32).
Updated cost center search
description.
1.2
Card Reader (on page 16)
Added PLUS card reader configuration
instructions.
1.3
Mounting Options (on page 35)
Corrected a link.
1.4
Card Reader (on page 16)
Added MiCard PLUS config tool
download instructions.
1.5
FCC and IC Compliance Notes (see
"Compliance and Disposal Notes" on
page 35)
Updated IC Notes.
1.6
Configuration (on page 6)
Added note about network cable
connection.
1.7
Info Screen (on page 27)
Added description of info screen.
1.8
Firmware Update (on page 24)
Added information on where to
download the newest firmware.
1.9
Specific Settings (on page 10)
Added Printed Queue Parameter
(uniFLOW V5.4, firmware 1.0 SR4
only).
1.10
Release Station (see "uniFLOW Release
Station" on page 14)
Added new parameter Server Ping
Interval for Emergency Access
(seconds).
1.11
uniFLOW Release Station Website (on page
12)
Settings (on page 23)
Logout (on page 23)
Factory Reset (on page 24)
Described new login screen.
Described new settings page.
Described new logout page.
Updated Factory Reset infos.
1.12
uniFLOW Release Station Website (on page
12)
Updated URL.
1.13
Specifications (on page 28)
Reformatted chapter, moved to end of
book, added disposal note.
2.0
uniFLOW Online (on page 20), Network (on
page 19), uniFLOW Release Station
Website (on page 12)
Added firmware V1.1 features:
uniFLOW Online connectivity, proxy
configuration, HTTPS support,
changed screenshots.
2.1
uniFLOW Online (on page 20)
Firmware V1.2: Added wizard based
adding to uniFLOW Online.
2.2
Firmware Update (on page 24)
Added a more detailed description.
2.3
Various topics
Added uniFLOW Release Station
MiCard PLUS-2 V2
Page 6

Page 7

Disclaimer
NT-ware Systemprogrammierungs-GmbH, all its affiliates, partners and licensors disclaim all warranties,
including, but not limited to, warranties about the accuracy or completeness of statements of this
site's/document's content or the content of any site or external sites for a particular purpose. This
site/document and the materials, information, services, and products at this site/document, including,
without limitation, text, graphics, and links, are provided 'as is' and without warranties of any kind, whether
expressed or implied.
All rights reserved. No parts of this work may be reproduced in any form or by any means - graphic,
electronic, or mechanical, including photocopying, recording, taping, or information storage and retrieval
systems - without the prior written permission of NT-ware Systemprogrammierungs-GmbH (hereinafter
also referred to as NT-ware).
Company and product names mentioned herein are registered or unregistered trademarks of their
respective companies. Mention of third-party products is for information purposes only and constitutes
neither an endorsement nor a recommendation. NT-ware assumes no responsibility with regard to the
performance or use of these products. Also, NT-ware makes no claim to these trademarks. Any use of
trademarks, logo, service marks, trade names, and product names is prohibited without the written
permission of the respective owners.
Adlib, Express and Express Server are either registered trademarks or trademarks of Adlib Publishing
Systems Inc.; Adobe®, Adobe® Reader®, Acrobat®, Distiller®, PostScript® and products of the CREATIVE
SUITE(S) are either registered trademarks or trademarks of Adobe Systems Incorporated in the United
States and/or other countries; Android is a trademark of Google Inc.; Apple®, the Apple® logo, Mac®, Mac
OS®, Macintosh®, iPhone®, iPad® and AirPrint® are trademarks of Apple Inc. registered in the U.S. and other
countries; Box of Box Inc.; Blackboard Transact™ of Blackboard Inc.; CANON, imageRUNNER, imageRUNNER
ADVANCE, MEAP, CPCA, AMS, iW AMS, iW Desktop, iSend, iW SAM are trademarks or registered
trademarks of Canon Inc.; CardSmith® is a trademark of CardSmith LLC; CBORD CS Gold® of the CBORD
Group Inc.; Crystal Reports and other Business Objects products and services mentioned herein as well as
their respective logos are trademarks or registered trademarks of Business Objects Software Ltd. Business
Objects is an SAP company; Dropbox of Dropbox Inc.; eCopy™, eCopy ShareScan® and eCopy ScanStation™
are marks or trademarks of Nuance Communications, Inc.; Evernote® of Evernote Corporation; FileNet® of
IBM Corporation; Foxit®SDK and Foxit® Reader of Foxit Corporation; Google Docs of Google Inc.; Google
Cloud Print™ web printing service is a trademark of Google Inc.; Helix™ Production Workflow is a trademark
of NT-ware Systemprogrammierungs-GmbH; HP, HEWLETT-PACKARD, PCL and LASERJET are registered
trademarks that belong to Hewlett-Packard Development Company; KONICA MINOLTA is a registered
trademark of KONICA MINOLTA Inc.; iOS® of Cisco Technology Inc.; iDRS™ SDK and IRISConnect™ are
unregistered trademarks of I.R.I.S. Group S.A.; JAWS pdf courier™ are trademarks of Global Graphics SA.;
Microsoft®, Windows®, Windows Server®, Internet Explorer®, Internet Information Services, Microsoft®
Word, Microsoft® Excel, Microsoft SharePoint®, Microsoft SharePoint® Online, OneDrive®, One Drive® for
Business, SQL Server®, Active Directory®, Hyper-V® are either registered trademarks or trademarks of
Microsoft Corporation in the United States and/or other countries of Microsoft Corporation; Neevia
Document Converter Pro™ of Neevia Technology; NetWare®, Novell®, Novell eDirectory™ of Novell Inc. are
registered/unregistered trademarks of Novell Inc. in the United States and other countries; MobileIron® of
Mobile Iron Inc., Océ, Océ PlotWave®, Océ ColorWave® and PRISMA are trademarks or registered
trademarks of Océ-Technologies B.V. Océ is a Canon company, OpenOffice.org™ of Oracle Corporation;
PAS™ is a trademark of Equitrac Corp.; PosterJet is copyrighted and an internationally registered trademark
of Eisfeld Datentechnik GmbH & Co. KG; RedTitan EscapeE of RedTitan Limited; NETAPHOR®, SiteAudit™ are
Page 8

trademarks of NETAPHOR SOFTWARE Inc.; SAMSUNG is a trademark of SAMSUNG in the United States or
other countries; Therefore™, Therefore™ Online of Therefore; UNIX® is a registered trademark of The Open
Group; uniFLOW®, uniFLOW Serverless Secure Printing®, Helix Production Workflow®, MIND®,
microMIND®, MiCard® and uniFLOW Service for AirPrint® are registered trademarks of NT-ware
Systemprogrammierungs-GmbH; pcProx®, AIR ID® are registered trademarks of RFIdeas Inc.Readers;
CASI-RUSCO® is a registered trademark of ID Card Group; Radio Key® is a registered trademark of Secura
Key; GProx™ II is an unregistered trademark of Guardall; HID® ProxHID is a registered trademark of HID
Global Corporation; Indala® is a registered trademark of Motorola; ioProx™ is an unregistered trademark of
Kantech; VMware vSphere® and VMware vSphere® Motion® are registered trademarks of VMware; Xerox,
Xerox and Design, as well as Fuji Xerox and Design are registered trademarks or trademarks of Xerox
Corporation in Japan and/or other countries.
All other trademarks, trade names, product names, service marks are property of their respective owners
and are hereby acknowledged.
While every precaution has been taken in the preparation of this document, NT-ware assumes no
responsibility for errors or omissions, or for damages resulting from the use of information contained in this
document or from the use of programs and source code that may accompany it. NT-ware does not assume
any responsibility or liability for any malfunctions or loss of data caused by the combination of at least one
NT-ware product and the used operation system and/or third-party products. In no event shall NT-ware be
liable for any loss of profit or any other commercial damage caused or alleged to have been caused directly
or indirectly by this document.
In addition, this manual provides links to the sites of affiliated or independent companies and certain other
businesses. NT-ware is not responsible for examining or evaluating, and NT-ware does not warrant the
offerings of, any of these businesses or individuals or the content of their websites. NT-ware does not
assume any responsibility or liability for the actions, product, and content of all these and any other third
parties. You should carefully review their privacy statements and other conditions of use.
Friday, December 08, 2017, Bad Iburg (Germany)
Important Note
Serious problems might occur if you modify the registry of your Windows operating system incorrectly.
These problems might require that you reinstall the operating system. We strongly recommend to always
back up the registry of your Windows operating system before applying changes to it, just in case you do
something wrong. NT-ware does not assume any responsibility or liability for any impact on the
operating system after changing the registry. You understand and accept that you use this information
and modify the registry of your Windows operating system at your own risk.
uniFLOW and corresponding components like Web Submission and Internet Gateway rely heavily on
their SQL databases. We strongly suggest that you refrain from modifying these SQL databases manually
without prior consultation from the NT-ware support team. NT-ware does not assume responsibility or
liability for possible impact on your uniFLOW environment after modifying any of the SQL databases.
Copyright and Contact
NT-ware Systemprogrammierungs-GmbH
Niedersachsenstraße 6
49186 Bad Iburg
Germany
Page 9

www.nt-ware.com
Tel: +49 - 54 03 - 7243 - 0
Fax: +49 - 54 03 - 78 01 03
Email: info@nt-ware.com
Register of Companies: Amtsgericht Osnabrück
No. of entry in Register of Companies: HRB 110944
Chief Executive Officer: Karsten Huster
Responsible according to § 6 MDStV: Karsten Huster
VAT registration no. according to §27 a Umsatzsteuergesetz: DE 230932141
©1998-2017 NT-ware Systemprogrammierungs-GmbH.
Feedback
Should you come across any relevant errors or have any suggestions please contact
documentation@nt-ware.com or use the Send feedback here button of the uniFLOW Online Help.
Technical Support
First technical support services will be provided by your dealer. Before you contact the dealer for technical
support, ensure you have read this document.
Page 10
Important Note:
Information that is crucial for the correct functioning of the uniFLOW software.
Further Information:
Pointer to additional manuals, installation manuals, white papers or the NT-ware
Knowledgebase.
Region Specific Feature:
Indicator for uniFLOW features that are not available worldwide.
External Link:
Link to an external web page.
Settings:
Detailed explanation of configuration settings or operational procedures.
Compass:
Path to the menu or configuration page in the software.
How to use this Document
Text Styles
This style is used for text that is displayed on screen.
This style is used for text the user has to type in.
This style is used for hyperlinks to web pages, internal links to other pages in this manual.
This style is used for code examples: XML code, variables or regular expressions.
Pictograms
Screenshots and Diagrams
This manual contains screenshots of the software, diagrams explaining relations and pictures of products.
Even though all visuals are up-to-date at the time of writing, they are subject to change.
Language and Translations
This document has originally been written in English language. Translations of this document are based on
the English original. Some screenshots, diagrams and pictures in this document may not be translated and
appear in English language only.
Send Feedback
Should you come across any relevant errors or have any suggestions please contact
documentation@nt-ware.com or use the Send feedback here button of the uniFLOW Online Help.
Page 11

About this Document
This document is delivered as part of the device / the software from NT-ware. Please read this document
before using the device / the software and keep this document or the link to an online version of this
document for future reference. Please make sure that all persons operating the device / the software are
familiar with this document. Please observe all instructions given in this document. Installation,
configuration and maintenance must only be performed by sufficiently qualified personnel. Failure to
comply with this document may void the warranty.
Every effort has been made to ensure that the contents of this manual are accurate. However, NT-ware
reserves the right to make changes without notice.
Page 12

Page 13

uniFLOW Release Station Contents
Contents
1 Introduction ............................................................................................... 1
2 Available Models ........................................................................................ 2
3 Scope of Supply .......................................................................................... 2
4 Ports ........................................................................................................... 3
5 LED / Beep Status ....................................................................................... 4
6 Copy Control Cables.................................................................................... 5
7 Installation ................................................................................................. 6
8 Configuration ............................................................................................. 6
8.1 Advanced Configuration ................................................................................................ 8
8.1.1 Specific Settings ........................................................................................................................... 10
8.2 uniFLOW Release Station Website ............................................................................... 12
8.2.1 uniFLOW Release Station ............................................................................................................. 14
8.2.2 Card Reader ................................................................................................................................. 16
8.2.3 Port Configuration ....................................................................................................................... 16
8.2.3.1 Signal Interpreter ................................................................................................................................. 17
8.2.4 Network ....................................................................................................................................... 19
8.2.5 Support ........................................................................................................................................ 20
8.2.6 Upgrade ....................................................................................................................................... 20
8.2.7 uniFLOW Online ........................................................................................................................... 20
8.2.8 About ........................................................................................................................................... 22
8.2.9 Settings ........................................................................................................................................ 23
8.2.10 Logout .......................................................................................................................................... 23
8.3 MiCard Configuration .................................................................................................. 23
8.4 Factory Reset .............................................................................................................. 24
8.5 Firmware Update ........................................................................................................ 24
9 Job Release ............................................................................................... 25
10 Info Screen ............................................................................................... 27
11 Specifications ........................................................................................... 28
11.1 Supported Card Standards........................................................................................... 30
11.2 Mounting Options ....................................................................................................... 35
11.3 Compliance and Disposal Notes ................................................................................... 35
I
Page 14

uniFLOW Release Station Contents
12 Index ........................................................................................................ 41
II
Page 15
uniFLOW Release Station
Copy accounting can only be used on devices for which a copy control cable has been
developed and produced.
For a list of available copy control cables, please refer to chapter Copy Control Cables
(on page 5).
MiCard Magnetic Card Reader is not supported at the moment.
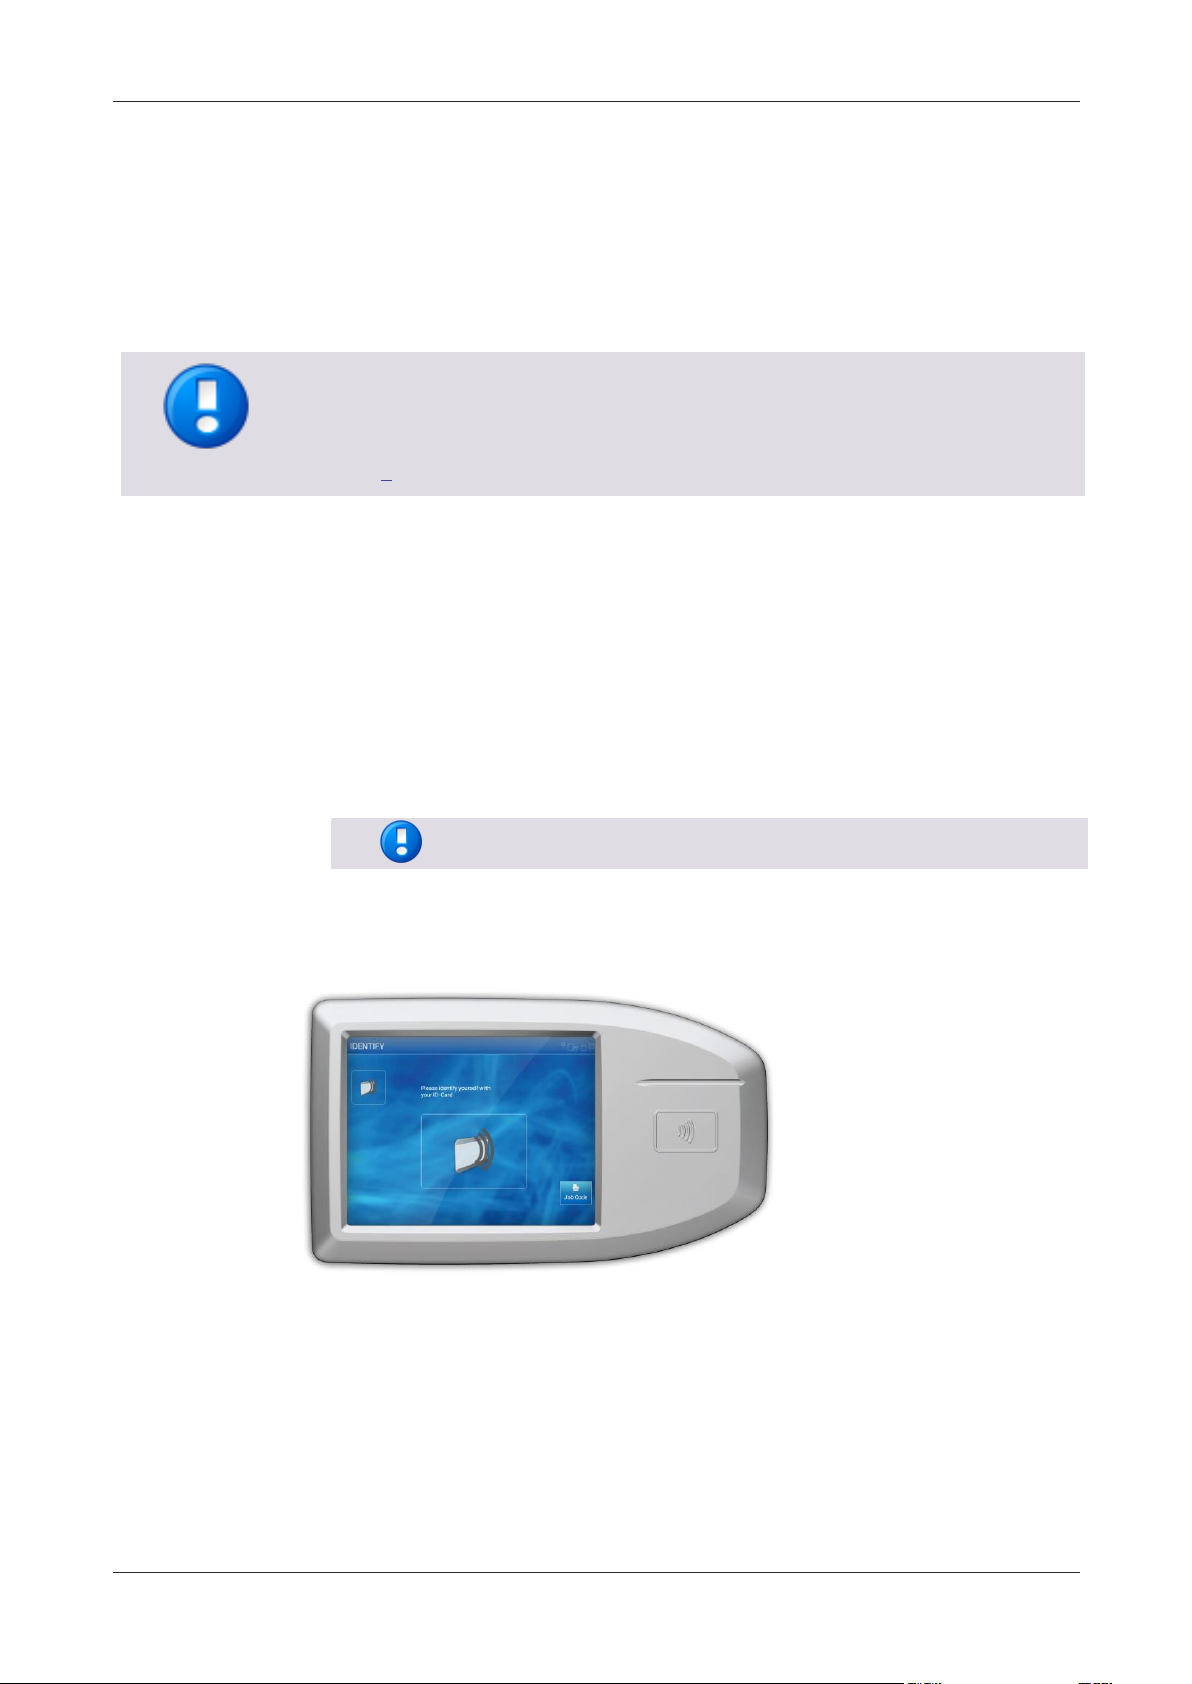
1 Introduction
The uniFLOW Release Station is an easy to use external terminal with touch screen and
embedded card reader that can be used for releasing personal secure print jobs from
any device as well as for print & copy accounting.
Specifications
5.7 inch capacitive multi-touch screen.
Integrated MiCard contactless card readers or model without card reader for PIN
code or credentials authentication.
Integrated two port network switch.
For a use in projects, the uniFLOW Release Station is furthermore equipped with:
A USB port for connecting external MiCard card readers via USB.
An I/O connector for controlling and monitoring copying devices via copy control
cable.
1
Page 16

uniFLOW Release Station
2 Available Models
The uniFLOW Release Station is available in versions with integrated MiCard card
readers and in a version without integrated card reader.
Available Models
uniFLOW Release Station Hitag (with MiCard Hitag reader)
uniFLOW Release Station HID (with MiCard HID reader)
uniFLOW Release Station Multi (with MiCard Multi reader)
uniFLOW Release Station PLUS (with MiCard PLUS reader)
uniFLOW Release Station PLUS-2 V2 (with MiCard PLUS-2 V2 reader)
uniFLOW Release Station Touch (PIN code or credentials only; without
integrated card reader)
3 Scope of Supply
The uniFLOW Release Station package includes:
The uniFLOW Release Station device.
A patch cable to connect the device to a printer.
Power supply.
The uniFLOW Release Station Installation Guide.
2
Page 17
uniFLOW Release Station
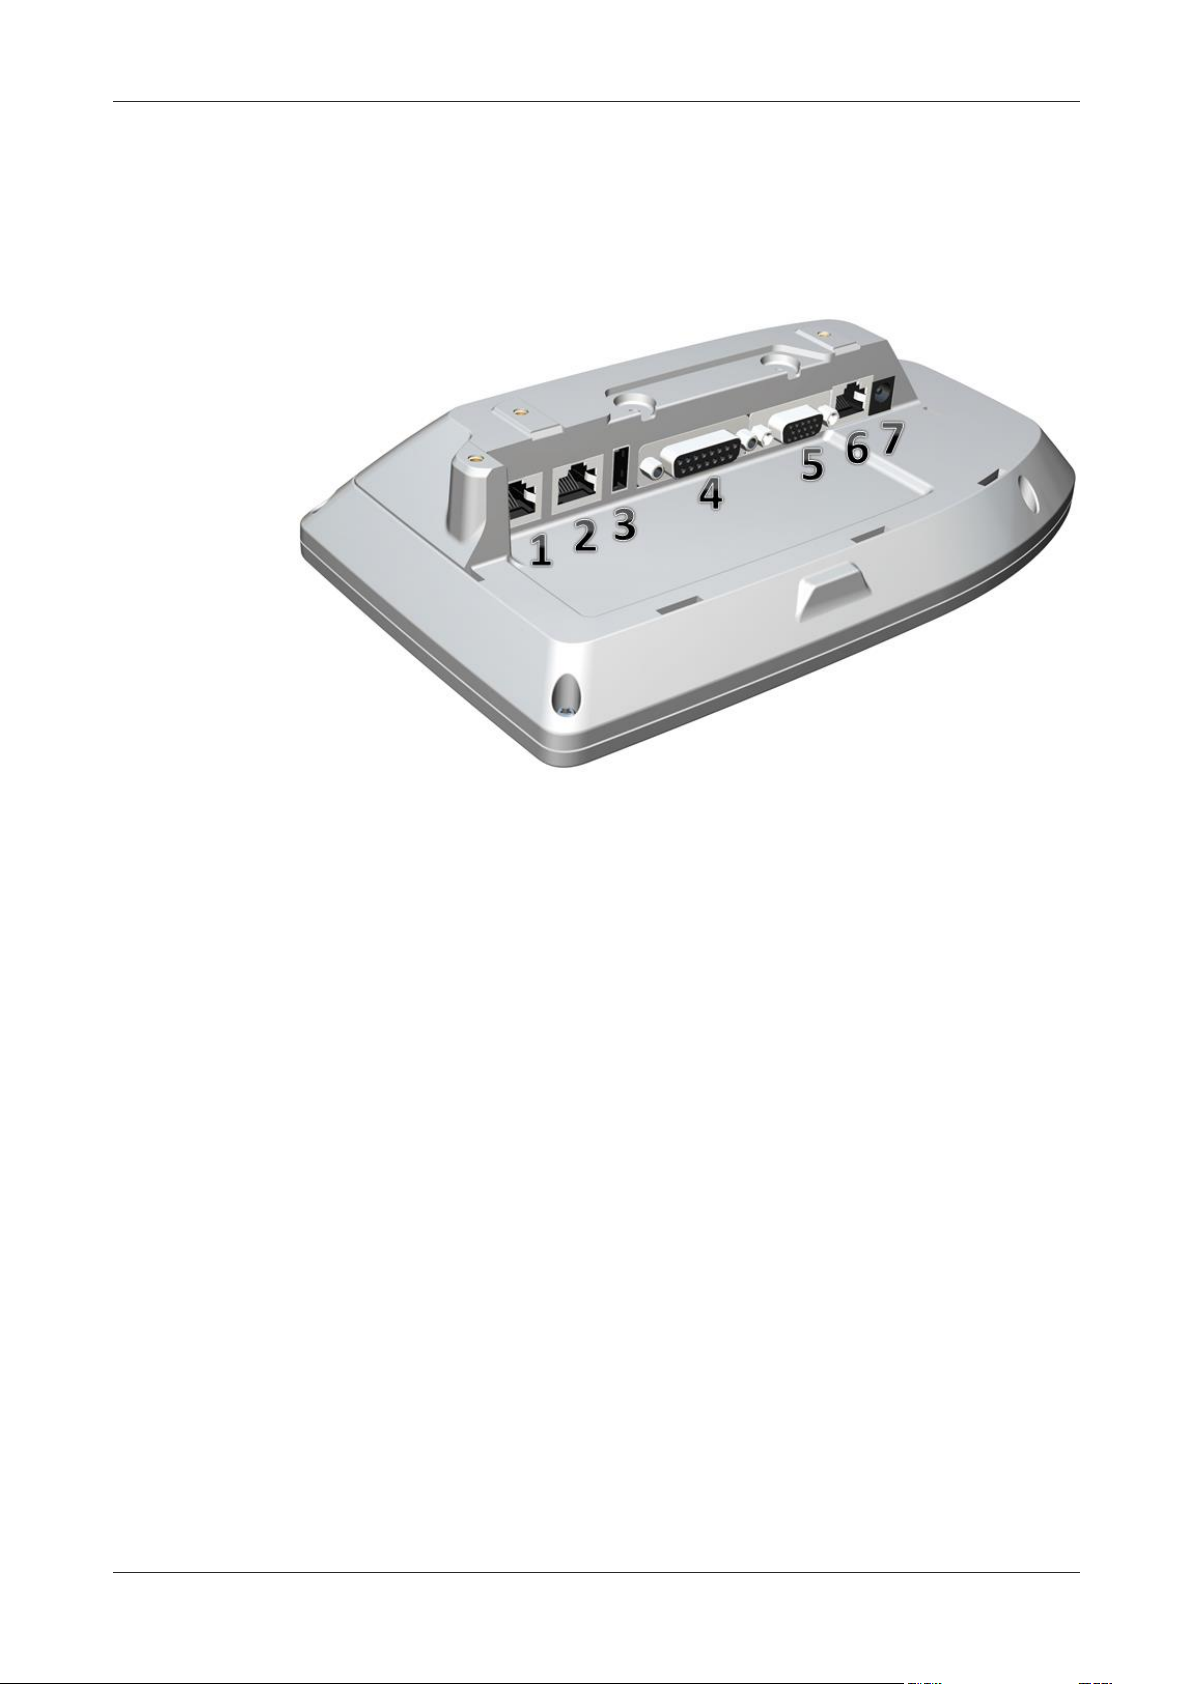
4 Ports
1. Network port 1:
To connect the uniFLOW Release Station to the printer or to the network.
2. Network port 2:
To connect the uniFLOW Release Station to the printer or to the network.
3. USB port:
Used to connect an additional MiCard USB card reader to the uniFLOW Release
Station.
4. Copy Control port 1:
To connect a copy control cable.
5. Copy Control port 2:
To connect a copy control cable.
6. RJ45 port:
Only for internal use.
7. Power input jack:
To connect the external power supply.
3
Page 18

uniFLOW Release Station
Status
Green LED
Yellow LED
Red LED
Booting up
flashing
flashing
Not synchronized
flashing
Synchronized (operating)
flashing
Authentication OK
on
flashing
Authentication failed
flashing
on
Status
Beep Signal
The card reader is booting up.
2 x fast
The card reader is not parameterized which means, there
was no saved config found.
2 x slow
The card reader is parameterized. A configuration was found
on the device.
1 x short
If parameters are sent to the card reader.
2 x slow
A card has been detected.
1 x long
If a Facility Code has been detected as invalid.
3 x fast
5 LED / Beep Status
The uniFLOW Release Station is equipped with either three, one or no LEDs, depending
on what model is used.
uniFLOW Release Station Hitag/HID/Multi
The uniFLOW Release Station Hitag/HID/Multi is equipped with 3 status LEDs: green
(left), yellow (middle) and red (right). The table below shows the status information
given by the respective LED.
The uniFLOW Release Station Hitag/HID/Multi is equipped with a little beeper which
emits different beep tones for different statuses. The table below shows the status
information given by the beeper.
uniFLOW Release Station PLUS / PLUS-2 V2
The uniFLOW Release Station PLUS / PLUS-2 V2 is equipped with 1 status LED that can
show three colors: Green, Yellow and Red. The table below shows the status
information given by the LED.
4
Page 19

uniFLOW Release Station
Status
LED color/Beep
Booting up
yellow, then green with beep
Not synchronized
flashing yellow
Synchronized (idle)
steady red
Reading/Hold
green with beep
Status
LED color
A link to a network is established.
green
A link to a network is established
and data is transmitting.
green flashing
The network speed is 100 Mbit/s.
yellow ON
The network speed is 10 Mbit/s.
yellow OFF
Copy control cables are sold separately and are not included by default with the
uniFLOW Release Station.
Copy control cables have to be configured via the PORTS.ini file. For more
information, refer to chapter Port Configuration (on page 16).
This is not necessary, if the uniFLOW Release Station is connected to uniFLOW
Online.
For a detailed list of all available copy control cables, please refer to the NT-ware DIF
Portal (http://difportal.nt-ware.net) or to the NT-ware Accessory Guide which can be
found on the NT-ware Partner Site (https://web.nt-ware.net/partner/).
uniFLOW Release Station Touch
The uniFLOW Release Station Touch does not have any LEDs. Neither does it have a
beeper.
Network Port LED (all models)
6 Copy Control Cables
A copy control cable is needed to make use of uniFLOW copy accounting and device
lock options. The cables are developed by NT-ware to make them fit to the uniFLOW
Release Station.
5
Page 20

uniFLOW Release Station
Please refer to the NT-ware DIF Portal (http://difportal.nt-ware.net) or to the
Accessory Guide on the NT-ware Partner Site (https://web.nt-ware.net/partner/) for
more information about which copy control cable is required for your specific
machine(s).
Connecting the copy control cable to your MFP might require
additional installation steps.
7 Installation
Required Components
uniFLOW Release Station.
Power supply for the uniFLOW Release Station.
Printer.
Network cable (delivered with the uniFLOW Release Station).
Optional Components
Copy control cable for the manufacturer and model of your device.
Installation
1. Switch off the desired printer.
2. Disconnect the printer from the network.
3. Attach network cable of the printer to one of the two network ports.
4. Optional: In case copy accounting is required on an MFP: Attach the uniFLOW
Release Station with the respective copy control cable to the MFP.
5. Attach the uniFLOW Release Station to the network.
6. Attach the power supply to the uniFLOW Release Station.
7. The uniFLOW Release Station boots up.
8. Switch on the printer.
The uniFLOW Release Station is now ready for more advanced configurations. For the
uniFLOW Release Station configuration, see chapter Configuration (on page 6).
8 Configuration
The uniFLOW Release Station works without any additional configuration if your
network has a DHCP server configured to provide an IP address.
6
Page 21

uniFLOW Release Station
If no DHCP is available, the uniFLOW Release Station obtains an IP address from
the link-local block (for IPv4 169.254.0.0/16, for IPv6 the fe80::/10 prefix). You can
use this IP address to access the uniFLOW Release Station website and assign the
correct IP address manually.
uniFLOW Release Station does not support IPv6 at the moment. IPv6 can only be
used for a temporary link-local address for configuration purposes. Any further use
of IPv6 is not supported.
Please make sure to attach the network cable to the uniFLOW Release Station
before switching it on.
The uniFLOW Release Station does not require any separate license to be
purchased in order to work with uniFLOW and RPS.
The uniFLOW Release Station uses TCP port 8000 for discovery and EAI
communication with uniFLOW. Make sure this port is open in both directions if
you have any connection problems.
1. After the uniFLOW Release Station has been successfully connected to the
network of the uniFLOW server, it will display its assigned IP address:
2. The uniFLOW Release Station has now to be assigned to a Secure Print - Output
Printer in uniFLOW. To do so, the Secure Print - Output Printer with uniFLOW
Release Station printer wizard has to be used:
a. Go to uniFLOW Server Configuration > Printer/ Scanner > Wizard.
b. Select the Secure Print - Output Printer with uniFLOW Release Station.
c. Follow the steps of the wizard. Make sure to have IP addresses of the Release
Station and the printer at hand.
3. After the uniFLOW Release Station has been successfully configured in uniFLOW, it
will display the login screen of the login method you chose during the wizard.
The uniFLOW Release Station is now ready to use.
7
Page 22

uniFLOW Release Station
Copy accounting can only be used on devices for which a copy control cable has been
developed and produced.
For a list of available copy control cables, please refer to chapter Copy Control Cables
(on page 5).
8.1 Advanced Configuration
If you want to change the configuration of the uniFLOW Release Station after you have
run the wizard, you can do so simply by running the wizard again.
Alternatively, you can change the settings configured during the wizard under
Connections > Agents/Terminals > EAI. The sections relevant for the uniFLOW Release
Station are General Information, List view and the Network Configuration.
General Configuration
Here you can define a global behavior that applies to all uniFLOW Release Stations
connected to the uniFLOW server.
To configure the global behavior, expand the select box next to Please select one of
the embedded applets to change its configuration and choose uniFLOW Release
Station.
The options are the same as explained in chapter Specific Settings (on page 10).
8
Page 23

uniFLOW Release Station
The general configuration set here is only used, if no settings are made under Specific
Settings (on page 10) for the corresponding uniFLOW Release Station.
List View
This section lists all configured EAI devices in uniFLOW. The uniFLOW Release Station is
listed here as well. The uniFLOW Release Station can be configured by clicking the
button. This will open a new window with device specific settings. Please refer to the
chapter Specific Settings (on page 10) for a detailed explanation of these options.
Network Configuration
Here you can configure the IP address of the uniFLOW Release Station.
IPs:
Currently configured EAI devices and their IP addresses.
Discovering Server:
Leave at default (All) unless you want to limit EAI discovery to single servers.
Device:
IP address of the uniFLOW Release Station.
EAI Server:
http://<uniFLOW_Release_Station>:8000/mom/eai.htm
Update interval in sec.:
The interval in which EAI devices are being detected by uniFLOW or an RPS.
9
Page 24

uniFLOW Release Station
Device Lock is only available, if a copy control cable is used.
8.1.1 Specific Settings
The uniFLOW Release Station specific settings can be changed under Connections >
Agents/Terminals > EAI > List view. Click on the button of the uniFLOW Release
Station entry.
General:
Select the main functionality for the uniFLOW Release Station. You can select
more than one functionality at the time by holding the shift key and selecting with
the mouse.
o PrintJobRelease:
Allows the uniFLOW Release Station to access your secure printing queue and
release your print jobs.
o CardReader:
Not applicable for uniFLOW Release Station.
o DeviceLock:
Allows the uniFLOW Release Station to lock the device until the user logs in.
o PrintedQueue:
Users can see new, not yet printed jobs and already printed jobs in different
queues (called New Jobs and Printed Jobs). When pressing the Print+Keep
button, the document is printed and moved to the Printed Jobs queue. The
Printed Jobs queue additionally displays the time and date the job was
printed.
Authentication:
Select the desired authentication method here.
o PIN:
The user is asked to enter their PIN code. At the moment, only numeric PIN
codes can be entered on the uniFLOW Release Station.
o Username/Password:
The user is asked to enter their Username/Password.
o CardReader:
The user is asked to swipe their card.
o CardReader with PIN:
The user is asked to swipe their card. Alternatively, the user can login with
their PIN code by hitting the PIN Code button.
o CardReader with Username/Password:
The user is asked to swipe their card. Alternatively, the user can login with
their user name and password by hitting the AD Login button.
Cost Center Selection:
Tick the checkbox if you want to give users the possibility to select a cost center on
the uniFLOW Release Station after having logged in.
Change Cost Center without Logout:
If checked, the users can change their cost centers without the necessity to
10
Page 25

uniFLOW Release Station
previously log-out. To change a cost center, the user has to touch the Change Cost
Center button.
Card Registration Method:
If you have unknown cards in the system and you are using a Card Reader for the
authentication, you can select a card registration method here. This can either be
via UserName/Password or via TIC (Temporary Identification Code).
Accounting:
Not applicable for uniFLOW Release Station.
On Server Failure:
Here you decide what can be done if the device becomes inaccessible in case of a
server failure. There are five options:
o None
o Lock Device
o Unlock Device with Account
o Only Emergency Accounts
o Emergency & Cached Accounts:
During server or network failure the Username/Password login type is not
available.
Refer to chapter Emergency Account Access for setup information.
11
Page 26

uniFLOW Release Station
Login Page
The login page exists since firmware version V1.0 SR4.
On Network Failure:
Here you have the same options as with On Server Failure.
8.2 uniFLOW Release Station Website
The uniFLOW Release Station website contains general information and configuration
options about the device like its firmware version, its serial number and its current IP
address.
The login screen for the website can be accessed under:
http://<uniFLOW_Release_Station>:8002/login.htm
Firmware versions V1.1 or higher use HTTPS in order to be compatible with uniFLOW
Online and automatically redirect to:
https://<uniFLOW_Release_Station>:8442/login.htm
12
Page 27
uniFLOW Release Station
If your uniFLOW Release Station still has an older firmware version installed, the
website can be accessed under:
http://<uniFLOW_Release_Station>:8002/config.htm
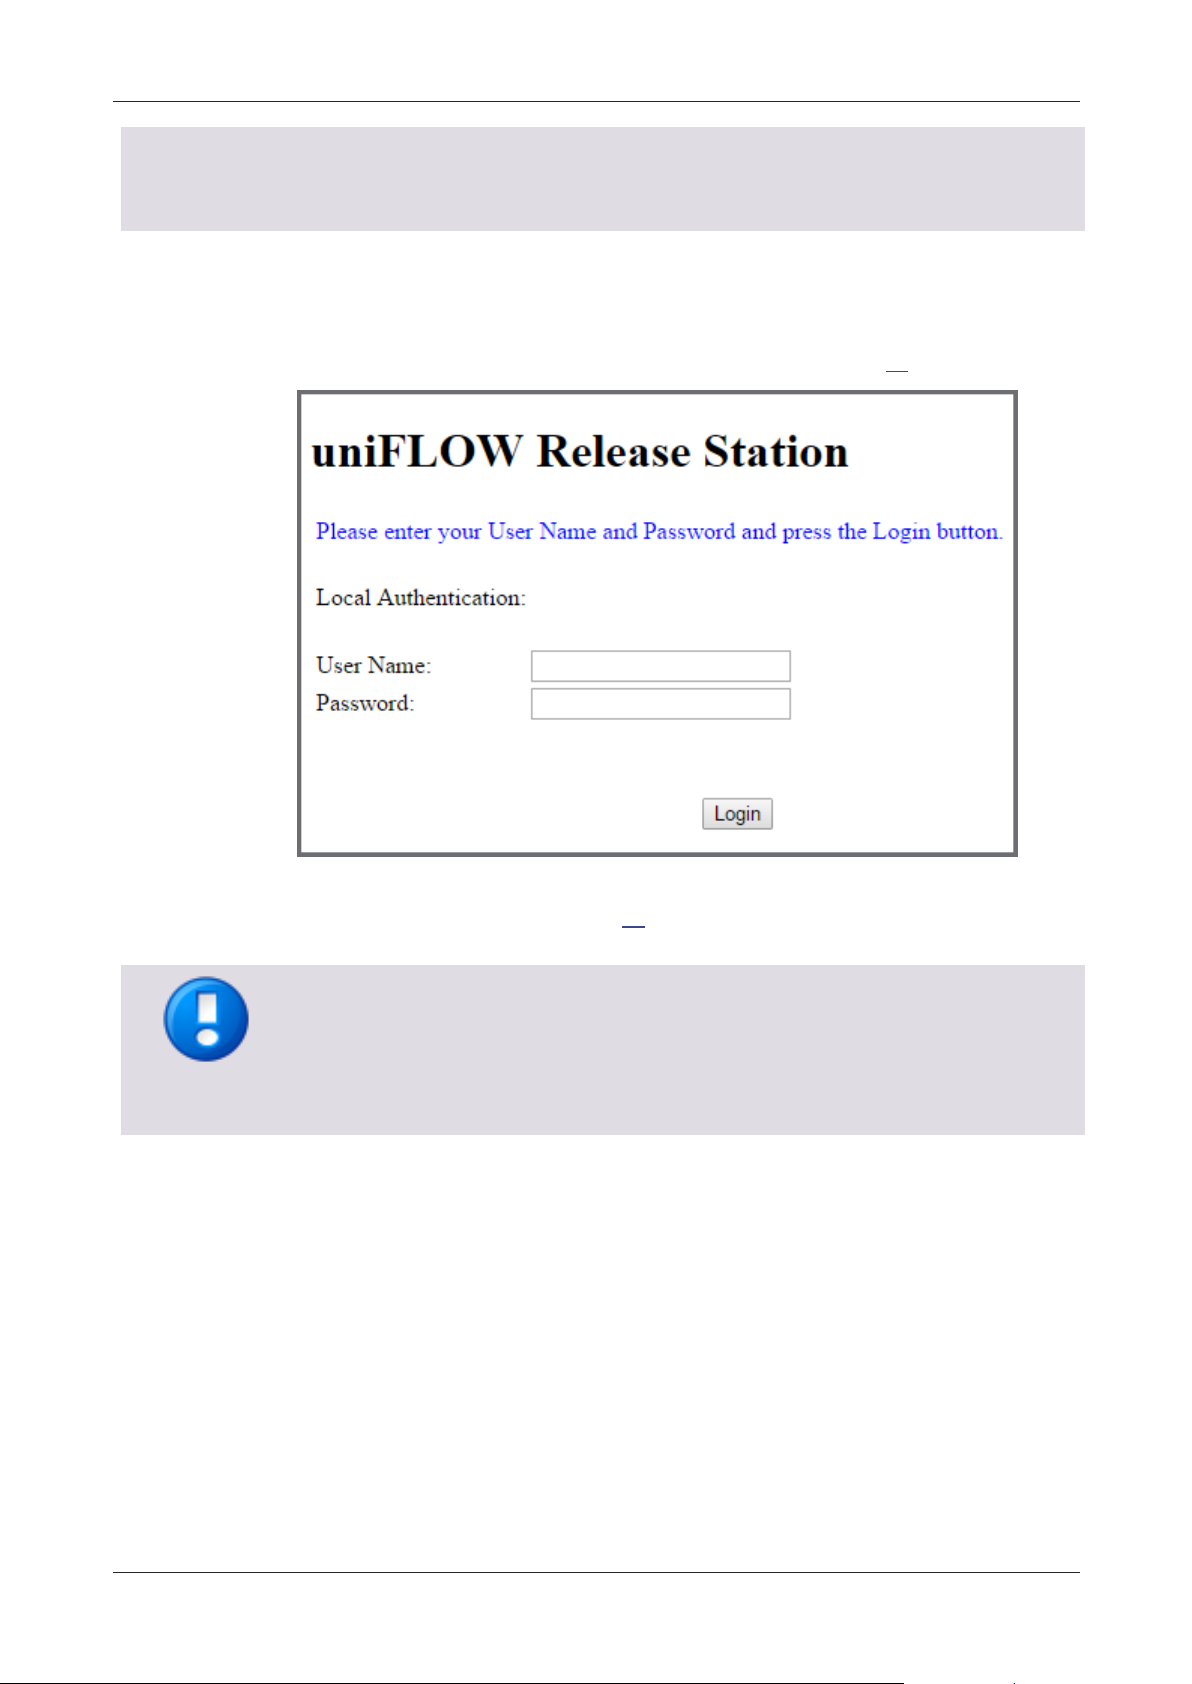
Administrator Login Only
Only administrator users with the ACL feature Administer enabled in uniFLOW can
login to the uniFLOW Release Station website when uniFLOW Server Authentication is
used.
Enter your User Name and Password and click Login to access the uniFLOW Release
Station configuration website.
The standard user name is administrator, the standard password is password. You
should change these after the first login on the Settings (on page 23) page.
If you have checked the parameter Authentication for Config Settings on uniFLOW
Server? on the Settings (on page 23) page, you have to login using uniFLOW user
credentials.
13
Page 28

uniFLOW Release Station
After login, you will be automatically transported to the uniFLOW Release Station web
page.
The following chapters explain the different web pages.
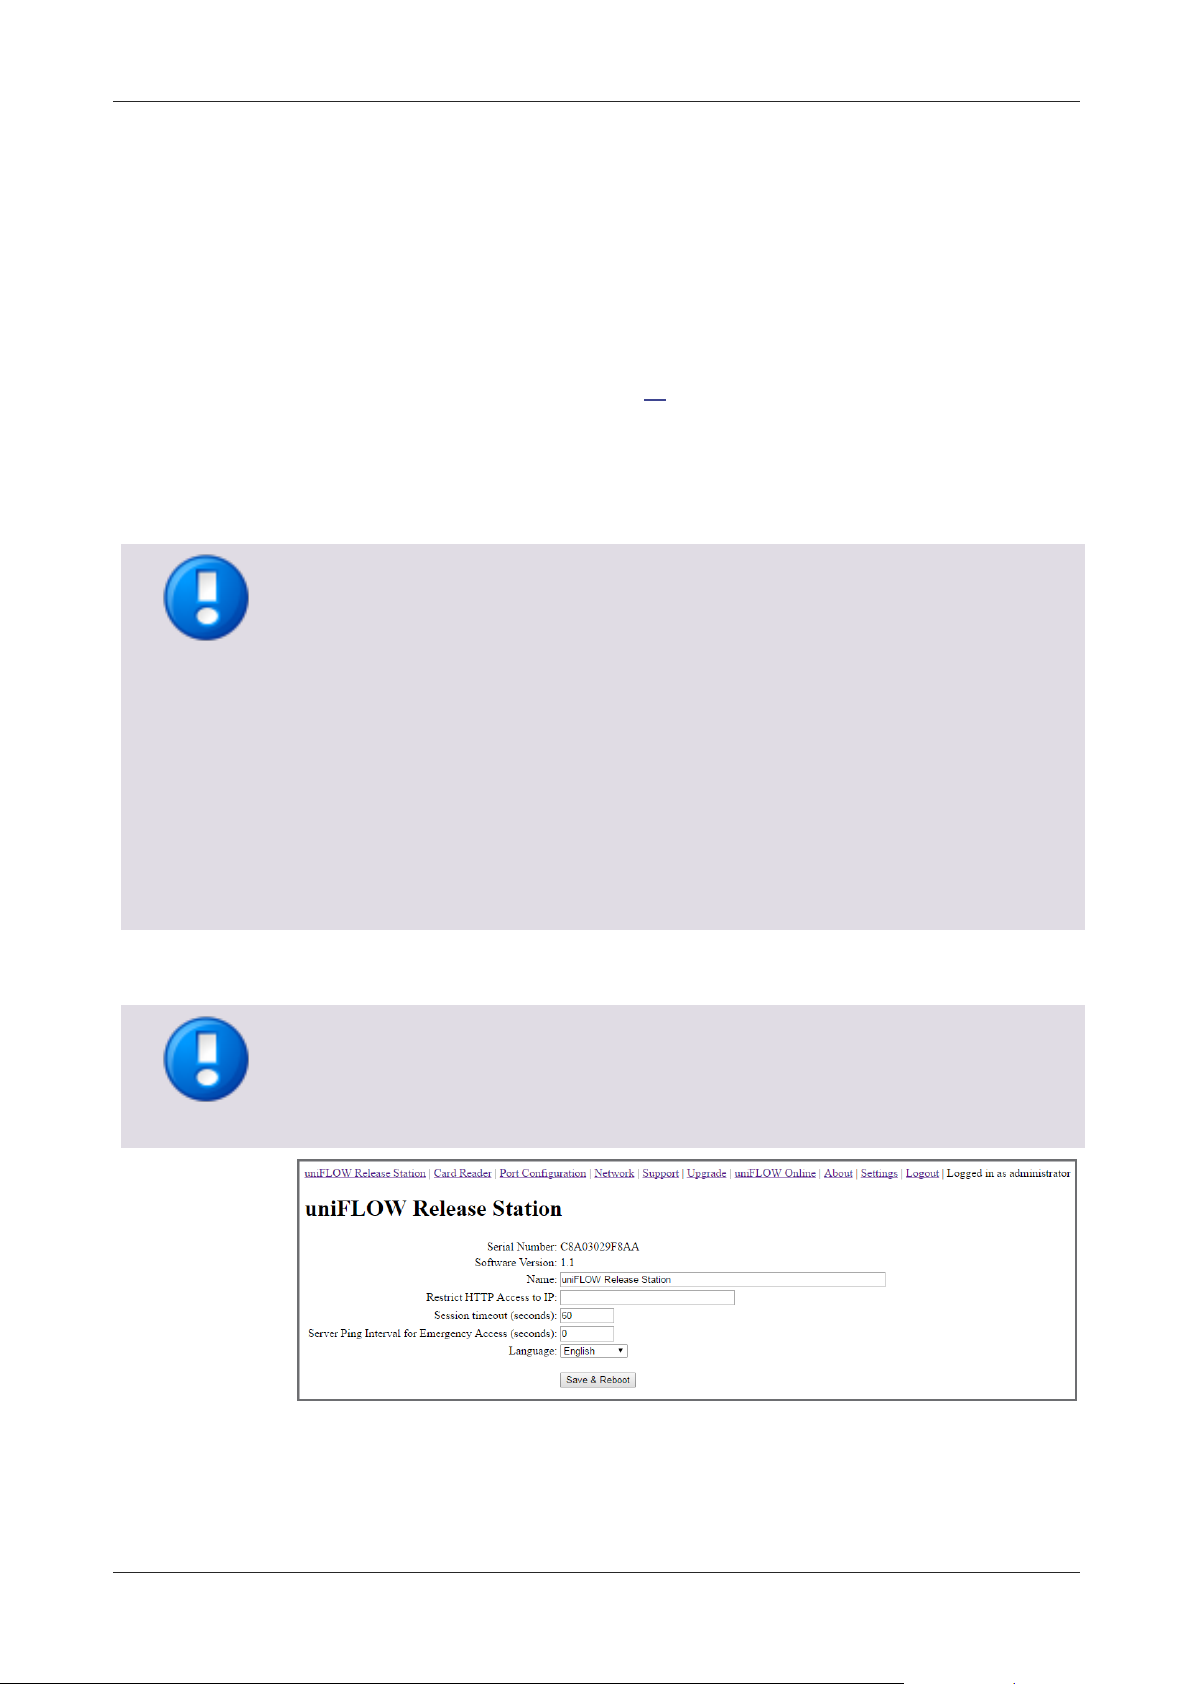
8.2.1 uniFLOW Release Station
The uniFLOW Release Station site gives information about the following:
Serial Number:
This is the serial number of the uniFLOW Release Station itself. It is used to select
a uniFLOW Release Station during the printer wizard. You will also find this
number on a sticker on the back of each uniFLOW Release Station.
The serial number of the uniFLOW Release Station is derived from its MAC address
(without colons and leading zeros).
Software Version:
The current firmware version of the uniFLOW Release Station.
Last ID (raw):
This option is only displayed if Restrict HTTP Access to IP is set.
It shows the last read card number without code conversion (raw data).
Name:
You can change the default name of the uniFLOW Release Station for an easier
identification of the device itself, for example the name of the associated printer.
The name will also appear as Model name under the List view of the uniFLOW EAI
settings.
The preconfigured default name is "uniFLOW Release Station".
Restrict HTTP Access to IP:
Only the computer with the IP address entered here is able to open the websites
of the uniFLOW Release Station. If this IP address is not the uniFLOW server, then
you are not able to access the websites from the uniFLOW server. However, this
does not affect necessary communication between the uniFLOW server and the
uniFLOW Release Station. If left blank, there is no access limitation.
14
Page 29
uniFLOW Release Station
Languages if connected to uniFLOW Online
If connected to uniFLOW Online, the uniFLOW Release Station currently only supports
the following languages:
English
French
Italian
German
Spanish
Simplified Chinese
Any other language falls back to English.
Restart required after changes
A restart of the uniFLOW Release Station is necessary in order for the settings to be
applied. The login screen is updated once the language strings have been downloaded.
Session timeout (seconds):
Specify the time it takes for the uniFLOW Release Station to automatically log out
if a user has logged in and does not touch the screen and the device is not used.
Server Ping Interval for Emergency Access (seconds) (default: 60):
The time interval in which the uniFLOW Release Station checks if the network
and/or uniFLOW Server is still available. This parameter is only active if emergency
behavior has been configured under uniFLOW Server Configuration > Connections
> Agents/Terminals > EAI > uniFLOW Release Station. For more information refer
to topic Specific Settings (on page 10).
Language:
Specify the language of the uniFLOW Release Station on-screen UI. This setting is
independent from the UI language set in uniFLOW or uniFLOW Online. The default
language is English.
Save & Reboot:
Saves the settings and restarts the uniFLOW Release Station to apply them.
15
Page 30

uniFLOW Release Station
To download the file, please refer to MANUAL - uniFLOW Release
Station - Installation and Configuration (MOMKB-770
(https://web.nt-ware.net/its/browse/MOMKB-770)) in the
NT-ware Knowledgebase.
Please note that registration is required in order to access the
NT-ware Knowledgebase. Access to the NT-ware Knowledgebase is
limited to trained Canon personnel only. If you require the above
document and you do not have access to the NT-ware
Knowledgebase, please contact your Canon partner.
The option Save USB device hex raw data to (SDK) file ... is only
available in the new versions of the pcProxConfig.exe.
This chapter is only relevant if your uniFLOW Release Station is connected to uniFLOW.
If your uniFLOW Release Station is connected to uniFLOW Online, the correct port
configuration is automatically downloaded from uniFLOW Online and uploaded to the
uniFLOW Release Station. Manually uploading a PORT.ini has no effect.
8.2.2 Card Reader
If you own a uniFLOW Release Station PLUS / PLUS-2 V2, you can upload a MiCard
PLUS / MiCard PLUS-2 V2 configuration file here in order to configure the build-in card
reader with specific settings. The configuration file can be created using the MiCard
PLUS configuration utility (pcProxConfig.exe):
1. Download the newest version of the MiCard PLUS / MiCard PLUS-2 V2
configuration utility.
2. Install and run pcProxConfig.exe.
3. Select File > Save USB device hex raw data to (SDK) file ...
4. Save the configuration text file.
5. On the uniFLOW Release Station Card Reader site, browse for the configuration
text file and click Upload & Configure.
For more information, please refer to chapter MiCard Configuration in the uniFLOW
User Manual.
Upload & Configure:
Uploads the configuration file to the uniFLOW Release Station and applies the
settings.
8.2.3 Port Configuration
The Port Configuration site allows you to change the DIPORT settings. This is necessary
if you use a copy control cable for features such as device lock and copy accounting.
16
Page 31

uniFLOW Release Station
These can be changed by uploading a certain configuration file (PORT.ini). Please refer
to chapter Signal Interpreter (on page 17) in the installation manual for more
information about how to create such a configuration file.
8.2.3.1 Signal Interpreter
The uniFLOW Release Station signal interpreter allows the configuration of simple
pattern matching rules. These include multi-click events and clock driven events while
observing multiple I/O port pins in parallel.
.INI Configuration
[PORTS]
The Digital Input Port can be configured in the a .INI file on the uniFLOW Release
Station. The general configuration is in the [PORT] section as follows:
REVERSE - Set to 1 if the bit order of the I/O port pins shall be reversed, e.g.
b101000 instead of b000101. Otherwise, set to 0. This means that for example the
port pin previously addressed as [DIPORT0] would then be addressed as
[DIPORT5].
INVERT - Set to 1 if the bits on the I/O port pins shall be inverted, e.g. b001000
instead of b110111. Otherwise, set to 0.
17
Page 32

uniFLOW Release Station
Note that that the numerical values in the rules (and only in the rules, not elsewhere)
can be entered either in decimal (e.g. 17), binary (b10001), octal (o21) or hexadecimal
(0xd1 or $D1) format. Comments can be started after the {clicks} value with any
non-whitespace character, for example '#' or ';'.
[DIPORTn]
Each pin on the I/O port can be configured under [DIPORT0] ... [DIPORT5]. The
following settings are available:
Interpreter Parameters
DEBOUNCE - The number of milliseconds after a signal edge has been detected, to
suspend monitoring. Helps to solve double-click problems because of signal
bouncing.
TIMEOUT - period since last edge after which an open multi-click sequence is
terminated. A multi-click sequence is regarded as open after the first matching
event.
EDGE - 0 for valid signal event on rising edge, 1 for falling edge, 2 for both edges.
RULEn - defines rules for pattern matching as explained below. n may be within 1
to 16. The sequence must be continuous or the rules won't be used after the
discontinuity. For example if RULE1, RULE2, RULE3, RULE5 are defined, only
RULE1, 2 and 3 will be used.
Interpreter Rules
Different Rules can be defined for each port pin in the respective [DIPORTn] sections.
Rules must be defined under the port which holds the clock signal in order to trigger
port events. The rule format is
RULE{number}={product}: {mask}, {pattern}, {counter}, {clicks} where
{number}: 1,2,3,... up to 16. Do not use a leading 0, i.e. do not use RULE01, RULE02
… but instead RULE1, RULE2 …
{product}: Product index which is used for click counting if the rule matches. The
product index is calculated directly as mask&x if the value is set to -1, where x is
the data word on the I/O port and "&" denotes the binary AND operator. The data
bits in x may occur reversed or inverted or both if configured as explained under
[PORTS] above.
{mask}, {pattern}: The rule match condition holds true if mask&x = pattern, where
x is the data word on the I/O port. Again, "&" denotes the binary AND operator.
The data bits in x may be reversed or inverted or both if configured as explained
under [PORTS] above.
{counter}: For multi-clicks the assignment of a counter index is required. The
counter index may be within 0 and 15 and if not used set to -1. The counters are
shared between all [DIPORTn] sections.
{clicks}: Set to 0 if multi-clicks are not used. Otherwise, give the number of clicks
for this match to hold true.
18
Page 33

uniFLOW Release Station
For lists of single hosts, the port has to be added. For example:
10.128.1.34:8443,W81X64CLI-34.test.example.com:8443
For lists with wildcards, no port is needed. For example:
10.128.1.*, 10.128.5.*,10.128.10.*
Example
An example of the PORT.ini would look like this:
[DIPORT2]
DEBOUNCE=20
EDGE=0
TIMEOUT=200
RULE1=2:3,0,-1,0 #copy A4 COL
RULE2=4:3,1,-1,0 #copy A3 COL
RULE3=1:3,2,-1,0 #copy A4 B/W
RULE4=3:3,3,-1,0 #copy A3 B/W
8.2.4 Network
This page displays the network configuration of the uniFLOW Release Station.
IP Address:
The IP address of the uniFLOW Release Station.
Netmask:
The network mask of the uniFLOW Release Station.
Gateway:
The gateway of the uniFLOW Release Station.
Activate DHCP:
If checked, the uniFLOW Release Station uses DHCP to obtain IP Address, Netmask
and Gateway automatically.
If unchecked, you have to enter IP Address, Netmask and Gateway manually for a
static IP address.
Proxy Type:
Here you can configure a proxy. This is necessary if your uniFLOW Release Station
has limited internet access. HTTPS internet access is needed for the uniFLOW
Release Station in order to communicate with uniFLOW Online.
o None:
No proxy is configured.
o HTTP:
Allows configuration of an HTTP proxy.
o SOCKS:
Allows configuration of a SOCKS proxy.
Proxy Server:
The IP address and port of the proxy server.
Bypass Proxy for:
Here you can enter comma separated IP addresses and URLs the proxy shall be
bypassed for.
19
Page 34

uniFLOW Release Station
IPv6 Support
uniFLOW Release Station does not support IPv6.
Save & Reboot:
Saves the settings and reboots the uniFLOW Release Station to apply them.
8.2.5 Support
Here you can export, show and clear the log of the uniFLOW Release Station. The
uniFLOW Release Station support team might request a copy of the log file, in order to
solve problems more effectively.
8.2.6 Upgrade
On this screen you can upload a file to update the firmware of the uniFLOW Release
Station. For more information, refer to chapter Firmware Update (on page 24).
8.2.7 uniFLOW Online
On this page, you can connect your uniFLOW Release Station with uniFLOW Online.
Parameters
Status:
Shows whether the uniFLOW Release Station is connected to uniFLOW Online.
Printer:
Enter the IP address or FQDN of the printer the uniFLOW Release Station is
connected to.
o Obtain Printer Details via SNMP:
Check, if you want to obtain printer information like manufacturer, serial
number, device name, device location and model name automatically. The
printer details are forwarded to uniFLOW Online during the registration
process and are prefilled automatically.
Secret:
The secret value that has to be entered during the uniFLOW Online registration
process.
uniFLOW Online URL:
The URL of the uniFLOW Online tenant you want to connect the uniFLOW Release
Station with.
o Save:
Save the URL before clicking on connect.
20
Page 35

uniFLOW Release Station
o Connect:
Opens a new browser window with uniFLOW Online and starts the registration
process.
o Disconnect (only shown when connected to uniFLOW Online):
Disconnects the uniFLOW Release Station from uniFLOW Online.
Response:
Here you can manually enter the uniFLOW Online registration response code, in
case uniFLOW Online cannot directly connect to the uniFLOW Release Station
during registration.
Connecting uniFLOW Release Station to uniFLOW Online
Via the uniFLOW Online Add Device Wizard (firmware V1.2 or newer required)
1. Login to uniFLOW Online as an Customer Tenant administrator.
2. Navigate to Print > Devices and click the "+" button.
3. Follow the wizard steps.
Manually
1. Open https://<uniFLOW Release Station IP>:8442/uniflowonline.htm.
2. Under Printer, enter the IP address or FQDN of the printer the uniFLOW Release
Station is connected to. This step is optional, you can do so in step 9 as well.
3. Check Obtain Printer Details via SNMP. This step is optional, you can also
manually enter the data in step 9.
4. Under uniFLOW Online URL, enter the URL of your uniFLOW Online tenant. For
example: https://exampletenant.eu.uniflowonline.com.
5. Click Save.
6. Click Connect.
7. uniFLOW Online opens in a new browser window (make sure your browser allows
pop-ups for this page).
8. Login to uniFLOW Online if necessary.
21
Page 36

uniFLOW Release Station
If for any reason uniFLOW Online cannot send the registration response to the
uniFLOW Release Station, a message with the registration response is shown after you
clicked on Register. To finish the registration process, copy this response, paste it in
the Response field of the uniFLOW Release Station uniflowonline.htm page and click
Submit.
9. The AUTHORIZATION window opens. Enter all the necessary data about the
printer. Most of it should be prefilled if you did not skip steps 2 and 3.
10. Under Secret Value, enter the Secret value from the uniFLOW Release Station
uniflowonline.htm page.
11. Click Register to finish the registration process.
8.2.8 About
General information about the uniFLOW Release Station and legal info.
22
Page 37

uniFLOW Release Station
The MiCard PLUS and MiCard PLUS-2 V2 reader cannot be configured in uniFLOW.
Please use its configuration utility and upload a configuration file instead.
For more information, refer to chapter Card Reader (on page 16).
8.2.9 Settings
Authentication for Config Settings on uniFLOW Server?:
If checked, only uniFLOW users with the ACL feature Administer enabled in
uniFLOW can login to the uniFLOW Release Station website using their uniFLOW
credentials (e.g. LDAP Login). The local username and password are disabled.
uniFLOW Release Station has to be connected to a uniFLOW Server.
Username (Local):
Here you can change the username for logging in to the uniFLOW Release Station
website. Disabled, if Authentication for Config Settings on uniFLOW Server? is
checked.
New Password (Local):
Here you can change the password for logging in to the uniFLOW Release Station
website. Disabled, if Authentication for Config Settings on uniFLOW Server? is
checked.
Retype New Password (Local):
Confirm your new password by retyping it here.
Save:
Save your settings.
8.2.10 Logout
Click Logout to log out the currently logged in user. You are transported back to the
login screen.
8.3 MiCard Configuration
The uniFLOW Release Station is available in versions with different integrated MiCard
card readers. These card readers are preconfigured with a standard configuration and
can be used in most cases without any further configuration necessary. However, if
you still want to configure specific settings for the card readers, you can do so under
Connections > Agents/Terminals > MiCard.
For more information about the MiCard specific settings available, please refer to
chapter MiCard Configuration in the uniFLOW User Manual.
23
Page 38

uniFLOW Release Station
The MiCard and MiCard PLUS configuration is not covered by the factory reset.
To obtain the newest firmware .apk file, please refer to uniFLOW Release Station -
Firmware (MOMKB-816 (https://web.nt-ware.net/its/browse/MOMKB-816)) in the
NT-ware Knowledgebase.
Please note that registration is required in order to access the NT-ware
Knowledgebase. Access to the NT-ware Knowledgebase is limited to trained Canon
personnel only. If you require the above document and you do not have access to the
NT-ware Knowledgebase, please contact your Canon partner.
8.4 Factory Reset
It is possible to do a factory reset to the internal settings of the uniFLOW Release
Station:
1. Create an empty text file with the name: ResetToFactoryDefaults.txt.
2. Copy the file to the root folder of an USB drive formatted with FAT or FAT32 file
system.
3. Connect the USB drive to the uniFLOW Release Station.
4. The uniFLOW Release Station detects the USB drive and if it finds the file, it resets
the settings and automatically reboots.
The following settings are reset to default:
Release Station:
o Name
o Restrict HTTP access to IP
o Session timeout
o Contact server on interval
o Language
Port Configuration:
o The default ports configuration file is used.
Network:
o Activate DHCP
Settings:
o Authentication for Config Settings on uniFLOW Server?
o Username (Local)
o Password (Local)
8.5 Firmware Update
It is possible to update the firmware of the uniFLOW Release Station. To do so, you
first have to download the newest firmware .apk file.
24
Page 39

uniFLOW Release Station
Only official NT-ware signed .apk files can be used for the firmware update.
There are two ways to update the firmware of the uniFLOW Release Station:
Via USB Drive
1. Copy the downloaded .apk to the root folder of an USB drive formatted with FAT
or FAT32 file system.
2. Plug-in the USB drive while the uniFLOW Release Station app is running. The
uniFLOW Release Station will detect the USB drive mounting and read the first
.apk file it finds in the root folder.
3. A pop-up window appears on the uniFLOW Release Station asking you to install
the application. Select Install.
4. After installation, select Open to start the new uniFLOW Release Station firmware.
Via Web Browser
1. Open http://<uniFLOW_Release_Station>:8002/upgrade.htm in a browser to
access the Release Station - Upgrade web page.
2. Under Upload package, click the Browse button and select downloaded .apk file.
3. Click Upload & Install and wait until the web page displays sent.
4. A pop-up window appears on the uniFLOW Release Station asking you to install
the application. Select Install.
5. After installation select Open to start the new uniFLOW Release Station firmware.
You can check the new version of the firmware by hitting the top bar of the screen to
open the About page. You can see the build version there.
9 Job Release
The core functionality of the uniFLOW Release Station is the job release of your print
jobs in the secure print queue.
After you have logged in with your PIN or card and have selected your desired cost
center (see below), your secure print queue is displayed. Here, the following actions
are available:
Print+Delete:
Prints the selected jobs and deletes them.
Delete:
Deletes the selected jobs with without printing them.
Print+Keep:
Prints the selected jobs and keeps in in the queue.
25
Page 40

uniFLOW Release Station
One page can display a maximum of 100 jobs. If there are more than 100 jobs in the
queue, you can scroll down and tap the arrow buttons to go to switch pages.
Refresh:
Refreshes the jobs displayed in the secure queue.
Select All:
Selects all jobs on the current page.
Logout:
Logs out the currently logged in user.
Simply select the desired job by tapping on it and select the appropriate action.
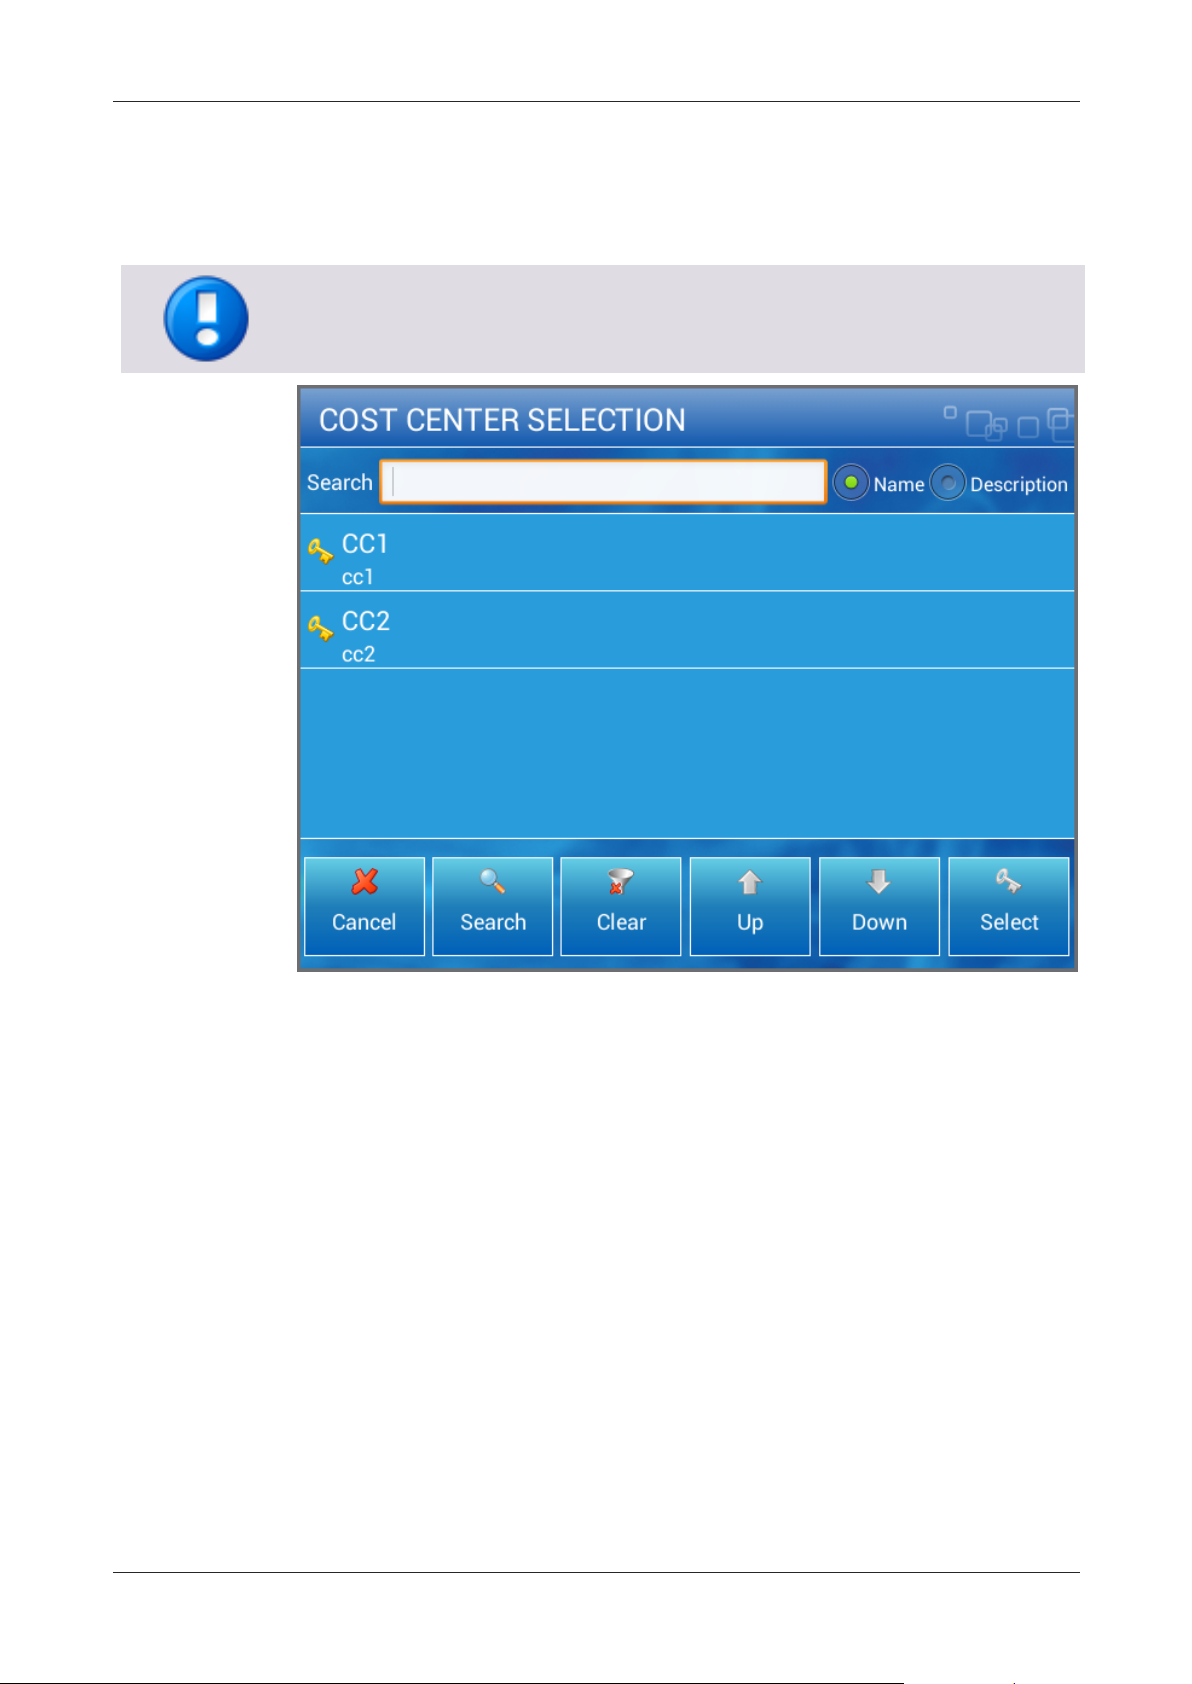
Cost Center Selection
If you enabled cost center selection during the configuration of the uniFLOW Release
Station, you will be first presented with the Cost Center Selection screen after logging
in.
Select the desired cost center and choose one of the following actions:
Cancel:
Return to the login screen.
Search:
Search for the cost center entered in the Search field on top of the screen.
Clear:
Remove the search filter.
Up:
Move up a cost center level.
26
Page 41
uniFLOW Release Station
One page can display a maximum of 100 cost centers. If there are more than 100 cost
centers, you can scroll down and tap the arrow buttons to go to switch pages.
Down:
Move down a cost center level.
Select:
Proceed to the secure print queue.
10 Info Screen
You can access an info screen with general information about the uniFLOW Release
Station by touching the top bar of either the login screen or the "This application is not
yet configured"-screen.
The info screen provides the following relevant information:
Firmware version
Serial number
IP address
27
Page 42

uniFLOW Release Station
Model:
uniFLOW Release Station HID
uniFLOW Release Station Hitag
uniFLOW Release Station Multi
uniFLOW Release Station PLUS
uniFLOW Release Station PLUS-2 V2
uniFLOW Release Station Touch
Power Supply:
12 V LPS, min 1.0 A.
Use a polarized plug 2.1/5.5 mm with positive wire to
the inner jack.
Ethernet Connector:
2x RJ-45 Ethernet connection with a built in 10/100
MBit switch.
USB Connector:
USB Type A connection with USB 2.0 to connect a USB
identification device.
D-SUB-15:
Digital I/O Connector to lock/unlock the machine for
copy accounting.
D-SUB-15HD:
Digital I/O Connector to lock/unlock the machine for
copy accounting.
Indicators:
The uniFLOW Release Station is equipped with
different LEDs depending on the built in card reader.
See chapter LED/Beep Status (see "LED / Beep
Status" on page 4) for more info.
Display:
5.7" LCD with capacitive multi-touch and LED
background lighting, 640 x 480 pixels
Transmit Frequency:
uniFLOW Release Station HID: 125 kHz
uniFLOW Release Station HiTag: 125 kHz
uniFLOW Release Station Multi: 13,56MHz
uniFLOW Release Station PLUS: 125 kHz & 13.56 MHz
uniFLOW Release Station PLUS-2 V2:
125 kHz & 13.56 MHz
Dimensions:
218 mm x 127 mm x 58 mm (8.58" x 5" x 2.28")
Weight:
uniFLOW Release Station HID
uniFLOW Release Station Hitag 524 g (18.5 oz)
uniFLOW Release Station Multi
uniFLOW Release Station PLUS 525 g (18.5 oz)
uniFLOW Release Station PLUS-2 V2
uniFLOW Release Station Touch 492 g (17.4 oz)
Operating Temperature Range:
0 … +35 °C (32 … +95 °F)
11 Specifications
28
Page 43
uniFLOW Release Station
Included Items:
uniFLOW Release Station
Cover
Ethernet cable
Power supply 12V GT-41080 EU/UK/CN/KR/AUS
Installation manual
uniFLOW Compatibility:
uniFLOW and/or RPS V5.3 or higher.
Safety Restrictions:
Use only in closed rooms.
Certifications:
CE
FCC
RCM
UL
VCCI
IC
Never use alcohol, benzene, paint thinner, aerosol sprays or any other highly
flammable substance for cleaning.
Modifications
Changes and/or modifications of the uniFLOW Release Station not approved by
NT-ware will invalidate the user’s authority to operate the uniFLOW Release Station.
IC
Cleaning
Clean the device with a slightly dampened cloth that has been well wrung out. Turn off
the power or unplug the device before cleaning.
29
Page 44

uniFLOW Release Station
uniFLOW Release Station HITAG
Read unique ID number using the following
standards
HITAG 2, HITAG S, EM4102 and EM4150
technologies
Configurable
HITAG 1 technology
Operating frequency
125 kHz
uniFLOW Release Station HID
Read transponders using the following
standards
PCProx technology from HID
Configurable
Reading out different lengths of Facility Codes
and ID Codes of the PCProx technology HID
cards.
Operating frequency
125 kHz
uniFLOW Release Station Multi
Read unique ID number using the following
standards
MIFARE® and MIFARE® ultra light
technologies, MIFARE® DESFire (EV1),
iCLASS®, Inside Contactless, other ISO15693 /
ISO14443A cards/transponders.
Configurable
LEGIC prime, LEGIC advant
Operating frequency
13,56 MHz
11.1 Supported Card Standards
30
Page 45

uniFLOW Release Station
uniFLOW Release Station PLUS
125 kHz Supported Cards
AWID
Cardax*
CASI-RUSCO®
Deister*
DIGITAG
EM 410x
Farpointe Data
GProx™ II*
HID® Prox
HiTag 1, S & 2
Indala® (Motorola)
ioProx™ (Kantech)
Keri NXT
Keri*
Nexwatch (Honeywell)
Pyramid
Radio Key®
ReadyKey Pro*
*Unique ID
13,56 MHz Supported Cards
Advant CSN (Legic)
eTag CSN
HID iCLASS CSN
I-Code CSN
I-tag CSN
ISO 14443A CSN
ISO 15693 CSN
MIFARE CSN
31
Page 46

uniFLOW Release Station
uniFLOW Release Station PLUS-2 V2
125 kHz Supported Cards
AWID
Cardax UID
CASI-RUSCO®
CDVI
Cotag
Deister UID
DIGITAG
Dimpna UID
EM 410x
EM 4102
EM 4150
GProx™ II UID
GProx™ II ID
HID® Prox
HiTag 1
HiTag 2
HiTag S
IDTECK (64 bits)
IDTECK Alternate (128 bits)
Indala® (Motorola)
ioProx™ (Kantech)
Isonas™
Keri UID
Keri NXT UID
Nedap
Nexwatch (Honeywell)
Postech
Pyramid (Farpointe Data)
Radio Key®
ReadyKey Pro
Rosslare
Russwin UID
Secura Key
32
Page 47

uniFLOW Release Station
uniFLOW Release Station PLUS-2 V2
13,56 MHz Supported Cards
ISO 14443A:
LEGIC Advant CSN
MIFARE® Classic CSN
MIFARE® DESFire® CSN
MIFARE® Ultralight® CSN
MIFARE® Plus® S, X CSN
MIFARE® Pro® X CSN
MIFARE® Smart MX CSN
Oyster
ISO 14443B:
Cepas
Pico Pass
ISO 15693:
HID iCLASS® CSN
HID iCLASS® SE/SR CSN
HID iCLASS® ID
33
Page 48

uniFLOW Release Station
34
Page 49

uniFLOW Release Station
Brackets are sold separately and are not included with the uniFLOW Release Station.
For a detailed list of all available mounting options, please refer to the NT-ware Device
Bracket Guide which can be found under Brackets/Mounting on the NT-ware Partner
Site (https://web.nt-ware.net/partner/). Assembly instructions for each mounting
option can be found on the NT-ware Partner Site as well.
11.2 Mounting Options
There are different ways of mounting the uniFLOW Release Station. Depending on the
device manufacturer and model, the uniFLOW Release Station can either be attached
directly to the machine using a device bracket, be mounted on the wall or be set up on
a stand pole next to the machine.
11.3 Compliance and Disposal Notes
FCC Compliance Notes (for USA)
Note: This equipment has been tested and found to comply with the limits for a Class B
digital device, pursuant to part 15 of the FCC Rules. These limits are designed to
provide reasonable protection against harmful interference in a residential installation.
This equipment generates, uses and can radiate radio frequency energy and, if not
installed and used in accordance with the instructions, may cause harmful interference
to radio communications. However, there is no guarantee that interference will not
occur in a particular installation. If this equipment does cause harmful interference to
radio or television reception, which can be determined by turning the equipment off
and on, the user is encouraged to try to correct the interference by one or more of the
following measures:
Reorient or relocate the receiving antenna.
Increase the separation between the equipment and receiver.
Connect the equipment into an outlet on a circuit different from that to which the
receiver is connected.
Consult the dealer or an experienced radio/TV technician for help.
IC Compliance Notes
For all models with integrated RFID functionality (uniFLOW Release Station Hitag, HID,
Multi, PLUS, PLUS-2 V2):
35
Page 50

uniFLOW Release Station
This device complies with Industry Canada licence-exempt RSS standard(s). Operation
is subject to the following two conditions: (1) this device may not cause interference,
and (2) this device must accept any interference, including interference that may cause
undesired operation of the device.
Le présent appareil est conforme aux CNR d'Industrie Canada applicables aux appareils
radio exempts de licence. L'exploitation est autorisée aux deux conditions suivantes :
(1) l'appareil ne doit pas produire de brouillage, et (2) l'utilisateur de l'appareil doit
accepter tout brouillage radioélectrique subi, même si le brouillage est susceptible
d'en compromettre le fonctionnement.
For all models without RFID functionalty (uniFLOW Release Station Touch):
CAN ICES-3 (B)/NMB-3(B)
Product Label Location
The product label is permanently attached on the device housing as indicated below:
For some installations, a plastic cover will be attached that can be easily removed.
Information on Disposal for Users of Waste Electrical & Electronic Equipment
(WEEE)
The WEEE symbol on the product and/or accompanying documents means that used
electrical and electronic equipment should not be mixed with general household
waste. For proper treatment, recovery and recycling, please take this product to
designated collection points, in accordance with your national legislation and the
Directive 2012/19/EU.
The correct disposal of this product will help save valuable resources and prevent any
potential negative effects on human health and the environment, which could
otherwise arise from inappropriate waste handling.
Please contact your local authority for further details of your nearest designated
collection point.
For professional users in the European Union
If you wish to discard electrical and electronic equipment (EEE), please contact your
dealer or supplier for further information.
For disposal in countries outside of the European Union
36
Page 51

uniFLOW Release Station
This symbol is only valid in the European Union (EU). If you wish to discard this product
please contact your local authorities or dealer and ask for the correct method of
disposal.
37
Page 52

uniFLOW Release Station
38
Page 53

uniFLOW Release Station
39
Page 54

Page 55

uniFLOW Release Station Index
.
.INI Configuration • 17
A
About • 22
Advanced Configuration • 8
Available Models • 2
C
Card Reader • 5, 16, 23
Compliance and Disposal Notes • 5, 35
Configuration • 5, 6
Copy Control Cables • 1, 5, 8
D
Disclaimer • 7
L
LED / Beep Status • 4, 28
Logout • 5, 23
M
MiCard Configuration • 23
Mounting Options • 5, 35
N
Network • 5, 19
P
Port Configuration • 5, 16
Ports • 3
S
Scope of Supply • 2
F
Factory Reset • 5, 24
Firmware Update • 5, 20, 24
H
How to use this Document • 10
I
Info Screen • 5, 27
Installation • 6
Introduction • 1
J
Job Release • 5, 25
Settings • 5, 13, 23
Signal Interpreter • 17
Specific Settings • 5, 8, 9, 10, 15
Specifications • 5, 28
Support • 20
Supported Card Standards • 30
U
uniFLOW Online • 5, 20
uniFLOW Release Station • 5, 14
uniFLOW Release Station Website • 5, 12
Upgrade • 20
V
Versioning • 3
41
Page 56

© NT-ware 2009-2017
 Loading...