

Page 1
’07.2
Page 2

DoCoMo W-CDMA System
Thank you for purchasing the FOMA SH903iTV.
Make sure to thoroughly read this manual and the manuals for accessories before and
during use to ensure proper operation. If any of the contents in this manual are unclear,
please contact number listed in “General Inquiries” on the back of this manual.
The FOMA SH903iTV is designed to make your everyday life more convenient. Careful
use will ensure a long service life.
Using the FOMA Terminal
Because it relies on radio signals, the FOMA terminal cannot be used in places with no signal (such as
tunnels, underground, or in buildings), in places with a weak signal or outside the FOMA service area. There
may be times when the terminal cannot be used in the upper floors of a building even with no obstructi ons in
sight. There may also be times when the signal is strong and you are not moving but the call is interrupted.
Make sure not to disturb others when using in public places, places with many people or quiet places.
Because the FOMA terminal uses electrical signals, it is possible for a third party to listen in on a
conversation. However, the W-CDMA system automatically applies privacy to every call, a third party that
tries to listen in only hears static.
The FOMA terminal converts conversations into a digital signal and sends it to the other party over the
radio. If the signal cannot be reconverted properly by such as moving to an area with a weak signal, the
voice may not be heard correctly.
Keep a separate memo and note information stored in the FO MA terminal. DoCoMo shall not be liable for
any loss of content.
The user hereby agrees that the user shall be solely responsible for the result of the use of SSL. Neither
DoCoMo nor the certifier as listed herein makes any represent ation and warran ty as for t he secur ity i n the
use of SSL. In the event that the user shall sust ain damage o r loss due to the use of SSL, ne ither DoCoMo
nor the certifier shall be liable for any such damage or loss.
Certifier: VeriSign Japan K.K., Cybertrust Japan, Inc., GeoTrust Japan, Inc., RSA Security Japan Ltd.,
This FOMA terminal supports FOMA Plus-Area.
The FOMA terminal can be used only via the FOMA network provided by DoCoMo.
Secom Trust Systems Co., Ltd.
For First Time FOMA Users
If this is your first FOMA terminal, please read this manual in the order indicated below. This will
give you an explanation of the preparation required to use the FOMA terminal and basic
functions.
1. Attach the battery pack and charge (nP. 39, P. 40)
2. Turn the power on, make initial settings and check your phone number
(nP. 43, P. 45, P. 46)
3. Check the roles of various parts of the FOMA terminal (nP. 24)
4. Check the meanings of icons that appear on the display (nP. 28)
5. Check the operation of the menu (nP. 32)
6. Check how to make/receive calls (nP. 47)
Download the latest version of this manual from the NTT DoCoMo web page.
“User’s Manual (in PDF format)” Download
http://www.nttdocomo.co.jp/english/support/manual/index.html
※ The URL and contents of this manual are subject to change without prior notice.
Page 3
Using This Manual
This manual uses illustrations and icons to explain operations for proper phone use.
Icons and screens that appear on the display have been set by default in accordance with the handset color
(Kisekae Tool nP. 136).
The explanations in this manual are based on the case when Kisekae Tool is set for the handset color “White”.
The screens and illustrations in this manual are shown as examples. The actual screens and illustrations may differ.
Notation of Keys and Operation Procedure
This manual refers to keys as simplified icons.
Actual key Notation in this manual
Example)
The notation and meaning of operation procedure are shown below.
Example)
/
Notation Meaning
s (for 1+ seconds)
Searching This Manual
Use this manual to find explanations of functions and services. There are several ways to find
information in this manual.
See the next page for more details.
1
Refer to “Component Names and Functions” on P. 24.
Press s for 1 second or more.
Index n
Use this when you know the function or service name, or to search for function
names that appear on the FOMA SH903iTV display.
Easy search n
Search for frequently used or convenient functions using easy-to-understand
language.
Indexed pages n
Search this manual using the index on the cover and the sides of pages.
Table of contents
Search for functions by category.
Main functions
Search for new and convenient functions or characteristic functions of the FOMA SH903iTV.
Menu list
Menus that appear on the FOMA SH903iTV are listed.
Quick manual
The basic functions are explained briefly. Tear out the Quick manual to keep as a
reference when away from home.
Note that “FOMA SH903iTV” is referred to as the “FOMA terminal” in this manual.
This manual describes functions using the microSD Memory Card. Please note that microSD Memory Cards
are sold separately (nP. 318 for details).
Reproduction of this manual in part or in whole is prohibited.
The contents of this manual are subject to change without prior notice.
n
n
n
n
P. 466
P. 4
?
Cover
P. 6
P. 8
P. 418
P. 476
1
Page 4
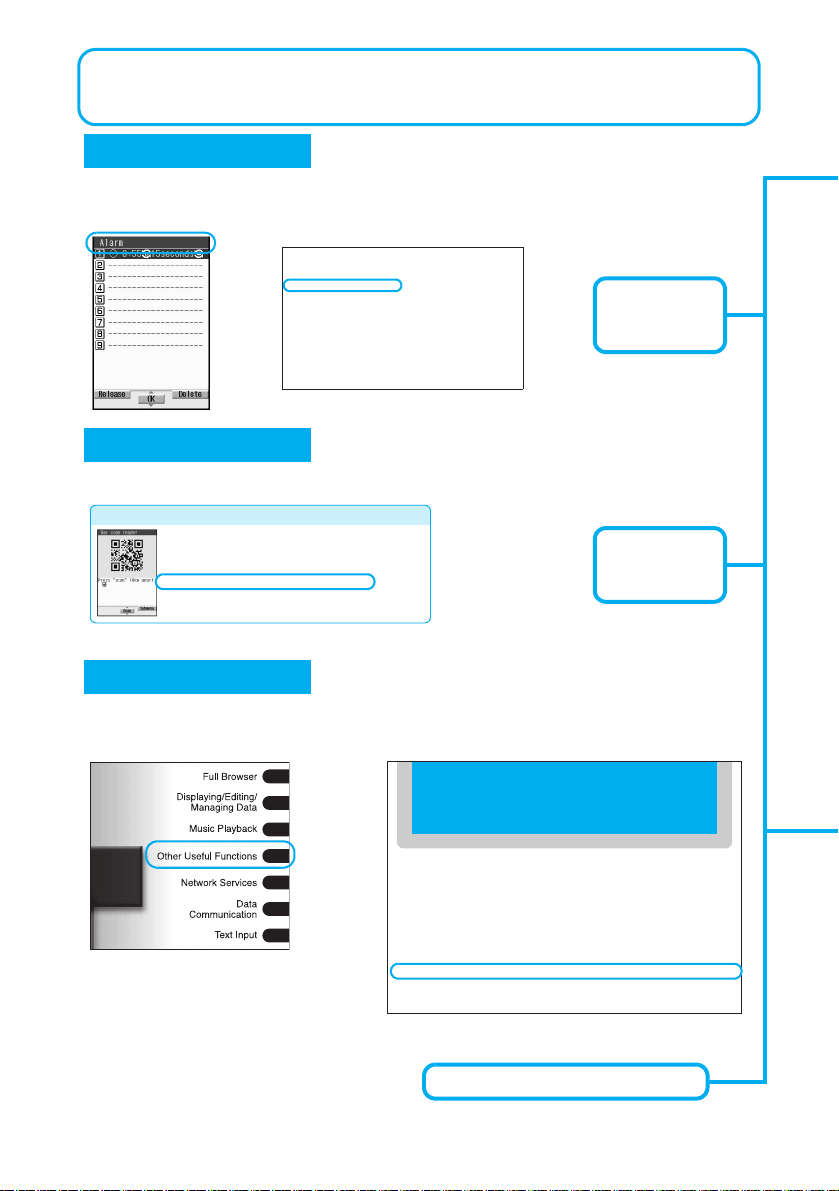
As an example, how to look up the Alarm function using the Index, Easy search and Indexed
pages are explained below.
Content differs from actual pages in this manual.
n
Index
P. 466
Use this when you know the function or service name, or to search for function names that
appear on the FOMA SH903iTV display.
Delete
??
Easy search
. . . . . . . . . . . . . . 401
Reply message
After-sales service
Alarm
. . . . . . . . . . . . . . . . 369
Quick alarm
. . . . . . . . . 369
Reception reserve alarm
. . . . . . . . . . . . . . . . . 281
Recording reserve alarm
. . . . . . . . . . . . . . . . . 281
Schedule alarm
Snooze
. . . . . . . . . . . . . 370
ToDo alarm settings
All lock
. . . . . . . . . . . . . . . 148
Disable
. . . . . . . . . . . . . 149
n
. . . . . . 401
. . . . . . 450
. . . . . . 373
. . 378
P. 4
Battery pack
Charging
Check battery level
Times of use
Bookmark
. . . . . . . . . . . . . 188
Attach to mail
Delete
. . . . . . . . . . . . . 190
Display
. . . . . . . . . . . . . 189
Edit title
. . . . . . . . . . . . 190
Bookmark folder
BookReader
Copy text
Current location
Delete
. . . . . . . . . . . . . 351
. . . . . . . . . 39
. . . . . . . . . . . . 40
. . . . 43
. . . . . . . . . 40
. . . . . . . 189
. . . . . . . 190
. . . . . . . . . . . 346
. . . . . . . . . . . 348
. . . . . 348
P. 369
Page that
explains “Alarm”
Search for frequently used or convenient functions using easy-to-understand language.
Other features
Saving battery power . . . . . . . . . . . . . . . . . 130 (Power saver set)
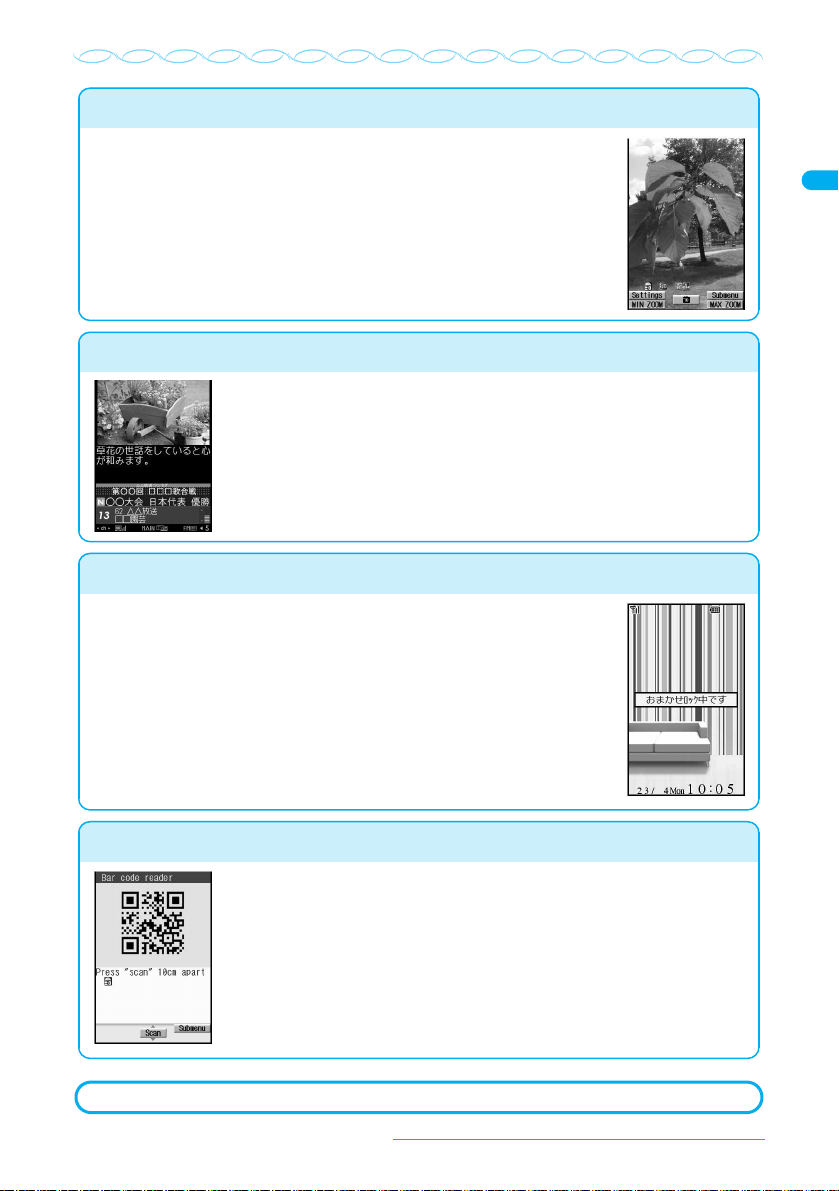
Scanning QR codes and bar codes . . . . . . 176 (Bar code reader)
Using microSD Memory Cards. . . . . . . . . . 318
Ir-exchanging information. . . . . . . . . . . . . . 332 (Ir exchange)
Listening to music. . . . . . . . . . . . . . . . . . . . 353 (Music playback)
Setting the alarm . . . . . . . . . . . . . . . . . . . . 369 (Alarm)
Using the calculator . . . . . . . . . . . . . . . . . . 383 (Calculator)
Updating the software. . . . . . . . . . . . . . . . . 452 (Software update)
Updating the security . . . . . . . . . . . . . . . . . 458 (Scanning function)
Indexed pages
(microSD Memory Card)
n
Cover
?
P. 369
Page that
explains “Alarm”
Search for functions going in the order of “cover” → “beginning of the chapter” → “description
page”. The beginning of each chapter shows a table of contents.
Other Useful Functions
?
Checking Settings . . . . . . . . . . . . . . . . . . . . . . . . . . . . . . . . . . . . . . . . .<Check Settings>364
Multiaccess. . . . . . . . . . . . . . . . . . . . . . . . . . . . . . . . . . . . . . . . . . . . . . . . . <Multiaccess>364
Using Multi Assistant (Multitask) . . . . . . . . . . . . . . . . . . . . . <Multi Assistant (Multitask)>364
Retrieving the Recently Used Function or File. . . . . . . . . . . . . . . . . . . . .<Active Marker>365
Turning Power On Automatically . . . . . . . . . . . . . . . . . . . . . . . . . . . . . <Auto Power ON>367
Turning Power Off Automatically . . . . . . . . . . . . . . . . . . . . . . . . . . . . <Auto Power OFF>368
Sounding Alarm After Set Time Passes. . . . . . . . . . . . . . . . . . . . . . . . . . . . . . . . <Timer>368
Sounding Alarm at Set Time . . . . . . . . . . . . . . . . . . . . . . . . . . . . . . . . . . . . . . . . <Alarm>369
Managing Schedules . . . . . . . . . . . . . . . . . . . . . . . . . . . . . . . . . . . . . . . . . . . <Schedule>371
Saving ToDo Lists . . . . . . . . . . . . . . . . . . . . . . . . . . . . . . . . . . . . . . . . . . . . . <ToDo List>377
Accessing Functions Quickly . . . . . . . . . . . . . . . . . . . . . . . . . . . . . . . . . <Shortcut Menu>380
?
P. 369 Page that explains “Alarm”
2
Page 5
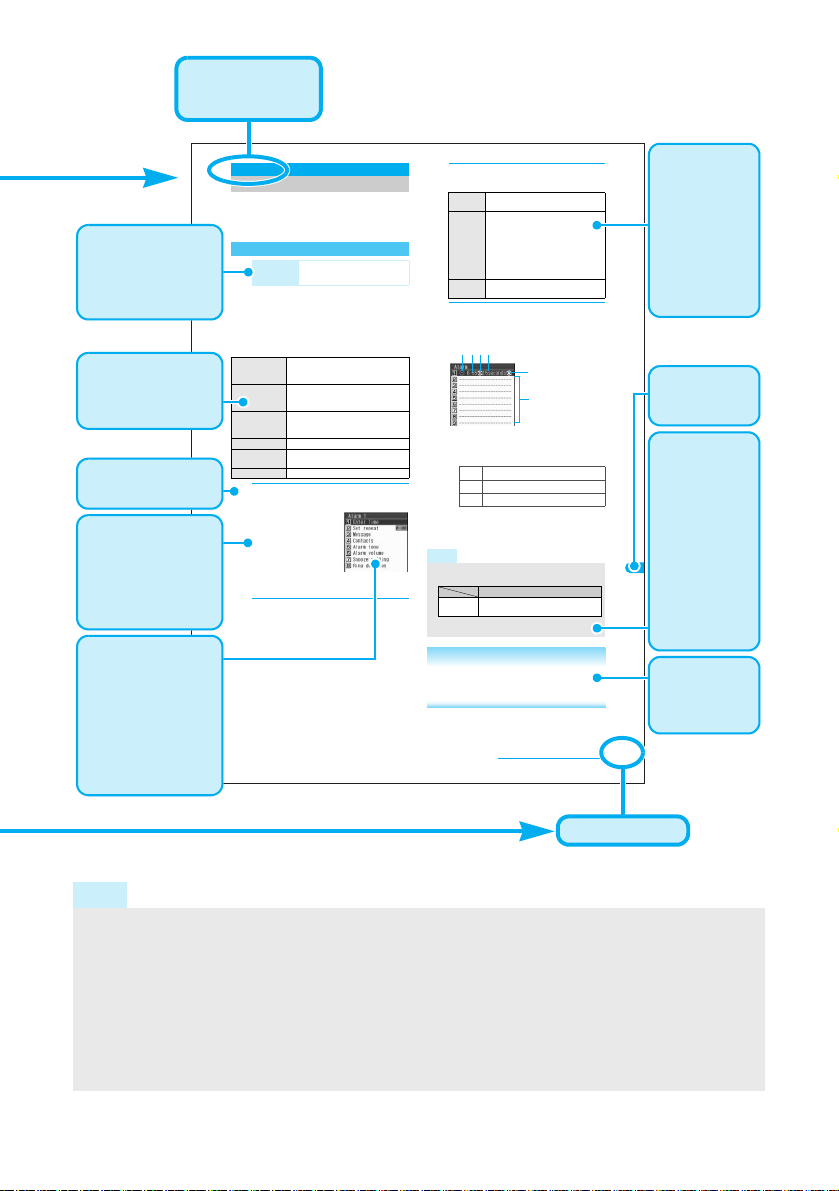
This is the function
name as it appears
in the index.
Default settings are
shown. Default
settings are also
shown in “Menu List”
(nP. 418).
The names of
displayed items and
their explanations
are shown.
The operation is
detailed in steps.
Additional
information,
precautions and
advice relating to
operations are
explained.
Screens
demonstrating
various steps are
shown. Refer to the
screens while using
the FOMA terminal
(Text which is input,
numbers and settings
are examples).
Alarm
Sounding Alarm at Set Time
Activate melody, Chaku-uta full® or movie/
i-motion at the set time/day.
If Vibration mode (nP. 121) is set, vibrator operates
along with alarm.
Setting Alarms
Basic setting methods for alarm time and day are
described below.
Set the operations when alarm is activated
(nP. 370). For the settings, change the alarm
volume and tone, display a message and a phone
number or perform other operations. Also, change
stereo effects (nP. 120) and an LED (nP. 140).
Message Show messages when alarm
Contacts Show phone numbers when alarm
Alarm tone Change alarm tone. Melody,
Alarm volume Change the volume.
Snooze setting Set the number of times to ring alarm
Ring duration Change the duration to ring alarm.
1
2
Alarm tone: إˍ, Alarm volume:
Volume 5, Snooze setting: OFF,
Default setting
Ring duration: 15 seconds
operates. Enter up to 60 single-byte
(30 double-byte) characters.
operates. Make calls when alarm
operates.
®
Chaku-uta full
and movie/i-motion
are available.
and its interval.
In stand-by, press t9284
and enter registration number.
Set the correct date
and time in advance
(nP. 45).
Save up to nine alarms.
Alarms are repeated
until disabled when set
to activate everyday or
if the day of the week
setting is set to repeat.
Press 1 [Enter Time], enter
activation time (four digits) and
press t.
Use 24-hour format.
Move cursor with v.
Alarm setting screen
Press 2 [Set repeat] and select a
3
repeat method.
To sound
once1 Setting is disabled after activation.
2 o select day t (repeatable) o
To sound
on
C
specified
If a check is placed in Exclude
day
holidays, alarm does not activate
for set vacations or holidays.
To disable, select day and press t.
Press i [SelAll]/i [ClrAll] to
select or clear all.
To sound
3
every day
Press i [Complete].
4
Press H to end setting (\ appears in
stand-by display).
Setting details
1 2 3 4
5
6
1
Appears when alarm is set
2
Time
3
Repeat frequency
Once only
l
Set day of week
k
Daily
j
4
Duration of alarm
5
Appears when snooze is set
6
Unsaved
Note
When multiple alarm functions are set to the same
time, the alarms are prioritized in the following order.
Alarm
function
One-time alarm can also be easily set on the current day
(the following day if set time has passed) (Quick alarm).
Related Operations
Set alarm from stand-by
In stand-by, enter time (ex. 2:05 PM: 1405) ?
t2.
Priority (high o low)
Recording o Reception o Alarm o
Schedule/ToDo list
<Quick alarm>
Other Useful Functions
Continued on next page??
369
The setting
details and the
operation
methods are
described
(Some
functions are
not executed
according to
the settings).
Search by
chapter from
the index.
Necessary
information,
precautions
and other
information for
using functions
are explained.
Blue characters
indicate they
are included in
Index. Search
from the index
is available.
Related
operations are
explained in a
simplified style.
Page number
※ Content differs from actual pages in this manual.
Note
Refer to “Menu List” on P. 418 for default settings.
This manual refers to microSD Memory Card as “microSD Memory Card” or “microSD”.
This manual refers to “Osaifu-Keitai compatible i-appli with IC card function” as “Osaifu-Keit ai compatible
i-appli”.
Viewing the display
The explanations in this manual are based on default settings. The actual screens may differ depending on
settings changed after purchase.
When Flash movies and icons featuring animation effects are displayed, screens may differ from those
described in this manual.
3
Page 6
Easy Search
Use this feature to find simple description for any function.
Useful functions for making calls
Notifying caller ID . . . . . . . . . . . . . . . . . . . . . 46 (Notify caller ID)
Putting a call on hold while talking . . . . . . . . 51 (Hold active call)
Switching to Videophone during voice call . . 52 (
Adjusting the volume of the other party’s voice . . .
When unable to take a call
Placing a call on hold without
answering the call . . . . . . . . . . . . . . . . . . . . 67 (On hold)
Indicating that it is necessary to refrain from
talking on the mobile phone . . . . . . . . . . . . 68 (
. . . . . . . . . . . . . . . . . . . . . . . . . . . . . . . . . . . . 70 (
Recording phone messages . . . . . . . . . . . . . . . . .
Changing melody and illumination
Setting the ring tone for each caller . . . . . . . . 100 (Select ring tone)
Changing the ring tone. . . . . . . . . . . . . . . . . . 116 (Select ring tone)
Adjusting the ring tone volume. . . . . . . . . . . . 118 (Phone ring volume)
Muting the tone of keys pressed. . . . . . . . . . . 119 (
Notifying incoming calls with vibration . . . . . . 121 (Vibrator)
Setting Manner mode. . . . . . . . . . . . . . . . . . . 123 (Manner mode)
Changing the light color and
pattern for incoming calls. . . . . . . . . . . . . . . 138 (LED settings)
Public mode (Drive mode)
Public mode (Power OFF)
71 (
Record message (voice/
Videophone calls))
Switch between voice
call and Videophone
67 (Earpiece volume)
)
)
Key/Standby i-motion
)
)
Changing the display
Meanings of display icons. . . . . . . . . . . . . . . . 28 (View the display)
Switching the menu display. . . . . . . . . . . . . . . 32 (Menu selections)
Changing stand-by wallpaper . . . . . . . . . . . . 125 (Stand-by display)
Setting calendar in stand-by . . . . . . . . . . . . . 126 (Calendar display)
Changing the font width . . . . . . . . . . . . . . . . 141 (Font style)
Keeping the display private. . . . . . . . . . . . . . 142 (Private filter)
Changing the font size
. . . . . . . . . . . . . . . . . . . 184, 236, 293, 348, 409 (Font size)
Using mail
Sending Deco-mail. . . . . . . . . . . . . . . . . . . . . 216 (Deco-mail)
Sending images . . . . . . . . . . . . . . . . . . . . . . . 220 (Attachments)
Sorting and saving mail automatically . . . . . . 236 (Sort rules)
Easy Search/Table of Contents/Precautions
4
Page 7
Using the camera
Changing the image size. . . . . . . . . . . . . . . 171 (Select size)
Saving to the microSD Me m ory Card . . . . . . .
Showing shot images . . . . . . . . . . . . . . . . . 296 (Image Viewer)
175 (Switch phone⇔SD)
Using the TV
Watching TV. . . . . . . . . . . . . . . . . . . . . . . . . . 275 (Activate One Seg )
Changing settings for video,
voice and sound . . . . . . . . . . . . . . . . . . . . . 278 (Set One Seg)
Setting timer to start or
record a TV program . . . . . . . . . . . . . . . . . 280 (Booking list)
Recording a TV program . . . . . . . . . . . . . . . . 284 (Record One Seg
Securing the FOMA terminal
Saving terminal data, such as phonebook
from unexpected loss . . . . . . . 112, 114, 159 (Data Security Service)*
Keeping phonebook contents secret. . . . . . 113 (Set secret)
Locking the FOMA terminal remotely in
case of loss . . . . . . . . . . . . . . . . . . . . . . . 149 (Omakase Lock)
Rejecting calls without caller ID . . . . . . . . . 157 (Reject by reason of
non-disclosure)
Rejecting callers not saved
in the phonebook. . . . . . . . . . . . . . . . . . . 159 (Reject unknown)
while watching)
Other features
Saving battery power . . . . . . . . . . . . . . . . . 130 (Power saver set)
Scanning QR codes and bar codes . . . . . . 176 (Bar code reader)
Using microSD Memory Cards. . . . . . . . . . 318
Ir-exchanging information. . . . . . . . . . . . . . 332 (Ir exchange)
Listening to music. . . . . . . . . . . . . . . . . . . . 353 (Music playback)
Setting the alarm . . . . . . . . . . . . . . . . . . . . 369 (Alarm)
Using the calculator . . . . . . . . . . . . . . . . . . 383 (Calculator)
Updating the software. . . . . . . . . . . . . . . . . 452 (Software update)
Updating the security . . . . . . . . . . . . . . . . . 458 (Scanning function)
* This service is a paid service that requires subscription.
Frequently used functions are described in the Quick manual (nP. 476).
(microSD Memory Card)
Easy Search/Table of Contents/Precautions
5
Page 8

Table of Contents/Precautions
Table of Contents
Using This Manual ........................................................................................................... 1
Easy Search.....................................................................................................................4
Main Functions of the FOMA SH903iTV.......................................................................... 8
Maximizing Use of the FOMA SH903iTV....................................................................... 10
Safety Precautions (To Be Strictly Followed)................................................................. 12
Handling Precautions..................................................................................................... 18
Intellectual Property....................................................................................................... 20
Standard Parts Packaged with Unit and Main Optional Parts........................................ 22
Before Using the FOMA Terminal............................................................... 23
Component Names and Functions, View the Display, Menu Selectio ns, Support book, FOMA Card, Insert an d
Remove the Battery Pack, Charge the Mobile Phone, Battery Level, Power ON/OFF, Select Language, Initial
Settings, Date Settings, Notify Caller ID, Own Number
Phone/Videophone....................................................................................... 47
Use Videophone, Make Calls/Videophone Calls, Switch Between V oice Call and Videophone, Redial/Received
Calls, Chaku-moji, Send Own No./No Caller ID, Pause Dial, WORLD CALL, International Dial Assist,
International Prefix, Sub Address, Reco nnect Control, Noise Reduction, Hands-free, Answer Calls/Videophone
Calls, Switch Between Voice Call and Videophone to Receive Calls, Any Key Answer, Ro tation-link Reply, Set
When Folded, Earpiece Volume, On Hold, Set On Hold Tone, Set Hold Tone, Public Mode (Drive Mode/P ower
OFF), Missed Calls, Record Message (Voice/Videophone Calls), Quick Message, Play/Delete Recorded
Messages or Voice Memos, Chara-den, Set the Image to Send to the Other Party, Hands-free V.phone,
Videophone Set, Change Videophone Settings, Notify Swit ch Mode, Packet Transmission Arrival Action,
Picture Memo
PushTalk .......................................................................................................83
PushTalk, Send PushTalk Transmissions, Add Member, Receive PushTalk Transmissions, Add to PushTalk
Phonebook, Use PushTalk Phonebook to Send PushTalk Tran smissions, Delete PushTalk Phonebook Ent ries,
Set PushTalk
Phonebook.................................................................................................... 95
Phonebooks Available on FOMA Terminal, Add to Phonebook, Add to FOMA Card Phonebook, Save to
Phonebook from Redial and Received Calls, Group Settings, Se arch Phonebook, Edit Entries, Del ete Entrie s,
Data Security Service, Set Secret, 2-touch Dialing/2-touch Mail, Use Data Security Service
Sound/Screen/Light Settings.................................. ... ... ... ... .... ... ... ... .... ... .. 115
Sound Settings, Select Volume, Sound Playback, Vibra t or, Quality Alarm, Ring Time Setting, Ring Output,
Manner Mode, Original Manner Mode, Main Display, Call/Receive Display, Send/Receive Display,
Picture Call Set, Sub Display Setting, Power Saver Set, User Set, Personalize, Personalize Menu, Kisekae
Tool, LED Settings, Missed Call Notice/New Unread Mail Notice, Vibrant Image Mode, Font Style, Private Filter
Security Settings......................................................................... ... ... .........143
FOMA Terminal Security Code, Change Security Code, UIM Settings, Disable PIN Lock, Lock Functions, All
Lock, Omakase Lock, Self Mode, Function Lock, Keypad Dial Lock, Multi Easy Lock, Multi Lock Auto-set,
Side Key Guard, Show Call/Received, Secret Mode, Accept Calls, Reject Calls, Reject by Reason of
Non-disclosure, Set Mute Ring Time, Reject Unknown, Data Security Service, Other Security Settings
Camera........................................................................................................ 161
Before Using the Camera, Shoot Still Picture, Shoot Movie, Change Settings for Shooting, Change Camera
Settings, Send Message, Bar Code Reader, Character Reader (OCR)
i-mode/i-motion/i-Channel......................................................................... 181
i-mode, View Sites, Site Layout and Operation, My Menu, Change i-mode Password, Internet Access,
Bookmark, Screen Memo, Save Image, i-melody, Download PDF, Kisekae Tool, Download Dictionary,
Download Chara-den, Download ToruCa, Phone To (AV Phone To)/Mail To/Web To/Media To Function, Set
i-mode, Message R/F, Receive Message R/F, Check New Messages, View Message R/F, Set SSL Certificate s,
i-motion, Download i-motion, Automatic Replay, i-motion Type, i-Channel, Show i-Channel, i-Channel Ticker,
Reset i-Channel
Easy Search/Table of Contents/Precautions
6
Page 9

Mail .............................................................................................................. 211
FOMA Terminal Mail Functions, i-mode Mail, Mail Menu, Compose/Send i-mode Mail, Deco-mail, Send Using a
Template, Attachments, Save i-mode Mail, Auto Receive, Receive Option, Check New Message, Reply to i-mode
Mail, Forward i-mode Mail, Add to Phonebook, Acquire Attached Files for Manual Reception, View Attachment, View
Image in Mail, Save Template, Inbox/Outbox/Unsent Messages, Received/Sent Messages History, Mail Setting,
Compose/Send SMS, Receive SMS, SMS Settings, Save SMS to FOMA Card, Delete SMS, Scan Message
i-appli.......................................................................................................... 245
i-appli, i-appliDX, Download, Run i-appli, Auto Start, i-appli To Function, i-appli Stand-by, Manage i-appli,
Used by i-appli, Use Various i-appli Functions
Osaifu-Keitai/ToruCa .................................................................................261
Osaifu-Keitai, iC Transfer Service, Start Osaifu-Keitai Compatible i- appli, ToruCa, Retrieve ToruCa, ToruCa
Viewer, View ToruCa List/Details Screen, ToruCa Settings, IC Card Lock
Watching TV ............................................................................................... 271
TV, Channel Setting, Activate One Seg, Program Guide, Bo oking List, Use Data Broadcas ting, TVlink, Record One
Seg While Watching, One Seg Settings
Full Browser ............................................................................................... 287
View Web Pages Designed for PC, Set Full Browser
Displaying/Editing/Managing Data ...........................................................295
Image Viewer, Edit Image, i-motion Player, Edit Movie, Video Player, Chara-den Player, Melody Player,
microSD Memory Card, Contents Transfer Compatible, Copy to microSD, Backup/Rest ore, View microSD
Data, Copy to the Phone, Manage microSD Memory Card, Manage Data, Ir Exchange, Send and Receive Data
Individually, Send and Receive All Data I tems, Use Ir Exchange with i- appli Software, Infrared Remote Control,
iC Transmission, Send and Receive Data Individually, Send and Re ceive All Data Items, V oice Recorder, PDF
Viewer, Manage PDF Files, Document Viewer, Manage Documents, BookReader, Use the Information in
e-Book and e-Dictionary, Character Reader, Manage e-Book and e-Dictionary, Print Setting (DPOF)
Music Playback .......................................................................................... 353
Play Back Music, Music, Chaku-uta full® Download, Save Music Data to microSD Memory Card, Manage
Playlist, SD-Audio, FM Transmitter Output
※ “Chaku-uta full” is a registered trademark of the Sony Music Entertainment (Japan) Inc.
Other Useful Functions ....................... ... .... ... ... ... .... .................................. 363
Check Settings, Multiaccess, Multi Assistant (Multit ask), Act ive Marker, Auto P ower O N, Auto Power OFF, Timer,
Alarm, Schedule, ToDo List, Shortcut Menu, Owner In formation, Voice Memo (During Call/Stand-by), Calculator, Talk
Time/Cost, Text Memo, Earphone/Microphone with Switch, Se t Auto An swer , Rese t Settin gs, Delete User Data
Network Services ....................................................................................... 391
Network Services from the FOMA Terminal, Voice Mail Service, Call Waiting, Call Forwarding Service, Nuisance
Call Barring Service, Caller ID Request Service, Dual Network Service, English Guidance, Service Number,
Arrival Call Action, Set Arrival Action, Remote Control, Multi Number, OFFICEED, Additional Services (USSD)
Data Communication ................................................................................. 403
Data Communication, Before Use, General Flow to Prepare for Data Communicat i on, AT Commands,
CD-ROM, DoCoMo Keitai Datalink
Text Input.................................... .... ... ................................................ .... ... .. 407
Text Input, 5-touch, Save Phrases, Copy Text, Kuten Code Input, Register Words (User Dictionary), Clear
Memory Terms, Download Dictionary, Quick Dictionary/Next Word Guess, 2-touch
Appendix/Using with External Devices/Troubleshooting ...................... 417
Menu List, Pre-installed Data, Dial Key Assignments (5-touch/2-touch), Symbols/Special Character List, Pictograph/
Emoticon List, Phrase List, Use the Calculator, Multiaccess Combinations, Multi Assistant (Multitask) Combinations,
Available Services, Options and Accessories, Use with External Devices, Troubleshooting, List of Error Messages,
Warranty and After-sales Services, Software Update, Scanning Function, Main Specifications, Number of Saved/
Registered/Protected Entries in the FOMA Terminal, Specific Absorption Rate (SAR), Japan Export Control
Regulation/Export Administration Regulation
Index/Quick Manual ............................. ... .... ... ... ... .... .................................. 465
Index, Quick Manual
Easy Search/Table of Contents/Precautions
7
Page 10

Main Functions of the FOMA SH903iTV
FOMA is the name of DoCoMo’s service based on W-CDMA, which is recognized as a global
standard for third generation mobile communications system (IMT-2000).
The World of i-mode
Use the i-mode terminal display to access i-mode, an online service used to access useful
information from i-mode menu sites (programs) or i-mode supported sites, or easily send and
receive e-mail.
i-mode (monthly fees apply)
※i-mode is a paid service that requires
subscription. nP. 182
i-motion compatible
Download and enjoy images and music from
sites or the Internet. Set i-motion as
Chaku-motion to use as ring tone or receive
display. nP. 205
i-mode Mail, Deco-mail Pictograph
Attach up to ten files (JPEG, ToruCa, etc.) in
total of 2 MB to a message. Deco-mail/
Deco-mail pictograph is available for i-mode
mail. Create and send expressive mail by
changing text color, character size and
background color in message text. nP. 212
Chaku-uta full
Download one song in whole from a site
available for i-mode to play the song or set the
song as a ring tone. nP. 116, P. 354, P. 356
®
Security Settings
Omakase Lock* nP. 149
The FOMA terminal can be locked by request
when it is lost. The lock can be disabled also
by request. Refer to the back cover for details
on inquiries.
* Omakase Lock is a service to lock the handset
by the request of the subscriber. Please note
that the lock service can be applied by a
request of the subscriber even if the subscriber
is not a user of the FOMA terminal.
Mega i-appli, i-appliDX
Download i-appli from sites to play games and
automatically update stock prices and weather
information. Supporting large Mega i-appli lets
you enjoy high-definition 3D games and long
RPGs. With i-appliDX, use i-appli in
conjunction with phonebook or mail
information in the i-mode terminal. nP. 246
Data Security Service nP. 112, P. 114,
P. 159
By using this service, phonebook, still pictures,
messages in the phone can be saved in the
Data Storage Center, and the lost data can be
restored from the data saved on the network
when the phone is lost. In addition, the data
saved on Data Storage Center can be edited
and managed using a PC. The edited data can
be reflected to the phone.
Refer to “Mobile Phone User’s Guide [i-mode]”
for precautions and details on the Data
Security Service and the back cover of this
manual for inquiries. This service is a paid
service that requires subscription.
Numerous Network Services
Dual Network Service (monthly fees apply)
nP. 397
Voice Mail Service (monthly fees apply)
nP. 392
Easy Search/Table of Contents/Precautions
8
Call Waiting (monthly fees apply) nP. 394
SMS (Short Message) nP. 240
Call Forwarding Service nP. 395
Page 11
Approx. 2 Million Effective Pixel Camera and High-definition Displa y
Approx. 2 million effective pixel CMOS
camera
(Recorded pixels: approximately 1.9 million
(main camera), approximately 0.1 million (sub
camera))
Shoot and play back still pictures and movies
using auto-focus with the built-in digital
camera. Multishot and shooting with frames
are also available. Use the CMOS camera
(approximately 2 million effective pixels) or the
CMOS sub camera (approximately 0.11 million
effective pixels) to shoot images of yourself or
to use Videophone. nP. 162
Sub display
Receiving calls, PushTalk or mail can be
checked and the clock, Chaku-moji and
i-Channel ticker can be displayed when the
FOMA terminal is closed. The information
such as the titles and artist’s names appears
during music playback. nP. 129
A Wide Array of Functions
microSD Memory Card compatible
Supporting a minimum-sized memory,
microSD Memory Card. Exchange data
between FOMA terminal handset and microSD
Memory Card. Save movies directly to the
microSD Memory Card to shoot and play long
movie files. Record movies of a One Seg
program and save the contents transfer
compatible data. In addition, save music or
images using a PC. nP. 318
Active Marker
Easily access the function or file that was
recently used. The current day’s schedule and
ToDo list details are also available. nP. 365
One-touch Power saver mode
Switch the display settings to Power saver
(Eco) with one-touch operation and conserve
battery power. nP. 130
3.0 inch WQVGA High-definition
Large Display LCD
Watch One Seg on the 3.0 inch wide screen.
The wide screen also lets you enjoy high
quality view of shot still pictures and movies.
The wide screen also let you enjoy lively
i-appli games. The brightness sensor adjusts
the brightness of the backlight accordin g to the
detected surrounding light. This is useful for
power saving purposes. nP. 132
Private filter
Change the contrast of the display to protect
your important privacy. nP. 142
Kisekae Tool
Personalize the menu icons and background
images of Top menu, i-mode menu and mail
menu, and also the stand-by display and ring
tones with Kisekae Tool collectively.
nP. 136
Fix camera shake
Shoot movies with the camera while camera
shake is automatically fixed. nP. 174
FM transmitter
Play sound and music of One Seg, Video
player, Music player or SD-Audio of the FOMA
terminal with a receiver such as an FM radio o r
an in-vehicle FM tuner. To do this, transmit the
sound and music from the FOMA terminal with
FM radio waves and receive the radio waves
with the receiver. nP. 361
Wide Array of Lock Functions and Security Settings
There are various lock functions and security settings for the FOMA terminal.
Lock functions nP. 148 Secret mode nP. 154 Multi easy lock nP. 152
Multi lock auto-set nP. 153 Show call/received nP. 153
Easy Search/Table of Contents/Precautions
9
Page 12
Maximizing Use of the FOMA SH903iTV
The functions of the FOMA SH903iTV are described below.
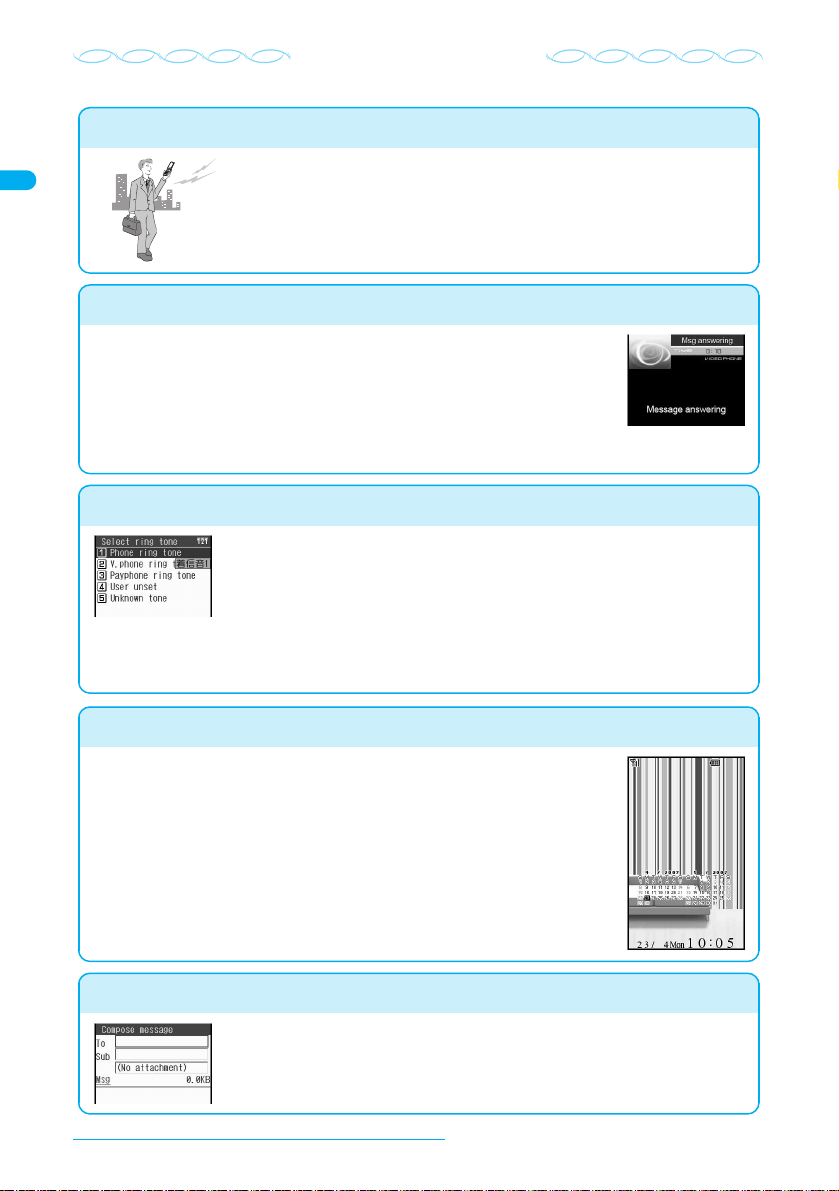
Videophone
Face-to-face communication
J
using the sub camera
Have conversations while looking at each
other’s faces.
nP. 48
J Shoot live movies with the
main camera
Use main camera and microphone to send
image + voice of surroundings in real time.
i-Channel
Periodically receive updated information without performing operations each time.
Press the i-Channel supported key to view the channel list. More detailed information is
available here.
※ i-Channel is only available in Japanese.
PushTalk
Simply select the other party from the phonebook and press the PushTalk key to communicate
with multiple people at once (up to five including yourself).
PushTalk is useful when speaking to specific groups or conveying short information.
Osaifu-Keitai/ToruCa
i-mode terminals supporting i-mode FeliCa is called an “Osaifu-Keitai”.
Simply hold the handset of Osaifu-Keitai up to the reader/writer (external device) at participating
stores. Use electronic money to pay for shopping and use as an airline ticket or a service card
with purchase points accumulated according to the purchased amount.
The IC card in Osaifu-Keitai enables depositing electronic money, checking your balance or
viewing usage history from sites, and other useful functions.
Moreover, preinstalled i-appli for “DCMX”, a DoCoMo’s credit service, turns your mobile phone
into a convenient tool in your daily life by using it as “Osaifu-Keitai”. This terminal also supports
iC transfer service that makes transferring data in the IC card easier when the FOMA terminal is
changed into a new model.
nP. 208
utc (J)
nP. 84
nP. 262
Easy Search/Table of Contents/Precautions
10
Page 13
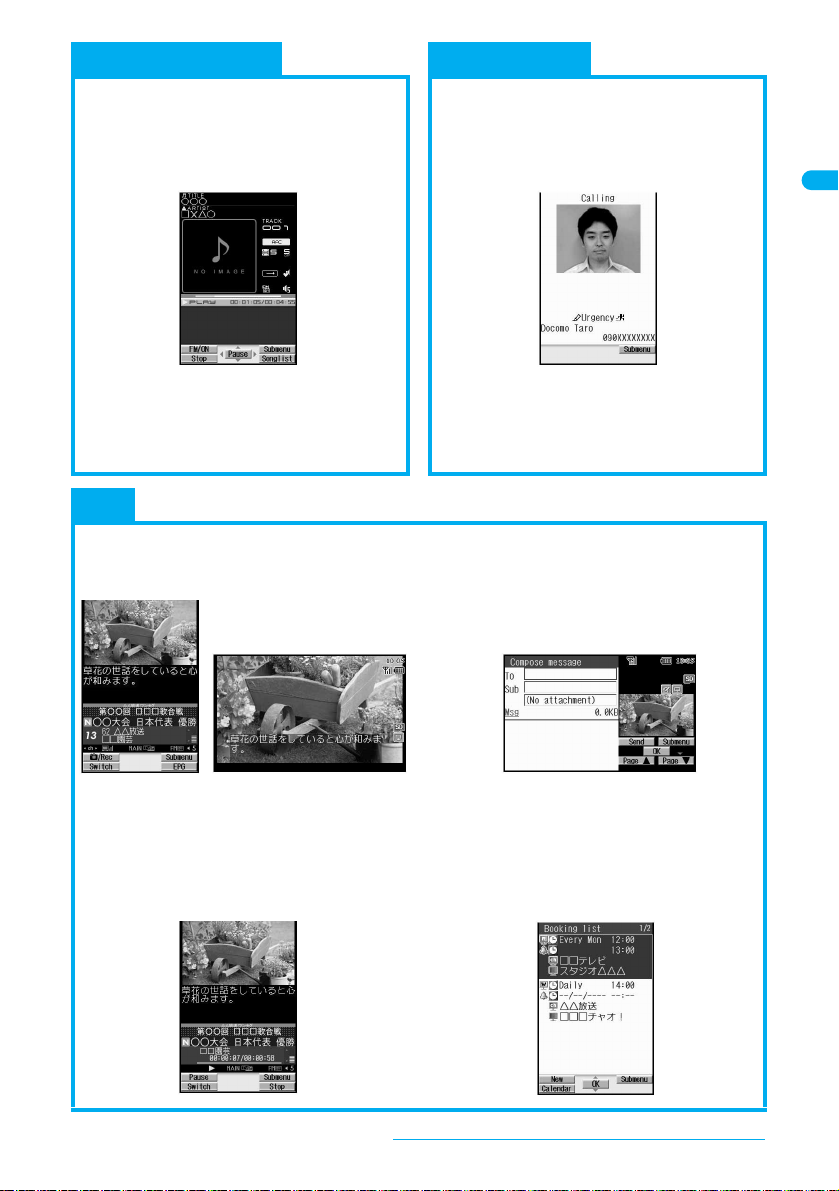
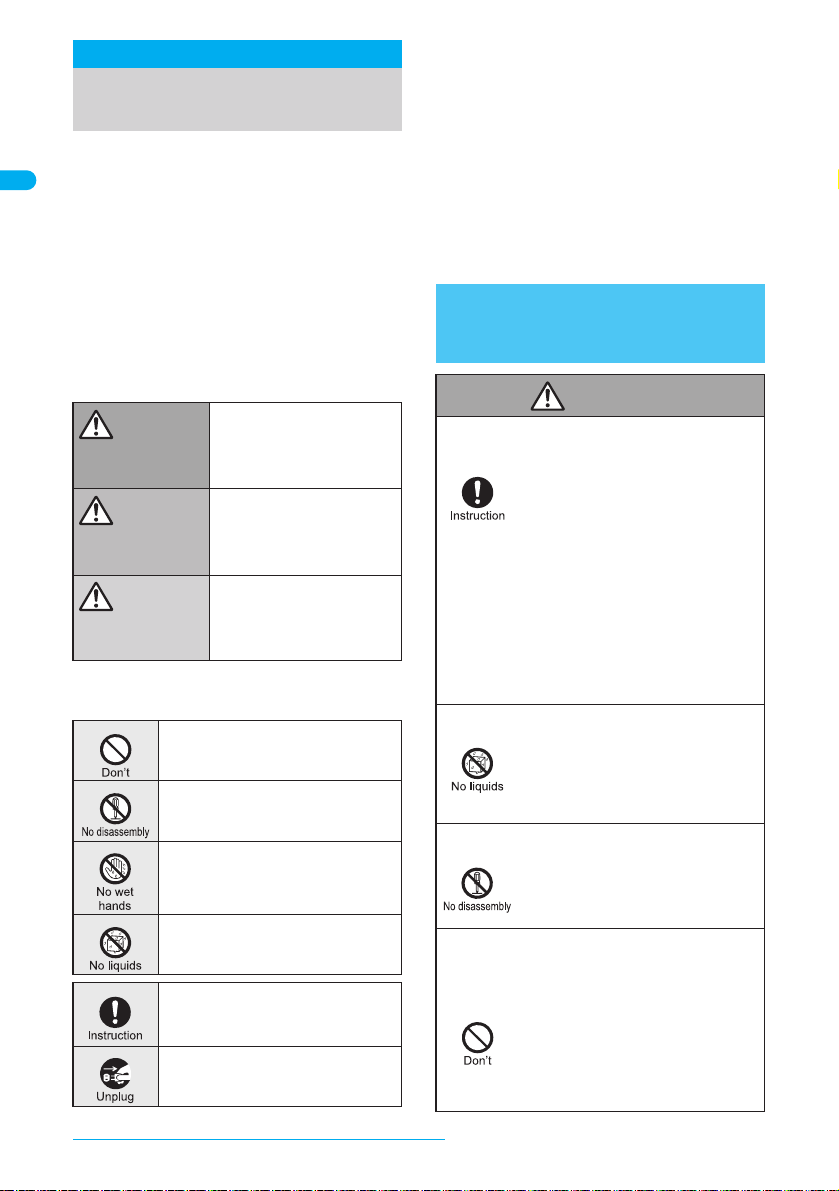
Music Playback Chaku-moji
J
Music player nP. 354
Play back Chaku-uta full® downloaded from
sites or Internet web pages using Music
player. Also play back the data saved to the
Multimedia folder of i-motion.
J SD-Audio nP. 358
Use SD-Jukebox or PC to save songs from a
CD to the microSD Memory Card and play on
the FOMA terminal.
Display a message on the receive display.
Points and degree of urgency can be
previously sent.
Messages can be also checked on the
received calls details screen.
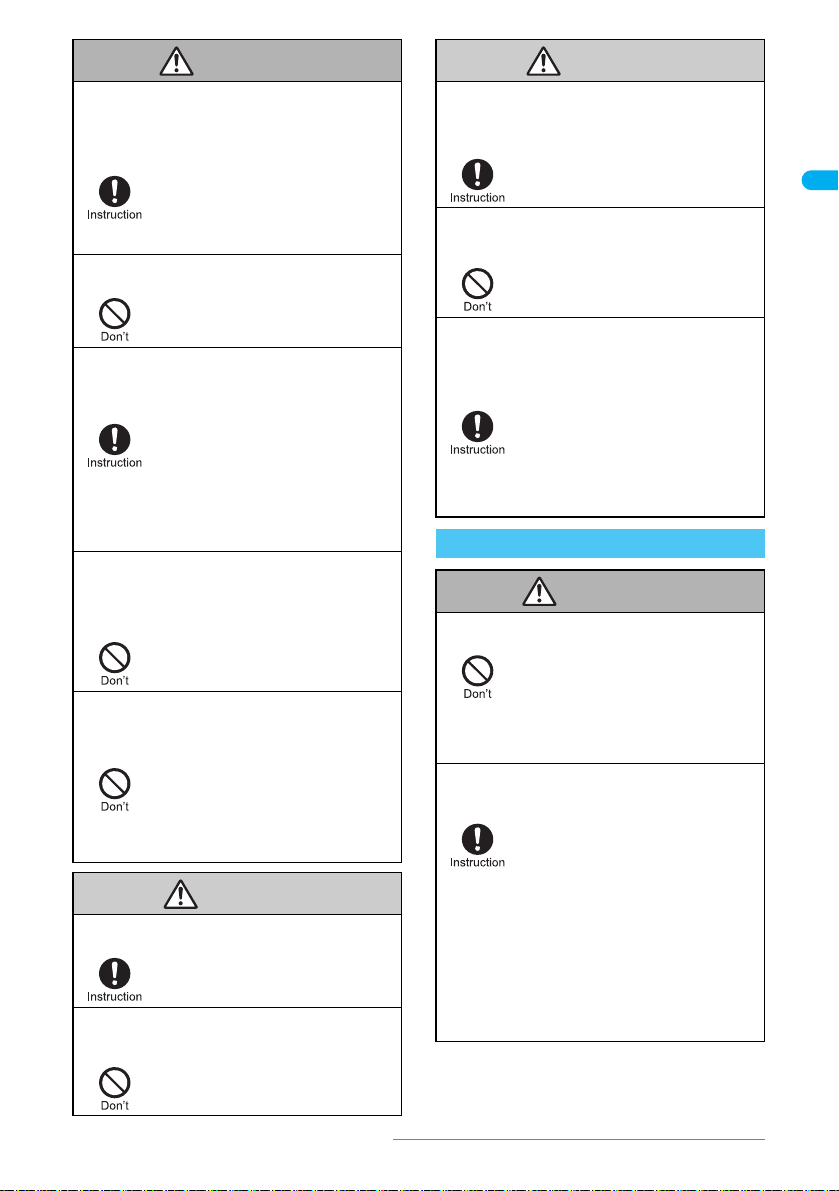
TV
J One Seg nP. 275
Watch “One Seg”, which is digital terrestrial
broadcasting for mobile devices.
J Multi Window nP. 278
While watching One Seg on Multi Window in
the Cycloid position, use another function.
nP. 56
J Video
nP. 284, P. 296, P. 311
Record movies and a scene as a still picture
for One Seg program being played. Watch
the recorded movies and still pictures with
the FOMA terminal.
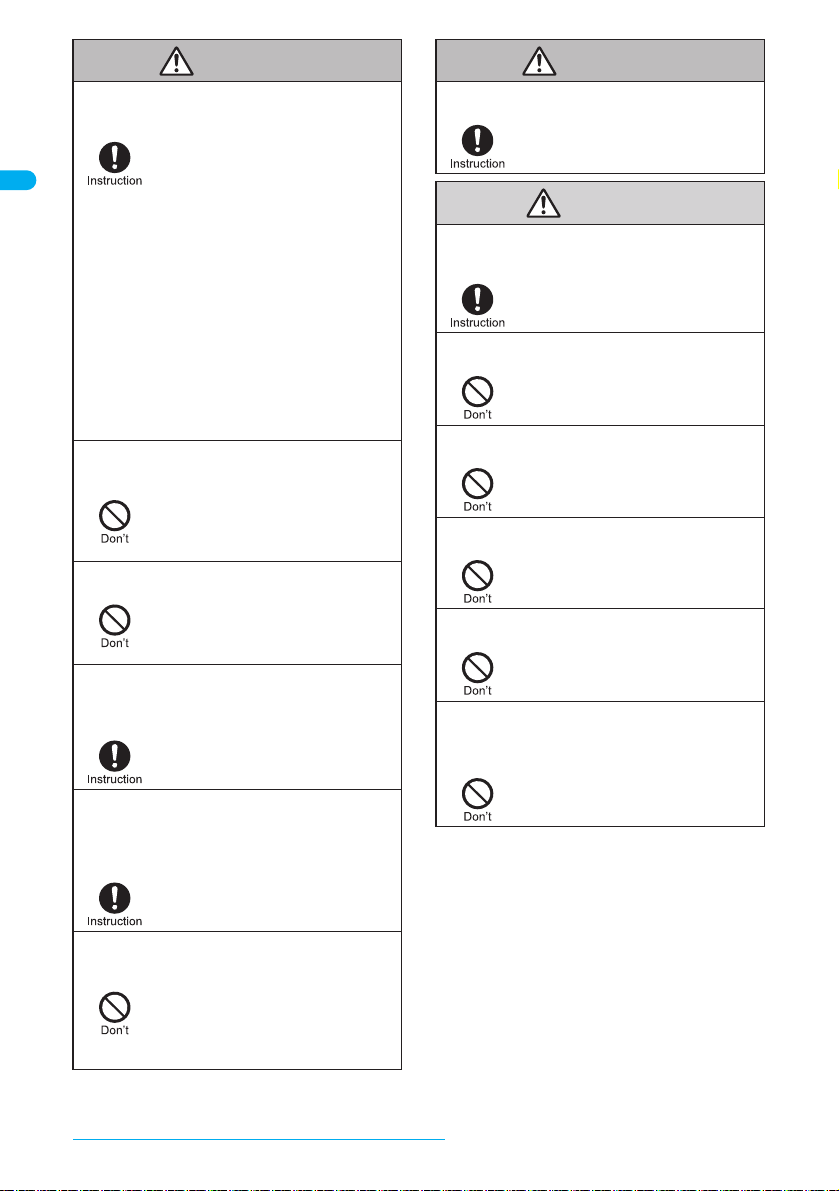
J TV timer and Recording
timer nP. 280
Set timer for starting or recording TV
programs.
Easy Search/Table of Contents/Precautions
11
Page 14
Safety Precautions (To Be Strictly Followed)
Before use, read these “Safety Precautions”
carefully and use your FOMA properly.
Keep this manual in a safe place for future refere nce.
These safety precautions contain information
intended to prevent bodily injury to the user and to
surrounding people, as well as damage to
property, and must be observed at all times.
The following symbols indicate the
different degrees of injury or
damage that may occur if
information provided is not
observed and the FOMA terminal is
used improperly.
This symbol indicates that
“death or serious bodily injury
Danger
Warning
Caution
The following symbols indicate
specific directions.
Easy Search/Table of Contents/Precautions
12
may directly and immediately
result from improper use”.
This symbol indicates that
“death or serious bodily injury
may result from improper
use”.
This symbol indicates that
“bodily injury and/or property
damage may result from
improper use”.
Indicates a prohibited action.
Indicates not to disassemble the
device.
Indicates not to handle the device with
wet hands.
Indicates not to use the device near
water or get it wet.
Indicates that instructions
specified are compulsory
(must be followed).
Indicates that the power cord must be
unplugged from the power outlet.
“Safety Precautions” is explained in
the following six sections.
Handling the FOMA Terminal, Battery Pack,
Adapters (Chargers), and FOMA Card
(General) . . . . . . . . . . . . . . . . . . . . . . . . .
P. 12
Handling the FOMA Terminal . . . . . . . P. 13
Handling the Battery Pack. . . . . . . . . . P. 15
Handling the Adapters (Chargers) . . .P. 16
Handling Mobile Phones near Electronic
Medical Equipment . . . . . . . . . . . . . . . P. 17
Handling the FOMA Card . . . . . . . . . . P. 17
Handling the FOMA Terminal,
Battery Pack, Adapters (Chargers),
and FOMA Card (General)
Danger
Use only the battery packs and adapters
(chargers) specified by the DoCoMo group
companies for use with the FOMA terminal.
Do not get the FOMA terminal, battery pack,
adapters (chargers) or FOMA card wet.
Do not attempt to disassemble or modify.
In addition, do not attempt to solder.
Do not use or leave the FOMA terminal,
battery pack, adapters (chargers) o r FOMA
card in locations subject to high
temperatures, such as near a fire or heater, in
direct sunlight, or inside a car on a hot day.
The use of devices other than those
specified may cause the FOMA
terminal, battery pack or other
devices to leak, overheat, explode,
catch fire or malfunction.
Battery pack SH11
Desktop holder SH13
FOMA AC Adapter 01
FOMA DC Adapter 01
FOMA Dry Battery Adapter 01
FOMA USB Cable with Charge
Function 01
※ For information on other
compatible products, contact a
DoCoMo Shop or retailer.
Contact with water, pet urine, and
other liquids may cause overheating,
electric shock, fire, malfunction or
bodily injury. Be attentive to where
and how you use the handset.
May cause accidents such as fires,
bodily injury, electric shock or
malfunction. In addition, the battery pack
may leak, overheat, explode or catch fire.
The FOMA may malfunction or b ecome
deformed. In addition, the battery pack
may leak, overheat, explode, catch fire
or suffer performance loss and a
reduced service life. Part of the casing
may also become hot and cause burns.
Page 15
Warning
Make sure to turn off the mobile phone in
locations such as gas stations where
flammable gas is generated.
In addition, do not recharge the battery. I t
may cause a gas explosion or fire.
To use Osaifu-Keitai in loca ti o ns
such as gas stations, make sure to
turn off the power in advance (If the
IC card lock is set, disable the lock
before turning off the power).
Do not throw or otherwise subject to
strong force or impacts.
The battery pack may leak, overheat,
explode or catch fire. Other equipment
may also be damaged or catch fire.
If you notice anything unusual, such as an
unusual odor, overheating, discoloration or
deformation during use, charging or storage,
immediately follow the instructions below.
1. Unplug the power cord from the
outlet or cigarette lighter socket.
2. Turn off the FOMA terminal.
3. Remove the battery pack from the
FOMA terminal.
Continued use (charging) may cause
overheating, explosion, or fire. In
addition, the battery pack may leak.
Do not allow conductive materials (such
as metal objects and pencil lead) to come
into contact with the charger terminal or
external device terminal. In addition, do
not insert such objects.
The battery pack may short-circuit
and cause a fire or malfunction.
Do not place the FOMA terminal, battery
pack, adapters (chargers), or FOMA card
inside cooking appliances such as
microwave ovens or pressure cookers.
The battery pack may leak,
overheat, explode or catch fire, and
the FOMA terminal and adapters
(chargers) may overheat, emit
smoke or catch fire. The internal
circuitry may also be damaged.
Caution
Keep the FOMA out of the reach of young
children.
Do not store the FOMA in locations that
are subject to dust, humidity or high
temperatures.
A small child may swallow
components or suffer other bodily
injury.
May cause a malfunction.
Caution
If being used by a child, have a guardian
teach them the proper handling
procedures. In addition, check that the
child is using the FOMA as directed.
May result in bodily injury.
Do not leave the FOMA on unstable
surfaces, such as on a wobbling table or
sloped surface.
The FOMA may fall and cause injury
or be damaged.
The FOMA terminal, battery pack or adapters
(chargers) may become warm when
charging, when recording or playing movies,
or when using Videophone, TV, i-m ode or
a
ppli repeatedly or for long periods o f time.
i-
Exposure to high temperature areas
for a prolonged period of time may
cause skin irritations, or itchiness in
some people.
Take special care when using the
FOMA terminal for long periods while
connected to the adapter (chargers).
Handling the FOMA Terminal
Warning
Never use the FOMA while driving a
motor vehicle.
Turn off the FOMA in areas where the use
of mobile phones is prohibited, such as
in aircraft or hospitals.
As of November 1, 2004, use of a
mobile phone while driving is
punishable by law. Even when using
the In-car hands-free kit, stop your
vehicle in a safe place before using.
Activate Public mode or Voice Mail
Service when drivi n g.
The FOMA may interfere with the
operation of sensitive devices and
electronic medical equipment. In
addition, make sure that the Auto
power ON function is set to OFF
before turning the FOMA OFF.
Follow the instructions given by the
respective medical facilities
regarding the use of mobile phones
on their premises. In addition,
actions such as speaking on a
mobile phone aboard aircraft are
prohibited and may be punishable by
law.
Easy Search/Table of Contents/Precautions
Continued on next page??
13
Page 16
Warning
Turn the FOMA terminal off near
high-precision electronic devices or
devices that use weak electronic signals.
If you are using electronic medical equipment,
do not put the FOMA in your breast pocket or
in the inside pocket of your jacket.
Do not aim the Ir (Infrared) data port
towards the eyes.
If you have a weak heart, take extra
precautions when setting functions such
as the Vibrator and Ring tone volume for
incoming calls.
If you hear thunder while using the
FOMA terminal outdoors, put the
antenna back into the FOMA terminal,
immediately turn it off and move to a safe
location.
The FOMA may interfere with the
operation of sensitive electronic
equipment.
Take particular care with the
following devices:
Hearing aids, implanted cardiac
pacemakers, implanted
cardioverter-defibrillators, or other
electronic medical equipment. Fire
alarms, automatic doors and other
equipment controlled by electronic
signals.
If you use an implanted cardiac
pacemaker, implanted
cardioverter-defibrillator or other
medical equipment, contact the
respective manufacturer or vendor to
check whether the operation of the
equipment is affected by signals.
Using the FOMA terminal in close
proximity to electronic medical
equipment may cause the equipment
to malfunction.
May cause eye injury. In addition, do
not aim or direct the Ir data port
towards another Ir device as this may
cause the device to malfunction.
Various settings may have effects on
your heart.
There is a risk of being struck by
lightning and suffering electric shock.
Warning
During a call in which Hands-free is set,
keep the FOMA terminal away from the ears.
This may cause hearing loss.
Caution
Using the FOMA in an automobile may
sometimes affect the electronic
equipment in some vehicle models.
Never place a magnetic card near or in
antenna, the FOMA terminal.
Do not swing the FOMA terminal by its
antenna, strap, etc.
Do not use the FOMA terminal in area
with many people.
Do not use the FOMA terminal with the
damaged antenna.
Do not allow water or other liquids,
metal, flammable material, or other
foreign objects to enter the FOMA card
port on the FOMA terminal.
In such cases, stop using the FOMA,
as this could impede safe driving.
The stored magnetic data in cash
cards, credit cards, telephone cards
and floppy disks, etc. may be erased.
The FOMA may strike you or others
around you, resulting in bodily injury or
damage to the FOMA or other property.
The antenna may strike others,
resulting in bodily injury.
Touching the antenna may cause burn
or other injuries.
May cause a fire, electric shock or
other malfunctions.
Do not place the FOMA terminal on the
dashboard or near the airbag where it
could interfere with the airbag inflating.
If the air bag inflates, the FOMA
terminal may strike you or others
around you, resulting in bodily injury
or damage to the FOMA terminal or
other property.
Easy Search/Table of Contents/Precautions
14
Page 17
Caution
Use of the FOMA may cause skin
irritations such as itchiness, rashes or
eczema in some people. If this occurs,
immediately stop using the FOMA and
seek medical treatment.
Part
Multi-guide key
OK key
Metal part of TV
antenna
Rear model
name panel
(Large)
Rear model
name panel
(Small)
Model name
panel at lower
part of the main
display
Earphone/
Microphone
terminal
External
connector
terminal
Charger
terminal
Inside microSD
Memory Card
slot
Material
ABS
Brass
Nickel
Stainless
steel
Do not close the FOMA terminal on your
fingers or objects such as the strap.
May result in bodily injury or cause a
malfunction.
Watch TV in a well-lit place, keeping a
certain distance from the screen.
Otherwise, eyesight may be
decreased.
Use the FeliCa reader/writer function only in
Japan.
The FeliCa reader/writer function in
the FOMA terminal conforms to the
domestic radio wave standards and
has obtained its approval. Using the
function overseas may re su lt in
punishment.
Use the FM transmitter only in Japan.
The FM transmitter in the FOMA
terminal conforms to the domestic
radio wave standards and has
obtained its approval. Using the
function overseas may re su lt in
punishment.
Surface
treatment
Chrome
plating
Coating
Tin
plating
Gold
plating
−
Handling the Battery Pack
Check the type of battery using the information
printed on the battery pack label.
Label Battery type
Li-ion Lithium-ion
Danger
Do not throw the battery pack into a fire.
Do not touch terminals with metallic
objects such as wires. In addition, do not
carry or store the battery pack with
metallic necklaces, etc.
If the battery fluid comes into contact
with your eyes, do not rub your eyes but
immediately rinse your eyes with clean
water. Then seek prompt medical
treatment.
If you are having difficulty fitting the
battery pack to the FOMA terminal, do
not use excessive pressure to force the
battery into place. Check that the battery
pack is facing the correct direction
before you attach it.
Do not puncture, hit with a hammer or
step on the battery pack.
The battery pack may leak,
overheat, explode or catch fire.
The battery pack may leak,
overheat, explode or catch fire.
Battery fluid is harmful to your eyes
and may result in loss of eyesight.
The battery pack may leak,
overheat, explode or catch fire.
The battery pack may leak,
overheat, explode or catch fire.
Warning
If the battery pack is not fully charged
after the specified time has elapsed, stop
charging.
If battery fluid comes into contact with
your skin or clothing, stop using the
FOMA terminal immediately and rinse it
off with clean water.
Easy Search/Table of Contents/Precautions
The battery pack may leak,
overheat, explode or catch fire.
Battery fluid is harmful to your skin.
Continued on next page??
15
Page 18
Warning
If the battery pack leaks or emits an
unusual odor, immediately stop use and
move it away as far as possible from any
flame or fire.
The battery fluid is flammable and
could ignite, causing a fire or
explosion.
Caution
Do not dispose of used battery packs in
ordinary garbage.
May cause fires or damage to the
environment. Place tape over the
terminals to insulate unnecessary
battery packs, and take them to a
DoCoMo Shop, retailer or institution
that handles used batteries in your
area.
Handling the Adapters
(Chargers)
Warning
Take care not to short-circuit the
charging terminal when connected to a
power outlet or cigarette lighter socket.
Also, take care not to allow any part of
your body (fingers, etc.) to come into
contact with the charging terminal.
Place the charger and desktop holder on
stable surfaces when charging. In addition,
do not cover or wrap the charger or
desktop holder with clothing or bedding.
Never use the AC adapter, desktop
holder or the DC adapter in humid or
steamy locations such as a bathroom.
Do not handle the cord and plug of the
adapters (chargers) with wet hands.
May result in a fire, electric shock,
equipment malfunction or bodily
injury.
The FOMA terminal may detach,
overheat, or cause a fire or
malfunction.
May result in electric shock.
May result in electric shock.
Warning
Do not touch the FOMA terminal or
adapters (chargers) if you hear thunder.
There is a risk of being struck by
lightning and suffering electric shock.
Do not use if the adapter’s (charger’s)
cord or power cord is damaged.
If the fuse in the DC adapter blows, always
replace it with a fuse of the specified type.
Always use the specified power supply
and voltage.
Wipe off any dust on the plug.
Unplug the power cord from the outlet
when not using for a long time.
Should water or other liquids enter the
adapters (chargers), remove the plug
from the outlet or cigarette lighter socket
immediately.
The DC adapter should only be used in
negative grounded vehicles. Never use
these adapters in positive grounded
vehicles.
May cause electric shock,
overheating or fire.
Using the incorrect fuse may cause a
fire or malfunction. Refer to the
respective manuals for information
on the correct fuse specifications.
Using the incorrect voltage may
cause a fire or malfunction.
When using overseas, use the
overseas-compatible FOMA AC
adapter 01.
AC adapter: 100VAC
Overseas-compatible FOMA AC
adapter 01: 100 to 240VAC (Connect
only with household AC outlet)
DC adapter: 12/24VDC (for negative
grounded vehicles only)
May cause a fire.
May cause an electric shock,
equipment malfunction, or fire.
May cause an electric shock, smoke
emission or fire.
May cause a fire.
Easy Search/Table of Contents/Precautions
16
Page 19
Warning
When plugging the AC adapter into the
power outlet, make sure that no metallic
straps or other metallic objects are
caught between the plug and the socket.
May cause electric shock,
short-circuiting or fire.
Caution
Always pull the plug out of the power
outlet or cigarette lighter socket before
cleaning the adapters (chargers).
Do not place heavy objects on the power
cords for the adapters (chargers).
Always grasp the plug when unplugging
the adapters (chargers) from the power
outlet or cigarette lighter socket. Do not
pull by the cord or power cord.
May result in electric shock.
May cause an electric shock or fire.
Pulling on the cord may damage the
cord and cause an electric shock or
fire.
Handling Mobile Phones near
Electronic Medical Equipment
The safety precautions detailed here conform to
the guidelines drawn up by the Electromagnetic
Compatibility Conference Japan, regarding the
protection of electronic medical equipment from
signals emitted by mobile phones.
Warning
If you have an implanted cardiac
pacemaker or an implanted
cardioverter-defibrillator, always carry or
use your FOMA terminal at least 22 cm
away from your implant.
Electromagnetic signals may affect
the operation of implanted cardiac
pacemakers and implanted
cardioverter-defibrillators.
Warning
Observe the following in hospitals or
other medical facilities.
Turn off your FOMA terminal in crowded
places such as rush-hour trains in case
somebody nearby is using an implanted
cardiac pacemaker or implanted
cardioverter-defibrillator.
Patients receiving medical treatment
away from a hospital or medical facility
(e.g. home treatment) who are using
electronic medical equipment other than
implanted cardiac pacemakers or
implanted cardioverter-defibrillators
should consult the respective
manufacturers for information regarding
the effects of signals on the equipment.
Do not take your FOMA terminal
into operating rooms, ICUs
(Intensive Care Units) or CCUs
(Coronary Care Units).
Turn off your FOMA terminal
inside hospital wards.
Turn off your FOMA terminal even
when you are in an area outside
hospital wards, such as a hospital
lobby, since electronic medical
equipment may be in use nearby.
Where a medical facility has specific
instructions prohibiting the carrying
and use of mobile phones, observe
those instructions strictly.
If Auto power ON function is set to
ON, disable this function before
turning off your mobile phone.
Electromagnetic signals may affect
the operation of implanted cardiac
pacemakers and implanted
cardioverter-defibrillators.
Electromagnetic signals may affect
the operation of electronic medical
equipment.
Handling the FOMA Card
Caution
Be careful when detaching the FOMA
card (IC).
May cause injuries to your hand or
fingers.
Easy Search/Table of Contents/Precautions
17
Page 20

Handling Precautions
General Notes
Do not expose to water. FOMA terminal, battery
pack, adapters (chargers) and FOMA Card are not
waterproof. Do not use in humid or steamy areas
such as bathrooms and avoid exposing to rain and
other forms of moisture. If FOMA terminal is
carried close to skin, perspiration may cause
internal components to corrode and result in
malfunction. Note that if problem is found to be
due to moisture, handset and parts are not
covered by warranty and in some cases may be
irreparable. Even where repairs are possible,
repair charges will be incurred since damage is not
covered by warranty.
Clean only with a soft and dry cloth (such as the type
used for eyeglasses).
The surface of the handset’s LCD has a special
coating to improve the visibility of the color display.
Forceful rubbing of LCD with a dry cloth may scratch
LCD surface. Handle the handset carefully and
clean using a soft and dry cloth (such as the type
used for eyeglasses). Note also that LCD coating
may peel off or stain if moisture or soiling is left on
the surface for a long period.
Never use chemicals such as alcohol, thinners,
benzene or detergents, as these agents may erase
the printing on the handset or cause discoloration.
Occasionally clean connection terminals with a dry
cotton swab.
Unclean connection terminals may result in poor
connections and loss of power. Additionally, keep
terminal clean with a dry cloth or cotton swab to
prevent charge performance loss.
Do not place the handset near an air conditioning
vent. Condensation formed due to rapid changes in
temperature may cause internal corrosion and lead
to malfunction.
Do not leave handset in a location subject to
excessive force.
Carrying the handset in a tightly packed bag, or
sitting on the handset in your pocket may result in
damage to LCD or other internal components,
which are not covered by warranty.
Read the manuals supplied with the battery pack
and adapters (chargers) carefully.
Notes About FOMA Terminal
Using the handset close to landline phones, TVs or
radios may affect the operation of such equipment.
Move as far away as possible from such items
before use.
Keep a separate memo and note information stored
in the FOMA terminal. DoCoMo shall not be liable
for any loss of content.
Do not put the handset in back pocket and then sit
on it. Additionally, do not put handset where it may
be subjected to excessive weight or pressure, such
as the bottom of a briefcase. May cause malfunction.
Do not close FOMA terminal on strap. May damage
the handset and cause malfunction.
Do not apply thick stickers to the surface of the main
display or the surface with dial keys. May damage
the handset and cause malfunction.
Avoid using the handset in extremely high or low
temperatures. Use the FOMA terminal within the
range of a temperature between 5°C and 35°C
and a humidity between 45% and 85%.
FOMA terminal may become warm with continuous
use or during charging. This is normal and not a
malfunction.
Do not leave the camera in direct sunlight. May
cause discoloration or burn-in.
A radio frequency-preventing sheet is attached on
the back of the back cover. Do not peel off this
sheet.
Handling Battery Pack
Battery pack is a consumable product. Though
usage time varies with use, change battery if
battery level is extremely low even after fully
charged. Purchase a new battery pack for
specified handset.
Always charge the battery before the first use or
after not using battery for a long time.
The usage time for a battery depends on the
usage and deterioration of battery pack.
Charge battery in areas where ambient
temperature is between 5°C and 35°C.
Store in a cool, well ventilated location that is not
exposed to direct sunlight. If the battery pack is not
be used for a long time, empty the battery, remove
it from the FOMA terminal, place in a plastic bag in
which the battery pack is contained or other
container and store.
Depending on usage, the battery may swell as it
approaches the end of its service life but this will
not cause problems.
Easy Search/Table of Contents/Precautions
18
Page 21

Handling the Adapters
(Chargers)
Adapters (chargers) may become warm during
charging. This is normal and not a malfunction.
Charge battery in areas where ambient
temperature is between 5°C and 35°C.
Do not charge battery pack in the following
locations:
Close to landline phones, TVs or radios, etc.
Areas with high humidity or dust, or in areas
exposed to strong vibrations
Do not use DC adapter to charge battery when the
car engine is not running. May cause car battery to
run down.
When using a power outlet with a feature to
prevent the plug from being removed accidentally,
follow instructions in the outlet user’s guide.
Do not subject to strong force or impacts. Also, do
not disfigure the charger terminals or the terminal
guides. May cause a malfunction.
Notes About Cameras
If the FOMA terminal is used in a manner, which
creates a serious public nuisance, the owner may
be subject to punishment under legal and/or
regulatory guidelines (such as nuisance
prevention ordinance).
Please respect the privacy of others
when using a camera-enabled mobile
t
phone to shoot and send images.
FeliCa Reader/Writer
The FeliCa reader/writer function in the FOMA
terminal uses weak electric waves in the handling
of which does not require a license of radio station.
The frequency in use is the 13.56 MHz band.
When another reader/writer is being used nearby,
keep enough distance from it. Make sure that
there is no radio station using the same frequency
band in the nearby area.
Notes About FOMA Card
Avoid using in extremely high or low temperatures.
Always keep IC area clean.
FOMA card may become warm during use. This is
not a malfunction.
Customer is responsible for malfunctions arising
from inserting FOMA card into a different IC card
reader/writer.
To protect the environment, please take any
unnecessary FOMA cards to your local DoCoMo
Shop or retailer.
Keep a separate memo and note information
stored in the FOMA card. DoCoMo shall not be
liable for any loss of data.
Clean only with a soft and dry cloth (such as the
type used for eyeglasses).
Do not damage, touch haphazardly or short-circuit
the IC. May cause data loss or malfunction.
Do not drop or otherwise subject the FOMA card
to severe impact. May cause a malfunction.
Never bend or place heavy objects on the FOMA
card. May cause a malfunction.
Do not apply unnecessary force when removing
the FOMA card.
Do not apply unnecessary force when inserting
card into the FOMA terminal.
FM Transmitter
The FM transmitter function in the FOMA terminal
uses weak electric waves in the handling which
does not require a license of radio station.
The frequency in use is the 77.4 to 85.0 MHz
band. Select the frequency other than that of an
FM broadcasting station of your area. Not doing so
may affect surrounding FM radio users.
Easy Search/Table of Contents/Precautions
19
Page 22
Intellectual Property
Copyrights and Rights of Portrait
Data with third party copyrights such as text,
images, music and software that is downloaded or
acquired via Internet web pages, shot by the
FOMA terminal, or acquired from TV or other video
cannot be duplicated, altered or publicly
transmitted without rightful party’s consent. Only
duplicating, quoting, etc. for personal use is
permitted under copyright laws.
Even if for personal use, filming and recording may
be prohibited for demonstrations, performances
and exhibitions.
Also, shooting another’s image or posting
another’s image on Internet web pages without
their consent may constitute a violation of one’s
right to their image.
Registered Trademarks and
Trademarks
“FOMA”, “mova”, “ToruCa”, “PushTalk”,
“PushTalkPlus”, “mopera”, “mopera U”,
“FirstPass”, “Chara-den”, “Deco-mail”,
“Chaku-motion”, “i-motion mail”, “i-appli”,
“i-appliDX”, “i-motion”, “i-mode”, “i-Channel”,
“iD”, “DCMX”, “Short Mail”, “WORLD WING”,
“Public mode”, “DoPa”, “WORLD CALL”,
“Dual Network”, “visualnet”, “V-live”,
“Security Scan”, “musea”, “sigmarion”,
“My DoCoMo”, “OFFICEED”, “IMCS”, the “i-mode”
logo, the “FOMA” logo, the “i-appli” logo, the
“DCMX” logo, the “iD” logo are trademarks or
registered trademarks of NTT DoCoMo, Inc.
Toll-free number service name and toll-free
number logo are trademarks of NTT
Communications Corporation.
licensed from Symbian Software Ltd.
Symbian, Symbian OS and other associated
Symbian marks are all trademarks of Symbian
Software Ltd.
©1998-2007 Symbian Software Ltd. All rights
reserved.
キャッチホン
trademark of Nippon Telegraph and Telephone
Corporation.
FeliCa, which uses non-contact IC card
technology, was created by Sony Corporation.
FeliCa is a registered trademark of Sony
Corporation.
b is a registered trademark of FeliCa Networks,
Inc.
This product is equipped with NetFront Browser,
NetFront Sync Client and NetFront Browser DTV
Profile Wireless Edition by ACCESS Co., Ltd. for
an internet browser or other application software.
This product adopts Media: specifications of
ACCESS CO., Ltd. for activating broadcasting
contents.
Copyright © 1996-2007 ACCESS CO., LTD.
Easy Search/Table of Contents/Precautions
20
This product includes software
(Call Waiting) is a registered
T his product includes modules developed by the
Independent JPEG Group.
ACCESS, NetFront and Media: are trademarks or
registered trademarks of ACCESS Co., Ltd. in
Japan and other countries.
Microsoft, Windows and PowerPoint are
registered trademarks of Microsoft Corporation in
the U.S.A. and other countries. (The official name
for Windows is Microsoft
system.)
Microsoft Excel and Microsoft Word are product
names of Microsoft Corporation in the U.S.A.
Java and all Java-based trademarks and logos are
trademarks or registered trademarks of Sun
Microsystems, Inc. in the U.S.A. and other
countries.
QuickTime is a registered trademark of Apple
Computer, Inc. in the U.S.A. and other countries.
QR Code is a registered trademark of DENSO
WAVE INCORPORATED.
The microSD logo is a trademark.
Powered by JBlend Copyright
2002-2006 Aplix Corporation. All rights
reserved.
JBlend and JBlend related trademarks
are trademarks or registered trademarks
of Aplix Corporation in Japan and other countries.
Viewer, Picsel Document Viewer and the Picsel
cube logo are trademarks or registered trad emarks
of Picsel Technologies and/or its affiliates.
T his handset features LCFONT, developed by
Sharp Corporation, to make the LCD easier to
view and read. LCフォント/LCFONT and
are registered trademarks of Sharp Corporation.
“AQUOSケータイ”, “サイクロイド” and “Cycloid”
are trademarks or registered trademarks of Sharp
Corporation.
McAfee and VirusScan are registered trademarks
or trademarks of McAfee, Inc. and/or its affiliates in
the U.S.A. and other countries.
All other registered and unregistered trademarks
herein are the sole property of their respective
owners.
2006 Networks Associates Technology, Inc. All
Rights Reserved.
Gガイド, G-GUIDE, Gガイドモバ
イル, G-GUIDE MOBILE and the
G-GUIDE related logos are
registered trademarks of
Gemstar-TV Guide International, Inc. and/or its
affiliates in Japan.
Multitask is a registered trademark of NEC
Corporation.
IrSimple, IrSS or IrSimpleShot are
trademarks of Infrared Data Association
All other company names and product names are
trademarks or registered trademarks of the
respective companies.
Windows operating
Document Viewer is powered
by Picsel Technologies.
Picsel, Picsel Powered, Picsel
.
Page 23

Others
Under the MPEG-4 Visual Patent Portfolio
License, customers have licensed permission for
the following use of this product to engage in
non-profit personal use. Other uses are not
permitted.
・ Encoding MPEG-4 standard video (henceforth
referred to as MPEG-4 video).
・ Decoding an MPEG-4 video that a customer not
engaged in personal commercial activities has
encoded.
・ Decoding an MPEG-4 video obtained from a
licensed provider.
For details on other intended uses, contact MPEG
LA, LLC.
This product is licensed under the MPEG-4
Systems Patent Portfolio License for encoding in
compliance with the MPEG-4 Systems Standard.
An additional license and payment of royalties are
necessary in the following cases.
・ Data stored or replicated in physical media
which is paid for on a title by title basis.
・ Data which is paid for on a title by title basis and
is transmitted to an end user for permanent
storage and/or use.
Such additional license may be obtained from
MPEG LA, LLC. Contact MPEG LA, LLC for
additional details.
This product is licensed under the AVC patent
portfolio license for the personal and
noncommercial use of a consumer to
(i) encode video in compliance with the AVC
standard (henceforth referred to as AVC video)
and/or
(ii) decode AVC video that was encoded by a
consumer engaged in a personal and
noncommercial activity and/or was obtained from
a video provider licensed to provide AVC video.
No license is granted or shall be implied for any
other use. Additional information may be obtained
from MPEG LA, L.L.C.
See HTTP://WWW.MPEGLA.COM
This product uses the Flash
Adobe Systems Incorporated. Flash Lite and
Macromedia are trademarks or registered
trademarks of Adobe Systems Incorporated in the
U.S.A. and other countries.
Lite technology of
Licensed by QUALCOMM Incorporated under one
or more of the following United States Patents
and/or their counterparts in other nations;
4,901,307 5,490,165 5,056,109
5,504,773 5,101,501 5,506,865
5,109,390 5,511,073 5,228,054
5,535,239 5,267,261 5,544,196
5,267,262 5,568,483 5,337,338
5,600,754 5,414,796 5,657,420
5,416,797 5,659,569 5,710,784
5,778,338
T his product uses Adobe
®
Reader® from Adobe
Systems Inc.
Copyright 1984-2007 Adobe Systems
Incorporated. All rights reserved.
Adobe and Adobe Reader are trademarks or
registered trademarks of Adobe Systems
Incorporated in the U.S.A. and other countries.
CP8 PATENT
Windows
Windows
This manual refers to Windows
This manual refers to Windows
®
2000 Professional is an abbreviation of
®
Microsoft
system.
Windows
Microsoft
Windows® 2000 Professional operat ing
®
XP is an abbreviation of Microsoft®
®
XP Professional operating system or
®
Windows® XP Home Edition operating
system.
Professional as Windows 2000.
and Windows
®
XP Home Edition as Windows XP.
®
2000
®
XP Professional
Easy Search/Table of Contents/Precautions
21
Page 24
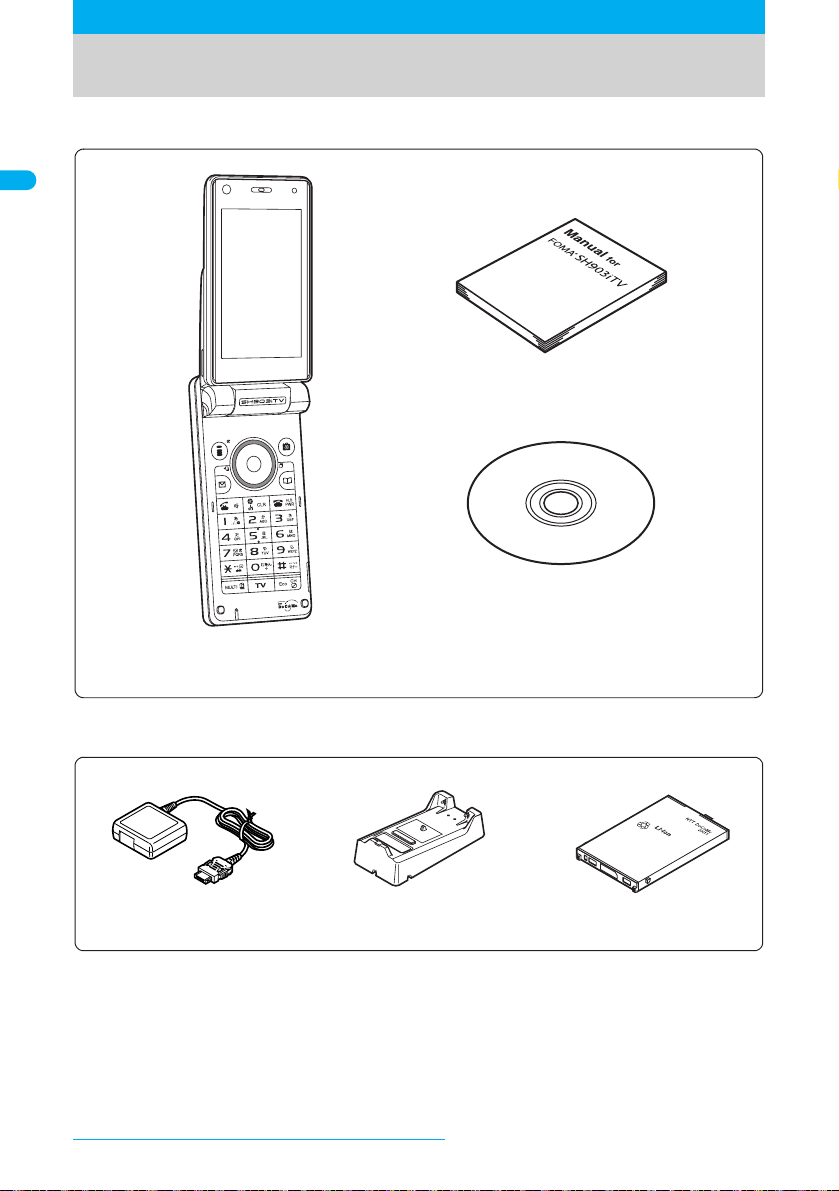
Standard Parts Packaged with Unit and Main Optional Parts
J Standard package
FOMA SH903iTV manual (this manual)
※Quick manual can be found on P. 476.
FOMA SH903iTV CD-ROM
FOMA SH903iTV terminal
(includes warranty and back cover SH14)
※ “Manual for Data Communication”,
“Kuten Code List”
in the PDF format is contained.
J Main optional parts
FOMA AC Adapter 01
(includes warranty and user’s guide)
Refer to P. 437 for details on other optional parts.
Easy Search/Table of Contents/Precautions
22
Desktop holder SH13
(includes user’s guide)
Battery pack SH11
(includes user’s guide )
Page 25

Before Using the FOMA
Terminal
Component Names and Functions. . . . . . . . . . . . . . . . . . . . . . . . . . . . . . . . . . . . . . . . . . . .24
Viewing the Display . . . . . . . . . . . . . . . . . . . . . . . . . . . . . . . . . . . . . . . . . . . . . . . . . . . . . . .28
Menu Selections. . . . . . . . . . . . . . . . . . . . . . . . . . . . . . . . . . . . . . . . . . . . . . . . . . . . . . . . . .32
Displaying the Supportbook . . . . . . . . . . . . . . . . . . . . . . . . . . . . . . . . . . . . .<Supportbook>35
Using a FOMA Card. . . . . . . . . . . . . . . . . . . . . . . . . . . . . . . . . . . . . . . . . . . <FOMA Card>36
Inserting and Removing the Battery Pack . . . . . . . . . . . . . . . . . . . . . . . . . . . . . . . . . . . . . . 39
Charging the Mobile Phone . . . . . . . . . . . . . . . . . . . . . . . . . . . . . . . . . . . . . . . . . . . . . . . . .40
How to Check the Battery Level. . . . . . . . . . . . . . . . . . . . . . . . . . . . . . . . . <Battery Level>43
Turning the Power On and Off . . . . . . . . . . . . . . . . . . . . . . . . . . . . . . . . <Power ON/OFF>43
Switching Display to English . . . . . . . . . . . . . . . . . . . . . . . . . . . . . . . . <Select Language>44
Making the Initial Settings . . . . . . . . . . . . . . . . . . . . . . . . . . . . . . . . . . . . .<Initial Settings>45
Setting the Date and Time . . . . . . . . . . . . . . . . . . . . . . . . . . . . . . . . . . . . . <Date Settings>45
Sending Your Own Phone Number to the Other Party. . . . . . . . . . . . . . .<Notify Caller ID>46
Checking Your Phone Number. . . . . . . . . . . . . . . . . . . . . . . . . . . . . . . . . . <Own Number>46
23
Page 26
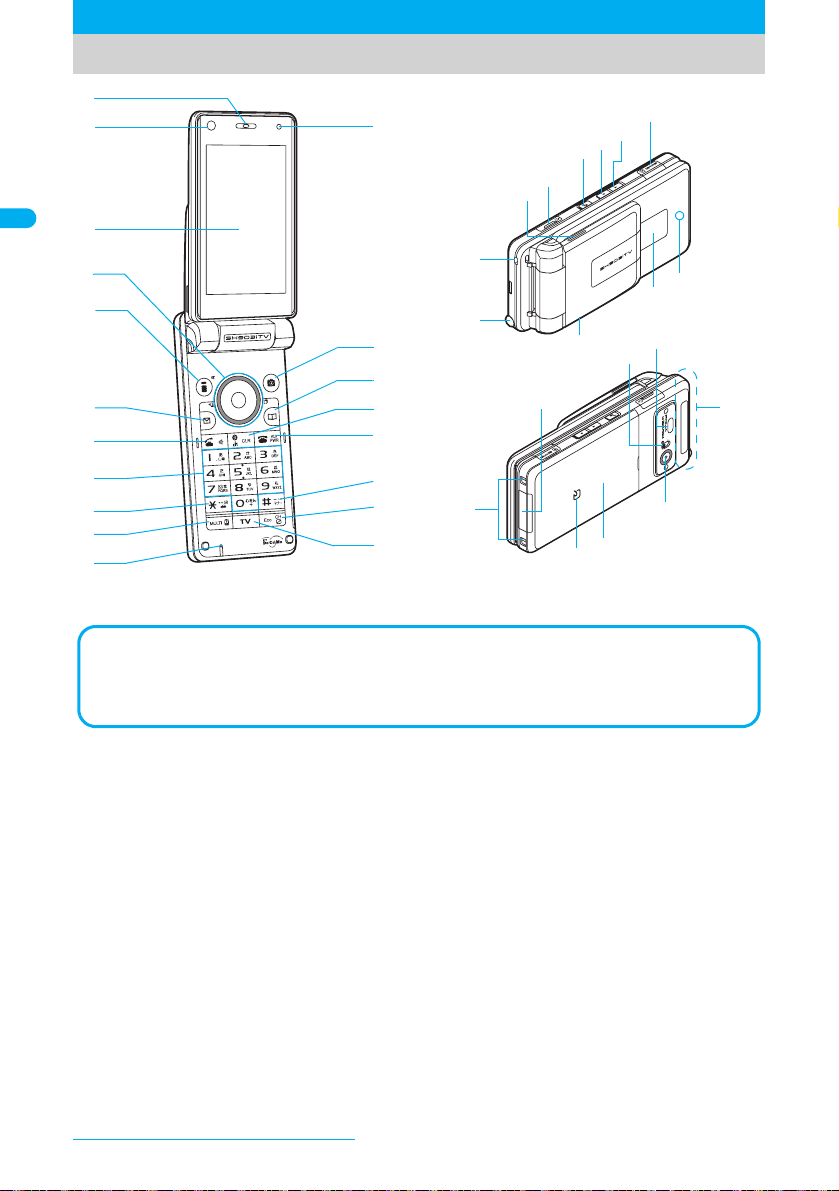
Component Names and Functions
1
2
c
k
m
l
n
p
o
3
4
5
d
t
s
k
v
r
q
w
e
6
7
8
9
a
f
g
h
i
j
>
b
※ Key illustrations are examples and may look different from actual keys.
u
<
y
z
The brightness sensor area
When Brightness of Power Saver (nP. 130, P. 132) is set to Automatic, the sensor detects
the light of the surrounding area and automatically adjusts the display brightness and keypad
backlight. Do not cover the sensor area (c) with a sticker. May interfere with the sensor.
x
1
Earpiece
Emits the other party’s voice.
When in stand-by, listen to Record
message/Voice memo using the earpiece.
2
Sub camera
Use to shoot own image (nP. 168) or to
send video shot during a Videophone call
n
P. 48) to the other party.
(
3
Main display (nP. 28)
4
Multi-guide key (four-way key w and
OK key
t
) (nP. 27)
Press to display and select Top menu,
Redial, Received calls, Shortcut menu,
Active marker (
these functions.
In stand-by, press t for 1+ seconds to set
or cancel Multi easy lock (
disable, terminal security code is required.
Before Using the FOMA Terminal
24
n
P. 365) as well as use
n
P. 152). To
In stand-by, press r for 1+ seconds to set
or cancel IC card lock (
disable, terminal security code is required.
In stand-by, press u for 1+ seconds to
adjust earpiece volume (
5
i-mode/Guidance key i (,)
Press to make or receive a Videophone
n
n
P. 49, P. 63).
P. 27).
a
ppli screen (nP. 248).
call (
Press to use i-mode (nP. 182).
Press to execute the function displayed at
the lower left of the display in guid an c e
(
In stand-by, press for 1+ seconds to
display the i-
n
P. 270). To
n
P. 119).
Page 27

6
Mail/Guidance key
Press to use mail functions (nP. 214).
In stand-by, press for 1+ seconds to
display a new mail message screen
n
P. 214).
(
Press to execute the function displayed at
the lower left of the display in guidance
n
P. 27).
(
Press to switch between upper and lower
case when entering text (
Press for 1+ seconds in text input screen to
display insert phrase screen (
Press twice to check new messages
n
P. 201, P. 225).
(
7
Start/Hands-free key
Press to make or receive a voice call.
Press for 1+ seconds during a voice call to
turn Hands-free on and off (
Press during a Videophone call to turn
Hands-free on and off (
Press during a PushTalk transmission to
turn Hands-free on and off (
8
Dial/Text entry keys 1 to 9,
Press to enter a phone number
n
P. 49).
(
Press to enter text (nP. 408).
9 b
/Line break/Public mode (Drive mode)
key
*
Press to enter an asterisk (b), dakuten
゛
), handakuten (゜) or a line break
(
n
P. 409).
(
In stand-by, press for 1+ seconds to set or
cancel Public mode (Drive mode)
n
P. 68).
(
a
Multi/
Supportbook key
To activate Multi Assistant: Press while
running an application to use the
phonebook, mail or other useful functions
n
P. 364).
(
To view Supportbook: Press in stand-by to
view Supportbook (preset) (
To save a shortcut in the S h ortc u t m e nu :
Press for 1+ seconds when
screen to save a shortcut (
b
Microphone
Sends out your own voice.
c
Brightness sensor (nP. 130, P. 132)
The sensor detects the light of the
surrounding area and automatically adjusts
the display brightness and key backlight ON/
OFF.
d
Camera/Guidance key
Press to use Camera mode (nP. 166).
Press to execute the function displayed at
the lower right of the display in guidance
n
P. 27).
(
m
s
n
C
n
$
P. 411).
n
n
P. 80).
n
n
m
n
P. 51).
P. 86).
0
P. 35).
is on the
P. 380).
P. 412).
In stand-by, press for 1+ seconds to
display Data box (
P. 311, P. 354).
e
Phonebook/Guidance key
Press to use the phonebook (nP. 96).
In stand-by, press for 1+ seconds to
display the phonebook entry screen
n
P. 98, P. 103).
(
Press to execute the function displayed at
the lower right of the display in guidance
n
P. 27).
(
Press to change the type of text to be
entered (
In text input screen, press for 1+ seconds
to use Internet-related phrases
(
f
i-Channel/Clear/i-appli stand-by key c
(
J
Press to show the channel list
(
Use to delete phone numbers and text
(
Press to return to the previous menu or page.
Press when i-appli stand-by is set and
i-
g
Power/End/On hold key
Press for 2+ seconds to turn the po w er o n
or off (
Press to end a call or i-mode, or to put calls
on hold (
Press to play or pause when animated GIF
or Flash movie is set as the stand-by
display. Press while setting i-motion to play
or stop (
h
#/Manner mode/Camera mode key
Press to enter a (#), prolonged sound
(
mark (!), question mark (?), or chuten (
In stand-by, press for 1+ seconds to set or
disable Manner mode (
Press to switch between the main camera
and the sub camera while shooting images
(
i
Power saver (Eco)/Private filter/Channel
key
In stand-by, press to set to Pow e r sa v e r
(Eco). When Power saver (Eco) is already
set, the Power saver set screen appears
(
Press for 1+ seconds to enable or disable
Private filter (
Channels are switched in order while
watching One Seg on Multi Window
(
n
n
P. 412).
)
n
P. 209).
n
P. 410).
a
ppli starts (nP. 257).
n
n
n
ー), touten (、), kuten (。), exclamation
n
P. 168, P. 171).
y
n
P. 130).
n
P. 276).
P. 410).
P. 43).
P. 67).
P. 126).
n
n
P. 296, P. 304,
H
n
P. 142).
a
P. 123).
#
・
).
Before Using the FOMA Terminal
Continued on next page??
25
Page 28
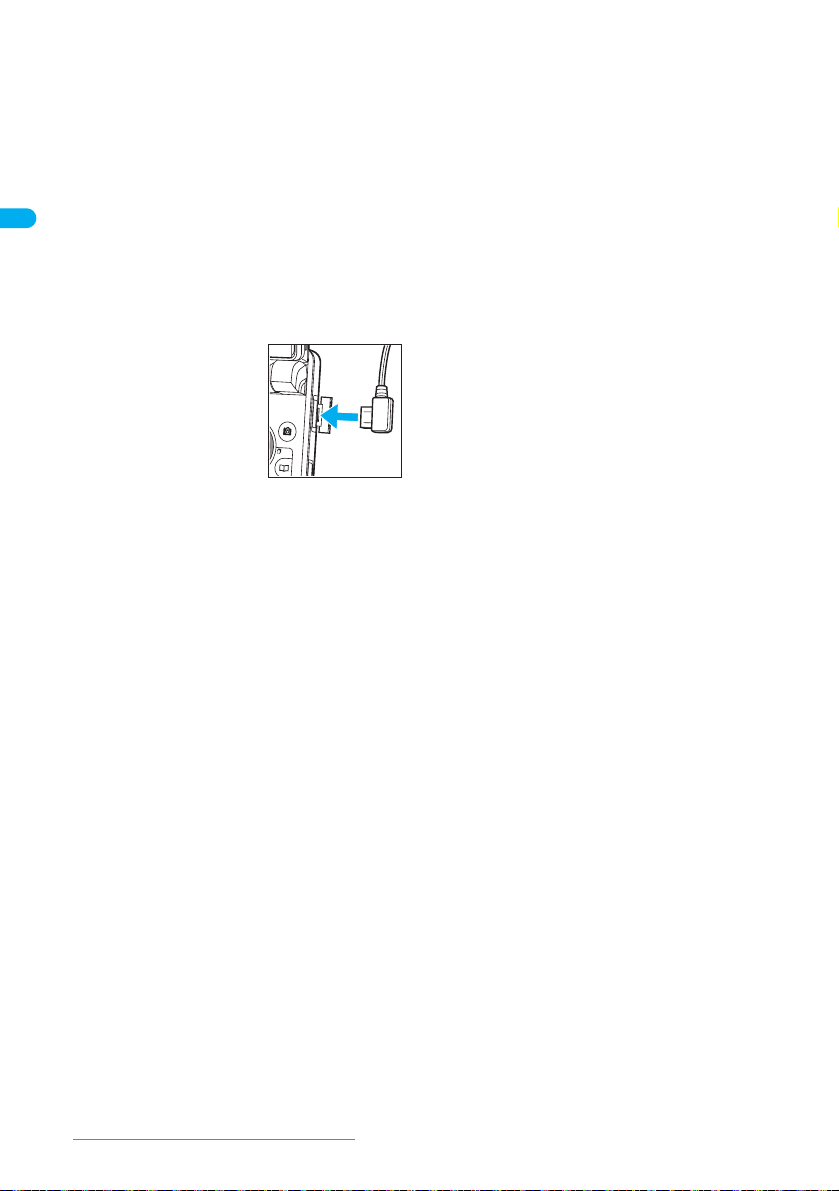
j
TV key
x
Press to activate One Seg (nP. 275).
In stand-by, press for 1+ seconds to
display One Seg menu screen
n
P. 274).
(
When One Seg and another function are
being used simultaneously with Multi
Assistant, press to switch their displays
n
P. 278).
(
k
Speakers
Emit ring tones and other sounds.
Emit the other party’s voice during
hands-free voice/Videophone/PushTalk
calls.
l
Earphone/Microphone terminal
(
n
P. 386)
Connect a flat-plug
earphone/microphone
with switch (sold
separately).
When using an
earphone plug adapter
(sold separately), an
earphone/microphone
with switch can also be used.
m
PushTalk key & (q)
Press to use the PushTalk phonebook
n
P. 89).
(
Press to send PushTalk transmissions.
Hold key to talk during PushTalk
transmission (
Press for 1+ seconds to enable/disable the
side key operation (
n
Volume UP key
Turn the earpiece volume up during
PushTalk transmission with the FOMA
terminal closed (
Turn the volume up while watching One
Seg (
Press to show i-Channel ticker on the sub
display with the FOMA terminal closed.
Turn the volume up during music playback
with the FOMA terminal close d. P res s fo r
1+ seconds to play the previous song/to
return to the beginning of song
n
(
o
Volume DOWN key
Turn the earpiece volume down during
PushTalk transmission with the FOMA
terminal closed (
Turn the volume down while watching One
Seg (
Turn the volume down during music
playback with the FOMA terminal closed.
Press for 1+ seconds to play the next song
n
(
n
P. 86).
:
n
n
P. 276).
P. 355, P. 359).
n
n
P. 276).
P. 355, P. 359).
n
P. 67).
+
P. 67).
P. 153).
p
microSD Memory Card slot (nP. 318)
Insert a micr o SD Memory Card.
q
Called LED/Charging LED/Camera LED
Flashes when there is an incoming call
n
P. 138).
(
Stays lit while charging (nP. 40).
Lights when the camera is a c tiva ted or
during shooting (
P. 169).
r
Sub display (nP. 28)
s
TV antenna (nP. 273)
Receive One Seg an d u s e th e FM transmitter
function.
t
Strap ring
Attach a commercially available strap with the
FOMA terminal closed .
u
External connector terminal
Terminal for connecting external devices,
such as an AC adapter, a DC adapter
n
P. 41), or a FOMA USB cable (sold
(
separately).
v
Closeup lever (nP. 169)
Switches between the closeup mode and the
normal mode.
w
Infrared port (nP. 334)
Use for the Ir exchange and Ir remote control.
x
FOMA antenna
An antenna is built in.
y
Main camera
Use to shoot an image of your surroundings
(nP. 162) or send a video of your
surroundings shot during a Videophone call
n
P. 48) to the other party.
(
z
Back cover (nP. 39)
<
FeliCa mark b (nP. 263)
The IC card is included (The IC c ard can n ot
be removed).
Use Osaifu-Keitai holding the FeliCa mark up
to the reader/writer (external device).
>
Charger terminal (nP. 42)
Terminal for recharging with the de s k top
holder.
n
P. 166, P. 167,
Before Using the FOMA Terminal
26
Page 29
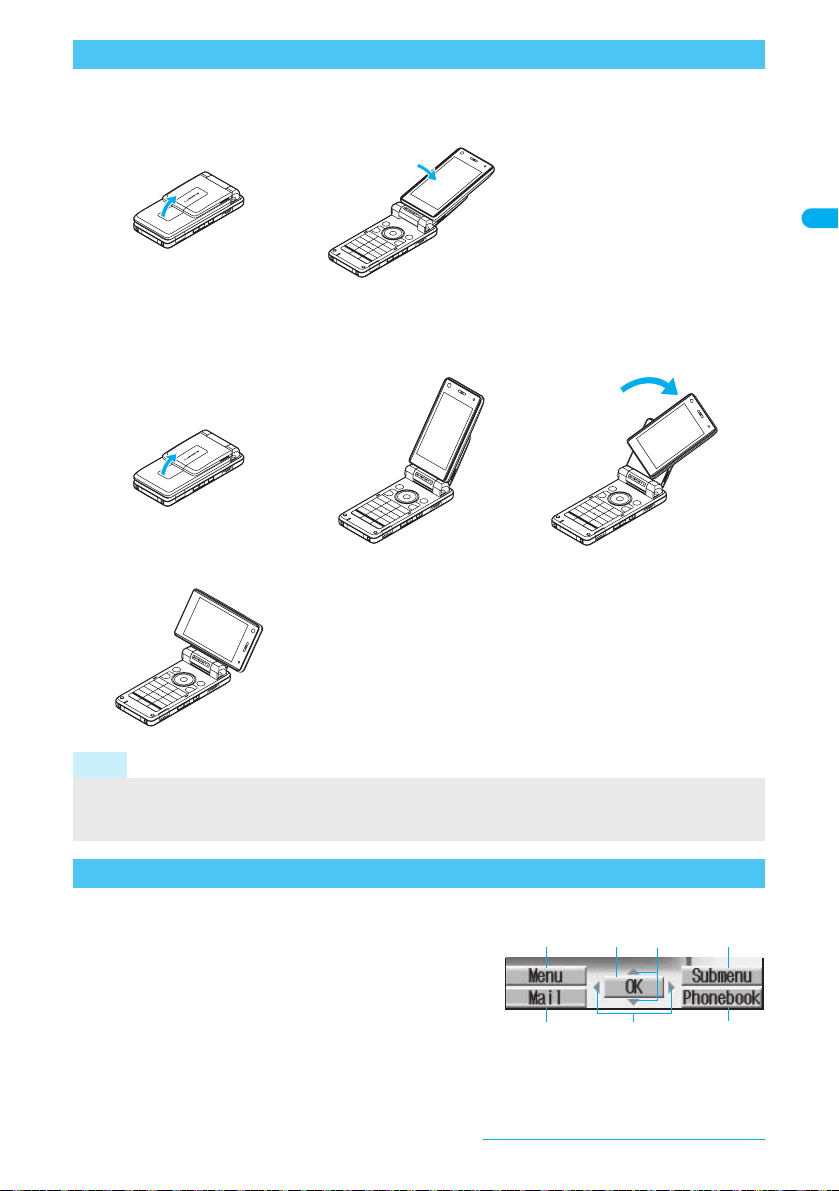
How to Open the FOMA Terminal
To use the FOMA terminal, open it (normal position) or use it in Cycloid position.
When carrying, keeping the FOMA terminal closed as shown in the diagram for step 1 is recommended.
J Normal position
1
Open carefully with both
hands.
J Cycloid position
In screens such as stand-by, set to Cycloid position to automatically activate One Seg.
1
Open carefully with both
hands.
2
Push the display back as far
as it will go.
2
Open the display until it
stops.
3
Rotate the display 90° to the
right.
4
Note
When rotating the FOMA terminal display, do not rotate in the opposite direction or further than 90°.
When talking in the Cycloid position, use a flat-plug earphone/microphone with switch (sold separately) or
use Hands-free. When using the earpiece to talk, make sure to switch to the normal position.
How to Use the Multi-guide Key and Guidance Key
J Multi-guide key
Use the Multi-guide key (four-way key w and OK key t)
to select and set menus that are shown. Move the cursor
with w and set the selection using t.
J Guidance keys
Use keys allotted to operate menu items of operation
guidance that appear in the lower part of the display
(Allotted functions differ depending on the situation).
ituC
m
Before Using the FOMA Terminal
v
a
27
Page 30
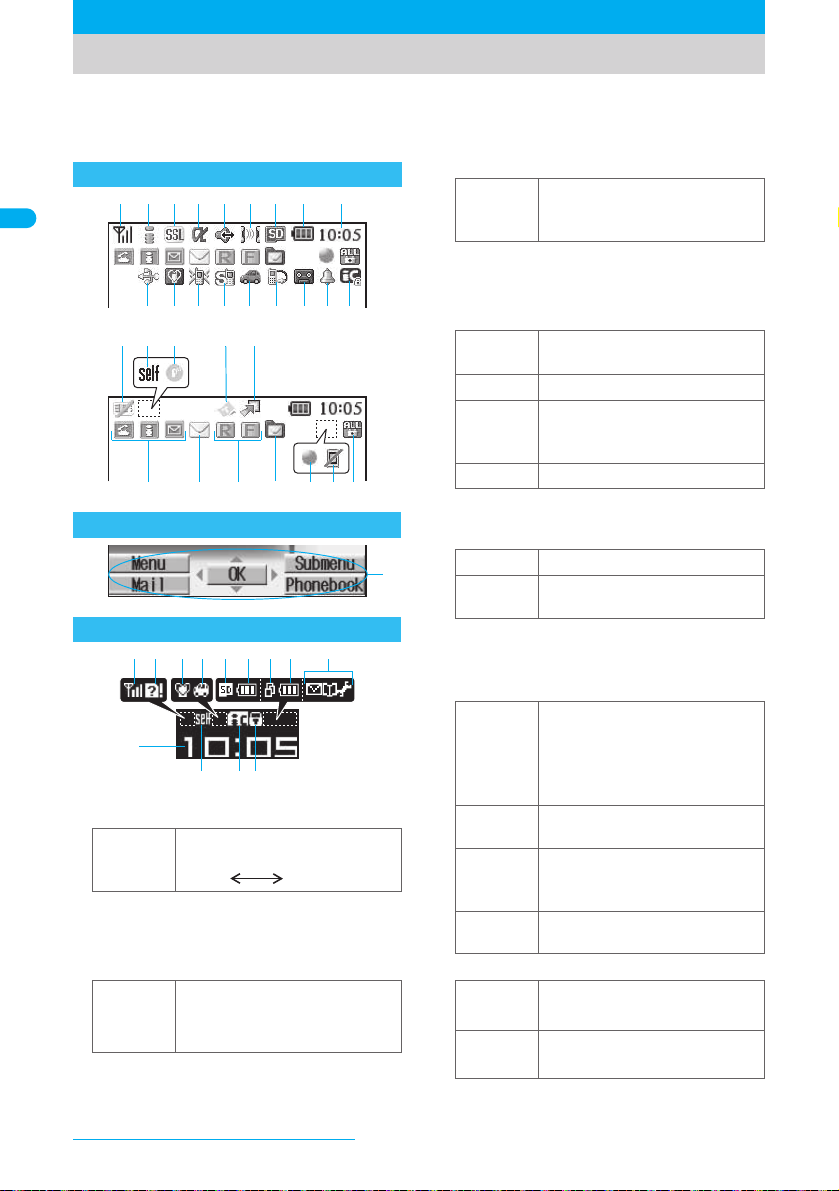
Viewing the Display
The display allows you to check the current status after the power is turned on or while
setting up functions (The main display is described first and the sub display next).
The display lights for a set period of time when a key is pressed. The default setting is 10
seconds (nP. 130).
3
Icons that appear in the upper part of the display
321456789
i
jk l
Icons that appear in the lower part of the display
Icons that appear in the sub display
hj1e78w8u
9
1
Signal status
Indication of the signal strength
]/a
When A (Out of service area) appears, the
handset is outside the service area or in a
place with no signal. Signal icon can be
changed (nP. 133).
2
i-mode/Full Browser (nP. 182, P. 289)
7= A
A B
N
] n op
Strong Weak
Indicates i-mode or Full Browser
status
O
edf
mn
t
oka
bcgh
a
rsu
q op
v
SSL (nP. 183)
SSL compatible sites are viewed
SSL compatible Internet web
o
pages are viewed
When o appears while using Multi Assistant,
function such as i-mode, Full Browser, i-appli
or Software update is being used with Multi
Assistant.
4i-a
ppli (nP. 248)
i-appli is running
G
i-
a
ppli stand-by is running
i-appli stand-by is set
N
i-appliDX is being activated
i-
a
I
Q
* Indicates that an i-appli is set as the stand-by
display, but cannot be used.
5
Hands-free (nP. 51, P. 79)
;
(red)
;
(green)
When the Hands-free icon appears, the
ToruCa icon does not appear even if there
is unread ToruCa.
6
Ir exchange/External device
J
t
(green)
t
(red)
u
7
microSD Memory Card (nP. 318)
(gray)
^
m
(pink)
^
l
ppliDX stand-by is being
activated
i-appliDX stand-by is set
Hands-free active call
Connected to Hands-free
compatible device
Data is communicated with
another device using the Ir
exchange function (
Data is sent using the Ir remote
n
control (
Connected to an external device
and transmitting packets
Connected to an external device
and sending/receiving pack et
data
Connected to an external device
and transmitting 64K data
/
microSD Memory Card is
inserted
/
Data on microSD Memory Card
is being viewed
P. 336)
*
n
*
P. 332)
Before Using the FOMA Terminal
28
Page 31

8
Battery level/Charging (nP. 43)
"/b
{/k
Signal icon can be changed (nP. 133).
9
Clock display (nP. 45)
Indicates the time that is set.
a
IC card lock (nP. 270)
Y/c
b
Alarm (Alarm/Schedule/ToDo list/
Reception/Recording) (
Battery level
Charging
IC card is locked
n
P. 281,
P. 369, P. 373, P. 378)
Schedule alarm is set*
ToDo alarm is set*
Alarm is set
\
Reception reserve alarm is set*
Recording reserve alarm is set*
* Appears only when an Alarm is set for that day.
c
Record message (nP. 71)
Record message is set
]
When there are messages, D to P
appears, indicating the total number of both
types of messages. When there are three
Record messages (voice calls) and two
Record messages (Videophone), k appears.
d
Earphone/microphone connection
(
n
P. 386)
A flat-plug earphone/
microphone with switch (sold
separately) is connected (when
s
Auto answer for voice/
Videophone calls is set)
Auto answer for PushT alk is set
Appears when Auto answer for PushTalk is
set even if earphone/microphone with switch
is not connected.
e
Public mode (Drive mode) (nP. 68)
_/d
f
Silent (nP. 118)
g
Vibrator (nP. 121)
h
Manner mode (nP. 123)
Z/f
Public mode (Drive mode) is set
The phone ring volume
[
set
Vibration mode is set
b
Manner mode is set
Silent
i
USB mode (nP. 326)
FOMA USB cable (sold
x
separately) is connected
j
FOMA card error
Appears when FOMA card is
malfunctioning or not inserted
Appears when a card other than
the FOMA card is inserted
Self mode is set
During PushTalk transmission
a
Unread ToruCa
Q
Appears when the function can
m
be added to the Shortcut m e nu
Secret mode
Secret data is being edited
S
Keypad dial lock
T
All locked
Function lock is set
Keypad dial lock and Function
lock are set
Secret mode and Function lock
or Keypad dial lock are set
Key guard is set
Private filter is set
P
One Seg is being recorded
a
is
R/j
B/h
k
Self mode (nP. 150)
g/g
Appears when the handset cannot make/
receive calls or PushTalk, send/receive
i-mode mail or SMS, use i-mode functions or
use Ir exchange.
l
PushTalk (nP. 85)
m
ToruCa (nP. 266)
n
Shortcut menu (nP. 380)
o
Restriction indicator (nP. 148, P. 154)
R/i
U/e
V/e
W/e
K/e
X/e
p
Private filter (nP. 142)
q
One Seg being recorded (nP. 280,
P. 284)
When the icon indicating that One Seg is
being recorded appears, the Private filter icon
does not appear even if it is set to ON.
r Storage status of i-mode center
(n
P. 223)
Mail being held at the center
W
Mail being held at the center full
X
Before Using the FOMA Terminal
Continued on next page??
29
Page 32

s
Message R/F icon (nP. 200)
A
(green) B (green)
A
(yellow) B (yellow)
GISTz8
<9>07!
The status may not always be indicated even
if messages are held at center.
t
i-mode mail/SMS received (nP. 223)
U
(green)
U
(red)
hH
[
(red font)
[
(blue font)
u
Multitask (nP. 364)
Indicates functions that are runn in g.
When two or more func tion s are running,
icons also appear on the sub display.
Four or more
applications
g
are running
Videophone
*
Voice call
h
PushTalk/
PushTalk
k
phonebook
Modem
transmission
(appears
#
during data
transmission)
Software
i
update
Receive Ir data
j
i-appli
l
i-mode
m
Full Browser
n
i-Channel
o
Mail/SMS/
Check new
p
message
Mail/SMS being
q
composed
Indicates the
reception status of
the Message R/F
Indicates the
storage status of
the Message R/F
Indicates the status of the
i-mode mail/SMS receptio n
Indicates the status of the
memory to store received
mail
Phonebook
t
Camera
2
(still picture)
Camera (movie)
3
Camera (OCR)
4
Bar code
5
reader
Voice recorder
v
Schedule
w
ToDo
x
Text memo
y
Calculator
z
BookReader
6
ToruCa
>
Alarm
{
Timer
8
microSD
}
manager
General
9
settings
Record
message/Voice
0
memo
Show redial
!
One Seg
f
Message R/F
r
SD-Audio
s
Data box
u
v
Operation guidance
Indicates the functions that ca n b e us e d w ith
keys such as
w
In operating
When the FOMA terminal is closed with
displays other than the stand-by display
shown on the main display,
the sub display. When the stand-by display is
shown on the main display, the icon
disappear.
w
i, m, t, w, C
Other than the stand-by display
are shown on the main display
Document
7
Viewer
Received calls
|
Own number
"
and a.
w
may appear on
J Other icons
Refer to respective pages for information on
icons for the functions shown below.
Videophone (nP. 48)
Redial/Received calls (nP. 53 to P. 55)
Phonebook (nP. 97 to P. 99)
Camera mode (nP. 164 to P. 166)
Message R/F (nP. 200 to P. 202)
Mail/SMS (nP. 229 to P. 231)
Received/Sent message list/details screen
(nP. 235)
ToruCa (nP. 266)
My picture of Data box (nP. 297 to P. 298)
i-motion of Data box (nP. 307 to P. 308)
Melody of Data box (nP. 317)
One Seg (nP. 276)
Note
microSD Memory Card is referred to as microSD
or SD on the FOMA terminal (nP. 318).
Some of the screen shots in this manual have
been modified or abbreviated.
The display for the FOMA terminal is
manufactured using high-precision technology,
but it may occasionally contain dots that fail to
light or that remain permanently lit. This is not a
malfunction.
The display time of the sub display follows the
Display light time.
Before Using the FOMA Terminal
30
Page 33

Checking Notices with Stock Icon
J
Display messages such as xx missed call(s) or xx mail message(s) and stock icons when you
miss a call or have a new mail. In stand-by, select stock icons to check notice details.
Stock icon
Icon Message Details
Appears when an incoming call is missed.
Received calls list appears (nP. 71).
Appears when a new i-mode mail or SMS is
received.
Inbox folder list appears (nP. 223).
Appears when new ToruCa is received.
ToruCa list appears (nP. 266).
Appears when a new message is recorded at the
Voice Mail Service center.
The Voice Mail Service message confirmation
screen appears (nP. 393).
Appears when there is a new Recorded message.
Record message list appears and the message can
be played (nP. 74).
Message
Number of entries
Stock icon
xx missed call(s)
B
xx mail message(s)
C
xx new ToruCa(s)
D
xx voice mail(s)
E
xx message(s)
xx V.phone
F
message(s)
Top menu Top menu appears (nP. 33).
G
When a stock icon appears in stand-by, press t.
1
When Zoom menu is selected, the displayed stock icon messages are partly
changed.
Stock icons do not appear when playing i-motion set to stand-by or running
i-appli in stand-by.
Select a stock icon with u and press t.
2
Check notice details.
After the details are checked, the stock icon and message disappear.
Switching Between Displays
When Calendar is set, press H in stand-by to switch between the stand-by and the calendar
(nP. 126).
H
Stand-by Calendar
(2 months down)
When the calendar is set to 1 month (Large), icons
appear to the right of dates with schedule entries.
Before Using the FOMA Terminal
31
Page 34

Menu Selections
Functions are set or registered after a menu appears.
Menus can be displayed using the following methods.
Retrieve a function by entering a function number (nP.32).
Select a function starting from the Top menu (nP. 33).
Select a function from the Shortcut menu (nP. 380).
Select a frequently used function displayed in large font (Zoom menu) (nP. 34).
Select a function from the Submenu shown in guidance (nP. 35).
This manual explains how to select menus based on the entry of function numbers.
In the Top menu, the Shortcut menu, or t he Zoom m enu, press i [Menu] to switch menus. To show the menu
previously used, press t in stand-by.
If G (MENU) and any of B, C, D, E, or F appear in stand-by, press t, select G (MENU) with u and
press t.
To reselect a function, press c and the previous screen reappears.
Retrieving a Function by Entering a Function Number
Functions can be retrieved quickly by entering a function number.
The first numbers in the function numbers are 1 through 8 for the setting menus, 91 for the Data
box menu, 92 for the LifeKit and 93 for the Media tool menu.
Functions cannot be retrieved by entering function numbers from the Shortcut menu or the Zoom menu.
In stand-by, press t and enter function numbers. Select a function using u and press t.
Example: When retrieving My picture(phone) using function number 911 to view the still
pictures in Camera
t911
Stand-by
Before Using the FOMA Terminal
32
When My picture(phone) appears
ut
When Camera appears
Page 35

Selecting Functions from the Top Menu
Use or set up functions from menu categorized under nine icons.
Refer to P. 418 to P. 425 when selecting menu and retrieving functions.
Icons can be changed (Icon image settings nP. 134).
In stand-by, press t, select a menu or an icon using w and press t. Select a function using u
and press t.
Example: When retrieving My picture(phone) from the Top menu to view the still pictures in
Camera
t
Stand-by When Data box appears
ut
When My picture(phone) appears When Camera appears
Note
Images on Top menu, i-mode menu or Mail menu screen can be changed (nP. 134, P. 136).
When Top menu appears
ut
wt
Before Using the FOMA Terminal
33
Page 36

Selecting a Function from the Zoom Menu <Zoom Menu>
The Zoom menu displays frequently used functions enlarged. Use the Zoom menu to perform
basic functions using an enlarged character display.
At the time of purchase, press t in stand-by and press i [Menu] twice to show the Zoom menu.
Select a function using u and press t.
Menu Function Screen
View
phonebook
Received calls
Record
Phone
message
Add
phonebook
Own phone
No
Compose
msg
Receive msg
Mail
All rcvd msg Inbox
All sent msg Outbox Text memo Text memo list P. 385
All unsent msg
7Menu iMenu P. 182
All bookmarks
i-mode
Screen memos
Last URL Last URL screen P. 183
Shoot picture
View picture
Camera
func
Shoot movie
View movie
Barcode reader
When Zoom menu is selected, press i, m and a in stand-by to show i-mode menu, Mail menu and Search
phonebook in Zoom menu.
Search phonebook P. 107
Display one item P. 54
Record/Play/
Function lock
selection screen
Phonebook entry
screen
Own number screen P. 46
Compose message
screen
Check new
messages
Unsent messages
Bookmark list P. 189
Screen memo list P. 191
Still picture shooting
screen
My picture (phone)
folder list of Data box
Movie shooting
screen
i-motion (phone)
folder list of Data box
Bar code reader P. 176
Page
P. 74
P. 102
P. 214
P. 225 BookReader
P. 229
to
P. 231
P. 167
P. 296
P. 169
P. 304
Menu Function Screen
Ring tone
Stand-by
Settings
disp
Talk time/cost
Voice Mail
VoiceRec Voice recorder P. 338
Schedule Calendar P. 371
Calculator Calculator P. 383
Useful
func
Alarm
Ring volume/Ring
tone/Mail ring
volume/Mail ring tone
selection screen
Stand-by display
setting screen
Talk time/cost
confirmation screen
Voice Mail settings
screen
BookReader folder
list
Alarm setting screen
Page
P. 116
P. 118Redial Display one item P. 53
P. 125
P. 384
P. 392
P. 346
P. 369
tii ut
Zoom menuStand-by When Mail is selected
When Top menu appears in the operation guidance, press i to show Top menu.
Press C [Support] in Zoom menu to show Supportbook.
Before Using the FOMA Terminal
34
Page 37

Selecting Functions from the Submenu
When Submenu appears in the operation guidance, press C to show the functions (Submenu)
that can be used in that screen.
Scroll through multiple pages in the Submenu with v.
This manual explains how to select Submenus based on the entry of function numbers.
However, some Submenus do not have function numbers. In such ca ses, select the function using u
and press
Example: When switching the image list to 16-part
t
.
1 or
Cr
ut
When My Picture
setting is selected
1
or
ut
When Switch view
mode is selected
Submenu
Unavailable items
cannot be selected.
2 or
ut
When 16-part is selected
Supportbook
Displaying the Supportbook
Supportbook (preset) is a simple operation guide on the FOMA terminal
that uses BookReader. Use this function when unsure of operations
(nP. 346).
For example, when composing a message with Multi Assistant, press $
to use Supportbook (preset) (nP. 364).
Useful tips and functions are explained to allow for rapid comprehension.
Directly start functions that were looked up in Supportbook.
Example: When checking own address
In stand-by, press $, select A メール (Mail) and press t.
1
Alternatively, press C [Support] in the Zoom menu to show Supportbook.
Before Using the FOMA Terminal
35
Continued on next page??
Page 38

Select A
2
Details screen
自分のアドレス確認
A description appears below the title.
(Check your own address) and press t.
Related Operations
Start functions from Supportbook
In the Supportbook details screen, select the function to start ? t ? Yes ? t.
Note
Functions cannot be started from Supportbook when functions other than Supportbook are used simultaneously.
FOMA Card
Using a FOMA Card
A FOMA card is an IC card that records personal information, such as phone numbers. A
FOMA card can store phonebook data and SMS. By switching FOMA cards, multiple FOMA
terminals can be used for different purposes as needed.
If a FOMA card is not inserted, voice/Videophone calls, PushTalk transmission, i-mode, i-Channel, i-mode mail
and SMS transmission, Message R/F reception and data transmission are not available on the FOMA terminal.
In addition, One Seg cannot be watched.
Inserting and Removing a FOMA Card
※ Refer to step 1 of “Turning the Power Off” on P. 44 to turn off the power, position the back facing upwards and
remove the battery pack. Then insert or remove the FOMA card.
J Inserting
Close and hold the FOMA terminal with your both hands when inserting the FOMA card.
Notch
1
Hold the FOMA card with the
1
IC facing down and insert the
FOMA card as shown on the
left (1).
Push the FOMA card all the way in 2.
Notch
IC (gold)
Before Using the FOMA Terminal
36
2
Page 39

J Removing
Close and hold the FOMA terminal with your both hands when removing the FOMA card.
Push the top of the FOMA card
1
and pull it out straight as
shown on the left.
Do not allow the FOMA card to fall when
removing it.
Note
Inserting or removing the FOMA card forcibly may damage the card. Use caution.
Refer to the FOMA card user’s guide for more information on the FOMA card.
If the FOMA card is inserted into another i-Channel supported terminal,
i-Channel tickers are automatically shown when the latest information is received or the channel list is shown.
Do not misplace the FOMA card once it is taken out.
The FOMA terminal power may turn off if the IC area of the FOMA card is dirty.
i-Channel tickers
do not appear. The
FOMA Card Security Codes
The FOMA card has a PIN1 code and a PIN2 code.
Both are set to 0000 by default but can be changed to a four- to eight-digit number by the user
(nP. 147).
FOMA Card Restriction Functions <FOMA Card Restriction Functions>
The FOMA card has built-in restriction functions as security functions for protecting personal data
and files.
When the FOMA card is inserted into the FOMA terminal and data or files are retrieved using any of the
following methods or when an i-appli is running, FOMA card restriction functions are automatically set in the
retrieved data or files.
When a file such as an image, melody or PDF is downloaded from a site or Internet web page
When a site or Internet web page is saved as a screen memo
When i-mode mail with a file attached is received
When an i-appli is running
Data, files or software with FOMA card restriction function s run o nly when in use with th e FOMA card in serte d
at time of acquisition. Display, play, attach to i-mode mail, run software, send data using Ir function or iC
transmission function and copy to microSD Memory Card can be executed.
The following indicates the data for which FOMA card restriction is set.
Image in Deco-mail Image in Message R/F Kisekae Tool
File attached to i-mode mail Chara-den i-a ppli
Image or melody Videophone picture memo Download dictionary
File attached to Message R/F Screen memo i-motion
The following indicates the settings saved in FOMA card.
Own number PIN setting SMS expiry
SMS center Language SSL certificates
The above operations cannot be performed if the FOMA card inserted at time of data/file retrieval or i-appli
startup is replaced with a different FOMA card.
※ Explanation that follows refers to the FOMA card inserted at time of data/files retrieval as “one’s own FOMA
card” and other FOMA cards as “another’s FOMA card”.
Before Using the FOMA Terminal
Continued on next page??
37
Page 40

One’s own FOMA card
One’s own FOMA card
restriction functions are set
for downloaded data, files
attached to received mail
a
ppli that have been
and irun, allowing viewing and
playback of data.
Another’s FOMA card
Different FOMA card inserted
When another’s FOMA
card is inserted, data with
one’s own FOMA card
restriction functions set
cannot be viewed or
played back.
Note
When one’s own FOMA card is replaced with another’s FOMA card, the data or files for which FOMA card
restriction functions are set cannot be set as stand-by displays or ring tones.
When a FOMA card is replaced with a different FOMA card, FOMA card restriction functions are activated
and if data or file retrieved from a site is set as the stand-by display or ring tone, the setting is reset to the
default. When one’s own FOMA card is re-inserted, the setting returns.
Example: When setting Melody A, for which FOMA card restriction functions are set, as a ring tone
When one’s own FOMA card is taken out or is replaced with another’s FOMA card, ring tone returns to
default setting. When one’s own FOMA card is put back, the ring tone returns to Melody A.
FOMA card restrictions functions cannot be set for data received using Ir exchange or data transmission
functions, and still pictures, Continuous mode images, or movies shot with the FOMA terminal.
It is possible to move or delete data or files for which FOMA card restriction functions are set even when
another’s FOMA card is inserted.
Running i-appli by sele cting hig hlighted text in i- mode mail display screen cann ot be perfor med or re tri eved
when FOMA card restriction functions are set.
If the FOMA card is replaced with another’s after i-appli stand-by is set, the set i-appli cannot be activated
in stand-by, and the image set in Main display appears.
Differences in FOMA Card Functions
Note the following differences between FOMA card (blu e) and FOMA ca rd (green/white) used on the F OMA
terminal.
Number of phone number digits available in
the FOMA card phonebook
Client certificate operations for FirstPass Not available Available P.203
Use of WORLD WING Not available Available P. 38
Service number Not available Available P. 399
Function FOMA card (blue)
Up to 20 digits Up to 26 digits P. 103
FOMA card (green/white)
Page
About WORLD WING
WORLD WING is a DoCoMo FOMA international roaming service that makes it possible to use the mobile
phone number registered in Japan to make and receive calls while abroad by inserting the FOMA card (green/
white) in a supported FOMA terminal or local mobile phone (W-CDMA or GSM format).
If subscribed to the FOMA service after September 1, 2005, subscription for “WORLD WING” is not
required. However, if subscription for “WORLD WING” is canceled at or after subscription for the FOMA
service, subscription for “WORLD WING” is required again.
If subscribed to the FOMA service before August 31, 2005 but not subscribed to “WORLD WING”,
subscription for “WORLD WING” is required.
Some payment plans are not available.
When the FOMA card (green/white) is lost or stolen overseas, promptly cont ac t NTT DoCoMo a nd conduct a
procedure for canceling the use of service. Refer to “General Inqu iries” on the b ack of this manual f or inquiries.
Note that transmission/calling charges after the FOMA card is lost or stolen are incu rred to t he subscriber.
Before Using the FOMA Terminal
38
Page 41

Inserting and Removing the Battery Pack
Use the battery pack SH11 exclusive to the FOMA terminal.
J Inserting the battery pack
Close and hold the FOMA terminal in your both hands before removing.
1
3
Tabs
Character side as the product name, SH11 facing up
5
J Removing the battery pack
Turn the power off, close and hold the FOMA terminal in your both hands before removing.
Note
Using unnecessary force when inserting or removing the battery pack may damage the battery pack and
connection terminal (charger terminal) on the FOMA terminal.
Refer to the battery pack SH11 user’s guide for details.
Firmly close the back cover. If not closed firmly, the back cover may come off and the battery pack may fall
out due to vibration.
If the battery pack connection terminal side or FOMA terminal battery pack (charger terminal) is dirty, the
FOMA terminal power may turn off. Additionally, the battery may not be sufficiently recharged. Wipe off any
dirt with a dry cloth or cotton swab.
When using the battery pack for the first time or after replacing it, battery pack must be charged. Battery
pack is not fully charged at the time of purchase.
2
4
Tab
Lightly press back cover in the
1
direction of the arrow (
slide approximately two mm (
Lift the
2
direction of the arrow (3) and
remove it.
Insert the battery pack (4).
3
The battery pack has tabs that make it easy
Battery pack
connection
terminal side
Reattach the
4
Position the handset and the back cover as
Follow steps 1 and 2 of
“
1
Inserting the battery pack” on
P. 39 to remove the
Remove the battery pack.
2
The battery pack has a tab that makes it
back
cover in the
to insert. Insert the battery pack with
character side as the product name (SH11)
facing up.
Battery pack
Tabs
back
cover (5).
shown in the illustration and then press the
back cover and slide into place.
easy to remove. Press the tab with your
fingers without placing too much force. Lift
the battery pack to remove.
Before Using the FOMA Terminal
1
back
) and
2
cover .
).
39
Page 42

Charging the Mobile Phone
Cautions When Charging
The battery pack is not fully charged at the time of purchase. Be sure to charge the battery using
the exclusive AC or DC adapter (sold separately) before use.
J Estimated charge times and LED display
The following figures are estimated times for charging an empty battery pack with the FOMA
terminal turned off.
Charger name Charge time
FOMA AC Adapter 01 140 minutes
FOMA DC Adapter 01 140 minutes
Charging LED illuminates in red when charging and turns off when charging is completed.
Check that the battery pack has been properly inserted when charging LED f lashes red. The LED also f lashes
red when the battery pack has reached the end of its service life.
The battery pack can also be charged with the FOMA terminal turned on (The { on the display flashes during
charging).
When charging is complete, charging LED turns off and the
When the battery becomes warm, charging may automatically stop even if the battery has not been fully
charged. Charging resumes after the temperature lowers to an appropriate temperature. While charging is
stopped, charging LED turns off (The { on the display flashes while stopped).
J Estimated times of use when fully charged
Criteria Battery pack SH11
Continuous stand-by time 580 hours (at rest)/440 hours (when mobile)
Continuous talk (transmission) time 200 minutes (voice call)/130 minutes (Videophone call)
Time for watching One Seg 320 minutes
Continuous talk time is estimated as the usage time at normal transmission signal strength, and continuous stand-by
time is estimated as the usage time while moving with the FOMA terminal closed at normal signal strength. Talk and
stand-by times may be reduced by about half depending on conditions including battery level status, stand-by display,
Power saver mode, Missed call notice and New unread mail notice settings, temperature and other environmental
conditions, and signal strength (no signal or weak signal). Using i-mode reduces talk (transmission) and stand-by
times. When i-Channel is subscribed, information is automatically received and updated. Talk (transmission) time and
stand-by time will be reduced. In addition, when shooting or editin g an imag e, watch ing One Seg , compo sing i-mode
mail, activating the downloaded iplayer, the call (transmission)/stand-by duration will be shorten even if calls or i-mode transmission are not made.
a
ppli software may continue transmission even after downloading. To avoid this, set not to connect in advance.
Some i-
The actual usage time is a combination of stand-by time and talk time, and the longer the call duration, the
shorter the stand-by time becomes.
Time for watching One Seg depends on conditions including batte ry level status, function s used, tempera ture
and other environmental conditions.
a
ppli or the i-appli stand-by, or using FM transmitter output, SD-Audio or Music
J Battery pack service life
Battery pack is a consumable. Service time per charge is gra duall y reduced e very time the bat tery i s charged.
When service time per charge is reduced to about half of the default time, this means that the battery pack is
approaching the end of its service life. In such a case, it is recommended to replace the battery pack as soon
as possible. Depending on usage, the battery pack may swell as it approaches the end of its service life but this
will not cause problems.
The estimated service life of a battery pack is about one year. However, the service life of the battery pack may
become shorter than estimated when the battery pack is charged and discharged repeatedly in a short cycle,
charged in a location where the battery pack is subject to high temperatures or left charged for a long time.
To protect the environment, return used batteries to NTT DoCoMo, any DoCoMo retailer, or a
recycling agency.
{
on the display changes to ".
J Cautions when charging
Do not charge for long periods of time with the power left on. If the FOMA terminal is left on after charging is
complete, the battery pack charge decreases.
In such cases, the AC or DC adapter charges the battery again. However, depending on when the FOMA
terminal is disconnected from the AC or DC adapter, the battery charge level may be low, the battery alert
tone may sound, or the battery may only be usable for a short time.
When the battery is empty and terminal is recharging, charging LED may not illuminate immediately.
If the alert tone sounds and the power cannot be turned on, charge the battery for a while.
If the battery empty alert is displayed and charging begins within 60 seconds of the alert tone, the status
returns to normal.
Before Using the FOMA Terminal
40
Page 43
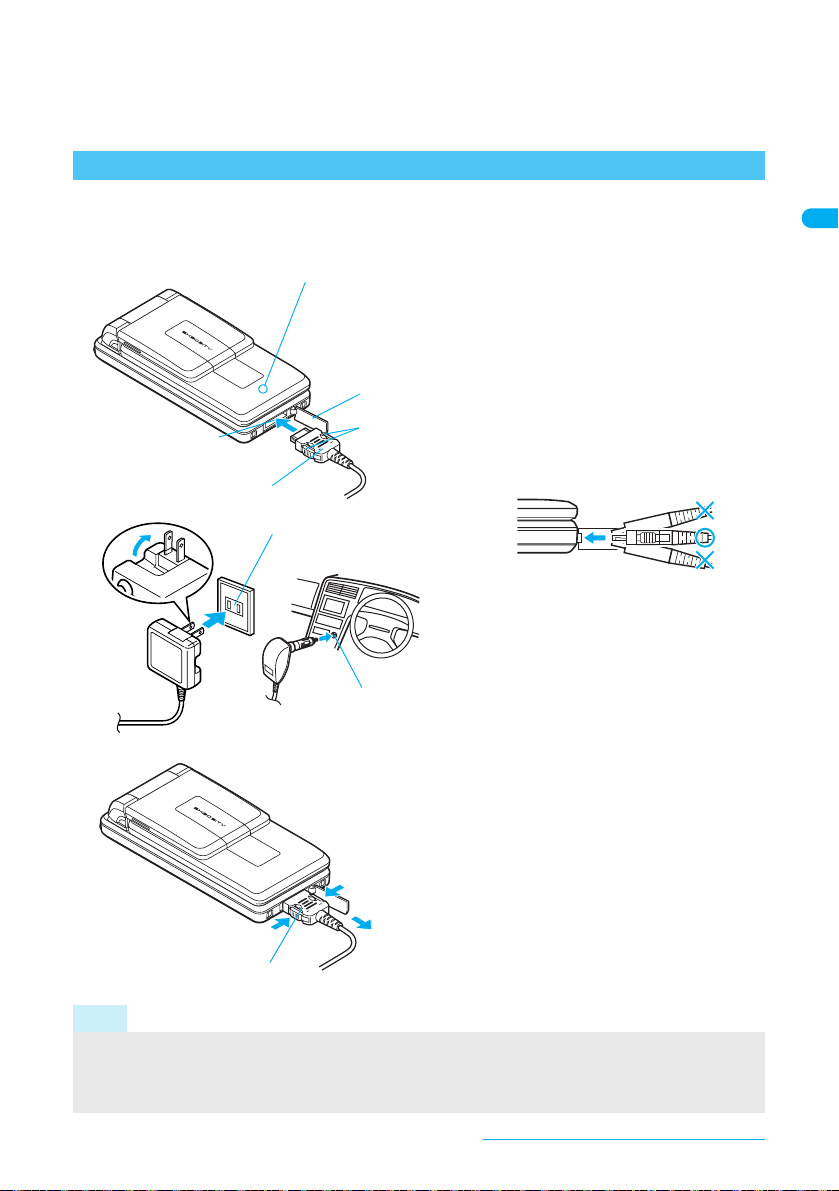
While charging, terminal may not be turned on even when charging LED is illuminated in red. Charge longer
and try turning power on again.
Frequently recharging the battery when power is still remaining enough may shorten the life of the battery
pack. It is recommended to use the battery to a certain level before recharging.
The battery pack cannot be charged by itself.
Avoid watching One Seg or using features such as i-appli for a long time while charging as this may lessen
the battery’s service life.
Charging Using the AC Adapter/DC Adapter
[Read “FOMA AC adapter 01 (sold separately)/FOMA DC adapter 01 (sold
separately) user’s guide” carefully.]
Battery pack can be charged with FOMA terminal open and in Cycloid position.
Charging/Called LED
Open the external connector
terminal cover.
1
Check the direction (see diagram)
of the AC or DC adapter connector
2
and insert horizontally into the
external connector terminal.
Check the direction of the connector, keep it
parallel with the FOMA terminal and firmly
push all the way in until it clicks.
External connector
terminal
Connector
(Face the side with the arrows up)
1
2
100VAC outlet
Cover
Release
buttons
For an AC adapter, lift the plug
and insert into a 100VAC outlet.
3
For a DC adapter, plug into a car
cigarette lighter socket.
For AC adapter
3
Cigarette
3
lighter socket
For DC adapter
Charge start sound is heard and charging
LED illuminates in red. When a call is
received while charging, the call is notified
with set called LED color.
4
When Charge end sound is
heard and charging LED turns
4
off, charging is complete.
When removing the connector, always hold
1
2
1
Connector
(Face the side with the arrows up)
Note
Check the direction and angle (see diagram) of connector, such as an AC adapter, and connect carefully without
using unnecessary force. Do not forcibly insert or remove. May cause damage to the external connector terminal.
Do not forcefully pull the rubber covers on the external connector terminal. May damage the cover.
Do not place objects near the FOMA terminal when charging. The FOMA terminal may be damaged.
the release buttons on both sides (1) and
unplug it by pulling out horizontally (2). Pull
by force may cause a malfunction.
After removing the connecter, close the
external connector terminal cover.
Pull the adapter out of the outlet or cigarette
lighter socket if it will not be used for a long time.
Before Using the FOMA Terminal
Continued on next page??
41
Page 44

Note
When using a DC adapter
Do not use with the car engine shut off. May drain the car battery.
The DC adapter and in-car adapter should only be used in negative grounded vehicles (12 and 24VDC).
The DC adapter power is interlocked with the car ignition switch, but the interlock may not work wit h some
vehicles. Make sure that the power is turned off before leaving the car.
Note that even if the FOMA terminal is turned on, turning off the ignition or pulling the DC adapter out of the
cigarette lighter socket will turn the FOMA off. To make a call or stay in stand-by, first disconnect the
connector from the FOMA terminal.
The DC adapter fuse (2A) is a consumable. For replacement, purchase a new fuse at a local automobile
supply shop.
Charging Using the Desktop Holder
[Read “Desktop holder SH13 (sold separately) user’s guide” carefully.]
Battery pack can be charged with FOMA terminal open and in Cycloid position.
Charging/Called LED
1
2
100VAC
outlet
Connector
(Face the
side with
the arrows down)
FOMA AC
adapter 01
3
Side with the arrows
Connector
terminal
Insert cord
into conduit
Face the side with the arrows
1
1
of the AC adapter connector
down and insert it into the
connector terminal of the
desktop holder.
Keeping the connector parallel with the desktop
2
holder, firmly push it all the way in until it clicks.
The connection port for the desktop holder is
on the back.
Lift the AC adapter plug and
2
insert into a 100VAC outlet.
Place the FOMA terminal into
3
the desktop holder.
Place the FOMA terminal as shown in 1 on
the left, and push in the direction of the arrow
shown in 2 until it clicks.
Charge start sound is heard and Charging
LED illuminates in red. When a call is
received while charging, the call is notified
with set called LED color.
When Charge end sound is
4
heard and charging LED turns
off, charging is complete.
Hold the desktop holder and lift the FOMA
terminal out.
Pull the AC adapter out of the outlet when left
unused for a long period of time.
Note
When Charge start sound is not heard (except when Charge start sound is set to Silent, Manner mode is
set or when terminal is turned off) or when charging LED does not illuminate, check that the FOMA terminal
is placed securely in the desktop holder.
Before Using the FOMA Terminal
42
Page 45

Note
When placing the FOMA terminal in the desktop holder, be car eful that the strap is not caught in bet ween the
handset and the desktop holder.
Battery Level
How to Check the Battery Level
Check the approximate battery level in the display.
Battery level is still sufficient.
"
Battery level is low.
#
Battery is almost empty. Charge the battery.
$
Battery is empty (Power will turn off soon).
%
Battery pack is being charged.
{
When icons have been changed (nP. 133), the above icons may differ.
Checking the Battery Level with Sound and Display
In stand-by, press t313.
1
Graphic for battery level appears (A different sound is heard for each battery level).
The battery level sound is heard at the volume set in Key/Standby i-motion (nP.119).
Wait approximately two seconds or press c or t and the previous menu reappears.
Graphic
Sound Three beeps Two beeps One beep
Status
Battery is sufficiently full. Battery is running low. Battery is almost empty.
Charge the battery.
If the Battery Runs Out
Battery empty. Unsaved data will be lost. Ending current operation
appears if battery starts to run out (Press t to clear the message).
After a while, an alert tone sounds. The screen on the right appears, handset
operations are disabled and power turns off after approximately 60 seconds.
During a voice/Videophone call, the alert tone sounds and Batter y empty. Uns aved data will be lost.
Ending current operation appears. The call is disconnected after approximately 20 seconds. At the same
time, the screen above appears and after approximately 60 seconds, the power turns off.
Alert tone does not sound when Manner mode is set (Alert tone sounds during a call).
When H is pressed during a call, the call is disconnected. Turn off the power and recharge the battery.
Power ON/OFF
Turning the Power On and Off
Turning the Power On
Before turning the power on, check that the FOMA card is properly inserted (nP. 36).
If the FOMA card is not inserted, Insert UIM and a FOMA card error appear (nP. 29).
Before Using the FOMA Terminal
Continued on next page??
43
Page 46

Press H (Power) for 2+ seconds.
1
Note
When a FOMA card is replaced with a new card, the terminal security code (four to eight digits) must be
entered after turning on the terminal. If a corr ect termi nal security cod e is entered, stand-b y display appea rs.
When a wrong terminal security code is entered five times, the power is turned off (However, turning on the
power again is possible).
It may take some time for the wakeup screen to appear.
The wakeup screen appears followed by the initial settings screen. Proceed to
initial settings (nP. 45). If initial settings are not yet completed, the setting
screen appears every time the power is turned on.
If initial settings have been completed, the screen shown
on the right appears when power is turned on. This screen
is called the “stand-by display”.
When Enter PIN1 code appears, enter the PIN1 code
(nP. 146).
When A (Out of service area) appears, the handset is
outside the service area or in a place with no signal. Move
to a place where the icon disappears.
Stand-by display
Turning the Power Off
Press H (Power) for 2+ seconds.
1
It may take some time for the power to be turned off (The end screen appears on the display until the
power is turned off).
Note
Before connecting to an external device, make sure t hat a ll t ransmission s are complete and th en turn of f t he
FOMA terminal.
Select Language
Switching Display to English
Default setting 日本語
Switch display language between Japanese and English for functions, messages, and
menu items.
In stand-by, press t35 and press 1 [日本語]/2 [English].
1
Japanese display English display
Note
If a FOMA card is inserted, settings are saved to the card. Select language settings are saved to FOMA
terminal handset and inserted FOMA card. When each setting varies, the setting in FOMA card is prior iti ze d.
Before Using the FOMA Terminal
44
Page 47

Initial Settings
Making the Initial Settings
The initial settings screen appears automatically when the power is turned on for the first
time. Each setting item can also be set from Menu (When the initial settings are complete,
the stand-by display appears).
Date and time settings Change terminal security code Key/Standby i-motion
PushTalk caller ID setting Software update
When items that have not been set remain, the setting screen appears every time the power is turned on.
Set the date and time (nP. 45).
1
In stand-by, press t8 to perform initial settings.
Set date and time from 00:00 January 1, 2001 to 23:59 December 31, 2050.
Register a terminal security code (nP. 145).
2
The default setting is 0000.
Set the Key/Standby i-motion (nP. 119).
3
To sound the Key/Standby i-motion 1
To make the Key/Standby i-motion silent 2
Set PushTalk caller ID (nP. 94).
4
Select Send ID or No ID for PushTalk caller ID and press t.
Set software update confirmation (nP. 453).
5
Select Yes and press t.
Software update starts and checks to see if Software update is necessary.
Note
Canceling the initial settings
Press H while setting. Date settings are set even if canceled.
Date Settings
Setting the Date and Time
Default setting Auto time set: ON
Set the date and time on the FOMA terminal. Set to automatically correct the date and time.
In stand-by, press t34.
1
Select Auto time set, press t and select ON or OFF.
2
To automatically correct date and time
To enter date and time Select OFF → t → Date → t → enter date → t → Time → t
When Limit settings is set to Enable, terminal security code is required to set
date and time.
Times appear in 24-hour format.
Select ON → t → i
→ enter time → t → i
Use 24-hour format. When entering month, day and time, add 0
before numbers one through nine (example: 01, 02, 03, etc.).
Alternatively, select numbers with u. If you make a mistake,
move the cursor using v and re-enter.
Before Using the FOMA Terminal
Continued on next page??
45
Page 48

Note
The date and time that are set are saved even if the bat tery pa ck i s removed , but if the bat te ry pack remains
removed for approximately one week or more or th e battery rema ins empty, t he settin gs may be reset. Wh en
this happens, set again after charging the battery.
If the date and time are not set correctly, dates are not correctly recorded for Redial, Received calls,
Record message (voice/Videophone calls), and camera image titles/shooting date. In addition, functions
that use the clock, such as Auto power ON/OFF, Alarm, Schedule, ToDo list, SSL (authentication),
i-appli Auto start, starting i-appliDX, Reception or Recording cannot be used properly.
When setting reset notification for Limit settings and the date is set to the following month or later, Reset
time passed appears in stand-by.
When Auto time set is set to ON
The FOMA automatically adjusts the time by connecting to the DoCoMo network’s time informat i on.
When Auto time set is set to ON, the time is sometimes not adjusted for a while. To activate Auto time set,
turn off FOMA terminal power and restart.
Time is not adjusted depending on the signal status.
Time may be off by a few seconds.
Notify Caller ID
Sending Your Own Phone Number to the Other Party
Default setting
Display your number (caller ID) on the other party’s phone (display) when making a voice/
Videophone call.
Handset number (caller ID) is important personal information. Be very careful about your caller ID setting.
The Notify caller ID function is available only on compatible phone devices.
Set whether or not to send your caller ID using the methods below.
Method Notify call er ID Do not notify caller ID
To set up in
advance
To set up when
making a call
Notify caller ID cannot be set while A (Out of service area) appears on the scre en.
To check the Notify caller ID setting, press t451 [Status request] in stand-by.
Specifications made when making a call take priority over the Notify caller ID setting. If no specifications are
made when a call is made, the Notify caller ID setting is followed.
The method for making specifications when making a voice call is enabled for PushTalk. However, specifications
are not made by adding
In stand-by, press t452 and enter the
network security code (nP. 144)
Add 186 or 184 before a phone number Add 186 Add 184
Enter the phone number and select from the
Submenu (nP. 57)
186
or
184
. Refer to P. 94 for details on setting Notify caller ID for PushTalk.
Set to Yes Set to No
C21 C22
Do not notify
Own Number
Checking Your Phone Number
In stand-by, press t0.
1
Own number screen
Before Using the FOMA Terminal
46
If during a voice call, press C4. If during a Videophone call, press C8.
While Function lock is applied to phonebook, enter terminal security code and
press t.
Refer to P. 38 1 fo r de t ai l s on co nfirming, saving or changing owner in fo r mation.
Page 49

Phone/Videophone
Making Calls/Videophone Calls
Using Videophone . . . . . . . . . . . . . . . . . . . . . . . . . . . . . . . . . . . . . . . . . . . . . . . . . . . . . . . .48
Making Calls/Videophone Calls . . . . . . . . . . . . . . . . . . . . . . . . . . . . . . . . . . . . . . . . . . . . . . 49
Switching Between Voice Call and Videophone. . . . . . . . . . . . . . . . . . . . . . . . . . . . . . . . . . 52
Using Redial and Received Calls. . . . . . . . . . . . . . . . . . . . . . . . . <Redial/Received Calls>53
Setting Chaku-moji. . . . . . . . . . . . . . . . . . . . . . . . . . . . . . . . . . . . . . . . . . . . .<Chaku-moji>56
Setting Caller ID to Send/Not Send for a Single Call
. . . . . . . . . . . . . . . . . . . . . . . . . . . . . . . . . . . . . . . . . . . . . . .<Send Own No./No Caller ID>57
Sending Touch-tone Signals with Simple Operations . . . . . . . . . . . . . . . . . . <Pause Dial>58
Making International Calls . . . . . . . . . . . . . . . . . . . . . . . . . . . . . . . . . . . . <WORLD CALL>59
Setting International Call . . . . . . . . . . . . . . . . . . . . . . . . . . . . . . . . . . . . . <Int’l Dial Assist>60
Setting a First Number to Phone Numbers . . . . . . . . . . . . . . . . . . . . . . . . . . . <Int’l Prefix>61
Making Calls with Sub Address Set . . . . . . . . . . . . . . . . . . . . . . . . . . . . . . <Sub Address>61
Reconnecting Disconnected Calls Automatically . . . . . . . . . . . . . . . .<Reconnect Control>62
Reducing Noise Interference to Hear Calls Clearly . . . . . . . . . . . . . . . .<Noise Reduction>62
Using Handset in a Car . . . . . . . . . . . . . . . . . . . . . . . . . . . . . . . . . . . . . . . . .<Hands-free>62
Answering Calls/Videophone Calls
Answering Calls/Videophone Calls . . . . . . . . . . . . . . . . . . . . . . . . . . . . . . . . . . . . . . . . . . .63
Switching Between Voice Call and Videophone to Receive Calls . . . . . . . . . . . . . . . . . . . . 65
Answering Calls by Pressing Any Key . . . . . . . . . . . . . . . . . . . . . . . . . . <Any Key Answer>66
Answering Calls by Rotating the Display . . . . . . . . . . . . . . . . . . . . . . .<Rotation-link Repl>66
Closing the FOMA Terminal to End/Hold Calls . . . . . . . . . . . . . . . . . . <Set When Folded>66
Adjusting the Volume During a Call . . . . . . . . . . . . . . . . . . . . . . . . . . . <Earpiece Volume>67
When Calls/Videophone Calls Cannot Be Answered/Could Not Be Answered
Placing Calls On Hold . . . . . . . . . . . . . . . . . . . . . . . . . . . . . . . . . . . . . . . . . . . . <On Hold>67
Setting On Hold Tone. . . . . . . . . . . . . . . . . . . . . . . . . . . . . . . . . . . . . <Set On Hold Tone>68
Setting Hold Tone. . . . . . . . . . . . . . . . . . . . . . . . . . . . . . . . . . . . . . . . . . . <Set Hold Tone>68
Using Public Mode (Drive Mode) . . . . . . . . . . . . . . . . . . . . . . <Public Mode (Drive Mode)>68
Using Public Mode (Power OFF) . . . . . . . . . . . . . . . . . . . . . . <Public Mode (Power OFF)>70
Checking Missed Calls. . . . . . . . . . . . . . . . . . . . . . . . . . . . . . . . . . . . . . . . .<Missed Calls>71
Recording Messages When Calls Cannot Be Answered
. . . . . . . . . . . . . . . . . . . . . . . . . . . . . . . . . . <Record Message (Voice/Videophone Calls)>71
Recording Messages When Incoming Calls Cannot Be Answered . . . . <Quick Message>74
Playing/Deleting Recorded Messages or Voice Memos
. . . . . . . . . . . . . . . . . . . . . . . . . . . . . <Play/Delete Recorded Messages or Voice Memos>74
Chara-den . . . . . . . . . . . . . . . . . . . . . . . . . . . . . . . . . . . . . . . . . . . . . . . . . . . . . . . . . . . . . .75
Setting the Image to Send to the Other Party . . . . . . . . . . . . . . . . . . . . . . . . . . . . . . . . . . .77
Setting Hands-free Videophone. . . . . . . . . . . . . . . . . . . . . . . . . . . .<Hands-free V.phone>79
Setting the Image During Videophone Calls . . . . . . . . . . . . . . . . . . . . . <Videophone Set>80
Changing Videophone Settings . . . . . . . . . . . . . . . . . . . . . . . . . . . . . . . . . . . . . . . . . . . . . .81
Setting to Switch Between Voice Call and Videophone. . . . . . . . . . <Notify Switch Mode>82
Selecting Actions for Incoming Videophone Calls During i-mode
. . . . . . . . . . . . . . . . . . . . . . . . . . . . . . . . . . . . . . . . . . . . . . . . . . . . <Packet Trans Arr Act>82
Saving Other Party’s Image as a Still Picture. . . . . . . . . . . . . . . . . . . . . . .<Picture Memo>82
47
Page 50

Using Videophone
N
iti
Make calls while viewing each other’s image.
Videophone transmits at 64K (kbps) only.
Chaku-moji can be sent or received with Videophone call (nP. 56).
Send a Chara-den or still picture as substitute image to the other party instead of images shot with your
camera and make or receive calls (nP. 75, P. 77).
Digital transmission fees are incurred even when a Chara-den or still picture is sent/received as substitute
image in place of a camera image of oneself.
Make international Videophone calls using “WORLD CALL”, DoCoMo’s international telephone service (nP. 59).
Videophone communication is available only between terminals compatible with DoCoMo Videophone.
DoCoMo Videophones comply with 3G-324M*
is not available with Videophones using other standards.
*1 3G-324M: International standard for Videophone systems for third-generation mobile Videophones.
*2 3GPP (3rd-Generation Par tnership Pr oject): A regional st andard ization orga nization to establi sh the commo n
technical specifications for third-generation mobile telecommunication systems (IMT-2000).
Viewing the Screen During Videophone Calls
1
, as defined by the international 3GPP*2 standard. Connection
ormal pos
3
2
1
on
5
4
6
7
8
1
Main screen: Other party’s camera image (default)
2
Subscreen: Your camera image (default)
3
Appears during Videophone call
Videophone call in progress
*
4
Hands-free icon
;
;
5
Brightness of camera image: Indicates the brightness of your
Hands-free in progress
(red)
USB hands-free in progress
(green)
camera image.
QRSTU
S
Dark ← Normal → Bright
6
Send image icon
a b9
Cycloid position
5
8
67
2
1
The screen shown is only
example. Actual screen may
differ.
3
4
7
8
9
a
b
Appears while sending
5
camera image
Appears while sending still
6
picture as substitute image
Appears while sending an
image from My picture of
9
Data box
Appears while pausing
0
camera image
Appears while sending
7
Chara-den in Full action mode
Appears while sending
Chara-den in Part action
8
mode
Receive image icon
Appears when shooting and saving images of the other
!
party
Call duration: Displays up to 9 hours 59 minutes 59 seconds.
If it exceeds 9:59:59, the counter restarts from 0:00.
Earpiece volume icon
v (Volume 1) to 4 (Volume 10)
.
Hands-free icon
5
6
Hands-free in progress
(red)
USB hands-free in progress
(green)
DTMF mode icon
ON
7
OFF
8
Phone/Videophone
48
Page 51

Note
The display brightness during a Videophone call follows the setting of User set in Power saver set. When
Videophone in Display light time is set to Same as normal, the brightness is adjusted to the setting of
Brightness. When ON is set, the brightness is adjusted to Brightness 2.
Making Calls/Videophone Calls
Check that there are sufficient battery and signal strength.
When A (Out of service area) appears, the handset is outside the service area or in a place with no signal.
Move to a place where the icon disappears.
Calls may be interrupted even when the signal is strong (] appears) and you are not moving.
To talk while viewing each other’s image during a Videophone call, use the flat-plug earphone/microphone
with switch (sold separately) (nP. 386) or use Hands-free (nP. 79). The default setting is ON for
Hands-free V.phone. Hands-free is available when the call starts.
In stand-by, dial the phone number starting with the area code.
1
Press s [Phone]/i [V.phone].
2
Outgoing calls of
Videophone
When name and
still picture are
saved in the
phonebook
Always dial the area code, even when the number is in the same area.
Mobile phone Enter other party’s number (090-XXXX- XXXX,
080-XXXX-XXXX) (11 digits).
PHS Enter other party’s number (070-XXXX-XXXX) (11 digits).
Enter up to 80 digits for phone number. When the number exceeds 13 digits, it
appears on two lines. When the number exceeds 26 digits, the last 26 digits
appear in two lines.
When a mistake is made while dialing, press c to erase the last digit. Press
c for 1+ seconds to delete all digits and stand-by reappears.
Refer to P. 59 when making an international call.
Unlike ordinary telephones, mobile phones send call tones in short beeps before
the standard ring tone.
Phone number and name appear if saved in phonebook. Image also appears if
set in advance.
When the other party is busy, there is a busy signal. Press H to disconnect and
try again later.
When a guidance message plays requesting the caller ID, the other party has
set Caller ID Request to “Activate”. Set the caller ID and make a call again
(nP. 46, P. 57).
Voice calls
Calling appears while calling.
h appears in the upper part of the display during a call.
Videophone calls
Dialing videophone appears while dialing.
Refer to “Viewing the Screen During Videophone Calls” on P. 48 for view types
during a Videophone call.
Phone/Videophone
Continued on next page??
49
Page 52

Talk when the other party answers the phone.
3
Videophone
Press C4 during a voice call and C8 during a Videophone call t o view your
phone number.
Videophone calls
The following operations are available during a Videophone call.
To send a substitute image during a
Videophone call
To send
touch-tone signals
<DTMF mode>
While sending
camera image
While sending
Chara-den
i
The still picture or Chara-den set as
substitute image appears (nP. 77).
Enter numbers to send
C7 → 1 → enter numbers to send
Press H to end the call.
4
Note
During a call, approximate call duration appears on the screen. When the call duration exceeds 9: 59:59, the
display resets to 0:00.
The FOMA terminal may become warm after continuous use. This is not a malfunction.
Voice calls
Calls can be made even when steps 1 and 2 are reversed. If no operations are performed for five seconds
after dialing, the call is made.
When talking in the Cycloid position, use a flat-plug earphone/microphone with switch (sold separately) or
use Hands-free. When using the earpiece to talk, make sure to switch to the normal position.
Switch to hands-free? appears when the FOMA terminal is set to the Cycloid position during a call. Select
Yes to switch to hands-free. Hands-free is not disabled even if returned to the normal position.
Videophone calls
Videophone calls cannot be made to emergency numbers (110, 119, and 118) from the FOMA terminal.
When the other party answers, Connected to videophone press l key to enable/disable hands-free
appears. Digital transmission fees are incurred from this point.
Videophone call is not connected when placed to an unsupporte d han dset. I n ad dition, it is not conne cted t o
devices such as PHS phones for which 64K cannot be used due to network conditions. If Redial voice call
is set to ON, the number is automatically redialed as a voice call. In such cases, voice call charges are
incurred. Note that this operation may not work if a call is placed to an ISDN synchronous 64K, PIAFS
access point or an ISDN Videophone that do es not supp ort the 3G -324M stand ard (nP.48) (as of January
2007), or if an invalid phone number is dialed by mistake. In addition, charges may be incurred.
When sending own image from a location with little light, noise such as white lines increase. Also, direct
sunlight or strong light from lamps may darken or distort images. Use Videophone under suitable lighting
conditions.
If Call Waiting is subscribed to, the number is recorded in Received calls and xx missed call(s) appears in
stand-by when a voice/Videophone call is received during a Videophone call.
During a Videophone call, i-mode mail and Message R/F are held at the i-mode center. After a Videopho ne
call, i-mode mail or Message R/F held at the i-mode center can be retrieved by performing Check new
message. However, SMS are received automatically even during Videophone calls.
When the sending/receiving of audio or video fails, the Videophone ca ll is not automatically restored. Make
the Videophone call again.
When a Videophone call is started, Redial voice call is not performed.
Videophone calls are counted toward V.phone talk time (nP. 384).
Voice calls or i-mode operations cannot be performed during a Videophone call.
When connected, the earphone/microphone is used for a call regardless of Hands-free V.phone.
When your image taken with the camera is sent during a Videophone call in the Cycloid position, the
displayed image is made larger than that in the normal position.
Phone/Videophone
50
Page 53

Note
When the Videophone call does not connect
When the Videophone call does not connect, a message explaining the reason appea rs. The other party’s
actual conditions may vary depending upon the type of phone and network service subscriptions.
Message Reason
Check number, then redial A call is made to unused phone number.
Busy The other party is engaged in a call.*
Your call is being forwarded The other party’s handset is set to forward Videophone calls.
Out of service area/power off
Set Caller ID to ON Connected without notifying caller ID (When calling V-live or visualnet).
Redial using voice call The other party’s handset is set to the Call Forwarding Service and the
Busy with packet transmission
Connection failed Appears in cases other than those listed above.
Upper limit has been
exceeded. Connection failed
Please make your call from
the i-mode web page
* The message may appear during a packet transmission depending on the other party’s terminal.
The other party is outside the service area, or their mobile phone is turned off.
forwarding destination does not support Videophone.
The other party is performing a packet transmission.
Upper limit that has been set by payment plans with limit function (Type
Limit or Family Wide Limit) has been exceeded.
A Videophone call is directly made to the V-live which shoul d be accessed
after connecting to i-mode. Access a site run by t he content s provider an d
view it by making a Videophone call from the link.
Related Operations
Use hands-free <Hands-free>
During a voice call, press s for 1+ seconds.
During a Videophone call, press s.
To disable during a voice call: Press s for 1+ seconds.
To disable during a Videophone call: Press s.
Place calls on hold <Hold active call>
1 During a call, press C1.
Alternatively, press t for a Videophone call.
2 To resume voice call, press C.
To resume Videophone call, press s.
For Videophone, press i to send a substitute image and answer the call.
Select Multi Number and make a call <Sel Multi number>
1 In stand-by, enter a phone number ? C4.
2 Select Multi Number ? t ? s [Phone]/i [V.phone].
Note
Using Hands-free
M appears during hands-free operation.
Speak from approximately 20 to 40 cm away from the mouthpiece. When the surroundings are noisy,
sound may break up and the call may not be satisfactory.
When using Hands-free outdoors or in a location where surroundings are noisy, use the flat-plug
earphone/microphone with switch (sold separately).
Cannot be operated when receiving a call and dialing a voice call.
Increasing earpiece volume may make conversation difficult. In such cases, press p and lower the
volume.
Hands-free is disabled when a call ends.
Hold
The hold tone plays. Hold tone does not sound from the FOMA terminal when Manner mode is set.
Phone/Videophone
Continued on next page??
51
Page 54

Related Operations
Note
The other party hears the hold tone, and the call is placed on hold. For Videophone calls, the image set
in Hold image is sent to the other party. The image is sent to the other party with Hold superimposed.
Calls stay on hold even when the FOMA terminal is closed. Set when folded does not apply.
Selecting Multi Number
Those subscribing to Multi Number can select a saved Multi Number and make a call.
Switching Between Voice Call and Videophone
Switch between voice call and Videophone for placed calls.
V.phone appears for voice calls and Phone appears for Videopho ne calls at the lower right of the display in
guidance and call can be switched (Available with models that support switching between voice call and
Videophone).
Notify switch mode (nP. 82) must be set to “Activate” for the other party’s FOMA terminal.
Received calls cannot be switched. Have the other party switch.
When switching, Unable to switch may appear and switching is disabled depending on the oth er party’s
FOMA terminal status (nP. 65).
Calls cannot be switched while One Seg is being activated.
Press a [V.phone] during a voice call, select Yes and press t.
1
Alternatively, press C5 [Switch to v.phone] during a voice call .
To switch from Videophone to voice call, press a [Phone] or C6 [chg to voice call] during a call.
Select No and the voice call screen reappears.
Switching takes approximately five seconds. Switching may take more time depending on signal
status. While switching, Please wait for a while appears and a guidance message is played.
The call switches to Videophone and your image is sent to the other party. During a Videophon e call,
the call switches to voice call.
Switching from voice call to Videophone
Switch between voice call and Videophone is possible as many times as necessary during a call.
When switched, call duration resets to 0 seconds.
Note
Calls may not be switched from voice call to Videophone nor from Videophone to voice call and may be
disconnected depending on signal status.
Switching is not included in the talk time and charges are not incurred.
Switching from voice call to Videophone
The other party’s camera image does not appear if the other party selects to not show image.
When performing packet transmissions, disconnect packet transmission before switching to Videophone.
Hands-free V.phone is ON by default (nP. 79). If a call is switched to Videophone, Hands-free is activated
regardless of call status.
Hands-free is not available while Please wait for a while is shown.
Phone/Videophone
52
Page 55

Note
Calls received with Call Waiting cannot be switched from voice call to Videophone call.
Switching from Videophone to voice call
When switching to voice call from Hands-free Videophone call, Hands-free is disabled.
Redial/Received Calls
Using Redial and Received Calls
Redialing Previously Called Numbers <Redial>
The FOMA terminal keeps a record of the 30 most recent phone numbers to which calls were
made (including PushTalk).
When 30 calls are exceeded, phone numbers are erased starting with the oldest.
If the same number was called multiple times, only the most recent is recorded. However, each call is
recorded if PushTalk transmission is sent to multiple parties or the call is made using the PushTalkPlus.
In stand-by, press r (I).
1
Types of calls
Redial list
No icon
1
B
w
to
3
Phone numbers and dates are listed starting with the most recent redial numbers.
Name appears if saved in phonebook. If the same number is saved in the
phonebook, the name with the smallest memory number appears.
For PushTalk, the other party’s name or the PushTalk group name appears.
Voice call
Videophone call
International call
Multi Number outgoing call
(Only when Multi Number is set)
ab
ac
ad
PushTalk (When transmitted to one
person)
PushTalk (When transmitted to
multiple people)
PushTalk (Using PushTalkPlus)
To show the redial details screen Select a phone number → t
To switch to the received calls list q
Select phone number and dial.
2
Voice call s
Videophone t → i
PushTalk & (q)
Call is placed to the displayed phone number.
When 184 or 186 is added to the phone number, the call is saved as a separate dial.
Note
If a call is switched between voice call and Videophone, the type of Redial is decided by the origina l call t ype.
Refer to “Show Call/Received” on P. 153 for details on the Redial/Show received calls.
Press & (q) or t to call all parties when using Redial for PushTalk transmission made to multiple people.
Voice/Videophone calls cannot be made.
When the redial display for Show call/received is set t o OFF, the histo ry is saved but Redi al does not a ppear.
Press i in the redial list screen to show the sent messages list (nP.235).
Phone/Videophone
Continued on next page??
53
Page 56

Note
Redial Submenu
Items in the redial list
screen
UAdd to phonebook U Add to phonebook Saves phone number in the phonebook.
VDelete VDelete one Deletes a saved Redial (nP. 54).
─
─
─
─
─
\Com p ose message \Compose message
rU Create schedule rU
Items in the redial
details screen
WCaller ID setting Sends caller ID/Does not send caller ID when calling.
XAdd prefix setting Selects a prefix or makes an international call.
YSel Multi number
ZV.phone image Sets the image to send to the other party during a
[Chaku-moji Composes a message, selects a message or displays Sent
Create schedule
Selects a phone number saved in Multi Number (nP. 400).
Videophone call.
messages.
Composes a message. If the mail address is not saved in the
phonebook, the outgoing number is entered for the address.
Saves phone number and redial date in the schedule.
Explanation
Related Operations
Delete Redials/Received calls <Delete>
1
In stand-by, press r (I) (Redial)/q (M) (Received calls) ? select a phone number.
2 Press C21 [Delete one] ? Yes ? t.
To delete all Redials/Received calls: Press C22.
Note
If all Redials are deleted, Chaku-moji Sent messages are also deleted.
Making Calls from Received Calls
The FOMA terminal keeps a record (Received calls) of the 30 most recent phone numbers
(including PushTalk) received.
When 30 calls are exceeded, phone numbers are erased starting with the oldest.
In stand-by, press q (M).
1
Received calls list
Phone/Videophone
54
Phone numbers and dates are listed starting with the most recent Received calls.
Name appears if saved in phonebook. If the same number is saved in the
phonebook, the name with the smallest memory number appears.
Types of history
Calls that were answered or put on hold
g
Calls that left a recorded message
I
Calls that were not answered or were forwarded to a forwarding
number or Voice Mail Service center, calls that were rejected
because of Reject calls (nP. 156), Accept calls (nP. 155),
D
Reject unknown (nP. 159), Reject by reason of non-disclosure
(nP. 157), Public mode (Drive mode) (nP. 68)
Page 57

Types of calls
No icon
1
Voice call
Videophone call
B
64K data communications
x
International call
w
Multi Number received
to
3
(Only when Multi Number is set)
e
ab
ac
ad
Chaku-moji
PushTalk (When transmitted to one
person)
PushTalk (When transmitted to
multiple people)
PushTalk (Using PushTalkPlus)
When xx missed call(s) appears in
stand-by (Missed calls)
To display the received calls details screen Select a phone number → t
To switch to the redial list screen r
In stand-by, press t → select B xx missed call(s) →
t
The most recent Received calls appear (nP.71).
Select a phone number and dial.
2
Voice call s
Videophone t → i
PushTalk & (q)
Note
Refer to P. 54 for details on deleting Received calls.
Even if a call is switched between voice call and Videophone, th e recei ved call type depends on th e way t he
call was answered.
Calls cannot be made from Received calls while Keypad dial lock is set.
Press & (q) or t to call all parties when using Received calls for PushTalk transmission made to multiple
people. Voice/Videophone calls cannot be made.
When Function lock is applied to the phonebook, only the phone number appears. When Function lock is
disabled, the name registered in the phonebook appears.
When a call is received from a caller using Dial-in, a number different from the caller’s Dial-in number may
appear.
When Show received calls of Show call/received is set to OFF, the call is recorde d but Received call s does
not appear.
Press i in the received calls list to show the received messages list (nP.235).
If a call is made from Received calls of Chaku-moji, the received Chaku-moji will not be sent.
For a received call with Chaku-moji, the message contents are displayed on the received calls details screen.
Received calls Submenu
The following operations are available as in the Redial submenu. Refer to “Redial Submenu” on P.54 for
details.
Add to phonebook Delete Compose message Create schedule
When Set mute ring tone is set to ON and Missed call history is set to OFF and the following call not saved
in phonebook is received, the number does not appear in Received calls.
The call is disconnected during mute seconds duration
The call is disconnected due to weak signal strength
However, the following operation shows Received call.
Items from received
calls list
rV Display setting rV Display setting Performs Display all/Limit display and Ringing time*.
* A ringing time of 0:00 appears when a call is rejected due to Accept call s , Reject calls, Reject
unknown, Reject by reason of non-disclosure and Public mode (Drive mode) settings.
Ring time does not appear for items with g (calls that have been answered or disconnected while on
hold). It does not appear if the Display settings is selected in the received calls list.
Items from received
calls details screen
Explanation
Phone/Videophone
55
Page 58

Chaku-moji
Setting Chaku-moji
What Is Chaku-moji?
Send a message (Chaku-moji) at the same time when making a voice call or Videophone call to
display it on the other party’s ringing phone and to previously tell the points.
Save the Chaku-moji message in advance. Set if Chaku-moji is displayed or not when it is
received.
Send up to 10 single/double-byte characters, pictographs or symbols.
Charges are applied to the sender side. Not applied to the receiver side.
Ahead of the Chaku-moji messages on the send and receive displays, e appears.
Chaku-moji appears only while a call is received (calling). When the call is answered, Chaku-moji disappears.
Compatible models: 902iS series, SH902iSL, N902iX HIGH-SPEED, N902iL, 903i series, 702iS series
Receive display when Chaku-moji is received
Main display Sub display Main display Sub display
The message contents of received Chaku-moji can also be checked in th e received calls details screen (nP. 55).
(excluding N702iS, M702iS, M702iG), 703i series, 601i series (excluding L601i),
D800iDS
For voice call For Videophone call
Editing and Setting Chaku-moji Message
J Saving the Chaku-moji message <Create message>
Save up to ten Chaku-moji messages.
In stand-by, press t571.
1
Select a number, press i [Edit], enter a message and press t.
2
To check a saved Chaku-moji message, select a number and press t.
J Enabling/Disabling Chaku-moji display <Message display>
In stand-by, press t572 and select Chaku-moji display
1
method.
To display all 1
To display ones only from callers saved in the phonebook 2
To display ones only from Notify caller ID callers 3
To not display 4
Phone/Videophone
56
Default setting With caller ID
Page 59

Dialing with Chaku-moji Message <Chaku-moji>
In stand-by, enter the other party’s phone number and press C6
1
[Chaku-moji].
Refer to P. 110 when calling with Chaku-moji from the phonebook.
Select a Chaku-moji message.
2
To create a new message 1 → enter a Chaku-moji message → t
To select from saved Chaku-moji messages
To select from Sent messages 3 → select a Chaku-moji message → t
2 → select a Chaku-moji message → t
To delete one Sent messages entry, select a Chaku-moji
message, press C1, select Yes and press t. To
delete all Sent messages entries, press C2, select
Yes and press t.
Press s [Phone]/i [V.phone].
3
Note
The ten most recently sent messages are recorded as Sent messages.
Even if a call is shorter than the set ringing time of the Set mute ring time, Chaku-moji is displayed and
charges are applied.
Depending on the signal strength, sending results may not be displayed even if the other part y has received
Chaku-moji. In this case, charges are applied.
Chaku-moji cannot be sent to foreign countries.
On Redial voice call, Chaku-moji used when Videophone was dialed will be automatically sent.
Chaku-moji does not support PushTalk.
When the call recipient is in the following setting, Chaku-moji does not appear and transmission cha rges are
not incurred even if dialed with Chaku-moji.
When the recipient’s terminal does not support Chaku-moji
When a call is received from numbers rejected by the message display settings
In addition, when the call recipient is in the following setting or status, the send results do not appear on the
sender side display (Chaku-moji is not recorded in Received calls on the receiver side).
When outside the service area or the power is turned off
When Public mode (Drive mode) is set
When the answering duration for Record message is set to 0 seconds
If Chaku-moji reaches the recipient,
Transmission completed appears and
transmission charges are incurred.
Send Own No./No Caller ID
Setting Caller ID to Send/Not Send for a Single Call
J To not send caller ID
In stand-by, enter a phone number, press C22 [No caller ID] and
1
press s [Phone] or i [V.phone].
Phone/Videophone
57
Page 60

J To send caller ID
In stand-by, enter a phone number, press C21 [Send own no.]
1
and press s [Phone] or i [V.phone].
Note
Alternatively, make calls by setting caller ID from Submenus in the Phonebook, Redial or Received calls
details screen.
When a phone number is entered after entering 186 and C22 [No caller ID] is pressed, caller ID is sent.
If 186 is selected from Select prefix after entering a phone number, caller ID is sent.
When a phone number is entered after entering
sent.
If 184 is selected from Select prefix after entering a phone number, caller ID is not sent.
When 184 or 186 is added to a phone number, the call is saved as a separate dial.
Related Operations
Add 186 (To notify caller ID)
In stand-by, press 186 ? enter phone number ? s [Phone]/i [V.phone].
Add 184 (To not notify caller ID)
In stand-by, press 184 ? enter phone number ? s [Phone]/i [V.phone].
Note
Sending caller ID for a single call
This function is available regardless of the network service’s caller ID setting.
Pause Dial
184
and
C21
[Send own no.] is pressed, caller ID is not
Sending Touch-tone Signals with Simple Operations
Use pagers and services such as ticket reservations and bank balance inquiries, with
simple operations by saving the combinations of phone numbers and messages (numbers)
in the phonebook.
Saving Touch-tone Data to the Phonebook
Enter a phone number in phonebook (nstep 3 on P. 98), press o and
enter the number to send.
1
Press o to enter a pause P.
Enter the number and press o to continue adding numbers.
Press t and enter the other phonebook items.
2
Refer to “Basic Saving Operations” on P. 98 for details.
Sending Messages Using Touch-tone Signals
Make a call from the phonebook with a touch-tone signal.
1
Refer to P. 107 to P. 110 for details.
When the call is connected, the numbers after P appear on the screen.
Phone/Videophone
58
Page 61

Press i [PB send] at the appropriate time to send.
2
The numbers after P are sent with touch-tone signals.
When multiple numbers separated by P are saved, press i [PB send] for each number.
Some equipment may not be able to receive signals properly.
Sending Touch-tone Signals Using the Dial Keys During a Call
Send touch-tone signals one at a time during a call by pressing the dial keys.
Make a call and when the call is connected, press the corresponding
1
numbers on the keypad.
The number is sent as a touch-tone signal.
Enter 80 digits or more when sending a message usin g touch-t one signals (De letes en tered di gits from
the beginning).
WORLD CALL
Making International Calls
“WORLD CALL” Is DoCoMo’s International Calling Service
WORLD CALL is an international calling service available from DoCoMo mobile phones.
“WORLD CALL” is registered when FOMA services are registered (Registration for “WORLD
CALL” is optional).
[Calling Method] 009130 O 010 O Country code O Area code (city code) O Other
The calling method shown above can be saved on the FOMA terminal handset phonebook.
For area codes (city codes) that begin with 0, omit the 0 when dialing (However, include the 0 when calling
Italy).
Call to about 240 countries and regions worldwide.
“WORLD CALL” charges are billed with the monthly mobile phone charges.
Subscription and monthly usage fees are free.
Check an estimate of the most recent call duration on the display (nP. 384).
When using phonebook, Received calls or Redial, 009130010 is automatically added to make calls.
Change in procedures for making international calls
Because “MY LINE” service is not available for mobile communications, WORLD CALL also cannot be used
with “MY LINE”. With the offering of the “MY LINE” service, the dialing procedures for international calls have
changed. The former dialing procedure (procedure listed above without 010) cannot be used.
For further details on WORLD CALL, contact the number listed in “General Inquiries” on the back of this
manual.
To make an international call through a company other than DoCoMo, contact the representative companies
directly for instructions.
Some payment plans may not be available.
party’s phone number O s
When calling Videophone compatible specific overseas 3G mobile phone customers, use “International
Videophone” by making the call in Videophone mode after the dialing method above.
Refer to the DoCoMo web page for information on available countries and providers.
Depending on the other party’s international Videophone terminal, the image that appears on the FOMA
terminal may be distorted, or connection may not be possible.
Phone/Videophone
59
Page 62

Int’l Dial Assist
Setting International Call
Automatically Adding International Call Access Code <Int’l Prefix Conv>
Default setting ON
When making an international call, enter + before dialing the overseas number to automatically
place the international call access code.
In stand-by, press t6931 and 1 [ON].
1
J Using + to make an international call
Press 0 for 1+ seconds to enter +.
In stand-by, enter +, the country code, area code (city code), other
1
party’s phone number and press s.
The number with the international call access code, which is converted from +, appears.
Select Yes and press t.
2
The international call is made.
Setting Numbers Other Than WORLD CALL <Int’l Prefix>
Default setting WORLD CALL 009130-010
Save up to ten international access call access codes used when international calls are made.
In stand-by, press t6932, select -------------------- to save a
1
new number and press t.
To change a saved number Select a number → t → 1
To delete a saved number Select a number → t → 2 → Yes → t
To set Auto prefix Select a number → t → 3
Enter a name and press t.
2
Enter up to 14 single-byte (7 double-byte) characters.
w appears to the right of the name.
Perform the operations over to disable Auto prefix.
Enter a prefix and press t.
3
Press 0 for 1+ seconds to enter +.
Up to 16 digits can be entered.
J Selecting an international access code <International Call>
Enter only the country code, area code (city code) and the phone number to make internationa l calls.
In stand-by, enter the country code, area code (city code), other
1
party’s phone number and press C32 [International Call].
Select an international call access code, press t and s.
2
Phone/Videophone
60
Page 63
Related Operations
Make a call from phonebook
In the phonebook entry details screen, press C422 ? select an international call
access code ? t ? s.
Make a call from Received calls or Redial
In the Received calls or Redial details screen, press C42 ? select an international
call access code ? t ? s.
Int’l Prefix
Setting a First Number to Phone Numbers
Default setting 009130-010
Save up to five prefixes, including international call access codes, to place at the beginning
of phone numbers. The numbers are also available when calls are made from phonebook,
Received calls or Redial.
In stand-by, press t691, select -------------------- to save a new
1
number and press t.
To change a saved number Select a number → t → 1
To delete a saved number Select a number → t → 2 → Yes → t
Enter a prefix and press t.
2
Press 0 for 1+ seconds to enter +.
Up to 16 digits can be entered.
Calling with Prefixes <Select Prefix>
In stand-by, enter the other party’s phone number and press C3
1
1 [Select prefix].
Select a prefix, press t and s.
2
Related Operations
Make a call from phonebook
In the phonebook entry details screen, press C421 ? select prefix ? t ? s.
Make a call from Received calls or Redial
In the Received calls or Redial details screen, press
Sub Address
Making Calls with Sub Address Set
Using sub address allows calls to be made to specific terminals when calling an ISDN terminal.
A sub address is a number assigned to a terminal when there are multiple ISDN terminals for a single ISDN
line. It is used in selecting contents for V-live.
C41 ?
select prefix ? t ? s.
Default setting ON
Phone/Videophone
Continued on next page??
61
Page 64

In stand-by, press t692 and 1 [ON].
1
J Making calls with sub address set
Ask the other party for their phone number and sub address.
In stand-by, enter phone number, press *, enter sub address and
1
press s.
Note
If b is entered at the beginning of a phone number or after 184, 186 or a prefix, the numbers after b are
recognized as the phone number.
Reconnect Control
Reconnecting Disconnected Calls Automatically
Reconnect control is also available for PushTalk transmissions.
In stand-by, press t612 and select an alarm tone.
1
To set alarm to high 1
To set alarm to low 2
To set alarm to off 3
Note
The amount of time that can elapse to reconnect varies depending on signal strengt h. The esti mated time is
approximately ten seconds.
The other party hears no sound until the call is reconnected (up to ten seconds). Charges are incurred for
this duration.
Default setting Alarm on(high)
Noise Reduction
Reducing Noise Interference to Hear Calls Clearly
It is recommended that this function be kept set to ON.
In stand-by, press t611 and 1 [ON].
Default setting ON
1
Note
Noise reduction processes sound to make conversations clearer. Sound quality may vary depending on
surrounding noise and tone of the voice.
Hands-free
Using Handset in a Car
Use the In-Car Hands-Free Kit 01 (sold separately) to connect hands-free devices such as
car navigation to the FOMA terminal, and make/receive voice calls from the device.
Refer to the user’s guide of each product for more details. Use a FOMA In-Car Hands-Free
Cable 01 (sold separately) for the In-Car Hands-Free Kit 01 (sold separately).
Phone/Videophone
62
Page 65
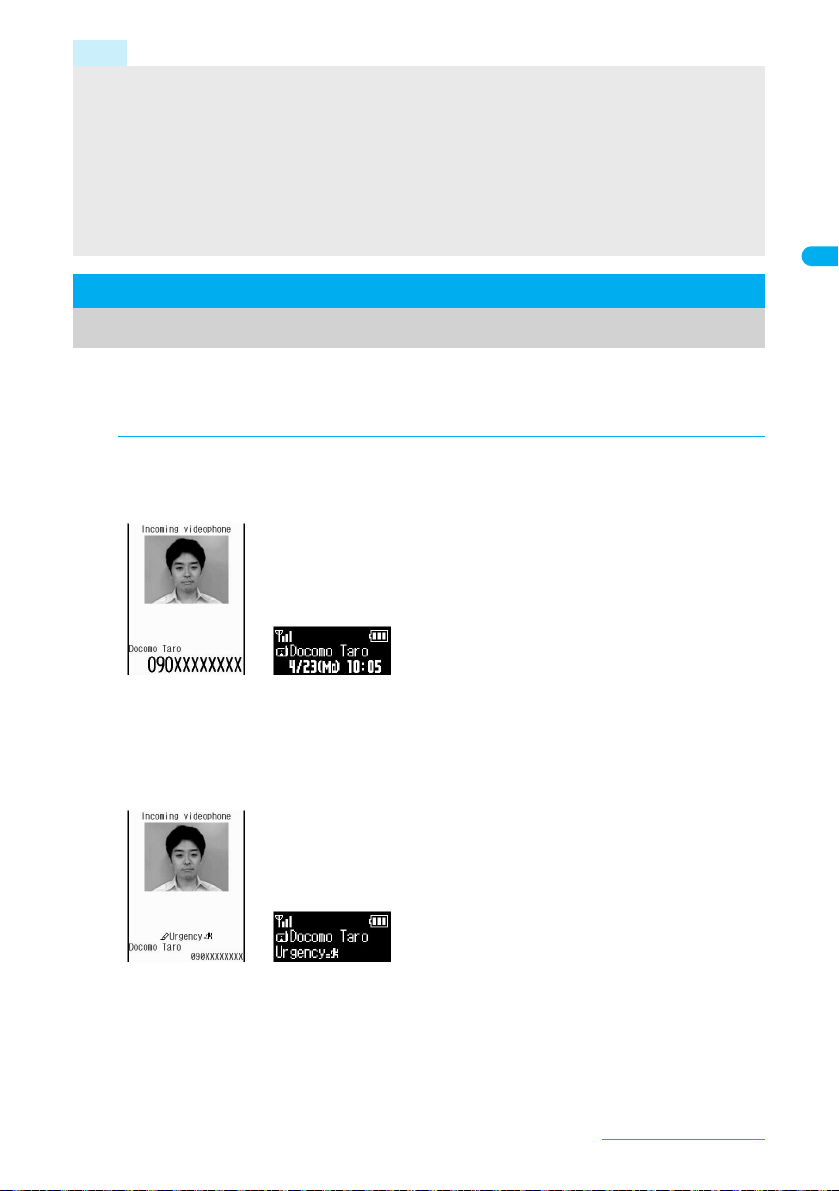
Note
Functions such as display settings, ring tones and Public mode (Drive mode) call functions follow the
FOMA terminal settings for incoming calls.
If a hands-free device has sound enabled, the device plays a ring tone even when the FOMA terminal is set
to Manner mode or Silent.
When a Videophone call is made or received using a hands-free compatible device, a substitute image is
sent to the other party.
When FOMA terminal sound is enabled,
device sound is enabled, the call continues when the FOMA terminal is closed regardless of Set when folded.
Record message settings are followed even when the handset is connected to the device.
Some handset functions may not be available depending on device characteristics and specifications.
Set when folded
is followed if the handset is closed during a call. If
Answering Calls/Videophone Calls
When receiving a call, verify it using ring tone, called LED, vibrator, etc.
When receiving a Videophone call, use the flat-plug earphone/microphone with switch (sold separately)
(nP. 386) or use Hands-free (nP. 79) to talk while viewing each other’s image. The default setting is ON
for Hands-free V.phone. So when the call starts, Hands-free is available.
When a call is received, the ring tone sounds and the called LED
1
flashes.
Incoming Videophone screen
When caller ID is sent, the phone number appears. If the
other party’s name and phone number are saved in the
phonebook, they appear on the screen.
When Picture call (still picture or movie/i-motion) is
saved in the phonebook (nP. 100), the name, phone
number and image appear on the screen (The image
for Phone ring tone is prioritized when i-motion is set as
Phone ring tone).
Main display
When the name and still picture are saved
in the phonebook
Chaku-moji Videophone screen
Sub display
They do not appear if the caller does not send caller ID.
Voice calls
Calling appears while receiving a call.
Videophone calls
Incoming videophone appears while receiving a call.
When Chaku-moji is received, the message appears
(nP. 56).
When the caller does not send caller ID, a
non-disclosure reason message appears.
User unset, Payphone or Not support (nP. 158)
Main display Sub display
When Chaku-moji is received
Phone/Videophone
Continued on next page??
63
Page 66

Press s.
2
Refer to the following for key operations while receiving a call.
When FOMA terminal is open When FOMA terminal is closed
On hold (nP. 67) H
Quick silent (nP. 124) # +
Quick message (nP. 74) 7 (for 1+ seconds)
Manner mode (nP. 123) # (for 1+ seconds) + (for 1+ seconds)
Record message/Forward calls/
Auto forward/Call Rejection*
Answer with substitute image
(for only Videophone calls)
* Videophone calls can be rejected by pressing m [Call Rejection] while One Seg is activated.
For Videophone calls, all key operations except those listed above are not available even when Any
key answer is set to ON.
Voice calls
Calls can also be received with Any key answer (nP. 66).
Videophone calls
Calls can be answered with your image. The other party’s image appears in the main scree n and yo ur
image taken with the camera appears in the subscreen. When images are not received from the other
party, a black screen appears.
C
i
−
−
−
−
Press H to end the call.
3
Note
Calls to the FOMA terminal cannot be made from phones with no direct outside line, such as an internal
building phone.
Set mute ring time can be set to delay ring tone sounding until set number of second s pass wh en a call is
received from an unregistered number or a number without caller ID. Reject unknown can be set to p revent
callers not registered in Phonebook from being connected.
Save a specified phonebook in a list and set Reject/Accept calls.
Use Notification of Voice Mail Service to receive notification of missed calls when the handset is turned off
or outside the service area. An SMS is received after returning to the service area or when power is turned
on. If a call is received from a person saved in the phonebook, the person’s name appears in the message.
When a call is received while in Public mode (Drive mode), the ring tone does not sound, and the called
LED does not flash. The call is saved in Received calls.
Voice calls
When talking in the Cycloid position, use a flat-plug earphone/microphone with switch (sold separately) or
use Hands-free. When using the earpiece to talk, make sure to switch to the normal position.
Switch to hands-free? appears when the FOMA terminal is set to the Cycloid position during a call. Select
Yes to switch to hands-free. Hands-free is not disabled even if returned to the normal position.
Videophone calls
The type of substitute image to be sent can be set in Substitute image.
If a Videophone call is received from the Videophone compatible model when Voice Mail Service is set to
“Activate”, the call is connected to Voice Mail Service and message recording is activated after the set
ringing time passes. Answering during the set ringing time connects call without connecting to Voice Mail
Service.
Even when Call Forwarding Service is set to “Activate” on the receiver side, the Videophone call is not
forwarded if the set forwarding destination is not set to a device that supports Videophone and conforms to
the 3G-324M standard (nP. 48). Check forwarding destination before setting.
When a call is received during edit ing
If a call is received while editing phonebook, i-mode mail, SMS or a Chaku-moji message, editing is
temporarily suspended. When this happens, edited data is automatically saved. When the conversation is
finished, the screen before the call was received reappears and editing can be resumed. However,
characters that are in the process of being converted and not confirmed may not be saved.
Phone/Videophone
64
Page 67

Note
When a call is received from a saved Mult i Number
A Multi Number name appears to the right of Calling/Incoming v.phone when a call is received.
When using the flat-plug earphone/microphone with switch (sold separately)
When a Videophone call is received while the flat-plug earphone/microphone with switch is connected,
pressing the switch for 2+ seconds will answer the call with your image when the FOMA terminal is open,
and with the set substitute image when the FOMA terminal is closed. Switch between substitute image and
camera image during a call (nP. 77).
When Set auto answer is set to ON and the flat-plug earphone/microphone with switch is connected, after
the specified ring time, the substitute image is automatically sent. Switch between substitute image and
camera image during a call (nP. 77).
J
When the handset beeps during a voice call indicating an incoming call
When any of services such as Voice Mail, Call forwarding or Call Waiting is subscribed to and Set
arrival act is set to “Activate” while Arrival call act is set to Answer, the following operations can be
performed when the handset beeps during a call.
Call Forwarding Service
Voice Mail Service Press C3 [Auto forward] to forward the call to the Voice Mail Service center
Call Waiting Put the current call on hold and answer the incoming call (nP. 394).
Press C2 [Forward calls] to forward the call to the set forward number (nP. 395).
(nP. 392).
Switching Between Voice Call and Videophone to Receive Calls
The caller (other party) selects to switch between voice call and Videophone.
The call recipient cannot switch (Available with models that support switching between voice call and Videophone).
Notify switch mode (nP. 82) must be set to “Activate” for the recipient’s FOMA terminal.
The caller switches between Videophone and voice call during a call.
1
Switching from voice call to Videophone
Select Yes and press t.
2
Switching from voice call to Videophone
Your image is sent to the other party.
Select No to not send own image. Camera Off appears on the other party’s screen.
Switching takes approximately five seconds.
Switching may take more time depending on
signal status. While the call being switched,
Please wait for a while appears and a guidance
message is played.
Switching from voice call to Videophone
When the caller switches to Videophone call, a
message is played and the screen on the left
appears before switching. Proceed to step 2.
Switching from Videophone to voice call
When the caller switches to voice call during
Videophone call, a message is played before
switching. Start conversation in voice call.
Note
This setting is not available when another screen is displayed from the Multi Assistant, when the FOMA
terminal is closed, while a call is on hold or during a packet transmission. Also, the setting may not be
available when a function is performed from Submenu.
Phone/Videophone
65
Page 68

Any Key Answer
Answering Calls by Pressing Any Key
Default setting ON
Set Any key answer so that calls can be answered with the keys other than the ones
normally used.
Normal Any key answer
Voice call s1 to 9, 0, *, t, w, i, m, a, c, $, y*, x*
Videophone s, i
PushTalk s, & (q) 1 to 9, 0, *, t, i, C, m, a, c, $, y*, x*
* Calls cannot be answered with y or x when One Seg is activated.
Refer to P. 51, P. 67 for details on being resumed/started while on hold.
−
In stand-by, press t631 and 1 [ON].
1
Rotation-link Repl
Answering Calls by Rotating the Display
Default setting ON
When a voice/Videophone call or PushTalk is received in the Cycloid position, return to the
normal position to answer the call.
When a Videophone call is received, calls can be answered with your image.
In stand-by, press t633 and 1 [ON].
1
Set When Folded
Closing the FOMA Terminal to End/Hold Calls
Default setting Phone/Videophone: Finish call, PushTalk: Speaker phone
In stand-by, press t67 and select a close operation.
1
Phone/Videophone 11 To set to Hold sound (with hold tone)
12 To set to Finish Call
13 To set to Silent (without hold tone)
PushTalk 21 To set to Finish transmission
22 To play the other party’s voice through the speakers
Note
When set to Hold sound, hold tone plays. Hold tone can be change d (nP. 68). For Videophone calls, the
image set in Hold image is sent to the other party.
When set to Silent, hold tone does not sound. For Videophone calls, if the Substitute image is a still
picture, the still picture is sent to the other party. Chara-den is sent to the other party if set.
When set to Hold sound or Silent, open the FOMA terminal to resume the call.
If a device such as a flat-plug earphone/microphone with switch (sold separately) is connected, the call can
continue while the handset is closed, regardless of Hold sound, Silent or Finish call settings.
※ For Videophone calls, the set substitute image is sent to the other party. Open the FOMA terminal to
send camera image to the other party (nP. 78).
Phone/Videophone
66
Page 69

Note
For voice/Videophone calls, if the earphone/microphone is disconnected while the FOMA terminal is close d,
the call will become mute when Silent or Finish call is set, or the call is put on hold whe n Hold sound is set.
The call resumes when the earphone/microphone is reconnected or the handset is opened. For PushTalk, if
the earphone/microphone is disconnected while the FOMA terminal is closed, the call can be continued
through the speaker whether set to Finish call or set to Speaker phone.
For PushTalk, when Speaker phone is set, open the FOMA terminal to retrieve the transmission status of
Hands-free PT.
Earpiece Volume
Adjusting the Volume During a Call
Default setting Volume 5
Select from ten earpiece volume levels during a call.
If earpiece volume is raised for a call, noise may occur dep endin g on t he surro undi ngs. Use a t an appr opria te
volume.
The volume remains at an adjusted level even when the handset is turned off or the battery pack is removed.
During a call, press o or p.
1
Earpiece volume
screen
Press o (louder) or p (softer) to adjust.
2
After adjusting the volume, press t or c, or wait approximately two seconds and the previous
screen reappears.
Refer to P. 119 for details on adjusting the earpiece volume when in stand-by.
Alternatively, press C2 during a Videophone call.
Note
Press : (louder) or + (softer) to adju st the volume when the FOMA t erminal is clo sed du ring a tra nsmission.
On Hold
Placing Calls On Hold
Place voice/Videophone calls on hold which cannot be answered immediately.
The other party is charged for the call while on hold.
While a ring tone is sounding, press H.
1
When a voice call is received, the other party hears the hold tone (nP. 68), and the call is placed on hold.
When a Videophone call is received, the other party hears the hold tone (n
image set by your FOMA terminal is sent to the other party with On hold superimposed.
To disconnect a call while on hold, press H (The call is saved in Received calls).
When the other party disconnects the call while on hold, the call is saved in Received calls.
If subscribed to Call Forwarding Service or Voice Mail Service, a received call is forwarded to the set
destination or connected to the Voice Mail Service center (nP. 65).
Press s when ready to answer.
2
For Videophone, press i to send a substitute image and answer the call.
P. 68
), and the On hold
Phone/Videophone
67
Page 70

Set On Hold Tone
Setting On Hold Tone
Default setting On hold tone 1
Set the on hold guidance that the other party hears.
Select On hold tone 1 (Japanese), On hold tone 2 (English) or recorded voice memo.
On hold tone 1 ... ただいま電話に出ることができません。そのままお待ちになるか、しばらくたってからお
On hold tone 2 ... I can’t take your call now. Please hold the line for a moment or call me back later, thank you.
かけ直しください。
In stand-by, press t181 and select a hold tone.
1
Set Hold Tone
To set the guidance language
To set after recording voice
memo
To set recorded Stand-by
voice memo
To apply Function lock to
voice memo
To play back, select On hold tone 1 or On hold tone 2 and press i. Press i
again to stop playback and the previous screen reappears.
1: Japanese/2: English
31 →
record
→ 2
Press t to abort recording.
32 → select memo → i
33 → enter terminal security code → t → 1
To disable Function lock: Press 2.
[Play] → select memo
Setting Hold Tone
Default setting Hold melody 1
Set the hold tone that the other party hears.
The hold tone plays at the same volume as the earpiece volume.
In stand-by, press t182 and select a hold tone.
1
To set Hold melody 1 [Hold melody 1]/2 [Hold melody 2]
To set after recording voice
memo
To set recorded Stand-by
voice memo
To apply Function lock to
voice memo
To play back, select Hold melody 1 or Hold melody 2 and press i. Press i
again to stop playback and the previous screen reappears.
31 →
record → 2 [Play] → select memo →
Press t to abort recording.
32 → select memo → i
33 → enter terminal security code → t → 1
To disable Function lock: Press 2.
→ i
i
Public Mode (Drive Mode)
Using Public Mode (Drive Mode)
Public mode is an automatic answering service used to ensure manner in public places. When a
voice call is received, the caller hears a message indicating you are driving or otherwise unable
to speak (on the train, bus, in a movie theater, etc.) and the call is disconnected.
Activating/Deactivating Public mode is only available in stand-by (Available even when A (Out of service area) is
showing on the screen).
Calls can be made normally in Public mode.
This function is not available during data transmissions.
A message requesting caller ID is played when User unset calls are received while Call er ID Request is set to
“Activate” (The Public mode message is not played).
In stand-by, press * for 1+ seconds.
1
Public mode is set and _ appears.
A message stating the owner of the phone is driving or is in a place that does not allow mobile phone
use is played to the other party.
If Manner mode is also set, Public mode setting is prioritized.
Phone/Videophone
68
Page 71

Disabling Public Mode (Drive Mode)
In stand-by, press * for 1+ seconds.
1
Public mode is disabled and _ disappears.
J When Public mode (Drive mode) is set
A ring tone does not sound when a voice/Videophone or PushTalk call is received. xx missed
call(s) appears and the call is saved in Received calls (nP. 53).
When a voice call is received, the caller hears a message indicating that you are driving or otherwise unable
to speak and the call is disconnected. When a Videophone call is received, Public mode video guidance is
played to the other party and the call is disconnected. If the handset is turned off or in a place with no signal,
the guidance for outside service area plays.
The FOMA terminal will not vibrate when i-mode mail, SMS or Message R/F is received even if Vibration mode is
set. Although a ring tone does not sound, the message is received automatically, and received mail icon appears.
When data transmission is received, vibrator, ring tone and called LED do not activate.
An incoming PushTalk is automatically disconnected and Connection failed appears on the caller’s display.
Driving mode status can be notified to all connecting members if 3+ people have participated.
J When a call is received while Public mode (Drive mode) and various
services are set
Service When a voice call is received When a Videophone call is received
Voice Mail Service
(nP. 392)
Call Forwarding Service
(nP. 395)
Call Waiting
(nP. 394)
Nuisance Call Barring
Service (when a call is
received from a barred
number) (nP. 396)
Caller ID
Request
Service
(nP. 397)
*1 The message is not heard when Voice Mail Service ring time is set to 0 seconds and the call is immediately
connected to the center. The call is not saved in Received calls.
*2 The message is not heard when Call Forwarding Service ring time is set to 0 seconds and the call is
immediately connected to the destination. The call is not saved in Received calls.
When the
caller ID is
not sent
When the
caller ID is
sent
A ring tone does not sound, a message
indicating that you are driving or otherwise
unable to speak plays, and the caller is
connected to the Voice Mail Service center.
The call is saved in Received calls.*
The call is not connected, a message
indicating that you are driving or
otherwise unable to speak plays, and the
call is forwarded to the set destination.
The call is saved in Received calls.*
A ring tone does not sound and the caller
hears a message indicating that you are
driving or otherwise unable to speak and
the call is disconnected. The call is saved
in Received calls.
The call is not connected, call rejection
message is played to the other party and
the call ends. The call is not saved in
Received calls.
The call is not connected, caller ID
request message plays and the call ends.
The call is not saved in Received calls.
A ring tone does not sound and the caller
hears a message indicating that you are
driving or otherwise unable to speak and
the call is disconnected. The call is saved
in Received calls.
Public mode video guidance is not played
to the other party and is connected to the
Voice Mail Service center.
1
The call is not connected and forwarded
immediately. However, if the forwarding
number is not a 3G-324M (nP. 48)
compliant Videophone, the call is
2
disconnected. The call is saved in
Received calls.
A ring tone does not sound. The Public
mode video guidance is played to the
other party and the call is disconnected.
The call is saved in Received calls.
The Call Rejection video guidance is
played to the other party and the call is
disconnected. The call is not saved in
Received calls.
The Caller ID request video guidance is
played to the other party and the call is
disconnected. The call is not saved in
Received calls.
The Public mode video guidance is
played to the other party and the call is
disconnected. The call is saved in
Received calls.
Note
Even if the alarm time arrives in Public mode, the alarm does not sound. Called LED, vibrator and sub
display are not activated.
Phone/Videophone
69
Page 72

Public Mode (Power OFF)
Using Public Mode (Power OFF)
Public mode (power OFF) is an automatic answering service used to ensure manner in
public places. Set Public mode (power OFF) to play a message for the caller indicating that
the power is off and you are unable to speak (in a hospital, airplane, train near the priority
seats), and the call ends.
In stand-by, press *25251s.
1
Public mode (power OFF) is set (Nothing changes in stand-by).
When a call is received while Public mode (power OFF) is set, a message indicating that the owner of
the phone is currently in a place that does not allow mobile phone use is played.
J Disabling Public mode (power OFF)
In stand-by, press *25250s.
1
Public mode (power OFF) is disabled.
J Checking Public mode (power OFF) setting
In stand-by, press *25259s.
1
Check the current setting.
J When Public mode (power OFF) is set
Public mode (power OFF) remains set until disabled. Setting is not canceled when the power is
turned ON. The Public mode (power OFF) message is played when the handset is outside the
service area or in a place with no signal. When a call is received, a message indicating that the
owner of the phone is in a place that does not allow mobile phone use is played and the call is
disconnected. An incoming PushTalk is automatically disconnected and Connection failed
appears on the caller’s display. Members are notified that the owner of the phone is not a
participant in the call when 3+ people have participated.
J When a call is received while Public mode (power OFF) and various
services are set
Service When a voice call is received
Voice Mail Service
(nP. 392)
Call Forwarding Service
(nP. 395)
Nuisance Call Barring
Service (when a call is
received from a barred
number) (nP. 396)
Caller ID
Request
Service
n
(
P. 397)
When the
caller ID is
not sent
When the
caller ID is
sent
A message stating the owner of the
phone is in a location in which the
handset must be turned off is played and
the call is automatically connected to the
Voice Mail Service center.*
A message stating that the owner of the
phone is in a location in which the
handset must be turned off is played and
the call is forwarded to the set
destination. The Public mode (power
OFF) guidance setting follows Call
Forwarding Service guidance settings
(nP. 395).*
The Call Rejection guidance is played to
the other party and the call is
disconnected.
The Caller ID request message is played
and the call is disconnected.
The Public mode (power OFF) message
is played and the call is disconnected.
2
1
When a Videophone call is received
The Public mode video guidance is not
played to the other party and is
connected to the Voice Mail Service
center.
The call is immediately forwarded without
playing the Public mode (power OFF)
video guidance. If the destination does
not support Videophone calls, the call is
disconnected without forwarding.
The Call Rejection video guidance is
played to the other party and the call is
disconnected.
The Caller ID request video guidance is
played and the call is disconnected.
The Public mode (power OFF) video
guidance is played and the ca ll i s
disconnected.
Phone/Videophone
70
Page 73

*1 The message is not heard when Voice Mail Service ring time is set to 0 seconds and the call is immediately
connected to the center. The call is not saved in Received calls.
*2 The message is not heard when Call Forwarding Service ring time is set to 0 seconds and the call is
immediately connected to the destination. The call is not saved in Received calls.
Missed Calls
Checking Missed Calls
If an incoming call is not answered, xx missed call(s)
and the number of missed calls appear in stand-by
(Missed Calls).
When missed calls are checked or c is pressed for 1+
seconds, xx missed call(s) disappears.
Missed calls are also indicated by LED (nP. 140).
When xx missed call(s) appears in stand-by, press t.
1
Alternatively, press q (M) to check Received calls (nP.54).
Select B xx missed call(s) and press t.
2
D appears next to missed calls.
Select a phone number and press t.
3
Missed call details appear.
Use the same operations as Received calls to make calls and check other entries in Received calls.
Record Message (Voice/Videophone Calls)
Main display Sub display
Recording Messages When Calls Cannot Be Answered
Set Record message to record messages when a call cannot be answered. When a voice call is
received, a voice message is played and the caller’s message is recorded. When a Videophone
call is received, a reply image is sent and the caller’s message and image are recorded.
Record message is not available when the FOMA terminal is turned off or outside the service area. This
function is convenient when used in conjunction with Network Voice Mail Service.
Record up to three Record messages for voice calls (about 15 seconds each). Voice memos recorded during
a voice call or in stand-by are also included in these three Record messages for voice calls.
Record up to two Record messages for Videophone calls (about 15 seconds each).
The number of recorded messages appearing in stand-by is the total number of Record messages for voice/
Videophone calls.
Record message cannot be set or disabled in Manner mode.
Setting Record Message (Voice/Videophone Calls)
In stand-by, press t651 and 1 [ON].
1
Record message
Record message is set. Press H to return to stand-by and ] appears.
When a message is recorded, an icon appears to show the number of
messages. Example: D (for one message), E (for two messages), etc.
When there are three Record message s (voice calls) and two Record messages
(Videophone), k appears and Record message does not respond when a
voice/Videophone call is received. Delete unnecessary messages to reactivate
Record message.
Phone/Videophone
Continued on next page??
71
Page 74

Note
For Voice Mail Service, record up to 20 messages of up to three minutes each. When Voice Mail Service is
set, messages are saved at the Voice Mail Service center even if there are three Record messages (voice
calls) and two Record messages (Videophone).
Refer to P. 74 for details on playing and deleting Record messages.
When Record message is set by Record message settings or Manner mode settings, Record message will
automatically answer.
The reply image for Record messages for Videophone can be set in Videophone reply image.
J Disabling Record message
In stand-by, press t651 and 2 [OFF].
1
Record message is disabled. Press H to return to stand-by and ] disappears.
When Record Message (Voice/Videophone Calls) Is Set
When a call is received, Record message is activated after set
1
answering duration (nP. 73).
Voice call reply
message
Main display Main display
Videophone reply
message
When a voice call is received, the caller hears a voice
guidance.
When a Videophone call is received, after Preparing
message. Please wait appears, the reply image for
Record message (Videophone) appears. When a
Videophone call is received, the caller hears a reply
message and sees a reply image.
Press s to answer a call while playing a reply
message, recording sounds or movies. Press i to
answer a Videophone call with a substitute image sent.
Sub display Sub display
Record the caller’s message.
2
Voice call record
Main display Main display
Sub display Sub display
Phone/Videophone
72
message
Indicator
Videophone record
message
Time
The indicator and time are an estimate.
After the message is recorded, the previous screen
reappears.
While a message is recorded (voice call), the caller’s
voice can be heard through the earpie ce (When Ma nner
mode is set, caller’s voice cannot be heard through the
earpiece).
The caller hears a beep when recording starts.
While a message is recorded (Videophone), the other
party’s image does not appear on the screen but is
recorded.
Record message (voice call) may not be saved if three
seconds or less.
When a call is answered while a message is being
recorded, the voice or Videophone message is recorded
until the call is received.
Page 75

Note
Saved contents may be lost due to malfunctions, repairs or other handling of the FOMA terminal. DoCoMo
shall not be liable for any loss of content. It is recommended that a memo be kept of contents for Record
message (voice/Videophone calls).
Recording may be cut off depending on signal strength.
During Record messages (Videophone), the reply image set on your FOMA terminal is sent to the other
party with Record message superimposed.
During recording, calls from a third party cannot be answered. The third party hears a busy signal.
Messages that indicate outside the service area, changed phone number, Voice mail starti ng, et c. cannot be
recorded.
Record message is not available when Public mode (Drive mode) is set.
Related Operations
Set the message response time <Answering duration>
In stand-by, press t652 ? enter answering duration (three digits: 000 to 120
seconds) ? t.
To set response time for Record message immediately started: Enter 000 seconds.
Set reply messages <Reply message>
1 In stand-by, press t653.
2 Select the type of messages ? t.
To record original message: Press 31 ? record ? 2 ? select memo ? i.
To set original message: Press 32 ? select memo ? i.
To play/stop message: Press i.
Set the reply image for Videophone record message <V.phone reply image>
In stand-by, press t654 ? select folder ? t ? select still picture ? i.
To check the still picture: Select still picture ? t.
Note
Answering duration
Answering duration applies to Record messages for both voice calls and Videophone calls.
The default setting is 13 seconds.
Cannot be set to the same time as Auto answer.
When Record message is set simultaneously with Voice Mail Service or Call Forwarding Service, the
priority will depend on the set ringing time.
To prioritize Record message, set answering duration shorter than for Voice Mail Service or Call
Forwarding Service.
Reply message
The default setting is Reply message 1 for Reply message.
Reply message 1 and Reply msg 2(Eng) are preset.
Reply message 1.......... ただいま電話に出ることができません。 ピーッという発信音のあとに、お
Reply message 2 (Eng) . . . . I can’t take your call now. Please leave your message, thank you.
Returns to default setting when original reply message is deleted (nP. 75).
Press t to abort recording.
Videophone reply image
Use JPEG or GIF images saved in My picture of Data box that are set to QCIF: 176×144 (W×H).
Animated GIFs are not available.
Still pictures that are restricted for output from the FOMA terminal are not available.
The default setting is テレビ電話代替.
名前とご用件をお話しください。
Phone/Videophone
73
Page 76

Quick Message
Indicat
Recording Messages When Incoming Calls Cannot Be Answered
Record a message for an incoming voice/Videophone call when Record message is not set.
During an incoming call, press 7 for 1+ seconds.
1
Alternatively, press C1 [Record message] during an incoming voice call. Recording starts after a
voice guidance is played.
During an incoming Videophone call, press C2 [Record message] as an alternative. After
Preparing message. Please wait appears, the reply image for Record message (Videophone)
appears and recording starts.
Refer to P. 71 for details on Record messages.
Play/Delete Recorded Messages or Voice Memos
Playing/Deleting Recorded Messages or Voice Memos
Play or delete recorded messages and voice memos (during call and in stand-by).
Playing Recorded Messages or Voice Memos
The Playback volume follows the Earpiece volume (nP. 67) settings.
Refer to P. 382 for details on recording voice memos.
In stand-by, press t9285 and press 2 [Play].
1
Memo list
Alternatively, press 7 for 1+ seconds in stand-by, and press 2.
When xx message(s) xx V.phone message(s) appears
In stand-by, press t, select F, press t and press 2.
w appears next to memos that have not been played.
Types of message/memo
Voice memo during call
g
Record message
I
Voice memo in stand-by
(
Phone type
B
Voice call
Videophone call
No icon
Select memo and press t [Play].
2
74
Record message
for voice calls
Phone/Videophone
or
The indicator is an estimate.
Name and number do not appear for User unset calls and voice memos in
stand-by.
Press t to stop playback. Memo list appears, press t again to play from the
beginning during playback. Select a memo and press t to play other memos
during playback.
Playback of recorded messages and voice memos automatically stops when a
call is received.
Playback of recorded messages and voice memos automatically stops when
alarm sounds at set alarm time.
When Show received calls is set to OFF, the memo list does not appear and
recorded messages and voice memos cannot be played or deleted.
Page 77
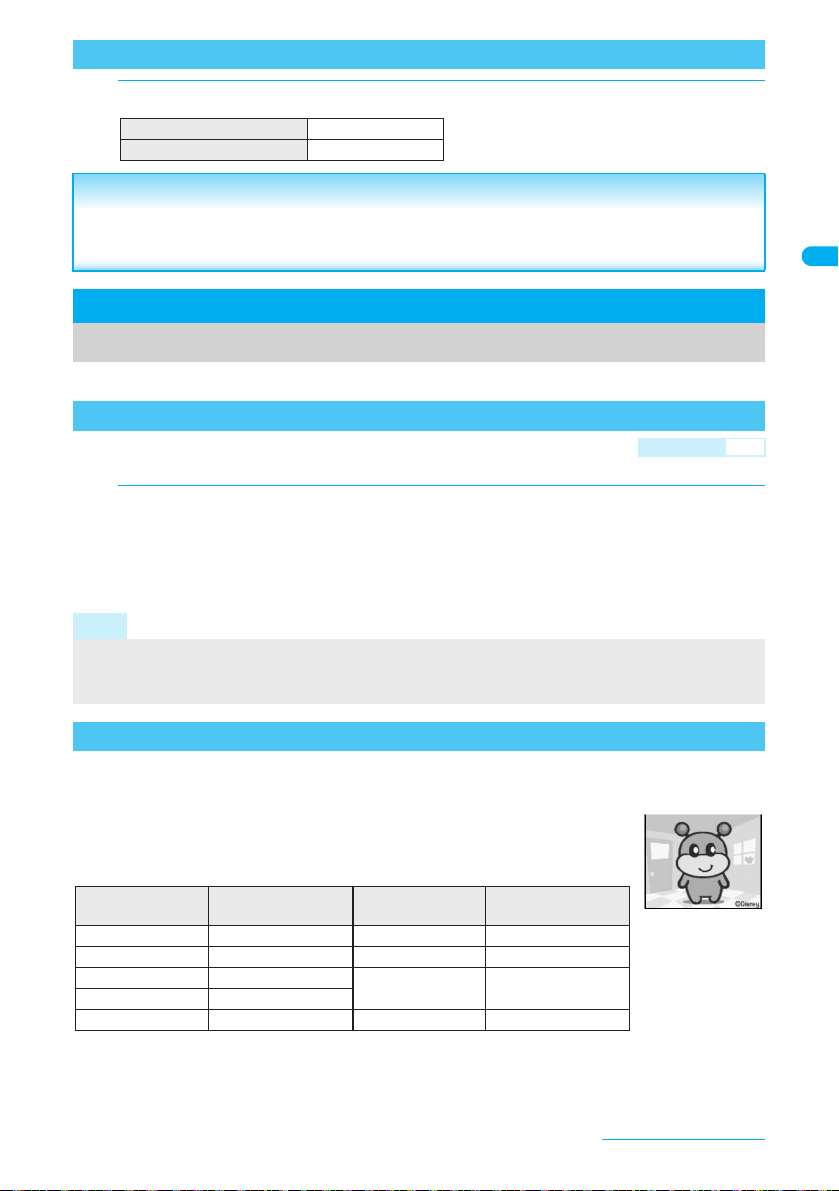
Deleting Recorded Messages or Voice Memos
In memo list (nP. 74), select a memo and deletion method.
1
To delete one C1 → Yes → t
To delete all C2 → Yes → t
Related Operations
Lock Recorded message and Voice memo <Function lock>
In stand-by, press t9285 ? 3 ? enter terminal security code ? t ? 1.
Chara-den
Refer to P. 313 for details on Chara-den.
Sending Chara-den as Substitute Image <Change Send Img>
Default setting Dimo
During a Videophone call, send a character to the other party in place of a camera image.
During a Videophone call, press C33 [Chara-den], select a
1
folder, press t, select a Chara-den and press i [OK].
If Chara-den is already set as substitute image (nP.78), press i [Subst img] during a Videophone
call to send the image. When a Videophone call is received, press i [Subst img] to answer the call
with Chara-den.
Note
When DTMF mode is set to ON, the Chara-den key operations become unavailable because of the
touch-tone signals sent with the dial keys.
To switch to テレビ電話代替, delete Dimo and perform Reset settings.
Preset Chara-den
The following Chara-den are preset.
J Dimo
Dimo is capable of showing emotions such as happiness and anger, and can
perform various body actions.
Full-action mode action list
Number
(key operation)
1
2
3
4
5 OK 9
Press 0 to abort action.
Dimo does not support Part-action mode.
Action
笑う (Laugh)
泣く (Cry)
怒る (Angry)
こんにちは (Hello)
Number
(key operation)
6 NG
7
8
Action
サメ (Shark look)
博士風メガネ
(Doctor-look glasses)
ガーン (Oh my God)
Phone/Videophone
75
Page 78

J キャラ (女性) Woman
This character is a Japanese businesswoman. She can perform a variety of
actions such as expressing happiness and distress, waving her hands and
tilting her head.
Full-action mode action list Part-action mode action list
Number
(key operation)
1
2
3
4
5
6
7
8
9
Press 0 to abort action.
喜ぶ (Happy)
怒る (Angry)
哀しむ (Sad)
投げキッス (Blow a kiss)
驚く (Surprised)
ゴメン (Apology)
恥ずかしー (Embarrassed)
ずっこけ (Whoa ho ho!)
バーン! (Bang!)
Action
Number
(key operation)
11
12
13
14
15
16
17
18
(右腕) 手を振る (ループ)
(Wave right hand (loop))
(左腕) 手を振る (ループ)
(Wave left hand (loop))
(顔) うなずく (Nod head)
(右腕) おいでおいで (ループ)
(Beckon with right hand (loop))
(左腕) おいでおいで (ループ)
(Beckon with left hand (loop))
(顔)
左右ブルブル
(顔) 右に傾ける (Tilt head to the right)
(顔) 左に傾ける (Tilt head to the left)
J キャラ (男性) Man
This character is a Japanese businessman. He can perform a variety of actions
such as nodding his head, laughing and raising his hands.
Full-action mode action list Part-action mode action list
Number
(key operation)
1
2
3
4
5
6
7
Press 0 to abort action.
うなずく (Nod head)
笑う (Laugh)
怒る (Angry)
驚く (Surprised)
悩む (Worried)
携帯電話 (Mobile phone)
決めポーズ (Last posing)
Action
Number
(key operation)
11
44
33
66
88
99
右手を上げる (Raise right hand)
右手を下げる (Put right hand down)
左手を上げる (Raise left hand)
左手を下げる (Put left hand down)
通常ズーム (Normal zoom in)
ズームアップ (Zoom in)
Action
(Shake head sideways)
Action
Switching Chara-den During a Videophone Call <Change Chara-den>
Switch to send a different Chara-den during a Videophone call.
While sending Chara-den as a substitute image, press Cr21
1
[Change Chara-den], select a folder, press t, select Chara-de n and
press i [OK].
Switching Between Full-action and Part-action <Change Action>
Switch between full-action and part-action while displaying Chara-den.
While sending Chara-den as a substitute image, press o for 1+
1
seconds or Cr22 [Change action].
Modes are switched between full-action and part-action.
Phone/Videophone
76
Page 79

Making Chara-den Perform Actions
Make Chara-den perform actions.
Alternatively, enter the action number by pressing 1 to 9 to have the character perform an action.
For preset Chara-den actions, refer to P. 75.
In Full-action mode, express emotions such as 笑う (laughing) and 怒る (angry).
Change to Part-action mode to move body parts, jump and dance.
Perform different actions together in Part-action mode.
Some Chara-den move the mouths, synchronizing with sound from a microphone.
For others, actions may not be available.
Depending on the Chara-den, some actions are performed automatically.
While sending Chara-den as a substitute image, press m [Action],
1
press p for 1+ seconds or press Cr23 [Action list].
To perform action Select an action → t
To display details i
To end action: Press 0.
Setting the Image to Send to the Other Party
Changing Image to Send During Call <Change Send Img>
Change the image to send during a Videophone call.
Use JPEG or GIF images saved in My picture of Data box that are set to QCIF: 176×144 (W×H). Animated
GIFs are not available.
Still pictures that are restricted for output from the FOMA terminal are not available. Images shot with the
FOMA terminal are available regardless of File restriction (Images shot wit h Picture memo are not availabl e) .
Still pictures saved onto a microSD Memory Card are not available directly. Copy to the Acquired data folder
in My picture of the FOMA terminal handset.
During a Videophone call, press C3 [Change send img] and select
1
image to send.
Press i [Subst img] during a Videophone call to send the substitute image set
by Substitute image. Press i [My side] to return to the self-portrait.
My side 1
Substitute image 2 → select folder → t → select still picture → i
Chara-den 3 → select folder → t → select Chara-den → i
This setting is disabled when a Videophone call ends.
©Disney
Related Operations
Zoom in and zoom out <Zoom in/Zoom out>
1 During a Videophone call, press r or q.
2 Press r (zoom in) or q (zoom out).
Press a for the maximum zoom and m for the minimum zoom.
Phone/Videophone
Continued on next page??
77
Page 80

Related Operations
Switch between main camera and sub camera <Main/sub camera>
During a Videophone call, press m or Cr1.
To switch to the sub camera: Press m or Cr1 again.
Send a still picture from Data box <File playback>
During a Videophone call, press C34 ? select folder ? t ? select still picture ? i.
To send own camera image: Press i or C31.
Adjust brightness <Brightness>
During a Videophone call, press o for 1+ seconds (brighter) or p for 1+ seconds (darker).
Note
Zoom in/Zoom out
Set up to 20 zoom levels for the main camera and two zoom levels for the sub camera.
Zoom is not available while substitute images are being sent.
Zoom is not available for the other party’s image.
When the cameras are switched or a Videophone call ends, zoom is disabled.
Main/Sub camera
Returns to the sub camera after a Videophone call ends.
If the battery level is $ or less or if the camera area gets hotter, Unable to use the main ca mera at the
moment appears and the main camera becomes unavailable. The main camera in use switches to the
substitute image. The sub camera cannot be switched to the main camera.
When DTMF mode is set to OFF, press # to switch the cameras.
Brightness
Q, R, S, T, or U appears in the upper part of the display.
Brightness is reset after a Videophone call ends.
Brightness cannot be adjusted while a substitute image is being sent.
Changing Image When Making a Call <V.phone Image>
Enter a phone number, press C5 [V.phone image] and select an
1
image to send.
To call from the redial details/received calls/phonebook ent r y details screen, press C6.
The setting is only enabled for one time.
My side 1
Chara-den 2 → select folder → t → select Chara-den → i
To check Chara-den, select Chara-den and press t. Press c and the previous
screen reappears.
Setting a Substitute Image <Substitute Image>
Default setting Dimo
Set a still picture or Chara-den (nP. 313) as the substitute image during a Videophone call.
Use JPEG or GIF images saved in My picture of Data box that are set to QCIF: 176×144 (W×H). Animated
GIFs are not available.
Still pictures that are restricted for output from the FOMA terminal are not availa ble.
In stand-by, press t6421 and select a substitute image.
1
Phone/Videophone
78
Substitute image 1 → select folder → t → select still picture → i
Chara-den 2 → select folder → t → select Chara-den → i
To check image, select an image and press t. Press c and the previous
screen reappears.
Page 81

Note
Press i during a Videophone call to send the set substitute image.
While sending a still picture as substitute image, the still picture is sent to the other party with Camera Off
superimposed. If Chara-den is set, Camera Off does not appear.
Substitute images are sent in the following order.
Priority (high → low)
Image Set substitute image in the phonebook → Set substitute image in the Videophone setting
Related Operations
Change On hold and Hold images <On hold image/Hold image>
1 In stand-by, press t642.
2 For Hold image settings, press 2.
To set On hold substitute image: Press 3.
3 Select folder ? t ? select image ? i.
Note
The default setting is テレビ電話代替 for both.
Setting Outgoing Image Quality <Visual Preference>
Default setting Normal
Set the quality of the image sent during a Videophone call.
In stand-by, press t645 and select an image quality.
1
To set during a Videophone call, press C53.
Prefer img qual 1 To place emphasis on shape and color
Normal 2 To create a balance of clarity and movement
Prefer motion spd 3 To place emphasis on movement
Note
The image quality setting during a Videophone call is only temporary. When a Videophone call is ended, the
image quality returns to the quality set in stand-by with t645 [Visual preference].
Image quality settings for the sender and receiver during a Videophone call differ.
Hands-free V.phone
Setting Hands-free Videophone
Default setting ON
Set whether to automatically switch to Hands-free for Videophone calls. When Hands-free
is set, hear the other party’s voice through the speaker and talk while viewing their image.
Please use in a place where it will not disturb others.
Speak from approximately 20 to 40 cm away from the mouthpiece. When the surroundings are noisy, sound
may break up and the call may not be satisfactory.
In stand-by, press t647 and 1 [ON].
1
Phone/Videophone
79
Page 82

To Turn Hands-free On and Off During a Call
During a Videophone call, press s.
1
Press s to turn the Hands-free on and off.
; appears during the Hands-free operation.
Note
When using Hands-free outdoors or in a location where surroundings are noisy, use the flat-plug earphone/
microphone with switch (sold separately).
If sound breaks up during a Hands-free call, lower Earpiece volume.
Videophone Set
Setting the Image During Videophone Calls
Change the image displayed during Videophone calls.
Set the following items.
Item Setting details Default setting Page
Brightness Adjusts the brightness of camera image in five levels. ±0P.78
Display setting Changes both party’s display method. Show me small P. 80
Subscreen disp
Lighting
Self-portrait Sets self-portrait to Reverse off, Reverse on, or Pause. Reverse on P. 81
J Setting the Videophone Display <Display setting>
Videophone display settings remain even after a Videophone call ends.
Select from the following four settings.
Sets the location of the subscreen. Upper left P. 80
Sets the light duration for the display for a Videophone call.
Always ON P. 81
Show me small Other Show me big Me
During a Videophone call, press C51 [Display setting].
1
Alternatively, press t643 in stand-by.
Select a display method and press t.
2
J Setting the Videophone Subscreen <Subscreen disp>
If the subscreen is set to Lower right, the call duration, brightness and sent/received image icons appear on
the lower left.
The subscreen position setting remains even after a Videophone call ends.
Select from the following two settings.
Upper left Lower right
Phone/Videophone
80
Page 83

During a Videophone call, press C52 [Subscreen disp].
1
Alternatively, press t644 in stand-by.
Select a display location and press t.
2
Related Operations
Set light <Lighting>
1 During a Videophone call, press C54.
In stand-by: Press t27413.
2 Press 2.
For Same as normal: Press 1.
Send own image as still picture <Pause>
During a Videophone call, press C351.
To undo: Press i or c.
Set own image as normal image <Reverse on/off>
During a Videophone call, press C352.
Note
Lighting
If Same as normal is set, the duration is what was set by normal of Display light time.
Note that increasing light duration shortens the continuous stand-by time.
The setting for Lighting remains even after a Videophone call ends.
Self-portrait (Pause, Reverse on/off)
The image appears in normal orientation to the other party regardless of settings.
Paused camera image can also be sent.
Reverse on reverses image orientation as if viewing in a mirror. Reverse off returns image to normal.
While substitute image is being sent, Self-portrait is not available.
While paused, your image is sent to the other party with Stopped superimposed.
Self-portrait is reset after a Videophone call ends.
The image cannot be switched between the normal image and the mirrored image during a Videophone
call in the Cycloid position.
When the screen is rotated while paused, the FOMA terminal restarts operation.
Changing Videophone Settings
Redialing as Voice Call Automatically <Redial Voice Call>
Default setting OFF
When a Videophone call is not connected, the call is automatically switched to the voice call and
made again.
In stand-by, press t641 and 1 [ON].
1
If Videophone communication is started, Redial voice call is not performed.
Note
If a call is redialed as a voice call, voice call charges are incurred.
Phone/Videophone
Continued on next page??
81
Page 84

Note
Note that Redial voice call may not work if a call is placed to an I SDN synchronou s 64K, PI AFS access point
or an ISDN Videophone that does not support the 3G-324M standard (nP.48) (as of January 2007), or if
an invalid phone number is dialed by mistake. In addition, charges may be incurred.
Notify Switch Mode
Setting to Switch Between Voice Call and Videophone
Default setting Indication ON
This setting lets the other party know whether the FOMA terminal can be switched between
voice call and Videophone.
When Notify switch mode is set to “Deactivate”, the other party cannot switch the call.
Notify switch mode cannot be changed during voice calls, Videophone calls or outside the service area.
In stand-by, press t646 and select the notify setting.
1
To activate 1 → Yes → t
To deactivate 2 → Yes → t
To check settings 3
Packet Trans Arr Act
Selecting Actions for Incoming Videophone Calls During i-mode
Default setting V-phone priority
Set actions for Videophone calls received during packet transmission.
Videophone calls, during PushTalk transmission, Software update, Pattern definitions update or data
transmission using packet transmission, are rejected.
In stand-by, press t648 and select an arrival action.
1
V-phone priority 1 Answers incoming Videophone calls.
Packet priority 2 Rejects incoming Videophone calls.
Voice mail 3 Automatically connects to Voice Mail Service.
Call forwarding 4 Automatically connects to Call Forwarding Service.
V-phone priority setting does not automatically end packet transmission unless the Videophone is
answered (The packet transmission is disconnected when the call is answered).
To set to Voice mail or Call forwarding, registration for the respective service is required.
Picture Memo
Saving Other Party’s Image as a Still Picture
During a Videophone call, take a still picture of the other party.
When Display Setting is set to Me, Picture memo cannot be selected.
The shot size applicable to still picture is QCIF: 176×144 (W×H).
During a Videophone call, press C4 [Picture memo] and press t
1
[Y].
While still pictures are being shot, your image is sent to the other party with Recording superimposed.
Shutter does not sound.
The still picture is recorded and Saving appears.
The picture is saved to the Camera folder in My picture of Data box.
The picture cannot be output from the FOMA terminal.
Phone/Videophone
82
Page 85

PushTalk
PushTalk . . . . . . . . . . . . . . . . . . . . . . . . . . . . . . . . . . . . . . . . . . . . . . . . . . . . . . . . . . . . . . . 84
Sending PushTalk Transmissions . . . . . . . . . . . . . . . . . . . . . . . . . . . . . . . . . . . . . . . . . . . . 86
Adding a Member During PushTalk Transmission. . . . . . . . . . . . . . . . . . . <Add Member>87
Receiving PushTalk Transmissions . . . . . . . . . . . . . . . . . . . . . . . . . . . . . . . . . . . . . . . . . . .88
Adding to PushTalk Phonebook. . . . . . . . . . . . . . . . . . . . . <Add to PushTalk Phonebook>89
Using PushTalk Phonebook to Send PushTalk Transmissions . . . . . . . . . . . . . . . . . . . . . . 91
Deleting PushTalk Phonebook Entries. . . . . . . . . . . . . . . . . . . . . . . . . . . . . . . . . . . . . . . . .92
Setting PushTalk Send/Receive Options . . . . . . . . . . . . . . . . . . . . . . . . . . <Set PushTalk>93
83
Page 86

PushTalk
Press the PushTalk key, recall PushTalk phonebook entries, select the other party and
press the PushTalk key again to easily communicate with multiple people at once (up to
five including yourself). Transmission fees are incurred each time the key is pressed
(transmission is sent).
Voice can only be transmitted while the key is pressed. Other members can only listen
while someone is speaking. Information about the members, such as who is currently
speaking, is indicated on the screen.
PushTalk is useful when speaking to specific groups or conveying short information at the
same time.
Compatible models: 902i series, 902iS series, SO902iWP+, SH902iSL, N902iX HIGH-SPEED, N902iL, 903i
With the following models*, members can join or re-join the conversation during transmission.
* 903i series, 703i series (excluding N703iD, F703i, D703i, P703iµ, N703iµ)
series, 702i series (excluding SH702iD, N702iD, F702iD, D702i, SA702i, SO702i), 702iS
series (excluding N702iS, D702iF, M702iS, M702iG), 703i series (excluding N703iD,
F703i, D703i, P703iµ, N703iµ)
Two people
Hello
Caller
Recipient
Hold PushTalk key
while talking
Multiple people
Recipient
Call
Caller
I’m almost there
Recipient
Recipient
Recipient
Hold PushTalk key
while talking
J PushTalkPlus
Use PushTalkPlus to access a phonebook saved on the network and to communicate with up to
20 people (including yourself) at once. In addition, enjoy other useful functions such as checking
the status of other members with more convenient use than PushTalk. Subscription is required to
use PushTalkPlus.
Refer to the PushTalkPlus guide provided at the time of subscription for details of the service.
84
PushTalk
Page 87

J PushTalk transmission screen layout
1
2
3
4
51
6
7
8
9
a
PushTalk icon
PushTalk in progress
a
2
Speaker’s name: Name of the person who is currently speaking
(Phone number when not saved in phonebook)
Myself: When you are the speaker (has the right to speak)
No display: Nobody is speaking
?: When the speaker is not identified
Name appears if saved in the FOMA terminal handset phonebook. Image
also appears if phonebook Picture call is set. If the call is transmitted from
PushTalkPlus, the name saved in the network phonebook appears, and
the image does not appear even if Picture call is set.
3
Group name: Group name saved in the PushTalk phonebook or
the network phonebook appears.
4
Members: Name appears if saved in the FOMA terminal handset
phonebook. If the call is transmitted from PushTalkPlus, the
name saved in the network phonebook appears. Phone number
appears for unregistered participants.
5
Hands-free icon
(red)
;
6
Status of members: Transmission status of each member is
Hands-free in progress
shown. When a status changes while connected, a tone
indicating that the user is connected or disconnected (leaving
PushTalk) sounds and the status shown changes.
Scroll bar appears when all members cannot be shown on the screen
at once. Scroll with v to view members.
7
Connected: Participating in PushTalk.
8
Disconnected*: No reply, the other party has ended PushTalk,
the other party is out of the service area or the other party has
power turned off.
9
Driving* : The other party has Public mode (Drive mode) set.
a
Calling* : Ringing the other party.
* Appears only when PushTalk transmission is in progress with three or more
participants.
PushTalk
85
Page 88

Sending PushTalk Transmissions
Use packet transmissions and press the PushTalk button to communicate easily. Have
conversation one on one or with multiple people.
Only one person can speak at once. Press & (q) to get the right to speak.
Voice can only be transmitted when granted the right to speak. When granted the right to speak, other
people’s voices are inaudible.
PushTalk charges are incurred for the caller while & (q) is pressed and right to speak is being granted.
Save PushTalk phonebook entries to easily communicate with those members.
In stand-by, dial the phone number.
1
Alternatively, use one of the following methods.
F rom the PushTalk phonebook (nP. 91)
F rom the FOMA terminal handset phonebook (nP. 107)
F rom Redial (nP. 53)
F rom Received calls (nP. 54)
Using Phone To function (nP. 195)
Press & (q).
2
PushTalk dialing
screen
Press & (q) when speaker’s name is blank. When Myself appears,
speak while pressing & (q).
3
A right-obtained tone sounds when the right to speak is granted and
An error tone sounds if & (q) is pressed while another person is speaking.
Release & (q) when finished speaking. A right-released tone sounds.
Adjust the volume during PushTalk transmission (nP. 67).
a flashes at the upper left of the display while dialing.
When the other party replies, a tone indicating that the user is connected
sounds, a lights and the PushTalk transmission screen appears.
To switch to hands-free on and off, press s or i. Switching is not available
while & (q) is pressed.
Myself
is shown for the speaker’s name.
Press H to end the transmissions.
4
The number of times the right to speak was granted is shown and the stand-by display reappears.
Note
When talking in the Cycloid position, use a flat-plug earphone/microphone with switch (sold separately) or
use Hands-free. When using the earpiece to talk, make sure to switch to the normal position.
When the caller disconnects the transmission, all participants are disconnected.
PushTalk calls cannot be made to emergency numbers (110, 119, and 118).
There is a time limit when speaking. If the right to speak keeps obtained for a set time, a tone indicating that
the speaking time is over sounds and the right to speak is terminated.
PushTalk is not available during voice calls, Videophone calls and data transmission.
i-mode transmission is disconnected if PushTalk transmission is sent during i-mode.
When Set PushTalk arrival action is set to Answer, press s to end PushTalk transmission and answer
voice calls received during PushTalk transmission.
When a voice call is received while a hands-free call is in progress, hands-free is disabled if the voice call is answered.
i-mode is not available during PushTalk transmission.
PushTalk is automatically disconnected when no one speaks for a set amount of time.
When the PushTalk sender has set PushTalk
members are notified. If set to
who received the transmission. The phone number is important personal information. Be careful when sending caller ID.
Approximate number of times the right to speak was obtained appears when PushTalk transmission is
ended. 999 is the maximum value that appears. When exceeded,
PushTalk
86
No ID, No ID
caller ID setting
appears for speaker and members’ fields on the handsets of all the members
to
Send ID
, phone numbers for the caller and all
***
appears.
Page 89

Related Operations
Send PushTalk transmissions from Received calls/Redial
In stand-by, press q ? select Received calls ? & (q).
In stand-by, press r ? select Redial ? & (q).
Return to a PushTalk conversation with multiple members after disconnecting
When a PushTalk call for multiple members is answered and PushTalk is disconnected, or
when a PushTalk call cannot be answered, the transmissions can only be rejoined by calling
the member from the Received calls if the PushTalk transmissions are still in progress.
If the PushTalk transmission has been ended, a new transmission is sent from you.
In stand-by, press q ? select Received calls ? & (q).
Add Member
Adding a Member During PushTalk Transmission
When a PushTalk sender is Myself, add a member during PushTalk transmission.
When calling from PushTalkPlus, a member cannot be added.
Even if a member is added during transmission, it is not recor ded in Redial. It is not re corded in Recei ved calls
on the other party’s terminal that has been already in transmission.
Press C1 [Add member] during PushTalk transmission.
1
Select an adding method and send the transmission.
2
When a member is
selected from
PushTalk
phonebook
Note
When the other party on the PushTalk transmission uses a model which does not support the Add member
function, the other party’s terminal may operate as follows:
When a member is added, the added member does not appear and a tone indicating that the member is
connected does not sound.
When an added member speaks, ? appears for the speaker field.
When an added member leaves PushTalk, a tone indicating that the member is disconnected does not sound.
When a PushTalk sender has set PushTalk caller ID setting to Send ID, the sender and all members’
phone numbers are sent to all the members including the added members. If set to No ID, No ID appears for
speaker and members’ fields on the handsets of all the members including the added members. Howeve r,
when the other party on the PushTalk transmission uses a model which does not support the Add member
function, the added members do not appear on the other party’s screen regardless of the caller ID setting.
When Function lock is applied to the phonebook, a member to add cannot be selected from the FOMA
terminal handset phonebook or PushTalk phonebook. Adding a member by direct input is not availabl e while
Keypad dial lock is set.
Alternatively, press m [Add member] during PushTalk transmission to add a
member.
To select a member from FOMA
terminal handset phonebook
To select a member from
PushTalk phonebook
To enter directly 3 → enter phone number → C [Dial]
Add up to five members including self as many times as necessary.
The number of members that can be added at once is up to five followed by the
next conditions.
When a member is selected from the PushTalk phonebook: Three
When a member is selected from the FOMA terminal handset phonebook or
directly enter a number: One
1 → select a name → t [Dial]
2 → select a name and i (repeatable)
→ C [Dial]
PushTalk
87
Page 90
Receiving PushTalk Transmissions
When PushTalk is received, ring tone sounds and called LED
1
flashes.
Press & (q) or s.
2
A PushTalk call can also be received with Any key answer (nP. 66).
If a PushTalk call is received in the Cycloid position, return to the normal position to answer the call
(nP. 66).
A call is answered with hands-free if the FOMA terminal is closed. The operation follows Hands-free
PT if the FOMA terminal is opened (nP.94).
a at the upper left of the display lights and the PushTalk transmission screen appear s.
Transmission procedures are the same as for “Sending PushTalk Transmissions” on P. 86.
Adjust the volume during PushTalk transmission (nP. 67).
Refer to the following for key operations while receiving a call.
When FOMA terminal is open When FOMA terminal is closed
Disconnected H :
Quick silent (nP. 124) # +
Manner mode (nP. 123) # (for 1+ seconds) + (for 1+ seconds)
Press H to end the transmissions.
3
Note
When talking in the Cycloid position, use a flat-plug earphone/microphone with switch (sold separately) or
use Hands-free. When using the earpiece to talk, make sure to switch to the normal position.
When Set auto answer is set to ON, received PushTalk calls are automatically answered with hands-free.
However, calls are not answered automatically even if Set auto answer is set to ON while in Manner mode.
PushTalk cannot be placed on hold.
To accept or reject calls from specified callers, set Accept calls, Rej ect calls and Reject unknown. The
settings are common with voice/Videophone call. However, they are not applied to transmissions from the
PushTalkPlus.
PushTalk calls received during a voice call, Videophone call or data transmission are not connected. During
a voice call, the call is recorded in Received calls and xx missed call(s) appears in stand-by. During a
Videophone call or data communication, the call is not recorded.
When a Videophone call, 64K data communication or different PushTalk call is received during PushTalk
transmission, the call is recorded in Received calls and the PushTalk transmission is continued. When Set
PushTalk arrival action is set to Answer, press s to end PushTalk transmission and answer voice calls
received during PushTalk transmission. If Set PushTalk arrival action is set to other than Answer, the call is
recorded in Received calls and the PushTalk transmission is continued.
When i-mode arrival action is set to PushTalk preferred, i-mode transmission is disconnected and
PushTalk is connected if PushTalk is received during i-mode. When set to i-mode preferred, PushTalk is
not connected nor recorded in Received calls. The default setting is PushTalk preferred.
When a PushTalk call is received while Public mode (Drive mode) is set and the handset is turned on, the
call is not connected but is recorded in Received calls and xx missed call(s) appears in stand-by. Driving
appears for the status on the other member’s transmission screen. The message does not appear if the
other party is one person.
88
PushTalk
Page 91

Add to PushTalk Phonebook
Adding to PushTalk Phonebook
Entries saved to the PushTalk phonebook are also saved to the FOMA terminal handset
phonebook.
Save entry to the FOMA terminal handset phonebook and save the name, reading and one
phone number to the PushTalk phonebook. Save entries already saved in the FOMA
terminal phonebook to the PushTalk phonebook. Up to 750 entries can be saved in the
PushTalk phonebook (nP. 96).
J Entry items
Icon Item Details
Name
=
Reading
B
PushTalk group
%
PushTalk phone
$
number
In stand-by, press & (q) and press C1 [New] in the PushTalk
1
member list screen (nP. 89).
When the PushTalk group list screen appears, press m [Member].
Select a saving method and save phonebook entry.
2
To select from
phonebook
To enter directly 2 → enter name → t → enter phone number → t → select phone number
J PushTalk phonebook
Select a group from the PushTalk group list screen or select members from the PushTalk member
list screens to send a transmission to the members saved in the PushTalk phonebook. Press m
[Member]/m [Group] to switch between the PushTalk group list screen and the PushTalk member
list screen.
Enter name. Enter up to 32 single-byte (16 double-byte) characters.
Reading is entered automatically. Can be edited. Enter up to 32 single-byte
characters.
Save the entry to a PushTalk group. Groups 1 to 9 are available. Group
names can be changed.
Save phone number for PushTalk.
1 → select name → t
When multiple phone numbers are saved, select a phone number to use for
PushTalk and press t.
type icon → t → i → t
FOMA terminal handset phonebook name entry screen appears.
Refer to P. 96 “Adding to FOMA Terminal Handset Phonebook” for details on
saving methods.
When multiple phone numbers are saved, select a phone number to use for
PushTalk after saving to the FOMA terminal handset phonebook and press t.
& (q)
PushTalk member list
m
PushTalk group list
t
Group members screen
PushTalk
89
Page 92

Registering to PushTalk Group <Group>
Set groups in the PushTalk phonebook to easily call all members of a PushTalk group.
Save up to 19 members per group. Up to four people can be called simultaneously.
Set up to nine groups. Edit default group names (グループ1 to グループ9).
J Creating a new PushTalk group <New group>
To create a new group, delete an already registered group from
(
n
P. 93).
In the PushTalk member list screen (nP. 89), press C51 [New
1
group].
In the PushTalk group list screen, press C11.
Enter PushTalk group name and press t.
2
Enter up to 20 single-byte (10 double-byte) characters for a PushTalk group name.
Related Operations
Edit PushTalk group name <Edit group name>
1 In PushTalk member list screen, press C52 ? select group ? t.
In the PushTalk group list screen: Select group ? C12.
2 Edit group name ? t.
J Registering to PushTalk group <Add PushTalk group>
Save PushTalk phonebook entries that are already saved as PushTalk members.
In the PushTalk member list screen (nP. 89), select name and
1
press i [Select].
When nothing is checked, only the entry at the position of the cursor is selected.
Press C4 [Add PushTalk group].
グループ1
to
グループ9
2
in advance
Select PushTalk group, press t, select location to save to and
3
press t.
If the selected location already has a member saved, the member is overwritten. The same phone
number cannot be saved more than once to the same group.
Selecting a save location is not necessary if multiple members are selected in step 1.
Related Operations
Register to PushTalk group from PushTalk group list <Add PushT alk group>
1 In the PushTalk group list screen, select group ? a or C13.
In the group member screen: Press a or C23.
2 Select member and press t (repeatable) ? i.
PushTalk
90
Page 93
J Editing PushTalk phonebook entries <Edit data>
Change phone numbers and groups of saved PushTalk phonebook entries.
In the PushTalk member list screen (nP. 89), select name and
1
press C2 [Edit data].
Select item, press t and edit.
2
Other phone numbers saved to the FOMA terminal handset phonebook entry are available.
To change groups, select the group to change, press t, check the save list and press t.
Press i [Complete], select Yes and press t.
3
Using PushTalk Phonebook to Send PushTalk Transmissions
Call from the PushTalk phonebook. Save members in the PushTalk phonebook in advance.
J Sending from PushTalk groups
Transmit to up to four people at once.
In stand-by, press & (q) and select the other party.
1
If a PushTalk member list screen appears, press m [Group].
To select group (to send PushTalk
transmissions to all members of the
group)
To select multiple members from a group Select group with u → t → select name i [Select]
u
(repeatable) (H → E)
When nothing is checked, only the party at the position of
the cursor is selected.
Press & (q).
2
Transmission procedures are the same as “Sending PushTalk Transmissions” on P. 86.
When transmission is sent with five or more members saved in a group, Exceeds max number of
simultaneous calls appears. Select up to four members and send transmission.
J Selecting the other party and sending a transmission
Select the other party from the PushTalk member list screen and send a transmission.
In stand-by, press & (q).
1
If the PushTalk group selection screen appears, press m [Member].
Select name and press i.
2
Alternatively, enter reading to search. The cursor moves to the closest entry after each character is
entered.
Press & (q).
3
Continued on next page??
PushTalk
91
Page 94

Related Operations
Receive transmissions automatically <Set auto answer>
In the PushTalk member list screen, press C61 ? 1.
Set the ring duration <Ring time setting>
1 In the PushTalk member list screen, press C63.
2 Enter duration of ring tone (two digits: 01 to 60 seconds) ? t.
Set the operation when the phone is folded during PushTalk transmission
<Set when folded>
In the PushTalk member list screen, press C64.
To end transmission: Press 1.
To play the other party’s voice through the speakers: Press 2.
Note
Set auto answer
The default setting is OFF.
When a call is received with Auto answer, th e call is aut omatically swi tched to hand s-free. Au to answer is
not available while in Manner mode.
The Set auto answer in the PushTalk phonebook is linked with the PushTalk in Set auto answer. Setting
one of them to ON switches the other to ON.
Ring time setting
The default setting is 30 seconds.
When calls are not answered within the set duration in a transmission with multiple people,
Disconnected appears on the other members’ transmission screens.
Ring time setting cannot be selected when Set auto answer is set to ON.
Set when folded
The default setting is Speaker phone.
Select to end the transmission or activate speakers when the FOMA terminal is closed.
The Set when folded in the PushTalk phonebook is linked with the PushTalk in the Set when folded.
Changing one of them changes the other.
Network connection
A PushTalkPlus subscription is required to use the network connection.
Deleting PushTalk Phonebook Entries
In the PushTalk member list screen (nP. 89), select a member an d
1
press C3 [Delete].
When the PushTalk group list screen appears, press m [Member].
Member selection is not necessary for Delete all in group and Delete all.
Select deletion method.
2
To delete one phonebook entry 1
92
To delete entries collectively 2 → select member t (repeatable) → C
To delete all entries in a group
created in the FOMA terminal
handset phonebook
To delete all PushTalk
phonebook entries
PushTalk
Press i [SelAll]/i [ClrAll] to select or clear all.
3 → select group → t → enter terminal security code → t
4 → enter terminal security code → t
Page 95

Select a deletion method for the FOMA terminal handset
3
phonebook, select Yes and press t.
To only delete from PushTalk
phonebook
To also delete from the FOMA
terminal handset phonebook
1
2
Entries are deleted from FOMA terminal handset phonebook and
PushTalk phonebook.
Deleting PushTalk Groups <Delete>
In the PushTalk group list screen (nP. 89), select group and pr ess
1
C2 [Delete].
When the PushTalk member list screen appears, press m [Group].
Select a deletion method, select Yes and press t.
2
To delete one group 1
To delete all groups 2
Deleting Members from PushTalk Groups <Delete from Group>
In the PushTalk group list screen (nP. 89), select group and pr ess
1
t.
When the PushTalk member list screen appears, press m [Group].
Select member, press C1 [Delete from group] and select a
2
deletion method.
To delete one member 1 → Yes → t
To delete members collectively 2 → select member t (repeatable) → C → Yes → t
To delete all members in group 3 → Yes → t
Press i [SelAll]/i [ClrAll] to select or clear all.
Set PushTalk
Setting PushTalk Send/Receive Options
Set the following items.
Item Setting details Page
Caller ID setting
Ring time setting
Set auto answer
Set PT arrival act
i-mode arrival act
Hands-free PT
Set when folded
Set mute ring time
Set to send own and group member’s phone numbers when sending PushTalk
transmission.
Set the duration to sound the PushTalk ring tone. P. 122
Set to automatically answer PushTalk transmissions. P. 388
Set actions for voice calls received during PushTalk transmissions. P. 94
Set to receive/reject PushTalk transmissions received during i-mode
transmissions.
Set whether to automatically switch to Hands-free when PushTalk transmissions
start.
Set Finish call or Speaker phone (other party’s voice is heard through the
speakers) to engage when the FOMA terminal is closed during a transmission.
Set the number of seconds to delay the start of ring tone for calls from unknown
callers and calls with no ID. This setting applies to both voice/Videophone calls.
Continued on next page??
P. 94
P. 199
P. 94
P. 66
P. 158
PushTalk
93
Page 96

Item Setting details Page
Reconnect
Set to automatically reconnect when a transmission is disconnected due to signal
conditions. This setting is applied to both voice/Videophone calls.
P. 62
Sending Own and Member’s Phone Number <Caller ID Setting>
Default setting No ID
In stand-by, press t661 and 1 [Send ID].
1
Alternatively, press C65 to select from the PushTalk member list screen.
Note
Regardless of the Notify caller ID setting, when the PushTalk sender has set PushTalk caller ID sett ing to
Send ID, the sender and all members’ phone numbers are sent to all the members including the added
members. If set to No ID, No ID appears for speaker and members fields on the handsets of a ll the member s
including the added members.
However, when the other party on the PushTalk transmission uses a model which does not support the Add
member function, the added members do not appear on the other party’s screen regardless of the caller ID
setting.
When multiple caller ID settings are set/operate d simultaneously at t he time of PushTalk transmission, caller
ID is prioritized in the following order.
Priority (high → low)
Caller ID Setting
Caller ID is set when calling → PushTalk caller ID setting is set
Selecting Actions for Incoming Calls During a Transmission
<Set PT Arrival Act>
Default setting Answer
Set actions for voice calls received during PushTalk transmissions.
In stand-by, press t662 and select an arrival action.
1
Alternatively, press C62 to select from the PushTalk member list screen.
Voice Mail 1 Automatically connect to Voice Mail Service.
Call Forwarding 2 Automatically connect to Call Forwarding Service.
Call Rejection 3 Reject calls.
Answer 4
To set to Voice Mail or Call Forwarding, subscription to the respective service is required. If Voice
Mail or Call Forwarding is set without subscription, a voice call is set to Answer.
Select to continue PushTalk transmission or end and answer the incoming voice call.
Setting PushTalk Hands-free Operation <Hands-free PT>
Set whether to automatically switch to Hands-free when PushTalk transmissions start.
The setting is switched to hands-free regardless of Hands-free PT if the FOMA terminal is closed.
In stand-by, press t663 and press 1 [ON].
1
Alternatively, press C66 to select from the PushTalk member list screen.
To disable: Press 2 [OFF].
Note
The setting cannot be switched to hands-free while in Manner mode even if Hands-free PT is set to ON.
PushTalk
94
Default setting ON
Page 97

Phonebook
Phonebooks Available on FOMA Terminal . . . . . . . . . . . . . . . . . . . . . . . . . . . . . . . . . . . . . 96
Adding to FOMA Terminal Handset Phonebook . . . . . . . . . . . . . . . . <Add to Phonebook>96
Saving to FOMA Card Phonebook. . . . . . . . . . . . . . . . <Add to FOMA Card Phonebook>103
Saving to Phonebook from Redial and Received Calls . . . . . . . . . . . . . . . . . . . . . . . . . . .104
Setting Groups . . . . . . . . . . . . . . . . . . . . . . . . . . . . . . . . . . . . . . . . . . . .<Group Settings>105
Making Calls from Phonebook . . . . . . . . . . . . . . . . . . . . . . . . . . . . <Search Phonebook>107
Editing Phonebook Entries. . . . . . . . . . . . . . . . . . . . . . . . . . . . . . . . . . . . . .<Edit Entries>111
Deleting Phonebook Entries. . . . . . . . . . . . . . . . . . . . . . . . . . . . . . . . . . <Delete Entries>112
Saving (Restoring/Updating) Phonebook to Data Storage Center
. . . . . . . . . . . . . . . . . . . . . . . . . . . . . . . . . . . . . . . . . . . . . . . . . . . . . <Data Sec. Service>112
Hiding Private Numbers . . . . . . . . . . . . . . . . . . . . . . . . . . . . . . . . . . . . . . . . <Set Secret>113
Calling and Sending Mail with a Few Key Strokes. . . . . . <2-touch Dialing/2-touch Mail>113
Using Data Security Service. . . . . . . . . . . . . . . . . . . . . . . . . . . . . . . . . . . . . . . . . . . . . . . . 114
95
Page 98

Phonebooks Available on FOMA Terminal
Use FOMA terminal handset phonebook and FOMA card phonebook. Save items such as
names, phone numbers and mail addresses for FOMA terminal handset and FOMA card
phonebooks.
The FOMA terminal also features a phonebook exclusively for PushTalk.
FOMA Terminal Handset Phonebook, FOMA Card Phonebook and
PushTalk Phonebook
Entries saved in FOMA card phonebook are available even if your FOMA card is inserted into other FOMA
terminals. To use phonebook on other FOMA terminals, save numbers in FOMA card phonebook.
FOMA terminal handset
phonebook
Number of
entries
Number of
characters
for name
Reading Up to 32 single-byte characters Single-byte alphanumerics: up
Group
settings
Icon Phone number: seven types
Memory
numbers
Phone
number
Mail
address
−: Not available
In addition to the above items, save one entry per item for the following data in the FOMA terminal handset
phonebook.
P ostal code Select ring tone Mail/Message LED color
Postal address Mail ring tone Mail LED pattern
Birthday Called LED color Image (Picture call)
Memo Called LED pattern Substitute imag e
750 DoCoMo FOMA card: 50 750
Up to 32 single-byte (16
double-byte) characters
20 groups 11 groups Nine groups (PushTalk group
Mail address: four types
000 to 749
Three per entry
(Up to 2,250 phone numbers
can be saved in the phonebook)
Three per entry
(Up to 2,250 mail addresses
can be saved in the phonebook)
FOMA card phonebook PushTalk phonebook
Single-byte alphanumerics: up
to 21 characters
Double-byte, mixed
single-byte/double-byte or
single-byte katakana: up to ten
characters
to 25 characters
Double-byte, mixed
single-byte/double-byte: up to
12 characters
−−
−−
One per entry One per entry
One per entry
Up to 32 single-byte
(16 double-byte) characters
Up to 32 single-byte characters
nP. 90)
−
Add to Phonebook
Adding to FOMA Terminal Handset Phonebook
Register frequently used phone numbers, names and mail addresses to easily access when
calling, or sending i-mode mail or SMS.
Add still pictures, movies/i-motion, etc. shot with camera to phonebook entries. When a call is received from
someone with an image in their phonebook entry, their name, phone number and im age appear.
Save to PushTalk phonebook when saving to the FOMA terminal handset phonebook.
Phonebook
96
Page 99

J Entry items
Icon Item Details Page
Name Enter name. P.98
=
Reading Reading is entered automatically. Can be edited. P. 98
B
Group Entries can be sorted in groups.
Q
FOMA terminal
handset phonebook
entry screen
Phone
9
number
Mail address
S
Postal code
N
Postal
O
address
Birthday Enter a birthday. P. 100
P
Memo Save memos. P. 100
G
Secret
;
Secret code
F
Select ring
<
tone
Mail ring tone
V
Called LED
q
color
Called LED
-
pattern
Mail LED
:
color
Mail LED
+
pattern
Picture call
8
set
Substitute
1
image
Save up to three numbers. Select from one of
seven icons for each phone number.
Save up to three addresses. Select from one of
four icons for each address.
Enter postal code.
Enter postal address. P. 100
Keep privacy by hiding phonebook entries. Set to
keep phonebook entries private.
Enter secret code specified by the other party. Use
when sending mail.
Differentiate callers using specific ring tones or
Chaku-motion.
Differentiate incoming mail using specific mail ring
tones or Chaku-motion.
Differentiate incoming calls using specific LED
colors.
Set called LED flashing pattern. P. 100
Differentiate incoming mail using specific mail LED
colors.
Set Mail LED flashing pattern. P. 100
Differentiate incoming/outgoing calls using images.
Specific image appears in phonebook list. One still
picture or movie/i-motion shot with the camera can
be saved.
Set still picture or Chara-den for when sending a
substitute image during a Videophone call.
Note
When upgrading the handset at a DoCoMo Shop or retailer, data saved in the FOMA terminal may not be
copied depending on specifications of the new model.
Note information saved in phonebook separately or transfer/store them on a PC us ing microSD Memory
Cards (nP. 318) or DoCoMo keitai datalink (nP. 406). Data Security Service (nP. 112, P. 114,
P. 159) (requires a separate subscription) allows you to store the phonebook entries of the FOMA
terminal handset to the Data Storage Center.
Saved content may be lost due to malfunctions, repairs or other handling of the FOMA terminal. DoCoMo
shall not be liable for any loss of content.
P. 99
P. 98
P. 98
P. 100
P. 100
P. 100
P. 100
P. 100
P. 100
P. 100
P. 100
P. 101
Phonebook
97
Page 100

Basic Saving Operations
Save name, phone number and mail address.
In stand-by, press aC2 and press 1 [Phone].
1
If during a voice call, press C31.
Enter name and press t.
2
FOMA terminal
handset phonebook
entry screen
Enter up to 32 single-byte (16 double-byte) characters for name. Enter up to 32
single-byte characters for reading.
Reading is automatically entered in B. Changes made to entered name are not
reflected automatically.
Reading is not automatically entered if symbols and pictographs are entered for
name or when using 1-touch conversion.
When reading is incorrect, select B, press t and correct reading.
Select 9, press t, enter phone number and press t.
3
Always dial the area code, even when the number is in the same area for
landline phone numbers.
Enter up to 26 digits for phone number.
Phone number may include
i-mode mail and SMS are not sent properly when a number saved to the
phonebook with 186 added is selected as the recipient.
Press 0 for 1+ seconds and enter + and a phone number to save the phone
number for an international call.
Press o to enter a pause P.
Press c and the last digit or character at the cursor is deleted.
Press c for 1+ seconds with the cursor at the end to delete the entire number.
When the cursor is at another location, numbers after the cursor are deleted.
b
or # but call may not connect.
Select phone number type icon.
4
Landline phone 1
9
Mobile phone 2
y
Videophone 3
A
Home phone 4
3
Repeat steps 3 and 4 to save multiple phone numbers.
T
Y
Z
Office phone 5
Home fax 6
Office fax 7
5
Phonebook
98
Select S, press t, enter mail address and press t.
Enter up to 50 single-byte alphabet, numbers or symbols (not all symbols are
available).
Pictographs are not available.
To enter @ and period (.) 1 (multiple times)
To enter an Internet-related
phrase
a (for 1+ seconds)
Enter part of mail address easily (nP.412).
Alternatively, press m (for 1+ seconds) and
5 [Internet].
 Loading...