

NT x Ion Meter
User Guide
V5

NT x Ion Meter User Guide
2
1 Specifications ....................................................................................................................................... 4
1.1 Technical features .......................................................................................................................... 4
1.2 Connection ..................................................................................................................................... 4
1.3 Power supply .................................................................................................................................. 4
1.4 System requeriments ..................................................................................................................... 4
1.5 Compatible electrodes ................................................................................................................... 5
2 Ntx Ion Meter software use................................................................................................................. 5
2.1 Software setup ............................................................................................................................... 5
2.2 Software execution ........................................................................................................................ 8
2.3 Initial configuration ........................................................................................................................ 9
2.3.1 Probe selection ..................................................................................................................... 9
2.3.2 Calibration solution selection ............................................................................................. 12
2.3.3 Options ............................................................................................................................... 15
2.4 Calibration .................................................................................................................................... 16
2.4.1 Acquisition time .................................................................................................................. 16
2.4.2 Calibration mode ................................................................................................................ 16
2.4.3 Calibration process ............................................................................................................. 17
2.5 Batch measurements ................................................................................................................... 19
2.6 Monitoring or continious measurement ...................................................................................... 21
2.6.1 Ions ..................................................................................................................................... 22
2.6.2 Sampling time ..................................................................................................................... 22
2.6.3 Units (axis) .......................................................................................................................... 22
2.6.4 Actions – monitoring & export files .................................................................................... 23
2.6.5 Last calibration ................................................................................................................... 23
2.6.6 Zoom use ............................................................................................................................ 23
2.7 BNC Connector ............................................................................................................................. 24

NT x Ion Meter User Guide
3
2.7.1 Combination electrode ....................................................................................................... 24
2.7.2 Half-cell eletrode ................................................................................................................ 25
2.8 Temperature ................................................................................................................................ 26
2.9 *.nts files ...................................................................................................................................... 27
2.10 Common errors ....................................................................................................................... 27
2.10.1 Framework 4 o later not installed ...................................................................................... 27
2.10.2 Corrupt installation of nt sensors software ........................................................................ 27
2.10.3 E30: Ion Meter not connected ............................................................................................ 27
2.10.4 Comunication error ............................................................................................................ 28
3 Doubts and suggestions..................................................................................................................... 28

NT x Ion Meter User Guide
4
1 SP E CIFIC A TIONS
1.1 T ECHNICAL F EATUR ES
• Input/Measure channels: 7 Channels
• Measurement range from -2500 mV to 2500 mV.
• Input impedance of 1e12 Ohms.
• Resolution of 0.1 mV.
• Working temperature: from 0º C to 70º C.
• Temperature measure range: -10º C to 70º C
• Temperature resolution: 0.1 ºC
• Dimensions 155 x 90 x 35 mm.
• Weight 240 g.
• ABS enclosure
1.2 C ONNE CTION
The device has three connectors:
• Multiple connector of 8 pins (for Multi Ion probe input)
• BNC Connector (for Combination or Half-cell electrodes)
• Mini USB female connector type AB (for power supplying/communication to PC). (Provided)
1.3 P OWER SUPPLY
The instrument is powered directly from the USB port connected to the PC, so it does not require any
additional power supply.
1.4 S YSTEM REQU ERIME NTS
Windows XP, Windows Vista o Windows 7.
Net Framework 4 o later (official link).
NTx Ion Meter Software (supplied).
Available USB port.
Mouse and keyboard are required.

NT x Ion Meter User Guide
5
1.5 C OMPAT IBLE E LECTR ODES
NT Ion meters are compatible with the CNT_ISE from NT Sensors. Also other commercially available
electrodes could be used with NT Ion meters. Ask for more info about compatibility of other types of
electrodes.
2 NTX ION M ETER SOFT WARE U SE
2.1 S OFTWA RE SE TUP
Insert the software disc into the CD-ROM drive of your computer/laptop.
If the installation does not run automatically, make double click on “NTx_Setup.msi”.
After the installation, the user could select the language ( English/Spanish).
Screenshot 1: Installation I

NT x Ion Meter User Guide
6
Once installation is executed, the Screenshot 1: Installation I will appear. Select the button “Next >”, to
continue the installation process.
Screenshot 2: Installation II
Choose the directory where the program should be installed. By defect, the setup will create a folder
called “NT Sensors” in Program Files. To continue, click on the next button “Next >”.
RECOMMENDATION
Do not modify the folder if you are not an advanced user.

NT x Ion Meter User Guide
7
Screenshot 3: Installation III
If the system requires additional licenses to install the software, allow to continue. Finally, the software
program will be installed in the specific folder.
NT x Ion Meter User Guide
8
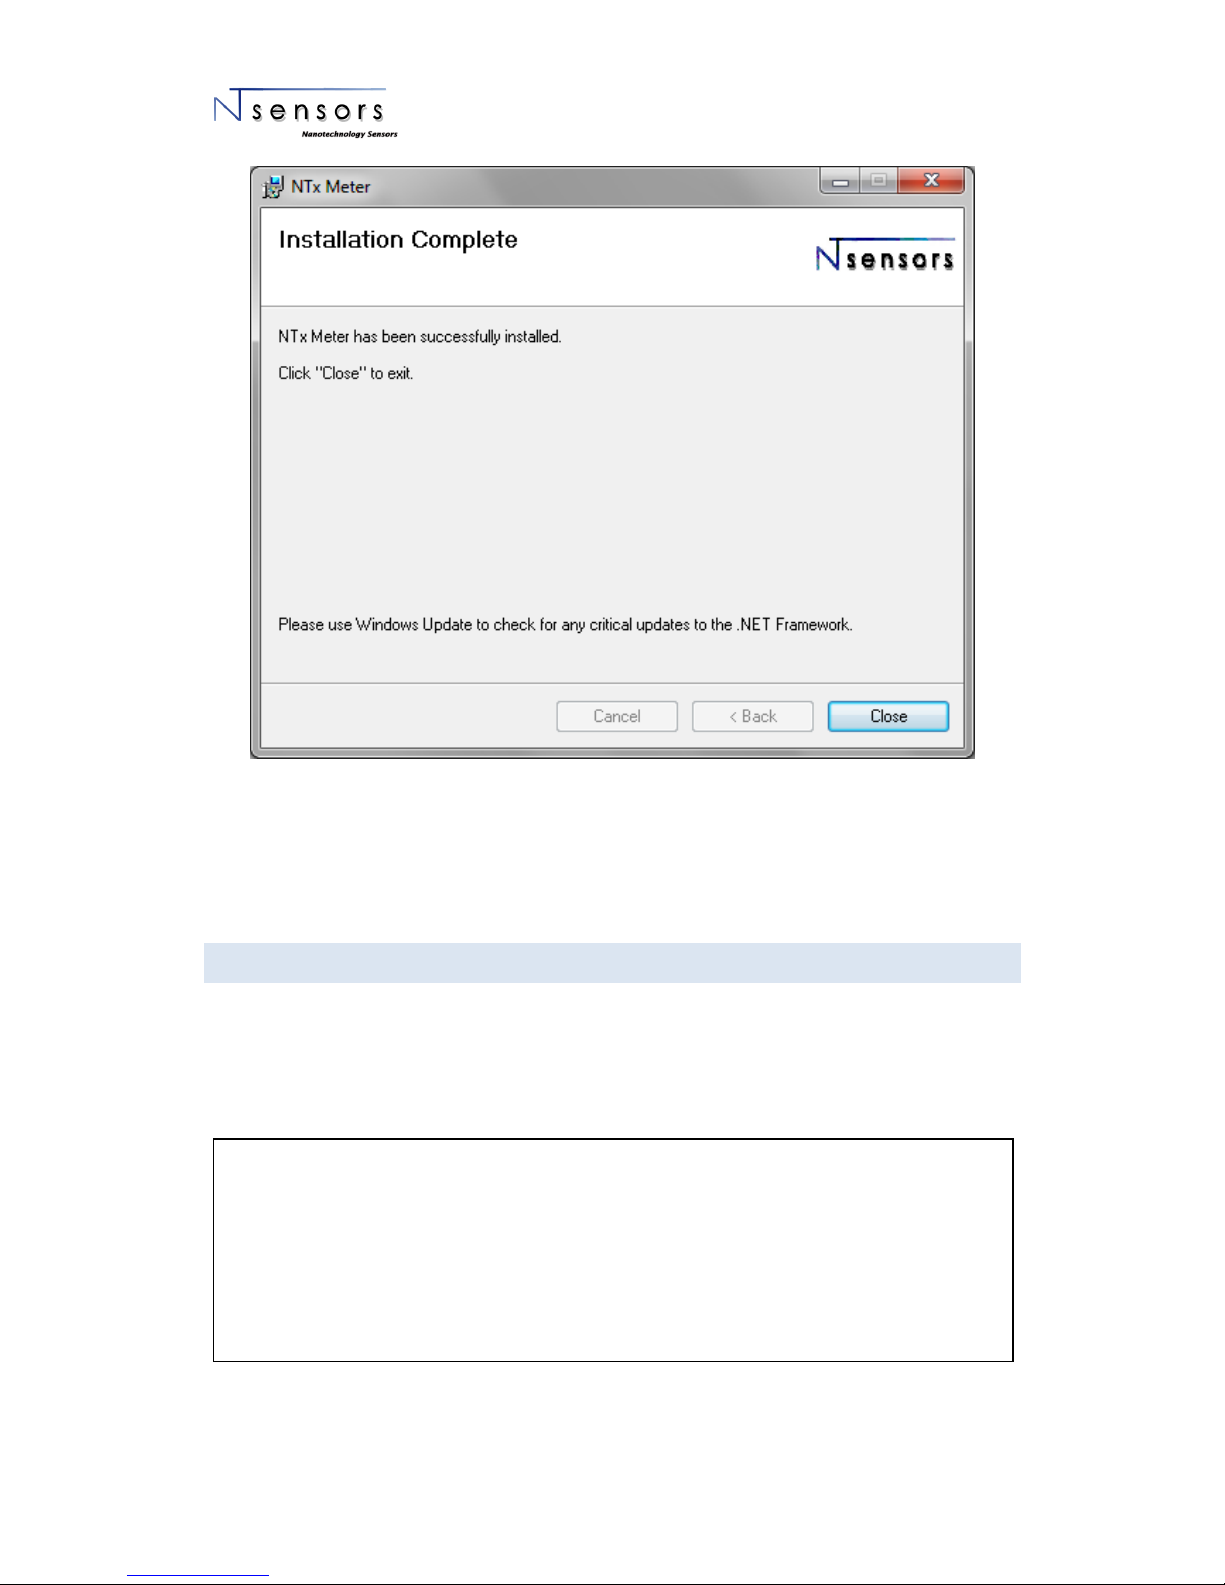
Screenshot 4: Installation IV
When installation is completed, the NTx IonMeter icon will be created on your desktop. Double clicking
on this will start the program.
2.2 S OFTWA RE EX ECUTI ON
Before starting, connect the NT Ion Meter to the PC through the USB cable supplied.
Plug through the specific connector the electrodes/sensors that are going to be used in the assay.
When NT Ion Meter is connected, run NTx IonMeter software from desktop shortcut icon.
IMPORTANT NOTE
Do not leave the meter connected to the PC when not in use or when do not have to be used in a
long period of time.
It is not necessary to unplug the sensors when the analysis is finished. The sensors can remain
connected to the meter.

NT x Ion Meter User Guide
9
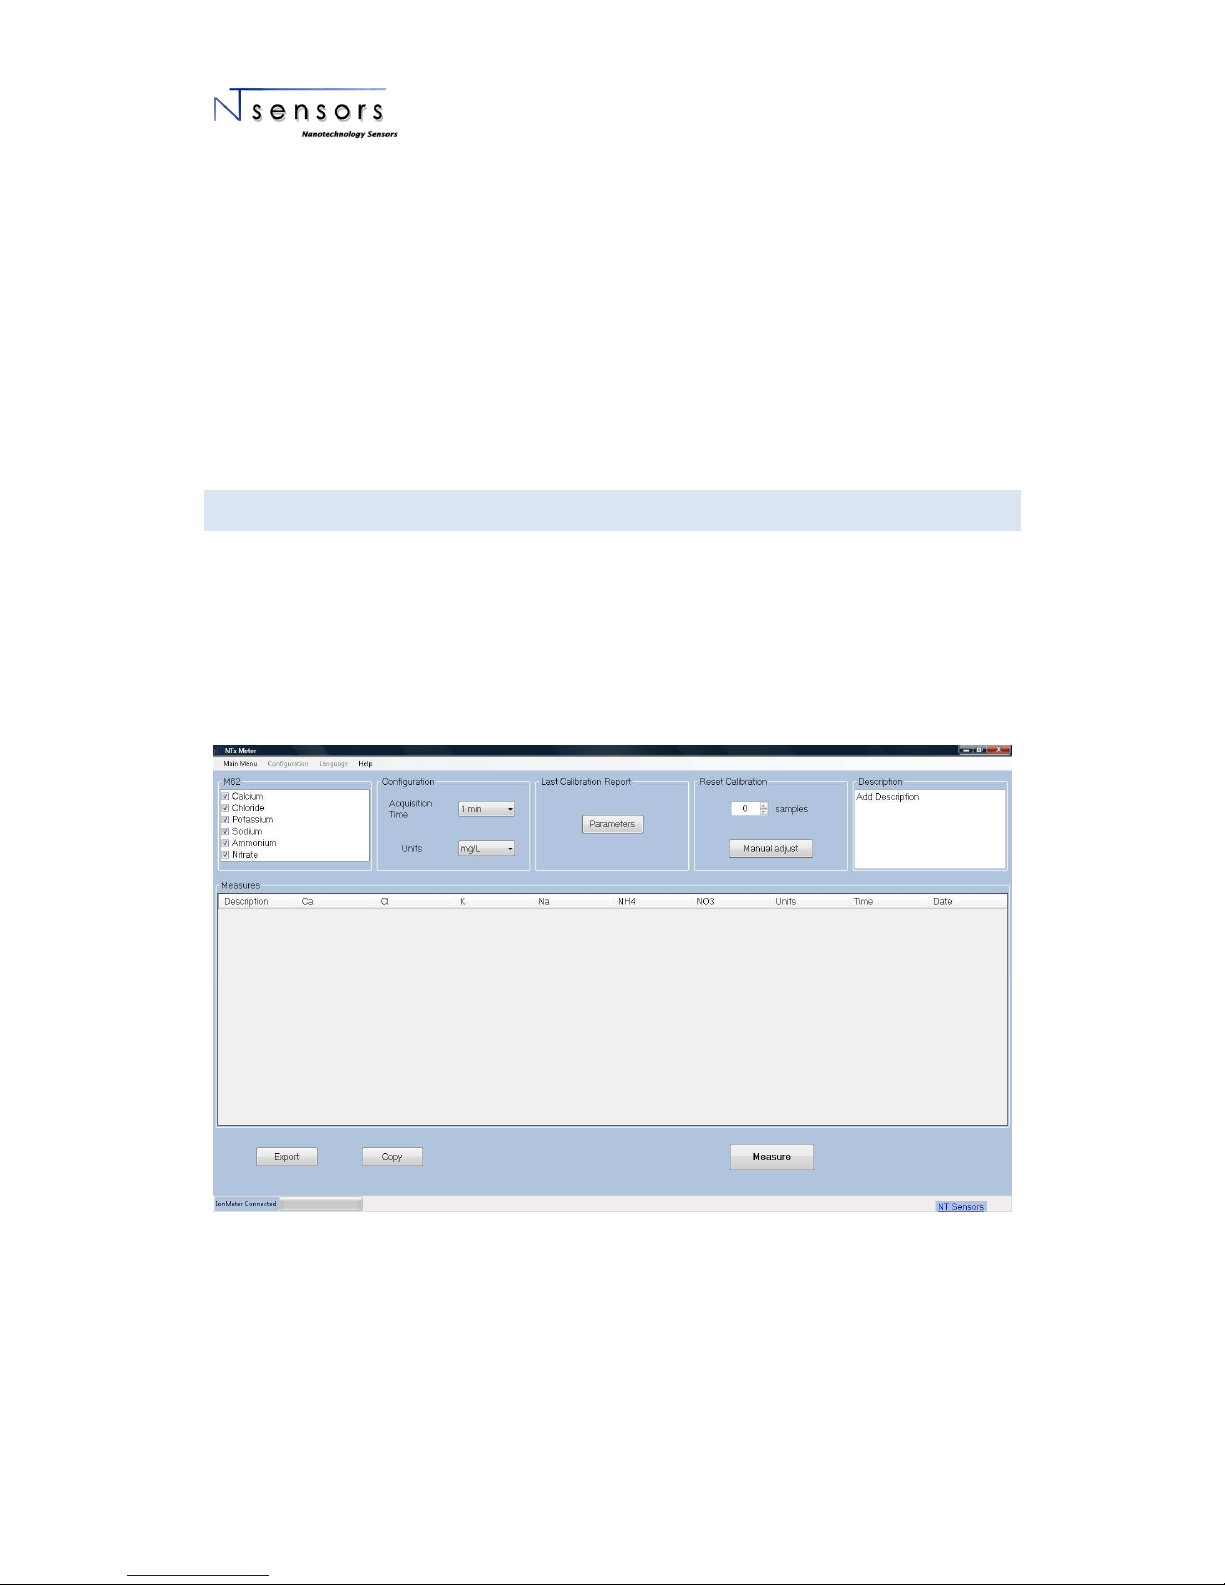
2.3 I NITI A L CON FIGUR ATION
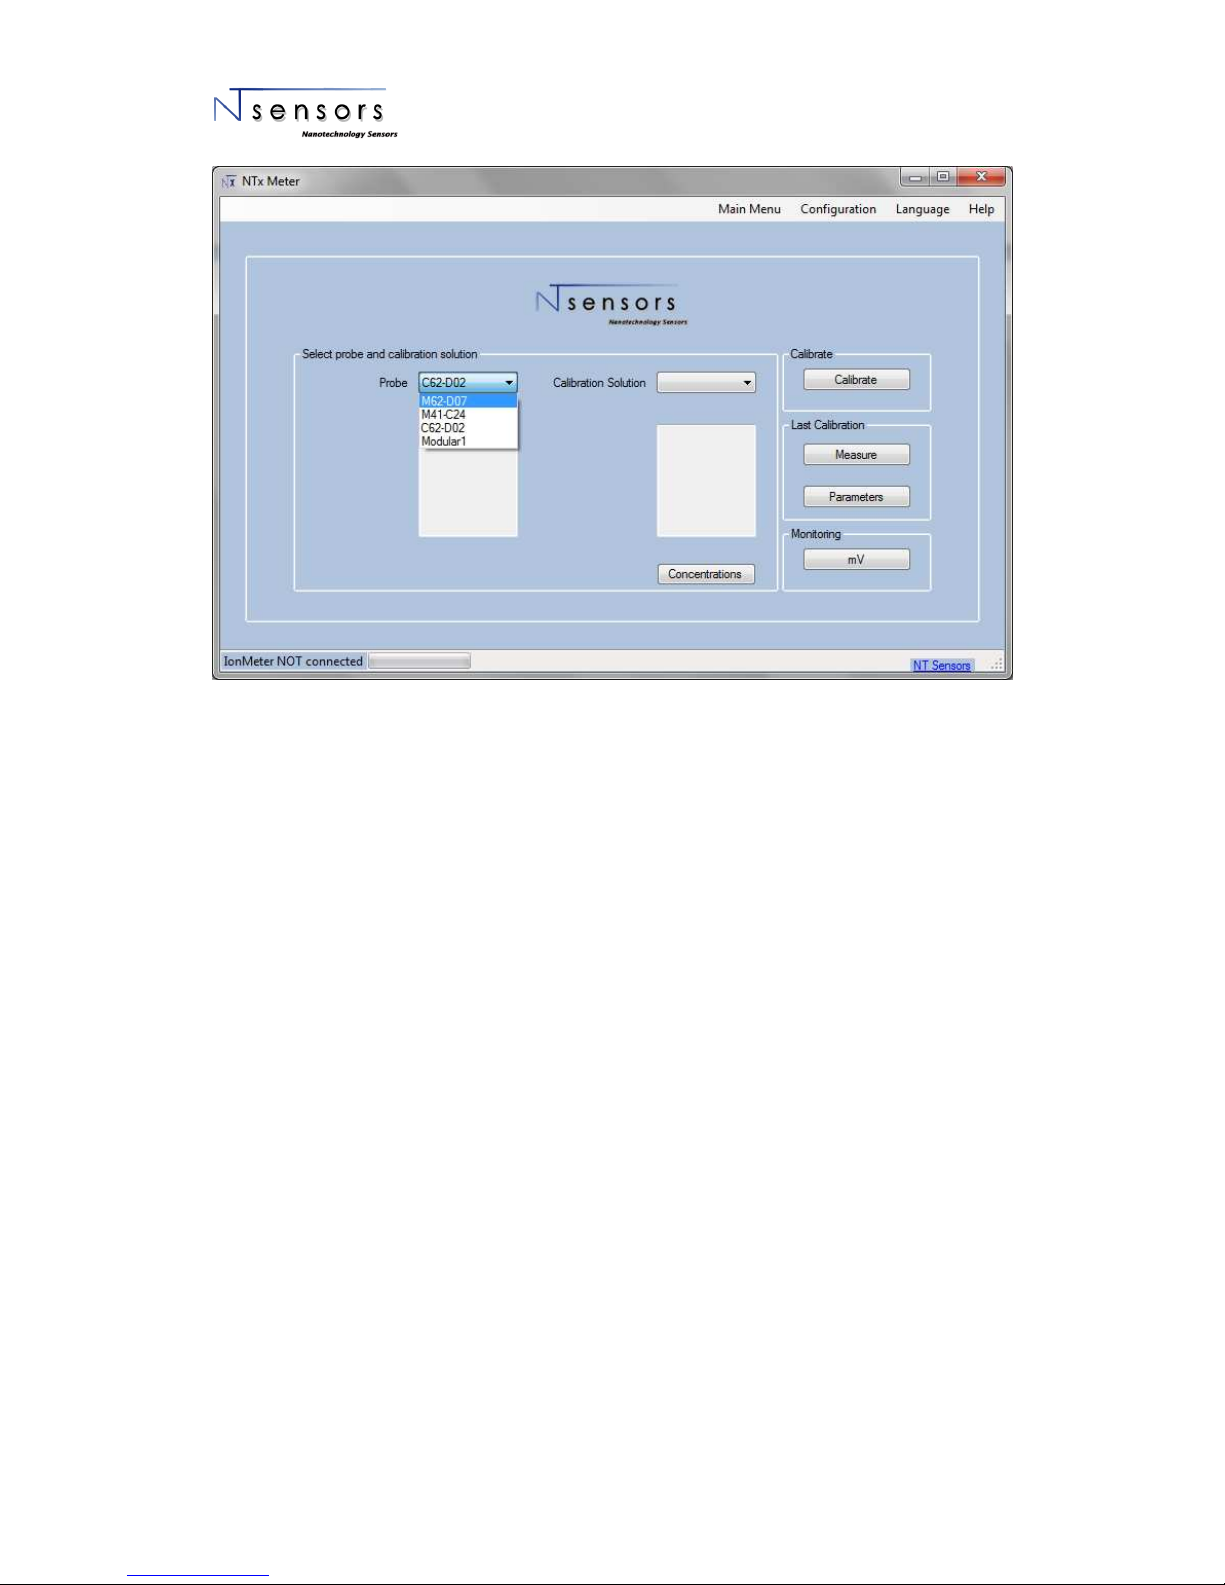
In the first screen you will setup the probe or electrodes and the calibration solution.
Screenshot 5: Initial Screen
2.3 .1 PRO BE SE LECTI ON
Clicking on the dropdown button displays the set of probes or sensors that the user has introduced. By
selecting a particular probe, the ions will be detailed in the box below.
NT x Ion Meter User Guide
10
Screenshot 6: Probe selection
CREATE A PROBE
When using the software for the first time or when you have to introduce a new probe, go to
"Configuration" in the menu bar at the top of the screen.
Once there, choose "Add probe." A window appears where you must enter:
• The name of the probe.
• Total number of ions.
• Identify the ions according to their channel position. (Each Ion is placed on a specific
position, you can find the configuration list on your probe’s detail in delivery note).
Finally, click "save probe".

NT x Ion Meter User Guide
11
Screenshot 7: Create a probe
NOTE: Generally, in a Multi Ion probe the ions are arranged alphabetically according to the
chemical symbols for each specie.
E.g: Channel 1: Ca, Channel 2: Cl; Channel 3: K, Channel 4: Na; Channel 5: NH4,
Channel 6: NO3.
DELETE PROBE
To delete a probe, go to "Configuration" in the menu bar at the top. Click the drop-down
button, select the probe you want to remove and click "Delete".

NT x Ion Meter User Guide
12
Screenshot 8: Delete probe
2.3 .2 CAL IBRA TION S OLUTI ON SE LECTI ON
Clicking on the dropdown button shows the calibration solutions that the user has registered. When
selects one solution, in the box at the bottom appears the ions there are in it.
Screenshot 9: Calibration solution selection
NT x Ion Meter User Guide
13
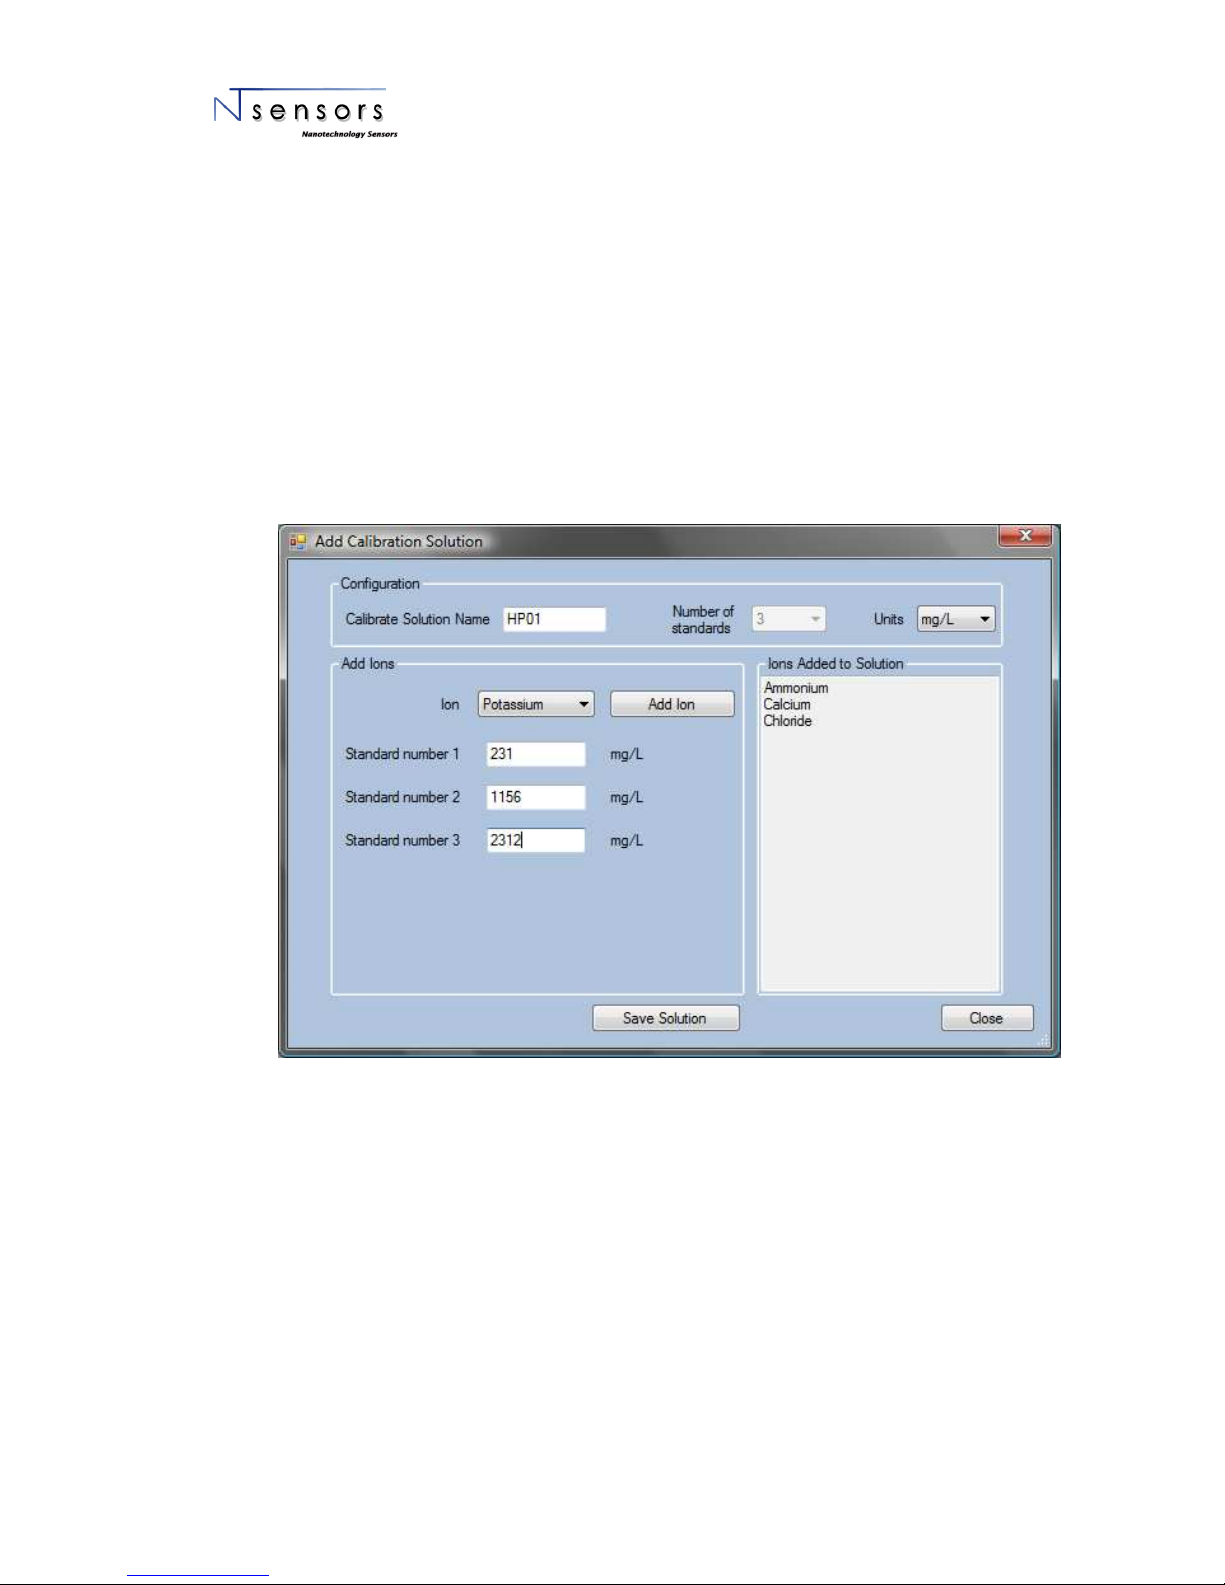
CREATE A CALIBRATION SOLUTION
To create a set of calibration solutions, go to "configuration" on the top menu bar and choose
"add calibration solution."
A window appears where you must enter the name of the calibration solution, select the
number of calibration standards (from 2 to 5) and select the desired concentration units (those
that appear in the supplied standards).
Then, you must enter the concentrations of each ion that is contained in the calibration
standard. Once entered, click on the "add ion". The added ions appear in the information box
on the right side of the screen.
Once you have added all ions, click on "save solution" to save the solution.
Screenshot 10: Create a Calibration Solution
DELETE A CALIBRATION SOLUTION
To delete a calibration solution, go to "Configuration" in the menu bar at the top. Click the
drop-down button, select the probe you want to remove and click "Delete".

NT x Ion Meter User Guide
14
Screenshot 11: Delete a Calibration Solution
CONCENTRATIONS
In order to view the data about the calibration solution, click on "Concentrations" button. A
window appears showing ion concentrations for each calibration standard from selected
solution.
Screenshot 12: Information about ion concentrations

NT x Ion Meter User Guide
15
2.3 .3 OPT IONS
When we have defined the probe and the calibration solution, the software allows three functions:
Calibrate the probe / sensor, batch or continuous measures or record mV data if the sensor is not
currently calibrated. They are listed in buttons as follows:
- Calibrate
- Measure (only available if the sensors have been previously calibrated, batch measures)
- mV: monitoring or continuous measurements in mV mode (or units of concentration if the probe
has been previously calibrated)
LAST CALIBRATION
The NTx Ion Meter software stores the data of last calibration performed on a probe or any of
its sensors. To check the data about the last calibration, click on the "Parameters".
A window appears with information concerning the parameters obtained in the last calibration
for each sensor, and the date and time it was performed.
Screenshot 13: Last calibration information
The simbols have the following meaning:
Correct calibration
The measure will not have high accuracy.
See calibration evaluation. If this alert persists the electrode may be aged.
Erroneous calibration, measure not true.
See calibration evaluation.
Contact with Technical Support from NT Sensors
For more info about calibration parameters refer to the user guide of the multi ion kit.

NT x Ion Meter User Guide
16
2.4 C ALIBR ATIO N
To calibrate the probe, use the calibration menu shown in the image below. You must click previously
on the Calibrate button on the main menu.
Screenshot 14: Calibration
First we shall set the calibration parameters and select the acquisition time and calibration mode.
2.4 .1 AC QUISI T ION T IME
The selection of acquisition time of the analysis depends on the response time of the contained ions in a
probe (indicated in the technical specifications).
When the probe is in the right standard, the user decides when to begin the measurement of each
point. Depending on the selected acquisition time, the software will record the potential shown by the
sensor after this time (1, 2 or 3 minutes).
2.4 .2 CAL IBRA TION M ODE
In this section the user chooses how to calibrate the probe or the measuring system: "Simultaneous" to
calibrate simultaneously all ions or "Custom" to calibrate them separately or individually.
NOTE: If you have sensors with different acquisition time, always select the larger response time.

NT x Ion Meter User Guide
17
Screenshot 15: Customized Calibration
In the mode "Simultaneous", all the ions contained in the standard solution are going to be calibrated at
the same time (middle box not active). The probe will be calibrated with all the selected ions
simultaneously.
In the "Customized" mode, the user can select in the middle box the ions to be calibrated. Once finished
the calibration, the user can select the remaining ions and calibrate them in a second calibration
process.
Through the drop-down button "Calibration solution", the user can choose the solution to calibrate each
set of ions. An information box list all the ions contained within the calibration solution.
2.4 .3 CAL IBRA TION P ROCES S
Once the calibration parameters have been setup, the user can proceed to calibrate the probe / sensors.
The calibration is carried out by recording data from of each calibration standard. The user must place
the probe in the first standard and then click the "Start" button. A counter will appear with the
remaining time for the calibration step.

NT x Ion Meter User Guide
18
Screenshot 16: Calibration process
A wizard will guide through the whole calibration process, showing messages for the steps to be carried
out.
At the left bottom corner of the screen a bar indicator will report of the course of each reading.
After calibration, a screen pops up appears with “Calibration Parameters” obtained. The “Parameters”
button provides information about the slope, intercept and correlation coefficient obtained, plus the
date and time of calibration.
Screenshot 17: End of Calibration
At this stage the section "calibration report" is enabled and the user can access to “Parameters” and
“Data”.
NT x Ion Meter User Guide
19
Once evaluated the parameters related to the calibration process, if some error is detected by the user,
the calibration can be repeated by clicking on the "Recalibrate" button. .
After calibration, you can choose among two different modes to record the concentrations of the
sample:
- ¡Error! No se encuentra el origen de la referencia.(“Measure” button)
- Continuous monitoring (“Monitoring” button)
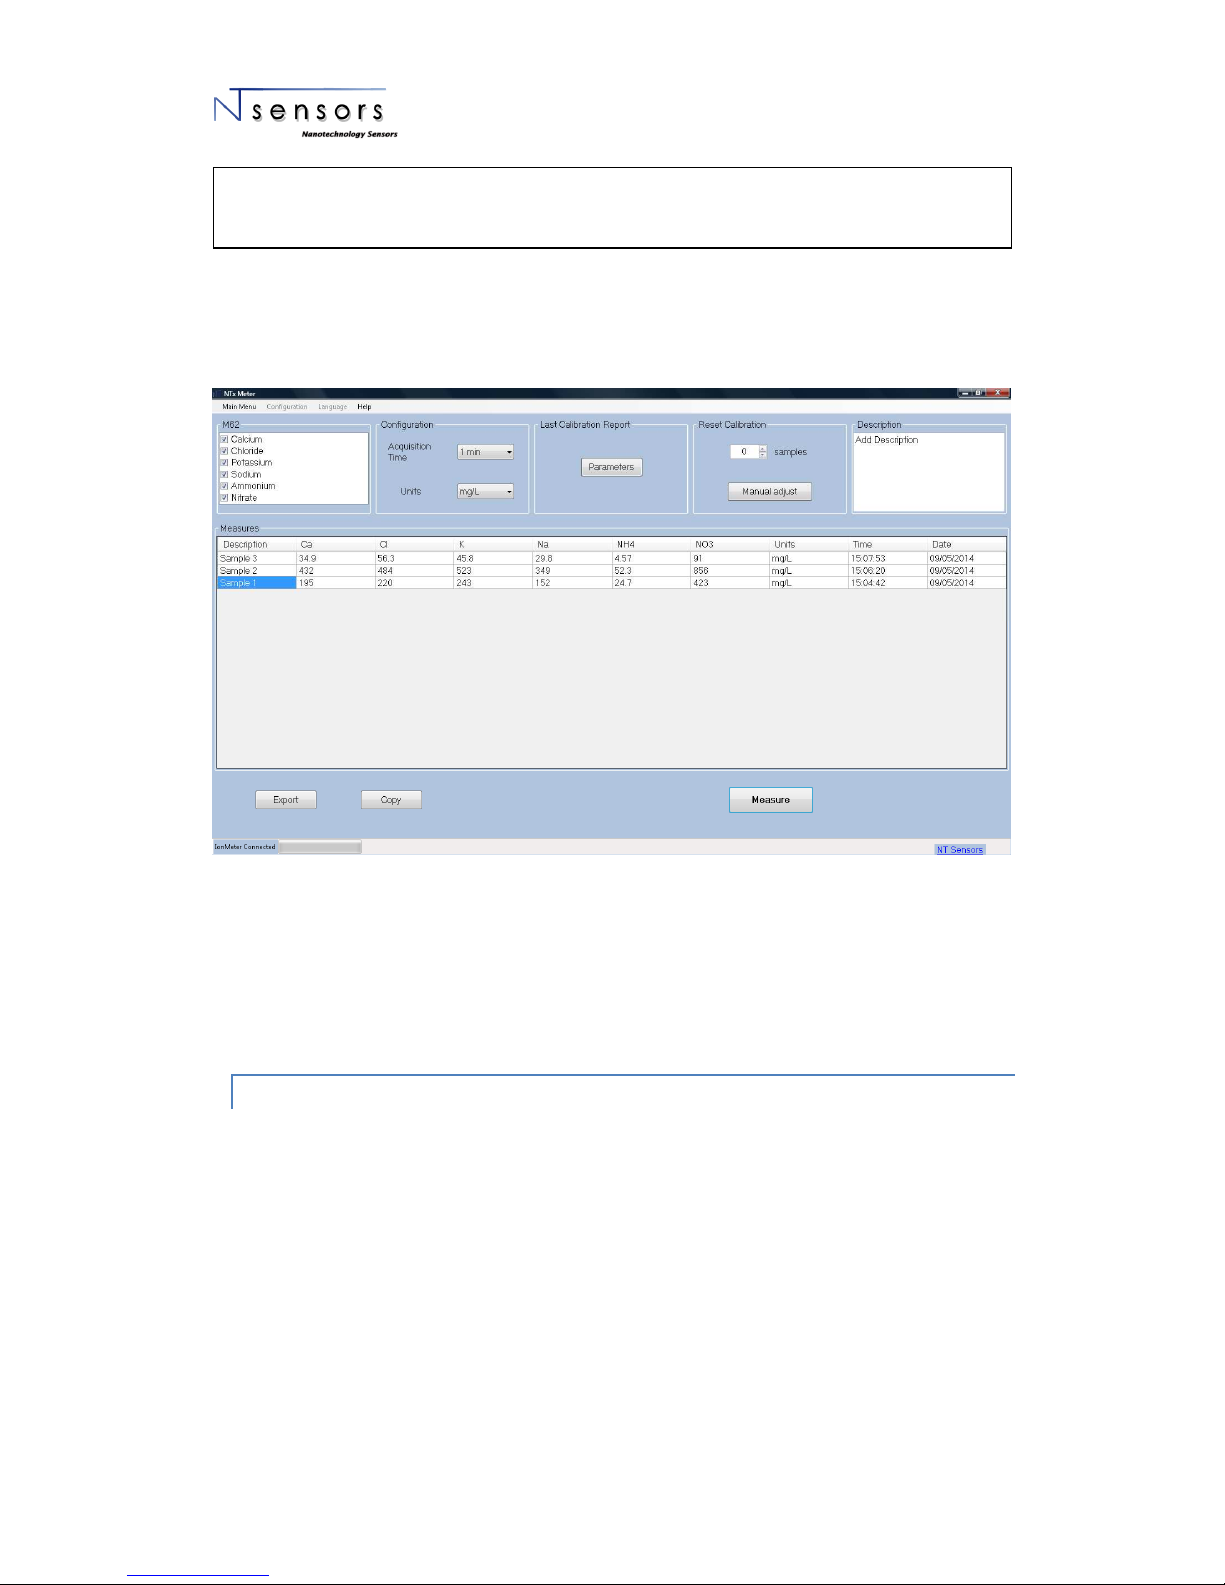
2.5 B ATCH MEASU REMEN TS
To get to this section, the probe must have been calibrated before. In order to obtain correct
measurements the calibration used must be recent (you can check this information through the button
"Parameters")
The purpose of this mode is to obtain discrete measures. By default, the results are obtained in the
same units as the calibration was performed, although you can select the units to display the result of
each single measurement.
Screenshot 19: Batch measurements
At the top left, the probe’s ions information is shown. The calibrated ions are marked and displayed by
default. If you do not want to display all the ions, simply unmark them.
Acquisition time: this time is defined generally by the response time of each sensor, which appears in
the technical specifications of each one.
NT x Ion Meter User Guide
20
At the top right is a box where the user can enter a general description of the experiment. This
description is recorded when the test data is exported.
To take measurements, click on the "Measure" button.
Screenshot 20: Measurement description
The user can edit the column "description" to enter some details or a description of the measured
sample.
In order to save to a file the performed measurements, click on the button "Export". However, doing
click on the button “Copy” the data is copying to clipboard.
2.5 .1 REA DJUS T CAL IBRATI O N
The readjust calibration option is in order to maintain the highest accuracy across a large number of
measures. In this process, the intermediate point of the calibration (solution nº2) is used to recalculate
the calibration parameters in order to minimize the natural drift of the electrodes after a several
number of samples.
This step can be selected to be done automatically by selecting a frequency, then after the selected
number of samples the system will ask to introduce the probe in the second standard solution. Also this
adjustment can be performed manually by the user, by clicking the ‘Manual Adjust’ button.
It is strongly recommended to use the same acquisition time during the sampling and calibration
tests.
NT x Ion Meter User Guide
21
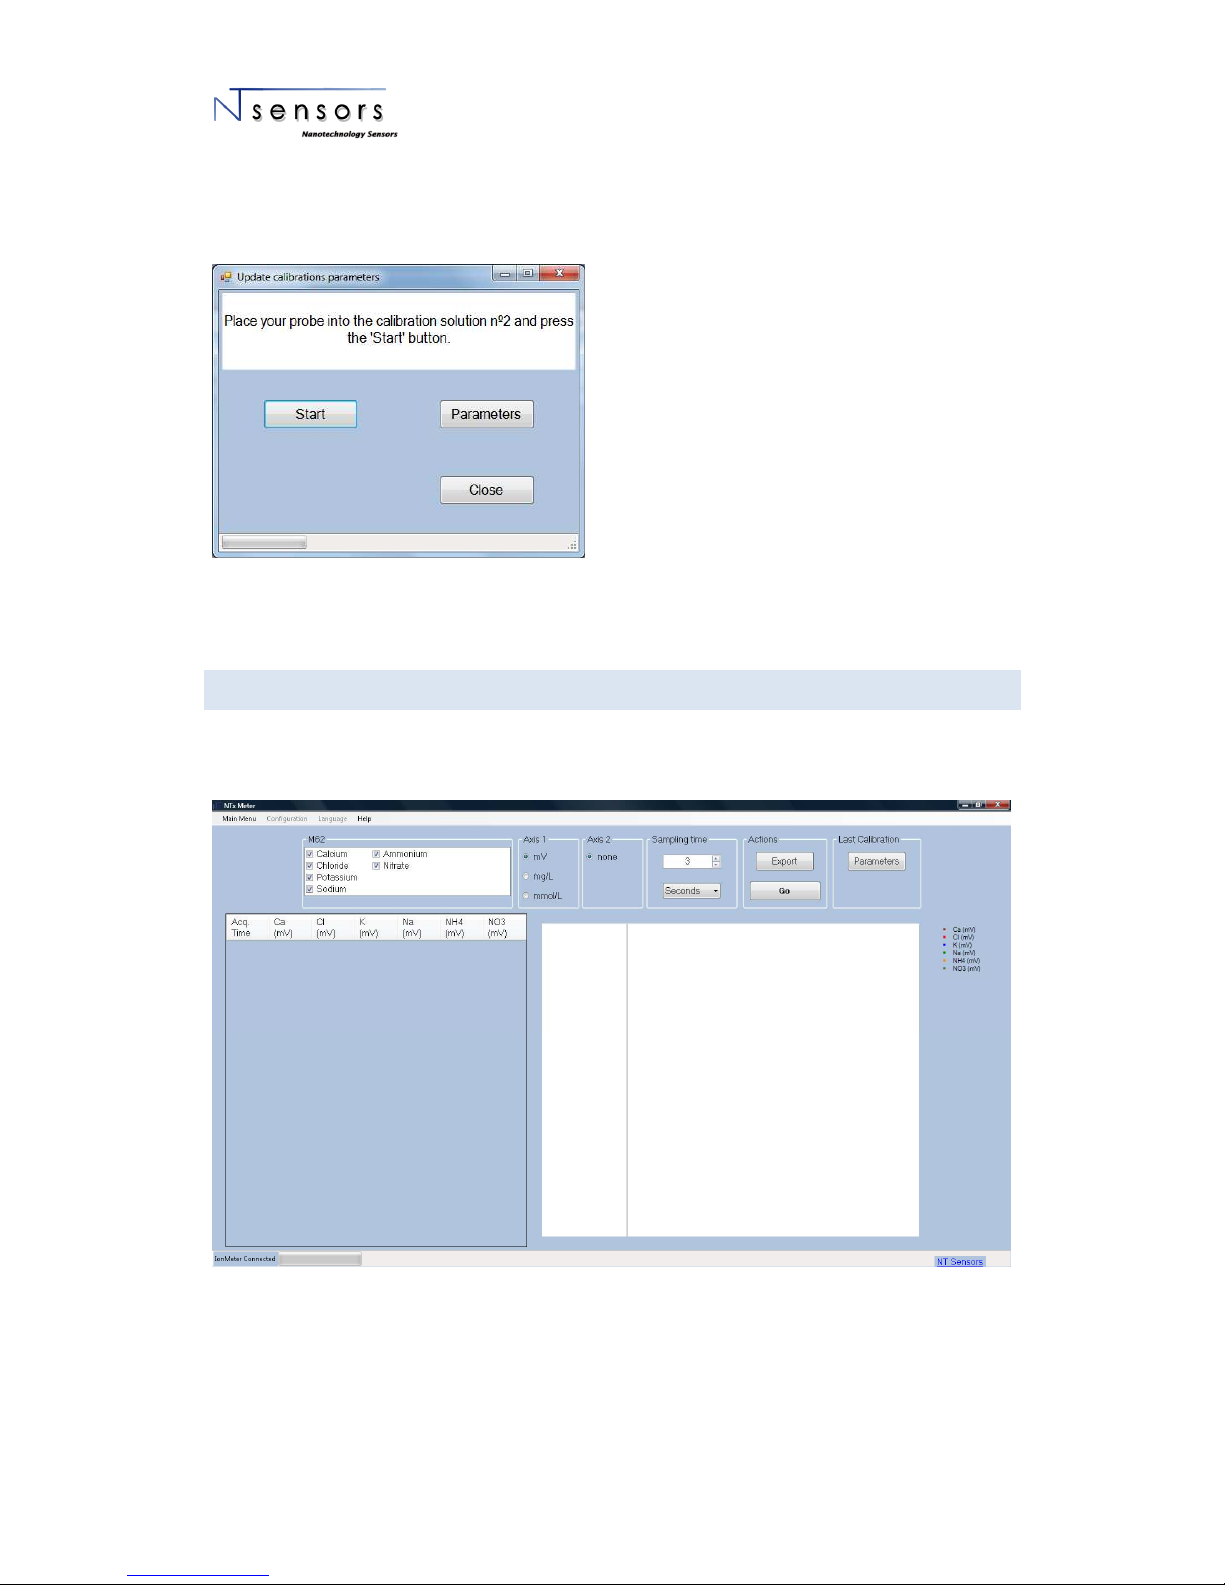
To adjust de calibration parameters, introduce the probe into standard solution 2 and click ‘Start’
button. When it is done, the parameters window will appear and show the new values. Then, close the
readjust calibration window and continue measuring.
Screenshot 21: Calibration adjust
2.6 M ONITO RING OR CO NTINI OUS M E ASUR EMENT
For continuous-time measurement user should go to “Monitore” through the button that is located on
the Main Menu.
Screenshot 22: Monitorization

NT x Ion Meter User Guide
22
2.6 .1 IO NS
At the top left, the probe’s ions information is shown. The calibrated ions are marked and displayed by
default. If you do not want to display all the ions, simply unmark them.
2.6 .2 SA M PLING TIME
The user can change the sampling period by introducing a numerical digit and selecting the time unit
(seconds, minutes or hours).
2.6 .3 UNITS ( AXIS)
While the measures are undertaken, you can choose the displayed units on the plot in the section "Axis
1". In order to display the mV data or the concentration or "mg / L" or "mmol / L" (if the probe is
calibrated), simply mark the desired unit.
Checking the desired units will automatically change the output value that appears in both the table and
in the plot.
"Axis 2" section allows monitoring pH or Temperature in parallel to the measurement of ion
concentration. By selecting "pH" or “Temp”, you enable a secondary axis. The pH option only appears if
there is a pH sensor in the measurement system.
Screenshot 23: Secondary axis

NT x Ion Meter User Guide
23
2.6 .4 AC T IONS – MO N ITORI NG & E XPORT FILE S
Once all the parameters are defined, the measurements will start by clicking on the button "Go". After
the process is started, the states "Pause" and "Resume" will be alternated.
At any time during the monitoring the user can generate an exported file containing the measurements.
The file created will contain information about the probe and the results of monitoring (mV). If the
probe is already calibrated, the exported file will contain the calibration parameters.
The export button will export only data in the units that are currently selected. You can export in all the
units that are listed in the section “Axis 1”. Just select the units in which format you want to export data
and click “Export”. The data file will only contain the selected units. When you export, it creates a file
with the data that appears in the screen, i.e.: "mV".
2.6 .5 LAST CAL IBRA T ION
In this section the user can review the parameters of the current calibration that is being used.
Screenshot 24: Monitoring
When the measures are finished, you can return to the main menu or close the application directly.
2.6 .6 ZOO M USE
To make zoom in the plot, select the area with the left mouse button, then automatically the zoom will
be applied. To restart to the initial view, make click on the right mouse button.

NT x Ion Meter User Guide
24
Screenshot 25: Plot zoom
2.7 B NC CO NNECT OR
In addition to the Multipin connector of the Multi Ion probe, Ion Meter NTx has a standard BNC
connector.
Due to the presence of the BNC connector the NTx Ion Meter could work with any standard combinated
electrode, as a meter of one single channel. It also allows the incorporation of a half-cell electrode,
which acts as the seventh sensor in measuring system, when a multiion probe is used.
2.7 .1 COM BINA TION E LECTR ODE
The BNC connector allows the NTx Ion Meter to work with any combinated electrode (reference
electrode + indicator electrode) (“Combi ION”) or pH sensor.
For the combined electrode configuration, go to "Configuration" menu in the menu bar at the top right
of the initial screen.
As indicated in part 2.3.1, you must enter the name of the probe and then, in the number of ions
selector, select the "Combi" option. Selecting this option will disable the first 6 ions showing "None" as
an indicator that no sensors connected those channels. Then, select the specific ion in question on
channel 7.

NT x Ion Meter User Guide
25
Screenshot 26: Combination electrode configuration
The steps of calibration, batch measurements and monitoring will be made through the normal process
described above in parts 2.4, 2.5 and 2.6 respectively.
2.7 .2 HA LF-CE LL ELE TRODE
The BNC connector also enables incorporate a half-cell electrode (or "single ion") to the measurement
system. As a half-cell electrode does not contain a reference electrode, it must work together with the
multiion probe simultaneously ( immersed in the same solution at the same time).
The configuration of this electrode is made as described in the section 2.3.1, regarding it as channel 7 of
the measuring system.
With this electrode “single ion” the user can obtain the measures simultaneously for the seven
channels.
ATTENTION
The combinated electrode can only work if Multi Ion probe is not used and disconnected. (The multi
ion probe must be outside from the solution when using a Combi ion

NT x Ion Meter User Guide
26
Screenshot 27: Half-cell electrode configuration
The steps of calibration, batch measurements and monitoring will be made through the normal process
described above in parts 2.4, 2.5 and 2.6 respectively.
2.8 T EMPERATURE
The NTx Ion Meter incorporates temperature measurement. Multi Ion Probe contains a temperature
sensor that is connected to the meter through the multipin connector of the same probe.
The temperature recorded appears in the "Parameters" button, part 2.4.3, indicating the temperature at
which the process was performed calibration.
In the "batch measures", section 2.5, the recorded temperature appears in each discrete readings, as a
column next to other parameters (units, date, time ...).
The temperature is also displayed in the "monitoring" menu, Section 2.6, in the table on the left of the
screen in data associated with each measurement. As we can see in section 2.6.3, the temperature can
also be monitored through the second axis.
ATTENTION
The half-cell electrode can only work together with the Multi Ion probe. The two probes must
remain immersed in the same solution (sample).

NT x Ion Meter User Guide
27
2.9 * .NTS FILES
The files created by the software are text files. It can be open in spreadsheet programs (Excel) or in
notepad or similar.
If your computer do not recognize it automatically, press with the left button the file, and select the
option “open with” and then select you desired program (e.g. Microsoft Excel) and save you preferences
to open always with this program.
The exported files contain, firstly, a brief description of the experiment, which contains the probe used,
and description edit by the user (if provided). Secondly, the calibration parameters and finally, the
measurements performed.
2.1 0 COMMO N ERR ORS
2.1 0.1 FRAME WORK 4 O LA TER N OT IN STALL E D
Download and install from the official Microsoft website .NET framework (link).
If the error persists, please contact with tech.support@ntsensors.com
2.1 0.2 CORRU PT IN STALL ATION OF NT SENS ORS S OFTWAR E
When executing the program, this cannot be initialized, proceed to reinstall the program.
If the error persists, please contact with tech.support@ntsensors.com
2.1 0.3 E30: I ON ME TER N OT CO NNECT ED
When using the program, if some of the following error messages appears in the screen, Error 12, 13 or
14, could be due to three different situations:
1. Ion meter not connected to the computer. Be sure of the connection or connect them.
2. The driver is not installed: if this happens in the first attempt to use / connect the ion meter to the
computer, please wait until the drivers are being installed automatically.

NT x Ion Meter User Guide
28
3. If it is not any problem described above, please unplug the USB cable from the meter, and plug
again after 10 seconds. If the problem persists, check that the USB port from the computer is
working properly.
4. If the error persists, please contact with tech.support@ntsensors.com
2.1 0.4 COMUN ICATI ON ER ROR
If an error message - different from the Error40 - appears while performing measure, please unplug the
USB cable from the meter, and plug again after 10 seconds. You must be able to continue with the
measures.
If the error persists, please contact with tech.support@ntsensors.com
3 DOU BTS A ND SU GGEST I ONS
Any question or comments please feel free to contact with the NT Sensors team.
Thanks for using our products.
NT Sensors S.L.
+34 977 653 925
info@ntsensors.com
tech.support@ntsensors.com
www.ntsensors.com
 Loading...