

Page 1
Page 2

2
Helpline 0870 241 3201
Safety information
Use only the batteries supplied with this telephone (NI-MH 1.2V
650mAh).
Do not use with any other mains adaptor other than the one
supplied otherwise you may damage your phone.
Do not use the phone in damp humid conditions such as
bathrooms.
Do not expose the phone or batteries to water or fire.
Do not dispose of the batteries in household waste or by burning.
Do not use in a explosive hazard area.
Do not try to open the handset or base.
Do not short the metal terminals on the phone or base.
Unplug the phone from the phone line during storms.
Health information
We advise that this phone is not used near or by people with
pacemakers or near intensive care equipment.
If you wear a hearing aid, please note that this phone works by
sending and receiving radio signals between the base and handset,
wearers of hearing aids may experience interference in the form of
a humming noise.
Page 3
3
Helpline 0870 241 3201
Introducing
your ntl
VS1503
Introduction
Your ntl VS1503 telephone makes use of the latest technologies in
cordless telephone design. It offers DECT functionality with superb
sound quality. It includes a wide range of easy to use functions and
features.
Caller ID is a facility available from some telephone network
suppliers allowing the user to identify incoming calls.
Your ntl VS1503 has the software necessary to utilise this facility.
In order for you to use Caller ID, you must first subscribe
to your network supplier’s Caller ID service.
This telephone is not GAP compatible.
You can not register additional handsets to the base.
Please read this user guide carefully before using your
VS1503 for the first time.
Important
This equipment is not designed for making emergency
calls when the power fails. Make alternative arrangements
for access to emergency services.
Note for people with hearing aids
The VS1503 works by sending radio signals between the
base and handset. This may interfere with some hearing
aids, causing a humming noise.
Warning
We recommend that this product is not used near
emergency intensive care medical equipment or by people
with a pacemaker fitted.
Page 4

4
Helpline 0870 241 3201
Safety information ................................. 2
Health information ................................. 2
Introducing your ntl VS1503 .............. 3
Contents ............................................ 4
In the box ........................................... 6
Getting started ....................................7
Getting your VS1503 ready for use ...... 7
Positioning the base unit ................................................... 7
Connecting the mains power to the base unit ................... 7
Connecting the mains power to the chargers .................... 7
Inserting the batteries ........................................................ 8
Charging the handsets ....................................................... 8
Standby mode .................................................................... 9
Low battery ....................................................................... 9
Connecting the telephone line .......................................... 9
Fitting the base stand clip ............................................... 10
ntl VS1503 handsets .......................... 11
The handset display ............................. 12
Basic operation ................................ 13
During standby ..................................... 13
Battery status ................................................................... 13
Making and ending calls ....................... 13
Normal dialling ............................................................... 13
Preparatory dialling (Pre-Dial) ....................................... 13
Redial .............................................................................. 14
Receiving calls ...................................... 14
During a call ................................ 15
Call timer ........................................................................ 15
Adjusting the earpiece volume ....................................... 1 5
Muting a call ................................................................... 15
Receiving a second call ................................................... 15
Making an inquiry call .................................................... 15
Transferring a call ........................................................... 15
Intercom ............................................ 16
Phonebook ........................................ 16
Setting up the phonebook records .................................. 16
Making a call from the phonebook ................................. 17
Deleting phonebook records ........................................... 17
Caller ID ............................................ 18
Caller ID call back .......................................................... 18
Reviewing caller ID records ............................................ 18
Deleting caller ID records ............................................... 18
Call waiting number ....................................................... 19
Message waiting .............................................................. 19
Programming .................................... 19
Handset ringer melody and volume ................................ 19
Key beep .......................................................................... 20
Recall duration ................................................................ 20
Default settings ............................................................... 21
Other features .................................. 21
Handset ringer On/Off .................................................... 21
Paging ............................................................................. 21
Base ringer volume ......................................................... 21
Out of range indication ................................................... 22
Contents
Page 5

5
Helpline 0870 241 3201
Service and maintenance ................ 23
Cleaning .......................................................................... 2 3
Siting ............................................................................... 23
Battery disposal ............................................................... 23
Troubleshooting ............................... 24
Technical details .............................. 25
Warranty .......................................... 26
Page 6
6
Helpline 0870 241 3201
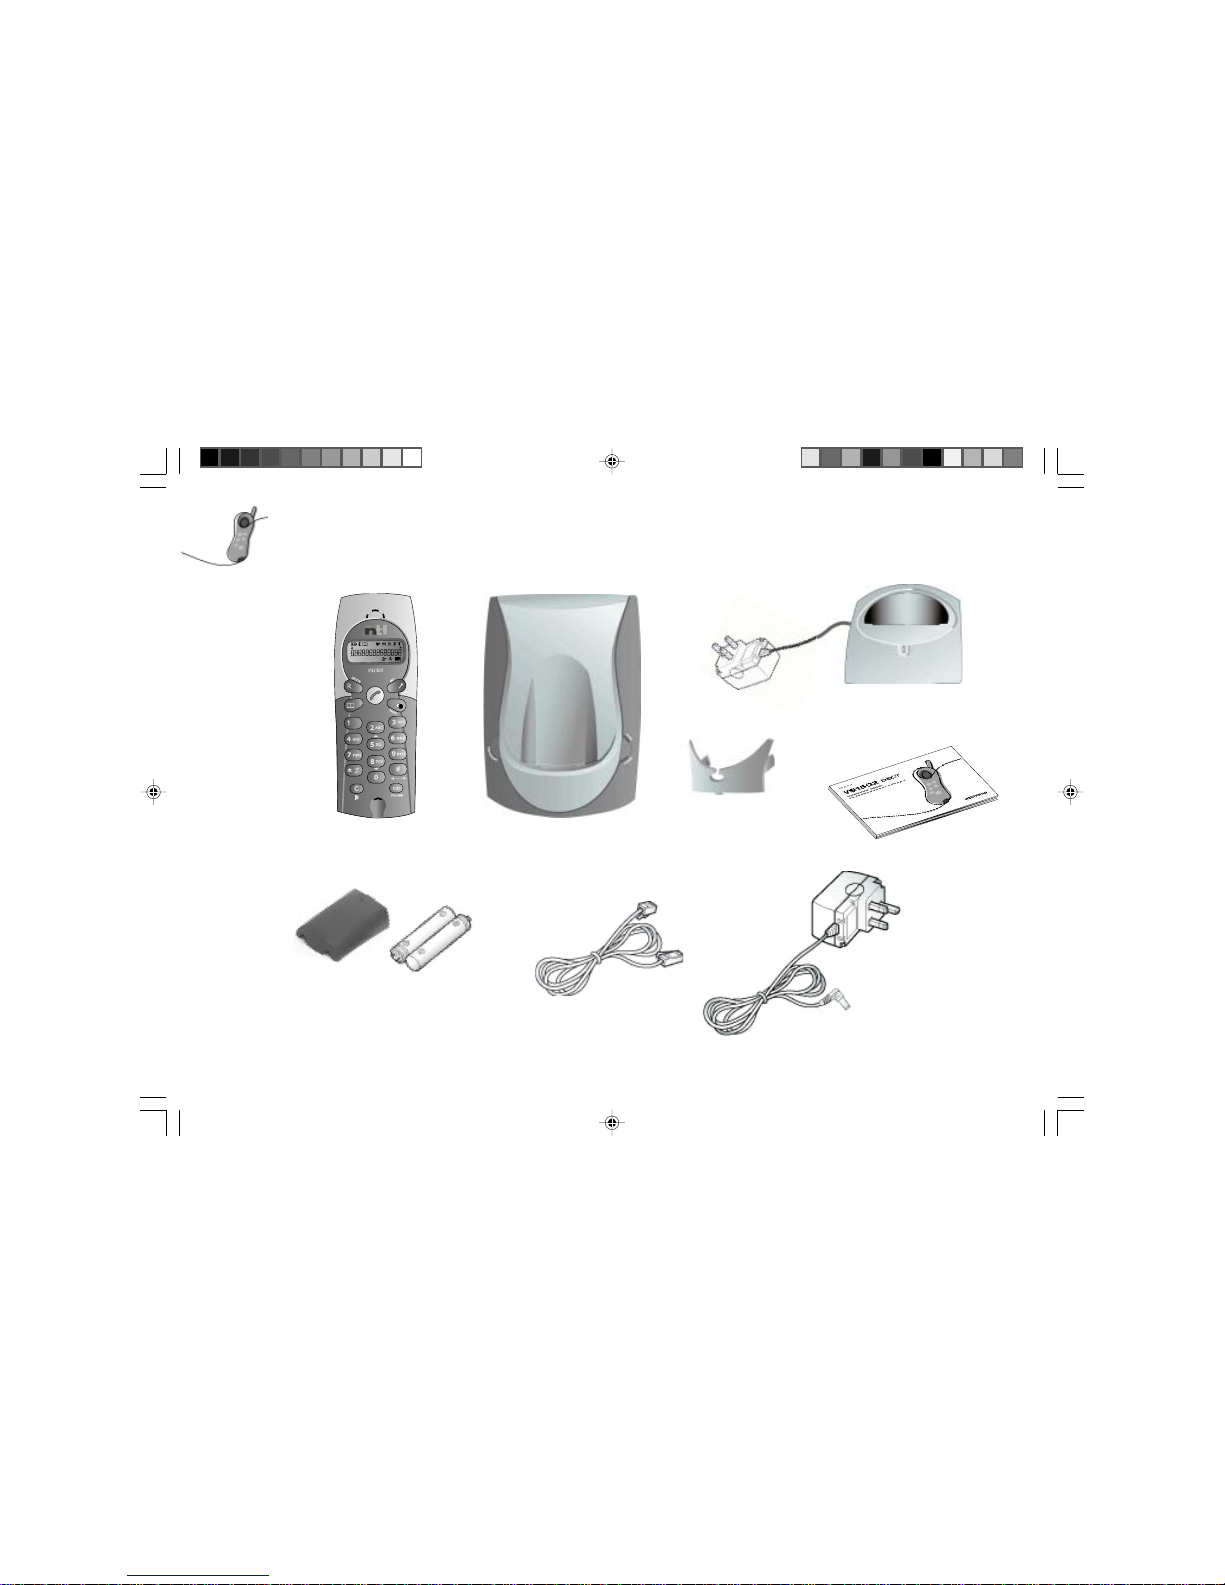
Handset (x 4)
Base Unit
Charging Base and Power Adapter (x 3)
Handset Batteries and
Battery Compartment Cover (x 4)
(Rechargeable Ni-MH 1.2V 650mAh)
Telephone Cable
User Guide
Base Stand Clip
In the box
This package contains the following:
Power Supply Adapter
(Output 9V DC 300mA)
Page 7
7
Helpline 0870 241 3201
Getting
started
Getting your VS1503 ready for
use
Positioning the base unit
Situate your VS1503 base unit close enough to the telephone and
mains power sockets so that the cables will reach. The higher the
base unit is located the better.
To avoid interference, position your VS1503 at least 1 metre away
from other electrical appliances, e.g. televisions, radios and
computers. Avoid bathrooms and other humid areas.
Connecting the mains power to the
base unit
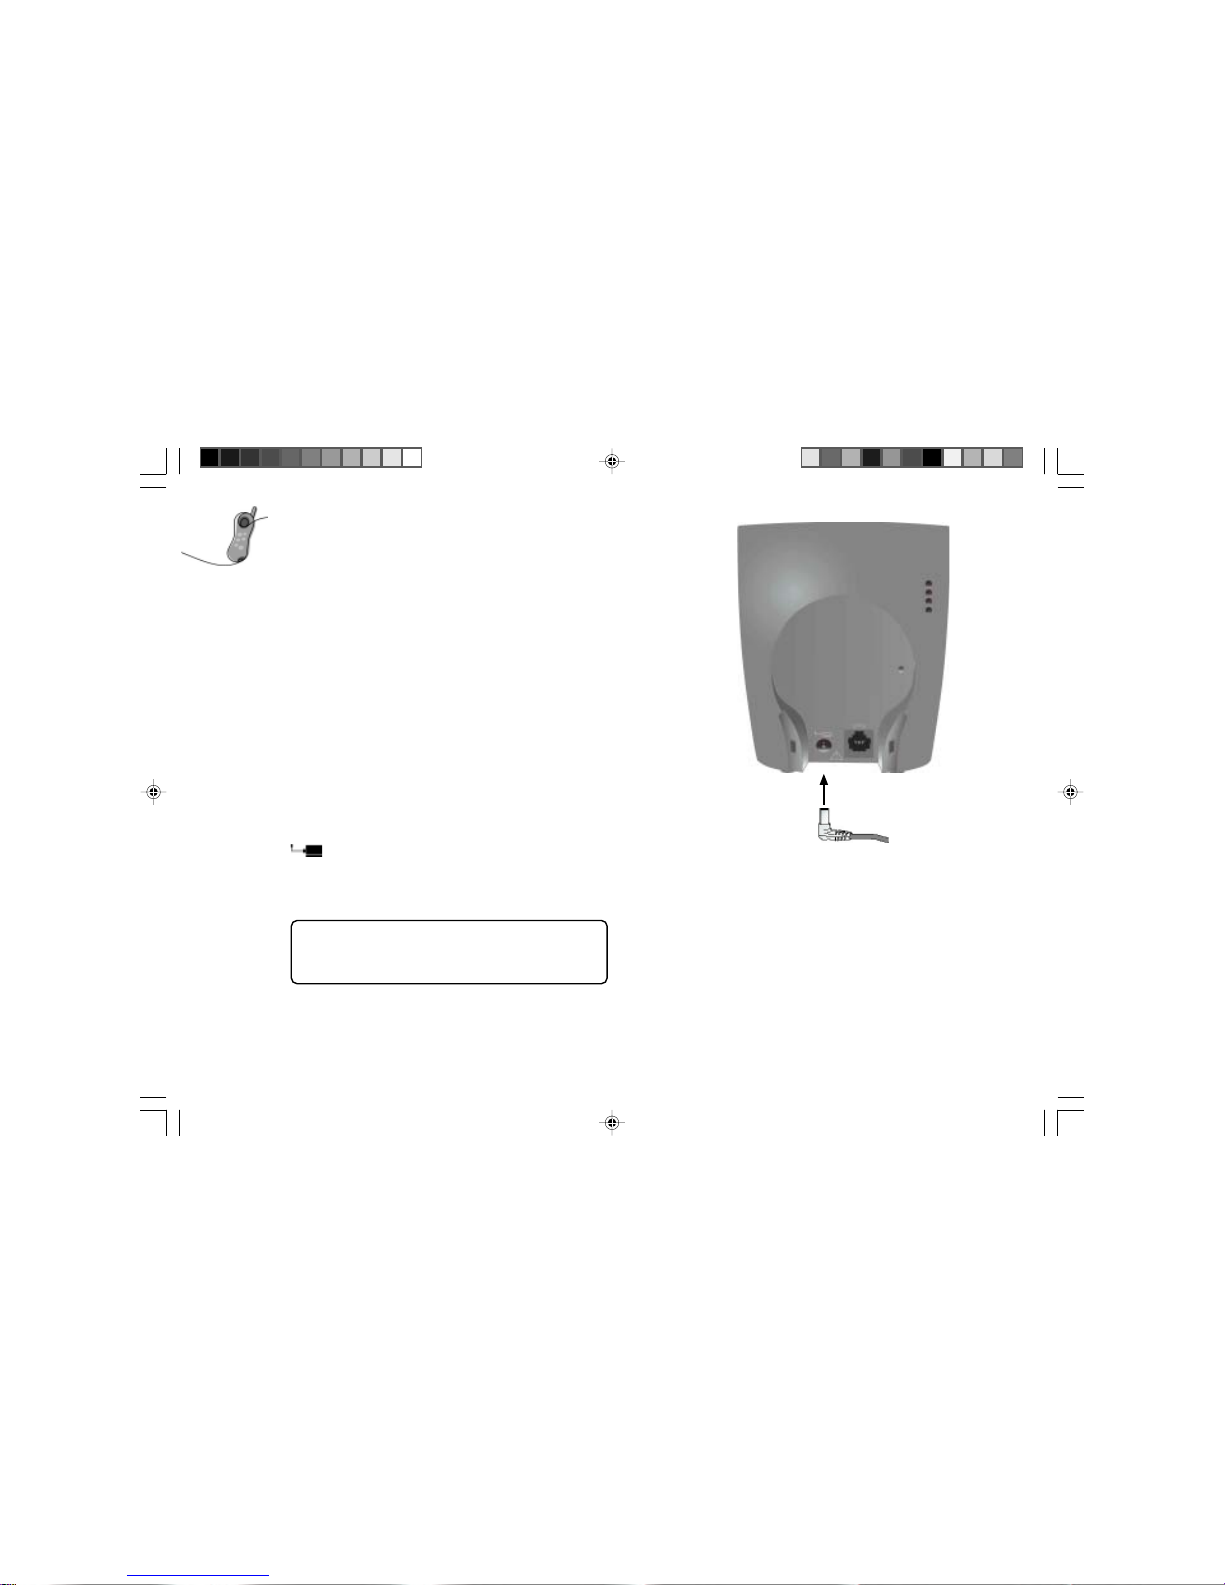
Connect the lead from the power adapter to the socket marked
on the back of your VS1503 base, see opposite.
Now plug the other end of the adapter into the mains power supply
and switch the power on. The green in use light will flash once and
you will hear a confirmation beep.
Use only the mains power adapter supplied. Any other
adapter could seriously damage your VS1503 and
invalidate your warranty.
Connecting the mains power to the
chargers
Plug the power adapters attached to the handset chargers into the
mains supply and switch the power on.
Page 8
8
Helpline 0870 241 3201
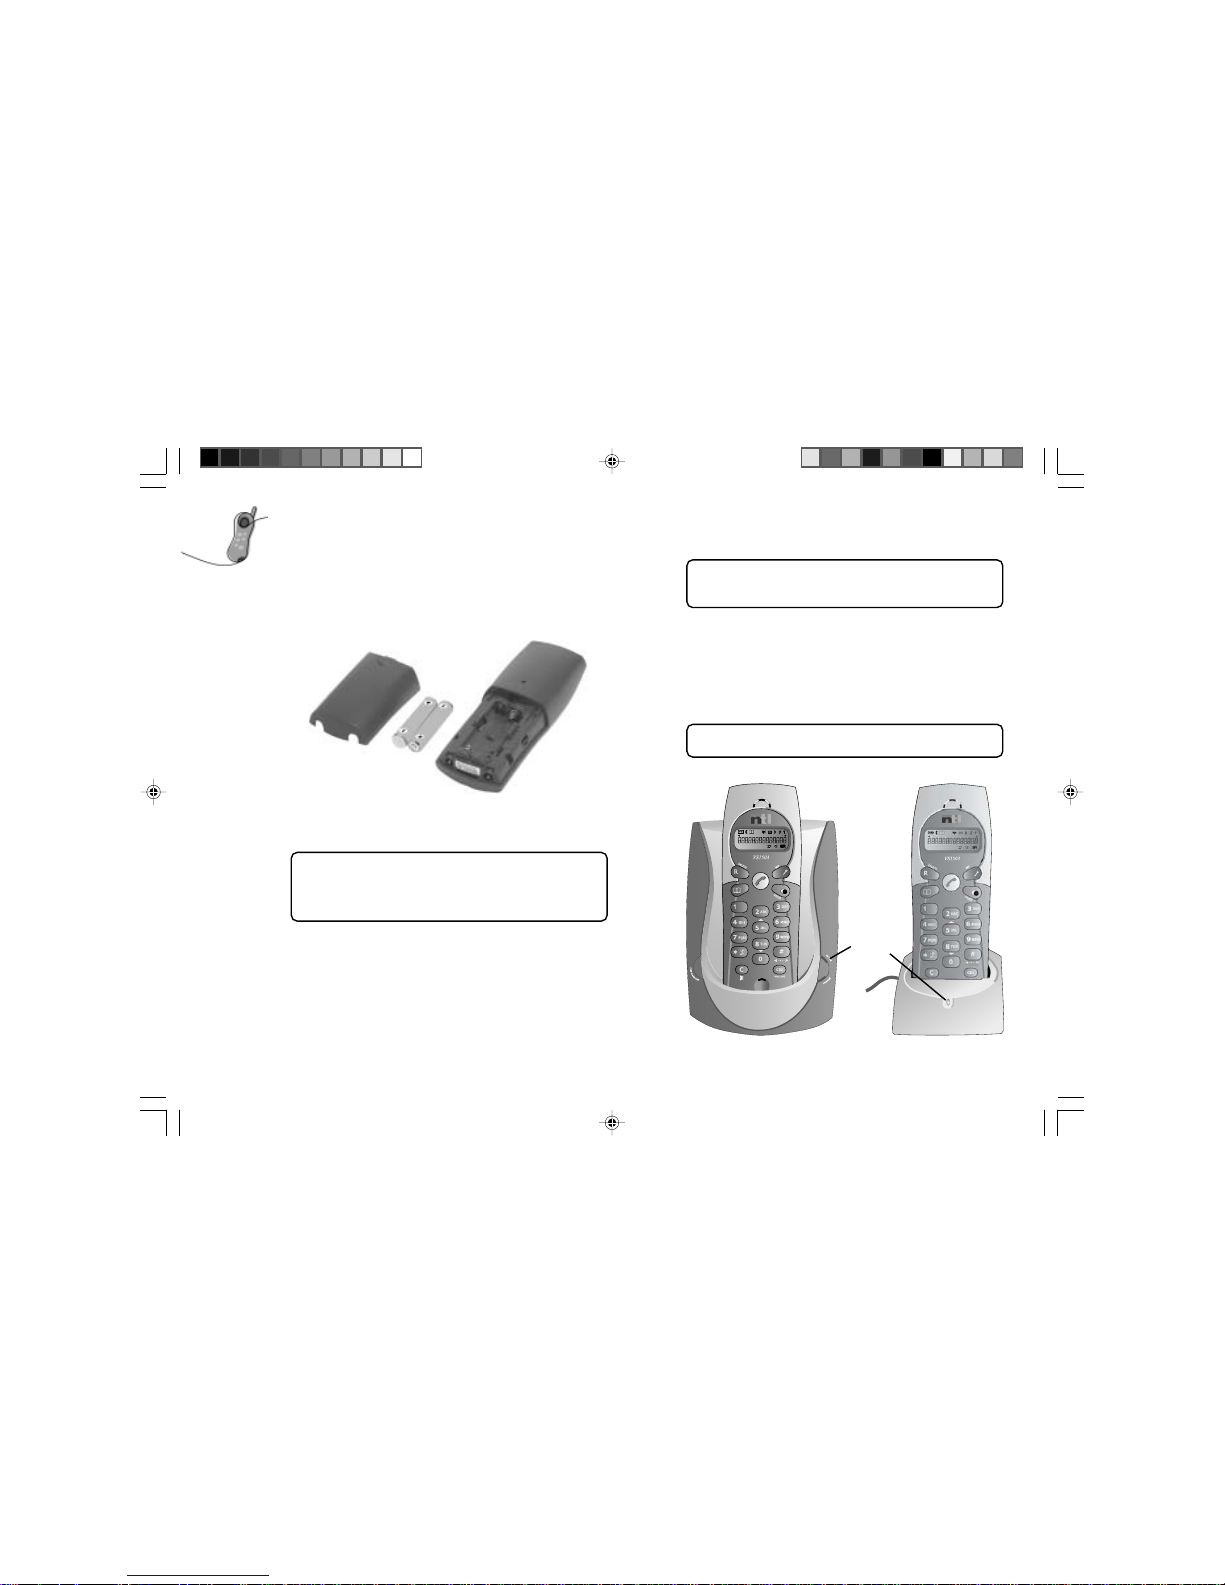
Inserting the handset batteries
On each handset:
Remove the battery cover if necessary.
Insert the 2 x AAA rechargeable batteries supplied, as shown inside
the battery compartment.
Replace the battery cover.
Use only the batteries supplied or the recommended
batteries. Never use non-rechargeable batteries. If
you use an incorrect battery type there is a risk of
explosion or damage to your VS1503.
Charging the handsets
We recommend that you charge your handsets for at least
14 hours before plugging the phone lead into the
telephone wall socket for the first time.
Place one handset onto the base and the other handsets onto the
chargers.
The charge lights on both the base and the chargers come on and
you will hear a confirmation beep. The handsets will show the
standby display as shown below.
All of your handsets come pre-registered to your VS1503
base.
Charging
lights
+
+
-
-
Page 9
9
Helpline 0870 241 3201
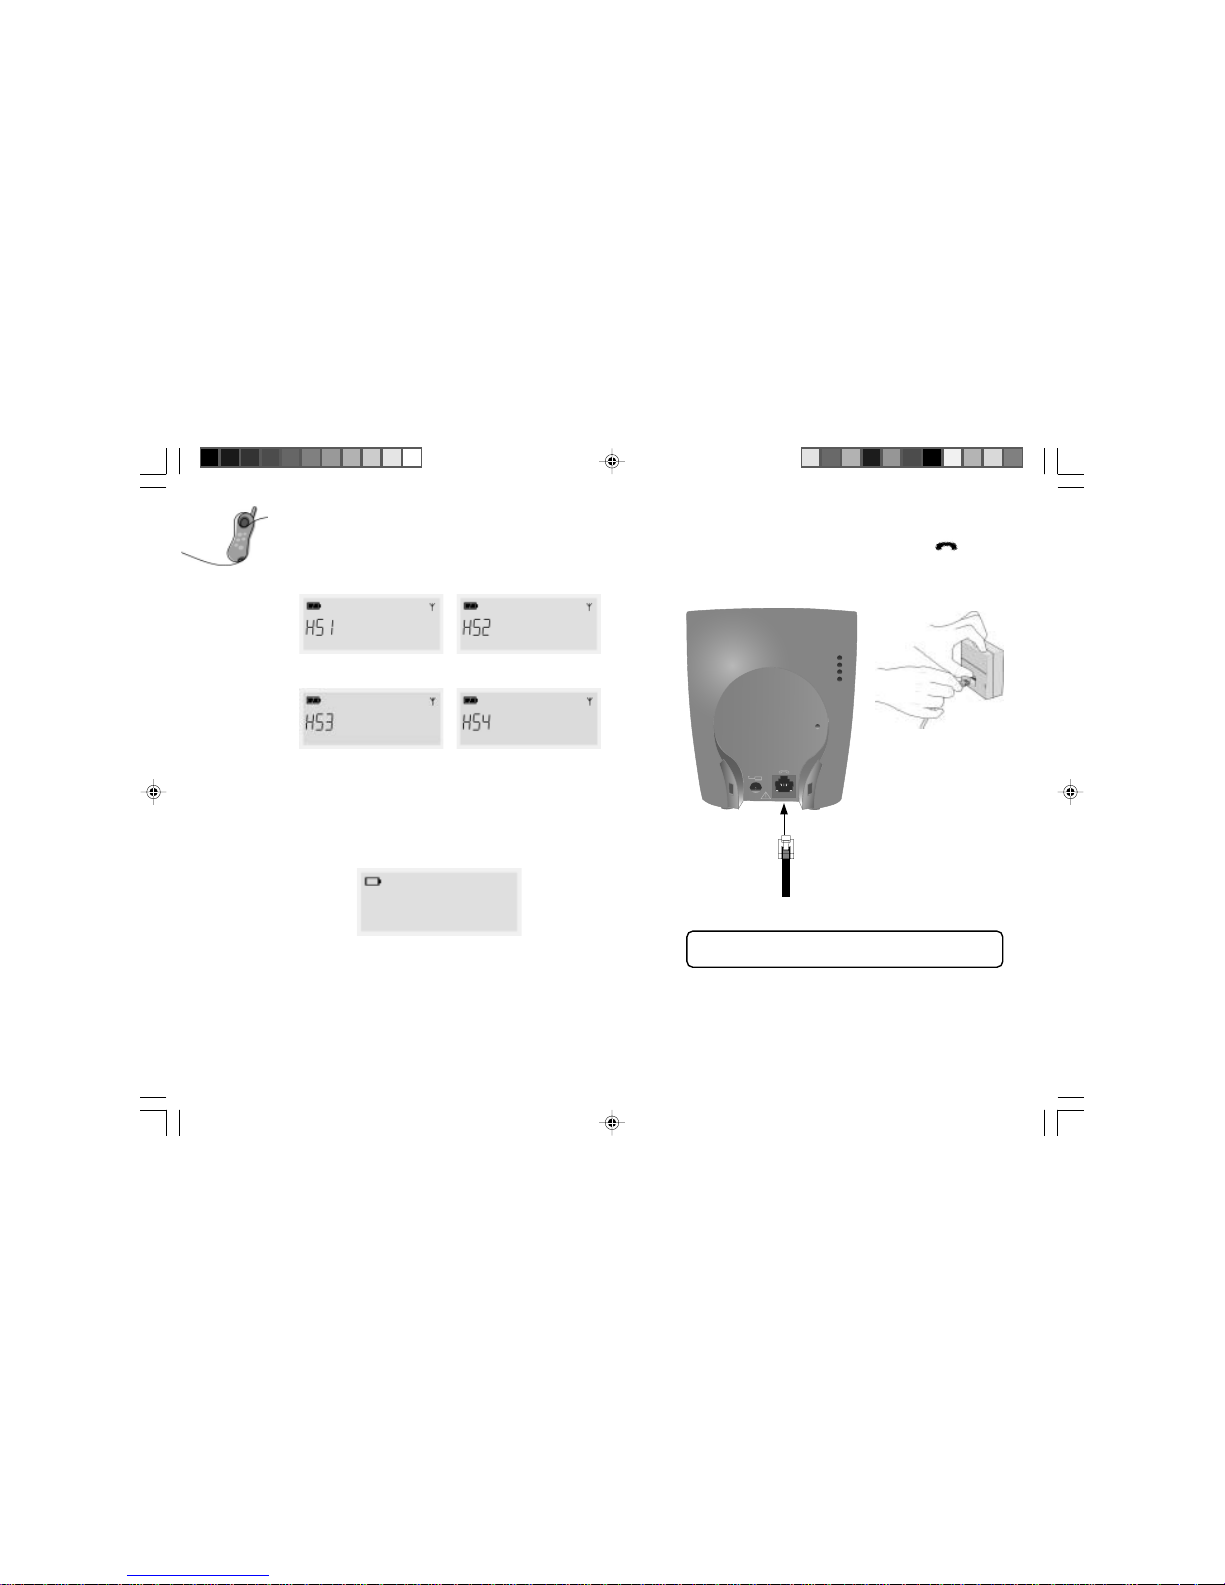
Standby mode
Once charged, your handset display will be as below displaying the
handset number. This is referred to as ‘standby mode’.
Low battery
When the batteries of a handset need charging there will be a low
battery warning beep every 60 seconds and the indicator shown
below will be displayed.
Connecting the telephone line
Plug the telephone line cable into the socket marked on the
back of the base unit and plug the other end into the telephone wall
socket.
Only use the telephone line cable supplied or your
VS1503 may not work correctly.
As soon as the handset is charged you will be able to make and
receive calls.
Handset 1 Handset 2
Handset 3
Handset 4
Page 10
10
Helpline 0870 241 3201
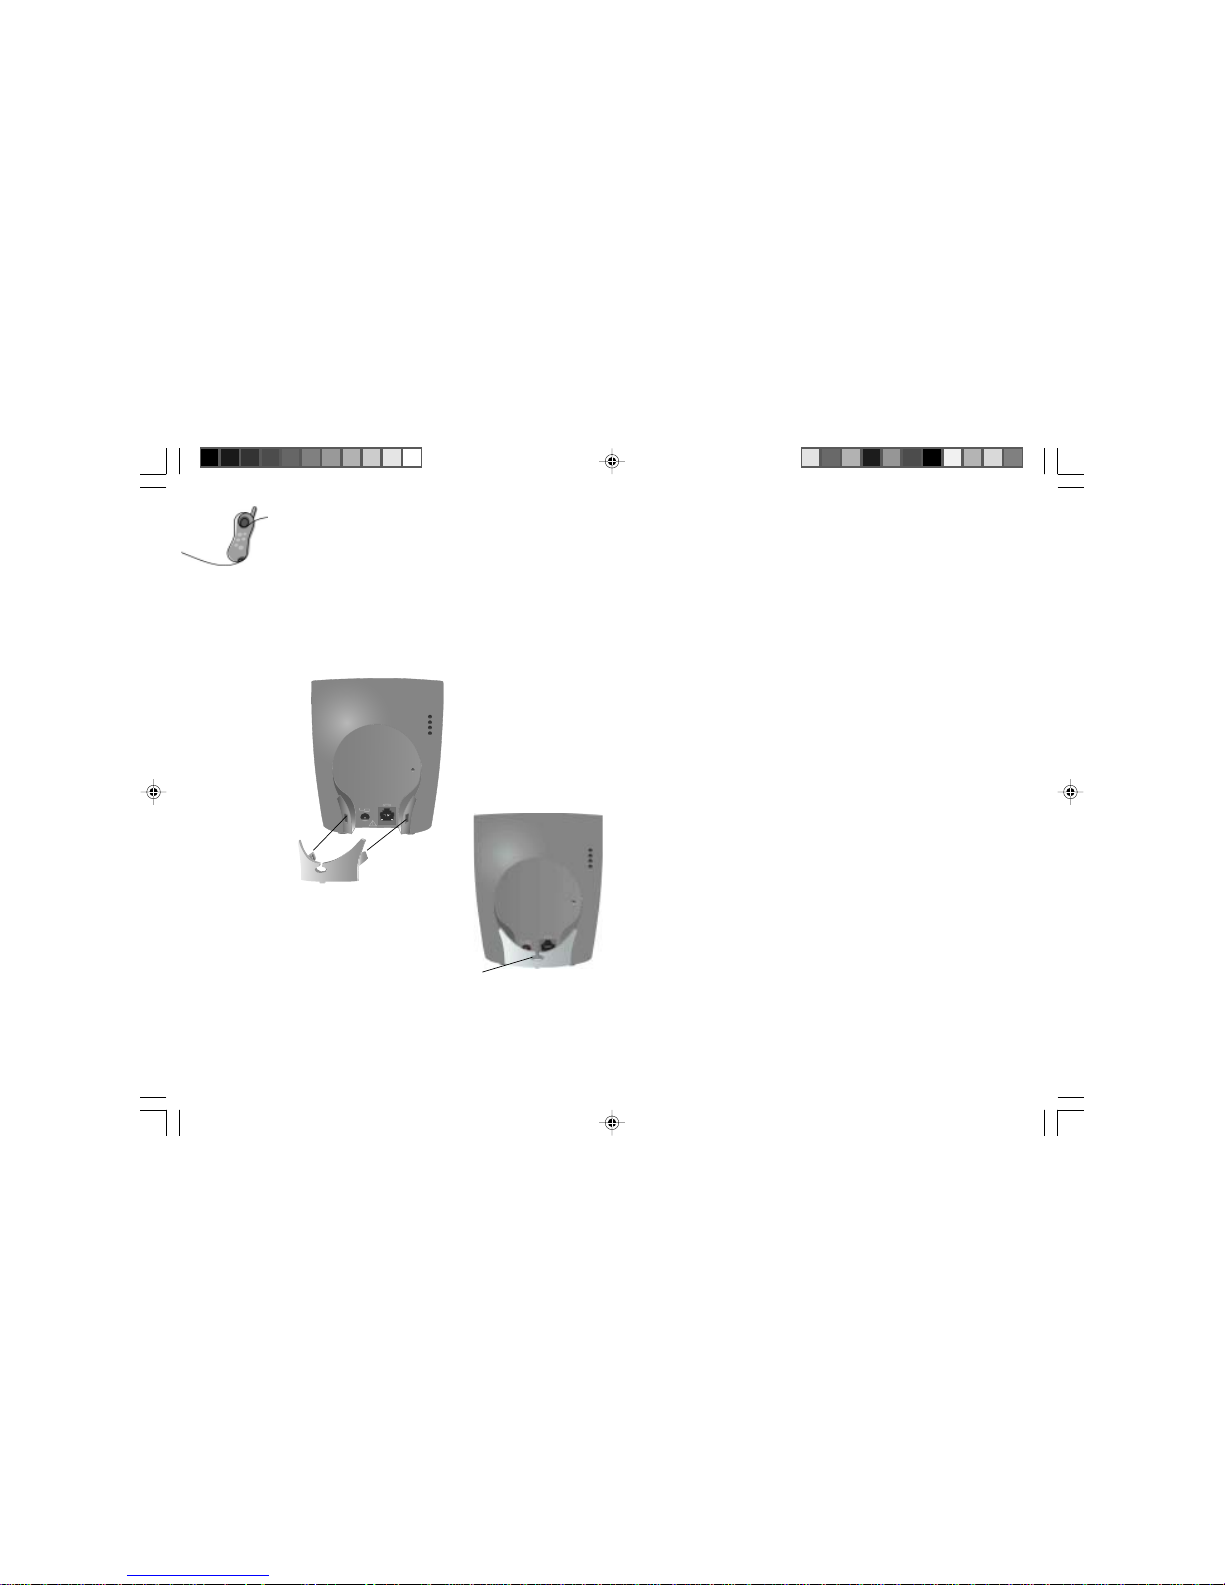
Cables slot
into cut-out
Fitting the base unit stand clip
Once the power and telephone cables have been connected to the
base unit, you can fit the base stand clip.
The stand clips into the two holes on the rear of the base unit as
shown below. The cables (not shown) slot into the cut-out of the
stand.
Your telephone is now set up and you will be able to make and
receive calls.
Page 11
11
Helpline 0870 241 3201
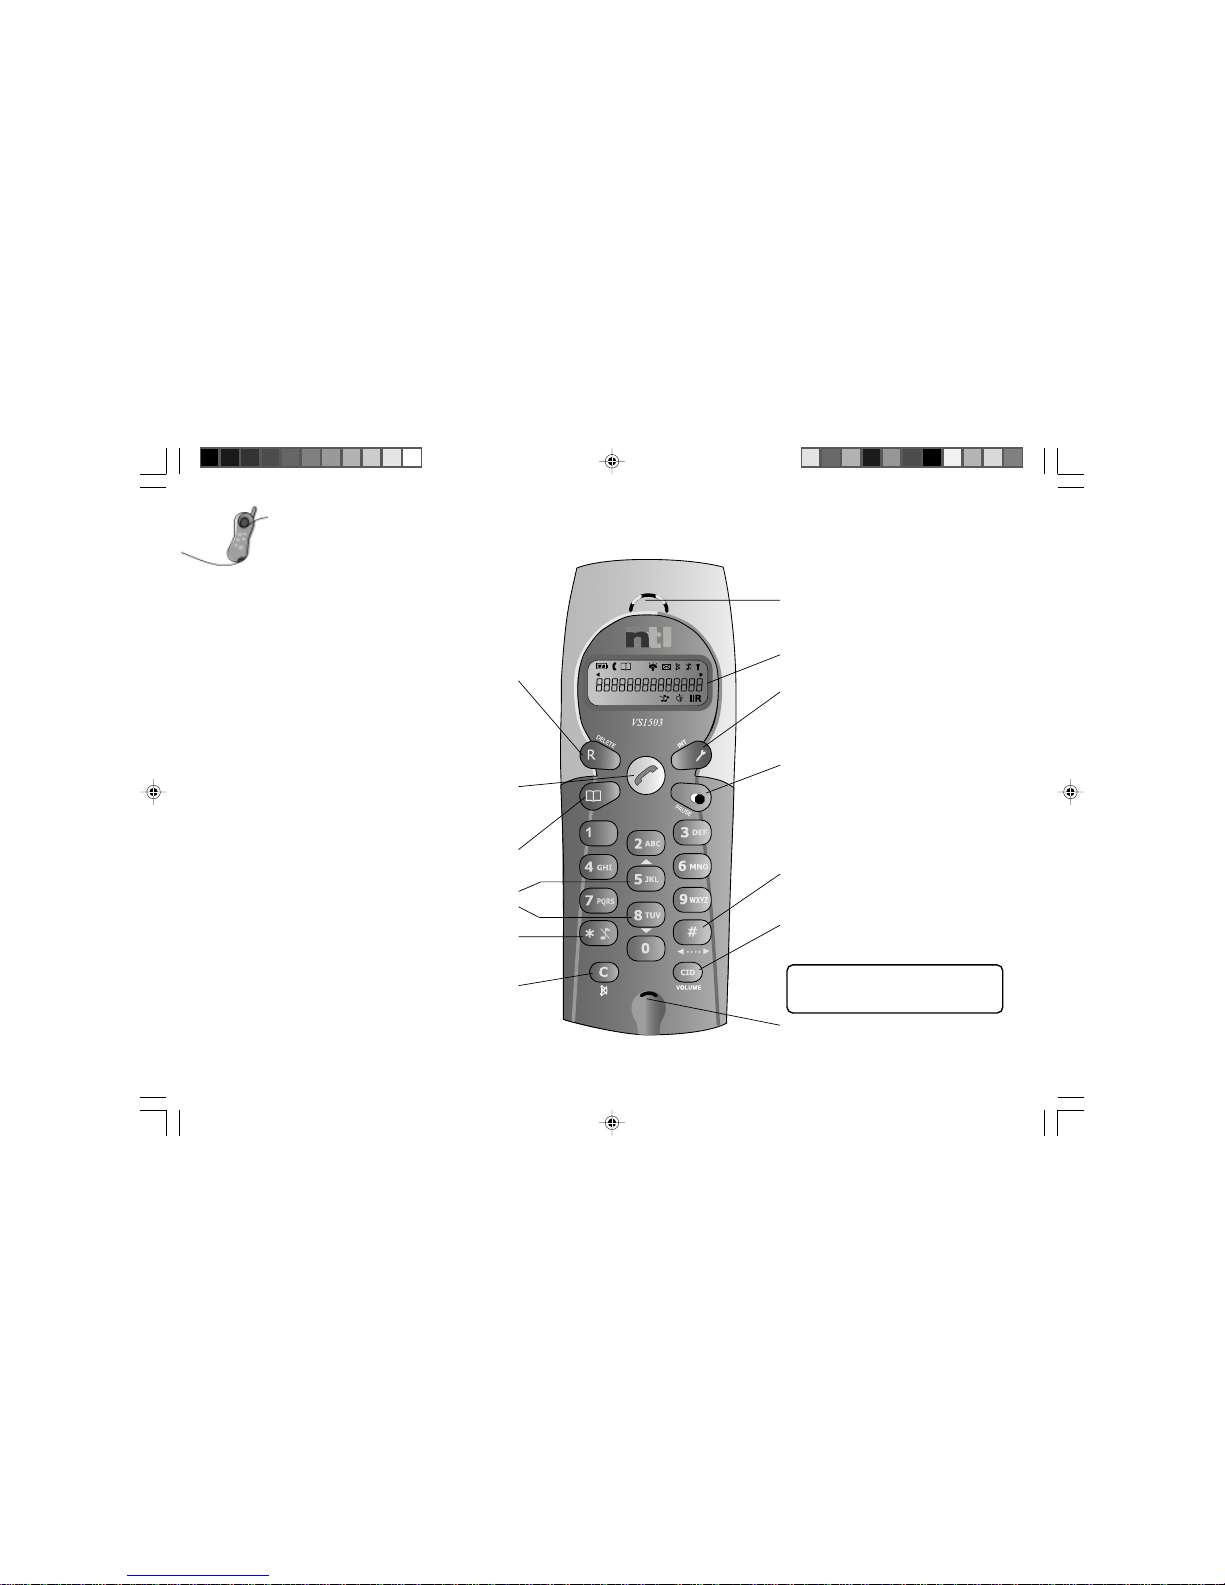
ntl VS1503
handsets
Earpiece
Display
Intercom/Program
When held for 1 second, enters the
programming mode. Also used to transfer and
make intercom calls.
Redial/Pause
Displays the last number you dialled.
When entering a number, inserts a pause.
CID*/Volume
Access the last number that called.
Adjust the earpiece volume during a call.
#/Scroll
Used to scroll across the display when the
number or name exceeds 14 characters.
Microphone
Clear/Mute
Clears characters from the display.
Also used to prevent the caller from
hearing your voice.
*/Ringer On-Off
Press and hold to switch the
ringer tones on or off.
Call Log Scrolling
Used to scroll up and down the Call List.
Phonebook
Allows you to access the phonebook.
Handset button
Makes, answers or ends a call.
Recall/Delete
Sends a Recall (Flash) signal down the
telephone line and is used in conjunction with
special services such as “Call waiting” which
may be offered by your network.
Also used to delete Phonebook and Call List
entries.
* Requires subscription to your network
service provider. Check availability of this
service with your network provider.
Page 12
12
Helpline 0870 241 3201
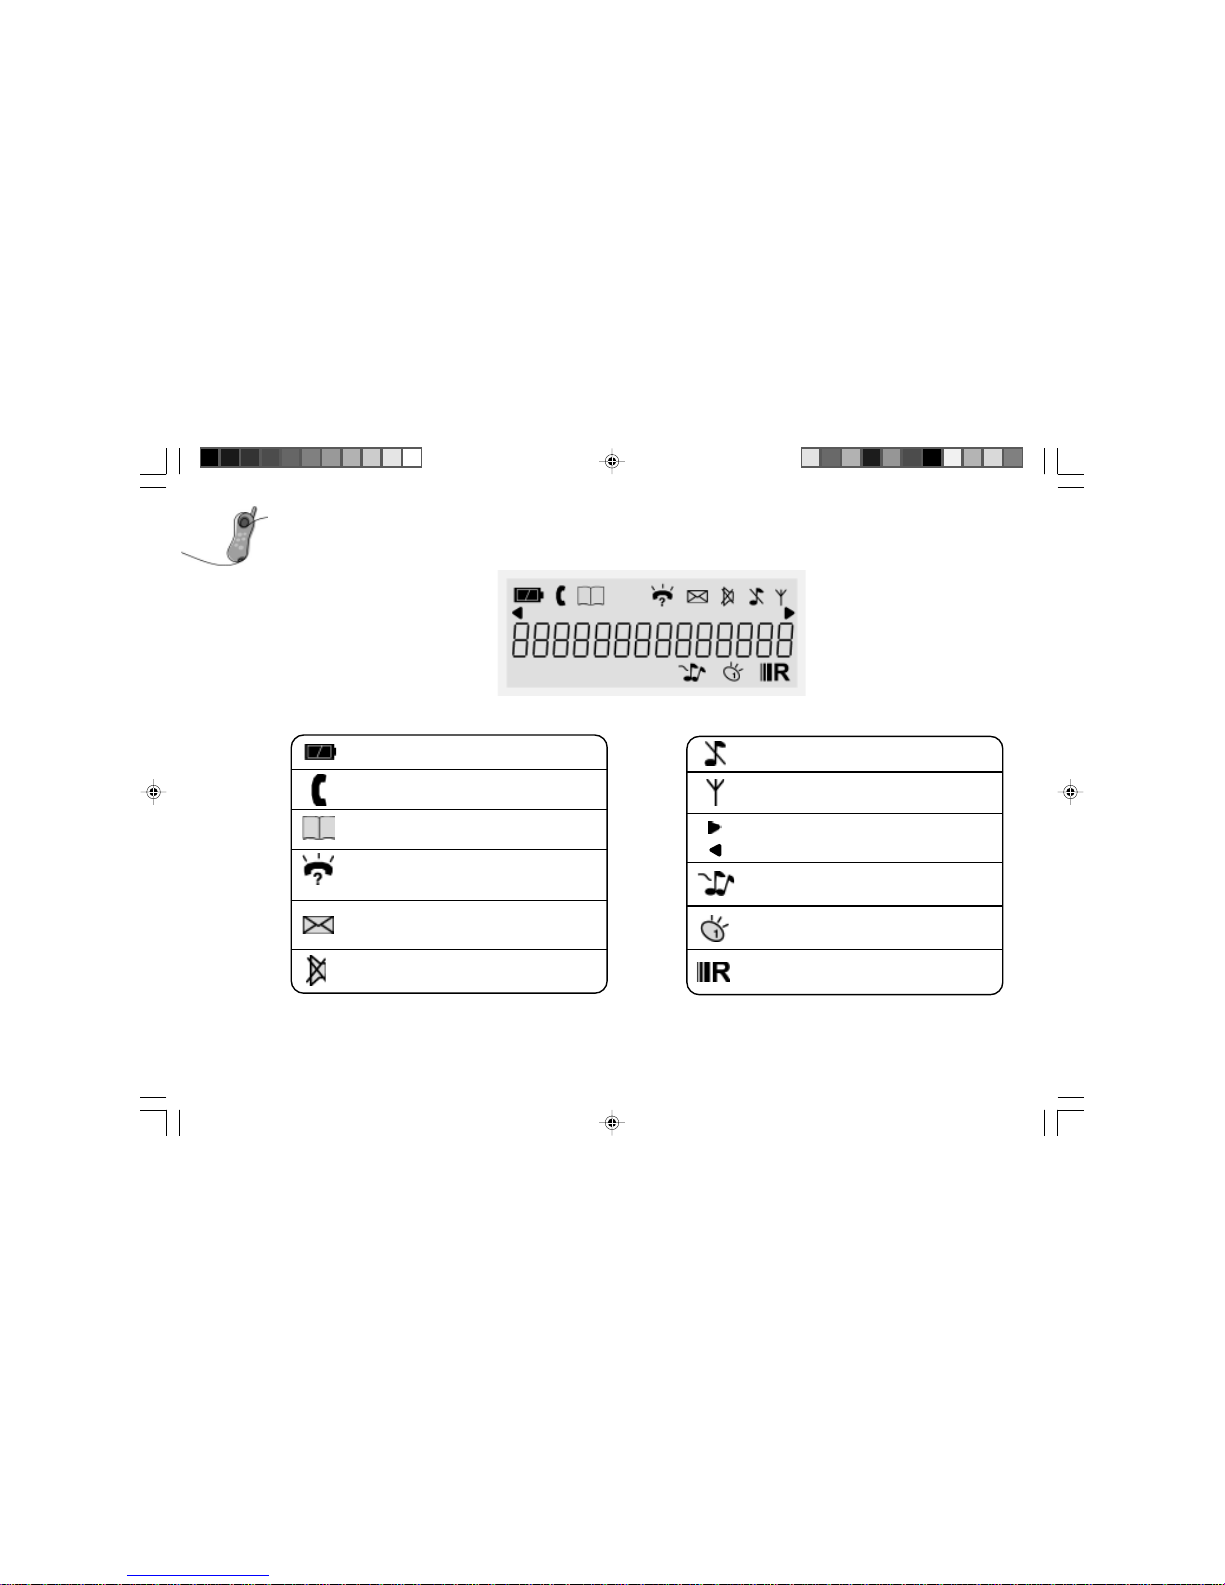
The handset display
Indicates the battery level: full, half or low.
The phone is in use.
Phonebook records are being retrieved or set up.
There is a new CID record or CID records are
being reviewed. (Requires subscription to your
network operator’s Caller ID service.)
There is a new message. (Requires subscription
to your network operator’s Caller ID service.)
The call is muted.
The ringer is turned off.
The phone is in handset ringer
programming mode.
The phone is in key beep programming mode.
The phone is in recall timing programming mode.
The handset is linked to the base.
More digits to the right.
More digits to the left.
Page 13
13
Helpline 0870 241 3201
Basic
operation
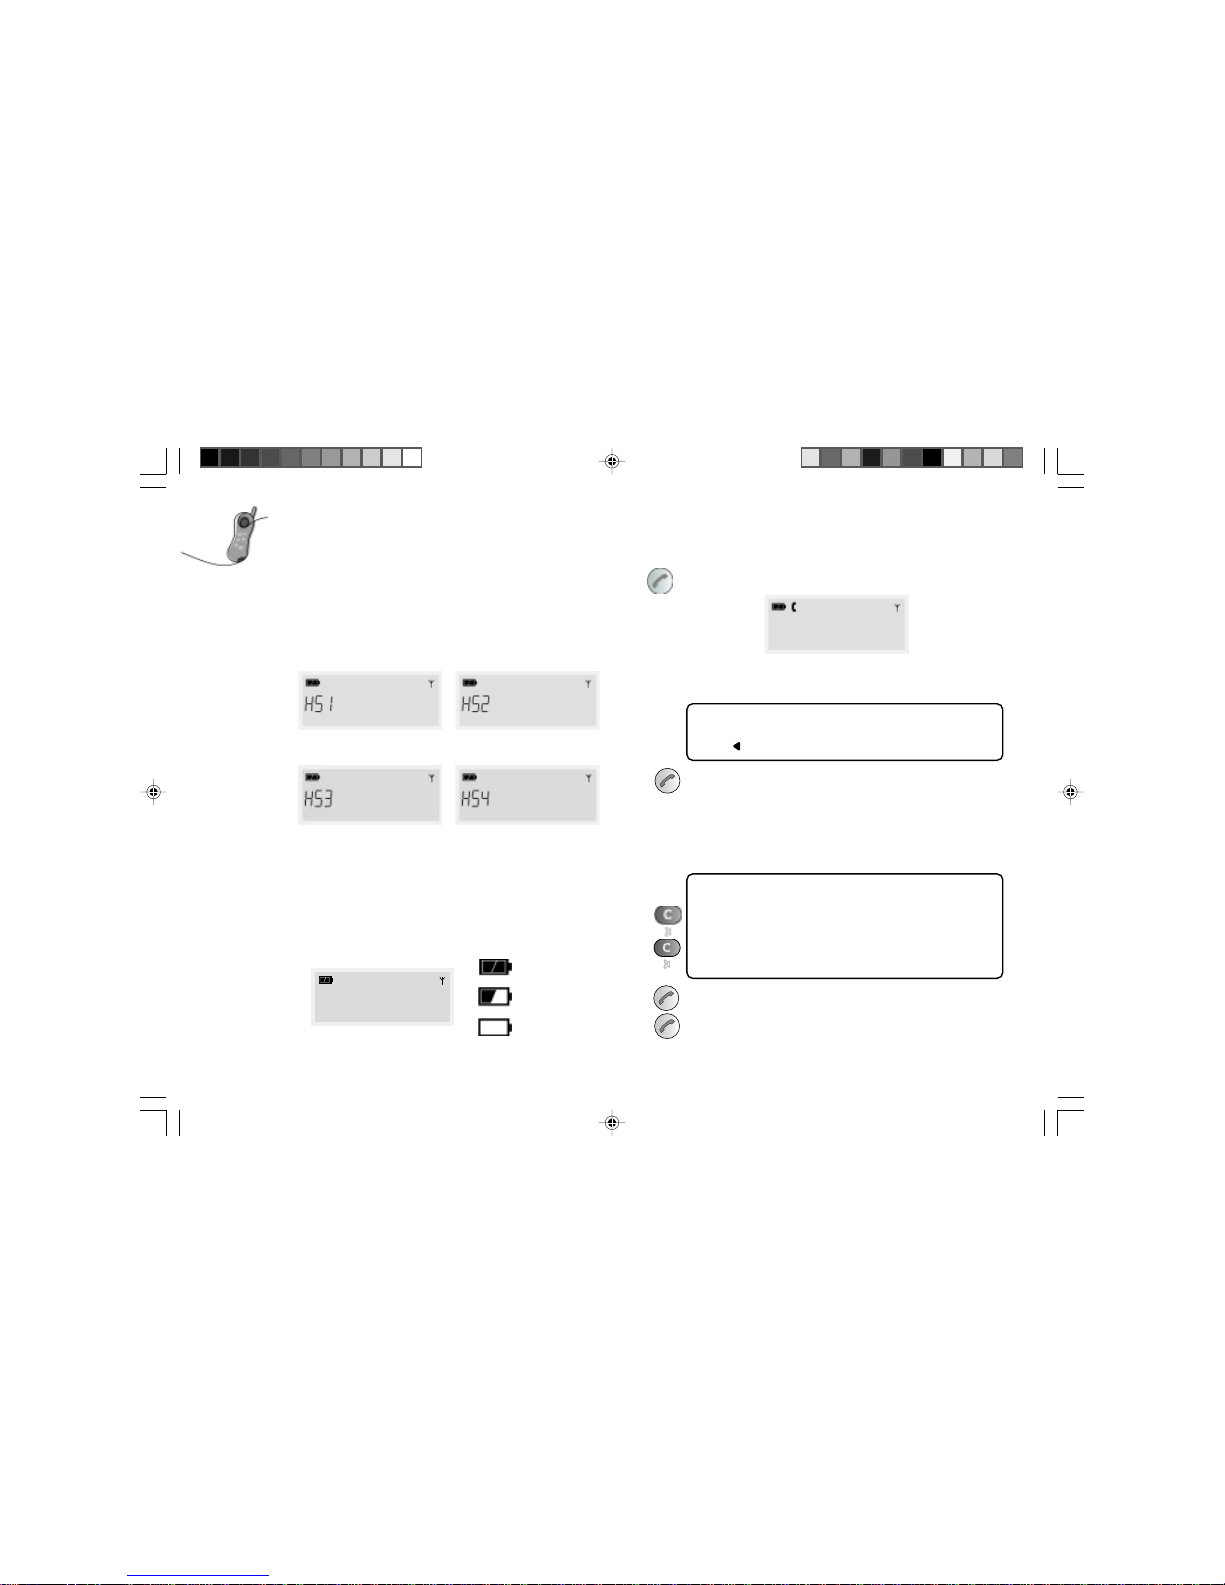
During standby
In standby mode the display will show the handset name:
The battery icon shows the battery charge level and the signal icon
indicates that the handset is linked to the base.
Battery status
The charged state of the handset batteries is indicated by the
battery icon on the display as shown below:
Fully charged
Half charged
Low charge
Making and ending calls
Normal dialling
Press the green handset button. The display will show:
When you hear the dial tone, dial the number you require. The
number appears in the display as you dial.
The display will only show the last 14 digits so if the
number dialled contains more than 14 the ‘more digits’
icon, , will be displayed.
To end the call either press the green handset button or place the
handset on the base/charger.
Preparatory dialling (pre-dial)
Enter the number you want to call (up to 20 digits). It will appear
in the display but will not be dialled.
The number can contain up to 20 digits. If you attempt to
enter more than 20 the handset will emit a reject beep.
If you enter a digit incorrectly, press clear, C, to delete it.
If you press and hold clear, C, for more than one second,
all digits entered will be cleared and the handset will
return to standby mode.
Press the green handset button to dial the number entered.
To end the call either press the green handset button or place the
handset on the base/charger.
Handset 1 Handset 2
Handset 3
Handset 4
Page 14
14
Helpline 0870 241 3201
Redial
Your handset allows you to redial the last number dialled. Each
handset has its own redial memory.
The display will only show the first 14 digits of the
retrieved number. To view the other digits press the scroll
button, #.
To redial the last number either:
Press the Redial button. The last number dialled will be displayed.
Press the green handset button to dial the number.
When no numbers are found, a blank screen will be
displayed.
Press the green handset button to end the call.
or:
Press the green handset button.
Press the Redial button to dial the number.
Press the green handset button to end the call.
Receiving calls
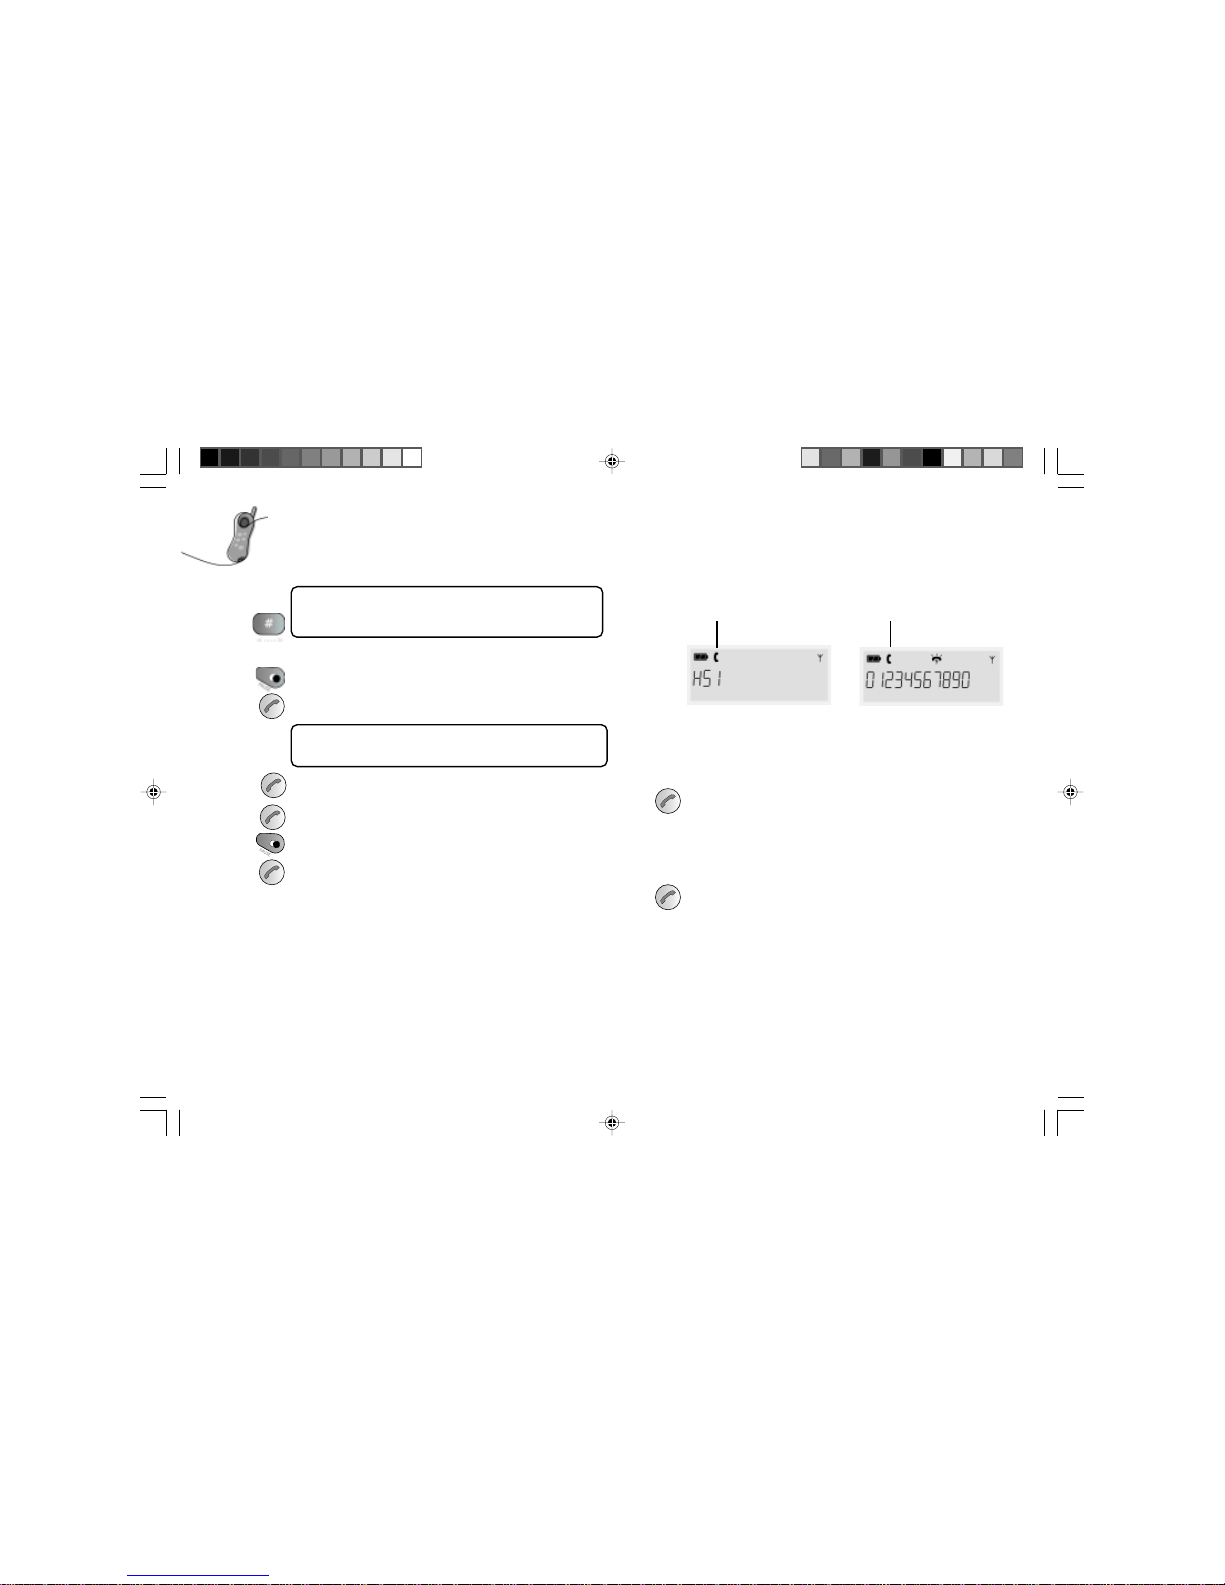
When you receive an incoming call, the handset and base will ring,
the ‘in use’ indicator on the base will flash and the ‘in use’ icon
will flash on the handset display as shown below.
If you have enabled the Caller ID function through your local
network operator, the caller’s number will also be displayed. Refer
to page 18 for further information on Caller ID.
To answer the call, press the green handset button and speak to the
caller.
Once connected, the ‘in use’ indicator on the base will cease to
flash and remain on. The ‘in use’ icon on the handset ceases to
flash and remains on and after approximately 10 seconds the call
timer is displayed.
To end the call, press the green handset button or replace the
handset onto the base unit.
In use icon flashes
Without Caller ID
In use icon flashes
With Caller ID
Page 15
15
Helpline 0870 241 3201
During a call
Call timer
Approximately 10 seconds after a call has connected the call timer
will be displayed. This will show the duration of the call in minutes
and seconds for the first hour, then hours and minutes after that.
When the call is ended the duration remains displayed for
approximately five seconds before the display returns to the
standby mode.
Adjusting the earpiece volume
During a call, you can adjust the volume of the handset’s earpiece
by pressing the Volume button (CID) repeatedly to select the
required volume (low, medium, high).
The display indicates the setting as follows:
‘ooo’ high volume
‘oo’ medium volume
‘o’ low volume
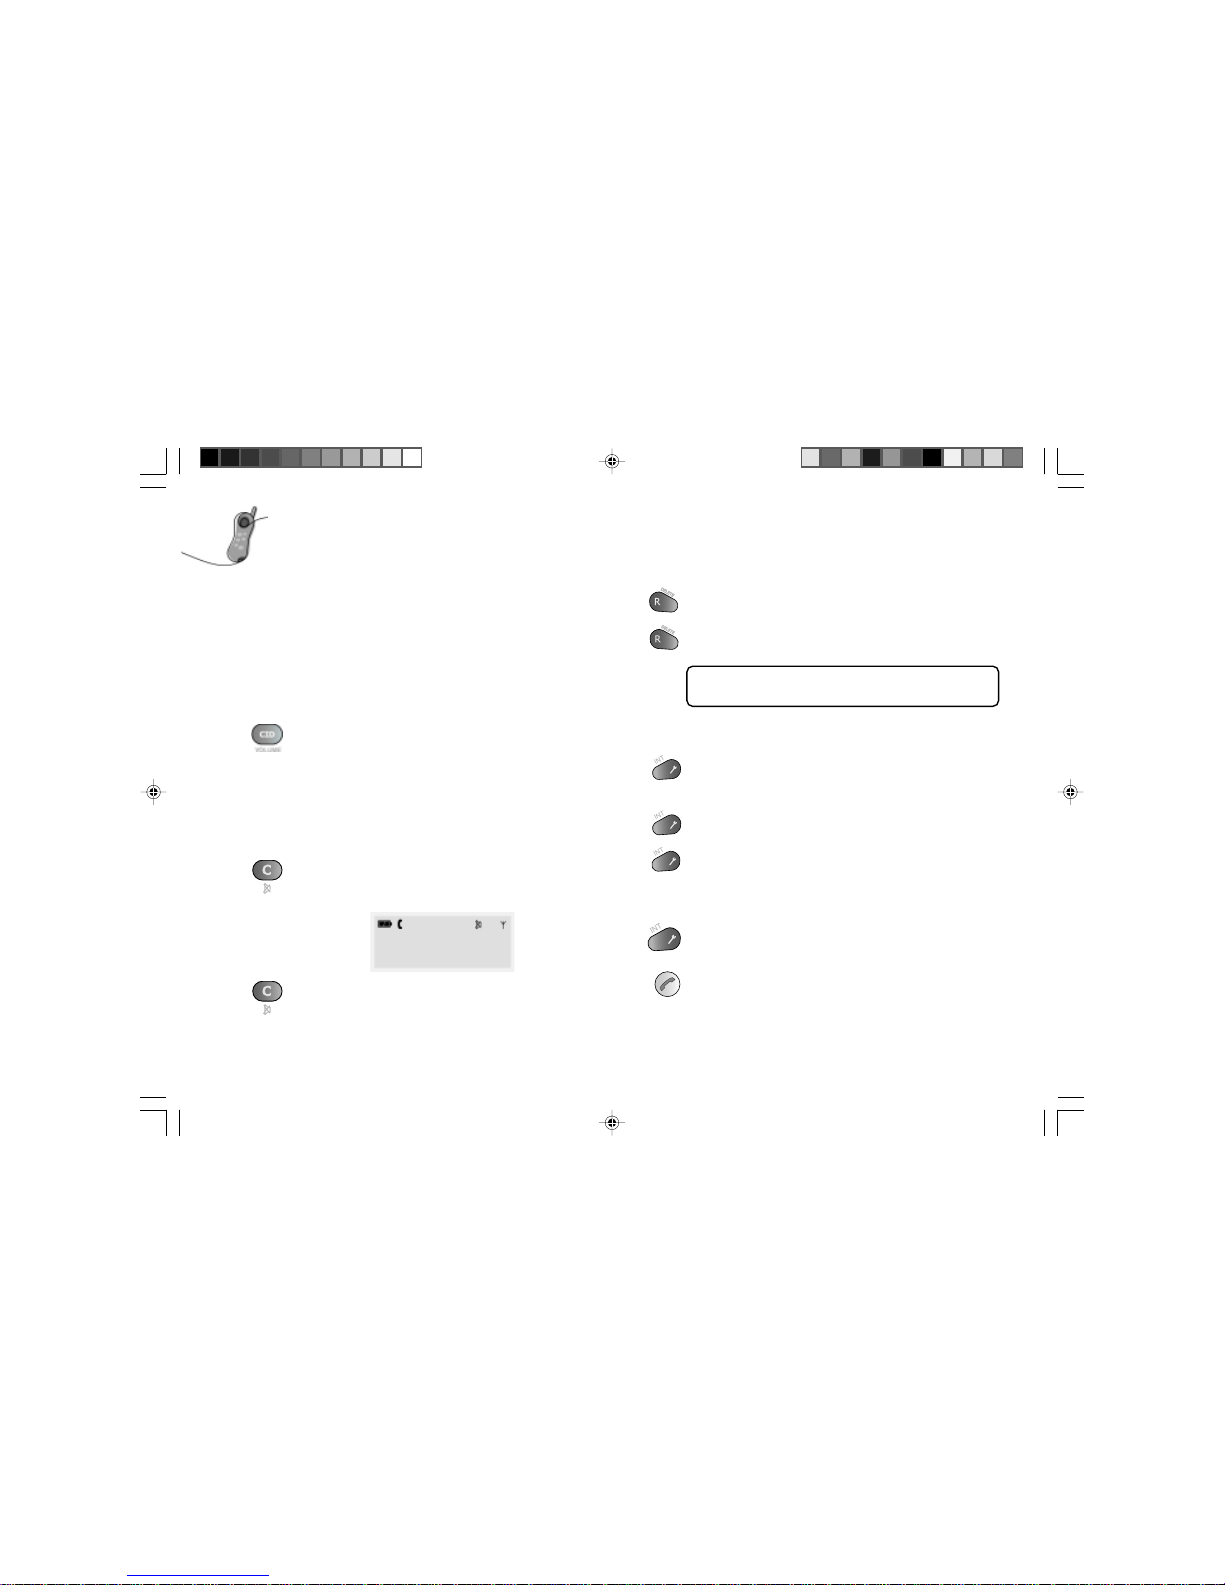
Muting a call
When a conversation is in progress, you can mute the call by
pressing the mute button, (C), which will prevent the caller from
hearing you. The mute icon will be displayed:
To return to the call, press the mute button, (C), again.
Receiving a second call
If you have subscribed to the Caller ID on Call Waiting service, the
telephone will give an audible signal and show the number of
another incoming call while you are already connected to a caller.
To speak to the second caller put the current call on hold by
pressing the recall button.
Subsequent presses of the recall button will switch between the two
callers.
If this facility is not available you will need to contact
your network operator.
Making an inquiry call
You can contact another second handset during an external call.
Press the intercom button to put the call on hold.
Press the number of the second handset (1, 2, 3 or 4) to call it.
If the other handset is not answered, you can return to the original
call by pressing the intercom button again.
When the other handset is answered, you can switch between the
external call and the other handset by pressing the intercom button.
The party that you are not talking to is put on hold.
Transferring a call
You can transfer an external call to another handset.
During the external call press the intercom button to place the
caller on hold.
Press the number of the other handset, 1, 2, 3 or 4, and when it is
answered either press the green handset button or return your
handset to the base.
Page 16
16
Helpline 0870 241 3201
Intercom
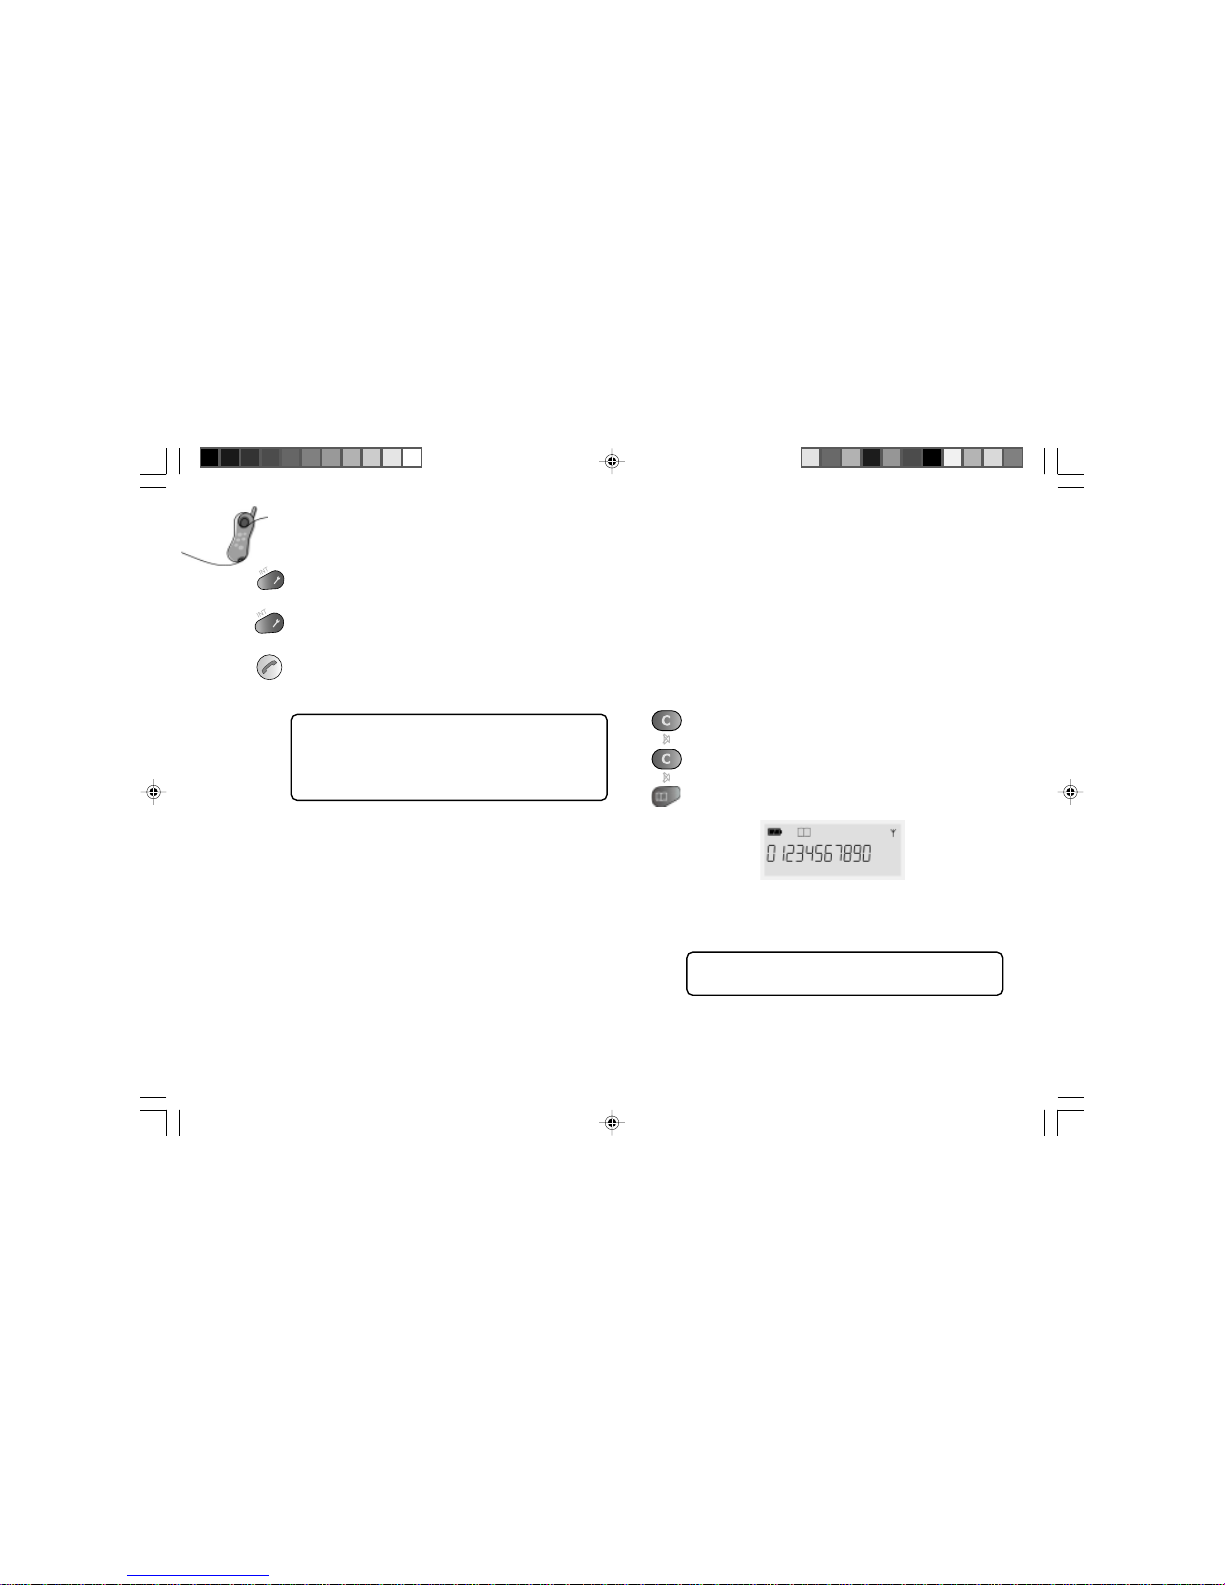
You can use two handsets to make intercom calls.
To call the other handset, press the intercom button. When you hear
the dial tone press the number of the other handset, 1, 2 3 or 4.
Alternatively you can press the number of the handset first then
press the intercom button.
The called handset rings and is answered as normal.
To end an intercom call either press the green handset button or
return the handset to the base.
If you receive an external call during an intercom call, you
will hear a series of short beeps and, if you have
subscribed to Caller ID, the callers number will be
displayed. You need to end the intercom call before you
can take the external call.
Phonebook
The phonebook allows you to store frequently used phone numbers
in your personal directory so that you can easily make a call
without having to remember or enter the phone number. You can
store up to 10 numbers of up to 20 digits each, on each handset.
Each handset has its own phonebook and must be programmed
separately.
Setting up phonebook records
In standby mode, enter the telephone number you wish to store.
If you make a mistake while entering a phone number at
this step, use the clear button, C, to correct the mistake.
Each time you press this button, the last digit is cleared.
To clear all digits, press and hold the clear button, C, then
enter the correct number.
Press and hold the phonebook button until the phonebook icon is
displayed.
Press the memory location you wish to use to store the number
(0-9). You will hear a confirmation beep and the phonebook icon
will extinguish.
Note that any number that was previously stored in
the selected location will be overwritten.
Page 17
17
Helpline 0870 241 3201
You can also retrieve a telephone number from redial or
Caller ID and save as a phonebook entry. Refer to the
Redial or Caller ID section of this book for instructions on
retrieving the number. When the telephone number is
displayed press and hold the phonebook button and
proceed as described above.
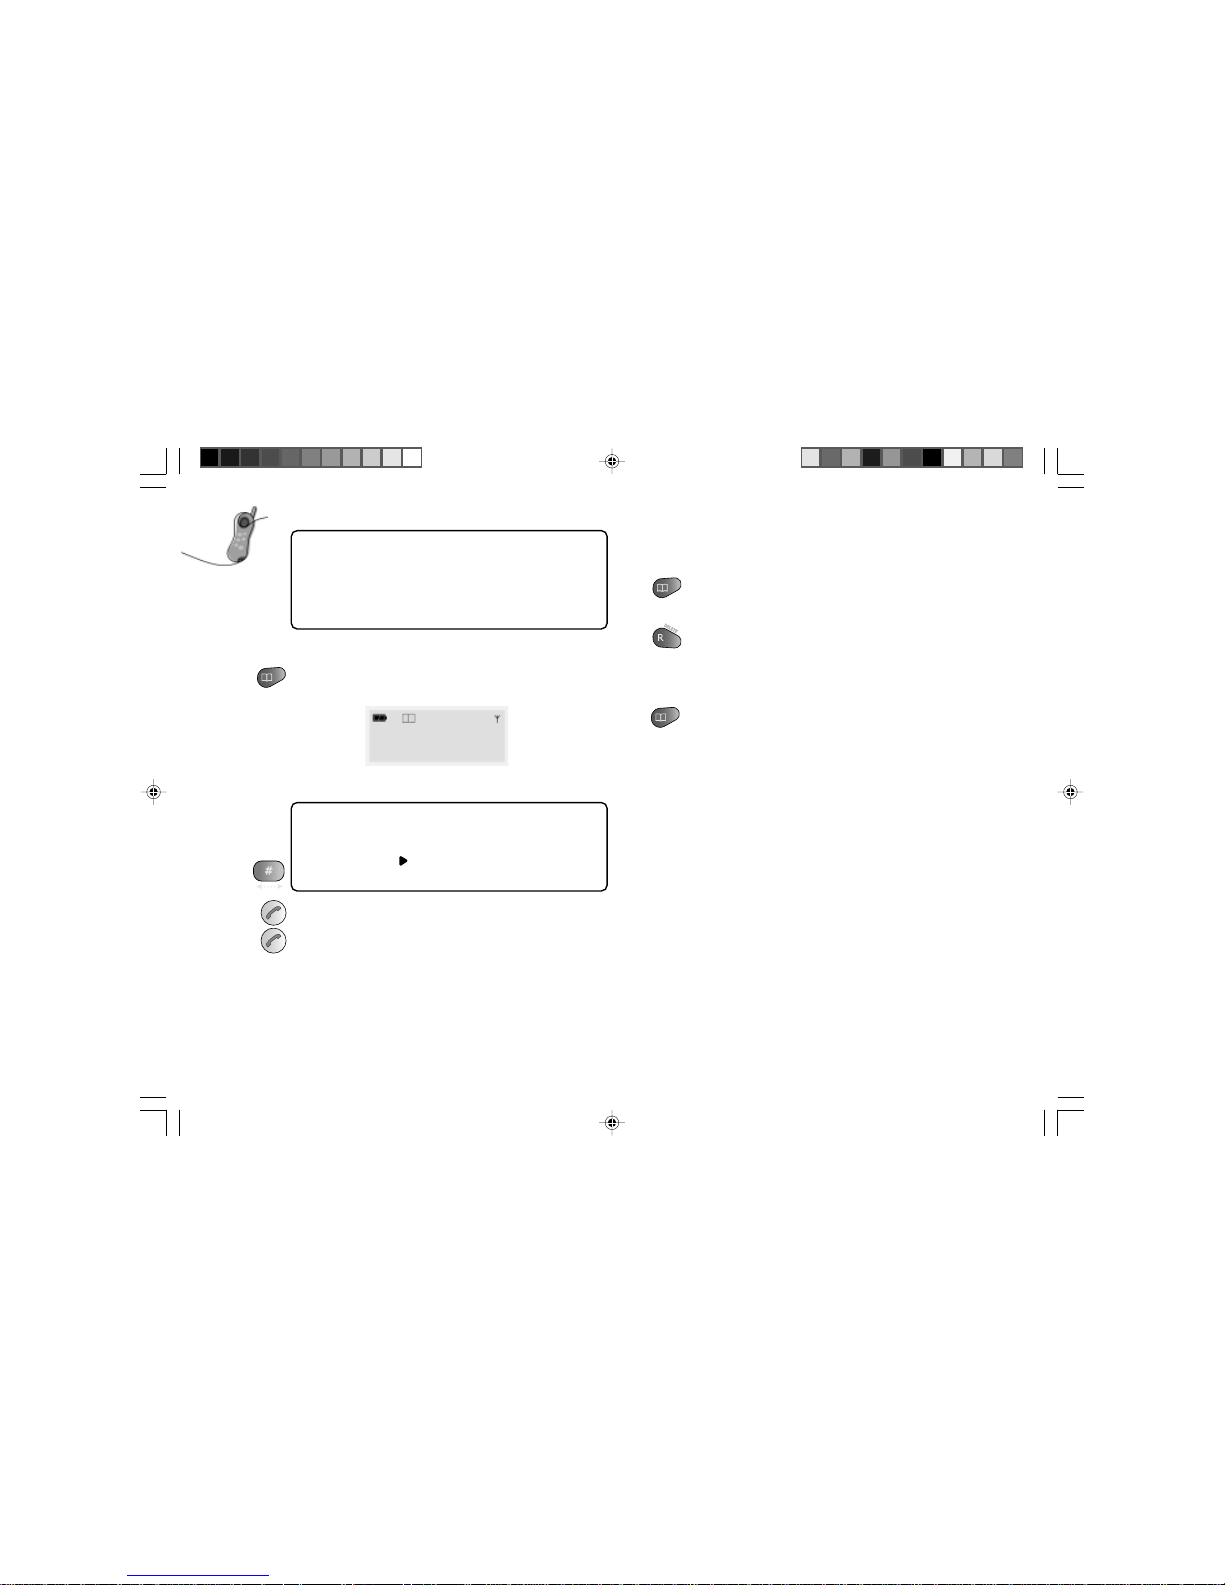
Making a call from the phonebook
Press the phonebook button. The phonebook icon will be
displayed:
Press 0 to 9 to view the stored number.
If no phone number is stored in a particular location the
display will be blank.
If the stored number contains more than 14 digits the
‘more digits’ icon, , will be displayed. To view the other
digits press the scroll button, #.
Once the number has been selected, press the green handset button
to dial the number.
To end the call either press the green handset button or return the
handset to the base.
Deleting phonebook records
The phonebook records can be deleted one at a time on both
handsets independently.
With the handset in the standby mode, press the phonebook button.
The phonebook icon is displayed.
Press the location number (0 to 9) of the record you wish to delete.
Press and hold delete until you hear a confirmation beep. The
record has been deleted and the phone number is no longer
displayed.
To delete another record press the location number and repeat the
process above.
Press the phonebook button to return to the standby mode.
Page 18
18
Helpline 0870 241 3201
Caller ID
Before you can use this facility, you must subscribe to your
network operator’s Caller ID service. You will need to call your
telephone company to arrange this.
When the handset rings, the caller’s number (or the last 14 digits of
the number) will be shown on the display.
The handset can store the last 20 received Caller ID records. Each
record holds up to 20 digits.
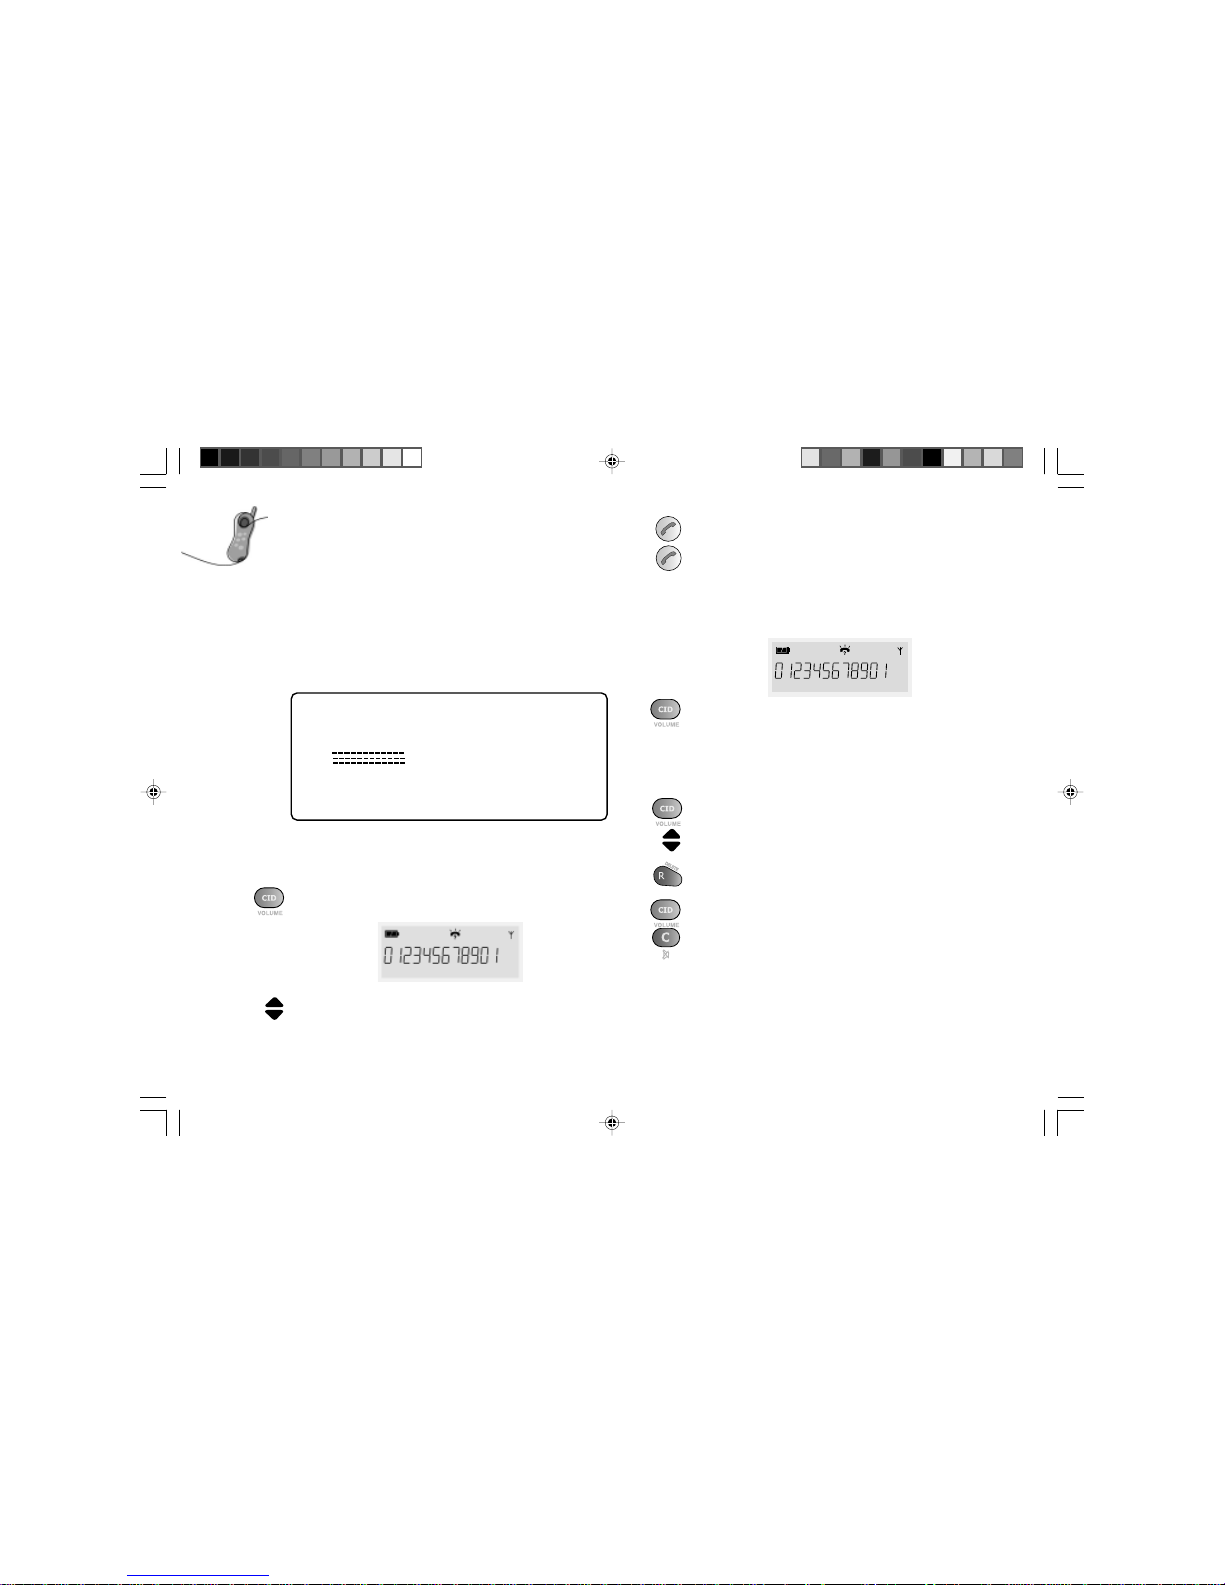
There are three types of call where the Caller ID number
will not be displayed and each of these has a different
display as follows:
Caller ID call back
You can return a call with the received Caller ID record provided
that it contains a valid phone number.
Press the CID button. The Caller ID record icon will be displayed:
Press either of the Call Log scroll keys (5 or 8) to select the Caller
ID record you wish to return call.
Press the green handset button to dial the number.
To end the call either press the green handset button or return the
handset to the base.
Reviewing caller ID records
When a new Caller ID record is received the ‘CID record’ icon is
displayed:
Press the CID button while the handset is in standby mode. The
most recent Caller ID record is displayed. If there are no Caller ID
records the display will be blank.
Deleting caller ID records
The Caller ID records can be deleted one at a time on the handsets
independently.
Press the CID button while the phone is in standby mode.
Press either of the Call Log scroll keys (5 or 8) to select CID record
you wish to delete.
Press and hold the delete button until you hear a confirmation
beep. The phone will show the next Caller ID record.
Repeat this process if you wish to delete other records.
Press either the CID button or the clear button, C, to return the
phone to the standby mode.
Witheld CID
ooooooooooooo Unavailable CID
------------------- International CID
Page 19
19
Helpline 0870 241 3201
Call waiting number
If you have subscribed to Caller ID on call waiting, and you receive
a call during a call, the second caller’s number will be displayed.
Refer to the ‘Receiving a second call’ section on page 15.
Contact your network service provider if you have any problem
with this service.
Message waiting
If you subscribe to Caller ID your network operator may also offer
a voice messaging service.
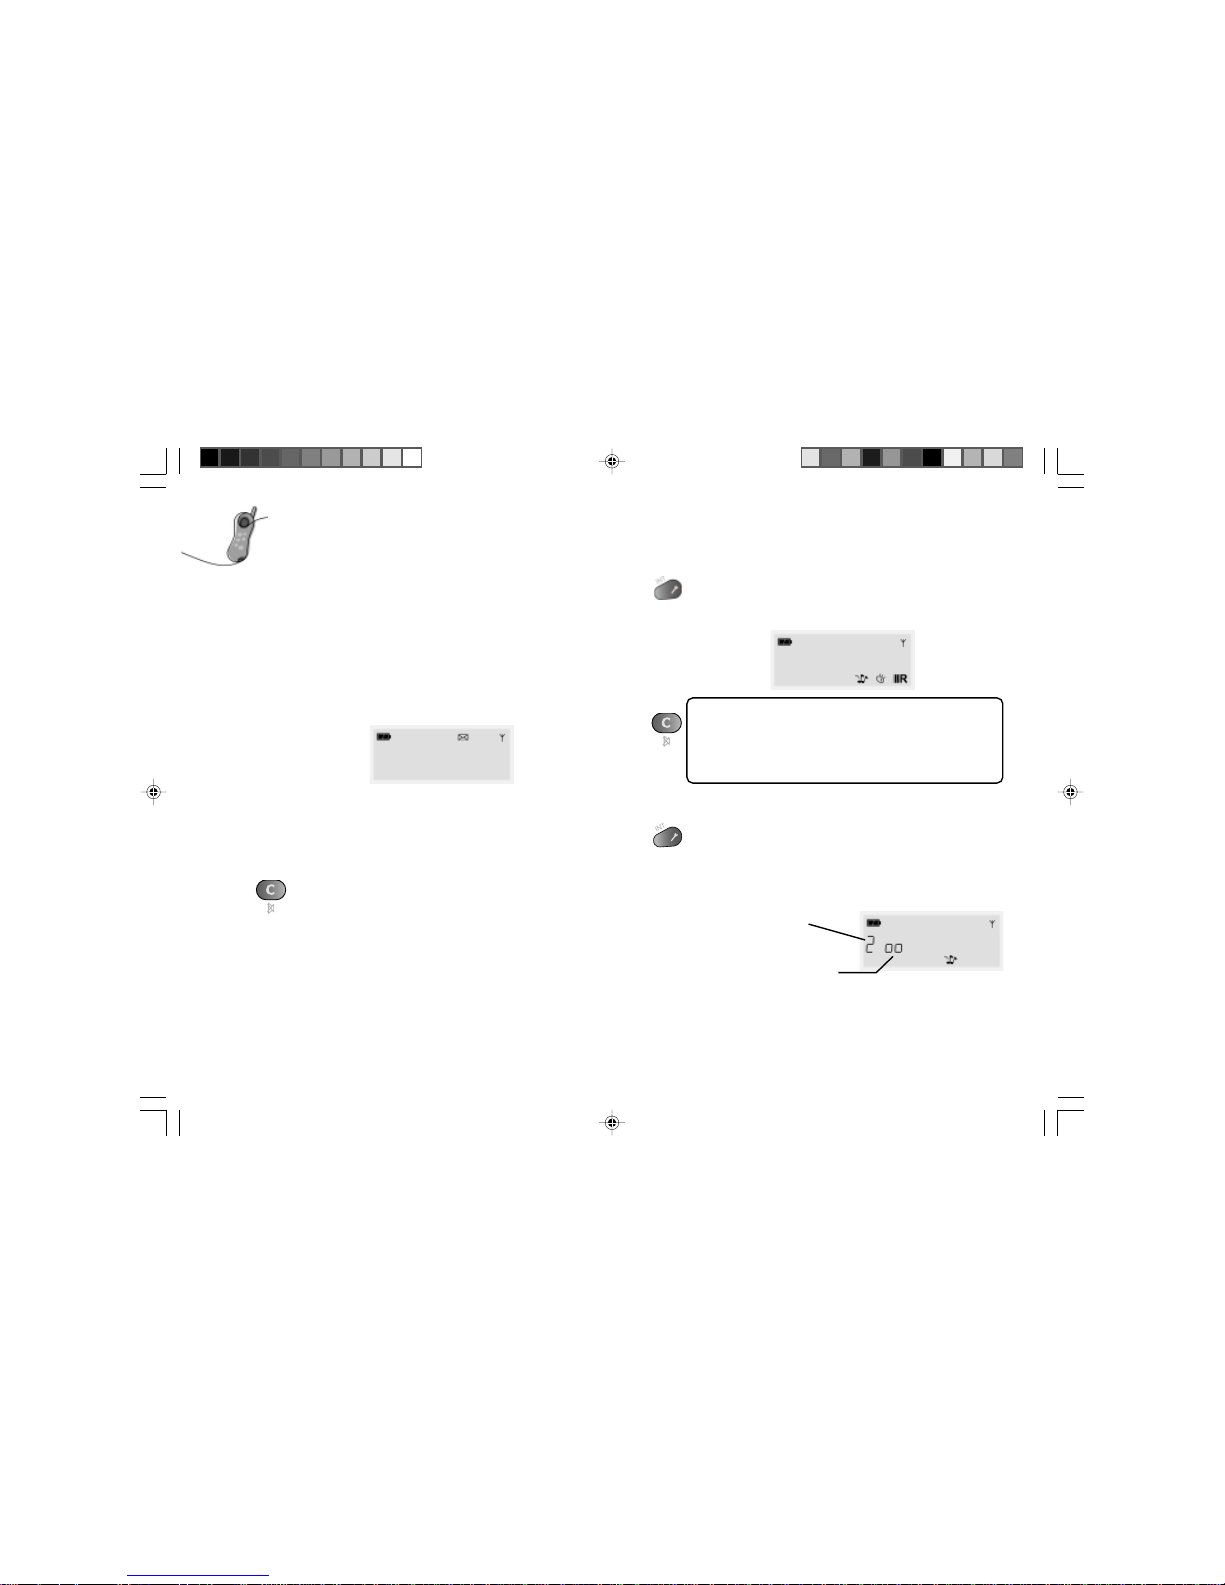
If you have a new message the ‘new message’ icon will be
displayed:
Your network operator will give instructions on how to listen to
your messages.
When you have listened to all of your messages the new message
icon will be extinguished.
You can also turn the new message indication off by pressing the
clear button, C, for two seconds when the handset is in the standby
mode.
Programming
When the handset is in the standby mode press and hold the
program button for one second to enter the programming mode.
The three programming icons will be displayed:
You can exit the programming mode without saving any
changes by pressing the clear button, C, at any time.
All the programming items are handset independent;
changes made to one handset will not affect the setting of
the other handset.
Handset ringer melody and volume
Press and hold the program button for 1 second to enter
programming mode.
Press the ‘1’ button. The ringer melody will be heard and the
display will show the current melody selected and the volume
setting:
Press 1 to 5 to choose the melody. The melody is played once.
The number indicates
the melody selected.
The ‘o’s represent the volume
setting: ‘ooooo’ the highest, ‘o’
the lowest and blank for Off.
Page 20

20
Helpline 0870 241 3201
Press the Volume button, (CID), repeatedly to scroll through the
volume settings: blank Off, ‘ooooo’ (high)..., ‘o’ (low). The ringer
will play once to indicate the volume level.
If Off is selected the ringer off symbol is displayed as shown
below:
Press the Program button to confirm your selection. You will hear
a confirmation beep.
If the volume is set to Off, the only indications of a call
are the flashing lamp and ringer on the base and the
flashing handset symbol on the display.
Each handset can have a different melody and ringer
volume.
Key beep
When the key beep is on you will hear a beep whenever you press a
button on the handset. You have the option to turn the key beep on
or off.
Press and hold the program button for 1 second to enter the
programming mode.
Press the ‘2’ button to enter the key beep programming mode. The
display changes to:
The display will show the current setting: 1 indicates that the key
beep is off, 2 that it is on.
Press 1 to turn the key beep off, 2 to turn it on.
Press the program button to confirm the setting and return to the
standby mode.
Recall duration
Depending on your network operator, Caller ID applications such
as Call Waiting may require a recall signal (also known as a flash
signal) to the exchange or central office. The recall signal can be of
either short (100 ms) or long (250 ms) duration. Contact your
network operator if you are not sure which duration to set.
Press and hold the program button for 1 second to enter
programming mode.
Press the ‘3’ button to enter the recall duration programming mode.
The display changes to:
The display will show the current setting: 1 for short duration, 2 for
long duration.
Press 1 to select a short duration signal and 2 to select a long
duration signal.
Press the program button to confirm the setting and return to the
standby mode.
Page 21
21
Helpline 0870 241 3201
Default settings
A handset can be reset to the settings made at the time of
manufacture. These are known as the default settings.
When a handset is reset to its default settings the redial
numbers, phonebook and Caller ID records are
deleted.
Press and hold the program button for 1 second to enter
programming mode.
Press and hold the delete button until you hear a confirmation
beep. The handset is reset and returns to the standby mode.
Other features
Handset ringer On/Off
The ringer can be switched on or off by pressing and holding the
* / Ringer on-off button. The ringer off icon will be displayed when
it is set to off.
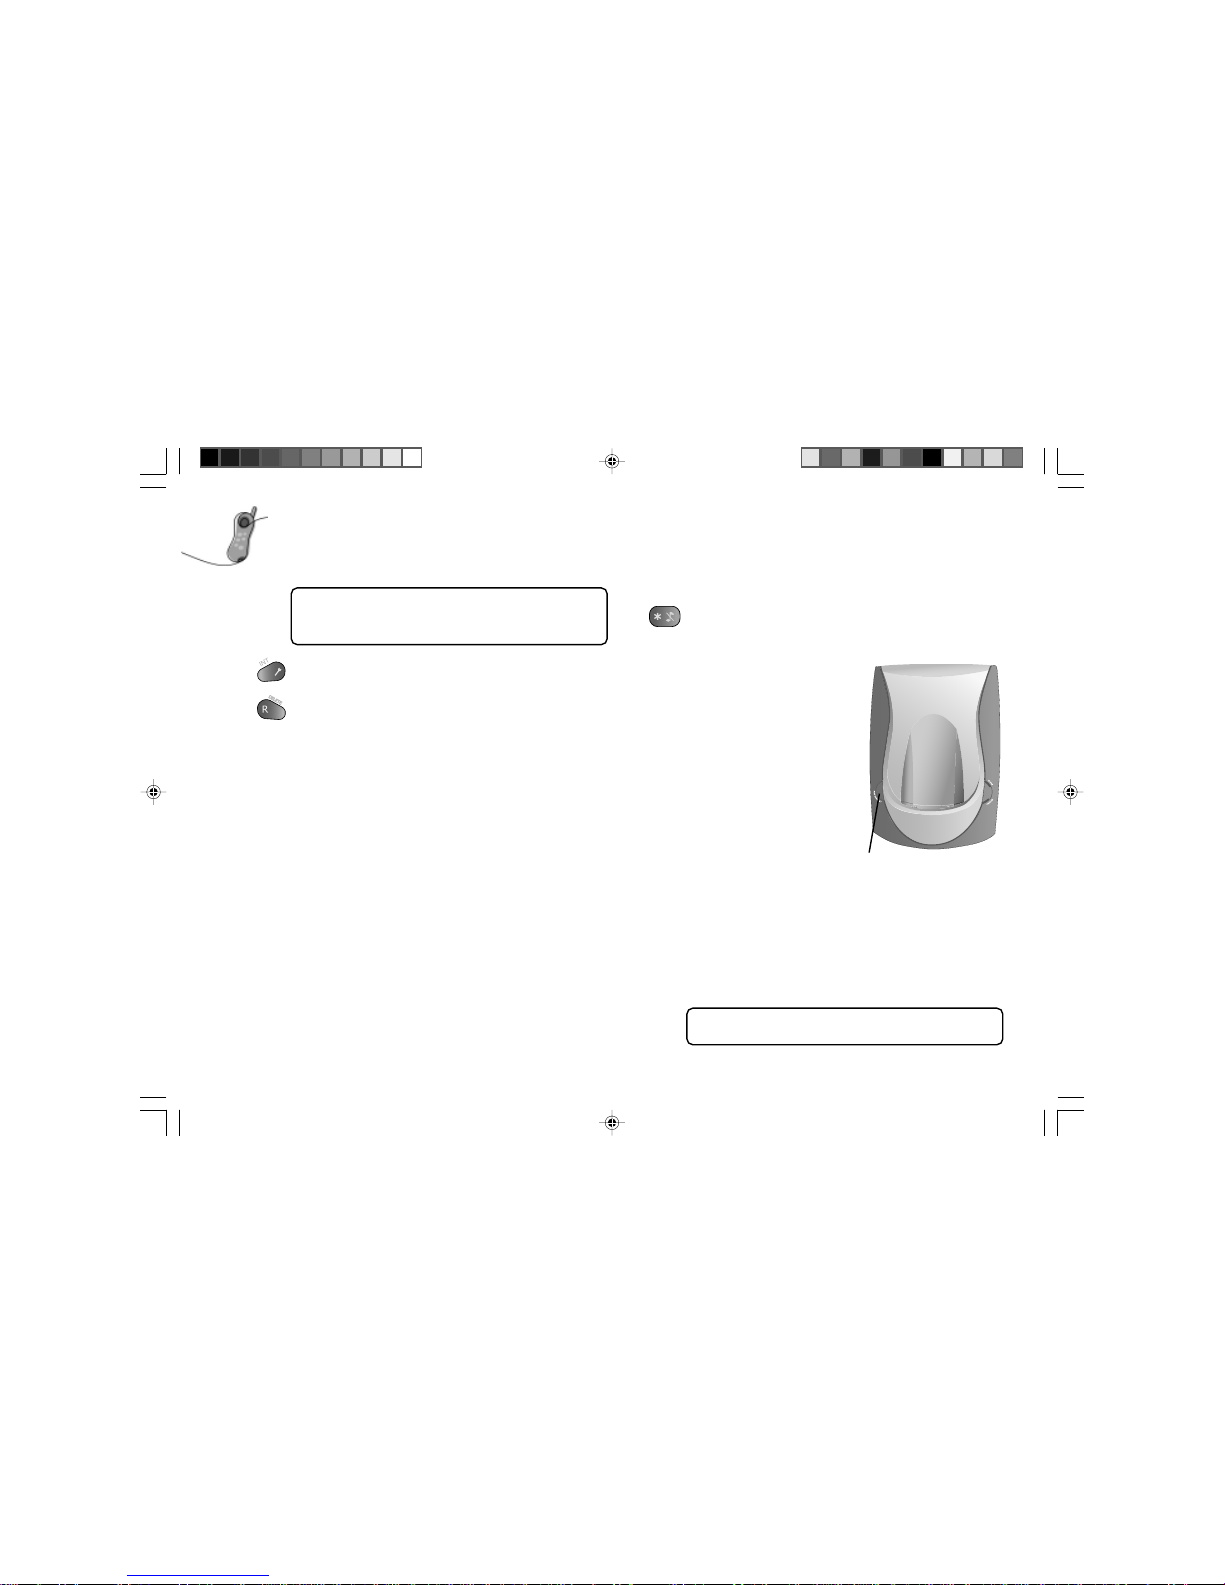
Paging
You can page the handset from
the base unit if it has been
misplaced.
Press the Find Handset button on
the base unit, see opposite.
The ‘in use indicator’ on the base
unit will flash once. The handset
will ring for 30 seconds and
show ‘0000’ on the display.
To stop paging, press any button
on the handset.
If a call is received while the
handset is being paged, the
handset stops paging and will
ring as normal.
Base ringer volume
The base ringer volume has three settings: off, low and loud.
To change the setting press and hold the base Find Handset button.
Each time the button is pressed the volume changes to the next
setting. The off setting is indicated by two short beeps.
The base ringer volume setting cannot be changed if
you are talking on the phone.
Find Handset
button
Page 22
22
Helpline 0870 241 3201
Out of range indication
If the handset is located too far from the base unit, the handset
cannot engage the telephone line. The signal icon will not be
displayed to warn you that you are out of range.
If the handset is carried too far from the base unit during a call, you
will hear an alert signal through the earpiece, a rapidly repeated
beep. If you fail to bring the handset back within range of the base,
the telephone line will be disconnected. The alert signal can be
cancelled by pressing the green handset button.
When the handset is back in range, it will not reconnect to
the telephone line unless the green handset button is
pressed or the handset is replaced onto the base unit.
Page 23

23
Helpline 0870 241 3201
Service and
maintenance
Cleaning
Occasionally wipe the base, chargers and handsets with a clean dry
cloth.
Do not use sprays or abrasive cleaners as they may damage the
casing and interior components.
Siting
Make sure your VS1503 is within reach of a power socket and a
telephone point.
Do not position on or near a television or video recorder.
Do not place on untreated antique furniture.
Avoid exposure to direct sunlight, extreme temperatures, high
humidity or places where your VS1503 can get wet.
Battery disposal
Never dispose of batteries into a fire or with
household waste.
Check with your local authority for disposal regulations.
There are no user repairable parts in this telephone.
Page 24

24
Helpline 0870 241 3201
There is no dial tone
Is the telephone line correctly plugged into the telephone and the
telephone socket? See page 9.
Check that the base is connected to the mains power and the switch
is on. See page 7.
Make sure you are using the leads supplied with this product.
The handset does not ring
Check the handset ringer is not set to off. See page 21.
Check that the handset is in range of the base unit. See page 22.
Make sure you are using the leads supplied with this product.
Check for low battery. See page 13.
Warning beep occurs when making
a call
Check that the handset batteries are fully charged.
The call is dropped during
conversation
Check that the handset is in range with the base unit.
See page 22.
Check that the handset battery is charged.
No display
The batteries may need recharging.
Place the handset back on the base or charger.
No Caller ID info
Check your subscription is still active with your network provider.
Troubleshooting
Handset has not charged properly
Check that the base and charger are connected to the mains power
and the switch is on. See page 7.
Check your handset is sitting correctly in the base or charger. See
page 8.
Check the batteries are correctly installed. See page 8.
Consistently short battery life may indicate that replacement of
batteries is necessary.
Your handset does not link up with
the base station
Move closer to your base unit as you may be out of range.
See page 22.
Check that the base is connected to the mains power and the switch
is on. See page 7.
Check the battery symbol, if the batteries are low, place your
handset back on the base or charger to recharge. See page 13.
You are experiencing interference
on your radio, TV, computer.
To avoid risk of interference, we recommend you use your VS1503
base unit/handset at least one metre away from electrical
equipment.
Try to move the base unit/handset to another location in the house.
See page 23.
Page 25

25
Helpline 0870 241 3201
This product is intended for use on Public Switched Telephone
Networks (PSTNs) and Private Branch Exchanges (PABXs) in the
United Kingdom as indicated below:
• Direct Exchange Lines providing Multi-frequency (MF)
signalling and Timed Break Recall facilities.
• Compatible switchboards which utilise MF signalling and
Timed Break Recall.
The Ringer Equivalence Number (REN) of this apparatus is 1.
If the RENs of all the units connected to your line are added up, the
total must not exceed 4 since this is the normal limit of most
exchange lines.
This product complies with the essential requirements for Radio
and Telecommunication.
CE Mark in accordance with:
89/336 EEC - EMC
72/23 EEC - Low Voltage
93/68 EEC - CE Directive
1999/5 EC - R&TTE
Technical
details
Page 26

26
Helpline 0870 241 3201
Warranty
This product has a warranty of 12 months and is therefore
guaranteed to be free from defects in materials during that period.
If you experience a problem within that time, simply call our
Helpline on 0870 241 3201 (9.00am – 5.00pm, Monday – Friday).
If your problem cannot be solved by our Helpline, you will need to
return your product to the place it was purchased. Remember to
take your receipt as proof of purchase as it must be produced
before the warranty can be honoured.
• The product must have been used only for the intended
purpose and not subject to wilful or accidental damage.
• This warranty does not cover damage caused by excessive
voltage, lightning or faults on the telephone line.
• If the product has been tampered with in any way, the
warranty shall be considered to be null and void.
This guarantee does not affect your statutory rights.
IMM/REV1/JUN03/PDF
Page 27

www.ntl.com
© ntl Group Ltd 2003
The small print.
Registered office: ntl House, Bartley Wood Business
Park, Hook, Hampshire, RG27 9XA. Registered in
England and Wales number 2154841.
The ntl logo is a registered trademark of ntl Group Ltd
IMM/Issue 1/May 03
 Loading...