


QUICK GUIDE
Gateway Mode
Remote Access the XL2 Sound Level Meter
This document describes how to remotely access the XL2 Sound
Level Meter via the NTi Audio Gateway.
Index
Minimum Requirements 2
First Steps 2
Programming your own Remote Application 6
Connecting the XL2 within a local Network 7
Connecting a GPS Receiver 9
Connecting a Weather Station 11
Archiving Completed Measurements 13
Sleep when idle (for Power Save) 15
Server Verification 17
Troubleshooting 17
Secure FTP Connection
FTP Browser
2017-03-16_SLM_000.XL2
2017-03-16_SLM_000_123_Report.txt
2017-03-16_SLM_000_123_Log.txt
2017-03-16_SLM_000_RTA_3rd_Report.txt
LAN
Mobile
2017-03-16_SLM_000_RTA_3rd_Log.txt
2017-03-16_SLM_000_Audio_FS136.0dB(PK)_00.wav
XL2
www.nti-audio.com
USB
XL2 Data Explorer
Configuration in NoiseScout Gateway Mode
Page 1 / 18
QUICK GUIDE
Minimum Requirements
• XL2 Sound Level Meter
• NetBox - Communication Hub for XL2
• Computer with internet connection
First Steps
• Login at My NTi Audio https://my.nti-audio.com.
• Register the NetBox using the Serial Number on the front of
the NetBox (format xxxxx-xxxxx).
• Login at https://www.noisescout.com using your personal
My NTi Audio username and password.
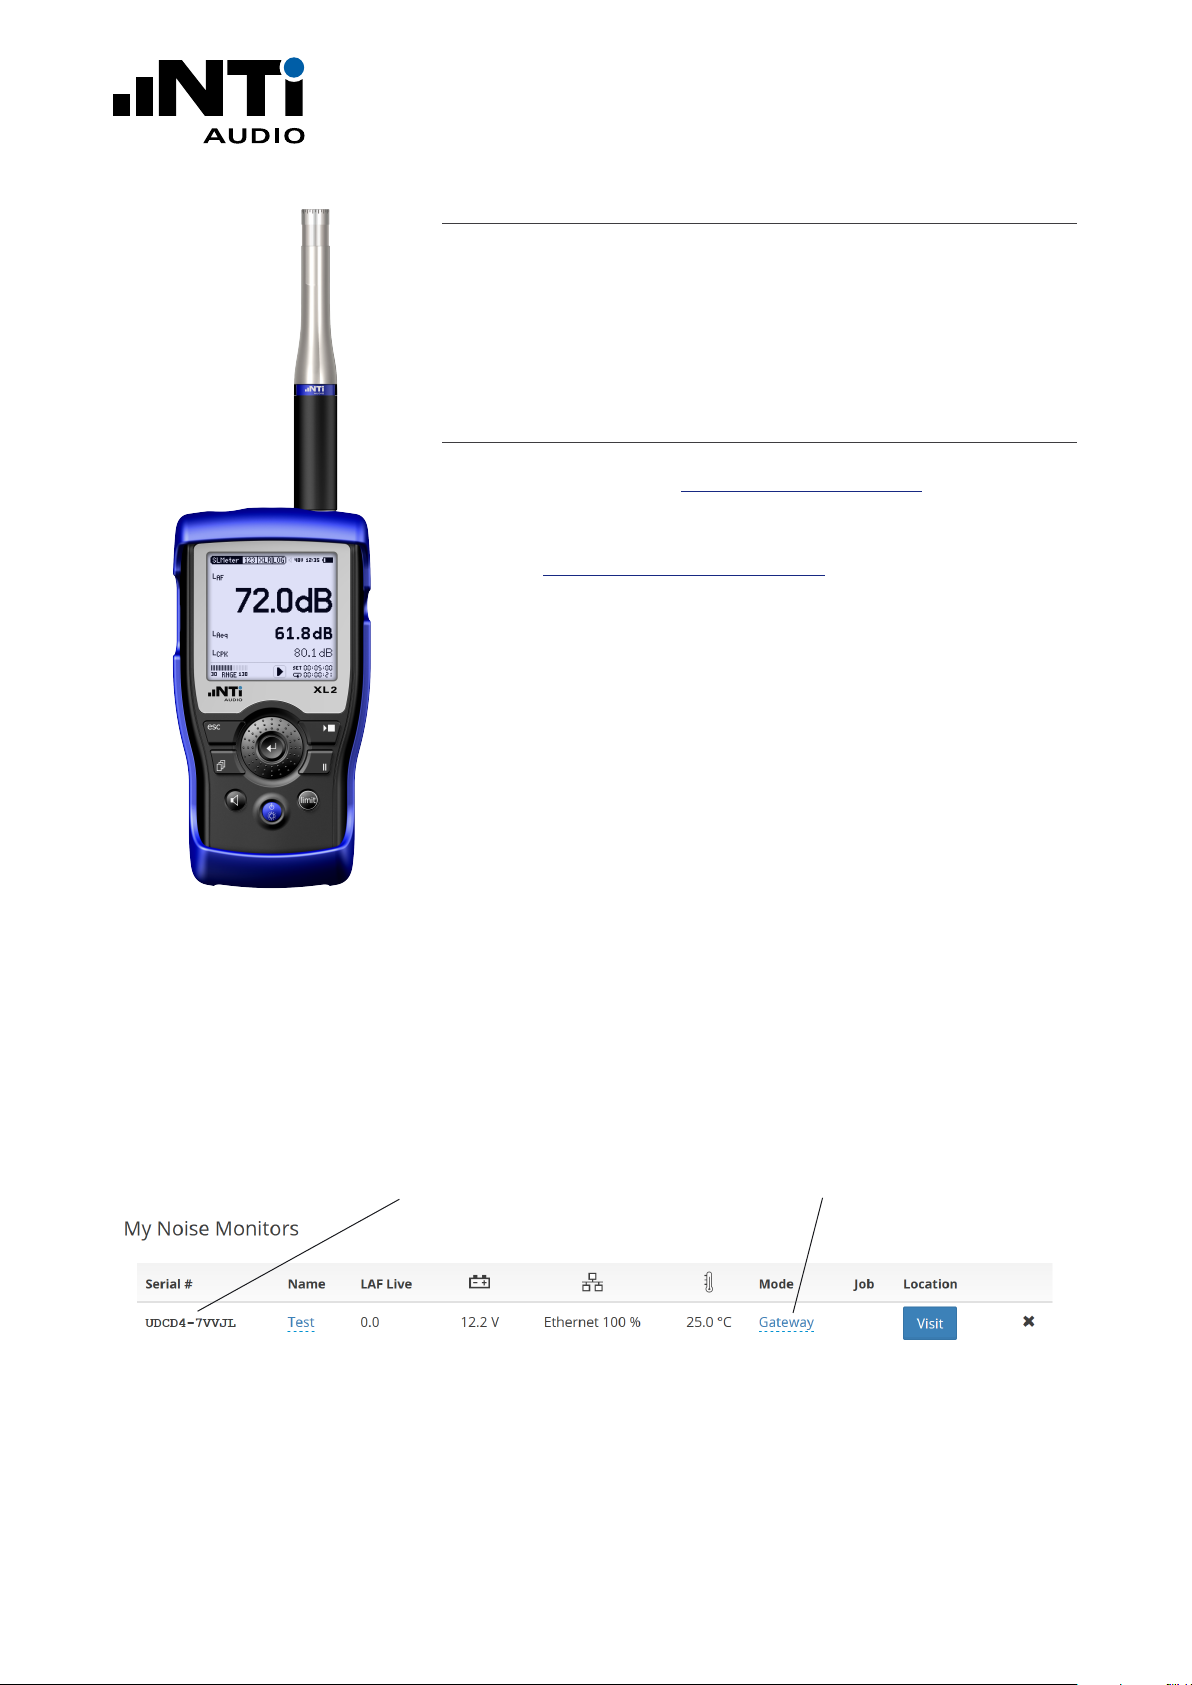
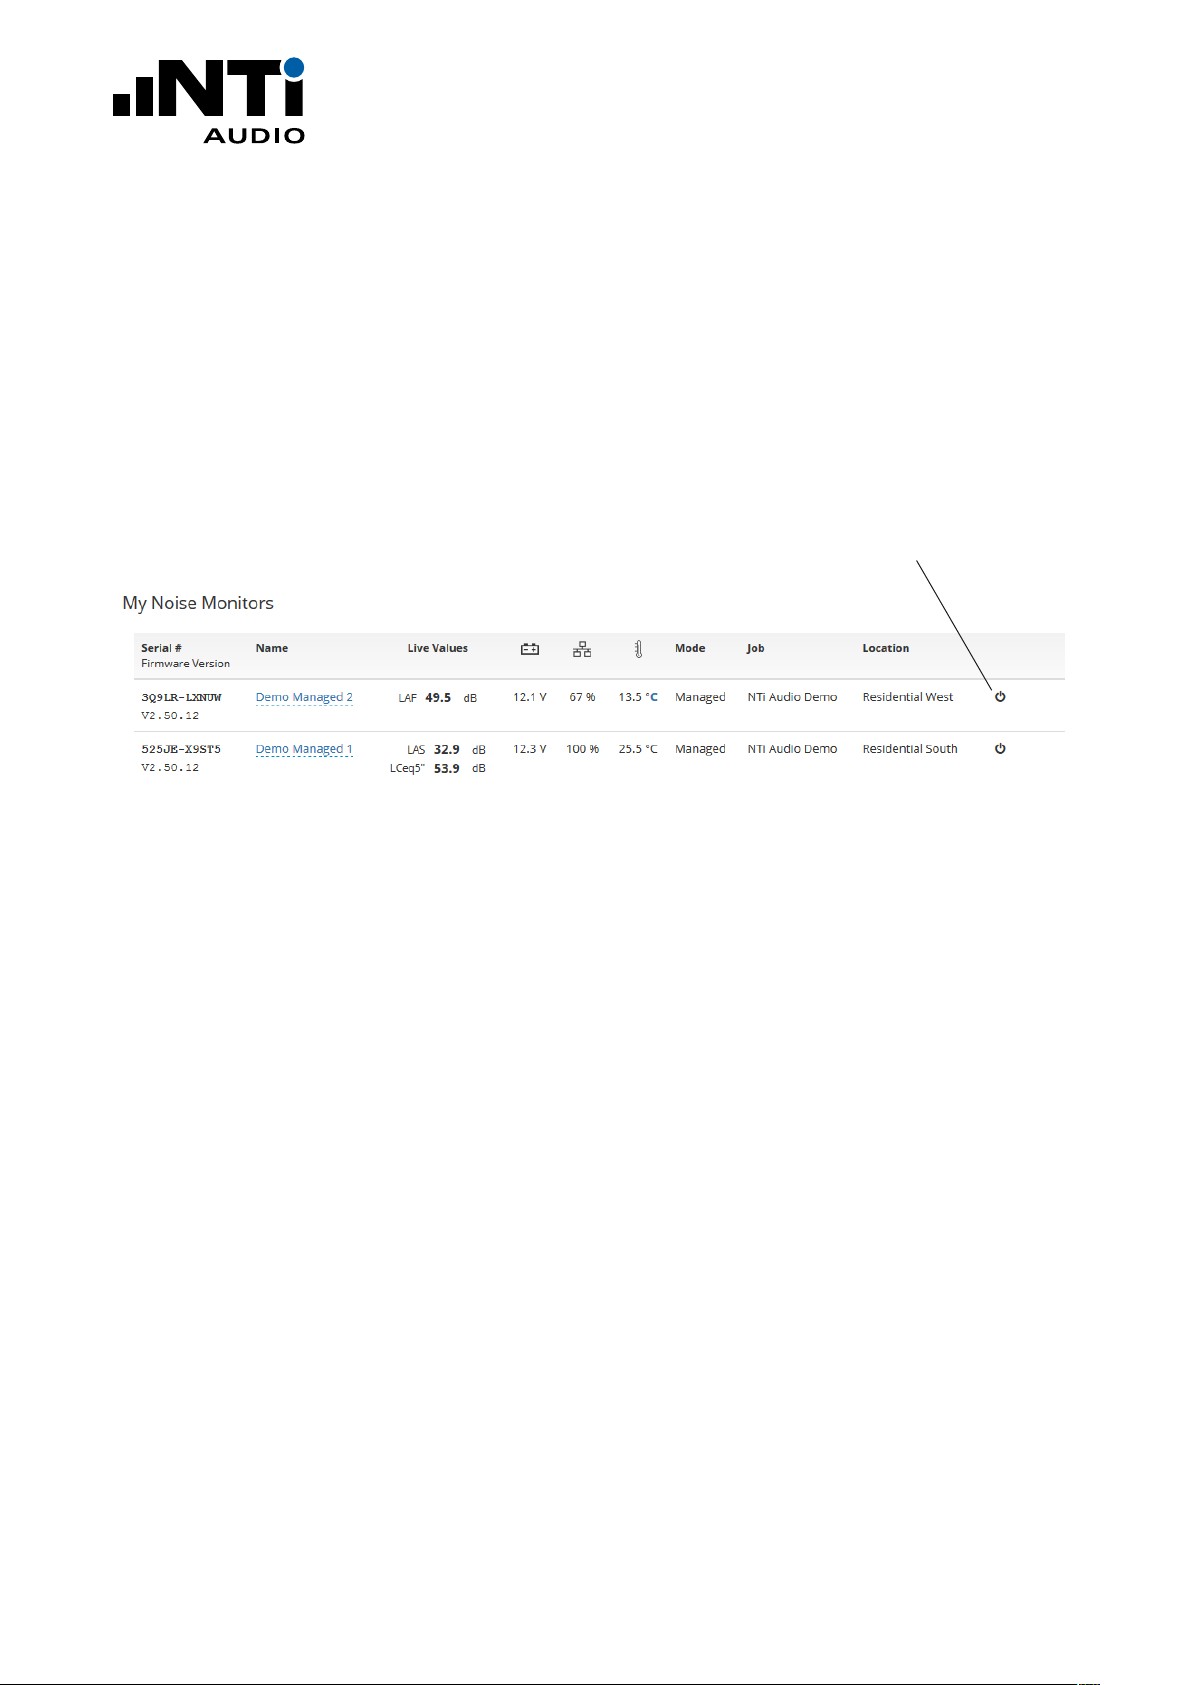
The NetBox is listed under “My Noise Monitors”.
XL2 Sound Level Meter
• Switch the Noise Monitor to “Gateway” Mode. (Ensure that
the Noise Monitor is not assigned to a Location in Managed
Mode.)
NetBox Serial Number
Switch between NoiseScout and Gateway Modes
List of your registered Noise Monitors on the dashboard of www.noisescout.com
www.nti-audio.com Page 2 / 18
QUICK GUIDE
Connecting the remote XL2 Sound Level Meter
• Connect the XL2 Sound Level Meter to the NetBox.
• Connect mains power to the NetBox.
The NetBox and XL2 power up within approx. two minutes.
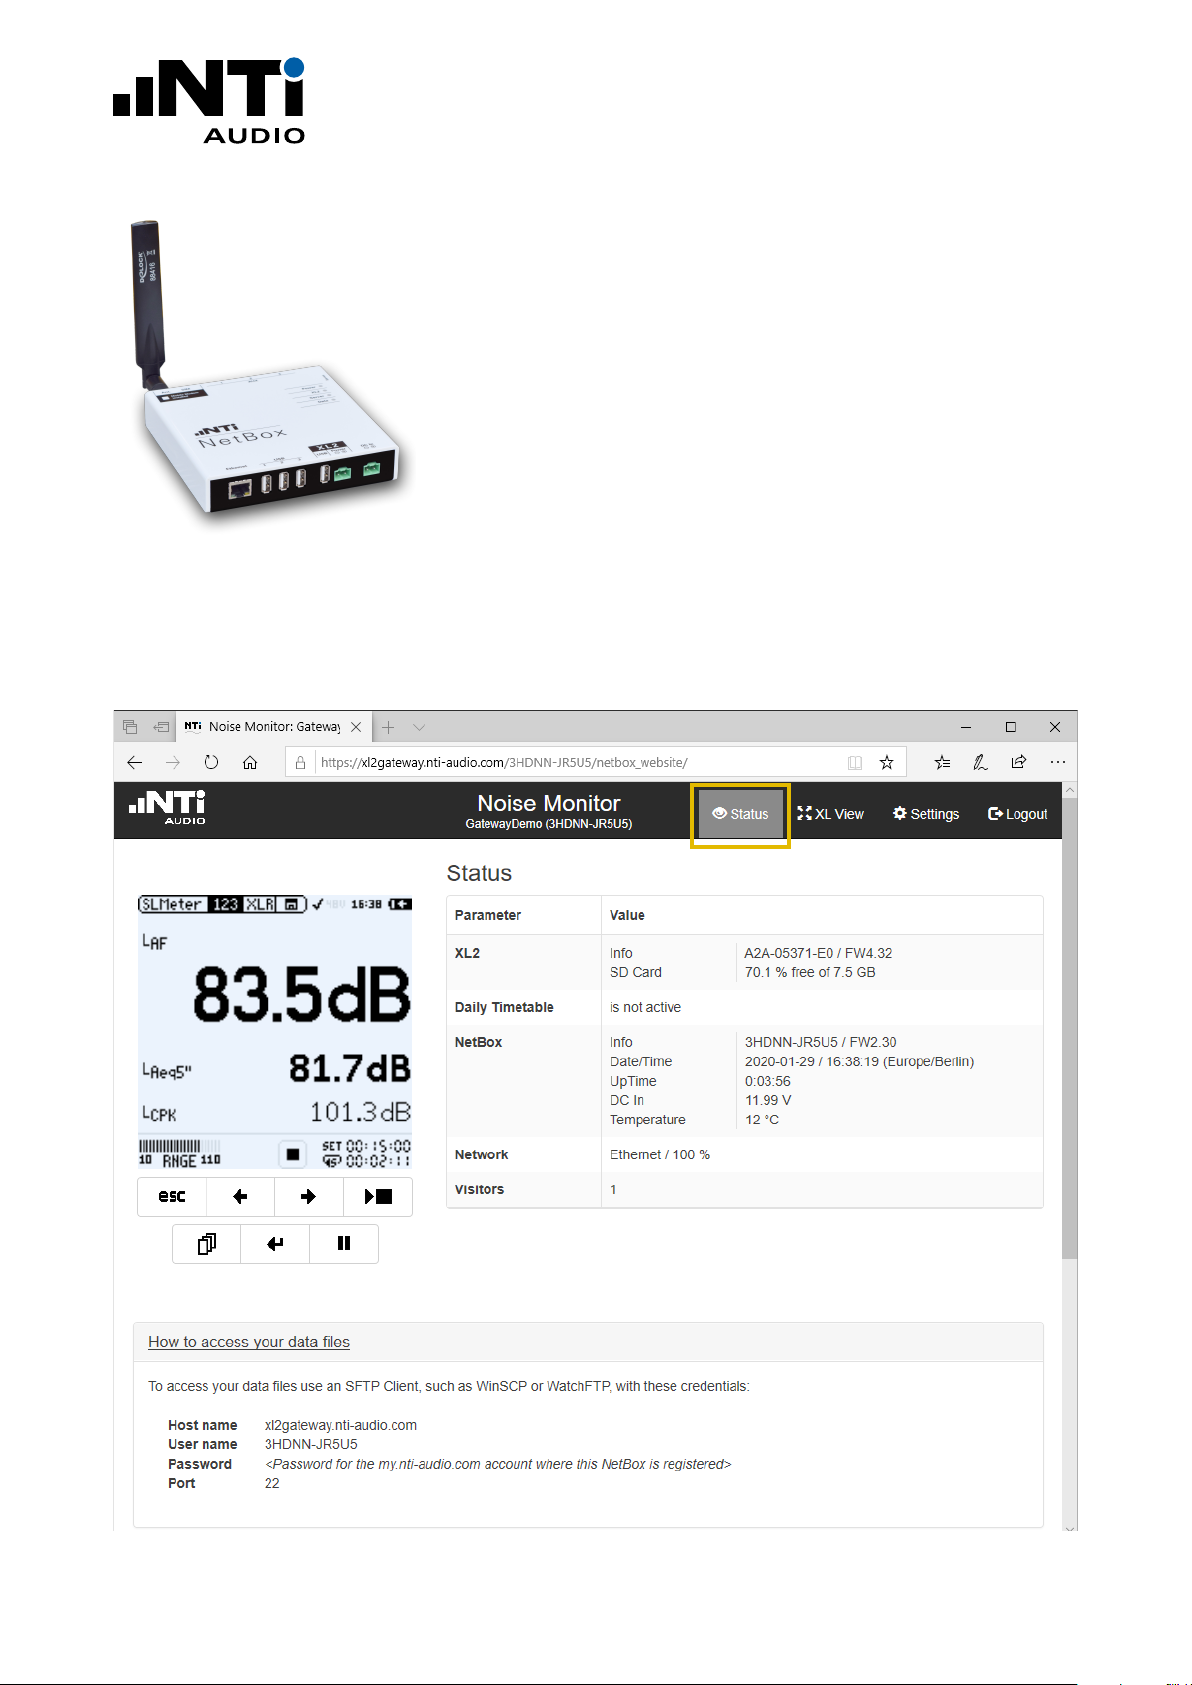
• Press the “Visit” button in the dashboard.
• Enter your personal My NTi Audio password again.
The browser window “Noise Monitor Status” is displayed.
• Control the remote XL2 from the browser.
NetBox with 3G modem
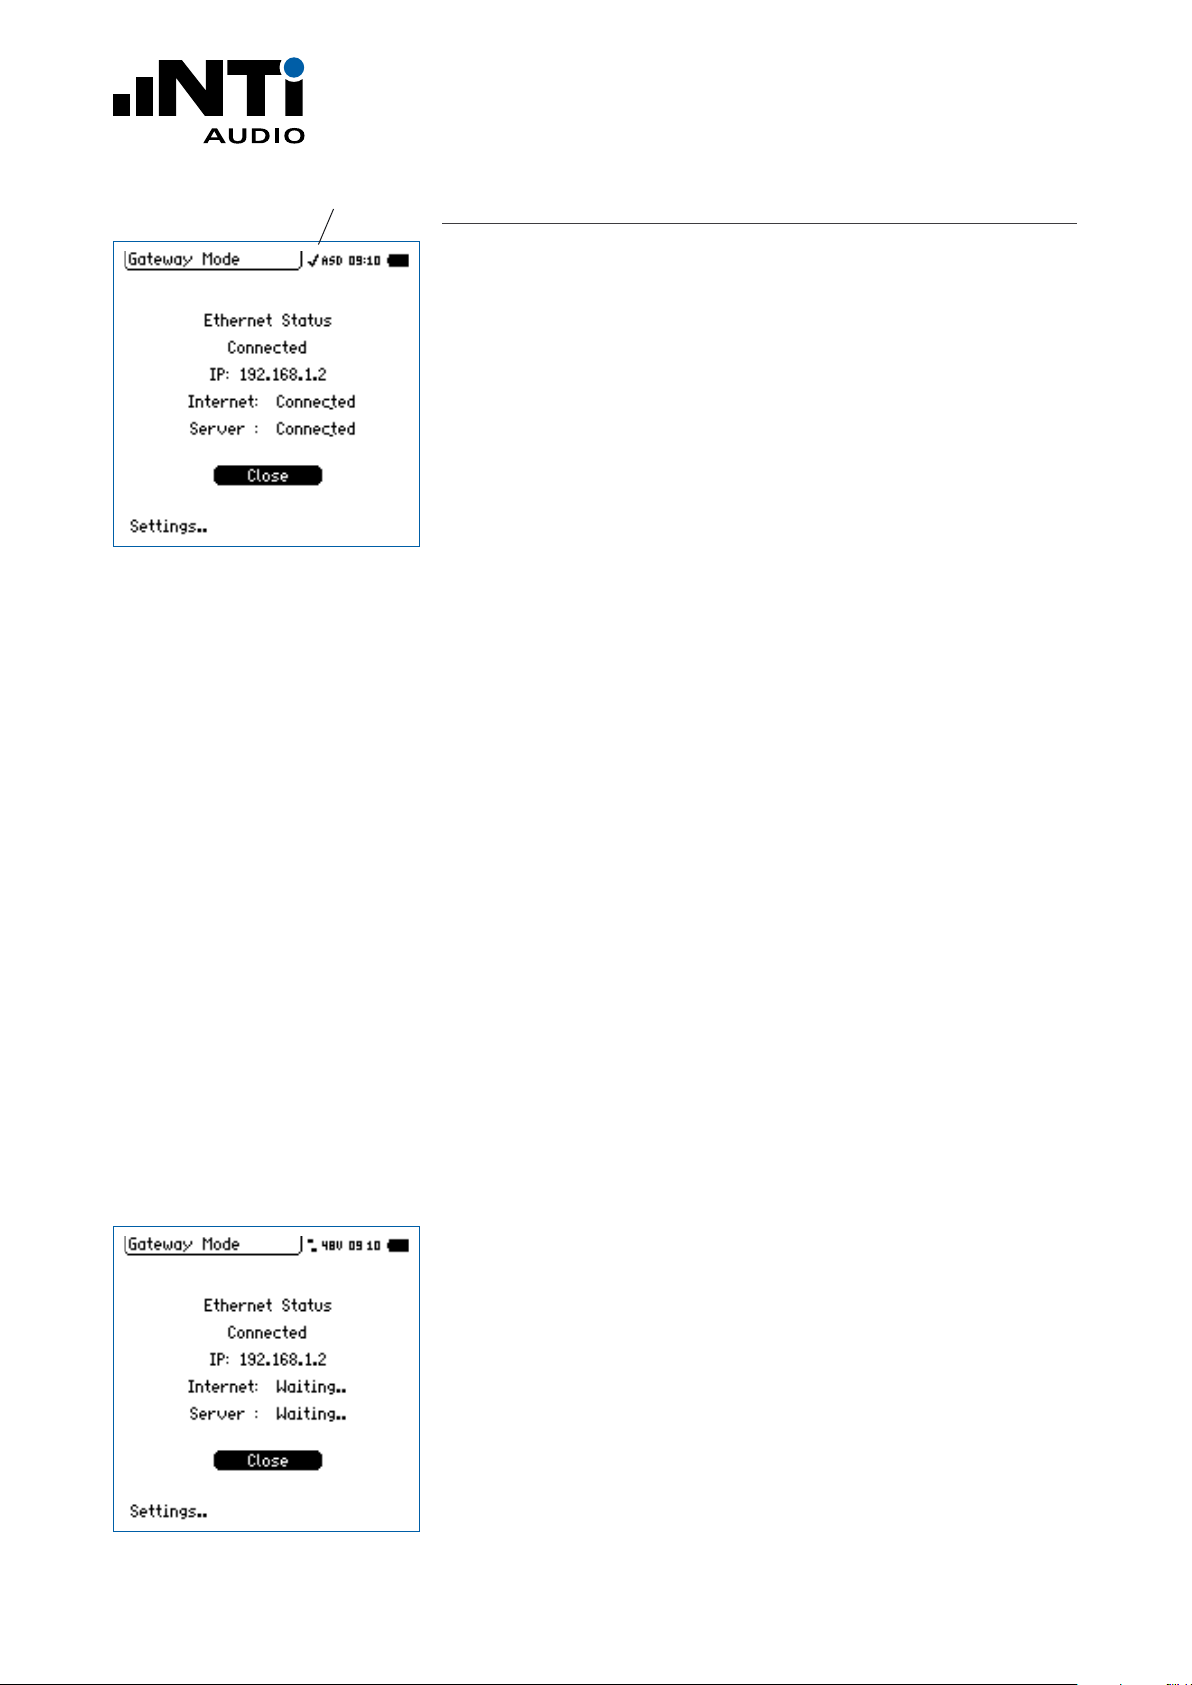
• Select the Status View or XL View
Status View
www.nti-audio.com Page 3 / 18
QUICK GUIDE
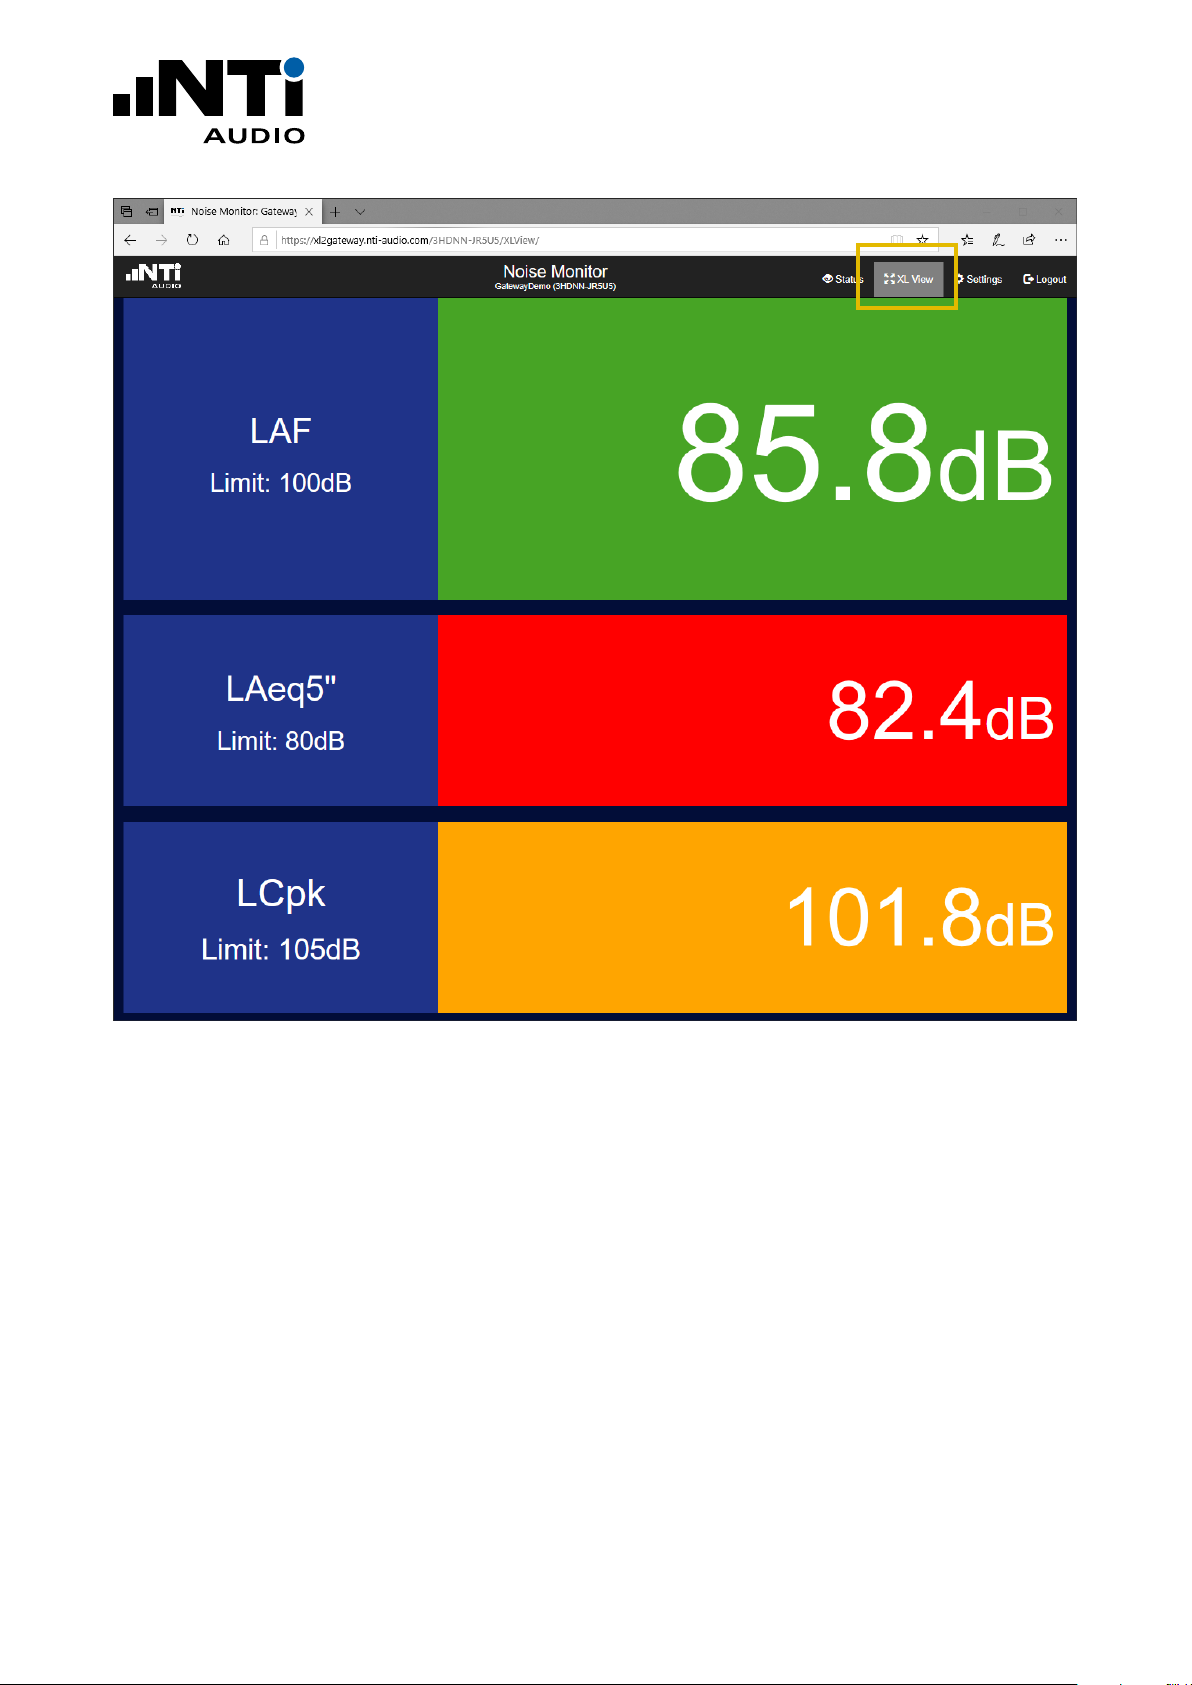
XL View - Big Screen
www.nti-audio.com Page 4 / 18
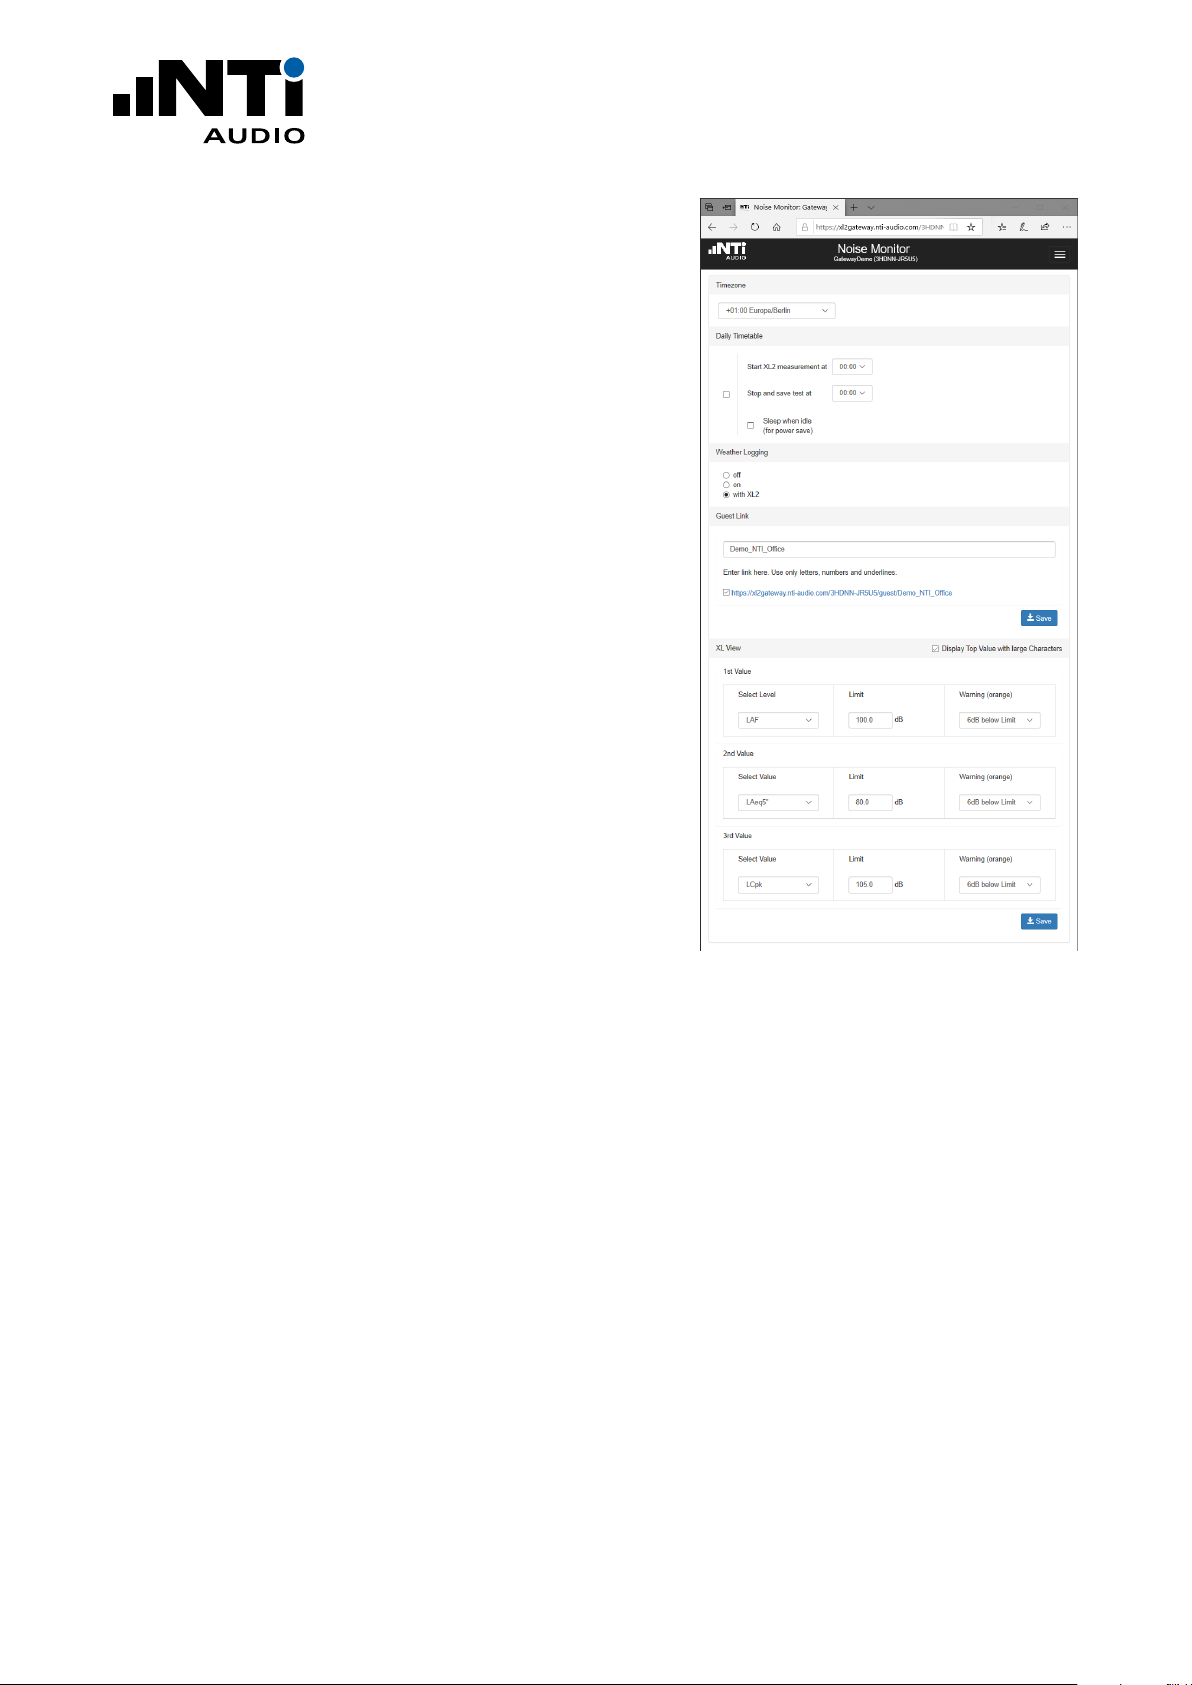
Settings
Select “Settings” in the menu.
• Time Zone
Set your time zone.
• Daily Timetable
Activate the Daily Timetable for repeated measurements. For 24-hour measurement, choose the same
Start and Stop time. In this case, the measurement
stops 20 seconds before the Stop time and begins
again exactly at the Start time.
If, for example, measurement is set between 7:00 and
22:00, you can check the “Sleep when idle” checkbox
to reduce power consumption during the time when no
measurements are taking place. The XL2 turns itself off
and wakes up again shortly before the next measurement Start time (prerequisite: XL2 serial number ending
with “E0”).
Using the “Digital I/O Adapter PCB”(an XL2 accessory)
the XL2 can also turn off the NetBox, making power
consumption negligible during idle periods.
QUICK GUIDE
• Weather Logging
Choose when you would like weather station data to be
logged.
• Guest Link
Activate a view-only Guest link if required. Third parties can then view the ongoing measurement, but not
change the settings. The last part of the link name can
be edited.
• XL View
Choose the level and limits for the XL View - Big Screen.
Levels that exceed the limits are shown in warning amber or an alarming red.
Click “Status” to return to the measurement.
Settings View
www.nti-audio.com Page 5 / 18

QUICK GUIDE
Direct File Access to the XL2
• Install your favorite SFTP client software on your computer
(such as WinSCP, https://winscp.net or similar).
• Enter these settings in the SFTP client software:
- Host: xl2gateway.nti-audio.com
- Username: <xxxxx-xxxxx> (NetBox serial number)
- Password: <your my.nti-audio.com password>
- Port: 22
The direct file access to the XL2 is enabled
• Download the required data for
- completed measurements from the folder “Projects”
- any ongoing measurements from “Projects/.Unsaved/SLM”
How to Setup an automated Data Download via FTP
Commercial programs like WatchFTP, www.watchftp.com, can
be used to automatically access and download the available data
from the XL2 and delete the data from the XL2 SD-Card if required. This solution allows you to download the data files from
many remote noise monitors to your local drive.
Programming your own Remote Application
You may program a customized measurement application for remote sound level monitoring, audio analysis or automated measurement tasks.
All remote measurement commands are available once the Remote Measurement Option is installed on your XL2. The measurement data may be captured in real time into a PC application, e.g.
C# or LabView.
See the Remote Measurement Manual for more details.
www.nti-audio.com Page 6 / 18
QUICK GUIDE
Status Symbol
IP Address of the Noise Monitoring Station
Connecting the XL2 within a local Network
The XL2 may also be remotely operated within a local network
using the IP address of the connected NetBox.
• Verify the IP address by selecting the Status Symbol on the top
line of the XL2 display.
• Confirm your selection with the enter button.
The XL2 displays the IP address of the NetBox within the local
network.
• Type this IP address into your preferred browser.
• Enter your personal My NTi Audio password.
“Noise Monitor Status” is displayed in the browser window.
File Access to the XL2 within a local Network
• Install your favorite SFTP client software on your computer
(such as WinSCP, https://winscp.net or similar).
• Enter these settings in the SFTP client software:
- Host: <IP address of the NetBox>
- Username: ftpuser1
- Password: <your my.nti-audio.com password>
- Port: 22
The direct file access to the XL2 is enabled
• Download the required data for
- completed measurements from the folder “Projects”
- any ongoing measurements from “Projects/.Unsaved/SLM”
Connecting the XL2 in an Intranet without Internet
• Follow the chapter “First Steps” in this Quick Guide for the
initial configuration.
• In case a precise XL2 clock is required with GPS time synchronization, then an NTP server (Network Time Protocol) is required. The NetBox connects to the following NTP servers:
• 0.debian.pool.ntp.org
• 1.debian.pool.ntp.org
• 2.debian.pool.ntp.org
• 3.debian.pool.ntp.org
IP Address of the Noise Monitoring Station
www.nti-audio.com Page 7 / 18
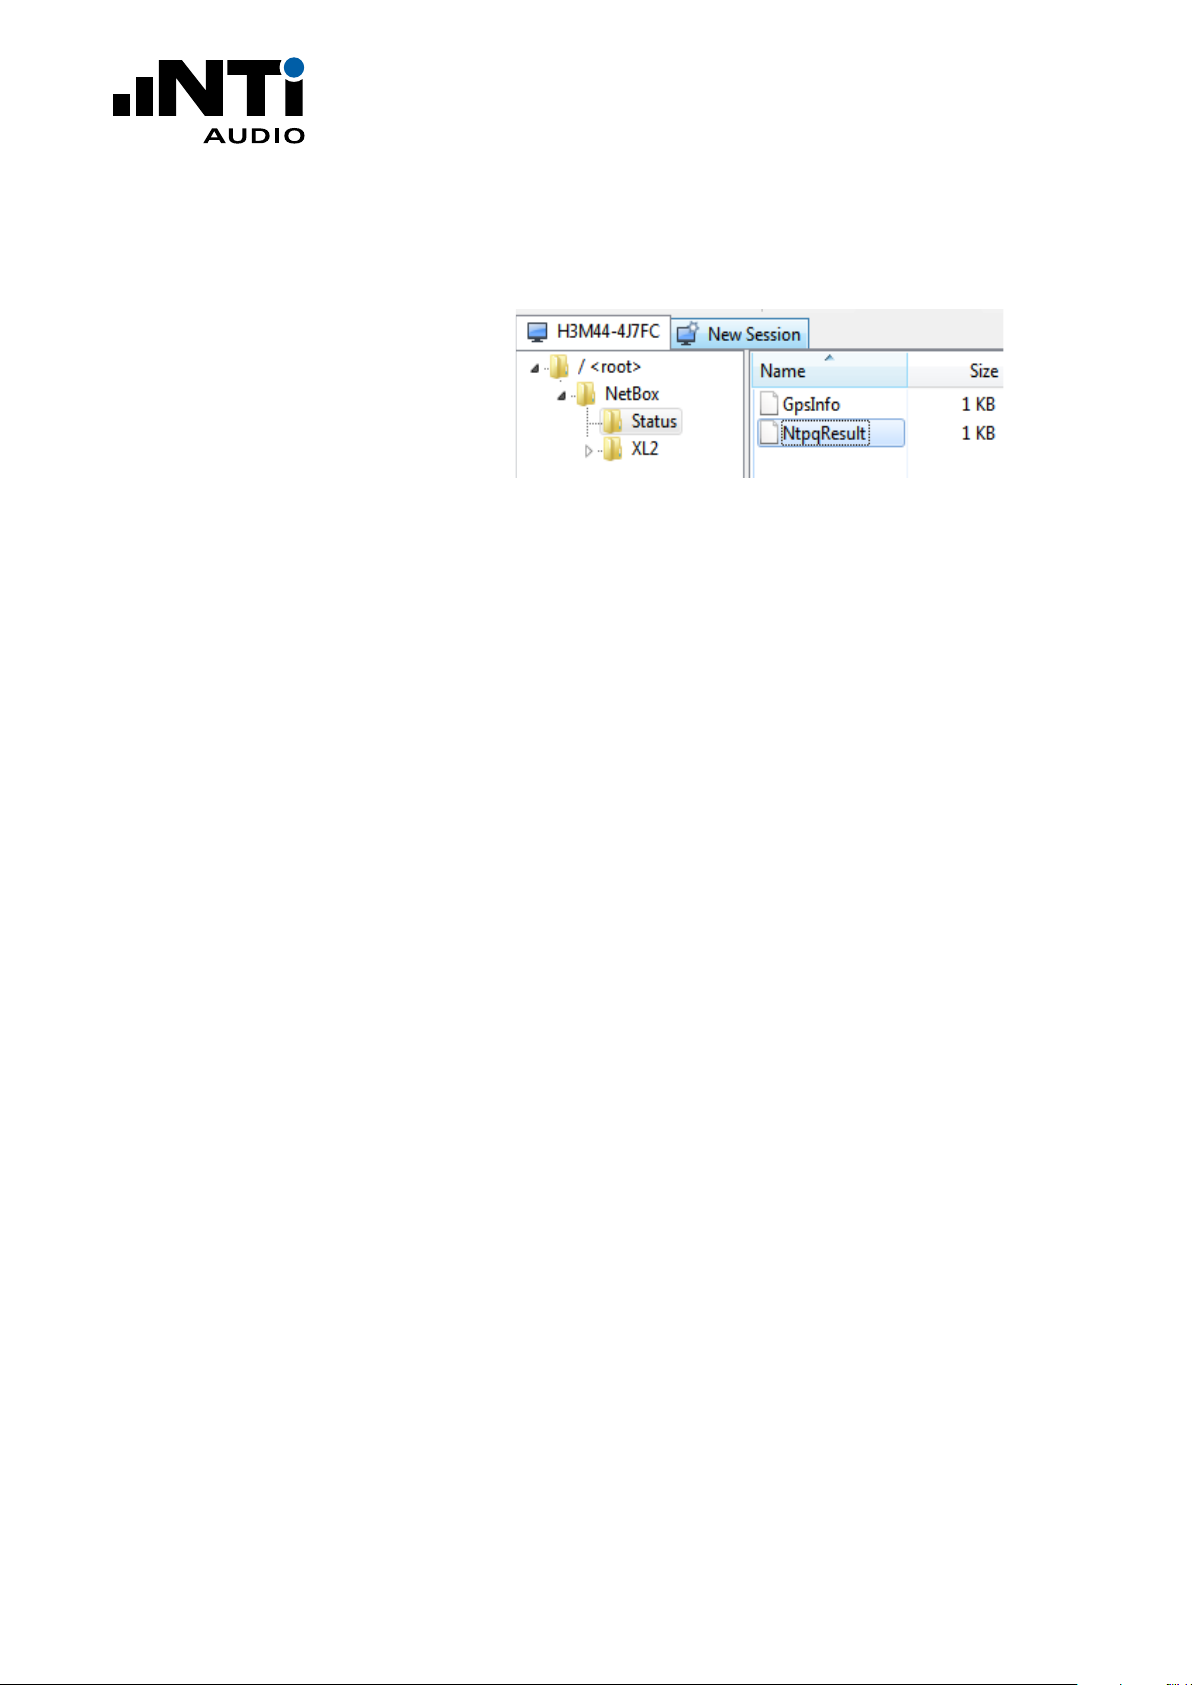
This communication has to be re-routed to an existing server. Debugging the NTP is supported by the result of the “ntpq -pn” command (https://linux.die.net/man/8/ntpq) available using sftp.
Sample output of the NtpqResult File:
QUICK GUIDE
remote refid st t when poll reach delay offset jitter
=================================================================
127.127.28.0 .GPS. 0 l - 16 0 0.000 0.000 0.000
*213.172.105.106 213.172.96.14 2 u 93 128 377 9.094 0.439 0.095
+5.34.248.225 251.4.108.178 3 u 85 128 377 1.459 0.490 0.067
+5.34.248.224 251.4.108.178 3 u 10 128 377 1.337 0.157 0.190
www.nti-audio.com Page 8 / 18

QUICK GUIDE
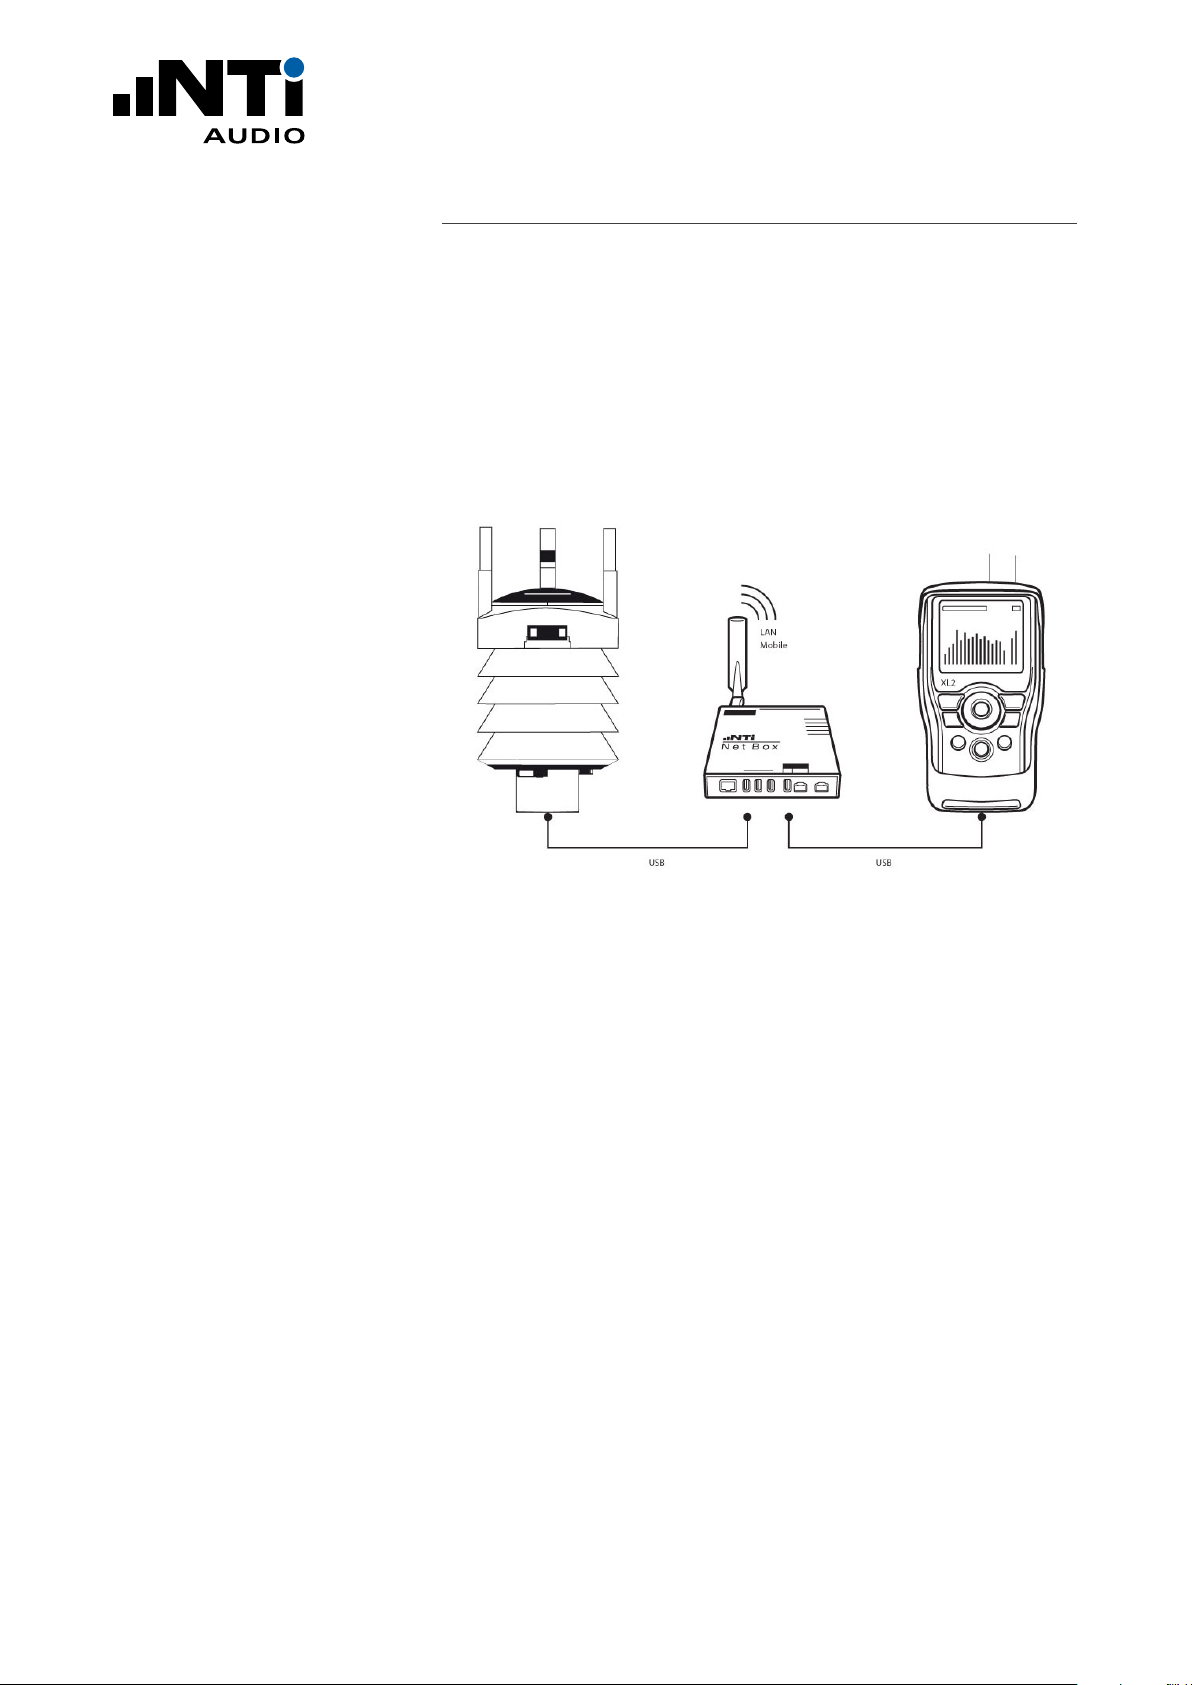
Connecting a GPS Receiver
The XL2 Analyzer can synchronize the start time precisely with a
GPS signal. The measurement start matches the GPS time with
an accuracy of +/- 0.7 ms (+/- 32 samples @ 48 kHz).
This requires the specially-adapted GPS Receiver,
NTi Audio # 600 000 357. Connect the GPS Receiver to the
NetBox using one of the USB inputs, and to the XL2 RCA input.
The NetBox detects the GPS Receiver automatically and the GPS
location data is presented on the website.
Connection Diagram:
GPS Receiver MD6/RCA Adapter Cableconnect to XL2 RCA Input MD6/USB Adapter Cable
The incidents table lists the actual status of measurement start
synchronization with GPS:
• XL2 measurement started … synced to GPS
• XL2 measurement started … NOT(!) synced to GPS
The initial detection of the correct GPS time is listed in the incidents table
• XL2 GPS Info: XL2 synched to GPS
The actual status of the time synchronization is noted in the status
table
• Unlocked
• Locked
• Locked (xx:xx:xx ago)
(with xx:xx:xx indicating the duration since the last successful
GPS time synchronization)
connect to NetBox USB Input
www.nti-audio.com Page 9 / 18

QUICK GUIDE
Status View with GPS and Wind Data
www.nti-audio.com Page 10 / 18
QUICK GUIDE
Connecting a Weather Station
Rain, strong wind and the wind direction can influence the
measured outdoor sound pressure level. Connect a weather station to your noise measurement station to simultaneously record
the noise level and the weather data. Depending on the weather
station model used, air pressure, temperature, air humidity, rain,
wind speed and wind direction are documented. NoiseScout supports the Vaisala models WXT532, WXT533 and WXT536.
The weather station is connected to the NetBox via a 1.4 m USB
cable. Alternatively, the weather station can also be purchased
with a 10 m cable and the WSP152 surge protector to bridge
longer distances between the weather station and the NetBox.
The connection from the WSP152 to the NetBox is again with the
1.4 m USB cable.
Which weather stations are supported?
NoiseScout supports Vaisala models WXT532, WXT533 and
WXT536 (www.vaisala.com).
• WXT532: Wind
• WXT533: Rain and wind
• WXT536: Air pressure, temperature, humidity, rain, and wind
Which weather data can be recorded?
• Wind speed in [m/s] or [mph]
• Wind direction in [°]
• Rain intensity [mm/h] or [in/h]
• Hail intensity [hits/cm²h] or [hits/in²h]
• Temperature [°C] or [°F]
• Relative humidity [%]
• Air pressure [hPa]
www.nti-audio.com Page 11 / 18

QUICK GUIDE
The following settings for weather data logging are supported:
• off: no weather data logging
• on: continuous weather data logging
• with XL2: log weather data when XL2 is measuring
Weather Logging Settings
www.nti-audio.com Page 12 / 18

QUICK GUIDE
Archiving Completed Measurements
By connecting a USB mass storage device (SSD, HDD, Stick) to
the NetBox, the data storage capacity of the XL2 can be expanded
by up to 2 terabytes.
Completed measurements are then automatically archived from
the XL2 SD-card to the external storage.
The external storage can, as with the XL2, be accessed via a secure FTP connection. The data is downloaded from the external
storage up to four times faster than with direct access to the SDcard of the XL2.
Formatting the Storage Device
The storage device must be FAT32-formatted. To format you can
use a tool such as “fat32format”:
http://www.ridgecrop.demon.co.uk/index.htm?fat32format.htm
Automatic Archiving of XL2 Measurement Results
www.nti-audio.com Page 13 / 18

QUICK GUIDE
Archiving
Completed measurement files are moved to the external storage device. The files are deleted from the XL2 only after they are
successfully copied. The archiving status is shown on the Status
Page of the NetBox website.
The “Daily Timetable” allows you to schedule a daily measurement period. This is described in the “Settings” section on page 5.
In case of power failure, the data generated in the
“RESTORE_AFTER_POWERFAIL” folder is also archived.
Removing the External Storage Device
In principle, the storage medium may be removed at any time
without risk of data loss. However, we recommend that you wait
until any active archiving has been completed.
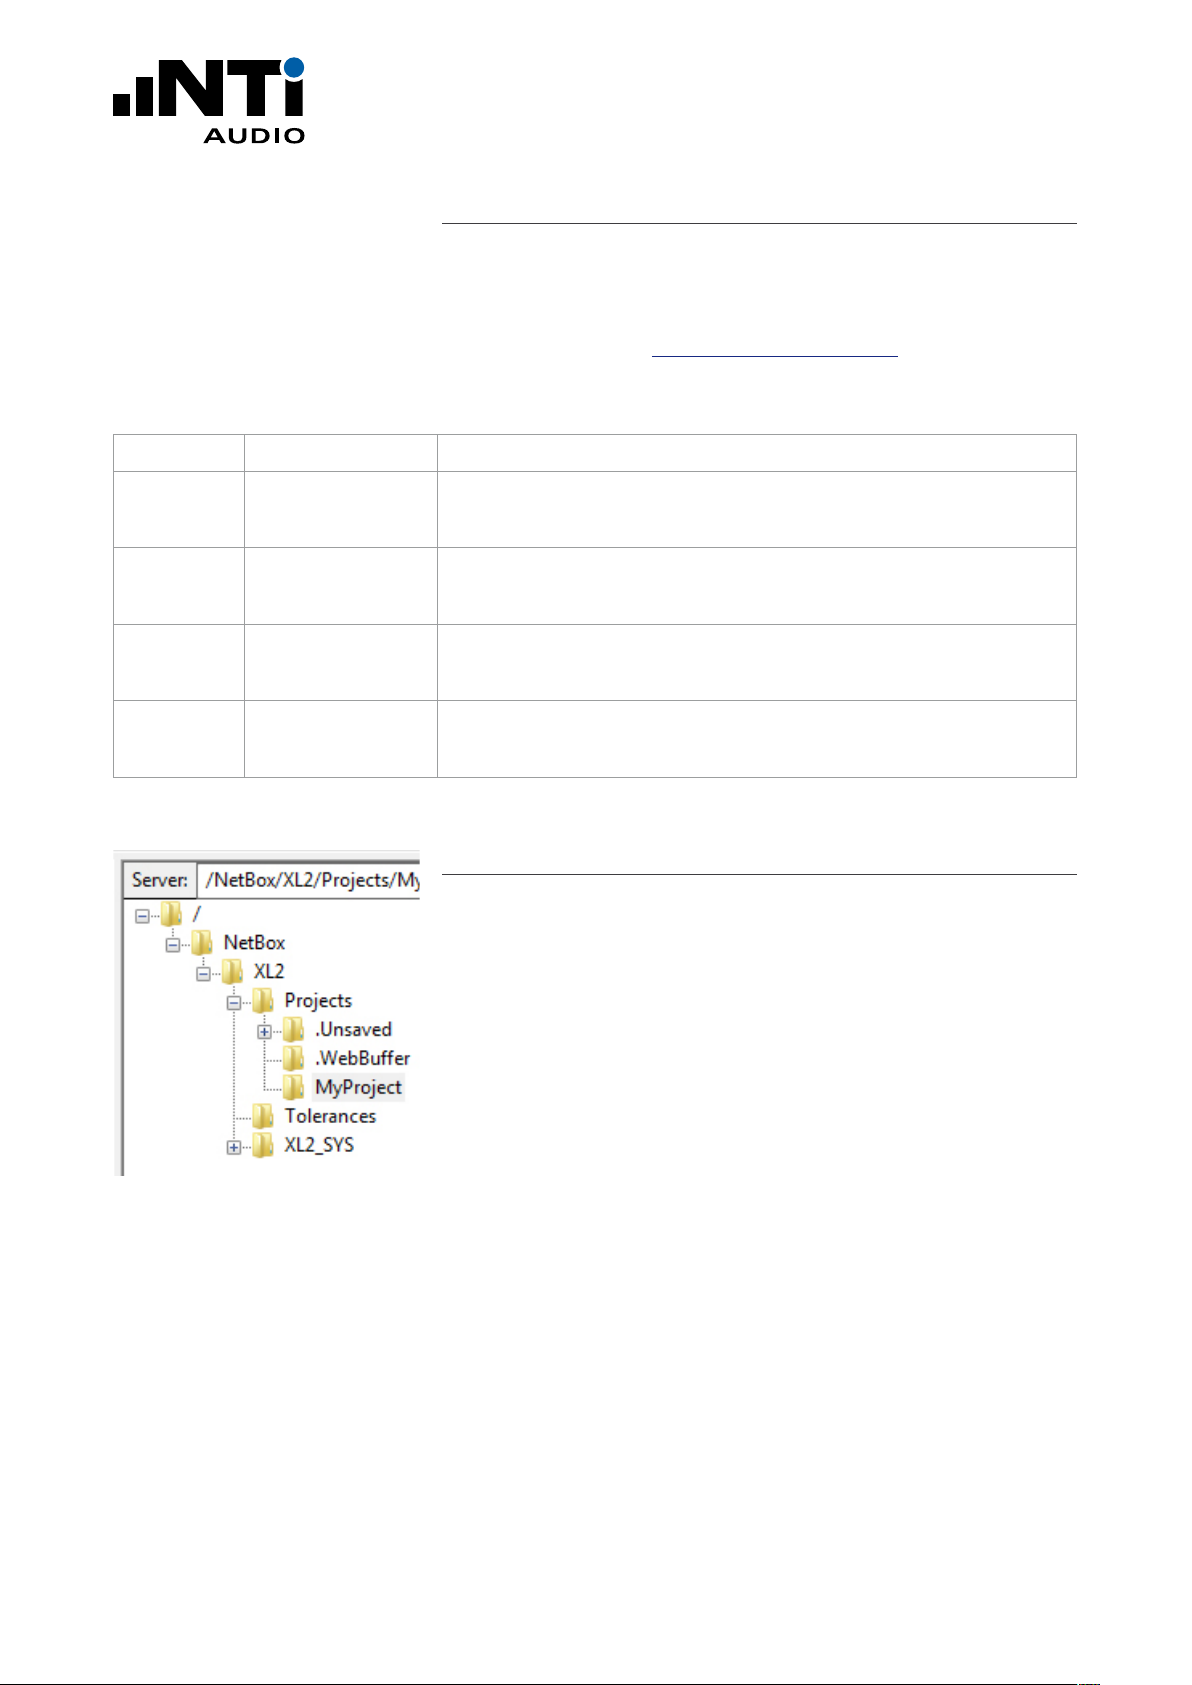
Archive Folder Structure
Naming Conventions in the Archive
Data is stored by XL2 serial number, year and month. When controlled by the Daily Timetable, a folder is created for each day.
If several measurements are started per day while archiving is
switched on, the XL2 assigns the same file name several times
because past measurements have already been archived. In this
case, file names in the archive are supplemented with an additional extension:
Such measurements can be grouped with “Sort by extension”.
Remote Access via sFTP
During remote access, the external storage medium can be accessed through the name UsbDrive_xx.
Location of drive in sFTP
www.nti-audio.com Page 14 / 18
QUICK GUIDE
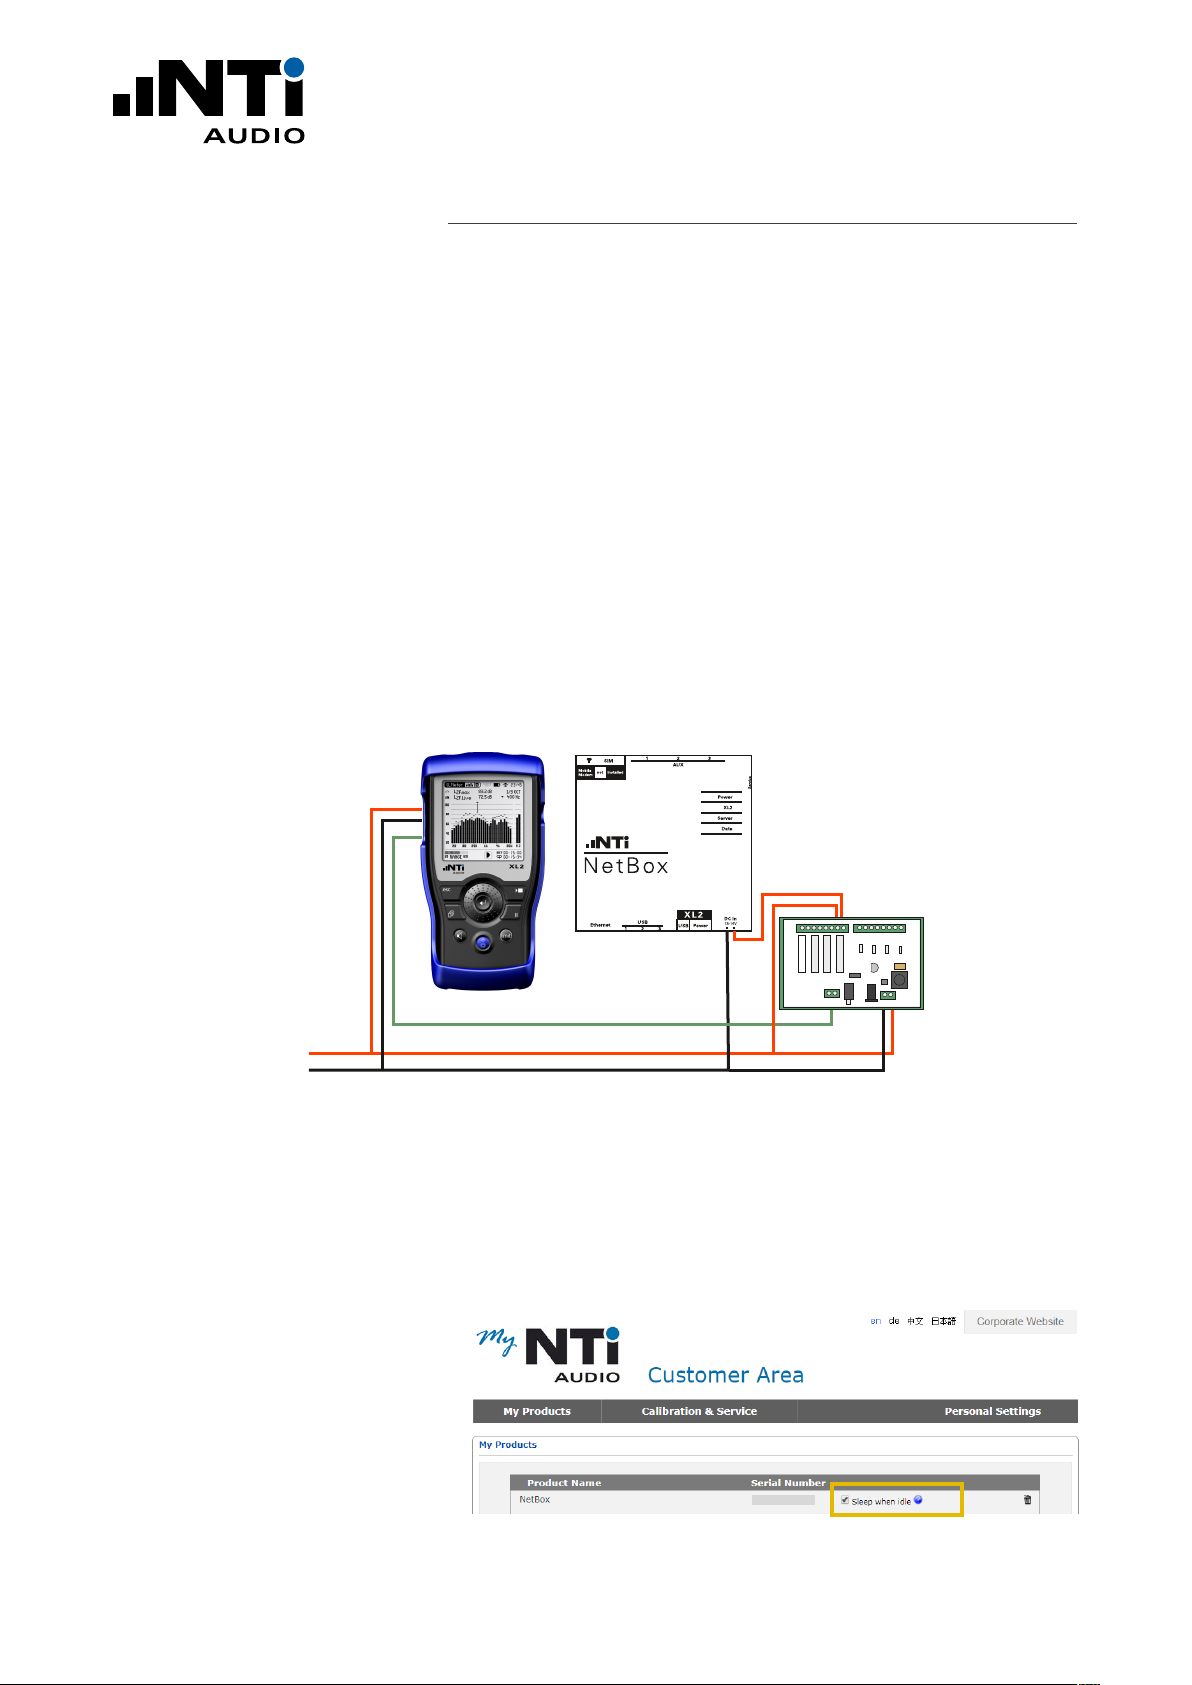
Sleep when idle (for Power Save)
The XL2 can switch itself and the NetBox off during non-measurement times. This reduces the power consumption of the entire system to a few mA (prerequisite: XL2 serial number ends
with “E0”).
The power supply to the NetBox must be routed via Out4
of the “Digital IO Adapter” (NTi Audio # 600 000 380) and
“Sleep when idle” must be activated in the settings.
Pin4on.txt
If the XL2 finds a file with the name Pin4on.txt on the SD card
when starting, it closes the relay to Out4. This starts the NetBox. The NetBox automatically installs Pin4on.txt on the XL2, but
when starting up for the first time it may be necessary to create
the file manually (the content of the file is irrelevant).
Power
+
-
Digital IO
Note:
“Sleep when idle” can also be deactivated in the customer portal my.nti-audio.com. You can thus prevent a NetBox from being
switched off again after the next time it wakes up.
“Sleep when idle” switch
www.nti-audio.com Page 15 / 18
QUICK GUIDE
Manual Override
By using the power button on the XL2 to turn it on, the
“Sleep when idle” settings can be manually reset. The system remains on for a period of 5 minutes before the settings in
“Sleep when idle” are considered again.
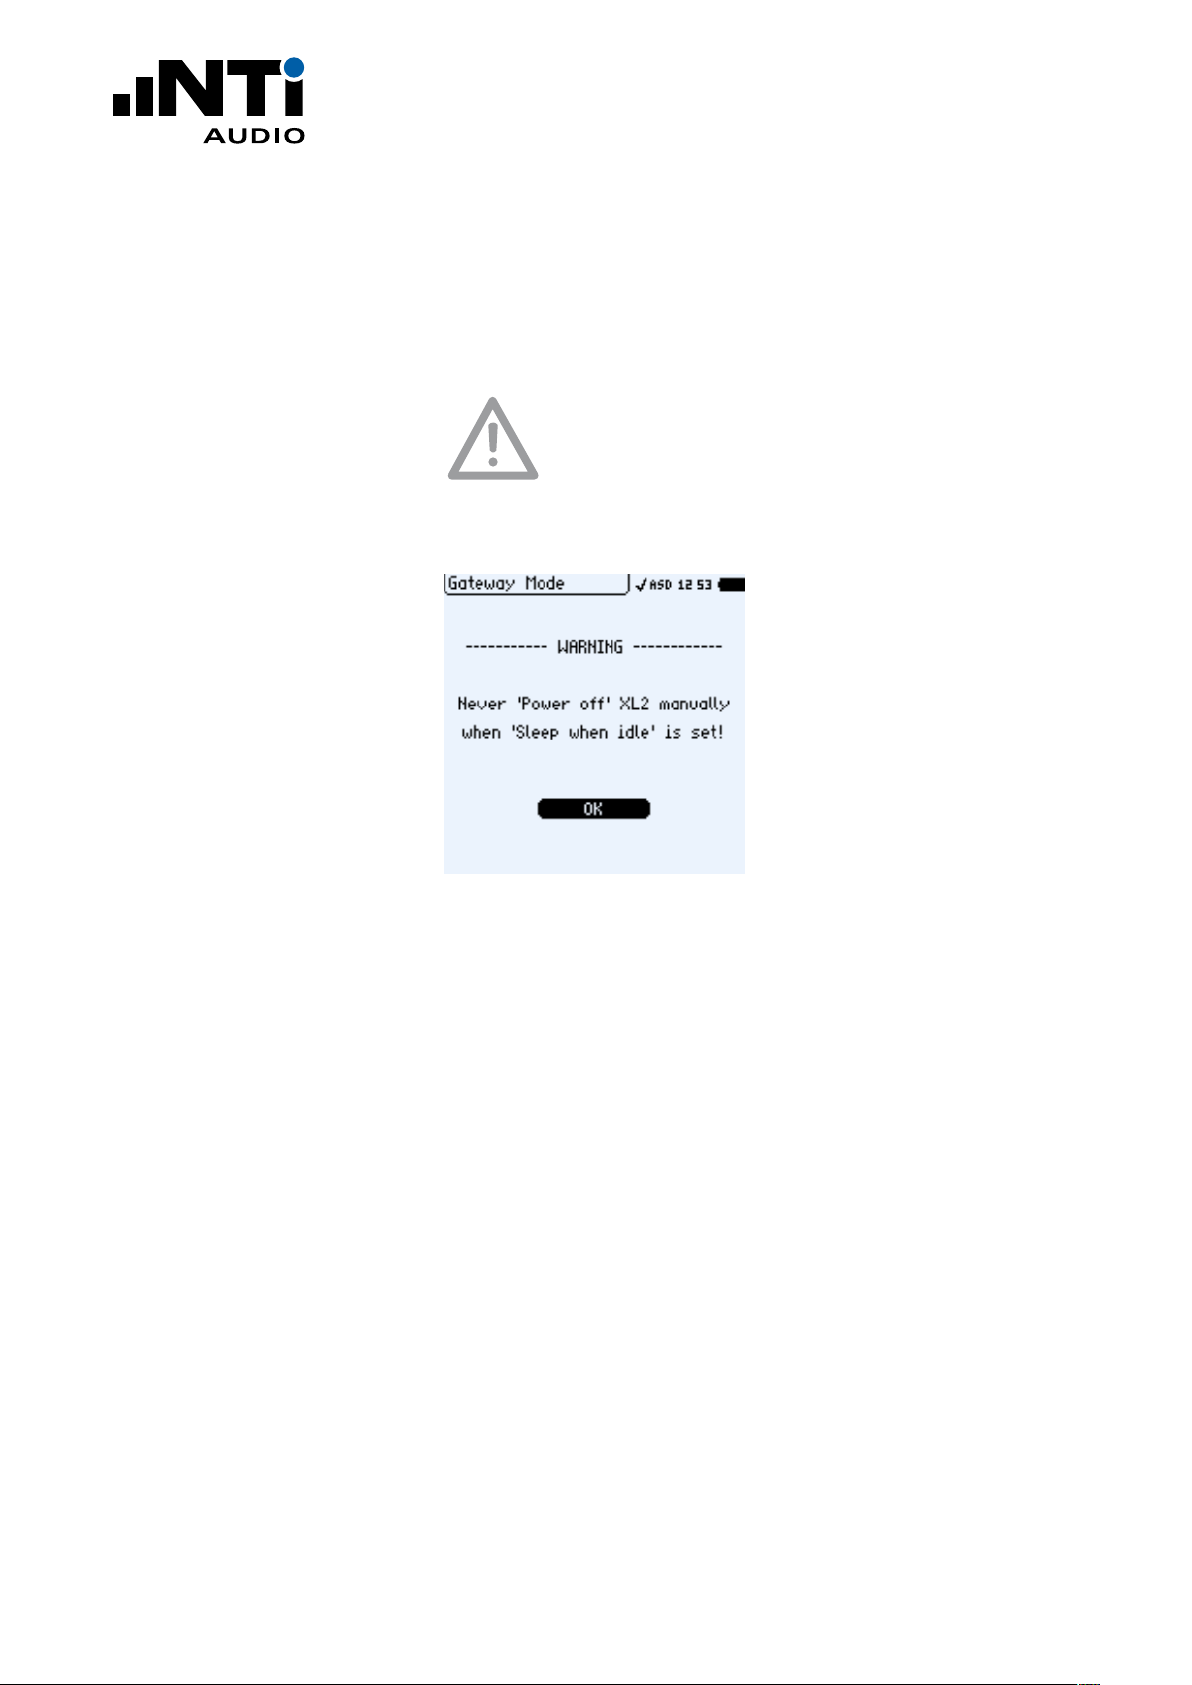
Do not manually turn the XL2 off when
“Sleep when idle” is active. Otherwise the system will
remain turned off until it is manually turned on again.
Warning against manually switching off
www.nti-audio.com Page 16 / 18
QUICK GUIDE
Server Verification
SFTP protocol versions use different host keys. When your SFTP
client connects to the server for the first time you may be asked
to trust the host key. To confirm that you are actually connected
to the correct server (xl2gateway.nti-audio.com), your SFTP Client
should show one of the following fingerprints:
Algorithm Key length [bit] Key Fingerprint
ED25519 256 SHA 256: KPr/08XsmkNmhYyVP1ta+21z7Ivp48ZGksjICyc4YJA
MD5: 82:f4:d5:c1:f6:94:d3:09:ee:f2:15:69:a0:d8:2c:1e
ECDSA 256 SHA 256: tt2S3pUICyu19uLPtO11E+lC/khuJwXijGEjeR3zpHU
MD5: 4a:2b:3c:18:ca:7c:68:7b:82:e0:cb:fa:c2:4b:51:cc
DSA 1024 SHA 256: j74iOEBG3mbkx+zT4AvihsVKG81hky1sOfZ5sukmsNw
MD5: fe:d8:2f:51:9e:7b:d4:0f:84:76:dd:a9:80:b7:0a:e6
RSA 2048 SHA 256: YoH4hFprpwtQ58yfPL5apRxubpNV3acghEcMykmgkIU
MD5: 33:c7:43:72:81:16:de:98:91:a1:ec:42:ec:fb:cb:e6
Table of Key Fingerprints confirming the trusted Connection
Troubleshooting
The root directory of your login contains the subdirectory /NetBox.
This contains the XL2 root directory of the SD card.
• NetBox offline
In case the NetBox is not connected to the server, the /NetBox
directory contains a file named “NetBox is Offline.txt”.
• XL2 not connected
In case the XL2 is not connected to the NetBox, the /XL2 subdirectory contains a file named “XL2 not mounted.txt”. Verify
that your XL2 is powered on, an SD-Card is inserted in the XL2
and the XL2 is connected via USB to the NetBox.
Folder Structure
During ongoing measurements, all data is stored in temporary files
in the folder ‘/Projects/.unsaved/SLM/’. As soon as the measurement is completed these files are moved to the current Project
folder and renamed to their given filename. Reading the temporary files provides access to the latest measurement data. Kindly
be aware of the following details:
• There might be a delay between the time that values are measured and the time that the data is available in the temporary
file.
• Due to latency in writing, you may possibly miss the last 10
seconds of audio data.
www.nti-audio.com Page 17 / 18
QUICK GUIDE
Irregular Behaviour
In case of any irregular behaviour, the noise monitor may be restarted remotely. This will reboot the NetBox. The actual noise
monitoring continuous without any interrupts (based on an internal battery pack or an alternative individual power supply to the
XL2 Sound Level Meter is available)
• Press the button below to reboot the NetBox.
Reboot the NetBox here
List of registered Noise Monitors on the dashboard of www.noisescout.com
www.nti-audio.com Page 18 / 18
 Loading...