

Page 1
NoiseScout
USER MANUAL
© 2018 NTi Audio AG
Markus Becker
July 06, 2018
Page 2

Table of Contents
1. Introduction 3
1.1 System requirements .................................................................................................... 6
1.2 Product safety & legal information ............................................................................. 7
1.3 License agreement ......................................................................................................... 8
1.4 Tutorial ......................................................................................................................... 10
2. System setup 17
2.1 NetBox registration ..................................................................................................... 18
2.2 Noise Monitor .............................................................................................................. 19
2.3 Network connection ................................................................................................... 20
3. Web portal 23
3.1 Login ............................................................................................................................. 26
3.2 Dashboard .................................................................................................................... 26
2
3.3 Job ................................................................................................................................. 27
3.4 Location ........................................................................................................................ 31
Alarm messages .................................................................................................... 333.4.1
Location panel ....................................................................................................... 333.4.2
Location setup ....................................................................................................... 353.4.3
Alarm list ................................................................................................................ 363.4.4
Periods & limits ..................................................................................................... 383.4.5
Audit data .............................................................................................................. 383.4.6
Incidents ................................................................................................................ 393.4.7
3.5 Share Job or Location view ......................................................................................... 40
3.6 Download data ............................................................................................................ 40
4. Hints & tips 42
4.1 Navigation .................................................................................................................... 43
4.2 Troubleshooting .......................................................................................................... 44
4.3 Support ......................................................................................................................... 46
Index
47
NoiseScout © 2018 NTi Audio AG
Page 3

Introduction
Page 4
Introduction
1 Introduction
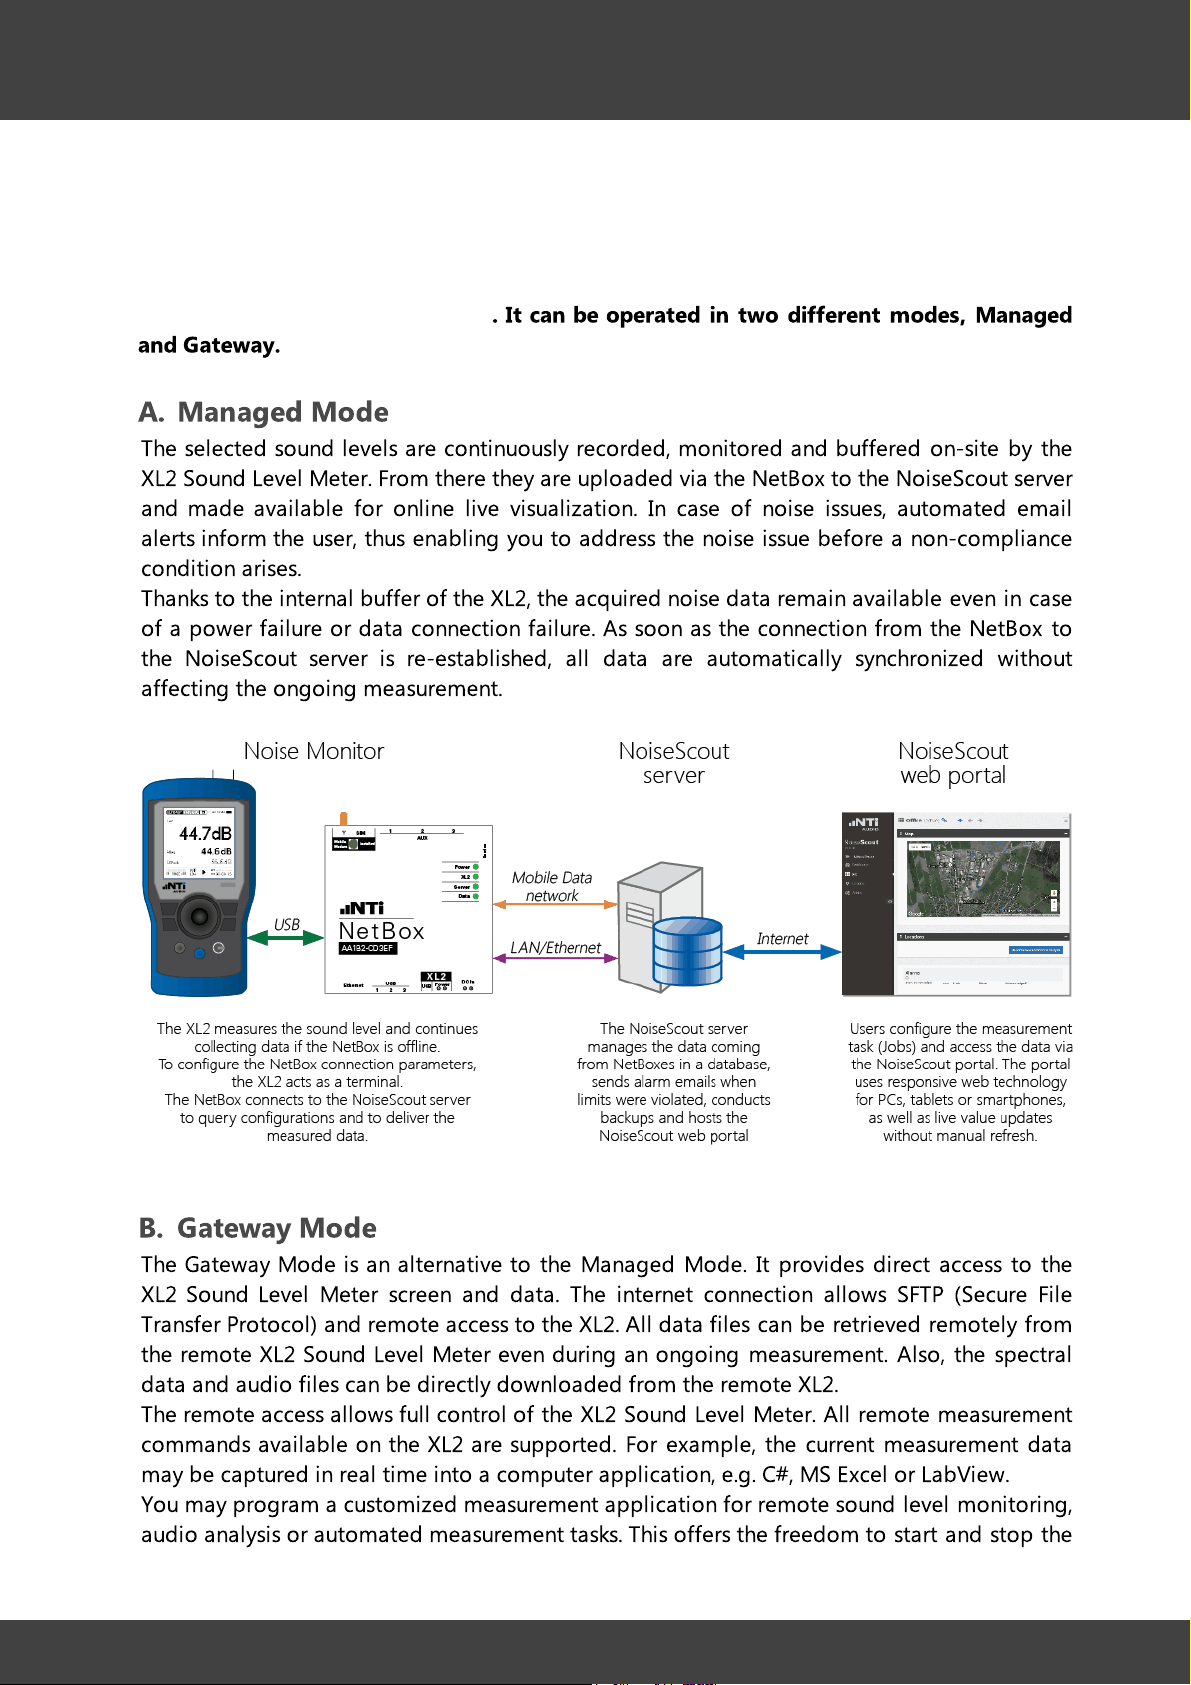
NoiseScout provides a comprehensive but easy-to-use 24/7 noise monitoring solution.
Noise levels are recorded on-site by the XL2 Sound Level Meter and are available for
remote monitoring and download
and Gateway.
A. Managed Mode
The selected sound levels are continuously recorded, monitored and buffered on-site by the
XL2 Sound Level Meter. From there they are uploaded via the NetBox to the NoiseScout server
and made available for online live visualization. In case of noise issues, automated email
alerts inform the user, thus enabling you to address the noise issue before a non-compliance
condition arises.
Thanks to the internal buffer of the XL2, the acquired noise data remain available even in case
of a power failure or data connection failure. As soon as the connection from the NetBox to
the NoiseScout server is re-established, all data are automatically synchronized without
affecting the ongoing measurement.
. It can be operated in two different modes, Managed
4
B. Gateway Mode
The Gateway Mode is an alternative to the Managed Mode. It provides direct access to the
XL2 Sound Level Meter screen and data. The internet connection allows SFTP (Secure File
Transfer Protocol) and remote access to the XL2. All data files can be retrieved remotely from
the remote XL2 Sound Level Meter even during an ongoing measurement. Also, the spectral
data and audio files can be directly downloaded from the remote XL2.
The remote access allows full control of the XL2 Sound Level Meter. All remote measurement
commands available on the XL2 are supported. For example, the current measurement data
may be captured in real time into a computer application, e.g. C#, MS Excel or LabView.
You may program a customized measurement application for remote sound level monitoring,
audio analysis or automated measurement tasks. This offers the freedom to start and stop the
NoiseScout © 2018 NTi Audio AG
Page 5
Introduction
online noise monitoring from your office or your mobile device; a useful tool for complete
control.
NOTE The explanations provided hereunder refer to the Managed mode only. For more
information regarding Gateway mode, please refer to the corresponding User
Guide.
© NTi Audio AG, July06, 2018
5
NoiseScout © 2018 NTi Audio AG
Page 6
Introduction
1.1 System requirements
·
XL2 Sound Level Meter: firmware V3.11 or higher, and SD-card with minimum 8 GB
6
Hint The audio file recording is only supported for XL2 with firmware V3.33 or
higher
·
Microphone; choose from NTi Audio M2230, M2211, M2215 M4260 or M4261, with ASD
cable (
·
USB cable from NTi Audio (with ferrite)
·
NetBox (includes 10 days data credits by default)
o
·
Power supply 7.5 – 16 VDC, ≤ 9 W (e.g. mains power adapter, solar panel, battery)
·
Internet connection
o
o
·
Web browser capable device such as PC, Tablet or Smartphone
·
NTi Audio Data Explorer software (
Hint NoiseScout is optimized to work with the Google Chrome web browser; using
optional
Mobile Data modem, antenna + SIM card (
LAN / Ethernet (with DHCP compatible router)
Mobile Data communication (
another browser may affect the look and significantly decrease the speed of the
web site (download the latest version of Chrome here)
)
36
optional
optional - factory installation
)
optional
)
)
NoiseScout © 2018 NTi Audio AG
Page 7
Introduction
7
1.2
Product safety & legal information
Operational safety
·
Those who, as a result of their physical, sensory or mental capabilities or lack of experience
or knowledge, are not in a position to use the product safely must not be allowed in the
vicinity of the product without supervision or instruction by a person responsible for their
safety.
·
Never open the housing of the NetBox, XL2 or the charger.
·
Do not insert any object into the ports or openings of the NetBox, XL2 or charger.
·
Exposing the device to electrostatic discharge can interrupt the data transfer between the
device and the network or impair the functions of the device. Should this happen,
disconnect the device from the power supply and the USB port and reconnect it or rebuild
the network connection from scratch.
·
Protect the device from extremely high or low temperatures, condensation or moisture.
Repair
·
No parts inside the device require maintenance or cleaning.
·
Should the device become wet, turn it off immediately. Ensure the device is checked for
operational safety before using it again.
·Refer all servicing to qualified service personnel. Servicing is required when the apparatus
has been damaged in any way, such as power-supply cord or plug is damaged, liquid has
been spilled or objects have fallen into the apparatus, the apparatus has been exposed to
rain or moisture, does not operate normally, or has been dropped.
Maximum modem transmission power
·
Class 4 (2 W, 33 dBm) @ GSM 850 / 900
·
Class 1 (1 W, 30 dBm) @ GSM 1800 / 1900
·
Class 3 (0.25 W, 24 dBm) @ UMTS
·
Class E2 (0.5 W, 27 dBm) @ EDGE 850 / 900
·
Class E2 (0.4 W, 26 dBm) @ EDGE 1800 / 1900
FCC user information
FCC 15.21
Changes or modifications not expressly approved by the party responsible for compliance
could void the user’s authority to operate the equipment.
Part 15 statement according to FCC 15.19/RSS gen issue 3 sect. 7.1.3
This device complies with Part 15 of the FCC Rules and with Industry Canada license-exempt
R
SS standard(s). Operation is subject to the following two conditions: (1) this device may not
cause harmful interference, and (2) this device must accept any interference received,
including interference that may cause undesired operation.
Le présent appareil est conforme aux CNR d'Industrie Canada applicables aux appareils radio
exempts de licence. L'exploitation est autorisée aux deux conditions suivantes : (1) l'appareil ne
doit pas produire de brouillage, et (2) l'utilisateur de l'appareil doit accepter tout brouillage
radioélectrique subi, même si le brouillage est susceptible d'en compromettre le fonctionnement.
NoiseScout © 2018 NTi Audio AG
Page 8
Introduction
8
1.3
License agreement
Scope
This End-User License Agreement (“EULA”) is a legal agreement between you (either an
individual or a single entity) and NTi Audio AG (“NTi Audio”). By installing or using the NTi
Audio software, content or documentation (collectively the “NTi Audio software”)
accompanying this EULA, you accept these terms and are consequently bound to them. If you
do not agree to the terms of this EULA, do not install or use the NTi Audio software.
The NTi Audio software is licensed, not sold, to you by NTi Audio for use only under the terms
of this license agreement. This EULA only gives you some rights to use the software. You may
use the software only as expressly permitted in this EULA.
This EULA also applies for all upgrades or updates to the NTi Audio software (if any),
supplements, internet-based services, and support services for this NTi Audio software, unless
other terms accompany those items. If so, those terms will govern.
License Uses and Restrictions
A. Software Installation: Subject to the terms and conditions of this license agreement, you
are granted a limited, non-exclusive license to use and run the NTi Audio software. Data
transfer from an XL2 Audio & Acoustic analyzer to the NTi Audio software is only enabled
if the corresponding license is installed on the analyzer.
B. No Reverse Engineering: You may not and you agree not to, or to enable others to, copy
(except as expressly permitted by this license agreement or by the usage rules if they are
applicable to you), publish, distribute, decompile, reverse engineer, disassemble, attempt
to derive the source code of, decrypt, modify, or create derivative works of the NTi Audio
software or any services provided by the NTi Audio software, or any part thereof.
C. Termination: This license is effective until terminated. Your rights under this license
agreement will terminate automatically or otherwise cease to be effective without notice
from NTi Audio if you fail to comply with any term(s) of this license agreement. Upon the
termination of this license, you must cease all use of the NTi Audio software and destroy all
copies, full or partial, of the NTi Audio software.
Services
The NTi Audio software may enable access to NTi Audio and third party services and web
sites (collectively and individually, “NTi Audio services”). Such NTi Audio services may not be
available in all languages or in all countries. Use of these NTi Audio services requires internet
access and use of certain NTi Audio services may requires an NTi Audio ID, may require you to
accept additional terms and may be subject to additional fees. By using this software in
connection with an NTi Audio ID or other NTi Audio account, you agree to the applicable
terms of service for that account.
Disclaimer
A. NTi Audio and all our affiliates do not give any warranty, guarantee or conditions for this
software, i.e. you bear the sole risk of using it. This limitation applies to anything related to
this software, including breach of contract, warranty, guarantee or condition, strict liability,
NoiseScout © 2018 NTi Audio AG
Page 9
Introduction
negligence or other tort to the extent permitted by applicable law. It also applies if NTi
Audio knew or should have known about the possibility of the damages.
B. The NTi Audio software and services are provided “as-is”, i.e. with all faults. You bear the
sole risk of using it. NTi Audio gives no express warranties, guarantees or conditions. NTi
Audio excludes the implied warranties of merchantability, fitness for a particular purpose
and non-infringement.
C. You acknowledge that the NTi Audio software and services are not intended or suitable for
use in situations or environments where the failure or time delays of, or errors or
inaccuracies in the content, data or information provided by the NTi Audio software or
services could lead to death, personal injury, or severe physical or environmental damage,
including without limitation the operation of nuclear facilities, aircraft navigation or
communication systems, air traffic control, life support or weapons systems.
D. No oral or written information or advice given by NTi Audio or an NTi Audio authorized
representative shall create a warranty. Should the NTi Audio software or services prove
defective, you assume the entire costs of all necessary servicing, repair or correction.
E. In no event shall NTi Audio be liable for personal injury, or any incidental, special, indirect
or consequential damages whatsoever, including, without limitation, damages for loss of
profits, loss of data or information, business interruption or any other commercial damages
or losses, arising out of or related to your use or inability to use the NTi Audio software or
services or any third party software or applications in conjunction with the NTi Audio
software or services, however caused, regardless of the theory of liability (contract, tort or
otherwise) and even if NTi Audio has been advised of the possibility of such damages. In
no event shall NTi Audio’s total liability to you for all damages exceed the amount of ten
US dollars (USD 10.00). The foregoing limitations will apply even if the above stated
remedy fails of its essential purpose.
9
Separate Provisions
If any provision of this EULA shall be held to be invalid, illegal or unenforceable, the validity,
legality and enforceability of the remaining provisions shall in no way be affected or impaired
thereby.
Privacy
At all times your information will be treated in accordance with NTi Audio’s privacy policy,
which is incorporated by reference into this license agreement and can be viewed at
http://www.nti-audio.com/privacy-statement
Controlling Law
This license agreement will be governed and construed in accordance with the laws of
Liechtenstein, Europe, excluding its conflict of law principles. No amendment to or
modification of this EULA will be binding unless in writing and signed by NTi Audio. The
English version of this EULA shall govern, to the extent not prohibited by local law in your
j
urisdiction.
NoiseScout © 2018 NTi Audio AG
Page 10
Introduction
10
1.4
·
·
·
·
Tutorial
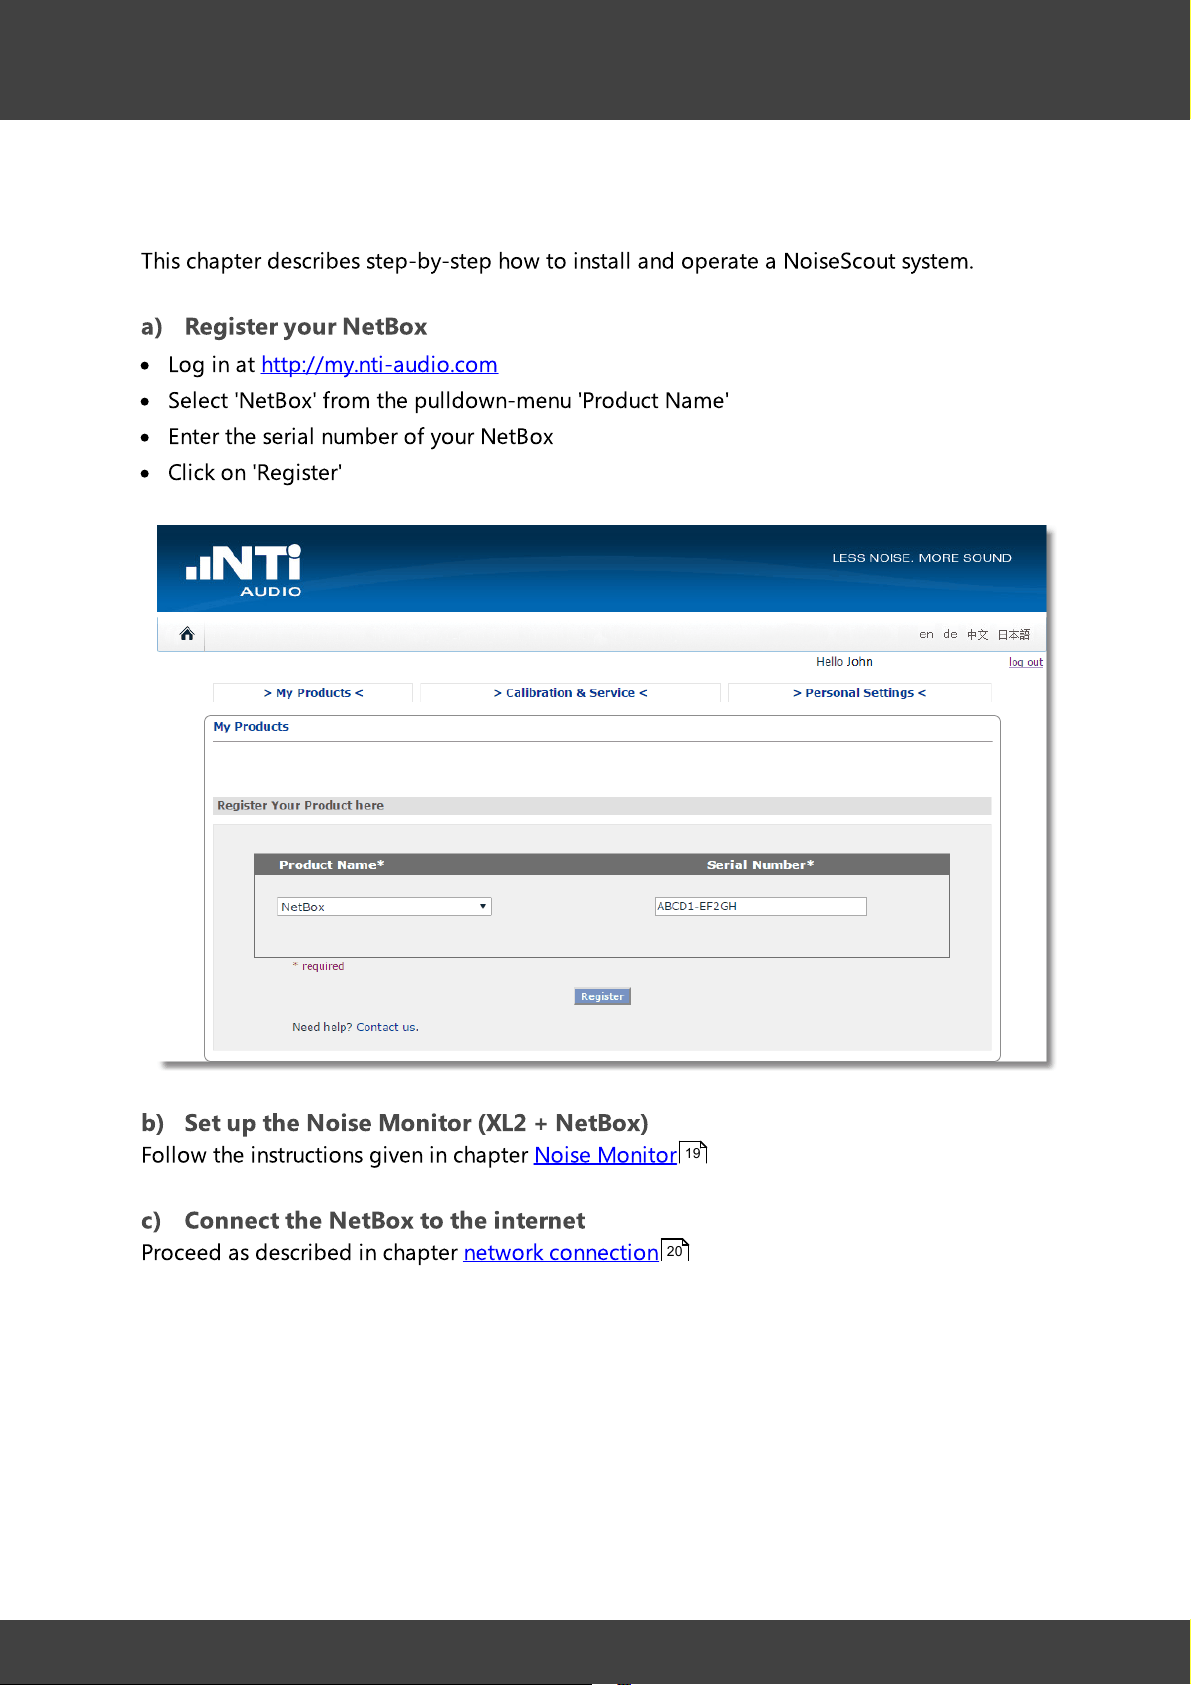
This chapter describes step-by-step how to install and operate a NoiseScout system.
a) Register your NetBox
Log in at http://my.nti-audio.com
Select 'NetBox' from the pulldown-menu 'Product Name
Enter the serial number of your NetBox
Click on 'Register
'
'
b) Set up the Noise Monitor (XL2 + NetBox)
Follow the instructions given in chapter Noise Monitor
c) Connect the NetBox to the internet
Proceed as described in chapter network connection
NoiseScout © 2018 NTi Audio AG
19
20
Page 11
Introduction
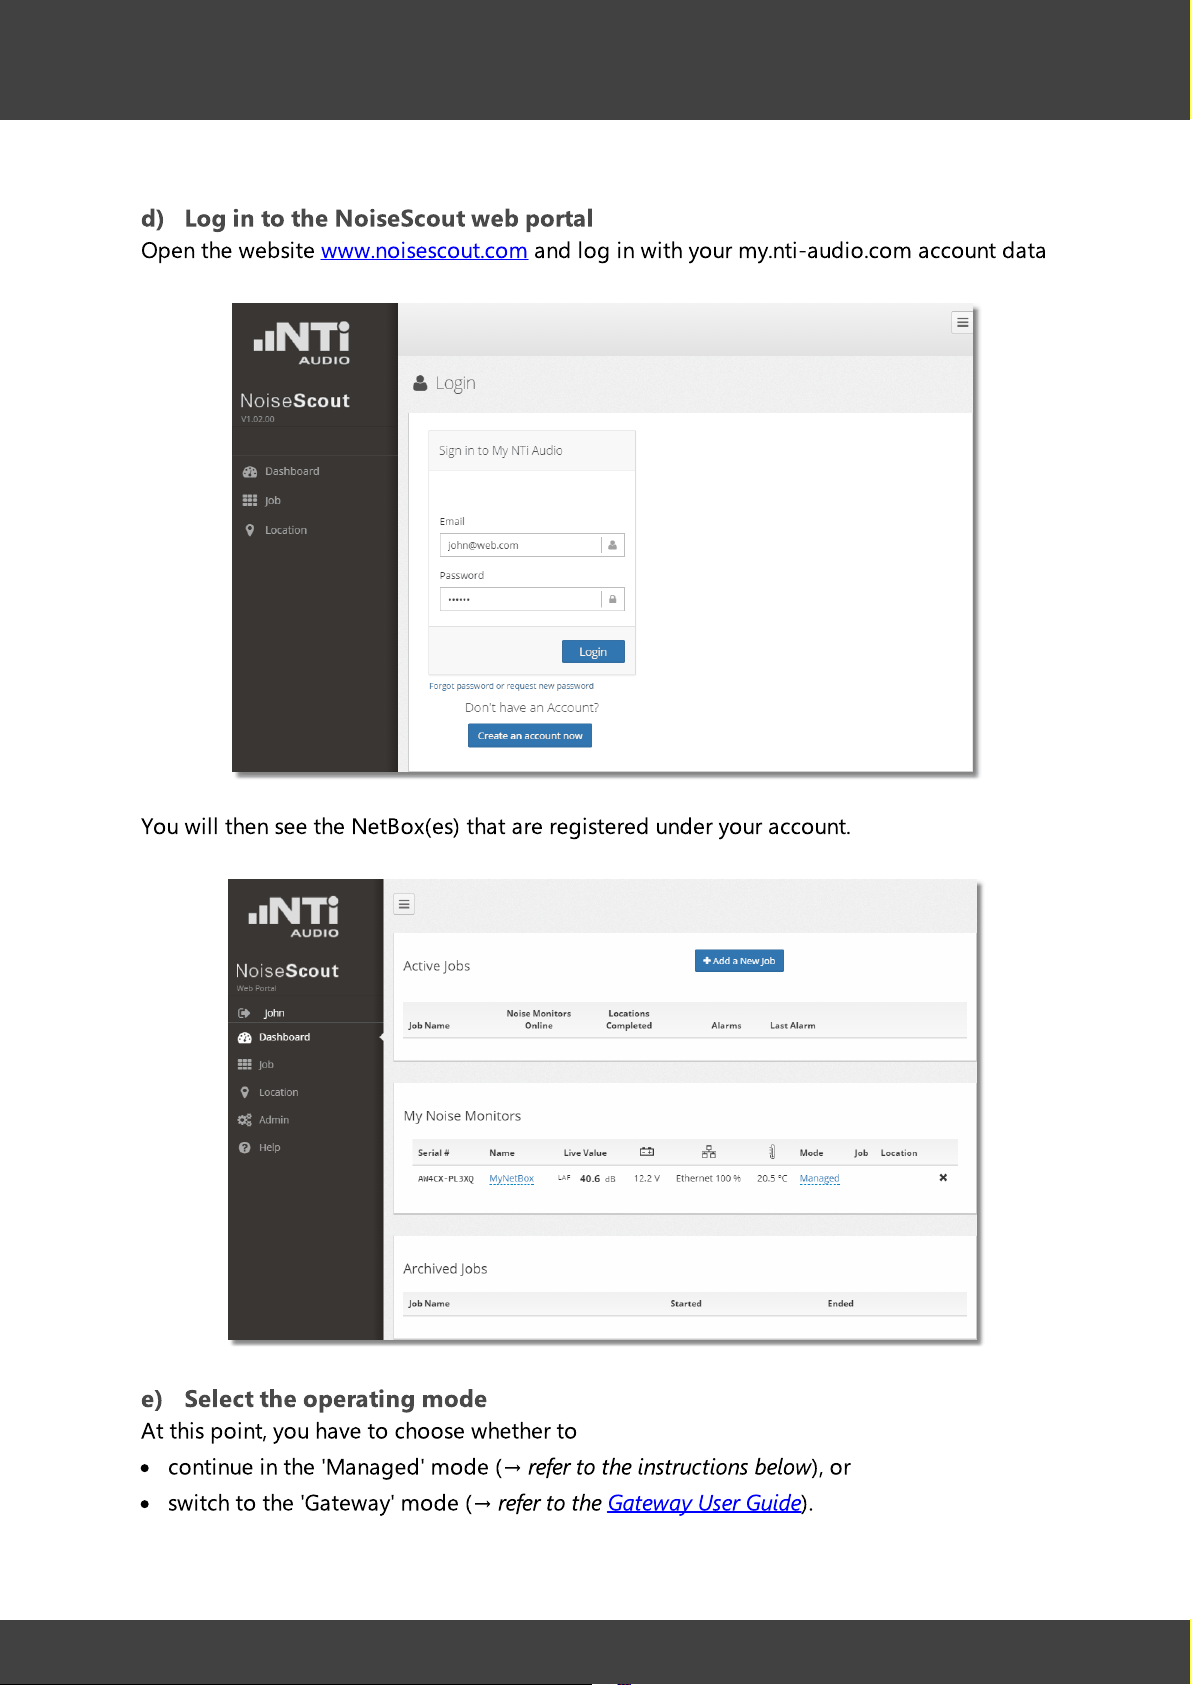
d) Log in to the NoiseScout web portal
O
pen the website www.noisescout.com and log in with your my.nti-audio.com account data
11
You will then see the NetBox(es) that are registered under your account.
e) Select the operating mode
At this point, you have to choose whether to
·
continue in the 'Managed' mode (→
·
switch to the 'Gateway' mode (→
NoiseScout © 2018 NTi Audio AG
refer to the instructions below
refer to the Gateway User Guide
), or
).
Page 12
Introduction
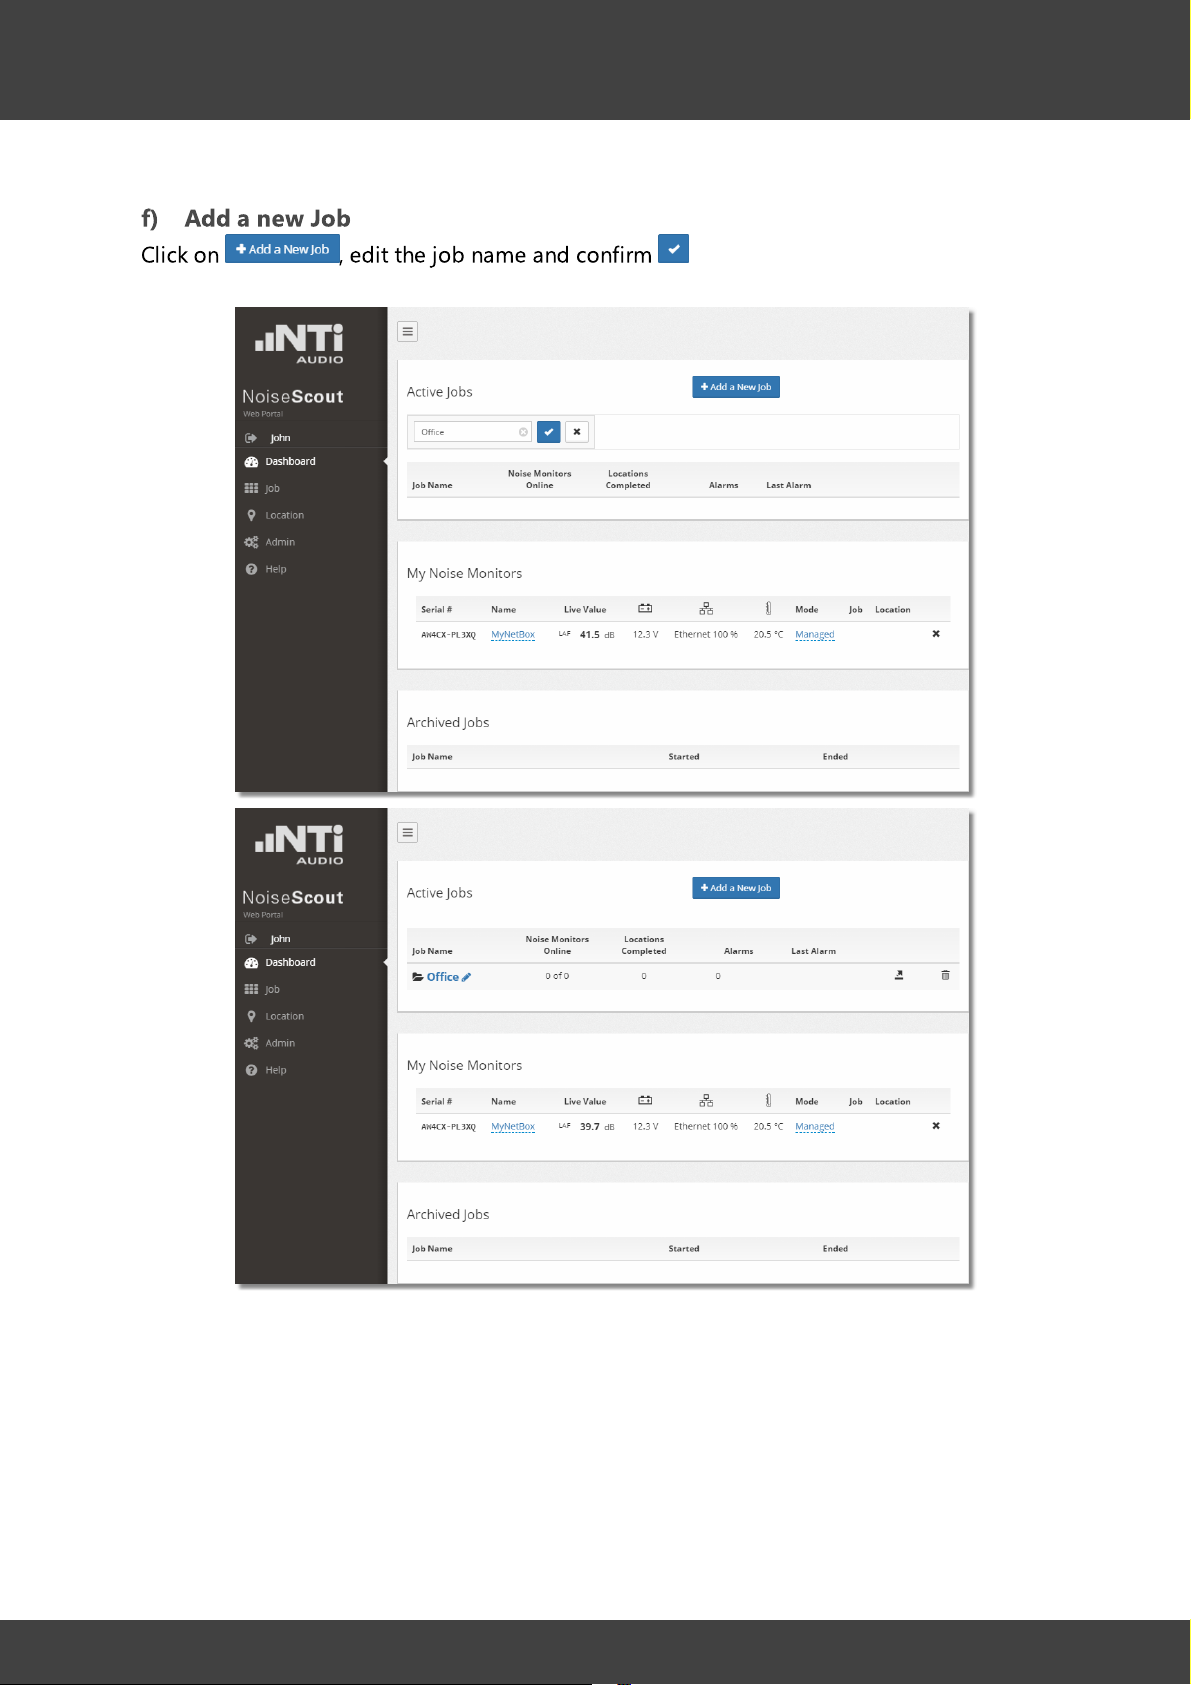
f) Add a new Job
Click on , edit the job name and confirm
12
NoiseScout © 2018 NTi Audio AG
Page 13
Introduction
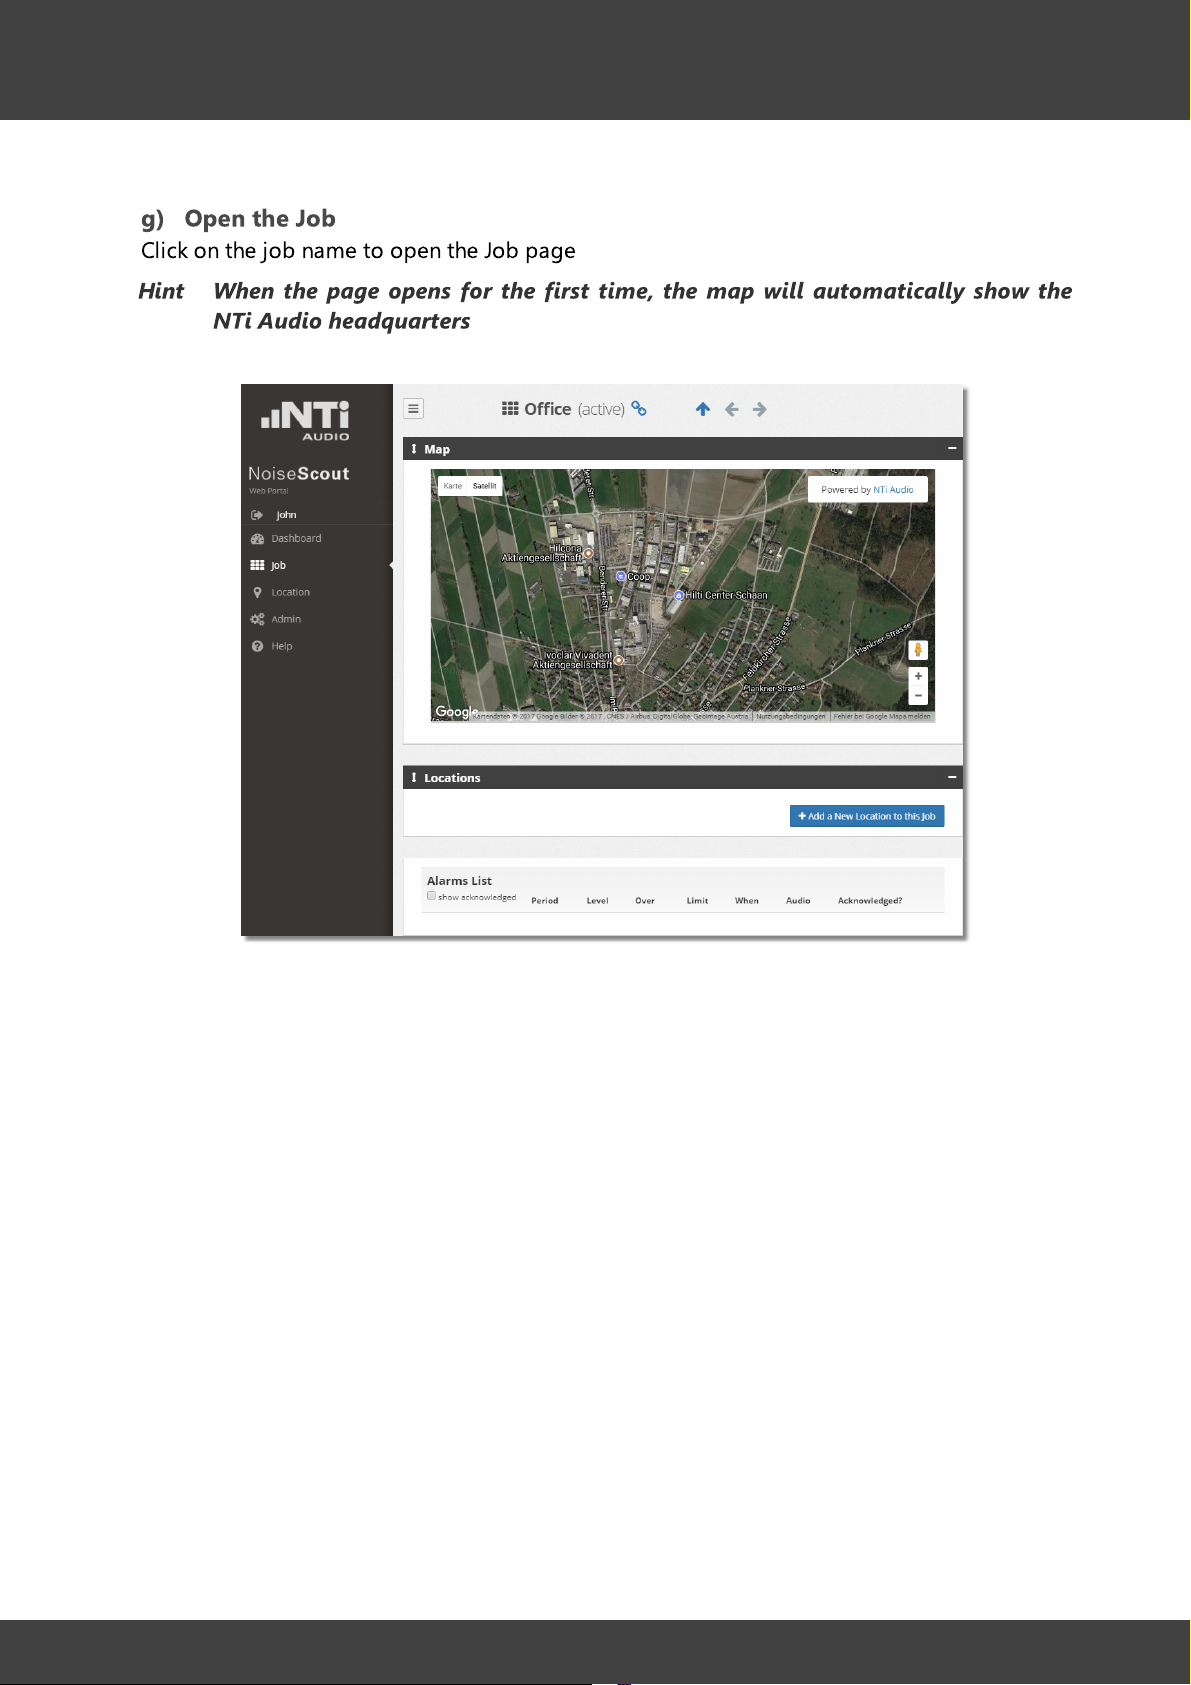
g) Open the Job
Click on the job name to open the Job page
Hint When the page opens for the first time, the map will automatically show the
NTi Audio headquarters
13
NoiseScout © 2018 NTi Audio AG
Page 14
Introduction
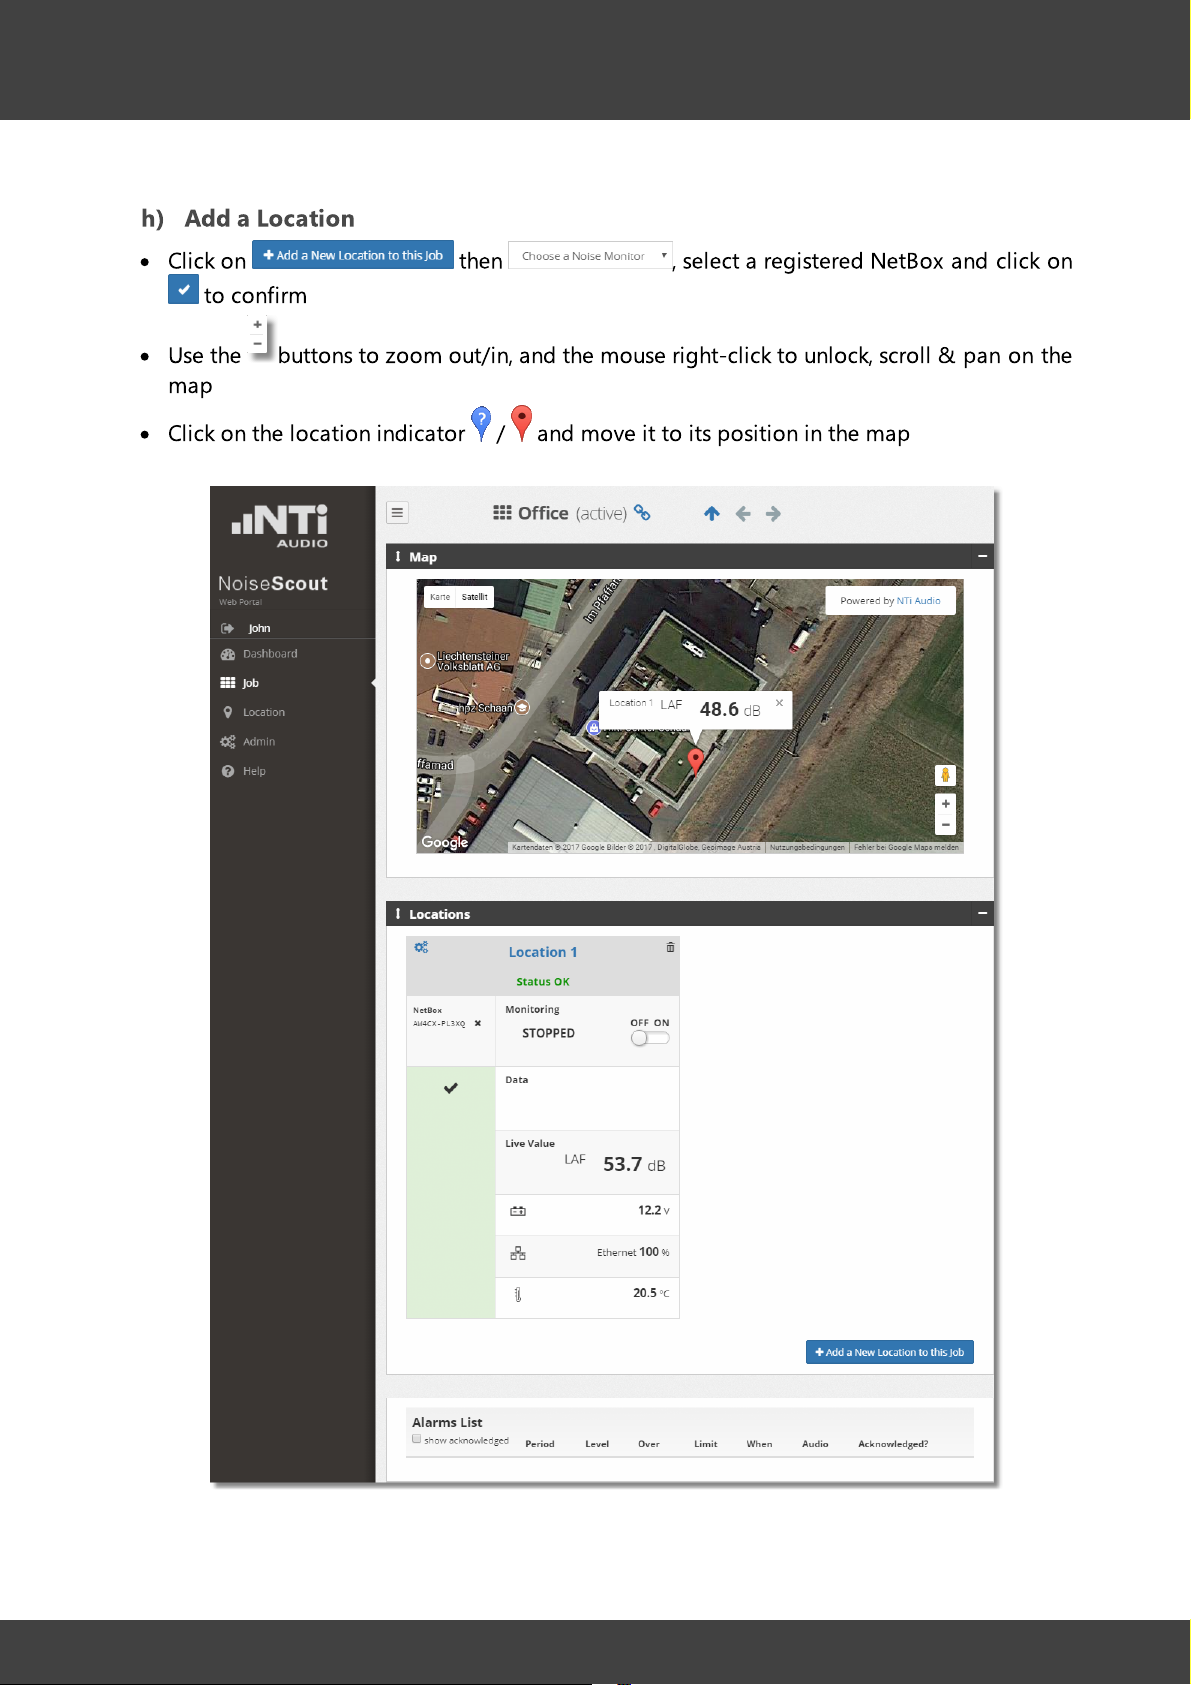
h) Add a Location
·
Click on then , select a registered NetBox and click on
to confirm
·
Use the buttons to zoom out/in, and the mouse right-click to unlock, scroll & pan on the
map
·
Click on the location indicator / and move it to its position in the map
14
NoiseScout © 2018 NTi Audio AG
Page 15
Introduction
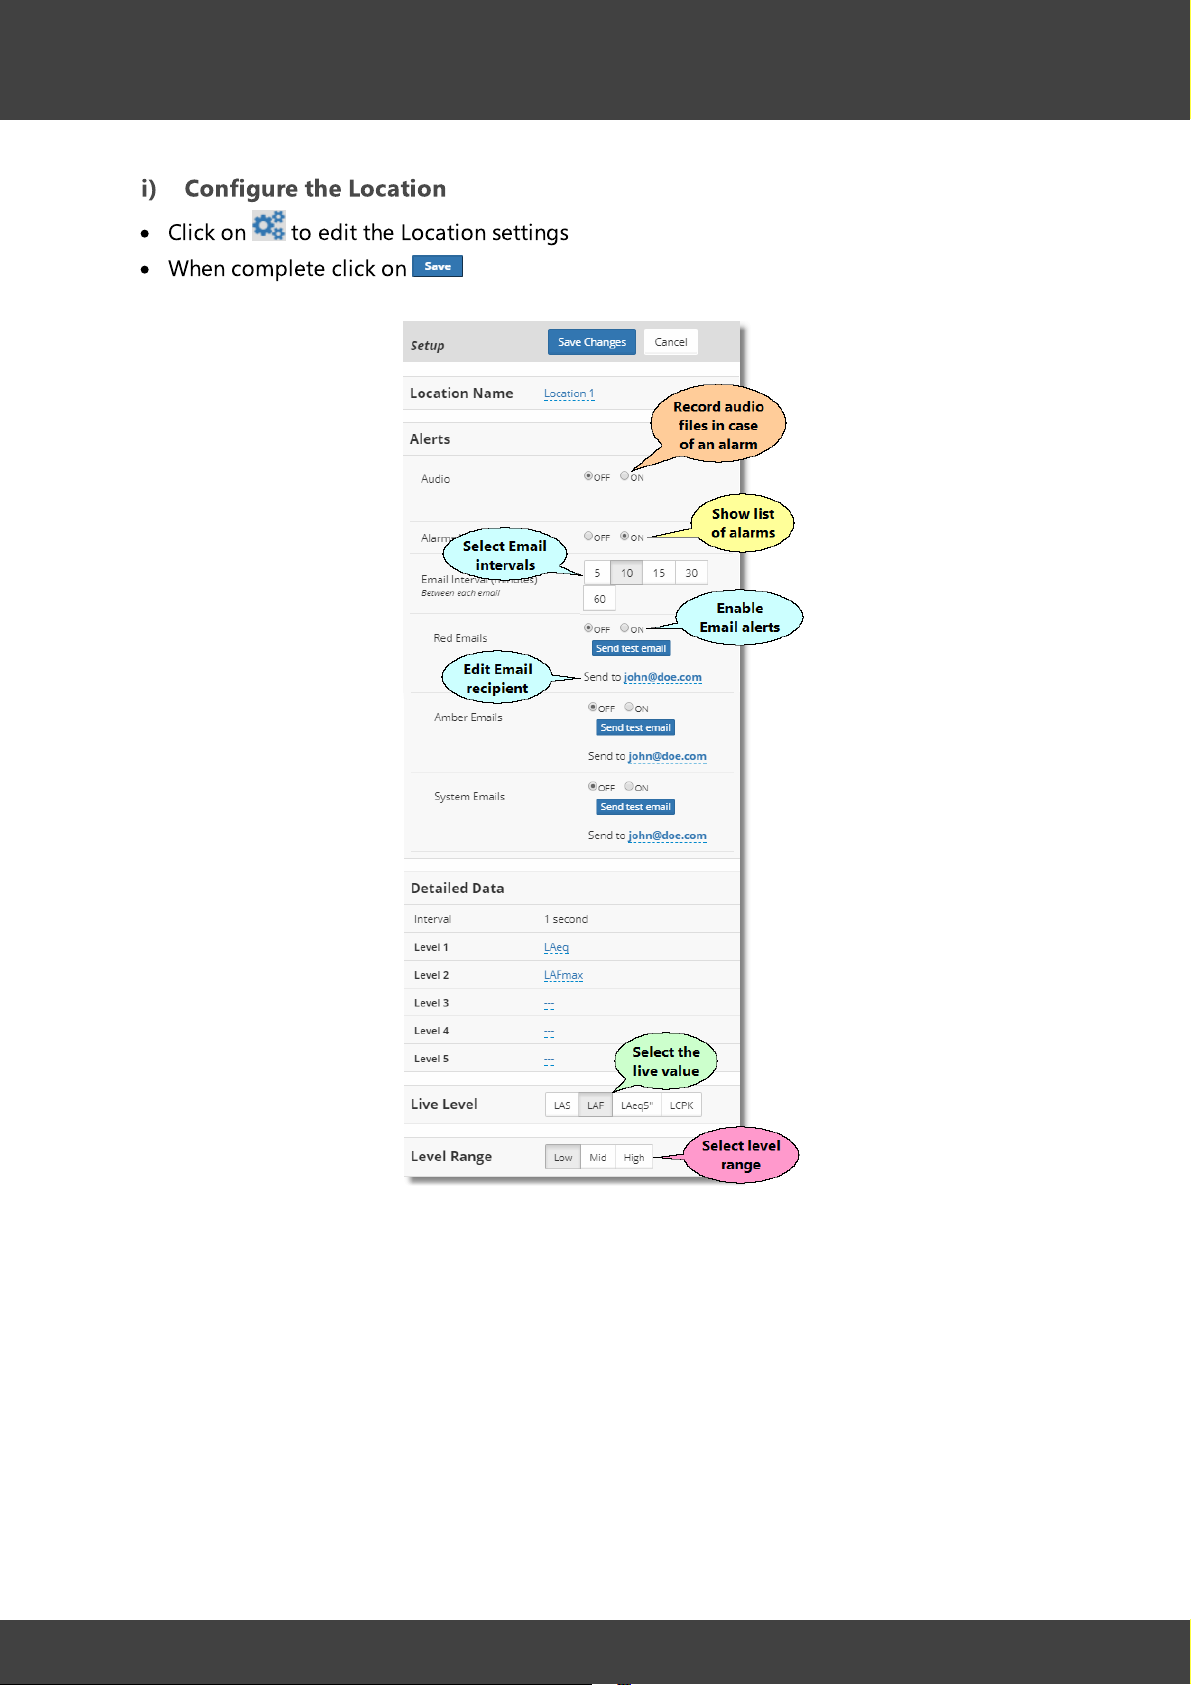
i) Configure the Location
·
Click on to edit the Location settings
·
When complete click on
15
NoiseScout © 2018 NTi Audio AG
Page 16

Introduction
k) Adjust the Periods & Limits
·
Click on (or the name that you have assigned to the location)
·
Scroll down and edit the Periods according to your demands, i.e. the Description (name),
applicable Days and Start/Finish times
·
Select a Limits Group; therein, select the Level per period, and adjust the related Time
Interval as well as the Red/Amber alarm Limits
·
Click on to save your settings
16
l) Start the Noise Monitor
Switch the Noise Monitor ON to begin the measurement at the Location
NoiseScout © 2018 NTi Audio AG
Page 17

System setup
Page 18

System setup
2 System setup
The following sketch visualizes the basic installation procedure for a NoiseScout system.
2.1 NetBox registration
Before putting a NetBox into operation, you have to register it under your my.nti-audio.com
account.
1. Log in to your my.nti-audio.com account
18
2. Select 'NetBox' from the pulldown-menu 'Product Name
3. Enter the Serial Number of your NetBox
4. Click on
'
Hint A NetBox can be registered only once, i.e. by a single user.
You may however register several NetBoxes under your account.
NoiseScout © 2018 NTi Audio AG
Page 19

System setup
19
2.2
Noise Monitor
A Noise Monitor consists of an XL2 and a NetBox, which are connected to a NoiseScout
20
server via the internet.
·
Connect the XL2 with the USB and power cables to the NetBox
·
Connect the NetBox with the network hardware, i.e.
a) LAN / Ethernet cable, or
b) Mobile Data modem (
·Optionally connect an Input Keypad to the XL2
·
Switch ON the XL2
·
Connect the NetBox to a DC power supply (e.g. mains power adapter, solar panel + battery
6
factory installation
33
), antenna + SIM-card (
to be supplied by customer
etc.)
→ Continue with network connection
20
)
Hint The LED states are described in chapter Troubleshooting
NoiseScout © 2018 NTi Audio AG
44
Page 20

System setup
20
2.3
i. LAN/Ethernet
ii. Mobile Data
Hints The NetBox must be registered under my.nti-audio.com before connecting it
Network connection
The NetBox can be connected to the internet via LAN/Ethernet or Mobile Data (i.e. cellular
network as e.g. GSM, UMTS, 3G). If one or both connections are available, the NetBox will
automatically choose one based on the following priority:
18
to the network.
All network settings are saved on the NetBox; the XL2 serves as I/O terminal
and data logger.
You may abort the network connection procedure at any time by pressing the
'Esc' key of the XL2.
Network connection procedure
A) LAN/Ethernet connection
Connecting the NetBox to a LAN (Local Area Network) requires a DHCP compatible router
that provides dynamic IP addresses and is connected to the internet.
For this setup, no settings are required: the connection from the NetBox to the network is
established automatically.
1. Prepare the hardware setup as described in chapter Noise Monitor
19
2. If you want to see the connection status, turn the XL2 rotary wheel to select the network
status indicator and press enter
3. To quit the connection status screen, select 'Close' and press enter
21
↲
↲
B) Mobile Data connection
1. Prepare the hardware setup including SIM-card and antenna as described in chapter Noise
Monitor
2. Power ON the XL2
3. Turn the XL2 rotary wheel to select the network status indicator and press enter
19
21
↲
NoiseScout © 2018 NTi Audio AG
Page 21

System setup
Connection to NoiseScout server and internet is up
Connected to the internet, but so far not to the NoiseScout server
No internet connection
21
4. Select 'Settings' and press enter
5. Select 'Mobile Data' and press enter
6. Enter the user name, password, access point name (APN) and the PIN of the SIM-card, and
confirm via 'ok
7. Select 'Apply settings' and press enter
'
↲
↲
↲
8. The NetBox will automatically connect to the Mobile Data network and query the IP
address
Network status indicator
When connected to a NetBox, the XL2 shows major NetBox status information in the top line
at the position of the speaker symbol.
NoiseScout © 2018 NTi Audio AG
Page 22

System setup
NetBox failure (➝ troubleshooting )
44
Edit network settings
O
nce a network connection has been established, the related settings will be saved in the
NetBox (including the passwords).
You may however amend the saved network settings at any time. To do so, select 'Settings' in
the network status screen, press enter ↲ and edit the requested settings.
Delete connection
If required, you may also delete the saved network settings.
1. Prepare the hardware setup as described in chapter Noise Monitor
2. Switch ON the XL2
3. Turn the XL2 rotary wheel to select the network status indicator and press enter
19
21
↲
22
4. Select 'Settings' and press enter
5. Select '-> Delete connection' and press enter
6. Select 'Continue' and press enter
↲
↲
↲
NoiseScout © 2018 NTi Audio AG
Page 23

Web portal
Page 24

Web portal
3 Web portal
24
The NoiseScout web portal provides access to your Noise Monitors , Locations and
27
J
ob . The web portal has a responsive layout, i.e. it automatically adapts to the display of
your PC, tablet or smartphone.
Use the portal to:
·
assign a Noise Monitor to a Location
·
set up Locations and organize them in Jobs
·
monitor the sound level of a Job or Location
·
share a Job or Location view with a 3rd party
·
download the logged data from a Location
19 31
System overview
NoiseScout © 2018 NTi Audio AG
Page 25

Web portal
Example of an active Job with 3 Noise
Monitors
(and 1 available Noise Monitor)
Example of an archived Job
(4 Noise Monitors are available)
Job structure
As soon as you log in to the NoiseScout web portal, you get access to your personal client
area, from where you may set up, organize and edit the Jobs.
Typically you first add a new Job, and therein a new Location / Noise Monitor.
·
When a Noise Monitor has been assigned to a Location , it is no longer available for
another Location or Job; however, a Noise Monitor may be removed from a Location, or re-
added at a later time.
·
The noise measurements at a Location must be started (and stopped) manually by the
operator.
·
As soon as the measurement at a Location is stopped, the related Noise Monitor may be
removed (thus becoming available again).
·
A stopped Location can be re-started at a later time.
·
A Location can be deleted or archived at any time.
24
31
25
NoiseScout © 2018 NTi Audio AG
Page 26

Web portal
3.1 Login
NOTE You must have an account at my.nti-audio.com to set up and configure a Noise
Monitor under the NoiseScout web portal.
1)Open the website www.noisescout.com and click on
2) Enter your e-mail address and the password of your my.nti-audio.com account
3) Click on
3.2 Dashboard
26
The main page of the NoiseScout web portal is the Dashboard. It shows your personal client
25 27 19
area with the active and archived Jobs , as well as the available Noise Monitors .
Hint You have access to only the NetBoxes that you have registered under my.nti-
audio.com.
In the Dashboard view, you may
·
Create a new Job → click on , enter the name of the new Job and confirm via
·
Edit the name of an existing Job → click on and confirm via
·Open a Job → click on the Job name
·
Archive an active Job → click on
·
Delete a Job → click on
·
Edit the name of a Noise Monitor → click on the Name and confirm via
·
Toggle between the Managed and Gateway mode → click on the Mode, select the
preferred solution and confirm via
·
Deregister a NetBox of a Noise Monitor → click on
appear while the NetBox is assigned to a Location)
4 4
19
(NOTE The Deregister does not
18
NoiseScout © 2018 NTi Audio AG
Page 27

Web portal
27
Example of Dashboard view
3.3 Job
A Job can be described as a noise monitoring task that runs over a certain period of time. A
J
ob normally contains minimum one or more Locations , whereby each Location is assigned
to a Noise Monitor (please refer also to → Job structure ).
19 25
Examples
·
Surveillance of a building site, where several Noise Monitors are installed to monitor the
environmental noise at different positions
·
Monitoring the traffic noise of a busy road via a single Noise Monitor
·
Ensuring that the maximum allowed sound level is not exceeded during a music festival
with several stages
Location
A Location is a subset of a Job, and represents a connected Noise Monitor .
31 19
31
To add a Location, click on , select an available Noise Monitor and
confirm via
Active vs. archived Job
An active Job can be described as a container (or folder) for Locations . A Job may be
archived or deleted at any time.
NoiseScout © 2018 NTi Audio AG
31
Page 28

Web portal
The Job view of an active Job shows by default
·
a map with the added Locations
·
the Locations that are ready to start
·
active Locations that are logging
·
active Locations that are stopped
·
alarms
28
NoiseScout © 2018 NTi Audio AG
Page 29

Web portal
29
Example of active Job view
The Job view of an archived Job shows
NoiseScout © 2018 NTi Audio AG
Page 30

Web portal
30
·
a map with the Locations
·
Locations that are stopped
·
Alarm list
36
31
Example of archived Job view
NoiseScout © 2018 NTi Audio AG
Page 31

Web portal
31
3.4
Location
The Location view typically includes the
·
Location panel and map
·
Alarm list
·
Periods & limits
·
Audit data and incidents
33
36
38
38
NoiseScout © 2018 NTi Audio AG
Page 32

Web portal
32
NoiseScout © 2018 NTi Audio AG
Page 33

Web portal
33
Location view
3.4.1
Alarm messages
A key feature of the NoiseScout system in the Managed Mode is the generation of alarm
4
messages. These messages can be generated in two ways,
a) automatically: if the recorded sound level exceeds a user-defined threshold,
b) manually: by pressing a button on the XL2 Input Keypad .
19
a) Automated alarms
The user can configure the system behavior in case of an automated alarm.
·
The alarm thresholds are defined under Periods & limits
·
The alarm handling can be adjusted in the Location setup panel:
o
record an Audio file of the moment when the alarm occurred (
o
show all occurred alarms in a list (
o
send an email alert to the host (
optional
optional
),
).
38
35
optional
),
b) Keypress events
The system behavior in case of a keypress event (i.e. manually triggered alarm) is defined as
follows:
·
Pressing any of the four keys on the XL2 Input Keypad , even briefly, triggers a keypress
event.
·
Pressing any of the four keys again ends the event.
·
If no key is pressed to end the event, the event expires in 90 seconds.
·
Audio is provided from 30 seconds before the first keypress down in an event until the
second keypress or the 90-second event timeout.
·Keypressed events are recorded together with the 1-second log data.
·
The duration of each single keypress is marked in XL2 Data Explorer software as “Key1,
K
ey2, Key3, or Key4” respectively.
·
The audio is also shown in the XL2 Data Explorer software.
·
To not put the system under too much pressure, the amount of audio per day is limited to
54 MB.
·Keypressed events are shown in the alarm list and added to alarm email notifications.
·
Links to the keypressed event audio are provided in the alarm list.
36
19
3.4.2
Location panel
The Location panel displays the status of the Noise Monitor.
NoiseScout © 2018 NTi Audio AG
Page 34

Web portal
·
Location status
o
Status OK →
a NetBox has been successfully added to the Location
o
Register a NetBox →
No NetBox is available, i.e. a new NetBox must
be registered and added to the Location
o
Add a Noise Monitor →
a NetBox is available, but it has not yet
been added to the Location
o
No microphone detected →
the microphone of the Noise Monitor
is missing, disconnected or defective
o
No XL2 detected →
the XL2 analyzer of the Noise Monitor is
missing, disconnected or defective
o
Noise monitor is offline →
the Noise Monitor is not connected to
the internet or NoiseScout server
o
NoiseScout system is offline →
the NoiseScout system is currently
offline
·
NetBox serial number
·
Monitoring status
o
The
ON/OFF
switch allows to manually turn the monitoring ON or
O
FF (i.e. start / stop the Noise Monitor).
o
SETTLING →
the monitoring just has been started, yet the Noise
Monitor is still settling
o
RUNNING →
monitoring is in progress
o
RESTARTING →
after having changed some Noise Monitor
parameters (XL2 is running)
o
UPDATING SYSTEM →
while a new firmware is installed
o
SYNCHRONIZING TIME →
XL2 is synchronizing its real-time clock
with the NoiseScout server
o
STOPPED →
monitoring has been stopped
Click on the switch to start (ON) or stop (OFF) the sound
level measurement at the Location.
34
·
Alarm status
o
o
·
Data
o
o
·
Live value
o
·
·
·
o
→ audit level is within the limit
→ audit level has exceed the limit
First → the date & time when the Location was put into operation for the very first time
Latest → the date & time of the last measurement at the Location
listen → click on this link to download the audio recording of the previous 10 seconds
Supply voltage
Network type & status
Ambient temperature
Estimated ambient temperature (based on a measurement within the NetBox)
NoiseScout © 2018 NTi Audio AG
Page 35

Web portal
Location Name
Assign a name to the location and confirm via
Alerts
Audio → tick the ON radio button to enable live audio listening,
and that the NoiseScout server provides 10 sec. audio files (WAV
format) with the highest total sound energy for the alarms
Hint The audio file recording is only supported for XL2 with
firmware V3.33 or higher
Alarm List → as long as the ON radio button is ticked, new alarms
will be shown in the Alarm List
Emails → tick the ON radio button to let the NoiseScout server send
an e-mail, if the recorded level has exceeded the given limit(s)
Send to → edit the Email recipient(s), i.e. the e-mail address(es) of the
recipient(s) who shall receive the aforementioned alarm(s)
Interval → select the minimum interval between successive emails: 5,
10, 15, 30 or 60 minutes
Hint The alarm thresholds are defined under Periods &
Limits
Detailed Data
Tick the ON radio button to upload & show the detailed data from
the XL2 to the NoiseScout server
·
Interval → the XL2 recording interval is fixed at 1 second
·
Level 1 ... 5 → select up to five level measurements that shall be
logged by the XL2
Live Level
→
select the measurement result that shall be shown numerically on
top of the Location panel
Level range
→
adjust the XL2 input range according to the level expectations at
the Location
35
3.4.3
Location setup
Location map / position
Click on in the map and move the Location to the position where the Noise Monitor has
been actually installed.
The Location indicator will change to a and the Location is permanently assigned to the
corresponding time zone.
Location setup
Click on to edit the Location setup.
36
36
19
38
38
NoiseScout © 2018 NTi Audio AG
Page 36

Web portal
Example: XL2 with M2230 microphone
·LO
W: 0 – 100 dBSPL
·
MID: 20 – 120 dBSPL
·HIGH: 40 – 140 dBSPL
Hint Environmental noise monitoring typically requires "Low"
range
Live sound applications typically require "High" range
Click on to return or to abort.
Hint All values in the Location setup can be changed in between measurements or during a
measurement; certain changes however require that the XL2 is restarted - this is done
automatically and there could be data missing during this event.
36
3.4.4
Alarm list
Alarm list
The alarm list shows all the level alarms and manually triggered events that have occurred
since the Location was started.
·
Clear / tick the checkbox to show all / only the not-acknowledged
alarms
·
Click on the 'thumbs down' icon or on 'acknowledge all' to acknowledge the
corresponding alarm(s)
Audio
NoiseScout can automatically provide an audio recording of alarms that occur at a Location,
i.e. in case the measured noise level exceeds the preset limit.
This feature has to be enabled/disabled in the Location settings .
NoiseScout © 2018 NTi Audio AG
Alarm list (example)
35
Page 37

Web portal
Hints The number of audio files is limited to ≤ 300 per day, while the number of
alarm notifications is not limited.
The audio file recording is only supported for XL2 with firmware V3.33 or
higher.
Audio recording process
·
If the Audio feature is enabled , the XL2 will permanently record the incoming audio.
·
If the alarm condition is met, the system finds the three intervals* with the highest total
sound energy (LAeq) within the Time Interval , and uploads a 10-second audio recording
for each of these intervals to the Web Portal; a maximum number of 100 audio files may be
uploaded per day (as soon as this limit has been reached, no further audio files will be
created on that calendar day).
·
To ensure that the SD-card does not run out of memory, the oldest parts of the audio
recording are deleted.
*Example
35
38
37
·
Within a 15-minute time interval (alarm period), the system groups the one-second data
(LAeq_1") into one-minute periods.
·
For each minute group, it calculates the one-minute equivalent value (LAeq_1') from the
one-second data.
·
The system takes the top 5 one-minute periods with the highest LAeq_1' levels (e.g. minute
# 3, 5, 8, 9, and 13 - see graph below), and finds the maximum one-second value within
each of these 5 chosen minutes.
·
It applies a 10-second interval to each of these 5 points, starting 2 seconds before this
maximum point until 8 seconds after it; if two of these 10-second intervals overlap (e.g. in
minute # 8 and 9), the point with the lower max value is discarded (e.g. minute # 9).
·
The remaining points are sorted in descending order and the top 3 of them are selected
(e.g. minute # 5, 8, and 13).
·
For each point, the system create the 10-second WAV files.
Audio file recording principle (schematic illustration)
Audio file characteristics
NoiseScout © 2018 NTi Audio AG
Page 38

Web portal
·
10 seconds / alarm
·
WAV file
·
Compressed audio (ADPCM) with AGC (automated gain control)
·
Sampling frequency fs = 12 kHz
38
3.4.5
Periods & limits
This feature allows you to define individual alarm levels for customized periods and time
intervals.
·
Click on any cell in the
o
Description → customized name of the period
o
Days → applicable weekdays
o
Start → start time of the period
o
Finish → end time of the period
o
Duration → automatically calculated duration of the period
o
→
delete the corresponding period
·
Click on any cell in a
o
Level → the sound level that has to be monitored
o
Time Interval → time interval, during which the monitored level must exceed the threshold to
create an alarm
oRed limit (dB) → threshold level for a red alarm
o
Amber limit (dB) → threshold level for an amber alarm
Periods
table to edit its contents, e.g.
Limits Group
table to edit its contents, e.g.
Periods & Limits (example)
3.4.6
NoiseScout © 2018 NTi Audio AG
Audit data
·
The graphs show the logged sound levels of the past 24 hours / 60 minutes
·
Tick / clear the LAeq, LAFmax checkboxes to show / hide the corresponding test results
·
Click on a download link to save the corresponding data on your PC
Page 39

Web portal
39
Daily audit data / Last hour detailed data (example)
3.4.7
Incidents
List of all incidents (e.g. loss of network connection) that occurred since the Noise Monitor
had been put into operation
Incidents (example)
NoiseScout © 2018 NTi Audio AG
Page 40

Web portal
40
3.5
1. Click on on top of the Job or Location view
2. Copy the link of the web page that opens
3. Send the link to the entitled person
Hint The shared link is unique and applies only to the view, where it has been
Share Job or Location view
The operator of a NoiseScout system may grant a 3rd party read-only access to any Job or
Location view.
27 31
created.
3.6 Download data
If you want to get access to the logged measurement data of a running or an archived Job ,
you have to
1. open the Job
27
2. click on the
3. select the required time period via the calendar, and confirm via
4. download the logged data in text file format – if you intend to import the logged data
also to the XL2 Data Explorer, you must download, in addition, the 'Data Explorer License
file'.
Location
name, from which you want to download the logged data
NoiseScout © 2018 NTi Audio AG
Page 41

Web portal
41
NoiseScout © 2018 NTi Audio AG
Page 42

Hints & tips
Page 43

Hints & tips
log out
go to the Dashboard view
go to the Job view
go to the Location view
collapse/expand the sidebar menu
collapse/expand the map, Location panels
share the current view with a 3rd party user → copy the URL of the new tab and
send it to anybody who may view this page, but without granting the right to edit
the page
go to the Dashboard , Job view
view the previous/next Job or Location
4 Hints & tips
43
·
Navigation
·
Troubleshooting
·
Support
43
46
4.1 Navigation
Buttons
40
44
24
27
31
24 27
Mouse
·Right-click map (Job or Location) to unlock/lock zoom, scroll or pan
·Right-click map (Job or Location) to center automatically on Location(s)
NoiseScout © 2018 NTi Audio AG
Page 44

Hints & tips
→
visit the my.nti-audio.com website, open your account and register the NetBox
→
close the NoiseScout web portal, and log in under the account of the NetBox owner; or
the other person must de-register the NetBox before you can register it
→
connect the NetBox to an appropriate power supply
→
verify the network connection of your Noise Monitor
→
open the Job, to which the Noise Monitor has been assigned; you may now turn
monitoring off, remove the NetBox and add it to the new location
→
connect the XL2 and the NetBox to an appropriate power supply
→
switch ON the XL2
→
Verify the USB cable connection between the XL2 and the NetBox
→
download & install the latest XL2 firmware from the my.nti-audio.com website
→
download & install the latest XL2 firmware from the my.nti-audio.com website
→
select the Location and turn the monitoring ON
→
verify the power supply
→
verify the network connection
→
check the XL2 firmware version (must be v3.03 or higher); update the XL2 firmware if
necessary
→
you have to manually switch ON the XL2 after connecting it to the power supply
44
4.2
Troubleshooting
There is no NetBox / Noise Monitor available
Possible reasons:
NetBox is not registered
NetBox has been registered by another person
NetBox is not connected to the power supply
NetBox is not connected to the internet / NoiseScout server
20
NetBox has been assigned to another Job
The Noise Monitor does not transmit data
18
6
Possible reasons:
The XL2 / NetBox are not properly powered
No communication between the XL2 and the NetBox
The XL2 firmware version is too old
The Location / Noise Monitor has not been started yet
31
Miscellaneous
All NetBox LEDs are OFF
6
The NetBox Data LED is not blinking
20
The XL2 display does not show the symbol
6
The XL2 is not switching ON after connecting to the NetBox
The XL2 shows the Error: "Too many log files in NetBox directory. Please delete
manually"
NoiseScout © 2018 NTi Audio AG
Page 45

Hints & tips
→
open the folder 'Projects', and then '.WebBuffer' on the SD-card of your XL2 and delete
its contents.
→
the maximum number of 100 Audio files per days may have been exceeded.
·ON → power supply voltage
OK
·OFF → no power supply voltage, or too low
·ON → XL2 is connected via USB cable to NetBox
·OFF → no XL2 connected to NetBox
·OFF → NetBox not connected to internet / NoiseScout server
·
Blinking → NetBox is connected to internet, but not (yet) to NoiseScout server
·ON → NetBox is successfully connected to the NoiseScout server
·
Blinking → NetBox is currently transferring data to the NoiseScout server
·
XL2, Server & Data LEDs are blinking → Error during power up ⇒ NetBox will re-start
after a short time
The Audio feature is active, but no Audio files are uploaded after an Alarm
NetBox LEDs
The Power LED is hard-wired, while the other three LEDs are controlled by the NetBox
firmware.
Power
XL2
Server
45
Data
Special states
NoiseScout © 2018 NTi Audio AG
Page 46

Hints & tips
Phone
Fax
Email
+423 239-6060
+423 239-6089
support@nti-audio.com
46
4.3
Support
For dedicated support, please contact your nearest NTi Audio partner.
© NTi Audio AG
Im alten Riet 102
9494 Schaan
Liechtenstein, Europe
www.nti-audio.com
NoiseScout © 2018 NTi Audio AG
Page 47

Index
47
- A -
address 46
alarm list 36
audio 36
download 33, 36, 38
audit data 38
- B -
browser
requirements 6
buttons 43
- C -
clear
network settings 20
password 20
contact 46
- D -
Dashboard 26
data
download 40
Data Explorer 40
- J -
Job
active 27
archive 26
archived 27
create 26
delete 26
edit name 26
overview 27
structure 24
view 27
- L -
LAN
network conncection 20
LED status 44
license agreement 8
limits 38
Location
add 27
overview 31
panel 33
setup 35
view 31
log data 38
login 26
- E -
edit
network settings 20
password 20
- F -
FCC 7
- H -
hardware
requirements 6
- I -
incidents 39
- M -
Mobile Data
network conncection 20
mouse 43
- N -
navigation 43
NetBox
deregister 26
network connection 20
registration 18
network
connection 20
connection loss 39
settings 20
status indicator 20
Noise Monitor
LED status 44
NoiseScout © 2018 NTi Audio AG
Page 48

Index
Noise Monitor
setup 19
- O -
operation 7
- P -
password
delete 20
edit 20
periods 38
- S -
safety 7
share view 40, 43
software
license agreement 8
support 46
system
overview 4
requirements 6
setup 18
48
- T -
time interval 38
troubleshooting 44
tutorial 10
- W -
web portal 24
Wi-Fi
network conncection 20
NoiseScout © 2018 NTi Audio AG
 Loading...