

NTI ST-C6HD-CLA-L-300M, ST-C6HD-IR-300, ST-C6HD-LA-2L-300M, ST-C6HD-300, ST-C6HD-A-300 Installation And Operation Manual
...
®
XTENDEX
Series
ST-C6HD(-A)-300
ST-C6HD-(A)IR-300
300 FOOT HDMI, STEREO AUDIO AND IR
EXTENDER
Installation and Operation Manual
MAN111 Rev Date 11/21/2012

TRADEMARK
XTENDEX is a registered trademark of Network Technologies Inc in the U.S. and other countries.
COPYRIGHT
Copyright © 2008, 2012 by Network Technologies Inc. All rights reserved. No part of this publication may be reproduced, stored
in a retrieval system, or transmitted, in any form or by any means, electronic, mechanical, photocopying, recording, or otherwise,
without the prior written consent of Network Technologies Inc, 1275 Danner Drive, Aurora, Ohio 44202.
CHANGES
The material in this guide is for information only and is subject to change without notice. Network Technologies Inc reserves the
right to make changes in the product design without reservation and without notification to its users.
Note: CATx connection cable used between NTI XTENDEX Series Local and Remote or any XTENDEX Series products
should not be run underground, outdoors or between buildings.
WARNING: Outdoor or underground runs of CATx cable could be dangerous and will void the warranty.
i

TABLE OF CONTENTS
Introduction......................................................................................................................................................................1
Materials..........................................................................................................................................................................2
Connectors And LEDs.....................................................................................................................................................3
Limitations .......................................................................................................................................................................4
Preparation for Installation ..............................................................................................................................................4
Installation .......................................................................................................................................................................5
Installing The Local Unit ..............................................................................................................................................5
Installing The Remote Unit ..........................................................................................................................................6
Connect the CATx Cables...........................................................................................................................................7
Plug-in and Boot Up.....................................................................................................................................................7
Rackmount Modules (optional)...................................................................................................................................8
Mount the ST-C6RCK-24 Rackmount Extender Module Tray..................................................................................8
Connect the HDMI Video/Audio Source ...................................................................................................................9
Connect Local Display(s)........................................................................................................................................10
Connect the CATx cable.........................................................................................................................................10
Plug-in and Boot Up...................................................................................................................................................11
Infrared Control .............................................................................................................................................................12
Technical Specifications................................................................................................................................................13
Interconnection Cable Wiring Method...........................................................................................................................14
Troubleshooting.............................................................................................................................................................14
Warranty Information.....................................................................................................................................................15
TABLE OF FIGURES
Figure 1- Connect the XTENDEX Local Unit to the source................................................................................................................5
Figure 2- Connect the XTENDEX Local Unit to stereo audio source.................................................................................................5
Figure 3- Connect the extended video display to the Remote Unit....................................................................................................6
Figure 4- Connect self-powered stereo speakers to the Remote Unit ...............................................................................................6
Figure 5- Connect CATx cable...........................................................................................................................................................7
Figure 6- Connect the AC adapter.....................................................................................................................................................7
Figure 7- Mount ST-C6RCK-24 Extender Module Tray in a rack.......................................................................................................8
Figure 8- Secure each module to the tray..........................................................................................................................................8
Figure 9- Secure each power supply to the tray ................................................................................................................................9
Figure 10- Connect cable between video/audio source and module .................................................................................................9
Figure 11- Connect Local Display....................................................................................................................................................10
Figure 12- Connect the CATx cable between the Local and Remote Units.....................................................................................10
Figure 13- Connect AC adapters .....................................................................................................................................................11
Figure 14- Connect IR Emitter and Receiver (models with IR support only)....................................................................................12
Figure 15- View looking into RJ45 female........................................................................................................................................14
ii

NTI XTENDEX 300 Foot HDMI and IR Extender
INTRODUCTION
The XTENDEX Series ST-C6HD-300 CAT6 HDMI and IR Extender (XTENDEX) is designed to enable the vide o and audio output
from one digital video/audio source to be viewed and heard by a remote user. Each video extender consists of a local unit that
connects to an HDMI source and optional IR emitter, and a remote unit that connects to an HDMI display and optional IR receiver
as much as 300 feet away via Category 5e,6, 6a or 7 twisted-pair cable.
The XTENDEX Series Extender is extremely simple to install and has been thoroughly tested to insure reliable performance.
Through the use of CAT5e/6/6a/7 (CATx) cable it is possible to economically increase the flexibility of a computer system . Here
are some of the features and ways this can benefit any workplace:
• Allows the placement of an HDMI-enabled monitor in a location where only these parts are needed without having the
video/audio source there too, taking up valuable space
• Allows digital video/audio to be viewed and heard by a remote user (up to 300 feet away)
• Provides crisp and clear computer resolution to 1920 x 1200 and HDTV resolutions to 1080p (see page 8 for more
details)
• Transmits HDMI signal over one CATx cable.
• Only one power supply is necessary (Power supply can be connected to either the local or remote unit.)
• Supports an HDMI or DVI monitor. (DVI requires optional adapter cable- see page 2)
• Supports 480p, 720i/p a nd 1080i/p video formats
OPTIONS:
Available with optional full Infrared Remote (IR) extension-full IR control of HDMI source from remote HDTV extension
(add “IR” to the model number ST-C6HD-IR-300)
Available with optional stereo audio extension (add “A” to the model numb er- ST -C6HD-A-300)
Rackmount Modules
The XTENDEX Series CAT6 Local Extenders can be ordered as rackmount modules- add “M” to the model number (i.e. STC6HD-LA-L-300M). When ordering rackmount modules, also order the ST-C6RCK-24 Rackmount Extender Module Tray (see
page 8). The XTENDEX® Rackmount Extender Module Tray allows you to mount up to 12 extender modules in a space-saving
2RU shelf. The local extender modules and remote extenders are interconnected via one CAT7 cable. Rackmount Modules
include support for locally mounted video devices (“local access”) and IR extension as standard features.
Only one power supply is necessary per local rackmount module to power both the local module and remote unit(s).
Optional CEC (Consumer Electronic Control) support for local display-add a “C” to the model number
(i.e. ST-C6HD-CLA-L-300M) CEC support for remote display is standard.
Optional dual HDMI support- includes two local units in one case- add a “2” to the model number
(i.e. ST-C6HD-LA-2L-300M)
Model Single HDMI
ST-C6HD-LA-L-300M Y N N Y
ST-C6HD-CLA-L-300M Y N Y Y
ST-C6HD-LA-2L-300M N Y N Y
ST-C6HD-CLA-2L-300M N Y Y Y
• HDMI 1.3, HDCP 1.2 compliant
Supports:
• x.v.Color
• Dolby Digital and DTS
• Dolby TrueHD and DTS-HD Master Audio
• bandwidth to 225 MHz (6.75 Gbps)
• 12-bit Deep Color
• Supports the DDC2B protocol.
• Lip Sync
• Supports digital audio format, such as LPCM/Dolby Digital (AC-3)/(Plus)/DSD
• Support for CEC (consumer electronic control) compatible devices.
Support
Dual HDMI
Support
CEC Support Local Access
1
NTI XTENDEX 300 Foot HDMI and IR Extender
MATERIALS
Materials Included with ST-C6HD-300 kit:
9 NTI ST-C6HD-300 Local Unit
9 NTI ST-C6HD-300 Remote Unit
9 1-100VAC to 240VAC at 50 or 60Hz-24VDC/1.0A AC Adapter
9 1- Power Cord- country specific
9 This manual
Additional Materials Included with ST-C6HD-IR-300 kit:
9 3 Foot IR-EMITTER (IR-EMTR-3)
9 3 Foot IR-RECEIVER (IR-RCVR-3)
Additional Materials Included with Modular Local Unit:
9 3 Foot IR-EMITTER (IR-EMTR-3) (Models with dual HDMI include 2pcs of IR-EMITTER)
Additional materials may be required but are not supplied:
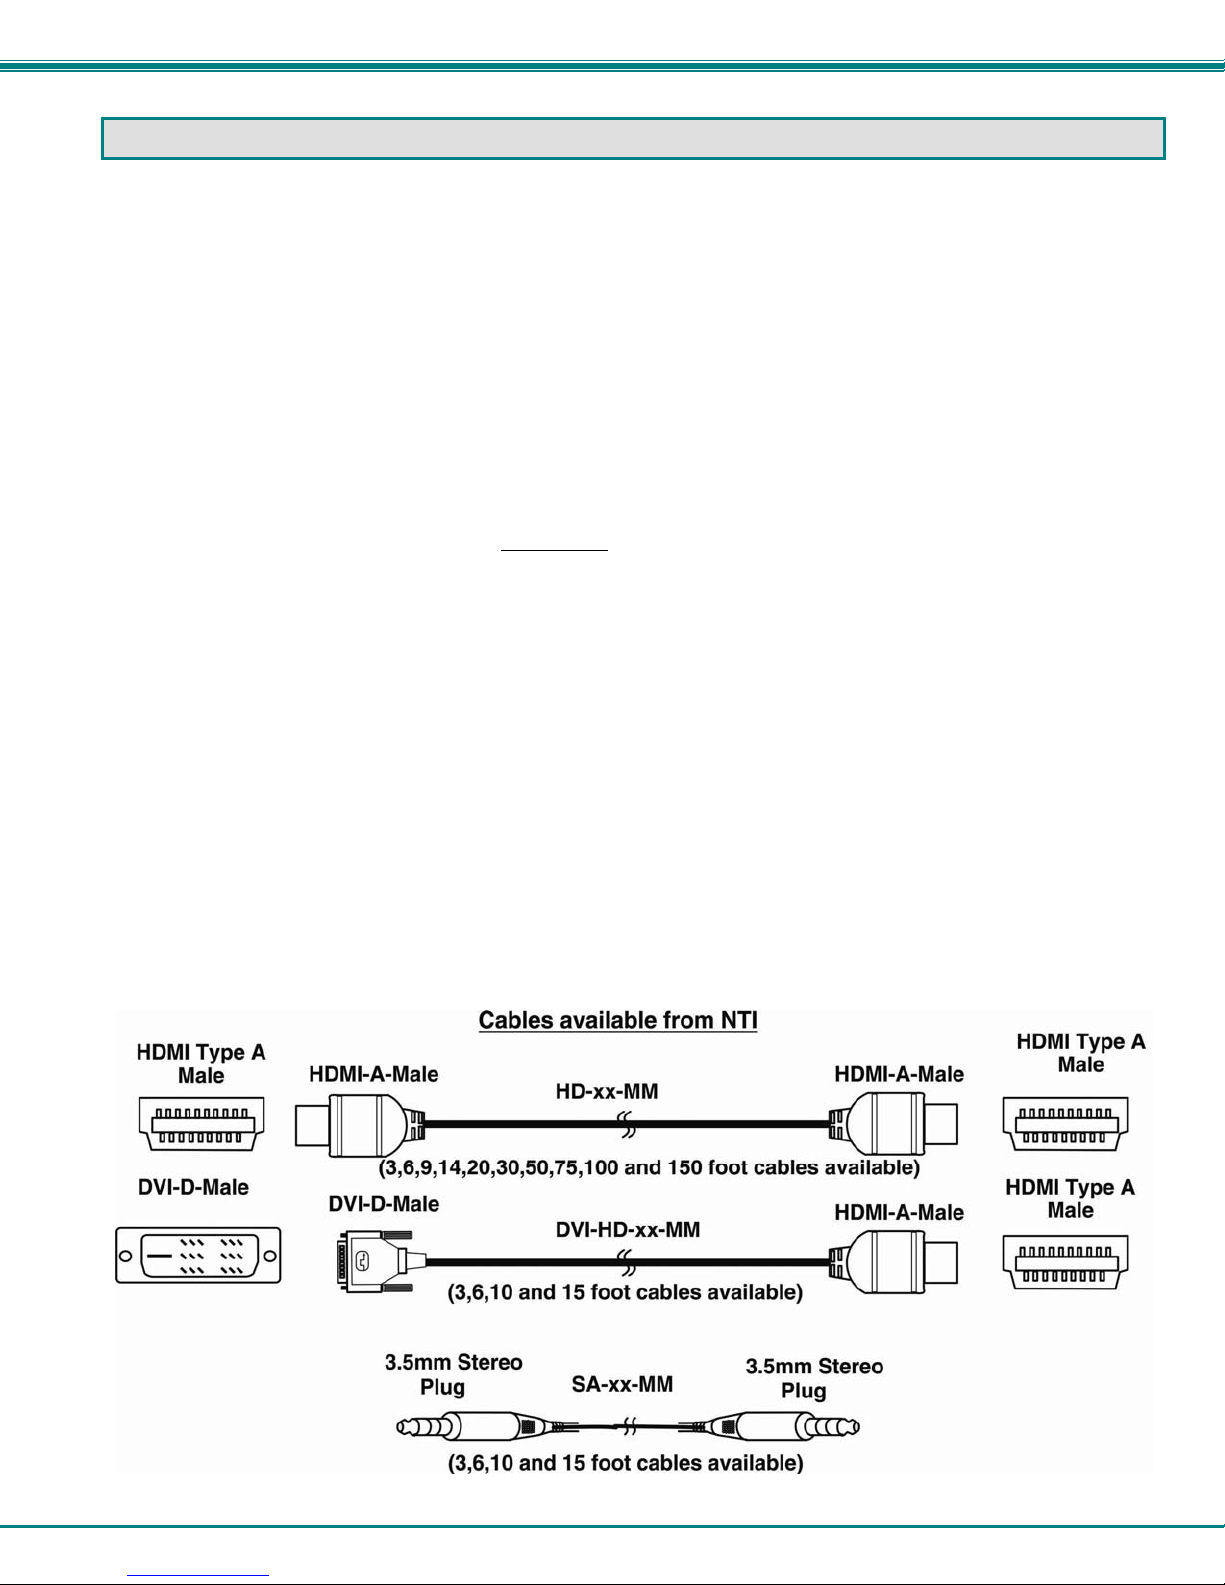
¾ CAT5e solid/stranded UTP ; 6/6a solid UTP; CAT7 solid STP (CATx) twisted-pair cables terminated with RJ45 connectors
wired straight thru- pin 1 to pin 1, etc. (see page 14 for proper EIA/TIA 568 B wiring method)
Note: Use only CAT7 solid STP cable if the extender is a rackmount module (i.e. ST-C6HD-LA-L-300M).
¾ HDMI male-male cable to connect a HDMI source or display (Order NTI # HD-xx-MM where xx=3, 6, 9,14,20,30, 50,75,100
and 150 foot cable).
¾ DVI-D male to HDMI-A male single link cable to connect a DVI source or display (Order NTI # DVI-HD-xx-MM where xx=3, 6,
10, or 15 foot cable)
¾ 3.5mm Stereo plug male-to-male cable to connect stereo audio source or self-powered stereo speakers.
(Order NTI# SA-xx-MM where xx= 3, 6, 10 or 15 foot cable)
Always use the shortest possible cable for best performance.
Contact your nearest NTI distributor or NTI directly for all of your KVM needs at 800-RGB-TECH (800-742-8324) in US & Canada
or 330-562-7070 (Worldwide) or at our website at http://www.networktechinc.com and we will be happy to be of assistance.
2
NTI XTENDEX 300 Foot HDMI and IR Extender
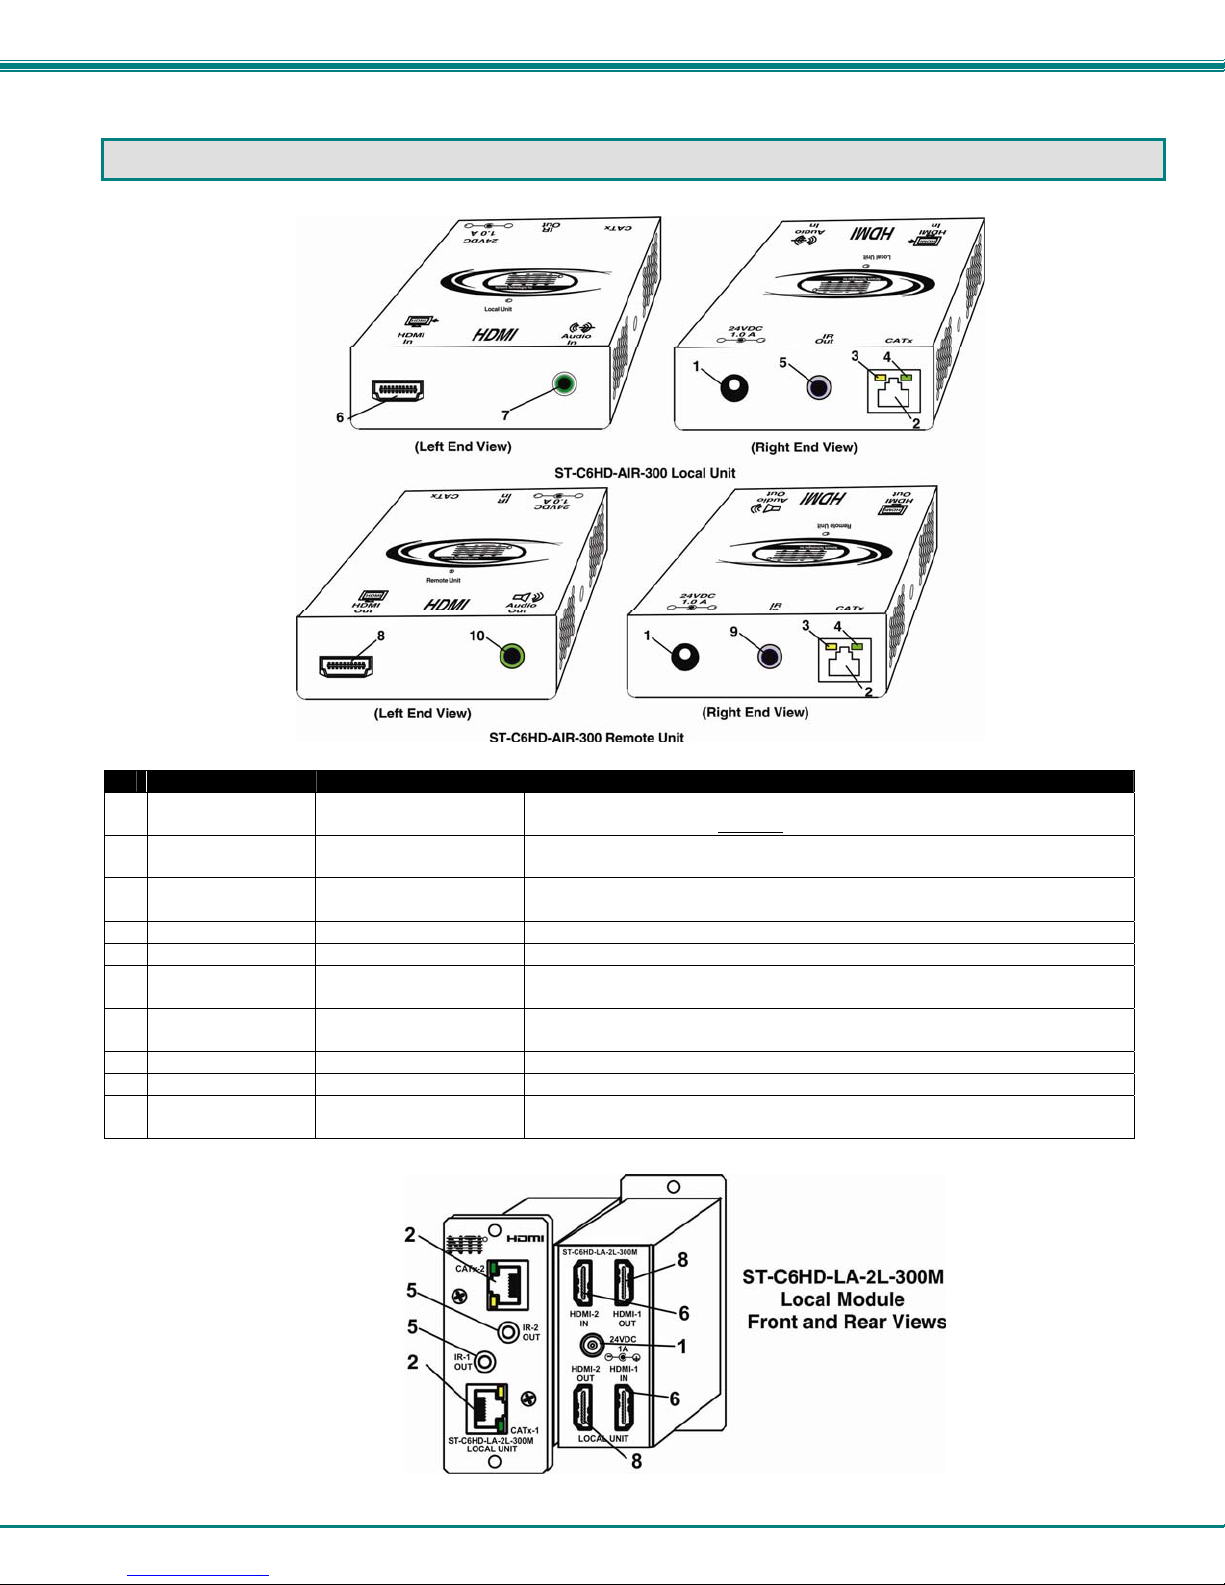
CONNECTORS AND LEDS
#
LABEL CONNECTOR DESCRIPTION
1 24VDC- 1.0A
2 CATx
3 Yellow LED -- traffic indicator- illuminates when there is communication between the
4 Green LED -- power indicator- illuminates when power has been supplied to the unit
5 IR Out
6 HDMI In
7 Audio In
8 HDMI Out
9 IR In
10 Audio Out
1.0mm Power Jack connection jack for the AC adapter (only the Local or the Remote Unit
needs to be powered, not both)
RJ45 connector for connecting the CAT5e/6/6a/7 cable between the Local and Remote
units
local and remote units.
3.5mm Stereo Jack for connecting the IR Emitter (models with IR support only)
HDMI Type A Female for connecting an HDMI cable between the Local Unit and the video
source
3.5mm Stereo jack For connecting to stereo audio source (mod els with stere o aud io support
only)
HDMI Type A Female for connecting the remote display device
3.5mm Stereo Jack for connecting the IR Receiver (models with IR support only)
3.5mm Stereo jack For connecting self-powered stereo speakers (models with stereo audio
support only)
3
 Loading...