

NTI SERIMUX-SECURE-x Installation And Operation Manual
NTI
R
NETWORK
TECHNOLOGIES
INCORPORATED
SERIMUX-SECURE-x
Secure Access Console Switch
Installation and Operation Manual
1275 Danner Dr
Aurora, OH 44202
www.nti1.com
Tel:330-562-7070
Fax:330-562-1999
SERIMUX® SECURE
MAN008 Rev 2/10/2004

Warranty Information
The warranty period on this product (parts and labor) is one (1) year from the date of purchase. Please contact Network
Technologies Inc at (800) 742-8324 (800-RGB-TECH) or (330) 562-7070 or visit our website at http://www.nti1.com for
information regarding repairs and/or returns. A return authorization number is required for all repairs/returns.
COPYRIGHT
Copyright © 2004 by Network Technologies Inc. All rights reserved. No part of this publication may be reproduced, stored in a
retrieval system, or transmitted, in any form or by any means, electronic, mechanical, photocopying, recording, or otherwise,
without the prior written consent of Network Technologies Inc, 1275 Danner Drive, Aurora, Ohio 44202.
CHANGES
The material in this guide is for information only and is subject to change without notice. Network Technologies Inc reserves the
right to make changes in the product design without reservation and without notification to its users.

TABLE OF CONTENTS
Introduction......................................................................................................................................................................................1
SERIMUX Model Support..............................................................................................................................................................1
Key Features .................................................................................................................................................................................1
Materials........................................................................................................................................................................................1
User Groups ..................................................................................................................................................................................1
Root and Admin Usernames and Passwords ................................................................................................................................1
Adding Port Administrators and Users...........................................................................................................................................2
Features and Functions.................................................................................................................................................................2
Ways to Configure the SERIMUX..................................................................................................................................................3
Web Interface.............................................................................................................................................................................3
Configuration Menu....................................................................................................................................................................3
Command Line Interface............................................................................................................................................................3
Ways of Accessing the SERIMUX: Overview ................................................................................................................................4
Web Interface Access Menu......................................................................................................................................................4
Port Access Menu......................................................................................................................................................................4
Direct Port Access .....................................................................................................................................................................5
Custom Menus...........................................................................................................................................................................5
Saving and Applying Changes...................................................................................................................................................5
Getting Started.................................................................................................................................................................................5
Introduction....................................................................................................................................................................................5
Assigning IP Settings from the Console Port.................................................................................................................................5
Configuring HTTP and HTTPS ......................................................................................................................................................6
Configuring for SSH.......................................................................................................................................................................7
Options ......................................................................................................................................................................................7
Configuring the Port Access Menu for SSH...............................................................................................................................7
Configuring a Port for SSH ........................................................................................................................................................7
Adding, Editing, and Removing Users ...........................................................................................................................................8
Procedure ..................................................................................................................................................................................8
About Shell Options............................................................................................................
Using the Configuration Menu .......................................................................................................................................................9
Configuring SSH........................................................................................................................................................................9
Adding, Editing, and Removing Users .....................................................................................................................................10
Installing and Configuring PC Cards...........................................................................................................................................10
Introduction..................................................................................................................................................................................10
Compatible PC Cards..................................................................................................................................................................10
Adding a Compact-flash Card......................................................................................................................................................12
Configuring the Compact-flash Card........................................................................................................................................12
Automatic Configuration File Backup.......................................................................................................................................13
Adding a Network Card................................................................................................................................................................13
Adding a Wireless LAN Card.......................................................................................................................................................14
Adding A Serial Modem...............................................................................................................................................................15
Using the Configuration Menu .....................................................................................................................................................15
Adding and Configuring a PC Card..........................................................................................................................................15
Configuring Ports ..........................................................................................................................................................................16
Introduction..................................................................................................................................................................................16
Host Mode Configuration.............................................................................................................................................................16
Console Server Mode..............................................................................................................................................................16
Terminal Server Mode .............................................................................................................................................................16
Dial-In Modem Mode................................................................................................................................................................17
Dial-In Terminal Server Mode..................................................................................................................................................17
Configuring Host Mode................................................................................................................................................................18
Supported Protocols .................................................................................................................................................................... 19
Port Parameters...........................................................................................................................................................................19
DTR Behavior ..........................................................................................................................................................................19
Inter-character Timeout............................................................................................................................................................19
Using the Configuration Menu .....................................................................................................................................................20
Host Mode Configuration.........................................................................................................................................................20
Port Parameters.......................................................................................................................................................................20
System and Port Logging .............................................................................................................................................................21
Introduction..................................................................................................................................................................................21
Enabling System Logging Services..............................................................................................................................................21
Enable Syslog Server ..............................................................................................................................................................21
Enable NFS Server..................................................................................................................................................................21
Enable A Compact-flash Card..................................................................................................................................................22
.......................................................9

Enable SERIMUX Memory.......................................................................................................................................................22
Configuring System Logging Services.........................................................................................................................................22
Viewing System Logs...............................................................................................................................................................23
Port Logging ................................................................................................................................................................................23
Using the Configuration Menu .....................................................................................................................................................24
System Logging.......................................................................................................................................................................24
Alerts and Notifications.................................................................................................................................................................25
Introduction..................................................................................................................................................................................25
Configuring SMTP Alerts .............................................................................................................................................................26
SNMP Information........................................................................................................................................................................26
Configuring SNMP.......................................................................................................................................................................27
Managing the SNMP Protocol......................................................................................................................................................28
Configuring Port Event Handling..................................................................................................................................................28
Using the Configuration Menu .....................................................................................................................................................29
Configuring SNMP...................................................................................................................................................................29
Configuring SMTP....................................................................................................................................................................29
Configuring Security and Authentication....................................................................................................................................30
Introduction..................................................................................................................................................................................30
Configuring Network IP Filtering ..................................................................................................................................................30
Console and Web IP Filtering ..................................................................................................................................................30
Serial Port IP Filtering..............................................................................................................................................................31
Using IP Tables ...........................................................................................................................................................................31
Configuring User Access Control.................................................................................................................................................31
Sniff Session............................................................................................................................................................................32
Viewing A Sniff Session...........................................................................................................................................................33
Authentication..............................................................................................................................................................................34
Configuring Authentication Methods for Port Access...................................................................................................................34
Configuring Authentication for the Web Server..................................................................................
..........................................35
Using the Configuration Menu .....................................................................................................................................................35
Network IP Filtering..................................................................................................................................................................35
Port IP Filtering........................................................................................................................................................................36
Sniff Sessions..........................................................................................................................................................................36
Authentication..........................................................................................................................................................................36
Custom and Default Menus...........................................................................................................................................................37
Introduction..................................................................................................................................................................................37
Making Custom Menus................................................................................................................................................................37
Adding Users ........................................................................................................................................................................... 37
Creating Menu Names.............................................................................................................................................................37
Adding Menu Items..................................................................................................................................................................38
Assigning Users To A Menu ....................................................................................................................................................39
Using the Configuration Menu .....................................................................................................................................................39
Port Access Menu........................................................................................................................................................................40
Configuring Remote Dial-In Access.............................................................................................................................................40
Configuring For Dial-In Modem Access .......................................................................................................................................41
Adding a PC Modem....................................................................................................................................................................41
Configuring For Dial-In Terminal Server Access..........................................................................................................................41
Using the Configuration Menu .....................................................................................................................................................42
Dial-in Modem Access.............................................................................................................................................................42
Dial-in Terminal Server Access................................................................................................................................................43
Port Clustering...............................................................................................................................................................................44
Introduction..................................................................................................................................................................................44
Configuring Port Clustering..........................................................................................................................................................44
Assigning Master Clustering Mode ..........................................................................................................................................44
Configuring Slave Ports on the Master Unit.............................................................................................................................44
Clustering Parameters.............................................................................................................................................................45
Using the Configuration Menu .....................................................................................................................................................46
Clustering.................................................................................................................................................................................46
Command Line Interface...............................................................................................................................................................47
Introduction..................................................................................................................................................................................47
Linux Commands.........................................................................................................................................................................47
Important File Locations...............................................................................................................................................................48
Default Script ...........................................................................................................................................................................48
Booting Sequence....................................................................................................................................................................48
User Storage Space.................................................................................................................................................................48
System Administration..................................................................................................................................................................48
Introduction..................................................................................................................................................................................48
Upgrading the Firmware ..............................................................................................................................................................48

Web Interface...........................................................................................................................................................................48
Resetting Factory Defaults.......................................................................................................................................................48
Setting Date and Time.................................................................................................................................................................49
Configuring A Device Name.........................................................................................................................................................50
Adding, Editing, and Removing Users .........................................................................................................................................50
Using the Configuration Menu .....................................................................................................................................................51
Firmware Upgrade...................................................................................................................................................................51
Restoring Factory Defaults ......................................................................................................................................................51
Setting Date and Time.............................................................................................................................................................52
Adding, Editing, and Removing Users .....................................................................................................................................52
Accessing the Boot Loader Program ...........................................................................................................................................53
Hardware Test Menu ...............................................................................................................................................................53
Disaster Recovery....................................................................................................................................................................53
Microsoft SAC Support .................................................................................................................................................................54
About SERIMUX Support for Microsoft Windows Server 2003....................................................................................................54
Set Up Overview......................................................................................................................................................................54
Setting Up the SERIMUX for SAC Support..................................................................................................................................54
Accessing the Windows Server 2003 Console Port from the SERIMUX GUI..............................................................................55
Hardware Information....................................................................................................................................................................56
Introduction..................................................................................................................................................................................56
Hardware Specifications: SERIMUX 16 and SERIMUX 32 AC Powered.....................................................................................56
Hardware Specifications: SERIMUX 16 and SERIMUX 32 DC Powered.....................................................................................57
Hardware Specifications: SERIMUX 8 AC Powered....................................................................................................................57
LED Indicators .............................................................................................................................................................................57
About Serial Port Cabling.............................................................................................................................................................57
Serial Port Pinouts.......................................................................................................................................................................58
Cable Adapters............................................................................................................................................................................58
Certifications..................................................................................................................................................................................60
Safety...........................................................................................................................................................................................60
Working Inside the SERIMUX......................................................................................................................................................60
Replacing the Battery...................................................................................................................................................................60
Safety Instructions ....................................................................................................................................................................... 61
Emissions ....................................................................................................................................................................................61
Immunity......................................................................................................................................................................................61
Index ...............................................................................................................................................................................................62
TABLE OF FIGURES
Figure 1- SERIMUX SECURE WEB Interface- Main menu ...............................................................................................................3
Figure 2- SERIMUX-SECURE Telnet Session- Configuration menu.................................................................................................3
Figure 3- WEB Interface- Port login screen .......................................................................................................................................4
Figure 4- Attach a workstation to the console port.............................................................................................................................5
Figure 5- The IP configuration menu..................................................................................................................................................6
Figure 6- Enable Web server HTTP/HTTPS service..........................................................................................................................6
Figure 7- Configure the port access menu for SSH...........................................................................................................................7
Figure 8- Configure a port for SSH ....................................................................................................................................................8
Figure 9- The Edit user menu............................................................................................................................................................9
Figure 10- Using configuration menu to configure SSH...................................................................................................................10
Figure 11- Location of PC card slot .................................................................................................................................................12
Figure 12- PC card configuration menu...........................................................................................................................................12
Figure 13- Network PC card configuration menu.............................................................................................................................13
Figure 14- Configure a Wireless Network PC card..........................................................................................................................14
Figure 15- Configure a Serial Modem PC card................................................................................................................................15
Figure 16- Use Configuration menu to add a PC card.....................................................................................................................15
Figure 17- Host Mode Configuration- Console server mode............................................................................................................16
Figure 18- Host Mode Configuration- Terminal server mode...........................................................................................................16
Figure 19- Host Mode Configuration- Dial-In modem mode.............................................................................................................17
Figure 20- Host Mode Configuration- Dial-In terminal server mode.................................................................................................17
Figure 21- Configure serial port for host mode ................................................................................................................................18
Figure 22- Setup serial port communication parameters ..........................................................................
Figure 23- Configure Host mode via Configuration menu................................................................................................................20
Figure 24- Setup Port communication parameters via Configuration menu.....................................................................................20
Figure 25- SYSLOG server configuration menu ..............................................................................................................................21
Figure 26- NFS server configuration menu......................................................................................................................................22
Figure 27- Configure system logging services.................................................................................................................................23
.......................................19

Figure 28- Port logging menu ..........................................................................................................................................................24
Figure 29- System status logging setup via Configuration menu.....................................................................................................25
Figure 30- SERIMUX used for system alerts and notifications ........................................................................................................25
Figure 31- SMTP configuration menu..............................................................................................................................................26
Figure 32- SMNP configuration menu..............................................................................................................................................27
Figure 33- Configure a port for to enable logging of port events......................................................................................................28
Figure 34- Configure port for event handling ...................................................................................................................................28
Figure 35- Configure SNMP via Configuration menu.......................................................................................................................29
Figure 36- Configure SMTP via Configuration menu .......................................................................................................................29
Figure 37- SERIMUX access controlled by IP filtering.....................................................................................................................30
Figure 38- IP filtering menu..............................................................................................................................................................30
Figure 39- Serial Port IP filtering......................................................................................................................................................31
Figure 40- Configure User access control........................................................................................................................................32
Figure 41- User in a Sniff Session...................................................................................................................................................33
Figure 42- Sniff session user menu.................................................................................................................................................33
Figure 43- SERIMUX supports user authentication.........................................................................................................................34
Figure 44- Configure SERIMUX for authentication..........................................................................................................................34
Figure 45- Configure WEB server for authentication........................................................................................................................35
Figure 46- Use Configuration menu to setup IP filtering ..................................................................................................................35
Figure 47- Configure Port IP filtering through the Configuration menu ............................................................................................36
Figure 48- Setup user authentication through the Configuration menu............................................................................................36
Figure 49- Add users to the system.................................................................................................................................................37
Figure 50- Creating menu names ....................................................................................................................................................37
Figure 51- Adding menu items.........................................................................................................................................................38
Figure 52- Assign users to a menu..................................................................................................................................................39
Figure 53- The Configuration Menu.................................................................................................................................................39
Figure 54- The Port Access menu through the Configuration menu................................................................................................40
Figure 55- SERIMUX supports remote dial-in access for users .......................................................................................................40
Figure 56- Configure port for dial-in modem access........................................................................................................................41
Figure 57- Configure port for dial-in terminal server access ............................................................................................................42
Figure 58- Use Configuration menu to configure port for dial-in modem access .............................................................................43
Figure 59- Use Configuration menu to configure port for dial-in terminal server access.................................................................. 43
Figure 60- SERIMUX used for port clustering..................................................................................................................................44
Figure 61- Assign the Master cluster device....................................................................................................................................44
Figure 62- Configure Slave ports on the Master Unit.......................................................................................................................45
Figure 63- Enable a Slave unit and setup the port information........................................................................................................45
Figure 64- Setup clustering parameters...........................................................................................................................................46
Figure 65- Setup clustering using Configuration menu....................................................................................................................46
Figure 66- Locate the firmware upgrade file ....................................................................................................................................48
Figure 67- Reset factory defaults.....................................................................................................................................................48
Figure 68- Reset factory defaults through web interface..................................................................................................................49
Figure 69- Set the date and time .....................................................................................................................................................49
Figure 70- Administrator's user administration window....................................................................................................................50
Figure 71- Edit a user ......................................................................................................................................................................50
Figure 72- Configuration menu..................................................................................................
......................................................51
Figure 73- Reset factory defaults through Configuration menu........................................................................................................51
Figure 74- Choose which factory defaults to reset...........................................................................................................................52
Figure 75- Edit users through Configuration menu..........................................................................................................................52
Figure 76- The Boot Loader program...............................................................................................................................................53
Figure 77- Firmware upgrade via Boot Loader program..................................................................................................................53
Figure 78- Setup SERIMUX for SAC support ..................................................................................................................................55
Figure 79- Access Windows Server 2003 console port from SERIMUX GUI...................................................................................55
Figure 80- Windows Server 2003 controls.......................................................................................................................................56

INTRODUCTION
Introduction
SERIMUX Model Support
This manual offers information on SERIMUX 32-port, 16-port, and 8-port models.
Key Features
The SERIMUX (console management) provides secure, flexible management of servers, routers, switches, and other networked
devices. Key features include:
• SSH v1 and v2 for server and clients
• IP filtering
• Authentication using RADIUS, LDAP, TACACS+, Kerberos, and a local database
• Custom menuing
• System and port logging
• Microsoft Windows Server 2003 Special Administration Console (SAC) support
• A web interface that supports both HTTP and HTTPS and simplifies configuration
Materials
Materials Supplied with this kit:
• NTI SERIMUX-SECURE Secure Console Access Server
• RJ45 M/M UTP CAT5 Patch Cable
• Console Adapter RJ45-DB25 Female
• Console Adapter RJ45-DB25 Male
• Modem Adapter RJ45- DB25 Male
• Serial Adapter RJ45-DB9 Female
• RJ45 Diagnostic Loop back Plug
• Mounting Kit
• AC Power Cable
• This Owners Manual (on CD ROM)
• Quick Start Guide (also on CD ROM)
• Discovery Tool (on CD ROM)
Materials Not Supplied, but REQUIRED:
Ethernet cable is required to connect the SERIMUX to the network.
Note: In order to comply with FCC standards, the SERIMUX requires the use of a shielded Category 5 cable connected to
the Ethernet Interface
User Groups
The SERIMUX comes with built-in user groups, defined by access levels. The following table lists user groups, their access rights,
and default user names.
Group Access Privileges Configuration Privileges Defaults
--
Root Yes Yes Yes Yes root dbps
System Yes Yes (read only) Yes Yes admin admin
Admin Yes No Yes No - UserYesNo NoNo- -
Ports Command Line Ports System Login Password
Root and Admin Usernames and Passwords
The SERIMUX comes with two default users, root and system admin.
User Name Default Password
root dbps
admin admin
Note: Root's password can be modified through the command lin e in terface using the command passwd.
1
Adding Port Administrators and Users
The system administrator and root user can add port administrators and users easily with the web interface by choosing System
administration > User administration > Add user. Root’s password must be modified from the command line using the command
passwd.
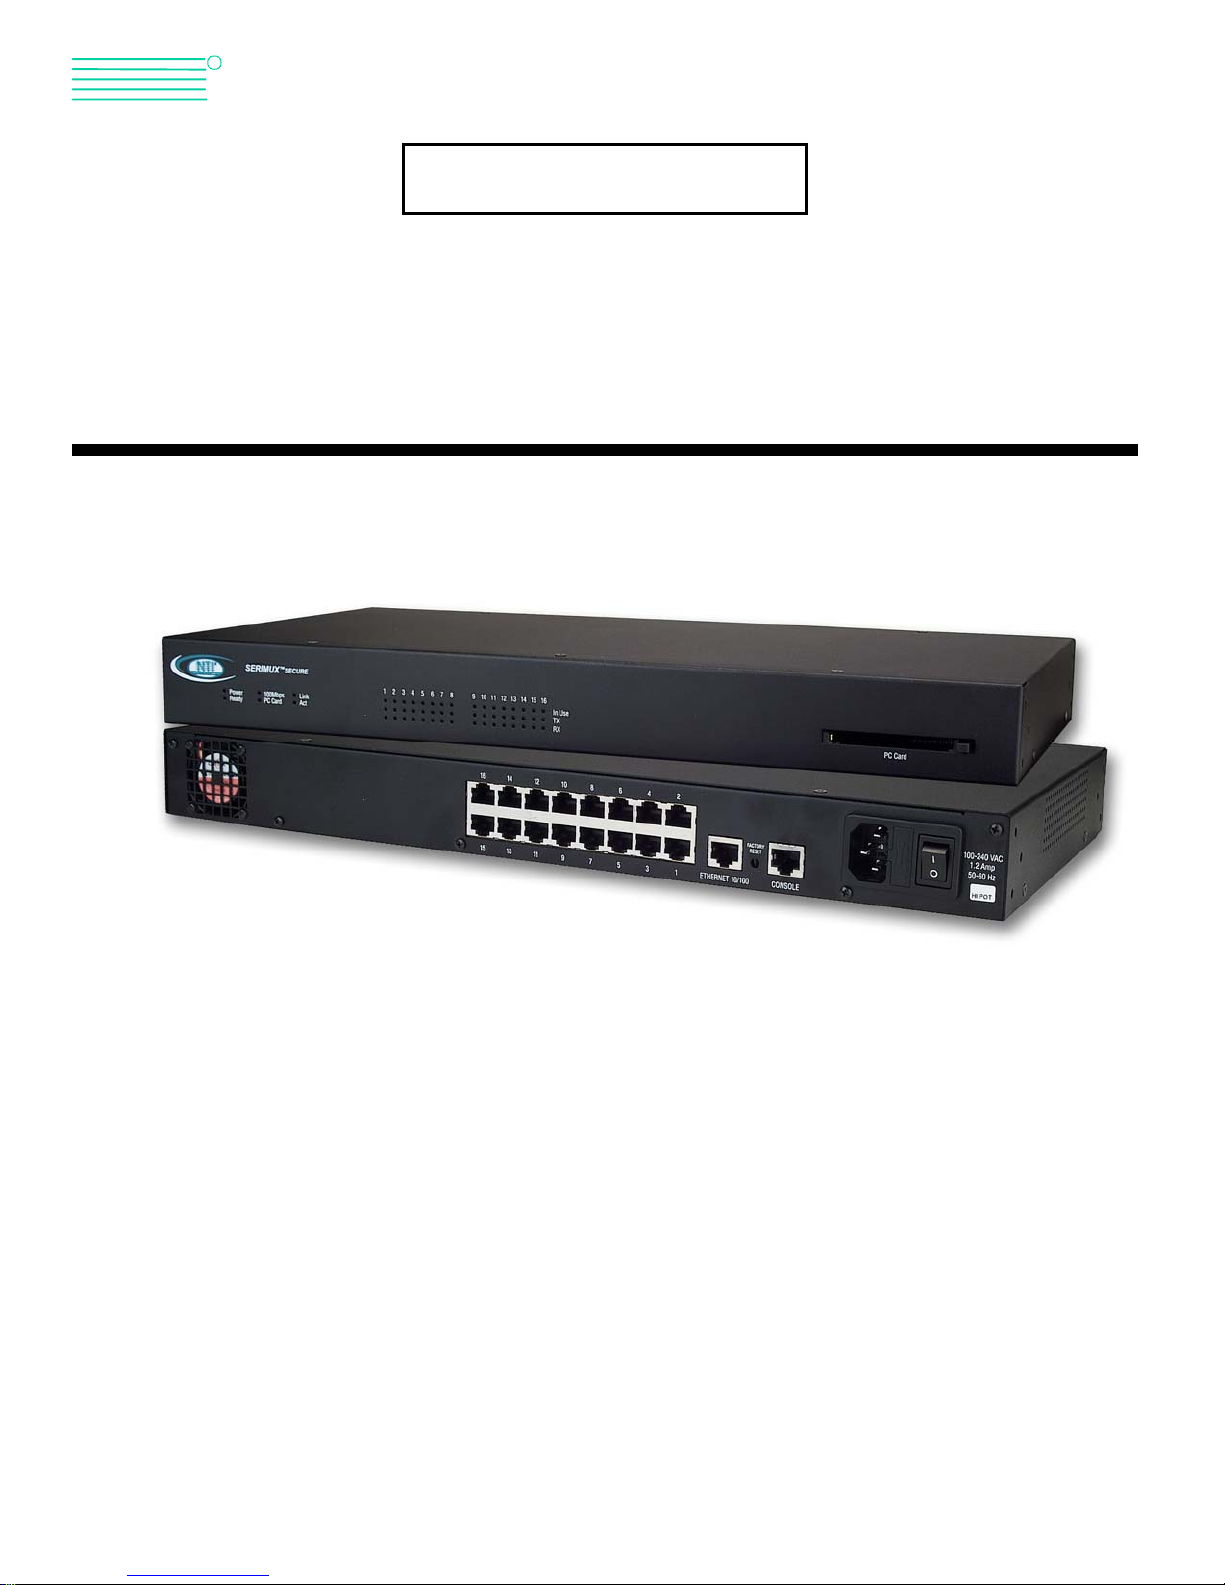
F r o n t V i e w o f S E R I M U X - S e c u r e
N T I
N e t w o rk Te c h n o lo g ie s In c
R
P o w e r
R e a d y
S E R I M U X
1 0 0 M b p s
P C C a r d
T M
S E C U R E
1 1
L i n k
A c t
1 2 3 4 5 6 7 8 9 1 0
1 2 1 3 1 4 1 5 1 6
1 9
1 7 1 8
2 0 2 1 2 2 2 3 2 4 2 5 2 6
2 8 2 9 3 0 3 1 3 2
2 7
I n U s e
T X
R X
P C C a r d
1
2 3
5 6
4
7 8 9 1 0
R e a r V i e w o f S E R I M U X - S E C U R E
1 83 2
3 1
Features and Functions
1. Power LED- Indicates SERIMUX is powered up
2. Ready- Indicates SERIMUX is ready to run
3. 100Mbps LED- for visual indication that a 100Base-TX connection has been detected
4. PC Card LED- visual indication that a PCMCIA device is running
5. Link LED- visual indication of a connection to an ethernet network
6. ACT LED- visual indication of any activities, either transmitting or receiving data, through SERIMUX
7. RX LED- indicates the port is receiving data
21 6
11 51 7
1 1
F A C T O R Y
R E S E T
E T H E R N E T 1 0 / 1 0 0 C O N S O L E
1 2 1 3 1 4 1 5 1 6
1 0 0 - 2 4 0 V A C
1 .2 A m p
5 0 - 6 0 H z
1 7
8. TX LED- indicates the port is transmitting data
9. In Use- indicates the port has a connection an is enabled
10. PC Card- For attachment of optional PCMCIA device (memory card, LAN Card, or modem card)
11. RJ45 Connector- For attachment of devices to be connected by SERIMUX
12. RJ45 Connector- Ethernet 10/100- for connection to Ethernet LAN
13. Factory Reset- button to enable user reset to factory default settings
14. Console- RJ45 Connector- For attachment of local access user console
15. IEC Power Socket- for connection of power cord
16. Fuse- Overcurrent protection fuse
17. Power ON/OFF switch
2
Ways to Configure the SERIMUX
This section discusses the three ways to configure the SERIMUX, web interface, configuration menu, and command line interface.
Web Interface
The web interface provides an easy way to configure the SERIMUX. The root user and system administrator can configure all
features from it. Port administrators can configure ports, including port clustering, but cannot modify system settings. Users cannot
use the web interface for configuration. To access the web interface, enter the SERIMUX IP address or host name in a
browser’s URL window. The default IP address is 192.168.161.5. The following page is displayed after log in.
Note: The SERIMUX web interface features HTTPS for secure access
R
NTI
Figure 1- SERIMUX SECURE WEB Interface- Main menu
Configuration Menu
The root user and system administrator have full access to the configuration menu from a Telnet session or a serial connection
through the console port. Functionality is similar to the web interface, with the exception of custom menus, which can be created
only from the web interface. The configuration menu is presented to system administrators automatically. Root users access it by
entering the command configmenu. Port administrators can access this menu but can modify serial port configuration only.
Users cannot access this menu.
Figure 2- SERIMUX-SECURE Telnet Session- Configuration menu
Command Line Interface
The command line interface can be accessed from a Telnet session or from the console port. The root user al ways has access to
this interface. The system administrator can be granted read-only permission as well. No other users can access the command
line interface.
3
Ways of Accessing the SERIMUX: Overview
There are four ways to access the SERIMUX including:
• Web Interface
• Port Access Menu
• Direct Port Access
• Custom Menus
Web Interface Access Menu
The web interface menu provides easy and convenient access to ports. All users can acc ess the men u b y enter ing the SERIMUX
IP address or host name in a web browser’s URL window.
To access a port from the web interface, do the following:
1. Access the web interface.
2. Choose Serial port > Connection.
3. Choose a port by clicking in the appropriate icon.
A Java applet or Telnet window opens with a login prompt.
Figure 3- WEB Interface- Port login screen
Port Access Menu
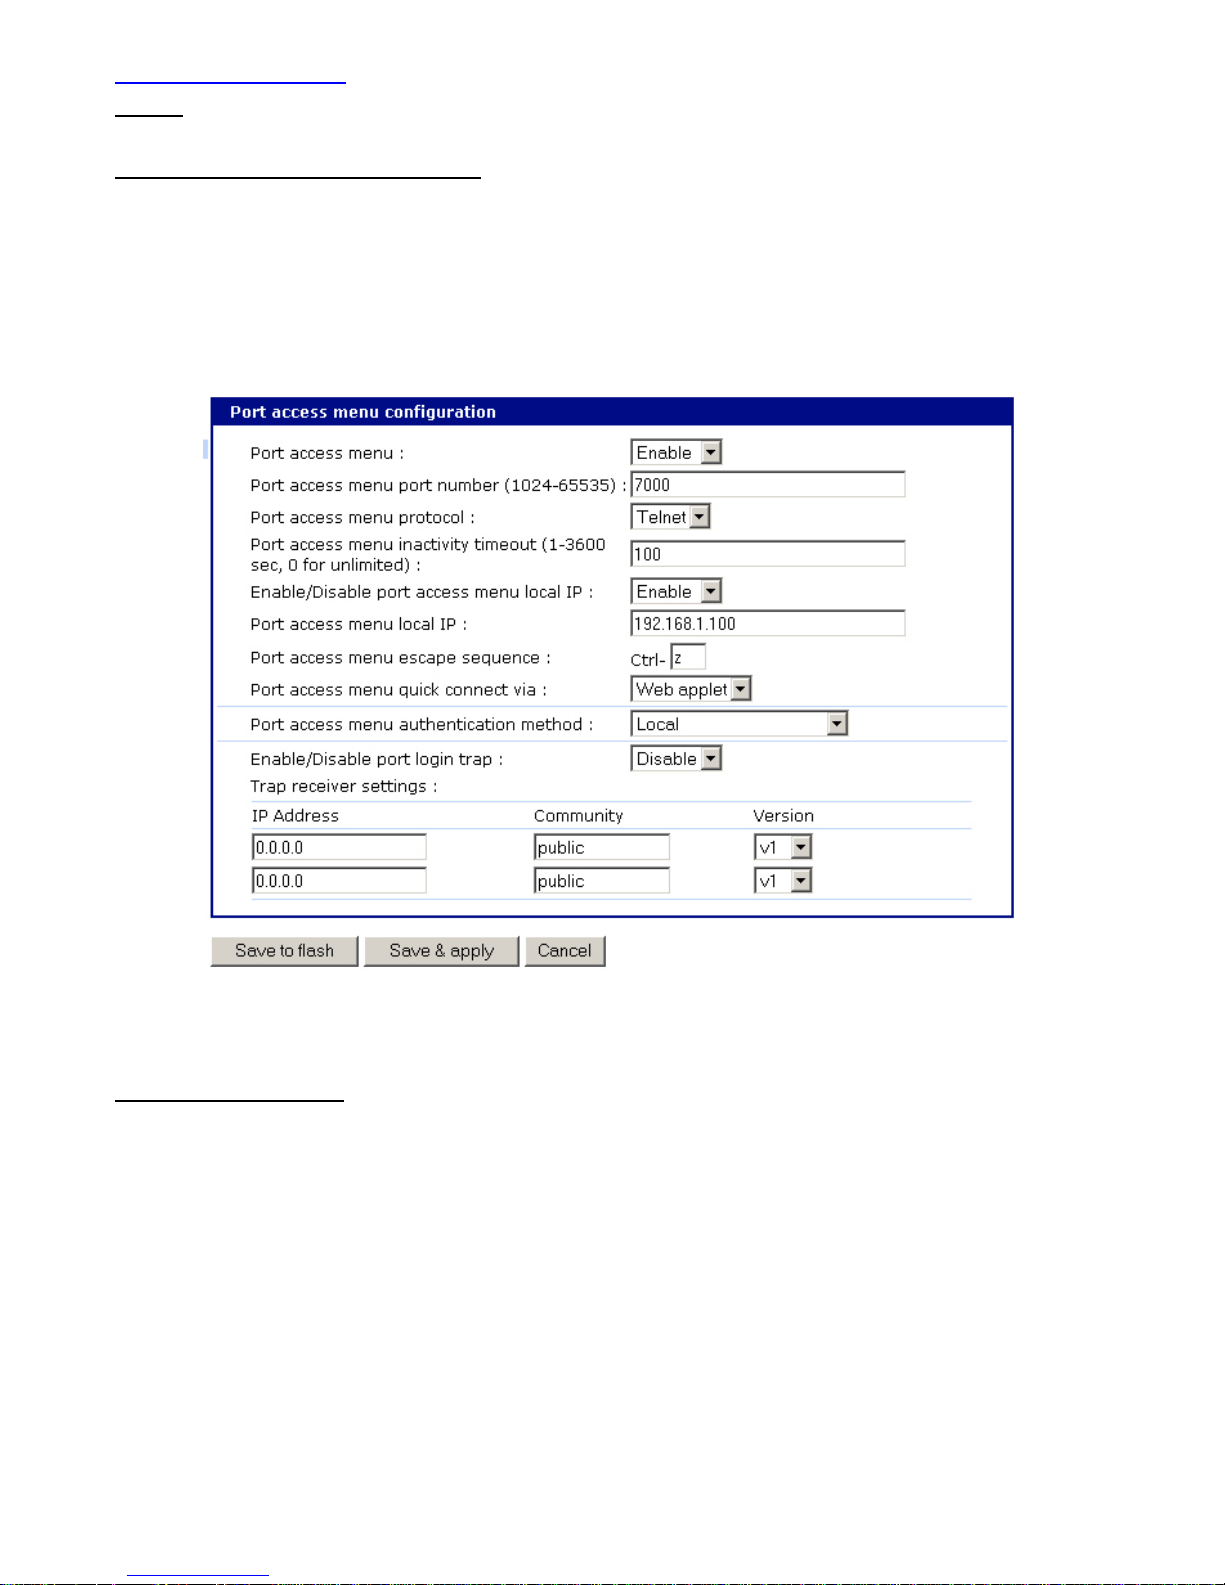
The Port Access Menu provides access to ports. It is accessible to all users through the web interface, Telnet and SSH sessions,
and remote modem access. The information that follows shows how to access this menu.
Access Type Permissions Procedure
Web interface Any user can use
This method.
Telnet Any user can use
This method.
Command line Root From the command line, issue the portaccessmenu command.
1. Access the web interface.
2. Choose Serial port > Connection > Port access menu connection.
3. Log in.
1. Telnet to the SERIMUX specifying its IP address and port 7000.
Example: Telnet 192.168.15.7 7000
2. Log in.
Example: portaccessmenu
4

Direct Port Access
Users can connect directly to a properly configured port through a Telnet or SSH session. Configuration requirements includ e
setting the Host Mode to Console Server Mode and the Protocol to either Telnet or SSH. Ports, by default, are set to Console
Server Mode and Telnet. Use the information that follows to make a Telnet or SSH connection to a port:
Type Command Syntax Example Connection to Port 3
telnet ip-address tcp-port
Telnet
where ip-address is the SERIMUX’s IP
telnet 192.168.15.7 7003
address and tcp-port is the Listening
TCP port for a port
ssh user-name@ ip-address tcp-port
SSH
where user-name is a user’s name,
ipaddress is the SERIMUX’s IP address
ssh admin@ 192.168.15.7 7003
and tcp-port is the Listening TCP port for
a port
Note: The example assumes that the Listening TCP port is 7003, the default for port 3.
Custom Menus
Custom menus are created by either root or the system administrator to limit a user’s access to specific ports. For more
information, see "Making Custom Menus" on page 36.
Saving and Applying Changes
In the web interface, the user can save and apply configuration changes in two ways. With the one-step method, choose “Save &
apply” and changes are saved and applied enabling them to take effect immediately. With the two-step method, choose “Save to
flash,” which immediately saves changes but the changes do not take effect until choosing "Apply changes.” This might be more
efficiently used if multiple changes are being made. The following topics describe how to do each of these oper ations.
One Step: Save and Apply Changes
To save and apply changes immediately, choose the Save & apply button.
Two-Step: Save to Flash and then Apply Changes
To save multiple changes but apply changes once, do the following:
1. Choose the Save to flash button after each configuration change.
2. When finished changing the configuration, choose the Apply changes link, which is located on the main menu.
Getting Started
Getting Started
Introduction
This chapter covers basic configuration topics. Included is information on assigning IP settings, enabling secure access with the
web interface, accessing the unit through SSH, and adding and removing users.
Note: Initial setup is described in the Quick Start Guide included with the product packaging.
Assigning IP Settings from the Console Port
To use the console port to assign IP settings, do the following:
1. Connect the console port on the rear panel of the SERIMUX to a serial port on a workstation using the Ethernet console cable
and DB-9 adapter packaged with the SERIMUX. (See Fig. 4) The default IP address is 192.168.161.5.
R e a r V i e w o f S E R I M U X - S E C U R E
1 83 2
3 1
Figure 4- Attach a workstation to the console port
21 6
11 51 7
F A C T O R Y
R E S E T
E T H E R N E T 1 0 / 1 0 0 C O N S O L E
R J 4 5
P a t c h C a b l e
( s u p p l i e d )
D B - 9 F e m a l e
( s u p p i e d )
1 0 0 -2 4 0 V A C
1 . 2 A m p
5 0 - 6 0 H z
C o n n e c t t o a w o r k s t a t i o n
( T e r m i n a l o r P C )
5

2. Configure a terminal emulation program, such as HyperTerminal, using the following settings:
bps = 9600
data bits = 8
parity = none
stop bits = 1
flow control = none.
3. Establish a connection to the console port and press Enter to get a command prompt.
4. At the login prompt, log in as admin.
The default password for admin is admin.
The Configuration menu appears.
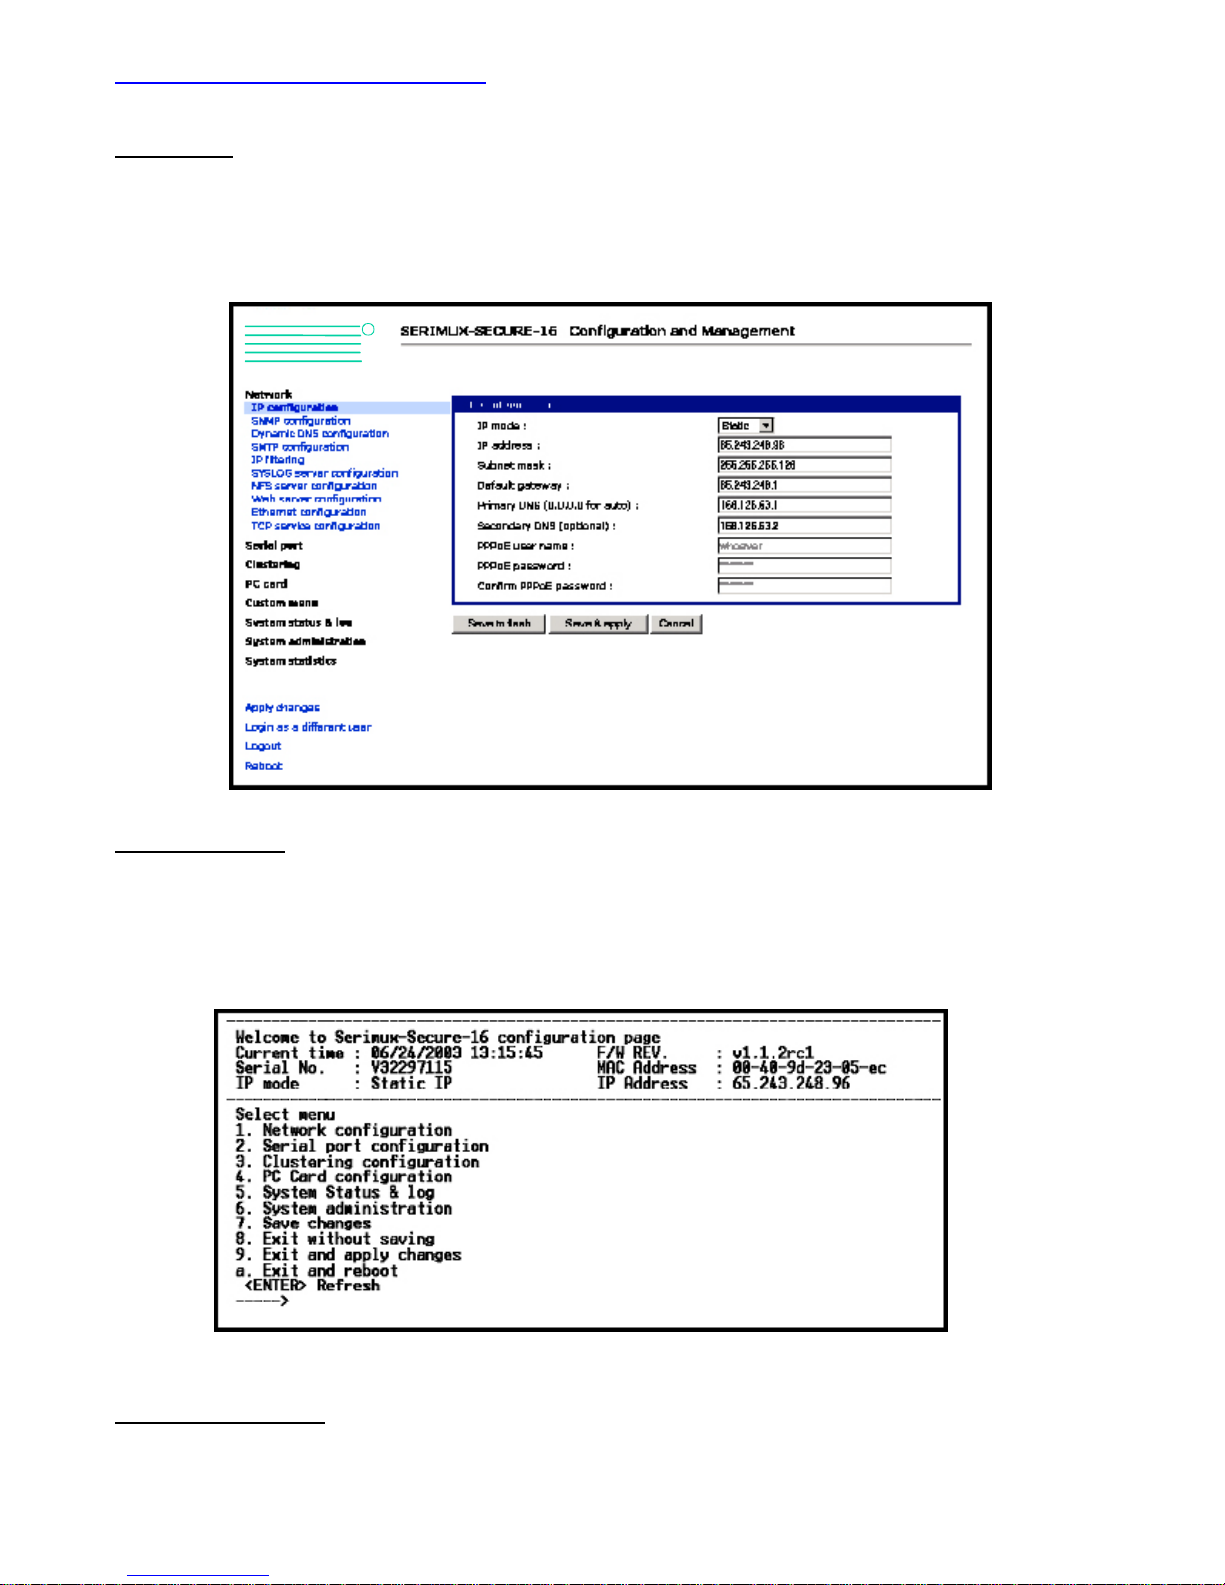
5. Enter the following to navigate to the IP configuration:
a. 1 for Network configuration
b. 1 for IP configuration
c. The numbers for the individual IP settings.
The following menu is displayed.
Figure 5- The IP configuration menu
6. Press ESC when done to return to the main configuration menu.
7. Enter number 9 to exit and apply changes.
Changes are saved and applied immediately. There is no need to reboot.
Configuring HTTP and HTTPS
By default HTTP and HTTPS are enabled on the SERIMUX device. To modify these settings, do the following:
1. Enter the IP address for the SERIMUX in a web browser’s URL.
2. Choose Web server configuration from the Network Configuration heading on the web interface menu.
3. Choose Enabled or Disabled.
4. Set the desired refresh rate for statistics data. The default value is 10 seconds.
5. Choose an authentication method for accessing the web interface. The default is local.
6. To save and apply changes, choose Save & apply.
Figure 6- Enable Web server HTTP/HTTPS service
6
Configuring for SSH
Options
The Port Access Menu and individual ports can be configured for SSH.
Configuring the Port Access Menu for SSH
1. Access the web interface.
2. Log in as root, admin, or a member of the port administration group.
The default password for root is dbps,
The default password for admin is admin.
3. Choose Serial port > Configuration > Port access configuration menu.
The Port access configuration menu appears.
4. Choose SSH as the Port access menu protocol.
Figure 7- Configure the port access menu for SSH
5. Choose Save & apply.
Configuring a Port for SSH
1. Access the web interface.
2. Log in as root, admin, or a member of the port administration group.
The default password for root is dbps
The default password for admin is admin.
3. Choose Serial port > Configuration.
4. Choose the port or ports to be configured for SSH.
5. Choose Host mode configuration.
6. Specify SSH as the Protocol.
7. Choose Save & Apply.
Note: The SERIMUX supports Blowfish and 3DES encryption methods for SSH.
7
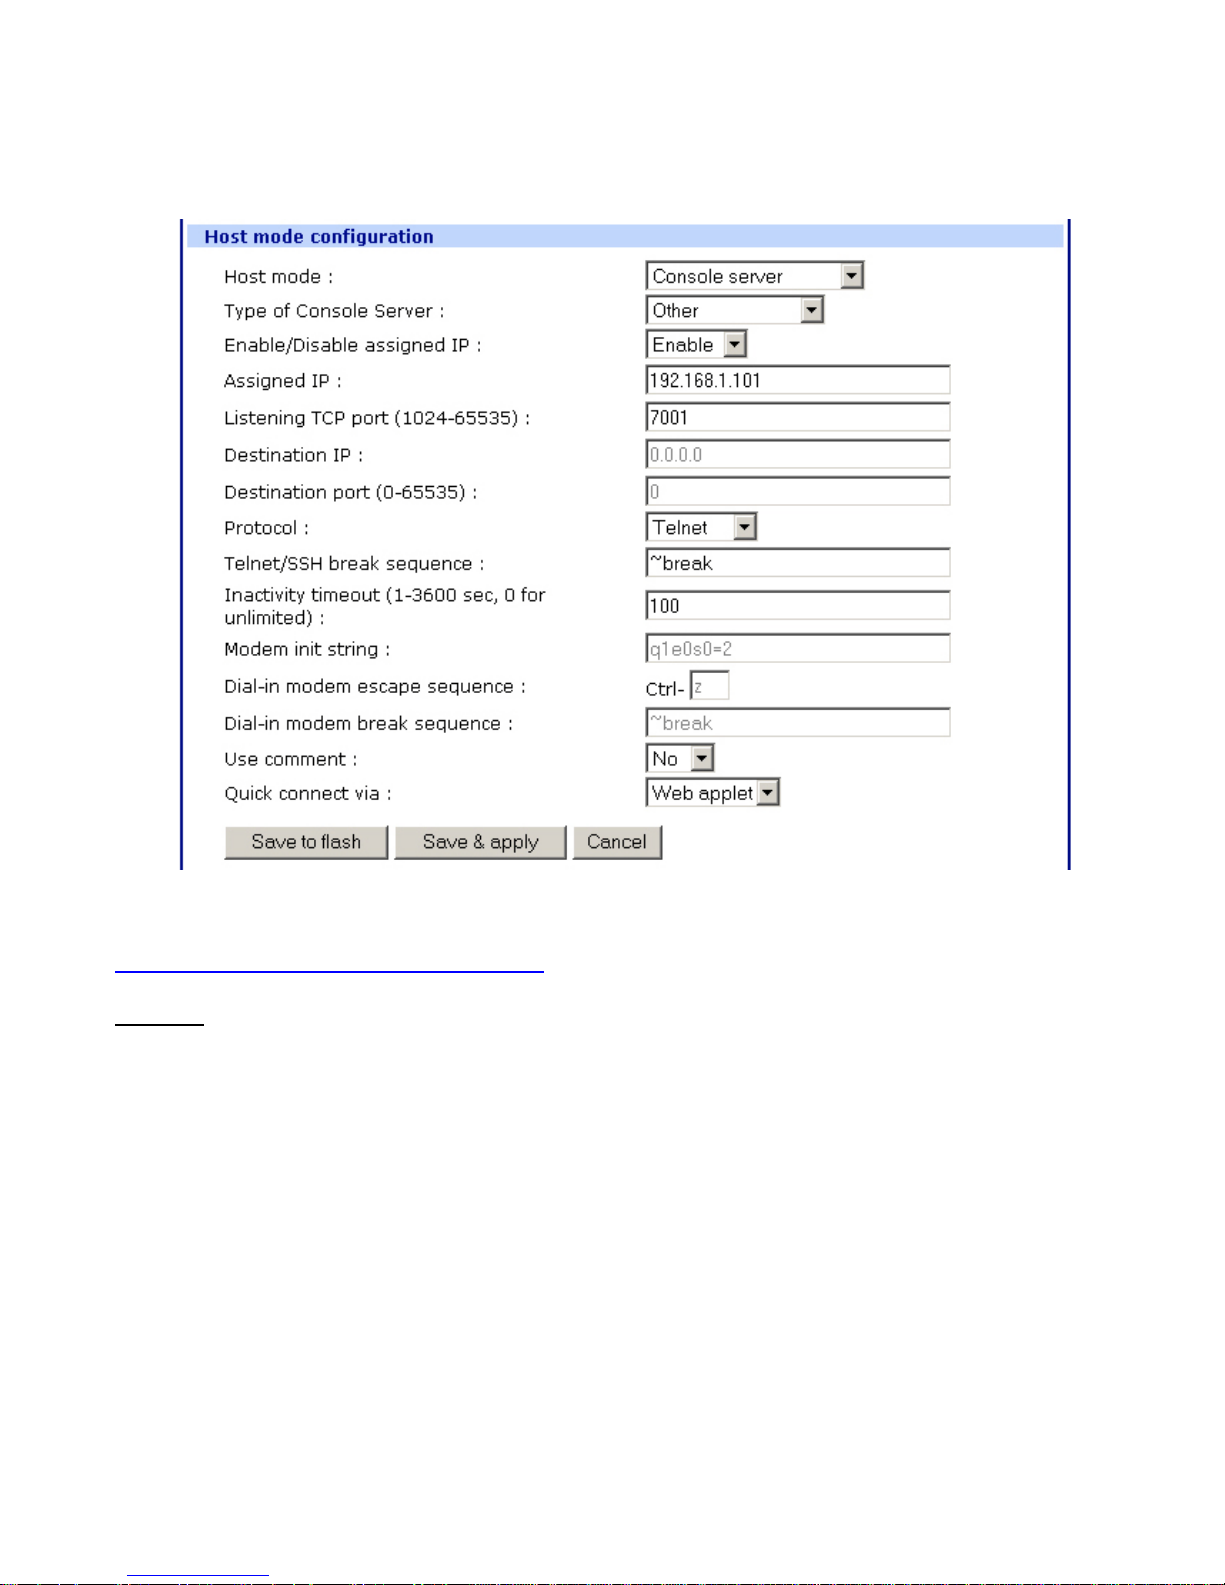
Figure 8- Configure a port for SSH
Adding, Editing, and Removing Users
The root user and system administrator can add, remove, or edit users from the web interface.
Procedure
1. Access the web interface.
2. Log in as root or admin.
The default password for root is dbps
The default password for admin is admin.
3. Under the System administration heading choose Users administration.
4. Choose Add User, Edit User, or Remove User.
• Add a user: Assign a name, user group, password, and shell.
• Edit user files: Change user group, password, or their shell
• Remove a user: Remove a user from the system
5. Choose Submit or Cancel.
Note: The root and admin users cannot be removed from the system. The password for root can be changed from the
command line only using the command passwd.
8
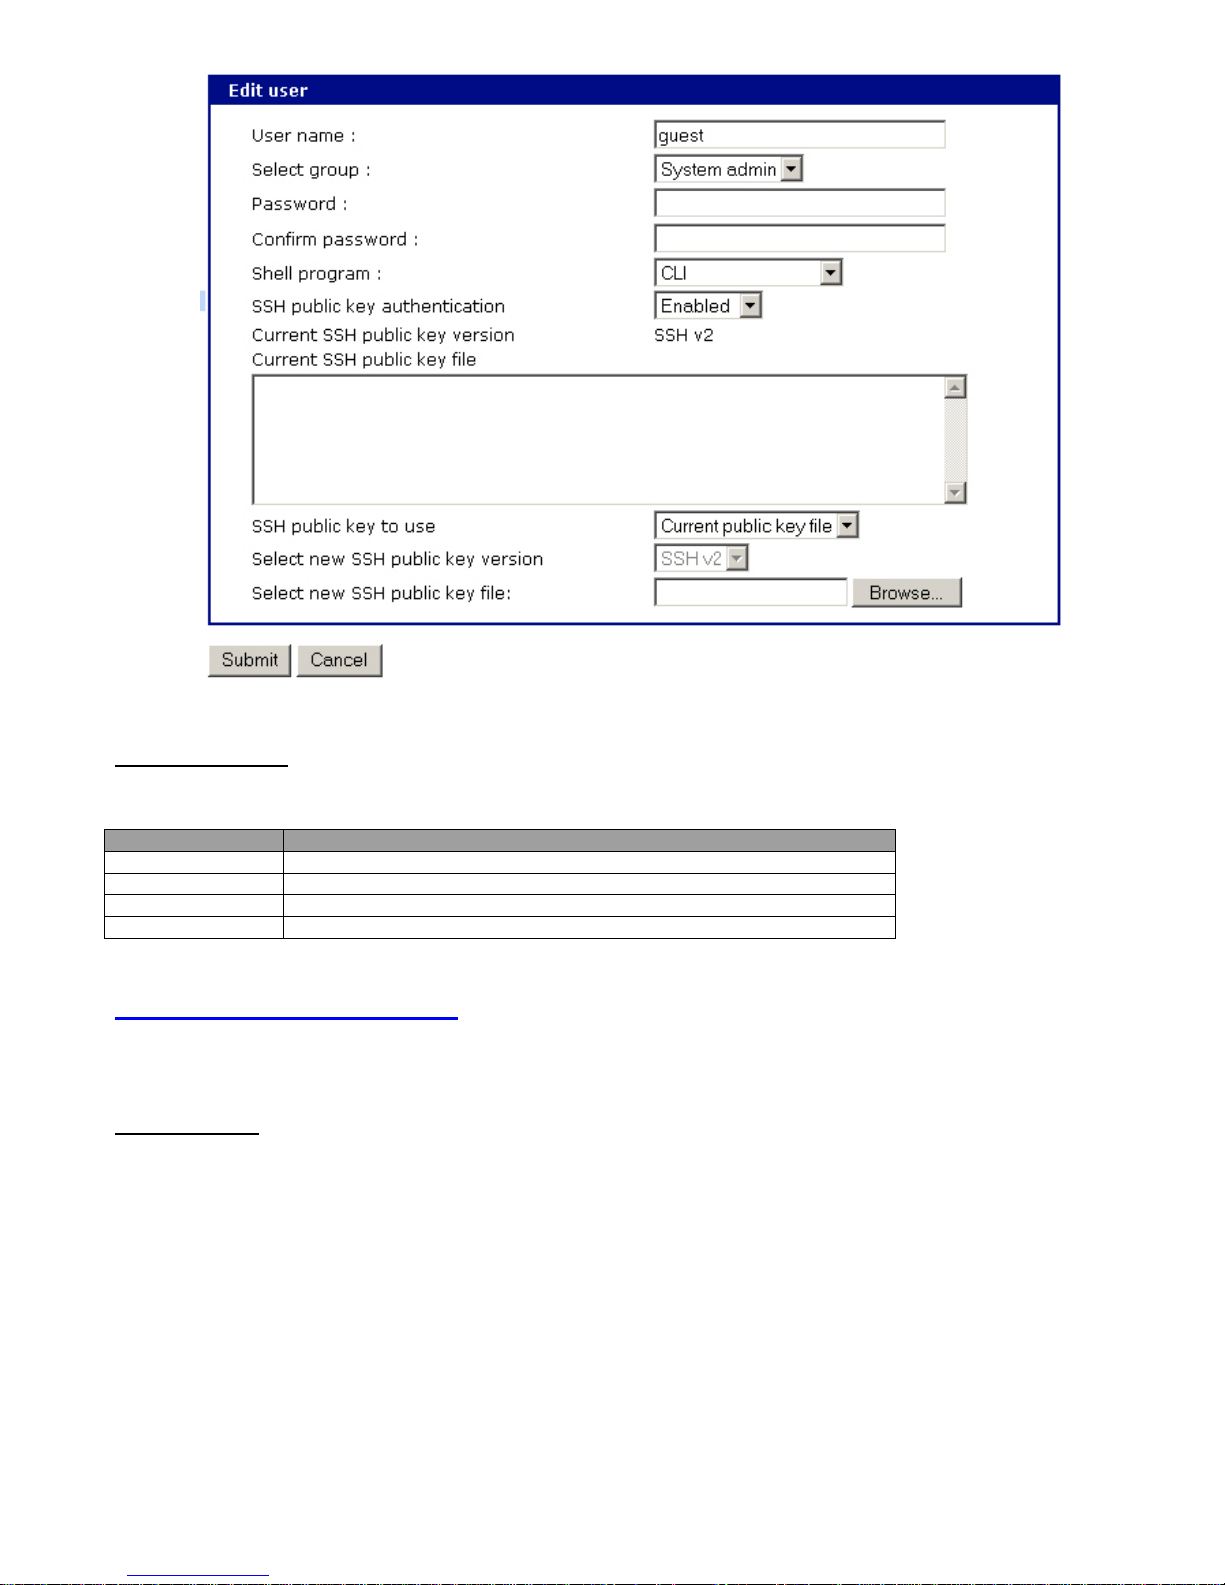
Figure 9- The Edit user menu
About Shell Options
The shell program selection determines the interface the user sees when establishing a Telnet or SSH session with the
SERIMUX.
User Group Shell Program Options
root Command line
system admin Command line, configuration menu, port access menu, custom menus
port admin Configuration menu, port access menu, custom menus
user Port access menu, custom men us
Using the Configuration Menu
The configuration menu presents the same functionality in configuring the SERIMU X as does the web interface, excluding the
creation of custom menus. The configuration menu is navigated by using the number representing the menu item and the ESC
key to return to earlier menus.
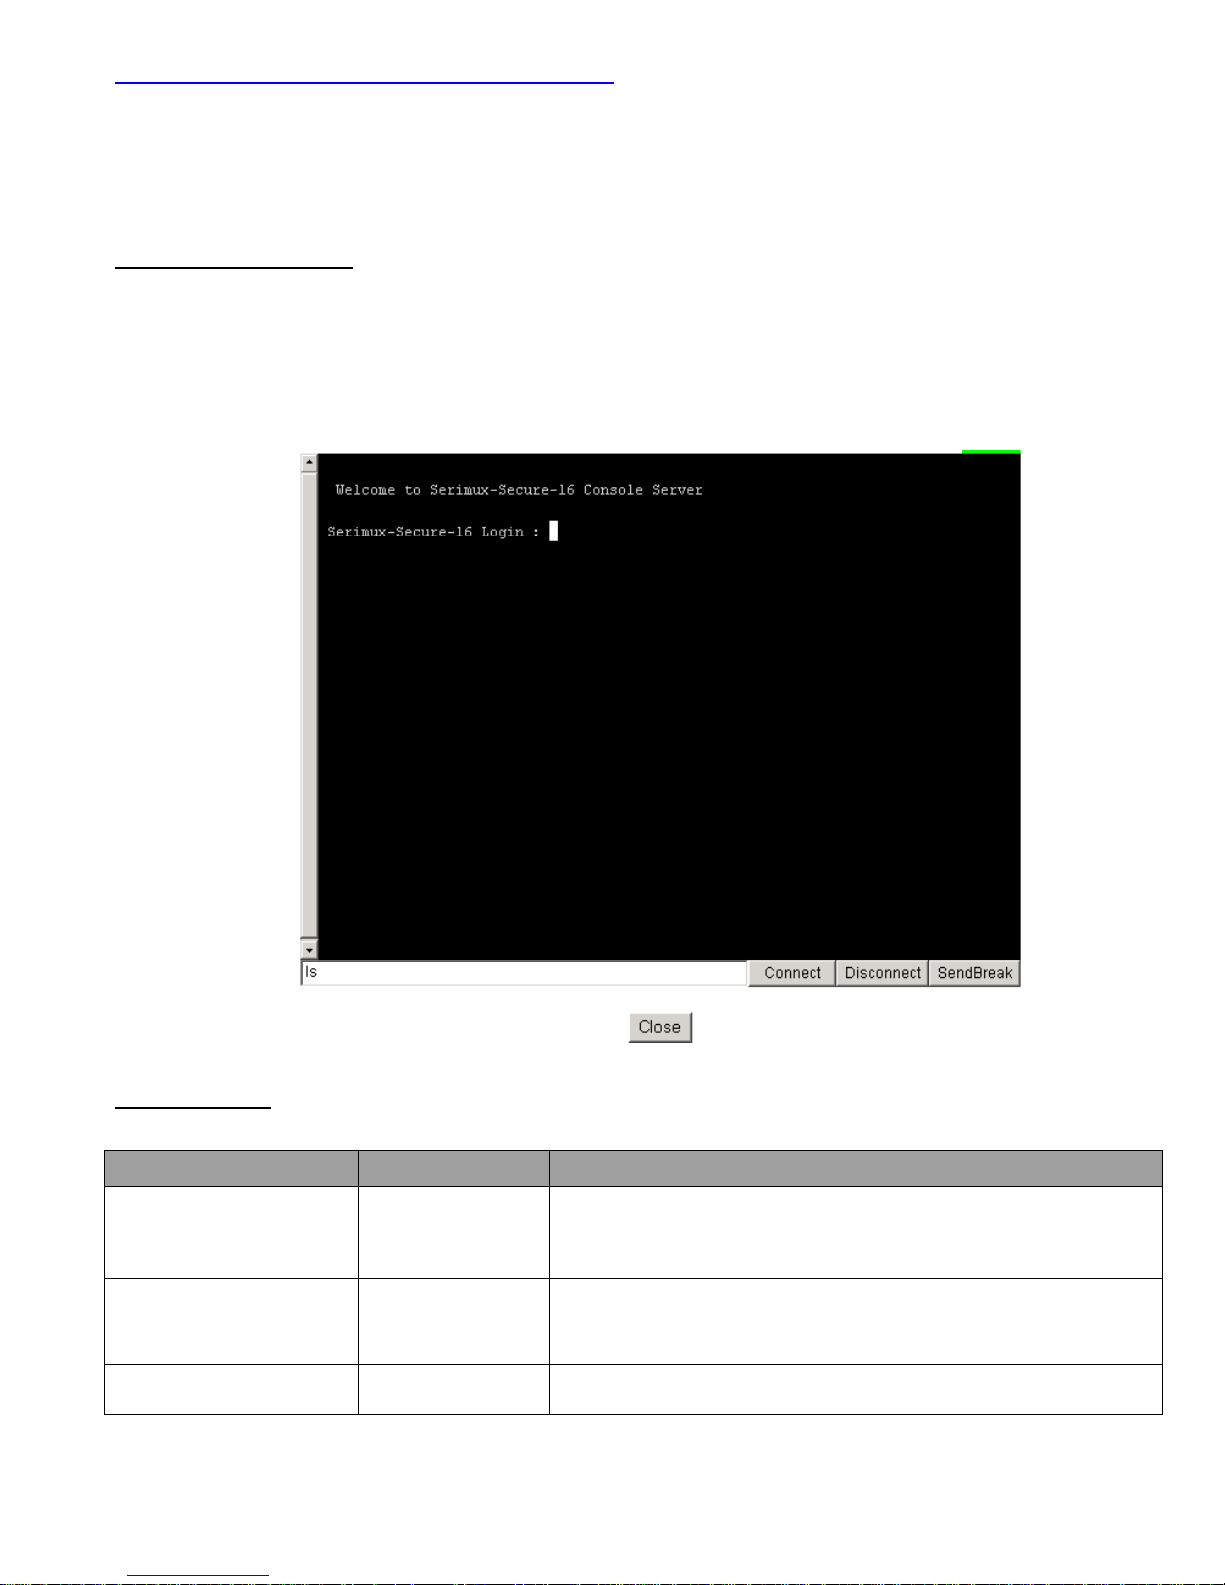
Configuring SSH
1. Telnet to the SERIMUX.
2. Log in as root or admin.
The default password for root is dbps
The default password for admin is admin.
3. Do one of the following:
• If the user is logged in as admin, the configuration menu will automatically appear, so go to the next step.
Note: The Save changes option saves changes to flash memory only.
• If the user is logged in as root, enter the configmenu command.
9
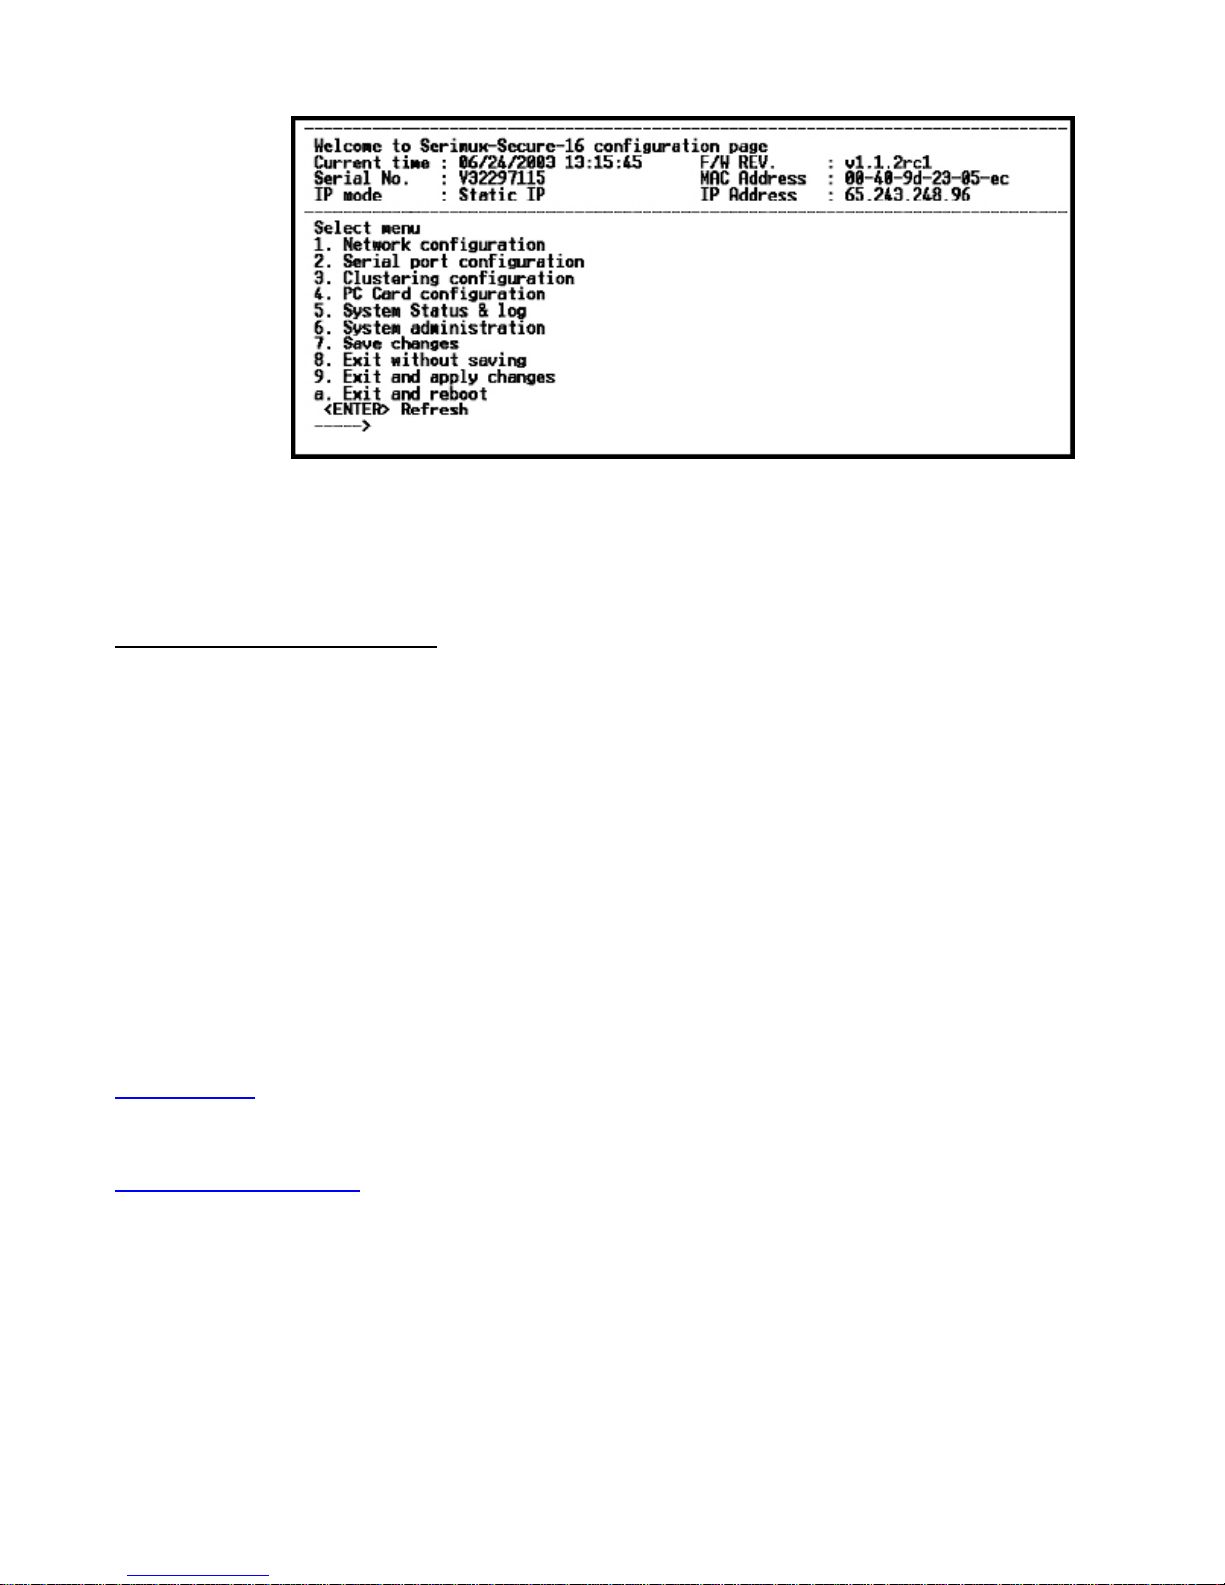
Figure 10- Using configuration menu to configure SSH
4. Choose 2 (Serial port configuration) and then an individual port number or 0 (zero) for all ports.
5. Choose 3 (Host mode configuration) and then 4 (Protocol) and 2 (for SSH).
6. Use the ESC key to return to the main configuration menu.
7. Choose 9 (Exit and apply changes).
Adding, Editing, and Removing Users
1. Telnet to the SERIMUX.
2. Log in as root or admin.
The default password for root is dbps,
The default password for admin is admin.
3. Do one of the following:
• If the user is logged in as admin, the configuration menu will automatically appear, so go to the next step.
• If the user is logged in as root, enter the configmenu command.
4. Choose 6 (System administration) > 1 (User administration) and then choose an operation to perform (Add, Remove, or Edit).
5. Configure the user as required.
6. Use the ESC key to return to the main configuration menu.
7. Choose 9 (Exit and apply changes).
Note: Choose Exit and apply changes when all of the changes have been made
.
Installing and Configuring PC Cards
Introduction
This chapter includes information on adding and configuring PC cards for the SERIMUX. PC devices that can be added to the
SERIMUX include a serial modem, compact-flash card, wireless LAN card, and a network LAN card.
Compatible PC Cards
All compact-flash cards work with the SERIMUX, but not all serial modem, wireless LAN, or regular LAN cards do. See the charts
below for compatible cards that have been tested with the SERIMUX.
10
SERIMUX Supported PC Card List
Ethernet LAN Cards:
Manufacturer Description Model Name Specification
3COM 3CXE589ET-AP
3Com Megahertz 589E
TP/BNC LAN PC Card
10 Mbps LAN card
Wireless LAN Cards:
Manufacturer Description Model Name Specification
Cisco Systems AIR-PCM340/Aironet 340
Modem Cards:
Manufacturer Description Model Name Specification
Billionton Systems Inc. FM56C series
Viking PC Card Modem 56K Viking V.90 K56flex 021 A MODEM PC Card
Cisco Systems 340 Series
Wireless LAN Adapter
PCMCIA CARD
56KFaxModem FM56C-NFS
5.41
11 Mbps Wireless LAN
Adapter
Ambient (Intel) V.90
FAX/MODEM PC Card
Multitech
Actiontec Datalink FM560LK V.90 D ata/Fax Modem
Star Logic Platinum FM56C-NFS
Zoom Zoom/Modem 3075-00-00L
MultiMobile PC Card
Modem
MT5634ZLXI
V.90 Data/Fax World
Modem
V.92 56K PC Card
Modem
V.90/V.92 56K PCMCIA
Fax/Modem
11
Adding a Compact-flash Card
A PC card slot is located on the front panel of the SERIMUX. (See Fig. 11) To install and configure the compact-flash card on the
SERIMUX, do the following.
1. Insert the card into the PC card slot.
2. Access the web interface.
3. Under the PC card heading choose Configuration.
4. Choose Discover a new card.
The SERIMUX searches for a PC card and displays a configuration menu.
5. Enter the appropriate parameters in the configuration menu.
F r o n t V i e w o f S E R I M U X - S E C U R E
R
N T I
N e t w o rk Te c h n o lo g i e s In c
P o w e r
R e a d y
Figure 11- Location of PC card slot
S E R I M U X
1 0 0 M b p s
P C C a r d
T M
S E C U R E
1 1
L i n k
A c t
1 2 3 4 5 6 7 8 9 1 0
1 2 1 3 1 4 1 5 1 6
1 9
1 7 1 8
2 0 2 1 2 2 2 3 2 4 2 5
2 6
2 7
2 8 2 9 3 0 3 1 3 2
I n U s e
T X
R X
P C C a r d
P C c a r d s l o t
Figure 12- PC card configuration menu
Note: Always select the Stop card service button before removing a PC card.
Configuring the Compact-flash Card
• Total data size to be used: Enter the amount of memory to be assigned to the compact-flash card for configuration
files.
• Delete all files in ATA/IDE Fixed Disk Card: Select this button to clear the compact-flash card of all files.
• Format ATA/IDE Fixed Disk Card: The options are EXT2 or FAT formats.
Select the format option and then select the Format button.
• Export configuration to PC card: Exports the current configuration to the compact-flash card.
• Import configuration from PC card: Imports the last saved configuration file from the compact-flash card.
• Import configuration except IP configuration: Imports the last saved configuration file from the compact-flash card,
excluding the IP settings.
12

Automatic Configuration File Backup
The SERIMUX provides for automatic configuration backup and restoration. The following describes fields related to this function.
• Automatically backup configuration: Choose Yes to enable and No to disable automatic backup.
• Restore previously saved configuration: Click Restore to import the previously saved configuration.
• Restore currently saved configuration: Click Restore to import the most recently saved configuration.
Adding a Network Card
To install and configure a network card on the SERIMUX, do the following.
1. Insert the card into the PC slot.
2. Access the web interface.
3. Under the PC card heading, choose Configuration.
4. Choose Discover a new card.
The SERIMUX searches for the PC card and displays a configuration menu. (See Fig. 13)
5. Enter the appropriate parameters in the configuration menu.
6. Choose Save & Apply.
Figure 13- Network PC card configuration menu
13

Adding a Wireless LAN Card
To install and configure a wireless LAN card on the SERIMUX, do the following.
1. Insert the card into the PC slot.
2. Access the web interface.
3. Under the PC card heading, choose Configuration.
4. Choose Discover a new card.
The SERIMUX searches for the PC card and displays a configuration menu.
5. Enter the appropriate parameters in the configuration menu.
WEP is the acronym for Wired Equivalent Privacy and is a security protocol for wireless LANs using encryption to protect data
transfers. If you are unsure of the settings for the wireless card, see your network administrator.
• SSID: Stands for Set Service Identifier and is the name of the wireless LAN network
• Use WEP key: The options are to enable or disable the WEP key
• WEP mode: Select the mode, either encrypted or unencrypted
• WEP key length: The options are 40 or 128 bits if the WEP key is enabled
• WEP key string: Refer to the wireless network administrator for the wireless encryption key string
6. Choose Save & apply.
Figure 14- Configure a Wireless Network PC card
14
Adding A Serial Modem
The modem must first be inserted and installed on the system before it can be used. To configure the modem do the following:
1. Access the web interface.
2. From the menu choose Configuration under the PC card heading.
3. Choose Discover a new card.
The SERIMUX searches for a PC card and displays a configuration menu.
4. Modify or accept the default Init string.
5. Choose Save & apply.
Figure 15- Configure a Serial Modem PC card
Using the Configuration Menu
Adding and Configuring a PC Card
To add a modem card, compact-flash card, wireless LAN card, or a network card to the SERIMUX using the configuration menu,
do the following:
1. Access the configuration menu.
2. Choose PC Card configuration then Discover a new card.
The system searches for the card and displays information on the product model number and type of card.
3. Configure the card by choosing Change card configuration.
4. Use the ESC key to back out to the main configuration menu.
5. Choose Save changes.
Figure 16- Use Configuration menu to add a PC card
15
 Loading...