

Product Overview
Smart Entry is the first access control system that protects your company by
integrating various security measures. Smart Entry facilitates biometric entrypoint
registration, tracking employee attendance and company visitors. Smart Entry allows
property administrators to engage visitors in a video call, with its built-in Session
Initiation Protocol (SIP) server, leaving a better corporate impression
Product Overview
Upon knowing that your Smart Entry is complete:
Once Smart Entry has powered up, (1) we will need to name the device and (2) we
will need to connect it to the Internet. Smart Entry requires a stable internet
connection to work
Product Setup (SIP Server)
Let’s register the Smart Entry to NTEK SIP Cloud Server. This will allow the product to
use the full range of its features as a PABX.
System Configuration (Internet & Device)
Product Installation
Before installing the Smart Entry unit, decide first where you want to place the
device. Take into consideration the wiring set up, both for the power and network
connections.
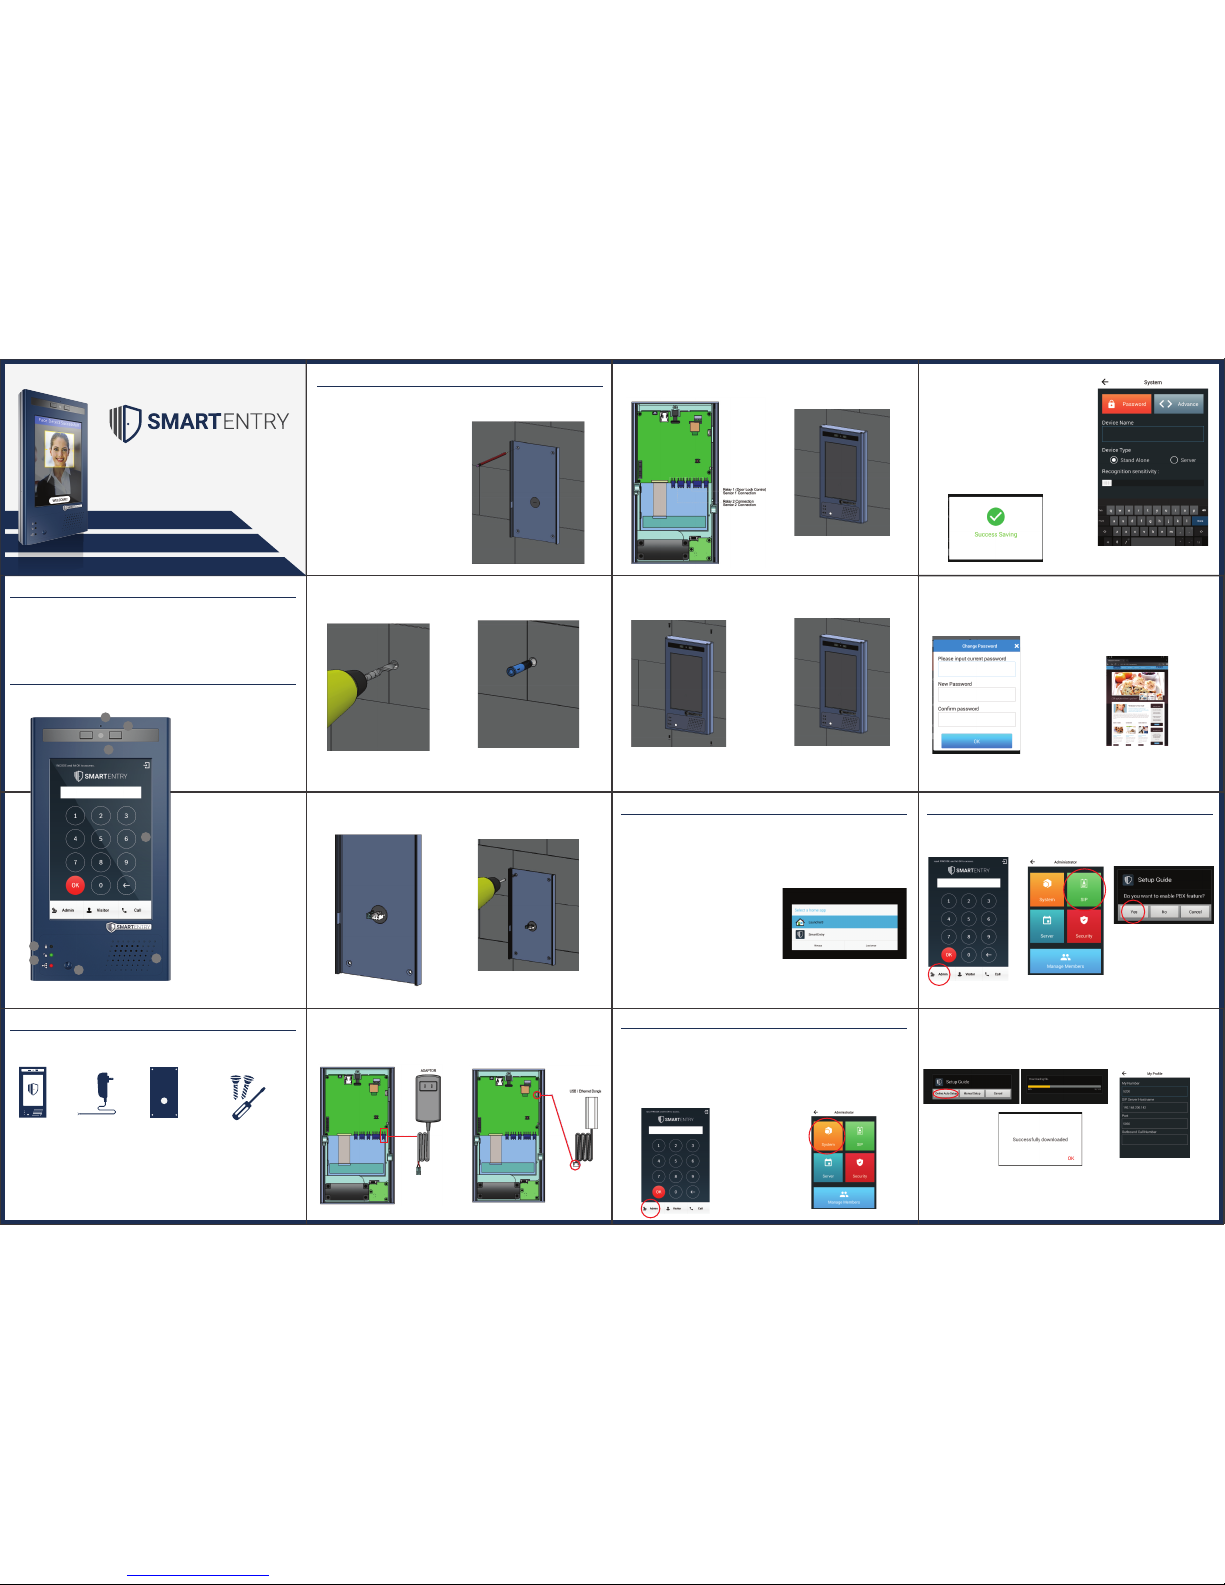
Product’s Design
1
3
2
4
5
6
7
8
1) Microphone
2) Camera
3) LED Light
4) 7” LCD Screen
5) Speaker
6) Motion Sensor
7) LAN Status Indicator
8) Door Lock Status Indicator
Advanced Visitor Management Solution
To know that your product is complete with all its accessories, we have listed
them as the following:
Reminders:
NTEK Systems will not be liable for any defect arising from the use of unauthorized accessories
which may void the warranty.
What’s In The Box?
Smart Entry
Main Unit
Power Adapter
(12V 2A)
Mounting Bracket
Step 1: Place the rear metal panel against the wall.
Step 2: Mark through the screw holes and wire
outlet (if it is a through-wall wire set-up) using a
pencil or a marker.
Step 9: Connect your device to any
of the available slots as indicated in
the figure.
Step 3: Drill through the markings using
the appropriate drill bit.
Step 4: Place the screw anchor after
drilling the wall.
Step 5: Position the wires accordingly
before affixing the rear metal panel onto
the wall.
Step 7: Connect the power supply/adaptor. Step 8: If LAN connection is preferred,
connect the provided USB/ Ethernet Dongle
to its port (USB)
Step 6: Wind the provided self-tapping
screws into the wall surface.
1. Connect the Power Adapter into the Smart Entry Main Unit
2. Plug the Power Adapter into the Power Source and wait for the Smart Entry to automatically power
up and redirect to the main screen (This may take around 30-60 seconds)
You may be asked to select a Home App:
1. Tap Smart Entry
2. Tap Always
Once Smart Entry has powered up, we will
need to connect it to the Internet. Smart
Entry requires a stable internet connection
to work.
1. Tap "Admin" 2. Tap "SIP"
3. Tap "SIP Setting"
1. From the Smart Entry Home Page, Tap Admin
2. Enter the default password: admin
Note: This will send you to the “Administrator
Main Page”
3. Tap System
- This will allow you to (1) Name the Device, (2)
Change Default Password, and (3) Connect the
device to the internet
Please note that the adapter’s power requirements are
the following:
Output: 12V 2A
Input: 100 - 250VAC 50-60 Hz
Step 10: Place/Align the Smart Entry unit
together with the rear metal panel.
1.Tap Device Name
2. Input a Device Name of your choice
Device Type is Stand Alone by default, allowing you to
store Smart Entry’s database inside the Smart Entry Main
Unit
- You may select Server if you wish to store your
Database in another device. You will need to have the IP
information of that device. Visit our website for further
support on this feature.
3. Tap Save
Note: A message will confirm successful saving
Let’s Rename your Smart Entry
1. Tap Password
2. Enter default or current password
3. Enter desired new password
4. Confirm desired new passpord
5. Tap OK
If You Want to Change the Default Password
1. Tap Advance
- This will open the Android Setting on the WiFi tab
2. Tap your preferred WiFi Network
3. Enter WiFi Network Password
4. Tap OK
Note: To check the connection, you may open the
internet browser app and connect to any website.
If this is your first Smart Entry and you are setting it up as your SIP Server, please continue to the next step,
Product Setup (SIP Server) . If you are setting up this Smart Entry as a client to an existing SIP Server,
kindly proceed to Product Setup (as Client).
Let’s Connect to the InternetStep 11: Use the provided screws to
securely lock the device.
Step 12: Your Smart Entry is ready.
Note: A pop up message will display
for Setup Guide will appear
4. Tap “Yes” to proceed registering
the product
AutoProvision
To make use of our AutoProvision Solution and easily set up your Smart Entry, kindly
follow the next steps. If you wish to manually set SIP configurations, please proceed to
the Manual Set-up below.
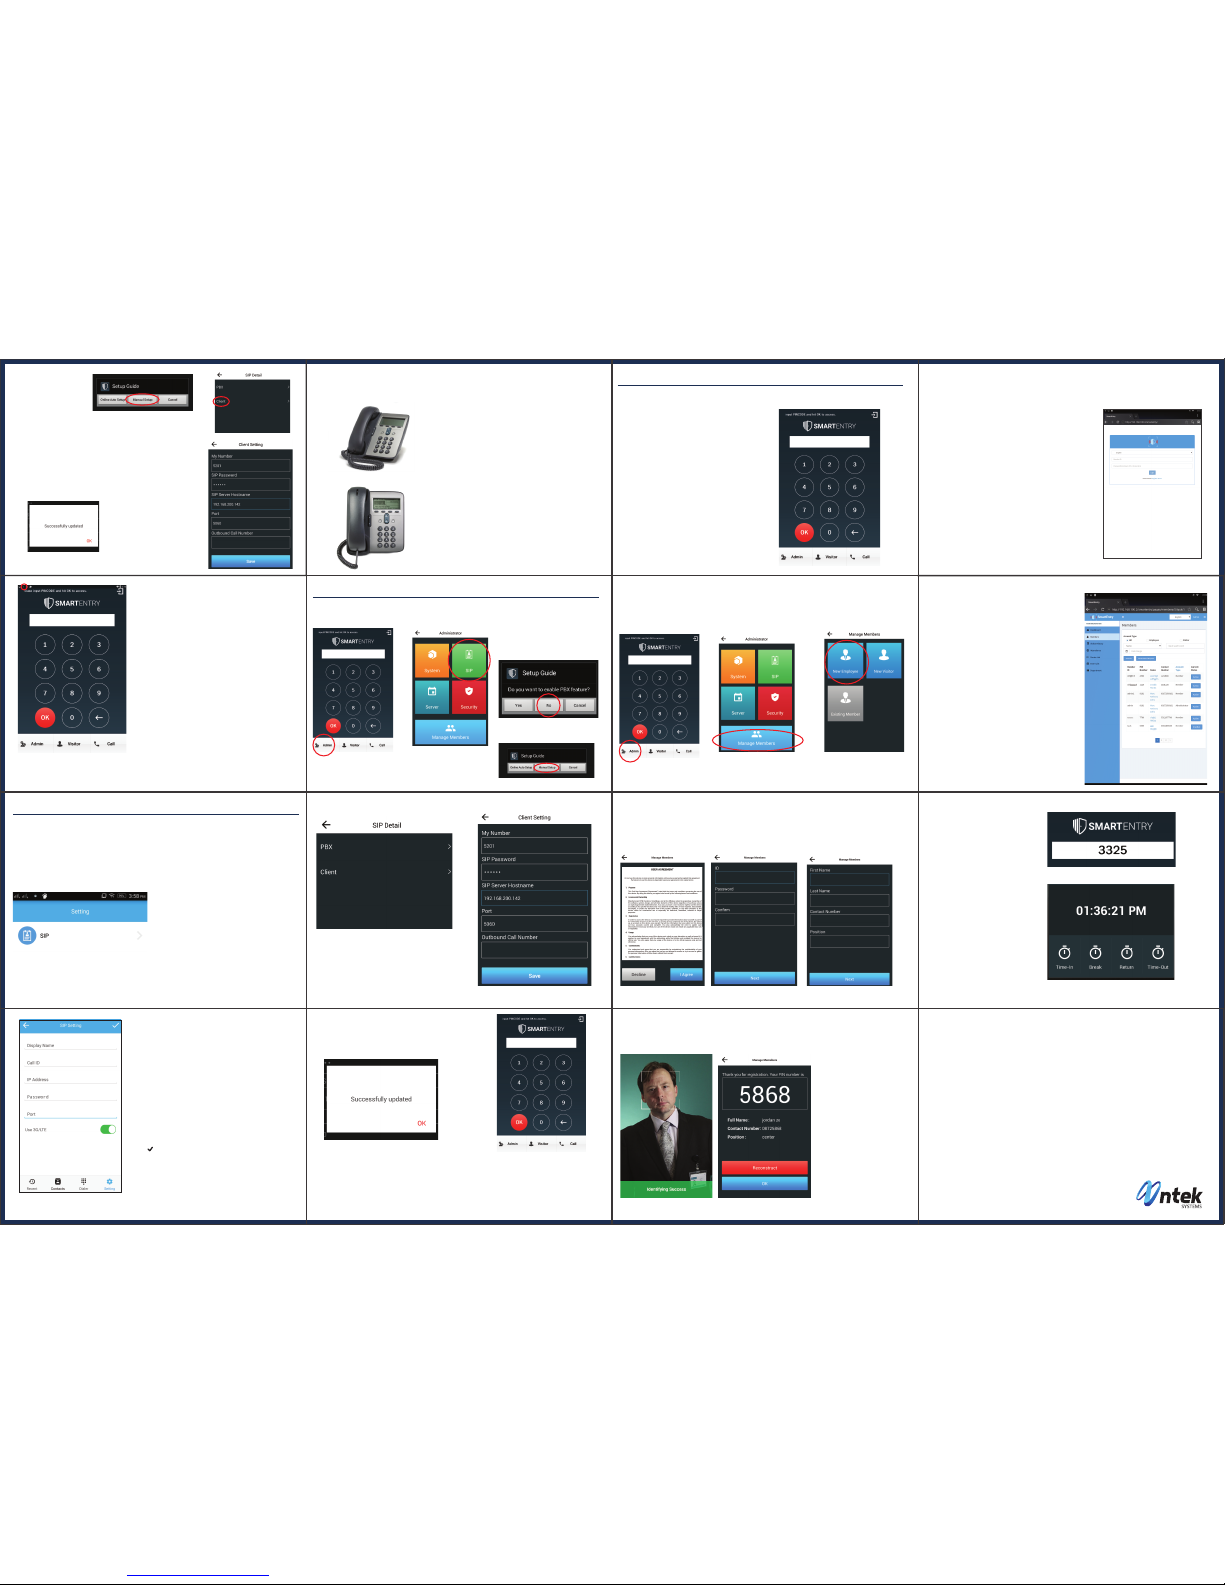
1. Tap “Online Auto Setup”
2. Tap “OK”
Note: Your device will be
downloading SIP Settings
from our NTEK SIP Cloud
Server. A message will
confirm a successful
download.
Note: You will be directed to the My Profile
Page where you can view your device local
extension number
Congratulations! You should be able to use the Smart Entry now as SIP Server. Please proceed to
Product Configuration should you wish to add local extensions.
Enter the admin password
(default password: admin)
Enter the admin password
(default password: admin)
QUICK START GUIDE
v1
• Screw Holder
• Torx Screw Bit
• Phillips Screw Bit
• M4x25 Screw ( 4 pcs )
• Plastic Screw Anchor ( 4 pcs )
Product Configuration (Adding Clients)
In this section, we will be guiding you to adding clients to your Smart Entry, adding
and assigning local extensions to other devices.
Product Setup (as Client)
In this section, we will help you use your Smart Entry as a client to an existing SIP Server.
Product Basic Features
In this section, we will help you use your Smart Entry as a client to an existing SIP Server.
Confirmation:
Green Dot should appear on the Top Left Screen of
Smart Entry when you swipe down the Top Left Screen.
(Smart Entry was successfully registered to the SIP
Server and is ready to call and receive call from the
Client Device)
Notes:
If the dot is Red, make sure that Smart Entry device is
connected to the WiFi network with Internet
If the dot is Gray, make sure that SIP Settings received
are unaltered or correct
If you do not wish to use the default SIP Call ID you may
check the autoprovision.nexportals.com using the
following steps
1. Tap “PBX Settings”
2. Enter default username “admin”
3. Enter default password “admin”
You will be able to have access to the list of SIP Call IDs
available to your Smart Entry
Congratulations! You should be able to use the Smart Entry now as SIP Server. Please proceed to
Product Configuration should you wish to add local extensions.
Call ID (SIP Call ID Number): Enter Default 5200
IP Address (SIP Server Address): Enter Device IP Address
Password (SIP Account Password): Enter Default 000000
Port (SIP Server Port): Enter Defaut 5060
Note: A pop up message will display saying
Successfully Updated
1. Tap “Manual Setup”
2. Tap “Client”
Manual Setup
3. Input the following SIP
Account details for the
Smart Entry device.
4. Tap Save
5. Tap “OK”
Nex Phone Application
Make sure that your Smartphone and Smart Entry is connected to the same network.
1. Download the NEX Phone Application
from the Play Store on your smart device
2. Open the Application
3. Tap “Settings”
4 .Tap “SIP”
5. Enter the SIP Settings
(This can be found by tapping Setting > tapping My Profile)
•Display Name (Indicate the Name you want to appear in
your Phone Book)
• Call ID (Kindly check autoprovision.nexportals.com for
the available extensions for your DoorPad)
• IP Address (Enter the IP address you’re both connected)
• Default Password (000000)
• Port (Enter the default SIP Port: 5060)
• Swipe 3G/LTE if you want to use mobile data.
• Note: Carrier charges for internet service may apply
• Tap “ ”
You may now use NEX Phone App as a local extension
IP Phone
(For Illustration, we are using a generic IP Phone. Terms may vary for branded IP
Phones. Our Technical Support will be glad to help)
1. Connect IP Phone to LAN Cable on the same Network
that the Smart Entry is connected
2. Select “Menu”
3. Select “Setting”
4. Select “Advanced”
5. Enter default IP Phone Password (this may vary
depending on model)
6. Select Accounts
7. Set IP address of the SIP Server
8. Set Server Port of the SIP Server
9. Set User ID / Call ID. This will be the local extension
number
10. Enter Smart Entry Default Password: 000000
11. Set Display Name. This is the same as the local
extension number
12. Make sure of the following:
Outbound Proxy: Disabled
Registration: Enabled
13. Save Details
You may now use the IP Phone as a local extension
Direct Call
This allows you to Call (Video or Audio) a
particular extension
1. From the Home Screen, enter Four (4) Digit
Extension Number
2. Tap Call
Note: You can use any device to access the admin page. Make sure that the WiFi network you are
connected is the same as the WiFi network of the Smart Entry
1. Open a web browser
2. Enter the IP address that you get followed by
"/smartentry" (e.g; 192.168.100.2/smartentry),
3. Tap search and you will be re direct to the admin
page
On admin page, Enter the following information
"admin" for member ID
"admin" for password
4. Tap "Login". You can see now the whole admin page.
5. Tap Members, You will see the list of member that
already registered and needs activation.
6. Tap "Activate" on the Inactivate Status of member
that you want to allow their PIN code.
Registering New Employee
This allows you to create a profile for the employees or members that will be using Smart Entry
Activating Employee Registration
This section will allow you to approve registered members of the Smart Entry
Employee Smart Entry Use4. Read the Member Agreement.
Tap “Agree” if these terms are
agreeable.
5. Input the following details:
ID (unique identity / name)
Enter Password
Confirm Password
6. Tap “Next”
7. Input the following details:
First Name
Last Name
Contact Number
Position
1. On the Smart Entry main screen,
enter the generated PIN Code
2. Tap "OK"
Note: The camera will open for
biometric data extraction and
recording.
3. Position your face directly in front of
the device to enable face recognition
and capture. Adjust your pose if
necessary.
A pop message display to choose if you
are going to Time In, Time Out, Break
and Return
4. Tap your choice of function
Note: A voice prompt will confirm
“Login Accepted”
1. Tap "Admin"
Enter the admin password
(default password: admin)
2. Tap “Manage Member”
3. Tap “New Employee”
5. Tap “Client”
6. Input the following SIP Account details
for the Smart Entry device.
7. Tap "Save"
8. Tap "Ok"
Call ID (SIP Call ID Number)
IP Address (SIP Server Address)
Password (SIP Account Password)
Port (SIP Server Port)
Note:
A pop up message will display saying Successfully Updated
Congratulations! You should be able to use the Smart Entry now as a local extension. Please proceed
to Product Basic Features to use its basic functions. You may visit our website for a list of advanced
features.
Confirmation:
Green Dot should appear on the Top Left Screen of Smart Entry when you swipe down the Top Left
Screen. (Smart Entry was successfully registered to the SIP Server and is ready to call and receive call
from the Client Device)
8. Position you face directly in front of the device for face detection and capture. Adjust your pose if
necessary. Wait and stand firmly until the process is complete
9. Tap “OK” on the profile
10. Tap “OK” on the confirmation
pop up
11. Wait for the Admin to activate
the registration
Note: A registration confirmation
will appear with the provided
personal information and
generated pin code. If you wish
to edit the procedure, tap
“Reconstruct”
Note: ID and Password are should be 6-digit alpha numeric
Note: The camera will open for biometric data extraction
7. Tap “Next”
The preceding instructions have been created for the purpose of allowing users to setup
their Smart Entry to its functional state.
Diagrams, Illustrations and Mechanics are consistent to the latest
Smart Entry Update on 09/01/16.
Additional and Advanced Features are found on
http://nteksystems.com/pages/download
www.nteksystems.com
1. Tap "Admin" 2. Tap "SIP"
3. Tap "SIP Setting"
3. Tap “No”
Note: A pop up message will display
for Setup Guide will appear
Enter the admin password
(default password: admin)
4. Tap “Manual Setup”
 Loading...