

Home Automation and Management Solution
Product Overview
DoorPad is the center of your home automation that you can connect to multiple
platforms and devices. DoorPad expands home communications through internet
calls with its built-in IP-PBX Server. DoorPad gives you absolute convenience in
monitoring your security system and managing your home automation.
Product Installation
Upon knowing that your DoorPad is complete:
Let’s register the DoorPad to NTEK SIP Cloud Server. This will allow the product to
use the full range of its features as a SIP Server.
Plan your installation and wiring.
Before starting the installation process, plan
first how your device will be powered, the
network connection type (wireless or LAN) and
what devices you plan to integrate with
DoorPad. Decide whether the wiring should go
through the wall or pass underneath the
device.
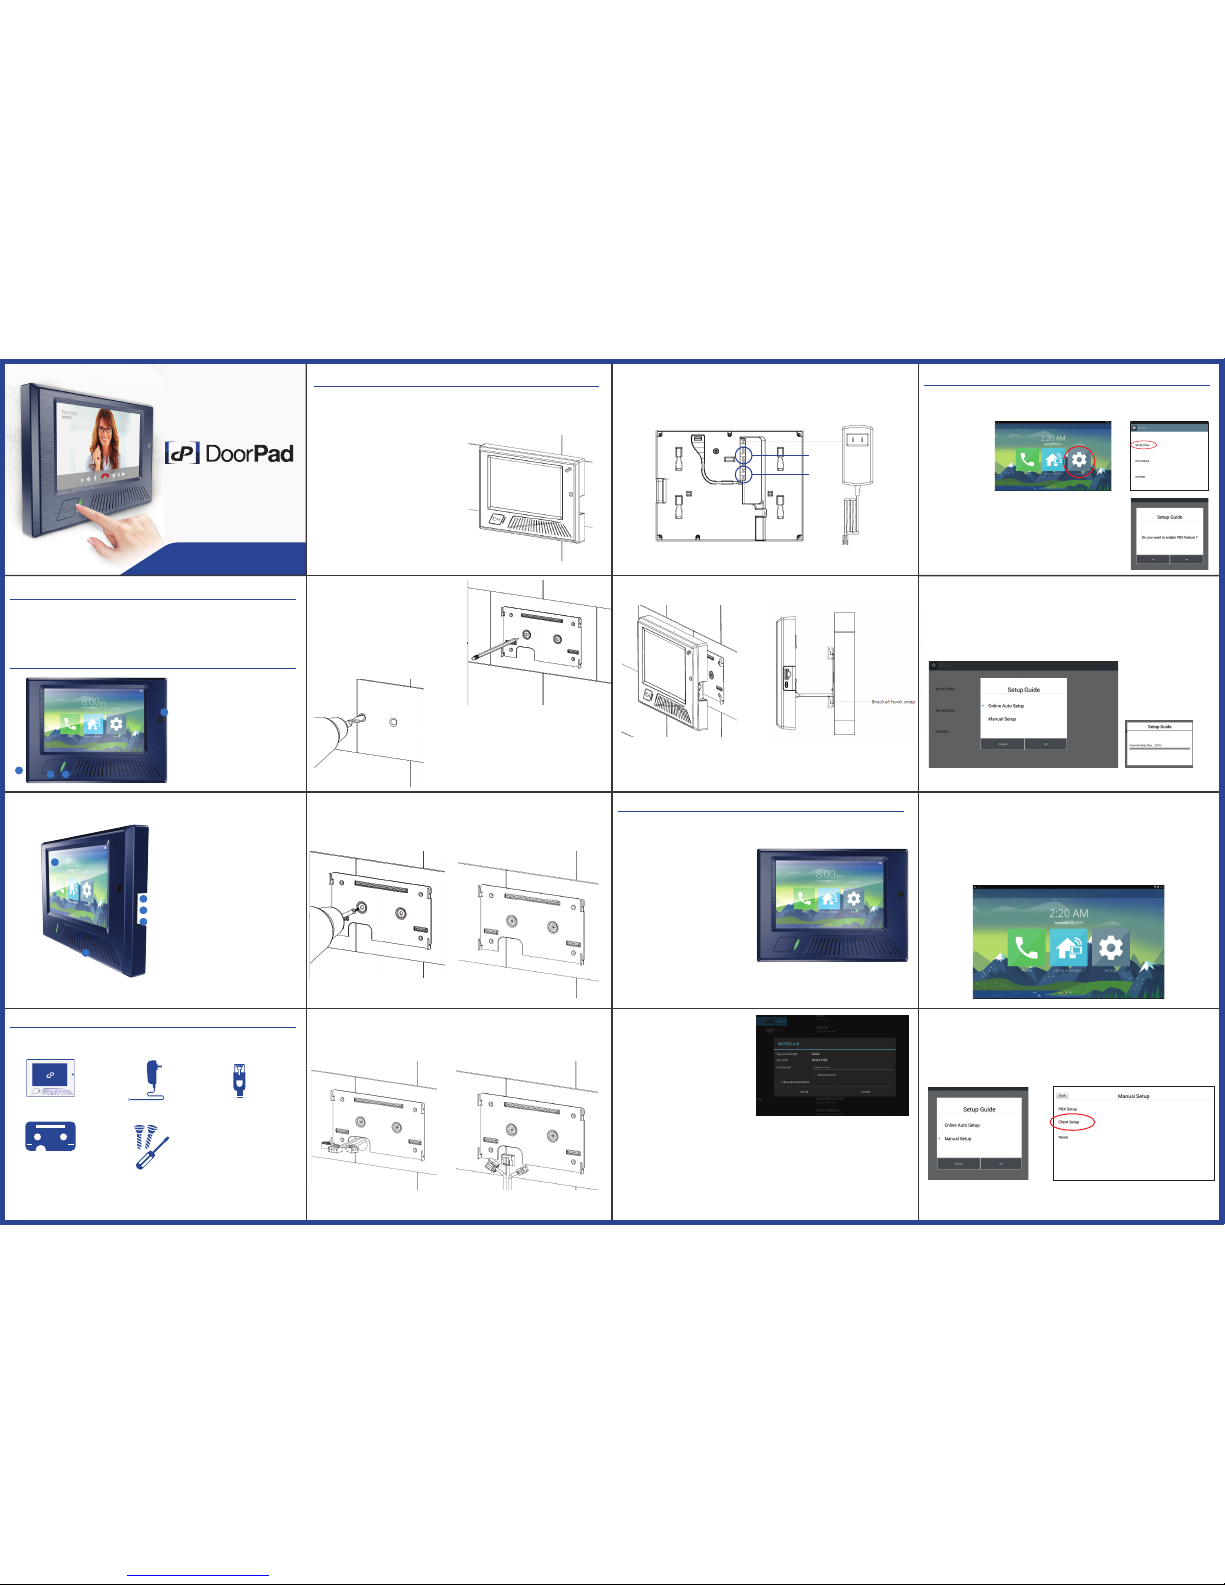
Product Preparation
Product Setup (SIP Server)
What’s in the box
To know that your product is complete with all its accessories, we have listed them
as the following:
Product’s Design
1) Camera
2) Status Indicator
3) Power/Wake-up Button
4) Microphone
5) LCD Screen
6) Speaker
7) Micro SD Slot
8) USB Port.
9) Motion Sensor
5
1
7
8
9
6
2
3
4
DoorPad Main Unit
Power Adapter (12V 2A)
RJ45 USB Dongle - RK
Metallic Wall Mount
• Screw Driver Set
• Screw Holder
• Phillips Screw Bit
• M4x25 Screw ( 2 pcs )
• Plastic Screw Anchor ( 2 pcs )
Reminders:
NTEK Systems will not be liable for any defect arising from the use of unauthorized accessories
which may void the warranty.
1. Place the Metalic Wall Mount against the
wall and mark through the screw holes and
wire outlet (through-wall wiring) using a pencil
or marker.
3. Mount the back cover onto the wall using the provided cross-slot screws and a phillips
screwdriver. For concrete or brick walls, wind the screw through the inserted screw anchors.
4. Attach the cables to the corresponding slots.
Refer to your security system’s manual or consult a specialist for technical information.
5. Once all the wire connections are in place, the device can then be mounted and fixed.
2. Drill through the markings using the
appropriate drill bit, depending on the type of
wall. For concrete or brick walls, the screw holes
should just be wide enough that the provided
screw anchors will fit through tightly and not
loose.
Note
For through wall wire setting : make hole on the bracket portion for wire out
For Bottom wire setting : set the wire downward on the bracket portion for wire out
Note
Align and slide downward the unit to snap/ fix the unit on the bracket
If this is your first DoorPad and you are setting it up as your SIP Server, please proceed
to the next step Product Setup.
If you are setting up this DoorPad as a client to an existing SIP Server,
kindly proceed to Product Setup (as Client).
Reminders: Please note that the adapter’s power requirements are the following:
Output: 12V 2A Input: 100 - 250VAC 50-60 Hz
Note
To check the connection, you may open the
internet browser app and connect to any website.
through wall wire setting Bottom wire setting
Relay output
connection
Sensor Input
connection
1.Connect the Power Adapter into the
DoorPad Main Unit
2. Plug the Power Adapter into the Power
Source and wait for the DoorPad to
automatically power up and redirect to the
main screen (This may take around 30-60
seconds)
Once DoorPad has powered up, we will
need to connect it to the Internet. DoorPad
requires a stable internet connection to
work.
3. Swipe down on top right side of the screen
• This will pull down device setting buttons
4. Tap Settings
5. Tap WiFi OFF Button to turn it ON
• This will show you a selection of available WiFi
connections
6. Tap your preferred WiFi Network
7. Enter WiFi Network Password
8. Tap Connect
AutoProvisioning
To make use of our AutoProvision Solution and easily set up your Vivex Deskphone, kindly
follow the next steps. If you wish to manually set SIP configurations, please proceed to
the Manual Set-up below.
Note:
A pop up message will display for Setup Guide will appear
Note:
Your device will be
downloading SIP Settings
from our NTEK SIP Cloud
Server. A message will
confirm a successful
download.
3. Tap “Yes” to proceed registering the product
1. Tap “Online Auto Setup”
2. Tap “OK”
3. Tap “OK”
Manual Setup
To configure your DoorPad manually, use the following steps
1. Tap “Manual Setup”
2. Tap “OK”
3. Tap “Client Setup”
Note:
If the dot is Red, make sure that Vivex device is connected to the WiFi network with Internet
If the dot is Red, make sure that SIP Settings received are unaltered or correct.
Confirmation:
Green Dot should appear on the Top Left Screen of Vivex Deskphone. (Vivex Deskphone was
successfully registered to the SIP Server and is ready to call and receive call from the Client Device)
Congratulations! You should be able to use the Vivex Deskphone now as SIP Server. Please proceed to
Product Configuration should you wish to add local extensions.
1. Tap “Settings”
2. Tap “SIP Setting”
QUICK START GUIDE
v1.1
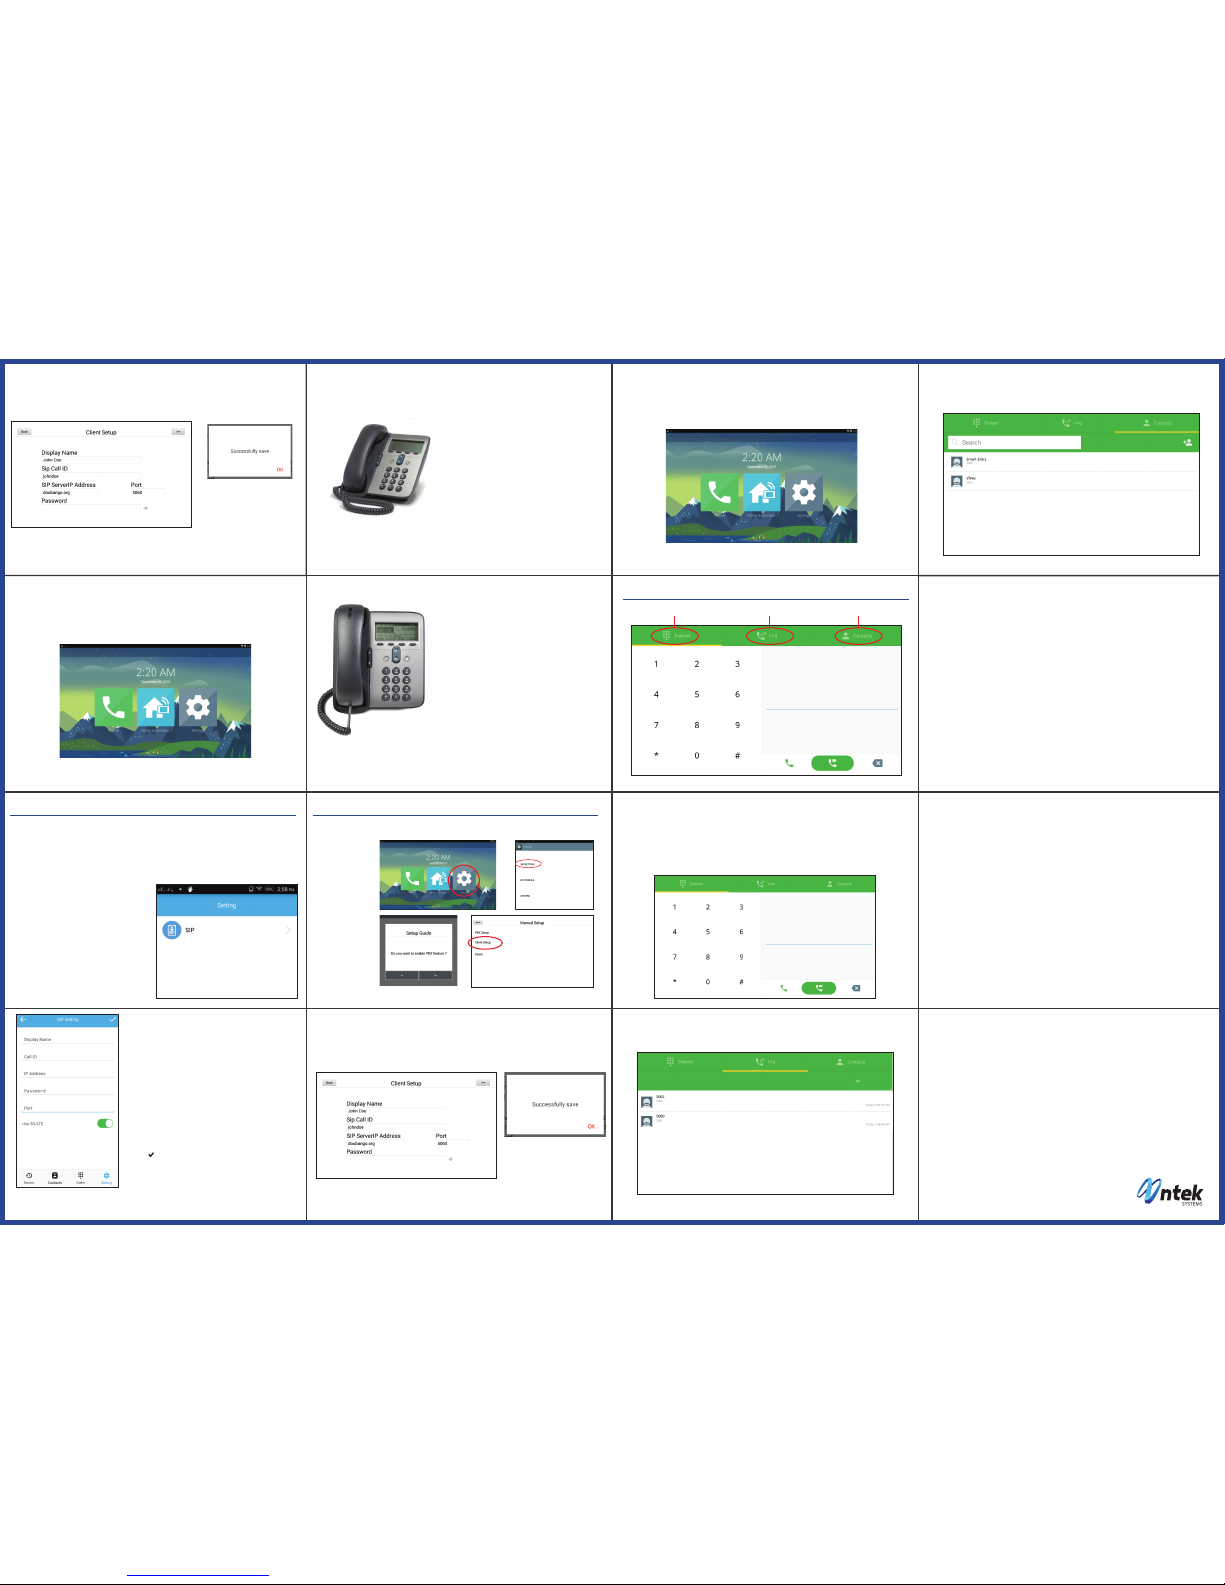
4. Input the following SIP Account details for the DoorPad device. 5. Tap "Save"
6. Tap "Ok"
5. Tap "Save"
Call ID (SIP Call ID Number): Enter Default 5200
IP Address (SIP Server Address): Enter Device IP Address
Password (SIP Account Password): Enter Default 000000
Port (SIP Server Port): Enter Defaut 5060
Note:
A pop up message will display
saying Successfully Save
Note:
If the dot is Red, make sure that DoorPad device is connected to the WiFi network with Internet
If the dot is Gray, make sure that SIP Settings received are unaltered or correct.
Confirmation:
Green Dot should appear on the Top Left Screen of DoorPad. (DoorPad was successfully registered to
the SIP Server and is ready to call and receive call from the Client Device)
Congratulations! You should be able to use DoorPad now as SIP Server. Please proceed to
Product Configuration should you wish to add local extensions.
Nex Phone Application
Make sure that your Smartphone and DoorPad is connected to the same network.
IP Phone
(For Illustration, we are using a generic IP Phone. Terms may vary for branded IP Phones.
Our Technical Support will be glad to help)
(Add Clients to DoorPad) In this section, we will be guiding you to adding clients to
your Doorpad which are local extensions to other smart devices.
In this section, we will help you use your DoorPad as a client to an existing SIP Server.
1. Download the NEX Phone Application
from the Play Store on your Smart Phone
2. Open the Application
3. Tap “Settings”
4 .Tap “SIP”
5. Enter the SIP Settings
(This can be found by tapping Setting > tapping My Profile)
•Display Name (Indicate the Name you want to appear in
your Phone Book)
• Call ID (Kindly check autoprovision.nexportals.com for
the available extensions for your DoorPad)
• IP Address (Enter the IP address you’re both connected)
• Default Password (000000)
• Port (Enter the default SIP Port: 5060)
• Swipe 3G/LTE if you want to use mobile data.
• Note: Carrier charges for internet service may apply
• Tap “ ”
You may now use NEX Phone App as a local extension. For more Phone Features, please proceed to
Product Basic Features
Product Configuration
Product Basic Features
Product Setup (as Client)
7. Input the following SIP Account details
for the DoorPad device.
6. Tap "Save"
Call ID (SIP Call ID Number)
IP Address (SIP Server Address)
Password (SIP Account Password)
Port (SIP Server Port)
7. Tap "Ok"
Note:
A pop up message will display saying
Successfully Saved
Direct Call
There are multiple ways to call with a particular extension
From the Home Screen
1. Tap “Dialer Tab”
2. Enter Four (4) Digit Extension Number
3. Tap “Call” button to call
Do not Disturb
Temporarily stops incoming calls
1. To enable, simply dial and call *78
2. To disable. Simply dial and call *79
Call Transfer
Direct your live call to another extension
1. Tap “Call Transfer Icon”
2. Enter Four (4) Digit Extension
Call Pickup
Allows other users to answer incoming call for someone. To intercept an incoming call:
1. Tap “Dialer Tab”
2. Tap “Call Pick Up” or Dial *8
Call Forward - Immediate
Redirects a call to another destination immediately when the extension is called or reached.
To set Call Forward - Immediate
1. Tap “Dialer Tab”
2. Enter recipient extension number
3. Tap “Enable”
To update the Call Forward recipient
1. Tap “Dialer Tab”
2. Enter recipient extension number
3. Tap “Update”
To disable Call Forward - Immediate
1. Tap “Dialer Tab”
2. Tap “Call Forward Immediate”
3. Tap “Disable”
Call Forward - Busy
Redirects a call to another destination when the extension is busy or when the call is rejected
To set Call Forward - Busy
1. Tap “Dialer Tab”
2. Enter recipient extension number
3. Tap “Enable”
To update the Call Forward recipient
1. Tap “Dialer Tab”
2. Enter recipient extension number
3. Tap “Update”
To disable Call Forward - Busy
1. Tap “Dialer Tab”
2. Tap “Call Forward - Busy”
3. Tap “Disable”
Surveillance
Home Automation
From the Home Screen
1. Tap “Call Logs”
2. Tap “Call Button” on the right side of the caller extension
From the Home Screen
1. Tap “Contacts Tab”
2. Tap “Call Button”
Note:
If the dot is Red, make sure that DoorPad device is connected to the WiFi network with Internet
If the dot is Red, make sure that SIP Settings received are unaltered or correct.
Confirmation:
Green Dot should appear on the Top Left Screen of DoorPad. (DoorPad was successfully registered to
the SIP Server and is ready to call and receive call from the Client Device)
Congratulations! You should be able to use DoorPad now as SIP Server. Please proceed to
Product Basic Features should you wish to add local extensions.
1. Connect IP Phone to LAN Cable on the same Network
that the DoorPad is connected
2. Select “Menu”
3. Select “Setting”
4. Select “Advanced”
5. Enter default IP Phone Password (this may vary
depending on model)
6. Select Accounts
7. Set IP address of the SIP Server
8. Set Server Port of the SIP Server
9. Set User ID / Call ID. This will be the local extension
number
10. Enter DoorPad Default Password: 000000
11. Set Display Name. This is the same as the local
extension number
12. Make sure of the following:
Outbound Proxy: Disabled
Registration: Enabled
13. Save Details
You may now use the IP Phone as a local extension
The preceding instructions have been created for the purpose of allowing users to setup
their DoorPad to its functional state.
Diagrams, Illustrations and Mechanics are consistent to the latest
DoorPad Update on 09/01/16.
Additional and Advanced Features are found on
http://nteksystems.com/pages/download
www.nteksystems.com
Contacts TabCall LogsDialer Tab
Note:
A pop up message will
display for Setup Guide
will appear
3. Tap "No"
4. Tap "Manual Setup"
5. Tap "OK"
6. Tap "Client Setup"
1. Tap “Settings”
2. Tap “SIP Setting”
 Loading...