

Page 1

Table of Contents
Part 1. Basic Operations
1-1. Description of parts
Main Controller Screen / Data (USB,SD,HDMI)
......................................................
Screen
Main Controller Screen
Data (USB,SD,HDMI) Screen
1-2. Getting Started
1-3. Return to the previous Menu
1-4. Screen Off
1-5. Volume control
1-6. Wireless headphone operation
1-7. Choosing the File from the File List
................................
................................
........................
......................................
.....................
...........................................
.....................................
...................
Part 2. Setup
2-1. Display
2-2. Speaker
2-3. Information
...............................................
..............................................
.........................................
Part 3. Photo
3-1. Photo Mode Window Components
3-2. Photo Mode Basic Actions
3-3. Slide show
..........................................
......................
Part 4. Music
4-1. Music Mode Window Components
4-2. Music Mode Basic Actions
.....................
Part 5. Movie
5-1. Movie Mode Window Components
5-2. Movie Mode Basic Actions
.....................
Part 6. HDMI
Part 6. HDMI
...........................................
...........
............
...........
...........
Part 9. Optional AUX mode
Part 9. Optional AUX mode
3
Part 10. Manual mode
3
3
Part 10. Manual mode
3
4
Specifications
4
Specifications
4
4
5
6
7
8
8
9
9
10
11
12
13
14
15
...............................
........................................
.........................
23
23
24
Part 7. Dual Link
7-1. Dual Link Connection
How to connect Android phone
How to connect iOS phone
7-2. Dual Link Disconnection
..........................
......................
...........................
.......................
Part 8. Dual Screen Mode
Dual Screen (Main-Data)
Dual Screen (Video)
Dual Screen (Music)
Dual Screen (Photo)
............................
..................................
..................................
..................................
16
16
17
19
21
21
21
22
1
Page 2

Precautions
The product is subject to change without notice
The Screens Shown in the examples may differ from actual screens, which may be changed
without notice for performance and function improvement.
Monitor Protection
To protect the monitor from damage, do not operate the monitor using a ball point pen
or similar tool with the sharp tip.
Cleaning
When cleaning the touch screen, turn off the unit and use the soft cleaning cloth.
Please do not use cloths such as those made with hard, chemical, or oiled materials
(alcohol, benzene, etc.) This may damage or distort the surface of the unit.
Do not disassemble or repair the system. If problem exists, please contact your local dealer
for advice.
If the vehicle was parked in a very cold or very hot place, you may see a blank screen,
distorted picture.
The system will return to normal after the unit temperature returns to a normal operating
range. This may take more than an hour depending on the temperature.
Warning
Please do not insert a separate USB device which supplies power to the multimedia
USB port.
2
Page 3
Part 1. Basic Operations
1-1. Description of parts
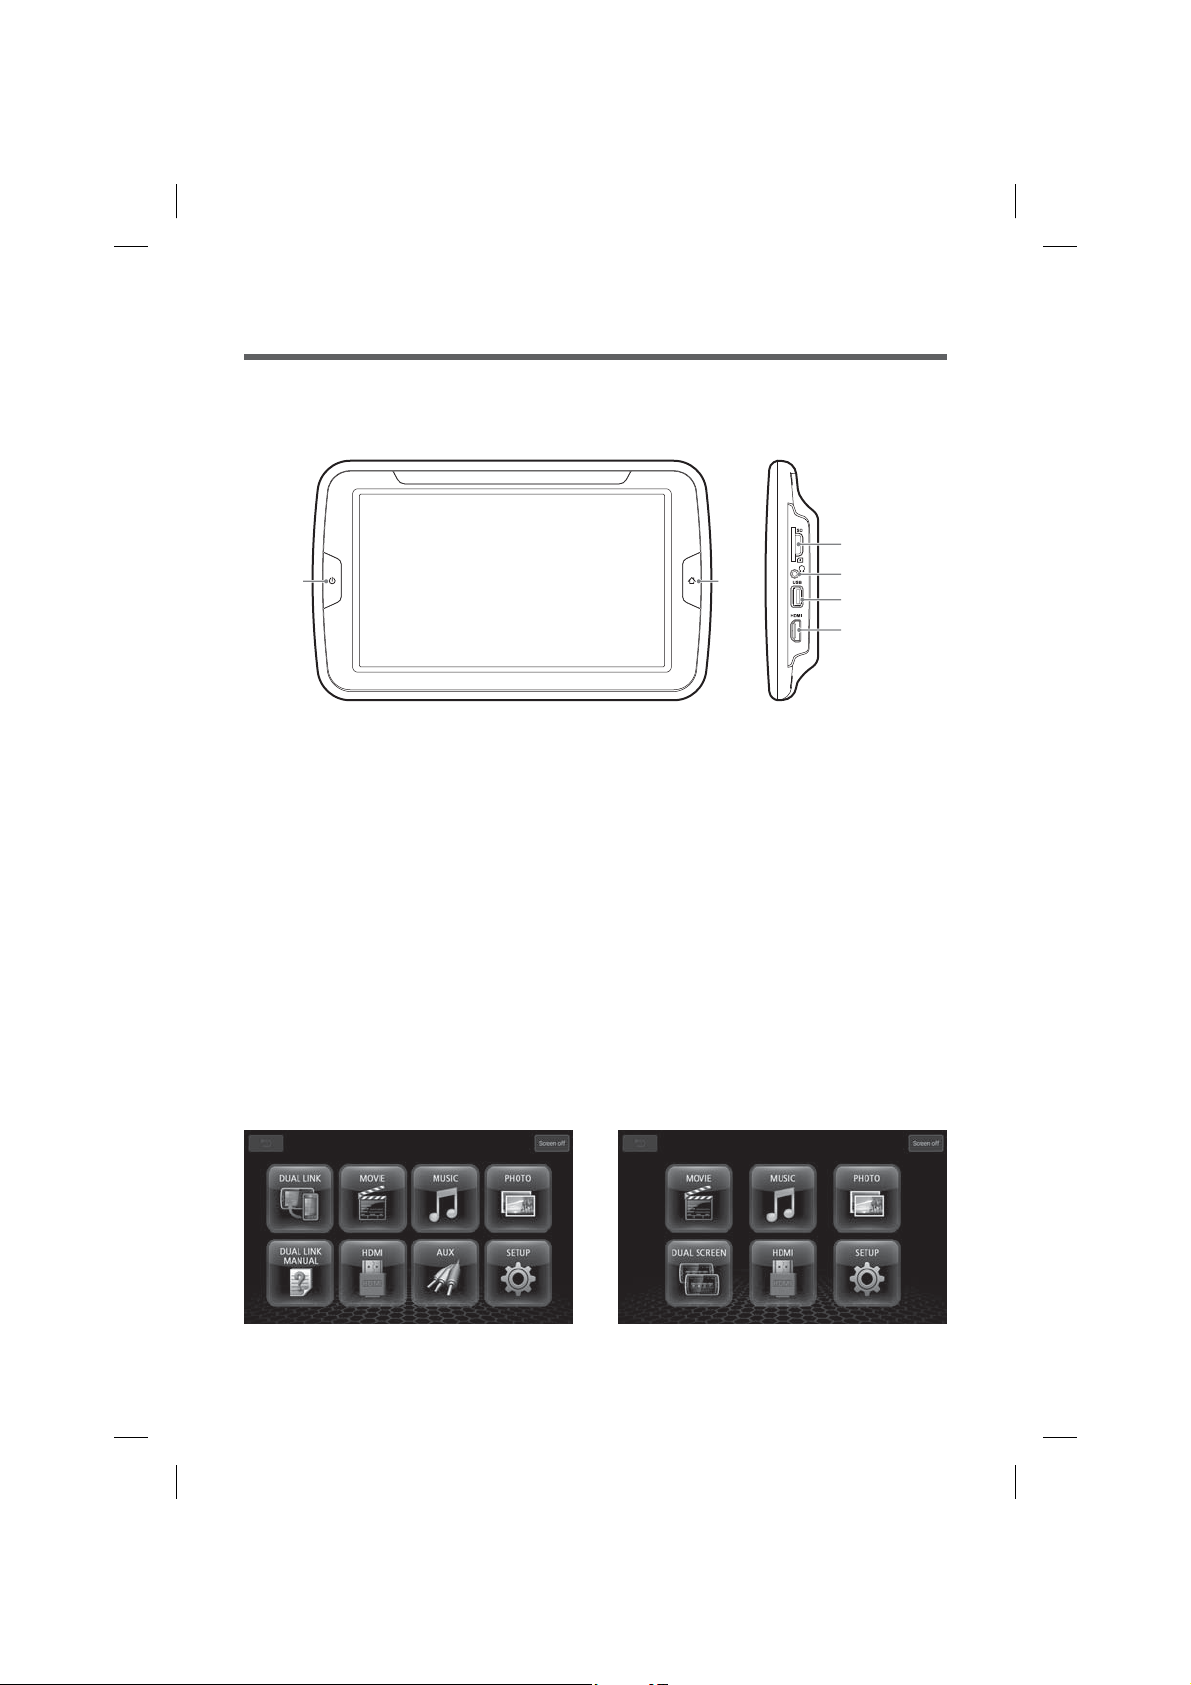
Main Controller Screen / Data (USB,SD,HDMI) Screen
Power
Basic Control Buttons
1) Power
Press to turn on power of the unit
Press and Hold the Power button to switch to off mode.
2) Home
Press to display the Top Menu Screen.
3) Reset
Press Power and Home Button together.
4) Brightness
Press home button for 3 seconds (long key), LED will change from Green to Red,
and you can adjust brightness levels.
Press the Power Button to decrease the brightness, and the Home button to increase
the brightness.
If you don’t press home button within 5 sec, the LED will change back to Green
and the button control returns to normal.
Home
SD SLOT
3.5Ø Audio
output
USB
HDMI
Main Controller Screen Data (USB,SD,HDMI) Screen
3
Page 4
Part 1. Basic Operations
1-2. Getting Started
System Start
1. To start the system, the vehicle ignition key switch must be in the ACC or engine ON position
2. Press “Power” button to turn on power of the unit.
3. After Logo image display, Main Menu will appear on Main Controller Screen.
1) The Main Controller Screen can send the same screen to the Data (USB,SD,HDMI) Screen,
but the Data (USB,SD,HDMI) Screen cannot pass the same display to the Main Controller
Screen.
2) The picture of the Main Controller Screen will be displayed on the Data (USB,SD,HDMI)
Screen while the main control screen is playing a Movie, Music or photos.
3) For more details, please refer ”Part 8. Dual Screen Mode” from the manual.
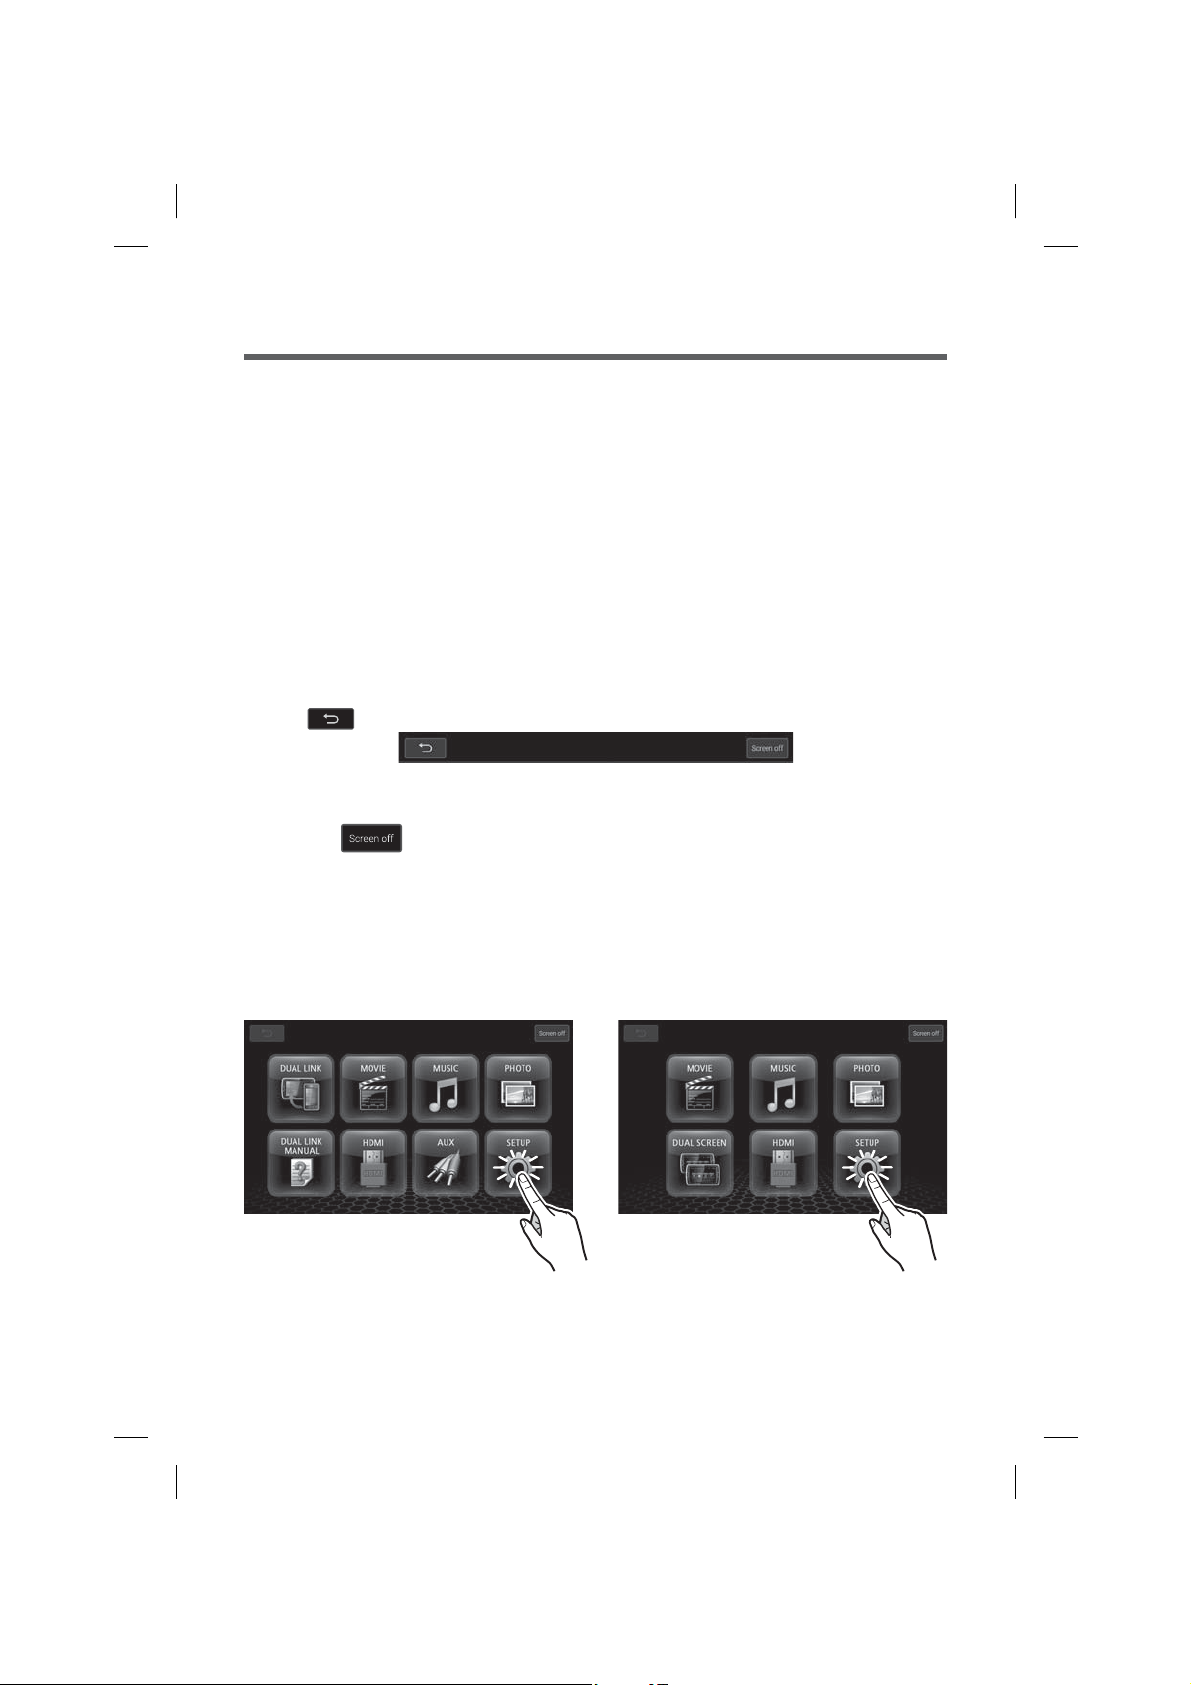
1-3. Return to the previous Menu
Press Button at the upper Left-hand corner of Screen to move to the previous Menu.
1-4. Screen Off
Press the button at the upper right-hand corner of the screen to turn the screen off.
The audio of AV keeps playing while the screen is turned off.
Touch the screen to turn the screen on again.
1-5. Volume control
1.Press the SETUP button on the Main menu screen.
Main Controller Screen Data (USB,SD,HDMI) Screen
4
Page 5
Part 1. Basic Operations
-
2. Control the Main Volume by pressing
Main Controller Screen Data (USB,SD,HDMI) Screen
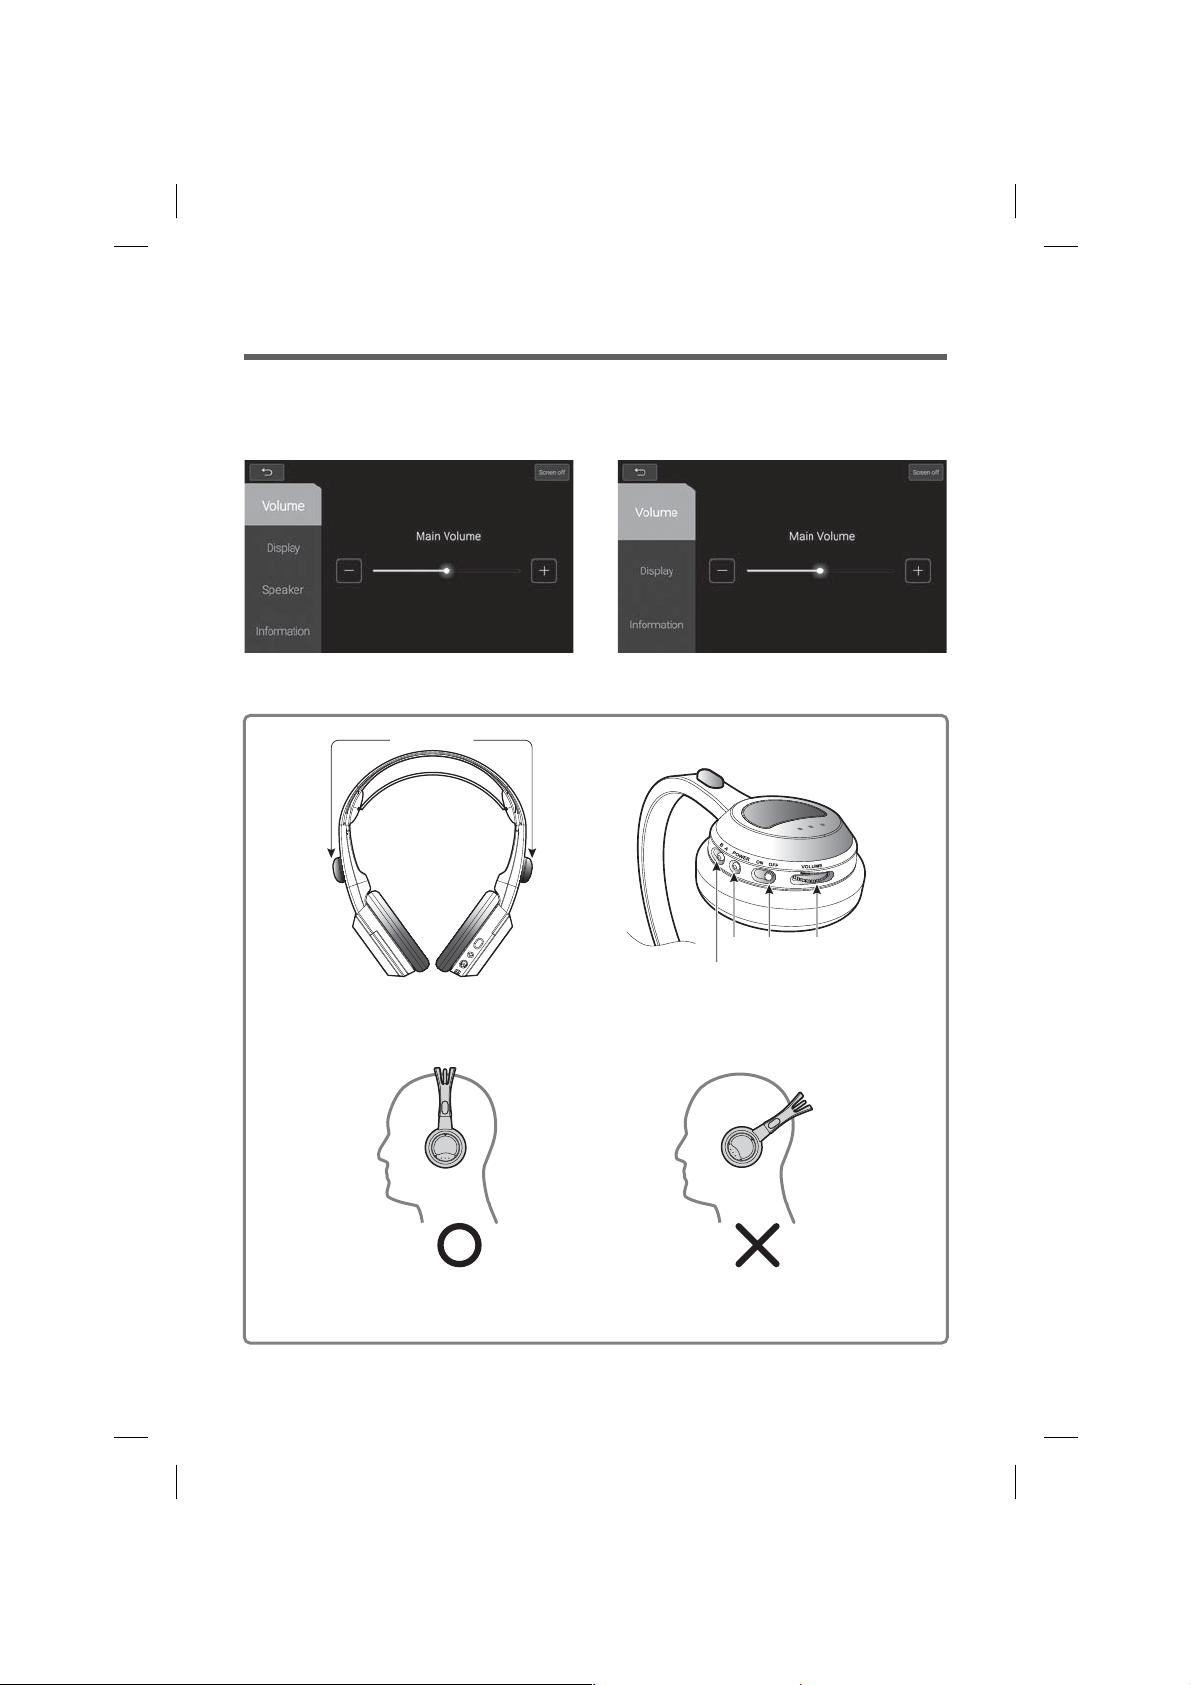
1-6. Wireless headphone operation
IR Receiver
,+
button.
Power
Power
Left
Right
LED
Headphone A/B
ON/OFF
VOLUME
※Notice
The right way to wear a headphone.
For best audio performance, the headphones must be worn correctly,
with the headband over the top of the head.
5
Page 6
Part 1. Basic Operations
Headphone ON/OFF
To turn the headphones on, toggle the ON/OFF switch to the on position.
To turn the headphones off, toggle the ON/OFF switch to the off position.
If no signal has been received within 3 minutes, POWER will automatically turn off for battery
saving.
To turn the headphones on again, cycle the power switch to the Off then On position again.
Headphone A/B
Main Controller Screen: A channel, Data (USB,SD,HDMI) Screen: B channel
LED
LED will be illuminated when the headphone is ON.
Headphone volume
Turn the volume dial to adjust volume to desired level.
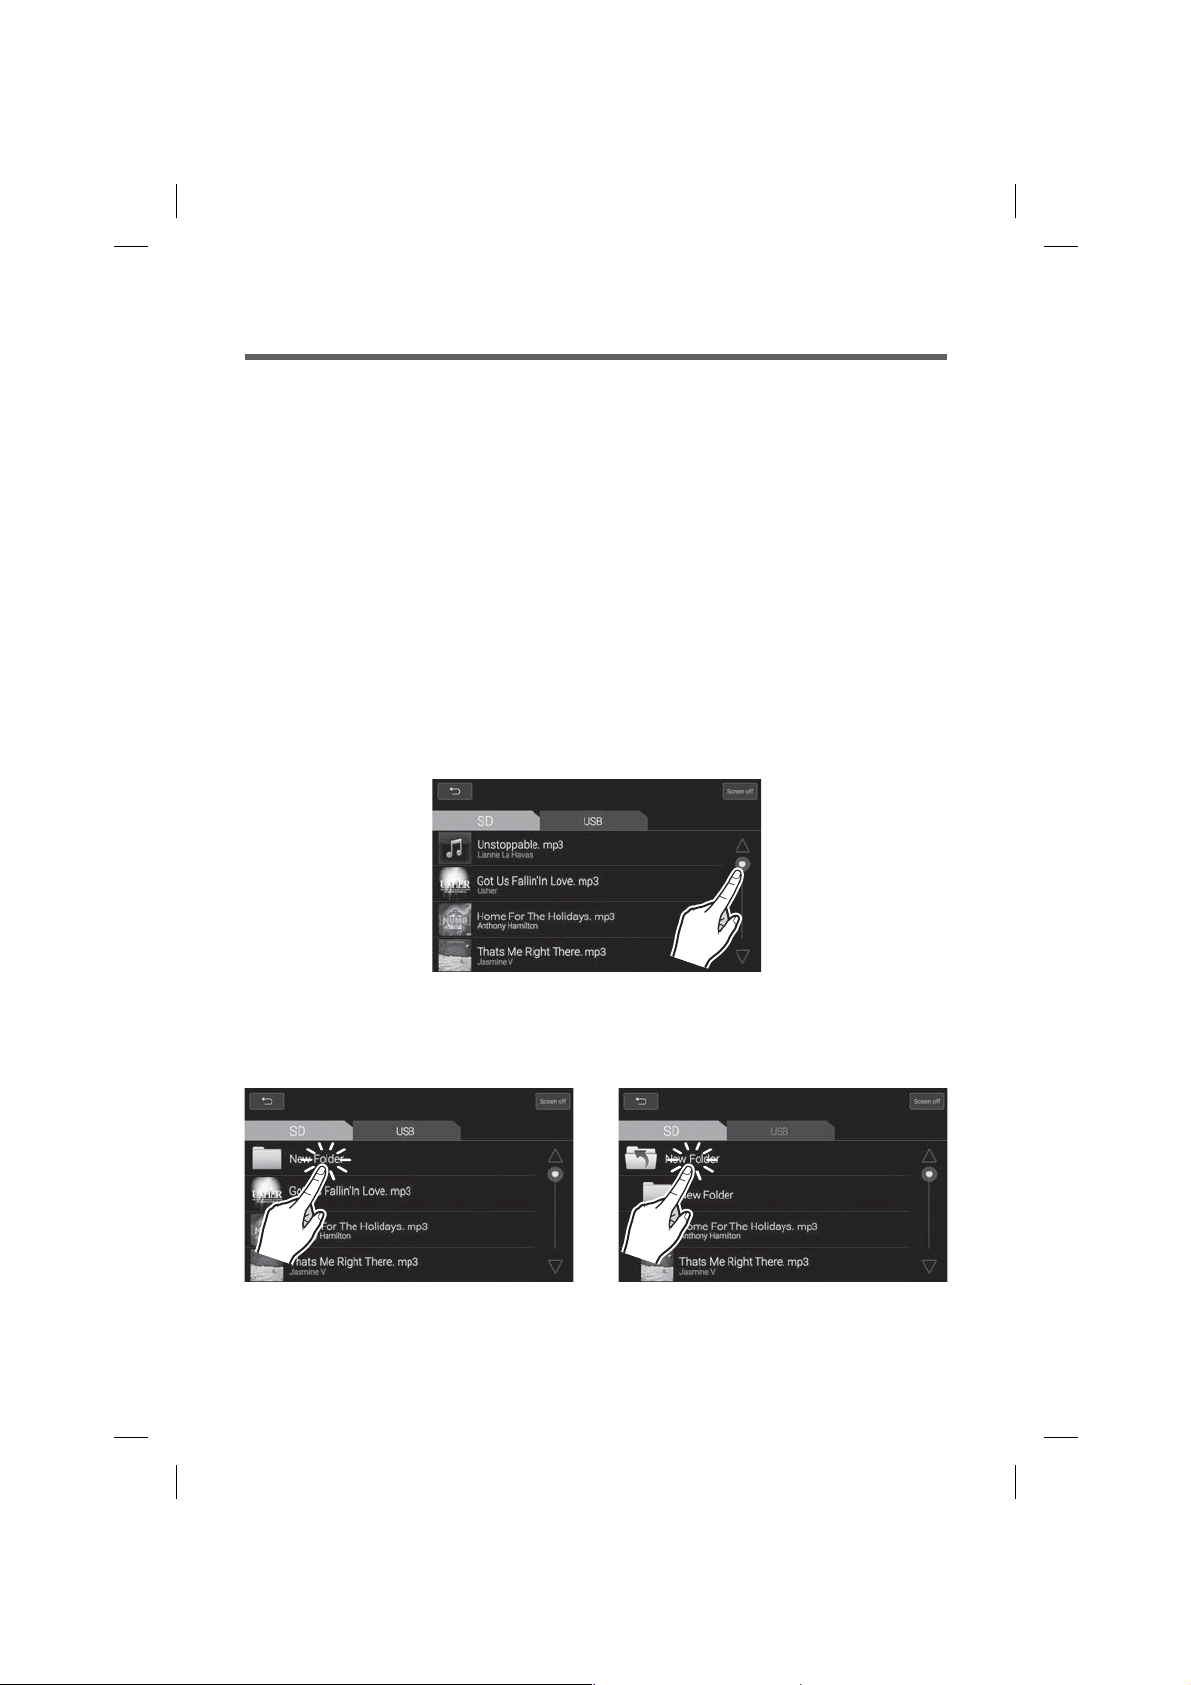
1-7. Choosing the File from the File List
Move to the file list
Touch the screen and drag upwards or downwards to scroll through a file list.
Move to a folder in the file list
Touch a folder from the file list.
6
Return to Previous Folder icon to move to
the upper level folder.
Page 7

Part 2. Setup
Press the SETUP button on the Main menu screen.
Main Controller Screen Data (USB,SD,HDMI) Screen
2-1. Display
Main Controller Screen Data (USB,SD,HDMI) Screen
Language
Press English or Arabic to change the main menu language.
Brightness
Set the Brightness of the screen to your desired level.
Info
Press button to restore system settings to factory default.
7
Page 8
Part 2. Setup
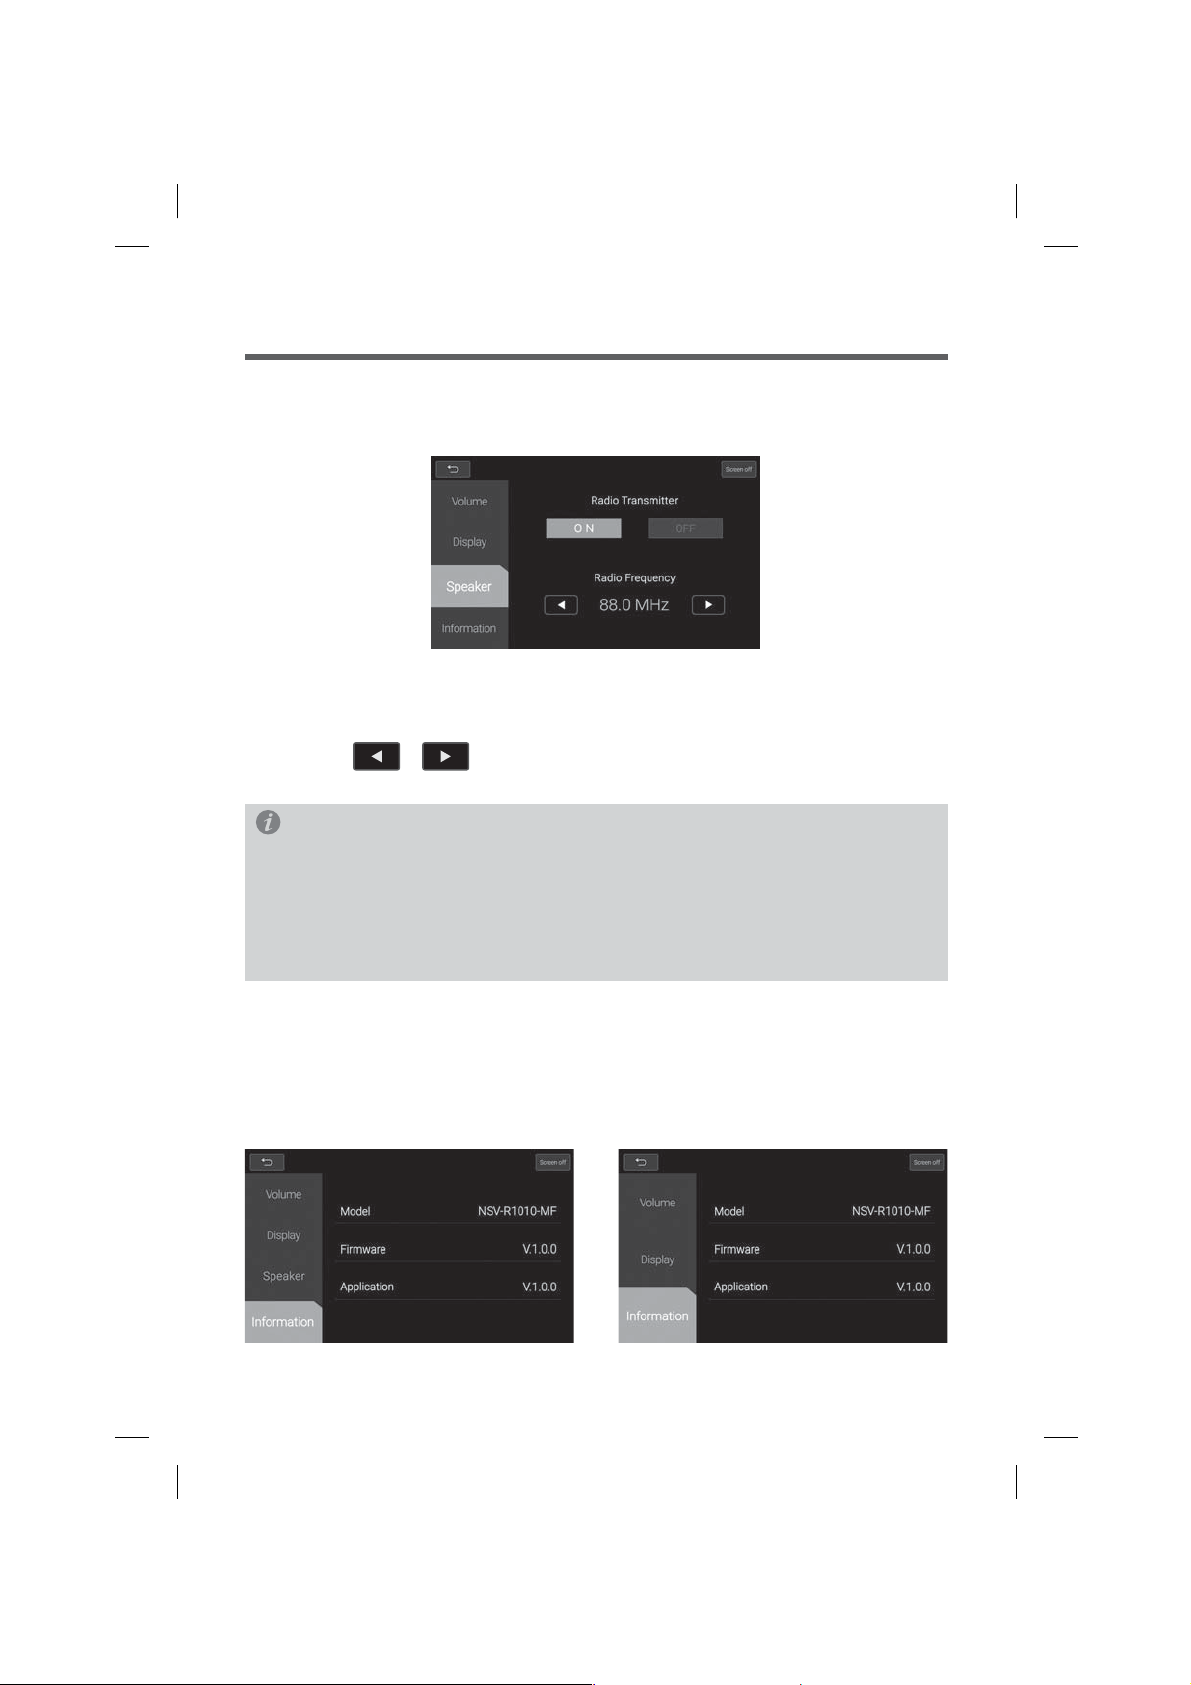
2-2. Speaker
※ This function is only available on Main Controller Unit
Radio Transmitter
Press On/Off button to turn Radio Transmitter On/Off.
Radio Frequency
Press the , button to select the desired Radio Frequency.
(88.0~90.7MHz, 0.3MHz step)
Info
For best results, select a station with minimal background noise or existing broadcasts in your
area. The best method to do this is to first turn the FM Transmitter feature OFF, and then check
the following stations one by one to look for the one with least interference or existing
broadcasts - 88.0, 88.3, 88.6, 88.9, 89.2, 89.5, 89.8, 90.1, 90.4, 90.7. Ideally you should find a
station with a clean "white noise".
Set this as one of your presets on the car's stereo, then turn ON the transmitter and adjust the
frequency on the Rear Seat Entertainment to match this number.
2-3. Information
Press the Information button on the Setup mode screen.
This will display version numbers of the Firmware and applications.
Press the Back Button to move back to the previous mode.
Main Controller Screen Data (USB,SD,HDMI) Screen
8
Page 9

Part 3. Photo
Press the Photo button on the Main menu screen.
Main Controller Screen Data (USB,SD,HDMI) Screen
3-1. Photo Mode Window Components
1
3
1
Previous button: Select previous photo.
2
Next button: Select next photo.
3
Slide show button: Sets the slide show.
4
Photo Title Display: Displays the title of the photo.
5
File List Button: Enters the media file list.
2
5
4
3-2. Photo Mode Basic Actions
1. Press the File List Button. 2. Choose the storage device (SD/USB) that
contains the files you require.
3. Choose a photo file from the file list.
9
Page 10

Part 3. Photo
4. Selected photo file will be displayed.
3-3. Slide show
1. Press the slide show button.
5. Each time you touch the screen, the screen
will move back and forth between full screen
and previous menu screen.
2. Setup the show time.
The next photo will be automatically
displayed after the set time is reached.
3. Touch screen to stop the slide show.
10
Page 11

Part 4. Music
Press the Music button on the Main menu screen.
Main Controller Screen Data (USB,SD,HDMI) Screen
4-1. Music Mode Window Components
1
3
6
4 57 8
1
Repeat Button : Turns the Repeat function ON / OFF.
2
Shuffle button: Turns the Shuffle function ON / OFF.
3
Album art: Displays the album image of the current file that is playing.
4
Play Time: Displays the play time of the current file.
5
Total Time: Displays the total play time of the file.
6
Previous Button: Select previous track.
7
Play/Pause Button: Play or pauses the file.
8
Next Button: Select next track.
9
File List Button: Enters the media file list.
2
9
11
Page 12

Part 4. Music
4-2. Music Mode Basic Actions
1. Press the File List Button. 2. Choose the storage device (SD/USB) that
4. The selected music file will be displayed.
contains the files you require.
3. Choose a music file from the playlist.
5. Press the album art icon to switch screen to
Music info display.
Press the Music info display to move to the
previous mode.
12
Page 13
Part 5. Movie
Press the Movie button on the Main menu screen.
Main Controller Screen Data (USB,SD,HDMI) Screen
5-1. Movie Mode Window Components
1
3
4 56
1
Previous Button: Select previous video file.
2
Next Button: Select next video file.
3
Play/Pause Button: Play or pauses your video.
4
Play Time: This displays the play time of the video.
5
Total Time: This displays the total play time of the video.
6
Title: Displays the title information of the current file.
7
File List Button: Enters the media file list.
2
7
13
Page 14
Part 5. Movie
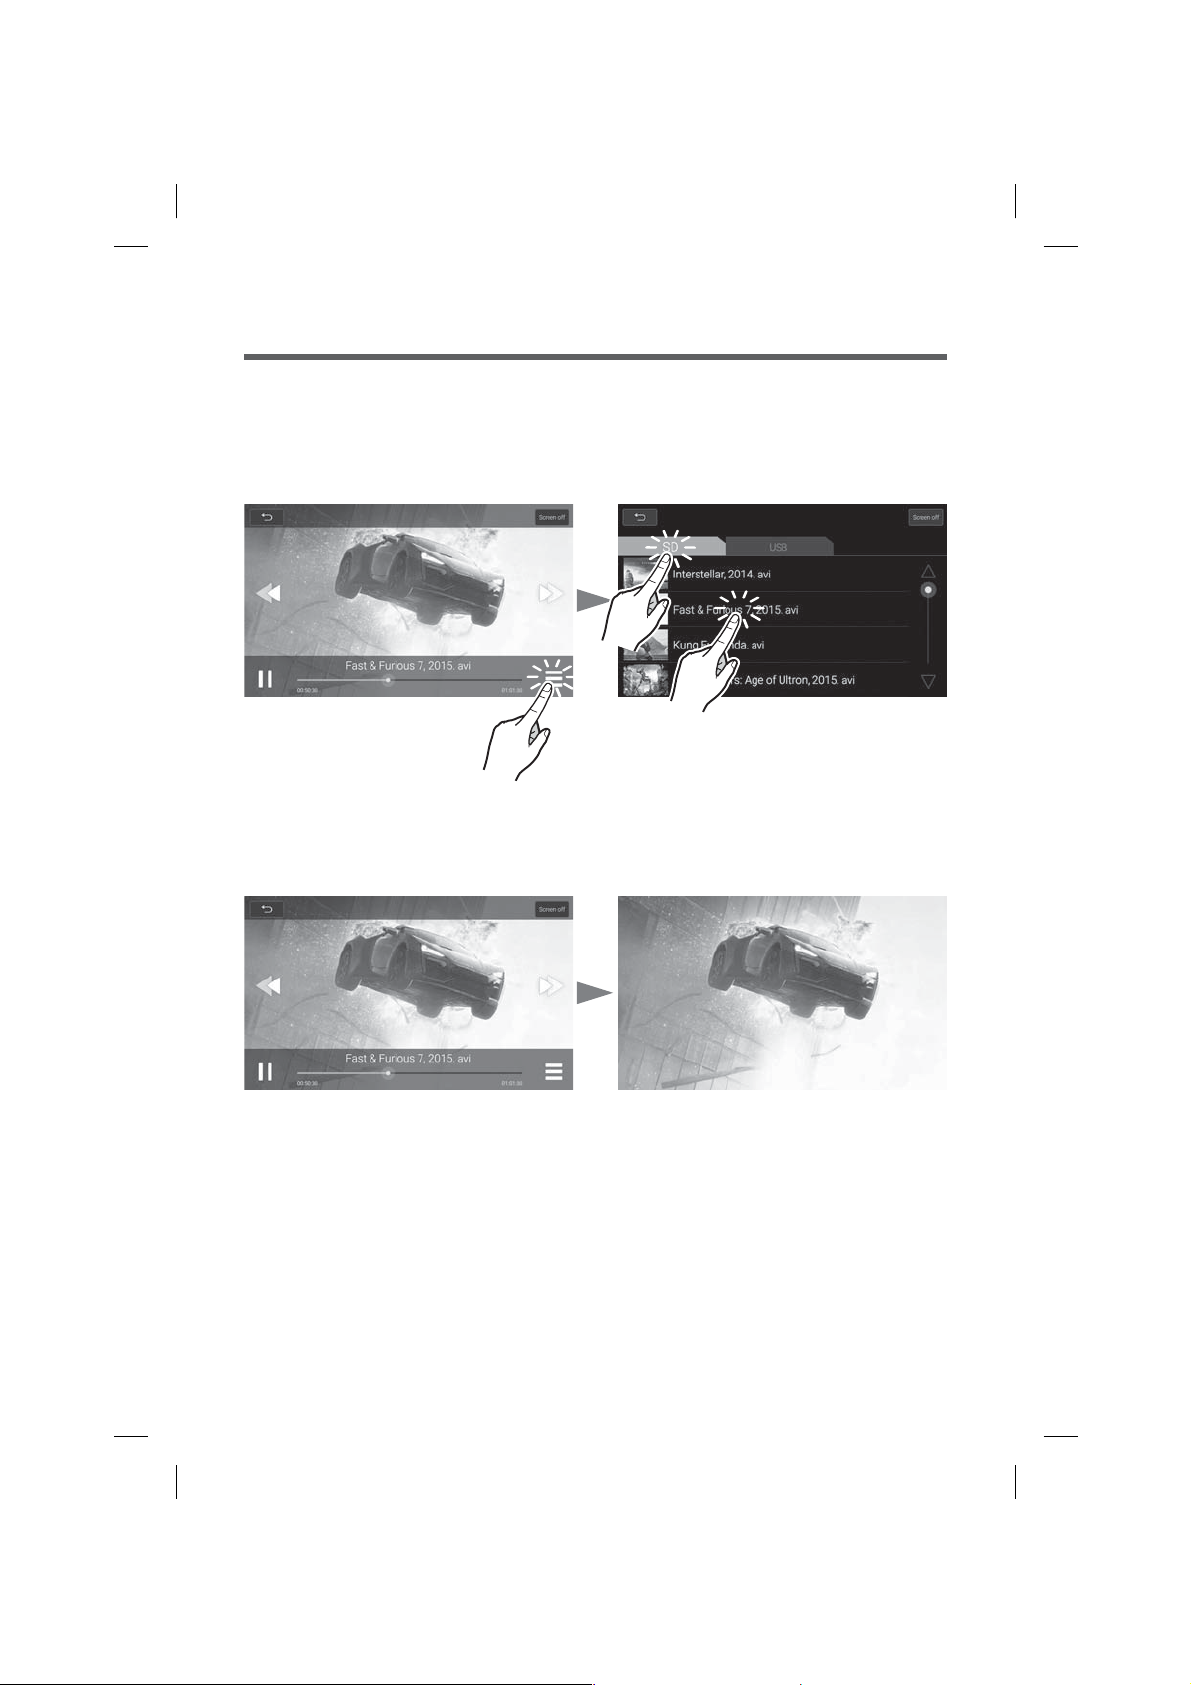
5-2. Movie Mode Basic Actions
1. Press the File List Button. 2. Choose the storage device (SD/USB) that
contains the files you require.
3. Choose a video file from the file list.
4. Selected movie file will be displayed. 5. Each time you touch the screen, the screen
will move back and forth between full screen
and previous menu.
14
Page 15

Part 6. HDMI
Connect the AV equipment and the Rear seat entertainment with HDMI cable.
1. Press the HDMI button on the Main menu screen.
Main Controller Screen Data (USB,SD,HDMI) Screen
2. Video and Audio Output from connected AV device will be played by RSE.
15
Page 16

Part 7. Dual Link
※ This function is only available on Main Controller Unit
Dual Link is a feature that allows you to enjoy music stored on mobile devices, your videos or
pictures through Rear seat entertainment system.
1) Mirroring Function with Android Phones OS software version has to be minimum 4.2 onwards.
Info
Some Android phones might support Mirroring function from 4.1.2 Version.
Please check with the manufacturer.
2) iPhone Mirroring/AirPlay OS will function from iOS 7.1 onwards.
3) Operation will vary depending on the Android device and SW version of the Android OS.
4) Compatibility with all Android devices is not guaranteed.
7-1. Dual Link Connection
How to connect Android phone
1. Press the Dual link button on the Main
menu screen.
2. Press the Android Button.
3. The device name and the operating system
will appear on the screen.
16
4. Press the (Screen mirroring, Miracast) button
from your smartphone when the search is
completed, select the "RSE".
Page 17

Part 7. Dual Link
5. Click the "Accept" button when search is completed.
How to connect iOS phone
1. Press the Dual link button on the Main
menu screen.
2. Press the iOS Button.
3. Press HDMI or continue button to
proceed to next function.
4. Turn on the "Hotspot" of your device.
Enter the wifi Password "12345678".
12345678
17
Page 18
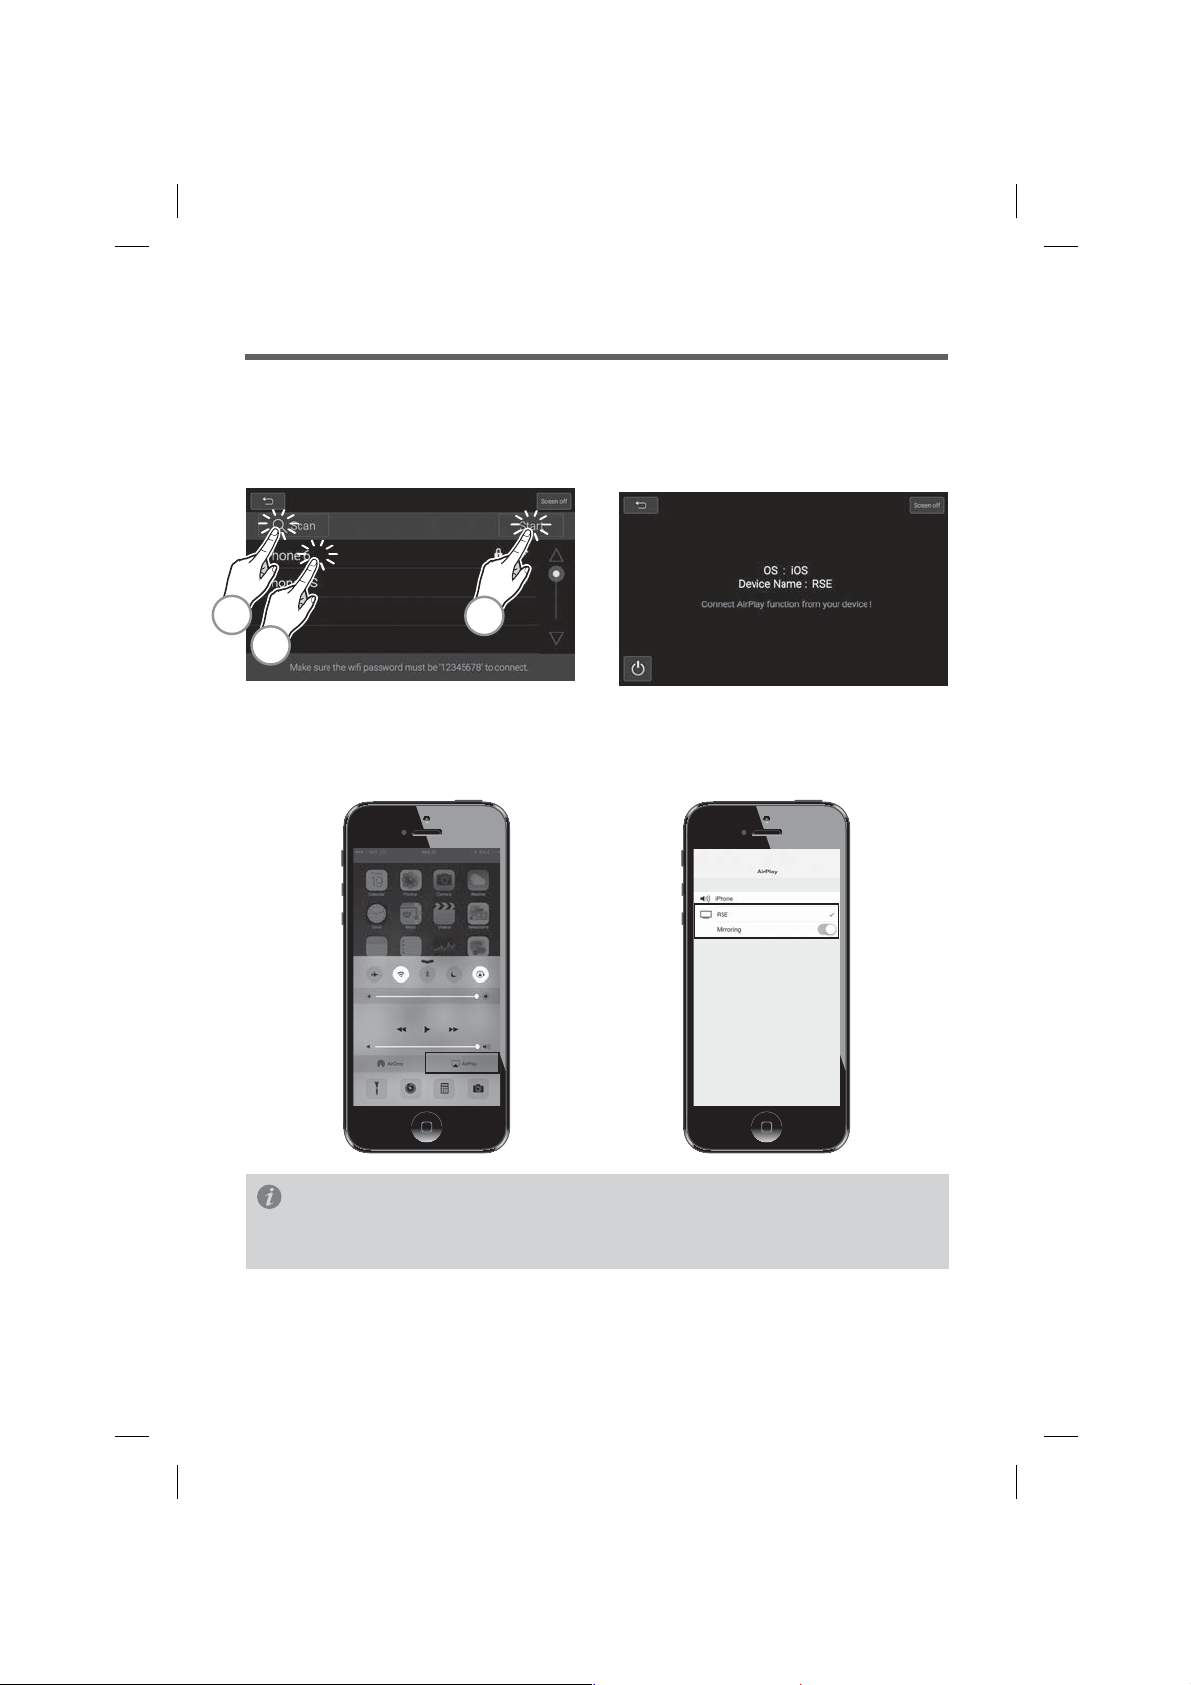
Part 7. Dual Link
5. Searching connectible Device.
A. Press Scan button.
B. Select your device from the list.
C. Press Start button.
A
C
6. The device name and the operating system
will appear on the screen.
B
7. Press the "AirPlay" button on the iPhone. 8. Select RSE in AirPlay mode.
Mirroring set to "ON"
Info
When connected with AirPlay on and mirroring function off, IOS is able to play videos on the RSE
and will still allow you to use your phone's other functions on the iPhone itself.
18
Page 19

Part 7. Dual Link
7-2. Dual Link Disconnection
1. Turn off (Screen mirroring, Miracast, Airplay) from your smartphone to disconnect dual link mode.
2. Press power button to disconnect Dual Link mode.
19
Page 20

Part 8. Dual Screen Mode
Dual screen mode info
Users can enjoy the same files on both rear seat monitors.
The rear seat entertainment system is divided into the Main Controller Screen and Data (USB,SD,
HDMI) Screen.
The Main Controller Screen can send the same screen to the Data (USB,SD,HDMI) Screen,
but the Data (USB,SD,HDMI) Screen cannot pass the same display to the Main Controller Screen.
1. Music, Video, Picture, Dual Link mode
image from Main Controller Screen will be
displayed.
3. Same image will be displayed in both
sides Screen.
2. Press Dual Screen button from Data
(USB, SD, HDMI) Screen.
4. Press Home button on Data(USB, SD, HDMI)
Screen to discontinue Dual Screen mode.
Main Controller images on Data (USB,SD,HDMI)
Screen appear when Music, Video, Picture, and
Dual Link mode is playing next image will appear
in Main Menu, File list, and setup mode.
20
Page 21

Part 8. Dual Screen Mode
Dual Screen (Main-Data) Dual Screen (Video)
Main menu on main controller screen does
not appear on Data (USB,SD,HDMI) Screen.
Video list does not appear on Data (USB,SD,
HDMI) Screen.
Main controller screen sends video image
Dual Screen (Music)
only when the video is playing.
Music list does not appear on Data (USB,SD,
HDMI) Screen.
Main controller screen sends music display
image only when the music is playing.
21
Page 22

Part 8. Dual Screen Mode
Dual Screen (Photo)
Photo list does not appear on Data (USB,SD,
HDMI) Screen.
Main controller screen sends photo image
only when the photo is displayed on the main
screen.
22
Page 23

Part 9. Optional AUX Mode
※ This function is only available on Main Controller Unit.
The rear seat passengers can enjoy the same video file that is being played on the front Audio
Video Navigation (AVN) unit in the vehicle through an optional connection that can be fitted.
1. Play a video file of AVN at driver side.
2. Press the AUX button on the specific
RSE that users desire to play.
Info
AUX function will only be utilized when the RSE system is connected to the front AVN unit.
Please see your authorised vehicle service centre for further information on enabling this optional
feature.
3. The same video file will be played as the AVN
screen on the full screen.
Part 10. Manual mode
※ This function is only available on Main Controller Unit.
Dual Link Function Manual will appear when you click the button.
23
Page 24

Specifications
10.1 inch Touch Screen LCD
Resolution of LCD : 1024(H)x600(V)
Monitor
General
Function
Active area : 222.72mm x 125.28mm
Dot pitch : 0.2175(W) x 0.2088(H)
Backlight : LED
Luminance : 500 cd/m
Input operating voltage range : +10.8V~16V selectable
Headphone Output power of unit : 10mW (at 16ohm)
Dimension : 249(W)x149(H)x33.8(D)mm
Operation Temperature : -10°C~60°C
External ACC : Max 1.5A
Multimedia formats
①Video Codec : OPEN Divx(3.x/4.x), AVI(Max size 720 x 480)
②Audio Codec : MP3, WMA
③Image Codec : BMP, JPG
SD/USB
SD Card Slot : SD card slot (Supports FAT 12/16/32 file system)
USB Socket (USB 2.0 Host Port) : USB Memory & USB HDD Support
Supports FAT 12/16/32 file system for USB device, USB : Max 5V, 1.0A
2CH HEADPHONE: IR
3.5 Ø AUDIO OUTPUT
AV INPUT (AUX)
HDMI
DUAL LINK
FM TRANSMITTER
2
24
Page 25

FCC Radiation Exposure Statement:
This equipment complies with FCC radiation exposure limits set forth for an uncontrolled environment. This
equipment should be installed and operated with minimum distance 20cm between the radiator & your body.
FCC Warning
This device complies with Part 15 of the FCC Rules. Operation is subject to the following two conditions:
(1) This device may not cause harmful interference, and (2) this device must accept any interference received,
including interference that may cause undesired operation.
NOTE: Any changes or modifications to this unit not expressly approved by the party responsible for compliance
could void the user's authority to operate the equipment.
 Loading...