

Page 1
MUSIC SYSTEMS OF THE FUTURE
USER MANUAL
icon
apollo
apollo
Page 2
Table of Contents
USER INTERFACE
1.0 Main Menu........................................................1
1.1 Search...............................................................2
1.2 Artists................................................................6
1.3 Charts...............................................................8
1.4 Popular..............................................................9
1.5 Feature*..............................................10
1.6 Language Selector............................................14
SERVICE MODE
2.0 Main Menu........................................................15
2.1 Monetary...........................................................17
2.2 Updates............................................................20
2.3 Scrolling Message............................................22
2.4 Popularity..........................................................25
2.5 Book Keeping...................................................28
2.6 Volume Control.................................................30
2.7 Play Settings....................................................32
2.8 Price Lists.........................................................35
2.9 Network............................................................37
2.10 BGM.................................................................39
2.11 Lockouts...........................................................54
2.12 Admin...............................................................59
Jukebox User Manual
TM
You
* Only for Online Jukeboxes fitted with YouTube Upgrade Kit
icon
apollo
apollo
Page 3

USER INTERFACE
Page 4
1.0 Main Menu
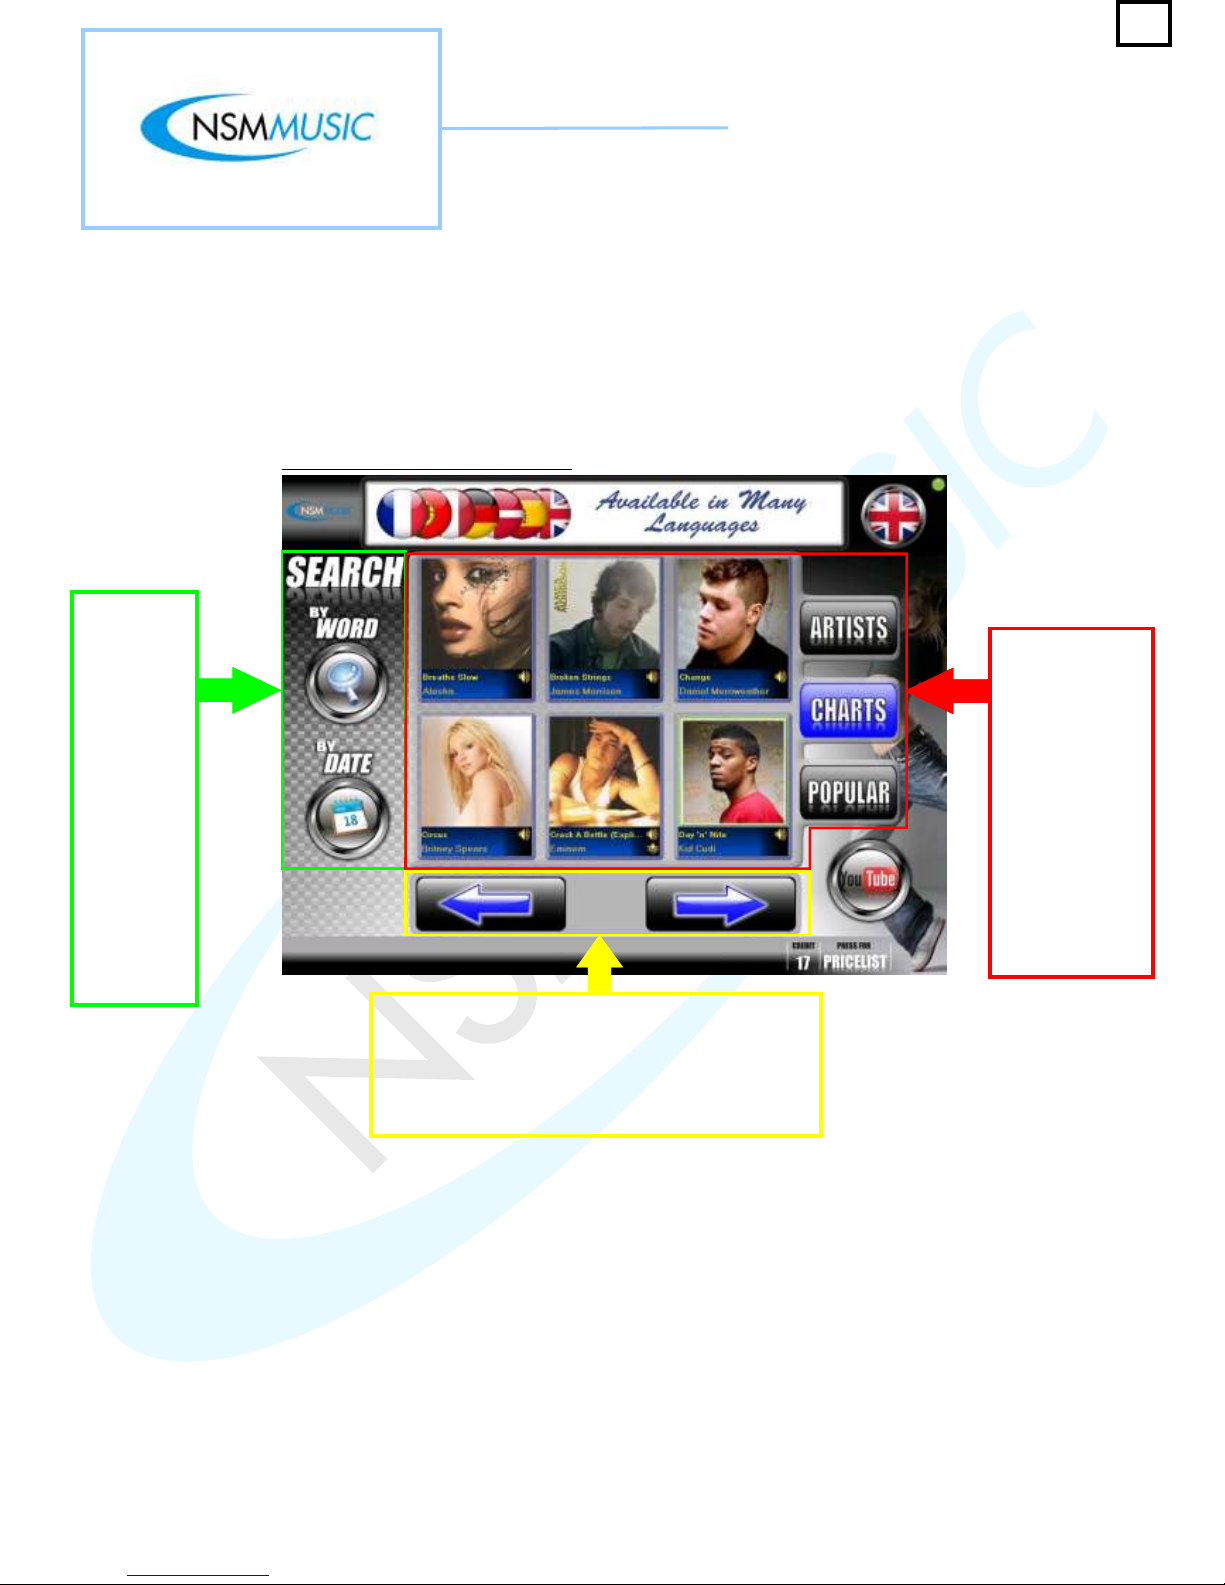
Once the Icon Apollo’s Interface has loaded, the first screen will be the all-new Main Menu screen
(fig. 1.0). This new-look Main Menu screen allows the user to navigate the jukebox in a much
simpler way, allowing faster time to find their music as the main sections ARTISTS, CHARTS and
POPULAR are all accessed through the same screen. Each of these sections and
the other navigation buttons will be covered in further detail in this User Manual.
This is the main
navigation area
for the user to
select their
choice of music.
As you will see it
is divided up into
3 sections
(ARTISTS,
CHARTS and
POPULAR).
These sections
will be outlined in
further detail later
in this manual.
This is the scroller navigation for each of the 3
sections. The scroller is the same for each section
except for the Artists section where an extra button
appears in the middle. Here you simply press either
directional arrow button until you reach the desired
Artist/Track you wish the jukebox to play.
The Main
Menu screen
has the
facility to
search for
tracks withing
the 3
sections by
Word or by
Date. For
more
information
on the
Search
Feature see
section (1.1)
in this user
manual.
As you may also notice, there are some interesting other new features on the
such as the use of Advertising (this can be promotional advertising for anything such as Taxi’s,
Pizza Restaurants, Limousine Hire and of course to advertise your own business.
Also if your new Icon Apollo is online and is able to receive updates via the internet, you can easily check
to see if your jukebox is currently connected to the internet or not by the / Notification Icon
in the top right hand side of the jukebox ( = connected / = disconnected).
Also new for 2009, is that the Icon Apollo comes YouTube ready. Operators have the option to install a
separate piece of hardware (at a small cost) in the jukebox to allow it to access YouTube without
interfering with the current music being played on the main speakers in the venue.
Finally, both the Credits and Price List (at the bottom of the Main Menu screen) have been designed to
be more user-friendly, for example the Price List is hidden from normal view until pressed by the user.
Also each Icon Apollo has the ability to be in different languages (see page 14 for more information).
Green
Green
Red
Red
fig. 1.0 - Main Menu User Interface
1
Page 5
1.1 Search
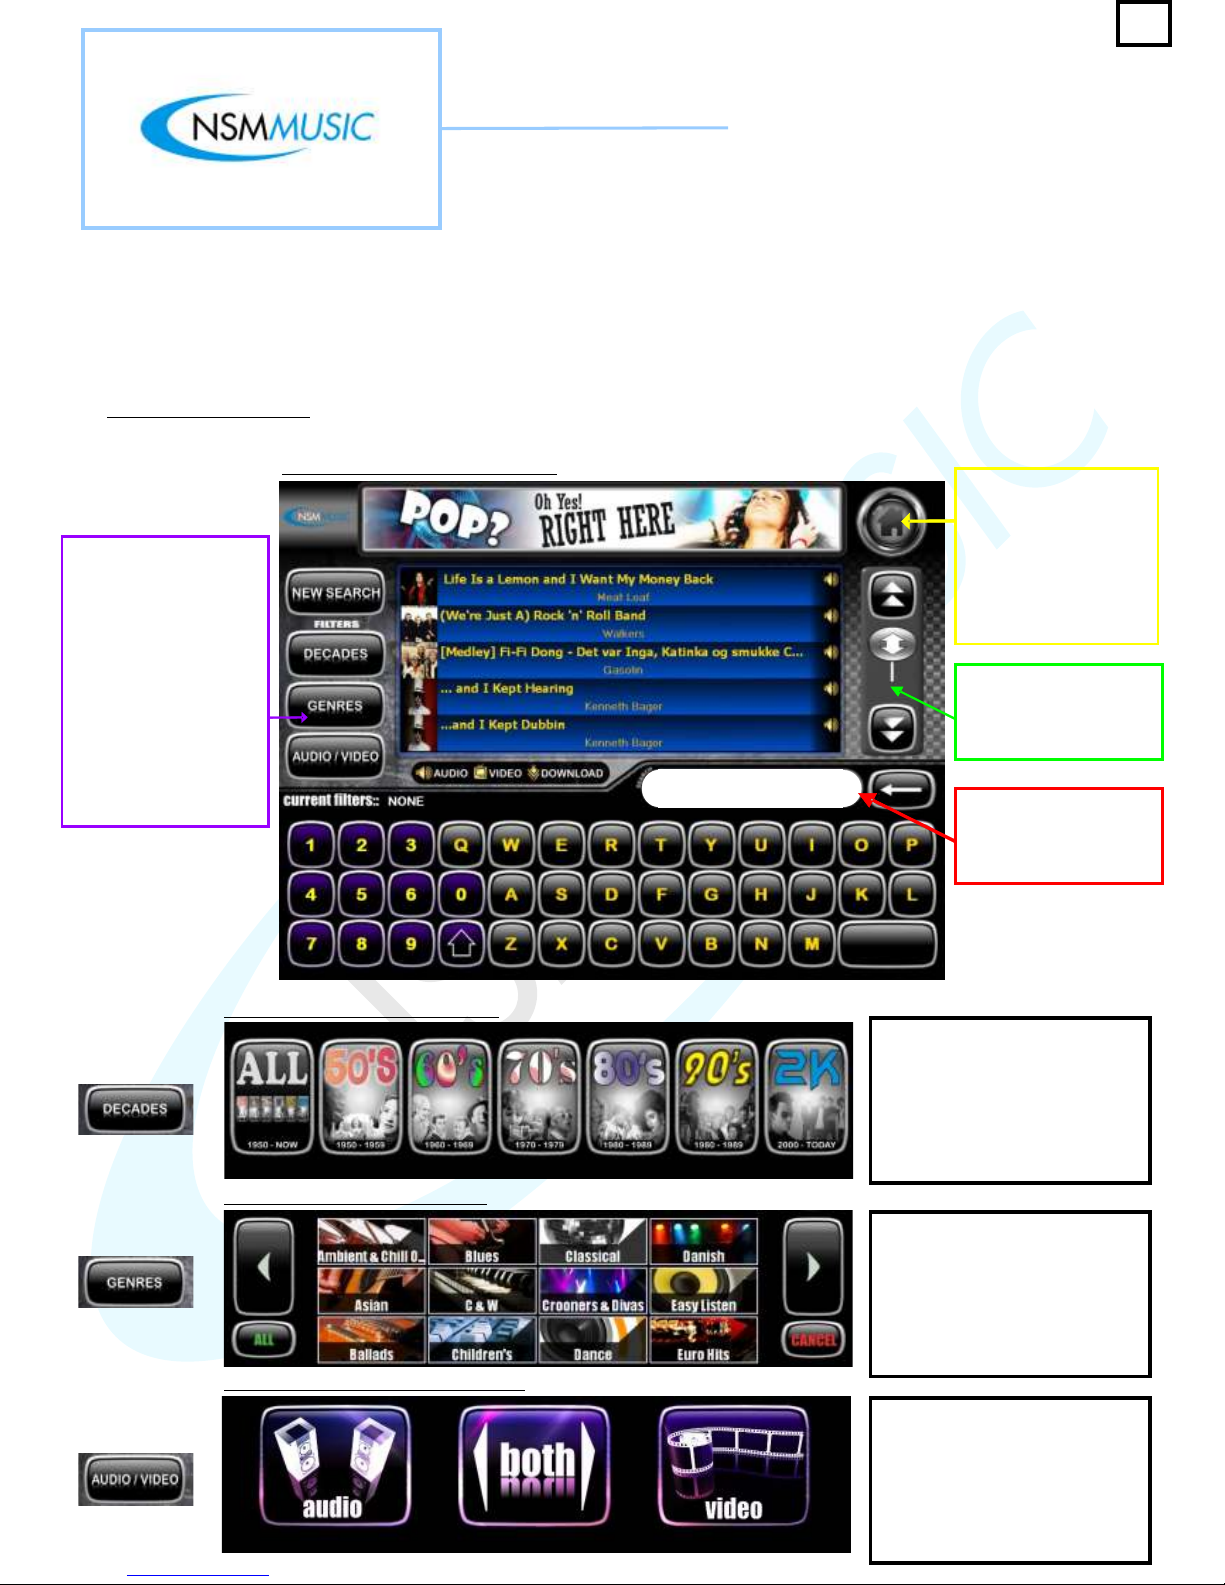
The Icon Apollo has its Search feature split into 2 areas: By Word and By Date. Fig 1.1 below shows
the screen the user will see when they press the Search By Word Button. As you will have noticed by
now, all the buttons in the jukebox are interactive. For example when the user presses the Search By
Word button, the background for this button highlights in blue to show the user that they have pressed
that button.
fig. 1.1 - Search By Word Screen
When the user presses the
Decades button under the filter
menu on the left hand side, the
keyboard is replaced with this,
allowing the user to search for
tracks within a decade of their
choice.
When the user presses the
Genres button under the filter
menu on the left hand side, the
keyboard is replaced with this,
allowing the user to search for
tracks within a genre of their
choice.
When the user presses the
Genres button under the filter
menu on the left hand side, the
keyboard is replaced with this,
allowing the user to search for
tracks by either Audio, Video or
Both.
The entry the User has
typed in appears here,
with the Backspace
button to the side
The Slider control is
used to navigate
through the Search
Results with ease
This Home button
allows for quick
navigation to the Main
Menu Screen, and
appears on every
screen that navigates
away from the Main
Menu
The Search By Word
option has 3 filters the
user can filter their
searches if they wish.
These are by:
Decades, Genres and
Audio/Video. If the user
presses the New
Search button above, it
will restore the
keyboard shown on
screen and clear any
current searches
fig. 1.1.1 - Decades Search Filter
fig. 1.1.2 - Genres Search Filter
fig. 1.1.3 - Audio/Video Search Filter
Search By Word
2
Page 6
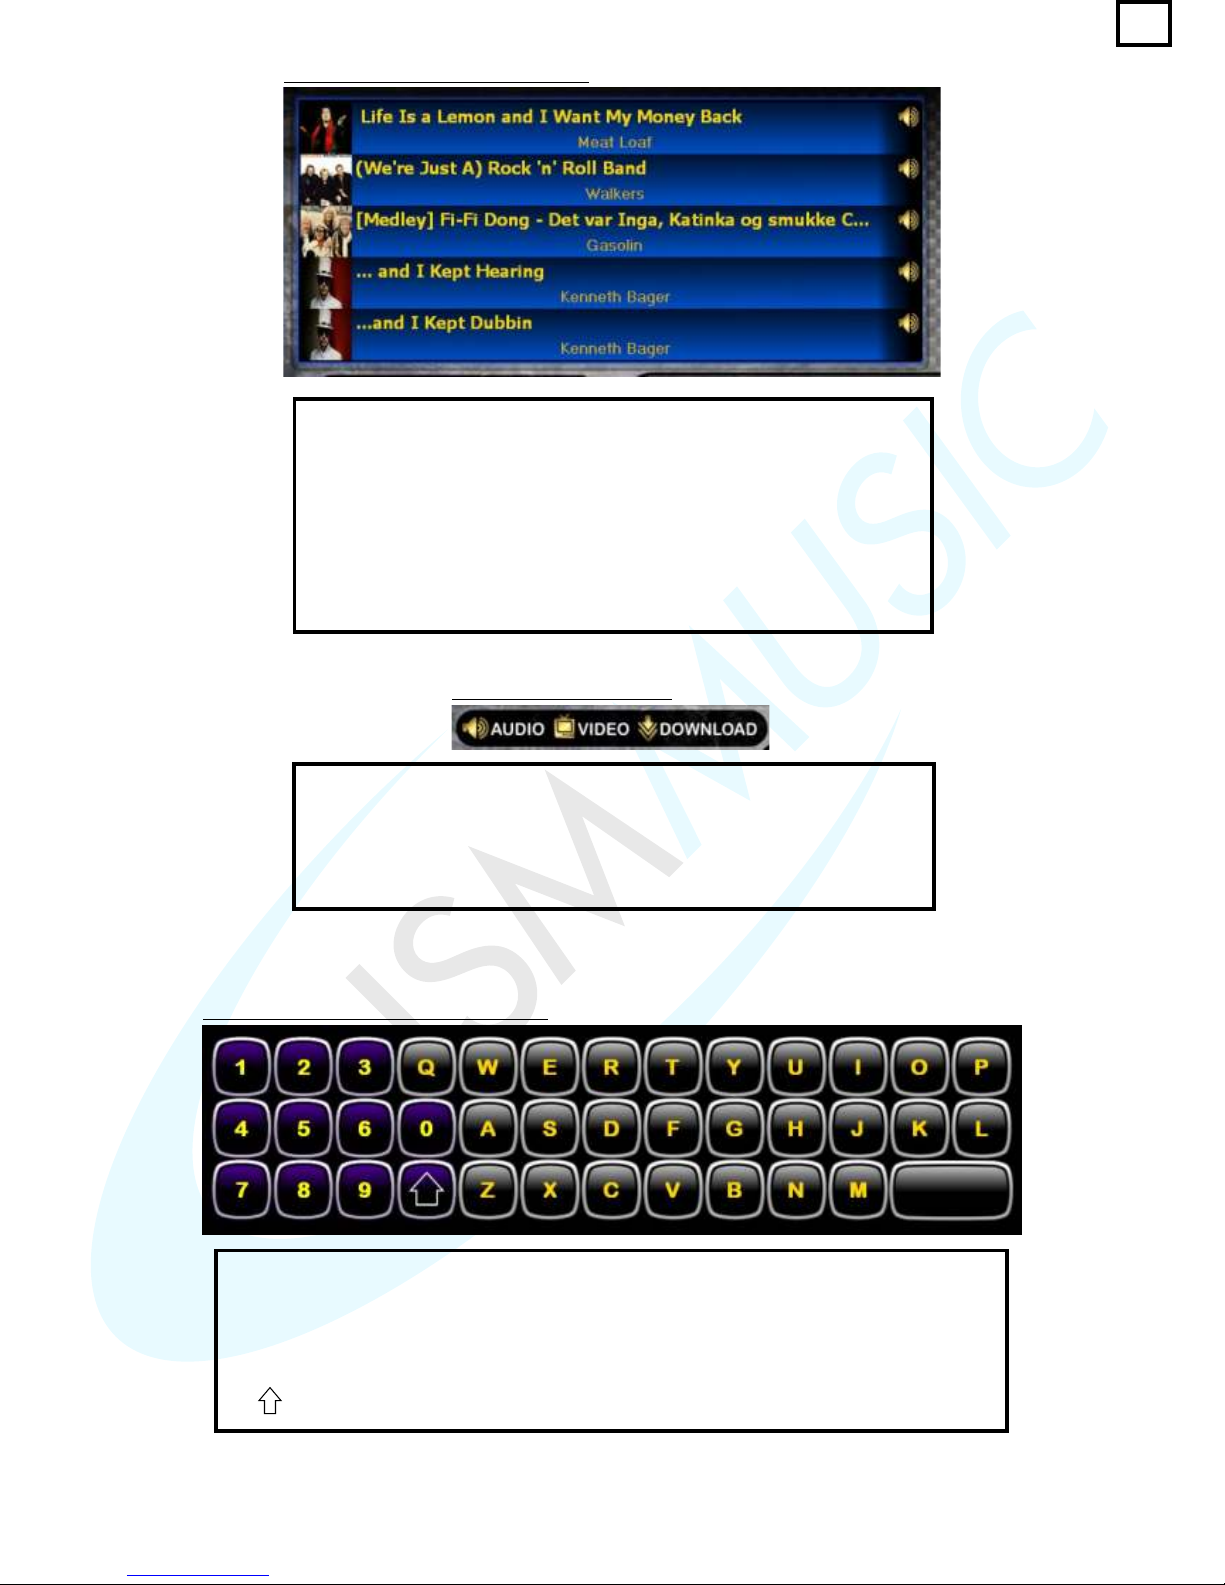
The List View in the Search By Word Search screen displays the results
of your search. The Background colour of each result changes
depending on whether it is an Audio ( background) or Video* (
background). On the left hand side of each track you will notice it has a
small artist image, this allows the user to quickly identify the track(s) they
wish to play. Also on the right hand side there are symbols to
differentiate whether the track is Audio or Video (see fig. 1.1.5 for Key to
Symbols used)
* Depending on Jukebox option
Blue Purple
fig. 1.1.4 - Search By Word List View
fig. 1.1.5 - Key to Symbols
fig. 1.1.6 - Touchscreen Qwerty Keyboard
The Key to Symbols indicates to the user whether the track(s) they wish
to play is a Audio, Video, or a Download track (Download indicates that it
is stored on our external database and downloads the track via internet
and after remain on that one jukebox, so this option will only appear on
search results where jukeboxes are on-line) on the Search results and
also on the Track Listing of each Artist (see section 1.2) .
The full Qwerty keyboard on the Search By Word screen enables the user to search for a
specific Artist or Track, each letter pressed is shown in the text box above the keyboard
and automatically refreshes the List View of results. The keyboard is also interactive in the
sense that each letter you press you know it has been pressed as it displays a depressed
effect. If the Track or Artist has symbols (or if the Jukebox is in another language and the
Track/Artist requires the use of accents) the user can press the Shift button identified by
the symbol and the Keyboard alters to show symbols and accents.
3
Page 7
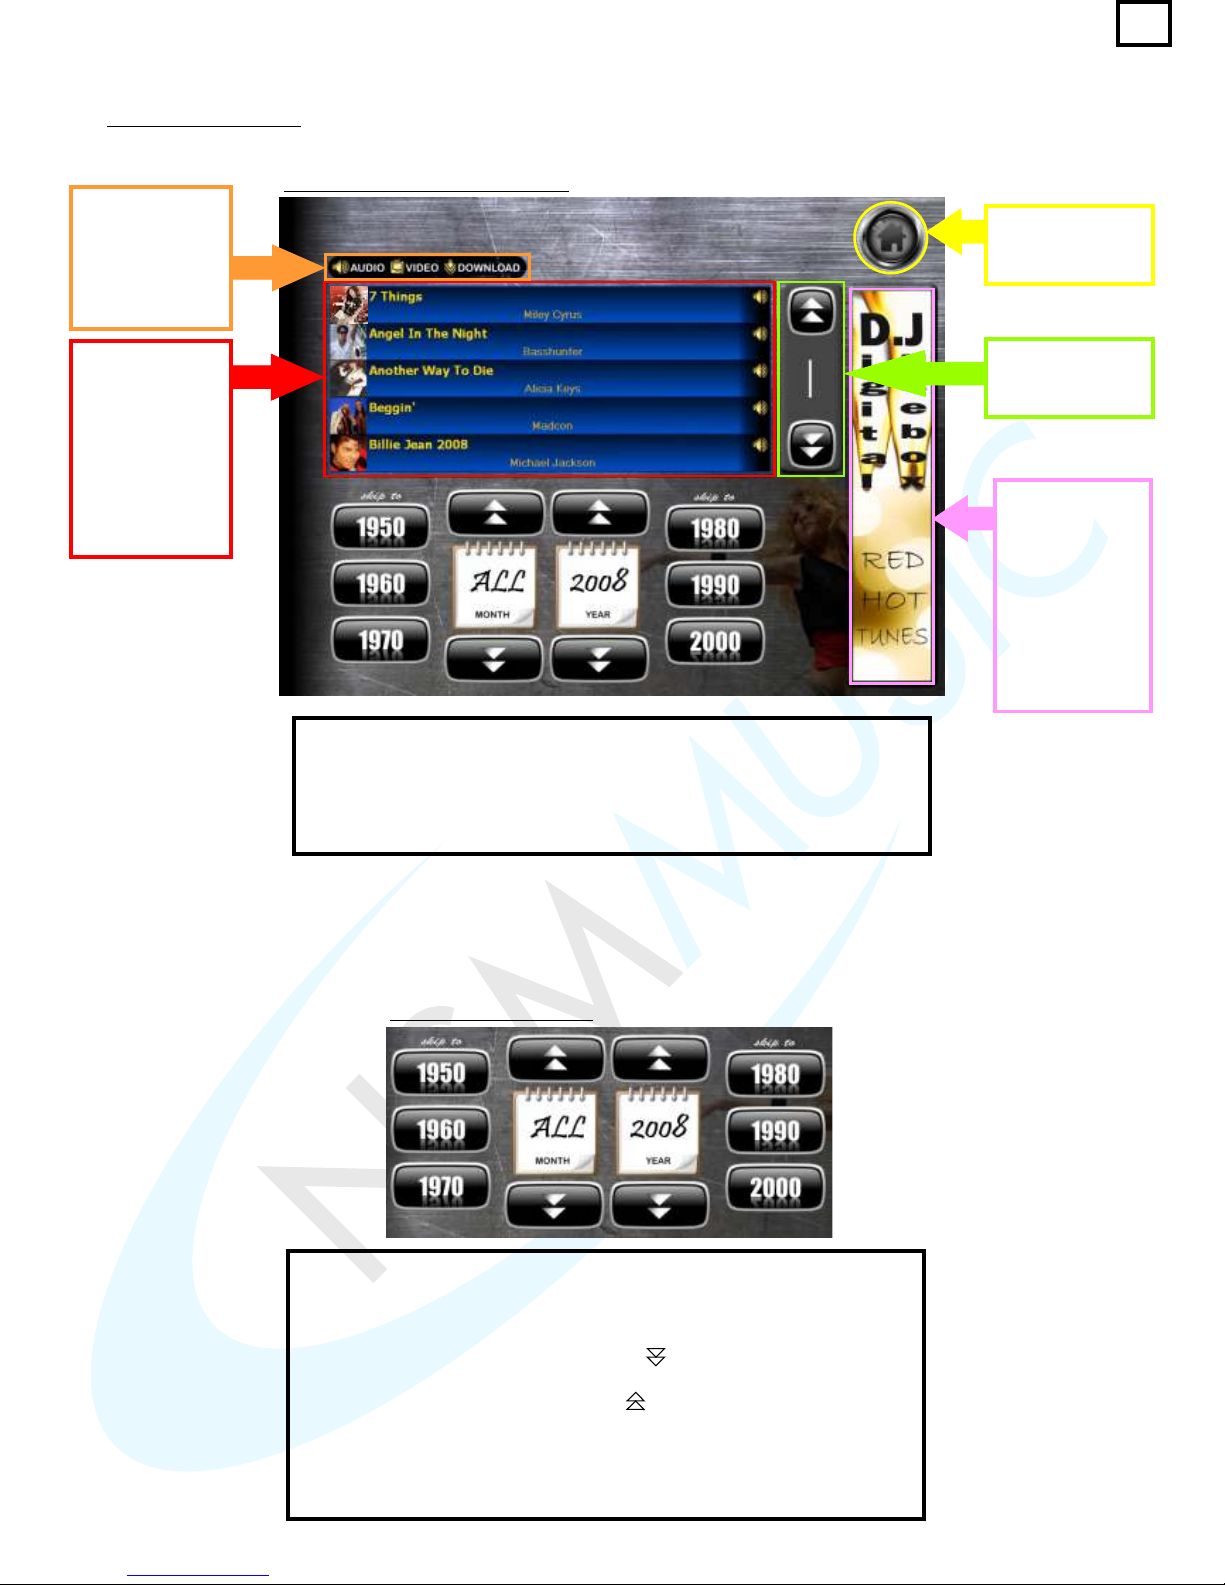
fig. 1.1.7 - Search By Date Screen
The List View on
the Search By
Date screen as
described in fig.
1.1.4. As default,
the List View
sorts results by
alphabetical
order
Navigation button
to return to Main
Menu screen
Slider control to
browse through
the search results
Advertisements
like this appear
on all of the
Screens on the
Icon Apollo.
These can be
customised to
advertise your
own premises or
products
The Key to
Symbols on the
Search By Date
screen as
described in fig.
1.1.5
When the user presses the Search By Date button on the Main Menu
screen (fig. 1.0), the screen above is displayed. As with the other search
screen, this also has a List View to show the user all of the tracks,
however replacing the Qwerty keyboard is a Date Selector (see fig. 1.1.8)
which will show results of music within a specific month and year.
fig. 1.1.8 - Date Selector
The Date Selector enables the user to filter the search results shown in
the List View by a specific month and year. For example if they wanted
to search for a track in January 1969 the user would first press the
button ‘1970' and 1970 will appear in the Year Calendar, then press the
button with the two arrows pointing down which will now show 1969
as the year. Next the user will press the button with the two arrows
pointing up above the Month Calendar which will show the month ‘1'
in the Calendar. As the user will have noticed, the List View
automatically refreshes itself with each option pressed. The Search By
Date feature is especially useful if the user wishes to look for a track on
a memorable date.
Search By Date
4
Page 8
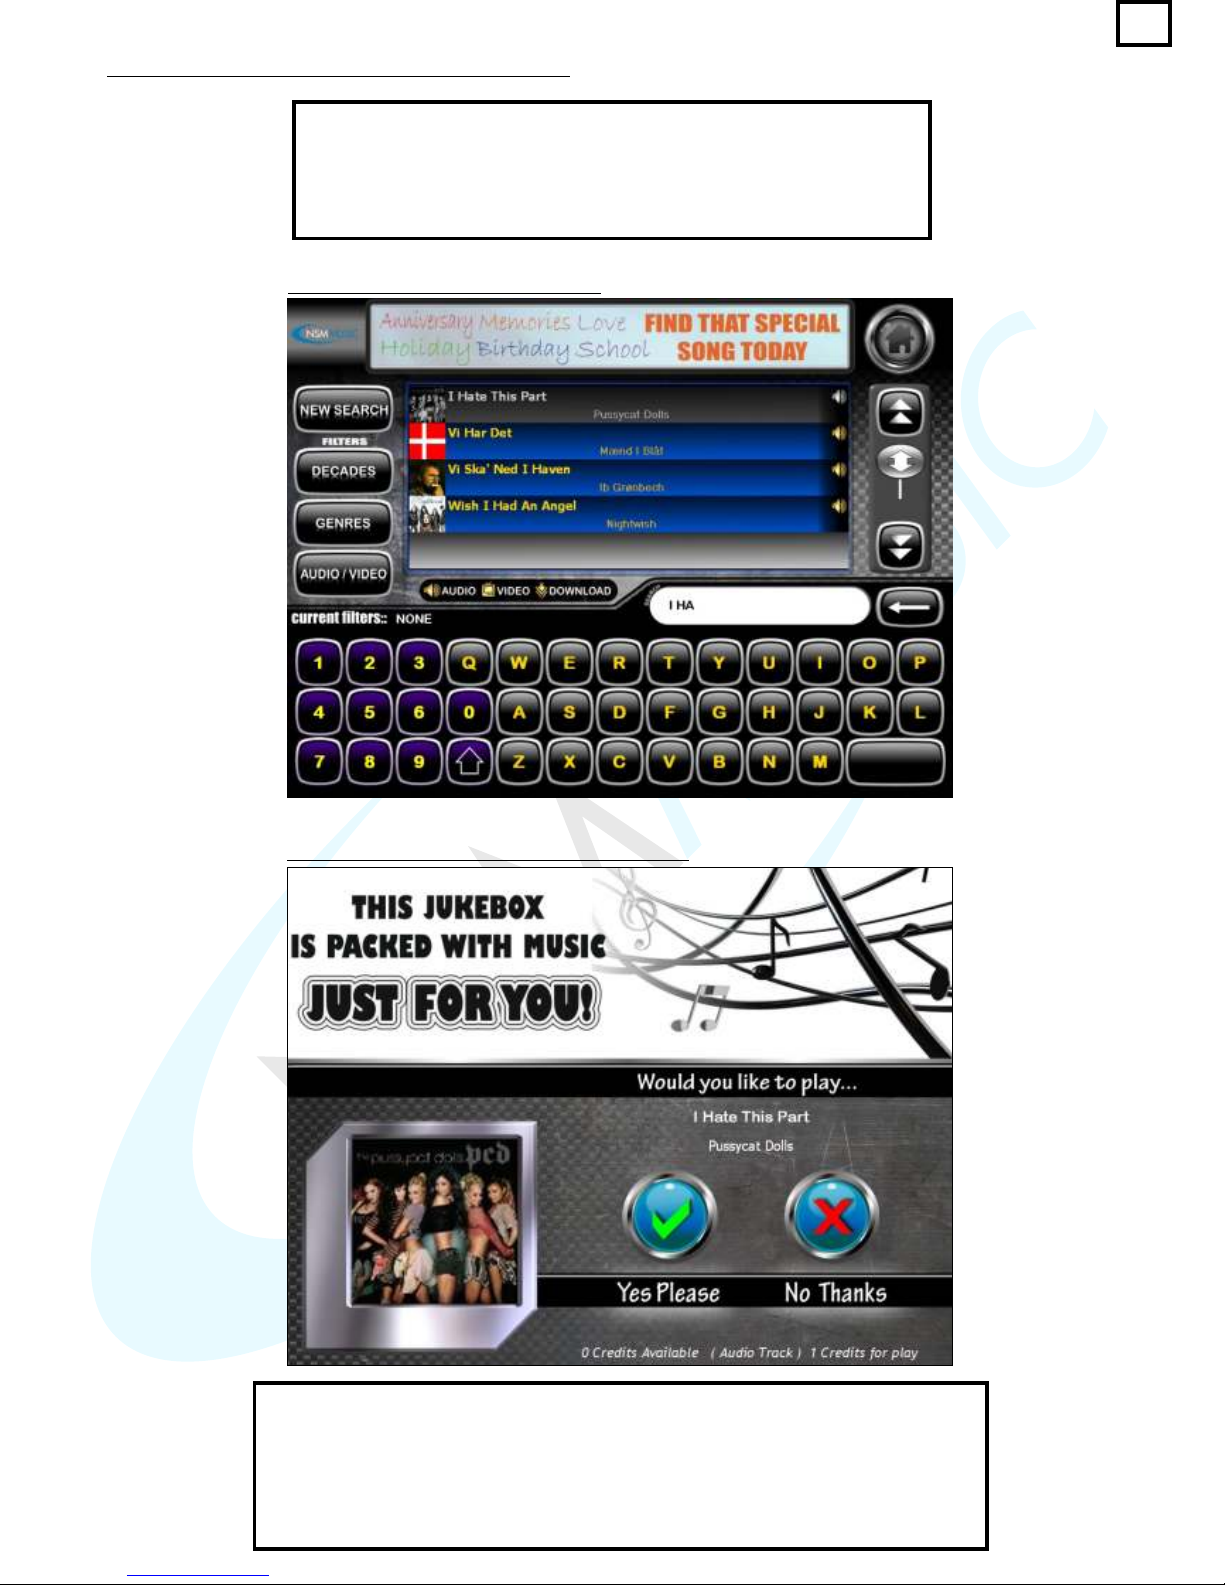
Once the user is happy filtering their search, whichever option they go
down and wish to play a Track from their search results, the user simply
presses on the track in the List View (fig. 1.1.4), which highlights in
to inform you that you have pressed it (fig. 1.1.9) and from there takes
you to the Track Selection Confirmation screen (fig. 1.1.10)
Grey
The Track Selection Confirmation screen gives you a final reminder if the user really
wishes to play the Track. To play the user simply presses the Yes button, and to
discard, the user presses the No button returning them to the previous screen which
they were on. At the bottom of this screen is a reminder of how many Credits there
are left on the Jukebox, what type of Track you have selected (Audio/Video) and
how many Credits are required to play the chosen Track. Of course if there are no
Credits available a screen will pop up saying ‘Insufficient Credits’
fig. 1.1.9 - Selected Track in List View
fig. 1.1.10 - Track Selection Confirmation screen
Selecting Track to Play Using Search
5
Page 9
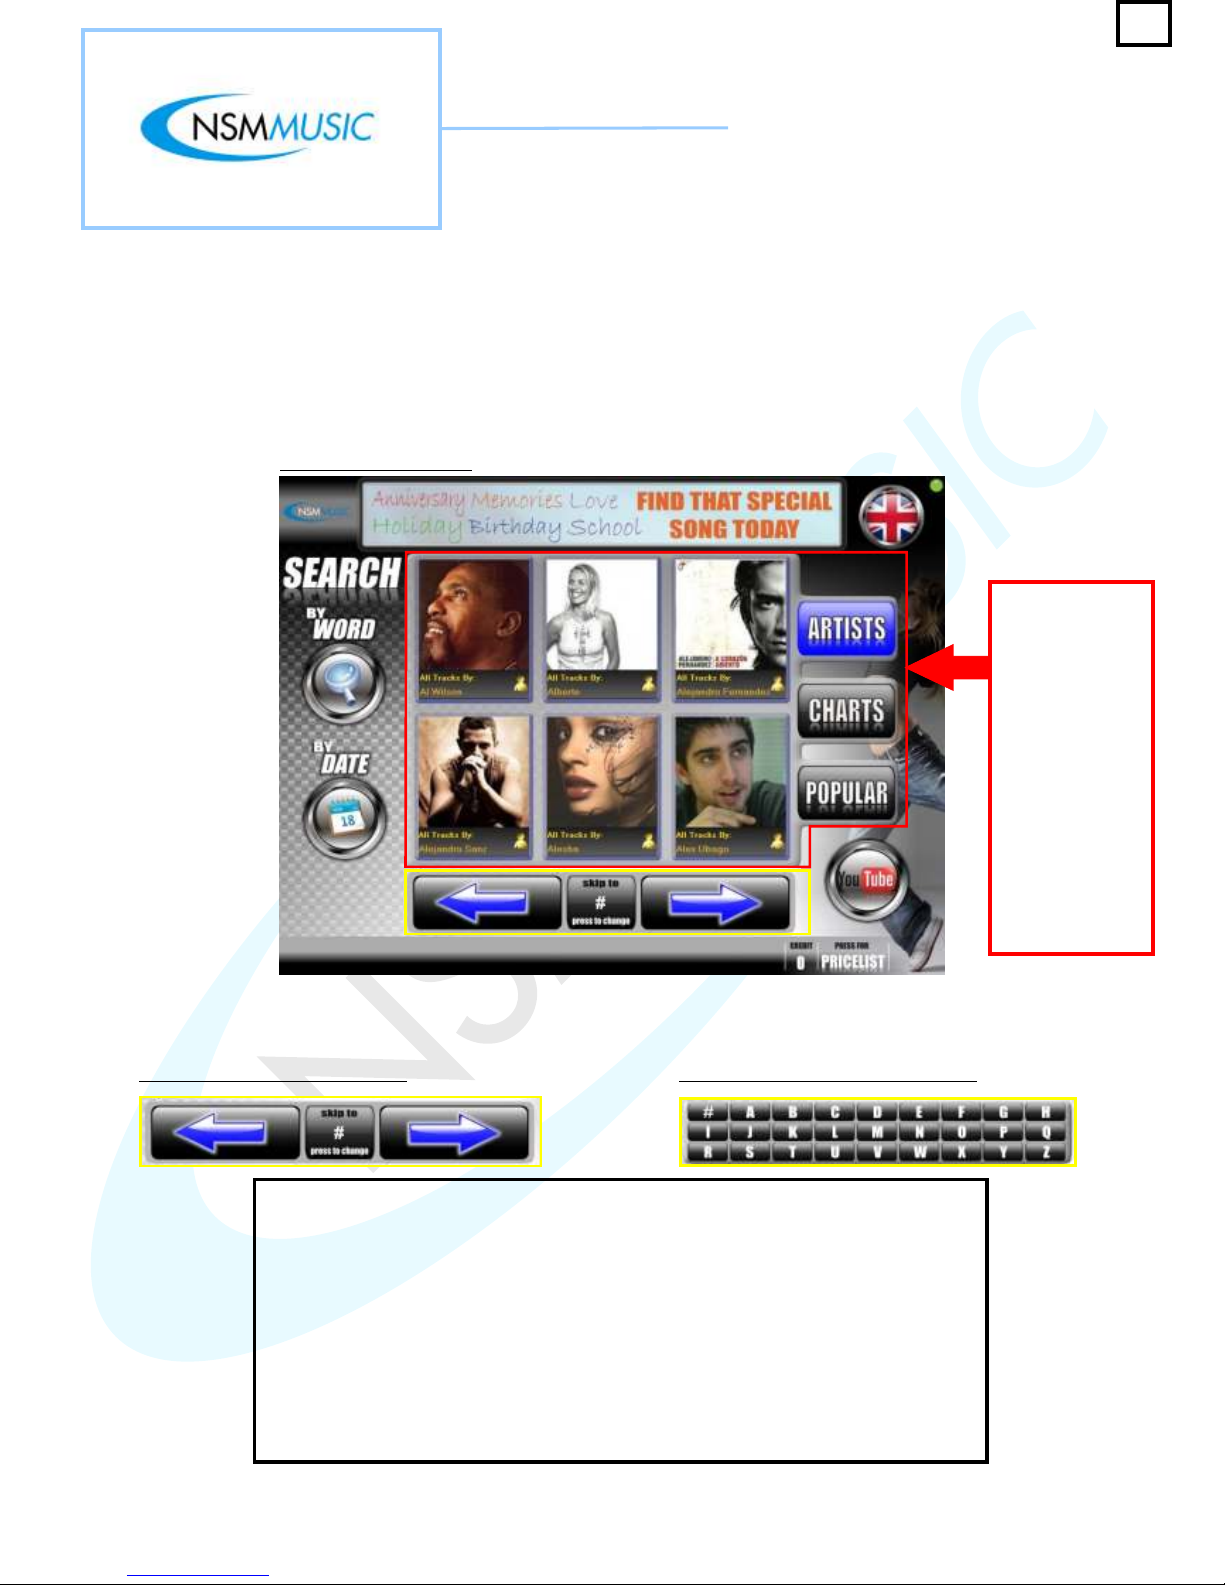
1.2 Artists
The Icon Apollo’s Artists section is accessed via the Main Menu screen (fig.1.0) by pressing the Artists
button. This will alter the screen as shown below in fig.1.2. The user is now able to browse the list of
Artists using the Scroller Control at the bottom (fig. 1.2.1). You will know when you have selected the
Artists section as the Artists button background changes to . Blue
fig. 1.2 - Artists Section
The new Artists
section has been
simplified to be
displayed on the
Main Menu
screen, so it is
easier and faster
for the user to
browse for their
favourite Artist(s)
/ Track(s). A lot of
thought has gone
into the User
Interface to make
it much more
user friendly
fig. 1.2.1 - Artist Section Scroller
The Scroller on the Artist Section is unique to the Artists Section in that the Scroller
incorporates an extra button in the middle which displays the Artist Selection
Keypad (fig. 1.2.1.0), thus allowing the user to select the first letter of their desired
artist and use the scroll buttons either side to find the Artist they are looking for
more quickly. As the user presses the left or right scroll button, the screen
automatically refreshes the Artist images to coincide with the current location. The
scroller will automatically begin the next letter in sequence if the user carries on
pressing the scroll buttons to the left or right.
N.B: Once the user has selected a letter from the keypad, the keypad will then
disappear with the normal scroller in place with the exception that the letter the user
has chosen appears in the middle button.
Once the user has found their chosen Artist, they simply press on their image and the screen in fig.
1.2.2 is displayed which will list all the available tracks by that Artist.
6
fig. 1.2.1.0 - Artist Selection Keypad
Page 10
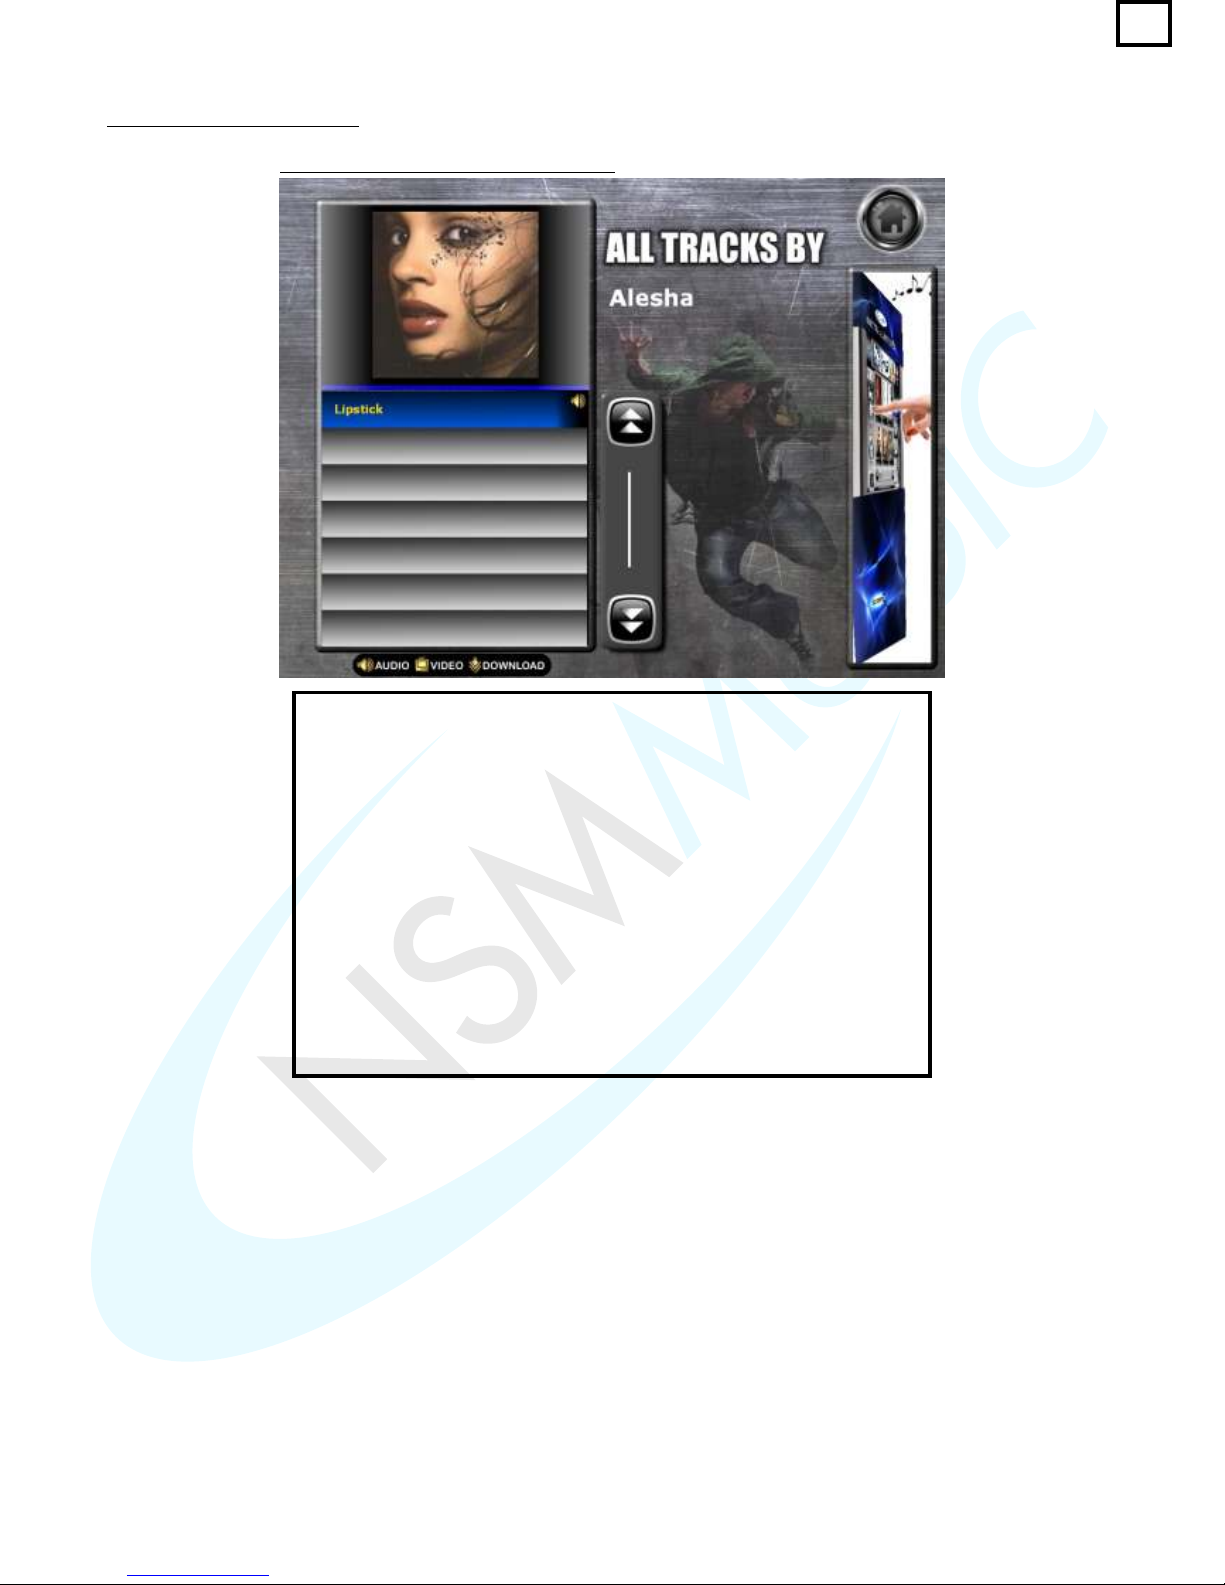
fig. 1.2.2 - Artist Tracks Selection screen
On the Artist Tracks Confirmation screen, the user will be presented with
the screen shown above which shows them the Image of the Artist they
have selected and the Artist name to the right hand side of the image.
Below the image will be displayed a list of all the current Tracks by that
artist in alphabetical order, whether they are Audio or Video Tracks (if
the Jukebox is Video enabled) and Tracks that are available for
download (if the Jukebox is online). The user will easily be able to
differentiate the difference in the list if a Track is Audio or Video by the
colour of the background (see fig. 1.1.4). If the Artist has 7 Tracks or
less in the list then the user would press on the Track they wish. If the
Artist has more than 7 Tracks, then the user would use the Slider control
(as described in fig. 1.2.1) to browse through the list of Tracks until they
find their selection. Once the user has found the Track they wish to play,
they simply press on it in the list and from there it will take you to the
Track Selection Confirmation screen (fig. 1.1.10) where the user can
then have their selected music played.
Artist Tracks screen
7
Page 11
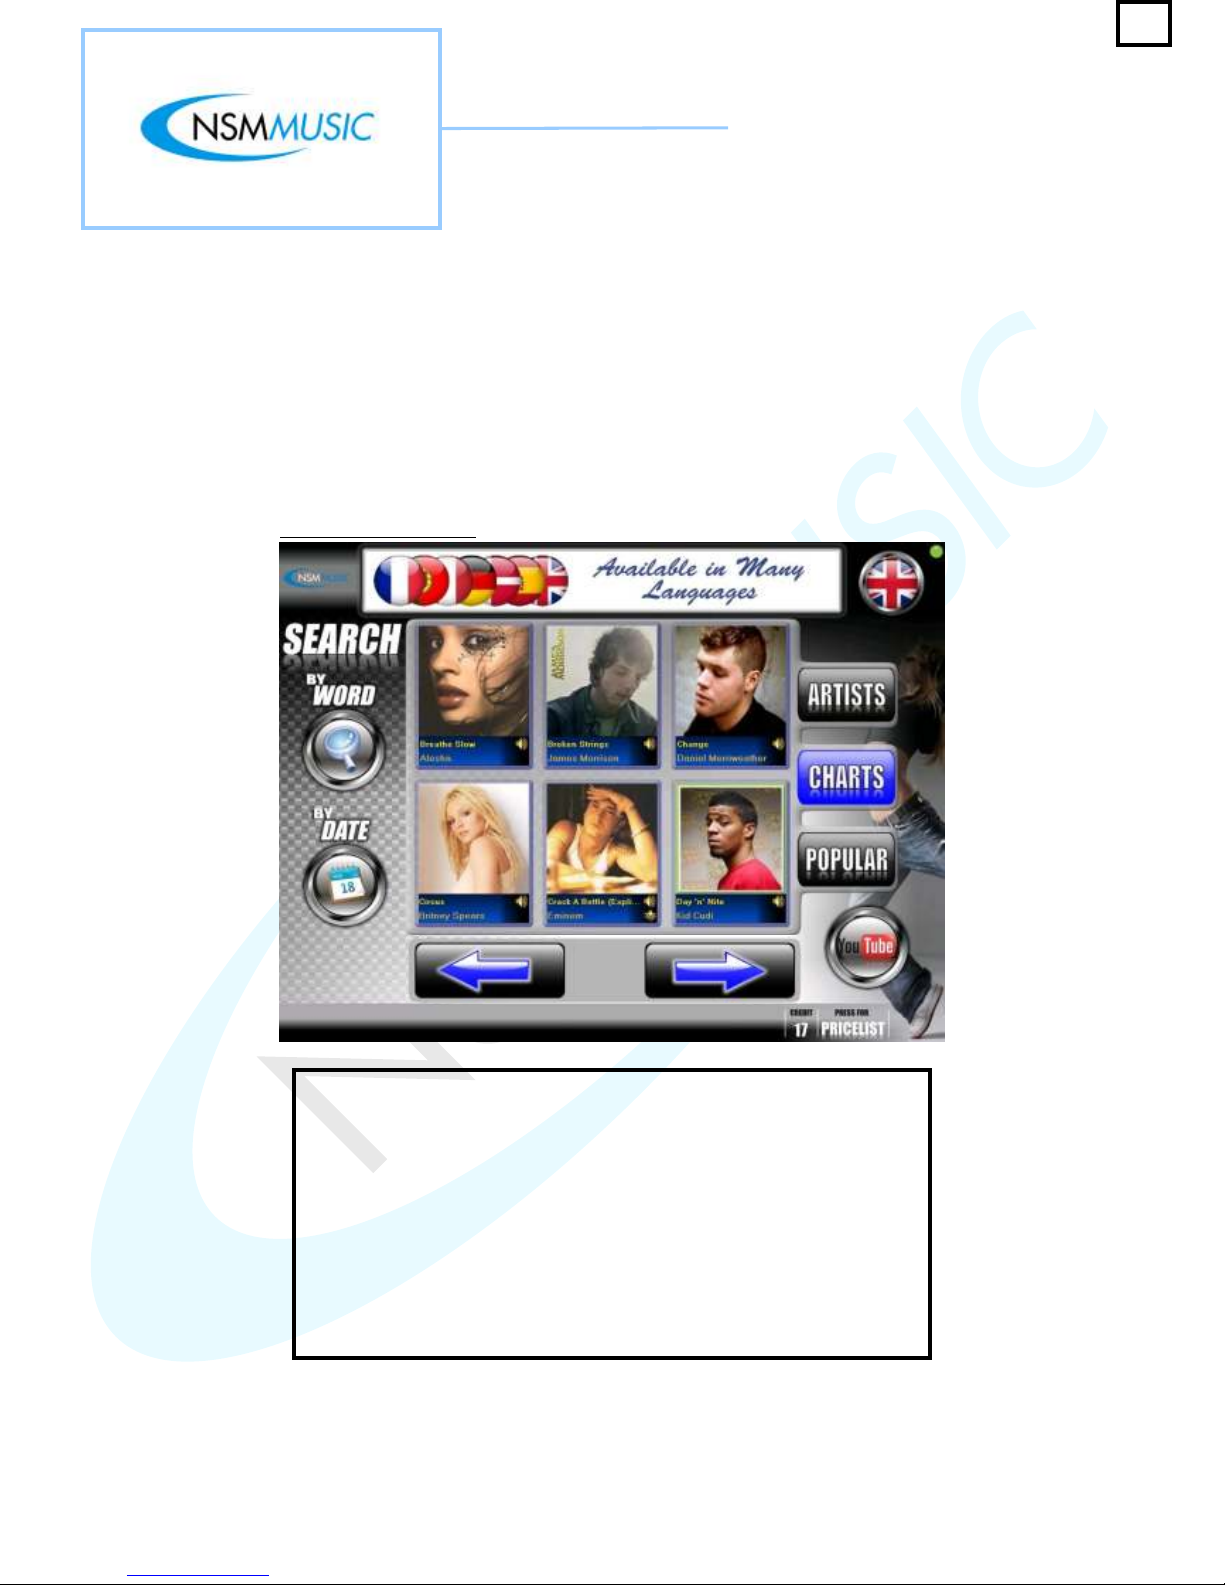
1.3 Charts
The Icon Apollo’s Charts section is accessed via the Main Menu screen (fig.1.0) by pressing the Charts
button. This will alter the screen as shown below in fig.1.3. The user is now able to browse the list of
current Tracks by Artists that are in the charts using the Scroller Control at the bottom of the screen.
You will know when you have selected the Charts section as the Charts button background changes to
. By default, when the Jukebox first initialises and the Main Menu screen is loaded, it
defaults to show the Charts section.
Blue
The Charts section on the Main Menu displays the most recent tracks in
the current charts by alphabetical order. Below the Artist Image of each
Track in the Charts section, you have the title of the Track and whether it
is a Download Track (Online Jukeboxes only), a Video Track (the Track
will appear twice but each one having a different background colour to
differentiate them as Audio/Video, or simply an Audio Track - see fig.
1.1.5 for Key to Symbols used. The user can use the Scroller Control at
the bottom of the screen to browse through the Tracks in the Charts.
Once the user has found the Track they wish to play, they simply press
on it and from there it will take them to the Track Selection Confirmation
screen (fig. 1.1.10) where the user can then have their selected music
played.
fig. 1.3 - Charts Section
8
Page 12
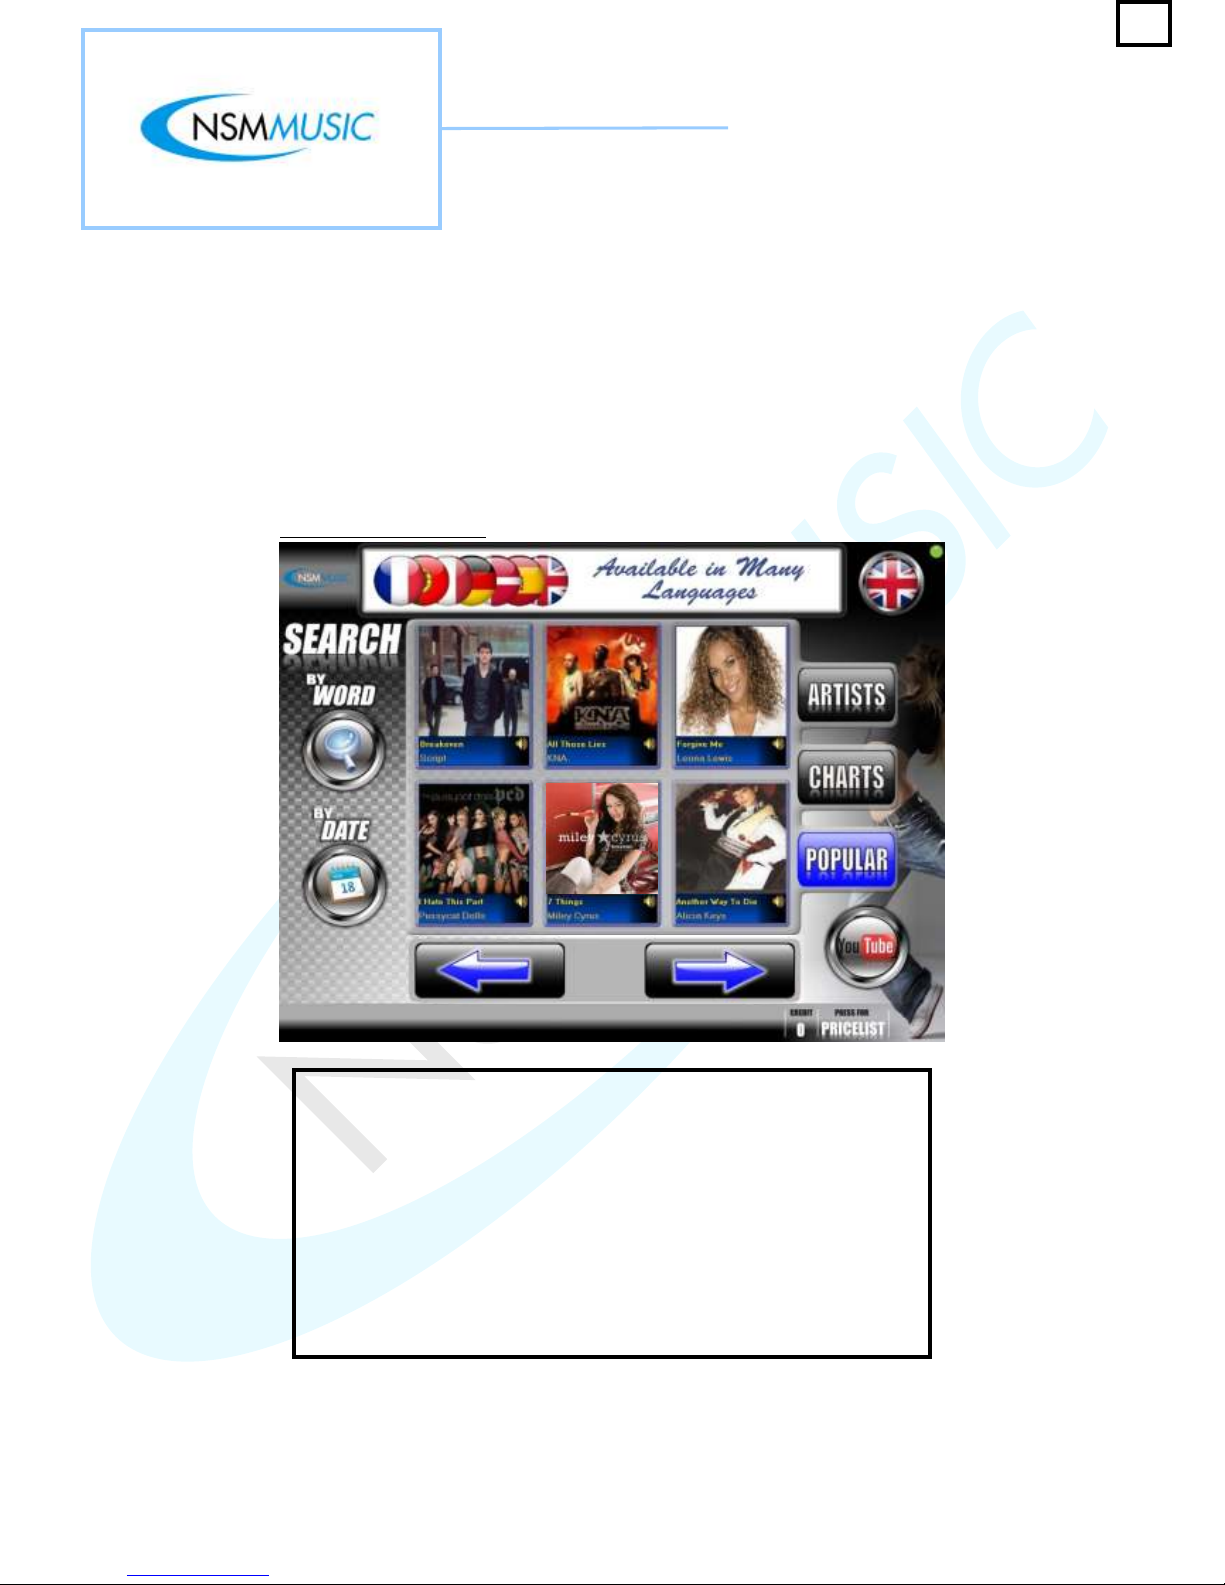
1.4 Popular
The Icon Apollo’s Popular section is also accessed via the Main Menu screen (fig.1.0) by pressing the
Popular button. This will alter the screen as shown below in fig.1.4. The user is now able to browse the
list of Popular Tracks by Artists that are on the Jukebox using the Scroller Control at the bottom of the
screen. You will know when you have selected the Popular section as the Popular button background
changes to . Blue
fig. 1.4 - Popular Section
The Popular section on the Main Menu displays the Tracks on the
Jukebox that have been played the most (this obviously will be different
and unique on each Jukebox). Below the Artist Image of each Track in
the Popular section, you have the title of the Track and whether it is a
Video Track (the Track will have a different background colour to
differentiate it from an Audio Track, or simply an Audio Track - see fig.
1.1.5 for Key to Symbols used. The user can use the Scroller Control at
the bottom of the screen to browse through the Popular Tracks. Once
the user has found the Track they wish to play, they simply press on it
and from there it will take them to the Track Selection Confirmation
screen (fig. 1.1.10) where the user can then have their selected music
played.
9
Page 13
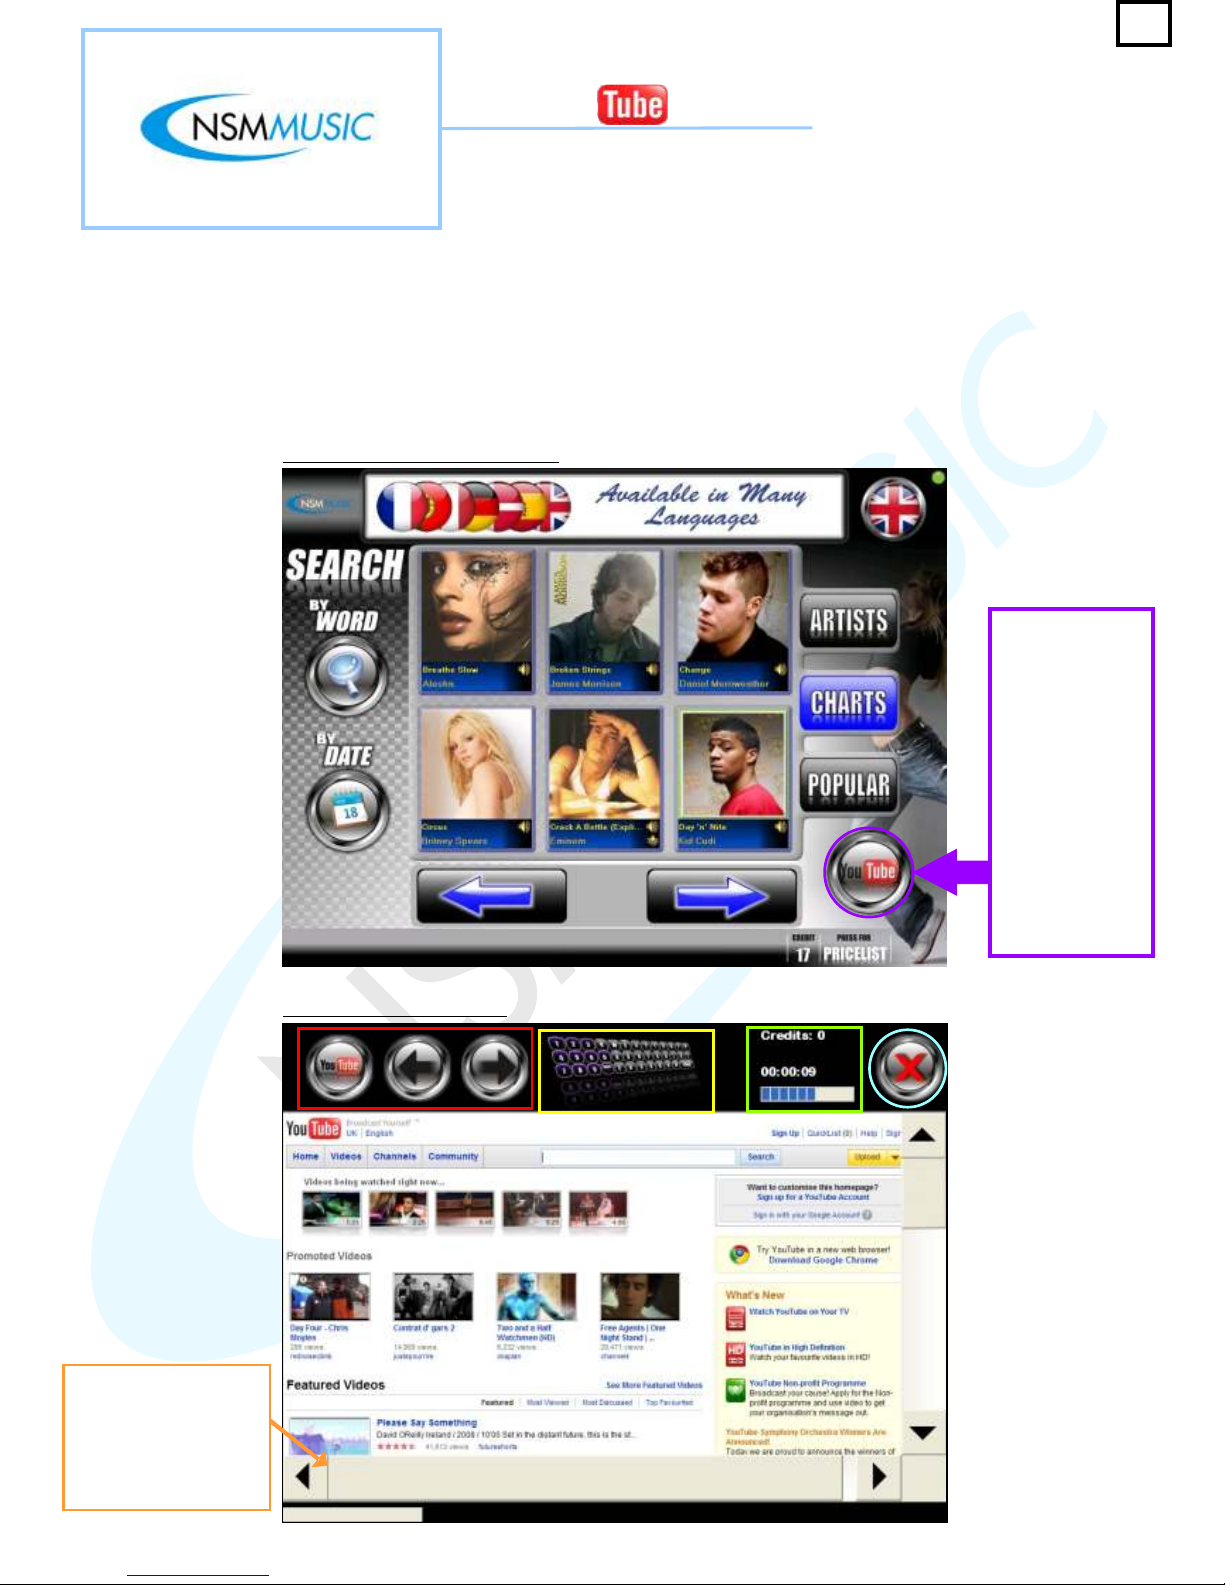
fig. 1.5 - YouTube Feature Button
1.5 Feature
The Icon Apollo has a new optional feature which allows the user to access YouTube via the Jukebox.
This option is only accessible to Jukeboxes who are online and have the optional YouTube Upgrade Kit.
The user can access the YouTube feature via the button on the Main Menu screen (fig.1.5). This will then
open up a screen which navigates to the YouTube screen homepage (fig.1.5.1)
TM
You
The YouTube
button on the
Main Menu
screen is only
visible when the
Jukebox is online
and has the
optional YouTube
Upgrade Kit
installed. For
more information
about acquiring
this Kit please
see page 13 for
information.
The scrollbars on the
YouTube screen have
been altered so that the
user can easily scroll
down and across the
page
fig. 1.5.1 - YouTube screen
10
Page 14
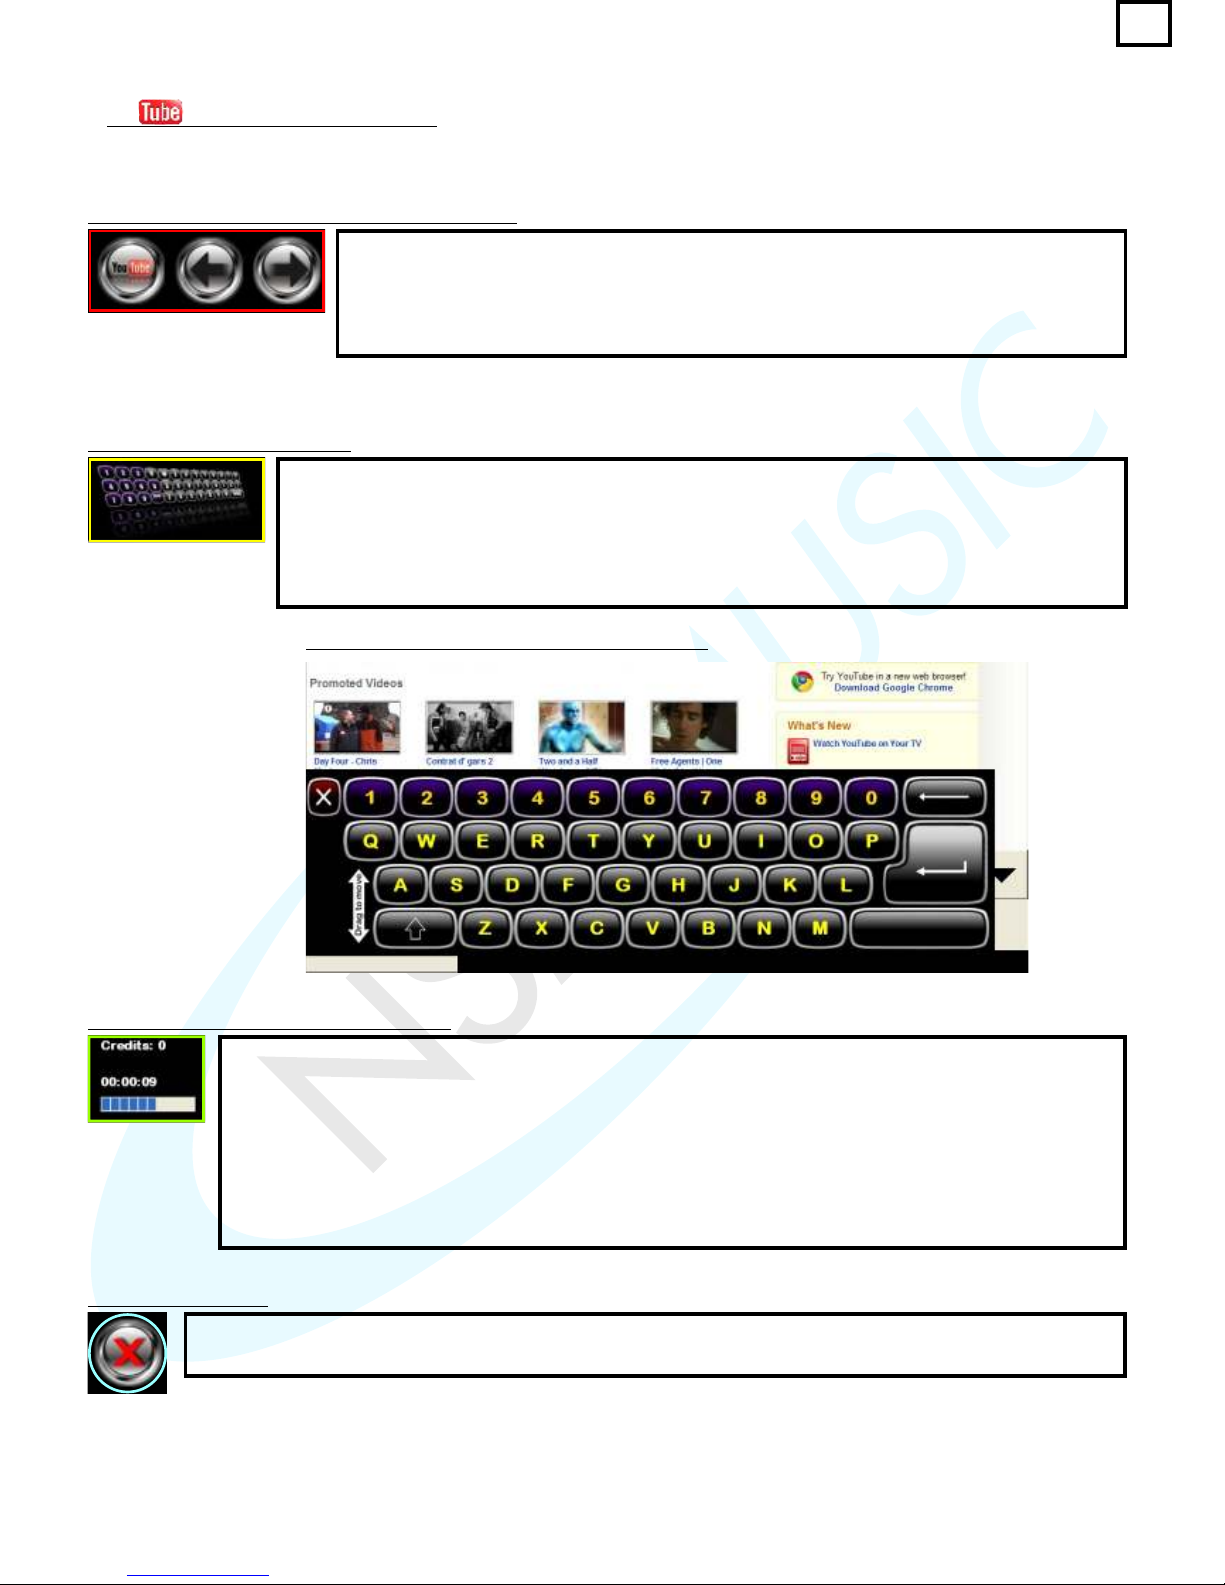
The YouTube screen has three main navigation buttons at the top left hand side. the first
button with the YouTube logo is to allow the user to navigate back the main homepage. The
other two buttons are used to navigate the pages backward or forward. When any of these
buttons are pressed, the background turns , letting the user know that the button has
been pressed.
Blue
The YouTube screen has an on-screen keyboard which the user can access by pressing the
keyboard button at the top of the screen. This keyboard then appears at the bottom of the screen
(fig. 1.5.4) which the use can now use if they wish to enter a search for a particular video. The
keyboard can also be moved up or down for easier viewing of search results. To hide the keyboard
the user can either press the keyboard button again or the red in the top left corner of the onscreen keyboard.
X
Navigation Buttons
TM
You
The Credits label on the YouTube screen imports whatever (if any) credits that are remaining on the
main Jukebox interface for the user to use here. If there are none, then the user can simply add credits
by inserting money into the coin mech. When the screen first loads, there is a 15 second Timer on the
screen (shown left, bottom) this is mainly to allow the homepage to load fully. If there are no credits at
this point you will need to insert some credits before the initial 15 seconds are up, as after, it will display
a message on screen saying ‘Not Enough Credits’ (see fig. 1.5.8) and will subsequently return the user
to the main Jukebox interface. If there are some credits already or have inserted some before the time is
up a second message appears asking the user if they would like to buy credits for use on YouTube
(see fig. 1.5.7).
The last navigation button on the YouTube screen simply is for exiting and retuning to the main Jukebox
interface.
fig. 1.5.2 - Main YouTube screen navigation buttons
fig. 1.5.3 - On-screen Keyboard
fig. 1.5.5 - Available Credits label and Timer
fig. 1.5.6 - Exit Button
fig. 1.5.4 - screen section of on-screen keyboard
11
Page 15
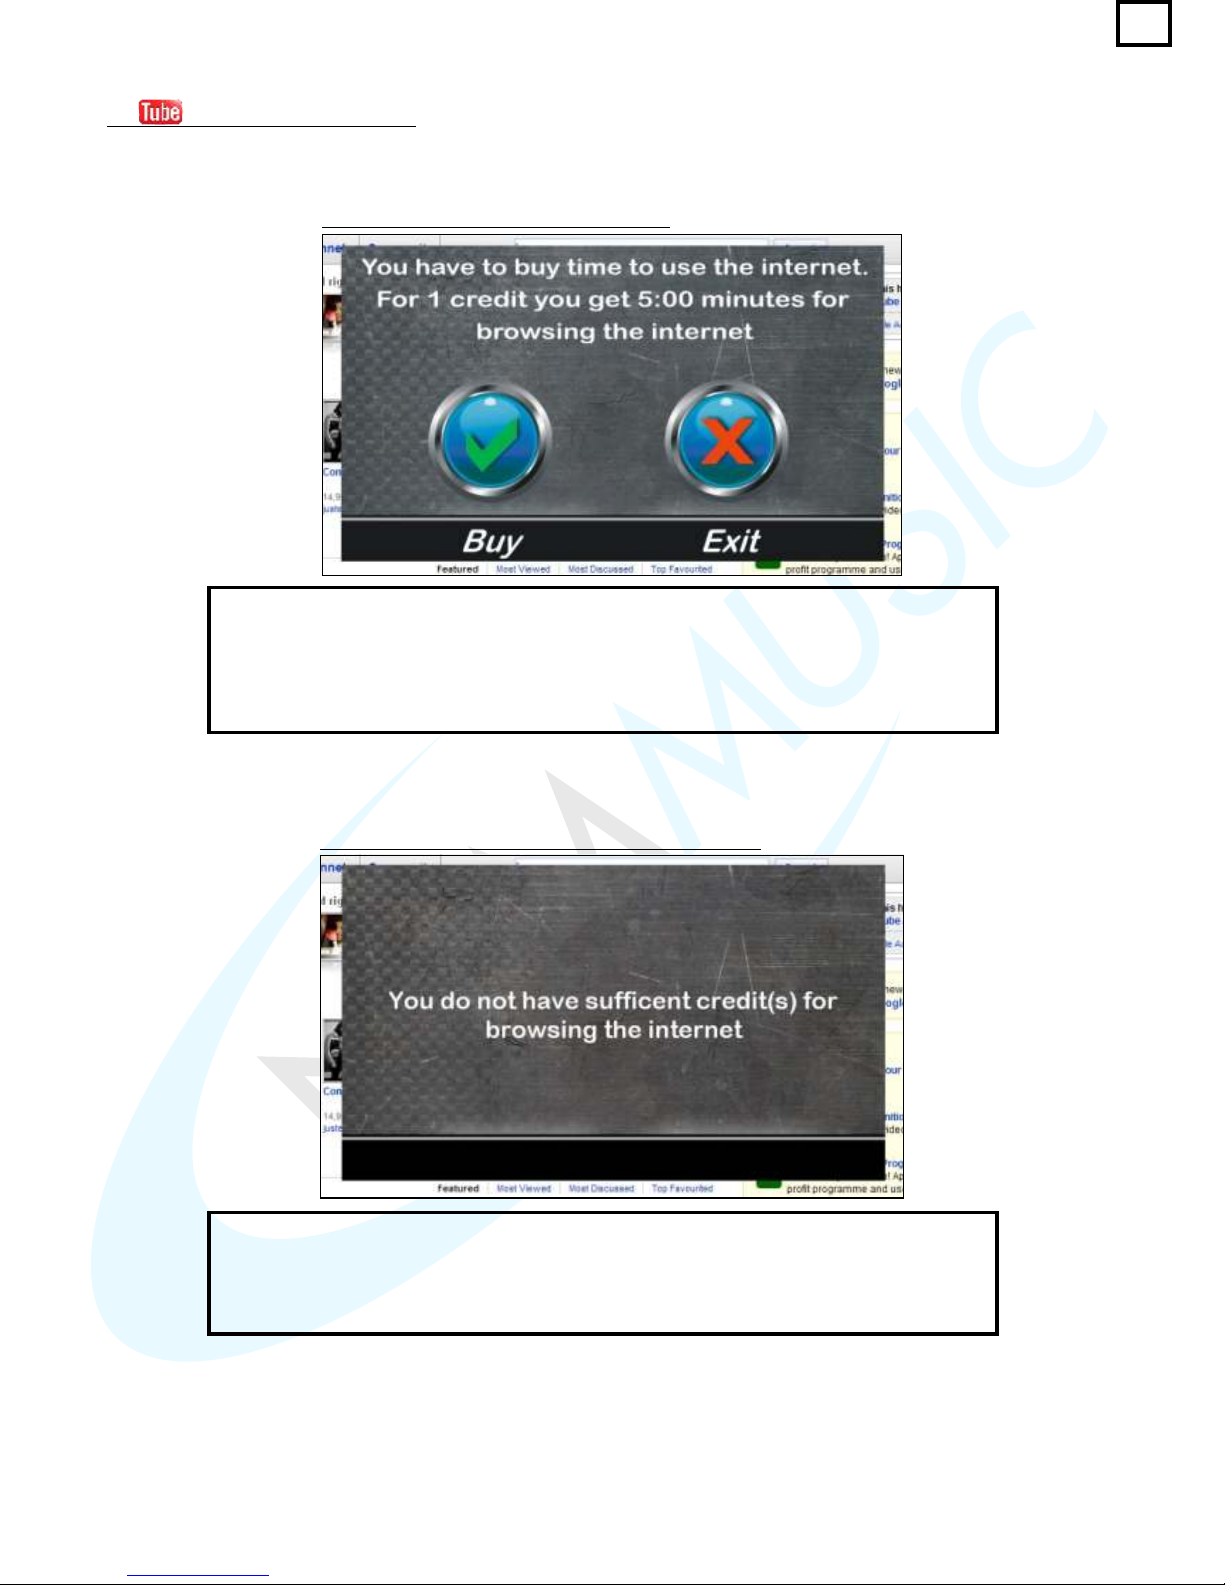
Message Screens
TM
You
After the initial 15 seconds on the YouTube screen, if there are any existing credits on the
Jukebox, this message will appear in the middle of the screen informing the user that in
order to use the YouTube site they will need to insert 1 credit. If they press ‘Yes’ then it will
deduct 1 credit and the user will be able to use the YouTube site for 5:00 minutes. If the
user presses ‘No’, it will return them back to the main Jukebox interface with any of the
remaining credits intact.
If there are no Credits on the Jukebox, or after the user has used up all Credits on YouTube
this message will appear after the first 15 seconds of loading the homepage or after the
remaining 5:00 has been used up informing that there are no Credits available to use this
feature. The message will then disappear and close the YouTube screen, returning the
Jukebox to the main user interface.
fig. 1.5.7 - Buy Time Information Message
fig. 1.5.8 - No Sufficient Credits Information Message
12
Page 16
Upgrade Kit
TM
You
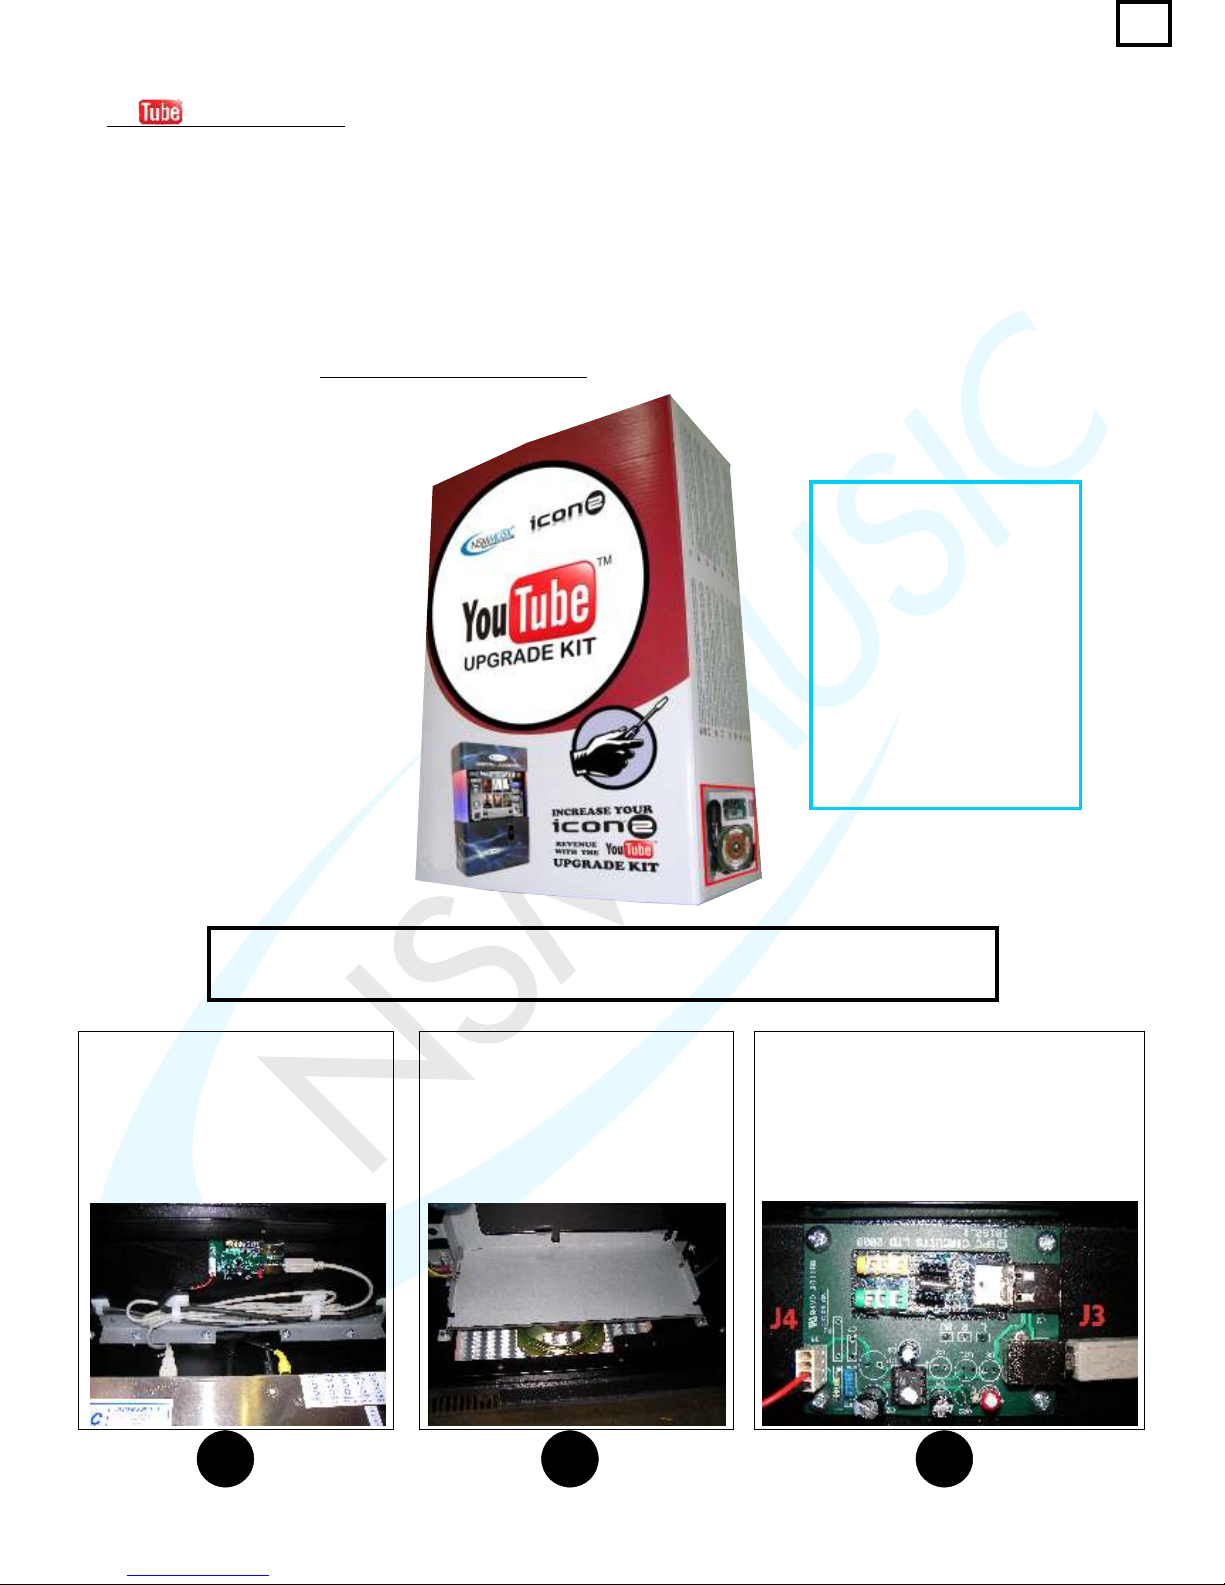
In order for the Icon Apollo to access the YouTube feature it is necessary to purchase the YouTube
Upgrade Kit from NSM Music. Each new Icon Apollo comes YouTube ready, in the sense that once it
has been installed and the Jukebox is online, the button will appear on the Main Menu screen
and is designed so as not to interfere with current music being played. If a Kit is required you will be
sent a box with all the fixtures and fittings required to install the additional upgrade (fig. 1.5.9).
fig. 1.5.9 - YouTube Upgrade Kit
The YouTube Upgrade kit comprises of a custom built circuit board, separate speaker (so
not to interfere with music played), USB cable, and all fixtures and fittings necessary. You
will be sent also full installation details, which briefly comprises of the following below:
21 3
Please Note: Ensure your Icon Apollo is connected to the internet. Power on, the YouTube logo should appear on the
main menu. Enjoy.
1. Mount the circuit board to the
inside to the top panel using the
screws and spacers provided.
Plug the USB lead into the circuit
board connector identified as J3
and into the first available USB port
on top of the Ipac. Use the adhesive
cable tidies for surplus cable.
2. Remove the cash box. Unscrew
the cash box holding plate and
place speaker on the grill beneath.
Screw the cash box holding plate
back on. The speaker will
magnetically attach to the plate
holding it in place.
3. Feed the speaker cable up the right hand
side of the ipac up to the top of the unit. Use
the cable tidies to secure it. Plug the cable
into the 4 pin connector identified as J4.
TO REQUEST A YOUTUBE
UPGRADE KIT PLEASE
CONTACT:
NSM MUSIC LTD
UNIT 4
MAPLE PARK
LOWFIELDS AVENUE
LEEDS
LS12 6HH
Tel. +44 (0)113 2713708
Fax +44 (0)113 2705648
Email: [email protected]
13
Page 17
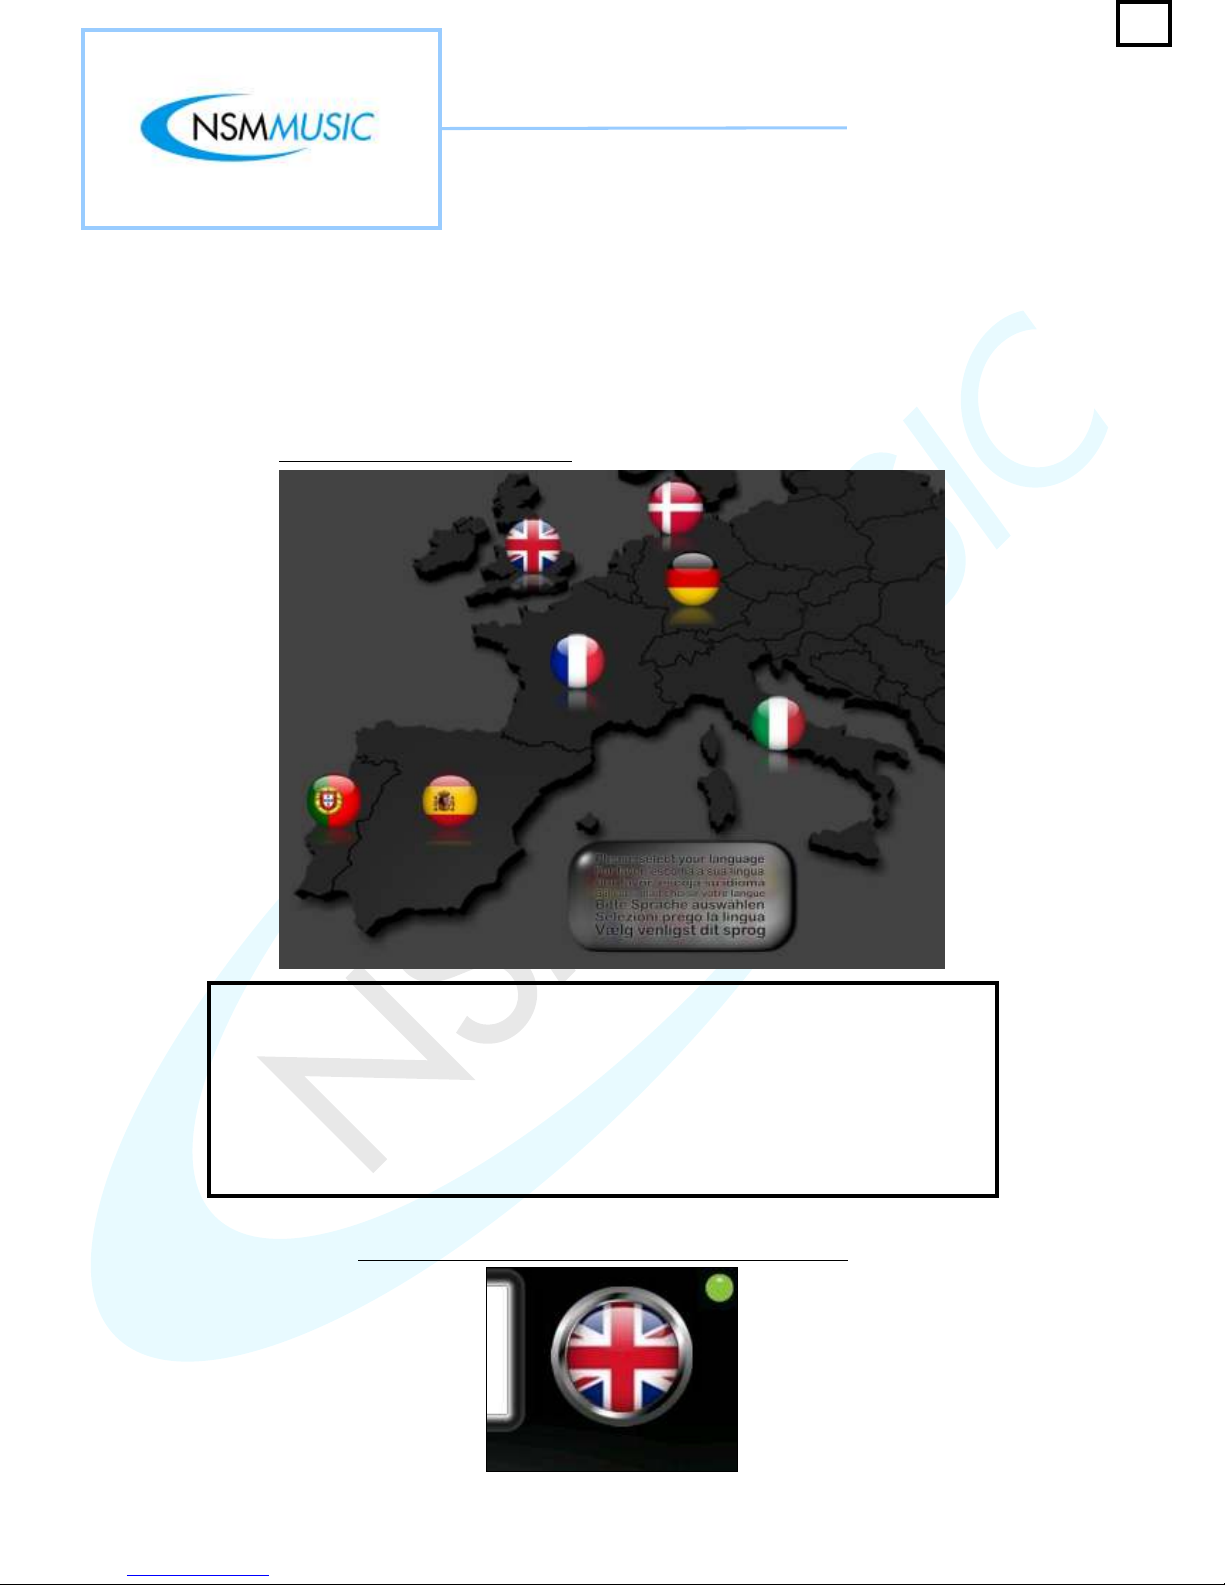
1.6 Language Selector
The Icon Apollo has the capability of having its entire user interface transformed into another language at
the touch of a button via the Main Menu screen (fig. 1.0) by pressing the button with the country flag
at the top right hand side* (fig. 1.6.1). This will show the screen show below (fig. 1.6) which allows the
user to select a language of their choice from a list of the main European languages. NB: This feature
should ideally be used by the operator and not general members of the public.
* Except in Éire
Once the Flag button has been pressed (fig. 1.6.1), you will see the screen above
displaying a map of Europe with buttons over the respective countries indicated by the
countries flags. Currently the Icon Apollo is available in English, French, German, Spanish,
Italian, Portuguese and Danish. Further languages may be added according to demand. To
alter the Jukebox interface language, you simply press on the button with the
corresponding flag image e.g. press the Spanish flag to change the Jukebox interface to
Spanish. Once pressed, the screen will close and return you to the Main Menu screen in
Spanish, subsequent screens will also be in Spanish until altered again in the Language
Selector screen.
fig. 1.6 - Language Selector screen
fig. 1.6.1 - Language Selector button on Main Menu screen
14
Page 18

SERVICE MODE
Page 19
2.0 Main Menu
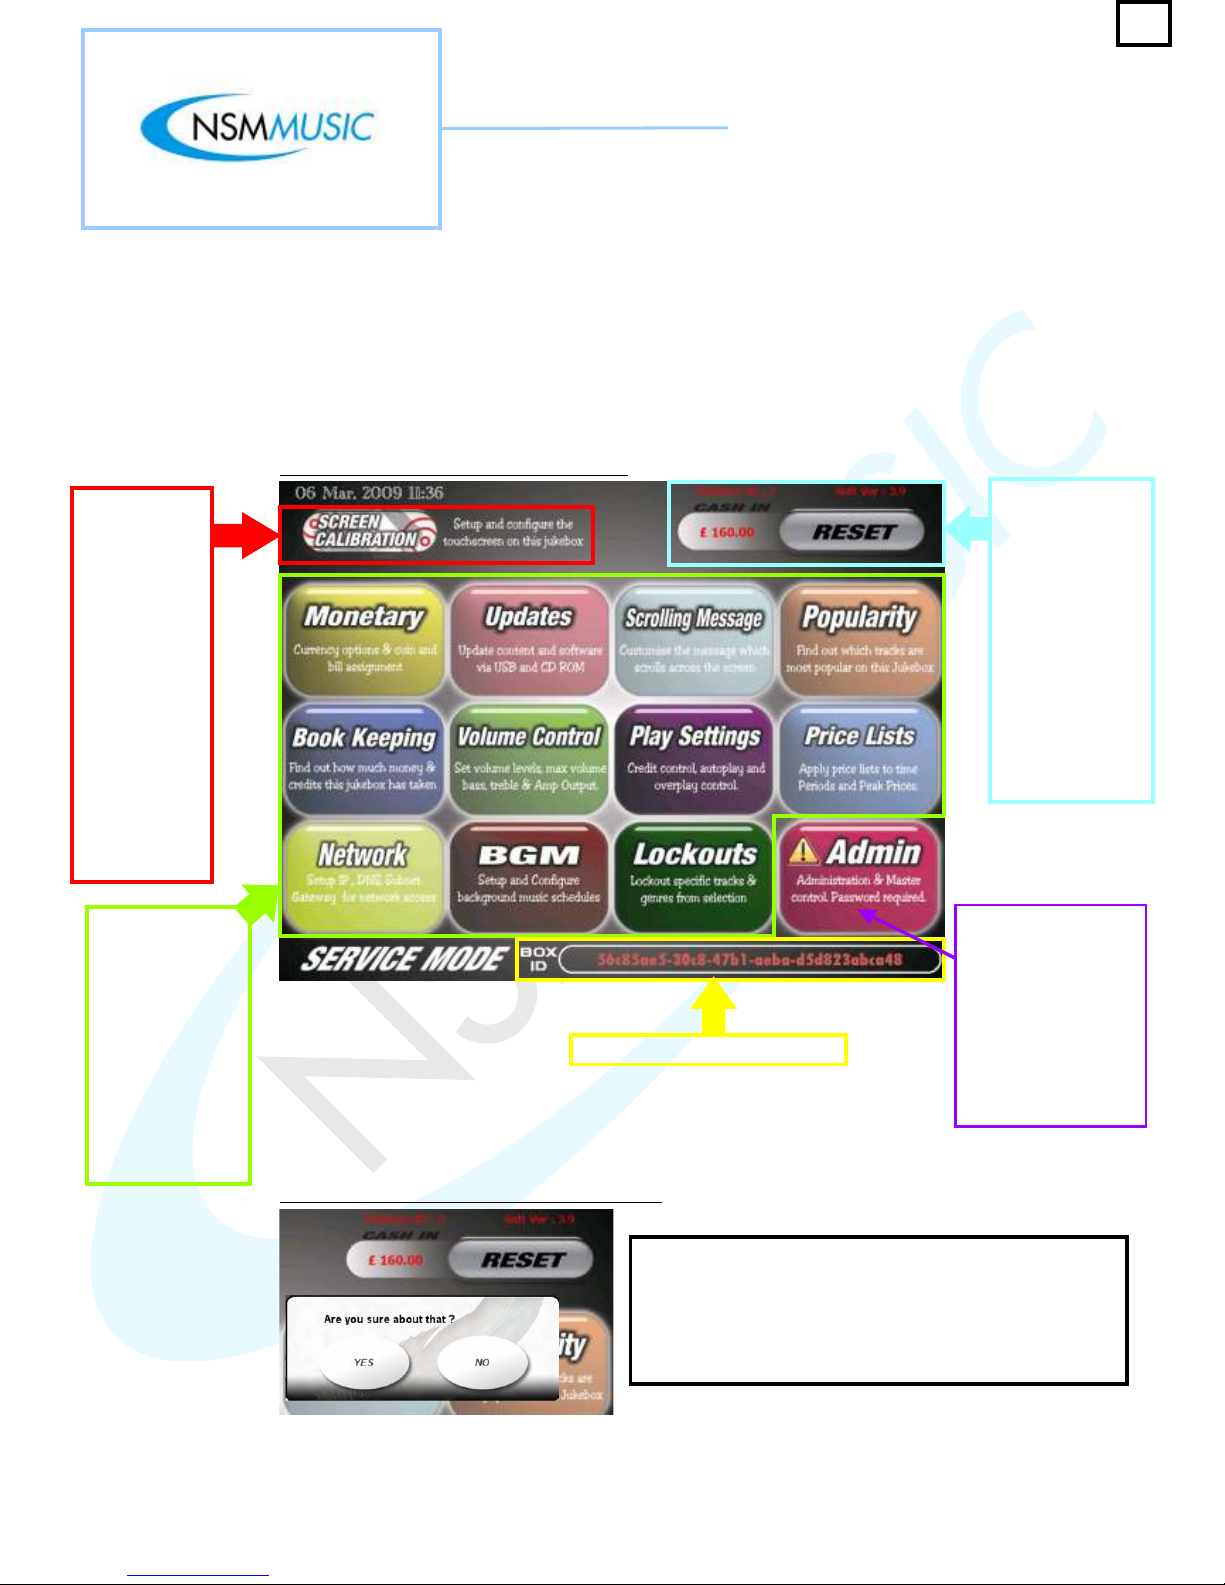
Once the Icon Apollo’s Service Switch has been pulled on the inside of the Jukebox, the Main Menu
screen (fig. 2.0) is displayed. This gives the user access to options to customize their own Jukebox
and see how much money the Jukebox has been taking. The service mode section of this user manual
is only for Jukebox Operators. Each of the areas on the Service Mode will be covered in further detail
in the following sections of this User Manual.
These are the
navigation
buttons on the
Service Mode
which open
separate screens
to allow the user
to customize their
own Jukebox.
These areas will
be outlined in
further detail.
Unique Jukebox Serial Number
If the
touchscreen
doesn’t seem
to be
responding as
well as should
be you can recalibrate it by
pressing this
button. This
will show the
re-calibration
screen (fig.
2.0.2) and just
follow the onscreen
instructions
On the right hand
side of the Main
Menu are
information
relating to the ID
and software
version of the
Jukebox, the total
amount of cash
the Jukebox has
received to date
and a reset
button (see fig.
2.0.1)
The Admin button is
strictly for users who
have administrator
privileges (NSM
Music Operators
Only) as requires a
password. This area
of the Service Mode
be discussed briefly
in section 2.12
fig. 2.0 - Service Mode Main Menu screen
fig. 2.0.1 - Reset button on Main Menu screen
The Reset button on the Service Mode Main Menu when
pressed, will display a message (as shown left) as by
pressing this button you will be clearing the total number
of cash the Jukebox has received to date. Only press
this button if you are certain you wish to erase all cash
data form the Jukebox.
15
Page 20
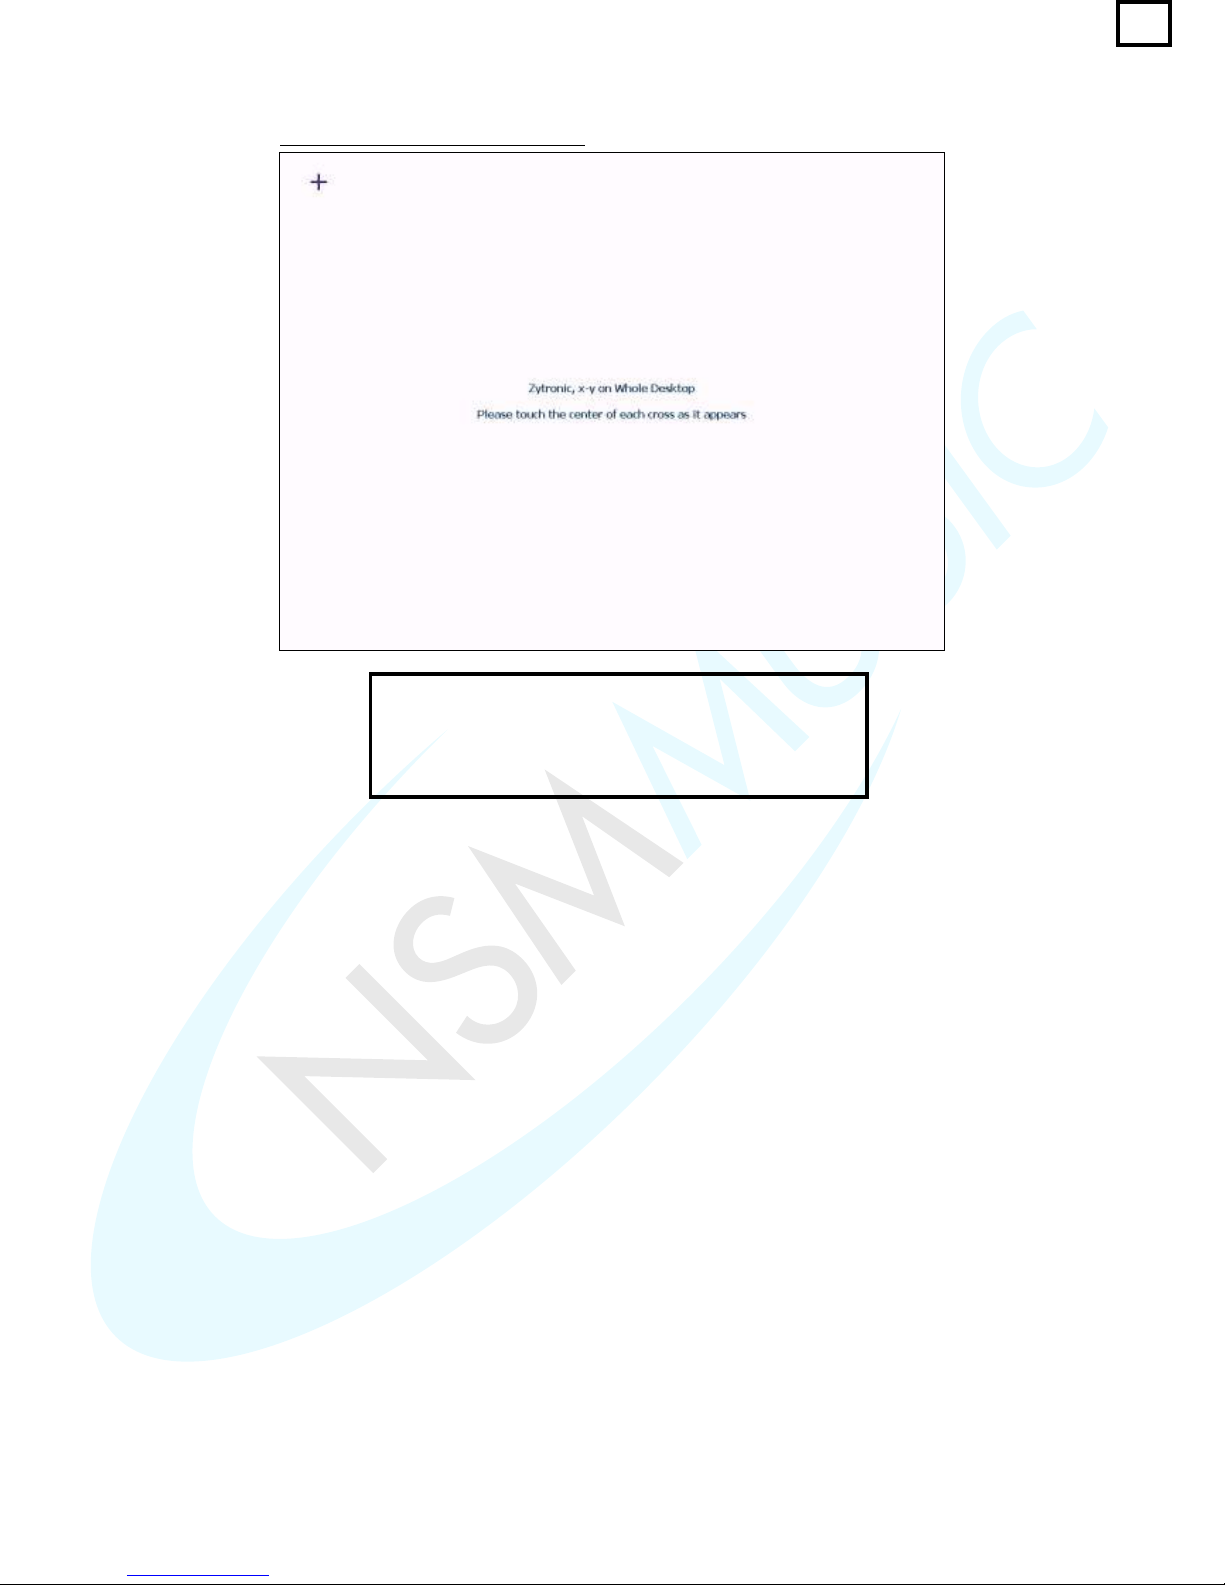
The screen above shows what happens when the user
presses the Screen Calibration Button. When the button
is pressed this new screen appears allowing the user to
set up the touch screen, or to re-calibrate the touch screen
after it has not been functioning as well as it should.
fig. 2.0.2 - Screen Calibration screen
16
Page 21
2.1 Monetary
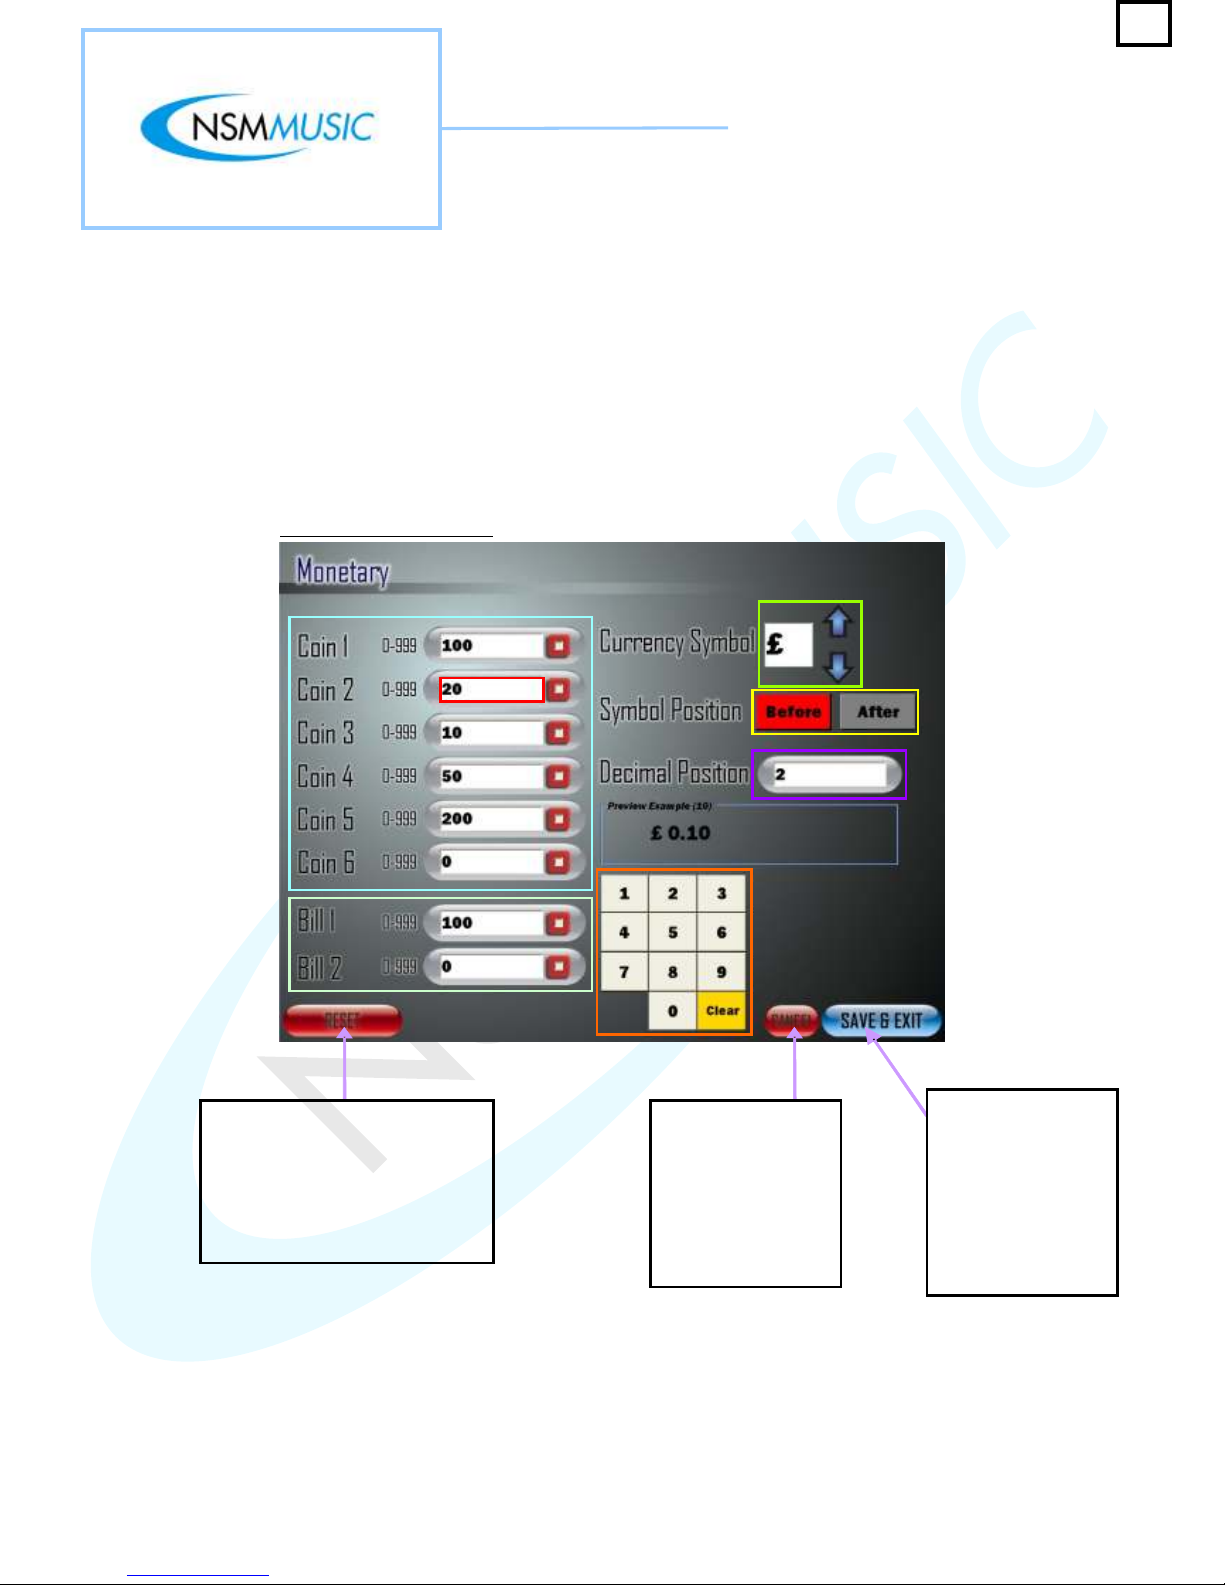
Once the user presses the Monetary button on the Service Mode Main Menu, The screen in fig. 2.1
will appear. In this screen if any of the numerical fields requires altering, the user presses in the field
they wish to alter, which will be highlighted in (In this case in fig. 2.1 the Coin 2 field has been
selected) to distinguish the current selection, presses Clear on the Numerical Keypad to clear the
numerical values in the selected field and then the user can type in new values using the Numerical
Keypad.
Red
fig. 2.1 - Monetary screen
The Save & Exit
button when
pressed, closes the
Monetary screen and
returns to the Service
Mode Main Menu
screen (fig. 2.0)
saving any changes
made by the user
The Cancel button
when pressed,
closes the Monetary
screen and returns to
the Service Mode
Main Menu screen
(fig. 2.0) without
saving any changes
The Reset button when pressed,
restores all the settings as was
when the Jukebox was first
installed (default factory settings).
Only press this button if you are
certain you wish to reset ALL
monetary settings
17
Page 22
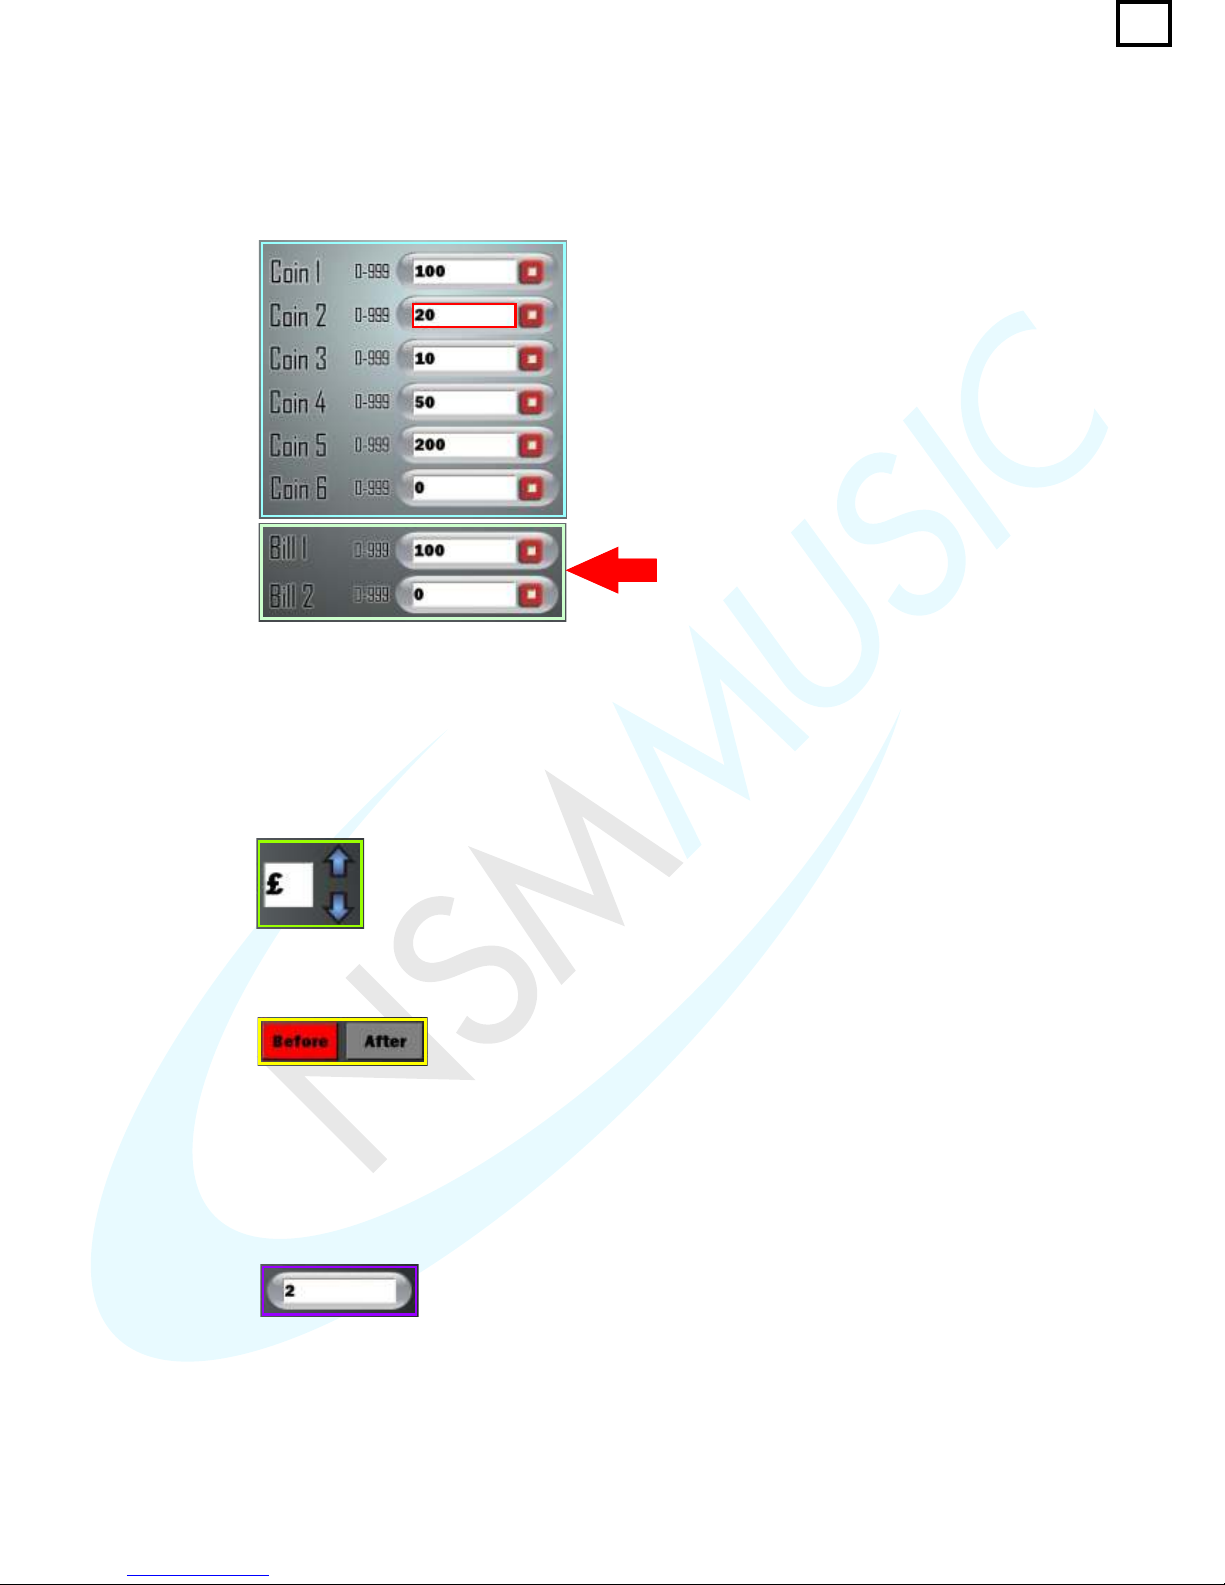
The Monetary screen settings can be altered in a number of ways
o Changing the Amount of Currency the users can enter.
This allows the user to set the type of money customers can put in. The values in fig.2.1
are preset but can be changed if the user wishes to by using the Numerical keypad.
Each number denotes a unit of currency, for example 100 = £1.00, 20 = £0.20 and so
forth.
This follows the same structure as the coins (mentioned
above). However, this section enables the use of paper
Notes, or Bills if the Jukebox has the requires Note
Reader device to take Notes or Bills.
o Changing the Currency Symbol and Position.
The Currency Symbol can be altered by pressing either the Up or Down arrows. The
preset currency symbols are: €, £, Rs, ¥, $ (Or to any currency of the Users Choice if
specified to NSM Music before production). Preset to country of origin.
Clicking either the Before or After button, places the currency symbol either before
or after the number. The current position is highlighted in .Red
o Changing the Decimal Position.
This allows you set the number of decimal places for the selected currency. It is
automatically preset to 2.
18
Page 23
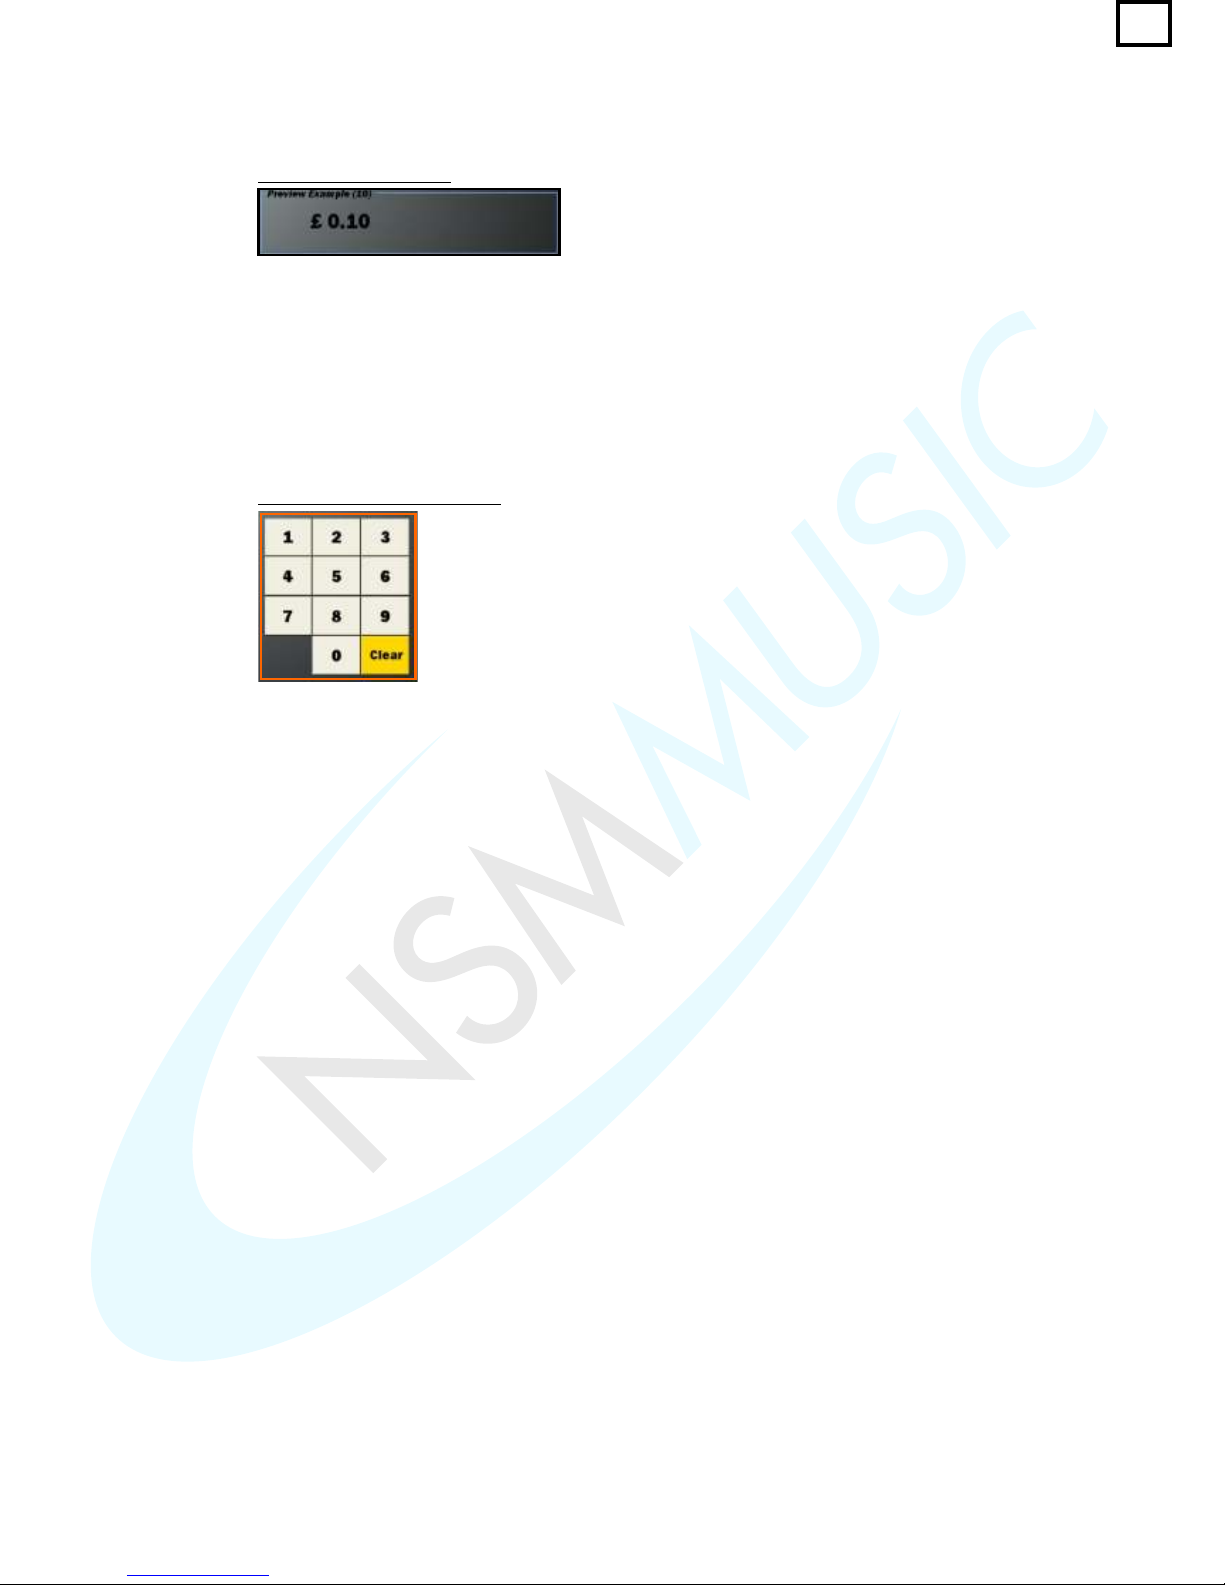
The Preview Box displays a preview of the current currency symbol and position settings. If any of
them are altered the Preview Box automatically updates itself.
fig. 2.1.1 - Preview Box
The Numerical keypad allows the user to alter any of the numerical monetary settings and any field
that requires numerical input in any further Service Mode screens. Any screen in the Service Mode
which has the Numerical Keypad it will perform the same function, so will only be mentioned in this
section.
fig. 2.1.2 - Numerical Keypad
19
Page 24
2.2 Updates
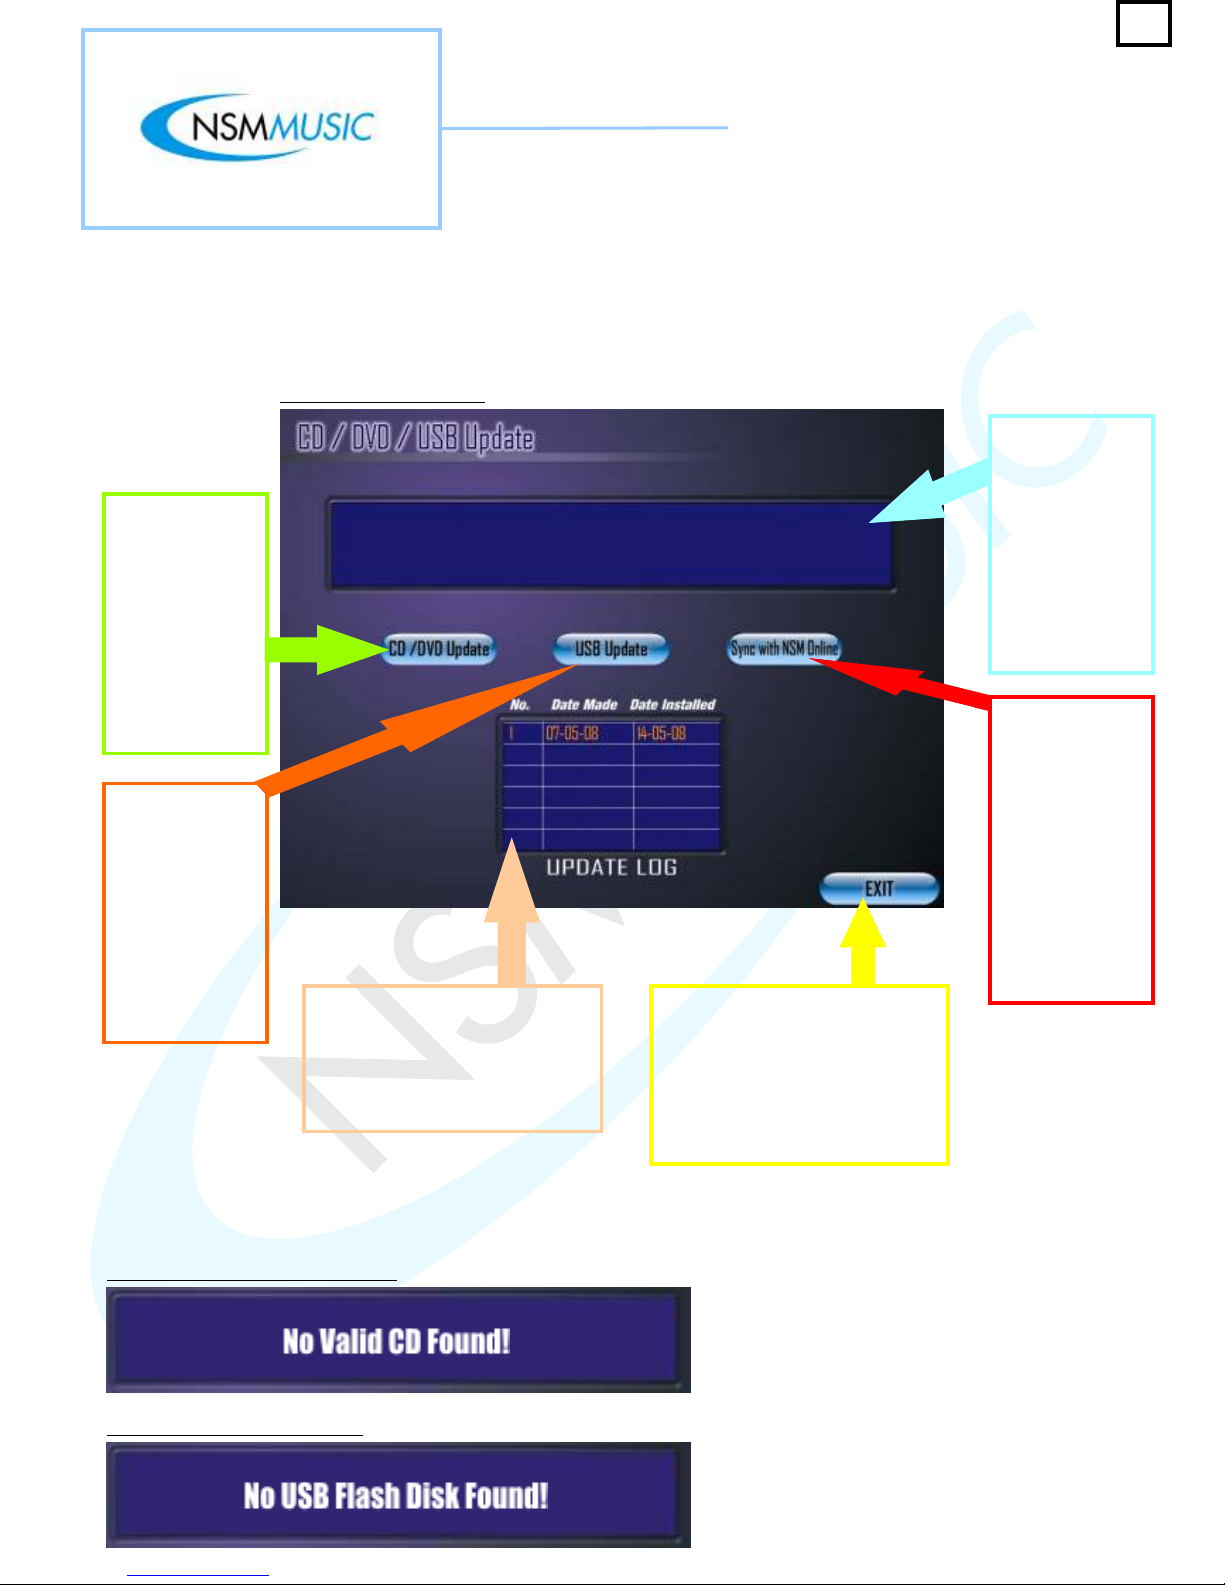
If the user presses the Updates button on the Service Mode Main Menu screen (fig. 2.0), the
following screen is displayed:
fig. 2.2 - Updates screen
The CD/DVD
Update button
when pressed,
initialises the
update of
songs/videos (as
well as any
software update)
which are held on
the CD/DVD to
the Jukebox
The Exit button when pressed
closes the current screen and
returns the user back to the
Service Mode Main Menu screen.
Any screen in the Service Mode
section which has this button will
perform the same function.
This field displays
messages to the
user when either
of the three
buttons are
pressed. For the
types of
messages which
appear, see figs
2.2.1, 2.2.2,2.2.3,
2.2.4, 2.2.5
If the Jukebox is
Online, the user
can press the
Sync with NSM
Online button
which will update
the latest
audio/video
tracks and
software updates
without the use of
a CD/DVD/USB
stick
The USB Update
button when
pressed,
initialises the
update of
songs/videos (as
well as any
software update)
which are held on
the CD/DVD to
the Jukebox
The Update Log displays the
latest 6 Updates that were
installed on the Jukebox. This is
used for quick reference to make
sure the update was applied and
installed
If the user presses on either the CD/DVD Update button or the USB Update button without firstly
inserting a CD/DVD or a USB Flash Memory Stick, the following two messages appear:
fig. 2.2.1 - CD/DVD Error Message
fig. 2.2.2 - USB Error Message
20
Page 25
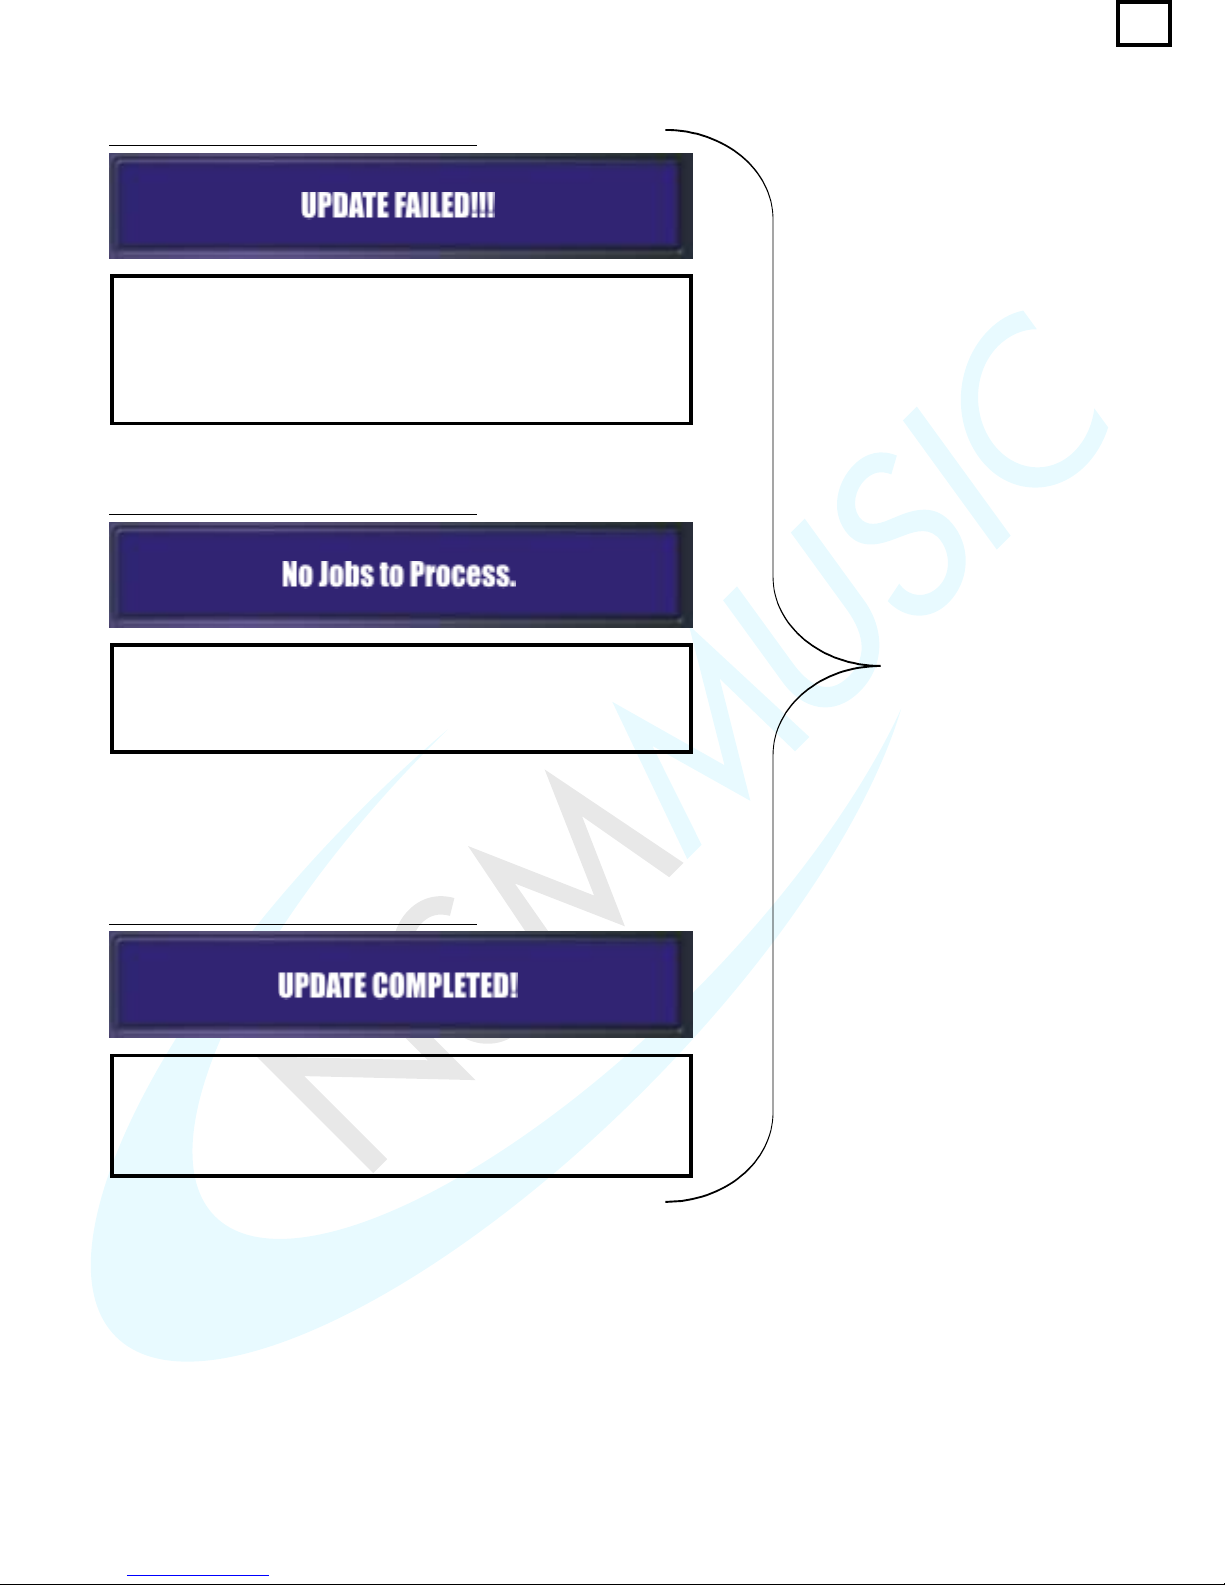
The following messages appear when the user inserts a CD/DVD or USB Flash Memory Stick
and presses either the CD/DVD Update or USB Update button:
fig. 2.2.3 - CD/DVD/USB Update Message 1
If this message occurs, re-insert the CD/DVD or USB Flash
Memory Stick and try the update again.
If the same message occurs again please consult your supplier to
request a new update as the original CD/DVD or USB Flash
Memory Stick may be faulty.
fig. 2.2.4 - CD/DVD/USB Update Message 2
If this message occurs then there are no updates available on the
CD/DVD or USB Flash Memory Stick. Either the update has
already been applied or the wrong CD/DVD or USB Flash Memory
Stick has been inserted.
If this message occurs then the update has been applied
successfully.
You may need to reboot the Jukebox for the new updates to take
effect.
fig. 2.2.5 - CD/DVD/USB Update Message 3
Note:
During the update process
the user will see in the
Message Field all the
tracks and/or updates
being applied
21
Page 26
2.3 Scrolling Message
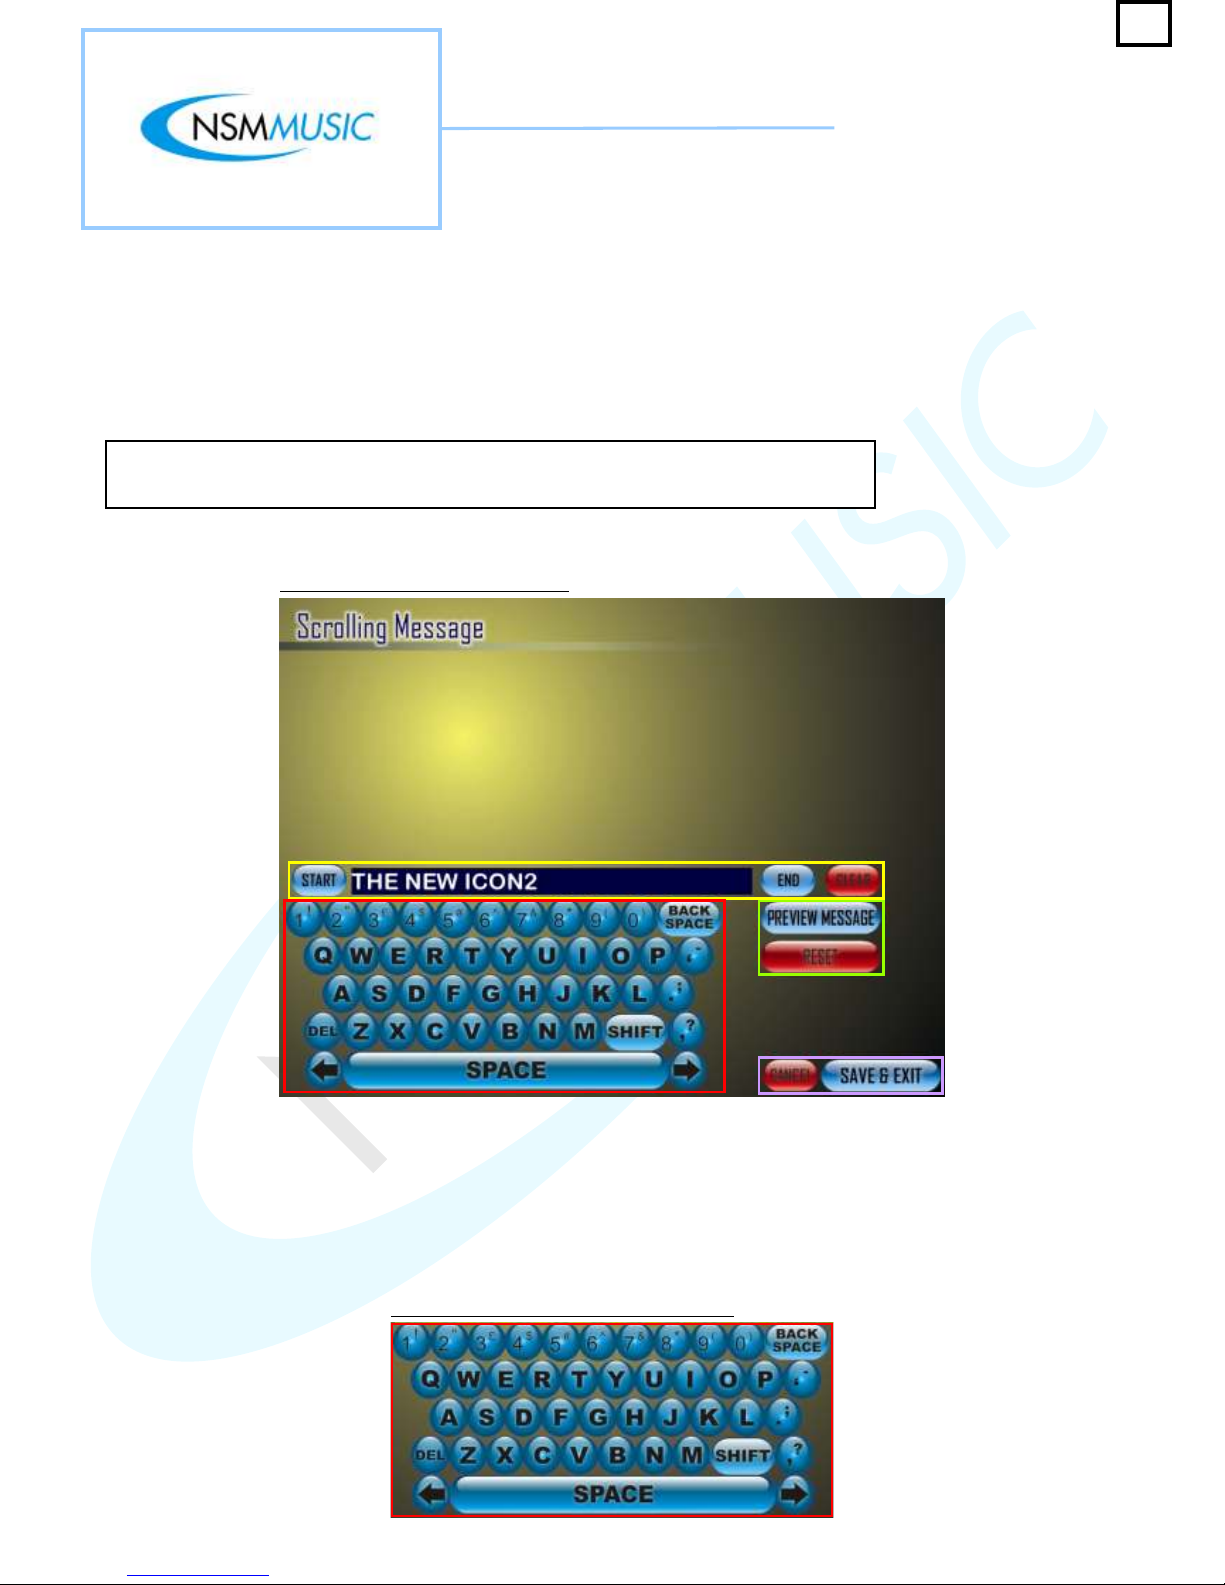
The Scrolling Message screen (fig. 2.3) applies to Jukeboxes with the Video option enabled. It will
then display the Scrolling Message when the Jukebox is in 'Attract Mode' or showing adverts on its
separate screen (TV).
The Scrolling Message is automatically preset to:
“Make your favourite title selections at the New Jukebox from
NSM Music : The Icon!”
However, this can be altered to anything the user wishes.
fig. 2.3 - Scrolling Message screen
The Scrolling message can be altered to any message the user wishes by using the On-Screen
Keyboard (fig. 2.3.1) which is a fully functional touchscreen keyboard designed to allow users to enter
text in the Scrolling Message text box and any field that requires text input in any further
Service Mode screens. The On-Screen Keyboard performs the same basic functions on all of the
Service Mode screens that have need for it.
fig. 2.3.1 - Scrolling On-Screen Keyboard
22
Page 27
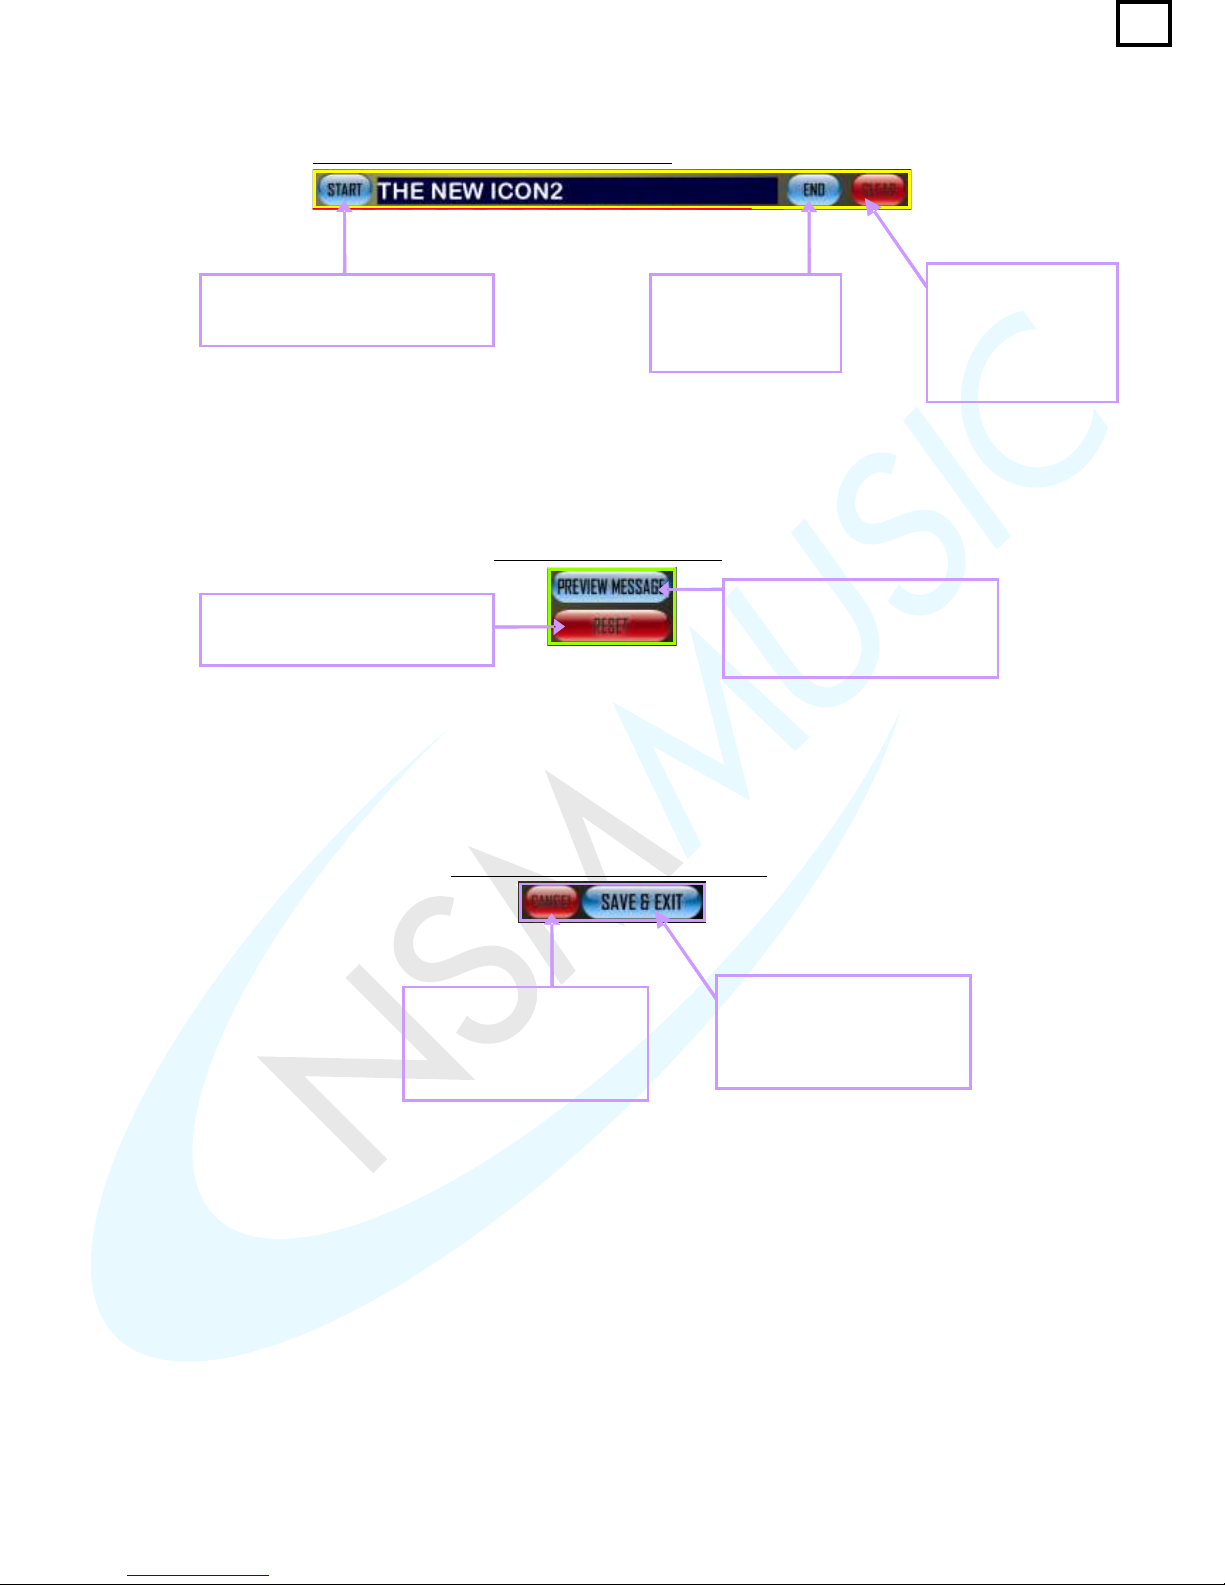
The Text Box field shows the text entered by the user on the keyboard, if altered, or the default
message text.
The Clear Button
clears ALL the text in
the text box field
ready for the user to
enter a message of
their choice
The End button
moves the text in the
Text Box field to the
end
The Start button moves the text
in the Text Box field to the
beginning
fig. 2.3.2 - Scrolling Message Text Box field
Next to the text box, below the End button, there are two buttons which will either preview the
message in the text box (fig. 2.3.5) or reset the text in the text box to it's default text.
The Preview Message button
displays a preview of the
Scrolling Message above the
Text Box field (fig. 2.3.5)
The Reset button restores the
Scrolling Message to its default
text
fig. 2.3.3 - Text Box buttons
At the bottom right hand corner of the Scrolling Message screen there are two buttons, Cancel
and Save & Exit (fig 2.3.4). Any screen in the Service Mode which has any of these buttons will
perform the same function.
fig. 2.3.4 - Cancel/Save & Exit buttons
The Save & Exit button
closes the current screen
and returns to the Service
Mode Main Menu screen
saving any changes made
The Cancel button closes
the current screen and
returns to the Service Mode
Main Menu screen without
saving any changes
23
Page 28
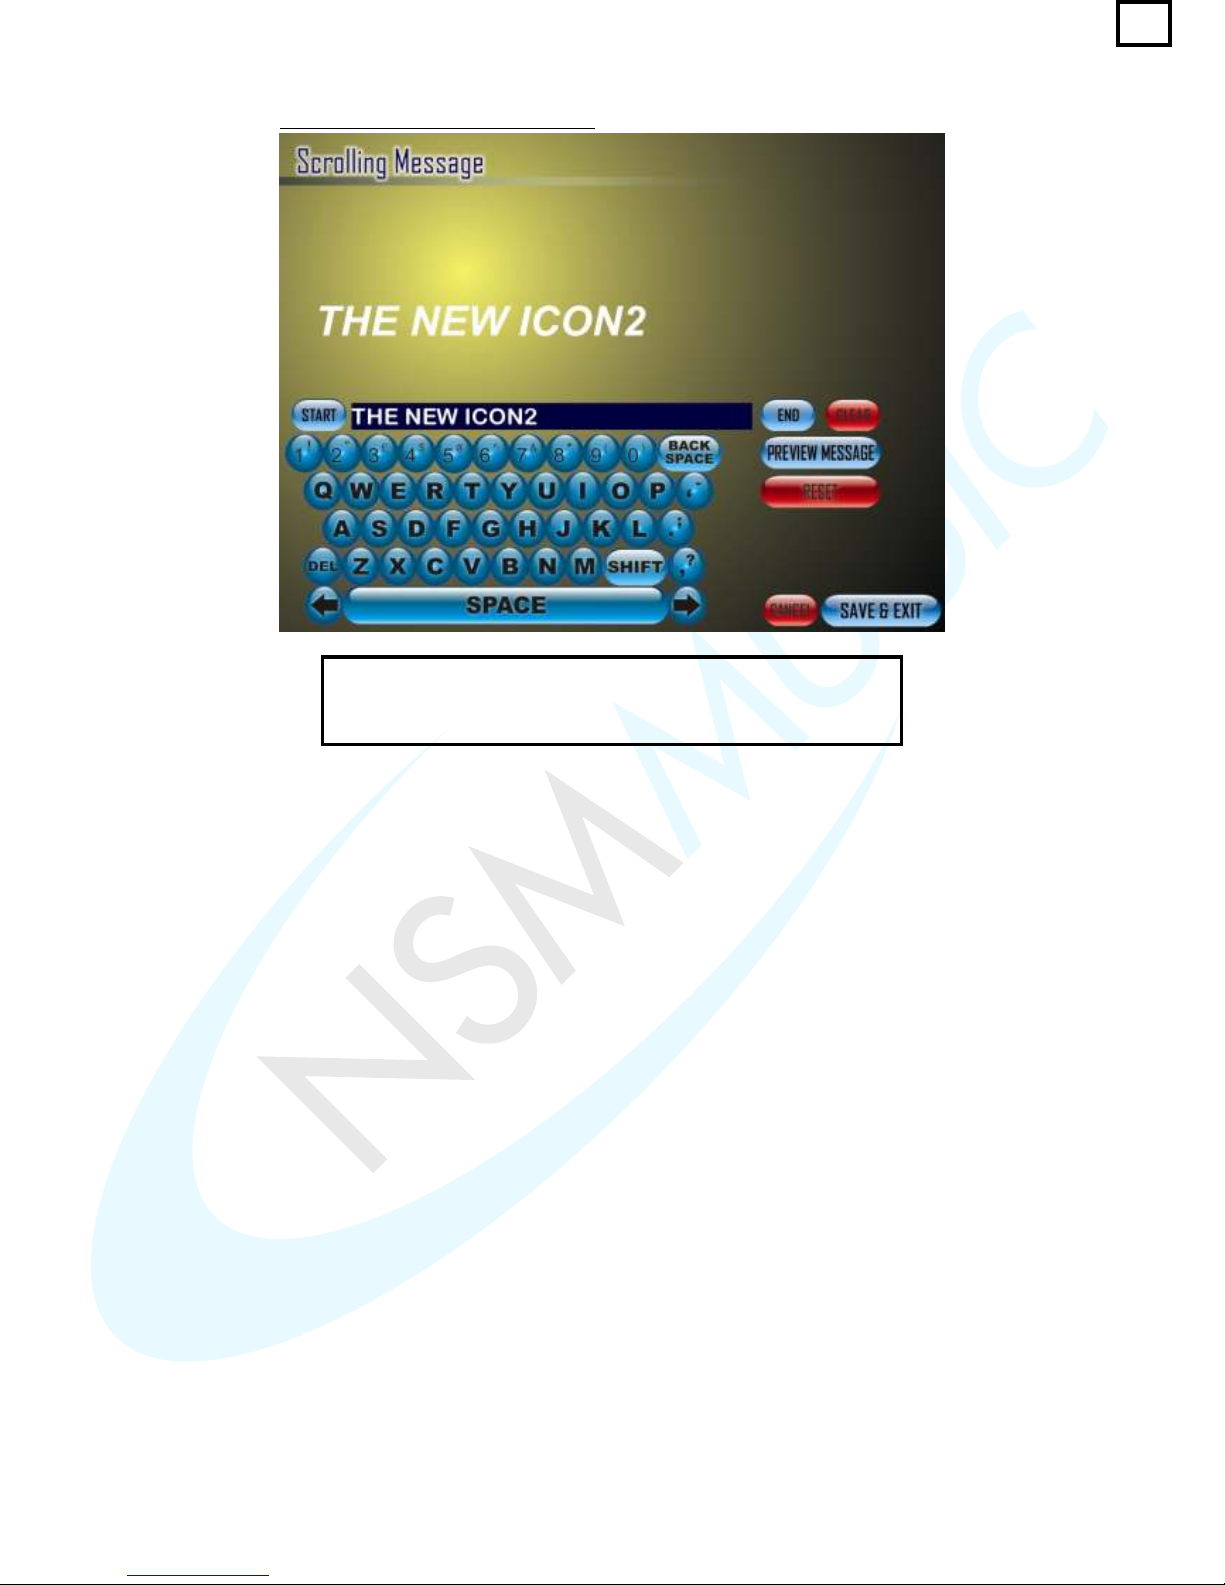
When the user presses the Preview Message button, above the
Text Box field will commence a scrolling preview of the default
message or any message created by the user.
fig. 2.3.5 - Scrolling Message Preview
24
Page 29
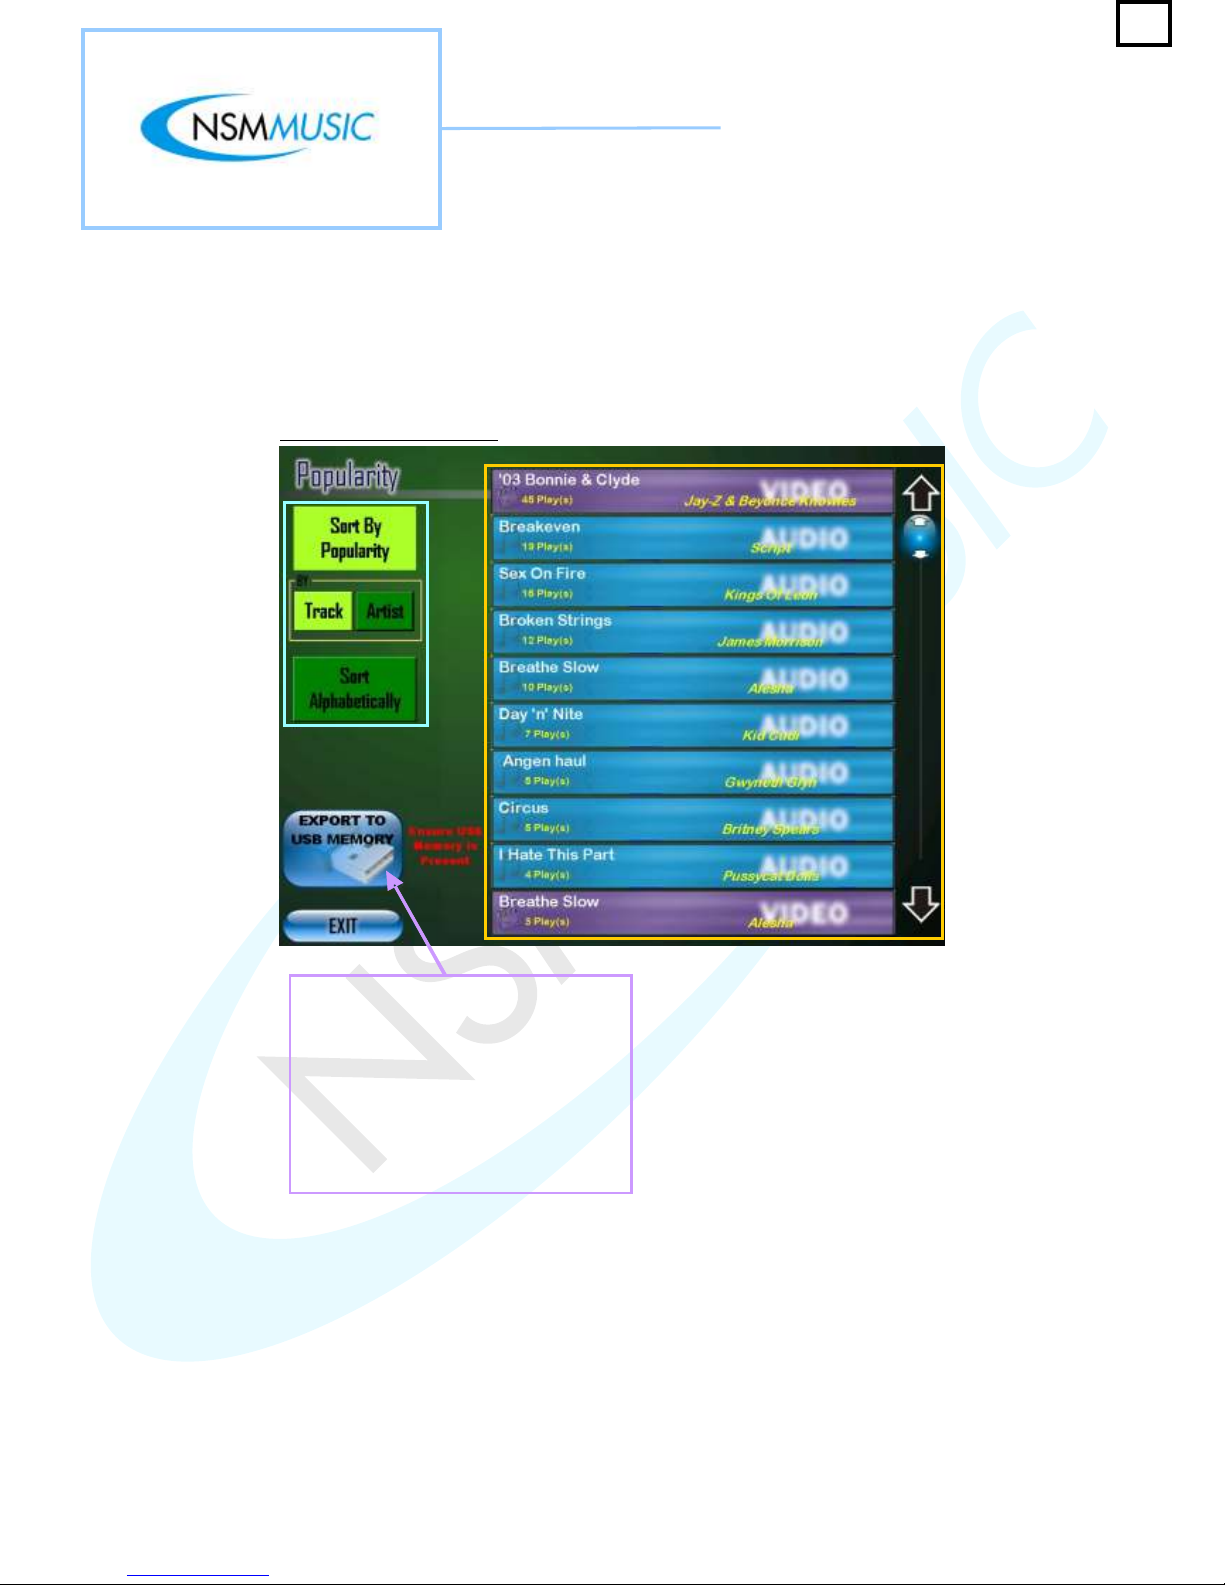
2.4 Popularity
If the user presses the Popularity button on the Service Mode Main Menu screen, the screen
below (fig. 2.4) is shown. The Popularity screen displays a list of all the songs/videos by order
of most played. The Popularity screen is set to default to sort the Popularity List by track.
fig. 2.4 - Popularity screen
The Export To USB Memory Button
saves the Popularity List as a .csv
format which can be opened in
Microsoft Excel for future Reference.
Next to the button is a little reminder to
the user to make sure that they have
inserted a USB Flash Memory Stick.
Any screen within the Service Mode
which has this button will perform the
same function.
25
Page 30
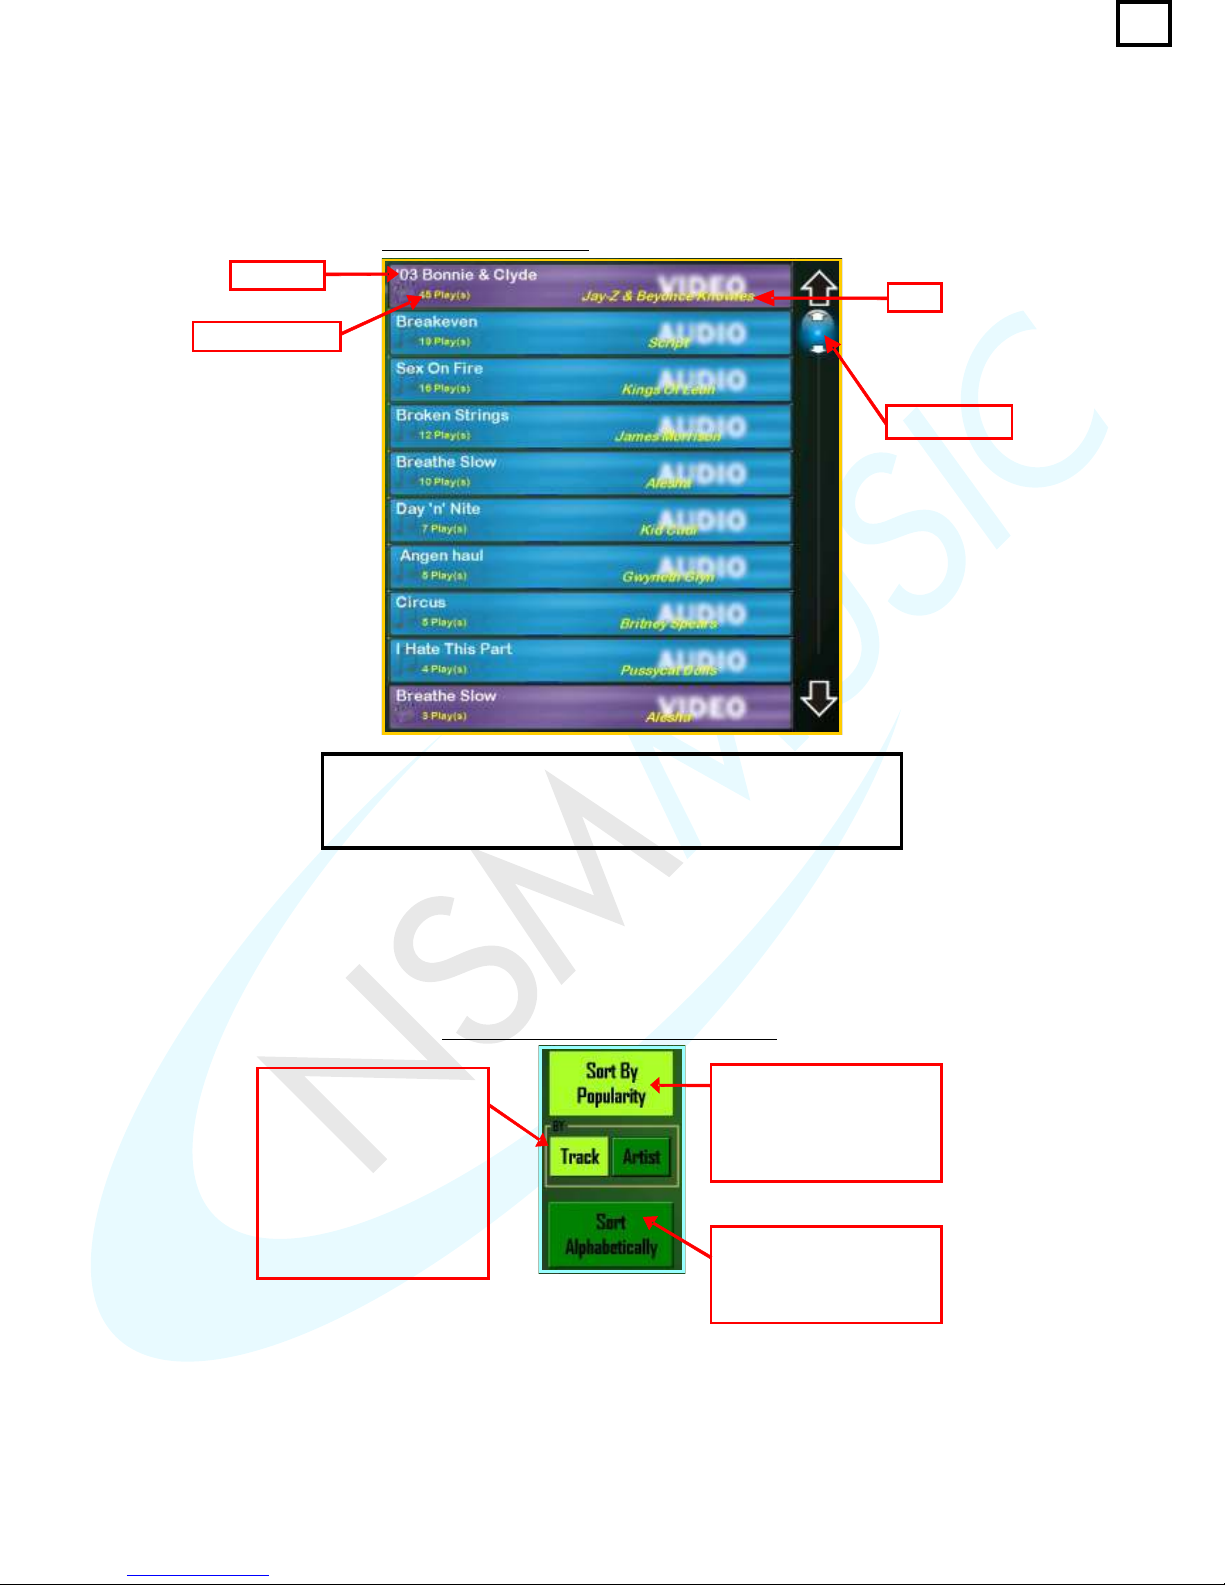
The Popularity List displays all the songs in order of Most Played. The Popularity List lists the:
Title, Artist, and Number Of Plays the track has received. As you may see, the Popularity List is in
2 colours, and . The represents an Audio Track and the represents a
Video Track - the same as the Jukebox main User Interface.
Blue BluePurple Purple
fig. 2.4.1 - Popularity List
The Popularity List can be browsed through by either using the Up
and Down arrows which moves the list up or down 1 position at a
time, or by moving the Slider Control to the right hand side of the
Popularity List to browse the list more quickly.
Slider Control
Track Title
Number of Plays
Artist
The Popularity List can be sorted by popularity and alphabetically. Each option can be further sorted
by Track or Artist (fig. 2.4.2).
fig. 2.4.2 - Popularity List sorting buttons
The Sort By Popularity
Button displays the
Popularity List by order of
Most Played by Track.
This is the default setting.
The Sort Alphabetically
Button displays the
Popularity List as shown in
fig. 2.4.4 and 2.4.5
The By box has two
Buttons: Track and Artist.
The Track Button displays
the Popularity List as
shown in fig. 2.4.1 - this is
the default setting. The
Artist Button displays the
Popularity List as shown in
Fig. 2.4.3
26
Page 31
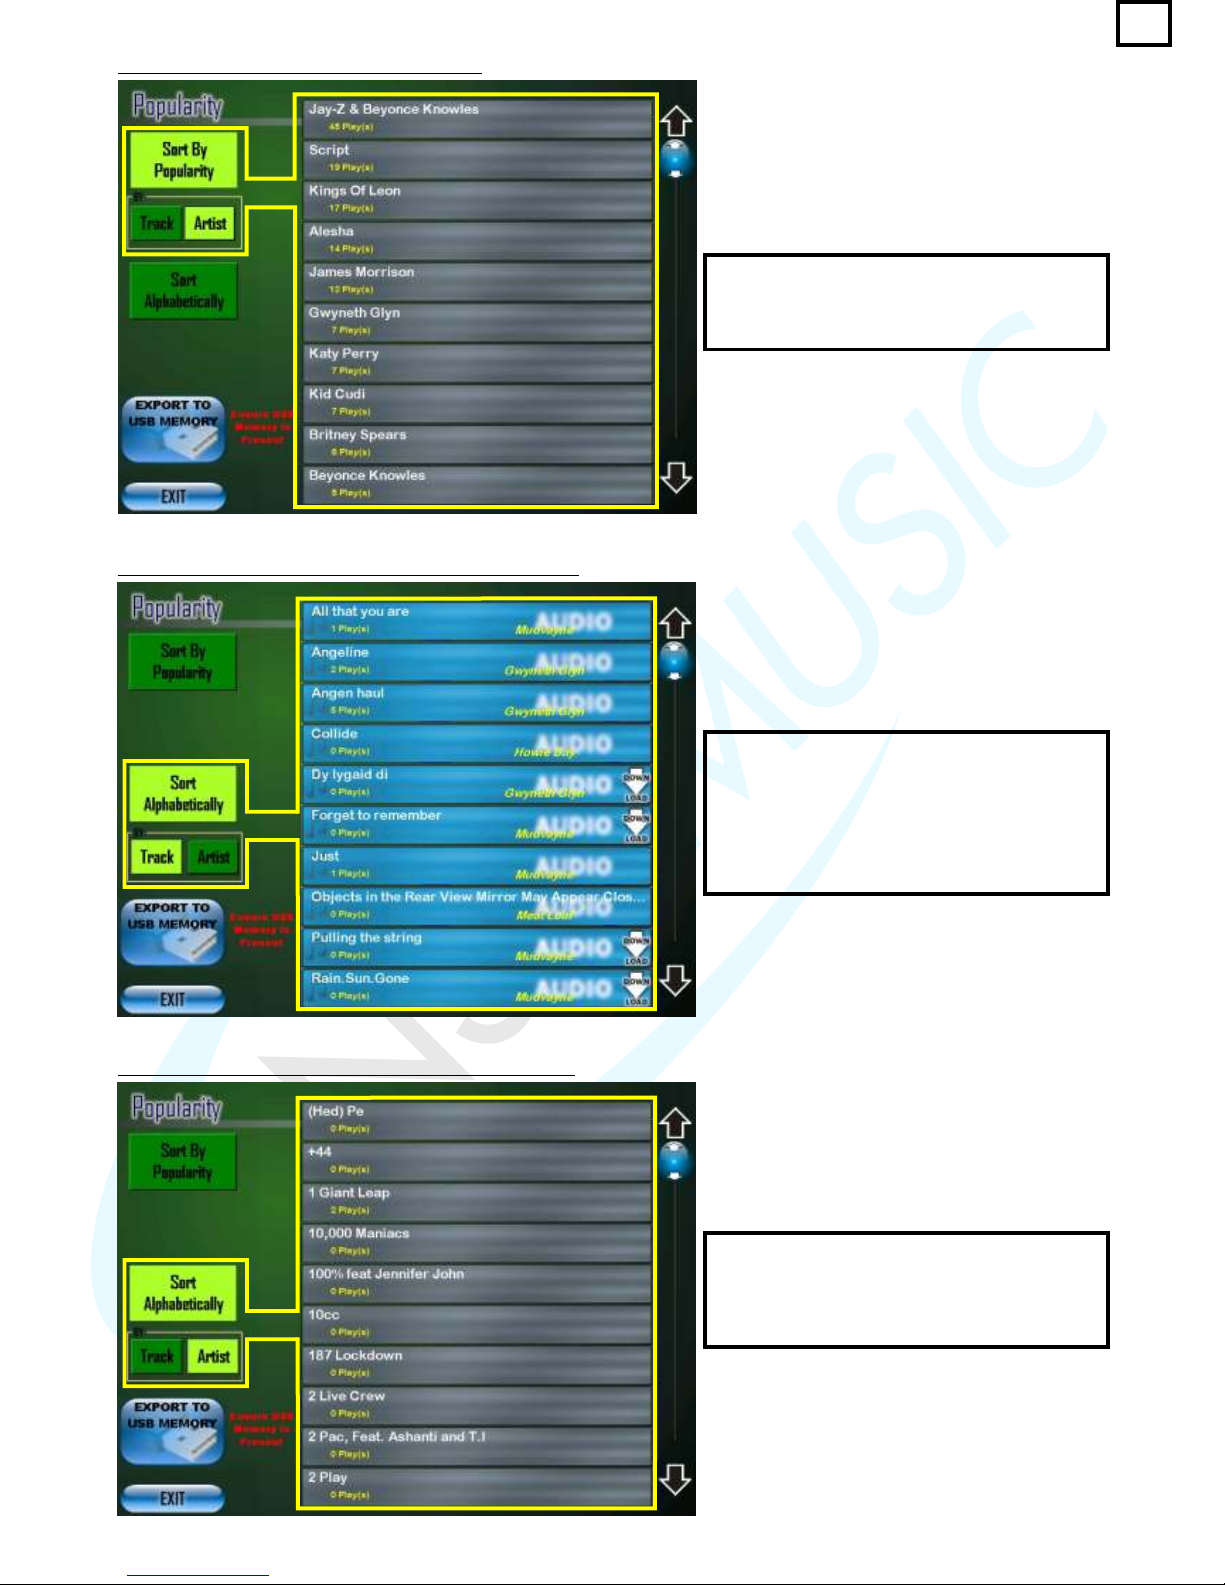
If the user presses Sort By Popularity By Artist
button, the Popularity List has now changed
colour, displaying only the Artist Name and the
Total number of songs played by that Artist.
If the user presses Sort Alphabetically button,
the Popularity List has now changed
displaying the Artist Name, the Total number of
times the song has been played, but this time
the list is ordered alphabetically by Track (it
defaults to Track when the user presses the
Sort Alphabetically button).
If the user presses Sort Alphabetically By Artist
button, the Popularity List has now changed
displaying only the Artist Name and the Total
number of songs played by that Artist, but this
time the list is ordered alphabetically by Artist.
fig. 2.4.3 - Popularity List displayed by Artist
fig. 2.4.4 - Popularity List sorted Alphabetically by Track
fig. 2.4.5 - Popularity List sorted Alphabetically by Artist
27
Page 32
2.5 Book Keeping
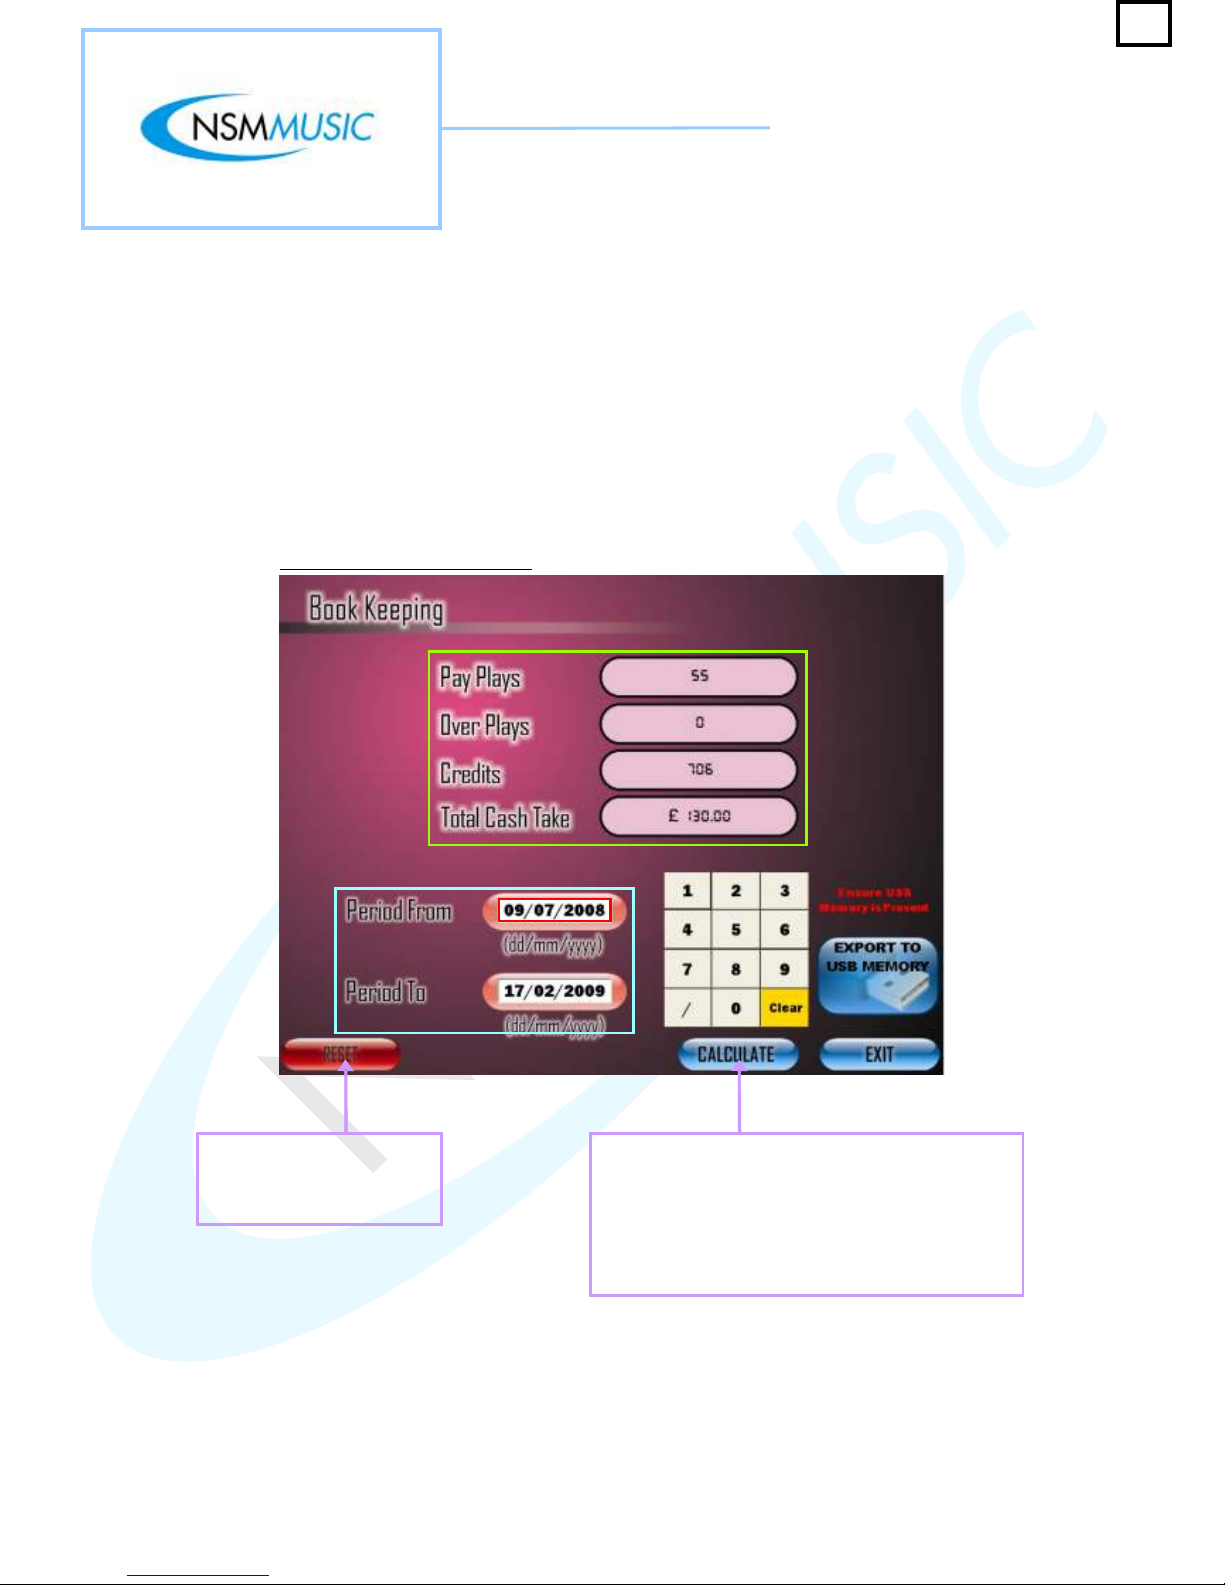
The Book Keeping screen allows the user to find out the total number of paid for songs, over plays,
the total number of credits used, and the total amount of cash taken between two specific dates,
which can then be saved on a USB Flash Memory Stick for future reference if desired.
In fig. 2.5, if the Period From and Period To dates wish to be altered, the user clicks the field they
wish to alter, which will then be highlighted in to distinguish the current selection, selects Clear
on the Numerical keypad to clear the numerical values in the selected field and then proceeds to
type in the new values using the Numerical keypad.
Red
The Reset Button restores
the Period From and
Period To dates to their
default values.
The Calculate Button, when pressed, calculates
the Total number of songs played which were
paid for, the number of over plays, the total
number of credits and the total amount of cash
taken between the dates specified in the Period
From and Period To boxes and places the
results in the top four fields.
fig. 2.5 - Book Keeping screen
28
Page 33
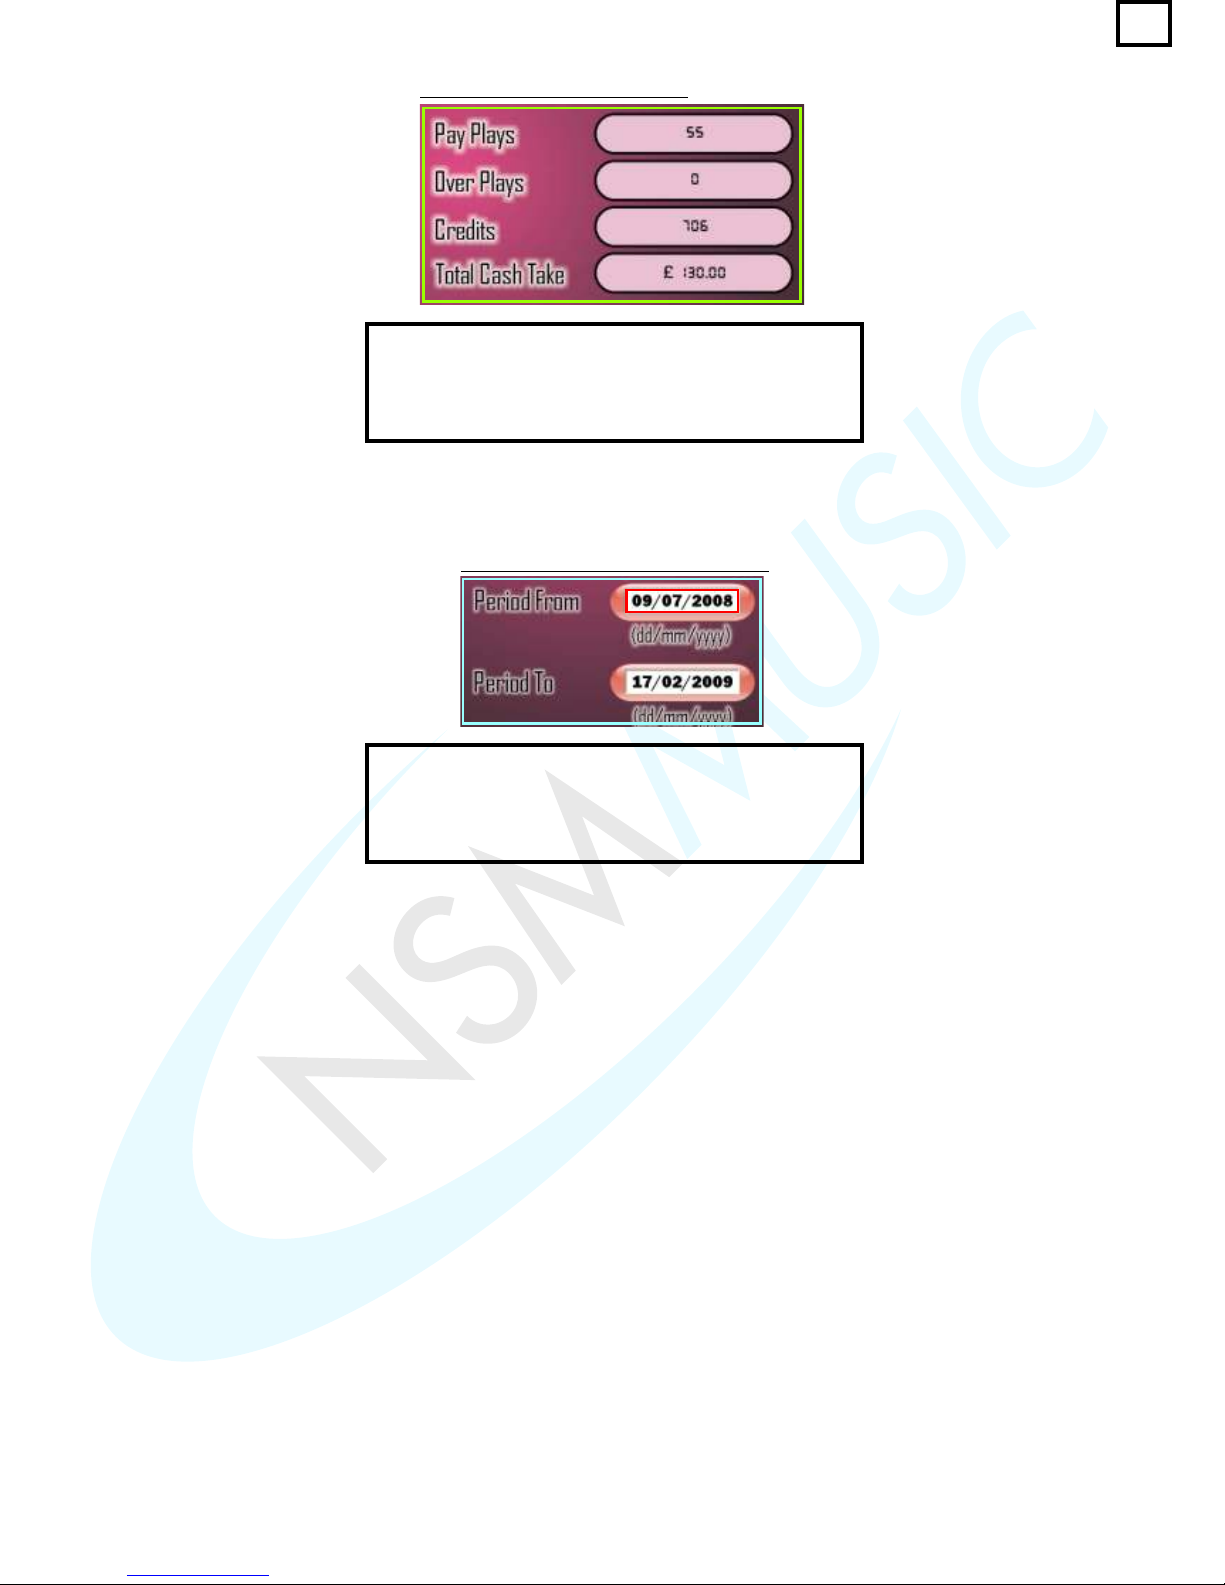
The figures in the four headings in fig. 2.5.1 are calculated
when the user changes the Period From and Period To
dates (fig. 2.5.2) and clicks the Calculate button. As
default the dates are set to when the Jukebox was initially
set up till the current date so far.
fig. 2.5.1 - Book Keeping figures
fig. 2.5.2 - Period From and To Dates
The Period From and Period To dates in fig. 2.5.2 are
default to the dates when the Jukebox was initially set up
till the current date so far. These dates can be altered by
the user to any dates required by using the Numerical
keypad.
29
Page 34
2.6 Settings
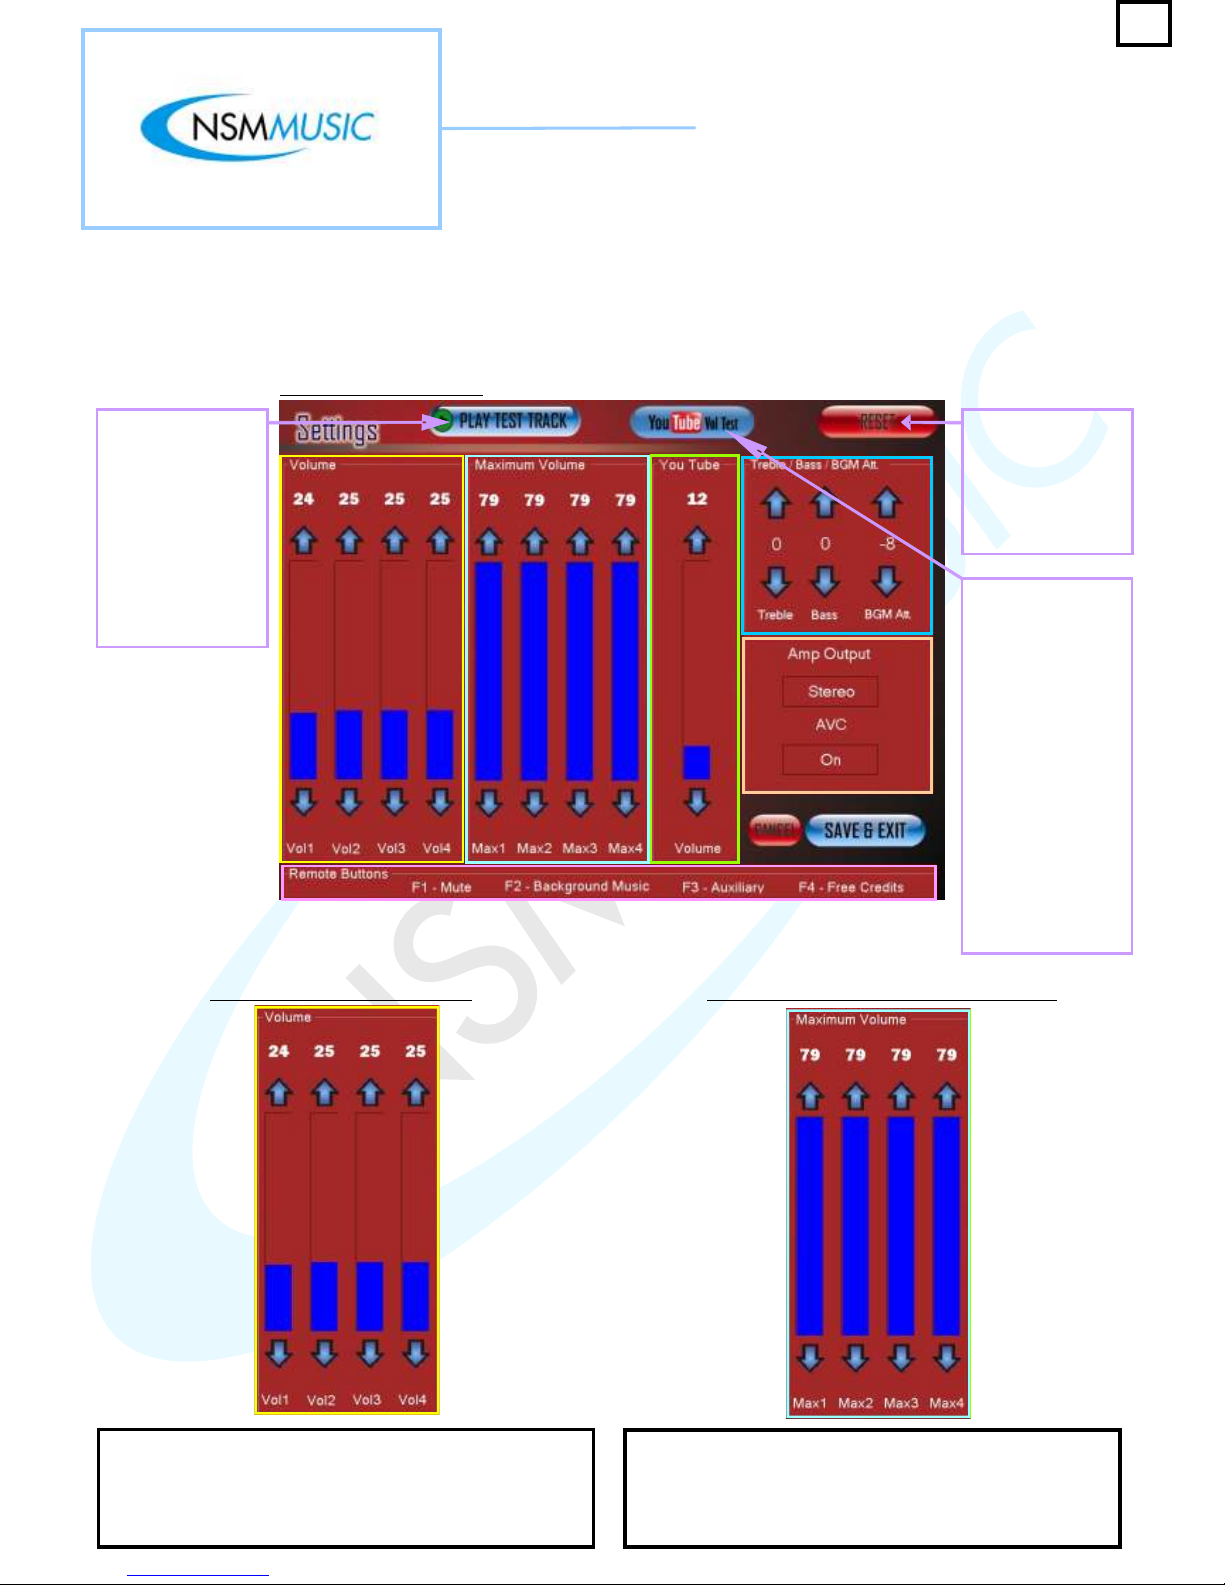
The Settings Screen allows the user to make changes to the Audio volume and quality of the Jukebox.
The Play Test
Track Button plays
a short track to
allow the user to
hear what the
Jukebox audio will
play like before
they save any
changes that they
may have made.
The Reset Button
restores all the
Settings to default.
By pressing this
button you will lose
any saved settings.
The YouTube Vol
Test button (for
YouTube enabled
Jukeboxes only Kit is not installed
this feature will not
be visible) plays a
short track on its
separate speaker
to allow you to
hear what the
Jukebox will play
like before you
save any changes
that you have
made.
fig. 2.6 - Settings screen
The Volume box (fig. 2.6.1) has four bars (two for each
speaker – L & R) which allow the user to change
the output volume on the Jukebox. They can be adjusted
by using the Up and Down arrows on each bar.
The Default Setting is 20 on each channel.
fig. 2.6.1 - Volume Box Settings
fig. 2.6.2 - Maximum Volume Box Settings
The Maximum Volume box (fig. 2.6.2) has four bars (two
for each speaker – L & R) with the option to set the
maximum volume limit of the Jukebox to anything from 0-
79. They can be adjusted by using the Up and Down
arrows on each bar.
fig. 2.6 - Settings screen
30
Page 35
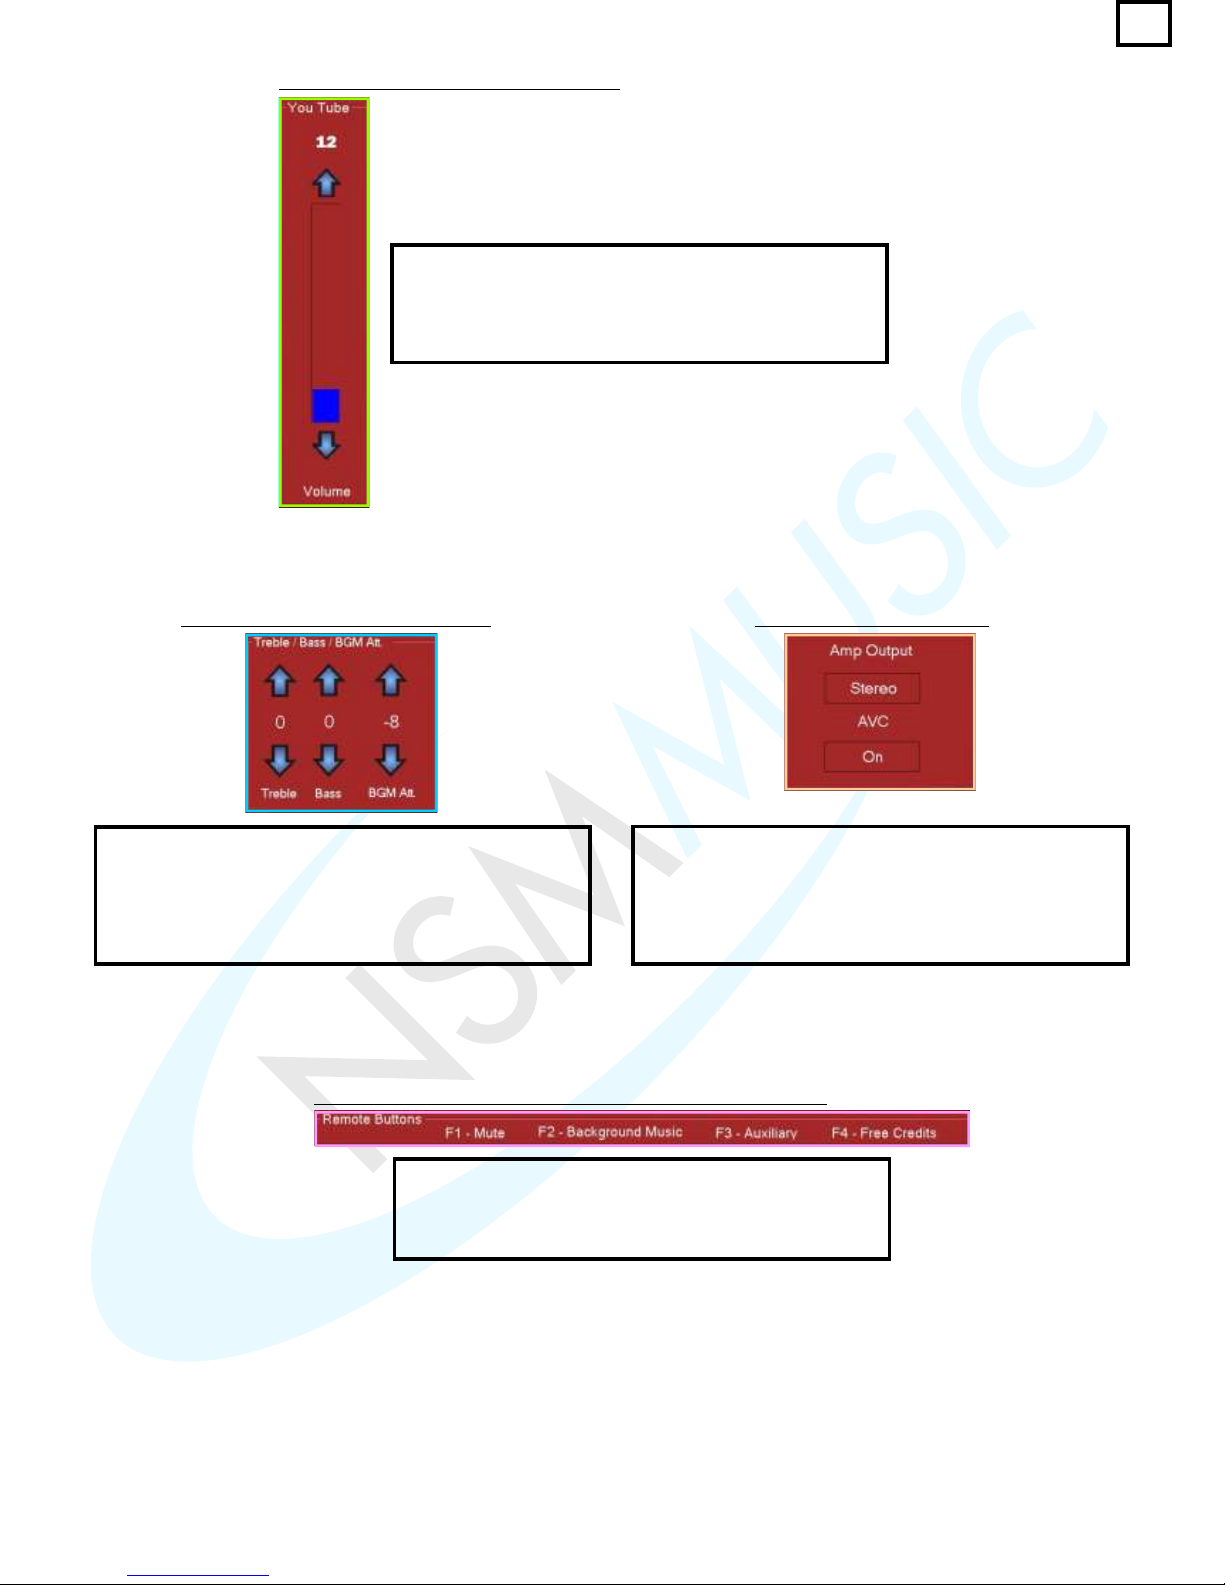
The YouTube Volume box, if the Kit is installed, (fig.
2.6.3) has only one bar (its own separate speaker) with
the option to set the maximum volume limit of the YouTube
feature to anything from 0-79. They can be adjusted by
using the Up and Down arrows on each bar.
fig. 2.6.3 - YouTube Volume Box Settings
The settings in fig. 2.6.4 allow the user to set equalizer
settings for the Jukebox. The Treble can be changed from
-14 to 14, the Bass can be changed from -14 to 14 and
the BGM Att can be changed from -36 to 0. These are all
altered by using the Up and Down arrows on each option.
The default settings are: 0, 0, -8 respectively.
The settings in fig. 2.6.5 allow the user to change the
amplifier settings for the Jukebox. The Amp Output can
be changed between Mono and Stereo by clicking the
button, the AVC (Automatic Volume Control) can be
changed between On or Off by clicking the button. The
default settings are: Mono, On respectively.
fig. 2.6.4 - Treble/Bass/BGM Settings fig. 2.6.5 - Amplifier Settings
fig. 2.6.6 - Key to ‘F’ buttons on remote supplied with Jukebox
The section in fig. 2.6.5 is an explanation of the 'F' keys on
the Remote Control supplied with the Jukebox. So: F1 =
Mute, F2 = Background Music, F3 = Auxiliary, F4 = Free
Credits.
31
Page 36
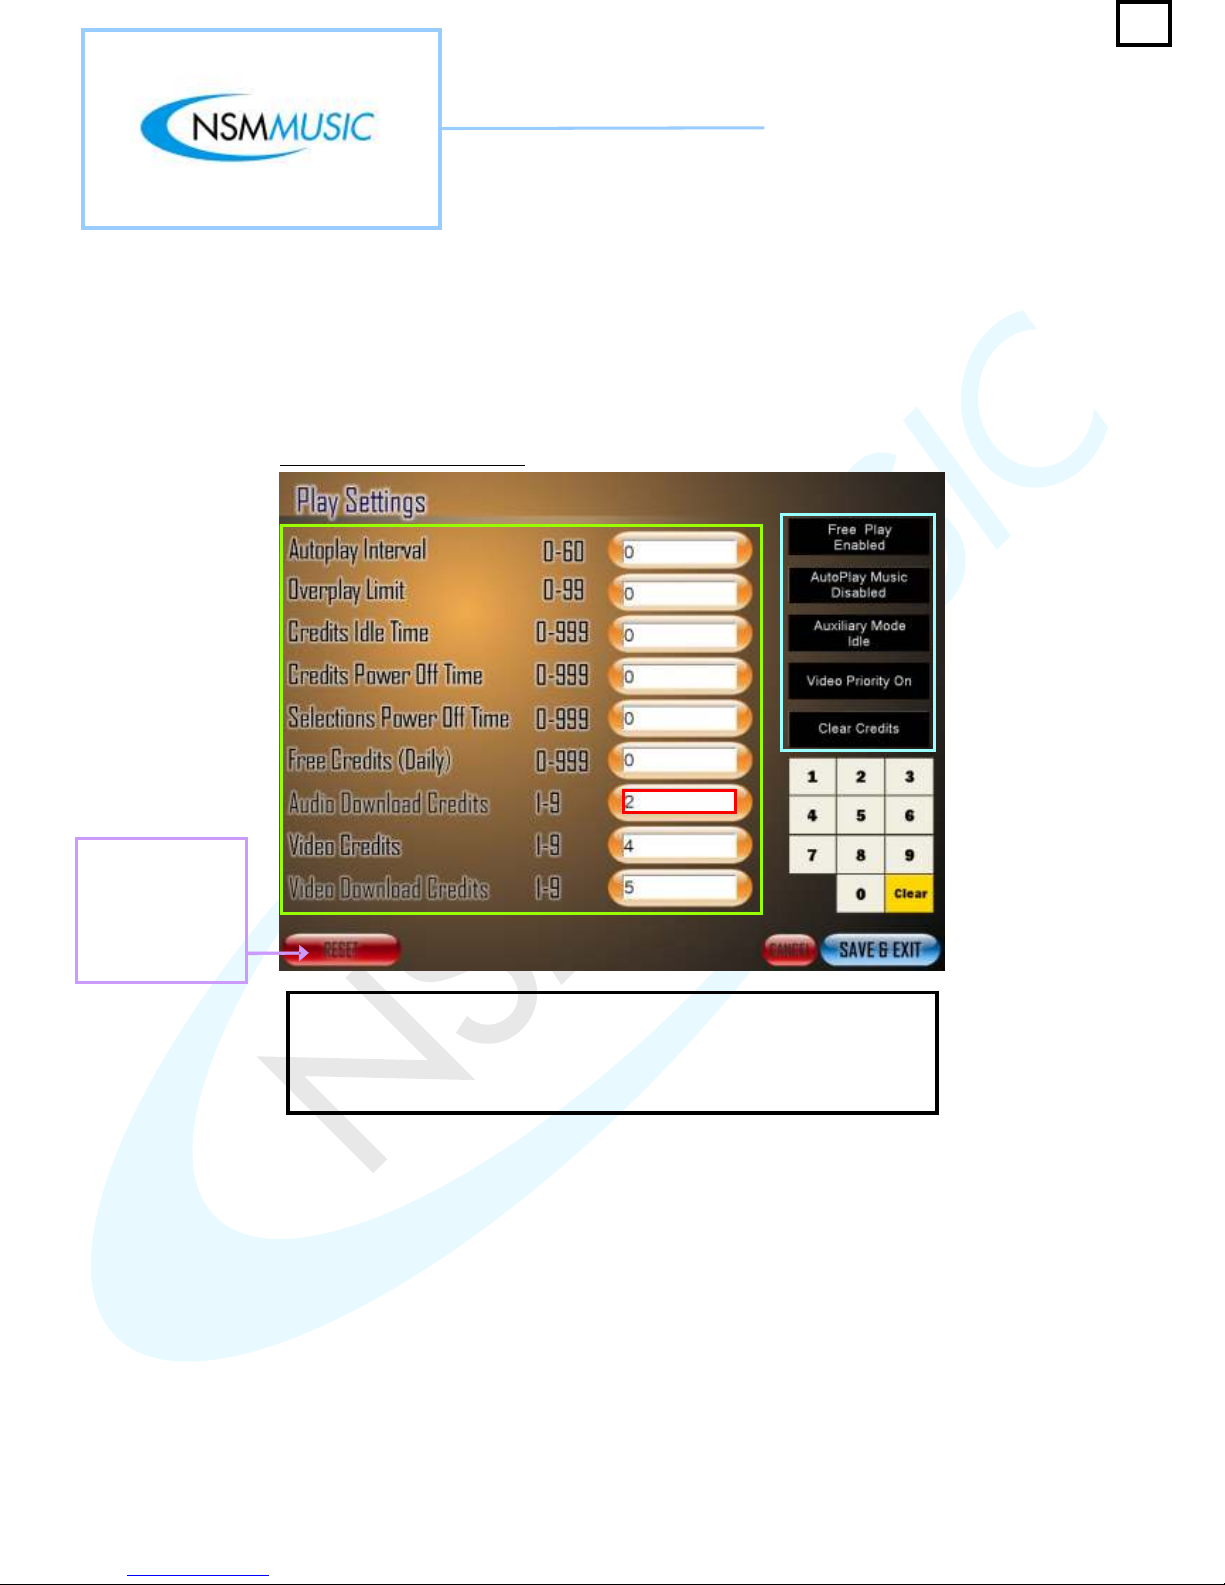
2.7 Play Settings
The Play Settings Screen allows the user alter the AutoPlay delay time, the number of songs to play
when the AutoPlay is Enabled. It also lets the user edit the number of credits for the Jukebox. All the
values in the fields in fig. 2.7 are the default settings.
fig. 2.7 - Play Settings screen
In fig. 2.7, if any of the numerical fields requires altering, the user presses
the field they wish to alter, which will then be highlighted in to distinguish
the current selection, selects Clear on the Numerical keypad to clear the
numerical values in the selected field and then proceeds to type in the new
values using the Numerical keypad.
Red
The Reset Button
restores all the
Settings to default.
By pressing this
button you will lose
any saved settings.
32
Page 37
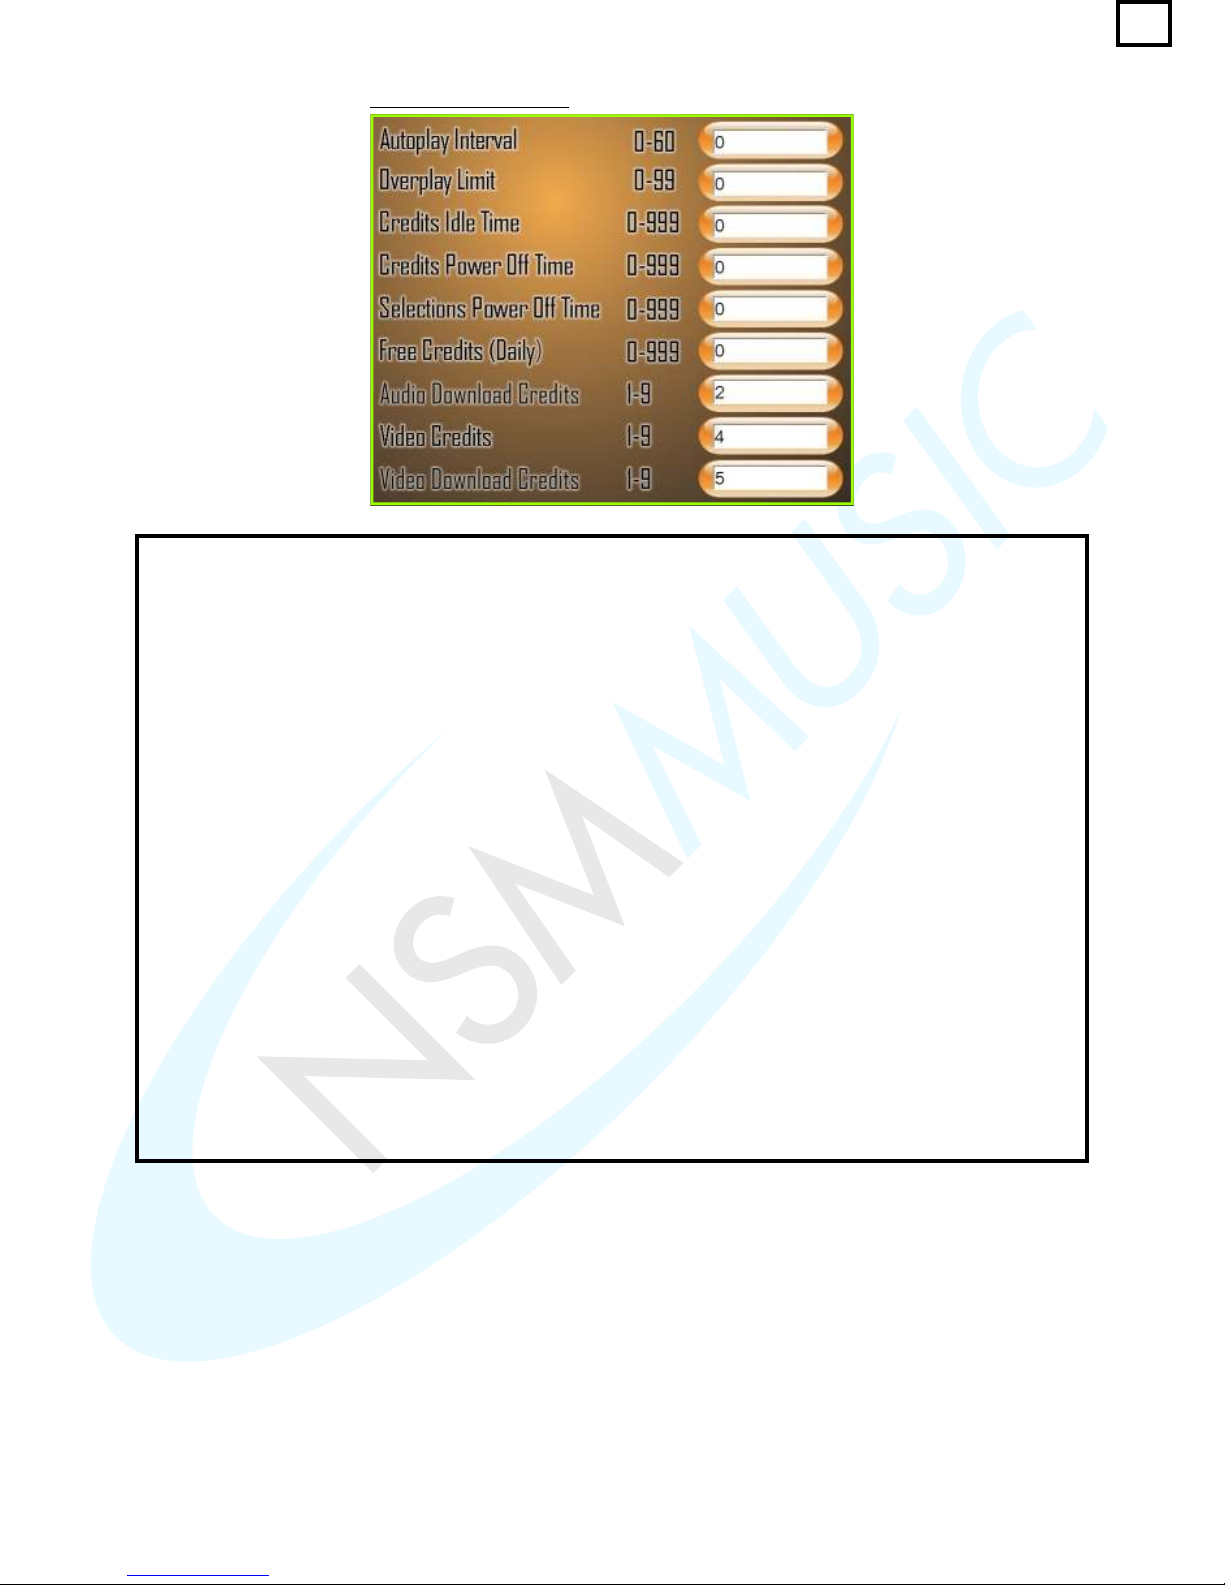
In fig. 2.7.1 the user can set limits for Credits and timing for the AutoPlay of songs. These and all other settings
can be altered by using the Numerical keypad on the right hand side of the screen.
The Autoplay Interval sets the time interval (e.g. 1 song every 15 minutes) when a random song will play on
the Jukebox. The Autoplay Music button (fig.2.7.2) has to be Enabled for any random song to play.
The Overplay Limit sets the number of times a particular song can be queued up. If the same song is added to
the play queue more than once, it is only played once if the Overplay Limit is set to 1. (Note that the currently
playing song is not counted).
The Credits Idle Time sets the number of credits allowed to remain on the Jukebox while it is in its 'Idle' state.
The Credits Power Off Time signifies the total number of credits allowed remaining on the Jukebox after it has
been powered off and restarted.
The Selections Power Off Time signifies the total number of selections allowed remaining on the Jukebox after
it has been powered off and restarted.
The Free Credits (Daily) signifies the number of Free Credits allowed to be used each day when the user
presses the Free Credit button on the supplied remote (F4).
The Audio Download Credits sets the number of credits the customer has to use in order for them to
download an audio track of their choice onto the Jukebox
The Video Credits sets the number of credits the customer has to use to play a video track.
The Video Download Credits sets the number of credits the customer has to use in order for them to download
a video track of their choice onto the Jukebox
fig. 2.7.1 - Play Settings
33
Page 38
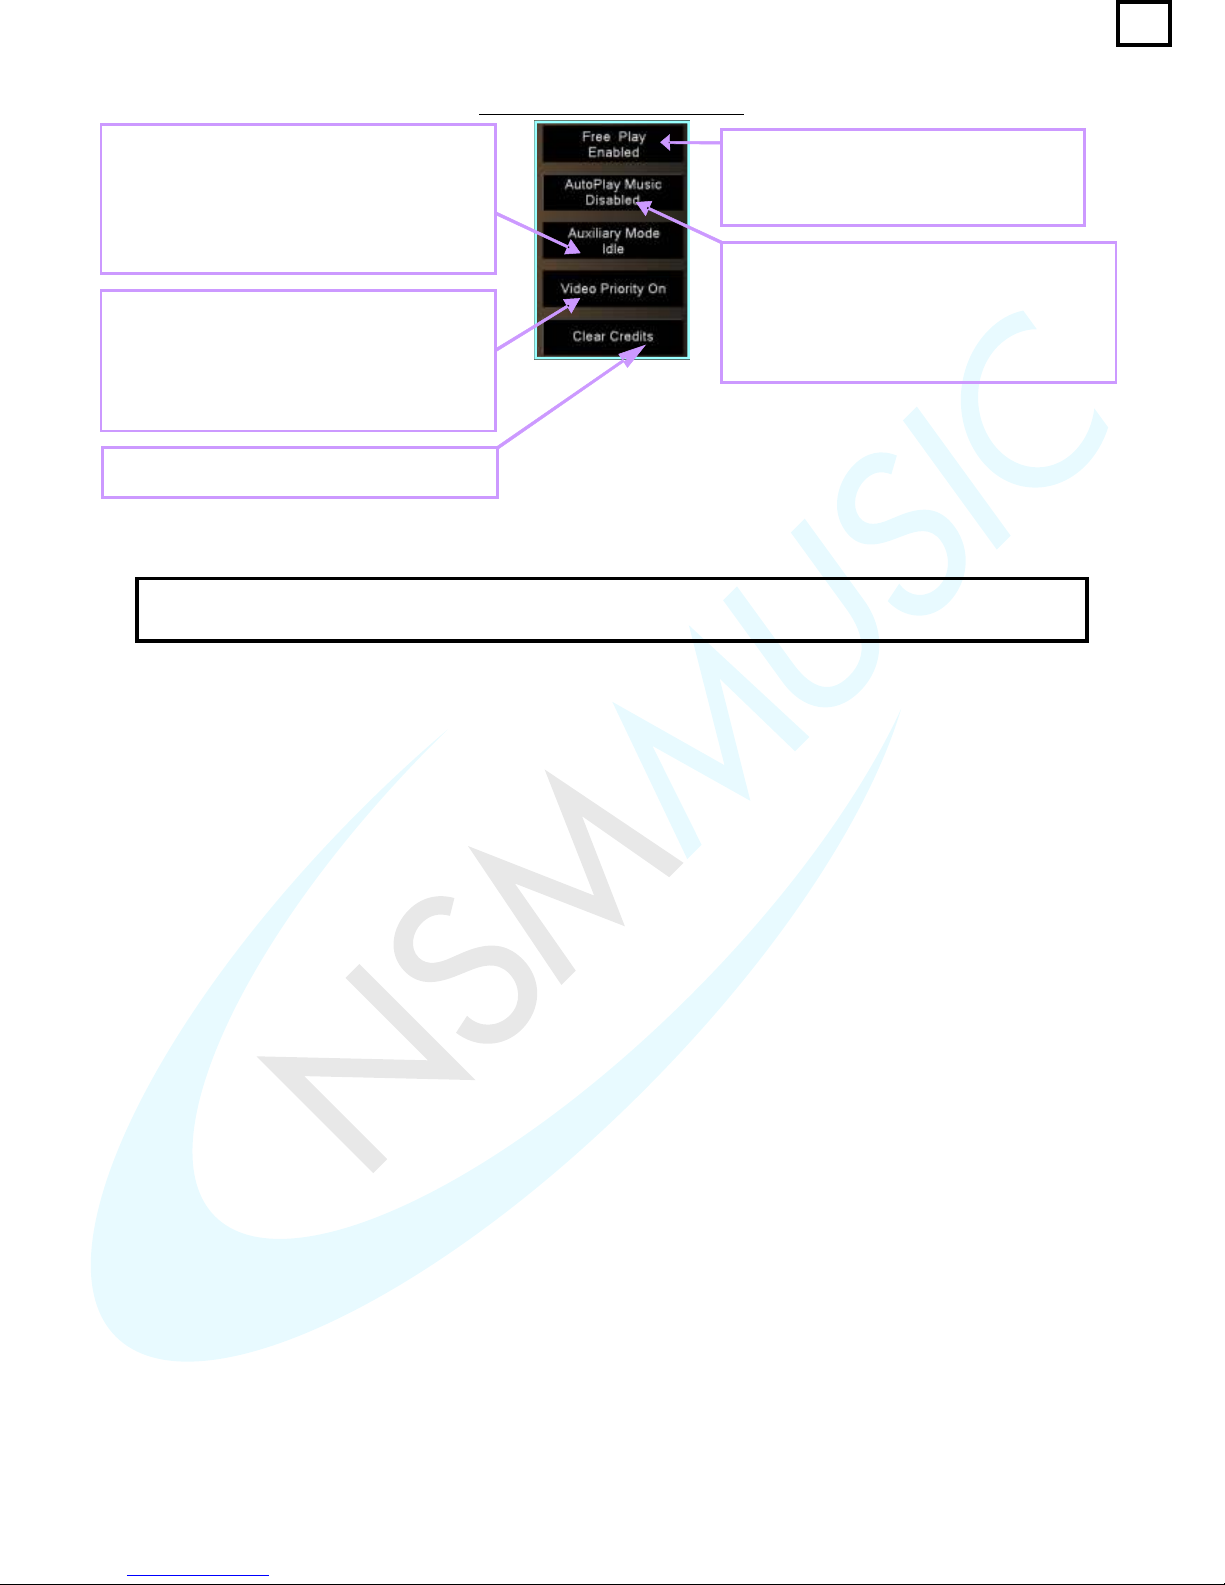
The buttons in fig.2.7.2 opposite the Play Settings allow the user to change the Free Play, Background Music,
AutoPlay Music and clear the credits on the Jukebox.
fig. 2.7.2 - Play Settings buttons
The Free Play Button allows the user to
select any music on the Jukebox without
charge. It toggles between Enabled and
Disabled. Its default setting is Disabled.
The AutoPlay Music Button enables the
user to set the Jukebox to play music when
not in use. It uses the AutoPlay Interval
time to play a random song (e.g. 1 every 15
minutes). It toggles between Enabled and
Disabled. If Disabled, no songs will play.
The Clear Credits Button resets all the
Credits on the Jukebox back to 0.
The Auxiliary Mode Button enables the
auxiliary inputs on the Jukebox so if no
music is being played on the Jukebox at the
time the user can add an external source
(i.e. hi-fi) to the auxiliary inputs, which will
play music. It toggles between Idle and Off.
The Video Priority Button allows the user to
set whether a Video Track should be played
first in a queue of Audio tracks (hence
jumping it to the front of the queue as uses
more credits) or not - it toggles between On
and Off.
34
Page 39
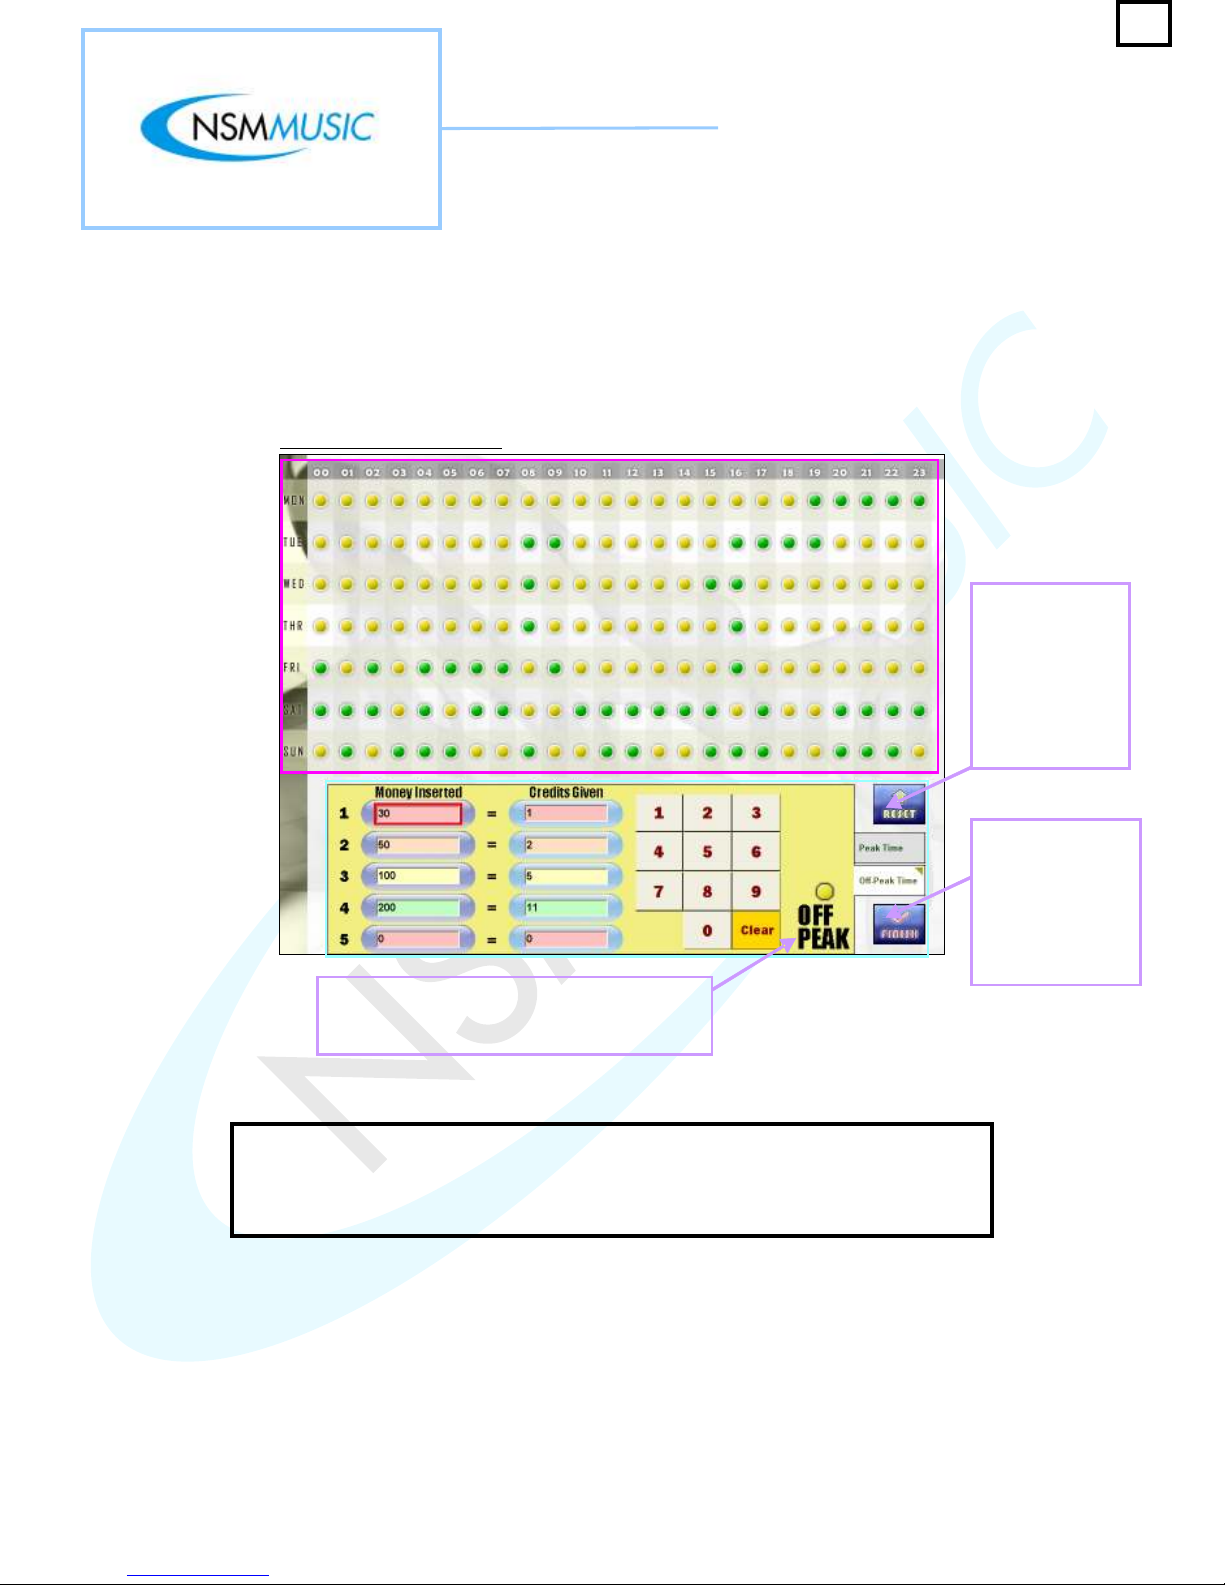
2.8 Price Lists
The Price Lists Screen allows the user to set prices for Peak and Off Peak Modes and edit the days
and times which the Peak and Off Peak prices apply.
In fig. 2.8, if the Money Inserted and Credits Given fields wish to be altered, the user
clicks the field they wish to alter, which will then be highlighted in to distinguish the
current selection, selects Clear on the Numerical keypad to clear the numerical values in
the selected field and then proceeds to type in the new values using the Numerical
keypad.
Red
fig. 2.8 - Price Lists screen
The Reset Button
clears ALL the
saved Peak and
Off Peak days
and times and
restores them all
to Off Peak
(Yellow).
The Finish Button
closes the current
screen and returns
to the main
Service Mode
screen saving any
changes made.
This informs the user that they are currently
in Off Peak Editing Mode. The Peak Editing
Mode is shown in Fig. 2.8.3
35
Page 40
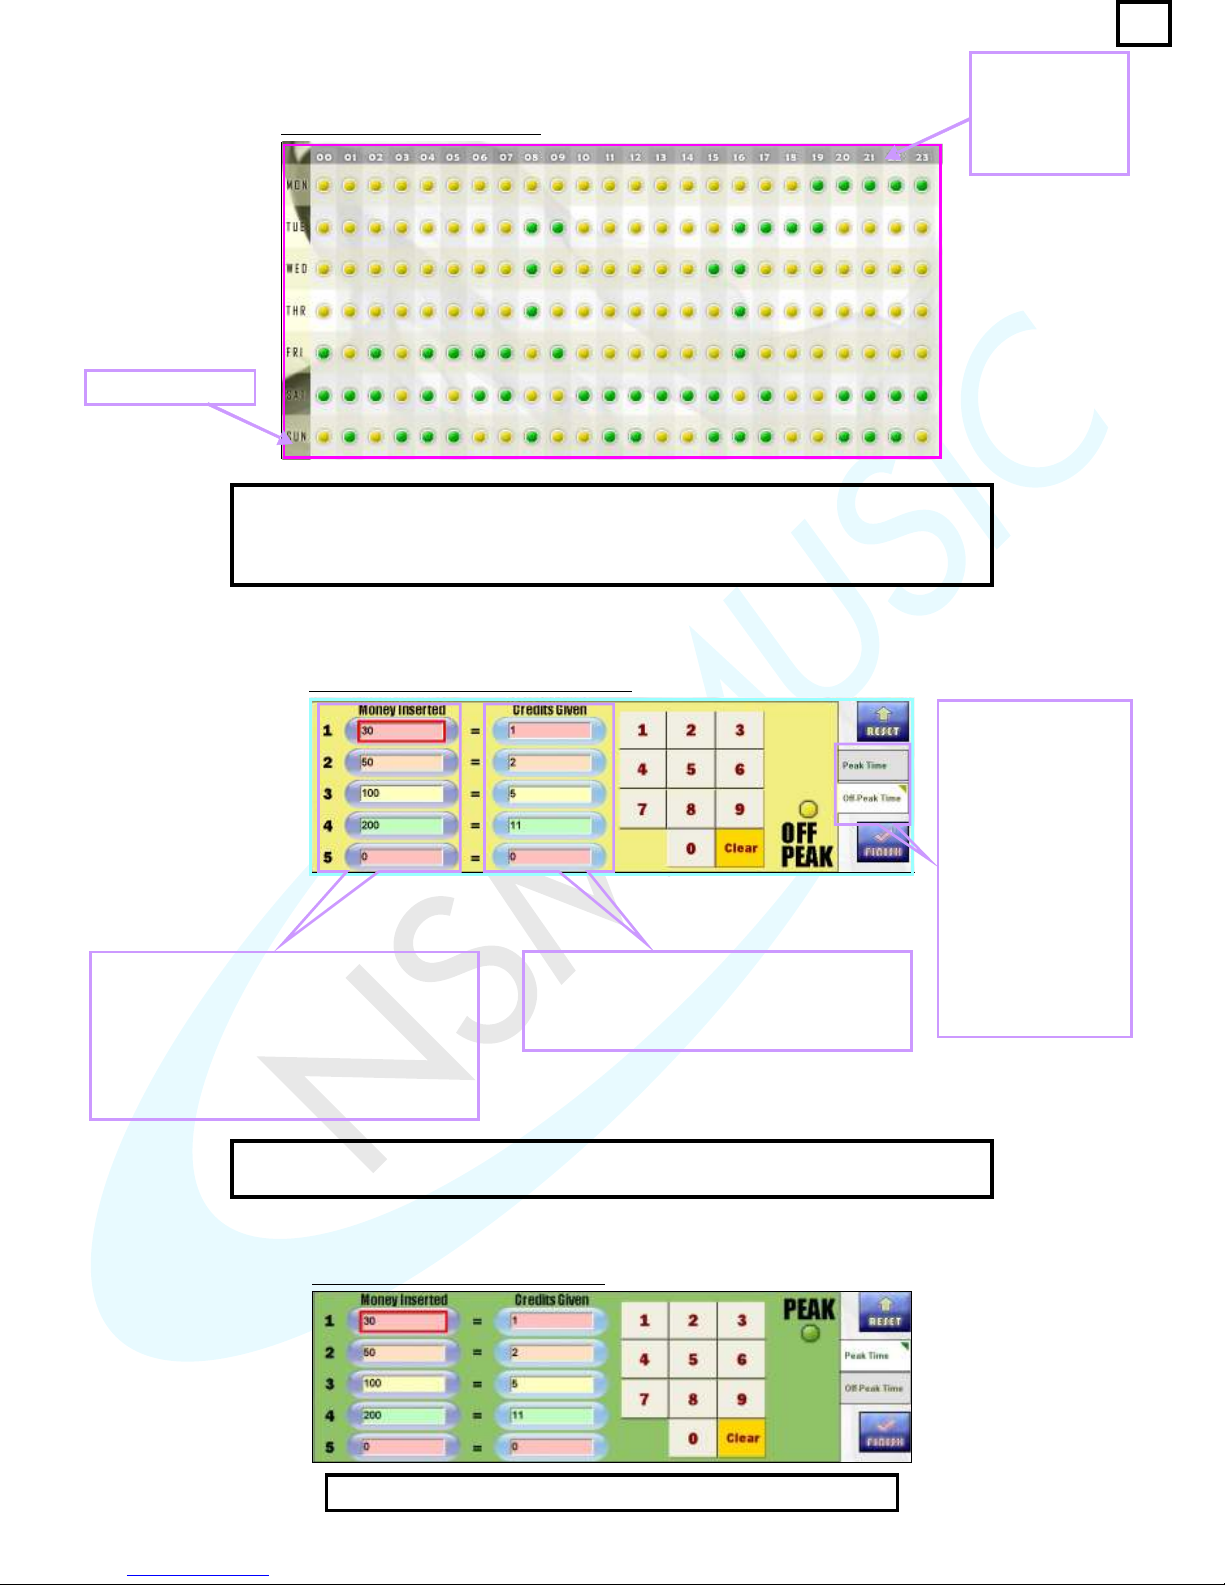
There are two modes which the user can edit the pricing of the Jukebox – Off Peak (fig.
2.8.2) and Peak (fig. 2.8.3).
The and dots in the table in fig. 2.8.1 identify what time and day the Jukebox
prices are Peak and Off Peak. The dots signify Off Peak and the dots
signify Peak times. For example, Mondays at 19:00pm the pricing is Peak. These can be
changed at any time just by clicking on any of the dots to change their status.
yellow
yellow
green
green
The numbers
here indicate the
hours in a day
(e.g. 08 =
08:00am).
Days of the week
fig. 2.8.1 - Peak/Off Peak Table
fig. 2.8.2 - Off Peak Time Editing Mode
This allows the user to set the type of
money customers can put in. The values in
fig. 2.8 are preset but can be changed if the
user wishes to by using the Numerical
keypad. Each number denotes a unit of
currency, for example 100 = £1.00, 20 =
£0.20 and so forth.
Here the user can set limits for Credits
Given for a certain amount of money. These
can be altered by using the Numerical
keypad.
The Peak Time and
Off Peak Time
Buttons allow the
user to toggle
between both the Off
Peak and the Peak
Editing Modes. The
Off Peak Editing
Mode is distinguished
by the colour yellow
and the Peak Editing
Mode is distinguished
by the colour green
(fig. 2.8.3).
fig. 2.8.3 - Peak Time Editing Mode
The Peak Time Editing Mode is distinguished by the colour .Green
36
Page 41
2.9 Network
37
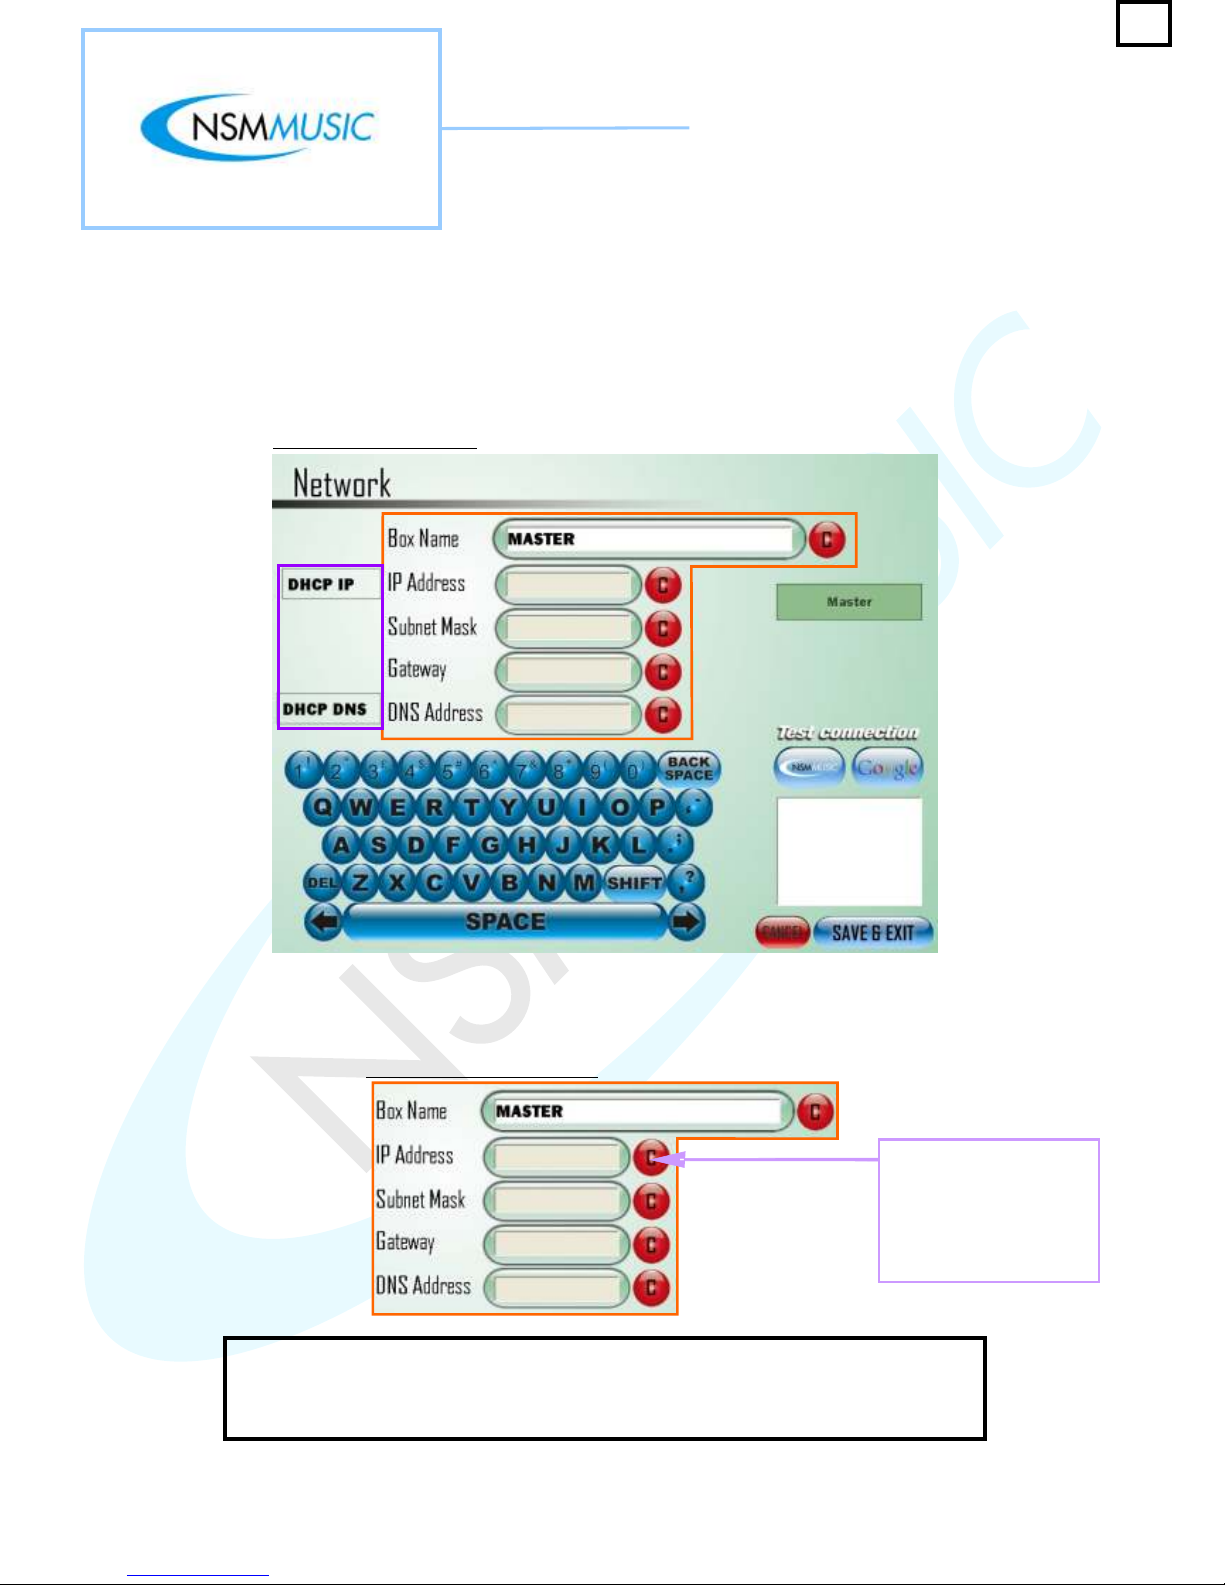
The Network screen allows the access to download updates/tracks by using the IP Address, Subnet
Mask, Gateway and DNS Address to make it compatible with your router. By default the Icon Apollo
comes shipped with the Network screen set to DHCP (Dynamic Host Configuration Protocol). These
settings should NEVER be altered unless told to do so by NSM Music.
fig. 2.9 - Network screen
fig. 2.9.1 - Network Settings
The five fields in fig 2.9.1 are the main settings for the capability to download the latest
songs/videos or updates onto the Jukebox. These fields will be blanked out by default
when you receive the Icon Apollo as it is set to DHCP. These settings should only ever be
altered if told to do so by NSM Music. If you have any queries, please contact NSM Music.
The 'C' Button clears the
selected field ready to
accept new text/numbers
if the Static IP and/or
the Static DNS button is
active.
Page 42
38
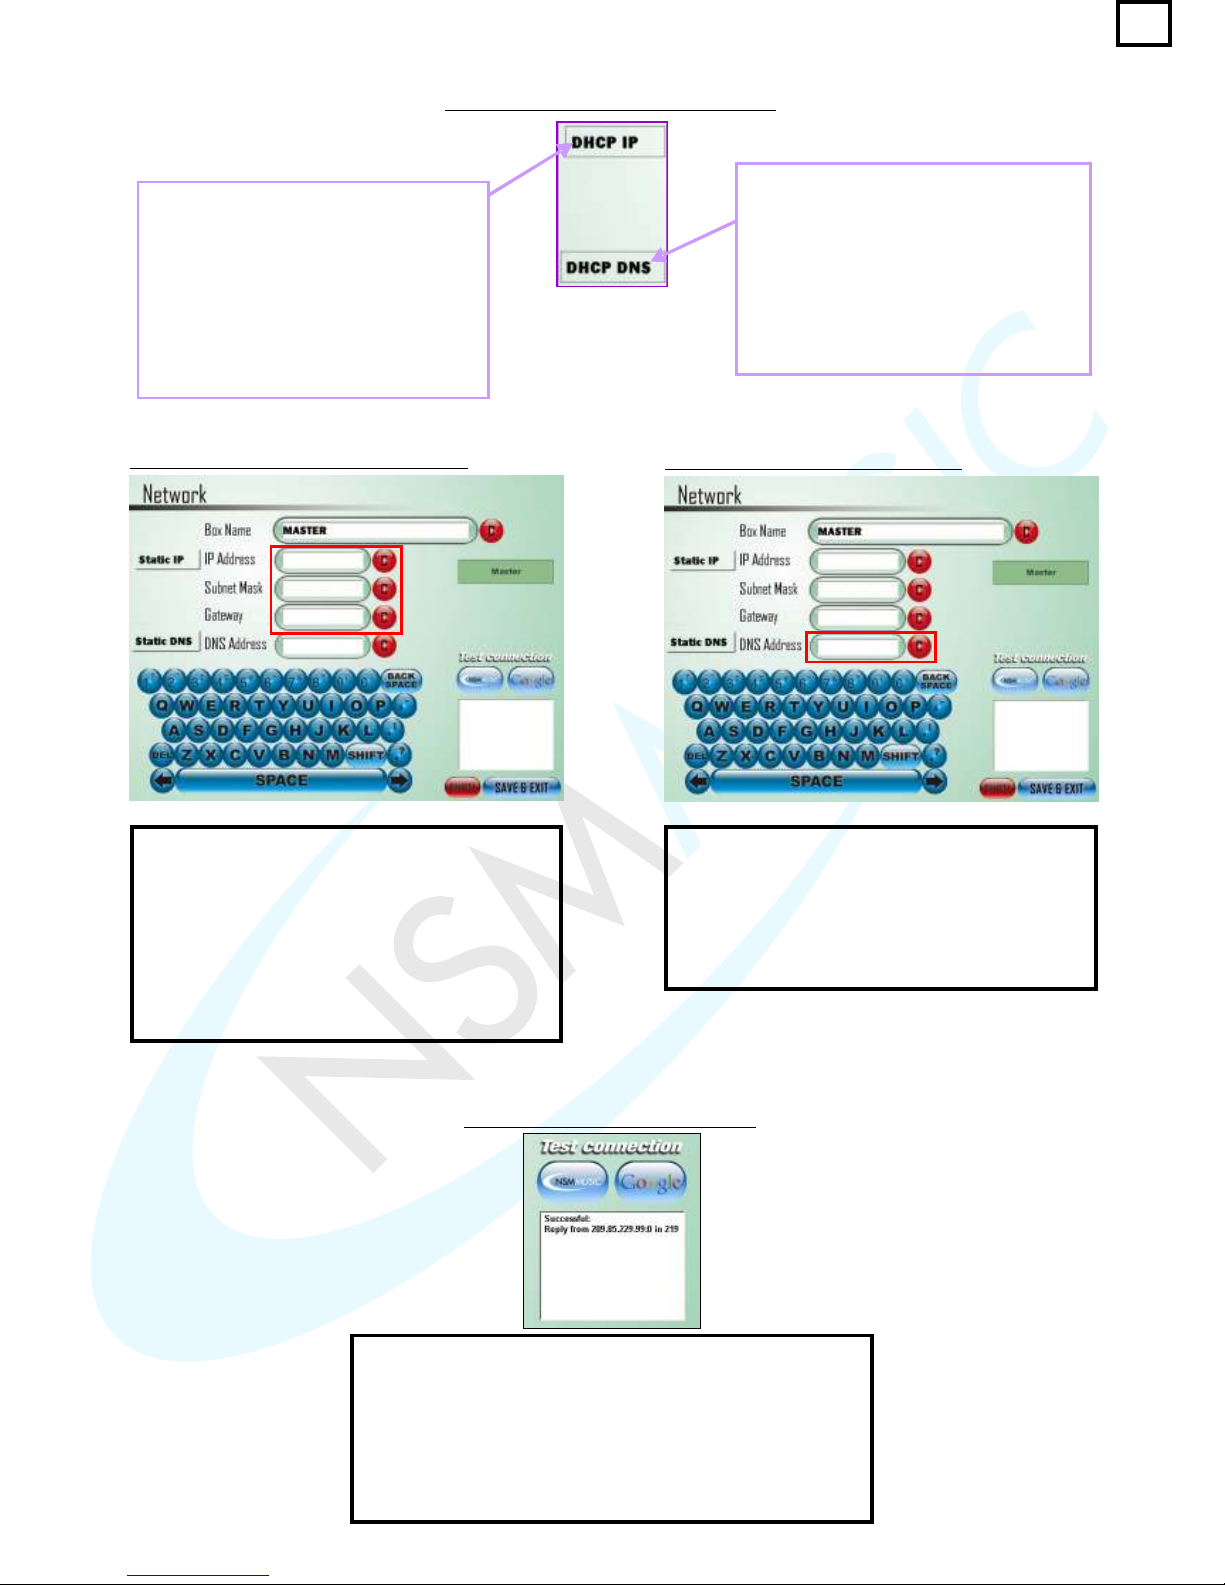
fig. 2.9.2 - Static IP/ Static DNS Buttons
The DHCP DNS (Domain Name Server)
Button greys out the DNS Address field
to allow for automatic detection and
connection. If the user presses the
DHCP DNS button, the field becomes
active and the text on the button
changes to read Static DNS. This
allows the user to enter their own DNS
settings. (see fig. 2.9.4).
The DHCP IP Button
Address, Subnet Mask and Gateway
fields to allow for automatic detection
and connection. If the user presses the
DHCP IP button, the fields become
active and the text on the button
changes to read Static IP. This allows
the user to enter their own connection
settings. (see fig. 2.9.3).
greys out the IP
The Screen above shows what happens when the
user presses the DHCP IP Address Button. Here,
highlighted in the box are the Active Address
fields, to allow allows the user to enter a Static IP
Address and settings. Notice also how the DHCP
IP Button has changed to read Static IP.
Pressing the same button again greys out the
fields and returns to the automatic DHCP IP
Address settings.
red
The Screen shot above shows what happens
when the user presses the DHCP DNS Address
Button. It follows exactly the same principle as the
DHCP IP Address Button, except that it only
activates one field (highlighted in ). Pressing
the same button again returns to the automatic
DHCP DNS Address settings button.
red
fig. 2.9.3 - Setup Static IP Adress screen
fig. 2.9.4 - Setup Static DNS screen
If the user wishes to test to see if there is an active internet
connection, they can simply press either of the two buttons
NSM Music or Google. These will automatically send a
signal to these addresses (www.nsmmusic.com or
www.google.com) and bounce back a reply from these
websites to see if they are reachable. If so, the box below
the buttons displays the message ‘Successful: Reply from
xx’ where xx is the IP address of the website.
fig. 2.9.5 - Test Connection Section
Page 43
2.10 BGM
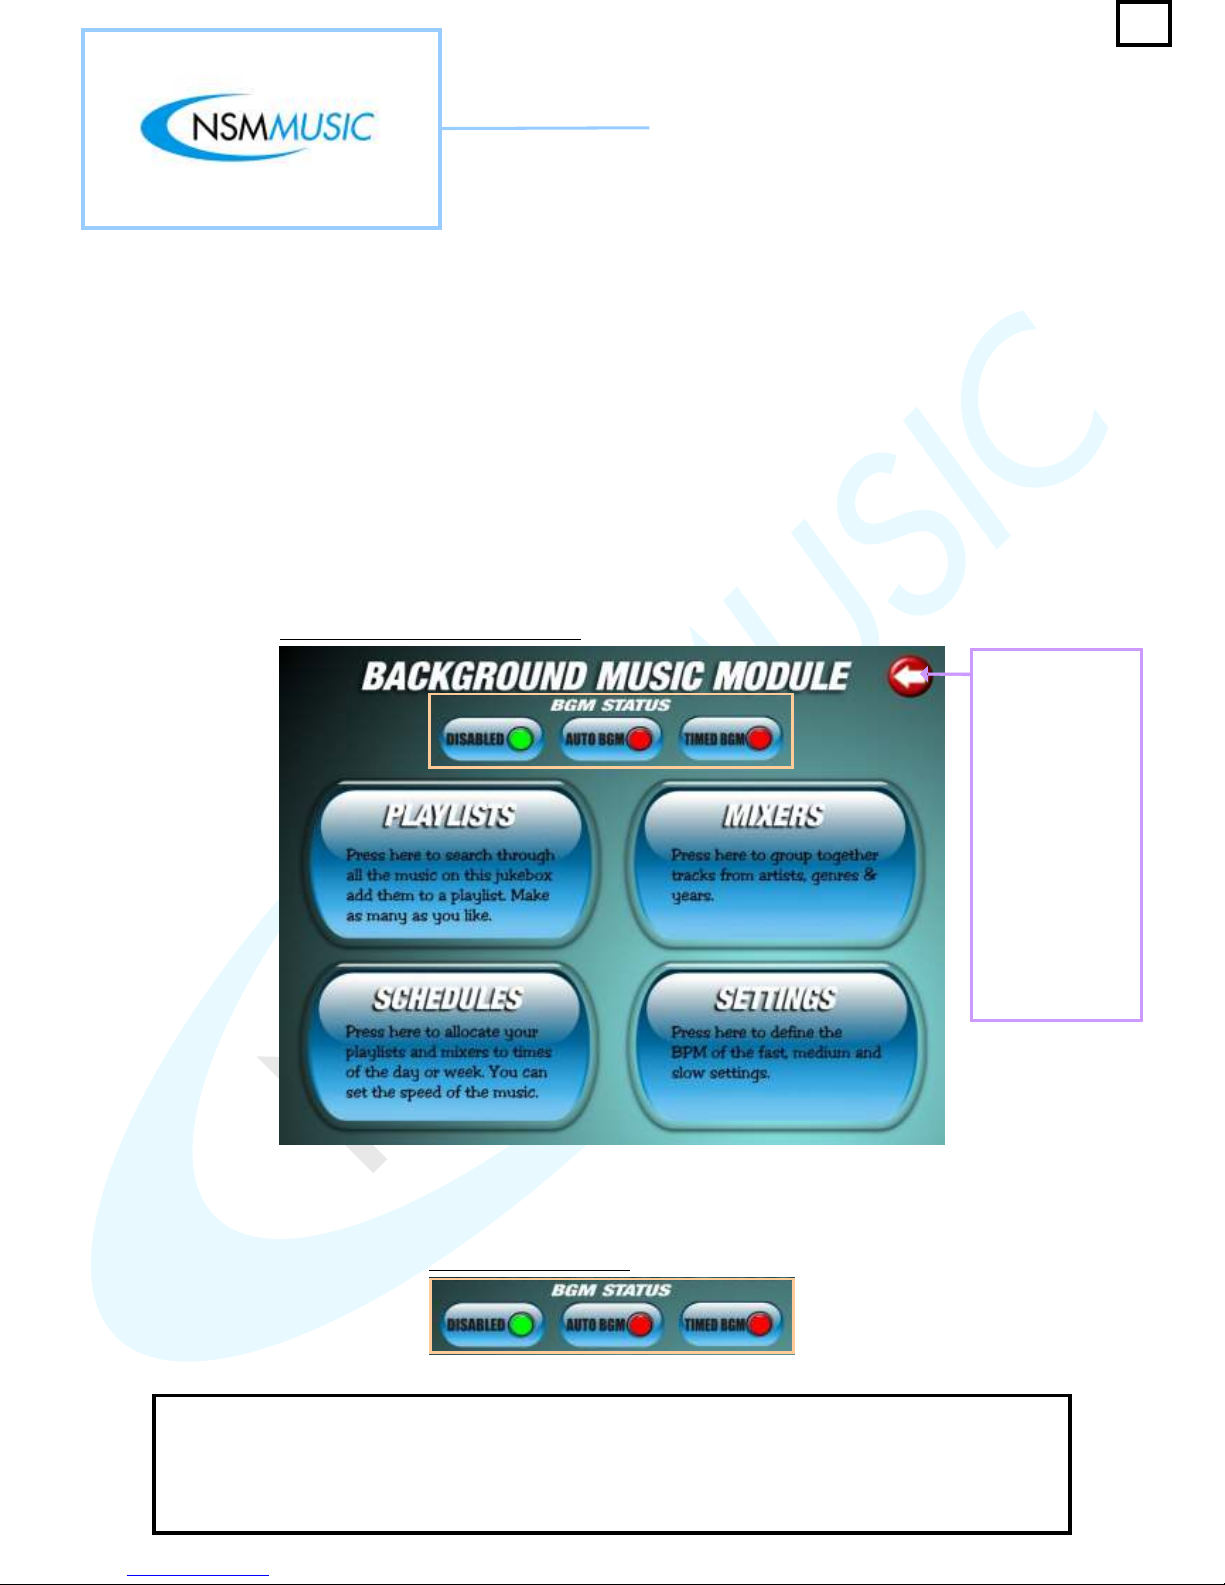
The BGM (Background Music) section accessed via the Service Mode Main Menu screen (fig. 2.0)
displays the initial screen below. Here the user will be faced with 4 main options:
1.Playlists – to allow the user to search for and add their music to a custom playlist
2.Mixers – to allow the user to group tracks from different genres or years, for example.
3.Schedules – To allow the user to pick a time and day to play their chosen playlist.
4.Settings – This allows the user to define the BPM (Beats Per Minute) for Fast, Medium and Slow
tracks
In order for the playlist to be played the user must navigate through the BPM Module in order as
numbered above (1 to 3) whereas the BPM settings in the Settings screen can be altered at any time.
This is the back
button to allow the
user to go back to
the previous
screen. In this
case it will exit the
BGM Music
Module and return
to the main Service
Mode screen. This
button appears on
every main screen
in the BGM Music
Module always in
the top right hand
corner.
fig. 2.10 - BGM Module Main screen
fig. 2.10.1 - BGM Status
There a 3 status buttons on the BGM Main screen each with and indicators. If the indicator is
, it signifies that button is enabled/true - signifies disabled/false. The Disabled button disables the
BGM from playing music in the background if enabled but will still allow the user to make playlists and make
a schedule. The Auto BGM button if enabled, will play music in the playlists in the background while the
Jukebox is not being used. The Timed BGM button if enablede, will play a set playlists or all playlists at a
given time
Red
Red
Green
Green
39
Page 44
1. Playlists
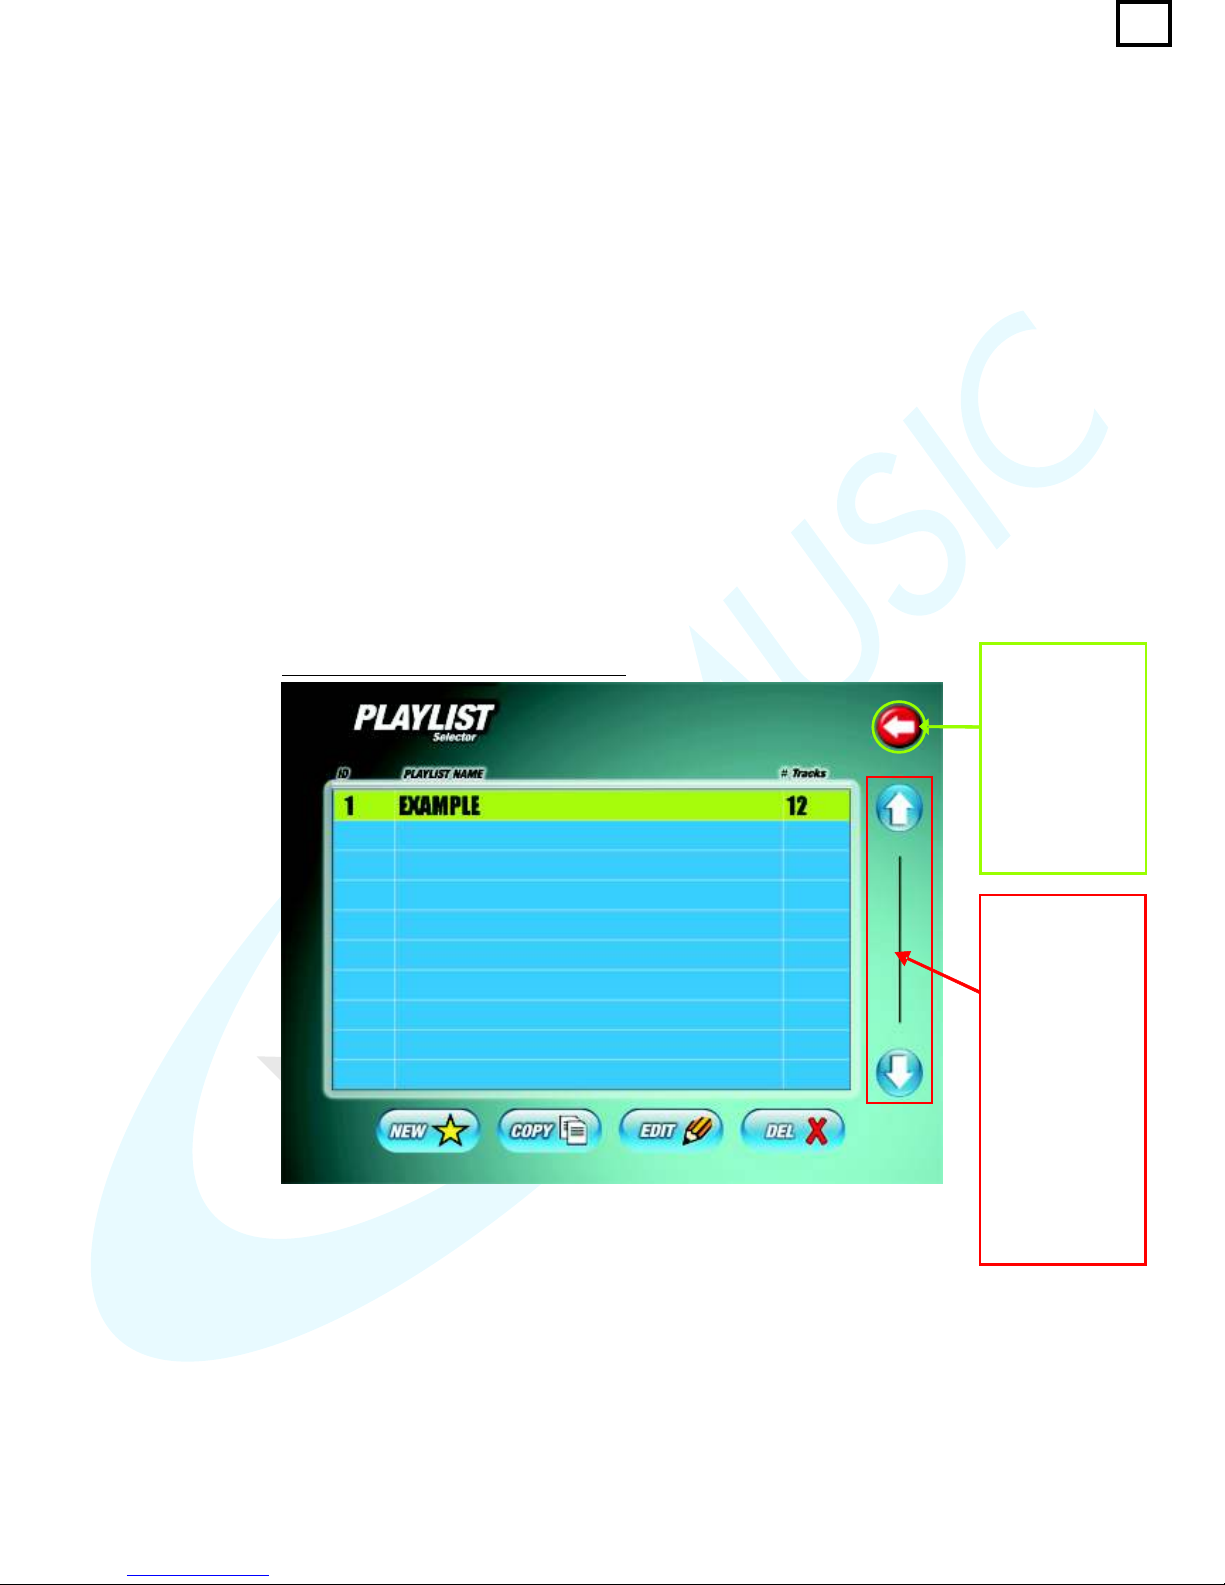
When the user selects the PLAYLISTS button on the main BGM screen (fig. 2.10) the screen below
will be displayed. In fig.2.11 you can see that there is a playlist entitled 'EXAMPLE' in the list box. The
list box has 3 headings:
? ID
? PLAYLIST NAME
? # TRACKS
The ID is generated automatically and sorts all the playlists that have been added in order they were
created. When there are more than 10 playlists in the list box, you can then either use the Up & Down
arrows or the Slider control to browse through the list.
Below the list box there are 4 buttons
? NEW – Displays a screen to create a new playlist
? COPY – Copies the selected playlist (the selected playlist will always be highlighted in Yellow).
? EDIT – Displays a screen so you can edit the name of the selected playlist and then the tracks in that
playlist
? DEL – Deletes the selected playlist
Each of these buttons will now be further explained and demonstrated.
This button closes
the current screen
and returns you
back to the main
BJM screen
(fig.2.10). This
button appears on
every main screen
of the BGM
section.
The Up & Down
arrows allow the
user to scroll
through the list of
playlists 1 at a
time. If there are
more than 10
playlists in the list
then a slider
control appears
which will allow
the user to scroll
through the list
more quickly as
you drag it up or
down.
fig. 2.10.1 - BGM Module Playlist screen
40
Page 45
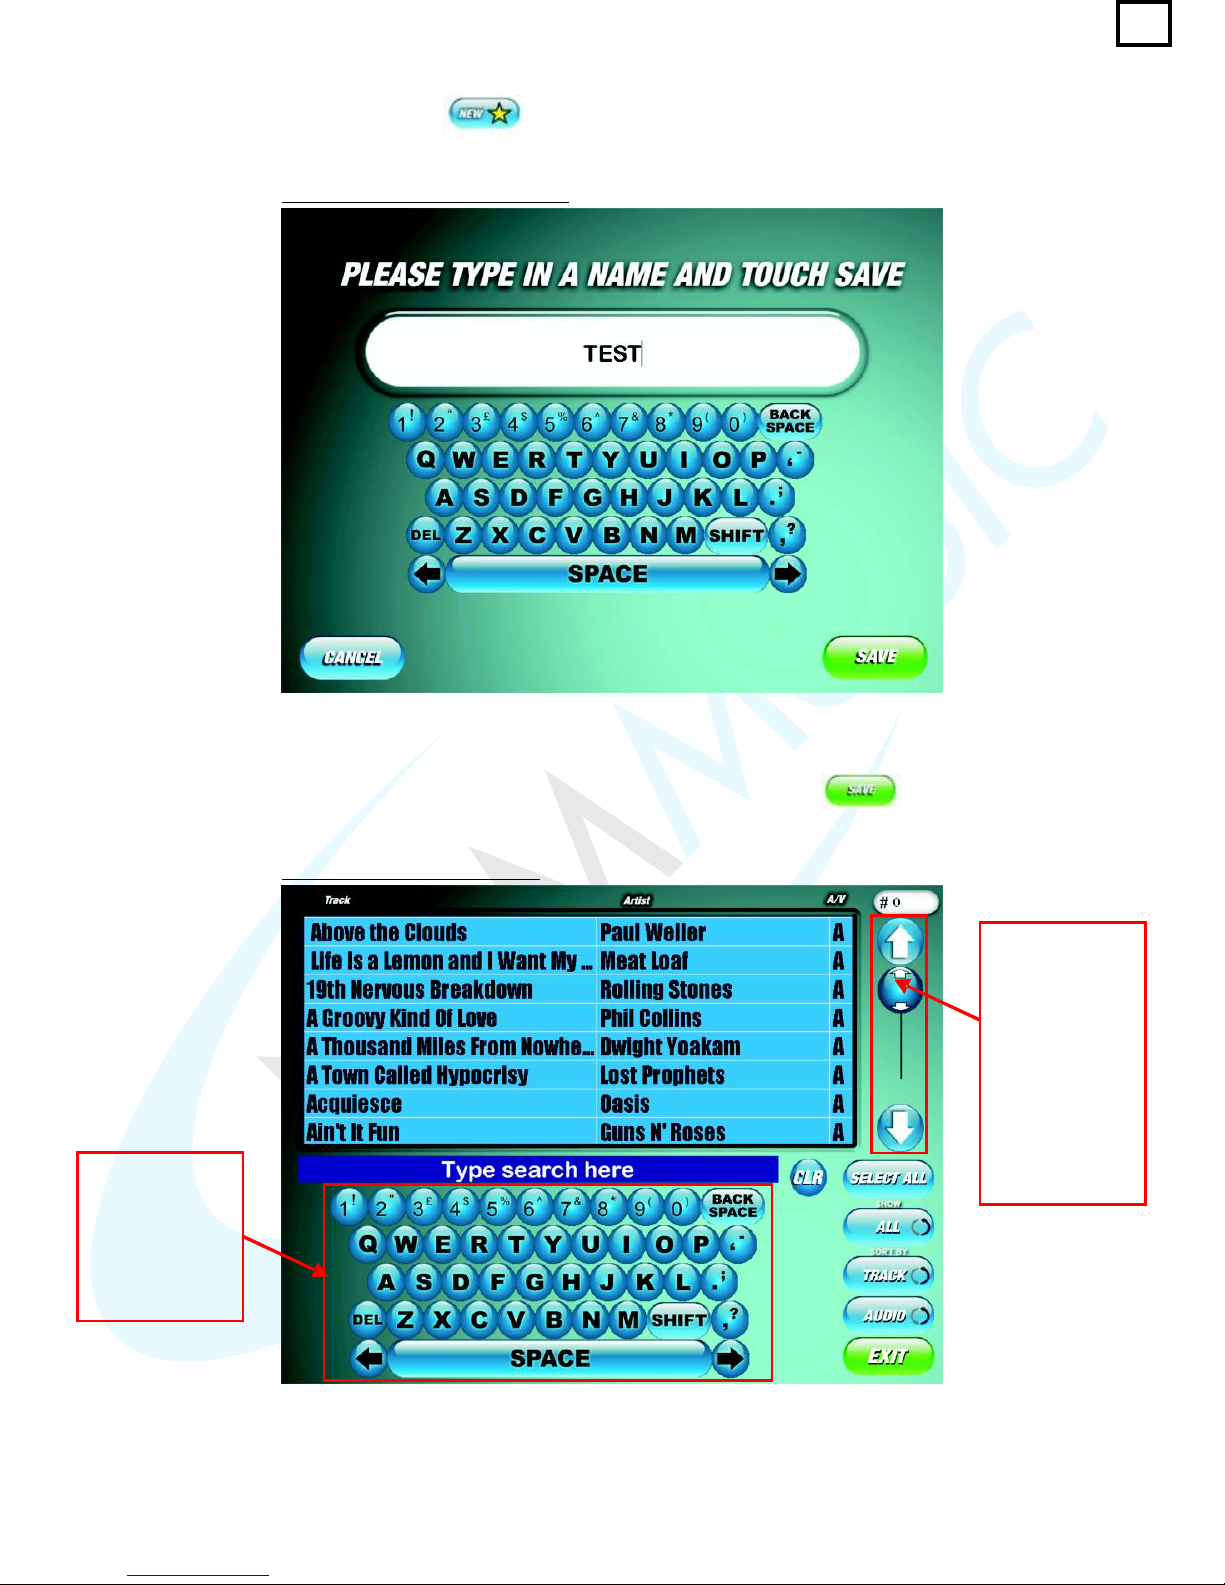
To Create a New Playlist:
To create a new playlist press the button. This will display the following screen:
Next enter a name for your playlist using the on-screen keyboard (there is a backspace button and
a delete button if you make any errors). In the example shown above, the playlist has been given the
name TEST. After you have entered the name of your choice, touch the button. The
following screen is then displayed:
fig. 2.10.2 - Edit/Add Name screen
fig. 2.10.3 - Edit Playlist screen
The Up & Down
arrows allow the
user to scroll
through the list
view of tracks 1
track at a time.
The Slider control
scrolls through the
list view of tracks
but more quickly
as you drag it up
or down.
The full QWERTY
on-screen
keyboard allows
the user to enter
any text to search
through the track
list.
41
Page 46
Next you select the tracks you want to add into your playlist. There are 3 main ways you can do this.
Firstly, you can scroll through the whole list via the Up & Down Arrows or the Slider control (fig.2.10.3)
and touch the tracks you want to add which will then be highlighted in Yellow. Also you can use the
on-screen keyboard to type in the name of a track which will search through the entire list for it and
then you can select it by touching it. The final way is by touching the SELECT ALL button when you
begin to enter a search criteria using the on-screen keyboard which will add all the tracks in that
search criteria (if there are 200 results or less ONLY) into your playlist, highlighting the entire list in
Yellow. You can deselect a track at any time by touching on the highlighted track.
You can check the current number of tracks in your playlist by looking in the field in the top right hand
corner.
Once you have selected all the tracks you want to put into your playlist press the EXIT button to return
to the Playlist Selector screen.
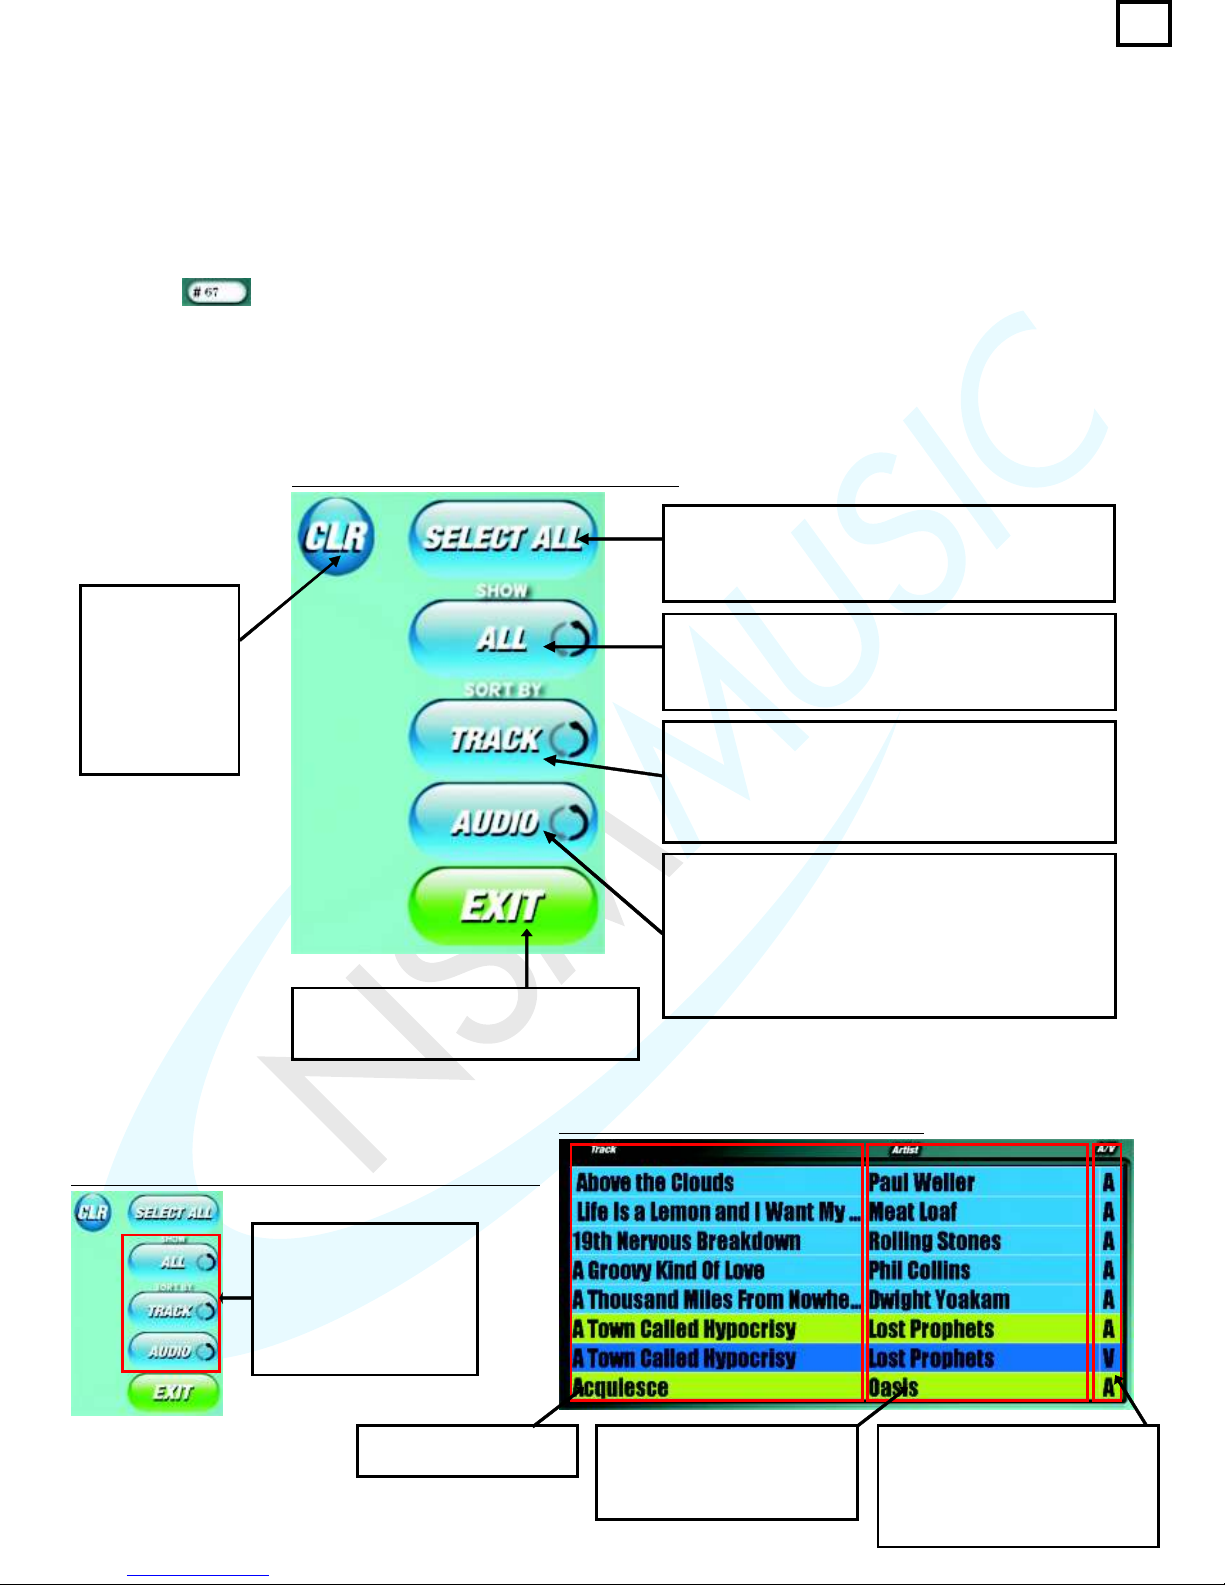
The screen where you select the tracks you want to add have the following buttons for the user to
select from:
The SELECT ALL button selects the entire list of a
search query by the user if the results are 200 or
less ONLY as otherwise it would select the entire
database of tracks.
This button arranges the list view to either show the
whole list with any selected tracks or only the
tracks that the user has selected. It toggles
between ALL and SELECTED.
The TRACK button displays the list view by order of
Track. This is the Default setting. It toggles
between TRACK and ARTIST. ARTIST will display
the list by order of Artist. Both of these display the
list view in alphabetical order.
The AUDIO button will display the list view of tracks
by order of Audio first. This is the Default setting. It
can toggle between AUDIO and VIDEO. When in
VIDEO mode it will display the list view of tracks by
order of Video first. You would only ever select
videos into your playlist if the Jukebox was Video
enabled.
The Exit button closes the current
screen and returns you to the Playlist
Selector Screen.
The CLR button,
when pressed,
clears all the text
that is in the Text
Box that the user
has typed in
using the onscreen keyboard.
This shows the different
options on the Toggle
buttons when they are
pressed. Each of these
sorts the list view of
tracks in a different way.
fig. 2.10.4 - Edit Playlist screen Toggle Buttons
fig. 2.10.5 - Edit screen Alternate View of Toggle Buttons
fig. 2.10.6 - List View on Edit Playlist screen
Track column in list view
sorted alphabetically.
Artist column in list view. This
can be sorted alphabetically
when the user selects
ARTIST on the Sort By button
A/V column in list view
differentiates whether the track
is Audio (A) or Video (V). Video
Tracks will only be displayed if
your box is Video Enabled.
42
Page 47
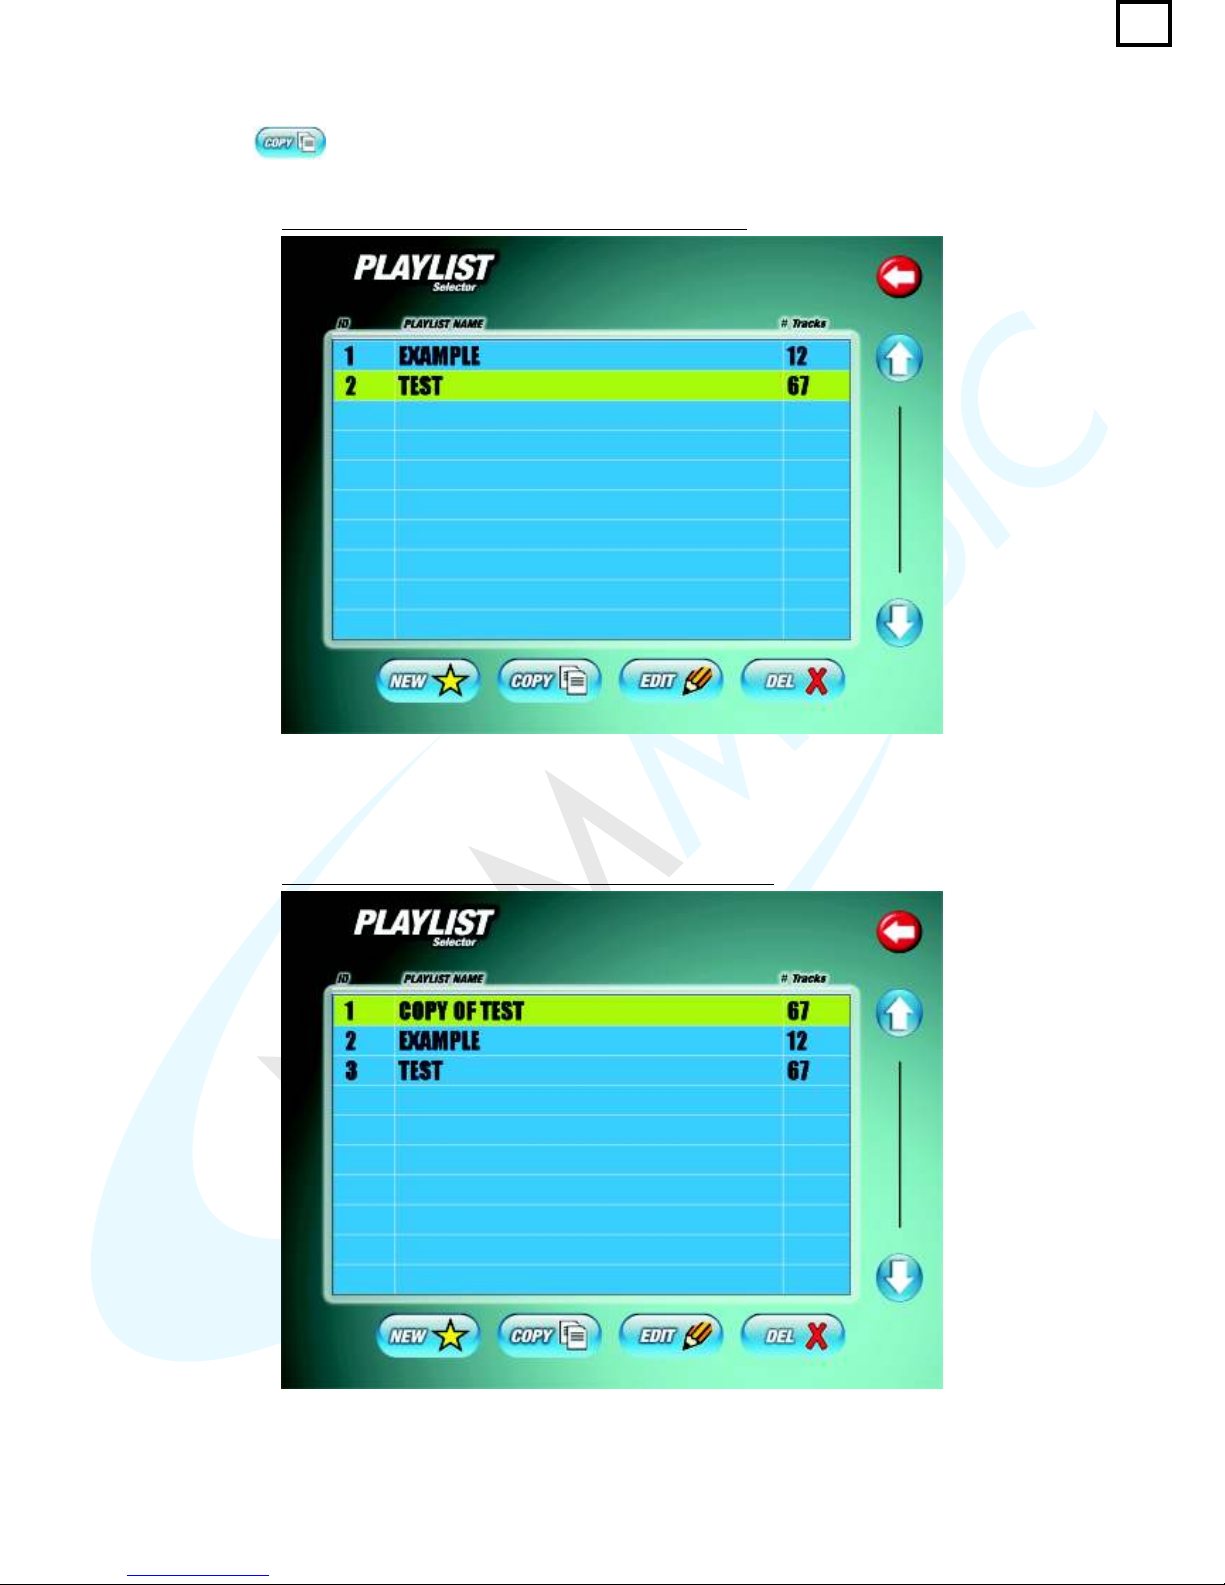
To Copy a Playlist:
To copy a playlist, simply select the playlist you want to copy in the Playlist Selector screen (fig.2.10.7)
and press the button.
fig. 2.10.7 - Playlist Selector screen showing highlighted
This will then create a copy towards the top of the list with the text “COPY OF” before your playlist
as shown below. The playlist is always sorted alphabetically. This copied playlist can now be Edited
as described next.
fig. 2.10.8 - Playlist Selector screen showing copied playlist
43
Page 48
To Edit a Playlist:
To edit a playlist you press the playlist you want to edit which will be highlighted in Yellow and then
press the button.
You will then be presented with the same screen as in fig.2.10.2. Here you can edit the name of the
playlist to whatever you want by either clearing the text by pressing the DEL button or by using the
BACKSPACE button on the on-screen keyboard. Once you have edited your name, if you so wished
to, then press the SAVE button to take you to the screen where you can add/remove tracks to your
playlist.
In this screen (fig.2.10.3) you simply do the same process as you would when you created a new playlist
and added tracks. In this screen you can either add more tracks to your playlist or
remove them. Once you have finished with your track selections press the EXIT button to return you
back to the Playlist Selector screen.
NOTE: If you want to make any changes to the tracks in your playlist, you have to always
press EDIT and select SAVE on the screen if fig.2.12 even if you do not alter the name of
the playlist. If you pressed CANCEL it would return you back to the previous screen.
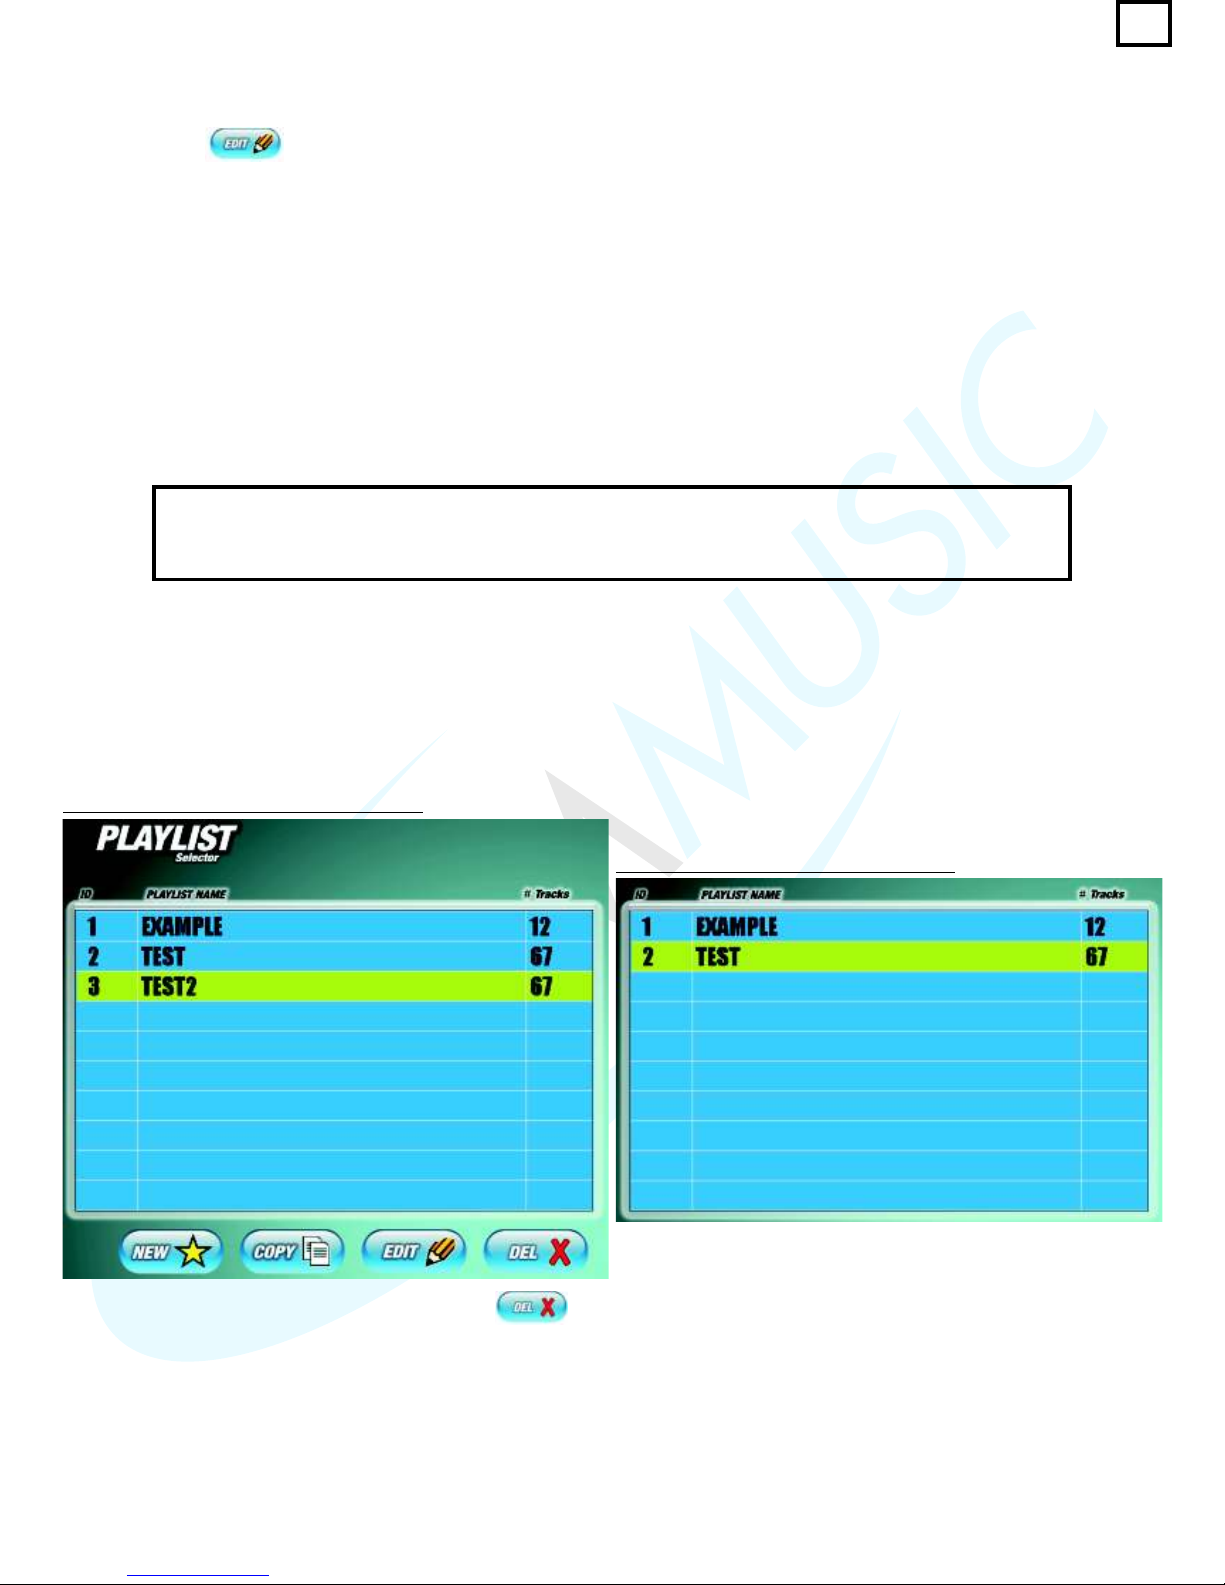
To Delete a Playlist:
To delete a playlist, firstly select the playlist you want to remove from the Playlist Selector screen
(fig.2.10.9) so it is highlighted in Yellow.
fig. 2.10.9 - Playlist Highlighted for Deletion
fig. 2.10.10 - Highlighted Playlist Deleted
With the playlist now selected press the
button. This will remove the playlist and the List
View in the Playlist Selector screen will look
similar to the one on the right (fig. 2.10.10)
If the user wanted to delete more than one playlist,
then repeat this process.
44
Page 49
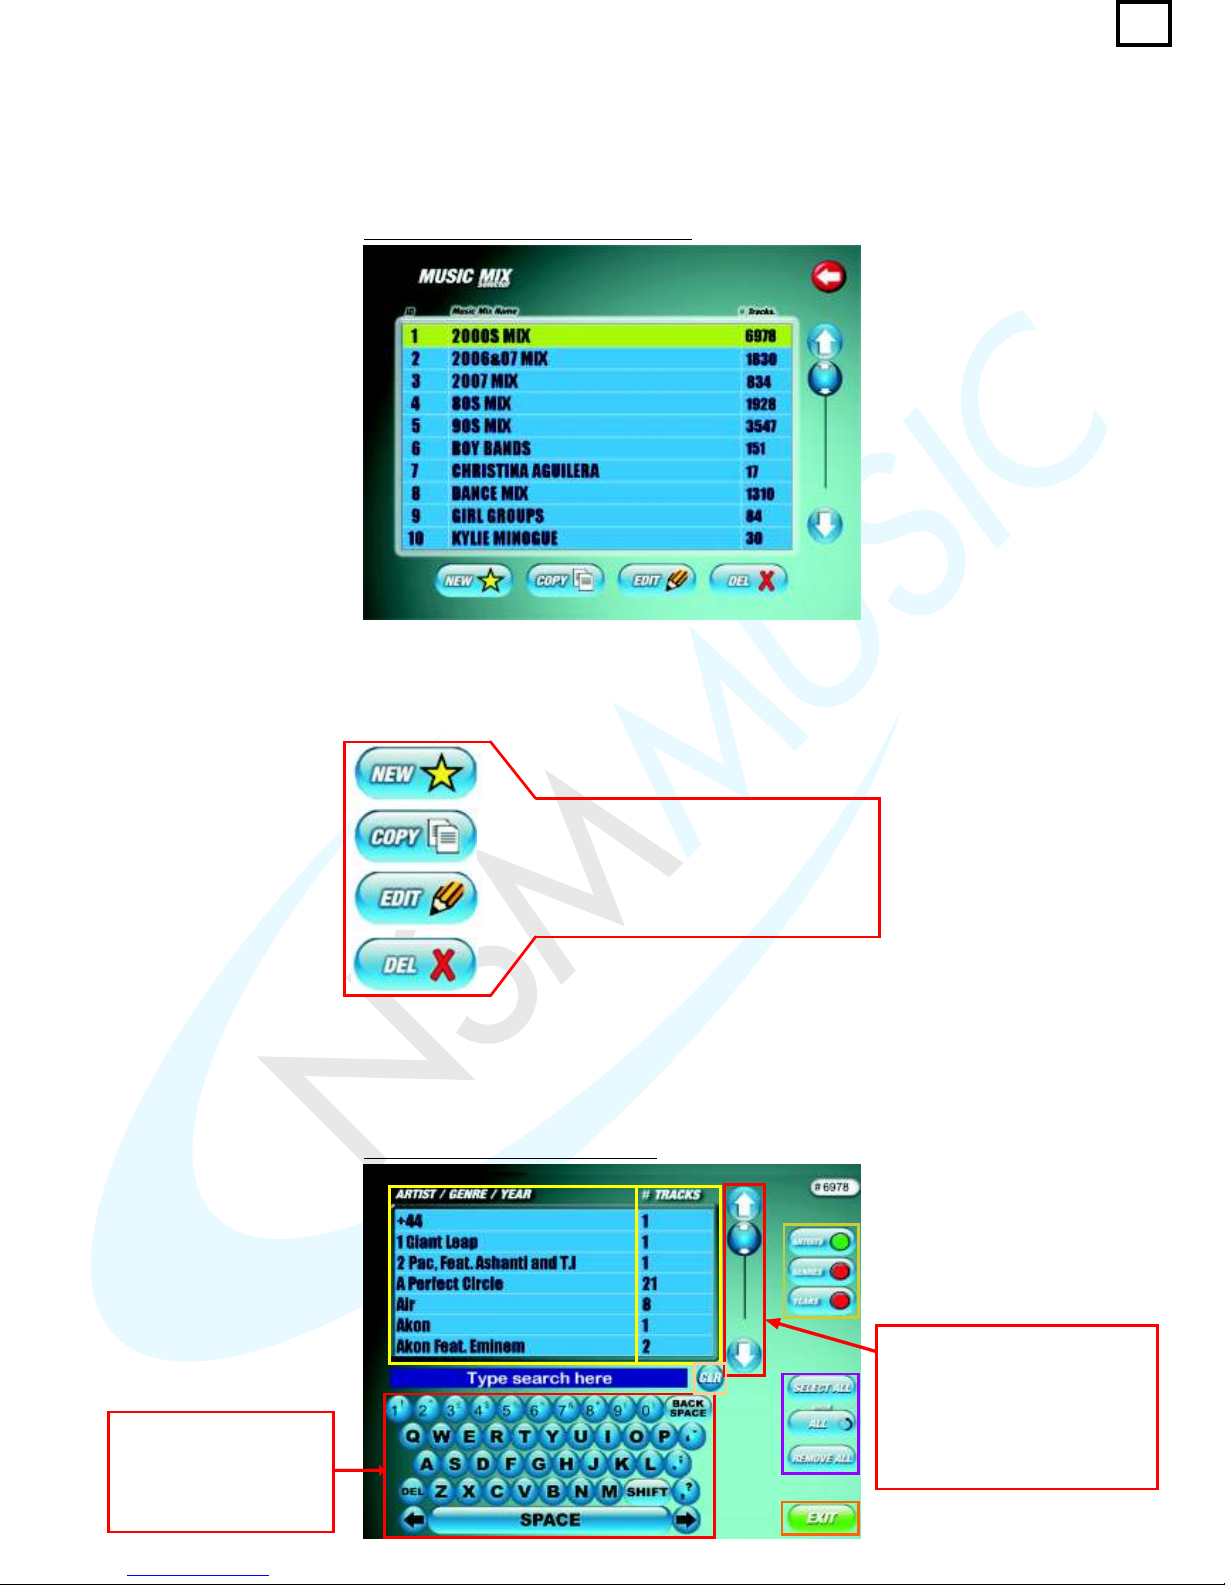
2. Mixers
When the user presses the MIXERS button from the main BGM screen (fig.2.10) the screen below will
be displayed:
These buttons perform exactly the same
functions as those in the Playlist Selector
section and so will not be covered again
with the exception of the EDIT button as
it displays a different screen after the
user presses SAVE.
The user will be presented with a list of different mixes to choose from in the List Box. The List Box is
ALWAYS arranged in ascending order by ID. The user is presented with the same buttons at the
bottom of the List Box as found in the Playlist Selector section.
The user can add a new mix if they wanted to which will take them to the same screen as shown in
fig.3.2 if they press SAVE on the main edit screen (fig.2.10.2). The user can also alter the names and
number of tracks in the preset mixes if they want. Note that fig.2.10.12 shows the 2000S MIX being
edited.
fig. 2.10.11 - Music Mix Selector screen
fig. 2.10.12 - Music Mix Edit screen
The full QWERTY onscreen keyboard allows
the user to enter any text
to search through the list
view.
The Up & Down arrows allow
the user to scroll through the
list view of tracks 1 track at a
time. The Slider control scrolls
through the list view of tracks
but more quickly as you drag it
up or down.
45
Page 50
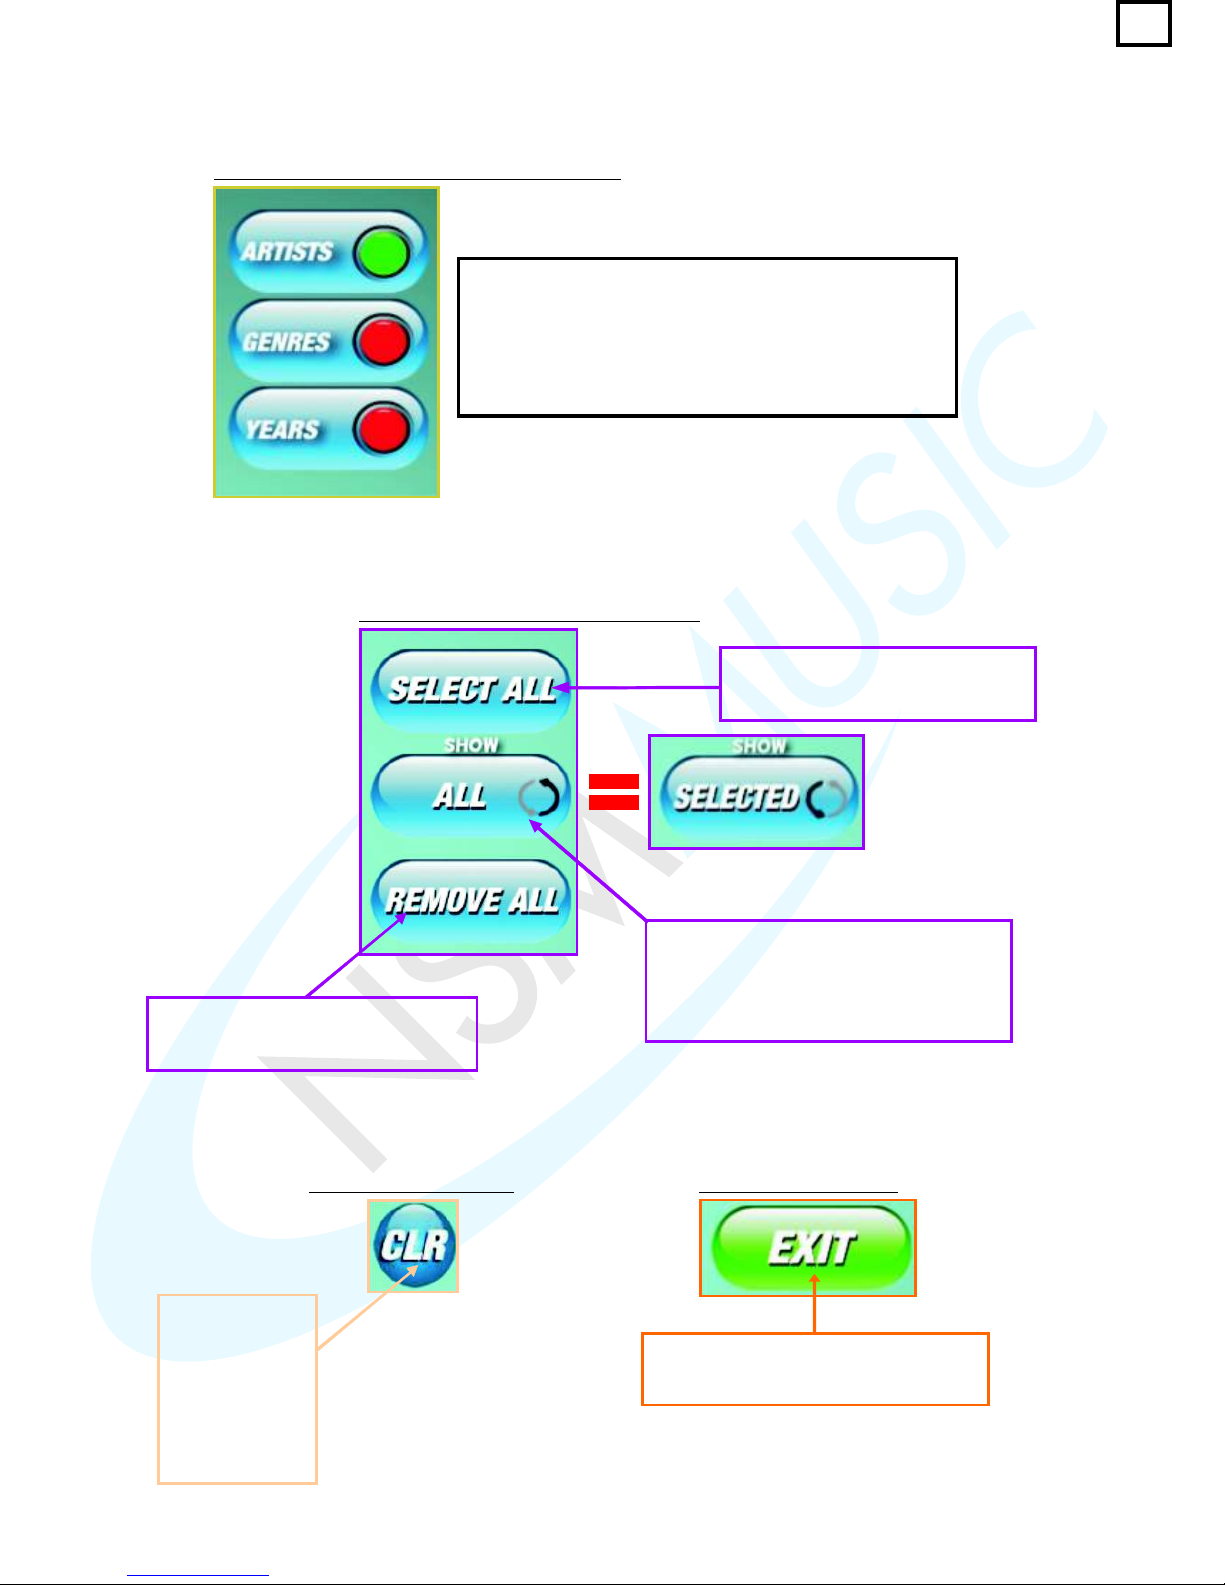
This screen has the following buttons to allow the user to switch between different lists, select all the
tracks in the list and show either all the selected tracks in the mix or not.
fig. 2.10.13 - Music Mix List View Sort By buttons
The 3 buttons opposite the list view allow the user to
search for tracks in 3 different and independent databases
(Artists, Genres or Years). The current selected database
of tracks being viewed can be distinguished by the Green
LED, the Red LED means that the others are not selected
but can be when pressed, disabling the currently selected
database of tracks.
fig. 2.10.14 - Music Mix List View buttons
The SELECT ALL button selects
the entire list of tracks in the List
View, highlighting them all in Yellow.
This button arranges the list view to
either show the whole list with any
selected tracks or only the tracks that the
user has selected. It toggles between
ALL and SELECTED when pressed.
The REMOVE ALL button de-selects
the entire list of the current selected
tracks the user has chosen.
fig. 2.10.15 - CLR button
fig. 2.10.16 - Exit button
The Exit button closes the current
screen and returns the user to the
Music Mix Selector Screen.
The CLR button,
when pressed,
clears all the text
that is in the Text
Box that the user
has typed in
using the onscreen keyboard.
46
Page 51
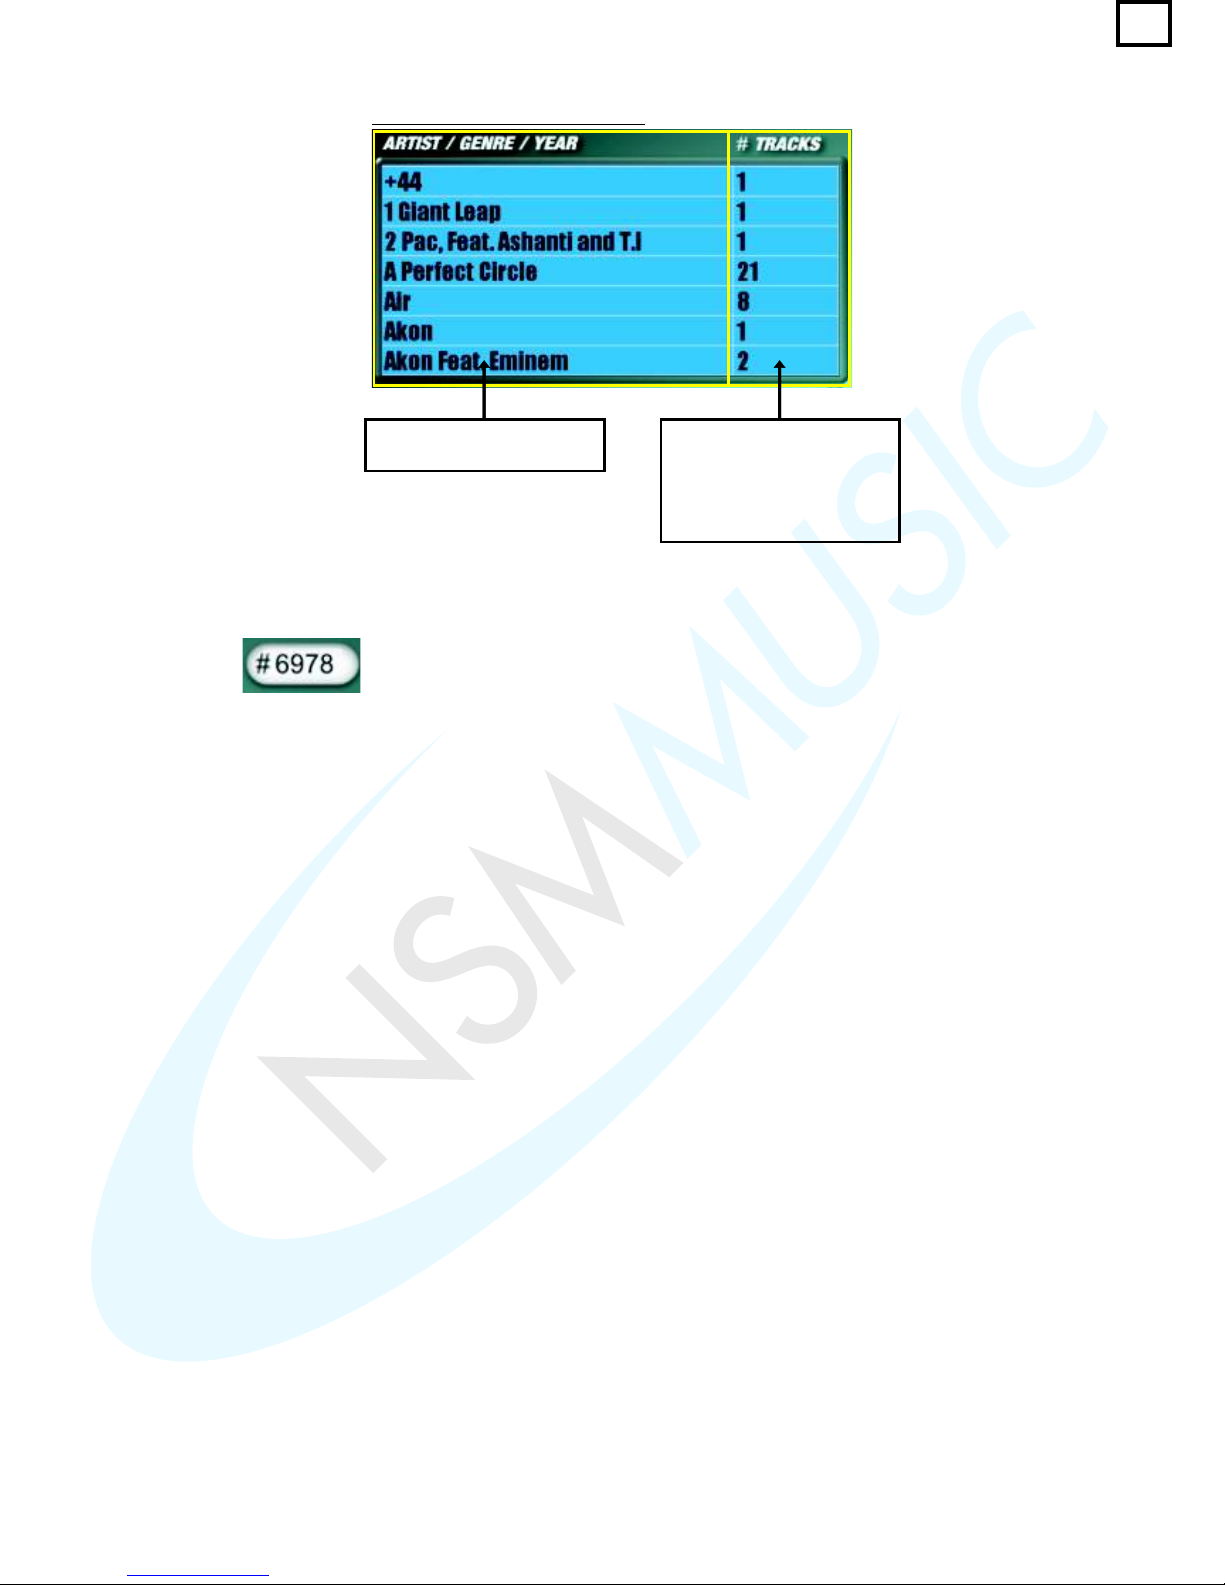
This column either displays
the Artist, Genre or Year
Tracks column in list view.
This displays the number
of tracks by a particular
Artist or in a specific Genre
or Year.
fig. 2.10.17 - Music Mix List View
The user can check the current number of tracks in your playlist by looking in the field in the top right
hand corner.
Once the user is happy with any changes they have made they can then press the EXIT button which
saves any changes made and returns them back to the Music Mix Selector screen.
47
Page 52
3. Shedules
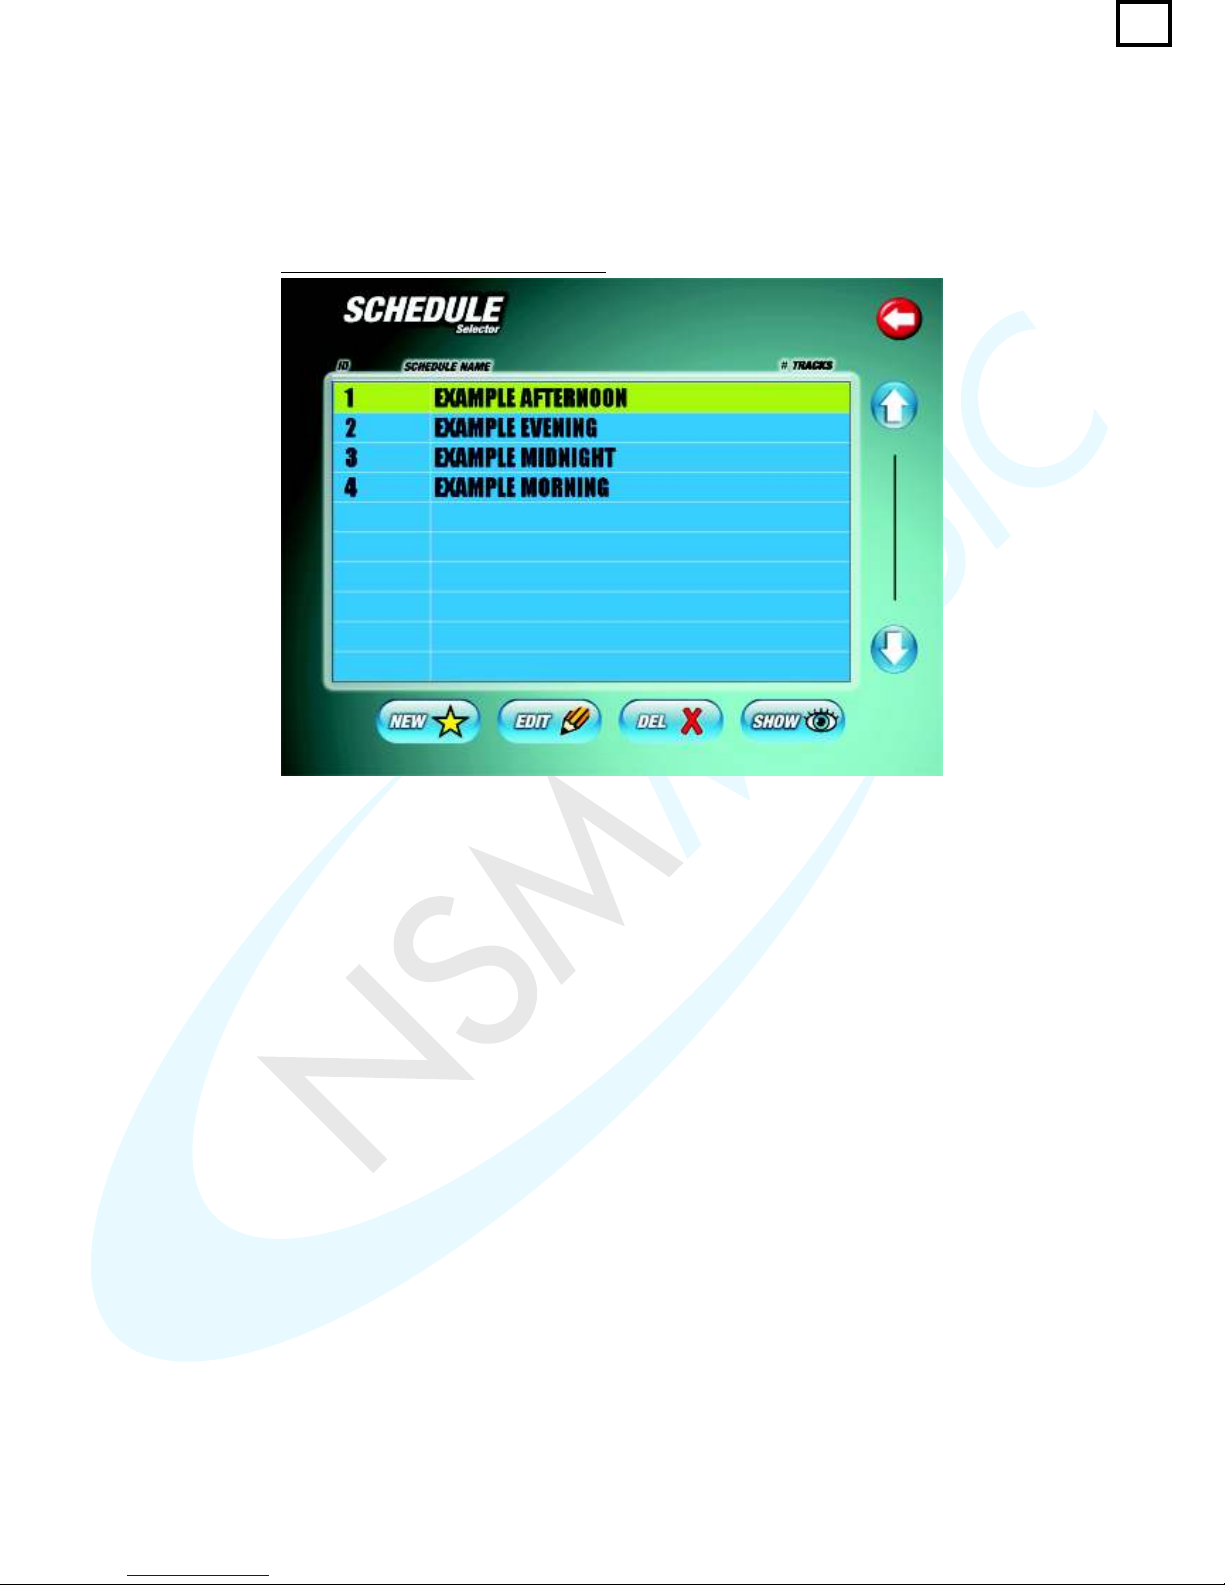
When the user selects the SCHEDULE button on the main BGM screen (fig. 2.10) the screen below
will be displayed. The Up and Down arrows can be used to scroll the list and when there are more
than 10 Schedules in the list a Slider control appears.
fig. 2.10.18 - Schedule Selector screen
There are 4 preset schedule examples for the user to use or amend it they wish. The user can also
create a schedule of their choice by pressing the NEW button. This will take them to a screen as
shown in fig. 2.10.2.
Once the user has entered a name for their new schedule using the on-screen keyboard and pressed
SAVE, the screen in fig. 2.10.19 is shown.
The EDIT button displays the screen as shown in fig. 2.10.2 and when the user user presses SAVE
the same screen as in fig. 2.10.19 is shown.
The DEL button performs the same function as outlined earlier in this section of the manual. It deletes
highlighted schedule in this case.
If the user selects a schedule and presses the SHOW button, it will display the same screen as shown
in fig. 2.10.22 but without the option to edit that screen as it will display ALL the schedules the user has
in their list.
48
Page 53
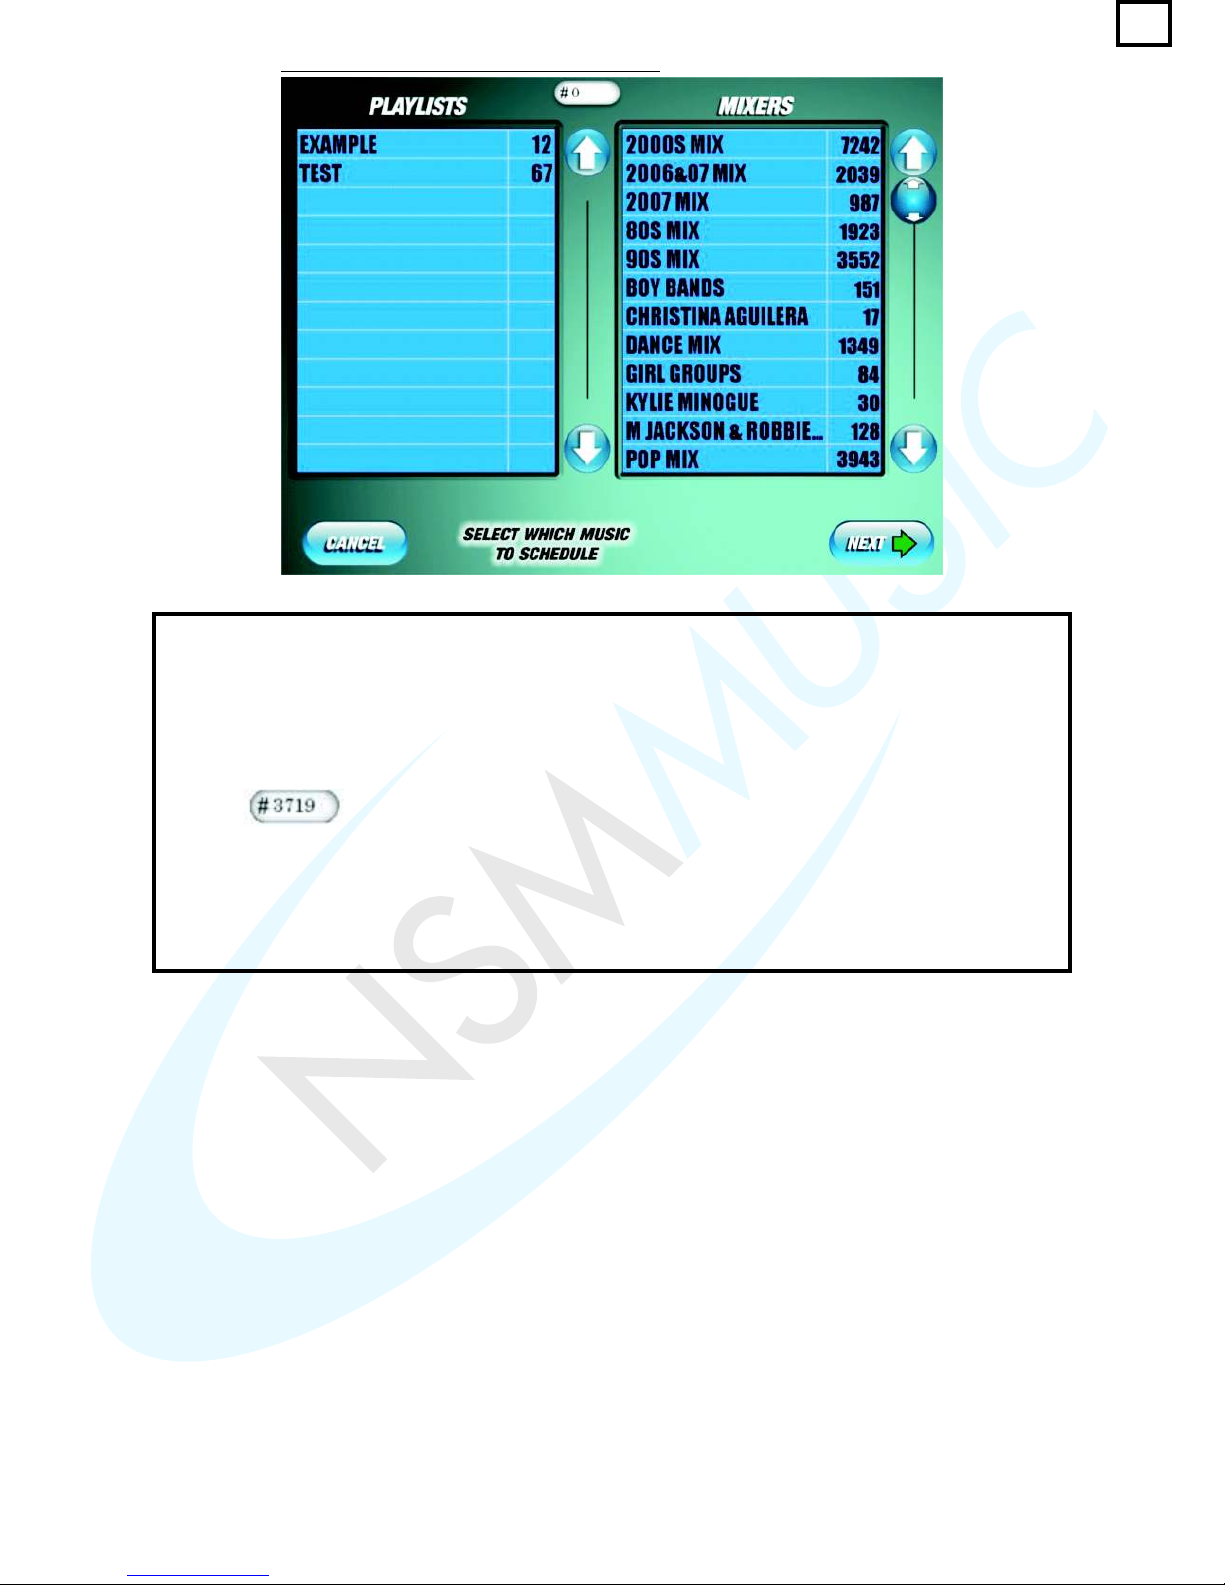
fig. 2.10.19 - Schedule Music Selector screen
In the screen above the user is confronted with 2 list views, one displays all of the Playlists you have made
in the Playlist Selector section and the other displays all of the Mixes in the Music Mix Selector section that
you have made – including all of the preset Mixes and Playlists.
The user can select any or all of the playlists or mixes by pressing them once to highlight them in Yellow. To
deselect a playlist or mix, simply press the highlighted playlist or mix you want to deselect.
This screen is also displayed when the user presses EDIT to change the selection for their highlighted
schedule. This will automatically change when you either select or deselect a Playlist or Mix.
As with the other screens there are Up and Down arrows and a slider Control to browse through the 2 lists.
The CANCEL button when pressed will return the user to the Schedule Selector screen (fig. 2.10.18)
The NEXT button will display the screen in fig. 2.10.20 which will allow the user to assign a day and time for
their highlighted (selected) Schedule to be played on the Jukebox.
49
Page 54
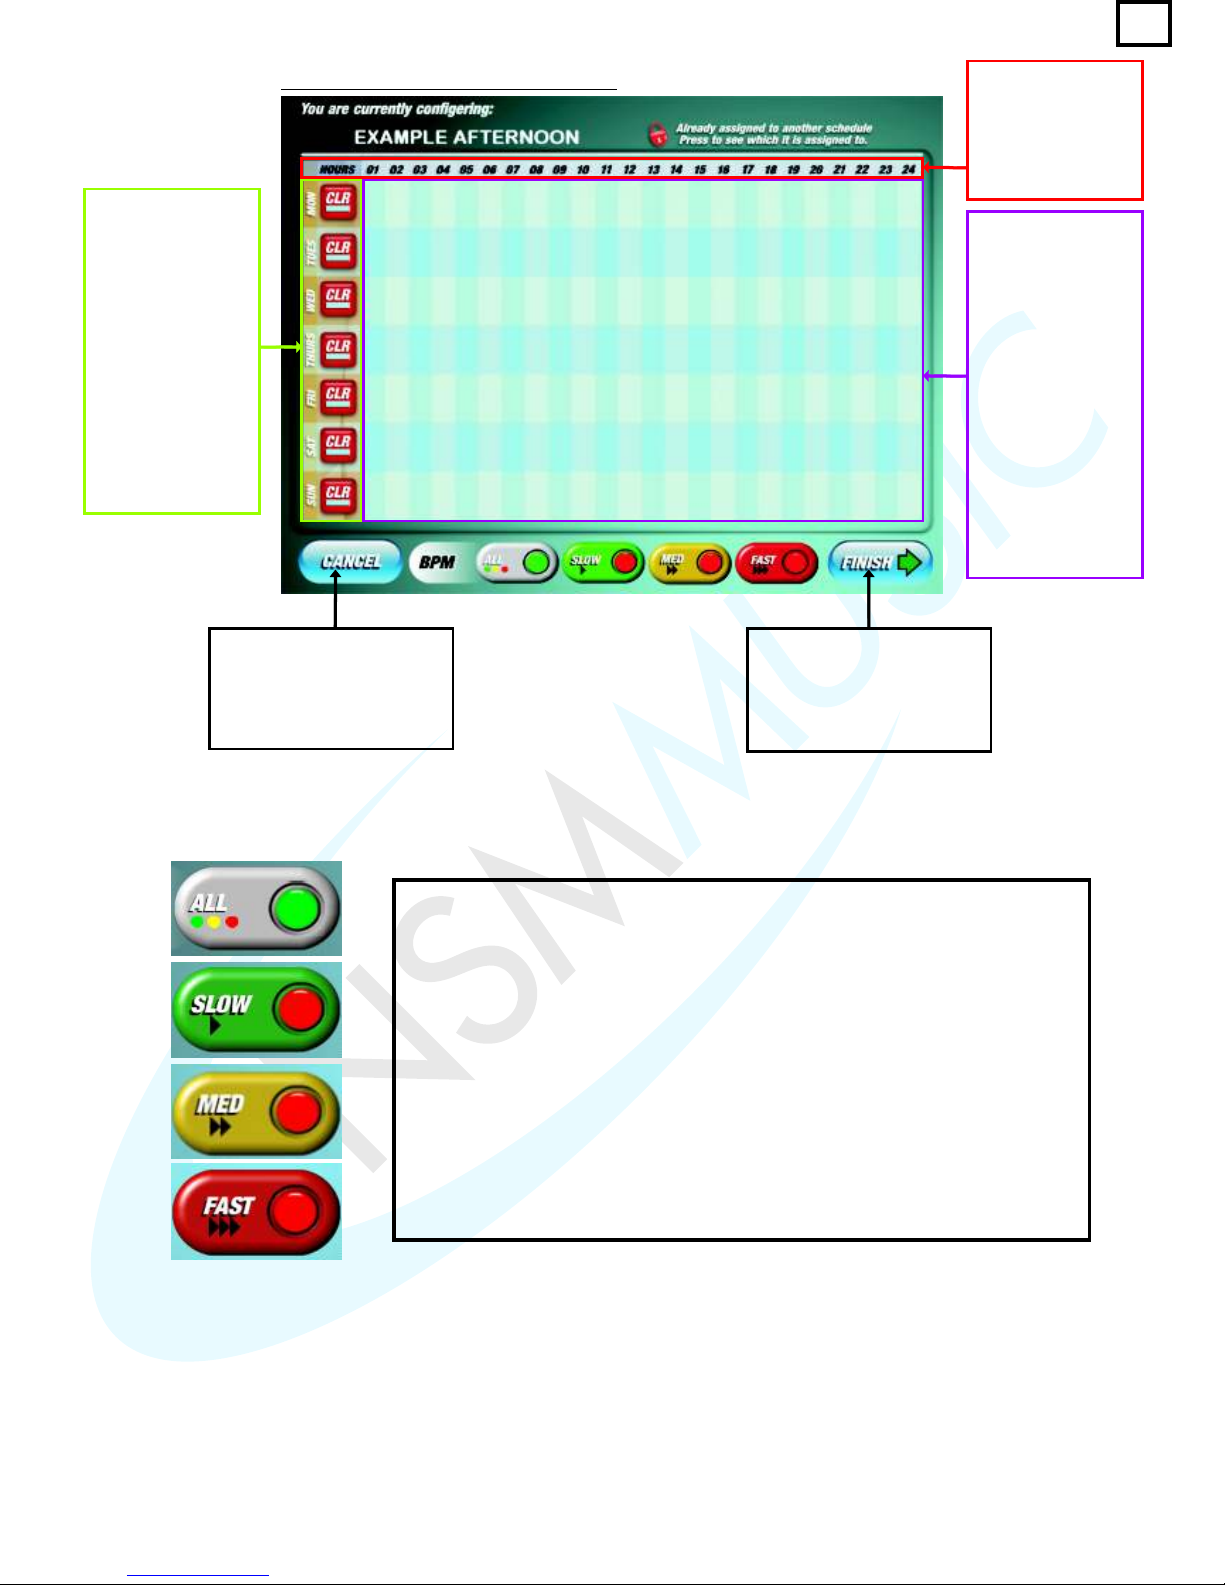
fig. 2.10.20 - Schedule Allocation screen
The CANCEL button
discards any changes
made to your schedule and
brings you back to the
Schedule Selector screen.
The FINISH button saves
the changes made to your
schedule and brings you
back to the Schedule
Selector main screen.
This displays the
days of the week
and also has a CLR
button for each day
to clear any
schedules that
already appear on
that day. This is
especially useful
when the user
wants to put a
schedule on for a
day and time that
already has one.
This is the grid
where you can
allocate your
Schedule to play at
whatever time and
day you want by
pressing in the area
you want. An
example of this is
shown in fig.4.4.
These are
distinguished by
coloured blocks
which are the same
colours as the BPM
buttons.
This displays the
Hours of the day
i.e. the numbers 10
– 12 indicate the
hours between 10
and 12 am.
The BPM buttons allow the user to differentiate between the types of tracks being
played. There are FOUR main types the user can choose from:
? ALL – This is the Default setting. This will add all of the tracks with all of
the types of BPM's (Beats Per Minute).
? SLOW – This will only play the tracks within this range of BPM. Note: If
none exist in your scheduled Playlists and/or Mixes and you select SLOW
BPM no tracks will be played.
? MED – This will only play the tracks within this range of BPM.
? FAST – This will only play the tracks within this range of BPM.
To switch between the BPM buttons, simply press the one you want to use and it
will display the Green LED instead of Red to inform you that you have made that
button the current selected BPM.
The settings for these types of BPM can be altered in the Settings section of the
BPM, which will be outlined in the last section of this manual.
50
Page 55
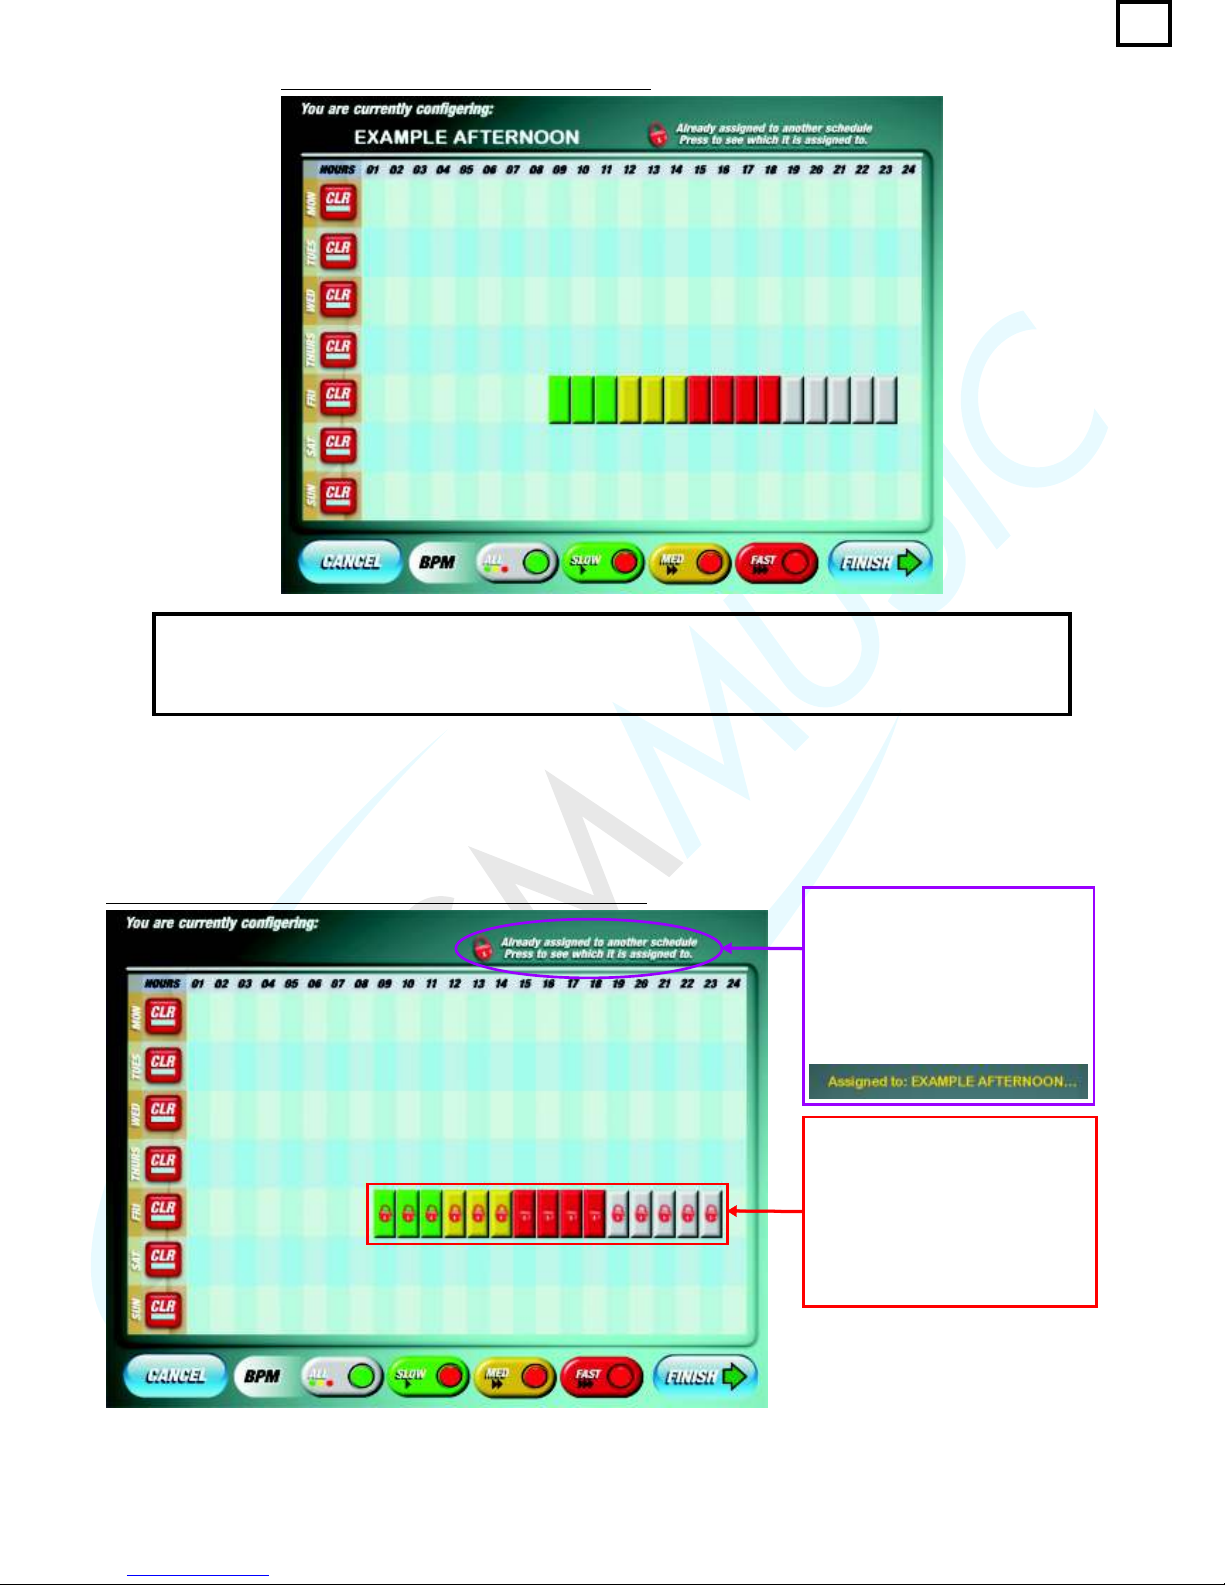
fig. 2.10.21 - Example of Schedule Allocated
In the above screen you can see, as an example that various blocks have been put in to the Schedule
“Example Afternoon” on a Friday from 9am until 11pm. If you made a schedule like this you would have to
press the FINISH button to save the changes. This will remain like this until you clear the schedule for that
day by pressing the CLR button.
If the user wishes to check their schedules they can press the SHOW button on the Schedule Selector
screen, and it will show them the Schedule Window screen similar to that below:
Here you can see that there are
padlock symbols on each of the
blocks – indicating that they can
not be altered and are assigned
to a Schedule. The only way to
alter this is to edit the Schedule
that has the blocks assigned to
and press the CLR button.
This is a reminder to inform the
user that any blocks with a
padlock symbol has a Schedule
already assigned to it. If the user
tries to add a block to one of the
assigned schedules, the
following information will appear
instead:
fig. 2.10.22 - Schedule Allocation screen showing ALL Schedules
To return back to the main Schedule Selector screen, you can press either the CANCEL or the FINISH
buttons.
51
Page 56
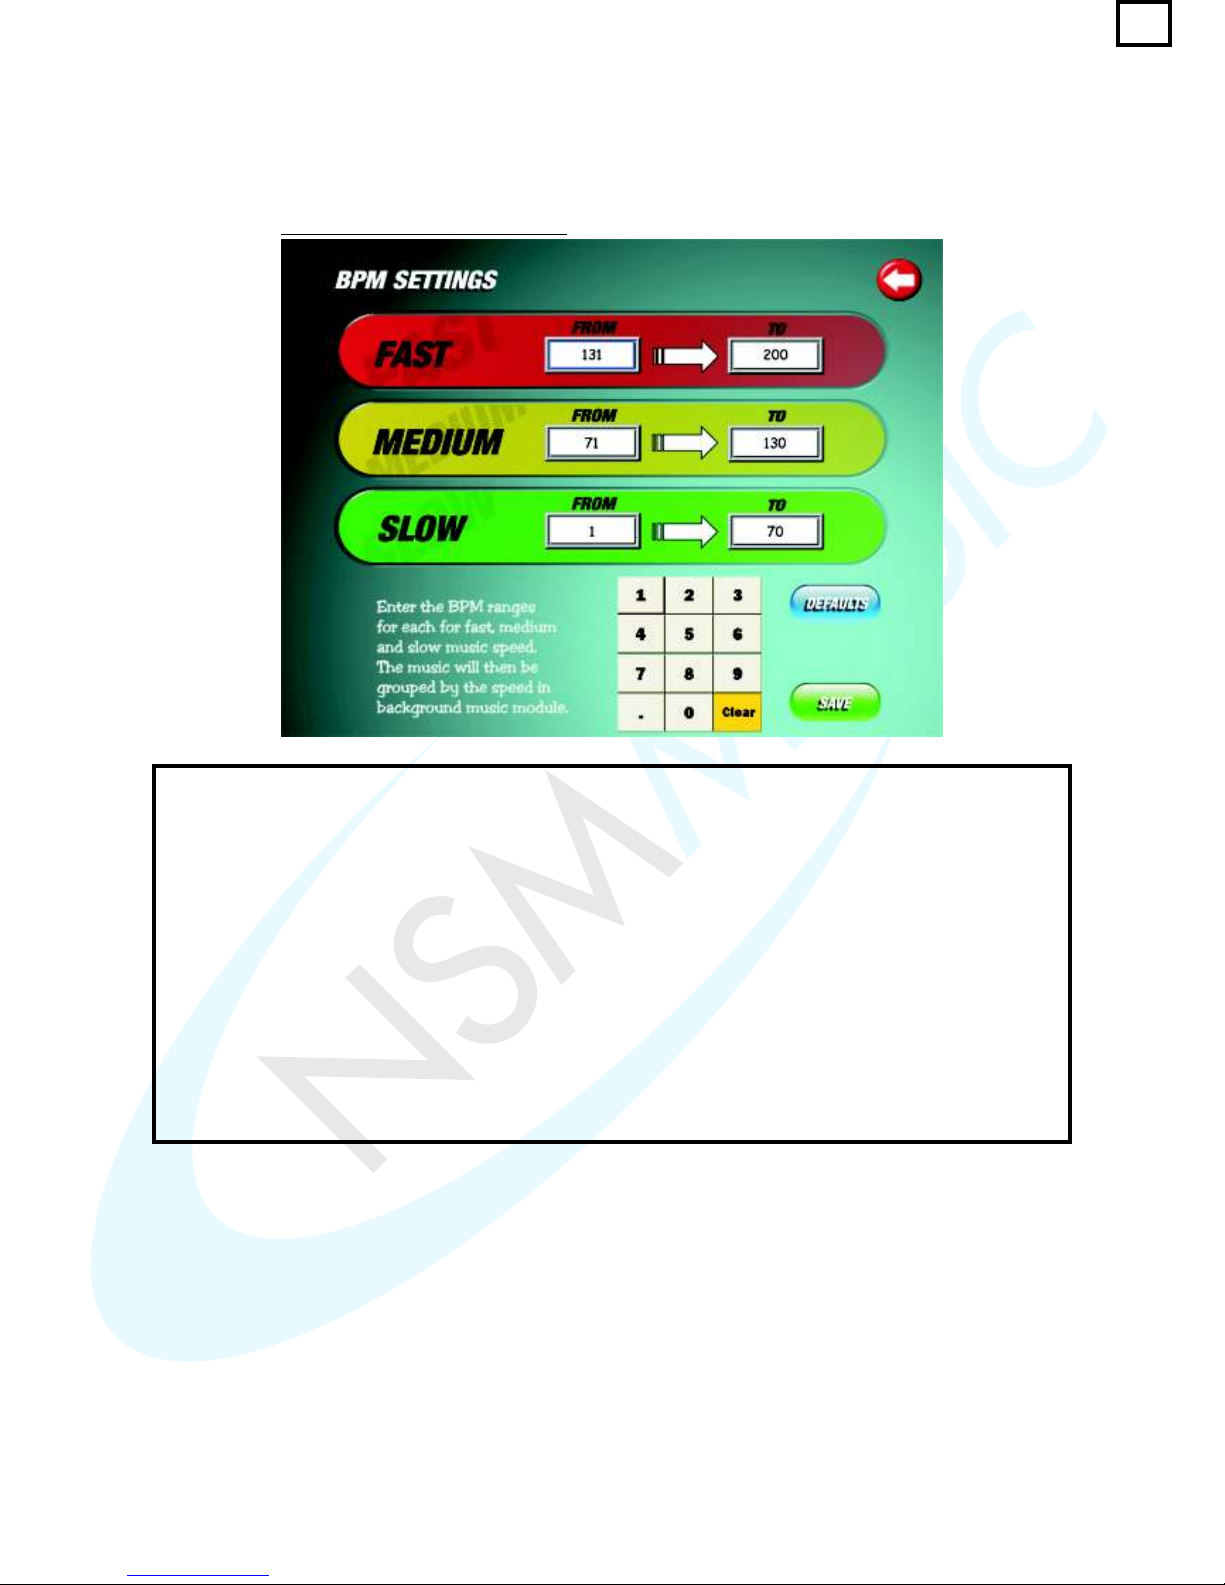
4. Settings
When the user presses the SETTINGS button on the main BGM screen (fig. 2.10) the screen below
will be displayed:
fig. 2.10.23 - BPM Settings screen
This screen has 3 settings to set the range of BPM's for various tracks:
? SLOW – 1 → 70
? MEDIUM – 71 → 130
? FAST – 131 → 200
These range of numbers are the Default setting, but can be altered at any time by using the Numerical
Keypad. Note that if you alter one number in the range of your chosen BPM category you will have to
change the numbers in the other categories so that they follow suit.
To change the BPM settings, first press the number that you want to alter (fig. 2.10.24) so it has a Blue
border around the box where the number is. Next Press the CLEAR button to remove the numbers in that
selected field, then using the Numerical Keypad, enter the new number. Repeat this process for the other
settings so that they follow a logical order as in fig. 2.10.24. Once you are happy with the result press the
SAVE button to store the changes you made. If at any time you want to revert back to the Default settings,
just press the DEFAULTS button and press the SAVE button again.
52
Page 57
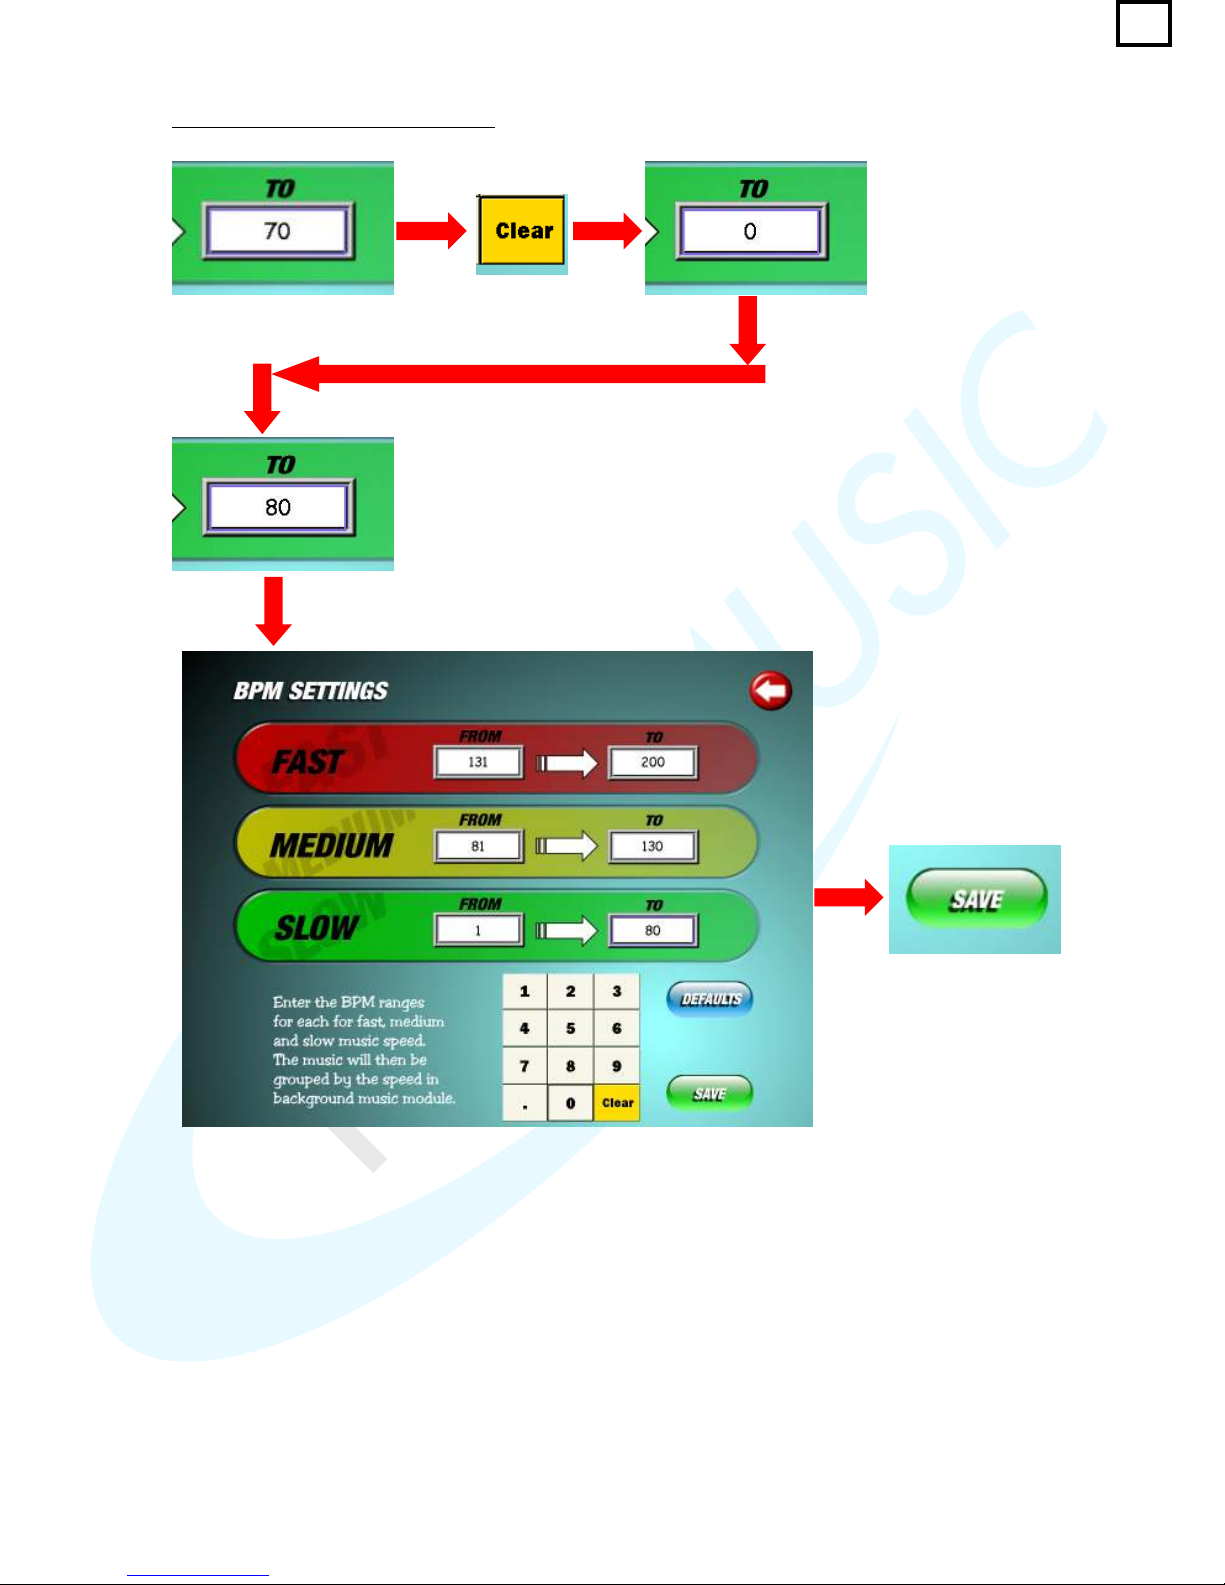
Make the same
alterations to suit for the
rest of the settings.
Use Numerical Keypad to
enter a number.
fig. 2.10.24 - Altering the BPM Settings
53
Page 58
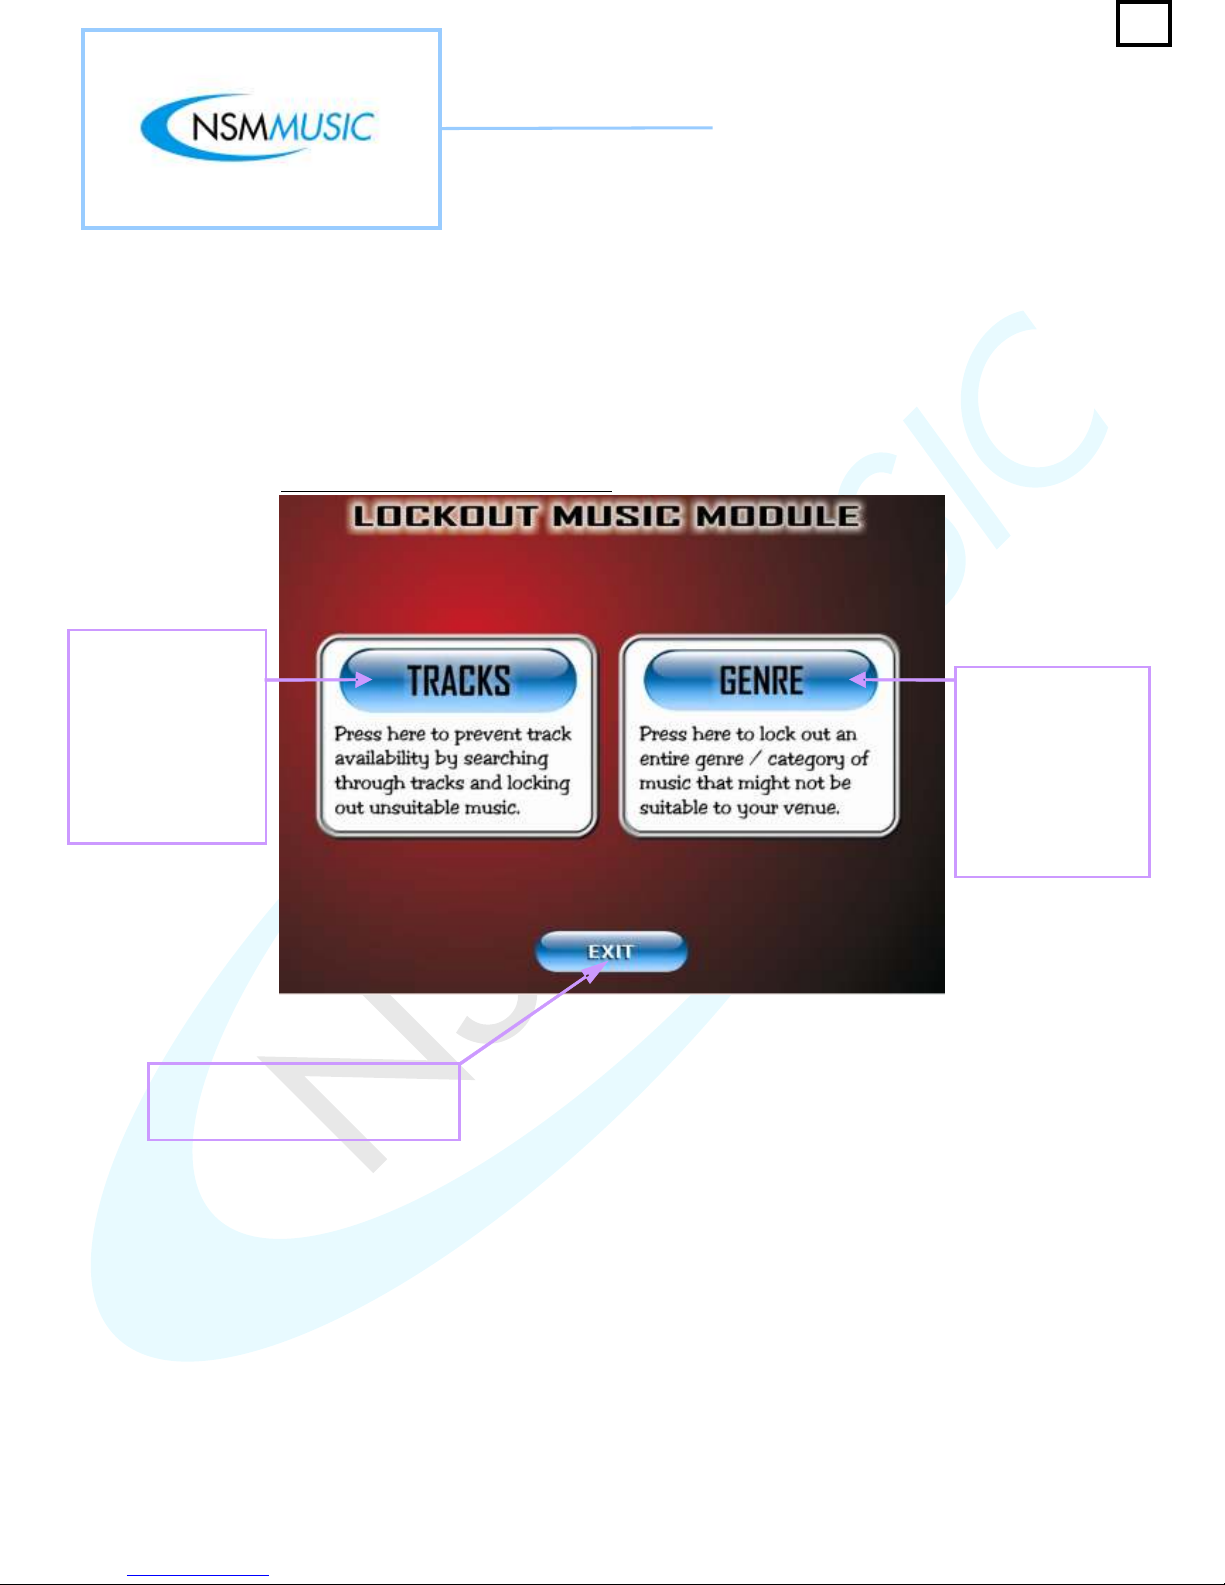
2.11 Lockouts
When the user presses the Lockouts button on the Service Mode Main Menu screen (fig. 2.0), the
screen as shown in fig. 2.11 is displayed. This screen splits up the Lockouts section into 2 parts:
Tracks and Genre. These sections will each be discussed in further detail below, firstly the Tracks
Lockout section.
fig. 2.11 - Lockout Music Module screen
The Genre button,
when pressed will
take the user to the
screen as shown in
fig. 2.11.10 where
they can lock specific
genres form
appearing on the
Jukebox.
The Tracks button,
when pressed will
take the user to the
screen as shown in
fig. 2.11.1 where they
can lock specific
tracks form playing on
the Jukebox due to
illicit content etc.
The Exit Button closes the current
screen and returns the user to the
Service Mode Main Menu screen
54
Page 59
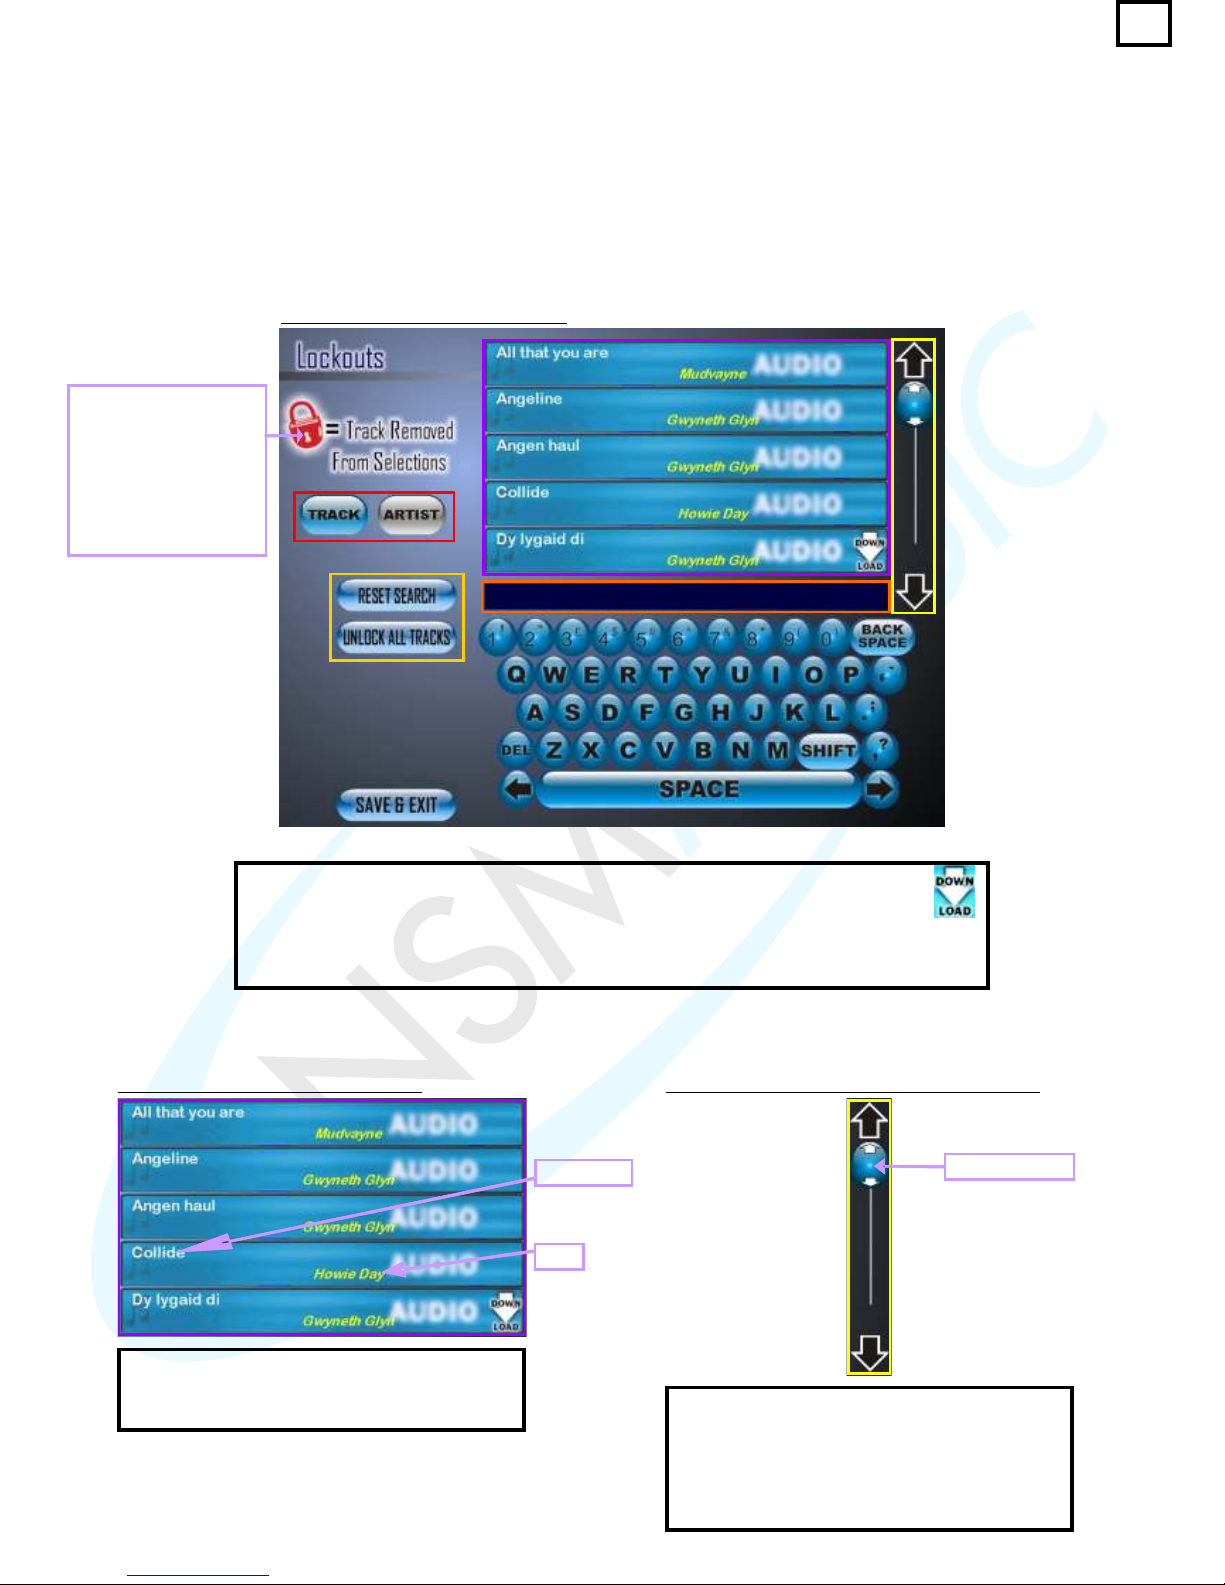
Tracks Lockouts
The Tracks Lockouts Screen enables the user to select any Tracks that the user does not wish to play
due to explicit content or of other factors.
To lock a Track, all the user has to do is click on the track or artist they wish to lock or type in the
Artist/Track using the on-screen keyboard.
This indicates that if
the red padlock is
visible on one of the
Track or Artist
listings the Track is
'Locked Out'. See fig.
2.11.7
fig. 2.11.1 - Tracks Lockout screen
fig. 2.11.2 - Tracks Lockout List View fig. 2.11.3 - Tracks Lockout List View Scroller
The List View in fig. 2.11.2 displays the entire
list of Tracks or Artists available on the
Jukebox to be searched and 'Locked Out'.
The Track Listing (or Artist Listing – Fig. 2.11.7)
can be browsed through by either using the Up
and Down arrows which moves the list up or
down 1 position at a time, or by moving the
Slider Control to browse the list more quickly
(fig. 2.11.3).
NB: You may have noticed the Download Image next to some tracks.
This tells the user that the track is not on the Jukebox but is available to be
downloaded using the settings in the Setup Screen. Once downloaded, the
track will remain on the Jukebox and the Image next to the track will have
disappeared.
Slider Control
Track Title
Artist
55
Page 60
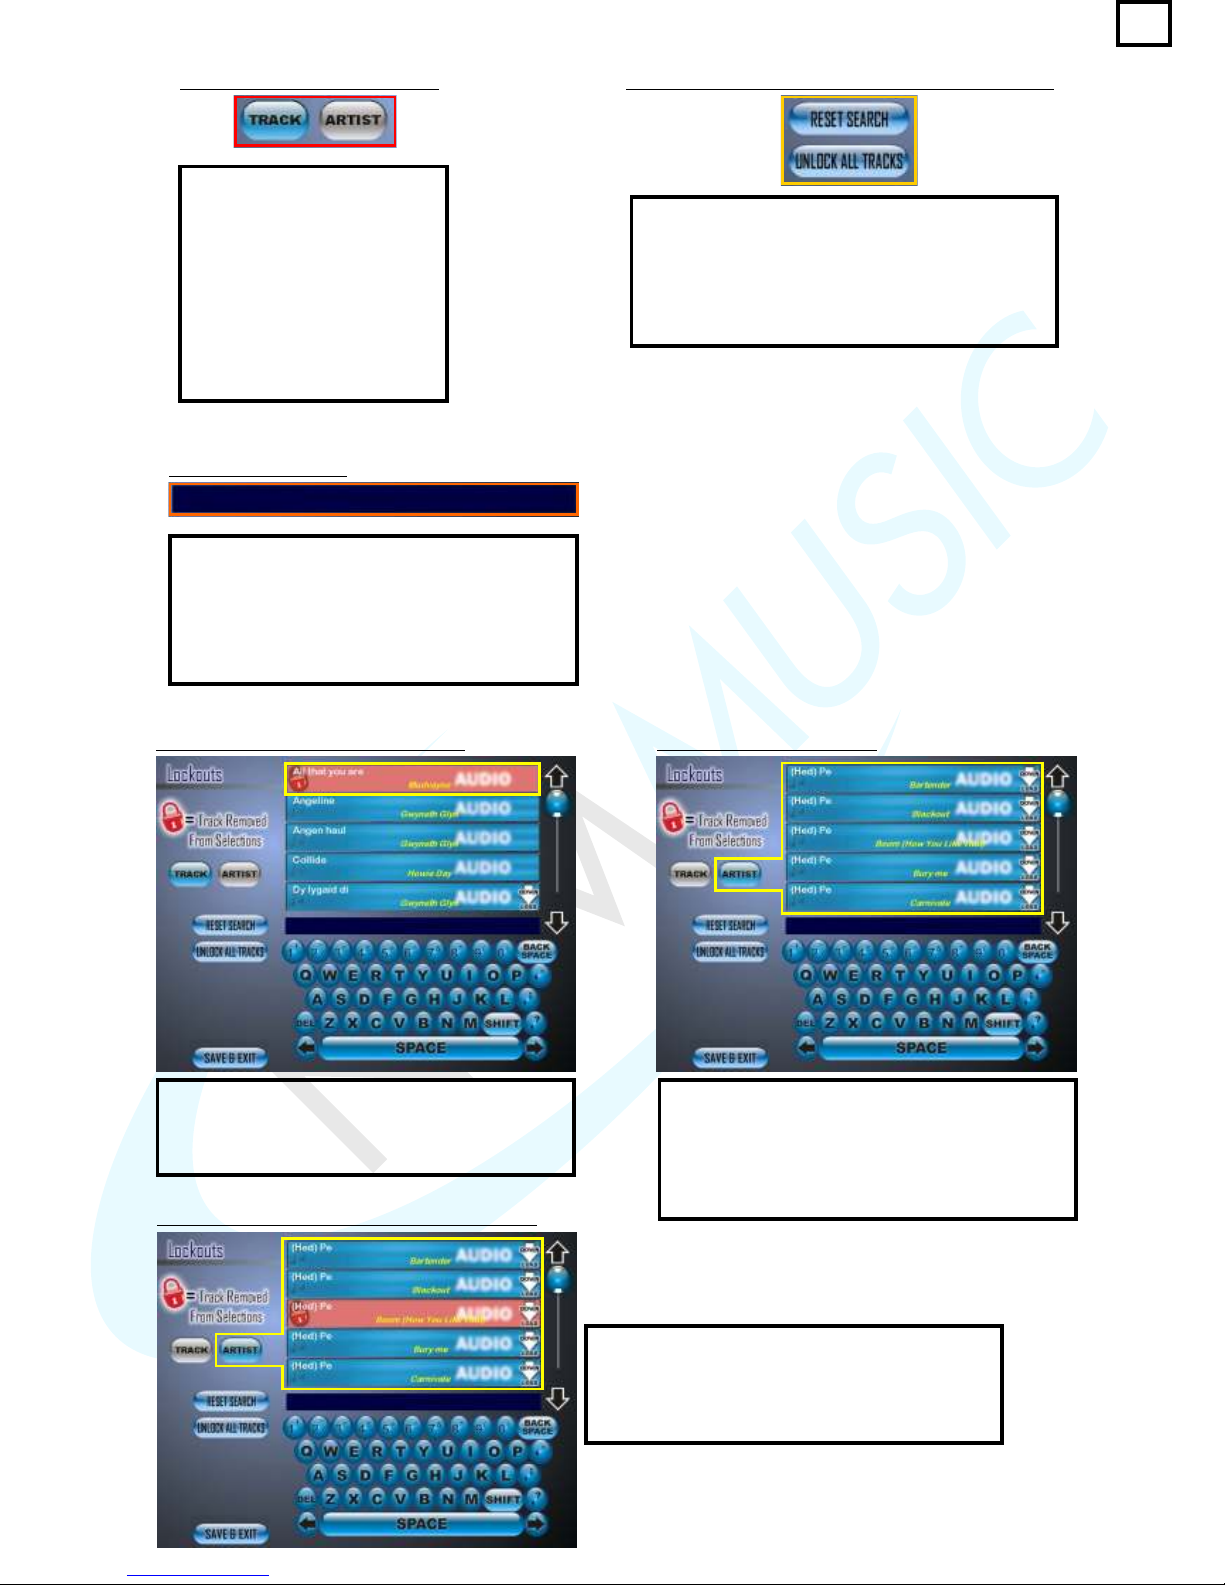
fig. 2.11.4 - Track/Artist buttons fig. 2.11.5 - Reset Search/Unlock All Tracks buttons
The Track and Artist buttons
(fig. 2.11.4) allow the user to
toggle the list view to show
either the Tracks or the
Artists currently on the
Jukebox. If the button is ,
it indicates that this is the
current selection. If , it
indicates that the button has
not been clicked.
Blue
Grey
The Reset Search button (fig. 2.11.5) clears any
text entered by the user in the Text Field and
refreshes the list view back to the start.
The Unlock All Tracks button (fig. 2.11.5) clears
ALL the tracks that have been locked by the user.
The Text Field (fig. 2.11.6) shows the letters
and/or numbers entered by the user on the
Keyboard. Whenever a letter appears in this
box, it automatically begins to search through
the Track Listing (or Artist Listing – Fig.
2.11.8).
fig. 2.11.6 - Text Field
The Screen above shows a selected track which
has been 'Locked Out' (highlighted in ). It
can be unlocked by pressing on the track again
or by pressing the Unlock All Tracks Button.
Yellow
The Screen above shows what happens when
the user presses the Artist Button (highlighted in
). The list view is sorted by Artist instead
of by Tracks. Any Artist now which is clicked on
to be locked out will lock out the selected track
by that particular Artist.
Yellow
The Screen to the left shows a selected Track
sorted by Artist which has been 'Locked Out'
(highlighted in ). It can be unlocked by
clicking on the Artist again or by clicking the
Unlock All Tracks Button.
Yellow
fig. 2.11.7 - Locking a Selected Track fig. 2.11.8 - Artist List View
fig. 2.11.9 - Locking a Selected Track by Artist
56
Page 61
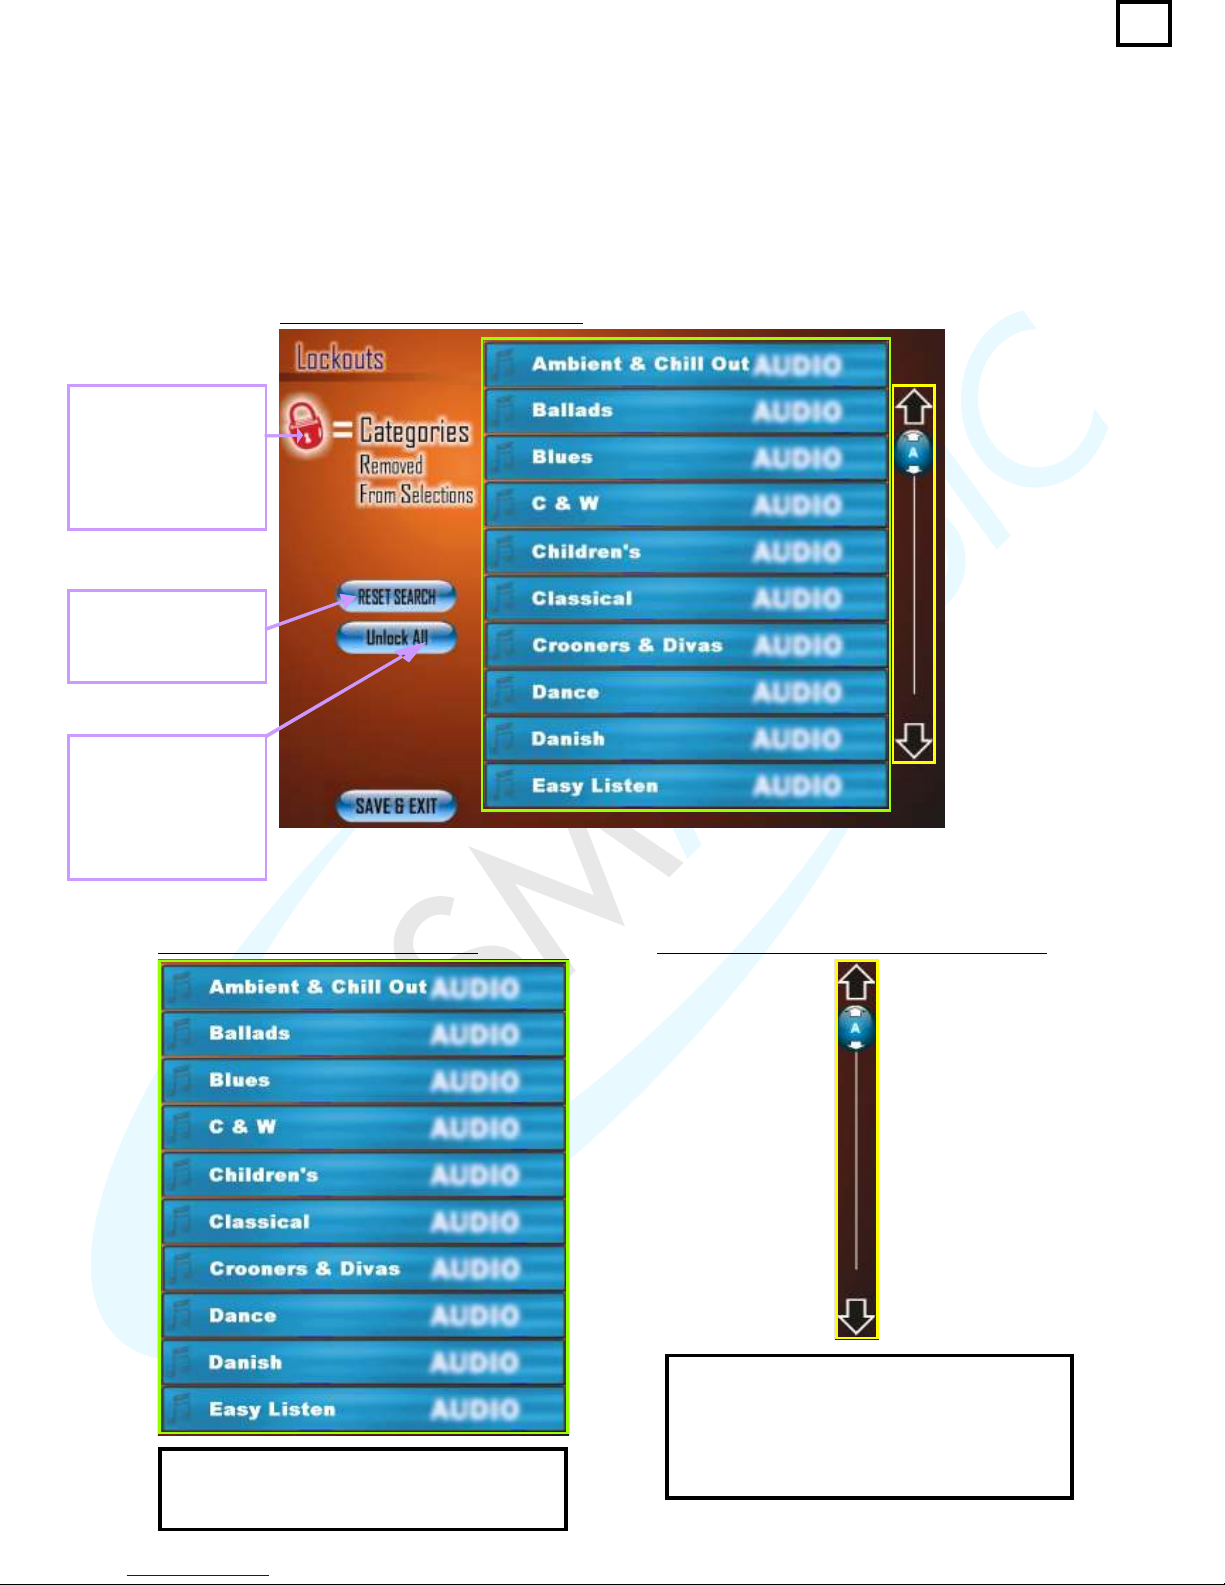
Genre Lockouts
The Genre Lockouts Screen enables the user to select any genres that the user does not wish
to play (e.g. to lock all Rap Music songs).
To lock a Genre, all the user has to do is press on the Genre they wish to lock in the List View.
Hence, any tracks that appear in this Genre will not be displayed as well as the genre on the main
Jukebox Interface.
This indicates that if
the red padlock is
visible on one of the
Genre listings the
Genre is 'Locked
Out'. See fig. 2.11.7
fig. 2.11.10 - Genre Lockouts screen
The Reset Search
button, when pressed,
refreshes the List
View back to the start.
The Unlock All
button, when pressed,
unlocks all the
Genres that have
been locked by the
user.
The List View in fig. 2.11.11 displays the entire
list of Genres available on the Jukebox to be
searched and 'Locked Out'.
The Genre Lockouts List View – fig. 2.11.11)
can be browsed through by either using the Up
and Down arrows which moves the list up or
down 1 position at a time, or by moving the
Slider Control to browse the list more quickly
(fig. 2.11.12).
fig. 2.11.11 - Genre Lockouts List View fig. 2.11.12 - Genre Lockouts List View Scroller
57
Page 62
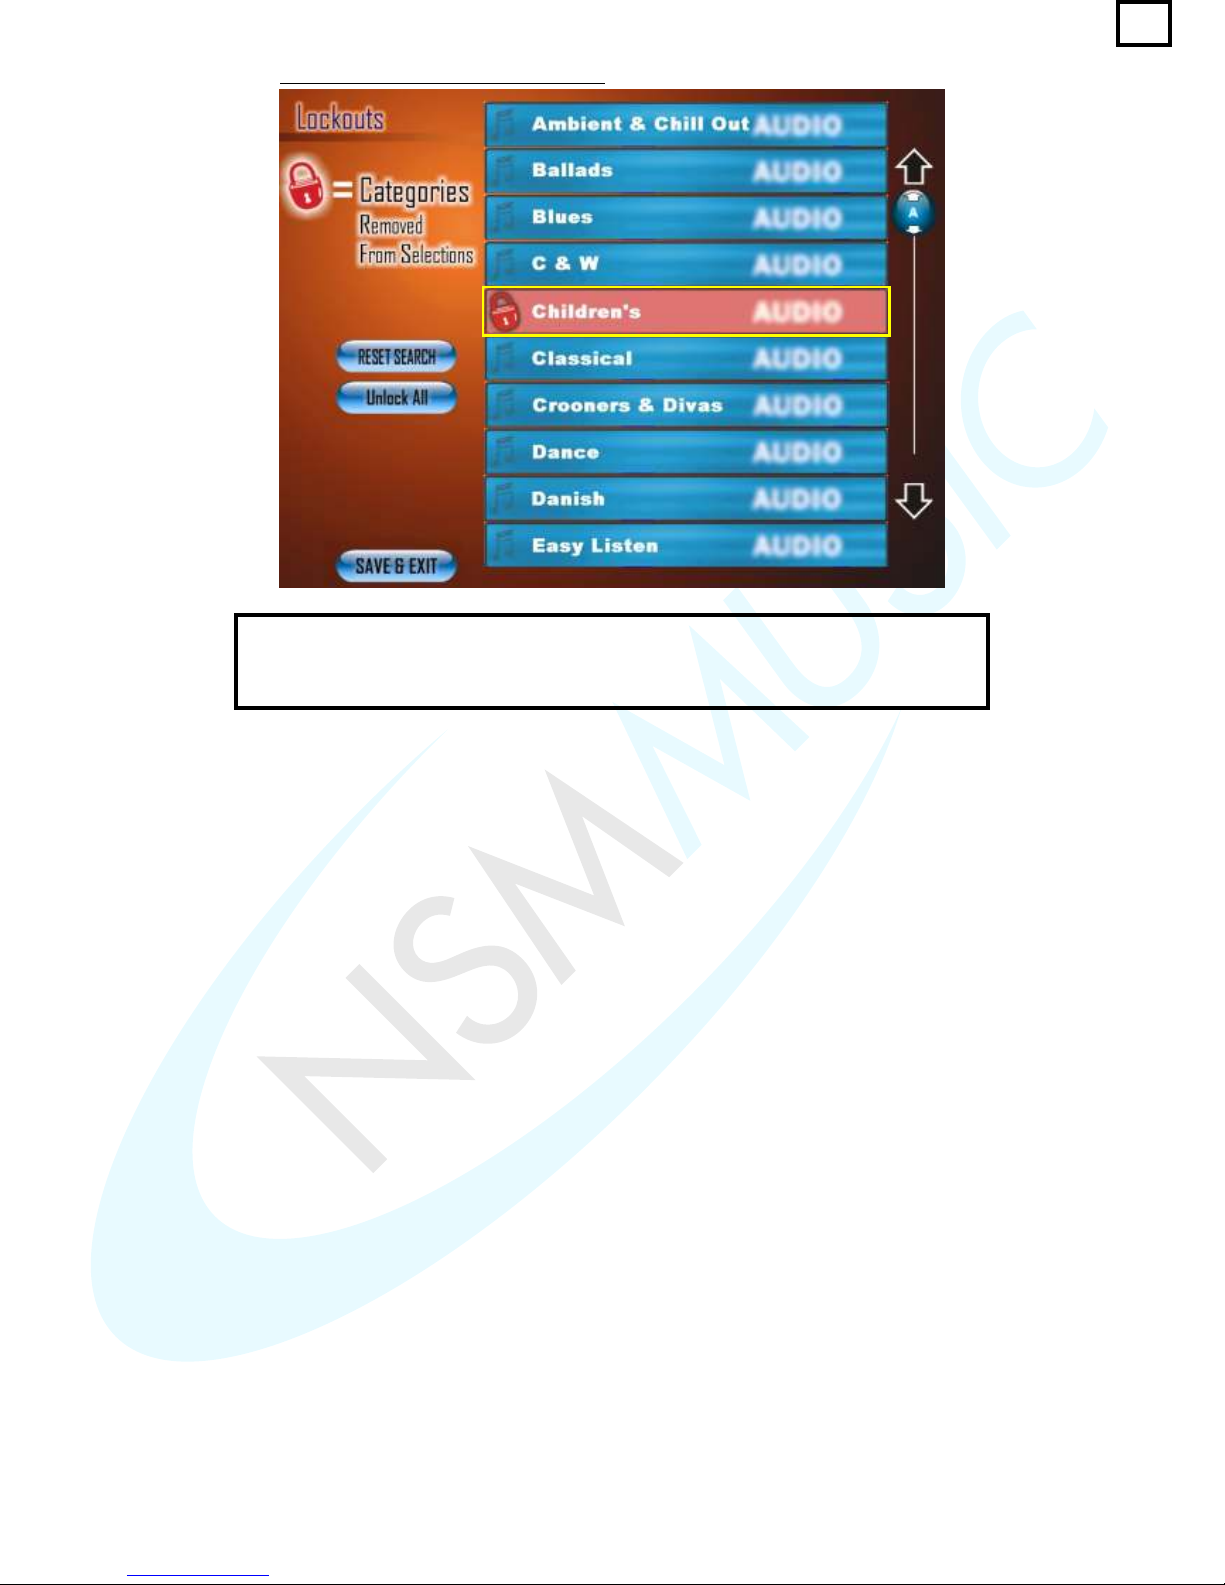
The Screen above shows a selected Genre which has been 'Locked Out'
(highlighted in ). It can be unlocked by clicking on the Genre again
or by clicking the Unlock All Button.
Yellow
fig. 2.11.13 - Locking a Selected Genre
58
Page 63
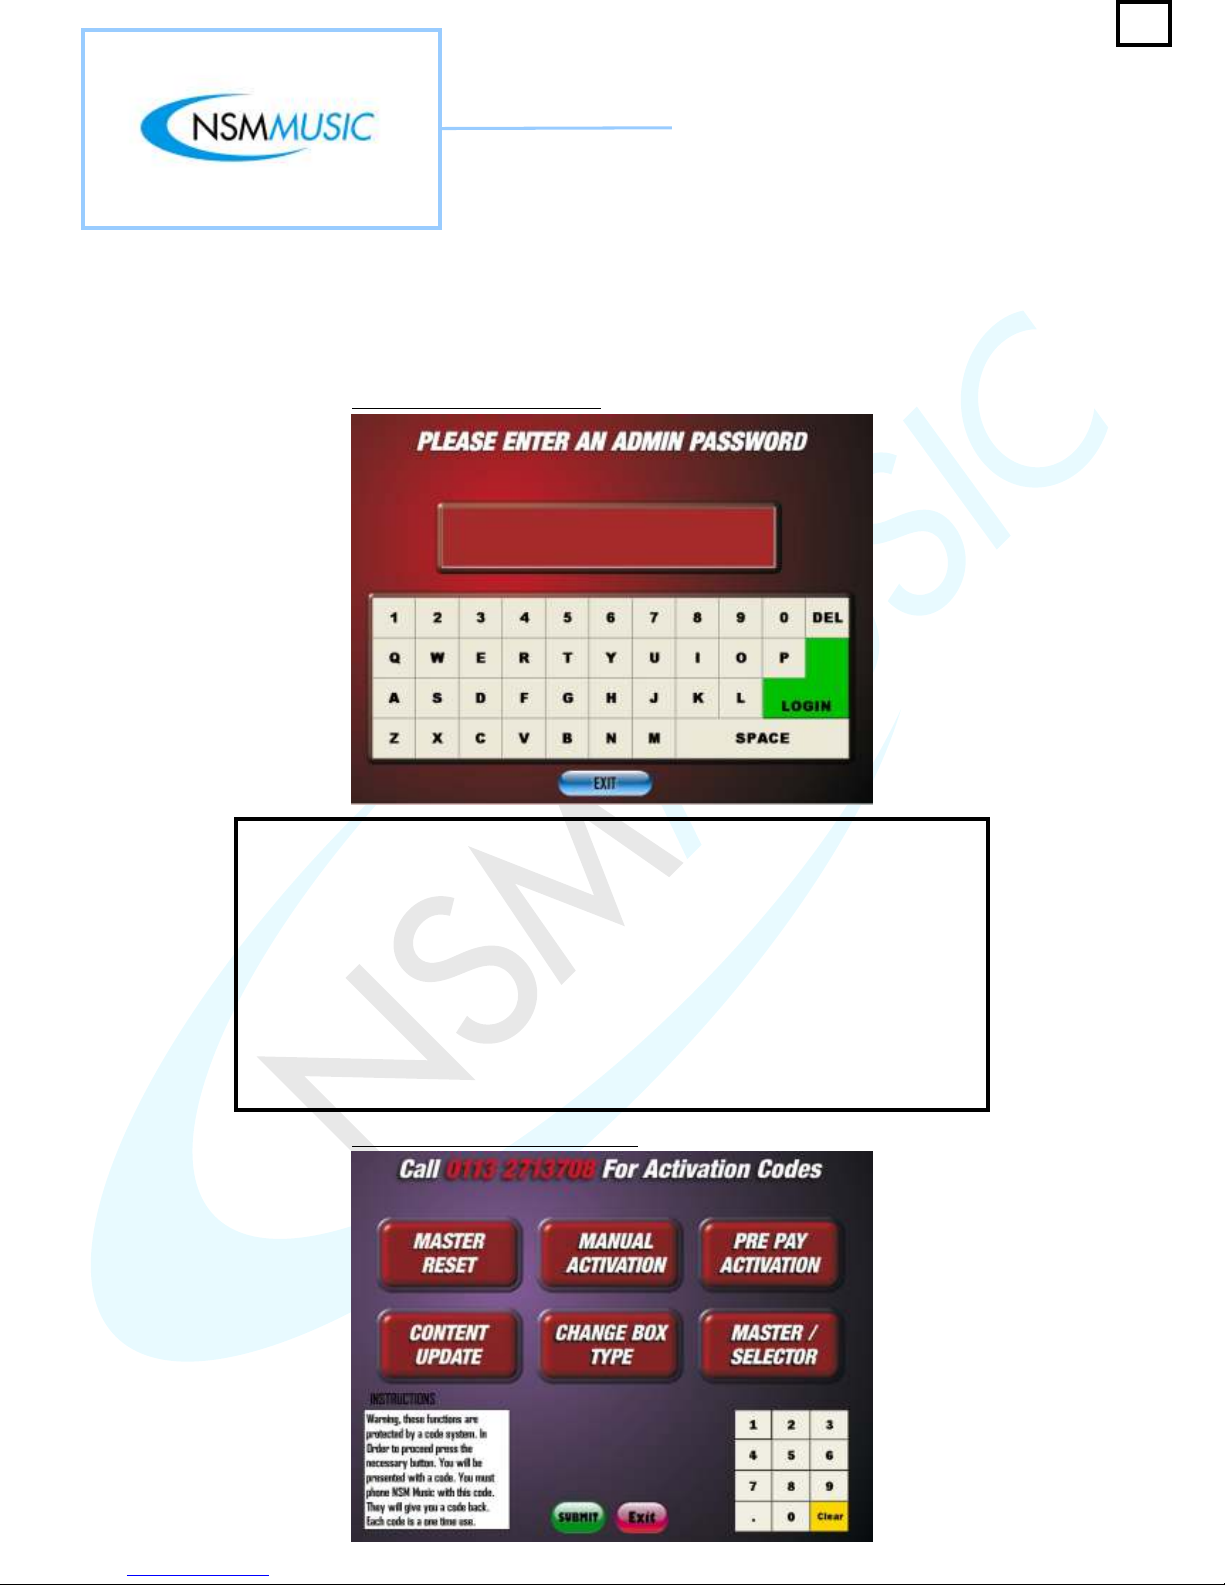
59
2.12 Admin
When the user presses the Admin button on the Service Mode Main Menu screen (fig. 2.0), the
screen as shown in fig. 2.12 is displayed. The Admin Mode is t o control advanced settings in the
BGM music database. Requires authentication - for operators ONLY
If you wish to control master settings in the Jukebox you have to press the ADMIN
button in the Service Mode Main Menu screen. This will present you with a screen with
a touchscreen QWERTY keyboard and a box to enter the password. You will need to
enter ADMIN for the password and then press the LOGIN button. This will display the
screen as displayed below.
Here you are presented with 6 main buttons (MASTER RESET, MANUAL ACTIVATION,
PRE PAY ACTIVATION, CONTENT UPDATE, CHANGE BOX TYPE, and
MASTER/SELECTOR ) and a numerical keypad. Each button you press will display 2
boxes, with 1 containing a number and the other one left blank for a number to be
entered using the numerical keypad. This number can only be obtained by calling NSM
Music before you proceed. Once you receive this number you press the SUBMIT button
to proceed further.
fig. 2.12 - Admin Login screen
fig. 2.12.1 - Admin Settings screen
Page 64

Page 65

NSM Music Ltd
Unit 4
Maple Park
Lowfields Avenue
Leeds
LS12 6HH
United Kingdom
Tel. +44 (0)113 2713708
Fax +44 (0)113 2705648
Email: [email protected]
 Loading...