

Page 1
High Speed Air Turbine Handpiece
S-Max pico
OM-T0496E 001
Page 2

Page 3

Intended to Use: This handpiece is designed only for dental treatment use.
CAUTION
· When operating the handpiece always consider the safety of the patient.
· Do not exceed maximum bur length.
· Check for vibration, noise and overheating outside the patient's oral cavity before use. If any abnormalities are found, stop using the Product immediately and contact
authorized dealer.
· Should the handpiece function abnormally, cease operation immediately and return the handpiece to an dealer for repair.
· Depressing the Push-Button while the handpiece is rotating will result in OVERHEATING of the handpiece head. Special caution must be exercised during use to keep
cheek tissue AWAY from the Push-Button of the handpiece. Contact with cheek tissue may cause the Push-Button to depress and burn injury to the patient may occur.
· Do not exceed the Air Pressure recommended in specification below as bur breakage or wear may occur if it exceeds the Air Pressure.
· Do not allow any impact on to the handpiece . Do not drop the handpiece.
· Refer to the coupling manual before connecting it to the handpiece tubing.
· Do not attempt to disassemble the handpiece or tamper with the mechanism.
· NSK has not recommended the repair and disassembly of the cartridge without exception. Handpiece may perform abnormally (abnormal noise or abnormal vibration).
Damage, failure or accidents are outside of our guarantee.
· Avoid continual eye contact with the LED light (pico BLED, pico WLED).
· If any abnormalities (dark, do not light on or flashing) are found for LED, stop using the product immediately and contact authorized dealer. (pico BLED, pico WLED
· This handpiece is a LED product classified in the "Exempt Group" (no photobiological hazard) in accordance with IEC62471/EN62471 (pico BLED, pico WLED).
ENGLISH
)
1
Page 4
· Use a power source which meets the following requirements (pico BLED, pico WLED).
1. The electricity supply of the power source is below 15W both under normal and single-failure conditions.
2. The power source uses a SELV circuit for electricity supply.
3. The output voltage of the power source is within the range recommended by the manufacturer of this product.
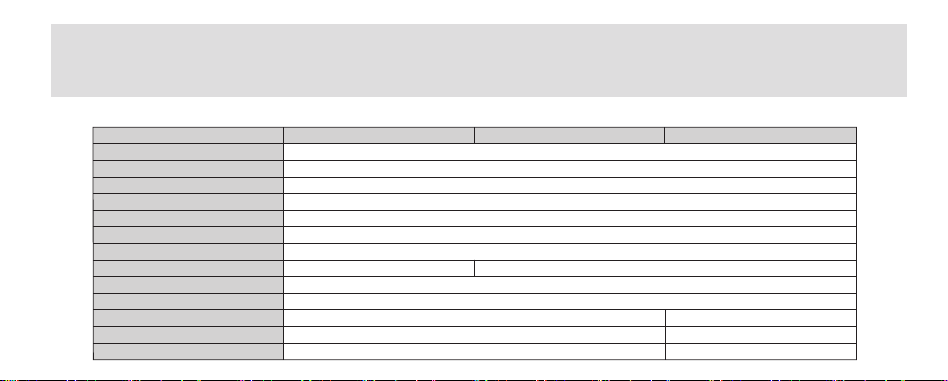
1. Specification
Model
Head Type
Rotation Speed
Spray Type
Chuck Type
Bur
Bur Length
Maximum Bur Diameter
Air Supply
Air Consumption
Head Dimension x Height
Optic
2
Voltage
Activate Voltage
0.20MPa (2.0 kgf/cm2)~0.25MPa (2.5 kgf/cm2)
pico
ISO1797-1 Type3 Ø1.59~1.60mm Short Shank Bur/Super Short Shank Bur
Max. Bur length: 18.5 mm Bur fixing Length: 8.0 mm
pico KL / pico SL
380,000 ~ 450,000 min
Single Spray
Push Button Chuck
45 ± 5 NL/min
Ø 8.6 mm x 9.0 mm
-
-
Miniature
2.0 mm
Ø
0.25MPa (2.5 kgf/cm
-1
2
)~0.30MPa (3.0 kgf/cm2)
pico BLED / pico WLED
White LEDGlass Rod
AC/DC 3.3 ± 0.05 V
3.0 - 4.0 V
Page 5
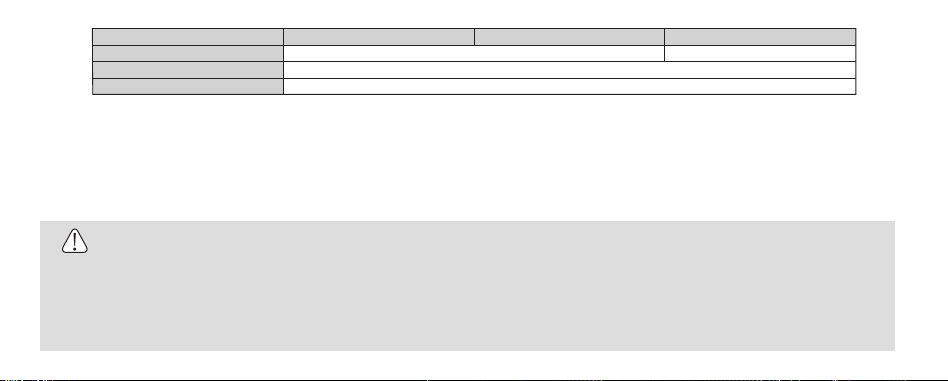
Model
Consumption Current
Use Environment
Transportation and Storage Environment
pico
Temperature : 0 – 40 ˚C, Humidity : 30 - 75% HR, Atmospheric Pressure : 700 - 1,060hPa
Temperature : -10 – 50 ˚C, Humidity : 10 - 85% RH, Atmospheric
pico KL / pico SL pico BLED / pico WLED
-
Pressure
0.38 Typical (3.3V)
: 500 - 1,060hPa
Within this Operation Manual, Model will be written down as follows.
S-Max pico = pico, S-Max pico KL = pico KL, S-Max pico SL = pico SL, S-Max pico BLED = pico BLED, S-Max pico WLED = pico WLED
KaVo® and MULTIflex® are registered trademarks of Kaltenbach & Voigt GmbH & Co., Germany. (pico KL) / Sirona® is a registered trademark of Sirona Dental Systems GmbH, Germany. (pico SL)
®
and Roto Quick® are registered trademarks of W&H Dentalwerk Bürmoos GmbH, Austria. (pico WLED) / Bien-Air® and Unifix® are registered trademarks of Bien-Air Dental S.A.,Switzerland. (pico BLED)
W&H
2. Insertion & Removal of the bur
CAUTION
· Do not use any bur longer than recommended by NSK in Specification.
· Do not use bent, worn, damaged, or non-concentric burs. Such burs can cause damage to the handpiece.
· Do not exceed the bur speed recommended by the bur manufacturer.
· Always keep the bur shank clean. Entry of hard debris into the chuck via the bur shank could cause rotation slip and also prevent the bur from
being securely located in the chuck.
ENGLISH GERMAN FRENCH SPANISH ITALIAN
3
Page 6
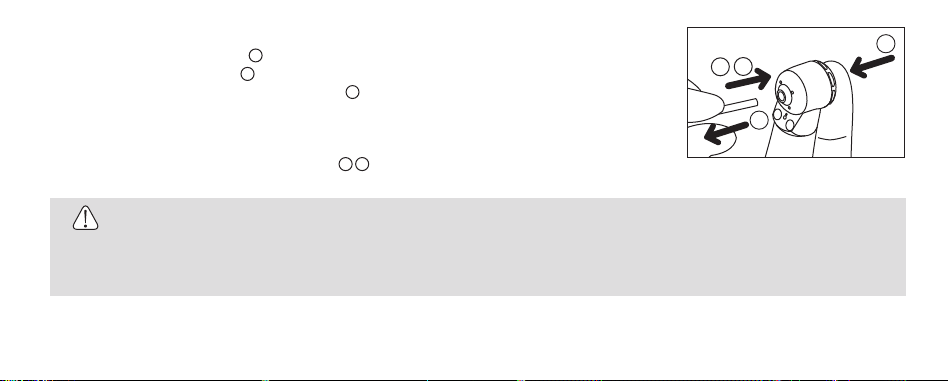
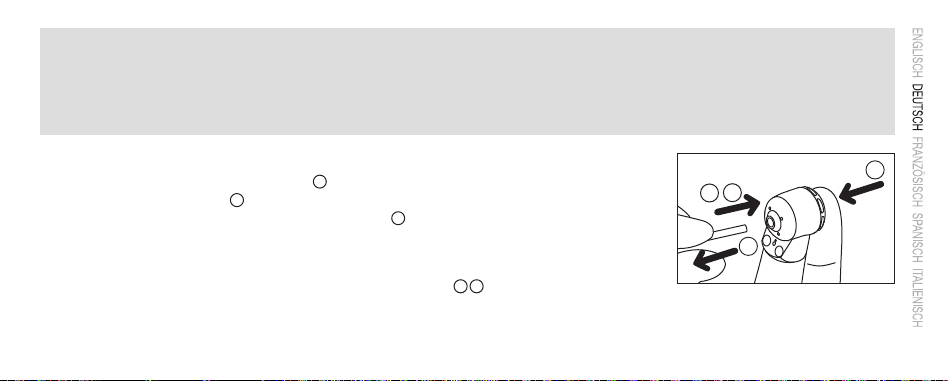
2-1 To insert the Bur
1
1) Insert the bur until it stops.
2) Depress the Push Button.
3) Insert the bur into the chuck until it is stops.
4) Release the button.
( )
( )
2
( )
3
1
3
4
2-2 To remove the Bur
4
2
Depress the Push Button and remove the bur.
( )
CAUTION
· Fully depress the Push Button and insert the bur into the chuck until it is secure.
· Do not use carbide bur when the crown is removed. It may cause malfunction.
Do not apply too much pressure to the bur. Bur may break or bent or difficult to remove. (Be sure to irrigate water. Cutting should be soft touch.
·
4
2
Fig. 1
)
Page 7
3. Maintenances
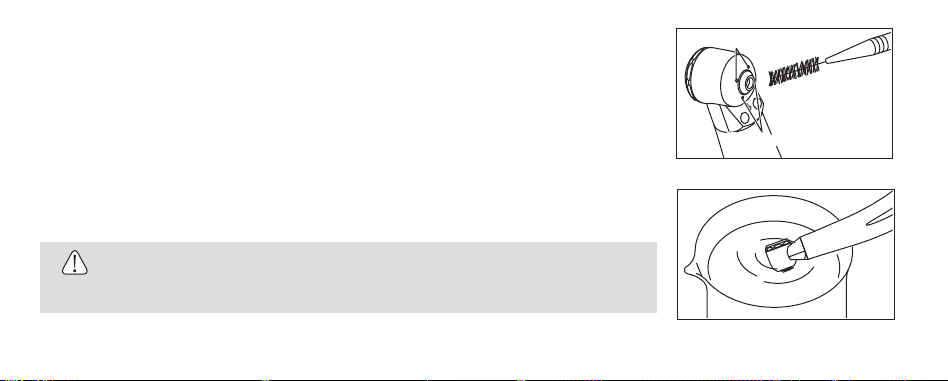
3-1 Cleaning (Clean-Head System)
1) Half fill a cup with clean water.
2) Brush off the debris at the Clean Head Holes. Do not use a wire brush. (Fig. 2)
3) Rotate the handpiece and immerse half of the handpiece head. (Fig. 3
4) Rotate and stop intermittently the handpiece about 2 to 3 seconds. (About 3 times
5) By the function of the clean head system, the clean head hole can be washed.
6) Stop the handpiece and wipe it dry. If the dirt could not remove from the hole, remove the cartridge
and clean it by brush.
7) Perform lubrication and sterilization. (3-5 Lubrication and Sterilization
)
)
)
CAUTION
Use only clean water to maintain the Clean Head System.
Clean Head Hole
ENGLISH GERMAN FRENCH SPANISH ITALIAN
Clean Head HoleClean Head Hole
Fig. 2
Fig. 3
5
Page 8
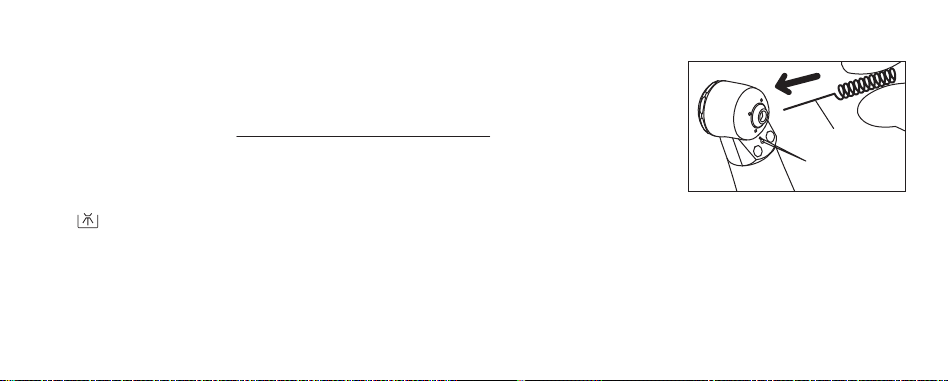
3-2 Cleaning (Spray Port)
When spray nozzle are clogged, or spray does not exit evenly from three ports, clean the ports as
follows:
1) Remove the bur from the chuck.
2) Take out the cleaning wire from the back end of the brush holder. Insert the wire straight into the
spray ports with caution. Do not forcibly insert the wire into the port. Damaged or disoriented port
could cause the spray diverge or directed away from the bur, and the cooling efficiency deteriorates.
3) After use, clean the cleaning wire. Push into the brush holder with the pointed end of the wire inward.
Cleaning Wire
Spray Ports
3-3 Cleaning (Handpiece)
This handpiece can be washed via Thermo Disinfector.
Scrub dirt and debris from the handpiece, and wipe clean with alcohol-immersed cotton swab or cloth. Do not use a wire brush.
Refer to the manual of Thermo-Disinfector for performing it.
6
Fig. 4
Page 9
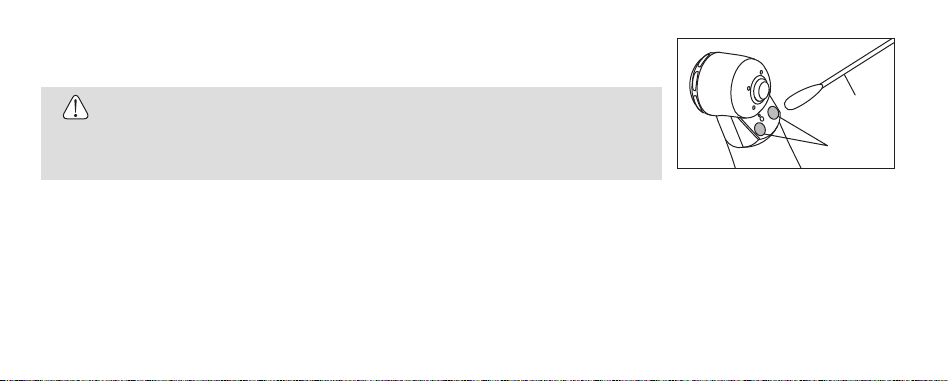
3-4 Cleaning (Optic
Wipe clean the Glass Rod (Fig. 5) with an alcohol-immersed cotton swab. Remove all debris and oil.
)
ENGLISH GERMAN FRENCH SPANISH ITALIAN
CAUTION
Do not use a sharp tool to clean the cellular glass optic rod. It could damage the glass and reduce the
light transmission. If illumination becomes dim please contact dealer.
3-5 Lubrication and Sterilization
Refer to the Maintenance Guide
OM-Z0135E.
Cotton Swab
Glass Rod
Fig. 5
7
Page 10

4. Replacing the Cartridge
1) Insert a dummy bur into the chuck.
2)
Unscrew the Head Cap by turning counter-clockwise and remove.
3) Push up the dummy bur upwards to remove Cartridge.
4) Clean the interior of the Head casing.
5) Insert the new Cartridge.
6) Replace the Head Cap and firmly screw into place.
SX-PU03: Order Code P1140200
PUSH
O-Ring
CAUTION
· Make sure that the O-Ring is removed, when removing the Cartridge. O-Ring might be remained in the Head, when removing the Cartridge. If
there is a remained O-Ring, the new Cartridge can not be inserted properly.
· Use only NSK genuine cartridge. If you use other cartridge, specification may not be satisfied and we can not warranty of this situation.
· The head cap screw thread is very fine. To prevent damage to the thread always first tighten the handpiece head cap using fingers, then
secure with the head cap wrench.
8
· Make sure that the O-ring (Fig. 6) is correctly located on the cartridge.
WrenchCartridge Head CapHead
Fig. 6
Page 11
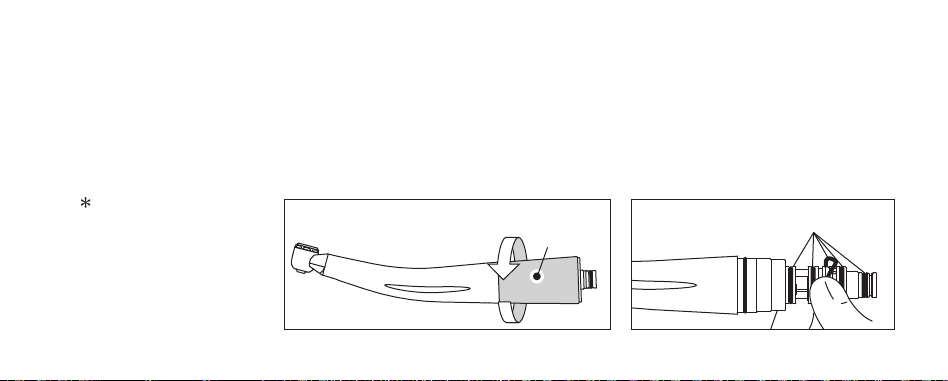
5. Replacing the O-rings (pico)
Replace the O-Rings if water is present in the exhaust air line. This is an indication of possible water leakage within the coupling.
ALWAYS change the complete set of O-Rings.
1) Loosen and Remove the Taper Ring at the rear of the handpiece. (Fig. 7)
2) Gently remove each O-Rings with your thumb. (Fig. 8
3) Insert the complete set of new O-Rings in the correct grooves.
4) Replace and firmly tighten the Taper Ring.
PTL O-ring Set:
Order Code Y900580
)
Loosen
Taper Ring
ENGLISH GERMAN FRENCH SPANISH ITALIAN
O-Ring
Fig. 7 Fig. 8
9
Page 12
CAUTION
· Do not disassemble the Taper Ring except the O-ring changing.
· Make certain that the Taper Ring is firmly tightened. If the Taper Ring is loose water and air leakage could occur.
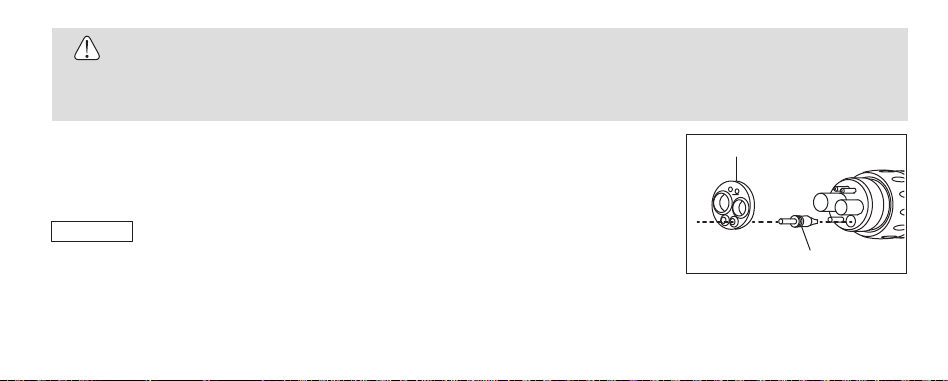
6. Non-Retraction Valve
A Non-Retraction Valve is equipped in the Coupling Joint, which shuts off the water retraction right at the
handpiece head, to prevent oral fluids sucked into the water line.
NSK Coupling
Remove the back-end Gasket. Pull and remove the water tube, and replace the Non-Retraction Valve.
10
Gasket
Non-Retraction Valve
Fig. 9
Page 13

pico BLED
1) Remove the handpiece from the coupling and loosen the Taper
Ring to remove. (Fig. 7
)
Joint
2) Pull out the joint then remove the Non-Retraction Valve Pull out
the old Non-Retraction Valve with thin stick. (Fig. 10
)
3) Insert New Non-Retraction Valve securely.
4) Mount the Joint into the handpiece. Make certain the pipe and
joint together. (Fig. 11
)
5) Tighten the Taper Ring tight.
Non-Retraction Valve
Fig. 10
CAUTION
Make certain that the Taper Ring is firmly tightened. If the Taper Ring is loose water and air leakage could occur.
Handpiece
Align
ENGLISH GERMAN FRENCH SPANISH ITALIAN
Joint
Fig. 11
11
Page 14
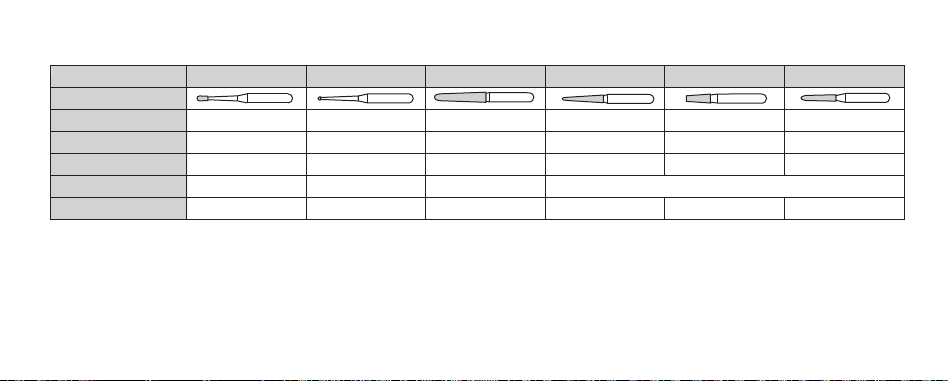
7. Option Parts List
Model PC1 PC2
Bur
Length
Max working part length
Working part diameter
Grit Fine
Order code (3pcs)
16.5 mm
1.9 mm
0.9 mm
Standard
16.5 mm
0.4 mm
0.6 mm
Y1001818Y1001817
PC3 PC4 PC5 PC6
17.5 mm 16.0 mm 14.0 mm 15.5 mm
9.0 mm 7.0 mm 4.0 mm 6.0 mm
1.8 mm 1.3 mm 1.6 mm 1.1 mm
Coarse Standard
Y1001819 Y1001820 Y1001821 Y1001822
8. Disposing product
In order to avoid the health risks of operators handling the disposal of medical equipment, as well as the risks of environmental contamination caused
thereof, a surgeon or a dentist is required to confirm the equipment is sterile. Ask specialist firms who are licensed to dispose of specially controlled
industrial wastes, to dispose the product for you.
12
Page 15

9. Warranty
NSK products are warranted against manufacturing errors and defects in materials. NSK reserves the right to analyze and determine the cause of any
problem. Warranty is voided should the product be not used correctly or for the intended purpose or has been tampered with by unqualified personnel
or has had non NSK parts installed. Replacement parts are available for seven years beyond discontinuation of the model.
ENGLISH GERMAN FRENCH SPANISH ITALIAN
13
Page 16

Page 17

Vorgesehene Verwendung : Dieses Handstück ist nur für den professionellen zahnmedizinischen Gebrauch vorgesehen.
VORSICHT
· Berücksichtigen Sie beim Betrieb des Handstücks immer die Sicherheit des Patienten.
· Überprüfen Sie vor dem Einsatz die Vibration, das Geräusch und die Überhitzung außerhalb der Mundhöhle des Patienten. Wenn irgendeine
Abweichung festgestellt wird, stellen Sie die Verwendung des Handstücks sofort ein und setzen Sie sich mit Ihrem Händler in Verbindung.
· Sollte das Handstück nicht einwandfrei funktionieren, stellen Sie den Einsatz sofort ein, und bringen Sie das Handstück zwecks Instandsetzung
zu einem Händler zurück.
· Drücken der Drucktaste, während sich das Handstück dreht, führt zu einer Überhitzung des Handstückkopfs. Lassen Sie besondere Vorsicht
während des Einsatzes walten, damit das Wangengewebe nicht mit der Drucktaste des Handstücks in Kontakt kommt. Ein Kontakt mit dem
Wangengewebe kann dazu führen, dass die Drucktaste gedrückt wird und der Patient verletzt wird.
· Wenden Sie in der Richtung, in der der Bohrer entfernt wird, keine übermäßige Kraft auf. Wenn der Bohrer in die Mundhöhle des Patienten fällt,
kann dieser ihn versehentlich schlucken, was zu Verletzungen führen kann.
· Lassen Sie keinerlei Stöße auf das Handstück zu. Lassen Sie das Handstück nicht herunterfallen.
· Überschreiten Sie nicht den empfohlenen Luftdruck. Wenn der empfohlene Wert überschritten wird, kann...
- der Bohrer aus dem Handstück springen oder brechen
- das Lager verschleißen
· Halten Sie die Bohrerschäfte immer sauber. Schmutz oder Ablagerungen in einem Spannfutter könnten mangelhaften Rundlauf des Bohrers
oder zu geringe Haltekraft des Spannfutters verursachen.
15
Page 18

· Überschreiten Sie nicht den empfohlenen Luftdruck in den technischen Daten unten. Dies ist wichtig, um zu hohe Geschwindigkeiten zu
vermeiden, die zum Bruch des Bohrers und zu vorzeitigem Ausfall des Lagers führen könnten.
· Überschreiten Sie nicht die vom Bohrerhersteller empfohlene Rotationsgeschwindigkeit. Wenn die Rotationsgeschwindigkeit des Handstücks
höher ist als vom Hersteller des Bohrers empfohlen, verwenden Sie bitte Bohrer einer anderen Marke.
· Das Handstück oder den Bohrer nicht anschließen oder abtrennen, solange der Motor nicht komplett zum Stillstand gekommen ist.
· Nicht versuchen, den Einsatz zu reparieren oder zu zerlegen. Das Handstück arbeitet in diesem Fall eventuell nicht mehr normal (abnorme
Geräusche oder Vibrationen). Schäden, Ausfall oder Unfälle fallen nicht unter unsere Garantie.
· Nicht mit stark saurem Wasser oder Sterilisationslösungen abwischen, reinigen oder darein eintauchen.
· Tragen Sie bei Benutzung dieses Handstücks für Ihre Sicherheit eine Schutzbrille.
· Der Benutzer ist für Betrieb, Wartung und Sicherheit verantwortlich.
· Wenn das Handstück längere Zeit nicht benutzt wird, prüfen Sie bitte vor Gebrauch, ob Sie ungewöhnliche Geräusche,.
· Schauen Sie nicht direkt in das LED-Licht (pico BLED, pico WLED).
· Wenn Störungen des LED-Displays auftreten (dunkel, leuchtet nicht oder blinkt), stellen Sie die Benutzung des Produkts sofort ein und wenden
Sie sich an den Händler. (
· Dieses Instrument ist ein LED-Produkt, welches gemäß EN62471 klassifiziert ist in der "Befreiten Gruppe" (keine photobiologische Gefährung)
(pico BLED, pico WLED).
· Benutzen Sie eine Stromquelle, die die folgenden Anforderungen erfüllt (
1. Die Stromversorgung der Stromquelle liegt sowohl unter normalen Bedingungen als auch im Fehlerfall unter 15W.
2. Die Stromquelle verwendet einen SELV-Kreis für die Stromversorgung.
3. Die Ausgangsspannung der Stromquelle befindet sich innerhalb des vom Hersteller dieses Produkts empfohlenen Bereichs.
16
pico BLED, pico WLED
)
pico BLED, pico WLED
).
Page 19

1. Technische Daten
Modell
Kopftyp
Rotationsgeschwindigkeit
Sprühmitteltyp
Typ Spannfutter
Bohrer
Mindestbohrerlänge
Maximale Bohrerlänge
Maximales Bohrermaß
Luftzufuhr
Luftverbrauch
Kopfabmessungen x Höhe
Optisch
Spannung
Aktivierungsspannung
Verbrauchsstrom
pico
ISO1797-1 Typ 3 Ø1,59 - 1,60mm Kurzschaftbohrer/Super-Kurzschaftbohrer
0,20MPa (2,0 kgf/cm2) - 0,25MPa(2,5 kgf/cm2)
Glasstab
pico KL / pico SL
Mini
380.000 - 450.000 min
-1
pico BLED / pico WLED
Einfaches Sprühmittel
Druckknopf Spannfutter
8,0mm
18,5mm
Ø 2,0mm
0,25MPa (2,5 kgf/cm
2
) - 0,30MPa (3,0 kgf/cm2)
45 ± 5 NL/min
Ø 8,6mm x 9,0mm
Weiße LED
-
AC/DC 3,3 V ± 0,05 V
- 3,0 - 4,0V
- 0,38A typisch (3,3 V)
17
Page 20

Modell
Benutzen Sie Umgebung
Transport und Lagerort
pico
Temperatur : 0 - 40 ˚C, Feuchte : 30 - 75% HR, Atmosphärischer Druck : 700 - 1.060hPa
Temperatur : -10 - 50 ˚C, Feuchte : 10 - 85%RH, Atmosphärischer Druck : 500 - 1.060hPa
pico KL / pico SL
pico BLED / pico WLED
Modelle werden an wie folgt geschrieben; S-Max pico = pico, S-Max pico KL = pico KL, S-Max pico SL = pico SL, S-Max pico BLED = pico BLED,
S-Max pico WLED = pico WLED
KaVo® und MULTIflex® sind eingetragene Marken von Kaltenbach & Voigt GmbH & Co., Deutschland. (pico KL) / Sirona® ist eine eingetragene Marke von Sirona Dental Systems GmbH, Deutschland. (pico SL)
®
und Roto Quick® sind eingetragene Marken von W&H Dentalwerk Bürmoos GmbH, Österreich. (pico WLED) / Bien-Air® und Unifix® sind eingetragene Marken von Bien-Air Dental S.A., Schweiz. (pico BLED)
W&H
2. Einsetzen/Entfernen des Bohrers
VORSICHT
· Keine Bohrer verwenden, die länger sind als von NSK empfohlen.
· Verwenden Sie keine verbogenen, verschlissenen, beschädigten oder nicht konzentrischen Bohrer. Solche Bohrer können Schäden am
Handstück verursachen.
18
Page 21
· Überschreiten Sie nicht die vom Bohrerhersteller angegebene Bohrergeschwindigkeit.
· Halten Sie den Bohrerschaft immer sauber. Das Eindringen harter Fremdkörper in das Spannfutter über den Bohrerschaft kann zu Schlupf
führen und verhindern, dass der Bohrer sich fest ins Spannfutter einspannen lässt.
· Drücken Sie den Druckknopf und setzen Sie den Bohrer in das Spannfutter, bis er sicher sitzt.
· Verwenden Sie keine Kurzschaftbohrer in Standardhandstücken.
2-1 Einsetzen des Bohrers
1) Den Bohrer bis zum Anschlag einführen.( )
2) Den Druckknopf drücken.( )
2
3) Den Bohrer ins Spannfutter einsetzen, bis er einrastet.( )
1
3
4) Lassen Sie den Druckknopf los.
2-2 Entfernen des Bohrers
Drücken Sie den Druckknopf fest ein und entfernen Sie den Bohrer. ( )
Druckknopf
3
1
2
4
2
4
Abb. 1
19
Page 22

VORSICHT
· Setzen Sie den Bohrer in das Spannfutter ein, bis er fest sitzt.
· Verwenden Sie zum Entfernen von Kronen keinen Hartmetallbohrer. Diese können zu Störungen führen.
· Üben Sie nicht zu viel Druck auf den Bohrer aus. Der Bohrer kann brechen oder verbiegen. (Unbedingt mit Wasser spülen. Bohrvorgang sollte
ohne Druckausübung erfolgen.)
20
Page 23

3. Wartung
3-1 Reinigung (Clean-Head-System)
1) Füllen Sie einen Becher zur Hälfte mit sauberem Wasser.
2) Entfernen Sie die Ablagerungen an den Öffnungen mit einer Bürste. Keine Drahtbürste benutzen.
(Abb. 2)
3) Drehen Sie das Handstück und tauchen Sie den Handstückkopf halb ein. (Abb. 3)
4) Lassen Sie das Handstück ca. 2 bis 3 Sekunden lang im Wasser abwechselnd laufen und stoppen.
(Etwa 3 Mal)
5) Bei Betrieb des Clean-Head-Systems kann die Clean-Head-Öffnung gereinigt werden.
6) Stoppen Sie das Handstück und wischen Sie es trocken. Wenn der Schmutz sich nicht aus der
Öffnung entfernen lässt, entfernen Sie den Einsatz und reinigen Sie ihn mit der Bürste.
7) Führen Sie Schmierung (3-4 Schmierung) und Sterilisation durch. (3-5 Schmierung und Sterilisation).
VORSICHT
Für die Pflege des Clean-Head-Systems nur sauberes Wasser verwenden.
Kopföffnung reinigen
Kopföffnung reinigenKopföffnung reinigen
Abb. 2
Abb. 3
21
Page 24

3-2 Reinigung (Handstück mit Reinigungsdraht)
Wenn die Sprühdüse verstopft oder die drei Düsen nicht gleichmäßig sprühen, reinigen Sie die Öffnungen wie folgt:
1) Entfernen Sie den Bohrer aus dem Spannfutter.
2) Nehmen Sie den Reinigungsdraht aus hinteren Ende der Bürstenhalterung heraus. Führen Sie den Draht
vorsichtig gerade in die Sprühdühafen ein. Beim Einführen des Drahtes in die Öffnung sollten Sie keinen zu starken
Druck ausüben. Eine beschädigte oder falsch ausgerichtete Öffnung kann eine Abweichung der Sprührichtung
oder eine Entfernung vom Bohrer zur Folge haben und zu einer Beeinträchtigung der Kühlung führen.
3) Reinigen Sie den Draht nach dem Gebrauch. Setzen Sie die Bürstenhalterung mit dem spitzen Ende
des Drahtes nach innen ein.
3-3 Reinigung (Handstück)
Dieses Handstück kann mittels Thermodesinfektor gereinigt werden.
Wischen Sie Schmutz und Ablagerungen vom Handstück ab, und wischen Sie es mit einem in Alkohol getränkten Ohrenstäbchen oder Tuch
sauber. Keine Drahtbürste benutzen.
Verfahren Sie nach der Anleitung für den Thermodesinfektor.
22
Reinigungsdraht
Sprühdühafen
Abb. 4
Page 25

3-4 Reinigung (Optik)
Wischen Sie den Eintrittspunkt der zellularen Glasstaboptik und Austrittspunkt (Abb. 5) mit einem in
Alkohol getränkten Wattetupfer ab. Entfernen Sie sämtliche Ablagerungen und Öl.
VORSICHT
Verwenden Sie keine scharfen Werkzeuge zum Reinigen der Glasstaboptik. Dadurch könnte das Glas
beschädigt und die Lichtleistung verringert werden. Wenn die Beleuchtung schwach wird, wenden Sie
sich an Ihren Fachhändler.
3-5 Schmierung und Sterilisation
Siehe Wartungsleitfaden
OM-Z0135E.
Wattestäbchen
Glasstaboptik
Abb. 5
23
Page 26

4. Wechseln des Einsatzes
1) Befestigen Sie eine Bohrerattrappe im Spannfutter.
2) Lösen Sie die Kopfkappe durch Drehen gegen den Uhrzeigersinn und entfernen Sie sie.
3) Schieben Sie die Bohrerattrappe hoch, um den Einsatz zu entfernen.
4) Reinigen Sie das Kopfgehäuse von innen und reinigen Sie es.
5) Setzen Sie den neuen Einsatz ein.
6) Bringen Sie die Kopfkappe wieder an und schrauben Sie sie fest.
SX-PU03: Artikelnummer P1140200
O-Ring
VORSICHT
· Überprüfen Sie, ob der O-Ring entfernt wurde, wenn Sie den Einsatz entfernen. Der O-Ring könnte weiterhin im Kopf stecken, wenn der Einsatz
entfernt wird. Wenn noch ein O-Ring vorhanden ist, kann der neue Einsatz nicht richtig eingeführt werden.
· Verwenden Sie nur einen NSK Originaleinsatz. Wenn Sie einen anderen Einsatz benutzen, wird eventuell die Spezifikation nicht erfüllt und wir
können keine Garantie geben.
· Das Schraubgewinde des Kopfdeckels ist sehr fein. Um eine Beschädigung des Gewindes zu vermeiden, den Kopfdeckel stets zuerst mit den
Fingern einschrauben und dann mit dem Kopfdeckelschlüssel anziehen.
· Stellen Sie sicher, dass die beiden O-Ringe (Abb. 6) korrekt an der Patrone angebracht sind.
24
SchlüsselEinsatzes KopfkappeKopf
Abb. 6
Page 27

5. Ersetzen der O-Ringe (pico)
Ersetzen Sie die O-Ringe, falls Wasser in der Abluftleitung vorhanden ist. Dies lässt auf
ein mögliches Wasserleck innerhalb der Kupplung schließen.
Tauschen Sie IMMER den kompletten Satz von O–Ringen aus. Nehmen Sie das
Handstück von der Kupplung ab.
1) Lösen und entfernen Sie den Reduzierring hinten am Handstück. (Abb. 7)
2) Entfernen Sie vorsichtig jeden O-Ring mit Ihrem Daumen. (Abb. 8)
3) Setzen Sie den kompletten Satz neuer O-Ringe in die richtigen Rillen ein.
4) Montieren Sie den Reduzierring und ziehen Sie ihn sicher fest.
PTL O-Ring-Satz: Artikelnummer Y900580
VORSICHT
· Stellen Sie sicher, dass der Reduzierring sicher festgezogen ist. Bei locker sitzendem
Reduzierring können Wasser- und Luftlecks auftreten.
· Entfernen Sie den Reduzierring nur zum Wechseln des O-Rings.
O-Ring
Reduzierring
Abb. 7
Abb. 8
25
Page 28

6. Rückschlagventil
Die Kupplungsdichtung ist mit einem Rückschlagventil versehen, das den Wasserrückfluss direkt am
Handstückkopf abwehrt, sodass vermieden wird, dass Mundflüssigkeit in die Wasserleitung gesaugt wird.
(Abb. 9)
NSK-Kupplung
Entfernen Sie die hintere Dichtung, um das Ventil zu ersetzen. Ziehen Sie am Wasserschlauch und
entfernen Sie diesen. Ersetzen Sie anschließend das Rückschlagventil.
pico BLED
1) Nehmen Sie das Handstück von der Kupplung ab. Lösen und entfernen Sie den Reduzierring.
2) Entfernen Sie das Rückschlagventil. Ziehen Sie das alte Rückschlagventil mit einem dünnen Stift heraus
und setzen Sie das neue Rückschlagventil fest ein. (Abb. 10)
26
Dichtung
Rückschlagventil
Abb. 9
Dichtung
Rückschlagventil
Abb. 10
Page 29

3) Montieren Sie die Dichtung in das Handstück. Vergewissern Sie sich, dass Leitung und Dichtung an
einander befestigt sind. (Abb. 11)
4) Ziehen Sie den Reduzierring sicher fest.
VORSICHT
· Stellen Sie sicher, dass der Reduzierring sicher festgezogen ist. Bei locker sitzendem Reduzierring
können Wasser- und Luftlecks auftreten.
· Halten Sie beim Anziehen des Reduzierrings den Lampenhalter leicht fest.
7. Zubehörliste
Modell
Bohrer
Länge
Max. Arbeitsteil länge
Arbeitsteil-Durchmesser
Körnung
Bestellnummer (3St.)
16,5 mm
1,9 mm
0,9 mm
Standard
Y1001817
16,5 mm
0,4 mm 9,0 mm
0,6 mm
Fein
Y1001818
17,5 mm
1,8 mm
Y1001819 Y1001820
Grob
Handstück
Stimmen Sie überein
16,0 mm
7,0 mm 4,0 mm 6,0 mm
1,3 mm 1,6 mm 1,1 mm
14,0 mm
Standard
Y1001821
Verbindung
PC6PC5PC4PC3PC2PC1
15,5 mm
Y1001822
Abb. 11
27
Page 30

8. Entsorgung des Erzeugnisses
Zur Vermeidung von Risiken der Gesundheit des Benutzers bei der Entsorgung der medizinischen Ausrüstung sowie des Risikos der
Umweltverschmutzung durch die Entsorgung der medizinischen Ausrüstung muss ein Chirurg oder ein Zahnarzt bestätigen, dass die Ausrüstung steril
ist. Beauftragen Sie eine Fachfirma, die über eine Zulassung zur Entsorgung von speziell kontrollierten industriellen Abfällen verfügt, mit der Entsorgung
des Produkts.
9. Garantie
NSK garantiert, dass das Handstück keine Produktionsfehler und Materialmängel aufweist. NSK behält sich das Recht vor, die Ursache von Problemen
zu analysieren und zu ermitteln. Die Garantie erlischt, wenn das Handstück unsachgemäß verwendet wird. Ersatzteile sind sieben Jahre nach
Einstellung der Produktion des Modells erhältlich.
28
Page 31

Utilisation : Cette pièce à main est uniquement conçue pour un usage dentaire clinique professionnel.
AVERTISSEMENT
· Lorsque vous utilisez la pièce à main, veillez à toujours vous assurer de la sécurité du patient.
· Ne dépassez pas la longueur maximum.
· Vérifiez la vibration, le bruit et la surchauffe à l’extérieur de la cavité buccale du patient avant d’utiliser l’appareil. En cas d’anomalies, arrêtez immédiatement d’utiliser la
pièce à main et contactez votre revendeur.
· Si la pièce à main ne fonctionne pas correctement, arrêtez immédiatement de l’utiliser et renvoyez-la à un distributeur pour réparation.
· Si vous appuyez sur le bouton-poussoir pendant que la pièce à main tourne, celle-ci risque de chauffer. Lorsque vous utilisez l’appareil, veillez à ce que le tissu de la joue
reste LOIN du bouton-poussoir de la pièce à main. Un contact avec le tissu de la joue pourrait en effet entraîner l’enclenchement du bouton-poussoir et brûler le patient.
N‘exercez pas de pression excessive sur la fraise. Si la fraise venait à se détacher dans la cavité buccale du patient, ce dernier pourrait l’avaler accidentellement ou se blesser.
·
· Veillez à ce que la pièce à main ne soit soumise à aucun impact. Ne faites pas tomber la pièce à main.
· Vous vous référez le raccord de manuel avant vous relies.
· Ne démontez pas la pièce à main ou son mécanisme, sauf si NSK le recommande explicitement dans le présent manuel d'utilisation.
· N’essayez pas de réparer ou de démonter la cartouche. Le bon fonctionnement de la pièce à main pourrait en être altéré (bruit anormal ou vibrations anormales).
Dommages, pannes ou accidents ne sont pas couverts par notre garantie.
· Evitez le contact des yeux avec la lumière LED (pico BLED, pico WLED).
· En cas d’anomalies (clignotement, pas de lumière, sombre) au niveau de l’écran LED, arrêtez d'utiliser le produit et contactez immédiatement votre revendeur agréé.
(pico BLED, pico WLED)
· Cette instrument rotatif est un produit LED faisant partie de la classification "Groupe exempté" (pas de risque photobiologique) conformément à la norme
IEC62471/EN62471 (pico BLED, pico WLED).
· Utilisez une source d'alimentation répondant aux caractéristiques ci-après (pico BLED, pico WLED).
29
Page 32

1. L'alimentation électrique de la source d'alimentation est inférieure à 15 W en conditions normes de service comme de défaillance unique.
2. La source d'alimentation est alimentée par un circuit SELV.
3. La tension de sortie de la source d'alimentation se situe dans la plage recommandée par le fabricant de ce produit.
1. Caractéristiques :
Modèle
Type de tête
Vitesse de rotation
Type spray
Type de griffe
Fraise
Longueur min. de la fraise
Longueur max. de la fraise
Dimension max. de la fraise
Arrivée d’air
Consommation d’air
Dimension de la tête x hauteur
Lumière
Voltage
30
Voltage actif
Consommation courant
0,20MPa(2,0 kgf/cm2) - 0,25MPa(2,5 kgf/cm2)
pico
ISO1797-1 Type3 Ø1,59 - 1,60 mm Fraise à mandrin court/Fraise à mandrin super court
Barreau de quartz
-
- 3,0 - 4,0V
- 0,38A Typique (3,3 V)
pico KL / pico SL
Mini
380.000 - 450.000 min
Simple spray
Griffe à bouton poussoir
8,0mm
18,5mm
Ø 2,0mm
0,25MPa(2,5 kgf/cm
45 ± 5 NL/min
Ø 8,6 mm x 9,0 mm
-1
2
) - 0,30MPa(3,0 kgf/cm2)
pico BLED / pico WLED
LED blanche
CA/CD 3,3V±0,05V
Page 33

Modèle
Environnement d’utilisation
Environnement de stockage et transport
pico
Température : 0 - 40 degrés, Humidité: 30 - 75% HR, Pression atmosphérique : 700 - 1.060hPa
Température : -10 - 50 degrés, Humidité : 10 - 85% RH, Pression atmosphérique : 500 - 1.060hPa
pico KL / pico SL
pico BLED / pico WLED
Des modèles sont écrits dessus comme suit; S-Max pico = pico, S-Max pico KL = pico KL, S-Max pico SL = pico SL, S-Max pico BLED = pico BLED,
S-Max pico WLED = pico WLED
KaVo® et MULTIflex® sont des maques déposées de la société Kaltenbach & Voigt GmbH & Co., Allemagne. (pico KL) / Sirona® est une maque déposée par la société Sirona Dental Systems GmbH, Allemange. (pico SL)
®
et Roto Quick® sont des marques déposées de la société W&H Dentalwerk Bürmoos GmbH, Autriche. (pico WLED) / Bien-Air® et Unifix® sont des marques déposées de la société Bien-Air Dental S.A., Suisse. (pico BLED)
W&H
2. Montage/démontage de la fraise
AVERTISSEMENT
· Utilisez des fraises plus longues que les longueurs recommandées par NSK.
· N’utilisez pas de fraises endommagées, courbées ou non concentriques. De telles fraises pourraient endommager la pièce à main.
· Ne dépassez pas la vitesse de fraisage recommandée par le fabricant de la fraise.
· Veillez à ce que le mandrin de la fraise soit toujours propre. L’introduction de débris dans la griffe par le biais du mandrin risque de provoquer
une mauvaise rotation et d’empêcher le bon verrouillage de la fraise dans la griffe.
· Enfoncez le bouton-poussoir et insérez la fraise dans la griffe jusqu’à ce qu’elle soit correctement fixée.
· N’utilisez pas de fraises à mandrin court dans des pièces à main à tête standard.
31
Page 34

2-1 Insertion de la fraise
1) Insérez la fraise jusqu’à ce qu’elle bute.( )
2) Appuyez sur le bouton-poussoir.( )
3) Insérez la fraise davantage dans la griffe jusqu’à ce qu’elle bute.( )
4) Relâchez le bouton.
1
2
3
3
1
4
2-2 Démontage de la fraise
2
Appuyez sur le bouton-poussoir et retirez la fraise.( )
4
AVERTISSEMENT
· Insérez la fraise dans la griffe jusqu’à ce qu’elle soit correctement fixée.
· N’utilisez pas de fraise au carbure lorsque la couronne est ôtée. Ceci pourrait engendrer un dysfonctionnement.
N’appliquez pas trop de pression sur la fraise. Cela pourrait casser ou fléchir la fraise. (Veillez à irriguer l’eau. La coupe devrait être un toucher léger.)
·
32
Bouton-poussoir
2
Fig. 1
Page 35

3. Maintenances
3-1 Nettoyage (système Clean-Head)
1) Remplissez la moitié d’une tasse d’eau propre.
2) Eliminez les débris présents au niveau des orifices avec une brosse. N'utilisez pas de brosse métallique.
(Fig. 2)
3) Faites tourner la pièce à main et immergez-en la moitié de la tête. (Fig. 3)
4) Faites tourner et arrêtez la pièce à main par intervalles de 2 à 3 secondes. (Environ 3 fois)
5) Le système clean head permet de nettoyer l’orifice clean head.
6) Arrêtez la pièce à main et essuyez-la en frottant. Si la saleté résiste, retirez la cartouche et nettoyez à
l’aide d’une brosse.
7) Lubrifiez (3-5 Lubrification et Stérilisation).
AVERTISSEMENT
N’utilisez que de l’eau propre pour entretenir le système clean head.
Orifice Clean Head
Orifice Clean HeadOrifice Clean Head
Fig. 2
Fig. 3
33
Page 36

3-2 Nettoyage (pièce à main avec fil de nettoyage)
Si l’embout du spray est obstrué ou si le spray n’est pas expulsé équitablement des trois ports, nettoyez
ces derniers comme suit :
1) Ôtez la fraise de la griffe.
2) Retirez le fil de nettoyage de l’arrière du porte-balai. Insérez avec précaution le fil dans trou de jet
l’embout du spray. Ne forcez pas le fil dans le port. Un port endommagé ou déplacé pourrait modifier la
trajectoire du spray ou l’éloigner de la fraise, et réduire ainsi l’efficacité du refroidissement.
3) Après utilisation, nettoyez le fil de nettoyage. Replacez le porte-balais avec l’extrémité pointue du fil
vers l’intérieur.
3-3 Nettoyage (pièce à main)
Cette pièce à main peut être lavée avec un thermodésinfecteur.
Éliminez la saleté et les débris situés sur la pièce à main et nettoyez-la avec un coton-tige ou un tissu imbibé d’alcool. N’utilisez pas de brosse métallique.
Référez-vous au manuel du thermodésinfecteur pour l’utilisation de ce dernier.
34
Fil de nettoyage
Trou de jet
Fig. 4
Page 37

3-4 Nettoyage (Lumière)
Nettoyez les extrémités d’entrée et de sortie (Fig. 5) du barreau de quartz avec un coton-tige imbibe
d’alcool. Eliminez tous les débris et l’huile.
AVERTISSEMENT
Ne pas utiliser d’outil pointu pour nettoyer le barreau de quartz. Cela pourrait l’endommager et
réduire la transmission lumineuse. Si la luminosité baisse, contacter le revendeur NSK.
3-5 Lubrification et Stérilisation
Référez-vous au Guide d'entretien
OM-Z0135E.
Coton-tige
Barreau
de quartz
Fig. 5
35
Page 38

4. Remplacement de la cartouche
1) Insérez une fausse fraise dans la griffe.
2) Dévissez le bouchon de tête en le tournant dans le sens inverse des aiguilles
d’une montre et enlevez-le.
3) Relevez la fausse fraise pour retirer la cartouche.
4) Nettoyez l’intérieur de revêtement de la tête.
5) Insérez la nouvelle cartouche.
6) Remplacez le bouchon de tête et vissez-le fermement.
SX-PU03 : Code de commande P1140200
Joint
AVERTISSEMENT
· Veillez à ce que le joint soit retiré lorsque vous enlevez la cartouche. Le joint pourrait rester dans la tête lorsque vous enlevez la cartouche. S’il
reste un joint, la nouvelle cartouche ne pourra pas être insérée correctement.
· N’utilisez que des cartouches NSK originales. Si vous utilisez vos cartouches, il se peut que les spécifications ne soient pas respectées et la
garantie sera annulée.
· Le filetage du couvercle est très fin. Pour éviter de l’endommager, commencer par revisser le capuchon manuellement, puis terminer avec la clé de couvercle.
36
· S’assurer que les 2 joints (Fig. 6) soient correctement positionnés sur le rotor.
CléCartouche Bouchon de têteTête
Fig. 6
Page 39

5. Remplacement des joints (pico)
Remplacez les joints si de l’eau est présente dans la ligne d’air d’échappement. C’est un
signe de fuite d’eau possible dans le couplage.
Changez TOUJOURS le jeu complet de joints. Enlevez la pièce à main du couplage.
1) Desserrez et enlevez l’Anneau conique à l’arrière de la pièce à main. (Fig. 7)
2) Ôtez gentiment chaque joint à l’aide de votre pouce. (Fig. 8)
3) Insérez le jeu complet de nouveaux joints dans les bonnes rainures.
4) Replacez et serrez fermement l’anneau conique.
Jeu de joints PTL : Code de commande Y900580
AVERTISSEMENT
· Assurez-vous que l’Anneau conique est fermement serré. Si l’Anneau conique est desserré,
il y a un risque de fuite d’eau et d’air.
· Ne démontez pas l’anneau, sauf pour le remplacement du joint.
Joint
Anneau
conique
Fig. 7
Fig. 8
37
Page 40

6. Valve anti-retour
Une valve anti-retour est intégrée dans le joint du raccord et empêche la rétraction de l’eau à la tête de
la pièce à main pour éviter l’introduction des fluides oraux dans la conduite d’eau. (Fig. 9)
Joint
Couplage NSK
Pour remplacer la valve, enlevez le joint final. Tirez et enlevez la conduite d’eau et remplacez la valve
anti-retour.
pico BLED
1) Ôtez la pièce à main du couplage et desserrez l’anneau conique pour le retirer.
2) Enlevez la valve anti-retour Retirez l’ancienne valve anti-retour avec un fin bâton et insérez la nouvelle
valve anti-retour correctement.(Fig. 10)
38
Valve anti-retour
Fig. 9
Joint
Valve anti-retour
Fig. 10
Page 41

3) Insérez le joint dans la pièce à main. Assurez-vous que la broche et le joint sont serrés. (Fig. 11)
4) Serrez l’anneau conique fermement.
AVERTISSEMENT
· Assurez-vous que l’anneau conique est fermement serré. Si l’anneau conique est desserré, il y a un
risque de fuite d’eau et d’air.
· Lorsque vous serrez l’anneau conique, maintenez légèrement le support à lampe.
7. Liste des pièces en option
Modèle PC1 PC2
Fraise
Longueur
Longueur max. de la fraise
Diamètre de la fraise
Grain
Référence (3pcs.)
16.5 mm
1.9 mm
0.9 mm
Standard
Y1001817
,5 mm
16
,4 mm
0
,6 mm
0
Fin
Y1001818
PC3 PC4 PC5 PC6
17,5 mm 16,0 mm 14,0 mm 15,5 mm
9,0 mm
1,8 mm 1,3 mm 1,6 mm 1,1 mm
Gros
Y1001819 Y1001820 Y1001821 Y1001822
Pièce à main
alignez
7,0 mm 4,0 mm 6,0 mm
Standard
Joint
Fig. 11
39
Page 42

8. Elimination du produit
Afin d'éviter tout risque pour la santé des opérateurs en charge de la mise au rebut d'équipements médicaux ainsi que tout risque de contamination
environnementale qui pourrait en résulter, le chirurgien ou le dentiste doit obligatoirement confirmer que l'équipement est stérile.
Demandez à des entreprises spécialisées agréées pour la mise au rebut de déchets industriels sous contrôle spécifique de se charger de la mise au
rebut du produit.
9. Garantie
NSK garantit la pièce à main contre tout défaut de fabrication et de matériau. NSK se réserve le droit d’analyser et de déterminer la cause de tout
problème. La garantie sera nulle si la pièce à main n’a pas été utilisée correctement. Des pièces de rechange sont disponibles pour sept ans après
l’arrêt de production du modèle.
40
Page 43

Uso previsto : Esta pieza de mano ha sido diseñada únicamente para un uso clínico-dental profesional.
PRECAUCIÓN
· Al utilizar una pieza de mano, piense siempre en la seguridad del paciente.
· No exceda la longitud máxima.
· Antes de utilizarla compruebe la vibración, el ruido y el sobrecalentamiento fuera de la cavidad oral del paciente. Si se produjera alguna anormalidad, detenga
inmediatamente la pieza de mano y póngase en contacto con el distribuidor.
· En caso de que esta pieza de mano funcione de forma anormal, detenga inmediatamente su funcionamiento y devuélvala a su distribuidor para que la repare.
· Al apretar el botón de arranque mientras la pieza de mano está en funcionamiento se producirá un SOBRECALENTAMIENTO del cabezal de la pieza de mano.
Preste especial atención durante el uso para que los tejidos de los carrillos queden LEJOS del botón de arranque de la pieza de mano. Al estar en contacto con
los tejidos de los carrillos, el botón de arranque podría activarse y provocar quemaduras al paciente.
·
No aplique excesiva potenciada en la dirección en la que se retira la fresa. Si la fresa cayese en la cavidad oral del paciente, éste podría beberla por error y lesionarse.
· Evite que la pieza de mano sufra cualquier impacto. Evite que se le caiga la pieza de mano.
· Refiera al mano del acoplamiento antes de conectarlo con la tubería del pieza de mano.
· No intente desmontar la pieza de mano o modificar el mecanismo excepto que así lo recomienden NSK en su mano de operaciones.
· Utilice únicamente fresas de buena calidad que están en una condición de funcionamiento correcto.
· Evite el contacto visual permanente con la luz LED (pico BLED, pico WLED).
· Si se produjera alguna anormalidad en el LED (oscura, sin iluminar o parpadear), deje de usar inmediatamente el producto y póngase en contacto con su
proveedor autorizado. (pico BLED, pico WLED)
· Esta pieza de mano es un producto LED clasificado en el "Grupo Exento" (sin peligro fotobiológico) según IEC62471/EN62471 (pico BLED, pico WLED).
41
Page 44

· Utilice una fuente de alimentación que cumpla las siguientes condiciones (pico BLED, pico WLED).
1. El suministro eléctrico de la fuente de alimentación debe ser inferior a 15 W tanto en situación de funcionamiento normal como de fallo simple.
2. La fuente de alimentación utiliza un circuito SELV para el suministro eléctrico.
3. El voltaje de salida de la fuente de alimentación entra dentro del rango recomendado por el fabricante de este producto.
1. Características técnicas
Modelo
Tipo de cabezal
Velocidad de rotación
Tipo de pulverizador
Tipo de dispositivo de sujeción
Fresa
Longitud mínima de fresa
Longitud máxima de fresa
Dimensión máxima de fresa
Suministro de aire
Consumo de aire
Dimensión x altura de cabezal
Óptico
42
Voltaje
Activación del voltaje
0,20 MPa (2,0 kgf/cm2) - 0,25 MPa (2,5 kgf/cm2)
pico
ISO1797-1 Tipo3 Ø 1,59 - 1,60 mm Fresa adaptador corto/Fresa adaptador super corto
Varilla de vidrio
pico KL / pico SL
Mini
380.000 - 450.000 min
Vaporizador único
Pulse el botón del dispositivo de sujeción
8,0 mm
18,5 mm
Ø 2,0 mm
0,25 MPa (2,5 kgf/cm
45 ± 5 NL/min
Ø 8,6 mm x 9,0 mm
-
- 3,0 - 4,0 V
-1
2
) - 0,30 MPa (3,0 kgf/cm2)
pico BLED / pico WLED
LED blanco
AC/DC 3,3V±0,05V
Page 45

Modelo
Corriente de consumo
Entorno de uso
Transporte y almacenamiento de entorno
pico
Temperatura : 0 - 40 Grados, Humedad : 30 - 75% HR, Presión atmosférica : 700 - 1.060hPa
Temperatura : -10 - 50 Grados, Humedad : 10 - 85% RH, Presión atmosférica : 500 - 1.060hPa
- 0,38 A típico (3,3 V.)
pico KL / pico SL
pico BLED / pico WLED
Los modelos se escriben encendido como sigue; S-Max pico = pico, S-Max pico KL = pico KL, S-Max pico SL = pico SL, S-Max pico BLED = pico BLED, S-Max pico WLED = pico WLED
KaVo® y MULTIflex® son marcas registradas de Kaltenbach & Voigt GmbH & Co., Alemania. (pico KL) / Sirona® es una marca registrada de Sirona Dental Systems GmbH, Alemania. (pico SL)
®
y Roto Quick® son marcas registradas de W&H Dentalwerk Bürmoos GmbH, Austria. (pico WLED) / Bien-Air® y Unifix® son marcas registradas de Bien-Air Dental S.A., Suiza. (pico BLED)
W&H
2. Inserción y retirada de la fresa
PRECAUCIÓN
· No utilice ninguna fresa más larga de lo que recomienda la especificación de NSK.
· No utilice fresas dobladas, desgastadas, dañadas o que no sean concéntricas. Podrían dañar la pieza de mano.
· No supere la velocidad recomendada para la fresa por el fabricante.
· Mantenga siempre limpio el adaptador de la fresa. La entrada de desechos duros en el dispositivo de sujeción a través del adaptador de fresa
podría causar una salida por rotación así como evitar que la fresa esté colocada de forma segura en el dispositivo de sujeción.
· Apriete completamente el botón de arranque e introduzca la fresa en el dispositivo de sujeción hasta que esté firme.
· No utilice adaptadores cortos de fresa en el cabezal estándar de la pieza mano.
43
Page 46

2-1 Para insertar la fresa
1) Inserte la fresa hasta que se detenga.( )
2) Apriete el botón de arranque.( )
3) Introduzca el fresa más en el dispositivo de sujeción hasta que se detenga.( )
4) Apriete el botón de arranque.
1
2
3
3
1
4
2-2 Para retirar la fresa
2
Apriete el botón de arranque con firmeza y retire la fresa.( )
4
PRECAUCIÓN
·
Inserte la fresa en el dispositivo de sujeción hasta que quede asegurada.
·
No utilice la fresa de carburo al retirar la corona. Esto podría provocar un mal funcionamiento.
·
No aplique demasiada presión a la fresa. La fresa podría romperse o doblarse. (Asegúrese de irrigar agua. El corte debe realizarse con un toque suave).
44
Botón de arranque
2
Fig. 1
Page 47

3. Mantenimiento
3-1 Limpieza (sistema de limpieza de cabezal)
1) Llene un recipiente con agua por la mitad.
2) Cepille los deshechos en los orificios. No utilice un cepillo de alambre. (Fig. 2)
3) Rote la pieza mano e introduzca la mitad del cabezal de la pieza mano. (Fig. 3)
4)
Rote y detenga de forma intermitente la pieza mano durante unos dos a tres segundos. (Unas tres veces)
5) Con la función del sistema de limpieza de cabezal se puede lavar el orificio de cabezal limpio.
6) Detenga la pieza mano y séquela con una toallita. Si la suciedad no se puede retirar del orificio, retire
el cartucho y límpielo con un cepillo.
7) Lleve a cabo la lubricación y esterilización. (3-5 Lubricación y Esterilización).
PRECAUCIÓN
Utilice únicamente agua limpia para mantener el sistema de limpieza de cabezal.
Limpie orificio de cabezal
Limpie orificio de cabezalLimpie orificio de cabezal
Fig. 2
Fig. 3
45
Page 48

3-2 Limpieza (pieza mano con alambre de la limpieza)
Cuando la boquilla del pulverizador esté obstruida o no salga por igual de los tres conductos, deberá limpiar estos de la siguiente forma:
1) Retire la fresa del dispositivo de sujeción.
2) Saque el cable de limpieza de la parte trasera del soporte del cepillo. Introduzca el cable en la
boquilla del pulverizador con precaución. No introduzca el cable por la fuerza en el conducto. Un
conducto dañado o descolocado puede dar lugar una mala pulverización y deteriorar la eficacia del
enfriado.
3) Después de usarlo, limpie el cable de limpieza. Presione el soporte del cepillo con la punta del cable
hacia dentro.
3-3 Limpieza (pieza mano)
Esta pieza mano puede lavarse con un termo-desinfectante.
Restriegue la suciedad y los deshechos de la pieza mano con un paño o trapo de algodón impregnado en algodón. No utilice un cepillo de alambre.
Consulte el mano de termo-desinfectante para llevar a cabo esta acción.
46
alambre de la limpieza
agujero
del aerosol
Fig. 4
Page 49

3-4 Limpieza (óptica)
Limpie el punto de entrada de la fibra óptica y el punto de salida (Fig. 5 con un bastoncillo de algodón
con alcohol. Elimine todos los restos y todo el aceite.
PRECAUCIÓN
No utilice ningún objeto puntiagudo para limpiar la varilla óptica de vidrio celular. Esto podría dañar el vidrio
y reducir la transmisión de luz. Si se opaca la iluminación, sírvase ponerse en contacto con su agente.
3-5 Lubricación y Esterilización
Consulte el mano de mantenimiento OM-Z0135E.
Bastoncillo
de algodón
Varilla óptica
Fig. 5
47
Page 50

4. Reemplazar el cartucho
1) Inserte una fresa de prueba en el dispositivo de sujeción.
2) Desatornille el tapón del cabezal girándolo en el sentido contrario a las agujas del
reloj y retírelo.
3) Empuje hacia arriba la fresa de prueba para retirar el cartucho.
4) Limpie el interior de la cubierta del cabezal.
5) Inserta el nuevo cartucho.
6) Reemplace el tapón del cabezal y atorníllelo firmemente en su lugar.
SX-PU03: Código de pedido P1140200
Junta tórica
PRECAUCIÓN
· Compruebe que ha retirado la junta tórica cuando vaya a quitar el cartucho. La junta tórica debe permanecer en el cabezal cuando quite el
cartucho. De lo contrario no podrá introducir el nuevo cartucho correctamente.
· Utilice únicamente cartuchos genuinos de NSK. Si utiliza su cartucho, las características podrían no ser satisfactorias y no podríamos cubrir esta situación.
· La rosca de la tapa es muy fina. Para prevenir daños en la rosca apriete siempre la tapa primero utilizando los dedos y despues empleando la llave.
· Asegúrese de que los dos anillos (Fig. 6) estén correctamente colocados en el cartucho.
48
LlaveCartucho Tapón de cabezalCabezal
Fig. 6
Page 51

5. Sustituir las juntas tóricas (pico)
Hay que sustituir las juntas tóricas cuando haya escapes de agua en la línea de aire.
Puede ser signo de una posible fuga de agua en el acoplamiento.
Cambie SIEMPRE todas las juntas tóricas a la vez. Quite la pieza de mano del acoplamiento.
1) Afloje y quite el Anillo de control en la parte trasera de la pieza de mano. (Fig. 7)
2) Quite con suavidad cada una de las juntas tóricas con el pulgar. (Fig. 8)
3) Introduzca las nuevas juntas tóricas en las ranuras correspondientes.
4) Sustituya y ajuste el Anillo de control.
Juego de juntas tóricas PTL: Código de pedido Y900580
PRECAUCIÓN
· Asegúrese de que el Anillo de control esté bien Ajustado. Si el Anillo de control está suelto,
podría producirse una fuga de agua y aire.
· No desensamble el Anillo de control excepto cuando cambie la junta tórica.
Junta tórica
Anillo
de control
Fig. 7
Fig. 8
49
Page 52

6. Válvula anti-retorno
La junta de acoplamiento cuenta con una válvula de anti-retorno para cerrar la retracción del agua justo en el
cabezal de la pieza de mano para evitar que los fluidos orales succionados lleguen a la línea de agua. (Fig. 9)
Junta
Acoplamiento NSK:
Para volver a colocar la válvula, retire la junta de la extremidad trasera. Tire del tubo de agua, retírelo y
sustituya la válvula de no retracción.
pico BLED
1) Retire la pieza de mano del acoplamiento, suelte y retire el anillo de control.
2) Quite la válvula anti-retorno; saque la válvula anti-retorno vieja con un palillo e inserte la nueva de forma
segura. (Fig. 10)
50
Válvula anti-retorno
Fig. 9
Junta
Válvula anti-retorno
Fig. 10
Page 53

3) Monte la junta en la pieza de mano. Asegúrese de que el tubo y la junta están juntos. (Fig. 11)
4) Apriete con fuerza el anillo de control.
PRECAUCIÓN
· Asegúrese de que el anillo de control esté bien ajustado. Si el anillo de control está suelto, podría
producirse una fuga de agua y aire.
· Al apretar el anillo de control, sujete con fuerza el soporte de lámpara.
7. Lista de piezas opcionales
Modelo
Fresa
Longitud
Longitud máx. Fresa
Diámetro de pieza de trabajo
Arenilla
Código del pedido (3uds.)
PC1 PC2
16,5 mm
1,9 mm
0,9 mm
Estándar
Y1001817
16,5 mm
0,4 mm
0,6 mm
Fina
Y1001818
PC3 PC4 PC5
17,5 mm
9,0 mm
1,8 mm
Gruesa
Y1001819
16,0 mm
7,0 mm
1,3 mm
Y1001820
Pieza de mano
14,0 mm
4,0 mm
1,6 mm
Estándar
Y1001821
Alinee
PC6
15,5 mm
6,0 mm
1,1 mm
Y1001822
Junta
Fig. 11
51
Page 54

8. Producto desechable
Con el fin de evitar riesgos para la salud de los operarios que llevan a cabo la eliminación de los equipos médicos, así como riesgos de contaminación
ambiental fruto de dicha eliminación, se solicita al cirujano o dentista que confirme que el equipo es estéril. Encargue dicho trabajo a empresas
especializadas con licencia para eliminar desechos industriales especialmente controlados.
9. Garantía
NSK garantiza la pieza de mano ante errores de producción y defectos de material. NSK se reserva el derecho a analizar y determinar la causa de
cualquier problema. La garantía pierde su vigencia si la pieza de mano no se utiliza correctamente. Hay repuestos disponibles los siete años
posteriores al momento en el que se deja de fabricar el modelo.
52
Page 55

Destinazione d’uso : Il presente manipolo è progettato per l’esclusivo utilizzo clinico odontoiatrico.
ATTENZIONE
· Durante l’utilizzo del manipolo dare sempre priorità alla sicurezza del paziente.
· Non superi la lunghezza massima.
· Verificare la vibrazione, la rumorosità e il surriscaldamento prima dell’uso fuori dalla cavità orale del paziente. Se si riscontrano anomalie, sospendere
immediatamente l'uso del manipolo e contattare il distributore.
· In caso di funzionamento anomalo del manipolo, sospenderne immediatamente l’uso e inviarlo a un distributore autorizzato per la riparazione.
· La pressione del pulsante durante la rotazione del manipolo provocherà il surriscaldamento della testina del manipolo. Durante l’utilizzo prestare particolare
attenzione per EVITARE IL CONTATTO tra i tessuti della guancia del paziente e il pulsante del manipolo. A contatto con i tessuti della guancia, il pulsante potrebbe
essere premuto inavvertitamente causando lesioni da ustione al paziente.
· Non applicare una forza eccessiva nella direzione di rimozione della fresa. L’eventuale caduta della fresa nella cavità orale del paziente potrebbe essere causa di
possibili lesioni dovute all’accidentale ingestione della stessa.
· Avere cura che il manipolo non subisca urti. Non far cadere il manipolo.
Non cercare di smontare il manipolo o di manometterne il meccanismo. Seguire sempre le raccomandazioni di smontaggio di NSK contenute nel presente manuale d’uso.
·
· Non superare la pressione d’aria raccomandata indicata nelle Specifiche tecniche riportate di seguito. Ciò è importante onde evitare velocità superiori che
potrebbero causare la rottura della fresa e guasti prematuri del cuscinetto.
· Non tentare di riparare o smontare la cartuccia. Il manipolo potrebbe funzionare in modo anomalo (rumori anomali o vibrazioni anomale). In tal caso eventuali
danni, guasti o incidenti non saranno coperti dalla nostra garanzia.
· Non fissare la luce emessa dal LED (pico BLED, pico WLED).
· In caso di anomalie riscontrate sul display LED (display scuro, spento o lampeggiante), sospendere immediatamente l'uso del prodotto e contattare il distributore
autorizzato. (pico BLED, pico WLED)
· Il presente manipolo è LED, classificato come "Gruppo Esente" (nessun rischio fotobiologico) in accordo alla IEC62471/EN62471 (pico BLED, pico WLED).
53
Page 56

· Usare una fonte di alimentazione che soddisfa i seguenti requisiti (pico BLED, pico WLED).
1. L'erogazione di energia elettrica della fonte di alimentazione è inferiore a 15W sia in condizioni di normale funzionamento sia in condizioni di singoli guasti.
2. La fonte di alimentazione utilizza un circuito SELV per l'erogazione di energia elettrica.
3. La tensione di uscita della fonte di alimentazione rientra nella gamma raccomandata dal fabbricante del presente prodotto.
1. Specifiche tecniche
Velocità di rotazione
Tipologia mandrino
Lunghezza minima della fresa
Lunghezza massima della fresa
Dimensione massima della fresa
Alimentazione dell’aria
Dimensione testina x altezza
54
Modello
Tipologia testina
Tipo di spray
Fresa
Consumo aria
Luce
Voltaggio
pico
ISO1797-1 Tipo 3 Ø1,59-1,60mm Fresa a gambo corto/Fresa a gambo supercorto
0,20MPa(2,0 kgf/cm2) - 0,25MPa(2,5 kgf/cm2)
Fibre Ottiche in vetro
380.000 - 450.000 min
Mandrino a pulsante
-
pico KL / pico SL
Mini
Spray singolo
8,0mm
18,5mm
Ø 2,0mm
0,25MPa(2,5 kgf/cm
45 ± 5 NL/min
Ø 8,6mm x 9,0mm
-1
2
) - 0,30MPa(3,0 kgf/cm2)
pico BLED / pico WLED
LED bianco
AC/DC 3,3V±0,05V
Page 57

Modello
Voltaggio di attivazione
Assorbimento corrente
Ambiente di utilizzo
Trasporto e Ambiente di Conservazione
pico
Temperatura : 0 - 40 ˚C, Umidità : 30 - 75% HR, Pressione atmosferica : 700 - 1.060hPa
Temperatura : -10 - 50 ˚C, Umidità : 10 - 85% RH, Pressione atmosferica : 500 - 1.060hPa
- 3,0~4,0V
- 0,38A tipico (3,3 V)
pico KL / pico SL
pico BLED / pico WLED
I modelli sono scritti sopra come segue; S-Max pico = pico, S-Max pico KL = pico KL, S-Max pico SL = pico SL, S-Max pico BLED = pico BLED, S-Max pico WLED = pico WLED
KaVo® e MULTIflex® sono marchi registrati di Kaltenbach & Voigt GmbH & Co., Germania. (pico KL) / Sirona® è un marchio registrato di Sirona Dental Systems GmbH, Germania. (pico SL)
®
e Roto Quick® sono marchi registrati di W&H Dentalwerk Bürmoos GmbH, Austria. (pico WLED) / Bien-Air® e Unifix® sono marchi registrati di Bien-Air Dental S.A., Svizzera. (pico BLED)
W&H
2. Inserimento/rimozione della fresa
ATTENZIONE
· Non utilizzare frese più lunghe di quanto raccomandato nelle Specifiche tecniche NSK.
· Non utilizzare frese curve, usurate, danneggiate o non concentriche. Queste frese potrebbero danneggiare il manipolo.
· Non superare la velocità della fresa raccomandata dal produttore.
· Mantenere il gambo della fresa sempre pulito. La penetrazione di impurità nel mandrino attraverso il gambo della fresa può essere causa di slittamenti
durante la rotazione e può ostacolare il corretto fissaggio della fresa nel mandrino.
· Premere a fondo il pulsante a pressione e inserire la fresa nel mandrino fino a fissarla.
· Non utilizzare frese a gambo corto con manipoli provvisti di testine standard.
55
Page 58

2-1 Inserimento della fresa
1) Inserire la fresa fino al suo arresto ( ).
2) Premere il pulsante a pressione ( ).
3) Inserire la fresa nel mandrino fino al suo arresto ( ).
4) Rilasciare il pulsante.
1
2
3
3
1
4
2-2 Rimozione della fresa
2
Premere a fondo il pulsante e rimuovere la fresa ( ).
4
ATTENZIONE
· Inserire la fresa nel mandrino fino a fissarla.
· Non utilizzare la fresa al carburo quando la corona è stata rimossa. Potrebbe causare un malfunzionamento.
Non esercitare troppa pressione sulla fresa. La fresa potrebbe rompersi o curvarsi. (Assicurare l’erogazione di acqua. Il taglio andrebbe eseguito con un tocco leggero).
·
56
Pulsante
2
Fig. 1
Page 59

3. Manutenzione
3-1 Pulizia (Foro Clean Head)
Quando il beccuccio spray è intasato o quando lo spray non esce da tre condotti, è necessario pulirli nel
seguente modo:
1) Riempire fino a metà una coppetta con acqua pulita.
2) Rimuovere eventuali impurità dai fori con l’ausilio di una spazzola. Non utilizzare una spazzola
metallica. (Fig. 2)
Foro Clean Head
Foro Clean Head Foro Clean Head
Fig. 2
57
Page 60

3) Ruotare il manipolo e immergere la testina a metà (Fig.3).
4)
Attivare e disattivare in modo intermittente il manipolo per 2-3 secondi circa (ripetere l’operazione per 3 volte circa).
5) La funzione del sistema Clean Head permette di pulire il foro della testina.
6) Arrestare il manipolo e asciugarlo. Se non è possibile rimuovere la sporcizia dal foro, rimuovere la cartuccia e
pulirla con l’ausilio di una spazzola.
7) Lubrificare (3-5 Lubrificazione e Sterilizzazione)
ATTENZIONE
Utilizzare solo acqua pulita per la manutenzione del sistema Clean Head.
3-2 Pulizia (manipolo con cleansing of tying)
Quando il beccuccio spray è intasato o quando lo spray non esce da tre condotti, è necessario pulirli nel
seguente modo: foro dello
1) Rimuovere la fresa dal mandrino.
2)
Estrarre il filo per la pulizia dalla parte posteriore del porta-spazzola. Inserire il filo nel beccuccio spray con
cautela. Non inserire a forza il filo nel condotto. Un condotto danneggiato o fuori sede potrebbe essere la causa
di uno spruzzo scorretto e compromettere l’efficacia del raffreddamento.
3)
58
Dopo l’uso, pulire il filo della pulizia. Inserire nel porta-spazzola con l’estremità appuntita del filo rivolta verso l’interno.
Fig. 3
Cleansing of tying
Foro dello spray
Fig. 4
Page 61

3-3 Pulizia (manipolo)
Questo manipolo è lavabile in sterilizzatore termico.
Rimuovere sporcizia e impurità dal manipolo e pulirlo con un tampone di cotone o un panno imbevuti di alcol. Non utilizzare una spazzola metallica.
Per procedere alla pulizia consultare il manuale dello sterilizzatore termico.
3-4 Pulizia (Luce)
Pulire il punto di entrata e di uscita (Fig. 5) delle Fibre Ottiche con un tampone di cotone imbevuto
d’alcol. Rimuovere residui o olio.
ATTENZIONE
Per pulire le Fibre Ottiche non usare oggetti acuminati. In caso contrario il vetro si potrebbe rigare con conseguente
riduzione della trasmissione luminosa. Quando l'intensità luminosa si riduce rivolgersi al proprio distributore.
3-5 Lubrificazione e Sterilizzazione
Consultare la Guida alla manutenzione
OM-Z0135E.
Tampone
di cotone
Fibra Ottica
Fig. 5
59
Page 62

4. Sostituzione della cartuccia
1) Inserire una fresa di prova nel mandrino.
2) Svitare il cappuccio della testina ruotandolo in senso antiorario e rimuoverlo.
3) Spingere la fresa di prova verso l’alto per rimuovere la cartuccia.
4) Pulire l’interno dell’alloggiamento della testina.
5) Inserire la cartuccia nuova.
6) Sostituire il cappuccio della testina e avvitarlo saldamente.
SX-PU03: codice d’ordine P1140200
O-Ring
ATTENZIONE
· Verificare che l’O-ring sia stato rimosso mentre si estrae la cartuccia. In caso contrario l’O-ring potrebbe rimanere nella testina durante la
rimozione della cartuccia. Se ciò avviene, non è possibile inserire correttamente la nuova cartuccia.
· Utilizzare esclusivamente cartucce originali NSK. L’uso di cartucce diverse potrebbe comportare il mancato soddisfacimento delle specifiche
previste e inficiare la garanzia.
· I filetti della testina sono molto sottili. Per evitare danni ai filetti all’inizio avvitare sempre manualmente il cappuccio, dopodichè terminare
saldamente con la chiave.
60
· Assicurarsi che I due O-Ring (Fig. 6) siano correttamente collocati nella cartuccia.
ChiaveCartuccia Cappuccio della testinaTestina
Fig. 6
Page 63

5. Sostituzione degli O-ring (pico)
È necessario sostituire gli O-ring se nella linea dell’aria vi è presenza d'acqua. Ciò indica
una possibile perdita d’acqua all’interno dell’attacco.
Sostituire SEMPRE il set completo di O-ring. Estrarre il manipolo dall’attacco.
1) Svitare e rimuovere l’Anello conico sul retro del manipolo (Fig. 7).
2) Con il pollice, rimuovere delicatamente tutti gli O-ring (Fig. 8).
3) Inserire il set completo di O-ring nuovi nelle fessure corrispondenti.
4) Sostituire e serrare saldamente l’Anello conico.
Set O-ring PTL: codice d’ordine Y900580
ATTENZIONE
· Verificare che l’Anello conico sia ben avvitato. Se l’Anello conico è lento si possono
verificare perdite d’acqua e di aria.
· Non smontare l’Anello conico se non durante la sostituzione dell’O-ring.
O-Ring
Anello
conico
Fig. 7
Fig. 8
61
Page 64

6. Valvola di non-ritorno
All’interno del giunto dell’attacco è integrata una valvola di non ritorno che blocca il reflusso dell’acqua proprio
in corrispondenza della testina del manipolo per impedire che i fluidi orali vengano aspirati fin dentro la linea
dell’acqua (Fig. 9).
Attacco NSK
Per la sostituzione della valvola, rimuovere la tenuta posteriore. Tirare e rimuovere il tubo per l’acqua quindi
sostituire la valvola di non-ritorno.
pico BLED
1) Scollegare il manipolo dall’attacco quindi svitare e rimuovere l’anello conico.
2) Rimuovere la valvola di non-ritorno. Estrarre la valvola di non-ritorno con un bastoncino sottile e inserire
saldamente la valvola di non-ritorno nuova (Fig. 10).
62
Tenuta
Valvola di non-ritorno
Fig. 9
Giunto
Valvola di non-ritorno
Fig. 10
Page 65

3) Montare il giunto nel manipolo. Assicurarsi che il tubicino e il giunto siano attaccati (Fig. 11).
4) Serrare bene l’anello conico.
ATTENZIONE
· Verificare che l’anello conico sia ben avvitato. Se l’anello conico è lento si possono verificare perdite
d’acqua e di aria.
· Tenere leggermente il portalampada mentre si avvita l’anello conico.
7. Elenco dei pezzi opzionali
Modello
Fresa
Lunghezza
Lunghezza max. parte di lavoro
Diametro parte di lavoro
Grana
Codice d'ordine (3pezzi.)
PC1 PC2
16,5 mm
1,9 mm
0,9 mm
Y1001817
16,5 mm
0,4 mm
0,6 mm
Y1001818
PC3 PC4 PC5 PC6
17,5 mm 16,0 mm 14,0 mm 15,5 mm
9,0 mm 7,0 mm 4,0 mm 6,0 mm
1,8 mm 1,3 mm 1,6 mm 1,1 mm
GrossaFineStandard
Y1001819 Y1001820 Y1001821 Y1001822
Manipolo
Standard
Allini
Giunto
Fig. 11
63
Page 66

8. Smaltimento dell'apparecchio
Per evitare i rischi per la salute degli operatori addetti allo smaltimento di apparecchiature mediche e onde prevenire rischi di inquinamento ambientale
causati dallo smaltimento stesso, è necessario che la sterilità delle apparecchiature sia comprovata da un chirurgo o un dentista. Rivolgersi ad aziende
specializzate autorizzate allo smaltimento di rifiuti industriali speciali per procedere allo smaltimento del prodotto.
9. Garanzia
NSK garantisce il manipolo da eventuali errori di produzione e difetti di materiale. NSK si riserva il diritto di analizzare e di stabilire la causa di qualsiasi
problema. La garanzia è nulla in caso di uso non conforme del manipolo. Dal quando il modello è messo fuori produzione, i ricambi sono disponibili per
altri sette anni.
64
Page 67

The EU directive 93/42/EEC was applied in the design and production of this medical device.
Specifications are subject to change without notice. 2018.08.23 01
M
 Loading...