

Page 1
H
N
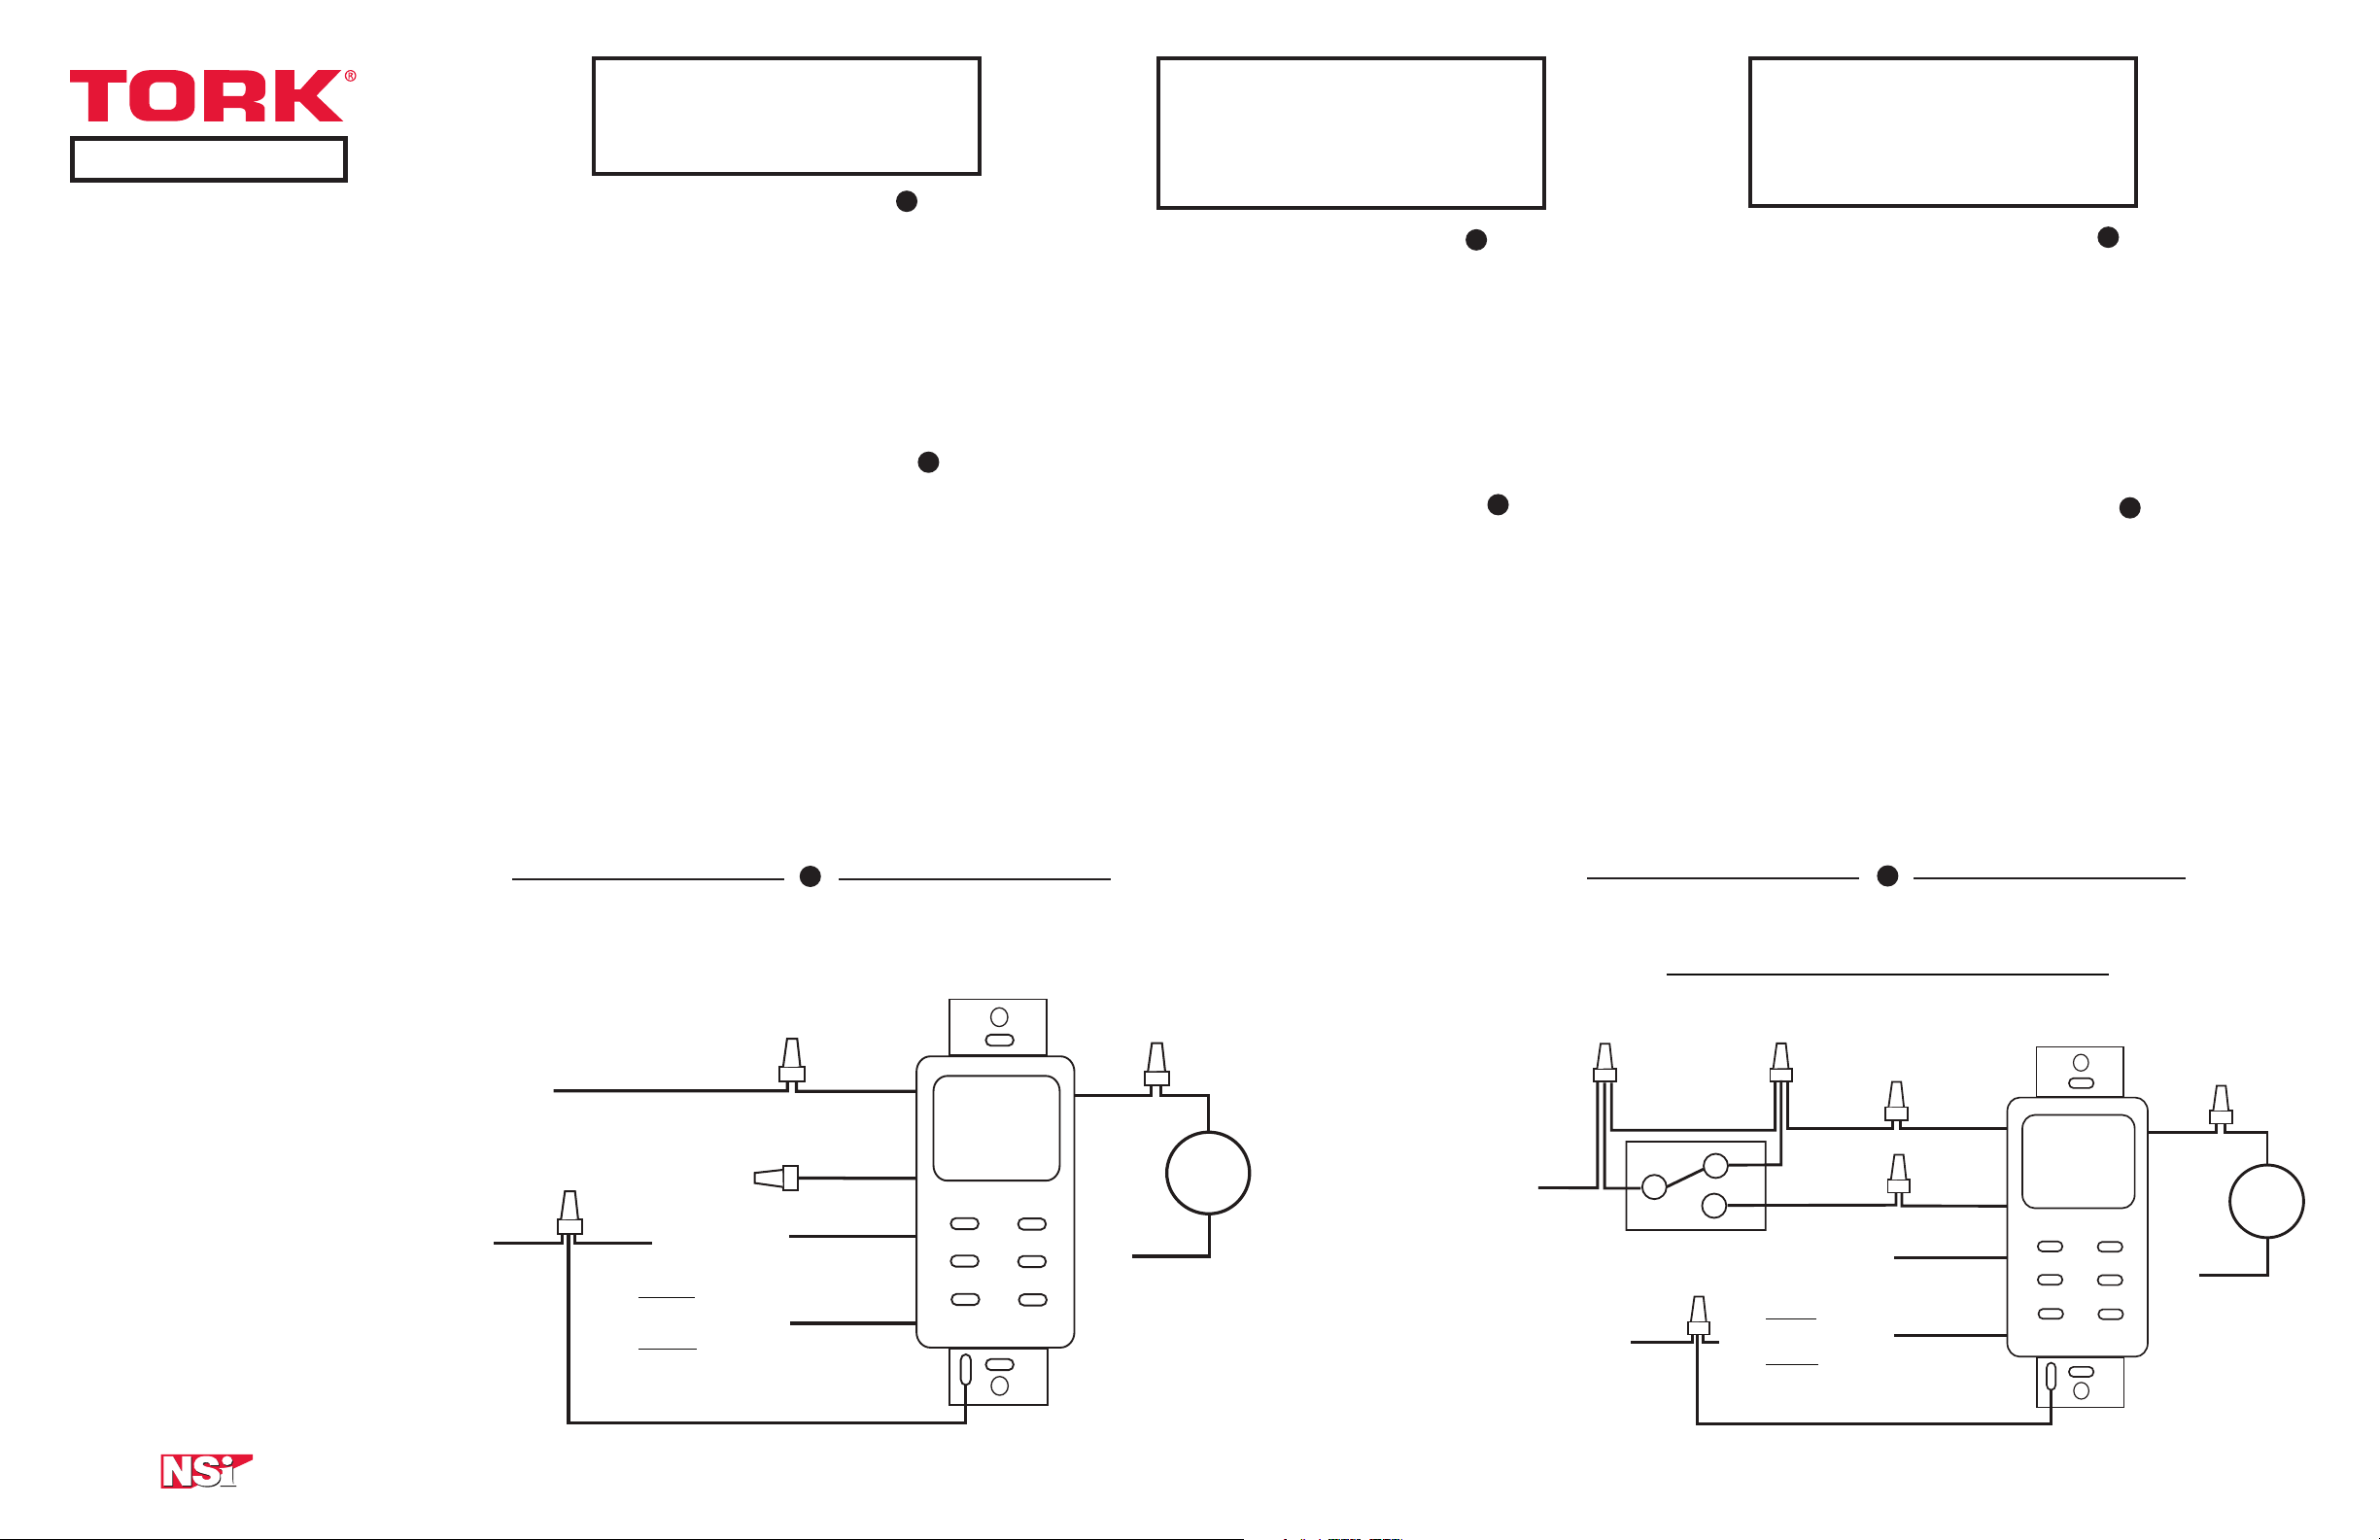
WIRING DIAGRAM: THREE-WA Y INSTALLATION SS700Z
SCHÉMA DU CÂBLAGE : ADAPTA TION DE LA MINUTERIE SS700Z À UN INTERRUPTEUR À TROIS VOIES
DIAGRAMA DEL CABLEADO: INSTALACIÓN DE TRES VÍAS SS700Z
Connect a wire inside the gang-box between Traveler A and Hot.
Branchez un fil de la boîte de connexion entre le conducteur A et la branche sous tension.
Conecte un conductor dentro de la caja, entre el "viajero A" y la energizada.
Black
Noir
Negro
Ground
Mise à la terre
Tierra
120VAC
277VAC
Green
Ve rt
Verde
Green/Vert/Verde
Green+Yellow
Ve rt+Jaune
Verde+Amarillo
Blue
Bleu
Azul
White
Blanc
Blanco
Switch #1
Interrupteur n° 1
Interruptor#1
Load
Charge
Carga
Traveler A/Conducteur A/Viajero A
Traveler B/Conducteur B/Viajero B
Connect only one wire:
120 or 277V, cap other.
Branchez un seul fil :
120 v ou 277 v, couvrez
l’autre.
Conecte sólo un conductor:
120 ó 277 v. tape el otro
con un empalme plástico.
Black
Noir
Negro
Red
Rouge
Rojo
Black
Noir
Negro
WIRING DIAGRAM: INSTALLATION SS700Z
SCHÉMA DU CÂBLAGE : INSTALLATION DE LA MINUTERIE SS700Z
DIAGRAMA DEL CABLEADO: INSTALACIÓN DE SS700Z
H
N
120VAC
277VAC
Load
Charge
Carga
Connect only one groud wire.
Branchez un seul fil :
120 v ou 277 v, couvrez
l’autre.
Conecte sólo un conductor:
120 ó 277 v. tape el otro
con un empalme plástico.
Ground
Mise à la terre
Tierra
Black
Noir
Negro
Red
Rouge
Rojo
Green
Ve rt
Verde
Green+Yellow
Ve rt+Jaune
Verde+Amarillo
Blue
Bleu
Azul
White
Blanc
Blanco
Black
Noir
Negro
Green/Vert/Verde
INSTALLATION INSTRUCTIONS
A DIVISION OF NSi INDUSTRIES, LLC
SS700Z
SS700ZA
RATINGS
• 120/277VAC 16A 1920/4432W Resistive
• 120/277VAC 10A 1200/2770VA Ballast
• 120VAC 8A 960W Tungsten
• 120VAC 1/2 HP
CARACTÉRISTIQUES
• 120/277 V c.a. 16 A 1920/4432 W résistif
• 120/277 V c.a. 10 A 1200/2770 VA délestage
• 120/277 V c.a. 8 A 960 W tungstène
• 120/277 V c.a. 1/2 HP
CLASIFICACIONES
• 120/277 VCA 16 A 1920/4432 vatios resistivo
• 120/277 VCA 10 A 1200/2770 VA reactancia
• 120/277 VCA 8 A 960 vatios tungsteno
CAUTION
Before wiring and servicing, power to this time switch and the
equipment it controls must be turned off at the main panel.
WARNING
Unit must be properly grounded to operate correctly.
SS700Z SMART TIMER
1
INSTALLATION
1. Connect black and blue wires as shown in the diagram.
Cap the red wire.
2. Depending upon line voltage, connect the mounting strap
green wire to either
(a) the timer green wire (for 120VAC) or
(b) the timer green/yellow wire (for 277VAC)
and the ground. Cap all unused wires.
3. Mount the timer inside electrical box using 2 mounting
screws provided.
4. Install cover plate.
5. Turn power on at the electrical panel.
RETROFITTING A SS700Z
2
TO EXISTING 3-WAY SWITCH
1. Disconnect the second 3-way switch.
2. Connect the timer blue wire to the load. Connect the timer
black wire to “Traveler A” and the timer red wire to “Traveler B”.
3. Depending upon line voltage, connect the mounting strap
green wire to either
(a) the timer green wire (for 120VAC) or
(b) the timer green/yellow wire (for 277VAC)
and the ground. Cap all unused wires.
4. Mount the timer inside electrical box using 2 mounting
screws provided.
5. At switch #1 connect a wire between the hot leg of the
3-way and “Traveler A” inside of that switch’s gang-box.
6. Install cover plates.
7. Turn power on at the electrical panel.
MISE EN GARDE
Avant de procéder au câblage ou à l’entretien, l’alimentation
de cette minuterie et de l’appareil qu’elle gère doit être
coupée à partir du tableau de distribution principal.
AVERTISSEMENT
Pour qu’il fonctionne correctement, cet appareil
doit être mis à la terre convenablement.
MINUTERIE INTELLIGENTE
SS700Z – INSTALLATION
1. Branchez les fils noir et bleu comme l’illustre la figure.
Couvrez le fil rouge.
2. Selon la tension sectorielle, branchez le fil vert de la traverse soit
(a) au fil vert de la minuterie (pour 120 V c.a.) ou
(b) au fil vert et jaune (pour 277 V c.a.) et à la mise à la terre.
Couvrez tous les fils inutilisés.
3. Fixez la minuterie à l’intérieur du coffret de branchement en
vous servant des deux vis de montage fournies.
4. Posez le couvercle.
5. Ouvrez l’alimentation à partir du tableau de distribution.
1
ADAPTATION DE LA MINUTERIE
SS700Z À UN INTERRUPTEUR
2
À TROIS VOIES DÉJÀ EN PLACE
1. Débranchez le deuxième interrupteur à trois voies.
2. Branchez le fil bleu de la minuterie à la charge. Branchez
le fil noir de la minuterie au « conducteur A » et le fil rouge
de la minuterie au « conducteur B ».
3. Selon la tension sectorielle, branchez le fil vert de la traverse soit
(a) au fil vert de la minuterie (pour 120 V c.a.) ou
(b) au fil vert et jaune (pour 277 V c.a.) et à la mise à la terre.
Couvrez tous les fils inutilisés.
4. Fixez la minuterie à l’intérieur du coffret de branchement en vous
servant des deux vis de montage fournies.
5. Interrupteur n° 1 : branchez un fil entre la branche sous tension
de l’interrupteur à trois voies et le « conducteur A » qui se trouve à
l’intérieur de la boîte de connexion de cet interrupteur.
6. Posez les couvercles.
7. Ouvrez l'alimentation à partir du tableau de distribution.
PRECAUCIÓN
Antes de proceder al cableado y mantenimiento, se debe
cortar la alimentación al interruptor del temporizador y a los
controles del equipo en el panel principal.
ADVERTENCIA
La unidad debe contar con puesta a tierra para
funcionar adecuadamente.
INSTALACIÓN DEL TEMPORIZADOR
INTELIGENTE SS700Z
1. Conecte los conductores negro y blanco como se muestra en el
diagrama. Tape el conductor rojo con un empalme plástico.
2. Según el voltaje de alimentación, conecte el conductor verde
de la placa de montaje ya sea al
(a) conductor verde del temporizador (para 120 V CA) o al
(b) conductor amarillo/verde del temporizador (para 277 V CA)
y al de tierra. Tape los conductores sin usar con un empalme plástico.
3. Instale el temporizador en la caja eléctrica con los 2 tornillos de
montaje incluidos.
4. Instale la placa de cubierta.
5. Conecte la alimentación eléctrica en el panel eléctrico.
REAJUSTE DE UN SS700Z A UN
INTERRUPTOR DE TRES VÍAS INSTALADO
1. Desconecte el segundo interruptor de tres vías.
2. Conecte el conductor azul del temporizador a la carga. Conecte
el conductor negro del temporizador al “viajero A” (Traveler A)
y el conductor rojo del temporizador al “viajero B” (Traveler B).
3. Según el voltaje de alimentación, conecte el conductor verde de la
placa de montaje ya sea al
(a) conductor verde del temporizador (para 120 V CA) o al
(b) conductor amarillo/verde del temporizador (para 277 V CA)
y al de tierra. Tape los conductores sin usar con un empalme plástico.
4. Instale el temporizador en la caja eléctrica con los 2 tornillos de
montaje incluidos.
5. En el interruptor #1 conecte un conductor entre la clavija energizada
del interruptor de tres vías y el “viajero A” al interior de dicha caja
de interruptor.
6. Instale las placas de cubierta.
7. Conecte la alimentación eléctrica en el panel eléctrico.
1
2
ONE YEAR LIMITED WARRANTY: If this product fails
because of a manufacturing defect within one year after
purchase, we will, at our option, either repair or replace
it at no charge. Our warranty does not cover damage
caused by accident, abuse or misuse. We assume no
further liability with respect to the sale or use of this
product. THIS WARRANTY IS IN LIEU OF ALL OTHER
WARRANTIES, EXPRESSED OR IMPLIED, INCLUDING
THE WARRANTY OF MERCHANTABILITY. We make no
warranty with respect to the fitness of any goods for the
users particular application. This warranty gives you
specific legal rights, and you also may have other rights
which vary from state to state.
It is our intent to provide accurate and current
specification information. However, in the interest of
product improvement, TORK may alter the specifications
or constructional details without prior notice.
1
WIRING DIAGRAMS
FOR TECHNICAL SUPPORT: SOUTIEN TECHNIQUE : PARA COMUNICARSE CON EL SERVICIO TÉCNICO: techsupport@nsiindustries.com 877.230.7874
2
LI-785
Page 2
MAINE
VT
NH
MASS
NEW YORK
PENNSYLVANIA
OHIO
IND
ILLINOIS
KENTUCKY
VIRGINIA
NORTH CAROLINATENNESSEE
WEST
VIRGINIA
SOUTH
CAROLINA
GEORGIAALABAMA
MISS
FLORIDA
LOUISIANA
ARKANSAS
OKLAHOMA
MISSOURI
TEXAS
KANSAS
NEW MEXICO
MEXICO
ARIZONA
CALIFORNIA
NEVADA UTAH COLORADO
NEBRASKA
WYOMING
IDAHO
OREGON
SOUTH DAKOTA
IOWA
WISCONSIN
MICHIGAN
MINN
NORTH DAKOTA
MONTANA
WASHINGTON
RHODE ISLAND
CONNECTICUT
NEW JERSEY
MARYLAND
DELAWARE
45°
50°
60°
ALASKA
40°
35°
30°
25°
ASTRONOMIC LATITUDE ZONES
ZONES DE LATITUDE
ZONAS ASTRONOMICAS (LATITUDES)
21° HAW AII 18° PUERTO
RICO
CLK
AM
ON
AM ASTRO
M T W TH F SA SU
OFF
CLK
AM
D AT E
F
:
ON
SCH
ON
AM ASTRO
M T W TH F SA SU
OFF
OFF
ASTRO
M T W TH F SA SU
CLK
AM
D A TE
F
:
SU
ON
SCH
ON
SCH
OFF
PM ASTRO ON
M T W TH F SA SU
AM ASTRO
M T W TH F SA SU
OFF
OFF
ASTRO
M T W TH F SA SU
ASTRO
AUTO
T
AM ON
T
ON
AM ASTRO
M T W TH F SA SU
OFF
ON
SCH
ON
AM ASTRO
M T W TH F SA SU
OFF
OFF
ASTRO
M T W TH F SA SU
ON
SCH
ON
SCH
OFF
AM ASTRO
M T W TH F SA SU
OFF
OFF
ASTRO
M T W TH F SA SU
ASTRO
ON
SCH
ON
SCH
OFF
PM ASTRO ON
AM ASTRO
M T W TH F SA SU
OFF
OFF
ASTRO
M T W TH F SA SU
ASTRO
AUTO
T
AM ON
AM ASTRO
M T W TH F SA SU
OFF
AM ASTRO
M T W TH F SA SU
OFF
OFF
ASTRO
M T W TH F SA SU
ASTRO
AUTO
T
AM ON
AM ASTRO
M T W TH F SA SU
OFF
OFF
ASTRO
M T W TH F SA SU
ASTRO
AUTO
T
AM ON
MAN
T
AM ON
PROGRAMMING INSTRUCTIONS
CLK
AM
D AT E
F
:
ON
SCH
ON
SCH
OFF
AM ASTRO
M T W TH F SA SU
OFF
OFF
ASTRO
M T W TH F SA SU
ASTRO
AM ASTRO
M T W TH F SA SU
OFF
OFF
ASTRO
M T W TH F SA SU
ASTRO
AM ASTRO
M T W TH F SA SU
OFF
OFF
ASTRO
M T W TH F SA SU
ASTRO
AM ASTRO
M T W TH F SA SU
OFF
OFF
ASTRO
M T W TH F SA SU
ASTRO
ON
SCH
ON
SCH
OFF
PM ASTRO ON
ASTRO ON
M T W TH F SA SU
AM ASTRO
M T W TH F SA SU
OFF
OFF
ASTRO
M T W TH F SA SU
ASTRO
AUTO
T
AM ON
MAN
T
AM ON
AM ASTRO
M T W TH F SA SU
OFF
OFF
ASTRO
M T W TH F SA SU
A DIVISION OF NSi INDUSTRIES, LLC
SS700Z
SS700ZA
ONE YEAR LIMITED WARRANTY: If this product fails
because of a manufacturing defect within one year after
purchase, we will, at our option, either repair or replace
it at no charge. Our warranty does not cover damage
caused by accident, abuse or misuse. We assume no
further liability with respect to the sale or use of this
product. THIS WARRANTY IS IN LIEU OF ALL OTHER
WARRANTIES, EXPRESSED OR IMPLIED, INCLUDING
THE WARRANTY OF MERCHANTABILITY. We make no
warranty with respect to the fitness of any goods for the
users particular application. This warranty gives you
specific legal rights, and you also may have other rights
which vary from state to state.
It is our intent to provide accurate and current
specification information. However, in the interest of
product improvement, TORK may alter the specifications
or constructional details without prior notice.
PLEASE READ ALL INSTRUCTIONS FIRST
When rst powered-up or after pressing reset button the unit will display
the word “HOLd” and a 30 second countdown will begin. The display will then
flash “SS700” and show “12:00am.” The unit is ready for programming.
VEUILLEZ LIRE TOUTES LES INSTRUCTIONS
AVANT D’UTILISER CE PRODUIT
Ensuite apparaîtra le message « HOLd » (patientez) et un compte à
rebours de 30 secondes s’amorcera. Quand « 12:00 » clignote à l’écran,
EMPIECE POR LEER TODAS LAS INSTRUCCIONES
Luego mostrará la palabra “HOLd” y se iniciará una cuenta regresiva de
30 segundos. Cuando la pantalla muestre 12:00 titilando, la unidad estará
lista.
l’appareil est prêt.
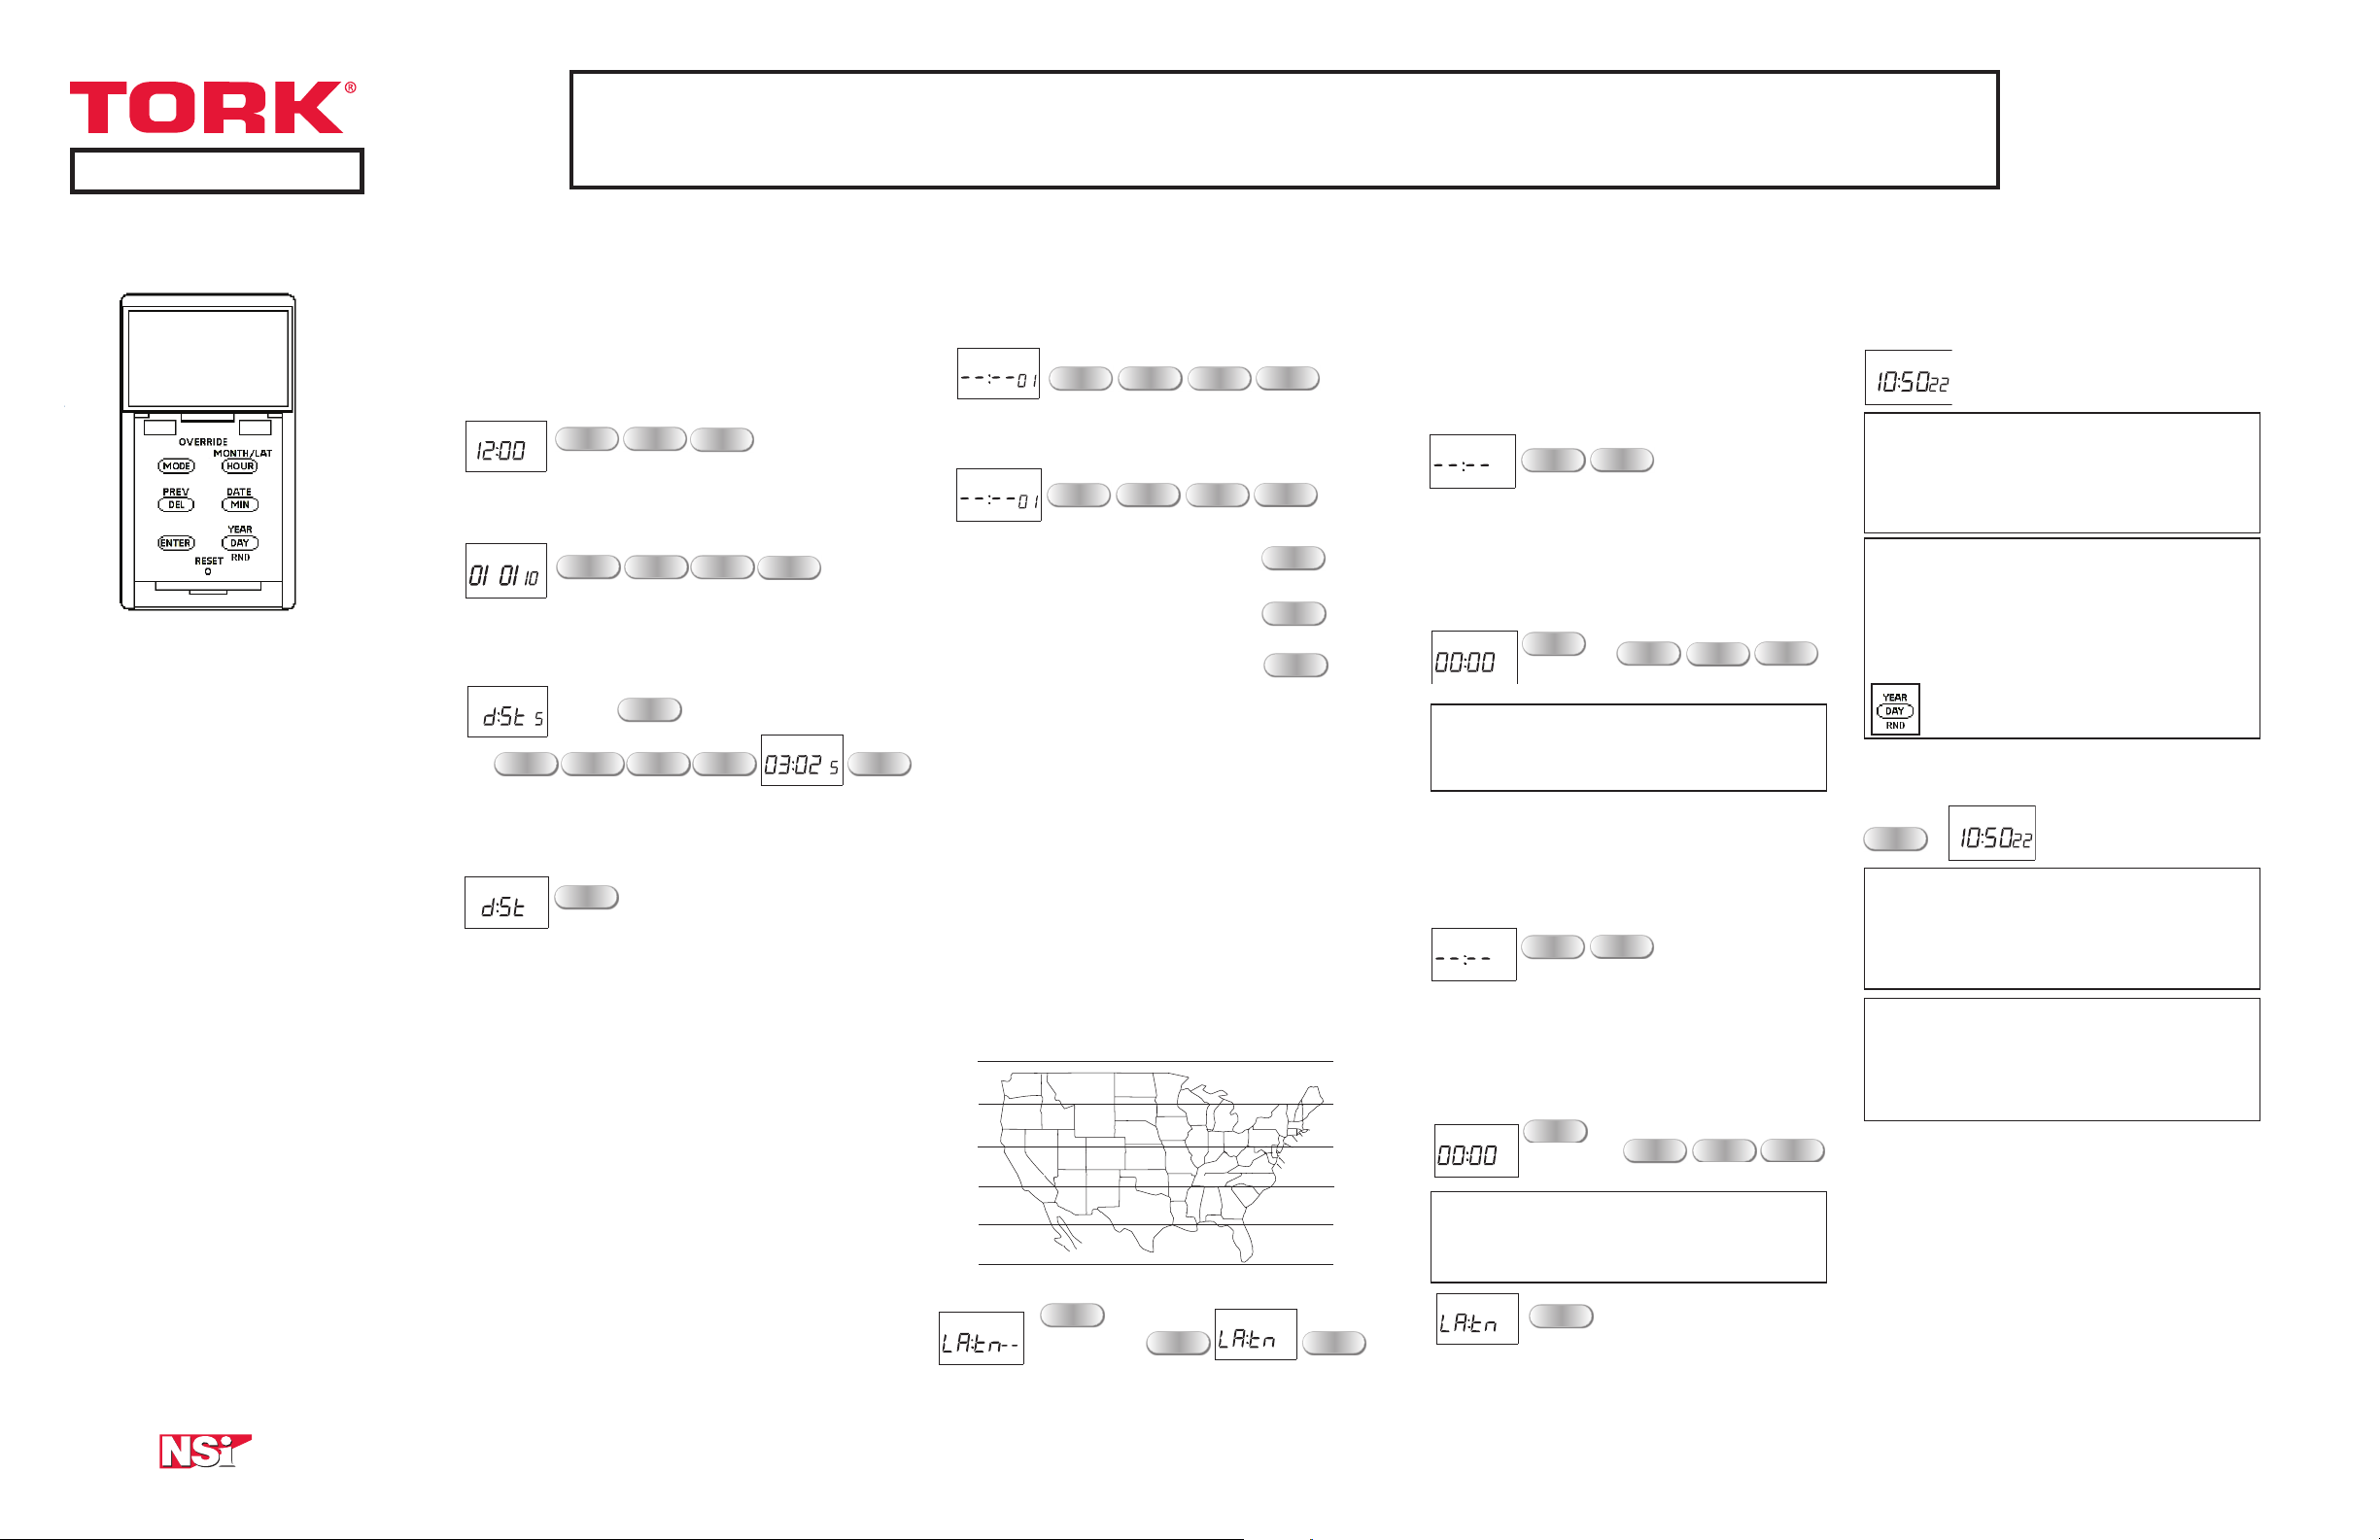
1.0 Press MODE to go to the CLK mode.
• Appuyez sur la touche MODE pour passer au mode horloge (CLK).
• Presione la tecla MODE para ir al modo CLK.
2.0 TO SET CLOCK
• RÉGLAGE DE L’HORLOGE
• AJUSTE DEL RELOJ
HOUR
MIN
ENTER
3.0 TO SET DATE
6.1 SETTING AN ON TIME
• RÉGLAGE DE L’HEURE DE MISE EN MARCHE
• AJUSTE DE UNA HORA DE ENCENDIDO
DAY
HOUR
MIN
6.2 SETTING AN OFF TIME
• RÉGLAGE DE L’HEURE D’ARRÊT
• AJUSTE DE UNA HORA DE APAGADO
DAY
HOUR
MIN
ENTER
ENTER
• RÉGLAGE DE LA DATE
• AJUSTE DE LA FECHA
MONTH
DATE
YEAR
ENTER
6.3 NEXT SCHEDULE
Repeat steps 6.1 & 6.2 for additional ON/OFF pairs OR
• HORAIRE SUIVANT
MODE
Pour régler d’autres heures de mise en marche et
4.0 TO SET AUTOMATIC DAYLIGHT
SAVING TIME ADJUSTMENT
• RÉGLAGE AUTOMATIQUE DE L’HEURE AVANCÉE
• AJUSTE AUTOMÁTICO DEL HORARIO DE VERANO
To skip
Or
Ou
O
Pour passer
Para ignorar
ENTER ENTER ENTER ENTER
MODE
5.0 DAYLIGHT SAVINGS MODE CONFIRMATION
• CONFIRMATION DU MODE DE RÉGLAGE AUTOMATIQUE
DE L’HEURE AVANCÉE
• CONFIRMACIÓN DEL MODO DE HORARIO DE VERANO
MODE
MODE
d’arrêt répétez les étapes 6.1 et 6.2
• SIGUIENTE PROGRAMACIÓN
Repita los pasos 6.1 y 6.2 para agregar pares de
encendido y apagado adicionales
7.0 TO SET AUTOMATIC DAILY
SUNSET/SUNRISE (ASTRO) SCHEDULE
See map below. Find desired degree of latitude from 10° to 60° north.
Use LAT key to advance. If the screen reads LAtS it is for south hemisphere.
Advance to N.
• RÉGLAGE DU FONCTIONNEMENT AUTOMATIQUE EN FONCTION
DU COUCHER ET DU LEVER DU SOLEIL
Consultez la carte ci-dessous. Déterminez le degré de latitude souhaité
(entre 10 ° et 60 ° nord). Appuyez sur la touche LAT pour continuer. LAtS
correspond à l’hémisphère sud. Sélectionnez N.
• AJUSTE AUTOMÁTICO DEL HORARIO DIARIO
DE ANOCHECER/AMANECER (ASTRO)
Consulte el mapa a continuación. Encuentre la latitud deseada desde 10° a 60°
OU
MODE
MODE
O
norte. Use la tecla LAT para avanzar. Si en la apantalla aparece LAtS,
6.0 SCHEDULE SET MODE
corresponde a la latitud sur. Avance hacia N.
a) For automatic sunset ON/sunrise OFF, press MODE and go to step 7
b) For sunset ON & time OFF press ENTER and go to step 6.2 to set OFF time
then go to step 7.
c) To set an ON/OFF time go to step 6.1
• MODE DE RÉGLAGE DE L’HORAIRE
a) Afin que la minuterie se mette automatiquement en marche (ON) au coucher
du soleil et qu’elle s’arrête (OFF) au lever du soleil, appuyez sur la touche
MODE et passez à l’étape 7.
b) Afin que la minuterie se mette en marche (ON) au coucher du soleil et qu’elle
s’arrête (OFF), appuyez sur la touche ENTER et passez à l’étape 6.2 pour
régler l’heure d’arrêt. Passez ensuite à l’étape 7.
c) An de régler une heure de mise en marche ou d’arrêt passez à l’étape 6.1.
• AJUSTE DEL HORARIO
a) Para un encendido al anochecer y un apagado al amanecer automáticos,
presione la tecla MODE y continúe con el paso 7.
b) Para que se encienda al anochecer y ajustar una hora de apagado, presione
la tecla ENTER vaya al paso 6.2 para ajustar una hora de apagado y
continúe con el paso 7.
c) Para ajustar una hora de encendido y de apagado continúe con el paso 6.1.
FOR TECHNICAL SUPPORT: SOUTIEN TECHNIQUE : PARA COMUNICARSE CON EL SERVICIO TÉCNICO: techsupport@nsiindustries.com 877.230.7874
MODE
To skip
Pour passer
Para ignorar
Or
LAT
Ou
O
34
ENTER
7.1 SET SUNSET ON
Press DAY to show today’s sunset time.
• RÉGLAGE DE LA MISE EN MARCHE (ON)
AU COUCHER DU SOLEIL
Appuyez sur la touche DAY afin de connaître l’heure du coucher
du soleil d’aujourd’hui.
• AJUSTE DE ENCENDIDO AL ANOCHECER
Presione la tecla DAY para ver a qué hora anochece hoy.
DAY
ENTER
7.2 OPTIONAL OFFSET
Turn load ON before or after calculated sunset.
• DÉCALAGE (FACULTATIF)
Mettez sous tension (ON) avant ou après l’heure du coucher
du soleil.
• DERIVACIÓN OPCIONAL
Encienda la carga antes o después del anochecer calculado.
ENTER
To skip
Pour passer
Para ignorar
OR
HOUR
MIN
ENTER
NOTE: Press HOUR to move from after sunset (“AF”) to before sunset (“bF”)
REMARQUE : Appuyez sur la touche HOUR pour passer d’après le coucher du
soleil (« bF ») à avant le coucher du soleil (« bF ».)
NOTA: Presione la tecla HOUR para moverse desde después del anochecer
(“AF”) hasta antes del anochecer (“bF”.)
7.3 SET SUNRISE OFF
Press DAY to show today’s sunrise time.
• RÉGLAGE DE L’ARRÊT (OFF) AU LEVER DU SOLEIL
Appuyez sur la touche DAY afin de connaître l’heure du lever du
soleil d’aujourd’hui.
• AJUSTE DEL APAGADO AL AMANECER
Presione la tecla DAY para ver a qué hora amanece hoy.
DAY
ENTER
7.4 OPTIONAL OFFSET
Turn load OFF before or after calculated sunrise
• DÉCALAGE (FACULTATIF)
Mettez hors tension (OFF) avant ou après l’heure du
lever du soleil.
• DERIVACIÓN OPCIONAL
Apague la carga antes o después del amanecer calculado.
ENTER
To skip
Pour passer
Para ignorar
OR
HOUR
MIN
ENTER
NOTE: Press HOUR to move from after sunrise (“AF”) to before sunrise (“bF”)
REMARQUE : Appuyez sur la touche HOUR pour passer d’après le lever du
soleil (« AF ») à avant le lever du soleil (« bF ».)
NOTA: Presione la tecla HOUR para moverse desde después del amanecer
(“AF”) hasta antes del amanecer (“bF”).
MODE
34
8.0 AUTO (AUTOMATIC) MODE
• MODE AUTOMATIQUE (AUTO)
• MODO AUTOMÁTICO (AUTO)
NOTE: AUTO mode will follow the programmed schedule. OVERRIDE sets
ON/OFF until the next event.
REMARQUE : Le mode automatique (AUTO) respectera l’horaire programmé.
L’interruption manuelle (OVERRIDE) met en marche ou arrête la minuterie
jusqu’à l’événement suivant.
NOTA: El modo AUTO responderá al horario programado. OVERRIDE
(Anulación) fija el encendido y apagado vigentes hasta el siguiente evento.
NOTE: Press RND to put unit in optional random mode. ON events will be
delayed up to 30 minutes and the OFF events will be delayed up to 45 minutes.
REMARQUE : Afin d’activer le mode aléatoire de l’appareil (facultatif),
appuyez sur la touche RND. Les événements de mise en marche (ON) seront
retardés d’au plus 30 minutes, et les événements d’arrêt (OFF) seront retardés
d’au plus 45 minutes.
NOTA: Presione la tecla RND para poner la unidad en modo aleatorio opcional.
Los eventos de encendido tendrán un retrazo de hasta 30 minutos y los eventos
de encendido tendrán un retrazo de hasta 45 minutos.
9.0 MAN (MANUAL) MODE
• MODE MANUEL (MANUAL)
• MODO MAN (MANUAL)
MODE
NOTE: MAN mode will bypass programmed schedule. OVERRIDE set ON/OFF
until next OVERRIDE push
REMARQUE : Le mode manuel (MAN) omettra l’horaire programmé.
L’interruption manuelle (OVERRIDE) met en marche ou arrête la minuterie
tant que vous n’appuierez pas à nouveau sur la touche OVERRIDE.
NOTA: El modo MAN ignorará el horario programado. OVERRIDE fija el
encendido y apagado vigentes hasta que se presione OVERRIDE.
NOTE: Press RESET to clear time and date. To clear all, press ENTER, press
DEL, then ENTER again.
REMARQUE : Afin d’effacer l’heure et la date, appuyez sur la touche RESET
(réinitialisation). Afin de tout effacer, appuyez sur la touche ENTER, puis sur la
touche DEL et, à nouveau, sur la touche ENTER.
NOTA: Presione la tecla RESET para borrar la hora y fecha. Para borrar todo,
presione la tecla ENTER, presione la tecla DEL y luego ENTER otra vez.
LI-785
 Loading...