

Page 1

NOTE: Unit can be fully programmed using battery
power only.
4. Reinstall unit by reversing step #1 above and con-
KEY FUNCTIONS
DAY/MONTH: Press to advance the day in the CLK
and SKIP modes. Press to advance the month in the
DATE mode.
HOUR/DATE: Press to set the Hours in the CLK
mode and in the Schedule SET mode. Press to
advance date in the DATE mode.
MIN/YEAR: Press to set the Minute in the CLK mode
and in the schedule SET mode. Press to advance
Year in the DATE mode.
OVERRIDE: Press to execute or terminate a signal.
MODE: Press to advance to next mode without
affecting the display information. Sequence is: RUN,
CLK, DATE, schedule SET, SIG 1, SIG 2, Skip (SP).
In the SET mode, unit automatically reverts to the
RUN mode if no entries are made for a short peri-
od of time.
SP DAY: Press to set or delete SKIP days (those on
which no signal schedule is executed)
SIG/SEC: Press to select signal 1, signal 2, or no
event - or to set the duration of signals in seconds.
ENTER: Press to store the displayed information into
memory. Information will not be stored until
ENTER is pressed.
NOTE: During settings, each press of the key will
advance one number. For rapid advance, hold key in.
DAY
MONTH
HOUR
DATE
MIN
YEAR
OVER-
RIDE
MODE
SP
DAY
SIG
SEC
ENTER
TORK DGS180
DIGITAL SIGNAL TIMER
24 HOUR WITH DAY OMIT
READ INSTRUCTIONS CAREFULLY BEFORE SETTING UNIT
FEATURES
Single channel signal timer with 2 duration settings
288 signals in 5 minute increments
24 Hour scheduling with day omitting
Battery back-up uses standard 9 volt non-recharge-
able (not supplied). Lithium averages 450 hours of
power outage; Alkaline averages 175 hours
Manual activation or deactivation of signal
Automatic daylight saving - user selectable
Automatic leap year compensation
AM/PM or 24 hour format - user selectable
INSTALLATION
UNIT IS TO BE INSTALLED BY A LICENSED ELECTRICIAN
1. To remove unit from enclosure: Push tab on right
to swing unit to the left and remove.
2. Mount the enclosure at eye level using screws or
other suitable fastening device. Bring supply and
load wires in through bottom or side knockouts.
DO NOT USE TOP.
Input wires to controller must be dedicated i.e. no
other loads connected to the same circuit.
3. Install a standard 9 volt lithium or alkaline battery
(not supplied) by gently squeezing the right side of
the battery cover on the front of the unit and pull
to open. Pull out the battery connector and connect the battery. Reinstall battery cover. Lithium
should be replaced every 3-5 years, Alkaline
every year.
Page 2

NOTE: Unit can be fully programmed using battery
power only.
4. Reinstall unit by reversing step #1 above and connect wires to unit as per suggested wiring diagrams. See illustration on enclosure label.
KEY FUNCTIONS
DAY/MONTH: Press to advance the day in the CLK
and SKIP modes. Press to advance the month in the
DATE mode.
HOUR/DATE: Press to set the Hours in the CLK
mode and in the Schedule SET mode. Press to
advance date in the DATE mode.
MIN/YEAR: Press to set the Minute in the CLK mode
and in the schedule SET mode. Press to advance
Year in the DATE mode.
OVERRIDE: Press to execute or terminate a signal.
MODE: Press to advance to next mode without
affecting the display information. Sequence is: RUN,
CLK, DATE, schedule SET, SIG 1, SIG 2, Skip (SP).
In the SET mode, unit automatically reverts to the
RUN mode if no entries are made for a short period of time.
SP DAY: Press to set or delete SKIP days (those on
which no signal schedule is executed)
SIG/SEC: Press to select signal 1, signal 2, or no
event - or to set the duration of signals in seconds.
ENTER: Press to store the displayed information into
memory. Information will not be stored until
ENTER is pressed.
NOTE: During settings, each press of the key will
advance one number. For rapid advance, hold key in.
2
DAY
MONTH
HOUR
DATE
MIN
YEAR
OVER-
RIDE
MODE
SP
DAY
SIG
SEC
ENTER
Page 3
TO SET CLOCK
Press MODE key; display shows CLK.
Press DAY/MONTH key to select today’s day. Press
HOUR key to set present hour (check AM/PM). Press
MIN key to set present minutes. Press ENTER key.
Unit now stores present time. Seconds are set at
zero.
DAYLIGHT SAVING
The user may select either standard U.S. option or no
daylight saving at all.
1. U.S. OPTION: Daylight saving is automatically set
when entering the current month/date/year. The
unit will add one hour on the first Sunday in April,
and subtract one hour on the last Sunday in
October. You never need to look up the tables, or
enter the spring and fall correction dates yourself.
2. NO DAYLIGHT SAVING: The unit will not be con-
figured for daylight saving time correction by not
entering the month/date/year.
TO SET DATE
NOTE: ENTER ONLY IF AUTOMATIC DAYLIGHT
SAVING IS DESIRED. IF NOT REQUIRED, DO
SET DATE. INSTEAD, SKIP THE FOLLOWING
SECTION AND PRESS MODE KEY UNTIL DIS-
PLAY SHOWS SET.
SU
AM
CLK
SETTING THE UNIT
SELECT AM/PM OR
24 HOUR MILITARY FORMAT
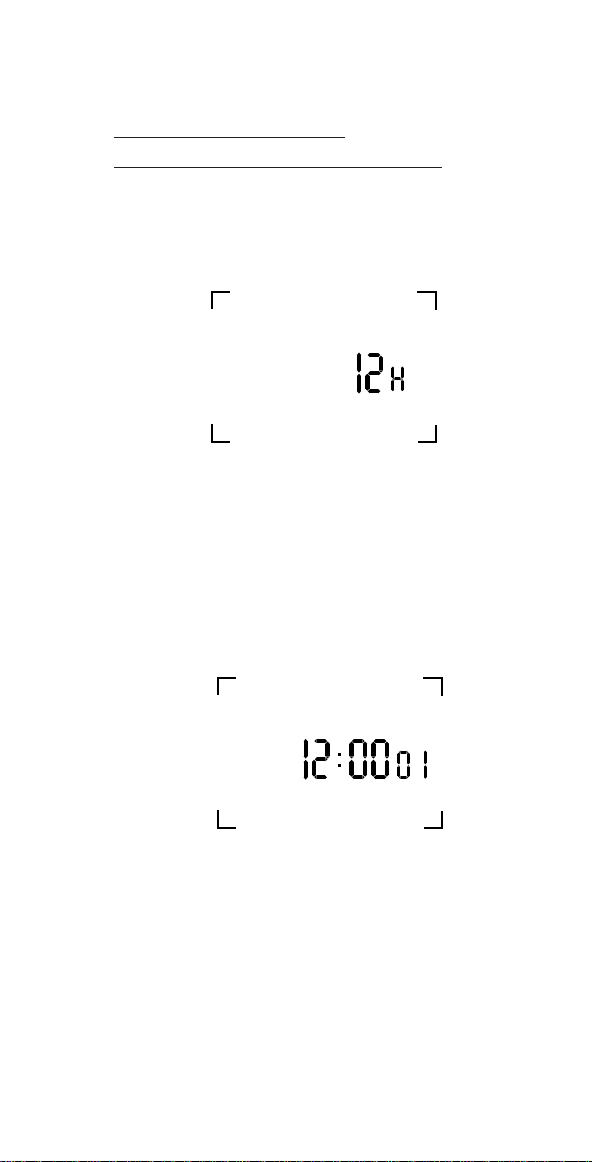
Upon powering up the unit, model number 180S
appears on the screen. The LCD will next display
12H which is an automatic (AM/PM) format.
Press ENTER to keep AM/PM format or press HOUR
key to alter 24 hour (Military) format and then press
ENTER.
Once the ENTER is pressed, unit goes to RUN mode
You can recognize that the unit is in the RUN mode
when the real time (including seconds) is displayed.
NOTE: Once you select and ENTER the above format (either AM/PM or 24 hour military), you can not
alter it without removing all power to the unit by disconnecting the battery and line power.
3
SU
AM
OFF
Page 4

TO SET CLOCK
Press MODE key; display shows CLK.
Press DAY/MONTH key to select today’s day. Press
HOUR key to set present hour (check AM/PM). Press
MIN key to set present minutes. Press ENTER key.
Unit now stores present time. Seconds are set at
zero.
DAYLIGHT SAVING
The user may select either standard U.S. option or no
daylight saving at all.
1. U.S. OPTION: Daylight saving is automatically set
when entering the current month/date/year. The
unit will add one hour on the first Sunday in April,
and subtract one hour on the last Sunday in
October. You never need to look up the tables, or
enter the spring and fall correction dates yourself.
2. NO DAYLIGHT SAVING: The unit will not be configured for daylight saving time correction by not
entering the month/date/year.
TO SET DATE
NOTE: ENTER ONLY IF AUTOMATIC DAYLIGHT
SAVING IS DESIRED. IF NOT REQUIRED, DO
NOT
SET DATE. INSTEAD, SKIP THE FOLLOWING
SECTION AND PRESS MODE KEY UNTIL DISPLAY SHOWS SET.
4
SU
AM
CLK
Page 5

Press mode key until display shows DATE.
Press MONTH key to select month. Press DATE key
to set today’s date. Press YEAR key to set present
year. Press ENTER key. Unit now stores present
date.
Note: If unit has correct entry for the calendar, then
the unit will go into the SET mode. If the calendar has
an incorrect entry, then the unit will stay in the DATE
mode, with MM--YY displayed, signifying that the
date does not correspond with the month, and/or
year, i.e. Feb. 31,1996. If this occurs, set the correct
date, and then press ENTER.
TO SET SCHEDULE
For convenience, write out your desired schedule on
a separate piece of paper. If display does not show
SET then press MODE key until display shows SET.
The display will show 12:00 AM.
1. Press HOUR key to set hour (check AM/PM)
2. Press MIN key to set minutes
Note: Minutes advance in intervals of 5 because
scheduling execution has 5 minute resolution.
5
DATE
AM
SET
3. Press SlG/SEC key to set signal 1 or signal 2.
4. Press ENTER key to store the signal event.
REPEAT ABOVE STEPS FOR ALL DESIRED SIG-
NAL EVENTS
Note: After each event is entered, the clock (in the
set mode only) automatically advances 5 minutes.
5. Press MODE key to return to RUN mode.
TO SET SIGNAL DURATIONS
1. Press MODE key until display shows SIG 1 and
2. Press SIG/SEC key to set duration time in sec-
3. Press ENTER key to store the information.
4. Again press SIG/SEC key to set duration time in
TO SET SKIP DAYS
1. Press MODE key until display shows SP
2. Press DAY/MONTH key and SU starts flashing.
3. If you want Sunday to be a skip day, press SP
4. If you want to delete a previously set skip day, press
Summary: SP DAY key sets a flashing day as a
SKIP day and also eliminates a constantly dis-
played day from Skip day status. DAY/MONTH
key advances the days.
Page 6

3. Press SlG/SEC key to set signal 1 or signal 2.
(Actual duration of signals will be set later.)
4. Press ENTER key to store the signal event.
REPEAT ABOVE STEPS FOR ALL DESIRED SIGNAL EVENTS
Note: After each event is entered, the clock (in the
set mode only) automatically advances 5 minutes.
5. Press MODE key to return to RUN mode.
TO SET SIGNAL DURATIONS
1. Press MODE key until display shows SIG 1 and
00.
2. Press SIG/SEC key to set duration time in sec-
onds (1-99).
3. Press ENTER key to store the information.
Display now shows SIG 2.
4. Again press SIG/SEC key to set duration time in
seconds (1-99). Press ENTER key.
TO SET SKIP DAYS
1. Press MODE key until display shows SP
2. Press DAY/MONTH key and SU starts flashing.
3. If you want Sunday to be a skip day, press SP
DAY key and SU will remain solid. Next day (MO)
will begin flashing. If you do not want Sunday to
be a skip day, press DAY/MONTH key to advance
to the first desired Skip Day. Then press SP DAY
key.
4. If you want to delete a previously set skip day, press
DAY/MONTH key to advance to that day - then
(when Flashing) Press SP DAY key to delete it.
Summary: SP DAY key sets a flashing day as a
SKIP day and also eliminates a constantly displayed day from Skip day status. DAY/MONTH
key advances the days.
6
Page 7

5. When all selected skip days are displayed as constant. Press ENTER key. Unit goes to run mode
and clock shows real time. Skip day(s) will flash
when its day of the week is reached.
6. To skip schedules on all days (such as for vacation shut-down) press the SP DAY key when unit
is in the run mode. Current day of the week will
flash and a “D” will appear in the upper right display. To resume normal schedule, press SP DAY
key again.
REVIEW/MODIFY
SCHEDULE:
1. Press MODE key until display shows SET. The
first chronological event will be displayed.
2. Press ENTER repeatedly to continue reviewing
the other scheduled events. After all are displayed, unit will show 12:00 AM and new entries
may be made.
3. To modify an event, press mode key until display
shows SET. Then press ENTER key until the
scheduled event is displayed. Then press the
SlG/SEC key to change to SIG 1, SIG 2, or blank
which indicates delete entirely. PRESS ENTER
KEY AFTER EACH MODIFICATION.
SKIP DAYS:
Press Mode key until display shows SP. All of the
skip days are displayed as solid. To modify, use
DAY/MONTH and SP DAY keys. (See section “TO
SET SKIP DAYS”).
OVERRIDE:
Override can only be executed when unit is in the run
mode and is accomplished by pressing the OVERRIDE key.
When pressed, duration time of signal 1 will be executed. If no specific duration had been set for signal
1, then it will sound for 1 second.
If either signal 1 or signal 2 are in progress when
OVERRIDE key is pressed, then the signal will be
terminated.
7
MLI-91(A)
TORK
®
1 GROVE STREET, MT. VERNON, NY 10550 TEL: 914-664-3542
FAX: 914-664-5052
 Loading...