

Page 1
User Guide
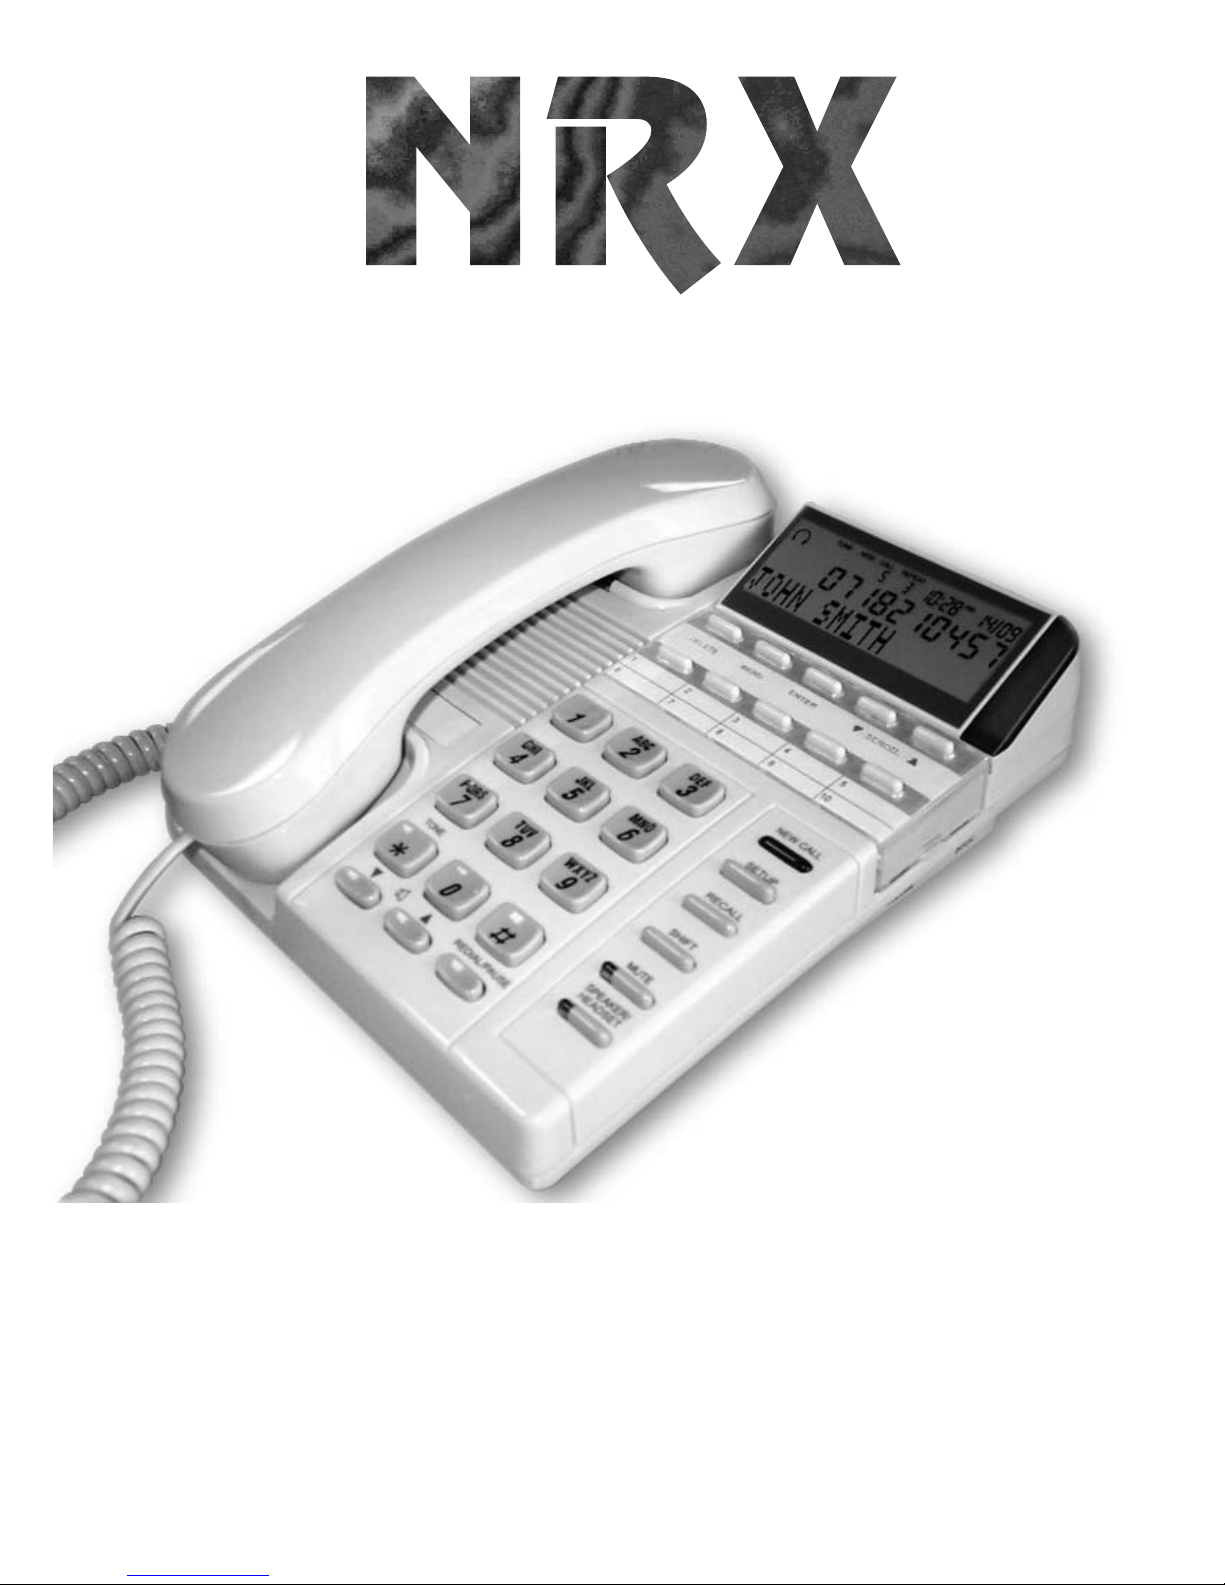
NRX-5
The display feature
telephone for the
corporate user
Telephones of Distinction
Business Telephone Range
Page 2
2
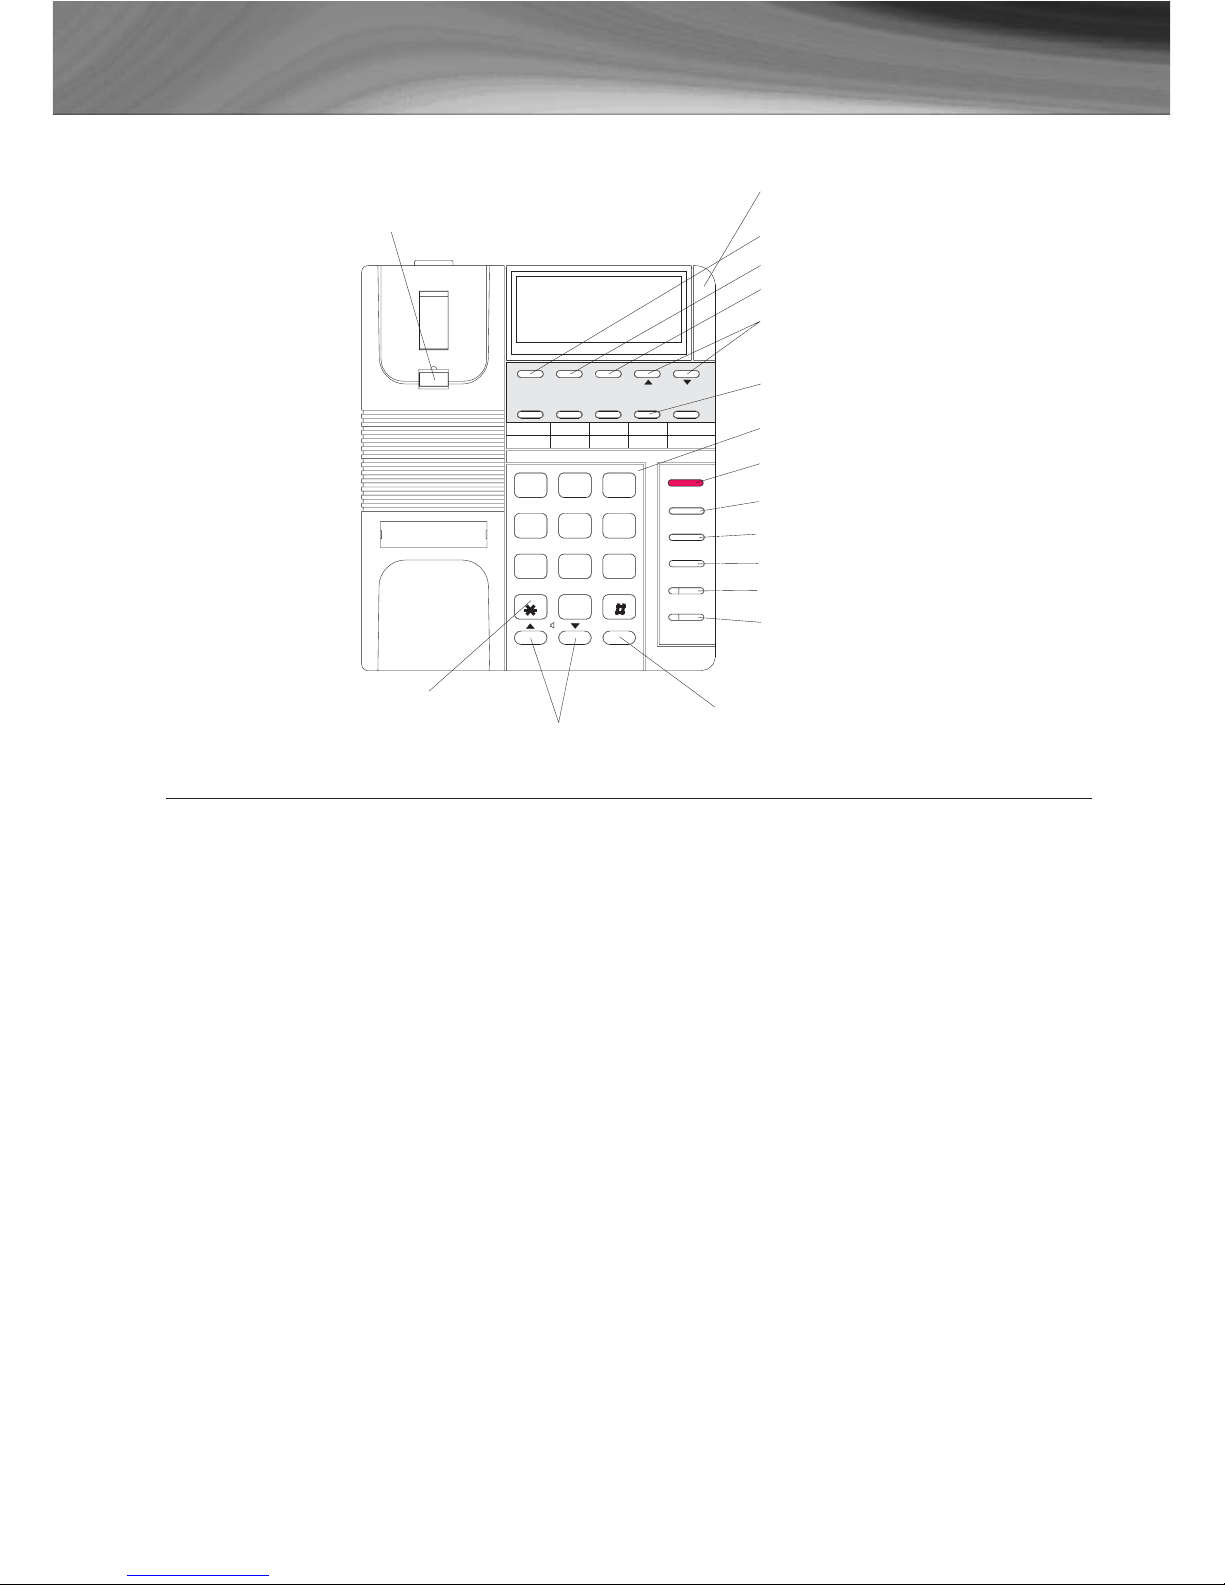
NRX-3 - Display Feature PhoneNRX-5 - Telephone Layout
Number Keypad
Memory Shift
Button
Recall Button
Mute Button
Message Waiting/
Ring Indicator
Wall Mount Tab
Tone Button
Volume Step Up/Step Down
Control Buttons
Pause/Last Number
Redial Button
Headset/Speakerphone
Dial Button
Menu Button
Memory Buttons
MENU
RECALL
TONE
SHIFT
MUTE
SPEAKER/
HEADSET
Tel No:
EXT:
0
4
7
1
6
5
8
9
2 3
ABC DEF
MNOJKL
GHI
TUV
PQRS
WXYZ
DELETE
CANCEL
SELECT
REDIAL/PAUSE
SHIFT
NEW CALL
1.
3.
5. 7.
9.
10.
8.
6.
4.2.
New Call LED
Delete Button
Cancel Button
Select Button
Menu Scroll Buttons
INDEX
11.. IINNSSTTAALLLLAATTIIOONN
1.1 Telephone Set-Up
22.. OOPPEERRAATTIIOONN
2.1 Dialling
2.2 Volume Control
2.3 Telephone Ringer
2.4 Programming the Memory Buttons
2.5 Phonebook
2.6 Caller ID
2.7 Privacy (Muting the Microphone during Conversation)
2.8 Redial
2.9 Pause Button
2.10 Recall Facility
2.11 Headset Facility
2.12 Speakerphone
2.13 Hearing Aid Compatibility
33.. WWAALLLL MMOOUUNNTTIINNGG TTHHEE UUNNIITT
Page 3
3
NRX-3 - Display Feature PhoneNRX-5 - Display Feature Phone
1. INSTALLATION
Connect the small plug (RJ-11) of the telephone line cord to the socket at the
back of the unit and the other plug to the telephone socket at the wall.
Connect the AC adaptor into a standard 220-240VAC mains socket and the
power socket at the back of the NRX-5.
The New Call LED will light for about 1 second and the display will show
0000--0000--0000
. After about 4 seconds the display will show
TTOOTTAALL::0000 NNEEWW::0000
If you have subscribed to a Caller ID Service, the time and date will be automatically updated when the first call is received. Otherwise, it is necessary to set
the time and date manually, please refer to the Telephone Setup Menu
In case of power failure or accidental unplugging of the AC adaptor, the built-in
EEPROM will retain all the telephone's memory including phone book and CID
records.
1.1 Telephone Set-Up
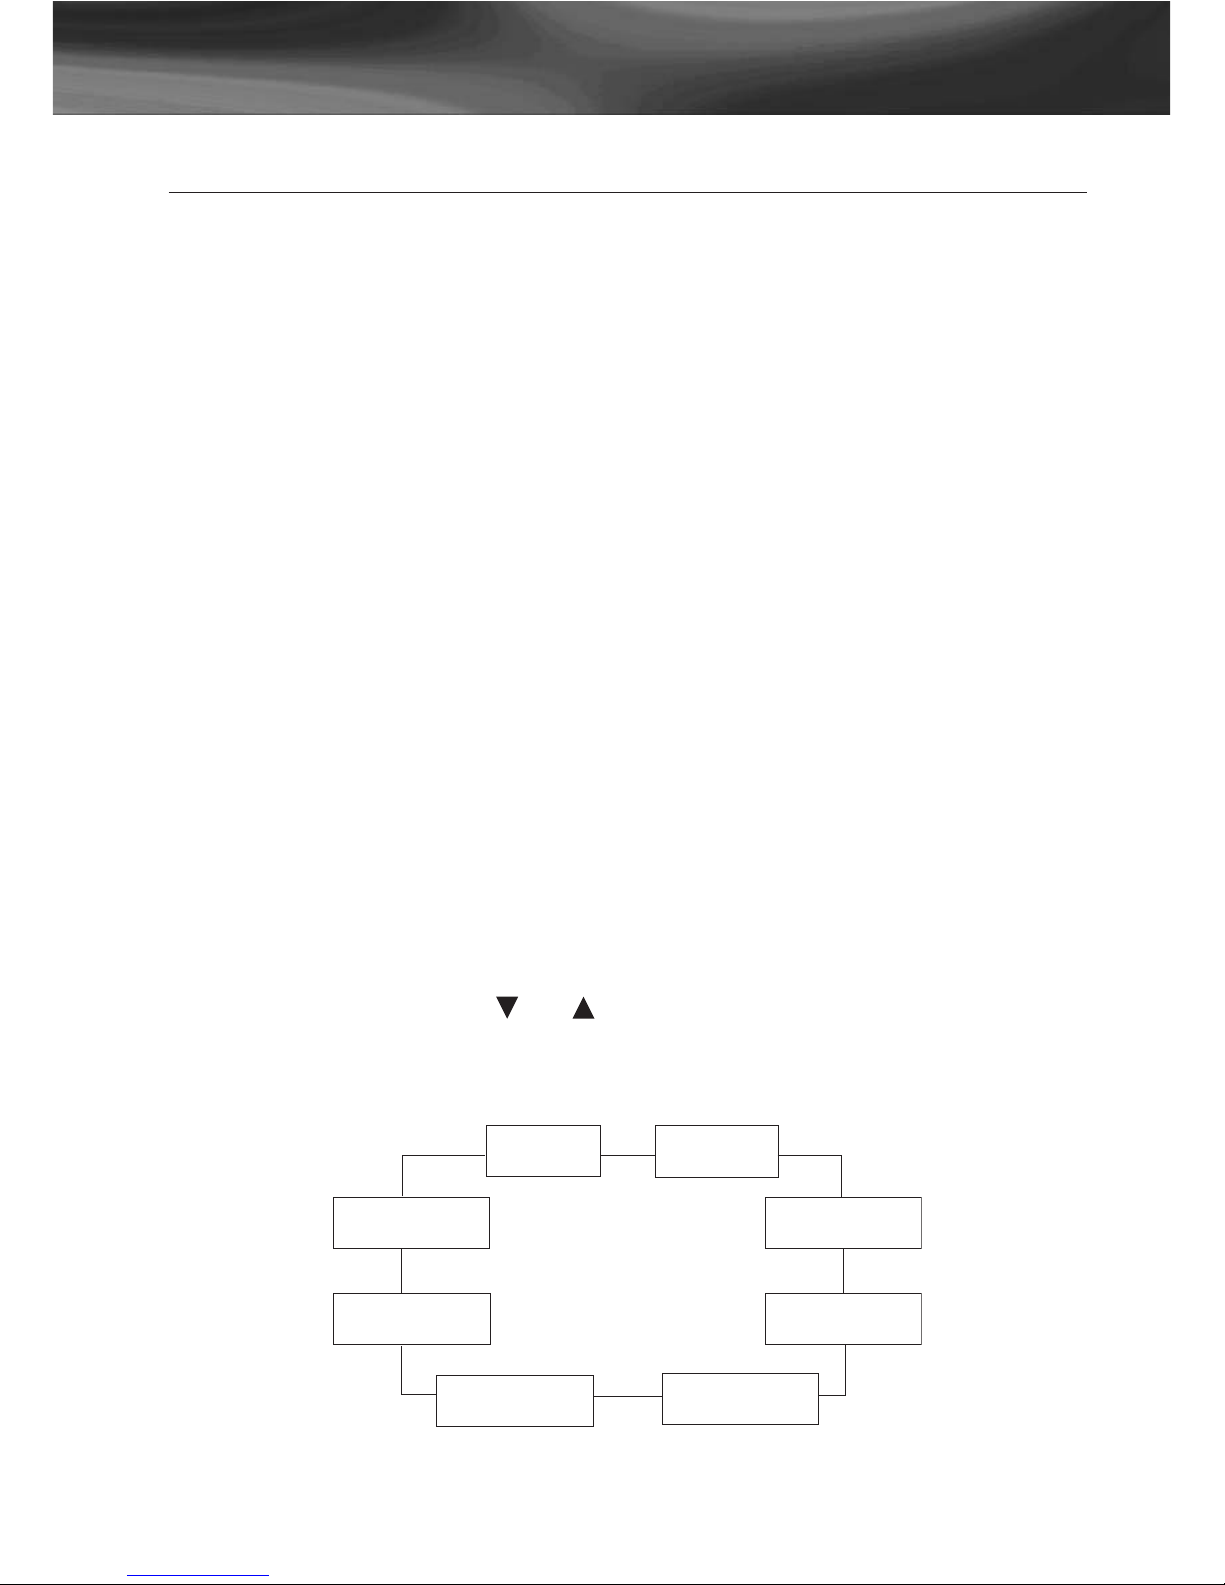
1.1.1 In standby mode, press the MENU button twice; the display will show
SYSTEM.
1.1.2 Using the SCROLL or buttons will switch between the various
setting modes of the main System Menu loop as shown below:
SET TIME
SET RECALL
LCD CONTRAST
MESSAGE
WAITING
TIME MODE
AREA CODE
PABX Prefix
NZ CLID
Page 4

NRX-5 - Display Feature Phone
4
1.1.3 Set Time
Scroll to 'SET TIME' on the System Menu and then press the SELECT button.
Use the SCROLL buttons to adjust to the desired time and date using the
SELECT button for confirmation after setting HOUR, MINUTE, DATE & MONTH.
1.1.4 Set Recall
Scroll to 'SET RECALL' on the System Menu and then press the SELECT button.
Use the SCROLL buttons to adjust the required setting of either TBR (Timed
Break Recall) or EARTH (Earth Recall) then press the SELECT button to confirm.
If TBR is selected, after pressing the SELECT button you will need to use the
SCROLL buttons to select the TBR timing (100ms to 1200ms). Once again press
the SELECT button to confirm your selection. The standard setting for Australia
is normally 100ms.
NOTE: By default your NRX-6 is factory set at TBR 100ms.
1.1.5 Set LCD Contrast
Scroll to 'LCD CONTRAST' on the System Menu and then press the SELECT
button. Use the SCROLL buttons to adjust to the desired LCD contrast then press
the SELECT button. The default setting is 4.
1.1.6 Set Message Waiting Type
Scroll to 'MESSAGE WAITING' on the System Menu and then press the SELECT
button. Use the SCROLL button to select one of the following options:
LINE REVERSAL
HICOM
90V DC
ERICSSON MD-110
AT&T/ALCATEL
FSK MWI (Spectrum)
Then press the SELECT button.If Line Reversal is selected - use the SCROLL
buttons to select Polarity Normal, Polarity Reversal or OFF and then press the
SELECT button. All message wait options not required should be set to OFF.
1.1.7 Set Time Mode
Scroll to 'TIME MODE' on the System Menu and then press the SELECT button.
Use the SCROLL buttons to select either 24 Hour or 12 Hour time format and
then press the SELECT button.
The default setting for the telephone is 24 Hour format.
Page 5

NRX-5 - Display Feature Phone
1.1.8 Set Area Code
• Scroll to 'AREA CODE' on the System Menu and then press the
SELECT button.
• If no Area Code is programmed into the unit then 'ADD AREA CODE
?' will be
displayed on the screen.
• Press the SELECT button again. The display will show 'ENTER AREA CODE'.
• Enter using the keypad then press the SELECT button.
If you select 'AREA CODE' from the System Menu when an area code has
already been programmed into the unit, then 'CHG AREA CODE
' appears on
the display together with the area code already entered. To change the code,
press the SELECT button, enter the new code using the keypad then press
SELECT again. To delete the code press the SELECT button twice.
1.1.9 Set PABX Prefix
This function allows Caller ID numbers to be stored into the Phone Book with
the correct prefix to allow direct dialing.
• Scroll to 'PABX PREFIX' on the System Menu and then press the
SELECT button.
• If no PABX Prefix is programmed into the unit then 'ADD P
ABX CODE?'
will be displayed on the screen.
• Press the SELECT button again. The display will now show
'ENTER PABX CODE'.
• Enter using the keypad then press SELECT button
1.2 New Zealand CLID
The default setting for New Zealand CLID is OFF.
2. OPERATION
2.1 Dialling
Lift the handset and dial the number. The telephone is pre-set at tone mode.
To terminate a phone call, simply replace the handset.
2.2 Volume Control
Handset or Headset mode:
• During the call, pressing volume buttons once will decrease or increase the
volume level respectively.
• There are 4 levels for handset or headset receivers.
Page 6

NRX-5- Display Feature Phone
6
• The volume level, steps from 1 to 4 and will be showed on the LCD
when adjusting.
• Volume 1 is the lowest level
• Volume 4 is the highest level
2.2.2 Speakerphone mode:
• During the call, pressing the volume buttons once will decrease or increase
the volume level respectively.
• There are 8 levels for handsfree speaker.
• The volume level, steps from 1 to 8, will be showed on the LCD when
adjusting.
• Volume 1 is the lowest level
• Volume 8 is the highest level
2.3 Telephone Ringer
The ringer volume and pitch can be adjusted via the two slide switches on the
right side of the NRX-5
The ringer volume can be set to Off, Low or High levels depending on the
position of the switch. There is an LED ring indicator inside the red lens. This
indicator is independent of the ringer volume switch position.
While the phone is ringing, you can adjust the ringer tone of your telephone
by moving the ringer pitch switch.
2.4 Direct Memory Buttons
5 one-touch speed dial numbers and 5 two-touch speed dial numbers can be
programmed into the memory of your phone.
Each memory location can store a maximum 16 digits phone number and a
maximum 16 letters for name.
1. Press the
SSEELLEECCTT
button
2. Enter the phone number using the keypad
3. Press the
SSEELLEECCTT
button
4. Enter the memory name using the keypad
i.e To enter 'A' press the 2 button once, to enter 'B' press the 2 button
twice etc.
5. Press then memory button (Use the
SSHHIIFFTT
button to access the second bank
of memories).
Page 7

NRX-5 - Display Feature Phone
7
During the memory storage procedure, you may wish to press the
RREEDDIIAALL//PPAAUUSSEE
button to insert a pause between numbers. A
““PP””
will show on
the LCD to indicate a 2 second pause in the dialling sequence. Each pause counts
as one digit.
There are four different ways to dial a stored speed dial number, depending on
your preference.
1. Pick up the handset and press the desired memory button
2. Press the
SSPPEEAAKKEERR//HHEEAADDSSEETT
button and then press the desired memory
button.
3. Press the desired memory button and check the LCD shows the correct
information. Press the
SSPPEEAAKKEERR//HHEEAADDSSEETT
button. (Handsfree Predialing mode)
4. Press the desired memory button and check the LCD shows the correct
information. Pick up the handset. (Handset Predialing mode).
If the one-touch or two touch memory button pressed has not been stored with
a number, the LCD will show ---------------- and
EEMMPPTTYY
and no dialling action will
be made.
2.5 Phonebook
The NRX-5 can store up to 200 of your frequently used names and numbers.
2.5.1 To Add a Contact to the Phone Book
1. Press MENU button once and the display will show PHONE BOOK XX,
where
XX denotes the number of phone book records stored.
2. Press the SELECT button once. The display will show ADD CONT
ACT?. Press
the SELECT button again to enter editor mode.
3. Enter the desired number using keypad. When number is displayed correctly
(up to 32 digits can be stored), press SELECT button to end the number entry
and start name entry.
4. Using the keypad letters to enter names, press the key until the correct letter
is displayed. When correct letter is displayed, move on to the next letter if it
is on another key. If you want to enter two successive letters that are on the
same key, you can press SCROLL key between letters or wait for 2 seconds
after the first letter has been shown to allow the cursor to move to the next
space. At the end of the name entry (maximum 16 letters), press SELECT
button to save this record. The display will show the editor mode again.
NOTE: If you want to add another record to the phone book, repeat steps 3
and 4. Up to 200 phone book records are allowed. If the entering action has
been completed, press CANCEL button twice.
Page 8

NRX-5 - Display Feature Phone
8
If the total stored number of records has reached 100, the display will show
PHONE BOOK FULL. It will not be possible to add another record without
deleting existing records.
2.5.2 To Copy a Caller ID Record to the Phone Book
Press SCROLL buttons to select the desired CLID record.
Press SELECT button to enter editor mode.
Use SCROLL buttons or DELETE button to edit the number if necessary.
Press the SELECT button to save the CLID phone number and enter the CLID
name editor mode.
Use SCROLL buttons or DELETE button to edit the name if necessary.
Press the SELECT button to save the CLID record into the phone book.
2.5.3 To Copy the Last Dialed Number to the Phone Book
Press the REDIAL/PAUSE button. The last number dialed will be shown on
the LCD.
Press SELECT button to enter editor mode.
Use SCROLL buttons or DELETE button to edit the number if necessary.
Press SELECT button again.
Use SCROLL buttons or DELETE button to edit the name if necessary.
Press SELECT button again to save the record.
2.5.4 To Review the Phone Book
Press the MENU button once. The display will show PHONE BOOK XX
,
where XX denotes the number of phone book records stored.Use SCROLL
buttons to scroll through the phone book records. The records will be
displayed in alphabetical name order.
2.5.5 To Search for a Contact
Press MENU button once. The display will show PHONE BOOK XX, where XX
denotes the number of phone book records stored.Use the keypad letters to
enter the first letter of the name you require (or the full name) then press
SELECT button.
2.5.6 To Dial a Number in the Phone Book
When the desired phone book record appears on the display, pick up the
handset or press SPEAKER/HEADSET button to activate the call.
Page 9

NRX-3 - Display Feature Phone
9
NRX-5 - Display Feature Phone
2.5.7 To Delete a Number in the Phone Book
Press MENU button once. The display will show PHONE BOOK
XX.
Use the SCROLL buttons until the record you wish to delete appears on the
display.Press the DELETE button once.
The display will show DELETE
?.
Press the SELECT button once for confirmation.
2.6 Caller ID
To make use of these features, you must first subscribe to Caller ID Service.
2.6.1 99 Caller ID records
When you use this telephone with the Caller ID service, the NRX-5 enables you to
see the number of the calling party (unless the call is blocked or is from a silent
number) when the phone rings. Up to 99 most recent received calls' records,
together with their time and the date information, are stored. Each call is
numbered in the call history,
2.6.2 New call notification
When a new call is received, the time, date and calling number of this call will
be displayed between the first and second ring.
The
NNEEWW CCAALLLL
LED will flash when the phone has received a new CLID. It will
continue to flash until all new call information in the call history has been
reviewed.
2.6.3 New call review
To review the new calls:
1. Press menu scroll buttons to review the new calls
2. When all new calls have been reviewed, the NEW CALL LED will stop flashing
and switched off.
2.6.4 Caller ID record summary
The display will show the Caller ID's record summary as TOTAL:XX, where XX is
the total number of calls stored in the memory.
The display also show the number of new calls received as NEW:YY, where YY is
the number of new calls.
2.6.5 Call review
To review all the calls in the CLID call log, use the menu scroll buttons buttons.
Page 10

NRX-5 - Display Feature Phone
2.6.6 Deleting a call from the call history
It is possible to delete a call in the call log by using the menu scroll buttons until
the screen displays the information you wish to delete.
Press the
DDEELLEETTEE
button once, the displayed call record will be deleted and the
next CLID information will be displayed on the screen.
2.6.7 Speed dialling from the Caller ID call log
Use the menu scroll buttons to scroll through the call log.
When the desired number is shown, press the
SSPPEEAAKKEERR//HHEEAADDSSEETT
button or
pick up the handset. The telephone will dial the displayed call log number.
NNOOTTEE:: IItt iiss ppoossssiibbllee ttoo ccoommpplleetteellyy cclleeaarr aallll PPhhoonneebbooookk aanndd CCLLIIPP mme
emmoorriieess
aanndd rreellooaadd tthhee tteelleepphhoonneess ddeeffaauulltt sseettttiinnggss.. TThhiiss iiss hhoowweevveerr aa iirrrreevveerrssiibbllee
aaccttiioonn.. PPrreessss tthhee DDEELLEETTEE bbuuttttoonn aanndd tthheenn bbootthh ssccrroollll uupp aanndd ssccrroollll ddoowwnn
bbuuttttoonnss ttooggeetthheerr..
2.7 Privacy (Mute)
Press the
MMUUTTEE
button to turn off the transmission of the speech to the
telephone line from the handset microphone in handset mode or headset
microphone in headset mode or base microphone in speakerphone mode.
Press the
MMUUTT
E button again to resume the conversation with the calling party.
2.8 Redial
To redial the last dialled number, pick up the handset or press the
SSPPEEAAKKEERR//HHEEAAD
DSSEETT
button, then press the
RREEDDIIAALL//PPAAUUSSEE
button. The
telephone will automatically redial the last number dialled.
Alternatively, press the
RREEDDIIAALL//PPAAUUSSEE
button while the NRX-5 is at off-line, the
display will show the last dialled number and its call duration. Pick up the handset
or press the
SSPPEEAAKKEERR//HHEEAADDSSEETT
button, the telephone will automatically dial
the last number dialled.
2.9 Pause
If the
RREEDDIIAALL//PPAAUUSSEE
button is pressed between numbers, a “P” will show on
the LCD to indicate a 2 second pause in the dialling sequence.
2.10 Recall Facility
The NRX-5 has a Recall facility which is used to access network/PBX services.
To use this facility pick up the handset or press the
SSPPEEAAKKEERR//HHEEAADDSSEETT
button
then press the
RREECCAALLLL
button.
See Telephone Set-Up for Recall types available and set-up.
Page 11

NRX-3 - Display Feature Phone
11
NRX-5 - Display Feature Phone
2.11 Headset Facility
The
SSPPEEAAKKEERR//HHEEAADDSSEETT
button enables you to use the telephone without lifting
the handset. Connect a headset and simply press the ‘Headset’ button once to
connect to the line. (An icon will appear on the LCD to indicate you are in
Headset mode). Pressing the ‘Headset’ button again will disconnect the telephone
line and terminate the call.
During a headset (handsfree) conversation, lifting the handset will switch the unit
to the handset mode. The headset will be disabled and the handset should be
used for conversation instead. The headset mode will be activated again by
pressing the ‘Headset’ button and replacing the handset.
2.12 Speakerphone
The SPEAKER/HEADSET button allows the user to operate the telephone without
lifting the handset. Press the '
SSPPEEAAKKEERR//HHSS
' button once, then operate the
telephone as normal. Communication with the party at the other end of the
telephone line is possible using the built in Microphone and Speaker. To indicate
that the telephone is in Speakerphone mode, an Icon will appear on the LCD.
2.13 Hearing Aid Compatibility
The handset receiver is hearing aid compatible.
3. WALL-MOUNTING THE UNIT
The NRX-5 can be wall mounted using the wall mount bracket installed on the
bottom of the unit.
3.1 -Dismount the wall mount bracket from the unit.
3.2 -Place the wall mount bracket to the required position on the wall
3.3 -Drill two holes on the wall according to the distance as marked by two
mounting holes.
3.4 -Install the two screws supplied with the unit in the wall.
3.5 -Re-install the wall mount bracket to the bottom cabinet for the wall mount
position.
3.6 -Position the wall mount slots on the bracket of the unit over the two screws
on the wall. Pull down and lock into place.
3.7 -Beneath the earpiece section of the cradle you will find a small tab. Pull this
up to form the hook for the handset.
3.8 -When you are on the telephone, you sometimes need to put the handset
down for a moment. There is a special hook at the back (top) of the unit so that
you can hang the handset on the unit, when it is wall-mounted, without
terminating the call.
Page 12

12
Polaris Communications Pty Ltd
393 Flemington Road, North Melbourne, Victoria 3051
Sales & Service: 1-800 626 505 Fax: 1-800 079 036
Email: [email protected] Web: www.polaris.com.au
Polaris Communications Pty Ltd ACN: 006 102 601
 Loading...