

Page 1

m
o
c
m
o .
c
NRX EVoIP 1
le
te
rx.n
w
USER GUIDE
ww
Page 2
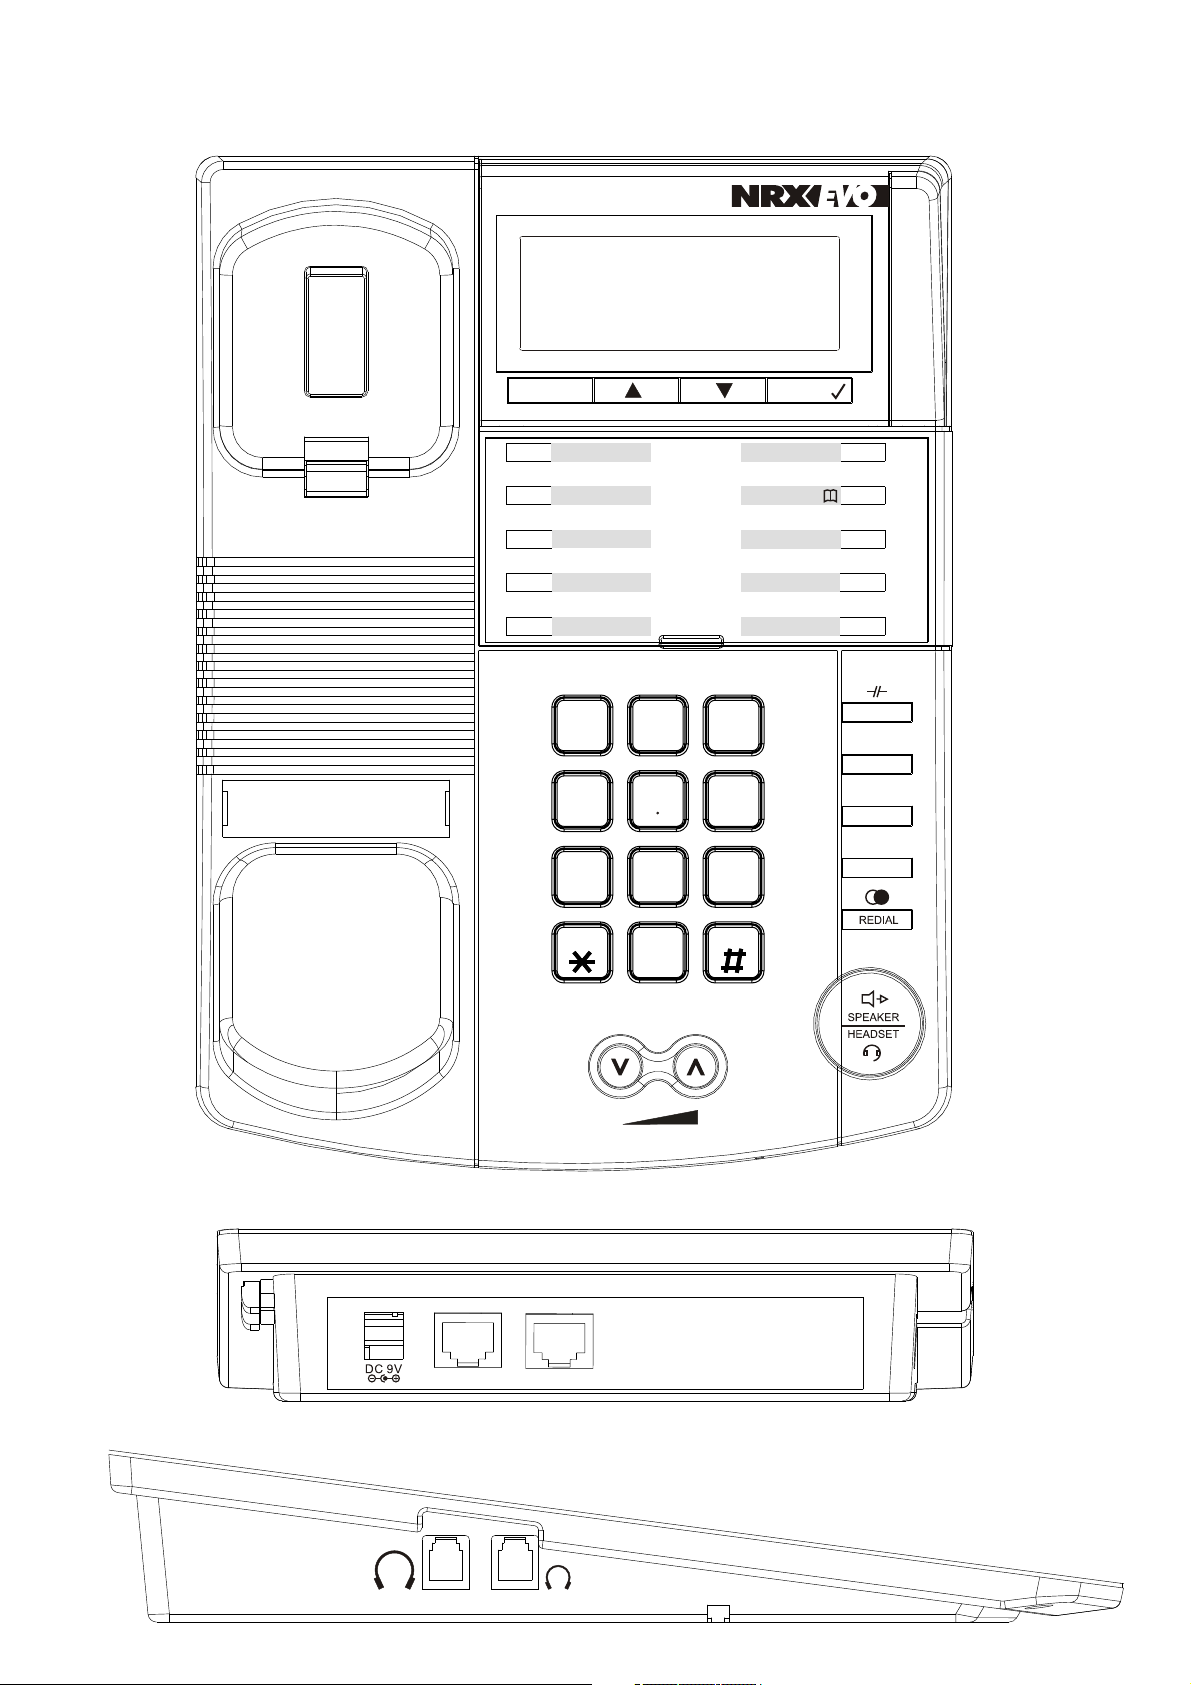
The layout of your NRX EVoIP 1
Tel No:
EXT:
MEN U ENT ER
L 1
L 2
L 3
M1
M2
1
GHI
4
PQRS
7
ABC
2
JKL
5
TUV
8
DEL /MUTE
PHO NEBOO K
CAL L LOG
FOR WAR D
DEF
3
MNO
6
WXYZ
9
OK
DND
HOL D
TRA NSFER
CON F
VMA IL
WAN
0
LAN
Page 3

Contents
Quick Start Guide:
Step 1: Broadband (ADSL/Cable Modem) Connections for NRX EVoIP 1 Page 2
Step 2: Configurations from Keypad Page 3
Step 3: Configurations from PC Web Browser Page 4
Step 4: Making Point-To-Point SIP Calls Page 7
Main User Manual:
1. Introduction Page 8
2. Features Page 8
3. Standard Compliances Page 9
4. Packing Contents Page 10
5. LED Indicators Page 10
6. Installations & SIP Configuration Page 11
7. Default Reset by Using Keypads Page 11
8. Configuration by Web Browser Page 12
9. Menu Shortcuts Page 49
10. VoIP Application Examples Page 54
11. Trouble Shooting for Web Configurations Page 60
12. WARRANTY Page 63
1
Quick Start Guide
Step 1: Broadband (ADSL/Cable Modem) Connections for NRX EVoIP 1
1. Connect one end of handset cord to the telephone handset and the other end to the handset socket located on the
underside of the telephone.
NOTE: You will need to remove the wall mount bracket to access this socket.
2. Connect the RJ45 WAN port to a ADSL NAT Router.
3. Connect the RJ45 LAN port to Notebook PC LAN port using a Category 5 LAN cable.
4. Connect DC Power Adaptor. The LCD Panel will start showing 'Loading Program!'
5. The LCD panel will show Date, Time and No service without SIP registration, or <phone number>
after successful SIP registration.
6. Pick up the phone, and the LCD panel will show IP Dialing.. 1. Please hang up.
7. Press MENU , 4 , 5 from the keypad to check the LAN IP address (default: 192.168.123.1) for NRX EVoiP
telephone.
8. The MENU key is used for menu/escape, the UP , DOWN and ENTER keys for navigating the menu
system, phonebook or Call log.
Figure A. ADSL Connections with NAT Router for NRX EVoIP 1
2
Page 4
Quick Start Guide
Step 2: Configurations from Keypad
Keypad Settings for Password and SIP Account:
1. Press MENU , 7 , 4 and the LCD panel will show Password:
2. Enter password (Default: admin) i.e. press 2 two times, 3 two times, 6 two times, 4 four times, 6 three
times, then press ENTER. Note: The password must be entered first to access the other settings.
3. Press MENU , 5 , ENTER to configure First realm for SIP account.
Keypad Settings for IP Status:
1. IP Addresses for WAN and LAN Ports: Press MENU , 4 , 5
2. WAN port Status : Press MENU , 4 , 1 , 1
3. LAN port Status : Press MENU , 4 , 2
Example: Network Settings for Fixed IP by Keypad (M=MENU; E=ENTER)
For Network Settings, there are three choices for IP type in the WAN Settings; Fixed IP, DHCP, and PPPoE.
For Fixed IP, the user must key in a static fixed IP address, Subnet Mask, and Gateway IP with DNS Server
IP address.
1. Fixed IP: Press M_4_E_1_E_M_M_M to select Fixed IP and reboot.
2. Set IP Address: Press M_4_E_2_1 and enter 192*168*101*112 then E_M_M_M_M_M to reboot.
3. Set Subnet Mask: Press M_4_E_2_2 and enter 255*255*255*000 then E_M_M_M_M_M to reboot.
4. Set Gateway IP: Press M_4_E_2_3 and enter 192*168*101*001 then E_M_M_M_M_M to reboot.
5. Set DNS Server IP address as the following page if necessary.
6. Power the unit OFF and then ON again.
3
Quick Start Guide
Step 3: Configurations from PC Web Browser
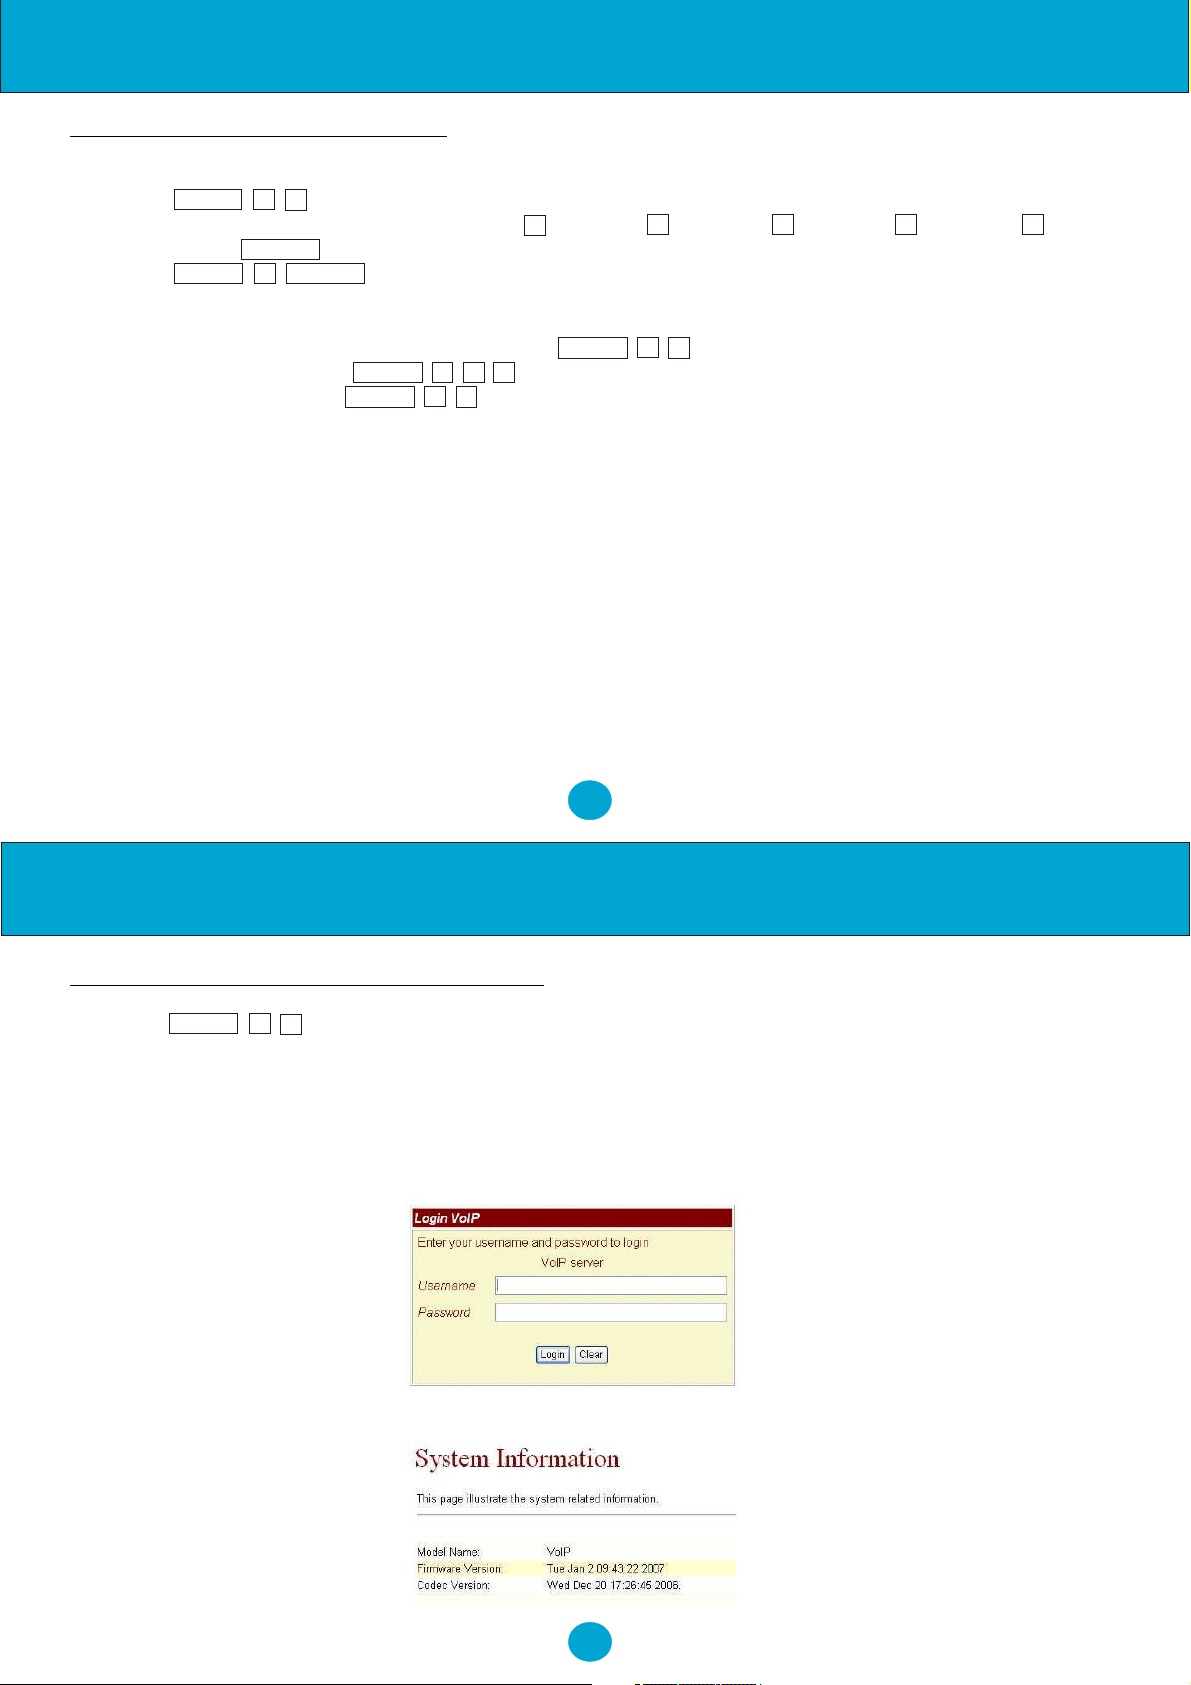
1. Press MENU , 4 , 5 from keypad to get WAN and LAN IP addresses.
2. Enter the IP address into your Web Browser i.e Given the IP address 192.168.123.1 for LAN port, enter
http://192.168.123.1:9999 into the Web browser to display login page for Web configuration.
3. Enter username and password and click LOGIN.
Default:
Username: admin
Password: admin
5. The Web browser will show the following System Information page.
4
Page 5
Quick Start Guide
6. You need to set up the following web configuration:
Phone, Network WAN/LAN Settings, SIP
Settings. Remember to submit, save and reboot for
new configuration.
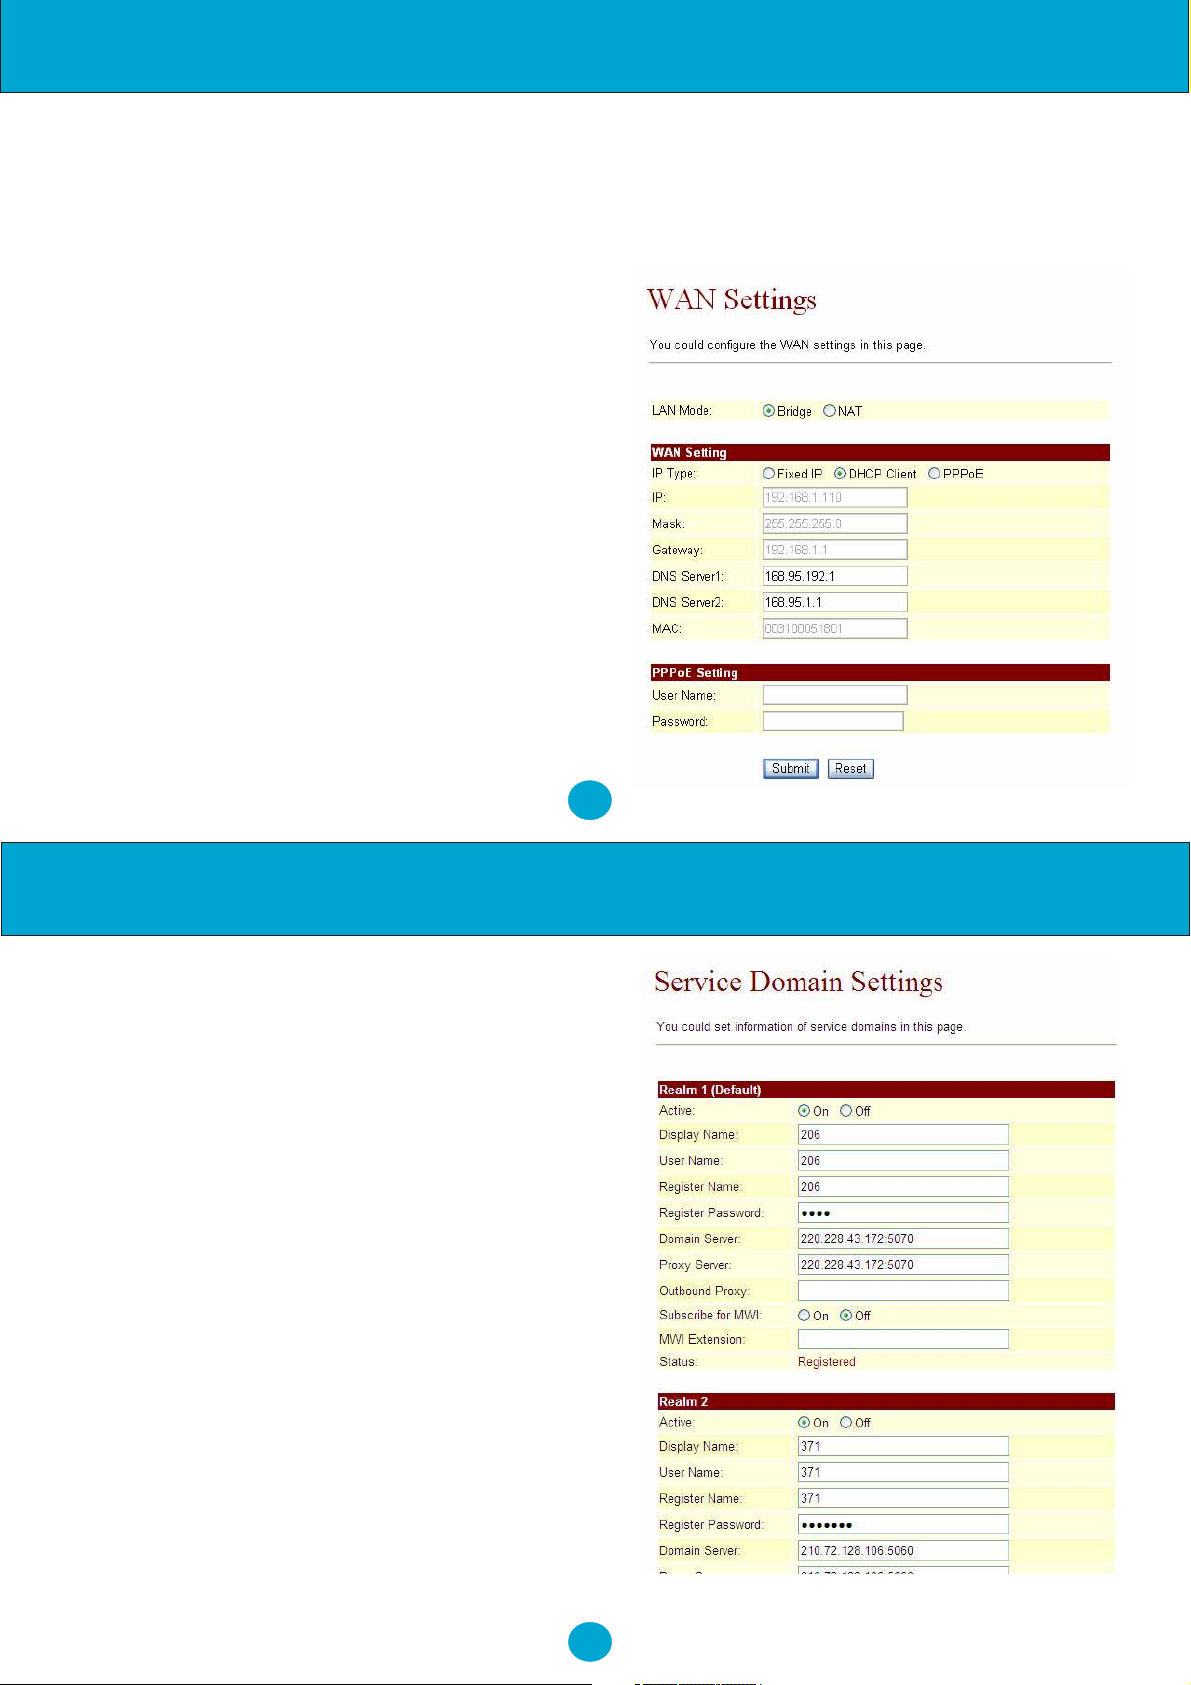
7. For WAN settings:
DHCP:
This is for Dynamic IP address and is commonly
selected for WAN IP address when NAT is selected.
Once selected, the IP address, Subnet mask, and
Gateway IP will be automatically assigned.
Remember to click Submit button to get effective.
PPPoE:
This is for ADSL IP address when PPPoE protocol is
used. Once selected, the user needs to enter
the PPPoE username and password, and the WAN
port will get an IP automatically.
Bridge LAN mode:
The Bridge LAN mode can be selected when NAT is
not needed. In this case, the WAN and LAN port
are transparent as Ethernet Bridge Hub. Note that
the embedded NAT is enabled at default.
Quick Start Guide
8. SIP Settings: You may configure up to 3 SIP
registration accounts with the 3 realms in Service
Domain Settings.
Realm 1 (Default for 1st SIP registration account)
Active: ON
Display Name: 206
User Name: 206
Register Name: 206
Register Password: 1234
Proxy Server: 220.228.43.172:5070
Domain Server: 220.228.43.172:5070
Outbound Proxy:
Realm 2 & 3 (for 2nd & 3rd SIP registration accounts)
Active: ON
Display Name: 371
User Name: 371
Register Name: 371
Register Password: 1234567
Proxy Server: 210.72.128.106:5060
Domain Server: 210.72.128.106:5060
Outbound Proxy:
5
6
Page 6

Quick Start Guide
SIP Account Number Selections:
With 3 SIP account registered numbers, the NRX EVoIP telephone may receive all the incoming calls from
the 3 SIP servers. Realm 1, 2, and 3 are used to configure the registered numbers for the 1st, 2nd, and 3rd
SIP servers, respectively. The telephone may register different phone numbers to different SIP servers.
You can select the different lines by pressing LINE 1, LINE 2 or LINE 3 on the telephone. Line 1 is used at
default. When one or more of the lines are registered the LED indicator will switch on.
9. The LCD will display the registered <phone number> after successful SIP registration to the 1st SIP
server at default.
Step 4: Making Point-To-Point SIP Calls
1. Select one of the three SIP servers. Pick up the handset or press the 'Speaker/Headset' button, you
should hear a dial tone.
2. Press 123456# to call the party with the number 123456 registered in the SIP server. Note # is used to
send out the call immediately. In a moment, you should hear the ring back tone, and wait for the called party
to answer.
Note: If you have difficulties in configuring your NRX EVoIP telephone, please refer to the last chapter for
trouble shooting.
7
Introduction
1. Introduction
The NRX EVoIP is an IP Telephone with SIP Protocols for Voice over IP (VoIP) applications. Connecting to
the Internet, the NRX EVoIP can make a VoIP call over the Internet. The NRX EVoIP provides one WAN port
for Internet ADSL connections, one LAN port for PC connection, and two RJ11 connectors for optional
Headset. With an embedded NAT/DHCP server, the unit can be easily configured for different network
requirements by using a IE Web browser or the telephone keypad.
Note: The NRX EVoIP telephone requires an IP address, a subnet mask, and its gateway Router IP address to
connect to Internet. These three are available from your Internet service provider. The NRX EVoiP can use
PPPoE or DHCP to automatically get an assigned dynamic IP from the ITSP. Please refer to Section 8
Configurations by Web Browser for detailed information.
2. Features
The NRX EVoIP has the following features:
• Two LED Indicators: REG for registration, VMS for voice mail
• RJ45 x 2 for WAN and LAN ports + RJ11 x 2 for Headset ports
• Configurations by Web Browser and Telephone Keypad
• Embedded NAT/DHCP Server
• PPPoE/DHCP Client for Dynamic IP plus NAT, DNS, and DDNS Clients
• Support STUN server for NAT Traversal
• Support registrations for up to 3 SIP accounts
• Hot Line Mode
8
Page 7

Standard Compliances
• Dial Plan Settings
• Speaker Phone, Voice Mail (VMS) for incoming IP calls
• Call Forward/Transfer/Waiting/Hold, and 3-Way Conference Call features
• Auto Configurations by TFTP, HTTP, or FTP server
• Remote Firmware Upgraded with HTTP or TFTP server by Web PC
• Direct IP/URL Dial without SIP Proxy or Dial number via SIP server
• Telephone features: Volume adjustment, Phone book, Redial
• Function Keys: Speed Dial, 3 SIP Registration Lines, DND & VMS
• Out-Band DTMF (RFC 2833) / In-Band DTMF / Send DTMF SIP Info
3. Standard Compliances
The NRX EVoIP Phone supports for the following standards:
• VoIP Protocol: IETF RFC3261 and RFC 2543 for SIP
• SIP Authentication: IETF RFC2069 and RFC 2617 for MD5
• Speech Codec: ITU-T G.711, G.723, G.729A/B, VAD and CNG
• Echo Cancellation: ITU-T G.165/168
9
Packing Contents
4. Packing Contents
Inside the NRX EVoIP box you should find:
(1) One NRX EVoIP telephone (Including Handset & Handset Cord)
(2) One AC to DC Power Adaptor (9~12VDC/1A)
(3) One User Manual
(4) One network cable
Please check if the packing is damaged or any component is missing. If so, please contact your
distributor.
5. LED Indicators
On the top right hand side of the NRX EVoIP telephone, there are two LED indicators.
REG: "Red On" indicates successful SIP registration .
VMS: "Red Flashing" indicates there are voice messages for incoming VoIP calls.
To hear the message, press the Speaker Phone key then VMS function key.
10
Page 8

Installation & SIP Configuration
6. Installations & SIP Configurations
1. Connect the NRX EVoIP RJ45 WAN port to NAT Router using a Category 5 LAN cable.
2. Connect RJ45 LAN port to your PC using a Category 5 LAN cable.
3. Connect RJ11 Headset port to a headset if available.
4. Connect DC Power Adaptor. The LCD Panel will start displaying "Loading Program" for about 5
seconds, and the LEDs will be ON and start initializations.
5. The LCD panel will show Date, Time and No service without SIP registration, or <phone number>
after successful SIP registration.
6. Pick up the phone, and you will hear a dial tone and the LCD panel will show IP Dialing.. 1. If you
hear a busy tone, please check if the WAN port is connected and hang up.
7. Press Menu_7_4, and test (i.e. press 8 two times_3 three times_7 five times_8 two times_enter) to
enter password first. Press Menu_4_5 from keypad to read WAN and LAN IP addresses. The
default LAN IP address is 192.168.123.1.
8. Go to Chapter 8 and you may enter this IP address in IE Web browser for web configurations.
Configure and register the NRX EVoIP into your SIP server. There are more details and examples for
VoIP application of SIP registrations in Chapter 10.
9. If NRX EVoIP has successfully registered in the SIP server, the LED REG will turn ON.
10. Pick up the phone, and press 123456# to call the party with the number 123456 registered in the
SIP server. Note that # will dial out the number immediately. Dialing without # will not dial out until
the auto dial timer (default=5 seconds) elapsed. In a moment, you should hear a ring back tone,
and wait for answer.
7. Default Reset by Using Keypads
Press Menu / 7.Administrator / 3.Default setting / 1.Load default by using Menu and arrow keys to
11
Configuration by Web Browser
reset back to factory defaults, and the LCD panel will show Set Default…. In 5 seconds, the LCD will
start showing Loading Program and System Initialized. The NRX EVoIP will reset to default and restart.
Press Menu / 7.Administrator / 7.Restart to reboot the NRX EVoIP. In 5 seconds, the LCD will start showing
Loading Program and System Initialized.
8. Configurations by Web Browser
You may enter the IP address from a Web browser to configure the NRX EVoIP telephone.
1. Enter the IP address into the browser address window followed by :9999
For example -
2. The following Web page should be displayed on PC. If you have difficulties accessing the Web page
from the PC Web browser, please refer to Chapter 9 for trouble shooting.
http://192.168.123.1:9999
12
Page 9
Configuration by Web Browser
8.2. Please enter the username and password into the blank fields. The default settings are:
Username: admin
Password: admin
8.3. Click the "Login" button to enter the System information page for web configuration.
Whenever you change the setting in each Web page, you need to click the "Submit" button on the
page, and then click "Save Change" on the tool bar followed by the 'Save' Button confirmation to save into
the phones non-volatile memory.
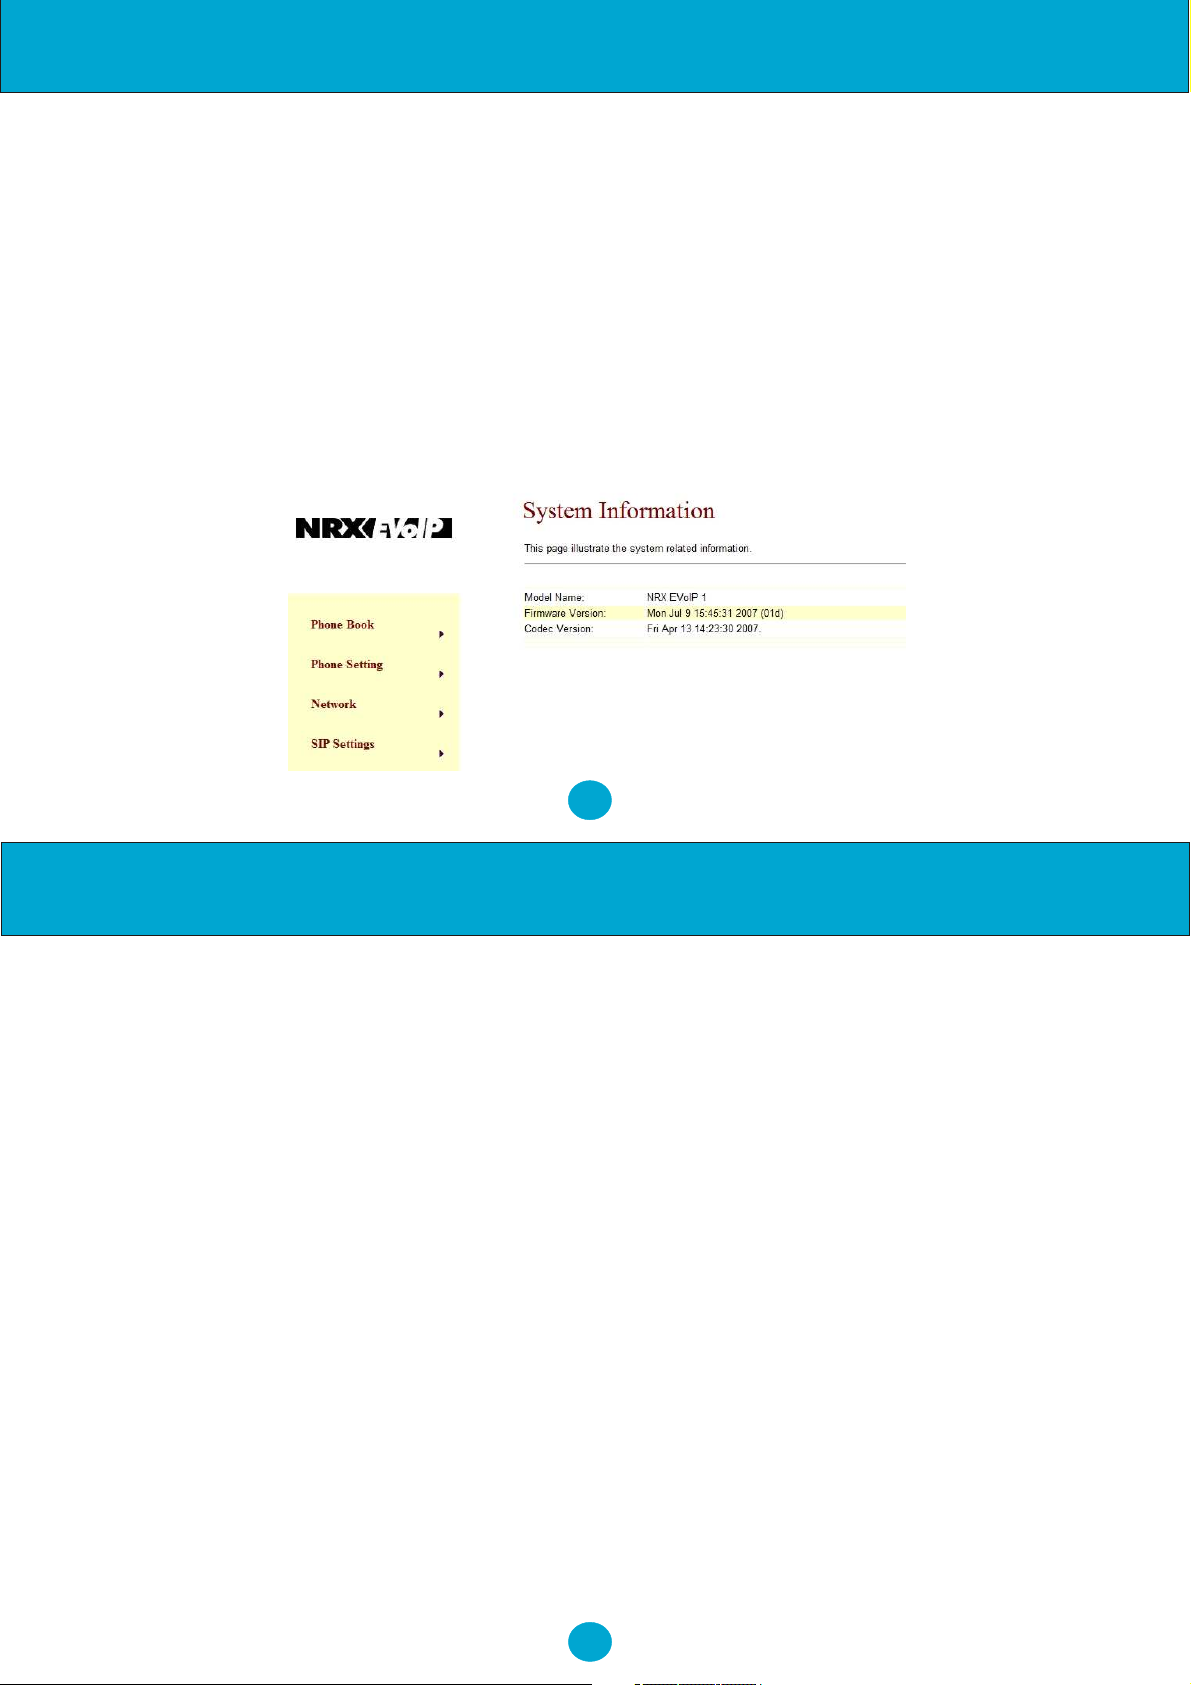
System Information
8.4. The system information shows firmware version, Codec, etc.
8.5. You can click the buttons, for example Phone Book, at the left hand side to configure the NRX EVoIP
telephone.
13
Configuration by Web Browser
Phone Book
Phone Book Settings:
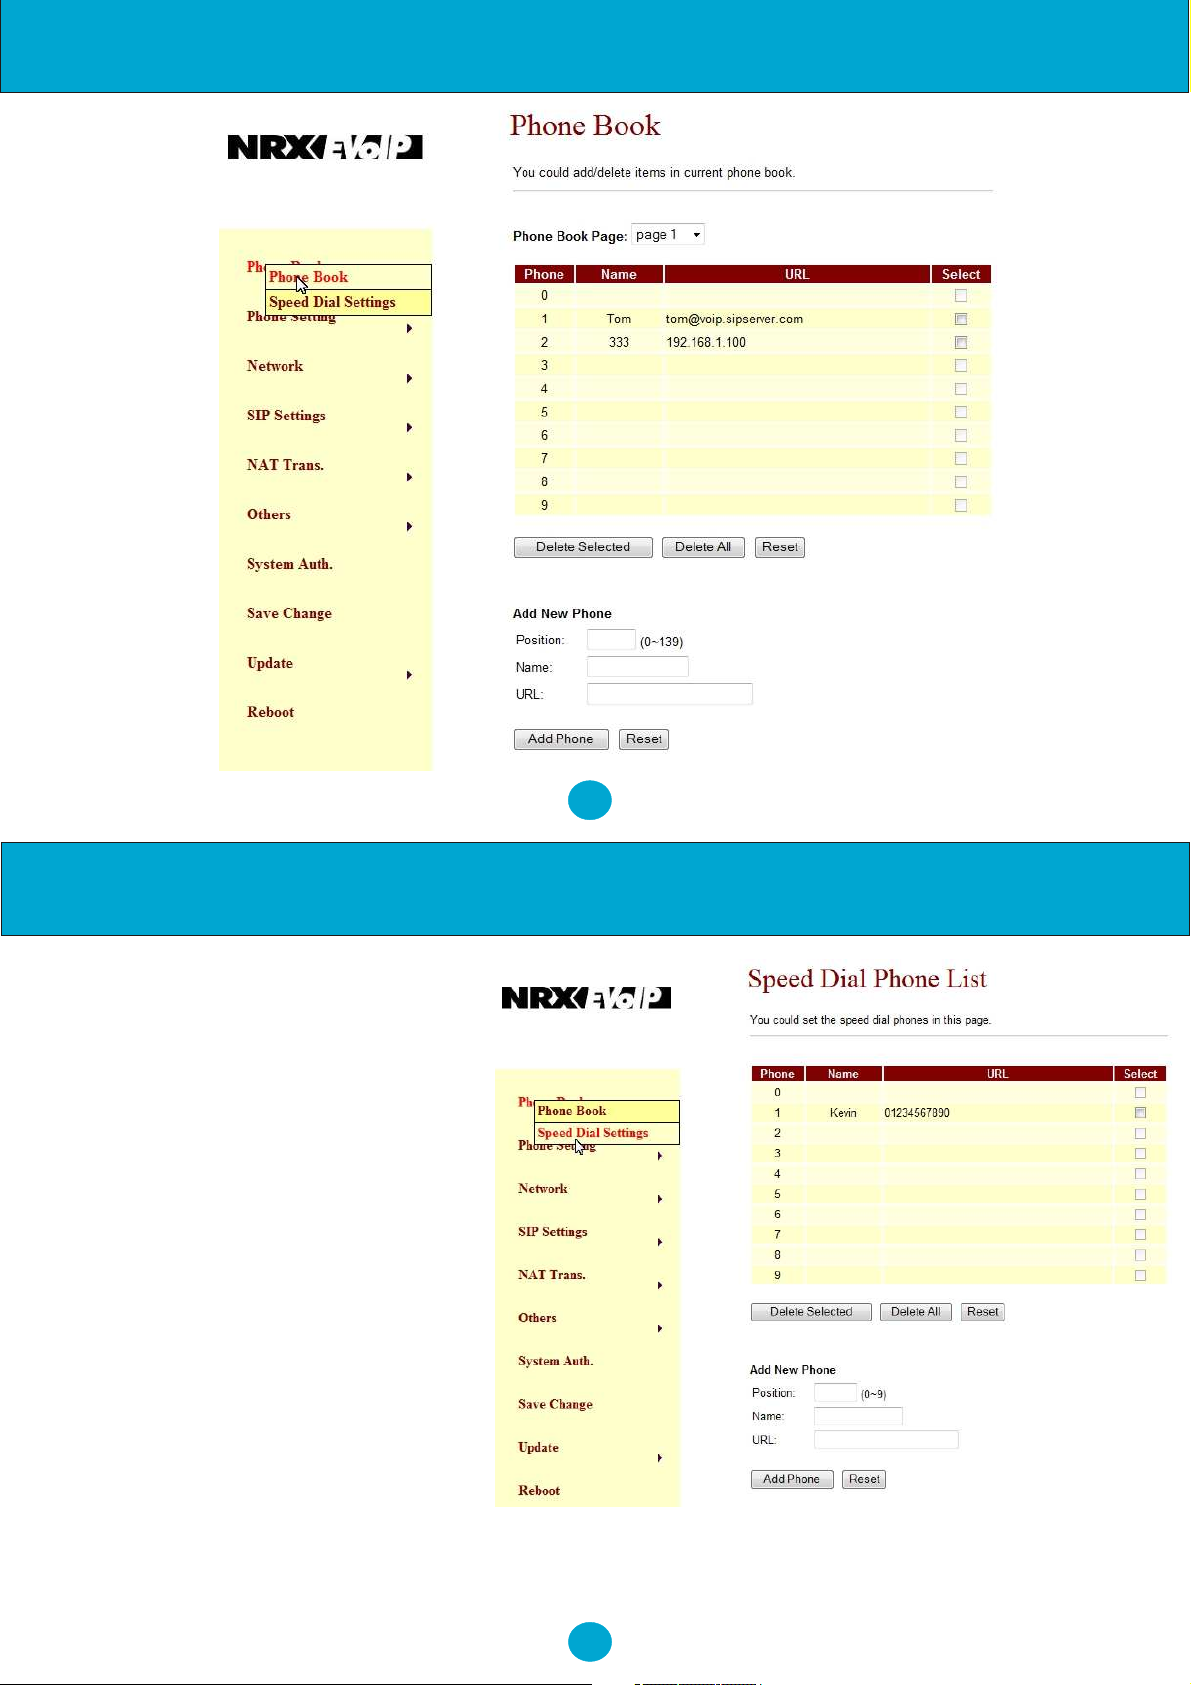
8.6. You can add/delete names up to maximum 140 entries in Phone book list.
8.7. To add a phone name, you need to enter the position, the name, and the phone URL. When you have
finished, click the "Add Phone" button.
8.8. To delete a phone name, select the record then click "Delete Selected" button.
8.9. To delete all the phone names, please click "Delete All" button.
8.10.To dial from the phonebook, the records can either be accessed by pressing the 'Phonebook' button
and then scrolling through the records until you have the required record, then pressing the 'Speakerphone/
Headset' button or lifting the handset. Alternatively, the records can be speed dialed from the keypad as
follows:
Example 1: Name: 333, URL: 192.168.1.100
Press 333# on telephone, the phone at 192.168.1.100 will start ringing.
Example 2: Name: 201, URL: 14081234567
Press 201# on telephone, the phone will call the registered number 14081234567.
Example 3: Name: 301, URL: 192.168.1.100:5062
Press 301# on telephone, the phone at 192.168.1.100 with port 5062.
Example 4: No Name 401 in phone book.
Press 401# on telephone, the phone will call 401.
NOTE: The # key acts as a send button when pressed after a number has been entered, If the # key is not
pressed, the number is dialled automatically after five seconds.
14
Page 10
Configuration by Web Browser
15
Configuration by Web Browser
Speed Dial Phone List
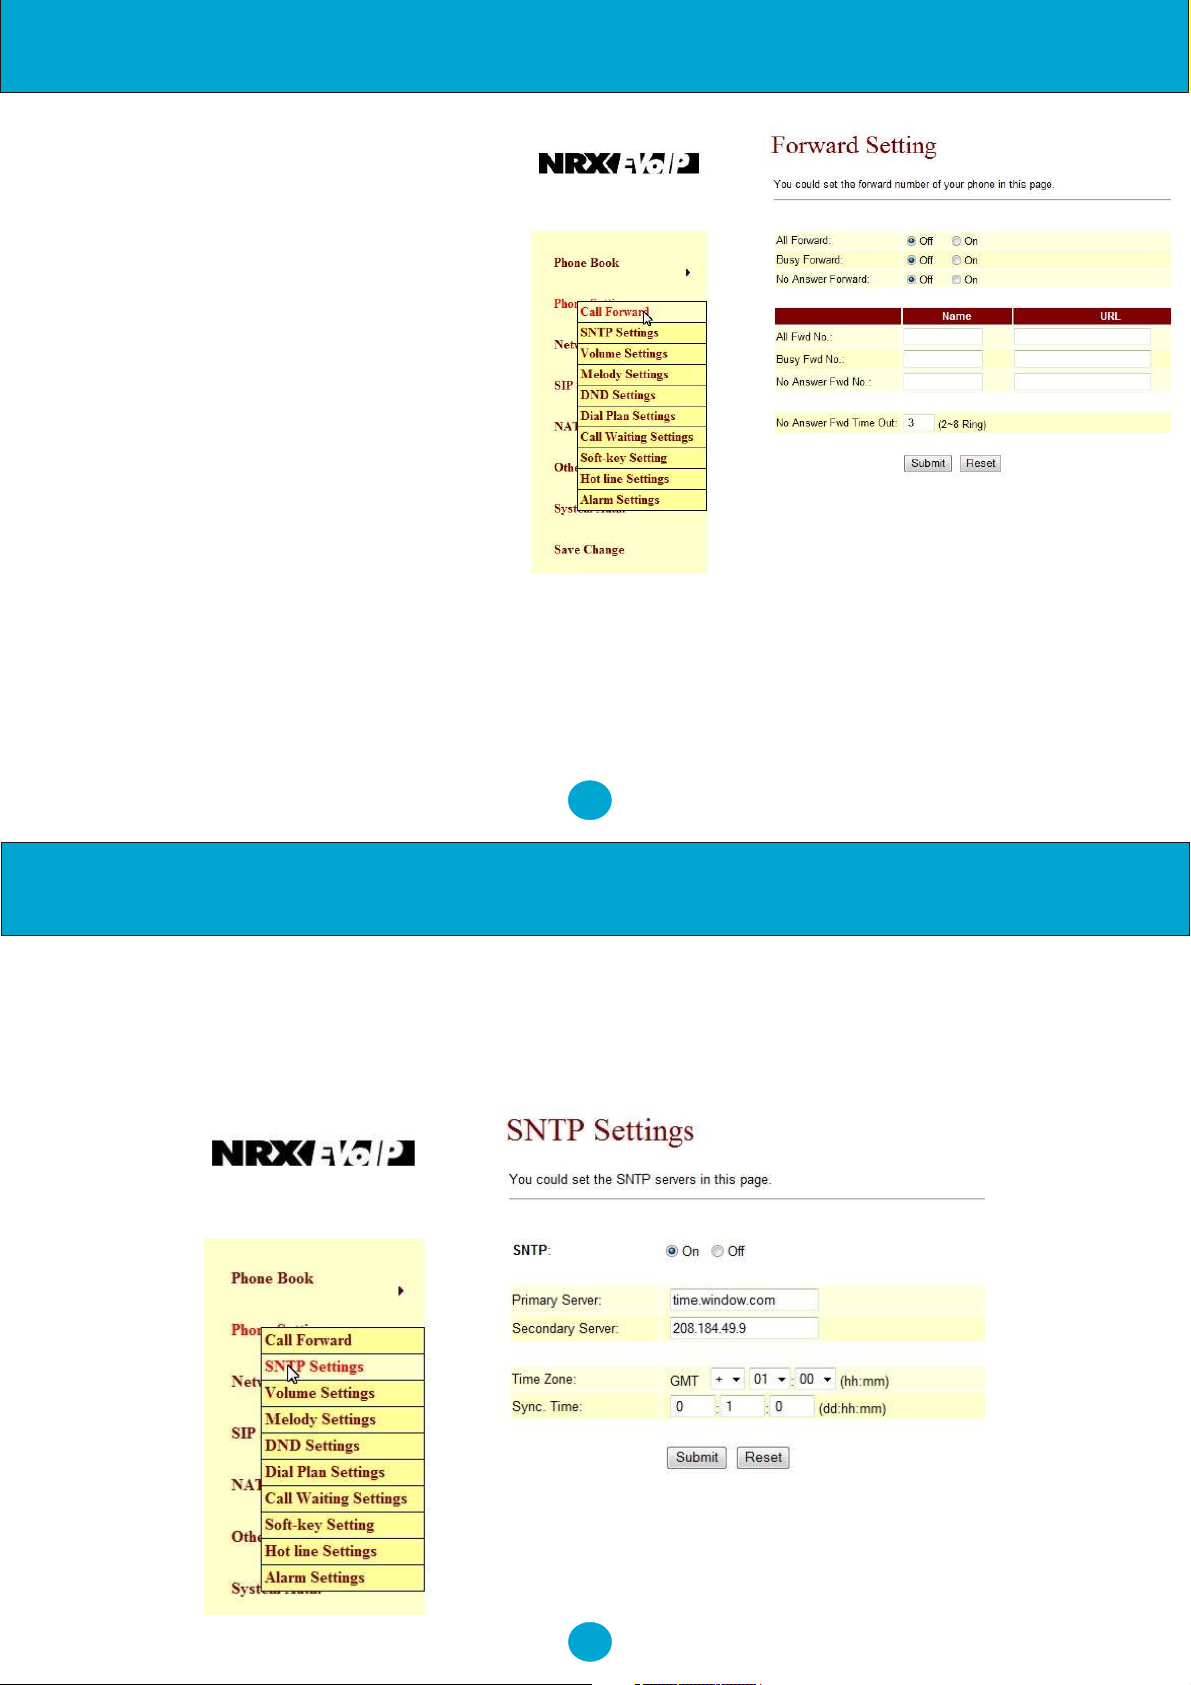
8.11. You can add/delete Speed Dial
number up to maximum 10 entries in
Speed Dial Phone List.
8.12. If you need to add a phone number
into the Speed Dial list, you need to enter
the position, the name, and the URL.
Click the "Add Phone" button to finish the
setting.
8.13. To delete a phone number, please
select the phone number you want to
delete then click "Delete Selected"
button. If you want to delete all phone
numbers, please click "Delete All" button
.
Example 1: Press 1# from keypad to
Speed Dial the phone number 2
immediately.
Example 2: Press M1 or M2 function
key will Speed Dial the phone number 1
or 2 immediately.
16
Page 11
Configuration by Web Browser
Phone Setting
Call Forward Setting:
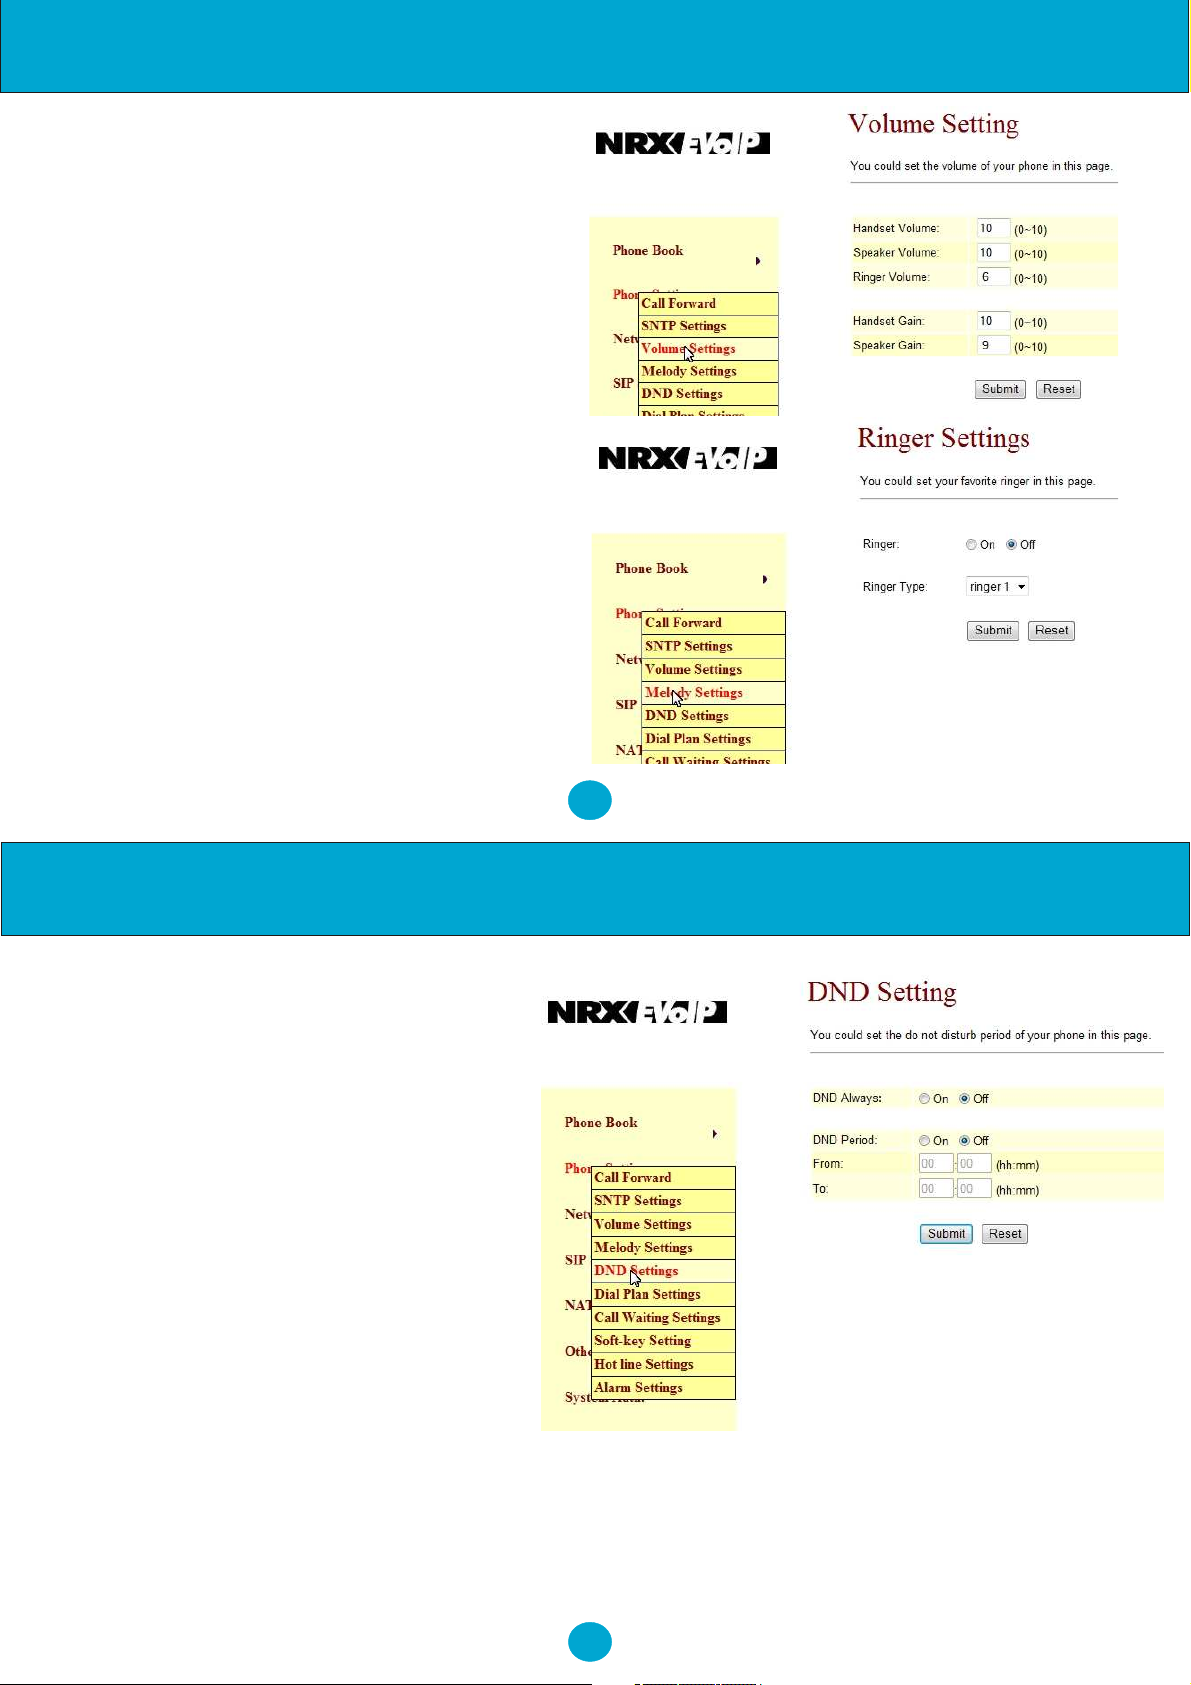
8.14. You can select the forward mode and
enter the forward URL.
All Forward: All incoming call will forward to
the URL you choose.
Busy Forward: The incoming call will
forward to the URL when you are busy and on
the phone.
No Answer Forward: The incoming call will
forward to the URL when no answer.
8.15.You need to set the Time Out ring which
will initiate No-Answer forwarding to the
number you choose. When you finished the
setting, please click the "Submit" button.
17
Configuration by Web Browser
SNTP Settings
8.16.You can setup the primary and the second SNTP Server IP Addresses to get the date/time information.
You may also set the Time Zone, and how often the phone synchronizes. When you finished the setting,
please click the "Submit" button.
18
Page 12
Configuration by Web Browser
Volume Settings
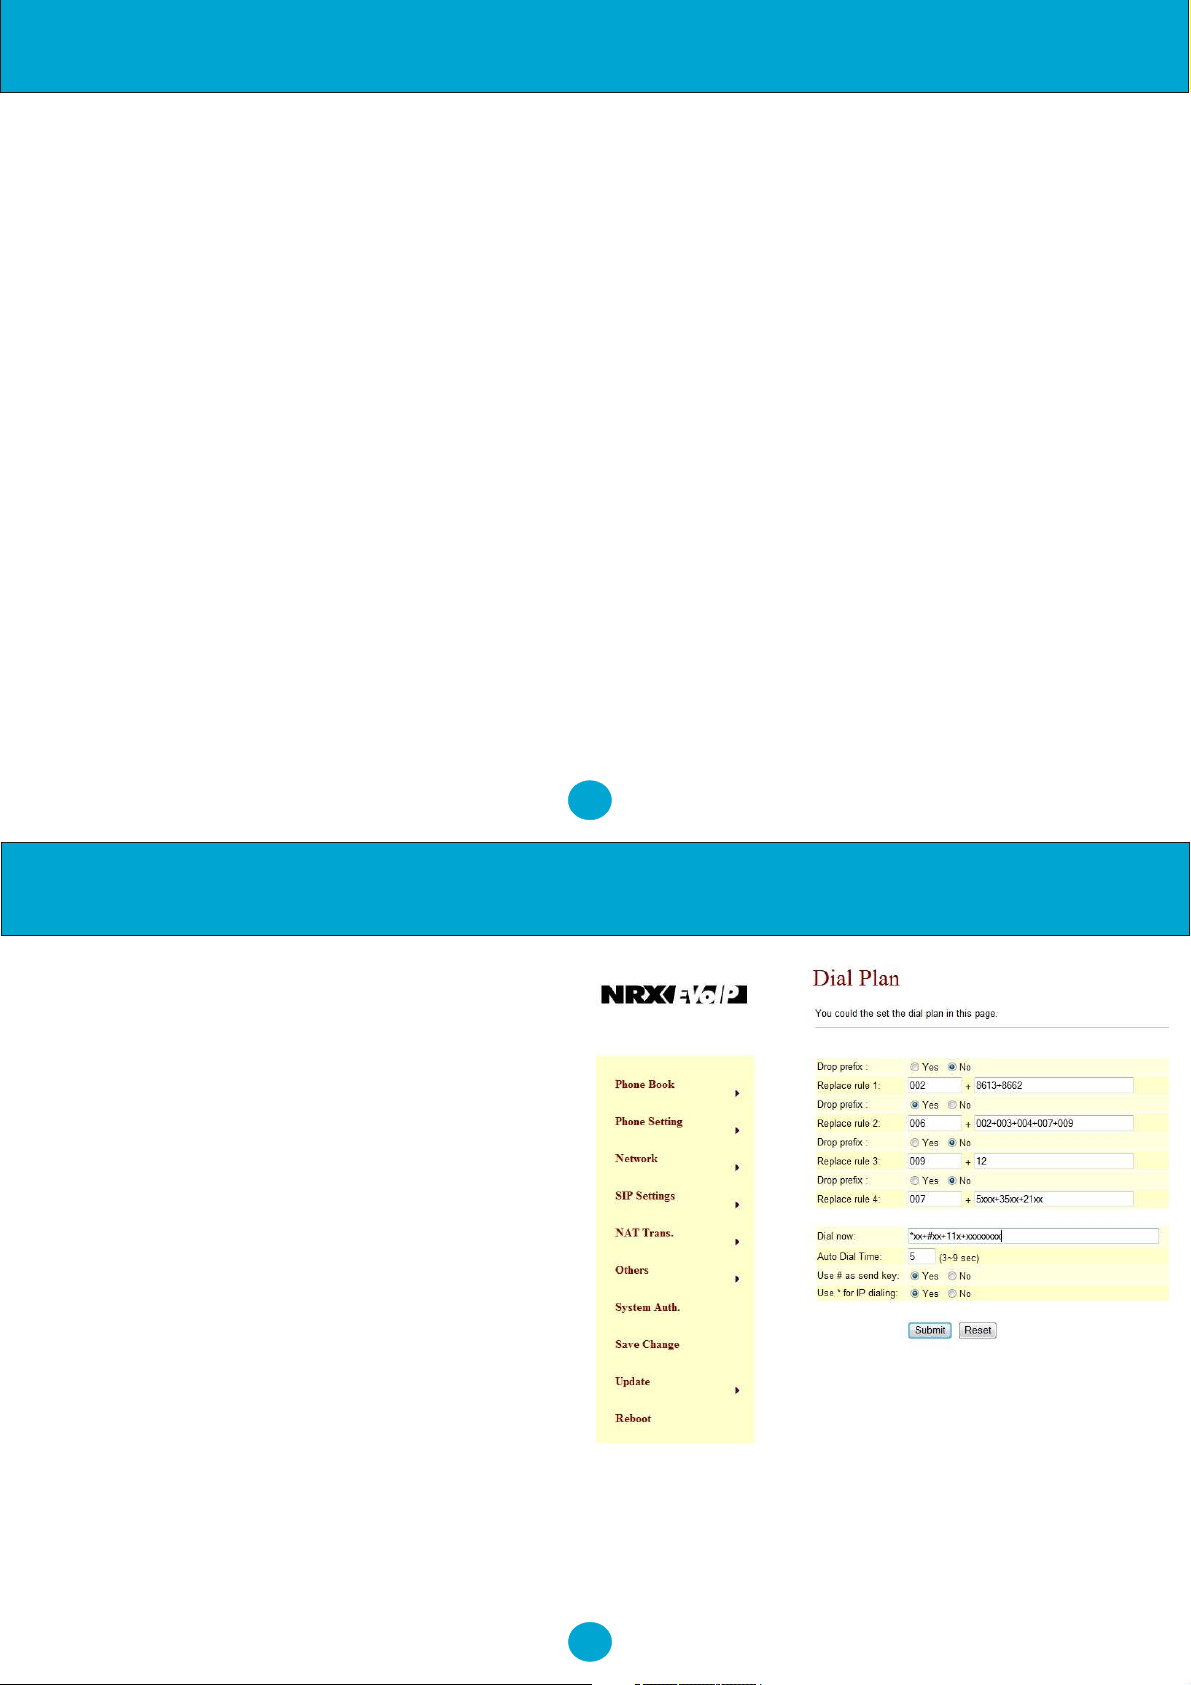
8.17. You can setup the Handset
Volume/Gain, Ringer Volume, and Speaker
Volume/Gain in this page. Handset/Speaker
Volume is to set the volume hearing from the
handset/Speaker. Handset Gain is to set the
volume send out from the handset. Speaker
Gain is to set the volume send out from the
microphone at the front of the NRX EVoIP.
Melody Settings
8.18. You can select the ringer melody type
for the incoming call.
19
Configuration by Web Browser
DND Settings
8.19.You can setup the DND (Do Not
Disturb) to keep the phone silent. You can
choose DND Always or DND period.
DND Always: All incoming call will be
blocked until the feature is disabled.
DND Period: Set a time period and the
phone will be blocked during the time period.
If the "From" time is larger than the "To" time,
the block time will from Day 1 to Day 2.
When you finished the setting, please click
the Submit button.
20
Page 13
Configuration by Web Browser
Dial Plan Settings
8.20. Dial plan and auto dial timer settings can be set on this page. The dial plan allows you to map the
dialing into an easy-to-remember phone number system. The auto dial timer specifies the elapse time
between the dialing digits. When Drop prefix is ON and the dialing prefix is matched, the prefix will be
dropped and replaced by the rule digits and followed by the rest of dialing digits. When Drop prefix is OFF
and the dialing prefix is matched, the rule digits will be added before the dialing digits in accord with the
settings.
Example 1: Drop Prefix: No, Replace rule 1: 002, 8613+8662
a) Pressing 8613xxx will result in dialing out 002+8613+xxx.
b) Pressing 8662xxx will result in dialing out 002+8662+xxx.
Example 2: Drop Prefix: Yes, Replace rule 2: 006, 002+003+004+005+007+009
a) Pressing 002xxx will result in dialing out 006+xxx.
b) Pressing 003xxxx will result in dialing out 006+xxxx.
Example 3: Drop Prefix: No, Replace rule 3: 009, 12
a) Pressing 12xxx will result in dialing out 009+12xxx.
Example 4: Drop Prefix: No, Replace rule 4: 007, 5xxx+35xx+21xx
a) Pressing 5xxx will result in dialing out 007+5xxx.
b) Pressing 534 will result in dialing out 534 (not matched for the rest 3 digits).
c) Pressing 35xx will result in dialing out 007+35xx.
d) Pressing 356 will result in dialing out 356 (not matched for the rest 2 digits).
e) Pressing 35668 will result in dialing out 35668 (not matched for the rest 2 digits).
21
Configuration by Web Browser
Example 5: Dial Now: *xx+#xx+11x+xxxxxxxx
a) Pressing *00, *01, *02 .. *99 will result in dialing
out the same *xx immediately.
b) Pressing #00, #01, #02 .. #99 will result in dialing
out the same #xx immediately.
c) Pressing 110, 111, .. 119 will result in dialing out
11x immediately.
d) Pressing 12345678 (8 digits) will result in dialing
out 12345678 immediately. This implies that phone
numbers with 9 or more digits are prohibited.
8.22. Auto Dial Timer: The inter-digit timer. Default is
5 seconds.
8.23. When you finish the setting, please click the
Submit button.
8.24.Click the Save button. The changes you have
made will be saved into the system and the system
will reboot automatically.
22
Page 14
Configuration by Web Browser
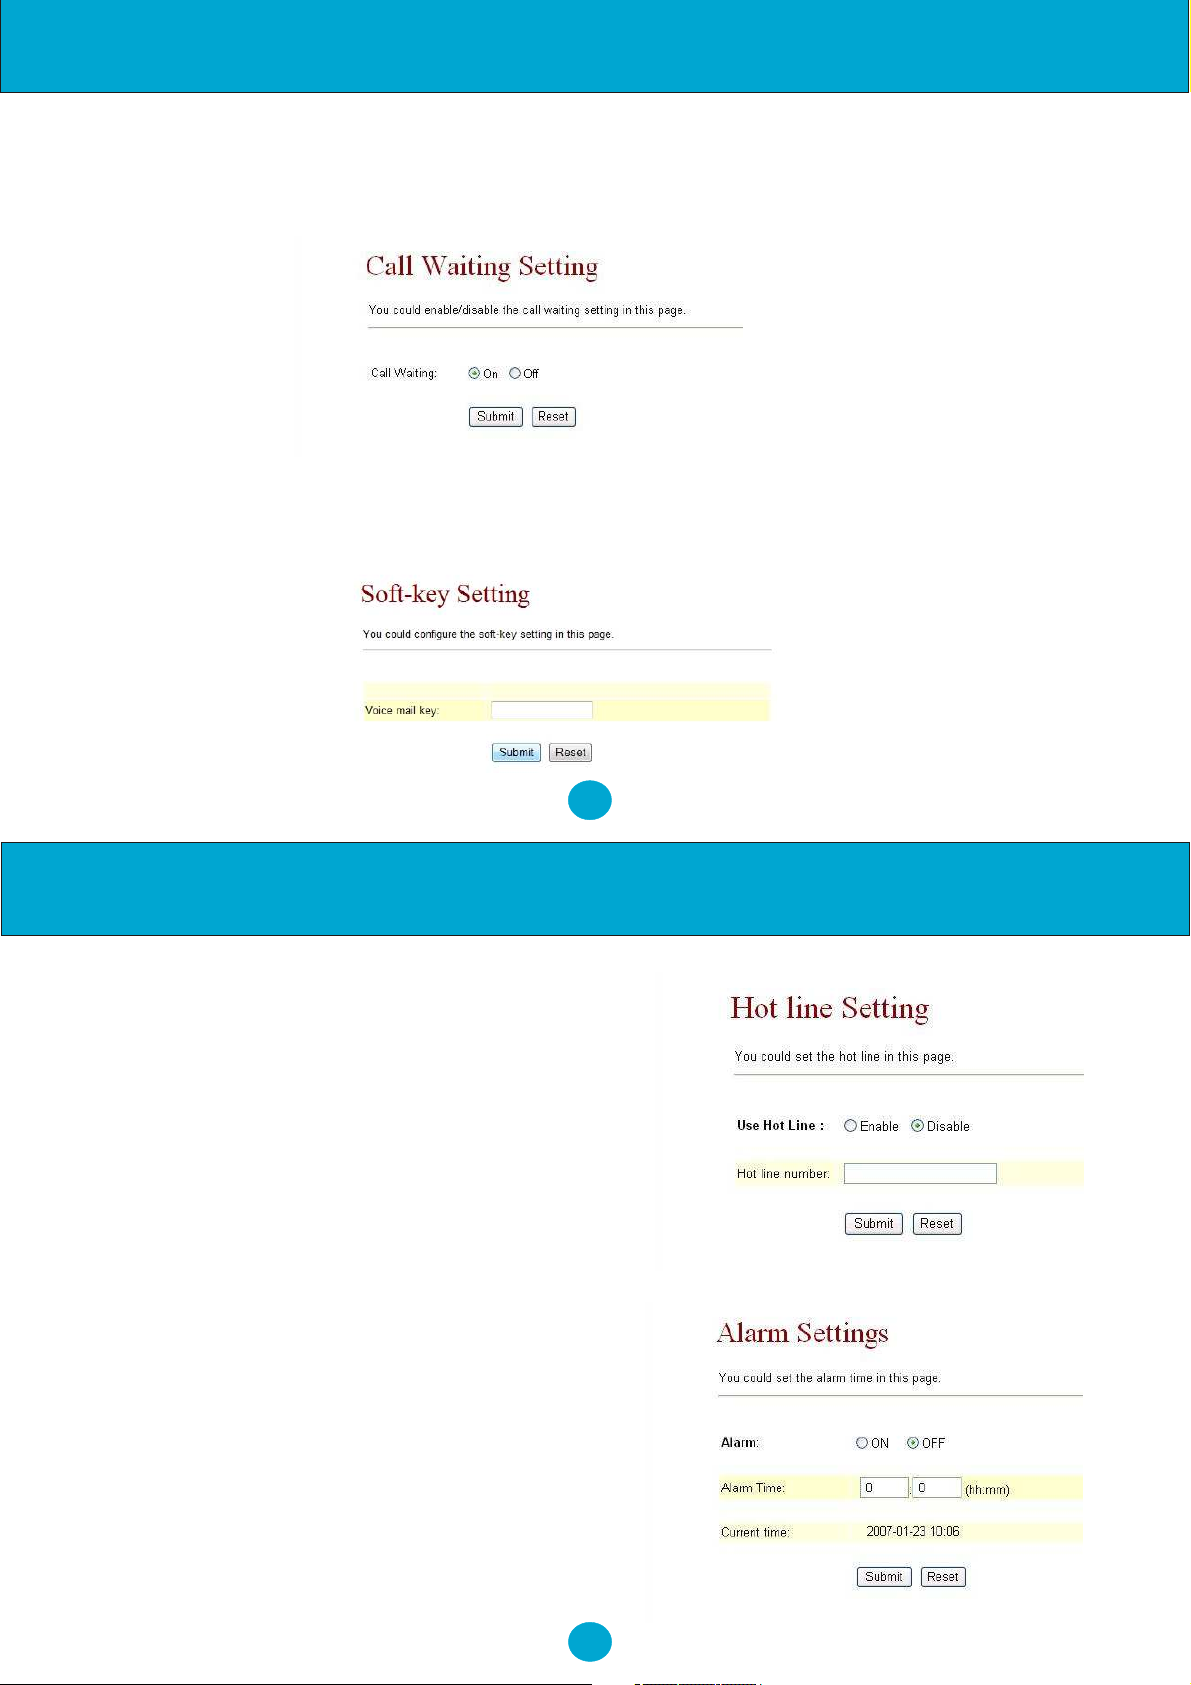
Call Waiting Setting:
8.25. When call waiting is set ON, you will hear an interrupt tone over the phone to remind
that there is an incoming call from the third party.
Soft Key Setting:
8.26. You can configure the VMS key (Voice Mail) setting to work with an IP PBX on this page.
23
Configuration by Web Browser
When registered with an IP PBX with an incoming
voice message, the LED VMS will start flashing. To
hear
the message, press the Speaker Phone key or lift the
handset then press the VMS function key.
Hot Line Settings:
8.29. You can enable/disable and set a Hot Line
phone number in this page.
8.30.When Hot Line mode is enabled, you just pick
up the phone and the NRX EVoIP phone will call the
Hot line number immediately. The default for Hot Line
mode is disabled.
8.31.Hot-Line Mode is very convenient for IP calling
to a Public Switching Telephone Network (PSTN)
number through FXO Gateway.
Alarm Settings:
8.32. You can configure the Alarm setting on this
page.
24
Page 15
Configuration by Web Browser
Network
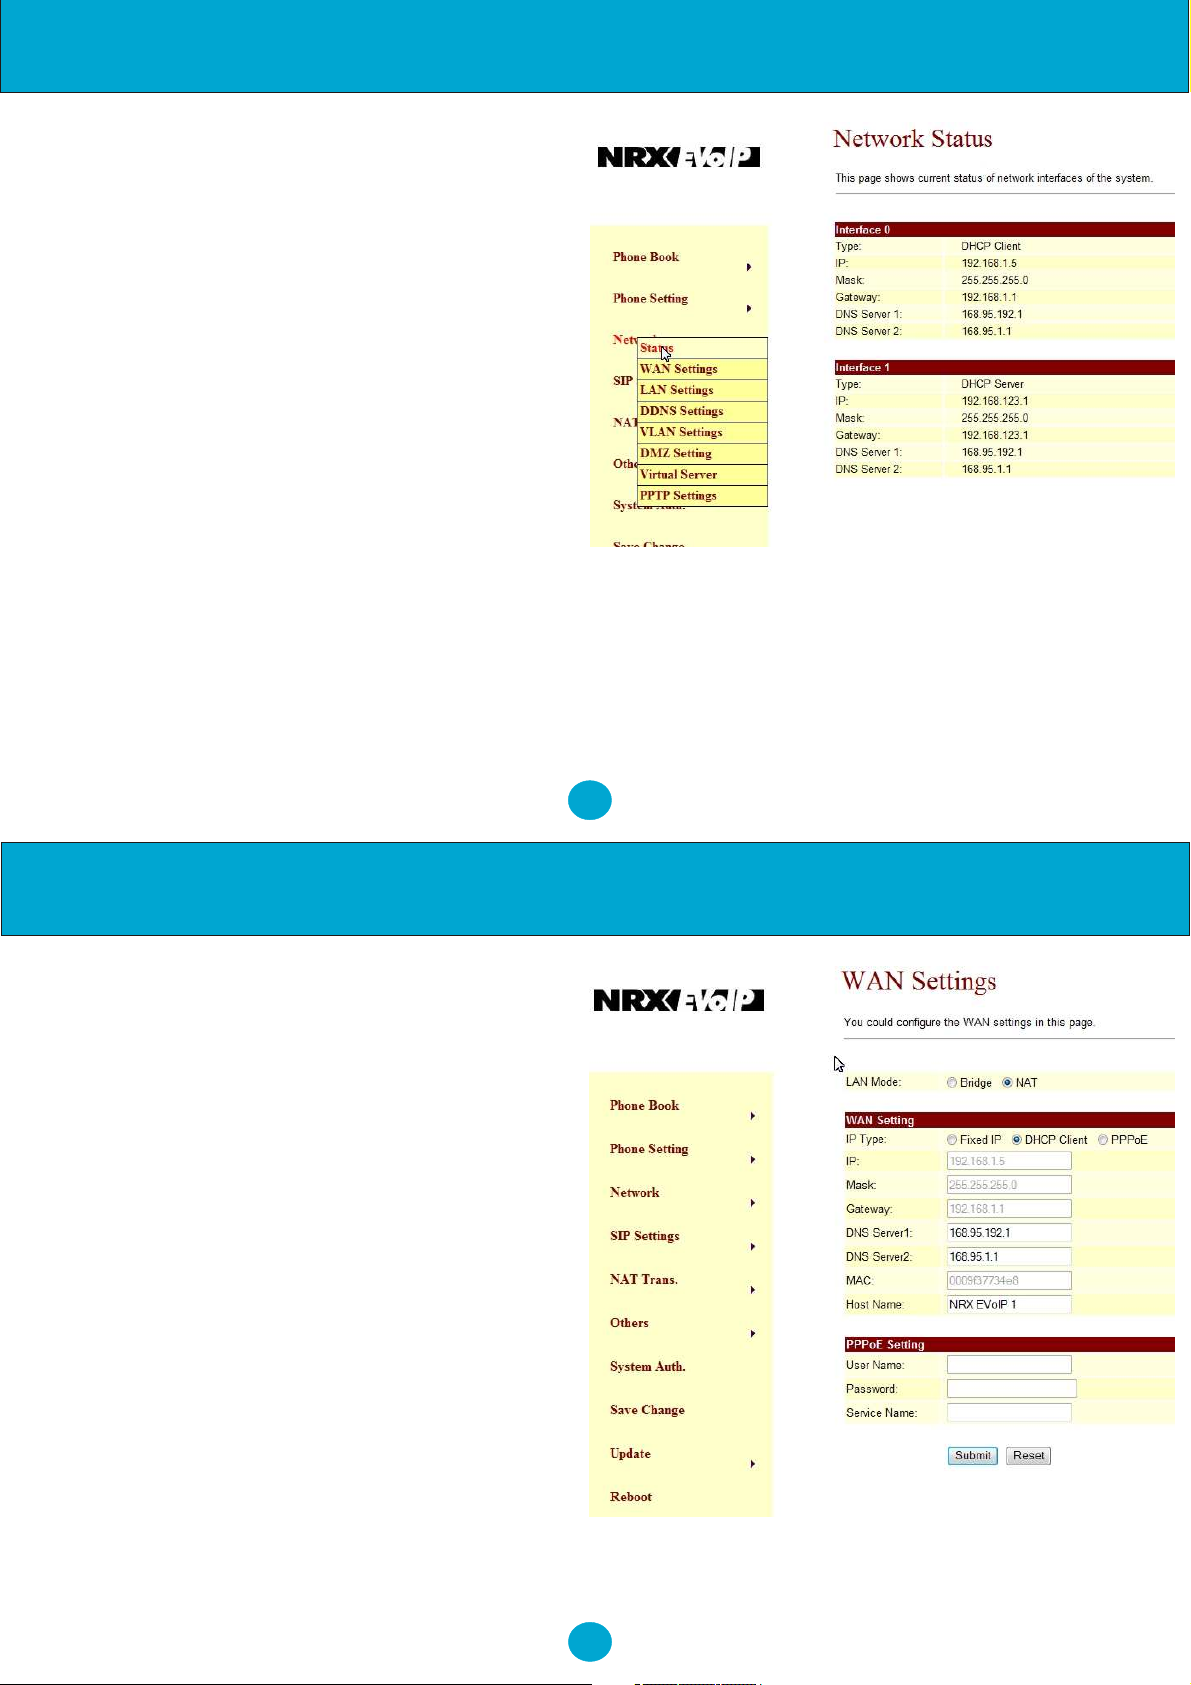
8.33.You can check the Network status, and
configure the WAN, LAN, DDNS, and VLAN
settings in this
section.
Network Status:
8.34. You can check and show the current Network
setting in this page.
25
Configuration by Web Browser
WAN Settings:
8.35. The WAN setting is used to configure the
Ethernet port connects to the ADSL Modem/Router.
8.36.The default setting is NAT mode for IP Phone,
and this enables the embedded NAT router between
the LAN port and PC port. You may change to
Bridge Mode if you need NOT use the embedded
NAT router. When setting to Bridge Mode, the
WAN and the LAN ports will be bridged.
8.37.There are three selections for WAN: Fixed IP,
DHCP Client, and PPPoE modes. This WAN setting
is for the LAN port when set in NAT mode.
The WAN default is at DHCP Client Mode.
8.38.For Fix IP Mode, please make sure the IP
address. Net Mask, Gateway, and DNS settings are
suitable in your current network environment.
8.39.For PPPoE Mode, you have to enter correct
username and password to get the IP address from
your Internet Service Provider.
8.40. When you finished the setting, please click the
Submit button.
26
Page 16
Configuration by Web Browser
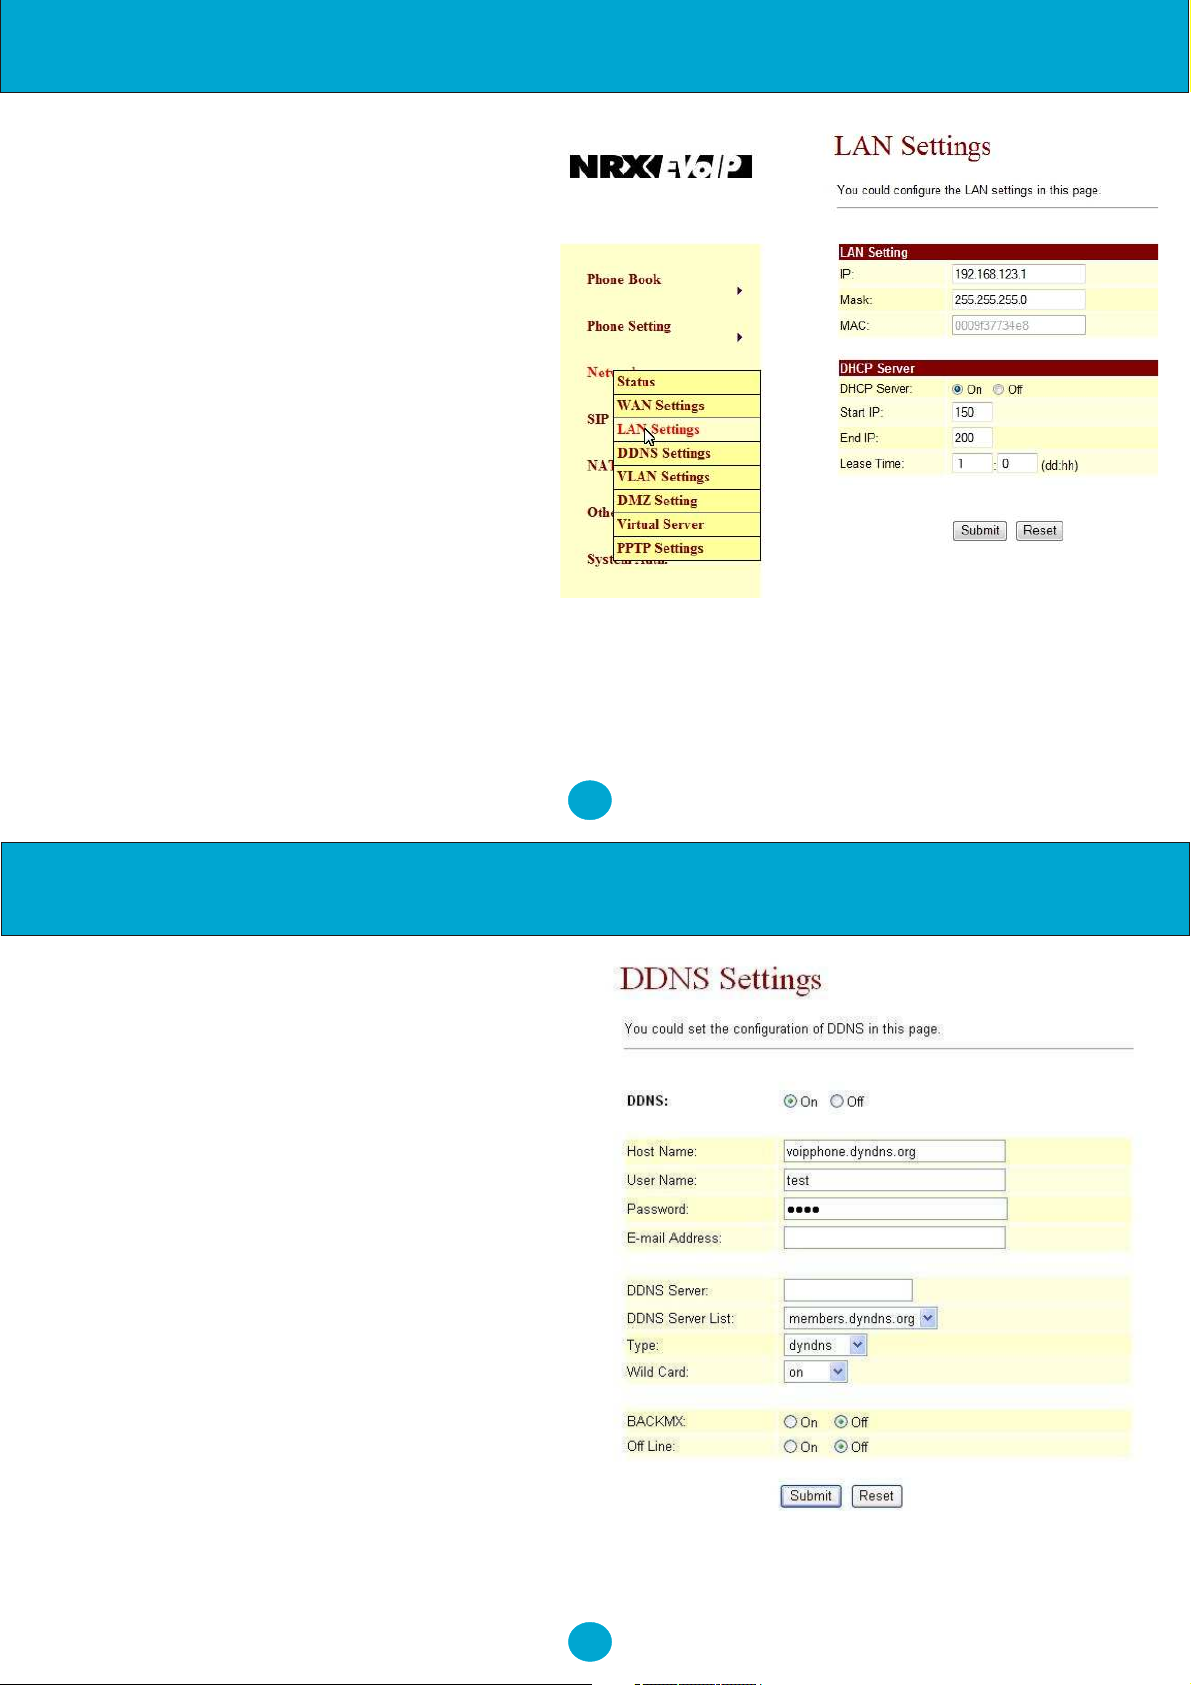
LAN Settings:
8.41.The default IP address is 192.168.123.1 for
the NRX EVoIP phone, with Net Mask
255.255.255.0., and DHCP Server enabled. The
IP addresses for DHCP are from 150 to 200.
8.42.Connect your PC to the PC port, set your
PC as DHCP Client mode, and then the PC will
get an IP address from the NRX EVoIP
automatically.
8.43. When you finished the setting, please click
the Submit button.
27
Configuration by Web Browser
DDNS Settings:
8.44.You can configure the DDNS setting on this
page. You need to have the DDNS account and
input the informations properly. You need a DDNS
account with a public IP address then others can
call you via the DDNSaccount. Most of the VoIP
applications work with a SIP Proxy Server as well
as DDNS Server. When you finished the setting,
please click the Submit button.
28
Page 17
Configuration by Web Browser
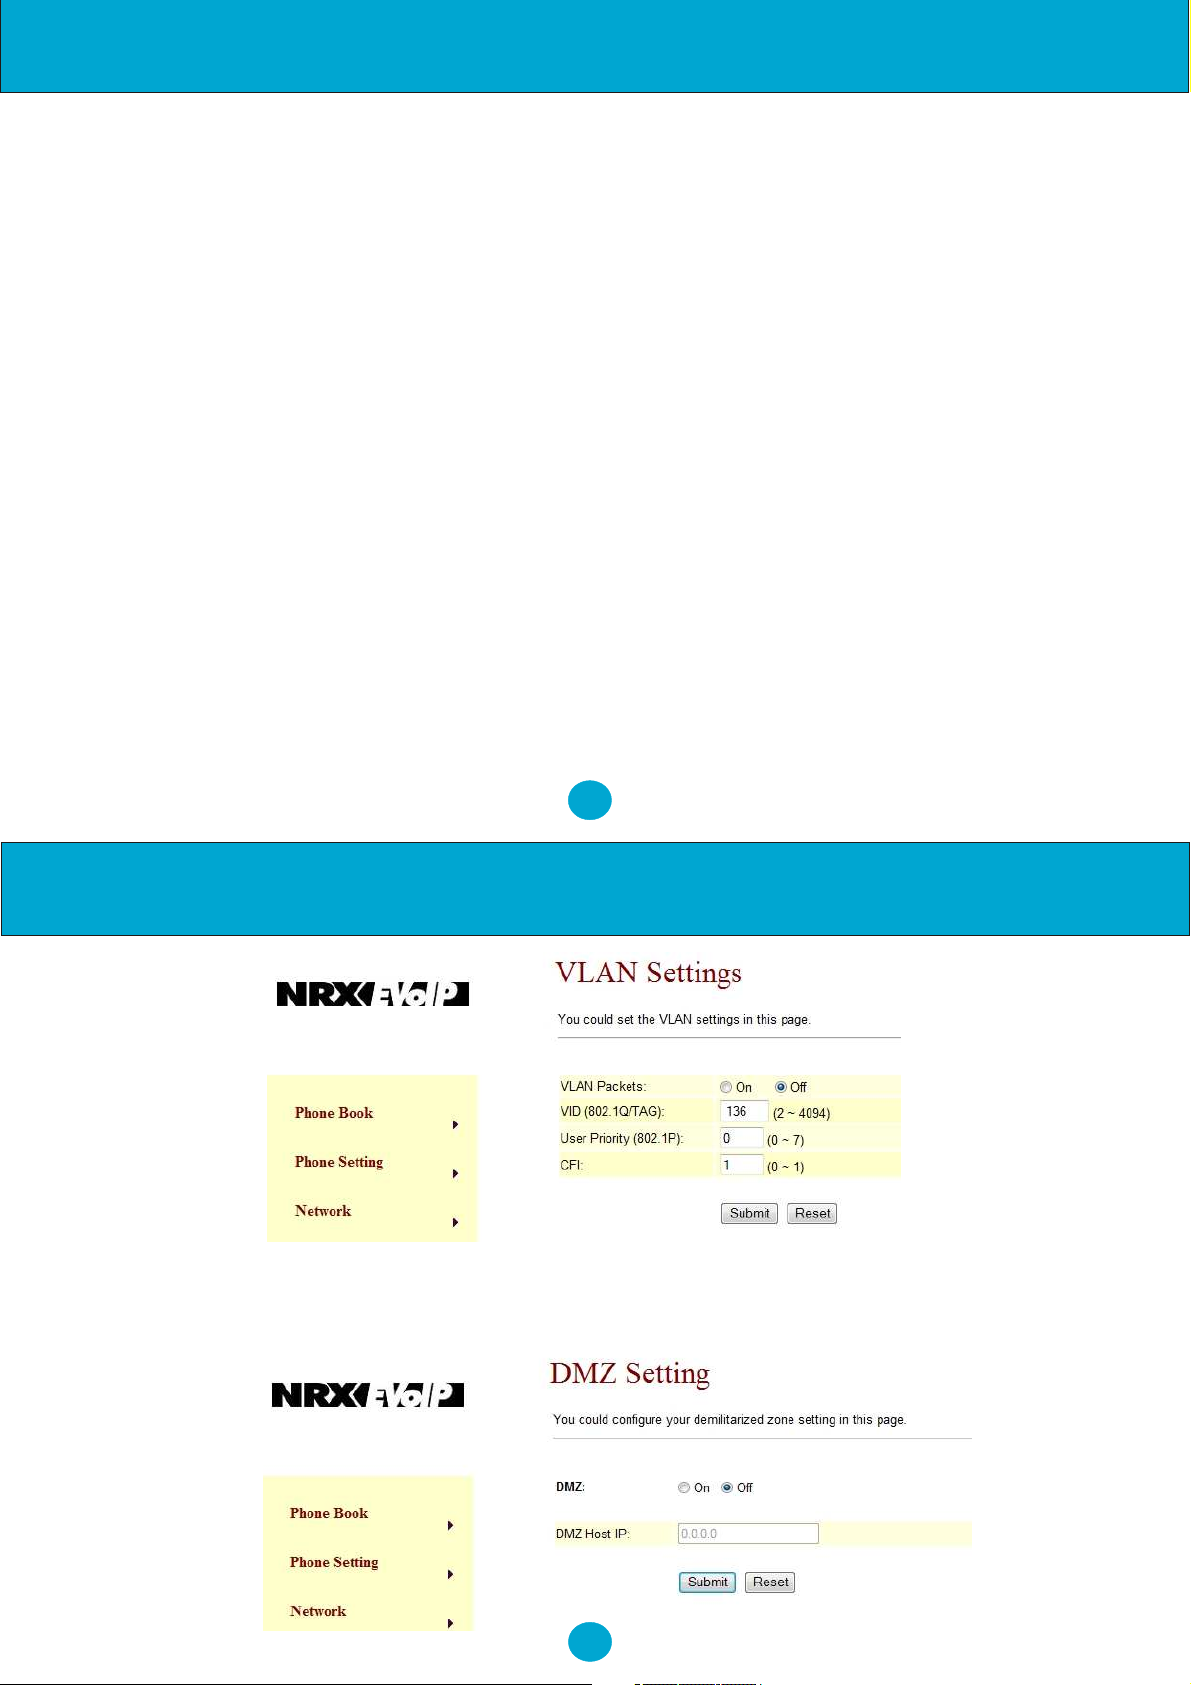
VLAN Settings:
8.45.There are two parts for VLAN settings. One is to set for VoIP packets related to the NRX EVoIP, and the
other is for the VLAN setting in the NAT Mode.
8.46.There are two kinds of destination packets coming to the WAN port, one is VoIP packets for NRX EVoIP,
and the other will go through the WAN port to the LAN port.
8.47.VLAN Packets: If you enable VLAN Packets and set the VID, User Priority, and CFI, then all the
incoming packets will be checked with the IP Address and the VID.
8.48. VID: Please set your VID in accordance with your service provider.
8.49. User Priority: Defines user priority with eight (2^3) priority levels. IEEE 802.1P defines the operation
for these 3 user priority bits. Usually, this will be defined by your service provider.
8.50.CFI: Canonical Format Indicator is always set to zero for Ethernet switches. CFI is used for compatibility
between Ethernet type network and Token Ring type network. If a frame received at an Ethernet port has a CFI
set to 1, then that frame should not be forwarded as it is to an untagged port.
8.51 When you enable the VLAN Packets and set the VID, User Priority, and CFI, then all the incoming
packets with the NRX EVoIP IP address and the same VID will be accepted by the phone. If the incoming
packets with the NRX EVoIP IP address but different VID then the packets will be discarded by phone. The
Other incoming packets with different IP address will go through the WAN port to the LAN port.
.
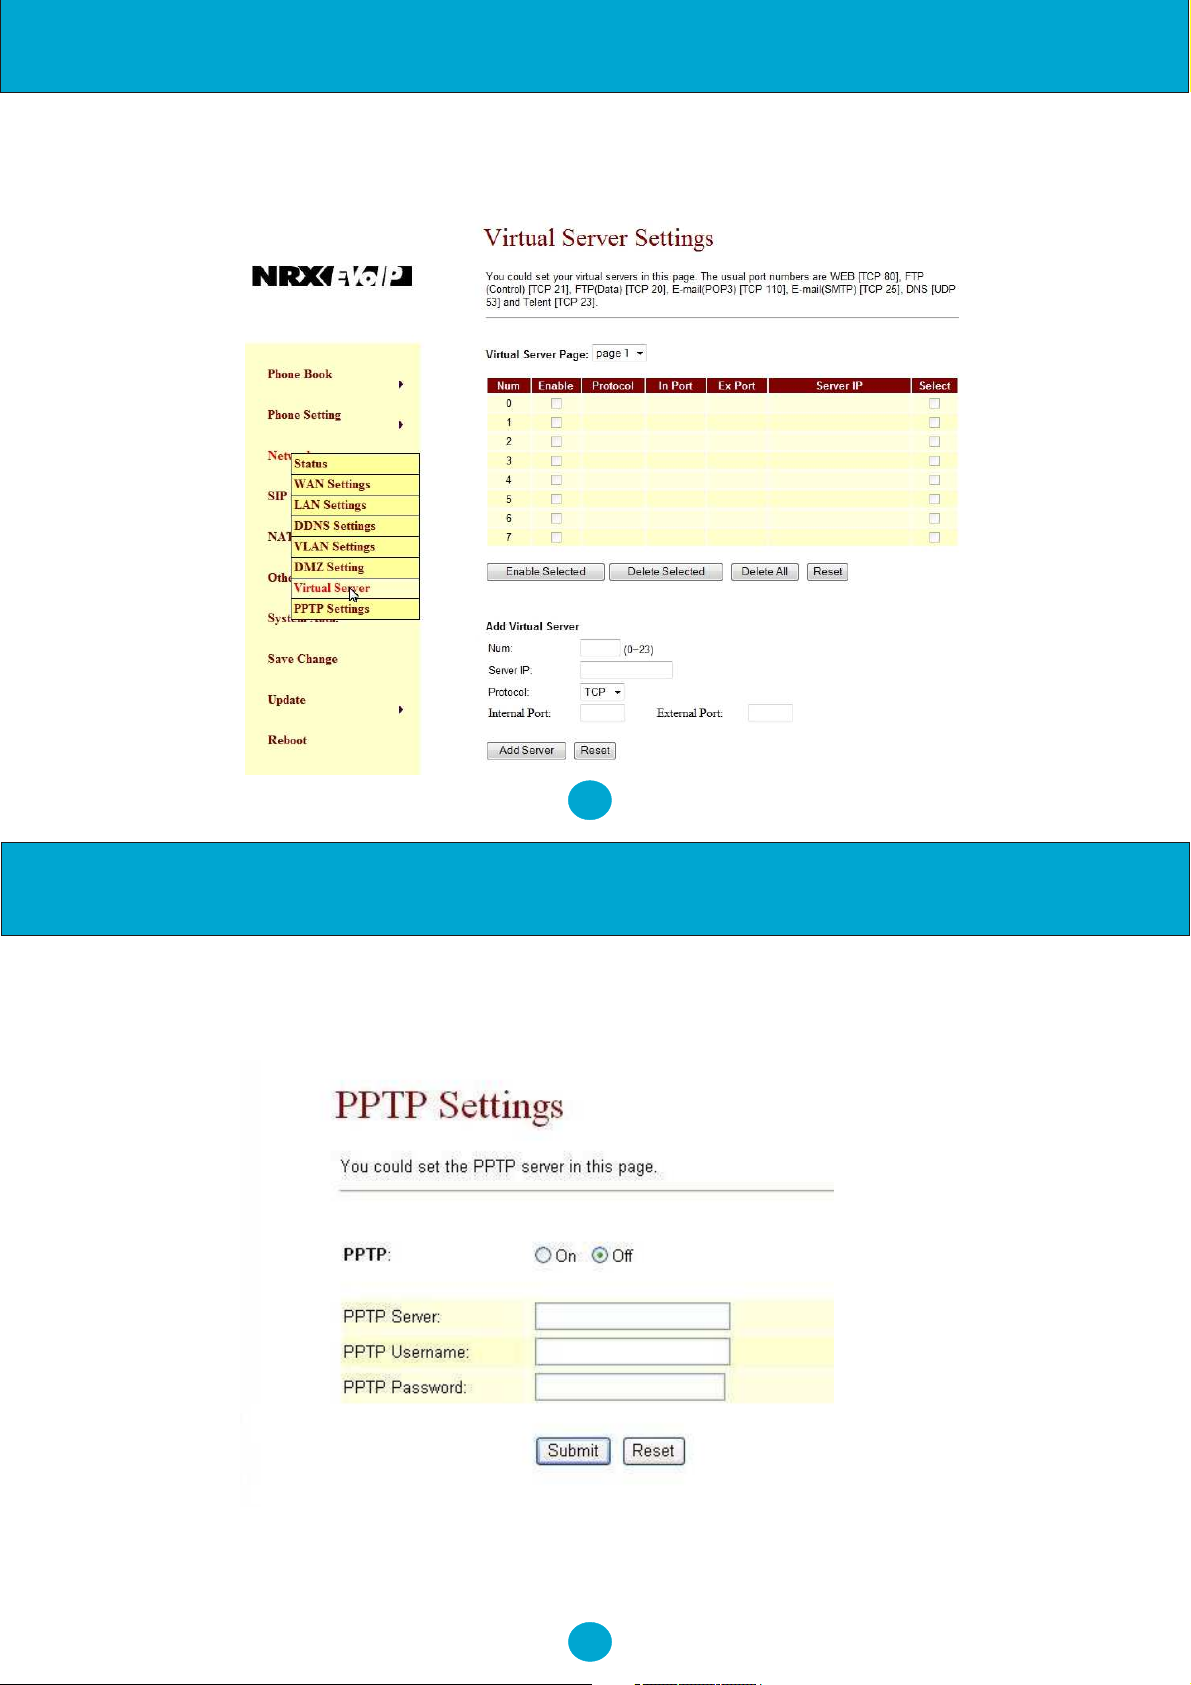
29
Configuration by Web Browser
DMZ Setting:
8.52. The DMZ can be enabled/disabled and configured in this page.
30
Page 18
Configuration by Web Browser
Virtual Server:
8.53. The Virtual Server IP and Port numbers can be configured in this page.
31
Configuration by Web Browser
PPTP Setting:
8.54. The PPTP Server can be set ON/OFF in this page.
32
Page 19
Configuration by Web Browser
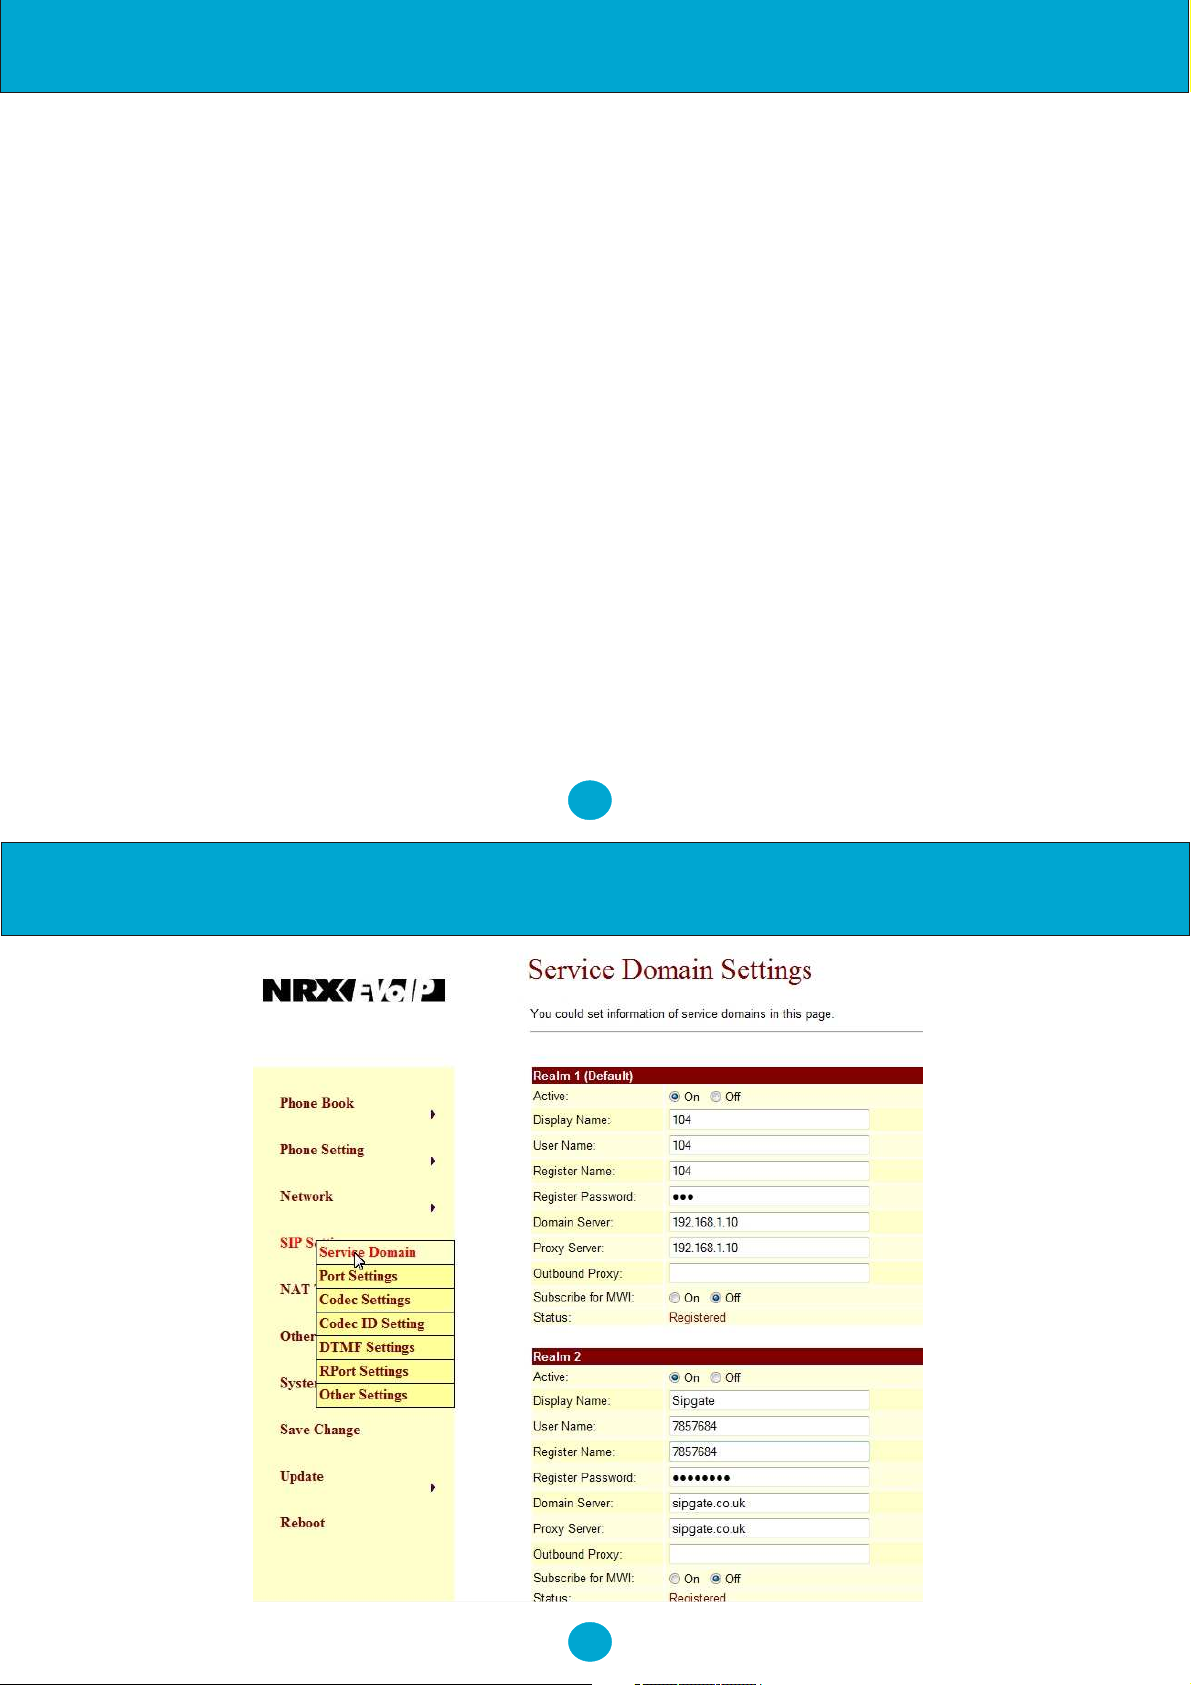
SIP Settings:
Service Domain Settings
8.55.You can setup the Service Domain, Port Settings, Codec Settings, RTP Setting, RPort Setting and
Other Settings for SIP Proxy Server registrations on this page.
8.56.You may register up to three SIP Servers for three Realms in the NRX EVoIP telephone. You can receive
the incoming calls from all the three SIP Servers. For outgoing calls, you may select the registration SIP
server by pressing the appropriate line button, and then call the associated registration phone number.
8.57. Click "Active" ON to enable the Service Domain, then enter the following items:
8.58. Display Name: enter the name you want to display.
8.59. User Name: enter the User Name given by your ITSP.
8.60. Register Name: enter the Register Name given by your ITSP.
8.61. Register Password: enter the Register Password given by your ITSP.
8.62. Domain Server: enter the Domain Server given by your ITSP.
8.63. Proxy Server: enter the Proxy Server given by your ITSP.
8.64. Outbound Proxy: enter the Outbound Proxy of ITSP. If not provided, you may skip this.
8.65. When it shows "Registered" in the Register Status, it indicates a successful registration to the ITSP,
and the "REG" LED will turn ON. The NRX EVoIP is then ready for VoIP call.
8.66. After you finished the setting, please click the "Submit" button.
NOTE: The User Name and Register Name are also refered to as SIP ID. Many voice over IP service
providers will only provide a SIP ID, if this is the case then enter this as both the User Name and
Register Name. It is also recommended that when registering with a voice over IP provider that the
MWI indication is turned off.
33
Configuration by Web Browser
34
Page 20
Configuration by Web Browser
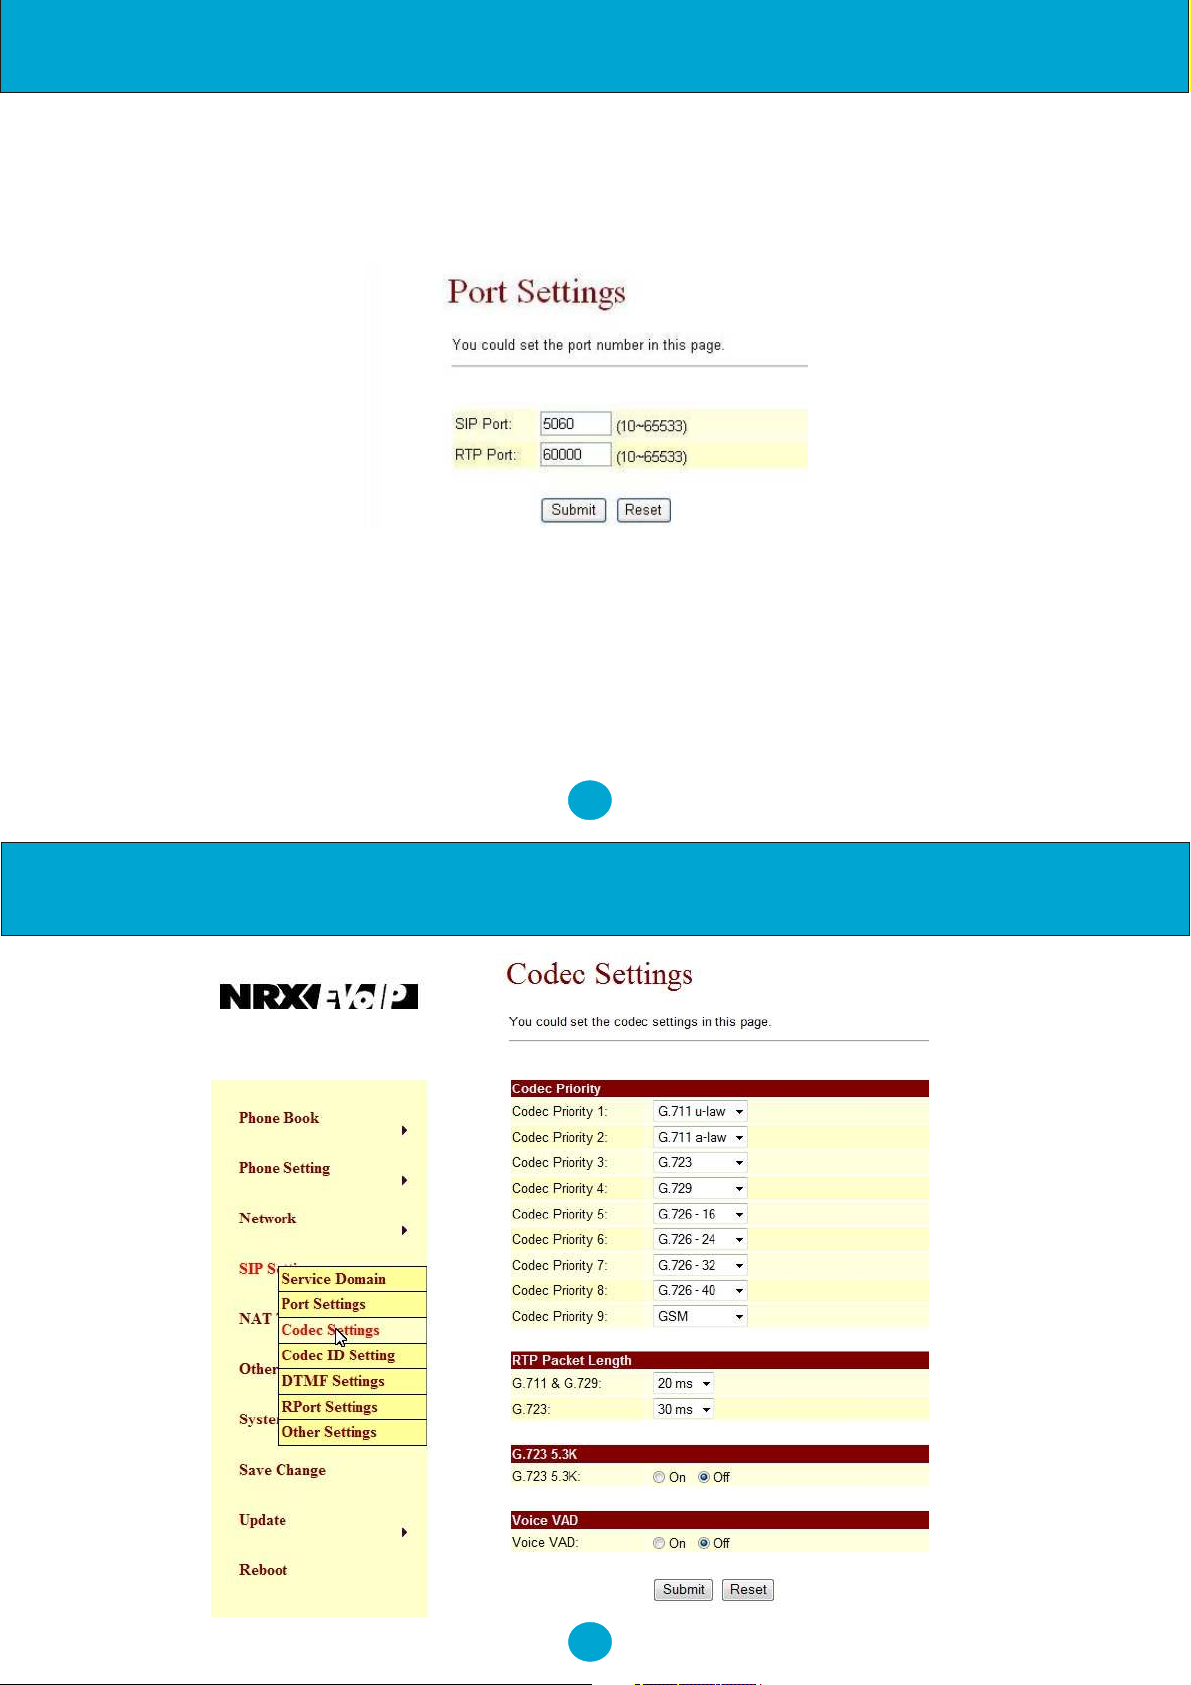
Port Settings:
8.67.The SIP Port and RTP Port numbers are default at 5060 and 60000, respectively. The RTP port
number must be even number. If you have more than one VoIP phones under the same NAT router, it is
recommended that different RTP port numbers be assigned to each of IP Phones.
Codec Settings:
8.68.You can setup the Codec priority, RTP packet length, and VAD function in this page. When you
finished the setting, please click the Submit button.
NOTE: It is suggested that you do not alter these settings from the default telephone setup unless you
have technical expertise in this area.
35
Configuration by Web Browser
36
Page 21
Configuration by Web Browser
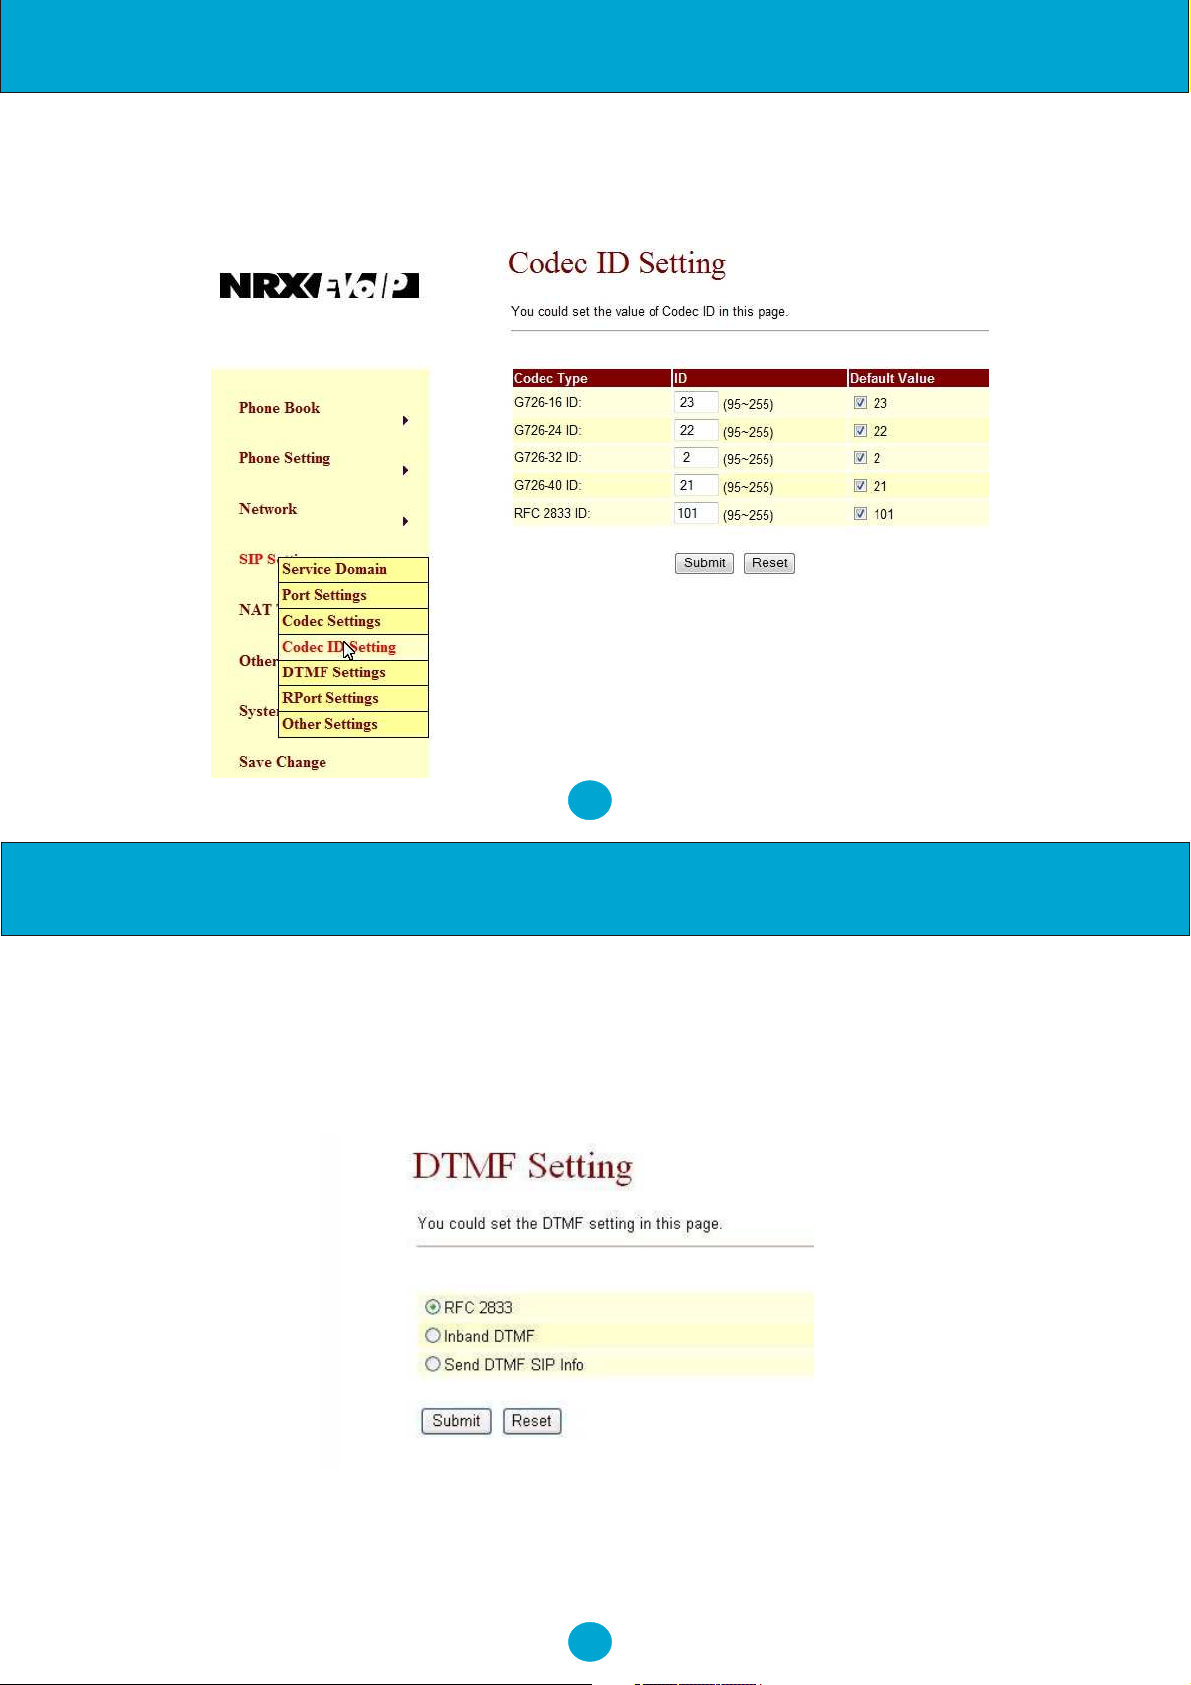
Codec ID Settings:
8.69.You can set the Codec ID to meet the other device's requirement. When you finished the setting,
please click the Submit button.
37
Configuration by Web Browser
DTMF Settings:
8.70.You can setup the options for DTMF function in this page. The options include RFC2833 (Outband
DTMF), Inband DTMF, and Send DTMF SIP info. If you are making two-stage callings for extension
to PSTN, you might need to select RFC2833 DTMF option.
38
Page 22
Configuration by Web Browser
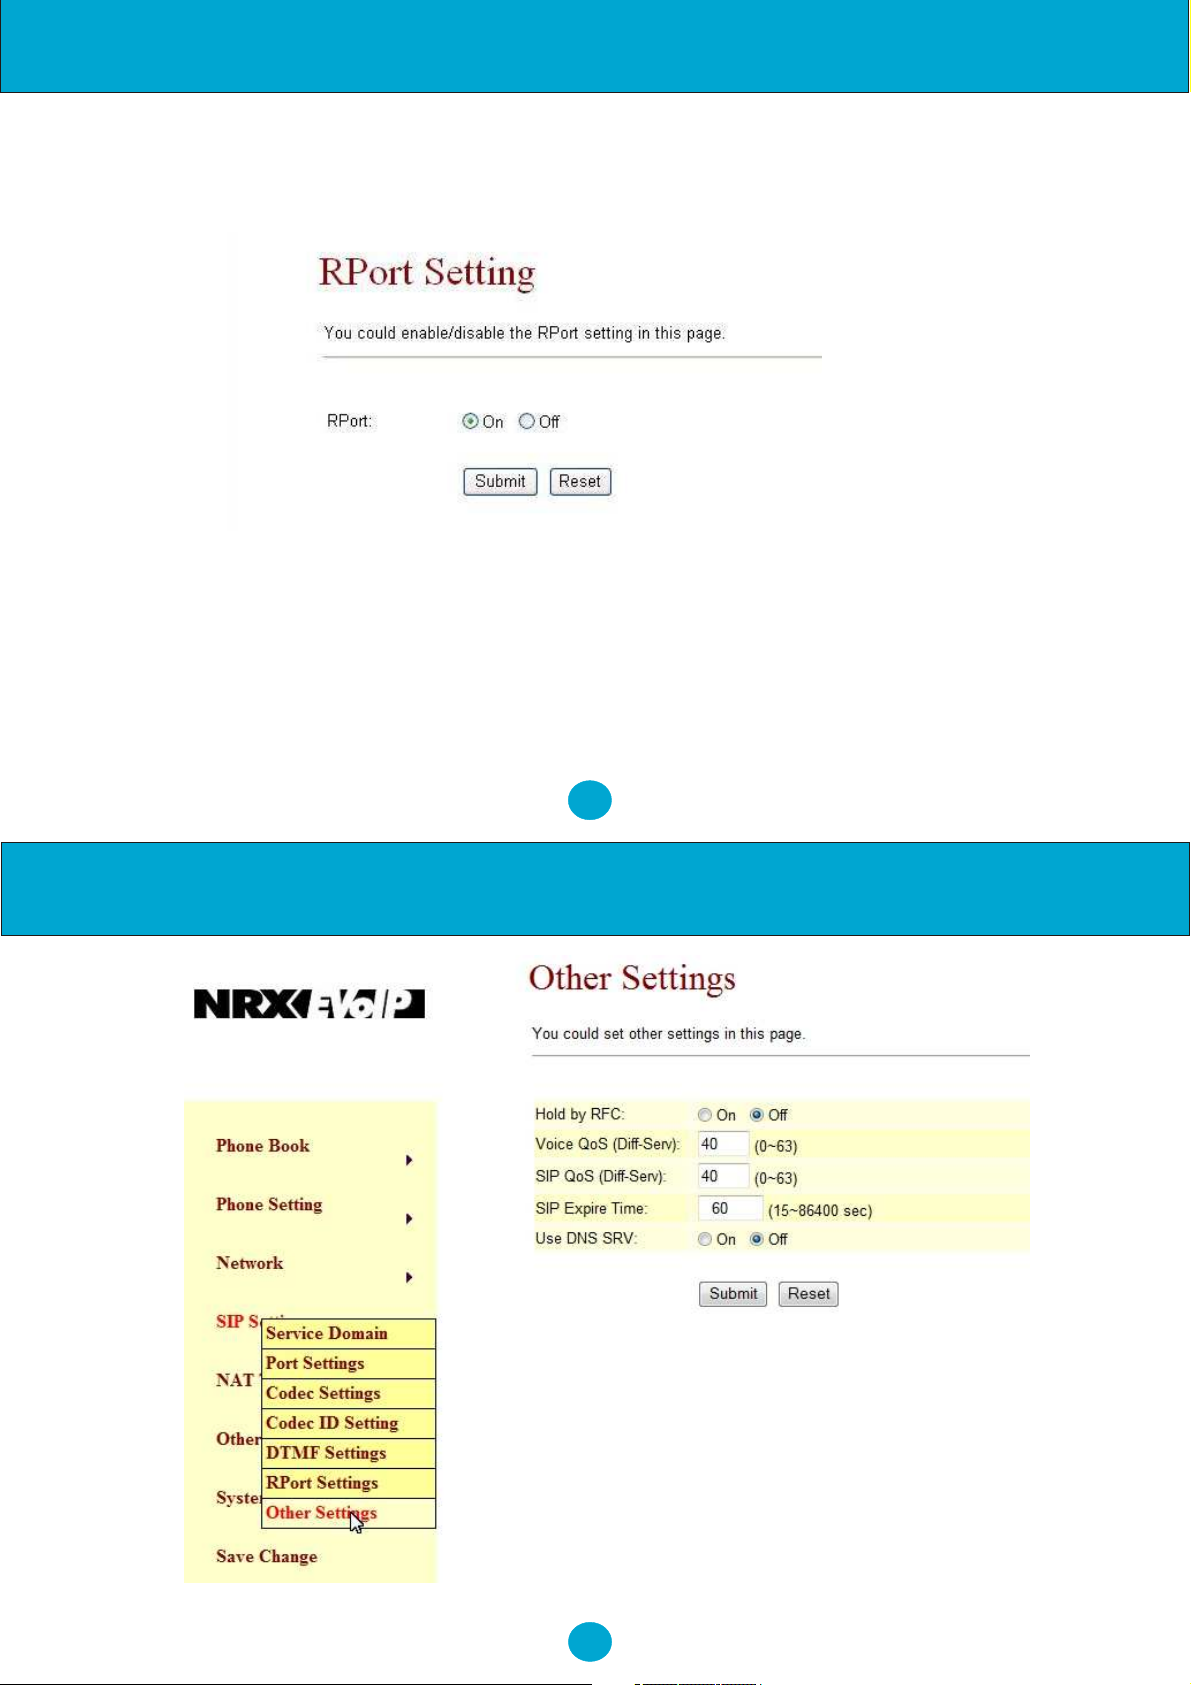
RPort Function:
8.71.You can enable/disable the RPort in this page. To change this setting, please follow your ISP
information. When you finished the setting, please click the Submit button.
Other Settings:
8.72.You can setup the Hold by RFC, Voice/SIP QoS and SIP expire time in this page. To change these
settings please following your ISP information. When you finished the setting, please click the Submit button.
The QoS setting is to set the voice packets' priority. Higher value for voice packets will get higher priority to the
Internet. It is required that all the Internet routes are with the QoS function for voice priority.
39
Configuration by Web Browser
40
Page 23
Configuration by Web Browser
NAT Transversal:
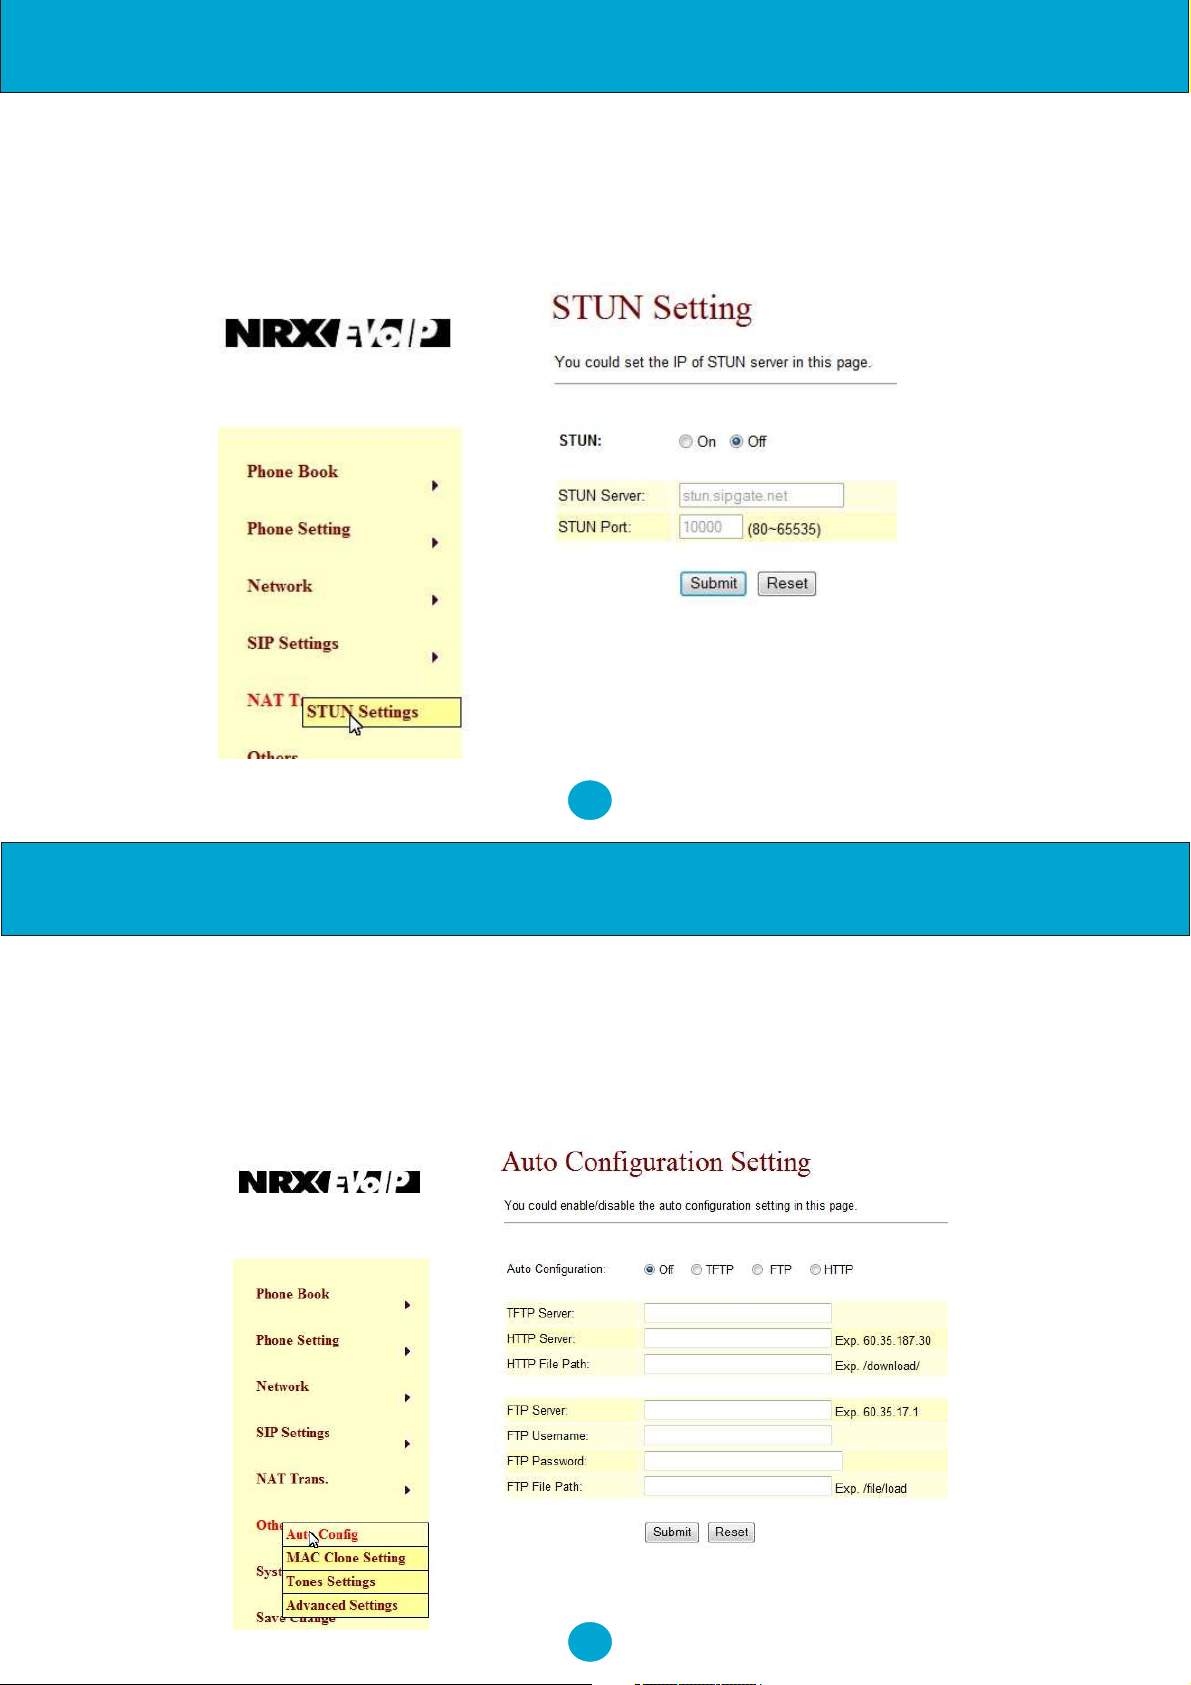
STUN Setting
8.73.You can Enable/Disable and configure STUN Server IP address in this page. This function helps IP
Phone working properly behind NAT. To change these settings please follow your ISP information.
When you finished the setting, please click the Submit button.
41
Configuration by Web Browser
Auto Configuration Setting:
8.75.Auto Configuration function can be used to download a configuration file stored on a TFTP, HTTP,
or FTP server. This function must work in conjunction with the Auto Config Server. After enabling the function,
please click the "Submit" button. Remember to click "Save" in the Save Change section. The IP Phone will
then reboot and automatically download the configurations from the corresponding server. Note that the TFTP
download works only for a public IP address.
42
Page 24
Configuration by Web Browser
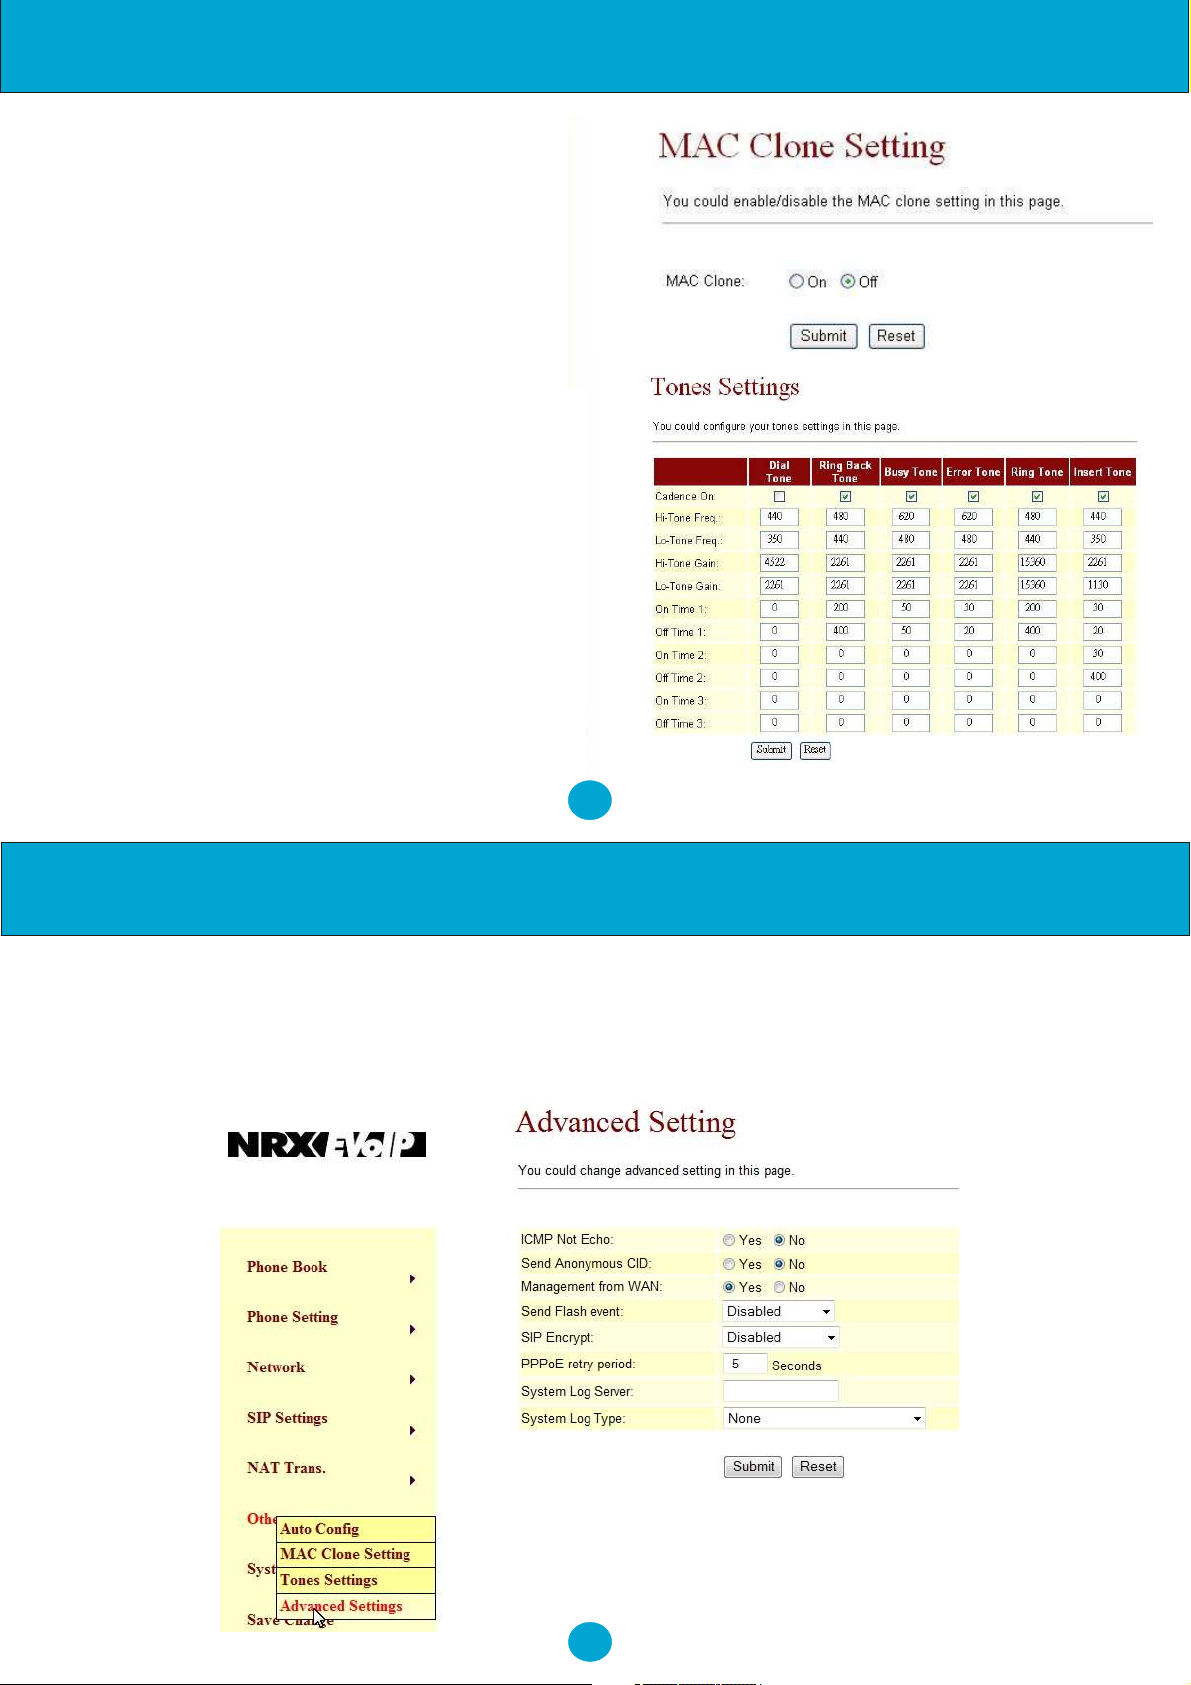
MAC Clone Setting:
8.76.The MAC Clone function is to clone the
MAC when only one MAC is available from ITSP.
This is to share with the PC using the same MAC.
When you finished settings, please click the
Submit button.
Tones Settings:
8.77.The Tone setting can be adjusted to
generate Dial tone, Ring tone, Ring Back tone,
and Busy tone for different countries. When you
finished with the settings, please click the Submit
button.
43
Configuration by Web Browser
Advanced Setting:
8.78.The advanced settings might be useful for some network requirements. The ICMP function is to echo
when someone ping this device. This can prevent hackers from attacking the device by not echoing. When
you finished the setting, please click the Submit button.
44
Page 25
Configuration by Web Browser
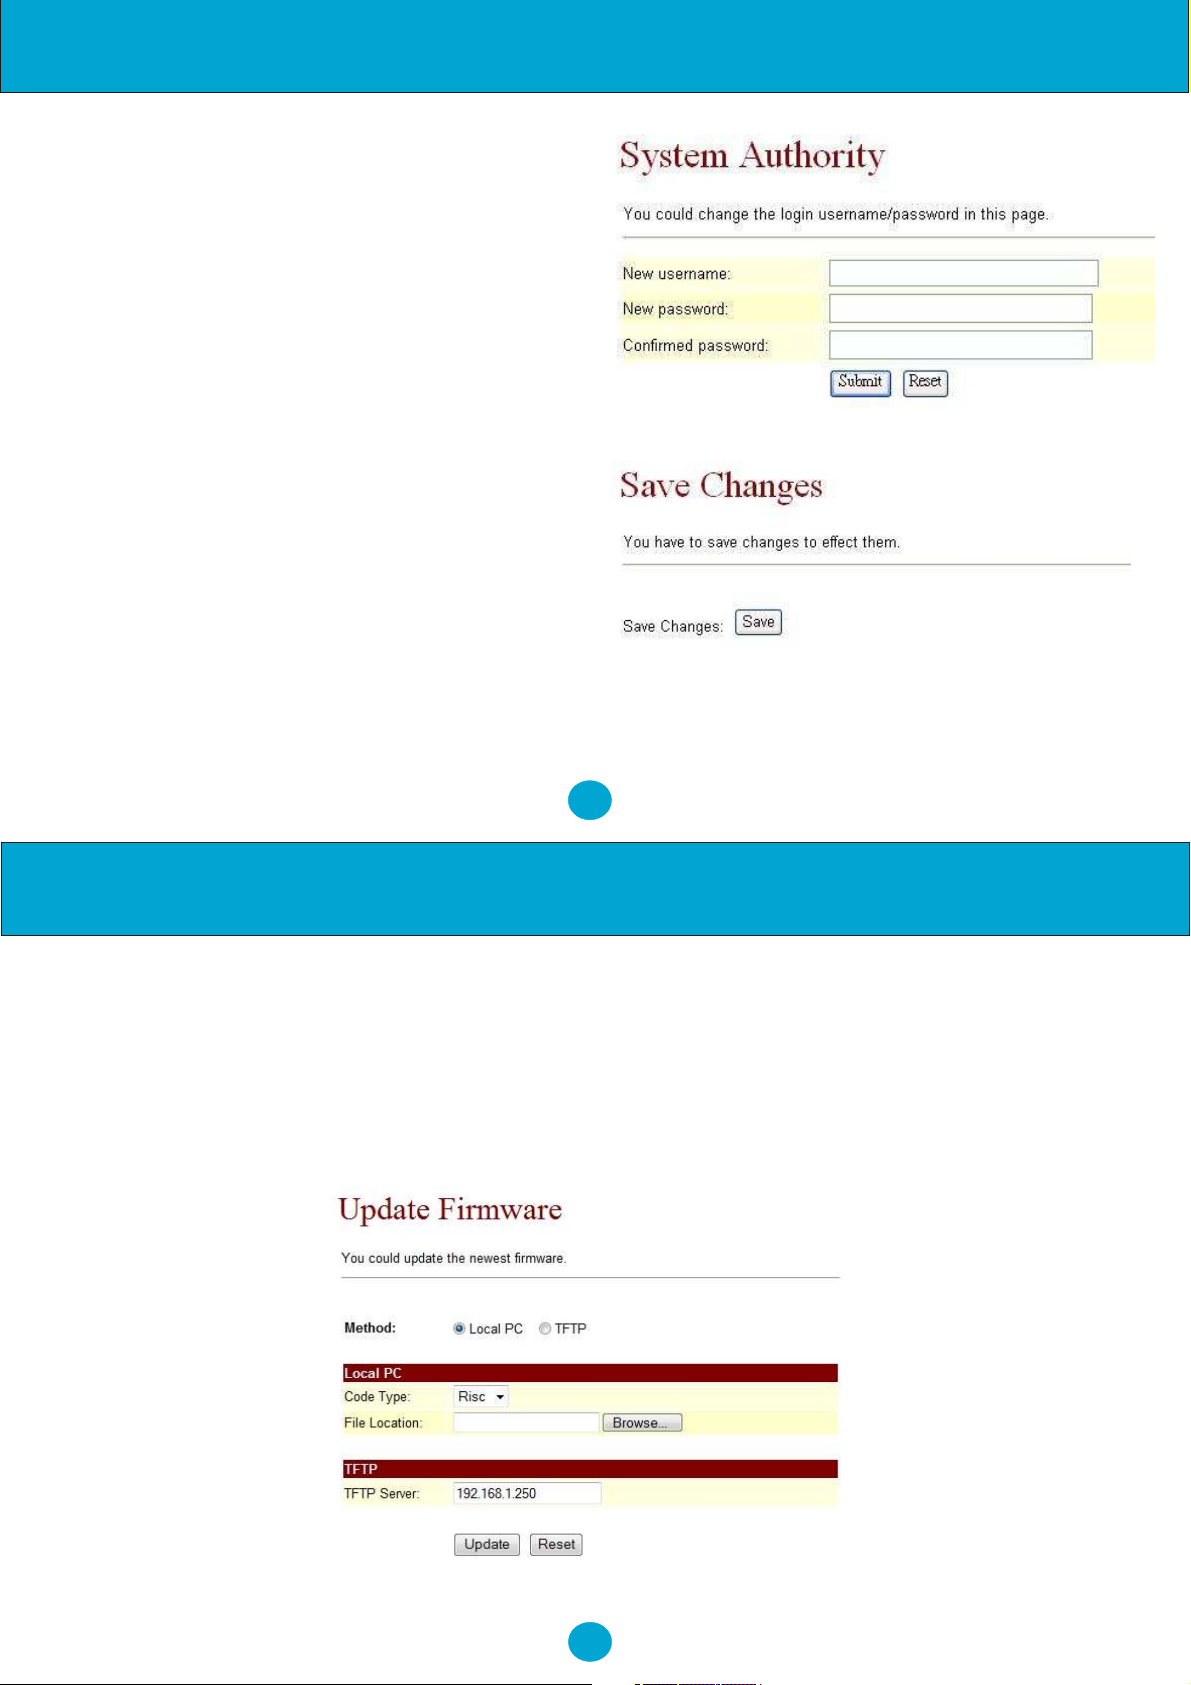
System Authority:
8.79. The user login name and password can be
changed in this page.
Save Change:
8.80.If you want to save the changes you have
made for new setting in the NRX EVoIP Phone,
You have to click the Save button. After you click
the Save button, the phone will automatically
restart and the new setting will implemented.
45
Configuration by Web Browser
Update:
Update Firmware
8.81. The IP Phone provides two methods, HTTP or TFTP, to update new firmware as follows:
8.82. Select the firmware code type, Risc or DSP code. (Usually Risc code)
8.83. Click the "Browse" button to choose the updated file location for HTTP download, or
8.84.Select TFTP and enter the IP address of TFTP server for firmware download, then click the
"Update" button.
46
Page 26
Configuration by Web Browser
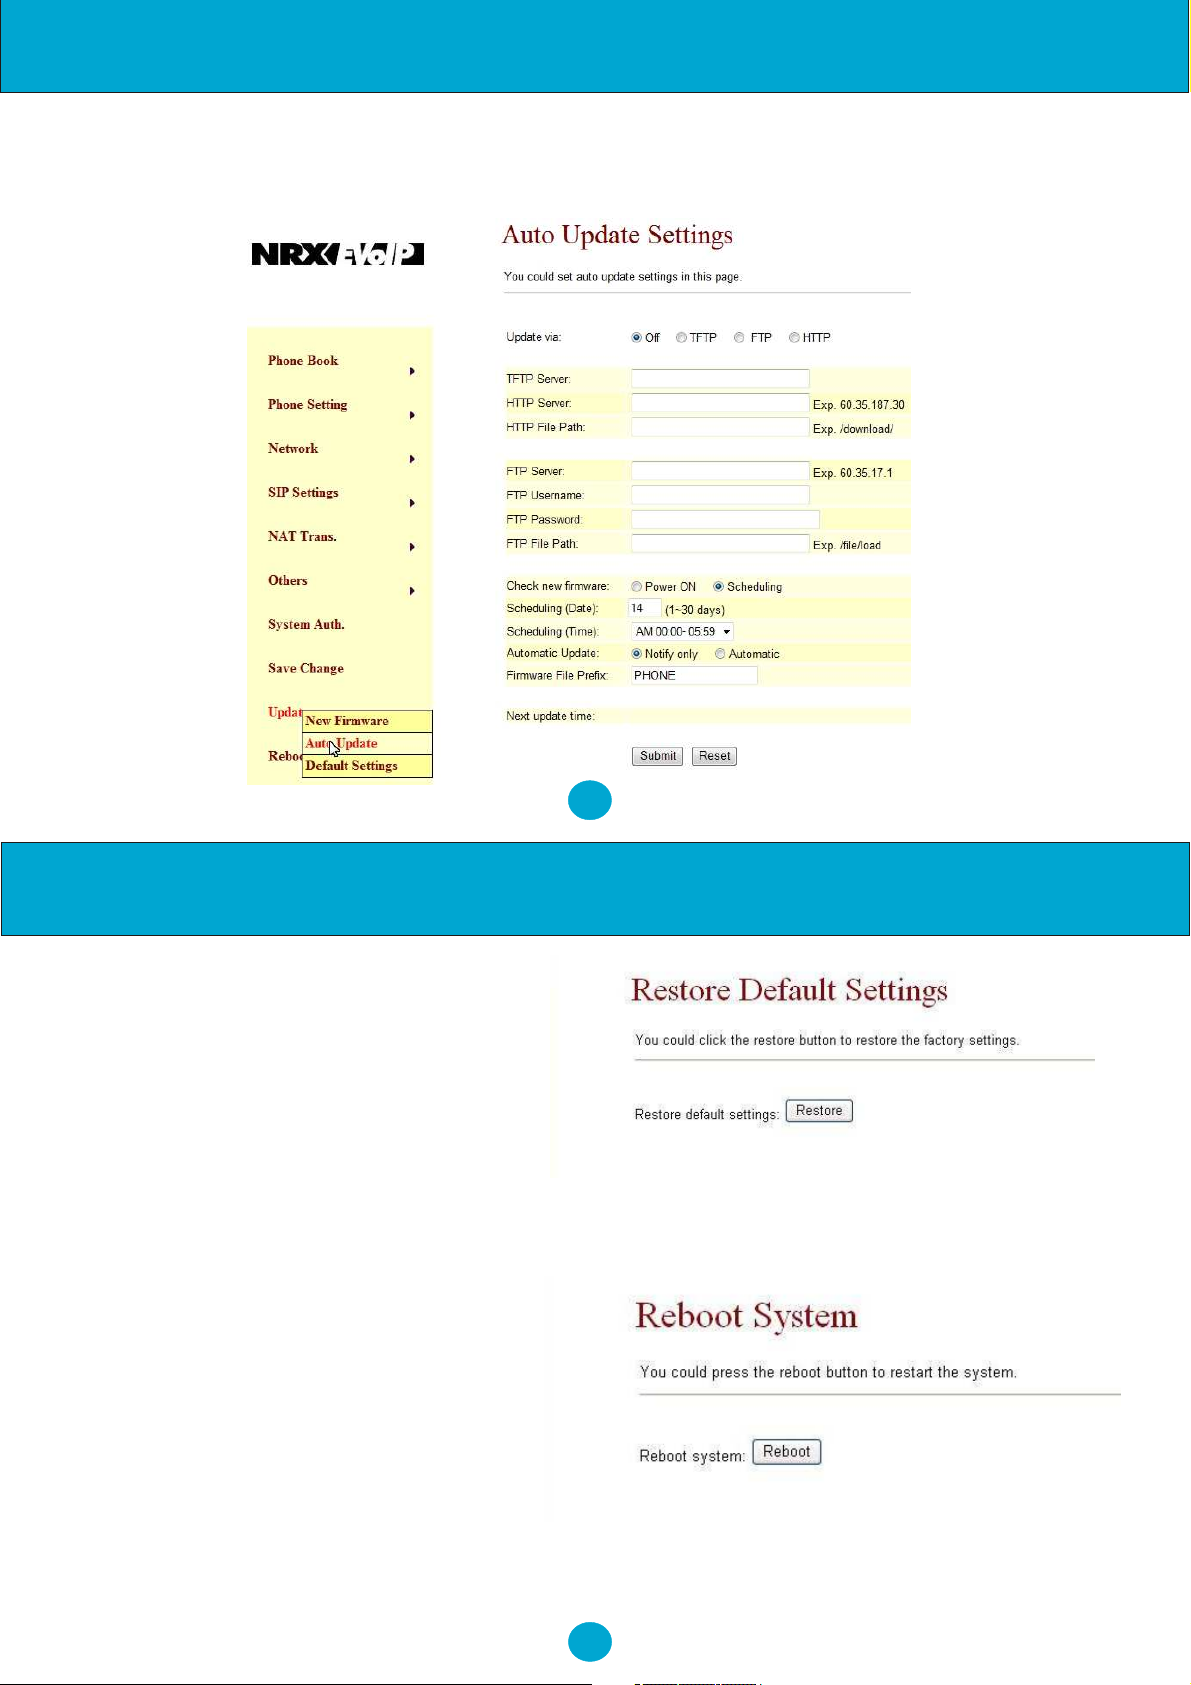
Auto Update Settings:
8.85. The IP Phone provides two methods, HTTP or TFTP, to update new firmware as the following steps:
47
Configuration by Web Browser
Restore Default Settings:
8.86.You can restore the NRX EVoIP to factory
default on this page. Click the Restore button,
then the phone will restore to default and
automatically restart again.
Reboot:
8.87.If you want to restart the NRX EVoIP
Phone, you can just click the Reboot button, and
then the phone will restart automatically.
48
Page 27

Menu Shortcuts
MENU shortcuts:
To use the menu shortcuts press the 'MENU' button followed by the keypad numbers shown.
1. Phone Book
1.1 Search: Search Phone Book.
1.2 Add entry: Add new phone number to phone book.
1.3 Speed dial: Add speed dial phone number to speed dial list.
1.4 Erase all: Erase all phone number from Phone Book.
2. Call history
2.1 Incoming calls: Show all incoming call.
2.2 Dialed numbers: Show all dialed call.
2.3 Erase record: Delete call history.
2.3.1 All: Delete all call history.
2.3.2 Incoming: Delete all incoming call.
2.3.3 Dialed: Delete all dialed out call.
3. Phone setting
3.1 Call forward:
3.1.1 All Forward:
3.1.1.1 Activation: To Enabled/Disabled this function.
3.1.1.2 Number: Forward to a registered or URL Number.
3.1.2 Busy Forward.
3.1.2.1 Activation: To Enabled/Disabled this function.
3.1.2.2 Number: Forward to a registered or URL Number.
Menu Shortcuts
3.1.3 No Answer Forward.
3.1.3.1 Activation: To Enabled/Disabled this function.
3.1.3.2 Number: Forward to a registered or URL Number.
3.1.4 Ring Timeout: Set the Ring times to start the No Answer Forward function.
3.2 Do not Disturb
3.2.1 Always: Block all calls
3.2.2 By Period: Block calls by the period time
3.2.3 Period Time: Set the start time and end time to Block calls.
3.3 Alarm Setting:
3.3.1 Activation: Enable/Disable alarm
3.3.2 Alarm Time: Set the alarm time
3.4 Date/Time setting:
3.4.1 Date & Time: Set the IP Phone Date and Time.
3.4.2 SNTP setting:
3.4.2.1 SNTP: Enabled / Disable SNTP.
3.4.2.2 Primary SNTP: Set Primary SNTP server IP address or URL.
3.4.2.3 Secondary SNTP: Set Secondary SNTP server IP address or URL.
3.4.2.4 Time zone: Set Time zone.
3.4.2.5 Adjustment Time: Set adjustment time period.
3.5 Volume and Gain
3.5.1 Handset volume: Set Handset volume from 0~15 (max.) for you to hear.
3.5.2 Speaker volume: Set Speaker phone volume from 0~15 (max.) for you to hear.
3.5.3 Handset Gain: Set Handset Gain from 0~15 (max.) for remote site to hear.
3.5.4 Speaker Gain: Set Speakerphone Gain from 0~15 (max.) for remote site to hear.
3.6 Ringer:
3.6.1 Ringer volume: Ringer volume selection from 0~15 (max.).
49
50
Page 28

Menu Shortcuts
3.7 Auto Dial: Auto Dial time selection from 3~9 seconds.
4. Network
4.1 WAN Setup:
4.1.1 IP Type:
4.1.1.1 Fixed IP client
4.1.1.2 DHCP client:
4.1.1.3 PPPoE client:
4.1.2 Fixed IP setting:
4.1.2.1 Host IP
4.1.2.2 Subnet mask
4.1.2.3 Gateway IP
4.1.3 PPPoE setting:
4.1.3.1 User name
4.1.3.2 Password
4.2 LAN Setup:
4.2.1 Bridge
4.2.2 NAT
4.3 DNS Server:
4.3.1 Primary DNS
4.3.2 Secondary DNS
4.4 VLAN:
4.4.1 Activation
4.4.2 VID
4.4.3 Priority
4.4.4 CFI
4.5 Status: Show IP addresses of WAN, LAN and MAC address (use UP/Down keys).
51
Menu Shortcuts
5. SIP Settings
To set the SIP setting from keypad, you have to press Menu_7_4 to input the password first, or the
SIP setting may not be allowed to access.
5.1 Service Domain
5.1.1 First realm
5.1.1.1 Activation:
5.1.1.2 User name:
5.1.1.3 Display name:
5.1.1.4 Register name:
5.1.1.5 Register password:
5.1.1.6 Proxy server: Proxy Server IP Address
5.1.1.7 Domain server: Domain Server IP Address
5.1.1.8 Outbound proxy: Outbound Proxy IP Address
5.2 Codec
5.2.1 Codec type
5.2.1.1 G.711 uLaw: G.711 uLaw
5.2.1.2 G.711 aLaw: G.711 aLaw
5.2.1.3 G.723: G.723.1
5.2.1.4 G.729: G.729A
5.2.1.5 G.726-16: G.726 16Kbps
5.2.1.6 G.726-24: G.726 24Kbps
5.2.1.7 G.726-32: G.726 32Kbps
5.2.1.8 G.726-40: G.726 40Kbps
5.2.2 VAD: Voice Activity Detection Enable/Disable.
52
Page 29
Menu Shortcuts
5.3 RTP Setting:
5.3.1 Outband DTMF: Outband DTMF Enabled/Disabled.
5.3.2 Duplicate RTP
5.3.2.1 No duplicate: No resend voice packets.
5.3.2.2 One duplicate: Resend voice packets once.
5.3.2.3 Two duplicate: Resend voice packets twice.
5.4 RPort Setting: RPort Enabled/Disabled.
5.5 Hold by RFC: Hold by RFC3261 Enabled/Disabled.
5.6 Status: Use Up/Down keys to show the SIP Proxy register status.
6. NAT Transversal
6.1 STUN setting
6.1.1 STUN: STUN Enabled/Disabled.
6.1.2 STUN server: Server IPAddress or URL.
7. Administrator
7.1 Auto Config
7.1.1 Config Mode: Select Disable/TFTP/FTP/HTTP for auto config function with server.
7.1.2 TFTP server: Set the TFTP server IP address.
7.1.3 FTP server: Set the FTP server IP address.
7.1.4 FTP Login Name: Set the login name to the FTP server.
7.1.5 FTP Password: Set the Password to the FTP server.
7.2 Upgrade System: You can restore to the default setting.
7.2.1 Upgrade Now: Select Yes/No to upgrade with the upgrade Server.
7.2.2 Upgrade via: Select Disable/TFTP/FTP/HTTP to do upgrade.
7.2.3 Status:
7.2.4 Reset Time: Set Yes/No to reset time.
53
Voip Application Examples
7.3 Default setting: To load/abort the default setting.
7.4 System Authority: Must enter the password first for SIP setting. Default is "admin".
7.5 Version: This shows the firmware version.
7.6 Watch Dog: This enables Watch Dog function for debugging.
7.7 Restart: This function will restart your IP Phone.
10. VoIP Application Examples:
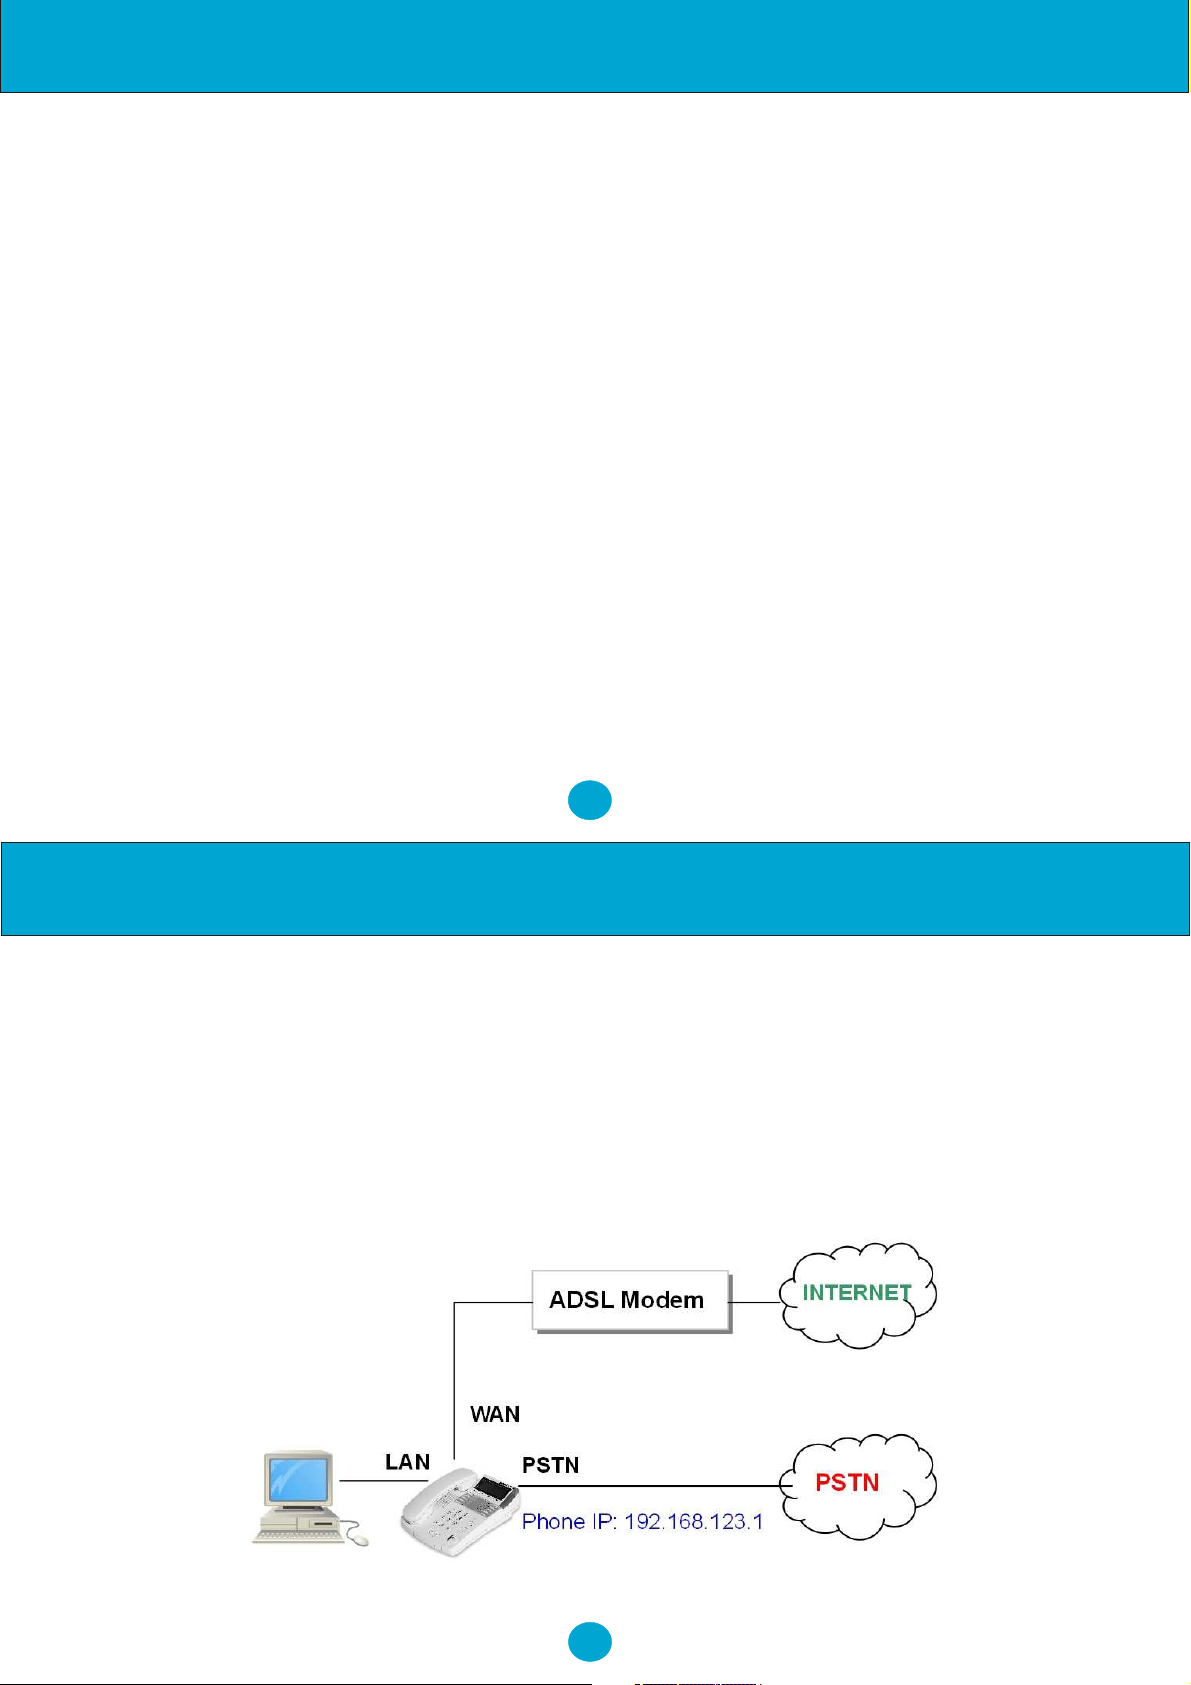
A. ADSL Connections without NAT Router for NRX EVoIP
54
Page 30
Voip Application Examples
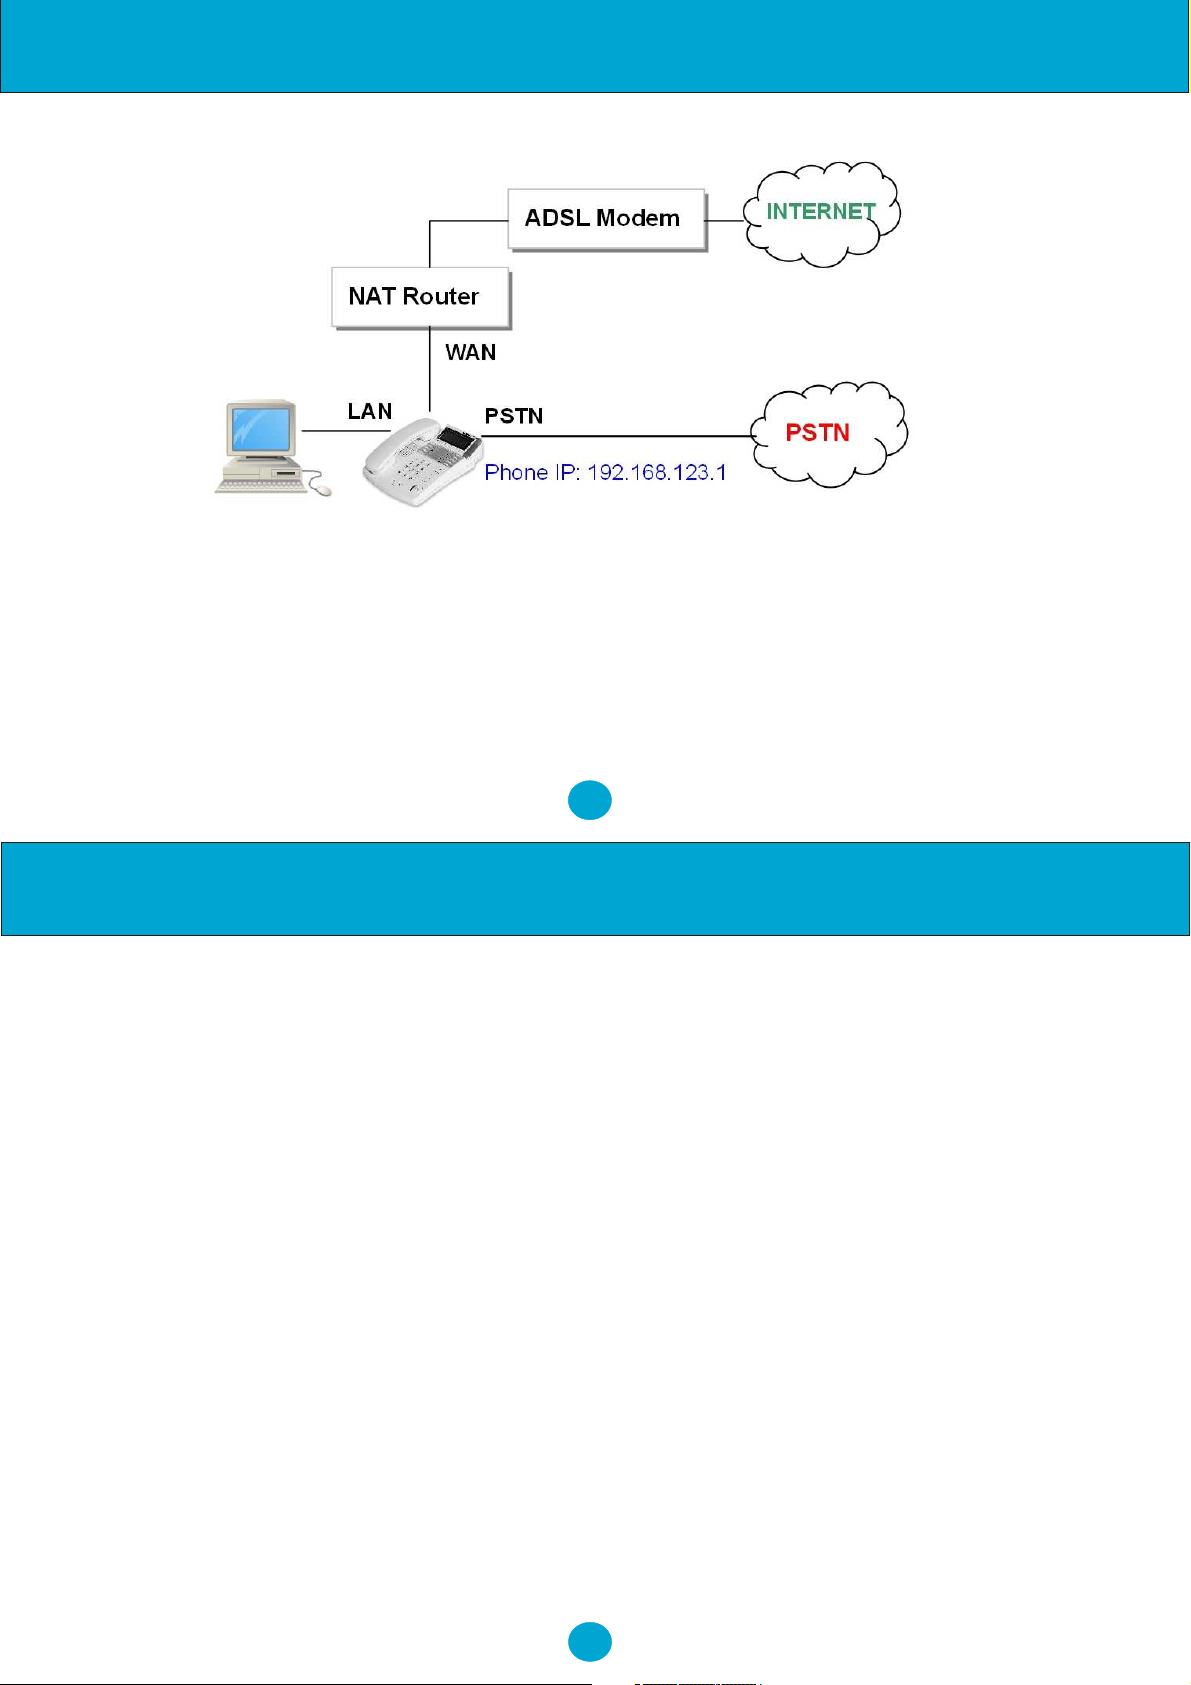
B. ADSL Connections with NAT Router for NRX EVoIP
Example 1: SIP-to-SIP Calling/Answering
Application:
The SIP-to-SIP calling works when both calling and answering parties are registered to SIP server with given
registered phone numbers. The ADSL connections can be as in either Diagrams A or B. Both parties are
registered to SIP server under NAT router. For Diagram A without NAT router, you may select NAT mode to
enable the embedded NAT router. For Diagram B with external NAT router, you may select Bridge mode to
disable the embedded NAT.
55
Voip Application Examples
Configuration:
1. Select either "NAT" or "Bridge" in accord with your network in "WAN settings" page,
2. Select "DHCP Client" to automatically get an IP address from NAT router.
3. Remember to click the "Submit" button,
4. Select Active "ON" in the "SIP settings / Service Domain" page,
5. Enter the Register Name, Register Password, Proxy Server, and Outbound Proxy,
6. Select "ON" in the "STUN setting", if Outbound Proxy is NOT available.
7. Upon successful SIP registration, the REG LED indicator will be ON and the LCD will show registered
<phone number>.
Calling:
8. Pick up the phone, and you should hear a dial tone for VoIP mode.
9. Press 1688# or 1688 to call the party with the registered SIP phone number 1688. Note that # key will
dial out the number immediately. Dialing without # will not dial out until the auto dial timer default=5 seconds)
elapsed.
Example 2: SIP to Direct IP Calling
Applications:
The application is for the calling party with ADSL connection as in either Diagrams A or B. The calling party is
registered to SIP server with either fixed real IP or private IP under NAT router. The answering party is with
fixed real IP. You may also use the Phone Book to call Direct IP Address.
Configuration:
1. Same as in Example 1.
56
Page 31

Voip Application Examples
2. Select "ON" in "STUN setting" page, if Outbound Proxy is NOT available.
3. Upon successful SIP registration, the LCD will show registered <phone number>.
Calling:
4. Press Speakerphone key, and you should hear a dial tone.
5. Press 211*21*191*4# or 211*21*191*4 to call the party with the real IP address of 211.21.191.4. In a
moment, you should hear a ring back tone, and wait for the VoIP called party to answer.
Example 3: Direct IP to Direct IP Calling/Answering
Application:
The applications are for ADSL connection without NAT router as in Diagram A. Both parties are with fixed
real IP. The Direct IP calling works when both calling and answering parties are with
known fixed IP. SIP server registrations are not required in this application.
Configuration:
1. Select "Fixed IP" in the "Network / WAN settings" page,
2. Enter the items of IP, Subnet Mask, Gateway IP,
3. Click the "Submit" button.
Calling:
4. Pick up the phone, and you should hear a dial tone.
5. Press 211*21*191*4# or 211*21*191*4 to call the party with the real IP address of 211.21.191.4.
Note that # key will dial out the number immediately. Dialing without # will not dial out until the auto dial timer
(default=5 seconds) elapsed. In a moment, you should hear a ring back tone, and wait for the VoIP called
party to answer.
57
Voip Application Examples
Example 4: Direct IP to Direct IP Calling within NAT Router
Application:
For the calling party in ADSL connection with NAT router as in Diagram B, this Direct IP calling can work
when the answering parties are with fixed private IP addresses within the same VPN network, or with fixed
real IP addresses.
Configuration:
1. Select "Fixed IP" in the "Network / WAN settings" page,
2. Enter the items of IP, Subnet Mask, Gateway IP,
3. Click the "Submit" button.
Calling:
4. Pick up the phone, and you should hear a dial tone
5. Press 192*168*1*51# or 192*168*1*51 to call the party with the private IP address of 192.168.1.51.
Press 211*21*191*4 to call the party with the real IP address of 211.21.191.4. In a moment, you should hear
a ring back tone, and wait for the called party to answer.
58
Page 32

Voip Application Examples
Example 5: 3-Way Conference Call, Call Transfer, Call Waiting, Hold
Application:
The Call Transfer and 3-Way Conference Call applications are for calls among Parties A, B, and C.
Three parties are registered to SIP server with either fixed real IP or private IP. There are two kinds of call
transfer; Blind Transfer and Attendant Transfer.
Blind Transfer:
1. Party A calls Party B.
2. While in conversation, Party B may press Transfer key, and should hear a dial tone.
3. Party B enters [Party C number] # and then hang up to transfer to Party C.
Attendant Transfer:
1. Party A calls Party B.
2. While in conversation, Party B may press Transfer key, and should hear a dial tone.
3. Party B enters [Party C number] # and talks to Party C.
4. When Party B then hangs-up, Party A will transfer and connect to Party C.
3-Way Conference Call:
1. Party A calls Party B.
2. While in conversation, Party B may press Hold key to hold the call, and should hear a dial tone.
3. Party B calls Party C.
4. While in conversation, Party may press Conf. key to join in Party A for a three-way conference.
Call Waiting Application:
When a new call is coming while you are talking, you will hear an interrupt "dodo" tone and you can
press Hold key to answer the new incoming call. You may press Hold key to switch back to the previous call.
59
Trouble Shooting
Call Hold Application:
You may press Hold key to hold the current call for a while, then press Hold key again to resume
conversations.
11. Trouble Shooting for Web Configurations:
11.1. DO NOT HEAR DIAL TONE?
When you pick up the phone and hear a busy tone, it indicates the WAN port is NOT connected.The LCD will
show Ethernet Error! Make sure the ADSL Ethernet cable is connected to the WAN port of NRX EVoIP
phone and Power Reset again.
11.2. CAN NOT ACCESS WEB PAGE?
IE Web Browser is a useful tool to configure NRX EVoIP phone. When you have difficulties in accessing the
default IP address http://192.168.123.1 of the phone, the most likely reason is that your PC might have
different subnet IP settings from 192.168.123.xxx. In this case, you must change NRX EVoIP phone's IP
address to the same subnet as your PC and NAT router.
Example: To change the NRX EVoIP IP address to the same subnet as PC and NAT router
1. Set the phone to DHCP Client mode. The NRX EVoiP phone will reboot, and LED will start flashing to get
an IP address from NAT DHCP server.
2. Press Menu_4_5 to read IP Addresses for WAN and LAN Ports, for example, 192.168.62.51.
3. Enter from IE web browser http://192.168.62.51:9999 to login to the web page for configurations
60
Page 33
Trouble Shooting
11.3. CONFIGURE PC'S IP SETTINGS FOR VP306 EMBEDDED NAT FUNCTION?
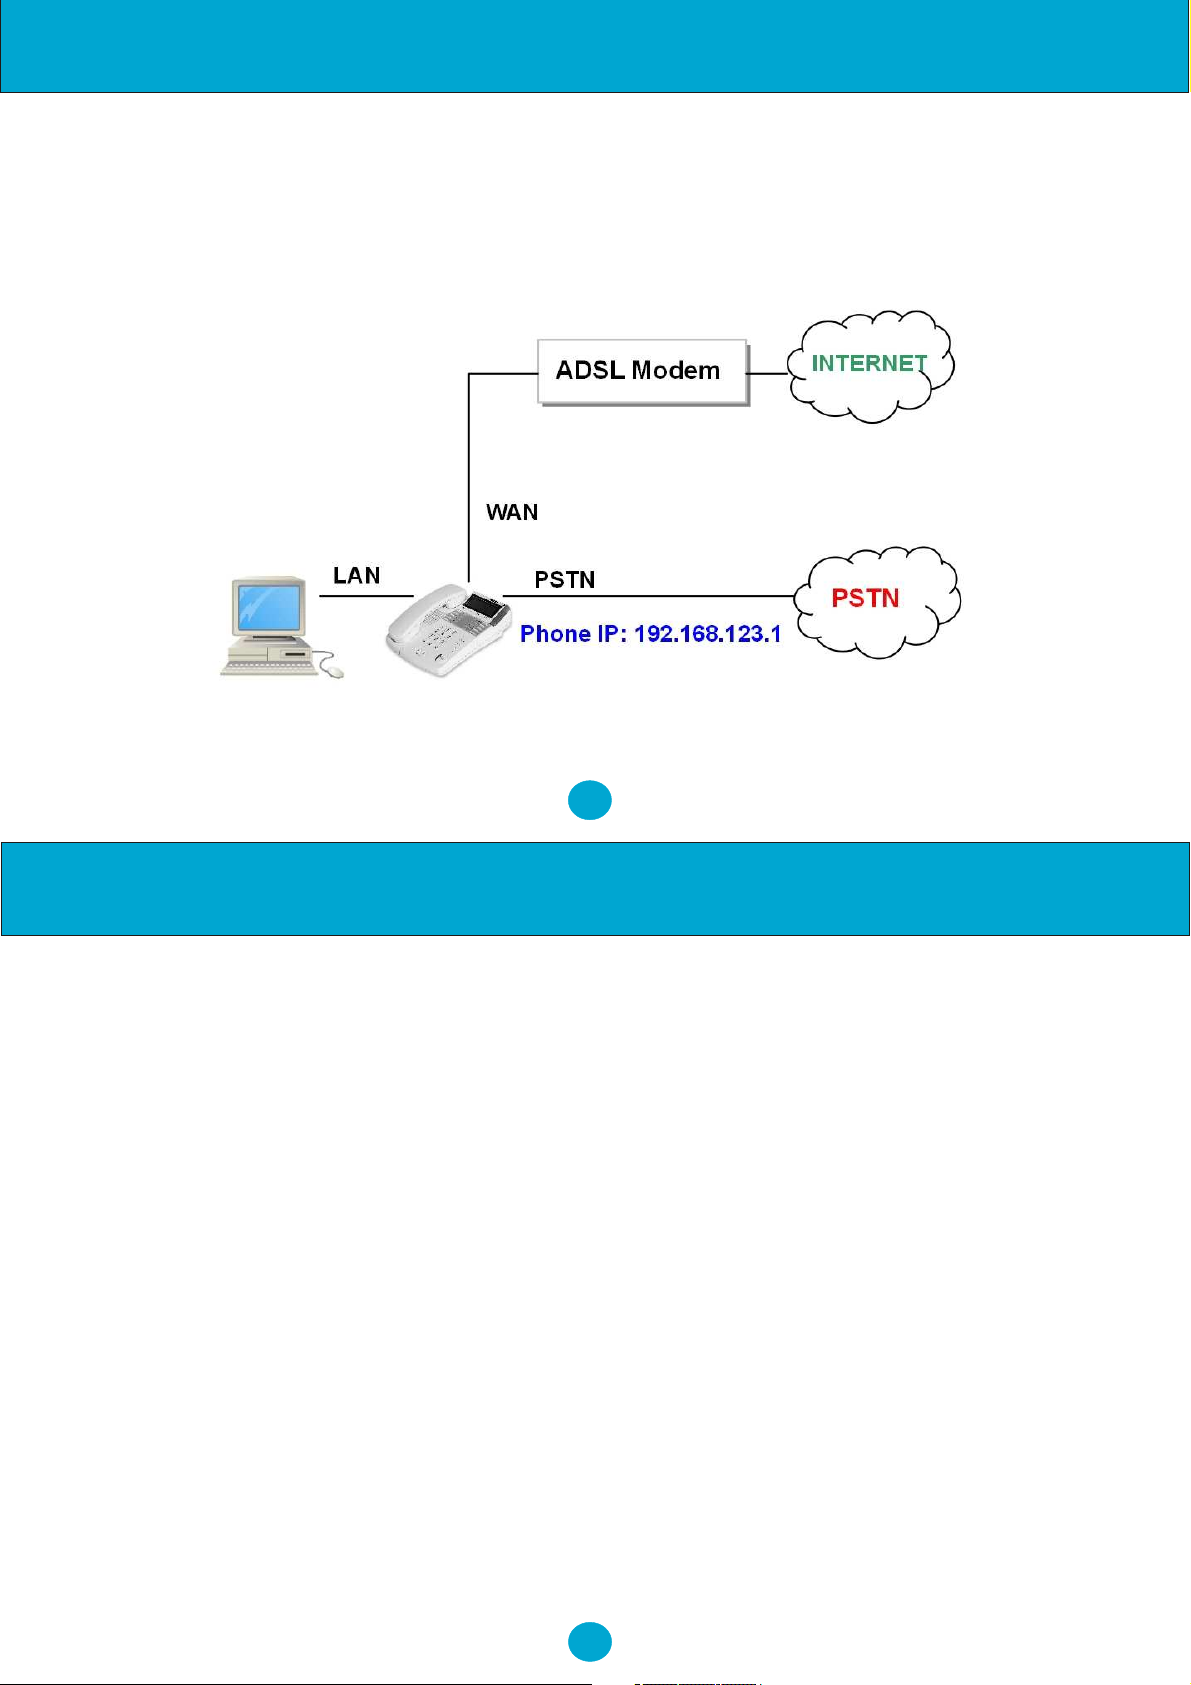
If you don't have a router to connect both your PC and NRX EVoIP for sharing the only one IP address from
ADSL/Cable modem, you should enable the embedded NAT function inside the NRX EVoIP phone.
You need to change your PC's IP settings to recognize the NRX EVoIP as the default gateway. In this case,
you should enable the embedded NAT router of the NRX EVoIP to provide more than one IP addresses for
the PC and NRX EVoIP.
61
Trouble Shooting
Example: To change your PC IP address to the same subnet as 192.168.123.1 for the NRX EVoIP
1. As in Window 2000 (my computer),
• At "Network and Dialup Connections", right click on "Local Area Connection", then click on property.
• The "Local Area Connection Properties" window will pop up.
• Double click on "Internet Protocol (TCP/IP)".
• The "Internet Protocol (TCP/IP) Properties" window will pop up.
• Click on "Use the following IP Address".
• Enter IP: 192.168.123.50 (50 can be any number other than 1, which is used by the NRX EVoIP).
• Enter Subnet mask: 255.255.255.0.
• Enter Default gateway: 192.168.123.1
• Click on OK button.
3. You will lose internet connection at this time.
4. At IE browser, type http://192.168.123.1
5. Follow the example in "Advanced Settings for Embedded NAT" for web login.
6. At LAN setting, turn on DHCP server.
7. At WAN setting, choose "DHCP client" to work with your ADSL/Cable modem.
8. Save change, wait for the NRX EVoIP to reboot.
9. Change your PC's "Internet Protocol (TCP/IP) Properties" back to "obtain an IP address
automatically".
10. You may press Menu_4_5 to read IP Addresses for WAN and LAN Ports.
62
Page 34

Warranty
12. WARRANTY
Trojan Telecom has built the NRX EVoIP telephone to a high standard. Our warranty reflects our belief that during it’s working
life you should not experience any mechanical failures.
Trojan Telecom will at all times use a sensible and supportive attitude towards warrantable returns, working with you in
identifying ‘no fault found’.
The following terms and conditions apply:
1) Where we find a genuine warranty failure, Trojan Telecom will replace the faulty instrument with a one-for-one
replacement.
2) It is the responsibility of the user to return the faulty telephone to Trojan Telecom. We ask you to cover this cost and we
will return your replacement telephone at our expense.
3) We reserve the right to repair the faulty item or replace it with a similar telephone of the same make.
4) Discontinued models under warranty will be replaced with a similar or more featured telephone.
5) We reserve the right to charge for items considered to be chargeable under fair wear and tear.
6) User misuse or any modification carried out to the NRX EVoIP telephone by the customer is not considered a
manufacturing fault or component defect. Therefore it is not covered by the warranty.
7) Accidental damage such as liquid spillage or user damage will not be covered under the terms of the warranty.
8) When returning the telephone please ensure you fully complete the returns authorisation form, failure to do so could cause
63
Warranty
you unnecessary delay.
The terms of this warranty do not effect your statutory rights.
Warranty applies to UK customers only.
Faulty units should be returned to our service centre at the following address, together with the completed return form on the
opposite page.
SERVISCOMM
UNIT 2, RED BARNES WAY
McMullen Road, Darlington
DL1 2RR UK
64
Page 35

Ist Floor
Amphenol Complex
Thanet Way
Whitstable
Kent
CT5 3JF
ENGLAND
Tel: (+44) (0)1227 275357 Fax: (+44) (0)1227 272932
e-mail: [email protected]
REF: NRXEVO350140607
 Loading...