


USER INSTRUCTION
OVENS
EN
02

Safety Indications
• During cooking, moisture may condense inside the oven cavity or on
the glass of the door. This is a normal condition. To reduce this effect,
wait 10-15 minutes after turning on the power before putting food
inside the oven. In any case, the condensation disappears when the
oven reaches the cooking temperature.
• Cook the vegetables in a containerwith a lid instead of an open tray.
• Avoid leaving food inside the oven after cooking for more than 15/20
minutes.
• WARNING: the appliance and accessibleparts become hot during use.
Be careful not to touch any hot parts.
•WARNING: the accessible parts can become hot when the grill is in
use. Children should be kept at a safe distance.
•WARNING: ensure that the appliance is switched off before replacing
the bulb, to avoid the possibility of electricshocks.
•WARNING: in order to avoid any danger caused by the accidental
resetting of the thermal interruption device, the appliance should not
be powered by an external switching device, such as a timer, or be
connected to a circuit that is regularly switched on and off.
•Children under 8 should be kept at a safe distance from the appliance
if not continuously supervised.
•Children should not play with the appliance. The appliance can be
used by those aged 8 or over and by those with limited physical,
sensorial or mental capacities, without experience or knowledge of the
product, only if supervised or provided with instruction as to the
operation of the appliance, in a safe way with awareness of the possible
risks.
•Cleaning and maintenance should not be carried out by unsupervised
children.
•Do not use rough or abrasive materials or sharp metal scrapers to
clean the oven door glasses, as they can scratch the surface and cause
the glass to shatter.
•The oven must be switched off before removing the removable parts
and, after cleaning, reassemble them according the instructions.
EN 02

•Only use the meat probe recommended for this oven.
•Do not use a steam cleaner.
•Put the plug into a socket equipped with a third contact which
corresponds to the earth and which must be connected and in
operation. For models without a plug, attach a standard plug to the
cable that is able to bear the load indicated on the tag. The earth
conductor is yellow-green in colour. This operation should be carried
out by a suitably qualified professional. In case of incompatibility
between the socket and the applianceplug, ask a qualifiedelectrician to
substitute the socket with another suitable type. Connection to the
power source can also be made by placing an omnipolar breaker
between the appliance and the power source that can bear the
maximum connected load and that isin line with current legislation. The
yellow-green earth cable should not be interrupted by the breaker. The
socket or omnipolar breaker used for the connection should be easily
accessible when the appliance isinstalled.
•If the power cable is damaged, it should be substituted with a cable or
special bundle available from the manufacturer or by contacting the
customer service department.
If the cable is damaged, replace it promptly in accordance with the
followinginstructions:
- open the cover of the terminalblock;
- remove the power cable and substitute it with a similar cable which is
compatible with the appliance (type , H05V2V2-F).H05VV-F
•This operation should be carried out by a suitably qualified
professional. The earth conductor (yellow-green) must be
approximately 10 mm longer than the other conductors. For any
repairs, refer only to the Customer Care Department and request the
use of original spare parts.
•Failure to comply with the above can compromise the safety of the
appliance and invalidatethe guarantee.
EN 03

Summary
General Instructions
5
Product Description
7
Use of the Oven
8
Oven Cleaning and Maintenance
11
1.1 Safety indications
1.2 Electrical safety
1.3 Recommendations
1.4 Installation
1.5 Waste management
1.6 Conformity declaration
2.1 Overview
2.2 Accessories
2.3 First use
3.1 Display description
3.2 Cooking modes
4.1 General notes on cleaning
4.2 Maintenance
• Removal and cleaning of grills
• Removal of the oven window
• Removal and cleaning of the glass
door
• Changing the bulb
Troubleshooting
13
Installation
14
5.1 F.A.Q.
6.1 For Equepped With Fixing Squares
EN 04
1. General Instructions
We thank you for choosing one of our products. Forthe
best results with your oven, you should read this
manual carefully and retain it for future reference.
Before installing the oven, take note of the serial
number so that you can give it to customer service staff
if any repairs are required. Having removed the oven
from its packaging, check that it has not been damaged
during transportation. If you have doubts, do not use
the oven and refer to a qualified technician for advice.
Keep all of the packaging material (plastic bags,
polystyrene, nails) out of the reach of children. When
the oven is switched on for the first time, strong
smelling smoke candevelop, whichis causedby theglue onthe insulationpanels surrounding the oven
heating for the first time. This is absolutely normal and, if it occurs, you should wait for the smoke to
dissipate before putting food in the oven. The manufacturer accepts no responsibility in cases where
the instructions contained in thisdocument arenot observed.
NOTE: the oven functions, properties and accessories cited in this manual will vary, depending on the
model you have purchased.
1.1 Safety Indications
Only use the oven for its intended purpose, that is only for the cooking of foods; any other use, for
example as a heat source, is considered improper and therefore dangerous. The manufacturer cannot
be held responsiblefor anydamage resultingfromimproper, incorrector unreasonable usage.
The use ofanyelectrical appliance impliesthe observanceof some fundamental rules:
- do notpull on the powercableto disconnect theplug fromthe socket;
- do nottouchthe appliance withwetor damp handsor feet;
- in general the useof adaptors, multiple sockets and extension cables is notrecommended;
- in caseof malfunction and/or poor operation, switch off the applianceand do nottamper withit.
1.2 Electrical Safety
ENSURE THAT AN ELECTRICIAN OR QUALIFIED TECHNICIAN MAKES THE ELECTRICAL CONNECTIONS.
The powersupply to which the oven is connected must conform with the laws in forcein the country of
installation.The manufacturer accepts noresponsibilityfor any damage caused by thefailure toobserve
these instructions. The oven must be connected to an electrical supply with an earthed wall outlet or a
disconnector with multiple poles, depending on the laws in force in the country of installation. The
electrical supply should be protected with suitable fuses and the cables used must have a transverse
section that can ensure correct supplyto theoven.
CONNECTION
The Appliance should only be connected via a suitable cable, to an electrical supply with 220-240V AC
50HZ power between phases orbetweenthe phase andneutral.
Beforethe oven is connectedto theelectrical supply,it is important to check:
- Oven Max output onthe rating plate.
- Correctly rated circuit breaker/fuse.
The grounding wire connected to the ovens earth terminal must be connected to the earth terminal of
the power supply.
WARNING
Beforeconnecting the oven to thepowersupply, aska qualified electrician tocheck the continuity of the
power supply's earth terminal. The manufacturer accepts no responsibility for any accidents or other
problems caused byfailure to connect theoven to theearth terminal orby an earth connection thathas
defectivecontinuity.
EN 05

NOTE: as the oven couldrequiremaintenance work, it is advisableto keep anotherwall socket available
so that the oven can be connected to this if it is removed from the space in which it is installed. The
power cable must only be substituted by technical service staff or by technicians with equivalent
qualifications.
1.3 Recommendations
After each useof the oven, a minimumof cleaning will helpkeepthe oven perfectly clean.
Do not linethe oven walls withaluminium foil or single-useprotection available from stores. Aluminium
foil or any other protection, in direct contact with the hot enamel, risks melting and deteriorating the
enamel of the insides. In order to prevent excessive dirtying of your oven and the resulting strong
smokey smells, we recommend not using the oven at very high temperature. It is better to extend the
cooking time and lower the temperature a little. In addition to the accessories supplied with the oven,
we advise you only usedishes and bakingmoulds resistant to very hightemperatures.
1.4 Installation
The manufacturers have noobligationto carry thisout. Ifthe assistance ofthe manufacturer is required
to rectify faults arising from incorrect installation, this assistance is not covered by the guarantee. The
installation instructions for professionally qualified personnel must be followed. Incorrect installation
may cause harm or injury to people, animals or belongings. The manufacturer cannot be held
responsible for such harmor injury.
The oven can be located high in a column or under a worktop. Before fixing, you must ensure good
ventilation in the oven space to allow proper circulation of the fresh air required for cooling and
protectingthe internal parts.Make theopenings specified on last pageaccording tothe type offitting.
1.5 Waste management and environmental protection
This appliance is labelled in accordance with European Directive 2012/19/EU regarding
electric and electronic appliances (WEEE). The WEEE contain both polluting substances
(that can have a negative effect on the environment) and base elements (that can be
reused). It isimportant that the WEEE undergo specific treatmentstocorrectly remove and
dispose of the pollutants and recover all the materials. Individuals can play an important
role in ensuring that the WEEE do not become an environmental problem; it is essential to
followa few basic rules:
- the WEEEshould not be treated asdomestic waste;
- the WEEE should be taken to dedicated collection areas managed by the town council or a registered
company.
In many countries, domestic collections may be available for large WEEEs. When you buy a new
appliance, the old one can be returned to the vendor who must accept it free of charge as a one-off, as
long as theappliance is of anequivalenttype and hasthe same functionsas thepurchased appliance.
SAVINGAND RESPECTINGTHE ENVIRONMENT
Where possible,avoid pre-heating the oven and always try to fill it. Openthe ovendoor as infrequently
as possible, because heat from the cavity disperses every time it is opened. For a significant energy
saving, switch off the oven between 5 and 10 minutes beforethe planned end of the cooking time, and
use the residualheat thatthe oven continues togenerate. Keep the sealsclean and inorder,to avoid any
heat dispersal outside of the cavity. If you have an electric contract with an hourly tariff, the "delayed
cooking" programme makes energy saving more simple, moving the cooking process to start at the
reduced tariff time slot.
1.6 Declaration of compliance
The parts ofthis appliance thatmay comeintocontact with foodstuffscomply with theprovisionsof EEC
Directive89/109.
By placing the mark on thisproduct, we are confirmingcompliance toall relevant European safety,
health and environmentalrequirementswhich are applicable inlegislation forthis product.
EN 06

2. Product Description
1
2
3
2.1 Overview
1
3
6
3
5
4
6
1. Control panel
2. Shelf positions
2
2
(lateral wire grid if included)
3. Metal grill
4. Drip pan
5. Fan (behind the steel plate)
6. Oven door
2.2 Accessories
Metal grill
1
Holds baking trays and plates.
3
Drip pan
2
Drip tray
Collects the residuesthat dripduring the cooking
of foods on thegrills.
4
Handle for tray
EN 07

2.3 First Use
PRELIMINARY CLEANING
Clean theoven before using forthe first time. Wipe over externalsurfaces with adamp softcloth. Wash
all accessories and wipe inside the oven with a solution of hot water and washing up liquid. Set the
empty ovento the maximum temperature and leave on for about 1 hour, this will removeany lingering
smells of newness.
3. Use of the Oven
3.1 Display description
8
8
1. Timer
2. Cooking time
3. End of cooking
4. Timer display
5. LCD display adjustment controls
6. Thermostat knob (upper cavity)
7. Function selector knob (upper cavity)
8. Upper cavity signal lamp
9. Thermostat knob (lower cavity)
10. Function selector knob (lower cavity)
11. Lower cavity signal lamp
9
9
WARNING!
The first operation to carry out after the oven has
been installed or following the interruption of
power supply (this is recognizable the display
pulsating and showing ) is setting the correct
time. This isachieved asfollows.
•Push the central button 4 times
•Set time with" " " " buttons.-+
•Release all buttons.
ATTENTION: The oven will only operate providing
the clock isset.
12:00
10
11
10
11
EN 08

FUNCTION HOW TO ACTIVATE WHAT IT DOES
•Child Lock function is
activated by touching
Set (+) for a minimum of
5 seconds. From this
KEY LOCK
MINUTE
MINDER
COOKING
TIME
moment on all other
function are locked and
the display will flash
STOP and preset time
intermittently.
•Push the central
button
1 times
•Press the buttons "-"
"+"
to set the required time
•Release all the buttons
• Push the central
button2 times
• Press the buttons "-"
or "+"to setthe lenght of
cooking required
• Release all buttons
• Set the cooking
function with the oven
function selector.
HOW TO SWITCH
IT OFF
•Child Lock function is
deactivated by touching
touchpad Set (+) again
for a minimum of 5
seconds. From this
moment on all functions
are selectable again.
•When the set time as
elapsed anaudible alarm
is activated (this alarm
will stop on its own,
howeveritcanbe
stopped immediately by
pressing the button)
SELECT.
•When the time is
elapsed the oven will
switch off automatically.
Should you wish to stop
cooking earlier either
turn the function
selector to 0, or set time
to 0:00 (SELECT and "-"
"+" buttons)
•Sounds an alarm at the
end of the set time.
•During the process, the
display shows the
remaining time.
• It allows to preset the
cooking time required
forthe recipe chosen.
• To check how long is
left to run press the
SELECT button 2Times.
• To alter/change the
preset timepress SELECT
and "-" "+" buttons.
WHAT IT IS FOR
•Allows to use the oven as
alarm clock (could be
activated either with
operating the oven or with
out operating the oven)
•Push any button to stop
the signal. Push the central
button to return to the
clock function.
END OF
COOKING
•Push the central
button3 times
•Press the buttons "-"
"+" to set the time at
which you wish the
oven to switch off.
•Release the buttons
•Set the cooking
function with the oven
function selector.
•At the time set, the
oven will switch off. To
switch off manually,
turn the oven
function selector to
position O.
EN 09
•Enables you to set the
end of cooking time.
•To check the preset
time push the central
button 3 times.
•To modify the preset
time press buttons
SELECT + "-" "+"
•This function is typically
used with “cooking time”
function.
For example if the dish has
to be cooked for 45 minutes
and needs to be ready by
12:30, simply select the
required function, set the
cooking time to 45 minutes
and the end of cooking time
to 12:30.
•At the end of the cooking
set time, the oven will
switch offautomatically and
an audible alarmwill ring.
•Cooking will start
automatically at 11:45
(12:30 minus 45 mins) and
will continue until the preset end-of-cooking-time,
when the oven will switch
itself off automatically.
WARNING.
If the END of cooking is
selected without setting the
length of cooking time, the
oven will start cooking
immediately and it will stop
at the END of cooking time
set.

3.2 Cooking Modes
Function
Dial
*
**
T °C
default
40
180
210
220
210
200
L3
220 50 ÷ 280
T °C
range
40 ÷ 40
50 ÷ 240
50 ÷ 240
50 ÷ 280
50 ÷ 230
150 ÷ 220
L1 ÷ L5
Function (Depends on the oven model)
LAMP: Turns on the oven light.
DEFROST: When the dial is set to this position. The fan circulates air at room
temperature around the frozen food so that it defrosts in a few minutes
without the protein content of thefood beingchanged oraltered.
FAN COOKING: We recommend you use this method for poultry, pastries, fish
and vegetables. Heatpenetrates intothe food better andboth the cookingand
preheating times are reduced. You can cook different foods at the same time
with or without the same preparation in one or more positions. This cooking
method gives even heatdistribution andthesmells are not mixed.
Allow about ten minutesextra whencooking foodsat thesame time.
CONVENTIONAL COOKING: Both top and bottom heating elements are used.
Preheat the oven for about ten minutes. This method is ideal for all traditional
roastingand baking. For seizingred meats,roastbeef, leg oflamb, game,bread,
foil wrapped food (papillotes), flakypastry. Placethe foodand its dishon a shelf
in mid position.
FAN + LOWER ELEMENT: The bottom heating element is used with the fan
circulating the airinside the oven. Thismethod is idealforjuicy fruit flans,tarts,
quiches and pâté.
It prevents food from drying and encourages rising in cakes, bread dough and
other bottom-cookedfood.
Place the shelfin thebottomposition.
FANASSISTED GRILL : use theturbo-grill withthe door closed.
The top heatingelement is usedwith the fan circulating theair inside theoven.
Preheating is necessary for red meats but not for white meats. Ideal for
cooking thick food items, whole pieces such as roast pork, poultry, etc. Place
the food to be grilled directly on the shelf centrally, at the middle level. Slide
the driptray underthe shelfto collect the juices.Makesure that thefood is not
too close to thegrill. Turn thefood overhalfway through cooking.
GRILL : usethe grillwith the doorclosed.
The top heating element is used alone and you can adjust the temperature.
Five minutes preheating is required to get the elements red-hot. Success is
guaranteed for grills,kebabs and gratin dishes. White meatsshould beput ata
distance from the grill; the cooking time is longer, but the meat will be tastier.
You can put red meats and fish fillets on the shelf with the drip tray
underneath. The oven hastwo grillpositions:
Grill: 2140 W
FUNCTION PIZZA: this function with hot air circulated in the oven ensure
perfectresult for dishes such aspizza orfocaccia.
*Tested in accordance with the CENELEC EN 60350-1
**Tested in accordance with the CENELEC EN 60350-1 used for definition of energy class.
EN 10

4. Oven cleaning and maintenance
4.1 General notes on cleaning
The lifecycle of theappliance can be extended through regular cleaning.Wait for the oventocool before
carrying out manual cleaning operations. Never useabrasive detergents, steel wool orsharp objects for
cleaning, so as to not irreparably damage the enamelled parts. Use only water, soap or bleach-based
detergents(ammonia).
GLASS PARTS
It is advisable to clean the glass window with absorbent kitchen towel after every use of the oven. To
remove more obstinate stains, you can use a detergent-soaked sponge, well wrung out, and then rinse
with water.
OVEN WINDOW SEAL
If dirty,the seal canbe cleanedwith a slightlydampsponge.
ACCESSORIES
Clean accessories with a wet, soapy sponge before rinsing and drying them: avoid using abrasive
detergents.
DRIP PAN
After using thegrill, remove thepan from the oven.Pour the hotfatinto a container and washthe pan in
hot water, using asponge and washing-up liquid.
If greasy residuesremain, immerse the pan in water anddetergent. Alternatively, youcan wash the pan
in the dishwasheror usea commercial oven detergent. Never puta dirtypan back intothe oven.
4.2 Maintenance
REMOVALAND CLEANINGOF THE SIDERACKS
1- Remove the wireracks bypulling them in thedirection of the arrows (seebelow)
2- To clean the wireracks either put them inthe dishwasher oruse awet sponge, ensuring that theyare
dried afterwards.
3- After thecleaning processinstallthe wire racks in reverse order.
REMOVALOF THE OVEN WINDOW
1. Open thefrontwindow.
2. Open the clamps of the hinge housing on the right and left side of the front window by pushing them
downwards.
3. Replace thewindow bycarrying out theprocedure inreverse.
EN 11

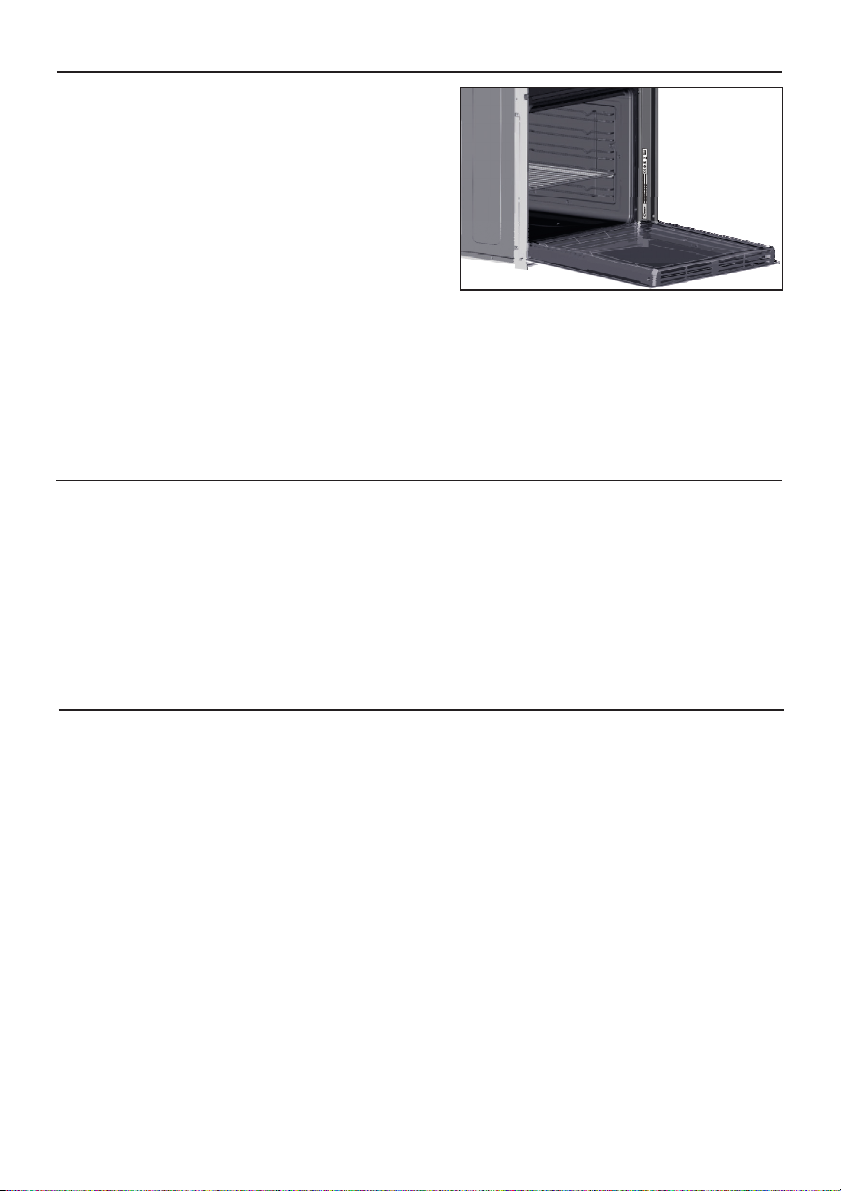
REMOVALAND CLEANINGOF THE GLASSDOOR
1. Open theovendoor.
2.3.4. Lock thehinges,remove the screws andremove theupper metal cover by pullingit upwards.
5.6. Remove the glass, carefully extracting it from the oven door (NB: in pyrolytic ovens, also remove
the second andthird glass(if present)).
7. At the endof cleaning orsubstitution, reassemblethe parts in reverse order.
On all glass, the indication "Pyro" must belegible and positionedon theleft side ofthe door,close to the
left-hand lateral hinge. In thisway, the printed label ofthe firstglass will beinside thedoor.
1.
2.
3.
5.
6.
1
2
3
7.
4.
EN 12

CHANGING THE BULB
1. Disconnect theoven fromthe mains supply.
2. Undo theglass cover, unscrew the bulband replace it witha new bulbof the same type.
3. Once thedefectivebulb isreplaced, replace the glasscover.
5. Troubleshooting
5.1 FAQ
PROBLEM POSSIBLE CAUSE SOLUTION
The oven does not heat up
The oven does not heat up
The oven does not heat up
The clock is not set Set the clock
The child lock is on
A cooking function and
temperature has not been set
Deactivate the child lock
Ensure that the necessary
settings are correct
EN 13
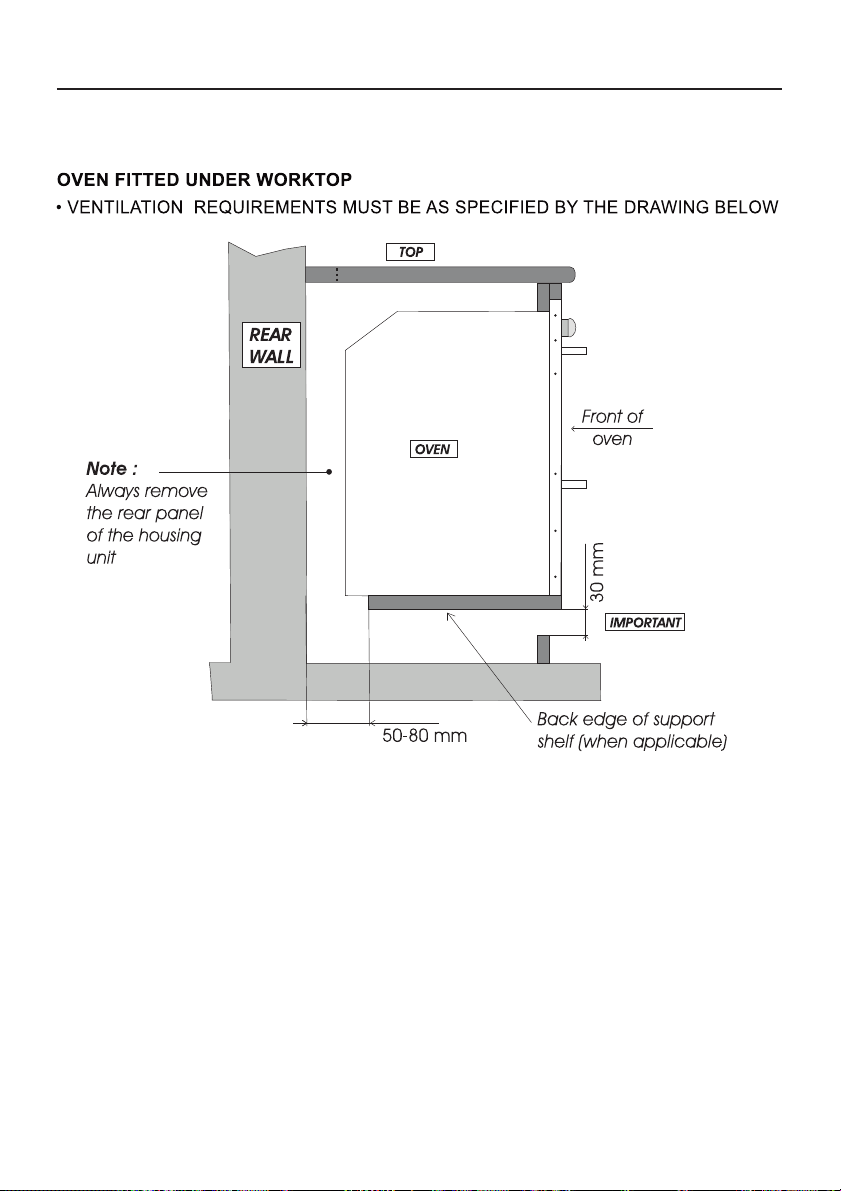
6 Installation.
EN 14

6.1 For Equepped With Fixing Squares B: 720
OVEN FITTED BETWEEN FURNITURES
B: 720
EN 15

INSTALLATION
50-60
500
A: 875 - 878
B: 705 - 708
GB
545
595
550 min.
A: 885
B: 720
50-60
500
554 + 564
545
22
GB
The manufacturer will notbe responsiblefor anyinaccuracy resultingfrom printingortranscripterrors containedin thisbrochure.We
reserve theright to carryout modifications to products asrequired, including theinterestsof consumption, without prejudice tothe
characteristicsrelating tosafetyor function.
11.2018 • REV.0 • 42830236
 Loading...