

Page 1
1
Please ensure these Instructions are fully read and understood before using this
equipment. Retain these instructions in a safe place for future reference. If you
are unable to understand the Instructions or safety precautions, please contact a
healthcare professional or our OT Advice Line (0845 121 8113) for assistance.
For information on how to obtain the User Instructions in other formats for use by
people with visual, reading or cognitive impairments, please contact
[email protected] or telephone 0845 120 4522. Additional copies of this user
instruction are available on our website
www.nrs-uk.co.uk.
User Instructions
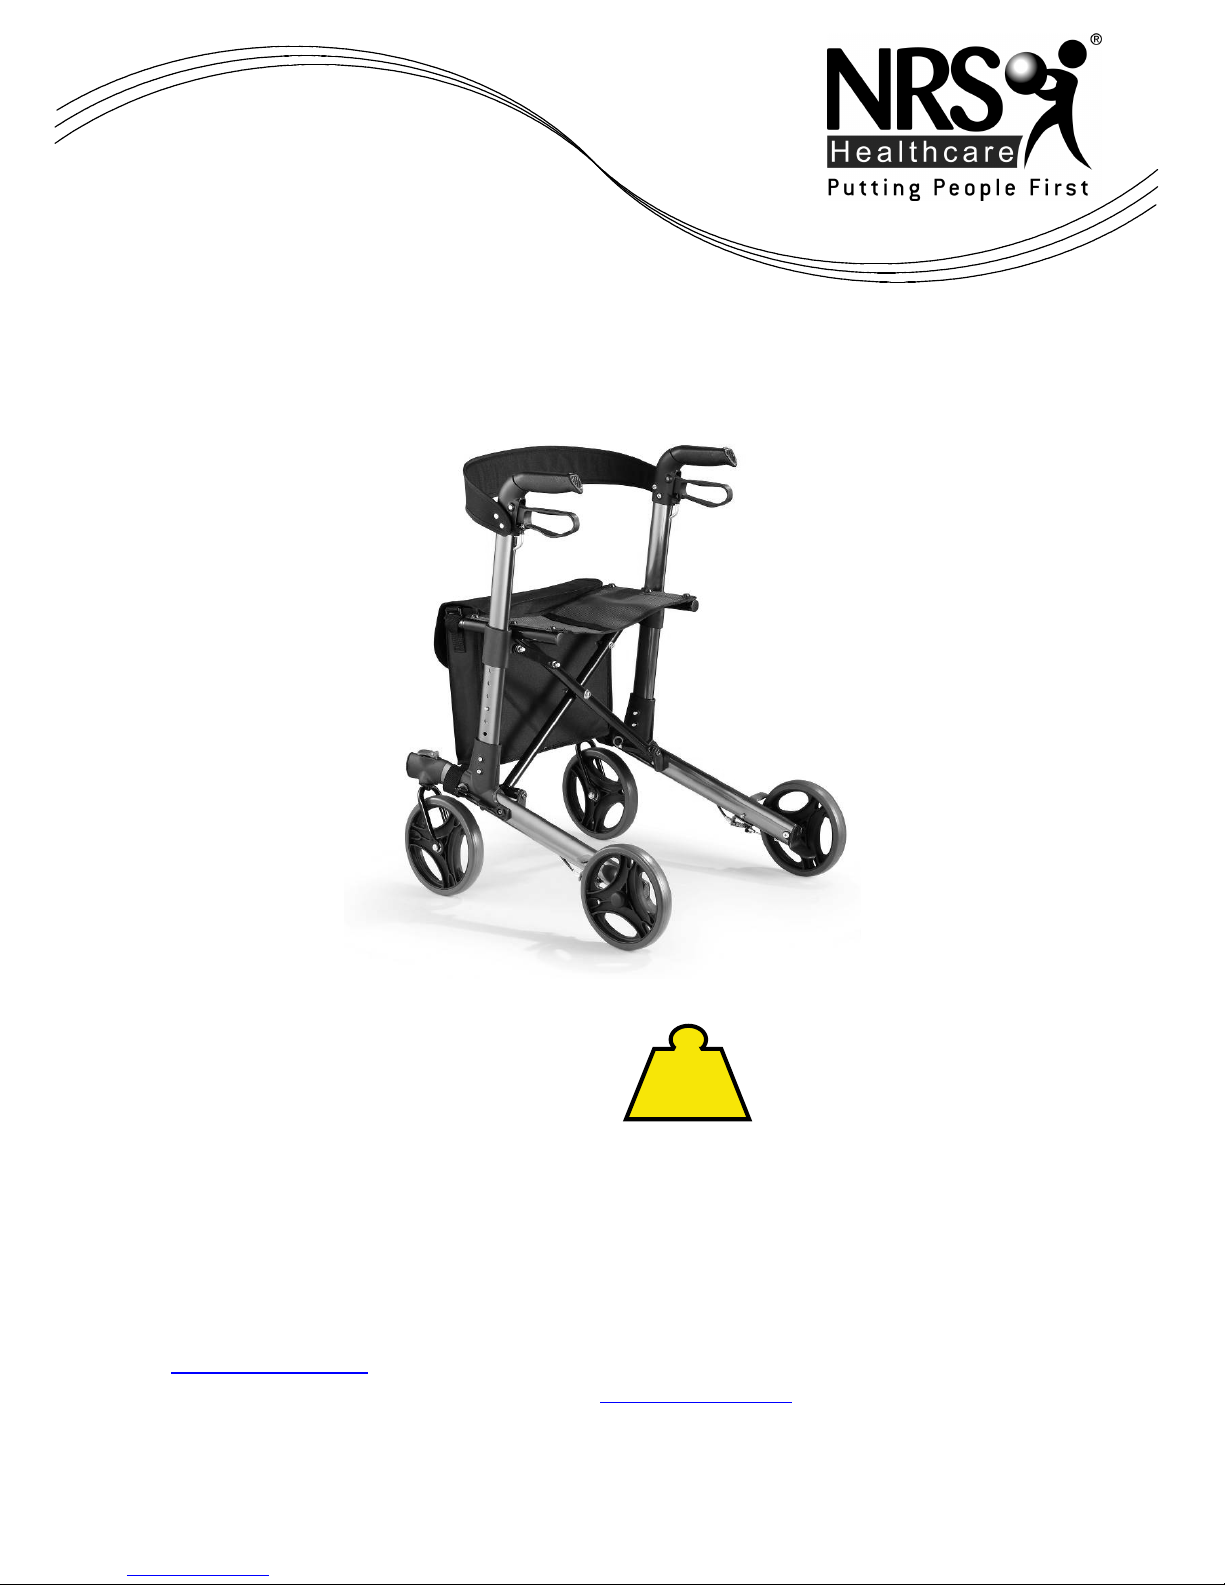
Compact Easy Rollator M66739
21st
135kg
Maximum Safe
Working Load
Page 2

2
CONTENTS
1. INTENDED USE
2. HANDLE HEIGHT RANGE
3. SAFETY PRECAUTIONS
4. PRODUCT DESCRIPTION
5. ASSEMBLY
5.1 UNFOLDING THE ROLLATOR
5.2 HANDLE HEIGHT ADJUSTMENT
5.3 SAFETY CHECKS
6. USING THE ROLLATOR
6.1 BRAKE OPERATION
6.2 FOLDING THE ROLLATOR
6.3 FRONT WHEEL OPERATION
7. CARE AND MAINTENANCE
7.1 CLEANING INSTRUCTIONS
7.2 MAINTENANCE
7.3 BRAKE ADJUSTMENT
Page 3
3
1 – Intended Use
The Compact Easy Rollator is designed to provide support and assistance to those
unable to, or who lack the confidence to, walk without some level of support. This
Rollator is intended for indoor and outdoor use.
2 - Handle Height Range
The handles are height adjustable in increments from 80.5 – 93.5cm from the floor. To
set the correct handle height, stand upright with your arms by your side and adjust the
handle bar height to align with your wrists. If in doubt, please consult a healthcare
professional. See section 5.2 Handle Height Adjustment.
3 – Safety Precautions – Do’s and Don’ts
• Do not exceed the maximum safe working load of 135Kg (21st).
• Do not use the Rollator on stairs or an escalator.
• Do not attempt to push the Rollator while someone is sitting in the seat.
• Do not use the seat to transport people or objects.
• Do not use the seat without the backrest in place.
• Do not sit on the seat when the Rollator is on an incline.
• Only use the specified accessories and spare parts for this Rollator
• Loads should only be transported using the bag supplied.
• Do not hang heavy items from the handles as this may affect the stability of the
Rollator.
Safety Precautions - Pre Use Checks
• Always check the seat tubes are locked down and well connected with the frame
when the Rollator is open.
• Check the folding mechanism catches are correctly engaged.
• Check the brakes before use.
• Make sure that all parts are secure and that moving parts are in good working order.
Page 4
4
Safety Precautions - During use
• Do not self propel the Rollator while seated. Serious injury to the user and/or
damage to the Rollator frame or wheels may result from improper use.
• Do not use the Rollator to walk backwards.
• Caution must be taken when negotiating curbs and other obstacles, or when using
on sloping, uneven or slippery surfaces. Failure to do so may result in a serious risk
of a fall or injury.
• Do not perform any adjustments to the Rollator while it is in use.
• Exercise caution when there is a heavy load in the bag
• The bag supplied with the Rollator has a maximum safe load of 5Kg.
• All wheels must be in contact with the floor at all times.
• Brakes must be in the locked position before using the seat.
• When using the Rollator in a stationary position, the brakes must be locked.
• Always test the brake after every height adjustment to avoid a free flex of the cable.
• Care should be taken when lifting the folded Rollator into the back of the car; please
follow good manual handling practice.
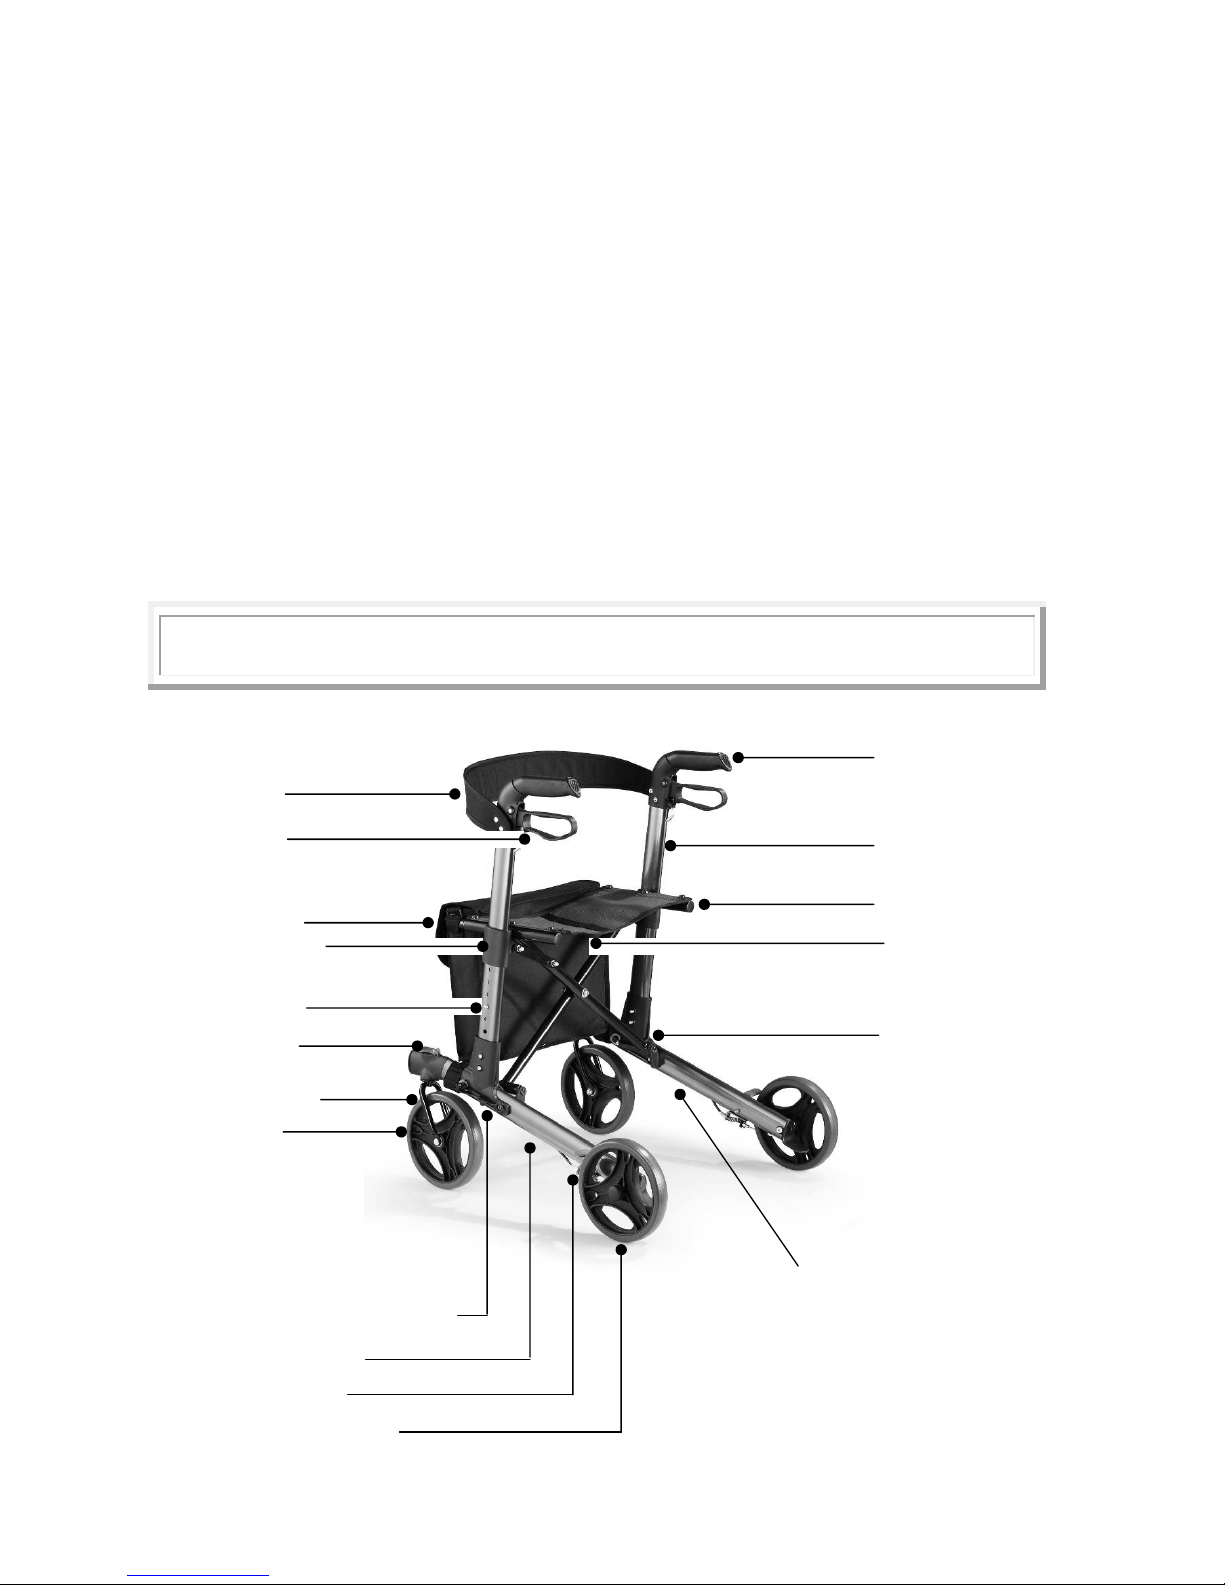
4 – Product Description
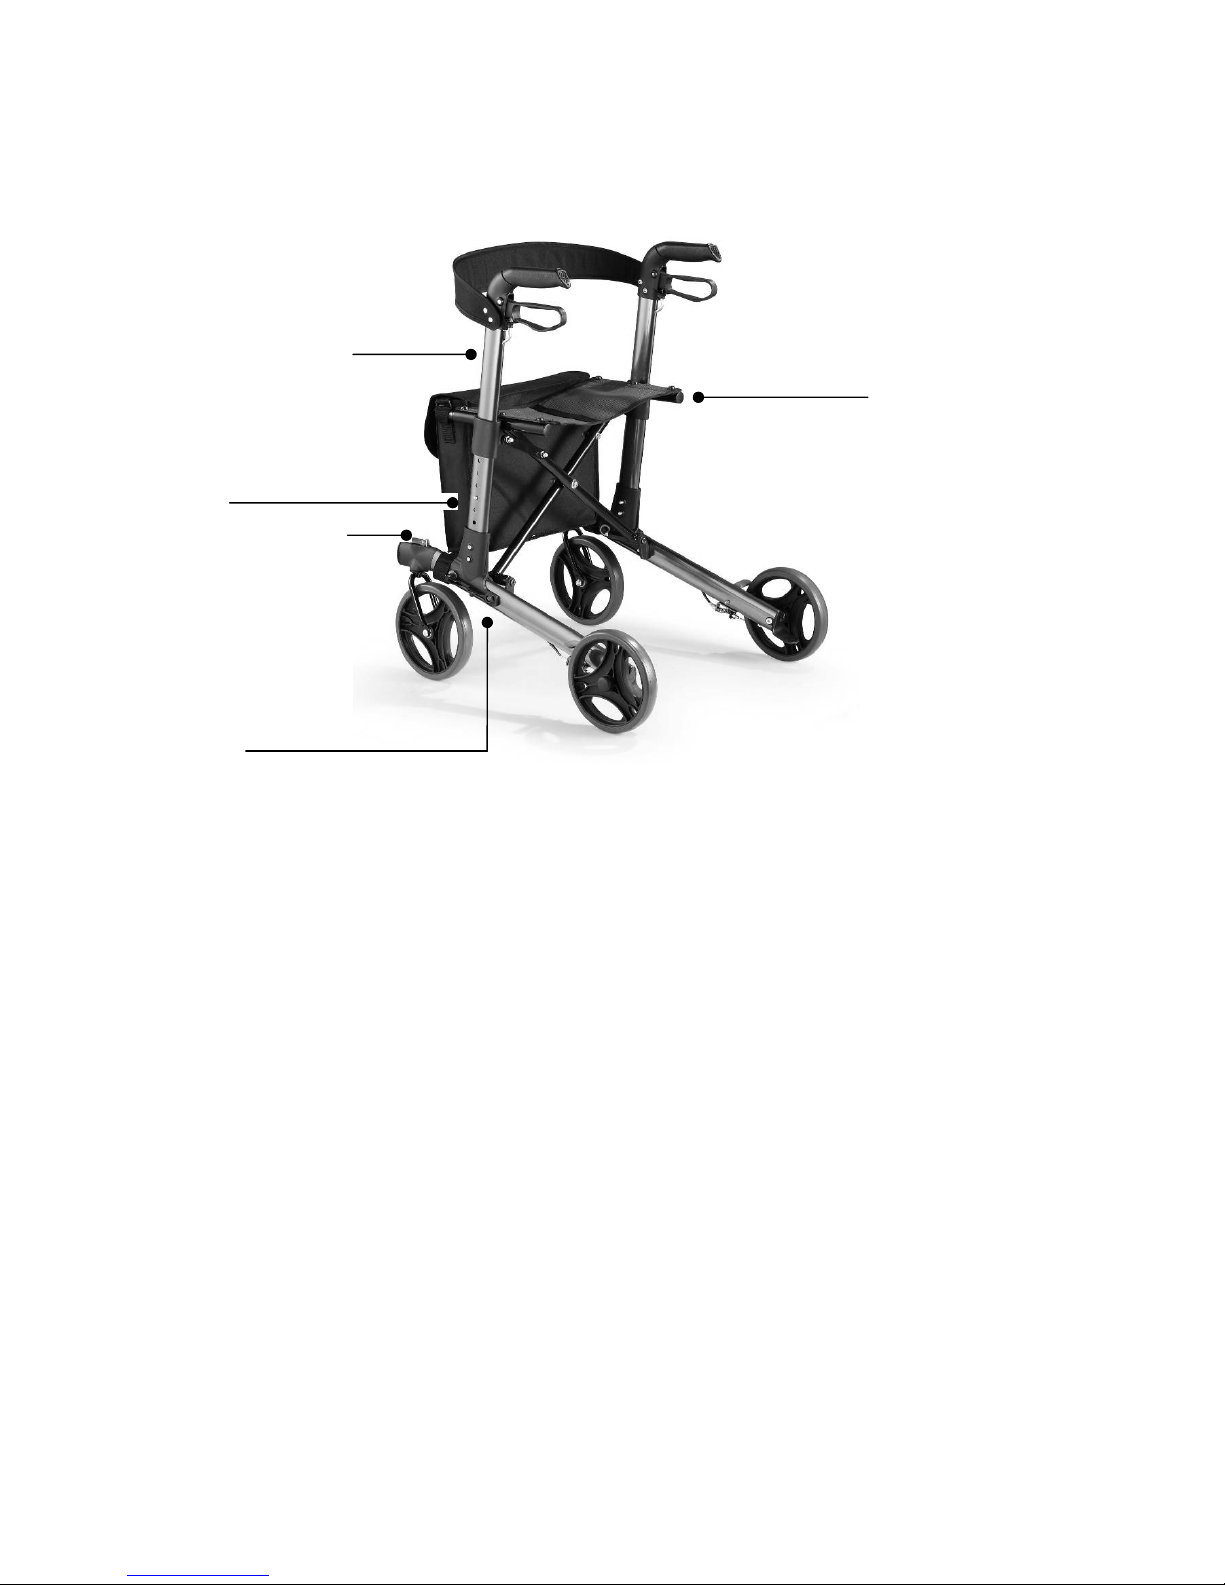
Location of
Product
Identification
Label
Snap Button
Swivel/Single
Direction lever
Front wheel Fork
Front Wheel
Bag (supplied)
Plastic Connector
Brake Loop
Backrest
Hand Grip
Plastic Main
Bracket Moulding
Seat Mesh Cloth
Seat Tube
Handle Tube
Rear Wheel
Leg Tube
Brake
Folding Lock Lever
Page 5
5
5 – Assembly
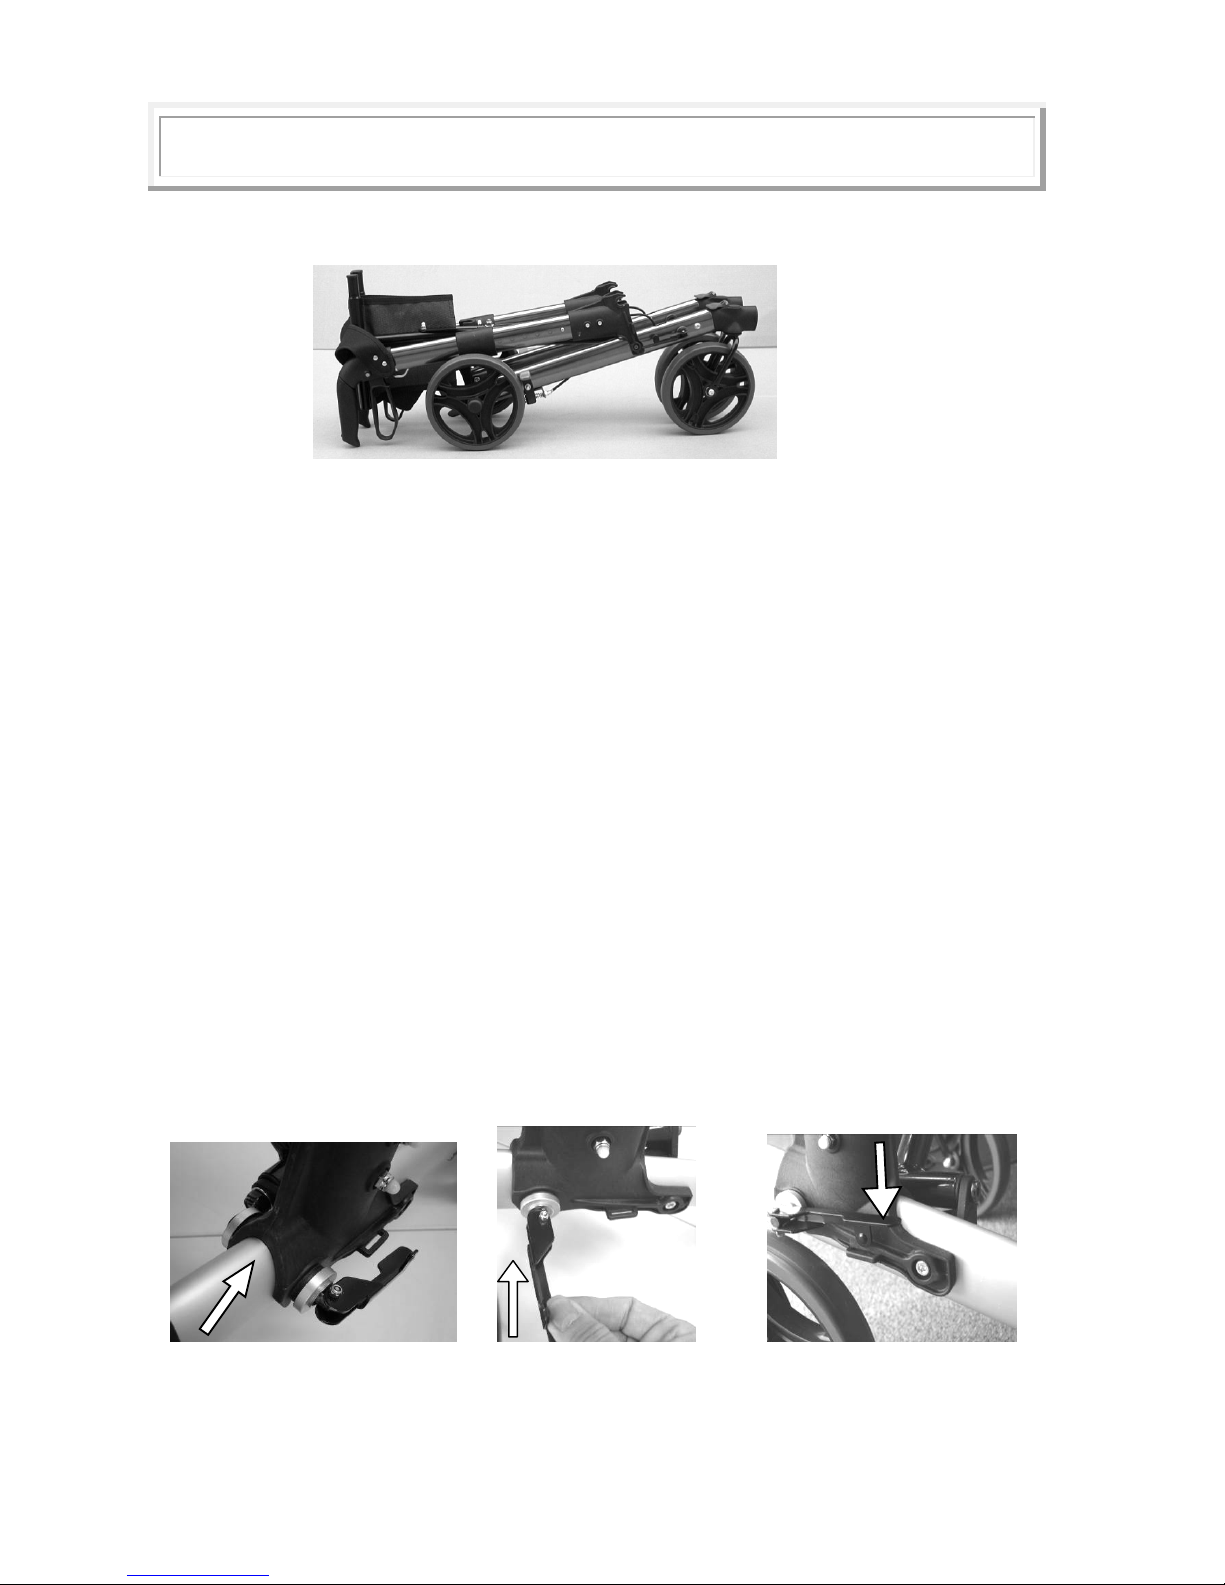
Note: The Rollator is supplied fully assembled, in the folded position. (As shown below)
5.1 Unfolding the Rollator
• Carefully remove the Rollator from the packaging and check for any obvious signs
of damage or missing parts. If any damage or missing parts are suspected do not
assemble the Rollator. Please contact your supplier for further information.
• Put the Rollator on a flat floor and unfold it by lifting up the handles.
• With the handle tube standing upright and the oval Plastic Main Bracket Moulding
firmly against the leg tube. (Step: 1). Safety Note: The Oval Plastic Main Bracket
Moulding and frame tube must be fully fixed together without any gap when locking
the levers. Do not press the levers too hard without fully fixing the two parts,
otherwise damage may occur.
• Pull the Folding Lock Lever away from the frame, (as shown in Step: 2) and continue
to rotate through 180 degrees until the lever is pointing towards the front of the
Rollator, if any resistance is felt while carrying out this operation, ensure the handle
tube is upright, the main bracket is firmly against the frame tube and the cup washer
at the end of the lock lever is located correctly to the main bracket.
• To lock the Folding Lock Lever, (Step: 3) Rotate the lever through 180 degrees, this
time parallel to the frame, and lock the lever clip into the slot on the Plastic Main
Bracket.
• Repeat for the other side
The oval plastic main bracket
and bottom oval tube must be
fully aligned and fixed together
when locking the levers
The Lever presses against
the washer and the washer
locates correctly
When the washer is located
correctly, lock the lever into
the slot
STEP: 1
STEP: 2 STEP: 3
Page 6
6
• Push down on the top of the seat tubes with the palms of your hands until they click
into the plastic slots (keep fingers from under the seat tube). The Rollator is now
fully open
NOTE: Before using the Rollator check it is assembled correctly by pushing down on the side
tubes to ensure the seat tubes are securely fixed into the plastic slots
5.2. Handle Height Adjustment
NOTE: DO NOT remove the inner handle tube out of outer handle tube when adjusting
the height.
Adjust the Rollator handle height so that when the user’s arm is down to their side, the
handgrip is at wrist height. This will ensure the arms are at an approximate 20°-30°
bend when using the Rollator.
i) Depress the snap button on the hand-rest tube of the Rollator and slide the hand-rest
tube up or down to the desired height. Ensure the snap button protrudes through the
appropriate adjustment hole on the hand-rest tube. Repeat for the other side.
5.3 Safety Checks
Perform the Pre-Use safety checks indicated in Section 3: If everything is working
correctly the Rollator is now ready for use
Snap Button should
be fully out and
visible
Lever set in locked
position
Seat Tube – located
fully into plastic slot
Handle Tube – Set
at correct height
Rollator shown in Fully Open Position
Red lever – Set in
correct position
Page 7
7
6 – Using the Rollator
Please refer to Safety Precautions in Use in section 3.
6.1 Brake Operation
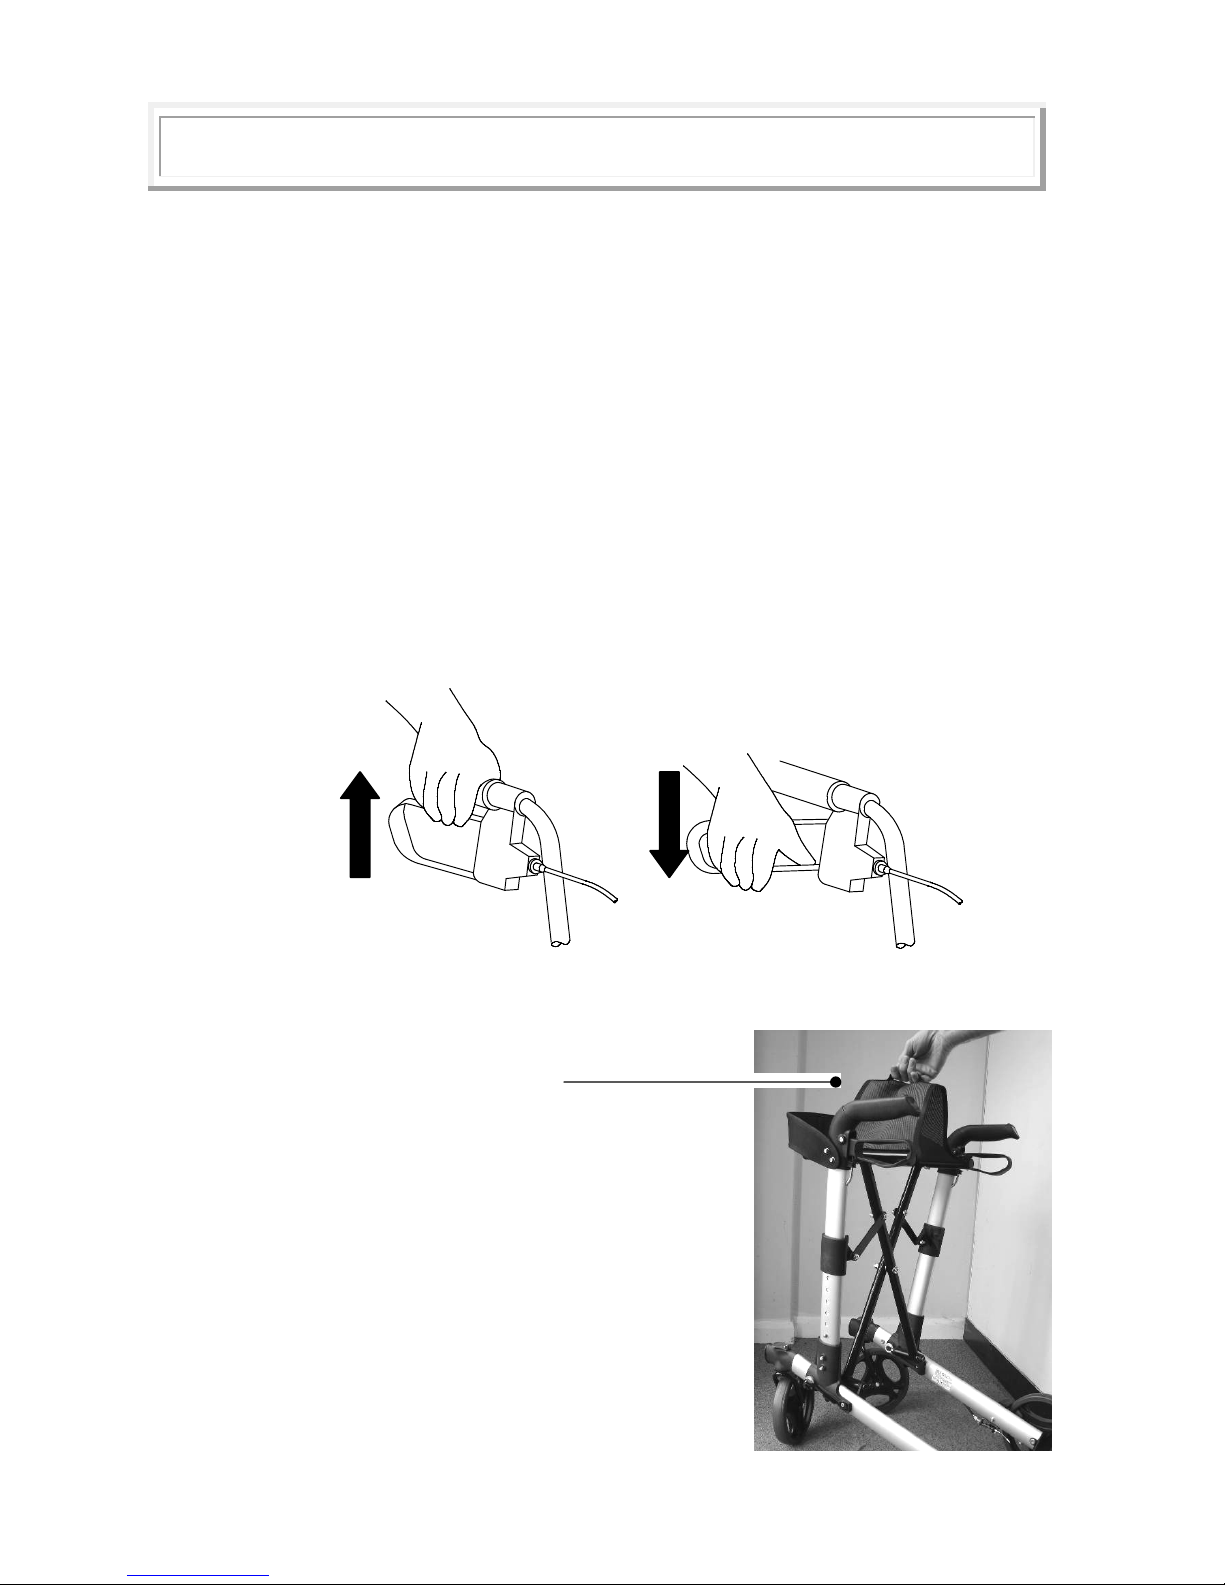
• To slow down, pull up both of the loop handles. (See Diagram 1)
• To apply the parking brakes, push down both handles until they lock down and are
in the correct position. (See Diagram 2) It is important that both brakes are put in
the parking position when they are used.
• Lift up both handles to release the parking brakes.
• If you apply the parking brakes, or pull up the brakes to stop whilst moving, and the
rear wheels on the Rollator still move, stop use immediately. Do not use again until
the brakes have been checked and correctly adjusted. Refer to the maintenance
section.
6.2 Folding the Rollator
Diagram: 1
Diagram: 2
i). Lift the pulling strip up, on the seat
to fold the Rollator (as shown)
Page 8
8
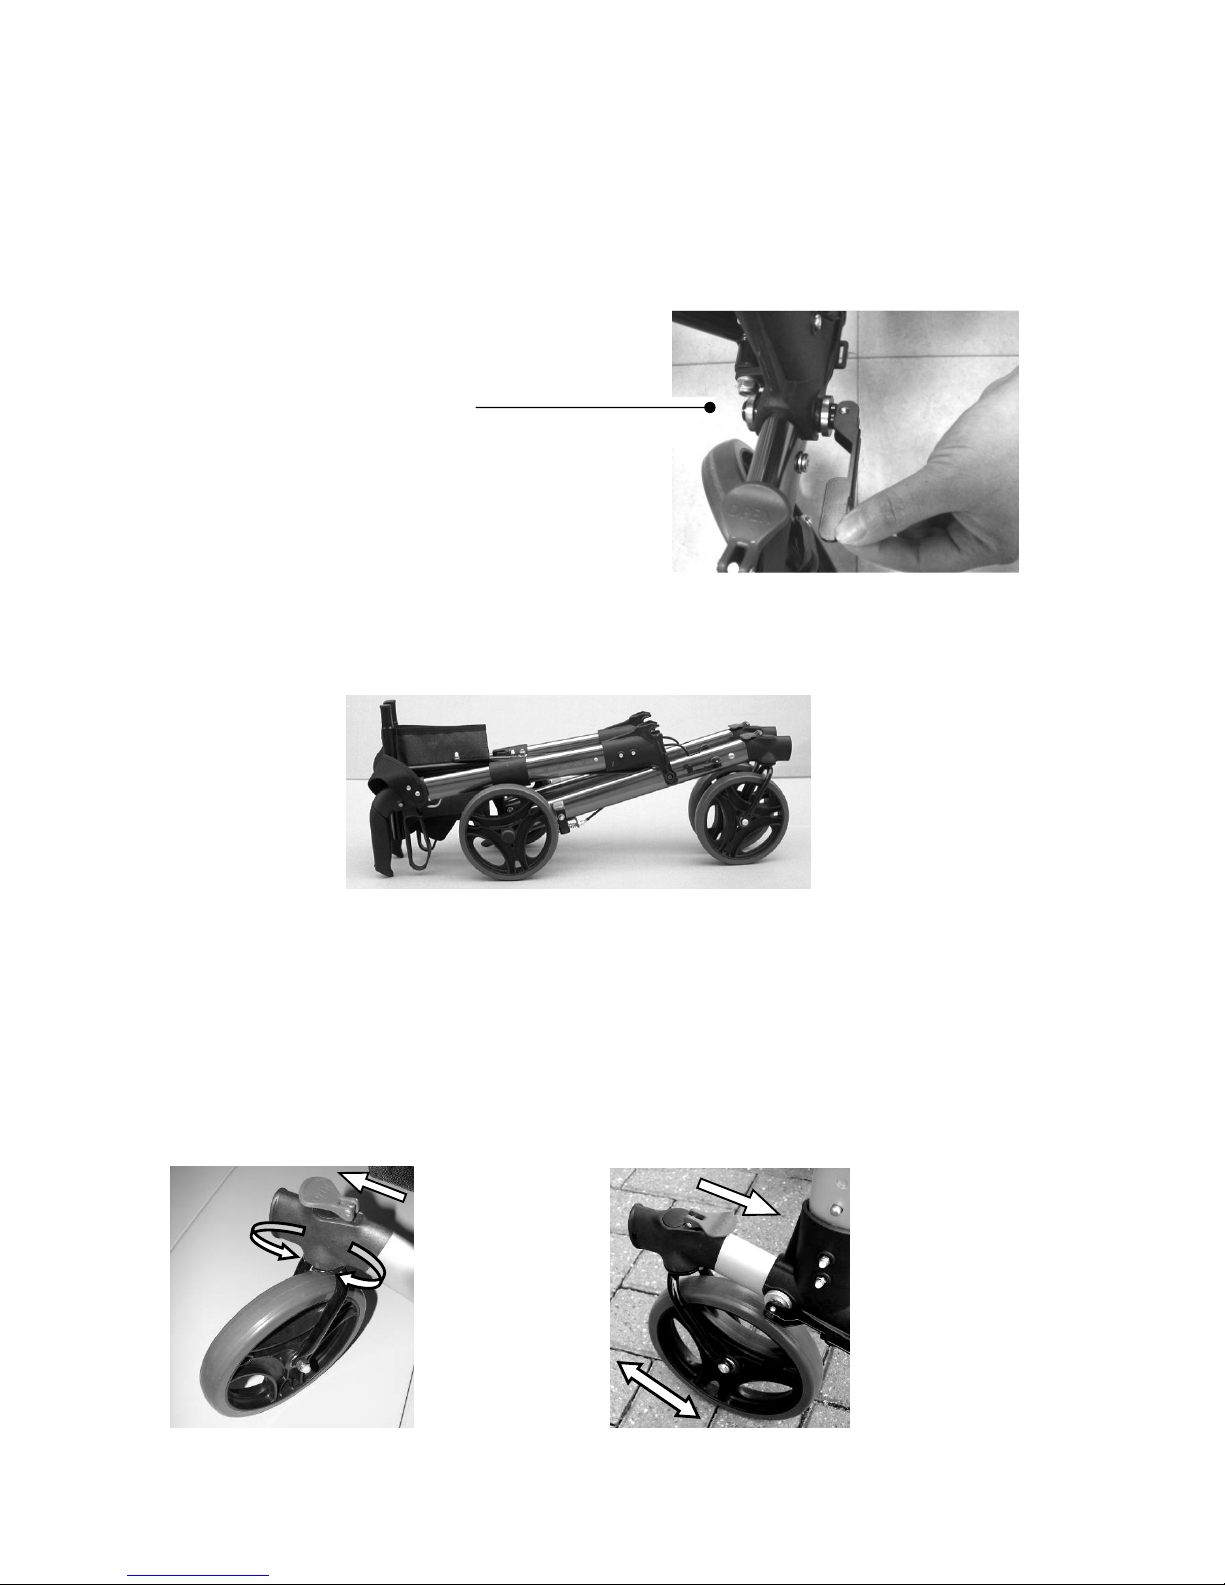
ii) Unlock the lever from the slot, on both sides of the Rollator, then contra-rotate the
lever, as described in section 5.1 to release the frame and lower the handles to the fully
folding position shown in the diagrams below.
Safety Note
Do not release the folding levers during use.
Rollator Shown Fully Folded
6.3 Front Wheel Operation
The front wheels can be set to either go straight forward or rotate.
When the red lever is turned to the OPEN position (Fig: 1), the front wheels are free to
rotate
When the red lever above the wheel is turned to the CLOSED position (Fig: 2), the
wheel will be locked in the forward only position.
When the lever is fully
released, the plastic part and
the round cover will be
detached, details as shown.
The main bracket can now be
rotated and the Rollator folded
fully (as shown below)
Fig 1 Lever in
OPEN
Position: Wheel
is free to rotate
Fig 2 Lever in
CLOSED
Position: Wheel
in forward only
position
Page 9
9
7 – Care and Maintenance
7.1. Cleaning Instructions
• Clean regularly, wipe down with water and mild cleanser using a soft, non abrasive
cloth.
• Dry with a soft, clean, non abrasive, dry cloth.
• Ensure there is no build up of dirt or debris around the axle, brakes and wheels.
• Do not use cleaning agents containing phenol or chlorine, as this may damage
aluminum and polyamide materials.
• Lubricate with 3-in-l oil periodically or if wheels begin to squeak.
7.2 Maintenance
• Regularly check for wear and tear and that all screws and fixings are securely
fastened.
• Check brakes are working satisfactorily by both walking and squeezing the brakes
and by braking to a stop.
• Check the parking brakes by pushing the handles into the locked position, and then
trying to push the Rollator.
• If the brakes do not completely lock the wheels the brakes need to be adjusted.
7.3 Brake Adjustment
• Note: The brake cables run inside the handle tubes, DO NOT remove the cable
from the tubes as this could cause the brakes to fail.
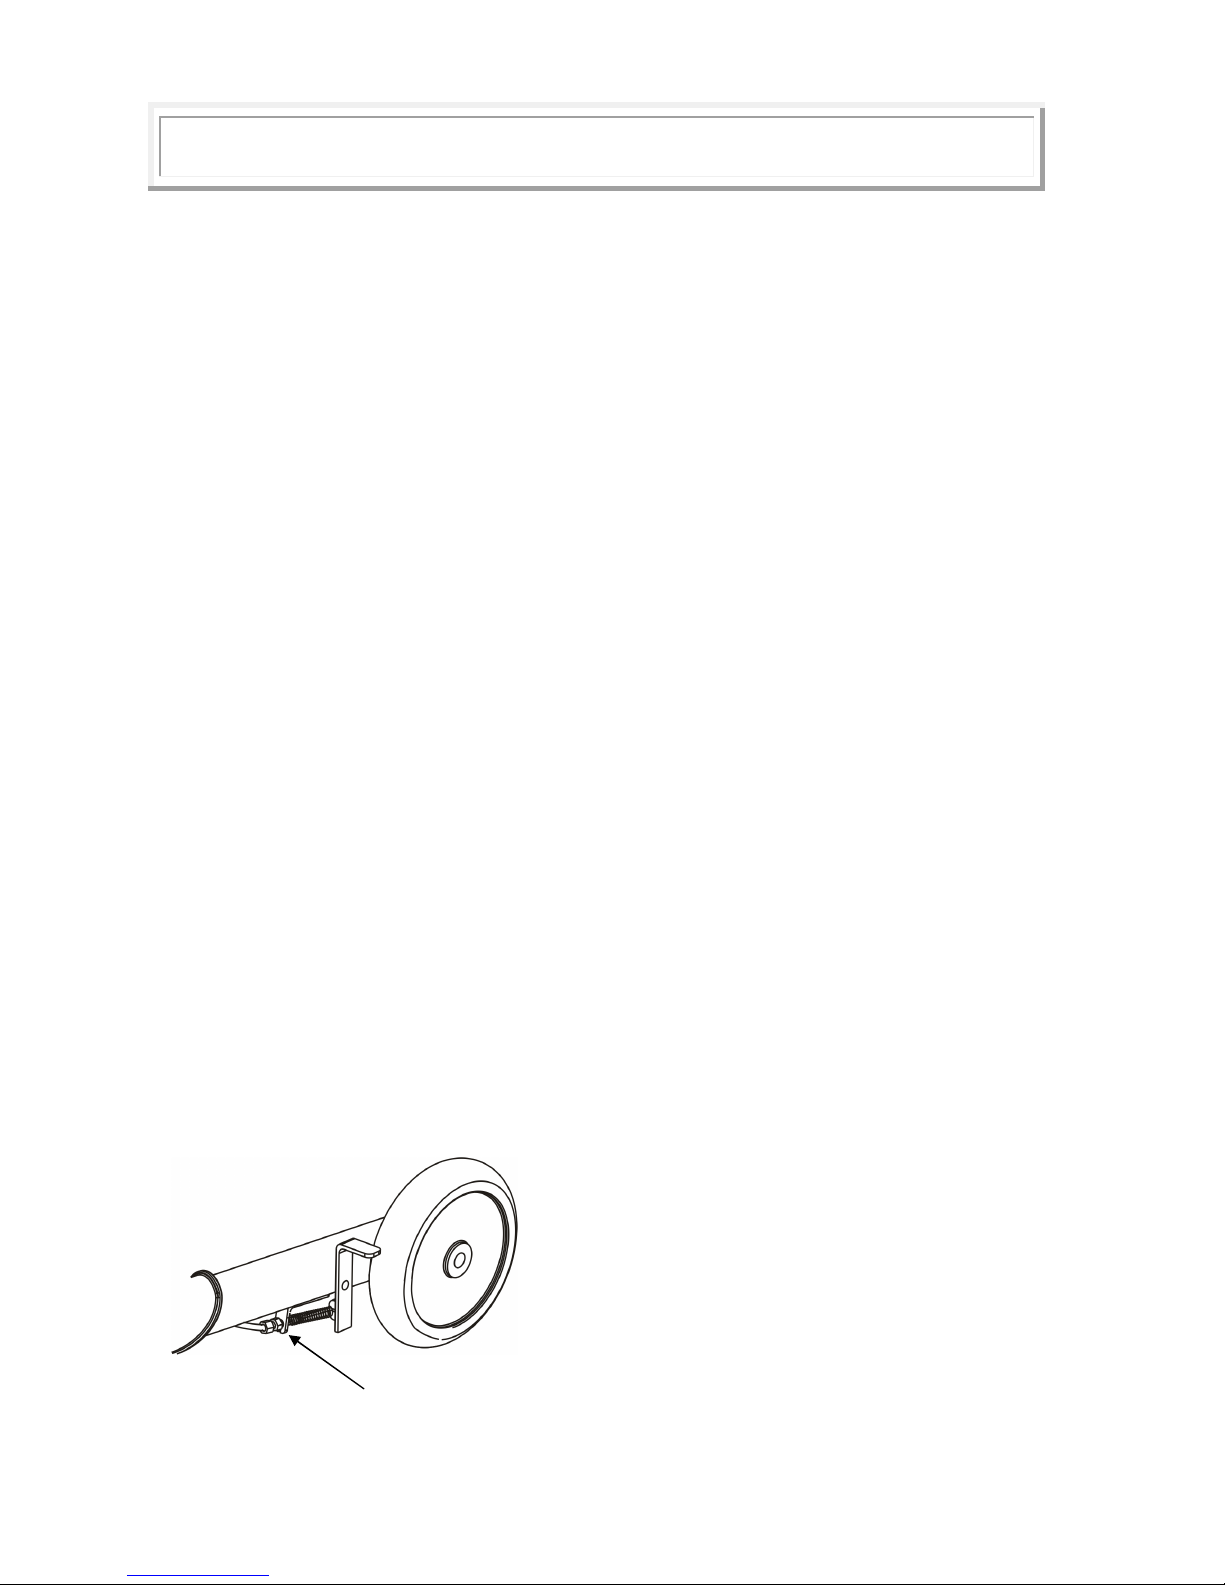
• Brake cable route. For the brakes to function properly, the brake cable should be
flush along the tube as shown in fig 3.
• For correct adjustment the brake mechanism, when not in use, should not touch the
wheel, but the gap should be no greater than 3mm.
• Caution: After making any adjustments to the brakes, you must test them before the
Rollator is used.
• If adjustment does not tighten the brakes, do not use the Rollator. Contact your
dealer or NRS Customer services.
Fig: 3
Brake adjustment
• To tighten the brake (reduce the gap
between brake and wheel) rotate the
adjusting nut clockwise
• To loosen the brake (increase the gap
between brake and wheel) rotate the
adjusting nut anti-clockwise
Brake
Adjustment Nut
Page 10
10
This product is from a range of over 3000 daily living aids available from NRS Healthcare.
To view the full range visit www.nrs-uk.co.uk or request a catalogue from NRS
Customer Services
UI/M66739/10/12/Iss3
www.nrs
-
uk.co.uk
If you use this product….you may also find useful:
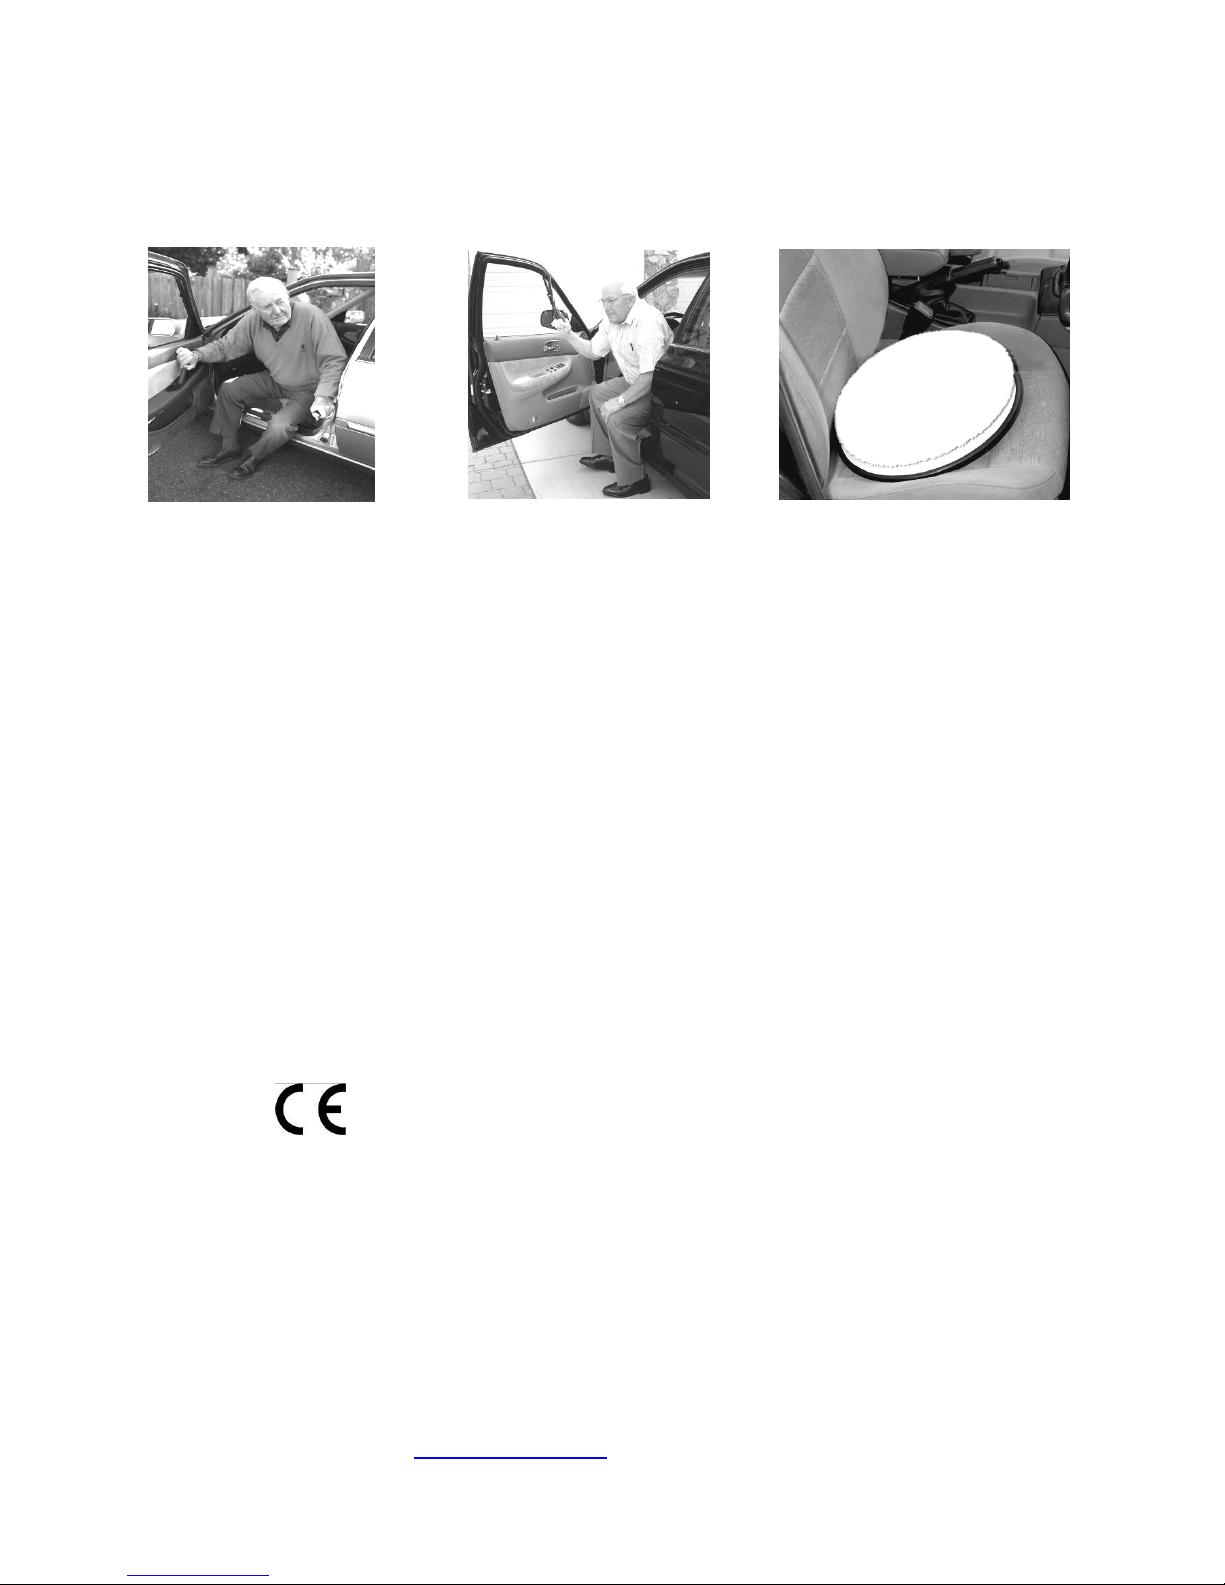
• Aids for getting into and out of the car
Handy bar
Code: M14674
Car Caddie
Code:
M15393
Swivel Seat Deluxe
Code: L33996
NRS Healthcare
Clinitron House, Excelsior Road,
Ashby Park, Ashby de la Zouch,
Leicestershire, LE65 1JG
United Kingdom
Tel: 0845 120 4522
Fax: 0845 121 8112
Email: [email protected]
 Loading...