


1
TELESCOPES
TAL-1, TAL-1M, TAL-2,
TAL-150P, TAL-150P8
Instruction manual

2
NPZ Optics State Corp.
(Novosibirsk Instrument-making plant)
D. Kovalchuk 179/2 Novosibirsk,
630049 RUSSIAN FEDERATION
Fax +7 3832 261594
prinsib@sol.ru;
www.npzoptics.com

3
Page
General instructions. . . . . . . . . . . . . . . . . . . . . . . . . . . . . . . . . 3
Technical specications . . . . . . . . . . . . . . . . . . . . . . . . . . . . . 4
Inventory list . . . . . . . . . . . . . . . . . . . . . . . . . . . . . . . . . . . . . . . 6
Construction of the telescope . . . . . . . . . . . . . . . . . . . . . . . . 8
Preparing telescope for observations . . . . . . . . . . . . . . . . . . 12
Assembling the telescope . . . . . . . . . . . . . . . . . . . . . . . . . . . 12
Balancing the telescope . . . . . . . . . . . . . . . . . . . . . . . . . . . . . 13
Aligning the nder scope . . . . . . . . . . . . . . . . . . . . . . . . . . . . . 14
Power supply and hand controller . . . . . . . . . . . . . . . . . . . . . .15
Polar alignment . . . . . . . . . . . . . . . . . . . . . . . . . . . . . . . . . . . 16
Calibrating the setting circles . . . . . . . . . . . . . . . . . . . . . . . . . 18
Observations . . . . . . . . . . . . . . . . . . . . . . . . . . . . . . . . . . . . . . 19
Visual observations . . . . . . . . . . . . . . . . . . . . . . . . . . . . . . . . 20
Astrophotography . . . . . . . . . . . . . . . . . . . . . . . . . . . . . . . . . 22
Maintenance . . . . . . . . . . . . . . . . . . . . . . . . . . . . . . . . . . . . . . . 24
Collimation (alignment) of the optics . . . . . . . . . . . . . . . . . . 25
Storage . . . . . . . . . . . . . . . . . . . . . . . . . . . . . . . . . . . . . . . . . . 27
Acceptance certicate . . . . . . . . . . . . . . . . . . . . . . . . . . . . . . . 27
Appendix A: Precise Polar alignment for the MT-1 and
MT-1C mounts . . . . . . . . . . . . . . . . . . . . . . . . . . 29
Appendix B: Double stars list for telescope
image quality test . . . . . . . . . . . . . . . . . . . . . . . . 31
Appendix C: Brightnest stars visible
in the Northern Hemisphere. . . . . . . . . . . . . . . . 32
Due to continuous product improvements, specications are subject
to change without notice.
TABLE OF CONTENTS

4
GENERAL INSTRUCTIONS
Warning!
Never observe the Sun directy through your telescope or its nder
scope - permanent eye damage could result.
The telescope is designed for visual observations of celestial
objects and for astronomical photography. It requires careful
treatment and some knowledge of astronomy. Only in this case
the use of telescope will bring satisfaction to its owner.
The telescope may be used at an ambient temperature ranging
from 30° to -30°C.
When buying the telescope inspect the package to make sure
that the original packaging is in good condition, and seals are
not broken or missing. Having opened the package, check the
presence of all components described in inventory list.
Read instruction manual rst before using the telescope.

5
Specication
TAL-1
Aperture, mm
Focal length, mm
Mirror Surface
Focal ratio
Diagonal mirror
diameter, mm
Telescope
magnication, x
Resolving power
Limiting visual
magnitude
Finderscope
magnication, x
Finderscope
aperture, mm
Focuser
Equatorial mount
150
1200
parabolic
1:8
30
48; 96;
160;320
1"
12.5
m
8
50
1.25"; 2"
MT-3S
150
750
parabolic
1:5
40
30; 60;
100;200
1"
12.5
m
8
50
1.25"; 2"
MT-3S
110
800
spherical
1:7.3
26
32; 64;
80;160
1.3"
11.5
m
6
30
1.25"
MT-1
110
800
spherical
1:7.3
26
32; 64;
80;160
1.3"
11.5
m
6
30
1.25"
MT-1C
150
1200
spherical
1:8
40
48; 96;
160;320
1"
12.5
m
8
50
1.25"; 2"
MT-3S
TAL-1M TAL-2
TAL-150P TAL-150P8
TECHNICAL SPECIFICATIONS

6
Specication
TAL-1
Right ascension
turning angle
Declination turning
angle
Latitude adjustment
range
Input
voltage V AC
Frequency, Hz
Power, Watts
Output voltage, V
Dimensions, mm:
OTA* length
Telescope height
OTA weight, kg
Telescope
weight, kg
360°
(24 h)
±90°
0...70°
220
(110)
50 (60)
10
12 DC
1200
1700
8.5
35
360°
(24 h)
±90°
0...70°
220
(110)
50 (60)
10
12 DC
770
1620
6.5
30
360°
(24 h)
±90°
0...70°
-
-
-
-
850
1780
4.5
20
360°
(24 h)
±90°
0...70°
220
(110)
50 (60)
10
12 AC
850
1780
4.5
22
360°
(24 h)
±90°
0...70°
220
(110)
50 (60)
10
12 DC
1200
1700
8.5
35
TAL-1М TAL-2
TAL-150P TAL-150P8
*Optical Tube Assembly

7
INVENTORY LIST
Component
TAL-1
Telescope
Finderscope:
6xx30
9xx50
Polar axis nderscope
6xx23
Equatorial mount:
MT-1 with counter
weight 2.2 kg
MT-1C with counter
weight 2.2 kg
MT-3S (MT-3S-2D)
with counter-weight
2.2 kg (2 units)
MT-3S (MT-3S-2D)
with counter-weight
3.7 kg (2 units)
Pier with legs:
C75 (800 mm)
C110 (770 mm)
Power supply:
direct current (DC)
alternating current (AC)
Hand controller:
for direct current
for alternating current
Power cord (10 m)
Spare parts and accessories:
Plössl eyepsiece f’=7.5mm
Plössl eyepiece f’=10mm
Plössl eyepiece f’=25mm
2x Barlow lens
Reticle
Camera holder
Plug for photographing
T-adapter M42x0.75
Sun projection screen
Instruction manual
+
+
+
-
-
-
+
+
+
-
+
+
+
+
+
+
+
+
+
+
+
+
+
-
-
+
-
+
-
+
-
+
+
+
+
+
+
+
+
+
+
+
+
-
-
+
-
-
-
+
-
-
-
-
-
-
+
+
+
+
+
-
+
+
+
+
-
-
-
+
-
-
+
-
-
+
-
+*
+
+
+
+
+
+
-
+
+
+
+
+
-
-
-
+
+
+
-
+
+
+
+
+
+
+
+
+
+
TAL-1М TAL-2
TAL-150P TAL-150P8
*Optional

8
Component
TAL-1
Optional accessories:
Tripod
Plössl eyepieces (1.25’’):
f’=6.3mm
f’=12.5mm
f’=17mm
f’=20mm
f’=32mm
f’=40mm
Super wide angle eyepieces (1.25’’):
f’=10mm (60°)
f’=15mm (65°)
f’=20mm (65°)
Ultra wide angle eyepieces (80°):
f’=15mm (1.25’’)
f’=20mm (2’’)
f’=24mm (2’’)
f’=25mm (2’’)
3x Barlow lens
Guide eyepieces
12.5mm (1.25’’)
Off-axis guider (2’’)
Color lters M28.5x0.6:
black
neutral
yellow
blue
red
green
Color lters M48x0.75:
black
neutral
yellow
blue
red
green
Power cord extension
cable with car adapter
-
-
-
-
-
-
-
-
-
-
-
-
-
-
-
-
-
-
-
-
-
-
-
-
-
-
-
-
-
-
-
-
-
-
-
-
-
-
-
-
-
-
-
-
-
-
-
-
-
-
-
-
-
-
-
-
-
-
-
-
-
-
-
-
-
-
-
-
-
-
-
-
-
-
-
-
-
-
-
-
-
-
-
-
-
-
-
-
-
-
-
-
-
-
-
-
-
-
-
-
-
-
-
-
-
-
-
-
-
-
-
-
-
-
-
-
-
-
-
-
-
-
-
-
-
-
-
-
-
-
-
-
-
-
-
-
-
-
-
-
-
-
-
-
-
-
-
-
-
-
TAL-1М TAL-2
TAL-150P TAL-150P8

9
CONSTRUCTION OF THE TELESCOPE
The telescope consists of three
main parts:
- Optical tube assembly (OTA)
(1),
- German equatorial mount (2),
- A pier or tripod (3).
The optical tube is a basic
component of the telescope. It
includes all main optical units such
as a primary mirror, a diagonal
mirror and a focuser.
A Newtonian Reflectors Telescope: parallel beams of rays
enter the tube of the telescope
and is projected at the focal plane
of the eyepiece (3) with the help
of primary (1) and diagonal (2)
mirrors.
A standard set includes two
eyepieces and a Barlow lens,
which allow observing celestial
objects with various rate of
magnication.
Th e OTA s u p p l i e d wi t h a
nderscope, makes searching
for celestial objects easier.
The primary mirror is fastened in
a cell and installed in a tube.
The diagonal mirror i s flat.
It is glued to the holder and
xed inside of the OTA with the
help of four vane spiders. Both
mirrors are made of a high quality
optical glass with high reection
aluminum coatings with protective level.

10
The eyepiece unit includes a
focuser with an eyepiece tube.
Focuser consists of rack and
pinion. The pinion axis has fo-
cus knobs, which help move the
eyepiece tube in order to focus
telescope.
To provide the smoothness of
TAL-1 telescope focuser, hold the
left focus knob (1) with one hand
and turn the right focus knob (2)
clockwise (with a little effort) with
other hand.
Fix the position of the focuser, if
necessary, using the same pro-
cedure.
For telescopes TAL-2, TAL-150P,
TAL-150P8 the smoothness of the
focuser can be adjusted with the
help of four screws (1).
The equatorial mount is designed
for pointing the telescope at the
celestial objects and tracking their
movement.
The equatorial mount consists
of two axes square with each
other: the polar axis and the
axis of declination. There is a
mounting plate with OTA rings on
the top point of the declination axis,
and a counter-weight shaft with
counterweights on the other side.

11
It is possible to place all types of
the mounts on a pier or tripod.
Different models of telescopes are
provided with different mounts.
The mount MT-1 has manual slow-
motion controls on both axes and is
used with TAL-1 telescope.
For the rst sight-in on the object,
loosen the telescope,s Dec. and
R.A. locks (1) and move the
telescope to center an object in
the eld of view.
The ne alignment is done by
manual slow-motion controls (2)
within ±4° on each axis.
The polar axis is xed in a tripod
(pier) mounting head with a
latitude dial.
MT-1C mount is equipped with a
clock R.A. drive along with manual
slow-motion controls on both axes.
The clock drive enables tracking of
celestial objects.
For the rst sight-in on the object,
loosen the telescope,s Dec. lock
(1) and turn Dec. axis to move the
telescope in order to center an
object in the eld of view.
The ne alignment is done by
manual Dec. slow-motion control
(2) within ±4° on Dec. axis, and
R.A. slow-motion control (3)
embedded into the clock drive.
The design of the mount allows
manual corrections wi t h out
stopping the clock drive, and
also to use hand controller as an
additional accessory tool.

12
M T- 3 S m ou n t i s us e d w i t h
telescopes with primary mirror
diameter of 150mm and above.
The mount head has a clock drive
embedded, which enables tracking
of celestial objects with user dened
speed.
The speed is set by a hand controller
and has three tracking rates: solar,
lunar and stellar, as well as two
additional correction speeds acceleration and deceleration at
50%. Hand controller has a night
light lamp.
For the rst sight-in on the object,
loosen the telescope,s Dec. and
R.A. locks (1) and move the
telescope to center an object in
the eld of view.
The fine alignment is done by
manual Dec. slow-motion control
(2) on Dec. axis, and R.A. slowmotion control (3) embedded into
the clock drive.
The polar axis has embedded polar
axis nderscope (optional) (4) and
is xed in a tripod (pier) mounting
head with a latitude dial.
The pier serves for holding an
equatorial mount with an OTA.
It consists of the tube and three
attachable legs.
The tripod can be better used
on a rugged terrain. For comfort
observing it is equipped with an
accessory shelf (1).

13
PREPARING TELESCOPE FOR
OBSERVATIONS
ASSEMBLING THE TELESCOPE
Take a pier (1) and legs (2) out of
the package. Attach tightly three
legs to the bottom point of the pier
using the captive screws. The pier
must not swing on the legs.
Place the pier on a firm plain
surface.
Take the equatorial mount and
place it on the top of the pier.
When using MT-3S orient equatorial
head so that the pin (1) on the pier
lines up with the azimuth adjustment
knobs (2).
Turn the handle (3) clockwise to x
the mount on the pier tightly. Make
sure there is no wobbling of the
mount on the pier.
Thread the counterweight shaft (2)
into the base of the Declination axis
(6) of the equatorial mount and x
it with the lock-nut (5). Unscrew
the safety washer/knob (1) and
slide the counterweight (3) to the
midpoint on the counterweight shaft
and secure it in place with the lock
knob (4). Screw back in the safety
washer/knob (1), which will not
let the weight slide entirely off the
counterweight shaft if slipped. Fix
the tube rings (7) on the mounting
plate and lay the OTA in the rings.

14
Place the finderscope bracket
(1) in the wedge slides for TAL2, TAL-150P, and TAL-150P8
telescopes. Tal-1 and TAL-1M
telescopes have finderscope
bracket mounted directly on the
OTA. Fix the nderscope with six
thumbscrews (2).
Place the polar axis in the
horizontal position (0° on the
latitude dial).
Enable unrestricted motion of the
polar axis with R.A. lock released.
Slide the counterweights along
the counterweight shaft until they
counterbalance the OTA.
For MT-1C mount polar axis
balancing release each of the
three screws (2) through the
cover (1).
After telescope balanced x the
screws (2) so that the polar axis
could not rotate.
Now with Dec. lock released,
loosen the tube ring lock clamps
and slide the OTA forward or back
in the tube rings until balanced.
Fix the tube ring lock clamps.
Fix the Dec. axis.
Repeat balancing each time when
placing additional accessories on
the telescopic tube, such as photo
and video cameras, eyepieces,
guides and other devices, which
enlarge the weight of the OTA.
BALANCING THE TELESCOPE
To provide a smooth motion of the telescope and reliable operation of
equatorial mount drives, the balancing of the telescopes is required.
15
Keep in mind that if the telescope
is not balanced properly, the
clock drive periodic error will
increase.
However, for the proper use of the
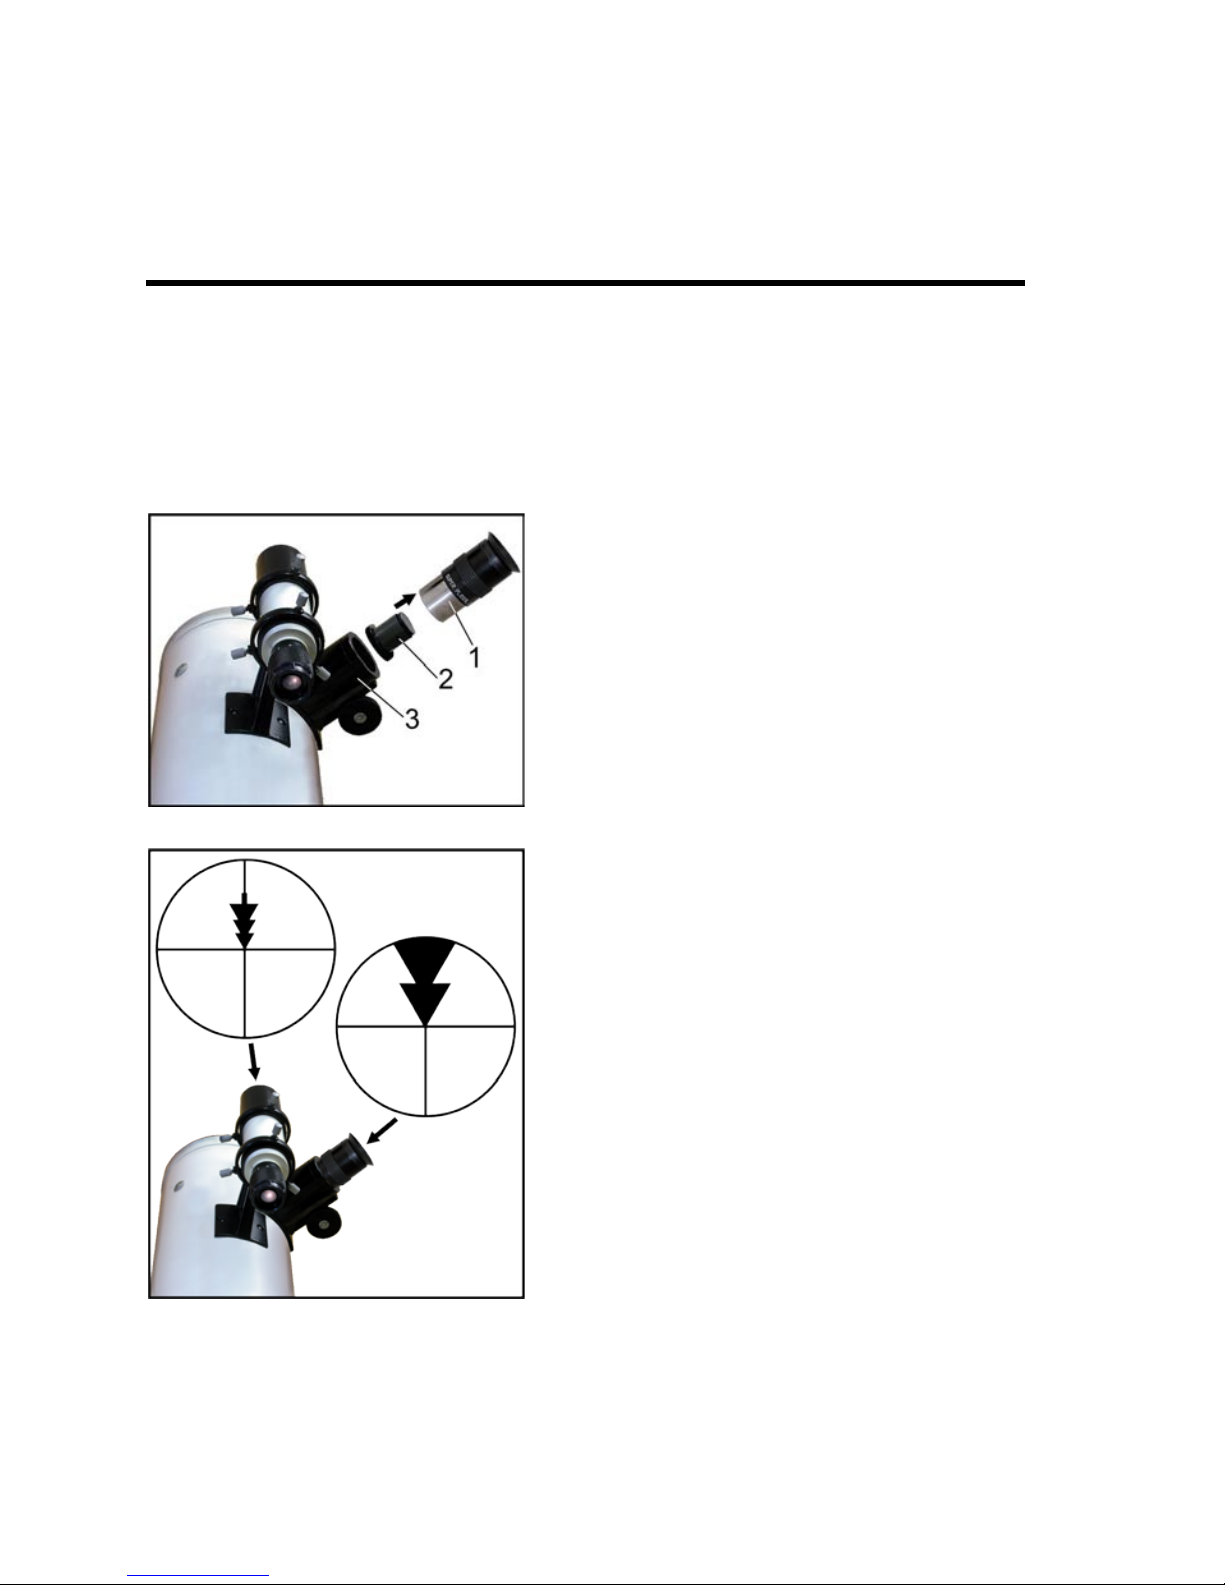
nder scope, it must be aligned with
the main telescope, so that both the
nder scope and the telescope point
at the same position in the sky.
Place the crosshair (2) into the
eyepiece f’=25mm (1) and then
insert the eyepiece in the focuser
tube (3).
Point the telescope at the distant
object (at least 400meters/yards
away), and then center it in the
telescopic field of view using
the reticle. Fix telescope in this
position with the R.A. and Dec.
locks.
Now, looking through the nder
scope and using the six alignment
thumbscrews, center the object on
the intersection of the crosshairs
of the nder scope.
In future, check the co-alignment
of the telescope and the nder
scope prior to observations.
ALIGNING THE FINDER SCOPE
High magnication of the main telescope makes it difcult to nd a
required celestial object in the sky because of the small eld of view.
This is why the telescope is equipped with a low-power nder scope
with a wide eld of view. The nder scope makes it easier to locate
the object you want and then to observe it in the eld of view of the
telescope.
16
Place the switch of the power
supply in the “0” position.
Connect the power supply 12V
output with the mount socket
using the power cord.
Plug in the power supply into the
220/110 V AC power outlet.
Place the switch of the power
supply in the “l” position. The LED
light on the power supply should
turn on.
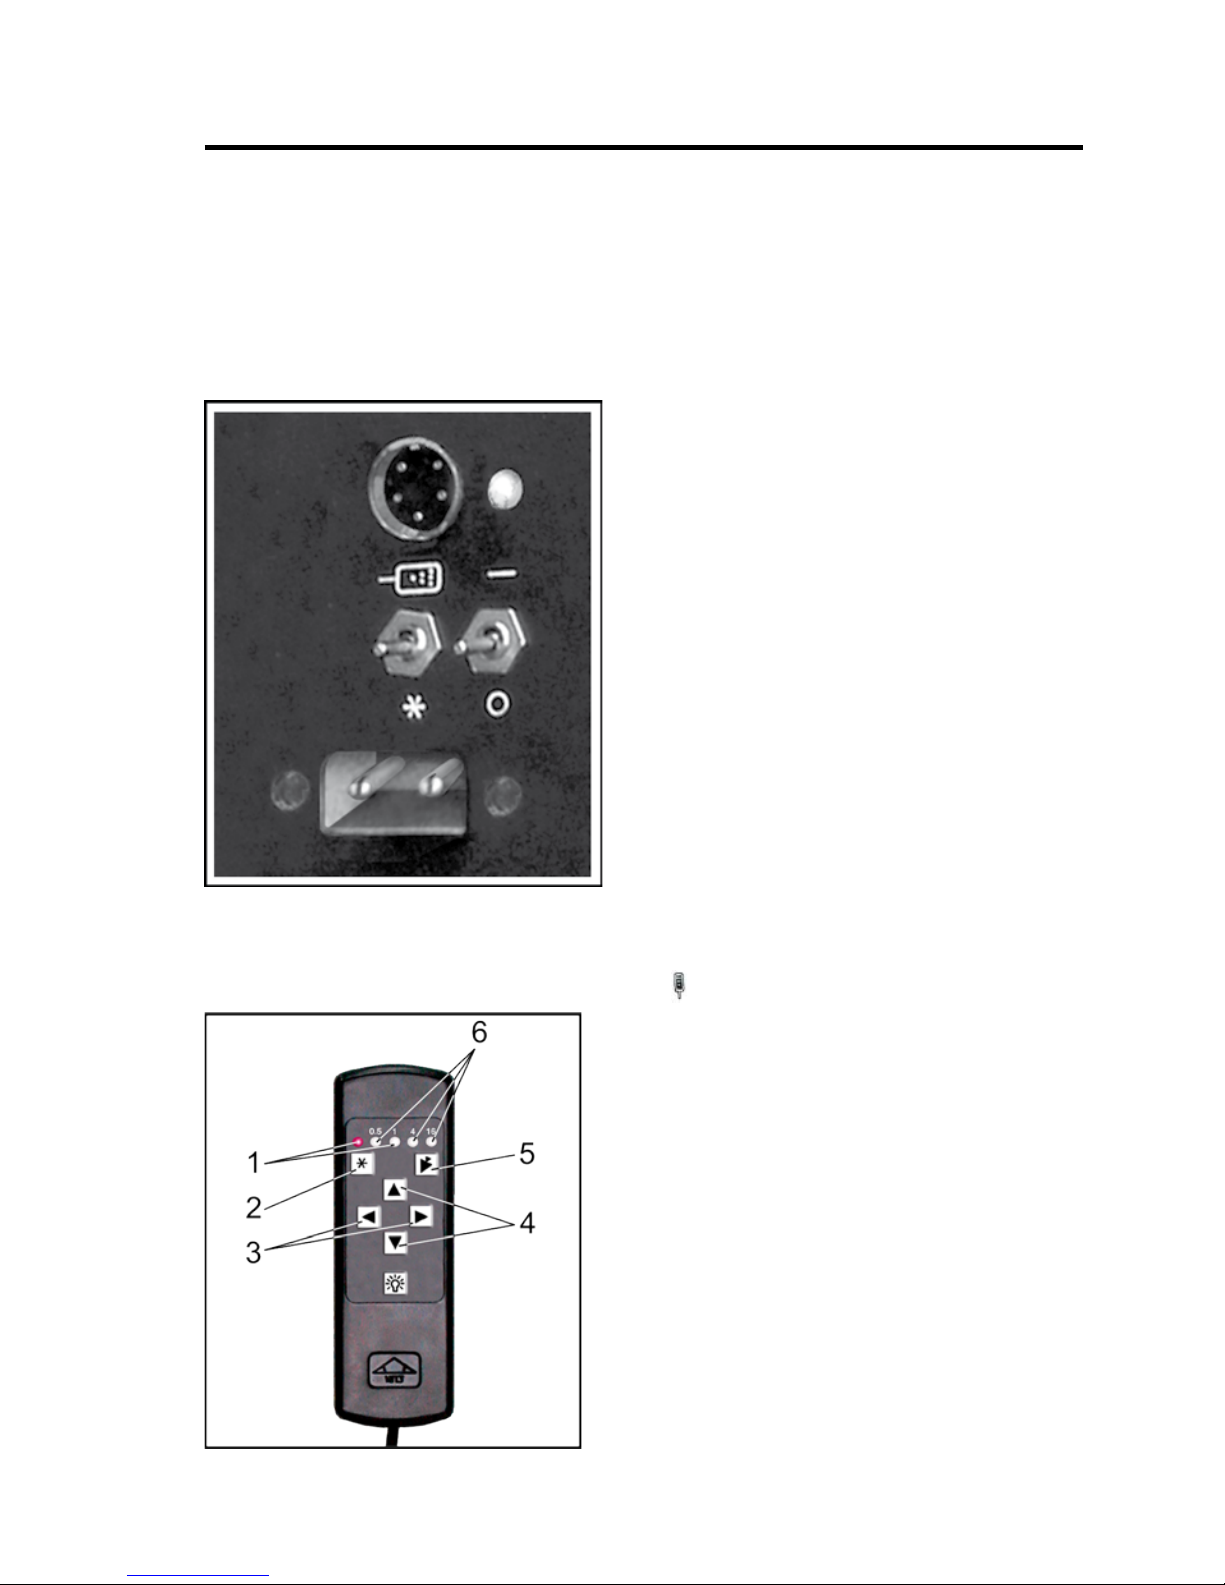
For MT-1C
mount place the left
switch in “*” position.
Turn on the mount clock drive
by placing the second switch in
“l” position. The LED light on the
power supply should turn on.
Connect hand controller to the
mount and place the left switch in
" " position (see picture).
Press one of the speed buttons
(1) to start the clock drive. The
LED light on the hand controller
should turn on (2). Push the same
button again to stop the clock
drive.
Press one of the two speed
correction buttons (3) while clock
drive is working, if necessary. The
LED light on the hand controller
should blink (2) while button is
pressed down.
POWER SUPPLY AND HAND CONTROLLER
Warning!
Always connect power supply to the mount using the power cord
with power supply disconnected from the power outlet. Use only
original manufacturer,s power supply fuse or analogue (consult
your dealer). Always disconnect all the power, if replacing the
power supply fuse.

17
For MT-3S mount connect the
hand controller to the socket (1).
Then follow the same procedure
as for MT-1C mounts.
If the telescope is used in the
Southern hemisphere, the direction of the clock drive rotation must
be changed.
For MT-3S mount open the hand
controller cover and place the
inside switch with "N/S" (North/
South) markings in the required
position.
Polar alignment of the telescope
allows more comfortable observations, because you can follow
objects by moving the telescope
about one axis, the polar axis (or
Right Ascension (R.A.) axis), which
is in parallel with the Earth,s axis.
See Appendix A for details.
Release the latitude lock (1).
Using latitude adjustment knob
(2), move R.A. axis up or down
in order to set the latitude of your
location (see latitude dial).
Re-tighten the latitude lock (1).
POLAR ALIGNMENT
Due to the Earth,s rotation, celestial objects move in the telescope
eld of view (the higher telescope magnication - the faster those
mo-vements appear).

18
For visual observations point the R.A.
(polar) axis of the telescope towards.
Polaris (α UMi). See the picture.
With this level of pointing accurary,
very little use of the Dec. slowmotion control is necessary for
celestial objects tracking. Less
correction is required, when polar
alignment is done more precisely.
More precise polar alignment is
required for astrophotography.
MT-3S mount equipped with a polar
axis nder scope (1), for precise polar
alignment, with a reticle illumination.
The reticle also has major stars
of the Ursa Minor constellation,
including Polaris, depicted for the
Northern hemisphere, and stars
of the Octans constellation for the
Southern hemisphere.
Match stars depicted on the reticle
with the celestial objects in the sky,
using azimuth (2) and latitude (3)
adjustment knobs and rotating the
polar axis nder scope around its
axis.
For MT-1 and MT-1C mounts use
precise polar alignment procedure
described in Appendix B.
Polaris
Polar axis
Ursa Major
Axis of dec
-
linations

19
Level the Dec. axis (put it in the
horizontal position) and by rotating
R.A. setting circle put it in a "0"
(zero) position (see picture).
For the Dec. setting circle
cali b ratio n find bri g ht star
from the star atlas, and bring
selected object to the center
of the telescopic eld of view.
Rotating Dec. setting circle,
set the Declination of the star
observed. Correct Dec. setting
circle calibration by selecting
next star.
CALIBRATING THE SETTING CIRCLES
R.A. and Dec. axes have setting circles, which enable observer to
locate an object in the sky by its celestial coordinates - right ascension
(R.A.) and Declination (Dec.). Calibration of setting circles is done
after polar alignment of the telescope.

20
OBSERVATIONS
To achieve maximum stability
of the visible image and best
performance of the telescope,
all parts of the telescope need
to reach thermal equilibrium with
the ambient air. For better air
circulation inside of the OTA the
primary mirror cell has special
holes. TAL-1 telescope has an
end cap, which needs to be
removed prior to observations
(see picture).
Please note that some nights
could have bad observation
conditions because of the atmo-
spheric turbulence. Even observ-
ing ne Moon surface details can
be difcult.
Avoid observations through a
window, because of the window
glass aberrations, and temperature differences between inside
and outside air, which will cause
images to look blurred and distorted.
Put a soft cover on the telescope
and its power supply after observations, or to protect it from rain/
snow.
When using higher magnication not only the visible image size appears larger in the telescope, but also blurring and distortion of the image, star twinkle, caused by atmosphere become more signicant.

21
Point the telescope at any chosen
object, and do some coarse adjustments to put it in the nder scope
eld of view. Then center the object
using slow motion controls – rst
in the nderscope and then in the
main telescope eld of view, when
observing through the eyepiece.
Use focus knobs to focus, when
changing eyepieces. Provided eyepieces give several magnication
options for an observer.
VISUAL OBSERVATIONS
TAL-1; TAL-1M
Plössl f'=25 mm Plössl f'=10 mm
32
x
80
x
TAL-150P
Plössl f'=25 mm Plössl f'=7.5 mm
30
x
100
x
TAL-2; TAL-150P8
Plössl f'=25 mm Plössl f'=7.5 mm
48
x
160
x

22
For higher magnication, use Barlow lens with one of the eyepieces
(see picture). 2x Barlow lens doubles
magnication of the telescope.
Sun projection screen can be used
for solar observations. Place the
screen on the counterweight shaft
and x it with a screw so that the
widest part of the screen is opposite
to the top point of the tube of the
telescope.
Loosen the tube rings and rotate the
OTA so that the eyepiece is perpen-
dicular to the screen. Fix the OTA in
this position.
Attach a thick white paper sheet to
the screen using clamps.
Use the f’=25mm eyepiece to get
an optimal (approximately 100 mm)
Sun image. In order to change
size/brightness of the image, move
the screen along the counterweight
shaft. Use focus knobs for sharpness regulation.
TAL-1; TAL-1М
Plössl f'=25 mm,
2x Barlow
Plössl f'=10 mm,
2x Barlow
64
x
160
x
TAL-150P
Plössl f'=25 mm,
2x Barlow
Plössl f'=7.5 mm,
2x Barlow
60
x
200
x
TAL-2; TAL-150P8
Plössl f'=25 mm,
2x Barlow
Plössl f'=7.5 mm,
2x Barlow
96
x
320
x

23
For astrophotography with TAL-1
and TAL-1M telescopes mount a
camera (1) on the camera holder
(2), which is attached to the counterweight shaft. Fix the camera to
the holder using the lock knob (3).
As a long exposure is required for
the astrophotography, it is neces-
sary for a camera during this time
precisely to follow the sky in its
diurnal rotation.
Place the crosshairs into the eye-
piece f’=25mm, attach the Barlow
lens and then insert them in the
focuser tube.
Point the telescope at any bright
star near the center of the camera
eld of view. The star should stay in
the reticle during the exposure time.
For more comfortable guiding bring
the star a bit out of focus.
Use slow motion controls to avoid
shifting of the star from the reticle.
To minimize such adjustments
and for better photography quality
more precise polar alignment is
required.
ASTROPHOTOGRAPHY

24
For astrophotography with TAL-2,
TAL-150P and TAL-150P8 telescopes use the same procedure as
described above. However prime
focus photography is also available
when using M42x1 objective thread
cameras (M42x0.75 thread camera
adapter is also supplied with the
telescope).
For the prime focus setup unscrew
the objective lens from the camera
and remove the 2" and 1.25" adapters from the focuser drawtube.
Screw the camera adapter into
the focuser drawtube. Attach the
T-ring (T-adapter) to the camera and
thread it onto the camera adapter.
Mount the camera (2).
Precise guiding can be done with an
off-axis guider or a guide-telescope
(sold separately).

25
In order to keep telescope in good operating condition one should
provide good care and maintenance for the instrument. Please note
that lens or mirror surfaces should be cleaned as infrequently as
possible, only when absolutely necessary.
Optics self-cleaning only permitted after expiration of manufacturer limited warranty!
Keep telescope clean and protect it from any physical damage.
Use a dry cloth to remove dust from all metallic surfaces.
The primary and the secondary mirrors of the telescope are frontsurface aluminized. Improper cleaning can scratch mirror coatings,
so one should use blower bulb or special brush to remove dust
from their surfaces.
Spots of grease and smudges may be washed away.
To clean the primary mirror, carefully remove the mirror cell from
the telescope by loosening screws, which hold it inside the OTA.
Do not remove mirror from the mirror cell. Carefully wet the mirror
surface with a lot of pure spirit (alcohol) using the cotton cloth. Using the same cloth without pressure clean the mirror surface and
then rinse the mirror under a stream of water. Wait till the water
trickles away.
Swab remaining water drops from the surface with a dry cloth edge.
To clean the secondary mirror use the same procedure.
Use only quality optical lens cleaning tissue and optical lens cleaning uid specically designed for multi-coated optics to clean your
eyepieces and nderscope.
Keep the dust cover on the front of the telescope and the end cap
on the focuser tube when not in use.
MAINTENANCE

26
COLLIMATION (ALIGNMENT) OF THE
OPTICS
To inspect the view of the mirror
collimation, look down the focuser drawtube with the eyepiece
and the Barlow lens removed. If
optics are properly aligned you
should see the secondary mirror
centered in the drawtube, as well
as reection of the primary mirror
centered in the secondary mirror,
and the reection of the secondary mirror (and your eye) centered
in the reection of the primary
mirror (see picture).
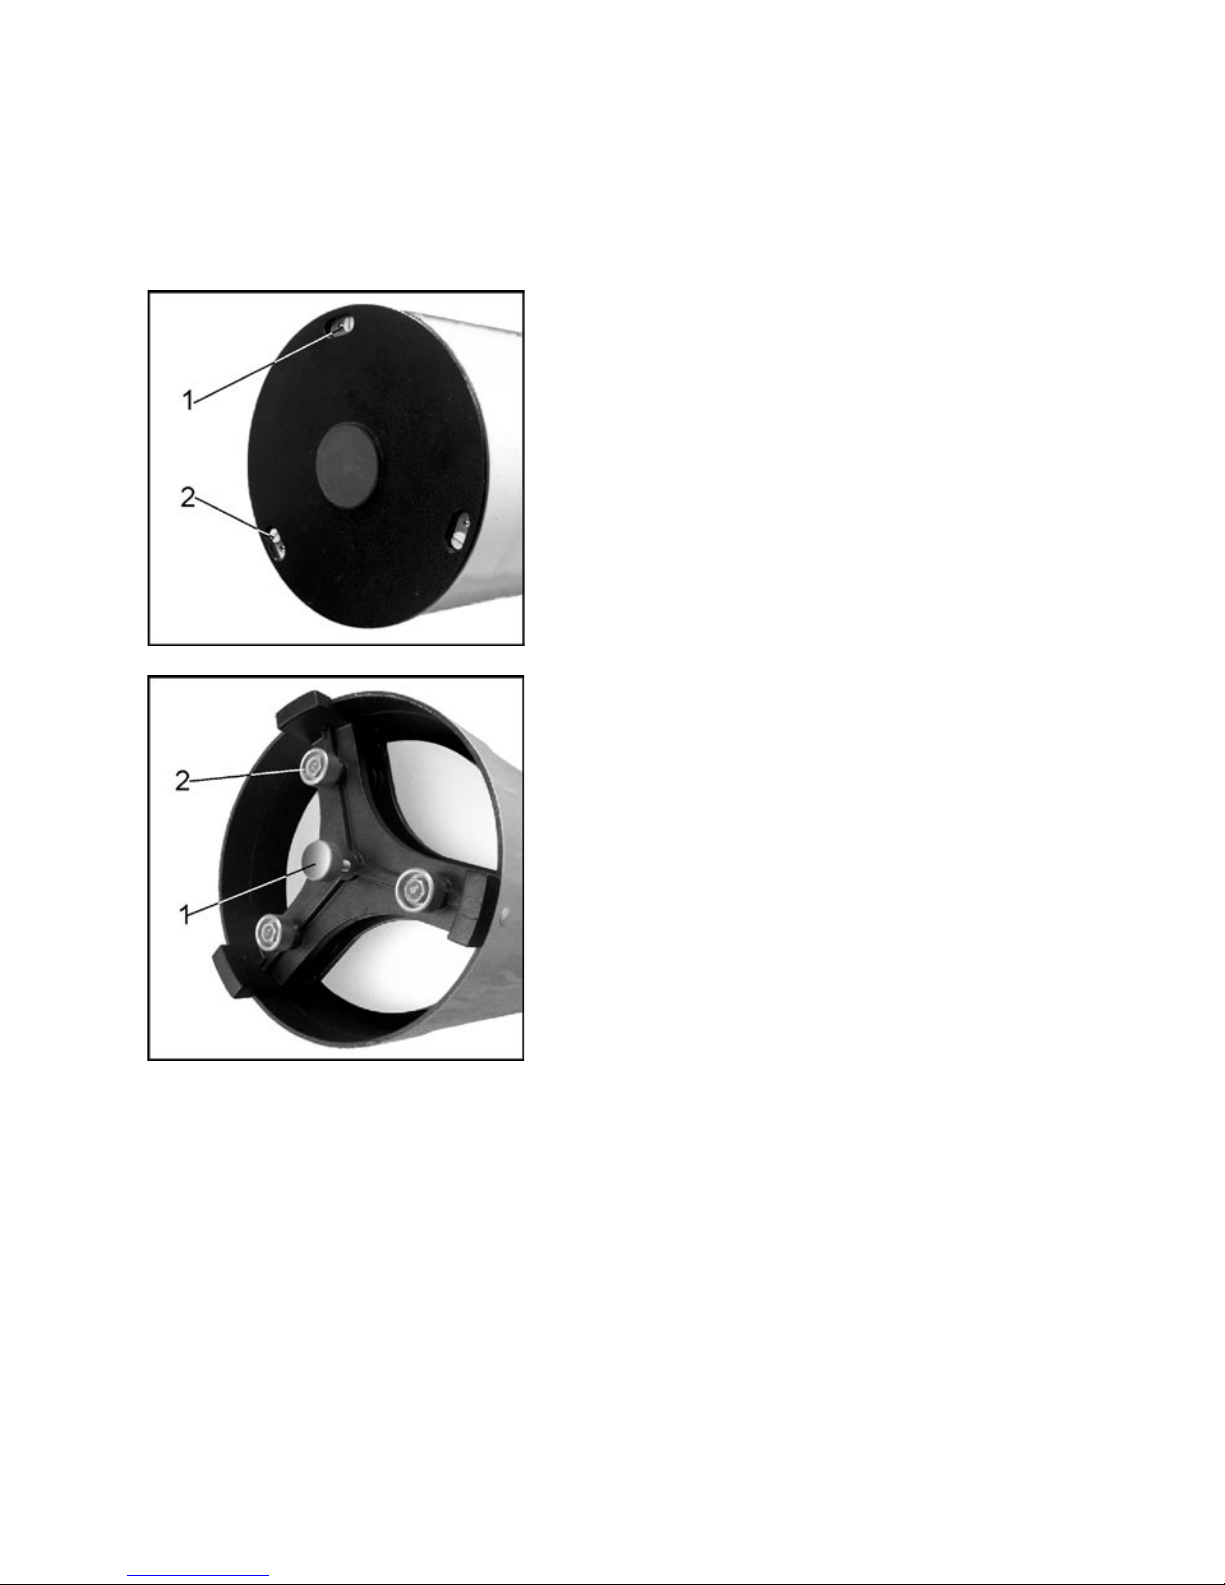
During the collimation process
the primary and/or secondary
mirror will need alignment. If the
reection of the primary mirror
is not centered in the secondary
mirror, aligning of the secondary
mirror is required. Loosen the
central screw of the secondary
mirror holder (1) and use the three
alignment screws (2) to center the
reection of the primary mirror in
the secondary mirror.
Collimation (alignment) of the optics is permitted only in case of
absolute necessity, and after expiration of manufacturer limited
warranty.
In case of accidental mirrors misalignment or after cleaning optical
parts, telescope collimation might be necessary.
27
If the primary mirror is misaligned,
the reection of the secondary mirror with spider vanes will be out of
center.
For TAL-1 and TAL-1M collimation,
loosen the three small screws that
lock the primary mirror (1). Then
adjust the tilt of the primary mirror
using larger adjustment thumbscrews (2), so that the reection of
the secondary mirror is centered.
Fix the mirror position after collimation is done.
Use analogous proce d ure to
collimate TAL-2, TAL-150P and
TAL-150P8 telescopes.

28
STORAGE
The telescope must be kept in a clean, dry (humidity must not exceed 80%), dust-free place with an ambient temperature between
+5° and +40°C.
Avoid collision and shaking of the telescope.
It is prohibited to store acids, alkalis, and any chemically active
substances, which may produce evolved gas or vapor harmful for
the optics, at the same place with the telescope.
ACCEPTANCE CERTIFICATE
Telescope ____________ , serial # ___________
Equatorial mount, serial # _____________
Passed the product approval and found serviceable.
Manufacturing date __________________
Signatures _____________________

29
Appendix A
Precise polar alignment
for the MT-1 and MT-1C mounts
For precise polar alignment for MT-1 and MT-1C mounts observe
two bright stars in the west and in the east by turns, using the eyepiece
f’=25mm with reticle.
If during the observation of the star in the east it slowly shifts, so
that you have to lower the top end of the telescope to follow it, then
the northern (upper) side of the R.A. (polar) axis of the mount should
be slightly lifted up.
If you have to lift up the top end of the telescope to follow the star
in the east during the observation, then the northern (upper) side of
the R.A. (polar) axis of the mount should be slightly lowered down.
For the precise azimuth adjustment follow the same procedure to
observe a bright star on a celestial meridian in the south. If during the
observation the star slowly shifts, so that you have to lower the top
end of the telescope to follow it, then the northern (upper) side of the
R.A. (polar) axis of the mount should be slightly moved west.
If you have to lift up the top end of the telescope to follow the star
in the south during the observation, then the northern (upper) side of
the R.A. (polar) axis of the mount should be slightly moved east.
After 20-30 minutes of such observations and adjustments, it is
possible to achieve a precise polar alignment, when any observed
star would stay on the intersection of the crosshairs (reticle) of the
eyepiece for 10-15 minutes without additional correction needed on
the Dec. axis.

30
Appendix B
Double stars list for telescope image quality test
Star
Constellation
R. A.
2000.0
Visible
distance
α Psc
γ Cet
ζ Ori
α Gem
ε Hya
38 Lyn
ε Boo
µ Dra
70 Oph
δ Cyg
2h02
m
2h43
m
5h40
m
7h34
m
8h46
m
9h18
m
14h44
m
17h05
m
18h05
m
19h44
m
+02°45'
+03°14'
-01
°56'
+31
°53'
+06°25'
+36°48'
+27°04'
+54°30'
+02°30'
+45°07'
Pisces
Cetus
Оrion
Gemini
Hydra
Lynx
Bootes
Draco
Ophinchus
Cygnus
1.9"
2.8"
2.5"
1.8"
2.9"
2.8"
3.0"
2.2"
2.4"
2.2"
4.3-5.3
3.4-4.4
2.0-4.2
2.0-2.8
3.5-6.9
4.9-6.0
2.7-5.1
5.8-5.8
4.0-6.0
3.0-6.5
Coordinates
Declination
2000.0
Magnitude,
m

31
Appendix C
Brightest stars visible in the Northern Hemisphere
Star
Constellation
R. A.
2000.0
Declination
2000.0
Visible
magnitude
Alpheratz
Mirach
Polaris
Mirfak
Aldebaran
Rigel
Capella
Betelgeuse
Sirius
Castor
Procyon
Pollux
Regulus
Merak
Dubhe
Phecda
Alioth
Mizar
Spica
Alkaid
Arcturus
Vega
Altair
Deneb
α And
β And
α UMi
α Per
α Tau
β Ori
α Aur
α Ori
α CMa
α Gem
α CMi
β Gem
α Leo
β UMa
α UMa
γ UMa
ε UMa
ζ UMa
α Vir
η UMa
α Boo
α Lyr
α Aql
α Cyg
Andromeda
Andromeda
Ursa Minor
Perseus
Taurus
Orion
Auriga
Orion
Canis Major
Gemini
Canis Minor
Gemini
Leo
Ursa Major
Ursa Major
Ursa Major
Ursa Major
Ursa Major
Virgo
Ursa Major
Bootes
Lyra
Aquila
Cygnus
2.07
m
2.07
m
1.97
m
1.79
m
0.87
m
0.18
m
0.08
m
0.45
m
-1.44
m
1.58
m
0.40
m
1.16
m
1.36
m
2.34
m
1.81
m
2.41
m
1.76
m
2.23
m
0.98
m
1.85
m
-0.05
m
0.03
m
0.76
m
1.25
m
+29°05'
+35°37'
+89°15'
+49°51'
+16
°30'
-8°12'
+45°59'
+7°24'
-16
°42'
+31
°53'
+5°13'
+28°01'
+11
°58'
+56°22'
+61
°45'
+53°41'
+55°57'
+54°55'
-11
°09'
+49°18'
+19
°10'
+38°47'
+8°52'
+45°16'
0h08
m
1h09
m
2
h
31
m
3h24
m
4h35
m
5
h
14
m
5
h
16
m
5h55
m
6h45
m
7h34
m
7h39
m
7h45
m
10
h
08
m
11
h
01
m
11h03
m
11h53
m
12
h
54
m
13
h
23
m
13
h
25
m
13
h
47
m
14
h
15
m
18
h
36
m
19
h
50
m
20
h
41
m
 Loading...