

Page 1
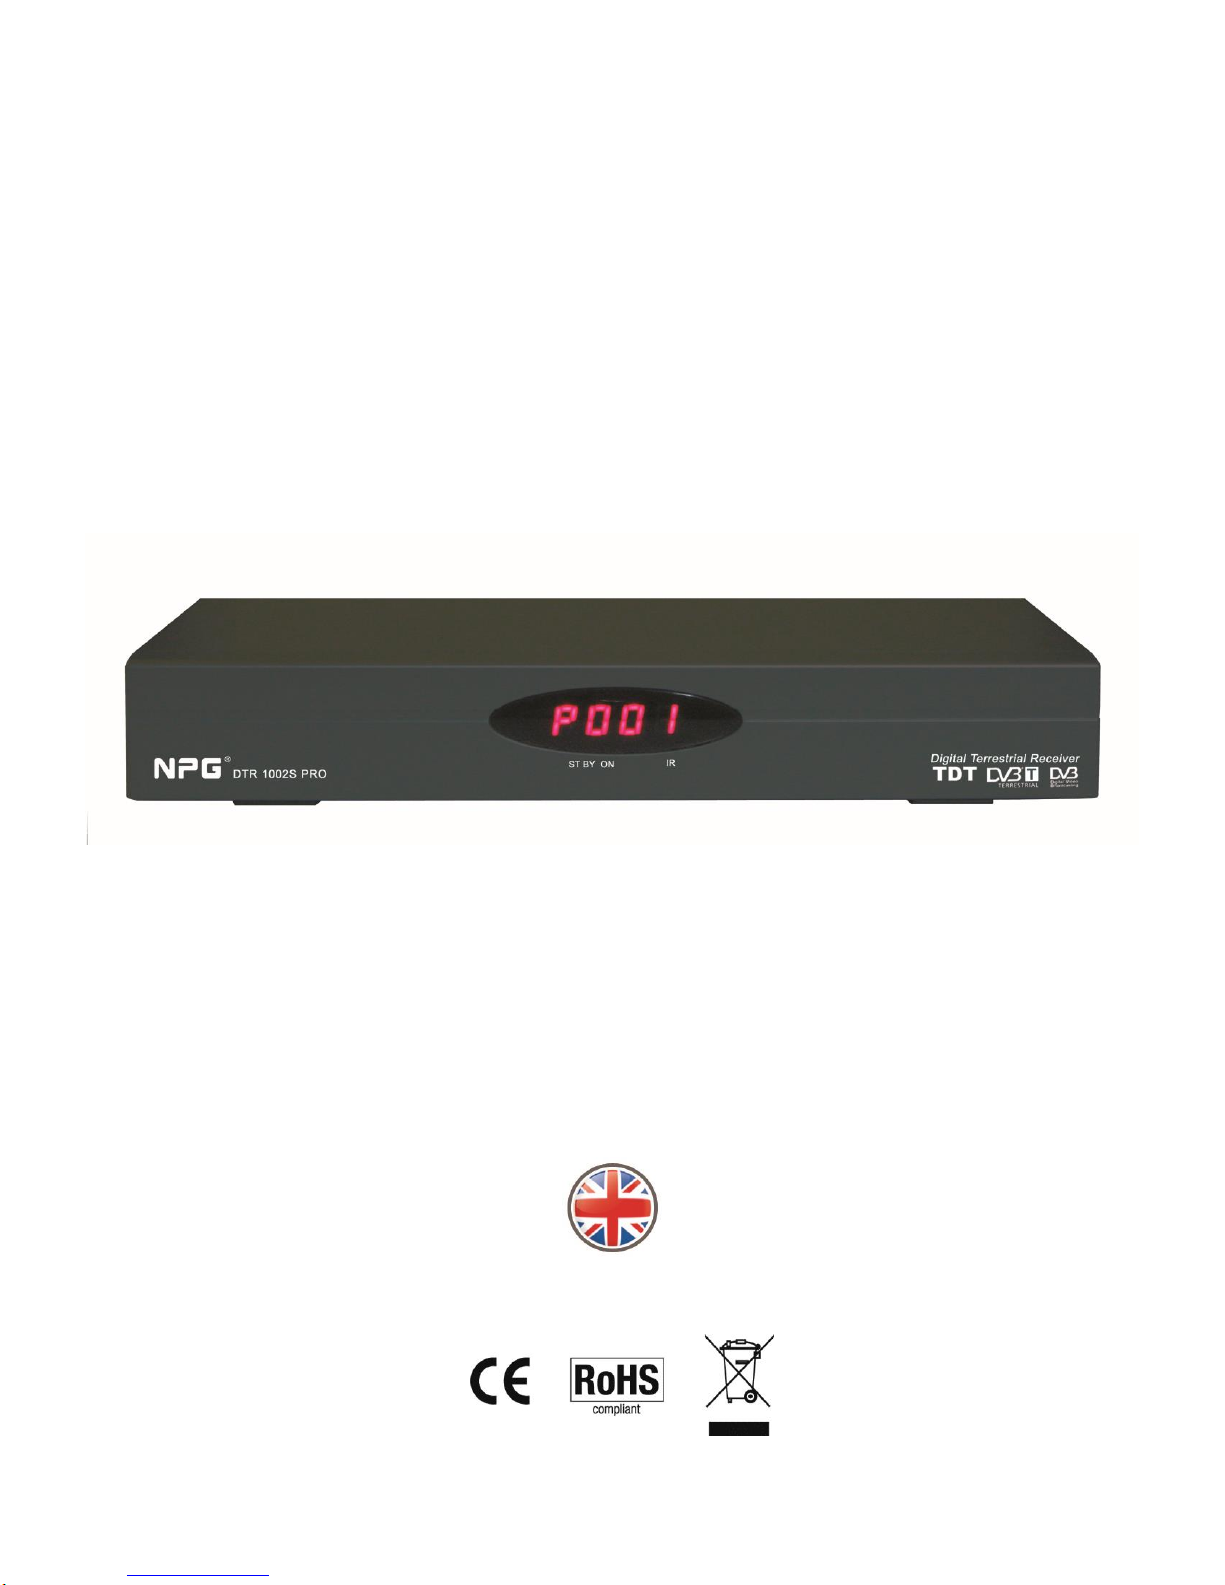
DTR 1002S PRO
DIGITAL TERRESTRIAL RECEIVER
User´s Manual
Page 2

NPG DTR 1002S PRO V2.3
CONTENTS……………………………………………………………………….………………………………………¡ERROR!
MARCADOR NO DEFINIDO.
1. IMPORTANT SAFETY INSTRUCTIONS……………………………………………………………....…………..2
2. CONTENTS AND EQUIPMENT…………………………………………………………………………………….4
2.1 REMOTE CONTROL…………………………………………………….…….……………….………………...6
2.2 CONNECTIONS AND PREPARATION ................................................................................................ 7
3. BASIC FUNCTIONS……………………………………………………………………………………………..…..9
3.1 ENTER INTO SYSTEM AND POWER ON-OFF…………………………………..…………………….......................- 9 -
3.2 TV/RADIO PROGRAMS SWITCH……...…………………………………………………………………………..- 10 -
3.3 STATION SWITCH…………………………………………………………….………………………………..…….- 10 -
3.4 DISPLAY INFORMATION OF PROGRAMS………………………………………………………….……….………...- 11 -
3.5 PROGRAM RETURN…………………………………………….……………………………………….………….- 11 -
3.6 AUDIO LANGUAGE SWITCH AND L/R CHANNEL SWITCH……………………..………………………….………....- 11 -
3.7 ELECTRONIC PROGRAMS GUIDE(EPG)…………………………………………………………………………. - 12 -
3.8 TELETEXT…………………………………………………………………………………………………………- 13 -
3.9 SUBTITLE………………………….………………………….…………………………….……………………….- 13 -
4 DIGITAL TV…………………………………………………………………………………………………………..- 14 -
4.1 INSTALLATION………………………………………………………………………………………………….14
4.1.1 Manual Search……………………………………………………………………………………………...- 15 -
4.1.2 Auto Search…………………….…………………………….………………………………….……………15
4.2 CHANNEL MANAGER………….………………………………………….………………..…………………………15
4.2.1 Channel Organizer....……….………………….……………………………………….…………….………- 15 -
4.2.2 Channel Sorting…………………………………………….……………………………………….….…….- 16 -
4.2.3 Channel Grouping....…………………………………………………………………………….………….- 16 -
4.2.4 Edit Channel…………………………………………………………………………………….…………..- 17 -
4.2.5 Delete All………….………….……….……………………………………….………………………………- 18 -
4.3 CONFIGURATION....……………….…………….…….…………….………………………….….…………..………...19
4.3.1 OSD………………………………………………………………………………….…………..…………..19
4.3.2 TV………….…………………….………………………………………………….……..…………...………..- 20 -
4.3.2.1 Display Mode…….………….………………………………………….………….…………………….- 20 -
4.3.2.2 Aspect Ratio……………………………………………………...……………………………………- 20 -
4.3.2.3 Video Output…………………………………………………………..…………………….…………- 20 -
4.3.2.4 Brightness…………………….……………………………………………….…………….…….……..- 21 -
4.3.2.5 Contrast………….………….………………………………………………….…………………………....- 21 -
4.3.2.6 HUE………………………………………………………………………………….….………………- 21 -
4.3.2.7 Saturation………………………………………………………………………………….……………- 22 -
4.3.3 System Setup…………………………………………………………………………..……….…………..- 22 -
4.3.4 Time…………………………………………………………………………………………………….….....- 23 -
4.3.5 Wakeup Timer……………………………………………………………………………..………………..23
4.3.6 Parental Lock………………………….………………….…………………….…………..……….………....- 23 -
4.4 SOFTWARE UPGRADE…………………………………………….……………………………………..……….....- 24 -
4.5 VERSION………………………….……………………….……………………...……………………………..24
4.6 FACTORY DEFAULT………..………………………………………………………………………………………24
5 GAMES………………………………………………………………………………………………………….….…24
6 TROUBLESHOOTING……………………………………………………………………….………..…….………25
7 GLOSARY OF TERMS ............................................................................................................................... 26
8 CARACTERISTIC……… ............................................................................................................................. 27
- 1 -
Page 3
NPG DTR 1002S PRO V2.3
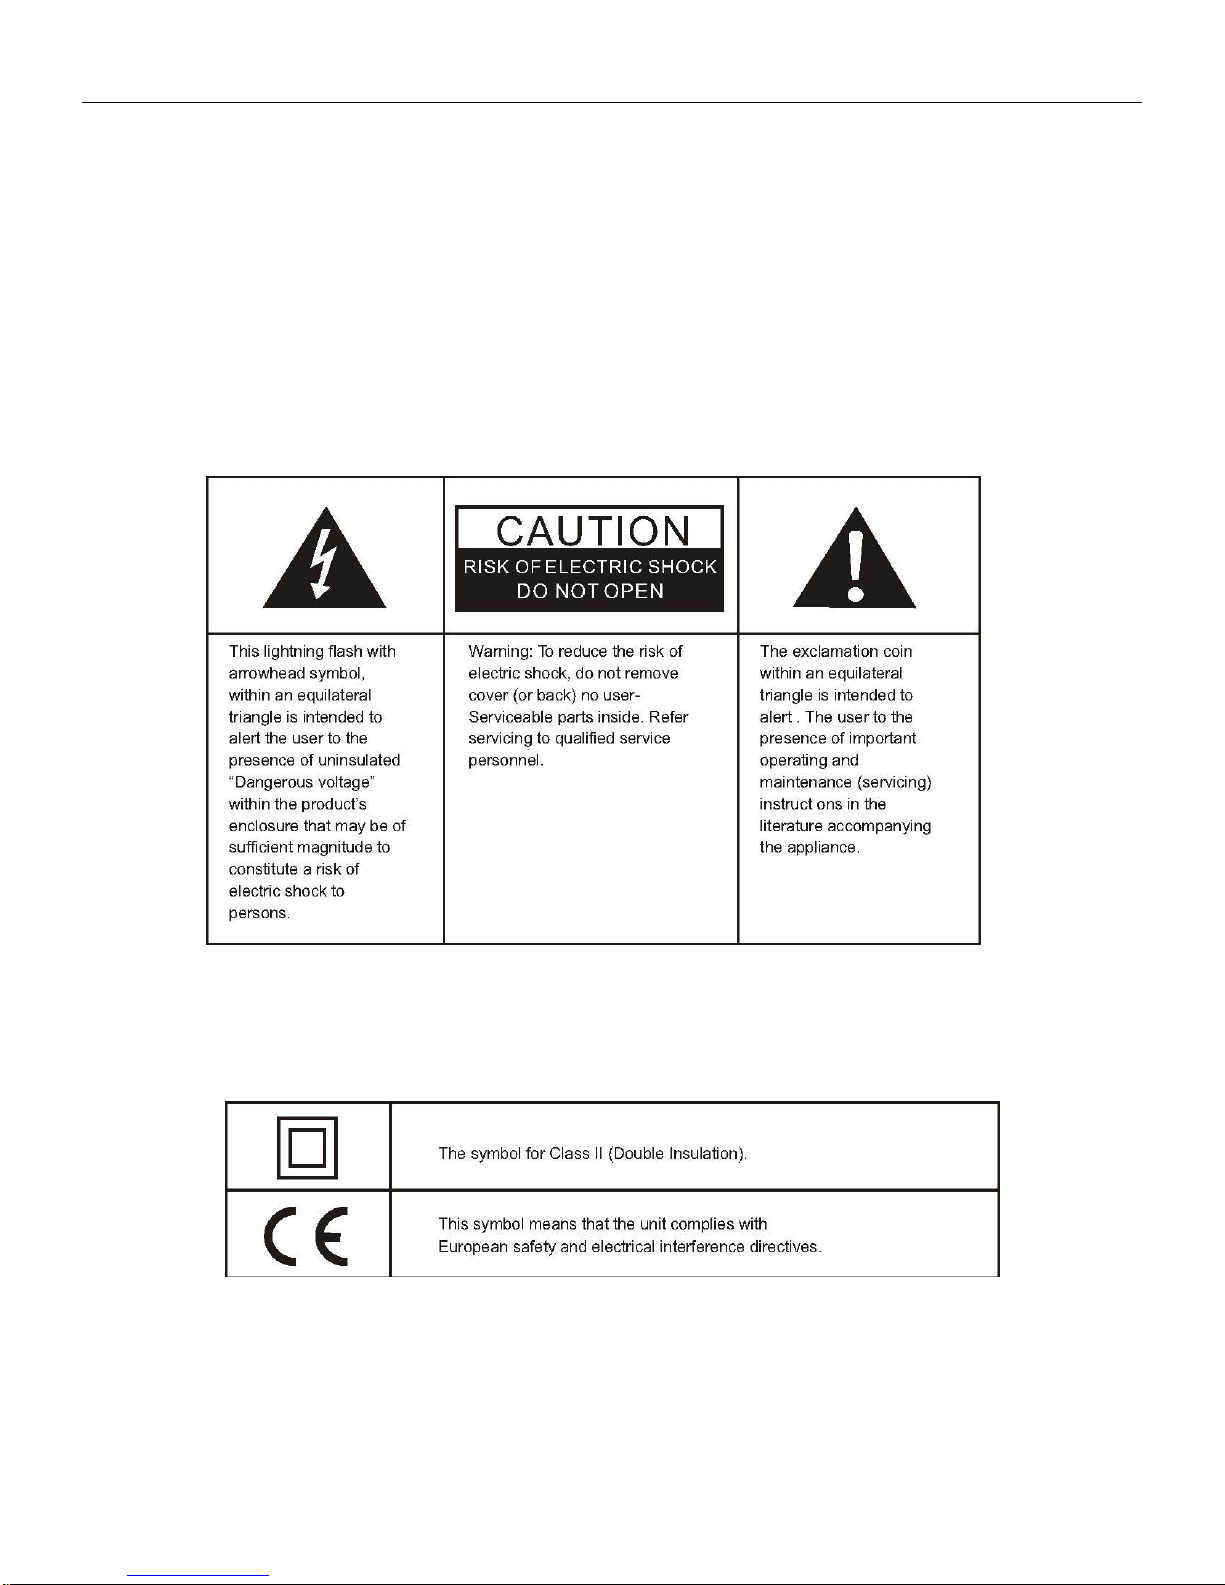
1. IMPORTANT SAFETY INSTRUCTIONS
WARNING
● TO PREVENT FIRE OR SHOCK HAZARD, DO NOT USE WITH AN EXTENSION CORD,
RECEPTACLE OR OTHER OUTLET UNLESS THE BLADES CAN BE FULLY INSERTED TO
PRESENT BLADE EXPOSURE.
● TO PREVENT FIRE OR SHOCK HAZARD. DO NOT EXPOSE THIS APPLIANCE TO RAIN OR
MOISTURE.
● TO PREVENT ELECTRICAL SHOCK, MATCH WIDE BLADE PLUG TO WIDE SLOT FULLY
INSERTED.
This appliance
shall not be exposed to dripping or splashing water and that no object filled with liquids such as vases
shall be placed on apparatus.
1. Read Instructions-All the safety and operating instructions should be read before the appliance is
- 2 -
Page 4

NPG DTR 1002S PRO V2.3
operated.
2. Retain Instructions-The safety and operating instructions should be retained for future reference
.
3. Heed Warnings-All warnings on the appliance and in the operating instructions should be
adhered to .
4. Follow Instructions-All operating and use instructions should be followed .
5. Water and Moisture-The appliance should not be used near water.
6. Ventilation-The appliance should be well situated that its location or position does not interfere
with its proper ventilation.
7. Heat-The appliance should be situated away from heat sources such as radiators, heat registers,
stoves that produce heat.
8. Power Sources-The appliance should be connected to a power supply only of the type described
in the operating instructions or as marked on the appliance.
9. Grounding or Polarization-Precautions should be taken.
10. Power -Cord Protection -Power supply cord should be routed so they are not likely to be walked
on or pinched by item placed upon or against them, pay plugs ,and the point where they exit from the
appliance.
11. Cleaning -The appliance should be cleaned only by ways recommended by the manufacturer .
12. Power Plug-Where the MAINS plug or an appliance coupler is used ad the disconnect device,
the disconnect device shall remain readily operable .
13. Power Lines -An outdoor antenna should be located away from power lines .
14. Outdoor Antenna Grounding-If an outside is connected to the receiver be sure the antenna
system is grounded so as to provide protection against voltage surges and to build up static charges.
15. Non-use Periods -The power cord of the appliance should be unplugged from the outlet when
left unused for a long period of time .
16. Object and Liquid Entry -Care should be taken so that objects do not fall and liquids are not
spilled ,into the enclosure through openings . The apparatus shall not be expose to dripping or
splashing and that no objects filled with liquids, such as vases , shall be placed on the apparatus.
17. Conditions Requiring Service -The Appliance should be serviced by qualified service
personnel when:
● The power-supply cord or the plug has been into the appliance.
● Objects have fallen or liquid has been spilled into the appliance.
● The appliance has been expose rain.
● The appliance does not appear to operate normally or exhibit a marked change in performance.
- 3 -
Page 5
NPG DTR 1002S PRO V2.3
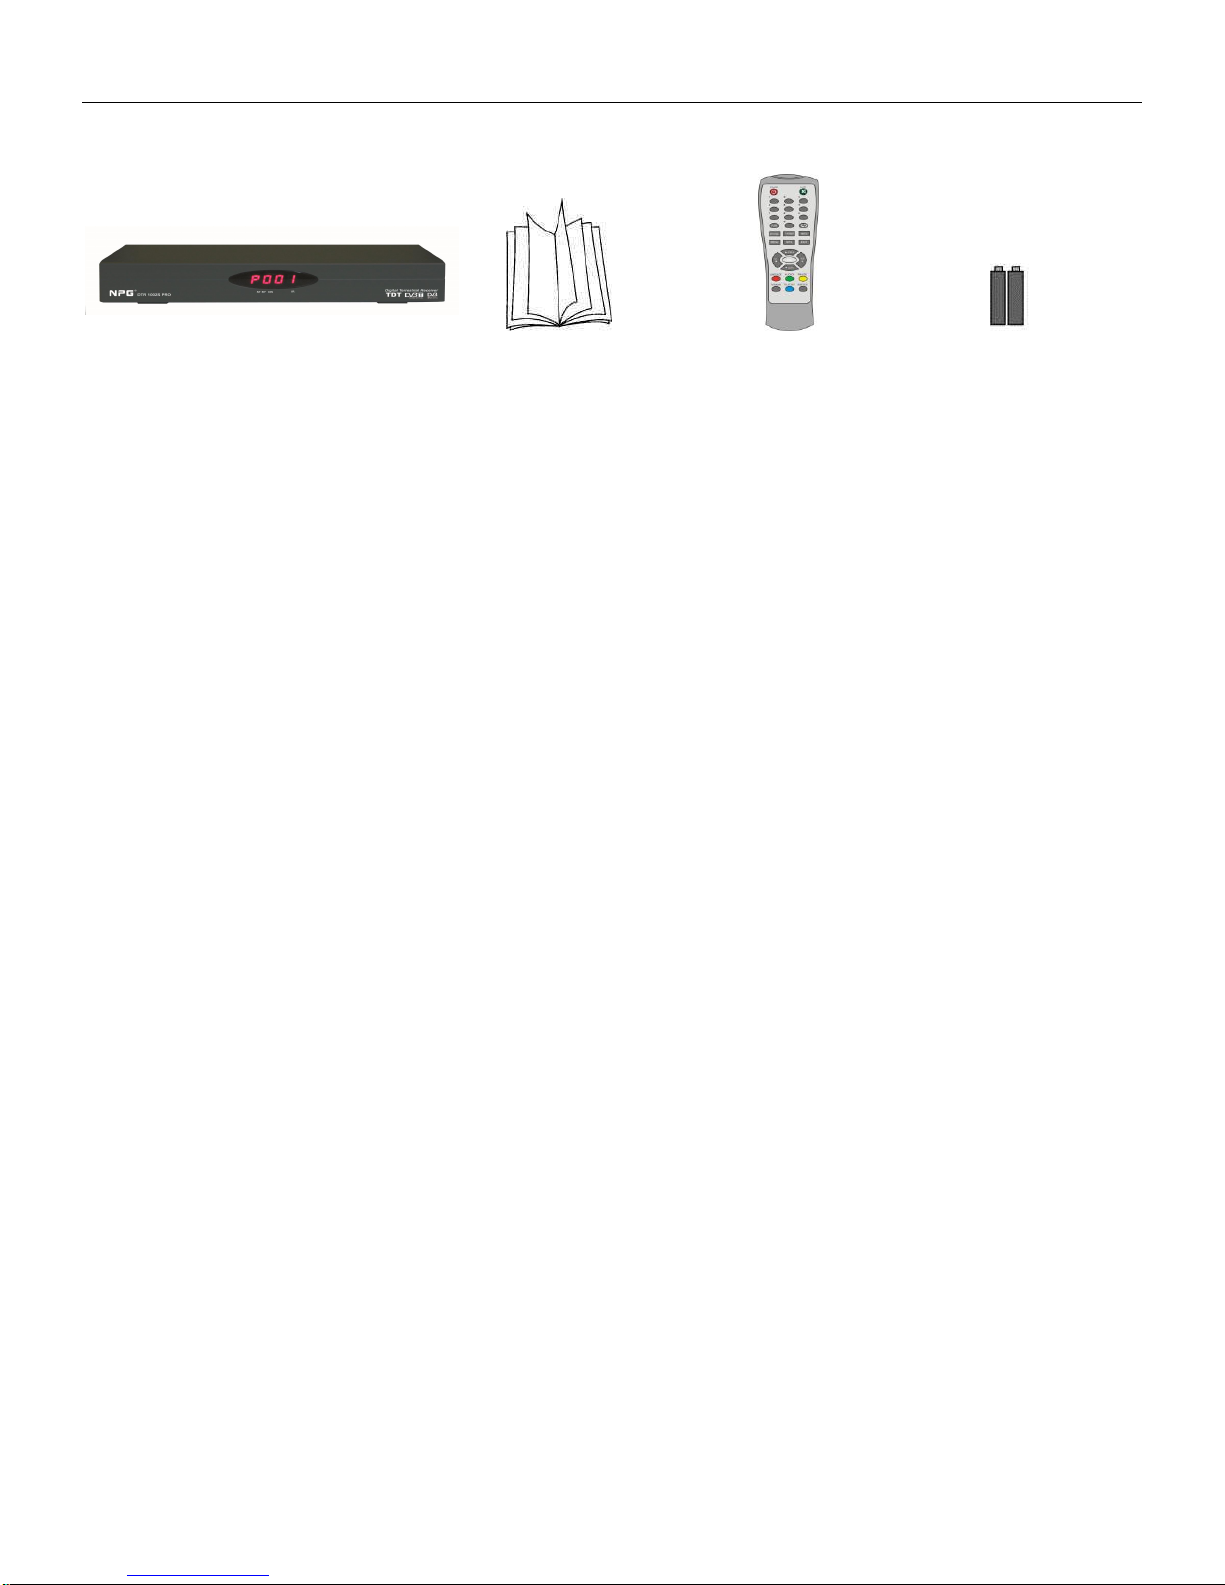
DTR 1002S PRO
Remote control X1
2 batteries 1.5V "AAA"
Operation manual X1
2. CONTENTS AND EQUIPMENT
Package Contents
1. DVB Product DTR 1002S PRO
2. Remote control DVB RECEIVER ( include 2 batteries Remote control x 1)
3. 2 batteries,1.5V ,"AAA" type
4. Operation manual
Using the remote control
Unless stated otherwise , the remote control can operate all features of the DVB Product. Always
point the remote control directly at the remote sensor on the front of the DVB Product, not the TV.
Before you begin
Refer to the manuals of your TV , stereo, or other equipment as necessary .Note the style of jacks
and connectors on the equipment .Determine how to choose different audio and video in channels
on your other equipment so you can and hear the DVB Product working on the TV, stereo ,etc.
You only need two audio connection and one video connection between the DVB Product and your
TV.So you might not use all the jacks on the DVB Product.
Disconnect all equipment from the power outlets. Connect the equipment to the power outlets only
after you have finished hooking up everything. Never make or change connections with equipment
connected to the power outlet.
- 4 -
Page 6
NPG DTR 1002S PRO V2.3
Decoder
Front Panel
Real Panel
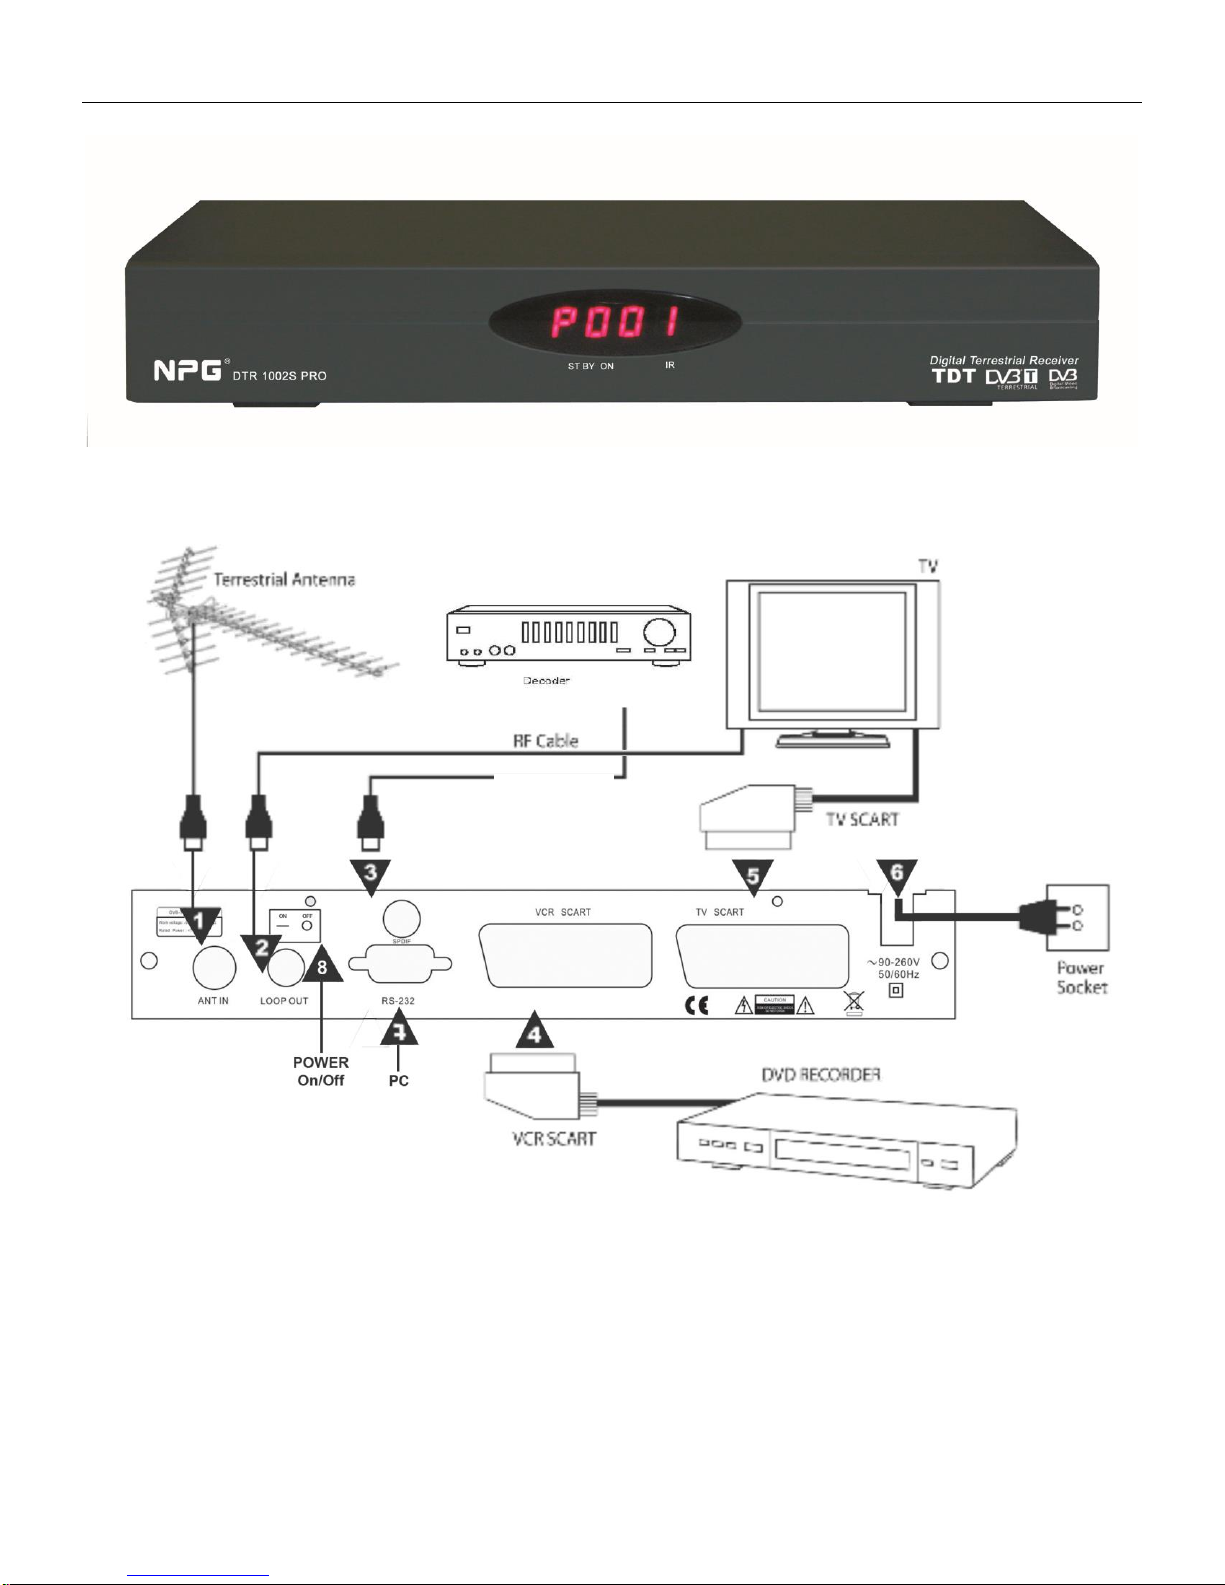
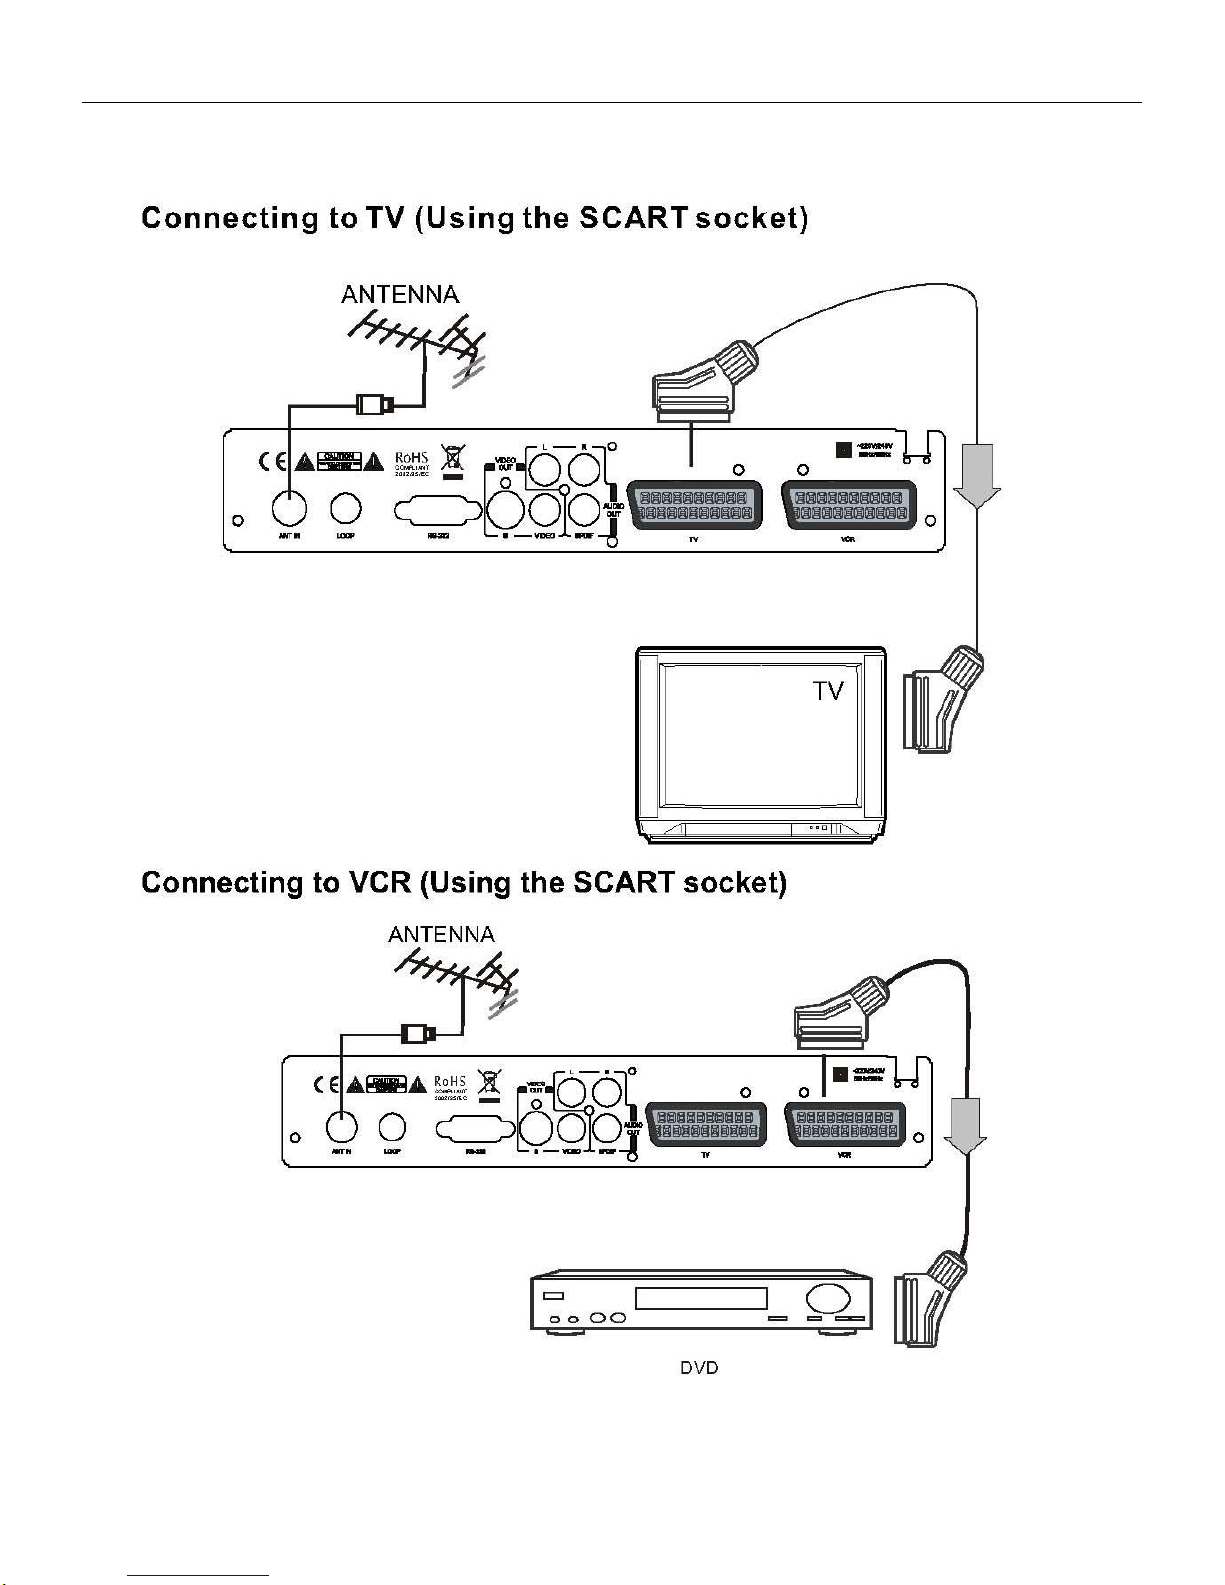
1. ANT IN Income marks them of antenna.
2. Exited LOOP OUT passing marks them of antenna towards the TV.
3. SPDIF Digital audio optical output.
4. Taken VCR SCART audio/video SCART for the videoregistrazione.
5. Exited TV SCART audio/video SCART for the connection to screen TV.
6. CABLE FEEDING Cable integrated for the connection to taken of net electrical worker 230 Volt
AC, 50Hz.
7. Taken RS232 given serial RS232 (classified to the technical attendance).
8. Power Buttton ON/OFF
- 5 -
Page 7
NPG DTR 1002S PRO V2.3
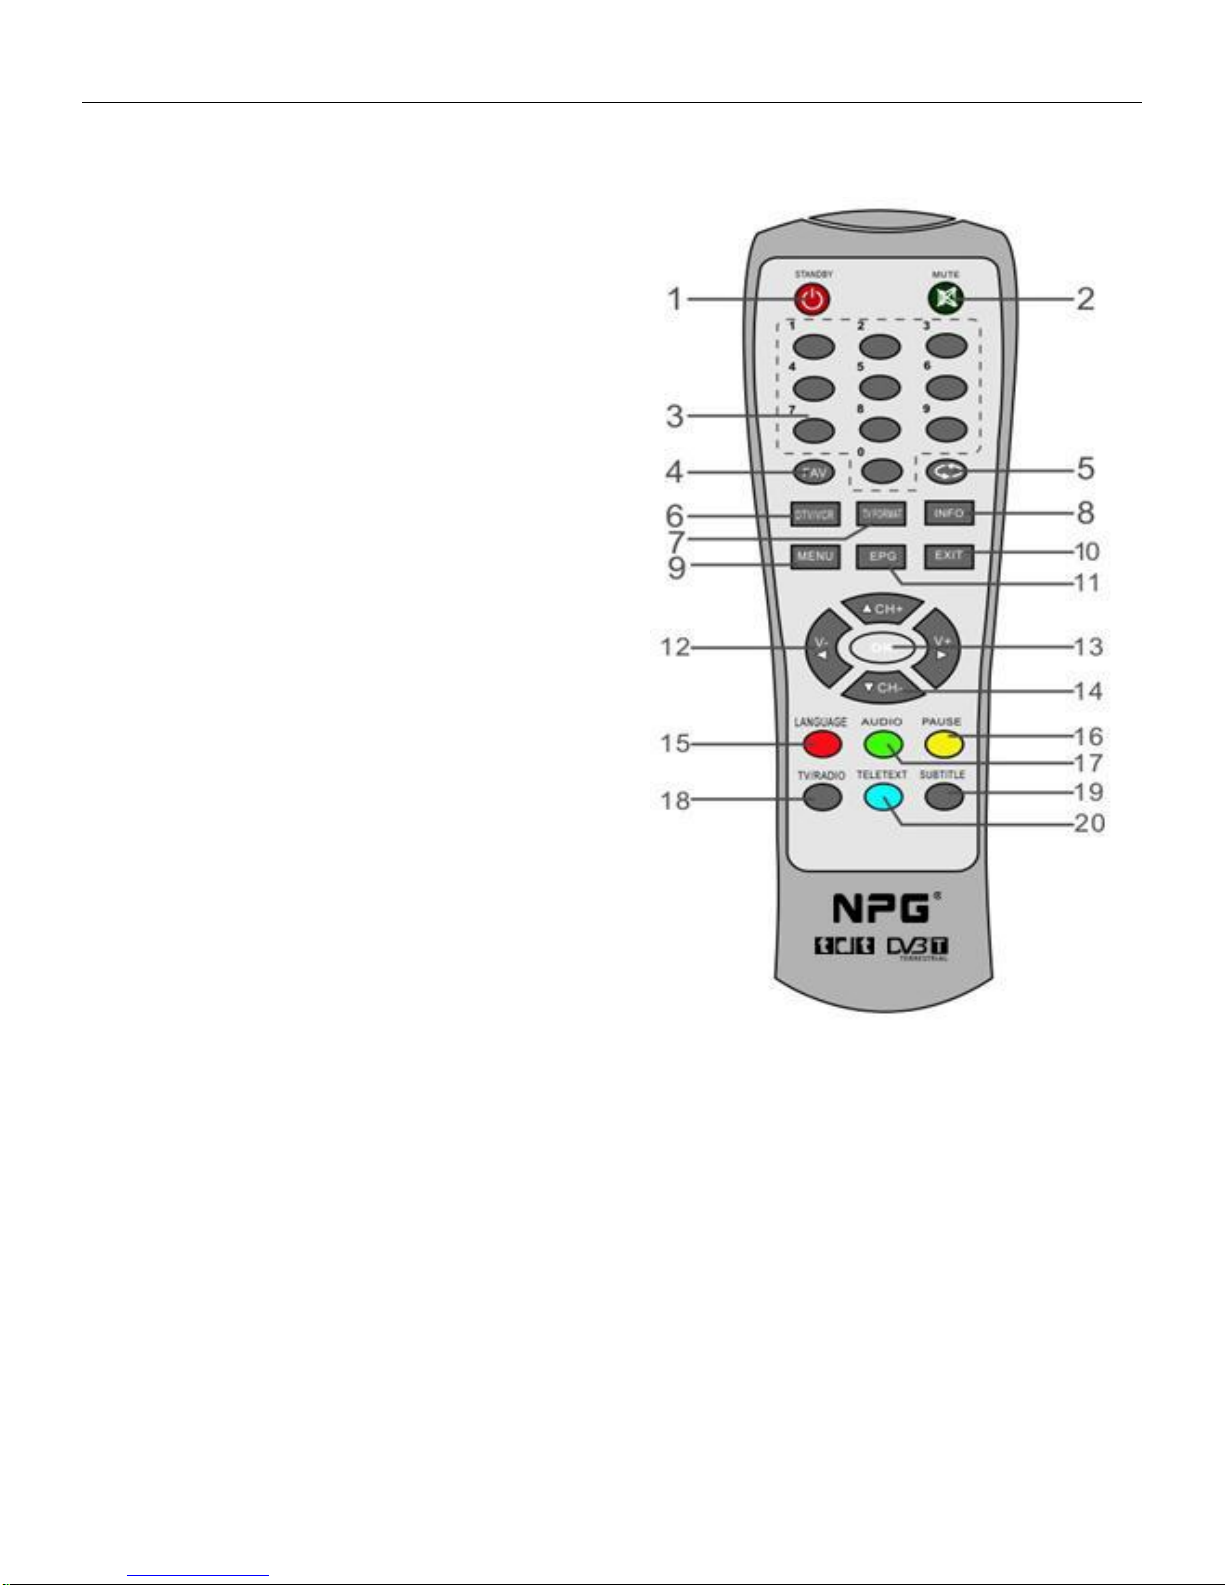
2.1 REMOTE CONTROL
1. POWER Switches the DVB -T between operation and standby mode.
2. MUTE Enables/disables the audio.
3. 0-9 (Numeric Keys)
Selects the TV or Radio service channels
and individual menu option
4. FAV To shows favorite channels list.
5. CIRCULATING
6. DTV/VCR.
7. TV FORMAT
8. INFO Displays the program information
box on the screen.
9. MENU Displays the Menu on screen or
returns to previous menu from submenu.
10. EXIT Returns to the previous menu and
the screen.
11. EPG Displays the EPG (Electronic
Programme Guide) on screen only when available.
12. VOL+/- Changes the volume level in viewing
mode and setting in menu mode.
13. OK Confirms the choices and selection
with highlight menu item.
14. CH+/- Changes channels in viewing mode
and moves cursor up or down in menu mode.
15. LANGUAGE
16. PAUSE To still picture in current channel.
17. AUDIO Set the output direction for speaker.
18. TV/RADIO Select the TV/Radio mode.
19. SUBTITLE
20.TELETEXT
- 6 -
Page 8
NPG DTR 1002S PRO V2.3
2.2 CONECTIONS
- 7 -
Page 9
NPG DTR 1002S PRO V2.3
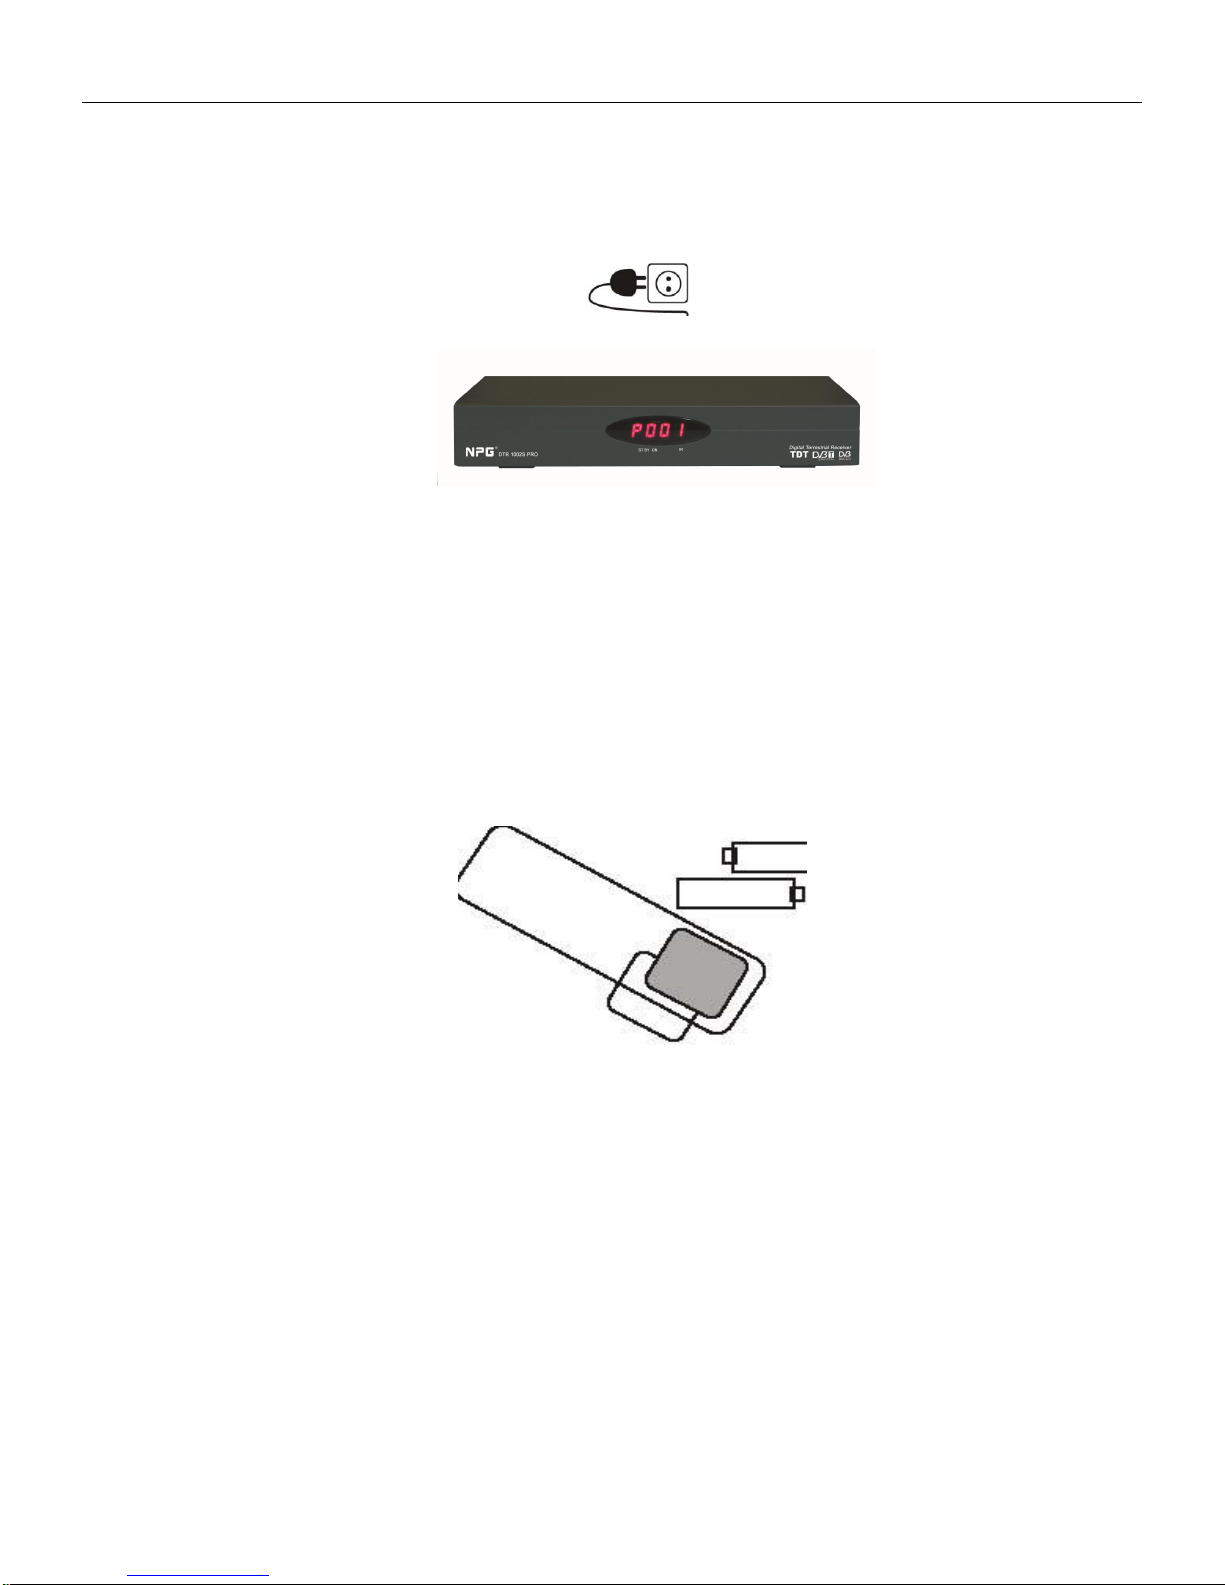
Connecting the power cable
Insert the plug of the power cable into the power socket.
Caution: The unit is completely disconnected from the mains supply if the power plug is pulled
out of the socket or with power button on OFF.
Inserting batteries into the remote control
To open battery compartment, press catch and remove cover. Observe correct polarity when
inserting the batteries (AAA, 2×1.5V)
Note:
If the unit no longer responds to the remote control, it is possible that the batteries are used up.
Make sure to remove consumed batteries.
Note on the environment:
Batteries must not be disposed of in domestic waste. Batteries must be handed in to a
used-battery collection point.
- 8 -
Page 10
NPG DTR 1002S PRO V2.3
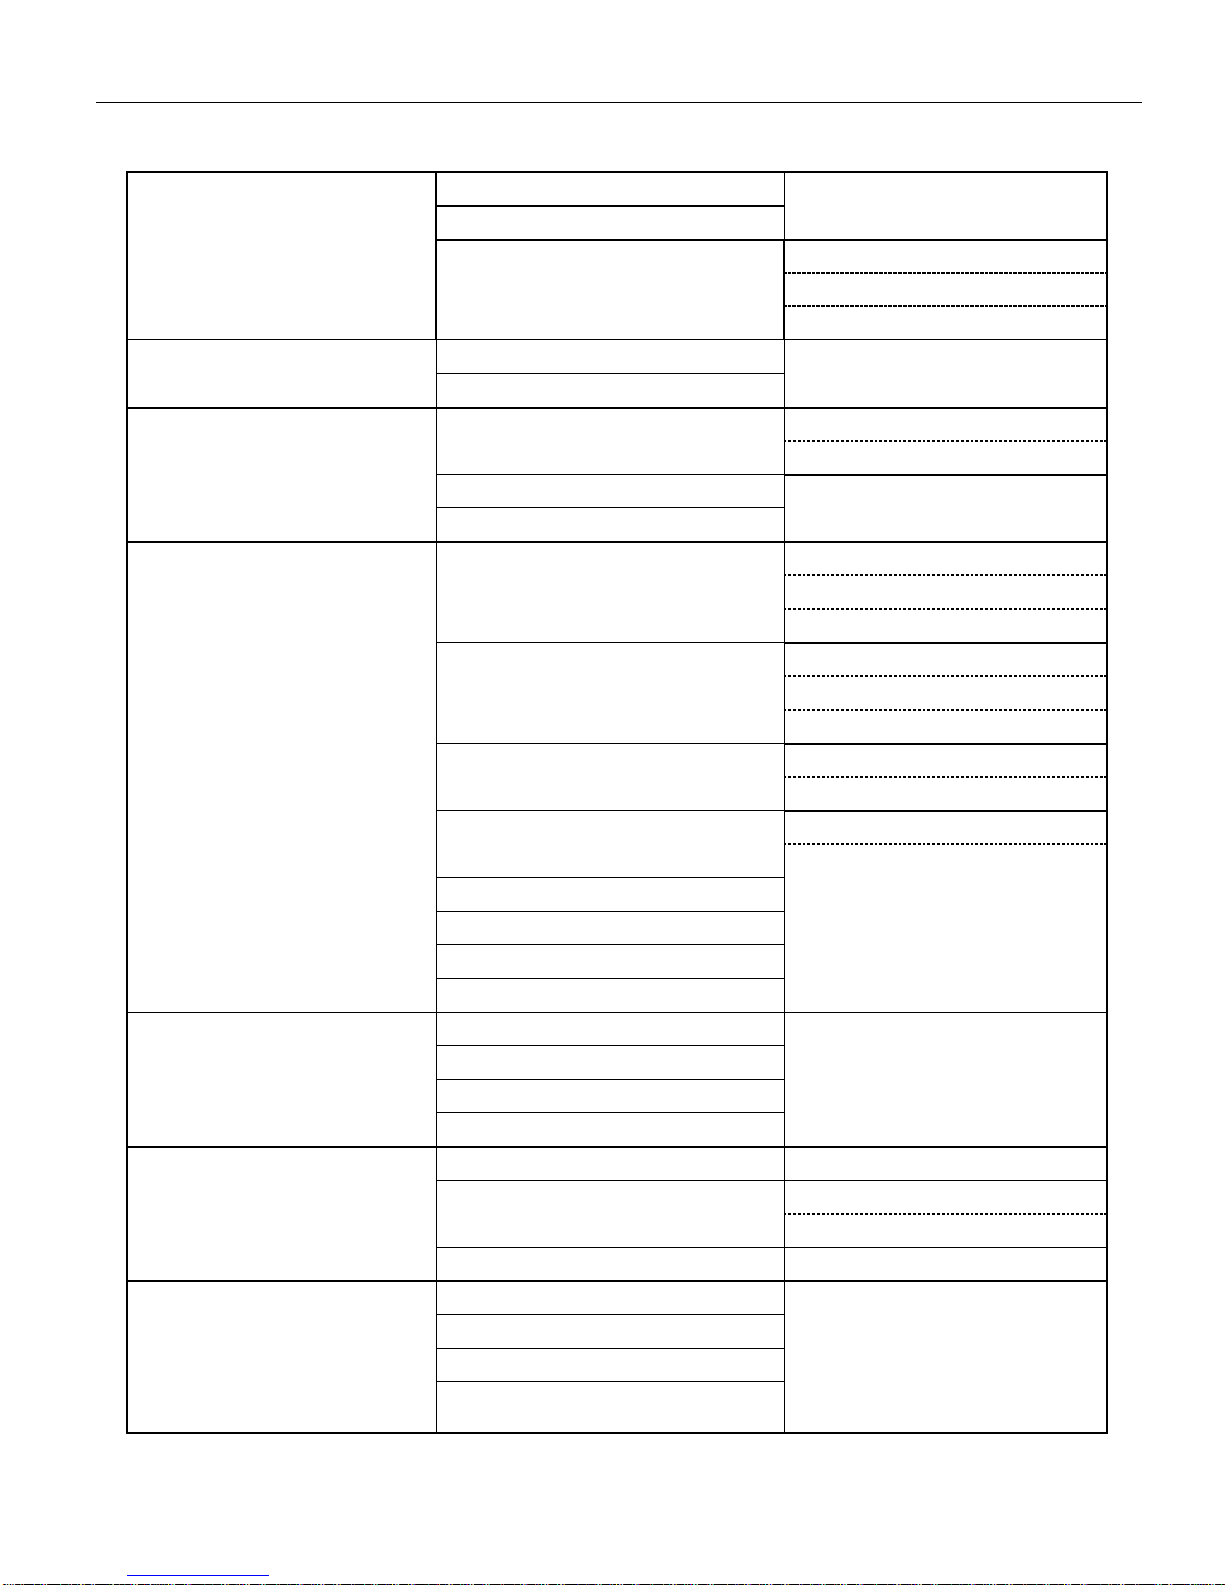
Program List
TV Program List
Music Program List
Sort
By Name
By Service ID
Channel No.
Program Search
Automatic Search
Manual Search
Parental Control
Channel Lock
YES
NO
Parental Setting
Change PIN
System Setting
TV Standard
PAL
NTSC
AUTO
Display Type
4:3 PS
4:3 LB
16:9
Video Output
CVBS+S-Video
CVBS+RGB
Antenna Power
OFF
ON
Regional Setting
Language
Time Setting
System Schedule
Game
Mine
Tetris
Gomoku
Calendar
Accessory
System Information
Factory Default
NO
YES
System update
Personal Style
Menu Color
Transparency Level
Border Pattern
Entry Animation
3. BASIC FUNCTIONS
- 9 -
Page 11
NPG DTR 1002S PRO V2.3
3.1 Enter into system and power on-off
It will continue to play the latest program before previous power off if the database having any TV or RADIO
program.
1. Power on
When it is in “standby” mode, press “power” to power on.
2. Power off
When it is running, press “power” will enter into “standby” mode.
3.2 TV/RADIO programs switch
Press “TV/RADIO” to switch the programs when it is in full screen.
3.3 Station switch
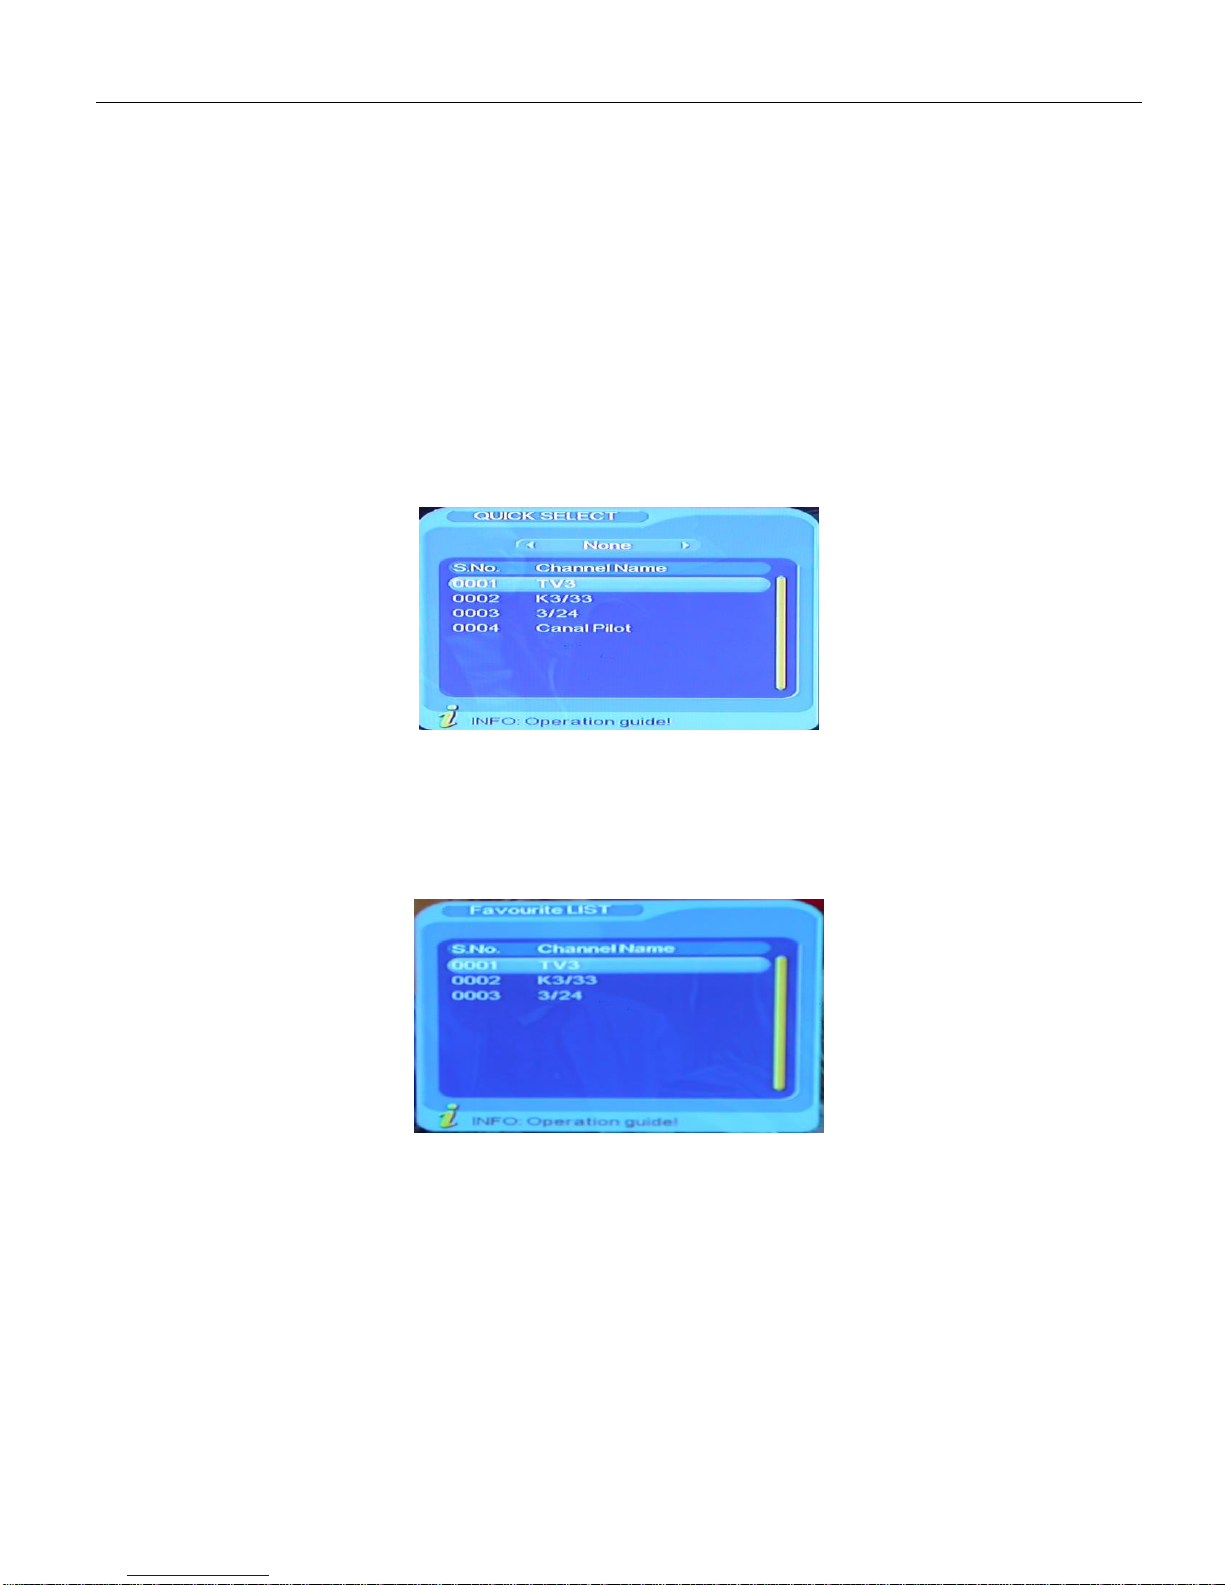
1. Press “OK” to switch to the quick selet program list, press “VOL+/VOL-” to select different program class; press
“CH+/CH-” to select program.
Press “OK” to confirm program selection, press “EXIT” return to hide menu
1. If there are some favorite programs that been set up, just press “FAV” key to enter into the favorite program
list:
Press “CH+/CH-” to select favorite program, Press “OK” to confirm the selection,press “EXIT” to return to hide
menu.
- 10 -
Page 12
NPG DTR 1002S PRO V2.3
3.4 Display information of programs
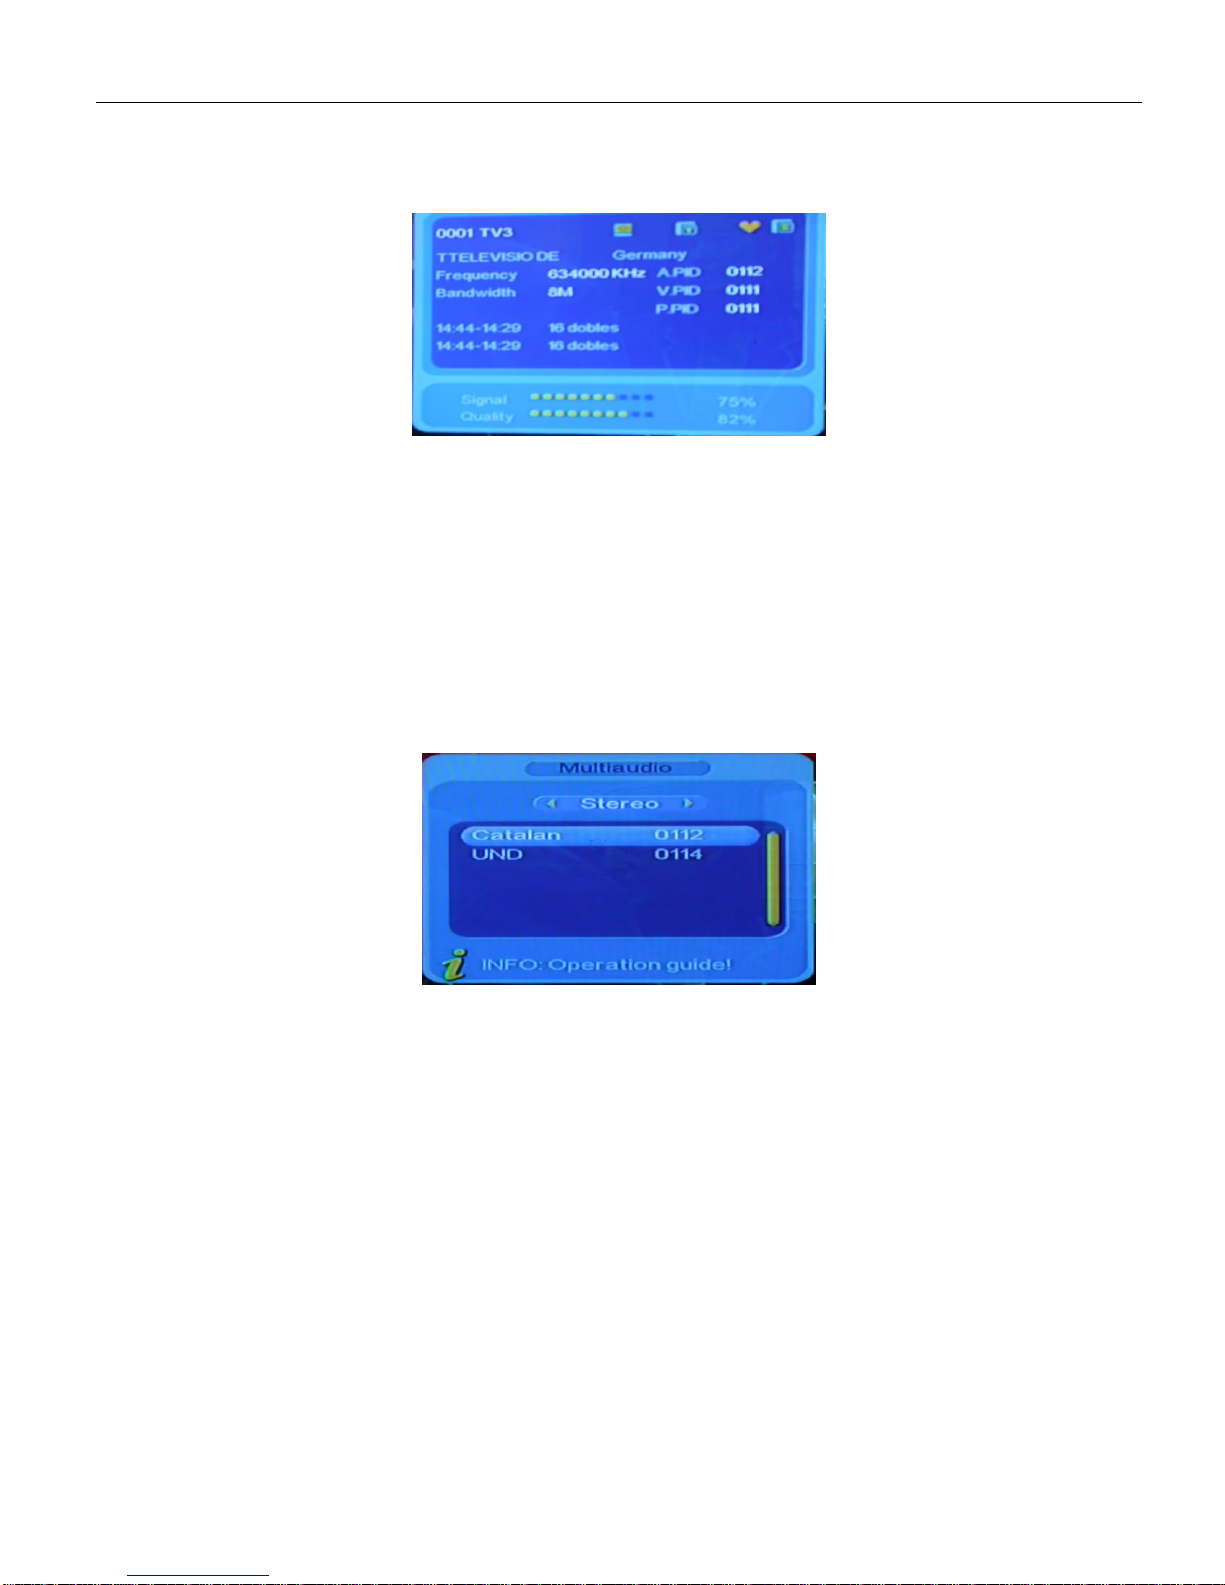
Press key “INFO” twice to show the information of current programs when it is in normal palying state.
3.5 Program return
Press “RECALL” under state of full-screen to return to the previous program palyed.
3.6 Audio and Language switch
1.Press “Language/Audio” key to switch the language of sound of current programs and switch among “stereo”“left”- “right”(stereo-left channel-right channel).
2.Press “VOL+/VOL-” to switch among “stereo”- “left”- “right”(stereo- left channel- right channel), press “CH+/CH-” to
switch the language of sound.
3.Press “OK” key to confirm the selection and return to full-screen play mode
- 11 -
Page 13
NPG DTR 1002S PRO V2.3
3.7 Electronic programs guide (EPG)
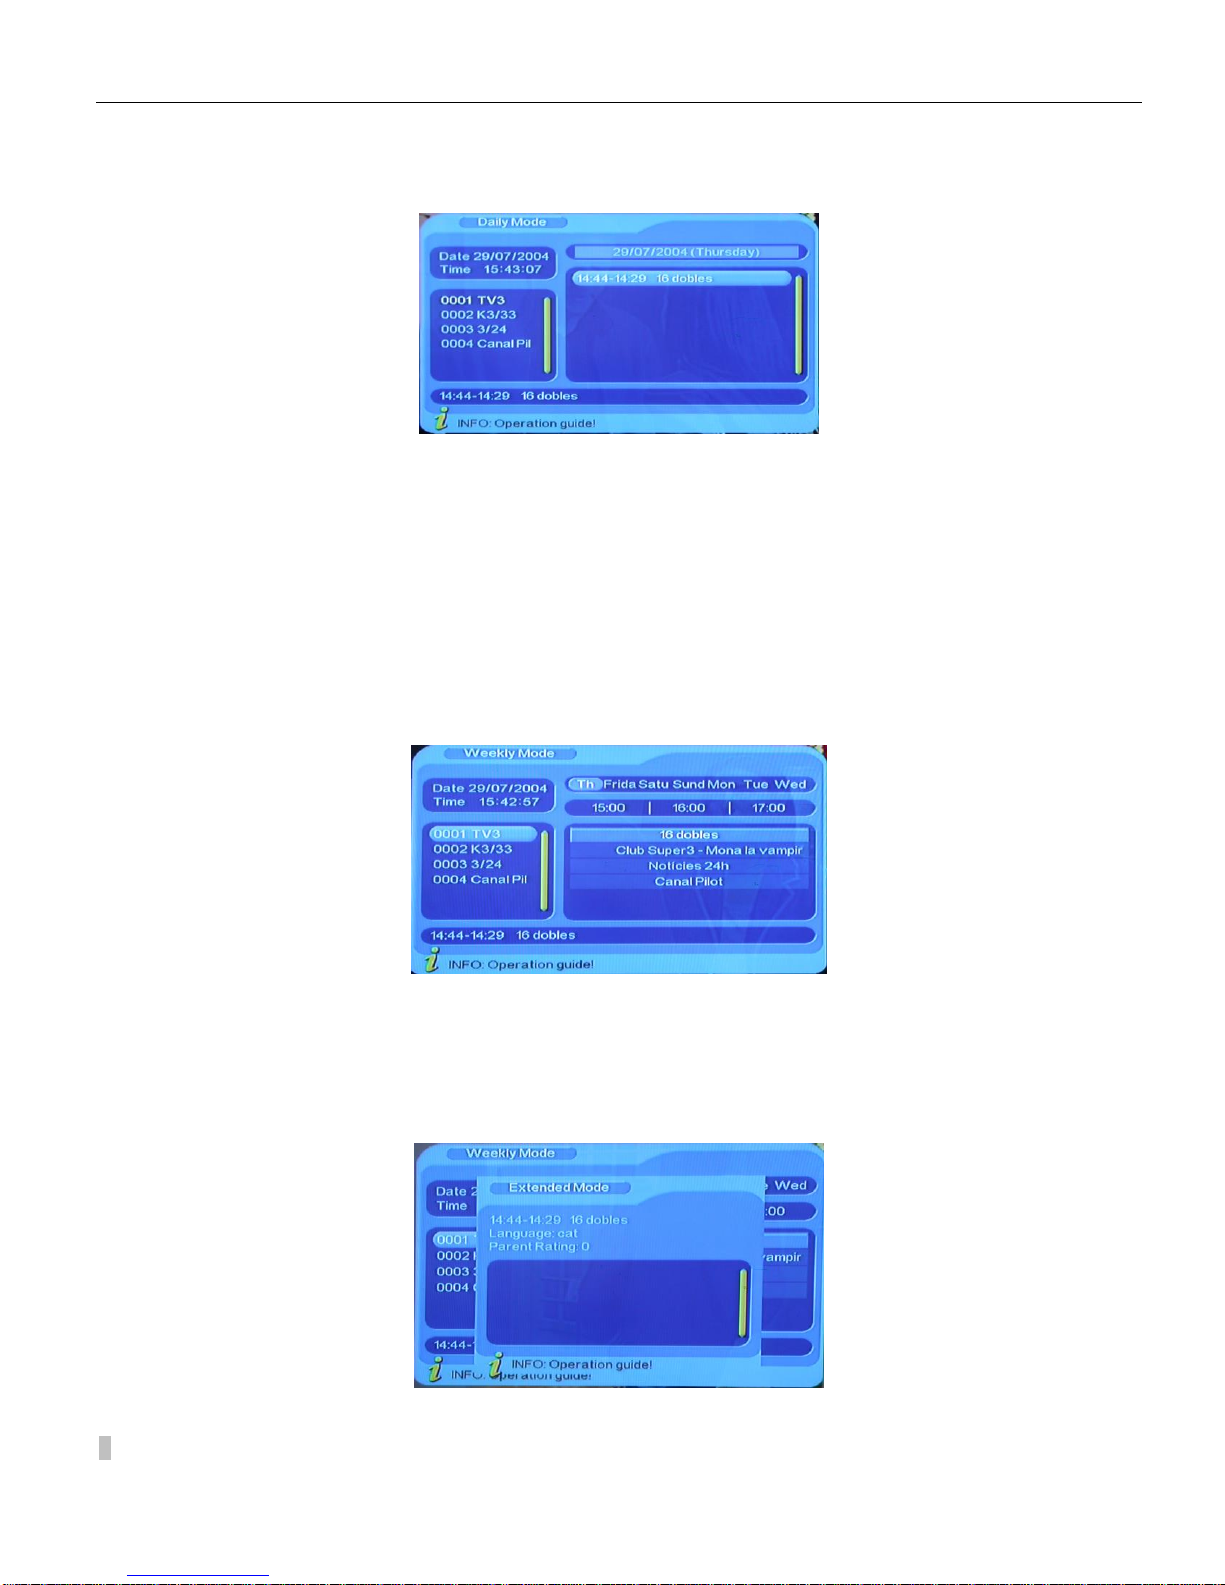
1. You can press key “EPG” on the remote control to enter into the EPG page to know more about the programs to
be played. As shown in the figure below:
(3).Tab 3 shows particular date list;
(4).Tab 4 shows program list, press “CH+/CH-” to switch between programs;
(5).Tab 5 shows the time range and program information, press “F.R & F.F” circularly to choose to browse the
time range and program information on basis of days of every week;
(6). Tab 6 shows the detailed program information in Tab 5;
(7). Tab 7 shows hint information for keys, corresponding to the three colors on the remote controller: Green
button, Yellow button , Blue button;
(8).Press “VOL+/VOL-” to switch between Tab 4 and Tab 5;
2. Press “Green” key to enter into Weekly Mode to display the programs and program information in different
time ranges of the currenty program list within one week
3.
(1).Press “F.R & F.F” key to switch between Thursday ---wednesday in Tab 3;
(2).Press “CH+/CH-“ key to move upward and downward to switch between the different programs in Tab 5;
(3).Press “VOL+/VOL-“ key to choose to view the program information in different time ranges in Tab 6.
3. When the cursor stops on Tab 5, press the yellow key to choose the detailed information corresponding to the
current program
4. When the cursor stops in Tab 5, press the” blue “key to enter Wakeup Timer menu to book programs
5. Press “EXIT” to exit from EPG.
- 12 -
Page 14
NPG DTR 1002S PRO V2.3
3.8 Teletext
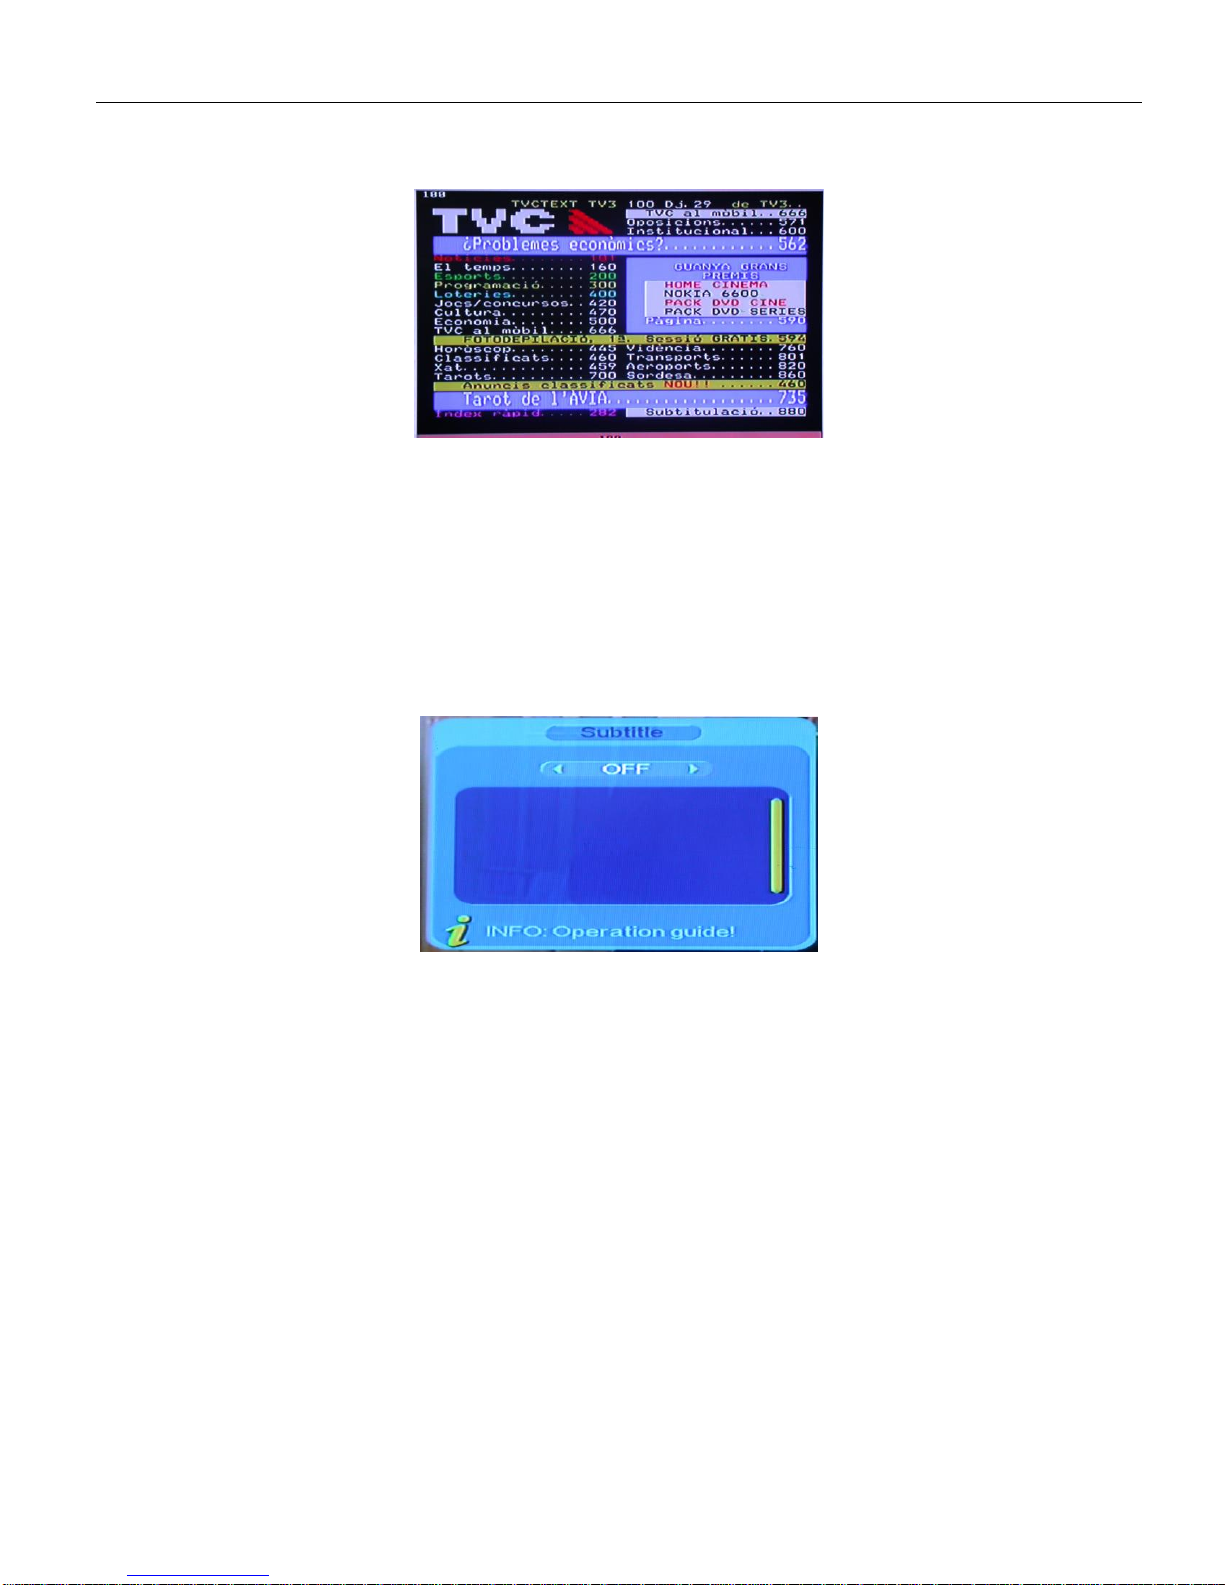
1. If you want to watch teletext, please press “Teletext” on the remote control to enter into teletext page.
2. Input three digits to go to corresponding page you want;
4. Press “CH+” to go to the previous page, while press “CH-” to go to the next page;
5. Press “VOL-” go to back 100pages, while press “VOL+” go to previous 100 pages.
6. Press “EXIT” to exit from teletext.
3.9 Subtitle
1. Subtitle is defaulted to be off; to see the caption information, press the “SUBTITLE” key on the remote control to
enter the Subtitle menu of the current programs
2. Press “VOL+/VOL-“ key to choose whether to open Subtitle
- 13 -
Page 15
NPG DTR 1002S PRO V2.3
4. Digital TV
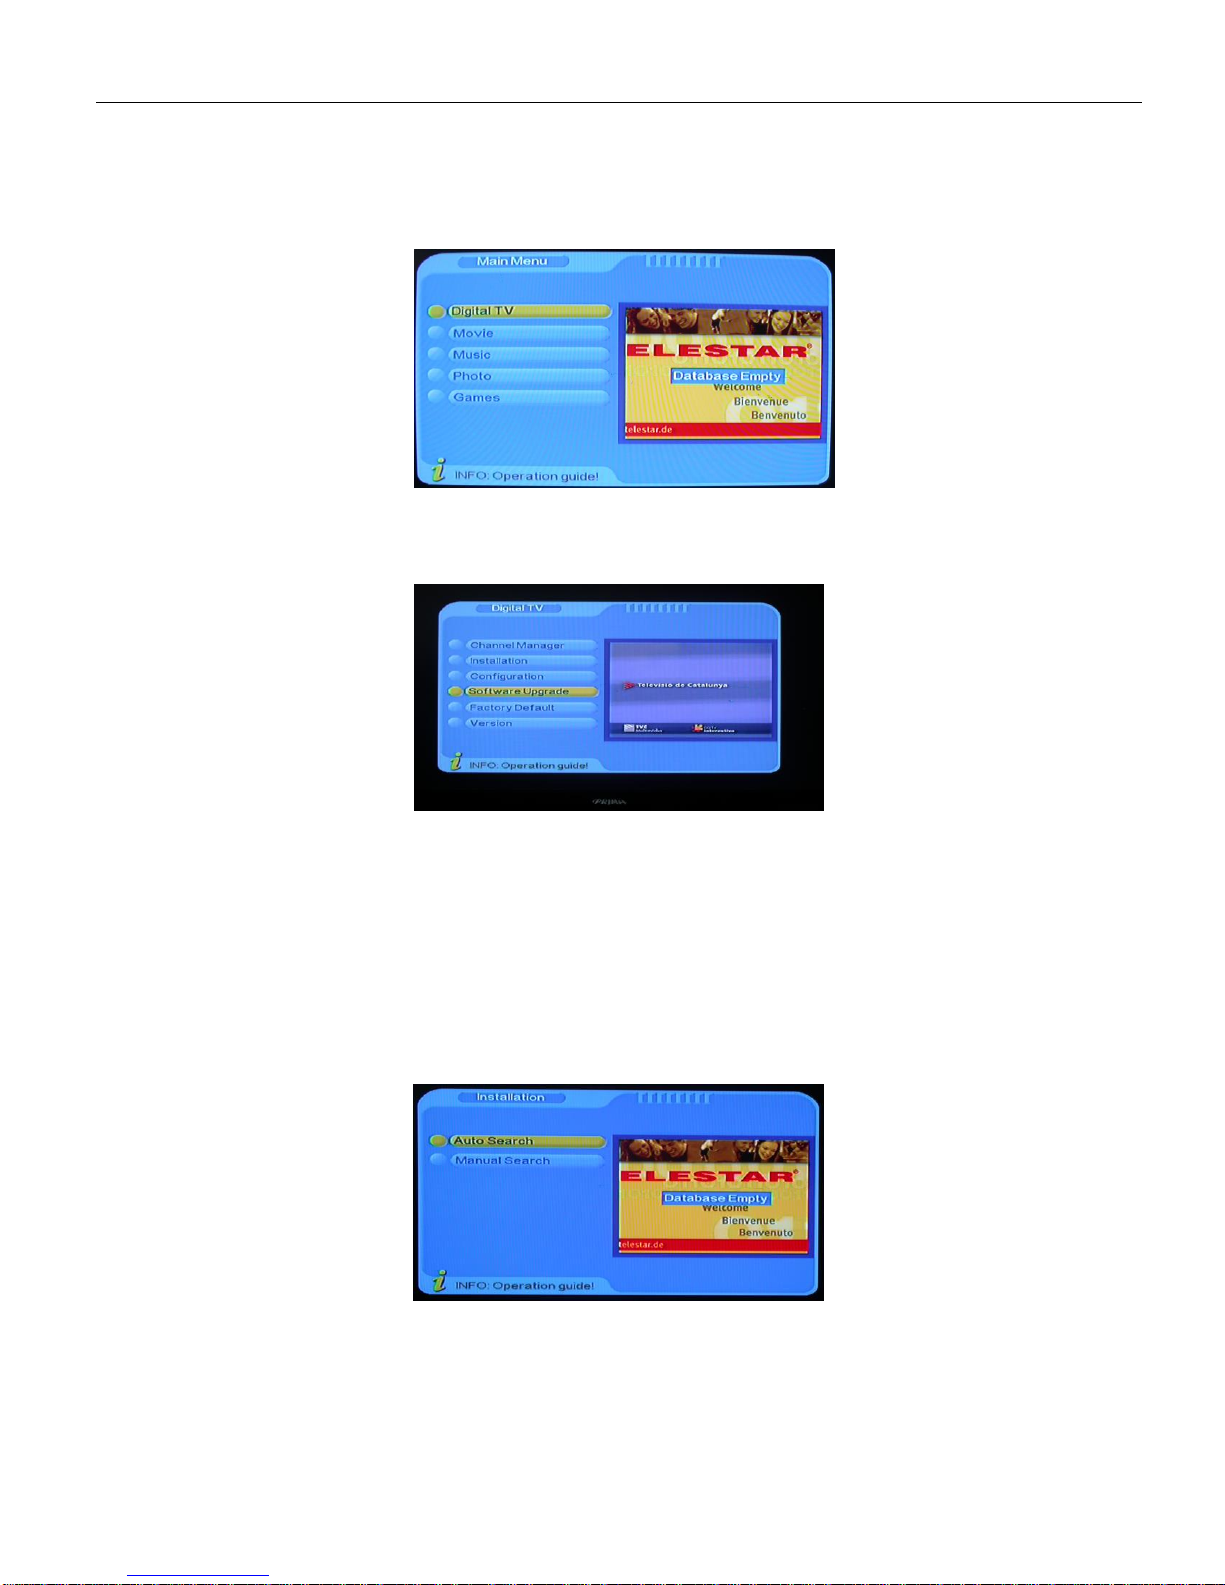
In the main menu of the system, under Digital TV, there are such as options as Channel manager , installation
, configuration , software upgrade , factory default , version
press MENU key firstly to enter the main menu
In Main Menu, press “CH+/CH-“ key to choose Digital TV option and then Press
“OK “key once to enter Digital TV menu
4.1 Installation
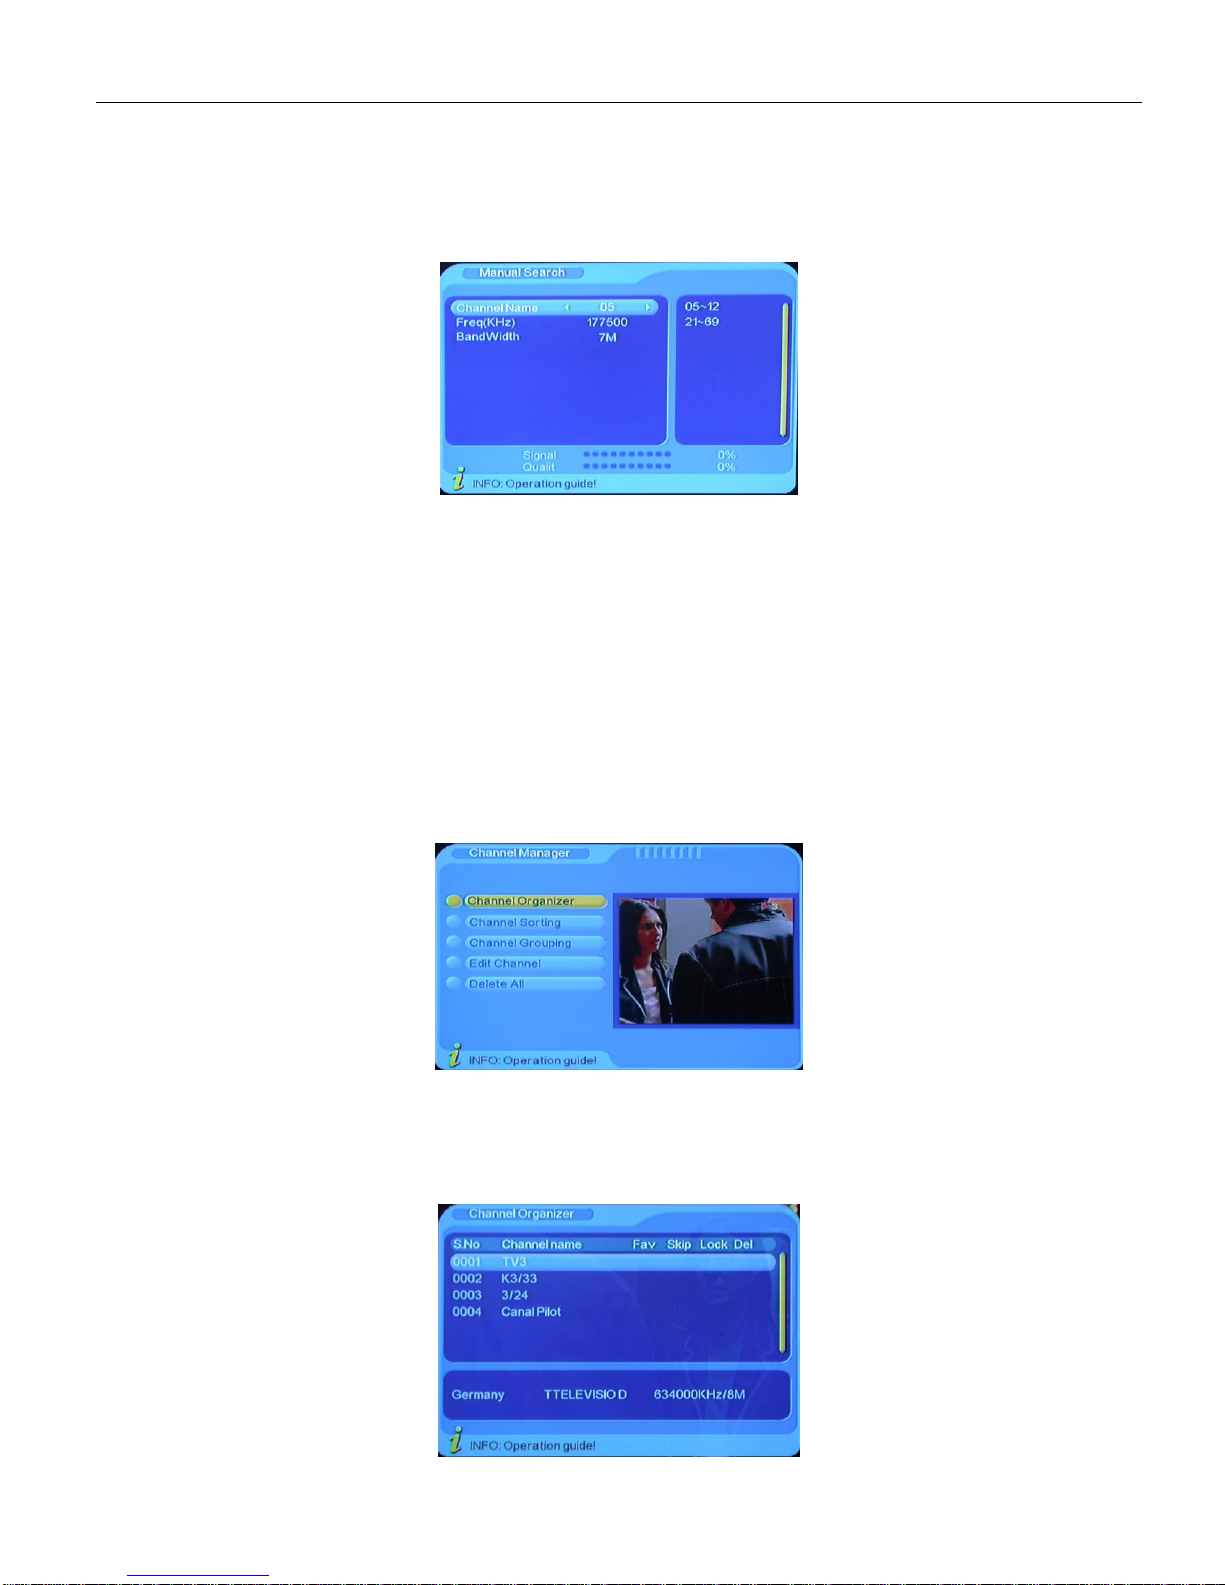
There are two kinds of Installation mode as follow:
1. Manual Search
2. Auto Search
You can enter into parameter “installation page” via input password digitals(default password is “0000”), As
shown in the figure below:
3. Area Search
- 14 -
Page 16
NPG DTR 1002S PRO V2.3
4.1.1 Manual Search
If you understand much about digital TV and know the frequency of the program or if you want to scan the
program at any frequency required, you can select manual scaning, whitch can save your much time.
1. You can move the cursor to “Manual search” via press “CH+/CH-” key under “installation menu”, then press
“OK” to enter into Manual searching page, As shown in the figure below:
4.1.2 Auto Search
You can search the programs of any channel.
1. You can move the cursor to “Auto search” via press “CH+/CH-” key under “installation menu”, then press “OK”
to enter into Auto searching page, As shown in the figure below:
4.1.3 Areal Search
4.2 Channel Manager
System offer an efficient function of channel management such as channel organizer , channel
sorting ,channel grouping , delete all
4.2.1 Channel Organizer
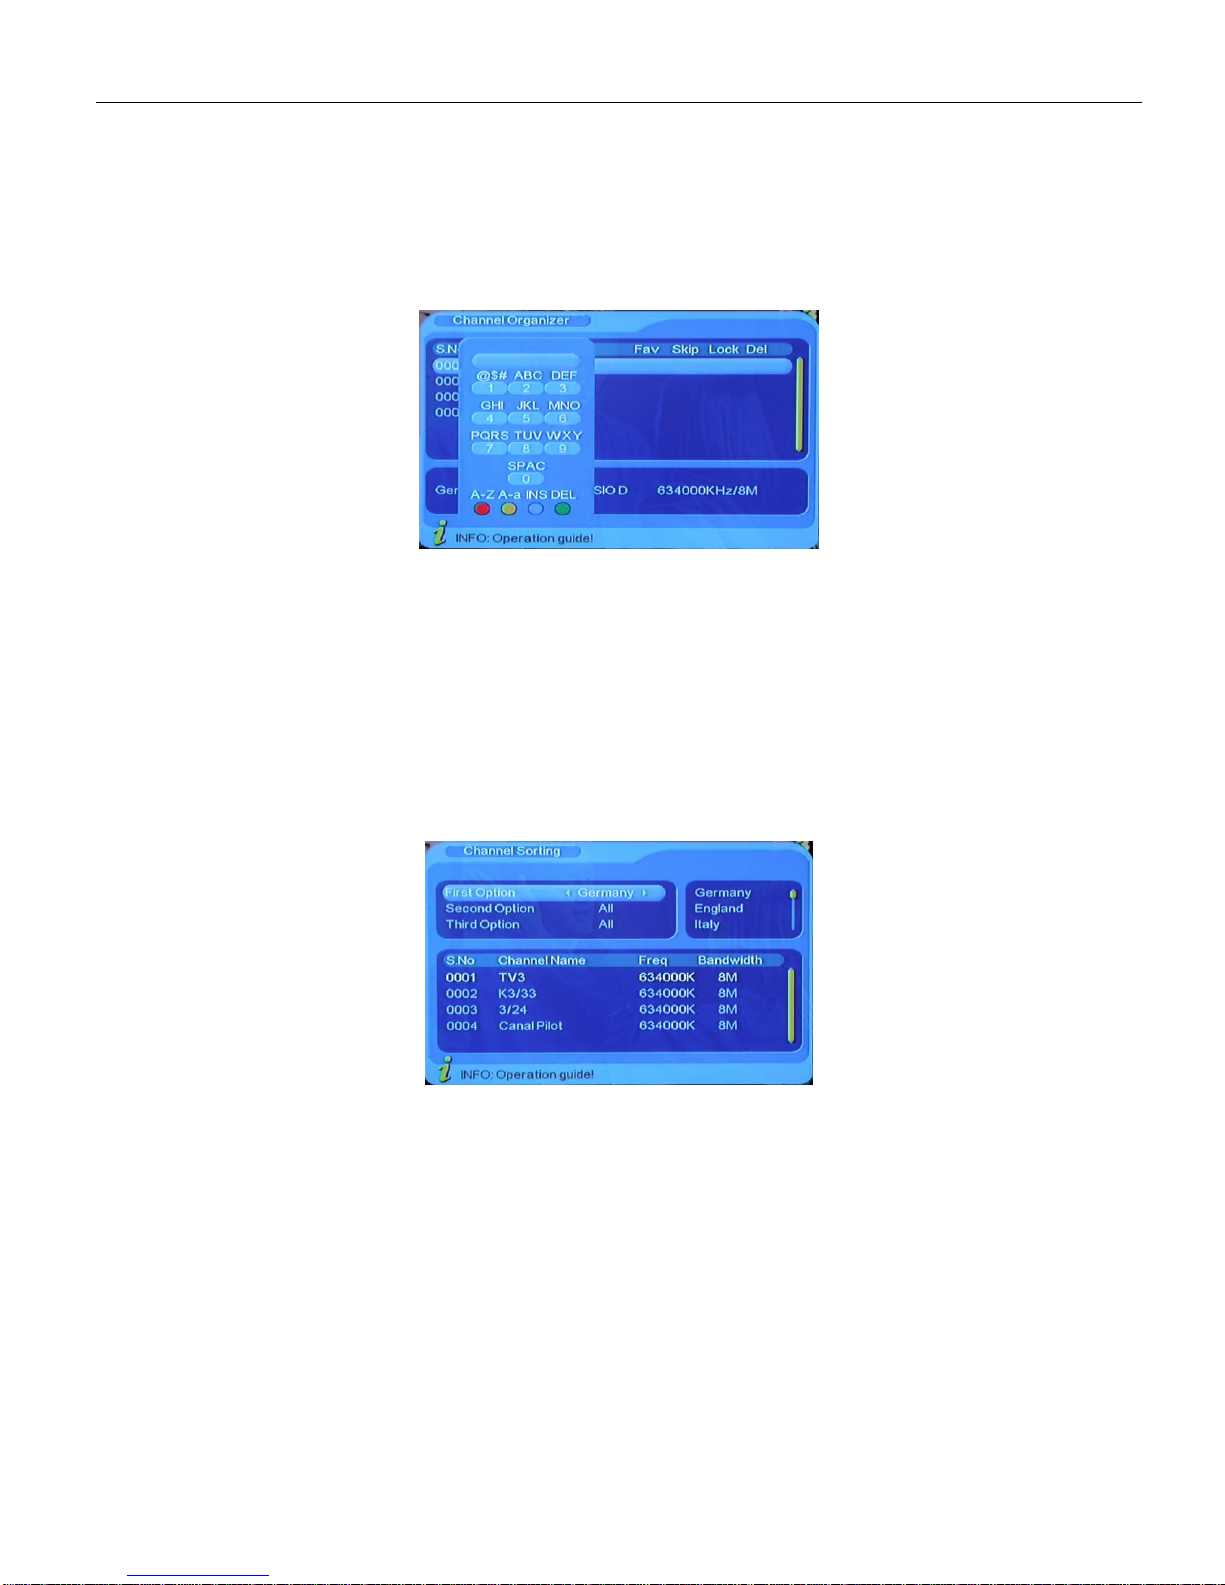
1. You can enter the page as shown in the figure below via “MENU->Digital TV-> Channel Manager -> Channel
Organizer”
2. it will pop up and dialogue box prompting that “Channel not available” when there are no channels in database to
- 15 -
Page 17
NPG DTR 1002S PRO V2.3
enter into, and it will not enter into channel organizer page.
3. Channel Organizer menu includes: Favorite Channel, Delete Channel, Mov Channel, Lock Channel. Press
“UP/DOWN” key to choose the line where Favorite Channel is, then press the 4-color key on the remote controller:
press the red key to set and cancel Favorite Channel, the green key to set or cancel “Delete Channel”, the yellow
3D key to set or cancel “Mov Channel”, the blue key to set or cancel “Lock Channel”;
4. To rename channel , press “CH+/CH-“ key to choose the line where the channel to be renamed is, press
“VOL+/VOL-“ key to enter the page to rename the channel, as shown below:
5. Press “EXIT” key to exit Channel Organizer page.
4.2.2 Channel Sorting
The channels shall be listed according to certain sequence so that the user can easily find them.
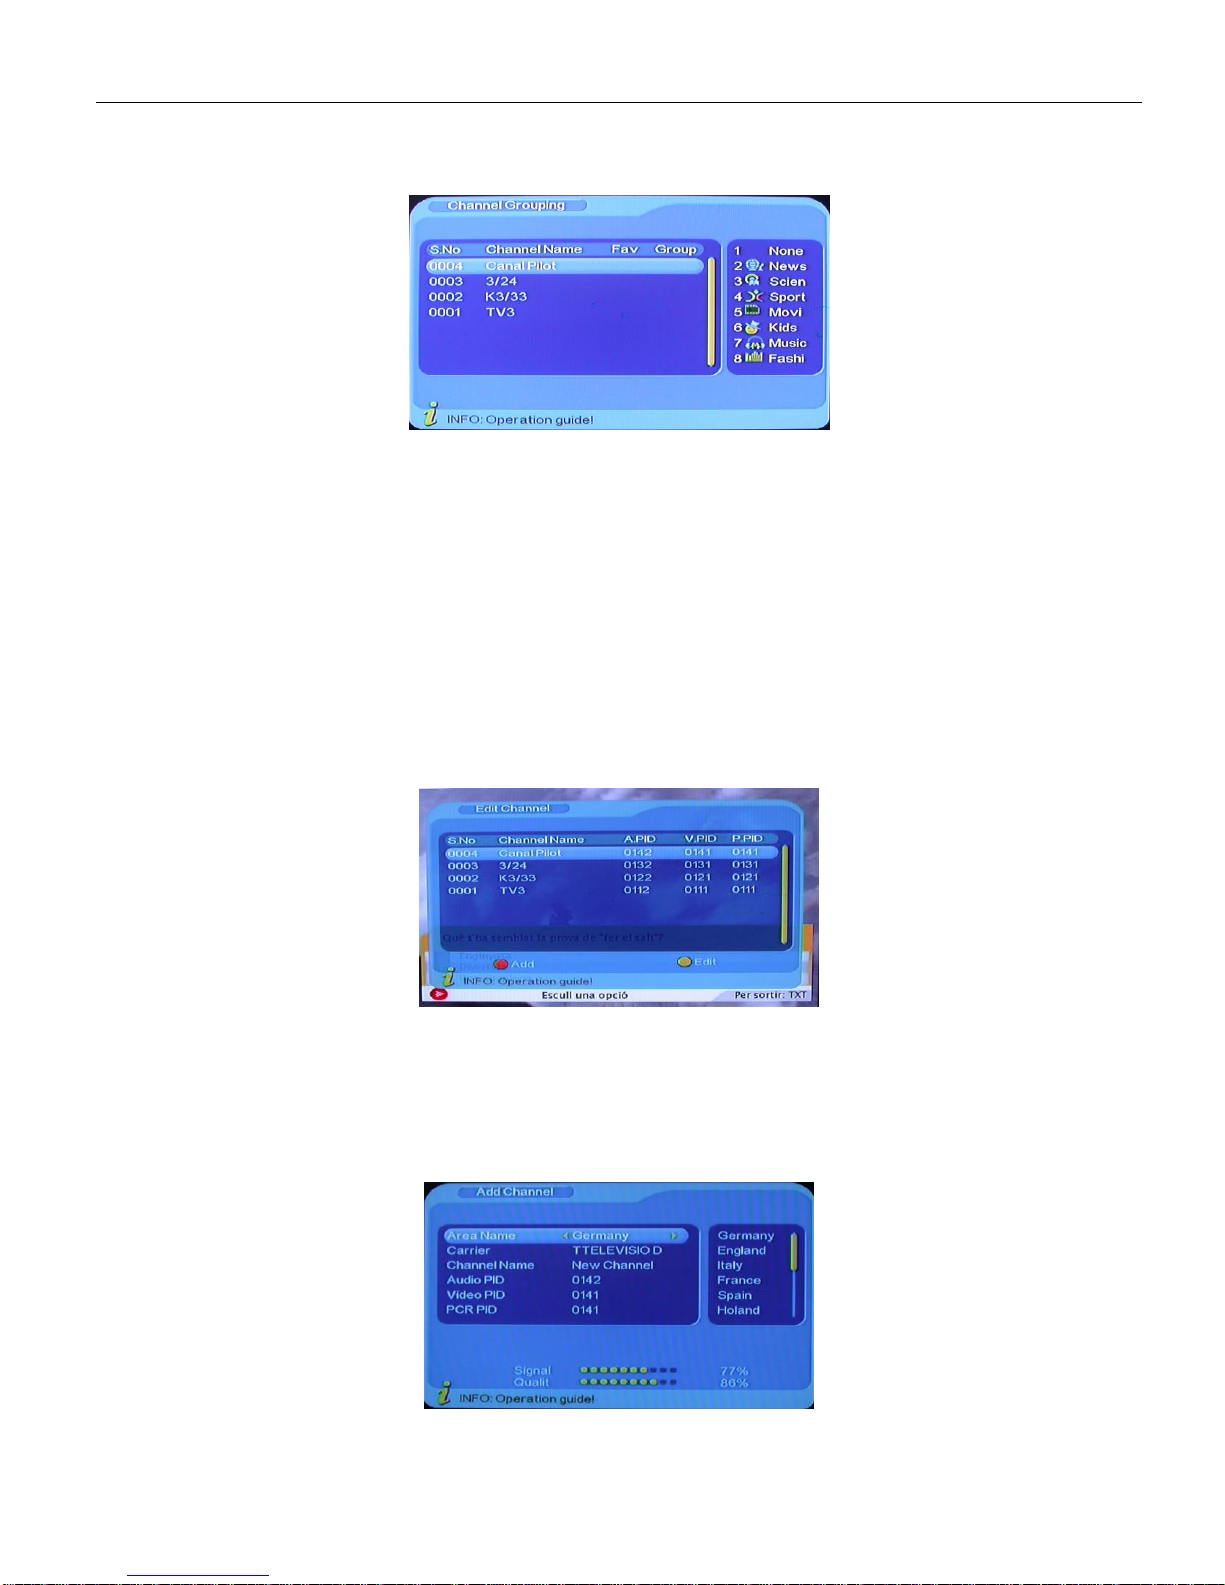
1. you can enter the page As shown in the figure below via “MENU->Digita TV-> Channel Manager -> Channel
Sorting”:
2. It will pop up and dialogue box prompt that “Channel not available” when there are no programs in database to enter
into, and it will not enter into channel sorting page.
3. Before sorting, the type of sorting shall be set, including the following items:
(1).First Option: choose the programs to be sorted via the selection area;
(2).Second Option: Press FTA(free of charge), Scramble(encrypted), ALL Freehand Encryted Channels;
(3).Third Option: According to alphabetic order A-Z, or Z-A,LCN+,LCN-,ALL
4.Press “CH+/CH-“ key choose Type , Press “VOL+/VOL-“ key to set Sorting Parameters;
5. After sorting is setted, to realize channel sorting, press “OK” key,
6.Press “EXIT” key to exit Channel Sorting page.
4.2.3 Channel Grouping
Group channels according to Movies, Sport, Music, Kids, Fashion etc.
- 16 -
Page 18
NPG DTR 1002S PRO V2.3
1. You can enter the page As shown in the figure below via “MENU->Digita TV-> Channel Manager -> Channel
Grouping”:
2. It will pop up and dialogue box prompting that “Channel not available” when there are no programs in database
to enter into, and it will not enter into channel grouping page.
3. Press “CH+/CH-“ key to choose the line where the channel to be grouped is in, then press the number keys 1-8
on the remote controller to set different channel grouping.
4. After channel is edited, when “EXIT” key is pressed to exit the menu
4.2.4 Edit Channel
Have such operations as Add, Delete and Rename to channels.
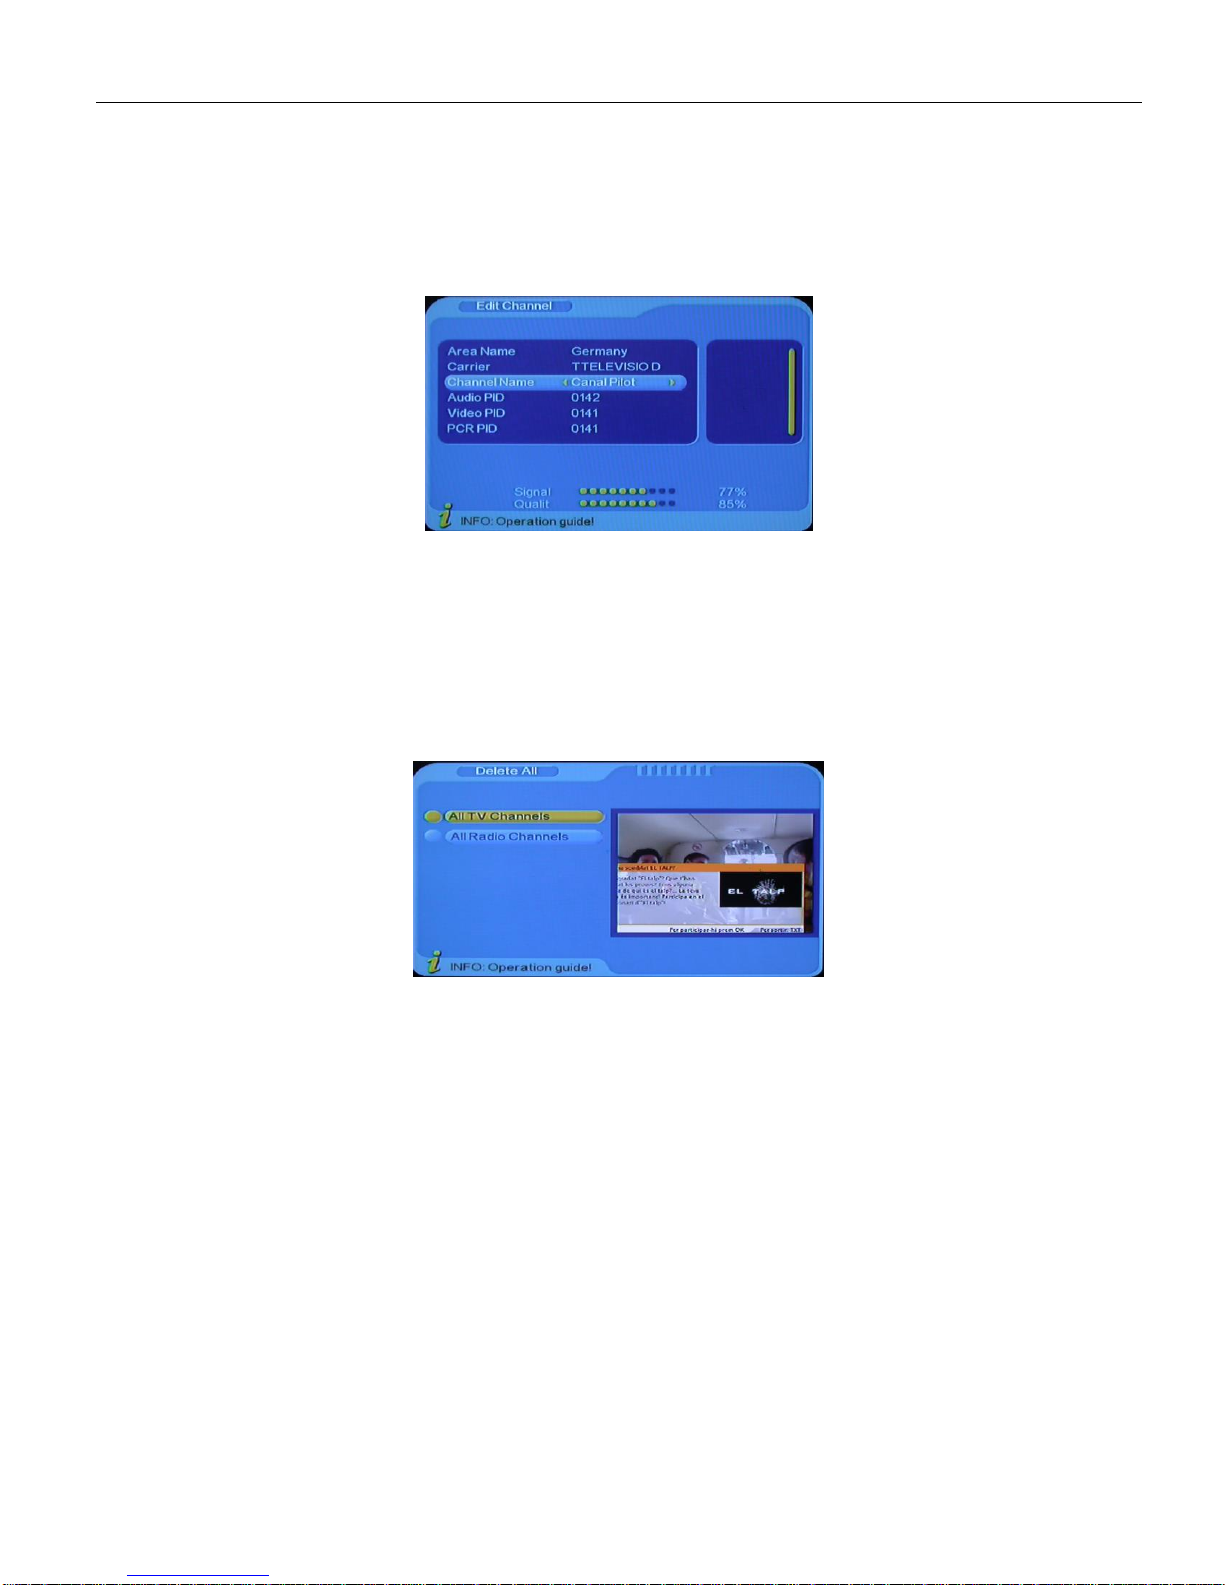
1. You can enter the page as shown in the figure below via “MENU->Digita TV-> Channel Manager -> Edit Channel”:
2. It will pop up and dialogue box prompting that “No Carriers” when there are no programs in database to enter
into, and it will not enter into ADD-Edit Channel page.
3.Press the red key of the remote controller to enter Add Channel menu, as shown in Below
Under Add Channel menu, there are 6 parameters for adding one channel as follows:
(1).Area Name: For Area Name, press the “VOL+” key of the remote controller to enter the Area Name list on
- 17 -
Page 19
NPG DTR 1002S PRO V2.3
the right, then press “CH+/CH-“ key to choose area name, press OK key to confirm;
(2).Carrier: Press “VOL+/VOL-“ key to choose;
(3).Channel Name: Press “VOL+/VOL-“ key to enter Rename Channel page as shown
(4).Audio PID, Video PID, PCR PID, Press 0-9 number key to revise values;
(5).Press “OK” key to confirm the adding, the system will hint with “successfully Updated” and return to Edit
Channel menu;
4.Press the yellow key of the remote controller to enter Rename Channel menu , as shown in below
The operation for this menu is as that of for Add Channel page.
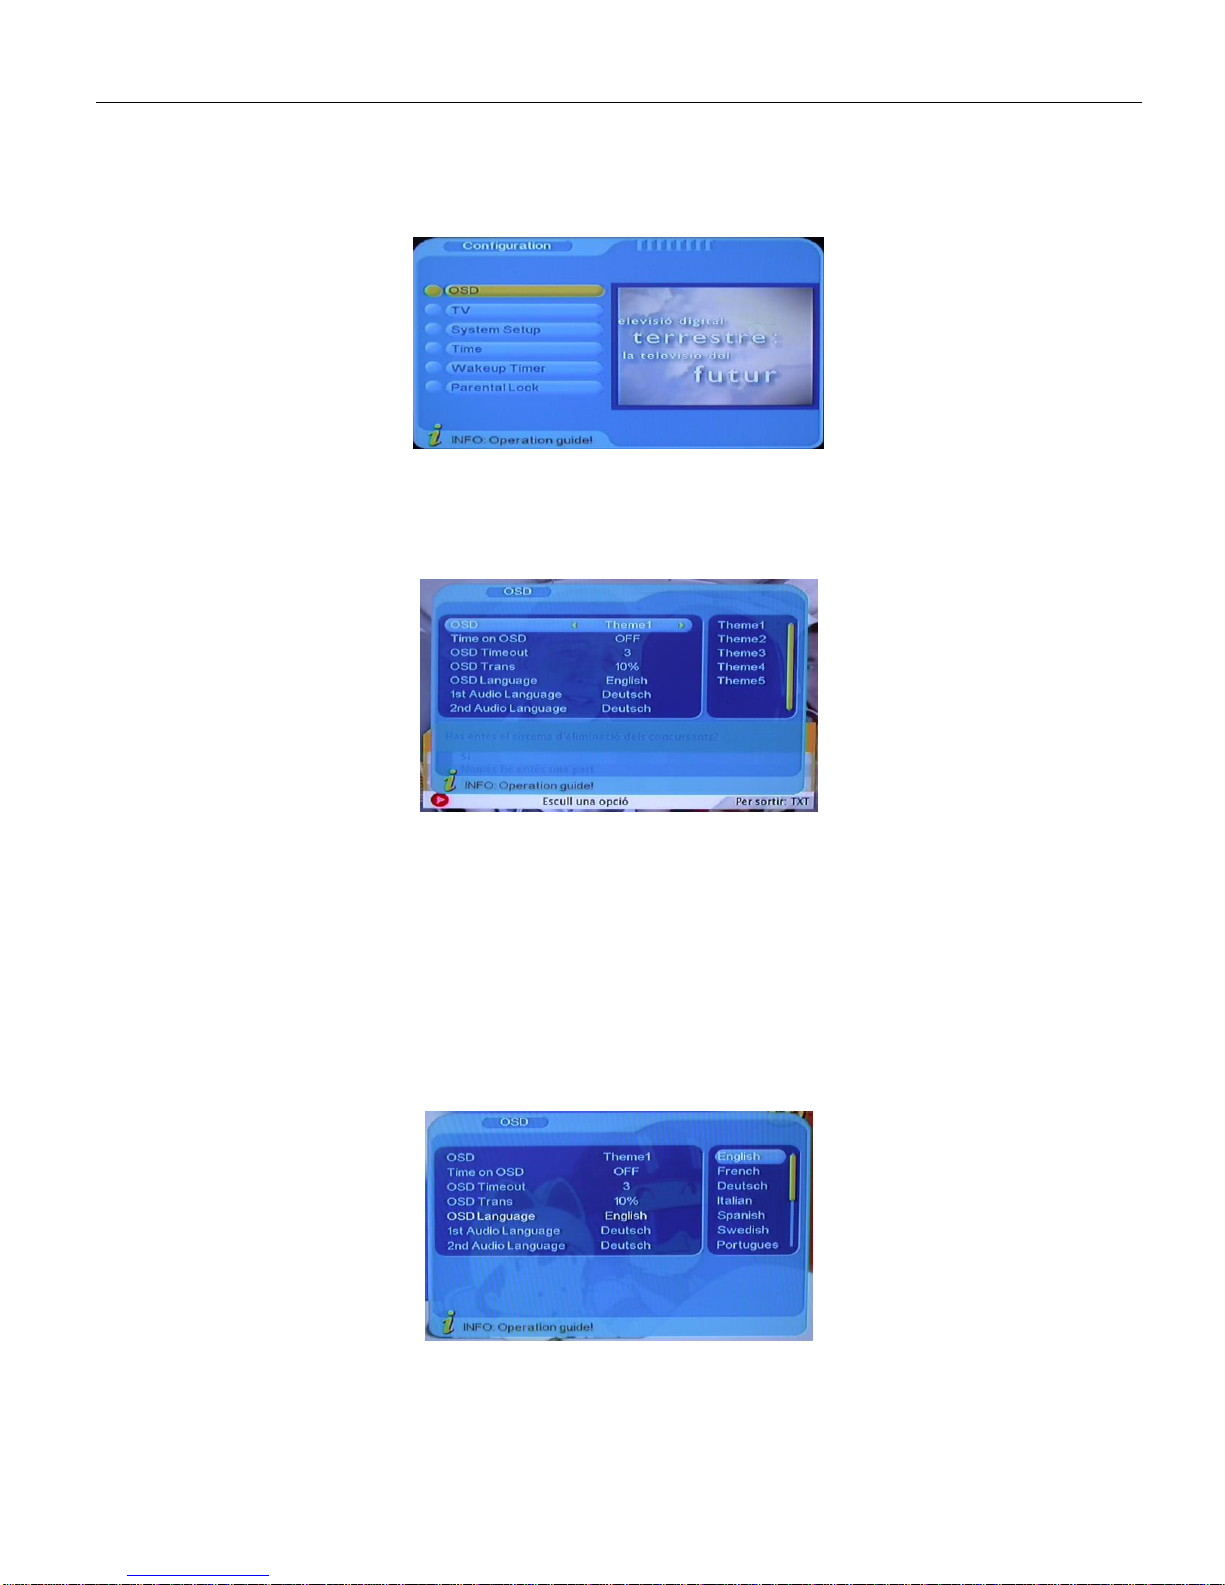
4.2.5 Delete All
1. Under Channel Manager menu, press “CH+/CH-“ key to choose Delete All option, press ”OK” key again, then
the system will hint with the dialogue box of inputting password which is defaulted as “0000” .
2. To delete all TV channels, press “CH+/CH-“ key to move the cursor to ALL TV Channels option, press “OK” key,
then the system will hint with ”Delete all TV Channels?”
3.To delete all RADIO channel, press “CH+/CH-“ key move the cursor to ALL Radio Channels option, press “OK” key, then
the system will hint with ”Delete all Radio Channels? ”dialogue box , press “VOL+/VOL-“ key to choose “Yes” or “No”,
press “OK” key to confirm;
- 18 -
Page 20
NPG DTR 1002S PRO V2.3
4.3 Configuration
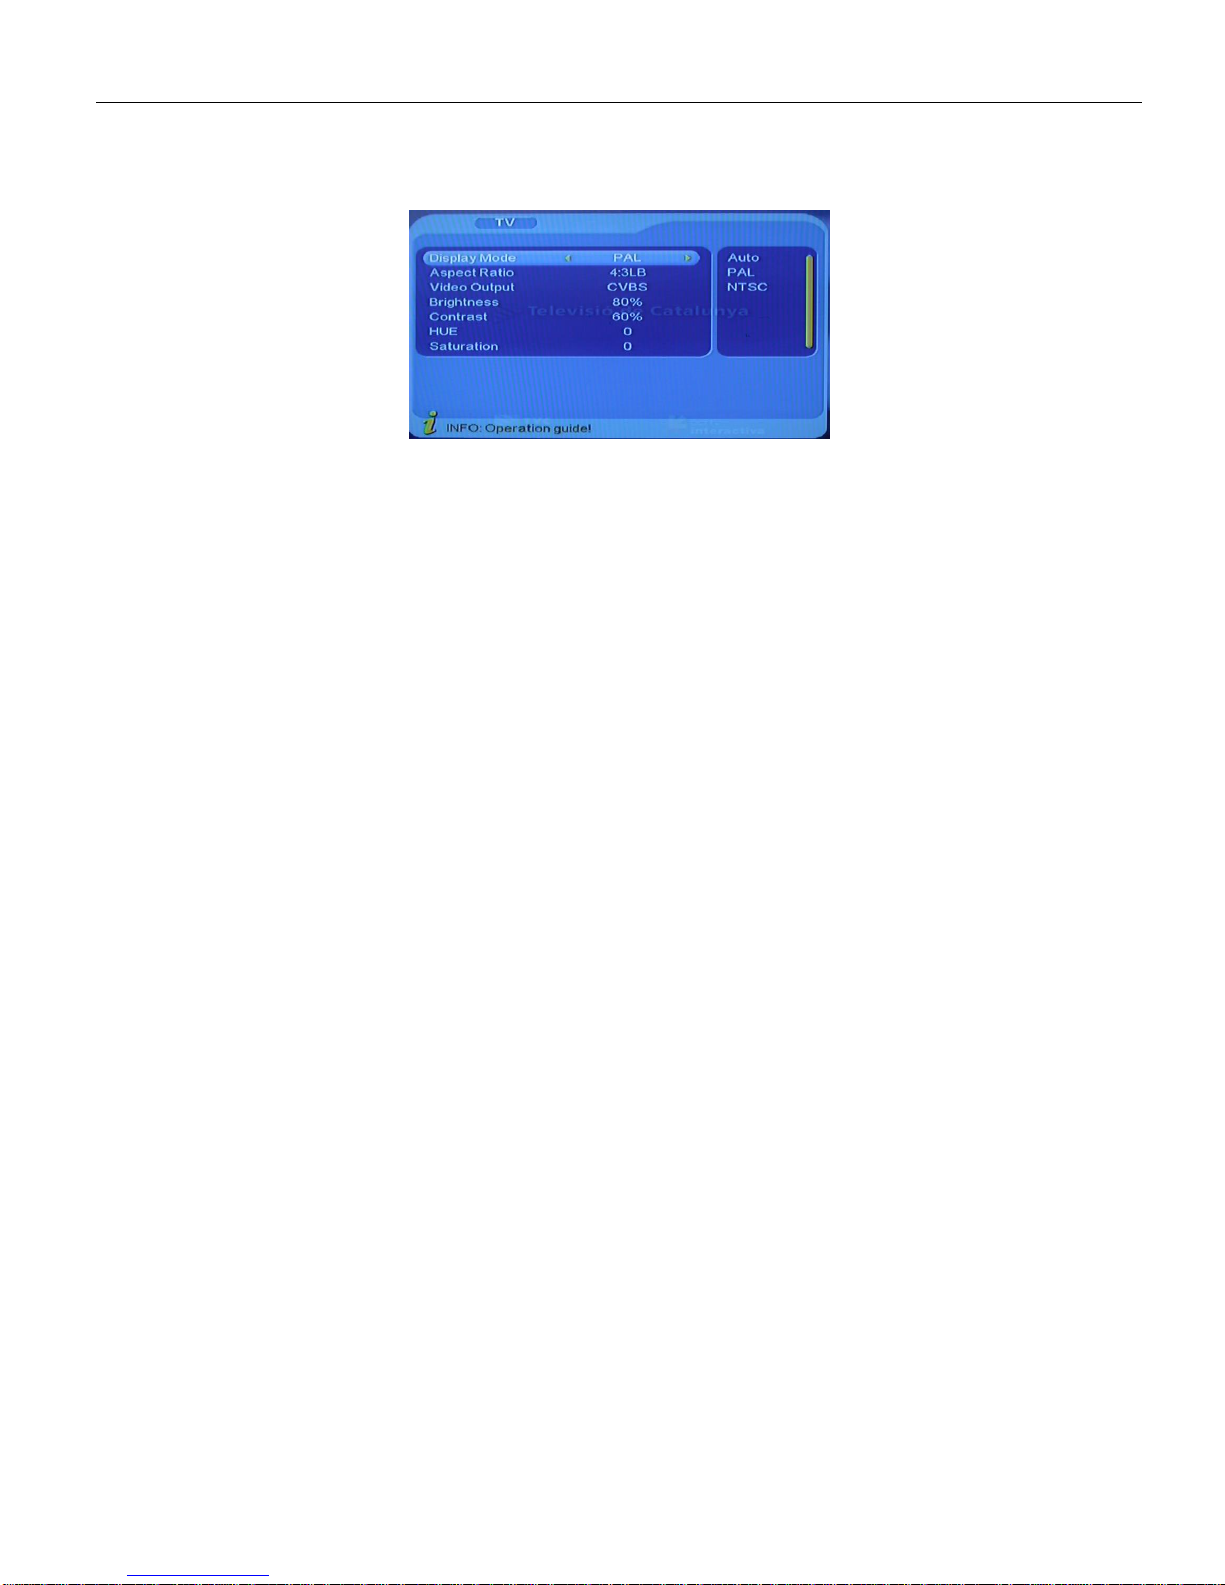
Configuration provides individualized system setup function, you can configure the system according to your
own hobby and demand. You can enter Configuration menu via the menu(MENU->Digita TV->Configuration), as
shown in below
4.3.1 OSD
Via OSD option setup, you can set the user interface display mode according to your own demand. Via the menu (
MENU->Digita TV->Configuration -> OSD), you can enter OSD menu, as shown in below
All options are listed on the left of the OSD menu, when the cursor moves on the option in OSD menu, the values
corresponding to this option on the right of the menu, press “CH+/CH-“ key to move upward and downward to choose
the options in OSD menu.
There are following options in OSD menu:
(1).OSD Option sets system color;
(2).Time on OSD Option sets whether to display system time in full-screen play channel (3)OSD Timeout Option, move
the cursor to OSD Timeout Option, press “VOL+/VOL-“ key to choose among 1-6s, the default is 3s;
(4). OSD Trans option set menu color, press “VOL+/VOL-“ key to adjust between 0%-60%.
(5) OSD Language option: The system has the user interface supporting a couple of languages, you can set language
via OSD Language option:
(1)Move the cursor onto OSD Language option , Press VOL+ key to enter OSD Language List as shown in below
(6) .1st Audio Language option: Press “VOL+” key to enter the currently supported Audio Language list, in the Audio
Languagelist, press “CH+/CH-“ key to choose language, press “OK” key to confirm;
Press “OK” key to confirm the editing action in OSDmenu
- 19 -
Page 21
NPG DTR 1002S PRO V2.3
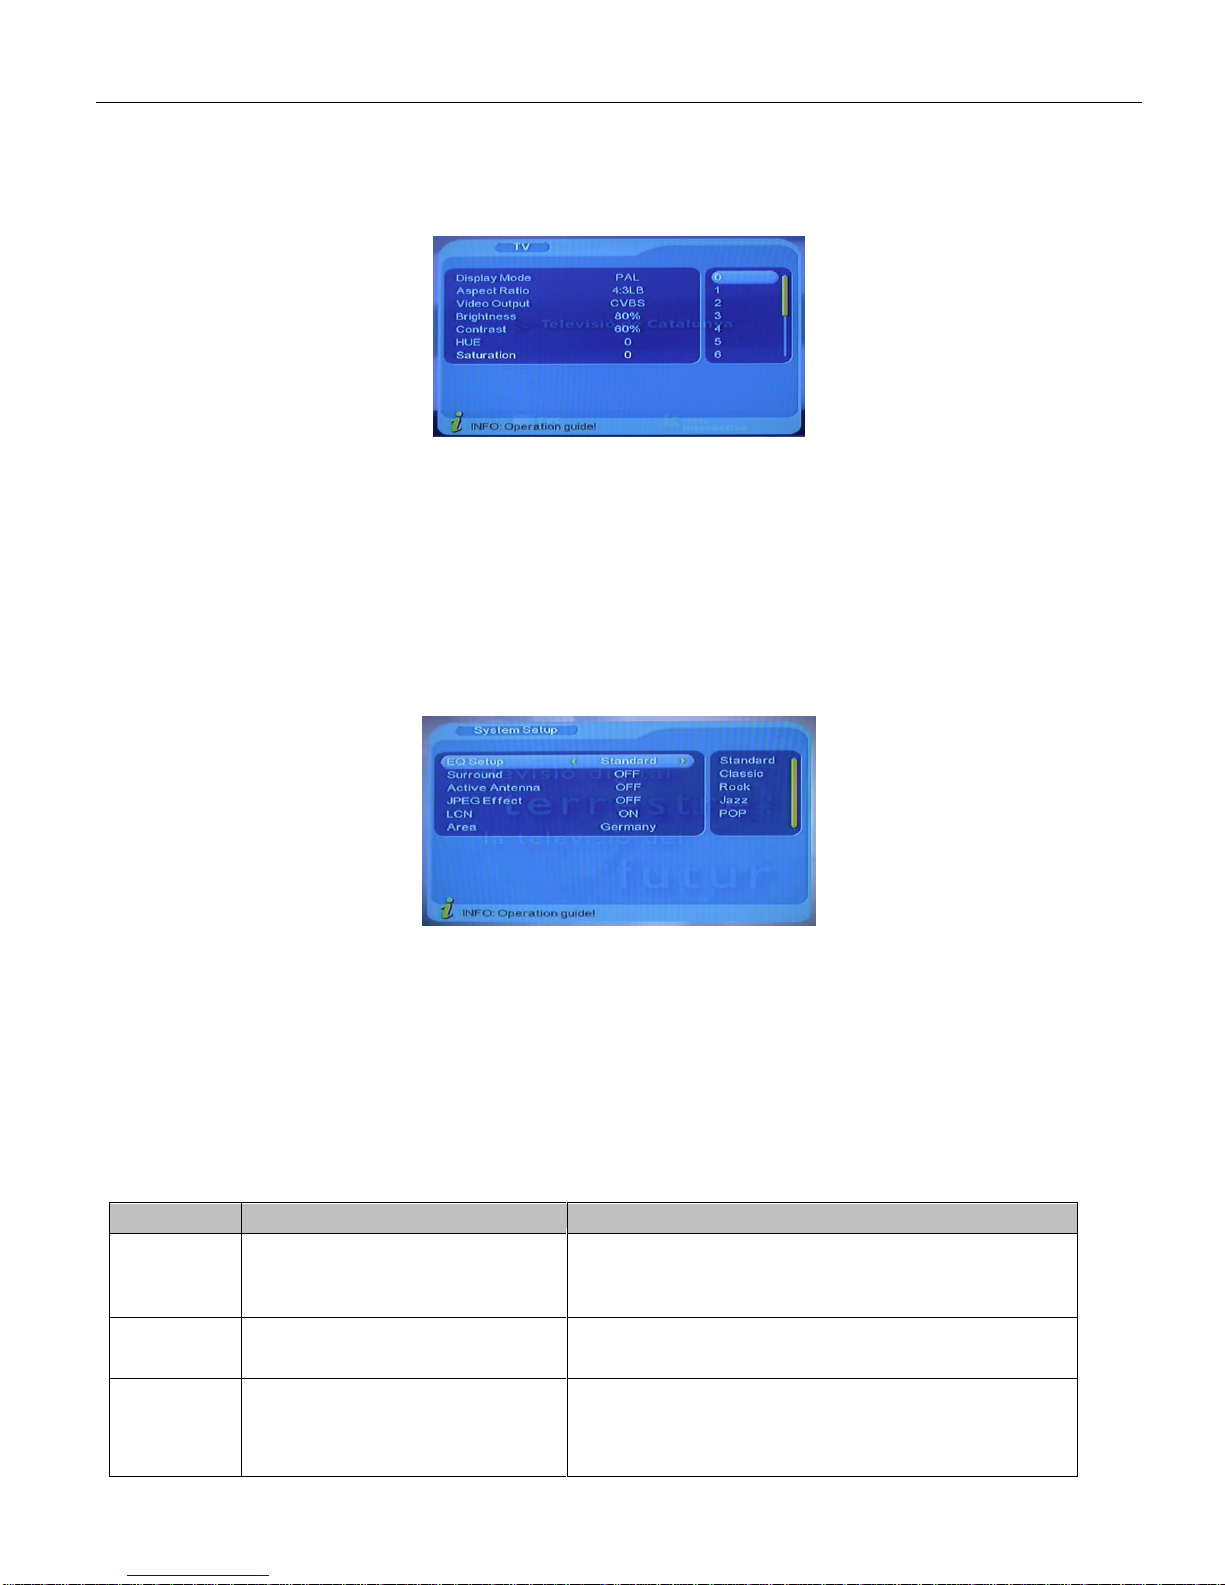
4.3.2 TV
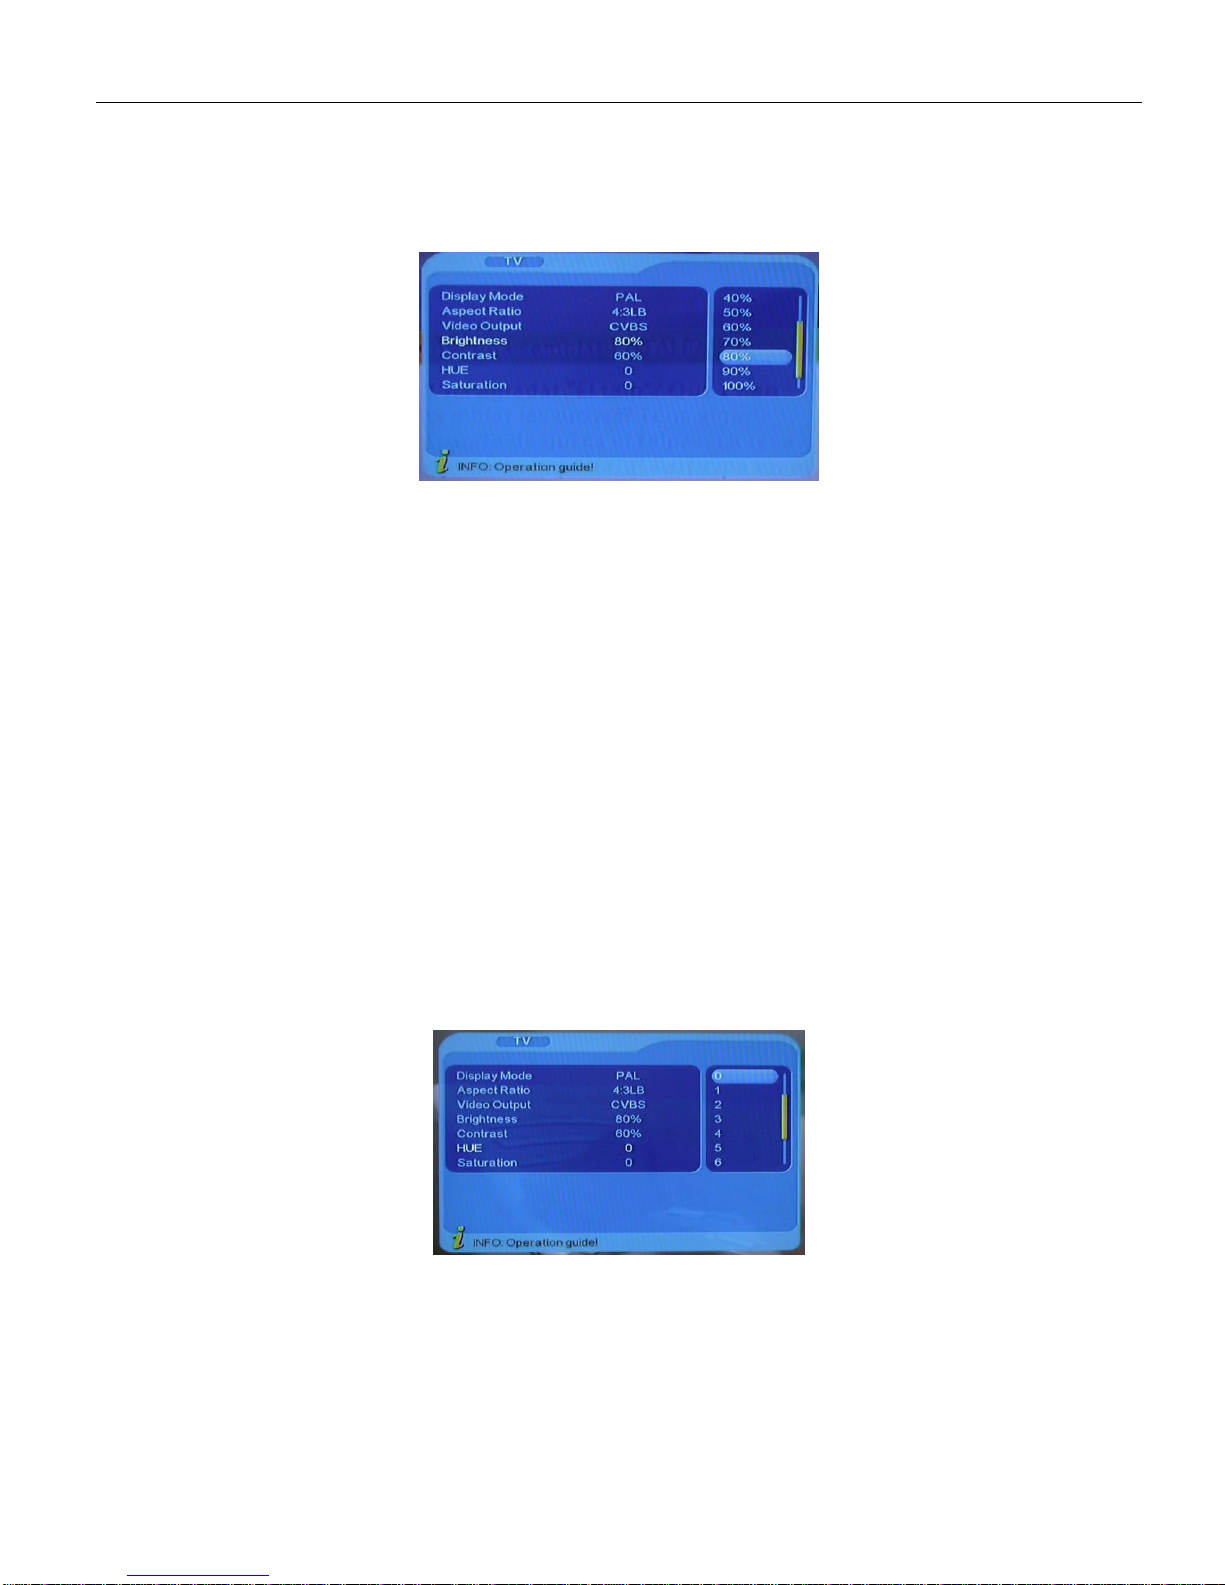
TV setup provides convenient TV input mode, you can via menu ( MENU->Digita TV->Configuration -> TV) enter
TV set, as shown in below
All options are listed on the left of the menu, when the cursor moves to the option on the left of the TV menu,
the values corresponding to this option can be displayed on the right of the menu.
4.3.2.1 Display Mode
TV mode can be changed the mode of the ouput video, you can adjust TV mode according to the actual
situation of you receiving equipment.
(1).Move the cursor to Display Mode option, press “VOL+/VOL-“ key to choose circularly among the options, and
the TV mode set can be effective immediately;
(2). TV Mode can be set as Auto, PAL, NTSC;
(3).Default TV Mode: PAL;
(4).Press “OK” key to save the setting
4.3.2.2 Aspect Ratio
Video output mode can be changed the mode of video output, you can adjust TV mode according to the
actual situation of you receiving equipment.
(1)Move the cursor to Aspect Ratio option, press “VOL+/VOL-“ key to move circularly and choose options;
(2).Aspect Ratio can be set as 16: 9, 4: 3PanScan, 4: 3LetterBox;
(3).Default Aspect Ratio 4: 3LB;
(4).Press “OK” key to save the setting
4.3.2.3 Video Output
Video Output mode can be changed the mode of video output, you can adjust TV mode according to the
actual situation of you receiving equipment.
Move the cursor to Video Output option, Press “VOL+/VOL-“ key to move circularly and choose options and the
setting can be effective.
Video Output mode can be set as CVBS, RGB;
Default: CVBS;
Press “OK” key to save set
- 20 -
Page 22
NPG DTR 1002S PRO V2.3
4.3.2.4 Brightness
If the brightness is not proper during watching, you can adjust the current brightness to be a proper one.
1. Move the cursor to Brightness option, press “VOL+” key to move the cursor into the Properties list on the right, as
shown in below
2. Press “CH+/CH-“ key to move upward and downward the cursor to choose, press “OK” key to confirm; in this
moment, move the cursor onto the options on the left, and then values will become the ones you want.
3. Brightness can be set as: 0%, 10%, 20%, 30%, 40%, 50%, 60%, 70%, 80%, 90% or100%;
4. Default:80%;
5. Press “OK” key to save the setting
4.3.2.5 Contrast
You can set system contrast via Contrast option.
1. Move the cursor to Contrast option, press “VOL+” key to move the cursor into the Properties list on the right
2. Press “CH+/CH-“ key to move upward and downward the cursor to choose, press ENTER key to confirm, in this
moment, move the cursor onto the options on the left, and then values will become the ones you want.
3. Contrast can be set as: 0%, 10%, 20%, 30%, 40%, 50%, 60%, 70%, 80%, 90% or 100%;
4. Default:60%;
Press “OK” key to save the setting
4.3.2.6 HUE
Adjust the system hue.
1. move the cursor to HUE option Press “VOL+” key to move the cursor into the Properties list on the right, as shown in
below
2. Press “CH+/CH-“ key to move upward and downward the cursor to choose, press ENTER key to confirm, in this
moment, move the cursor onto the options on the left, and then values will become the ones you want.
3. Hue can be set as: -6, -5, -4, -3, -2, -1, 0, 1, 2, 3, 4, 5 or 6;
4. Default: 0;
Press “OK” key to save set.
- 21 -
Page 23
NPG DTR 1002S PRO V2.3
Items
Purposes
Options
EQ setup
To set output sound effect.
Standard, Classic, Rock, Jazz, POP; default:
Standard
Surround
To set stage effect
OFF, Concert, Church, Passive, Live; default: concert
Area
To set scanning area and
choose, choose area to
download preset channel
settings.
List of countrys
4.3.2.7 Saturation
Adjust system saturation.
1. Move the cursor to Saturation option, Press “VOL+” key to move the cursor into the Properties list on the right,
as shown in below
2. Press “CH+/CH-“ key to move upward and downward the cursor to choose and press “OK” key to confirm, in
this moment, move the cursor onto the options on the left, and then values will become the ones you want.
3. Saturation can be set as: 0-12;
4. Default: 0;
5. Press “OK” key to save set, the system will hint with “Update succeeds”.
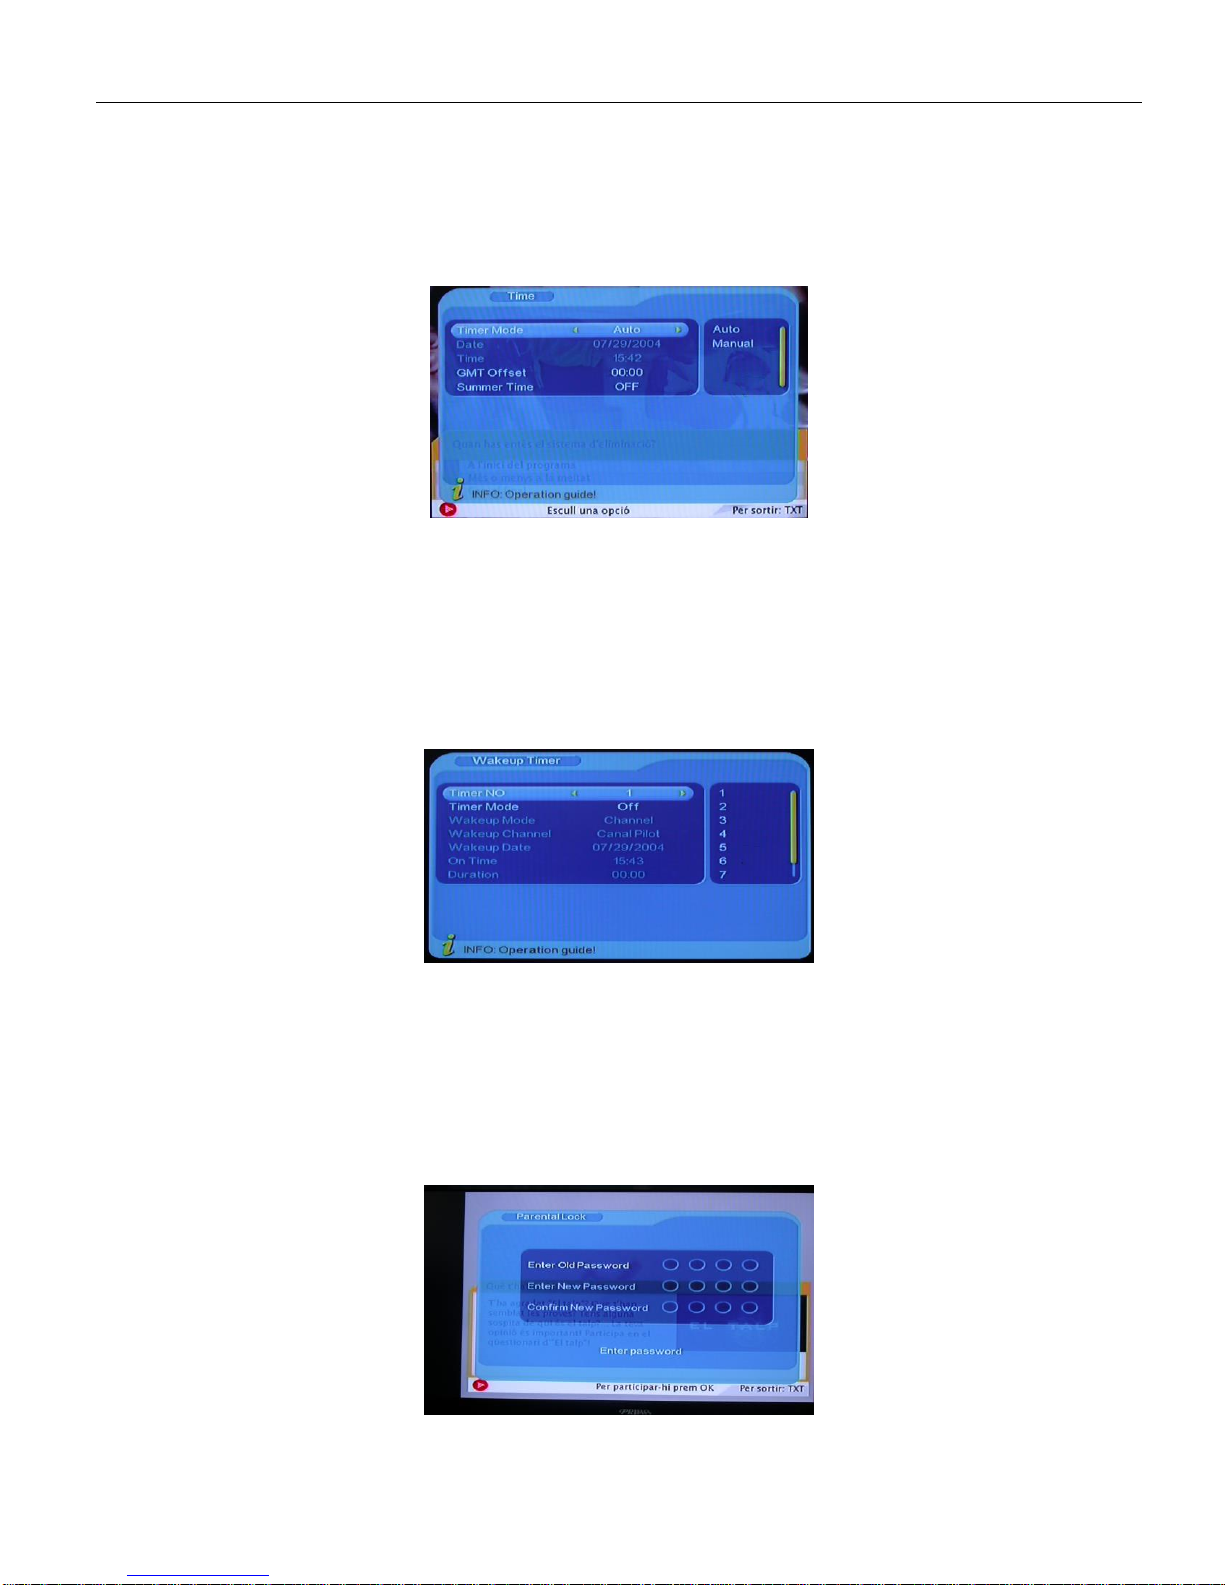
4.3.3 System Setup
System Setup menu can provide convenient system setup, you can via menu ( MENU->Digital
TV->Configuration -> System Setup) enter System Setup menu , as shown in below
In System Setup menu ,
(1). Press “CH+/CH-“ key to move upward and downward the cursor to choose option;
(2). When the cursor stays on the option: Press “VOL+/VOL-“ key to choose circularly among the values in this
option, press “OK” key to confirm;
- 22 -
Page 24
NPG DTR 1002S PRO V2.3
4.3.4 Time
Via menu ( MENU->Digita TV->Configuration -> Time), entertimeset, as shown in below:
In Time menu, there are two time modes, one is Auto setting, the other is Manual setting, Press
“VOL+/VOL-“ key to choose time mode.
1. The system defaults the setting as Automatic, press “CH+/CH-“ key to move only between Timer Mode, GMT
Offset and Summer Time.
2. When the setting is Manual, press “CH+/CH-“ key to to move only between Timer Mode, Date and Time.
4.3.5 Wakeup Timer
If you want to set channel playing at certain time or giving some hint information such as Birthday.You can set
via Wakeup Timer menu, as shown in below:
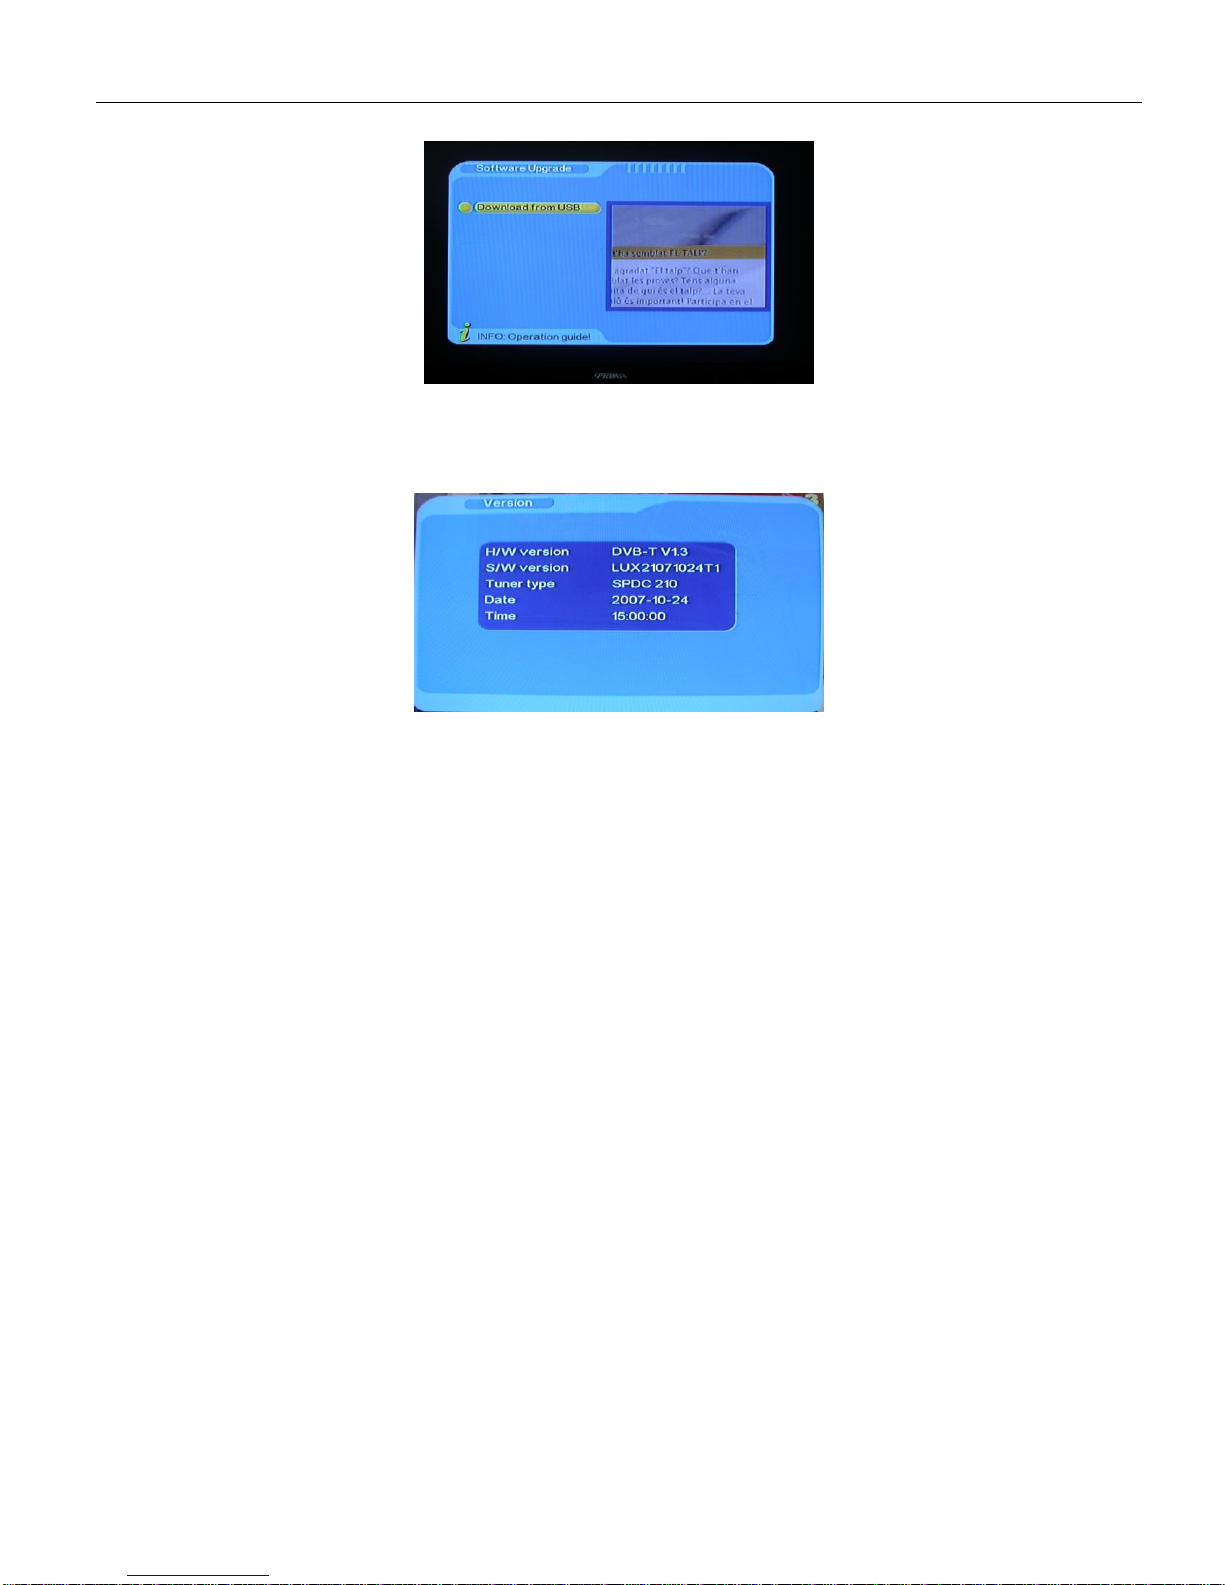
4.3.6 Parental Lock
You can revise system Password, you can via menu ( MENU->Digita TV->Configuration -> Parental Lock)to
enter Parental Lock menu , as shown in below:
1. Press the0-9number key on the remote control to input old Password, the system defaults Password
as“0000”.
- 23 -
Page 25
NPG DTR 1002S PRO V2.3
4.4 Software Upgrade
4.5 Version
Via menu ( MENU->Digita TV-> Version), enter the page as shown in below:
You can be provided with system software information, including H/W Version, S/W Version, Tuner Type,
Date, Time, Press “EXIT” key to return previous menu.
4.6 Factory Default
Via menu (Menu- Digital TV – Factory Default ) , default password is “0000” and “8888”
5. Games
If you want to have a rest or to relieve yourself after hard working, you can play some games attached in the
system.
- 24 -
Page 26

NPG DTR 1002S PRO V2.3
6. Troubleshooting
There may be various reasons for the abnormal operation of the receiver.
Check the receiver according to the procedures shown below. If the receiver does
not work properly after checking it ,please contact the dealer. Don't open the
receiver cover .It may cause a dangerous situation .
The display on front panel does not light up
● Check that the power cord is plugged into the wall outlet .
● Check whether Power Switch is on .
No picture
● Make sure that the product is in Operation Mode.
● Make sure that the AV Cable is correctly connected to the TV AV Channel
● Make sure the TV is in AV mode ,for this Set Top Box uses AV output .
● Make sure that antenna cable is correctly connected to the DVB Product.
● Check the brightness level of TV.
● Check the channel that is on air .
No or bad signal message appears
● Check other device connected between antenna and the receiver ,or
adjust the antenna position
Poor Picture & sound quality
● Install antenna where there is not obstacle ahead .
● Make sure to avoid putting mobile phone or microwave oven around the DVB Product.
● Use 75Ω coaxial cable to connecting TV and antenna.
● The DVB is a Standard Definition Receiver ,so when viewing High Definition channels on it may
cause poor image and sound
No or poor sound
● Check the volume level of the TV .
● Check the Mute status of the TV and product .
● Press the Audio button to change the Sound Track type .
Remote control does operate
● To manipulate the equipment with the remote control ,the control's emitting part should be directly pointing
towards the receiving part (IR Sensor) of receiver.
● Check the battery of Remote control.
NOTE: If the problem can not be solved by going through this Trouble
Shooting Guide please contact Our Customer Care Centre for additional help.
- 25 -
Page 27

NPG DTR 1002S PRO V2.3
7. GLOSSARY OF TERMS
EPG
Electronic Program Guide. A software that viewers to navigate easily among the large number of
channels provided by digital technology, in order to select the service the desire.
FTA
Free To Air
GMT
Greenwich Mean Time. (Australia time is GMT +10:00)
PIN Number
Personal ldentification Number. A four-digit code that is used for locking/unlocking,
e.g with the parental control feature.
OSD
On Screen Display
Rs232
Serial data port For use pc to upgrade software.
STB
Set Top Box
VBI
Vertical Blanking Interval
26
Page 28

NPG DTR 1002S PRO V2.3
Terrestrial
Tuner/Demodulator
Input Frequency
Standard
Channel Bandwidth
OFDM Spectrum
Modulation Mode Guard
Interval Modes
FEC Modes Rate
VHF:174MHz to 230MHz
UHF:470 MHz to 862MHz
DVB-T (ETSI 300 744)
6MHz, 7MHz, 8MHz
2k/8k-carrier hierarchical
QPSK, 16QAM, 64QAM
1/32, 1/16, 1/8, active symbol duration
1/4, 1/2 3/4, , 2/3, 5/6, 7/ 8
System
CPU
Transport
Flash Memory
SDRAM
SunPlus 1002 AT
DVB Demultiplexer
8MB
4X16M
Video
Standard
MPEG-1 ISO/IEC 13818 and
MPEG-2 MP@ML
Field/Frame Rate Output
mode supported
50/25Hz
720x576i
Aspect Ratio
4:3, 16:9 with letter box and Full Screen
supported
Audio
Standard
MPEG-1 ISO/IEC 11172-3 layers 1 and 2
MPEG-2 ISO/IEC 13818-3 Dolby Digital
AC-3
Sampling Frequency
Digital Audio Out Format
32, 44., 48kHz IEC-60958/IEC-61937
Rear panel interface
RF input / Loop through
TWO Scart Outputs
Digital Audio SPDIF
Power on/off Button
IEC Type 75 Ohm
TV/VCR
Coaxial
Manual switch
User Interface
Front Panel
Standby LED, Power LED
Software upgrade
Firmware Upgrade over RS232C
Power
Main input voltage
Operating Frequency
Power consumption
220V/240VAC
50/60Hz Normal operation 10W
Standby mode 5W
Max. 13W
Environmental
Condition
Operating Temperature
0~40 ℃
Dimension(WxDxH)
260X149.5X48(mm)
Weight
0.91kg
8. CARACTERISTIC
27
 Loading...