

Page 1
Español……. Page 1
English…….. Page 29
Page 2

1
Copyright
Los contenidos de este documento no pueden ser reproducidos total o parcialmente, guardados,
transcritos a un sistema de manejo de información, traducidos a cualquier lenguaje, o transmitidos de
cualquier forma o por cualquier medio – mecánico, magnético, electrónico, óptico, manual – sin
consentimiento previo por escrito.
Trademarks
Todo producto, compañía y nombre de marca son marcas comerciales o marcas registradas de sus
respectivas compañías. Éstas se utilizan únicamente por motivos de identificación. Las especificaciones
están sujetas a cambios sin previo aviso.
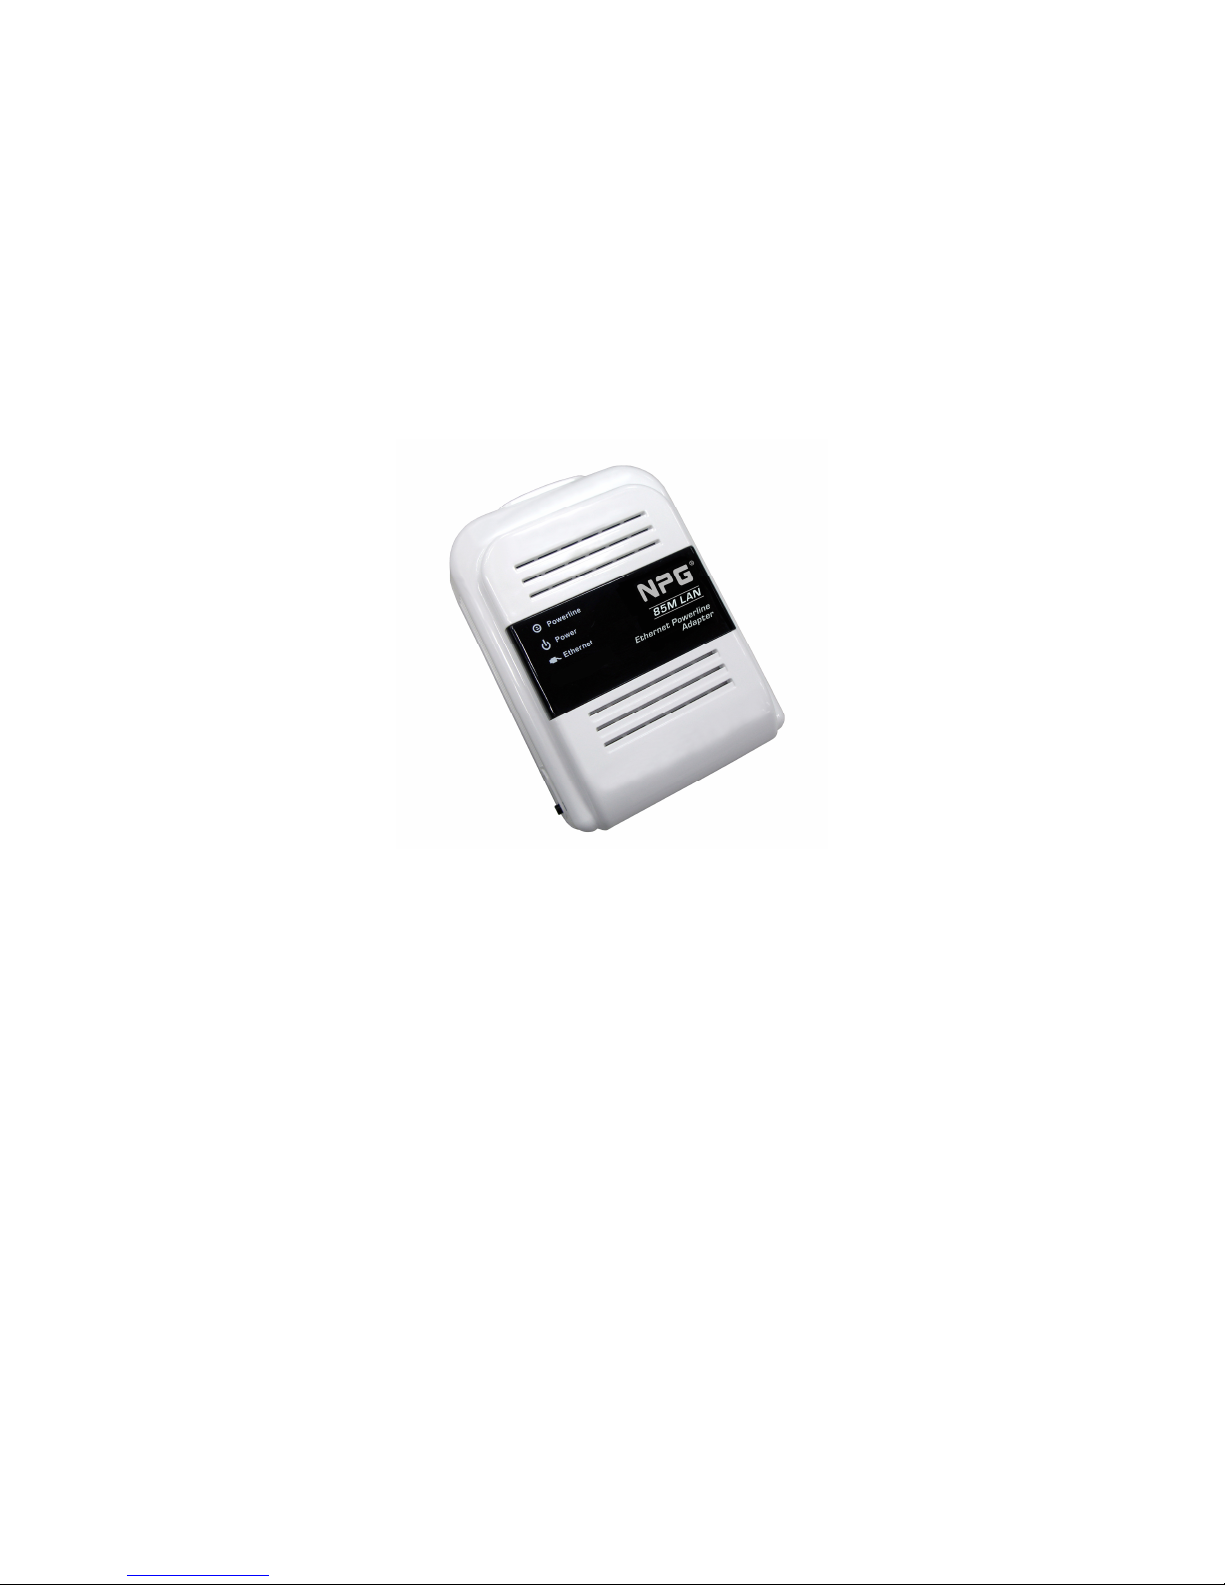
Ethernet Powerline Adaptor
Page 3

2
Normas de Radiación FCC
Este equipo a sido testeado y cumple con los limites de Clase B de dispositivos digitales de
conformidad a 47 CFR, Parte 2 y Parte 15 de las reglas de la Federal Communication Commission (FCC). El
funcionamiento esta sujeto a las siguientes dos condiciones:
1. Este dispositivo no puede causar interferencias perjudiciales
2. Este dispositivo debe aceptar cualquier interferencia recibida incluyendo interferencias que
pueden causar un funcionamiento no deseado.
Normas de Radiación CE
Este equipo a sido revisado para cumplir con los limites de European Council Directive 89/336/EEC en la
aproximación de la ley de los Estados miembros en lo que concierne EN 55022:1998/A1:2000/A2:2003 Clase
B, EN61000-3-2:2000, EN 61000-3-3:1995/A1:2001, EN 55024:1998/A1:2001/A2:2003 y EN 60950-1.
PELIGRO!
La Federal Communication Commission advierte al usuario que los cambios o modificaciones a la unidad no
aprobados expresamente por la parte responsable de conformidad podía anular la autoridad del usuario para
funcionar el equipo.
Ethernet Powerline Adaptor
Page 4

3
Contenido
COPYRIGHT .......................................................................................................................0
CAPITULO 1 INTRODUCCIÓN ..........................................................................................4
1.1 Características...........................................................................................................................5
1.2 Contenido del paquete...............................................................................................................6
CAPITULO 2 MECANISMO DE CONEXIÓN......................................................................7
2.1 Introducción..............................................................................................................................7
2.2 Indicador LED ..........................................................................................................................8
2.3 Interface Físico .........................................................................................................................9
2.4 Conexión Hardware – Ordenador............................................................................................10
2.5 Conexión Hardware – Internet ................................................................................................ 11
CAPITULO 3 INSTALANDO LA HERRAMIENTA DE ADMINISTRACIÓN ......................12
CHAPTER 4 USANDO LA HERRAMIENTA DE ADMINISTRACIÓN...............................16
4.1 Main .......................................................................................................................................16
4.1.1 Rename................................................................................................................................ 18
4.1.2 Enter Password ....................................................................................................................19
4.1.3 Add Device..........................................................................................................................20
4.2 QOS........................................................................................................................................21
4.3 Privacy....................................................................................................................................23
4.4 Diagnostics .............................................................................................................................25
4.5 About......................................................................................................................................27
APENDICE A: GUÍA DE SOLUCIÓN DE PROBLEMAS..................................................28
Ethernet Powerline Adaptor
Page 5

4
Capitulo 1 Introducción
Felicidades por su compra de este adaptador excepcional de Powerline de Ethernet. Este dispositivo es
un adaptador de Ethernet de 85Mbps Powerline que transforma el cableado eléctrico existente de su casa en
una infraestructura ubicua del establecimiento de una red. Simplemente conecte este adaptador de Powerline
de Ethernet 85Mbps en un enchufe ordinario de la corriente alterna que extienda fácilmente su conexión de
banda ancha de Cable/xDSL o red existente de Ethernet (LAN) a cualquier otro enchufe eléctrico en cualquier
sitio de una casa sin la necesidad de cablear de nuevo.
Este adaptador Ethernet Powerline soporta hasta 85Mbps de tasa de transferencia sobre el circuito
existente. Con tasas de 85Mbps, el uso completo multimedia se puede apoyar fácilmente a través de la casa
entera además del acceso del Internet.
Este adaptador de Powerline de Ethernet utiliza las líneas de energía existentes instaladas en un hogar
como trayectoria para transmitir datos digitales, voz, audio y el vídeo entre los dispositivos. Para asegurar
usos de la seguridad y de multimedia de comunicación de datos, este adaptador de Powerline de Ethernet
incorpora características de cifrado 56-bit DES y la calidad del servicio (QOS). Con una configuración
mínima, puede instalar y usar ese adaptador de Powerline de Ethernet en minutos.
Ethernet Powerline Adaptor
Page 6

5
1.1 Características
Homeplug Turbo:
Transferencia de datos a alta velocidad de hasta 85Mbps.
Totalmente compatible con Homeplug 1.0
Alta velocidad de transferencia de hasta 85Mbps
HomePlug Turbo standard
Funciona con AC de 100V ~ 240V
Plug-and-Play (PnP) configuración
Alta velocidad con interface Ethernet
Bajo consumo
OFDM técnicas para alta recepción de datos en condiciones de medios ruidosos
La adaptación inteligente del canal maximiza el rendimiento de procesamiento bajo
condiciones duras del canal
Integrado QoS y características de corrección de errores
Encriptación de enlace 56-bit DES con administración de claves para unas comunicaciones
sobre líneas de alimentación seguras.
Rango de hasta 300m sobre la red de línea eléctrica
Soporte de botones “Par” y “Reinicio” en las carcasa
RoHS
Requisitos del sistema
Al menos dos enchufes AC 100V ~ 240V
Un ordenador con lo siguiente:
Sistema Operativo con TCP/IP instalado
Procesador Pentium III compatible o superior
Tarjeta Ethernet LAN instalada con el protocolo TCP/IP
64 MB RAM o más
50 MB de espacio libre en disco (Mínimo)
Lector CD-ROM
Aplicaciones del producto
Distribución Standard Video TV (SDTV)
Mayor tasa de transferencia de datos
Compartir el acceso de banda ancha a Internet
Audio y video streaming y transferencia
Ampliar la cobertura de una red inalámbrica
Llamada bajo IP
Compartir archivos y aplicaciones en un PC
Compartir periféricos e impresoras
Juegos de red y Online
Camaras de seguridad
Ethernet Powerline Adaptor
Page 7

6
1.2 Contenido del paquete
The 85Mbps Ethernet Powerline Adaptor package contains the following items:
Un Ethernet Powerline Adaptor o dos en el pack doble
Un cable de red CAT-5 Ethernet (LAN) o dos en el pack doble
Una guía de inicio rápido
Un CD-ROM (Utility / Manual / Quick Setup Guide/Acrobat Reader)
Si cualquiera de estos contenidos están dañados u omitidos póngase en contacto con su distribuidor
inmediatamente.
Ethernet Powerline Adaptor
Page 8

7
Capitulo 2 mecanismo de Conexión
2.1 Introducción
Ethernet Powerline Adaptor soporta hasta 85Mbps de tasa de transferencia de datos. Con esta alta
velocidad de conexión, este Ethernet Powerline Adaptor te permite una red casera de alta velocidad usando
tu cableado de red eléctrica. Simplemente enchufa este Ethernet Powerline Adaptor en un enchufe normal
para ampliar tu conexión Cable/xDSL o red LAN existente a otro enchufe eléctrico en cualquier habitación de
tu casa.
Toma nota que este Ethernet Powerline Adaptor funciona en pareja. Necesitas enchufar un Ethernet
Powerline Adaptor en un enchufe para cada ordenador (Conectado a la tarjeta de red del ordenador). Si
quieres conectar Internet necesitas otro Ethernet Powerline Adaptor conectado a tu conexión Cable/xDSL
(Puerto Ethernet) para ampliar tu conexión a Internet.
Ethernet Powerline Adaptor
Page 9
8
2.2 Indicador LED
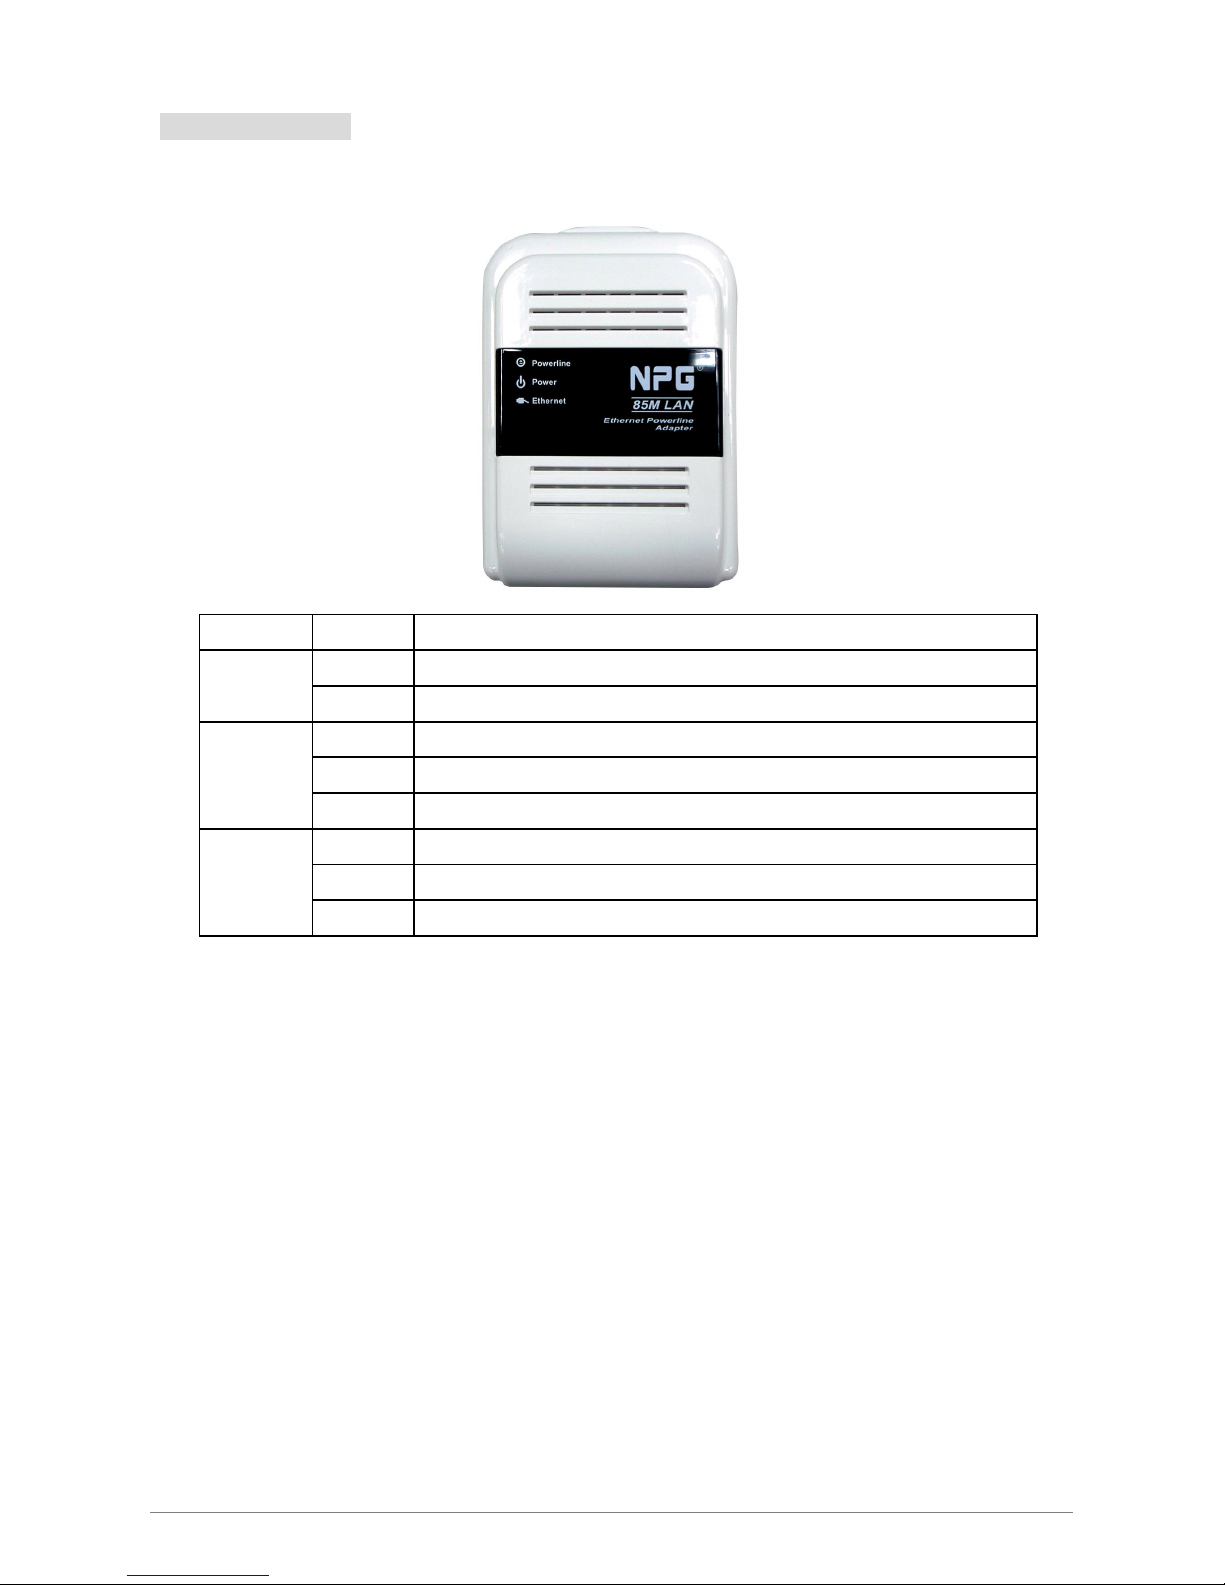
El indicador LED muestra información sobre el estado del dispositivo.
Label Status Description
Power
Powerline
Ethernet
ON
OFF
ON
OFF
Flashing
ON
OFF
Flashing
Ethernet Powerline Adaptor esta encendido
Ethernet Powerline Adaptor no esta recibiendo corriente
Otro Puerto
No se ha detectado otro Puerto
El puerto Powerline esta transmitiendo/recibiendo datos
El Puerto Ethernet esta activo para recibir/transmitir datos
El Puerto Ethernet no esta conectado o encendido
El Puerto Ethernet esta recibiendo/transmitiendo datos
Powerline se ha detectado en la misma red
Powerline
en la misma red
Ethernet Powerline Adaptor
Page 10
9
2.3 Physical Interface
Puerto 10/100Mbps Ethernet conectado a una tarjeta de red de PC o un
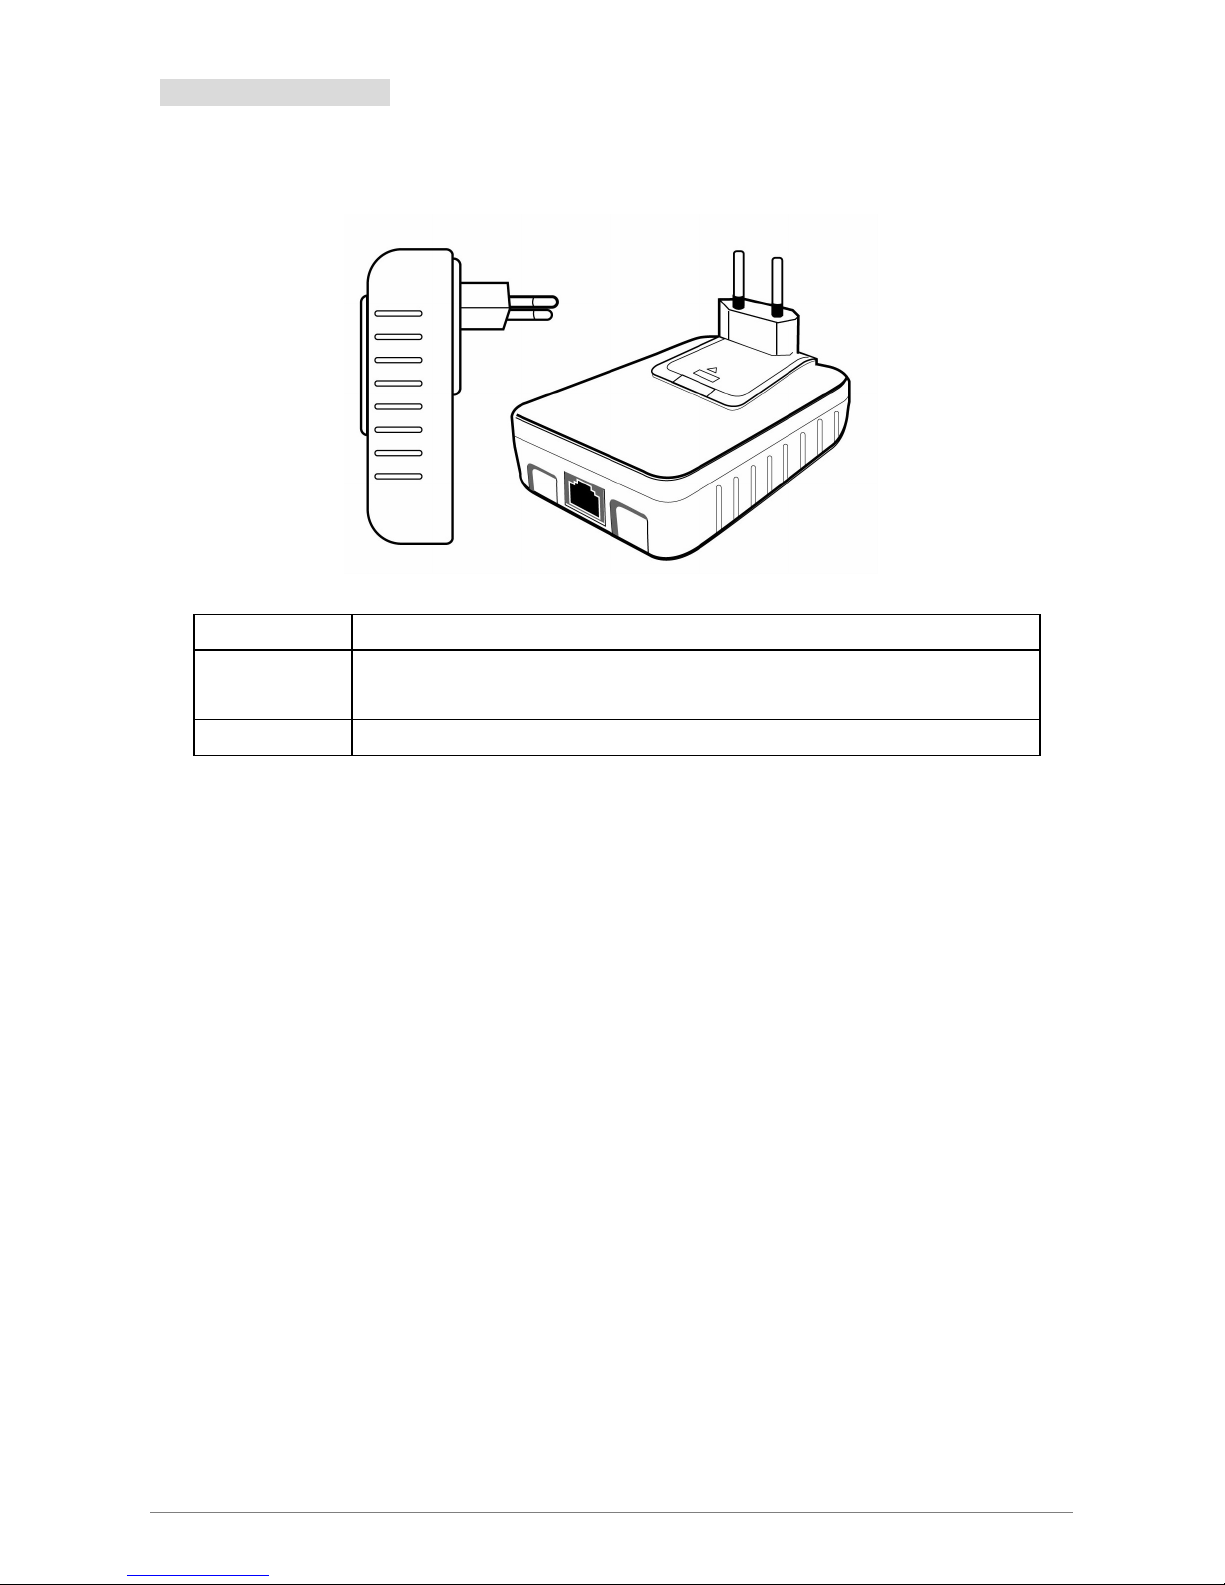
Hay 2 interfaces físicos en este Ethernet Powerline Adaptor.
Interface Description
Ethernet
Enchufe corriente Enchufe de corriente a cualquier conector 100V ~ 240V AC.
Un
dispositivo de banda ancha
Ethernet Powerline Adaptor
Page 11
10
2.4 Conexión Hardware – Ordenador
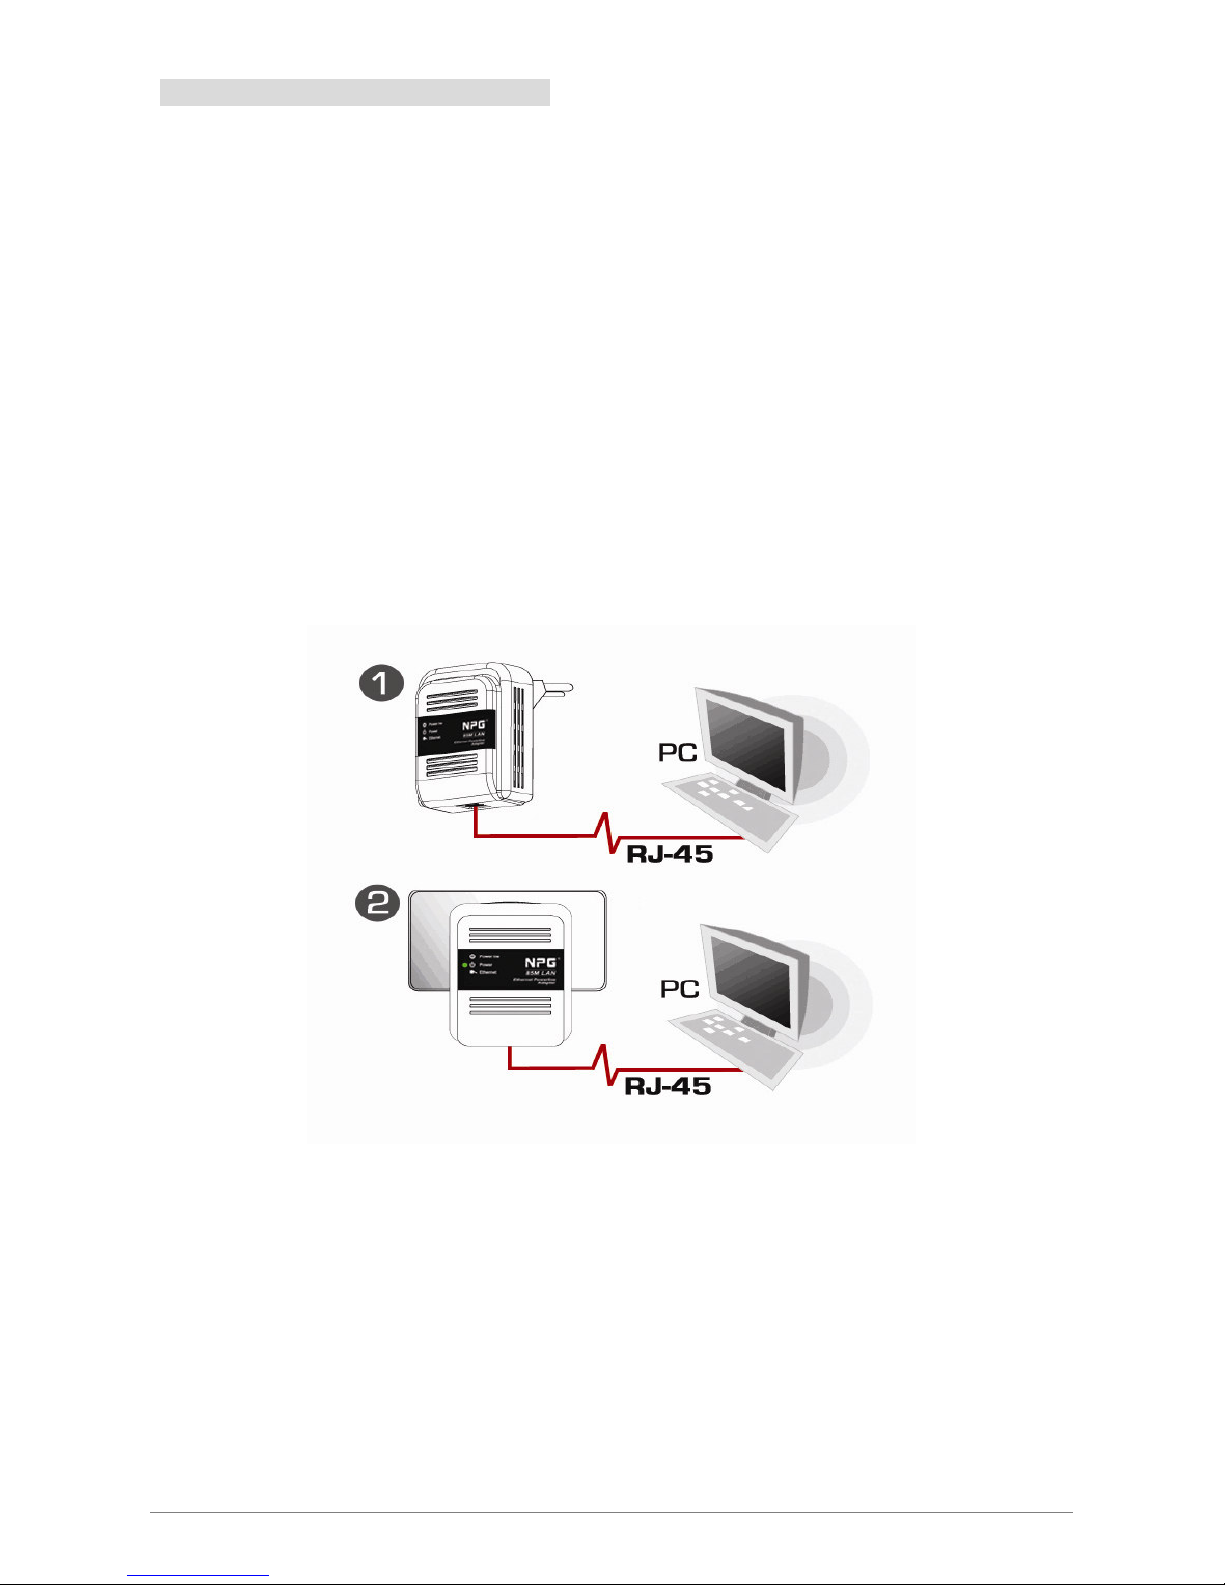
Estos son los pasos para conectar correctamente el Adaptador Ethernet Powerline a su computador:
1. Apague su PC o Equipo Portátil.
2. Conecte el cable Ethernet provisto (RJ-45) al puerto Ethernet del Adaptador Ethernet Powerline.
3. Conecte el otro extremo del cable Ethernet (RJ-45) al puerto de red de su computador.
4. Enchufe el Adaptador Ethernet Powerline a una toma de corriente cercana al computador.
5. Encienda su computador.
6. Compruebe que las señales luminosas de Power y Ethernet de su Adaptador Ethernet Powerline
estén encendidas (ON).
Ethernet Powerline Adaptor
Page 12
11
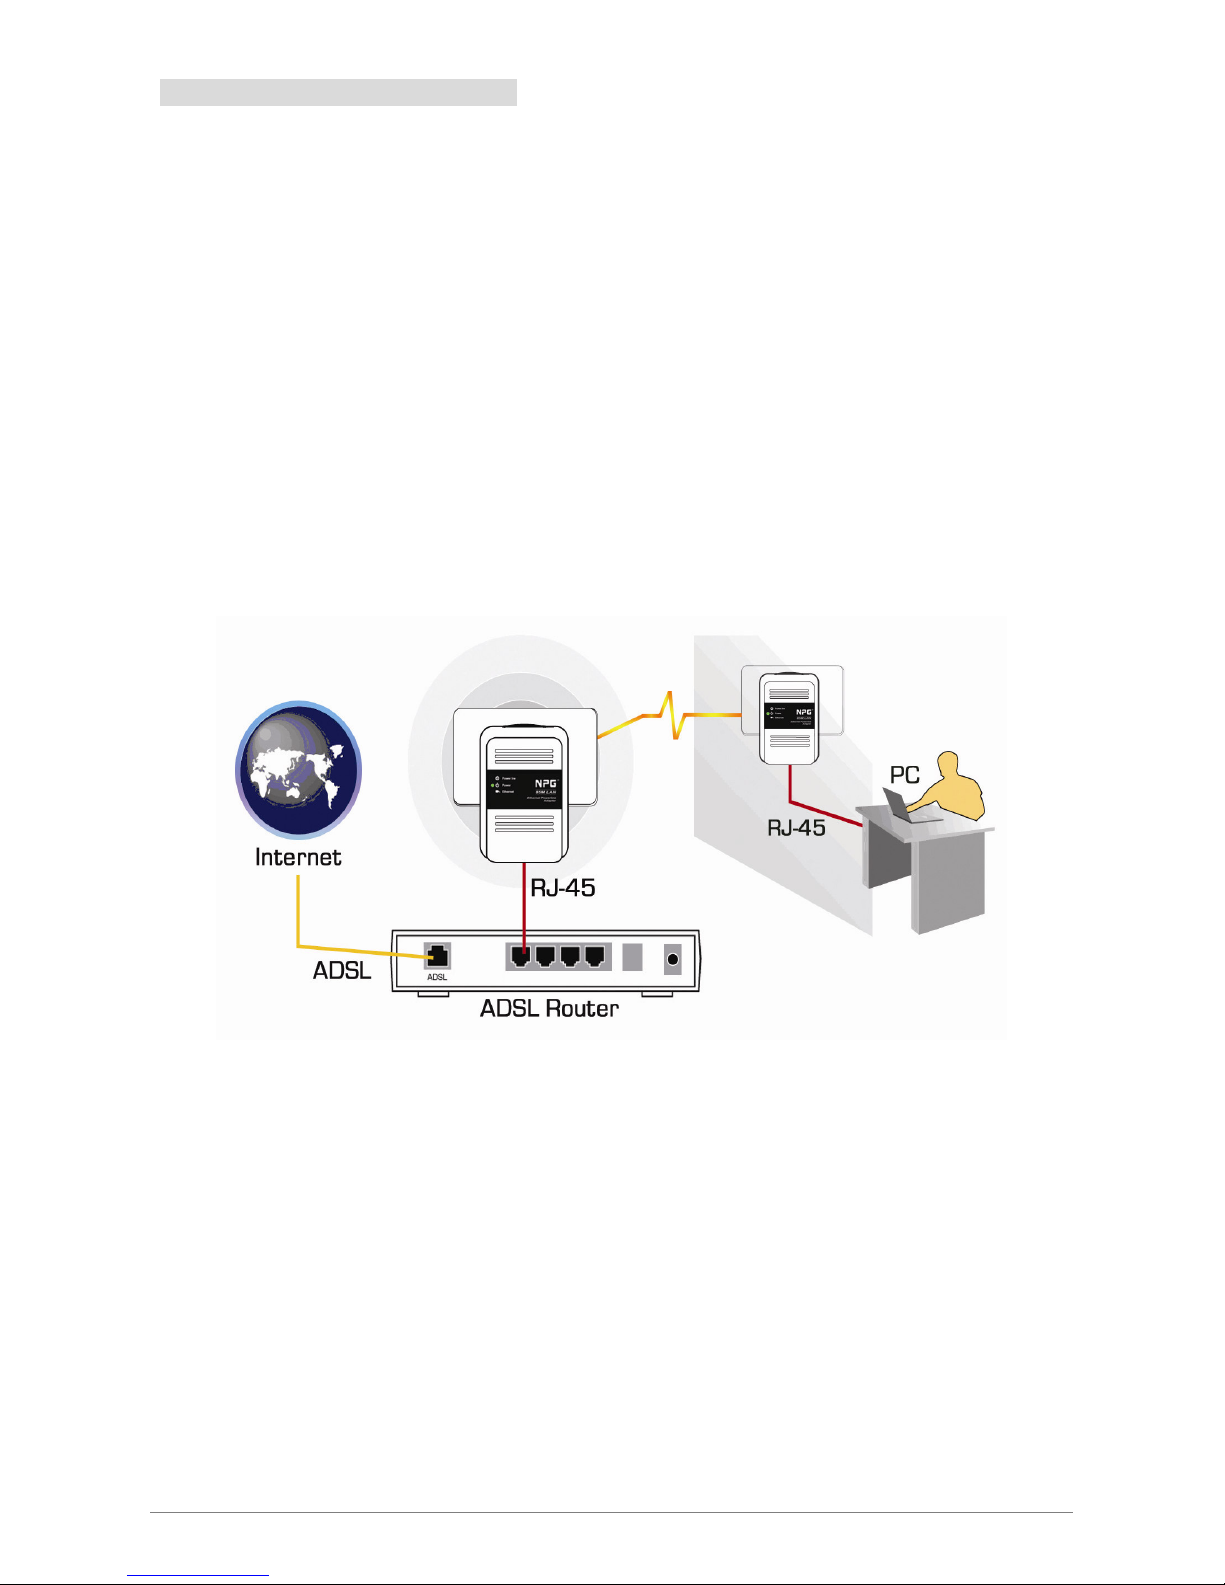
2.5 Conexión Hardware – Internet
Siga las instrucciones descritas abajo para conectar su Adaptador Ethernet Powerline a su conexión de
banda ancha ADSL:
1. Apague su PC o Equipo Portátil.
2. Conecte el cable Ethernet (RJ-45) provisto al puerto Ethernet del Adaptador Ethernet Powerline.
3. Conecte el otro extreme del cable Ethernet (RJ-45) a uno de los puertos Ethernet disponibles en
su router ADSL.
4. Enchufe su Adaptador Ethernet Powerline en una toma de corriente cercana al computador.
5. Encienda su computador.
6. Compruebe que las señales luminosas de Power, Powerline y Ethernet de su Adaptador Ethernet
Powerline se encuentran encendidas (ON).
Ethernet Powerline Adaptor
Page 13
12
Capitulo 3 Instalando la herramienta de administración
Siga los siguientes pasos para instalar adecuadamente la utilidad de Administración proporcionada en
el CD-ROM:
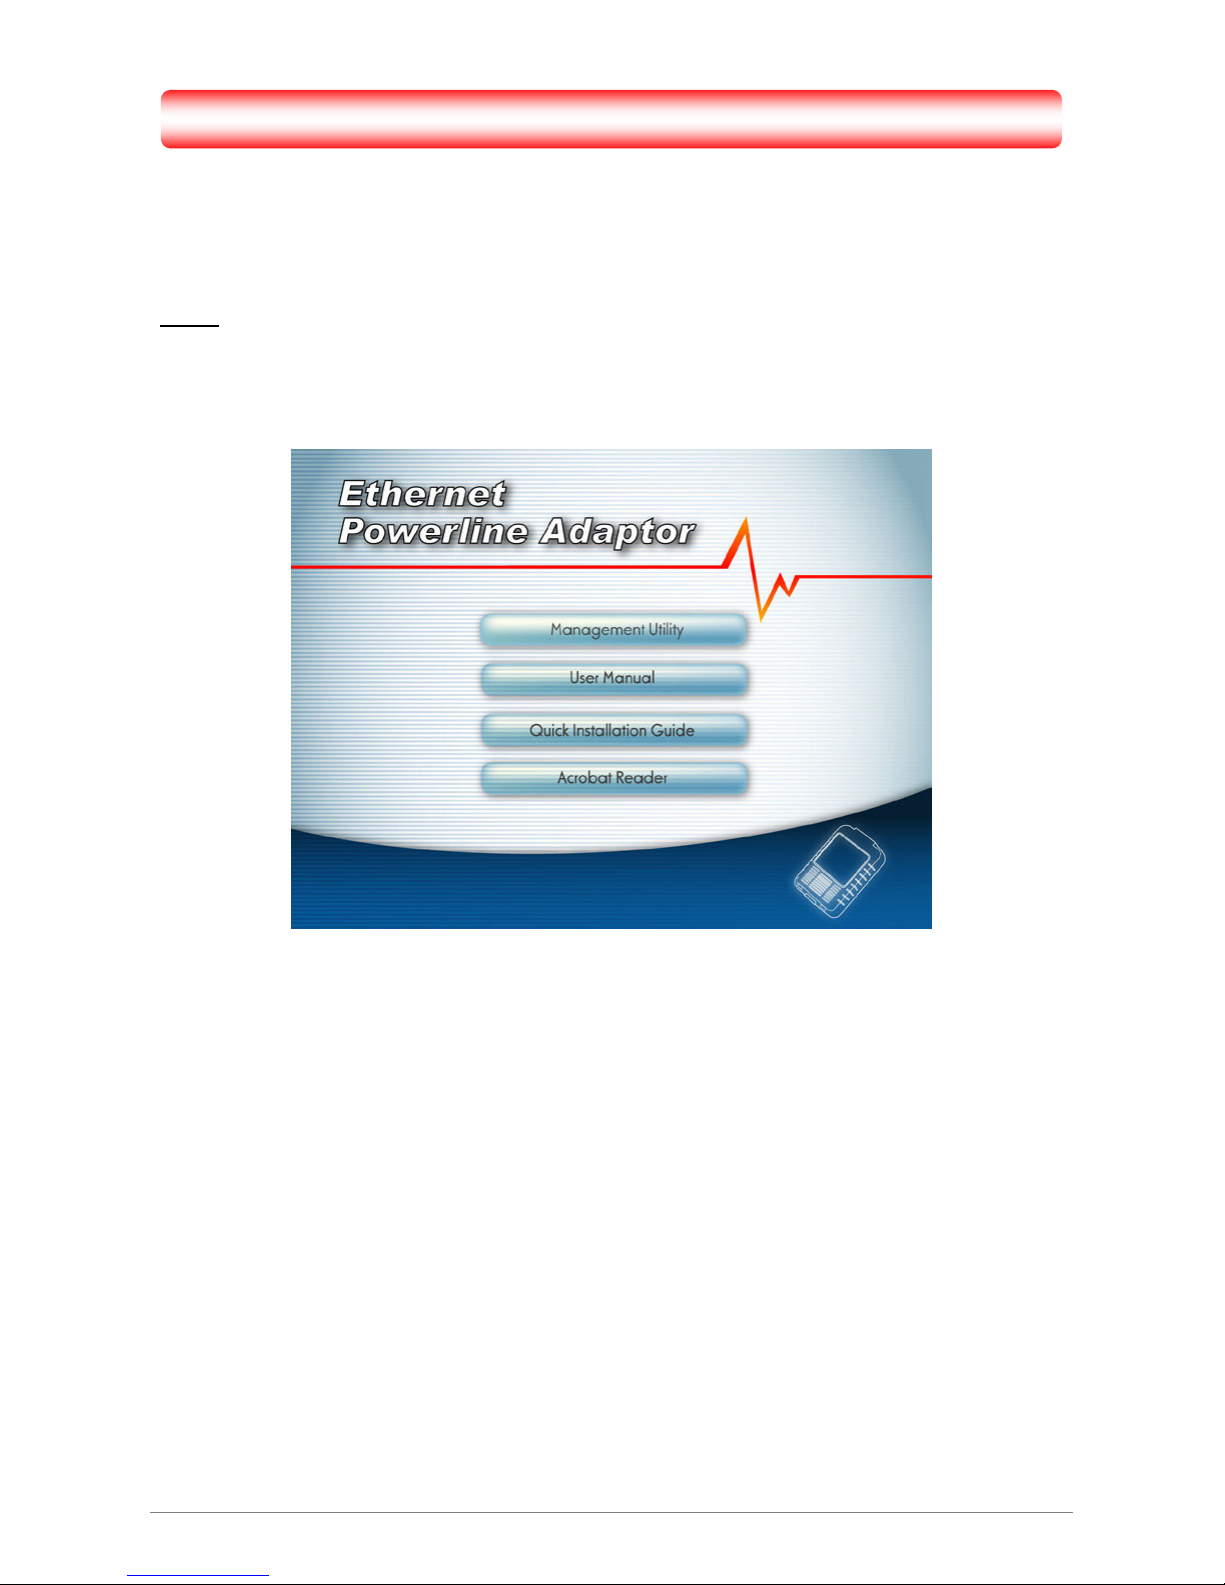
Paso 1: Encienda su computador e inserte el CD-ROM incluido con el Adaptador Ethernet Powerline en la
unidad lectora de CD-ROM. La siguiente pantalla aparecerá automáticamente. Seleccione
“Management Utility” para instalar la utilidad de Administración.
Ethernet Powerline Adaptor
Page 14
13
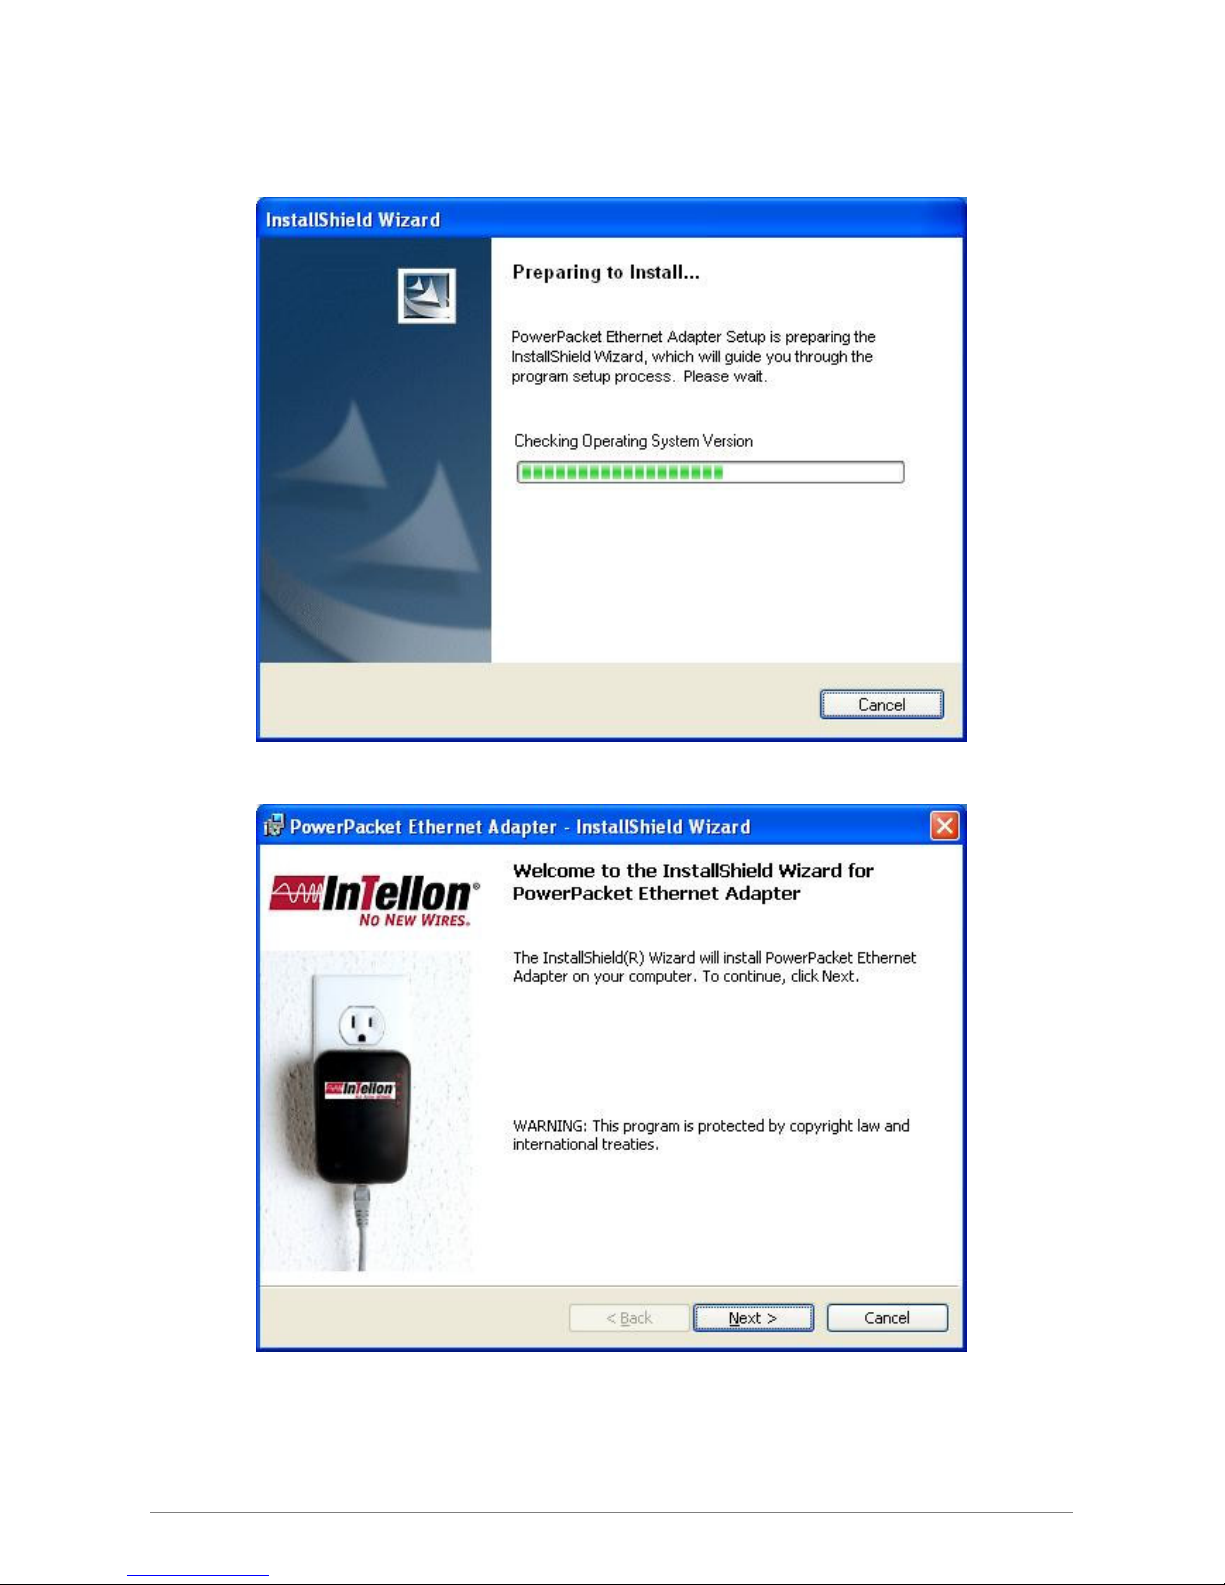
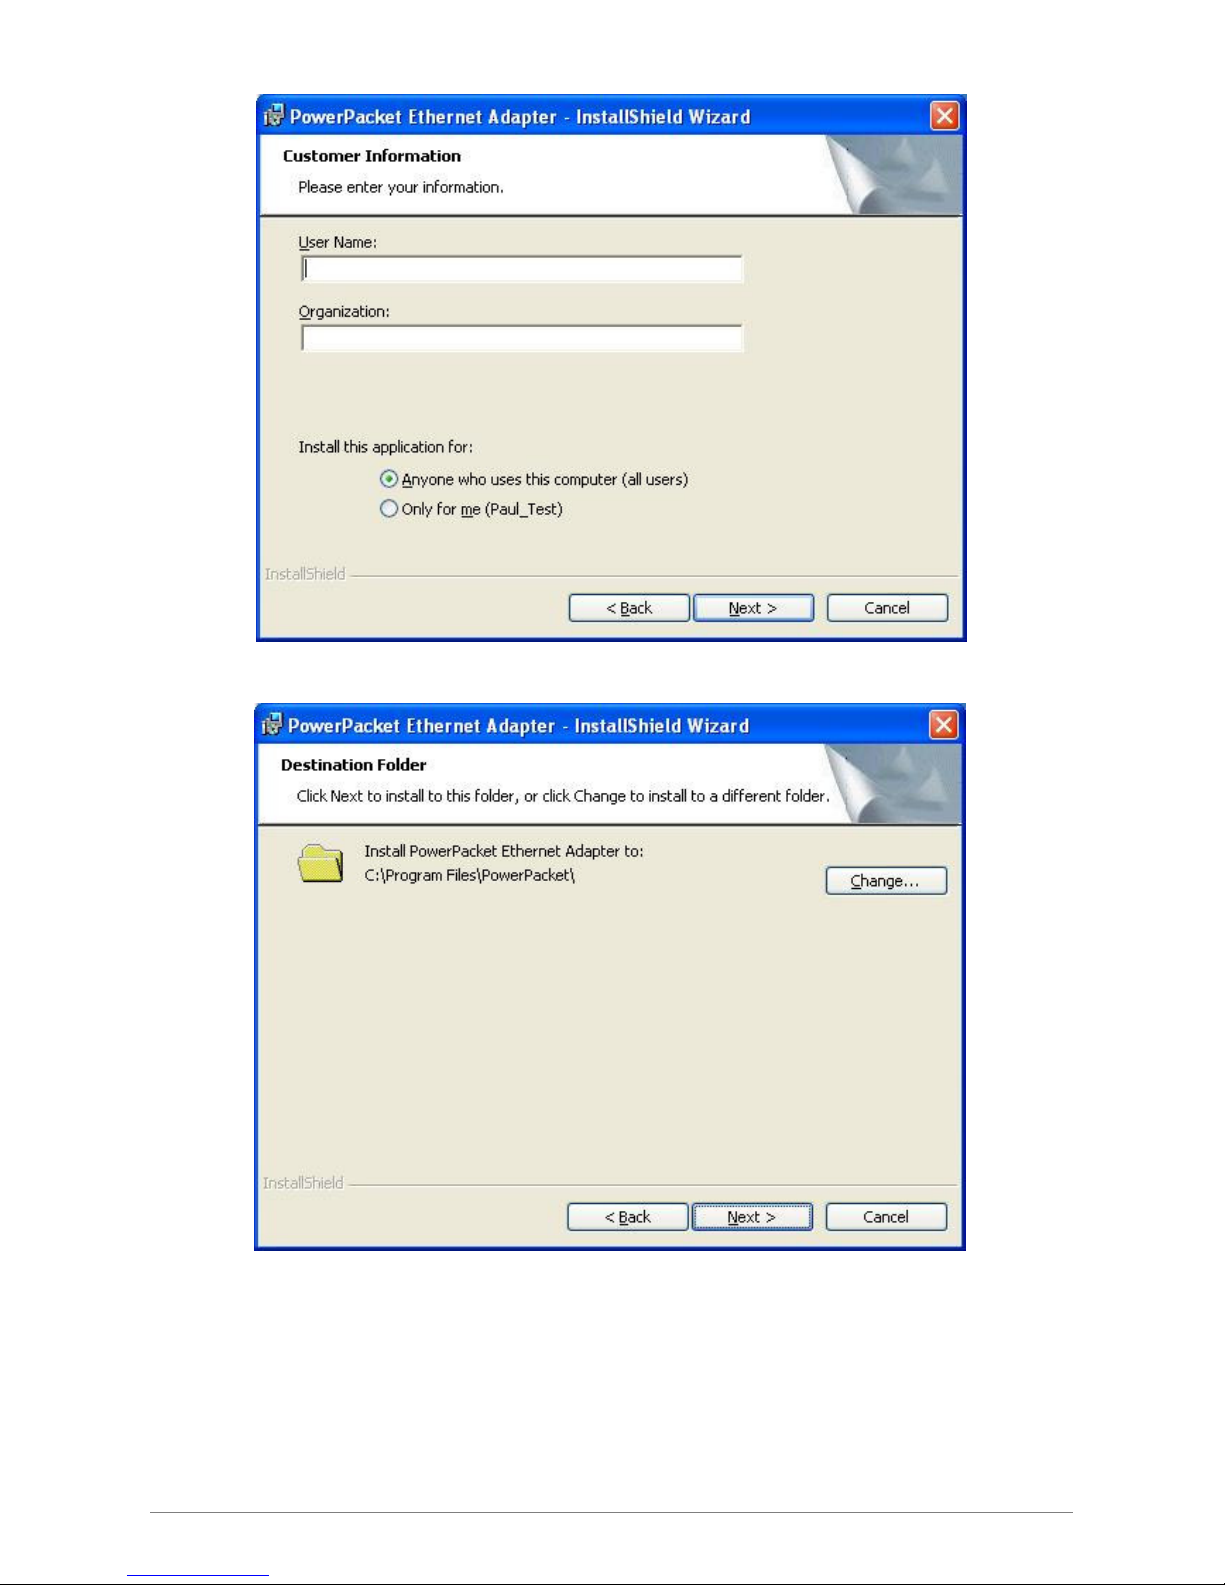
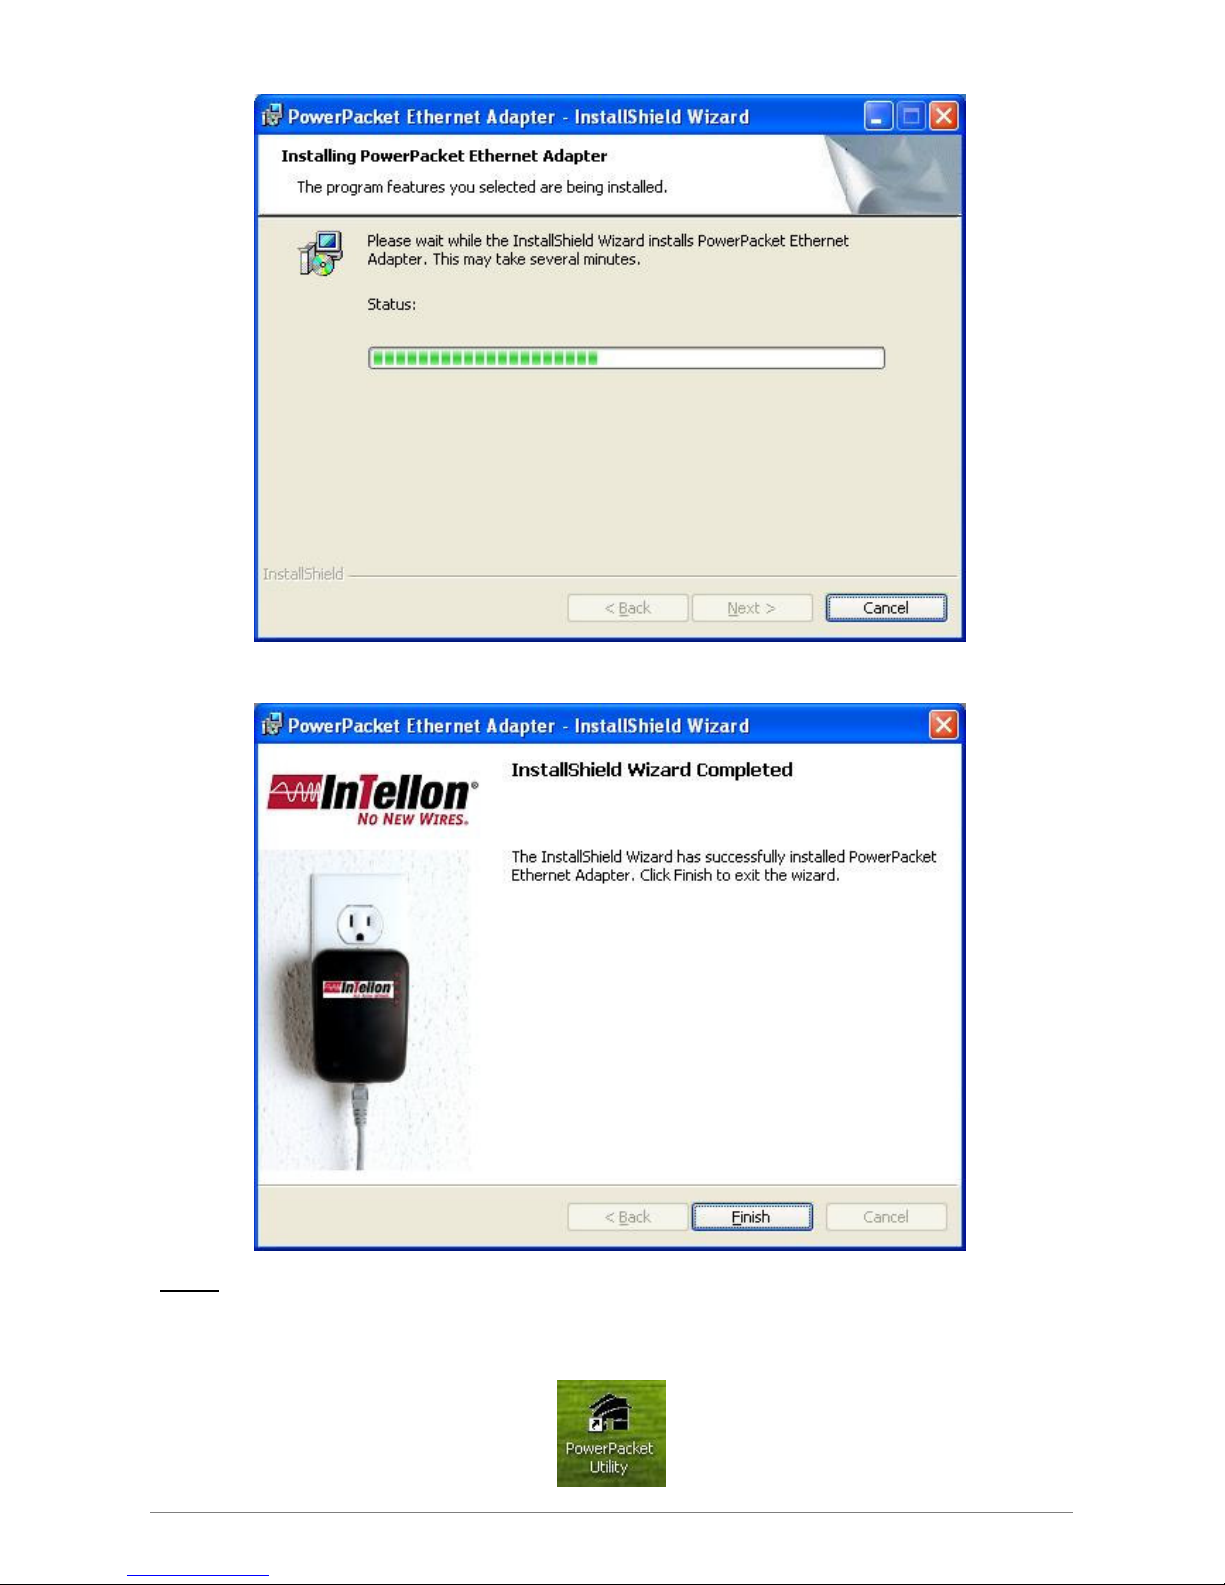
Paso 2: El programa de instalación copiará automáticamente todos los archivos que son necesarios a su
sistema.
Ethernet Powerline Adaptor
Page 15
14
Ethernet Powerline Adaptor
Page 16
15
Paso 3: Tras la instalación, un icono de acceso directo a la aplicación “Power Packet Utility” aparecerá
en su escritorio.
Ethernet Powerline Adaptor
Page 17
16
Capitulo 4 Usando la herramienta de administración
Después de haber instalado satisfactoriamente el Ethernet Powerline Adaptor, tanto la parte hardware
como la herramienta de administración, puedes configurar los dispositivos acorde a tus necesidades.
La herramienta de administración posibilita a los usuarios a identificar los dispositivos en la red
poweline, midiendo la velocidad de transferencia de datos, asegurando la privacidad y realizando
diagnósticos definidos por el usuario en la red poweline.
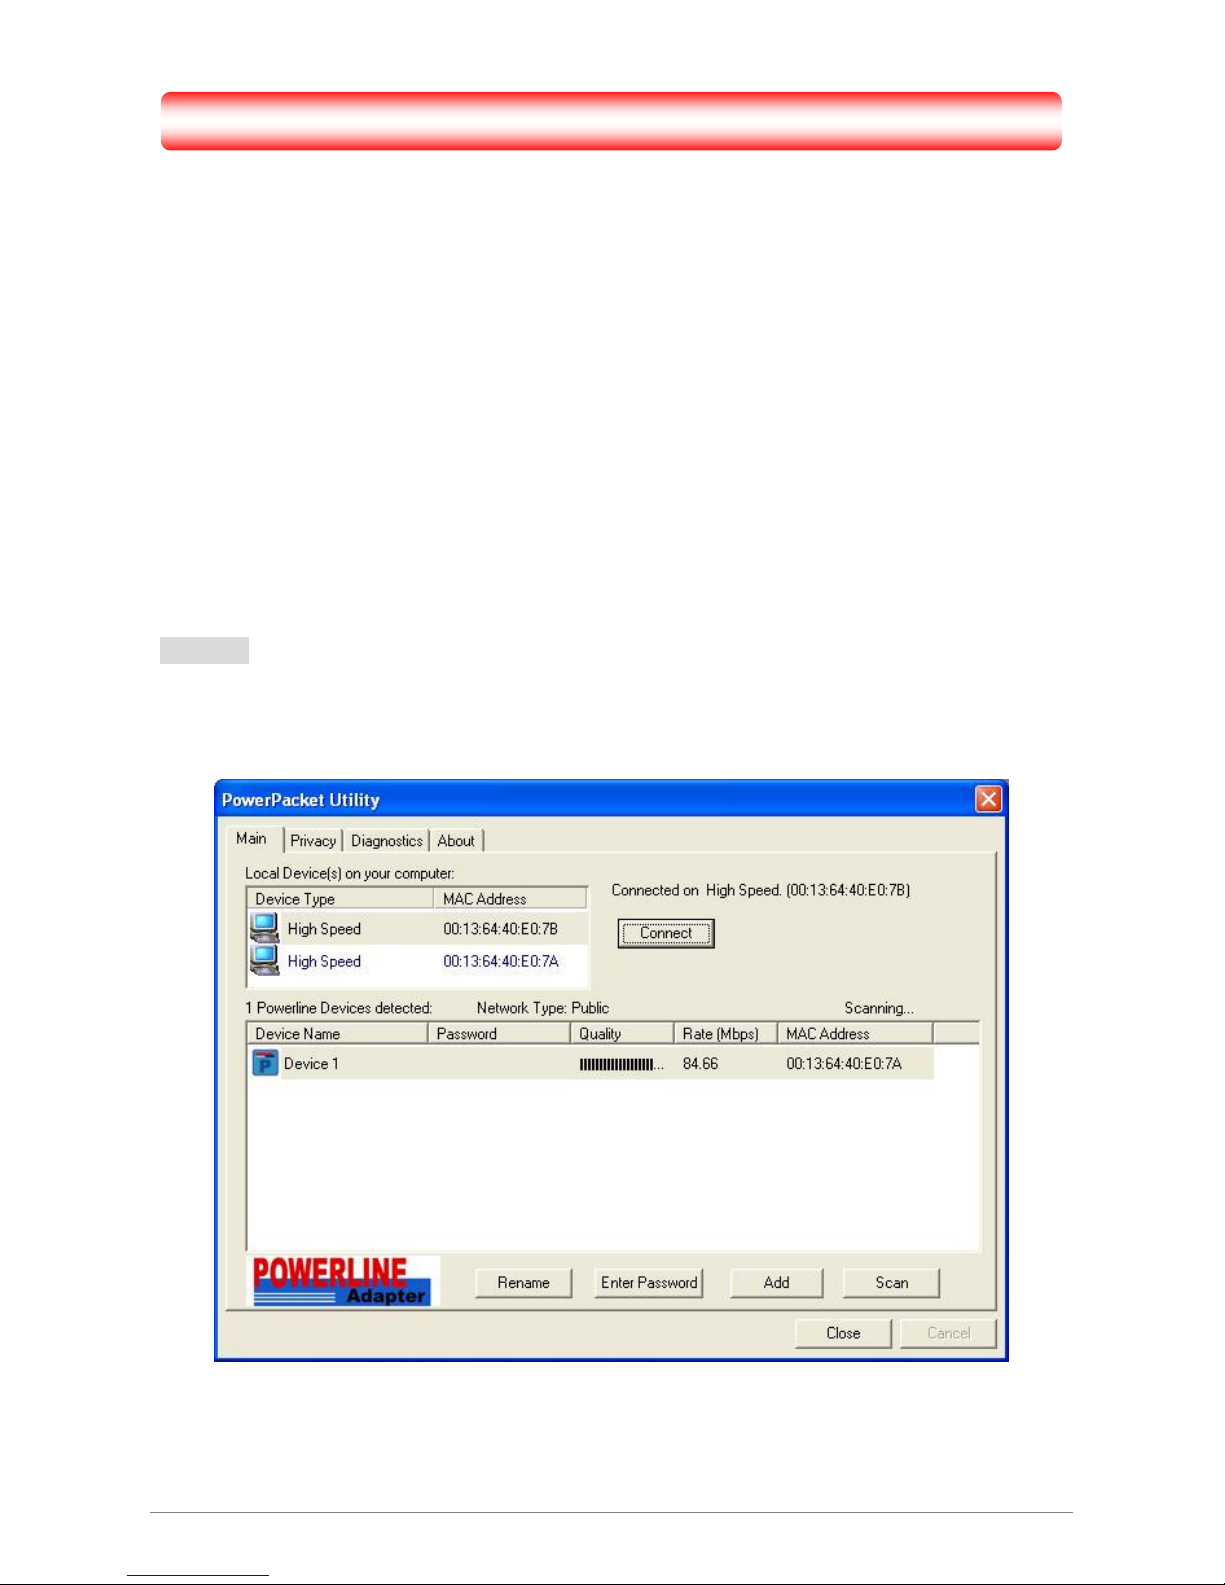
Haciendo doble clic en “Power Packet Utility” en tu escritorio de Windows, la siguiente pantalla
aparece. La herramienta consiste en una serie de pestañas llamadas “Main”, “Privacy”, “Diagnostics” y
“About”.
4.1 Main
La pantalla principal muestra todos los Ethernet Powerline Adaptor que estén conectados de forma
lógica al ordenador donde la herramienta se esta ejecutando.
Ethernet Powerline Adaptor
Page 18

17
Local Device(s) on your computer: Muestra todos los dispositivos conectados a la tarjeta de red
del ordenador. En la mayoría de los casos, solo un dispositivo se mostrará en este panel. Haz clic
y elije el dispositivo local mostrado en la pantalla y pulsa en la pestaña “Connect” para gestionar
el Ethernet Powerline Adaptor. Un mensaje de estado se mostrará sobre el botón “Connect” que
indica que tu PC esta conectado al mismo dispositivo. Una vez que el dispositivo esta
correctamente conectado, esta herramienta automáticamente escaneará la línea buscando otro
dispositivo powerline.
“x” Powerline Devices detected: muestra todos los dispositivos Ethernet Powerline Adaptor
encontrados en la red lógica actual. “x” muestra el número de dispositivos Ethernet Powerline
Adaptor descubiertos por la herramienta de administración.
Network Type: Muestra el tipo de red lógica: “Public” o “Private”.
Autoscan: Muestra el estado del escaneo (Default is “ON”).
Device Name: Muestra el nombre del dispositivo. Se puede renombrar o cambiar el nombre
haciendo clic en el nombre y editando en el campo o pulsando el botón “Rename”.
Password: Muestra la contraseña actual para el Ethernet Powerline Adaptor.
Quality: Muestra la calidad de conexión del Ethernet Powerline Adaptor.
Rate (Mbps): Muestra la tasa de transferencia de datos actual del Ethernet Powerline
Adaptor seleccionado.
MAC Address: Muestra la MAC del Ethernet Powerline Adaptor’s MAC.
Rename: Pulsa para cambiar el nombre del Ethernet Powerline Adaptor seleccionado.
Enter Password: Muestra la contraseña del Ethernet Powerline Adaptor (En inicio esta en
blanco). Para asignar una contraseña al Ethernet Powerline Adaptor (la culpa es necesaria para
crear una red privada), pulsa y elije el dispositivo mostrado en el panel inferior y pulsa en el botón
“Enter Password”. Sigue las ventanas emergentes para completar el proceso.
Add: Pulsa este botón para añadir un Ethernet Powerline Adaptor remoto a la red y que no esta
mostrado en el panel inferior. Sigue las ventanas emergentes para completar el proceso.
Scan: Pulsa el botón “Scan” para hacer una búsqueda inmediata de los Ethernet Powerline
Adaptor conectados al ordenador. La herramienta de administración automáticamente hará el
proceso de escaneo y actualizará la pantalla cada pocos segundos.
Ethernet Powerline Adaptor
Page 19
18
4.1.1 Rename
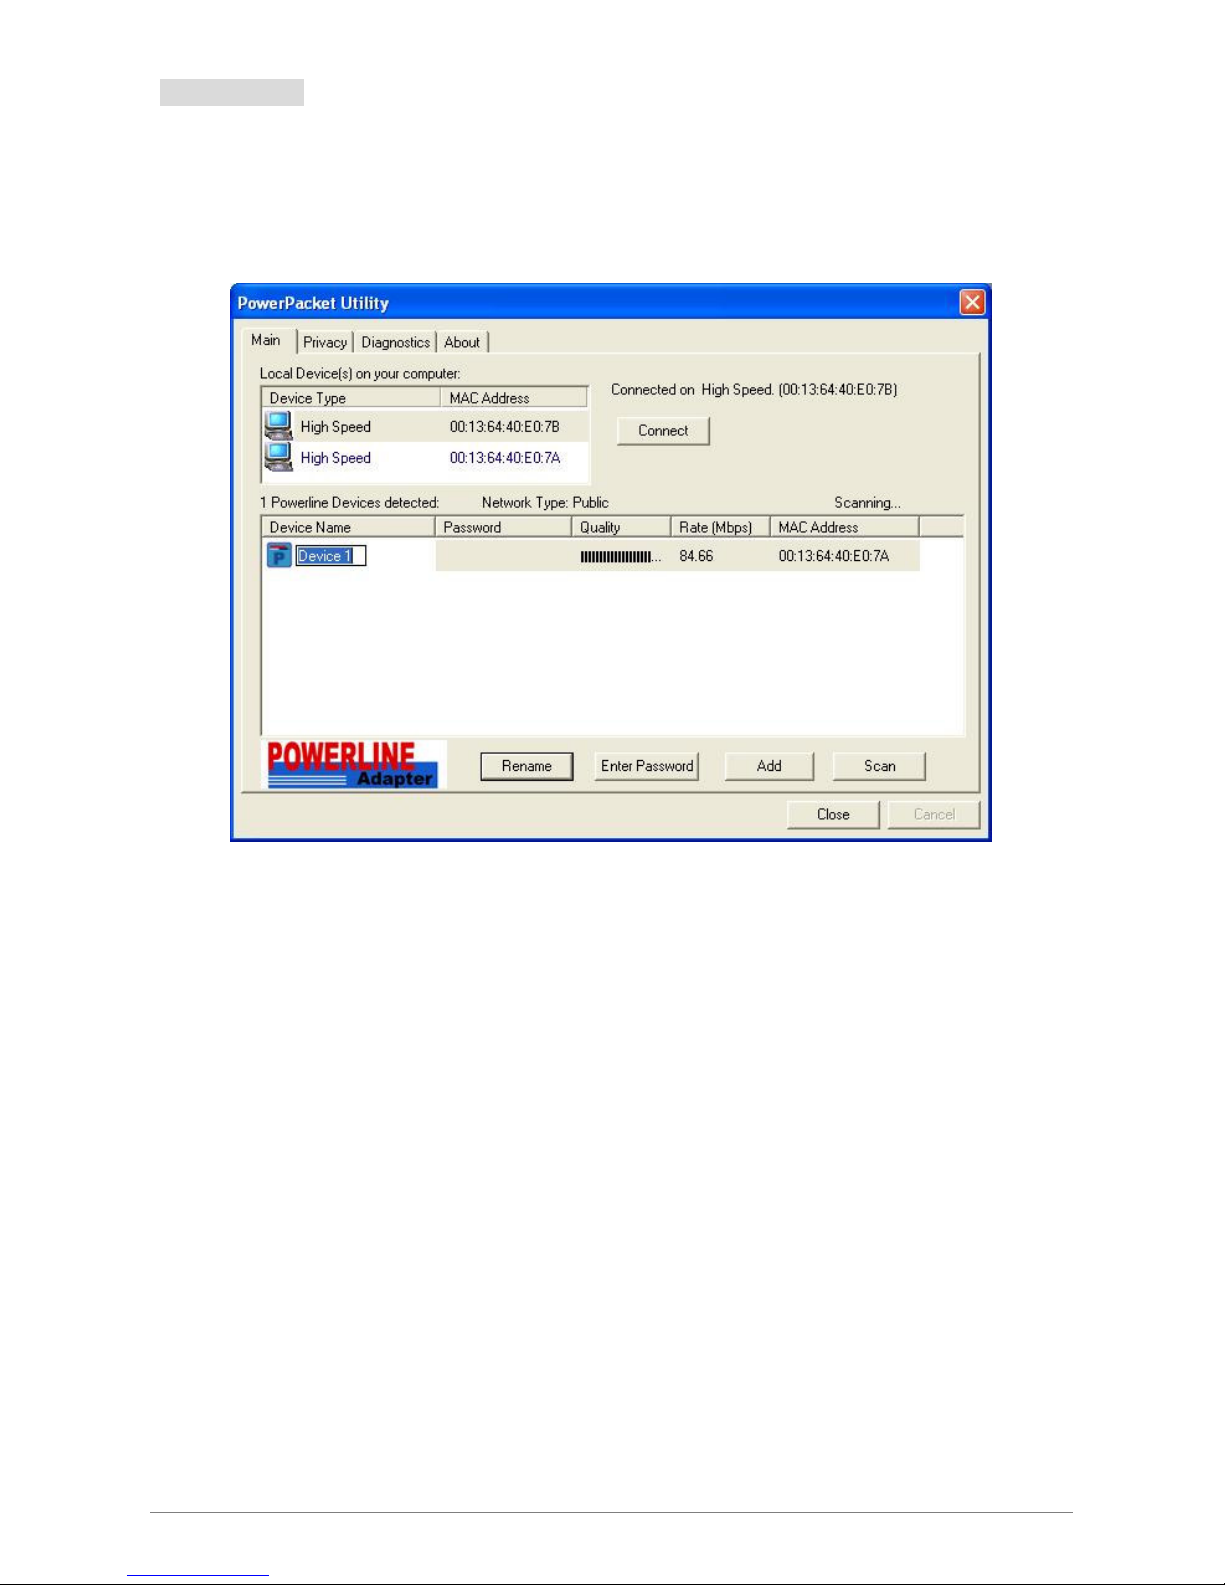
Esta herramienta de administración te permite cambiar el nombre de los Ethernet Powerline Adaptor
listados. Pulsa y selecciona el Ethernet Powerline Adaptor que desees cambiar de la lista, después pulsa en
la pestaña “Rename” y edita en el sitio para cambiar el nombre.
Ethernet Powerline Adaptor
Page 20
19
4.1.2 Enter Password
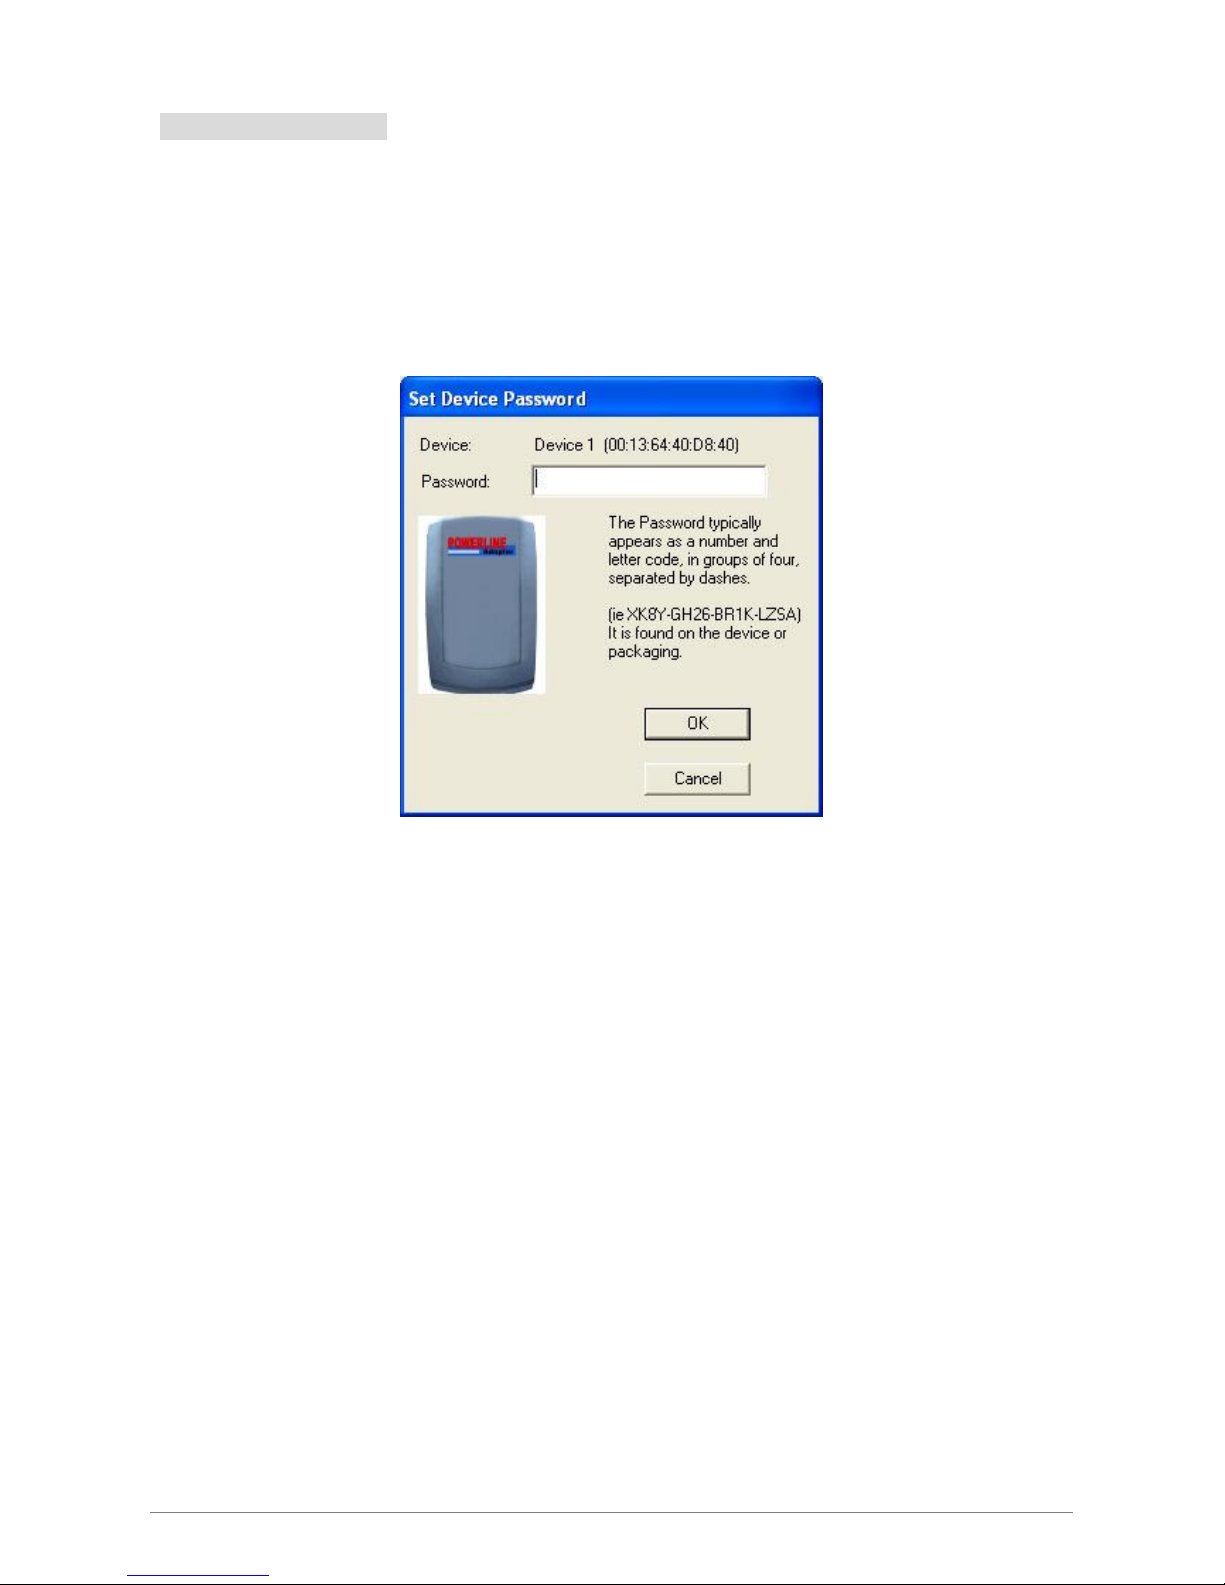
Para activar o cambiar tu contraseña en el Ethernet Powerline Adaptor, pulsa y elije el Ethernet
Powerline Adaptor que desees cambiar de la lista, luego pulsa en la pestaña “Enter Password” , la
siguiente ventana aparece.
Introduce tu contraseña (Toma nota del formato de la contraseña) y pulsa “OK” después.
Nota: El dispositivo Ethernet Powerline Adaptor debe estar presente y enchufado para que la
contraseña sea confirmada y añadida a la red, si el Ethernet Powerline Adaptor no puede ser
localizado, un mensaje de aviso será mostrado.
Ethernet Powerline Adaptor
Page 21
20
4.1.3 Add Device
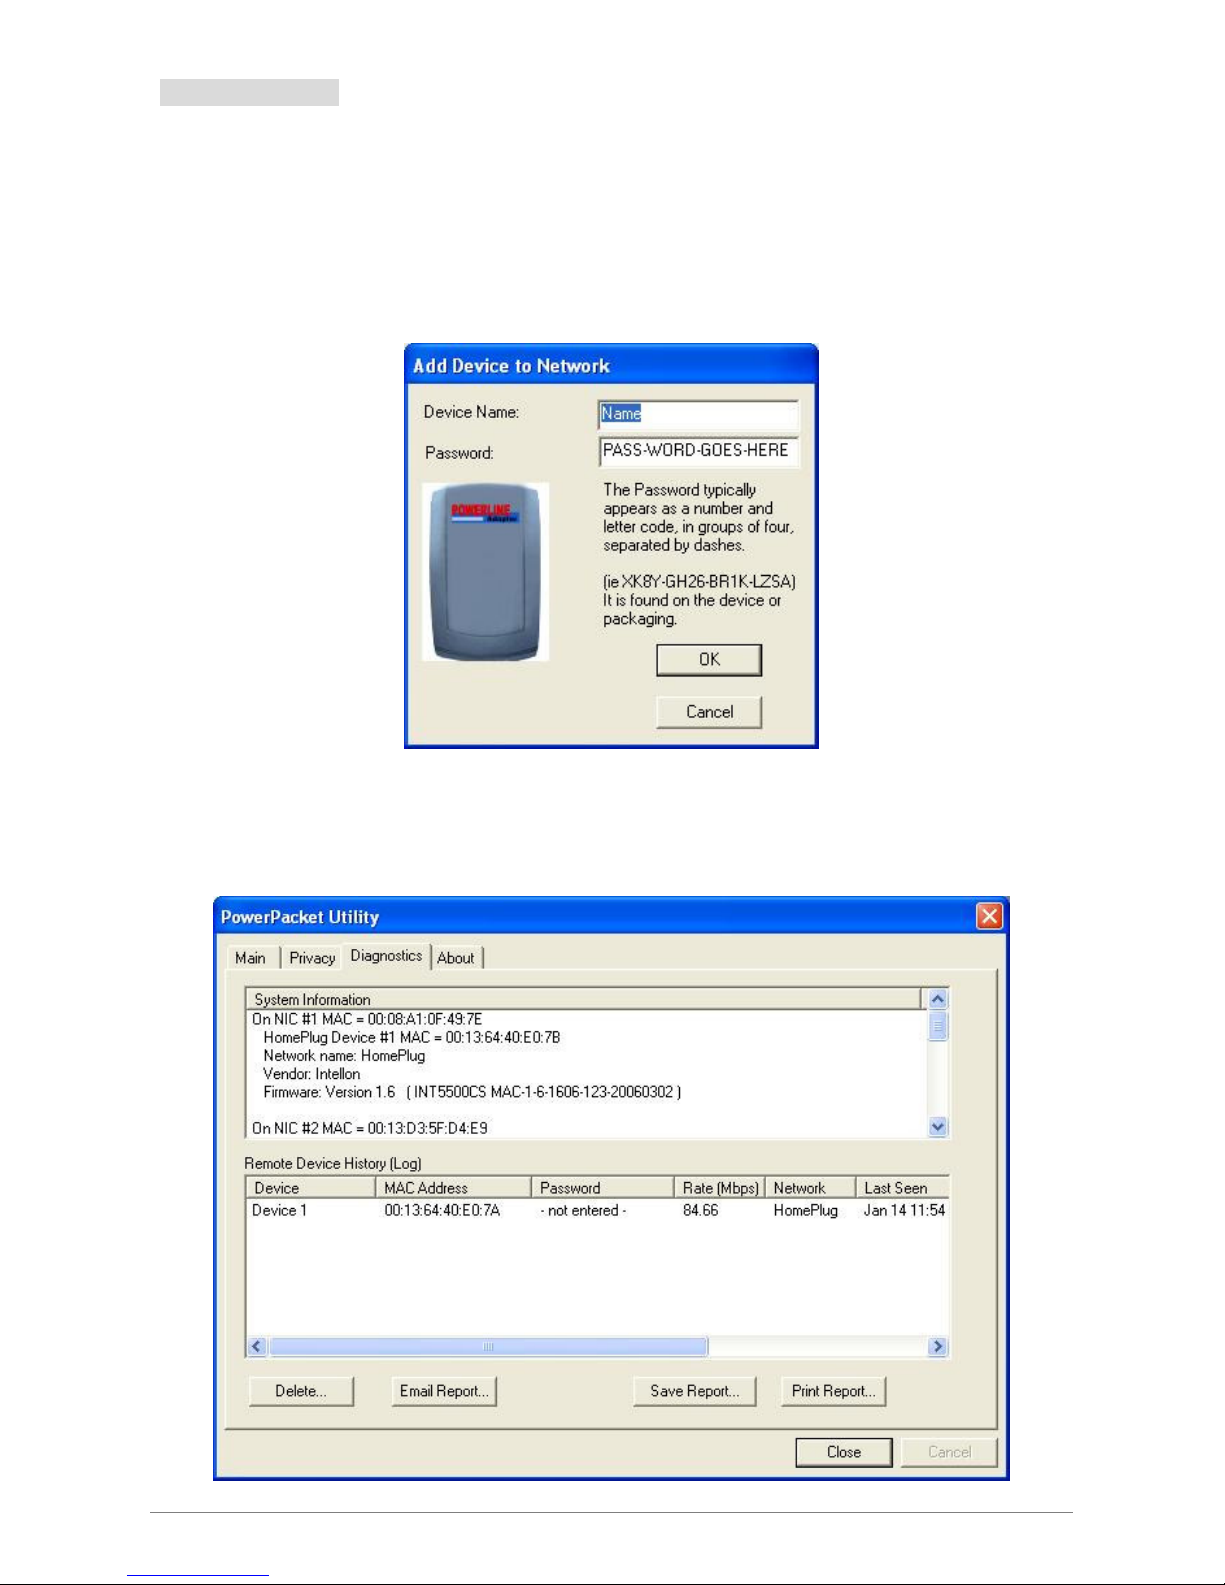
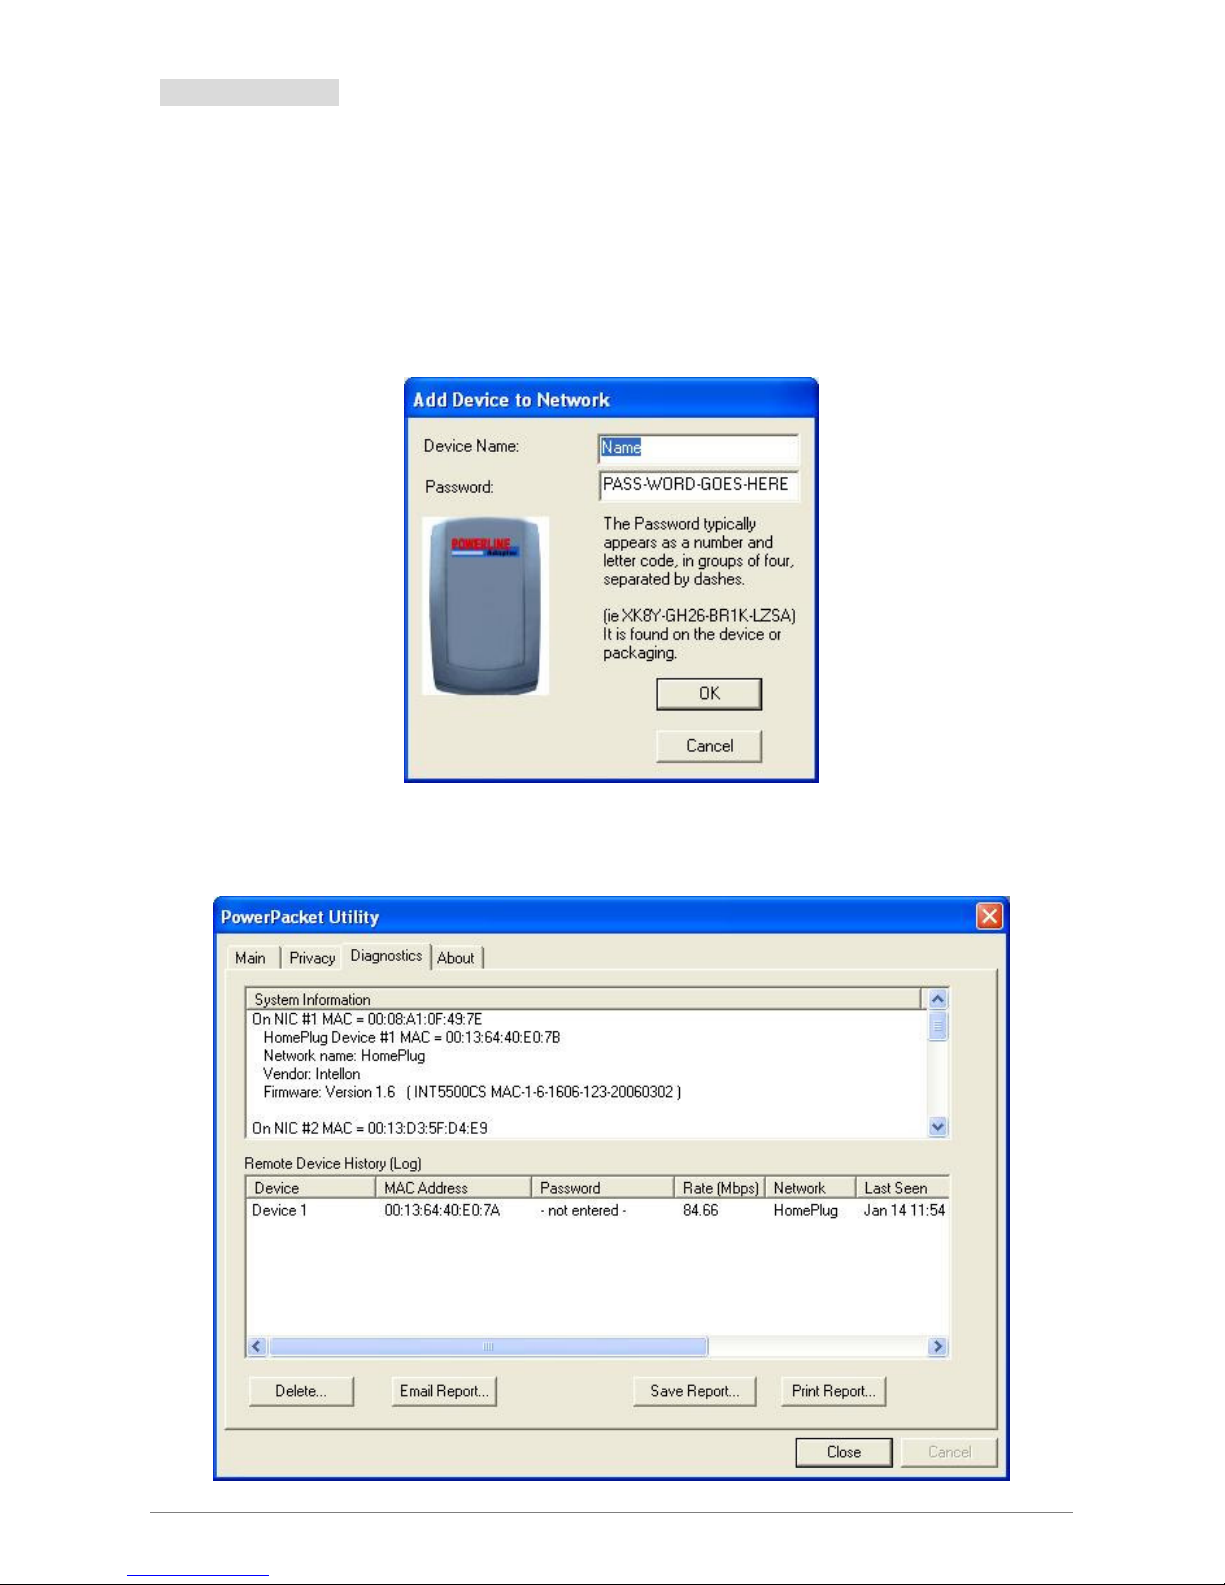
El siguiente dialogo en una ventana emergente se muestra al pulsar el botón “Add”. La ventana te
permite introducir el dispositivo seleccionado y su contraseña. El dispositivo Ethernet Powerline Adaptor
debe estar presente y enchufado para que la contraseña sea confirmada y añadida a la red.
Introduce el nombre y password del dispositivo (Toma nota del formato de la contraseña) y pulsa “OK”
al terminar.
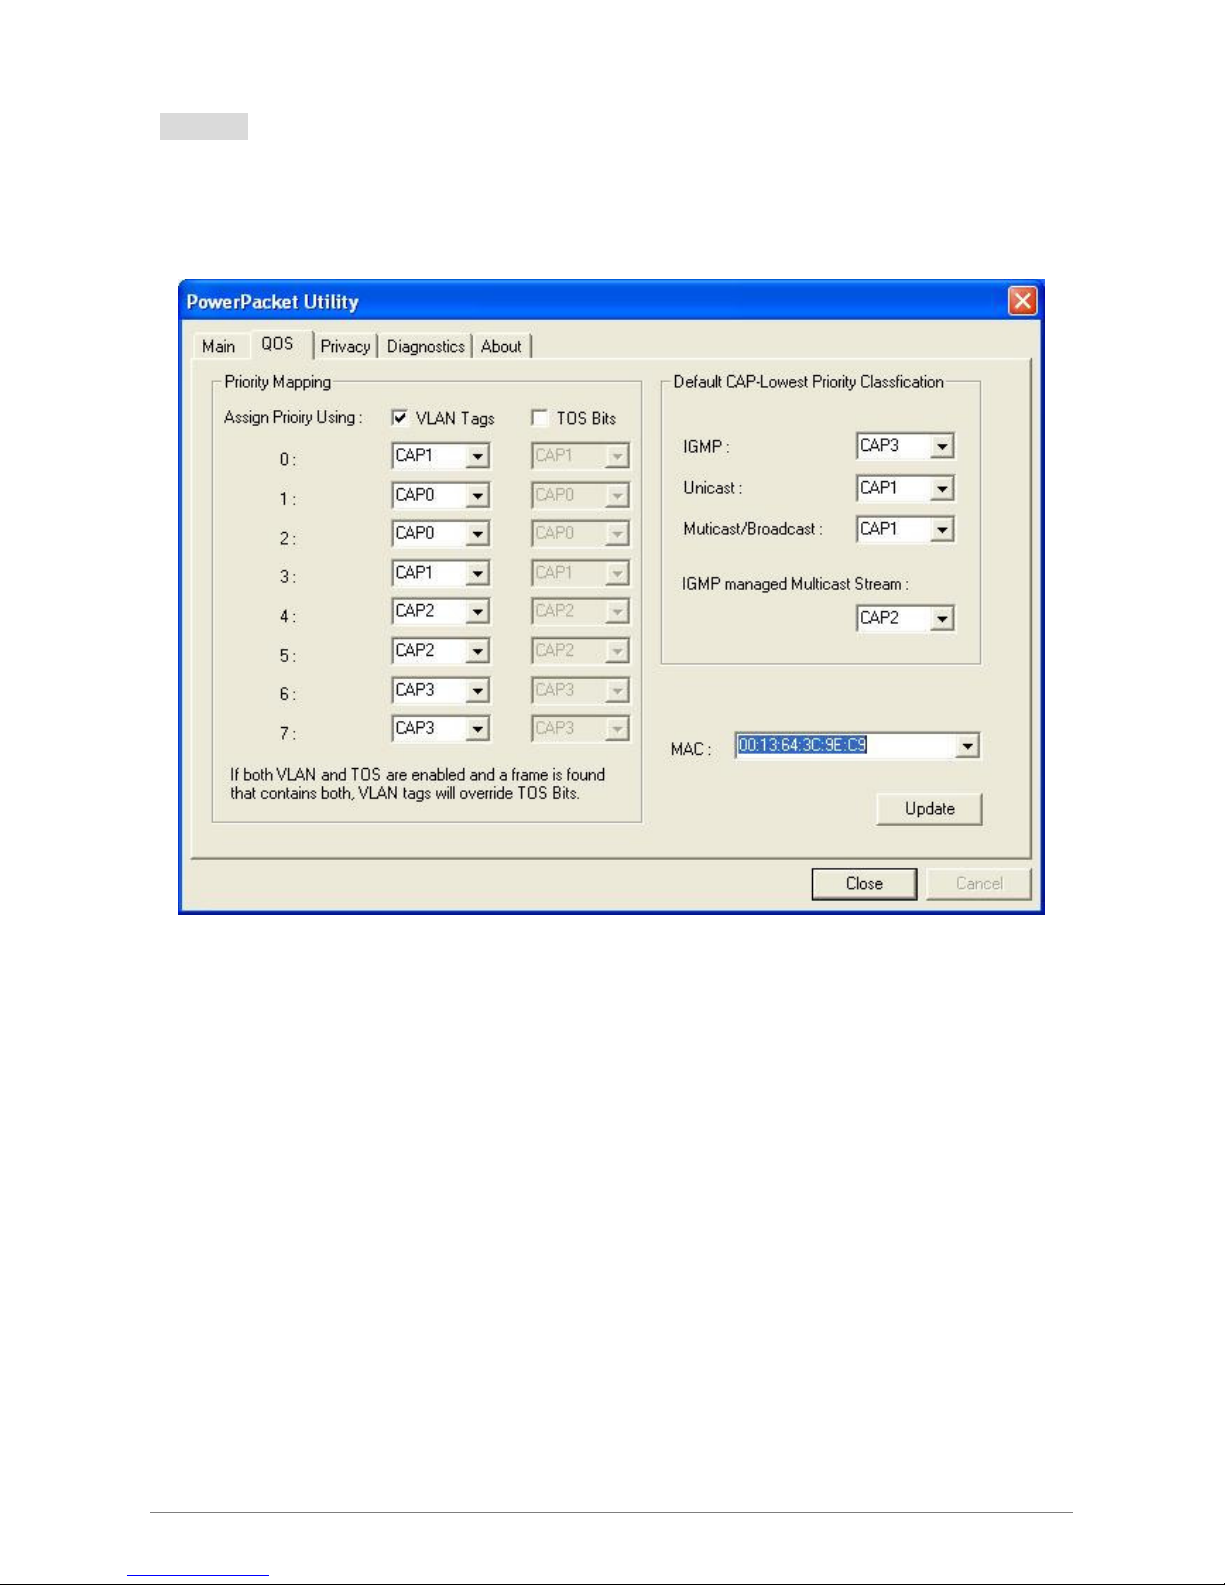
La siguiente ventana aparece después de poner el nombre y la contraseña, es la ventana de principal
de diagnósticos.
Ethernet Powerline Adaptor
Page 22
21
4.2 QOS
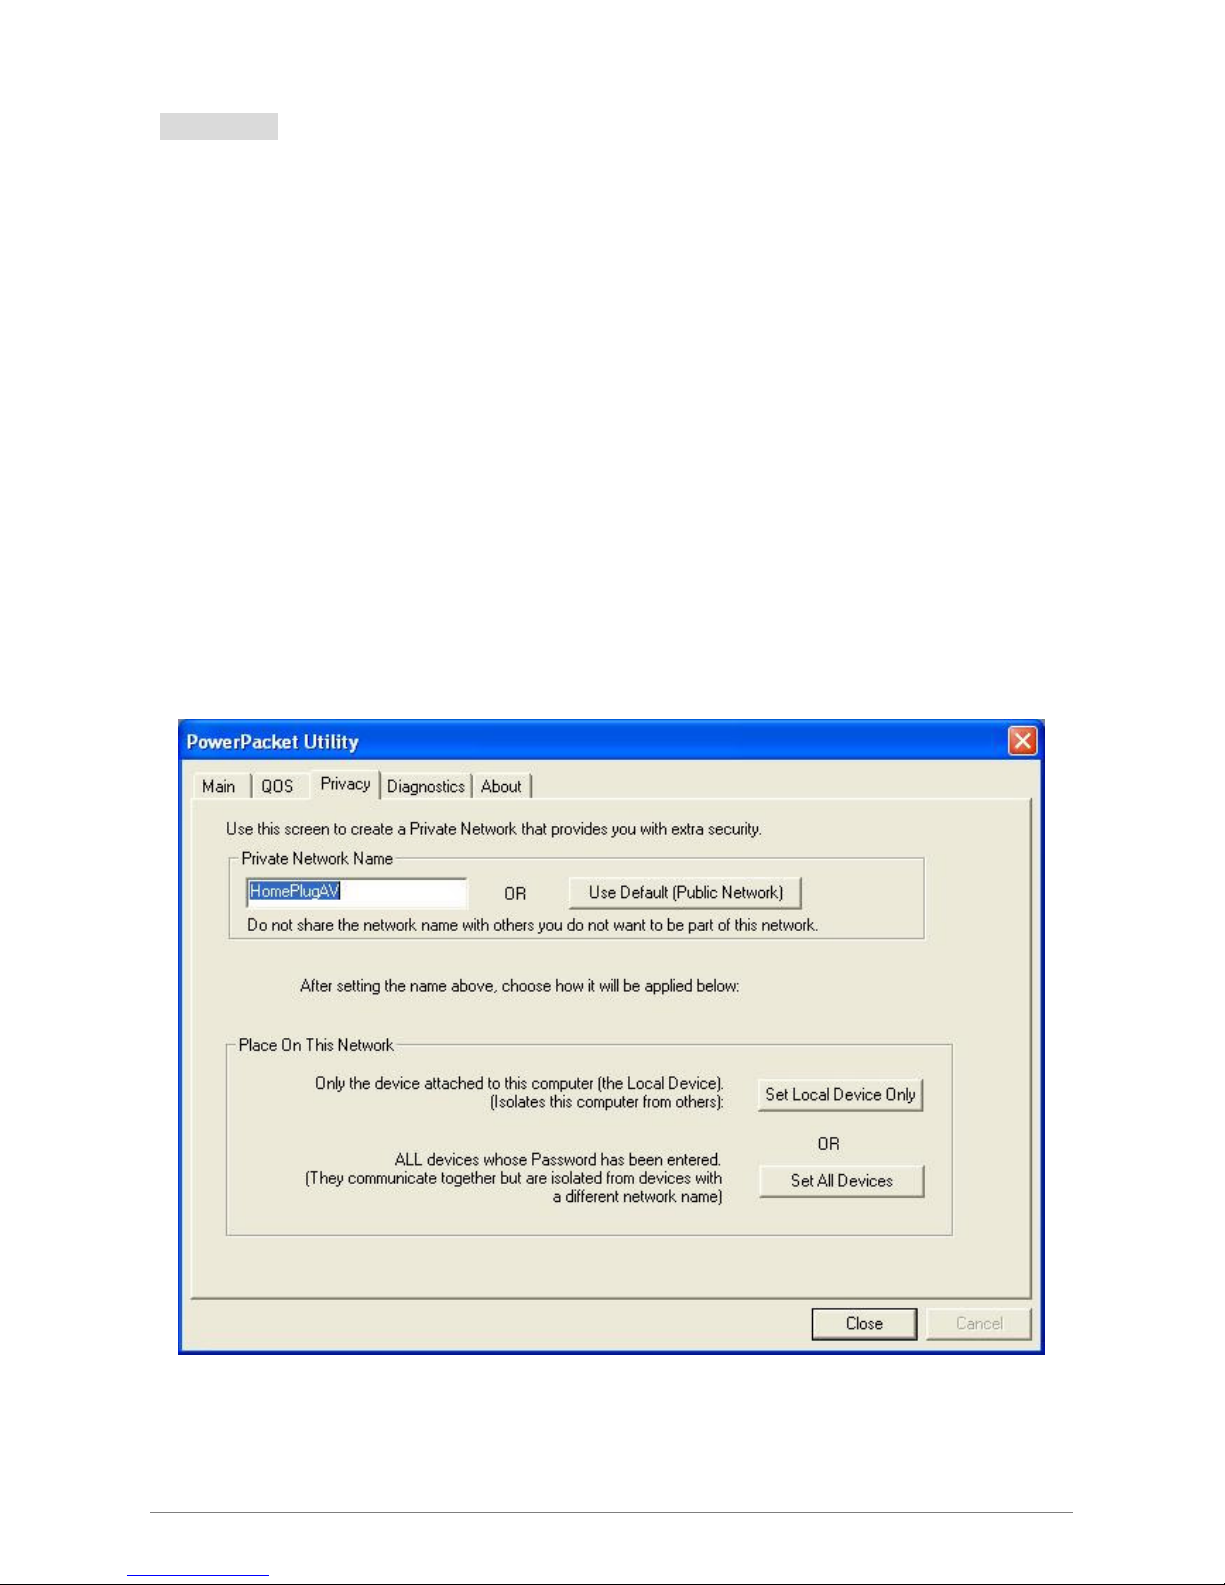
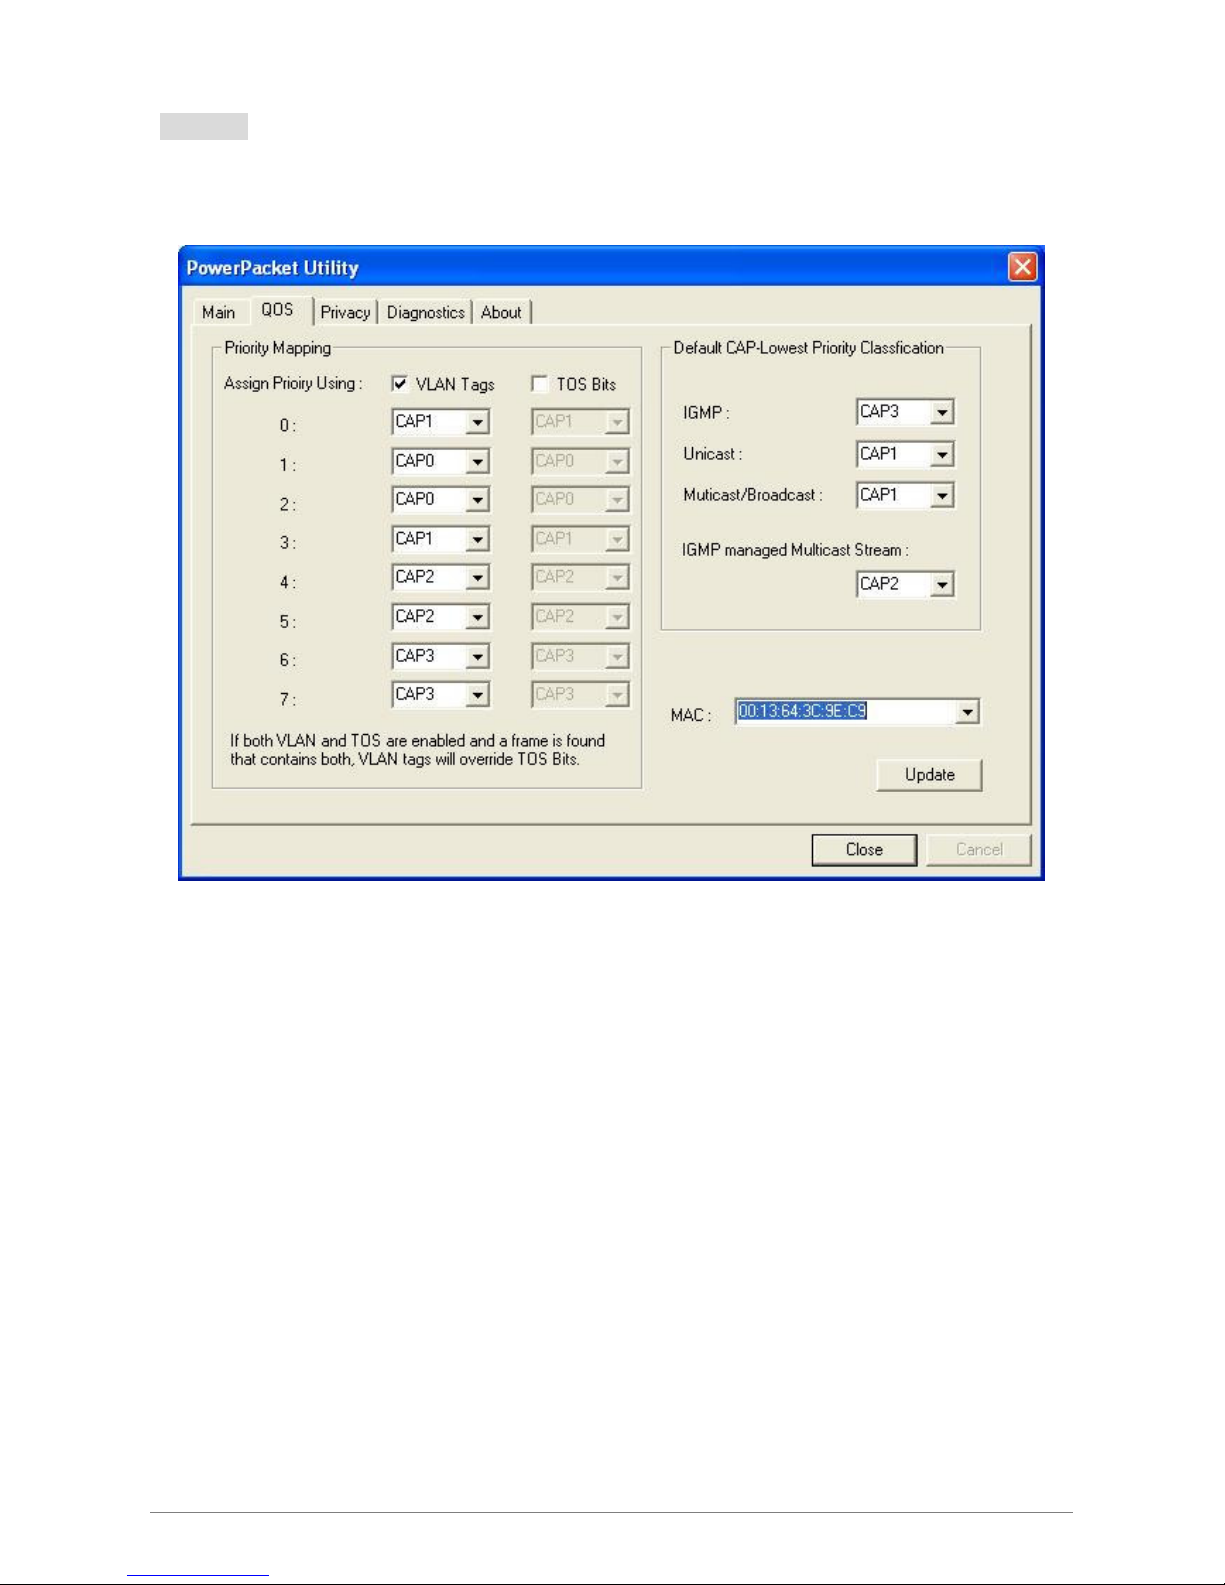
La segunda pestaña de la herramienta de administración, llamada ‘QoS’ para la calidad del servicio, se
muestra en la figura.
Los requisitos de QoS son diferentes para los diferentes tipos de datos como streaming de video o música,
voz y datos. Para asegurar un mayor QoS para streaming de datos, una prioridad de niveles puede ser
usada por medio de marcas al principio de los frames de datos. En una red Virtual de Area Local (Vlan)
802.1p las marcas de prioridades en los frames Ethernet son usadas para especificar 8 (0~7) niveles de
“prioridad de usuario”. HomePlug TURBO permite hasta 4 niveles de canales de prioridad de acceso
(CAP(0-3)). De todas formas, los 8 niveles de las marcas de VLAN Ethernet deben ser mapeados a los 4
niveles de prioridad CAP, donde CAP 3 es la mayor prioridad y CAP 0 es la menor. La prioridad CAP 3 puede
ser usada para voz, CAP 2 es usada para streaming de video mientras que CAP 1 y CAP 0 se usan para
datos.. Mapear marcas VLAN o TOS bits para los niveles CAP es sencillo usando la función de mapeo de
prioridades de VLAN en la ventana QoS.
El grupo ‘Priority Mapping’ contiene capacidad de mapeo para ambos, VLAN y TOS Bit. Cuando esta
seleccionado, a los paquetes correspondientes a la VLAN o la prioridad TOS Bit le serán correctamente
asignados su prioridad, si un paquete tiene ambos seleccionados, VLAN será quien tiene la prioridad.
Ethernet Powerline Adaptor
Page 23

22
El grupo ‘Default CAP’ permite mapear prioridades por defecto que no tienen VLAN or TOS bit (o si estan
desactivados). Esta opción esta disponible para Unicast (directamente a un host).
IGMP - (CAP 3 por defecto) – Marca la prioridad del canal de acceso para marcos IGMP – Estos
son los marcos de gestión de grupo, no los datos en stream.
Unicast – (CAP 1 por defecto) – Marca la prioridad del canal de acceso para marcos unicast que no
coinciden con ninguna otra clase de marcos.
IGMP managed Multicast Stream (Fijo en CAP 2) – Marca la prioridad del canal de acceso para
stream de datos pertenecientes al grupo IGMP de multidifusión.
Multicast/Broadcast – Marca el CAP predefinido para marcos de multidifusión que no están en
grupo.
Después de poner las características, pulsando en el botón “Write” enviara estos datos de la tabla de
configuración a la memoria NVRAM del dispositivo conectado.
Ethernet Powerline Adaptor
Page 24
23
4.3 Privacy
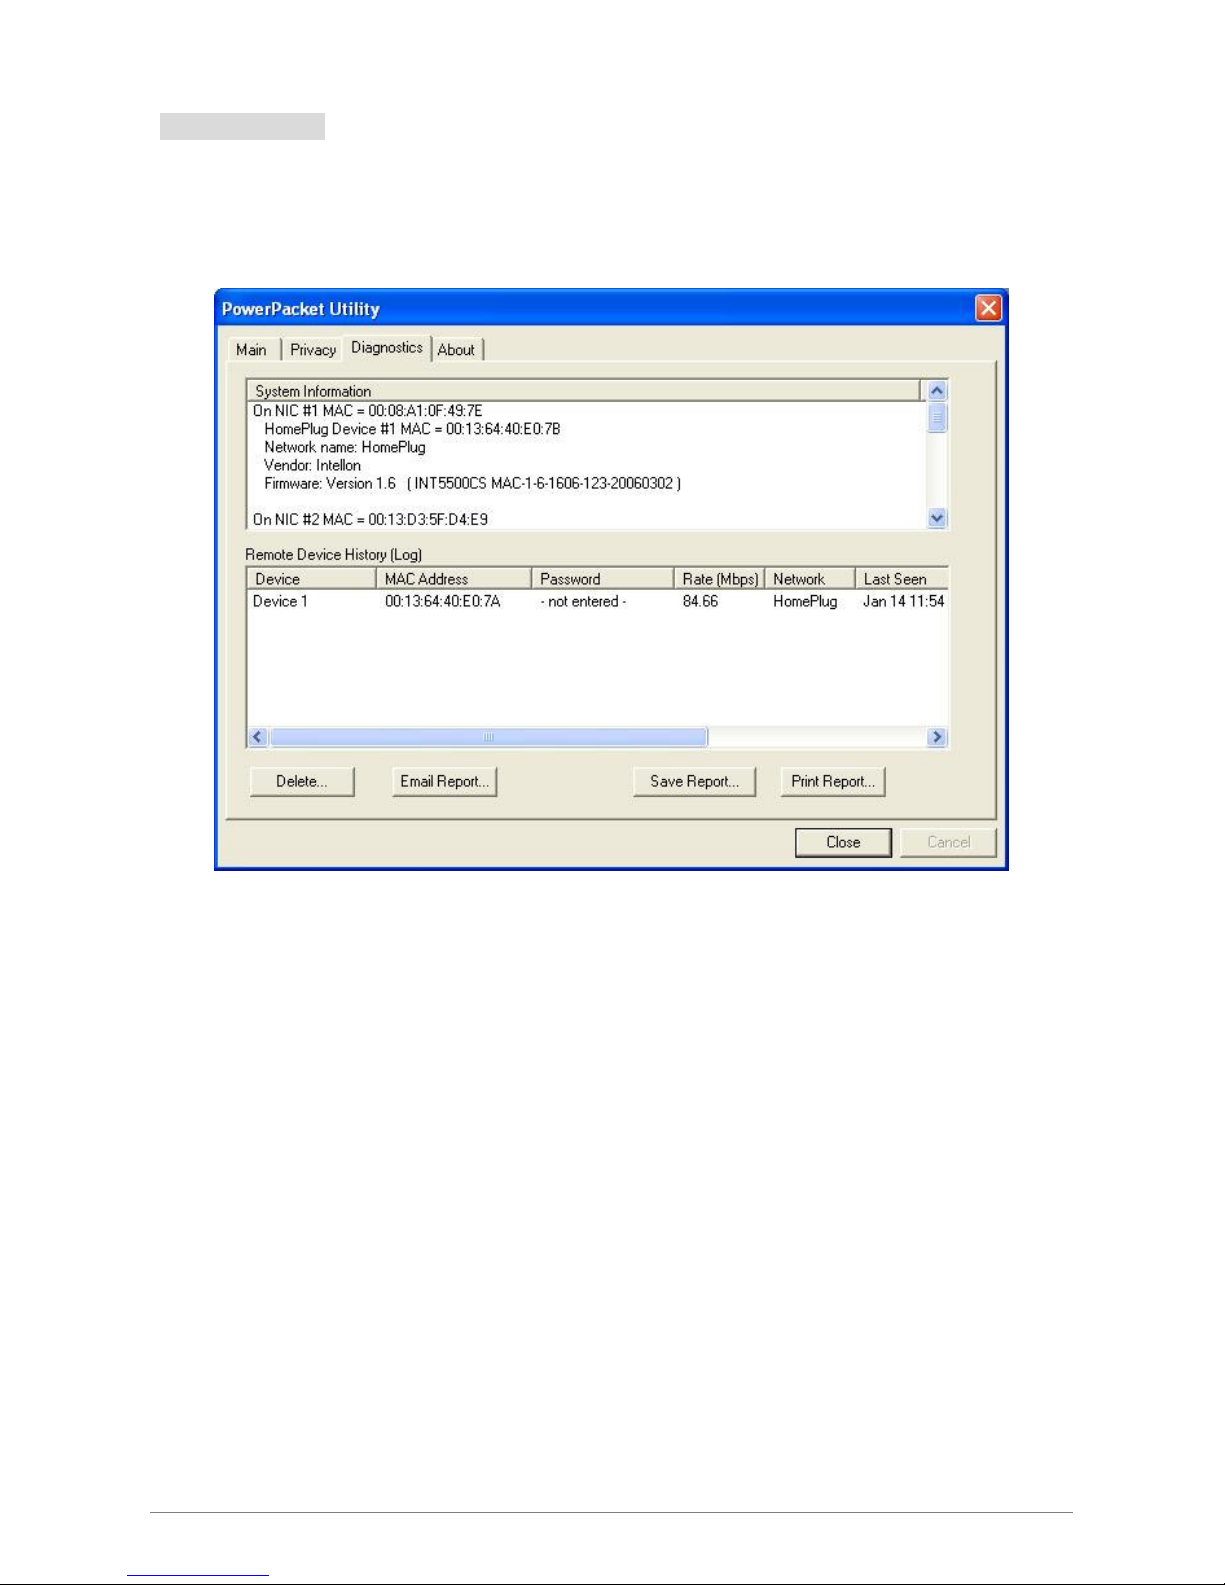
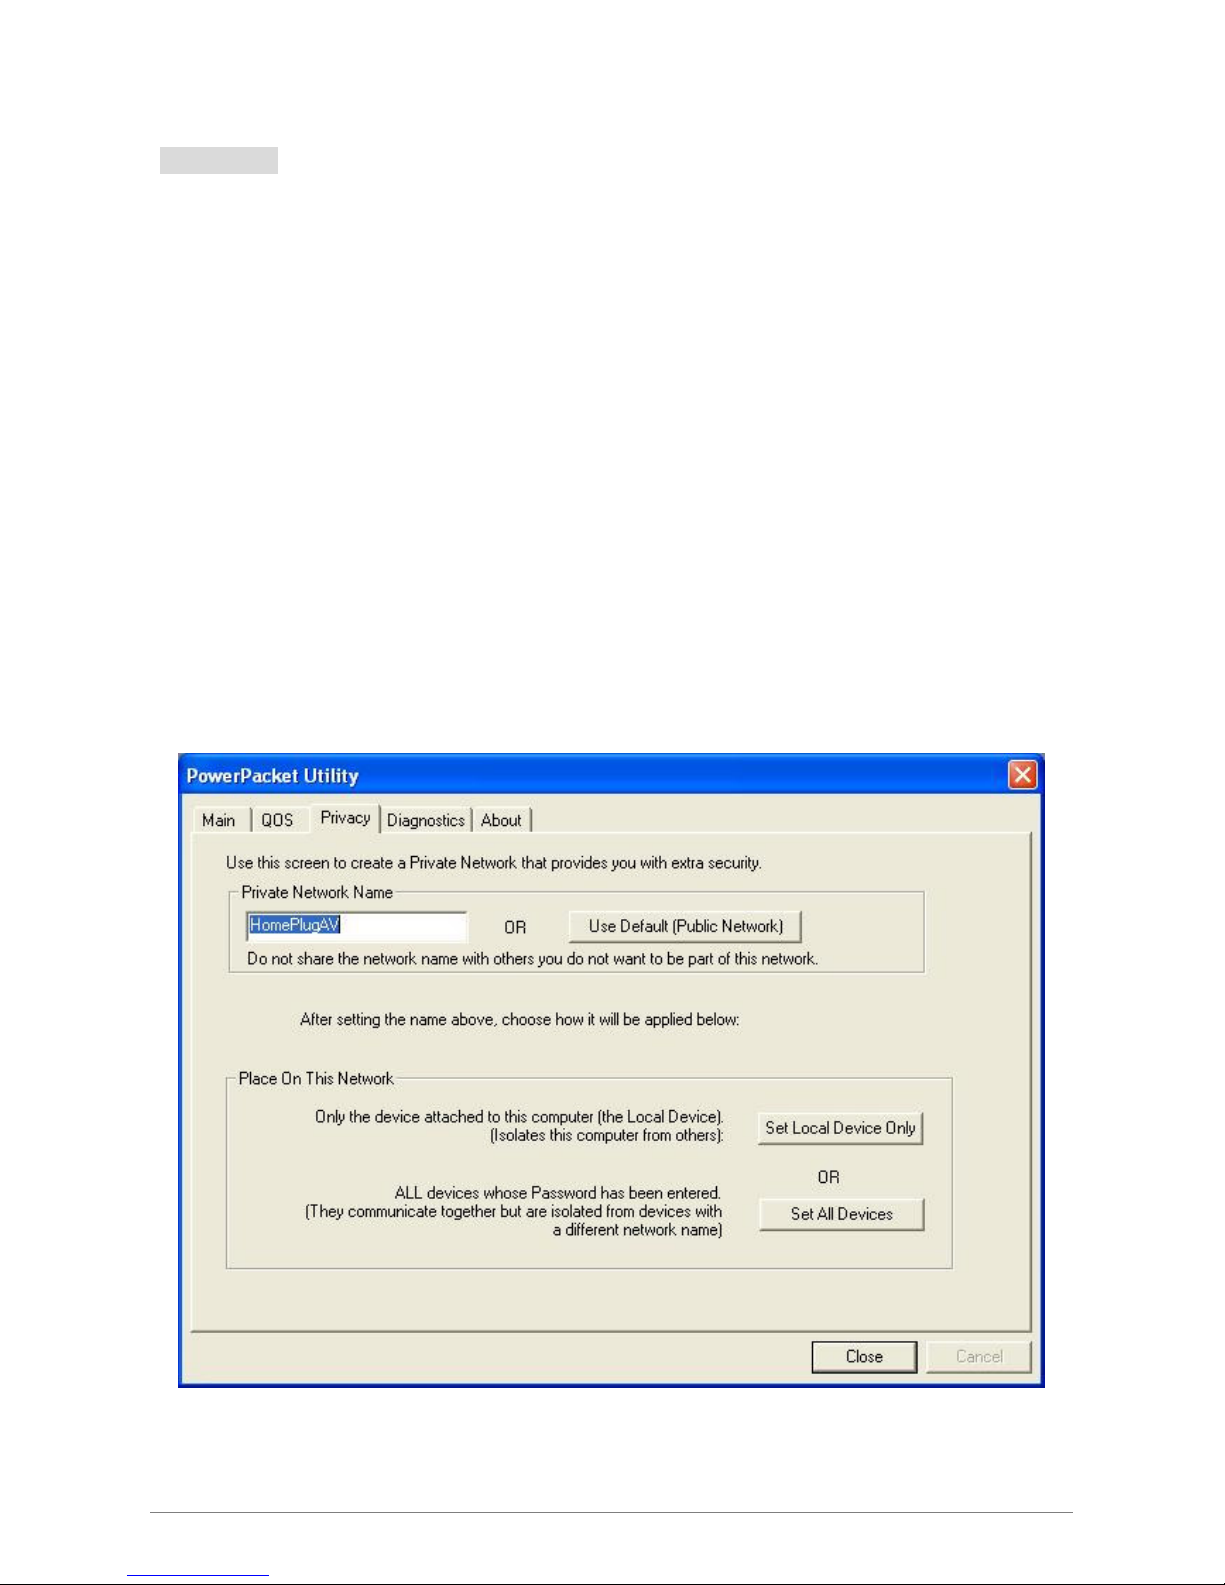
La página de configuración Privacy proporciona los medios para manejar la red, proporcionar la
seguridad adicional para la red lógica y también seleccionar los dispositivos que tiene que ser incluidos en la
red. Todos los dispositivos HomePlug se venden usando una unidad lógica de red (nombre de red) que es
normalmente “HomePlug”
La página Privacy de configuración permite cambiar el nombre de una red de Ethernet Powerline
Adaptor que esta actualmente conectado a un ordenador en una red privada. Cambia la red privada a una
red publica universal pulsando en “Use Default (Public Network)” o editando “HomePlug” bajo la columna
de “Private Network Name” que esta siempre disponible.
Tome nota de que cada Ethernet Powerline Adaptor en su red casera DEBE tener la misma contraseña
de red para que la conectividad pueda ser establecida a través de su casa.
Nota: Cambiando el nombre de red a algún otro que no sea “HomePlug” cambiará el tipo de red
en la ventana principal “Private”.
Ethernet Powerline Adaptor
Page 25

24
Set Local Device Only: Pulsa en este botón para cambiar solo el nombre de red del dispositivo
local Ethernet Powerline Adaptor. Todos los Ethernet Powerline Adaptor vistos en la ventana
Main anteriores a esto no volverán a estar presentes en la nueva red, haciendo al dispositivo local
que no pueda comunicar con los dispositivos que estan en la Antigua red lógica. Los dispositivos
con el mismo nombre de red apareceran en la lista de dispositivos.
Set All Devices: Este botón cambia la red lógica de todos los dispositivos que aparecen en la
ventana Main. Una ventana aparecerá para indicar que la operación a sido correctamente
ejecutada. Para dispositivos cuya contraseña no ha sido introducida, esta operación fallada y dará
un mensaje de error.
Ethernet Powerline Adaptor
Page 26
25
4.4 Diagnostics
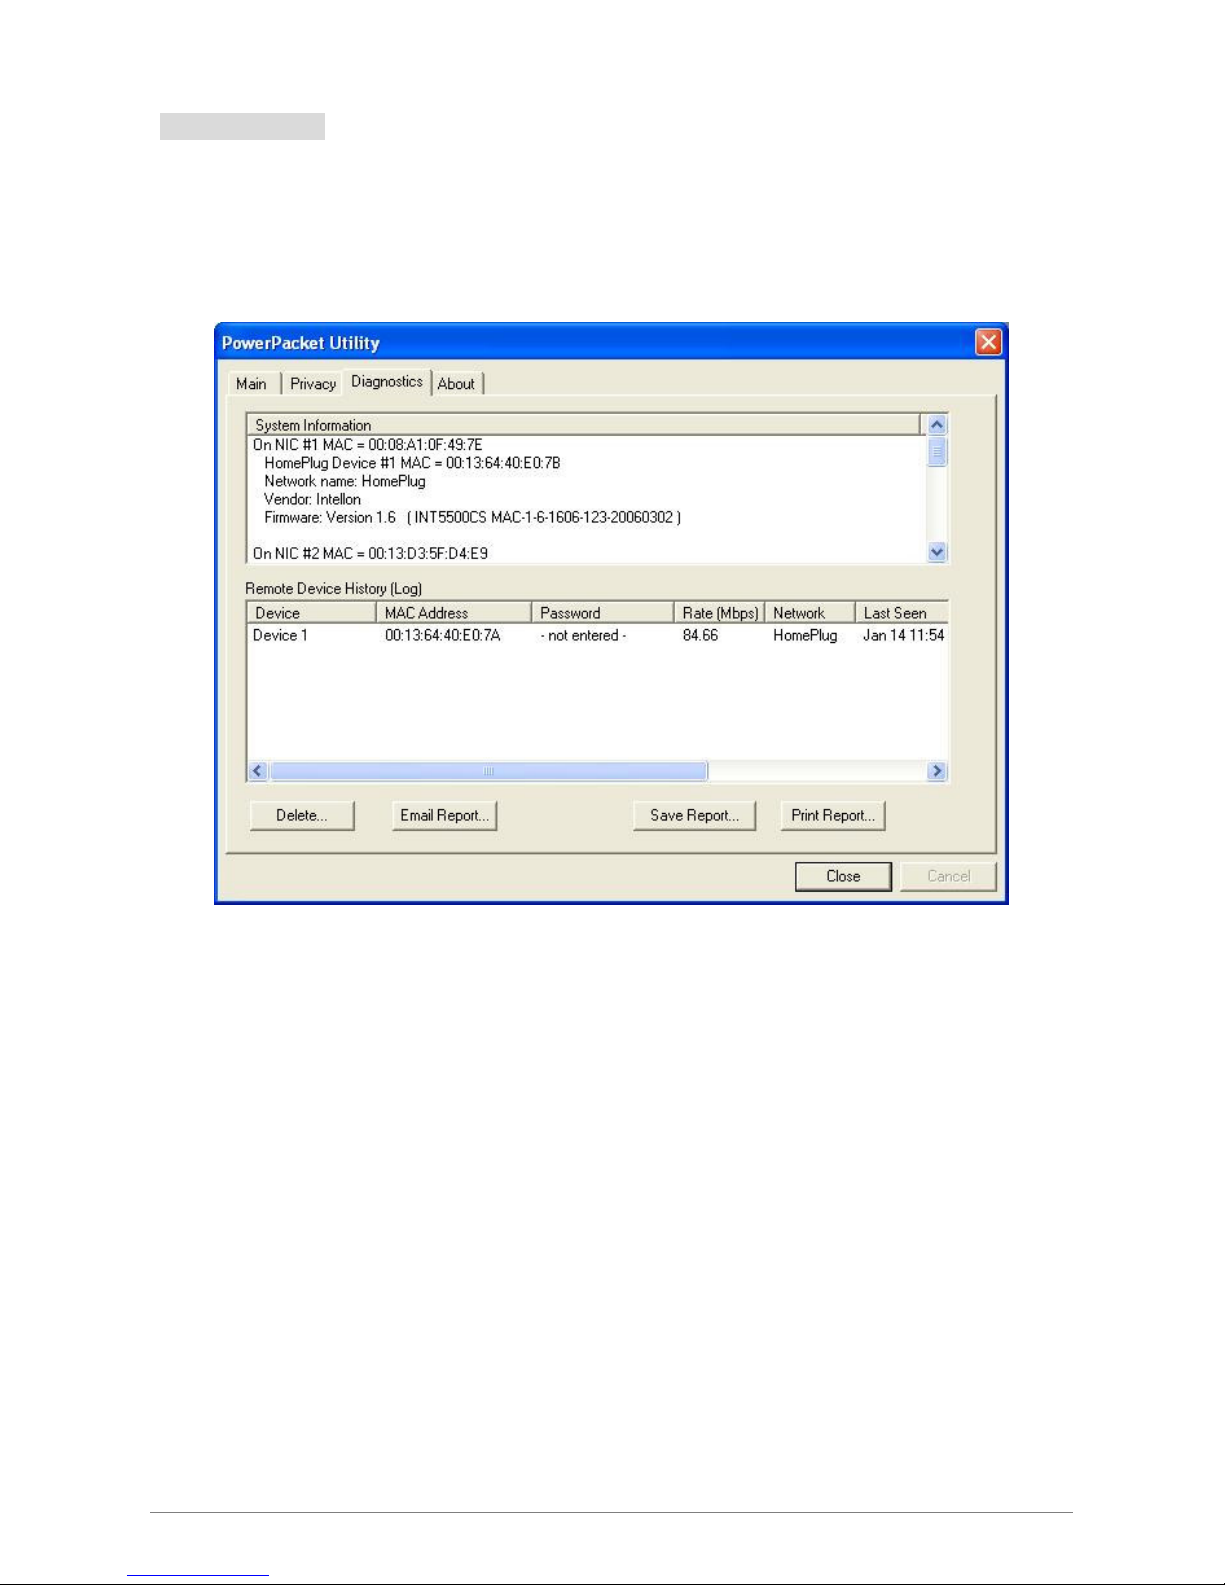
La ventana Diagnostics muestra la información del sistema y la historia de dispositivos de todos
los dispositivos vistos. Pulse en la pestaña “Diagnostics” y se mostrara la siguiente ventana.
La información mostrada puede ser guardada en un archivo de texto. Puede mandar por correo electrónico
al vendedor local cuando necesite soporte técnico o imprimir el archivo de texto como referencia durante una
conferencia técnica.
El panel superior muestra datos sobre software y hardware presentes en el ordenador que comunica
con el Ethernet Powerline Adaptor en la red Powerline. Incluye lo siguiente:
Sistema Operativo/Versión
Nombre del host de la red
Nombre de usuario
Dirección MAC de todas las NICs conectadas al host
Versiones de todas las librerías de controladores usadas
Direcciones MAC de todos los dispositivos conectados localmente al host
Pulsa en la pestaña “Delete” cuando el Ethernet Powerline Adaptor no forme ya parte de la red.
Ethernet Powerline Adaptor
Page 27

26
El panel inferior contiene un historial de todos los dispositivos Ethernet Powerline Adaptor vistos en el
ordenador durante un periodo de tiempo. Todos los dispositivos que han estado en la red Powerline esta
listados aquí con algunos parámetros. Los dispositivos Ethernet Powerline activos en la red lógica actual
mostraran su tasa de transferencia de datos en una columna, los dispositivos en otras redes o los
dispositivos que ya no están en la red se muestran con un “?”. La siguiente información esta disponible en la
ventana de diagnósticos:
Nombre.
Dirección MAC.
Contraseña.
Ultima tasa de transferencia conocida.
Ultimo nombre de red conocido.
Ultima vez visto en la red.
La información mostrada puede ser guardada en un archivo de texto. Puede mandar por correo
electrónico al vendedor local cuando necesite soporte técnico. El Ethernet Powerline Adaptor que ya no este
en la red, puede ser borrado usando el botón “delete”, una ventana de confirmación se abrirá si ha decidido
borrar un dispositivo que tenía contraseña.
Ethernet Powerline Adaptor
Page 28
27
4.5 About
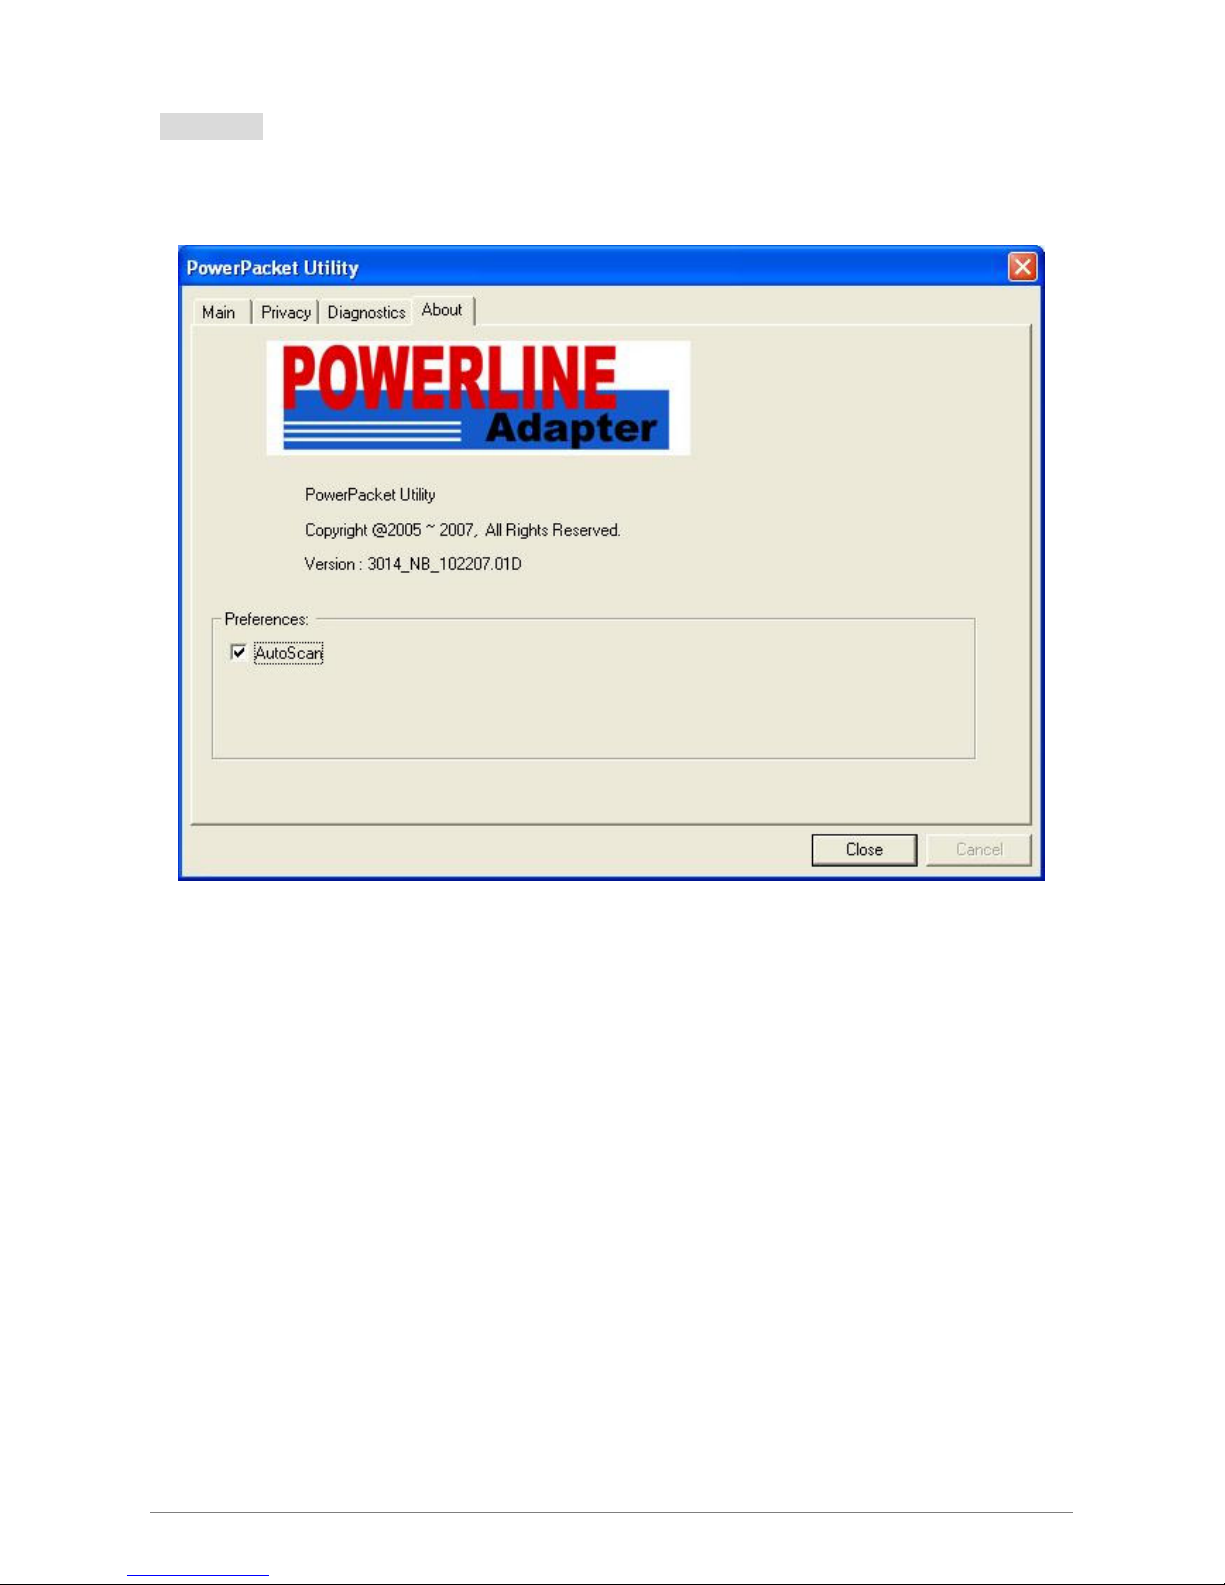
La ventana About muestra el número de versión de la herramienta de administración.
AutoScan: Cuando esta activada, la herramienta de administración automáticamente escanea
buscando dispositivos Ethernet Powerline Adaptor en la red local cada pocos segundos y
actualiza la información en la pagina principal Main.
Ethernet Powerline Adaptor
Page 29

28
Apendice A: Guía de Solución de Problemas
Esta guía da respuesta a las preguntas más recuentes sobre el Ethernet Powerline Adaptor.
1. la luz de funcionamiento no se enciende.
Respuesta. Comprobar lo siguiente:
1. Asegúrese que el Ethernet Powerline Adaptor esta bien enchufado a la corriente eléctrica.
2. Asegúrese de que el enfuche tiene corriente enchufando otro producto eléctrico en él.
3. Vuelve a enchufar el Ethernet Powerline Adaptor al enchufe de Nuevo. Si la luz de
funcionamiento todavía no enciende, contacta con tu vendedor para soporte técnico.
2. El LED de Ethernet no se enciende.
Respuesta. Comprobar lo siguiente:
1. Asegúrese de que el cable de de Ethernet (RJ-45) esta correctamente conectado al Puerto
de Ethernet Powerline Adaptor.
2. Asegúrese de que el cable de Ethernet (RJ-45) esta correctamente conectado al puerto de
la tarjeta de red del PC o al puerto de tu Cable/Adsl.
3. Asegúrese de que la tarjeta de Ethernet esta correctamente instalada y configurada.
4. Asegúrese de que su Adsl esta correctamente configurada y operativa.
5. Contacte con el departamento técnico de su distribuidor si el LED de Ethernet no se
enciende después de varios intentos de encendido.
3. El LED de Powerline no se enciende.
Respuesta. Comprobar lo siguiente:
1. Hacer doble click en la herramienta de administración, a continuación, pulse en “Scan”, bajo la
pestaña “Main” de la ventana de configuración. La herramienta de administración detectara
automáticamente todos los Ethernet Powerline Adaptor que haya en tu red eléctrica.
2. intenta enchufar un Segundo Ethernet Powerline Adaptor en un Enfuche cercano y
comprueba si la luz de Powerline se enciende o no.
3. Contacta con tu vendedor local por soporte técnico si el led de Powerline sigue sin encender
después de estos procedimientos.
Ethernet Powerline Adaptor
Page 30

29
Copyright
The contents of this publication may not be reproduced in any part or as a whole, stored, transcribed in
an information retrieval system, translated into any language, or transmitted in any form or by any means,
mechanical, magnetic, electronic, optical, photocopying, manual, or otherwise, without the prior written
permission.
Trademarks
All product, company, brand names are trademarks or registered trademarks of their respective
companies. They are used for identification purpose only. Specifications are subject to be changed without
prior notice.
Ethernet Powerline Adaptor
Page 31

30
FCC Radiation Norm
This equipment has been tested and found to comply with limits for a Class B digital device pursuant to
47 CFR, Part 2 and Part 15 of the Federal Communication Commission (FCC) rules. Operation is subject to
the following Two conditions:
3. This device may not cause harmful interference
4. This device must accept any interference received including interferences that may cause
undesired operations.
CE Radiation Norm
This equipment has been tested and found to comply with the limits of the European Council Directive
89/336/EEC on the approximation of the law of the member states relating to EN
55022:1998/A1:2000/A2:2003 Class B, EN6100-3-2:2000, EN 61000-3-3:1995/A1:2001, EN
55024:1998/A1:2001/A2:2003 and EN 60950.
FCC & CE Compliance Statement
These limits are designed to provide reasonable protection against radio interference in a residential
environment. This equipment can generates, uses and radiate radio frequency energy and, if not installed
and used in accordance with the instructions, may cause harmful interference to radio communications.
However, there is no guarantee that interference will not occur in a particular installation. If this
equipment does cause harmful interference to radio or television reception, which is found by turning the
equipment ON and OFF, the user is encouraged to try to reduce the interference by one or more of the
following measures:
• Reorient or relocate the receiving antenna
• Increase the separation between the equipment and the receiver
• Connect the equipment into an outlet on a circuit different from that to which the receiver is connect to
• Consult a dealer or an experienced technician for assistance
The Federal Communication Commission warns the user that changes or modifications to the unit not
expressly approved by the party responsible for compliance could void the user’s authority to operate the
CAUTION!
equipment.
Ethernet Powerline Adaptor
Page 32

31
Contents
COPYRIGHT .....................................................................................................................29
CHAPTER 1 INTRODUCTION..........................................................................................32
1.1 Features ..................................................................................................................................33
1.2 Packet Contents ......................................................................................................................34
CHAPTER 2 CONNECTING MECHANISM ......................................................................35
2.1 Introduction ............................................................................................................................35
2.2 LED Indicator.........................................................................................................................36
2.3 Physical Interface....................................................................................................................37
2.4 Hardware Connection – Computer ..........................................................................................38
2.5 Hardware Connection – Internet..............................................................................................39
CHAPTER 3 INSTALLING MANAGEMENT UTILITY ......................................................40
CHAPTER 4 USING THE MANAGEMENT UTILITY ........................................................44
4.1 Main .......................................................................................................................................45
4.1.1 Rename................................................................................................................................ 47
4.1.2 Enter Password ....................................................................................................................48
4.1.3 Add Device..........................................................................................................................49
4.2 QOS........................................................................................................................................50
4.3 Privacy....................................................................................................................................52
4.4 Diagnostics .............................................................................................................................54
4.5 About......................................................................................................................................56
APPENDIX A: TROUBLESHOOTING GUIDE..................................................................57
Ethernet Powerline Adaptor
Page 33

32
Chapter 1 Introduction
Congratulations on your purchase of this outstanding Ethernet Powerline Adaptor. This device is a
85Mbps Powerline Ethernet Adaptor which transforms your house’s existing electrical wiring into an
ubiquitous networking infrastructure. Simply plug this 85Mbps Ethernet Powerline Adaptor into an ordinary
AC power outlet which will easily extend your Cable/xDSL broadband connection or existing Ethernet (LAN)
network to any other electrical outlet in any room of a house without the need of any new cabling.
This Ethernet Powerline Adaptor supports up to 85Mbps data rate over the existing household power
circuit. With data rates of 85Mbps, full multimedia application can easily be supported throughout the whole
house in addition to Internet access. This Ethernet Powerline Adaptor uses the existing power lines installed
in a home as a path to transmit digital data, voice, audio and video between devices.
To ensure data communication’s security and multimedia applications, this Ethernet Powerline Adaptor
support built-in 56-bit DES encryption and Quality of Service features.
With minimum setup, you can install and use this Ethernet Powerline Adaptor within minutes.
Ethernet Powerline Adaptor
Page 34

33
1.1 Features
Homeplug Turbo
High speed data transfer rate up to 85Mbps
Fully compatible to HomePlug 1.0
Backward-compatible to HomePlug standard 1.0
Works with AC input of 100V ~ 240V
Plug-and-Play configuration
High-speed HomePlug adapter with Ethernet interface
Supports QAM 256/64/16, DQPSK, DBPSK and ROBO modulation
Low power consumption
OFDM techniques for high data reliability in noisy media conditions
Intelligent channel adaptation maximizes throughput under harsh channel conditions
Integrated Quality of Service (QoS) features
56-bit DES Link Encryption with key management for secure power-line communications
Transmission range up to 300m over household power supply grid
Ethernet specifications IEEE 802.3u compliant
Support Auto MDI / MDIX feature
System Requirement
At least two AC 100V ~ 240V power outlets with standard home power wiring
A computer with the following:
Operating System with TCP/IP installed
Pentium III compatible processor and above
Ethernet LAN card installed with TCP/IP protocol
64 MB RAM or more
50 MB of free disk space (Minimum)
CD-ROM Drive
Target Application
Standard Video TV (SDTV) Distribution
Higher data rate broadband sharing
Shared broadband Internet access
Audio and video streaming and transfer
Expanding the coverage of wireless LANs
Voice Over IP calls
PC file and application sharing
Printer and peripheral sharing
Network and online gaming
Security cameras
Ethernet Powerline Adaptor
Page 35

34
1.2 Packet Contents
The 85Mbps Ethernet Powerline Adaptor package contains the following items:
One 85Mbps Ethernet Powerline Adaptor or two on twin pack
One CAT-5 Ethernet Cable or two on twin pack
One CD-ROM (Utility / Manual / Quick Setup Guide)
If any of the above items are damaged or missing, please contact your dealer immediately.
Ethernet Powerline Adaptor
Page 36

35
Chapter 2 Connecting Mechanism
2.1 Introduction
The Ethernet Powerline Adaptor support up to 85Mbps data rate. With this high speed connection rate,
this Ethernet Powerline Adaptor allows you to setup a high speed home network by using your home existing
electrical wiring. Simply plug this Ethernet Powerline Adaptor into an ordinary power outlet to extend your
Cable/xDSL broadband connection or existing LAN network to any other electrical outlet in any rooms of your
house.
Take notes that this Ethernet Powerline Adaptor works in pairs. You need to plug one Ethernet
Powerline Adaptor into a power outlet for each computer (Connect to the computer LAN card) you want to
connect (Network access); you will also need another Ethernet Powerline Adaptor connected to your
Cable/xDSL broadband (Ethernet port) in order to extend your broadband connection or Internet surfing.
Section below describe the Ethernet Powerline Adaptor’s LED indicators, physical interface and
hardware connection mechanism.
Ethernet Powerline Adaptor
Page 37
36
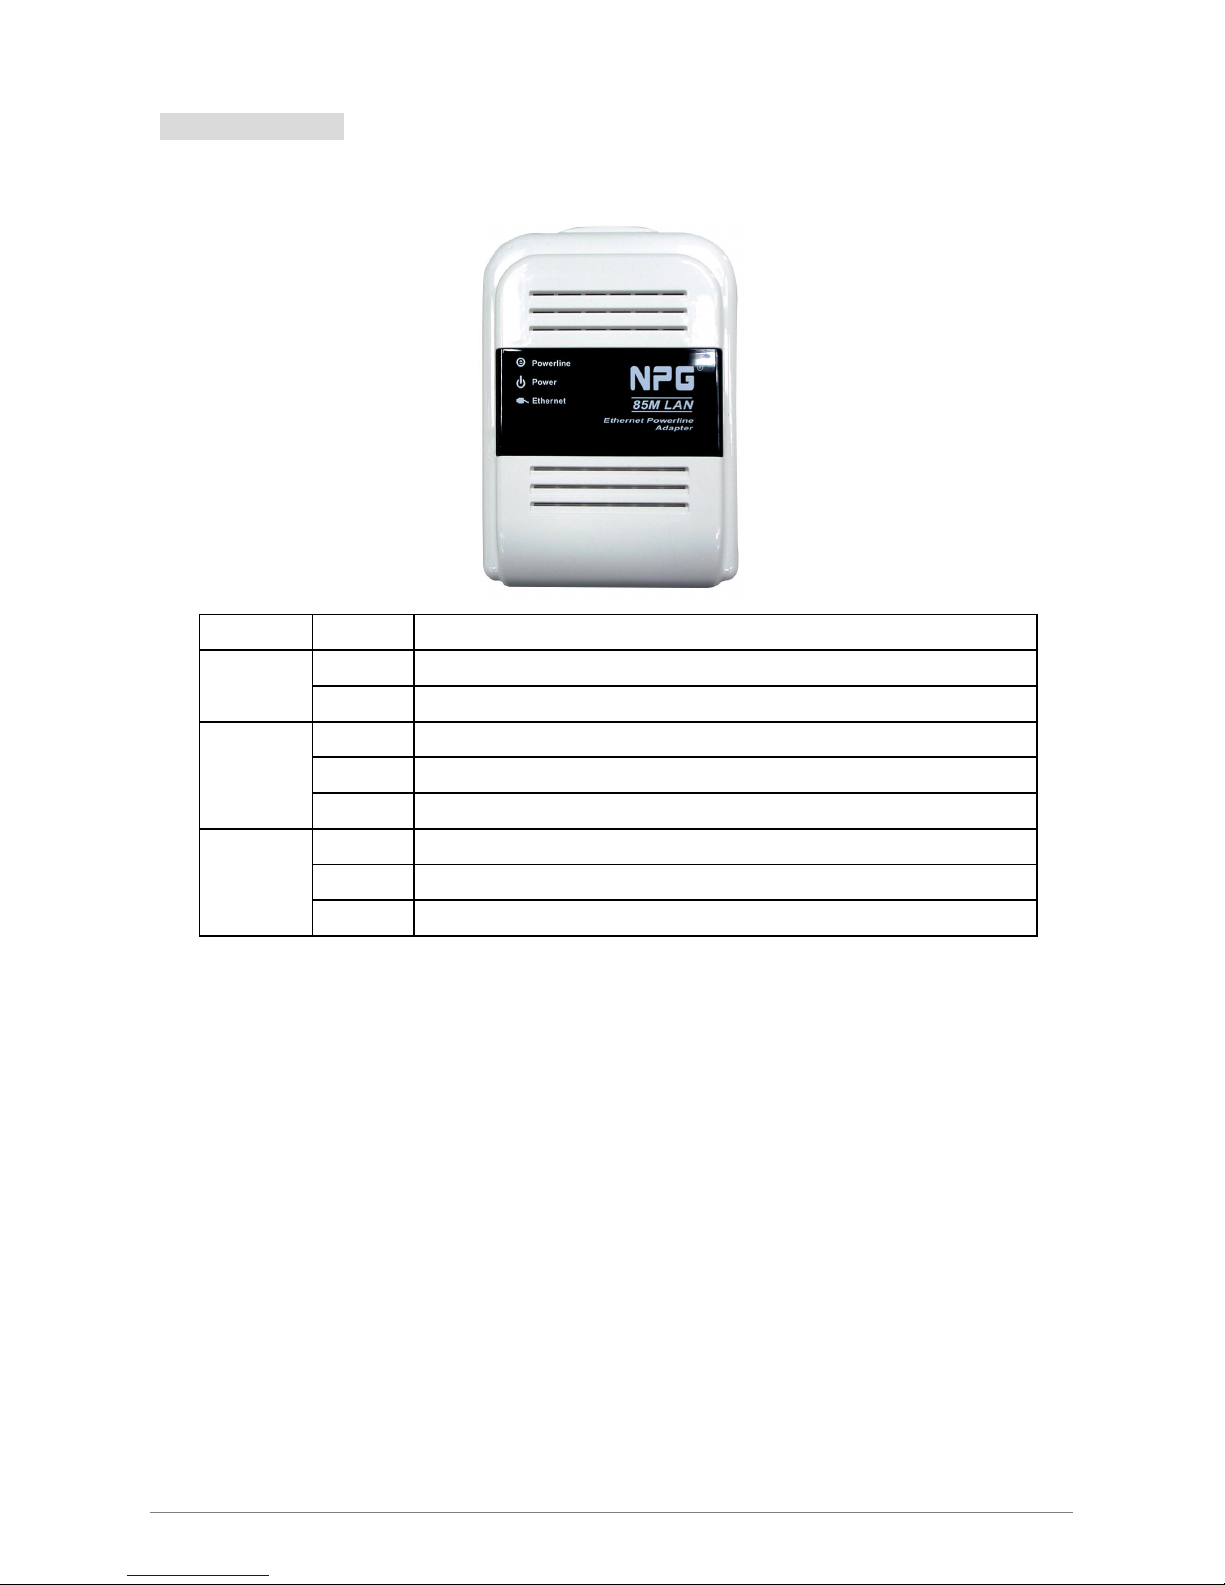
2.2 LED Indicator
The LED indicator displays information about the device’s status.
Label Status Description
Power
Powerline
Ethernet
ON
OFF
ON
OFF
Flashing
ON
OFF
Flashing
The Ethernet Powerline Adaptor is power on
The Ethernet Powerline Adaptor is not receiving power
Another
Did not detect any other
The Powerline port is transmitting/receiving data
The Ethernet port is on and ready to receiving/transmitting data
The Ethernet port is not connected or not power on
The Ethernet port is receiving/transmitting data
Powerline port
is detected on the same Powerline network
Powerline port
on the same powerline network
Ethernet Powerline Adaptor
Page 38
37
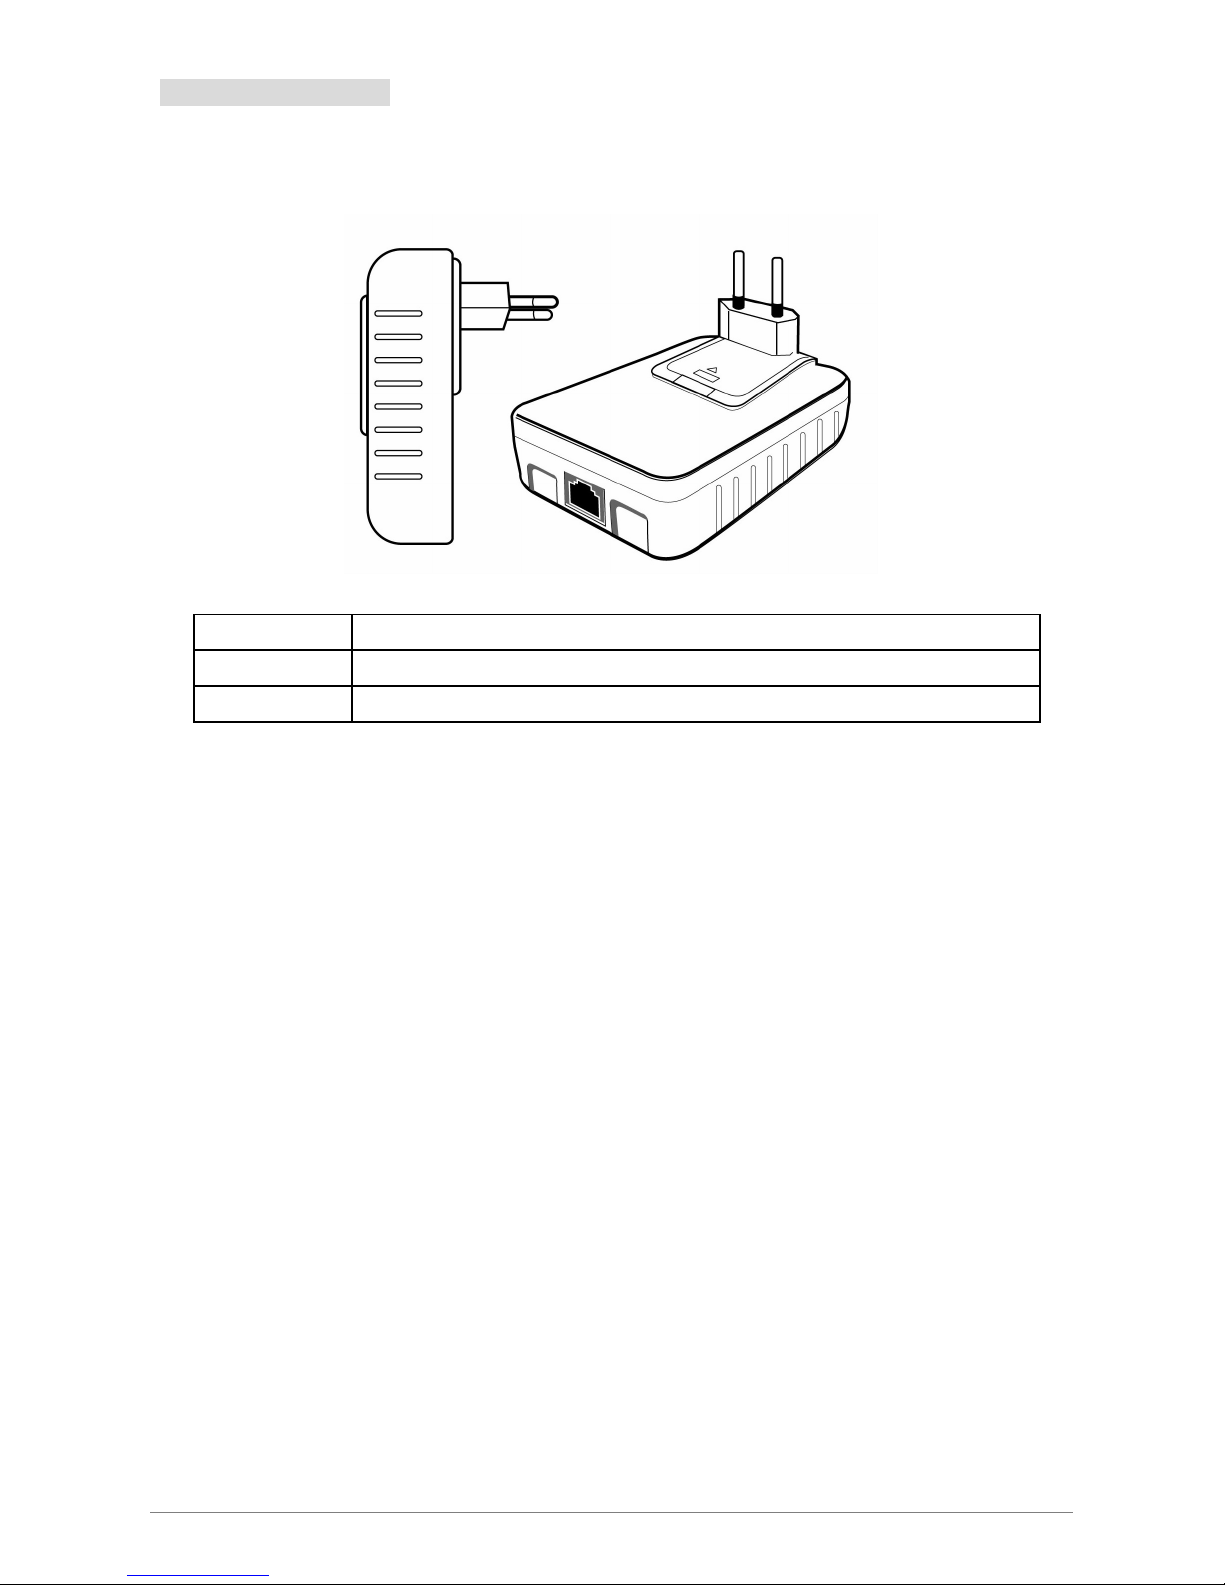
2.3 Physical Interface
There are two physical interface on this Ethernet Powerline Adaptor.
Interface Description
Ethernet One 10/100Mbps Ethernet port connected to PC LAN card or broadband device.
Power Plug Power Plug connected to any 100V ~ 240V AC power socket.
Ethernet Powerline Adaptor
Page 39
38
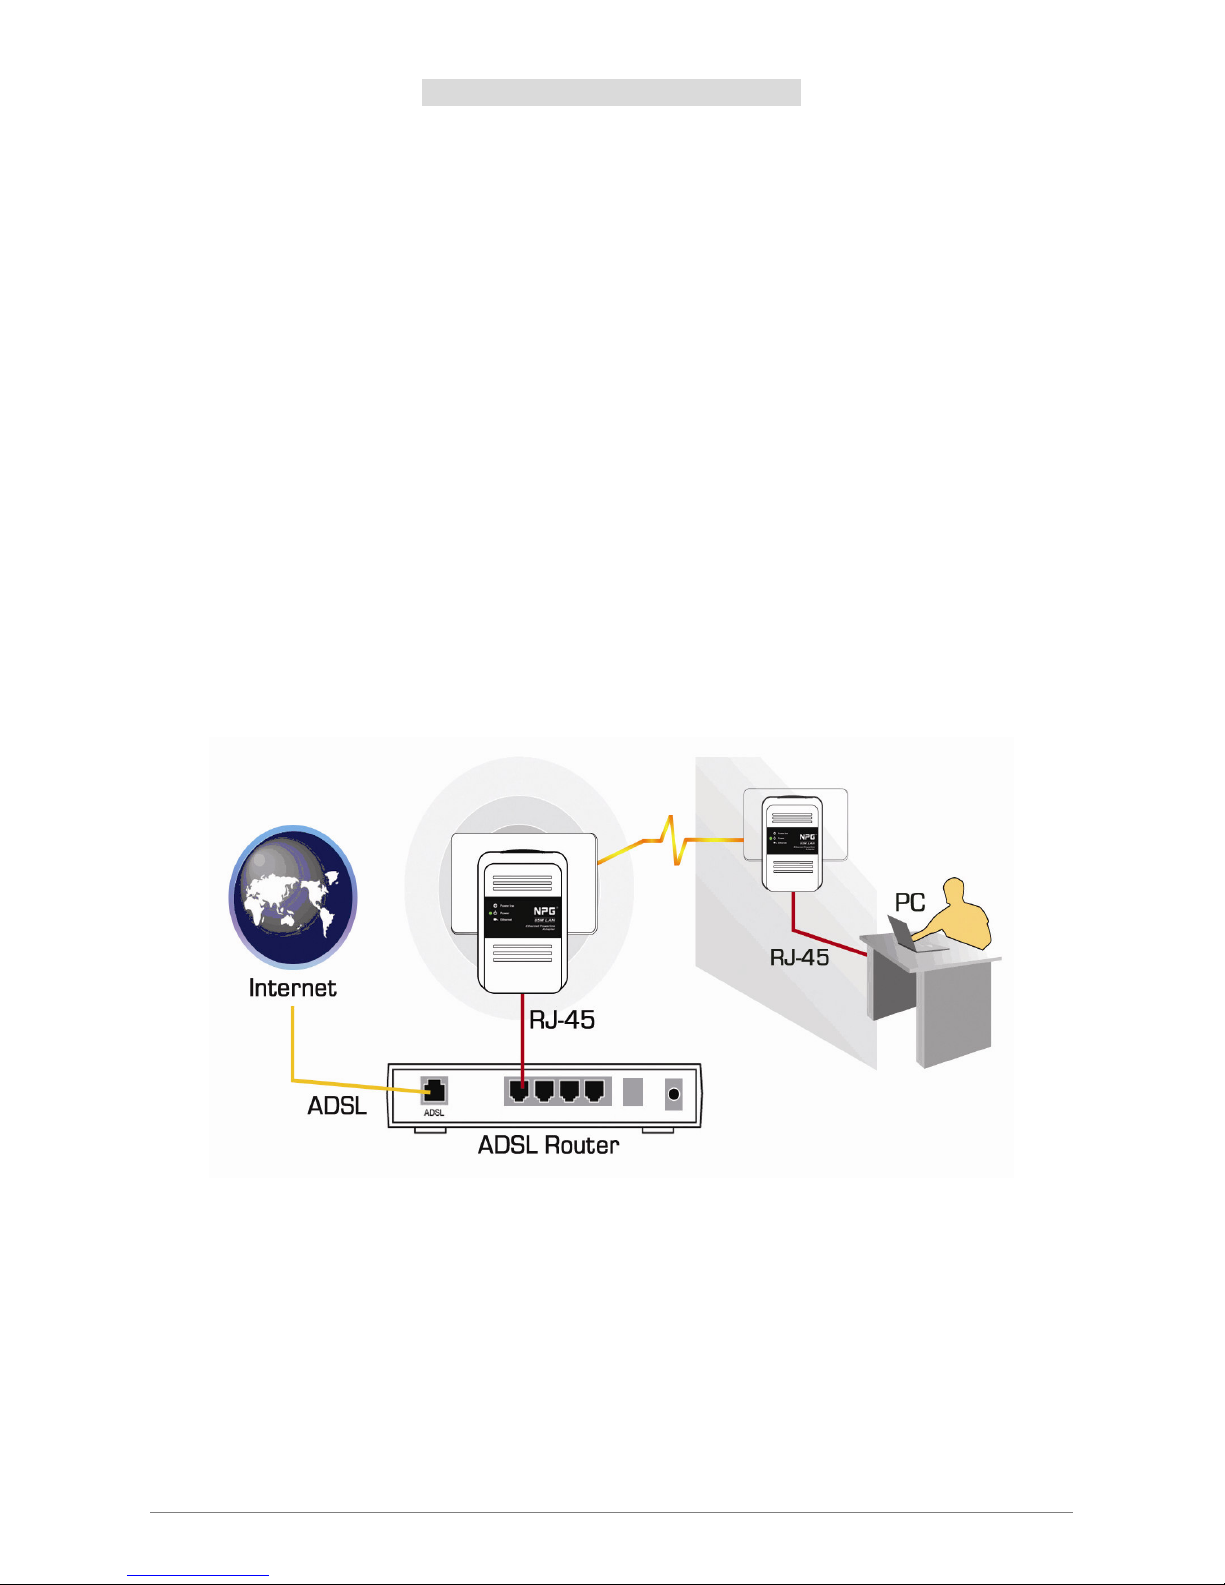
2.4 Hardware Connection – Computer
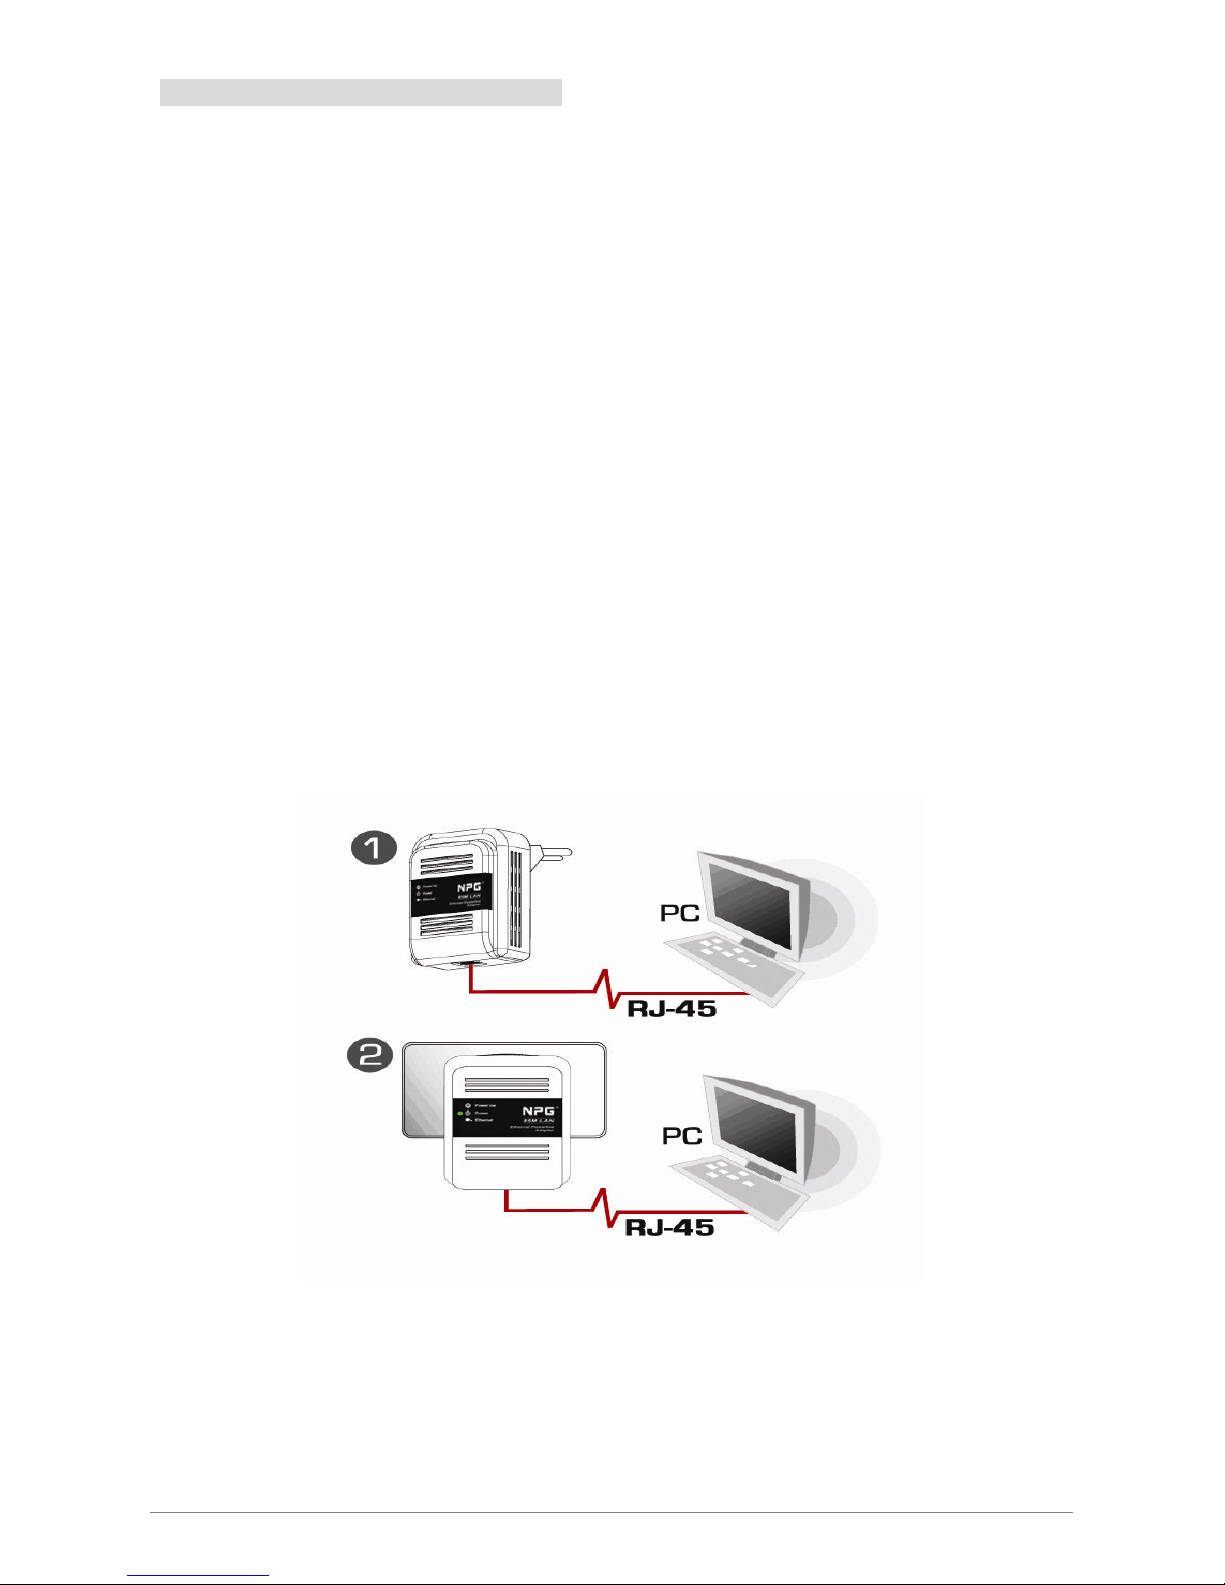
For those computers you wish to be networked by Ethernet Powerline Adaptor, each of the computer
must be properly connected with an Ethernet Powerline Adaptor through an Ethernet (RJ-45) cable.
Following are the steps to properly connect the Ethernet Powerline Adaptor to your computer:
1. Power off your PC or Notebook.
2. Connect the provided Ethernet (RJ-45) cable to the Ethernet Powerline Adaptor’s Ethernet port.
3. Connect the other end of the Ethernet (RJ-45) cable to you computer’s LAN port.
4. Plug the Ethernet Powerline Adaptor into a wall socket next to the computer.
5. Turn on your computer.
6. Check and confirm that the Power and Ethernet LEDs on the Ethernet Powerline Adaptor are ON.
The hardware connection mechanism is shown below:
Ethernet Powerline Adaptor
Page 40
39
2.5 Hardware Connection – Internet
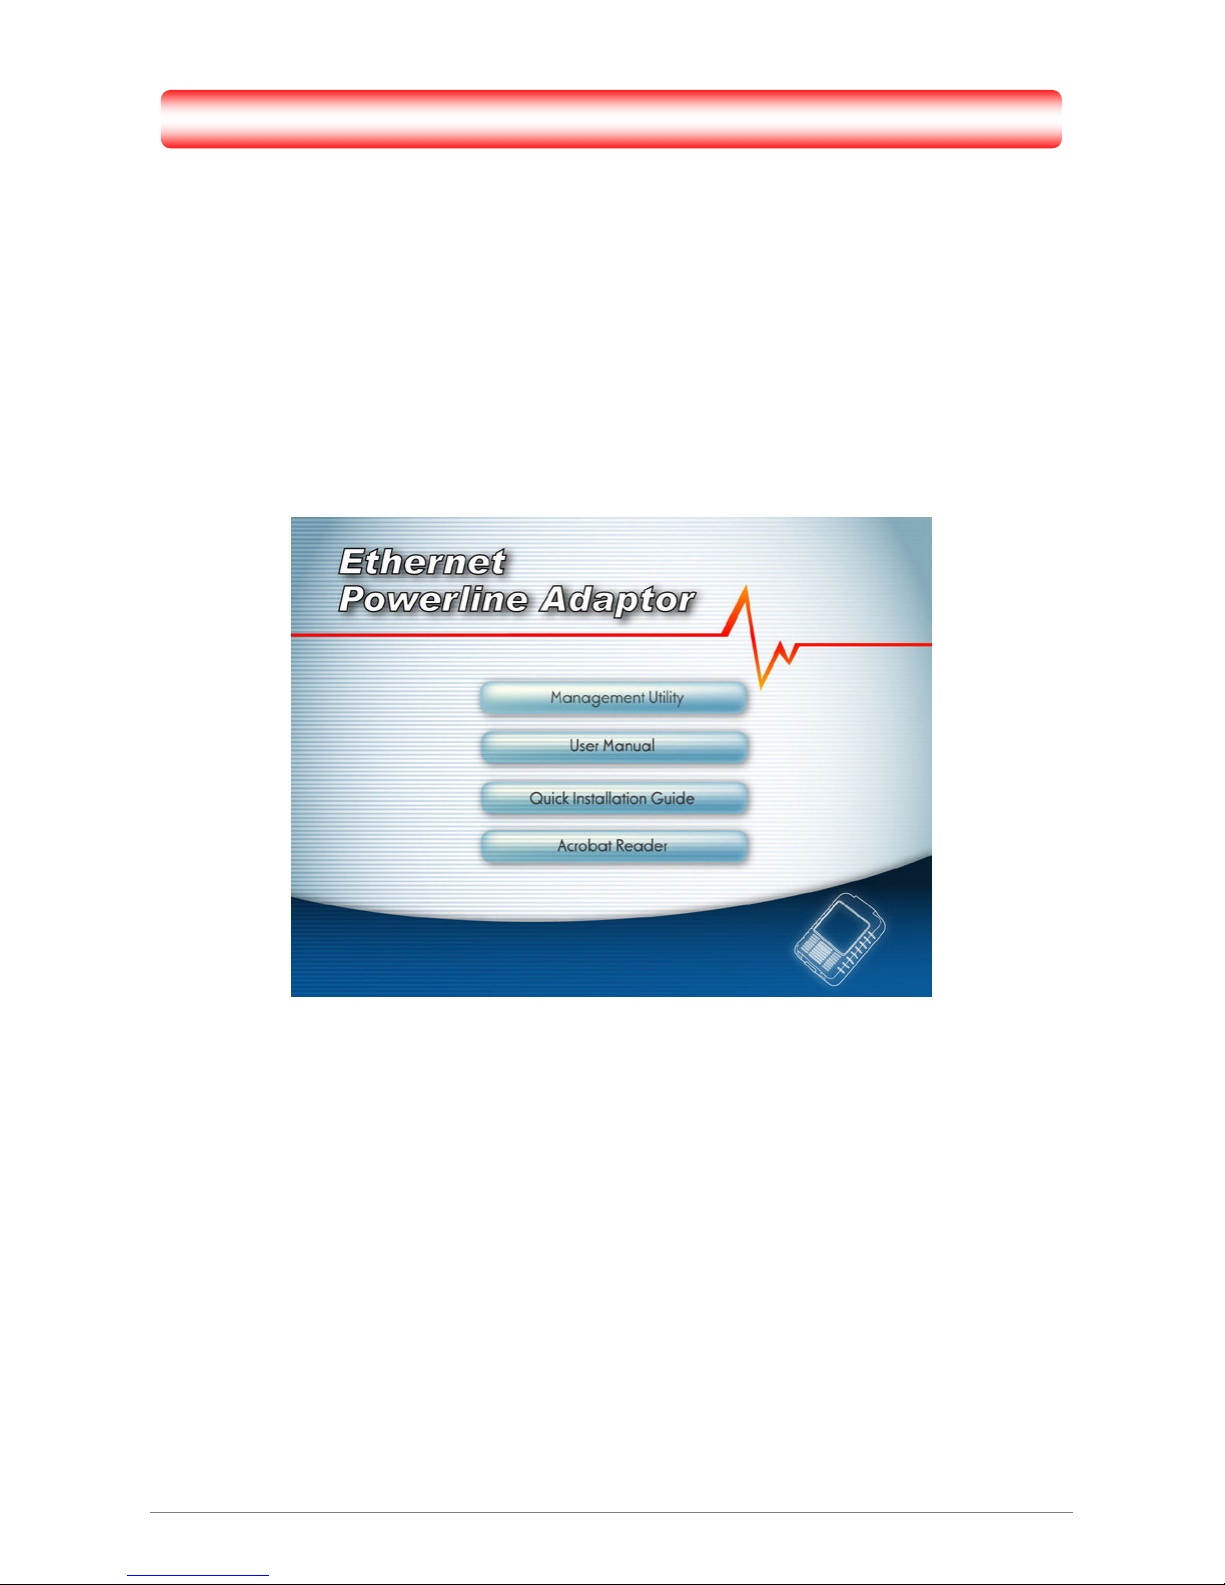
This section describe how to connect the Ethernet Powerline Adaptor into your existing ADSL
broadband connection via ADSL Ethernet port. Follow the procedures describe below to connect the Ethernet
Powerline Adaptor to your ADSL broadband connection:
1. Power off your PC or Notebook.
2. Connect the provided Ethernet (RJ-45) cable to the Ethernet Powerline Adaptor’s Ethernet port.
3. Connect the other end of the Ethernet (RJ-45) cable to an available Ethernet port of your ADSL
broadband Router.
4. Plug the Ethernet Powerline Adaptor into a wall socket next to the computer.
5. Turn on your computer.
6. Check and confirm that the Power, Powerline and Ethernet LEDs on the Ethernet Powerline
Adaptor are ON.
The hardware connection mechanism is shown below:
Ethernet Powerline Adaptor
Page 41
40
Chapter 3 Installing Management Utility
Please verify that no other Ethernet Powerline Adaptor or any Encryption Management Utilities are
installed before installing the provided software. If other Homeplug Utilities are installed, uninstall them and
restart your personal computer before installing this provided software.
Follow the following procedures to properly installing the provided Management Utility:
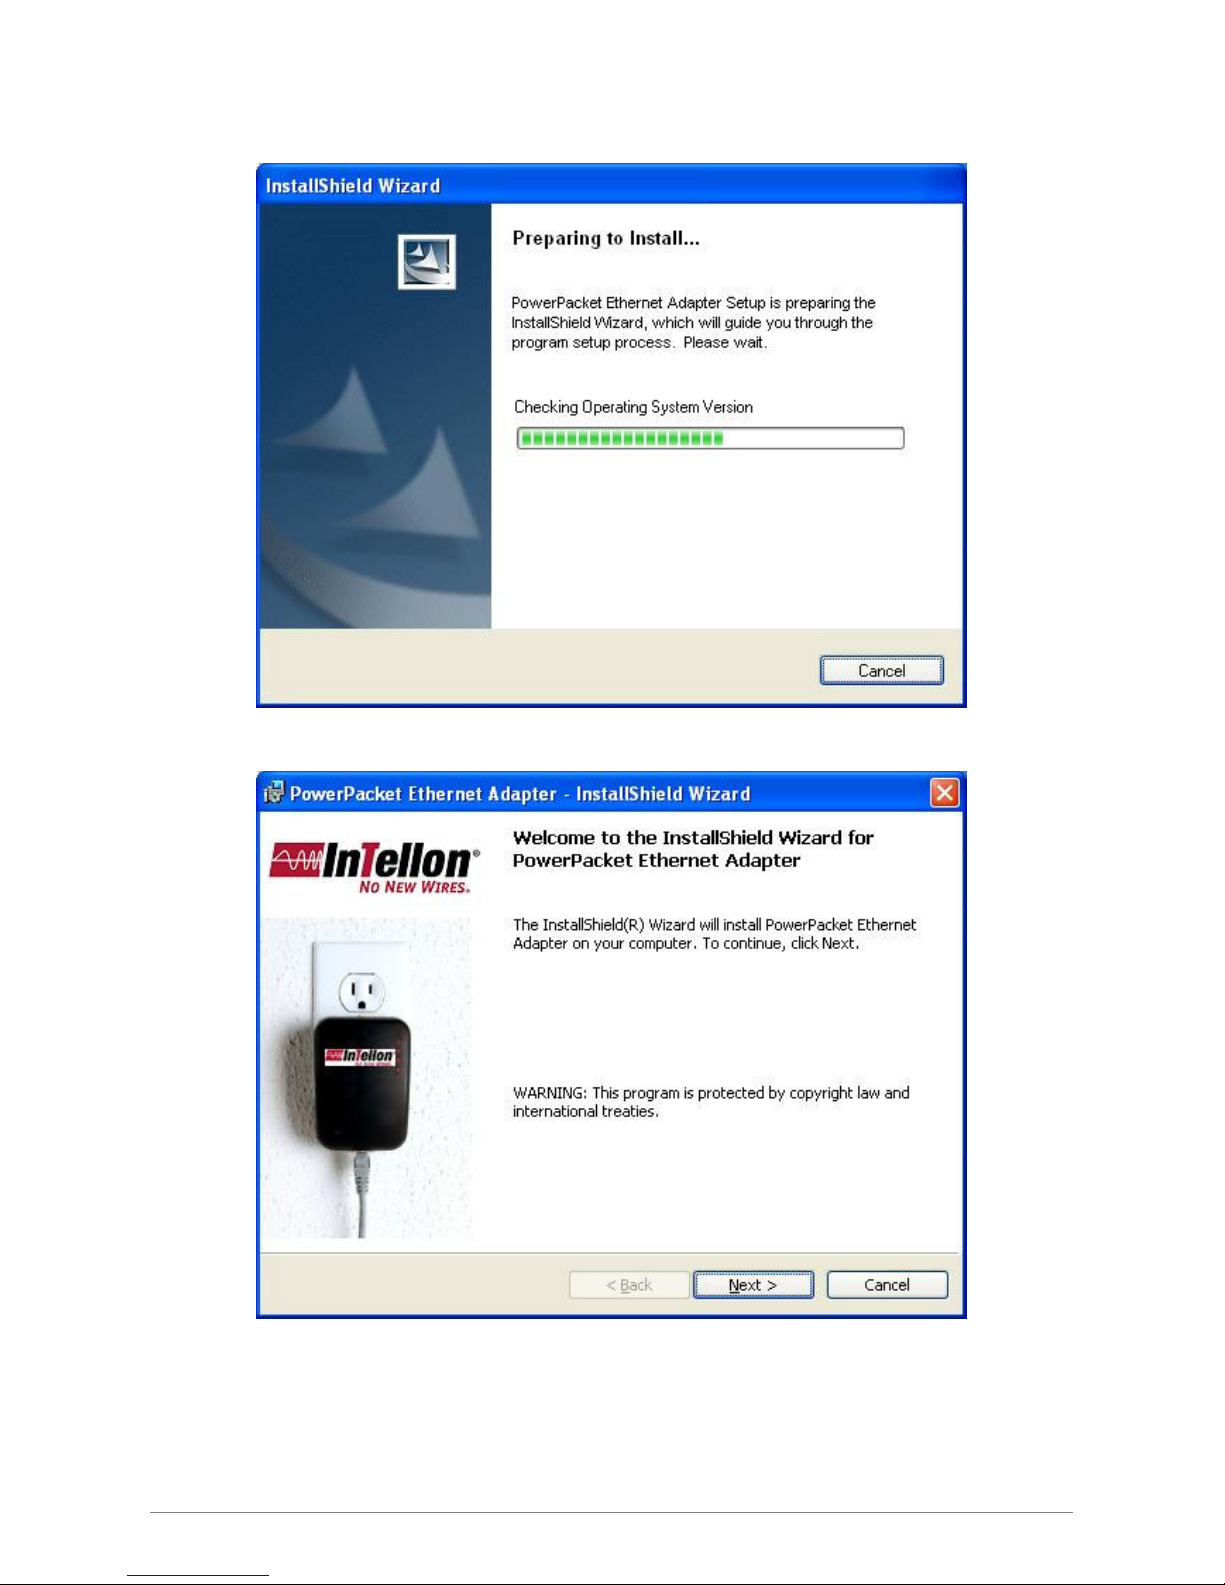
Step 1: Power on your computer and insert the provided CD into the CD-ROM drive, the following screen will
pop-up automatically. Click on “Management Utility” to install the Management Utility.
Ethernet Powerline Adaptor
Page 42
41
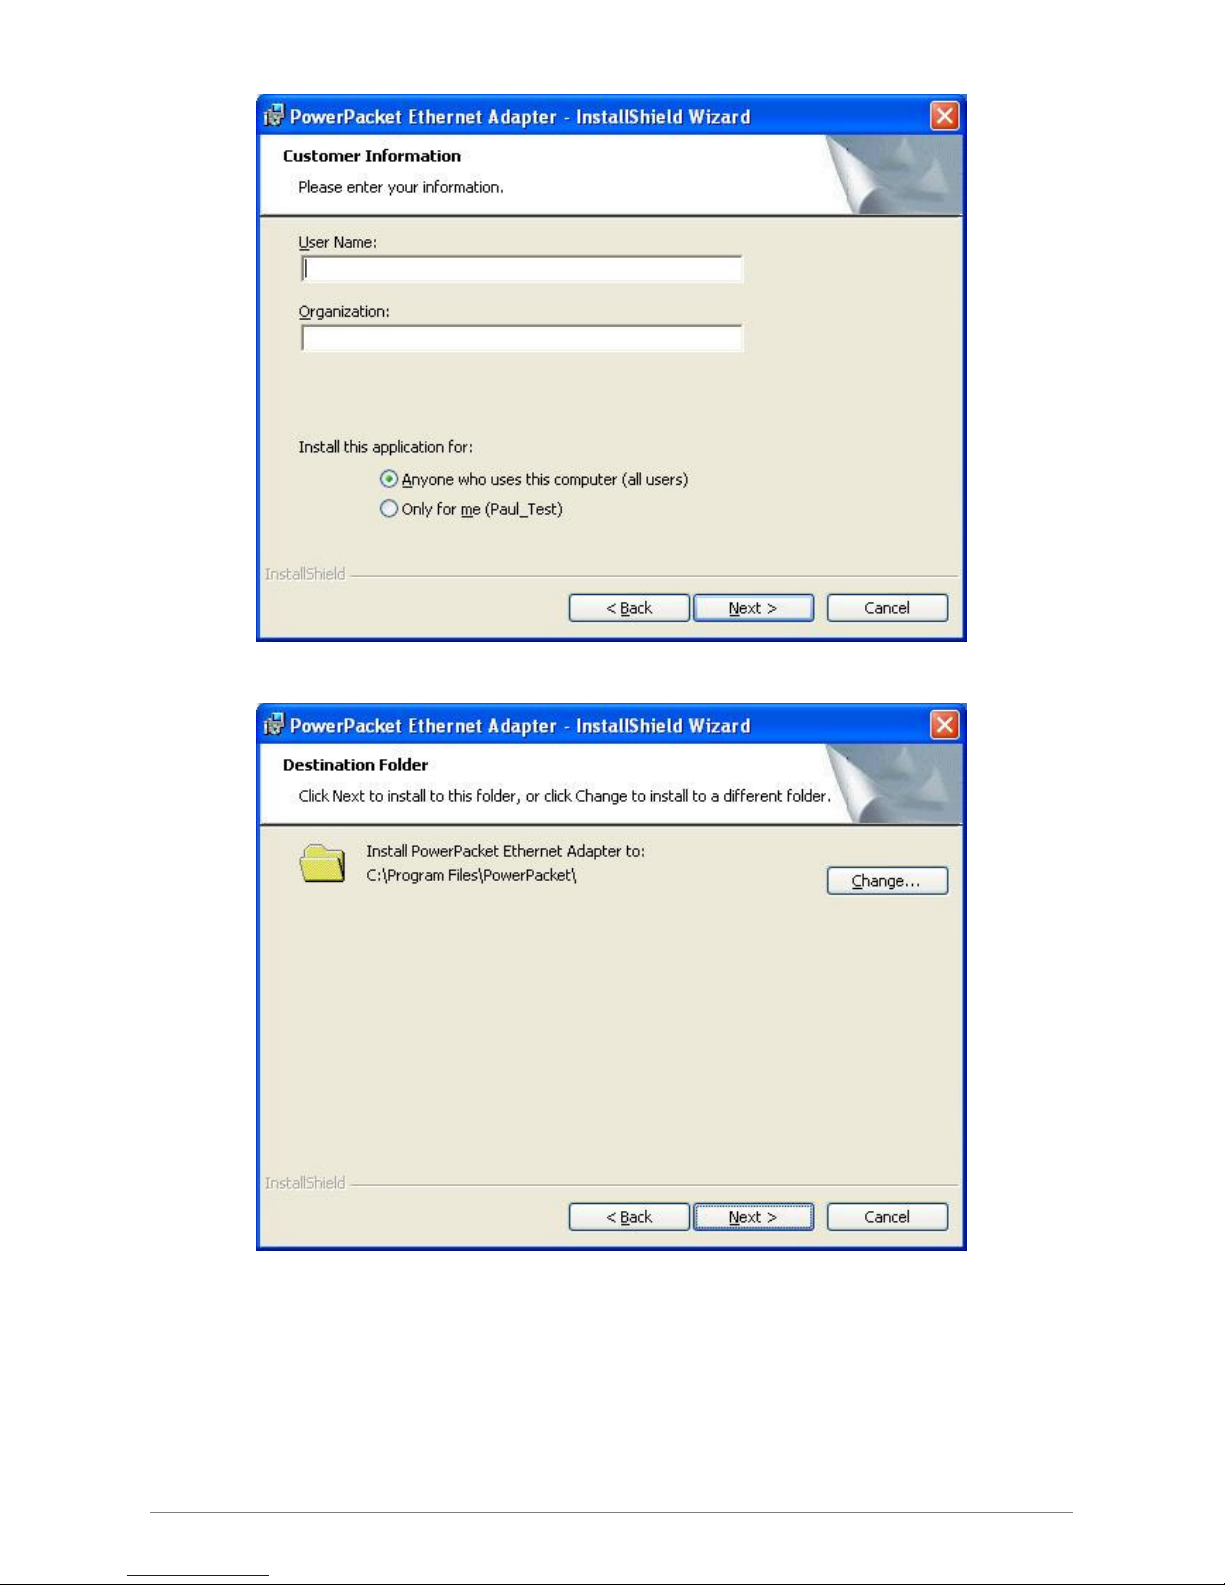
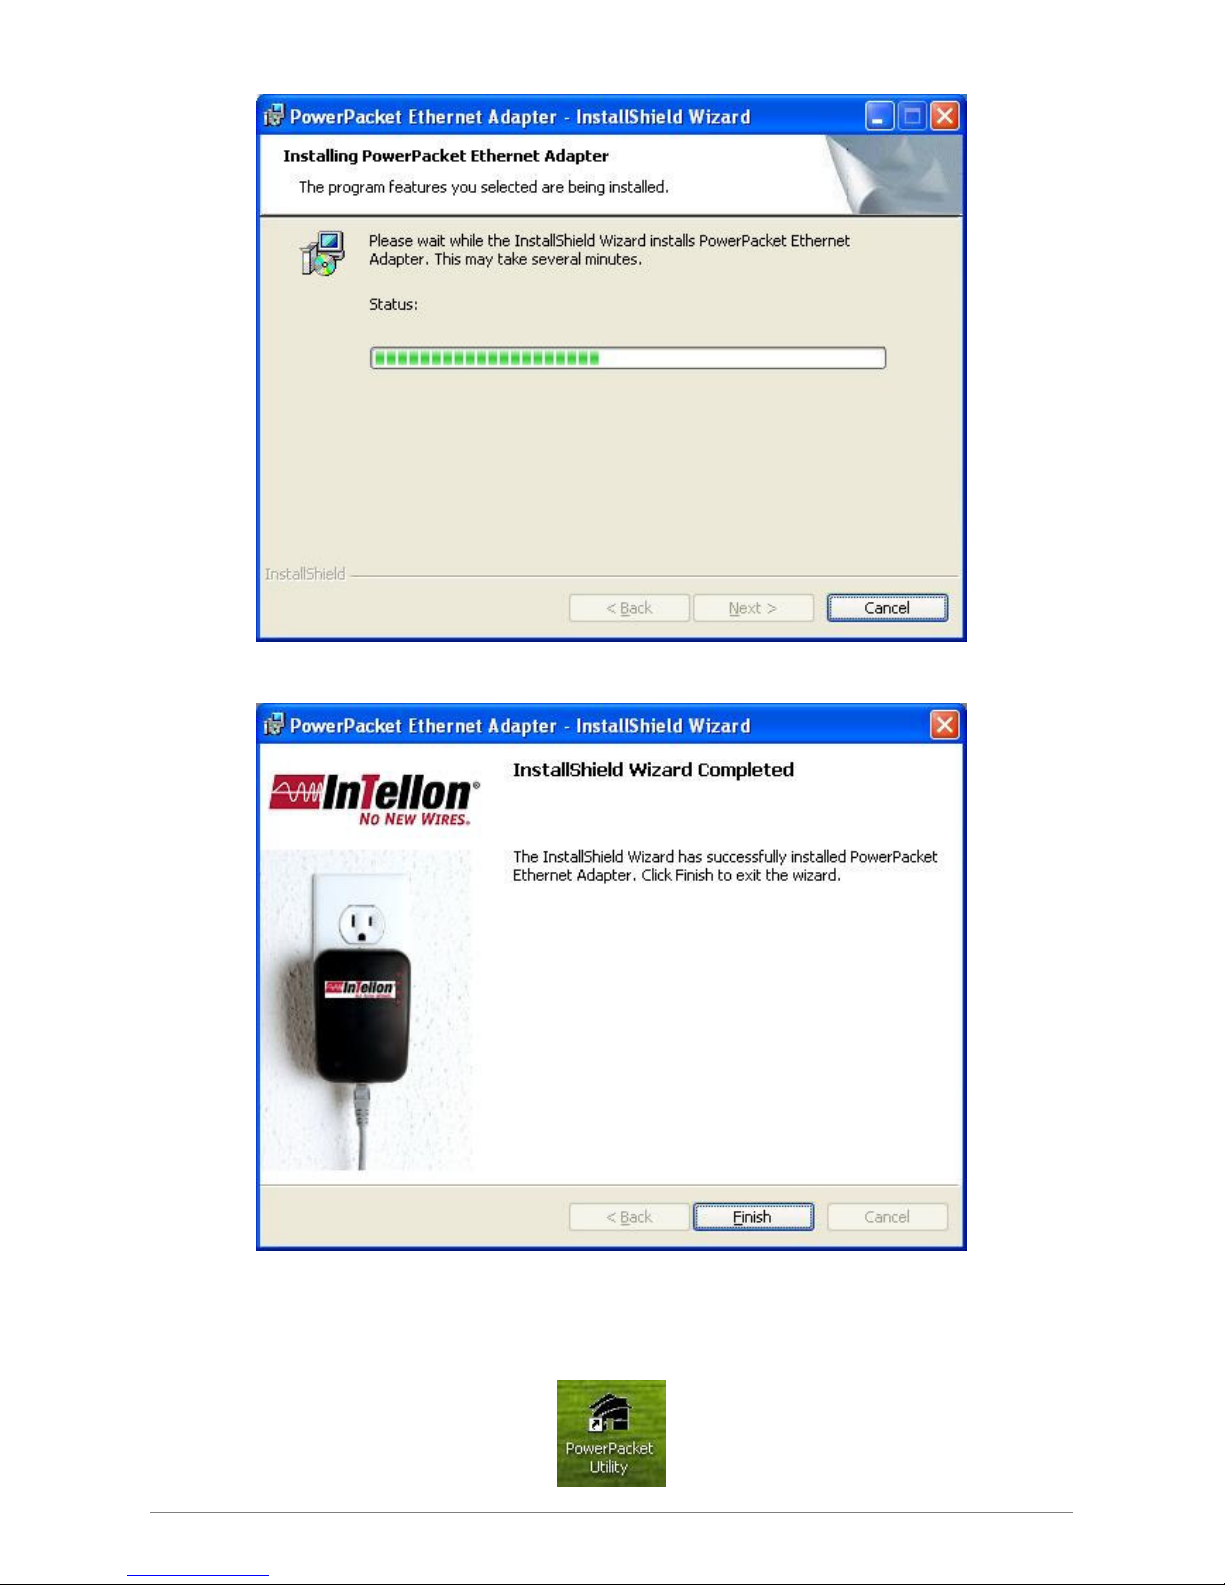
Step 2: The program installation process will carry out and copy all the necessary files to your system.
Ethernet Powerline Adaptor
Page 43
42
Ethernet Powerline Adaptor
Page 44
43
Step 3: After the installation, a shortcut to the “Power Packet Utility” application icon is provided on the
windows desktop.
Ethernet Powerline Adaptor
Page 45

44
Chapter 4 Using The Management Utility
After you’d successfully installed the Ethernet Powerline Adaptor hardware and Management Utility
software, you can setup or configure the devices according to your need.
This Ethernet Powerline Adaptor Configuration Utility enables the users to identify HomePlug devices
on the powerline network, measures data rate performance, ensures privacy and performs diagnostics by
setting user defined secure powerline networks.
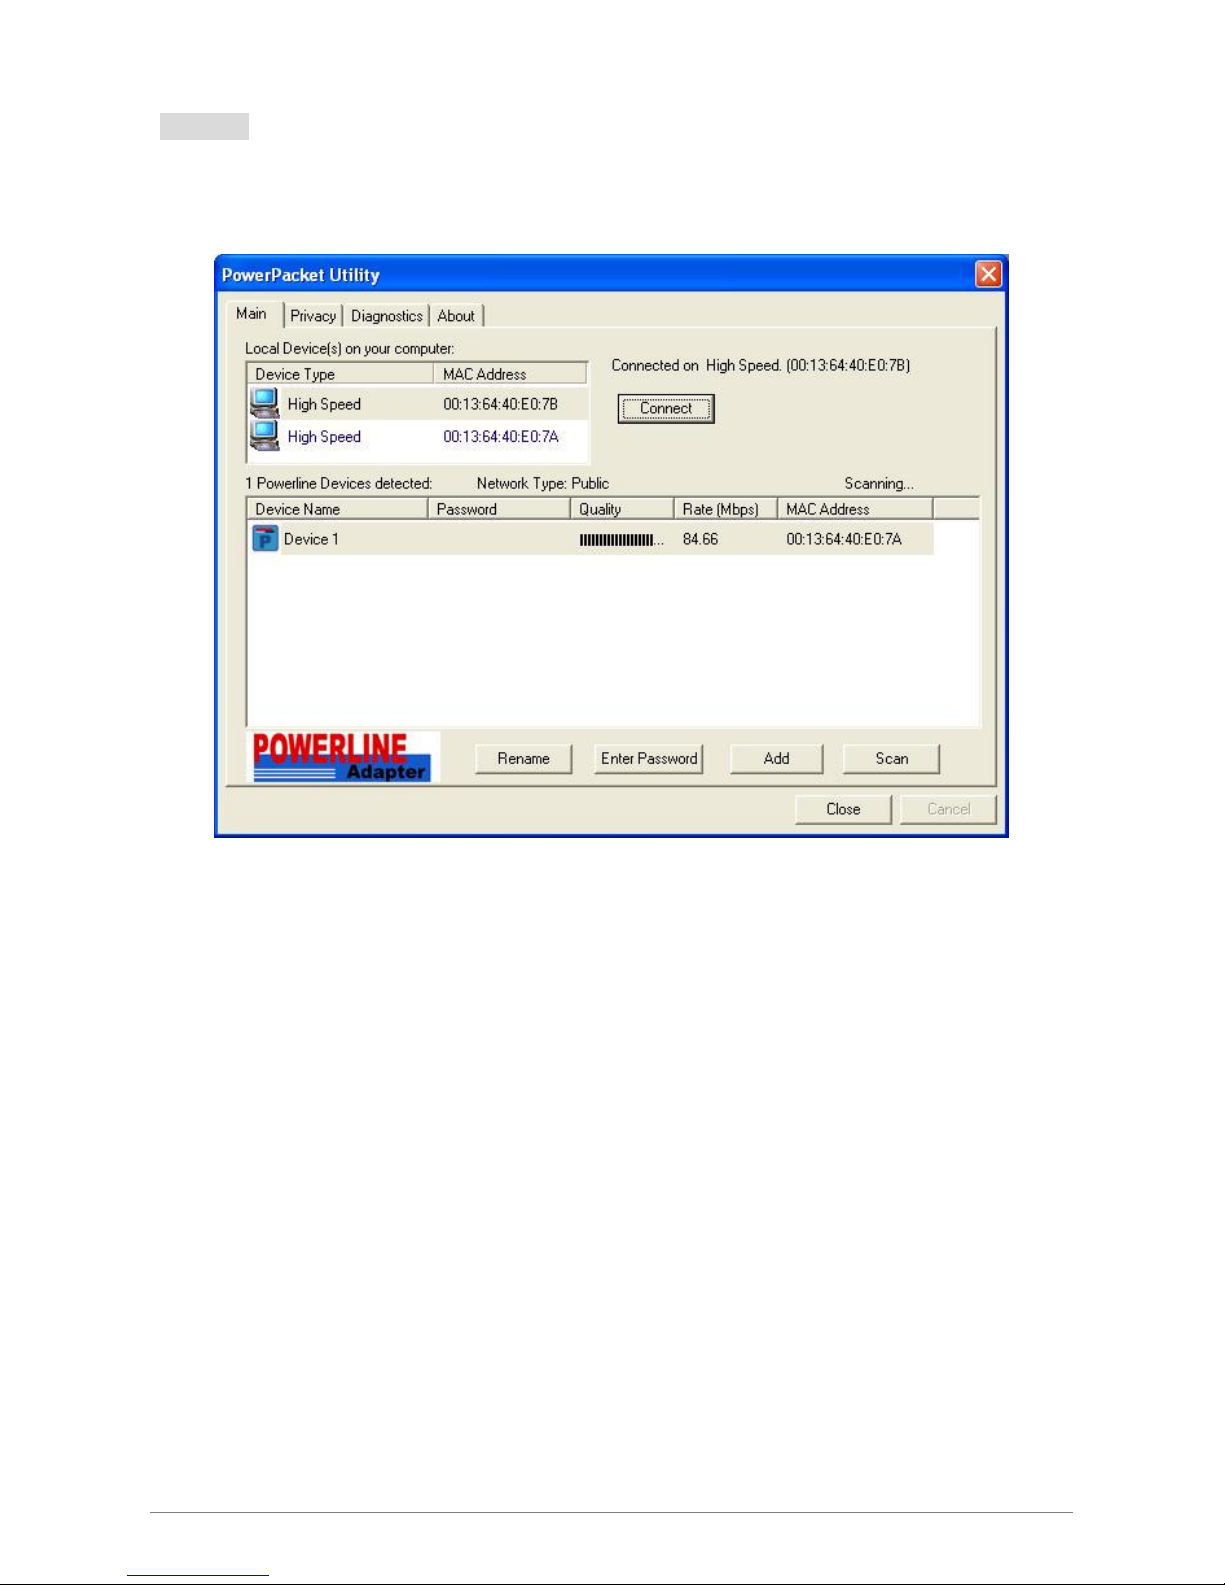
Double click on the “Power Packet Utility” from your windows desktop, the following screen display.
This Management Utility consists of a set of four property sheets, viz., “Main”, “Privacy”, “Diagnostics”
and “About”.
Ethernet Powerline Adaptor
Page 46
45
4.1 Main
The Main tab shows all the Ethernet Powerline Adaptor that are logically connected to the current
computer where the Management Utility is running.
Local Device(s) on your computer: This shows all local Ethernet Powerline Adaptor found
connected to the computer’s LAN card. In most cases, only one device will display in this panel.
Click and select the local device shown on the screen then click “Connect” tab to manage the
Ethernet Powerline Adaptor. The status message will be shown above the “Connect” button
indicates that your PC is connected to the same device. Once the chosen Ethernet Powerline
Adaptor is properly connected, this Management Utility will automatically scan the power line
periodically for any other existing powerline devices.
“x” Powerline Devices detected: This display all the Ethernet Powerline Adaptor found on the
current logical network. “x” shows the number of remote Ethernet Powerline Adaptor discovered
by this Management Utility.
Network Type: Displayed the type of logical network: “Public” or “Private”.
Ethernet Powerline Adaptor
Page 47

46
Autoscan: Shows the scanning status (Default is “ON”).
Device Name: Shows the default device name. One may redefine or change the name by
clicking on the name and editing in place or by clicking the “Rename” button.
Password: Shows the current password of the Ethernet Powerline Adaptor.
Quality: Shows the quality of the Ethernet Powerline Adaptor connection.
Rate (Mbps): Shows the current transmission rate of the selected Ethernet Powerline
Adaptor.
MAC Address: Shows the Ethernet Powerline Adaptor’s MAC address.
Rename: Click to change the name of the selected Ethernet Powerline Adaptor.
Enter Password: Shows the supplied Ethernet Powerline Adaptor’s password (Initially left blank).
To set the Ethernet Powerline Adaptor password (Which is required when creating a private
network), click and select the device shown in the lower panel and click on the “Enter Password”
button. Follow the pop-up dialog box to complete your password setting.
Add: Click this button to add a remote Ethernet Powerline Adaptor to your network that is not on
the lower panel displayed list. You will advice to locate the passwords for all Ethernet Powerline
Adaptor you wish to manage and add them to the local logical network by clicking the “Add”
button. Follow the pop-up dialog box to complete your setting.
Scan: Click the “Scan” button to perform an immediate search of the Ethernet Powerline Adaptor
connected to the computer. The Management Utility will automatically perform the scanning
process and update the display every few seconds by default.
Ethernet Powerline Adaptor
Page 48
47
4.1.1 Rename
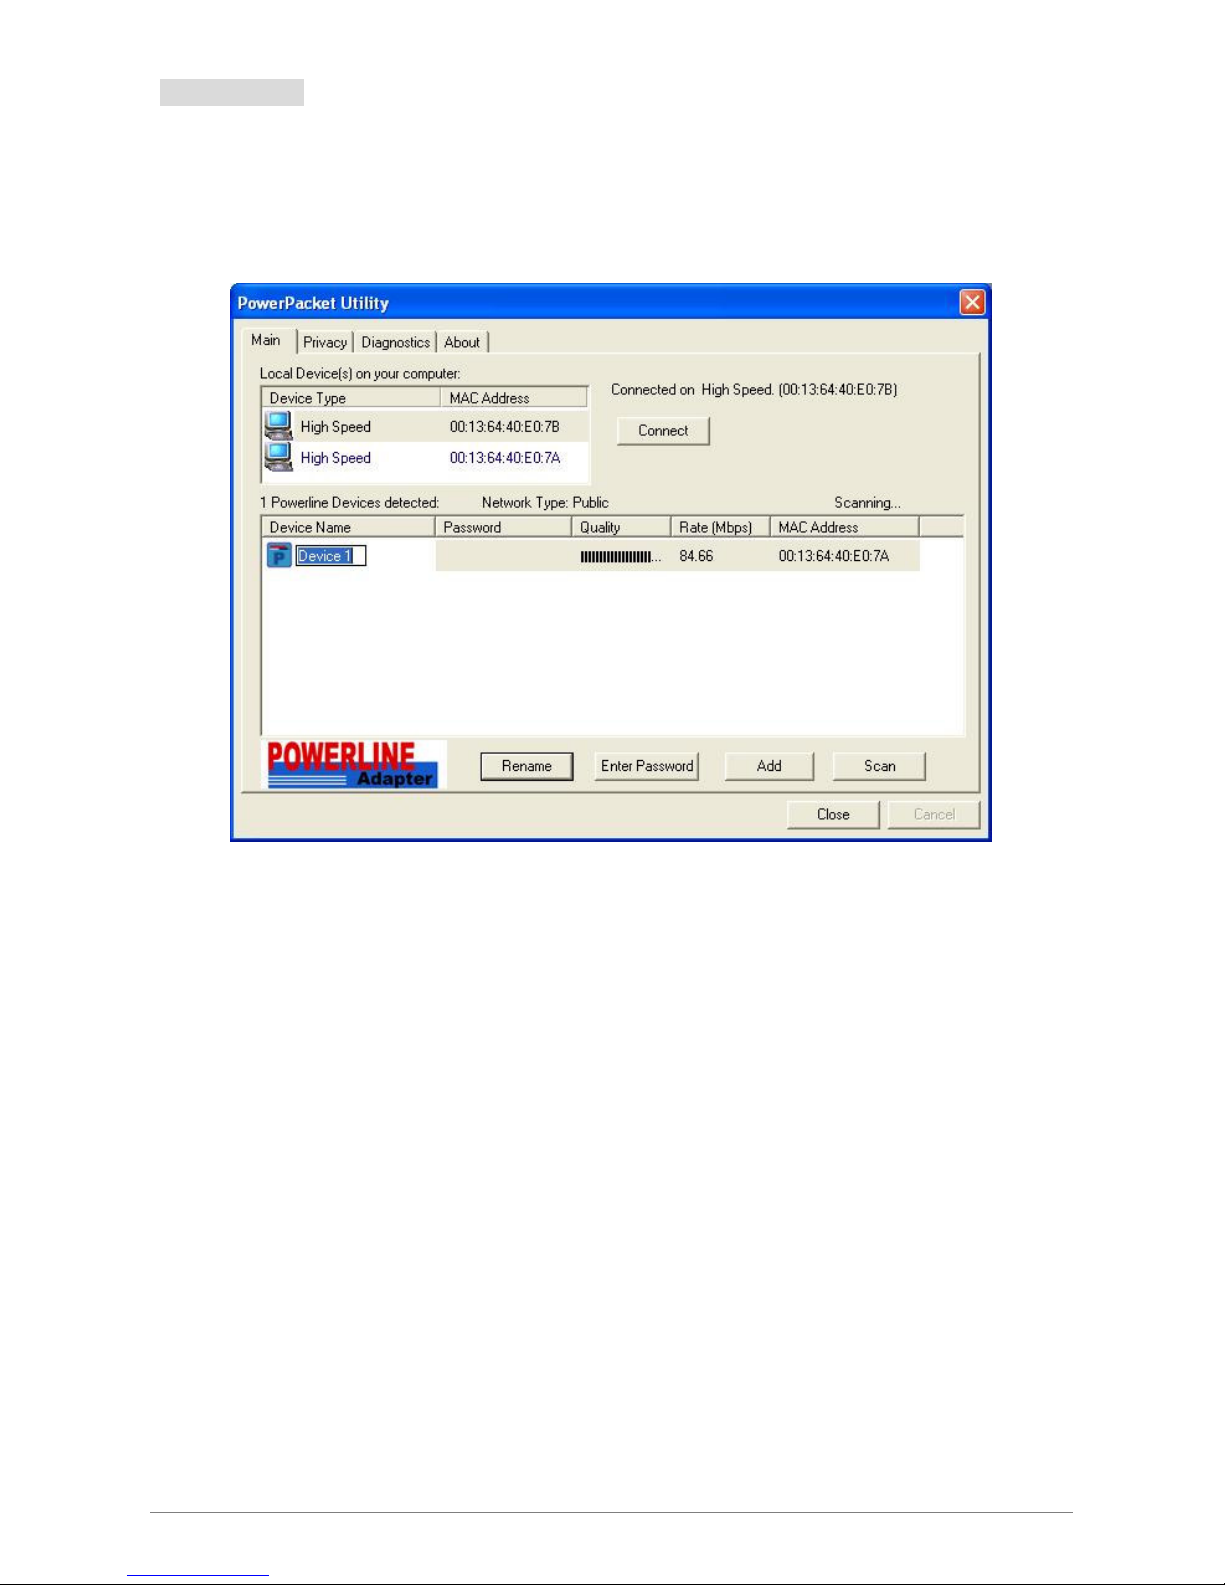
This Management Utility allows you to change the name of the listed Ethernet Powerline Adaptor. Click
and select the Ethernet Powerline Adaptor you wish to change from the list, then click on the “Rename” tab
and editing-in-place to change the name.
Ethernet Powerline Adaptor
Page 49
48
4.1.2 Enter Password
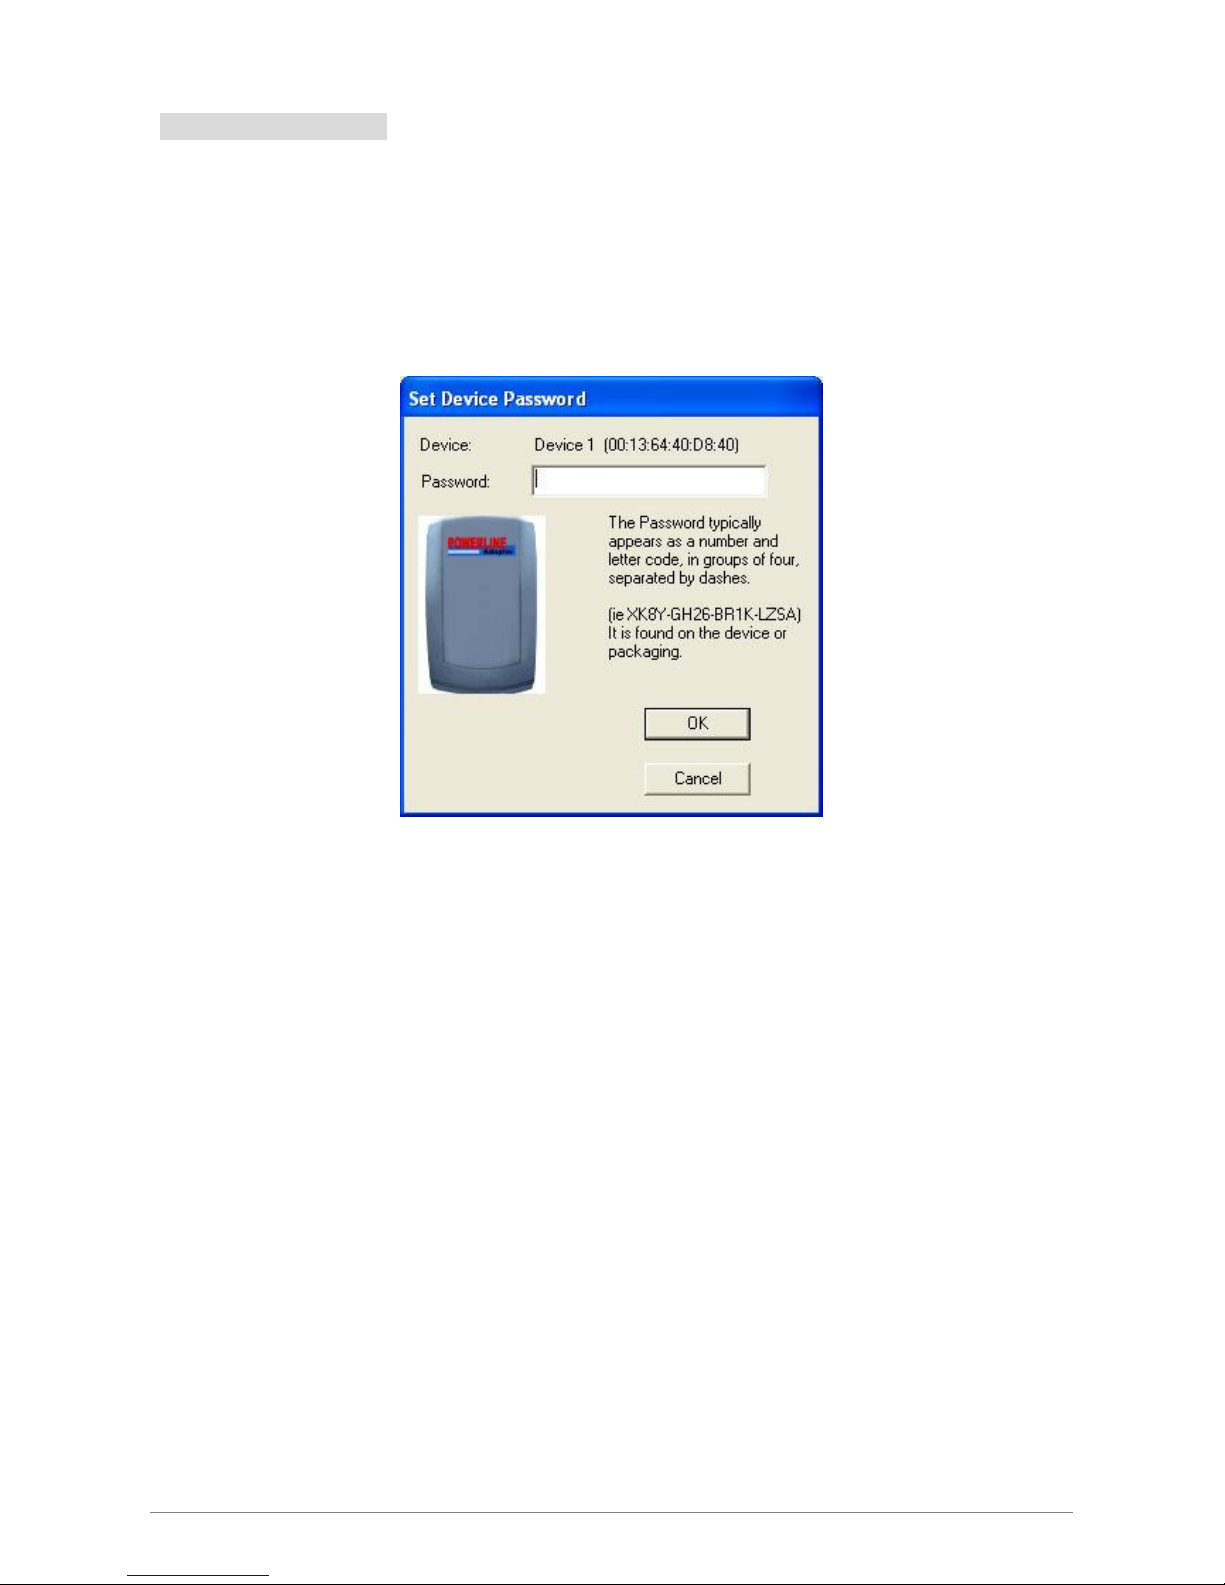
To set or change your Ethernet Powerline Adaptor’s password, click and select the Ethernet Powerline
Adaptor you wish to change from the list, then click on the “Enter Password” tab, the following screen
display.
Enter your Password (Take note to the password format) and click “OK” after setup.
Note: The Ethernet Powerline Adaptor device must be present on the power line (plugged in) in order for
the password to be confirmed and added to the network. If the Ethernet Powerline Adaptor device
could not be located, a warning message will be shown.
Ethernet Powerline Adaptor
Page 50
49
4.1.3 Add Device
The following dialog box pop-up when clicking the “Add” button under Main configuration homepage.
The dialog box allows you to enter both the selected device’s name and password. Noted that the Ethernet
Powerline Adaptor must be present on the power grid in order to activate the set password and added to the
local network.
Enter your Device Name and Password (Take note to the password format) and click “OK” after
setup.
The following screen display after the naming and password setting process, which is also the
Diagnostics configuration homepage.
Ethernet Powerline Adaptor
Page 51
50
4.2 QOS
The second tabbed window, labeled ‘QoS’ for Quality of Service, is shown in Figure.
QoS requirements are different for various data types such as streaming video or music, voice and raw data.
To provide higher QoS for streaming data, priority levels can be set using tags at the beginning of data frames.
Virtual Local Area Network (Vlan) 802.1p priority tags on Ethernet frames are used to specify 8 (0~7) levels of
‘user priority’. HomePlug TURBO powerline allows for 4 levels of Channel Access Priority (CAP(0-3)).
Therefore, the 8 levels of VLAN Ethernet tags must be mapped to the 4 levels of CAP priority, where CAP 3 is
the highest priority and CAP 0 is the lowest. CAP 3 priority might be used for voice and network management
frames, CAP 2 is used for streaming video-and must while CAP 1 can CAP 0 are used for data. Mapping
VLAN tags or TOS bits to CAP levels is easily done using the VLAM Priority Mapping function on the QoS tab
window.
The ‘Priority Mapping’ group contains both VLAN and TOS Bit mapping capability. When selected, packets
matching the VLAN or TOS Bit priority will be assigned the Powerline contention priority (channel Access
Priority, CAP) as set in the corresponding dropdown box. If a packet has both VLAN and TOS in it, VLAN will
override TOS.
Ethernet Powerline Adaptor
Page 52

51
The ‘Default CAP’ group allows for default priority mapping of packets that do not have a VLAN or TOS bit (or
if these are disabled). Setting are available for Unicast (directed to a host).
IGMP - (efault CAP 3) – sets the channel access priority for IGMP frames – these are the group
management frames, not the stream data
Unicast – (default CAP 1) – sets the default channel access priority for unicast frames not matching
any other classification or mapping.
IGMP managed Multicast Stream (Fixed to CAP 2) – sets the default channel access priority for
stream data belonging to a snooped IGMP multicast group.
Multicast/Broadcast – sets the default CAP for multicast frames not in a snooped group and for
broadcast frames.
After making CAP settings, clicking the Write button will commit these, along with the values from the
Configuration tab, to NVRAM on the connected device.
Ethernet Powerline Adaptor
Page 53
52
4.3 Privacy
The Privacy configuration page provides a means for managing the local network and providing
additional security for the logical network and also to select the devices that has to be included in the network.
All HomePlug devices are shipped using a default logical network (network name), which is normally
“HomePlug”
The Privacy configuration homepage allows you to change the Network Name of the Ethernet
Powerline Adaptor that is currently connected to this computer into a private network. Reset the private
network to universal public network by clicking on the “Use Default (Public Network)” or entering/editing
“HomePlug” under column of “Private Network Name” is always available.
Note that every Ethernet Powerline Adaptor on your home network MUST have the same Network
Password for connectivity to be established throughout your home.
Note: Changing the network name to anything other than “HomePlug” will show the network type on
the Main configuration screen as “Private”.
Ethernet Powerline Adaptor
Page 54

53
Set Local Device Only: Click this tab to change the network name of the local Ethernet Powerline
Adaptor device only. All Ethernet Powerline Adaptor devices seen on the Main configuration
homepage prior to this will be no longer present in the new network, effectively making the local
devices not to communicate to the devices who were in the old logical network. Devices previously
set up with the same logical network (same network name) will appear in the device list afterward
selecting this option.
Set All Devices: The Set All Devices button is used to change the logical network of all devices
that appear on the Main configuration homepage whose Device’s Password had been entered for
the same logical network. A dialog window will appear to report the success of this operation. For
devices whose device password’s were not entered, this operation will fail and will report a failure
message.
Ethernet Powerline Adaptor
Page 55
54
4.4 Diagnostics
The Diagnostics homepage shows the System Information and Remote Device History of all remote
devices seen over a period of time which are only readable. Click on the “Diagnostics” tab and the following
screen display.
The Diagnostics information displayed can be saved to a text file. One can email the saved text file
to the local supplier when there’s technical support require or print the saved text file as reference during a
technical support conference.
The Upper Panel shows technical data concerning software and hardware present on the host
computer which were used to communicate over Ethernet Powerline Adaptor on the Powerline network. It
may include the following:
Operating System Platform/Version
Host Network Name
User Name
MAC Address of all NICs (Network interface card) connected to the host
Identify versions of all Driver DLLs and Libraries used (NDIS) and optionally
MAC addresses of all devices connected locally to the host
Click the “Delete” tab when there’s Ethernet Powerline Adaptor devices no longer part of the network.
Ethernet Powerline Adaptor
Page 56

55
The Lower Panel contains a history of all remote Ethernet Powerline Adaptor devices seen on the
computer over a certain period of time. All devices that were on the powerline network are listed here along
with a few other parameters. Ethernet Powerline Adaptor devices that are active on the current logical
network will show a transfer rate in the Rate column; devices on other networks, or devices that may no
longer exist are shown with a “?” in the Rate column. The following remote Ethernet Powerline Adaptor
devices information is available from the diagnostics screen:
Device Alias Name
Device MAC Address
Device Password
Device Last known rate
Device Last Known Network name
Date device last seen on the network
The diagnostics information displayed may be saved to a text file for later use, or can be printed for
reference for a technical support call. Ethernet Powerline Adaptor devices, which are not part of the network
anymore, can be deleted using the delete button. A dialog window pops up with a confirmation message if we
try to delete a device whose password has been entered.
Ethernet Powerline Adaptor
Page 57
56
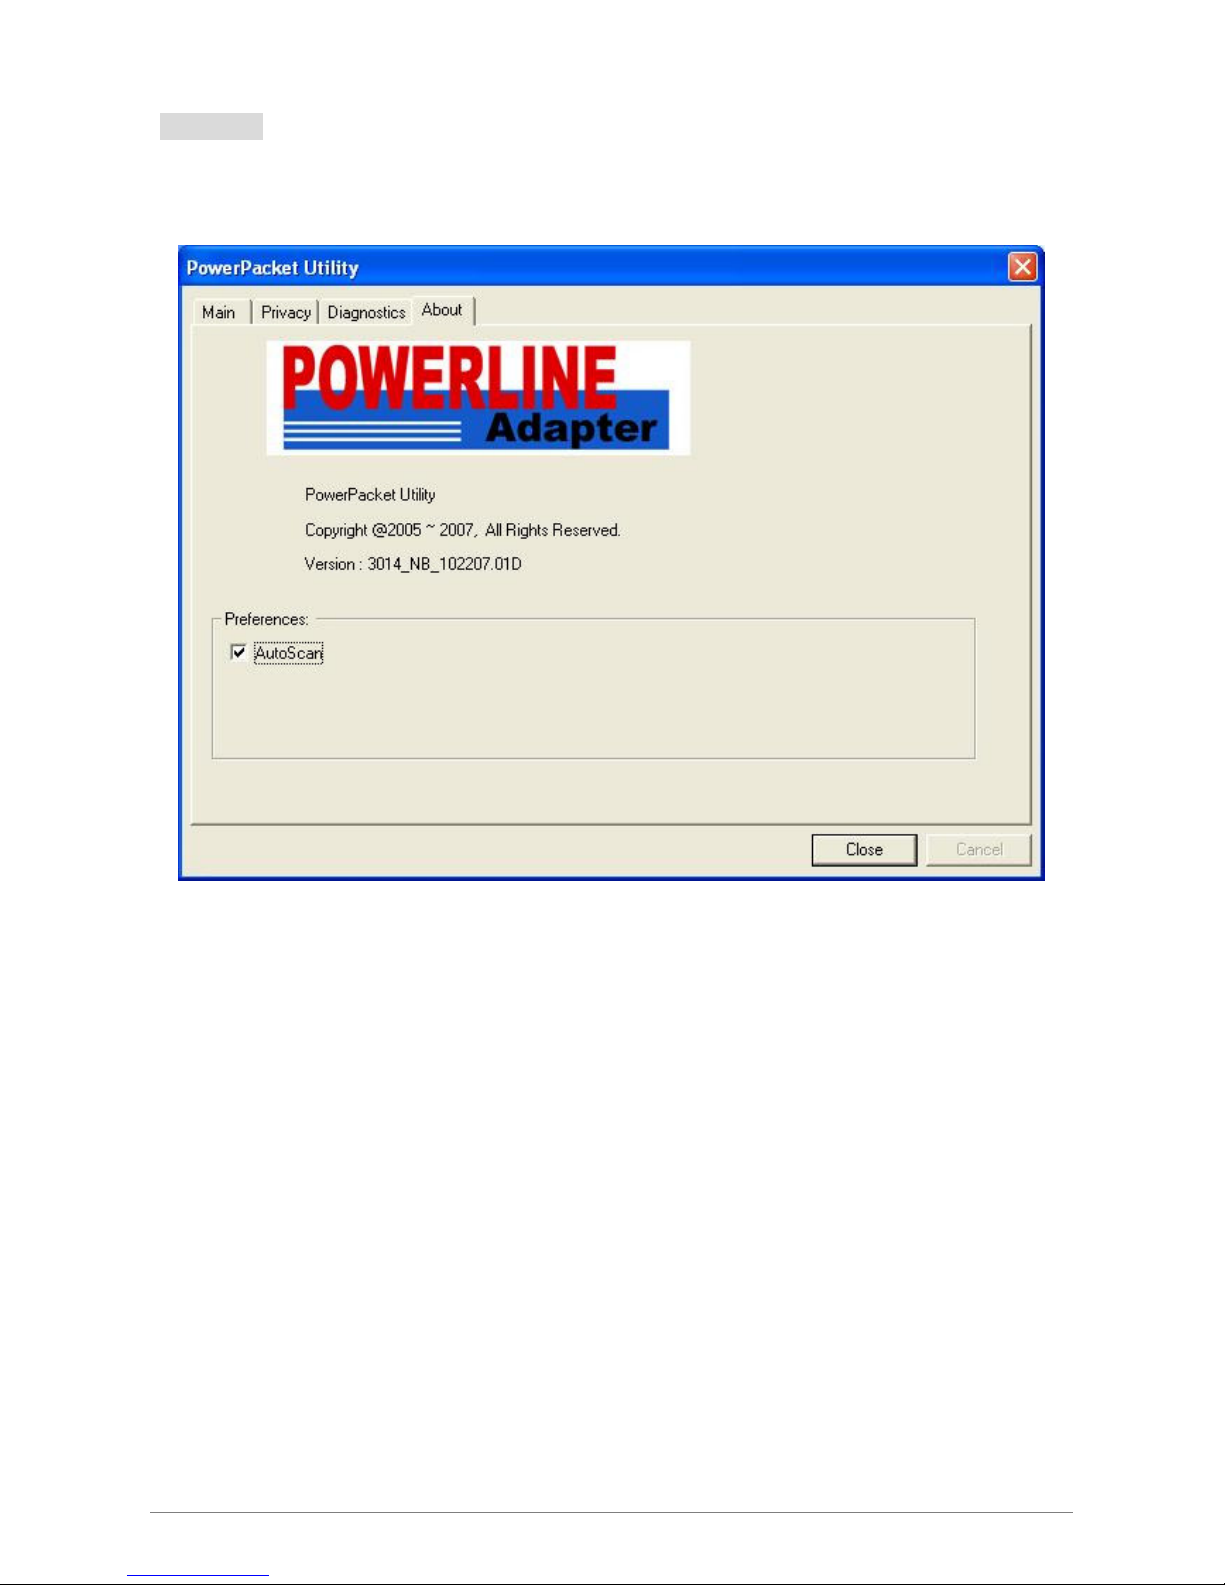
4.5 About
The About homepage show the Management Utility software version.
AutoScan: When enabled (Place a check), the Management Utility will automatically scan for
Ethernet Powerline Adaptor devices on the local network every few seconds and updated the
scanning information on the Main configuration homepage.
Ethernet Powerline Adaptor
Page 58

57
Appendix A: Troubleshooting Guide
The Troubleshooting Guide provides answers to common problems regarding the Ethernet Powerline
Adaptor.
1. The Power LED does not light up.
Ans. Check the following:
1. Make sure that the Ethernet Powerline Adaptor is properly plugged into a power outlet.
2. Make sure the power outlet is active (working) by plugging another electric device into it.
3. Re-plug the Ethernet Powerline Adaptor to the power outlet again. If the Power LED still
failed to light up, contact your local dealer for technical support.
2. The Ethernet LED does not light up.
Ans. Check the following:
1. Make sure that the Ethernet cable (RJ-45) is properly connected to the Ethernet Powerline
Adaptor’s Ethernet port.
2. Make sure that the other end of the Ethernet cable (RJ-45) is properly connected to the
computer LAN card or to you Cable/xDSL Ethernet port.
3. Make sure your computer LAN card is properly installed and configured.
4. Make sure your Cable/xDSL broadband access is working and configured correctly.
5. Contact your local dealer for technical support if the Ethernet LED still failed to lights up after
the above procedures.
3. Powerline LED does not light up.
Ans. Check the following:
1. Double click to enable the Management Utility and click the “Scan” tab under the Main
configuration homepage. The Management Utility will automatically detect all other Ethernet
Powerline Adaptor on your power line network.
2. Try to plug a second Ethernet Powerline Adaptor into a near by power outlet and check
whether the Powerline LED lights up or not.
3. Contact your local dealer for technical support if the Powerline LED still failed to lights up after
the above procedures.
Ethernet Powerline Adaptor
 Loading...