

Media Player
NOXON M740
Manual
Version 2.0 - 06/2011

M740
3
CE/FCC declaration
TERRATEC Electronic GmbH · Herrenpfad 38 · 41334 Nettetal · Germany
hereby declare that the product:
NOXON M740 (Full HD Network Multimedia Player)
to which this declaration refers is in compliance with the following standards or standardizing documents:
• EN 55022:1998 + A1:2000 + A2:2003, CLASS B
• EN 55024: 1998 + A1:2001 + A2:2003
• EN 61000-3-2:2000, Class A
• EN 61000-3-3:1995+A1:2001
• IEC 61000-4-2:2001
• IEC 61000-4-3:2002+A1:2002
• IEC 61000-4-4:2004
• IEC 61000-4-5:2001
• IEC 61000-4-6:2003+A1:2004
• IEC 61000-4-8:2001
• IEC 61000-4-11:2004
This device may only be used in the following environments and operating conditions:
residential, commercial and industrial environments, as well as small businesses. The
basic protective requirements of EMC Directive 89/336/EEC are thus fullled.
CE conformity has been demonstrated. As stipulated in R&TTE Directive (1999/5/EC),
this device corresponds to a Class 1 radio system (Commission Decision 2000/299/EC).
The device also complies with FCC Part 15, Subpart B, Class B, and ANSI C63.4:2003.
This declaration is based on:
• Test report(s) of the ADT Corp. testing laboratory
2

Index
CE/FCC declaration . . . . . . . . . . . . . . . . . . . . . . . . . . . . . . . . . . . . . . . . . . . . . . . . . . . . . . . . . . 2
Important safety information. . . . . . . . . . . . . . . . . . . . . . . . . . . . . . . . . . . . . . . . . . . . . . . . . . . . 4
Welcome! . . . . . . . . . . . . . . . . . . . . . . . . . . . . . . . . . . . . . . . . . . . . . . . . . . . . . . . . . . . . . . . . . . 5
Scope of delivery . . . . . . . . . . . . . . . . . . . . . . . . . . . . . . . . . . . . . . . . . . . . . . . . . . . . . . . . . . . . 5
Overview . . . . . . . . . . . . . . . . . . . . . . . . . . . . . . . . . . . . . . . . . . . . . . . . . . . . . . . . . . . . . . . . . . . . . 6
Front. . . . . . . . . . . . . . . . . . . . . . . . . . . . . . . . . . . . . . . . . . . . . . . . . . . . . . . . . . . . . . . . . . . . . . 6
Back . . . . . . . . . . . . . . . . . . . . . . . . . . . . . . . . . . . . . . . . . . . . . . . . . . . . . . . . . . . . . . . . . . . . . . 6
Remote control. . . . . . . . . . . . . . . . . . . . . . . . . . . . . . . . . . . . . . . . . . . . . . . . . . . . . . . . . . . . . . 9
Connection . . . . . . . . . . . . . . . . . . . . . . . . . . . . . . . . . . . . . . . . . . . . . . . . . . . . . . . . . . . . . . . . . . 14
Power supply . . . . . . . . . . . . . . . . . . . . . . . . . . . . . . . . . . . . . . . . . . . . . . . . . . . . . . . . . . . . . . 14
Video . . . . . . . . . . . . . . . . . . . . . . . . . . . . . . . . . . . . . . . . . . . . . . . . . . . . . . . . . . . . . . . . . . . . 14
Audio . . . . . . . . . . . . . . . . . . . . . . . . . . . . . . . . . . . . . . . . . . . . . . . . . . . . . . . . . . . . . . . . . . . . 14
Wired network (LAN) . . . . . . . . . . . . . . . . . . . . . . . . . . . . . . . . . . . . . . . . . . . . . . . . . . . . . . . . 15
Wireless network (WLAN) . . . . . . . . . . . . . . . . . . . . . . . . . . . . . . . . . . . . . . . . . . . . . . . . . . . . 15
Memory cards . . . . . . . . . . . . . . . . . . . . . . . . . . . . . . . . . . . . . . . . . . . . . . . . . . . . . . . . . . . . . 15
External storage devices (USB). . . . . . . . . . . . . . . . . . . . . . . . . . . . . . . . . . . . . . . . . . . . . . . . 15
External hard disk (SATA) . . . . . . . . . . . . . . . . . . . . . . . . . . . . . . . . . . . . . . . . . . . . . . . . . . . . 15
Internal hard disk (SATA) . . . . . . . . . . . . . . . . . . . . . . . . . . . . . . . . . . . . . . . . . . . . . . . . . . . . . 15
PC/Mac (USB) . . . . . . . . . . . . . . . . . . . . . . . . . . . . . . . . . . . . . . . . . . . . . . . . . . . . . . . . . . . . . 16
Setup . . . . . . . . . . . . . . . . . . . . . . . . . . . . . . . . . . . . . . . . . . . . . . . . . . . . . . . . . . . . . . . . . . . . . . . 17
Setup assistant. . . . . . . . . . . . . . . . . . . . . . . . . . . . . . . . . . . . . . . . . . . . . . . . . . . . . . . . . . . . . 17
UPnP server. . . . . . . . . . . . . . . . . . . . . . . . . . . . . . . . . . . . . . . . . . . . . . . . . . . . . . . . . . . . . . . 17
The M740 in server mode . . . . . . . . . . . . . . . . . . . . . . . . . . . . . . . . . . . . . . . . . . . . . . . . . . . . 18
The M740 in client mode . . . . . . . . . . . . . . . . . . . . . . . . . . . . . . . . . . . . . . . . . . . . . . . . . . . . . 20
Handling . . . . . . . . . . . . . . . . . . . . . . . . . . . . . . . . . . . . . . . . . . . . . . . . . . . . . . . . . . . . . . . . . . . . 22
Typical applications . . . . . . . . . . . . . . . . . . . . . . . . . . . . . . . . . . . . . . . . . . . . . . . . . . . . . . . . . 22
Main menu . . . . . . . . . . . . . . . . . . . . . . . . . . . . . . . . . . . . . . . . . . . . . . . . . . . . . . . . . . . . . . . . 23
Media menu . . . . . . . . . . . . . . . . . . . . . . . . . . . . . . . . . . . . . . . . . . . . . . . . . . . . . . . . . . . . . . . 24
Movies menu . . . . . . . . . . . . . . . . . . . . . . . . . . . . . . . . . . . . . . . . . . . . . . . . . . . . . . . . . . . . . . 25
Music menu . . . . . . . . . . . . . . . . . . . . . . . . . . . . . . . . . . . . . . . . . . . . . . . . . . . . . . . . . . . . . . . 25
Photo menu . . . . . . . . . . . . . . . . . . . . . . . . . . . . . . . . . . . . . . . . . . . . . . . . . . . . . . . . . . . . . . . 25
Data menu . . . . . . . . . . . . . . . . . . . . . . . . . . . . . . . . . . . . . . . . . . . . . . . . . . . . . . . . . . . . . . . . 25
Setup menu . . . . . . . . . . . . . . . . . . . . . . . . . . . . . . . . . . . . . . . . . . . . . . . . . . . . . . . . . . . . . . . 26
Appendix . . . . . . . . . . . . . . . . . . . . . . . . . . . . . . . . . . . . . . . . . . . . . . . . . . . . . . . . . . . . . . . . . . . . 34
Technical specications . . . . . . . . . . . . . . . . . . . . . . . . . . . . . . . . . . . . . . . . . . . . . . . . . . . . . . 34
License information . . . . . . . . . . . . . . . . . . . . . . . . . . . . . . . . . . . . . . . . . . . . . . . . . . . . . . . . . 34
3

M740
5
Important safety information
This device has been developed and manufactured so that it does not endanger personal safety. Improper use can cause electric shock or re. The safety features integrated
into this device can protect you only if you observe the following instructions for installation, use and maintenance:
• Please read this operating manual in its entirety.
• Observe all warnings and instructions.
• Do not use the device close to water.
• Clean it using a dry cloth only. Do not use any liquids!
• Do not cover up any ventilation openings. Install the device according to the instructions in this manual.
• Do not install the device in the immediate vicinity of heat sources such as radiators,
ovens or other devices that give off a great deal of heat.
• Route all cables so that no one can step on them and they are not pinched, especially
not on the connector, on the power outlet or at the location where the network cable
exits the device.
• Unplug the power cable from the socket during electrical storms or when the device will
not be used for a long time.
• All maintenance work may be carried out by qualied service technicians only. Maintenance work is required whenever the device has been damaged in any way, e.g. if
power cables or connectors are damaged, liquid gets into the device or objects fall into
it, if it has been exposed to rain or moisture, if it no longer functions normally or has
fallen down.
• The device may be operated at ambient temperatures of 5 °C to 35 °C (41 °F to 95
°F) only.
• Do not drop the device or expose it to mechanical shock!
• Do not move the device as long as it is switched on.
• Place the device on a level, dry surface to prevent re and electrical shock hazards as
well as possible damage to the player itself.
• Do not place objects lled with liquid such as vases or bottles on the device.
• If the device has been exposed to extreme differences in temperature, allow it to adjust
to the room temperature for one hour before plugging it in. Condensation may have
formed inside the device, which impairs its functionality or can cause damage to the
device itself.
4

Welcome!
Thank you very much for choosing a NOXON product!
Your NOXON M740 offers everything you need to play back your media collection on
your big-screen TV in brilliant (HD) resolution of up to 1080p. The great number of connectors offered make for an easy and exible combination with your other entertainment
devices.
You can play back movies and music from a large number of diverse sources:
• USB memory sticks, USB hard disks and CD/DVD drives
• SD/MMC memory cards
• Internal SATA hard disk*
• External SATA hard disk*
• Wired networks (LAN)
• Wireless networks (with the NOXON WLAN stick*)
* The NOXON WLAN stick, external and internal SATA hard disks as well as other storage devices are optional additions for your M740. They are not included in the scope of
delivery.
Scope of delivery
Please start by making sure that the contents of the package are complete:
• NOXON M740 media player
• Power cable
• HDMI cable
• A/V cable
• RGB cable
• SATA cable
• Remote control with battery
• Manual (EN/DE)
• Quick start guide (EN/DE/FR/IT/ES/NL)
• Service request form
Enjoy your new NOXON M740!
5
M740
7
Overview
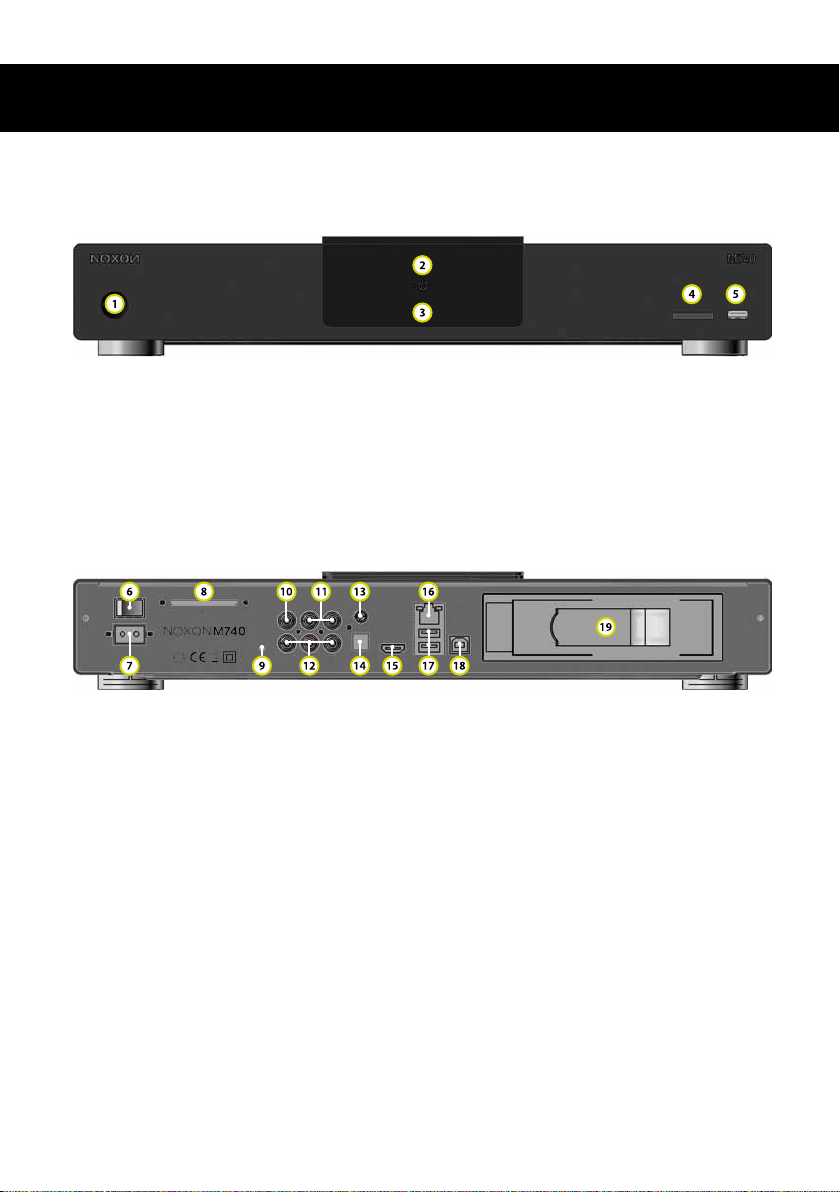
Front
1. On/Off button
2. Operating status display
3. Infrared receiver
4. SD/MMC card slot
5. Front USB port for external storage devices
Back
6. On/Off switch
7. Connection socket for power cable
8. SATA port
9. Reset button
10. Composite video output
11. Stereo audio outputs
12. Component video outputs
13. Coaxial S/PDIF audio output
14. Optical S/PDIF audio output
15. HDMI 1.3 interface
16. Network port (RJ-45)
17. USB ports for external storage devices
18. USB port for connection to a PC/Mac
19. 3.5“ SATA hard disk drive bay
6

1. On/Off button
Activates the M740 or switches it into standby mode.
2. Operating status display
This LED lights up red in standby mode, while in active mode it shines blue.
3. Infrared receiver
Receives signals from the wireless infrared remote control. Please do not cover this
sensor.
4. SD/MMC card slot
Play back movies, photos, music etc. from cards placed into this slot. The card reader
supports the following le formats: SD, SD-HC, MMC, MS and MS Pro.
5. Front USB port for external storage devices
Media les can also be accessed from external USB storage devices like hard disks and
memory sticks (USB 1.0, 1.1 and 2.0 up to 480 Mbit/s).
6. On/Off switch
Deactivating the M740 by this switch will completely disconnect it from mains and stop
any energy consumption of the unit. However, the media player cannot be activated by
the remote control or the On/Off button on the front panel in this mode.
7. Connection socket for power cable
Please only use the included cable for connecting your M740 to mains. Please make
sure that this cable shows no sign of wear or any defects.
8. SATA port
Use the supplied cable to connect a SATA hard disk (not eSATA). Once it has been connected to this port, you can play back audio and video data from the external drive.
9. Reset button
On rare occasions (e.g. after updating the rmware) it can happen that the M740 freezes
so that it does not react to commands anymore. This situation requires a reset. Please
switch the media player off with the On/Off switch on the back panel. Then use a ball pen
tip or something similar to push the reset button and hold it for ve seconds while switching the M740 back on again.
10. Composite video output
This yellow RCA connector carries an analogue video signal without sound. Please note
that the image quality of the other video outputs is superior to the quality of the composite
output. Therefore you should only use this option if the others cannot be used for your
purposes.
7

M740
9
11. Stereo audio outputs
These two RCA outputs carry the analogue audio signal (the left channel coming from
the white connector, the right channel from the red one).
12. Component video outputs
As a better alternative to the composite output you can connect your TV set and the
M740 via the component video output using the supplied cable. Please note that also in
this case the output does not carry an additional audio signal. The colour codes of the
corresponding RCA connectors are red, green and blue (RGB).
13. Coaxial S/PDIF audio output
This yellow RCA connectors carries the audio signal(s) in the digital S/PDIF format. The
digital signal transfer is lossless and, depending on the source le, audio will be available
in mono, stereo or surround.
14. Optical S/PDIF audio output
The digital audio signals can alternatively be transferred through a light wave cable according to the TOSLINK standard. If you are using this type of cable, please avoid bending it too much.
15. HDMI 1.3 interface
This interface grants the best video and audio quality by transferring digital signals from
your M740 to your TV through the supplied cable. If your TV set has an HDMI connector,
please make sure to use it instead of the other video connectors in order to enjoy the best
playback quality your media player can offer (up to 1080p 60Hz).
16. Network port (RJ-45)
This LAN/Ethernet connector lets you integrate the M740 into your cable home network
at 10 or 100 MBit speed. Please use a standard network cable with RJ45 connectors. A
green LED located at this port indicates a proper connection on both ends of the cable.
17. USB ports for external storage devices
In addition to the corresponding port on the front panel these connectors can be used to
access media data from external USB storage devices like hard disks and memory sticks
(USB 1.0, 1.1 and 2.0 up to 480 Mbit/s).
18. USB port for connection to a PC/Mac
If you have tted an internal SATA hard disk into your M740 you can use this port to connect it with your PC or Mac. Your NOXON will be recognized as an external hard disk
device without the need to install any drivers rst. This way you can transfer movies,
music and photos to your M740 fast and conveniently.
19. 3.5“ SATA hard disk drive bay
You can upgrade your M740 with an internal 3.5” SATA hard disk (not included). Please
8

make sure to deactivate the media player by the power switch on the back panel before
opening this bay. We suggest to use a hard disk with 5,400 RPM because of the lower
noise oor this type of HDD usually produces.
Remote control
The supplied infrared remote control is the exclusive command centre for your M740.
Please insert the supplied battery before rst use:
• Open the battery cover on the rear side of the remote control.
• Insert the battery into the battery compartment as indicated by the + and - symbols.
• Close the battery compartment again with its cover.
Please follow this common advice when handling batteries:
• If the remote control does not function properly or the range is no longer adequate,
replace the battery with a new one.
• Remove batteries when they are completely empty or if the remote control will not be
used for an extended period. This prevents leaky batteries from damaging your remote
control.
• Never throw batteries into a re!
• Ensure that you use alkaline batteries or, even better, rechargeable batteries.
• Dispose of used batteries at the appropriate disposal facilities.
• Always dispose of batteries in compliance with legal regulations. This helps to protect
the environment.
9
M740
11
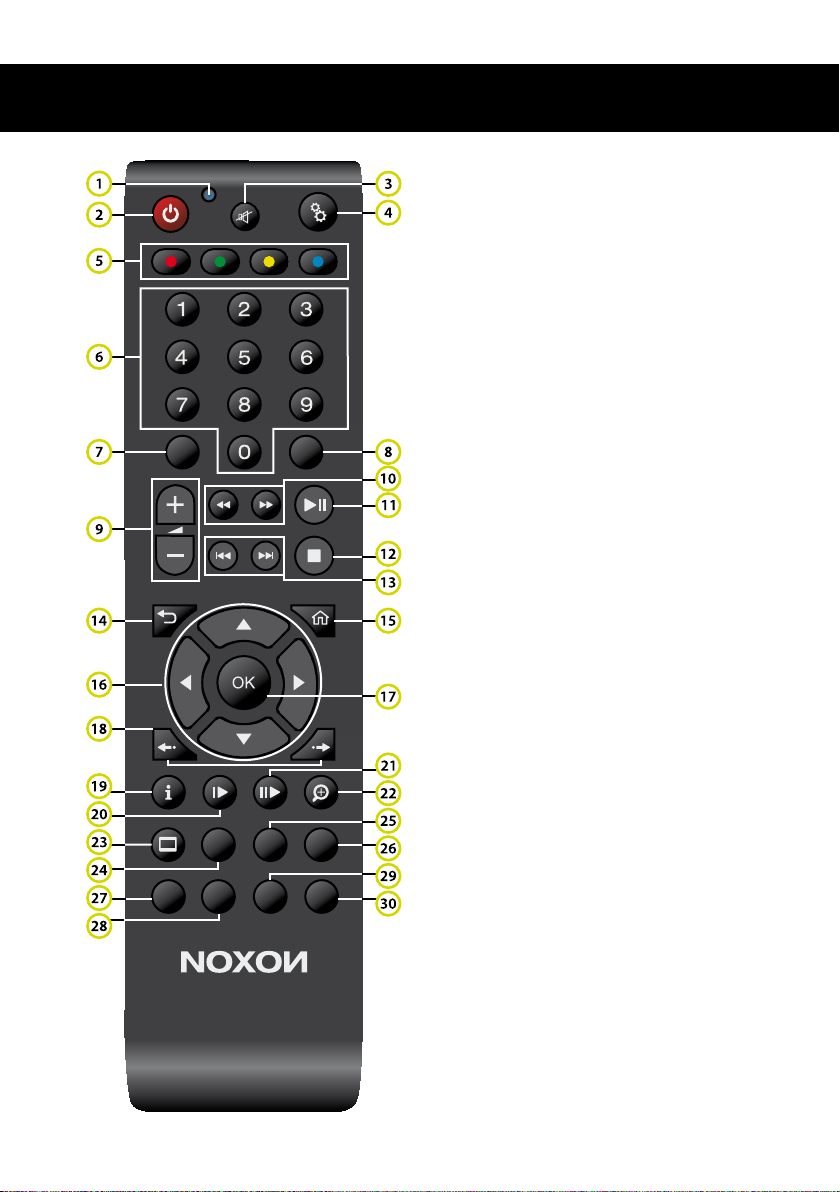
1. Activity monitor LED
2. Standby
3. Mute
4. Settings
5. Options
6. Keypad
7. Repeat
8. Goto
9. Volume Up/Down
10. Fast Backward/Forward
11. Play/Pause
12. Stop
13. Skip Back/Forth
14. Before
15. Main Menu
16. Navigation
17. OK
18. Time Leap Back/Forth
19. Option
20. Slow
21. Step
22. Zoom
23. 16:9
24. Angle
25. Menu
26. Title
27. TV Mode
28. A-B
29. Audio
30. Subtitle
10

1. Activity monitor LED
Lights up when one of the knobs is pressed. Please replace the battery if this should not
be the case.
2. Standby
Switches your M740 on – please note that this can take a short while. A second press will
switch the media player into standby or into server mode respectively.
3. Mute
Mutes the audio playback. A second press will return to normal audio playback at the
volume which had been set before.
4. Settings
This opens the “Setup“ menu of your M740. Here you can adapt the behaviour of your
media player according to your individual wishes.
5. Options
These buttons activate additional options. The On-Screen-Menu will show you when and
which specic options are available.
6. Keypad
You can enter the number 0 to 9 by using this keypad.
7. Repeat
Repeats single tracks/chapters or complete playlists. A second press will return to normal
playback mode.
8. Goto
Depending on the current le format, this function lets you chose a specic track, chapter
or point in time for playback.
9. Volume Up/Down
Increases or decreases the volume of the audio playback. Please be careful, as continuously high volumes can permanently damage your hearing.
10. Fast Backward/Forward
Increases the playback speed towards the beginning or the end of a track or a chapter.
Repeated pressing will increase the speed of the accelerated playback.
11. Play/Pause
This button starts the playback of a media le. A second press will pause and another
one will continue the playback again.
11

M740
13
12. Stop
The Stop button interrupts all playback and search functions of the M740.
13. Skip Back/Forth
Jumps towards the next or the previous track or chapter and continues playback there.
14. Before
Returns from the current window to the one you were before: back to the movie, back to
the previous menu - exactly the place were you had been before the actual one.
15. Main Menu
Jumps into the main menu.
16. Navigation
Use these buttons to navigate through the menus of your media player – up, down, left
and right.
17. OK
OK conrms your entries, selects folders, chooses storage devices or starts playing back
selected media les.
18. Time Leap Back/Forth
Jumps back in 15 second steps and forth in 30 second steps during playback. Just press
and hold the button for a sequence of leaps.
19. Option
Displays information like le size, playing time, subtitles or video/audio resolution during
playback. A second press will close the corresponding window.
20. Slow
Some le formats allow the slowed down playback of a movie. Repeated pressing will
lower the playback speed further.
21. Step
Shows continuous still images of a movie. Each press of this button will jump to the next
picture/frame, while holding the button will automatically show one picture after the other.
22. Zoom
Zooms into the display window. Repeated pressing will change the zoom factor: 1x, 2x,
3x, 4x and 8x. The image centre moved with the navigation keys in zoom mode.
23. 16:9
Depending on the movie and television format, you can use this button to switch between
the 4:3 Letterbox, 4:3 Pan/Scan, 16:9 and 16:10 formats.
12

24. Angle
Some movies support views from different camera angles. If your movie supports this
function, you can use this button to switch between several angles.
25. Menu
Press this button to call up the menu within a movie. However, please do not mistake this
for the separate button for the main menu of the M740.
26. Title
Takes you back to the title menu of your movie.
27. TV Mode
Depending on which screen resolution your TV set supports, you can choose the optimum setting for your device here. You can choose from PAL(576i), NTSC(480i), 480P,
576P, 720P at 50 Hz, 720P at 60 Hz, 1080i at 50 Hz, 1080i at 60 Hz, 1080p at 50 Hz and
1080P at 60 Hz.
28. A-B
To repeat a certain passage of a movie, press A-B once at the desired starting position.
If you press the button again, the “playback loop” starts at the point you marked with A
and ends at the point where you pressed the button again. Pressing the button a third
time ends the playback loop.
29. Audio
If a movie offers multiple audio tracks (e.g. different languages) you can select one of
them by repeatedly pressing this knob.
30. Subtitle
Pressing this button once opens the subtitle menu, which allows you to playback subtitle
les that are included in the movie or in the same folder along with the movie. You can
congure settings for subtitle display as desired using the menu. If you press this button
again, available subtitles are displayed or disabled automatically in sequence.
13

M740
15
Connection
Start by connecting your M740 to mains, then establish a video and audio connection to
your TV set and/or your hi- system. Now you can integrate your media player into your
wired or wireless network and nally add external and internal storage devices carrying
movies, music and pictures. The following details will help you getting started.
Power supply
Plug the provided cable into the corresponding connector (7) on the back panel. Please
do not use power cables which you suspect to be damaged. Now set the switch (6) to “I”
in order to feed the player with power.
Video
HDMI
If your TV set features a HDMI connector, you should make use of it instead of the other
video connection options. This way you will benet from maximum video and audio quality (up to 1080p/60Hz) via digital signal transfer. Use the supplied cable to connect the
HDMI interfaces of your M740 and your TV - this will transfer both video and audio signals through one single cable.
Component
If your TV set does not have an HDMI interface, but a Component input consisting of
three coloured RCA connectors (12), you should use this option to transfer your video
signals. Connect the red, green and blue RCA connectors on your NOXON and your
TV with the provided cable. Please note that this will only transfer video signals, which
requires an additional connection for audio.
Composite
The yellow RCA connector also carries a video signal which can be sent to the corresponding input of your TV with the supplied cable. However, the other video connectors
of the M740 offer a better signal quality. This is why you should use this option only in
case the others do not work for you. Also in this case, audio is not transferred together
with the video signal, which requires a separate audio connection.
Audio
Analog
If you’re not using the HDMI interface of your M740, you can send an analogue stereo
audio signal from these two RCA (11) connectors to your TV set or hi- system (the left
audio channel is coded white, the right one is red). Please note that surround audio signals can only be sent via the digital S/PDIF connectors or HDMI.
Coaxial S/PDIF
This yellow coded RCA connector (13) carries an audio signal in the digital S/PDIF format. Please use a standard RCA cable (not included) to establish the connection with
14

your TV or hi- receiver. Depending on the source le, audio is being transferred without
loss in mono, stereo or surround.
Optical S/PDIF
Alternatively, the digital audio signal can be transferred via a light wave cable (not included) according to the TOSLINK standard. Should you use this connection, please make
sure to plug in (14) and treat the cable with a certain care so it is not being bent too much.
Wired network (LAN)
Use a standard CAT 5 cable or similar (not included) for integrating your M740 into your
home network. Plug one of the RJ45 connectors into the corresponding port (16) on your
M740 and the other one into your router, switch or hub. A green LED located at this port
indicates a proper connection on both ends of the cable.
Wireless network (WLAN)
If you prefer to integrate the M740 into a wireless network, you can do so by using the
optional NOXON WLAN stick which uses the very fast 802.11n standard, featuring data
transfer rates of up to 300 MBit/s. It is fast enough to transfer even HD movies without
dropping frames. Of course the NOXON WLAN stick also supports the 802.11b and
802.11g standards as well as the WEP, TKZP, AES, WPA, WPA2 encryption/security
standards.
Memory cards
The front panel of the M740 features a reader (4) for standard memory cards. You can
playback movies, music and pictures from cards which have been inserted into this slot.
The card reader supports SD, SD-HC, MMC, MS and MS Pro cards which can also be
inserted during operation.
External storage devices (USB)
Your M740 features a total of three USB ports for connecting external storage devices
like hard disks and memory sticks – one on the front (5) and two on the back panel (17).
The media content of the storage devices connected to these ports can be accessed
from the specic menus of your M740. Initialising a new device connected here might
take a few seconds.
External hard disk (SATA)
Use the supplied cable to connect a SATA hard disk (not eSATA). Once it has been connected to this port (8), you can play back audio and video data from the external drive.
The cable transfers your media data and the power the HDD requires at the same time.
Internal hard disk (SATA)
In addition or as an alternative to an external hard disk you can also retrot an HDD directly into your media player. Please use a 3,5” SATA standard model, preferably with a
15

M740
17
speed of 5,400 RPM in order to keep the noise level as low as possible. Before installing
the hard disk, please make sure to disconnect your media player from mains. Now open
the SATA bay (19) located on the back panel and insert the HDD carefully with the connectors showing towards the bay and the label showing up. Please make sure not to retain the cover while doing so. After noticing a soft click you can close the cover of the bay.
PC/Mac (USB)
If you have retrotted your M740 with an internal SATA hard disk as described above, you
can establish a connection between your PC/Mac and your media player by inserting a
standard USB cable (not included) into the corresponding port (18). Your computer will
recognize the NOXON as an external hard disk without the need to install any drivers at
all. This is the fastest of several options to transfer media data like movies, music and
images to your M740.
16

Setup
Setup assistant
When you power up the M740 for the rst time, a setup assistant will help you to make
the most basic settings. You can always execute this assistant anew by going to „Options“ > “System“ > “Default“.
Start by choosing the language for the user interface with the Up/Down navigation and
the “OK” button.
The network conguration comes next. If you own a DSL router with an integrated DHCP
server, choose “DHCP IP (Auto)“ and conrm with “OK”. After conrming the question if
you want to save this conguration, your NOXON will automatically connect itself with
your network. Advanced users can also run a manual setup by using a static IP address.
You’ll nd more info on this in the “Network options” chapter.
UPnP server
UPnP means „Universal Plug and Play“. The M740 features an integrated UPnP server
which makes it possible to make the media data like movies, music, and pictures stored
on its internal HDD available to other UPnP capable devices in the same network.
But the M740 does not only act as a server, but it can also be a client and access/play
back media data provided by other UPnP capable devices in the same network.
17

M740
19
The M740 in server mode
When used as a server, the M740 provides its media data via UPnP in the network it is
connected to. These les can be accessed by additional players (clients) connected to
the same network.
Which requirements must be met for UPnP server operation?
• Min. rmware version 1.2.3.5
• Retrotted internal 3,5“ SATA hard disk
• Hard disk must have been formatted with the M740
• Additional software packages must be installed
• Options in the “System“ menu must be changed accordingly
How to activate the UPnP server?
The following is a step-by-step explanation about how to congure the UPnP server function on your NOXON M740.
Please make sure to use the latest Firmware version from our website:
http://www.terratec.net/en/drivers-and-support.html
Step 1: Firmware check/update
Use the navigation and “OK” buttons of your remote control to select the folder “Options”
> “System”. The sub item “System Reinstall” shows the version of the rmware which is
just running on your device. This this version number is lower than 1.2.3.5, you will need
to install a new rmware before proceeding.
Please follow these steps to do so:
• Download the latest rmware for your M740 from the following website:
http://www.terratec.net/en/drivers-and-support.html
• Copy the le “install.img” into the main directory of a USB memory stick
• Connect this memory stick to one of the USB ports of your M740
• Select “System Reinstall“ and conrm with “OK”
• Important: Do not switch the unit off while the rmware update is in progress!
Step 2: Install an internal hard disk
Please use a 3,5” SATA standard model, preferably with a speed of 5,400 RPM in order
to keep the noise level as low as possible. Before installing the hard disk, please make
sure to disconnect your media player from mains. Now open the SATA bay (19) located
on the back panel and insert the HDD carefully with the connectors showing towards the
bay and the label showing up. Please make sure not to retain the cover while doing so.
After noticing a soft click you can close the cover of the bay.
Step 3: Format the hard disk
In this next step the hard disk will be formatted and prepared for the UPnP server mode.
18

To start formatting, please select „Setup“, „Options“ and „HDD Format“ in the main menu.
A sub-menu will open in which you can select the specic hard disk to be formatted. In
our example it is called „HDD1“. A warning will appear.
ATTENTION: Formatting your HDD will delete all les stored on it. Please make sure to
backup existing les to another storage device if you will need them in the future.
Next you will be asked for conrmation once more. Select “Format” if you are sure you
want to proceed.
Step 4: Installing the required software
The required software packages for the UPnP server mode will be installed automatically
after your NOXON has nished formatting the inserted hard disk. Once the installation
has been completed, push “OK” in order to re-boot your media player.
Step 5: Activating the UPnP server mode
Finally, the UPnP server mode needs to be activated. In order to do so, please navigate
to „System“ > “RC Power Key Function“. Then press the power button on your remote
control to activate the UPnP server.
Note: After pressing the power button on your remote control you have the opportunity to
cancel the activation process by pressing the button again. Your NOXON will enter the
standby mode without activating the UPnP server mode.
A successful UPnP activation will show a “UPnP Server is active“ message on your TV
19

M740
21
screen. Now are the media les in the folders „image“, „movie“ and „music“ on your hard
disk are shared in the network. Other UPnP clients in the same network (e.g. NOXON
iRadio) will now show the entry “NOXON M740“ in their UPnP server list. This might
show up on the clients only after a slight delay.
For advanced users: You can also activate the UPnP server mode while the device is
running by pressing the blue button on your remote control. However, this may reduce
the performance of your NOXON M740 and the UPnP client.
Adding new media les
You can transfer videos, pictures or audio les from your USB sticks, hard disks or memory cards to your M740 with the integrated le manager. You can also connect your
NOXON M740 to your computer via the USB connector (18) on the back of your device
and use it as an external hard disk. If the UPnP server mode is activated, les can also
be transferred from a device in the same network the NOXON M740 is located in, for
example by inserting the IP address of your M740 (e.g. \\192.168.1.19) in the address
bar of the Windows Explorer.
ATTENTION: To access your les via the UPnP server please make sure to place them
into the correct corresponding folders. In other words, copy your video, picture, and music les into the folders “movies”, “images” and “music“. The UPnP database will update
itself every 60 minutes. This may result in a delayed availability of your newly added les.
To shorten this process you can restart your media player after adding new les.
How to access the provided les
Once the M740 is set to server mode, external UPnP capable clients can access the les
located on its internal HDD. For example, on a connected Windows PC you will nd the
M740 as a new device in the network environment. On a Mac you can nd the M740 in
the “Shared” tab of the Finder.
The M740 in client mode
When used as a so called client, the M740 can access and play back media data which
are hosted by another device via UPnP in the same network. Please make sure to run the
M740 in standard and not in server mode if you want to use it as a client. Of course, you
need at least one additional UPnP device acting as the server in this scenario.
Microsoft Windows
Windows Media Player (Version 11 or 12) is the simplest way to add such a server, since
it already has this service built in. Via the “Stream” menu item, select the “Enable media
streaming” function.
In the following dialogue you now have to enable this service explicitly and then activate
the corresponding devices, if you have multiple receivers. Now the NOXON can access
the music data in your library.
20

Mac OSX
Unfortunately, Apple does not supply any UPnP program itself, so it is necessary to rely
on a third-party supplier. Elgato offers a solution with its EyeConnect software. This is
available for free as a trial version and can be used with the full range of its functions
(including video streaming) for 30 days.
Even after this period, however, the Lite version remains available, which makes audio
les in the network available without restrictions. You will nd this software at Elgato’s
website: www.elgato.com.
21

M740
23
Handling
Typical applications
Listen to music from a USB memory stick
• Plug a USB memory stick into one of the USB ports on the front (5) or the back (17)
• Starting from the main menu, use the navigation buttons Left/Right to access the “Music” menu
• Use the navigation buttons Up/Down to select the “USB” submenu and conrm with
“OK”
• If the music you want to play is not located in the root directory of your USB memory
stick, use the Up/Down navigation buttons to select the desired folder and press “OK”
to access this folder
• Select the song you want to start with the Up/Down navigation buttons and press “OK”
to start playback
Watch photos from a memory card
• Insert a memory card into the card reader on the front panel (4)
• Starting from the main menu, use the navigation buttons Left/Right to access the “Photo” menu
• Use the navigation buttons Up/Down to select the “Card” submenu and conrm with
“OK”
• If the music you want to play is not located in the root directory of your USB memory
stick, use the Up/Down navigation buttons to select the desired folder and press “OK”
22

to access this folder
• Select the photo you want to start with by the Up/Down navigation buttons and press
“OK” to start the slide show
Watch a movie from the internal hard disk
• This requires the installation of a 3.5” SATA hard disk (not included). Please have a
look at “Installation - Internal Hard Disk” for more information.
• Starting from the main menu, use the navigation buttons Left/Right to access the “Movies” menu
• Use the navigation buttons Up/Down to select the “HDD” submenu and conrm with
“OK”
• If the music you want to play is not located in the root directory of your USB memory
stick, use the Up/Down navigation buttons to select the desired folder and press “OK”
to access this folder
• Select the movie you want to watch with the Up/Down navigation buttons. The preview
located on the right side of the screen will help you making your selection. Now press
“OK” to start your home cinema
M740 used as network le server
• This requires to setup your M740 for network use, the installation of a 3.5” SATA hard
disk (not included) and the installation of a UPnP server software. Please have a look
at “Setup - UPnP server” for more information.
• Use the power button of your remote control to activate the UPnP server mode. Once
the short initialization has been completed, other UPnP capable devices in the same
network can access and play back media les locate on the internal HDD of the M740.
• You can also activate the UPnP server functionality while the M740 remains in standard mode by pressing the blue button (5) on your remote control. However, this may
reduce the performance of your NOXON M740 and the UPnP client.
Main menu
The main menu of your NOXON M740 consists of the following items:
Media, Movies, Music, Photo, Data, Setup
You can navigate between the main items using the Left/Right navigation buttons on the
remote control and select additional options within a main item using the Up/Down button. Use the “OK” button to conrm your selections or execute functions.
The sources from which you can play back your media are available by using the Up/
Down buttons in the Media, Movies, Music and Photo menus. Depending on which data
carriers you have connected to your M740, some options may be displayed or hidden.
Thus, for example, the USB storage medium item is displayed only if you have also connected a USB data carrier.
23

M740
25
You can always use the “Before” button (14) on your remote to return to the window
where you had been before changing to the one which is currently displayed. Also, the
main menu button can be used in any situation to return back there.
Note: If you have selected the Photo menu item, for example, although you wanted to
call up Movies, you do not have to navigate back to the main menu overview. After the
selection, you can switch the display between videos, photos and music via the Left/
Right navigation buttons. The currently selected lter is displayed at the upper edge of
the screen!
Media menu
This menu shows a list of all movies, photos and music available on a selected storage
device. Please nd the supported le formats in the following chapters and in the appendix. File formats which are not supported by the M740 will not be shown in the list.
Starting from the main menu, use the navigation buttons Left/Right to access the Media
menu, select a storage device and conrm with “OK”.
Now you can use the Up/Down, “Before” and “OK” buttons to navigate through the folders. On the right side you will nd a preview for movies and images (if available) or further
information on songs. Once you have found the media les you were looking for, just
press “OK” or “Play” for watching or listening to them.
24

Movies menu
This menu functions the same way the Media menu does. However, while the Media
menu lists all available media les including pictures and audio les as well, the movies
menu only shows the video les available on the selected storage device. You can play
back movies in the following le formats: MPEG-1, MPEG-2, MPEG-4, Xvid, WMV9, ISO,
VOB, IFO, MP4, DAT, MOV, AVI, MKV, TS and M2TS.
Music menu
This menu exclusively lists the audio les available on a selected storage device. The
supported le formats are MP3, OGG, WMA, WAV, AAC, and FLAC.
Photo menu
Finally, this menu only shows the image les on a selected storage device. The supported le formats are HD-JPEG, JPG and BMP.
Data menu
This menu makes it possible for you to move or copy video and music les and photos
conveniently between several storage devices. This way you can e.g. copy videos or
photos from external data carriers such as an SD card or USB stick to the internal hard
drive (not included).
Starting from the main menu, select the Data menu via the “OK” button on your remote
control. Now you will see two columns – on the left side there is a list of possible source
data carriers and on the right side you can nd possible target data carriers.
25

M740
27
First, on the left side, use the Up/Down navigation buttons and the “OK” button to select
the source drive from which you would like to copy les. The M740 then automatically
jumps into the target window where you can select a drive the same way. Should you
want to change the source drive at this point, use the Left navigation button to return to
the source window.
Note: The le manager always shows all supported source and target storage devices –
even when they are not connected at the moment. For example, the items “Network” or
“DVD” (for an external DVD drive connected via USB) will be shown even when only a
USB memory stick and the internal HDD are connected to your M740. However, les can
only be transferred between currently connected targets and sources.
The next step takes you to the list of available les. Should you use sub folders to organize your les, you can select the desired folder with the Up/Down navigation buttons and
access it with “OK”. Now use the Up/Down buttons to go to the movie, music and image
les you want to copy or move and select them with the red option button on your remote.
Pressing the red button on an already selected le will deselect it.
When you have nished selecting les, press the Right navigation button in order to
select a target folder the same way used for the source. You can also use the “New
directory” function and the automatically displayed on-screen keyboard to generate and
name a new target folder. After you have selected the desired target folder, press the
Right navigation key again.
This will give you the following options:
• Copy: Writes a copy of the selected source les into the target folder. The source les
remain in their original location.
• Move: The selected les are removed from the source folder and moved into the target
folder.
• Cancel: Returns to the previous le selection window.
WARNING! If you select trash as the target directory, the selected les will be irretrievably deleted!
Setup menu
Use this menu to congure all available options on your M740. Starting from the main
menu, use the navigation buttons Left/Right to access the “Setup” menu and conrm
with “OK”. Now you will be shown six submenus which you can select with the Left/Right
navigation buttons: Audio, Video, Network, System, BD/DVD and Misc.
If you want to access a specic function in one of these submenus, select the one you
are looking for with the UP/Down navigation buttons and conrm with “OK”. The “Before”
button takes you back to the previous window if needed.
26

Audio options
Night Mode
The maximum volume and the intensity of changes in volume (dynamics) can be
reduced in two steps (“On” and “Comfort”). This helps you to maintain an adequate
volume e.g. during night time.
Default Audio Setup
Choose a digital output for audio signals and a corresponding mode.
• HDMI Dual CH (downmix)
Stereo signals will be transferred as such, but surround signals will also be converted
into stereo. Use this option if you are listening on the integrated stereo speakers of a
TV set which has been connected via HDMI.
HDMI Multi CH
This mode will not convert surround signals into stereo like above, but transfer them
as multichannel audio via HDMI.
HDMI RAW (BITSTREAM)
This mode will transfer digital audio signals without any changes via HDMI. Use this
option if you want to transfer digital audio signals like Dolby Digital, DTS or MPEG to
an external digital hi- receiver.
S/PDIF DOWNMIX PCM
The same as above, but in this case the digital audio signals will not be transferred
via HDMI but through the S/PDIF output of the M740.
• S/PDIF RAW (BITSTREAM)
The same as above for S/PDIF instead of HDMI.
27

M740
29
Advance Audio Setup
This item lets you dene special output settings for various audio modes (AC3, DTS,
AAC, WMA Pro). This is useful if, for example, your television does not support DTS
output. In this case, you can route the audio output via S/PDIF if a DTS audio channel
is present.
Video options
Aspect ratio
• Pan Scan 4:3
Makes a widescreen image ll the entire screen, cutting off the outermost left and
right ends. Select this if a standard 4:3 TV is connected.
Letter Box 4:3
Displays a widescreen image on a 4:3 TV with black bars at the top and bottom.
Select this if a standard 4:3 TV is connected.
• 16:9
Sets the aspect ratio to 16:9. Select this if a 16:9 widescreen TV is connected.
• 16:10
Sets the aspect ratio to 16:10. Select this if a 16:10 widescreen TV is connected.
Video system
Select the a combination of resolution and frequency which corresponds with the specications of your TV set. You can nd this information in the manual of your TV. If you are
using the HDMI cable, set this option to HDMI Auto which will automatically identify the
correct values for you.
SD video system
Here you can choose the video standard which is broadcasted in your country:
• PAL
Europe, Greenland, parts of Africa and South America, the Middle East, China, India,
Australia and Indonesia.
• NTSC
United States, Canada, Japan, Mexico, The Philippines, South Korea and Taiwan.
1080P 24Hz
The so called “cinema mode”. Some movies can be played back at 24 images per second, just like with the original lm reels in the cinema. If this option is active, the M740
can play back such movies without any conversions which could otherwise reduce the
image quality.
Scan mode
• Full Pixel (Just Scan)
For LCD, Plasma or LED TVs with a digital connection
28

• CRT TV (Over Scan)
For TV sets with Cathode Ray Tubes (CRT)
• LCD TV (Over Scan)
For LCD, Plasma or LED TVs with an analogue connection
Preview Set Time
This option lets you select at how many percent of the total runtime of a movie the preview starts. This way you can easily skip intros and trailers in order to let the preview start
right in the middle of action.
Brightness, Contrast, Hue and Saturation
We have selected the defaults to provide a well-balanced picture, but if you want it brighter, more colourful or with higher contrast, you can make all the adjustments to suit your
needs here.
Digital Noise Reduction
If you notice annoying image noise or pixelated frames, you can improve the image quality within certain limits by activating this function.
Network options
Wired LAN Setup
• DHCP IP (Auto)
Most routers and switches can be connected with the M740 without extended knowledge of networks. Select this option if your router supports DHCP and if you do not
want to set up a xed IP address.
• Fix IP (Manual)
Select this to enter the IP address, subnet mask, default gateway and DNS server IP
address manually.
Wireless Setup
The optional NOXON WLAN stick (not included) must be plugged into one of the USB
ports of the M740 in order to set up a wireless network connection. Please also refer to
the manual which comes with the WLAN stick.
• Connection prole
Your NOXON M740 can store up to three WLAN connections. Press “OK” to go to the
next step, the “Before” button to cancel.
• Connection mode
Choose between Infrastructure (AP) and Peer to Peer (Ad Hoc). Note: If you have
a normal DSL router, you will usually use Infrastructure. If your router supports a so
called “WiFi Protected Setup”, you can choose WPS as your connection mode. The
Peer to Peer mode (also called Ad Hoc or Computer to Computer mode) is used in
order to directly connect WLAN capable devices with each other - you will not need a
wireless router or Access Point in this case.
29

M740
31
• SSID Name
This menu shows a list of available wireless networks together with their signal
strength and encryption. The abbreviations “WEP” (Wired Equivalent Privacy) and
“WPA” (WiFi Protected Access) in the security list indicate that the network is encrypted. This means that a key is needed to have access to this network. “None” in
the list means that the network is open and unencrypted.
• WEP/WPA key
The password for encrypted networks can be entered via the on-screen keyboard using the remote control. Use the navigation buttons to select and press “OK” to enter
the desired characters. Press “CAPS” to permanently toggle between upper and
lower-case letters, “<-” to delete a character, “[_]” to insert a space, “shift” to insert a
single upper-case letter, and “OK” in order to conrm your entries and proceed.
• Connection test
The test process can take some time – please have a little patience. If the test is
successful, the network information (prole name, IP address, subnet mask, gateway
etc.) will be displayed on the screen afterwards.
System options
Menu language
Select the OSD (On Screen Display) language here.
Text Encoding
“Unicode (UTF8)” should be used for most countries. However, you can make different
settings for countries which are using a specic character set (e.g. Greece and Turkey).
30

Subtitle Automation Recognition
If a synchronised movie uses subtitles for dramaturgic reasons (e.g. Klingon or Elsh),
this stylistic device is called “Forced Subtitles”. You can activate or deactivate these being displayed here.
Subtitle Font
You can choose from several styles of lettering/fonts for displaying movie subtitles.
System Info
This sub menu lists installed services like Samba and UPnP servers. If you want to install
such components, please go to the next menu “System Update”.
System Update
• Extension Package Upgrade
Use this sub menu to install additional services like Samba and UPnP servers. This
requires retrotting an internal SATA hard disk (not included) rst. Please press “OK”
only once and then have a little patience, as the installation will take a short while.
• System Reinstall
Use this sub menu to install an updated version of the M740 rmware. Please read
the chapter “Setup: UPnP Server” for details on how to proceed.
HDD Format
This menu item executes the program to format your internal hard drive (not included).
Attention: If you format your HDD, all data on the drive is deleted and cannot be recovered!
RC Power Key Function
This option determines the function of the standby button (2) on your remote control.
• Server Mode
Pressing the standby button once activates the server mode, while pressing it a second time will set your M740 into standby mode.
• Standby
Pressing the standby button activates the standby mode immediately.
Restore Default
Select this menu to reset all settings you have entered and restore the factory defaults
of the device.
BD/DVD options
Audio Language
Choose a language for the audio tracks of your movie (of course, this language must be
included in your movie le).
31

M740
33
Subtitle Language
Here you can choose the language for the subtitles (which also needs to be included in
your movie le in order to be displayed).
R/RW Auto-Play
If you have connected an external CD/DVD drive via USB and you have activated this
option, playback will start automatically when a disc is inserted into this drive.
Angle Mark
Some movies feature views from several camera perspectives/angles. Here you can
choose if your M740 can access these or not.
BluRay Folder AutoPlay
Some movies have not been saved as one complete big le, but have been sliced into
several smaller ones instead. If this option is active, the M740 can play several associated single les in one run without interruption.
Misc options
UI Change Effect
Sets the speed at which the M740 cross-fades from one menu to the next one.
Resume Play
This option, when enabled, stores the position at which you interrupt a movie. The next
time you call up the movie, the M740 offers to resume playback from this point.
Slide Show Timing
Select the interval time for slide shows here, i.e. how long the individual pictures will be
displayed. If this option is set to “Off”, the images will not be displayed in an automatic
slide show, but have to be triggered manually with the Skip Back/Forth buttons (13).
Transition Effect
Select one of several transition effects between photos in slide show mode.
Ken Burns
This option enables/disables the characteristic slide show visual invented by Ken Burns.
TS Seamless playback
Plays multi-part TS les that belong together in one run without interruption.
Background music
If the directory on your storage medium that holds the images also contains additional
audio les, these can be played when the slide show starts. You can enable/disable this
option here.
32

Screen Saver
The M740 features a screen saver which becomes active after a longer period of inactivity. You can activate and deactivate this function here.
Movie Preview
The automatic movie preview can be disabled here.
Navigation Key Functions
• Subtitle Adjustment
The navigation buttons are used to change the position of the subtitles during playback.
• Playback Control
The navigation buttons are used to skip back/forward in a movie on an overlaid time
line during playback.
33

M740
35
Appendix
Technical specications
Video formats:
MPEG-1, MPEG-2, MPEG-4, Xvid, WMV9, ISO, VOB, IFO, MP4, DAT, MOV, AVI, MKV,
TS, M2TS
Audio formats:
MP3, OGG, WMA, WAV, AAC, FLAC including DTS, Dolby Digital, WMA and AACdownmix support
Image formats:
HD-JPEG, JPG, BMP
Connectors:
• Power supply:
230 V~ 50 Hz, Maximum power consumption 12 W
• SATA:
- External SATA hard disk drives (not eSATA)
- Internal SATA hard disk bay 3.5“ format
• Video:
- HDMI 1.3a (up to 1080p/60Hz)
- Component (RGB)
- Composite
• Audio:
- Analog (stereo)
- S/PDIF coaxial (stereo and surround)
- S/PDIF optical (stereo and surround)
• LAN:
10/100 Mbps, RJ-45
• USB:
3 x USB 1.0/1.1/2.0 up to 480 Mbit/s
• PC/Mac:
File exchange via USB when an internal SATA drive is retrotted
• Card reader:
SD/SD-HC/MMC/MS/MS Pro
License information
Licence information about the GPL/LGPL software used in this device.
This product uses free software (“freeware”) licensed under GNU General Public License, version 2 or higher. After purchasing this product, you may want to edit, modify or
redistribute the source code of the included GPL/LGPL software.
34

If you contact our Support department, they will be glad to provide the corresponding
sources. For this purpose, visit our website at www.terratec.de and download the corresponding sources or order them on a CD-ROM, though this will incur corresponding
material and shipping costs to your account (before ordering one of these CD-ROMs,
please nd out what the current costs are).
Important note! We assume no warranty of any kind for the corresponding source codes
and provide no support for the data material provided.
License information for the software used in the unit:
This product contains Free Software which is licensed under the GNU General Public
License version 2 or greater. After you purchase this product, you may procure, modify or
distribute the source code of the GPL/LGPL software that is used in this product.
The according source codes can be obtained from our website www.terratec.de or by
contacting our Support Center which will provide a CD-ROM charging only the actual
expensed involved (please ask for the actual fee for CD-ROM rst). However, please
be noted that we cannot provide guarantee with the source code, and there is also no
technical support for the source code from us.
GNU GENERAL PUBLIC LICENSE
Version 2, June 1991
Copyright(C) 1989, 1991 Free Software Foundation, Inc.
51 Franklin Street, Fifth Floor, Boston, MA 02110-1301, USA
Everyone is permitted to copy and distribute verbatim copies
of this license document, but changing it is not allowed
Preamble
The licenses for most software are designed to take away your freedom to share and
change it. By contrast, the GNU General Public License is intended to guarantee your
freedom to share and change free software--to make sure the software is free for all its
users. This General Public License applies to most of the Free Software Foundation‘s
software and to any other program whose authors commit to using it. (Some other Free
Software Foundation software is covered by the GNU Lesser General Public License
instead.) You can apply it to your programs, too.
When we speak of free software, we are referring to freedom, not price. Our General
Public Licenses are designed to make sure that you have the freedom to distribute copies of free software (and charge for this service if you wish), that you receive source code
or can get it if you want it, that you can change the software or use pieces of it in new free
programs; and that you know you can do these things.
To protect your rights, we need to make restrictions that forbid anyone to deny you these
rights or to ask you to surrender the rights. These restrictions translate to certain responsibilities for you if you distribute copies of the software, or if you modify it.
For example, if you distribute copies of such a program, whether gratis or for a fee, you
35

M740
37
must give the recipients all the rights that you have. You must make sure that they, too,
receive or can get the source code. And you must show them these terms so they know
their rights.
We protect your rights with two steps: (1) copyright the software, and (2) offer you this
license which gives you legal permission to copy, distribute and/or modify the software.
Also, for each author‘s protection and ours, we want to make certain that everyone understands that there is no warranty for this free software. If the software is modied by
someone else and passed on, we want its recipients to know that what they have is not
the original, so that any problems introduced by others will not reect on the original
authors‘ reputations.
Finally, any free program is threatened constantly by software patents. We wish to avoid
the danger that redistributors of a free program will individually obtain patent licenses,
in effect making the program proprietary. To prevent this, we have made it clear that any
patent must be licensed for everyone‘s free use or not licensed at all.
The precise terms and conditions for copying, distribution and modication follow.
TERMS AND CONDITIONS FOR COPYING, DISTRIBUTION AND MODIFICATION
0. This License applies to any program or other work which contains a notice placed by
the copyright holder saying it may be distributed under the terms of this General Public
License. The „Program“, below, refers to any such program or work, and a „work based
on the Program“ means either the Program or any derivative work under copyright law:
that is to say, a work containing the Program or a portion of it, either verbatim or with
modications and/or translated into another language. (Hereinafter, translation is included without limitation in the term „modication“.) Each licensee is addressed as „you“.
Activities other than copying, distribution and modication are not covered by this License; they are outside its scope. The act of running the Program is not restricted, and
the output from the Program is covered only if its contents constitute a work based on
the Program (independent of having been made by running the Program). Whether that
is true depends on what the Program does.
1. You may copy and distribute verbatim copies of the Program‘s source code as you
receive it, in any medium, provided that you conspicuously and appropriately publish on
each copy an appropriate copyright notice and disclaimer of warranty; keep intact all the
notices that refer to this License and to the absence of any warranty; and give any other
recipients of the Program a copy of this License along with the Program.
You may charge a fee for the physical act of transferring a copy, and you may at your
option offer warranty protection in exchange for a fee.
2. You may modify your copy or copies of the Program or any portion of it, thus forming
a work based on the Program, and copy and distribute such modications or work under
the terms of Section 1 above, provided that you also meet all of these conditions:
a) You must cause the modied les to carry prominent notices stating that you changed
the les and the date of any change.
b) You must cause any work that you distribute or publish, that in whole or in part contains or is derived from the Program or any part thereof, to be licensed as a whole at no
36

charge to all third parties under the terms of this License.
c) If the modied program normally reads commands interactively when run, you must
cause it, when started running for such interactive use in the most ordinary way, to print
or display an announcement including an appropriate copyright notice and a notice that
there is no warranty (or else, saying that you provide a warranty) and that users may
redistribute the program under these conditions, and telling the user how to view a copy
of this License. (Exception: if the Program itself is interactive but does not normally print
such an announcement, your work based on the Program is not required to print an announcement.)
These requirements apply to the modied work as a whole. If identiable sections of that
work are not derived from the Program, and can be reasonably considered independent
and separate works in themselves, then this License, and its terms, do not apply to those
sections when you distribute them as separate works. But when you distribute the same
sections as part of a whole which is a work based on the Program, the distribution of
the whole must be on the terms of this License, whose permissions for other licensees
extend to the entire whole, and thus to each and every part regardless of who wrote it.
Thus, it is not the intent of this section to claim rights or contest your rights to work written entirely by you; rather, the intent is to exercise the right to control the distribution of
derivative or collective works based on the Program.
In addition, mere aggregation of another work not based on the Program with the Program (or with a work based on the Program) on a volume of a storage or distribution
medium does not bring the other work under the scope of this License.
3. You may copy and distribute the Program (or a work based on it, under Section 2) in
object code or executable form under the terms of Sections 1 and 2 above provided that
you also do one of the following:
a) Accompany it with the complete corresponding machine-readable source code, which
must be distributed under the terms of Sections 1 and 2 above on a medium customarily
used for software interchange; or,
b) Accompany it with a written offer, valid for at least three years, to give any third party,
for a charge no more than your cost of physically performing source distribution, a complete machine-readable copy of the corresponding source code, to be distributed under
the terms of Sections 1 and 2 above on a medium customarily used for software interchange; or,
c) Accompany it with the information you received as to the offer to distribute corresponding source code. (This alternative is allowed only for noncommercial distribution and only
if you received the program in object code or executable form with such an offer, in accord with Subsection b above.)
The source code for a work means the preferred form of the work for making modications to it. For an executable work, complete source code means all the source code for
all modules it contains, plus any associated interface denition les, plus the scripts used
to control compilation and installation of the executable. However, as a special exception, the source code distributed need not include anything that is normally distributed
(in either source or binary form) with the major components (compiler, kernel, and so on)
of the operating system on which the executable runs, unless that component itself ac-
37

M740
39
companies the executable.
If distribution of executable or object code is made by offering access to copy from a
designated place, then offering equivalent access to copy the source code from the same
place counts as distribution of the source code, even though third parties are not compelled to copy the source along with the object code.
4. You may not copy, modify, sublicense, or distribute the Program except as expressly
provided under this License. Any attempt otherwise to copy, modify, sublicense or distribute the Program is void, and will automatically terminate your rights under this License.
However, parties who have received copies, or rights, from you under this License will
not have their licenses terminated so long as such parties remain in full compliance.
5. You are not required to accept this License, since you have not signed it. However,
nothing else grants you permission to modify or distribute the Program or its derivative
works. These actions are prohibited by law if you do not accept this License. Therefore,
by modifying or distributing the Program (or any work based on the Program), you indicate your acceptance of this License to do so, and all its terms and conditions for copying, distributing or modifying the Program or works based on it.
6. Each time you redistribute the Program (or any work based on the Program), the
recipient automatically receives a license from the original licensor to copy, distribute
or modify the Program subject to these terms and conditions. You may not impose any
further restrictions on the recipients‘ exercise of the rights granted herein. You are not
responsible for enforcing compliance by third parties to this License.
7. If, as a consequence of a court judgment or allegation of patent infringement or for any
other reason (not limited to patent issues), conditions are imposed on you (whether by
court order, agreement or otherwise) that contradict the conditions of this License, they
do not excuse you from the conditions of this License. If you cannot distribute so as to
satisfy simultaneously your obligations under this License and any other pertinent obligations, then as a consequence you may not distribute the Program at all. For example, if a
patent license would not permit royalty-free redistribution of the Program by all those who
receive copies directly or indirectly through you, then the only way you could satisfy both
it and this License would be to refrain entirely from distribution of the Program.
If any portion of this section is held invalid or unenforceable under any particular circumstance, the balance of the section is intended to apply and the section as a whole is
intended to apply in other circumstances.
It is not the purpose of this section to induce you to infringe any patents or other property
right claims or to contest validity of any such claims; this section has the sole purpose
of protecting the integrity of the free software distribution system, which is implemented
by public license practices. Many people have made generous contributions to the wide
range of software distributed through that system in reliance on consistent application of
that system; it is up to the author/donor to decide if he or she is willing to distribute software through any other system and a licensee cannot impose that choice.
This section is intended to make thoroughly clear what is believed to be a consequence
of the rest of this License.
8. If the distribution and/or use of the Program is restricted in certain countries either by
38

patents or by copyrighted interfaces, the original copyright holder who places the Program under this License may add an explicit geographical distribution limitation excluding those countries, so that distribution is permitted only in or among countries not thus
excluded. In such case, this License incorporates the limitation as if written in the body
of this License.
9. The Free Software Foundation may publish revised and/or new versions of the General Public License from time to time. Such new versions will be similar in spirit to the
present version, but may differ in detail to address new problems or concerns.
Each version is given a distinguishing version number. If the Program species a version
number of this License which applies to it and „any later version“, you have the option of
following the terms and conditions either of that version or of any later version published
by the Free Software Foundation. If the Program does not specify a version number of
this License, you may choose any version ever published by the Free Software Foundation.
10. If you wish to incorporate parts of the Program into other free programs whose distribution conditions are different, write to the author to ask for permission. For software
which is copyrighted by the Free Software Foundation, write to the Free Software Foundation; we sometimes make exceptions for this. Our decision will be guided by the two
goals of preserving the free status of all derivatives of our free software and of promoting
the sharing and reuse of software generally.
NO WARRANTY
11. BECAUSE THE PROGRAM IS LICENSED FREE OF CHARGE, THERE IS NO
WARRANTY FOR THE PROGRAM, TO THE EXTENT PERMITTED BY APPLICABLE
LAW. EXCEPT WHEN OTHERWISE STATED IN WRITING THE COPYRIGHT HOLDERS AND/OR OTHER PARTIES PROVIDE THE PROGRAM „AS IS“ WITHOUT WARRANTY OF ANY KIND, EITHER EXPRESSED OR IMPLIED, INCLUDING, BUT NOT
LIMITED TO, THE IMPLIED WARRANTIES OF MERCHANTABILITY AND FITNESS
FOR A PARTICULAR PURPOSE. THE ENTIRE RISK AS TO THE QUALITY AND PERFORMANCE OF THE PROGRAM IS WITH YOU. SHOULD THE PROGRAM PROVE
DEFECTIVE, YOU ASSUME THE COST OF ALL NECESSARY SERVICING, REPAIR
OR CORRECTION.
12. IN NO EVENT UNLESS REQUIRED BY APPLICABLE LAW OR AGREED TO IN
WRITING WILL ANY COPYRIGHT HOLDER, OR ANY OTHER PARTY WHO MAY
MODIFY AND/OR REDISTRIBUTE THE PROGRAM AS PERMITTED ABOVE, BE LIABLE TO YOU FOR DAMAGES, INCLUDING ANY GENERAL, SPECIAL, INCIDENTAL
OR CONSEQUENTIAL DAMAGES ARISING OUT OF THE USE OR INABILITY TO USE
THE PROGRAM (INCLUDING BUT NOT LIMITED TO LOSS OF DATA OR DATA BEING
RENDERED INACCURATE OR LOSSES SUSTAINED BY YOU OR THIRD PARTIES
OR A FAILURE OF THE PROGRAM TO OPERATE WITH ANY OTHER PROGRAMS),
EVEN IF SUCH HOLDER OR OTHER PARTY HAS BEEN ADVISED OF THE POSSIBILITY OF SUCH DAMAGES.
39

 Loading...