

Page 1
Manual
Copyright 2017 Nox Medical
Page 2
Nox A1 Manual
Version 2.1
Latest Revision: March 2017
Copyright © 2017
Nox Medical - All rights reserved
Manufactured by:
Nox Medical ehf
Katrinartuni 2
IS - 105 Reykjavik
Iceland
Website: www.noxmedical.com
For distributor information go to:
www.noxmedical.com
Copyright Notice
No part of this publication may be reproduced, transmitted, transcribed, stored in a retrieval system, or
translated into any language or computer language, in any form, or by any means: electronic, mechanical,
magnetic, optical, chemical, manual, or otherwise, without the prior written authorization from Nox Medical.
Disclaimer
This document may contain typographical errors or technical inaccuracies. Nox Medical does not accept any
liability for the use or misuse whether direct or indirect of the products, or for damages arising out of the use of
or inability to use the products. Users must accept all responsibility for any results obtained by or concluded
from data obtained by the products including software from Nox Medical. All clinical conclusions and decisions
that are based on the use of this product are the responsibility of the user.
License Notice
The Nox A1 recorder’s firmware contains BIGDIGITS multiple-precision arithmetic code originally written by
David Ireland, copyright © 2001-8 by D.I. Management Services Pty Limited <www.di-mgt.com.au>, and is used
with permission.
Page 3

Nox A1 Manual
~ 3 ~
Table of Contents
Table of Contents ..................................................................................................................................... 3
List of Abbreviations ................................................................................................................................. 5
Introduction .............................................................................................................................................. 7
Intended Use........................................................................................................................................ 7
Contraindications ................................................................................................................................. 7
Scope ................................................................................................................................................... 7
Instructions for Operators ................................................................................................................... 8
Warnings and Cautions for Use ........................................................................................................... 8
Nox A1 Description ................................................................................................................................. 11
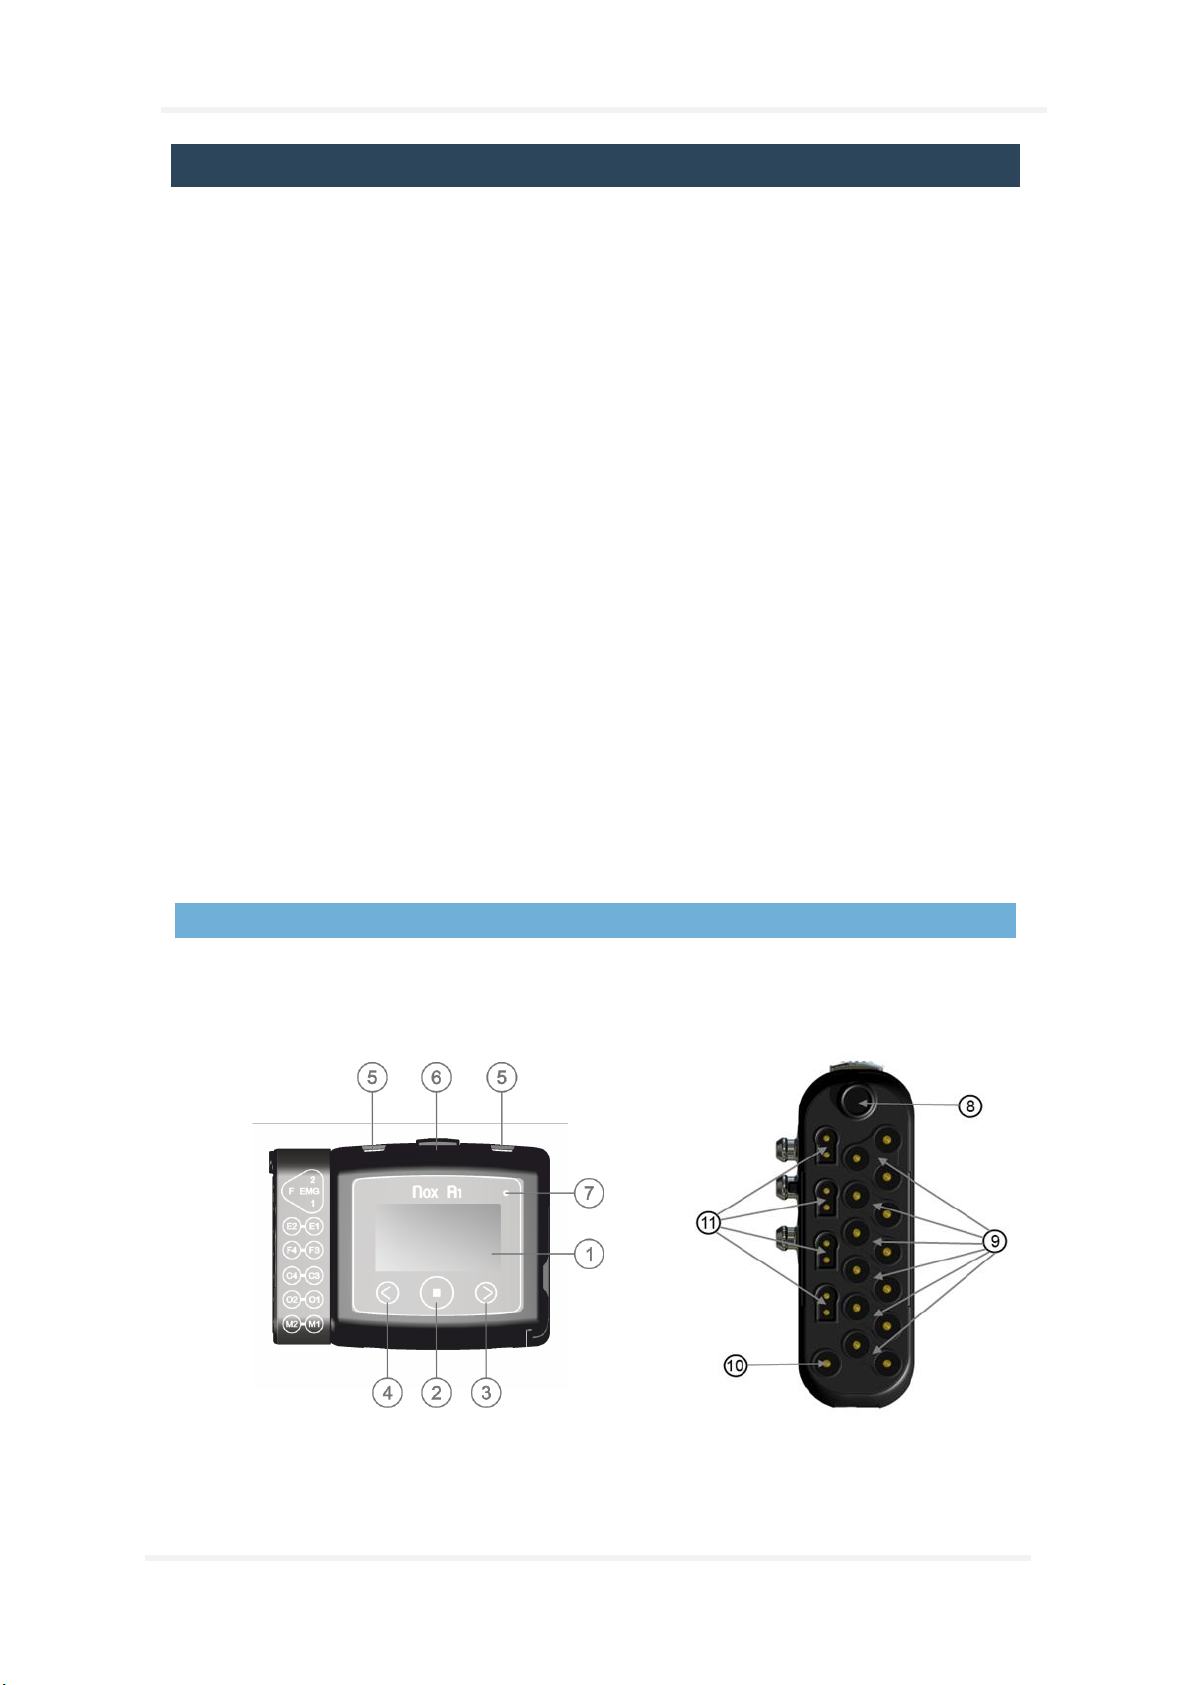
Nox A1 Interface ................................................................................................................................ 11
Operating Nox A1 ................................................................................................................................... 13
Connecting Nox A1 to a Computer .................................................................................................... 13
Configuring and Downloading from Nox A1 ...................................................................................... 13
Manually Starting/Stopping Nox A1 .................................................................................................. 14
Starting Nox A1 at a Scheduled Time ................................................................................................. 15
Nox A1 Status ..................................................................................................................................... 15
Nox A1 Patient Hookup .......................................................................................................................... 16
Inserting a Battery to the Nox A1 ...................................................................................................... 16
Attaching the Nox A1 and the Nox RIP Belts ..................................................................................... 17
Attaching the Nox Nasal Cannula ...................................................................................................... 19
Measuring Mask Pressure.................................................................................................................. 20
Measuring EEG Signals ....................................................................................................................... 20
Measuring EMG/ECG Signals ............................................................................................................. 22
Measuring Data from Auxiliary Devices ............................................................................................. 24
Measuring Pulse and Oxygen Saturation using Nonin 3150 Pulse Oximeter .................................... 24
Inserting Batteries into the Nonin 3150 Pulse Oximeter ................................................................... 25
Selecting Oximeter Sensor Size .......................................................................................................... 26
Attaching the Nonin 3150 Pulse Oximeter and Soft Sensor .............................................................. 26
Page 4

Nox A1 Manual
~ 4 ~
Configuring the Oximeter Setup ........................................................................................................ 28
Maintenance........................................................................................................................................... 29
Compatible Sensors and Devices ............................................................................................................ 32
Specifications .......................................................................................................................................... 37
Nox A1 and Accessories ..................................................................................................................... 37
Material Information ......................................................................................................................... 39
Nox A1 Battery Information ............................................................................................................... 40
Regulatory Information .......................................................................................................................... 41
Performance Testing and Validation Summary ................................................................................. 41
Nox A1 Classifications ........................................................................................................................ 41
Description of Symbols and Labels .................................................................................................... 41
Bluetooth® Wireless Technology ....................................................................................................... 44
Electromagnetic Compatibility (EMC) Information............................................................................ 44
About ...................................................................................................................................................... 50
Page 5

Nox A1 Manual
~ 5 ~
List of Abbreviations
AASM
- American Academy of Sleep Medicine
ABS
- Acrylonitrile Butadiene Styrene
BMI
- Body Mass Index
CISPR
- Comité International Spécial des Perturbations Radioélectriques (English:
International Special Committee on Radio Interference)
CMDR
- Canada Medical Device Regulations
ECG
- Electrocardiography
EEG
- Electroencephalography
EMG
- Electromyography
EMC
- Electromagnetic compatibility
EOG
- Electrooculography
ESD
- Electrostatic discharges
FCC
- Federal Communications Commission
FDA
- Food and Drug Administration
HF
- High Frequency
IEC
- International Electrotechnical Commission
ISM
- Industrial, Scientific and Medical
MDD
- Medical Device Directive
MRI
- Magnetic Resonance Imaging
NiMH
- Nickel-metal hydride battery rechargeable
PAP
- Positive Airway Pressure
PC
- Polycarbonate
PET
- Polyethylene Terephthalate
PE
- Polyethylene
PSG
- Polysomnography
PVC
- Polyvinyl Chloride
R&TTE
- Radio and Telecommunication Terminal Equipment
Page 6

Nox A1 Manual
~ 6 ~
RF
- Radio Frequency
RIP
- Respiratory Inductance Plethysmography
SpO2
- Oxygen Saturation Levels measured by pulse oximetry
TPE
- Thermoplastic Elastomer
WEEE
- Europe on Waste of Electrical and Electronic Equipment
Page 7

Nox A1 Manual
~ 7 ~
Int r oduction
Congratulations on choosing the Nox A1 recorder. The Nox A1 recorder is an American Academy of
Sleep Medicine (AASM) compliant body worn sleep recorder and is a part of the Nox Sleep System. Its
main function is to record physiological signals by use of built-in sensors and patient applied sensors.
The Nox A1 recorder has a built-in Bluetooth® module also allowing it to record signals from
compatible auxiliary devices. Placement of the recorder and connecting sensors is simple and makes
the setup quick and easy. The Nox A1 recorder is configured by the Noxturnal software from Nox
Medical, running on a PC, that also allows for the review, organization, analyzing, and summarizing of
all signals recorded by the device. The complexity of the study is defined by varying the number and
types of physiological signals measured, supporting both ambulatory and online sleep testing. During
online configuration of the Nox Sleep System, commands and data are sent between the Nox A1
recorder and the Noxturnal software by use of the Nox C1 Access Point from Nox Medical. The Nox A1
recorder can communicate over Bluetooth link, either direct or via the Nox C1 Access Point
(depending on the system configuration), with Noxturnal App from Nox Medical running on a mobile
platform for device control and online review of signals being recorded.
Intended Use
The Nox Sleep System is used as an aid in the diagnosis of different sleep disorders and for the
assessment of sleep.
The Nox Sleep System is used to measure, record, display, organize, analyze, summarize, and retrieve
physiological parameters during sleep and wake in patients greater than 2 years of age.
The Nox Sleep System allows the user to decide on the complexity of the study by varying the number
and types of physiological signals measured.
The Nox Sleep System allows for generation of user/pre-defined reports based on subject´s data.
The user of the Nox Sleep System are medical professionals who have received training in the areas of
hospital/clinical procedures, physiological monitoring of human subjects, or sleep disorder
investigation.
The intended environments are hospitals, institutions, sleep centers, sleep clinics, or other test
environments, including patient’s home.
Contraindications
The Nox Sleep System does not provide any alarms and is not intended to be used for continuous
monitoring where failure to operate can cause injuries or death of the patient.
Scope
This manual covers the use of the Nox A1 recorder and its components along with external sensors
and auxiliary devices that have been validated with the Nox Sleep System. The use of the Noxturnal
software application that is needed for device configuration, data download, review, and analysis as
well as the use of the Nox C1 Access Point that is needed for the online setup of the Nox Sleep System
are covered in:
• Noxturnal Manual
• Nox C1 Manual
This manual is only intended for professionals (healthcare professionals and service personnel) with
relevant qualifications and skills. Additional material can be found on the Nox Medical Website.
Page 8

Nox A1 Manual
~ 8 ~
Instructions for Operators
The Nox A1 recorder is only intended to be set-up and maintained by professionals (healthcare
professionals and service personnel) with relevant qualifications and skills according to the
instructions given in the “Operating the Device”, “Patient Hookup” and “Maintenance” sections. The
ONLY operation that patients might have to perform by themselves at home is to start recordings that
have been configured to be manually started. In that case, the professional setting up the Nox A1
recorder and hooking up the patient shall demonstrate how to start the recording manually and train
the patient to do so according to the “Manually Starting/Stopping a Recording” section.
Operators should contact Nox Medical or its sales representatives
• for assistance, if needed, in setting up, attaching, operating or maintaining the Nox Sleep
System, its accessories, and as applicable external sensors and auxiliary devices that have
been validated with the system; or
• to report unexpected operation or events.
Support information and information about Nox Medical’s sales representative can be found on Nox
Medical’s website: www.noxmedical.com/distributors.
Warnings and Cautions for Use
Warning: The Nox Sleep System is NOT certified to be used for continuous monitoring
where failure to operate can cause injuries or death of the patient.
Caution: U.S. Federal law restricts this device to sale by, or on the order of, a licensed
medical practitioner.
Caution: The Nox A1 recorder complies with the international standard IEC 60601-1-2 for
electromagnetic compatibility for medical electrical equipment and/or systems. That
standard is designed to provide reasonable protection against harmful interference in a
typical medical installation. However, because of the proliferation of radio-frequency
transmitting equipment and other sources of electrical noise in healthcare and other
environments, it is possible that high levels of interference due to close proximity or strength
of source might disrupt the performance of the device, affecting recorded signals and
therefore data analysis and resulting in possible incorrect treatment. Medical electrical
equipment needs special precautions regarding Electromagnetic Compatibility (EMC), and
needs to be installed and put into service according to the EMC information provided in the
“EMC Information” section of this manual.
Warning: The use of accessories, transducers, sensors, and cables other than those listed in
this manual may result in increased emissions and/or decreased immunity of the Nox Sleep
System and cause injuries to the operator/patient.
Warning: The Nox A1 recorder(s) should not be used adjacent to or stacked with other
equipment. If adjacent or stacked use is necessary, the device(s) should be observed to verify
normal operation in the configuration in which it/they will be used and prevent abnormal
operation which might cause injuries to the operator/patient.
Warning: The Nox Sleep System may be interfered with by other equipment, even if that
equipment complies with International Special Committee on Radio Interference (CISPR)
emission requirements, causing possible patient harm.
Caution: The Nox A1 recorder is designed to be safe for use for pacemaker patients if the
pacemakers comply with the standard: EN 50061 Safety of Implantable Cardiac Pacemakers.
Page 9

Nox A1 Manual
~ 9 ~
Using non-compliant pacemakers may result in the operation of the pacemaker being
affected by the use of Nox A1 recorder and lead to possible patient harm. Prior to using the
device with pacemaker patients, the operator should consult the accompanying documents
of the pacemaker regarding its certifications and requirements of use or, if necessary,
contact the producer..
Warning: The Nox A1 recorder is not defibrillator proof. Not removing the device from a
patient before defibrillation may lead to the creation of high current density at the electrode
sites, causing burns and leading to possible patient harm. Not removing the device from a
patient before defibrillation may also alter the intended flow of the current, affecting the
defibrillation efficiency and causing injuries or death of the patient.
Warning: The Nox A1 recorder and is accessories are not intended to be used with high
frequency (HF) equipment. Using the device with high frequency (HF) equipment could cause
potential serious harm to the patient.
Warning: The Nox EEG Head Cable/Nox 5 Lead EEG Cables do not provide protection against
the effect of the discharge of a cardiac defibrillator nor against high frequency burns. Not
removing the equipment from a patient before defibrillation may lead to the creation of high
current density at the electrode sites, causing burns and leading to possible patient harm.
Warning: The Nox A1 recorder and accessories are not designed to give a specified degree of
protection against harmful ingress of liquids. Do not autoclave or immerse the device in any
kind of liquids. Ingress of liquids may result in electric shock.
Warning: In the United States of America, only use United States Environmental Protection
Agency (EPA) registered products for cleaning/disinfection of the Nox A1 recorder and
accessories to prevent harm to the operator/patient.
Warning: The Nox A1 recorder is NOT suitable for use in presence of a flammable anesthetic
mixture with air or with oxygen or nitrous oxide. That could lead to the creation of
electrostatic charges or temperature exceeding limits resulting in sparks or ignition, causing
burns or explosions.
Warning: Do not use the Nox A1 recorder and accessories during radiography/X-ray studies.
The energy absorption in the device, cables or electrodes might lead to excessive heating and
cause burns.
Warning: As with all medical equipment, carefully route cables and connections to reduce
the possibility of entanglement or strangulation.
Warning: Do not use any part of the Nox Sleep System, including patient cables and
electrodes, in a MRI (Magnetic Resonance Imaging) environment. The energy absorption in
conductive materials might lead to excessive heating and cause burns.
Caution: The Nox A1 recorder and RIP belts should be worn over clothing to prevent allergic
reaction to the equipment materials.
Caution: The Nox RIP belts should fit the patient snugly without being uncomfortably tight to
avoid discomfort.
Warning: The Nox disposable RIP belts, Nox nasal cannulas, Nox filter tube connectors and
mask pressure tubes are single patient use. Re-using the disposable RIP belts may affect the
quality of recorded signals and lead to possible incorrect treatment. Using the same
disposable RIP belt, cannula, filter tube connector and mask pressure tube on more than one
patient poses a risk of cross-infection.
Warning: Do not use damaged equipment, sensors, or accessories. This may result in bad
performance of the Nox Sleep System or patient/operator injury.
Warning: The Nox A1 recorder and its accessories should be removed from the patient
before use of the USB connector to prevent electrical shock. The USB connector shall only be
Page 10

Nox A1 Manual
~ 10 ~
used for the purposes of configuring the device and downloading data from the device.
Warning: There are no user serviceable parts inside the Nox A1 recorder. The device should
be serviced by authorized parties only. Service performed by non-authorized parties may
affect data analysis and result in possible incorrect treatment. The warranty is void if the Nox
A1 recorder is opened (except for opening of the battery compartment).
Warning: No modification of the Nox A1 recorder and its accessories is allowed. Un-
authorized modifications could result in the device not performing as intended and cause
serious harm to the patient. To ensure patient safety and effective use of the Nox Sleep
System, only use accessories that have been validated for use by Nox Medical.
Warning: Remove batteries from the Nox A1 recorder if it is not used within 30 days to
prevent damage from possible battery leakage and prevent possible minor burns to the
operator/patient.
Warning: External equipment and all auxiliary devices intended for connection to signal
input, signal output or other connectors shall comply with the relevant product safety
standards, e.g. IEC 60950-1 for IT equipment and the IEC 60601 series for medical electrical
equipment, to prevent electric shocks. In addition, all such combinations – systems – shall
comply with the safety requirements stated in the collateral standard IEC 60601-1-1 or the
general standard IEC 60601-1, edition 3/3.1, clause 16. Any equipment not complying with
the leakage current requirements in IEC 60601-1 shall be kept outside the patient
environment i.e. at least 1.5 m from the patient support. Any person who connects external
equipment to signal input, signal output or other connectors has formed a system and is
therefore responsible for the system to comply with the requirements. If in doubt, contact
qualified medical technician or your local representative.
Warning: Avoid accidental contact between connected but unused patient applied parts and
other conductive parts including those connected to protective earth to prevent potential
serious harm to the operator/patient.
Warning: Make sure the conductive parts of electrodes and associated connectors, including
the neutral electrode, do not contact other conductive parts including earth to prevent
potential serious harm to the operator/patient.
Warning: Electrodes should only be used by or in consultation with a healthcare provider
familiar with their proper placement and use. Not using and placing the electrodes correctly
may affect recording of data, and therefore interpretation and diagnostics.
Warning: The electrodes should be applied only to intact, clean skin (e.g. not over open
wounds, lesions, infected or inflamed areas) to prevent infections.
Warning: The Nox 5 Lead EEG Electrode Cables should be properly disposed of if they cannot
be fully cleaned between uses to prevent the risk of cross-infection between patients.
Warning: The Nox 5 Lead EEG Electrode Cables are not certified to be used for electrical
stimulation purposes. Using the product for electrical stimulation purposes might create
burns and cause injuries to the patient.
Caution: The Nox A1 recorder and its accessories should always be transported in the
accompanying carrying case to ensure adequate protection and prevent damage.
Please read this manual carefully before use, especially sections marked with
an exclamation mark.
Page 11
Nox A1 Manual
~ 11 ~
Nox A1 Description
The Nox A1 is a body worn sleep recorder. The input channels and built-in capabilities of the device
include the following:
• 13 unipolar channels; for recording of electroencephalography (EEG), electrooculography
(EOG) and submental electromyography (EMG)
• 1 ground channel
• 4 bipolar channels; for recording of electrocardiogram (ECG), periodic limb movements
(PLM), bruxism, or additional EMG
• 1 pressure/cannula channel; for recording of nasal or mask pressure
• 2 respiratory effort channels; for recording of abdomen and thorax ventilatory effort signals
• 3-D built-in acceleration sensor; for recording of patient’s position and activity
• Built-in light sensor; for recording of ambient light
• Built-in microphone; for recording of audio and snoring
• Built-in Bluetooth® module; to support wireless connectivity allowing the device to record
signals from compatible auxiliary devices
During online configuration of the Nox Sleep System the Bluetooth function enables the Nox A1
recorder to communicate with the Noxturnal software and the Noxturnal App via the Nox C1 access
point for device control and online review of recorded signals.
During ambulatory configuration of the Nox Sleep System, the Bluetooth function enables the Nox A1
recorder to communicate with Noxturnal App for device control and online review of recorded
signals.
The Nox A1 recorder is powered with one AA battery.
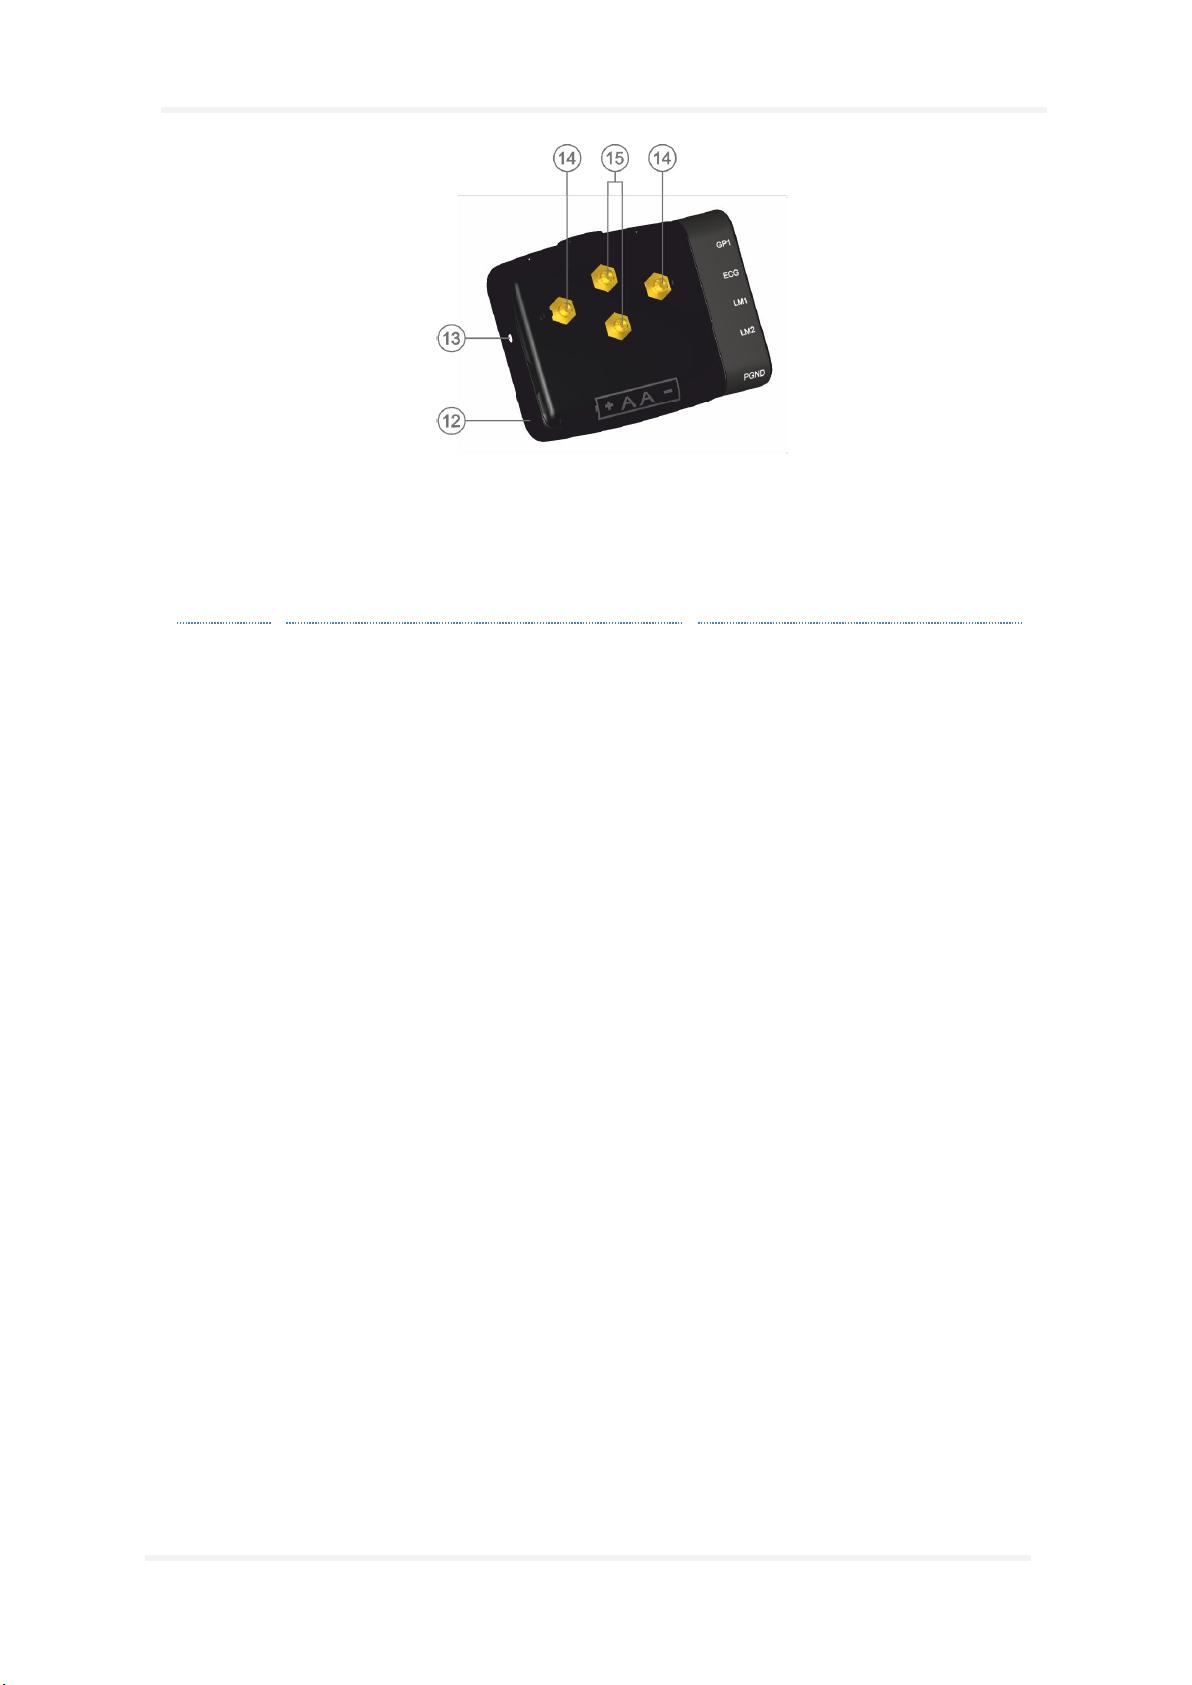
Nox A1 Interface
The Nox A1 recorder interface consists of a display, buttons, sensor inputs/connections and a USB
connector. The USB connector is placed under the battery lid and connects to a mini USB cable for
device configuration and data download. See the figures and tables below for detailed description.
Page 12
Nox A1 Manual
~ 12 ~
NUMBER
FUNCTION
INPUT/SENSOR LABEL
1
Display
NA
2
Push button – Middle
White square
3
Push button – Forward
White arrow pointing right
4
Push button – Backward
White arrow pointing left
5
2 Clip strap loops
NA
6
Microphone – For recording of respiratory sounds
NA
Light sensor located under the shaded transparent
microphone cover
NA
7
Indicator light for device status
NA
8
1 Pressure lock – Connects to nasal cannula/mask
pressure tube
PRES: Pressure input connector
9
13 Unipolar touch proof inputs
• EMG: 1,2, F – Electromyography
(EMG) input connectors
• E2-E1, F4-F3, C4-C3, O2-O1, M2-M1:
Electroencephalography (EEG) and
electrooculography (EOG) input
connectors
10
1 Reference ground input
• PGND: Patient ground
11
4 Bipolar touch proof inputs
• GP1: General purpose bipolar input
connector
• ECG: Electrocardiography (ECG) input
connectors
• LM1, LM2: Electromyography (EMG)
input connectors
12
Battery lid – Covers the battery and the USB
NA
13
Battery lid pin
NA
14
2 Metal snaps – Connects to thorax RIP belt
NA
15
2 Metal snaps – Connects to abdomen cable
NA
Page 13
Nox A1 Manual
~ 13 ~
Operating Nox A1
The Nox A1 recorder is only intended to be operated by professionals (healthcare professionals and
service personnel) with relevant qualifications and skills. The ONLY operation that patients might have
to perform by themselves at home is to start recordings that have been configured to be manually
started. In that case, the professional setting up the Nox A1 recorder and hooking up the patient shall
demonstrate how to start the recording manually and train the patient to do so according to the
“Manually Starting/Stopping a Recording” section.
The Nox A1 recorder is operated with three push buttons located on the front panel. Pressing the
Middle button turns on the display. The display will automatically turn off in 3 minutes.
Connecting Nox A1 to a Computer
Warning: The Nox A1 recorder and its accessories should be removed from the
patient before use of the USB connector to prevent electrical shock. The USB
connector shall only be used for the purposes of configuring the device and
downloading data from the device.
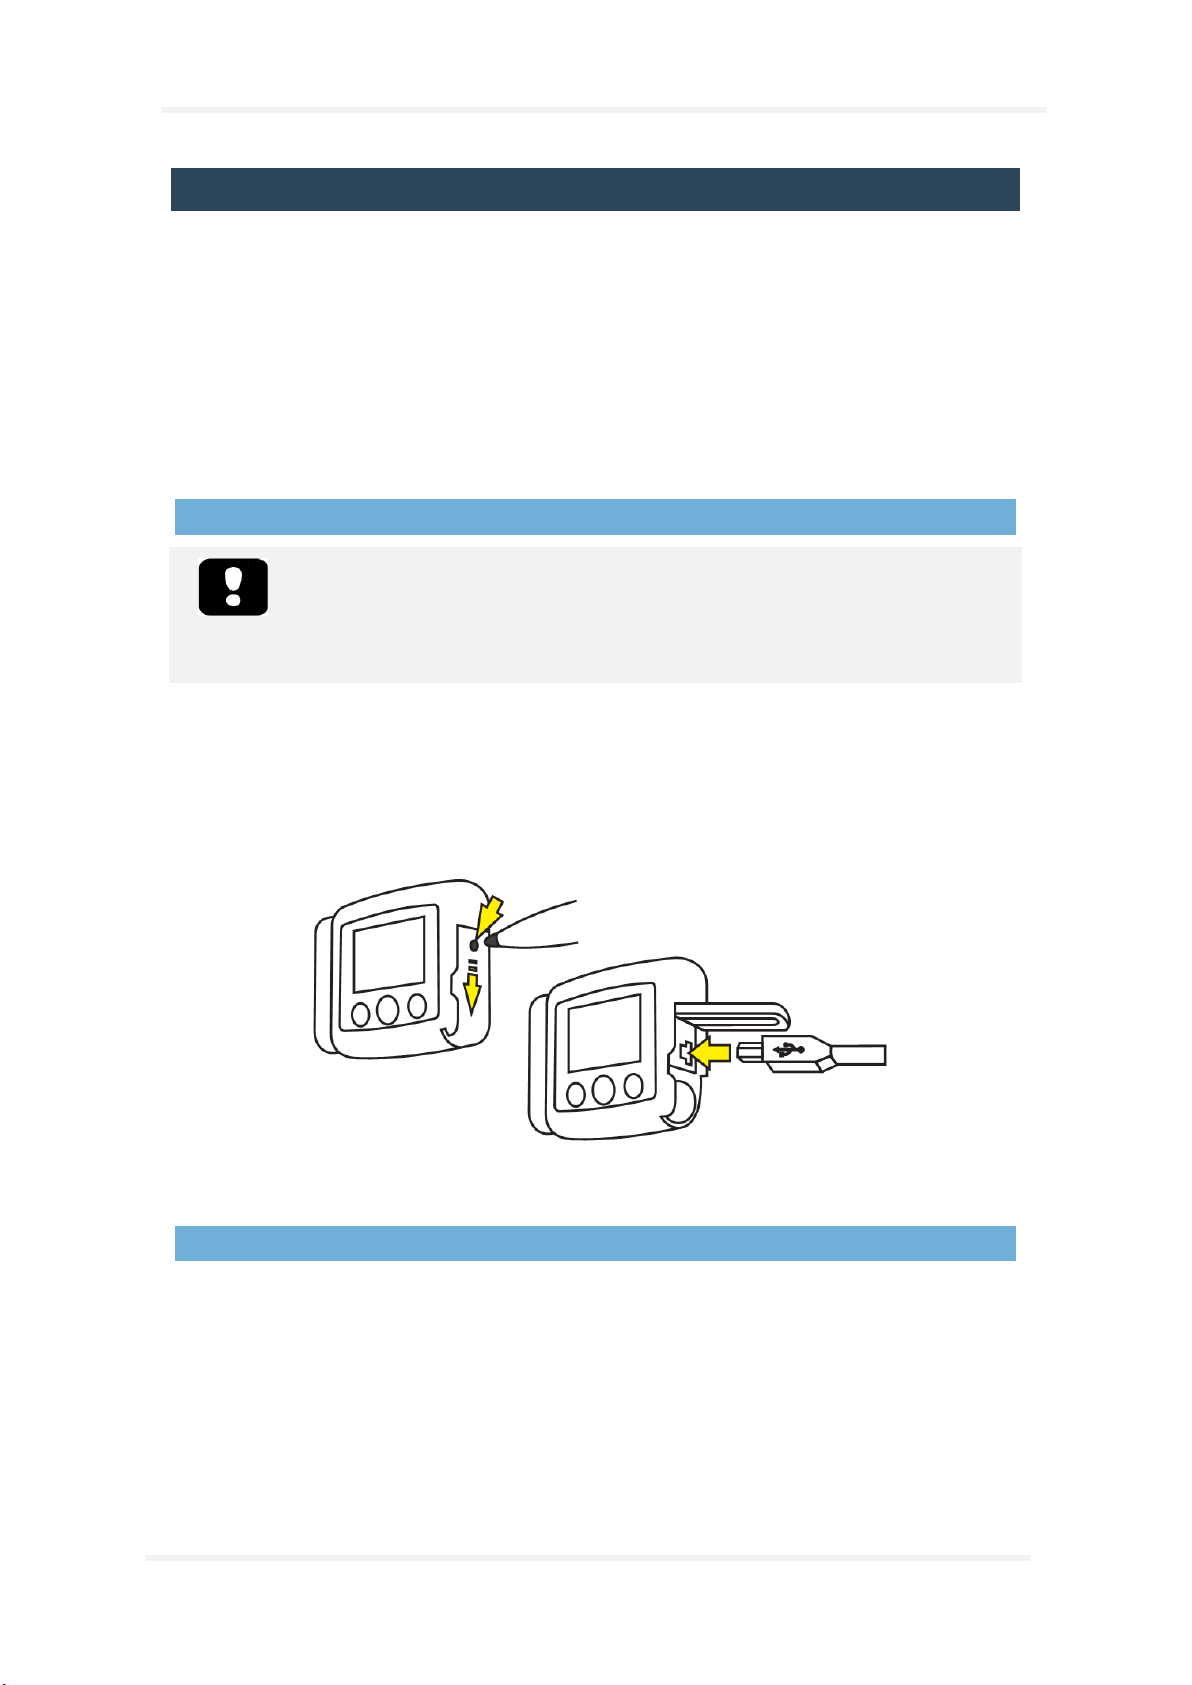
To connect Nox A1 recorder to a computer you need to access the USB connector on the device. The
USB connector is placed under the battery lid making it inaccessible and tamper proof for children. To
open the battery lid, press with the Nox battery Lid Key, accompanying the Nox A1 System Kit , on the
battery lid pin and slide the battery lid down, towards the bottom of the device. The Nox A1 recorder
connects to the computer by using Nox mini USB cable. The battery does not have to be inserted
while the device is connected to the computer.
When the Nox A1 recorder is connected to the computer the device display lights up and a message
saying the device is connected to the computer.
Configuring and Downloading from Nox A1
To download a recording or configure the Nox A1 recorder you will need to start the Noxturnal
software application and connect the device to the computer. Please refer to the Noxturnal manual
for more information on how to perform those tasks.
When you are done working with the device eject it from the Noxturnal software and unplug the Nox
mini USB cable. Insert the battery and close the battery compartment by pressing the lid back towards
the device without causing any strain, then slide it back into position, towards the top of the device.
Page 14
Nox A1 Manual
~ 14 ~
Manually Starting/Stopping Nox A1
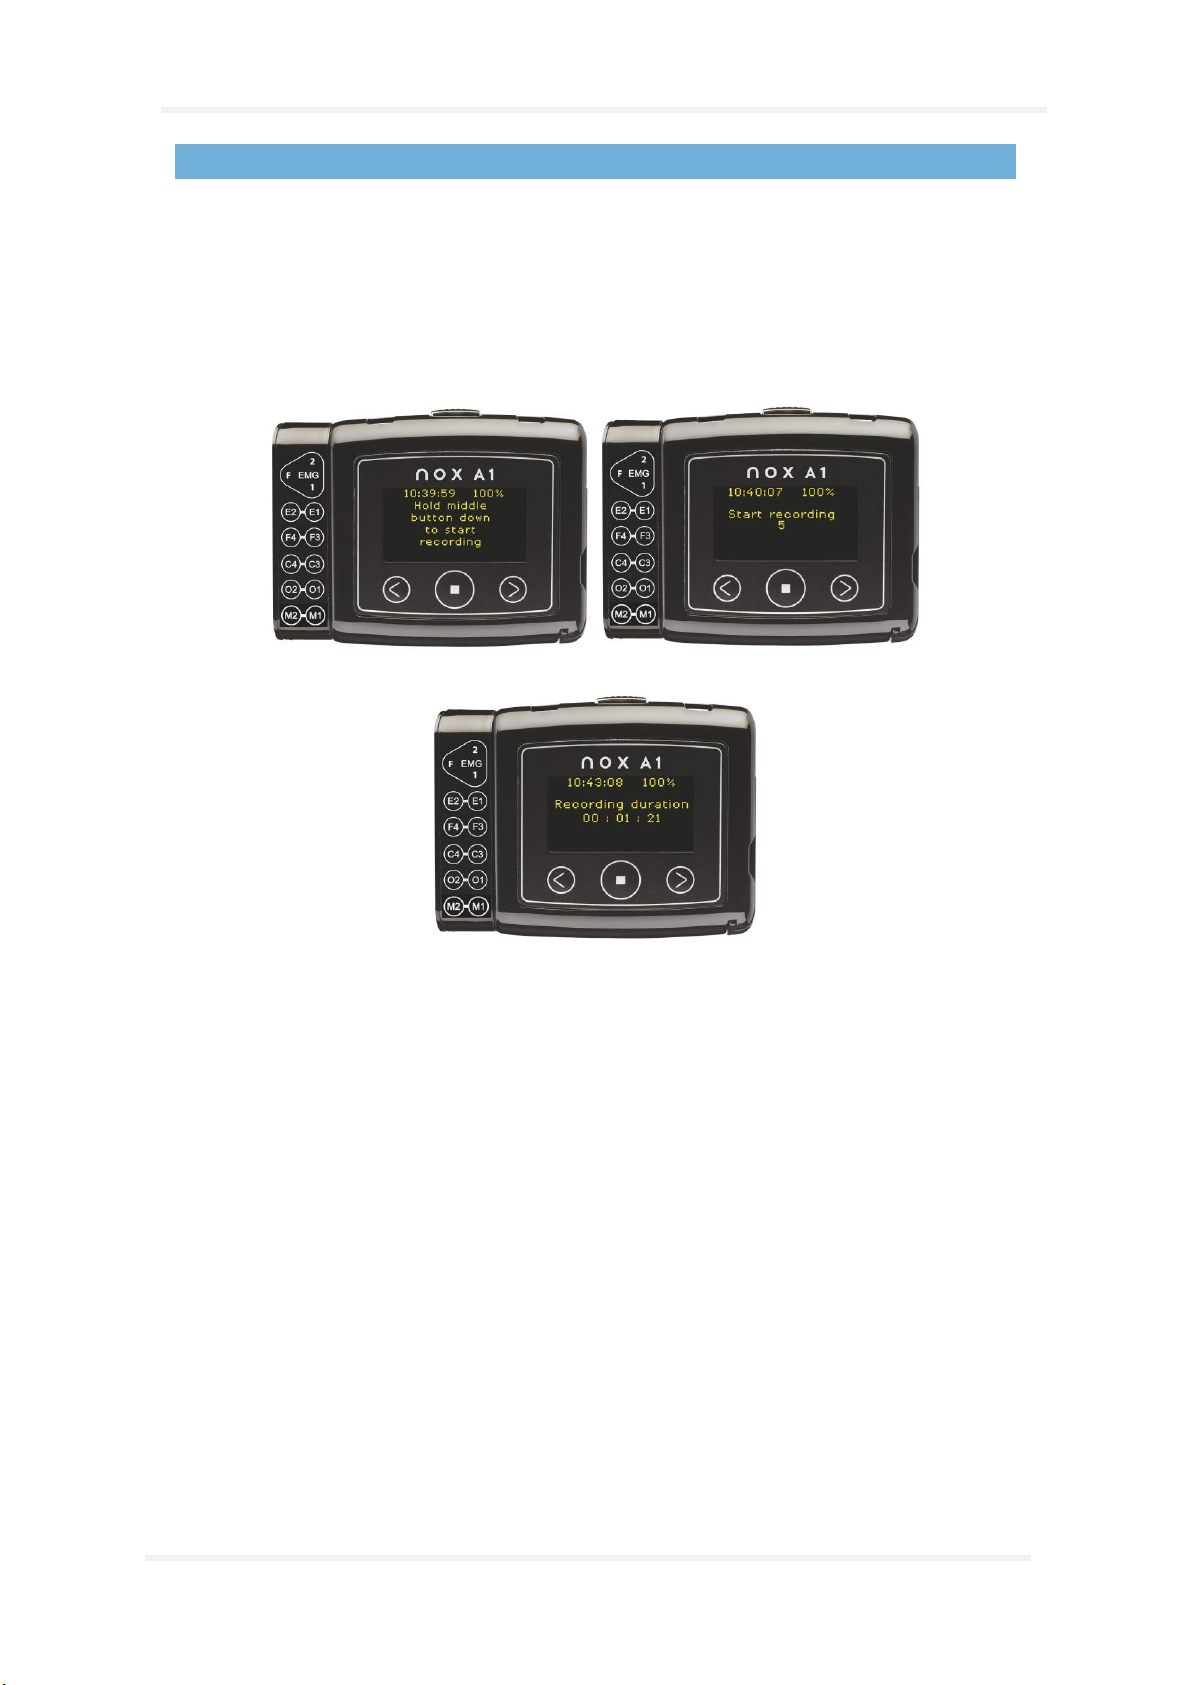
If the Nox A1 recorder has been configured to start the recording manually, you can use the Middle
button to manually start a recording. Pressing the middle button turns on the display. The device will
instruct you to “Hold middle button down to start recording”. Please do so until you see “Recording
Duration” displayed. Note the Middle button needs to be pressed down for approximately 4-5 s
before “Recording Duration” displays. At this point the device has started to record data. After the
display turns off, the light on the top right side of the display will blink green intermittently indicating
that recording is taking place. Use the same method to manually stop the recording.
If the duration of the recording has been specified during configuration, the recording will
automatically stop after the specified duration.
Page 15
Nox A1 Manual
~ 15 ~
3
2
Starting Nox A1 at a Scheduled Time
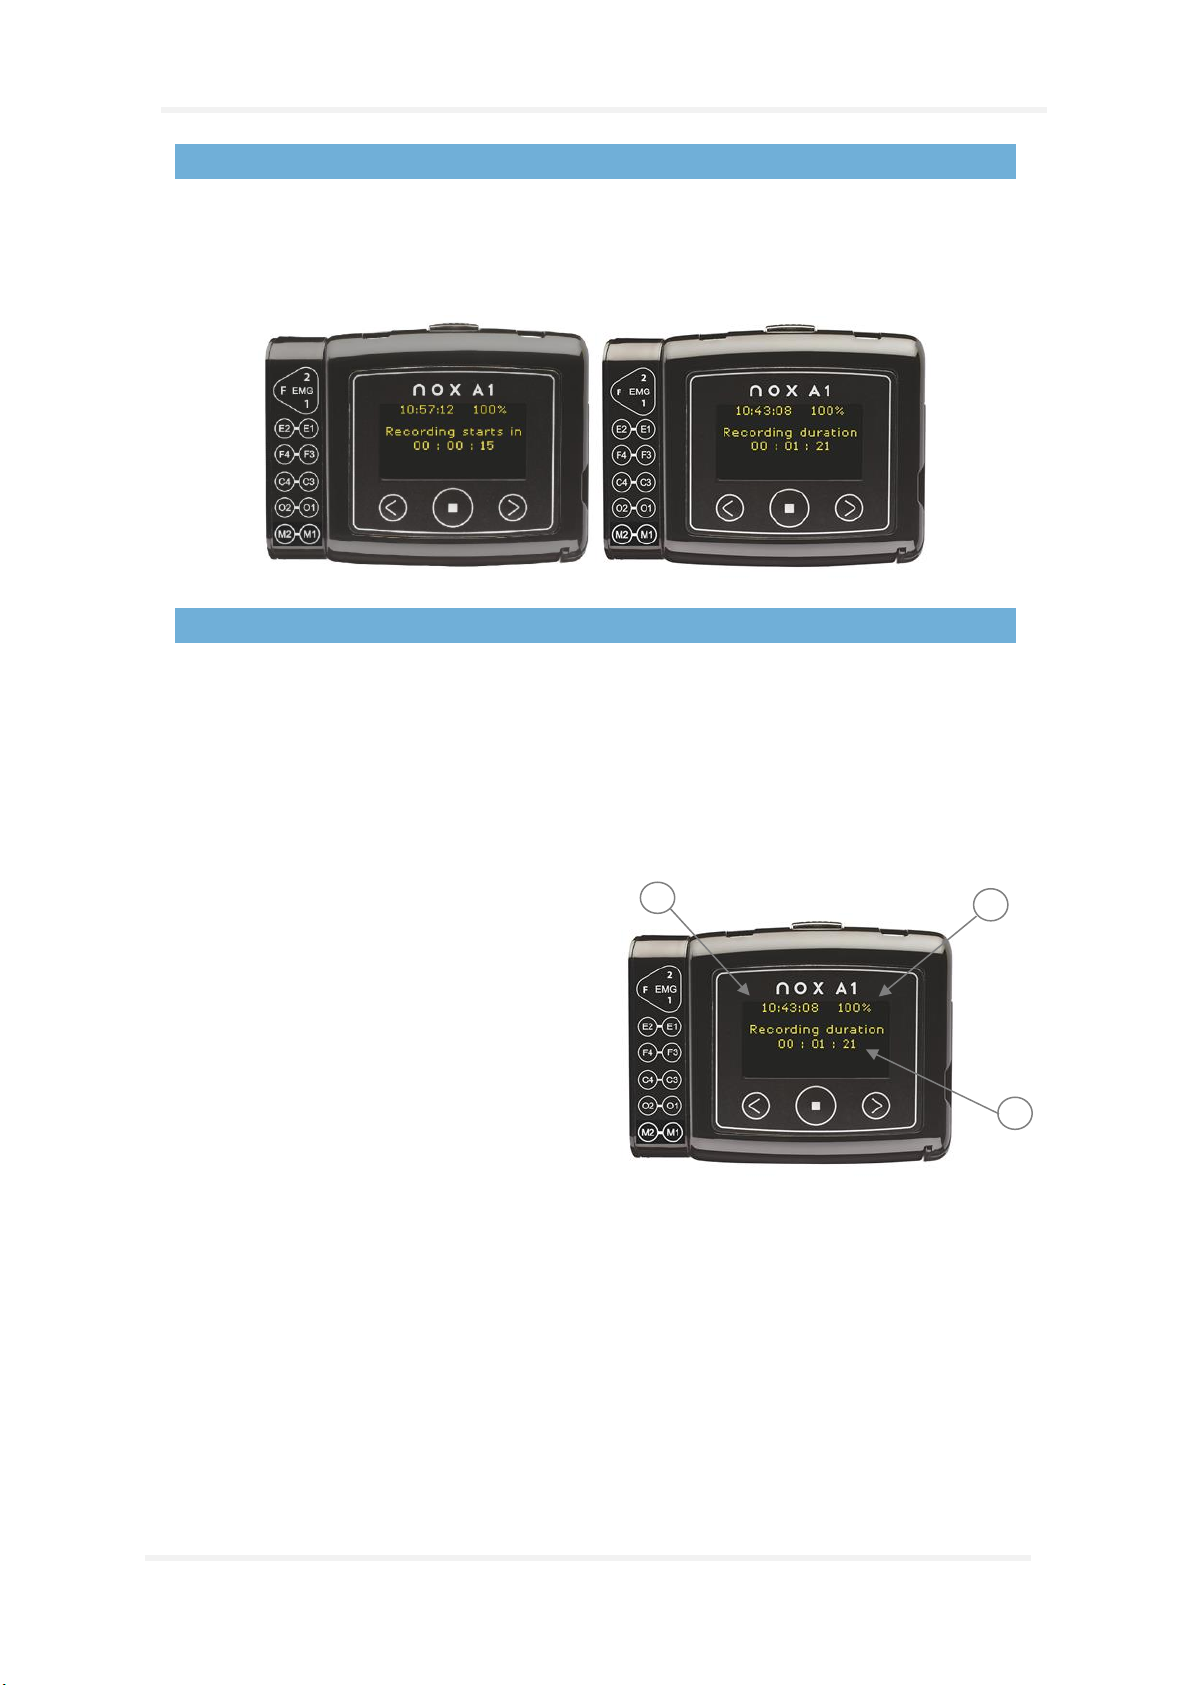
If the Nox A1 recorder has been configured to automatically start a recording at a scheduled time
there are no actions required for the recording to start. Pressing the Middle button before the
recording has started will display a countdown to the specified start time of the recording. If the
recording has begun, the display shows the current duration of the recording.
Nox A1 Status
The indicator light on the Nox A1 recorder blinks green when a recording is in progress and the device
is functioning normally. When there are any device warnings the indicator light blinks orange.
Warnings might include:
• Battery low
Information about the recording duration and the device is shown on the display. If the display is
turned off, pressing the Middle button turns it on. The display will turn itself off again after being
inactive for about 20 seconds. When Nox A1 is configured the clock is synchronized with the PC and is
shown at the top of the display.
1. On the top right corner is a battery
indicator which shows the battery status.
The battery indicator shows 100% when
the device has fresh batteries.
2. Duration being displayed.
3. The device’s clock
For detailed signal checks, please refer to the Noxturnal App from Nox Medical, available on the
Google Play® store.
Page 16
Nox A1 Manual
~ 16 ~
Nox A1 Patient Hookup
Warning: Do not use damaged equipment, sensors or accessories. This may result
in bad performance of the Nox Sleep System or patient/operator injury.
Warning: As with all medical equipment, carefully route cables and connections to
reduce the possibility of entanglement or strangulation.
Caution: The Nox A1 recorder and its accessories should always be transported in
its accompanying carrying case to ensure adequate protection and prevent
damage.
The Nox A1 recorder is only intended to be hooked-up by professionals (healthcare professionals and
service personnel) with relevant qualifications and skills.
Inserting a Battery to the Nox A1
Note: Always use fully charged Powerex 2700 mAh Rechargeable Batteries or
fresh lithium battery for each recording to prevent the need for the sleep study to
be repeated.
Note: All lithium batteries used with the Nox A1 recorder shall be per the standard
IEC 60086-4 Primary batteries - Part 4: Safety of lithium batteries.
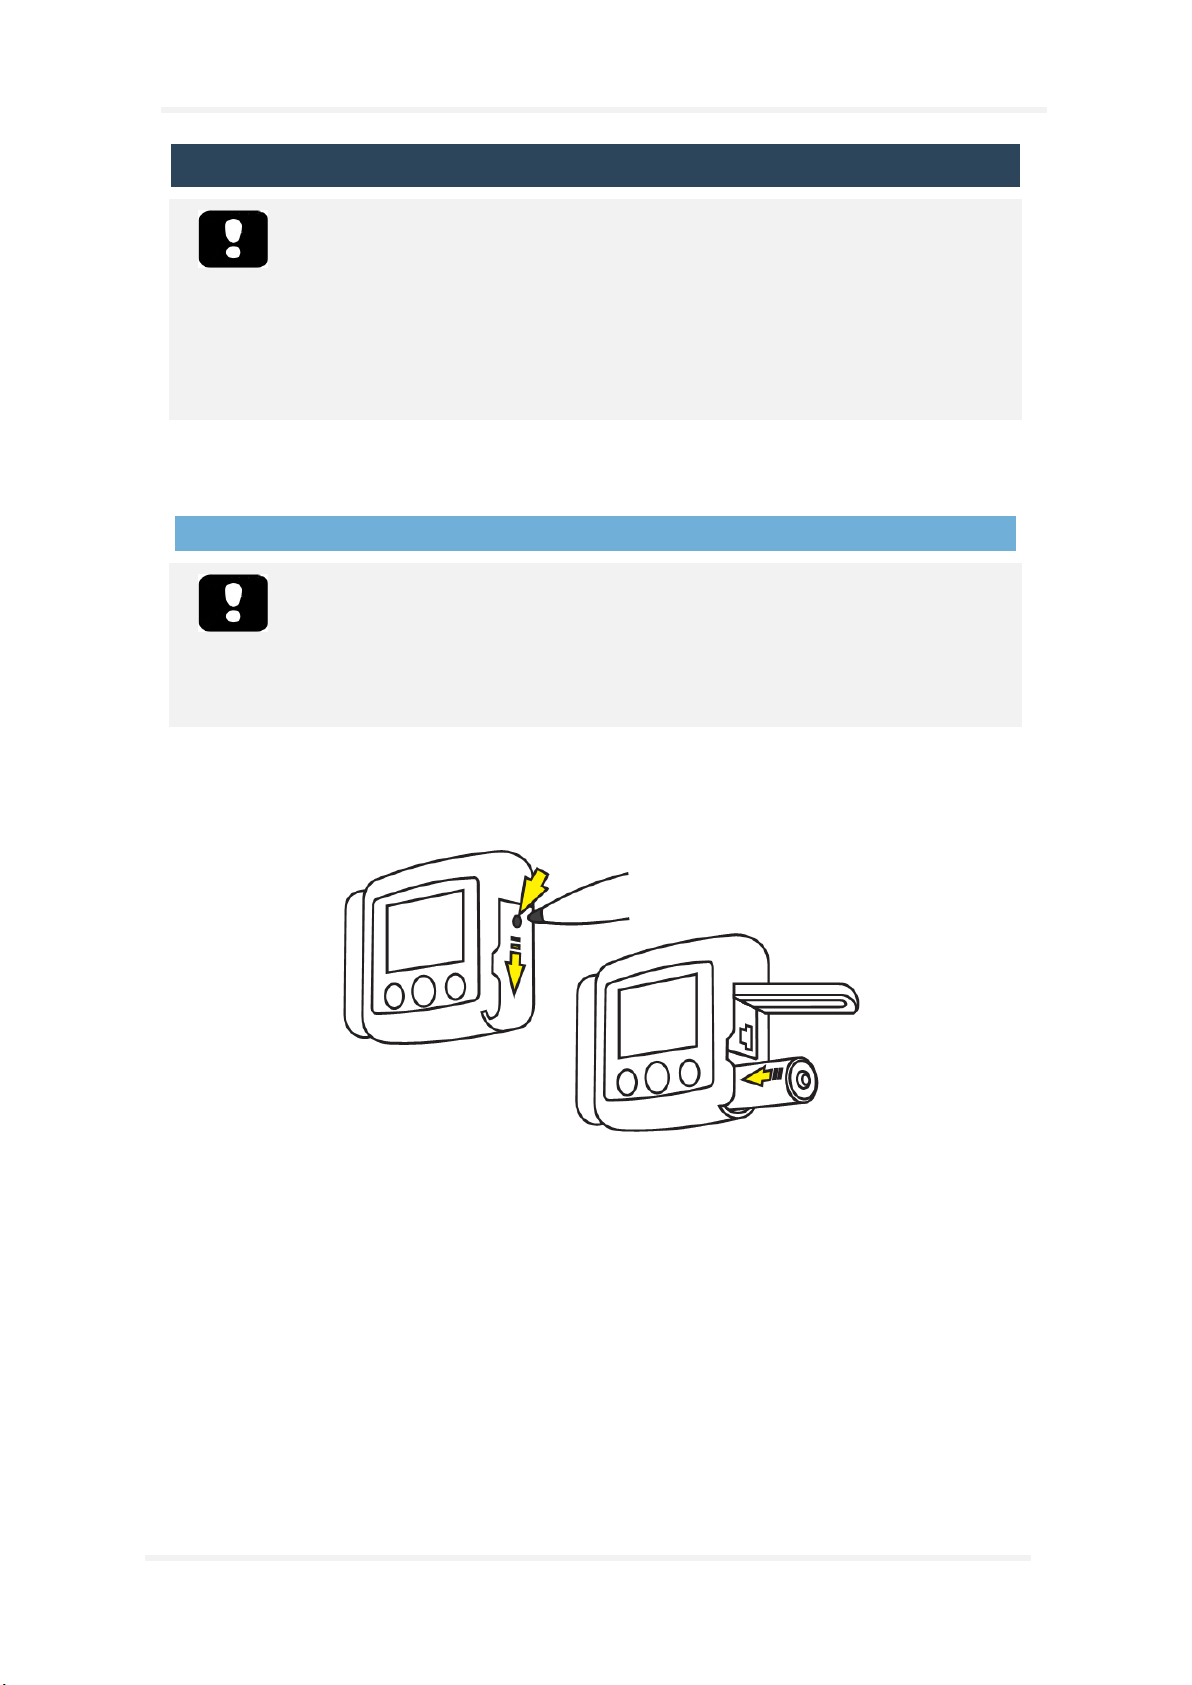
Before you start a recording, you should make sure that the Nox A1 recorder has a new or fully
charged battery. To insert a new battery, do the following:
1. Open the battery compartment by pressing down the battery lid pin with the Nox Battery Lid
Key accompanying the Nox A1 System Kit or similar tool and slide the lid towards the bottom
of the device.
2. Place one AA battery in the compartment aligning the battery poles as illustrated on the back
of the device (the positive (+) pole is towards the battery lid).
3. Close the battery compartment by pressing the lid back towards the device without causing
any strain, then slide it back into position, towards the top of the device. Make sure the lid is
securely closed.
The status of the battery can be checked by turning on the device. The battery status indicator
positioned in the upper right-hand corner of the device display allows you to check the battery status.
When the battery is running low during a recording the device will automatically stop the recording.
Page 17
Nox A1 Manual
~ 17 ~
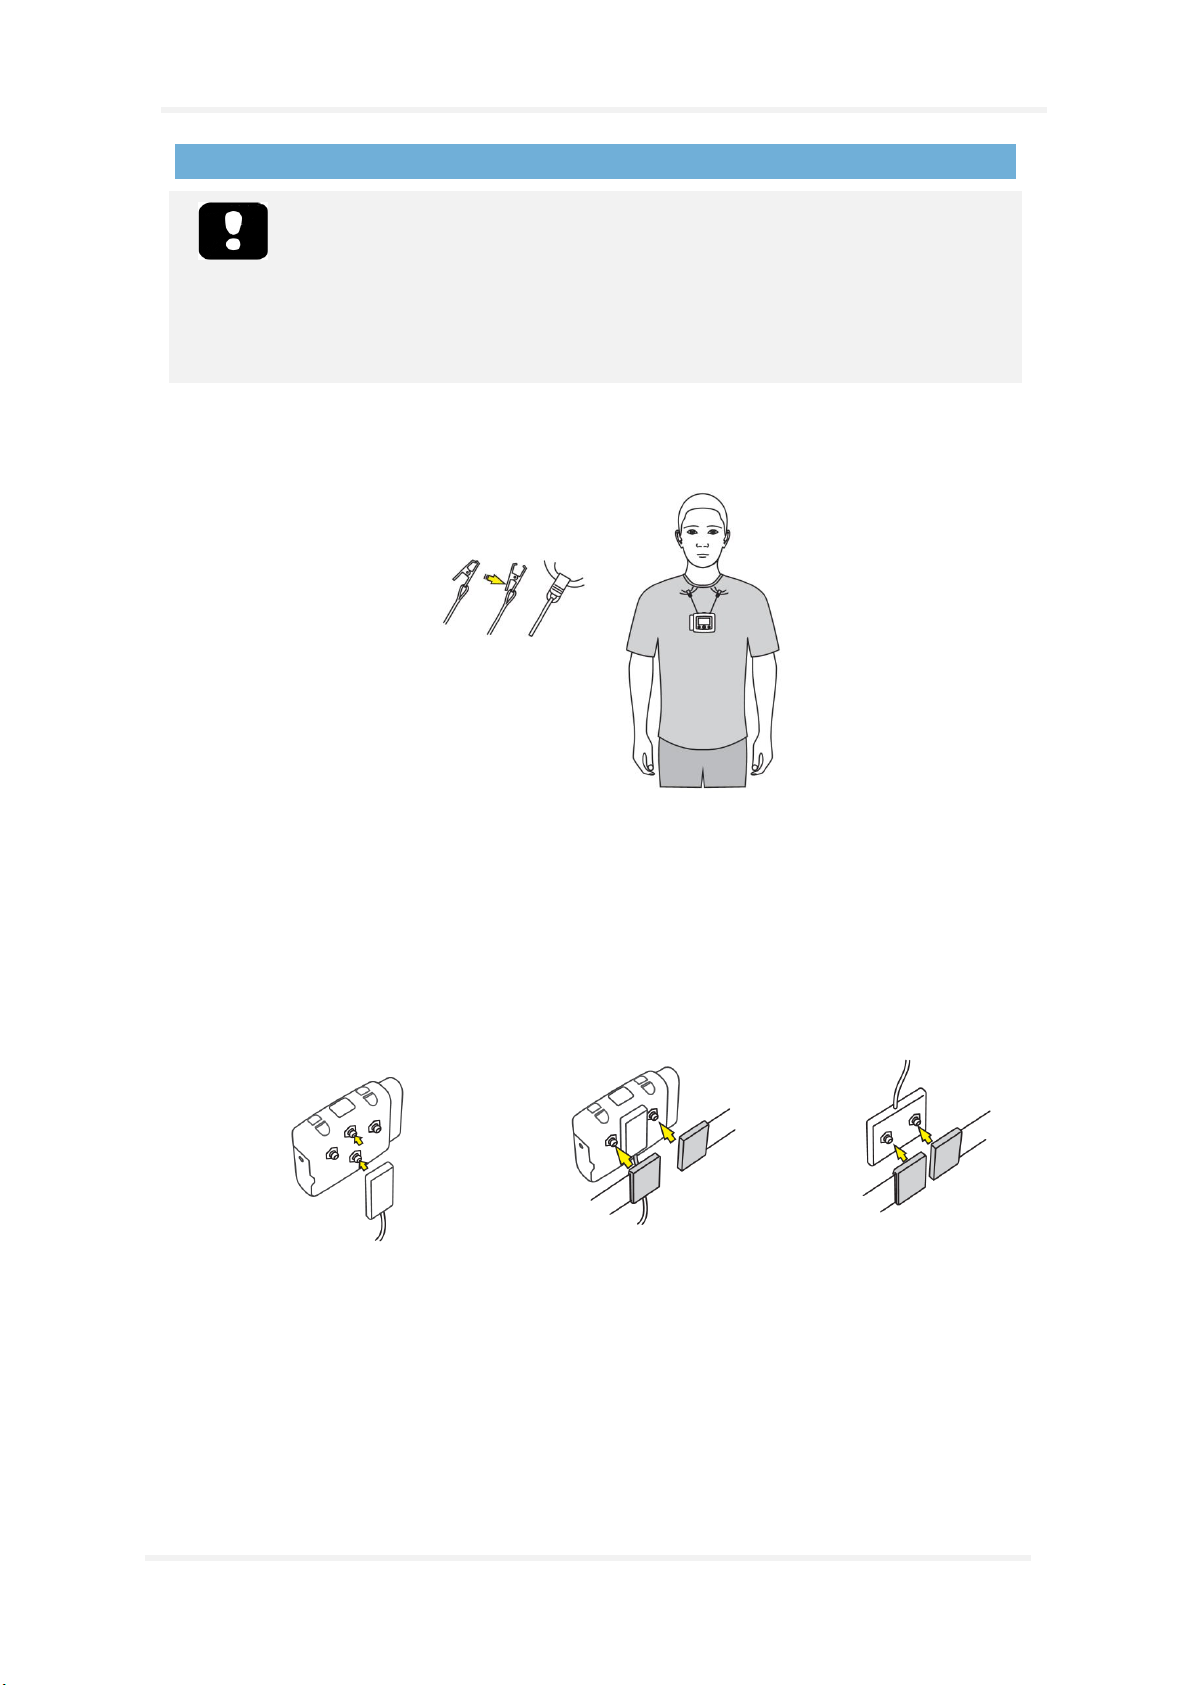
Attaching the Nox A1 and the Nox RIP Belts
Caution: The Nox A1 recorder and Nox disposable RIP belts should be worn over
clothing to prevent allergic reaction to the equipment materials.
Warning: The Nox disposable RIP belts are single use and single patient use. Re-
using the disposable RIP belts may affect the quality of recorded signals and lead
to possible incorrect treatment. Using the same disposable RIP belt on more than
one patient poses a risk of cross-infection.
Step 1
Snap the clips that are attached to the Nox A1 recorder to the patient’s shirt.
1
Step 2 to Step 4
• Snap the Nox abdomen cable to the back of the device.
• Place a Nox disposable RIP belt around the thorax and snap its ends to the back panel of the
device.
• Adjust the Nox abdomen cable length as needed by wrapping it around the abdomen
connection unit. Place a Nox disposable RIP belt around the abdomen and snap it in place.
2 3 4
Page 18
Nox A1 Manual
~ 18 ~
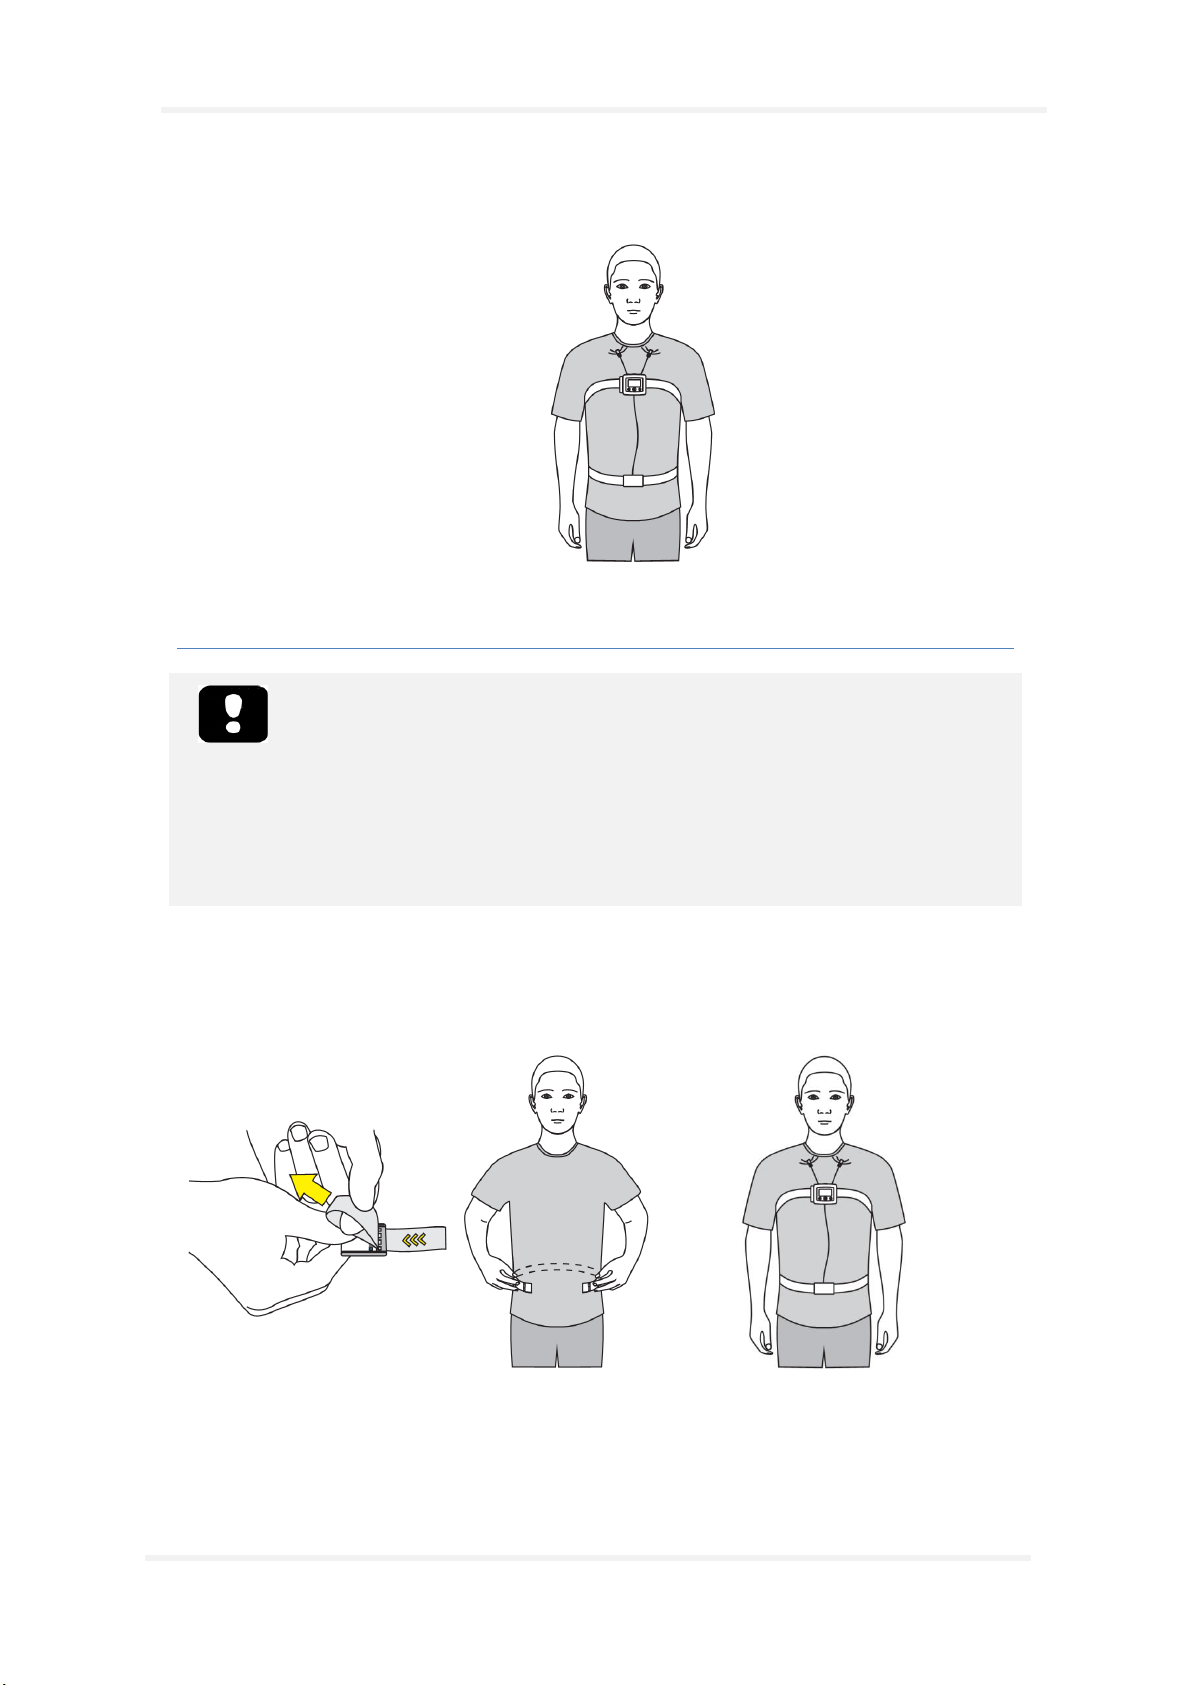
Step 5
Attaching the Nox A1 recorder and Nox disposable RIP belts is now completed.
5
Adjusting the Nox RIP Belts
Caution: The Nox disposable RIP belts should fit the patient snugly without being
uncomfortably tight to avoid discomfort.
Note: For most patients, the Nox disposable RIP belts do not need to be adjusted if
the correct belt size is chosen based on the patient’s abdomen circumference
and/or body mass index (BMI). Belt size selection tables accompany Nox
disposable RIP belts packages for more detailed instruction.
Fit the Nox disposable RIP belts around the patient’s waist and thorax and adjust the length using the
loop on each end to adjust the belt length such that the belt covers about two thirds of the patient’s
circumference when the belt is unstretched. The length is fixed with hooks on the plastic connector of
the belt.
Page 19
Nox A1 Manual
~ 19 ~
Attaching the Nox Nasal Cannula
Warning: The Nox nasal cannulas are single patient use. Using the same nasal
cannula on more than one patient poses a risk of cross-infection.
Note: Medical tape can be used to hold the cannula against the cheeks to secure
the cannula in place if necessary.
Note: The Nox nasal cannula with filter has a built-in hydrophobic filter and is the
preferred way to measure nasal airflow and snoring as it is designed to maximize
the signal quality and fits directly with the Nox A1 recorder. If it is preferred to use
a non-filtered Luer-lock cannula, it is necessary to use a filter tube connector from
Nox Medical to interface with the Nox A1 recorder.
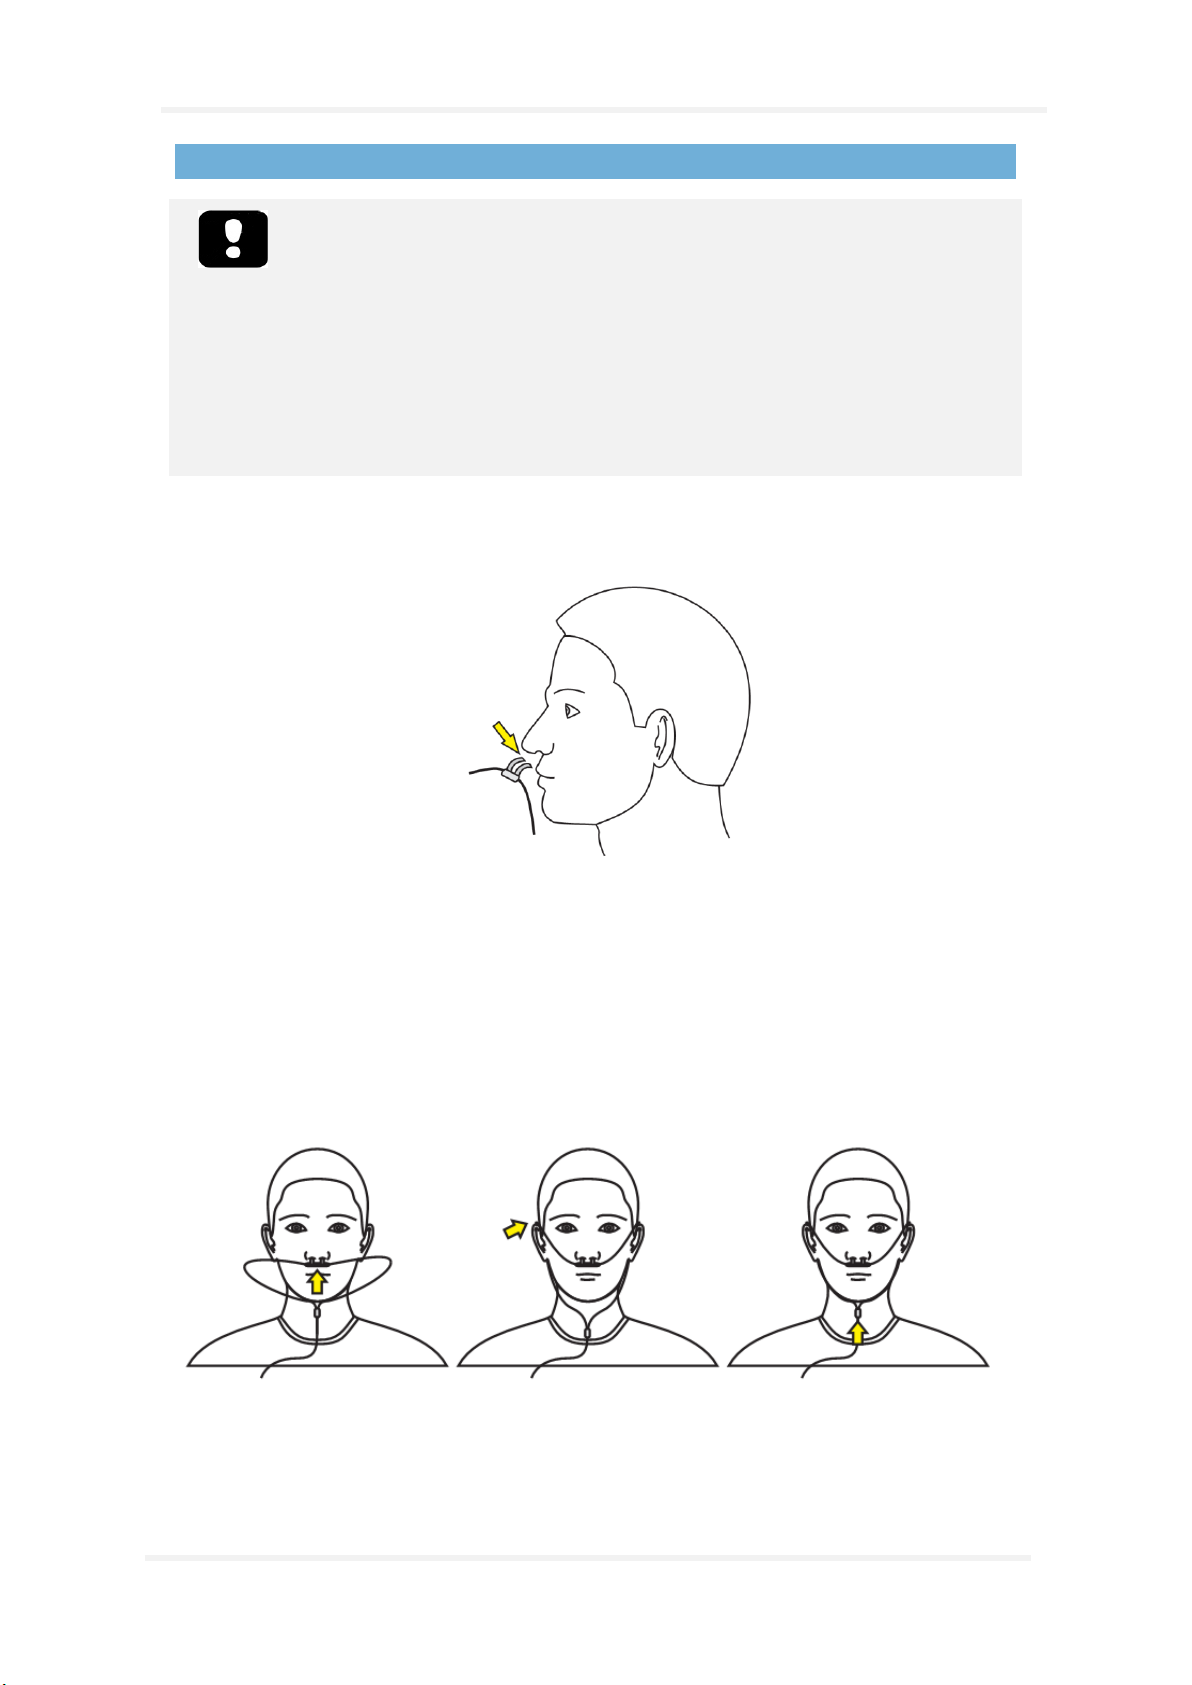
Step 1
Place the nasal prongs gently in the nostrils. The prongs should point downwards inside the nostrils.
Step 2
Pull the cannula tubing over the ears and then position it under the chin.
Step 3
Slide the fastener snugly under the chin to hold the cannula tubing securely in place.
1 2 3
Refer to the “Compatible Sensors and Devices” section regarding the types of Nox nasal cannulas that
have been validated with the Nox A1 recorder.
Page 20
Nox A1 Manual
~ 20 ~
Measuring Mask Pressu re
Warning: The mask pressure tubes and Nox filter tube connectors are single
patient use. Using the same mask pressure tube and filter tube connector on more
than one patient poses a risk of cross-infection.
Note: The mask pressure tube can only be connected to the pressure lock on the
Nox A1 recorder by using the Nox filter tube connector.
A mask pressure tube is used for connection to positive airway pressure (PAP) masks for measuring
mask pressure. The pressure tube connects to the pressure lock on the Nox A1 recorder via a filter
tube connector from Nox Medical.
Refer to the “Compatible Sensors and Devices” section regarding the types of mask pressure tubes
that have been validated with the Nox A1 recorder.
Measuring EEG Signals
Warning: Electrodes should only be used by or in consultation with a healthcare
provider familiar with their proper placement and use. Not using and placing the
electrodes correctly may affect recording of data, and therefore interpretation and
diagnostic.
Warning: The electrodes should be applied only to intact, clean skin (e.g. not over
open wounds, lesions, infected or inflamed areas) in order to prevent infections.
Warning: Make sure the conductive parts of electrodes and associated connectors,
including the neutral electrode, do not contact other conductive parts including
earth to prevent potential serious harm to the operator/patient.
Warning: The Nox 5 Lead EEG Electrode Cables should be properly disposed of if
they cannot be fully cleaned between uses in order to prevent the risk of crossinfection between patients.
Warning: The Nox 5 Lead EEG Electrode Cables are not certified to be used for
electrical stimulation purposes. Using the product for electrical stimulation
purposes might create burns and cause injuries to the patient.
Warning: The Nox EEG Head Cable/Nox 5 Lead EEG Cables do not provide
protection against the effect of the discharge of a cardiac defibrillator nor against
high frequency burns. Not removing the equipment from a patient before
defibrillation may lead to the creation of high current density at the electrode
sites, causing burns and leading to possible patient harm.
Note: The Nox EEG Head Cable is available in both pediatric and adult sizes.
Page 21
Nox A1 Manual
~ 21 ~
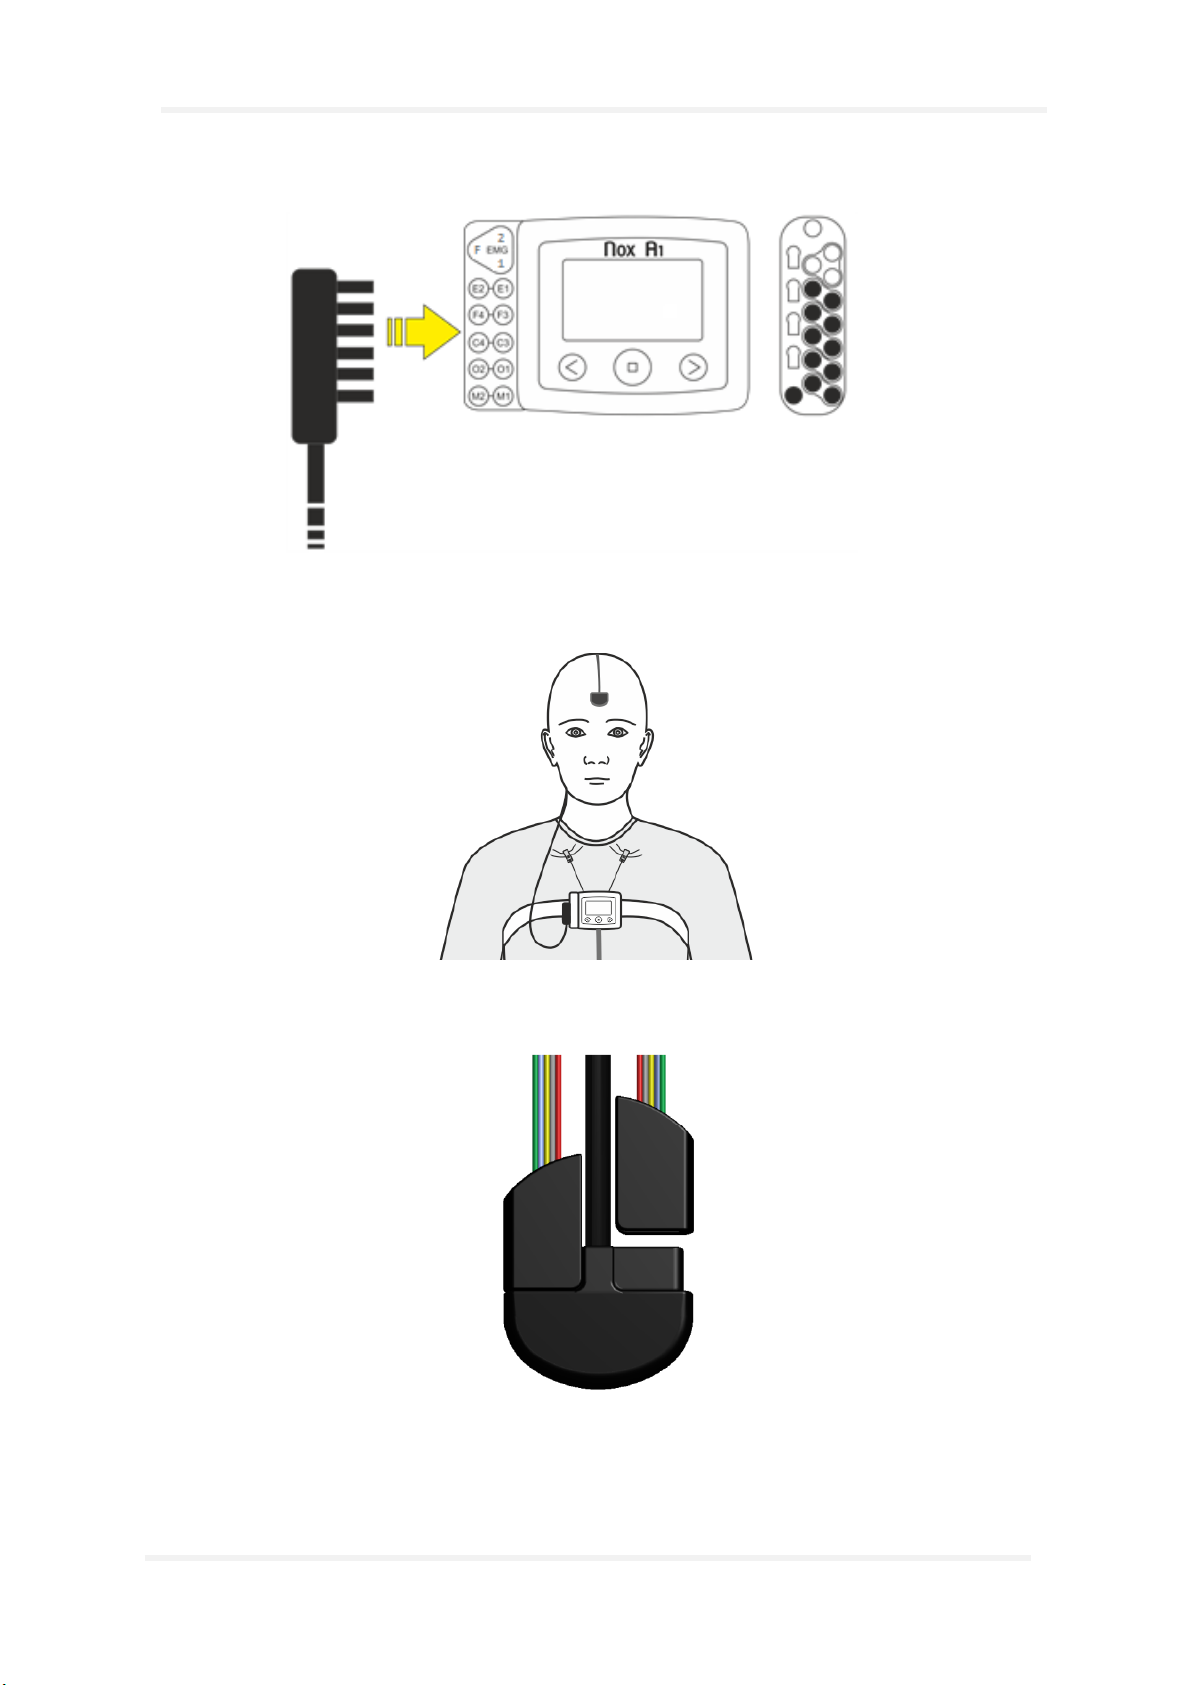
Connect the Nox EEG Head Cable to the E2-E1, F4-F3, C4-C3, O2-O1, M2-M1 unipolar and ground
inputs of the Nox A1 recorder.
Place a snap-on electrode on the middle of the patient’s forehead. Route the Nox EEG Head Cable
behind the patient’s head and snap the cable to the electrode.
Connect two Nox 5 Lead EEG Electrode Cables to the head cable, one on each side.
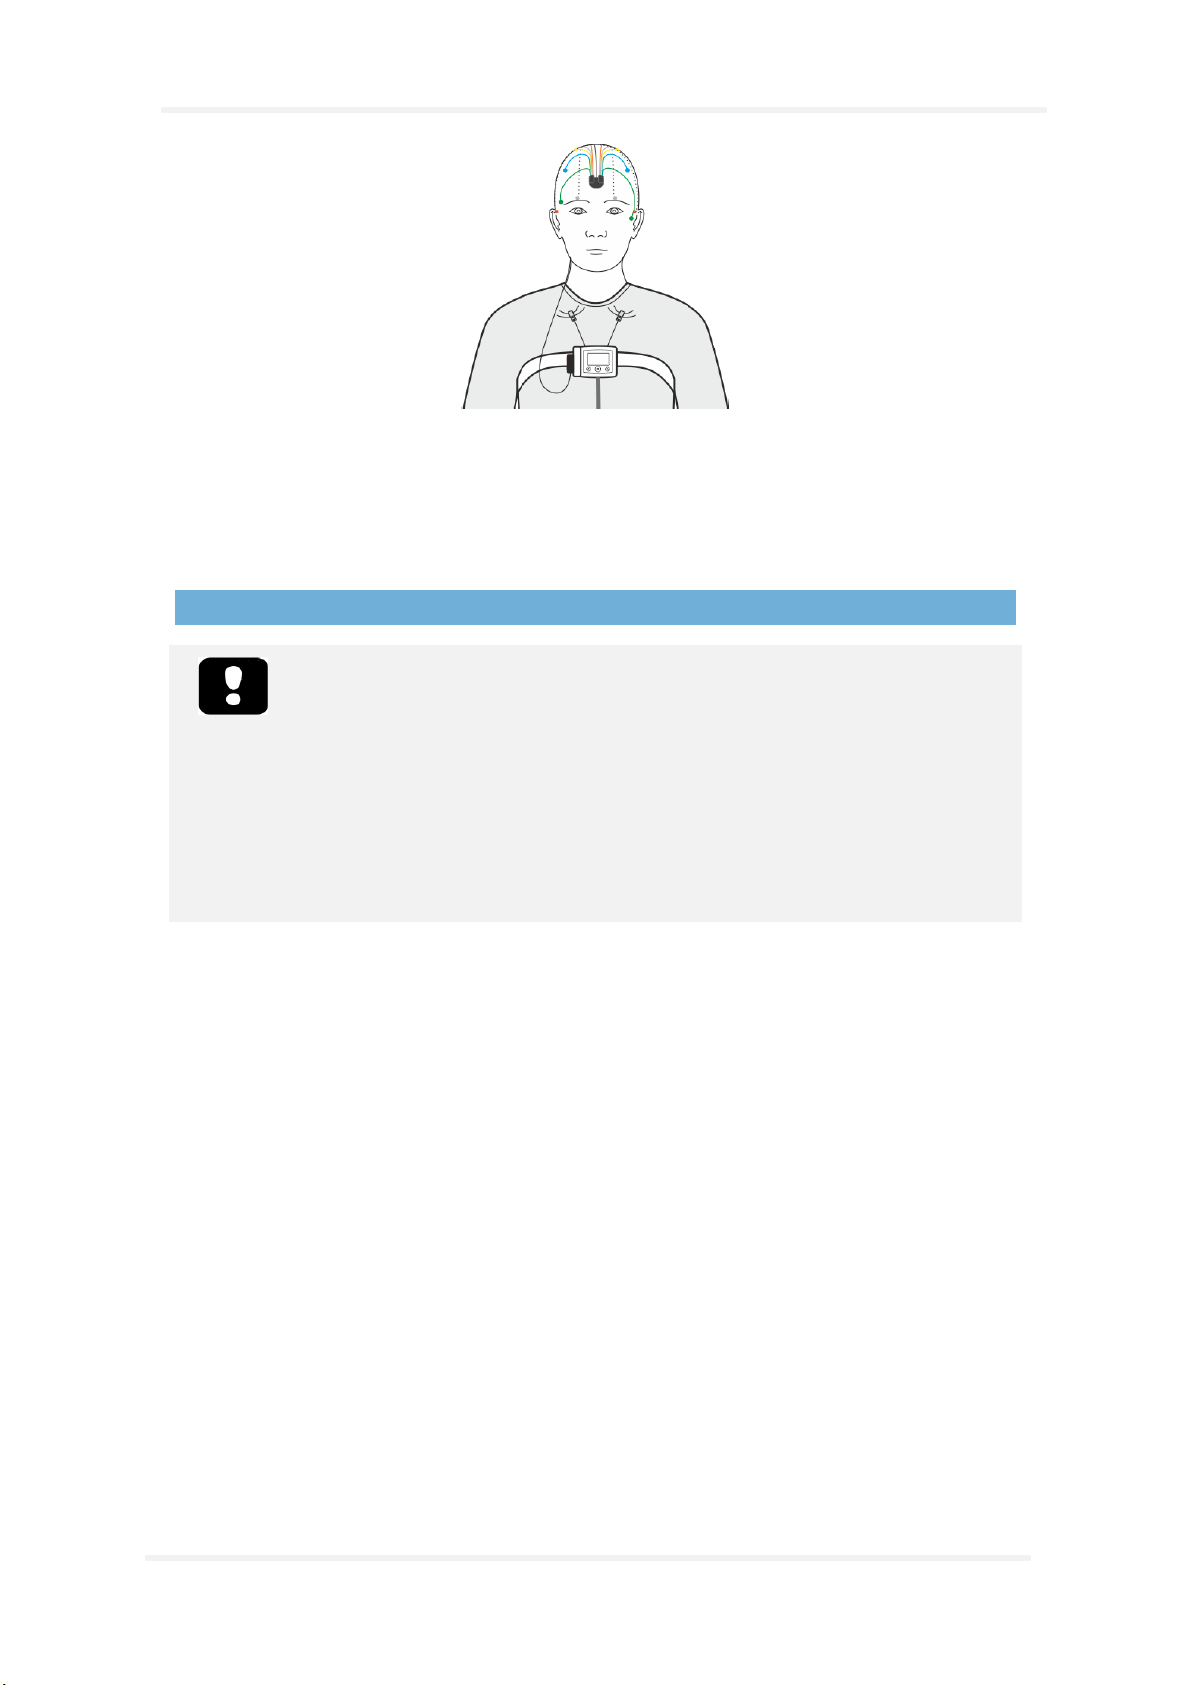
Attach the gold cup electrodes to the patient’s head. The green wire is for E1/E2, the blue wire is for
F3/F4, the yellow wire is for C3/C4, the grey wire is for O1/O2 and the red wire is for M1/M2.
Page 22
Nox A1 Manual
~ 22 ~
Before electrodes are placed it is important to inspect the skin locations and make sure the electrodes
are placed on a dry and clean location that has no abrasions or wounds. To prepare the skin, it is
recommended to clean the skin with water and abrasive skin prepping gel (55 50 10 Nuprep ECG &
EEG Abrasive Skin Prepping Gel). In some cases, if the skin is very oily it can be necessary to use wipes
with alcohol. The electrodes are then applied to the skin by use of suitable gel or paste (Ten20
Conductive EEG Paste) ensuring bio-compatibility and electrical contact.
Measuring EMG/ECG Signals
Warning: Electrodes should only be used by or in consultation with a healthcare
provider familiar with their proper placement and use. Not using and placing the
electrodes correctly may affect recording of data, and therefore interpretation and
diagnostic.
Warning: The electrodes should be applied only to intact, clean skin (e.g. not over
open wounds, lesions, infected or inflamed areas) to prevent infections.
Warning: Make sure the conductive parts of electrodes and associated connectors,
including the neutral electrode, do not contact other conductive parts including
earth to prevent potential serious harm to the operator/patient.
The Nox A1 recorder is equipped with 4 bipolar channels suitable for recording of ECG and EMG
signals such as leg EMG or masseter EMG for bruxism detection. The bipolar channels are labeled with
GP1, ECG, LM1, and LM2 and connect to bipolar electrode leads with keyhole connectors. However,
during recording setup, those channels can be defined for any EMG/ECG signals. Please refer to the
Noxturnal manual for more information on how to configure the Nox A1 recorder.
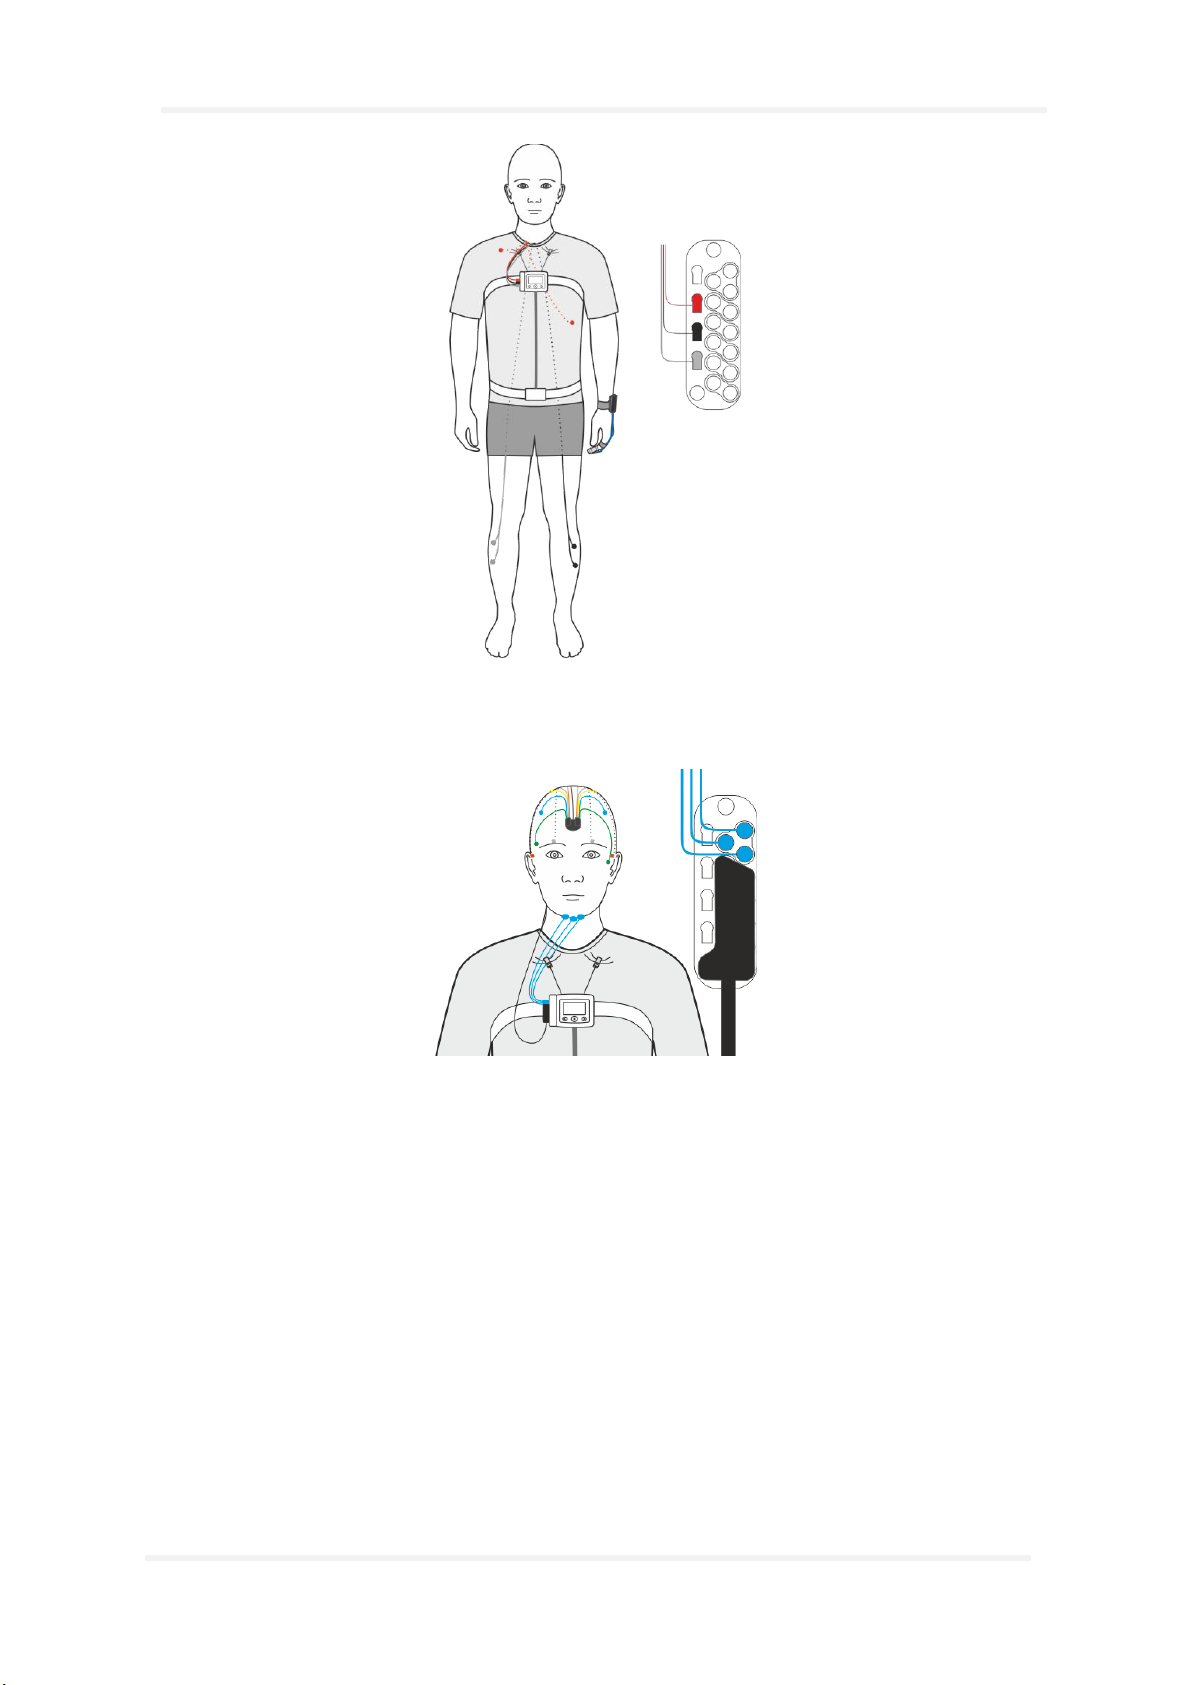
The figure below shows connections for ECG, EMG on right leg and EMG on left leg. When not using
the Nox EEG head cable you can connect your ground electrode to the PGND input on the device.
Page 23
Nox A1 Manual
~ 23 ~
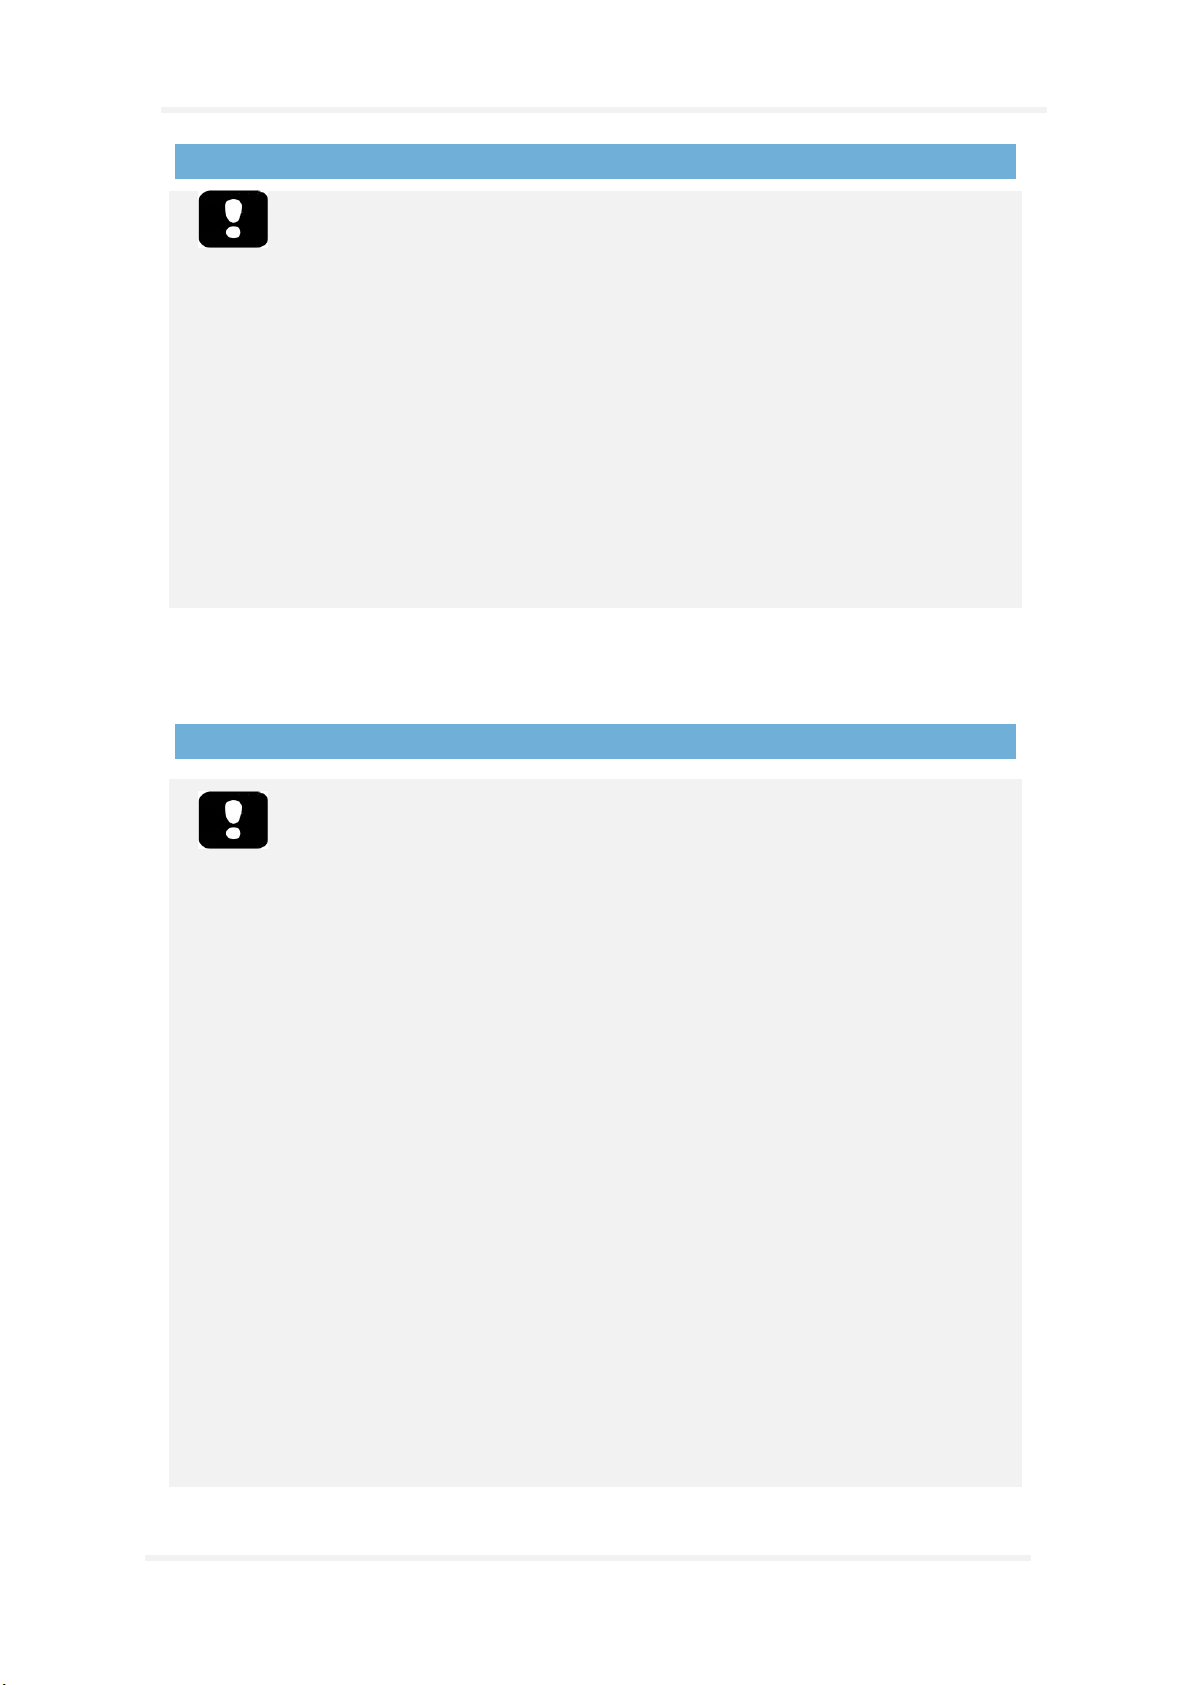
For submental EMG, insert the electrode leads into the EMG channels of the Nox A1 recorder and
attach the electrodes to the patient’s chin. The front chin electrode goes into the F input, the left chin
electrode goes into the 1 input, and the right chin electrode goes into the 2 input.
Before electrodes are placed it is important to inspect the skin locations and make sure the electrodes
are placed on a dry and clean location that has no small abrasions and wounds. To prepare the skin, it
is recommended to clean the skin with water and abrasive skin prepping gel (55 50 10 Nuprep ECG &
EEG Abrasive Skin Prepping Gel). In some cases, if the skin is very oily it can be necessary to use wipes
with alcohol. The electrodes are then applied to the skin by use of suitable gel or paste (Ten20
Conductive EEG Paste) ensuring bio-compatibility and electrical contact.
Page 24
Nox A1 Manual
~ 24 ~
Measuring Data from Auxiliary Devices
Warning: The Nox Sleep System is NOT certified to be used for continuous
monitoring where failure to operate can cause injuries or death of the patient.
Warning: External equipment and all auxiliary devices intended for connection to
signal input, signal output or other connectors shall comply with the relevant
product safety standards, e.g. IEC 60950-1 for IT equipment and the IEC 60601
series for medical electrical equipment, to prevent electric shocks. In addition, all
such combinations – systems – shall comply with the safety requirements stated in
the collateral standard IEC 60601-1-1 or the general standard IEC 60601-1, edition
3/3.1, clause 16. Any equipment not complying with the leakage current
requirements in IEC 60601-1 shall be kept outside the patient environment i.e. at
least 1.5 m from the patient support. Any person who connects external
equipment to signal input, signal output or other connectors has formed a system
and is therefore responsible for the system to comply with the requirements. If in
doubt, contact qualified medical technician or your local representative.
The Nox A1 recorder can communicate with supported auxiliary devices over a Bluetooth® link by use
of the Nox W7 link; for more information refer to the user instructions accompanying the Nox W7 link
kits.
Measuring Pulse and O xygen Saturation using Nonin 3150 Pulse Oximeter
Warning: The Nox Sleep System is NOT certified to be used for continuous
monitoring where failure to operate can cause injuries or death of the patient.
Warning: Avoid excessive pressure to the sensor application site as this may cause
damage to the skin beneath the sensor.
Warning: To prevent improper performance and/or patient injury, verify
compatibility of the Nox A1 recorder, oximeter, sensor(s), and accessories before
use.
Warning: Before changing the batteries, make sure the oximeter is off and the
sensor is not applied to a digit.
Caution: The oximeter has motion tolerant software that minimizes the likelihood
of motion artifact being misinterpreted as good pulse quality. In some
circumstances, however, the device may still interpret motion as good pulse
quality.
Caution: To avoid the risk of confusing or misinterpreting patient data when
transmitting data via Bluetooth, verify that the oximeter is paired with the correct
Nox A1 recorder.
Caution: Do not fasten the pulse oximeter too tightly around the patient’s wrist.
Inaccurate readings and patient discomfort could result.
Caution: Do not use a damaged sensor. If the sensor is damaged in any way,
discontinue use immediately and replace the sensor.
Caution: The oximeter is designed to determine the percentage of arterial oxygen
saturation of functional hemoglobin. Factors that may degrade pulse oximeter
performance or affect the accuracy of the measurement include the following:
• excessive ambient light
Page 25

Nox A1 Manual
~ 25 ~
• excessive motion
• electrosurgical interference
• blood flow restrictors (arterial catheter, blood pressure cuffs, infusion lines,
etc.)
• moisture in the sensor
• improperly applied sensor
• incorrect sensor type
• poor pulse quality
• venous pulsations
• anemia or low hemoglobin concentrations
• cardiogreen and other cardiovascular dyes
• carboxyhemoglobin
• methemoglobin
• dysfunctional hemoglobin
• artificial nails or fingernail polish
• residue (e.g., dried blood, dirt, grease, oil) in the light path
Caution: When using the oximeter in the home, avoid exposing it to lint and dust.
Caution: The pulse oximeter may not work when circulation is reduced. Warm or
rub the finger or reposition the sensor.
Refer to 3
rd
party instructions for use accompanying the pulse oximeter and/or
oximeter sensor for maximum oximeter application time at a single site.
Refer to 3
rd
party instructions for use accompanying the pulse oximeter and
oximeter sensor for additional warnings and cautions.
Warning: The Nonin wrist band is single patient use only. The wrist band may be
cleaned, refer to 3rd party instructions for use accompanying the pulse oximeter
for cleaning instructions, but after cleaning the wrist band should only be applied
to the same patient, not to a different patient.
The Nox A1 recorder can communicate with an auxiliary Bluetooth® pulse oximeter for recording of
oxygen saturation levels (SpO2), pulse rate, and plethysmography data.
Refer to the “Compatible Sensors and Devices” section regarding the types of pulse oximeters and
sensors that are supported by the Nox Sleep System.
Inserting Batteries into the Nonin 3150 Pulse Oximeter
Refer to the 3rd party accompanying instructions regarding replacement of batteries when using the
Nonin 3150 pulse oximeter.
Note: Single use batteries last up to 48 hours of use so it is important to track the
number of measurements made with the Nonin 3150 pulse oximeter. It is
recommended to change the batteries after 2-3 recordings depending on the
quality of the batteries being used.
Note: If you are using rechargeable batteries, it is recommended that you replace
Page 26
Nox A1 Manual
~ 26 ~
1
them before every recording.
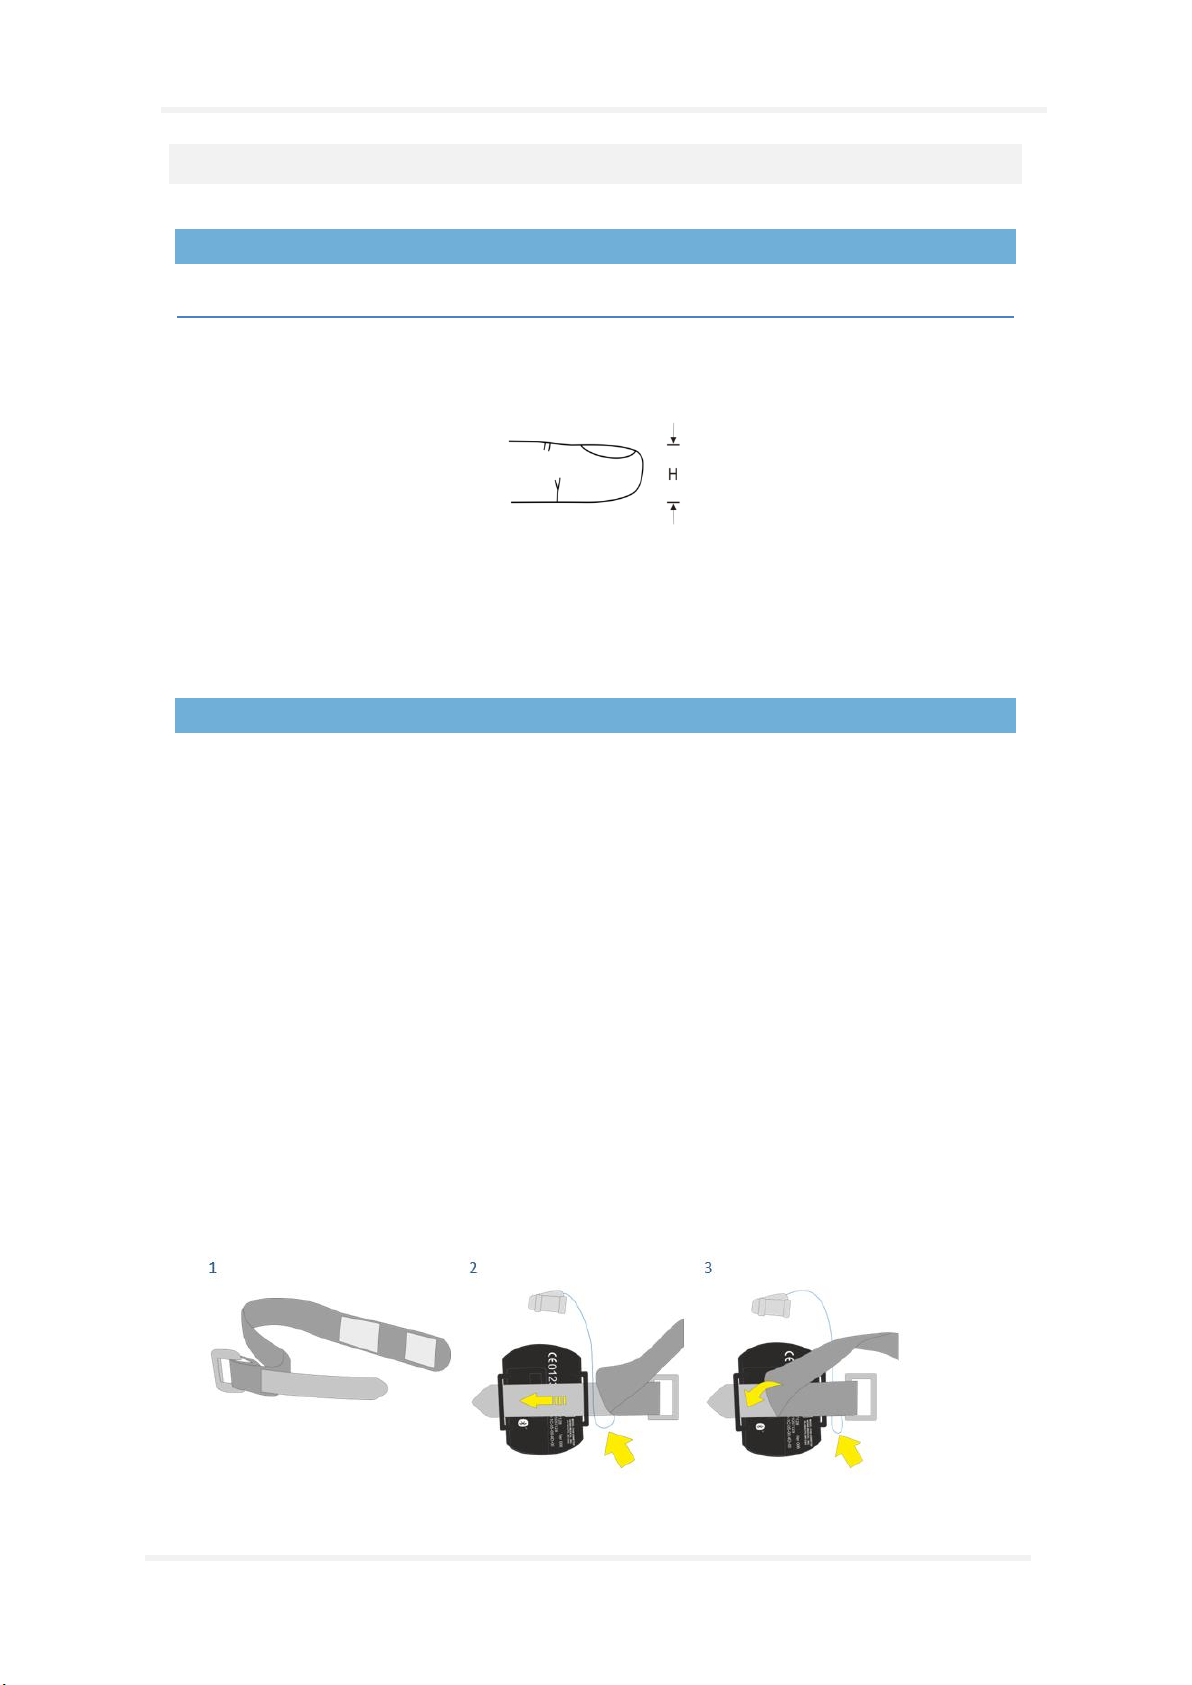
Selecting Oximeter Sensor Size
Nonin Reusable Soft Pulse Oximeter Sensor
Soft sensor size recommendations are based on digit height (thickness). The digit height (H) is
measured as shown in the figure below.
For digit height from 7.5 mm (0.3 in) to 12.5 mm (0.5 in), size small should be selected.
For digit height from 10.5 mm (0.4 in) to 19.0 mm (0.75 in), size medium should be selected.
For digit height from 12.5 mm (0.5 in) to 25.5 mm (1.0 in), size large should be selected.
Attaching the Nonin 3150 Pulse Oximeter and Soft Sensor
The Nonin 3150 WristOx2 Oximeter package accompanying the Nox A1 system kits includes:
• Model 3150, WristOx
2
Pulse Oximeter
• Model 8000SM-WO2, reusable soft sensor
• 1 wrist band
• CD – ROM of the Operator’s manual
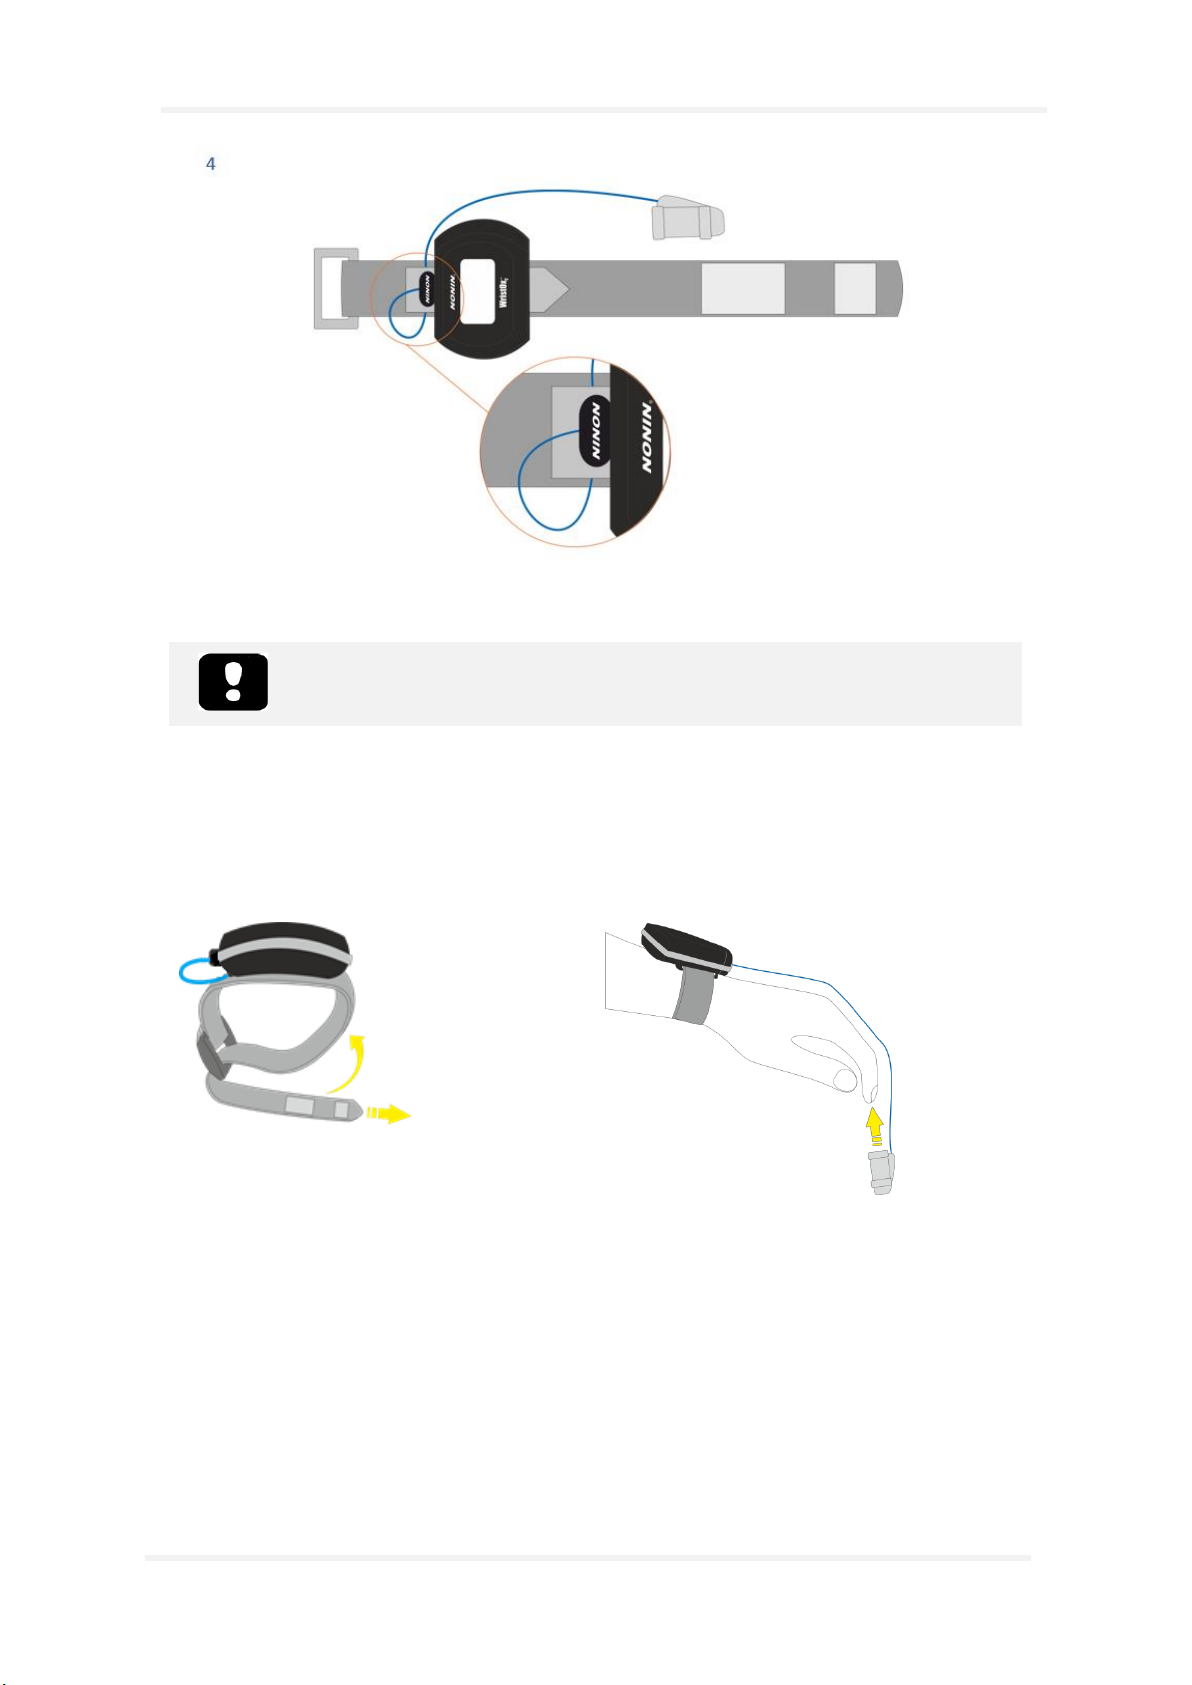
Step 1 to Step 4
1. Separate the short end of the wristband from the long end.
2. Insert the short end in the loops on the oximeter.
3. Place the probe wire between the short and long end of the wristband. Attach the long end
to the short end to secure the wristband on the oximeter.
4. The oximeter is now securely placed on the wristband and the probe wiring is secured
between the two ends, forming a loop that prevents direct pulling of the connector.
Page 27
Nox A1 Manual
~ 27 ~
Step 5 to Step 6
Note: To prevent the oximeter sensor from falling off, secure its cable with
medical tape.
5. Place the wristband around the patient’s wrist.
6. Put the probe on the finger.
5 6
Page 28
Nox A1 Manual
~ 28 ~
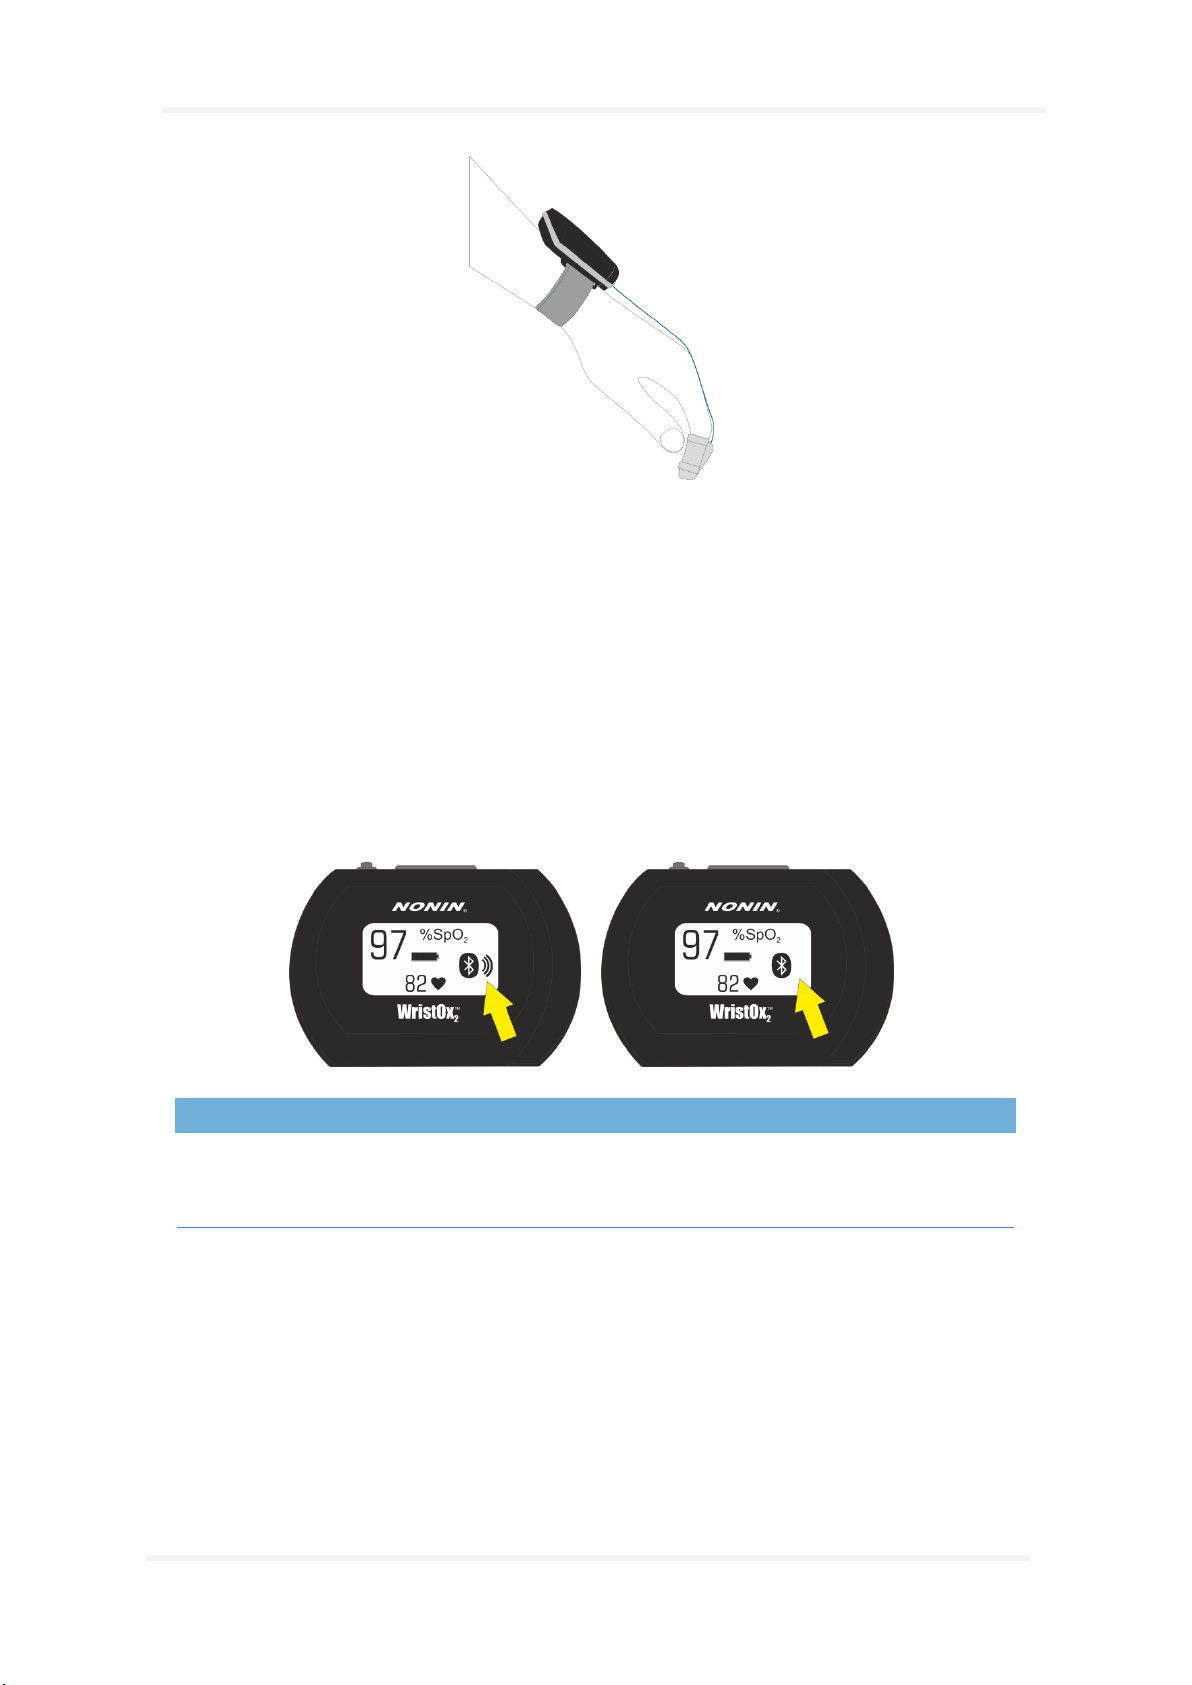
Step 7
7. Verify properly the connection status:
a. The Bluetooth® indicator displays with animated bars when the Bluetooth connection is
established.
b. The Bluetooth indicator displays without animated bars when the connection is NOT
established.
7.a 7.b
Configuring the Oximeter S etup
Establish Bluetooth® Connection between the Nonin 3150 Oximeter and the Nox A1
Recorder
Use the Noxturnal software or the Noxturnal App to establish the Bluetooth connection between the
Nonin 3150 oximeter and the Nox A1 Recorder. The connection is established by entering the
Bluetooth address (BDA) of the oximeter in the recording configuration.
Page 29
Nox A1 Manual
~ 29 ~
Maintenance
The Nox Sleep System is only intended to be maintained by professionals (healthcare professionals
and service personnel) with relevant qualifications and skills.
The Nox A1 recorder and accessories should be stored in a clean, dry place.
Handle the Nox A1 recorder with care and protect it against mechanical shocks, dirt, and liquids. The
device is not waterproof or splash proof.
To update the Nox A1 recorder you will need the Noxturnal software running on the computer which
the device is connected to. Please refer to the Noxturnal manual for more information on how to
perform this task.
No regular testing of the Nox A1 recorder or accessories, including patient cables, is needed.
The service life of the Nox A1 recorder and Nox A1 carry case is 5 years. The service life of Nox A1
head cables is 1 year. The service life of Nox EEG cup sets is 6 months.
Warning: Remove batteries from the Nox A1 recorder if it is not used within 30
days to prevent damage from possible battery leakage and prevent possible minor
burns to the operator/patient.
Warning: There are no user serviceable parts inside the Nox A1 recorder. The
device should be serviced by authorized parties only. Service performed by nonauthorized parties may affect data analysis and result in possible incorrect
treatment. The warranty is void if the Nox A1 recorder is opened (except for
opening of the battery compartment).
Warning: No modification of the Nox A1 recorder and it´s accessories is allowed.
Un-authorized modifications could result in the device not performing as intended
and cause serious harm to the patient.
Note: The Nox A1 recorder has an internal battery which is automatically charged
by regular use. It is recommended to charge the internal battery before the first
use or if the device has not been in use for three months or more. The battery is
charged by plugging the Nox A1 recorder to a computer with a USB cable for 6
hours or more.
Note: It is never recommended to downgrade the firmware of the Nox A1
recorder. Downgrading the firmware will result in losing the calibration for the
device: calibration values will be replaced with default values that might affect the
pressure and impedance signals being recorded. Only upgrade the firmware of the
Nox A1 recorder with firmware files that come directly from Nox Medical
Environmental Conditions
Temperature
Operation: +5°C to +40°C (+41°F to +104°F)
Transport/Storage: -25°C to +70°C (-13°F to 158°F)
Relative Humidity
Operation: 15-93% (non-condensing)
Transport/Storage: 10-95% (non-condensing)
Pressure
Withstands atmospheric pressures from 700 hPa to 1060 hPa
Page 30
Nox A1 Manual
~ 30 ~
Calibration
The Nox A1 recorder is factory calibrated. No further calibration is needed.
Cleaning of Nox A1 Recorder and its Accessories
All reusable components should be cleaned between each patient use.
Clean the Nox A1 recorder with a soft cloth dampened with hospital grade cleaner that is not
corrosive to plastic or metal. Do not pour or spray any liquids onto the device, and do not allow any
liquids to enter any openings on the device. Allow the unit to dry thoroughly before use.
All cables provided by Nox Medical to be used with the Nox A1 recorder are reusable. Clean the cables
with a moist cloth using hospital grade cleaner. Do not immerse the cables in liquid and avoid contact
of the cleaning solution with the connectors.
For disinfection of the Nox A1 recorder and cables the following materials may be used:
• Sodium hypochlorite diluted with water at 1:500 (bleach)
• 70-90% isopropanol
• Super Sani-Cloth Plus disinfection wipes (from PDI)
Clean the carry case with a moist cloth using water or mild soap solution.
The Nox gold cup electrodes and leads should be cleaned using a mild hospital-grade laundry
detergent, wiped with soft towels and air dried. In addition, standard alcohol wipes can be used to
clean leads (Super Sani-Cloth Plus disinfection wipes from PDI).
• Do not soak electrodes in alcohol
• Do not use bleach
• Do not use an abrasive-based cleaner on the electrodes, as it can damage the plating
• Only apply light force when cleaning gold plated surfaces. (Gold plating is soft and can easily
be damaged or scratched when contacted).
• A dampened soft towel or dampened soft foam swab is recommended for use when cleaning
gold plated surfaces.
Clean the gold cup electrodes immediately after use.
The Nox disposable RIP belts are single patient use ONLY.
The Nox nasal cannulas and filter tube connectors are single patient use ONLY.
Warning: The Nox A1 recorder is not designed to give a specified degree of protection
against harmful ingress of liquids. Do not autoclave or immerse the device, nor any
sensor, in any kind of liquids. Ingress of liquids may result in electric shock.
Warning: In the United States of America, only use United States Environmental
Protection Agency (EPA) registered products for cleaning/disinfection of the Nox A1
recorder to prevent harm to the operator/patient.
Clean the Nox A1 recorder separately from its associated sensors.
The Nox A1 recorder components are NOT intended to be sterilized.
Reusing single-use products on more than one patient poses a risk of cross-infection.
Regarding cleaning/disinfection and re-use of 3
rd
party components and 3rd party
sensors refer to the applicable 3
rd
party accompanying instructions.
Page 31

Nox A1 Manual
~ 31 ~
Disposal
Follow local governing ordinances and recycling instructions regarding disposal or recycling of this
device and accessories, including batteries.
According to the regulation in Europe on Waste of Electrical and Electronic Equipment
(WEEE) the components labeled with this symbol may not be disposed of as unsorted
municipal waste. The components shall be collected separately and returned to the
appropriate collection system available.
Please contact your distributor regarding take-back or recycling of the components.
Page 32
Nox A1 Manual
~ 32 ~
Com patible Sensors a n d Devices
Warning: No modification of the Nox A1 recorder and it´s accessories is allowed.
Un-authorized modifications could result in the device not performing as intended
and cause serious harm to the patient. To ensure patient safety and effective use
of the Nox Sleep System, only use accessories that have been validated for use by
Nox Medical.
The following table includes information on accessories, sensors and devices that have been validated
with the Nox A1 recorder.
The items listed below are Nox products and have been validated for use with the Nox A1 recorder:
NOX DISPOSABLE RIP BELTS
Type
Catalog Number
Nox RIP Belts Disposable, Extra Large 14 sets
551050
Nox RIP Belts Disposable, Large 20 sets
551040
Nox RIP Belts Disposable, Medium 20 sets
551030
Nox RIP Belts Disposable, Small 20 sets
551020
Nox RIP Belts Disposable, Pediatric 20 sets
551010
NOX NASAL CANNULAS/FILTER TUBE CONNECTORS
Type
Catalog Number
Nox Cannula with filter, 40 units
552010
Nox Cannula with Luer-lock, 50 units
552020
Nox Filter Tube Connector, 50 units
552110
NOX SLEEP SYSTEM COMPONENTS
Type
Catalog Number
Nox Abdomen Cable
562010
Nox USB Cable
562011
Nox A1 EEG Head Cable, Adult 90 cm
562110
Nox A1 EEG Head Cable, Pediatric 70 cm
562111
Nox A1 Carry Case
568011
Page 33

Nox A1 Manual
~ 33 ~
Nox Service Kit
569010
Nox Battery Lid
569011
Nox Clip Strap
569013
Nox Battery Lid Key
569014
Nox C1 Access Point
544020
Noxturnal
NA
Noxturnal App
536210
Noxturnal CD
539010
NOX UNIPOLAR SNAP-ON LEADS
Type
Catalogue Number
Nox Snap-on Lead 50 cm, white, 1.5mm connector, 2 units
554020
Nox Snap On Lead 30 cm, beige-white, 1.5 mm connector, 2 units
554021
Nox Snap On Lead 100 cm, green, 1.5 mm connector, 1 unit
554022
Nox Snap On Lead 50 cm, beige-green, 1.5 mm connector, 1 unit
554023
Nox Snap On Lead 150 cm, grey, 1.5 mm connector, 2 units
554024
Nox Snap On Lead 100 cm, beige-grey, 1.5 mm connector, 2 units
554025
Nox Snap On Lead 150 cm, black, 1.5 mm connector, 2 units
554026
Nox Snap On Lead 100 cm, beige-black, 1.5 mm connector, 2 units
554027
Nox Snap On Lead 100 cm, orange, 1.5 mm connector, 2 units
554028
NOX BIPOLAR SNAP-ON LEADS
Type
Catalogue Number
Nox Snap On Double-Lead 50/100 cm, orange, keyhole connector, 1 unit
554310
Nox Snap On Double-Lead 30/50 cm, beige-orange, keyhole connector, 1 unit
554311
Nox Snap On Double-Lead 148/150 cm, grey, keyhole connector, 1 unit
554312
Nox Snap On Double-Lead 98/100 cm, beige-grey, keyhole connector, 1 unit
554313
Page 34

Nox A1 Manual
~ 34 ~
Nox Snap On Double-Lead 148/150 cm, black, keyhole connector, 1 unit
554314
Nox Snap On Double-Lead 98/100 cm, beige-black, keyhole connector, 1 unit
554315
Nox Snap On Double-Lead 50/52 cm, white, keyhole connector, 1 unit
554316
Nox Snap On Double-Lead 30/32 cm, beige-white, keyhole connector, 1 unit
554317
NOX GOLD CUP ELECTRODES
Type
Catalogue Number
Nox Standard Gold Cup Electrode, 10 units
554410
Nox A1 EEG 5 Lead Electrode Cable
554411
NOX BLUETOOTH® LINKS
Type
Catalogue Number
Nox W7 Link Kit - S
544010
Nox W7 Link Kit - R
544011
NOX W7 Link Kit – A
544012
The items listed below are 3rd party products and have been validated for use with the Nox A1
recorder:
PULSE OXIMETERS
Type
Catalogue Number
Nonin WristOx2 Pulse Oximeter, Model 3150
541010
PULSE OXIMETER ACCESSORIES
Type
Catalogue Number
NONIN WristOx2 Soft Sensor – Small
553010
NONIN WristOx2 Soft Sensor – Medium
553020
NONIN WristOx2 Soft Sensor – Large
553030
NONIN Flex Sensor with 25 Flexi Wraps, 1 m (39 in) cable – Neonatal
553110
NONIN Flex Sensor with 25 Flexi Wraps, 1 m (39 in) cable – Infant
553120
Page 35

Nox A1 Manual
~ 35 ~
NONIN WristOx2 Flex Sensor with 25 Flexi Wraps, 30 cm (12 in) cable – Adult
553130
NONIN WristOx2 Wrist Band
564042
DIFFERENTIAL PRESSURE SENSOR
Type
Catalogue Number
Differential Pressure Sensor Kit
547010
THERMAL FLOW SENSORS
Type
Catalogue Number
Thermal Flow Sensor - Adult
552230
Thermal Flow Sensor – Pediatric
552231
MASK PRESSURE TUBING
Type
Catalogue Number
Mask tubing 183cm (72in) Male x Male, 50 units
552310
Mask tubing 183cm (72in) Female x Male, 50 units
552320
ELECTRODES
Type
Catalogue Number
Lead with Attached Electrode 100 cm, 1.5 mm connector, 10 units
554109
Lead with Attached Electrode 152 cm, 1.5 mm connector, 10 units
554110
Lead with Attached Electrode 50 cm, 1,5 mm connector, 12 units
554111
Snap on Electrode Disposable, small 25 units
554209
Blue Sensor® Snap on Electrode, 50 units
554210
ELECTRODE APPLIANCES
Type
Catalogue Number
Nuprep ECG & EEG Abrasive Skin Prepping Gel, 4oz (114g), 3 units
555010
Ten20 Conductive EEG Paste, 4oz (114g), 3 units
555020
EC2 Electrode Cream, 3.5oz (100g), 1 unit
555030
Page 36

Nox A1 Manual
~ 36 ~
CLEANING
Type
Catalogue Number
Super Sani-Cloth Plus Disinfection Wipes
559010
Page 37

Nox A1 Manual
~ 37 ~
Specifications
Nox A1 and Accessories
DESCRIPTION
PROPERTIES
FUNCTION
Nox A1 Storage Capacity
1GByte
Nox A1 Recording Time
8 hours
Nox A1 Internal Channels
Two RIP Respiratory Effort
Pressure
Respiratory sound/snoring
Four bipolar
Thirteen unipolar
Position
Activity
Light
Nox A1 External Channels
Oximeter data via Bluetooth®
Capnography data via Bluetooth®
CPAP data via Bluetooth®
PHYSICAL
Nox A1 Dimensions
82 mm (3.2”) W, 63 mm (2.5”) H, 21 mm (0.85”) D
Nox A1 Weight
132 g (163 g with battery) (0.29 lbs (0.36 lbs with battery))
Nox A1 Bipolar Inputs
Touch proof 1 mm keyhole connector
Input range ±1024 mV DC
Bandwidth 0.1 - 85 Hz
Input impedance >5 MΩ
Sampling Rate = 256 kHz
Storage rate = 200 Hz
Nox A1 Unipolar Inputs
Touch proof DIN 42-802
Input range ±3.2 mV AC
Bandwidth 0.1 - 85 Hz
Input impedance >5 MΩ
Sampling Rate = 256 kHz
Page 38

Nox A1 Manual
~ 38 ~
Storage rate = 200 Hz
Nox A1 Pressure Sensor
Pressure input range: ±100 cmH
2
O
Proprietary Nox Connector
Nox EEG Head Cable
Head-end connector: Proprietary Nox Connector
Device-end connector: Proprietary Nox Connector
Lengths: Adults – 90 cm (35.4”) , Pediatric – 70 cm (27.6”)
Nox EEG 5 Lead Electrode
Cables
Proprietary Nox Connector
10 mm (0.39”) diameter cup electrodes
Nox Abdomen Cable
50 cm (19.7”) length of cable
Nox USB Cable
Type of USB connector at device end: Mini-B
Type of USB connector at PC end: Standard A
POWER
Nox A1 Power Source
One 1.5 V AA battery
Host PC (data configuration and download)
Nox A1 Battery Type
Lithium
Powerex 2700 mAh Rechargeable Batteries
Nox A1 DISPLAY
Type
OLED
Nox A1 Transmitter
Bluetooth® Compliance
Version 2.0
Operating Frequency
2.402-2.480 GHz
Output Power
< 1.62 mW
Network Topology
Point-to-Point: Point-to-Multipoint
Operation
Scatter-Net Master
Antenna Type
Internal
Modulation Type
Frequency Shift Keying/Frequency Hopping Spread Spectrum
Bandwidth
1 MHz
Page 39

Nox A1 Manual
~ 39 ~
Material Information
COMPONENT
MATERIAL CONTENT
Nox A1 Recorder
Enclosure: 10% glass filled PC/ABS
Proxy: PC/ABS
Snaps: Gold plated stainless steel
Display/Keypad: PET
Clips: Nickel-plated steel clip, nylon rope, brass crimp
Nox Abdomen Cable
Abdomen and thorax plastic enclosures: PC/ABS
Cable jacket: PVC
Snaps: Gold-plated stainless steel
Strain relief for device end: TPE
Strain relief for belt end: PVC
Nox USB Cable
Cable Jacket: PVC
Connector: PVC
Nox Snap on electrode
cables, Bipolar
Cable Jacket: PVC
Connector: Gold-plated spring socket contacts, TPE
Snap: Nickel-plated brass socket, TPE
Nox Snap on electrode
cables, Unipolar
Cable Jacket: PVC
Connector: Gold-plated spring socket contacts, TPE
Snap: Nickel-plated brass socket, TPE
Nox EEG Head Cable
Cable Jacket: PVC
Head-end connector: TPE
Device-end connectors: Gold-plated contacts, TPE
USB Micro Connector: gold-plated contacts
Connector Pins at Device End: gold-plated contacts
Nox EEG 5 Lead Electrode
Cables
Cable Jacket: PVC
USB Micro Connector: gold-plated contacts, TPE
Electrode Cups: Gold-plated copper, TPE overmold
Nox A1 Carry Case
External Part: Polypropylene
Internal Part: PE foam
Nox Disposable RIP Belts
Belt Elastic: Polyester/Spandex
Connector: ABS
Page 40

Nox A1 Manual
~ 40 ~
Belt Wire: Tin plated copper
Nox A1 Battery Information
Note: Always use fully charged or fresh batteries for each sleep study to prevent
the need for the sleep study to be repeated.
Note: All lithium batteries used with the Nox A1 recorder shall be according to the
standard IEC 60086-4 Primary batteries - Part 4: Safety of lithium batteries.
Note: The recording durations listed below depend on the quality of the batteries
used.
The list below is provided to assist the user in selecting the appropriate battery type for the Nox A1
study:
• Lithium batteries and Powerex 2700 mAh rechargeable batteries should be used to record a
minimum of 8 hours.
Page 41
Nox A1 Manual
~ 41 ~
Reg ulatory Informat i o n
Performance Testing and Validation Summary
The Nox Sleep System has been tested and verified in various phases to include internal testing,
verification, and validation as well as external testing to assure product safety, effectiveness, and
reliability. The design was verified and validated, including clinical evaluation, throughout the design
process, according to requirement specifications and intended use. External accredited test houses
were used to conduct testing needed to comply with the applicable standards regarding
Electromagnetic Compatibility (EMC) and patient safety as well as additional RF testing to assure
compliance with Federal Communications Commission (FCC) and Radio and Telecommunication
Terminal Equipment (R&TTE) Directive.
The compliance of the Nox Sleep System towards patient safety and medical device standards has
ONLY been verified and validated with the sensors and accessories listed in this manual. This includes
all signal characteristics and automatic analysis provided by the Nox Sleep System.
Furthermore, use of other sensors or accessories with the Nox A1 recorder invalidates the Declaration
of Conformity issued by Nox Medical towards the Medical Devices Directive 93/42/EEC (MDD). Use of
other components than verified, validated or recommended by Nox Medical with the Nox A1 recorder
is considered to be a modification of the Nox Sleep System. Such modifications could result in the
system not performing as intended and cause serious harm to the patient.
Nox Medical holds an ISO 13485:2016 certified Quality Management System which complies with the
requirements of the Medical Device Directive (MDD), FDA Quality System Regulation (QSR) and
Canada Medical Device Regulations (CMDR).
Nox A1 Classifications
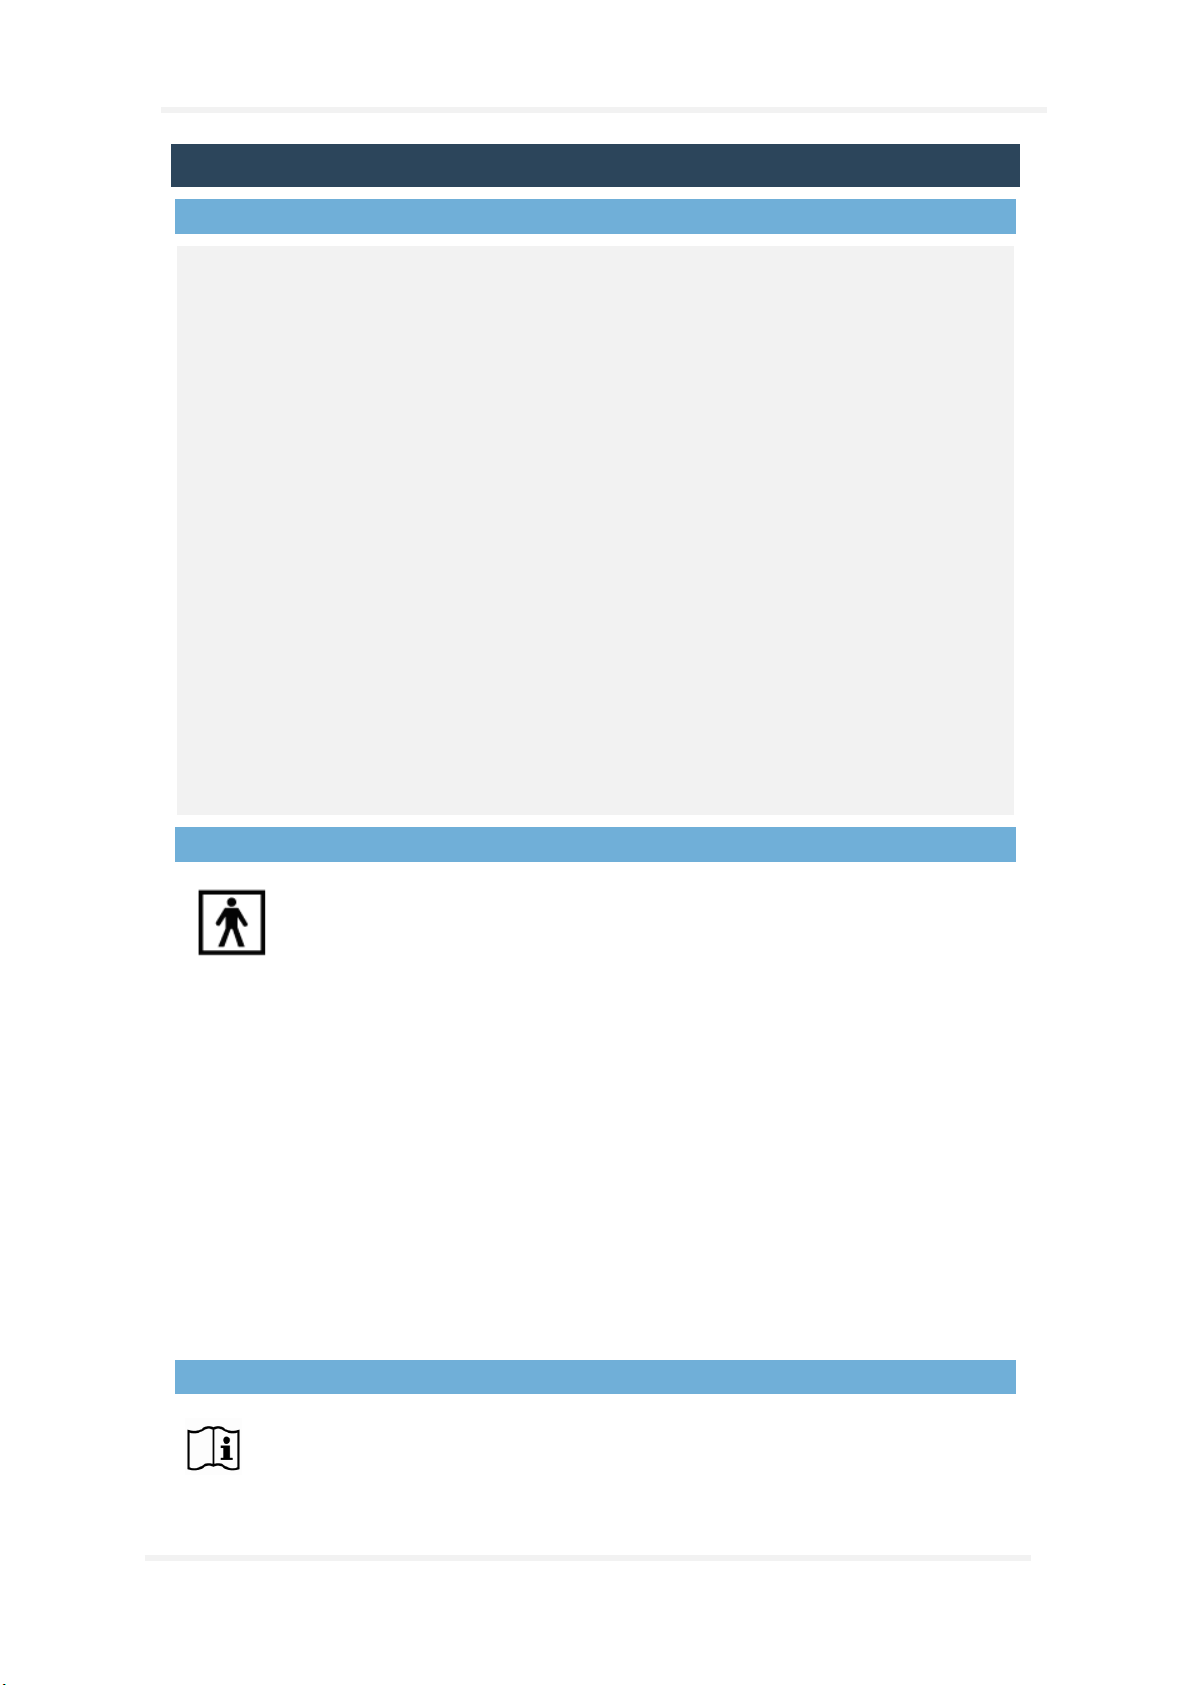
Degree of protection (applied part) against electric shock: The entire device is an
applied part and is classified as of type BF (see symbol to the left).
Powering of the device: The device is internally powered.
Degree of protection against harmful ingress of liquids and particulate matter:
o The Nox A1 recorder is classified IP20, i.e. as defined by the
standard IEC 60529 it is protected against solid foreign objects of
12.5 mm diameter and greater, but it is not protected against
harmful ingress of liquids.
Method of sterilization: The device is NOT delivered sterile or intended to be
sterilized.
Suitability for use in an oxygen rich environment: The device is NOT intended for
use in an oxygen rich environment.
Suitability for use with flammable agents and anesthetics: The device is NOT
intended for use in conjunction with flammable agents or with flammable
anesthetic mixture with air or with oxygen or nitrous oxide.
Mode of operation: The device is intended for continuous operation.
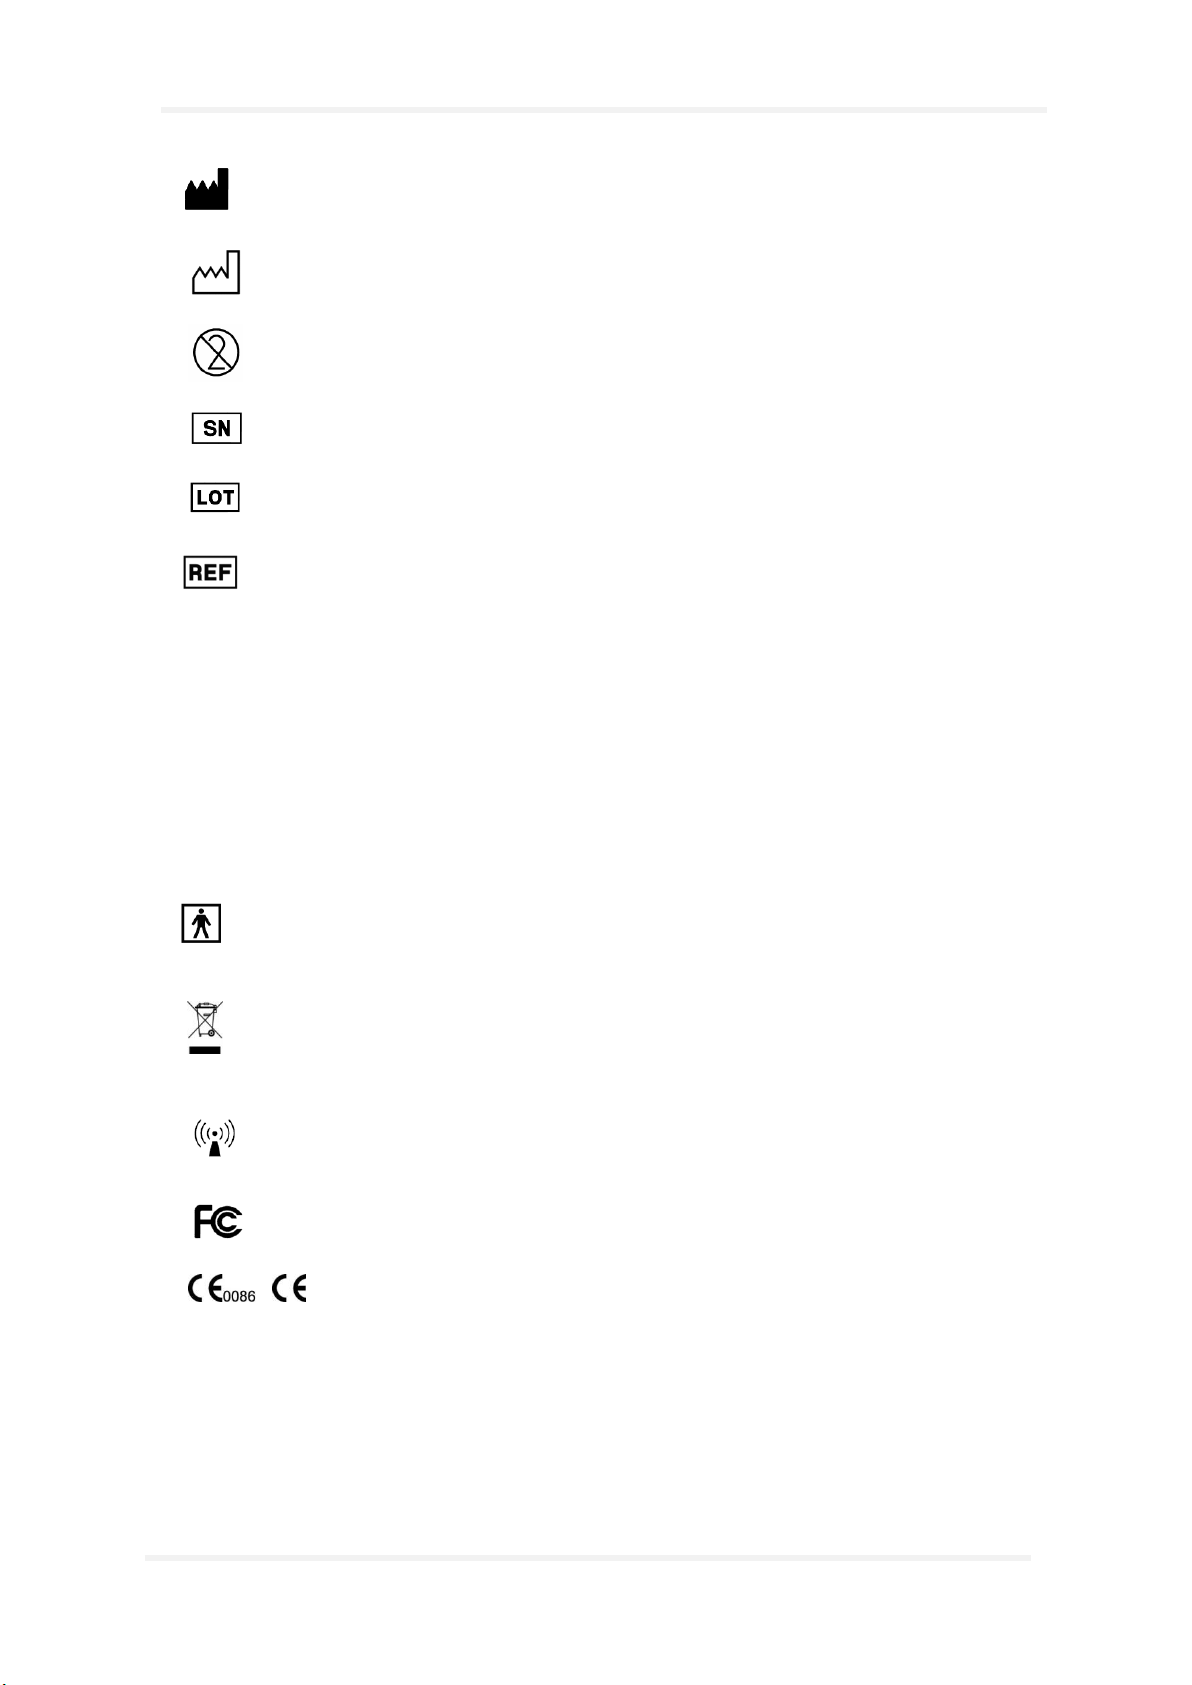
Description of Symbols and Labels
Operating instructions / Consult instructions for use
Page 42
Nox A1 Manual
~ 42 ~
Manufacturer information
Date of manufacture
Do not re-use
Serial number
Batch code / Lot number
Catalogue number / Reference number
(01)1569431111XXXX(11)YYMMDD
(21)WWWWWWWWW
(01)1569431111XXXX(11)YYMMDD
(10)ZZZZZZ
Unique Device Identifier (UDI); the Application Identifier
(01) represents the device identifier (DI)
(“1569431111XXXX”), the Application Identifier (11) the
production date/date of manufacture (“YYMMDD”, with
“YY” the last two digits of the production year, “MM”
the production month and “DD” the production day),
the Application Identifier (21) the serial number of the
device (“WWWWWWWWW”) if applicable, and the
Application Identifier (10)ZZZZZZ the lot number of the
device (“ZZZZZZ”) if applicable
Type BF applied part (patient isolation from electrical
shock)
In compliance with the European Directive on Waste of
Electrical and Electronic Equipment (WEEE) 2002/96/EC,
do not dispose of this product as unsorted municipal
waste
Non ionizing radiation. Equipment includes RF
transmitter: interference may occur in the vicinity of
equipment marked with this symbol
Federal Communications Commission (FCC) logo
/
CE marking indicating conformance to EC directive
93/42/EEC and 2007/47/EC concerning medical devices
Nox A1
Brand name/Model name
APSG1EU, APSG1US
Technical name
Contains TX IC: 1520A-LMX9838
Industry Canada (IC) label
Page 43
Nox A1 Manual
~ 43 ~
FCC ID: ED9LMX9838
FCC ID label
REV
Revision of device
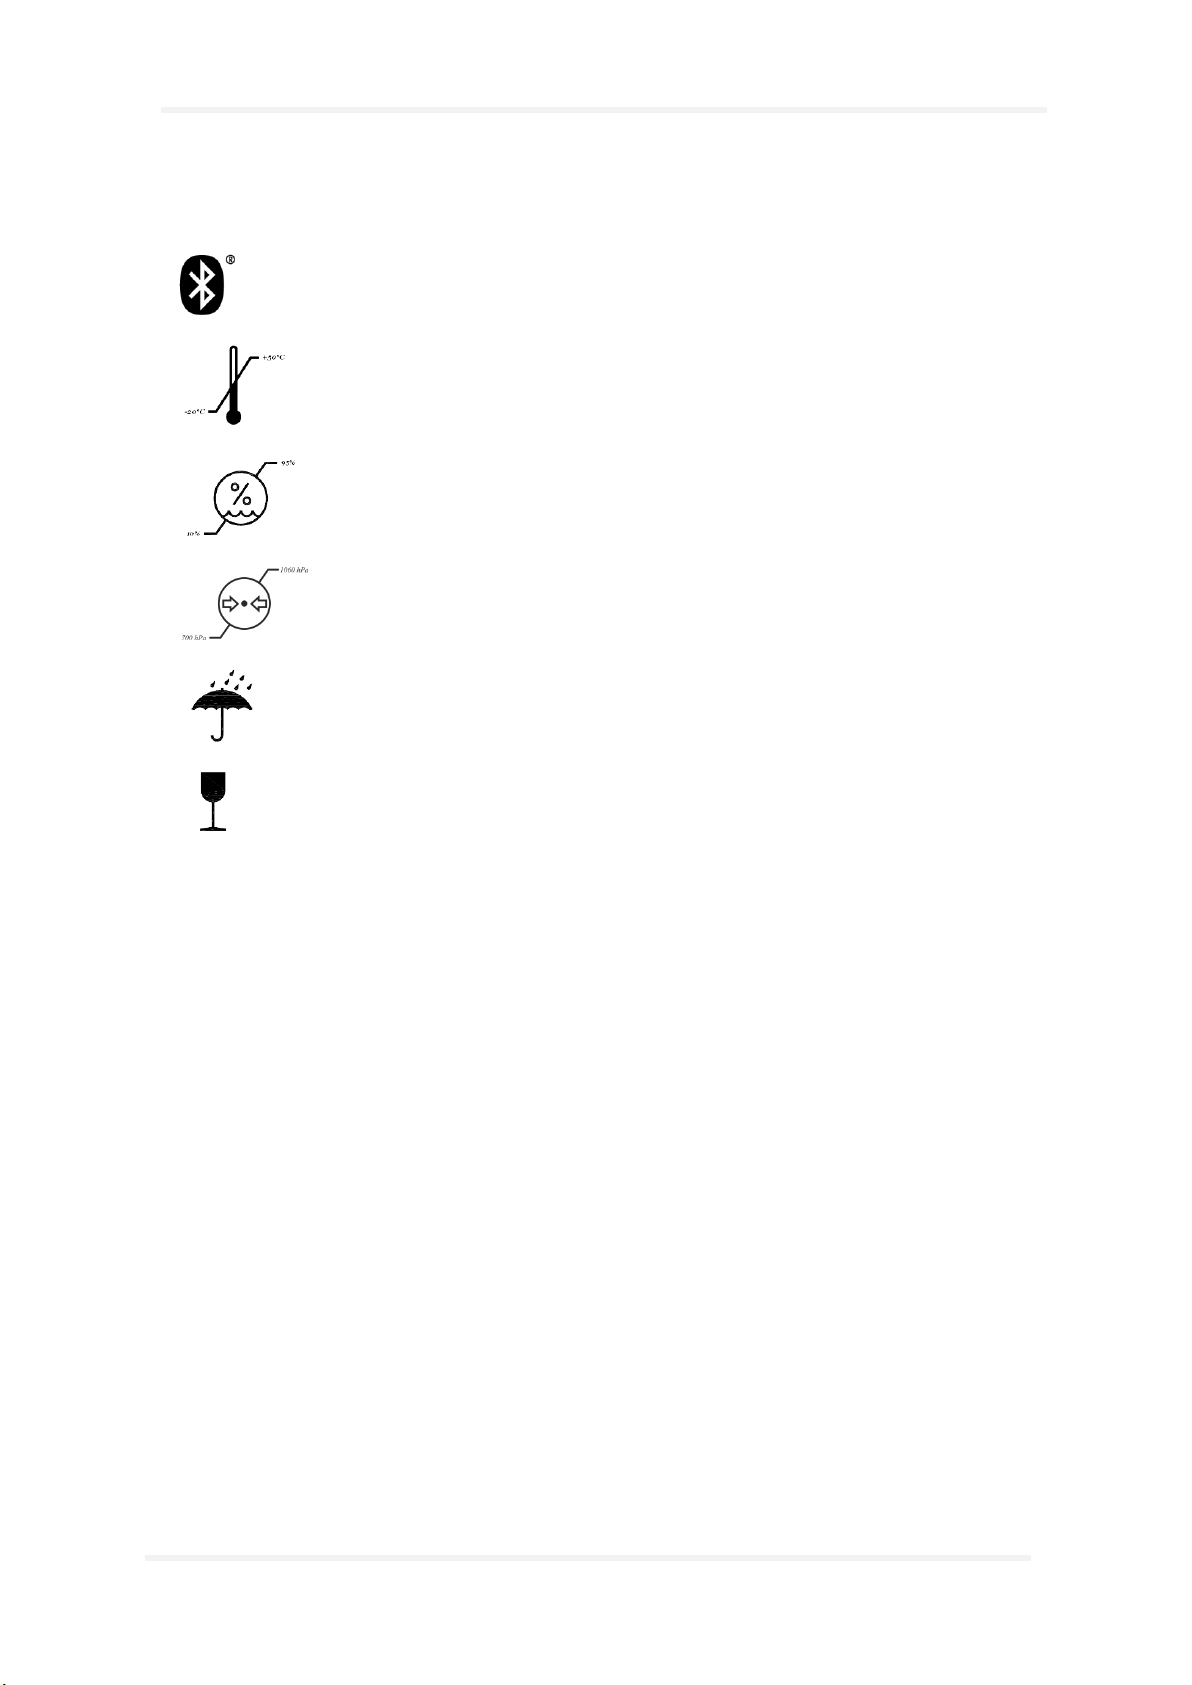
Bluetooth® wireless technology
Temperature limit
Humidity limitation
Atmospheric pressure limitation
Keep dry
Fragile, handle with care
IPN1N2
Degree of protection against harmful ingress of water or
particulate matter as defined by the standard IEC 60529,
where N1 defines the degree of protection against
harmful ingress of particulate matter and N2 the degree
of protection against harmful ingress of water
Page 44
Nox A1 Manual
~ 44 ~
Bluetooth® Wireless Technology
The Nox A1 recorder uses Bluetooth® 2.0 wireless technology to communicate with external
Bluetooth modules.
The Bluetooth wireless technology is based on a radio link that offers fast and reliable transmission of
data. Bluetooth radio uses globally available frequency range in the industrial, scientific and medical
(ISM) band, intended to ensure communication compatibility worldwide and a fast acknowledgement
and frequency-hopping scheme to make the link robust, even in noisy radio environments. Please
refer to the “Specifications” section for details on Radio Frequency (RF) specifications for the Nox A1
recorder.
The Bluetooth® word mark and logos are registered trademarks owned by the Bluetooth SIG, Inc. and
any use of such marks by Nox Medical is under license. Other trademarks and trade names are those
of their respective owners.
Electromagnetic Compatibility (EMC) Information
Caution: Exposure to radio frequency radiation.
Portable and mobile Radio Frequency (RF) communications can affect the
performance of the Nox A1 recorder.
Warning: The Nox A1 recorder(s) should not be used adjacent to, or stacked with
other equipment. If adjacent or stacked use is necessary, the device(s) should be
observed to verify normal operation in the configuration in which it will be used
and prevent abnormal operation which might cause injuries to the
operator/patient.
Warning: The use of accessories, transducers, sensors, and cables other than those
listed in this manual may result in increased emissions and/or decreased immunity
of the Nox A1 recorder and cause injuries to the operator/patient.
Warning: The Nox Sleep System may be interfered with by other equipment, even
if that equipment complies with CISPR (Special International Committee on Radio
Interference) emission requirements, causing possible patient harm
Refer to the tables below in this section for specific information regarding the Nox
A1 recorder’s compliance to the standard IEC60601-1-2: Medical electrical
equipment - Part 1-2: General requirements for basic safety and essential
performance - Collateral Standard: Electromagnetic disturbances - Requirements
and tests.
Page 45

Nox A1 Manual
~ 45 ~
Declarations of Conformity with the US Federal Communications Commission ( FCC)
and Industry Canada Regulations
USA - FEDERAL COMMUNICATIONS COMMISSION (FCC)
This equipment has been tested and found to comply with the limits for a Class B digital device,
pursuant to Part 15 of FCC Rules. These limits are designed to provide reasonable protection against
harmful interference in a residential installation. This equipment generates, uses, and can radiate
radio frequency energy. If not installed and used in accordance with the instructions, it may cause
harmful interference to radio communications. However, there is no ensured specification that
interference will not occur in a particular installation.
If this equipment does cause harmful interference to radio or television reception, which can be
determined by tuning the equipment off and on, the user is encouraged to try and correct the
interference by one or more of the following measures:
• Reorient or relocate the receiving antenna.
• Increase the distance between the equipment and the receiver.
• Connect the equipment to outlet on a circuit different from that to which the receiver is
connected.
• Consult the dealer or an experienced radio/TV technician for help.
Caution: Exposure to Radio Frequency Radiation.
This device must not be co-located or operating in conjunction with any other antenna or transmitter.
CANADA - INDUSTRY CANADA (IC)
This device complies with RSS 210 of Industry Canada.
Operation is subject to the following two conditions:
(1) this device may not cause interference, and
(2) this device must accept any interference, including interference that may cause undesired
operation of this device.
Caution: Exposure to Radio Frequency Radiation.
The installer of this radio equipment must ensure that the antenna is located or pointed such that it
does not emit RF field in excess of Health Canada limits for the general population; consult Safety
Code 6, obtainable from Health Canada’s website: http://www.hc-sc.gc.ca/ewhsemt/pubs/radiation/radio_guide-lignes_direct/index-eng.php.
MODIFICATION STATEMENT
Any changes or modifications not expressly approved by Nox Medical could void the user’s authority
to operate the equipment.
Page 46
Nox A1 Manual
~ 46 ~
Guidance and Manufacturer’s Declaration – Electromagnetic Emissions
Guidance and manufacturer’s declaration – electromagnetic emissions
The Nox A1 recorder is intended for use in the electromagnetic environment specified below. The customer or
the user of the device should assure that it is used in such an environment.
Emissions test
Compliance
Electromagnetic environment – guidance
RF emissions
CISPR 11
Group 2
The device must emit electromagnetic energy in order to perform
its intended function. Nearby electronic equipment may be
affected.
RF emissions
CISPR 11
Class B
The device is suitable for use in all establishments, including
domestic establishments and those directly connected to the
public low-voltage power supply network that supplies buildings
used for domestic purposes.
Harmonic emissions
IEC 61000-3-2
Not
applicable
Voltage fluctuations/
flicker emissions
IEC 61000-3-3
Not
applicable
Page 47
Nox A1 Manual
~ 47 ~
Guidance and Manufacturer’s Declaration – Electromagnetic Immunity
Guidance and manufacturer’s declaration – electromagnetic immunity
The Nox A1 recorder is intended for use in the electromagnetic environment specified below. The customer or
the user of the device should assure that it is used in such an environment.
Immunity test
IEC 60601 test
level
Compliance level
Electromagnetic environment – guidance
Electrostatic
discharge (ESD)
IEC 61000-4-2
±6 kV contact
±8 kV air
±6 kV contact
±8 kV air
Floors should be wood, concrete or ceramic
tile. If floors are covered with synthetic
material, the relative humidity should be at
least 30%.
Electrical fast
transient/burst
IEC 61000-4-4
± 2 kV for power
supply lines
± 1 kV for
input/output lines
Not applicable
Mains power quality should be that of a
typical commercial or hospital environment.
Surge
IEC 61000-4-5
± 1 kV line(s) to
line(s)
± 2 kV lines(s) to
earth
Not applicable
Mains power quality should be that of a
typical commercial or hospital environment.
Voltage dips, short
interruptions and
voltage variations
on power supply
input lines
IEC 61000-4-11
<5 % UT
(>95 % dip in UT)
for 0,5 cycle
40 % UT
(60 % dip in UT)
for 5 cycles
70 % UT
(30 % dip in UT)
for 25 cycles
<5 % UT
(>95 % dip in UT)
for 5 s
Not applicable
Mains power quality should be that of a
typical commercial or hospital environment. If
the user of the A1 device requires continued
operation during power mains interruptions,
it is recommended that the A1 device be
powered from an uninterruptible power
supply or a battery.
Power frequency
(50/60 Hz)
magnetic field
IEC 61000-4-8
3A /m
3 A/m
Power frequency magnetic fields should be at
levels characteristic of a typical location in a
typical commercial or hospital environment.
NOTE UT is the a.c. mains voltage prior to application of the test level.
Page 48
Nox A1 Manual
~ 48 ~
Guidance and Manufacturer’s Declaration – Electromagnetic Immunity (Continued)
Guidance and manufacturer’s declaration – electromagnetic immunity
The Nox A1 recorder is intended for use in the electromagnetic environment specified below. The customer or
the user of the device should assure that it is used in such an environment.
Immunity test
IEC 60601 test level
Compliance level
Electromagnetic environment – guidance
Portable and mobile RF communications
equipment should be used no closer to any
part of device, including cables, than the
recommended separation distance calculated
from the equation applicable to the frequency
of the transmitter.
Recommended separation distance
Conducted RF
IEC 61000-4-6
3 V
rms
150 kHz to 80 MHz
3 V
d = 1.2 √P
Radiated RF
IEC 61000-4-3
3 V/m
80 MHz to 2.5 GHz
3V/m
d = 1.2 √P 80 MHz to 800 MHz
d = 2.3 √P 800 MHz to 2.5 GHz
where P is the maximum output power rating
of the transmitter in watts (W) according to
the transmitter manufacturer and d is the
recommended separation distance in meters
(m).
Field strengths from fixed RF transmitters, as
determined by an electromagnetic site
survey,a should be less than the compliance
level in each frequency range.b
Interference may occur in the vicinity of
equipment marked with the following
symbol:
NOTE 1 At 80 MHz and 800 MHz, the higher frequency range applies.
NOTE 2 These guidelines may not apply in all situations. Electromagnetic propagation is affected by absorption
and reflection from structures, objects and people.
a
Field strengths from fixed transmitters, such as base stations for radio (cellular/cordless) telephones and land
mobile radios, amateur radio, AM and FM radio broadcast and TV broadcast cannot be predicted theoretically
with accuracy. To assess the electromagnetic environment due to fixed RF transmitters, an electromagnetic site
survey should be considered. If the measured field strength in the location in which the Nox A1 recorder is used
exceeds the applicable RF compliance level above, the device should be observed to verify normal operation. If
abnormal performance is observed, additional measures may be necessary, such as reorienting or relocating the
device.
b
Over the frequency range 150 kHz to 80 MHz, field strengths should be less than 3 V/m.
Page 49
Nox A1 Manual
~ 49 ~
Recommended Separation Distance between Portable and Mobile RF
Communications Equipment and the Nox A1 Recorder
Recommended separation distance between portable and mobile RF communications equipment and the Nox
A1 Recorder
The Nox A1 recorder is intended for use in an electromagnetic environment in which radiated RF disturbances
are controlled. The customer or the user of the device can help prevent electromagnetic interference by
maintaining a minimum distance between portable and mobile RF communications equipment (transmitters) and
the device as recommended below, according to the maximum output power of the communications equipment.
Rated maximum output
power of transmitter
W
Separation distance according to frequency of transmitter
m
150 kHz to 80 MHz
d = 1.2 √P
80 MHz to 800 MHz
d = 1.2 √P
800 MHz to 2.5 GHz
d = 2.3 √P
0.01
0.12
0.12
0.23
0.1
0.38
0.38
0.73
1
1.2
1.2
2.3
10
3.8
3.8
7.3
100
12
12
23
For transmitters rated at a maximum output power not listed above, the recommended separation distance d in
meters (m) can be estimated using the equation applicable to the frequency of the transmitter, where P is the
maximum output power rating of the transmitter in watts (W) according to the transmitter manufacturer.
NOTE 1 At 80 MHz and 800 MHz, the separation distance for the higher frequency range applies.
NOTE 2 These guidelines may not apply in all situations. Electromagnetic propagation is affected by absorption
and reflection from structures, objects and people.
Page 50

Nox A1 Manual
~ 50 ~
About
This manual and associated translations are provided in electronic format according to Commission
Regulation (EU) No 207/2012 of 9 March 2012 on electronic instructions for use of medical devices.
They are also available in electronic format on Nox Medical’s website: www.noxmedical.com.
Electronic versions are provided as PDF documents and a PDF reader is required to open the
documents. PDF readers are commonly available at no cost for users. Refer to the applicable system
and hardware requirements for the PDF reader that is used.
Hard copies can be requested at no additional cost by emailing [email protected]. The hard
copy will be sent within 7 calendar days.
 Loading...