

Page 1
USB mic preamplifier and
digital audio interface
User manual
Bedienungsanleitung
Mode d‘emploi
Manual del usuario
Podręcznik użytkownika
USB_PRE_PEN_DINA5_01.indd 3 24.10.13 14:52
Page 2

User manual 4
Bedienungsanleitung 10
Mode d‘emploi 16
Instrucciones de uso 22
Instrukcja obsługi 28
USB_PRE_PEN_DINA5_01.indd 3 24.10.13 14:52
Page 3

4
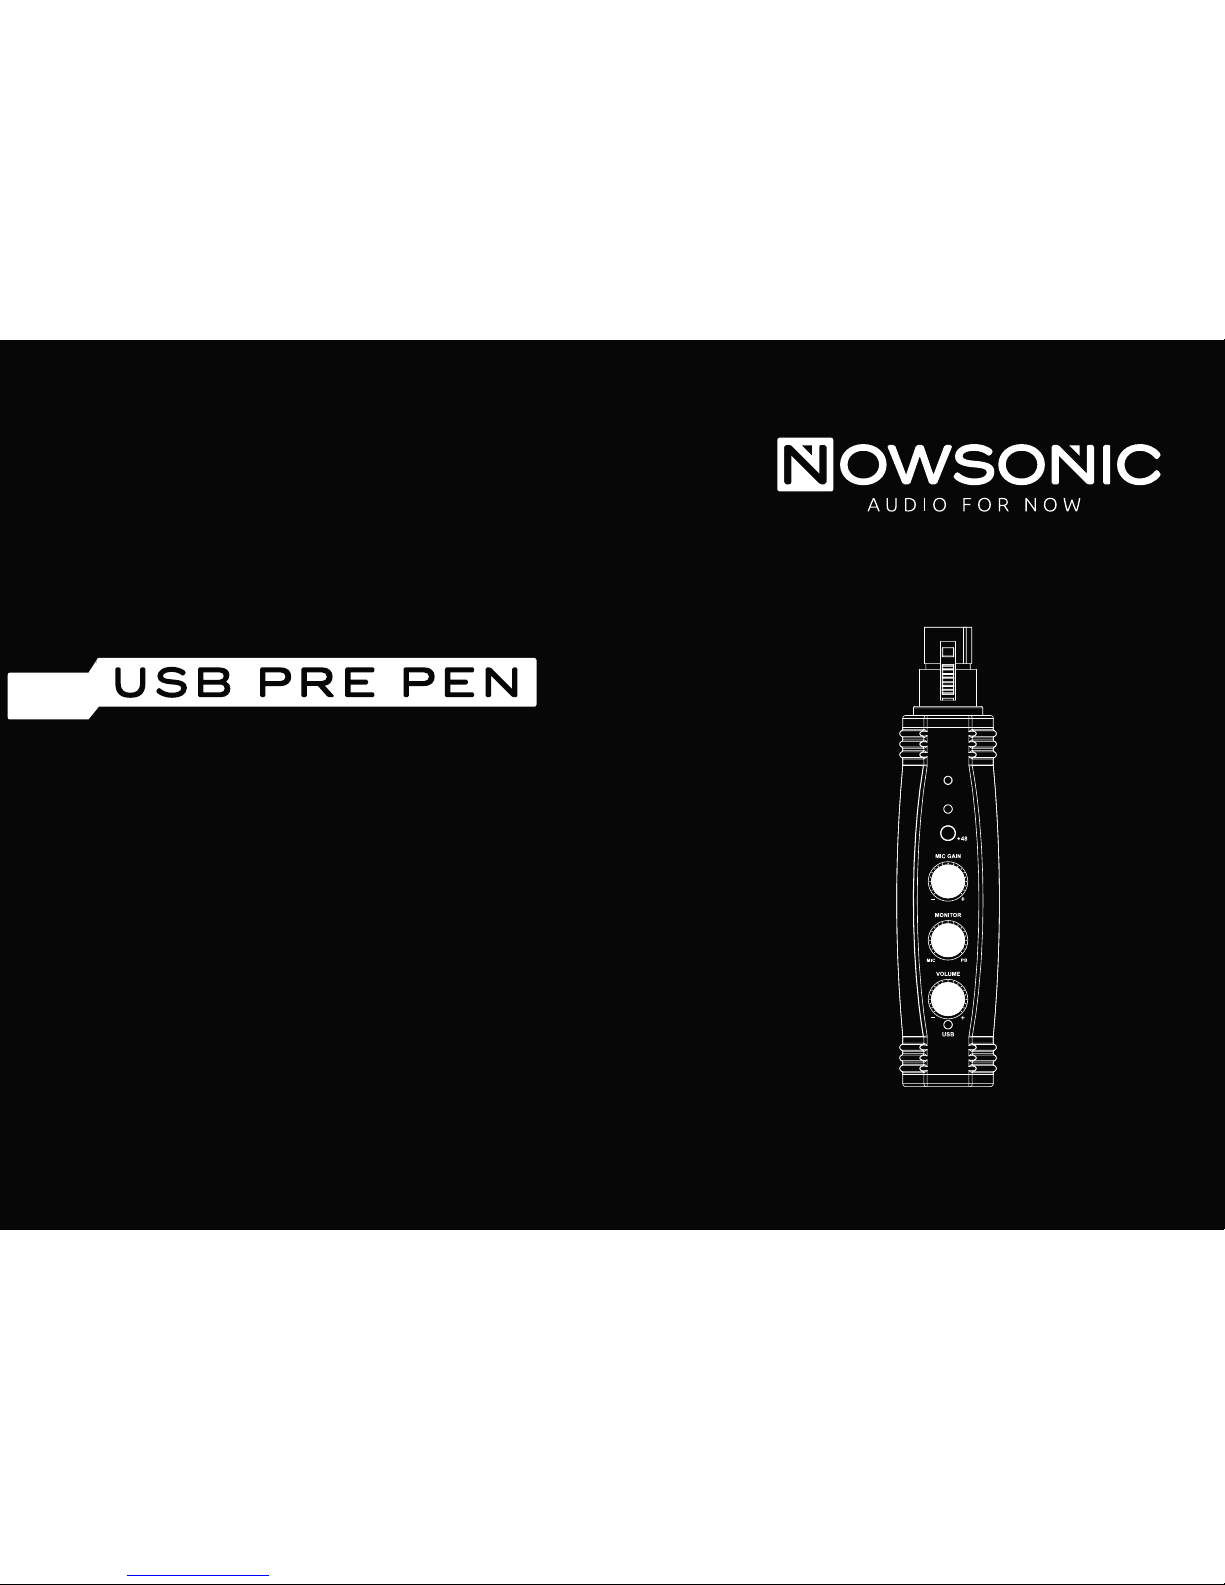
USB Pre Pen
User manual
GB
www.nowsonic.com
Contents
Introduction
Features
Application
Description of the Controls
Choosing USB Pre Pen as the audio device for your computer
Operation
Troubleshooting
Specifications
Scope of supply
Servicing
Introduction
Thank you very much for purchasing the Nowsonic USB Pre Pen! Nowsonic USB Pre Pen is an extremely compact USB audio interface for
connec
ting microphones directly to the computer (Windows oder
Mac). USB Pre Pen amplifies and converts the mic signal and allows
analog audio to be recorded and played back in perfect quality using
an appropriate software.
Thanks to the driver technology, AD/DA conversion up to 48KHz is
performed with low latency. USB Pre Pen is directly supported by the
USB device driver of the operating system and therefore no separate
driver installation is required.
Please take your time to read these instructions carefully in order to
operate USB Pre Pen properly.
Please check the unit after unpacking for any damages. In case the
housing is visibly damaged, please do not operate the unit, but contact your local dealer from whom you have purchased it.
USB_PRE_PEN_DINA5_01.indd 4 24.10.13 14:52
Page 4

5
USB Pre Pen
User manual
GB
www.nowsonic.com
Features
USB Pre Pen has the following features:
Audio interface with XLR and USB ports
Direct connection of any microphone to the USB port of your
computer
Simple „Plug & Play“ operation with your PC (Windows XP or higher)
or Mac (Mac OS X 10.0 or higher)
Rugged metal enclosure with Velcro strap for fastening at the
mic stand
Internal mic preamp with LED meter for adjusting the mic input gain
+48V phantom power switchable for condenser microphones
Zero latency monitoring while recording
Separate volume knob for the headphone output
Application
In combination with an appropriate microphone and a compatible
audio software, USB Pre Pen is recommended for the following
applications:
Miking and converting vocals
Recording of acoustic instruments and instrument amps
Live recording of a concert or rehearsals
High quality audio playback from the computer
USB_PRE_PEN_DINA5_01.indd 5 24.10.13 14:52
Page 5
6
USB Pre Pen
User manual
GB
www.nowsonic.com
Description of the Controls
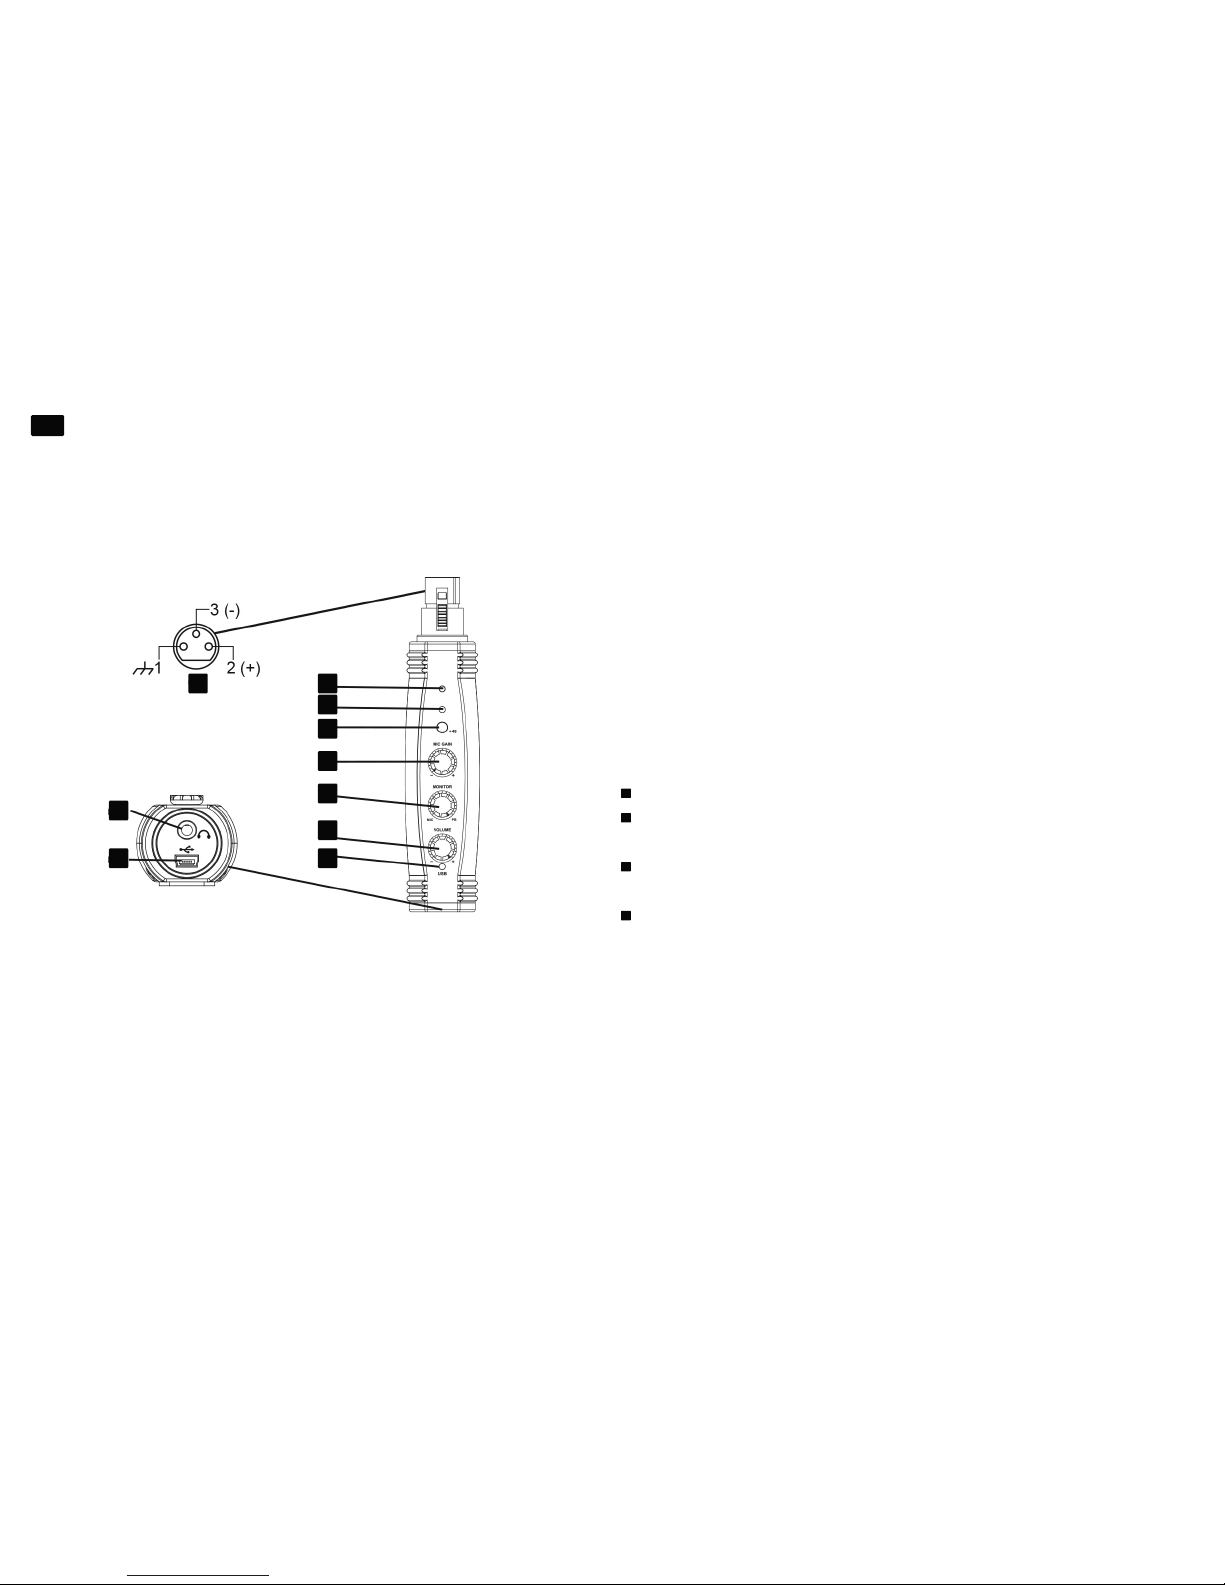
Nowsonic USB Pre Pen features an internal XLR socket (1) for connecting
a microphone (not supplied) to the audio interface. On the front, USB
Pre Pen has a 48 V button for phantom power (7), so you can use dynamic as well as condenser microphones. When phantom power is on, the
+48
(8) LED lights up. Please turn off the phantom power when using a
dynamic microphone to reduce power consumption.
Using the supplied USB cable, connect the USB mini connector (10) in
the base plate of USB Pre Pen with your computer (Mac or PC). Next, USB
Pre Pen is automatically detected by the operating system, no separate
driver installation is required. When the communication with the computer is established, the USB LED (9) lights continuously green. In addition, USB Pre Pen is Bus powered via this connector: there is no need for
an additional po
wer supply.
The MIC GAIN knob (3) on the front controls the mic gain for the internal pre-amplifier and for the recording software. A three-color LED (2)
ser
ves as a level meter:
if no mic is connected, the LED is not lit.
If the LED lights green, a signal with a level range from -30dB to -12dB
FS is detected.
For maximum audio quality, the mic level should be set so that the LED
remains steady green, flashing yellow at peak levels (-12 to 0dB FS).
If the LED flashes red, lower the Mic Gain. In this case, the 0 dB level
limit is reached and the converted signal is clipping.
Please make sure to check the gain also with the on screen meters of the
recording channel in your host software.
Connect your stereo headphones to the 1/8“ TRS jack (4) on the base
plate. The headphone level is adjusted via the VOLUME knob (5) on the
front of USB Pre Pen. Alternatively, you can connect USB Pre Pen via this
socket to an external monitoring system.
1 2
8
7
3
6
5
9
4
10
USB_PRE_PEN_DINA5_01.indd 6 24.10.13 14:52
Page 6

7
USB Pre Pen
User manual
GB
www.nowsonic.com
The MONITOR knob on the front is used to balance the playback signal
seamlessly between MIC (direct signal of the mic) and PB (output signal
of the host software in the computer).
The MONITOR knob on the front is used to balance the playback signal
seamlessly between MIC (direct signal of the mic) and PB (output signal
of the host software in the computer).
Choosing USB Pre Pen as the audio device for your computer
After connecting USB Pre Pen to the computer, a plug & play driver of
the OS is installed: no additional driver installation is required.
However, to record the mic signal in your software, you must set USB
Pre Pen as the input and output device in the system settings. Proceed
as follows:
Windows XP and higher
1) Choose „Settings > Control Panel > Sounds, Speech and Audio
devices“.
2) Select „USB audio device“ as the input and output device in the
Audio tab.
or
1) Choose „All Programs > Accessories > Entertainment > Volume
control > Options“.
2) Select „USB audio codec“ as the Mixer device.
Mac OS X 10.0 and higher
1) Choose „System Preferences > Sound“.
2) Select „USB audio codec“ in the „Input“ and „Output“ tabs.
NOTE: Garage Band users should first launch the application and then
connect USB Pre Pen. By this, the USB interface is automatically selected.
Operation
Connect a microphone to the XLR socket of USB Pre Pen. For a condenser microphone turn on the +48 button. If needed, you can secure
USB P
re Pen to a microphone stand using the supplied straps. Point
the microphone towards the audio source and turn up the MIC GAIN
knob so that the level LED lights permanently green and flashes yellow for signal peaks. If the LED lights red, turn down MIC GAIN.
C
onnect USB Pre Pen to a free USB port of your computer or laptop
using the supplied USB cable. Next, the plug & play driver is automatically installed and the USB LED lights green.
NO
TE: The USB port of your computer / laptop must provide bus pow-
er. If the power of the port is too low, you must use an active USB hub.
T
he phone jack provides direct monitoring of the mic signal during
recording without any latency. If you are monitoring the mic signal via
the computer, there is, however, an audible latency.
USB_PRE_PEN_DINA5_01.indd 7 24.10.13 14:52
Page 7

8
USB Pre Pen
User manual
GB
www.nowsonic.com
Operation
Turn down the VOLUME knob before connecting the headphone.
Then increase the volume while listening to the mix of the mic signal
and the already recorded tracks. Using the MONITOR knob, you can set
the balance between the microphone and the playback as needed.
NOTE: Make sure that direct monitoring via the audio software is
deactivated. Otherwise you will hear the mic signal doubled by a short
delay.
Troubleshooting
The USB indicator doesn‘t light
Make sure that USB Pre Pen is connected to a USB 1.1 or 2.0 port with
sufficient supply voltage.
In case of doubt use an active USB hub.
No signal in the headphones
Turn up the pre-amplification via the MIC GAIN knob.
Turn up the output level via the VOLUME knob
Set the mix balance to MIC.
The audio signal is distorted
Turn down the pre-amplification via the MIC GAIN knob.
Turn down the output level via the VOLUME knob
The source sounds delayed
Turn off the direct monitoring in the audio software.
Set the mix balance to MIC.
The headphones are not loud enough
Windows: From the „Control Panel“, choose „Sound and Audio
Devices“, select the „Audio“ tab, click „Volume under Sound playback“
and turn up the „Volume“ control.
Mac: From „System Preferences“, choose „Sound“, select the „Output“
tab and turn up the „Output volume“.
USB_PRE_PEN_DINA5_01.indd 8 24.10.13 14:52
Page 8

9
USB Pre Pen
User manual
GB
www.nowsonic.com
Specifications
Frequency response 20 Hz – 20Khz, +/-1dB
AD/DA conversion 16bit, max. 48KHz (selectable via the
host software)
Digital noise MIC GAIN set to minimum: -81dB FS
MIC GAIN set to maximum: -78dB FS
(20Hz to 20KHz each, A weighted)
Level meter off: <-30dB FS
green: -30 to-12dB FS
yellow: -12 to 0dB FS
red: <-0dB FS
Adjustable gain range 50dB
Computer port USB 1.1 or 2.0 with Bus power
Operating system Windows XP, Vista, 2000, and higher
Mac OS 10.0 and higher
Power supply USB-Bus power, 5V, max. 500mA
Headphone output 1/8“ TRS jack
Scope of supply
USB Pre Pen: 1 pc
USB 2.0 cable, 3m: 1 pc
User manual: 1 pc
Transport bag: 1 pc
Servicing
If you have any question or encounter technical issues, please first
contact your local dealer from whom you have purchased the device.
In case servicing is required, please contact your local dealer. Otherwise you may contact us directly. Please find our contact data on our
w
ebsite under www.nowsonic.com.
Legal information
Copyright for this user manual © 2013: Nowsonic
Product features, specifications and availability are subject to change
without prior notice.
Edition v1.0, 10/2013
USB_PRE_PEN_DINA5_01.indd 9 24.10.13 14:52
Page 9

10
USB Pre Pen
Bedienungsanleitung
DE
www.nowsonic.com
Inhalt
Einleitung
Merkmale
Anwendungsbereich
Beschreibung der Bedienelemente
Auswahl von USB Pre Pen als Audiogerät im Computer
Inbetriebnahme
Fehlerbehebung
Spezifikationen
Lieferumfang
Service
Rechtliche Hinweise
Einleitung
Vielen Dank, dass Sie sich für Nowsonic USB Pre Pen entschieden
haben. Nowsonic USB Pre Pen ist ein extrem kompaktes USB-AudioInterface zum direkten Anschluss eines Mikrofons an dem Computer
(Windows oder Mac). Das Mikrofonsignal wird dabei im USB Pre Pen
verstärkt und gewandelt und kann im Computer in Verbindung mit
einer geeigneten Software zur hochwertigen Aufnahme und Wiedergabe von Audiodaten genutzt werden.
Dank der
Treibertechnologie ist eine AD/DA-Wandlung bis 48 kHz bei
geringer Latenz möglich. USB Pre Pen wird direkt von den USB-GeräteTreibern im Betriebssystem unterstützt, eine separate Treiber-Installation ist nicht notwendig.
Bitt
e nehmen Sie sich Zeit und lesen Sie diese Bedienungsanleitung sorgfältig durch, damit Sie USB Pre Pen richtig in Betrieb nehmen können.
Bitt
e überprüfen Sie das Gerät nach dem Auspacken auf etwaige Schäden: Sofern Schäden am Gehäuse sichtbar sind, nehmen Sie das Gerät bitte nicht in Betrieb, sondern wenden sich sofort an Ihren lokalen
Händler
, bei dem Sie das Gerät gekauft haben.
USB_PRE_PEN_DINA5_01.indd 10 24.10.13 14:52
Page 10

11
USB Pre Pen
Bedienungsanleitung
DE
www.nowsonic.com
Merkmale
USB Pre Pen bietet folgende Merkmale:
Audio-Interface mit XLR- und USB-Schnittstelle
Direkter Anschluss von Mikrofonen am USB-Port eines Computers
Einfacher „Plug & Play“-Betrieb mit dem PC (ab Windows XP oder
höher) oder Mac (ab Mac OS X 10.0)
Robustes Metallgehäuse mit Klettbefestigung am Mikrofonstativ
Integrierter Mikrofonvorverstärker mit LED-Anzeige zur Aussteuerung
des Mikrofoneingangs
Schaltbare +48 V Phantomspannung für Kondensatormikrofone
Latenzfreies Monitoring während der Aufnahme
Separater Lautstärkeregler für den Kopfhörerausgang
Anwendungsbereich
In Verbindung mit einem geeigneten Mikrofon und einer kompatiblen Audio-Software empfiehlt sich USB Pre Pen für folgende Anwendungsbereiche:
Abnahme und Wandlung von Gesang
Aufnahme von akustischen Instrumenten und
Instrumentalverstärkern
Mitschnitt von Konzerten oder im Übungsraum
Hochwertige Audiowiedergabe aus dem Computer
USB_PRE_PEN_DINA5_01.indd 11 24.10.13 14:52
Page 11

12
USB Pre Pen
Bedienungsanleitung
DE
www.nowsonic.com
Beschreibung der Bedienelemente
Nowsonic USB Pre Pen verfügt über einen integrierten XLR-Anschluss
(1), über den sich das Audio-Interface direkt an einem Mikrofon (nicht
im Lieferumfang enthalten) anschließen lässt. USB Pre Pen bietet auf der
Vorderseite einen Taster für 48 V Phantomspeisung (7), sodass sich neben dynamischen auch hochwertige Kondensatormikrofone betreiben
lassen.
Wenn die Phantomspeisung aktiv ist, leuchtet die LED +48 (8):
Deaktivieren Sie die Phantomspeisung im Betrieb mit dynamischen Mikrofonen, um den Stromverbrauch zu verringern.
Über die USB-M
ini-Buchse (10) in der Bodenplatte verbinden Sie USB
Pre Pen über das mitgelieferte USB-Kabel mit einem Computer (Mac
oder PC). Nachdem Anschluss wird USB Pre Pen automatisch erkannt,
eine zusätzliche Treiberinstallation ist nicht notwendig. Wenn die Kommunikation mit dem Computer eingerichtet ist, leuchtet die LED USB
(9)
dauerhaft grün. Über diesen Anschluss wird USB Pre Pen auch mit
USB-Bus-Power gespeist: Eine separate Stromversorgung ist nun nicht
vorgesehen.
Zur Aussteuerung des Mikrofons auf den integrierten Vorverstärker und
damit auf die Aufnahme-Software dient der Regler MIC GAIN (3) auf
der Vorderseite. Die Aussteuerung wird über eine dreifarbige LED (2)
dargestellt:
Wenn kein Mikrofon angeschlossen ist, leuchtet die LED nicht.
Wenn die LED grün leuchtet, liegt ein Signal im Pegelbereich von 30
bis -12 dB FS an.
Für einen optimalen Pegel sollten Sie das Mikrofonsignal so aussteu-
ern, dass die LED vornehmlich grün und bei Pegelspitzen gelb (-12
bis 0 dB FS) aufleuchtet.
Sofern die LED rot leuchtet, senken Sie MIC GAIN ab: In diesem Fall
wird die Pegelgrenze 0 dB erreicht und das gewandelte Signal übersteuert.
Überprüfen Sie die Aussteuerung in jedem Fall auch mit Hilfe der Onscreen-Pegelanzeigen für den entsprechenden Aufnahmekanal in der
Host
-Software.
1 2
8
7
3
6
5
9
4
10
USB_PRE_PEN_DINA5_01.indd 12 24.10.13 14:52
Page 12

13
USB Pre Pen
Bedienungsanleitung
DE
www.nowsonic.com
Über die 3,5 mm TRS-Miniklinkenbuchse (4) in der Bodenplatte schließen Sie einen Stereokopfhörer an: Die Aussteuerung der KopfhörerLautstär
ke erfolgt über den Regler VOLUME (5) auf der Vorderseite von
USB Pre Pen. Alternativ können Sie USB Pre Pen über diese Buchse auch
an ein externes Abhörsystem anschließen
Über den Regler MONITOR auf der Frontseite stellen Sie das Mischungsverhältnis für die Mini-Klinkenbuchse (4) stufenlos zwischen MIC (Direktsignal des Mikrofons) und PB (Ausgangssignal der Host-Software im
C
omputer) ein.
Auswahl von USB Pre Pen als Audiogerät im Computer
Nach dem Anschluss von USB Pre Pen wird automatisch ein interner
Plug & Play –Treiber des Betriebssystems installiert: Eine weitere TreiberInstallation ist nicht notwendig.
Allerdings müssen Sie USB Pre Pen als Ein- und/oder Ausgabegerät in
der Systemsteuerung eintragen, um das Mikrofonsignal in einer AudioSoftware aufnehmen zu können. Gehen Sie wie folgt vor:
Windows XP und höher
1) Wählen Sie „Einstellungen > Systemsteuerung > Sounds und
Audiogeräte“.
2) Wählen Sie „USB Audiogerät“ im Reiter Audio für die Soundwieder-
gabe und –aufnahme.
or
1) Wählen Sie „Programme > Zubehör > Unterhaltungsmedien >
Lautstärke > Optionen“.
2) Wählen Sie „USB Audio Codec“ als Mixer-Gerät.
Mac OS X 10.0 und höher
1) Wählen Sie „Systemeinstellungen > Ton “.
2) Wählen Sie „USB Audio Codec“ in den Reitern „Eingabe“ und „Ausgabe“.
ANMERKUNG: Wenn Sie Garage Band benutzen, starten Sie das Pro-
gramm zuerst und schließen erst dann USB Pre Pen an: Das USB-Interface wird nun automatisch angewählt.
I
nbetriebnahme
Schließen Sie ein Mikrofon an der XLR-Steckverbindung von USB Pre
Pen an. Sofern es sich um ein Kondensatormikrofon handelt, aktivieren
Sie den Schalter +48. Bei Bedarf können Sie USB Pre Pen über die mitgelieferten Haltebänder direkt am Mikrofonständer befestigen. Richten Sie das Mikrofon auf die Schallquelle und drehen Sie den Regler
MIC GAIN auf
, sodass die Pegel-LED vornehmlich grün und bei Spitzenpegel kurz gelb aufleuchtet. Wenn die LED rot leuchtet, verringern
Sie die A
ussteuerung.
Schließen Sie USB Pre Pen nun mit dem mitgelieferten USB-Kabel an
einem freien USB-Port Ihres Computers oder Laptops an. Nach dem
Anschluss wird der Plug & Play-Treiber automatisch installiert und die
USB-LED sollte grün leuchten.
USB_PRE_PEN_DINA5_01.indd 13 24.10.13 14:52
Page 13

14
USB Pre Pen
Bedienungsanleitung
DE
www.nowsonic.com
ANMERKUNG: Der USB-Port Ihres Computers/Laptops muss in jedem
Fall Bus-Power zur Verfügung stellen. Sofern die Leistung des Ports zu
gering ist, müssen Sie einen aktiven USB-Hub zwischenschalten.
Die Kopfhörerbuchse ermöglicht ein direktes Abhören des Mikrofonsignals während der Aufnahme ohne jegliche Verzögerung: Wenn Sie
das M
ikrofonsignal dagegen über den Computer abhören, kommt es
zu einer hörbaren Latenz.
Drehen Sie den Regler VOLUME zurück, bevor Sie den Kopfhörer
anschließen. Dann heben Sie die Lautstärke an, während Sie bereits
aufgenommene Spuren aus der Audio-Software zusammen mit dem
Mikrofonsignal abhören. Über den Regler MONITOR stellen Sie das
Lautstärkeverhältnis zwischen Mikrofon und Playback nach Bedarf ein.
ANMERKUNG: Deaktivieren Sie in jedem Fall das Software-Monitoring in der Audio-Software. Andernfalls hören Sie das Mikrofonsignal
doppelt und mit einer k
urzen Verzögerung
Fehlerbehebung
Die USB-LED leuchtet nicht auf
Stellen Sie sicher, dass USB Pre Pen an einem USB 1.1- oder USB 2.0-An-
schluss mit ausreichender Versorgungsspannung angeschlossen ist.
Verwenden Sie im Zweifelsfall einen aktiven USB-Hub.
Kein Audiosignal im Kopfhörer
Heben Sie die Vorverstärkung über den Regler MIC GAIN an.
Heben Sie den Ausgabepegel über den Regler VOLUME an.
Stellen Sie die Mix-Balance auf MIC ein.
Das Audiosignal verzerrt
Senken Sie die Vorverstärkung über den Regler MIC GAIN ab.
Senken Sie den Ausgabepegel über den Regler VOLUME an.
Schallquelle klingt verzögert
Deaktivieren Sie das Direct-Monitoring in der Audio-Software.
Stellen Sie die Mix-Balance auf MIC ein.
Die Kopfhörer sind nicht laut genug
Windows: Öffnen Sie in der Systemsteuerung den Reiter „Sound- und
Audiogeräte”, wählen Sie die Registerkarte „Audio“ und klicken Sie
unter „Soundwiedergabe“ auf den Eintrag „Lautstärke“: Heben Sie den
Lautstärkeregler an.
Mac: Öffnen Sie in den Systemeinstellungen das Register „Ton“
und wählen Sie dort den Reiter „Ausgang“: Heben Sie den Lautstärkeregler an.
USB_PRE_PEN_DINA5_01.indd 14 24.10.13 14:52
Page 14

15
USB Pre Pen
Bedienungsanleitung
DE
www.nowsonic.com
Spezifikationen
Frequenzgang 20 Hz – 20 kHz, +/- 1 dB
AD/DA-Wandlung 16 Bit, bis 48 kHz (Auswahl über die
Host-Software)
Digitales Grundrauschen Minimale Einstellung für MIC GAIN: -81 dB FS
Maximale Einstellung für MIC GAIN: -78 dB FS
(jeweils 20 Hz bis 20 kHz, A-gewichtet)
Pegelanzeige Aus: <-30 dB FS
Grün: -30 bis -12 dB FS
Gelb: -12 bis 0 dB FS
Rot: > 0 dB FS
Verstärkungsbereich 50 dB
Computer-Schnittstelle USB 1.1 oder 2.0 mit Bus Power
Betriebssystem ab Windows XP, Vista oder 2000
ab Mac OS 10.0 oder höher
Stromversorgung USB-Bus-Power, 5 V, max. 500 mA
Kopfhörerausgang 3,5 mm TRS Miniklinke
Lieferumfang
USB Pre Pen: 1x
USB 2.0 Kabel, 3 Meter: 1x
Bedienungsanleitung: 1x
Transporttasche: 1x
Service
Wenn Sie Probleme oder technische Fragen haben, wenden Sie sich bit
te zuerst an Ihren lokalen Händler, bei dem Sie das Gerät gekauft haben.
Bei einem S
ervice-Fall wenden Sie sich bitte ebenfalls an Ihren lokalen
Händler. Andernfalls können Sie uns auch direkt kontaktieren. Sie finden
unsere Kontaktdaten auf unserer Webseite unter www.nowsonic.com.
Rechtliche Hinweise
Copyright für diese Bedienungsanleitung © 2013: Nowsonic
Produktmerkmale, Spezifikationen und die Verfügbarkeit können ohne
vorherige Ankündigung geändert werden.
Ausgabe v 1.0, 10/2013
USB_PRE_PEN_DINA5_01.indd 15 24.10.13 14:52
Page 15

16
USB Pre Pen
Mode d‘emploi
FR
www.nowsonic.com
Sommaire
Introduction
Caractéristiques
Domaine d‘application
Description des entrées
Sélection de l‘USB Pre Pen comme interface audio dans l‘ordinateur
Mise en service
Dépannage
Caractéristiques techniques
Contenu
Maintenance
Mentions légales
Introduction
Merci beaucoup d‘avoir choisi l‘USB Pre Pen Nowsonic. L‘USB Pre Pen
Nowsonic est une interface audio-USB extrêmement compacte pour
brancher directement un microphone à votre ordinateur (Windows ou
Mac). Le signal du microphone est amplifié et converti dans l‘USB Pre
Pen et, en conjonction avec un logiciel approprié pour l‘enregistrement
et la lecture à haute qualité de données audio, peut être utilisé dans
l‘ordinateur.
Grâce à la technologie du pilote USB Pre Pen, une conversion A/N-N/A
à 48 kHz avec faible latence est possible. L‘USB Pre Pen est directement pris en charge par le pilote de périphérique USB du système
d‘
exploitation, aucune installation de pilote propre n‘est nécessaire.
Veuillez prendre le temps de lire attentivement ce mode d‘emploi afin
de pouvoir assurer une mise en service correcte de l‘USB Pre Pen.
Veuillez contrôler tout éventuel dommage de l‘unité au déballage : si
le boîtier présente des dommages visibles, ne mettez pas l‘unité en
service mais contactez immédiatement le revendeur chez qui vous
l‘avez achetée.
USB_PRE_PEN_DINA5_01.indd 16 24.10.13 14:52
Page 16

17
USB Pre Pen
Mode d‘emploi
FR
www.nowsonic.com
Caractéristiques
L‘USB Pre Pen offre les fonctionnalités suivantes :
Interface audio avec ports XLR et USB
Connexion directe de micros au port USB d‘un ordinateur
Fonctionnement simple, « plug and play », avec votre PC (Windows
XP ou supérieur) ou Mac (Mac OS X 10.0 ou supérieur)
Boîtier métallique robuste avec fixation velcro sur le pied de micro
Préampli microphone intégré avec indicateur de niveau à DEL de
l‘entrée microphone
Alimentation fantôme +48 V commutable les micros à condensateur
Écoute de contrôle sans latence durant l‘enregistrement
Contrôle du volume séparé pour la sortie casque
Domaine d‘application
En conjonction avec un microphone adapté et un logiciel audio compatible, l‘USB Pre Pen est recommandé pour les applications suivantes:
Capture et conversion de chant
Enregistrement d‘instruments acoustiques et d‘amplificateurs
d‘instruments
Enregistrement de concerts ou en salle de répétition
Lecture audio de haute qualité à partir de l‘ordinateur
USB_PRE_PEN_DINA5_01.indd 17 24.10.13 14:52
Page 17

18
USB Pre Pen
Mode d‘emploi
FR
www.nowsonic.com
Description des entrées
L‘USB Pre Pen Nowsonic dispose d‘un connecteur XLR intégré (1) grâce
auquel l‘interface audio peut être directement connectée à un microphone (non fourni). L‘USB Pre Pen possède en face avant un commutateur d‘alimentation fantôme 48
V (7), pour fonctionner non seulement
avec les microphones dynamiques mais aussi avec les électrostatiques
(« à condensateur ») de haut de gamme. Lorsque l‘alimentation fantôme
est activée, le voyant +48 (8) est allumé : coupez l‘alimentation fantôme
lorsque vous utilisez des microphones dynamiques pour réduire la consommation électrique.
C
onnectez votre ordinateur (Mac ou PC) au mini-port USB (10) sous
l‘USB Pre Pen via le câble USB fourni. Après connexion, l‘USB Pre Pen
est automatiquement reconnu, aucune installation de pilote supplémentaire n‘est nécessaire. Lorsque la communication est établie avec
l‘
ordinateur, le voyant USB (9) s‘allume en vert. Cette connexion fournit
également à l‘USB Pre Pen une alimentation par le bus USB : une alimentation séparée n‘est pas prévue.
La commande
MIC GAIN (3) de la face avant sert à contrôler le niveau
du microphone dans le préamplificateur intégré et donc dans le logiciel
d‘enregistrement. La modulation est représentée par une diode à trois
couleurs (2) :
Si aucun microphone n‘est branché, le voyant ne s‘allume pas.
Le voyant est allumé en vert en cas de signal d‘un niveau compris
entre 30 et -12 dB FS.
Pour un niveau optimal, réglez le signal du microphone de sorte
que le voyant soit principalement vert et ne vire au jaune que sur les
crêtes de niveau (-12 à 0 dB FS).
Si le voyant s‘allume en rouge, baissez MIC GAIN: dans ce cas, la
limite de niveau de 0 dB est atteinte et le signal converti sature.
Vérifiez toujours le niveau en utilisant à l‘écran les indicateurs de
niveau du canal d‘enregistrement correspondant dans le logiciel hôte.
1 2
8
7
3
6
5
9
4
10
USB_PRE_PEN_DINA5_01.indd 18 24.10.13 14:52
Page 18

19
USB Pre Pen
Mode d‘emploi
FR
www.nowsonic.com
Vous pouvez brancher un casque stéréo à la prise mini-jack 3,5 mm
3 points (TRS) de dessous : le contrôle du volume du casque se fait par
la commande VOLUME (5) sur le devant de l‘USB Pre Pen. Sinon, vous
pouvez aussi connecter l‘USB Pre Pen à un système d‘écoute de contrôle
externe via cette prise.
Avec la commande MONITOR de la face avant, vous réglez en continu
la balance de mixage pour la prise mini-jack (4) entre MIC (signal direct
du microphone) et PB (signal sortant du logiciel hôte de l‘ordinateur).
Sélection de l‘USB Pre Pen comme interface audio dans l‘ordinateur
Après la connexion de l‘USB Pre Pen, un pilote Plug & Play interne du système d‘exploitation sera automatiquement installé
: aucune installation
d‘autre pilote n‘est nécessaire.
Cependant, vous devez sélectionner l‘USB Pre Pen comme interface
d‘entrée et/ou de sortie dans le panneau de configuration du système
pour pouvoir enregistrer le signal du microphone dans un logiciel audio.
Procédez comme suit :
Windows XP et supérieur
1) Sélectionnez « Démarrer > Panneau de configuration > Sons et
périphériques audio ».
2) Dans l‘onglet Audio, sélectionnez « Périphérique audio USB » pour
l‘enregistrement et la lecture audio.
ou
1) Sélectionnez « Tous les programmes > Accessoires > Divertisse-
ment > Contrôle du volume > Options ».
2) Sélectionnez « USB Audio Codec » comme périphérique de mixage.
Mac OS X 10.0 et supérieur
1) Sélectionnez « Préférences système > Son ».
2) Sélectionnez « USB Audio Codec » dans les onglets « Entrée » et « Sortie ».
REMARQUE : Pour les utilisateurs de Garage Band: Ouvrir Garage Band
avant de brancher le microphone pour sélectionner automatiquement
le périphérique USB.
Mise en service
Branchez un microphone au connecteur XLR de l‘USB Pre Pen. Si c‘est
un microphone électrostatique (à condensateur), activez le commutateur +48
. Si nécessaire, vous pouvez monter directement l‘USB Pre
Pen sur le pied de micro à l‘aide des sangles fournies. Faites pointer le
microphone vers la source sonore et réglez la commande MIC GAIN
de sorte que le voyant de niveau s‘allume principalement en vert et
brièvement en jaune sur les crêtes de niveau. Si le voyant s‘allume en
rouge, baissez le niveau.
Connectez maintenant l‘USB Pre Pen à un port USB libre de votre ordinateur de bureau ou portable au moyen du câble USB fourni. Après
la connexion, le pilot
e Plug & Play sera automatiquement installé et le
voyant USB doit s‘allumer en vert.
USB_PRE_PEN_DINA5_01.indd 19 24.10.13 14:52
Page 19

20
USB Pre Pen
Mode d‘emploi
FR
www.nowsonic.com
REMARQUE: le port USB de votre ordinateur/portable doit toujours
fournir une alimentation de bus. Si l‘alimentation du port est trop faible, vous devez passer par un concentrateur (hub) USB actif (alimenté).
La pr
ise casque permet une écoute de contrôle directe et sans au-
cune latence du signal du microphone pendant l‘enregistrement
: si
vous écoutez le signal du microphone en même temps que celui de
l‘ordinateur, un temps de latence est cependant audible.
Baissez la commande VOLUME avant de brancher le casque. Ensuite,
montez le volume pendant que vous écoutez les pistes déjà enregistrées dans le logiciel audio en même temps que le signal du microphone. Avec la commande MONITOR, réglez si nécessaire la balance de
v
olume entre le signal du microphone et le signal de lecture.
REMARQUE: désactivez toujours l‘écoute de contrôle par logiciel dans
le logiciel audio. Sinon, vous entendez deux fois le signal du microphone, avec un court délai.
Dépannage
L
e voyant USB ne s‘allume pas
Vérifier que l‘USB Pen Pre est connecté à un port USB 1.1 ou USB 2.0
offrant une tension d‘alimentation suffisante.
En cas de doute, intercaler un concentrateur (hub) USB actif (alimenté).
Pas de son dans le casque d’écoute
Augmenter la préamplification avec la commande MIC GAIN.
Monter le bouton VOLUME ou MIC GAIN du microphone.
Régler la balance de mixage du micro.
Le son est distordu
Baisser la préamplification avec la commande MIC GAIN.
Baisser le niveau de sortie avec la commande VOLUME.
La source semble retardée
Désactiver l‘écoute de contrôle directe dans le logiciel audio.
Régler la balance de mixage du micro.
Le volume des écouteurs n’est pas assez fort
Windows : ouvrir « Sons et périphériques audio » dans le panneau de
configuration, sélectionner l‘onglet « Audio » et cliquer sur « Volume »
dans « Lecture audio » : monter la commande de volume.
Mac : Depuis les « Préférences Système », choisir « Son », choisir
l’onglet « Sortie » et augmenter le volume de sortie.
USB_PRE_PEN_DINA5_01.indd 20 24.10.13 14:52
Page 20

21
USB Pre Pen
Mode d‘emploi
FR
www.nowsonic.com
Caractéristiques techniques
Réponse en fréquence 20 Hz – 30 kHz, +/- 1 dB
Conversion A/N-N/A 16 bits, jusqu’à 48 kHz
(choix dans le logiciel hôte)
Bruit de fond numérique Réglage du MIC GAIN minimum: -81 dB FS
Réglage du MIC GAIN maximum: -78 dB FS
(20 Hz á 20 kHz, pondéré en A)
Affichage du niveau Éteint : <-30 dB FS
Vert : -30 -12 dB FS
Jaune : -12 0 dB FS
Rouge : > 0 dB FS
Plage de gain réglable 50 dB
Interface d‘ordinateur USB 1.1 ou 2.0 avec alimentation du bus
Système d‘exploitation à partir de Windows XP, Vista ou 2000
Mac OS 10.0 et supérieur
Alimentation alimentation par le bus USB, 5 V,
500 mA, maximum
Sortie écouteurs mini-jack 3,5 mm 3 points (TRS)
Contenu
USB Pre Pen: 1
Câble USB 2.0, 3 mètres : 1
Mode d‘emploi : 1
Sacoche de transport : 1
Maintenance
Si vous avez des questions ou des problèmes techniques, veuillez
d‘abord contacter le revendeur chez qui vous avez acheté l‘appareil.
Pour toute réparation, veuillez également contacter votre revendeur. Si
cela n‘est pas possible, vous pouvez aussi nous contacter directement.
Nos coordonnées se trouvent sur notre site Web www.nowsonic.com.
Mentions légales
Ce mode d‘emploi est sous copyright © 2013 : Nowsonic
Les fonctionnalités, caractéristiques techniques et disponibilité du pro
duit peuvent être modifiées sans préavis.
É
dition v1.0, 10/2013
USB_PRE_PEN_DINA5_01.indd 21 24.10.13 14:52
Page 21

22
USB Pre Pen
Instrucciones de uso
ES
www.nowsonic.com
Contenido
Introducción
Características
Campo de aplicación
Descripción de los dispositivos de mando
Selección de USB Pre Pen como dispositivo audio en el ordenador
Puesta en servicio
Localización de averías
Especificaciones
Volumen de suministro
Servicio
Advertencias legales
Introducción
¡Muchas gracias por haber adquirido el USB Pre Pen de Nowsonic!
El USB Pre Pen de Nowsonic es una interfaz de audio USB extremadamente compacta para la conexión directa de un micrófono al ordenador (Windows o Mac). Así, la señal del micrófono es amplificada
y con
vertida en el USB Pre Pen y puede usarse en el ordenador en
combinación con un software adecuado para conseguir grabaciones
y reproducciones de archivos audio de primera calidad.
Gracias a la tecnología de driver, es posible una conversión AD/DA
de hasta 48 kHz en caso de latencias reducidas. El USB Pre Pen es soportado directamente por los drivers para dispositivos USB del sistema
operativ
o, no es necesaria una instalación de driver adicional.
Le rogamos que invierta algo de tiempo en leer estas instrucciones de
uso para poner en funcionamiento el USB Pre Pen de manera correcta.
Después de desempaquetarlo, compruebe que el aparato no presente
daños: en caso de daños visibles en la carcasa, no ponga el aparato en
funcionamiento y diríjase de inmediato al distribuidor local donde lo
haya comprado.
USB_PRE_PEN_DINA5_01.indd 22 24.10.13 14:52
Page 22

23
USB Pre Pen
Instrucciones de uso
ES
www.nowsonic.com
Características
El USB Pre Pen presenta las siguientes características:
Interfaz audio con interfaz XLR y USB
Conexión directa de micrófonos al puerto USB de un ordenador
Sencillo funcionamiento „Plug & Play“ con PC (a partir de Windows XP
o superior) o Mac (a partir de Mac OS X 10.0)
Robusta carcasa de metal con sujeción de velcro al soporte del
micrófono
Preamplificador de micrófono integrado con indicación de LED para
la configuración del nivel de señal de la entrada de micrófono
Alimentación fantasma +48 V conectable para micrófonos de con-
densador
Monitorización libre de latencia durante la grabación
Regulador de los altavoces independiente para la salida de los
auriculares
Campo de aplicación
En combinación con un micrófono adecuado y con un software audio
compatible, el USB Pre Pen se recomienda para los siguientes campos
de aplicación:
Reducción y conversión de la voz
Grabación de instrumentos acústicos y de amplificadores de
instrumentos
Grabación de conciertos o en sala de ensayo
Reproducción de audio de alta calidad desde el ordenador
USB_PRE_PEN_DINA5_01.indd 23 24.10.13 14:52
Page 23

24
USB Pre Pen
Instrucciones de uso
ES
www.nowsonic.com
Descripción de los dispositivos de mando
USB Pre Pen de Nowsonic dispone de una conexión XLR integrada (1),
mediante la que se conecta la interfaz de audio directamente a un
micrófono (no incluido en el volumen de suministro). USB Pre Pen presenta en la parte delantera un contacto para alimentación fantasma de
48 V (7), de esta manera puede funcionar con micr
ófonos de condensa-
dor dinámicos de alta calidad. Cuando está activa la alimentación fantasma, se ilumina el LED +48 (8): desactive la alimentación fantasma en
el funcionamient
o con micrófonos dinámicos para reducir el consumo
de corriente.
A través de un mini enchufe USB (10) en la placa de fondo puede usted
conectar el USB Pre Pen mediante el cable USB suministrado con un
ordenador (Mac o PC). Tras la conexión, el USB Pre Pen es reconocido
automáticamente, no es necesario instalar un driver adicional. Cuando
se ha establecido la comunicación con el ordenador, el LED USB (9) se
ilumina en verde de manera estable. Mediante esta conexión, se alimenta también el USB Pre Pen con alimentación por el bus USB: no está
pr
evista una alimentación de corriente separada.
Para la configuración del nivel de señal del micrófono en el preamplificador integrado y, con ello, en el software de grabación, se utiliza
el r
egulador MIC GAIN (3) de la parte delantera. La configuración del
nivel de señal se representa mediante un LED (2) tricolor:
Si no está conectado ningún micrófono, el LED no se ilumina.
Si el LED se ilumina en verde, en el campo de nivel hay una señal de
30 a -12 dB FS.
Para obtener un nivel óptimo, debe configurar la señal del micrófono
de manera que el LED se ilumine sobre todo en verde y, en caso de
picos de nivel, en amarillo (de -12 a 0 dB FS).
Si el LED se ilumina en rojo, baje el nivel de Mic Gain: en este caso, se
alcanza el límite de nivel de 0 dB y la señal convertida resulta sobre-
modulada.
Por favor, asegúrese de comprobar la configuración del nivel de señal
mediante los indicadores de nivel en pantalla para el correspondiente
canal de grabación del software anfitrión.
1 2
8
7
3
6
5
9
4
10
USB_PRE_PEN_DINA5_01.indd 24 24.10.13 14:52
Page 24

25
USB Pre Pen
Instrucciones de uso
ES
www.nowsonic.com
A través del minijack hembra de 3.5 mm (4) de la placa de fondo se
pueden conectar unos auriculares estéreo: la configuración del nivel
de señal del volumen de los auriculares se realiza mediante el regulador V
OLUME (5) de la parte delantera del USB Pre Pen. Mediante este
conector hembra, tiene usted también la alternativa de conectar el USB
Pre Pen a un sistema de escucha externo.
Mediante el regulador MONITOR en la parte frontal, se puede graduar
la relación de mezcla para el minijack hembra (4) de manera continua
entre el MIC (señal directa del micrófono) y el PB (señal de salida del
software anfitrión en el ordenador).
Selección de USB Pre Pen como dispositivo audio en el ordenador
Después de la conexión del USB Pre Pen, se instalará automáticamente
un driver Plug & Play interno del sistema operativo: no es necesaria una
instalación de driver adicional.
Sin embargo, debe registrar el USB Pre Pen como dispositivo de entrada
y/o de salida en el panel de control para poder grabar la señal del micrófono en un software audio. Proceda de la siguiente forma:
W
indows XP y superior
1) Elija „Configuración > Panel de Control > Dispositivos de sonido,
audio y voz“.
2) Seleccione „Dispositivo de audio USB“ como dispositivo de entrada
y salida en la pestaña Audio.
o
1) Elija „Todos los programas > Accesorios > Entretenimiento > Con-
trol de volumen > Opciones“.
2) Seleccione „USB audio codec“ como el dispositivo del Mixer.
Mac OS X 10.0 y superior
1) Elija „Preferencias del sistema > Sonido“.
2) Seleccione „USB audio codec“ en las pestañas „Input“ y „Output“.
OBSERVACIÓN: Para los usuarios de Garage Band: abra el programa
Garage Band antes de enchufar el micrófono para que se seleccione
automáticamente el dispositivo de USB.
Puesta en servicio
Conecte el micrófono a la conexión XLR del USB Pre Pen. Si se tratara
de un micrófono de condensador, active el interruptor +48. En caso
de necesidad, puede fijar el USB Pre Pen directamente al soporte del
micrófono mediante la cinta de sujeción suministrada. Ajuste el micrófono a la fuente de sonido y aumente el regulador MIC GAIN de manera que el LED de nivel se ilumine sobre todo en verde y brevemente
en amar
illo durante los picos de nivel. Si el LED se ilumina en rojo,
disminuya la configuración del nivel de señal.
Conecte el USB Pre Pen exclusivamente con el cable USB suministrado
a un puerto libre USB de su ordenador o de su portátil. Después de la
conexión se instalará automáticamente el driver Plug & Play y el LED
USB debería iluminarse en verde.
USB_PRE_PEN_DINA5_01.indd 25 24.10.13 14:52
Page 25

26
USB Pre Pen
Instrucciones de uso
ES
www.nowsonic.com
OBSERVACIÓN: El puerto USB de su ordenador/portátil debe ser
necesariamente de tipo de alimentación por bus. En caso de que la
potencia del puerto sea demasiado baja, debe conectar un hub USB.
El conector hembra para los auriculares permite escuchar directamente la señal del micrófono durante la grabación sin ningún retardo: en
cambio
, si escucha la señal del micrófono a través del ordenador, se
produce una latencia audible.
Baje el regulador VOLUME antes de conectar los auriculares. Después,
suba el volumen mientras ya escuche las pistas grabadas provenientes
del software audio junto con la señal del micrófono. Mediante el regulador MONIT
OR, ajuste según las necesidades la relación de volumen
entre el micrófono y el playback.
OBSERVACIÓN: desactive siempre la monitorización del software en
el software audio. De lo contrario, escuchará la señal del micrófono
doblada y con un pequeño retardo
Localización de averías
El LED USB no se enciende
Verifique que el USB Pre Pen esté conectado a conexión USB 1.1 ó 2.0
con tensión de alimentación suficiente.
En caso de duda, utilice un hub USB activo.
No llega ninguna señal de audio a los auriculares
Suba la preamplificación mediante el regulador MIC GAIN.
Suba el nivel de salida mediante el regulador VOLUME.
Ajuste el balance de mezcla en MIC.
La señal de audio está distorsionada
Baje la preamplificación mediante el regulador MIC GAIN.
Baje el nivel de salida mediante el regulador VOLUME.
La fuente de sonido suena con retardo
Desactive la monitorización directa en el software audio.
Ajuste el balance de mezcla en MIC.
Los auriculares no emiten un sonido suficientemente intenso
Windows: Desde el Panel de Control, elija „Sonidos y dispositivos de
Audio“, seleccione la pestaña „Audio“, haga clic en „Volumen“, bajo
„Reproducción de sonido“ y ajuste el control de Volumen.
Mac: Desde „Preferencias de sistema“, elija „Sonido“, seleccione „Salida“
y suba el volumen de Salida.
USB_PRE_PEN_DINA5_01.indd 26 24.10.13 14:52
Page 26

27
USB Pre Pen
Instrucciones de uso
ES
www.nowsonic.com
Especificaciones
Respuesta de frecuencia 20 Hz – 20 kHz, +/-1 dB
Conversión AD/DA 16 bit, hasta 48 kHz (ajustable a través
del software anfitrión)
Ruido de fondo digital Valor mínimo de MIC GAIN: -81 dB FS
Valor máximo de MIC GAIN: -78 dB FS
(de 20 Hz a 20 kHz, con ponderación A)
Indicador de nivel de señal apagado: <-30 dB FS
verde: de –30 a –12 dB FS
amarillo: de –12 a 0 dB FS
rojo: > 0 dB FS
Gama de ajuste de ganancia 50 dB
Interfaz ordenador USB 1.1 o 2.0 con alimentación por bus
Sistema operativo a partir de Windows XP, Vista o 2000
a partir de Mac OS X 10.0 o superior
Alimentación de corriente alimentación por el bus USB, 5 V,
máx. 500 mA
Salida auriculares minijack hembra de 3.5 mm
Volumen de suministro
USB Pre Pen: 1 x
Cable USB 2.0 de 3 metros: 1 x
Instrucciones de uso: 1 x
Bolsa de transporte: 1 x
Servicio
Si tiene problemas o preguntas técnicas, consulte primero al
distr
ibuidor local donde haya adquirido el aparato.
En caso de requerir servicio técnico, le rogamos que también se dirija a
su distribuidor local. De lo contrario, también puede ponerse
dir
ectamente en contacto con nosotros. Encontrará nuestros datos
de contac
to en nuestra página web www.nowsonic.com.
Advertencias legales
Copyright de este manual del usuario © 2013: Nowsonic
Las características, especificaciones y disponibilidad del producto pue
den modificarse sin aviso previo.
E
dición v1.0, 10/2013
USB_PRE_PEN_DINA5_01.indd 27 24.10.13 14:52
Page 27

28
USB Pre Pen
Instrukcja obsługi
PL
www.nowsonic.com
Spis treści
Wstęp
Cechy urządzenia
Zakres zastosowania
Opis elementów obsługi
Wybór USB Pre Pen jako urządzenia audio w komputerze
Uruchamianie
Usuwanie błędów
Specyfikacja
Skład zestawu
Serwis
Zastrzeżenia prawne
Wstęp
Dziękujemy za zakupienie urządzenia Nowsonic USB Pre Pen. Nowsonic USB Pre Pen jest wyjątkowo zwartym interfejsem USB audio do
bezpośr
edniego podłączenia mikrofonu do komputera (Windows lub
Mac). Dzięki temu sygnał mikrofonowy zostaje w USB Pre Pen wzmocniony i przetworzony oraz może być rejestrowany w komputerze przy
uż
yciu odpowiedniego oprogramowania do wysokiej jakości nagrań i
odtwarzania sygnałów audio.
Dzięki odpowiednim sterownikom możliwe jest przetwarzanie cyfrowe AD/DA z próbkowaniem do częstotliwości 48 kHz przy nieznacznej latencji. USB Pre Pen jest bezpośrednio obsługiwany przez oprogramowanie USB w systemie operacyjnym i nie wymaga oddzielnej
instalacji st
erowników.
Poświęć trochę czasu i przeczytaj uważnie niniejszą instrukcję obsługi,
by móc właściwie użytkować USB Pre Pen.
Po rozpakowaniu urządzenia sprawdź, czy nie ma ono uszkodzeń:
jeśli na obudowie widoczne są jakiekolwiek uszkodzenia, nie korzystaj z niego i niezwłocznie skontaktuj się ze sprzedawcą, u którego
ur
ządzenie zostało zakupione.
USB_PRE_PEN_DINA5_01.indd 28 24.10.13 14:52
Page 28

29
USB Pre Pen
Instrukcja obsługi
PL
www.nowsonic.com
Cechy urządzenia
USB Pre Pen ma następujące cechy:
Interfejs audio ze złączem XLR i USB
Bezpośrednie podłączenie mikrofonu do portu USB komputera
Prosta współpraca „Plug & Play“ z komputerami PC (od wersji Win-
dows XP lub wyższej) lub Mac (od wersji Mac OS X 10.0)
Wytrzymała metalowa obudowa z mocowaniem na rzepa do statywu
mikrofonu
Wbudowany wzmacniacz mikrofonu z wskaźnikami LED poziomu
wysterowania wejścia mikrofonu
Włączalne napięcie fantomowe +48 V do podłączenia mikrofonu
pojemnościowego
Bezlatencyjne (bez opóźnienia) odsłuchiwanie sygnału mikrofonowe-
go podczas nagrania
Osobny regulator głośności wyjścia słuchawkowego
Zakres zastosowania
USB Pre Pen nadaje się, w połączeniu z odpowiednim mikrofonem
i kompatybilnym oprogramowaniem audio, do następujących
zastosowań:
Odbieranie i przetwarzanie śpiewu
Nagrywanie instrumentów akustycznych i wzmacniaczy
instrumentalnych
Miksowanie koncertów i w salach ćwiczeń
Wysokiej jakości odtwarzanie dźwięku z komputera
USB_PRE_PEN_DINA5_01.indd 29 24.10.13 14:52
Page 29

30
USB Pre Pen
Instrukcja obsługi
PL
www.nowsonic.com
Opis elementów obsługi
Nowsonic USB Pre Pen posiada zintegrowane gniazdo XLR (1), przez które podłącza się interfejs audio bezpośrednio do mikrofonu (nie wchodzi w skład zestawu). USB Pre Pen oferuje na płycie czołowej przycisk
do włączania napięcia fant
omowego 48 V (7), dzięki czemu możliwe
jest używanie, oprócz mikrofonów dynamicznych, także mikrofonów
pojemnościowych. Jeśli zasilanie fantomowe jest aktywne, świeci się
dioda LED +48 (8): wyłącz zasilanie fantomowe przy współpracy z mikrofonem dynamicznym, aby zmniejszyć zużycie prądu.
P
rzez gniazdo mini USB (10) w płycie tylnej połącz USB Pre Pen z kom-
puterem (Mac lub PC), używając kabla dostarczonego w zestawie. Po
podłącz
eniu, USB Pre Pen zostanie rozpoznany automatycznie, instalacja dodatkowych sterowników nie jest konieczna. Po nawiązaniu
łączności z k
omputerem zielona dioda LED USB (9) świeci się w sposób
ciągły. Poprzez złącze USB realizowane jest zasilanie urządzenia USB
Pre Pen (USB Bus Power). Nie jest przewidziane żadne dodatkowe zasilanie.
P
okrętło MIC GAIN (3) na płycie czołowej służy do wysterowania pozio-
mu sygnału z mikrofonu doprowadzonego do wewnętrznego przedwzmacniacza, a tym samym do oprogramowania nagrywającego. Poziom
w
ysterowania jest pokazywany przez trójkolorową diodę LED (2):
Kiedy dioda LED nie świeci się, nie jest podłączony żaden mikrofon.
Kiedy dioda LED świeci się na zielono, sygnał z mikrofonu leży w
przedziale od 30 do -12 dB FS.
W celu osiągnięcia optymalnego poziomu dźwięku należy sygnał z
mikrofonu tak ustawić, aby dioda LED świeciła się głównie na zielono i
błyskała na żółto przy chwilowych przesterowaniach (-12 bis 0 dB FS).
Kiedy dioda LED świeci się na czerwono, obniż wzmocnienie
MIC GAIN: w tym przypadku sygnał osiąga poziom graniczny 0 dB i
następuje przesterowanie wzmacniacza.
Zawsze sprawdź wysterowanie sygnału, obserwując także wskaźniki
na ekranie monitora komputerowego w okienku programu
nagrywającego obsługującego urządzenie.
1 2
8
7
3
6
5
9
4
10
USB_PRE_PEN_DINA5_01.indd 30 24.10.13 14:52
Page 30

31
USB Pre Pen
Instrukcja obsługi
PL
www.nowsonic.com
Podłącz słuchawki stereofoniczne do gniazda minijack 3,5 mm (4)
płycie tylnej: regulacja głośności słuchawek odbywa się pokrętłem
VOLUME (5) na płycie czołowej urządzenia USB Pre Pen. Możesz
tego gniazda użyć zamiennie do podłączenia USB Pre Pen do
zewnętrznego systemu odsłuchowego
Pokrętłem MONITOR na płycie czołowej ustawiasz płynnie proporcje
sygnału w gnieździe minijack (4), między sygnałem MIC (bezpośredni
sygnał z mikrofonu) i PB (sygnał wyjściowy z oprogramowania komputera).
W
ybór USB Pre Pen jako urządzenia audio w komputerze
Po podłączeniu USB Pre Pen do komputera następuje automatyczna instalacja systemowego sterownika Plug & Play: instalacja dodatkowego
st
erownika nie jest konieczna.
Jednak niezbędne jest dodanie USB Pre Pen do listy urządzeń wejścia/
wyjścia, aby móc rejestrować sygnał z mikrofonu przy użyciu oprogramowania audio. Postępuj w następujący sposób:
W
indows XP y superior
1) Wybierz „Ustawienia > Panel sterowania > Dźwięki i urządzenia
audio“.
2) Wybierz „Urządzenie audio USB“ w karcie Audio „Odtwarzanie
dźwięku“ i „Nagrywanie dźwięku“, jako urządzenie domyślne.
lub
1) Wybierz „Wszystkie programy > Akcesoria > Rozrywka > Regulacja
głośności > Opcje“.
2) Wybierz „USB Audio Codec“ jako mikser.
Mac OS X 10.0 i nowsze
1) Wybierz „Preferencje systemowe > Dźwięk“.
2) Wybierz „USB Audio Codec“ na kartach „Wejście“ i „Wyjście“.
ADNOTACJA: Jeśli używasz oprogramowania Garage Band, najpierw
uruchom program i dopiero później podłącz USB Pre Pen: interfejs USB
zostanie dzięki temu wybrany automatycznie.
Uruchamianie
Podłącz mikrofon do wejścia XLR urządzenia USB Pre Pen. Jeśli w
grę wchodzi mikrofon pojemnościowy, uaktywnij włącznik +48. W
razie potrzeby można USB Pre Pen przymocować do statywu mikrofonowego taśmą znajdująca się w zestawie. Wykieruj mikrofon na
źr
ódło dźwięku i przekręć pokrętło MIC GAIN tak, aby wskaźnik poziomu sygnału LED świecił na zielono i krótko błyskał na żółto przy
ch
wilowych przesterowaniach. Kiedy dioda LED świeci się na czerwono, zmniejsz poziom wysterowania.
P
odłącz teraz USB Pre Pen kablem USB, dostarczonym w zestawie, do
wolnego portu USB Twojego komputera lub laptopa. Po podłączeniu
nastąpi automatyczna instalacja sterownika Plug & Play i dioda USBLED powinna zaświecić się na zielono.
USB_PRE_PEN_DINA5_01.indd 31 24.10.13 14:52
Page 31

32
USB Pre Pen
Instrukcja obsługi
PL
www.nowsonic.com
ADNOTACJA: Port USB Twojego komputera/laptopa musi posiadać
funkcję zasilania Bus Power. Jeśli moc zasilania portu jest zbyt mała,
musisz włączyć urządzenie przez hub aktywny.
Gniazdo słuchawkowe umożliwia bezpośredni odsłuch sygnału z
mikrofonu w trakcie nagrywania bez jakiegokolwiek opóźnienia:
przy odsłuchu mikrofonu przez komputer dochodzi do słyszalnego
opóźnienia sygnału (latencji).
Skręć regulator głośności do minimum, zanim podłączysz słuchawki.
Następnie zwiększ głośność, jednocześnie odsłuchując nagranych
przez oprogramowanie audio ścieżek dźwiękowych w połączeniu
z sygnałem z mikrofonu. Pokrętłem MONITOR ustawiasz żądaną
proporcję głośności między sygnałem z mikrofonu i odtwarzaną
ścieżką dźwiękową.
ADNOTACJA: Koniecznie wyłącz monitorowanie softwarowe w opro
gramowaniu audio. W przeciwnym przypadku będziesz słyszał sygnał
z mik
rofonu podwójnie i z lekkim opóźnieniem
Usuwanie błędów
Dioda USB-LED nie świeci się
Upewnij się, że USB Pre Pen jest podłączony do portu USB 1.1 lub USB
2.0 o wystarczającej mocy zasilania.
W razie wątpliwości włącz aktywny hub USB.
Brak sygnału audio w słuchawkach
Zwiększ wzmocnienie sygnału wejściowego pokrętłem MIC GAIN.
Zwiększ poziom sygnału wyjściowego pokrętłem VOLUME.
Ustaw balans miksowania sygnałów w pozycji MIC.
Sygnał audio jest zniekształcony
Zwiększ wzmocnienie sygnału wejściowego pokrętłem MIC GAIN.
Zwiększ poziom sygnału wyjściowego pokrętłem VOLUME.
W sygnale dźwiękowym jest słyszalne opóźnienie
Wyłącz bezpośrednie monitorowanie dźwięku w
oprogramowaniu audio.
Ustaw balans miksowania sygnałów w pozycji MIC.
Sygnał w słuchawkach nie jest wystarczająco głośny
Windows: Otwórz w panelu sterowania „Urządzenia dźwiękowe i
audio”, wybierz kartę „Audio“ i w polu „Odtwarzanie dźwięku“ kliknij na
pozycji „Głośność“: przesuń w górę suwak regulatora głośności.
Mac: Otwórz w panelu sterownia rejestr „Dźwięk“ i wybierz kartę
„Wyjście“: przesuń górę suwak regulatora głośności..
USB_PRE_PEN_DINA5_01.indd 32 24.10.13 14:52
Page 32

33
USB Pre Pen
Instrukcja obsługi
PL
www.nowsonic.com
Specyfikacja
Zakres częstotliwości 20 Hz – 20 kHz, +/- 1 dB
Przetwornik cyfrowy AD/DA 16 Bit, do 48 kHz (wybór następuje w
oprogramowaniu sterującym)
Szum cyfrowy minimalne ustawienie wzmocnienia
MIC GAIN: -81 dB FS
maksymalne wzmocnienie MIC GAIN: -78 dB FS
(zawsze w paśmie 20 Hz do 20 kHz,
A-ważony)
Wskazanie poziomu sygnału brak: <-30 dB FS
zielony: -30 do -12 dB FS
zielony: -12 do -0 dB FS
czerwony: > 0 dB FS
Zakres wzmocnienia 50 dB
Zgodność interfejsu USB 1.1 lub 2.0 z funkcją zasilania
Bus Power
System operacyjny od Windows XP, Vista lub 2000
od wersji Mac OS 10.0 lub nowszej
Zasilanie USB Bus Power, 5 V, max. 500 mA
Wyjście słuchawkowe 3,5 mm minijack
Skład zestawu
USB Pre Pen: 1 szt.
Kabel USB 2.0, 3 metry: 1szt.
Instrukcja obsługi: 1 szt.
Torba do przenoszenia: 1 szt.
Serwis
W przypadku wystąpienia jakichkolwiek problemów lub pytań natury
technicznej, prosimy zwrócić się w pierwszej kolejności do lokalnego
sprzedawcy, u którego urządzenie zostało zakupione.
W przypadku naprawy serwisowej, prosimy zwrócić się również do lo
kalnego sprzedawcy. W innym przypadku prosimy o skontaktowanie
się bezpośr
ednio z nami. Nasze dane kontaktowe znajdziesz na naszej
stronie internetowej www.nowsonic.com.
Zastrzeżenia prawne
Prawa autorskie do niniejszego podręcznika użytkownika
© 2013: Nowsonic
Cechy produktu, specyfikacja i dostępność mogą ulec zmianie bez
wcześniejszej zapowiedzi.
Wydanie w. 1.0, 10/2013
USB_PRE_PEN_DINA5_01.indd 33 24.10.13 14:52
Page 33

Distributed by Sound Service GmbH
WEEE-Reg.-Nr.: DE 18189133
www.nowsonic.com
USB_PRE_PEN_DINA5_01.indd 2 24.10.13 14:52
 Loading...