

Page 1
STAGETRIP 10 / 12
Active on-stage monitor
and FOH full-range speaker
User manual
Bedienungsanleitung
Mode d‘emploi
Manual del usuario
Podręcznik użytkownika
Page 2

Page 3

User manual 4
Bedienungsanleitung 12
Mode d‘emploi 20
Instrucciones de uso 28
Instrukcja obsługi 36
Page 4

GB
Nowsonic Stagetrip 10 / Stagetrip 12
User manual
www.nowsonic.com
IMPORTANT SAFETY INSTRUCTIONS
1) Read these instructions.
2) Keep these instructions.
3) Heed all warnings.
4) Follow all instructions.
5) Do not use this apparatus near water.
6) Clean only with dry cloth.
7) Do not block any of the ventilation openings! Install in
accordance with the manufacturer’s instructions.
8) Do not install near any heat sources such as radiators, heat
registers, stoves, or other apparatus (including amplifiers) that
produce heat.
9) Do not defeat the safety purpose of the polarized or grounding-
type plug. A polarized plug has two blades with one wider than
the other. A grounding type plug has two blades and a third
grounding prong. The wide blade or the third prong is provided
for your safety. If the provided plug does not fit into your outlet,
consult an electrician for replacement of the obsolete outlet.
10) Protect the power cord from being walked on or pinched,
particularly at plugs, convenience receptacles, and the point
where they exit from the apparatus.
11) Only use attachments/accessories specified by the manufacturer.
12) Use only with a cart, stand, tripod, bracket, or table specified by
the manufacturer, or sold with the apparatus. When a cart is used,
use caution when moving the cart/apparatus combination to
avoid injury from tip-over.
13) Unplug this apparatus during lightning storms or when unused
for long periods of time.
14) Refer all servicing to qualified service personnel. Servicing is
required when the apparatus has been damaged in any way,
such as power-supply cord or plug is damaged, liquid has been
spilled or objects have fallen into the apparatus, the apparatus
has been exposed to rain or moisture, does not operate normally,
or has been dropped.
4
Page 5

www.nowsonic.com
Nowsonic Stagetrip 10 / Stagetrip 12
User manual
GB
WARNING:
To reduce the risk of fire or electric shock, do not expose this
apparatus to rain or moisture.
Do not expose this equipment to dripping or splashing and
ensure that no objects filled with liquids, such as vases, are placed
on the equipment.
This apparatus must be earthed.
Use a three-wire grounding type line cord like the one supplied
with the product.
Be advised that different operating voltages require the use of
different types of line cord and attachment plugs.
Always observe the local safety regulations.
This equipment should be installed near the socket outlet and
disconnection of the device should be easily accessible.
To completely disconnect this equipment from the AC Mains,
disconnect the power supply cord plug from the AC receptacle.
Please follow all instructions of the manufacturer for installation.
Do not install in a confined space.
Do not open the unit – risk of electric shock.
CAUTION!
Please note: Changes or modifications to the device not expressly
approved in this manual could void your authority to operate the
instrument.
Servicing
There are no user-serviceable parts inside.
All service must be performed by qualified personnel.
CAUTION: TO REDUCE THE RISK OF ELECTRIC SHOCK, DO NOT
REMOVE THE COVER. NO USER SERVICEABLE PARTS INSIDE.
REFER SERVICING TO QUALIFIED PERSONNEL ONLY.
The lightning flash with an arrowhead symbol within an equilateral
triangle is intended to alert the user to the presence of uninsulated
“dangerous voltage” within the product’s enclosure that may be of
sufficient magnitude to constitute a risk of electric shock to persons.
The exclamation point within an equilateral triangle is intended
to alert the user to the presence of important operating and
maintenance(servicing) instructions in the literature accompanying
the product.
5
Page 6

GB
Nowsonic Stagetrip 10 / Stagetrip 12
User manual
www.nowsonic.com
Introduction
Thank you very much for purchasing the Nowsonic Stagetrip 10/12
active speaker. The Nowsonic Stagetrip 10/12 is an active mono
speaker offering considerably better directivity thanks to a coaxial arrangement of the woofer and the tweeter. The on-axis audio output
improves source location and also considerably minimizes unwanted
effects caused by phase cancellation or addition. The Stagetrip 10
features a 10” woofer plus a 1” titanium dome tweeter; the internal
bi-amping power amplifier provides 300 watts for the woofer and
100 watts for the tweeter. The Stagetrip 12 includes a 12” woofer and a
1.35” titanium dome tweeter driven at 100 and 450 watts, respectively.
Thanks to its enclosure design and the speaker-stand mount adapt-
er, you can use the Stagetrip 10/12 as a floor wedge for monitoring
purposes or as a full-range speaker for front-of-house (
FOH) applica-
tions. When mounting the speaker onto a stand, the power amplifier
will be positioned at the bottom, thus improving protection against
humidity and dirt. On the input side, the Stagetrip 10/12 accepts line
signals (from a mixing console, a
CD player, etc.). In addition, you can
connect a dynamic microphone after adjusting the input sensitivity
using a dedicated switch. A high-pass filter can be engaged to increase
intelligibility.
The Stagetrip 10/12 also has output sockets for audio and power pass-
through.
Features
Active two-way speaker system with coaxial speaker arrangement
1 × 10” / 1 × 12” woofer plus 1 × 1” / 1 × 1.35” titanium dome
tweeter
60° × 60° sound-field coverage
High power and high sound pressure due to a built-in bi-amping
power amplifier (300/450 watts and 100 watts, respectively)
Combo socket providing for directly connecting dynamic
microphones or line sources
Power supply through mechanically secured PowerCon port,
power passthrough to following devices
Separate high-pass filter (120 Hz)
Rugged enclosure from multilayer plywood
Applications
High-performance on-stage floor wedge
Full-range FOH speakers for small-scale sound-reinforcement
applications
Easy-to-use rehearsal amp for vocalists
Personal full-range monitor speaker for instrument preamps
of guitar or bass players, etc.
6
Page 7
www.nowsonic.com
Nowsonic Stagetrip 10 / Stagetrip 12
User manual
GB
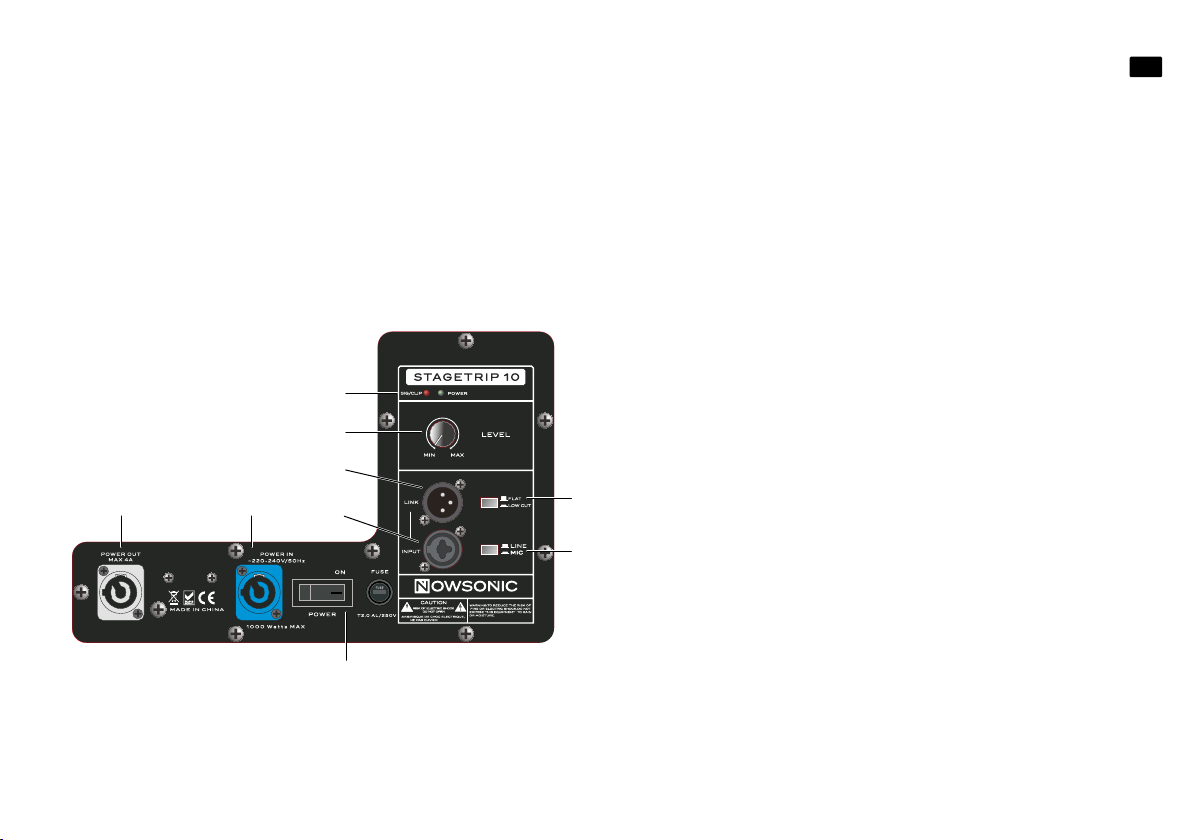
Connectors and controls
You can access the following connectors and controls on the righthand side panel of the Stagetrip 10/12:
4
5
6
2
3
7
1
1. POWER switch and fuse
Use this switch to turn the internal power amplifier of the Stagetrip
10/12 on or off: when power is properly supplied through the
socket (3) to the speaker, the POWER indicator (4) will light.
IN
The fuse of the internal amplifier is located adjacent to the
switch: if the POWER indicator does not light after turning on the
switch and the coaxial speaker does not produce any audible noise, be
sure to check the internal fuse first.
NOTE: DISCONNECT THE POWERCON CABLE BEFORE OPE
NING THE FUSE HOLDER.
Use a suitable tool such as a screwdri-
ver for opening the fuse holder, then remove the holder from the
enclosure.
250 V
8
9
plifier.
2. POWER OUT socket
The PowerCon-type
ALWAYS replace with a fuse of the same type (T2.0AL
); failing to do so might result in damage to the power am-
POWER OUT socket of the Stagetrip 10/12 allows
for passing the input power through to following devices.
NOTE: Note that the POWER OUT port supplies a maximum
current of 4 A. Therefore, if the following consumer requires more
power, connect it directly to the mains.
POWER
POWER
7
Page 8

GB
Nowsonic Stagetrip 10 / Stagetrip 12
User manual
www.nowsonic.com
3. POWER IN socket
Connect the supplied PowerCon cord to the
so, insert the PowerCon connector into the socket, then turn it clockwise until it locks into place. This will firmly attach the connector to the
device, so it cannot be removed accidentally. To unplug the connector,
pull the spring-mounted catch back, then turn the connector counterclockwise.
If the power cord gets lost, please contact the dealer where you
purchased your Stagetrip 10/12 unit for replacement.
4.
SIG/CLIP and POWER indicators
When the Stagetrip 10/12 has been connected to the mains using the
supplied power cord and has been switched on, the green
indicator will light constantly. If the indicator remains dark, be sure to
check the internal fuse (see step
The
SIG/CLIP indicator will light up when a signal is present at the
socket (–20 dB). If the signal level exceeds the sensitivity of the
INPUT
Stagetrip 10/12 input stage, the indicator will change to red; in this
case, lower the source level until the indicator does not light up in red
anymore.
5.
LEVEL control
You can adjust the level of the internal power amplifier of the Stagetrip
10/12 using the
LEVEL control.
1).
POWER IN socket. To do
POWER
6.
LINK socket
The
LINK socket allows for passing the signal present at the INPUT
socket (7) through to following units (for example, other Stagetrip
monitor speakers). The socket outputs a line signal.
7. INPUT socket
The
INPUT combo socket allows for connecting an external source to
the internal power amplifier of the Stagetrip 10/12. The Stagetrip 10/12
accepts microphone and line signals. Use the
adjusting the input sensitivity as required.
The line-in part of the socket is a
NOTE: As the INPUT socket of the Stagetrip 10/12 outputs no
phantom power, it is not suitable for connecting a condenser
microphone directly; using that kind of microphone requires an
external power supply.
8.
FLAT/LOW CUT button
Pushing this button enables the internal high-pass filter used for
reducing subsonic noise (below 120 Hz). When the high-pass filter
is on, it will reduce low-frequency noise (for example, when using
the Stagetrip 10/12 as a floor wedge) or pops (when connecting a
microphone). Pressing the button again disables the filter.
TRS (balanced) input.
MIC/LINE switch (9) for
8
Page 9

www.nowsonic.com
Nowsonic Stagetrip 10 / Stagetrip 12
User manual
GB
9. MIC/LINE button
Using this button, you can adjust the input sensitivity of the Stagetrip
10/12 to the source connected to the
a microphone, turn the switch on to increase the sensitivity; when the
switch is off, the
NOTE: Always remember to set the input sensitivity appropriately.
Feeding a line signal while the
in audible clipping as you might overdrive the input stage; on the
other hand, you may not achieve a sufficient volume level when
connecting a microphone with the
Therefore, whenever output-level issues occur, be sure to check
the status of the
Using the Stagetrip 10/12 as an FOH Speaker
You can use the Stagetrip 10/12 not only as a monitor speaker but also
as a full-range speaker for small-scale
pose, the enclosure of the Stagetrip 10/12 features a mount adapter for
standard-size speaker stands (extension-tube diameter: 35-mm / 1
on the right-hand side next to the connector and operation panel. The
benefit of this design is that all connections, controls, and the internal power amplifier are located at the enclosure bottom, thus offering
better protection against humidity, dirt, and/or direct sunlight.
INPUT socket accepts line sources.
MIC/LINE switch first.
INPUT socket. When connecting
MIC/LINE switch is on can result
MIC/LINE switch disabled.
FOH applications. For that pur-
3
/8”)
When using the Stagetrip 10/12 as an
insert the extension tube of the speaker stand into the mount adapter.
When doing so, make sure that the tube is fully inserted into the mount
adapter to ensure maximum stability.
WARNING: Always make sure that the speaker stand‘s center of
gravity is low enough so that the Stagetrip 10/12 may not accidentally fall over. Tighten all threads of the stand properly and
protect the setup of the Stagetrip 10/12 and the speaker stand
from falling over as appropriate.
IN NO EVENT SHALL NOWSONIC BE LIABLE FOR DAMAGE
OF ANY KIND THAT RESULTS FROM A STAGETRIP SPEAKER
MOUNTED ONTO A SPEAKER STAND FALLING OVER.
FOH speaker, lift it carefully and
9
Page 10

GB
Nowsonic Stagetrip 10 / Stagetrip 12
User manual
Specications Scope of supply
Model Stagetrip 10 Stagetrip 12
Type
Speakers
Crossover frequency 2.6 kHz 2.5 kHz
Coverage pattern 60° × 60° (coaxial horn)
Output power
Setting options
Inputs Mic/Line input via
Mic-input sensitivity 6 mV
Line-input sensitivity 450 mV
Power connection PowerCon In (blue), PowerCon Out (grey), max. 4 amps
Supply voltage 220–240 V, 50 Hz
Power consumption 450 watts 600 watts
Fuse T2.0
Frequency range 65 Hz–20 kHz 55 Hz–20 kHz
SPL
Enclosure Multiplex plywood, coated
Dimensions 408 × 361 × 460 mm 482 × 406 × 530 mm
Color structure coating, black
Weight 12.8 kg 16.0 kg
Self-powered coaxial 2 way speaker for full-range
applications
1 × 10“ woofer and 1 × 1“
titanium dome tweeter
max. 300W + 100W
(bi-amping)
Level, Flat/Low Cut (120Hz) button, Mic/Line Input
button
XLR/TRS combo socket
AL 250 V
max. 121dB max. 123dB
1 × 12“ woofer and 1 × 1.35“
titanium dome tweeter
max. 450 W + 100W
(bi-amping)
Disclaimer
Nowsonic has taken all possible steps to ensure that the information
given here is both correct and complete.
In no event can Nowsonic accept any liability or responsibility for any
loss or damage to the owner of the equipment, any third party, or any
equipment which may result from use of this manual or the equipment
which it describes.
Servicing
If you have any question or encounter technical issues, please first
contact your local dealer from whom you have purchased the device.
In case servicing is required, please contact your local dealer. Otherwise you may contact us directly. Please find our contact data on our
website under www.nowsonic.com.
www.nowsonic.com
Stagetrip 10/12: 1 pc
PowerCon cord: 1 pc
User manual: 1 pc
10
Page 11

www.nowsonic.com
NOTE: We take great care in packing the device in a well protec-
ted box at the factory, so any shipping damage is very unlikely.
However, should this happen please contact your supplier immediately to report the damage. We recommend to keep the original
packing materials in case you need to ship or transport the device
at a later date.
Legal information
Copyright for this user manual © 2014: Nowsonic
Product features, specifications and availability are subject to change
without prior notice.
Edition v1.0, 07/2014
Stagetrip 10: Part no. 310772
Stagetrip 12: Part no. 310773
Nowsonic Stagetrip 10 / Stagetrip 12
User manual
GB
11
Page 12

DE
Nowsonic Stagetrip 10 / Stagetrip 12
Bedienungsanleitung
www.nowsonic.com
WICHTIGE SICHERHEITSHINWEISE
1) Lesen Sie diese Anleitung.
2) Bewahren Sie diese Anleitung auf.
3) Beachten Sie alle Warnungen.
4) Befolgen Sie alle Anweisungen.
5) Betreiben Sie dieses Gerät nicht in unmittelbarer Nähe von
Wasser.
6) Verwenden Sie zum Reinigen des Geräts ausschließlich ein
trockenes Tuch.
7) Halten Sie die Lüftungsschlitze frei! Folgen Sie bei der Installation
den Anweisungen des Herstellers.
8) Stellen Sie das Gerät nicht in der Nähe von Heizkörpern,
Wärmespeichern, Öfen oder anderer Wärmequellen auf.
9) Kleben Sie in keinem Fall den Schutzkontakt des Steckers ab. Ein
verpolungssicherer Stecker besitzt zwei Kontakte, von denen ein
Kontakt breiter ist als der andere. Ein Schukostecker besitzt zwei
Kontakte und einen dritten Erdungskontakt. Der breitere Kontakt
des verpolungssicheren Steckers bzw. der Erdungs kontakt
des Schukosteckers dient Ihrer Sicherheit. Sollte der Stecker
des mitgelieferten Netzkabels nicht in Ihre Steckdose passen,
besorgen Sie sich im Fachhandel ein passendes Kabel.
10) Treten Sie nicht auf das Kabel, knicken Sie das Kabel nicht und
behandeln Sie Stecker und Buchsen besonders vorsichtig.
11) Verwenden Sie ausschließlich Zubehör, das vom Hersteller für
das Gerät vorgesehen ist.
12) Verwenden Sie nur Ständer, Stative oder Tische, die den Anforde-
rungen des Herstellers entsprechen oder die zum Lieferumfang
des Geräts gehören. Seien Sie beim Transport vorsichtig, um
Verletzungen durch verrutschende oder fallende Gegenstände
zu vermeiden.
13) Ziehen Sie während eines Gewitters den Netzstecker; ziehen
Sie den Netzstecker auch, wenn Sie das Gerät längere Zeit nicht
verwenden.
14) Wenden Sie sich im Service-Fall an qualifiziertes Personal. Lassen
Sie das Gerät von einem Fachmann überprüfen, wenn z. B.
Netzkabel oder -stecker beschädigt sind, wenn Flüssigkeit oder
Gegenstände in das Gehäuse gelangt sind, das Gerät Regen oder
Feuchtigkeit ausgesetzt war, das Gerät fallen gelassen wurde,
nicht ordnungsgemäß funktioniert oder anderweitig beschädigt
wurde.
12
Page 13
www.nowsonic.com
Nowsonic Stagetrip 10 / Stagetrip 12
Bedienungsanleitung
DE
WARNUNG:
Verringern Sie die Gefahr von Feuer und elektrischen Stromschlägen, indem Sie das Gerät nicht Regen oder Feuchtigkeit
aussetzen.
Stellen Sie keine Behälter mit Flüssigkeiten auf das Gerät, da diese
umkippen könnten und Wasser in das Gerät gelangen könnte.
Dieses Gerät muss geerdet sein.
Verwenden Sie ein geschirmtes Netzkabel mit drei Leitern wie das
mit dem Gerät ausgelieferte Netzkabel.
Beachten Sie, dass bei unterschiedlichen Betriebsspannungen
unterschiedliche Netzkabel und/oder Netzstecker benötigt
werden.
Beachten Sie zu jeder Zeit Ihre lokalen Sicherheitsvorschriften.
Stellen Sie das Gerät in der Nähe einer Netzsteckdose auf. Die
Steckdose sollte immer leicht zugänglich sein.
Um das Gerät völlig stromlos zu machen, ziehen Sie den
Netzstecker aus der Steckdose.
Befolgen Sie bei der Aufstellung immer alle Hinweise des
Herstellers.
Betreiben Sie das Gerät nicht unter beengten Platzverhältnissen.
Öffnen Sie das Gerät nicht – Gefahr eines Stromschlags.
VORSICHT!
Beachten Sie, dass alle Änderungen oder Modifikationen am Gerät,
die nicht ausdrücklich in diesem Handbuch eingeräumt werden, Ihre
Berechtigung zum Betrieb dieses Gerät aufheben können
Wartung
Es befinden sich keine vom Anwender zu wartenden Teile
im Gerät.
Lassen Sie das Gerät nur von qualifiziertem Fachpersonal
reparieren.
VORSICHT: ZUM SCHUTZ VOR STROMSCHLÄGEN DARF DAS GE
HÄUSE NICHT GEÖFFNET WERDEN. ES BEFINDEN SICH KEINE
VOM ANWENDER TAUSCHBAREN BAUTEILE IM GERÄT. WENDEN
SIE SICH IM SERVICEFALL AN QUALIFIZIERTES FACHPERSONAL.
Das Blitzsymbol innerhalb eines gleichseitigen Dreiecks soll den
Anwender auf nicht isolierte Leitungen und Kontakte im Geräteinneren hinweisen, an denen hohe Spannungen anliegen, die im
Fall einer Berührung zu lebensgefährlichen Stromschlägen führen
können.
Das Ausrufezeichen innerhalb eines gleichseitigen Dreiecks soll den
Anwender auf wichtige Bedienungs- sowie Servicehinweise in den
dazugehörigen Handbüchern aufmerksam machen.
13
Page 14

DE
Nowsonic Stagetrip 10 / Stagetrip 12
Bedienungsanleitung
www.nowsonic.com
Einleitung
Vielen Dank, dass Sie sich für den Aktivlautsprecher Nowsonic Stagetrip
10/12 entschieden haben. Nowsonic Stagetrip 10/12 ist ein monophon-
er Aktivlautsprecher, der dank der koaxialen Anordnung des Woofers
und des Hochtöners ein deutlich verbessertes Abstrahl verhalten bietet: Durch die punktuelle Audiowiedergabe kann der Hörer die Schallquellen besser orten, zudem werden Phasenfehler durch Auslöschungen oder Überbetonungen deutlich minimiert. Stagetrip 10/12 bietet
einen 10“ (Stagetrip 10) bzw. 12“ Woofer (Stagetrip 12) sowie einen
1“ (Stagetrip 12: 1,35“) Titan-Hochtöner, die über die interne Bi-Amp-
ing-Endstufe mit 300/450 Watt (Woofer) bzw. 100 Watt angetrieben
werden. Dank der Gehäuseform sowie eines integrierten Stativadapters lässt sich Stagetrip 10/12 wahlweise als Bodenmonitor oder auch
in
FOH-Anwendungen als Fullrange-Speaker betreiben: Im Stativbe-
trieb sitzt die Endstufe im unteren Bereich des Gehäuses und ist daher
besser gegen Feuchtigkeit und Staub geschützt. Eingangsseitig kann
Stagetrip 10/12 mit Line-Signalen (von einem Mischpult oder einem
-Spieler) beschickt werden. Alternativ bietet sich die Möglichkeit,
CD
ein dynamisches Mikrofon anzuschließen: Die Empfindlichkeit wird per
Taste umgeschaltet, ein schaltbarer Hochpass sorgt bei Bedarf für eine
bessere Sprachverständlichkeit.
Über entsprechende Ausgänge lässt sich das eingespeiste Audiosignal
ebenso wie die anliegende Stromversorgung auf nachfolgende Geräte
durchschleifen.
Merkmale
2-Wege-Aktivlautsprecher mit koaxial angeordneten
Lautsprechern
1 × 10“ bzw. 1 × 12“ Tieftöner und 1 × 1“ bzw. 1 × 1,35“
Titanium-Hochtöner
Schallfeldabdeckung mit 60° × 60°
Hohe Leistung und hoher Schalldruck dank interner
Bi-Amping-Endstufe (300/450 Watt bzw. 100 Watt)
Direkter Anschluss von einem dynamischen Mikrofon oder einer
Line-Quelle über Kombibuchse
Stromversorgung über mechanisch gesicherte PowerCon-Buchse
und Durchschleifbetrieb an nachfolgende Geräte
Aktivierbarer Hochpassfilter bei 120 Hz
Stabiles Gehäuse aus Multiplexholz
Anwendungsbereiche
Leistungsstarker Bodenmonitor für den Betrieb auf der Bühne
Fullrange-FOH-Lautsprecher für kleinere PA-Anwendungen
Einfacher Gesangsverstärker für die Probe
Persönlicher Fullrange-Monitor für die Instrumental-Preamps von
Gitarristen, Bassisten u.a.
14
Page 15

www.nowsonic.com
Nowsonic Stagetrip 10 / Stagetrip 12
Bedienungsanleitung
DE
Anschlüsse und Bedienelemente
Auf der rechten Seite von Stagetrip 10/12 stehen folgende Anschlüsse
und Bedienelemente zur Verfügung:
4
5
6
2
3
7
1
1. POWER-Schalter und Sicherung
Mit diesem Schalter schalten Sie die interne Endstufe von Stagetrip
10/12 ein bzw. aus: Wenn der Lautsprecher über die Buchse
(3) ordnungsgemäß mit Strom versorgt wird, leuchtet die LED
IN
POWER
Neben dem
interne Endstufe: Sofern die
(4) dauerhaft grün.
POWER-Schalter befindet sich die Sicherung für die
LED POWER nach dem Einschalten nicht
leuchtet und der koaxiale Lautsprecher kein hörbares Rauschen erzeugt, sollten Sie zuerst die interne Sicherung überprüfen.
ANMERKUNG: Entfernen Sie IN JEDEM FALL das PowerCon-
Netzkabel, bevor Sie den Sicherungshalter mit einem geeigneten
Schraubenzieher öffnen und vorsichtig aus dem Gehäuse ziehen:
Ersetzen Sie die Sicherung
8
gleichen Typs (
T2.0AL 250 V), andernfalls kann die interne End-
IMMER durch eine Sicherung des
stufe ernsthaft beschädigt werden.
9
2. Buchse POWER OUT
Über die PowerCon-Buchse POWER OUT können Sie die anliegende
Stromversorgung von Stagetrip 10/12 auf nachfolgende Geräte durchschleifen.
ANMERKUNG: Beachten Sie, dass die Buchse POWER OUT eine
Stromstärke von maximal 4 Ampere zur Verfügung stellt. Sofern
der nachfolgende Verbraucher eine höhere Leistung benötigt,
sollten Sie ihn direkt an das Stromnetz anschließen.
POWER
15
Page 16

DE
Nowsonic Stagetrip 10 / Stagetrip 12
Bedienungsanleitung
www.nowsonic.com
3. Buchse POWER IN
An der PowerCon-Buchse POWER IN schließen Sie das im Lieferum-
fang enthaltene Power
Stecker dazu in die Buchse ein und drehen Sie ihn nach rechts, bis er
einrastet: Damit ist der Stecker im Gerät fixiert, ein versehentliches
Herausziehen wird damit unmöglich. Um den Stecker zu entfernen,
ziehen Sie die gefederte Arretierung nach hinten und drehen den
Stecker nach links.
Im Fall eines Verlusts des Netzkabels wenden Sie sich bitte an den
Händler, bei dem Sie Stagetrip 10/12 gekauft haben.
4.
LEDs SIG/CLIP und POWER
Wenn Stagetrip 10/12 über das mitgelieferte PowerCon-Netzkabel mit
dem Stromnetz verbunden und eingeschaltet ist, leuchtet die
POWER
in jedem Fall die interne Sicherung, siehe Punkt 1.
Die
(-20 dB) anliegt. Sofern der Signalpegel die Empfindlichkeit der Ein-
gangsstufe von Stagetrip 10/12 überschreitet, leuchtet die
Senken Sie in diesem Fall den Pegel an der Quelle so weit ab, dass die
LED
5. Regler
Über den Regler LEVEL steuern Sie die Lautstärke der internen End-
stufe von Stagetrip 10/12 aus.
dauerhaft grün: Sofern die LED nicht leuchtet, überprüfen Sie
LED SIG/CLIP leuchtet, wenn an der Buchse INPUT ein Signal
nicht mehr rot aufleuchtet.
LEVEL
CON-Netzkabel an. Führen Sie den PowerCon-
LED
LED rot:
6. Buchse
Über die Buchse LINK können Sie das an der Buchse INPUT (7)
anliegende Signal auf nachfolgende Geräte (wie z. B. weitere Stage tripMonitore) durchschleifen. Das Signal wird mit Linepegel ausgegeben.
7. Buchse
Über die Kombibuchse INPUT speisen Sie ein externes Signal auf die
interne Endstufe von Stagetrip 10/12. Stagetrip 10/12 kann wahlweise
Mikrofon- oder Line-Signale verarbeiten, die Umschaltung der
Empfindlichkeit erfolgt über die Taste
Der Line-Anschluss ist als
chend symmetrisch belegt werden.
8. Taste
Über diese Taste können Sie einen internen Hochpassfilter aktivieren,
der Störsignal unterhalb von 120 Hz absenkt. Auf diese Weise lassen
sich z. B. tieffrequente Resonanzen (im Betrieb als Bühnenmonitor)
oder auch Pop-Geräusche (bei Anschluss eines Mikrofons) minimieren.
Wenn die Taste nicht gedrückt ist, ist der Filter inaktiv.
LINK
INPUT
MIC/LINE (9).
TRS-Eingang ausgeführt und kann entspre-
ANMERKUNG: Beachten Sie, dass der Mikrofoneingang der
Buchse
INPUT nicht zum direkten Anschluss von Kondensator-
mikrofonen vorgesehen ist: Die benötigte Speisespannung kann
nicht über Stagetrip 10/12 ausgegeben werden. Sie benötigen in
diesem Fall ein externes Speisegerät für das Mikrofon.
FLAT/LOW CUT
16
Page 17

www.nowsonic.com
Nowsonic Stagetrip 10 / Stagetrip 12
Bedienungsanleitung
DE
9. Taste MIC/LINE
Über diese Taste passen Sie die Eingangsempfindlichkeit von Stagetrip
10/12 auf das Signal an der Buchse
Mikrofons heben Sie die Empfindlichkeit an, indem Sie die Taste
drücken. Wenn die Taste nicht gedrückt ist, ist die Buchse
den Anschluss von Line-Quellen ausgesteuert.
ANMERKUNG: Beachten Sie, dass die Empfindlichkeit immer an
die angeschlossene Quelle angepasst werden muss. Wenn Sie ein
Line-Signal einspeisen und die Taste
es zu hörbaren Verzerrungen kommen, da die Eingangsstufe evtl.
überlastet wird. Umgekehrt erzielen Sie unter Umständen keine
ausreichende Lautstärke, wenn Sie ein Mikrofon anschließen und
die Taste
Problemen mit der Aussteuerung immer zuerst die Taste
LINE
Betrieb als FOH-Lautsprecher
Alternativ zum Betrieb als Bühnenmonitor können Sie Stagetrip
10/12 auch als Fullrange-Lautsprecher für kleinere
gen verwenden. Für diesen Einsatzfall bietet Stagetrip 10/12 auf der
rechten Gehäuseseite direkt neben dem Anschluss- und Bedienfeld
einen Adapter für herkömmliche Stative (Durchmesser Auszugsrohr:
35 mm): Diese Anordnung hat den Vorteil, dass sich die Anschlüsse,
Bedien elemente sowie die interne Endstufe auf der Gehäuseunterseite
befinden und so besser gegen etwaige Feuchtigkeit, Staub und/oder
direkte Sonneneinstrahlung geschützt sind.
MIC/LINE nicht gedrückt ist. Überprüfen Sie daher bei
.
INPUT an. Bei Anschluss eines
INPUT für
MIC/LINE gedrückt ist, kann
MIC/
FOH-Anwendun-
Für den Betrieb als
vorsichtig an und führen das Auszugsohr des Stativs in die dafür
vorgesehene Öffnung ein: Achten Sie darauf, dass das Stativrohr bis
zum Ende des Adapters eingeführt werden muss, um maximale Stand-
festigkeit zu gewährleisten.
ACHTUNG: Stellen Sie in jedem Fall sicher, dass der Schwer-
punkt des Stativs so weit unten liegt, dass Stagetrip 10/12 nicht
versehentlich umkippen kann. Verschrauben Sie alle Gewinde
des Stativs ordnungsgemäß und sichern Sie die Kombination
aus Stativ und Stagetrip 10/12 gegebenenfalls gegen Umfallen/
Kippen.
NOWSONIC KANN IN KEINEM FALL FÜR ETWAIGE SCHÄDEN
VERANTWORTLICH GEMACHT WERDEN, DIE DURCH DAS
UMKIPPEN EINES AUF EINEM STATIV BETRIEBENEN STAGE
TRIPLAUTSPRECHERS ENTSTEHEN.
FOH-Lautsprecher heben Sie Stagetrip 10/12
17
Page 18

DE
Nowsonic Stagetrip 10 / Stagetrip 12
Bedienungsanleitung
Spezikationen Lieferumfang
Modell Stagetrip 10 Stagetrip 12
Typ
Lautsprecherbestückung
Crossover-Frequenz 2,6 kHz 2,5 kHz
Abstrahlverhalten 60° × 60° Koaxial-Horn
Leistung
Einstellmöglichkeiten Level, Taste Flat/Low Cut (120 Hz), Taste Mic/Line Input
Eingänge Mic-/Line-Eingang als
Empfindlichkeit Mic 6 mV
Empfindlichkeit Line 450 mV
Stromanschluss PowerCon In (blau), PowerCon Out (Grau), max. 4 Amp.
Betriebsspannung 220–240 Volt, 50 Hz
Leistungsaufnahme 450 Watt 600 Watt
Sicherung T2.0
Frequenzbereich 65 Hz–20 kHz 55 Hz–20 kHz
SPL
Gehäuse Multiplexholz, lackiert
Abmessungen 408 × 361 × 460 mm 482 × 406 × 530 mm
Farbe Strukturlack, schwarz
Gewicht 12,8 kg 16,0 kg
Koaxialer 2-Wege-Aktivlautsprecher für den
Fullrange-Betrieb
1 × 10“ Tieftöner und 1 × 1“
Titanium-Hochtöner
max. 300 W + 100 W
(Bi-Amping)
AL 250 V
max. 121 dB max. 123 dB
1 × 12“ Tieftöner und
1 × 1,35“ TitaniumHochtöner
max. 450 W + 100 W
(Bi-Amping)
XLR-/TRS-Kombibuchse
Haftungsausschluss
Nowsonic hat höchstmögliche Sorgfalt darauf verwendet, alle in
diesem Handbuch enthaltenen Informationen so korrekt und vollständig wie möglich wiederzugeben.
Nowsonic übernimmt keinerlei Haftung oder Verantwortung für
Verluste oder Schäden, die dem Eigentümer des Geräts, Dritten oder
an anderen Geräten durch die Informationen in diesem Handbuch
oder das darin beschriebene Gerät entstehen.
Service
Wenn Sie Probleme oder technische Fragen haben, wenden Sie sich
bitte zuerst an Ihren lokalen Händler, bei dem Sie das Gerät gekauft
haben.
Bei einem Service-Fall wenden Sie sich bitte ebenfalls an Ihren lokalen
Händler. Andernfalls können Sie uns auch direkt kontaktieren. Sie finden
unsere Kontaktdaten auf unserer Webseite unter www. nowsonic.com.
Stagetrip 10/12: 1 ×
PowerCon-Netzanschlusskabel: 1 ×
Bedienungsanleitung: 1 ×
www.nowsonic.com
18
Page 19

www.nowsonic.com
ANMERKUNG: Das Gerät wurde ab Werk so verpackt, dass ein
ausreichend hoher Schutz gegen Transportschäden besteht.
Sofern es dennoch zu einem Transportschaden gekommen sein
sollte, wenden Sie sich bitte unmittelbar an den Lieferanten, der
das Gerät an Sie ausgeliefert hat, und zeigen Sie den Schaden
an. Wir möchten Ihnen empfehlen, das originale Verpackungs-
material für den Fall aufzubewahren, das Sie das Gerät zu einem
späteren Zeitpunkt verschicken müssen.
Rechtliche Hinweise
Copyright für diese Bedienungsanleitung © 2014: Nowsonic
Produktmerkmale, Spezifikationen und die Verfügbarkeit können ohne
vorherige Ankündigung geändert werden.
Ausgabe v 1.0, 07/2014
Stagetrip 10: Artikelnr. 310772
Stagetrip 12: Artikelnr. 310773
Nowsonic Stagetrip 10 / Stagetrip 12
Bedienungsanleitung
DE
19
Page 20

FR
Nowsonic Stagetrip 10 / Stagetrip 12
Mode d‘emploi
www.nowsonic.com
DIRECTIVES DE SÉCURITÉ IMPORTANTES
1) Lisez ces indications.
2) Conservez ces indications.
3) Respectez tous les avertissements.
4) Suivez toutes les instructions.
5) N’utilisez pas cet appareil avec de l’eau à proximité.
6) Nettoyez-le uniquement avec un chiffon sec.
7) N’obstruez aucune ouverture de ventilation ! Installez-le
conformément aux instructions du fabricant.
8) N’installez pas l’appareil près de radiateurs, bouches de chauf-
fage, poêles ou autres sources de chaleur.
9) Ne neutralisez jamais la broche de terre. Une fiche polarisée
possède deux broches, l’une plus large que l’autre. Une fiche de
terre a deux broches identiques et une troisième broche pour
la mise à la terre. La broche plus large de la fiche polarisée ou la
troisième broche de la fiche de terre servent à votre sécurité. Si la
fiche du câble d’alimentation fourni n’entre pas dans votre prise,
procurez-vous un câble approprié chez un revendeur spécialisé.
10) Évitez de marcher sur le cordon d’alimentation et de le plier, et
soyez particulièrement délicat avec les fiches et les prises.
11) N’utilisez que des accessoires conçus pour l’appareil par le
fabricant.
12) Utilisez-le uniquement avec un support, trépied ou table
répondant aux spécifications du fabricant ou fourni avec
l’appareil. Soyez prudent lors du transport pour éviter toute
blessure due au glissement à ou la chute d’objets.
13) Débranchez le cordon d’alimentation en cas d’orage ou de non
utilisation prolongée.
14) Confiez toute réparation à des techniciens de maintenance
qualifiés. Faites-le vérifier par un technicien, par exemple si
le cordon ou la fiche d’alimentation est endommagé, si du
liquide a été renversé sur l’appareil ou si des objets sont tombés
dedans, si l’appareil a été exposé à la pluie ou à l’humidité, s’il ne
fonctionne pas normalement, ou s’il est endommagé.
20
Page 21

www.nowsonic.com
Nowsonic Stagetrip 10 / Stagetrip 12
Mode d‘emploi
FR
AVERTISSEMENT:
Réduisez le risque d’incendie ou d’électrocution en n’exposant pas
le produit à la pluie ni à l’humidité.
Ne placez pas d’objet rempli de liquide sur l’appareil, car il pourrait
se renverser et le liquide pénétrer dans l’appareil.
Cet appareil doit être mis à la terre.
Utilisez un câble d’alimentation blindé à trois conducteurs comme
celui fourni avec l’appareil.
Notez qu’en fonction de la tension d’alimentation nécessaire, les
cordons et/ou fiches d’alimentation nécessaires sont différents.
Respectez toujours les réglementations de sécurité locales.
Placez l’appareil à proximité d’une prise de courant. La prise doit
toujours être facilement accessible.
Pour totalement isoler l’appareil du secteur, débranchez le cordon
d’alimentation de la prise.
Suivez toujours toutes les instructions du fabricant pour
l’installation.
Ne faites pas fonctionner l’appareil dans un espace confiné.
N’ouvrez pas l’appareil – Risque d’électrocution.
ATTENTION!
Notez que tous les changements ou modifications apportés à l’appareil
qui ne sont pas expressément indiqués dans le présent mode d’emploi
peuvent annuler votre droit à utiliser cet appareil.
Entretien
Aucune pièce de l’appareil n’est réparable par l’utilisateur.
Confiez toute réparation à un technicien qualifié.
ATTENTION : POUR ÉVITER TOUT CHOC ÉLECTRIQUE, NE PAS
OUVRIR LE BOÎTIER. AUCUN COMPOSANT DE L’APPAREIL N’EST
REMPLAÇABLE PAR L’UTILISATEUR. CONFIEZ TOUTE RÉPARATION
À DES TECHNICIENS DE MAINTENANCE QUALIFIÉS.
Le symbole d’éclair à tête de flèche dans un triangle équilatéral sert
à prévenir l’utilisateur de la présence dans l’enceinte du produit
d’une tension dangereuse non isolée d’une grandeur suffisante
pour constituer un risque d’électrocution pour les personnes.
Le point d’exclamation dans un triangle équilatéral sert à
prévenir l’utilisateur de la présence d’instructions importantes de
fonctionnement et de maintenance (entretien) dans les documents
accompagnant l’appareil.
21
Page 22

FR
Nowsonic Stagetrip 10 / Stagetrip 12
Mode d‘emploi
www.nowsonic.com
Introduction
Merci beaucoup d’avoir choisi l’enceinte active Stagetrip 10/12 de
Nowsonic. La Stagetrip 10/12 de Nowsonic est une enceinte active
monophonique, qui offre une dispersion sonore nettement améliorée
grâce à la disposition coaxiale du woofer et du tweeter : grâce à la
reproduction audio à source ponctuelle, l’auditeur peut mieux situer
les sources sonores, et les erreurs de phase avec annulation ou accentuation sont considérablement réduites. La Stagetrip 10/12 offre un
woofer de 25 cm (Stagetrip 10) ou de 30 cm (Stagetrip 12) ainsi qu’un
tweeter titane de 25 mm (Stagetrip 12 : 34 mm), qui reçoivent en biamplification 300/450 watts (woofer) et 100 watts des amplificateurs de
puissance internes. Grâce à la forme de l’enceinte et à son embase
intégrée pour trépied, la Stagetrip 10/12 peut aussi bien être employée
comme retour de scène de type « bain de pieds » que comme enceinte large bande dans les applications de façade : en utilisation sur
un pied, l’amplificateur de puissance se trouve dans la partie inférieure
de l’enceinte et est donc mieux protégé contre l’humidité et la poussière. Du côté entrée, la Stagetrip 10/12 peut recevoir des signaux de
niveau ligne (venant d’une console de mixage ou d’un lecteur
CD).
Sinon, il y a possibilité de connecter un microphone dynamique : la
sensibilité se commute à l’aide d’une touche, un filtre passe-haut commutable assure si nécessaire une meilleure intelligibilité de la parole.
Par les sorties correspondantes sont renvoyés le signal audio entrant et
l’alimentation électrique vers les appareils branchés en aval.
Caractéristiques
Enceinte active 2 voies avec haut-parleurs coaxiaux
1 woofer de 25 cm ou de 30 cm et 1 tweeter titane de 25 mm ou
de 34 mm
Couverture de diffusion 60° × 60°
Haute puissance et forte pression acoustique grâce à la
biamplification interne (300/450 watts et 100 watts)
Connexion directe d’un microphone dynamique ou d’une source
de niveau ligne sur prise mixte
Alimentation par prise PowerCon à sécurité mécanique et renvoi
vers les appareils en aval
Filtre passe-haut commutable à 120 Hz
Enceinte robuste en contreplaqué
Applications
Puissant moniteur « bain de pieds » pour une utilisation comme
retour de scène
Enceinte large bande de façade pour petites sonorisations
Amplificateur vocal simple pour répétitions
Moniteur large bande personnel pour les préamplis instrument
des guitaristes, bassistes, entre autres.
22
Page 23

www.nowsonic.com
Nowsonic Stagetrip 10 / Stagetrip 12
Mode d‘emploi
FR
Connexions et commandes
Sur le côté droit de la Stagetrip 10/12 sont disponibles les connexions
et commandes suivantes :
4
5
6
2
3
7
1
1. Interrupteur d’alimentation POWER et fusible
Cet interrupteur permet d’allumer ou d’éteindre l’amplificateur de
puissance interne de la Stagetrip 10/12 : quand l’enceinte est correctement alimentée par la prise
POWER IN 3, le voyant POWER 4 est
allumé en vert.
À côté de l’interrupteur d’alimentation
l’amplificateur de puissance interne : si le voyant
POWER se trouve le fusible de
POWER ne s’allume
pas après la mise sous tension et si le haut-parleur coaxial ne produit
pas de son audible, vérifiez d’abord le fusible interne.
REMARQUE : DANS TOUS LES CAS, débranchez le câble
d’alimentation PowerCon avant d’ouvrir le porte-fusible avec un
tournevis adapté et de le retirer soigneusement de l’enceinte.
Remplacez
8
(
T2.0AL 250 V), sinon l’amplificateur de puissance interne risque
TOUJOURS le fusible par un modèle de même type
d’être sérieusement endommagé.
9
2. Prise POWER OUT
Grâce à la prise PowerCon POWER OUT, vous pouvez renvoyer
l’alimentation électrique de la Stagetrip 10/12 vers les appareils branchés à la suite.
REMARQUE: notez que la prise POWER OUT fournit un courant
maximal de 4 ampères. Si les appareils branchés en aval nécessitent une intensité supérieure, vous devez les connecter directement au réseau électrique.
23
Page 24

FR
Nowsonic Stagetrip 10 / Stagetrip 12
Mode d‘emploi
www.nowsonic.com
3. Prise POWER IN
Branchez le câble d’alimentation PowerCon fourni à la prise POWER
. Enfoncez le connecteur PowerCon dans la prise et tournez-le vers
IN
la droite jusqu’à ce qu’il se verrouille : ainsi, le connecteur est maintenu dans l’appareil, une déconnexion accidentelle sera donc impossible. Pour le retirer, tirez le loquet à ressort vers l’arrière et tournez le
connecteur vers la gauche.
En cas de perte du câble d’alimentation, veuillez contacter le détaillant
chez qui vous avez acheté votre Stagetrip 10/12.
4. Voyants
Quand la Stagetrip 10/12 est raccordée au secteur au moyen du câble
d’alimentation PowerCon fourni et allumée, le voyant
lumé en vert : si le voyant ne s’allume pas, vérifiez toujours le fusible
interne, voir le point 1.
Le voyant
signal (-20 dB). Si le niveau du signal dépasse la sensibilité de l’étage
d’entrée de la Stagetrip 10/12, le voyant s’allume en rouge : dans ce
cas, baissez le niveau de la source jusqu’à ce que le voyant ne s’allume
plus en rouge.
5. Commande
Avec la commande LEVEL, vous contrôlez le volume de l’amplificateur
de puissance interne de la Stagetrip 10/12.
SIG/CLIP et POWER
POWER est al-
SIG/CLIP s’allume quand la prise d’entrée INPUT reçoit un
LEVEL
6. Prise
LINK
Avec la prise LINK, vous pouvez renvoyer vers les appareils suivants
(comme par exemple d’autres moniteurs Stagetrip) le signal reçu en
prise
INPUT 7. Le signal sort au niveau ligne.
INPUT
7. Prise
Avec la prise d’entrée mixte INPUT, vous faites entrer un signal externe
dans l’amplificateur de puissance interne de la Stagetrip 10/12. La Stagetrip 10/12 peut traiter des signaux de niveau microphone ou ligne,
la commutation de la sensibilité se faisant au moyen de la touche
LINE 9
La connexion ligne se fait par l’entrée jack 6,35 mm 3 points (
peut donc être symétrique.
8. Touche
Avec cette touche, vous pouvez activer un filtre passe-haut interne
pour réduire les parasites en dessous de 120 Hz. De cette façon, vous
pouvez par exemple minimiser les résonances de basse fréquence
(dans une utilisation comme retour de scène) ou les plosives (si vous
branchez un microphone).
Lorsque la touche n’est pas enfoncée, le filtre est inactif.
.
REMARQUE: notez que l’entrée microphone de la prise INPUT
n’est pas destinée à la connexion directe d’un microphone électrostatique (« à condensateur »). La tension d’alimentation requise
ne peut pas être fournie par la Stagetrip 10/12. Il vous faut dans ce
cas une alimentation externe pour le microphone.
FLAT/LOW CUT
MIC/
TRS) et
24
Page 25

www.nowsonic.com
Nowsonic Stagetrip 10 / Stagetrip 12
Mode d‘emploi
FR
9. Touche MIC/LINE
Avec cette touche, vous choisissez la sensibilité d’entrée de la Stagetrip 10/12 pour le signal reçu par la prise
microphone, augmentez la sensibilité en enfonçant la touche. Si la
touche n’est pas enfoncée, la prise
ment d’une source de niveau ligne.
REMARQUE: notez que la sensibilité doit toujours être adaptée
à la source connectée. Si vous faites entrer un signal de niveau
ligne alors que la touche
peut se produire, due à la saturation de l’étage d’entrée. Inverse-
ment, vous risquez de ne pas obtenir un volume suffisant si vous
connectez un microphone alors que la touche
pas enfoncée. Par conséquent, en cas de problèmes, commencez
toujours par vérifier la touche
Utilisation comme enceinte de façade
En alternative à l’utilisation comme retour de scène, la Stagetrip 10/12
peut aussi servir d’enceinte de façade dans de petites sonorisations.
Pour cette application, la Stagetrip 10/12 possède sur son côté droit,
juste à côté du panneau des connecteurs et commandes, une embase
pour trépied standard (diamètre du mât : 35 mm) : cette disposition
présente l’avantage de mieux protéger sous l’enceinte les connecteurs,
les commandes et l’amplificateur interne contre l’humidité, la poussière et/ou l’exposition directe au soleil.
MIC/LINE est enfoncée, de la distorsion
INPUT. Si vous branchez un
INPUT est réglée pour le branche-
MIC/LINE n’est
MIC/LINE .
Pour l’utilisation comme enceinte de façade, soulevez délicatement la
Stagetrip 10/12 et guidez le mât du trépied dans l’embase prévue à
cet effet : assurez-vous que le mât du trépied est inséré à fond dans
l’embase pour assurer une stabilité maximale.
ATTENTION: veillez toujours à ce que le centre de gravité du
pied soit aussi bas que possible pour que la Stagetrip 10/12 ne
puisse pas basculer accidentellement. Serrez correctement toutes
les molettes du trépied et si nécessaire, arrimez l’ensemble trépied
– Stagetrip 10/12 pour éviter sa chute/bascule.
NOWSONIC NE PEUT EN AUCUN CAS ÊTRE TENU RESPON
SABLE D’UN QUELCONQUE DOMMAGE DÛ AU RENVERSE
MENT D’UNE ENCEINTE STAGETRIP MONTÉE SUR PIED.
25
Page 26

FR
Nowsonic Stagetrip 10 / Stagetrip 12
Mode d‘emploi
Caractéristiques techniques Contenu
Modèle Stagetrip 10 Stagetrip 12
Type
Haut-parleurs
Fréquence de
répartition (Crossover)
Dispersion pavillon coaxial 60° × 60°
Puissance
Commandes de
réglage
Entrées
Sensibilité micro 6 mV
Sensibilité ligne 450 mV
Connexion électrique entrée PowerCon (bleue), sortie PowerCon (grise), max. 4 A
Tension d'alimentation 220–240 volts, 50 Hz
Puissance consommée 450 watts 600 watts
Fusible T2.0
Plage de fréquences 65 Hz–20 kHz 55 Hz–20 kHz
Niveau de pression
acoustique (
Enceinte contreplaqué peint
Dimensions 408 × 361 × 460 mm 482 × 406 × 530 mm
Couleur peinture texturée noire
Poids 12,8 kg 16,0 kg
SPL)
Enceinte active coaxiale à 2 voies pour une utilisation
large bande
1 woofer de 25 cm et 1
tweeter titane de 25 mm
2,6 kHz 2,5 kHz
max. 300 W + 100 W
(biamplification)
niveau, touche d'activation de filtre coupe-bas (120 Hz),
touche d'entrée micro/ligne
entrée microphone/ligne sur connecteur mixte
XLR/jack 6,35 mm 3 points (TRS)
AL 250 V
max. 121 dB max. 123 dB
1 woofer de 30,5 cm et 1
tweeter titane de 34 mm
max. 450 W + 100 W
(biamplification)
www.nowsonic.com
Stagetrip 10/12 : 1
Câble d’alimentation PowerCon : 1
Mode d’emploi : 1
Clause de non responsabilité
Nowsonic a veillé avec le plus grand soin à ce que toutes les informations contenues dans ce mode d’emploi soient aussi précises et
complètes que possible.
Nowsonic n’assume aucune responsabilité en cas de perte ou
dommage, subi par le propriétaire de l’appareil, par d’autres appareils
ou par des tiers, découlant des informations contenues dans ce mode
d’emploi ou du matériel décrit ici.
Maintenance
Si vous avez des questions ou des problèmes techniques, veuillez
d’abord contacter le revendeur chez qui vous avez acheté l’appareil.
Pour toute réparation, veuillez également contacter votre revendeur. Si
cela n’est pas possible, vous pouvez aussi nous contacter directement.
Nos coordonnées se trouvent sur notre site Web www.nowsonic.com.
26
Page 27

www.nowsonic.com
REMARQUE: l’appareil a été emballé à l’usine de façon à assurer
un niveau de protection suffisamment élevé contre les dommages
dus à l’expédition. S’il a néanmoins été endommagé pendant le
transport, veuillez contacter directement le vendeur qui vous a
livré l’appareil et lui indiquer les dommages. Nous vous recom-
mandons de conserver les emballages d’origine au cas où vous
auriez besoin un jour d’expédier l’appareil.
Mentions légales
Ce mode d’emploi est sous copyright © 2014 : Nowsonic
Les fonctionnalités, caractéristiques techniques et disponibilité du produit peuvent être modifiées sans préavis.
Édition v. 1.0, 07/2014
Stagetrip 10 : Art. 310772
Stagetrip 12 : Art. 310773
Nowsonic Stagetrip 10 / Stagetrip 12
Mode d‘emploi
FR
27
Page 28

ES
Nowsonic Stagetrip 10 / Stagetrip 12
Instrucciones de uso
www.nowsonic.com
INSTRUCCIONES DE SEGURIDAD IMPORTANTES
1) Lea estas instrucciones.
2) Conserve estas instrucciones.
3) Preste atención a todas las advertencias.
4) Siga todo lo indicado en estas instrucciones.
5) No utilice este aparato cerca del agua.
6) Límpielo solo con un trapo suave y seco.
7) ¡No bloquee ninguna de las aberturas de ventilación! Instale este
aparato de acuerdo con las instrucciones del fabricante.
8) No instale esta unidad cerca de radiadores, calentadores, hornos
u otras fuentes de calor.
9) No desconecte en ningún caso el contacto de seguridad del
enchufe. Un enchufe polarizado tiene dos bornes de distinta
anchura. Un enchufe schuko tiene dos contactos y un tercero de
toma de tierra. El borne ancho del enchufe polarizado, es decir, la
toma de tierra del enchufe schuko, sirve para preservar su propia
seguridad Si el enchufe del cable de red suministrado no encaja
en su toma corriente, procúrese en un comercio especializado
un cable adecuado.
10) No aplaste ni doble el cable, y maneje con especial atención
tanto la clavija como los conectores hembra.
11) Use solo acoplamientos/accesorios especificados por el
fabricante.
12) Utilice esta unidad solo con bastidores, trípodes o mesas que
respeten las especificaciones del fabricante o que estén incluidos
en el volumen de suministro del aparato. Tenga mucho cuidado
durante el transporte para evitar lesiones debidas a la caída de
objetos o a partes oxidadas.
13) Desenchufe este aparato durante las tormentas eléctricas o
cuando no lo use por un largo periodo de tiempo.
14) Remita todo servicio de reparación o mantenimiento a personal
técnico cualificado. Es necesario que un especialista revise el
aparato cuando haya sufrido algún tipo de daño, por ej., cuando
se haya dañado el enchufe o cable de alimentación, se haya
derramado líquido o se hayan introducido objetos en el aparato,
el aparato haya sido expuesto a lluvia o humedad, no funcione
de manera normal o haya sufrido algún otro tipo de daño.
28
Page 29

www.nowsonic.com
Nowsonic Stagetrip 10 / Stagetrip 12
Instrucciones de uso
ES
ADVERTENCIA:
Para reducir el riesgo de incendios o descargas eléctricas, no
permita que este aparato quede expuesto a la lluvia o la humedad.
Este equipo no debe ser expuesto a goteos o salpicaduras de
líquidos.
Este dispositivo debe estar conectado a tierra.
Utilice un cable de red apantallado con tres conductores como el
suministrado junto con el aparato.
Tenga en cuenta que los distintos tipos de voltajes requieren el uso
de distintos tipos de cables y enchufes.
Respete siempre las normas de seguridad locales.
Este equipo debe instalarse cerca de una toma de corriente. La
toma de corriente debe ser siempre fácilmente accesible.
Para desconectar completamente este equipo de la red,
desconecte el enchufe del cable de alimentación de la toma de
corriente.
Por favor siga las instrucciones del fabricante para su instalación.
No lo instale en un espacio restringido.
No abra la unidad – riesgo de descarga eléctrica.
PRECAUCIÓN!
Por favor tenga en cuenta que: los cambios o modificaciones de
este dispositivo que no hayan sido aprobados expresamente en este
manual podrían invalidar su autorización para manejar el instrumento.
Servicio
No hay piezas reparables por el usuario en su interior.
Para mantenimiento solicite la ayuda de personal cualificado.
PRECAUCIÓN: PARA REDUCIR EL RIESGO DE DESCARGAS
ELÉCTRICAS, NO DESMONTE LA CUBIERTA SUPERIOR. NO HAY
PIEZAS EN SU INTERIOR QUE PUEDA SUSTITUIR EL USUARIO.
REMITA TODO SERVICIO DE MANTENIMIENTO SÓLO A PERSONAL
TÉCNICO CUALIFICADO.
El rayo dentro de un tríangulo equilátero alerta al usuario de la
presencia de voltaje peligroso no aislado dentro del producto, que
puede tener un nivel suficiente para constituir un riesgo de descarga eléctrica para el usuario.
El signo de exclamación inscrito en un triángulo equilátero alerta a
los usuarios de la presencia de instrucciones importantes de funcionamiento y mantenimiento (servicio) en la literatura que acompaña
al producto.
29
Page 30

ES
Nowsonic Stagetrip 10 / Stagetrip 12
Instrucciones de uso
www.nowsonic.com
Introducción
¡Muchas gracias por adquirir el altavoz activo Nowsonic Stagetrip
10/12! El Nowsonic Stagetrip 10/12 es un altavoz monofónico que
debido a la disposición coaxial del woofer y el tweeter proporciona
una mejora significativa en la dispersión del sonido: debido a la reproducción sonora selectiva, el oyente puede localizar mejor las fuentes
de sonido, también se reducen significativamente los errores de fase
por cancelación o sobreacentuación. El Stagetrip 10/12 está equipado
con un woofer de 10“ (Stagetrip 10), o bien, de 12“ (Stagetrip 12), así
como con un tweeter de titanio de 1“ (Stagetrip 12: 1,35“) que son
excitados por una etapa final interna con 2 canales de amplificación
(bi-amping) de 300/450 vatios (woofer) y de 100 vatios. Gracias a la
forma de su caja, así como el adaptador integrado para trípodes, el
Stagetrip 10/12 se puede utilizar como monitor de piso o en siste-
mas
FOH como altavoz de rango completo: en su uso con trípode, el
amplificador se encuentra en la parte inferior de la caja y está por tanto
mejor protegido contra la humedad y el polvo. En la entrada, el Stagetrip 10/12 puede recibir señales de nivel de línea (de un mezclador
o un reproductor de
CD). También es posible conectar un micrófono
dinámico: la sensibilidad se conmuta mediante un botón, un filtro de
paso alto conmutable, en caso necesario, mejora la inteligibilidad de
una voz.
Con las salidas respectivas, la señal de audio de entrada y la fuente de
alimentación pueden ser pasadas a la siguiente unidad.
Características
Altavoz activo de 2 vías con altavoces en disposición coaxial
Woofer de 1 × 10“ o 1 × 12“ y tweeter de titanio de 1 × 1“ o 1 × 1,35“
Cobertura de campo acústico de 60° × 60°
Alta potencia y alta presión acústica gracias a la etapa final bi-
amping interna (300/450 vatios y 100 vatios)
Conexión directa de un micrófono dinámico o de una fuente de
línea con el conector combo
Alimentación a través de conector PowerCon con seguro mecáni-
co y con posibilidad de conexión en bucle a equipos conectados
a continuación
Filtro de paso alto activable a 120 Hz
Caja robusta de madera contrachapada
Aplicaciones
Monitor de piso de gran potencia para uso en escenarios
Altavoz FOH de rango completo para sistemas PA de pequeño
tamaño
Amplificador de voz para ensayos
Monitor de rango completo personal para el uso con
preamplificadores de guitarristas, bajistas, etc.
30
Page 31

www.nowsonic.com
Nowsonic Stagetrip 10 / Stagetrip 12
Instrucciones de uso
ES
Conectores y controles
En la parte lateral derecha del Stagetrip 10/12 se encuentran las
siguientes conexiones y controles:
4
5
6
2
3
7
1
8
9
1. Interruptor POWER y fusible
Este interruptor enciende o apaga el amplificador interno del Stagetrip
10/12: si el monitor recibe energía correctamente a través del conector
POWER IN 3, el LED POWER 4 se enciende en color verde.
Junto al interruptor de encendido
para el amplificador de potencia interno: si el indicador
encendido
POWER no se ilumina después de conectarlo y el altavoz
POWER se encuentra el fusible
LED de
coaxial no produce ningún ruido audible, debe comprobar el fusible
interno.
OBSERVACIÓN: retire SIEMPRE el cable de alimentación
PowerCon antes de abrir el portafusibles con un destornillador
adecuado y sáquelo con cuidado. Reemplace
por un fusible del mismo tipo
T2.0AL 250 V, de lo contrario
SIEMPRE el fusible
el amplificador de potencia interno podría resultar dañado
seriamente.
2. Enchufe
POWER OUT
A través del enchufe PowerCon POWER OUT puede hacer pasar la
alimentación de energía del Stagetrip 10/12 a unidades conectadas a
continuación.
OBSERVACIÓN: tenga en cuenta que el conector de salida
POWER OUT
proporciona una corriente máxima de 4 amperios.
Si la siguiente unidad requiere más potencia, deberá conectarla
directamente a la red eléctrica.
31
Page 32

ES
Nowsonic Stagetrip 10 / Stagetrip 12
Instrucciones de uso
www.nowsonic.com
3. Enchufe POWER IN
En el enchufe PowerCon POWER IN se conecta el cable de alimen-
tación PowerCon suministrado. Inserte el conector PowerCon en el
enchufe y gire hacia la derecha hasta que encaje: Con ello, el conector queda fijado al equipo, un desenchufe accidental no es posible.
Para retirar el conector, tire del bloqueo por resorte hacia atrás y gire el
conector hacia la izquierda.
En caso de pérdida del cable, póngase en contacto con el distribuidor
donde compró su Stagetrip 10/12.
4. Los
LED SIG/CLIP y POWER
Cuando el Stagetrip 10/12 está conectado, con el cable de alimentación PowerCon incluido, a la red eléctrica y encendido, se activa
el indicador
compruebe el fusible interno, véase el punto 1 anterior.
EL LED SIG/CLIP se enciende cuando en la entrada INPUT se
encuentra una señal de (-20 dB). Si el nivel de la señal excede la
sensibilidad de la etapa de entrada del Stagetrip 10/12, el
enciende en rojo: reduzca en tal caso el nivel de la fuente hasta que el
LED
5. Control
Con el control LEVEL puede controlar el nivel de volumen del
amplificador interno del Stagetrip 10/12.
LED POWER en color verde. Si el LED no se enciende,
LED se
no se encienda en rojo.
LEVEL
6. Enchufe
Con el enchufe LINK puede pasar la señal conectada al enchufe
INPUT 7
La señal se emite con nivel de línea.
7. Enchufe INPUT
Con el conector combo INPUT puede conectar una señal externa
al amplificador interno del Stagetrip 10/12. El Stagetrip 10/12 puede
recibir una señal de micrófono o de línea, la conmutación de la sensibilidad se realiza con el botón
La conexión de línea es una entrada del tipo
cuencia una señal balanceada.
8. Botón
Con este botón puede activar un filtro de paso alto interno que reduce señales de interferencia por debajo de 120 Hz. De esta manera se
pueden minimizar, por ejemplo, las resonancias de baja frecuencia (en
un uso como monitor de escenario) y también ruidos al conectar un
micrófono.
Si el botón no está pulsado, el filtro no está activado.
LINK
a otras unidades (por ejemplo, otros monitores Stagetrip).
MIC/LINE 9.
TRS y posibilita en conse-
OBSERVACIÓN: tenga en cuenta que la entrada de micrófono
no está prevista para la conexión directa de micrófonos de
INPUT
condensador. La tensión de alimentación requerida no está disponible desde el Stagetrip 10/12. En este caso necesitará una fuente
de alimentación externa para el micrófono.
FLAT/LOW CUT
32
Page 33

www.nowsonic.com
Nowsonic Stagetrip 10 / Stagetrip 12
Instrucciones de uso
ES
9. Botón MIC/LINE
Utilice este botón para ajustar la sensibilidad del Stagetrip 10/12 a la
señal de entrada en el enchufe
fono, aumente la sensibilidad pulsando el botón. Si no se pulsa el
botón, el enchufe
de línea.
OBSERVACIÓN: tenga en cuenta que la sensibilidad debe
adaptarse siempre a la fuente conectada. Si conecta una señal de
línea y el botón
torsiones audibles ya que la etapa de entrada posiblemente esté
sobrecargada. A la inversa, puede haber un volumen insuficiente
si se conecta un micrófono y no está pulsado el botón
Por ello, compruebe —en caso de problemas de modulación—
siempre el botón
Uso como altavoz
Como alternativa al uso como monitor de escenario, puede utilizar
el Stagetrip 10/12 como altavoz de rango completo para pequeños
sistemas
en el lado derecho de la caja, junto a las conexiones y controles, un
adaptador para trípodes convencionales (diámetro de tubo: 35 mm).
Esta disposición tiene la ventaja de que los conectores, los controles
y el amplificador interno se encuentran en la parte inferior de la caja
y están mejor protegidos contra la humedad, el polvo y la luz solar
directa.
FOH. Para este caso de aplicación, el Stagetrip 10/12 lleva
INPUT está ajustado para la conexión de señales
MIC/LINE está pulsado, pueden producirse dis-
MIC/LINE.
FOH
INPUT. Cuando se conecta un micró-
MIC/LINE.
Para el funcionamiento como altavoz
Stagetrip 10/12 y posiciónelo sobre el tubo del trípode en el orificio
previsto: asegúrese de que el tubo quede insertado hasta el fondo del
adaptador para tener la máxima estabilidad.
ATENCIÓN: asegúrese también de que el centro de gravedad del
trípode quede suficientemente bajo para que el Stagetrip 10/12
no pueda caer accidentalmente. Apriete correctamente todos las
roscas del trípode y fije también el conjunto trípode y Stagetrip
10/12 contra una posible caída o vuelco.
NOWSONIC NO SE HACE RESPONSABLE POR CUALQUIER
DAÑO PRODUCIDO POR EL VUELCO DE UNA UNIDAD
STAGETRIP USADA CON UN TRÍPODE.
FOH, levante con cuidado el
33
Page 34

ES
Nowsonic Stagetrip 10 / Stagetrip 12
Instrucciones de uso
Especicaciones Volumen de suministro
Modelo Stagetrip 10 Stagetrip 12
Tipo Altavoz activo coaxial de 2 vías de rango completo
Altavoces
Frecuencia de cruce 2,6 kHz 2,5 kHz
Directividad 60° × 60° bocina coaxial
Potencia
Ajustes
Entradas conector híbrido
Sensibilidad Mic 6 mV
Sensibilidad Line 450 mV
Conexión a la red PowerCon In (azul), PowerCon Out (gris), máx. 4 Amp
Tensión de funciona-
miento
Consumo de potencia 450 vatios 600 vatios
Fusible T2.0
Margen de frecuencia 65 Hz–20 kHz 55 Hz–20 kHz
SPL
Caja contrachapado con un acabado de pintura
Dimensiones 408 × 361 × 460 mm 482 × 406 × 530 mm
Color acabado en negro texturizado
Peso 12,8 kg 16,0 kg
1 × 10" woofer y 1 × 1"
tweeter de titanio
máx. 300 W + 100 W
(biamplificación)
Nivel, botón de corte de graves (Flat/Low, 120 Hz), botón
de entrada micrófono/línea (Mic/Line)
XLR y TRS para micrófono/línea
220–240 V
máx. 121 dB máx. 123 dB
CA, 50 Hz
AL 250 V
1 × 12" woofer y 1 × 1,35"
tweeter de titanio
máx. 450 W + 100 W
(biamplificación)
Stagetrip 10/12: 1 ×
Cable de alimentación PowerCon: 1 ×
Instrucciónes de uso: 1 ×
Descargo de responsabilidad
Nowsonic ha llevado a cabo todos los pasos posibles para asegurar
que la información aquí contenida es a la vez correcta y completa.
Nowsonic no puede aceptar en ningún caso responsabilidades por
pérdidas o daños al propietario del equipo, terceras partes u otros
equipos, que pudieran resultar del uso de este manual o del equipo
que se describe en este documento.
Servicio
Si tiene problemas o preguntas técnicas, consulte primero al distribui-
dor local donde haya adquirido el aparato.
En caso de requerir servicio técnico, le rogamos que también se dirija a
su distribuidor local. Si lo desea, también puede ponerse directamente
en contacto con nosotros. Encontrará nuestros datos de contacto en
nuestra página web www.nowsonic.com.
www.nowsonic.com
34
Page 35

www.nowsonic.com
OBSERVACIÓN: tenemos gran cuidado en el empaquetado del
dispositivo colocándolo en una caja bien protegida en la fábrica,
por lo que es muy improbable que sufra daños durante el envío.
No obstante, si esto sucediera, por favor, póngase en contacto
inmediatamente con el proveedor que le ha entregado el aparato
y muéstrele los daños. Le recomendamos que conserve el emba-
laje original para el caso de que sea necesario enviar el aparato en
un momento posterior.
Advertencias legales
Copyright de este manual del usuario © 2014: Nowsonic
Las características, especificaciones y disponibilidad del producto
pueden modificarse sin aviso previo.
Edición v 1.0, 07/2014
Stagetrip 10: N.° de artículo 310772
Stagetrip 12: N.° de artículo 310773
Nowsonic Stagetrip 10 / Stagetrip 12
Instrucciones de uso
ES
35
Page 36

PL
Nowsonic Stagetrip 10 / Stagetrip 12
Instrukcja obsługi
www.nowsonic.com
WAŻNE WSKAZÓWKI DOTYCZĄCE BEZPIECZEŃSTWA
1) Przeczytaj niniejszą instrukcję.
2) Zachowaj niniejszą instrukcję.
3) Przestrzegaj wszystkich ostrzeżeń.
4) Stosuj się do wszystkich poleceń.
5) Nie obsługuj niniejszego urządzenia w pobliżu wody.
6) Do czyszczenia urządzenia używaj wyłącznie suchej ściereczki.
7) Nie zastawiaj wylotu otworów wentylacyjnych. Przy instalacji
urządzenia postępuj zgodnie z poleceniami producenta.
8) Nie stawiaj urządzenia w pobliżu grzejników, bojlerów, pieców
lub innych źródeł ciepła.
9) W żadnym wypadku nie zaklejaj kontaktu uziemienia wtyczki.
Wtyczka bezpieczeństwa zawiera dwa bolce, z których jeden jest
szerszy od drugiego. Zwykła wtyczka sieciowa zawiera dwa bolce
oraz trzeci kontakt uziemienia. Szerszy bolec bezpiecznej wtyczki
lub kontaktu uziemienia wtyczki sieciowej służy zapewnieniu
Twojego bezpieczeństwa. W przypadku, kiedy wtyczka kabla sie-
ciowego znajdującego się w dostarczonym komplecie nie pasuje
do gniazdka, zakup pasujący kabel w sklepie specjalistycznym.
10) Nie depcz kabla, nie załamuj go i obchodź się z nim ostrożnie,
szczególnie w miejscu połączenia z urządzeniem.
11) Używaj wyłącznie części przewidzianych przez producenta dla
tego urządzenia.
12) Używaj tylko stojaków, statywów lub stołów, które odpowiadają
wymaganiom producenta lub są dostarczane razem z
urządzeniem. Zachowaj ostrożność podczas transportu, by
uniknąć obrażeń spowodowanych przez przesuwające się lub
spadające przedmioty.
13) Wyciągnij wtyczkę z gniazdka sieciowego podczas burzy a także
wtedy, kiedy nie używasz urządzenia przez dłuższy czas.
14) W przypadku naprawy serwisowej korzystaj z usług
wykwalifikowanego personelu. Pozwól skontrolować urządzenie
fachowcowi, w przypadku kiedy np. uszkodzone są kabel lub
wtyczka sieciowa, do obudowy dostały się płyny lub inne
przedmioty, urządzenie stało na deszczu lub w wilgotnym
środowisku, nieprawidłowo funkcjonuje lub w jakikolwiek inny
sposób zostało uszkodzone.
36
Page 37

www.nowsonic.com
Nowsonic Stagetrip 10 / Stagetrip 12
Instrukcja obsługi
PL
OSTRZEŻENIE:
Aby ograniczyć niebezpieczeństwo pożaru i porażenia prądem,
nie wystawiaj urządzenia na deszcz i nie poddawaj go działaniu
wilgoci.
Nie stawiaj na urządzeniu żadnych pojemników z wodą, gdyż
mogą one się przewrócić i woda może dostać się do wnętrza
urządzenia.
Niniejsze urządzenie musi być uziemione.
Używaj trójprzewodowego, ekranowanego kabla zasilającego
takiego, jak dostarczony razem z urządzeniem kabel zasilający.
Zwróć uwagę, że dla różnych napięć potrzebne są różne kable
zasilające i/lub wtyczki sieciowe.
Przestrzegaj zawsze lokalnych przepisów bezpieczeństwa.
Ustaw urządzenie w pobliżu gniazda sieciowego. Gniazdo
powinno być zawsze łatwo dostępne.
Wyciągnij wtyczkę z gniazdka, aby całkowicie odciąć urządzenie
od prądu.
Podczas instalacji stosuj się do wszystkich wskazówek producenta.
Nie używaj urządzenia w trudno dostępnym miejscu.
Nie otwieraj urządzenia – niebezpieczeństwo porażenia prądem.
UWAGA!
Zwróć uwagę, że wszystkie zmiany lub modyfikacje urządzenia, które
nie są wyraźnie wymienione w niniejszej instrukcji, mogą pozbawić Cię
prawa do używania tego urządzenia
Konserwacja
W urządzeniu nie ma żadnych części, podlegających serwisowaniu
przez użytkownika.
W celu naprawy urządzenia korzystaj tylko z usług
wykwalifikowanego personelu.
UWAGA: ABY UNIKNĄĆ PORAŻENIA PRĄDEM, NIE WOLNO
OTWIERAĆ OBUDOWY. WEWNĄTRZ URZĄDZENIA NIE MA
ŻADNYCH CZĘŚCI, KTÓRE MOGĄ BYĆ WYMIENIANE PRZEZ
UŻYTKOWNIKA. W PRZYPADKU NAPRAWY SERWISOWEJ KORZYS
TAJ Z USŁUG WYKWALIFIKOWANEGO PERSONELU.
Symbol błyskawicy wewnątrz trójkąta równobocznego stanowi
ostrzeżenie przed odsłoniętymi przewodami we wnętrzu
urządzenia, znajdującymi się pod wysokim napięciem, których
dotknięcie grozi niebezpiecznym dla życia porażeniem prądem.
Symbol wykrzyknika wewnątrz trójkąta równoramiennego zwraca
uwagę użytkownika na ważne wskazówki zawarte w załączonej
instrukcji dotyczące obsługi i serwisu urządzenia.
37
Page 38

PL
Nowsonic Stagetrip 10 / Stagetrip 12
Instrukcja obsługi
www.nowsonic.com
Wstęp
Dziękujemy za wybranie aktywnego głośnika Nowsonic Stagetrip
10/12 Nowsonic Stagetrip 10/12 to głośnik monofoniczny, który dzięki
koncentrycznemu układowi głośnika nisko- i wysokotonowego znacznie poprawia zasięg: dzięki selektywnemu odtwarzaniu słuchacz może
lepiej lokalizować źródło dźwięku; co więcej, taka konstrukcja znacznie zmniejsza błędy fazy. Nowsonic Stagetrip 10/12 posiada 10-calowy (Stagetrip 10) lub 12-calowy (Stagetrip 12) głośnik niskotonowy i
1-calowy (Stagetrip 12: 1,35 cala), tytanowy, kopułkowy głośnik wyso-
kotonowy, które są sterowane wewnętrznym wzmacniaczem o mocy
100 W lub 300/ 450 W (głośnik niskotonowy) w trybie bi-amp. Dzięki
zastosowanej obudowie oraz zintegrowanej przystawce do montażu
na statywie, Stagetrip 10/12 może pracować jako monitor podłogowy
lub jako głośnik szerokopasmowy w zastosowaniach
FOH: w trybie
pracy na statywie wzmacniacz znajduje się w dolnej części obudowy,
a zatem jest lepiej chroniony przed wilgocią i pyłem. Głośnik Stagetrip
10/12 może być sterowany sygnałem liniowym (z miksera lub odtwa-
rzacza
CD). Alternatywnie istnieje możliwość podłączenia mikrofonu
dynamicznego: czułość gniazda wejściowego można regulować przy-
ciskiem [
LINE/MIC], a przyciskiem [FLAT/LOW CUT], jeśli to konieczne,
można włączyć filtr górnoprzepustowy, zapewniający lepszą zrozumia-
łość mowy.
Dzięki odpowiedniemu wyjściu sygnał audio może być również kiero-
wany do kolejnych urządzeń.
Cechy urządzenia
Dwudrożna, aktywna kolumna głośnikowa ze współosiowymi
głośnikami
Jeden 10- lub jeden 12-calowy głośnik niskotonowy oraz jeden
tytanowy głośnik wysokotonowy o średnicy 1 lub 1,35 cala
Dyspersja (rozproszenie) 60° × 60°
Wysoka wydajność i duże ciśnienie akustyczne dzięki
wewnętrznemu wzmacniaczowi, pracującemu w trybie bi-amp
(300/450 W lub 100 W ).
Gniazdo zespolone, umożliwiające bezpośrednie podłączenie
mikrofonu dynamicznego lub źródła sygnału liniowego.
Gniazdo wejściowe i wyjściowe zasilania PowerCon z zabezpieczeniem mechanicznym i opcją zasilania kolejnych urządzeń.
Aktywny filtr górnoprzepustowy na pasmo 120 Hz
Solidna obudowa wykonana ze sklejki
Zastosowania
Potężny monitor podłogowy do zastosowań estradowych
Szerokopasmowy głośnik FOH do stosowania w mniejszych
systemach nagłaśniających
Prosty wzmacniacz do prób wokalnych
Osobisty, szerokopasmowy monitor, współpracujący m.in.
z przedwzmacniaczem gitarzysty lub basisty.
38
Page 39

www.nowsonic.com
Nowsonic Stagetrip 10 / Stagetrip 12
Instrukcja obsługi
PL
Złącza i elementy obsługi
Po prawej stronie głośnika Stagetrip 10/12 znajdują się następujące
złącza i elementy sterowania:
4
5
6
2
3
7
1
1. Przełącznik [POWER] i bezpiecznik
Przełącznik służy do włączania lub wyłączania wewnętrznego wzmacniacza mocy: gdy głośnik jest zasilany przez gniazdo
POWER IN 3
dioda POWER 4 świeci kolorem zielonym.
Obok włącznika zasilania znajduje się bezpiecznik, chroniący wzmacniacz wewnętrzny: jeśli po włączeniu zasilania dioda
POWER nie
będzie się świecić, a głośnik nie będzie generować słyszalnego
dźwięku, najpierw należy sprawdzić bezpiecznik.
UWAGA: Przed wyjęciem oprawki bezpiecznika W KAŻDYM
PRZYPADKU
należy najpierw odłączyć kabel zasilania, odpo-
wiednim śrubokrętem odkręcić oprawkę i ostrożnie wyjąć ją z
obudowy; bezpiecznik zawsze należy zastąpić bezpiecznikiem
tego samego typu (
8
9
wewnętrzny wzmacniacz może zostać poważnie uszkodzony.
2. Gniazdo POWER OUT
T2.0AL, 250V), gdyż w innym przypadku
Gniazdo POWER OUT umożliwia przesyłanie zasilania do kolejnych
urządzeń.
UWAGA: Należy pamiętać, że gniazdo POWER OUT może
przesyłać prąd zasilania o natężeniu maksymalnie 4 A. Jeśli
kolejne urządzenie wymaga większej mocy, należy je podłączyć
bezpośrednio do sieci energetycznej.
39
Page 40

PL
Nowsonic Stagetrip 10 / Stagetrip 12
Instrukcja obsługi
www.nowsonic.com
3. Gniazdo POWER IN
Do gniazda zasilania PowerCon POWER IN należy podłączać kabel za-
silania sieciowego PowerCon. Wtyczkę PowerCon włożyć do gniazda
i przekręcić w prawo, aż zatrzaśnie się w gnieździe; tak zamocowana
wtyczka uniemożliwia przypadkowe odłączenie zasilania. Aby wyjąć
wtyczkę, odciągnij sprężynowy zatrzask i wyciągnij obracając w lewo.
W przypadku utraty kabla zasilającego należy skontaktować się ze
sprzedawcą, u którego zakupiono głośnik Stagetrip 10/12.
4. Diody
Jeśli głośnik Stagetrip 10/12 jest podłączony do sieci PowerCon za po-
mocą dostarczonego kabla zasilania i jest włączony, to dioda zasilania
POWER świeci kolorem zielonym: jeśli dioda nie świeci się, w każdym
przypadku należy najpierw sprawdzić wewnętrzny bezpiecznik, patrz
punkt
Dioda
sygnał wejściowy (-20 dB). Jeśli poziom sygnału przewyższa czułość
stopnia wejściowego głośnika Stagetrip10/12, dioda świeci kolorem
czerwonym: należy obniżyć poziom sygnału wejściowego, aby dioda
nie świeciła się.
5. Potencjometr
Potencjometr LEVEL służy do regulacji poziomu wewnętrznego
wzmacniacza mocy głośnika Stagetrip 10/12.
SIG/CLIP I POWER
1.
SIG/CLIP świeci się, gdy do gniazda INPUT doprowadzony jest
LEVEL
6. Gniazdo
Poprzez gniazdo LINK sygnał wejściowy, odbierany gniazdem INPUT
7
Stagetrip). Sygnał będzie mieć poziom sygnału liniowego.
7. Gniazdo INPUT
Gniazdem zespolonym INPUT sygnał wejściowy jest doprowadzany do
wewnętrznego wzmacniacza mocy głośnika Stagetrip 10/12. Głośnik
Stagetrip 10/12 może przetwarzać sygnał liniowy lub monofoniczny
sygnał mikrofonowy, a czułość wejścia zmienia się przełącznikiem
MIC/LINE 9
Wejście liniowe wykonano za pomocą gniazda typu
stosowanie połączenia symetrycznego.
LINK
można przesyłać do kolejnych urządzeń (np. do innych monitorów
.
TRS, co umożliwia
UWAGA: Należy pamiętać, że wejście mikrofonowe gniaz-
da
INPUT nie jest przystosowane do podłączania mikrofonu
pojemnościowego: do gniazda nie jest doprowadzane napięcie,
niezbędne do zasilania mikrofonów pojemnościowych. W takim
przypadku należy stosować zewnętrzne zasilanie mikrofonu
pojemnościowego.
40
Page 41

www.nowsonic.com
Nowsonic Stagetrip 10 / Stagetrip 12
Instrukcja obsługi
PL
8. Przycisk FLAT/LOW CUT
Przycisk służy do włączania wewnętrznego filtra górnoprzepustowego,
tłumiącego dźwięki o częstotliwościach poniżej 120 Hz. Dzięki temu
daje to możliwość redukowania poziomu częstotliwości rezonanso-
wych (gdy głośnik pracuje jako monitor odsłuchowy) lub eliminowania
szumów (gdy podłączony jest mikrofon).
Gdy przycisk nie jest wciśnięty, filtr jest wyłączony.
9. Przycisk
Użyj tego przycisku, aby dopasować czułość wejściową głośnika
Stagetrip 10/12 do sygnału wejściowego, doprowadzonego do gniazda
INPUT. Po podłączeniu mikrofonu zwiększ czułość poprzez naciśnięcie
tego przycisku. Jeśli przycisk nie będzie wciśnięty, do gniazda
będzie można podłączać urządzenia o wyjściu liniowym.
MIC/LINE
INPUT
UWAGA: Należy pamiętać, aby czułość wejściowa była dopaso-
wana do przyłączonego źródła. Jeśli w przypadku dostarczania
sygnału liniowego przycisk
powodować słyszalne zakłócenia, wynikające z ewentualnego
przeciążenia stopnia wejściowego. I odwrotnie, jeśli przycisk
nie będzie wciśnięty, uzyskanie odpowiedniej głośności po
LINE
podłączeniu mikrofonu może być niemożliwe. Dlatego zawsze
należy sprawdzić, czy problemy ze sterowaniem nie są związane z
położeniem przycisku
MIC/LINE będzie wciśnięty, może to
MIC/
MIC/LINE.
Praca jako głośnik
Alternatywnym przeznaczeniem głośnika Stagetrip 10/12 może być
używanie go jako głośnika szerokopasmowego w mniejszych systemach
FOH. W tym celu, po prawej stronie obok panelu sterowania,
umieszczono gniazdo do montażu na konwencjonalnym statywie
(średnica montażowa pod rurę teleskopową: 35 mm): To rozwiązanie
ma tę zaletę, że złącza, elementy sterujące i wzmacniacz wewnętrzny
znajdują się na dole i są lepiej zabezpieczone przed wilgocią, kurzem i/
lub bezpośrednim działaniem promieni słonecznych.
Aby przygotować głośnik Stagetrip 10/12 do pracy w trybie
nieś go ostrożnie i starannie włóż rurę stojaka w otwór: rura stojaka
powinna być do końca włożona w otwór w celu zapewnienia maksymalnej stabilności.
UWAGA: Upewnij się za każdym razem, że środek ciężkości stoja-
ka jest taki, że nie spowoduje przypadkowego przewrócenia się
głośnika Stagetrip 10/12. Jeśli to konieczne, starannie i mocno
dokręć gwintowane połączenie statywu, aby uchronić głośnik
Stagetrip 10/12 przed upadkiem lub przechyleniem się.
FIRMA NOWSONIC NIE BIERZE ODPOWIEDZIALNOŚCI
ZA JAKIEKOLWIEK SZKODY, PONIESIONE W ZWIĄZKU Z
NIEWŁAŚCIWYM MONTAŻEM NA SCENIE GŁOŚNIKÓW
AKTYWNYCH STAGETRIP.
FOH
FOH, pod-
41
Page 42

PL
Nowsonic Stagetrip 10 / Stagetrip 12
Instrukcja obsługi
Specykacja Skład zestawu
Model Stagetrip 10 Stagetrip 12
Typ
Głośniki
Częstotliwość podziału
pasma
Dyspersja 60° × 60° osiowo-stożkowa
Moc
Regulacja
Wejścia
Czułość wejścia mikrofonowego
Czułość wejścia liniowego
Złącze zasilania
Zakres napięcia zasilania 220–240 V AC, 50 Hz
Pobór mocy 450 W 600 W
Bezpiecznik T2.0AL 250 V
Zakres częstotliwości 65 Hz–20 kHz 55 Hz–20 kHz
Poziom ciśnienia akusty-
cznego
Obudowa sklejka lakierowana
Wymiary 408 × 361 × 460 mm 482 × 406 × 530 mm
Kolor czarny (lakier strukturalny)
Waga 12,8 kg 16,0 kg
Aktywny, współosiowy głośnik dwudrożny do
wszechstronnych zastosowań
1 × 10-calowy głośnik
niskotonowy oraz 1 × 1- calowy, tytanowy głośnik
wysokotonowy
2,6 kHz 2,5 kHz
max. 300 W + 100 W
(Bi-Amping)
Potencjometr poziomu, przełącznik filtra górnoprzepustowego (120 Hz), przycisk typu wejścia (Mic/Line)
wejście mikrofonowo-liniowe, wykonane za pomocą gniazda
zespolonego XLR/TRS
6 mV
450 mV
wejście PowerCon (niebieskie), wyjście PowerCon (szare),
prąd maksymalny 4 A.
maks. 121 dB maks. 123 dB
1 × 12-calowy głośnik
niskotonowy oraz 1 × 1,35- calowy, tytanowy głośnik
wysokotonowy
max. 450 W + 100 W
(Bi-Amping)
Wyłączenie odpowiedzialności cywilnej
Firma Nowsonic dołożyła wszelkich starań, by wszystkie informacje w
niniejszym podręczniku zostały przedstawione w jak najdokładniejszy
i wyczerpujący sposób.
Firma Nowsonic nie bierze na siebie jakiejkolwiek odpowiedzialności
za powstałe uszkodzenia lub straty wyrządzone właścicielowi urządze-
nia, osobie trzeciej lub powstałe w innych urządzeniach a będących
skutkiem informacji zawartych w tym podręczniku.
Serwis
W przypadku wystąpienia jakichkolwiek problemów lub pytań natury
technicznej, prosimy zwrócić się w pierwszej kolejności do lokalnego
sprzedawcy, u którego urządzenie zostało zakupione.
W przypadku naprawy serwisowej, prosimy zwrócić się również do
lokalnego sprzedawcy. W innym przypadku prosimy o skontaktowanie
się bezpośrednio z nami. Nasze dane kontaktowe znajdziesz na naszej
stronie internetowej www.nowsonic.com.
42
Głośnik Stagetrip 10/12: 1 szt.
Kabel zasilania PowerCon: 1 ×
Instrukcja obsługi: 1 szt.
www.nowsonic.com
Page 43

www.nowsonic.com
UWAGA: urządzenie zostało firmowo tak zapakowane, by było
wystarczająco zabezpieczone podczas transportu. Gdyby jednak
doszło do uszkodzenia urządzenia podczas transportu, zwróć się
niezwłocznie do dostawcy, który je dostarczył i wskaż uszkodzenia. Zalecamy zachowanie oryginalnego opakowania, na wypadek
konieczności ponownego wysłania urządzenia.
Zastrzeżenia prawne
Prawa autorskie do niniejszego podręcznika użytkownika © 2014:
Nowsonic
Cechy produktu, specyfikacja i dostępność mogą ulec zmianie bez
wcześniejszego powiadomienia.
Wersja 1.0, 07/2014
Artykuł nr. Stagetrip 10: 310772
Artykuł nr. Stagetrip 12: 310773
Nowsonic Stagetrip 10 / Stagetrip 12
Instrukcja obsługi
PL
43
Page 44

Distributed by Sound Service GmbH
WEEE-Reg.-Nr.: DE 18189133
www.nowsonic.com
 Loading...