

Page 1
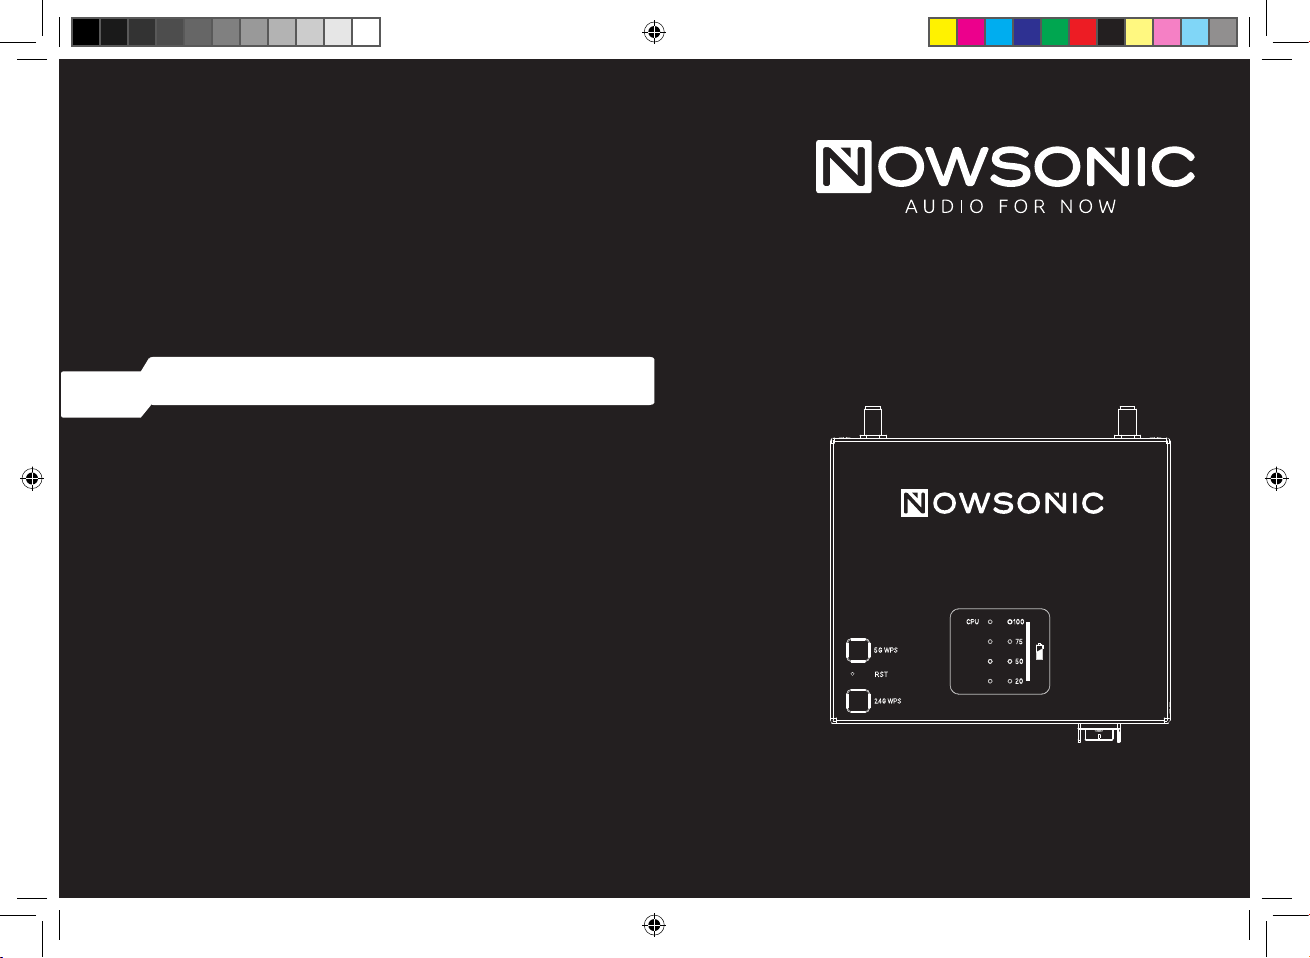
Nowsonic Stage Extender 313806
Dual Band Wireless AC Range Extender
User manual
Bedienungsanleitung
Mode d‘emploi
Manual de usario
Podręcznik użytkownika
5G EXT
2.4G EXT
LINK/ACT
Nowsonic_StageExtender.indb 1 08.03.17 16:20
Page 2
User manual 3
Bedienungsanleitung 13
Mode d‘emploi 23
Manual del usuario 33
Podręcznik użytkownika 43
Nowsonic_StageExtender.indb 2 08.03.17 16:20
Page 3

User manual
www.nowsonic.com
EN
Stage Extender
Contents
■ Introduction
■ Application
■ Safety and handling
■ Description of the back panel
■ Description of the front panel
■ Description of the top panel
■ Connecting the Stage Extender
■ Setting up the connection between the Stage Extender and the Stage Router (Pro)
■ Connecting using the web interface
■ Conguring the Stage Extender using a browser
■ Specications
■ Scope of supply
■ Servicing
■ Legal information
Introduction
Thank you very much for purchasing the Nowsonic Stage Extender! The Nowsonic Stage Extender is a dual band Wi-Fi extender that extends the
range of any Wi-Fi network (802.11 ac/a/n/b/g). It is compatible with both single and dual-band routers, and allows other wireless devices (such
as iPads, iPods, notebooks, tablets and smartphones) to access the Internet. It also has a WAN/LAN port for connecting wired devices to the Wi-Fi
network. The wall plug mounting with interchangeable attachments can be used in conjunction with a range of conventional wall brackets. The
Nowsonic Stage Extender gives users wireless Internet access in hard-to-reach places.
NOTE: The Nowsonic Stage Extender provides a Wi-Fi environment for external peripheral devices. For information on communication problems between an app and the controlled device, please contact the manufacturer of the application or device.
Features
■
Dual-band Wi-Fi extender
■
Complies with the standards 802.11ac/a/b/g/n
■
Data rate of up to 300MBps in the 2.4G band or 433MBps in the 5G band
3
Nowsonic_StageExtender.indb 3 08.03.17 16:20
Page 4

User manual
www.nowsonic.com
EN
Stage Extender
■
Two external antennas supplied for increasing the data rate
■
Metal housing with thread in the base plate for mounting on walls or beams
■
Supports WPS (Wi-Fi Protected Setup)
■
Pairing with other Wi-Fi devices in the same band at the press of a button
■
ON/OFF switch with protective frame
■
Ethernet port for connecting wired devices to the Wi-Fi network
■
Integrated rechargeable battery
■
Micro USB port for charging the integrated battery
■
LEDs showing the battery status
■
Can be operated with power adapter or integrated battery (approx.8 hours)
■
Ideal extension for Nowsonic Stage Router Pro and Stage Router, but also suitable for other Wi-Fi routers
Application
In conjunction with a suitable Wi-Fi router such as the Nowsonic Stage Router and Nowsonic Stage Router Pro models or other Ethernet-ready
devices, the Nowsonic Stage Extender is ideal for the following applications:
■
Use as a mobile or xed Wi-Fi repeater to extend the range of an existing wireless network
■
Wireless control of digital mixers via appropriate apps installed on a Wi-Fi enabled tablet or PC
■
Data transmission between the app on a host computer and a digital peripheral device
Safety and handling
■
Safety instructions
•
When using the Nowsonic Stage Extender, please be aware of the following safety instructions in order to protect yourself, the Stage Extender and connected devices from damage.
•
Please take your time to read this manual carefully in order to operate your Stage Extender properly.
•
Please check the unit for damage after unpacking. If the housing is visibly damaged, please do not operate the unit, but contact your local
dealer where you purchased it.
•
Do not install the Stage Extender during a thunderstorm.
•
Disconnect the Stage Extender from the power during thunderstorms.
•
Never let liquids or dust get inside the housing of the Stage Extender as this could result in electric shocks or could cause short circuits.
4
Nowsonic_StageExtender.indb 4 08.03.17 16:20
Page 5
User manual
www.nowsonic.com
EN
Stage Extender
(BNC uses a special anti-thread and size)
•
The Stage Extender is intended for indoor use only.
•
Do not open the Stage Extender housing. The device contains hazardous components and should only be opened by authorized technicians.
•
Place the Stage Extender in a dry location that is free of dust and protected from direct sunlight, rain, snow and fog from fog machines.
•
Do not place the Stage Extender on top of or below excessively heat-producing units such as power ampliers.
■
Usage instructions
•
To operate and establish a wireless connection with a computer, tablet PC or smartphone, position the Stage Extender as centrally as possible in the range of the desired network coverage.
•
Make sure to keep sucient distance from potential sources of interference and ensure the Stage Extender is positioned in such a way that
the antennas are not concealed by any obstacles.
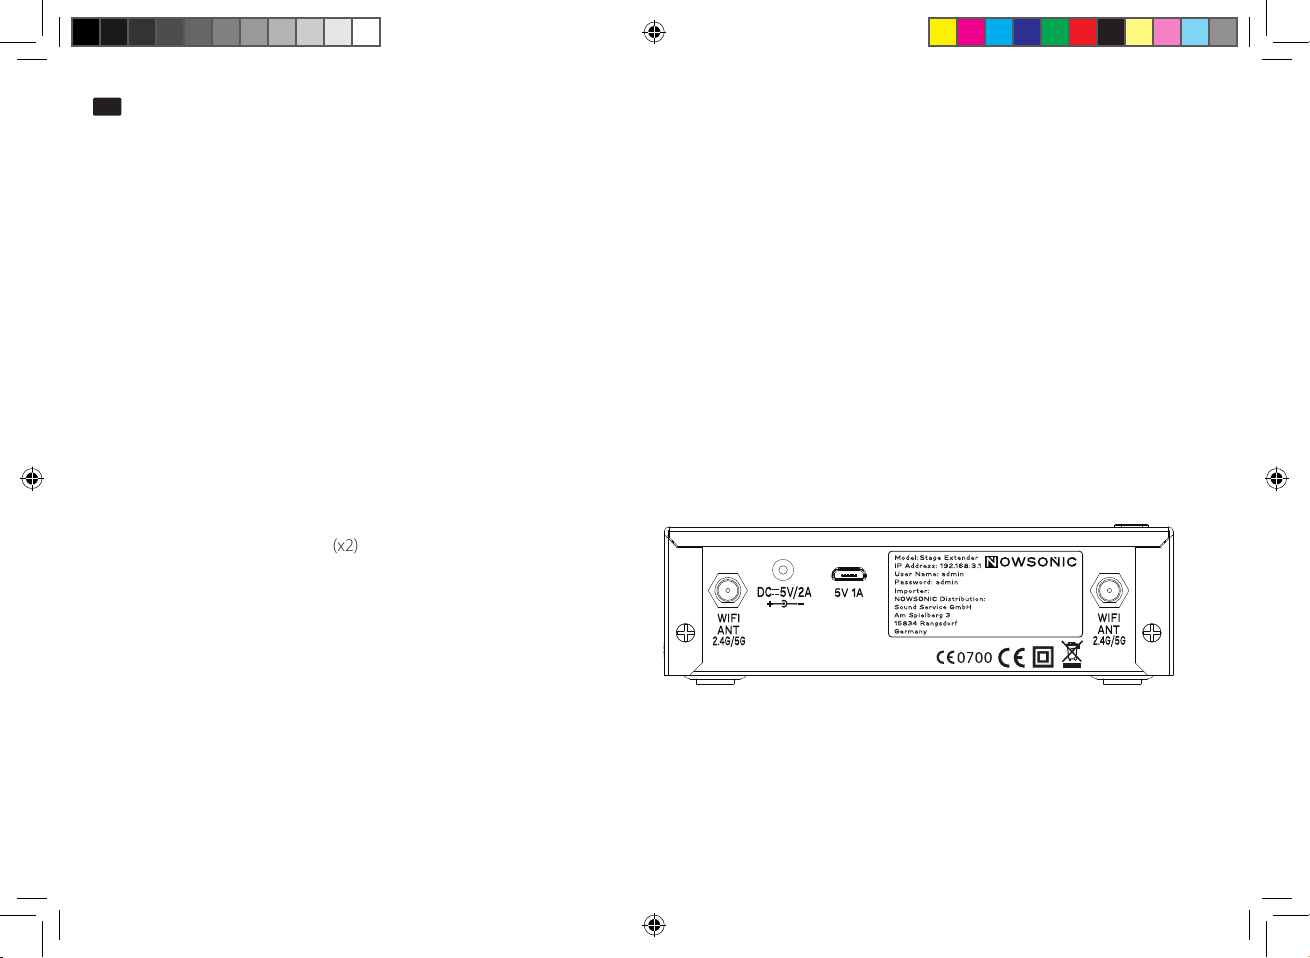
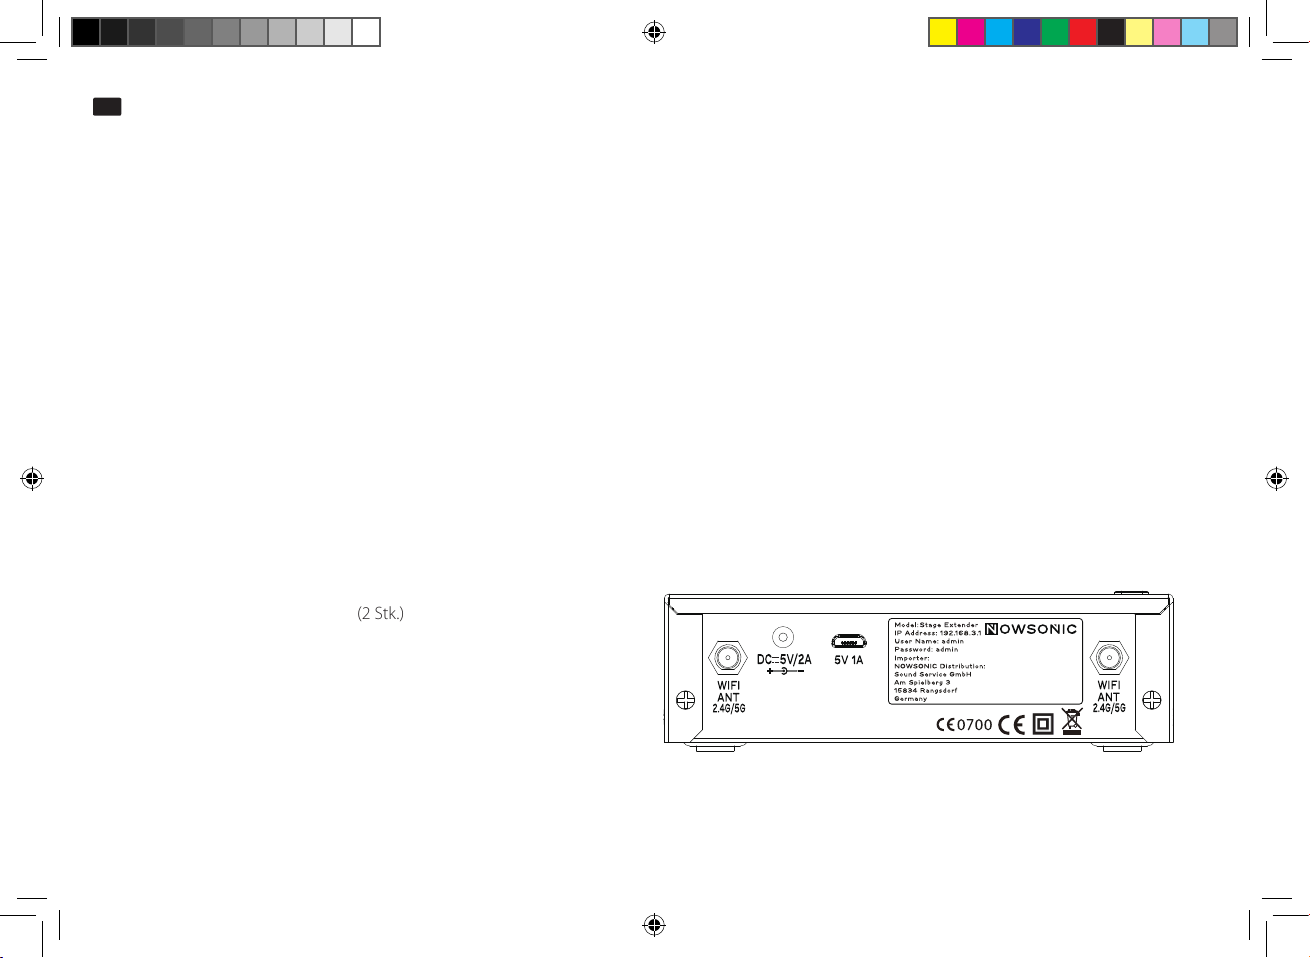
Description of the back panel
The Nowsonic Stage Extender has the following ports on the back panel (from left to right):
■
ANT 2.4G/5G BNC port (x2)
These BNC ports are used to connect the supplied radio antennas
or the antennas from the optionally available Stage Antenna Set.
Always connect both antennas to ensure interruption-free data
transfer in so-called true diversity mode.
■
5V 1A USB port
This USB port can be used to connect an external USB power adapter for charging the internal battery: An appropriate USB charging cable (type A to micro type B) is supplied. Alternatively, you can use this port
to connect the Stage Extender to the USB port on the front of the Nowsonic Stage Router Pro, which provides a voltage of 5V at 2A: The LEDs
on the top of the Stage Extender show the internal battery’s charging status (see “Description of the top panel” on page 7).
NOTE: On the back panel you will nd the Stage Extender’s name plate: This indicates the IP address the device uses to connect to the network. You will also nd the user name and password for conguring the Stage Extender here. For additional information refer to page 11.
Nowsonic_StageExtender.indb 5 08.03.17 16:20
5
Page 6
User manual
www.nowsonic.com
EN
Stage Extender
■
DC 5V/2A socket
This mains adapter socket is used to connect the supplied power adapter (100 – 240V; 50/60Hz 0.4A) for mains operation.
NOTE: Please note that the internal battery can only be charged by a power source connected to the 5V 1A USB port, and not by the DC 5V/2A
mains adapter socket.
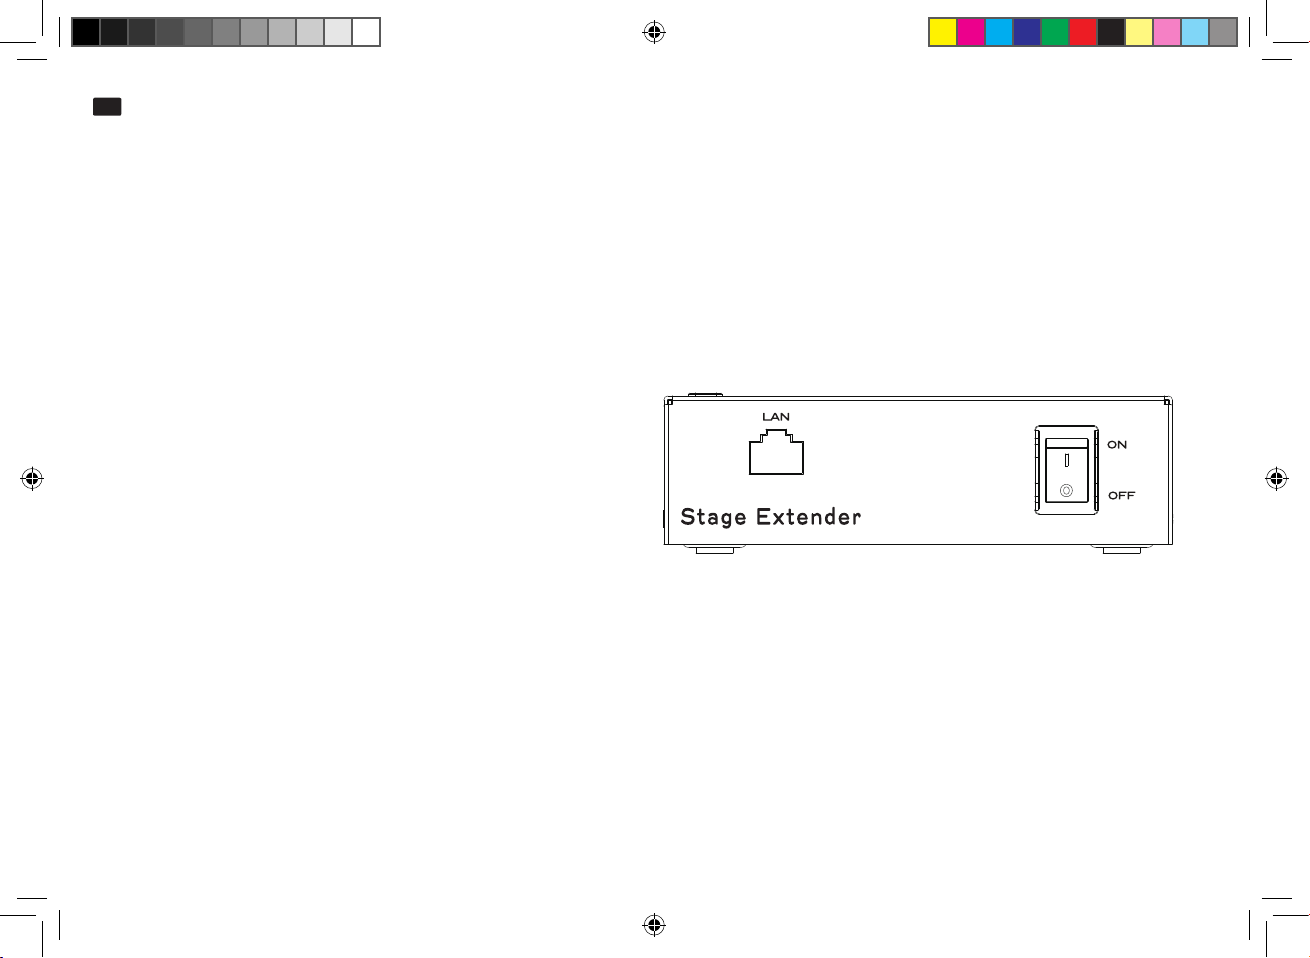
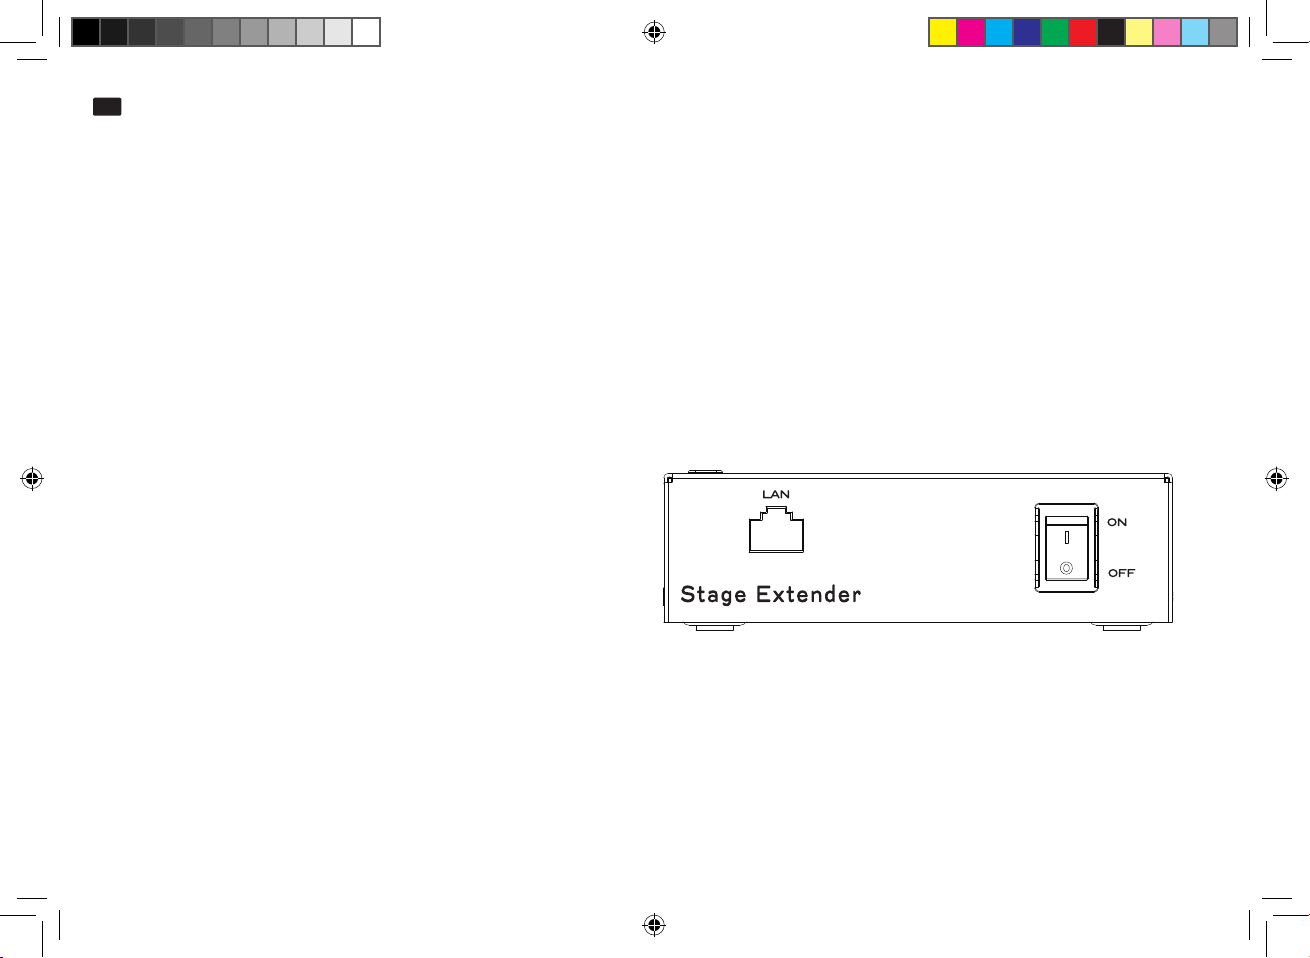
Description of the front panel
The Nowsonic Stage Extender has the following ports and controls on the front panel:
■
LAN
Use this RJ45 port to connect the Stage Extender via a standard
CAT5 cable to a DSL cable modem or directly to the Ethernet port
on a computer in order to connect to the Internet.
■
ON/OFF switch
Use this switch to turn the Nowsonic Stage Extender on or o
during battery or mains operation. When the unit is turned on, the
CPU LED on the top panel ashes: In battery mode, the battery’s
charging status will also be displayed by the 20 - 50 - 75 - 100 LEDs.
NOTE: Use a small, sharp pencil or a bent paper clip to push the button in the opening labeled RST on the left-hand side of the housing: If you
press and hold the button for more than 5 seconds, the Stage Extender will be reset to its default settings.
6
Nowsonic_StageExtender.indb 6 08.03.17 16:20
Page 7
User manual
www.nowsonic.com
EN
Stage Extender
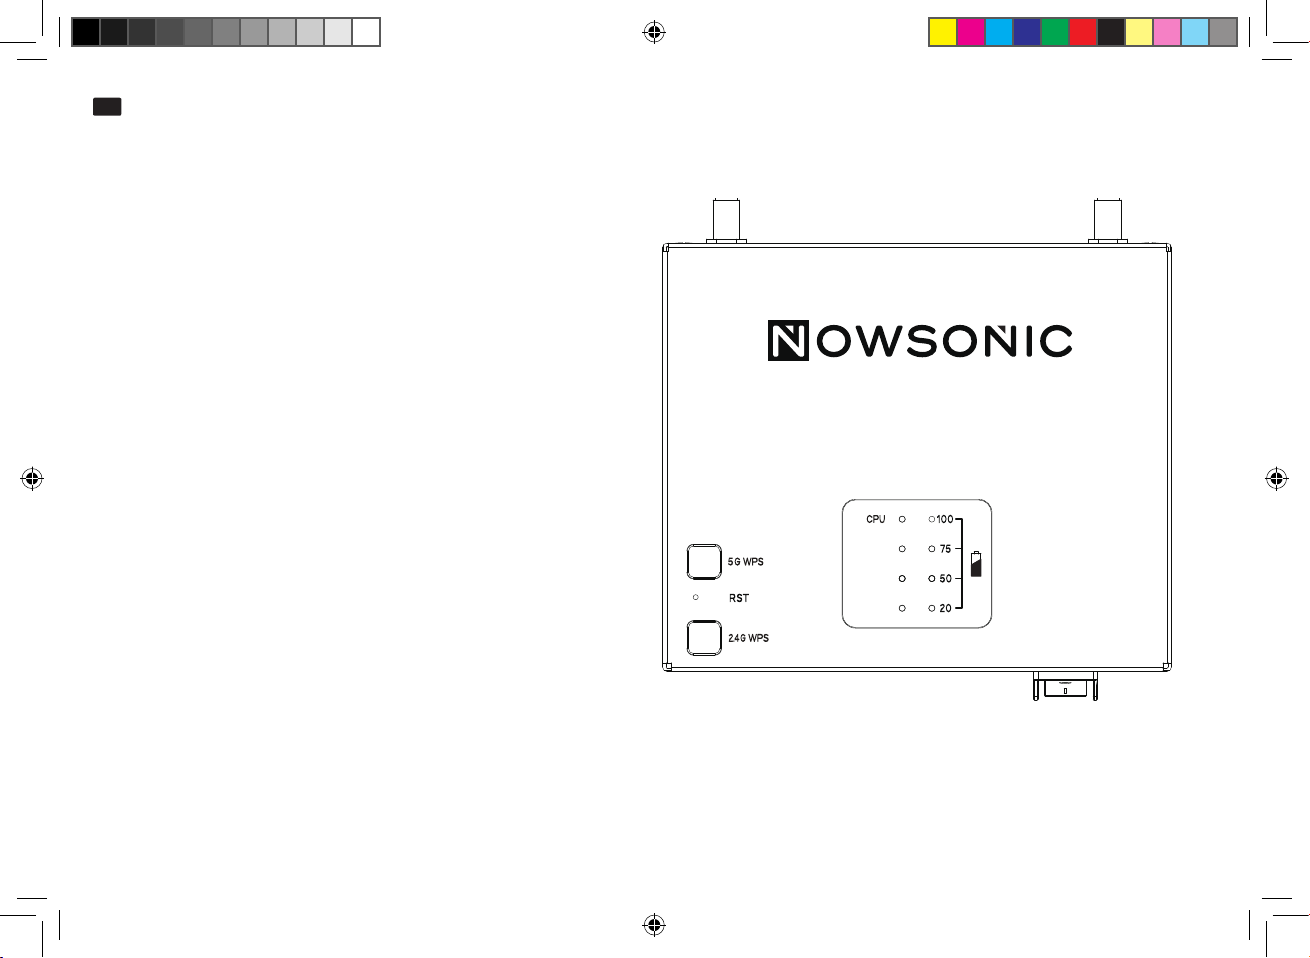
Description of the top panel
The Nowsonic Stage Extender has the following controls and indicators on the top panel:
■
5G WPS button
If you press the 5G WPS button briey, the Stage Extender will
automatically establish a secure connection with all currently connected devices on the 5GHz radio frequency (802.11n mode).
■
2.4G WPS button
If you press the 2.4G WPS button briey, the Stage Extender will
automatically establish a secure connection with all currently connected devices on the 2.4 GHz radio frequency (802.11g mode).
NOTE: The 2.4G and 5G connection modes can be activated in parallel. If you also want to set up radio microphone lines, you should
use the Stage Extender exclusively in the 5GHz (802.11n) frequency
band. Transmitting on the 2.4GHz radio frequency (802.11g mode)
can cause transmission problems (even in true diversity mode).
■
CPU indicator
When the Stage Extender is switched on, this LED will ash blue. If
you have reset the Stage Extender using the RST button, the CPU
LED will temporarily ash faster.
■
5G EXT indicator
When the 5GHz band is being used for radio transmission, this LED will light.
■
2.4G EXT indicator
When the 2.4 GHz band is being used for radio transmission, this LED will light.
5G EXT
2.4G EXT
LINK/ACT
7
Nowsonic_StageExtender.indb 7 08.03.17 16:20
Page 8

User manual
www.nowsonic.com
EN
Stage Extender
■
LINK/ACT indicator
This LED will stay on if the Stage Extender is connected to a computer via the LAN port. If data is being transferred, the LED will ash.
■
20 - 50 - 75 - 100 LEDs
These four LEDs show the charging status or the remaining capacity of the internal battery as a percentage. If only the 20 LED is lit up, you
should charge the battery by connecting the Stage Extender to a suitable USB power adapter/charger via the mini USB port.
Connecting the Stage Extender
The Stage Extender can be connected either directly to a computer, a DSL cable modem or a single or dual band router to extend the Wi-Fi coverage. To connect and start up the Stage Extender:
1) Position the Stage Extender in a suitable spot to extend the existing Wi-Fi network.
2) If you wish to use the Stage Extender in a xed installation, you can mount it to a wall or beam using the screwed connection in the base along
with a suitable bracket.
3) Connect the supplied radio antennas to the BNC ports on the back panel of the Stage Extender using the bayonet connectors. Alternatively,
you can connect the optionally available Stage Antenna Set to the BNC sockets using corresponding antenna cables.
4) Connect the supplied power adapter to the DC 5V/2A socket on the back panel of the Stage Extender and to a conventional power outlet: The
power supply in the Stage Extender is designed for a voltage range of 100 to 240V 50/60Hz.
5) Use a standard CAT5 cable to connect your computer’s Ethernet port (or, for Internet use, an Internet-ready port such as a DSL modem or the
like) to the LAN port on the front panel of the Stage Extender.
6) If necessary, connect a USB-ready charger/power adapter to the 5V 1A port on the back panel of the device to charge the battery.
7) Turn the Stage Extender on and check the status of the LEDs: If it is connected correctly, the CPU and LINK/ACT LEDS should light up/ash
respectively.
8
Nowsonic_StageExtender.indb 8 08.03.17 16:20
Page 9

User manual
www.nowsonic.com
EN
Stage Extender
Setting up the connection between the Stage Extender and the Stage Router (Pro)
To use the Stage Extender as a Wi-Fi extender for a suitable primary router (such as the Nowsonic Stage Router Pro and Stage Router):
1) Press the WPS button on the Stage Router (Pro) for 2 seconds.
2) Then press the 2.4G WPS button on the Stage Extender for 2 seconds: Wait for a moment until the 2.4G EXT LED stays on. The Stage Extender’s Wi-Fi functionality is now active in the 2.4GHz band.
3) To activate the 5GHz band as well (or instead), press the 5G WPS button on the Stage Extender for 2 seconds. Wait until the 5G EXT LED stays
on and this Wi-Fi module is also active.
4) Now press the WPS button on the Stage Router (Pro) again for 2 seconds to activate the connection with the Stage Extender in the relevant
band.
The Stage Extender can now exchange data wirelessly with the Stage Router (Pro) and with a computer or similar device connected to the Stage
Extender.
NOTE: It is advisable to position the Stage Extender as close as possible to the Stage Router (Pro) for setup in order to establish the best possible connection between the devices. After setting up the Stage Extender, you can turn it o and position it in the desired spot in the room:
After turning it on, the Stage Extender automatically detects the last connected router and establishes the connection again.
Connecting using the web interface
Alternatively, you can set up the Stage Extender using a computer. For the initial setup, you will have to connect the Stage Extender to the
computer’s Ethernet port using a standard CAT5 cable. Next, adjust the network settings accordingly. The required settings for a PC are described
below.
1) Click on Start and choose Control Panel > Network and Internet > Network connections.
2) Right-click the Local Area Connection in the Network connections screen and choose Properties.
3) Double-click Internet Protocol Version 4 (TCP/IPv4) in the Local Area Connection Properties dialog box.
4) In the Internet Protocol Version 4 (TCP/IPv4) Properties dialog box, tick Use the following IP address and enter the following information:
•
IP address: 192.168.0.5
•
Subnet mask: 255.255.255.0
•
Default gateway: 192.168.0.254
5) Click OK and then OK again in the following dialog box.
9
Nowsonic_StageExtender.indb 9 08.03.17 16:20
Page 10

User manual
www.nowsonic.com
EN
Stage Extender
Conguring the Stage Extender using a browser
The Stage Extender is congured via a HTML Administrator Tool to work as an access point. The tool can be opened via the browser on your host
computer. Proceed as follows to congure the Stage Extender:
1) Open a web browser on your computer and type 192.168.0.5 in the address eld: This is the preset IP address which is printed on the rear
panel of the Stage Extender. Press Enter.
2) A log-in screen will then be displayed: For both the user name and password, enter admin (default) and then click LOGIN.
3) An input screen will then open. Here, click on 2.4GHz Extender Setup: The AP option is activated here by default. Instead, select the Extend-
er (AP+Client) option.
4) Click on the AP Scan button in the top right-hand corner of the dialog box: The names of all recognized networks are now listed in the dialog
box.
5) Select the name of the desired network, enter the password for the network in the Encryption key eld in the lower part of the dialog box
and then click Apply.
6) The connection with the network is now established and the network option is marked with Extender / Connected.
Finally, you can check the conguration based on the information on the status page. The Stage Extender is only set up for operation as a Wi-Fi
repeater/extender.
10
Nowsonic_StageExtender.indb 10 08.03.17 16:20
Page 11
User manual
www.nowsonic.com
EN
Stage Extender
Specications
■
Hardware
Interfaces 10/100BaseTX (Auto MDI/MDIX) RJ45 connector (x1)
Power supply 5V / 2A
Battery Lithium 3.7V/5000mAh
Buttons 1 x 5G WPS, 1 x 2.4G WPS, 1 x Power ON/OFF, 1 x RST
LED indicators 1 x Power, 1 x CPU, 1 x LAN, 1 x 5G, 1 x 2.4G
Antennas 4dBi antenna (x2)
■
Environmental conditions
Temperature
■
Wireless
Standards IEEE 802.11ac, IEEE 802.11a, IEEE 802.11n, IEEE 802.11g, IEEE 802.11b
RF frequencies 2.4GHz/5GHz
Data rate 2.4GHz: up to 300Mbps; 5GHz: up to 433Mbps
Wi-Fi security 64/128-bit WEP, WPA/WPA2, WPA-PSK/WPA2-PSK ( TKIP/AES)
Channels 2.4GHz: 1–11 (North America), 1–13 (General Europe), 1–14 (Japan); 5GHz: 36~165
Modulation type DBPSK, DQPSK, CCK and OFDM (BPSK,QPSK,16-QAM/64-QAM)
Reception sensitivity 270m: -61dBm@10% PER; 135 m: -65dBm@10% PER; 54 m: -68dBm@10% PER; 11 m: -85dBm@8% PER;
USB 2.0 port
Battery life 8 hours
Operation
Storage
-20°C~45°C
-20°C~4
6m: -88dBm@10% PER; 1 m: -90dBm@8% PER
5°C
11
Nowsonic_StageExtender.indb 11 08.03.17 16:20
Page 12

User manual
www.nowsonic.com
EN
Stage Extender
Scope of supply
•
Nowsonic Stage Extender
•
2 antennas
•
User manual (this document)
•
USB cable, type A to micro type B
•
Power adapter (100 – 240V; 50/60Hz 0.4A; Power supply 5V; 2,000mA)
The following options are available separately:
•
Nowsonic Stage Router
•
Nowsonic Stage Router Pro
•
Nowsonic Stage Antenna Set 2.4 GHz
•
Nowsonic Stage Antenna Set 5.0 GHz
Servicing
If you have any questions or technical issues, please rst contact your local dealer where you purchased the device.
If servicing is required, please also contact your local dealer. Otherwise you may contact us directly. You can nd our contact details on our website at www.nowsonic.com.
Legal information
Copyright for this user manual © 2017: Nowsonic
Product features, specications and availability are subject to change without prior notice.
Edition v1.0, 02/2017
12
Nowsonic_StageExtender.indb 12 08.03.17 16:20
Page 13

Bedienungsanleitung
www.nowsonic.com
DE
Stage Extender
Inhalt
■ Einleitung
■ Anwendungsbereich
■ Sicherheits- und Gebrauchshinweise
■ Beschreibung der Rückseite
■ Beschreibung der Vorderseite
■ Beschreibung der Oberseite
■ Anschluss des Stage Extenders
■ Einrichten der Verbindung zwischen dem Stage Extender und dem Stage Router (Pro)
■ Einrichten der Verbindung über das Web-Interface
■ Konguration des Stage Extenders über einen Browser
■ Spezikationen
■ Lieferumfang
■ Service
■ Rechtliche Hinweise
Einleitung
Vielen Dank, dass Sie sich für den Nowsonic Stage Extender entschieden haben. Der Nowsonic Stage Extender ist ein Dualband WLAN Extender,
der die Reichweite für jedes WLAN-Netzwerk (802.11 ac/a/n/b/g) erweitert. Er ist sowohl mit Einzel- als auch Dualbandroutern kompatibel und
ermöglicht weiteren kabellosen Geräten (wie z. B. iPads, iPods, Notebooks, Tablets und Smartphones) Zugang zum Internet. Mit an Bord bendet
sich zudem ein WAN/LAN Anschluss, um kabelgebundene Geräte mit dem WLAN-Netzwerk zu verbinden. Die Dübelmontage mit auswechselbaren Aufsätzen lässt sich in Verbindung mit einer Reihe von herkömmlichen Wandhalterungen nutzen. Der Nowsonic Stage Extender ermöglicht
Nutzern kabellosen Internetzugang an schwer erreichbaren Orten.
ANMERKUNG: Der Nowsonic Stage Extender stellt eine Wi-Fi-Umgebung für externe Peripheriegeräte zur Verfügung. Für Probleme, die zwischen einer App und einem angesteuerten Gerät auftreten können, wenden Sie sich bitte an den Hersteller dieser Programme bzw. Geräte.
Merkmale
■
Dualband WLAN Extender
■
Konform mit den Standards 802.11ac/a/b/g/n
13
Nowsonic_StageExtender.indb 13 08.03.17 16:20
Page 14

Bedienungsanleitung
www.nowsonic.com
DE
Stage Extender
■
Datendurchsatz mit bis zu 300 MBps im 2.4 G Band oder 433 MBps im 5G Band
■
Zwei externe Antennen zur Verstärkung des Datendurchsatzes im Lieferumfang
■
Metallgehäuse mit Gewinde in der Bodenplatte zur Montage an Wänden oder Traversen
■
Unterstützt WPS (Wi-Fi Protected Setup)
■
Pairing mit anderen Wi-Fi-Geräten im jeweiligen Band per Tastendruck
■
ON/OFF-Schalter mit Schutzrahmen
■
Ethernet-Anschluss zur Verbindung von kabelgebundenen Geräten mit dem WLAN-Netzwerk
■
Integrierter, wiederauadbarer Akku
■
Mikro-USB-Anschluss zum Auaden des integrierten Akkus
■
LEDs zur Darstellung des Akkustatus
■
Betrieb wahlweise mit Netzteil oder integriertem Akku (ca. 8 Stunden)
■
Ideale Erweiterung für Nowsonic Stage Router Pro und Stage Router, aber auch für andere WLAN-Router geeignet
Anwendungsbereich
In Verbindung mit einem geeigneten WLAN-Router wie den Modellen Nowsonic Stage Router und Nowsonic Stage Router Pro oder anderen
Ethernet-fähigen Geräten empehlt sich der Nowsonic Stage Extender für folgende Anwendungsbereiche:
■
Einsatz als mobiler oder festinstallierter WLAN-Repeater zur Erweiterung der Reichweite eines vorhandenen WLAN-Netzwerks
■
Drahtlose Steuerung von Digitalmischpulten über geeignete, auf einem WLAN-fähigen Tablet oder Computer installierte Apps
■
Datenübertragung zwischen der App auf einem Host-Computer und einem digitalen Peripheriegerät
Sicherheits- und Gebrauchshinweise
■
Sicherheitshinweise
•
Beachten Sie im Betrieb des Nowsonic Stage Extenders folgende Sicherheitshinweise, um sich selbst, den Stage Extender sowie damit verbundene Geräte vor Schäden zu schützen.
•
Nehmen Sie sich die Zeit und lesen Sie dieses Handbuch aufmerksam durch, um den Stage Extender ordnungsgemäß zu betreiben.
•
Prüfen Sie das Gerät nach dem Auspacken auf Schäden. Sofern das Gehäuse sichtbare Schäden aufweist, dürfen Sie es nicht in Betrieb nehmen. Wenden Sie sich in diesem Fall an Ihren örtlichen Händler, bei dem Sie das Gerät erworben haben.
•
Nehmen Sie den Stage Extender nicht während eines Gewitters in Betrieb.
14
Nowsonic_StageExtender.indb 14 08.03.17 16:20
Page 15
Bedienungsanleitung
www.nowsonic.com
DE
Stage Extender
(BNC uses a special anti-thread and size)
•
Ziehen Sie die Stromversorgung des Stage Extenders während eines Gewitters ab.
•
Flüssigkeiten oder Staub dürfen nicht in das Gehäuse des Geräts gelangen, da das zu einem Stromschlag oder Kurzschluss führen kann.
•
Der Stage Extender ist ausschließlich für einen Betrieb in Innenräumen vorgesehen.
•
Önen Sie in keinem Fall das Gehäuse des Stage Extenders. Das Gerät enthält gefährliche Bauteile und sollte nur von autorisiertem Fachpersonal geönet werden.
•
Stellen Sie den Stage Extender an einem trockenen, staubfreien Ort auf, der Schutz vor direkter Sonneneinstrahlung, Regen, Schnee oder
künstlichem Nebel einer Nebelmaschine bietet.
•
Platzieren Sie den Stage Extender niemals auf oder unter Geräten wie Leistungsverstärkern, die übermäßige Wärme erzeugen.
■
Gebrauchshinweise
•
Für den Betrieb und die drahtlose Kommunikation mit einem Computer, Tablet-PC oder Smartphone stellen Sie den Stage Extender möglichst zentral in dem Bereich der gewünschten Netzabdeckung auf.
•
Vergewissern Sie sich, dass ein ausreichender Abstand zu etwaigen Störquellen gegeben ist und stellen Sie den Stage Extender immer so auf,
dass die Antennen nicht durch Hindernisse verdeckt werden.
Beschreibung der Rückseite
Auf der Rückseite bietet der Nowsonic Stage Extender folgende Anschlüsse (von links nach rechts):
■
BNC-Buchse ANT 2.4G/5G (2 Stk.)
An diesen BNC-Buchsen schließen Sie die im Lieferumfang enthaltenen Funkantennen oder die Antennen aus dem optional erhältlichen Stage Antenna Set an. Schließen Sie immer beide Antennen
an, um im so genannten True-Diversity-Betrieb eine besonders
störungsfreie Datenübertragung sicherzustellen.
■
USB-Buchse 5V 1A
An diesem USB Port können Sie ein externes USB-Netzteil zum Auaden des internen Akkus anschließen: Ein entsprechendes USB-Ladekabel
(Typ A auf Typ B Micro) ist im Lieferumfang enthalten. Alternativ können Sie den Stage Extender über diesen Anschluss mit dem USB-Port auf
der Vorderseite des Nowsonic Stage Router Pro verbinden, der eine Spannung von 5 V bei 2A bereitstellt: Der Status des Ladezustands des
internen Akkus wird über die LEDs auf der Oberseite des Stage Extenders (siehe „Beschreibung der Oberseite“ auf Seite 17) dargestellt.
15
Nowsonic_StageExtender.indb 15 08.03.17 16:20
Page 16
Bedienungsanleitung
www.nowsonic.com
DE
Stage Extender
ANMERKUNG: Auf der Rückseite nden Sie das Typenschild für den Stage Extender: Hier ist die IP-Adresse vermerkt, über die sich das Gerät
im Netzwerk ansprechen lässt. Zudem nden Sie hier den Benutzernamen und das Passwort für die Konguration des Stage Extenders. Weitere
Informationen dazu nden Sie auf Seite 21.
■
Buchse DC 5V/2A
An dieser Netzteilbuchse schließen Sie das im Lieferumfang enthaltene Netzteil (100 - 240V; 50/60Hz 0,4A) für den Betrieb am Stromnetz an.
ANMERKUNG: Beachten Sie bitte, dass der interne Akku nur über eine an der USB-Buchse 5V 1A angeschlossene Spannungsquelle, nicht aber
über die Netzteilbuchse DC 5V/2A geladen wird.
Beschreibung der Vorderseite
Auf der Vorderseite bietet der Nowsonic Stage Extender folgende Anschlüsse und Bedienelemente:
■
LAN
Über diesen RJ45-Anschluss verbinden Sie den Stage Extender
über ein herkömmliches CAT5-Kabel mit einem DSL-Kabelmodem
oder direkt mit dem Ethernet-Anschluss eines Computers, um eine
Verbindung zum Internet herzustellen.
■
ON/OFF-Schalter
Über diesen Schalter schalten Sie den Nowsonic Stage Extender im
Akku- oder Netzteilbetrieb ein bzw. aus. Wenn das Gerät eingeschaltet ist, blinkt die LED CPU auf der Oberseite: Im Akku-Betrieb wird zudem der Ladezustand des Akkus über die LEDs 20 - 50 - 75 - 100
dargestellt.
ANMERKUNG: Verwenden Sie einen schmalen spitzen Stift oder eine aufgebogene Heftklammer, um die Taste in der Önung RST auf der
linken Gehäuseseite auszulösen: Wenn Sie die Taste für wenigstens 5 Sekunden gedrückt halten, wird der Stage Extender auf seine Werksein-
stellungen zurückgesetzt.
16
Nowsonic_StageExtender.indb 16 08.03.17 16:20
Page 17

Bedienungsanleitung
www.nowsonic.com
DE
Stage Extender
Beschreibung der Oberseite
Auf der Oberseite bietet der Nowsonic Stage Extender folgende
Bedienelemente und Anzeigen:
■
Taste 5G WPS
Wenn Sie die Taste 5G WPS einmal kurz drücken, stellt der Stage
Extender automatisch eine sichere Verbindung mit allen momentan angeschlossenen Clients im Frequenzband 5 GHz (802.11n) her.
■
Taste 2.4G WPS
Wenn Sie die Taste 2.4G WPS einmal kurz drücken, stellt der Stage
Extender automatisch eine sichere Verbindung mit allen momentan angeschlossenen Clients im Frequenzband 2,4 GHz (802.11g)
her.
ANMERKUNG: Die Verbindungsmodi 2,4G und 5 G können parallel
aktiviert werden. Wenn Sie zusätzlich Funkmikrofonstrecken einrichten, sollten Sie den Stage Extender ausschließlich im Frequenzband 5 GHz (802.11n) betreiben. Im Band 2,4 GHz (802.11g) kann
es andernfalls auch im True-Diversity-Betrieb zu Störungen in der
5G EXT
2.4G EXT
LINK/ACT
Übertragung kommen.
■
Anzeige CPU
Diese LED blinkt blau, wenn der Stage Extender eingeschaltet ist.
Wenn Sie den Stage Extender über die Taste RST zurückgesetzt haben, blinkt die LED CPU vorübergehend schneller.
■
Anzeige 5G EXT
Diese LED leuchtet, wenn die Übertragung über das Frequenzband 5 GHz aktiv ist.
■
Anzeige 2.4G EXT
Diese LED leuchtet, wenn die Übertragung über das Frequenzband 2,4 GHz aktiv ist.
17
Nowsonic_StageExtender.indb 17 08.03.17 16:20
Page 18

Bedienungsanleitung
www.nowsonic.com
DE
Stage Extender
■
Anzeige LINK/ACT
Diese LED leuchtet dauerhaft, wenn der Stage Extender über den LAN-Port mit einem Computer verbunden ist. Wenn Daten übertragen werden, blinkt die LED.
■
Anzeigen 20 - 50 - 75 - 100
Über diese vier LEDs wird der Ladezustand bzw. die Restkapazität des internen Akkus in Prozent dargestellt. Wenn nur noch die LED 20
leuchtet, sollten Sie den Stage Extender über die Mini-USB-Buchse an einem geeigneten USB-Netzteil/Ladegerät anschließen, um den Akku
aufzuladen.
Anschluss des Stage Extenders
Der Stage Extender kann wahlweise direkt mit einem Computer, einem DSL-Kabelmodem oder einem Einzel- bzw. Dualbandrouter verbunden
werden, um die Wi-Fi-Reichweite zu erweitern. Gehen Sie wie folgt vor, um den Stage Extender anzuschließen und in Betrieb zu nehmen:
1) Stellen Sie den Stage Extender an einer zur Erweiterung des bestehenden Wi-Fi-Netzwerks geeigneten Position auf.
2) Sofern Sie den Stage Extender in einer Festinstallation einsetzen möchten, können Sie ihn über den Gewindeanschluss im Boden sowie eine
geeignete Halterung an einer Wand oder Traverse montieren.
3) Schließen Sie die mitgelieferten Funkantennen über die Bajonett-Verschlüsse an den BNC-Buchsen auf der Rückseite des Stage Extenders.
Alternativ können Sie das optional erhältliche Stage Antenna Set über die zugehörigen Antennenleitungen mit den BNC-Buchsen verbinden.
4) Schließen Sie das mitgelieferte Netzteil an der Buchse DC 5V/2A auf der Rückseite des Stage Extenders und an einer herkömmlichen Steckdose an: Das Netzteil im Stage Extender ist für einen Spannungsbereich von 100 bis 240 V 50/60 Hz ausgelegt.
5) Verbinden Sie den Ethernet-Port Ihres Computers (oder für die Internet-Nutzung: einen Internet-fähigen Port wie ein DSL-Modem o. ä.)mit
einem herkömmlichen CAT5-Kabel mit dem LAN-Port auf der Vorderseite des Stage Extenders.
6) Schließen Sie bei Bedarf ein USB-fähiges Ladegerät/Netzteil an der Buchse 5V 1A auf der Rückseite des Geräts an, um den internen Akku zu
laden.
7) Schalten Sie den Stage Extender ein und überprüfen Sie den Status der LEDs: Bei einer korrekten Verbindung sollten die LEDs CPU und LINK/
ACT leuchten bzw. blinken.
18
Nowsonic_StageExtender.indb 18 08.03.17 16:20
Page 19

Bedienungsanleitung
www.nowsonic.com
DE
Stage Extender
Einrichten der Verbindung zwischen dem Stage Extender und dem Stage Router (Pro)
Um den Stage Extender als Wi-Fi-Erweiterung für einen geeigneten primären Router (wie Nowsonic Stage Router Pro und Stage Router) zu verwenden, gehen Sie wie folgt vor:
1) Drücken Sie die Taste WPS am Stage Router (Pro) für 2 Sekunden.
2) Drücken Sie anschließend die Taste 2.4G WPS am Stage Extender für 2 Sekunden: Warten Sie einen Moment, bis die LED 2.4G EXT dauerhaft
leuchtet. Nun ist die Wi-Fi-Funktionalität des Stage Extenders im 2,4 GHz Band aktiv.
3) Um zudem (oder alternativ) das 5 GHz Band zu aktivieren, drücken Sie die Taste 5G WPS am Stage Extender für 2 Sekunden. Warten Sie, bis die
LED 5G EXT dauerhaft leuchtet und auch dieses Wi-Fi-Modul aktiv ist.
4) Drücken Sie nun erneut die Taste WPS am Stage Router (Pro) für 2 Sekunden, um die Verbindung mit dem Stage Extender im jeweiligen Band
zu aktivieren.
Der Stage Extender kann nun drahtlos Daten mit dem Stage Router (Pro) und einem am Stage Extender angeschlossenen Computer u. ä. austauschen.
ANMERKUNG: Es empehlt sich, den Stage Extender für die Einrichtung möglichst nahe am Stage Router (Pro) zu platzieren, um eine
möglichst gute Verbindung zwischen den Geräten herzustellen. Nach der Einrichtung können Sie den Stage Extender ausschalten und an der
gewünschten Position im Raum platzieren: Nach dem Einschalten erkennt der Stage Extender den zuletzt verbundene n Router automatisch
und richtet die Verbindung wieder ein.
Einrichten der Verbindung über das Web-Interface
Alternativ können Sie den Stage Extender über einen Computer einrichten. Für die Ersteinrichtung müssen Sie den Stage Extender über ein herkömmliches CAT5-Kabel mit dem Ethernet-Port des Computers verbinden. Anschließend passen Sie die Netzwerkeinstellungen entsprechend an.
Im Folgenden beschreiben wir die notwendigen Einstellungen für einen PC.
1) Klicken Sie auf Start und wählen Sie den Eintrag Systemsteuerung > Netzwerk und Internet > Netzwerkverbindungen.
2) Klicken Sie mit der rechten Maustaste auf das Alias LAN-Verbindung im Bildschirm Netzwerkverbindungen und wählen Sie den Eintrag
Eigenschaften.
3) Doppelklicken Sie im Dialog Eigenschaften von LAN-Verbindung auf den Eintrag Internetprotokoll Version 4 (TCP/IPv4).
4) Aktivieren Sie im Dialog Eigenschaften von Internet-Protokoll Version 4 (TCP/IPv4) das Markierungsfelder Folgende IP-Adresse ver-
wenden und tragen Sie folgende Informationen ein:
19
Nowsonic_StageExtender.indb 19 08.03.17 16:20
Page 20

Bedienungsanleitung
www.nowsonic.com
DE
Stage Extender
•
IP-Adresse: 192.168.0.5
•
Subnetzmaske: 255.255.255.0
•
Standardgateway: 192.168.0.254
5) Klicken Sie abschließend OK und im folgenden Dialog erneut auf OK.
Konguration des Stage Extenders über einen Browser
Die Konguration des Stage Extenders für den Betrieb als WLAN-Zugangspunkt erfolgt über eine HTML-Administrator-Maske, die Sie über den
Browser auf Ihrem Host-Computer aufrufen. Gehen Sie wie folgt vor, um Stage Extender zu kongurieren:
1) Önen Sie einen Browser auf Ihrem Computer, geben Sie in der Adresszeile 192.168.0.5 ein: Hierbei handelt es sich um die voreingestellte
IP-Adresse, die auch auf der Rückseite des Stage Extenders aufgedruckt ist. Bestätigen Sie die Eingabe mit Enter.
2) Daraufhin wird eine Log-In-Maske eingeblendet: Geben Sie hier als Benutzername und Passwort jeweils admin (Voreinstellung) ein und klicken
Sie auf die Schaltäche LOGIN.
3) Daraufhin wird die Eingabemaske geönet. Klicken Sie hier auf den Eintrag 2.4GHz Extender Setup: Ab Werk ist hier die Option AP aktiviert.
Wählen Sie stattdessen die Option Extender (AP+Client).
4) Klicken Sie auf die Schaltäche AP Scan in der rechten oberen Ecke des Dialogs: Nun werden die Namen aller erkannten Netzwerke im Dialog
aufgelistet.
5) Wählen Sie den Namen des gewünschten Netzwerks aus, geben Sie im Feld Encryption key im unteren Bereich des Dialogs das Passwort für
das Netzwerk ein und klicken Sie auf die Schaltäche Apply.
6) Nun wird die Verbindung mit dem Netzwerk hergestellt und der Netzwerkeintrag wird mit dem Vermerk Extender / Connected gekennzeichnet.
Abschließend können Sie die Konguration anhand der Informationen auf der Seite Status Information überprüfen. Der Stage Extender ist nur für
den Betrieb als Wi-Fi-Repeater/Erweiterung eingerichtet.
20
Nowsonic_StageExtender.indb 20 08.03.17 16:20
Page 21

Bedienungsanleitung
www.nowsonic.com
DE
Stage Extender
Spezikationen
■
Hardware
Schnittstellen 10/100BaseTX (Auto MDI/MDIX) RJ45 Anschluss (1 Stk.)
Spannungsversorgung 5V / 2A
Akku Lithium 3,7 V/5000 mAh
Akkulaufzeit 8 Stunden
Tasten 1 x 5G WPS, 1 x 2.4G WPS, 1 x Strom ON/OFF, 1 x RST
LED-Anzeigen 1 x Power, 1 x CPU, 1 x LAN, 1 x 5G, 1 x 2.4G
Antennen 4 dBi Antenne (je 2 Stk.)
■
Umgebungsbedingungen
Temperatur
Betrieb
Lagerung
■
Mobilfunk
Standards IEEE 802.11ac, IEEE 802.11a, IEEE 802.11n, IEEE 802.11g, IEEE 802.11b
RF-Frequenzen 2,4 GHz/5 GHz
Datendurchsatz 2,4 GHz: Bis zu 300 MBps; 5 GHz: Bis zu 433 MBps
WLAN-Sicherheit 64/128-bit WEP, WPA/WPA2, WPA-PSK/WPA2-PSK ( TKIP/AES)
Kanäle 2,4 GHz: 1-11 (Nordamerika), 1 -13 (Europa allgemein), 1 -14 (Japan); 5 GHz: 36~165
Modulationsart DBPSK, DQPSK, CCK und OFDM (BPSK,QPSK,16-QAM/64-QAM)
Empndlichkeit 270 m: -61 dBm@10% PER; 135 m: -65 dBm@10% PER; 54 m: -68 dBm@10% PER; 11 m: -85 dBm@8% PER;
USB 2.0 Anschluss
-20° C~45° C
-20° C~4
5°
6 m: -88 dBm@10% PER; 1 m: -90 dBm@8% PER
21
Nowsonic_StageExtender.indb 21 08.03.17 16:20
Page 22

Bedienungsanleitung
www.nowsonic.com
DE
Stage Extender
Lieferumfang
•
Nowsonic Stage Extender
•
2 Antennen
•
Bedienungsanleitung (dieses Dokument)
•
USB-Kabel, Typ A auf Typ B Micro
•
Netzteil (100 - 240V; 50/60Hz 0,4A; Spannungsversorgung 5V; 2.000mA)
Folgende Optionen sind separat erhältlich:
•
Nowsonic Stage Router
•
Nowsonic Stage Router Pro
•
Nowsonic Stage Antenna Set 2,4 GHz
•
Nowsonic Stage Antenna Set 5,0 GHz
Service
Wenn Sie Probleme oder technische Fragen haben, wenden Sie sich bitte zuerst an Ihren lokalen Händler, bei dem Sie das Gerät gekauft haben.
Bei einem Service-Fall wenden Sie sich bitte ebenfalls an Ihren lokalen Händler. Andernfalls können Sie uns auch direkt kontaktieren. Sie nden
unsere Kontaktdaten auf unserer Webseite unter www.nowsonic.com.
Rechtliche Hinweise
Copyright für diese Bedienungsanleitung © 2017: Nowsonic
Produktmerkmale, Spezikationen und die Verfügbarkeit können ohne vorherige Ankündigung geändert werden.
Ausgabe v 1.0, 02/2017
22
Nowsonic_StageExtender.indb 22 08.03.17 16:20
Page 23

Mode d'emploi
www.nowsonic.com
FR
Stage Extender
Sommaire
■ Introduction
■ Domaine d'application
■ Consignes de sécurité et d'utilisation
■ Description de la face arrière
■ Description de la face avant
■ Description de la face supérieure
■ Branchement du Stage Extender
■ Établissement de la connexion entre le Stage Extender et le Stage Router (Pro)
■ Établissement de la connexion via l'interface Web
■ Conguration du Stage Extender au moyen d'un navigateur
■ Caractéristiques techniques
■ Contenu
■ Maintenance
■ Mentions légales
Introduction
Merci beaucoup d'avoir choisi le Stage Extender Nowsonic. Le Stage Extender Nowsonic est un répéteur sans l double bande qui étend la portée
de tout réseau sans l (802.11 ac/a/n/b/g). Il est compatible avec les routeurs à simple et double bande et permet à des appareils sans l (tels que
des iPad, iPod, ordinateurs portables, tablettes et smartphones) d'accéder à Internet. Il possède aussi un port WAN/LAN pour connecter des périphériques câblés au réseau sans l. Le montage sur chevilles avec xations interchangeables peut se faire en conjonction avec diverses xations
murales classiques. Le Stage Extender Nowsonic permet aux utilisateurs d'accéder sans l à Internet dans les endroits mal couverts.
REMARQUE: le Stage Extender Nowsonic établit un environnement Wi-Fi à la disposition de périphériques externes. Pour les problèmes qui
peuvent se produire entre une App et un appareil contrôlé, veuillez consulter les fabricants de ce programme et de cet appareil.
Caractéristiques
■
Répéteur sans l double bande
■
Conforme aux normes 802.11ac/a/b/g/n
■
Débit de données atteignant 300Mbit/s dans la bande 2.4G ou 433Mbit/s dans la bande 5G
23
Nowsonic_StageExtender.indb 23 08.03.17 16:20
Page 24

Mode d'emploi
www.nowsonic.com
FR
Stage Extender
■
Livré avec deux antennes externes pour améliorer le débit de données
■
Boîtier en métal avec letages dans la plaque de dessous pour le montage mural ou sur poutrelle
■
Prise en charge du WPS (Wi-Fi Protected Setup)
■
Appairage avec d'autres appareils Wi-Fi dans chaque bande par simple pression d'un bouton
■
Commutateur ON/OFF avec encadrement de protection
■
Port Ethernet pour connecter des périphériques câblés au réseau sans l
■
Batterie interne rechargeable
■
Port micro-USB pour charger la batterie interne
■
LED témoins de la charge de batterie
■
Alimentation par adaptateur secteur ou batterie interne (autonomie d'environ 8heures)
■
Extension idéale pour Stage Router Pro et Stage Router Nowsonic, mais aussi pour d'autres routeurs sans l
Domaine d'application
En conjonction avec un routeur sans l approprié comme les modèles Stage Router et Stage Router Pro de Nowsonic ou d'autres appareils compatibles Ethernet, le Stage Extender Nowsonic est recommandé pour les applications suivantes:
■
Utilisation comme répéteur mobile ou xe de réseau local sans l pour étendre la portée d'un réseau sans l existant
■
Commande sans l des consoles de mixage numériques par Apps appropriées installées sur une tablette ou un ordinateur connectable au
réseau Wi-Fi local
■
Transmission de données entre l'App d'un ordinateur hôte et un périphérique numérique
Consignes de sécurité et d'utilisation
■
Consignes de sécurité
•
Respectez les consignes de sécurité ci-dessous lors de l'utilisation du Stage Extender Nowsonic pour vous protéger, vous, le Stage Extender
et les appareils connectés, d'éventuels dommages.
•
Prenez le temps de lire attentivement la totalité de ce mode d'emploi pour faire fonctionner correctement votre Stage Extender.
•
Veuillez contrôler tout éventuel dommage de l'unité au déballage. Si le boîtier a été endommagé, vous ne devez pas l'utiliser. Dans ce cas,
adressez-vous au revendeur chez qui vous avez acheté l'appareil.
•
Ne faites pas fonctionner le Stage Extender pendant un orage.
24
Nowsonic_StageExtender.indb 24 08.03.17 16:20
Page 25

Mode d'emploi
www.nowsonic.com
FR
Stage Extender
(BNC uses a special anti-thread and size)
•
Débranchez l'alimentation du Stage Extender en cas d'orage.
•
Les liquides et la poussière ne doivent pas pénétrer dans le boîtier de l'appareil, car cela pourrait provoquer un choc électrique ou un court-circuit.
•
Le Stage Extender n'est conçu que pour une utilisation en intérieur.
•
N'ouvrez en aucun cas le boîtier du Stage Extender. L'appareil contient des composants dangereux et ne doit être ouvert que par un professionnel agréé.
•
Installez le Stage Extender dans un endroit sec, sans poussière, protégé de la lumière directe du soleil, de la pluie, de la neige ou du brouillard
articiel d'une machine à brouillard.
•
Ne placez jamais le Stage Extender au-dessus ou au-dessous d'appareils dégageant une chaleur excessive comme des amplicateurs de
puissance.
■
Instructions d'utilisation
•
Pour le fonctionnement et la communication sans l avec un ordinateur, une tablette PC ou un smartphone, installez le Stage Extender à
l'endroit le plus au centre de la zone à couvrir.
•
Assurez-vous de maintenir à distance susante toute source d'interférence et installez toujours le Stage Extender an que ses antennes ne
soient pas masquées par des obstacles.
Description de la face arrière
En face arrière, le Stage Extender Nowsonic ore les connecteurs suivants (de gauche à droite):
■
Prise BNC ANT 2.4G/5G (2pièces)
Ces prises BNC servent à brancher les antennes fournies ou celles
des kits d'antenne de scène optionnels. Branchez toujours les deux
antennes pour assurer une transmission des données sans perturbations en mode dit True Diversity.
■
Prise USB 5V, 1A
Vous pouvez connecter à ce port USB un adaptateur secteur USB externe pour charger la batterie interne: un câble de recharge USB approprié (type A vers type micro-B) est fourni. Sinon, vous pouvez raccorder
le Stage Extender par ce connecteur au port USB de la face avant du Stage Router Pro Nowsonic, qui fournit une tension de 5V en 2A: l'état
de charge de la batterie interne est indiqué par des LED sur le dessus du Stage Extender (voir «Description de la face supérieure» en page 27).
25
Nowsonic_StageExtender.indb 25 08.03.17 16:20
Page 26

Mode d'emploi
www.nowsonic.com
FR
Stage Extender
REMARQUE: en face arrière, vous trouverez la plaque d'identication du Stage Extender: l'adresse IP à laquelle l'appareil répond sur le réseau
y est indiquée. Vous y trouverez également le nom d'utilisateur et le mot de passe pour la conguration du Stage Extender. Pour plus d'informations, consultez la page 31.
■
Prise d'alimentation DC5V/2A
Branchez l'adaptateur secteur fourni (100 - 240V, 50/60Hz, 0,4A) à cette prise pour une alimentation par le réseau électrique.
REMARQUE: veuillez noter que la batterie interne ne peut être chargée que par une source d'alimentation branchée à la prise USB 5V, 1A,
mais pas par la prise d'alimentation DC5V/2A.
Description de la face avant
En face avant, le Stage Extender Nowsonic ore les prises et commandes suivantes:
■
LAN
Par cette prise RJ45, connectez le Stage Extender à un modem câble
ou ADSL via un câble CAT5 standard ou directement avec la prise
Ethernet d'un ordinateur pour établir une connexion à Internet.
■
Commutateur ON/OFF
Avec ce commutateur, vous allumez et éteignez le Stage Extender
Nowsonic, qu'il soit alimenté par la batterie ou l'adaptateur secteur.
Quand l'unité est sous tension, la LED CPU clignote sur le dessus.
Quand l'appareil est alimenté par la batterie, la charge de celle-ci est indiquée par les LED 20 - 50 - 75 - 100.
REMARQUE: utilisez un stylo à pointe ne ou un trombone déplié pour presser le bouton à l'intérieur de l'orice RST sur le côté gauche du
boîtier: si vous maintenez le bouton pendant au moins 5 secondes, le Stage Extender est réinitialisé et retrouve ses réglages d'usine.
26
Nowsonic_StageExtender.indb 26 08.03.17 16:20
Page 27

Mode d'emploi
www.nowsonic.com
FR
Stage Extender
Description de la face supérieure
Sur sa face supérieure, le Stage Extender Nowsonic ore les commandes et indicateurs suivants:
■
Bouton 5G WPS
Si vous appuyez une fois sur le bouton 5G WPS, le Stage Extender
établit automatiquement une connexion sécurisée avec tous les
clients connectés à ce moment dans la bande de fréquences des
5GHz (802.11n).
■
Bouton 2.4G WPS
Si vous appuyez une fois sur le bouton 2.4G WPS, le Stage Extender établit automatiquement une connexion sécurisée avec tous
les clients connectés à ce moment dans la bande de fréquences
des 2,4 GHz (802.11g).
REMARQUE: les modes de connexion 2.4G et 5G peuvent être activés en parallèle. Si vous installez conjointement des microphones
sans l, vous ne devez faire fonctionner le Stage Extender que dans
la bande de fréquences 5GHz (802.11n). Dans la bande 2,4GHz
(802.11g), des défauts de transmission peuvent survenir, même en
fonctionnement True-Diversity.
■
Voyant CPU
Cette LED clignote en bleu quand le Stage Extender est en ligne. Si vous avez réinitialisé le Stage Extender avec le bouton RST, la LED CPU
clignote temporairement plus vite.
■
Voyant 5G EXT
Cette DEL s'allume en cas d'activité de la transmission sur la bande de fréquences 5GHz.
5G EXT
2.4G EXT
LINK/ACT
27
Nowsonic_StageExtender.indb 27 08.03.17 16:20
Page 28

Mode d'emploi
www.nowsonic.com
FR
Stage Extender
■
Voyant 2.4G EXT
Cette DEL s'allume en cas d'activité de la transmission sur la bande de fréquences 2,4 GHz.
■
Voyant LINK/ACT
Cette LED reste allumée quand le Stage Extender est connecté à un ordinateur par le port LAN. Quand des données sont transmises, la DEL
clignote.
■
Voyants 20 - 50 - 75 - 100
Ces quatre LED indiquent l'état de charge ou capacité restante de la batterie interne sous forme de pourcentage. Si seule la LED 20 est allumée,
vous devriez connecter le Stage Extender par son connecteur mini-USB à un adaptateur secteur/chargeur USB approprié pour recharger la
batterie.
Branchement du Stage Extender
Le Stage Extender peut être directement connecté à un ordinateur, à un modem câble ou ADSL, ou à un routeur simple ou double bande pour
étendre la portée du Wi-Fi. Procédez comme suit pour brancher le Stage Extender et le mettre en service:
1) Installez le Stage Extender à un endroit adéquat pour accroître la portée du réseau Wi-Fi existant.
2) Si vous souhaitez utiliser le Stage Extender dans une installation permanente, vous pouvez le xer au moyen d'un support adapté grâce au
letage de sa face inférieure ainsi qu'au mur ou sur une poutrelle.
3) Branchez les antennes fournies sur les connecteurs à baïonnette des prises BNC à l'arrière du Stage Extender. Sinon, vous pouvez connecter le
kit d'antenne de scène optionnel aux connecteurs BNC d'entrée d'antenne.
4) Branchez l'adaptateur secteur fourni à la prise DC 5V/2A à l'arrière du Stage Extender et à une prise électrique standard: l'alimentation du
Stage Extender est prévue pour une plage de tension allant de 100 à 240V en 50/60Hz.
5) Connectez le port Ethernet de votre ordinateur (ou pour utiliser Internet: un port compatible Internet d'un modem ADSL ou équivalent) par
câble CAT5 standard au port LAN situé à l'avant du Stage Extender.
6) Si nécessaire, branchez un chargeur/adaptateur secteur compatible USB à la prise 5V 1A à l'arrière de l'appareil pour charger la batterie interne.
7) Allumez le Stage Extender et contrôlez ce qu'indiquent les LED: lorsque la connexion est correcte, les LED CPU et LINK/ACT doivent être
allumées ou clignoter.
28
Nowsonic_StageExtender.indb 28 08.03.17 16:20
Page 29

Mode d'emploi
www.nowsonic.com
FR
Stage Extender
Établissement de la connexion entre le Stage Extender et le Stage Router (Pro)
An d'utiliser le Stage Extender comme répéteur Wi-Fi pour un routeur principal adapté (comme le Stage Router Pro ou le Stage Router Nowsonic), procédez comme suit:
1) Appuyez sur le bouton WPS du Stage Router (Pro) pendant 2secondes.
2) Appuyez ensuite sur le bouton 2.4G WPS du Stage Extender pendant 2secondes: attendez que la LED 2.4G EXT s'allume xement. La fonctionnalité Wi-Fi du Stage Extender est activée dans la bande des 2,4GHz.
3) Pour activer aussi (ou à la place) la bande des 5GHz, appuyez sur le bouton 5G WPS du Stage Extender pendant 2secondes. Attendez que la
LED 5G EXT s'allume xement et alors ce module Wi-Fi est lui aussi actif.
4) Maintenant, appuyez de nouveau sur le bouton WPS du Stage Router (Pro) pendant 2secondes pour activer la connexion avec le Stage Extender dans chaque bande.
Le Stage Extender peut dorénavant échanger des données sans l avec le Stage Router (Pro) et un ordinateur ou appareil similaire connecté au
Stage Extender.
REMARQUE: il est conseillé de placer le plus près possible du Stage Router (Pro) le Stage Extender destiné à accroître sa portée pour obtenir la
meilleure connexion entre les appareils. Après l'installation, vous pouvez éteindre le Stage Extender et le placer à l'endroit désiré dans la salle:
une fois rallumé, le Stage Extender détecte automatiquement le dernier routeur connecté et rétablit la connexion.
Établissement de la connexion via l'interface Web
Sinon, vous pouvez congurer le Stage Extender depuis un ordinateur. Pour la conguration initiale, vous devez connecter le Stage Extender au
port Ethernet de l'ordinateur au moyen d'un câble CAT5 classique. Réglez ensuite vos paramètres réseau de façon appropriée. Ci-dessous, nous
décrivons les réglages nécessaires pour un PC.
1) Cliquez sur Démarrer et sélectionnez Panneau de conguration> Réseau et Internet> Connexions réseau.
2) Dans l'écran Connexions réseau, cliquez avec le bouton droit de la souris sur le raccourci Connexion au réseau local et sélectionnez Propriétés.
3) Dans la boîte de dialogue Propriétés de Connexion au réseau local, double-cliquez sur Protocole Internet version 4 (TCP/IPv4).
29
Nowsonic_StageExtender.indb 29 08.03.17 16:20
Page 30

Mode d'emploi
www.nowsonic.com
FR
Stage Extender
4) Dans la boîte de dialogue Propriétés de Protocole Internet version 4 (TCP/IPv4), sélectionnez Utiliser l'adresse IP suivante et sélection-
nez les informations ci-dessous:
•
Adresse IP: 192.168.0.5
•
Masque de sous-réseau: 255.255.255.0
•
Passerelle par défaut: 192.168.0.254
5) Enn, cliquez sur OK et dans la boîte de dialogue suivante à nouveau sur OK.
Conguration du Stage Extender au moyen d'un navigateur
La conguration du Stage Extender pour fonctionner comme un point d'accès sans l se fait via une interface Administrateur HTML que vous
appelez dans le navigateur de votre ordinateur hôte. Procédez comme suit pour congurer le Stage Extender:
1) Ouvrez un navigateur sur votre ordinateur, et saisissez 192.168.0.5 dans la barre d'adresse: c'est l'adresse IP prédénie, qui est également
imprimée à l'arrière du Stage Extender. Validez la saisie avec Enter.
2) Ensuite, un écran d'identication s'ache: saisissez-y admin à la fois comme nom d'utilisateur et comme mot de passe (par défaut) et cliquez
sur le bouton LOGIN.
3) Le masque de saisie s'ouvre alors. Cliquez sur 2.4GHz Extender Setup (conguration de l'Extender en 2,4GHz): en sortie d'usine, l'option AP
(point d'accès) est activée. Sélectionnez à la place l'option Extender (AP+Client).
4) Cliquez sur le bouton AP Scan dans le coin supérieur droit de la boîte de dialogue: maintenant, les noms de tous les réseaux détectés sont
répertoriés dans la boîte de dialogue.
5) Sélectionnez le nom du réseau désiré, saisissez le mot de passe du réseau dans le champ Encryption key (clé de cryptage) en partie basse de
la boîte de dialogue et cliquez sur le bouton Apply (Appliquer).
6) La connexion au réseau est alors établie, et le réseau portera l'indication Extender / Connected.
Enn, vous pouvez vérier la conguration au moyen des informations de la page Status Information. Le Stage Extender est conçu pour fonctionner comme un répéteur/extenseur Wi-Fi.
30
Nowsonic_StageExtender.indb 30 08.03.17 16:20
Page 31

Mode d'emploi
www.nowsonic.com
FR
Stage Extender
Caractéristiques techniques
■
Matériel
Interfaces Connecteur RJ45 (1 prise) 10/100BaseTX (auto MDI/MDIX)
Alimentation électrique 5V / 2A
Batterie Lithium 3,7 V/5000 mAh
Boutons 5G WPS, 2.4G WPS, Power ON / OFF, RST
LED témoins 1 x Power, 1 x CPU, 1 x LAN, 1 x 5G, 1 x 2.4G
Antennes Antenne 4 dBi (2 pièces).
■
Conditions environnementales
Température
■
Communications mobiles
Normes IEEE 802.11ac, IEEE 802.11a, IEEE 802.11n, IEEE 802.11g, IEEE 802.11b
Fréquences RF 2,4GHz/5GHz
Débit de données 2,4GHz: jusqu'à 300Mbit/s; 5GHz: jusqu'à 433Mbit/s
Sécurisation du réseau sans l
Canaux 2,4GHz: 1-11 (Amérique du Nord), 1-13 (Europe en général), 1-14 (Japon); 5GHz: 36~165
Modulation DBPSK, DQPSK, CCK et OFDM (BPSK,QPSK,16-QAM/64-QAM)
Sensibilité 270m: -61 dBm à 10% PER; 135 m: -65 dBm à 10% PER; 54 m: -68 dBm à 10% PER; 11 m: -85dBm à 8% PER;
Port USB 2.0
Autonomie 8 heures
Fonctionnement
Stockage
-20
°C~45°C
-20°C~4
WEP, WPA/WPA2, WPA-PSK/WPA2-PSK (TKIP/AES) 64/128bits
6m: -88 dBm à 10% PER; 1 m: -90 dBm@8% PER
5°C
31
Nowsonic_StageExtender.indb 31 08.03.17 16:20
Page 32

Mode d'emploi
www.nowsonic.com
FR
Stage Extender
Contenu
•
Nowsonic Stage Extender
•
2 antennes
•
Mode d'emploi (ce document)
•
Câble USB, type A vers type micro-B
•
Adaptateur secteur (100 - 240V, 50/60Hz, 0,4A; alimentation 5V, 2000mA)
Les options suivantes sont disponibles séparément:
•
Nowsonic Stage Router
•
Nowsonic Stage Router Pro
•
Nowsonic Stage Antenna Set 2.4 GHz
•
Nowsonic Stage Antenna Set 5.0 GHz
Maintenance
Si vous avez des questions ou des problèmes techniques, veuillez d'abord contacter le revendeur chez qui vous avez acheté l'appareil.
Pour toute réparation, veuillez également contacter votre revendeur. Si cela n'est pas possible, vous pouvez aussi nous contacter directement.
Nos coordonnées se trouvent sur notre site Web www.nowsonic.com.
Mentions légales
Ce mode d'emploi est sous copyright © 2017: Nowsonic
Les fonctionnalités, caractéristiques techniques et disponibilité du produit peuvent être modiées sans préavis.
Édition v.1.0, 02/2017
32
Nowsonic_StageExtender.indb 32 08.03.17 16:20
Page 33

Instrucciones de uso
www.nowsonic.com
ES
Stage Extender
Contenido
■ Introducción
■ Campo de aplicación
■ Advertencias de seguridad y uso
■ Descripción de la parte trasera
■ Descripción de la parte frontal
■ Descripción de la parte superior
■ Conexión del Stage Extender
■ Congure la conexión entre el Stage Extender y el Stage Extender (Pro)
■ Conguración de la conexión a través de la interfaz Web
■ Conguración del Stage Extender mediante un navegador
■ Especicaciones
■ Artículos suministrados
■ Servicio
■ Advertencias legales
Introducción
¡Muchas gracias por adquirir el Nowsonic Stage Extender! El Nowsonic Stage Extender es un Dualband WLAN Extender que amplía el alcance de
cualquier red WLAN de (802.11 ac/a/n/b/g). Es compatible con routers tanto de banda única como dual y permite el acceso a Internet a otros dispositivos inalámbricos (como por ej. iPads, iPods, ordenadores portátiles, tablets y smartphones). También se incluye una conexión de WAN/LAN
para conectar dispositivos con cable a la red WLAN. El montaje de tacos con suplementos intercambiables puede utilizarse en combinación con
una serie de soportes de pared de uso habitual. El Nowsonic Stage Extender proporciona a los usuarios acceso inalámbrico a Internet en lugares
de difícil acceso.
OBSERVACIÓN: El Nowsonic Stage Extender pone a disposición un entorno Wi-Fi para dispositivos periféricos externos. Si se produjeran problemas entre una aplicación y un equipo gestionado, por favor, diríjase al productor de estos programas o equipo.
Características
■
Dualband WLAN Extender
■
Conforme con los Estándares 802.11ac/a/b/g/n
■
Rendimiento de datos de hasta 300 MBps en banda de 2.4 G o 433 MBps en banda de 5G
33
Nowsonic_StageExtender.indb 33 08.03.17 16:20
Page 34

Instrucciones de uso
www.nowsonic.com
ES
Stage Extender
■
Dos antenas externas para amplicación del rendimiento de datos incluidas en el volumen de suministro
■
Carcasa de metal con roscas en la placa base para montaje sobre paredes o travesaños
■
Compatible con WPS (Wi-Fi Protected Setup)
■
Emparejamiento con otros dispositivos Wi-Fi en la misma banda con solo pulsar una tecla
■
Interruptor ON/OFF con marco de protección
■
Puerto Ethernet para conexión de dispositivos con cable a la red WLAN
■
Batería recargable integrada
■
Puerto micro USB para recarga de las baterías integradas
■
LEDs para indicación del estado de la batería
■
Funcionamiento a elección con fuente de alimentación o batería integrada (aprox. 8 horas)
■
Ampliación ideal para el Stage Router Pro y el Stage Router de Nowsonic, pero también apto para otros routers WLAN
Campo de aplicación
En combinación con un router WLAN como los modelos Nowsonic Stage Router y Nowsonic Stage Router Pro u otros dispositivos con capacidad
Ethernet, el Nowsonic Stage Extender se recomienda para los siguientes campos de aplicación:
■
Uso como repetidor WLAN móvil o jo para ampliar el alcance de una red WLAN existente
■
Control inalámbrico de mesas de mezcla digitales a través de apps apropiadas instaladas en un tablet u ordenador de escritorio con capacidad
de conexión a WLAN
■
Transmisión de datos entre la aplicación en un ordenador host y un equipo periférico digital
Advertencias de seguridad y uso
■
Advertencias de seguridad
•
Para el uso del Nowsonic Stage Extender tenga en cuenta las siguientes advertencias de seguridad para protegerse contra daños usted
mismo, al Stage Extender y a los dispositivos conectados a este.
•
Tómese un tiempo y lea cuidadosamente este manual para usar su Stage Extender de manera adecuada.
•
Después de desempaquetarlo, compruebe que el aparato no presenta daños: En caso de daños visibles en la carcasa, no ponga el aparato en
funcionamiento. En este caso póngase en contacto con el distribuidor local donde haya comprado el dispositivo.
•
No utilice el Stage Extender durante una tormenta eléctrica.
34
Nowsonic_StageExtender.indb 34 08.03.17 16:20
Page 35

Instrucciones de uso
www.nowsonic.com
ES
Stage Extender
(BNC uses a special anti-thread and size)
•
Desenchufe la alimentación del Stage Extender durante una tormenta.
•
Evite el ingreso de líquidos o polvo en la carcasa del aparato ya que podrían provocar un choque eléctrico o cortocircuito.
•
El Stage Extender está diseñado de manera exclusiva para su uso en espacios interiores.
•
No abra bajo ninguna circunstancia la carcasa del Stage Extender. El aparato contiene componentes peligrosos y solo debería ser abierto por
personal técnico cualicado.
•
Coloque el Stage Extender en un lugar seco y sin polvo que ofrezca protección contra la irradiación solar, la lluvia, la nieve o la niebla articial
producida por una máquina de niebla articial.
•
Nunca coloque el Stage Extender encima o debajo de aparatos como amplicadores de potencia, que generan calor en exceso.
■
Advertencias de uso
•
Para el uso y la comunicación inalámbrica con un ordenador, tablet o smartphone, coloque el Stage Extender en un sitio lo más central posible dentro del área de la cobertura de red deseada.
•
Asegúrese de que haya una distancia suciente con respecto a posibles fuentes de interferencia y coloque siempre el Stage Extender de
modo que las antenas no queden ocultas por obstáculos.
Descripción de la parte trasera
El Nowsonic Stage Extender cuenta con las siguientes conexiones en la parte posterior (de izquierda a derecha):
■
Hembrilla BNC ANT 2.4G/5G (2 uds.)
En estas hembrillas BNC se conectan las antenas inalámbricas incluidas en el volumen de suministro o las antenas del Stage Antenna
Set disponible de manera opcional. Conecte siempre ambas antenas para garantizar una transmisión de datos especialmente libre de
interferencias en el llamado funcionamiento True-Diversity.
■
Hembrilla USB 5V 1A
En este puerto USB puede conectar una fuente de alimentación USB externa para recargar la batería interna: El volumen de suministro incluye un
cable de carga USB correspondiente (Tipo A a Tipo B Micro). Como alternativa puede conectar el Stage Extender a través de esta conexión con el
puerto USB situado en la parte frontal del Nowsonic Stage Router Pro, que proporciona una tensión de 5 V con 2A: El estado de carga de la batería
interna se indica a través de los LEDs situados en la parte superior del Stage Extender (ver „Descripción de la parte superior“ en la página 37).
35
Nowsonic_StageExtender.indb 35 08.03.17 16:20
Page 36

Instrucciones de uso
www.nowsonic.com
ES
Stage Extender
OBSERVACIÓN: En la parte posterior se encuentra la placa de características del Stage Extender: Aquí se indica la dirección IP a través de la
que se puede acceder al dispositivo en la red. Por otra parte, aquí se encuentra el nombre de usuario y la contraseña para la conguración del
Stage Extender. Encontrará más información al respecto en la página 41.
■
Hembrilla DC 5V/2A
En esta hembrilla se conecta la fuente de alimentación incluida en el volumen de suministro (100 - 240V; 50/60Hz 0,4A) para el funcionamiento
con la red eléctrica.
OBSERVACIÓN: Tenga en cuenta que la batería interna solo se cargará a través de la fuente de tensión conectada a la hembrilla USB de 5V 1A
y no a través de la hembrilla de fuente de alimentación DC de 5V/2A.
Descripción de la parte frontal
El Nowsonic Extender cuenta con las siguientes conexiones y elementos de mando en la parte frontal:
■
LAN
Mediante esta conexión RJ45 el Stage Extender se conecta mediante un cable CAT5 convencional a un módem de cable DSL o de
manera directa al puerto Ethernet de un ordenador para establecer
una conexión a Internet.
■
Interruptor ON/OFF
Mediante este interruptor se enciende o apaga el Nowsonic Stage
Extender en modo de batería o fuente de alimentación. Cuando
el aparato está encendido, el LED CPU parpadea en azul en la parte superior: en modo de batería, el estado de carga de la batería se indica a
través de los LEDs 20 - 50 - 75 - 100.
OBSERVACIÓN: Utilice un bolígrafo puntiagudo o un clip enderezado para accionar el botón situado en la abertura RST situado en el lateral
izquierdo de la carcasa: Si mantiene la tecla apretada durante al menos 5 segundos, se restablecerán los ajustes de fábrica del Stage Extender.
36
Nowsonic_StageExtender.indb 36 08.03.17 16:20
Page 37

Instrucciones de uso
www.nowsonic.com
ES
Stage Extender
Descripción de la parte superior
El Nowsonic Stage Extender cuenta con los siguientes elementos de
mando e indicadores en la parte superior:
■
Botón 5G WPS
Si se pulsa brevemente una vez la tecla 5G WPS, el Stage Extender
establece automáticamente una conexión segura con todos los
clientes momentáneamente conectados en la banda de frecuencia
de 5 GHz (802.11n).
■
Botón 2.4G WPS
Si se pulsa brevemente una vez la tecla 2G WPS, el Stage Extender
establece automáticamente una conexión segura con todos los
clientes momentáneamente conectados en la banda de frecuencia
de 2,4 GHz (802.11g).
OBSERVACIÓN: Los modos de conexión 2,4G y 5 G pueden activarse en paralelo. Si se establecen rutas de micrófonos inalámbricos
adicionales, el Stage Extender debe funcionar exclusivamente en
la banda de frecuencia de 5 GHz (802.11n). Por el contrario, en la
banda 2.4 GHz (802.11g) pueden producirse interferencias en la
transmisión también en el funcionamiento True-Diversity.
■
Indicador CPU
Este LED parpadea en azul cuando el Stage Extender está encendido. Si se restablece el Stage Extender mediante la tecla RST, el LED CPU
parpadea temporalmente más rápido.
■
Indicador 5G EXT
Este LED se ilumina cuando está activa la transmisión a través de la banda de frecuencia de 5 GHz.
■
Indicador 2.4G EXT
Este LED se ilumina cuando está activa la transmisión a través de la banda de frecuencia de 2,4 GHz.
5G EXT
2.4G EXT
LINK/ACT
37
Nowsonic_StageExtender.indb 37 08.03.17 16:20
Page 38

Instrucciones de uso
www.nowsonic.com
ES
Stage Extender
■
Indicador LINK/ACT
Este LED se ilumina de manera continua cuando el Stage Extender está conectado con un ordenador a través del puerto LAN. Cuando se transmiten datos, el LED parpadea.
■
Indicadores 20 - 50 - 75 - 100
Mediante estos cuatro LEDs se indica en porcentaje el estado de carga o la capacidad restante de la batería interna. Cuando solo se ilumine el
LED 20, se debería conectar el Stage Extender mediante la hembrilla Mini USB a una fuente de alimentación/dispositivo de carga USB adecuado para recargar la batería.
Conexión del Stage Extender
El Stage Extender puede conectarse a elección directamente con un ordenador, un módem de cable DSL o un router de banda dual o individual
para ampliar el alcance Wi-Fi. Proceda de la siguiente manera para conectar el Stage Extender y ponerlo en funcionamiento:
1) Coloque el Stage Extender en una posición apropiada para la ampliación de la red Wi-Fi existente.
2) Si desea utilizar el Stage Extender en una instalación ja, puede montarlo mediante la conexión de rosca en la base y un soporte adecuado en
una pared o travesaño.
3) Conecte las antenas inalámbricas incluidas en el volumen de suministro mediante los cierres de bayoneta a las hembrillas BNC situadas en la
parte posterior del Stage Extender. Como alternativa se puede conectar el Stage Antenna Set con las hembrillas BNC mediante los cables de
antena respectivos.
4) Conecte la fuente de alimentación incluida en el volumen de suministro a la hembrilla DC 5V/2A situada en la parte posterior del Stage Extender y a una toma de corriente convencional: La fuente de alimentación en el Stage Extender está prevista para un margen de tensiones de 100
hasta 240 V 50/60 Hz.
5) Conecte el puerto Ethernet de su ordenador (o para el uso de Internet: un puerto con capacidad de Internet como un módem DSL o similar)
con un cable CAT5 convencional al puerto LAN situado en la parte frontal del Stage Extender.
6) Dado el caso conecte un dispositivo de carga/fuente de alimentación con capacidad USB a la hembrilla 5V 1A situada en la parte posterior del
dispositivo para cargar la batería interna.
7) Encienda el Stage Extender y compruebe el estado de los LEDs: Si la conexión es correcta, los LEDs CPU y LINK/ACT se iluminan o parpadean.
38
Nowsonic_StageExtender.indb 38 08.03.17 16:20
Page 39

Instrucciones de uso
www.nowsonic.com
ES
Stage Extender
Congure la conexión entre el Stage Extender y el Stage Extender (Pro)
Proceda de la siguiente manera para utilizar el Stage Extender como ampliación de Wi-Fi para un router principal adecuado (como Nowsonic
Stage Extender y Stage Router):
1) Pulse la tecla WPS en el Stage Router (Pro) durante 2 segundos.
2) A continuación pulse la tecla 2.4G WPS en el Stage Extender durante 2 segundos: Espere un momento hasta que el LED 2.4G EXT se ilumine
de manera continua. Ahora la funcionalidad Wi-Fi del Stage Extender está activa en la banda de 2,4 GHz.
3) Para activar además (o de manera alternativa) la banda 5 GHz, pulse la tecla 5G WPS en el Stage Extender durante 2 segundos. Espere hasta
que el LED 5G EXT se ilumine de manera continua y que este módulo Wi-Fi también esté activo.
4) Pulse nuevamente la tecla WPS en el Stage Router (Pro) durante 2 segundos para activar la conexión con el Stage Extender en la banda correspondiente.
El Stage Extender solo puede intercambiar datos de manera inalámbrica con el Stage Router (Pro) y un ordenador o dispositivo similar conectado
al Stage Extender.
OBSERVACIÓN: Se recomienda para la conguración colocar el Stage Extender lo más cerca posible del Stage Router (Pro) para establecer la
mejor conexión posible entre los dispositivos. Después de la conguración puede apagar el Stage Extender y situarlo en la posición deseada:
Después de encenderse, el Stage Extender reconoce automáticamente el router conectado por última vez y restablece la conexión.
Conguración de la conexión a través de la interfaz Web
Como alternativa puede congurar el Stage Extender mediante un ordenador. Para la primera conguración debe conectar el Stage Extender a
través de un cable CAT5 convencional con el puerto Ethernet del ordenador. Después establezca según corresponda los ajustes de red. A continuación se describen los ajustes necesarios para un ordenador.
1) Pinche en Inicio y seleccione la entrada Panel de control > Red e Internet > Conexiones de red.
2) En la pantalla Conexiones de red, pinche con la tecla derecha del ratón en Conexión LAN y seleccione la entrada Propiedades.
3) Doble clic en la ventana de diálogo Propiedades de la conexión LAN en la entrada Protocolo de Internet Versión 4 (TCP/IPv4).
4) Active en el cuadro de diálogo Propiedades de Protocolo de Internet Versión 4 (TCP/IPv4) el campo Utilizar la siguiente dirección IP e
introduzca la siguiente información:
•
Dirección IP: 192.168.0.5
•
Máscara de subred: 255.255.255.0
39
Nowsonic_StageExtender.indb 39 08.03.17 16:20
Page 40

Instrucciones de uso
www.nowsonic.com
ES
Stage Extender
•
Gateway estándar: 192.168.0.254
5) Haga clic en Aceptar y, en la siguiente ventana de diálogo, en Cerrar.
Conguración del Stage Extender mediante un navegador
La conguración del Stage Extender para el funcionamiento como punto de acceso WLAN se lleva a cabo mediante una interfaz de administración HTML a la que puede acceder a través del navegador de su ordenador host. Proceda de esta manera para congurar Stage Extender:
1) Abra un navegador en el ordenador e introduzca la dirección IP 192.168.0.5 en la barra de direcciones: esta es una dirección IP preestablecida
que también está impresa en la parte posterior del Stage Extender. Conrme la entrada con Enter.
2) A continuación se mostrará una máscara de inicio de sesión: ingrese aquí en ambos casos admin como usuario y contraseña (ajuste predeterminado) y pinche en el botón LOGIN.
3) A continuación se abre la máscara de entrada. Haga clic aquí en la entrada 2.4GHz Extender Setup: Aquí viene activada de fábrica la opción
AP. Seleccione en su lugar la opción Extender (AP+Client).
4) Haga clic en el botón AP Scan situado en la esquina superior derecha del cuadro de diálogo: A continuación se muestran en el cuadro de
diálogo los nombres de todas las redes detectadas.
5) Seleccione el campo de la red deseada, ingrese la contraseña de la red en el campo Encryption key situado en la parte inferior del cuadro de
diálogo y haga clic en el botón Apply.
6) Se establecerá la conexión con la red y la entrada de red se distinguirá con la nota Extender / Connected.
A continuación puede comprobar la conguración mediante la información presente en la página Status Information. El Stage Extender ha quedado congurado para el funcionamiento como repetidor/ampliación de Wi-Fi.
40
Nowsonic_StageExtender.indb 40 08.03.17 16:20
Page 41

Instrucciones de uso
www.nowsonic.com
ES
Stage Extender
Especicaciones
■
Hardware
Interfaces 10/100BaseTX (Auto MDI/MDIX) Conexión RJ45 (1 ud.)
Alimentación 5V / 2A
Batería Litio 3,7 V/5000 mAh
Duración de la aprox. 8 horas
batería
Botones 1 x 5G WPS, 1 x 2.4G WPS, 1 x Power ON/OFF, 1 x RST
Indicadores LED 1 x Power, 1 x CPU, 1 x LAN, 1 x 5G, 1 x 2.4G
Antenas 4 antenas dBi (2 uds. respectivamente)
■
Condiciones ambientales
Temperatura
Funcionamiento
Almacenamiento
■
Comunicaciones móviles
Estándares IEEE 802.11ac, IEEE 802.11a, IEEE 802.11n, IEEE 802.11g, IEEE 802.11b
Frecuencias RF 2,4 GHz/5 GHz
Rendimiento de datos 2,4 GHz: Hasta 300 Mbps; 5 GHz: Hasta 433 Mbps
Seguridad WLAN 64/128-bit WEP, WPA/WPA2, WPA-PSK/WPA2-PSK (TKIP/AES)
Canales 2,4 GHz: 1-11 (América del Norte), 1 -13 (Europa en general), 1 -14 (Japón); 5 GHz: 36~165
Tipo de modulación DBPSK, DQPSK, CCK y OFDM (BPSK,QPSK,16-QAM/64-QAM)
Sensibilidad 270 m: -61dBm@10% PER; 135m: -65dBm@10% PER; 54 m: -68dBm@10% PER; 11 m: -85dBm@8% PER;
Conexión USB 2.0
-20° C~45° C
-20° C~45° C
6m: -88dBm@10% PER; 1 m: -90dBm@8% PER
41
Nowsonic_StageExtender.indb 41 08.03.17 16:20
Page 42

Instrucciones de uso
www.nowsonic.com
ES
Stage Extender
Artículos suministrados
•
Nowsonic Stage Extender
•
2 antenas
•
Instrucciones de uso (este documento)
•
Cable USB, Tipo A a Tipo B Micro
•
Fuente de alimentación (100 - 240V; 50/60Hz 0,4A; suministro de tensión 5V; 2.000mA)
Las siguientes opciones están disponibles por separado:
•
Nowsonic Stage Router
•
Nowsonic Stage Router Pro
•
Nowsonic Stage Antenna Set 2,4 GHz
•
Nowsonic Stage Antenna Set 5,0 GHz
Servicio
Si tiene problemas o preguntas técnicas, consulte primero con el distribuidor local al que haya comprado el aparato.
En caso de requerir servicio técnico, le rogamos que también se dirija a su distribuidor local. De lo contrario, también puede ponerse directamente en contacto con nosotros. Encontrará nuestros datos de contacto en nuestra página web www.nowsonic.com.
Advertencias legales
Copyright de este manual del usuario © 2017: Nowsonic
Las características, especicaciones y disponibilidad del producto pueden modicarse sin aviso previo.
Edición v1.0, 02/2017
42
Nowsonic_StageExtender.indb 42 08.03.17 16:20
Page 43

Instrukcja obsługi
www.nowsonic.com
PL
Stage Extender
Spis treści
■ Wstęp
■ Zakres zastosowania
■ Zalecenia dotyczące bezpieczeństwa i pracy urządzenia
■ Opis płyty tylnej
■ Opis płyty czołowej
■ Opis ścianki górnej
■ Podłączenie Stage Extender
■ Konguracja połączenia między Stage Extender a Stage Router (Pro)
■ Instalacja połączenia przy użyciu browsera
■ Konguracja Stage Extender za pośrednictwem browsera
■ Specykacja
■ Skład zestawu
■ Serwis
■ Zastrzeżenia prawne
Wstęp
Dziękujemy za zakupienie urządzenia Nowsonic Stage Extender. Nowsonic Stage Extender jest dwuzakresowym wzmacniaczem Wi-Fi, rozszerzającym zasięg sieci (802.11 ac/a/n/b/g). Jest zgodny zarówno z jedno- jak i dwuzakresowymi routerami Wi-Fi oraz umożliwia innym urządzeniom (np.
iPad, iPod, notebooki, tablety i smartfony) dostęp do internetu. Wyposażony jest ponadto w złącze WAN/LAN do połączenia urządzeń przewodowych z siecią Wi-Fi. Sposób mocowania z wymiennymi nakładkami umożliwia montaż z wieloma typowymi uchwytami ściennymi. Nowsonic
Stage Extender umożliwia użytkownikom bezprzewodowy dostęp do internetu w trudno dostępnych miejscach.
UWAGA: Nowsonic Stage Extender udostępnia środowisko Wi-Fi urządzeniom peryferyjnym. W przypadku pojawienia się problemów w komunikacji między aplikacją, a sterowanym urządzeniem należy zwrócić się do producentów poszczególnych programów lub urządzeń.
Cechy urządzenia
■
Dwuzakresowy wzmacniacz Wi-Fi
■
Zgodny ze standardami 802.11ac/a/b/g/n
■
Przepustowość danych do 300 Mbit/s w paśmie 2.4 G albo 433 Mbit/s w paśmie 5G
■
Dwie zewnętrzne anteny służące wzmocnieniu przesyłu danych w zestawie
43
Nowsonic_StageExtender.indb 43 08.03.17 16:20
Page 44

Instrukcja obsługi
www.nowsonic.com
PL
Stage Extender
■
Metalowa obudowa z gwintowanym otworem w spodniej płycie do montażu na ścianie lub belkach nośnych
■
Wspiera WPS (Wi-Fi Protected Setup)
■
Parowanie z innymi urządzeniami Wi-Fi w obydwu pasmach za pomocą przycisku
■
Przełącznik ON/OFF z osłoną
■
Łącze Ethernet do połączenia urządzeń przewodowych z siecią Wi-Fi
■
Wbudowany akumulator
■
Złącze mikro-USB do ładowania wewnętrznego akumulatora
■
Diody LED do sygnalizacji stanu naładowania akumulatora
■
Praca z zasilaniem sieciowym albo akumulatorowym (ok. 8 godzin)
■
Idealne uzupełnienie dla routera Nowsonic Stage Router Pro i Stage Router, przystosowany także do współpracy z innymi routerami Wi-Fi
Zakres zastosowania
W połączeniu z odpowiednim routerem Wi-Fi jak np. Nowsonic Stage Router i Nowsonic Stage Router Pro albo innymi urządzeniami standardu
Ethernet, Nowsonic Stage Extender nadaje się do następujących zastosowań:
■
jako stały lub mobilny repeater Wi-Fi w celu zwiększenia zasięgu istniejących sieci Wi-Fi
■
Bezprzewodowe sterowanie cyfrowych pulpitów mikserskich za pośrednictwem odpowiednich aplikacji zainstalowanych na tabletach lub
komputerach wyposażonych w łączność Wi-Fi
■
Przenoszenie danych między aplikacją a komputerem głównym i cyfrowym urządzeniem peryferyjnym
Zalecenia dotyczące bezpieczeństwa i pracy urządzenia
■
Zalecenia dotyczące bezpieczeństwa
•
Korzystając z NOWSONIC Stage Extender przestrzegaj następujących zaleceń dotyczących bezpieczeństwa, by ochronić siebie, Stage Extender i z nim połączone urządzenia przed zniszczeniem.
•
Poświęć trochę czasu i przeczytaj uważnie treść niniejszej książeczki aby właściwie użytkować Stage Extender.
•
Sprawdź po rozpakowaniu, czy urządzenie nie jest uszkodzone. Jeśli obudowa posiada widoczne uszkodzenia, nie wolno uruchamiać urządzenia. W takim przypadku zwróć się do lokalnego sprzedawcy, u którego zakupiłeś urządzenie.
•
Nie uruchamiaj Stage Extender podczas burzy.
•
Podczas burzy odłącz zasilanie Stage Extender.
44
Nowsonic_StageExtender.indb 44 08.03.17 16:20
Page 45

Instrukcja obsługi
www.nowsonic.com
PL
Stage Extender
(BNC uses a special anti-thread and size)
•
Płyny i kurz nie powinny dostawać się do wnętrza urządzenia, ponieważ mogłyby doprowadzić do porażenia prądem lub spowodować zwarcie.
•
Stage Extender jest przeznaczony do pracy wyłącznie w pomieszczeniach zamkniętych.
•
Pod żadnym pozorem nie otwieraj obudowy Stage Extender. Urządzenie zawiera niebezpieczne podzespoły i powinno być otwierane jedynie przez wykwalikowany i autoryzowany do tego personel.
•
Ustaw Stage Extender na suchym, pozbawionym kurzu miejscu, zapewniającym ochronę przed bezpośrednim działaniem promieni słonecznych, deszczu, śniegu lub generatorów mgły.
•
Nigdy nie umieszczaj Stage Extender na lub pod urządzeniami, takimi jak wzmacniacze, wytwarzającymi nadmierne ilości ciepła.
■
Zalecenia dotyczące pracy urządzenia
•
W celu użytkowania i bezprzewodowej komunikacji z komputerem stacjonarnym, tabletem lub smartfonem, ustaw Stage Extender w miarę
możliwości centralnie.
•
Upewnij się, że zachowany jest wystarczający odstęp od ewentualnych źródeł zakłóceń oraz stawiaj Stage Extender zawsze tak, by anteny nie
były zasłonięte przez jakiekolwiek przeszkody.
Opis płyty tylnej
Na płycie tylnej Nowsonic Stage Extender znajdują się następujące złącza (od lewej do prawej):
■
Gniazdo BNC ANT 2.4G/5G (2 szt.)
Do tych gniazd dołączane są anteny dostarczone w zestawie lub
dostępne opcjonalnie anteny estradowe. W miarę możliwości należy
zamontować obydwie anteny, aby w tak zwanym trybie true diversity zapewnić przesyłanie danych bez zakłóceń.
■
Port USB 5V 1A
Do tego portu można podłączyć zewnętrzny zasilacz USB w celu ładowania wewnętrznego akumulatora urządzenia: Odpowiedni kabel USB (z wtyczkami A i B) znajduje się w zestawie. Alternatywnie można port
USB Stage Extender połączyć z portem USB na płycie czołowej routera Nowsonic Stage Router Pro, z którego dostarczany jest prąd ładowania 5
V 2A: Stan naładowania wewnętrznego akumulatora jest sygnalizowany przez diody LED na górnej ściance Stage Extender (zobacz „Opis ścianki
górnej“ na stronie 47).
Nowsonic_StageExtender.indb 45 08.03.17 16:20
45
Page 46

Instrukcja obsługi
www.nowsonic.com
PL
Stage Extender
UWAGA: Na ściance tylnej umieszczona jest płytka znamionowa urządzenia Stage Extender: Na niej znajduje się adres IP, pod którym urządzenie jest dostępne w sieci. Ponadto umieszczono na niej nazwę użytkownika i hasło dostępu w celu konguracji Stage Extender. Dalsze informacje na ten temat uzyskasz na strona 51.
■
Gniazdo DC 5V/2A
Gniazdo służy do podłączenia znajdującego się w zestawie zasilacza (100 - 240V; 50/60Hz 0,4A) przy pracy z zasilaniem sieciowym.
UWAGA: Należy zwrócić uwagę, że ładowanie wewnętrznego akumulatora odbywa się wyłącznie z zasilacza dołączonego do portu USB 5 V 1A
a nie przez złącze zasilacza sieciowego DC 5V/2A.
Opis płyty czołowej
Z przodu urządzenia Nowsonic Stage Extender znajdują się następujące elementy obsługi i złącza:
■
LAN
Poprzez wysokiej jakości zatrzaskowe złącze RJ45 Stage Extender
można podłączyć, używając zwykłego kabla CAT5, do modemu
przewodowego DSL lub gigabitowej sieci lokalnej dla nawiązania
połączenia z Internetem.
■
Przełącznik ON/OFF
Tym przełącznikiem włącza się lub wyłącza Stage Extender w trybie
zasilania sieciowego i akumulatorowego. Jeśli urządzenie jest
włączone, dioda LED CPU na górnej płycie obudowa migocze: W trybie pracy z zasilanie akumulatorowym stan naładowania akumulatora jest
sygnalizowany diodami LED 20 - 50 - 75 - 100.
UWAGA: Do naciśnięcia przycisku znajdującego się w otworze oznaczonym RST na lewej ściance obudowy użyj cienkiego długopisu lub
spinacza biurowego: Przytrzymaj wciśnięty przycisk przez co najmniej 5 sekund, wtedy Stage Extender zostanie zresetowany do ustawień
fabrycznych.
46
Nowsonic_StageExtender.indb 46 08.03.17 16:20
Page 47

Instrukcja obsługi
www.nowsonic.com
PL
Stage Extender
Opis ścianki górnej
Z przodu urządzenia Nowsonic Stage Extender znajdują się następujące elementy obsługi i wskaźniki:
■
Przycisk 5G WPS
Po krótkim, jednorazowym naciśnięciu przycisku 5G WPS, Stage
Extender automatycznie nawiąże bezpieczne połączenie ze wszystkimi aktualnie podłączonymi klientami w paśmie 5 GHz (802.11n).
■
Przycisk 2.4G WPS
Po krótkim, jednorazowym naciśnięciu przycisku 2.4G WPS, Stage
Extender automatycznie nawiąże bezpieczne połączenie ze wszystkimi aktualnie podłączonymi klientami w paśmie 2.4 GHz (802.11g).
UWAGA: Tryby pracy w pasmach 2,4G i 5 G mogą być aktywowane
równolegle. Jeśli instalujesz mikrofony bezprzewodowe, powinieneś używać Stage Extender wyłącznie w paśmie 5 GHz (802.11n).
W przeciwnym razie w paśmie 2,4 GHz (802.11g) może dojść do
zakłóceń transmisji również w trybie true diversity.
■
Wskaźnik CPU
Ta dioda LED migocze na niebiesko, gdy Stage Extender jest włączony. Jeśli zresetowałeś Stage Extender przyciskiem RST, dioda
LED CPU przejściowo migocze szybciej.
■
Dioda 5G EXT
Ta dioda LED świeci, jeśli aktywna jest transmisja w paśmie 5 GHz.
■
Wskaźnik 2.4G EXT
Ta dioda LED świeci, jeśli aktywna jest transmisja w paśmie 2,4 GHz.
5G EXT
2.4G EXT
LINK/ACT
47
Nowsonic_StageExtender.indb 47 08.03.17 16:20
Page 48

Instrukcja obsługi
www.nowsonic.com
PL
Stage Extender
■
Wskaźnik LINK/ACT
Ta dioda świeci w sposób ciągły, gdy Stage Extender jest połączony z komputerem za pośrednictwem portu LAN. Podczas przesyłania danych
dioda LED migocze.
■
Wskaźniki 20 - 50 - 75 - 100
Te wskaźniki sygnalizują stan naładowania, a dokładnie pozostałej porcji energii elektrycznej wewnętrznego akumulatora. Jeśli świeci się wyłącznie dioda 20, należy Stage Extender podłączyć przez gniazdo mini-USB z odpowiednim zasilaczem USB w celu naładowania akumulatora.
Podłączenie Stage Extender
Stage Extender może być połączony albo bezpośrednio z komputerem, modemem DSL albo z jedno- lub dwupasmowym routerem w celu rozszerzenia zasięgu sieci bezprzewodowej Wi-Fi. Aby podłączyć i uruchomić Stage Extender należy postępować w następujący sposób:
1) Stage Extender należy ustawić w odpowiedniej dla planowanego rozszerzenia zasięgu istniejącej sieci Wi-Fi pozycji.
2) Jeśli planowane jest umieszczenie Stage Extender na stałe, można do jego zamocowania wykorzystać gwintowany otwór w spodniej płycie
obudowy oraz odpowiedni uchwyt ścienny.
3) Dostarczone w zestawie anteny należy dołączyć złączami bagnetowymi do gniazd BNC na płycie tylnej Stage Extender. Dostępne osobno
anteny estradowe możesz zamiennie podłączyć kablami antenowymi do gniazd BNC.
4) Do gniazda DC 5V/2A na płycie tylnej należy dołączyć dostarczony w zestawie kabel sieciowy i podłączyć go do prądu: Wewnętrzny zasilacz
Stage Extender jest przeznaczony do pracy w sieci 50/60 Hz i napięć od 100 do bis 240 V.
5) Port Ethernet komputera (albo w celu dostępu do internetu: np. port modemu DSL) należy połączyć kablem sieciowym CAT5 z portem LAN na
płycie czołowej Stage Extender.
6) W razie potrzeby do gniazda 5V 1A na płycie tylnej należy dołączyć odpowiedni zasilacz USB w celu ładowania wewnętrznego akumulatora.
7) Następnie należy włączyć Stage Extender i sprawdzić stand diod LED: W przypadku prawidłowego podłączenia diody LED CPU i LINK/ACT
powinny świecić się lub migotać.
48
Nowsonic_StageExtender.indb 48 08.03.17 16:20
Page 49

Instrukcja obsługi
www.nowsonic.com
PL
Stage Extender
Konguracja połączenia między Stage Extender a Stage Router (Pro)
W celu użycia Stage Extender do rozszerzenia zasięgu Wi-Fi odpowiedniego routera głównego (jak np. Nowsonic Stage Router Pro i Stage Router),
należy postępować w następujący sposób:
1) Nacisnąć przycisk WPS na Stage Router (Pro) przez 2 sekundy.
2) Następnie nacisnąć przycisk 2.4G WPS Stage Extender przez 2 sekundy: Odczekać przez chwilę, aż dioda LED 2.4G EXT zaświeci się w sposób
ciągły. Od tej chwili funkcja Wi-Fi Stage Extender w paśmie 2,4 GHz jest aktywna.
3) Aby dodatkowo (albo zamiennie) aktywować pasmo 5 GHz, należy przycisk 5G WPS na obudowie Stage Extender nacisnąć przez 2 sekundy.
Odczekać, aż dioda LED 5G EXT zaświeci się w sposób ciągły i aktywny będzie także ten moduł Wi-Fi.
4) Należy ponownie nacisnąć przycisk WPS na obudowie Stage Router (Pro) przez 2 sekundy, w celu aktywowania połączenia ze Stage Extender
w każdym z pasm.
Od tej chwili Stage Extender może bezprzewodowo wymieniać dane między Stage Router (Pro) i dołączonym do Stage Extender komputerem itp.
UWAGA: W trakcie instalacji Stage Extender zaleca się umieszczenie go możliwie blisko Stage Router (Pro) dla zapewnienia możliwie dobrego
połączenia między nimi. Po zakończeniu instalacji Stage Extender może zostać wyłączony i przeniesiony na planowane miejsce: Po włączeniu
Stage Extender rozpozna automatycznie ostatnio połączone n routerów i ponownie połączy się z nimi.
Instalacja połączenia przy użyciu browsera
Stage Extender można alternatywnie zainstalować za pośrednictwem komputera. W tym celu Stage Extender musi zostać połączony kablem
sieciowym CAT5 z portem Ethernet komputera. Następnie należy odpowiednio dopasować ustawienia sieciowe. Poniżej opisane są ustawienia
dla komputera PC.
1) Kliknij na Start i wybierz opcję Panel sterowania > Sieć i Internet > Połączenia sieciowe.
2) Prawym przyciskiem myszy kliknij alias Połączenia LAN na ekranie Połączenia sieciowe i wybierz opcję Właściwości.
3) W oknie dialogowym Właściwości połączenia LAN kliknij dwa razy opcję Protokół internetowy wersja 4 (TCP/IPv4).
4) W oknie dialogowym Właściwości aktywuj Użyj następującego adresu IP i wprowadź kolejno:
•
Adres IP: 192.168.0.5
•
Maska podsieci: 255.255.255.0
•
Brama domyślna: 192.168.0.254
5) Następnie kliknij na OK i w kolejnym oknie dialogowym Zamknij.
49
Nowsonic_StageExtender.indb 49 08.03.17 16:20
Page 50

Instrukcja obsługi
www.nowsonic.com
PL
Stage Extender
Konguracja Stage Extender za pośrednictwem browsera
Konguracja urządzenia Stage Extender do zastosowania jako punkt dostępowy WLAN odbywa się w okienku administratora HTML, które otwiera
się w przeglądarce na komputerze. Aby skongurować Stage Extender, postępuj w następujący sposób:
1) Otwórz browser i wprowadź adres 192.168.0.5: Chodzi o zaprogramowany domyślny adres IP, wydrukowany także na tylnej ściance Stage
Extender. Potwierdź przyciskiem Enter.
2) W odpowiedzi pojawi się na ekranie dialog logowania: Wprowadź jako nazwę użytkownika i hasło admin (ustawione wstępnie) i kliknij LOGIN.
3) W odpowiedzi pokaże się maska opcji. Kliknij na opcję 2.4GHz Extender Setup: Fabrycznie aktywowana jest opcja AP. Zamiast tego wybierz
opcję Extender (AP+Client).
4) Kliknij na pole AP Scan w prawym górnym oknie dialogu: W odpowiedzi w dialogu pojawią się nazwy wszystkich rozpoznanych sieci.
5) Wzbierz nazwę żądanej sieci, podaj w polu Encryption key w dolnej części dialogu hasło dostępu do sieci i kliknij na pole Apply.
6) W tym momencie zostanie nawiązane połączenie z siecią i wybrana sieć zostanie opatrzona komentarzem Extender / Connected.
Na zakończenie można skontrolować konguracje sprawdzając informacje na stronie Status Information. Stage Extender jest gotów do pracy jako
repeater/extender Wi-Fi.
50
Nowsonic_StageExtender.indb 50 08.03.17 16:20
Page 51

Instrukcja obsługi
www.nowsonic.com
PL
Stage Extender
Specykacja
■
Hardware
Złącza 10/100BaseTX (Auto MDI/MDIX) RJ45 (1 szt.)
Zasilanie 5V / 2A
Akumulator litowy, 3,7 V/5000 mAh
Przyciski 1 x 5G WPS, 1 x 2.4G WPS, 1 x Power ON/OFF, 1 x RST
Wskaźniki LED 1 x Power, 1 x CPU, 1 x LAN, 1 x 5G, 1 x 2.4G
Anteny 4 dBi (po 2 sztuki)
■
Warunki otoczenia
Temperatura
■
Sieci bezprzewodowe
Standardy IEEE 802.11ac, IEEE 802.11a, IEEE 802.11n, IEEE 802.11g, IEEE 802.11b
Częstotliwości pracy 2,4 GHz/5 GHz
Przepustowość 2,4 GHz: Do 300 Mbit/s; 5 GHz: Do 433 Mbit/s
Zabezpieczenia Wi-Fi 64/128-bit WEP, WPA/WPA2, WPA-PSK/WPA2-PSK (TKIP/AES)
Kanały 2,4 GHz: 1-11 (Ameryka północna), 1 -13 (cała Europa), 1 -14 (Japonia); 5 GHz: 36~165
Rodzaj modulacji DBPSK, DQPSK, CCK i OFDM (BPSK,QPSK,16-QAM/64-QAM)
Czułość 270 m: -61dBm@10% PER; 135m: -65dBm@10% PER; 54 m: -68dBm@10% PER; 11 m: -85 dBm@8% PER;
Złącze USB 2.0
Czas pracy 8 godzin
akumulatora
Praca
Przechowywani
-20° C~45° C
-20° C~45° C
6 m: -88dBm@10% PER; 1 m: -90dBm@8% PER
51
Nowsonic_StageExtender.indb 51 08.03.17 16:20
Page 52

Instrukcja obsługi
www.nowsonic.com
PL
Stage Extender
Skład zestawu
•
Nowsonic Stage Extender
•
2 anteny
•
Instrukcja obsługi (niniejszy dokument)
•
Kabel USB, Typ A / Typ B Micro
•
Zasilacz (100 - 240V; 50/60Hz 0,4A; wyjście 5V; 2.000mA)
Następujące opcje są osobno dostępne:
•
Nowsonic Stage Router
•
Nowsonic Stage Router Pro
•
Zestaw anten estradowych Nowsonic Stage Antenna Set 2,4 GHz
•
Zestaw anten estradowych Nowsonic Stage Antenna Set 5,0 GHz
Serwis
W przypadku wystąpienia jakichkolwiek problemów lub pytań natury technicznej, prosimy zwrócić się w pierwszej kolejności do lokalnego sprzedawcy, u którego urządzenie zostało zakupione.
W przypadku naprawy serwisowej, prosimy zwrócić się również do lokalnego sprzedawcy. W innym przypadku prosimy o skontaktowanie się
bezpośrednio z nami. Nasze dane kontaktowe znajdziesz na naszej stronie internetowej www.nowsonic.com.
Zastrzeżenia prawne
Prawa autorskie do niniejszego podręcznika użytkownika © 2017: Nowsonic
Cechy produktu, specykacja i dostępność mogą ulec zmianie bez wcześniejszej zapowiedzi.
Wydanie w. 1.0, 02/2017
52
Nowsonic_StageExtender.indb 52 08.03.17 16:20
Page 53

Environmental Conditions:
Working Temperature -20 ~ 45℃
Working humidity 65+/-20%RH
Hereby, CMG Global Limited declares that this Nowsonic Stage Extender/ 313806 , is In compliance with the essential Requirements
and other relevant provisions of Directive 1999/5/EC.
The AC plug considered as disconnect device of adapter.
I/P AC 100-240V, 50/60Hz, 0.4A DC 5V, 2A
Environment friendly disposal
you can help protect the environment
Please remember to respect the local regulations: hand in the non-working electrical equipments to an appropriate waste disposal centre.
The RF distance between body and the product is 20cm
Nowsonic_StageExtender.indb 53 08.03.17 16:20
Page 54

FCC Caution:
This device complies with Part 15 of the FCC rules and Industry Canada license-exempt RSS standard(s). Operation is subject to the
following two conditions: (1) this device may not cause harmful interference, and (2) this device must accept any interference received,
including interference that may cause undesired operation.
The manufacturer is not responsible for any radio or TV interference caused by unauthorized modifications or change to this equipment.
Such modifications or change could void the user’s authority to operate the equipment.
This radio transmitter (identify the device by certification number or model number if Category II) has been approved by Industry Canada
to operate with the antenna types listed below with the maximum permissible gain indicated. Antenna types not included in this list,
having a gain greater than the maximum gain indicated for that type, are strictly prohibited for use with this device.
This equipment has been tested and found to comply with the limits for a Class B digital device, pursuant to part 15 of the FCC Rules.
These limits are designed to provide reasonable protection against harmful interference in a residential installation. This equipment
generates, uses and can radiate radio frequency energy and, if not installed and used in accordance with the instructions, may cause
harmful interference to radio communications. However, there is no guarantee that interference will not occur in a particular installation.
If this equipment does cause harmful interference to radio or television reception, which can be determined by turning the equipment off
and on, the user is encouraged to try to correct the interference by one or more of the following measures:
-- Reorient or relocate the receiving antenna.
-- Increase the separation between the equipment and receiver.
-- Connect the equipment into an outlet on a circuit different from that to which the receiver is connected.
-- Consult the dealer or an experienced radio/TV technician for help.
The device has been evaluated to meet general RF exposure requirement.
To maintain compliance with FCC’s RF exposure guidelines, this equipment should be installed and operated with a minimum distance of
20cm between the radiator and your body.
5G
Any emission is maintained within the band of operation under all conditions of normal operation. The max. frequency stability is less
than 20ppm.
Nowsonic_StageExtender.indb 54 08.03.17 16:20
Page 55

Nowsonic_StageExtender.indb 55 08.03.17 16:20
Page 56

Distributed by Sound Service GmbH
www.nowsonic.com
WEEE-Reg.-Nr.: DE 18189133
Nowsonic_StageExtender.indb 56 08.03.17 16:20
 Loading...