

Page 1
C
www.nowsonic.com
Professional
Headphone Amplifier
User manual
Bedienungsanleitung
Mode d‘emploi
Instrucciones de uso
Instrukcja obsługi
Page 2

User manual 4
Bedienungsanleitung 9
Mode d‘emploi 14
Instrucciones de uso 19
Podręcznik użytkownika 24
Page 3
4
www.nowsonic.com
Hexacon
User manual
GB
1) Read these instructions.
2) Keep these instructions.
3) Heed all warnings.
4) Follow all instructions.
5) Do not use this apparatus near water.
6) Clean only with dry cloth.
7) Do not block any of the ventilation openings! Install in accordance
with the manufacturer’s instructions.
8) Do not install near any heat sources such as radiators, heat regis-
ters, stoves, or other apparatus (including amplifiers) that produce
heat.
9) Do not defeat the safety purpose of the polarized or grounding-
type plug. A polarized plug has two blades with one wider than
the other. A grounding type plug has two blades and a third
grounding prong. The wide blade or the third prong is provided
for your safety. If the provided plug does not fit into your outlet,
consult an electrician for replacement of the obsolete outlet.
10) . Protect the power cord from being walked on or pinched,
particularly at plugs, convenience receptacles, and the point where
they exit from the apparatus.
11) Only use attachments/accessories specified by the manufacturer.
12) Use only with a cart, stand, tripod, bracket, or
table specified by the manufacturer, or sold with
the apparatus. When a cart is used, use caution
when moving the cart/apparatus combination to
avoid injury from tip-over.
13) Unplug this apparatus during lightning storms or when unused
for long periods of time.
14) Refer all servicing to qualified service personnel. Servicing is
required when the apparatus has been damaged in any way, such
as power-supply cord or plug is damaged, liquid has been spilled
or objects have fallen into the apparatus, the apparatus has been
exposed to rain or moisture, does not operate normally, or has
been dropped.
WARNING:
To reduce the risk of fire or electric shock, do not expose this
apparatus to rain or moisture.
Do not expose this equipment to dripping or splashing and ensure
that no objects filled with liquids, such as vases, are placed on the
equipment.
This apparatus must be earthed.
Use a three-wire grounding type line cord like the one supplied with
the product.
Be advised that different operating voltages require the use of diffe-
rent types of line cord and attachment plugs.
Always observe the local safety regulations. Ensure that the factory-
set power requirements for the device (refer to the label on the rear
panel) corresponds to the mains supply in your region.
This equipment should be installed near the socket outlet and discon-
nection of the device should be easily accessible.
To completely disconnect this equipment from the AC Mains, discon-
nect the power supply cord plug from the AC receptacle.
Please follow all instructions of the manufacturer for installation.
Do not install in a confined space.
Do not open the unit - risk of electric shock.
CAUTION!
Please note: Changes or modifications to the device not expressly
approved in this manual could void your authority to operate the
instrument.
Servicing
There are no user-serviceable parts inside.
All service must be performed by qualified personnel.
CAUTION: TO REDUCE THE RISK OF ELECTRIC SHOCK, DO NOT REMOVE THE COVER. NO USER SERVICEABLE PARTS INSIDE. REFER
SER
VICING TO QUALIFIED PERSONNEL ONLY.
IMPORTANT SAFETY INSTRUCTIONS
The exclamation point within an equilateral triangle is intended to alert the user to the presence of important operating
and
maintenance(servicing) instructions in the literature ac-
companying the product.
The lightning flash with an arrowhead symbol within an equilateral triangle is intended to alert the user to the presence of
uninsulat
ed “dangerous voltage” within the product’s enclosure that may be of sufficient magnitude to constitute a risk of
elec
tric shock to persons.
Page 4
5
www.nowsonic.com
Hexacon
User manual
GB
Contents
Introduction
Operation
Power supply
Connectors and controls
Operation
Specifications
Scope of supply
Disclaimer
Servicing
Legal information
Introduction
The Nowsonic Hexacon is a headphone amplifier with 6 separate output
channels. Each channel derives its signal from the stereo MAIN INPUT
on the rear panel. For a flexible routing you can replace the input signal
at the MAIN INPUT and feed the attached headphones with the signal
at the DIRECT IN jack on the front panel. In addition, each headphone
channel has its own stereo input for monitoring an alternative signal.
Each output channel features a BALANCE knob which controls either
the panning between the LEFT and RIGHT channel in the MAIN bus or
the MIX balance between the MAIN bus and the AUXILIARY input in the
channels output.
Each output channel features separate controls for BASS and TREBLE for
optimizing the output signal as needed. For a simplified setup and a flexible wiring the headphone outputs are in parallel as 1/4“ TRS jacks on
the rear and the front panel. Using the two MONO buttons, each channel can individually be toggled between the four operating modes Stereo, Mono Left, Mono Right and Mono Left & Right for providing various
monitoring options.
On the rear panel you will find balanced inputs (XLR and 1/4“ TRS) for
the MAIN bus. The input signal is looped through via normalized THRU
sockets (XLR, 1/4“ TRS). This allows to drive additional Hexacon units if
needed. The output level is metered via the 8-segment level meters per
channel and in the MAIN bus.
Operation
Hexacon is recommended for the following applications and environment: normally, Hexacon is used in recording studios to drive the artist
monit
or. For this purpose, Hexacon can be installed in the control or
recording room as required. Thanks to its standard size (19“, 1U), Hexacon can be mounted in every 19“ rack. Since the housing of Hexacon
is
made of sheet steel and aluminum, it is largely insensitive to interferences. However, you should not install Hexacon next to a power
amplifier
or any other device that can generate high temperatures or
electromagnetic fields.
Power supply
Hexacon has an internal power supply. Connect Hexacon to the mains
using the appropriate power cord. Please take care that the specification on the rear panel matches the mains power.
Hexacon is g
rounded via the ground pin of the mains plug: Do not
defeat the safety purpose of the polarized or grounding-type plug.
Page 5

6
www.nowsonic.com
Hexacon
User manual
GB
Connectors and controls
Front panel
Hexacon has the following sockets and controls
on the front (from left to right):
DIRECT IN jack
This 1/4“ TRS jack serves as an alternative input for the MAIN INPUT on
the rear: once you plug a TRS connector to that jack, the signal at the
MAIN INPUT in the MAIN bus is deactivated. Now the DIRECT IN signal
is fed to all 6 headphone channels via the MAIN bus. This allows to
input an alternative monitoring signal to your headphone channels,
when Hexacon is mounted in your studio rack and normally gets its
signal from the MAIN INPUT.
MASTER VOLUME control
This knob controls the level in the MAIN bus. The level in the MAIN bus
is always displayed on the 8-segment level meter next to the DIRECT
IN socket, regardless whether the DIRECT IN is used or not.
Since all headphone channels are identical,
we will only explain channel 1:
MONO L and MONO R buttons
These buttons change the routing for the headphone output: the
routing is toggled post-Fader and post-EQ. The following modes are
available:
Both buttons pressed: the signal is played back in stereo.
MONO L button is pressed, MONO R is not pressed: the left channel
of the stereo input signal is routed to the headphone output in
mono, the right channel is muted.
MONO L button is not pressed, MONO R is pressed: the right channel
of the stereo input signal is routed to the headphone output in
mono, the left channel is muted.
Both MONO L and MONO R buttons are pressed: both channels of
the stereo input signal are summed to mono and routed to the
headphone output
OUT jack
The 1/4“ TRS jack OUT is used to connect a stereo headphone. Alternatively,
you can feed the signal to another headphone via this output. There is
a parallel output on the rear of Hexacon.
BASS control
This knob boosts or cuts the frequency range below the cutoff
frequency 100 Hz. The control range of this shelving fi lter is +/-10dB.
In the middle position (0) the fi lter has no eff ect.
Treble control
This knob boosts or cuts the frequency range above the cutoff
frequency 10 kHz. The control range of this shelving fi lter is +/-10dB.
In the middle position (0) the fi lter has no eff ect.
BALANCE control
Depending on the channel‘s signal fl ow, the BALANCE knob has two
functions.
The AUX IN jack on the rear is not used
If the channel derives its signal from the MAIN INPUT, the BALANCE
knob controls the L/R balance of the signal in the MAIN bus.
The AUX IN jack on the rear is used
If the channel derives its signal from the AUX IN socket on the rear, the
BALANCE knob controls the mix between the signal in the MAIN bus
and the AUX IN signal. For example, you could feed the playback of the
band to the MAIN INPUT, while the vocals are connected via the AUX
IN input: using the BALANCE knob, the singer can mix the playback
with his vocals as required.
VOLUME control
This knob controls the output level of the signal in the MAIN bus to the
headphone. The 8-segment level meter shows the output level for the
corresponding headphone.
Power switch
The POWER switch turns Hexacon on and off .
NO WSO N IC H e xaC on
Page 6
7
www.nowsonic.com
Hexacon
User manual
GB
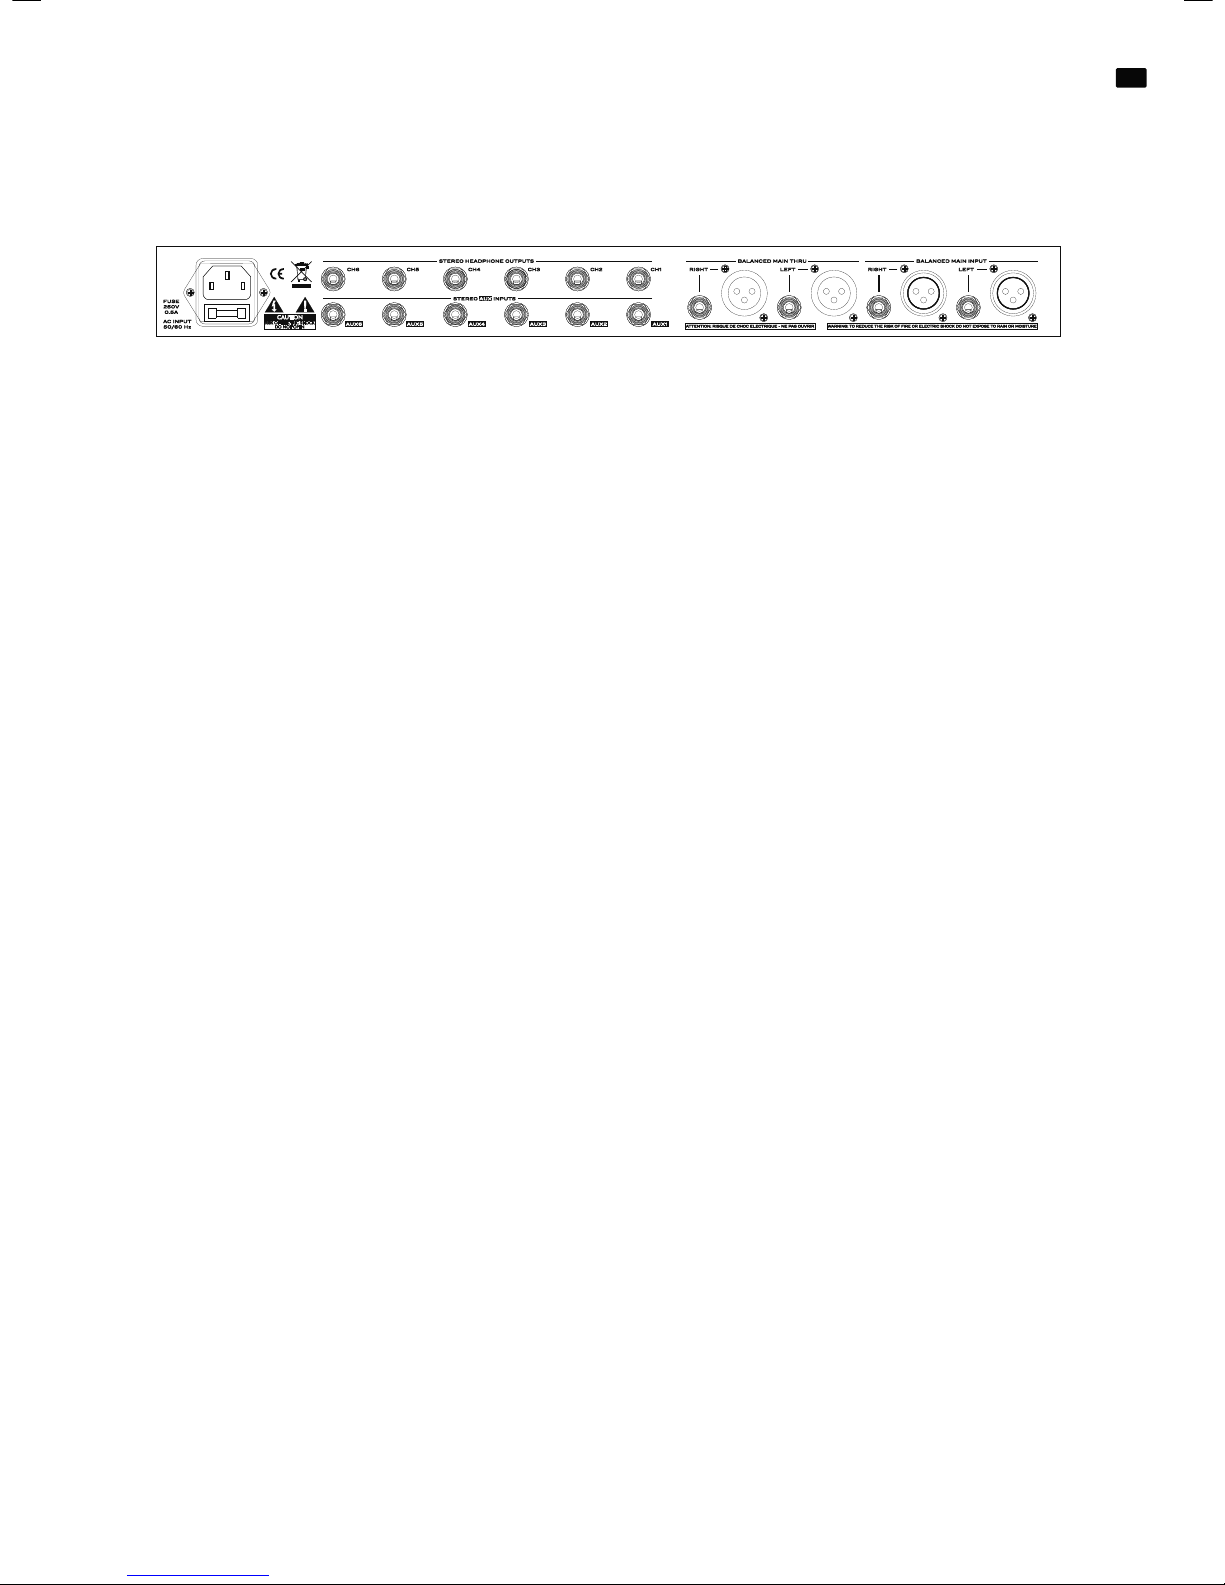
Connectors and controls
Back panel
Hexacon has the following connectors on the rear (from right to left)
BALANCED MAIN INPUT
These balanced XLR and 1/4“ TRS jacks are used to connect stereo signals with line level. Here, you can connect the stereo output of a mixer
and the like.
Note
If you plug a signal to the DIRECT IN socket on the front, these inputs
are automatically deactivated.
BALANCED MAIN THRU
These balanced XLR and 1/4“ TRS jacks are used to connect a stereo
device with line level. The signal in the MAIN bus is directly looped
through to a subsequent device (e.g. another Hexacon).
STEREO HEADPHONE OUTPUTS
These six TRS jacks are connected in parallel to the headphone outputs on the front. They are used to connect the headphones or to output their signal to a subsequent headphone amplifi er etc. You can use
these inputs alternatively or in parallel with the outputs on the front:
Hexacon is designed for headphones with a load impedance of 32 or
600 Ω. Accordingly, you can connect and drive multiple headphones
– however, the overall impedance must not exceed 16 Ω. Otherwise,
an overload may occur and the maximum output power is possibly
limited.
Note
If you encounter any problems connecting multiple headphones, please disconnect one headphone. If this solves the problem, the load
impedance of the headphones is too low. Please try other headphones or avoid connecting multiple headphones.
STEREO AUX INPUTS
Via these stereo TRS jacks you can directly feed a stereo line signal to
the corresponding headphone amplifi er. As soon as you plug a signal
to the AUX IN jack, the BALANCE knob serves as a mix control which
sets the mix ratio between the signal in the MAIN bus and the AUX IN
signal.
Operation
Please turn down the MASTER VOLUME and the VOLUME controls in
the channels before wiring Hexacon. Set the BASS, TREBLE, and BALANCE knobs to their middle position. Deactivate all MONO switches.
Now, you can wire the MAIN INPUT sockets with balanced XLR or TRS
plugs: for example, use a stereo aux output of a mixing desk etc. as a
source.
If required, you can directly tap the signal in the MAIN bus via the
MAIN THRU sockets and feed it to another Hexacon.
If needed, you can input the monitor signal via the DIRECT IN socket
on the front: now, the MAIN INPUT signals are deactivated.
Connect an appropriate headphone to the OUT socket and/or to the
channel sockets in the section STEREO HEADPHONE OUTPUTS. If you
would like to use the mix function in the channels, you must input
other signals via the AUX IN sockets in the respective channels. With
the BALANCE knob you can adjust the level between the MAIN bus
and the AUX signal.
After wiring turn on Hexacon with the POWER switch. Please set the
playback volume in the master section with the MASTER VOLUME
knob: please take care that the signal doesn‘t clip in the master level
meter. The green and amber LEDs should light up, while the red clip
LEDs should never be lit.
Next, adjust the playback volume in each channel as needed: choose
the playback mode for a channel via the corresponding MONO L and
MONO R buttons. You can listen to the signals either stereo or mono.
In mono mode, you can choose between diff erent sources (MONO L,
MONO R, MONO L&R).
Turn up the volume in the channel with the VOLUME knob: Again, the
signal should be metered on the green and amber LEDs without the
red clip LEDs. If a signal is connected to the AUX IN, you can set it in
relation to the signal in the MAIN bus via the BALANCE knob. If no AUX
signal is connected, the BALANCE knob controls the ratio between the
left and right channel of the stereo signal in the MAIN bus.
Optimize your listening experience with the BASS and TREBLE knobs.
Please note that the level of the channel signal is boosted by the gain
of the frequency bands. Therefore, clippings may occur: in this case,
lower the VOLUME knob as required.
NO WSO N IC H e xaC on
Page 7

8
www.nowsonic.com
Hexacon
User manual
GB
Note
If a signal is input to the MAIN INPUT and to the AUX IN at the same
time, you should check the phase of their signals. The signal could be
canceled by phase errors and will therefore not be amplified as expected: Please check the correlation by choosing different modes via the
MONO
L and MONO R buttons. In case of cancellations try to invert the
phase of the AUX signal and compare the results.
Specifications
Design 6 channel headphone amplifier with
equalizer and variable aux input per channel
Frequency response 20 Hz to 50KHz, +0/-2dB (no equalization)
Maximum gain 25.6dB @ 1kHz (no equalization)
Equalizer Treble EQ: ± 12 dB @ 10kHz, shelving filter
Bass EQ: ± 12 dB @ 100 Hz, shelving filter
Inputs XLR and 1/4“ TRS jacks (MAIN INPUT),
balanced and unbalanced pin assignment
1/4“ TRS jack (Aux inputs)
Input impedance 40kΩ (MAIN: balanced XLR and 1/4“ TRS jacks)
9.9kΩ (Direct In: 1/4“ jack)
15 to 21kΩ (AUX IN: 1/4“ TRS jacks)
Maximum output level +21.5dBu
Dynamic range ≥101dB typ. @ 130mW, 600Ω load, max. level
Outputs XLR and 1/4“ TRS jacks (MAIN THRU)
1/4“ TRS jacks (headphone outputs)
Output impedance ≤12Ω
Max. output level 600 Ω headphone: 150 mW (1 kHz)
32 Ω headphone: 500 mW (1 kHz)
8 Ω headphone: 150 mW (1 kHz)
Dimensions 44.5 x 482.6 x 190.5mm (H x W x D)
Weight 3.1kg
Power supply internal power supply, switchable between
115V, 60Hz and 230V, 50Hz
Consumption 18W idle, 60W max.
Reference: 0dBu = 0.775 VAC RMS
Scope of supply
Hexacon:
1 pc
P
ower cord:
1 pc
User manual:
1 pc
Disclaimer
No
wsonic has taken all possible steps to ensure that the information
given here is both correct and complete.
In no event can Nowsonic accept any liability or responsibility for any
loss or damage to the owner of the equipment, any third party, or any
equipment which may result from use of this manual or the equip
-
ment which it describes.
S
ervicing
If you have any question or encounter technical issues, please first
contact your local dealer from whom you have purchased the device.
In case servicing is required, please contact your local dealer. Otherwise you may contact us directly. Please find our contact data on our
w
ebsite under www.nowsonic.com.
NOTE: We take great care in packing the device in a well protected
box at the factory, so any shipping damage is very unlikely. However, should this happen please contact your supplier immediately to
r
eport the damage. We recommend to keep the original packing materials in case you need to ship or transport the device at a later date.
L
egal information
Copyright for this user manual © 2013: Nowsonic
Product features, specifications and availability are subject to change
without prior notice.
Edition v1.0, 08/2013
Page 8
9
www.nowsonic.com
Hexacon
Bedienungsanleitung
DE
1) Lesen Sie diese Anleitung.
2) Bewahren Sie diese Anleitung auf.
3) Beachten Sie alle Warnungen.
4) Befolgen Sie alle Anweisungen.
5) Betreiben Sie dieses Gerät nicht in unmittelbarer Nähe von Wasser.
6) Verwenden Sie zum Reinigen des Geräts ausschließlich ein trocke-
nes Tuch.
7) Halten Sie die Lüftungsschlitze frei! Folgen Sie bei der Installation
den Anweisungen des Herstellers.
8) Stellen Sie das Gerät nicht in der Nähe von Heizkörpern, Wärme-
speichern, Öfen oder anderer Wärmequellen auf.
9) Kleben Sie in keinem Fall den Schutzkontakt des Steckers ab. Ein
verpolungssicherer Stecker besitzt zwei Kontakte, von denen ein
Kontakt breiter ist als der andere. Ein Schukostecker besitzt zwei
Kontakte und einen dritten Erdungskontakt. Der breitere Kontakt
des verpolungssicheren Steckers bzw. der Erdungskontakt des
Schukosteckers dient Ihrer Sicherheit. Sollte der Stecker des mitgelieferten Netzkabels nicht in Ihre Steckdose passen, besorgen Sie
sich im Fachhandel ein passendes Kabel.
10) Treten Sie nicht auf das Kabel, knicken Sie das Kabel nicht und
behandeln Sie Stecker und Buchsen besonders vorsichtig.
11) Verwenden Sie ausschließlich Zubehör, das
vom Hersteller für das Gerät vorgesehen ist.
12) Verwenden Sie nur Ständer, Stative oder
Tische, die den Anforderungen des Herstellers
entsprechen oder die zum Lieferumfang des Geräts gehören. Seien Sie beim Transport vorsichtig, um Verletzungen
durch verrutschende oder fallende Gegenstände zu vermeiden.
13) Ziehen Sie während eines Gewitters den Netzstecker; ziehen
Sie den Netzstecker auch, wenn Sie das Gerät längere Zeit nicht
verwenden.
14) Wenden Sie sich im Service-Fall an qualifiziertes Personal.
Lassen Sie das Gerät von einem Fachmann überprüfen, wenn z.B.
Netzkabel oder -stecker beschädigt sind, wenn Flüssigkeit oder
Gegenstände in das Gehäuse gelangt sind, das Gerät Regen oder
Feuchtigkeit ausgesetzt war, das Gerät fallen gelassen wurde, nicht
ordnungsgemäß funktioniert oder anderweitig beschädigt wurde.
WARNUNG:
Verringern Sie die Gefahr von Feuer und elektrischen Stromschlägen,
indem Sie das Gerät nicht Regen oder Feuchtigkeit aussetzen.
Stellen Sie keine Behälter mit Flüssigkeiten auf das Gerät, da diese
umkippen könnten und Wasser in das Gerät gelangen könnte.
Dieses Gerät muss geerdet sein.
Verwenden Sie ein geschirmtes Netzkabel mit drei Leitern wie das
mit dem Gerät ausgelieferte Netzkabel.
Beachten Sie, dass bei unterschiedlichen Betriebsspannungen unter-
schiedliche Netzkabel und/oder Netzstecker benötigt werden.
Beachten Sie zu jeder Zeit Ihre lokalen Sicherheitsvorschriften. Stel-
len Sie sicher, dass die für die Monitore ab Werk eingestellte Werte
(siehe Aufkleber auf der Rückseite) mit Ihrer lokalen Netzspannung
überein stimmen.
Stellen Sie das Gerät in der Nähe einer Netzsteckdose auf. Die Steck-
dose sollte immer leicht zugänglich sein.
Um das Gerät völlig stromlos zu machen, ziehen Sie den Netzstecker
aus der Steckdose.
Befolgen Sie bei der Aufstellung immer alle Hinweise des Herstellers.
Betreiben Sie das Gerät nicht unter beengten Platzverhältnissen.
Öffnen Sie das Gerät nicht – Gefahr eines Stromschlags.
VORSICHT!
Beachten Sie, dass alle Änderungen oder Modifikationen am Gerät,
die nicht ausdrücklich in diesem Handbuch eingeräumt werden, Ihre
Berechtigung zum Betrieb dieses Gerät aufheben können.
Wartung
Es befinden sich keine vom Anwender zu wartenden Teile im Gerät.
Lassen Sie das Gerät nur von qualifiziertem Fachpersonal reparieren.
VORSICHT: ZUM SCHUTZ VOR STROMSCHLÄGEN DARF DAS GEHÄUSE NICHT GEÖFFNET WERDEN. ES BEFINDEN SICH KEINE
V
OM ANWENDER TAIUSCHBAREN BAUTEILE IM GERÄT. WENDEN
SIE SICH IM SERVICE-FALL AN QUALIFIZIERTES FACHPERSONAL.
WICHTIGE SICHERHEITSHINWEISE
Das Ausrufezeichen innerhalb eines gleichseitigen Dreiecks
soll den Anwender auf wichtige Bedienungs- sowie Servicehinweise in den dazugehörigen Handbüchern aufmerksam
machen.
Das Blitzsymbol innerhalb eines gleichseitigen Dreiecks soll
den Anwender auf nicht isolierte Leitungen und Kontakte
im Geräteinneren hinweisen, an denen hohe Spannungen
anliegen, die im Fall einer Berührung zu lebensgefährlichen
Stromschlägen führen können.
Page 9
10
www.nowsonic.com
Hexacon
Bedienungsanleitung
DE
Inhalt
Einleitung
Inbetriebnahme
Stromversorgung
Anschlüsse und Bedienlemente
Im Betrieb
Spezifikationen
Lieferumfang
Haftungsausschluss
Service
Rechtliche Hinweise
Einleitung
Der Nowsonic Hexacon ist ein Kopfhörerverstärker mit sechs separaten Verstärkerkanälen. Jeder Kanal wird über das Signal am stereophonen MAIN INPUT auf der Rückseite angesteuert. Zugunsten einer
hohen F
lexibilität können Sie das Eingangssignal am MAIN INPUT
über die Buchse DIRECT IN auf der Vorderseite „ersetzen“, um die angeschlossenen Kopfhörer vorübergehend mit einem anderen Signal
zu speisen. Z
udem verfügt jeder Kopfhörerkanal über einen eigenen
Stereo-Eingang, über den sich ein alternatives Monitorsignal anschließen lässt. Jeder Ausgangskanal bietet dazu einen BALANCE-Regler, der
wahlw
eise das Panorama-Verhältnis zwischen den Kanälen LEFT und
RIGHT im MAIN-Bus oder das MIX-Verhältnis zwischen dem MAIN-Bus
und dem AUXILIARY-Eingang im Kanal steuert.
Jeder Ausgangskanal bietet separate Regler für BASS und TREBLE, mit
denen sich der Klang des Ausgabesignals nach Bedarf optimieren
lässt. Für eine vereinfachte Inbetriebnahme und eine flexible Verkabelung stehen die Kopfhörer-Ausgänge als stereophone 6,35 mm TRSBuchsen parallel auf der
Vorderseite sowie auf der Rückseite zur Verfügung. Über zwei MONO-Tasten kann jeder Kanal individuell zwischen
den vier Betr
iebsarten Stereo, Mono Left, Mono Right und Mono Left
& Right umgeschaltet werden und bietet so sehr vielseitige Abhörmöglichkeiten.
Als
Anschlüsse für den Main-Bus stehen auf der Rückseite symmetrische XLR- und 6,3 mm TRS-Buchsen zur Verfügung, wobei das Eingangssignal über normalisierte THRU-Buchsen (XLR, 6,35 mm TRSK
linke) zur Kaskadierung auf weitere Hexacon-Geräte durchgeschliffen
werden kann. Der Ausgabepegel wird über die 8-stufige Pegelanzeige
pro Kanal sowie im MAIN-Bus visualisiert.
Inbetriebnahme
Hexacon empfiehlt sich für ganz unterschiedliche Anwendungsbereiche und Umgebungen: Üblicherweise wird Hexacon im Tonstudio für
das M
onitoring der Künstler genutzt. Dabei kann Hexacon wahlweise
in der Ton-Regie oder im Aufnahmeraum installiert werden. Dank der
genormten Baugröße (19“, 1 HE) kann Hexacon in jedem herkömmlichen 19“ Rack installiert werden. Obwohl Hexacon mit seinem Gehäuse aus Stahlblech und Aluminium gegen Einstreuungen weitgehend
unempfindlich ist, sollt
en Sie Hexacon nicht unmittelbar neben einem
Leistungsverstärker oder einem anderen Gerät installieren, das hohe
Temperaturen oder elektromagnetische Felder erzeugen kann.
Stromversorgung
Hexacon verfügt über ein internes Netzteil. Schließen Sie Hexacon
mit einem geeigneten Netzkabel am Stromnetz an: Achten Sie darauf,
dass Ihr Stromnetz mit den Vorgaben auf der Rückseite von Hexacon
übereinstimmt.
Über den Schutzkontakt ist Hexacon geerdet und bietet Schutz vor
Stromschlägen: Modifizieren Sie in keinem Fall den Schutzleiter und
kleben Sie ihn niemals ab.
Page 10

11
www.nowsonic.com
Hexacon
Bedienungsanleitung
DE
Anschlüsse und Bedienelemente
Vorderseite
Hexacon bietet Anschlüsse und Bedienelemente auf der Vorderseite
(von links nach rechts):
Buchse DIRECT IN
Diese 6,3 mm TRS-Klinkenbuchse dient als alternativer Stereo-Eingang
zum rückseitigen MAIN INPUT: Sobald Sie diese Buchse mit einem
TRS-Stereoklinkenstecker belegen, wird das Signal am MAIN INPUT
im MAIN-Bus deaktiviert. Nun wird das Signal am DIRECT IN über den
MAIN-Bus auf alle 6 Kopfhörer-Kanäle gespeist. Auf diese Weise können Sie ein alternatives Monitorsignal fl exibel auf die Kopfhörerkanäle
speisen, wenn Hexacon fest im Studio-Rack verkabelt ist und sein Signal normalerweise über den MAIN INPUT bezieht.
Regler MASTER VOLUME
Mit diesem Regler steuern Sie den Pegel im MAIN-Bus aus. Unabhängig davon, ob die Buchse DIRECT IN belegt ist oder nicht, wird der
Pegel im MAIN-Bus immer auf der 8-stufi gen Pegelanzeige neben der
Buchse DIRECT IN dargestellt.
Da alle Kopfhörerkanäle identisch aufgebaut sind, wird hier stellvertretend Kanal 1 beschrieben:
Tasten MONO L und MONO R
Mit diesen zwei Tasten verändern Sie das Routing für den Kopfhörerausgang: Die Umschaltung erfolgt hinter dem Pegelsteller und der
Klangregelung. Folgende Modi stehen zur Verfügung:
Beide Tasten inaktiv: Das Signal wird stereo wiedergegeben.
Taste MONO L aktiv, MONO R inaktiv: Die linke Seite des Stereoein-
gangssignals liegt mono am Kopfhörerausgang an, die rechte Seite
ist stummgeschaltet.
Taste MONO L inaktiv, MONO R aktiv: Die rechte Seite des Stereoein-
gangssignals liegt mono am Kopfhörerausgang an, die linke Seite ist
stummgeschaltet.
Tasten MONO L und MONO R aktiv: Beide Seiten des Stereoeingangs-
signals werden mono summiert und liegen am Kopfhörerausgang an
Buchse OUT.
Die 6,3 mm TRS-Buchse OUT dient zum Anschluss eines Stereo-Kopfhörers. Alternativ können Sie einen weiteren Kopfhörerverstärker über
diesen Ausgang ansteuern.
Dieser Ausgang liegt parallel auf der Rückseite von Hexacon an.
Regler BASS
Mit diesem Regler heben Sie den Frequenzbereich unter der Einsatzfrequenz 100 Hz an oder senken ihn ab. Der Regelbereich beträgt +/10 dB, der Filter arbeitet als Shelving-Filter. In der Stellung 0 hat das
Filter-Band keine Funktion.
Regler Treble
Mit diesem Regler heben Sie den Frequenzbereich über der Einsatzfrequenz 10 kHz an oder senken ihn ab. Der Regelbereich beträgt +/- 10
dB, der Filter arbeitet als Shelving-Filter. In der Stellung 0 hat das FilterBand keine Funktion.
Regler BALANCE
Der Regler Balance hat abhängig davon, welches Signal im Kanal anliegt, zwei Funktionen.
Rückseitige Buchse AUX IN ist nicht belegt
Wenn das Signal am MAIN INPUT im Kanal anliegt, steuert der Regler
BALANCE das L/R-Verhältnis des Signals im MAIN-Bus.
Rückseitige Buchse AUX IN ist belegt
Wenn ein Signal an der rückseitigen Buchse AUX IN angeschlossen ist,
stellen Sie über den BALANCE-Regler das Mischungsverhältnis zwischen dem Signal im MAIN-Bus und dem Signal am AUX IN ein. Beispielsweise können Sie über den MAIN INPUT das Backing einer Band
einspeisen, während Sie den Gesang über den AUX IN anschließen:
Über den Regler BALANCE kann sich der Sänger nun das Verhältnis
zwischen dem Backing und seinen Vocals nach Bedarf einstellen.
Regler VOLUME
Mit diesem Regler steuern Sie den Ausgabepegel des Signals im MAINBus auf den Kopfhörer aus. Die 8-stufi gen Pegelanzeigen visualisieren
entsprechend die Ausgabepegel an den jeweiligen Kopfhörer.
Power-Schalter
Mit dem Schalter POWER schalten Sie Hexacon ein und aus.
NO WSO N IC H e xaC on
Page 11

12
www.nowsonic.com
Hexacon
Bedienungsanleitung
DE
Anschlüsse und Bedienelemente
Rückseite
Hexacon bietet auf der Rückseite folgende Anschlüsse
(von rechts nach links)
BALANCED MAIN INPUT
Diese symmetrischen XLR- und 6,3 mm TRS-Klinkenbuchsen dienen
zum Anschluss von stereophonen Line-Signalen. Schließen Sie hier
beispielsweise einen Stereo-Aux-Ausgang eines Mischpults o.ä. an.
Anmerkung
Wenn Sie die Buchse DIRECT IN auf der Vorderseite belegen, werden
diese Eingänge automatisch deaktiviert.
BALANCED MAIN THRU
Diese symmetrischen XLR- und 6,3 mm TRS-Klinkenbuchsen dienen
zum Anschluss an ein stereophones Gerät mit Linepegel. Dabei wird
das Signal im MAIN-Bus direkt auf ein nachfolgendes Gerät (z. B. einen
weiteren Hexacon) durchgeschliff en.
STEREO HEADPHONE OUTPUTS
Diese sechs TRS-Buchsen sind mit den Kopfhörer-Ausgängen auf der
Vorderseite parallel geschaltet und dienen zum Anschluss von Kopfhörern oder geben Sie das Signal an nachfolgende Kopfhörerverstärker o.ä. aus. Sie können diese Eingänge alternativ oder gemeinsam mit
den Ausgängen auf der Vorderseite verwenden: Hexacon ist für Kopfhörer mit einer Last-Impedanz zwischen 32 und 600 Ohm ausgelegt.
Entsprechend können Sie mehrere Kopfhörer anschließen und speisen, allerdings sollte die Gesamtimpedanz nicht kleiner als 16 Ohm
sein. Andernfalls kann es zu Übersteuerungen kommen und die maximale Ausgangsleistung ist eventuell limitiert.
Anmerkung
Sollten Sie bei der Belegung mit mehreren Kopfhörern auf Probleme
stoßen, entfernen Sie einen der Kopfhörer. Wenn das Problem dadurch
gelöst wird, ist der Lastwiderstand der Kopfhörer zu gering. Verwenden
Sie anderen Kopfhörer oder vermeiden Sie eine Mehrfachbelegung.
STEREO AUX INPUTS
Über diese stereophonen TRS-Buchsen lässt sich ein stereophones
Line-Signal direkt auf den zugehörigen Kopfhörerverstärker speisen.
Sobald Sie die Buchse AUX IN belegen, arbeitet der Regler BALANCE
als MIX-Regler, mit dem Sie das Verhältnis zwischen dem Signal im
MAIN-Bus und am AUX IN aussteuern.
Im Betrieb
Bevor Sie Hexacon verkabeln, stellen Sie den Regler MASTER VOLUME
sowie VOLUME-Regler in den Kanälen auf ein Minimum ein. Stellen Sie
die Regler BASS, TREBLE und BALANCE zudem auf die Mittelposition
ein. Deaktivieren Sie alle MONO-Schalter.
Nun können Sie die Buchsen MAIN INPUT wahlweise mit XLR- oder
TRS-Klinkensteckern symmetrisch verkabeln: Als Quelle bietet sich
beispielsweise ein Stereo-Aux-Weg eines Mischpults o.ä. an.
Bei Bedarf können Sie das Signal im MAIN-Bus direkt über die Anschlüsse MAIN THRU abgreifen und auf einen weiteren Hexacon speisen.
Bei Bedarf können Sie das Monitorsignal auch über die Buchse DIRECT
IN auf der Vorderseite einspeisen: Das Signal in den MAIN INPUTS ist
dann deaktiviert.
Schließen Sie nun geeignete Kopfhörer an den Buchsen OUT und/
oder den Kanal-Buchsen im Bereich STEREO HEADPHONE OUTPUTS
an. Sofern Sie die Mix-Funktion in den Kanälen verwenden möchten,
schließen Sie zudem weitere Einspielwege an den Buchsen AUX IN
für die gewünschten Kanäle an: Über den Regler BALANCE können
Sie nun das Verhältnis zwischen MAIN-Bus und AUX-Signal individuell
aussteuern.
Nachdem Sie Hexacon verkabelt haben, schalten Sie den Kopfhörerverstärker über den POWER-Schalter ein. Steuern Sie die Wiedergabelautstärke im Master über den Regler MASTER VOLUME aus: Achten
Sie dabei darauf, dass das Signal auf der Master-Pegelanzeige nicht
„clippt“: Die grünen und gelben LEDs sollen leuchten, die rote ClipLED sollte hingegen niemals leuchten.
Nun können Sie die Wiedergabe für jeden Kanal nach Bedarf anpassen: Wählen Sie über die Tasten MONO L und MONO R den Wiedergabe-Modus für diesen Kanal: Sie können die Signal wahlweise stereo
oder mono abhören, wobei im Mono-Betrieb verschiedene Quellen
gewählten werden können (MONO L, MONO R, MONO L&R).
Heben Sie die Lautstärke im Kanal über den Regler VOLUME nach Bedarf an: Auch hier sollte das Signal im Bereich der grünen und gelben LEDs ausgesteuert werden, die rote CLIP-LED sollte jedoch nicht
leuchten. Sofern Sie ein Signal über den AUX IN einspeisen, steuern Sie
es im Verhältnis zum Signal im MAIN-Bus über den Regler BALANCE
aus. Wenn Sie kein AUX-Signal einspeisen, stellen Sie über BALANCE
das Verhältnis zwischen linkem und rechtem Kanal des Stereosignals
im MAIN-Bus ein.
Optimieren Sie nun Ihr Klangerlebnis, indem Sie das Signal über die
Regler BASS und TREBLE nach Bedarf entzerren. Beachten Sie allerdings,
dass Sie das Kanalsignal durch eine Verstärkung der Frequenzbänder
weiter anheben. Entsprechend können nun evtl. Übersteuerungen auftreten: Regeln Sie VOLUME in diesem Fall entsprechend zurück.
NO WSO N IC H e xaC on
Page 12

13
www.nowsonic.com
Hexacon
Bedienungsanleitung
DE
Anmerkung
Wenn Sie ein Signal, das ohnehin im MAIN INPUT anliegt, zusätzlich
über den AUX IN einspeisen, müssen Sie in jedem Fall die Phasenlage
überprüfen. Eventuell wird das Signal durch einen Phasenfehler eliminiert und nicht wie gewünscht verstärkt: Überprüfen Sie das, indem
Sie die
Wiedergabe über die Tasten MONO L und MONO R in verschiedene Modi schalten. Sofern Auslöschungen auftreten, versuchen Sie,
die P
hasenlage des AUX-Signals umzukehren, und vergleichen Sie die
Ergebnisse.
Spezifikationen
Bauform 6-kanaliger Kopfhörervorverstärker mit
Klangregelung und regelbarem
Aux-Eingang pro Kanal
Frequenzgang 20 Hz bis 50 kHz, +0/-2 dB
(Klangregelung linear eingestellt)
Maximale Verstärkung 25,6 dB bei 1 kHz (Klangregelung linear
eingestellt)
Klangregelung Höhen-EQ: ± 12 dB bei 10 kHz, Shelving-Filter
Bass-EQ: ± 12 dB bei 100 Hz, Shelving-Filter
Eingänge XLR und 6,3 mm TRS-Klinkenbuchsen
(MAIN INPUT), symmetrische und
unsymmetrische Belegung
6,3 mm TRS-Klinkenbuchsen (Aux-Eingänge)
Eingangsimpedanz 40 kOhm (MAIN: symmetrische XLR und
6,3 mm Klinkeneingänge)
9,9 kOhm (Direct In: 6,3 mm Klinkenbuchse)
15 bis 21 kOhm (AUX IN: 6,3 mm
TRS-Klinkenbuchsen)
Maximaler Eingangspegel +21,5 dBu
Dynamikbereich ≥ 101 dB (typ.), bezogen auf 130 mW an
600 Ohm Last, maximaler Pegel
Ausgänge XLR und 6,3 mm TRS-Klinkenbuchsen
(MAIN THRU)
6,3 mm TRS-Klinkenbuchsen
(Kopfhörerausgänge)
Ausgangsimpedanz ≤ 12 Ohm
Maximaler Ausgangs- an 600 Ohm Kopfhörer: 150 mW bei 1 kHz
pegel an 32 Ohm Kopfhörer: 500 mW bei 1 kHz
an 8 Ohm Kopfhörer: 150 mW bei 1 kHz
Abmessungen 44,5 x 482,6 x 190,5 mm (H x B x T)
Gewicht 3,1 kg
Stromversorgung internes Netzteil, umschaltbar zwischen
115 V, 60 Hz und 230 V, 50 Hz
Verbrauch 18 Watt Dauerbetrieb, 60 Watt Spitze
Referenz 0 dBu = 0,775 VAC RMS
Lieferumfang
Hexacon:
1x
Netzk
abel:
1x
Bedienungsanleitung: 1x
Haf
tungsausschluss
Nowsonic hat höchstmögliche Sorgfalt darauf verwendet, alle in diesem
Handbuch enthaltenen Informationen so korrekt und vollständig wie
möglich wiederzugeben.Nowsonic übernimmt keinerlei Haftung oder
Verantwortung für Verluste oder Schäden, die dem Eigentümer des Ge
räts, Dritten oder an anderen Geräten durch die Informationen in diesem Handbuch oder das darin beschriebene Gerät entstehen.
S
ervice
Wenn Sie Probleme oder technische Fragen haben, wenden Sie sich
bitte zuerst an Ihren lokalen Händler, bei dem Sie das Gerät gekauft
haben.Bei einem Service-Fall wenden Sie sich bitte ebenfalls an Ihren
lokalen Händler. Andernfalls können Sie uns auch direkt kontaktieren.
Sie finden unsere Kontaktdaten auf unserer Webseite unter
www.nowsonic.com.
ANMERKUNG: Das Gerät wurde ab Werk so verpackt, dass ein ausreichend hoher Schutz gegen Transportschäden besteht. Sofern es dennoch zu einem Transportschaden gekommen sein sollte, wenden Sie
sich bitt
e unmittelbar an den Lieferanten, der das Gerät an Sie ausgeliefert hat, und zeigen Sie den Schaden an. Wir möchten Ihnen empfehlen, das originale Verpackungsmaterial für den Fall aufzubewahren,
das Sie das G
erät zu einem späteren Zeitpunkt verschicken müssen.
Rechtliche Hinweise
Copyright für diese Bedienungsanleitung © 2013: Nowsonic
Produktmerkmale, Spezifikationen und die Verfügbarkeit können
ohne vorherige Ankündigung geändert werden.
Ausgabe v 1.0, 08/2013
Page 13

14
www.nowsonic.com
Hexacon
Mode d‘emploi
FR
1) Lisez ces indications.
2) Conservez ces indications.
3) Respectez tous les avertissements.
4) Suivez toutes les instructions.
5) N‘utilisez pas cet appareil avec de l‘eau à proximité.
6) Nettoyez-le uniquement avec un chiffon sec.
7) N‘obstruez aucune ouverture de ventilation ! Installez-le conformé-
ment aux instructions du fabricant.
8) N‘installez pas l‘appareil près de radiateurs, bouches de chauffage,
poêles ou autres sources de chaleur.
9) Ne neutralisez jamais la broche de terre. Une fiche polarisée possè-
de deux broches, l‘une plus large que l‘autre. Une fiche de terre a
deux broches identiques et une troisième broche pour la mise à la
terre. La broche plus large de la fiche polarisée ou la troisième broche de la fiche de terre servent à votre sécurité. Si la fiche du câble
d‘alimentation fourni n‘entre pas dans votre prise, procurez-vous
un câble approprié chez un revendeur spécialisé.
10) Évitez de marcher sur le cordon d‘alimentation et de le plier, et
soyez particulièrement délicat avec les fiches et les prises.
11) N‘utilisez que des accessoires conçus pour l‘appareil par le fabri-
cant.
12) Utilisez-le uniquement avec un support,
trépied ou table répondant aux spécifications du
fabricant ou fourni avec l‘appareil. Soyez prudent
lors du transport pour éviter toute blessure due
au glissement ou à la chute d‘objets.
13) Débranchez le cordon d‘alimentation en cas d‘orage ou de non
utilisation prolongée.
14) Confiez toute réparation à des techniciens de maintenance quali-
fiés. Faites-le vérifier par un technicien, par exemple si le cordon ou
la fiche d‘alimentation est endommagé, si du liquide a été renversé
sur l‘appareil ou si des objets sont tombés dedans, si l‘appareil a
été exposé à la pluie ou à l‘humidité, s‘il ne fonctionne pas normalement, ou s‘il est endommagé.
AVERTISSEMENT:
Réduisez le risque d‘incendie ou d‘électrocution en n‘exposant pas le
produit à la pluie ni à l‘humidité.
Ne placez pas d‘objet rempli de liquide sur l‘appareil, car il pourrait se
renverser et le liquide pénétrer dans l‘appareil.
Cet appareil doit être mis à la terre.
Utilisez un câble d‘alimentation blindé à trois conducteurs comme
celui fourni avec l‘appareil.
Notez qu‘en fonction de la tension d‘alimentation nécessaire, les
cordons et/ou fiches d‘alimentation nécessaires sont différents.
Respectez toujours les réglementations de sécurité locales. Assurez-
vous que les moniteurs ont été réglés en usine (voir l‘autocollant à
l‘arrière) sur la tension correspondant à votre réseau électrique local.
Placez l‘appareil à proximité d‘une prise de courant. La prise doit
toujours être facilement accessible.
Pour totalement isoler l‘appareil du secteur, débranchez le cordon
d‘alimentation de la prise.
Suivez toujours toutes les instructions du fabricant pour l‘installation.
Ne faites pas fonctionner l‘appareil dans un espace confiné.
N‘ouvrez pas l‘appareil – Risque d‘électrocution.
ATTENTION !
Notez que tous les changements ou modifications apportés à
l‘appareil qui ne sont pas expressément indiqués dans le présent
mode d‘emploi peuvent annuler votre droit à utiliser cet appareil.
Entretien
Aucune pièce de l‘appareil n‘est réparable par l‘utilisateur.
Confiez toute réparation à un technicien qualifié.
ATTENTION : POUR ÉVITER TOUT CHOC ÉLECTRIQUE, NE PAS OUVRIR LE BOÎTIER. AUCUN COMPOSANT DE L‘APPAREIL N‘EST REMPLAÇABLE PAR L‘UTILISATEUR. CONFIEZ TOUTE RÉPARATION À
DES
TECHNICIENS DE MAINTENANCE QUALIFIÉS.
DIRECTIVES DE SÉCURITÉ IMPORTANTES
Le point d‘exclamation dans un triangle équilatéral sert à prévenir l‘utilisateur de la présence d‘instructions importantes de
f
onctionnement et de maintenance (entretien) dans les docu-
ments accompagnant l‘appareil.
Le symbole d‘éclair à tête de flèche dans un triangle équilatéral sert à prévenir l‘utilisateur de la présence dans l‘enceinte
du pr
oduit d‘une tension dangereuse non isolée d‘une grandeur suffisante pour constituer un risque d‘électrocution pour
les personnes
.
Page 14

15
www.nowsonic.com
Hexacon
Mode d‘emploi
FR
Sommaire
Introduction
Mise en service
Alimentation électrique
Connexions et commandes
Mise en service
Caractéristiques techniques
Contenu
Clause de non responsabilité
Maintenance
Mentions légales
Introduction
Le Nowsonic Hexacon est un amplificateur pour casques avec six canaux
d‘amplification séparés. Chaque canal est dirigé via le signal du MAIN
INPUT stéréophonique sur la partie arrière. Pour une grande flexibilité,
vous pouvez « remplacer » le signal d‘entrée du MAIN INPUT via la prise
DIRECT IN sur le côté avant, afin d‘alimenter temporairement les casques
connectés avec un autre signal. De plus, chaque canal du casque dispose de sa propre entrée stéréo auquel on peut connecter un autre signal moniteur. En outre, chaque canal de sortie propose un régulateur
BALANCE, qui règle au choix l‘effet panoramique entre les canaux LEFT
et RIGHT dans le bus MAIN ou l‘effet MIX entre le bus MAIN et l‘entrée
AUXILIARY dans le canal.
Chaque canal de sortie dispose de régulateurs séparés pour les BASS et
TREBLE, avec lesquels le son du signal de sortie peut être optimisé selon
les besoins. Pour une mise en service simplifiée et un câblage flexible, les
sorties du casque, à savoir des jacks TRS stéréo 6,35 mm, se trouvent parallèlement sur le côté avant et arrière. Grâce aux deux boutons MONO,
il est possible de choisir individuellement pour chaque canal entre les
4 modes Stereo, Mono Left, Mono Right et Mono Left & Right, pour de
nombreuses possibilités d‘écoutes.
Les jacks symétriques TRS de 6,3 mm et XLR à l‘arrière servent de connexion pour le bus Main, bien que le signal d‘entrée peut être transmis via
les prises THRU (jacks XLR, TRS de 6,35 mm) pour la mise en cascade avec
d‘autres appareils Hexacon. Vous pouvez visualiser le niveau de sortie via
l‘affichage à 8 niveaux de chaque canal, ainsi que via le bus MAIN.
Mise en service
Hexacon convient à des domaines et des environnements d‘utilisation
très variés : habituellement, Hexacon est utilisé dans les studios
d‘enregistrement pour le suivi des artistes. Dans ce contexte, Hexacon
peut être utilisé aussi bien en régie que dans la salle d‘enregistrement.
Grâce à sa taille standardisée (19‘‘, 1 HE), Hexacon peut être installé
dans n‘importe quel rack de 19‘‘ traditionnel. Bien que Hexacon soit
très résistant aux perturbations grâce à son boîtier en tôle d‘acier et
aluminium, il est préférable de ne pas l‘installer directement à côté
d‘un amplificateur de puissance ou d‘un autre appareil qui peut dégager de hautes températures ou générer des champs magnétiques.
Alimentation électrique
Hexacon est équipé d‘une alimentation interne. Branchez Hexacon
avec un câble d‘alimentation approprié au réseau électrique. Assurezvous que votre installation électrique correspond aux prescriptions
figurant à l‘arrière d‘Hexacon.
Hexacon est mis à la terre via la prise de terre et offre une protection
contre les décharges électriques. Ne modifiez jamais le conducteur de
protection et ne le décollez jamais.
Page 15

16
www.nowsonic.com
Hexacon
Mode d‘emploi
FR
Connexions et commandes
Face avant
Hexacon est équipé de connexions et de commandes sur la face
avant (de gauche à droite)
Prise DIRECT IN
Ce jack TRS 6,3 mm sert d‘entrée stéréo alternative au MAIN INPUT de
la face arrière : Dès que vous insérez une fi che TRS stéréo dans cette
prise jack, le signal au niveau du MAIN INPUT du bus MAIN est désactivé. À présent, le signal est alimenté sur les 6 canaux de casques au
niveau du DIRECT IN via le bus MAIN. De cette manière, vous pouvez
alimenter avec fl exibilité un signal moniteur alternatif sur les canaux
du casque, si Hexacon est fermement câblé dans les racks du studio et
que son signal est normalement alimenté via le MAIN INPUT.
Régulateur MASTER VOLUME
Vous pouvez régler le niveau du bus MAIN grâce à ce régulateur. Peu
importe si la prise DIRECT IN est branchée ou pas, le niveau du bus
MAIN sera toujours renseigné sur l‘affi cheur à 8 niveaux à côté de la
prise DIRECT IN.
Étant donné que tous les canaux de casques sont identiquement
montés, le canal 1 est décrit ici à titre de référence pour les autres
canaux :
Boutons MONO L et MONO R
Vous pouvez changer le routage pour la sortie du casque avec ces
deux boutons : la commutation a lieu derrière le régulateur du niveau
et du son. Vous avez le choix entre les modes suivants :
Deux touches inactives : Le signal est diff usé en stéréo.
Bouton MONO L actif et MONO R inactif : Le côté gauche du signal
de sortie stéréo est en mono au niveau de la sortie du casque, le côté
droit est muet.
Bouton MONO L inactif et MONO R actif : Le côté droit du signal de
sortie stéréo est en mono au niveau de la sortie du casque, le côté
gauche est muet.
Boutons MONO L et MONO R actifs : Les deux côtés du signal de
sortie stéréo sont additionnés en mono et sont diff usés à la sortie du
casque.
Prise OUT
La prise TRS de 6,3 mm permet de connecter un casque stéréo. Vous
pouvez également utiliser un autre amplifi cateur pour casques via cette sortie.
Cette sortie se trouve parallèlement sur la face arrière de Hexacon.
Régulateur BASS
Ce régulateur permet d‘augmenter la gamme des fréquences sous la
fréquence de 100 Hz ou de la diminuer. La plage de commande s‘élève
à +/- 10 dB, le fi ltre remplit le rôle d‘un fi ltre shelf. La bande fi ltrante n‘a
aucune fonction dans la position 0.
Régulateur TREBLE
Ce régulateur permet d‘augmenter la gamme des fréquences au dessus de la fréquence de 10 kHz ou de la diminuer. La plage de commande s‘élève à +/- 10 dB, le fi ltre remplit le rôle d‘un fi ltre shelf. La bande
fi ltrante n‘a aucune fonction dans la position 0.
Régulateur BALANCE
Le régulateur BALANCE a deux fonctions, indépendamment du signal
qui occupe le canal.
La prise arrière AUX IN n‘est pas branchée
Lorsque le signal au MAIN INPUT occupe le canal, le régulateur BALAN-
CE permet de régler le rapport L/R du signal dans le bus MAIN.
La prise arrière AUX IN est branchée
Quant un signal est branché à la prise arrière AUX IN, vous pouvez ré-
gler, grâce au régulateur BALANCE, le mélange entre le signal du bus
MAIN et le signal AUX IN. Par exemple, vous pouvez alimenter via le
MAIN INPUT l‘arrangement d‘un groupe, tandis que vous connecter
le chant via l‘AUX IN : Le chanteur peut maintenant, via le régulateur
BALANCE, régler le rapport entre l‘arrangement et son chant selon ses
besoins.
Régulateur VOLUME
Ce régulateur permet de régler le niveau de sortie du signal au bus
MAIN sur le casque. Les affi cheurs à 8 niveaux informent des niveaux
de sorties correspondants de chaque casque.
L‘interrupteur d‘alimentation POWER permet d‘allumer et d‘éteindre
Hexacon.
NO WSO N IC H e xaC on
Page 16

17
www.nowsonic.com
Hexacon
Mode d‘emploi
FR
Connexions et commandes
Face arrière
Hexacon has the following connectors on the rear (from right to left)
BALANCED MAIN INPUT
Ces jacks TRS de 6,3 mm et XLR permettent de connecter les entrées
lignes stéréophoniques. Vous pouvez y connecter, par exemple, la sortie auxiliaire stéréo d‘une table de mixage, entre autres.
Remarque
Lorsque vous connectez la prise DIRECT IN sur la face avant, ces entrées sont automatiquement désactivées.
BALANCED MAIN THRU
Ces jacks TRS de 6,3 mm et XLR permettent de connecter un appareil
stéréophonique avec niveau d‘entrée ligne. Ceci permet de transmettre immédiatement le signal du bus MAIN sur un appareil suivant (un
autre Hexacon, par exemple).
STEREO HEADPHONE OUTPUTS
Ces six prises TRS sont couplées en parallèle avec les sorties casques
sur la face avant et permettent de connecter les casques ou de transmettre le signal aux amplifi cateurs pour casques suivants, entre autres. Vous pouvez utiliser alternativement ou conjointement ces entrées avec les sorties sur la face avant : Hexacon est conçu pour les
casques avec une impédance de charge entre 32 et 600 ohm. Vous
pouvez donc connecter et alimenter plusieurs casques. Cependant,
l‘impédance totale ne peut pas être inférieure à 16 ohm. Autrement, il
peut y avoir des pressions acoustiques et la puissance de sortie maximale peut être limitée.
Remarque
Si vous rencontrez des problèmes lorsque vous connectez plusieurs
casques, déconnectez l‘un des casques. Si cette action corrige le problème, cela signifi e que la résistance à la charge du casque était trop
faible. Utilisez un autre casque ou évitez les connexions multiples.
STEREO AUX INPUTS
Ces prises stéréophoniques TRS permettent d‘alimenter un signal ligne stéréophonique sur l‘amplifi cateur de casques correspondant. Dès
que vous connectez la prise AUX IN, le régulateur BALANCE sert de
régulateur MIX, avec lequel vous contrôler le rapport entre le signal
dans le bus MAIN et au niveau AUX IN.
Mise en service
Avant de câbler Hexacon, mettez le régulateur MASTER VOLUME et
le régulateur VOLUME dans les canaux au minimum. Positionnez les
régulateurs BASS, TREBLE et BALANCE au milieu. Désactivez tous les
interrupteurs MONO.
Vous pouvez à présent connecter symétriquement les prises MAIN INPUT selon vos préférences avec les jacks TRS ou XLR. Par exemple, vous
pouvez utiliser comme source un chemin auxiliaire stéréo d‘une table
de mixage, entre autres.
Vous pouvez, si nécessaire, puiser le signal du bus MAIN directement
via les connexions MAIN THRU et le diriger sur un autre Hexacon.
Vous pouvez aussi, si nécessaire, alimenter le signal moniteur via la
prise DIRECT IN sur la face avant. Le signal dans les MAIN INPUTS sera
alors désactivé.
Connectez maintenant des casques adaptés aux prises OUT et/ou aux
prises canaux au niveau des STEREO HEADPHONE OUTPUTS. Si vous
voulez utiliser la fonction de mélange dans les canaux, connectez
d‘autres chemins d‘entrées aux prises AUX IN pour les canaux souhaités. Le régulateur BALANCE vous permet de régler individuellement le
rapport entre le bus MAIN et le signal AUX.
Après avoir câblé Hexacon, allumez l‘amplifi cateur pour casques grâce
à l‘interrupteur POWER. Réglez le volume de lecture dans le master
via le régulateur MASTER VOLUME : Assurez-vous que le signal sur
l‘affi cheur du master ne soit pas « saccadé » : Les LED verts et jaunes
devraient être allumés, par contre, le LED rouge qui indique une saccade ne devrait jamais être allumé.
Vous pouvez maintenant adapter la lecture pour chaque canal selon
vos besoins : Choisissez à l‘aide des boutons MONO L et MONO R le
mode de lecture pour le canal concerné : Vous pouvez lire au choix le
signal en stéréo ou en mono. À noter que dans le mode mono, d‘autres
sources peuvent être choisies (MONO L, MONO R, MONO L&R).
Augmentez le volume dans le canal via le régulateur VOLUME selon
vos besoins : le signal devrait ici aussi être dirigé depuis la zone des
LED verts et jaunes, mais le LED rouge de saccade ne devrait pas être
allumé. Si vous connectez un signal via l‘AUX IN, réglez-le en fonction
du signal dans le bus MAIN via le régulateur BALANCE. Si vous ne connectez aucun signal AUX, réglez le rapport entre le canal gauche et
droit du signal stéréo dans le bus MAIN via BALANCE.
Optimisez le son en corrigeant au besoin le signal via les régulateurs
BASS et TREBLE. N‘oubliez toutefois pas que vous augmentez ainsi le signal du canal par un renforcement des bandes de fréquences. Lorsque
c‘est le cas, des pressions acoustiques peuvent apparaître: diminuez
en conséquence le volume via le régulateur VOLUME.
NO WSO N IC H e xaC on
Page 17

18
www.nowsonic.com
Hexacon
Mode d‘emploi
FR
Remarque
Lorsque vous avez un signal qui se trouve dans le MAIN INPUT, mais
qui est en plus alimenté via l‘AUX IN, vous devez dans tous les cas
contrôler la situation des phases. Une erreur de phase peut éventuellement éliminer le signal et ce dernier peut être renforcé non intentionnellement
: veuillez contrôler en réglant la lecture dans des modes
différents via les boutons MONO L et MONO R. En cas d‘interférences
destructives, essayez d‘inverser les phrases du signal AUX et comparez
les résultats.
Caractéristiques techniques
Assemblage Amplificateur pour casques à 6 canaux
avec réglage du son et entrée Aux
réglable pour chaque canal
Réponse en fréquence 20 Hz à 50 kHz, +0/-2 dB (réglage du son
linéaire)
Amplification maximale 25,6 dB à 1 kHz (réglage du son linéaire)
Réglage du son Égalisateur d‘aigus : ± 12 dB à 10 kHz,
filtre shelf
Égalisateur des basses : ± 12 dB à 100 Hz,
filtre shelf
Entrées Jacks XLR et TRS 6,3 mm (MAIN INPUT),
connexion symétrique et asymétrique
Jacks TRS 6,3 mm (entrées Aux)
Impédance d‘entrée 40 kohm (MAIN : entrées jacks
symétriques XLR et 6,3 mm)
9,9 kohm (Direct In: jack 6,35 mm)
15 à 21 kohm (AUX IN: jack 6,35 mm TRS)
Niveau d‘entrée maximal +21,5 dBu
Plage dynamique ≥ 101 dB (typ.), conditions : 130 mW
avec charge de 600 ohm,
niveau maximal
Sorties Jacks XLR et TRS de 6,3 mm (MAIN THRU)
Jacks TRS 6,3 mm (sorties casque)
Impédance de sortie ≤12 ohms
Niveau de sortie maximal sur casques 600 ohm : 150 mW à 1 kHz
sur casques 32 ohm : 500 mW à 1 kHz
sur casques 8 ohm : 150 mW à 1 kHz
Dimensions 44,5 x 482,6 x 190,5 mm (H x L x P)
Poids 3,1 kg
Alimentation alimentation interne, option entre 115 V,
60 Hz et 230 V, 50 Hz
Consommation 18 Watt en fonctionnement permanent,
60 Watt en fonctionnement intensif
Référence: 0 dBu = 0,775 VAC RMS
Contenu
Hexacon :
1
C
âble d‘alimentation :
1
M
ode d‘emploi :
1
Clause de non r
esponsabilité
Nowsonic a veillé avec le plus grand soin à ce que toutes les infor
mations contenues dans ce mode d‘emploi soient aussi précises et
complèt
es que possible.
Nowsonic n‘assume aucune responsabilité en cas de perte ou dommage, subi par le propriétaire de l‘appareil, par d‘autres appareils ou
par des tiers
, découlant des informations contenues dans ce mode
d‘emploi ou du matériel décrit ici.
Maintenance
Si vous avez des questions ou des problèmes techniques, veuillez
d‘abord contacter le revendeur chez qui vous avez acheté l‘appareil.
Pour toute réparation, veuillez également contacter votre revendeur.
Si cela n‘est pas possible, vous pouvez aussi nous contacter directement. Nos coordonnées se trouvent sur notre site Web
w
ww.nowsonic.com.
REMARQUE : l‘appareil a été emballé à l‘usine de façon à assurer un
niveau de protection suffisamment élevé contre les dommages dus à
l‘expédition. S‘il a néanmoins été endommagé pendant le transport,
veuillez contacter directement le vendeur qui vous a livré l‘appareil
et lui indiquer les dommages. Nous vous recommandons de conserver les emballages d‘origine au cas où vous auriez besoin un jour
d‘
expédier l‘appareil.
Mentions légales
Ce mode d‘emploi est sous copyright © 2013 : Nowsonic
Les fonctionnalités, caractéristiques techniques et disponibilité du
produit peuvent être modifiées sans préavis.
Édition v1.0, 08/2013
Page 18

www.nowsonic.com
19
Hexacon
Instrucciones de uso
ES
1) 1. Lea estas instrucciones.
2) Conserve estas instrucciones.
3) Preste atención a todas las advertencias.
4) Siga todo lo indicado en estas instrucciones.
5) No utilice este aparato cerca del agua.
6) Límpielo solo con un trapo suave y seco.
7) No bloquee ninguna de las aberturas de ventilación! Instale este
aparato de acuerdo con las instrucciones del fabricante.
8) No instale esta unidad cerca de fuentes de calor como radiadores,
calentadores, hornos u otros aparatos (incluyendo amplificadores)
que produzcan calor.
9) No anule el sistema de seguridad que supone un enchufe pola-
rizado o uno con toma de tierra. Un enchufe polarizado tiene dos
bornes de distinta anchura. Uno con toma de tierra tiene dos bornes idénticos y una lámina lateral que es la conexión a tierra. Esta
tercera lámina o el borne ancho se incluyen para su seguridad. Si el
enchufe suministrado no encaja en su toma corriente, consulte a
un electricista para sustituir la toma obsoleta.
10) Evite que el cable de corriente pueda quedar aplastado, retorcido
o ser pisado, especialmente en los enchufes, receptáculos y en el
punto en el que sale del aparato.
11) Use sólo acoplamientos/accesorios especificados por el fabricante.
12) Utilice esta unidad solo con un bastidor,
soporte, trípode, mesa o base especificado por
el fabricante o que se venda junto con el propio
aparato. Desenchufe este aparato de la salida de corriente durante
las tormentas eléctricas o si no lo va a usar durante un periodo de
tiempo largo.
13) Desenchufe este aparato durante las tormentas eléctricas o cuan-
do no lo use por un largo periodo de tiempo.
14) Remita todo servicio a personal técnico cualificado. Es necesario
reparar el aparato cuando haya sufrido algún tipo de daño, como
cuando se haya dañado el enchufe o cable de alimentación, se
haya derramado líquido o se hayan introducido objetos en el
aparato, el aparato haya sido expuesto a lluvia o humedad, no
funcione de manera normal o se le haya caído.
ADVERTENCIA:
Para reducir el riesgo de incendios o descargas eléctricas, no permita
que este aparato quede expuesto a la lluvia o la humedad.
Este equipo no debe ser expuesto a goteos o salpicaduras de líqui-
dos. No coloque sobre el equipo objetos que contengan líquidos,
como vasos o floreros.
Este dispositivo debe estar conectado a tierra.
Use un cable tripe con toma de tierra como el que se suministra con
el producto.
Tenga en cuenta que los distintos tipos de voltajes requieren el uso
de distintos tipos de cables y enchufes.
Respete siempre las normas de seguridad de su país o administra-
ción. Asegúrese de que los requisitos de alimentación de corriente
establecidos de fábrica para el dispositivo (consulte la etiqueta del
panel posterior) se corresponden con el suministro general en su
región.
Este equipo debería instalarse cerca de la toma de corriente y estar
fácilmente accesible para su desconexión.
Para desconectar completamente este equipo de la red, desconecte
el enchufe del cable de alimentación de la toma AC.
Por favor siga las instrucciones del fabricante para su instalación.
No lo instale en un espacio restringido.
No abra la unidad - riesgo de descarga eléctrica.
¡PRECAUCIÓN!
Por favor tenga en cuenta que: Los cambios o modificaciones sobre
este dispositivo que no hayan sido aprobadas expresamente en este
manual podrían invalidar su autorización para manejar el instrumento.
Servicio
No hay piezas reparables-por el usuario en su interior.
Para mantenimiento solicite la ayuda de personal cualificado.
PRECAUCIÓN: PARA REDUCIR EL RIESGO DE DESCARGAS ELÉCTRICAS, NO DESMONTE LA CUBIERTA SUPERIOR. NO HAY PIEZAS
REP
ARABLES POR EL USUARIO EN SU INTERIOR. REMITA TODO
SERVICIO SÓLO A PERSONAL TÉCNICO CUALIFICADO.
INSTRUCCIONES DE SEGURIDAD IMPORTANTES
El signo de exclamación dentro de un triángulo equilátero es
para avisar al usuario de la presencia de importantes instrucciones de manejo y mantenimiento (servicio) en la documentación que acompaña al producto.
El símbolo de un rayo con una punta de flecha dentro de un
triángulo equilátero es para alertar al usuario de la presencia
de “voltaje peligroso” sin aislar dentro del chasis del producto
que puede tener la suficiente magnitud como para consider
-
arse un riesgo de descarga eléctrica para las personas.
Page 19

www.nowsonic.com
20
Hexacon
Instrucciones de uso
ES
Contenido
Introducción
Manejo
Alimentación
Conectores y controles
Manejo
Especificaciones
Artículos suministrados
Descargo de responsabilidad
Servicio
Advertencias legales
Introducción
Nowsonic Hexacon es un amplificador para auriculares con 6 canales
de salida distintos. Cada canal recibe su señal desde el MAIN INPUT
estéreo en el panel posterior. Para un encaminamiento flexible puede
reemplazar la señal de entrada en el MAIN INPUT y alimentar los auriculares conectados con la señal del jack DIRECT IN en el panel frontal.
A
demás, cada canal de auricular dispone de su propia entrada estéreo
para monitorizar una señal alternativa. Cada canal de salida dispone
de un knob BALANCE que controla o bien la panoramización entre el
canal LEFT (izquierdo) y RIGHT (derecho) en el bus MAIN (principal) o el
balance de MIX (mezcla) entre el bus principal y la entrada AUXILIARY
en la salida de los canales.
Cada canal de salida dispone de controles aparte para BASS y TREBLE
para optimizar la señal de salida según sus necesidades. Para una configuración simplificada y un cableado flexible las salidas de auriculares
están en paralelo en f
ormato de jacks TRS de 1/4“ en la parte posterior
y el panel frontal. Con los dos botones MONO, es posible conmutar de
forma individual cada canal entre cuatro modos de funcionamiento
Stereo, Mono Left, Mono Right y Mono Left & Right para ofrecer varias
opciones de monitorización.
En el panel posterior hay entradas balanceadas (XLR y TRS de 1/4“)
para el bus MAIN. La señal de entrada se envía a un bucle al que se
puede acceder vía tomas THRU normalizadas (XLR, 1/4“ TRS). Esto permite utilizar unidades Hexacon adicionales si fuera necesario. La señal
de salida se mide con medidor
es de nivel de 8 segmentos por canal y
para el bus MAIN.
Manejo
Hexacon se recomienda para las siguientes aplicaciones y entornos:
normalmente Hexacon se usa en estudios de grabación para monitorizar al artista. Con este fin, Hexacon puede instalarse en la sala de control o de grabación según se requiera. Gracias a su tamaño estándar
(19“
, 1U), Hexacon puede montarse en cualquier rack de 19“. Puesto
que la carcasa de Hexacon está construida de hoja de acero y aluminio, es muy poco sensible a interferencias. No obstante, no debería
instalar Hexacon junt
o a un amplificador de potencia o cualquier otro
dispositivo capaz de generar altas temperaturas o campos electromagnéticos.
A
limentación
Hexacon tiene alimentación de corriente interna. Conecte Hexacon
a la red eléctrica usando el cable de corriente adecuado. Por favor
asegúrese de que las especificaciones en el panel posterior sean las
mismas que las de la corriente de la red eléctrica.
Hexacon dispone de toma de tierra a través de la patilla de tierra del
enchufe a la red: No anule el sistema de seguridad que supone un
enchufe polarizado o uno con toma de tierra.
Page 20

www.nowsonic.com
21
Hexacon
Instrucciones de uso
ES
Conectores y controles
Panel frontal
Hexacon tiene las siguientes tomas y controles en la parte frontal (de
izquierda a derecha):
Toma DIRECT IN
Este jack TRS de 1/4“ funciona como una entrada alternativa para
MAIN INPUT en la parte posterior: una vez que conecta un conector
TRS a ese jack, la señal en MAIN INPUT en el bus principal se desactiva.
Ahora la señal DIRECT IN se envía a los 6 canales de auriculares a través
del bus MAIN. Esto permite la entrada de una señal de monitorización
alternativa a sus canales de auriculares, cuando Hexacon está montado en su rack de estudio y normalmente recibe su señal desde el
MAIN INPUT.
Control MASTER VOLUME
Este knob controla el nivel en el bus MAIN. El nivel en el bus MAIN
siempre se muestra en el medidor de nivel de 8 segmentos junto a la
toma DIRECT IN, tanto si DIRECT IN se usa como si no.
Puesto que todos los canales de auriculares son idénticos, sólo vamos
a explicar el canal 1:
Botónes MONO L y MONO R
Estos botones cambian el encaminamiento para la salida de los auriculares: el encaminamiento se conmuta post-Fader y post-EQ. Están
disponibles los siguientes modos:
Ambos botones pulsados: la señal se reproduce en estéreo.
El botón MONO L está pulsado, MONO R no está pulsado: el canal
izquierdo de la señal de entrada estéreo se encamina a la salida de los
auriculares en mono, el canal derecho se silencia.
El botón MONO L no está pulsado, pero MONO R si está pulsado: el
canal derecho de la señal de entrada estéreo se encamina a la salida
de los auriculares en mono, el canal izquierdo se silencia.
Los dos botones MONO L y MONO R están pulsados: ambos canales
de la señal de entrada estéreo se suman en mono y se encaminan a
la salida de los auriculares.
Toma OUT.
El jack TRS de 1/4“ OUT se usa para conectar unos auriculares estéreo.
Opcionalmente, puede enviar la señal a otros auriculares a través de
esta salida. Hay una salida paralela en la parte posterior de Hexacon.
Control BASS
Este knob realza o atenúa el rango de frecuencia por debajo de la frecuencia de corte de 100 Hz. El rango de control de este fi ltro shelving
es +/-10dB. En la posición central (0) el fi ltro no tiene ningún efecto.
Control Treble
Este knob realza o atenúa el rango de frecuencia por encima de la frecuencia de corte de 10 kHz. El rango de control de este fi ltro shelving
es +/-10dB. En la posición central (0) el fi ltro no tiene ningún efecto.
Control BALANCE
Dependiendo del fl ujo de señal del canal, el knob BALANCE tiene dos
funciones.
El jack AUX IN en la parte posterior no se usa
Si el canal recibe su señal desde el MAIN INPUT, el knob BALANCE con-
trola el balance L/R de la señal en el bus MAIN.
El jack AUX IN en la parte posterior se usa
Si el canal recibe su señal desde la toma AUX IN en la parte posterior,
el knob BALANCE controla la mezcla entre la señal en el bus MAIN y
la señal de AUX IN. Por ejemplo, podría enviar la reproducción de la
música del grupo hacia el MAIN INPUT, mientras que las voces están
conectadas a través de la entrada AUX IN: usando el knob BALANCE, el
cantante puede mezclar la música con las voces según convenga.
Control VOLUME
Este knob controla el nivel de salida de la señal en el bus MAIN hacia
los auriculares. El medidor de nivel de 8 segmentos muestra el nivel de
salida de los auriculares correspondientes.
Interruptor de encendido
El interruptor POWER enciende y apaga la unidad Hexacon.
NO WSO N IC H e xaC on
Page 21

www.nowsonic.com
22
Hexacon
Instrucciones de uso
ES
Conectores y controles
Panel trasero
Hexacon tiene los siguientes conectores en la parte posterior
(de derecha a izquierda)
BALANCED MAIN INPUT
Estos jacks XLR balanceados y TRS de 1/4“ se usan para conectar señales estéreo con nivel de línea. Aquí, puede conectar la salida estéreo
de un mezclador y similares.
Observación
Si conecta una señal a la toma DIRECT IN en la parte frontal, estas entradas se desactivan automáticamente.
BALANCED MAIN THRU
Estos jacks XLR balanceados y TRS de 1/4“ se usan para conectar un
dispositivo estéreo con nivel de línea. La señal en el bus MAIN se puentea directamente a un dispositivo posterior (p.ej. un otro Hexacon).
STEREO HEADPHONE OUTPUTS
Estos seis jacks TRS están conectados en paralelo a las salidas de auriculares en el panel frontal. Se usan para conectar los auriculares o
sacar sus señales a un posterior amplifi cador de auriculares etc. Puede
usar estas entradas de forma opcional o en paralelo con las salidas en
el panel frontal: Hexacon ha sido diseñado para auriculares con una
carga de impedancia de 32 ó 600 Ω. Por lo tanto, puede conectar y
manejar múltiples auriculares – sin embargo, la impedancia total no
debe exceder de los 16 Ω. De lo contrario, puede producirse una sobrecarga y posiblemente verse limitada la ganancia de salida máxima.
Observación
Si se encuentra con problemas a la hora de conectar múltiples auriculares, por favor desconecte un auricular. Si esto soluciona el problema,
la carga de impedancia de los auriculares es demasiado baja. Por favor
pruebe con otros auriculares o evite conectar múltiples auriculares.
STEREO AUX INPUTS
A través de estos jacks TRS estéreo puede meter directamente una señal de línea estéreo al correspondiente amplifi cador de auriculares. En
cuanto conecte una señal al jack AUX IN, el knob BALANCE funciona
como un control de mezcla que ajusta el ratio de mezcla entre la señal
en el bus MAIN y la señal de AUX IN.
Manejo
Por favor baje los controles MASTER VOLUME y VOLUME en los canales
antes de conectar Hexacon. Ajuste los knobs BASS, TREBLE, y BALANCE a
su posición central. Desactive todos los interruptores MONO.
Ahora, ya puede conectar a las tomas MAIN INPUT enchufes XLR balanceados o TRS: por ejemplo, use una salida aux estéreo de una mesa de
mezclas etc. como fuente.
Si hace falta, es posible pinchar la señal en el bus MAIN a través de las
tomas MAIN THRU y enviarla a otro Hexacon.
Si fuera necesario, puede introducir la señal de monitorización a través
de la toma DIRECT IN en la parte frontal: ahora, las señales MAIN INPUT
están desactivadas.
Conecte unos auriculares apropiados a la toma OUT y/o a las tomas de
cada canal en la sección STEREO HEADPHONE OUTPUTS. Si quiere usar
la función de mezcla en los canales, debe meter otras señales a través
de las tomas AUX IN en los respectivos canales. Con el knob BALANCE
puede ajustar el nivel entre el bus MAIN y la señal AUX.
Después de conectar todo en Hexacon enciéndalo con el botón POWER. Por favor ajuste el volumen de la reproducción en la sección master
con el knob MASTER VOLUME: por favor asegúrese de que la señal no
recorte en el medidor de nivel maestro. Los LEDs verdes y ámbar deberían iluminarse, mientras que los LEDs rojos de recorte no deberían
iluminarse nunca.
A continuación, ajuste el volumen de reproducción de cada canal según
convenga: elija el modo de reproducción para un canal con los botones
correspondientes MONO L y MONO R. Puede escuchar las señales bien
en estéreo o mono. En el modo mono, puede elegir entre distintas fuentes (MONO L, MONO R, MONO L&R).
Suba el volumen del canal con el knob VOLUME: De nuevo, la señal debería medirse dentro de los LEDs verdes y ámbar y no con los LEDs rojos
de recorte. Si una señal está conectada al AUX IN, puede ajustarla con
relación a la señal del bus MAIN mediante el knob BALANCE. Si no se ha
conectado ninguna señal AUX, el knob BALANCE controla el ratio entre
el canal izquierdo y derecho de la señal estéreo en el bus MAIN.
Optimice su escucha con los knobs BASS y TREBLE. Por favor, tenga en
cuenta que el nivel de la señal del canal se realza con la ganancia de las
bandas de frecuencia. Por lo tanto, es posible que haya recortes: en este
caso, baje el knob VOLUME lo que sea necesario.
NO WSO N IC H e xaC on
Page 22

www.nowsonic.com
23
Hexacon
Instrucciones de uso
ES
Observación
Si una señal entra a través del MAIN INPUT y del AUX IN a la vez, debería
comprobar la fase de sus señales. Es posible que la señal se cancelase
por errores de fase y que no se amplificase como fuera de esperar: Por
favor compruebe la correlación eligiendo distintos modos mediante
los botones MONO L y MONO R. En caso de cancelaciones pruebe a
invertir la fase de la señal AUX y compare los resultados.
Especificaciones
Diseño amplificador de auriculares de 6 canales con
ecualizador y entrada aux variable por canal
Respuesta de frecuencia 20 Hz – 50 kHz, +0/-2 dB (sin ecualizador)
Ganancia máxima 25,6 dB @ 1kHz (sin ecualizador)
Ecualizador Ecualizador Treble: ± 12 dB @ 10 kHz, filtro shelving
Ecualizador Bass: ± 12 dB @ 100 Hz, filtro shelving
Entradas XLR y jacks TRS de 1/4“ (MAIN INPUT),
asignación de clavijas balanceadas y no
balanceadas
1/4“ TRS (entradas Aux)
Impedancia de entrada 40kΩ (MAIN: XLR balanceados y jacks TRS
de 1/4“)
9,9 kΩ (Direct In: jacks de 1/4“)
15 – 21kΩ (AUX IN: 1/4“ TRS)
Nivel máximo de salida +21,5 dBu
Rango dinámico ≥101dB typ. @ 130mW, 600Ω carga, nivel máx.
Salidas XLR y 1/4“ TRS (MAIN THRU)
1/4“ TRS (salidas de auriculares)
Impedancia de salida ≤12 Ω
Nivel máximo de salida auricular de 600 Ω: 150 mW (1 kHz)
auricular de 32 Ω: 500 mW (1 kHz)
auricular de 8 Ω: 150 mW (1 kHz)
Dimensiones 44,5 x 482,6 x 190,5 mm
Peso 3,1 kg
Alimentación alimentación interna, conmutable entre 115V,
60Hz y 230V, 50Hz
Consumo 18W inactivo, 60W máx.
Referencia: 0 dBu = 0,775 VAC RMS
Artículos suministrados
Hexacon:
1 x
C
able de alimentación:
1 x
I
nstrucciones de uso:
1 x
Descar
go de responsabilidad
Nowsonic ha llevado a cabo todos los pasos posibles para asegurar que
la información aquí contenida es a la vez correcta y completa.
En ningún caso puede Nowsonic aceptar cualquier responsabilidad so
bre cualquier pérdida o daño al propietario del equipo, terceras partes
o equipos que pudieran r
esultar del uso de este manual o del equipo
que éste describe.
Servicio
Si tiene problemas o preguntas técnicas, consulte primero al distribuidor local a través de quien haya adquirido el aparato.
En caso de r
equerir servicio técnico, le rogamos que también se dirija
a su distribuidor local. De lo contrario también puede ponerse directamente en contacto con nosotros. Encontrará nuestros datos de contacto en nuestra página web www.nowsonic.com.
OBSER
VACIÓN: Tenemos gran cuidado en el empaquetado del dis-
positivo colocándolo en una caja bien protegida aquí en la fábrica,
por lo que es muy impr
obable que sufra daños durante el envío. No
obstante, si esto sucediera, por favor, póngase en contacto con su
vendedor inmediatamente para informar del daño. Le recomendamos
que guarde los materiales que vienen en el embalaje original en caso
de que sea necesario enviar o transportar el dispositivo en una fecha
posterior.
Advertencias legales
Copyright de este manual del usuario © 2013: Nowsonic
Las características, especificaciones y disponibilidad del producto
pueden modificarse sin aviso previo.
Edición v1.0, 08/2013
Page 23

Hexacon
Instrukcja obsługi
PL
24
The exclamation point within an equilateral triangle is intended to alert the user to the presence of important operating
and
maintenance(servicing) instructions in the literature ac-
companying the product.
The lightning flash with an arrowhead symbol within an equilateral triangle is intended to alert the user to the presence of
uninsulat
ed “dangerous voltage” within the product’s enclosure that may be of sufficient magnitude to constitute a risk of
elec
tric shock to persons.
1) Przeczytaj niniejszą instrukcję.
2) Zachowaj niniejszą instrukcję.
3) Przestrzegaj wszystkich ostrzeżeń.
4) Stosuj się do wszystkich poleceń.
5) Nie obsługuj niniejszego urządzenia w pobliżu wody.
6) Do czyszczenia urządzenia używaj wyłącznie suchej ściereczki.
7) Nie zastawiaj wylotu otworów wentylacyjnych. Przy instalacji
urządzenia postępuj zgodnie z poleceniami producenta.
8) Nie stawiaj urządzenia w pobliżu grzejników, bojlerów, pieców lub
innych źródeł ciepła.
9) W żadnym wypadku nie zaklejaj kontaktu uziemienia wtyczki.
Wtyczka bezpieczeństwa zawiera dwa bolce, z których jeden
jest szerszy od drugiego. Zwykła wtyczka sieciowa zawiera dwa
bolce oraz trzeci kontakt uziemienia. Szerszy bolec bezpiecznej
wtyczki lub kontaktu uziemienia wtyczki sieciowej służy Twojemu
bezpieczeństwu. W przypadku, kiedy wtyczka kabla sieciowego
znajdującego się w dostarczonym komplecie nie pasuje do gniazdka, zakup pasujący kabel w sklepie specjalistycznym.
10) Nie depcz kabla, nie załamuj go i obchodź się z nim ostrożnie,
szczególnie w miejscu połączenia z urządzeniem.
11) Używaj wyłącznie części przewidzianych przez producenta dla
tego urządzenia.
12) Używaj tylko stojaków, statywów lub stołów, które odpowiadają
wymaganiom producenta lub są dostarczane razem z
urządzeniem. Zachowaj ostrożność podczas transportu, by uniknąć
obrażeń spowodowanych przez przesuwające się
lub spadające przedmioty.
13) Wyciągnij wtyczkę z gniazdka sieciowego
podczas burzy a także wtedy, kiedy nie używasz
urządzenia przez dłuższy czas.
14) W przypadku naprawy serwisowej korzystaj
z usług wykwalifikowanego personelu. Pozwól skontrolować
urządzenie fachowcowi, w przypadku kiedy np. uszkodzone są
kabel lub wtyczka sieciowa, do obudowy dostały się płyny lub
inne przedmioty, urządzenie stało na deszczu lub w wilgotnym
środowisku, nieprawidłowo funkcjonuje lub w jakikolwiek inny
sposób zostało uszkodzone.
OSTRZEŻENIE:
Aby ograniczyć niebezpieczeństwo pożaru i porażenia prądem, nie
wystawiaj urządzenia na deszcz i nie poddawaj go działaniu wilgoci.
Nie stawiaj na urządzeniu żadnych pojemników z wodą, gdyż mogą
one się przewrócić i woda może dostać się do wnętrza urządzenia.
Niniejsze urządzenie musi być uziemione.
Używaj trójprzewodowego, ekranowanego kabla zasilającego takiego,
jak dostarczony razem z urządzeniem kabel zasilający.
Zwróć uwagę, że dla różnych napięć potrzebne są różne kable
zasilające i/lub wtyczki sieciowe.
Przestrzegaj zawsze lokalnych przepisów bezpieczeństwa. Upewnij
się, że fabrycznie ustawione wartości zasilania (zob. naklejka na płycie
tylnej) zgadzają się z napięciem w Twojej lokalnej sieci.
Ustaw urządzenie w pobliżu gniazda sieciowego. Gniazdo powinno
być zawsze łatwo dostępne.
Wyciągnij wtyczkę z gniazdka, aby całkowicie odciąć urządzenie od
prądu.
Podczas instalacji stosuj się do wszystkich wskazówek producenta.
Nie używaj urządzenia w trudno dostępnym miejscu.
Nie otwieraj urządzenia – niebezpieczeństwo porażenia prądem.
UWAGA!
Zwróć uwagę, że wszystkie zmiany lub modyfikacje urządzenia, które
nie są wyraźnie wymienione w niniejszej instrukcji, mogą pozbawić
Cię prawa do używania tego urządzenia.
Konserwacja
W urządzeniu nie ma żadnych części, które użytkownik musiałby
poddawać konserwacji.
W celu naprawy urządzenia korzystaj tylko z usług wykwalifikowane-
go personelu.
UWAGA: UWAGA: ABY UNIKNĄĆ PORAŻENIA PRĄDEM, NIE
WOLNO OTWIERAĆ OBUDOWY. WEWNĄTRZ URZĄDZENIA NIE
MA ŻADNYCH CZĘŚCI, KTÓRE MOGĄ BYĆ WYMIENIANE PRZEZ
UŻYTKOWNIKA.
W przypadku naprawy serwisowej korzystaj z usług wykwalifikowanego personelu.
WAŻNE WSKAZÓWKI DOTYCZĄCE BEZPIECZEŃSTWA
Page 24

Hexacon
Instrukcja obsługi
PL
25
Spis treści
Wstęp
Uruchamianie
Zasilanie
Podłączenia i elementy obsługi
Działanie
Specyfikacja
Skład zestawu
Wyłączenie odpowiedzialności cywilnej
Serwis
Zastrzeżenia prawne
Wstęp
Nowsonic Hexacon jest wzmacniaczem słuchawkowym z sześcioma
oddzielnymi kanałami. Każdy kanał jest sterowany sygnałem doprowadzonym do stereofonicznego wejścia MAIN INPUT, które znajduje
się na t
ylnej ścianie obudowy. W razie potrzeby sygnał wejściowy MAIN
INPUT możesz „zastąpić“ sygnałem doprowadzanym do gniazda DIRECT IN z przodu obudowy aby czasowo odbierać go w słuchawkach.
D
odatkowo każdy z kanałów słuchawkowych posiada własne wejście
stereofoniczne, poprzez które można podłączyć dodatkowy sygnał
monitorowy. Każdy kanał wyjściowy posiada dodatkowo pokrętło BALANCE, które służy albo do regulacji balansu między kanałami LEFT
i RIGHT w głó
wnym torze MAIN-Bus, albo do ustawienia proporcji
między sygnałem głównym MAIN i dodatkowym, dołączonym do
wejścia AUXILIARY.
Każdy kanał wyjściowy jest wyposażony w oddzielne pokrętła BASS
i TREBLE, którymi w razie potrzeby można regulować brzmienie
dźwięku sygnału wyjściowego. Dla łatwiejszego uruchomienia i okablowania wzmacniacza, wyposażono go w połączone równolegle
w
yjściowe gniazda 6,35 mm Jack, znajdujące się na przedniej i tylnej
płycie urządzenia. Za pomocą dwóch przycisków MONO każdy kanał
może być osobno przestawiony na tryb pracy Stereo, Mono Left, Mono
Right i Mono Left & Right, dzięki czemu możliwy jest odsłuch dźwięku
na wiele sposobów.
Do podłączenia sygnałów wejściowych głównego toru MAIN-Bus wzmacniacza służą symetryczne gniazda XLR i Jack 6,3 mm umieszczone
na pły
cie tylnej, przy czym sygnał wejściowy może być przesyłany dalej poprzez znormalizowane gniazda THROUGH (XLR i 6,3 mm Jack), w
celu k
askadowego łączenia z kolejnymi urządzeniami Hexacon. Poziom sygnału wyjściowego jest pokazywany dla każdego kanału oraz
t
oru głównego MAIN na 8-stopniowym wyświetlaczu.
Uruchamianie
Wzmacniacz Hexacon nadaje się do wykorzystania w różnorodny
sposób i w różnym środowisku: Hexacon jest zazwyczaj używany w
studiu dźwiękowym do monitorowania wykonawców. Ponadto Hexacon może być według uznania instalowany w reżyserce dźwięku lub
w k
abinie nagrań. Dzięki znormalizowanej obudowie (19“, 1U), Hexacon można instalować w typowej rack o szerokości 19“. Chociaż Hexacon dzięki swojej obudowie ze stali i aluminium jest w znacznym
st
opniu odporny na wpływy zewnętrzne, nie powinieneś umieszczać
go w pobliżu wzmacniaczy mocy lub innych urządzeń, które mogą
wytwarzać wysoką temperaturę lub pole elektromagnetyczne.
Zasilanie
Hexacon posiada zasilacz wewnętrzny. Podłącz Hexacon odpowiednim kablem do sieci: zwróć uwagę na to, by parametry zasilania były
zgodne z dan
ymi podanymi na płycie tylnej urządzenia.
Kontakt uziemienia zapewnia ochronę przed porażeniem prądem: w
żadnym wypadku nie przerabiaj styku uziemienia ani go nie zaklejaj.
Page 25

Hexacon
Instrukcja obsługi
PL
26
Podłączenia i elementy obsługi
Płyta czołowa
Na płycie czołowej wzmacniacza Hexacon znajdują się następujące
złącza i elementy obsługi (od lewej do prawej):
Gniazdo DIRECT IN
Gniazdo 6,3 mm Jack służy jako alternatywne wejście stereofoniczne
dla wejścia głównego MAIN INPUT na płycie tylnej: gdy sygnał zostanie podłączony wtykiem Jack, sygnał z gniazda MAIN INPUT zostaje
odłączony od toru głównego MAIN-Bus. Teraz sygnał z wejścia DIRECT
IN zostaje przesłany za pośrednictwem toru głównego MAIN-Bus do
wszystkich 6 kanałów słuchawkowych. Tą drogą możesz w elastyczny sposób podłączyć alternatywny sygnał monitorowy do kanałów
słuchawkowych, gdy Hexacon jest na stałe wbudowany i okablowany
w rack, oraz ma sygnał wejściowy dołączony do gniazd MAIN INPUT.
Pokrętło MASTER VOLUME
Tym pokrętłem regulujesz poziom sygnału w torze głównym MAINBus. Niezależnie do tego, czy do gniazda DIRECT IN jest dołączony
sygnał czy nie, poziom sygnału w torze głównym MAIN-Bus jest
zawsze pokazywany na 8-stopniowym wskaźniku znajdującym się
obok gniazda DIRECT IN.
Ponieważ wszystkie kanały słuchawkowe są identycznie zbudowane,
opisany zostanie tu przykładowo kanał 1:
Przyciski MONO L i MONO R
Tymi dwoma przyciskami ustalasz drogę sygnału do wyjść
słuchawkowych: przełączanie odbywa się za regulatorem poziomu
sygnału i barwy dźwięku. Dostępne są następujące funkcje:
Obydwa przyciski nieaktywne: sygnał jest odtwarzany stereofonicznie.
Przycisk MONO L aktywny, MONO R nieaktywny: lewy kanał stereo
sygnału wejściowego jest przekazywany monofonicznie do lewego
wyjścia słuchawkowego, prawy kanał jest wyłączony.
Przycisk MONO L nieaktywny, MONO R aktywny: prawy kanał stereo
sygnału wejściowego jest przekazywany monofonicznie do prawego wyjścia słuchawkowego, lewy kanał jest wyłączony.
Przyciski MONO L i MONO R aktywne: kanały lewy i prawy
wejściowego sygnału stereofonicznego są sumowane i przesyłane
do wyjść słuchawkowych
Gniazdo OUT.
Gniazdo 6,3 mm Jack OUT służy do podłączenia słuchawek stereofonicznych. Alternatywnie możesz do niego podłączyć kolejny wzmacniacz słuchawkowy.
To wyjście jest równolegle połączone z wyjściem na płycie tylnej wzmacniacza Hexacon.
Pokrętło BASS
Tym pokrętłem wzmacniasz lub osłabiasz dźwięki o częstotliwościach
poniżej 100 Hz. Zakres regulacji wynosi +/- 10 dB, fi ltr działa w trybie
shelving. W pozycji 0 fi ltr jest wyłączony.
Pokrętło Treble
Tym pokrętłem wzmacniasz lub osłabiasz dźwięki o częstotliwościach
powyżej 10 kHz. Zakres regulacji wynosi +/- 10 dB, fi ltr działa w trybie
shelving. W pozycji 0 fi ltr jest wyłączony.
Pokrętło BALANCE
Ten regulator ma dwie funkcje w zależności od tego, jaki sygnał jest
doprowadzony do kanału.
Do gniazda AUX IN na płycie tylnej nie jest podłączony
żaden sygnał
Jeśli do gniazda MAIN INPUT doprowadzony jest sygnał wejściowy,
wówczas regulator BALANCE ustala relacje poziomu sygnału między
lewym a prawym kanałem w torze głównym MAIN-Bus.
Sygnał podłączony do gniazda AUX IN na płycie tylnej
Jeżeli do gniazda AUX IN na płycie tylnej jest dołączony sygnał, wów-
czas regulatorem BALANCE ustalane są proporcje mieszania sygnałów
toru głównego MAIN-Bus i sygnału z wejścia AUX IN. Przykładowo
możesz dołączyć do wejścia MAIN INPUT muzykę, podczas gdy śpiew
jest doprowadzony do wejścia AUX IN: pokrętłem BALANCE wokalista może ustawić proporcje głośności między tłem muzycznym i
śpiewem.
Pokrętło VOLUME
Tym pokrętłem regulujesz poziom sygnału wyjściowego w torze
głównym MAIN-Bus doprowadzanego do słuchawek. 8-stopniowe
wskaźniki pokazują poziom sygnału wyjściowego doprowadzonego
do słuchawek.
NO WSO N IC H e xaC on
Page 26

Hexacon
Instrukcja obsługi
PL
27
Podłączenia i elementy obsługi
Płyta tylna
Na płycie tylnej Hexacon znajdują się następujące podłączenia
(od prawej do lewej)
BALANCED MAIN INPUT
Te symetryczne gniazda XLR i 6,3 mm Jack służą do podłączenia stereofonicznych sygnałów „line“. Dla przykładu, podłącz tu wyjście stereo
Aux miksera lub inne źródło sygnału.
Wyjaśnienie
Jeśli wykorzystujesz gniazdo DIRECT IN na płycie czołowej, to wymienione wejścia zostają automatycznie wyłączone.
BALANCED MAIN THRU
Te symetryczne gniazda XLR i 6,3 mm Jack służą do połączenia z
urządzeniem stereofonicznym „line“. W tym przypadku sygnał toru
głównego MAIN-Bus zostanie bezpośrednio przesłany do następnego
urządzenia (np. kolejnego wzmacniacza Hexacon).
WYJŚCIA SŁUCHAWEK STEREO
Te sześć gniazd Jack jest połączonych równolegle do wyjść
słuchawkowych na płycie czołowej i służy do podłączenia słuchawek
lub połączenia z kolejnym wzmacniaczem słuchawkowym lub podobnym urządzeniem. Możesz używać tych wejść zamiennie lub
jednocześnie z wyjściami na płycie czołowej: Hexacon jest przystosowany do obciążenia słuchawkami o impedancji od 32 do 600 Ω. W
związku z tym możesz podłączać wiele słuchawek, jednakże wypadkowa impedancja nie może wynosić mniej niż 16 Ω. W innym przypadku
może dochodzić do przeciążenia i ewentualnego ograniczenia mocy
wyjściowej.
Wyjaśnienie
Jeśli pojawią się problemy spowodowane podłączeniem zbyt wielu słuchawek, odłącz jedną z nich. Jeśli dzięki temu problem zostaje
rozwiązany, to oznacza że łączna impedancja słuchawek jest zbyt niska. Użyj innych słuchawek lub unikaj podłączania wielu słuchawek do
urządzenia.
WEJŚCIA STEREO AUX
Poprzez niniejsze stereofoniczne gniazda Jack, można przesłać
bezpośrednio stereofoniczny sygnał „line“ na przyporządkowany mu
wzmacniacz słuchawkowy. Od momentu podłączenia sygnału do
gniazda AUX IN, pokrętło BALANCE spełnia funkcję regulatora balansu
MIX, za pomocą którego regulujesz proporcje mieszania sygnału toru
głównego MAIN-Bus i sygnału z wejścia AUX IN.
Działanie
Zanim okablujesz Hexacon, ustaw pokrętło MASTER VOLUME oraz
pokrętła VOLUME w kanałach na minimum. Ustaw ponadto pokrętła
BASS, TREBLE i BALANCE na pozycję środkową. Wyłącz wszystkie
włączniki MONO.
Teraz możesz dowolnie, wykorzystując gniazda XLR lub Jack, symetrycznie okablować wejścia MAIN INPUT: źródłem sygnału może być np.
wyjście miksera lub inne.
W razie potrzeby możesz sygnał toru głównego MAIN-Bus odgałęzić i
za pośrednictwem złączy MAIN THRU przesłać do następnego wzmacniacza Hexacon.
W razie potrzeby możesz podłączyć sygnał monitora do gniazda DIRECT IN na płycie czołowej: sygnał dołączony do gniazd MAIN INPUTS
zostaje wyłączony.
Podłącz teraz odpowiednie słuchawki do gniazd OUT i/lub wyjść
kanałów w polu STEREO HEADPHONE OUTPUTS. Jeśli chcesz używać
funkcji miksowania dźwięków w kanałach, dołącz kolejne źródła
sygnałów do wejść AUX IN wybranych kanałów: pokrętłem BALANCE
możesz indywidualnie regulować proporcje między sygnałem toru
głównego MAIN-Bus i AUX.
Po okablowaniu włącz wzmacniacz Hexacon za pomocą włącznika POWER. Głośność odtwarzania sygnału głównego regulujesz pokrętłem
MASTER VOLUME: zwróć uwagę na to, by sygnał główny nie osiągał
maksymalnego poziomu („clip“): zielone i żółte wskaźniki LED powinny
się świecić, natomiast diody czerwone (poziom „clip“) nie powinny się
nigdy zaświecić.
Teraz możesz wyregulować, stosownie do potrzeb, odtwarzanie w
każdym kanale: wybierz przyciskami MONO L i MONO R tryb odtwarzania danego kanału: dźwięki możesz monofonicznie lub stereofonicznie, przy czym w trybie monofonicznym mogą być wybrane różne
sygnały (MONO L, MONO R, MONO L&R).
W razie potrzeby zwiększ głośność w kanale za pomocą pokrętła VOLUME: także tutaj poziom sygnału powinien pozostawać w zakresie zielonych i żółtych wskaźników LED, czerwone diody CLIP/LED nie powinny
się zaświecić. W przypadku doprowadzenia sygnału do wejścia AUX
IN proporcje między nim, a sygnałem toru głównego MAIN-Bus jest
regulowane pokrętłem BALANCE. Jeśli do wejścia AUX nie dołączyłeś
żadnego sygnału, wówczas pokrętłem BALANCE regulujesz proporcje
między lewym i prawym kanałem stereo toru głównego MAIN-Bus.
Wyreguluj, stosownie do potrzeb, brzmienie dźwięku pokrętłami BASS
i TREBLE. Pamiętaj o tym, że poziom sygnału w kanale podnosi się
także na skutek regulacji barwy dźwięku. Może wówczas ewentualnie
dojść do przesterowania sygnału: zmniejsz wówczas wzmocnienie
pokrętłem VOLUME.
NO WSO N IC H e xaC on
Page 27

Hexacon
Instrukcja obsługi
PL
28
Wyjaśnienie
Jeżeli sygnał doprowadzony do wejścia MAIN, zostaje dodatkowo
dołączony do wejścia AUX IN, musisz sprawdzić zgodność faz obu
wejść. Przy błędnym fazowaniu sygnałów może, zamiast pożądanego
wzmocnienia, dojść do ich wzajemnego wyeliminowania: sprawdź
poprawność fazowania przełączając przyciski MONO L i MONO R w
różne tryby pracy. W przypadku wzajemnego wygaszania sygnałów,
spróbuj odwrócić fazę sygnału na wejściu AUX i porównaj wyniki testu.
Specyfikacja
Rodzaj urządzenia: 6-kanałowy wzmacniacz słuchawkowy
z regulacją barwy dźwięku i
poziomu dodatkowego sygnału
wejściowego Aux oddzielnie dla
każdego kanału
Zakres częstotliwości: 20 Hz do 50 kHz, +0/-2 dB
(regulatory barwy dźwięku w
pozycji charakterystyki liniowej)
Maksymalne wzmocnienie: 25,6 dB dla częstotliwości 1 kHz
(regulatory barwy dźwięku w pozycji
charakterystyki liniowej)
Regulacja barwy dźwięku
tony wysokie: ± 12 dB dla
częstotliwości 10 kHz, filtr shelving
tony niskie: ± 12 dB dla częstotliwości
100 Hz, filtr shelving
Wejścia: gniazda XLR i 6,3 mm Jack
(MAIN INPUT), symetryczne i
niesymetryczne przyporządkowanie
gniazda 6,3 mm Jack (wejścia
dodatkowe Aux)
Impedancja wejściowa: 40 kΩ (MAIN: symetryczne wejścia
XLR i 6,3 mm Jack)
9,9 kΩ (Direct In: gniazdo 6,3 mm Jack)
15 do 21 kΩ (AUX IN: gniazda
6,3 mm Jack)
Maksymalny poziom
sygnału wejściowego: +21,5 dBu
Zakres dynamiki: ≥ 101 dB (typ.), odniesiony do mocy
130 mW na obciążeniu 600 Ω,
maksymalny poziom sygnału
Wyjścia: XLR i gniazda 6,3 mm Jack (MAIN THRU)
gniazda 6,3 mm Jack (wyjścia
słuchawkowe)
Impedancja wyjściowa: ≤ 12 Ω
Słuchawki 600 Ω: 150 mW dla częstotliwości 1 kHz
Słuchawki 32 Ω: 500 mW dla
częstotliwości 1 kHz
Słuchawki 8 Ω: 150 mW dla
częstotliwości 1 kHz
Wymiary: 44,5 x 482,6 x 190,5 mm (W x S x G)
Waga: 3,1 kg
Zasilanie: zasilacz wewnętrzny, przełączany
między 115 V, 60 Hz i 230 V, 50 Hz
Pobór mocy: 18 watów dla pracy ciągłej, 60 watów
moc szczytowa
Sygnał odniesienia: 0 dBu = 0,775 VAC RMS
Skład zestawu
Hexacon: 1 szt.
Kabel sieciowy: 1 szt.
Instrukcja obsługi: 1 szt.
Wyłączenie odpowiedzialności cywilnej
Firma Nowsonic dołożyła wszelkich starań, by wszystkie informacje w
niniejszym podręczniku zostały przedstawione w jak najdokładniejszy
i wyczerpujący sposób.
Firma Nowsonic nie bierze na siebie jakiejkolwiek odpowiedzialności za
powstałe uszkodzenia lub straty wyrządzone właścicielowi urządzenia,
osobie trzeciej lub powstałe w innych urządzeniach a będących skut
-
kiem informacji zawartych w tym podręczniku.
S
erwis
W przypadku wystąpienia jakichkolwiek problemów lub pytań natury
technicznej, prosimy zwrócić się w pierwszej kolejności do lokalnego
sprzedawcy, u którego urządzenie zostało zakupione.
W przypadku naprawy serwisowej, prosimy zwrócić się również do lokalnego sprzedawcy. W innym przypadku prosimy o skontaktowanie
się bezpośr
ednio z nami. Nasze dane kontaktowe znajdziesz na naszej
stronie internetowej www.nowsonic.com.
WYJAŚNIENIE: urządzenie zostało firmowo tak zapakowane, by
było wystarczająco zabezpieczone podczas transportu. Gdyby jednak doszło do uszkodzenia urządzenia podczas transportu, zwróć
się niez
włocznie do dostawcy, który je dostarczył i wskaż uszkodzenia. Zalecamy zachowanie oryginalnego opakowania, na wypadek
k
onieczności ponownego wysłania urządzenia.
Zastrzeżenia prawne
Prawa autorskie do niniejszego podręcznika użytkownika © 2013:
Nowsonic
Cechy produktu, specyfikacja i dostępność mogą ulec zmianie bez
wcześniejszej zapowiedzi.
Wydanie w.1.0, 08/2013
Page 28

Page 29

B
www.nowsonic.com
Distributed by Sound Service GmbH
WEEE-Reg.-Nr.: DE 18189133
www.nowsonic.com
 Loading...