

Page 1

LED stage floodlight with
remote control
User manual
Bedienungsanleitung
Mode d‘emploi
Manual del usuario
Podręcznik użytkownika
AUTARK ID07
Page 2

Page 3

User manual 5
Bedienungsanleitung 19
Mode d‘emploi 33
Instrucciones de uso 47
Instrukcja obsługi 61
Page 4

Page 5

Nowsonic Autark ID07
User manual
www.nowsonic.com
Page 6
6
Nowsonic Autark ID07
User manual
GB
www.nowsonic.com
IMPORTANT SAFETY INSTRUCTIONS
1) Read these instructions.
2) Keep these instructions.
3) Heed all warnings.
4) Follow all instructions.
5) Do not use this apparatus near water.
6) Clean only with dry cloth.
7) Do not block any of the ventilation openings! Install in
accordance with the manufacturer’s instructions.
8) Do not install near any heat sources such as radiators, heat
registers, stoves, or other apparatus (including amplifiers) that
produce heat.
9) Do not defeat the safety purpose of the polarized or grounding-
type plug. A polarized plug has two blades with one wider than
the other. A grounding type plug has two blades and a third
grounding prong. The wide blade or the third prong is provided
for your safety. If the provided plug does not fit into your outlet,
consult an electrician for replacement of the obsolete outlet.
10) Protect the power cord from being walked on or pinched,
particularly at plugs, convenience receptacles, and the point
where they exit from the apparatus.
11) Only use attachments/accessories specified by the manufacturer.
12) Use only with a cart, stand, tripod, bracket, or table specified by
the manufacturer, or sold with the apparatus. When a cart is used,
use caution when moving the cart/apparatus combination to
avoid injury from tip-over.
13) Unplug this apparatus during lightning storms or when unused
for long periods of time.
14) Refer all servicing to qualified service personnel. Servicing is
required when the apparatus has been damaged in any way,
such as power-supply cord or plug is damaged, liquid has been
spilled or objects have fallen into the apparatus, the apparatus
has been exposed to rain or moisture, does not operate normally,
or has been dropped.
Page 7
7
Nowsonic Autark ID07
User manual
GB
www.nowsonic.com
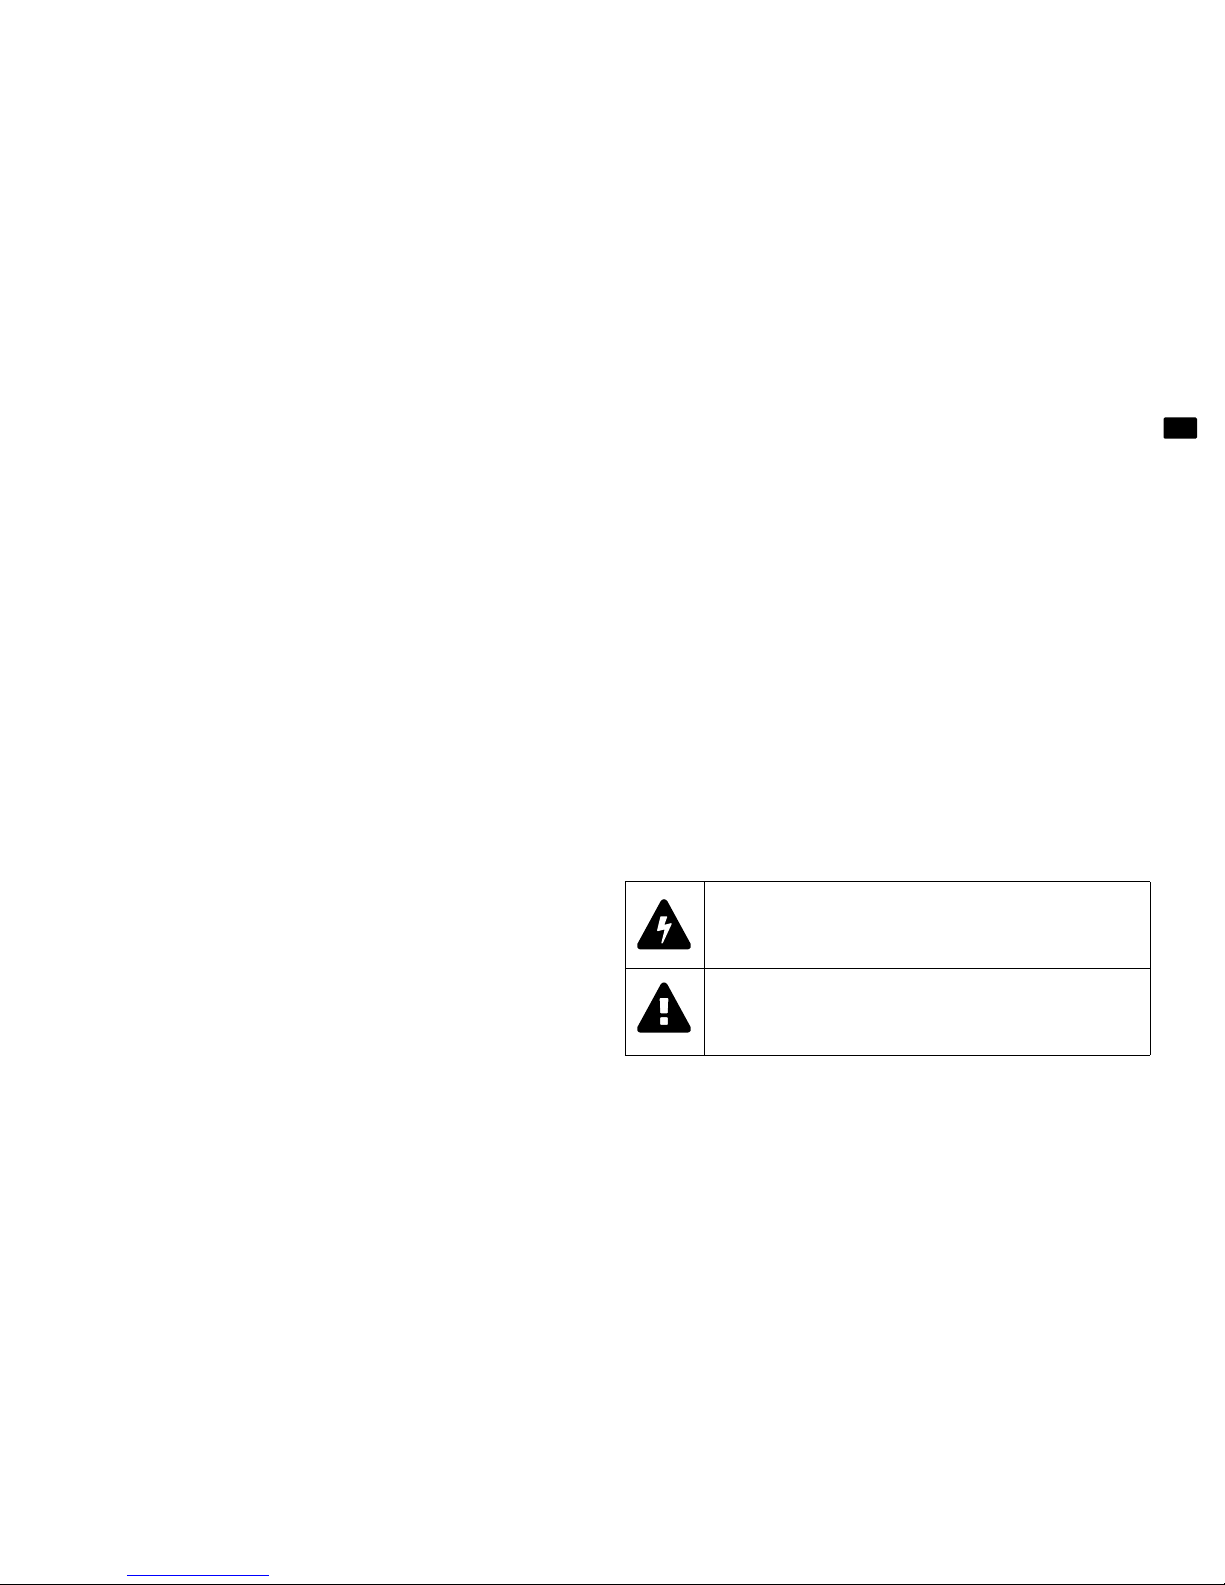
The lightning flash with an arrowhead symbol within an equilateral
triangle is intended to alert the user to the presence of uninsulated
“dangerous voltage” within the product’s enclosure that may be of
sufficient magnitude to constitute a risk of electric shock to persons.
The exclamation point within an equilateral triangle is intended
to alert the user to the presence of important operating and
maintenance(servicing) instructions in the literature accom panying
the product.
WARNING
To reduce the risk of fire or electric shock, do not expose this apparatus to rain or moisture.
Do not expose this equipment to dripping or splashing and
ensure that no objects filled with liquids, such as vases, are placed
on the equipment.
This apparatus must be earthed.
Use a three-wire grounding type line cord like the one supplied
with the product.
Be advised that different operating voltages require the use of
different types of line cord and attachment plugs.
Always observe the local safety regulations.
This equipment should be installed near the socket outlet and
disconnection of the device should be easily accessible.
To completely disconnect this equipment from the AC Mains,
disconnect the power supply cord plug from the AC receptacle.
Please follow all instructions of the manufacturer for installation.
Do not install in a confined space.
Do not open the unit – risk of electric shock.
CAUTION!
Please note: Changes or modifications to the device not expressly approved in this manual could void your authority to operate the
instrument.
Servicing
There are no user-serviceable parts inside.
All service must be performed by qualified personnel.
CAUTION: TO REDUCE THE RISK OF ELECTRIC SHOCK, DO NOT
REMOVE THE COVER. NO USER SERVICEABLE PARTS INSIDE.
REFER SERVICING TO QUALIFIED PERSONNEL ONLY.
Page 8

8
Nowsonic Autark ID07
User manual
GB
www.nowsonic.com
Introduction
Thank you very much for purchasing the Nowsonic Autark
ID07! Now-
sonic Autark
ID07 is a powerful stage floodlight featuring advanced
LED technology that can be operated wired or, in favor of a simple ins-
tallation, remotely controlled. In addition, the unit can be powered via
an internal battery pack. Despite of the compact size of the unit, the 7
powerful
RGBW LEDs offer a very high light intensity in four colors and
provide excellent color mixtures via 20 internal programs. As an alternative to the internal programs, the unit can be controlled externally
via the
DMX 512 protocol, in Master/Slave mode or wirelessly via an IR
remote control. In addition, the unit features a
LED display and specific
buttons for menu operation for local control.
Thanks to an internal 12 V battery pack and the IR receiver, Autark ID07
can be operated fully wirelessly in case it‘s difficult to set up wiring or
when installation must be done very quickly. With the remote control
and an optional
DMX radio transmitter respectively, the Autark ID07
can be controlled wirelessly via the
DMX 512 protocol.
For installation on the floor or to suitable brackets or trusses Autark
ID07 features a rugged double mounting clamp.
Features
Powerful 4 color stage flooder with advanced LED technology
Controllable via the DMX 512 protocol (4 modes: 1, 2, 6, 9 channels), in Master/Slave mode or via an IR remote control
Stand-alone Auto mode with 20 internal programs
Internal receiver for wireless remote control (IR remote supplied)
Internal battery pack for battery-backed operation up to 10 hours
Internal receiver for wireless DMX control
Electronic dimming from 0 to 100% without flickering
Double mounting clamp for installation on the floor or mounting
to suitable trusses
Applications
LED flooder for stage use and small music clubs
Mobile application for DJ sets
Page 9

9
Nowsonic Autark ID07
User manual
GB
www.nowsonic.com
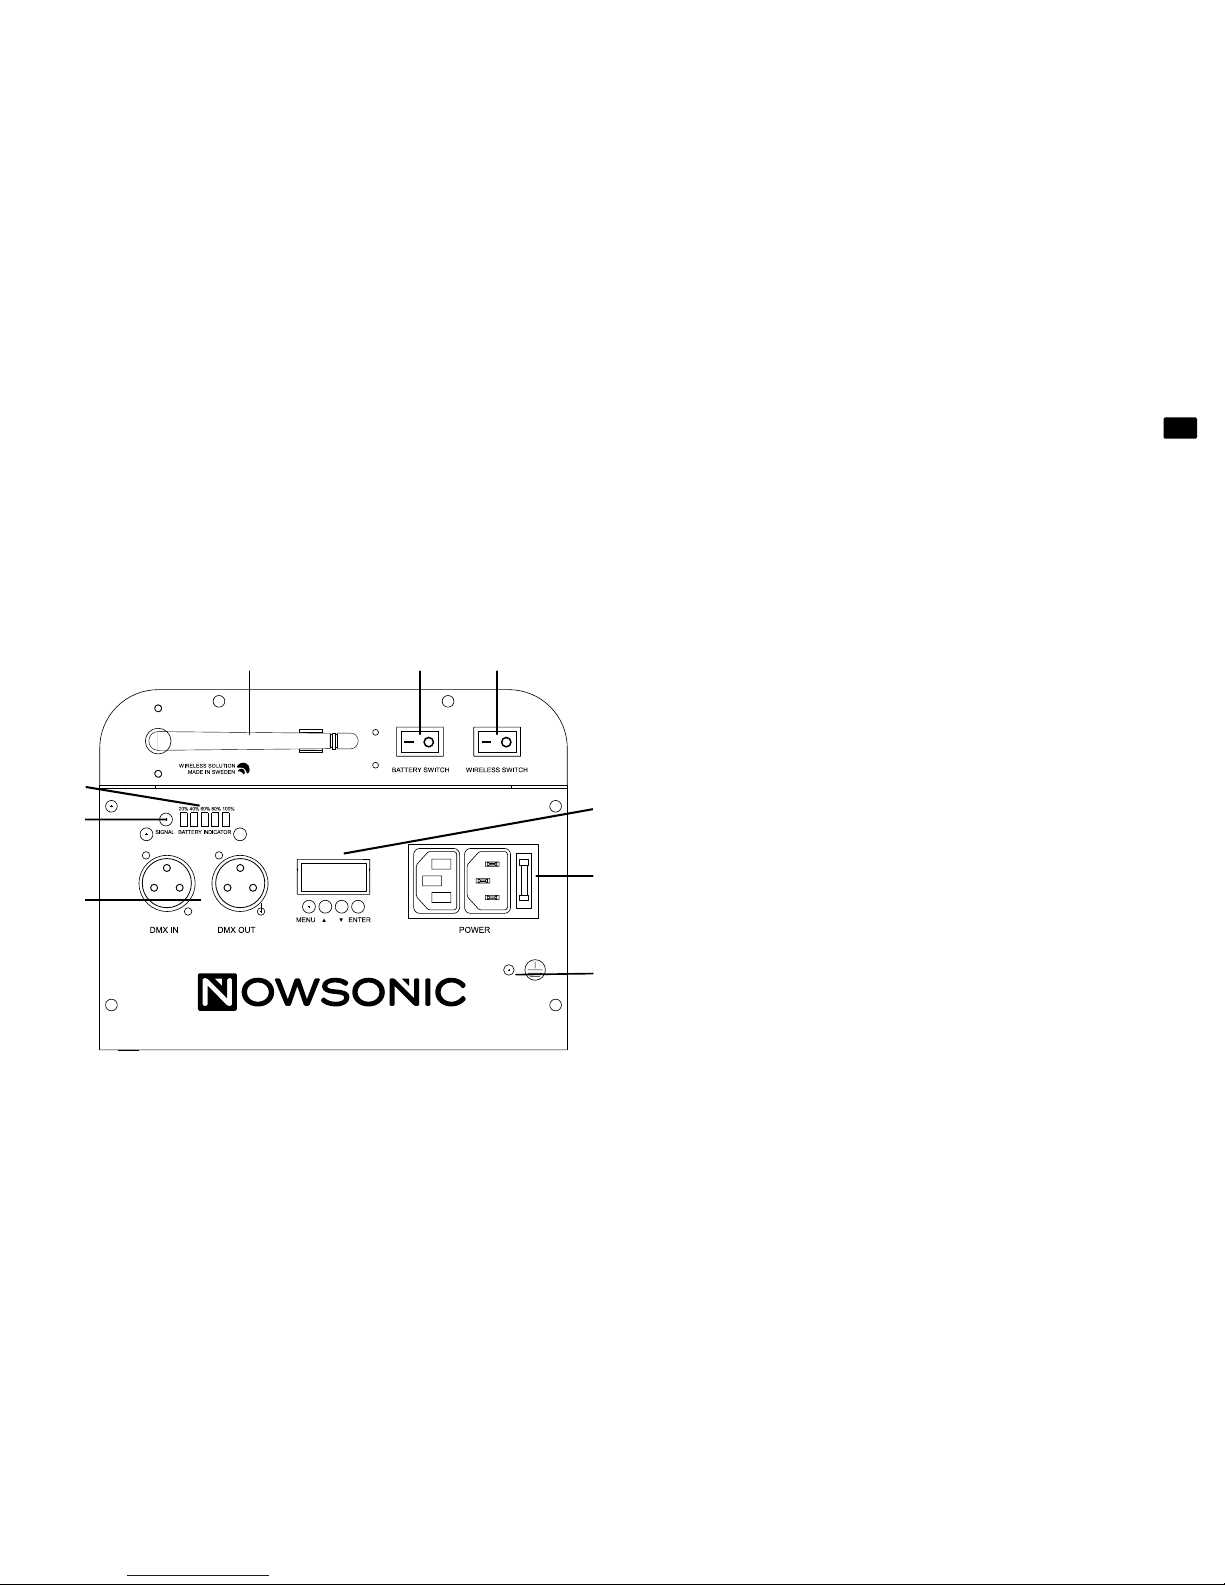
Outlets and controls on the rear panel
The following outlets and controls are available on the back panel of
Autark
ID07:
1. Mains sockets / fuse
Here you connect the supplied
IEC power cable. Using the IEC outlet
you can daisy-chain the mains to following devices. In addition, you
can replace the internal fuse here in case it should be blown due to
overload: use in every case a replacement fuse with identical specifications.
2. Menu and operating buttons
Autark
ID07 is locally controlled via the buttons underneath the LED
display. Navigating the uppermost menu level is done via the
MENU
button and the
and
buttons. For navigating the sub menu level,
press the
ENTER button and again the and
buttons. Press the
ENTER
button in order to open a menu item or to confirm your entry.
Press again the
ENTER or MENU button, to exit a sub menu.
3.
WIRELESS SWITCH
This button activates the internal receiver of Autark ID07. In the I
position, Autark
ID07 can be controlled either via the supplied remote
control or via a wireless
DMX transmitter: the address for the internal
DMX receiver is entered via the menu.
8888
1
2
345
6
7
8
9
Page 10

10
Nowsonic Autark ID07
User manual
GB
www.nowsonic.com
4. BATTERY SWITCH
This button activates the operation of Autark ID07 via the internal
battery pack. The internal battery pack is automatically charged when
Autark
ID07 is connected to the mains. The charging capacity of the
battery pack is displayed on the battery indicator (6).
5. Remote antenna
The antenna is connected to the internal
DMX receiver of Autark ID07.
Unfold the antenna to improve the reception quality for remote controlling.
6. Battery indicator
These
LEDs show the current charging status of the internal battery
pack: when fully charged (all
LEDs are lit), Autark ID07 can be operated
up to 10 hours without mains supply.
7. Signal LED
When the automatic sound control mode is active, this LED lights
depending on the sensitivity set in the S!Ln5 menu (see from page 7
on). The brighter the
LED lights up, the higher the sensitivity is.
8.
DMX IN / OUT sockets
These sockets allow to feed an external
DMX signal to Autark ID07 and
to loop thru the incoming
DMX signal to following Autark devices.
In Master/Slave mode, the Master device outputs the control signal
via its
DMX OUT socket, while the Slave unit receives the signal via its
DMX IN
socket.
NOTE: Please note that the last unit in a daisy chained configura-
tion via
DMX or in Master/Slave mode should be terminated by a
termination resistor. Otherwise control problems may arise.
9. Earthing point
This screw allows to connect external devices with the ground of
Autark
ID07.
Operation
You can operate Autark ID07 either in Stand-alone or Master/Slave
mode or wired and remotely controlled respectively via
DMX. In Stand-
alone mode, the sound sensing is automatically activated and toggles
the internal programs depending on the detected music signal.
Page 11

11
Nowsonic Autark ID07
User manual
GB
www.nowsonic.com
Wiring for Master/Slave mode
In Master/Slave mode, up to 16 Autark units can be linked whereat the
first unit serves as the master and all following units work as slaves. The
slave units receive their control messages from the master.
Proceed as follows:
1) Connect a XLR cable (not supplied) to the
DMX OUT socket on
the rear panel of the master unit.
2) Connect the other (male) plug of the cable to the
DMX IN
socket of the first slave device.
3) Connect additional slave units according to this pattern (Slave
DMX Out to Slave DMX In).
Next, you must set the devices to Master/Slave mode via their menus.
The operation in the menu is described from page 7.
Wiring in
DMX mode
Using a
DMX capable controller, you can control Autark ID07 over 1,
2, 6 or 9 channels in
DMX mode. For wired control, proceed as follows:
1) Connect a standard high quality XLR audio cable (not supplied)
to the DMX out socket of the controller.
NOTE: A suitable XLR audio cable connects the two signal leads
to
PIN 2 and 3, while ground is soldered to PIN 1. Please make
sure that the wiring doesn‘t change within the cables: a polarity
error or short circuit between the Pins will at least impair or completely stop the control functionality.
2) Connect the other (male) plug of the cable to the
DMX IN
socket of the first Autark unit.
3) Connect additional Autark units according to this pattern (Slave
DMX OUT to Slave DMX IN).
Next, you must enter an individual
DMX address for each Autark unit
via its menu. The operation in the menu is described from page 7.
Wireless control via DMX
Autark ID07 incorporates a DMX receiver that can receive and
implement control signals from a suitable
DMX transmitter. For remo-
te control via
DMX, proceed as follows:
1) Connect a XLR audio cable (not supplied) to the DMX out socket
of the controller.
2) Connect the other (male) plug of the cable to the DMX in socket
of an optional DMX transmitter (e. g. Nowsonic WRX-1).
3) Unfold the antenna of Autark ID07 to improve the reception
quality and activate the
WIRELESS SWITCH: The LED display
should now switch from Addr to A001.
4) Now you must enter an individual DMX address for the Autark
unit via the menu. The operation in the menu is described from
page 7.
5) Finally, press the button at the external DMX transmitter for
establishing and setting up the connection.
Page 12
12
Nowsonic Autark ID07
User manual
GB
www.nowsonic.com
Control via the supplied remote control
Autark
ID07 is supplied with an IR remote control for direct control of
various menu functions. You can operate the following functions via
the controls of the remote:
Button Function
POWER Here you can switch on the remote.
DMX Here you can activate the menu for entering the DMX address.
SLAVE Here you can activate the menu for toggling between Master and Slave mode.
AUTO 1, AUTO 2 Here you can activate the menu for selecting Auto mode 1 or 2.
SPEED Here you can activate the SPEED menu for entering the speed in Auto mode.
SOUND 1, SOUND 2 Here you can activate the menu SOUND 1 or 2.
UP, DOWN Using these two buttons, you can increase or decrease the current value in the active menu.
STROBE Here you can activate Strobe mode.
0, 1, 2, 3, 4, 6 Using these buttons, you can enter numeric values in Program mode.
5W, 7R, 8G, 9B Using these buttons, you can select the corresponding color (white, red, green, blue).
Page 13
13
Nowsonic Autark ID07
User manual
GB
www.nowsonic.com
Operation with battery
Autark
ID07 integrates a battery pack that is automatically charged
when connected to the mains. The battery pack allows for a batterybacked operation for up to 10 hours. To operate Autark
ID07 with
batteries, just pull the mains plug before powering the unit: after
powering up, the current charging status of the battery pack is shown
via the
LEDs of the battery indicator.
In case of a malfunction, you can access and exchange the internal
battery pack via service cover on the back panel. Please contact first
the dealer from whom you have purchased the device.
Operation via the menu
You can operate Autark
ID07 either via the menu display on the back
panel or via the supplied remote control.
For menu operation proceed as follows:
Select the desired menu item by repeatedly pressing the MENU
button. Alternatively, press the MENU button once and select the
desired menu item via the
and
buttons.
Open the selected menu by pressing the ENTER button: the
current setting flashes in the display and can now be modified.
Finally, the display returns to the previously selected menu item.
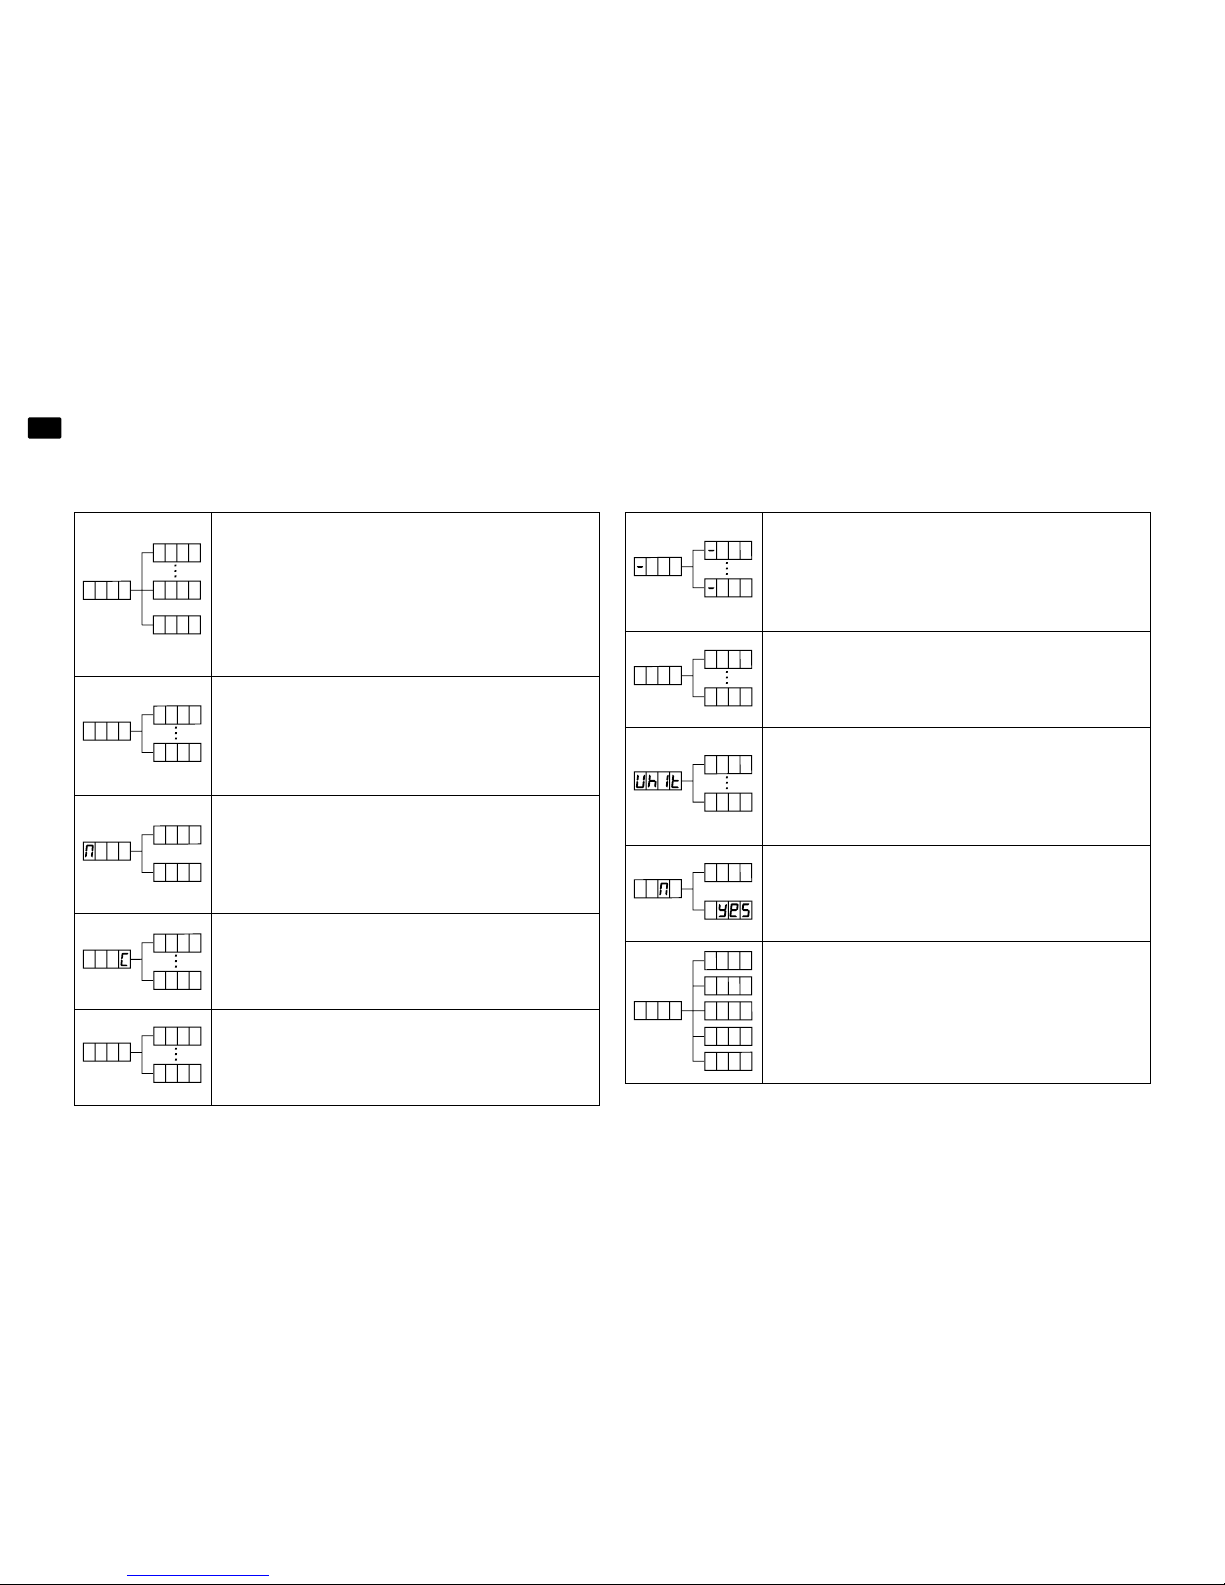
In order to adapt the settings, proceed as follows:
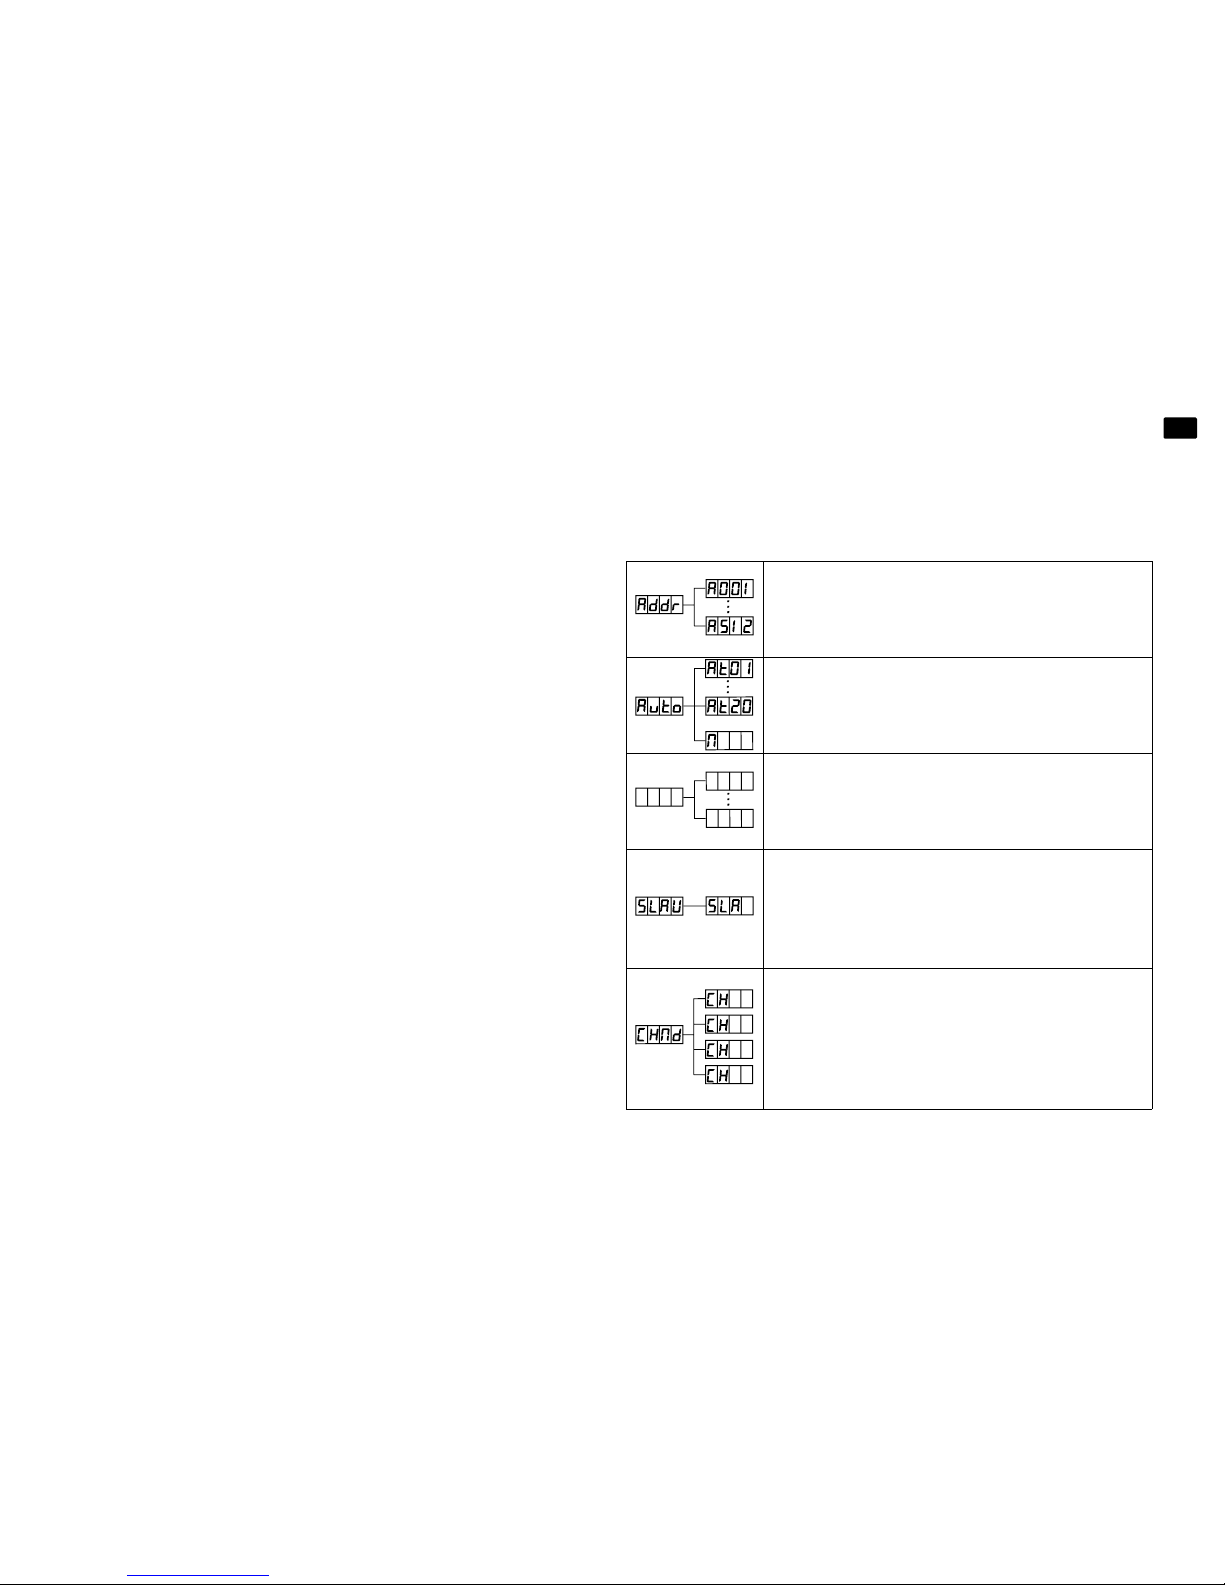
Entering the DMX address
Using the and buttons, select the desired DMX
address (A001 to A512).
Confirm your entry by pressing the ENTER button.
Choosing the Auto mode
Using the and buttons, select the internal program
(At01 to At20) or the m1 A5t status (Master).
Confirm your entry by pressing the ENTER button.
Entering the speed for Auto mode
Using the and buttons, enter the desired speed
(SP00 = off, SP01 = maximum, SP31 = minimum).
Confirm your entry by pressing the ENTER button.
Choosing Slave mode
Using the and buttons, select the SLA entry to
operate the Autark
ID07 in Slave mode with another
Master device.
Confirm your entry by pressing the ENTER button.
Choosing the
DMX channel mode
Using the and , select the desired DMX channel
mode. The (K1, (K2, (K6 and (K9 options are available.
For more information about the
DMX channels read from
page 9.
Confirm your entry by pressing the ENTER button.
SP E D
SP00
SP31
1
2
6
9
AST
Page 14
14
Nowsonic Autark ID07
User manual
GB
www.nowsonic.com
Setting the music sensitivity
Using the and buttons, select the desired sensitivity
for music control in Auto mode (low = 1, high = 100).
Otherwise you can deactivate the music control feature
(off): The sensitivity is also displayed via the
SIGNAL LED
next to the battery indicator.
Confirm your entry by pressing the ENTER button.
LED mode for music control
Using the and buttons, select the desired LED mode
for the Auto mode (Sov1 = steady light, Sov2 = strobe,
Sov3 = fade in, Sov4 = fade out).
Confirm your entry by pressing the ENTER button.
Choosing Master mode
Using the and buttons, select the on entry to
operate the Autark
ID07 in Master mode with (one) other
slave devices.
Confirm your entry by pressing the ENTER button.
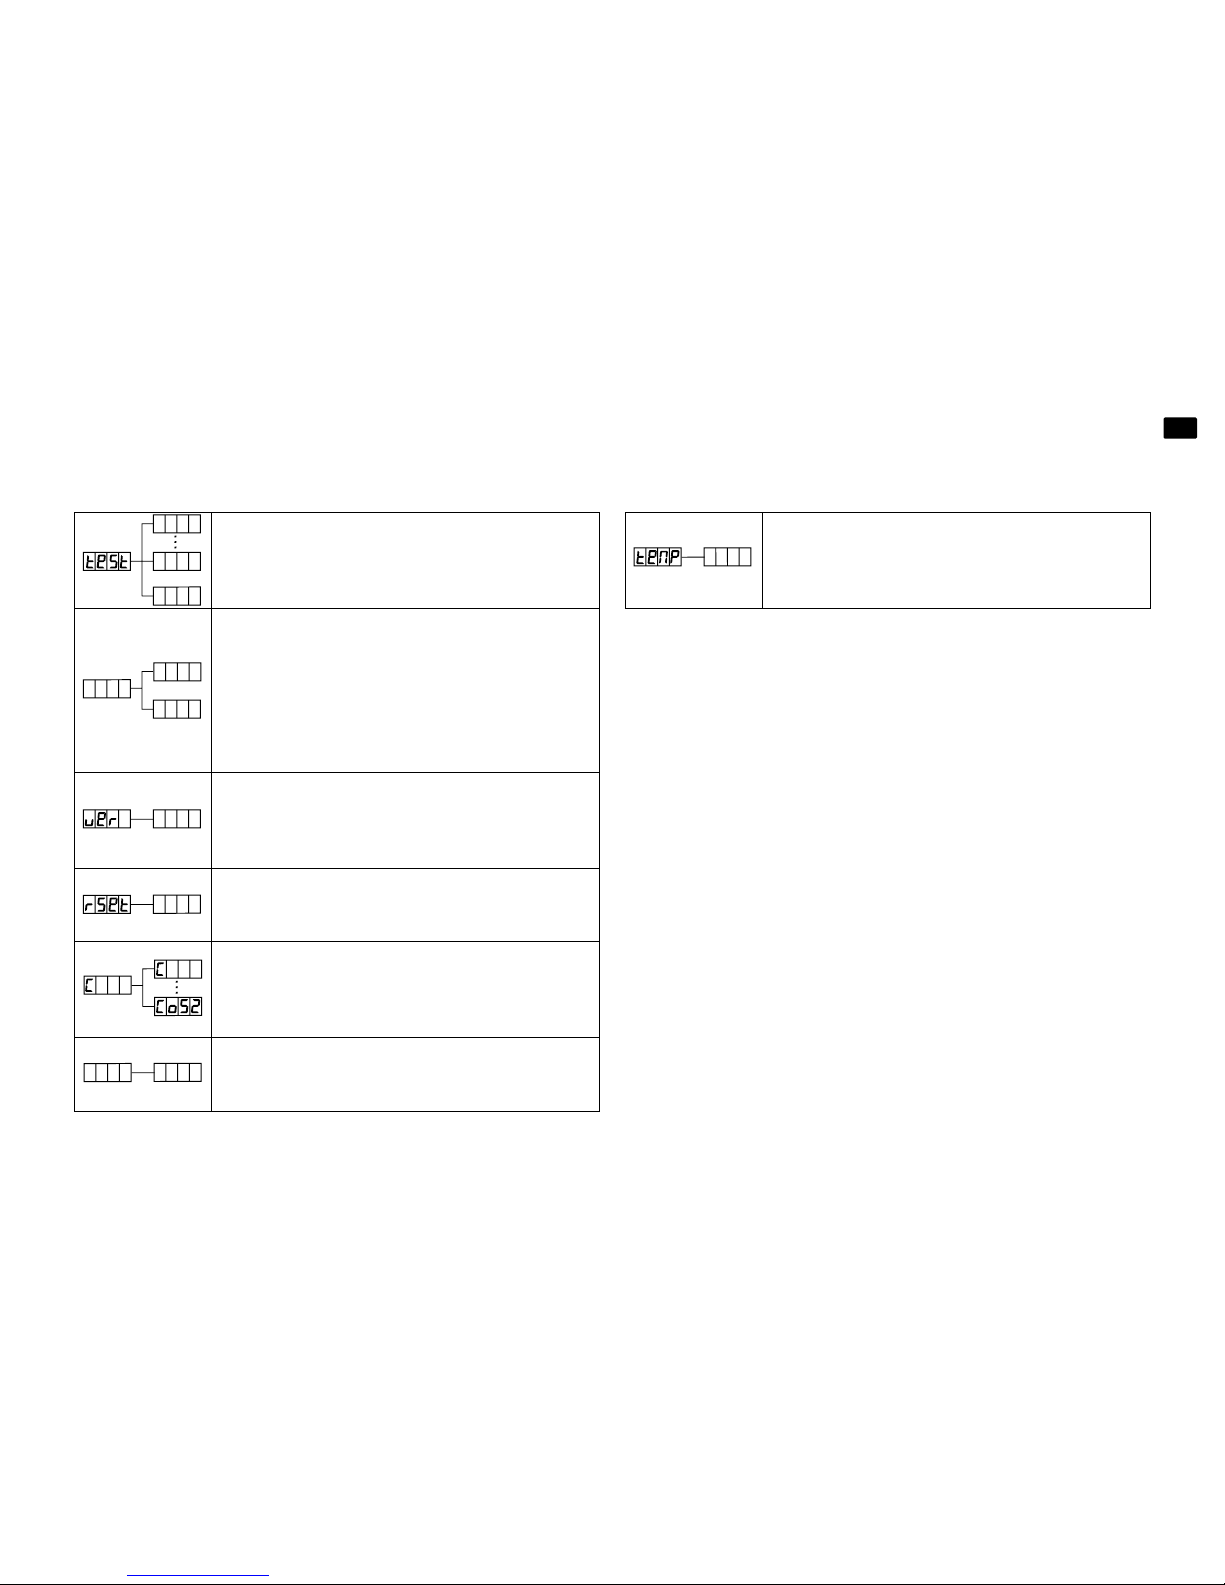
Setting the
LED brightness
Using the and buttons, set the desired overall
brightness for all 7
LEDs (off = 0, maximum = 255).
Confirm your entry by pressing the ENTER button.
Setting the light intensity for the color mode Red
Using the and buttons, set the desired light intensity
for the red color component (off = 0, maximum = 255).
Confirm your entry by pressing the ENTER button.
Setting the light intensity for the color mode Green
Using the and buttons, set the desired light intensity
for the green color component (off = 0, maximum =
255).
Confirm your entry by pressing the ENTER button.
Setting the light intensity for the color mode Blue
Using the and buttons, set the desired light intensity
for the blue color component (off = 0, maximum = 255).
Confirm your entry by pressing the ENTER button.
Setting the light intensity for the color mode White
Using the and buttons, set the desired light intensity
for the white color component (off = 0, maximum =
255).
Confirm your entry by pressing the ENTER button.
Turning the
LEDs on/o
Using the and buttons, select the desired status (off
= no, on = YP(S).
Confirm your entry by pressing the ENTER button.
Setting the duration for the
LED display
Using the and buttons, set the lighting duration
for the Autark display: when set to on, the display lights
continuously. With the other options (30, 60, 90, 120)
you can set the duration until the display goes off.
Confirm your entry by pressing the ENTER button.
1
100
OF F
SE N S
SO V 1
SO V D
SO V 4
AS T
ON
OF F
AL L
0
25 5
RE D
R0 0 0
R2 5 5
GREE
G0 0 0
G2 5 5
BLUE
B0 00
B2 5 5
U0 0 0
U2 5 5
BL D
ON
LE D
90
120
30
60
ON
Page 15
15
Nowsonic Autark ID07
User manual
GB
www.nowsonic.com
Displaying the internal temperature
When you choose this option, the display shows the
internal temperature of Autark
ID07.
Exit the display by pressing the ENTER button.
Performing various test routines
Using the and buttons, select the desired test (1 to
5) or quit test mode (off).
Confirm your entry by pressing the ENTER button.
Setting the reading direction of the display
Using the and , select the desired status: with the
diSP option, the menu entries are displayed normal,
while the dSiP option turns the display upside down
(180°). This helps to simplify the menu operation regardless of mounting orientation.
Confirm your entry by pressing the ENTER button.
Displaying the version number
When you choose this option, the current version number is immediately displayed.
Exit the display by pressing the ENTER button.
Restoring the default settings
When you choose this option, pressing the ENTER
button restores the default settings.
Choosing the internal color mode
Using the and buttons, you can select one of the 51
internal color schemes (1 to 52). Confirm your entry by
pressing the
ENTER button.
Resetting the Wireless
DMX signal
When you choose this option, pressing the ENTER
button resets the internal radio receiver.
1
5
OF F
DISP
DISP
DISP
U 1 7
0
OLO
O0 1
RE LE
0
21
Page 16

16
Nowsonic Autark ID07
User manual
GB
www.nowsonic.com
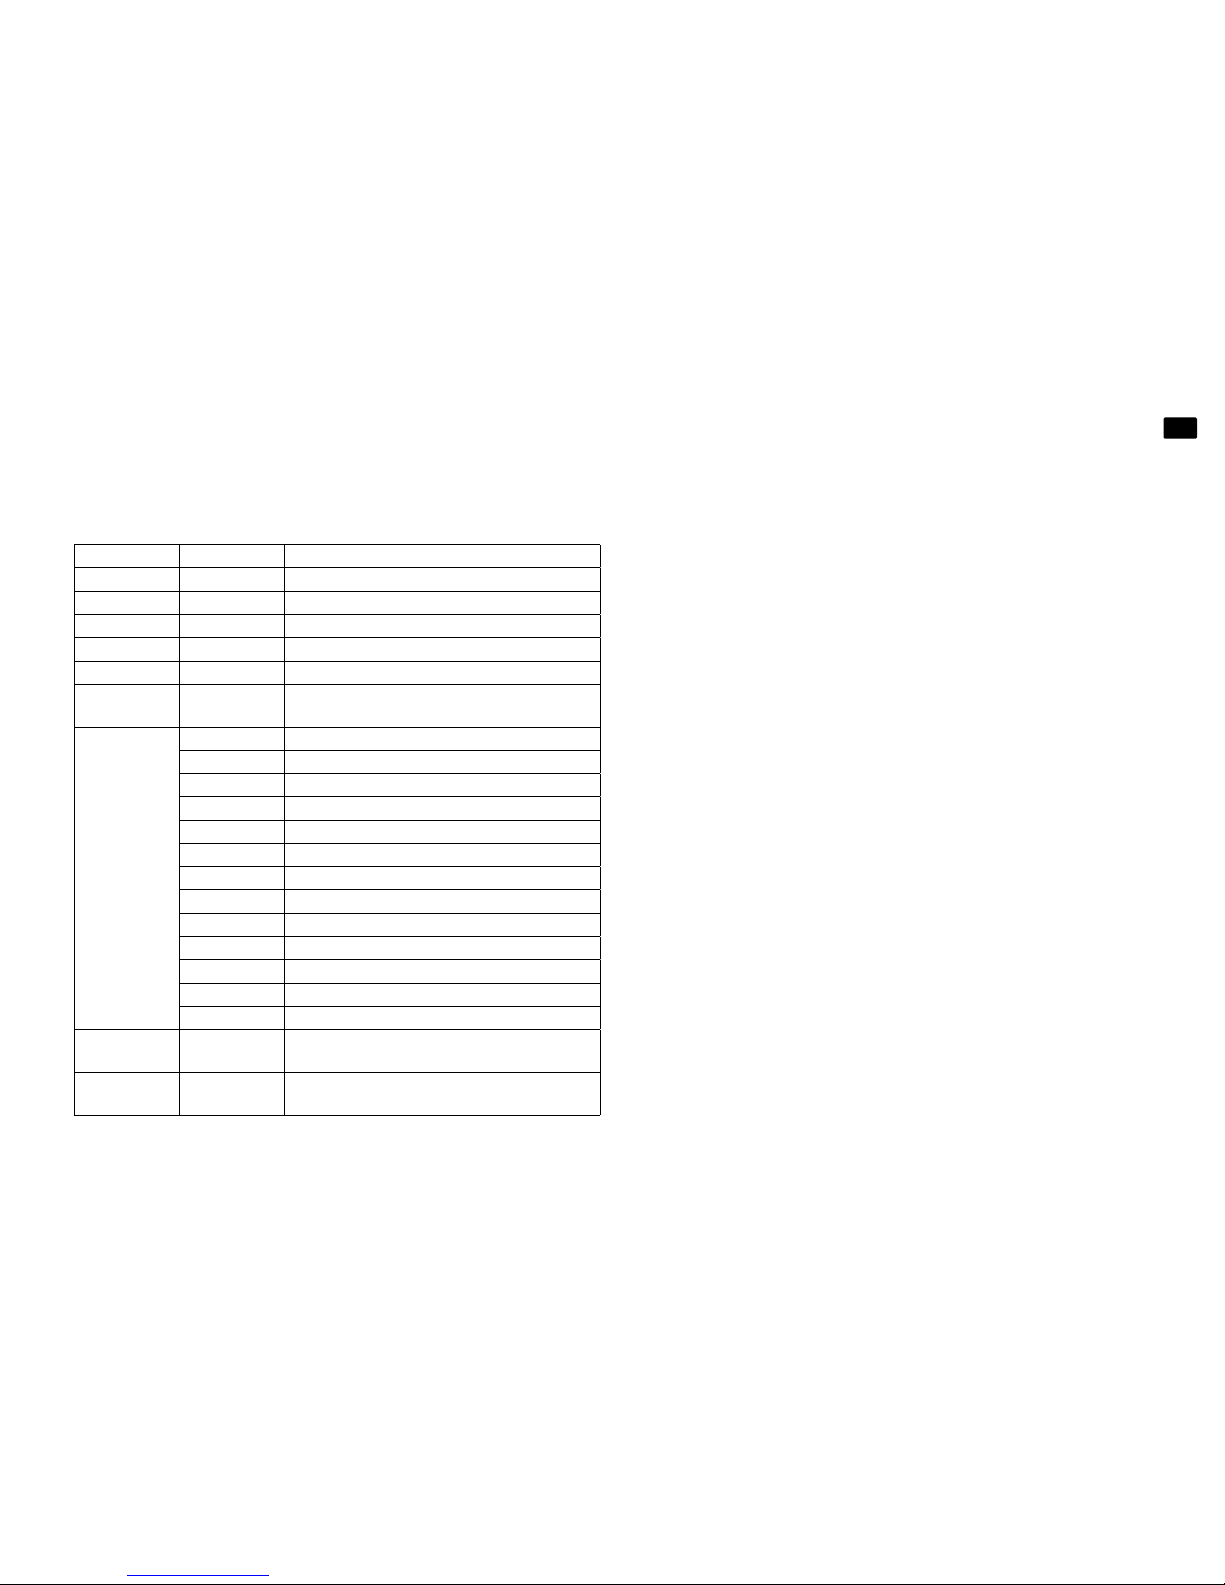
Control messages in the DMX modes
Using the
DMX protocol, you can control Autark ID07 either via 1, 2, 6
or 9 channels. The
DMX mode as well as the DMX address is set in the
menu (see previous section).
The following table lists the assignment between the DMX channels
and the functionality:
Channel Value Function
Channel 1 0–255 0 = off, 1–255 = various color macros
Channel Value Function
Channel 1 0–255 0 = off, 1–255 = Master dimmer
Channel 2 0–255 0 = off, 1–255 = various color macros
Channel Value Function
Channel 1 0–255 Master dimmer (0% to 100%)
Channel 2 0–255 Dimmer red (0% to 100%)
Channel 3 0–255 Dimmer green (0% to 100%)
Channel 4 0–255 Dimmer blue (0% to 100%)
Channel 5 0–255 Dimmer white (0% to 100%)
Channel 6
0–8
9–255
Full brightness, Strobe off Strobe on, speed
increases
Mode 1: 1 channel
Mode 2: 2 channels
Mode 3: 6 channels
Page 17
17
Nowsonic Autark ID07
User manual
GB
www.nowsonic.com
Channel Value Function
Channel 1 0–255 Master dimmer (0% to 100%)
Channel 2 0–255 Dimmer red (0% to 100%)
Channel 3 0–255 Dimmer green (0% to 100%)
Channel 4 0–255 Dimmer blue (0% to 100%)
Channel 5 0–255 Dimmer white (0% to 100%)
Channel 6 0–255
Full brightness, Strobe off Strobe on, speed
increases
Channel 7
0–10 Default
11–20 Automatic dimming (upwards)
21–30 Automatic dimming (downwards)
31–40 Automatic dimming (upwards/downwards)
41–50 4 color fade
51–60 4 color strobe
61–70 19 color strobe
71–80 15 color strobe
81–90 5 color fade
91–100 Red, green, and white fade
101–110 Red, blue, and white fade
111–120 Green, blue, and white fade
> 120 Color changes via music control
Channel 8 0–255
Speed for special functions or sound sensitivity;
auto program speed adjust
Channel 9
0–127
128–255
Static color changes
Strobe color changes (Sound mode)
Mode 4: 9 channels Specications
Light source 7 × 4 color LEDs (red, green, blue, white,
8W each)
Light intensity min. 2.200 lux @ 2 m
Operating voltage 100–240VAC ~, 50–60Hz
Rec. amperage 0.5A @ 110V
Fuse T3 15A
Power consumption 50W
Battery capacity 12V, 12.000mAh
Battery recharging time approx. 4 hours
Battery operating time approx. 10 hours (max. 2–3 colors)
Control DMX, wired or via IR
DMX connectors 3-pin XLR
DMX channels up to 9 channels
Electronic dimmer 0 to 100% without flickering
Tilting angle 360°, manually
Weight 3.8 kg (w/o packaging)
4.8 kg (incl. packaging)
Dimensions 240 × 240 × 235 mm (H × W × D, w/o
clamp)
Page 18

18
Nowsonic Autark ID07
User manual
GB
www.nowsonic.com
Scope of supply
Autark ID07: 1 pc
Power cord: 1 pc
Remote control: 1 pc
User manual: 1 pc
Disclaimer
Nowsonic has taken all possible steps to ensure that the information
given here is both correct and complete.
In no event can Nowsonic accept any liability or responsibility for any
loss or damage to the owner of the equipment, any third party, or any
equipment which may result from use of this manual or the equipment which it describes.
Servicing
If you have any question or encounter technical issues, please first
contact your local dealer from whom you have purchased the device.
In case servicing is required, please contact your local dealer. Otherwise you may contact us directly. Please find our contact data on our
website under www.nowsonic.com.
NOTE: We take great care in packing the device in a well protec-
ted box at the factory, so any shipping damage is very unlikely.
However, should this happen please contact your supplier immediately to report the damage. We recommend to keep the original
packing materials in case you need to ship or transport the device
at a later date.
Legal information
Copyright for this user manual © 2014: Nowsonic
Product features, specifications and availability are subject to change
without prior notice.
Edition v1.0, 05/2014
Part no. 310920
Page 19
Nowsonic Autark ID07
Bedienungsanleitung
www.nowsonic.com
Page 20
20
Nowsonic Autark ID07
Bedienungsanleitung
DE
www.nowsonic.com
WICHTIGE SICHERHEITSHINWEISE
1) Lesen Sie diese Anleitung.
2) Bewahren Sie diese Anleitung auf.
3) Beachten Sie alle Warnungen.
4) Befolgen Sie alle Anweisungen.
5) Betreiben Sie dieses Gerät nicht in unmittelbarer Nähe von
Wasser.
6) Verwenden Sie zum Reinigen des Geräts ausschließlich ein
trockenes Tuch.
7) Halten Sie die Lüftungsschlitze frei! Folgen Sie bei der Installation
den Anweisungen des Herstellers.
8) Stellen Sie das Gerät nicht in der Nähe von Heizkörpern, Wärme-
speichern, Öfen oder anderer Wärmequellen auf.
9) Kleben Sie in keinem Fall den Schutzkontakt des Steckers ab. Ein
verpolungssicherer Stecker besitzt zwei Kontakte, von denen ein
Kontakt breiter ist als der andere. Ein Schukostecker besitzt zwei
Kontakte und einen dritten Erdungskontakt. Der breitere Kontakt
des verpolungssicheren Steckers bzw. der Erdungs kontakt
des Schukosteckers dient Ihrer Sicherheit. Sollte der Stecker
des mitgelieferten Netzkabels nicht in Ihre Steckdose passen,
besorgen Sie sich im Fachhandel ein passendes Kabel.
10) Treten Sie nicht auf das Kabel, knicken Sie das Kabel nicht und
behandeln Sie Stecker und Buchsen besonders vorsichtig.
11) Verwenden Sie ausschließlich Zubehör, das vom Hersteller für
das Gerät vorgesehen ist.
12) Verwenden Sie nur Ständer, Stative oder Tische, die den Anforde-
rungen des Herstellers entsprechen oder die zum Lieferumfang
des Geräts gehören. Seien Sie beim Transport vorsichtig, um
Verletzungen durch verrutschende oder fallende Gegenstände
zu vermeiden.
13) Ziehen Sie während eines Gewitters den Netzstecker; ziehen
Sie den Netzstecker auch, wenn Sie das Gerät längere Zeit nicht
verwenden.
14) Wenden Sie sich im Service-Fall an qualifiziertes Personal. Lassen
Sie das Gerät von einem Fachmann überprüfen, wenn z.B.
Netzkabel oder -stecker beschädigt sind, wenn Flüssigkeit oder
Gegenstände in das Gehäuse gelangt sind, das Gerät Regen oder
Feuchtigkeit ausgesetzt war, das Gerät fallen gelassen wurde,
nicht ordnungsgemäß funktioniert oder anderweitig beschädigt
wurde.
Page 21

21
Nowsonic Autark ID07
Bedienungsanleitung
DE
www.nowsonic.com
WARNUNG
Verringern Sie die Gefahr von Feuer und elektrischen Stromschlä-
gen, indem Sie das Gerät nicht Regen oder Feuchtigkeit aussetzen.
Stellen Sie keine Behälter mit Flüssigkeiten auf das Gerät, da diese
umkippen könnten und Wasser in das Gerät gelangen könnte.
Dieses Gerät muss geerdet sein.
Verwenden Sie ein geschirmtes Netzkabel mit drei Leitern wie das
mit dem Gerät ausgelieferte Netzkabel.
Beachten Sie, dass bei unterschiedlichen Betriebsspannungen
unterschiedliche Netzkabel und/oder Netzstecker benötigt
werden.
Beachten Sie zu jeder Zeit Ihre lokalen Sicherheits vorschriften.
Stellen Sie das Gerät in der Nähe einer Netzsteckdose auf. Die
Steckdose sollte immer leicht zugänglich sein.
Um das Gerät völlig stromlos zu machen, ziehen Sie den Netzste-
cker aus der Steckdose.
Befolgen Sie bei der Aufstellung immer alle Hinweise des
Herstellers.
Betreiben Sie das Gerät nicht unter beengten Platzverhältnissen.
Öffnen Sie das Gerät nicht – Gefahr eines Stromschlags.
VORSICHT!
Beachten Sie, dass alle Änderungen oder Modifikationen am Gerät,
die nicht ausdrücklich in diesem Handbuch eingeräumt werden, Ihre
Berechtigung zum Betrieb dieses Gerät aufheben können
Wartung
Es befinden sich keine vom Anwender zu wartenden Teile im
Gerät.
Lassen Sie das Gerät nur von qualifiziertem Fachpersonal reparie-
ren.
VORSICHT: ZUM SCHUTZ VOR STROMSCHLÄGEN DARF DAS
GEHÄUSE NICHT GEÖFFNET WERDEN. ES BEFINDEN SICH KEINE
VOM ANWENDER TAIUSCHBAREN BAUTEILE IM GERÄT. WENDEN
SIE SICH IM SERVICEFALL AN QUALIFIZIERTES FACHPERSONAL.
Das Blitzsymbol innerhalb eines gleichseitigen Dreiecks soll
den Anwender auf nicht isolierte Leitungen und Kontakte im
Geräteinneren hinweisen, an denen hohe Spannungen anliegen,
die im Fall einer Berührung zu lebensgefährlichen Stromschlägen
führen können.
Das Ausrufezeichen innerhalb eines gleichseitigen Dreiecks soll den
Anwender auf wichtige Bedienungs- sowie Servicehinweise in den
dazugehörigen Handbüchern aufmerksam machen.
Page 22

22
Nowsonic Autark ID07
Bedienungsanleitung
DE
www.nowsonic.com
Einleitung
Vielen Dank, dass Sie sich für den Nowsonic Autark
ID07 entschieden
haben. Nowsonic Autark
ID07 ist ein leistungsfähiger Bühnenfluter
in moderner
LED-Technologie, der kabelgebunden oder zuguns-
ten einer einfachen Montage auch ferngesteuert sowie über einen
internen Akku betrieben werden kann. Trotz der kompakten Abmessungen liefern die sieben leistungsstarken
RGBW-LEDs eine hohe
Lichtleistung in vier Farben, 20 interne Programme sorgen für exzellente Farbmischungen. Alternativ zu den internen Programmen kann
die Steuerung auch extern über das
DMX 512 Protokoll, im Master/
Slave-Betrieb oder kabellos über eine IR-Fernbedienung eingerichtet
werden. Die Steuerung am Gerät selbst erfolgt über ein
LED-Display
sowie spezifische Tasten für die Menüführung.
Dank des integrierten 12 V Akkus und des IR-Empfängers lässt sich
Autark
ID07 komplett kabellos betreiben, sofern eine Verlegung der
Kabel schwierig ist oder die Einrichtung besonders schnell gehen
muss. Über die Fernbedienung bzw. einen optional erhältlichen Funk-
DMX Transmitter lässt sich der Autark ID07 auch kabellos über das
DMX 512 Protokoll steuern.
Für Aufstellung auf dem Boden bzw. die Montage an geeigneten
Traversen oder Bügeln verfügt Autark ID07 über einen stabilen
Doppelbügel.
Merkmale
Leistungsstarker 4-Farb-Bühnen-Fluter in moderner LED-Technik
Steuerung über das DMX 512 Protokoll (vier Modi: 1, 2, 6 und 9
Kanäle), im Master/Slave-Modus oder über IR-Fernbedienung
Automatischer Stand-Alone-Modus mit 20 internen Programmen
Integrierter Empfänger für kabellose Fernbedienung, IR-Fernbedienung im Lieferumfang enthalten
Integriertes Akku-Modul für einen batteriegestützten Betrieb für
bis zu 10 Stunden
Integrierter Empfänger für funkgestützte DMX-Steuerung
Elektronisches Dimmen im Bereich von 0 bis 100% ohne Flackern
Doppelbügel zur Aufstellung auf dem Boden oder zur Montage an
geeigneten Traversen
Anwendungsbereiche
LED-Fluter für den Bühnenbetrieb und kleinere Clubs
Mobiler Einsatz für DJ-Sets
Page 23
23
Nowsonic Autark ID07
Bedienungsanleitung
DE
www.nowsonic.com
Anschlüsse und Bedienelemente auf der Rückseite
Auf der Rückseite von Autark
ID07 stehen folgende Anschlüsse und
Bedienelemente zur Verfügung:
1. Netzanschlussbuchsen/Sicherung
Hier schließen Sie das im Lieferumfang enthaltene Katgerätenetzkabel
an. Über den
IEC-Ausgang können Sie den Stromanschluss auf nach-
folgende Geräte durchschleifen. Zudem können Sie hier die interne
Sicherung ersetzen, sofern diese aufgrund einer Überlastung durch-
gebrannt sein sollte: Verwenden Sie in jedem Fall eine Ersatzsicherung
mit identischen Werten.
2. Menü und Bedientasten
Über die Tasten unter dem
LED-Display nehmen Sie die lokale Steue-
rung von Autark
ID07 vor. Über die Taste MENU und die Tasten und
navigieren Sie in der obersten Ebene im Menü, mit der Taste ENTER
und den Tasten und navigieren Sie innerhalb der Untermenüs. Um
einen Menüpunkt zu öffnen oder eine Eingabe zu bestätigen, drücken
Sie die Taste
ENTER. Um ein Untermenü zu verlassen, drücken Sie die
Taste
ENTER oder MENU erneut.
3.
WIRELESS SWITCH
Mit diesem Schalter aktivieren Sie den internen Empfänger von Autark
ID07. In der Stellung I kann Autark ID07 wahlweise über die mitgelie-
ferte Fernbedienung oder über einen
DMX-Funksender angesteuert
werden: Die Adresse für den internen
DMX-Empfänger stellen Sie im
Menü ein.
8888
1
2
345
6
7
8
9
Page 24

24
Nowsonic Autark ID07
Bedienungsanleitung
DE
www.nowsonic.com
4. BATTERY SWITCH
Mit diesem Schalter aktivieren Sie den Betrieb von Autark ID07 über
den internen Akku. Der interne Akku wird automatisch geladen, wenn
Sie Autark
ID07 an das Stromnetz anschließen. Die Ladekapazität des
Akkus wird auf der Batterieanzeige (6) dargestellt.
5. Funk-Antenne
Die Antenne ist mit dem internen
DMX-Empfänger von Autark ID07
verbunden. Klappen Sie die Antenne aus, um die Empfangsqualität für
den ferngesteuerten Betrieb zu verbessern.
6. Batterieladeanzeige
Auf diesen
LEDs wird der aktuelle Ladezustand des internen Akkus dar-
gestellt: Bei voller Ladung (alle
LEDs leuchten) können Sie Autark ID07
bis zu 10 Stunden ohne Anschluss an das Stromnetz betreiben.
7. Signal-LED
Diese LED leuchtet abhängig von der im Menü S!Ln5 eingestellten
Empfindlichkeit auf (siehe ab Seite 7), wenn die automatische Musiksteuerung aktiv ist. Je heller die
LED aufleuchtet, desto höher ist die
Empfindlichkeit.
8. Buchsen DMX IN / OUT
Über diese Buchsen können Sie Autark ID07 über ein externes DMX-
Signal ansteuern bzw. das anliegende
DMX-Signal auf nachfolgende
Autark-Einheiten durchschleifen.
Im Master/Slave-Betrieb wird das Steuersignal von der Master-Einheit
über die Buchse
DMX OUT ausgegeben, die Slave-Einheit empfängt
das Steuersignal über die Buchse
DMX IN.
ANMERKUNG: Beachten Sie, dass die letzte Einheit in einer
seriellen Verkabelung über
DMX oder im Master/Slave-Modus mit
einem Abschlusswiderstand terminiert werden sollte. Andernfalls
können Fehler in der Steuerung auftreten.
9. Erdungspunkt
Über diese Schraube können Sie externe Geräte mit der Gehäusemasse von Autark
ID07 verbinden.
Inbetriebnahme
Sie können Autark ID07 wahlweise im Stand-Alone-, im Master/Slave-
Modus oder kabelgestützt bzw. ferngesteuert über
DMX betreiben.
Im Stand-Alone-Modus ist automatisch die Musikerkennung aktiv, um
die internen Programme abhängig vom erkannten Musiksignal umzuschalten.
Verkabelung für den Master/Slave-Modus
Im Master/Slave-Modus lassen sich bis zu 16 Autark-Einheiten verkoppeln, wobei das erste Gerät als Master und alle nachfolgenden Einheiten als Slaves dienen. Die Slaves erhalten ihre Steuerbefehle dann vom
Master.
Gehen Sie dazu wie folgt vor:
Page 25

25
Nowsonic Autark ID07
Bedienungsanleitung
DE
www.nowsonic.com
1) Schließen Sie ein XLR-Kabel (nicht im Lieferumfang) an der Buch-
se
DMX OUT auf der Rückseite des Master-Geräts an.
2) Schließen Sie das andere (männliche) Ende des Kabel an der
Buchse
DMX IN des ersten Slave-Geräts an.
3) Schließen Sie nach diesem Muster weitere Slave-Geräte an (Slave
DMX OUT auf Slave DMX IN).
Anschließend müssen Sie den Master/Slave-Status im Menü für das
jeweilige Gerät eingeben. Die Bedienung im Menü ist ab Seite 7
beschrieben.
Verkabelung für den DMX-Modus
Sofern Sie über einen
DMX-fähigen Controller verfügen, können Sie
Autark
ID07 im 1-, 2-, 6- oder 9-Kanal-Modus DMX ansteuern. Für die
kabelgebundene Steuerung gehen Sie wie folgt vor:
1) Schließen Sie ein herkömmliches, hochwertiges XLR-Audiokabel
(nicht im Lieferumfang enthalten) an der DMX-Ausgangsbuchse
des Controllers an.
ANMERKUNG: Bei geeigneten XLR-Audiokabeln sind die beiden
Signalleitungen mit den
PINs 2 und 3 verbunden, während die
Masse an
PIN 1 anliegt. Stellen Sie sicher, dass sich die PIN-Bele-
gung innerhalb der Kabel nicht ändert: Bei einer Verpolung oder
auch einem Kurzschluss zwischen den
PINs wird die Funktion der
Steuerung beeinträchtigt oder fällt vollständig aus.
2) Schließen Sie das andere (männliche) Ende des Kabel an der
Buchse
DMX IN der ersten Autark-Einheit an.
3) Schließen Sie nach diesem Muster weitere Autark-Geräte an
(DMX OUT auf DMX IN).
Anschließend müssen Sie jeder Autark-Einheit im Menü eine eige-
ne DMX-Adresse zuweisen. Die Bedienung im Menü ist ab Seite 7
beschrieben.
Drahtlose Steuerung über DMX
Autark ID07 integriert einen DMX-Empfänger, der Steuersignale von
einem geeigneten
DMX-Sender empfangen und umsetzen kann. Für
eine Fernsteuerung über
DMX gehen Sie wie folgt vor:
1) Schließen Sie ein XLR-Kabel (nicht im Lieferumfang) an der DMX-
Ausgangsbuchse des Controllers an.
2) Schließen Sie das andere (männliche) Ende des Kabel an der
DMX-Eingangsbuchse eines optional erhältlichen DMX-Senders
(z. B. Nowsonic WRX-1) an.
3) Klappen Sie die Antenne von Autark ID07 aus, um den Empfang
zu verbessern, und aktivieren Sie den
WIRELESS SWITCH: Die
Anzeige im LED-Display sollte nun von Addr auf A001 umschal-
ten.
4) Nun müssen Sie der Autark-Einheit im Menü eine eigene
DMX-Adresse zuweisen. Die Bedienung im Menü ist ab Seite 7
beschrieben
5) Bedienen Sie abschließend die entsprechende Taste zum Verbin-
dungsaufbau am externen DMX-Transmitter, um die Kommunikation einzurichten.
Page 26

26
Nowsonic Autark ID07
Bedienungsanleitung
DE
www.nowsonic.com
Steuerung über die mitgelieferte Fernbedienung
Autark
ID07 wird mit einer IR-Fernbedienung zur direkten Steuerung
verschiedener Menüfunktionen ausgeliefert. Über die Bedienelemente
der Fernbedienung können Sie folgende Funktionen steuern:
Taste Funktion
POWER Hier schalten Sie die Fernbedienung ein.
DMX Hier aktivieren Sie das Menü zur Eingabe der DMX-Adresse.
SLAVE Hier aktivieren Sie das Menü zur Umschaltung zwischen dem Master- und Slave-Modus.
AUTO 1, AUTO 2 Hier aktivieren Sie das Menü zur Auswahl der Automatik-Modi 1 bzw. 2.
SPEED Hier aktivieren Sie das Menü SPEED zur Eingabe der Geschwindigkeit.
SOUND 1, SOUND 2 Hier aktivieren Sie das Menü SOUND 1 bzw. 2.
UP, DOWN Mit diesen beiden Tasten heben Sie den aktuellen Wert im gewählten Menü an oder senken ihn ab.
STROBE Hier aktivieren Sie den Strobe-Modus.
0, 1, 2, 3, 4, 6 Über diese Tasten geben Sie numerische Werte im Programm-Modus ein.
5W, 7R, 8G, 9B Über diese Tasten wählen Sie die jeweiligen Farbe (Weiß, Rot, Grün, Blau) an.
Page 27

27
Nowsonic Autark ID07
Bedienungsanleitung
DE
www.nowsonic.com
Betrieb über Batterie
Autark
ID07 integriert ein Akku-Pack, das im Betrieb am Stromnetz
automatisch aufgeladen wird und ein batteriegestützten Betrieb für bis
zu 10 Stunden ermöglicht. Um Autark
ID07 über Batterie zu betreiben,
müssen Sie lediglich den Netzstecker entfernen, bevor Sie das Gerät
einschalten: Nach dem Einschalten wird der aktuelle Ladestand des
Akku-Packs auf den
LEDs der Batterieladeanzeige dargestellt.
Über die Service-Klappe auf der Rückseite haben Sie Zugriff auf das
interne Akku-Pack und können es im Falle einer Fehlfunktion auch austauschen: Wenden Sie sich in diesem Fall zuerst an den Händler, bei
dem Sie das Gerät gekauft haben.
Bedienung im Menü
Die Bedienung von Autark
ID07 erfolgt wahlweise menügestützt über
das Display auf der Rückseite oder über die mitgelieferte Fernbedienung.
Für die menügestützte Bedienung gehen Sie wie folgt vor:
Drücken Sie die Taste MENU mehrfach, um den gewünschten
Menüeintrag auszuwählen. Alternativ drücken Sie die Taste
MENU
einfach und wählen den gewünschten Menüeintrag über die
Tasten
und
aus.
Drücken Sie die Taste ENTER, um das gewählte Menü zu öffnen:
Die aktuelle Einstellung blinkt nun im Display und kann geändert
werden.
Nach der Eingabe blendet das Display wieder den zuvor gewählten Menüeintrag ein.
Gehen Sie wie folgt vor, um die Einstellungen anzupassen:
Eingabe der DMX-Adresse
Wählen Sie über die Tasten und die gewünschte
DMX-Adresse (A001 bis A512) aus.
Bestätigen Sie die Auswahl mit der Taste ENTER.
Auswahl des Automatik-Modus
Wählen Sie über die Tasten und das interne Programm
(At01 bis At20) oder den Status m1 A5t (Master) aus.
Bestätigen Sie die Auswahl mit der Taste ENTER.
Auswahl der Geschwindigkeit für den Automatik-Modus
Wählen Sie über die Tasten und die gewünschte
Geschwindigkeit (SP00 = aus, SP01 = maximal, SP31 =
minimal) aus.
Bestätigen Sie die Auswahl mit der Taste ENTER.
Auswahl des Betriebsmodus Slave
Wählen Sie über die Tasten und den Eintrag SLA,
um den Autark
ID07 im Slave-Modus mit einem anderen
Master-Gerät zu betreiben.
Bestätigen Sie die Auswahl mit der Taste ENTER.
Auswahl des
DMX-Kanalmodus
Wählen Sie über die Tasten und den gewünschten
DMX-Kanal-Modus: Zur Auswahl stehen die Optionen
(K1, (K2, (K6 und (K9. Weitere Informationen zu den
DMX-Kanälen erhalten Sie ab Seite 9.
Bestätigen Sie die Auswahl mit der Taste ENTER.
SP E D
SP00
SP31
1
2
6
9
AST
Page 28

28
Nowsonic Autark ID07
Bedienungsanleitung
DE
www.nowsonic.com
Eingabe der Empndlichkeit für die Musiksteuerung
Wählen Sie über die Tasten und die gewünschte
Empfindlichkeit für die Musiksteuerung im Automatikmodus aus (gering = 1, hoch = 100) oder deaktivieren
Sie die Musiksteuerung (off): Die Empfindlichkeit wird
auch über die
SIGNAL-LED neben den Batterielade-
anzeigen angezeigt.
Bestätigen Sie die Auswahl mit der Taste ENTER.
LED-Modus für die Musiksteuerung
Wählen Sie über die Tasten und den gewünschten
Modus für die
LEDs im Automatikmodus aus (Sov1 =
Standlicht, Sov2 = Flash, Sov3 = Fade In, Sov4 = Fade
Out).
Bestätigen Sie die Auswahl mit der Taste ENTER.
Auswahl des Betriebsmodus Master
Wählen Sie über die Tasten und den Eintrag on, um
den Autark
ID07 im Master-Modus mit (einem) anderen
Slave-Geräten zu betreiben.
Bestätigen Sie die Auswahl mit der Taste ENTER.
Eingabe der Helligkeit für die
LEDs
Wählen Sie über die Tasten und die gewünschte
Helligkeit für alle 7
LEDs gemeinsam aus (aus = 0, maxi-
mal = 255).
Bestätigen Sie die Auswahl mit der Taste ENTER.
1
100
OF F
SE N S
SO V 1
SO V D
SO V 4
AS T
ON
OF F
AL L
0
25 5
Eingabe der Lichtstärke für den Farbmodus Rot
Wählen Sie über die Tasten und die gewünschte
Lichtstärke für Farbanteil Rot aus (aus = 0, maximal =
255).
Bestätigen Sie die Auswahl mit der Taste ENTER.
Eingabe der Empndlichkeit für den Farbmodus Grün
Wählen Sie über die Tasten und die gewünschte
Lichtstärke für Farbanteil Grün aus (aus = 0, maximal =
255).
Bestätigen Sie die Auswahl mit der Taste ENTER.
Eingabe der Empndlichkeit für den Farbmodus Blau
Wählen Sie über die Tasten und die gewünschte
Lichtstärke für Farbanteil Blau aus (aus = 0, maximal =
255).
Bestätigen Sie die Auswahl mit der Taste ENTER.
Eingabe der Empndlichkeit für den Farbmodus Weiß
Wählen Sie über die Tasten und die gewünschte
Lichtstärke für Farbanteil Weiß aus (aus = 0, maximal =
255).
Bestätigen Sie die Auswahl mit der Taste ENTER.
Ein- und Ausschalten der
LEDs
Wählen Sie über die Tasten und den gewünschten
Status (aus = no, an = YP(S).
Bestätigen Sie die Auswahl mit der Taste ENTER.
RE D
R0 0 0
R2 5 5
GREE
G0 0 0
G2 5 5
BLUE
B0 00
B2 5 5
U0 0 0
U2 5 5
BL D
ON
Page 29

29
Nowsonic Autark ID07
Bedienungsanleitung
DE
www.nowsonic.com
Zurücksetzen der Einheit auf die Werkseinstellungen
Nach der Auswahl setzen Sie alle Einträge im Menü mit
der Taste
ENTER auf die Werkseinstellungen zurück.
Auswahl des internen Farbmodus
Wählen Sie über die Tasten und eines der 51
internen Farbschemen (1 bis 52) aus. Bestätigen Sie die
Auswahl mit der Taste
ENTER.
Zurücksetzen des Wireless-
DMX-Signals
Nach der Auswahl setzen Sie den internen Funk-Empfänger mit der Taste
ENTER zurück.
Einblenden der internen Temperatur
Nach der Auswahl zeigt Autark ID07 die aktuelle Temperatur im Gehäuse an.
Schließen Sie die Darstellung mit der Taste ENTER.
Eingabe der Anzeigedauer für das LED-Display
Wählen Sie über die Tasten und die Beleuchtungsdauer für das
LED-Display von Autark: In der Stellung
on leuchtet das Display dauerhaft, über die weiteren
Optionen (30, 60, 90, 120) wählen Sie die gewünschte
Dauer, bis das Display erlischt.
Bestätigen Sie die Auswahl mit der Taste ENTER.
Durchführen verschiedener Testroutinen
Wählen Sie über die Tasten und den gewünschten
Test (1 bis 5) oder deaktivieren Sie den Testmodus (off).
Bestätigen Sie die Auswahl mit der Taste ENTER.
Eingabe der Darstellungsrichtung im Display
Wählen Sie über die Tasten und den gewünschten
Status: Mit der Option diSP werden die Einträge im
Menü regulär dargestellt, mit der Option dSiP werden
sie um 180° gespiegelt (und stehen auf dem Kopf), um
die Bedienung im Menü unabhängig von der Montageausrichtung zu vereinfachen.
Bestätigen Sie die Auswahl mit der Taste ENTER.
Einblenden der Versionsnummer
Nach der Auswahl wird die aktuelle Versionsnummer
eingeblendet.
Schließen Sie die Darstellung mit der Taste ENTER.
LE D
90
120
30
60
ON
1
5
OF F
DISP
DISP
DISP
U 1 7
0
OLO
O0 1
RE LE
0
21
Page 30

30
Nowsonic Autark ID07
Bedienungsanleitung
DE
www.nowsonic.com
Steuerbefehle in den DMX-Modi
Über das
DMX-Protokoll können Sie Autark ID07 wahlweise über 1, 2,
6 oder 9 Kanäle steuern. Den
DMX-Modus wählen Sie ebenso wie die
DMX-Adresse im Menü aus (siehe vorheriger Abschnitt).
Die Zuordnung zwischen
DMX-Kanälen und Funktionen ist in den
folgenden Tabellen aufgelistet:
Kanal Wert Funktion
Kanal 1 0–255 0 = Aus, 1–255 = unterschiedliche Farbmuster
Kanal Wert Funktion
Kanal 1 0–255 0 = Aus, 1–255 = Master- Intensität
Kanal 2 0–255 0 = Aus, 1–255 = unterschiedliche Farbmuster
Kanal Wert Funktion
Kanal 1 0–255 Master-Intensität (0% bis 100%)
Kanal 2 0–255 Intensität Rot (0% bis 100%)
Kanal 3 0–255 Intensität Grün (0% bis 100%)
Kanal 4 0–255 Intensität Blau (0% bis 100%)
Kanal 5 0–255 Intensität Weiß (0% bis 100%)
Kanal 6
0–8
9–255
Volle Helligkeit, kein Strobe-Effekt Strobe-Effekt,
Geschwindigkeit zunehmend
Modus 1: 1 Kanal
Modus 2: 2 Kanäle
Modus 3: 6 Kanäle
Page 31

31
Nowsonic Autark ID07
Bedienungsanleitung
DE
www.nowsonic.com
Kanal Wert Funktion
Kanal 1 0–255 Master-Intensität (0% bis 100%)
Kanal 2 0–255 Intensität Rot (0% bis 100%)
Kanal 3 0–255 Intensität Grün (0% bis 100%)
Kanal 4 0–255 Intensität Blau (0% bis 100%)
Kanal 5 0–255 Intensität Weiß (0% bis 100%)
Kanal 6 0–255
Volle Helligkeit, kein Strobe-Effekt Strobe-Effekt,
Geschwindigkeit zunehmend
Kanal 7
0–10 Voreinstellung
11–20 Automatisches Dimmen (ansteigend)
21–30 Automatisches Dimmen (absteigend)
31–40 Automatisches Dimmen (ansteigend/absteigend)
41–50 Vier Farben Fade
51–60 Vier Farben Flash
61–70 Neunzehn Farben Flash
71–80 Fünfzehn Farben Flash
81–90 Fünf Farben Fade
91–100 Rot, Grün und Weiß Fade
101–110 Rot, Blau und Weiß Fade
111–120 Grün, Blau und Weiß Fade
> 120 Farbwechsel über Musiksteuerung
Kanal 8 0–255
Geschwindigkeit für Sonderfunktionen oder
Empfindlichkeit Audio; Geschwindigkeitssteuerung für Automatik-Programme
Kanal 9
0–127
128–255
Statische Farbwechsel
Strobe-Farbwechsel (Sound-Modus)
Modus 4: 9 Kanäle Spezikationen
Leuchtmittel 7 × Vierfarb-LEDs (rot, grün, blau, weiß,
jeweils 8 W)
Helligkeit min. 2.200 Lux @ 2 m
Betriebsspannung 100–240 V AC ~, 50–60 Hz
Empf. Stromstärke 0,5 A @ 110 V
Sicherung T3 15 A
Leistungsaufnahme 50 W
Batteriekapazität 12 V, 12.000 mAh
Batterieladezeit ca. 4 Stunden
Batterielaufzeit ca. 10 Stunden (bei 2 bis 3 Farben)
Steuerung DMX, kabelgebunden oder via IR
DMX-Anschlüsse XLR, 3 polig
DMX-Kanäle bis zu 9 Kanäle
Elektronischer Dimmer 0–100% ohne Flackern
Neigewinkel 360°, manuell
Gewicht 3,8 kg (ohne Verpackung)
4,8 kg (mit Verpackung)
Abmessungen 240 × 240 × 235 mm (B × H × T, ohne
Bügel)
Page 32

32
Nowsonic Autark ID07
Bedienungsanleitung
DE
www.nowsonic.com
Lieferumfang
Autark ID07: 1×
Netzkabel: 1×
Fernbedienung: 1×
Bedienungsanleitung: 1×
Haftungsausschluss
Nowsonic hat höchstmögliche Sorgfalt darauf verwendet, alle in
diesem Handbuch enthaltenen Informationen so korrekt und vollständig wie möglich wiederzugeben.
Nowsonic übernimmt keinerlei Haftung oder Verantwortung für
Verluste oder Schäden, die dem Eigentümer des Geräts, Dritten oder
an anderen Geräten durch die Informationen in diesem Handbuch
oder das darin beschriebene Gerät entstehen.
Service
Wenn Sie Probleme oder technische Fragen haben, wenden Sie sich
bitte zuerst an Ihren lokalen Händler, bei dem Sie das Gerät gekauft
haben.
Bei einem Service-Fall wenden Sie sich bitte ebenfalls an Ihren lokalen
Händler. Andernfalls können Sie uns auch direkt kontaktieren. Sie finden
unsere Kontaktdaten auf unserer Webseite unter www. nowsonic.com.
ANMERKUNG: Das Gerät wurde ab Werk so verpackt, dass ein
ausreichend hoher Schutz gegen Transportschäden besteht.
Sofern es dennoch zu einem Transportschaden gekommen sein
sollte, wenden Sie sich bitte unmittelbar an den Lieferanten, der
das Gerät an Sie ausgeliefert hat, und zeigen Sie den Schaden an.
Wir möchten Ihnen empfehlen, das originale Verpackungsma terial
für den Fall aufzubewahren, das Sie das Gerät zu einem späteren
Zeitpunkt verschicken müssen.
Rechtliche Hinweise
Copyright für diese Bedienungsanleitung © 2014: Nowsonic
Produktmerkmale, Spezifikationen und die Verfügbarkeit können ohne
vorherige Ankündigung geändert werden.
Ausgabe v 1.0, 05/2014
Artikelnr. 310920
Page 33

Nowsonic Autark ID07
Mode d‘emploi
www.nowsonic.com
Page 34

34
Nowsonic Autark ID07
Mode d‘emploi
FR
www.nowsonic.com
DIRECTIVES DE SÉCURITÉ IMPORTANTES
1) Lisez ces indications.
2) Conservez ces indications.
3) Respectez tous les avertissements.
4) Suivez toutes les instructions.
5) N‘utilisez pas cet appareil avec de l‘eau à proximité.
6) Nettoyez-le uniquement avec un chiffon sec.
7) N‘obstruez aucune ouverture de ventilation ! Installez-le confor-
mément aux instructions du fabricant.
8) N‘installez pas l‘appareil près de radiateurs, bouches de chauf-
fage, poêles ou autres sources de chaleur.
9) Ne neutralisez jamais la broche de terre. Une fiche polarisée
possède deux broches, l‘une plus large que l‘autre. Une fiche de
terre a deux broches identiques et une troisième broche pour
la mise à la terre. La broche plus large de la fiche polarisée ou la
troisième broche de la fiche de terre servent à votre sécurité. Si la
fiche du câble d‘alimentation fourni n‘entre pas dans votre prise,
procurez-vous un câble approprié chez un revendeur spécialisé.
10) Évitez de marcher sur le cordon d‘alimentation et de le plier, et
soyez particulièrement délicat avec les fiches et les prises.
11) N‘utilisez que des accessoires conçus pour l‘appareil par le
fabricant.
12) Utilisez-le uniquement avec un support, trépied ou table répon-
dant aux spécifications du fabricant ou fourni avec l‘appareil.
Soyez prudent lors du transport pour éviter toute blessure due
au glissement à ou la chute d‘objets.
13) Débranchez le cordon d‘alimentation en cas d‘orage ou de non
utilisation prolongée.
14) Confiez toute réparation à des techniciens de maintenance
qualifiés. Faites-le vérifier par un technicien, par exemple si le
cordon ou la fiche d‘alimentation est endommagé, si du liquide
a été renversé sur l‘appareil ou si des objets sont tombés dedans,
si l‘appareil a été exposé à la pluie ou à l‘humidité, s‘il ne fonctionne pas normalement, ou s‘il est endommagé.
Page 35

35
Nowsonic Autark ID07
Mode d‘emploi
FR
www.nowsonic.com
AVERTISSEMENT:
Réduisez le risque d‘incendie ou d‘électrocution en n‘exposant pas
le produit à la pluie ni à l‘humidité.
Ne placez pas d‘objet rempli de liquide sur l‘appareil, car il pourrait
se renverser et le liquide pénétrer dans l‘appareil.
Cet appareil doit être mis à la terre.
Utilisez un câble d‘alimentation blindé à trois conducteurs comme
celui fourni avec l‘appareil.
Notez qu‘en fonction de la tension d‘alimentation nécessaire, les
cordons et/ou fiches d‘alimentation nécessaires sont différents.
Respectez toujours les réglementations de sécurité locales.
Placez l‘appareil à proximité d‘une prise de courant. La prise doit
toujours être facilement accessible.
Pour totalement isoler l‘appareil du secteur, débranchez le cordon
d‘alimentation de la prise.
Suivez toujours toutes les instructions du fabricant pour l‘installation.
Ne faites pas fonctionner l‘appareil dans un espace confiné.
N‘ouvrez pas l‘appareil – Risque d‘électrocution.
ATTENTION!
Notez que tous les changements ou modifications apportés à l‘appareil
qui ne sont pas expressément indiqués dans le présent mode d‘emploi
peuvent annuler votre droit à utiliser cet appareil.
Entretien
Aucune pièce de l‘appareil n‘est réparable par l‘utilisateur.
Confiez toute réparation à un technicien qualifié.
ATTENTION : POUR ÉVITER TOUT CHOC ÉLECTRIQUE, NE PAS
OUVRIR LE BOÎTIER. AUCUN COMPOSANT DE L‘APPAREIL N‘EST
REMPLAÇABLE PAR L‘UTILISATEUR. CONFIEZ TOUTE RÉPARATION
À DES TECHNICIENS DE MAINTENANCE QUALIFIÉS.
Le symbole d‘éclair à tête de flèche dans un triangle équilatéral sert
à prévenir l‘utilisateur de la présence dans l‘enceinte du produit
d‘une tension dangereuse non isolée d‘une grandeur suffisante
pour constituer un risque d‘électrocution pour les personnes.
Le point d‘exclamation dans un triangle équilatéral sert à prévenir
l‘utilisateur de la présence d‘instructions importantes de fonctionnement et de maintenance (entretien) dans les documents accompagnant l‘appareil.
Page 36

36
Nowsonic Autark ID07
Mode d‘emploi
FR
www.nowsonic.com
Introduction
Merci beaucoup d‘avoir choisi l‘Autark
ID07 de Nowsonic. L‘Autark
ID07 de Nowsonic est un puissant projecteur de scène à technolo-
gie
LED moderne, qui peut être câblé ou, pour une installation simple,
être télécommandé en plus d‘être alimenté par une batterie interne.
Malgré des dimensions compactes, les sept puissantes
LED RGBW
offrent un rendement lumineux élevé en quatre couleurs, et 20 programmes intégrés apportent d‘excellents mélanges de couleurs. En
complément des programmes internes, le contrôle peut également se
faire à distance par protocole
DMX 512, en mode maître/esclave, ou
sans fil au moyen d‘une télécommande IR. Le contrôle sur l‘appareil luimême se fait via un écran à
LED ainsi que par des touches spécifiques
pour la navigation dans les options de menu.
Grâce à la batterie 12 V intégrée et au récepteur IR, l‘Autark
ID07 peut
fonctionner totalement sans fil, s‘il est difficile de faire courir des câbles
ou si l‘installation doit se faire rapidement. Avec la télécommande ou
un émetteur
DMX sans fil optionnel, l‘Autark ID07 peut également
être contrôlé sans fil par protocole
DMX 512.
Pour l‘installation sur le sol ou le montage sur des ponts ou structures
appropriés, l‘Autark
ID07 dispose d‘un double étrier solide.
Caractéristiques
Puissant projecteur 4 couleurs à technologie LED moderne
Contrôle par protocole DMX 512 (quatre modes : 1, 2, 6 et 9
canaux), en mode maître/esclave ou par la télécommande IR
Mode autonome automatique avec 20 programmes internes
Comprend un récepteur intégré pour la télécommande sans fil,
télécommande IR fournie
Batterie intégrée pour une autonomie atteignant 10 heures
Récepteur intégré pour la radiocommande DMX
Gradation électronique de 0 à 100 % sans saccades
Double étrier pour l‘installation sur le sol ou le montage sur une
structure appropriée
Applications
Projecteur LED pour la scène et les petits clubs
Emploi mobile pour installation de DJ
Page 37

37
Nowsonic Autark ID07
Mode d‘emploi
FR
www.nowsonic.com
Connexions et commandes en face arrière
En face arrière de l‘Autark
ID07 sont disponibles les connexions et
commandes suivantes :
1. Prises électriques/fusible
Branchez ici le câble d‘alimentation fourni. Grâce à la sortie
IEC, vous
pouvez renvoyer l‘alimentation aux appareils suivants. En outre, vous
pouvez remplacer ici le fusible interne, si celui-ci a grillé à cause d‘une
surcharge : utilisez toujours un fusible de rechange de même valeur.
2. Touches de menu et de commande
Les touches sous l‘écran à
LED contrôlent localement l‘Autark ID07.
Avec la touche
MENU et les touches et
, vous naviguez au niveau
supérieur du menu et avec la touche
ENTER et les touches et
,
vous naviguez dans les sous-menus. Pour ouvrir une option de menu
ou confirmer un choix, appuyez sur la touche
ENTER. Pour quitter un
sous-menu, appuyez de nouveau sur la touche
ENTER ou MENU.
3.
WIRELESS SWITCH
Utilisez ce commutateur pour activer le récepteur sans fil interne de
l‘Autark
ID07. En position I, l‘Autark ID07 peut être contrôlé soit par la
télécommande fournie soit via un émetteur
DMX sans fil : l‘adresse du
récepteur
DMX interne se règle dans le menu.
4.
BATTERY SWITCH
Utilisez ce commutateur pour activer l‘alimentation de l‘Autark ID07
par sa batterie interne. La batterie interne se recharge automatique-
ment lorsque vous raccordez l‘Autark
ID07 au secteur. La charge de la
batterie est affichée par l‘indicateur de charge de batterie (6).
8888
1
2
345
6
7
8
9
Page 38

38
Nowsonic Autark ID07
Mode d‘emploi
FR
www.nowsonic.com
5. Antenne radio
L‘antenne est reliée au récepteur
DMX interne de l‘Autark ID07. Dépliez
l‘antenne pour améliorer la qualité de réception en cas d‘utilisation à
distance.
6. Indicateur de charge de batterie
Ces
LED indiquent la charge actuelle de la batterie interne : lorsqu‘elle
est complètement chargée (toutes les
LED allumées), vous pouvez
faire fonctionner l‘Autark
ID07 jusqu‘à 10 heures sans raccordement
au secteur.
7. LED Signal
Cette
LED s‘allume en fonction du réglage de la sensibilité dans le menu
S!Ln5 (voir page 7), quand le contrôle automatique par la musique est
activé. Plus lumineuse est la
LED, plus haute est la sensibilité.
8. Prises
DMX IN/OUT
Ces prises vous permettent de contrôler l‘Autark ID07 au moyen d‘un
signal
DMX externe et de renvoyer le signal DMX qu‘il reçoit aux unités
Autark suivantes.
En fonctionnement de type maître/esclave, le signal de commande de
l‘unité maître est envoyé par la prise
DMX OUT, et l‘unité esclave reçoit
le signal de commande par la prise
DMX IN.
REMARQUE: notez qu‘une résistance de terminaison doit être
posée sur la dernière des unités reliées en série par
DMX ou en
mode maître/esclave. Sinon, des erreurs de commande peuvent
se produire.
9. Borne de mise à la terre
Vous pouvez raccorder des appareils externes à la masse du boîtier de
l‘Autark
ID07 au moyen de cette vis.
Mise en service
Vous pouvez faire fonctionner l‘Autark ID07 en mode autonome, en
mode maître/esclave ou par
DMX, avec ou sans fil. En mode auto-
nome, la détection de la musique est automatiquement activée pour
changer de programme interne en fonction du signal musical détecté.
Câblage pour le mode maître/esclave
En mode maître/esclave, vous pouvez associer jusqu‘à 16 unités Autark,
la première étant le maître et toutes les suivantes les esclaves. Les
esclaves reçoivent alors leurs commandes du maître.
Procédez comme suit :
1) Branchez un câble XLR (non fourni) à la prise
DMX OUT à
l‘arrière de l‘appareil maître.
2) Branchez l‘autre extrémité (mâle) du câble à la prise
DMX IN de
la première unité esclave.
3) Répétez cette configuration entre les autres appareils esclaves
(
DMX OUT d‘un esclave vers DMX IN de l‘esclave suivant).
Page 39

39
Nowsonic Autark ID07
Mode d‘emploi
FR
www.nowsonic.com
Ensuite, vous devez choisir le statut maître/esclave de chaque appareil
dans son menu. Le fonctionnement du menu est décrit en page 7.
Câblage pour le mode DMX
Si vous disposez d‘un contrôleur compatible DMX, vous pouvez
contrôler l‘Autark
ID07 en mode DMX à 1, 2, 6 ou 9 canaux. Pour la
télécommande filaire, procédez comme suit :
1) Branchez un câble audio XLR conventionnel mais de haute qua-
lité (non fourni) à la prise de sortie DMX du contrôleur.
REMARQUE : dans les câbles audio XLR appropriés, les deux
conducteurs de signal sont raccordés aux broches 2 et 3, tandis
que la masse est sur la broche 1. Assurez-vous que le brochage ne
bouge pas dans le câble : une inversion de polarité ou un courtcircuit entre les broches affecteraient ou empêcheraient même
le contrôle.
2) Branchez l‘autre extrémité (mâle) du câble à la prise
DMX IN de
la première unité Autark.
3) Répétez cette configuration entre les autres unités Autark (
DMX
OUT
vers DMX IN).
Vous devez ensuite aller dans le menu de chaque unité Autark pour
attribuer à chacune une adresse DMX propre. Le fonctionnement du
menu est décrit en page 7.
Contrôle sans l par DMX
L‘Autark ID07 possède un récepteur DMX qui capte et interprète les
signaux de commande d‘un émetteur
DMX approprié. Pour le contrôle
à distance par
DMX, procédez comme suit :
1) Branchez un câble XLR (non fourni) à la prise de sortie DMX du
contrôleur.
2) Branchez l‘autre extrémité (mâle) du câble à la prise d‘entrée
DMX d‘un émetteur DMX disponible en option (par exemple le
WRX-1 de Nowsonic).
3) Dépliez l‘antenne de l‘Autark ID07 afin d‘améliorer la réception et
activez le commutateur
WIRELESS SWITCH: sur l‘écran à LED,
l‘affichage devrait alors passer de Addr à A001.
4) Maintenant, dans le menu, vous devez attribuer une adresse
DMX propre à l‘Autark. Le fonctionnement du menu est décrit en
page 7.
5) Employez enfin la touche appropriée pour établir la communica-
tion par connexion à l‘émetteur DMX externe.
Page 40

40
Nowsonic Autark ID07
Mode d‘emploi
FR
www.nowsonic.com
Contrôle par la télécommande fournie
L‘Autark
ID07 est livré avec une télécommande IR pour le contrôle
direct des différentes fonctions du menu. Avec les touches de la télécommande, vous pouvez contrôler les fonctions suivantes :
Touche Fonction
POWER Allume la télécommande.
DMX Active le menu de saisie de l‘adresse DMX.
SLAVE Active le menu pour changer de mode entre maître et esclave.
AUTO 1, AUTO 2 Active le menu de sélection des modes automatiques 1 et 2.
SPEED Active le menu SPEED où se règle la vitesse.
SOUND 1, SOUND 2 Active le menu de sélection des modes SOUND 1 et 2 pour le son.
UP, DOWN Avec ces deux touches, vous pouvez augmenter ou abaisser la valeur actuelle dans le menu sélectionné.
STROBE Active le mode stroboscope.
0, 1, 2, 3, 4, 6 Utilisez ces touches pour saisir des valeurs numériques en mode programme.
5W, 7R, 8G, 9B Utilisez ces touches pour sélectionner les couleurs correspondantes (W pour blanc, R pour rouge, G pour vert, B pour bleu).
Page 41

41
Nowsonic Autark ID07
Mode d‘emploi
FR
www.nowsonic.com
Fonctionnement sur batterie
L‘Autark
ID07 possède une batterie qui se recharge automatiquement
quand il est raccordé au secteur et qui procure une autonomie atteignant 10 heures. Pour faire fonctionner l‘Autark
ID07 sur batterie, il
vous suffit de retirer le cordon d‘alimentation avant de mettre l‘appareil en service : après la mise en service, la charge actuelle de la batterie
est affichée par les
LED de l‘indicateur de charge de batterie.
Par la trappe de service située à l‘arrière, vous avez accès à la batterie
interne et pouvez la remplacer en cas de dysfonctionnement : dans
ce cas, adressez-vous d‘abord au revendeur chez qui vous avez acheté
l‘appareil.
Opérations dans le menu
L‘Autark ID07 se paramètre soit au moyen des touches de menu de
sa face arrière, soit avec la télécommande optionnelle.
Pour intervenir dans le menu, procédez comme suit :
Appuyez autant de fois que nécessaire sur la touche MENU pour
sélectionner l‘option de menu désirée. Sinon, appuyez sur la
touche
MENU et sélectionnez l‘option de menu voulue avec les
touches
et
.
Appuyez sur la touche ENTER pour ouvrir l‘option de menu choisie : le réglage actuel clignote à l‘écran et peut alors être changé.
Après le changement, l‘écran affiche de nouveau l‘option de menu
précédemment choisie.
Procédez comme suit pour régler les paramètres :
Saisie de l‘adresse DMX
Avec les touches et , sélectionnez l‘adresse DMX
souhaitée (de A001 à A512).
Confirmez la sélection en appuyant sur la touche ENTER.
Sélection du mode automatique
Avec les touches et , sélectionnez le programme
interne (de At01 à At20) ou le statut m1 A5t (Master ou
« maître »).
Confirmez la sélection en appuyant sur la touche ENTER.
Sélection de la vitesse pour le mode automatique
Avec les touches et , sélectionnez la vitesse souhaitée (SP00 = désactivée, SP01 = maximale, SP31 =
minimale).
Confirmez la sélection en appuyant sur la touche ENTER.
Sélection du mode de fonctionnement esclave
Avec les touches et , sélectionnez SLA (Slave ou
« esclave ») pour faire fonctionner l‘Autark
ID07 en mode
esclave avec un autre appareil maître.
Confirmez la sélection en appuyant sur la touche ENTER.
SP E D
SP00
SP31
AST
Page 42

42
Nowsonic Autark ID07
Mode d‘emploi
FR
www.nowsonic.com
Sélection du mode de fonctionnement maître
Avec les touches et , sélectionnez on pour faire
fonctionner l‘Autark
ID07 en mode maître avec un ou
plusieurs appareils esclaves.
Confirmez la sélection en appuyant sur la touche ENTER.
Réglage de luminosité des
LED
Avec les touches et , sélectionnez la luminosité
désirée pour l‘ensemble des 7
LED (nulle = 0, maximale
= 255).
Confirmez la sélection en appuyant sur la touche ENTER.
Réglage de l‘intensité lumineuse du mode de couleur
rouge
Avec les touches et , sélectionnez l‘intensité lumineuse souhaitée pour la composante de couleur rouge (nulle
= 0, maximale = 255).
Confirmez la sélection en appuyant sur la touche ENTER.
Réglage de l‘intensité lumineuse du mode de couleur
vert
Avec les touches et , sélectionnez l‘intensité lumineuse souhaitée pour la composante de couleur verte (nulle
= 0, maximale = 255).
Confirmez la sélection en appuyant sur la touche ENTER.
Réglage de l‘intensité lumineuse du mode de couleur
bleu
Avec les touches et , sélectionnez l‘intensité lumineuse souhaitée pour la composante de couleur bleue (nulle
= 0, maximale = 255).
Confirmez la sélection en appuyant sur la touche ENTER.
Sélection du mode de canaux DMX
Avec les touches et , sélectionnez le mode de canaux
DMX souhaité : vous pouvez sélectionner les options
(K1, (K2, (K6 et (K9 pour respectivement travailler
avec 1, 2, 6 ou 9 canaux. Pour plus d‘informations sur les
canaux
DMX, voir la page 9.
Confirmez la sélection en appuyant sur la touche ENTER.
Réglage de sensibilité pour le contrôle par la musique
Avec les touches et , réglez la sensibilité souhaitée
pour le contrôle par la musique en mode automatique
(faible = 1, élevée = 100) ou désactivez le contrôle par
la musique (off) : la sensibilité est également indiquée
par la
LED SIGNAL à côté de l‘indicateur de charge de
batterie.
Confirmez la sélection en appuyant sur la touche ENTER.
Mode des
LED pour le contrôle de la musique
Avec les touches et , sélectionnez le mode souhaité
pour les
LED en mode automatique (Sov1 = Allumées,
Sov2 = Clignotantes, Sov3 = Allumage progressif, Sov4
= Extinction progressive).
Confirmez la sélection en appuyant sur la touche ENTER.
1
100
OF F
SE N S
SO V 1
SO V D
SO V 4
AS T
ON
OF F
AL L
0
25 5
RE D
R0 0 0
R2 5 5
GREE
G0 0 0
G2 5 5
BLUE
B0 00
B2 5 5
1
2
6
9
Page 43

43
Nowsonic Autark ID07
Mode d‘emploi
FR
www.nowsonic.com
Achage du numéro de version
Après sélection de cette option, le numéro de la version
actuelle est affiché.
Quittez cet affichage avec la touche ENTER.
Restauration des réglages d‘usine de l‘unité
Après sélection de cette option, appuyez sur la touche
ENTER pour ramener toutes les options du menu à leur
réglage d‘usine.
Sélection du mode de couleur interne
Avec les touches et , sélectionnez une des 51
combinaisons de couleurs internes (1 à 52). Confirmez la
sélection en appuyant sur la touche
ENTER.
Réinitialisation du signal
DMX sans l
Après sélection de cette option, appuyez sur la touche
ENTER pour réinitialiser le récepteur radio interne.
Achage de la température interne
Après sélection de cette option, la température actuelle à
l‘intérieur du boîtier de l‘Autark
ID07 est affichée.
Quittez cet affichage avec la touche ENTER.
Réglage de l‘intensité lumineuse du mode de couleur
blanc
Avec les touches et , sélectionnez l‘intensité lumineuse souhaitée pour la composante de couleur blanche
(nulle = 0, maximale = 255).
Confirmez la sélection en appuyant sur la touche ENTER.
Allumage et extinction des
LED
Avec les touches et , sélectionnez l‘état souhaité
(désactivé = no, activé = YP(S).
Confirmez la sélection en appuyant sur la touche ENTER.
Réglage du temps d‘achage pour l‘écran à
LED
Avec les touches et , sélectionnez la durée
d‘allumage de l‘écran à
LED de l‘Autark : avec le réglage
on, l‘écran est en permanence allumé, les autres options
(30, 60, 90, 120) vous permettant de sélectionner le
temps au bout duquel l‘écran s‘éteint.
Confirmez la sélection en appuyant sur la touche ENTER.
Exécution de diverses routines de test
Avec les touches et , sélectionnez le test souhaité (1
à 5) ou désactivez le mode test (off).
Confirmez la sélection en appuyant sur la touche ENTER.
Réglage de l‘orientation de l‘achage
Avec les touches et , sélectionnez le statut souhaité :
avec l‘option diSP, l‘affichage est normal tandis qu‘avec
l‘option dSiP il est renversé à 180° (tête en bas) afin
de faciliter l‘emploi du menu quel que soit le sens de
montage.
Confirmez la sélection en appuyant sur la touche ENTER.
U0 0 0
U2 5 5
BL D
ON
LE D
90
120
30
60
ON
1
5
OF F
DISP
DISP
DISP
U 1 7
0
OLO
O0 1
RE LE
0
21
Page 44

44
Nowsonic Autark ID07
Mode d‘emploi
FR
www.nowsonic.com
Commandes de contrôle dans les modes DMX
Selon le protocole
DMX, vous pouvez contrôler sélectivement 1, 2, 6
ou 9 canaux de l‘Autark
ID07. Sélectionnez le mode DMX ainsi que
l‘adresse
DMX à partir du menu (voir la section précédente).
L‘allocation des fonctions aux canaux
DMX est répertoriée dans les ta-
bleaux suivants :
Canal Valeur Fonction
Canal 1 0–255 0 = éteint, 1–255 = différents motifs de couleur
Canal Valeur Fonction
Canal 1 0–255 0 = éteint, 1–255 = intensité générale
Canal 2 0–255 0 = éteint, 1–255 = différents motifs de couleur
Canal Valeur Fonction
Canal 1 0–255 Intensité générale (0 % à 100 %)
Canal 2 0–255 Intensité du rouge (0 % à 100 %)
Canal 3 0–255 Intensité du vert (0 % à 100 %)
Canal 4 0–255 Intensité du bleu (0 % à 100 %)
Canal 5 0–255 Intensité du blanc (0 % à 100 %)
Canal 6
0–8
9–255
Luminosité totale, pas d‘effet stroboscopique
Effet stroboscopique, vitesse croissante
Mode 1: 1 canal
Mode 2: 2 canaux
Mode 3: 6 canaux
Page 45

45
Nowsonic Autark ID07
Mode d‘emploi
FR
www.nowsonic.com
Canal Valeur Fonction
Canal 1 0–255 Intensité générale (0 % à 100 %)
Canal 2 0–255 Intensité du rouge (0 % à 100 %)
Canal 3 0–255 Intensité du vert (0 % à 100 %)
Canal 4 0–255 Intensité du bleu (0 % à 100 %)
Canal 5 0–255 Intensité du blanc (0 % à 100 %)
Canal 6 0–255
Luminosité totale, pas d‘effet stroboscopique
Effet stroboscopique, vitesse croissante
Canal 7
0–10 Par défaut
11–20 Gradation automatique (augmentation)
21–30 Gradation automatique (diminution)
31–40
Gradation automatique (augmentation/diminu-
tion)
41–50 Fondu quatre couleurs
51–60 Flash quatre couleurs
61–70 Flash dix-neuf couleurs
71–80 Flash quinze couleurs
81–90 Fondu cinq couleurs
91–100 Fondu rouge, vert et blanc
101–110 Fondu rouge, bleu et blanc
111–120 Fondu vert, bleu et blanc
> 120 Changement de couleur contrôlé par la musique
Canal 8 0–255
Vitesse pour des fonctions spéciales ou la
sensibilité à l‘audio ; contrôle de la vitesse pour les
programmes automatiques
Canal 9
0–127
128–255
Changement de couleur statique
Stroboscope – changement de couleur (mode
son)
Mode 4: 9 canaux Caractéristiques techniques
Éléments lumineux 7 LED quatre couleurs (rouge, vert, bleu,
blanc, chacune de 8 W)
Luminosité min. 2 200 lux à 2 m
Tension d‘alimentation CA ~ 100–240 V, 50–60 Hz
Ampérage recommandé 0,5 A en 110 V
Fusible T3 15 A
Puissance consommée 50 W
Capacité de la batterie 12 V, 12 000 mAh
Temps de charge environ 4 heures
Autonomie sur batterie environ 10 heures (2 à 3 couleurs)
Contrôle DMX, filaire ou par IR
Connexion DMX XLR, 3 points
Canaux DMX jusqu‘à 9 canaux
Gradateur électronique 0–100 % sans saccades
Angle d‘inclinaison 360°, manuel
Temps de charge 4 heures
Poids 3,8 kg (sans emballage)
4,8 kg (avec emballage)
Dimensions 240 × 240 × 235 mm (H × L × P, sans le
support)
Page 46

46
Nowsonic Autark ID07
Mode d‘emploi
FR
www.nowsonic.com
Contenu
Autark ID07 : 1
Câble d‘alimentation : 1
Télécommande : 1
Mode d‘emploi : 1
Clause de non responsabilité
Nowsonic a veillé avec le plus grand soin à ce que toutes les informations contenues dans ce mode d‘emploi soient aussi précises et complètes que possible.
Nowsonic n‘assume aucune responsabilité en cas de perte ou dommage, subi par le propriétaire de l‘appareil, par d‘autres appareils ou
par des tiers, découlant des informations contenues dans ce mode
d‘emploi ou du matériel décrit ici.
Maintenance
Si vous avez des questions ou des problèmes techniques, veuillez
d‘abord contacter le revendeur chez qui vous avez acheté l‘appareil.
Pour toute réparation, veuillez également contacter votre revendeur. Si
cela n‘est pas possible, vous pouvez aussi nous contacter directement.
Nos coordonnées se trouvent sur notre site Web www.nowsonic.com.
REMARQUE: l‘appareil a été emballé à l‘usine de façon à assurer
un niveau de protection suffisamment élevé contre les dommages
dus à l‘expédition. S‘il a néanmoins été endommagé pendant le
transport, veuillez contacter directement le vendeur qui vous a
livré l‘appareil et lui indiquer les dommages. Nous vous recommandons de conserver les emballages d‘origine au cas où vous
auriez besoin un jour d‘expédier l‘appareil.
Mentions légales
Ce mode d‘emploi est sous copyright © 2014 : Nowsonic
Les fonctionnalités, caractéristiques techniques et disponibilité du
produit peuvent être modifiées sans préavis.
Édition v. 1.0, 05/2014
Art. 310920
Page 47

Nowsonic Autark ID07
Instrucciones de uso
www.nowsonic.com
Page 48
48
Nowsonic Autark ID07
Instrucciones de uso
ES
www.nowsonic.com
INSTRUCCIONES DE SEGURIDAD IMPORTANTES
1) Lea estas instrucciones.
2) Conserve estas instrucciones.
3) Preste atención a todas las advertencias.
4) Siga todo lo indicado en estas instrucciones.
5) No utilice este aparato cerca del agua.
6) Límpielo solo con un trapo suave y seco.
7) ¡No bloquee ninguna de las aberturas de ventilación! Instale este
aparato de acuerdo con las instrucciones del fabricante.
8) No instale esta unidad cerca de fuentes de calor como radiado-
res, calentadores, hornos u otros aparatos (incluyendo amplificadores) que produzcan calor.
9) No anule el sistema de seguridad que supone un enchufe po-
larizado o uno con toma de tierra. Un enchufe polarizado tiene
dos bornes de distinta anchura. Uno con toma de tierra tiene dos
bornes idénticos y una lámina lateral que es la conexión a tierra.
Esta tercera lámina o el borne ancho se incluyen para su seguridad. Si el enchufe suministrado no encaja en su toma corriente,
consulte a un electricista para sustituir la toma obsoleta.
10) Evite que el cable de corriente pueda quedar aplastado, retor-
cido o ser pisado, especialmente en los enchufes, receptáculos y
en el punto en el que sale del aparato.
11) Use sólo acoplamientos/accesorios especificados por el fabrican-
te.
12) Utilice esta unidad solo con un bastidor, soporte, trípode, mesa
o base especificado por el fabricante o que se venda junto con
el propio aparato. Preste usted mucha atención durante el transporte para evitar sufrir lesiones debido a objetos que pudieran
caer o deslizarse.
13) Desenchufe este aparato durante las tormentas eléctricas o
cuando no lo use por un largo periodo de tiempo.
14) Encargue cualquier intervención en el aparato a personal técnico
cualificado. Es necesario reparar el aparato cuando haya sufrido
algún tipo de daño, como cuando se haya dañado el enchufe
o cable de alimentación, se haya derramado líquido o se hayan
introducido objetos en el aparato, el aparato haya sido expuesto
a lluvia o humedad, no funcione de manera normal o se le haya
caído.
Page 49

49
Nowsonic Autark ID07
Instrucciones de uso
ES
www.nowsonic.com
ADVERTENCIA:
Para reducir el riesgo de incendios o descargas eléctricas, no
permita que este aparato quede expuesto a la lluvia o la humedad.
Este equipo no debe ser expuesto a goteos o salpicaduras de
líquidos.
No coloque sobre el equipo objetos que contengan líquidos,
como vasos o floreros.
Este dispositivo debe estar conectado a tierra.
Use un cable tripe con toma de tierra como el que se suministra
con el producto.
Tenga en cuenta que los distintos tipos de voltajes requieren el uso
de distintos tipos de cables y enchufes.
Asegúrese de que los requisitos de alimentación de corriente
establecidos de fábrica para el dispositivo (consulte la etiqueta del
panel posterior) se corresponden con el suministro general en su
región. Este equipo debería instalarse cerca de la toma de corriente y estar fácilmente accesible para su desconexión.
Para desconectar completamente este equipo de la red, desconecte el enchufe del cable de alimentación de la toma AC.
Por favor siga las instrucciones del fabricante para su instalación.
No lo instale en un espacio restringido.
No abra la unidad – riesgo de descarga eléctrica.
¡PRECAUCIÓN!
Por favor tenga en cuenta que: los cambios o modificaciones de este
dispositivo que no hayan sido aprobados expresamente en este manual podrían invalidar su autorización para manejar el instrumento.
Servicio
No hay piezas reparables por el usuario en su interior.
Para mantenimiento solicite la ayuda de personal cualificado.
PRECAUCIÓN: PARA REDUCIR EL RIESGO DE DESCARGAS ELÉC
TRICAS, NO DESMONTE LA CUBIERTA SUPERIOR. NO HAY PIEZAS
REPARABLES POR EL USUARIO EN SU INTERIOR. REMITA TODO
SERVICIO SÓLO A PERSONAL TÉCNICO CUALIFICADO.
El símbolo de un rayo con una punta de flecha dentro de un triángulo equilátero es para alertar al usuario de la presencia de “voltaje
peligroso” sin aislar dentro del chasis del producto que puede tener
la suficiente magnitud como para considerarse un riesgo de descarga eléctrica para las personas.
El signo de exclamación dentro de un triángulo equilátero es para
avisar alusuario de la presencia de importantes instrucciones de
manejo y mantenimiento (servicio) en la documentación que
acompaña al producto.
Page 50

50
Nowsonic Autark ID07
Instrucciones de uso
ES
www.nowsonic.com
Introducción
¡Muchas gracias por adquirir el Nowsonic Autark
ID07! Nowsonic
Autark
ID07 es un potente proyector de escenario con tecnología LED
de última generación que puede ser usado con cable o con mando a
distancia y alimentado con una batería interna si fuese necesario por
razones de instalación. Aunque de dimensiones compactas, los siete
potentes
LED RGBW proporcionan una salida de luz de alta intensidad
en cuatro colores, los 20 programas de mezcla implementados ofrecen
excelentes mezclas de color. Como alternativa a los programas internos, el control también puede ser realizado de forma remota a través
del protocolo
DMX 512 con un mando a distancia IR en modo maest-
ro/esclavo. El control en el dispositivo se efectúa con una pantalla
LED
y botones específicos de navegación por menús.
Con la batería de 12 V integrada y el receptor de infrarrojos, el Autark
ID07 puede ser operado totalmente sin cables; en caso de que el
cableado fuese complicado o la instalación se deba hacer de forma
rápida. Con el mando a distancia o un transmisor
DMX inalámbrico
(opcional), el Autark
ID07 puede ser también controlado de forma
inalámbrica a través del protocolo
DMX 512.
El Autark
ID07 va equipado con una robusta horquilla doble para su
colocación en el suelo o el montaje en travesaños o soportes adecuados.
Características
Proyector de escenario de 4 colores de alta potencia en tecnología
LED de última generación
Control a través del protocolo DMX 512 (cuatro modos: 1, 2, 6 y 9
canales), en modo maestro/esclavo, o por mando a distancia IR
Modo autónomo automático con 20 programas internos
Está equipado con un receptor para el control remoto inalámbrico
y en el suministro se incluye un mando a distancia IR.
Módulo de batería integrado para una operación con batería de
hasta 10 horas
Receptor integrado para el control DMX inalámbrico
Atenuación electrónica de 0 a 100% sin parpadeo
Horquilla doble para la colocación en el suelo, o para la instalación
en travesaños adecuados
Aplicaciones
Proyector LED para escenarios y clubes de pequeño tamaño
Uso móvil para sistemas de DJ
Page 51

51
Nowsonic Autark ID07
Instrucciones de uso
ES
www.nowsonic.com
Conexiones y elementos de mando en la parte posterior
En la parte posterior de Autark
ID07 se encuentran a disposición las
siguientes conexiones, pantallas y controles:
1. Tomas de corriente / fusible
Aquí se conecta el cable de alimentación IEC incluido. A través de
la salida
IEC puede hacer pasar la corriente eléctrica a los siguientes
equipos. Además, aquí puede reemplazar el fusible interno, si se ha
quemado debido a una sobrecarga: use siempre un fusible de repuesto con los mismos valores.
2. Menú y botones de control
Con los botones bajo la pantalla
LED se realiza el control local del
Autark
ID07. Con el botón MENU y los botones y
puede nave-
gar al nivel superior del menú, con el botón
ENTER y los botones
y
puede navegar dentro de los submenús. Para abrir un punto de
menú o confirmar una entrada, pulse el botón
ENTER. Para salir de un
submenú, pulse de nuevo el botón
ENTER o MENU.
3.
WIRELESS SWITCH
Utilice este interruptor para activar el receptor interno del Autark ID07.
En la posición I, el Autark
ID07 puede ser controlado mediante el man-
do a distancia suministrado o mediante un transmisor
DMX inalám-
brico: la dirección para el receptor
DMX interno, se ajusta en el menú.
8888
1
2
345
6
7
8
9
Page 52

52
Nowsonic Autark ID07
Instrucciones de uso
ES
www.nowsonic.com
4. BATTERY SWITCH
Con este interruptor se activa el funcionamiento del Autark ID07 con
la batería interna. La batería interna se recarga automáticamente al
conectar el Autark
ID07 a la red eléctrica. La capacidad de carga de la
batería se muestra en el indicador de la batería (6).
5. Antena
La antena está conectada al receptor
DMX interno del Autark ID07.
Despliegue la antena para mejorar la calidad de recepción del control
remoto
6. Indicador de batería
Estos
LED muestran el estado de carga actual de la batería interna:
cuando está totalmente cargado (todos los
LED encendidos), el Autark
ID07 puede operar hasta 10 horas sin estar conectado a la red eléctrica.
7.
LED de señal
Este
LED se enciende en función del ajuste de sensibilidad configura-
do en el menú S!Ln5 (consulte la página 7), si el control automático de
la música está activo. Cuanto más brillante sea la iluminación del
LED,
mayor será la sensibilidad.
8. Conexiones DMX IN/OUT
Estos enchufes de conexión permiten controlar el Autark ID07 mediante una señal
DMX externa, o bien, pasar la señal DMX entrante a
otras a unidades Autark puestas a continuación.
En el modo maestro/esclavo, la señal de control de la unidad maestra
se transmite a través del conector
DMX OUT, la unidad esclava recibe
la señal de control a través de la entrada
DMX IN.
OBSERVACIÓN: tenga en cuenta que en la última unidad en un
cableado en serie a través de
DMX o en modo maestro/esclavo,
debe colocarse una resistencia de terminación. De lo contrario,
pueden producirse errores en el control.
9. Punto de masa
Con este tornillo se pueden unir equipos externos a la tierra de la
carcasa del Autark
ID07.
Manejo
Puede utilizar el Autark ID07 en modo autónomo, maestro/esclavo, o
bien, controlado por cable o a distancia a través de
DMX. En el modo
autónomo, el reconocimiento de música se activa automáticamente para conmutar los programas internos en función de la señal de
música reconocida.
Cableado para el modo maestro/esclavo
En el modo maestro/esclavo es posible acoplar hasta 16 unidades
Autark con la primera unidad como maestro y las demás unidades
subsiguientes como esclavos. Los esclavos reciben los comandos de
control del maestro.
Para ello, proceda de esta manera:
Page 53

53
Nowsonic Autark ID07
Instrucciones de uso
ES
www.nowsonic.com
1) Conecte un cable XLR (no suministrado) al enchufe DMX OUT
en la parte posterior del equipo maestro.
2) Conecte el otro extremo (macho) del cable al enchufe
DMX IN
de la primera unidad esclava.
3) Conecte siguiendo esta pauta los demás equipos esclavos (escla-
vo
DMX OUT a esclavo DMX IN).
Para finalizar, debe indicar el estado maestro/esclavo en el menú de
cada equipo. El manejo del menú está descrito a partir de la página 7.
Cableado para el modo
DMX
Si dispone de un controlador DMX compatible, puede controlar el Au-
tark
ID07 en modo de 1, 2, 6, 9 canales DMX. Para el control mediante
cable, proceda del modo siguiente:
1) Conecte un cable de audio XLR convencional de alta calidad (no
suministrado) al enchufe de salida DMX del controlador.
OBSERVACIÓN: en los cables de audio XLR adecuados, los
conductores de señal están en los pines 2 y 3, mientras que la
masa se encuentra en el pin 1. Asegúrese de que la asignación de
pines no cambia dentro del cable: con una polaridad inversa o un
cortocircuito entre los pines, la función del control es alterada o
falla por completo.
2) Conecte el otro extremo (macho) del cable al enchufe
DMX IN
de la primera unidad Autark.
3) Conecte siguiendo esta pauta otros equipos Autark (
DMX OUT
a DMX IN).
A continuación, debe asignar a cada unidad Autark una dirección
DMX
propia en el menú. El manejo del menú está descrito a partir de la
página 7.
Control inalámbrico vía
DMX
El Autark ID07 está equipado con un receptor DMX que puede recibir
y ejecutar las señales de control de un transmisor
DMX adecuado. Para
el control inalámbrico vía
DMX, proceda del modo siguiente:
1) Conecte un cable XLR (no suministrado) al enchufe de salida
DMX del controlador.
2) Conecte el otro extremo (macho) del cable al enchufe de entra-
da DMX de un transmisor DMX (opcional, por ejemplo, Nowsonic
WRX-1).
3) Despliegue la antena del Autark ID07 para mejorar la recepción, y
active el
WIRELESS SWITCH: La visualización en la pantalla LED
debería ahora cambiar de Addr a A001.
4) A continuación, debe asignar a la unidad Autark una dirección
DMX propia en el menú. El manejo del menú está descrito a
partir de la página 7.
5) Utilice por último el botón correspondiente en el transmisor
DMX externo para establecer la comunicación.
Page 54

54
Nowsonic Autark ID07
Instrucciones de uso
ES
www.nowsonic.com
Control con el mando a distancia incluido
El Autark
ID07 viene con un mando a distancia IR para el control direc-
to de diversas funciones del menú. Con los elementos de manejo del
mando a distancia puede controlar las funciones siguientes:
Botón Función
POWER Aquí puede activar el mando a distancia.
DMX Aquí puede activar el menú para introducir la dirección DMX.
SLAVE Aquí puede activar el menú para la conmutación entre el modo maestro y esclavo.
AUTO 1, AUTO 2 Aquí puede activar el menú para la selección de los modos automáticos 1 o 2.
SPEED Aquí puede activar el menú SPEED para indicar la velocidad.
SOUND 1, SOUND 2 Aquí se activa el menú SOUND 1 o 2.
UP, DOWN Con estos dos botones puede incrementar o reducir el valor actual en el menú seleccionado.
STROBE Aquí puede activar el modo estroboscópico.
0, 1, 2, 3, 4, 6 Utilice estos botones para introducir valores numéricos en el modo de programa.
5W, 7R, 8G, 9B Utilice estos botones para seleccionar el color correspondiente (blanco, rojo, verde, azul).
Page 55

55
Nowsonic Autark ID07
Instrucciones de uso
ES
www.nowsonic.com
Uso con batería
El Autark
ID07 está equipado con una batería que se carga automá-
ticamente durante el uso con alimentación eléctrica y permite una
operación con batería de hasta 10 horas. Para usar el Autark
ID07 con
batería, solo tiene que retirar el conector de alimentación antes de
encender el equipo: Una vez activado, el estado de carga actual de
la batería se visualiza en los
LED del indicador de carga de la batería.
Sobre la tapa de servicio en la parte posterior se puede acceder a la
batería interna para reemplazarla en caso de un mal funcionamiento:
dado el caso, póngase en contacto primero con el distribuidor donde
compró la unidad.
Manejo con el menú
El Autark
ID07 puede ser manejado desde la pantalla de menú en la
parte posterior o con el mando a distancia opcional.
Para el manejo con el menú, proceda del modo siguiente:
Pulse el botón MENU varias veces para seleccionar el elemento
de menú que desee. También puede pulsar el botón
MENU y
seleccionar la opción que desee con los botones
y
.
Pulse el botón ENTER para entrar en el menú seleccionado: el
ajuste actual parpadea en la pantalla y puede ser cambiado.
Después de introducir el nuevo valor, en la pantalla aparece de
nuevo el elemento de menú seleccionado previamente.
Siga estos pasos para realizar el ajuste:
Introduzca la dirección DMX
Use los botones y para seleccionar la dirección DMX
que desee (A001 a A512).
Confirme la selección con el botón ENTER.
Selección del modo automático
Seleccione con los botones y el programa interno
(At01 a At20) o el estado m1 A5t (Master).
Confirme la selección con el botón ENTER.
Selección de la velocidad para el modo automático
Seleccione con los botones y la velocidad que
desee (SP00 = off, SP01 = máxima, SP31 = mínima).
Confirme la selección con el botón ENTER.
Selección del modo esclavo
Seleccione con los botones y la entrada SLA, para
usar el Autark
ID07 en modo esclavo desde otro equipo
maestro.
Confirme la selección con el botón ENTER.
SP E D
SP00
SP31
AST
Page 56

56
Nowsonic Autark ID07
Instrucciones de uso
ES
www.nowsonic.com
Entrada de la sensibilidad para los LED
Seleccione con los botones y la luminosidad que
desee para los 7
LED (off = 0, máximo = 255).
Confirme la selección con el botón ENTER.
Entrada de la intensidad luminosa para el modo de
color rojo
Seleccione con los botones y la intensidad luminosa
que desee para el componente de color rojo (off = 0,
máximo = 255).
Confirme la selección con el botón ENTER.
Entrada de la sensibilidad para el modo de color verde
Seleccione con los botones y la intensidad luminosa
que desee para el componente de color verde (off = 0,
máximo = 255).
Confirme la selección con el botón ENTER.
Entrada de la sensibilidad para el modo de color azul
Seleccione con los botones y la intensidad luminosa
que desee para el componente de color azul (off = 0,
máximo = 255).
Confirme la selección con el botón ENTER.
Entrada de la sensibilidad para el modo de color blanco
Seleccione con los botones y la intensidad luminosa
que desee para el componente de color blanco (off = 0,
máximo = 255).
Confirme la selección con el botón ENTER.
Selección del modo de canal DMX
Seleccione con los botones y el modo de canal
DMX que desee: Puede seleccionar las opciones (K1,
(K2, (K6 y (K. Para obtener más información sobre los
canales
DMX disponibles, consulte a partir de la página 9.
Confirme la selección con el botón ENTER.
Entrada de la sensibilidad para el control de la música
Seleccione con los botones y la sensibilidad que
desee para el control de la música en modo automático
(mínima = 1, máxima = 100) o desactive el control de la
música (off): La sensibilidad también se muestra con el
LED SIGNAL junto al indicador de carga de la batería.
Confirme la selección con el botón ENTER.
Modo
LED para el control de la música
Seleccione con los botones y el modo que desee
para los
LED en modo automático (Sov1 = luz de pre-
sencia, Sov2 = flash, Sov3 = fundido de entrada, Sov4 =
fundido de salida).
Confirme la selección con el botón ENTER.
Selección del modo maestro
Seleccione con los botones y la entrada on, para
usar el Autark
ID07 en modo maestro con otras unidades
en modo esclavo.
Confirme la selección con el botón ENTER.
1
100
OF F
SE N S
SO V 1
SO V D
SO V 4
AS T
ON
OF F
AL L
0
25 5
RE D
R0 0 0
R2 5 5
GREE
G0 0 0
G2 5 5
BLUE
B0 00
B2 5 5
U0 0 0
U2 5 5
1
2
6
9
Page 57

57
Nowsonic Autark ID07
Instrucciones de uso
ES
www.nowsonic.com
Restablecer la unidad a los ajustes de fábrica
Después de su selección, todas las entradas en el menú
pasaran de nuevo a la configuración de fábrica al pulsar
ENTER.
Selección del modo de color interno
Seleccione con los botones y uno de los 51 esquemas de color internos (1 a 52). Confirme la selección con
el botón
ENTER.
Restablecer la señal
DMX inalámbrica
Una vez seleccionado, se restablece el radiorreceptor
interno al pulsar
ENTER.
Visualización de la temperatura interna
Después de su selección, el Autark ID07 muestra la
temperatura actual dentro de la carcasa.
Cierre la visualización con el botón ENTER.
Encendido y apagado de los LED
Seleccione con los botones y el estado que desee
(off = no, on = YP(S).
Confirme la selección con el botón ENTER.
Entrada del tiempo de visualización de la pantalla
LED
Seleccione con los botones y cuánto tiempo debe
permanecer encendida la pantalla
LED del Autark: En la
posición on, la pantalla se mantiene encendida de forma
permanente, con las otras opciones (30, 60, 90, 120)
puede seleccionar el tiempo que desee hasta que la
pantalla se apague.
Confirme la selección con el botón ENTER.
Realización de distintas rutinas de prueba
Seleccione con los botones y la prueba que desee
realizar (1 a 5) o desactive el modo de prueba (off).
Confirme la selección con el botón ENTER.
Entrada de la dirección de visualización en la pantalla
Seleccione con los botones y el estado que desee:
con la opción de dISP, las entradas en el menú se muestran de la forma habitual, con la opción dSIP aparecen
al revés (180°) con el fin de facilitar el manejo del menú
independientemente de la orientación de montaje.
Confirme la selección con el botón ENTER.
Mostrar el número de versión
Al seleccionarlo, se muestra el número de versión actual.
Cierre la visualización con el botón ENTER.
BL D
ON
LE D
90
120
30
60
ON
1
5
OF F
DISP
DISP
DISP
U 1 7
0
OLO
O0 1
RE LE
0
21
Page 58

58
Nowsonic Autark ID07
Instrucciones de uso
ES
www.nowsonic.com
Comandos de control en los modos DMX
Con el protocolo
DMX, el Autark ID07 puede controlar 1, 2, 6 o 9 cana-
les. Seleccione el modo
DMX, así como la dirección DMX, en el menú
(ver la sección anterior).
Las asignaciones de los canales DMX y sus funciones se enumeran en
las siguientes tablas:
Canal Valor Función
Canal 1 0–255 0 = off, 1–255 = diferentes colores
Canal Valor Función
Canal 1 0–255 0 = off, 1–255 = atenuador Master
Canal 2 0–255 0 = off, 1–255 = diferentes colores
Canal Valor Función
Canal 1 0–255 Atenuador Master (0%–100%)
Canal 2 0–255 Atenuador Rojo (0%–100%)
Canal 3 0–255 Atenuador Verde (0%–100%)
Canal 4 0–255 Atenuador Azul (0%–100%)
Canal 5 0–255 Atenuador Blanco (0%–100%)
Canal 6
0–8
9–255
Máxima luminosidad, sin efecto estroboscópico
Efecto estroboscópico, velocidad creciente
Modo 1: 1 canal
Modo 2: 2 canales
Modo 3: 6 canales
Page 59

59
Nowsonic Autark ID07
Instrucciones de uso
ES
www.nowsonic.com
Canal Valor Función
Canal 1 0–255 Atenuador Master (0%–100%)
Canal 2 0–255 Atenuador Rojo (0%–100%)
Canal 3 0–255 Atenuador Verde (0%–100%)
Canal 4 0–255 Atenuador Azul (0%–100%)
Canal 5 0–255 Atenuador Blanco (0%–100%)
Canal 6 0–255
Máxima luminosidad, sin efecto estroboscópico
Efecto estroboscópico, velocidad creciente
Canal 7
0–10 Preajuste
11–20 Atenuación automática (creciente)
21–30 Atenuación automática (decreciente)
31–40 Atenuación automática (creciente/decreciente)
41–50 Fundido de cuatro colores
51–60 Flash de cuatro colores
61–70 Flash de diecinueve colores
71–80 Flash de quince colores
81–90 Fundido de cinco colores
91–100 Fundido rojo, verde y blanco
101–110 Fundido rojo, azul y blanco
111–120 Fundido verde, azul y blanco
> 120 Cambio de color vía control de la música
Canal 8 0–255
Velocidad para funciones especiales o sensibilidad
de audio; control de velocidad para los programas
automáticos
Canal 9
0–127
128–255
Cambio de color estático
Cambio de color del estroboscópico (modo de
sonido)
Modo 4: 9 canales Especicaciones
Luminarias 7 lámparas LED de cuatro colores (rojo,
verde, azul, blanco, cada una de 8 W)
Luminosidad mín. 2.200 Lux @ 2 m
Tensión de funcionamiento 100–240 V CA ~, 50–60 Hz
Amperaje recom. 0,5 A @ 110 V
Fusible T3 15 A
Consumo de potencia 50 W
Capacidad de la batería 12 V, 12000 mAh
Tiempo de carga aprox. 4 horas
Duración de la batería aprox. 10 horas (con 2-3 colores)
Control DMX, con cable o vía IR
Conexiones DMX XLR, 3 pines
Canales DMX hasta 9 canales
Atenuación electrónica 0–100% sin parpadeo
Ángulo de inclinación 360°, manual
Peso 3,8 kg. (sin embalaje)
4,8 kg (con embalaje)
Dimensiones 240 × 240 × 235 mm (An × Al × Pr, sin
horquilla)
Page 60

60
Nowsonic Autark ID07
Instrucciones de uso
ES
www.nowsonic.com
Volumen de suministro
Autark ID07: 1×
Cable de alimentación: 1×
Mando a distancia: 1×
Instrucciónes de uso: 1×
Descargo de responsabilidad
Nowsonic ha llevado a cabo todos los pasos posibles para asegurar
que la información aquí contenida es a la vez correcta y completa.
En ningún caso puede Nowsonic aceptar responsabilidades sobre
cualquier pérdida o daño al propietario del equipo, terceras partes o
equipos que pudieran resultar del uso de este manual o del equipo
que éste describe.
Servicio
Si tiene problemas o preguntas técnicas, consulte primero al distribuidor local donde haya adquirido el aparato.
En caso de requerir servicio técnico, le rogamos que también se dirija a su distribuidor local. De lo contrario, también puede ponerse directamente en contacto con nosotros. Encontrará nuestros datos de
contacto en nuestra página web www.nowsonic.com.
OBSERVACIÓN: tenemos gran cuidado en el empaquetado del
dispositivo colocándolo en una caja bien protegida en la fábrica,
por lo que es muy improbable que sufra daños durante el envío.
No obstante, si esto sucediera, por favor, póngase en contacto con su vendedor inmediatamente para informar del daño.
Le recomendamos que guarde los materiales que vienen en el
embalaje original en caso de que sea necesario enviar o transportar el dispositivo en una fecha posterior.
Advertencias legales
Copyright de este manual del usuario © 2014: Nowsonic
Las características, especificaciones y disponibilidad del producto
pueden modificarse sin aviso previo.
Edición v 1.0, 05/2014
Artículo Nº 310920
Page 61

Nowsonic Autark ID07
Instrukcja obsługi
www.nowsonic.com
Page 62

62
Nowsonic Autark ID07
Instrukcja obsługi
PL
www.nowsonic.com
WAŻNE WSKAZÓWKI DOTYCZĄCE BEZPIECZEŃSTWA
1) Przeczytaj niniejszą instrukcję.
2) Zachowaj niniejszą instrukcję.
3) Przestrzegaj wszystkich ostrzeżeń.
4) Stosuj się do wszystkich poleceń.
5) Nie obsługuj niniejszego urządzenia w pobliżu wody.
6) Do czyszczenia urządzenia używaj wyłącznie suchej ściereczki.
7) Nie zastawiaj wylotu otworów wentylacyjnych. Przy instalacji
urządzenia postępuj zgodnie z poleceniami producenta.
8) Nie stawiaj urządzenia w pobliżu grzejników, bojlerów, pieców
lub innych źródeł ciepła.
9) W żadnym wypadku nie zaklejaj kontaktu uziemienia wtyczki.
Wtyczka bezpieczeństwa zawiera dwa bolce, z których jeden jest
szerszy od drugiego. Zwykła wtyczka sieciowa zawiera dwa bolce
oraz trzeci kontakt uziemienia. Szerszy bolec bezpiecznej wtyczki
lub kontaktu uziemienia wtyczki sieciowej służy zapewnieniu
Twojego bezpieczeństwa. W przypadku, kiedy wtyczka kabla sie-
ciowego znajdującego się w dostarczonym komplecie nie pasuje
do gniazdka, zakup pasujący kabel w sklepie specjalistycznym.
10) Nie depcz kabla, nie załamuj go i obchodź się z nim ostrożnie,
szczególnie w miejscu połączenia z urządzeniem.
11) Używaj wyłącznie części przewidzianych przez producenta dla
tego urządzenia.
12) Używaj tylko stojaków, statywów lub stołów, które odpowiadają
wymaganiom producenta lub są dostarczane razem z urządzeniem. Zachowaj ostrożność podczas transportu, by uniknąć
obrażeń spowodowanych przez przesuwające się lub spadające
przedmioty.
13) Wyciągnij wtyczkę z gniazdka sieciowego podczas burzy a także
wtedy, kiedy nie używasz urządzenia przez dłuższy czas.
14) W przypadku naprawy serwisowej korzystaj z usług wykwa-
lifikowanego personelu. Pozwól skontrolować urządzenie
fachowcowi, w przypadku kiedy np. uszkodzone są kabel lub
wtyczka sieciowa, do obudowy dostały się płyny lub inne przedmioty, urządzenie stało na deszczu lub w wilgotnym środowisku,
nieprawidłowo funkcjonuje lub w jakikolwiek inny sposób
zostało uszkodzone.
Page 63

63
Nowsonic Autark ID07
Instrukcja obsługi
PL
www.nowsonic.com
OSTRZEŻENIE:
Aby ograniczyć niebezpieczeństwo pożaru i porażenia prądem,
nie wystawiaj urządzenia na deszcz i nie poddawaj go działaniu
wilgoci.
Nie stawiaj na urządzeniu żadnych pojemników z wodą, gdyż
mogą one się przewrócić i woda może dostać się do wnętrza
urządzenia.
Niniejsze urządzenie musi być uziemione.
Używaj trójprzewodowego, ekranowanego kabla zasilającego
takiego, jak dostarczony razem z urządzeniem kabel zasilający.
Zwróć uwagę, że dla różnych napięć potrzebne są różne kable
zasilające i/lub wtyczki sieciowe.
Przestrzegaj zawsze lokalnych przepisów bezpieczeństwa.
Ustaw urządzenie w pobliżu gniazda sieciowego. Gniazdo
powinno być zawsze łatwo dostępne.
Wyciągnij wtyczkę z gniazdka, aby całkowicie odciąć urządzenie
od prądu.
Podczas instalacji stosuj się do wszystkich wskazówek producenta.
Nie używaj urządzenia w trudno dostępnym miejscu.
Nie otwieraj urządzenia – niebezpieczeństwo porażenia prądem.
UWAGA!
Zwróć uwagę, że wszystkie zmiany lub modyfikacje urządzenia, które
nie są wyraźnie wymienione w niniejszej instrukcji, mogą pozbawić Cię
prawa do używania tego urządzenia
Konserwacja
W urządzeniu nie ma żadnych części, które użytkownik musiałby
poddawać konserwacji.
W celu naprawy urządzenia korzystaj tylko z usług
wykwalifikowanego personelu.
UWAGA: ABY UNIKNĄĆ PORAŻENIA PRĄDEM, NIE WOLNO OTWIE
RAĆ OBUDOWY. WEWNĄTRZ URZĄDZENIA NIE MA ŻADNYCH
CZĘŚCI, KTÓRE MOGĄ BYĆ WYMIENIANE PRZEZ UŻYTKOWNIKA.
W PRZYPADKU NAPRAWY SERWISOWEJ KORZYSTAJ Z USŁUG
WYKWALIFIKOWANEGO PERSONELU.
Symbol błyskawicy wewnątrz trójkąta równobocznego stanowi
ostrzeżenie przed odsłoniętymi przewodami we wnętrzu
urządzenia, znajdującymi się pod wysokim napięciem, których
dotknięcie grozi niebezpiecznym dla życia porażeniem prądem.
Symbol wykrzyknika wewnątrz trójkąta równoramiennego zwraca
uwagę użytkownika na ważne wskazówki zawarte w załączonej
instrukcji dotyczące obsługi i serwisu urządzenia.
Page 64

64
Nowsonic Autark ID07
Instrukcja obsługi
PL
www.nowsonic.com
Wstęp
Dziękujemy za zakup urządzenia Nowsonic Autark
ID07. Nowsonic
Autark
ID07 to potężny reflektor sceniczny, wykonany w nowoczesnej
technologii
LED, przewodowej lub sterowany zdalnie w celu zapew-
nienia łatwego montażu, z możliwością zasilania z wewnętrznego akumulatora. Pomimo kompaktowych wymiarów siedem potężnych diod
RGBW zapewnia mocne światło w czterech kolorach, a 20 wbudowa-
nych programów zapewnia doskonałe ich mieszanie. Alternatywą dla
programów wewnętrznych jest również możliwość zdalnego sterowania urządzeniem poprzez protokół
DMX 512; należy to skonfigurować
bezprzewodowo za pomocą pilota zdalnego sterowania w trybie urządzenia sterującego (
MASTER) lub sterowanego (SLAVE). Sterowanie z
poziomu urządzenia poprzez wyświetlacz
LED, jak również za pomocą
klawiszy do nawigacji po menu.
Dzięki zintegrowanemu zasilaniu bateryjnemu o napięciu 12 V baterii
oraz odbiornikowi podczerwieni, urządzenie może być samowystarczalna i działać całkowicie bezprzewodowo, jeśli prowadzenie kabli
jest trudne lub instalacja musi się odbyć szybko. Urządzenie może być
sterowane zdalnie za pomocą pilota lub opcjonalnego przekaźnika
bezprzewodowego
DMX i protokołu sterującego DMX 512.
Autark
ID07 posiada solidne, podwójne uchwyty, umożliwiające usta-
wienie na podłodze lub montaż na odpowiednich poprzeczkach lub
trawersach dachowych.
Cechy urządzenia
Mocny, czterokolorowy reflektor, wykonany w technologii LED
Sterowanie za pomocą protokołu DMX 512 (cztery tryby: 1, 2, 6 i 9
kanały), w trybie MASTER lub SLAVE albo za pomocą pilota zdalnego sterowania na podczerwień.
Automatyczny tryb autonomiczny z dwudziestoma programami
Zintegrowany, budowany odbiornik do bezprzewodowego zdalne-
go sterowania za pomocą pilota zdalnego sterowania
Zintegrowany moduł zasilania, umożliwiający pracę na zasilaniu
bateryjnym nawet przez 10 godzin
Zintegrowany odbiornik radiowy do sterowania w trybie protokołu
DMX
Elektroniczne ściemnianie w zakresie od 0 do 100%, bez migotania
Podwójny uchwyt do montażu na podłodze lub do instalacji na
odpowiednich kratownicach
Aplikacje
Reflektor LED do zastosowań scenicznych i w mniejszych klubach
Aplikacje mobilne zestawów dla DJów
Page 65

65
Nowsonic Autark ID07
Instrukcja obsługi
PL
www.nowsonic.com
Złącza i elementy na ściance tylnej
Z tyłu reflektora Autark
ID07 znajdują się następujące złącza i elementy
sterowania:
1. Gniazdka elektryczne/zabezpieczenie
Tutaj należy podłączyć dołączony do urządzenia kabel zasilania. Za
pomocą gniazda
IEC można wyprowadzić zasilanie do kolejnych urzą-
dzeń. Ponadto tutaj znajduje się bezpiecznik wewnętrzny, chroniący
urządzenie przed przeciążeniami: w przypadku konieczności wymiany,
zawsze używać bezpiecznika o tej samej charakterystyce.
2. Przycisk
MENU oraz przyciski operacyjne
Przyciski pod wyświetlaczem
LED służą do lokalnego sterowania urzą-
dzeniem. Za pomocą przycisku
MENU oraz przycisków i
przejdź
do menu najwyższego poziomu, a za pomocą przycisku
ENTER i
przycisków
i
nawiguj po różnych podmenu. Aby otworzyć opcje
menu lub zatwierdzić, naciśnij przycisk
ENTER. Aby wyjść z podmenu,
naciśnij przycisk
ENTER lub ponownie przycisk MENU.
3.
WIRELESS SWITCH
Użyj tego przełącznika, aby włączyć wewnętrzny odbiornik urządze-
nia Autark
ID07. W ustawieniu w pozycji I urządzeniem będzie można
sterować za pomocą dołączonego pilota zdalnego lub bezprzewodowego nadajnika
DMX; żądaną opcję wybiera się za pomocą menu.
8888
1
2
345
6
7
8
9
Page 66

66
Nowsonic Autark ID07
Instrukcja obsługi
PL
www.nowsonic.com
4. BATTERY SWITCH
Użyj tego przełącznika, włączyć zasilanie urządzenia Autark ID07 z wewnętrznej baterii. Po podłączeniu zasilania zewnętrznego, wewnętrzny akumulator jest ładowany automatycznie. Stan naładowania wewnętrznego akumulatora jest sygnalizowany za pomocą wskaźnika (6).
5. Antena radiowa
Antena jest połączona z wewnętrznym odbiornikiem
DMX urządzenia
Autark
ID07. Rozłóż antenę, aby poprawić jakość odbioru sygnału zdal-
nego sterowania.
6. Wskaźnik naładowania akumulatora
Diody te wskazują aktualny stan naładowania wewnętrznej baterii:
przy pełnym naładowaniu wszystkie diody świecą się, Autark
ID07
może pracować przez 10 godzin bez podłączania do sieci elektrycznej.
7. Dioda sygnałowa LED
Ta dioda LED świeci w zależności od ustawień menu S!Ln5 (patrz stro-
na 7), gdy aktywna jest opcja automatycznego sterowania dźwiękiem.
Im jaśniej świeci dioda, tym wyższa czułość
8. Gniazda
DMX IN i DMX OUT
Gniazda te służą do sterowania reflektorem Autark ID07 za pomocą
zewnętrznego sygnału
DMX oraz kolejnymi reflektorami Autark, pra-
cującymi w pętli
DMX.
Sygnał sterujący z jednostki głównej (MASTER) jest transmitowany
gniazdem
DMX OUT, jednostka sterowana (SLAVE) odbiera sygnał
gniazdem
DMX IN.
UWAGA: Należy pamiętać, aby ostatnie urządzenie połączenia
szeregowego w systemie
DMX było wpięte za pomocą kabla,
wyposażonego w rezystor obciążający. W przeciwnym razie mogą
występować błędy sterowania.
9. Punkt uziemienia
Do tej śruby zaciskowej można podłączyć kabel uziemienia.
Uruchamianie
Autark
ID07 może funkcjonować samodzielnie w autonomicznym,
przewodowym trybie
MASTER lub SLAVE albo może być sterowany
zdalnie za pomocą protokołu
DMX. W trybie autonomicznym funkcja
rozpoznawana dźwięku jest włączana automatycznie, aby programy
wewnętrzne urządzenia były przełączane w zależności od rozpoznawanego sygnału dźwiękowego.
Okablowanie w trybie
MASTER/SLAVE
W trybie MASTER/SLAVE można posługiwać się szesnastoma urządzeniami Autark
ID07, z pierwszym urządzeniem pracującym w trybie
MASTER, a pozostałymi pracującymi w trybie SLAVE. Urządzenia stero-
wane (
SLAVE) odbierają polecenia sterujące od urządzenia sterującego
(
MASTER).
Page 67

67
Nowsonic Autark ID07
Instrukcja obsługi
PL
www.nowsonic.com
Postępuj w następujący sposób:
1) Wtyczkę kabla XLR (brak w wyposażeniu) włożyć do gniazda
DMX OUT urządzenia sterującego (MASTER).
2) Drugi koniec kabla, zakończony wtyczką męską XLR, włożyć do
gniazda
DMX IN pierwszego urządzenia sterowanego (SLAVE).
3) W podobny sposób podłączyć kolejne urządzenia sterowane
(gniazdo
DMX OUT pierwszego urządzenia sterowanego
połączyć z gniazdem
DMX IN drugiego urządzenia sterowanego,
itd.)
Następnie, za pomocą menu, należy określić status urządzenia (MA
STER
lub SLAVE) Menu obsługowe opisano na stronie 7.
Okablowanie w trybie
DMX.
Jeśli posiadasz sterownik, kompatybilny z protokołem
DMX, reflekto-
rem Autark
ID07 można sterować w trybie 1-, 2-, 6- lub 9-kanałowym.
Okablowanie dla trybu
DMX:
1) Do gniazda wyjściowego sterownika DMX podłączyć konwencjo-
nalny, wysokiej jakości kabel audio XLR (brak w zestawie).
UWAGA: We wtyczkach XLR używanych kabli przewody
sygnałowe muszą być przyłączone do kołków 2 i 3, a przewód
masy do kołka 1. Upewnić się, że układ styków w używanym kablu
nie jest inny: odwrotna biegunowość może prowadzić do zwarć
lub całkowicie uniemożliwić sterowanie urządzeniem.
2) Drugi koniec kabla, zakończony wtyczką męską XLR, włożyć do
gniazda
DMX IN pierwszego urządzenia sterowanego (SLAVE).
3) W podobny sposób podłączyć kolejne urządzenia sterowane
(gniazdo DMX OUT pierwszego urządzenia sterowanego
połączyć z gniazdem
DMX IN drugiego urządzenia sterowanego,
itd.)
Następnie każdemu używanemu reflektorowi Autark ID07 należy określić za pomocą menu jego własny adres
DMX. Menu obsługowe opi-
sano na stronie 7.
Sterowanie bezprzewodowe za pomocą protokołu DMX
Autark ID07 posiada zintegrowany odbiornik DMX, umożliwiające
odbiór i translację sygnałów sterujących z odpowiedniego nadajnika
DMX. Aby używać zdalnego sterowania wg protokołu DMX, wykonaj
następujące czynności:
1) Do gniazda wyjściowego sterującego urządzenia DMX podłącz
kabel XLR (brak w wyposażeniu).
2) Drugi koniec tego kabla, zakończony wtyczką XLR typu męskiego,
podłącz do gniazda wejściowego opcjonalnego nadajnika DMX
(np. Nowsonic WRX-1).
3) Rozłóż anteny reflektorów Autark D07, aby polepszyć odbiór i
włącz przełącznik
WIRELESS SWITCH: Na wyświetlaczu LED
opcja Addr powinna zmienić się na A001.
4) Następnie każdemu używanemu reflektorowi Autark ID07
należy określić za pomocą menu jego własny adres DMX. Menu
obsługowe opisano na stronie 7.
Page 68

68
Nowsonic Autark ID07
Instrukcja obsługi
PL
www.nowsonic.com
5) Następnie naciśnij odpowiedni przycisk, aby nawiązać połączenie
z zewnętrznym urządzeniem DMX w celu ustanowienia
połączenia.
Sterowanie za pomocą dołączonego pilota zdalnego sterowania
Autark
ID07 wyposażono w pracujący w paśmie podczerwieni pilot
zdalnego sterowania, umożliwiający bezpośrednie sterowanie różny-
mi opcjami menu. Za pomocą pilota można sterować następującymi
funkcjami:
Przycisk Funkcja
POWER Włączanie zdalnego sterowania
DMX Włączanie menu w celu określenia adresu DMX.
SLAVE Włączanie menu w celu określenie statusu MASTER lub SLAVE.
AUTO 1, AUTO 2 Włączanie menu, umożliwiającego wybranie trybu automatycznego 1 lub 2.
SPEED Włączanie menu w celu określenia adresu DMX.
SOUND 1, SOUND 2 Włączanie menu SOUND 1 lub SOUND 2.
UP, DOWN Te dwa przyciski służą do zwiększania lub zmniejszania wartości w ramach wybranego menu.
STROBE Włączanie trybu STROBE.
0, 1, 2, 3, 4, 6 Te przyciski służą do podawania wartości liczbowych w trybie PROGRAM.
5W, 7R, 8G, 9B Te przyciski służą do wybierania używanego koloru (biały, czerwony, zielony, niebieski).
Page 69

69
Nowsonic Autark ID07
Instrukcja obsługi
PL
www.nowsonic.com
Zasilanie bateryjne
Autark
ID07 posiada zintegrowany akumulator, ładowany automatycz-
nie podczas pracy na zasilaniu sieciowym i umożliwiający funkcjonowanie urządzenia do 10 godzin na zasilaniu bateryjnym. Aby Autark
ID07 działał na zasilaniu bateryjnym, wystarczy przed włączeniem
urządzenia wyjąć wtyczkę zasilania: po włączeniu zasilania aktualny
stan naładowania akumulatora jest sygnalizowany wskaźnikiem diodowym.
Pokrywa z tyłu urządzenia daje dostęp do wewnętrznego akumulatora,
który w razie awarii lub zużycia można wymienić: w takim przypadku
należy najpierw skontaktować się ze sprzedawcą urządzenia.
Operacje za pomocą menu
Autark
ID07 może być obsługiwany za pomocą ekranu, znajdującego
się z tyłu urządzenia lub za pomocą pilota zdalnego sterowania.
Obsługa menu polega na wykonywaniu następujących czynności:
Naciśnij kilka razy przycisk MENU, aby wybrać żądaną opcję menu.
Albo naciśnij przycisk
MENU jeden raz i wybierz żądaną opcję
przyciskami
i
.
Naciśnij przycisk ENTER, aby otworzyć wybrane menu: na
wyświetlaczu pojawi się aktualnie stosowana wartość i będzie
można ją zmienić.
Po wprowadzeniu wartości na ekranie pojawi się poprzednio
wybrana opcja menu
Aby dostosować ustawienia, postępuj w następujący sposób:
Określanie adresu DMX
Za pomocą przycisków i wybierz żądany adres DMX
(A001 do A512).
Naciśnij przycisk ENTER, aby zatwierdzić.
Wybór trybu automatycznego
Przyciskami i wybierz program wewnętrzny (At01
do At20) lub status m1 A5t (Master).
Naciśnij przycisk ENTER, aby zatwierdzić.
Określanie szybkości działania w trybie automatycznym.
Przyciskami i wybierz szybkość działania (SP00 =
OFF, SP01 = maksymalna, SP31 = minimalna).
Naciśnij przycisk ENTER, aby zatwierdzić.
Wybór trybu pracy
SLAVE
Przyciskami i wybierz opcję SLA, aby Autark ID07
pracował jako urządzenie sterowane (
SLAVE).
Naciśnij przycisk ENTER, aby zatwierdzić.
Wybór kanału dla trybu
DMX
Przyciskami i wybierz żądaną opcję trybu DMX:
można wybrać opcję (K1, (K2, (K6 oraz (K. Więcej
informacji o kanałach trybu
DMX na stronie 9.
Naciśnij przycisk ENTER, aby zatwierdzić.
SP E D
SP00
SP31
1
2
6
9
AST
Page 70

70
Nowsonic Autark ID07
Instrukcja obsługi
PL
www.nowsonic.com
Określanie natężenia koloru czerwonego
Przyciskami i określ intensywność świecenia
kolorem czerwonym (wył = 0, maksymalna = 255).
Naciśnij przycisk ENTER, aby zatwierdzić.
Określanie natężenia koloru zielonego
Przyciskami i określ intensywność świecenia
kolorem zielonym (wył = 0, maksymalna = 255).
Naciśnij przycisk ENTER, aby zatwierdzić.
Określanie natężenia koloru niebieskiego
Przyciskami i określ intensywność świecenia
kolorem niebieskim (wył = 0, maksymalna = 255).
Naciśnij przycisk ENTER, aby zatwierdzić.
Określanie natężenia koloru białego
Przyciskami i określ intensywność świecenia
kolorem białym (wył = 0, maksymalna = 255).
Naciśnij przycisk ENTER, aby zatwierdzić.
Włączanie i wyłączanie diod
LED
Przyciskami i określ żądany status (nie = no, tak =
YP(S).
Naciśnij przycisk ENTER, aby zatwierdzić.
Określanie czułości na sterowanie dźwiękiem
Przyciskami i określ czułość na sterowanie
dźwiękiem w trybie automatycznym (niska = 1, wysoka
= 100) lub wyłącz tę opcję (off): Czułość jest również
sygnalizowana diodą
SIGNAL, znajdującą się obok
wskaźnika stanu naładowania akumulatora.
Naciśnij przycisk ENTER, aby zatwierdzić.
Określanie sposobu działania diod
LED w trybie stero-
wania dźwiękiem
Przyciskami i określ sposób działania diod LED w
trybie automatycznym (Sov1 = światło ciągłe, Sov2 =
światło migające, Sov3 = z efektem
FADE IN, Sov4 = z
efektem
FADE OUT).
Naciśnij przycisk ENTER, aby zatwierdzić.
Wybór trybu pracy
MASTER
Przyciskami i wybierz opcję on, aby Autark ID07
pracował jako urządzenie nadrzędne (
MASTER), sterując
innymi urządzeniami, działającymi w trybie
SLAVE.
Naciśnij przycisk ENTER, aby zatwierdzić.
Określanie jasności świecenia diod
LED
Przyciskami i określ jasność świecenia wszystkich
siedmiu diod
LED (wył = 0, maksymalna = 255).
Naciśnij przycisk ENTER, aby zatwierdzić.
1
100
OF F
SE N S
SO V 1
SO V D
SO V 4
AS T
ON
OF F
AL L
0
25 5
RE D
R0 0 0
R2 5 5
GREE
G0 0 0
G2 5 5
BLUE
B0 00
B2 5 5
U0 0 0
U2 5 5
BL D
ON
Page 71

71
Nowsonic Autark ID07
Instrukcja obsługi
PL
www.nowsonic.com
Wybór trybu koloru wewnętrznego
Przyciskami i wybierz jeden z 51 dostępnych
schematów kolorystycznych (1 do 52). Naciśnij przycisk
ENTER
, aby zatwierdzić.
Resetowanie bezprzewodowego sygnału
DMX
Po zatwierdzeniu przyciskiem ENTER wewnętrzny
odbiornik radiowy zostanie zresetowany.
Wyświetlanie temperatury wewnętrznej
Po wybraniu tej opcji wyświetlona zostanie aktualna
temperatura wewnątrz obudowy.
Zamknij okno za pomocą przycisku ENTER.
Określanie czasu świecenia wyświetlacza LED
Przyciskami i określ czas świecenia wyświetlacza LED
reflektora Autark: wybierz wartość on, aby wyświetlacz
świecił się przez cały czas lub jedną z opcji (30, 60, 90,
120), aby określić czas, po którym wyświetlacz zgaśnie.
Naciśnij przycisk ENTER, aby zatwierdzić.
Wykonywanie różnych procedur testowych
Przyciskami i wybierz żądany test (1 do 5) lub
wyłącz tę opcję (off).
Naciśnij przycisk ENTER, aby zatwierdzić.
Określanie kierunku wyświetlania informacji na
wyświetlaczu
Przyciskami i określ status: po wybraniu opcji
diSP wpisy menu będą wyświetlane normalnie, po
wybraniu opcji dSiP będą odwrócone o 180° (do góry
nogami), aby obsługa menu była niezależna od sposobu
zamontowania reflektora.
Naciśnij przycisk ENTER, aby zatwierdzić.
Wyświetlanie numeru wersji
Po wybraniu tej opcji wyświetlany jest numer wersji.
Zamknij okno za pomocą przycisku ENTER.
Przywracanie ustawień fabrycznych
Po wybraniu tej opcji i naciśnięciu przycisku ENTER
wszystkie ustawienia powrócą do wartości fabrycznych.
LE D
90
120
30
60
ON
1
5
OF F
DISP
DISP
DISP
U 1 7
0
OLO
O0 1
RE LE
0
21
Page 72

72
Nowsonic Autark ID07
Instrukcja obsługi
PL
www.nowsonic.com
Polecenia sterujące trybów DMX
Za pomocą protokołu
DMX można sterować reflektorem Autark ID07
w trybie 1-, 2-, 6- i 9-kanałowym. Tryb
DMX wybiera się za pomocą
menu, w podobny sposób, jak adres
DMX (patrz rozdział poprzedni).
Zależność kanałów i funkcji
DMX wyszczególniono w poniższej tabeli:
Kanał Wartość Funkcja
Kanał 1 0–255 0 = OFF, 1–255 = rozmaite schematy kolorów
Kanał Wartość Funkcja
Kanał 1 0–255 0 = OFF, 1–255 = ogólne natężenie światła
Kanał 2 0–255 0 = OFF, 1–255 = rozmaite schematy kolorów
Kanał Wartość Funkcja
Kanał 1 0–255 Ściemniacz Master (0%–100%)
Kanał 2 0–255 Ściemniacz czerwony (0%–100%)
Kanał 3 0–255 Ściemniacz zielony (0%–100%)
Kanał 4 0–255 Ściemniacz niebieski (0%–100%)
Kanał 5 0–255 Ściemniacz biały (0%–100%)
Kanał 6
0–8
9–255
Pełna jasność, bez efektu stroboskopowego
Efekt stroboskopowy, prędkość rosnąca
Tryb 1: 1 kanał
Tryb 2: 2 kanałowy
Tryb 3: 6 kanałowy
Page 73

73
Nowsonic Autark ID07
Instrukcja obsługi
PL
www.nowsonic.com
Kanał Wartość Funkcja
Kanał 1 0–255 Ściemniacz Master (0%–100%)
Kanał 2 0–255 Ściemniacz czerwony (0%–100%)
Kanał 3 0–255 Ściemniacz zielony (0%–100%)
Kanał 4 0–255 Ściemniacz niebieski (0%–100%)
Kanał 5 0–255 Ściemniacz biały (0%–100%)
Kanał 6 0–255
Pełna jasność, bez efektu stroboskopowego
Efekt stroboskopowy, prędkość rosnąca
Kanał 7
0–10 Domyślnie
11–20 Ściemnianie automatyczne (rosnąco)
21–30 Ściemnianie automatyczne (malejąco)
31–40 Ściemnianie automatyczne (rosnąco/malejąco)
41–50 Blaknięcie czterech kolorów
51–60 Rozbłyski w czterech kolorach
61–70 Rozbłyski w dziewiętnastu kolorach
71–80 Rozbłyski w piętnastu kolorach
81–90 Rozbłyski w pięciu kolorach
91–100
Stopniowe zanikanie koloru czerwonego, zielonego i białego
101–110
Stopniowe zanikanie koloru czerwonego, niebieskiego i białego
111–120
Stopniowe zanikanie koloru zielonego, niebieskiego i białego
> 120 Sterowanie zmianami koloru za pomocą dźwięku
Kanał 8 0–255
Szybkość reakcji funkcji specjalnych albo czułości
na dźwięk; szybkość w trybie automatycznym
Kanał 9
0–127
128–255
Statyczna zmiana koloru
Zmiana kolorów stroboskopu (tryb dźwiękowy)
Tryb 4: 9 kanałowy Specykacja
Żarówki 7 × czterokolorowa dioda LED (czer
wony, zielony, niebieski, biały, każda o
mocy 8 W)
Jasność min. 2200 Lux przy 2 m
Zakres napięcia zasilania 100–240 V AC ~, 50–60 Hz
Pobór prądu 0,5 A przy 110 V
Bezpiecznik T3 15 A
Pobór mocy 50 W
Pojemność akumulatora 12 V, 12.000 mAh
Czas ładowania akumulatora ok. 4 godziny
Żywotność akumulatora ok. 10 godzin (2 lub 3 kolory)
Sterowanie DMX, kablowe lub podczerwienią
Złącza DMX typ XLR, 3 styki
Kanały DMX maks. 9 kanałów
Ściemnianie elektroniczne 0–100% bez migotania
Kąt nachylenia 360°, ustawiany ręcznie
Waga 3,8 kg (bez opakowania)
4,8 kg (z opakowaniem)
Wymiary 240 × 240 × 235 mm (szer. × wys. ×
głęb., bez uchwytu)
Page 74

74
Nowsonic Autark ID07
Instrukcja obsługi
PL
www.nowsonic.com
Skład zestawu
Autark ID07: 1 szt.
Kabel sieciowy: 1 szt.
Pilot zdalnego sterowania: 1 szt.
Instrukcja obsługi: 1 szt.
Wyłączenie odpowiedzialności cywilnej
Firma Nowsonic dołożyła wszelkich starań, by wszystkie informacje w
niniejszym podręczniku zostały przedstawione w jak najdokładniejszy
i wyczerpujący sposób.
Firma Nowsonic nie bierze na siebie jakiejkolwiek odpowiedzialności
za powstałe uszkodzenia lub straty wyrządzone właścicielowi urządzenia, osobie trzeciej lub powstałe w innych urządzeniach a będących
skutkiem informacji zawartych w tym podręczniku.
Serwis
W przypadku wystąpienia jakichkolwiek problemów lub pytań natury
technicznej, prosimy zwrócić się w pierwszej kolejności do lokalnego
sprzedawcy, u którego urządzenie zostało zakupione.
W przypadku naprawy serwisowej, prosimy zwrócić się również do lokalnego sprzedawcy. W innym przypadku prosimy o skontaktowanie
się bezpośrednio z nami. Nasze dane kontaktowe znajdziesz na naszej
stronie internetowej www.nowsonic.com.
UWAGA: urządzenie zostało firmowo tak zapakowane, by było
wystarczająco zabezpieczone podczas transportu. Gdyby jednak
doszło do uszkodzenia urządzenia podczas transportu, zwróć się
niezwłocznie do dostawcy, który je dostarczył i wskaż uszkodzenia. Zalecamy zachowanie oryginalnego opakowania, na wypadek konieczności ponownego wysłania urządzenia.
Zastrzeżenia prawne
Prawa autorskie do niniejszego podręcznika użytkownika © 2014:
Nowsonic
Cechy produktu, specyfikacja i dostępność mogą ulec zmianie bez
wcześniejszej zapowiedzi.
Wydanie w. 1.0, 05/2014
Urządzenie nr. 310920
Page 75

www.nowsonic.com
Page 76

Distributed by Sound Service GmbH
WEEE-Reg.-Nr.: DE 18189133
www.nowsonic.com
 Loading...