

Page 1
NOVUS AUTOMATION 1/5
TXMINI
-M12-485 / TXMINI-485 TRANSMITTER
OPERATING MANUAL
– V1.0x I
INTRODUCTION
TxMini-M12-485 is a compact temperature transmitter with internal
connection to temperature sensors Pt100. It consists of an
electronic circuit encapsulated and a M12 connection for power
and RS485 communication, which includes the screw thread for
closing the sensor output.
You should use an RS485 interface with Modbus RTU commands
to configure the transmitter. The DigiConfig software for
Windows® allows you to configure all features of the transmitter as
well as its diagnosis, and the possibility of using other Supervisory
software for configuration and reading of the information provided
by the device.
SPECIFICATIONS
Sensor Input:
Pt100 RTD: 3-wires connection, current drain of 0.8 mA, α=
0.00385, according NBR 13773. IEC 60751 (ITS-90).
Typical accuracy: 0.1 %;
Minimum accuracy: 0.2 %;
Measuring range: -200 to 600 ºC;
Minimum measuring range: 40 ºC.
Factory adjusted and calibrated using traceable standards.
Resistance effect of the sensor wires: 0.005 °C / Ω.
Maximum permissible resistance of the sensor wires: 25 Ω.
Settling time of the measurement: < 2.5 s.
Temperature effect: <
± 0.2 % / 25 °C.
Response time: 2 s (typical).
Maximum voltage allowed at input terminals no sensor: 3 V.
Power supply: 7 to 40 Vdc, current < 10 mA.
Operating Temperature: -40 to 85 °C.
Ambient humidity: 0 to 90 % UR.
No electrical isolation between input and output.
Internal protection against polarity inversion of the supply
voltage.
Connection Wire Cross Section: 0.14 to 1.5 mm².
Screw Tightening: 0.8 Nm.
Housing: Polyamide.
Order codes:
- P/N: 8806060420: TxMini-M12-485 Transmitter;
- P/N: 8806060430: TxMini-M12-485-CN Transmitter;
- P/N: 8806060520: TxMini-485 Transmitter (Equipment can only
be configured during production);
- P/N: 8806060530: TxMini-485-CN Transmitter.
- P/N: 8806065000: M12 Cable Connector for TxMini-M12
(accessory).
CONFIGURATION
Table 1 shows the default parameters of the transmitter:
Parameters Configuration
Error Value 0
Offset
0 ºC
Unit
ºC
Digital Filter
0
Timer Setting 60 s
Baud Rate 1200
Data Bits 8
Parity
Par
Stop Bits
1
Address
247
Table 1 - Default parameter values for TxMini-M12-485
When you use the transmitter with default configuration, none
intervention is required and its installation can be performed
immediately. When a change in the configuration parameters is
necessary, you can do it using DigiConfig software. You can
download the configuration software freely from the manufacturer's
website. To install it run the "DigiConfigSetup.exe" file and follow
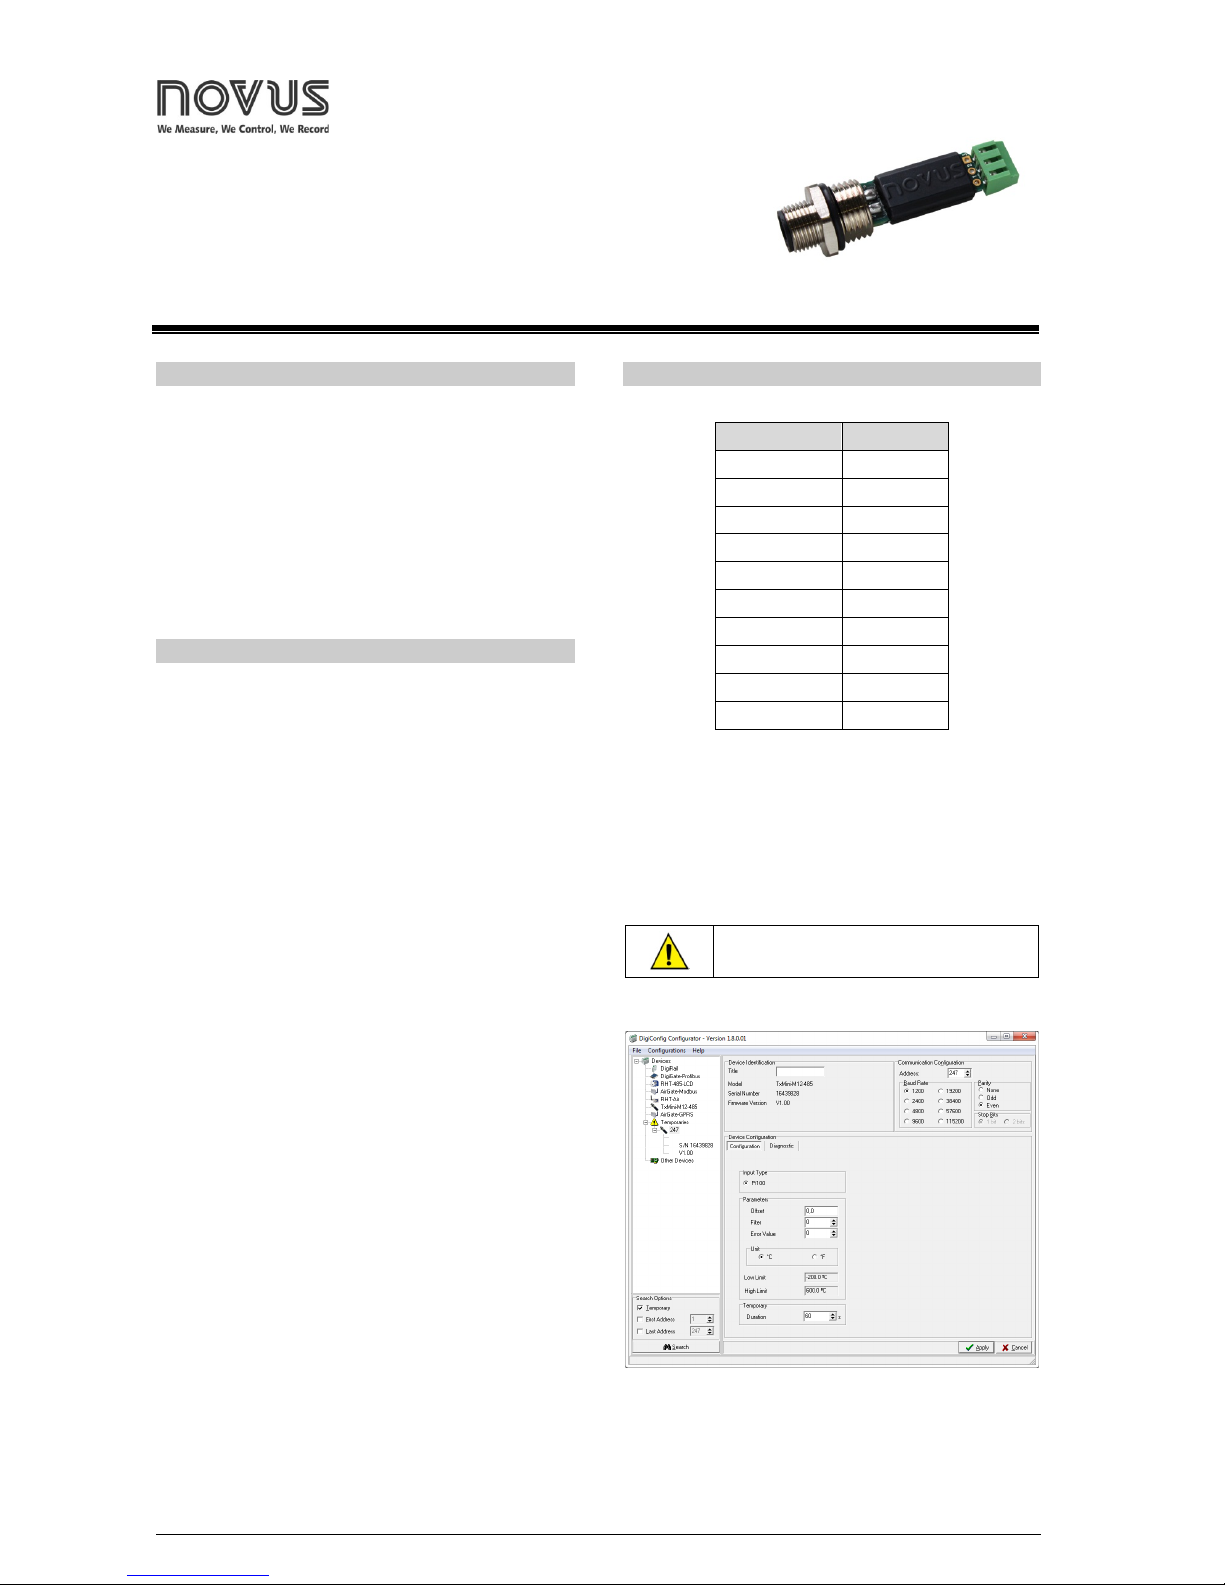
the installer´s instructions. Fig. 1 shows the main screen of
DigiConfig software.
SOFTWARE CONFIGURATION:
Fig. 1 - TxMini-M12-485 configuration screen in DigiConfig software
There is no electrical isolation between inp
ut and
output.
Page 2

TxMini-M12-485 Transmitter
NOVUS AUTOMATION 2/5
The top menu and the fields shown in Fig.1 allows configure the
transmitter. Follow a brief description about the functions for each
option. For more details, see the Help
Help Topics option.
1. File: Option to exit DigiConfig software.
2. Configurations: Allows you to set the Communication and
Language.
- Communication: Displays a window that allows you to configure
the communication parameters of the software.
- Language: Use this menu option to choose the language for the
DigiConfig. The available languages are English, Spanish and
Portuguese.
3. Help: Displays information on Help Topics and About.
- Help Topics: Assists through a descriptive window with detailed
information about the use and parameters of compatible devices
with the DigiConfig software such as TxMini-M12-485 transmitter.
- About: Shows information about the manufacturer´s website and
DigiConfig software version.
4. Devices: This field shows the compatible devices for
DigiConfig software. After detecting a device on the Modbus
network, the software displays a corresponding access icon to the
family of devices to which it belongs and its Modbus address.
5. Search Options: This field contains the search options for the
Temporary mode, and other equipment within an address range.
- Temporary: Use to search for equipment’s in Temporary mode
with the default communication parameters.
- First Address: If you select the Start Address selection box, the
software will search a device on the network that correspond to this
address, the same baud rate and parity values as configured on
DigiConfig Communication screen.
- First and Last Address: If you select the Start Address box and
Last Address box simultaneously, the software will search devices
on the network that have addresses within this range and the same
baud rate and parity values as configured in DigiConfig
Communication screen.
TXMINI-M12-485 CONFIGURATION SETTINGS
Using DigiConfig to configure devices with default values:
STEPS
1. Run DigiConfig software (from version 1.8).
2. Click on the tab Configuration Communication.
3. Select the serial COM port that DigiConfig will use.
Note: Select the COM port connected to the RS485 interface.
4. In the Search Options field, select the Temporary box.
5. Click the Search button:
6. If the software detect a device, it will appear in the devices tree
as a Temporary device.
7. The software will show a device with the address 247, an
empty Title field, Serial Number and Firmware Version for the
connected TxMini-M12-485 transmitter.
8. After displayed the equipment as Temporary, click the mouse
on the address (247), and will open a window for the new device
9. At the left-top of the screen, you can check in the Device
Identification field the following items:
- Title: In this field, you can enter a title up to ten characters to
identify the equipment in the devices field of the screen.
- Model: Shows the transmitter model.
- Serial Number: Shows the transmitter's serial number.
- Firmware Version: Displays the firmware version of the device.
10. In the Device Configuration field, you can check the following
items:
- Input Type: It indicates the Pt100 sensor used with the TxMini-
M12-485 transmitter.
- Offset: This field allows you to change the value read by the
temperature sensor in the range of -10 to +10 degrees.
- Filter: You can use this field to smooth the variations in the
temperature value of the readings in the Diagnostic tab, so that
the read value is more stable with lower oscillation. You can use
values from 0 to 20, with the value 0 as a default condition.
- Error Value: The default Error Value is 0, but can take values
from -9999 to 9999 according to the requirements. The software
will shows this value when there is an error in the sensor reading.
- Unit: The default Unit value is Celsius (°C), but there is the option
to display the temperature in Fahrenheit (ºF).
- Low Limit and High Limit: These fields shows the measurement
range for the Pt100 sensor. These two fields are read-only.
Fields Lower and Upper Limit are for viewing only.
Note: You can see detailed information about the function
Temporary
Duration after the Communication Settings step.
11. The Communication Settings field contains the following items:
- Address: On this field, you can define a Modbus network address
for the device selecting a number in the range of 1 to 247.
Note: The default address is 247.
- Baud Rate: On this field, you can define the communication Baud
Rate selecting one of the predefined values showed in Table 2.
Baud Rate
1200 19200
2400
38400
4800 57600
9600 115200
Table 2 - Options available for the baud rate
- Parity: The Parity field allows the user to select one of three
available values for the parity bit. The default value is Even. The
available options are:
Parity Stop bits
None 2
Odd 1
Even 1
Table 3 - Parity bit options
Note: The choice of parity define the quantity of stop bits in
accordance with the Modbus standard.
Sending a Configuration:
1. Edit the parameters in accordance with the requirements.
2. Then click on the Apply button.
3. The software will start to send the configuration data to the
device and will show a dialog (Sending configuration to the
device...).
4. After completing the transfer, it will pop up a window that
informs the successful of the operation. Then, click OK.
Temporary Device Configuration
The temporary mode was created in case you need to change
some device settings, but do not know the previously set
communication parameters such as Baud Rate, Address or Parity.
This mode aims to keep the same communication parameters to
the default values for some time, based on Table 1. The Duration
parameter is configured with the default value of sixty seconds (60
s), and can be set in the range of 10 to 60 s according to user
needs. For further clarification, follow an example to illustrate the
use of the temporary mode and function of the parameter Duration.
Ex: The user configure the device with the following parameters:
Baud Rate: 115200;
Address: 121;
Parity: None Stop Bits: 2.
Page 3
TxMini-M12-485 Transmitter
NOVUS AUTOMATION 3/5
Procedure for Temporary mode:
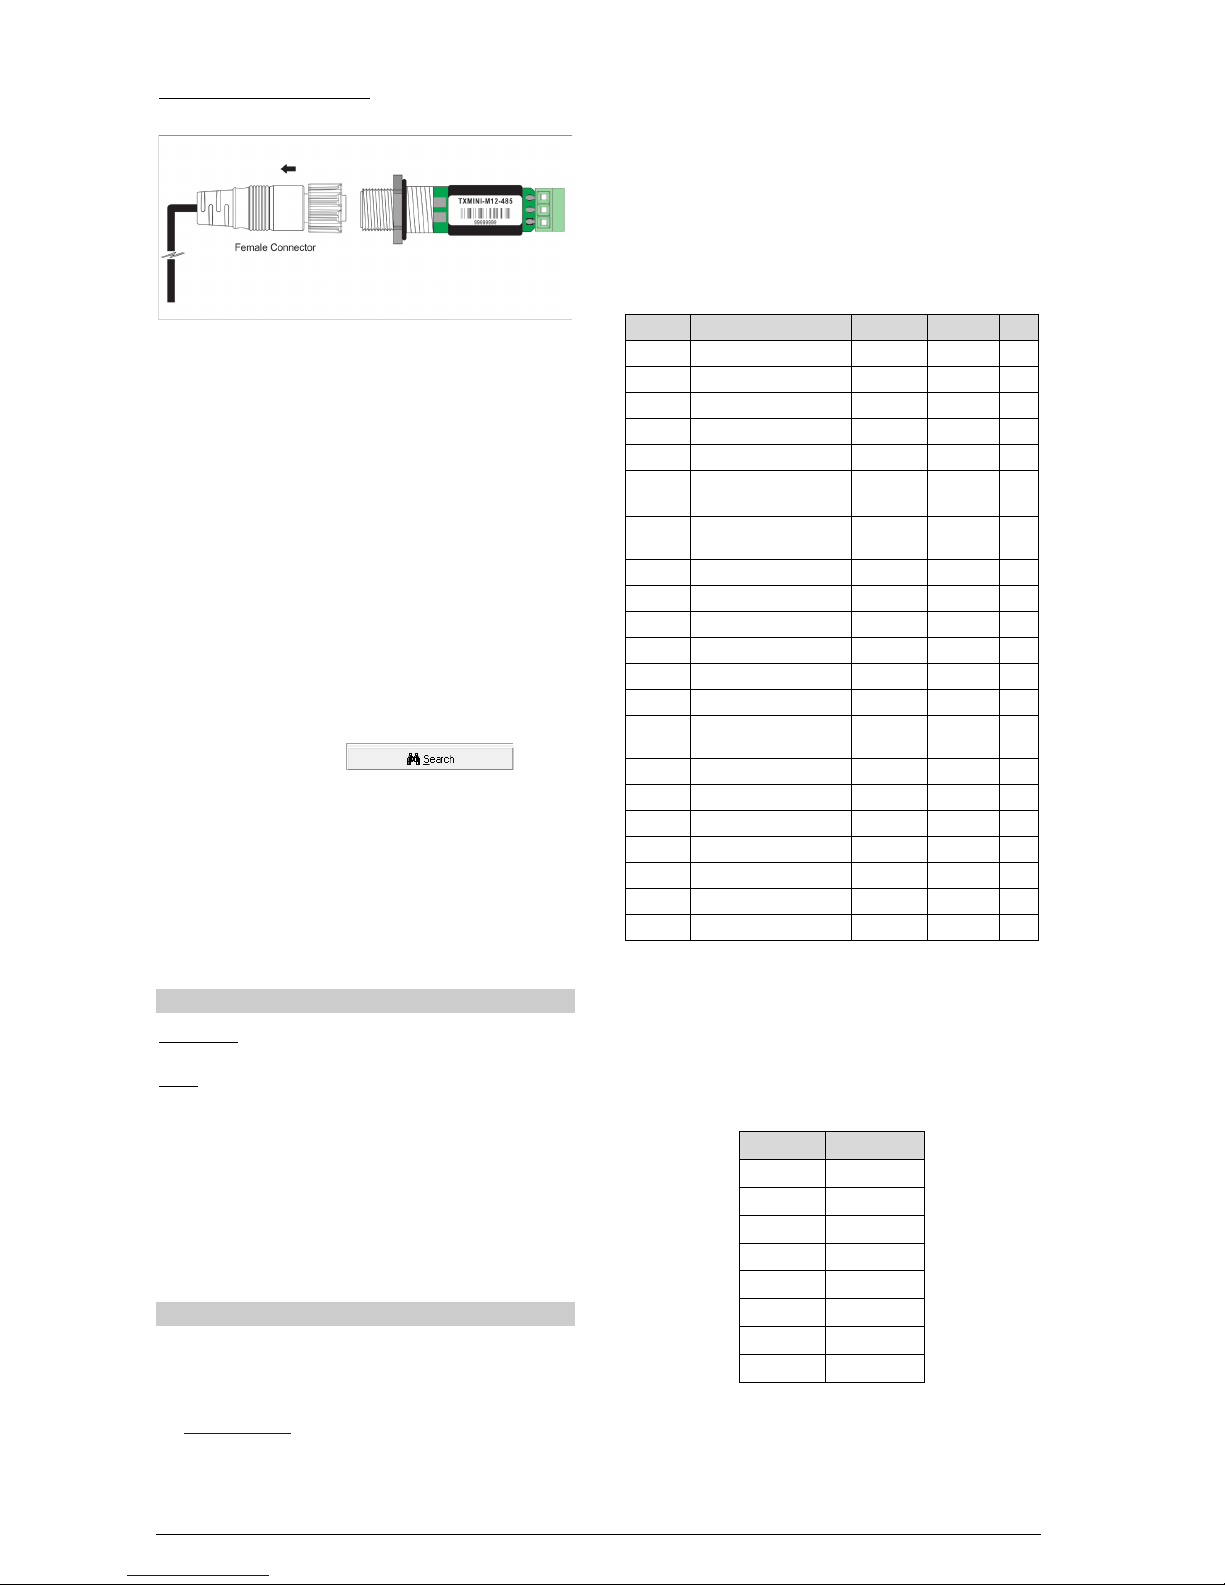
1º Disconnect the cable from the device (M12 connector).
Fig. 2 - Open the M12 connection
2º When reconnecting the power and communication cable (M12),
the transmitter will temporarily return to the default communication
parameter values for Baud Rate (1200), Parity (Even) and Address
(247). At this time, the default value of the Duration parameter (60
s) will ensure that the device remains with the default parameters
mentioned during this period, i.e., the user will have this time to
perform the procedures below (3 to 7) before the device returns to
the communication settings previously recorded in its memory:
Baud Rate: 115200, Address: 121 and Parity: None.
Note: If the user does not perform the steps (3 to 7) before the
time set in the Duration parameter, the device returns to the
previously set parameters.
3º Run DigiConfig software.
4º Click in the menu Configurations
Communication.
5º Make sure that you configure the DigiConfig communication
parameters with default values for the requested device, according
to Table 1.
6º In Search Options field, select the Temporary condition.
7º Click on the Search button:
8º The device will appear in the Devices field classified as
Temporary.
9º Click on the temporary device on the tree.
10º Will be shown the equipment with the address 247, title, serial
number of the transmitter (S/N) and the firmware version of
TxMini-M12-485.
Now you can check the previous configuration values for baud rate
(115200), parity (none) and address (121) of the device on the
Device Configuration field.
DIAGNOSTIC
Temperature: On the Diagnostics tab, it shows the read
temperature value and its corresponding unit.
Status: Close to the position of the temperature, there is the error
indicator. The error states are:
- Open Sensor: When we have no Pt100 sensor connected, the
status will indicate sensor break.
- Overflow: If the sensor is reading a temperature value above the
allowed measurements for Pt100 sensor, the status will indicate
overflow.
- Underflow: If the sensor is reading a temperature value below the
allowed measurements for Pt100 sensor, the status will indicate
underflow.
MODBUS COMMANDS
Table 4 lists the Modbus RTU commands (functions) that you can
use to supervise or configure the main parameters of the
transmitter. For further information with respect to each of these
commands and the Modbus protocol in general, please access the
site www.modbus.org.
READ HOLDING REGISTERS – 0 x 03
Use this command for reading the value of one or several holding
registers, according to the “Holding Registers Table”.
WRITE HOLDING REGISTERS – 0 x 06
Use this command for writing in a holding register, according to the
“Holding Registers Table”.
RETENTIVE REGISTERS
The specified addresses correspond to the low-level physical
addresses, where zero (0) corresponds to the address of PLC
40001.
The minimum and maximum values shows the range of valid
values for each parameter. The R/W column indicates whether the
parameter is read-write (R/W) or read-only (R).
Address
Description
Minimum
Maximum
R/W 0 Serial number (word high)
0
65535
R
1 Serial number (word low) 0 65535 R
2 Firmware release 100 199 R
3 Model 0 255 R
4
Input Reading - AD
- - R
5
Temperature Value
(ºC or ºF).*
-200 600 R
6
Status of error, overflow
underflow.
0 65535 R
7 Baud-Rate 0 7 R/W
8 Parity 0 2 R/W
9 Modbus Address 1 247 R/W
10
Temperature Unit
0 1 R/W
11
Error value
-9999
9999
R/W
12 Sensor 0 0 R
15
User offset for
temperature.*
-100 100 R/W
16 Title
- - R/W
17
Title
- - R/W
18
Title
- - R/W
19 Title
- - R/W
20 Title
- - R/W
21 Timer – Temporary Mode 10 90 R/W
22
Digital Filter
0
20
R/W
Table 4 - Retentive Registers
* For the table above, include one decimal digit. For ex.: -100
means -10.0.
DESCRIPTION OF SOME REGISTERS
REGISTER 7 – BAUD RATE
Defines the Modbus communication speed. The transmitter comes
factory-configured with a Baud Rate 1200.
Code Baud Rate
0 1200
1
2400
2
4800
3
9600
4 19200
5 38400
6 57600
7
115200
Table 5 - Baud Rate
Page 4
TxMini-M12-485 Transmitter
NOVUS AUTOMATION 4/5
REGISTER 8 – PARITY
Refers to the parity bit code used for Modbus communication. The
default parity for communication with the transmitter is even.
Code Parity
0 None
1 Odd
2 Even
Table 6 - Parity
REGISTER 9 – MODBUS ADDRESS
Refers to the transmitter address in the Modbus network. Valid
values are between 1 and 247. The transmitter is set to address
247 by default.
REGISTER 10 – TEMPERATURE UNIT
Refers to the temperature unit code used in Modbus
communication. The default value is degrees Celsius (°C).
Code
Unity
0
°C
1 °F
Table 7 - Temperature Unit
REGISTER 11 – ERROR VALUE
Refers to the error value established when the sensor has a
problem. The default value is 0.
REGISTER 15 – USER OFFSET FOR TEMPERATURE
Refers to the offset value in engineering units for the temperature.
The default value for the offset is 0.
REGISTER 16 to 20 – TITLE
Refers to an identification name for the TxMini-M12-485
transmitter, used in DigiConfig software.
REGISTER 21 – TEMPORARY TIMER
Refers to the time that the device will be in default mode of
communication (Baud, Address and Parity) for cases where the
user does not know or remember the previous configuration
parameters of communication.
Note: TEMPORARY: 1200 bps, 247, Even.
For more details, please see the previous section Procedure for
Temporary Mode.
REGISTER 22 – DIGITAL FILTER
Refers to the Digital Filter code set by the user for smooth the
variations of the temperature readings. The default value for the
filter is 0.
MECHANICAL INSTALLATION
You can install the TxMini-M12-485 Transmitter in pipes and
other small places. Vibrations, moisture and extreme temperatures,
electro-magnetic interference, high voltage and other interferences
can permanently damage the unit, and could cause error in the
measured value.
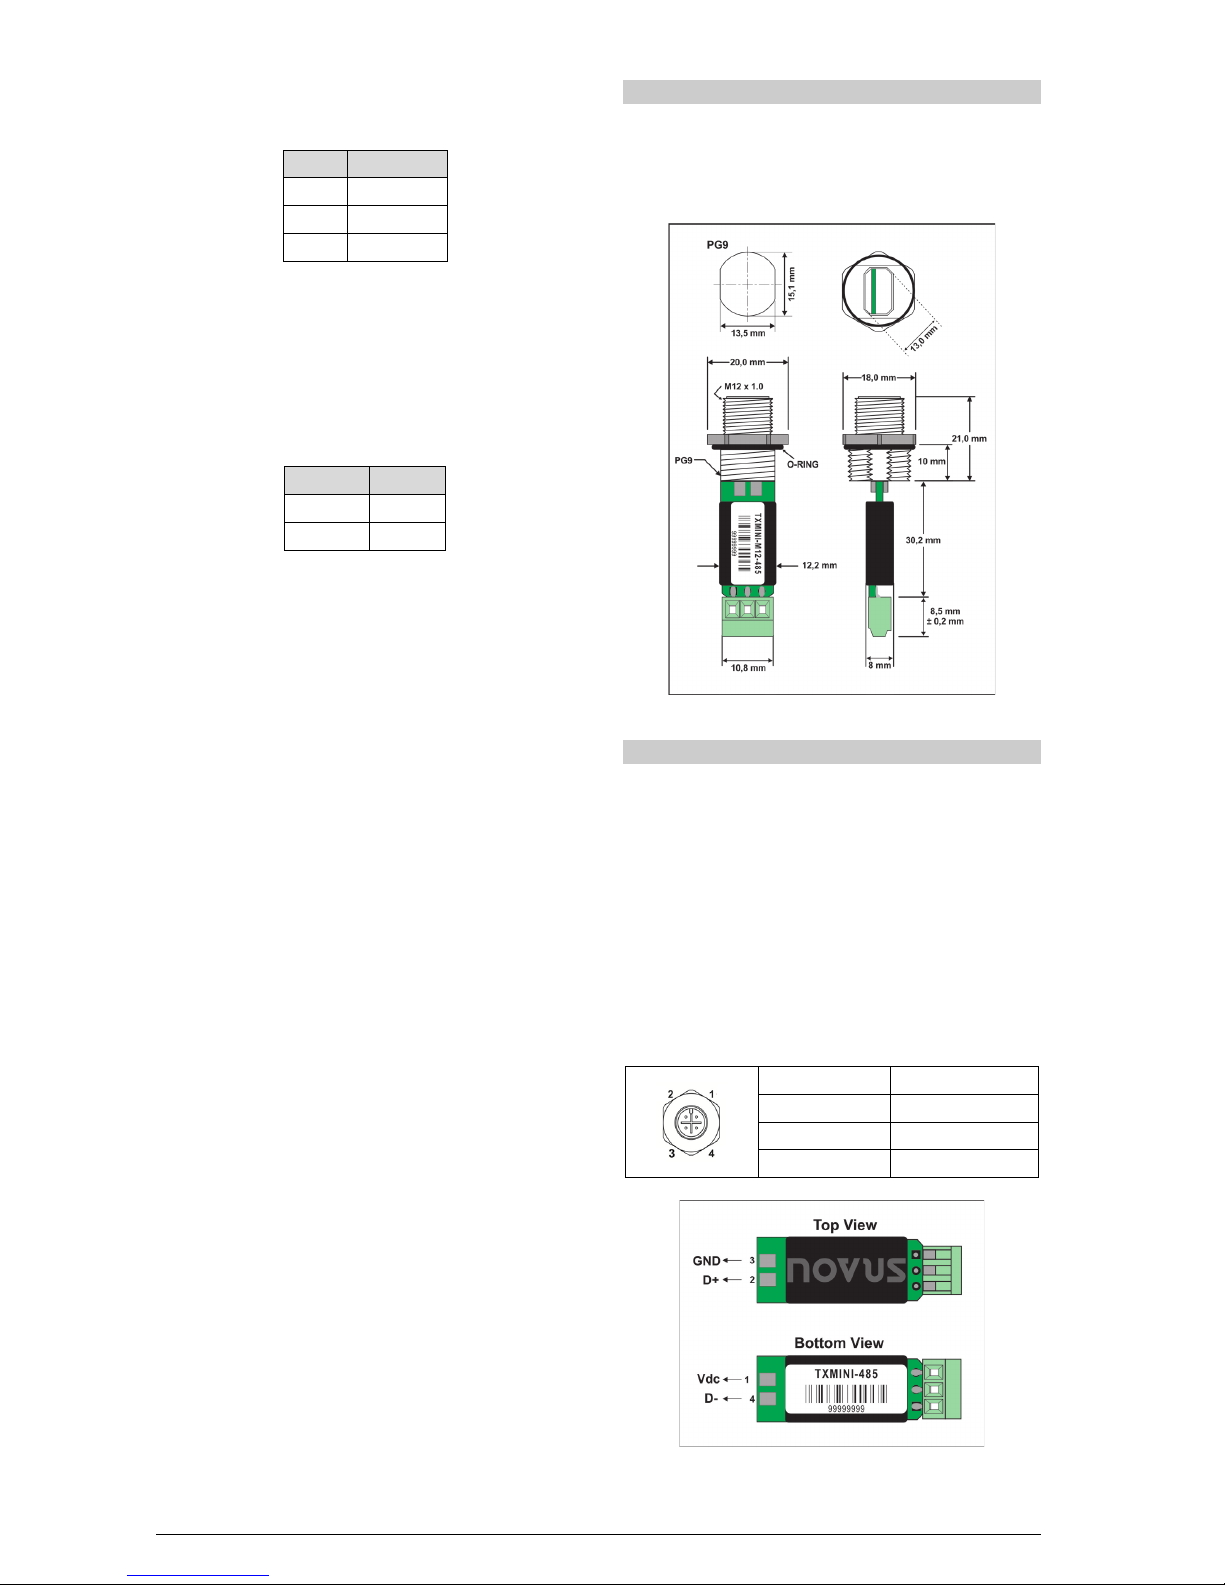
Fig. 3 - Dimensions of the transmitter
ELECTRICAL INSTALLATION
RECOMMENDATIONS FOR INSTALLATION
• Sensor signals conductors must go through the plant system
separate from power cables (loop), if possible in grounded
conduits.
• Use a dedicated power supply for instrumentation to energize
the transmitter.
• In control and monitoring applications is essential to consider
what can happen when any part of the system fails.
POWER SUPPLY AND COMMUNICATION CONNECTIONS
Serial communication uses the terminals 2 and 4, and the power
supply uses the terminals 1 and 3 as shown in the table below:
1
Vdc
2 D+
3 GND
4 D-
Fig. 4 - Connection diagram for the model without M12
Note: this model has no configuration interface and can only be
configured during production
.
Page 5
TxMini-M12-485 Transmitter
NOVUS AUTOMATION 5/5
SENSOR CONNECTION
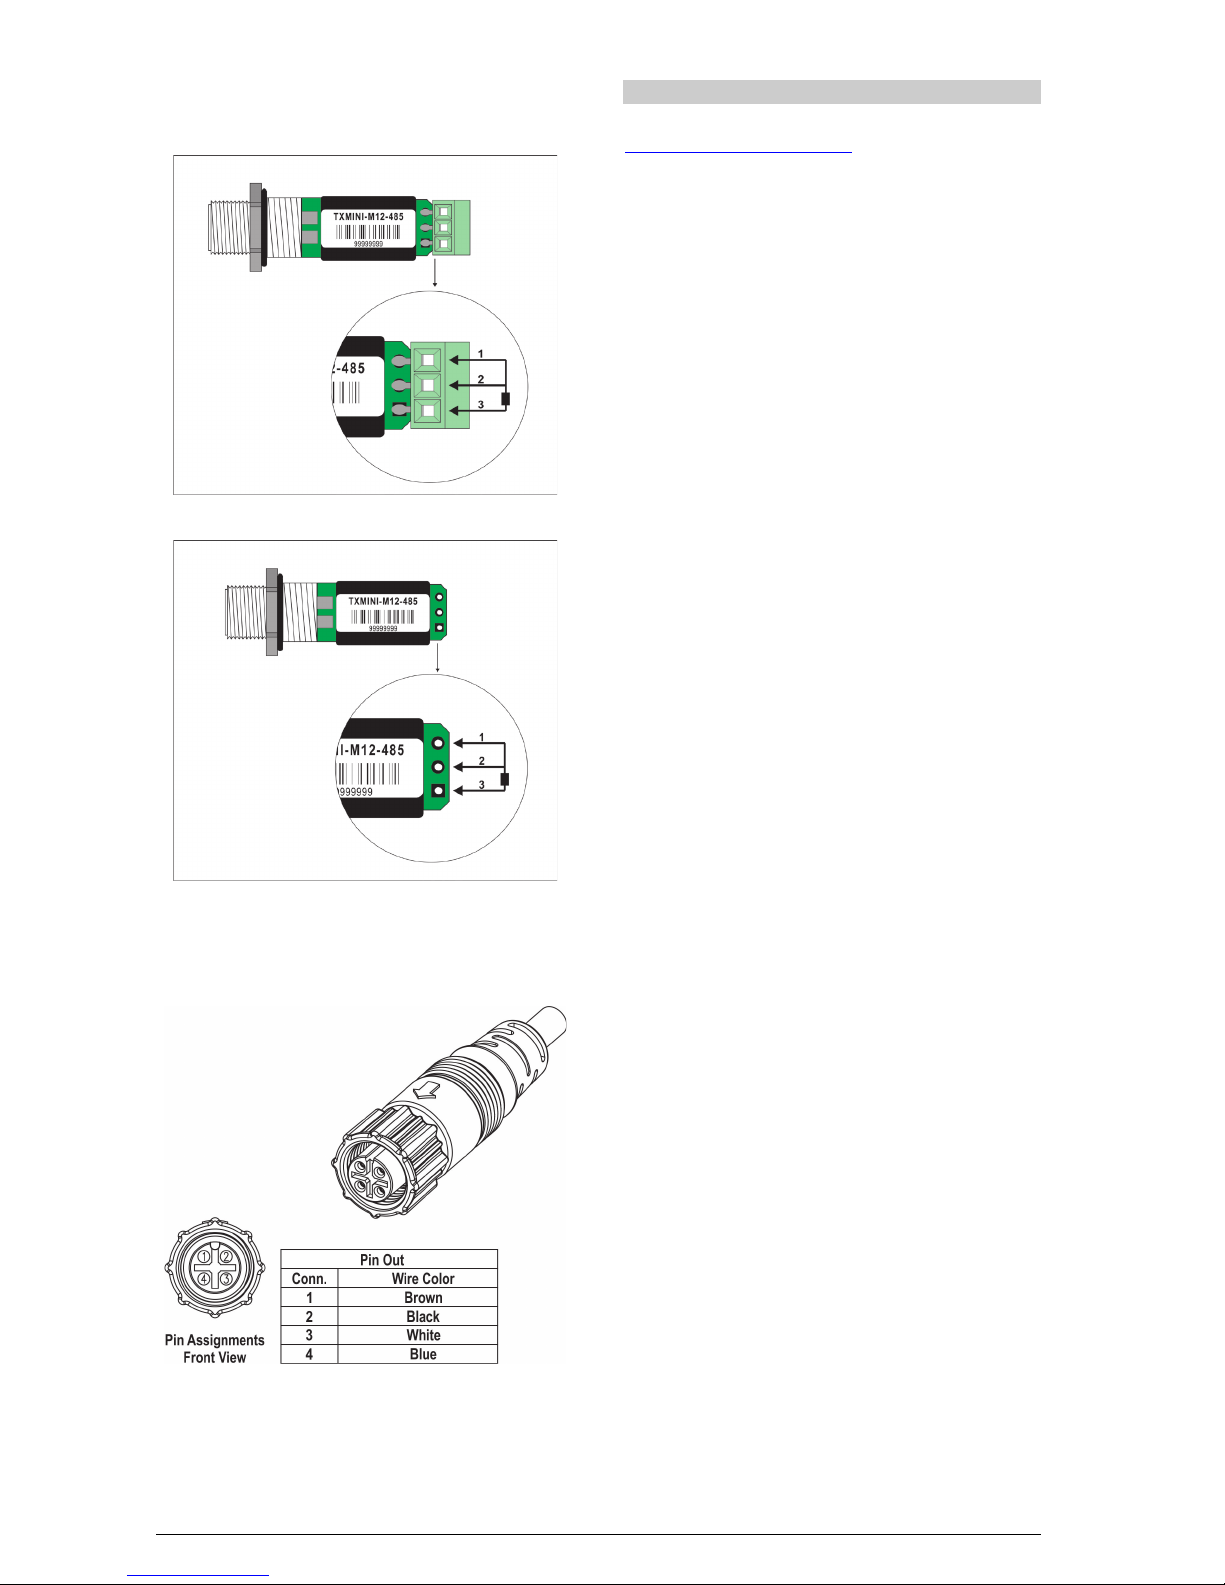
To connect the sensor use terminals 1, 2 and 3, and interconnect
the terminals 1 and 2 as shown below.
Fig. 5 - Pt100 sensor connection for the model with connector
Fig. 6 - Pt100 sensor connection for the model without connector
M12 CABLE CONECTION
See below guidelines for making or purchasing the M12 cable.
Fig. 7 – Connecting pins for M12 cable mounting
For appropriate cable resistance compensation, the same cable type
should be used for all terminals. Maximum wire resistance is 25 Ω.
Usage of a 3 or 4 wire with conductors of equal length and gauge is
recommended (cable not supplied).
WARRANTY
Warranty conditions are available on our website
www.novusautomation.com/warranty.
 Loading...