

Page 1

Interface TXCONFIG-HRT Português
Guia Rápido
O TxConfig-HRT é uma interface de configuração para os transmissores com
protocolo HART. É utilizado junto com o software de configuração TxConfig.
INSTALAÇÃO DA INTERFACE
No modelo TxConfig-HRT temos uma interface de comunicação tipo USB, que deve
ser conectada à porta USB disponível. Com este tipo de Interface o Windows
solicita a instalação de driver apropriado.
Instalação dos Drivers USB
As etapas de instalação de drives apresentadas podem variar de PC para PC,
mesmo para uma mesma versão do sistema operacional. As etapas apresentadas
a seguir são apenas orientativas.
1. Execute o arquivo do driver disponível em nosso website.
2. Conecte a interface à porta USB do PC. O Windows® irá reconhecer a
presença do novo hardware e após alguns instantes irá iniciar o processo de
instalação dos drivers.
3. O assistente de instalação de um novo hardware será apresentado, perguntando
se o driver deve ser instalado a partir do site Windows Update. Selecione a opção
“Não, não agora” e selecione Avançar.
4. Selecione a opção “Instalar de uma lista ou local específico (avançado)” e
clique em “Avançar”.
5. Selecione a opção “Procurar o melhor driver nestes locais” e marque a opção
“Pesquisar mídia removível”. Clique em “Avançar”. Caso os arquivos de
instalação não estejam em um CD, marque a opção “Incluir este local na
pesquisa” e indique o caminho para os arquivos.
6. Se for apresentada uma tela informando sobre a não compatibilidade com o
Windows®, clique em “Continuar assim mesmo”.
7. Os arquivos do driver da Interface serão copiados para o computador e após
alguns instantes será apresentada uma tela informando que o assistente
terminou a instalação do software para o conversor. Clique em “Concluir”.
8. Em algumas situações, as etapas acima podem se repetir uma segunda vez.
Siga os mesmos procedimentos.
Em utilizações posteriores da interface, é possível que o Windows® solicite
novamente a instalação do driver. Neste caso, o mesmo assistente de instalação
será apresentado, bastando selecionar a opção “Instalar o software
automaticamente (recomendável)”, pois o driver já está presente no computador.
Interface TXCONFIG-HRT Español
Guía Rápido
El TxConfig-HRT es una interface de configuración para los transmisores con el
protocolo HART. Es utilizado junto con el software de la configuración TxConfig.
INSTALACIÓN DE LA INTERFACE
En el modelo TxConfig-HRT tenemos una interface de comunicación tipo USB, que
debe ser conectada a la puerta USB disponible. Con este tipo de interface el Windows
solicita la instalación del driver apropiado.
Instalación de los Drivers USB
Las etapas de instalación de drives presentadas pueden cambiar de PC para PC,
mismo para una misma versión del sistema operacional. Las etapas presentadas
abajo son apenas orientativas.
1. Ejecute el archivo del driver disponible en nuestro sitio web.
2. Conecte la interface a la puerta USB del PC. El Windows® irá reconocer la
presencia del nuevo hardware y después algunos instantes irá empezar el
proceso de instalación de los drivers.
3. El asistente de instalación de un nuevo hardware será presentado, preguntando
si el driver debe ser instalado a partir del web sitio Windows Update. Seleccione
la opción “No, no ahora” y seleccione “Avanzar”.
4. Seleccione la opción “Instalar de una lista o local específico (avanzado)” y clic
en “Avanzar”.
5. Seleccione la opción “Procurar el mejor driver en estos locales” y marcar la
opción “Pesquisar en media removible”. Haz clic en “Avanzar”. Caso los
archivos de instalación no estén en un CD, marcar la opción “Incluir este local
en la pesquisa” y indicar el camino para los archivos.
6. Si fuera presentada una pantalla sobre la no compatibilidad con el Windows®, clic
en “Continuar así mismo”.
7. Los archivos del driver de la Interface serán copiados para el ordenador y
después algunos instantes será presentada una pantalla informando que el
asistente ha terminado la instalación del software para el conversor. Clic en
“Concluir”.
8. En algunas situaciones, las etapas arriba pueden repetirse una segunda vez.
Siga los mismos procedimientos.
En utilizaciones posteriores de la interface, es posible que el Windows® solicite otra
vez la instalación del driver. En este caso, el mismo asistente de instalación será
presentado, bastando seleccionar la opción “Instalar el software automáticamente
(recomendable)”, pues el driver ya está presente en el ordenador.
Interface TXCONFIG-HRT Français
Guide Rapide
TxConfig-HRT est une interface de configuration pour les transmetteurs par
Protocole HART, utilisée avec le logiciel de configuration TxConfig.
INSTALLATION DE L’INTERFACE
L’interface de communication du modèle TxConfig-HRT doi têtre connectée à un port
USB. Windows sollicitera l’installation du pilote approprié.
Installation des pilotes USB
Les étapes d’installation de pilotes présentées ci-dessous peuvent varier d’un
ordinateur à l’autre, mêmesi la version du système opérationnel est identique. Elles ne
sont donc données qu’à titre indicatif:
1. Executez le fichier du pilote disponible sur notre site Internet.
2. Connectez l’interface à un port USB de l’ordinateur. Windows® la reconnaîtra et
après quelques instants le processus d’installation des pilotes commencera.
3. L’assistant d’installation de nouveau matériel qui s’affichera demandera si le pilote
doit être installé via le site Windows Update. Cochez l’option « Non, pas pour cette
fois » puis cliquez sur « Suivant ».
4. Cochez « Installer à partir d’une liste ou d’un emplacement spécifique
(utilisateurs expérimentés) » et cliquez sur « Suivant ».
5. Sélectionnez « Rechercher le meilleur pilote dans ces emplacements » et cochez
l’option « Rechercher dans les medias amovibles (Disquette, CD-ROM...) ». Au
cas où les fichiers d’installation ne se trouveraient pas sur un CD, cochez l’option «
Inclure cet emplacement dans la recherche » et saisissez le chemin des fichiers.
Cliquez sur « Suivant ».
6. Si une fenêtre informe qu’il y aincompatibilité avec Windows®, cliquez sur «
Installer le pilote quand même ».
7. Les fichiers du pilote de l’interface seront copiés sur l’ordinateur et après
quelques instants une fenêtre informera que l’assistant a terminé l’installation.
Cliquez sur « Terminer ».
8. Dans certains cas, il peut être nécessaire de répéter les étapes cidessus.
Lors d’utilisations postérieures de l’interface, Windows® peut demander d’installer
le pilote de nouveau. Dans ce cas, le même assistant d’installation s’affichera, mais
il suffira de sélectionner l’option « Installer le logiciel automatiquement
(recommandé) », car le pilote sera déjà présent sur l’ordinateur.
Page 2
TXCONFIG-HRT Interface English
Quick Guide
The TxConfig-HRT is a configuration interface for transmitters with HART protocol. It
can be used together with the configuration software TxConfig.
INTERFACE INSTALLATION
In the TxConfig-HRT model there is a USB communication interface, which must be
connected to the available USB port. Windows will request the proper driver
installation.
USB Drivers Installation
The drives installation steps may vary according to the machine, even for the same
version of an operating system. The following steps are only to provide guidance.
1. Run the driver file available on our website.
2. Connect the interface the PC USB port. Windows® will acknowledge the
presence of new hardware and a few seconds later it will start the drivers
installation process.
3. The found new hardware wizard will be displayed, and you will be asked if you
want to install the driver from the Windows Update website. Select “No, not this
time”, and then click “Next”.
4. Select “Install from a list or specific location (Advanced)” and click “Next”.
5. Select “Search for the best driver in these locations” and check “Search
removable media”. Click “Next”. If installation files are not in a CD, check
“Include this location in the search” and show the file path.
6. If a prompt warns you that it does not support Windows®, click “Continue anyway”.
7. The interface driver files will be copied to the computer and after a few seconds
a screen is displayed informing that the software installation as been concluded.
Click “Finish”.
8. In some situations, the steps described above may be repeated again. Follow
the same procedures.
In later uses of the interface, Windows® may require the driver installation again. In
this case, the same installation wizard will be displayed, and you will have to select
the option “Install software automatically (recommended)”, as the driver may already
be in the computer.
FEATURES
• Easy installation;
• USB communication with the PC and serial with the transmitters;
• Pins to HRT device: polarity insensitive test clips;
• Compatible with USB 1.1 and 2.0;
• Rx / Tx LED indicators;
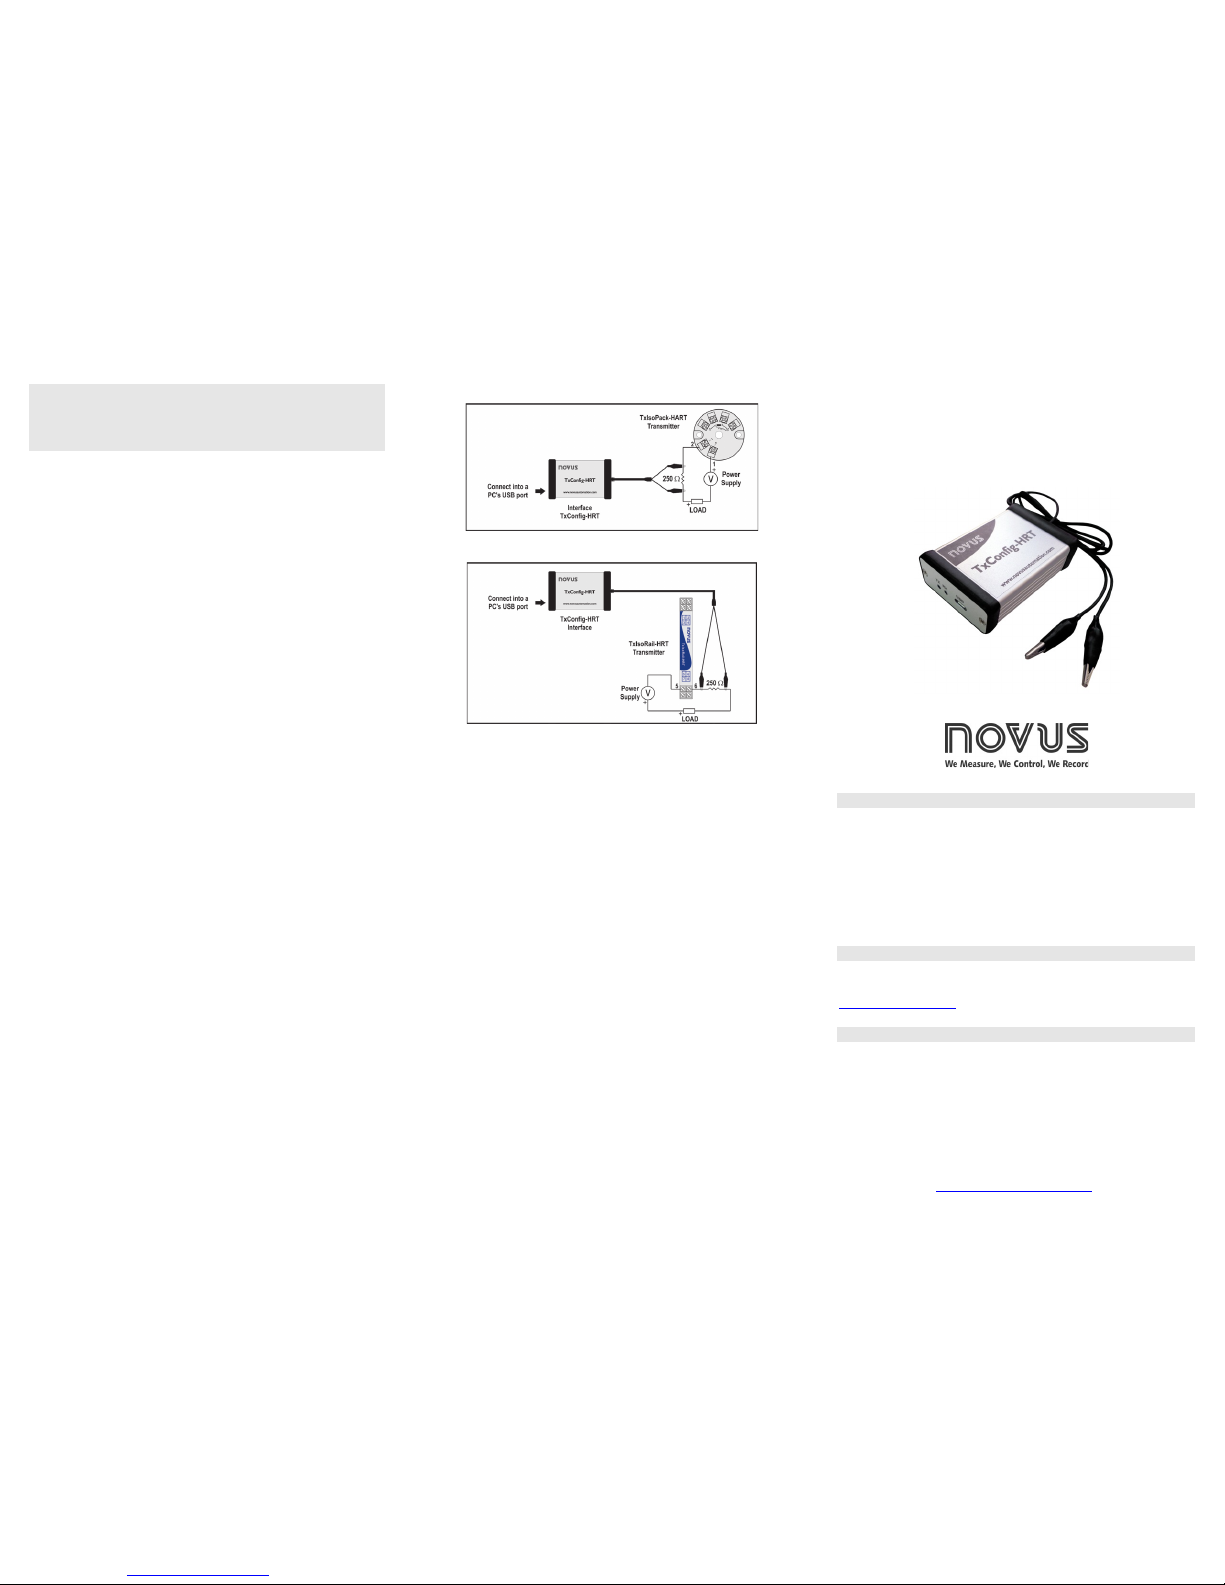
ELECTRICAL CONNECTIONS
• Connect the interface to the transmitter as shown in the following figures
depending on the model you are configuring;
• Connect the TxConfig-HRT interface to a free USB port on the PC;
• Launch the previously installed TxConfig software in order to perform the
transmitter configuration.
1. TxIsoPack-HART transmitter
2. TxIsoRail-HRT transmitter
OPERATION
Follow the instructions from the TxConfig software.
Status LED:
• Blinking Tx LED: sending data to the transmitter.
• Blinking Rx LED: data are being received from the transmitter.
SPECIFICATIONS
• HRT /USB converter;
• P ower: no external power supply required, powered from USB;
• USB Current Consumption: <60 mA;
• E nergy Consumption : <1.5 W;
• Elec trical Connections: PC: Cable USB A x mini-B, 1.8 m
HRT: Alligator clip;
• Operation Temperature: 0 to 50 ºC (32 to 122 °F);
• Storage Temperature: -40 to 80 ºC (-40 to 176 °F);
• Humid ity: 0 to 95 % (no condensing);
• Iso lation: 1500 Vdc galvanic isolation between transmitter and PC;
• Operating System: Windows 10, 8 and 7;
• Housing: 88 x 57 x 26 mm; IP20; Aluminu m and Plastic ABS.
TXCONFIG- HRT
INTERFACE
QUICK GUIDE
QG 5010027 V1.0x B
SAFETY INFORMATION
Any control system design should take into account that any part of the system has
the potential to fail. This product is not a protection or safety device and its alarms
are not intended to protect against product failures. Independent safety devices
should be always provided if personnel or property are at risk.
Product performance and specifications may be affected by its environment and
installation. It’s user’s responsibility to assure proper grounding, shielding, cable
routing and electrical noise filtering, in accordance with local regulations, EMC
standards and good installation practices.
SUPPORT AND MAINTENANCE
This product contains no serviceable parts inside. Contact our local distributor in
case you need authorized service. For troubleshooting, visit our FAQ at
www.novusautomation.com
.
LIMITED WARRANTY AND LIMITATION OF LIABILITY
NOVUS warrants to the original purchaser that this product is free from defects in
material and workmanship under normal use and service within one (1) year from
the date of shipment from factory or from its official sales channel to the original
purchaser.
NOVUS liability under this warranty shall not in any case exceed the cost of
correcting defects in the product or of supplying replacement product as herein
provided and upon the expiration of the warranty period all such liability shall
terminate.
For complete information on warranty and liability limitations, check appropriate
section in our website: www.novusautomation.com/warranty
.
 Loading...